
In Chapter 2, the overall architecture design was discussed, using the following diagram as a guide:
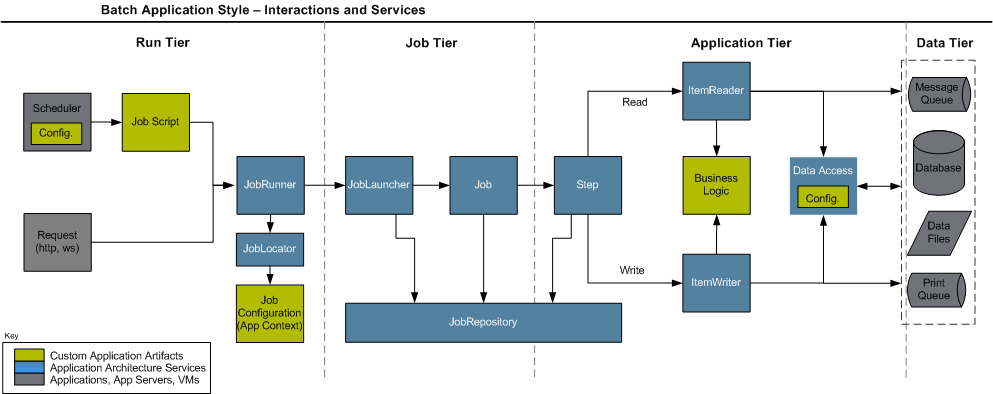 |
When viewed from left to right, the diagram describes a basic flow for the execution of a batch job:
A Scheduler kicks off a job script (usually some form of shell script)
The script sets up the classpath appropriately, and starts the
Java process. In most cases, using
CommandLineJobRunner as the entry point
The JobRunner finds the Job using the
JobLocator, pulls together the
JobParameters and launches the
Job
The JobLauncher retrieves a
JobExecution from the
JobRepository, and executes the
Job
The Job executes each
Step in sequence.
The Step calls read on the
ItemReader, handing the resulting item to the
ItemWriter until null is returned, periodically
committing and storing status in the
JobRepository.
When execution is complete, the Step
returns control back to the Job, and if no more
steps exist, control is returned back to the original caller, in this
case, the scheduler.
This flow is perhaps a bit overly simplified, but describes the complete flow in the most basic terms. From here, each tier will be described in detail, using actual implementations and examples.
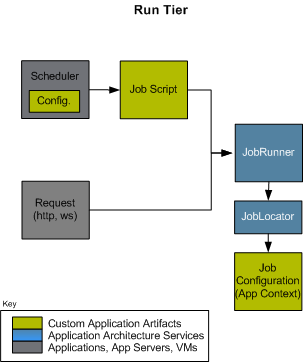
As its name suggests, this tier is entirely concerned with actually
running the job. Regardless of whether the originator is a Scheduler or an
HTTP request, a Job must be obtained, parameters must be parsed, and
eventually a JobLauncher called:
For users that want to run their jobs from an enterprise
scheduler, the command line is the primary interface. This is because
most schedulers (with the exception of Quartz unless using the
NativeJob) work directly with operating system
processes, primarily kicked off with shell scripts. There are many ways
to launch a Java process besides a shell script, such as Perl, Ruby, or
even 'build tools' such as ant or maven. However, because most people
are familiar with shell scripts, this example will focus on them.
Because the script launching the job must kick off a Java
Virtual Machine, there needs to be a class with a main method to act
as the primary entry point. Spring Batch provides an implementation
that serves just this purpose:
CommandLineJobRunner. It's important to note
that this is just one way to bootstrap your application, but there are
many ways to launch a Java process, and this class should in no way be
viewed as definitive. It performs four tasks:
Loads the appropriate Application Context
Parses command line arguments into JobParameters
Locates the appropriate job based on arguments
Uses the JobLauncher provided in the application context to launch the job.
All of these tasks are accomplished based completely upon the arguments passed in. The following are required arguments:
Table 4.1. CommandLineJobRunner arguments
| jobPath | The location of the XML file that will be used to
create an ApplicationContext. This file
should contain everything needed to run the complete
Job |
| jobName | The name of the job to be run. |
These arguments must be passed in with the path first and the name second. All arguments after these are considered to be JobParameters and must be in the format of 'name=value':
bash$ java CommandLineJobRunner endOfDayJob.xml endOfDay schedule.date(date)=2008/01/01In most cases you would want to use a manifest to declare your
main class in a jar, but for simplicity, the class was used directly.
This example is using the same 'EndOfDay' example from Chapter 2. The
first argument is 'endOfDayJob.xml', which is the Spring
ApplicationContext containing the Job. The
second argument, 'endOfDay' represents the job name. The final
argument, 'schedule.date=01-01-2008' will be converted into
JobParameters. An example of the XML
configuration is below:
  <bean id="endOfDay"
        class="org.springframework.batch.core.job.SimpleJob">
    <property name="steps">
      <bean id="step1" parent="simpleStep" />
      <!-- Step details removed for clarity -->
    </property>
  </bean>

  <!-- Launcher details removed for clarity -->
  <bean id="jobLauncher"
        class="org.springframework.batch.core.launch.support.SimpleJobLauncher" />
This example is overly simplistic, since there are many more
requirements to a run a batch job in Spring Batch in general, but it
serves to show the two main requirements of the
CommandLineJobRunner:
Job and
JobLauncher
When launching a batch job from the command-line, it is often
from an enterprise scheduler. Most schedulers are fairly dumb, and
work only at the process level. Meaning, they only know about some
operating system process such as a shell script that they're invoking.
In this scenario, the only way to communicate back to the scheduler
about the success or failure of a job is through return codes. A
number is returned to a scheduler that is told how to interpret the
result. In the simple case: 0 is success and 1 is failure. However,
there may be scenarios such as: If job A returns 4 kick off job B, if
it returns 5 kick off job C. This type of behavior is configured at
the scheduler level, but it is important that a processing framework
such as Spring Batch provide a way to return a numeric representation
of of the 'Exit Code' for a particular batch job. In Spring Batch this
is encapsulated within an ExitStatus, which is
covered in more detail in Chapter 5. For the purposes of discussing
exit codes, the only important thing to know is that an
ExitStatus has an exit code property that is
set by the framework (or the developer) and is returned as part of the
JobExecution returned from the
JobLauncher. The
CommandLineJobRunner converts this string value
to a number using the ExitCodeMapper
interface:
  public interface ExitCodeMapper {

    public int intValue(String exitCode);
}
The essential contract of an
ExitCodeMapper is that, given a string exit
code, a number representation will be returned. The default
implementation used by the job runner is the SimpleJvmExitCodeMapper
that returns 0 for completion, 1 for generic errors, and 2 for any job
runner errors such as not being able to find a
Job in the provided context. If anything more
complex than the 3 values above is needed, then a custom
implementation of the ExitCodeMapper interface
must be supplied. Because the
CommandLineJobRunner is the class that creates
an ApplicationContext, and thus cannot be
'wired together', any values that need to be overwritten must be
autowired. This means that if an implementation of
ExitCodeMapper is found within the BeanFactory,
it will be injected into the runner after the context is created. All
that needs to be done to provide your own
ExitCodeMapper is to declare the implementation
as a root level bean, and ensure it's part of the
ApplicationContext that is loaded by the
runner.
The Job Tier is responsible for the overall execution of a batch job. It sequentially executes batch steps, ensuring that all steps are in the correct state and all appropriate policies are enforced:

The job tier is entirely concerned with maintaining the three job
stereotypes: Job,
JobInstance, and
JobExecution. The
JobLauncher interacts with the
JobRepository in order to create a
JobExecution, and the Job
stores the JobExecution using the
repository.
The most basic implementation of the
JobLauncher interface is the SimpleJobLauncher.
It's only required dependency is a JobRepository,
in order to obtain an execution:
  <bean id="jobLauncher"
        class="org.springframework.batch.execution.launch.SimpleJobLauncher">
    <property name="jobRepository" ref="jobRepository" />
  </bean>
Once a JobExecution is obtained, it is
passed to the execute method of Job, ultimately
returning the JobExecution to the caller:
 |
The sequence is straightforward, and works well when launched from
a scheduler, but causes issues when trying to launch from an HTTP
request. In this scenario, the launching needs to be done
asynchronously, so that the SimpleJobLauncher
returns immediately to it's caller. This is because it is not good
practice to keep an HTTP request open for the amount of time needed by
long running processes such as batch. An example sequence is
below:
 |
The SimpleJobLauncher can easily be
configured to allow for this scenario by configuring a
TaskExecutor:
 <bean id="jobLauncher"
        class="org.springframework.batch.execution.launch.SimpleJobLauncher">
    <property name="jobRepository" ref="jobRepository" />
    <property name="taskExecutor">
      <bean class="org.springframework.core.task.SimpleAsyncTaskExecutor" />
    </property>
  </bean>
Any implementation of the spring
TaskExecutor interface can be used to control how
jobs are asynchronously executed.
One of the most common reasons for wanting to launching a
job asynchronously is to be able to gracefully
stop it. This can be done through the
JobExecution returned by the
JobLauncher:
  JobExecution jobExecution = launcher.run(getJob(), jobParameters);

  //give job adequate time to start
  Thread.sleep(1000);

  assertEquals(BatchStatus.STARTED, jobExecution.getStatus());
  assertTrue(jobExecution.isRunning());

  jobExecution.stop();

  //give job time to stop
  Thread.sleep(1000);

  assertEquals(BatchStatus.STOPPED, jobExecution.getStatus());
  assertFalse(jobExecution.isRunning());
The shutdown is not immediate, since there is no way to force
immediate shutdown, especially if the execution is currently in
developer code that the framework has no control over, such as a
business service. What it does mean, is that as soon as control is
returned back to the framework, it will set the status of the current
StepExecution to
BatchStatus.STOPPED, save it, then do the same
for the JobExecution before finishing.
The SimpleJobRepository is the only provided implementation of the
JobRepository interface. It completely manages
the various batch domain objects and ensures they are created and
persisted correctly. The SimpleJobRepository uses
three different DAO interfaces for the three major domain types it
stores: JobInstanceDao,
JobExecutionDao, and
StepExecutionDao. The repository delegates to
these DAOs to both persist the various domain objects and query for them
during initialization. The following configuration shows a
SimpleJobRepository configured with JDBC DAOs:
  <bean id="jobRepository" class="org.springframework.batch.core.repository.support.SimpleJobRepository">
    <constructor-arg ref="jobInstanceDao" />
    <constructor-arg ref="jobExecutionDao" />
    <constructor-arg ref="stepExecutionDao" />
  </bean>

  <bean id="jobInstanceDao" class="org.springframework.batch.core.repository.support.dao.JdbcJobInstanceDao" >
    <property name="jdbcTemplate" ref="jdbcTemplate" />
    <property name="jobIncrementer" ref="jobIncrementer" />
  </bean>

  <bean id="jobExecutionDao" class="org.springframework.batch.core.repository.support.dao.JdbcJobExecutionDao" >
    <property name="jdbcTemplate" ref="jdbcTemplate" />
    <property name="jobExecutionIncrementer" ref="jobExecutionIncrementer" />
  </bean>

  <bean id="stepExecutionDao" class="org.springframework.batch.core.repository.support.dao.JdbcStepExecutionDao" >
    <property name="jdbcTemplate" ref="jdbcTemplate" />
    <property name="stepExecutionIncrementer" ref="stepExecutionIncrementer" />
  </bean>

  <bean id="jdbcTemplate" class="org.springframework.jdbc.core.JdbcTemplate" >
    <property name="dataSource" ref="dataSource" />
  </bean>
The configuration above isn't quite complete, each DAO
implementation makes a reference to a Spring
DataFieldMaxValueIncrementer.
JobInstance, JobExecution,
and StepExecution each have unique IDs, and the
incrementers are used to create them.
Including the incrementers, which must be database specific, the
configuration above is verbose. In order to make this more manageable,
the framework provides a FactoryBean for
convenience: JobRepositoryFactoryBean.
  <bean id="jobRepository"
        class="org.springframework.batch.execution.repository.JobRepositoryFactoryBean"
    <property name="databaseType" value="hsql" />
    <property name="dataSource" value="dataSource" />
  </bean>
The databaseType property indicates the type of incrementer that must be used. Options include: "db2", "derby", "hsql", "mysql", "oracle", and "postgres".
There are scenarios in which you may not want to persist your domain objects to the database. One reason may be speed, storing domain objects at each commit point takes extra time. Another reason may be that you just don't need to persist status for a particular job. Spring batch provides a solution:
  <bean id="jobRepository" class="org.springframework.batch.core.repository.support.SimpleJobRepository">
    <constructor-arg ref="mapJobInstanceDao" />
    <constructor-arg ref="mapJobExecutionDao" />
    <constructor-arg ref="mapJtepExecutionDao" />
  </bean>

  <bean id="mapJobInstanceDao"
        class="org.springframework.batch.execution.repository.dao.MapJobInstanceDao" />

  <bean id="mapJobExecutionDao"
        class="org.springframework.batch.execution.repository.dao.MapJobExecutionDao" />

  <bean id="mapStepExecutionDao"
        class="org.springframework.batch.execution.repository.dao.MapStepExecutionDao" />
The Map* DAO implementations store the batch artifacts in a transactional map. So, the repository and DAOs may still be used normally, and are transactionally sound, but their contents will be lost when the class is destroyed.
If the JDBC daos are used with the JobRepository it is also essential to configure the transactional behaviour of the repository. This is to ensure that the batch meta data, including state that is necessary for restarts after a failure, is persisted correctly. The behaviour of the framework is not well defined if the repository methods are not transactional.
The Spring Batch samples have a simple-job-launcher-context.xml configuration file that contains the necessary details. Here is the relevant section:
<aop:config>
    <aop:advisor
        pointcut="execution(* org.springframework.batch.core..*Repository+.*(..))"
    <advice-ref="txAdvice" />
</aop:config>

<tx:advice id="txAdvice" transaction-manager="transactionManager">
    <tx:attributes>
        <tx:method name="create*" propagation="REQUIRES_NEW" isolation="SERIALIZABLE" />
        <tx:method name="*" />
    </tx:attributes>
</tx:advice>
This fragment can be used as is, with almost no changes. The
isolation level in the create* method attiributes is
specified to ensure that when jobs are launched there if two
processes are trying to launch the same job at the same time, only
one will succeed. This is quite aggressive, and READ_COMMITTED would
work just as well; READ_UNCOMMITTED would be fine if two processes
are not likely to collide in this way. However, since a call to the
create* method is quite short, it is unlikely
that the SERIALIZED will cause problems, as long as the database
platform supports it.
Remember also to include the appropiate namespace declarations and to make sure spring-tx and spring-aop (or the whole of spring) is on the classpath.
Spring Batch provides DDL samples for the meta-data tables in the Core jar file for several common database platforms. Index declarations are not included in that DDL because there are too many variations in how users may want to index dependeing on their precise platform, local conventions and also the business requirements of how the jobs will be operated. The table below provides some indication as to which columns are going to be used in a WHERE clause by the Dao ipmlementations provided by Spring Batch, and how frequently they might be used, so that individual projects can make up their own minds about indexing.
Table 4.2. Where clauses in SQL statements (exluding primary keys) and their approximate frequency of use.
| Default Table Name | Where Clause | Frequency |
| BATCH_JOB_INSTANCE | JOB_NAME = ? and JOB_KEY = ? | Every time a job is launched |
| BATCH_JOB_EXECUTION | JOB_INSTANCE_ID = ? | Every time a job is restarted |
| BATCH_STEP_EXECUTION_CONTEXT | STEP_EXECUTION_ID = ? and KEY_NAME = ? | On commit interval, a.k.a. chunk |
| BATCH_STEP_EXECUTION | VERSION = ? | On commit interval, a.k.a. chunk (and at start and end of step) |
| BATCH_STEP_EXECUTION | STEP_NAME = ? and JOB_EXECUTION_ID = ? | Before each step execution |
The only current implementation of the Job
interface is SimpleJob. Since a Job is just a
simple loop through a list of Steps, this implementation should be
sufficient for the majority of needs. It has only three required
dependencies: a name, JobRepository, and a list
of Steps.
  <bean id="footballJob"
        class="org.springframework.batch.core.job.SimpleJob">
    <property name="steps">
      <list>
        <!-- Step Bean details ommitted for clarity -->
        <bean id="playerload" parent="simpleStep" />
        <bean id="gameLoad" parent="simpleStep" />
        <bean id="playerSummarization" parent="simpleStep" />
      </list>
    </property>
    <property name="jobRepository" ref="jobRepository" />
  </bean>
Each Step will be executed in sequence
until all have completed successfully. Any Step that fails will cause
the entire job to fail.
One key concern when execution a batch job, is what happens when a failed job is restarted? A Job is considered to have been 'restarted' if the same JobInstance has more than one JobExecution. Ideally, all jobs should be able to start up where they left off, but there are scenarios where this is not possible. It is entirely up to the developer to ensure that a new instance is always created in this scenario. However, Spring Batch does provide some help. If a Job should never be restarted, but should always be run as part of a new JobInstance, then the restartable property may be set to 'false':
  <bean id="footballJob"
        class="org.springframework.batch.core.job.SimpleJob">
    <property name="steps">
      <list>
        <!-- Step Bean details ommitted for clarity -->
        <bean id="playerload" parent="simpleStep" />
        <bean id="gameLoad" parent="simpleStep" />
        <bean id="playerSummarization" parent="simpleStep" />
      </list>
    </property>
    <property name="jobRepository" ref="jobRepository" />
    <property name="restartable" value="false" />
  </bean>
To phrase it another way, setting restartable to false means
"this Job does not support being started again". Restarting a Job that
is not restartable will cause a
JobRestartException to be thrown:
  Job job = new SimpleJob();
  job.setRestartable(false);

  JobParameters jobParameters = new JobParameters();

  JobExecution firstExecution = jobRepository.createJobExecution(job, jobParameters);
  jobRepository.saveOrUpdate(firstExecution);

  try {
    jobRepository.createJobExecution(job, jobParameters);
    fail();
  }
  catch (JobRestartException e) {
    // expected
  }
This snippet of JUnit code shows how attempting to create a
JobExecution the first time for a non
restartable job will cause no issues. However,
the second attempt will throw a
JobRestartException.
During the course of the execution of a
Job, it may be useful to be notified of various
events in its lifecycle so that custom code may be executed. The
SimpleJob allows for this by calling a
JobListener at the appropriate time:
  public interface JobListener {

    void beforeJob(JobExecution jobExecution);

    void afterJob(JobExecution jobExecution);

    void onError(JobExecution jobExecution, Throwable e);

    void onInterrupt(JobExecution jobExecution);
  }
Listeners can be added to a SimpleJob via
the setJobListeners property:
  <bean id="footballJob"
        class="org.springframework.batch.core.job.SimpleJob">
    <property name="steps">
      <list>
        <!-- Step Bean details ommitted for clarity -->
        <bean id="playerload" parent="simpleStep" />
        <bean id="gameLoad" parent="simpleStep" />
        <bean id="playerSummarization" parent="simpleStep" />
      </list>
    </property>
    <property name="jobRepository" ref="jobRepository" />
  <property name="jobListeners">
    <bean class="org.springframework.batch.core.listener.JobListenerSupport" />
  </property>
</bean>Unlike many traditional Spring applications, many of the
components of a batch application are stateful, the file readers and
writers are obvious examples. The recommended way to deal with this is
to create a fresh ApplicationContext for each job
execution. If the Job is launched from the
command line with CommandLineJobRunner this is
trivial. For more complex launching scenarios, where jobs are executed
in parallel or serially from the same process, some extra steps have to
be taken to ensure that the ApplicationContext is
refreshed. This is preferable to using prototype scope for the stateful
beans because then they would not receive lifecycle callbacks from the
container at the end of use. (e.g. through destroy-method in XML)
The strategy provided by Spring Batch to deal with this scenario
is the JobFactory, and the samples provide an
example of a specialized implementation that can load an
ApplicationContext and close it properly when the
job is finished. A relevant examples is
ClassPathXmlApplicationContextJobFactory and its
use in the adhoc-job-launcher-context.xml and the
quartz-job-launcher-context.xml, which can be found in the
Samples project.
The Application tier is entirely concerned with the actual processing of input:

The figure above shows a simple 'item-oriented' execution flow.
One item is read in from an ItemReader, and then
handed to an ItemWriter, until their are no more
items left. When processing first begins, a transaction is started and
periodically committed until the Step is
complete. Given these basic requirements, the
ItemOrientedStep requires the following
dependencies, at a minimum:
ItemReader - The
ItemReader that provides items for
processing.
ItemWriter - The
ItemWriter that processes the items provided
by the ItemReader.
PlatformTransactionManager - Spring
transaction manager that will be used to begin and commit
transactions during processing.
JobRepository - The
JobRepository that will be used to
periodically store the StepExecution and
ExecutionContext during processing (just
before committing).
Despite the relatively short list of required dependencies for
an ItemOrientedStep, it is an extremely complex
class that can potentially contain many collaborators. In order to
ease configuration, a SimpleStepFactoryBean can
be used:
  <bean id="simpleStep"
        class="org.springframework.batch.core.step.item.SimpleStepFactoryBean" >
    <property name="transactionManager" ref="transactionManager" />
    <property name="jobRepository" ref="jobRepository" />
    <property name="itemReader" ref="itemReader" />
    <property name="itemWriter" ref="itemWriter" />
  </bean>
The configuration above represents the only required
dependencies of the factory bean. Attempting to instantiate a
SimpleStepFactoryBean without at least those
four dependencies will result in an exception being thrown during
construction by the Spring container.
As mentioned above, the ItemOrientedStep
reads in and writes out items, periodically commiting using the
supplied PlatformTransactionManager. By
default, it will commit after each item has been written. This is less
than ideal in many situations, since beginning and commiting a
transaction is expensive. Ideally, you would like to process as many
items as possible in each transaction, which is completely dependant
upon the type of data being processed and the resources that are being
interacted with. For this reason, the number of items that are
processed within a commit can be set as the commit interval:
 <bean id="simpleStep"
        class="org.springframework.batch.core.step.item.SimpleStepFactoryBean" >
    <property name="transactionManager" ref="transactionManager" />
    <property name="jobRepository" ref="jobRepository" />
    <property name="itemReader" ref="itemReader" />
    <property name="itemWriter" ref="itemWriter" />
    <property name="commitInterval" value="10" />
  </bean>
In this example, 10 items will be processed within each
transaction. At the beginning of processing a transaction is begun,
and each time read is called on the
ItemReader, a counter is incremented. When it
reaches 10, the transaction will be committed.
Earlier in this chapter, restarting a Job
was discussed. Restart has numerous impacts on steps, and as such may
require some specific configuration.
There are many scenarios where you may want to control the
number of times a Step may be started. An
example is a Step that may be run only once,
usually because it invalidates some resource that must be fixed
manually before it can be run again. This is configurable on the
step level, since different steps have different requirements. One
Step that may only be executed once can exist as part of the same
Job as Step that can
be run infinitely. Below is an example start limit
configuration:
 <bean id="simpleStep"
        class="org.springframework.batch.core.step.item.SimpleStepFactoryBean" >
    <property name="transactionManager" ref="transactionManager" />
    <property name="jobRepository" ref="jobRepository" />
    <property name="itemReader" ref="itemReader" />
    <property name="itemWriter" ref="itemWriter" />
    <property name="commitInterval" value="10" />
    <property name="startLimit" value="1" />
  </bean>
The simple step above can be run only once. Attempting to run
it again will cause an exception to be thrown. It should be noted
that the default value for startLimit is
Integer.MAX_VALUE.
In the case of a restartable job, there may be one or more steps that should always be run, regardless of whether or not they were successful the first time. An example might be a validation step, or a step that cleans up resources before processing. During normal processing of a restarted job, any step with a status of 'COMPLETED', meaning it has already been completed successfully, will be skipped. Setting allowStartIfComplete to true overrides this so that the step will always run:
 <bean id="simpleStep"
        class="org.springframework.batch.core.step.item.SimpleStepFactoryBean" >
    <property name="transactionManager" ref="transactionManager" />
    <property name="jobRepository" ref="jobRepository" />
    <property name="itemReader" ref="itemReader" />
    <property name="itemWriter" ref="itemWriter" />
    <property name="commitInterval" value="10" />
    <property name="startLimit" value="1" />
    <property name="allowStartIfComplete" value="true" />
</bean> <bean id="footballJob"
class="org.springframework.batch.core.job.SimpleJob">
<property name="steps">
<list>
<!-- Step Bean details ommitted for clarity -->
<bean id="playerload" parent="simpleStep" />
<bean id="gameLoad" parent="simpleStep" >
<property name="allowStartIfComplete" value="true" />
</bean>
<bean id="playerSummarization" parent="simpleStep" >
<property name="startLimit" value="2" />
</bean>
</list>
</property>
<property name="jobRepository" ref="jobRepository" />
<property name="restartable" value="true" />
</bean>The above example configuration is for a job that loads in
information about football games and summarizes them. It contains
three steps: playerLoad, gameLoad, and playerSummarization. The
playerLoad Step loads player information from
a flat file, while the gameLoad
Step does the same for games. The final
Step, playerSummarization, then summarizes
the statistics for each player based upon the provided games. It is
assumed that the file loaded by 'playerLoad' must be loaded only
once, but that 'gameLoad' will load any games found within a
particular directory, deleting them after they have been
successfully loaded into the database. As a result, the playerLoad
Step contains no additional configuration. It
can be started almost limitlessly, and if complete will be skipped.
The 'gameLoad' Step, however, needs to be run
everytime, in case extra files have been dropped since it last
executed, so it has 'allowStartIfComplete' set to 'true' in order to
always be started. (It is assumed that the database tables games are
loaded into has a process indicator on it, to ensure new games can
be properly found by the summarization step) The summarization
step, which is the most important in the
Job, is configured to have a start limit of
3. This is useful in case it continually fails, a new exit code will
be returned to the operators that control job execution, and it
won't be allowed to start again until manual intervention has taken
place.
This job is purely for example purposes and is not the same as the footballJob found in the samples project.
Run 1:
playerLoad is executed and completes successfully, adding 400 players to the 'PLAYERS' table.
gameLoad is executed and processes 11 files worth of game data, loading their contents into the 'GAMES' table.
playerSummarization begins processing and fails after 5 minutes.
Run 2:
playerLoad is not run, since it has already completed succesfully, and allowStartIfComplete is false (the default).
gameLoad is executed again and processes another 2 files, loading their contents into the 'GAMES' table as well (with a process indicator indicating they have yet to be processed)
playerSummarization begins processing of all remaining game data (filtering using the process indicator) and fails again after 30 minutes.
Run 3:
playerLoad is not run, since it has already completed succesfully, and allowStartIfComplete is false (the default).
gameLoad is executed again and processes another 2 files, loading their contents into the 'GAMES' table as well (with a process indicator indicating they have yet to be processed)
playerSummarization is not start, and the job is
immeadiately killed, since this is the third execution of
playerSummarization, and it's limit is only 2. The limit must
either be raised, or the Job must be
executed as a new JobInstance.
There are many scenarios where errors encountered while
processing should not result in Step failure,
but should be skipped instead. This is usually a decision that must be
made by someone who understands the data itself and what meaning it
has. Financial data, for example, may not be skippable because it
results in money being transferred, which needs to be completely
accurate. Loading in a list of vendors, on the other hand, might allow
for skips, since a vendor not being loaded because it was formatted
incorrectly, or missing necessary information, won't cause issues.
Usually these bad records are logged as well, which will be covered
later when discussing listeners. Configuring skip handling requires
using a new factory bean:
SkipLimitStepFactoryBean
  <bean id="skipSample" parent="simpleStep"
        class="org.springframework.batch.core.step.item.SkipLimitStepFactoryBean">
    <property name="skipLimit" value="10" />
    <property name="itemReader" ref="flatFileItemReader" />
    <property name="itemWriter" ref="itemWriter" />
    <property name="skippableExceptionClasses"
              value="org.springframework.batch.item.file.FlatFileParseException">
    </property>
  </bean>
In this example, a FlatFileItemReader is
used, and if at any point a FlatFileParseException is thrown, it will
be skipped and counted against the total skip limit of 10. It should
be noted that any failures encountered while reading will not count
against the commit interval. In other words, the commit interval is
only incremented on writes (regardless of success or failure).
In most cases you want an Exception to cause either a skip or
Step failure. However, not all exceptions are
deterministic. If a FlatFileParseException is encountered while
reading, it will always be thrown for that record. Resseting the
ItemReader will not help. However, for other
exceptions, such as a
DeadlockLoserDataAccessException, which
indicates that the current process has attempted to update a record
that another process holds a lock on, waiting and trying again might
result in success. In this case, a
StatefulRetryStepFactoryBean should be
used:
  <bean id="step1" parent="simpleStep"
        class="org.springframework.batch.core.step.item.StatefulRetryStepFactoryBean">
    <property name="itemReader" ref="itemGenerator" />
    <property name="itemWriter" ref="itemWriter" />
    <property name="retryLimit" value="3" />
    <property name="retryableExceptionClasses" value="org.springframework.dao.DeadlockLoserDataAccessException" />
  </bean>
The StatefulRetryStepFactoryBean requires a limit for the number of times an individual item can be retried, and a list of Exceptions that are 'retryable'.
The step has to take care of ItemStream
callbacks at the necessary points in its lifecycle. This is vital if a
step fails, and might need to be restarted, because the
ItemStream interface is where the step gets the
information it needs about persistent state between executions. The
factory beans that Spring Batch provides for convenient configuration
of Step instances have features that allow
streams to be registered with the step when it is configured.
If the ItemReader or
ItemWriter themselves implement the ItemStream
interface, then these will be registered automatically. Any other
streams need to be registered separately. This is often the case where
there are indirect dependencies, like delegates being injected into
the reader and writer. To register these they can be injected into the
factory beans through the streams property, as illustrated
below:
<bean id="step1" parent="simpleStep"
        class="org.springframework.batch.core.step.item.StatefulRetryStepFactoryBean">
    <property name="streams" ref="fileItemReader" />
    <property name="itemReader">
        <bean
            class="org.springframework.batch.item.validator.ValidatingItemReader">
            <property name="itemReader" ref="itemReader" />
            <property name="validator" ref="fixedValidator" />
        </bean>
    </property>
    ...
</bean>
In the example above the main item reader is being set up to delegate to a bean called "fileItemReader", which itself is being registered as a stream directly. The step will now be restartable and the state of the reader will be correctly persisted in case of a failure.
Just as with the Job, there are many
events during the execution of a Step that a
user may need notification of. For example, if writing out to a flat
file that requires a footer, the ItemWriter
needs to be notified when the Step has been
completed, so that it can write the footer. This can be accomplished
with one of many Step scoped listeners.
StepExecutionListener represents the
most generic listener for Step execution. It
allows for notification before a Step is
started, after it has completed, and if any errors are encountered
during processing:
  public interface StepExecutionListener extends StepListener {

    void beforeStep(StepExecution stepExecution);

    ExitStatus onErrorInStep(StepExecution stepExecution, Throwable e);

    ExitStatus afterStep(StepExecution stepExecution);
}
ExitStatus is the return type of
onErrorInStep and
afterStep in order to allow listeners the
chance to modify the exit code that is returned upon completion of a
Step. A
StepExecutionListener can be applied to any
step factory bean via the listeners property:
  <bean id="simpleStep"
        class="org.springframework.batch.core.step.item.SimpleStepFactoryBean" >
    <property name="transactionManager" ref="transactionManager" />
    <property name="jobRepository" ref="jobRepository" />
    <property name="itemReader" ref="itemReader" />
    <property name="itemWriter" ref="itemWriter" />
    <property name="commitInterval" value="10" />
    <property name="listeners" ref="stepListener" />
  </bean>
Because all listeners extend the
StepListener interface, they all may be
applied to factory beans in the same way.
A chunk is defined as the items processed within the scope of
a transaction. Committing a transaction commits a 'chunk'. It may be
useful to be nofied before and after a chunk has completed, in which
case the ChunkListener interface may be
used:
  public interface ChunkListener extends StepListener {

    void beforeChunk();

    void afterChunk();
  }
The beforeChunk method is called
after the transaction is started, but before
read is called on the
ItemReader. Conversely,
afterChunk is called after the last call to
write on the
ItemWriter, but before the chunk has been
committed.
When discussing skip logic above, it was mentioned that it may
be beneficial to log out skipped records, so that they can be deal
with later. In the case of read errors, this can be done with an
ItemReaderListener:
  public interface ItemReadListener extends StepListener {

    void beforeRead();

    void afterRead(Object item);

    void onReadError(Exception ex);
}
The beforeRead method will be called
before each call to read on the
ItemReader. The
afterRead method will be called after each
successful call to read, and will be passed
the item that was read. If there was an error while reading, the
onReadError method will be called. The
exception encounterd will be provided so that it can be
logged.
Just as with the ItemReaderListener, the writing of an item can be 'listened' to:
  public interface ItemWriteListener extends StepListener {

    void beforeWrite(Object item);

    void afterWrite(Object item);

    void onWriteError(Exception ex, Object item);
}
The beforeWrite method will be called
before write on the
ItemWriter, and is handed the item that will
be written. The afterWrite method will be
called after the item has been succesfully writen. If there was an
error while writing, the onWriteError
method will be called. The exception encountered and the item that
was attempted to be written will be provided, so that they can be
logged.
ItemOriented processing is not the only way to process in a
Step. What if a Step must
consist as a simple storec procedure call? You could implement the call
as an ItemReader and return null after the
procedure finishes, but it is a bit unnatural since there would need to
be a no-op ItemWriter and lots of overhead for
transaction handling, listeners, etc. Spring Batch provides an
implementation of Step for this scenario:
TaskletStep. As explained in Chapter 2, the
Tasklet is a simple interface that has one
method, execute, which will be a called once
for the whole Step.
Tasklet implementors might call a stored
procedure, a script, or a simple SQL upate statement. Because there are
less concerns, there are only two required dependencies for a
TaskletStep: a Tasklet,
and a JobRepository:
<bean id="taskletStep"
      class="org.springframework.batch.core.step.tasklet.TaskletStep" />
  <property name="tasklet" ref="tasklet" />
  <property name="jobRepository" ref="repository" />
</bean>As with other adapters for the ItemWriter
and ItemReader interfaces, the
Tasklet interface contains an implementation
that allows for adapting itself to any pre-existing class:
TaskletAdapter. An example where this may be
useful is an existing DAO that is used to upate a flag on a set of
records. The TaskletAdapter can be used to call
this class without having to write an adapter for the
Tasklet interface:
  <bean id="deleteFilesInDir" parent="taskletStep">
    <property name="tasklet">
      <bean class="org.springframework.batch.core.step.tasklet.TaskletAdapter">
        <property name="targetObject">
          <bean class="org.mycompany.FooDao">
        </property>
        <property name="targetMethod" value-"updateFoo" />
      </bean>
    </property>
</bean>Many batch jobs contains steps that must be done before the main
processing begins in order to set up various resources, or after
processing has completed to cleanup those resources. In the case of a
job that works heavily with files, it is often necessary to delete
certain files locally after they have been uploaded successfully to
another location. The example below taken from the Spring Batch
samples project, is a Tasklet implementation
with just such a responsibility:
  public class FileDeletingTasklet implements Tasklet, InitializingBean {

    private Resource directory;

    public ExitStatus execute() throws Exception {
      File dir = directory.getFile();
      Assert.state(dir.isDirectory());

      File[] files = dir.listFiles();
      for (int i = 0; i < files.length; i++) {
        boolean deleted = files[i].delete();
        if (!deleted) {
          throw new UnexpectedJobExecutionException("Could not delete file " + files[i].getPath());
        }
      }
      return ExitStatus.FINISHED;
    }

    public void setDirectoryResource(Resource directory) {
      this.directory = directory;
    }

    public void afterPropertiesSet() throws Exception {
      Assert.notNull(directory, "directory must be set");
    }
  }
The above Tasklet implementation will
delete all files within a given directory. It should be noted that the
execute method will only be called once. All
that is left is to inject the Tasklet into a
TaskletStep:
  <bean id="taskletJob" parent="simpleJob">
    <property name="steps">
      <bean id="deleteFilesInDir" parent="taskletStep">
        <property name="tasklet">
          <bean class="org.springframework.batch.sample.tasklet.FileDeletingTasklet">
            <property name="directoryResource" ref="directory" />
          </bean>
        </property>
      </bean>
    </property>
  </bean>

  <bean id="directory"
        class="org.springframework.core.io.FileSystemResource">
    <constructor-arg value="target/test-outputs/test-dir" />
</bean>Some batch jobs can be assembled purely from off-the-shelf
components in Spring Batch, mostly the ItemReader
and ItemWriter implementations. Where this is not
possible (the majority of cases) the main API entry points for
application developers are the Tasklet,
ItemReader, ItemWriter and
the various listener interfaces. Most simple batch jobs will be able to
use off-the-shelf input from a Spring Batch
ItemReader, but it is very often the case that
there are custom concerns in the processing and writing, which normally
leads developers to implement an ItemWriter, or
ItemTransformer.
Here we provide a few examples of common patterns in custom
business logic, mainly using the listener interfaces . It should be
noted that an ItemReader or
ItemWriter can implement the listener interfaces
as well if appropriate.
A common use case is the need for special handling of errors in a
step, item by item, perhaps logging to a special channel, or inserting a
record into a database. The ItemOrientedStep (created from the step
factory beans) allows users to implement this use case with a simple
ItemReadListener, for errors on read, and an
ItemWriteListener, for errors on write. The below
code snippets illustrate a listener that logs both read and write
failures:
public class ItemFailureLoggerListener extends ItemListenerSupport {

    private static Log logger = LogFactory.getLog("item.error");

    public void onReadError(Exception ex) {
        logger.error("Encountered error on read", e);
    }

    public void onWriteError(Exception ex, Object item) {
        logger.error("Encountered error on write", e);
    }

}
Having implemented this listener it must be registered with the step:
<bean id="simpleStep"
        class="org.springframework.batch.core.step.item.SimpleStepFactoryBean" >
    ...
    <property name="listeners">
        <bean class="org.example...ItemFailureLoggerListener"/>
    </property>
  </bean>
Remember that if your listener does anything in an
onError() method, it will be inside a transaction that is
going to be rolled back. If you need to use a transactional resource
such as a database inside an onError() method, consider
adding a declarative transaction to that method (see Spring Core
Reference Guide for details), and giving its propagation attribute the
value REQUIRES_NEW.
Spring Batch provides a stop() method through the JobLauncher interface, but this is really aimed at the operator, rather than the application programmer. Sometimes it is more convenient or makes more sense to stop a job execution from within the business logic.
The simplest thing to do is to throw a RuntimeException (one that isn't retried indefinitely or skipped), For example, a custom exception type could be used, as in the example below:
public class PoisonPillItemWriter extends AbstractItemWriter {

    public void write(Object item) throws Exception {

        if (isPoisonPill(item)) {
            throw new PoisonPillException("Posion pill detected: "+item);
       }

    }

}
Another simple way to stop a step from executing is to simply
return null from the
ItemReader:
public class EarlyCompletionItemReader extends AbstractItemReader {

    private ItemReader delegate;

    public void setDelegate(ItemReader delegate) { ... }

    public Object read() throws Exception {

        Object item = delegate.read();

        if (isEndItem(item)) {
            return null; // end the step here
        }

        return item;

    }

}
The previous example actually relies on the fact that there is a
default implementation of the CompletionPolicy
strategy which signals a complete batch when the item to be processed is
null. A more sophisticated completion policy could be implemented and
injected into the Step through the
RepeatOperationsStepFactoryBean:
<bean id="simpleStep"
        class="org.springframework.batch.core.step.item.RepeatOperationsStepFactoryBean" >
    ...
    <property name="chunkOperations">
        <bean class="org.springframework.batch.repeat.support.RepeatTemplate">
            <property name="completionPolicy">
                <bean class="org.example...SpecialCompletionPolicy"/>
            </property>
        </bean>
    </property>
  </bean>
An alternative is to set a flag in the
StepExecution, which is checked by the
Step implementations in the framework in between
item processing. To implement this alternative, we need access to the
current StepExecution, and this can be achieved by implementing a
StepListener and registering it with the Step. Here is an example of a
listener that sets the flag:
public class CustomItemWriter extends ItemListenerSupport implements StepListener {

    private StepExecution stepExecution;

    public void beforeStep(StepExecution stepExecution) {
        this.stepExecution = stepExecution;
    }

    public void afterRead(Object item) {

        if (isPoisonPill(item)) {
            stepExecution.setTerminateOnly(true);
       }

    }

}
The default behaviour here when the flag is set is for the step to
throw a JobInterruptedException. This can be
controlled through the StepInterruptionPolicy,
but the only choice is to throw or not throw an exception, so this is
always an abnormal ending to a job.
A very common requirement is to aggregate information during the
output process and to append a record at the end of a file summarizing
the data, or providing a checksum. This can also be achieved with a
callbacks in the step, normally as part of a custom
ItemWriter. In this case, since a job is
accumulating state that should not be lost if the job aborts, the
ItemStream interface should be
implemented:
public class CustomItemWriter extends AbstractItemWriter implements
    ItemStream, StepListener
{

    private static final String TOTAL_AMOUNT_KEY = "total.amount";

    private ItemWriter delegate;

    private double totalAmount = 0.0;

    public void setDelegate(ItemWriter delegate) { ... }

    public ExitStatus afterStep(StepExecution stepExecution) {
        // Add the footer record here...
        delegate.write("Total Amount Processed: " + totalAmount);
    }

    public void open(ExecutionContext executionContext) {
        if (executionContext.containsKey(TOTAL_AMOUNT_KEY) {
            totalAmount = executionContext.getDouble(TOTAL_AMOUNT_KEY);
        }
    }

    public void update(ExecutionContext executionContext) {
        executionContext.setDouble(TOTAL_AMOUNT_KEY, totalAmount);
    }

    public void write(Object item) {

        delegate.write(item);
        totalAmount += ((Trade) item).getAmount();

    }

}
The custom writer in the example is stateful (it maintains its
total in an instance variable totalAmount), but the
state is stored through the ItemStream interface
in the ExecutionContext. In this way we can be
sure that when the open() callback is received on a
restart. The framework garuntees we always get the last value that was
committed. It should be noted that it is not always necessary to
implement ItemStream. For example, if the ItemWriter is re-runnable, in
the sense that it maintains its own state in a transactional resource
like a database, there is no need to maintain state within the writer
itself.