1.1.1.RELEASE
Copyright © 2013-2015 Pivotal Software, Inc.
Table of Contents
- I. Preface
- II. Introduction
- III. Architecture
- IV. Spring Cloud Data Flow Runtime
- 15. Deploying on YARN
- 16. Deploying on AMBARI
- 17. Configuring Runtime Settings and Environment
- 18. How YARN Deployment Works
- 19. Troubleshooting
- 20. Using Sandboxes
- V. Streams
- 21. Introduction
- 22. Stream DSL
- 23. Register a Stream App
- 24. Creating custom applications
- 25. Creating a Stream
- 25.1. Application properties
- 25.2. Deployment properties
- 25.2.1. Passing instance count as deployment property
- 25.2.2. Inline vs file reference properties
- 25.2.3. Passing application properties when deploying a stream
- 25.2.4. Passing Spring Cloud Stream properties for the application
- 25.2.5. Passing per-binding producer consumer properties
- 25.2.6. Passing stream partition properties during stream deployment
- 25.2.7. Passing application content type properties
- 25.2.8. Overriding application properties during stream deployment
- 25.3. Deployment properties
- 26. Destroying a Stream
- 27. Deploying and Undeploying Streams
- 28. Other Source and Sink Application Types
- 29. Simple Stream Processing
- 30. Stateful Stream Processing
- 31. Tap a Stream
- 32. Using Labels in a Stream
- 33. Explicit Broker Destinations in a Stream
- 34. Directed Graphs in a Stream
- 35. Stream applications with multiple binder configurations
- VI. Tasks
- VII. Dashboard
- VIII. ‘How-to’ guides
- IX. Appendices
- A. Migrating from Spring XD to Spring Cloud Data Flow
- A.1. Terminology Changes
- A.2. Modules to Applications
- A.3. Message Bus to Binders
- A.4. Batch to Tasks
- A.5. Shell/DSL Commands
- A.6. REST-API
- A.7. UI / Flo
- A.8. Architecture Components
- A.9. Central Configuration
- A.10. Distribution
- A.11. Hadoop Distribution Compatibility
- A.12. YARN Deployment
- A.13. Use Case Comparison
- B. Building
- C. Contributing
The Spring Cloud Data Flow for Apache Yarn reference guide is available as html, pdf and epub documents. The latest copy is available at docs.spring.io/spring-cloud-dataflow-server-yarn/docs/current-SNAPSHOT/reference/html/.
Copies of this document may be made for your own use and for distribution to others, provided that you do not charge any fee for such copies and further provided that each copy contains this Copyright Notice, whether distributed in print or electronically.
Having trouble with Spring Cloud Data Flow, We’d like to help!
- Try the How-to’s — they provide solutions to the most common questions.
- Ask a question - we monitor stackoverflow.com for questions
tagged with
spring-cloud. - Report bugs with Spring Cloud Dataflow for Apache YARN at github.com/spring-cloud/spring-cloud-dataflow-server-yarn/issues.
![[Note]](images/note.png) | Note |
|---|---|
All of Spring Cloud Data Flow is open source, including the documentation! If you find problems with the docs; or if you just want to improve them, please get involved. |
This project provides support for orchestrating long-running (streaming) and short-lived (task/batch) data microservices to Apache YARN.
Spring Cloud Data Flow is a cloud-native orchestration service for composable data microservices on modern runtimes. With Spring Cloud Data Flow, developers can create and orchestrate data pipelines for common use cases such as data ingest, real-time analytics, and data import/export.
The Spring Cloud Data Flow architecture consists of a server that deploys Streams and Tasks. Streams are defined using a DSL or visually through the browser based designer UI. Streams are based on the Spring Cloud Stream programming model while Tasks are based on the Spring Cloud Task programming model. The sections below describe more information about creating your own custom Streams and Tasks
For more details about the core architecture components and the supported features, please review Spring Cloud Data Flow’s core reference guide. There’re several samples available for reference.
Spring Cloud Stream is a framework for building message-driven microservice applications. Spring Cloud Stream builds upon Spring Boot to create standalone, production-grade Spring applications, and uses Spring Integration to provide connectivity to message brokers. It provides opinionated configuration of middleware from several vendors, introducing the concepts of persistent publish-subscribe semantics, consumer groups, and partitions.
For more details about the core framework components and the supported features, please review Spring Cloud Stream’s reference guide.
There’s a rich ecosystem of Spring Cloud Stream Application-Starters that can be used either as standalone data microservice applications or in Spring Cloud Data Flow. For convenience, we have generated RabbitMQ and Apache Kafka variants of these application-starters that are available for use from Maven Repo and Docker Hub as maven artifacts and docker images, respectively.
Do you have a requirement to develop custom applications? No problem. Refer to this guide to create custom stream applications. There’re several samples available for reference.
Spring Cloud Task makes it easy to create short-lived microservices. We provide capabilities that allow short-lived JVM processes to be executed on demand in a production environment.
For more details about the core framework components and the supported features, please review Spring Cloud Task’s reference guide.
There’s a rich ecosystem of Spring Cloud Task Application-Starters that can be used either as standalone data microservice applications or in Spring Cloud Data Flow. For convenience, the generated application-starters are available for use from Maven Repo. There are several samples available for reference.
Spring Cloud Data Flow simplifies the development and deployment of applications focused on data processing use-cases. The major concepts of the architecture are Applications, the Data Flow Server, and the target runtime.
Applications come in two flavors
- Long lived Stream applications where an unbounded amount of data is consumed or produced via messaging middleware.
- Short lived Task applications that process a finite set of data and then terminate.
Depending on the runtime, applications can be packaged in two ways
- Spring Boot uber-jar that is hosted in a maven repository, file, http or any other Spring resource implementation.
- Docker
The runtime is the place where applications execute. The target runtimes for applications are platforms that you may already be using for other application deployments.
The supported runtimes are
- Cloud Foundry
- Apache YARN
- Kubernetes
- Apache Mesos
- Local Server for development
There is a deployer Service Provider Interface (SPI) that enables you to extend Data Flow to deploy onto other runtimes, for example to support Docker Swarm. There are community implementations of Hashicorp’s Nomad and RedHat Openshift is available. We look forward to working with the community for further contributions!
The component that is responsible for deploying applications to a runtime is the Data Flow Server. There is a Data Flow Server executable jar provided for each of the target runtimes. The Data Flow server is responsible for interpreting
- A stream DSL that describes the logical flow of data through multiple applications.
- A deployment manifest that describes the mapping of applications onto the runtime. For example, to set the initial number of instances, memory requirements, and data partitioning.
As an example, the DSL to describe the flow of data from an http source to an Apache Cassandra sink would be written as “http | cassandra”. These names in the DSL are registered with the Data Flow Server and map onto application artifacts that can be hosted in Maven or Docker repositories. Many source, processor, and sink applications for common use-cases (e.g. jdbc, hdfs, http, router) are provided by the Spring Cloud Data Flow team. The pipe symbol represents the communication between the two applications via messaging middleware. The two messaging middleware brokers that are supported are
- Apache Kafka
- RabbitMQ
In the case of Kafka, when deploying the stream, the Data Flow server is responsible to create the topics that correspond to each pipe symbol and configure each application to produce or consume from the topics so the desired flow of data is achieved.
The interaction of the main components is shown below

In this diagram a DSL description of a stream is POSTed to the Data Flow Server. Based on the mapping of DSL application names to Maven and Docker artifacts, the http-source and cassandra-sink applications are deployed on the target runtime.
The Data Flow Server deploys applications onto the target runtime that conform to the microservice architectural style. For example, a stream represents a high level application that consists of multiple small microservice applications each running in their own process. Each microservice application can be scaled up or down independent of the other and each has their own versioning lifecycle.
Both Streaming and Task based microservice applications build upon Spring Boot as the foundational library. This gives all microservice applications functionality such as health checks, security, configurable logging, monitoring and management functionality, as well as executable JAR packaging.
It is important to emphasise that these microservice applications are ‘just apps’ that you can run by yourself using ‘java -jar’ and passing in appropriate configuration properties. We provide many common microservice applications for common operations so you don’t have to start from scratch when addressing common use-cases which build upon the rich ecosystem of Spring Projects, e.g Spring Integration, Spring Data, Spring Hadoop and Spring Batch. Creating your own microservice application is similar to creating other Spring Boot applications, you can start using the Spring Initialzr web site or the UI to create the basic scaffolding of either a Stream or Task based microservice.
In addition to passing in the appropriate configuration to the applications, the Data Flow server is responsible for preparing the target platform’s infrastructure so that the application can be deployed. For example, in Cloud Foundry it would be binding specified services to the applications and executing the ‘cf push’ command for each application. For Kubernetes it would be creating the replication controller, service, and load balancer.
The Data Flow Server helps simplify the deployment of multiple applications onto a target runtime, but one could also opt to deploy each of the microservice applications manually and not use Data Flow at all. This approach might be more appropriate to start out with for small scale deployments, gradually adopting the convenience and consistency of Data Flow as you develop more applications. Manual deployment of Stream and Task based microservices is also a useful educational exercise that will help you better understand some of the automatic applications configuration and platform targeting steps that the Data Flow Server provides.
Spring Cloud Data Flow’s architectural style is different than other Stream and Batch processing platforms. For example in Apache Spark, Apache Flink, and Google Cloud Dataflow applications run on a dedicated compute engine cluster. The nature of the compute engine gives these platforms a richer environment for performing complex calculations on the data as compared to Spring Cloud Data Flow, but it introduces complexity of another execution environment that is often not needed when creating data centric applications. That doesn’t mean you cannot do real time data computations when using Spring Cloud Data Flow. Refer to the analytics section which describes the integration of Redis to handle common counting based use-cases as well as the RxJava integration for functional API driven analytics use-cases, such as time-sliding-window and moving-average among others.
Similarly, Apache Storm, Hortonworks DataFlow and Spring Cloud Data Flow’s predecessor, Spring XD, use a dedicated application execution cluster, unique to each product, that determines where your code should execute on the cluster and perform health checks to ensure that long lived applications are restarted if they fail. Often, framework specific interfaces are required to be used in order to correctly “plug in” to the cluster’s execution framework.
As we discovered during the evolution of Spring XD, the rise of multiple container frameworks in 2015 made creating our own runtime a duplication of efforts. There is no reason to build your own resource management mechanics, when there are multiple runtime platforms that offer this functionality already. Taking these considerations into account is what made us shift to the current architecture where we delegate the execution to popular runtimes, runtimes that you may already be using for other purposes. This is an advantage in that it reduces the cognitive distance for creating and managing data centric applications as many of the same skills used for deploying other end-user/web applications are applicable.
While Spring Boot provides the foundation for creating DevOps friendly microservice applications, other libraries in the Spring ecosystem help create Stream based microservice applications. The most important of these is Spring Cloud Stream.
The essence of the Spring Cloud Stream programming model is to provide an easy way to describe multiple inputs and outputs of an application that communicate over messaging middleware. These input and outputs map onto Kafka topics or Rabbit exchanges and queues. Common application configuration for a Source that generates data, a Process that consumes and produces data and a Sink that consumes data is provided as part of the library.
Spring Cloud Stream is most closely integrated with Spring Integration’s imperative "event at a time" programming model. This means you write code that handles a single event callback. For example,
@EnableBinding(Sink.class)
public class LoggingSink {

    @StreamListener(Sink.INPUT)
    public void log(String message) {
        System.out.println(message);
    }
}
In this case the String payload of a message coming on the input channel, is handed to the log method. The @EnableBinding annotation is what is used to tie together the input channel to the external middleware.
However, Spring Cloud Stream can support other programming styles. The use of reactive APIs where incoming and outgoing data is handled as continuous data flows and it defines how each individual message should be handled. You can also use operators that describe functional transformations from inbound to outbound data flows. The upcoming versions will support Apache Kafka’s KStream API in the programming model.
The Stream DSL describes linear sequences of data flowing through the system. For example, in the stream definition http | transformer | cassandra, each pipe symbol connects the application on the left to the one on the right. Named channels can be used for routing and to fan out data to multiple messaging destinations.
Taps can be used to ‘listen in’ to the data that if flowing across any of the pipe symbols. Taps can be used as sources for new streams with an in independent life cycle.
For an application that will consume events, Spring Cloud stream exposes a concurrency setting that controls the size of a thread pool used for dispatching incoming messages. See the {spring-cloud-stream-docs}#_consumer_properties[Consumer properties] documentation for more information.
A common pattern in stream processing is to partition the data as it moves from one application to the next. Partitioning is a critical concept in stateful processing, for either performance or consistency reasons, to ensure that all related data is processed together. For example, in a time-windowed average calculation example, it is important that all measurements from any given sensor are processed by the same application instance. Alternatively, you may want to cache some data related to the incoming events so that it can be enriched without making a remote procedure call to retrieve the related data.
Spring Cloud Data Flow supports partitioning by configuring Spring Cloud Stream’s output and input bindings. Spring Cloud Stream provides a common abstraction for implementing partitioned processing use cases in a uniform fashion across different types of middleware. Partitioning can thus be used whether the broker itself is naturally partitioned (e.g., Kafka topics) or not (e.g., RabbitMQ). The following image shows how data could be partitioned into two buckets, such that each instance of the average processor application consumes a unique set of data.
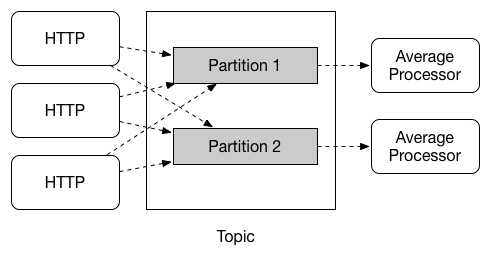
To use a simple partitioning strategy in Spring Cloud Data Flow, you only need set the instance count for each application in the stream and a partitionKeyExpression producer property when deploying the stream. The partitionKeyExpression identifies what part of the message will be used as the key to partition data in the underlying middleware. An ingest stream can be defined as http | averageprocessor | cassandra (Note that the Cassandra sink isn’t shown in the diagram above). Suppose the payload being sent to the http source was in JSON format and had a field called sensorId. Deploying the stream with the shell command stream deploy ingest --propertiesFile ingestStream.properties where the contents of the file ingestStream.properties are
app.http.count=3
app.averageprocessor.count=2
app.http.producer.partitionKeyExpression=payload.sensorId
will deploy the stream such that all the input and output destinations are configured for data to flow through the applications but also ensure that a unique set of data is always delivered to each averageprocessor instance. In this case the default algorithm is to evaluate payload.sensorId % partitionCount where the partitionCount is the application count in the case of RabbitMQ and the partition count of the topic in the case of Kafka.
Please refer to Section 25.2.6, “Passing stream partition properties during stream deployment” for additional strategies to partition streams during deployment and how they map onto the underlying {spring-cloud-stream-docs}#_partitioning[Spring Cloud Stream Partitioning properties].
Also note, that you can’t currently scale partitioned streams. Read the section Section 14.3, “Scaling at runtime” for more information.
Streams are composed of applications that use the Spring Cloud Stream library as the basis for communicating with the underlying messaging middleware product. Spring Cloud Stream also provides an opinionated configuration of middleware from several vendors, in particular providing {spring-cloud-stream-docs}#_persistent_publish_subscribe_support[persistent publish-subscribe semantics].
The {spring-cloud-stream-docs}#_binders[Binder abstraction] in Spring Cloud Stream is what connects the application to the middleware. There are several configuration properties of the binder that are portable across all binder implementations and some that are specific to the middleware.
For consumer applications there is a retry policy for exceptions generated during message handling. The retry policy is configured using the {spring-cloud-stream-docs}#_consumer_properties[common consumer properties] maxAttempts, backOffInitialInterval, backOffMaxInterval, and backOffMultiplier. The default values of these properties will retry the callback method invocation 3 times and wait one second for the first retry. A backoff multiplier of 2 is used for the second and third attempts.
When the number of retry attempts has exceeded the maxAttempts value, the exception and the failed message will become the payload of a message and be sent to the application’s error channel. By default, the default message handler for this error channel logs the message. You can change the default behavior in your application by creating your own message handler that subscribes to the error channel.
Spring Cloud Stream also supports a configuration option for both Kafka and RabbitMQ binder implementations that will send the failed message and stack trace to a dead letter queue. The dead letter queue is a destination and its nature depends on the messaging middleware (e.g in the case of Kafka it is a dedicated topic). To enable this for RabbitMQ set the {spring-cloud-stream-docs}#_rabbitmq_consumer_properties[consumer properties] republishtoDlq and autoBindDlq and the {spring-cloud-stream-docs}#_rabbit_producer_properties[producer property] autoBindDlq to true when deploying the stream. To always apply these producer and consumer properties when deploying streams, configure them as common application properties when starting the Data Flow server.
Additional messaging delivery guarantees are those provided by the underlying messaging middleware that is chosen for the application for both producing and consuming applications. Refer to the Kafka {spring-cloud-stream-docs}#_kafka_consumer_properties[Consumer] and {spring-cloud-stream-docs}#_kafka_producer_properties[Producer] and Rabbit {spring-cloud-stream-docs}#_rabbitmq_consumer_properties[Consumer] and {spring-cloud-stream-docs}#_rabbit_producer_properties[Producer] documentation for more details. You will find extensive declarative support for all the native QOS options.
Spring Cloud Data Flow is aware of certain Sink applications that will write counter data to Redis and provides an REST endpoint to read counter data. The types of counters supported are
- Counter - Counts the number of messages it receives, optionally storing counts in a separate store such as redis.
- Field Value Counter - Counts occurrences of unique values for a named field in a message payload
- Aggregate Counter - Stores total counts but also retains the total count values for each minute, hour day and month.
It is important to note that the timestamp that is used in the aggregate counter can come from a field in the message itself so that out of order messages are properly accounted.
The Spring Cloud Task programming model provides:
- Persistence of the Task’s lifecycle events and exit code status.
- Lifecycle hooks to execute code before or after a task execution.
- Emit task events to a stream (as a source) during the task lifecycle.
- Integration with Spring Batch Jobs.
The Data Flow Server uses an embedded servlet container and exposes REST endpoints for creating, deploying, undeploying, and destroying streams and tasks, querying runtime state, analytics, and the like. The Data Flow Server is implemented using Spring’s MVC framework and the Spring HATEOAS library to create REST representations that follow the HATEOAS principle.
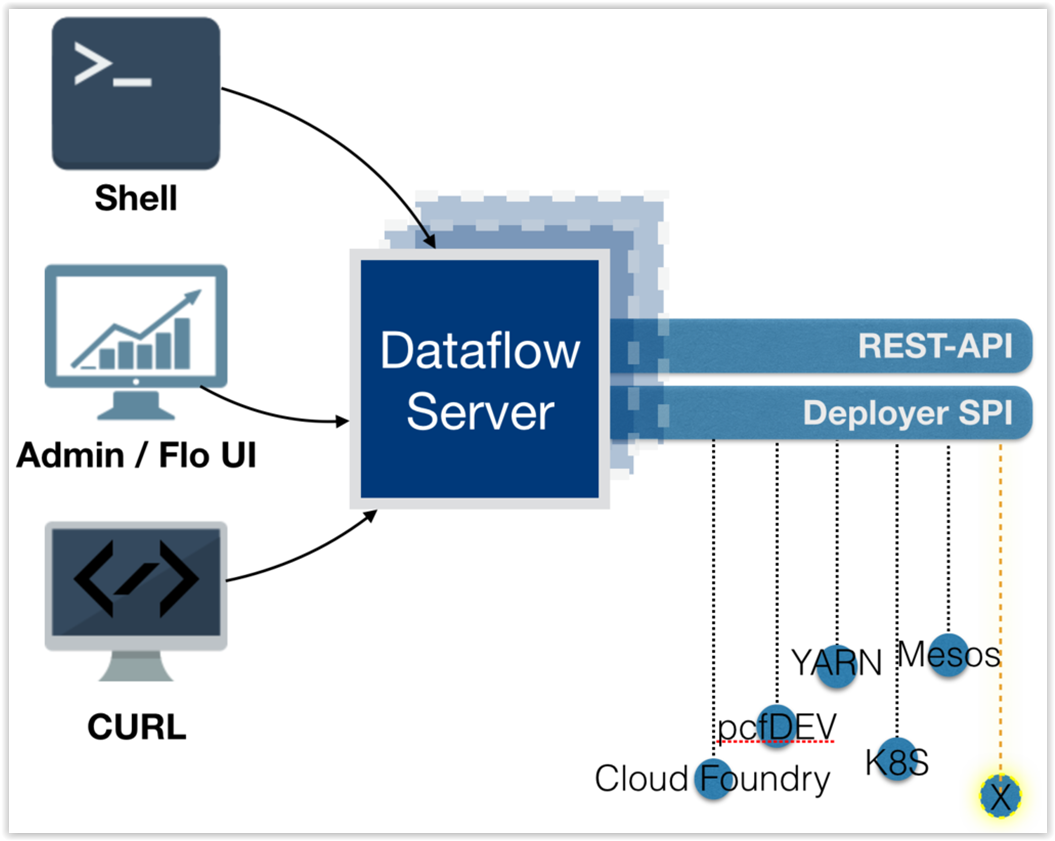
Each Data Flow Server executable jar targets a single runtime by delegating to the implementation of the deployer Service Provider Interface found on the classpath.
We provide a Data Flow Server executable jar that targets a single runtime. The Data Flow server delegates to the implementation of the deployer Service Provider Interface found on the classpath. In the current version, there are no endpoints specific to a target runtime, but may be available in future releases as a convenience to access runtime specific features
While we provide a server executable for each of the target runtimes you can also create your own customized server application using Spring Initialzr. This let’s you add or remove functionality relative to the executable jar we provide. For example, adding additional security implementations, custom endpoints, or removing Task or Analytics REST endpoints. You can also enable or disable some features through the use of feature toggles.
The Data Flow Server executable jars support basic http, LDAP(S), File-based, and OAuth 2.0 authentication to access its endpoints. Refer to the security section for more information.
Authorization via groups is planned for a future release.
The target runtimes supported by Data Flow all have the ability to restart a long lived application should it fail. Spring Cloud Data Flow sets up whatever health probe is required by the runtime environment when deploying the application.
The collective state of all applications that comprise the stream is used to determine the state of the stream. If an application fails, the state of the stream will change from ‘deployed’ to ‘partial’.
Each target runtime lets you control the amount of memory, disk and CPU that is allocated to each application. These are passed as properties in the deployment manifest using key names that are unique to each runtime. Refer to the each platforms server documentation for more information.
When deploying a stream, you can set the instance count for each individual application that comprises the stream. Once the stream is deployed, each target runtime lets you control the target number of instances for each individual application. Using the APIs, UIs, or command line tools for each runtime, you can scale up or down the number of instances as required. Future work will provide a portable command in the Data Flow Server to perform this operation.
Currently, this is not supported with the Kafka binder (based on the 0.8 simple consumer at the time of the release), as well as partitioned streams, for which the suggested workaround is redeploying the stream with an updated number of instances. Both cases require a static consumer set up based on information about the total instance count and current instance index, a limitation intended to be addressed in future releases. For example, Kafka 0.9 and higher provides good infrastructure for scaling applications dynamically and will be available as an alternative to the current Kafka 0.8 based binder in the near future. One specific concern regarding scaling partitioned streams is the handling of local state, which is typically reshuffled as the number of instances is changed. This is also intended to be addressed in the future versions, by providing first class support for local state management.
Application versioning, that is upgrading or downgrading an application from one version to another, is not directly supported by Spring Cloud Data Flow. You must rely on specific target runtime features to perform these operational tasks.
The roadmap for Spring Cloud Data Flow will deploy applications that are compatible with Spinnaker to manage the complete application lifecycle. This also includes automated canary analysis backed by application metrics. Portable commands in the Data Flow server to trigger pipelines in Spinnaker are also planned.
Data flow runtime can be deployed and used with YARN in two different ways, firstly using it directly with a YARN cluster and secondly letting Apache Ambari deploy it into its cluster as a service. Difference between these two deployment types is that YARN only provides a raw runtime environment for containers where user is required to setup all needed dependencies while Apache Ambari will try to focus on easy deployment where minimum set of required services exist in ambari managed cluster.
The server application is run as a standalone application. All applications used for streams and tasks will be deployed on the YARN cluster that is targeted by the server.
These requirements are not something yarn runtime needs but generally what dataflow core needs.
- Rabbit - If dataflow apps using rabbit bindings are used.
- Kafka - If dataflow apps using kafka bindings are used.
- DB - we currently use embedded H2 database, though any supported DB can be configured.
Download the Spring Cloud Data Flow YARN distribution ZIP file which includes the Server and the Shell apps:
$ wget http://repo.spring.io/release/org/springframework/cloud/dist/spring-cloud-dataflow-server-yarn-dist/1.1.1.RELEASE/spring-cloud-dataflow-server-yarn-dist-1.1.1.RELEASE.zip
Unzip the distribution ZIP file and change to the directory containing the deployment files.
$ cd spring-cloud-dataflow-server-yarn-1.1.1.RELEASE
Generic runtime settings can changed in config/servers.yml.
Dedicated section Chapter 17, Configuring Runtime Settings and Environment contains detailed
information about configuration.
servers.yml file is a central place to share common configuration as
it is added to Boot based jvm processes via option
-Dspring.config.location=servers.yml.
If this is the first time deploying make sure the user that runs
the Server app has rights to create and write to /dataflow
directory in hdfs. If there is an existing deployment on hdfs
remove it using:
$ hdfs dfs -rm -R /dataflow
Start the Spring Cloud Data Flow Server app for YARN
$ ./bin/dataflow-server-yarn
start spring-cloud-dataflow-shell
$ ./bin/dataflow-shell
Shell in a distribution package contains extension commands for a
hdfs file system.
dataflow:>hadoop fs
hadoop fs cat              hadoop fs copyFromLocal    hadoop fs copyToLocal      hadoop fs expunge
hadoop fs ls               hadoop fs mkdir            hadoop fs mv               hadoop fs rm
dataflow:>hadoop fs ls /
rwxrwxrwx root         supergroup 0 2016-07-25 06:54:15 /
rwxrwxrwx jvalkealahti supergroup 0 2016-07-25 06:58:38 /dataflow
rwxr-xr-x jvalkealahti supergroup 0 2016-07-25 07:31:32 /repo
rwxrwxrwx root         supergroup 0 2016-07-20 16:25:31 /tmp
rwxrwxrwx jvalkealahti supergroup 0 2015-10-29 10:59:24 /user
![[Tip]](images/tip.png) | Tip |
|---|---|
You can configure server address automatically by placing it in
a configuration using key |
By default, the application registry will be empty. If you would like to register all out-of-the-box stream applications built with the RabbitMQ binder in bulk, you can with the following command. For more details, review how to register applications.
dataflow:>app import --uri http://bit.ly/stream-applications-rabbit-maven
YARN integration also allows you to store registered applications
directly in HDFS instead of relying on maven or any other
resolution. Only thing to change during a registration is to use
hdfs address as shown below.
dataflow:>app register --name ftp --type sink --uri hdfs:/dataflow/artifacts/repo/ftp-sink-kafka-1.0.0.RC1.jar
Create a stream:
dataflow:>stream create --name foostream --definition "time|log" --deploy
List streams:
dataflow:>stream list
╔═══════════╤═════════════════╤════════╗
║Stream Name│Stream Definition│ Status ║
╠═══════════╪═════════════════╪════════╣
║foostream  │time|log         │deployed║
╚═══════════╧═════════════════╧════════╝
After some time, destroy the stream:
dataflow:>stream destroy --name foostream
The YARN application is pushed and started automatically during a stream deployment process. Once all streams are destroyed the YARN application will exit.
Create and launch task:
dataflow:>task create --name footask --definition "timestamp"
Created new task 'footask'
dataflow:>task launch --name footask
Launched task 'footask'
Launch tasks from streams:
task-launcher-yarn-sink itself bundles a YARN Deployer but doesn’t
push any apps into hdfs, thus pushed app needs to exist and match a
deployer version task-launcher-yarn-sink uses.
In below sample we use tasklaunchrequest processor to pass needed
properties into task-launcher-yarn sink. We explicitely defined
appVersion as appv1 which you would have pushed into hdfs prior
running this stream. With this processor you also need to define a
uri for a task application itself.
stream create --name launchertest --definition "http
--server.port=9000|tasklaunchrequest
--deployment-properties=spring.cloud.deployer.yarn.app.appVersion=appv1
--uri=hdfs:/dataflow/repo/timestamp-task.jar|task-launcher-yarn"
--deploy
To fire up a task just post a dummy message into http source.
http post --target http://localhost:9000 --data empty
| Note |
|---|---|
Using |
Overall app status can be seen from YARN Resource Manager UI or using Spring YARN CLI which gives more info about running containers within an app itself.
$ ./bin/dataflow-server-yarn-cli shell
When stream has been submitted YARN shows it as ACCEPTED before its
turned to RUNNING state.
$ submitted
  APPLICATION ID                  USER          NAME                     QUEUE    TYPE      STARTTIME       FINISHTIME  STATE     FINALSTATUS  ORIGINAL TRACKING URL
  ------------------------------  ------------  -----------------------  -------  --------  --------------  ----------  --------  -----------  ---------------------
  application_1461658614481_0001  jvalkealahti  scdstream:app:foostream  default  DATAFLOW  26/04/16 16:27  N/A         ACCEPTED  UNDEFINED

$ submitted
  APPLICATION ID                  USER          NAME                     QUEUE    TYPE      STARTTIME       FINISHTIME  STATE    FINALSTATUS  ORIGINAL TRACKING URL
  ------------------------------  ------------  -----------------------  -------  --------  --------------  ----------  -------  -----------  -------------------------
  application_1461658614481_0001  jvalkealahti  scdstream:app:foostream  default  DATAFLOW  26/04/16 16:27  N/A         RUNNING  UNDEFINED    http://192.168.1.96:58580
More info about internals for stream apps can be queried by
clustersinfo and clusterinfo commands:
$ clustersinfo -a application_1461658614481_0001
  CLUSTER ID
  --------------
  foostream:log
  foostream:time

$ clusterinfo -a application_1461658614481_0001 -c foostream:time
  CLUSTER STATE  MEMBER COUNT
  -------------  ------------
  RUNNING        1
After stream is undeployed YARN app should close itself automatically:
$ submitted -v
  APPLICATION ID                  USER          NAME                     QUEUE    TYPE      STARTTIME       FINISHTIME      STATE     FINALSTATUS  ORIGINAL TRACKING URL
  ------------------------------  ------------  -----------------------  -------  --------  --------------  --------------  --------  -----------  ---------------------
  application_1461658614481_0001  jvalkealahti  scdstream:app:foostream  default  DATAFLOW  26/04/16 16:27  26/04/16 16:28  FINISHED  SUCCEEDED
Launching a task will be shown in RUNNING state while app is
executing its batch jobs:
$ submitted -v
  APPLICATION ID                  USER          NAME                     QUEUE    TYPE      STARTTIME       FINISHTIME      STATE     FINALSTATUS  ORIGINAL TRACKING URL
  ------------------------------  ------------  -----------------------  -------  --------  --------------  --------------  --------  -----------  -------------------------
  application_1461658614481_0002  jvalkealahti  scdtask:timestamp        default  DATAFLOW  26/04/16 16:29  N/A             RUNNING   UNDEFINED    http://192.168.1.96:39561
  application_1461658614481_0001  jvalkealahti  scdstream:app:foostream  default  DATAFLOW  26/04/16 16:27  26/04/16 16:28  FINISHED  SUCCEEDED

$ submitted -v
  APPLICATION ID                  USER          NAME                     QUEUE    TYPE      STARTTIME       FINISHTIME      STATE     FINALSTATUS  ORIGINAL TRACKING URL
  ------------------------------  ------------  -----------------------  -------  --------  --------------  --------------  --------  -----------  ---------------------
  application_1461658614481_0002  jvalkealahti  scdtask:timestamp        default  DATAFLOW  26/04/16 16:29  26/04/16 16:29  FINISHED  SUCCEEDED
  application_1461658614481_0001  jvalkealahti  scdstream:app:foostream  default  DATAFLOW  26/04/16 16:27  26/04/16 16:28  FINISHED  SUCCEEDED
Yarn applications needed for a dataflow can be pushed manually
into hdfs with a given version which default to app.
Spring YARN Cli (v2.4.0.RELEASE)
Hit TAB to complete. Type 'help' and hit RETURN for help, and 'exit' to quit.
$ push -t STREAM
New version installed
$ push -t TASK
New version installed
$ push -t TASK -v appv1
New version installed
After above commands base directories for different app versions would look like as shown below. Streams and tasks can then use different versions which allows to use alternate configurations.
/dataflow/apps/stream/app
/dataflow/apps/task/app
/dataflow/apps/task/appv1
| Note |
|---|---|
Push happens automatically when stream is deployer or task launched. |
Ambari basically automates YARN installation instead of requiring user to do it manually. Also a lot of other configuration steps are automated as much as possible to easy overall installation process.
There is no difference on components deployed into ambari comparing of a manual usage with a separate YARN cluster. With ambari we simply package needed dataflow components into a rpm package so that it can be managed as an ambari service. After that ambari really only manage a runtime configuration of those components.
Generally it is only needed to install scdf-plugin-hdp plugin into
ambari server which adds needed service definitions.
[root@ambari-1 ~]# yum -y install ambari-server
[root@ambari-1 ~]# ambari-server setup -s
[root@ambari-1 ~]# wget -nv http://repo.spring.io/yum-release-local/scdf/1.1.1/scdf-release-1.1.1.repo -O /etc/yum.repos.d/scdf-release-1.1.1.repo
[root@ambari-1 ~]# yum -y install scdf-plugin-hdp
[root@ambari-1 ~]# ambari-server start
| Note |
|---|---|
Ambari plugin only works for redhat6/redhat7 and related centos based systems for now. |
When you create your cluster and choose a stack, make sure that
redhat6 or/and redhat7 sections contains repository named
SCDF-1.1.1 and that it points to
repo.spring.io/yum-release-local/scdf/1.1.1.
Ambari 2.4 contains major rewrites for stack definitions and how it
is possible to integrate with those from external contributions. Our
plugin will eventually integrate via extensions or management packs,
but for now you need to choose stack marked as a Default Version
Definition which contains correct yum repository. For example with
HDP 2.5 you have two default choices, HDP-2.5.0.0 and HDP-2.5
(Default Version Definition). As mentioned you need to pick latter.
With older ambari versions you don’t have these new options.
From services choose Spring Cloud Data Flow and Kafka. Hdfs,
Yarn and Zookeeper are forced dependencies.
| Note |
|---|---|
With |
Then in Customize Services what is really left for user to do is to customise settings if needed. Everything else is automatically configured. Technically it also allows you to switch to use rabbit by leaving Kafka out and defining rabbit settings there. But generally use of Kafka is a good choice.
| Note |
|---|---|
We also install H2 DB as service so that it can be accessed from every node. |
servers.yml file is also used to store common configuration with
Ambari. Settings in Advanced scdf-site and Custom scdf-site are
used to dynamically create a this file which is then copied over to
hdfs when needed application files are deployd.
Every additional entry added via Custom scdf-site is added into
servers.yml as is and overrides everything else in it.
![[Important]](images/important.png) | Important |
|---|---|
If ambari configuration is modified, you need to delete
|
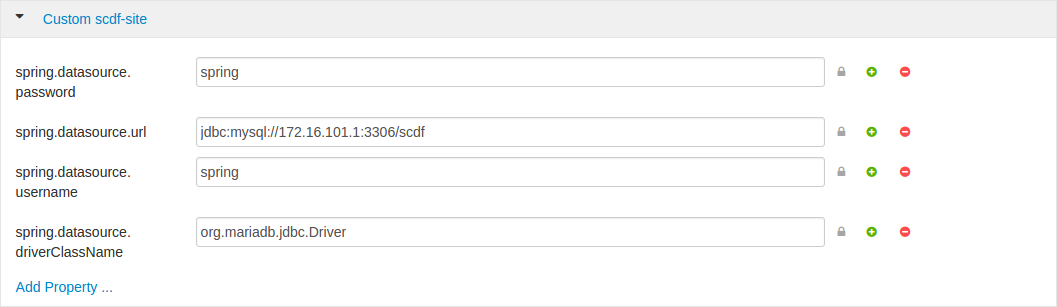
Ambari managed service defaults to H2 database. We currently support
using MySQL, PostgreSQL and HSQLDB as external datasources.
Custom datasource configuration can be applied via Custom scdf-site
as shown in below screenshot. After these settings are modified, all
related services needs to be restarted.
| Note |
|---|---|
Managed service SCDF H2 Database can be stopped and put in a maintenance mode after custom datasource settings has been added. |
This section describes how settings related to running YARN application can be modified.
All applications whether those are stream apps or task apps can be
centrally configured with servers.yml as that file is passed to apps
using --spring.config.location='servers.yml'.
Stream and task processes for application master and containers can be further tuned by setting memory and cpu settings. Also java options allow to define actual jvm options.
spring:
  cloud:
    deployer:
      yarn:
        app:
          streamappmaster:
            memory: 512m
            virtualCores: 1
            javaOpts: "-Xms512m -Xmx512m"
          streamcontainer:
            priority: 5
            memory: 256m
            virtualCores: 1
            javaOpts: "-Xms64m -Xmx256m"
          taskappmaster:
            memory: 512m
            virtualCores: 1
            javaOpts: "-Xms512m -Xmx512m"
          taskcontainer:
            priority: 10
            memory: 256m
            virtualCores: 1
javaOpts: "-Xms64m -Xmx256m"Base directory where all needed files are kept defaults to /dataflow
and can be changed using baseDir property.
spring:
  cloud:
    deployer:
      yarn:
        app:
baseDir: /dataflowSpring Cloud Data Flow app registration is based on URI’s with various
different endpoints. As mentioned in section Chapter 18, How YARN Deployment Works all
applications are first stored into hdfs before application container
is launched. Server can use http, file, http and maven based
uris as well direct hdfs uris.
It is possible to place these applications directly into HDFS and register application based on that URI.
Logging for all components is done centrally via servers.yml file
using normal Spring Boot properties.
logging:
  level:
    org.apache.hadoop: INFO
org.springframework.yarn: INFOYARN Nodemanager is continously tracking how much memory is used by individual YARN containers. If containers are using more memory than what the configuration allows, containers are simply killed by a Nodemanager. Application master controlling the app lifecycle is given a little more freedom meaning that Nodemanager is not that aggressive when making a desicion when a container should be killed.
| Important |
|---|---|
These are global cluster settings and cannot be changed during an application deployment. |
Lets take a quick look of memory related settings in YARN cluster and in YARN applications. Below xml config is what a default vanilla Apache Hadoop uses for memory related settings. Other distributions may have different defaults.
- yarn.nodemanager.pmem-check-enabled
- Enables a check for physical memory of a process. This check if enabled is directly tracking amount of memory requested for a YARN container.
- yarn.nodemanager.vmem-check-enabled
- Enables a check for virtual memory of a process. This setting is one
which is usually causing containers of a custom YARN applications to
get killed by a node manager. Usually the actual ratio between
physical and virtual memory is higher than a default
2.1or bugs in a OS is causing wrong calculation of a used virtual memory. - yarn.nodemanager.vmem-pmem-ratio
- Defines a ratio of allowed virtual memory compared to physical memory. This ratio simply defines how much virtual memory a process can use but the actual tracked size is always calculated from a physical memory limit.
- yarn.scheduler.minimum-allocation-mb
Defines a minimum allocated memory for container.
Note This setting also indirectly defines what is the actual physical memory limit requested during a container allocation. Actual physical memory limit is always going to be multiple of this setting rounded to upper bound. For example if this setting is left to default
1024and container is requested with512M,1024Mis going to be used. However if requested size is1100M, actual size is set to2048M.- yarn.scheduler.maximum-allocation-mb
- Defines a maximum allocated memory for container.
- yarn.nodemanager.resource.memory-mb
- Defines how much memory a node controlled by a node manager is allowed to allocate. This setting should be set to amount of which OS is able give to YARN managed processes in a way which doesn’t cause OS to swap, etc.
Enabling kerberos is relatively easy when existing kerberized cluster exists. Just like with every other hadoop related service, use a specific user and a keytab.
spring:
  hadoop:
    security:
      userPrincipal: scdf/[email protected]
      userKeytab: /etc/security/keytabs/scdf.service.keytab
      authMethod: kerberos
      namenodePrincipal: nn/[email protected]
      rmManagerPrincipal: rm/[email protected]
jobHistoryPrincipal: jhs/[email protected] | Note |
|---|---|
When using ambari, configuration and keytab generation are fully automated. |
| Important |
|---|---|
Currently released kafka based apps doesn’t work with cluster where zookeeper and kafka itself are configured to for kerberos authentication. Workaround is to use rabbit based apps or build stream apps based on new kafka binder having support for kerberized kafka. |
After a kafka based stream app has a kerberos support, some settings
in ambari’s kafka configuration needs to be changed. Effectively
listeners and security.inter.broker.protocol needs to use
SASL_PLAINTEXT. Also binder needs to be able to create topics, thus
scdf user needs to be added to a kafka’s super users.
listeners=SASL_PLAINTEXT://localhost:6667
security.inter.broker.protocol=SASL_PLAINTEXT
super.users=user:kafka;user:scdf
Additional configs are needed for binder and sasl config.
spring:
  cloud:
    stream:
      kafka:
        binder:
          configuration:
            security:
              protocol: SASL_PLAINTEXT
spring:
  cloud:
    deployer:
      yarn:
        app:
          streamcontainer:
            saslConfig: "-Djava.security.auth.login.config=/etc/scdf/conf/scdf_kafka_jaas.conf"
Where scdf_kafka_jaas.conf looks something like shown below.
KafkaClient {
   com.sun.security.auth.module.Krb5LoginModule required
   useKeyTab=true
   keyTab="/etc/security/keytabs/scdf.service.keytab"
   storeKey=true
   useTicketCache=false
   serviceName="kafka"
   principal="scdf/[email protected]";
}; | Important |
|---|---|
When ambari is kerberized via its wizard, everything else is
automatically configured except kafka settings for a |
Generic settings for dataflow components to work with
HA setup can be seen below where id is set to mycluster.
spring:
  hadoop:
    fsUri: hdfs://mycluster:8020
    config:
      dfs.ha.automatic-failover.enabled=True
      dfs.nameservices=mycluster
      dfs.client.failover.proxy.provider.mycluster=org.apache.hadoop.hdfs.server.namenode.ha.ConfiguredFailoverProxyProvider
      dfs.ha.namenodes.mycluster=nn1,nn2
      dfs.namenode.rpc-address.mycluster.nn2=ambari-3.localdomain:8020
dfs.namenode.rpc-address.mycluster.nn1=ambari-2.localdomain:8020 | Note |
|---|---|
When using ambari and Hdfs HA setup, configuration is fully automated. |
On default a dataflow server will start embedded H2 database using in-memory storage and effectively using configuration.
spring:
  datasource:
    url: jdbc:h2:tcp://localhost:19092/mem:dataflow
    username: sa
    password:
    driverClassName: org.h2.Driver
Distribution package contains a bundled self-contained H2 executable which can be used instead. This allows to persist data throughout server restarts and is not limited to single host.
./bin/dataflow-server-yarn-h2 --dataflow.database.h2.directory=/var/run/scdf/data
spring:
  datasource:
    url: jdbc:h2:tcp://neo:19092/dataflow
    username: sa
    password:
driverClassName: org.h2.Driver | Important |
|---|---|
With external H2 instance you cannot use |
| Note |
|---|---|
Port can be changed using property |
This bundled H2 database is also used in ambari to have a default
out of a box functionality. Any database supported by a dataflow
itself can be used by changing datasource settings.
YARN Deployer has to be able to talk with Application Master which then is responsible controlling containers running stream and task applications. The way this work is that Application Master tries to discover its own address which YARN Deployer is then able to use. If YARN cluster nodes have multiple NICs or for some other reason address is discovered wrongly, some settings can be changed to alter default discovery logic.
Below is a generic settings what can be changed.
spring
  yarn:
    hostdiscovery:
      pointToPoint: false
      loopback: false
      preferInterface: ['eth', 'en']
      matchIpv4: 192.168.0.0/24
matchInterface: eth\\d*- pointToPoint - Skips all interfaces which are most likely i.e. VPNs. Defaults to false.
- loopback - Don’t take loopback interface. Defaults to false.
- preferInterface - In case multiple interface names exist, setup preference order for discovery. Format is interface name without number qualifier so with eth0, use eth. There’s no defaults.
- matchIpv4 - Interface can be matched using its existing ip address which is given as CIDR format. There’s no defaults.
- matchInterface - Interface can also matched using a simple regex pattern which gives even better control if complex interface combinations exist in a cluster. There’s no defaults.
When YARN application is deployed into a YARN cluster it consists of two parts, Application Master and Containers. Application master is a control program responsible of handling applications lifecycle and allocation of containers. Containers are then where a real heavy lifting is done. In case of a stream there is always minimum of 3 containers, one for application master, one for sink and one for source. When running tasks there is always one application master and one container running a particular task.
Needed application files are pushed into hdfs automatically when needed. After stream and task is used once hdfs directory structure would like like shown above.
/dataflow/apps
/dataflow/apps/stream
/dataflow/apps/stream/app
/dataflow/apps/stream/app/application.properties
/dataflow/apps/stream/app/servers.yml
/dataflow/apps/stream/app/spring-cloud-deployer-yarn-appdeployerappmaster-1.0.0.BUILD-SNAPSHOT.jar
/dataflow/apps/task
/dataflow/apps/task/app
/dataflow/apps/task/app/application.properties
/dataflow/apps/task/app/servers.yml
/dataflow/apps/task/app/spring-cloud-deployer-yarn-tasklauncherappmaster-1.0.0.BUILD-SNAPSHOT.jar
| Note |
|---|---|
|
Application artifacts are cached under /dataflow/artifacts/cache
directory.
/dataflow/artifacts
/dataflow/artifacts/cache
/dataflow/artifacts/cache/hdfs-sink-rabbit-1.0.0.RC1.jar
/dataflow/artifacts/cache/time-source-rabbit-1.0.0.RC1.jar
/dataflow/artifacts/cache/timestamp-task-1.0.0.RC1.jar
| Important |
|---|---|
Artifact caching is happening on two levels, firstly on a local
disk where server is running, and secondly in a hdfs cache directory.
If working with snapshots or own development, it may be required to wipe
out |
YARN is fantastic runtime environment for running various workflows but when things don’t work excatly as it was planned, it may be a little bit of a tedious process to find out what went wrong. This section tries to provide instructions how to troubleshoot various issues causing abnormal behaviour.
When something is about to get launched into yarn, a generic procedure goes like this:
- Client is requesting resources(cpu and memory) for an application master.
- Application master is started as an jvm process controlling lifecycle of a yarn application as whole.
- Application master is requesting resources(cpu and memory) for its containers where real work is executed.
- Containers are executed as a jvm processes.
There are various places where things can go wrong in this flow:
- YARN resource scheduler will not allocate resources for a container possibly due to overallocation or misconfiguration.
- YARN will kill container because it thinks that a container is abusing requested amount of memory.
- JVM process itself dies either by abnormal behaviour or OOM errors caused by a wrong jvm options.
Log files are the most obvious place to look errors. YARN application
itself writes log files name Appmaster.stdout, Appmaster.stderr,
Container.stdout and Container.stderr under yarn’s application
logging directory. Also yarn’s own logs for Resource Manager and
especially for Node Manager contains additional information when
i.e. containers are getting killed by yarn itself.
Sandboxes are a single VM images to ease testing and demos without going through a full multi-machine cluster setup. However these images have a natural restrictions of resources which are a cornerstone of YARN to be able to run applications on it. With same limitations and a carefull configuration it is possible to install Spring Cloud Data Flow on those sandboxes. In this section we try to provide some instructions how this can be accomplished.
Install plugin repository.
$ wget -nv http://repo.spring.io/yum-release-local/scdf/1.1.1/scdf-release-1.1.1.repo -O /etc/yum.repos.d/scdf-release-1.1.1.repo
Install plugin.
$ ambari-server stop
$ yum -y install scdf-plugin-hdp
$ ambari-server start
Add needed services together spring Spring Cloud Data Flow. Tune server jvm options. Spring Cloud Data Flow → Configs → Advanced scdf-server-env → scdf-server-env template:
export JAVA_OPTS="-Xms512m -Xmx512m"
Tune jvm options for application masters and container. Spring Cloud Data Flow → Configs → Custom scdf-site:
spring.cloud.deployer.yarn.app.streamappmaster.javaOpts=-Xms512m -Xmx512m
spring.cloud.deployer.yarn.app.streamcontainer.javaOpts=-Xms512m -Xmx512m
spring.cloud.deployer.yarn.app.taskappmaster.javaOpts=-Xms512m -Xmx512m
spring.cloud.deployer.yarn.app.taskcontainer.javaOpts=-Xms512m -Xmx512m
In this section you will learn all about Streams and how to use them with Spring Cloud Data Flow.
In Spring Cloud Data Flow, a basic stream defines the ingestion of event data from a source to a sink that passes through any number of processors. Streams are composed of Spring Cloud Stream applications and the deployment of stream definitions is done via the Data Flow Server (REST API). The Getting Started section shows you how to start the server and how to start and use the Spring Cloud Data Flow shell.
A high level DSL is used to create stream definitions. The DSL to define a stream that has an http source and a file sink (with no processors) is shown below
http | file
The DSL mimics UNIX pipes and filters syntax. Default values for ports and filenames are used in this example but can be overridden using -- options, such as
http --server.port=8091 | file --directory=/tmp/httpdata/
To create these stream definitions you use the shell or make an HTTP POST request to the Spring Cloud Data Flow Server. For more information on making HTTP request directly to the server, consult the REST API Guide.
In the example above, we connected a source to a sink using the pipe symbol |. You can also pass properties to the source and sink configurations. The property names will depend on the individual app implementations, but as an example, the http source app exposes a server.port setting and it allows you to change the data ingestion port from the default value. To create the stream using port 8000, we would use
dataflow:> stream create --definition "http --server.port=8000 | log" --name myhttpstream
The shell provides tab completion for application properties and also the shell command app info <appType>:<appName> provides additional documentation for all the supported properties.
| Note |
|---|---|
Supported Stream <appType>'s are: source, processor, and sink |
Register a Stream App with the App Registry using the Spring Cloud Data Flow Shell
app register command. You must provide a unique name, application type, and a URI that can be
resolved to the app artifact. For the type, specify "source", "processor", or "sink".
Here are a few examples:
dataflow:>app register --name mysource --type source --uri maven://com.example:mysource:0.0.1-SNAPSHOT

dataflow:>app register --name myprocessor --type processor --uri file:///Users/example/myprocessor-1.2.3.jar

dataflow:>app register --name mysink --type sink --uri http://example.com/mysink-2.0.1.jar
When providing a URI with the maven scheme, the format should conform to the following:
maven://<groupId>:<artifactId>[:<extension>[:<classifier>]]:<version>
For example, if you would like to register the snapshot versions of the http and log
applications built with the RabbitMQ binder, you could do the following:
dataflow:>app register --name http --type source --uri maven://org.springframework.cloud.stream.app:http-source-rabbit:1.1.2.BUILD-SNAPSHOT
dataflow:>app register --name log --type sink --uri maven://org.springframework.cloud.stream.app:log-sink-rabbit:1.1.2.BUILD-SNAPSHOT
If you would like to register multiple apps at one time, you can store them in a properties file
where the keys are formatted as <type>.<name> and the values are the URIs.
For example, if you would like to register the snapshot versions of the http and log
applications built with the RabbitMQ binder, you could have the following in a properties file [eg: stream-apps.properties]:
source.http=maven://org.springframework.cloud.stream.app:http-source-rabbit:1.1.2.BUILD-SNAPSHOT
sink.log=maven://org.springframework.cloud.stream.app:log-sink-rabbit:1.1.2.BUILD-SNAPSHOT
Then to import the apps in bulk, use the app import command and provide the location of the properties file via --uri:
dataflow:>app import --uri file:///<YOUR_FILE_LOCATION>/stream-apps.properties
For convenience, we have the static files with application-URIs (for both maven and docker) available for all the out-of-the-box stream and task/batch app-starters. You can point to this file and import all the application-URIs in bulk. Otherwise, as explained in previous paragraphs, you can register them individually or have your own custom property file with only the required application-URIs in it. It is recommended, however, to have a "focused" list of desired application-URIs in a custom property file.
List of available Stream Application Starters:
| Artifact Type | Stable Release | SNAPSHOT Release |
|---|---|---|
RabbitMQ + Maven | http://bit.ly/Bacon-BUILD-SNAPSHOT-stream-applications-rabbit-maven | |
RabbitMQ + Docker | N/A ] | |
Kafka 0.9 + Maven | http://bit.ly/Avogadro-GA-stream-applications-kafka-09-maven | http://bit.ly/Bacon-BUILD-SNAPSHOT-stream-applications-kafka-09-maven |
Kafka 0.9 + Docker | http://bit.ly/Avogadro-GA-stream-applications-kafka-09-docker | N/A ] |
Kafka 0.10 + Maven | http://bit.ly/Avogadro-GA-stream-applications-kafka-10-maven | http://bit.ly/Bacon-BUILD-SNAPSHOT-stream-applications-kafka-10-maven |
Kafka 0.10 + Docker | http://bit.ly/Avogadro-GA-stream-applications-kafka-10-docker | N/A ] |
List of available Task Application Starters:
| Artifact Type | Stable Release | SNAPSHOT Release |
|---|---|---|
Maven | http://bit.ly/Belmont-BUILD-SNAPSHOT-task-applications-maven | |
Docker | N/A ] |
You can find more information about the available task starters look the Task App Starters Project Page and related reference documentation. For more information about the available stream starters look at the Stream App Starters Project Page and related reference documentation.
As an example, if you would like to register all out-of-the-box stream applications built with the RabbitMQ binder in bulk, you can with the following command.
dataflow:>app import --uri http://bit.ly/Avogadro-GA-stream-applications-rabbit-maven
You can also pass the --local option (which is TRUE by default) to indicate whether the
properties file location should be resolved within the shell process itself. If the location should
be resolved from the Data Flow Server process, specify --local false.
When using either app register or app import, if a stream app is already registered with
the provided name and type, it will not be overridden by default. If you would like to override the
pre-existing stream app, then include the --force option.
| Note |
|---|---|
In some cases the Resource is resolved on the server side, whereas in others the URI will be passed to a runtime container instance where it is resolved. Consult the specific documentation of each Data Flow Server for more detail. |
Stream applications are Spring Boot applications which are aware of many Section 34.1, “Common application properties”, e.g. server.port but also families of properties such as those with the prefix spring.jmx and logging. When creating your own application it is desirable to whitelist properties so that the shell and the UI can display them first as primary properties when presenting options via TAB completion or in drop-down boxes.
To whitelist application properties create a file named spring-configuration-metadata-whitelist.properties in the META-INF resource directory. There are two property keys that can be used inside this file. The first key is named configuration-properties.classes. The value is a comma separated list of fully qualified @ConfigurationProperty class names. The second key is configuration-properties.names whose value is a comma separated list of property names. This can contain the full name of property, such as server.port or a partial name to whitelist a category of property names, e.g. spring.jmx.
The Spring Cloud Stream application starters are a good place to look for examples of usage. Here is a simple example of the file sink’s spring-configuration-metadata-whitelist.properties file
configuration-properties.classes=org.springframework.cloud.stream.app.file.sink.FileSinkProperties
If we also wanted to add server.port to be white listed, then it would look like this:
configuration-properties.classes=org.springframework.cloud.stream.app.file.sink.FileSinkProperties
configuration-properties.names=server.port
| Important |
|---|---|
Make sure to add 'spring-boot-configuration-processor' as an optional dependency to generate configuration metadata file for the properties. <dependency> <groupId>org.springframework.boot</groupId> <artifactId>spring-boot-configuration-processor</artifactId> <optional>true</optional> </dependency> |
While there are out of the box source, processor, sink applications available, one can extend these applications or write a custom Spring Cloud Stream application.
The process of creating Spring Cloud Stream applications via Spring Initializr is detailed in the Spring Cloud Stream {spring-cloud-stream-docs}#_getting_started[documentation]. It is possible to include multiple binders to an application. If doing so, refer the instructions in Section 25.2.4, “Passing Spring Cloud Stream properties for the application” on how to configure them.
For supporting property whitelisting, Spring Cloud Stream applications running in Spring Cloud Data Flow may include the Spring Boot configuration-processor as an optional dependency, as in the following example.
<dependencies>
  <!-- other dependencies -->
  <dependency>
    <groupId>org.springframework.boot</groupId>
    <artifactId>spring-boot-configuration-processor</artifactId>
    <optional>true</optional>
  </dependency>
</dependencies>
| Note |
|---|---|
Make sure that the |
Once a custom application has been created, it can be registered as described in ???.
The Spring Cloud Data Flow Server exposes a full RESTful API for managing the lifecycle of stream definitions, but the easiest way to use is it is via the Spring Cloud Data Flow shell. Start the shell as described in the Getting Started section.
New streams are created by with the help of stream definitions. The definitions are built from a simple DSL. For example, let’s walk through what happens if we execute the following shell command:
dataflow:> stream create --definition "time | log" --name ticktock
This defines a stream named ticktock based off the DSL expression time | log. The DSL uses the "pipe" symbol |, to connect a source to a sink.
Then to deploy the stream execute the following shell command (or alternatively add the --deploy flag when creating the stream so that this step is not needed):
dataflow:> stream deploy --name ticktock
The Data Flow Server resolves time and log to maven coordinates and uses those to launch the time and log applications of the stream.
2016-06-01 09:41:21.728  INFO 79016 --- [nio-9393-exec-6] o.s.c.d.spi.local.LocalAppDeployer       : deploying app ticktock.log instance 0
   Logs will be in /var/folders/wn/8jxm_tbd1vj28c8vj37n900m0000gn/T/spring-cloud-dataflow-912434582726479179/ticktock-1464788481708/ticktock.log
2016-06-01 09:41:21.914  INFO 79016 --- [nio-9393-exec-6] o.s.c.d.spi.local.LocalAppDeployer       : deploying app ticktock.time instance 0
   Logs will be in /var/folders/wn/8jxm_tbd1vj28c8vj37n900m0000gn/T/spring-cloud-dataflow-912434582726479179/ticktock-1464788481910/ticktock.time
In this example, the time source simply sends the current time as a message each second, and the log sink outputs it using the logging framework.
You can tail the stdout log (which has an "_<instance>" suffix). The log files are located within the directory displayed in the Data Flow Server’s log output, as shown above.
$ tail -f /var/folders/wn/8jxm_tbd1vj28c8vj37n900m0000gn/T/spring-cloud-dataflow-912434582726479179/ticktock-1464788481708/ticktock.log/stdout_0.log
2016-06-01 09:45:11.250  INFO 79194 --- [  kafka-binder-] log.sink    : 06/01/16 09:45:11
2016-06-01 09:45:12.250  INFO 79194 --- [  kafka-binder-] log.sink    : 06/01/16 09:45:12
2016-06-01 09:45:13.251  INFO 79194 --- [  kafka-binder-] log.sink    : 06/01/16 09:45:13
Application properties are the properties associated with each application in the stream. When the application is deployed, the application properties are applied to the application via command line arguments or environment variables based on the underlying deployment implementation.
The following stream
dataflow:> stream create --definition "time | log" --name ticktockcan have application properties defined at the time of stream creation.
The shell command app info <appType>:<appName> displays the white-listed application properties for the application.
For more info on the property white listing refer to Section 23.1, “Whitelisting application properties”
Below are the white listed properties for the app time:
dataflow:> app info source:time
╔══════════════════════════════╤══════════════════════════════╤══════════════════════════════╤══════════════════════════════╗
║         Option Name          │         Description          │           Default            │             Type             ║
╠══════════════════════════════╪══════════════════════════════╪══════════════════════════════╪══════════════════════════════╣
║trigger.time-unit             │The TimeUnit to apply to delay│<none>                        │java.util.concurrent.TimeUnit ║
║                              │values.                       │                              │                              ║
║trigger.fixed-delay           │Fixed delay for periodic      │1                             │java.lang.Integer             ║
║                              │triggers.                     │                              │                              ║
║trigger.cron                  │Cron expression value for the │<none>                        │java.lang.String              ║
║                              │Cron Trigger.                 │                              │                              ║
║trigger.initial-delay         │Initial delay for periodic    │0                             │java.lang.Integer             ║
║                              │triggers.                     │                              │                              ║
║trigger.max-messages          │Maximum messages per poll, -1 │1                             │java.lang.Long                ║
║                              │means infinity.               │                              │                              ║
║trigger.date-format           │Format for the date value.    │<none>                        │java.lang.String              ║
╚══════════════════════════════╧══════════════════════════════╧══════════════════════════════╧══════════════════════════════╝
Below are the white listed properties for the app log:
dataflow:> app info sink:log
╔══════════════════════════════╤══════════════════════════════╤══════════════════════════════╤══════════════════════════════╗
║         Option Name          │         Description          │           Default            │             Type             ║
╠══════════════════════════════╪══════════════════════════════╪══════════════════════════════╪══════════════════════════════╣
║log.name                      │The name of the logger to use.│<none>                        │java.lang.String              ║
║log.level                     │The level at which to log     │<none>                        │org.springframework.integratio║
║                              │messages.                     │                              │n.handler.LoggingHandler$Level║
║log.expression                │A SpEL expression (against the│payload                       │java.lang.String              ║
║                              │incoming message) to evaluate │                              │                              ║
║                              │as the logged message.        │                              │                              ║
╚══════════════════════════════╧══════════════════════════════╧══════════════════════════════╧══════════════════════════════╝
The application properties for the time and log apps can be specified at the time of stream creation as follows:
dataflow:> stream create --definition "time --fixed-delay=5 | log --level=WARN" --name ticktockNote that the properties fixed-delay and level defined above for the apps time and log are the 'short-form' property names provided by the shell completion.
These 'short-form' property names are applicable only for the white-listed properties and in all other cases, only fully qualified property names should be used.
When deploying the stream, properties that control the deployment of the apps into the target platform are known as deployment properties.
For instance, one can specify how many instances need to be deployed for the specific application defined in the stream using the deployment property called count.
If you would like to have multiple instances of an application in the stream, you can include a property with the deploy command:
dataflow:> stream deploy --name ticktock --properties "app.time.count=3"Note that count is the reserved property name used by the underlying deployer. Hence, if the application also has a custom property named count, it is not supported
when specified in 'short-form' form during stream deployment as it could conflict with the instance count deployer property. Instead, the count as a custom application property can be
specified in its fully qualified form (example: app.foo.bar.count) during stream deployment or it can be specified using 'short-form' or fully qualified form during the stream creation
where it will be considered as an app property.
| Important |
|---|---|
When using the Spring Cloud Data Flow Shell, there are two ways to provide deployment properties: either inline or via a file reference. Those two ways are exclusive and documented below:
- Inline properties
- use the
--propertiesshell option and list properties as a comma separated list of key=value pairs, like so:
stream deploy foo
--properties "app.transform.count=2,app.transform.producer.partitionKeyExpression=payload"- Using a file reference
- use the
--propertiesFileoption and point it to a local Java.propertiesfile or.yamlor.ymlfile. The file should be on the file system of the machine running the shell. If using a.propertiesfile, normal rules apply (ISO 8859-1 encoding,=,<space>or:delimiter, etc.) although we recommend using=as a key-value pair delimiter for consistency.
stream deploy foo --propertiesFile myprops.properties
where myprops.properties contains:
app.transform.count=2
app.transform.producer.partitionKeyExpression=payload
Both the above properties will be passed as deployment properties for the stream foo above.
The application properties can also be specified when deploying a stream. When specified during deployment, these application properties can either be specified as 'short-form' property names (applicable for white-listed properties) or fully qualified property names. The application properties should have the prefix "app.<appName/label>".
For example, the stream
dataflow:> stream create --definition "time | log" --name ticktockcan be deployed with application properties using the 'short-form' property names:
dataflow:>stream deploy ticktock --properties "app.time.fixed-delay=5,app.log.level=ERROR"When using the app label,
stream create ticktock --definition "a: time | b: log"the application properties can be defined as:
stream deploy ticktock --properties "app.a.fixed-delay=4,app.b.level=ERROR"Spring Cloud Data Flow sets the required Spring Cloud Stream properties for the applications inside the stream. Most importantly, the spring.cloud.stream.bindings.<input/output>.destination is set internally for the apps to bind.
If someone wants to override any of the Spring Cloud Stream properties, they can be set via deployment properties.
For example, for the below stream
dataflow:> stream create --definition "http | transform --expression=payload.getValue('hello').toUpperCase() | log" --name ticktockif there are multiple binders available in the classpath for each of the applications and the binder is chosen for each deployment then the stream can be deployed with the specific Spring Cloud Stream properties as:
dataflow:>stream deploy ticktock --properties "app.time.spring.cloud.stream.bindings.output.binder=kafka,app.transform.spring.cloud.stream.bindings.input.binder=kafka,app.transform.spring.cloud.stream.bindings.output.binder=rabbit,app.log.spring.cloud.stream.bindings.input.binder=rabbit" | Note |
|---|---|
Overriding the destination names is not recommended as Spring Cloud Data Flow takes care of setting this internally. |
A Spring Cloud Stream application can have producer and consumer properties set per-binding basis.
While Spring Cloud Data Flow supports specifying short-hand notation for per binding producer properties such as partitionKeyExpression, partitionKeyExtractorClass as described in Section 25.2.6, “Passing stream partition properties during stream deployment”, all the supported Spring Cloud Stream producer/consumer properties can be set as Spring Cloud Stream properties for the app directly as well.
The consumer properties can be set for the inbound channel name with the prefix app.[app/label name].spring.cloud.stream.bindings.<channelName>.consumer. and the producer properties can be set for the outbound channel name with the prefix app.[app/label name].spring.cloud.stream.bindings.<channelName>.producer..
For example, the stream
dataflow:> stream create --definition "time | log" --name ticktockcan be deployed with producer/consumer properties as:
dataflow:>stream deploy ticktock --properties "app.time.spring.cloud.stream.bindings.output.producer.requiredGroups=myGroup,app.time.spring.cloud.stream.bindings.output.producer.headerMode=raw,app.log.spring.cloud.stream.bindings.input.consumer.concurrency=3,app.log.spring.cloud.stream.bindings.input.consumer.maxAttempts=5"The binder specific producer/consumer properties can also be specified in a similar way.
For instance
dataflow:>stream deploy ticktock --properties "app.time.spring.cloud.stream.rabbit.bindings.output.producer.autoBindDlq=true,app.log.spring.cloud.stream.rabbit.bindings.input.consumer.transacted=true"A common pattern in stream processing is to partition the data as it is streamed. This entails deploying multiple instances of a message consuming app and using content-based routing so that messages with a given key (as determined at runtime) are always routed to the same app instance. You can pass the partition properties during stream deployment to declaratively configure a partitioning strategy to route each message to a specific consumer instance.
See below for examples of deploying partitioned streams:
- app.[app/label name].producer.partitionKeyExtractorClass
- The class name of a PartitionKeyExtractorStrategy (default
null) - app.[app/label name].producer.partitionKeyExpression
- A SpEL expression, evaluated against the message, to determine the partition key;
only applies if
partitionKeyExtractorClassis null. If both are null, the app is not partitioned (defaultnull) - app.[app/label name].producer.partitionSelectorClass
- The class name of a PartitionSelectorStrategy (default
null) - app.[app/label name].producer.partitionSelectorExpression
- A SpEL expression, evaluated against the partition key, to determine the partition
index to which the message will be routed. The final partition index will be the
return value (an integer) modulo
[nextModule].count. If both the class and expression are null, the underlying binder’s default PartitionSelectorStrategy will be applied to the key (defaultnull)
In summary, an app is partitioned if its count is > 1 and the previous app has a
partitionKeyExtractorClass or partitionKeyExpression (class takes precedence).
When a partition key is extracted, the partitioned app instance is determined by
invoking the partitionSelectorClass, if present, or the partitionSelectorExpression % partitionCount,
where partitionCount is application count in the case of RabbitMQ, and the underlying
partition count of the topic in the case of Kafka.
If neither a partitionSelectorClass nor a partitionSelectorExpression is
present the result is key.hashCode() % partitionCount.
In a stream definition you can specify that the input or the output of an application need to be converted to a different type.
You can use the inputType and outputType properties to specify the content type for the incoming data and outgoing data, respectively.
For example, consider the following stream:
dataflow:>stream create tuple --definition "http | filter --inputType=application/x-spring-tuple
 --expression=payload.hasFieldName('hello') | transform --expression=payload.getValue('hello').toUpperCase()
 | log" --deploy
The http app is expected to send the data in JSON and the filter app receives the JSON data
and processes it as a Spring Tuple.
In order to do so, we use the inputType property on the filter app to convert the data into the expected Spring Tuple format.
The transform application processes the Tuple data and sends the processed data to the downstream log application.
When sending some data to the http application:
dataflow:>http post --data {"hello":"world","foo":"bar"} --contentType application/json --target http://localhost:<http-port>At the log application you see the content as follows:
INFO 18745 --- [transform.tuple-1] log.sink : WORLD
Depending on how applications are chained, the content type conversion can be specified either as via the --outputType in the upstream app or as an --inputType in the downstream app.
For instance, in the above stream, instead of specifying the --inputType on the 'transform' application to convert, the option --outputType=application/x-spring-tuple can also be specified on the 'http' application.
For the complete list of message conversion and message converters, please refer to Spring Cloud Stream {spring-cloud-stream-docs}#contenttypemanagement[documentation].
Application properties that are defined during deployment override the same properties defined during the stream creation.
For example, the following stream has application properties defined during stream creation:
dataflow:> stream create --definition "time --fixed-delay=5 | log --level=WARN" --name ticktockTo override these application properties, one can specify the new property values during deployment:
dataflow:>stream deploy ticktock --properties "app.time.fixed-delay=4,app.log.level=ERROR"When deploying the stream, properties that control the deployment of the apps into the target platform are known as deployment properties.
For instance, one can specify how many instances need to be deployed for the specific application defined in the stream using the deployment property called count.
If you would like to have multiple instances of an application in the stream, you can include a property with the deploy command:
dataflow:> stream deploy --name ticktock --properties "app.time.count=3"Note that count is the reserved property name used by the underlying deployer. Hence, if the application also has a custom property named count, it is not supported
when specified in 'short-form' form during stream deployment as it could conflict with the instance count deployer property. Instead, the count as a custom application property can be
specified in its fully qualified form (example: app.foo.bar.count) during stream deployment or it can be specified using 'short-form' or fully qualified form during the stream creation
where it will be considered as an app property.
| Important |
|---|---|
When using the Spring Cloud Data Flow Shell, there are two ways to provide deployment properties: either inline or via a file reference. Those two ways are exclusive and documented below:
- Inline properties
- use the
--propertiesshell option and list properties as a comma separated list of key=value pairs, like so:
stream deploy foo
--properties "app.transform.count=2,app.transform.producer.partitionKeyExpression=payload"- Using a file reference
- use the
--propertiesFileoption and point it to a local.properties,.yamlor.ymlfile (i.e. that lives in the filesystem of the machine running the shell). Being read as a.propertiesfile, normal rules apply (ISO 8859-1 encoding,=,<space>or:delimiter, etc.) although we recommend using=as a key-value pair delimiter for consistency:
stream deploy foo --propertiesFile myprops.properties
where myprops.properties contains:
app.transform.count=2
app.transform.producer.partitionKeyExpression=payload
Both the above properties will be passed as deployment properties for the stream foo above.
In case of using YAML as the format for the deployment properties, use the .yaml or .yml file extention when deploying the stream,
stream deploy foo --propertiesFile myprops.yaml
where myprops.yaml contains:
app:
  transform:
    count: 2
    producer:
partitionKeyExpression: payloadYou can delete a stream by issuing the stream destroy command from the shell:
dataflow:> stream destroy --name ticktock
If the stream was deployed, it will be undeployed before the stream definition is deleted.
Often you will want to stop a stream, but retain the name and definition for future use. In that case you can undeploy the stream by name and issue the deploy command at a later time to restart it.
dataflow:> stream undeploy --name ticktock
dataflow:> stream deploy --name ticktock
Let’s try something a bit more complicated and swap out the time source for something else. Another supported source type is http, which accepts data for ingestion over HTTP POSTs. Note that the http source accepts data on a different port from the Data Flow Server (default 8080). By default the port is randomly assigned.
To create a stream using an http source, but still using the same log sink, we would change the original command above to
dataflow:> stream create --definition "http | log" --name myhttpstream --deploy
which will produce the following output from the server
2016-06-01 09:47:58.920  INFO 79016 --- [io-9393-exec-10] o.s.c.d.spi.local.LocalAppDeployer       : deploying app myhttpstream.log instance 0
   Logs will be in /var/folders/wn/8jxm_tbd1vj28c8vj37n900m0000gn/T/spring-cloud-dataflow-912434582726479179/myhttpstream-1464788878747/myhttpstream.log
2016-06-01 09:48:06.396  INFO 79016 --- [io-9393-exec-10] o.s.c.d.spi.local.LocalAppDeployer       : deploying app myhttpstream.http instance 0
   Logs will be in /var/folders/wn/8jxm_tbd1vj28c8vj37n900m0000gn/T/spring-cloud-dataflow-912434582726479179/myhttpstream-1464788886383/myhttpstream.http
Note that we don’t see any other output this time until we actually post some data (using a shell command). In order to see the randomly assigned port on which the http source is listening, execute:
dataflow:> runtime apps
You should see that the corresponding http source has a url property containing the host and port information on which it is listening. You are now ready to post to that url, e.g.:
dataflow:> http post --target http://localhost:1234 --data "hello"
dataflow:> http post --target http://localhost:1234 --data "goodbye"
and the stream will then funnel the data from the http source to the output log implemented by the log sink
2016-06-01 09:50:22.121  INFO 79654 --- [  kafka-binder-] log.sink    : hello
2016-06-01 09:50:26.810  INFO 79654 --- [  kafka-binder-] log.sink    : goodbye
Of course, we could also change the sink implementation. You could pipe the output to a file (file), to hadoop (hdfs) or to any of the other sink apps which are available. You can also define your own apps.
As an example of a simple processing step, we can transform the payload of the HTTP posted data to upper case using the stream definitions
http | transform --expression=payload.toUpperCase() | log
To create this stream enter the following command in the shell
dataflow:> stream create --definition "http | transform --expression=payload.toUpperCase() | log" --name mystream --deploy
Posting some data (using a shell command)
dataflow:> http post --target http://localhost:1234 --data "hello"
Will result in an uppercased 'HELLO' in the log
2016-06-01 09:54:37.749 INFO 80083 --- [ kafka-binder-] log.sink : HELLO
To demonstrate the data partitioning functionality, let’s deploy the following stream with Kafka as the binder.
dataflow:>stream create --name words --definition "http --server.port=9900 | splitter --expression=payload.split(' ') | log"
Created new stream 'words'

dataflow:>stream deploy words --properties "app.splitter.producer.partitionKeyExpression=payload,app.log.count=2"
Deployed stream 'words'

dataflow:>http post --target http://localhost:9900 --data "How much wood would a woodchuck chuck if a woodchuck could chuck wood"
> POST (text/plain;Charset=UTF-8) http://localhost:9900 How much wood would a woodchuck chuck if a woodchuck could chuck wood
> 202 ACCEPTED
You’ll see the following in the server logs.
2016-06-05 18:33:24.982  INFO 58039 --- [nio-9393-exec-9] o.s.c.d.spi.local.LocalAppDeployer       : deploying app words.log instance 0
   Logs will be in /var/folders/c3/ctx7_rns6x30tq7rb76wzqwr0000gp/T/spring-cloud-dataflow-694182453710731989/words-1465176804970/words.log
2016-06-05 18:33:24.988  INFO 58039 --- [nio-9393-exec-9] o.s.c.d.spi.local.LocalAppDeployer       : deploying app words.log instance 1
   Logs will be in /var/folders/c3/ctx7_rns6x30tq7rb76wzqwr0000gp/T/spring-cloud-dataflow-694182453710731989/words-1465176804970/words.log
Review the words.log instance 0 logs:
2016-06-05 18:35:47.047  INFO 58638 --- [  kafka-binder-] log.sink                                 : How
2016-06-05 18:35:47.066  INFO 58638 --- [  kafka-binder-] log.sink                                 : chuck
2016-06-05 18:35:47.066  INFO 58638 --- [  kafka-binder-] log.sink                                 : chuck
Review the words.log instance 1 logs:
2016-06-05 18:35:47.047  INFO 58639 --- [  kafka-binder-] log.sink                                 : much
2016-06-05 18:35:47.066  INFO 58639 --- [  kafka-binder-] log.sink                                 : wood
2016-06-05 18:35:47.066  INFO 58639 --- [  kafka-binder-] log.sink                                 : would
2016-06-05 18:35:47.066  INFO 58639 --- [  kafka-binder-] log.sink                                 : a
2016-06-05 18:35:47.066  INFO 58639 --- [  kafka-binder-] log.sink                                 : woodchuck
2016-06-05 18:35:47.067  INFO 58639 --- [  kafka-binder-] log.sink                                 : if
2016-06-05 18:35:47.067  INFO 58639 --- [  kafka-binder-] log.sink                                 : a
2016-06-05 18:35:47.067  INFO 58639 --- [  kafka-binder-] log.sink                                 : woodchuck
2016-06-05 18:35:47.067  INFO 58639 --- [  kafka-binder-] log.sink                                 : could
2016-06-05 18:35:47.067  INFO 58639 --- [  kafka-binder-] log.sink                                 : wood
This shows that payload splits that contain the same word are routed to the same application instance.
Taps can be created at various producer endpoints in a stream. For a stream like this:
stream create --definition "http | step1: transform --expression=payload.toUpperCase() | step2: transform --expression=payload+'!' | log" --name mainstream --deploy
taps can be created at the output of http, step1 and step2.
To create a stream that acts as a 'tap' on another stream requires to specify the source destination name for the tap stream. The syntax for source destination name is:
`:<streamName>.<label/appName>`
To create a tap at the output of http in the stream above, the source destination name is mainstream.http
To create a tap at the output of the first transform app in the stream above, the source destination name is mainstream.step1
The tap stream DSL looks like this:
stream create --definition ":mainstream.http > counter" --name tap_at_http --deploy

stream create --definition ":mainstream.step1 > jdbc" --name tap_at_step1_transformer --deploy
Note the colon (:) prefix before the destination names. The colon allows the parser to recognize this as a destination name instead of an app name.
When a stream is comprised of multiple apps with the same name, they must be qualified with labels:
stream create --definition "http | firstLabel: transform --expression=payload.toUpperCase() | secondLabel: transform --expression=payload+'!' | log" --name myStreamWithLabels --deploy
One can connect to a specific destination name located in the broker (Rabbit, Kafka etc.,) either at the source or at the sink position.
The following stream has the destination name at the source position:
stream create --definition ":myDestination > log" --name ingest_from_broker --deploy
This stream receives messages from the destination myDestination located at the broker and connects it to the log app.
The following stream has the destination name at the sink position:
stream create --definition "http > :myDestination" --name ingest_to_broker --deploy
This stream sends the messages from the http app to the destination myDestination located at the broker.
From the above streams, notice that the http and log apps are interacting with each other via the broker (through the destination myDestination) rather than having a pipe directly between http and log within a single stream.
It is also possible to connect two different destinations (source and sink positions) at the broker in a stream.
stream create --definition ":destination1 > :destination2" --name bridge_destinations --deploy
In the above stream, both the destinations (destination1 and destination2) are located in the broker. The messages flow from the source destination to the sink destination via a bridge app that connects them.
If directed graphs are needed instead of the simple linear streams described above, two features are relevant.
First, named destinations may be used as a way to combine the output from multiple streams or for multiple consumers to share the output from a single stream.
This can be done using the DSL syntax http > :mydestination or :mydestination > log.
Second, you may need to determine the output channel of a stream based on some information that is only known at runtime. In that case, a router may be used in the sink position of a stream definition. For more information, refer to the Router Sink starter’s README.
In addition to configuration via DSL, Spring Cloud Data Flow provides a mechanism for setting common properties to all the streaming applications that are launched by it.
This can be done by adding properties prefixed with spring.cloud.dataflow.applicationProperties.stream when starting the server.
When doing so, the server will pass all the properties, without the prefix, to the instances it launches.
For example, all the launched applications can be configured to use a specific Kafka broker by launching the configuration server with the following options:
--spring.cloud.dataflow.applicationProperties.stream.spring.cloud.stream.kafka.binder.brokers=192.168.1.100:9092
--spring.cloud.dataflow.applicationProperties.stream.spring.cloud.stream.kafka.binder.zkNodes=192.168.1.100:2181
This will cause the properties spring.cloud.stream.kafka.binder.brokers and spring.cloud.stream.kafka.binder.zkNodes to be passed to all the launched applications.
| Note |
|---|---|
Properties configured using this mechanism have lower precedence than stream deployment properties.
They will be overridden if a property with the same key is specified at stream deployment time (e.g. |
 In some cases, a stream can have its applications bound to multiple spring cloud stream binders when they are required to connect to different messaging
middleware configurations. In those cases, it is important to make sure the applications are configured appropriately with their binder
configurations. For example, let's consider the following stream:
http | transform --expression=payload.toUpperCase() | log
and in this stream, each application connects to messaging middleware in the following way:
Http source sends events to RabbitMQ (rabbit1)
Transform processor receives events from RabbitMQ (rabbit1) and sends the processed events into Kafka (kafka1)
Log sink receives events from Kafka (kafka1)
Here, rabbit1 and kafka1 are the binder names given in the spring cloud stream application properties.
Based on this setup, the applications will have the following binder(s) in their classpath with the appropriate configuration:
Http - Rabbit binder
Transform - Both Kafka and Rabbit binders
Log - Kafka binder
The spring-cloud-stream binder configuration properties can be set within the applications themselves.
If not, they can be passed via deployment properties when the stream is deployed.
For example,
dataflow:>stream create --definition "http | transform --expression=payload.toUpperCase() | log" --name mystream
dataflow:>stream deploy mystream --properties "app.http.spring.cloud.stream.bindings.output.binder=rabbit1,app.transform.spring.cloud.stream.bindings.input.binder=rabbit1,
app.transform.spring.cloud.stream.bindings.output.binder=kafka1,app.log.spring.cloud.stream.bindings.input.binder=kafka1"
One can override any of the binder configuration properties by specifying them via deployment properties.
This section goes into more detail about how you can work with Spring Cloud Tasks. It covers topics such as creating and running task applications.
If you’re just starting out with Spring Cloud Data Flow, you should probably read the Getting Started guide before diving into this section.
A task executes a process on demand. In this case a task is a
Spring Boot application that is annotated with
@EnableTask. Hence a user launches a task that performs a certain process, and once
complete the task ends. An example of a task would be a boot application that exports
data from a JDBC repository to an HDFS instance. Tasks record the start time and the end
time as well as the boot exit code in a relational database. The task implementation is
based on the Spring Cloud Task project.
Before we dive deeper into the details of creating Tasks, we need to understand the typical lifecycle for tasks in the context of Spring Cloud Data Flow:
- Register a Task App
- Create a Task Definition
- Launch a Task
- Task Execution
- Destroy a Task Definition
While Spring Cloud Task does provide a number of out of the box applications (via the spring-cloud-task-app-starters), most task applications will be custom developed. In order to create a custom task application:
Create a new project via Spring Initializer via either the website or your IDE making sure to select the following starters:
Cloud Task- This dependency is thespring-cloud-starter-task.JDBC- This is the dependency for thespring-jdbcstarter.
- Within your new project, create a new class that will serve as your main class:
@EnableTask
@SpringBootApplication
public class MyTask {

    public static void main(String[] args) {
		SpringApplication.run(MyTask.class, args);
	}
}- With this, you’ll need one or more
CommandLineRunnerorApplicationRunnerwithin your application. You can either implement your own or use the ones provided by Spring Boot (there is one for running batch jobs for example). - Packaging your application up via Spring Boot into an über jar is done via the standard Boot conventions.
- The packaged application can be registered and deployed as noted below.
Register a Task App with the App Registry using the Spring Cloud Data Flow Shell
app register command. You must provide a unique name and a URI that can be
resolved to the app artifact. For the type, specify "task". Here are a few examples:
dataflow:>app register --name task1 --type task --uri maven://com.example:mytask:1.0.2

dataflow:>app register --name task2 --type task --uri file:///Users/example/mytask-1.0.2.jar

dataflow:>app register --name task3 --type task --uri http://example.com/mytask-1.0.2.jar
When providing a URI with the maven scheme, the format should conform to the following:
maven://<groupId>:<artifactId>[:<extension>[:<classifier>]]:<version>
If you would like to register multiple apps at one time, you can store them in a properties file
where the keys are formatted as <type>.<name> and the values are the URIs. For example, this
would be a valid properties file:
task.foo=file:///tmp/foo.jar
task.bar=file:///tmp/bar.jar
Then use the app import command and provide the location of the properties file via --uri:
app import --uri file:///tmp/task-apps.properties
For convenience, we have the static files with application-URIs (for both maven and docker) available for all the out-of-the-box Task app-starters. You can point to this file and import all the application-URIs in bulk. Otherwise, as explained in previous paragraphs, you can register them individually or have your own custom property file with only the required application-URIs in it. It is recommended, however, to have a "focused" list of desired application-URIs in a custom property file.
List of available static property files:
| Artifact Type | Stable Release | SNAPSHOT Release |
|---|---|---|
Maven | ||
Docker |
For example, if you would like to register all out-of-the-box task applications in bulk, you can with the following command.
dataflow:>app import --uri http://bit.ly/1-0-1-GA-task-applications-maven
You can also pass the --local option (which is TRUE by default) to indicate whether the
properties file location should be resolved within the shell process itself. If the location should
be resolved from the Data Flow Server process, specify --local false.
When using either app register or app import, if a task app is already registered with
the provided name, it will not be overridden by default. If you would like to override the
pre-existing task app, then include the --force option.
| Note |
|---|---|
In some cases the Resource is resolved on the server side, whereas in others the URI will be passed to a runtime container instance where it is resolved. Consult the specific documentation of each Data Flow Server for more detail. |
Create a Task Definition from a Task App by providing a definition name as well as
properties that apply to the task execution. Creating a task definition can be done via
the restful API or the shell. To create a task definition using the shell, use the
task create command to create the task definition. For example:
dataflow:>task create mytask --definition "timestamp --format=\"yyyy\""
 Created new task 'mytask'
A listing of the current task definitions can be obtained via the restful API or the
shell. To get the task definition list using the shell, use the task list command.
An adhoc task can be launched via the restful API or via the shell. To launch an ad-hoc
task via the shell use the task launch command. For Example:
dataflow:>task launch mytask
 Launched task 'mytask'
When a task is launched, any properties that need to be passed as the command line arguments to the task application can be set when launching the task as follows:
dataflow:>task launch mytask --arguments "--server.port=8080,--foo=bar"
Additional properties meant for a TaskLauncher itself can be passed
in using a --properties option. Format of this option is a comma
delimited string of properties prefixed with app.<task definition
name>.<property>.
If actual property is prefixed with spring.cloud.deployer it is
passed to TaskLauncher as a deployment property and its meaning may
be TaskLauncher implementation specific. Other properties are passed
to TaskLauncher as application properties and it is up to an
implementation to choose how those are passed into an actual task
application.
dataflow:>task launch mytask --properties "app.timestamp.spring.cloud.deployer.foo1=bar1,app.timestamp.foo2=bar2"
Once the task is launched the state of the task is stored in a relational DB. The state includes:
- Task Name
- Start Time
- End Time
- Exit Code
- Exit Message
- Last Updated Time
- Parameters
A user can check the status of their task executions via the restful API or by the shell.
To display the latest task executions via the shell use the task execution list command.
To get a list of task executions for just one task definition, add --name and
the task definition name, for example task execution list --name foo. To retrieve full
details for a task execution use the task display command with the id of the task execution,
for example task display --id 549.
Destroying a Task Definition will remove the definition from the definition repository.
This can be done via the restful API or via the shell. To destroy a task via the shell
use the task destroy command. For Example:
dataflow:>task destroy mytask
 Destroyed task 'mytask'
The task execution information for previously launched tasks for the definition will remain in the task repository.
Note: This will not stop any currently executing tasks for this definition, instead it just removes the task definition from the database.
Out of the box Spring Cloud Data Flow offers an embedded instance of the H2 database. The H2 is good for development purposes but is not recommended for production use.
To add a driver for the database that will store the Task Execution information, a dependency for the driver will need to be added to a maven pom file and the Spring Cloud Data Flow will need to be rebuilt. Since Spring Cloud Data Flow is comprised of an SPI for each environment it supports, please review the SPI’s documentation on which POM should be updated to add the dependency and how to build. This document will cover how to setup the dependency for local SPI.
- Open the spring-cloud-dataflow-server-local/pom.xml in your IDE.
- In the
dependenciessection add the dependency for the database driver required. In the sample below postgresql has been chosen.
<dependencies>
...
    <dependency>
        <groupId>org.postgresql</groupId>
        <artifactId>postgresql</artifactId>
    </dependency>
...
</dependencies>- Save the changed pom.xml
- Build the application as described here: Building Spring Cloud Data Flow
When launching a task application be sure that the database driver that is being used by Spring Cloud Data Flow is also a dependency on the task application. For example if your Spring Cloud Data Flow is set to use Postgresql, be sure that the task application also has Postgresql as a dependency.
| Note |
|---|---|
When executing tasks externally (i.e. command line) and you wish for Spring Cloud Data Flow to show the TaskExecutions in its UI, be sure that common datasource settings are shared among the both. By default Spring Cloud Task will use a local H2 instance and the execution will not be recorded to the database used by Spring Cloud Data Flow. |
To configure the datasource Add the following properties to the dataflow-server.yml or via environment variables:
- spring.datasource.url
- spring.datasource.username
- spring.datasource.password
- spring.datasource.driver-class-name
For example adding postgres would look something like this:
- Environment variables:
export spring_datasource_url=jdbc:postgresql://localhost:5432/mydb
export spring_datasource_username=myuser
export spring_datasource_password=mypass
export spring_datasource_driver-class-name="org.postgresql.Driver"
- dataflow-server.yml
spring:
  datasource:
    url: jdbc:postgresql://localhost:5432/mydb
    username: myuser
    password: mypass
driver-class-name:org.postgresql.DriverYou can also tap into various task/batch events when the task is launched.
If the task is enabled to generate task and/or batch events (with the additional dependencies spring-cloud-task-stream and spring-cloud-stream-binder-kafka, in the case of Kafka as the binder), those events are published during the task lifecycle.
By default, the destination names for those published events on the broker (rabbit, kafka etc.,) are the event names themselves (for instance: task-events, job-execution-events etc.,).
dataflow:>task create myTask --definition “myBatchJob"
dataflow:>task launch myTask
dataflow:>stream create task-event-subscriber1 --definition ":task-events > log" --deploy
You can control the destination name for those events by specifying explicit names when launching the task such as:
dataflow:>task launch myTask --properties "spring.cloud.stream.bindings.task-events.destination=myTaskEvents"
dataflow:>stream create task-event-subscriber2 --definition ":myTaskEvents > log" --deploy
The default Task/Batch event and destination names on the broker are enumerated below:
Table 39.1. Task/Batch Event Destinations
Event | Destination |
Task events |
|
Job Execution events |
|
Step Execution events |
|
Item Read events |
|
Item Process events |
|
Item Write events |
|
Skip events |
|
You can launch a task from a stream by using one of the available task-launcher sinks. Currently the only available
task-launcher sink is the task-launcher-local, which will launch a task on your local machine.
| Note |
|---|---|
|
A task-launcher sink expects a message containing a TaskLaunchRequest object in its payload. From the
TaskLaunchRequest object the task-launcher will obtain the URI of the artifact to be launched as well as the
properties and command line arguments to be used by the task.
The task-launcher-local can be added to the available sinks by executing the app register command as follows:
app register --name task-launcher-local --type sink --uri maven://org.springframework.cloud.stream.app:task-launcher-local-sink-kafka:jar:1.0.0.BUILD-SNAPSHOT
One way to launch a task using the task-launcher is to use the triggertask source. The triggertask source
will emit a message with a TaskLaunchRequest object containing the required launch information. An example of this
would be to launch the timestamp task once every 5 seconds, the stream to implement this would look like:
stream create foo --definition "triggertask --triggertask.uri=maven://org.springframework.cloud.task.app:timestamp-task:jar:1.0.0.BUILD-SNAPSHOT --trigger.fixed-delay=5 | task-launcher-local" --deploy
This section describe how to use the Dashboard of Spring Cloud Data Flow.
Spring Cloud Data Flow provides a browser-based GUI and it currently includes 6 tabs:
- Apps Lists all available applications and provides the control to register/unregister them
- Runtime Provides the Data Flow cluster view with the list of all running applications
- Streams List, create, deploy, and destroy Stream Definitions
- Tasks List, create, launch and destroy Task Definitions
- Jobs Perform Batch Job related functions
- Analytics Create data visualizations for the various analytics applications
Upon starting Spring Cloud Data Flow, the Dashboard is available at:
http://<host>:<port>/dashboard
For example: http://localhost:9393/dashboard
If you have enabled https, then it will be located at https://localhost:9393/dashboard.
If you have enabled security, a login form is available at http://localhost:9393/dashboard/#/login.
Note: The default Dashboard server port is 9393
The Apps section of the Dashboard lists all the available applications and provides the control to register/unregister them (if applicable). It is possible to import a number of applications at once using the Bulk Import Applications action.
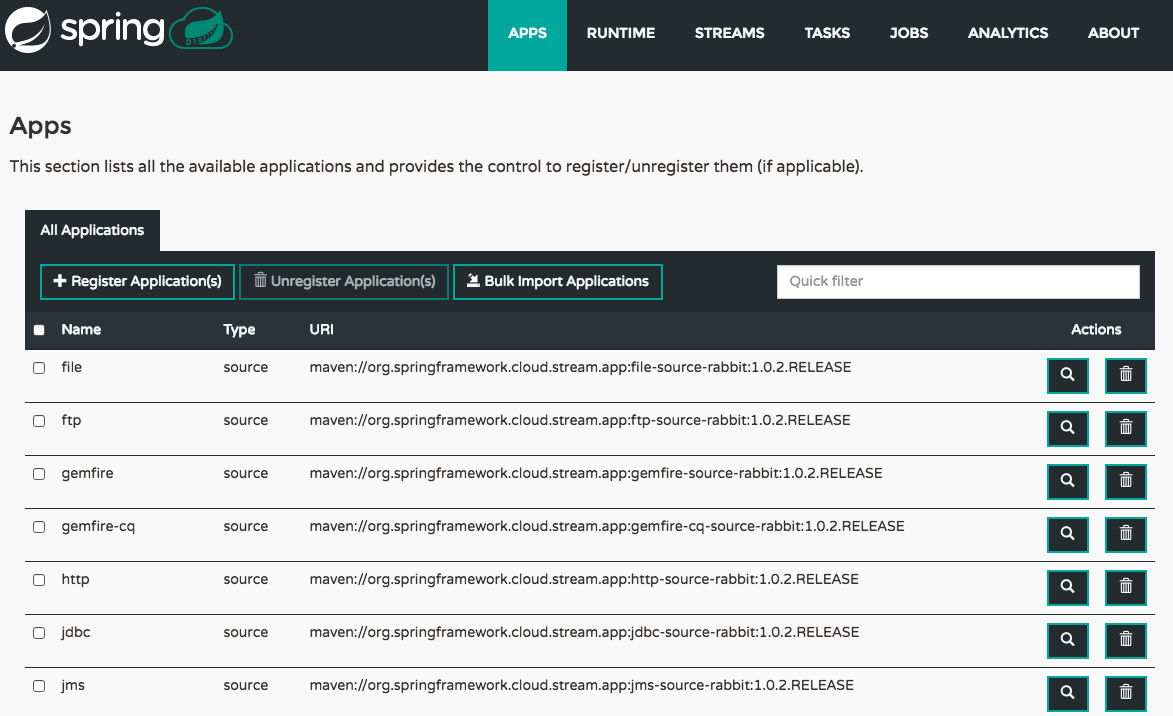
The bulk import applications page provides numerous options for defining and importing a set of applications in one go. For bulk import the application definitions are expected to be expressed in a properties style:
<type>.<name> = <coordinates>
For example:
task.timestamp=maven://org.springframework.cloud.task.app:timestamp-task:1.0.0.BUILD-SNAPSHOT
processor.transform=maven://org.springframework.cloud.stream.app:transform-processor-rabbit:1.0.3.BUILD-SNAPSHOT
At the top of the bulk import page an Uri can be specified that points to a properties file stored elsewhere, it should contain properties formatted as above. Alternatively, using the textbox labeled Apps as Properties it is possible to directly list each property string. Finally, if the properties are stored in a local file the Select Properties File option will open a local file browser to select the file. After setting your definitions via one of these routes, click Import.
At the bottom of the page there are quick links to the property files for common groups of stream apps and task apps. If those meet your needs, simply select your appropriate variant (rabbit, kafka, docker, etc) and click the Import action on those lines to immediately import all those applications.
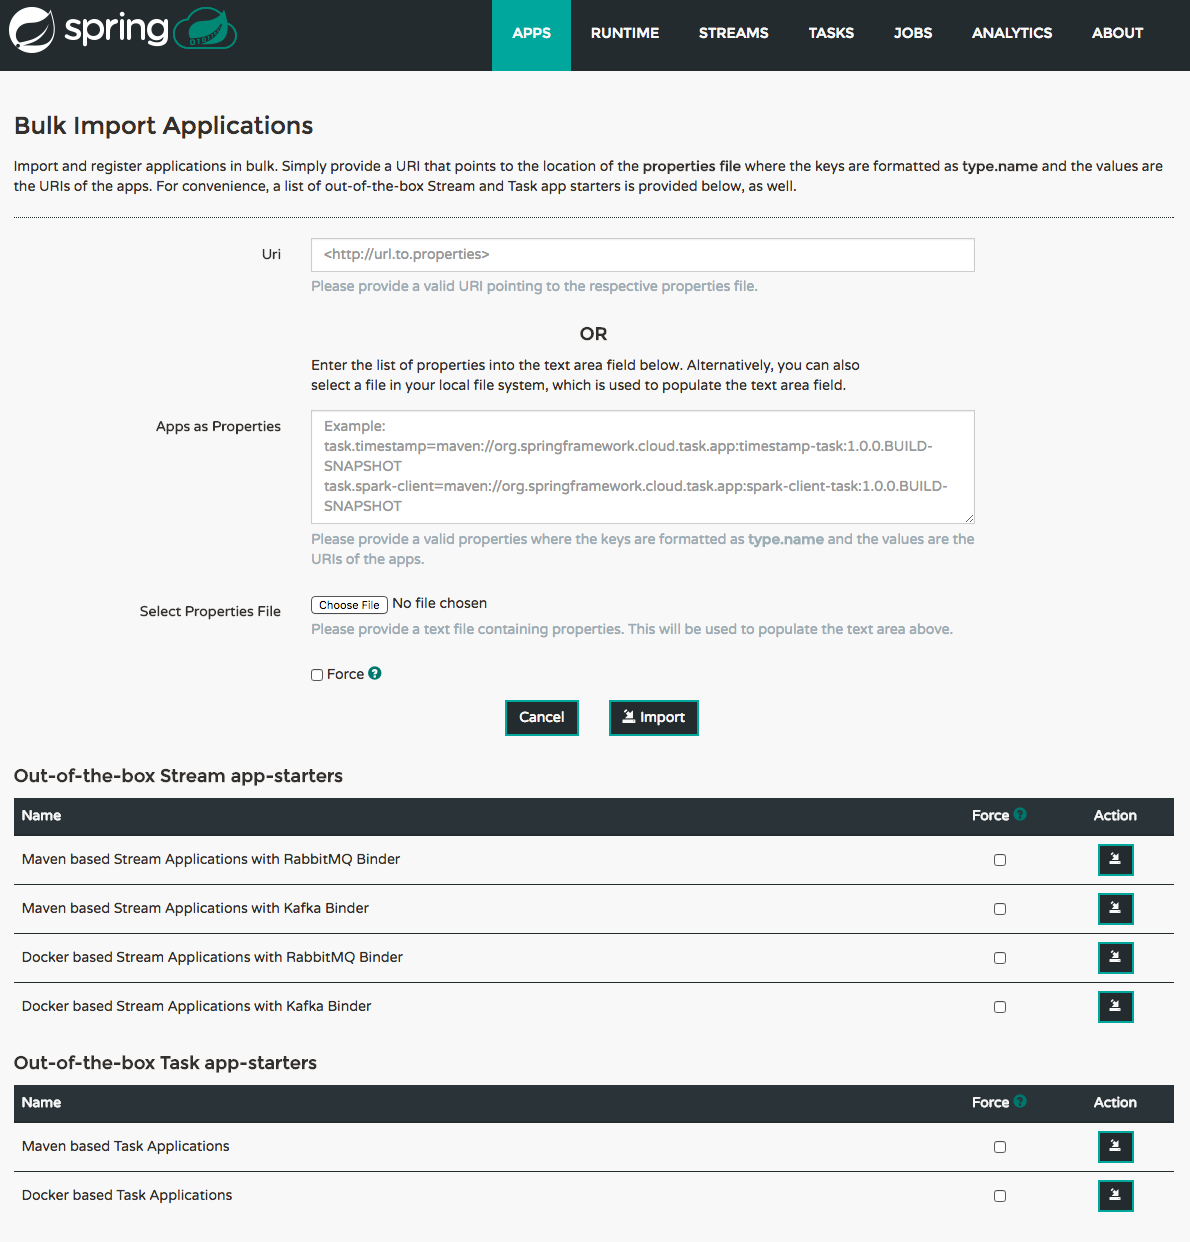
The Runtime section of the Dashboard application shows the Spring Cloud Data Flow cluster view with the list of all running applications. For each runtime app the state of the deployment and the number of deployed instances is shown. A list of the used deployment properties is available by clicking on the app id.
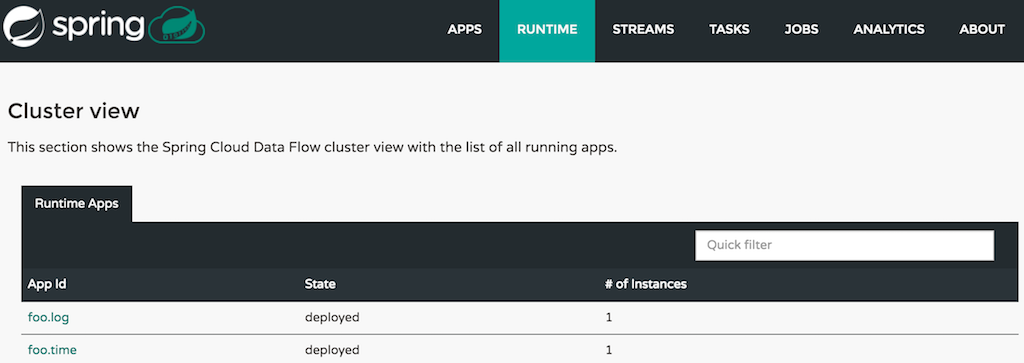
The Streams section of the Dashboard provides the Definitions tab that provides a listing of Stream definitions. There you have the option to deploy or undeploy those stream definitions. Additionally you can remove the definition by clicking on destroy. Each row includes an arrow on the left, which can be clicked to see a visual representation of the definition. Hovering over the boxes in the visual representation will show more details about the apps including any options passed to them. In this screenshot the timer stream has been expanded to show the visual representation:
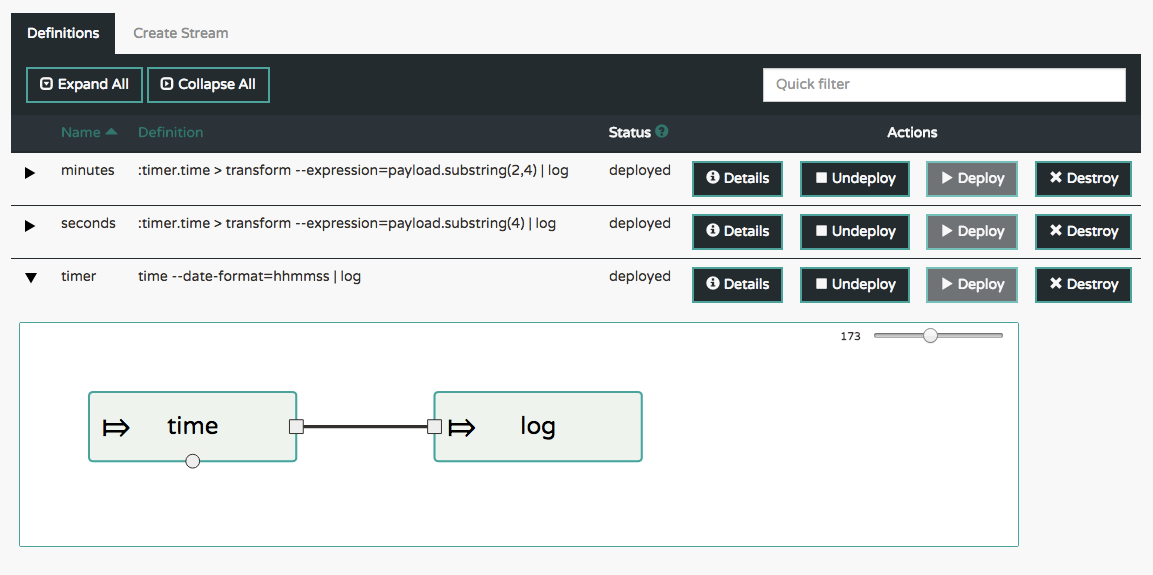
If the details button is clicked the view will change to show a visual representation of that stream and also any related streams. In the above example, if clicking details for the timer stream, the view will change to the one shown below which clearly shows the relationship between the three streams (two of them are tapping into the timer stream).
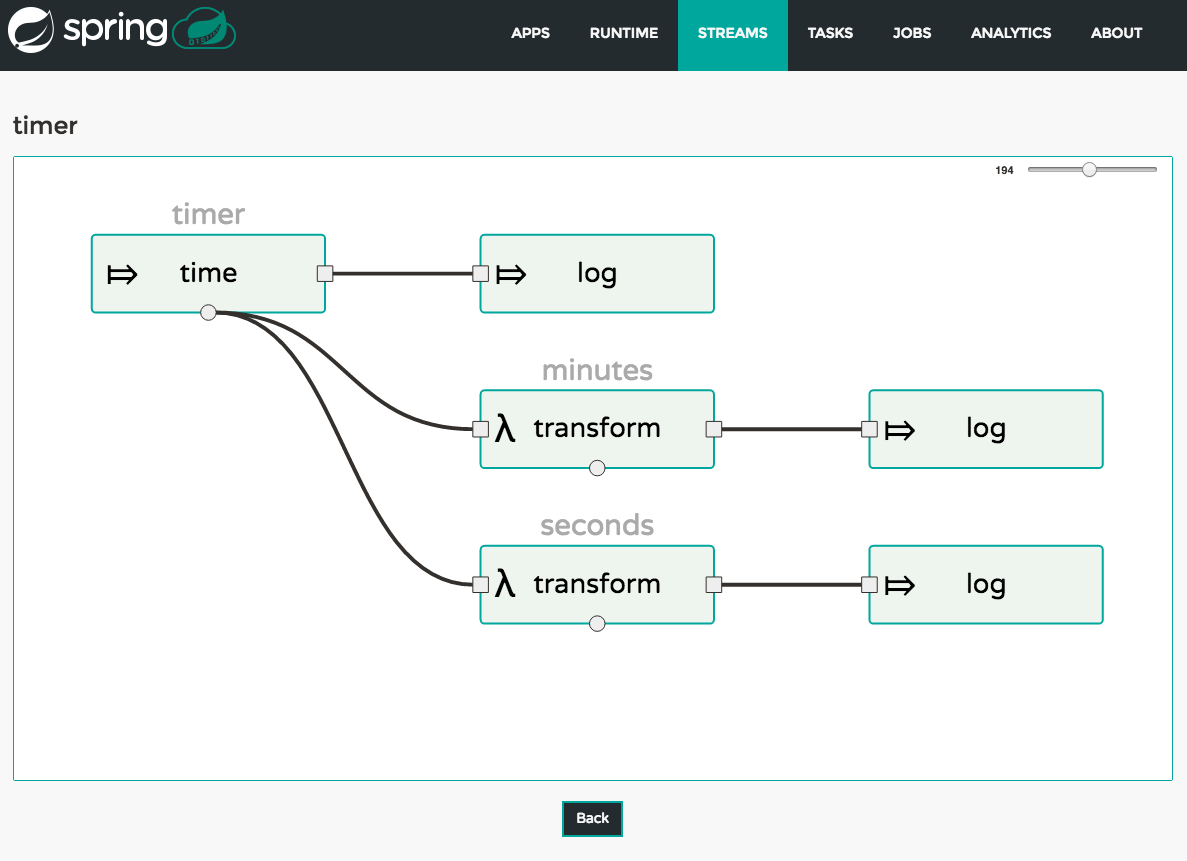
The Create Stream section of the Dashboard includes the Spring Flo designer tab that provides the canvas application, offering a interactive graphical interface for creating data pipelines.
In this tab, you can:
- Create, manage, and visualize stream pipelines using DSL, a graphical canvas, or both
- Write pipelines via DSL with content-assist and auto-complete
- Use auto-adjustment and grid-layout capabilities in the GUI for simpler and interactive organization of pipelines
Watch this screencast that highlights some of the "Flo for Spring Cloud Data Flow" capabilities. Spring Flo wiki includes more detailed content on core Flo capabilities.
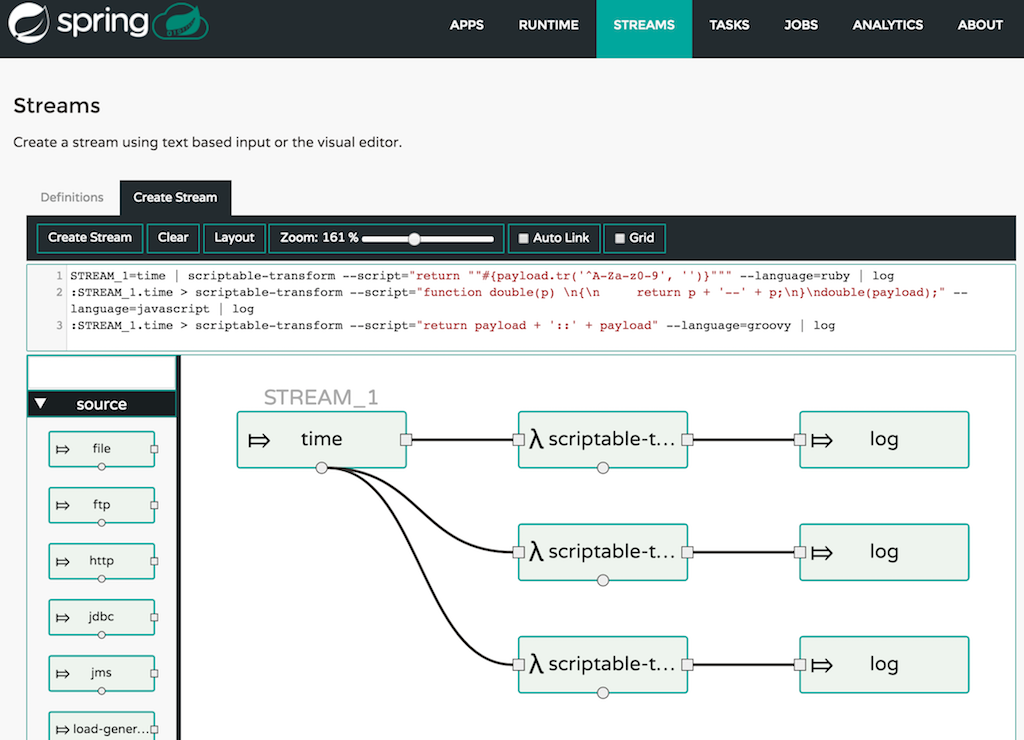
The Tasks section of the Dashboard currently has three tabs:
- Apps
- Definitions
- Executions
Apps encapsulate a unit of work into a reusable component. Within the Data Flow runtime environment Apps allow users to create definitions for Streams as well as Tasks. Consequently, the Apps tab within the Tasks section allows users to create Task definitions.
Note: You will also use this tab to create Batch Jobs.
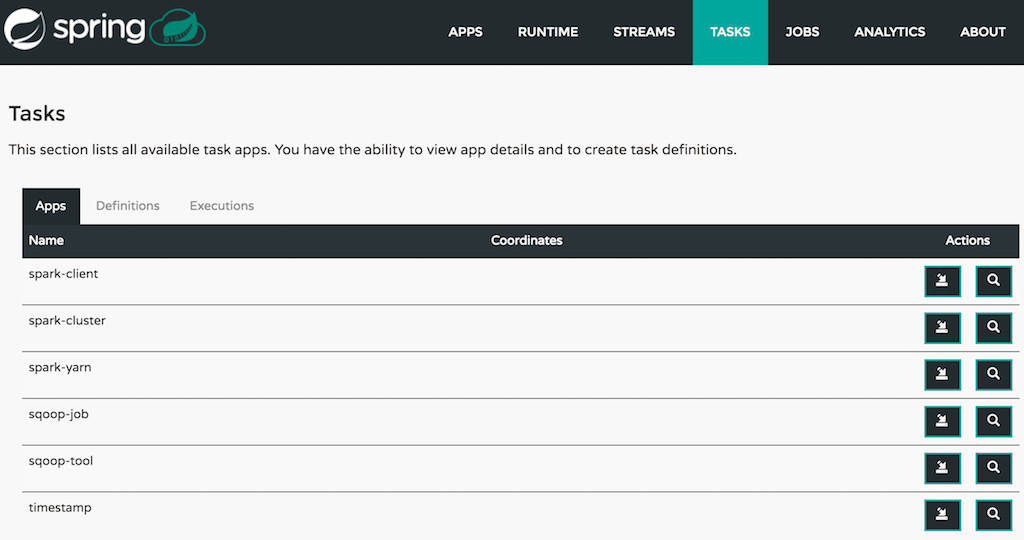
On this screen you can perform the following actions:
- View details such as the task app options.
- Create a Task Definition from the respective App.
On this screen you can create a new Task Definition. As a minimum you must provide a name for the new definition. You will also have the option to specify various properties that are used during the deployment of the app.
Note: Each parameter is only included if the Include checkbox is selected.
This page lists the Data Flow Task definitions and provides actions to launch or destroy those tasks. It also provides a shortcut operation to define one or more tasks using simple textual input, indicated by the bulk define tasks button.
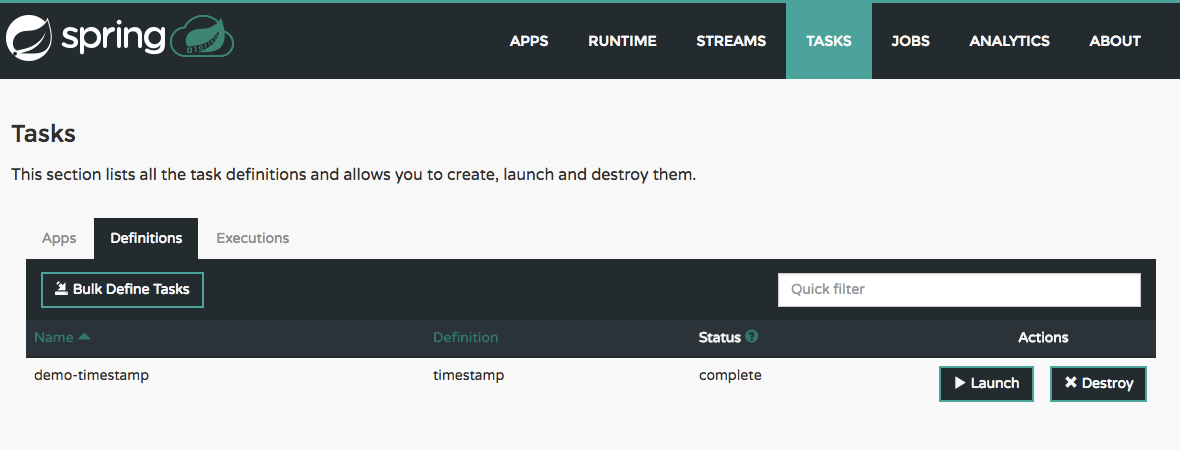
After pressing bulk define tasks, the following screen will be shown.
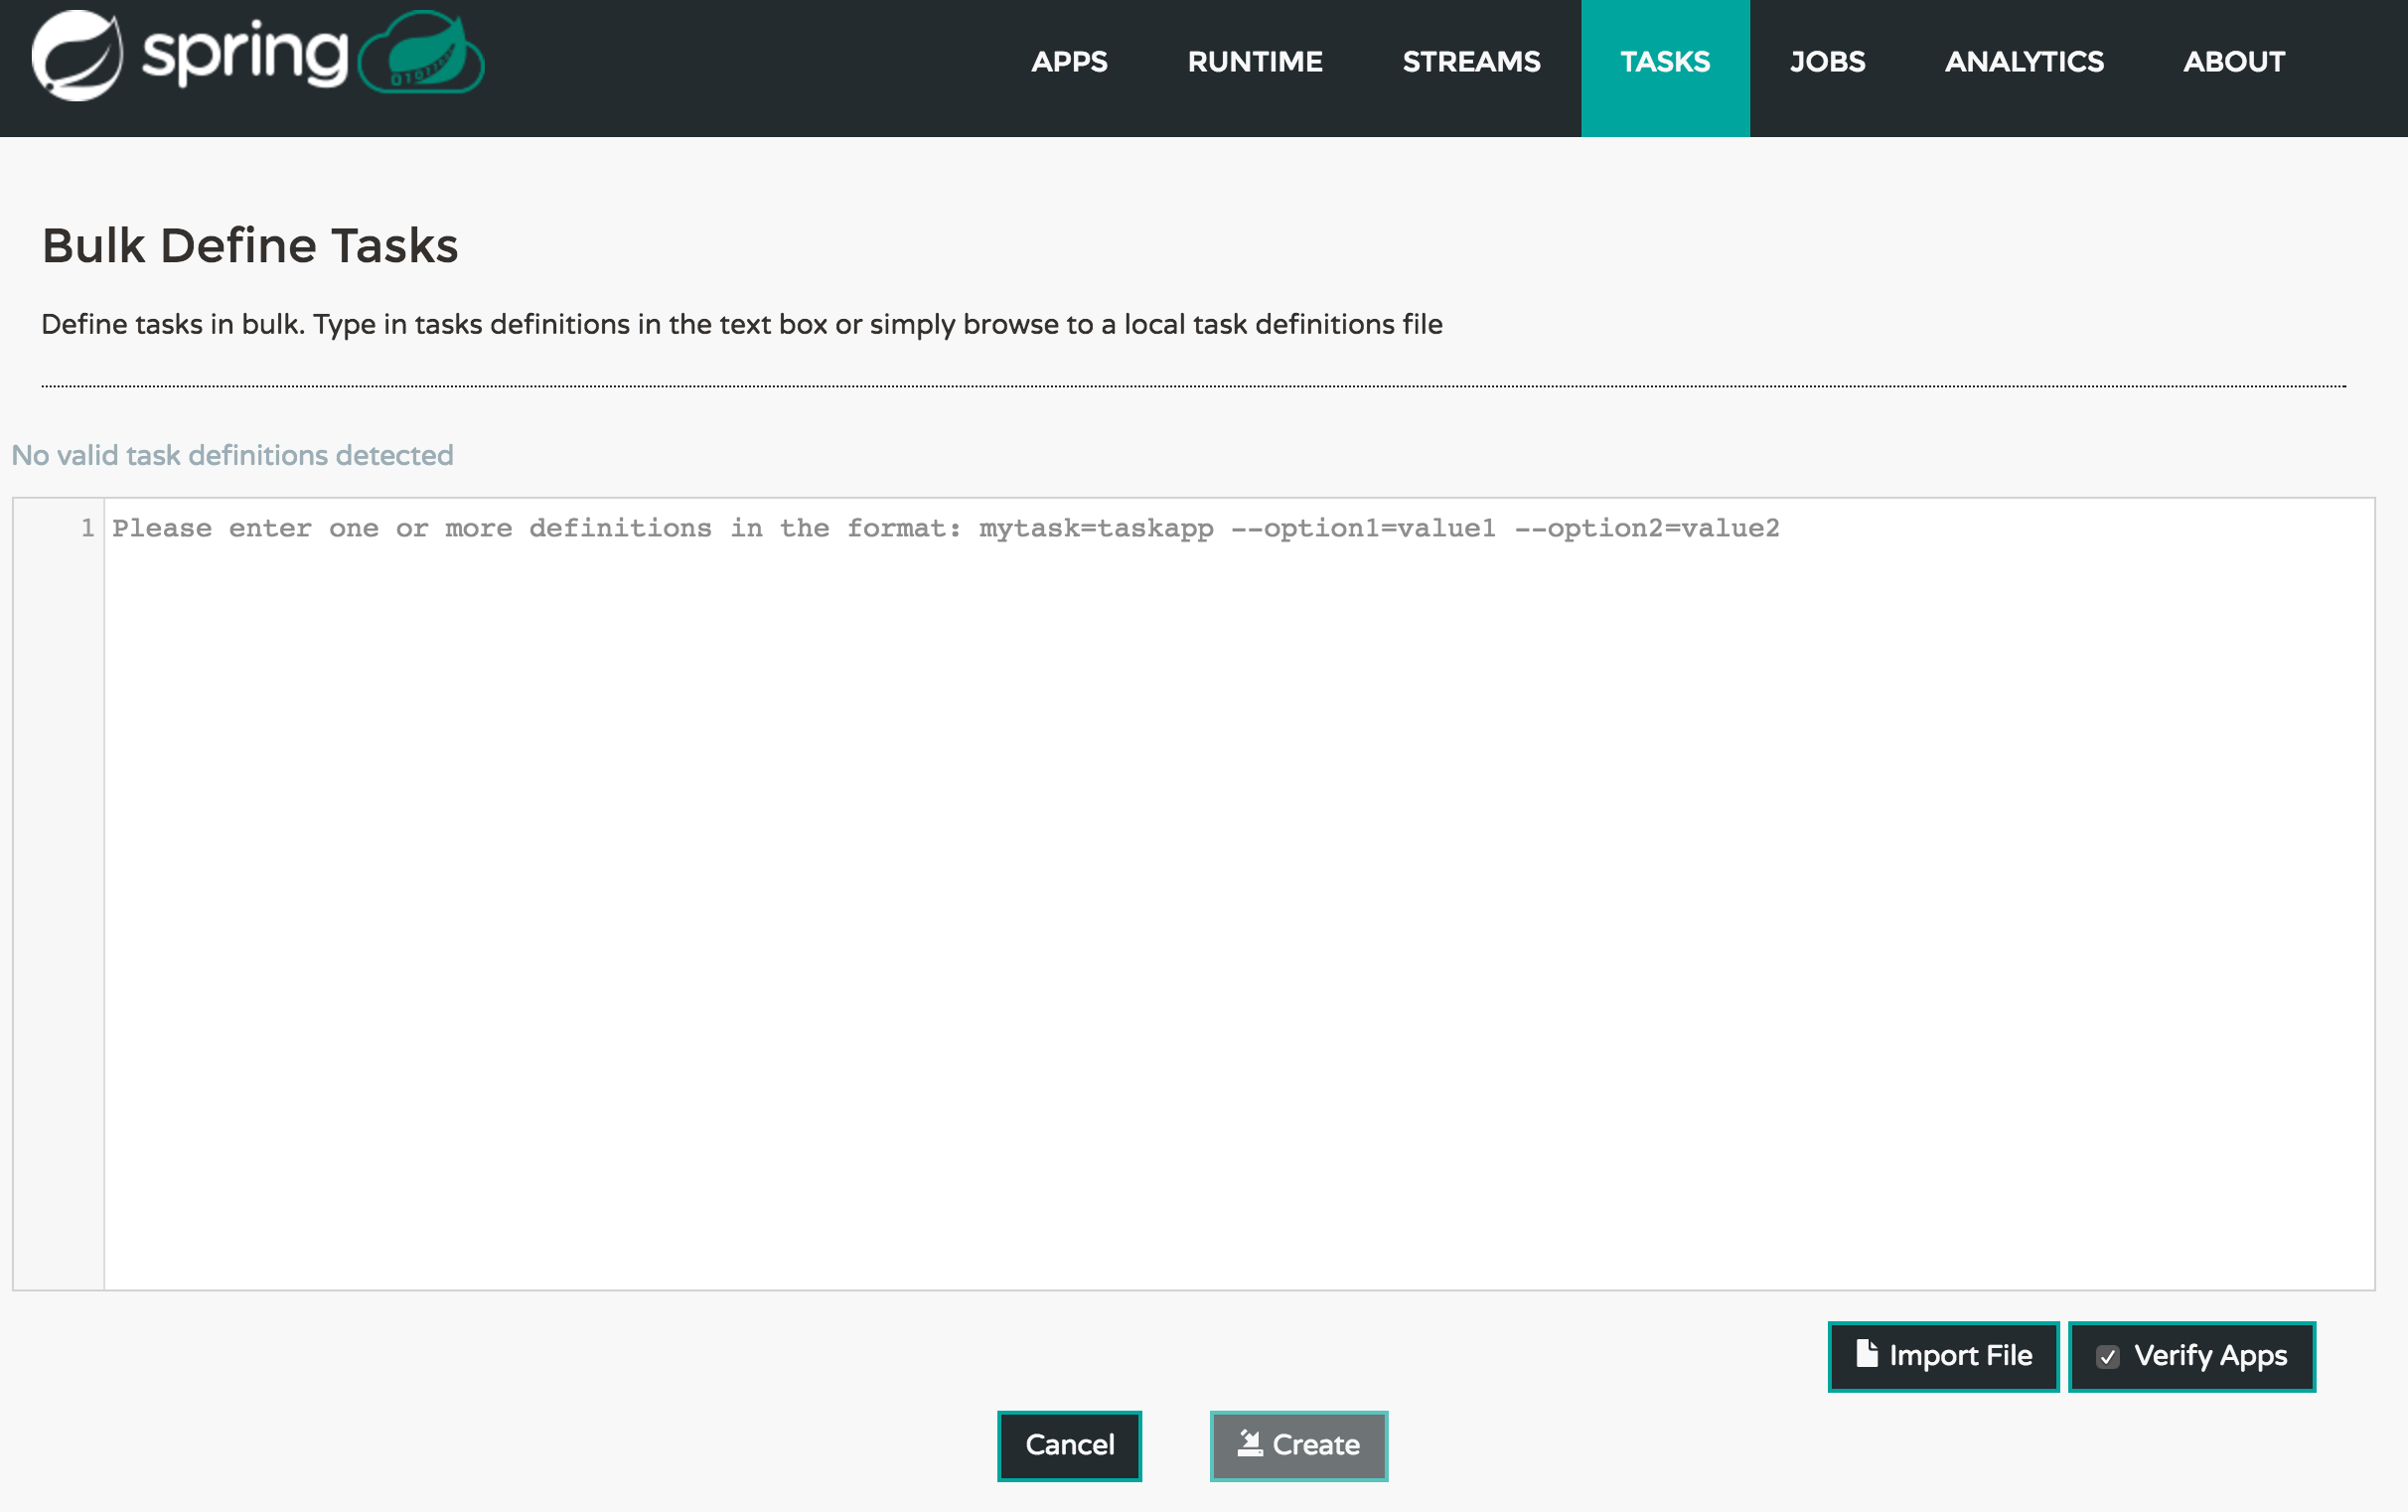
It includes a textbox where one or more definitions can be entered and then various actions performed on those definitions. The required input text format for task definitions is very basic, each line should be of the form:
<task-definition-name> = <task-application> <options>
For example:
demo-timestamp = timestamp --format=hhmmss
After entering any data a validator will run asynchronously to verify both the syntax and that the application name entered is a valid application and it supports the options specified. If validation fails the editor will show the errors with more information via tooltips.
To make it easier to enter definitions into the text area, content assist is supported. Pressing Ctrl+Space will invoke content assist to suggest simple task names (based on the line on which it is invoked), task applications and task application options. Press ESCape to close the content assist window without taking a selection.
If the validator should not verify the applications or the options (for example if specifying non-whitelisted options to the applications) then turn off that part of validation by toggling the checkbox off on the Verify Apps button - the validator will then only perform syntax checking. When correctly validated, the create button will be clickable and on pressing it the UI will proceed to create each task definition. If there are any errors during creation then after creation finishes the editor will show any lines of input, as it cannot be used in task definitions. These can then be fixed up and creation repeated. There is an import file button to open a file browser on the local file system if the definitions are in a file and it is easier to import than copy/paste.
Once the task definition is created, they can be launched through the Dashboard
as well. Navigate to the Definitions tab. Select the Task you want to launch by
pressing Launch.
On the following screen, you can define one or more Task parameters by entering:
- Parameter Key
- Parameter Value
Task parameters are not typed.
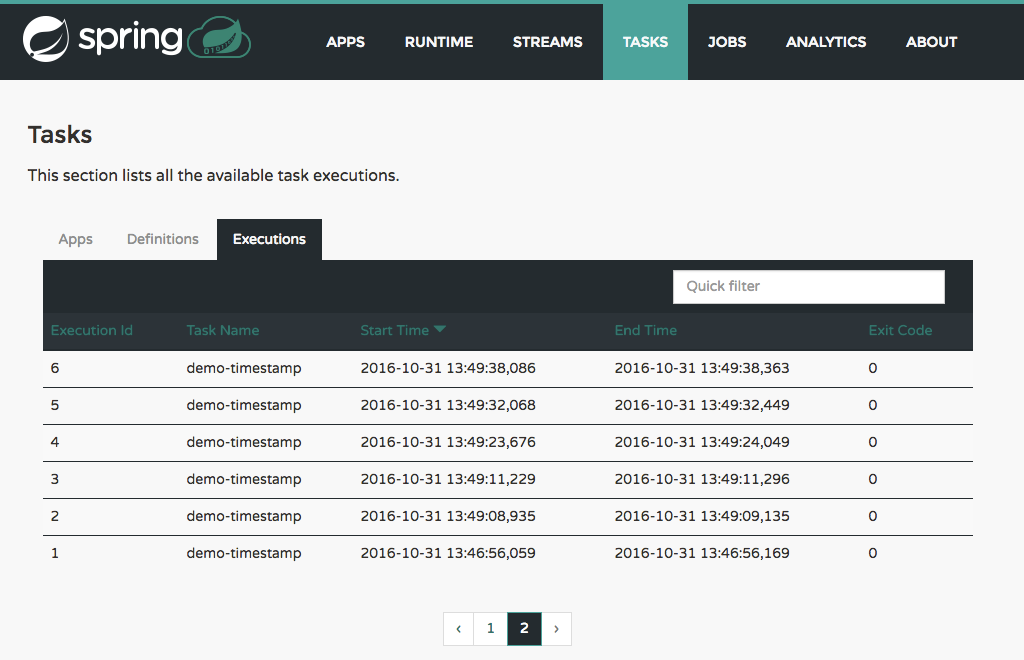
The Jobs section of the Dashboard allows you to inspect Batch Jobs. The main section of the screen provides a list of Job Executions. Batch Jobs are Tasks that were executing one or more Batch Job. As such each Job Execution has a back reference to the Task Execution Id (Task Id).
In case of a failed job, you can also restart the task. When dealing with long-running Batch Jobs, you can also request to stop it.
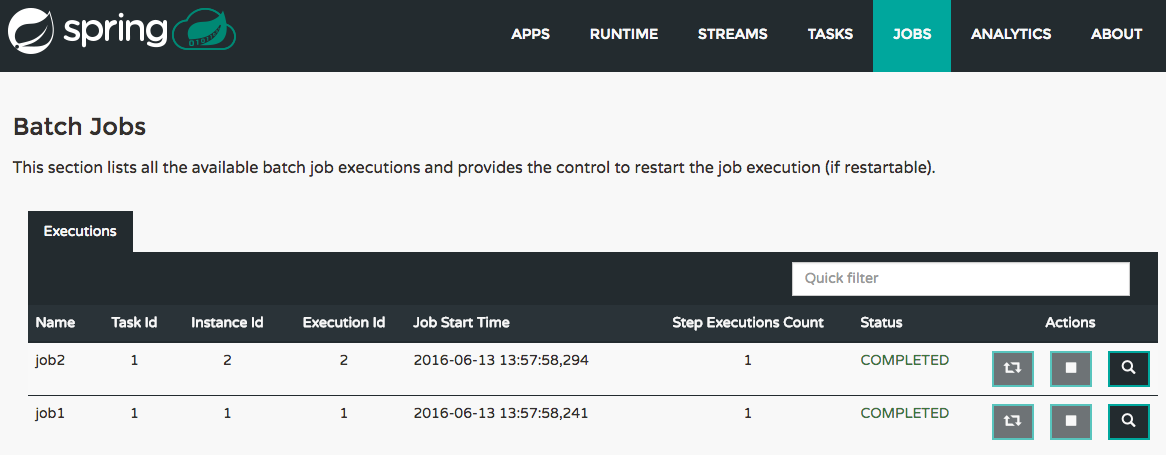
This page lists the Batch Job Executions and provides the option to restart or stop a specific job execution, provided the operation is available. Furthermore, you have the option to view the Job execution details.
The list of Job Executions also shows the state of the underlying Job Definition. Thus, if the underlying definition has been deleted, deleted will be shown.
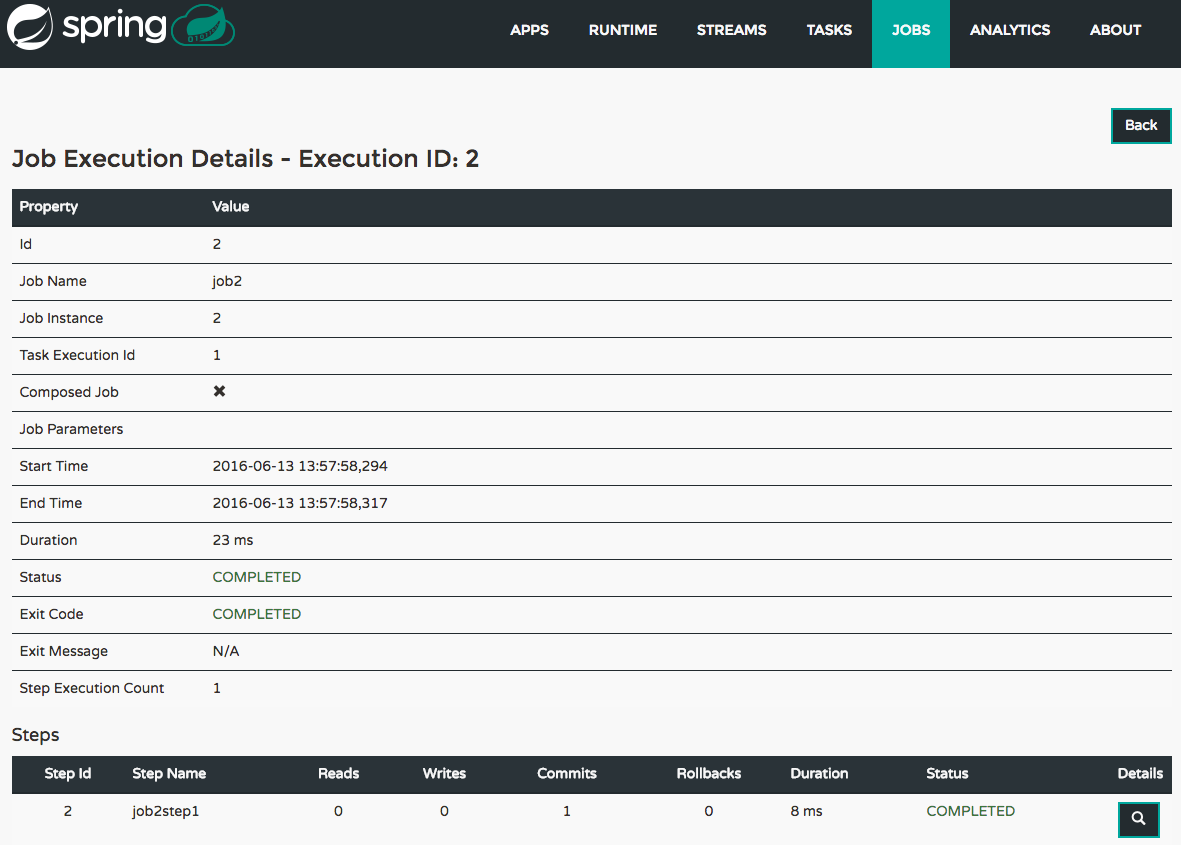
The Job Execution Details screen also contains a list of the executed steps. You can further drill into the Step Execution Details by clicking onto the magnifying glass.
On the top of the page, you will see progress indicator the respective step, with the option to refresh the indicator. Furthermore, a link is provided to view the step execution history.
The Step Execution details screen provides a complete list of all Step Execution Context key/value pairs.
| Important |
|---|---|
In case of exceptions, the Exit Description field will contain additional error information. Please be aware, though, that this field can only have a maximum of 2500 characters. Therefore, in case of long exception stacktraces, trimming of error messages may occur. In that case, please refer to the server log files for further details. |
On this screen, you can see a progress bar indicator in regards to the execution of the current step. Under the Step Execution History, you can also view various metrics associated with the selected step such as duration, read counts, write counts etc.
The Analytics section of the Dashboard provided data visualization capabilities for the various analytics applications available in Spring Cloud Data Flow:
- Counters
- Field-Value Counters
- Aggregate Counters
For example, if you have created the springtweets stream and the corresponding
counter in the Counter chapter, you can now easily create the corresponding
graph from within the Dashboard tab:
- Under
Metric Type, selectCountersfrom the select box - Under
Stream, selecttweetcount - Under
Visualization, select the desired chart option,Bar Chart
Using the icons to the right, you can add additional charts to the Dashboard, re-arange the order of created dashboards or remove data visualizations.
This section provides answers to some common ‘how do I do that…’ type of questions that often arise when using Spring Cloud Data Flow.
If you are having a specific problem that we don’t cover here, you might want to check out
stackoverflow.com to see if someone has
already provided an answer; this is also a great place to ask new questions (please use
the spring-cloud-dataflow tag).
We’re also more than happy to extend this section; If you want to add a ‘how-to’ you can send us a pull request.
You can set the maven properties such as local maven repository location, remote maven repositories and their authentication credentials including
the proxy server properties via commandline properties when starting the Dataflow server or using the SPRING_APPLICATION_JSON environment property
for the Dataflow server.
The remote maven repositories need to be configured explicitly if the apps are resolved using maven repository except for local Data Flow server. The other
Data Flow server implementations (that use maven resources for app artifacts resolution) have no default value for remote repositories.
The local server has repo.spring.io/libs-snapshot as the default remote repository.
To pass the properties as commandline options:
$ java -jar <dataflow-server>.jar --maven.localRepository=mylocal
--maven.remote-repositories.repo1.url=https://repo1
--maven.remote-repositories.repo1.auth.username=repo1user
--maven.remote-repositories.repo1.auth.password=repo1pass
--maven.remote-repositories.repo2.url=https://repo2 --maven.proxy.host=proxyhost
--maven.proxy.port=9018 --maven.proxy.auth.username=proxyuser
--maven.proxy.auth.password=proxypass
or, using the SPRING_APPLICATION_JSON environment property:
export SPRING_APPLICATION_JSON='{ "maven": { "local-repository": "local","remote-repositories": { "repo1": { "url": "https://repo1", "auth": { "username": "repo1user", "password": "repo1pass" } },
"repo2": { "url": "https://repo2" } }, "proxy": { "host": "proxyhost", "port": 9018, "auth": { "username": "proxyuser", "password": "proxypass" } } } }'
Formatted JSON:
SPRING_APPLICATION_JSON='{
  "maven": {
    "local-repository": "local",
    "remote-repositories": {
      "repo1": {
        "url": "https://repo1",
        "auth": {
          "username": "repo1user",
          "password": "repo1pass"
        }
      },
      "repo2": {
        "url": "https://repo2"
      }
    },
    "proxy": {
      "host": "proxyhost",
      "port": 9018,
      "auth": {
        "username": "proxyuser",
        "password": "proxypass"
      }
    }
  }
}'
| Note |
|---|---|
Depending on Spring Cloud Data Flow server implementation, you may have to pass the
environment properties using the platform specific environment-setting capabilities. For instance,
in Cloud Foundry, you’d be passing them as |
Spring Cloud Data Flow is built upon several Spring projects, but ultimately the dataflow-server is a Spring Boot app, so the logging techniques that apply to any Spring Boot application are applicable here as well.
While troubleshooting, following are the two primary areas where enabling the DEBUG logs could be useful.
Spring Cloud Data Flow builds upon Spring Cloud Deployer SPI and the platform specific dataflow-server uses the respective SPI implementations. Specifically, if we were to troubleshoot deployment specific issues; such as the network errors, it’d be useful to enable the DEBUG logs at the underlying deployer and the libraries used by it.
For instance, if you’d like to enable DEBUG logs for the local-deployer, you’d be starting the server with following.
$ java -jar <dataflow-server>.jar --logging.level.org.springframework.cloud.deployer.spi.local=DEBUG
(where,
org.springframework.cloud.deployer.spi.localis the global package for everything local-deployer related)For instance, if you’d like to enable DEBUG logs for the cloudfoundry-deployer, you’d be setting the following environment variable and upon restaging the dataflow-server, we will see more logs around request, response and the elaborate stack traces (upon failures). The cloudfoundry-deployer uses cf-java-client, so we will have to enable DEBUG logs for this library.
$ cf set-env dataflow-server JAVA_OPTS '-Dlogging.level.cloudfoundry-client=DEBUG'
$ cf restage dataflow-server
(where,
cloudfoundry-clientis the global package for everythingcf-java-clientrelated)If there’s a need to review Reactor logs, which is used by the
cf-java-client, then the following would be helpful.$ cf set-env dataflow-server JAVA_OPTS '-Dlogging.level.cloudfoundry-client=DEBUG -Dlogging.level.reactor.ipc.netty=DEBUG' $ cf restage dataflow-server
(where,
reactor.ipc.nettyis the global package for everythingreactor-nettyrelated)
| Note |
|---|---|
Similar to the |
The streaming applications in Spring Cloud Data Flow are Spring Boot applications and they can be independently setup with logging configurations.
For instance, if you’d have to troubleshoot the header and payload specifics that are being passed
around source, processor and sink channels, you’d be deploying the stream with the following
options.
dataflow:>stream create foo --definition "http --logging.level.org.springframework.integration=DEBUG | transform --logging.level.org.springframework.integration=DEBUG | log --logging.level.org.springframework.integration=DEBUG" --deploy(where, org.springframework.integration is the global package for everything Spring Integration related,
which is responsible for messaging channels)
These properties can also be specified via deployment properties when deploying the stream.
dataflow:>stream deploy foo --properties "app.*.logging.level.org.springframework.integration=DEBUG"| Old | New |
|---|---|
XD-Admin | Server (implementations: local, cloud foundry, apache yarn, kubernetes, and apache mesos) |
XD-Container | N/A |
Modules | Applications |
Admin UI | Dashboard |
Message Bus | Binders |
Batch / Job | Task |
If you have custom Spring XD modules, you’d have to refactor them to use Spring Cloud Stream and Spring Cloud Task annotations, with updated dependencies and built as normal Spring Boot "applications".
- Spring XD’s stream and batch modules are refactored into Spring Cloud Stream and Spring Cloud Task application-starters, respectively. These applications can be used as the reference while refactoring Spring XD modules
- There are also some samples for Spring Cloud Stream and Spring Cloud Task applications for reference
- If you’d like to create a brand new custom application, use the getting started guide for Spring Cloud Stream and Spring Cloud Task applications and as well as review the development guide
- Alternatively, if you’d like to patch any of the out-of-the-box stream applications, you can follow the procedure here
- Custom Stream/Task application requires being installed to a maven repository for Local, YARN, and
CF implementations or as docker images, when deploying to Kubernetes and Mesos. Other than maven and
docker resolution, you can also resolve application artifacts from
http,file, or ashdfscoordinates - Unlike Spring XD, you do not have to upload the application bits while registering custom applications anymore; instead, you’re expected to register the application coordinates that are hosted in the maven repository or by other means as discussed in the previous bullet
- By default, none of the out-of-the-box applications are preloaded already. It is intentionally designed to provide the flexibility to register app(s), as you find appropriate for the given use-case requirement
- Depending on the binder choice, you can manually add the appropriate binder dependency to build applications specific to that binder-type. Alternatively, you can follow the Spring Initialzr procedure to create an application with binder embedded in it
counter-sink:
- The peripheral
redisis not required in Spring Cloud Data Flow. If you intend to use thecounter-sink, thenredisbecomes required, and you’re expected to have your own runningrediscluster
- The peripheral
field-value-counter-sink:
- The peripheral
redisis not required in Spring Cloud Data Flow. If you intend to use thefield-value-counter-sink, thenredisbecomes required, and you’re expected to have your own runningrediscluster
- The peripheral
aggregate-counter-sink:
- The peripheral
redisis not required in Spring Cloud Data Flow. If you intend to use theaggregate-counter-sink, thenredisbecomes required, and you’re expected to have your own runningrediscluster
- The peripheral
Terminology wise, in Spring Cloud Data Flow, the message bus implementation is commonly referred to as binders.
Similar to Spring XD, there’s an abstraction available to extend the binder interface. By default, we take the opinionated view of Apache Kafka and RabbitMQ as the production-ready binders and are available as GA releases.
Selecting a binder is as simple as providing the right binder dependency in the classpath. If you’re to choose Kafka as the binder, you’d register stream applications that are pre-built with Kafka binder in it. If you were to create a custom application with Kafka binder, you’d add the following dependency in the classpath.
<dependency>
    <groupId>org.springframework.cloud</groupId>
    <artifactId>spring-cloud-stream-binder-kafka</artifactId>
    <version>1.0.2.RELEASE</version>
</dependency>
- Spring Cloud Stream supports Apache Kafka, RabbitMQ and experimental Google PubSub and Solace JMS. All binder implementations are maintained and managed in their individual repositories
- Every Stream/Task application can be built with a binder implementation of your choice. All the out-of-the-box applications are pre-built for both Kafka and Rabbit and they’re readily available for use as maven artifacts [Spring Cloud Stream / Spring Cloud Task or docker images [Spring Cloud Stream / Spring Cloud Task Changing the binder requires selecting the right binder dependency. Alternatively, you can download the pre-built application from this version of Spring Initializr with the desired “binder-starter” dependency
Fundamentally, all the messaging channels are backed by pub/sub semantics. Unlike Spring XD, the
messaging channels are backed only by topics or topic-exchange and there’s no representation of
queues in the new architecture.
${xd.module.index}is not supported anymore; instead, you can directly interact with named destinationsstream.indexchanges to:<stream-name>.<label/app-name>- for instance:
ticktock.0changes to:ticktock.time
- for instance:
“topic/queue” prefixes are not required to interact with named-channels
- for instance:
topic:foochanges to:foo - for instance:
stream create stream1 --definition ":foo > log"
- for instance:
If you’re building non-linear streams, you could take advantage of named destinations to build directed graphs.
for instance, in Spring XD:
stream create f --definition "queue:foo > transform --expression=payload+'-foo' | log" --deploy
stream create b --definition "queue:bar > transform --expression=payload+'-bar' | log" --deploy
stream create r --definition "http | router --expression=payload.contains('a')?'queue:foo':'queue:bar'" --deploy
for instance, in Spring Cloud Data Flow:
stream create f --definition ":foo > transform --expression=payload+'-foo' | log" --deploy
stream create b --definition ":bar > transform --expression=payload+'-bar' | log" --deploy
stream create r --definition "http | router --expression=payload.contains('a')?':foo':':bar'" --deployA Task by definition, is any application that does not run forever, including Spring Batch jobs, and they end/stop at some point. Task applications can be majorly used for on-demand use-cases such as database migration, machine learning, scheduled operations etc. Using Spring Cloud Task, users can build Spring Batch jobs as microservice applications.
- Spring Batch jobs from Spring XD are being refactored to Spring Boot applications a.k.a link: Spring Cloud Task applications
- Unlike Spring XD, these “Tasks” don’t require explicit deployment; instead, a task is ready to be launched directly once the definition is declared
| Old Command | New Command |
|---|---|
module upload | app register / app import |
module list | app list |
module info | app info |
admin config server | dataflow config server |
job create | task create |
job launch | task launch |
job list | task list |
job status | task status |
job display | task display |
job destroy | task destroy |
job execution list | task execution list |
runtime modules | runtime apps |
| Old API | New API |
|---|---|
/modules | /apps |
/runtime/modules | /runtime/apps |
/runtime/modules/{moduleId} | /runtime/apps/{appId} |
/jobs/definitions | /task/definitions |
/jobs/deployments | /task/deployments |
The Admin-UI is now renamed as Dashboard. The URI for accessing the Dashboard is changed from localhost:9393/admin-ui to localhost:9393/dashboard
- (New) Apps: Lists all the registered applications that are available for use. This view includes informational details such as the URI and the properties supported by each application. You can also register/unregister applications from this view
- Runtime: Container changes to Runtime. The notion of
xd-containeris gone, replaced by out-of-the-box applications running as autonomous Spring Boot applications. The Runtime tab displays the applications running in the runtime platforms (implementations: cloud foundry, apache yarn, apache mesos, or kubernetes). You can click on each application to review relevant details about the application such as where it is running with, and what resources etc. - Spring Flo is now an OSS product. Flo for Spring Cloud Data Flow’s “Create Stream”, the designer-tab comes pre-built in the Dashboard
(New) Tasks:
- The sub-tab “Modules” is renamed to “Apps”
- The sub-tab “Definitions” lists all the Task definitions, including Spring Batch jobs that are orchestrated as Tasks
- The sub-tab “Executions” lists all the Task execution details similar to Spring XD’s Job executions
Spring Cloud Data Flow comes with a significantly simplified architecture. In fact, when compared with Spring XD, there are less peripherals that are necessary to operationalize Spring Cloud Data Flow.
Spring Cloud Data Flow uses an RDBMS instead of Redis for stream/task definitions, application registration, and for job repositories.The default configuration uses an embedded H2 instance, but Oracle, DB2, SqlServer, MySQL/MariaDB, PostgreSQL, H2, and HSQLDB databases are supported. To use Oracle, DB2 and SqlServer you will need to create your own Data Flow Server using Spring Initializr and add the appropriate JDBC driver dependency.
Running a Redis cluster is only required for analytics functionality. Specifically, when the counter-sink,
field-value-counter-sink, or aggregate-counter-sink applications are used, it is expected to also
have a running instance of Redis cluster.
Spring XD’s xd-admin and xd-container server components are replaced by stream and task
applications themselves running as autonomous Spring Boot applications. The applications run natively
on various platforms including Cloud Foundry, Apache YARN, Apache Mesos, or Kubernetes. You can develop,
test, deploy, scale +/-, and interact with (Spring Boot) applications individually, and they can
evolve in isolation.
To support centralized and consistent management of an application’s configuration properties, Spring Cloud Config client libraries have been included into the Spring Cloud Data Flow server as well as the Spring Cloud Stream applications provided by the Spring Cloud Stream App Starters. You can also pass common application properties to all streams when the Data Flow Server starts.
Spring Cloud Data Flow is a Spring Boot application. Depending on the platform of your choice, you
can download the respective release uber-jar and deploy/push it to the runtime platform
(cloud foundry, apache yarn, kubernetes, or apache mesos). For example, if you’re running Spring
Cloud Data Flow on Cloud Foundry, you’d download the Cloud Foundry server implementation and do a
cf push as explained in the reference guide.
The hdfs-sink application builds upon Spring Hadoop 2.4.0 release, so this application is compatible
with following Hadoop distributions.
- Cloudera - cdh5
- Pivotal Hadoop - phd30
- Hortonworks Hadoop - hdp24
- Hortonworks Hadoop - hdp23
- Vanilla Hadoop - hadoop26
- Vanilla Hadoop - 2.7.x (default)
Spring Cloud Data Flow can be deployed and used with Apche YARN in two different ways.
- Deploy the server directly in a YARN cluster
- Leverage Apache Ambari plugin to provision Spring Cloud Data Flow as a service
Let’s review some use-cases to compare and contrast the differences between Spring XD and Spring Cloud Data Flow.
(It is assumed both XD and SCDF distributions are already downloaded)
Description: Simple ticktock example using local/singlenode.
| Spring XD | Spring Cloud Data Flow |
|---|---|
Start
| Start a binder of your choice Start
|
Start
| Start
|
Create
| Create
|
Review | Review |
(It is assumed both XD and SCDF distributions are already downloaded)
Description: Stream with custom module/application.
| Spring XD | Spring Cloud Data Flow |
|---|---|
Start
| Start a binder of your choice Start
|
Start
| Start
|
Register custom “processor” module to transform payload to a desired format
| Register custom “processor” application to transform payload to a desired format
|
Create a stream with custom module
| Create a stream with custom application
|
Review results in the | Review results by tailing the |
(It is assumed both XD and SCDF distributions are already downloaded)
Description: Simple batch-job.
| Spring XD | Spring Cloud Data Flow |
|---|---|
Start
| Start
|
Start
| Start
|
Register custom “batch-job” module
| Register custom “batch-job” as task application
|
Create a job with custom batch-job module
| Create a task with custom batch-job application
|
Deploy job
| NA |
Launch job
| Launch task
|
Review results in the | Review results by tailing the |
To build the source you will need to install JDK 1.8.
The build uses the Maven wrapper so you don’t have to install a specific version of Maven. To enable the tests for Redis you should run the server before bulding. See below for more information on how to run Redis.
The main build command is
$ ./mvnw clean install
You can also add '-DskipTests' if you like, to avoid running the tests.
| Note |
|---|---|
You can also install Maven (>=3.3.3) yourself and run the |
| Note |
|---|---|
Be aware that you might need to increase the amount of memory
available to Maven by setting a |
The projects that require middleware generally include a
docker-compose.yml, so consider using
Docker Compose to run the middeware servers
in Docker containers. See the README in the
scripts demo
repository for specific instructions about the common cases of mongo,
rabbit and redis.
There is a "full" profile that will generate documentation. You can build just the documentation by executing
$ ./mvnw clean package -DskipTests -P full -pl {project-artifactId} -am
If you don’t have an IDE preference we would recommend that you use Spring Tools Suite or Eclipse when working with the code. We use the m2eclipe eclipse plugin for maven support. Other IDEs and tools should also work without issue.
We recommend the m2eclipe eclipse plugin when working with eclipse. If you don’t already have m2eclipse installed it is available from the "eclipse marketplace".
Unfortunately m2e does not yet support Maven 3.3, so once the projects
are imported into Eclipse you will also need to tell m2eclipse to use
the .settings.xml file for the projects. If you do not do this you
may see many different errors related to the POMs in the
projects. Open your Eclipse preferences, expand the Maven
preferences, and select User Settings. In the User Settings field
click Browse and navigate to the Spring Cloud project you imported
selecting the .settings.xml file in that project. Click Apply and
then OK to save the preference changes.
| Note |
|---|---|
Alternatively you can copy the repository settings from |
Spring Cloud is released under the non-restrictive Apache 2.0 license, and follows a very standard Github development process, using Github tracker for issues and merging pull requests into master. If you want to contribute even something trivial please do not hesitate, but follow the guidelines below.
Before we accept a non-trivial patch or pull request we will need you to sign the contributor’s agreement. Signing the contributor’s agreement does not grant anyone commit rights to the main repository, but it does mean that we can accept your contributions, and you will get an author credit if we do. Active contributors might be asked to join the core team, and given the ability to merge pull requests.
None of these is essential for a pull request, but they will all help. They can also be added after the original pull request but before a merge.
- Use the Spring Framework code format conventions. If you use Eclipse
you can import formatter settings using the
eclipse-code-formatter.xmlfile from the Spring Cloud Build project. If using IntelliJ, you can use the Eclipse Code Formatter Plugin to import the same file. - Make sure all new
.javafiles to have a simple Javadoc class comment with at least an@authortag identifying you, and preferably at least a paragraph on what the class is for. - Add the ASF license header comment to all new
.javafiles (copy from existing files in the project) - Add yourself as an
@authorto the .java files that you modify substantially (more than cosmetic changes). - Add some Javadocs and, if you change the namespace, some XSD doc elements.
- A few unit tests would help a lot as well — someone has to do it.
- If no-one else is using your branch, please rebase it against the current master (or other target branch in the main project).
- When writing a commit message please follow these conventions,
if you are fixing an existing issue please add
Fixes gh-XXXXat the end of the commit message (where XXXX is the issue number).