© 2010-2018 Graph Aware Ltd - Neo Technology, Inc. - Pivotal Software, Inc.

| Copies of this document may be made for your own use and for distribution to others, provided that you do not charge any fee for such copies and further provided that each copy contains this Copyright Notice, whether distributed in print or electronically. |
- Preface
- 1. Spring and Spring Data
- 2. NoSQL and Graph databases
- 3. Requirements
- 4. Additional Resources
- 5. New & Noteworthy
- 6. Dependencies
- 7. Working with Spring Data Repositories
- 8. Auditing
- 9. SDN Reference Documentation
- 10. Neo4j OGM Reference Documentation
- 10.1. Introduction
- 10.2. Getting Started
- 10.3. Configuration
- 10.4. Annotating Entities
- 10.4.1. @NodeEntity: The basic building block
- 10.4.2. @Relationship: Connecting node entities
- 10.4.3. @RelationshipEntity: Rich relationships
- 10.4.4. Entity identifier
- 10.4.5. Optimistic locking with @Version annotation
- 10.4.6. @Property: Optional annotation for property fields
- 10.4.7. @PostLoad
- 10.4.8. Non-annotated properties and best practices
- 10.5. Indexing
- 10.6. Connecting to the Graph
- 10.7. Using Neo4j-OGM Session
- 10.8. Type Conversion
- 10.9. Filters
- 10.10. Events
- 10.10.1. Event types
- 10.10.2. Interfaces
- 10.10.3. Registering an EventListener
- 10.10.4. Using the EventListenerAdapter
- 10.10.5. Disposing of an EventListener
- 10.10.6. Connected objects
- 10.10.7. Events and types
- 10.10.8. Events and collections
- 10.10.9. Event ordering
- 10.10.10. Relationship events
- 10.10.11. Event uniqueness
- 10.11. Testing
- 10.12. High Availability (HA) Support
- 11. Appendix
Preface
The Spring Data Neo4J project applies core Spring concepts to the development of solutions using the Neo4j graph data store. We provide "repositories" as a high-level abstraction for storing and querying documents. You will notice similarities to the JPA/Hibernate support in the Spring Framework.
This document is the reference guide for Spring Data - Graph Support. It explains Graph module concepts and semantics and the syntax for various store namespaces.
This section provides some basic introduction to Spring and Graph databases.
The Spring Data Commons section then describes the common foundation of all Spring Data projects : the repositories. This part is taken from from SD commons project and may include examples from other persistence type such as JPA.
The rest of the document describes the Spring Data Neo4j features and specifics. It includes the Spring Data Neo4j reference, and the reference for OGM, on which SDN is based on. It assumes the user is familiar with the Neo4j graph database as well as Spring concepts.
1. Spring and Spring Data
Spring Data uses Spring framework’s core functionality, such as the IoC container, type conversion system, expression language, JMX integration, and portable DAO exception hierarchy. While it is not important to know the Spring APIs, understanding the concepts behind them is. At a minimum, the idea behind IoC should be familiar for whatever IoC container you choose to use.
The core functionality of the Neo4J support can be used directly, with no need to invoke the IoC services of the Spring Container. This is much like Hibernate Session or JPA EntityManager which can be used 'standalone' without any other services of the Spring container. To leverage all the features of Spring Data Neo4j, such as the repository support, you will need to configure some parts of the library using Spring.
To learn more about Spring, you can refer to the comprehensive (and sometimes disarming) documentation that explains in detail the Spring Framework. There are a lot of articles, blog entries and books on the matter - take a look at the Spring framework home page for more information.
2. NoSQL and Graph databases
A graph database is a storage engine that is specialised in storing and retrieving vast networks of information. It efficiently stores data as nodes and relationships and allows high performance retrieval and querying of those structures. Properties can be added to both nodes and relationships. Nodes can be labelled by zero or more labels, relationships are always directed and named.
Graph databases are well suited for storing most kinds of domain models. In almost all domains, there are certain things connected to other things. In most other modelling approaches, the relationships between things are reduced to a single link without identity and attributes. Graph databases allow to keep the rich relationships that originate from the domain equally well-represented in the database without resorting to also modelling the relationships as "things". There is very little "impedance mismatch" when putting real-life domains into a graph database.
2.1. Introducing Neo4j
Neo4j is an open source NOSQL graph database. It is a fully transactional database (ACID) that stores data structured as graphs consisting of nodes, connected by relationships. Inspired by the structure of the real world, it allows for high query performance on complex data, while remaining intuitive and simple for the developer.
Neo4j is very well-established. It has been in commercial development for 15 years and in production for over 12 years. Most importantly, it has an active and contributing community surrounding it, but it also:
-
has an intuitive, rich graph-oriented model for data representation. Instead of tables, rows, and columns, you work with a graph consisting of nodes, relationships, and properties.
-
has a disk-based, native storage manager optimised for storing graph structures with maximum performance and scalability.
-
is scalable. Neo4j can handle graphs with many billions of nodes/relationships/properties on a single machine, but can also be scaled out across multiple machines for high availability.
-
has a powerful graph query language called Cypher, which allows users to efficiently read/write data by expressing graph patterns.
-
has a powerful traversal framework and query languages for traversing the graph.
-
can be deployed as a standalone server, which is the recommended way of using Neo4j
-
can be deployed as an embedded (in-process) database, giving developers access to its core Java API
In addition, Neo4j provides ACID transactions, durable persistence, concurrency control, transaction recovery, high availability, and more. Neo4j is released under a dual free software/commercial licence model.
The jumping off ground for learning about Neo4J is neo4j.com. Here is a list of other useful resources:
-
The Neo4j documentation introduces Neo4j and contains links to getting started guides, reference documentation and tutorials.
-
The online sandbox provides a convenient way to interact with a Neo4j instance in combination with the online tutorial.
-
Neo4J Java Bolt Driver
3. Requirements
Spring Data Neo4j 5.0.x at minimum, requires:
-
JDK Version
8and above. -
Neo4j Graph Database
3.1and above. -
Spring Framework 5.0.13.RELEASE and above.
If you plan on altering the version of the OGM make sure it is only in the 3.0.0+ release family.
4. Additional Resources
4.1. Project metadata
-
Version control - http://github.com/spring-projects/spring-data-neo4j
-
Bugtracker - https://jira.spring.io/browse/DATAGRAPH
-
Release repository - https://repo.spring.io/libs-release
-
Milestone repository - https://repo.spring.io/libs-milestone
-
Snapshot repository - https://repo.spring.io/libs-snapshot
4.2. Getting Help & give feedback
If you encounter issues or you are just looking for advice, feel free to use one of the links below:
-
The sample project: SDN University. More example projects for Spring Data Neo4j are available in the Neo4j-Examples repository
-
The main SpringSource project site contains links to basic project information such as source code, JavaDocs, Issue tracking, etc.
-
Talk and share with the community on the SDN/OGM Slack channel
-
For more detailed questions, use Spring Data Neo4j on StackOverflow
-
Use the templates for reporting issues (they can also be used to bootstrap your projects).
-
For professional support feel free to contact Neo4j or GraphAware.
If you are new to Spring as well as to Spring Data, look for information about Spring projects.
5. New & Noteworthy
5.1. What’s new in Spring Data Neo4j 5.0.0
-
SDN 5.x is designed to work with Java 8, Neo4j 3.1+, Spring 5 and Spring Boot 2.x.
-
Bolt is now the default database protocol.
-
For simplicity, annotations are now only supported on entity attributes, no more on accessors.
-
New id management ; database ids are not mandatory anymore.
-
Smarter deep querying based on domain model structure.
-
Dynamic properties allow mapping in
Mapstructures. -
Projections support.
-
Improved causal cluster support and bookmark management.
-
More flexible configuration.
-
Better Java 8 support : all type queries can now return stream results and
Optional. Better date / time management. -
Internal metadata handling has been refactored for better reliability.
-
Auditing support (since 5.0.1)
When migrating from 4.x, please see the migration guide.
6. Dependencies
Due to the different inception dates of individual Spring Data modules, most of them carry different major and minor version numbers. The easiest way to find compatible ones is to rely on the Spring Data Release Train BOM that we ship with the compatible versions defined. In a Maven project, you would declare this dependency in the <dependencyManagement /> section of your POM, as follows:
<dependencyManagement>
  <dependencies>
    <dependency>
      <groupId>org.springframework.data</groupId>
      <artifactId>spring-data-releasetrain</artifactId>
      <version>Kay-SR14</version>
      <scope>import</scope>
      <type>pom</type>
    </dependency>
  </dependencies>
</dependencyManagement>
The current release train version is Kay-SR14. The train names ascend alphabetically and the currently available trains are listed here. The version name follows the following pattern: ${name}-${release}, where release can be one of the following:
-
BUILD-SNAPSHOT: Current snapshots -
M1,M2, and so on: Milestones -
RC1,RC2, and so on: Release candidates -
RELEASE: GA release -
SR1,SR2, and so on: Service releases
A working example of using the BOMs can be found in our Spring Data examples repository. With that in place, you can declare the Spring Data modules you would like to use without a version in the <dependencies /> block, as follows:
<dependencies>
  <dependency>
    <groupId>org.springframework.data</groupId>
    <artifactId>spring-data-jpa</artifactId>
  </dependency>
<dependencies>
6.1. Dependency Management with Spring Boot
Spring Boot selects a recent version of Spring Data modules for you. If you still want to upgrade to a newer version, configure the property spring-data-releasetrain.version to the train name and iteration you would like to use.
6.2. Spring Framework
The current version of Spring Data modules require Spring Framework in version 5.0.13.RELEASE or better. The modules might also work with an older bugfix version of that minor version. However, using the most recent version within that generation is highly recommended. :spring-framework-docs: http://docs.spring.io/spring/docs/5.0.13.RELEASE/spring-framework-reference :spring-framework-javadoc: https://docs.spring.io/spring/docs/5.0.13.RELEASE/javadoc-api
7. Working with Spring Data Repositories
The goal of the Spring Data repository abstraction is to significantly reduce the amount of boilerplate code required to implement data access layers for various persistence stores.
|
Spring Data repository documentation and your module This chapter explains the core concepts and interfaces of Spring Data repositories. The information in this chapter is pulled from the Spring Data Commons module. It uses the configuration and code samples for the Java Persistence API (JPA) module. You should adapt the XML namespace declaration and the types to be extended to the equivalents of the particular module that you use. “Namespace reference” covers XML configuration, which is supported across all Spring Data modules supporting the repository API. “Repository query keywords” covers the query method keywords supported by the repository abstraction in general. For detailed information on the specific features of your module, see the chapter on that module of this document. |
7.1. Core concepts
The central interface in the Spring Data repository abstraction is Repository. It takes the domain class to manage as well as the ID type of the domain class as type arguments. This interface acts primarily as a marker interface to capture the types to work with and to help you to discover interfaces that extend this one. The CrudRepository provides sophisticated CRUD functionality for the entity class that is being managed.
CrudRepository interfacepublic interface CrudRepository<T, ID extends Serializable>
extends Repository<T, ID> {
<S extends T> S save(S entity); (1)
Optional<T> findById(ID primaryKey); (2)
Iterable<T> findAll(); (3)
long count(); (4)
void delete(T entity); (5)
boolean existsById(ID primaryKey); (6)
// … more functionality omitted.
}| 1 | Saves the given entity. |
| 2 | Returns the entity identified by the given ID. |
| 3 | Returns all entities. |
| 4 | Returns the number of entities. |
| 5 | Deletes the given entity. |
| 6 | Indicates whether an entity with the given ID exists. |
We also provide persistence technology-specific abstractions, such as JpaRepository or MongoRepository. Those interfaces extend CrudRepository and expose the capabilities of the underlying persistence technology in addition to the rather generic persistence technology-agnostic interfaces such as CrudRepository.
|
On top of the CrudRepository, there is a PagingAndSortingRepository abstraction that adds additional methods to ease paginated access to entities:
PagingAndSortingRepository interfacepublic interface PagingAndSortingRepository<T, ID extends Serializable>
extends CrudRepository<T, ID> {
Iterable<T> findAll(Sort sort);
Page<T> findAll(Pageable pageable);
}To access the second page of User by a page size of 20, you could do something like the following:
PagingAndSortingRepository<User, Long> repository = // … get access to a bean
Page<User> users = repository.findAll(PageRequest.of(1, 20));
In addition to query methods, query derivation for both count and delete queries is available. The following list shows the interface definition for a derived count query:
interface UserRepository extends CrudRepository<User, Long> {

  long countByLastname(String lastname);
}
The following list shows the interface definition for a derived delete query:
interface UserRepository extends CrudRepository<User, Long> {

  long deleteByLastname(String lastname);

  List<User> removeByLastname(String lastname);
}
7.2. Query methods
Standard CRUD functionality repositories usually have queries on the underlying datastore. With Spring Data, declaring those queries becomes a four-step process:
-
Declare an interface extending Repository or one of its subinterfaces and type it to the domain class and ID type that it should handle, as shown in the following example:
interface PersonRepository extends Repository<Person, Long> { … } -
Declare query methods on the interface.
interface PersonRepository extends Repository<Person, Long> { List<Person> findByLastname(String lastname); } -
Set up Spring to create proxy instances for those interfaces, either with JavaConfig or with XML configuration.
-
To use Java configuration, create a class similar to the following:
import org.springframework.data.jpa.repository.config.EnableJpaRepositories; @EnableJpaRepositories class Config {} -
To use XML configuration, define a bean similar to the following:
<?xml version="1.0" encoding="UTF-8"?>
<beans xmlns="http://www.springframework.org/schema/beans"
   xmlns:xsi="http://www.w3.org/2001/XMLSchema-instance"
   xmlns:jpa="http://www.springframework.org/schema/data/jpa"
   xsi:schemaLocation="http://www.springframework.org/schema/beans
     http://www.springframework.org/schema/beans/spring-beans.xsd
     http://www.springframework.org/schema/data/jpa
     http://www.springframework.org/schema/data/jpa/spring-jpa.xsd">

   <jpa:repositories base-package="com.acme.repositories"/>

</beans>
The JPA namespace is used in this example. If you use the repository abstraction for any other store, you need to change this to the appropriate namespace declaration of your store module. In other words, you should exchange
jpain favor of, for example,mongodb.+ Also, note that the JavaConfig variant does not configure a package explicitly, because the package of the annotated class is used by default. To customize the package to scan, use one of the
basePackage…attributes of the data-store-specific repository’s@Enable${store}Repositories-annotation. -
-
Inject the repository instance and use it, as shown in the following example:
class SomeClient {

  private final PersonRepository repository;

  SomeClient(PersonRepository repository) {
    this.repository = repository;
  }

  void doSomething() {
    List<Person> persons = repository.findByLastname("Matthews");
  }
}
The sections that follow explain each step in detail:
7.3. Defining Repository Interfaces
First, define a domain class-specific repository interface. The interface must extend Repository and be typed to the domain class and an ID type. If you want to expose CRUD methods for that domain type, extend CrudRepository instead of Repository.
7.3.1. Fine-tuning Repository Definition
Typically, your repository interface extends Repository, CrudRepository, or PagingAndSortingRepository. Alternatively, if you do not want to extend Spring Data interfaces, you can also annotate your repository interface with @RepositoryDefinition. Extending CrudRepository exposes a complete set of methods to manipulate your entities. If you prefer to be selective about the methods being exposed, copy the methods you want to expose from CrudRepository into your domain repository.
| Doing so lets you define your own abstractions on top of the provided Spring Data Repositories functionality. |
The following example shows how to selectively expose CRUD methods (findById and save, in this case):
@NoRepositoryBean
interface MyBaseRepository<T, ID extends Serializable> extends Repository<T, ID> {

  Optional<T> findById(ID id);

  <S extends T> S save(S entity);
}

interface UserRepository extends MyBaseRepository<User, Long> {
  User findByEmailAddress(EmailAddress emailAddress);
}
In the prior example, you defined a common base interface for all your domain repositories and exposed findById(…) as well as save(…).These methods are routed into the base repository implementation of the store of your choice provided by Spring Data (for example, if you use JPA, the implementation is SimpleJpaRepository), because they match the method signatures in CrudRepository. So the UserRepository can now save users, find individual users by ID, and trigger a query to find Users by email address.
The intermediate repository interface is annotated with @NoRepositoryBean. Make sure you add that annotation to all repository interfaces for which Spring Data should not create instances at runtime.
|
7.3.2. Null Handling of Repository Methods
As of Spring Data 2.0, repository CRUD methods that return an individual aggregate instance use Java 8’s Optional to indicate the potential absence of a value.
Besides that, Spring Data supports returning the following wrapper types on query methods:
-
com.google.common.base.Optional -
scala.Option -
io.vavr.control.Option -
javaslang.control.Option(deprecated as Javaslang is deprecated)
Alternatively, query methods can choose not to use a wrapper type at all.
The absence of a query result is then indicated by returning null.
Repository methods returning collections, collection alternatives, wrappers, and streams are guaranteed never to return null but rather the corresponding empty representation.
See “Repository query return types” for details.
Nullability Annotations
You can express nullability constraints for repository methods by using Spring Framework’s nullability annotations.
They provide a tooling-friendly approach and opt-in null checks during runtime, as follows:
-
{spring-framework-javadoc}/org/springframework/lang/NonNullApi.html[
@NonNullApi]: Used on the package level to declare that the default behavior for parameters and return values is to not accept or producenullvalues. -
{spring-framework-javadoc}/org/springframework/lang/NonNull.html[
@NonNull]: Used on a parameter or return value that must not benull(not needed on a parameter and return value where@NonNullApiapplies). -
{spring-framework-javadoc}/org/springframework/lang/Nullable.html[
@Nullable]: Used on a parameter or return value that can benull.
Spring annotations are meta-annotated with JSR 305 annotations (a dormant but widely spread JSR). JSR 305 meta-annotations let tooling vendors such as IDEA, Eclipse, and Kotlin provide null-safety support in a generic way, without having to hard-code support for Spring annotations.
To enable runtime checking of nullability constraints for query methods, you need to activate non-nullability on the package level by using Spring’s @NonNullApi in package-info.java, as shown in the following example:
package-info.java@org.springframework.lang.NonNullApi
package com.acme;Once non-null defaulting is in place, repository query method invocations get validated at runtime for nullability constraints.
If a query execution result violates the defined constraint, an exception is thrown. This happens when the method would return null but is declared as non-nullable (the default with the annotation defined on the package the repository resides in).
If you want to opt-in to nullable results again, selectively use @Nullable on individual methods.
Using the result wrapper types mentioned at the start of this section continues to work as expected: An empty result is translated into the value that represents absence.
The following example shows a number of the techniques just described:
package com.acme;                                                       (1)

import org.springframework.lang.Nullable;

interface UserRepository extends Repository<User, Long> {

  User getByEmailAddress(EmailAddress emailAddress);                    (2)

  @Nullable
  User findByEmailAddress(@Nullable EmailAddress emailAdress);          (3)

  Optional<User> findOptionalByEmailAddress(EmailAddress emailAddress); (4)
}| 1 | The repository resides in a package (or sub-package) for which we have defined non-null behavior. |
| 2 | Throws an EmptyResultDataAccessException when the query executed does not produce a result. Throws an IllegalArgumentException when the emailAddress handed to the method is null. |
| 3 | Returns null when the query executed does not produce a result. Also accepts null as the value for emailAddress. |
| 4 | Returns Optional.empty() when the query executed does not produce a result. Throws an IllegalArgumentException when the emailAddress handed to the method is null. |
Nullability in Kotlin-based Repositories
Kotlin has the definition of nullability constraints baked into the language.
Kotlin code compiles to bytecode, which does not express nullability constraints through method signatures but rather through compiled-in metadata. Make sure to include the kotlin-reflect JAR in your project to enable introspection of Kotlin’s nullability constraints.
Spring Data repositories use the language mechanism to define those constraints to apply the same runtime checks, as follows:
interface UserRepository : Repository<User, String> {

  fun findByUsername(username: String): User     (1)

  fun findByFirstname(firstname: String?): User? (2)
}| 1 | The method defines both the parameter and the result as non-nullable (the Kotlin default). The Kotlin compiler rejects method invocations that pass null to the method. If the query execution yields an empty result, an EmptyResultDataAccessException is thrown. |
| 2 | This method accepts null for the firstname parameter and returns null if the query execution does not produce a result. |
7.3.3. Using Repositories with Multiple Spring Data Modules
Using a unique Spring Data module in your application makes things simple, because all repository interfaces in the defined scope are bound to the Spring Data module. Sometimes, applications require using more than one Spring Data module. In such cases, a repository definition must distinguish between persistence technologies. When it detects multiple repository factories on the class path, Spring Data enters strict repository configuration mode. Strict configuration uses details on the repository or the domain class to decide about Spring Data module binding for a repository definition:
-
If the repository definition extends the module-specific repository, then it is a valid candidate for the particular Spring Data module.
-
If the domain class is annotated with the module-specific type annotation, then it is a valid candidate for the particular Spring Data module. Spring Data modules accept either third-party annotations (such as JPA’s
@Entity) or provide their own annotations (such as@Documentfor Spring Data MongoDB and Spring Data Elasticsearch).
The following example shows a repository that uses module-specific interfaces (JPA in this case):
interface MyRepository extends JpaRepository<User, Long> { }

@NoRepositoryBean
interface MyBaseRepository<T, ID extends Serializable> extends JpaRepository<T, ID> {
  …
}

interface UserRepository extends MyBaseRepository<User, Long> {
  …
}
MyRepository and UserRepository extend JpaRepository in their type hierarchy. They are valid candidates for the Spring Data JPA module.
The following example shows a repository that uses generic interfaces:
interface AmbiguousRepository extends Repository<User, Long> {
 …
}

@NoRepositoryBean
interface MyBaseRepository<T, ID extends Serializable> extends CrudRepository<T, ID> {
  …
}

interface AmbiguousUserRepository extends MyBaseRepository<User, Long> {
  …
}
AmbiguousRepository and AmbiguousUserRepository extend only Repository and CrudRepository in their type hierarchy. While this is perfectly fine when using a unique Spring Data module, multiple modules cannot distinguish to which particular Spring Data these repositories should be bound.
The following example shows a repository that uses domain classes with annotations:
interface PersonRepository extends Repository<Person, Long> {
 …
}

@Entity
class Person {
  …
}

interface UserRepository extends Repository<User, Long> {
 …
}

@Document
class User {
  …
}
PersonRepository references Person, which is annotated with the JPA @Entity annotation, so this repository clearly belongs to Spring Data JPA. UserRepository references User, which is annotated with Spring Data MongoDB’s @Document annotation.
The following bad example shows a repository that uses domain classes with mixed annotations:
interface JpaPersonRepository extends Repository<Person, Long> {
 …
}

interface MongoDBPersonRepository extends Repository<Person, Long> {
 …
}

@Entity
@Document
class Person {
  …
}
This example shows a domain class using both JPA and Spring Data MongoDB annotations. It defines two repositories, JpaPersonRepository and MongoDBPersonRepository. One is intended for JPA and the other for MongoDB usage. Spring Data is no longer able to tell the repositories apart, which leads to undefined behavior.
Repository type details and distinguishing domain class annotations are used for strict repository configuration to identify repository candidates for a particular Spring Data module. Using multiple persistence technology-specific annotations on the same domain type is possible and enables reuse of domain types across multiple persistence technologies. However, Spring Data can then no longer determine a unique module with which to bind the repository.
The last way to distinguish repositories is by scoping repository base packages. Base packages define the starting points for scanning for repository interface definitions, which implies having repository definitions located in the appropriate packages. By default, annotation-driven configuration uses the package of the configuration class. The base package in XML-based configuration is mandatory.
The following example shows annotation-driven configuration of base packages:
@EnableJpaRepositories(basePackages = "com.acme.repositories.jpa")
@EnableMongoRepositories(basePackages = "com.acme.repositories.mongo")
interface Configuration { }
7.4. Defining Query Methods
The repository proxy has two ways to derive a store-specific query from the method name:
-
By deriving the query from the method name directly.
-
By using a manually defined query.
Available options depend on the actual store. However, there must be a strategy that decides what actual query is created. The next section describes the available options.
7.4.1. Query Lookup Strategies
The following strategies are available for the repository infrastructure to resolve the query. With XML configuration, you can configure the strategy at the namespace through the query-lookup-strategy attribute. For Java configuration, you can use the queryLookupStrategy attribute of the Enable${store}Repositories annotation. Some strategies may not be supported for particular datastores.
-
CREATEattempts to construct a store-specific query from the query method name. The general approach is to remove a given set of well known prefixes from the method name and parse the rest of the method. You can read more about query construction in “Query Creation”. -
USE_DECLARED_QUERYtries to find a declared query and throws an exception if cannot find one. The query can be defined by an annotation somewhere or declared by other means. Consult the documentation of the specific store to find available options for that store. If the repository infrastructure does not find a declared query for the method at bootstrap time, it fails. -
CREATE_IF_NOT_FOUND(default) combinesCREATEandUSE_DECLARED_QUERY. It looks up a declared query first, and, if no declared query is found, it creates a custom method name-based query. This is the default lookup strategy and, thus, is used if you do not configure anything explicitly. It allows quick query definition by method names but also custom-tuning of these queries by introducing declared queries as needed.
7.4.2. Query Creation
The query builder mechanism built into Spring Data repository infrastructure is useful for building constraining queries over entities of the repository. The mechanism strips the prefixes find…By, read…By, query…By, count…By, and get…By from the method and starts parsing the rest of it. The introducing clause can contain further expressions, such as a Distinct to set a distinct flag on the query to be created. However, the first By acts as delimiter to indicate the start of the actual criteria. At a very basic level, you can define conditions on entity properties and concatenate them with And and Or. The following example shows how to create a number of queries:
interface PersonRepository extends Repository<User, Long> {

  List<Person> findByEmailAddressAndLastname(EmailAddress emailAddress, String lastname);

  // Enables the distinct flag for the query
  List<Person> findDistinctPeopleByLastnameOrFirstname(String lastname, String firstname);
  List<Person> findPeopleDistinctByLastnameOrFirstname(String lastname, String firstname);

  // Enabling ignoring case for an individual property
  List<Person> findByLastnameIgnoreCase(String lastname);
  // Enabling ignoring case for all suitable properties
  List<Person> findByLastnameAndFirstnameAllIgnoreCase(String lastname, String firstname);

  // Enabling static ORDER BY for a query
  List<Person> findByLastnameOrderByFirstnameAsc(String lastname);
  List<Person> findByLastnameOrderByFirstnameDesc(String lastname);
}
The actual result of parsing the method depends on the persistence store for which you create the query. However, there are some general things to notice:
-
The expressions are usually property traversals combined with operators that can be concatenated. You can combine property expressions with
ANDandOR. You also get support for operators such asBetween,LessThan,GreaterThan, andLikefor the property expressions. The supported operators can vary by datastore, so consult the appropriate part of your reference documentation. -
The method parser supports setting an
IgnoreCaseflag for individual properties (for example,findByLastnameIgnoreCase(…)) or for all properties of a type that supports ignoring case (usuallyStringinstances — for example,findByLastnameAndFirstnameAllIgnoreCase(…)). Whether ignoring cases is supported may vary by store, so consult the relevant sections in the reference documentation for the store-specific query method. -
You can apply static ordering by appending an
OrderByclause to the query method that references a property and by providing a sorting direction (AscorDesc). To create a query method that supports dynamic sorting, see “Special parameter handling”.
7.4.3. Property Expressions
Property expressions can refer only to a direct property of the managed entity, as shown in the preceding example. At query creation time, you already make sure that the parsed property is a property of the managed domain class. However, you can also define constraints by traversing nested properties. Consider the following method signature:
List<Person> findByAddressZipCode(ZipCode zipCode);Assume a Person has an Address with a ZipCode. In that case, the method creates the property traversal x.address.zipCode. The resolution algorithm starts by interpreting the entire part (AddressZipCode) as the property and checks the domain class for a property with that name (uncapitalized). If the algorithm succeeds, it uses that property. If not, the algorithm splits up the source at the camel case parts from the right side into a head and a tail and tries to find the corresponding property — in our example, AddressZip and Code. If the algorithm finds a property with that head, it takes the tail and continues building the tree down from there, splitting the tail up in the way just described. If the first split does not match, the algorithm moves the split point to the left (Address, ZipCode) and continues.
Although this should work for most cases, it is possible for the algorithm to select the wrong property. Suppose the Person class has an addressZip property as well. The algorithm would match in the first split round already, choose the wrong property, and fail (as the type of addressZip probably has no code property).
To resolve this ambiguity you can use _ inside your method name to manually define traversal points. So our method name would be as follows:
List<Person> findByAddress_ZipCode(ZipCode zipCode);Because we treat the underscore character as a reserved character, we strongly advise following standard Java naming conventions (that is, not using underscores in property names but using camel case instead).
7.4.4. Special parameter handling
To handle parameters in your query, define method parameters as already seen in the preceding examples. Besides that, the infrastructure recognizes certain specific types like Pageable and Sort, to apply pagination and sorting to your queries dynamically. The following example demonstrates these features:
Pageable, Slice, and Sort in query methodsPage<User> findByLastname(String lastname, Pageable pageable);
Slice<User> findByLastname(String lastname, Pageable pageable);
List<User> findByLastname(String lastname, Sort sort);
List<User> findByLastname(String lastname, Pageable pageable);The first method lets you pass an org.springframework.data.domain.Pageable instance to the query method to dynamically add paging to your statically defined query. A Page knows about the total number of elements and pages available. It does so by the infrastructure triggering a count query to calculate the overall number. As this might be expensive (depending on the store used), you can instead return a Slice. A Slice only knows about whether a next Slice is available, which might be sufficient when walking through a larger result set.
Sorting options are handled through the Pageable instance, too. If you only need sorting, add an org.springframework.data.domain.Sort parameter to your method. As you can see, returning a List is also possible. In this case, the additional metadata required to build the actual Page instance is not created (which, in turn, means that the additional count query that would have been necessary is not issued). Rather, it restricts the query to look up only the given range of entities.
| To find out how many pages you get for an entire query, you have to trigger an additional count query. By default, this query is derived from the query you actually trigger. |
7.4.5. Limiting Query Results
The results of query methods can be limited by using the first or top keywords, which can be used interchangeably. An optional numeric value can be appended to top or first to specify the maximum result size to be returned.
If the number is left out, a result size of 1 is assumed. The following example shows how to limit the query size:
Top and FirstUser findFirstByOrderByLastnameAsc();
User findTopByOrderByAgeDesc();
Page<User> queryFirst10ByLastname(String lastname, Pageable pageable);
Slice<User> findTop3ByLastname(String lastname, Pageable pageable);
List<User> findFirst10ByLastname(String lastname, Sort sort);
List<User> findTop10ByLastname(String lastname, Pageable pageable);The limiting expressions also support the Distinct keyword. Also, for the queries limiting the result set to one instance, wrapping the result into with the Optional keyword is supported.
If pagination or slicing is applied to a limiting query pagination (and the calculation of the number of pages available), it is applied within the limited result.
Limiting the results in combination with dynamic sorting by using a Sort parameter lets you express query methods for the 'K' smallest as well as for the 'K' biggest elements.
|
7.4.6. Streaming query results
The results of query methods can be processed incrementally by using a Java 8 Stream<T> as return type. Instead of wrapping the query results in a Stream data store-specific methods are used to perform the streaming, as shown in the following example:
Stream<T>@Query("select u from User u")
Stream<User> findAllByCustomQueryAndStream();
Stream<User> readAllByFirstnameNotNull();
@Query("select u from User u")
Stream<User> streamAllPaged(Pageable pageable);
A Stream potentially wraps underlying data store-specific resources and must, therefore, be closed after usage. You can either manually close the Stream by using the close() method or by using a Java 7 try-with-resources block, as shown in the following example:
|
Stream<T> result in a try-with-resources blocktry (Stream<User> stream = repository.findAllByCustomQueryAndStream()) {
stream.forEach(…);
}
Not all Spring Data modules currently support Stream<T> as a return type.
|
7.4.7. Async query results
Repository queries can be run asynchronously by using Spring’s asynchronous method execution capability. This means the method returns immediately upon invocation while the actual query execution occurs in a task that has been submitted to a Spring TaskExecutor. Asynchronous query execution is different from reactive query execution and should not be mixed. Refer to store-specific documentation for more details on reactive support. The following example shows a number of asynchronous queries:
@Async
Future<User> findByFirstname(String firstname);               (1)

@Async
CompletableFuture<User> findOneByFirstname(String firstname); (2)

@Async
ListenableFuture<User> findOneByLastname(String lastname); (3)| 1 | Use java.util.concurrent.Future as the return type. |
| 2 | Use a Java 8 java.util.concurrent.CompletableFuture as the return type. |
| 3 | Use a org.springframework.util.concurrent.ListenableFuture as the return type. |
7.5. Creating Repository Instances
In this section, you create instances and bean definitions for the defined repository interfaces. One way to do so is by using the Spring namespace that is shipped with each Spring Data module that supports the repository mechanism, although we generally recommend using Java configuration.
7.5.1. XML configuration
Each Spring Data module includes a repositories element that lets you define a base package that Spring scans for you, as shown in the following example:
<?xml version="1.0" encoding="UTF-8"?>
<beans:beans xmlns:beans="http://www.springframework.org/schema/beans"
  xmlns:xsi="http://www.w3.org/2001/XMLSchema-instance"
  xmlns="http://www.springframework.org/schema/data/jpa"
  xsi:schemaLocation="http://www.springframework.org/schema/beans
    http://www.springframework.org/schema/beans/spring-beans.xsd
    http://www.springframework.org/schema/data/jpa
    http://www.springframework.org/schema/data/jpa/spring-jpa.xsd">

  <repositories base-package="com.acme.repositories" />

</beans:beans>
In the preceding example, Spring is instructed to scan com.acme.repositories and all its sub-packages for interfaces extending Repository or one of its sub-interfaces. For each interface found, the infrastructure registers the persistence technology-specific FactoryBean to create the appropriate proxies that handle invocations of the query methods. Each bean is registered under a bean name that is derived from the interface name, so an interface of UserRepository would be registered under userRepository. The base-package attribute allows wildcards so that you can define a pattern of scanned packages.
Using filters
By default, the infrastructure picks up every interface extending the persistence technology-specific Repository sub-interface located under the configured base package and creates a bean instance for it. However, you might want more fine-grained control over which interfaces have bean instances created for them. To do so, use <include-filter /> and <exclude-filter /> elements inside the <repositories /> element. The semantics are exactly equivalent to the elements in Spring’s context namespace. For details, see the Spring reference documentation for these elements.
For example, to exclude certain interfaces from instantiation as repository beans, you could use the following configuration:
<repositories base-package="com.acme.repositories">
  <context:exclude-filter type="regex" expression=".*SomeRepository" />
</repositories>
The preceding example excludes all interfaces ending in SomeRepository from being instantiated.
7.5.2. JavaConfig
The repository infrastructure can also be triggered by using a store-specific @Enable${store}Repositories annotation on a JavaConfig class. For an introduction into Java-based configuration of the Spring container, see JavaConfig in the Spring reference documentation.
A sample configuration to enable Spring Data repositories resembles the following:
@Configuration
@EnableJpaRepositories("com.acme.repositories")
class ApplicationConfiguration {

  @Bean
  EntityManagerFactory entityManagerFactory() {
    // …
  }
}
The preceding example uses the JPA-specific annotation, which you would change according to the store module you actually use. The same applies to the definition of the EntityManagerFactory bean. See the sections covering the store-specific configuration.
|
7.5.3. Standalone usage
You can also use the repository infrastructure outside of a Spring container — for example, in CDI environments. You still need some Spring libraries in your classpath, but, generally, you can set up repositories programmatically as well. The Spring Data modules that provide repository support ship a persistence technology-specific RepositoryFactory that you can use as follows:
RepositoryFactorySupport factory = … // Instantiate factory here
UserRepository repository = factory.getRepository(UserRepository.class);
7.6. Custom Implementations for Spring Data Repositories
This section covers repository customization and how fragments form a composite repository.
When a query method requires a different behavior or cannot be implemented by query derivation, then it is necessary to provide a custom implementation. Spring Data repositories let you provide custom repository code and integrate it with generic CRUD abstraction and query method functionality.
7.6.1. Customizing Individual Repositories
To enrich a repository with custom functionality, you must first define a fragment interface and an implementation for the custom functionality, as shown in the following example:
interface CustomizedUserRepository {
  void someCustomMethod(User user);
}
Then you can let your repository interface additionally extend from the fragment interface, as shown in the following example:
class CustomizedUserRepositoryImpl implements CustomizedUserRepository {

  public void someCustomMethod(User user) {
    // Your custom implementation
  }
}
The most important part of the class name that corresponds to the fragment interface is the Impl postfix.
|
The implementation itself does not depend on Spring Data and can be a regular Spring bean. Consequently, you can use standard dependency injection behavior to inject references to other beans (such as a JdbcTemplate), take part in aspects, and so on.
You can let your repository interface extend the fragment interface, as shown in the following example:
interface UserRepository extends CrudRepository<User, Long>, CustomizedUserRepository {

  // Declare query methods here
}
Extending the fragment interface with your repository interface combines the CRUD and custom functionality and makes it available to clients.
Spring Data repositories are implemented by using fragments that form a repository composition. Fragments are the base repository, functional aspects (such as QueryDsl), and custom interfaces along with their implementation. Each time you add an interface to your repository interface, you enhance the composition by adding a fragment. The base repository and repository aspect implementations are provided by each Spring Data module.
The following example shows custom interfaces and their implementations:
interface HumanRepository {
  void someHumanMethod(User user);
}

class HumanRepositoryImpl implements HumanRepository {

  public void someHumanMethod(User user) {
    // Your custom implementation
  }
}

interface ContactRepository {

  void someContactMethod(User user);

  User anotherContactMethod(User user);
}

class ContactRepositoryImpl implements ContactRepository {

  public void someContactMethod(User user) {
    // Your custom implementation
  }

  public User anotherContactMethod(User user) {
    // Your custom implementation
  }
}
The following example shows the interface for a custom repository that extends CrudRepository:
interface UserRepository extends CrudRepository<User, Long>, HumanRepository, ContactRepository {

  // Declare query methods here
}
Repositories may be composed of multiple custom implementations that are imported in the order of their declaration. Custom implementations have a higher priority than the base implementation and repository aspects. This ordering lets you override base repository and aspect methods and resolves ambiguity if two fragments contribute the same method signature. Repository fragments are not limited to use in a single repository interface. Multiple repositories may use a fragment interface, letting you reuse customizations across different repositories.
The following example shows a repository fragment and its implementation:
save(…)interface CustomizedSave<T> {
<S extends T> S save(S entity);
}
class CustomizedSaveImpl<T> implements CustomizedSave<T> {
public <S extends T> S save(S entity) {
// Your custom implementation
}
}The following example shows a repository that uses the preceding repository fragment:
interface UserRepository extends CrudRepository<User, Long>, CustomizedSave<User> {
}

interface PersonRepository extends CrudRepository<Person, Long>, CustomizedSave<Person> {
}
Configuration
If you use namespace configuration, the repository infrastructure tries to autodetect custom implementation fragments by scanning for classes below the package in which it found a repository. These classes need to follow the naming convention of appending the namespace element’s repository-impl-postfix attribute to the fragment interface name. This postfix defaults to Impl. The following example shows a repository that uses the default postfix and a repository that sets a custom value for the postfix:
<repositories base-package="com.acme.repository" />

<repositories base-package="com.acme.repository" repository-impl-postfix="MyPostfix" />
The first configuration in the preceding example tries to look up a class called com.acme.repository.CustomizedUserRepositoryImpl to act as a custom repository implementation. The second example tries to lookup com.acme.repository.CustomizedUserRepositoryMyPostfix.
Resolution of Ambiguity
If multiple implementations with matching class names are found in different packages, Spring Data uses the bean names to identify which one to use.
Given the following two custom implementations for the CustomizedUserRepository shown earlier, the first implementation is used.
Its bean name is customizedUserRepositoryImpl, which matches that of the fragment interface (CustomizedUserRepository) plus the postfix Impl.
package com.acme.impl.one;

class CustomizedUserRepositoryImpl implements CustomizedUserRepository {

  // Your custom implementation
}
package com.acme.impl.two;
@Component("specialCustomImpl")
class CustomizedUserRepositoryImpl implements CustomizedUserRepository {
// Your custom implementation
}If you annotate the UserRepository interface with @Component("specialCustom"), the bean name plus Impl then matches the one defined for the repository implementation in com.acme.impl.two, and it is used instead of the first one.
Manual Wiring
If your custom implementation uses annotation-based configuration and autowiring only, the preceding approach shown works well, because it is treated as any other Spring bean. If your implementation fragment bean needs special wiring, you can declare the bean and name it according to the conventions described in the preceding section. The infrastructure then refers to the manually defined bean definition by name instead of creating one itself. The following example shows how to manually wire a custom implementation:
<repositories base-package="com.acme.repository" />

<beans:bean id="userRepositoryImpl" class="…">
  <!-- further configuration -->
</beans:bean>
7.6.2. Customize the Base Repository
The approach described in the preceding section requires customization of each repository interfaces when you want to customize the base repository behavior so that all repositories are affected. To instead change behavior for all repositories, you can create an implementation that extends the persistence technology-specific repository base class. This class then acts as a custom base class for the repository proxies, as shown in the following example:
class MyRepositoryImpl<T, ID extends Serializable>
  extends SimpleJpaRepository<T, ID> {

  private final EntityManager entityManager;

  MyRepositoryImpl(JpaEntityInformation entityInformation,
                          EntityManager entityManager) {
    super(entityInformation, entityManager);

    // Keep the EntityManager around to used from the newly introduced methods.
    this.entityManager = entityManager;
  }

  @Transactional
  public <S extends T> S save(S entity) {
    // implementation goes here
  }
}
The class needs to have a constructor of the super class which the store-specific repository factory implementation uses. If the repository base class has multiple constructors, override the one taking an EntityInformation plus a store specific infrastructure object (such as an EntityManager or a template class).
|
The final step is to make the Spring Data infrastructure aware of the customized repository base class. In Java configuration, you can do so by using the repositoryBaseClass attribute of the @Enable${store}Repositories annotation, as shown in the following example:
@Configuration
@EnableJpaRepositories(repositoryBaseClass = MyRepositoryImpl.class)
class ApplicationConfiguration { … }
A corresponding attribute is available in the XML namespace, as shown in the following example:
<repositories base-package="com.acme.repository"
     base-class="….MyRepositoryImpl" />
7.7. Publishing Events from Aggregate Roots
Entities managed by repositories are aggregate roots.
In a Domain-Driven Design application, these aggregate roots usually publish domain events.
Spring Data provides an annotation called @DomainEvents that you can use on a method of your aggregate root to make that publication as easy as possible, as shown in the following example:
class AnAggregateRoot {

    @DomainEvents (1)
    Collection<Object> domainEvents() {
        // … return events you want to get published here
    }

    @AfterDomainEventPublication (2)
    void callbackMethod() {
       // … potentially clean up domain events list
    }
}| 1 | The method using @DomainEvents can return either a single event instance or a collection of events. It must not take any arguments. |
| 2 | After all events have been published, we have a method annotated with @AfterDomainEventPublication. It can be used to potentially clean the list of events to be published (among other uses). |
The methods are called every time one of a Spring Data repository’s save(…) methods is called.
7.8. Spring Data Extensions
This section documents a set of Spring Data extensions that enable Spring Data usage in a variety of contexts. Currently, most of the integration is targeted towards Spring MVC.
7.8.1. Querydsl Extension
Querydsl is a framework that enables the construction of statically typed SQL-like queries through its fluent API.
Several Spring Data modules offer integration with Querydsl through QuerydslPredicateExecutor, as shown in the following example:
public interface QuerydslPredicateExecutor<T> {

  Optional<T> findById(Predicate predicate);  (1)

  Iterable<T> findAll(Predicate predicate);   (2)

  long count(Predicate predicate);            (3)

  boolean exists(Predicate predicate);        (4)

  // … more functionality omitted.
}| 1 | Finds and returns a single entity matching the Predicate. |
| 2 | Finds and returns all entities matching the Predicate. |
| 3 | Returns the number of entities matching the Predicate. |
| 4 | Returns whether an entity that matches the Predicate exists. |
To make use of Querydsl support, extend QuerydslPredicateExecutor on your repository interface, as shown in the following example
interface UserRepository extends CrudRepository<User, Long>, QuerydslPredicateExecutor<User> {
}
The preceding example lets you write typesafe queries using Querydsl Predicate instances, as shown in the following example:
Predicate predicate = user.firstname.equalsIgnoreCase("dave")
	.and(user.lastname.startsWithIgnoreCase("mathews"));

userRepository.findAll(predicate);
7.8.2. Web support
| This section contains the documentation for the Spring Data web support as it is implemented in the current (and later) versions of Spring Data Commons. As the newly introduced support changes many things, we kept the documentation of the former behavior in [web.legacy]. |
Spring Data modules that support the repository programming model ship with a variety of web support. The web related components require Spring MVC JARs to be on the classpath. Some of them even provide integration with Spring HATEOAS. In general, the integration support is enabled by using the @EnableSpringDataWebSupport annotation in your JavaConfig configuration class, as shown in the following example:
@Configuration
@EnableWebMvc
@EnableSpringDataWebSupport
class WebConfiguration {}
The @EnableSpringDataWebSupport annotation registers a few components we will discuss in a bit. It will also detect Spring HATEOAS on the classpath and register integration components for it as well if present.
Alternatively, if you use XML configuration, register either SpringDataWebConfiguration or HateoasAwareSpringDataWebConfiguration as Spring beans, as shown in the following example (for SpringDataWebConfiguration):
<bean class="org.springframework.data.web.config.SpringDataWebConfiguration" />

<!-- If you use Spring HATEOAS, register this one *instead* of the former -->
<bean class="org.springframework.data.web.config.HateoasAwareSpringDataWebConfiguration" />
Basic Web Support
The configuration shown in the previous section registers a few basic components:
-
A
DomainClassConverterto let Spring MVC resolve instances of repository-managed domain classes from request parameters or path variables. -
HandlerMethodArgumentResolverimplementations to let Spring MVC resolvePageableandSortinstances from request parameters.
DomainClassConverter
The DomainClassConverter lets you use domain types in your Spring MVC controller method signatures directly, so that you need not manually lookup the instances through the repository, as shown in the following example:
@Controller
@RequestMapping("/users")
class UserController {

  @RequestMapping("/{id}")
  String showUserForm(@PathVariable("id") User user, Model model) {

    model.addAttribute("user", user);
    return "userForm";
  }
}
As you can see, the method receives a User instance directly, and no further lookup is necessary. The instance can be resolved by letting Spring MVC convert the path variable into the id type of the domain class first and eventually access the instance through calling findById(…) on the repository instance registered for the domain type.
Currently, the repository has to implement CrudRepository to be eligible to be discovered for conversion.
|
HandlerMethodArgumentResolvers for Pageable and Sort
The configuration snippet shown in the previous section also registers a PageableHandlerMethodArgumentResolver as well as an instance of SortHandlerMethodArgumentResolver. The registration enables Pageable and Sort as valid controller method arguments, as shown in the following example:
@Controller
@RequestMapping("/users")
class UserController {

  private final UserRepository repository;

  UserController(UserRepository repository) {
    this.repository = repository;
  }

  @RequestMapping
  String showUsers(Model model, Pageable pageable) {

    model.addAttribute("users", repository.findAll(pageable));
    return "users";
  }
}
The preceding method signature causes Spring MVC try to derive a Pageable instance from the request parameters by using the following default configuration:
|
Page you want to retrieve. 0-indexed and defaults to 0. |
|
Size of the page you want to retrieve. Defaults to 20. |
|
Properties that should be sorted by in the format |
To customize this behavior, register a bean implementing the PageableHandlerMethodArgumentResolverCustomizer interface or the SortHandlerMethodArgumentResolverCustomizer interface, respectively. Its customize() method gets called, letting you change settings, as shown in the following example:
@Bean SortHandlerMethodArgumentResolverCustomizer sortCustomizer() {
    return s -> s.setPropertyDelimiter("<-->");
}
If setting the properties of an existing MethodArgumentResolver is not sufficient for your purpose, extend either SpringDataWebConfiguration or the HATEOAS-enabled equivalent, override the pageableResolver() or sortResolver() methods, and import your customized configuration file instead of using the @Enable annotation.
If you need multiple Pageable or Sort instances to be resolved from the request (for multiple tables, for example), you can use Spring’s @Qualifier annotation to distinguish one from another. The request parameters then have to be prefixed with ${qualifier}_. The followig example shows the resulting method signature:
String showUsers(Model model,
      @Qualifier("thing1") Pageable first,
      @Qualifier("thing2") Pageable second) { … }
you have to populate thing1_page and thing2_page and so on.
The default Pageable passed into the method is equivalent to a PageRequest.of(0, 20) but can be customized by using the @PageableDefault annotation on the Pageable parameter.
Hypermedia Support for Pageables
Spring HATEOAS ships with a representation model class (PagedResources) that allows enriching the content of a Page instance with the necessary Page metadata as well as links to let the clients easily navigate the pages. The conversion of a Page to a PagedResources is done by an implementation of the Spring HATEOAS ResourceAssembler interface, called the PagedResourcesAssembler. The following example shows how to use a PagedResourcesAssembler as a controller method argument:
@Controller
class PersonController {

  @Autowired PersonRepository repository;

  @RequestMapping(value = "/persons", method = RequestMethod.GET)
  HttpEntity<PagedResources<Person>> persons(Pageable pageable,
    PagedResourcesAssembler assembler) {

    Page<Person> persons = repository.findAll(pageable);
    return new ResponseEntity<>(assembler.toResources(persons), HttpStatus.OK);
  }
}
Enabling the configuration as shown in the preceding example lets the PagedResourcesAssembler be used as a controller method argument. Calling toResources(…) on it has the following effects:
-
The content of the
Pagebecomes the content of thePagedResourcesinstance. -
The
PagedResourcesobject gets aPageMetadatainstance attached, and it is populated with information from thePageand the underlyingPageRequest. -
The
PagedResourcesmay getprevandnextlinks attached, depending on the page’s state. The links point to the URI to which the method maps. The pagination parameters added to the method match the setup of thePageableHandlerMethodArgumentResolverto make sure the links can be resolved later.
Assume we have 30 Person instances in the database. You can now trigger a request (GET http://localhost:8080/persons) and see output similar to the following:
{ "links" : [ { "rel" : "next",
                "href" : "http://localhost:8080/persons?page=1&size=20 }
  ],
  "content" : [
     … // 20 Person instances rendered here
  ],
  "pageMetadata" : {
    "size" : 20,
    "totalElements" : 30,
    "totalPages" : 2,
    "number" : 0
  }
}
You see that the assembler produced the correct URI and also picked up the default configuration to resolve the parameters into a Pageable for an upcoming request. This means that, if you change that configuration, the links automatically adhere to the change. By default, the assembler points to the controller method it was invoked in, but that can be customized by handing in a custom Link to be used as base to build the pagination links, which overloads the PagedResourcesAssembler.toResource(…) method.
Web Databinding Support
Spring Data projections (described in [projections]) can be used to bind incoming request payloads by either using JSONPath expressions (requires Jayway JsonPath or XPath expressions (requires XmlBeam), as shown in the following example:
@ProjectedPayload
public interface UserPayload {

  @XBRead("//firstname")
  @JsonPath("$..firstname")
  String getFirstname();

  @XBRead("/lastname")
  @JsonPath({ "$.lastname", "$.user.lastname" })
  String getLastname();
}
The type shown in the preceding example can be used as a Spring MVC handler method argument or by using ParameterizedTypeReference on one of RestTemplate's methods.
The preceding method declarations would try to find firstname anywhere in the given document.
The lastname XML lookup is performed on the top-level of the incoming document.
The JSON variant of that tries a top-level lastname first but also tries lastname nested in a user sub-document if the former does not return a value.
That way, changes in the structure of the source document can be mitigated easily without having clients calling the exposed methods (usually a drawback of class-based payload binding).
Nested projections are supported as described in [projections].
If the method returns a complex, non-interface type, a Jackson ObjectMapper is used to map the final value.
For Spring MVC, the necessary converters are registered automatically as soon as @EnableSpringDataWebSupport is active and the required dependencies are available on the classpath.
For usage with RestTemplate, register a ProjectingJackson2HttpMessageConverter (JSON) or XmlBeamHttpMessageConverter manually.
For more information, see the web projection example in the canonical Spring Data Examples repository.
Querydsl Web Support
For those stores having QueryDSL integration, it is possible to derive queries from the attributes contained in a Request query string.
Consider the following query string:
?firstname=Dave&lastname=MatthewsGiven the User object from previous examples, a query string can be resolved to the following value by using the QuerydslPredicateArgumentResolver.
QUser.user.firstname.eq("Dave").and(QUser.user.lastname.eq("Matthews"))
The feature is automatically enabled, along with @EnableSpringDataWebSupport, when Querydsl is found on the classpath.
|
Adding a @QuerydslPredicate to the method signature provides a ready-to-use Predicate, which can be run by using the QuerydslPredicateExecutor.
Type information is typically resolved from the method’s return type. Since that information does not necessarily match the domain type, it might be a good idea to use the root attribute of QuerydslPredicate.
|
The following exampe shows how to use @QuerydslPredicate in a method signature:
@Controller
class UserController {

  @Autowired UserRepository repository;

  @RequestMapping(value = "/", method = RequestMethod.GET)
  String index(Model model, @QuerydslPredicate(root = User.class) Predicate predicate,    (1)
          Pageable pageable, @RequestParam MultiValueMap<String, String> parameters) {

    model.addAttribute("users", repository.findAll(predicate, pageable));

    return "index";
  }
}| 1 | Resolve query string arguments to matching Predicate for User. |
The default binding is as follows:
-
Objecton simple properties aseq. -
Objecton collection like properties ascontains. -
Collectionon simple properties asin.
Those bindings can be customized through the bindings attribute of @QuerydslPredicate or by making use of Java 8 default methods and adding the QuerydslBinderCustomizer method to the repository interface.
interface UserRepository extends CrudRepository<User, String>,
                                 QuerydslPredicateExecutor<User>,                (1)
                                 QuerydslBinderCustomizer<QUser> {               (2)

  @Override
  default void customize(QuerydslBindings bindings, QUser user) {

    bindings.bind(user.username).first((path, value) -> path.contains(value))    (3)
    bindings.bind(String.class)
      .first((StringPath path, String value) -> path.containsIgnoreCase(value)); (4)
    bindings.excluding(user.password);                                           (5)
  }
}| 1 | QuerydslPredicateExecutor provides access to specific finder methods for Predicate. |
| 2 | QuerydslBinderCustomizer defined on the repository interface is automatically picked up and shortcuts @QuerydslPredicate(bindings=…). |
| 3 | Define the binding for the username property to be a simple contains binding. |
| 4 | Define the default binding for String properties to be a case-insensitive contains match. |
| 5 | Exclude the password property from Predicate resolution. |
7.8.3. Repository Populators
If you work with the Spring JDBC module, you are probably familiar with the support to populate a DataSource with SQL scripts. A similar abstraction is available on the repositories level, although it does not use SQL as the data definition language because it must be store-independent. Thus, the populators support XML (through Spring’s OXM abstraction) and JSON (through Jackson) to define data with which to populate the repositories.
Assume you have a file data.json with the following content:
[ { "_class" : "com.acme.Person",
 "firstname" : "Dave",
  "lastname" : "Matthews" },
  { "_class" : "com.acme.Person",
 "firstname" : "Carter",
  "lastname" : "Beauford" } ]
You can populate your repositories by using the populator elements of the repository namespace provided in Spring Data Commons. To populate the preceding data to your PersonRepository, declare a populator similar to the following:
<?xml version="1.0" encoding="UTF-8"?>
<beans xmlns="http://www.springframework.org/schema/beans"
  xmlns:xsi="http://www.w3.org/2001/XMLSchema-instance"
  xmlns:repository="http://www.springframework.org/schema/data/repository"
  xsi:schemaLocation="http://www.springframework.org/schema/beans
    http://www.springframework.org/schema/beans/spring-beans.xsd
    http://www.springframework.org/schema/data/repository
    http://www.springframework.org/schema/data/repository/spring-repository.xsd">

  <repository:jackson2-populator locations="classpath:data.json" />

</beans>
The preceding declaration causes the data.json file to
be read and deserialized by a Jackson ObjectMapper.
The type to which the JSON object is unmarshalled is determined by inspecting the _class attribute of the JSON document. The infrastructure eventually selects the appropriate repository to handle the object that was deserialized.
To instead use XML to define the data the repositories should be populated with, you can use the unmarshaller-populator element. You configure it to use one of the XML marshaller options available in Spring OXM. See the Spring reference documentation for details. The following example shows how to unmarshal a repository populator with JAXB:
<?xml version="1.0" encoding="UTF-8"?>
<beans xmlns="http://www.springframework.org/schema/beans"
  xmlns:xsi="http://www.w3.org/2001/XMLSchema-instance"
  xmlns:repository="http://www.springframework.org/schema/data/repository"
  xmlns:oxm="http://www.springframework.org/schema/oxm"
  xsi:schemaLocation="http://www.springframework.org/schema/beans
    http://www.springframework.org/schema/beans/spring-beans.xsd
    http://www.springframework.org/schema/data/repository
    http://www.springframework.org/schema/data/repository/spring-repository.xsd
    http://www.springframework.org/schema/oxm
    http://www.springframework.org/schema/oxm/spring-oxm.xsd">

  <repository:unmarshaller-populator locations="classpath:data.json"
    unmarshaller-ref="unmarshaller" />

  <oxm:jaxb2-marshaller contextPath="com.acme" />

</beans>
8. Auditing
8.1. Basics
Spring Data provides sophisticated support to transparently keep track of who created or changed an entity and when the change happened. To benefit from that functionality, you have to equip your entity classes with auditing metadata that can be defined either using annotations or by implementing an interface.
8.1.1. Annotation-based Auditing Metadata
We provide @CreatedBy and @LastModifiedBy to capture the user who created or modified the entity as well as @CreatedDate and @LastModifiedDate to capture when the change happened.
class Customer {

  @CreatedBy
  private User user;

  @CreatedDate
  private DateTime createdDate;

  // … further properties omitted
}
As you can see, the annotations can be applied selectively, depending on which information you want to capture. The annotations capturing when changes were made can be used on properties of type Joda-Time, DateTime, legacy Java Date and Calendar, JDK8 date and time types, and long or Long.
8.1.2. Interface-based Auditing Metadata
In case you do not want to use annotations to define auditing metadata, you can let your domain class implement the Auditable interface. It exposes setter methods for all of the auditing properties.
There is also a convenience base class, AbstractAuditable, which you can extend to avoid the need to manually implement the interface methods. Doing so increases the coupling of your domain classes to Spring Data, which might be something you want to avoid. Usually, the annotation-based way of defining auditing metadata is preferred as it is less invasive and more flexible.
8.1.3. AuditorAware
In case you use either @CreatedBy or @LastModifiedBy, the auditing infrastructure somehow needs to become aware of the current principal. To do so, we provide an AuditorAware<T> SPI interface that you have to implement to tell the infrastructure who the current user or system interacting with the application is. The generic type T defines what type the properties annotated with @CreatedBy or @LastModifiedBy have to be.
The following example shows an implementation of the interface that uses Spring Security’s Authentication object:
class SpringSecurityAuditorAware implements AuditorAware<User> {

  public Optional<User> getCurrentAuditor() {

    return Optional.ofNullable(SecurityContextHolder.getContext())
			  .map(SecurityContext::getAuthentication)
			  .filter(Authentication::isAuthenticated)
			  .map(Authentication::getPrincipal)
			  .map(User.class::cast);
  }
}
The implementation accesses the Authentication object provided by Spring Security and looks up the custom UserDetails instance that you have created in your UserDetailsService implementation. We assume here that you are exposing the domain user through the UserDetails implementation but that, based on the Authentication found, you could also look it up from anywhere.
:leveloffset: -1
9. SDN Reference Documentation
9.1. Introduction
In order to understand what Spring Data Neo4j can do it’s important to understand how an SDN application is structured and could have implications in how you design your application.
9.1.1. SDN Architecture
A high level look of the architecture looks like:

-
Drivers are used to connect to the database. At the moment these come in 3 variants: Embedded, HTTP and the binary protocol Bolt.
-
The Object Graph Mapper (OGM): This is similar to an ORM in that it maps database nodes to java objects. This library is agnostic of any framework (including Spring).
-
Spring Data Neo4j 4: Provides syntactic sugar and code on top of the OGM to help quickly build Spring Based Neo4j/OGM apps.
Those coming from other Spring Data projects or are familiar with ORM products like JPA or Hibernate may quickly recognise this architecture. A bulk of the heavy lifting has been moved into the OGM.
| It’s therefore worth noting that there will be backward compatibility issues when migrating to version 4.x, so be sure to check the Migration Guide to avoid any unwanted surprises. |
9.1.2. How to use this reference
Spring Data Neo4j is largely broken up into two main components:
-
OGM Support: Provides close integration between Spring Data and the OGM; the main underlying technology used in SDN.
-
Spring Data Repository Support: Provides Spring Repository support.
It is recommended SDN developers also familiarise themselves with the OGM. The OGM reference documentation has been reproduced after this section for convenience.
9.2. Getting started
Depending on what type of project you are doing there are several options when it comes to creating a new SDN project:
-
Use http://start.spring.io (for Spring Boot projects);
-
Use the Spring Tool Suite (based on eclipse);
-
Adding the required libraries using your dependency management tool.
If you plan on using Neo4j in server mode, you will also need a running instance. Refer to the Getting Started section of the Neo4j Developer manual on how to get that up and running.
9.2.1. Using Boot
To create a Spring Boot project simply go to http://start.spring.io and specify a group and artifact like: org.spring.neo4j.example and demo.
In the Dependencies box type: "Neo4J". You can also add any other Spring support like "Web" etc. Once you are satisfied with your dependencies
hit the generate button, download the zip and unzip into your workspace.
9.2.2. Using STS
To create a Spring project in STS go to File → New → Spring Template Project → Simple Spring Utility Project → press Yes when prompted. Then enter a project and a package name such as org.spring.neo4j.example.
Then add the following to pom.xml dependencies section.
<dependencies>

  <!-- other dependency elements omitted -->

  <dependency>
    <groupId>org.springframework.data</groupId>
    <artifactId>spring-data-neo4j</artifactId>
    <version>{version}</version>
  </dependency>

</dependencies>
Also change the version of Spring in the pom.xml to be
<spring.framework.version>{springVersion}</spring.framework.version>9.2.3. Using Dependency Management
Spring Data Neo4j projects can be built using Maven, Gradle or any other tool that supports Maven’s repository system.
| For more in depth configuration details please consult the Configuration section of the OGM Reference Manual. |
Maven
By default, SDN will use the BOLT driver to connect to Neo4j and you don’t need to declare it as a separate dependency in your pom. If you want to use the embedded or HTTP drivers in your production application, you must add the following dependencies as well. (This dependency on the embedded driver is not required if you only want to use the embedded driver for testing. See the section on Testing below for more information).
<dependencyManagement>
    <dependencies>
        <dependency>
            <groupId>org.springframework.data</groupId>
            <artifactId>spring-data-releasetrain</artifactId>
            <version>${spring-data-releasetrain.version}</version>
            <scope>import</scope>
            <type>pom</type>
        </dependency>
    </dependencies>
</dependencyManagement>

<dependencies>
    <dependency>
        <groupId>org.springframework.data</groupId>
        <artifactId>spring-data-neo4j</artifactId>
    </dependency>

    <!-- add this dependency if you want to use the embedded driver -->
    <dependency>
        <groupId>org.neo4j</groupId>
        <artifactId>neo4j-ogm-embedded-driver</artifactId>
    </dependency>

    <!-- add this dependency if you want to use the HTTP driver -->
    <dependency>
        <groupId>org.neo4j</groupId>
        <artifactId>neo4j-ogm-http-driver</artifactId>
    </dependency>
</dependencies>
Testing
    <dependency>
        <groupId>org.neo4j.test</groupId>
        <artifactId>neo4j-harness</artifactId>
        <version>3.2.5</version>
        <scope>test</scope>
    </dependency>
    <dependency>
        <groupId>org.springframework</groupId>
        <artifactId>spring-test</artifactId>
        <version>${spring.version}</version>
        <scope>test</scope>
</dependency>|
Using neo4j-harness brings in a dependency on Jetty container.
If you use Spring Boot dependency management the version may be set to an incompatible version.
This may be avoided by overriding Also having the jetty dependency on classpath might cause your application use jetty as servlet container in your tests instead of default Tomcat. You can avoid that e.g. by forcing the EmbeddedTomcat autoconfiguration. |
Gradle
Gradle dependencies are basically the same as Maven:
dependencies {
    compile 'org.springframework.data:spring-data-neo4j:{version}'

    # add this dependency if you want to use the embedded driver
    compile 'org.neo4j:neo4j-ogm-embedded-driver:{ogm-version}'

    # add this dependency if you want to use the Http driver
    compile 'org.neo4j:neo4j-ogm-http-driver:{ogm-version}'

}
9.2.4. Examples
There is an github repository with several examples that you can download and play around with to get a feel for how the library works.
9.2.5. Configuration
Right now SDN only supports JavaConfig. There is no XML based support but this may change in future.
| For those not familiar with how to configure the Spring container using Java based bean metadata instead of XML based metadata see the high level introduction in the reference docs here as well as the detailed documentation here. |
For most applications the following configuration is all that’s needed to get up and running.
@Configuration
@EnableNeo4jRepositories(basePackages = "org.neo4j.example.repository")
@EnableTransactionManagement
public class MyConfiguration {

    @Bean
    public SessionFactory sessionFactory() {
        // with domain entity base package(s)
        return new SessionFactory(configuration(), "org.neo4j.example.domain");
    }

    @Bean
    public org.neo4j.ogm.config.Configuration configuration() {
        ConfigurationSource properties = new ClasspathConfigurationSource("ogm.properties");
        org.neo4j.ogm.config.Configuration configuration = new org.neo4j.ogm.config.Configuration.Builder(properties).build();
        return configuration;
    }

    @Bean
    public Neo4jTransactionManager transactionManager() {
        return new Neo4jTransactionManager(sessionFactory());
    }

}
Here we wire up a SessionFactory configured from defaults. We can change these defaults by providing an ogm.properties file at the root of the
classpath or by passing in a org.neo4j.ogm.config.Configuration object.
The last infrastructure component declared here is the Neo4jTransactionManager. We finally activate Spring Data Neo4j repositories using the @EnableNeo4jRepositories annotation. If no base package is configured it will use the one the configuration class resides in.
Note that you will have to activate @EnableTransactionManagement explicitly to get annotation based
configuration at facades working as well as define an instance of this Neo4jTransactionManager with the bean name transactionManager.
The example above assumes you are using component scanning.
To allow your query methods to be transactional simply use @Transactional at the repository interface you define.
Driver Configuration
SDN provides support for connecting to Neo4j using different drivers.
The following drivers are available.
-
Http driver
-
Embedded driver
-
Bolt driver
To configure the Driver programmatically, create a Configuration bean and pass it as the first argument to the SessionFactory constructor in your Spring configuration:
@Bean
public org.neo4j.ogm.config.Configuration configuration() {
    org.neo4j.ogm.config.Configuration configuration = new org.neo4j.ogm.config.Configuration.Builder()
            .uri("bolt://localhost")
            .credentials("user", "secret")
            .build();
    return configuration;
}


@Bean
public SessionFactory sessionFactory() {
    return new SessionFactory(configuration(), <packages> ); (1)
}| 1 | packages is a list of java packages containing the annotated domain model. |
Configuration can also be initialized from an external file like this.
@Bean
public org.neo4j.ogm.config.Configuration configuration() {
    ConfigurationSource properties = new ClasspathConfigurationSource("db.properties");
    return new org.neo4j.ogm.config.Configuration.Builder(properties).build();
}
where db.properties looks like
URI=bolt://localhost
username=user
password=secret
connection.pool.size=... #see java driver doc
encryption.level=... #see java driver doc
trust.strategy=... #see java driver doc
trust.certificate.file=... #see java driver doc
connection.liveness.check.timeout=... #see java driver doc
verify.connection=... #see java driver doc| The driver is automatically inferred from the URI scheme. |
| To set up authentication, TLS or other advanced options please see the Configuration section of the OGM Reference. |
| As of 4.2.0 the Neo4j OGM embedded driver no longer ships with the Neo4j kernel. Users are expected to provide this dependency through their dependency management system. |
Spring Boot Applications
Spring Boot 2.0 works straight out of the box with Spring Data Neo4j 5.0.0.
Update your Spring Boot Maven POM with the following.
You may need to add <repositories> depending on versioning (when using milestone or snapshot versions).
    ...
    <dependencies>
        <dependency>
            <groupId>org.springframework.boot</groupId>
            <artifactId>spring-boot-starter-data-neo4j</artifactId>
        </dependency>
    </dependencies>
    ...
Then add to your Spring Boot configuration class these annotations:
@EnableNeo4jRepositories("com.company.project.repository")
@EntityScan(basePackages = "com.company.project.domain")9.2.6. Connecting to Neo4j
The SessionFactory is needed by SDN to create instances of org.neo4j.ogm.session.Session as required.
When constructed, it sets up the object-graph mapping metadata, which is then used across all Session objects that it creates.
As seen in the above example, the packages to scan for domain object metadata should be provided to the SessionFactory constructor.
There should typically be only one SessionFactory per application.
9.3. Neo4j OGM Support
To get started, you need only your domain model and the annotations provided by the OGM library. You use annotations to mark domain objects to be reflected by nodes and relationships of the graph database. For individual fields the annotations allow you to declare how they should be processed and mapped to the graph. For property fields and references to other entities this is straightforward.
Refer to the OGM documentation for more details.
9.3.1. What is an OGM?
An OGM (Object Graph Mapper) maps nodes and relationships in the graph to objects and references in your domain model. Object instances are mapped to nodes while object references are mapped using relationships, or serialized to properties (e.g. references to a Date). JVM primitives are mapped to node or relationship properties. An OGM abstracts the database and provides a convenient way to persist your domain model in the graph and query it without using low level drivers. It also provides the flexibility to the developer to supply custom queries where the queries generated by the OGM are insufficient.
The OGM can be thought of as analogous to Hibernate or JPA. It is expected users have a working understanding of the OGM when using this guide.
Session now replaces Neo4jTemplate functionality as all functionality can be found on the OGM Session object.
|
SDN now allows you to wire up the OGM Session directly into your Spring managed beans.
While SDN Repository will cover a majority of user scenarios sometimes it doesn’t offer enough options. The OGM’s Session offers a convenient API to interact more tightly with a Neo4j graph database.
Understanding the Session
A Session is used to drive the object-graph mapping framework. All repository implementations are driven by the Session.
It keeps track of the changes that have been made to entities and their relationships.
The reason it does this is so that only entities and relationships that have changed get persisted on save, which is particularly efficient when working with large graphs.
Sessions are usually bound to a thread by default and rely on the garbage collector to clean it up once it is out of scope of processing. For most users this means there is nothing to configure. Request/response type applications SDN will take care of Session management for you (as defined in the Configuration section above). If you have a batch or long running desktop type application you may want to know how you can control using the session a bit more.
9.3.2. Basic Operations
For Spring Data Neo4j, low level operations are handled by the OGM Session.
Basic operations are now entirely limited to CRUD operations on entities and executing arbitrary Cypher queries; more low-level manipulation of the graph database is not possible.
| There is no longer a way to manipulate relationship- and node-objects directly. |
Given that the latest version of the framework is driven by Cypher queries alone, there’s no way to work directly with Node and Relationship objects any more in remote server mode.
Similarly, the traverse() method has disappeared, again because the underlying query-driven model doesn’t handle it in an efficient way.
If you find yourself in trouble because of the omission of these features, then your best options are:
-
Write a Cypher query to perform the operations on the nodes/relationships instead
-
Write a Neo4j server extension and call it over REST from your application
Of course, there are pros and cons to both of these approaches, but these are largely outside the scope of this document. In general, for low-level, very high-performance operations like complex graph traversals you’ll get the best performance by writing a server-side extension. For most purposes, though, Cypher will be performant and expressive enough to perform the operations that you need.
9.3.3. Entity Persistence
Session allows you to save, load, loadAll and delete entities.
The eagerness with which objects are retrieved is controlled by specifying the 'depth' argument to any of the load methods.
All of these basic CRUD methods just call onto the underlying methods of Session, albeit with transaction handling and exception translation managed for you by SDN’s Transaction Manager bean.
9.3.4. Cypher Queries
The Session also allows execution of arbitrary Cypher queries via its query, queryForObject and queryForObjects methods.
Cypher queries that return tabular results should be passed into the query method.
An org.neo4j.ogm.session.result.Result is returned. This consists of org.neo4j.ogm.session.result.QueryStatistics representing statistics of
modifying cypher statements if applicable, and an Iterable<Map<String,Object>> containing the raw data, of which nodes and relationships are mapped to domain entities if possible.
The keys in each Map correspond to the names listed in the return clause of the executed Cypher query.
| Modifications made to the graph via Cypher queries directly will not be reflected in your domain objects within the session. |
9.3.5. Transactions
If you configured the Neo4jTransactionManager bean, any Session that is managed by Spring will automatically take part in Thread contextual Transactions.
In order to do this you will need to wrap your service code using @Transactional or the TransactionTemplate.
It is important to know that if you enable Transactions ALL code that uses the Session or a Repository must be enclosed in a @Transactional annotation.
|
For more details see Transactions
9.4. Neo4J Repositories
9.4.1. Introduction
This chapter will point out the specialties for repository support for Neo4J and the Neo4J OGM. This builds on the core repository support explained in Working with Spring Data Repositories. So make sure you’ve got a sound understanding of the basic concepts explained there.
The following table outlines the repositories functionality currently either supported, partially supported or not supported in SDN:
| Feature | Supported in SDN | Notes |
|---|---|---|
|
||
|
||
Derived Count Queries |
||
JavaConfig annotation based configuration |
||
XML based configuration |
||
Multi Spring Data module support |
||
Configurable Query Lookup Strategy |
||
Derived Query support |
See Supported keywords for query methods below |
|
Derived Query Property expressions support |
||
Paging and Slice support |
||
Derived query paging limit support |
||
Java 8 Streaming and Optional support |
||
|
||
Custom behaviour on repositories |
||
|
||
Web support (incl Spring Data REST) |
Partial: QueryDSL not supported. |
|
Repository populators |
9.4.2. Usage
The Repository instances are only created through Spring and can be auto-wired into your Spring beans as required.
@Repository
public interface PersonRepository extends Neo4jRepository<Person, Long> {}

public class MySpringBean {
   @Autowired
   private PersonRepository repo;
   ...
}

// then you can use the repository as you would any other object
Person michael = repo.save(new Person("Michael", 36));

Optional<Person> dave = repo.findById(123);

long numberOfPeople = repo.count();
The recommended way of providing repositories is to define a repository interface per domain class. The underlying Spring repository infrastructure will automatically detect these repositories, along with additional implementation classes, and create an injectable repository implementation to be used in services or other spring beans.
The repositories provided by Spring Data Neo4j build on the composable repository infrastructure in Spring Data Commons. These allow for interface-based composition of repositories consisting of provided default implementations for certain interfaces and additional custom implementations for other methods.
Spring Data Neo4j comes with a single org.springframework.data.repository.PagingAndSortingRepository specialisation called
Neo4jRepository<T. ID> used for all object-graph mapping repositories.
This sub-interface also adds specific finder methods that take a depth argument to control the horizon with which related entities are fetched and saved.
Generally, it provides all the desired repository methods.
If other operations are required then the additional repository interfaces should be added to the individual interface declaration.
9.4.3. Query Methods
Query and Finder Methods
Most of the data access operations you usually trigger on a repository result a query being executed against the Neo4j database. Defining such a query is just a matter of declaring a method on the repository interface
public interface PersonRepository extends PagingAndSortingRepository<Person, String> {

    List<Person> findByLastname(String lastname);                      (1)

    Page<Person> findByFirstname(String firstname, Pageable pageable); (2)

    Person findByShippingAddresses(Address address);                   (3)

    Stream<Person> findAllBy();                                        (4)
}| 1 | The method shows a query for all people with the given lastname. The query will be derived parsing the method name for constraints which can be concatenated with And and Or. Thus the method name will result in a query expression of {"lastname" : lastname}. |
| 2 | Applies pagination to a query. Just equip your method signature with a Pageable parameter and let the method return a Page instance and we will automatically page the query accordingly. |
| 3 | Shows that you can query based on properties which are not a primitive type. |
| 4 | Uses a Java 8 Stream which reads and converts individual elements while iterating the stream. |
| Keyword | Sample | Cypher snippet |
|---|---|---|
|
|
|
|
|
|
|
|
|
|
|
|
|
|
|
|
|
|
|
|
|
|
|
|
|
|
|
|
|
|
|
|
|
|
|
|
|
|
|
|
|
|
|
|
|
|
|
|
|
|
|
|
|
|
|
|
|
|
|
|
|
|
|
|
|
|
|
|
|
|
|
|
Annotated queries
Queries using the Cypher graph query language can be supplied with the @Query annotation.
That means a repository method annotated with
@Query("MATCH (:Actor {name:{name}})-[:ACTED_IN]->(m:Movie) return m")
will use the supplied query query to retrieve data from Neo4j.
The named or indexed parameter {param} will be substituted by the actual method parameter.
Node and Relationship-Entities are handled directly and converted into their respective ids.
All other parameters types are provided directly (i.e. Strings, Longs, etc).
There is special support for the Pageable parameter from Spring Data Commons, which is supported to add programmatic paging and slicing(alternatively static paging and sorting can be supplied in the query string itself).
If it is required that paged results return the correct total count, the @Query annotation can be supplied with a count query in the countQuery attribute. This query is executed separately after the result query and its result is used to populate the number of elements on the Page.
|
Custom queries do not support a custom depth.
Additionally, |
Named queries
Sometimes it makes sense to extract e.g. a long query.
Spring Data Neo4j will look in the META-INF/neo4j-named-queries.properties file to find named queries.
If you provide a query property like User.findByQuery=MATCH (e) WHERE e.name={name} RETURN e you can refer to this method by providing a finder method in your repository.
The repository has to support the given entity type (in this example User) and the method has to be named as the defined one (findByQuery).
As you can see in the example it is possible to parameterize the query.
Query results
Typical results for queries are Iterable<Type>, Iterable<Map<String,Object>> or simply Type.
Nodes and relationships are converted to their respective entities (if they exist).
Other values are converted using the registered conversion services (e.g. enums).
Cypher examples
MATCH (n) WHERE id(n)=9 RETURN n-
returns the node with id 9
MATCH (movie:Movie {title:'Matrix'}) RETURN movie-
returns the nodes which are indexed with title equal to 'Matrix'
MATCH (movie:Movie {title:'Matrix'})←[:ACTS_IN]-(actor) RETURN actor.name-
returns the names of the actors that have a ACTS_IN relationship to the movie node for 'Matrix'
MATCH (movie:Movie {title:'Matrix'})←[r:RATED]-(user) WHERE r.stars > 3 RETURN user.name, r.stars, r.comment-
returns users names and their ratings (>3) of the movie titled 'Matrix'
MATCH (user:User {name='Michael'})-[:FRIEND]-(friend)-[r:RATED]->(movie) RETURN movie.title, AVG(r.stars), COUNT(*) ORDER BY AVG(r.stars) DESC, COUNT(*) DESC-
returns the movies rated by the friends of the user 'Michael', aggregated by
movie.title, with averaged ratings and rating-counts sorted by both
Examples of Cypher queries placed on repository methods with @Query where values are replaced with method parameters, as described in the Annotated queries) section.
public interface MovieRepository extends Neo4jRepository<Movie, Long> {

    // returns the node with id equal to idOfMovie parameter
    @Query("MATCH (n) WHERE id(n)={0} RETURN n")
    Movie getMovieFromId(Integer idOfMovie);

    // returns the nodes which have a title according to the movieTitle parameter
    @Query("MATCH (movie:Movie {title={0}}) RETURN movie")
    Movie getMovieFromTitle(String movieTitle);

    // same with optional result
    @Query("MATCH (movie:Movie {title={0}}) RETURN movie")
    Optional<Movie> getMovieFromTitle(String movieTitle);

    // returns a Page of Actors that have a ACTS_IN relationship to the movie node with the title equal to movieTitle parameter.
    @Query(value = "MATCH (movie:Movie {title={0}})<-[:ACTS_IN]-(actor) RETURN actor", countQuery= "MATCH (movie:Movie {title={0}})<-[:ACTS_IN]-(actor) RETURN count(actor)")
    Page<Actor> getActorsThatActInMovieFromTitle(String movieTitle, PageRequest page);

    // returns a Page of Actors that have a ACTS_IN relationship to the movie node with the title equal to movieTitle parameter with an accurate total count
    @Query(value = "MATCH (movie:Movie {title={0}})<-[:ACTS_IN]-(actor) RETURN actor", countQuery = "MATCH (movie:Movie {title={0}})<-[:ACTS_IN]-(actor) RETURN count(*)")
    Page<Actor> getActorsThatActInMovieFromTitle(String movieTitle, Pageable page);

    // returns a Slice of Actors that have a ACTS_IN relationship to the movie node with the title equal to movieTitle parameter.
    @Query("MATCH (movie:Movie {title={0}})<-[:ACTS_IN]-(actor) RETURN actor")
    Slice<Actor> getActorsThatActInMovieFromTitle(String movieTitle, Pageable page);

    // returns users who rated a movie (movie parameter) higher than rating (rating parameter)
    @Query("MATCH (movie:Movie)<-[r:RATED]-(user) " +
           "WHERE id(movie)={movieId} AND r.stars > {rating} " +
           "RETURN user")
    Iterable<User> getUsersWhoRatedMovieFromTitle(@Param("movieId") Movie movie, @Param("rating") Integer rating);

    // returns users who rated a movie based on movie title (movieTitle parameter) higher than rating (rating parameter)
    @Query("MATCH (movie:Movie {title:{0}})<-[r:RATED]-(user) " +
           "WHERE r.stars > {1} " +
           "RETURN user")
    Iterable<User> getUsersWhoRatedMovieFromTitle(String movieTitle, Integer rating);

    @Query(value = "MATCH (movie:Movie) RETURN movie;")
    Stream<Movie> getAllMovies();
}
Queries derived from finder-method names
Using the metadata infrastructure in the underlying object-graph mapper, a finder method name can be split into its semantic parts and converted into a cypher query.
Navigation along relationships will be reflected in the generated MATCH clause and properties with operators will end up as expressions in the WHERE clause.
The parameters will be used in the order they appear in the method signature so they should align with the expressions stated in the method name.
public interface PersonRepository extends Neo4jRepository<Person, Long> {

    // MATCH (person:Person {name={0}}) RETURN person
    Person findByName(String name);

    // MATCH (person:Person)
    // WHERE person.age = {0} AND person.married = {1}
    // RETURN person
    Iterable<Person> findByAgeAndMarried(int age, boolean married);

    // MATCH (person:Person)
    // WHERE person.age = {0}
    // RETURN person ORDER BY person.name SKIP {skip} LIMIT {limit}
    Page<Person> findByAge(int age, Pageable pageable);

    // MATCH (person:Person)
    // WHERE person.age = {0}
    // RETURN person ORDER BY person.name
    List<Person> findByAge(int age, Sort sort);

    //Allow a custom depth as a parameter
    Person findByName(String name, @Depth int depth);

    //Fix the depth for the query
    @Depth(value = 0)
    Person findBySurname(String surname);

}
Mapping Query Results
For queries executed via @Query repository methods, it’s possible to specify a conversion of complex query results to POJOs. These result objects are then populated with the query result data and can be serialized and sent to a different part of the application, e.g. a frontend-ui. To take advantage of this feature, use a class annotated with @QueryResult as the method return type.
public interface MovieRepository extends Neo4jRepository<Movie, Long> {

    @Query("MATCH (movie:Movie)-[r:RATING]\->(), (movie)<-[:ACTS_IN]-(actor:Actor) " +
           "WHERE movie.id={0} " +
           "RETURN movie as movie, COLLECT(actor) AS 'cast', AVG(r.stars) AS 'averageRating'")
    MovieData getMovieData(String movieId);

    @QueryResult
    public class MovieData {
        Movie movie;
        Double averageRating;
        Set<Actor> cast;
    }

}
Sorting and Paging
Spring Data Neo4j supports sorting and paging of results when using Spring Data’s Pageable and Sort interfaces.
Pageable pageable = PageRequest.of(0, 3);
Page<World> page = worldRepository.findAll(pageable, 0);Sort sort = new Sort(Sort.Direction.ASC, "name");
Iterable<World> worlds = worldRepository.findAll(sort, 0)) {Pageable pageable = PageRequest.of(0, 3, Sort.Direction.ASC, "name");
Page<World> page = worldRepository.findAll(pageable, 0);|
The total number of pages reported by the |
Projections
Spring Data Repositories usually return the domain model when using query methods. However, sometimes, you may need to alter the view of that model for various reasons. In this section, you will learn how to define projections to serve up simplified and reduced views of resources.
Look at the following domain model:
@NodeEntity
public class Cinema {

  private Long id;
  private String name, location;

  @Relationship(type = "VISITED", direction = Relationship.INCOMING)
  private Set<User> visited = new HashSet<>();

  @Relationship(type = "BLOCKBUSTER", direction = Relationship.OUTGOING)
  private Movie blockbusterOfTheWeek;
  …
}
This Cinema has several attributes:
-
idis the graph id -
nameandlocationare data attributes -
visitedandblockbusterOfTheWeekare links to other domain objects
Now assume we create a corresponding repository as follows:
public interface CinemaRepository extends Neo4jRepository<Cinema, Long> {

  Cinema findByName(String name);
}
Spring Data will return the domain object including all of its attributes, including all the users that visited this cinema. That can be a big amount of data and can lead to performance issues.
There are several ways to avoid that :
-
use a custom
depthfor loading (see Queries derived from finder-method names) -
use a custom annotated query (see Annotated queries)
-
use a projection
public interface CinemaNameAndBlockbuster {  (1)

	public String getName(); (2)
	public Movie getBlockbusterOfTheWeek();
}
This projection has the following details:
| 1 | A plain Java interface making it declarative. |
| 2 | Only some attributes of the entity are exported. |
The CinemaNameAndBlockbuster projection only has getters for name and blockbusterOfTheWeek meaning that it will not serve up any user information. The query method definition returns in this case CinemaNameAndBlockbuster instead of Cinema.
interface CinemaRepository extends Neo4jRepository<Cinema, Long> {

  CinemaNameAndBlockbuster findByName(String name);
}
Projections declare a contract between the underlying type and the method signatures related to the exposed properties. Hence it is required to name getter methods according to the property name of the underlying type. If the underlying property is named name, then the getter method must be named getName otherwise Spring Data is not able to look up the source property.
This type of projection is also called closed projection.
Closed projections expose a subset of properties that could be used to optimize the query in a way to reduce the selected fields from the data store. However, it is not implemented at the moment. For performance sensitive querying, you can still use custom queries with maps or QueryResult (see Mapping Query Results)
|
The other type is, as you might imagine, an open projection.
Remodelling data
So far, you have seen how projections can be used to reduce the information that is presented to the user. Projections can be used to adjust the exposed data model. You can add virtual properties to your projection. Look at the following projection interface:
interface RenamedProperty {    (1)

  @Value("#{target.name}")
  String getCinemaName();       (2)

  @Value("#{target.blockbusterOfTheWeek.name}")
  String getBlockbusterOfTheWeekName();            (3)
}
This projection has the following details:
| 1 | A plain Java interface making it declarative. |
| 2 | Expose the name attribute as a virtual property called cinemaName. |
| 3 | Export the name sub-property of the linked Movie entity as a virtual property. |
The backing domain model does not have these properties so we need to tell Spring Data from where they are obtained.
Virtual properties are the place where @Value comes into play. The cinemaName getter is annotated with @Value to use SpEL expressions pointing to the backing property name. You may have noticed name is prefixed with target which is the variable name pointing to the backing object. Using @Value on methods allows defining where and how the value is obtained.
@Value gives full access to the target object and its nested properties. SpEL expressions are extremely powerful as the definition is always applied to the projection method.
We could imagine this :
interface RenamedProperty {

  @Value("#{target.name} #{(target.location == null) ? '' : target.location}")
  String getNameAndLocation();
}
In this example, the location is appended to the cinema name only if it is available.
9.4.4. Transactions
Neo4j is a transactional database, only allowing operations to be performed within transaction boundaries.
Spring Data Neo4j integrates nicely with both the declarative transaction support with @Transactional as well as the manual transaction handling with TransactionTemplate.
Demarcating @Transactional is required for all methods that interact with SDN.
CRUD methods on Repository instances are transactional by default. If you are simply just looking up an object through a repository for example,
then you do not need to define anything else: SDN will take of everything for you. That said, it is strongly recommended that you always annotate any service boundaries to the database with a @Transactional annotation. This way all your code for that method will always run in one transaction, even if you add a write operation later on.
More standard behaviour with Transactions is using a facade or service implementation that typically covers more than one repository or database call as part of a 'Unit of Work'. Its purpose is to define transactional boundaries for non-CRUD operations:
SDN only supports PROPAGATION_REQUIRED and ISOLATION_DEFAULT type transactions.
|
@Service
class UserManagementImpl implements UserManagement {

  private final UserRepository userRepository;
  private final RoleRepository roleRepository;

  @Autowired
  public UserManagementImpl(UserRepository userRepository,
    RoleRepository roleRepository) {
    this.userRepository = userRepository;
    this.roleRepository = roleRepository;
  }

  @Transactional
  public void addRoleToAllUsers(String roleName) {

    Role role = roleRepository.findByName(roleName);

    for (User user : userRepository.findAll()) {
      user.addRole(role);
      userRepository.save(user);
    }
}
This will cause call to addRoleToAllUsers(…) to run inside a transaction (participating in an existing one or create a new one if
none already running). The transaction configuration at the repositories will be neglected then as the outer transaction configuration
determines the actual one used.
It is highly recommended that users understand how Spring Transactions work. Below are some excellent resources:
Read only Transactions
You can start a read only transaction by marking a class or method with @Transactional(readOnly=true).
| Note that if you open a read only transaction from, for example a service method, and then call a mutating method that is marked as read/write your transaction semantics will always be defined by the outermost transaction. Be wary! |
Transaction Bound Events
SDN provides the ability to bind the listener of an event to a phase of the transaction. The typical example is to handle the event when the transaction has completed successfully: this allows events to be used with more flexibility when the outcome of the current transaction actually matters to the listener.
Spring Framework is currently structured in such a way that the context is not aware of the transaction support and has an open infrastructure to allow additional components to be registered and influence the way event listeners are created.
The transaction module implements an EventListenerFactory that looks for the new @TransactionalEventListener annotation. When this one is present, an extended event listener that is aware of the transaction is registered instead of the default.
@Component
public class MyComponent {

  @TransactionalEventListener(condition = "#creationEvent.awesome")
  public void handleOrderCreatedEvent(CreationEvent<Order> creationEvent) {
    ...
  }

}
@TransactionalEventListener is a regular @EventListener and also exposes a TransactionPhase, the default being AFTER_COMMIT. You can also hook other phases of the transaction (BEFORE_COMMIT, AFTER_ROLLBACK and AFTER_COMPLETION that is just an alias for AFTER_COMMIT and AFTER_ROLLBACK).
By default, if no transaction is running the event isn’t sent at all as we can’t obviously honor the requested phase, but there is a fallbackExecution attribute in @TransactionalEventListener that tells Spring to invoke the listener immediately if there is no transaction.
Only public methods in a managed bean can be annotated with @EventListener to consume events.
@TransactionalEventListener is the annotation that provides transaction-bound event support described here.
|
To find out more about Spring’s Event listening capabilities see the Spring reference manual and How to build Transaction aware Eventing with Spring 4.2.
9.4.5. Clustering support
Bookmark management
Neo4j causal clusters use bookmarks to manage read your own writes scenarios. You’ll find background information on the way causal clusters work in the Neo4j operations manual.
In SDN, you can use the bookmark management feature to handle these scenarios easily. You just need to:
-
Add the
@EnableBookmarkManagementannotation once on one of your Spring configuration classes. -
Provide one bean implementing
org.springframework.data.neo4j.bookmark.BookmarkManager. SDN supplies an implementation namedCaffeineBookmarkManagerbased on the popular caching framework Caffeine. -
Add
@UseBookmarkto each transactional Java method involved in a read your own writes scenario.
A configuration using Caffeine may look like this:
@Configuration
@EnableBookmarkManagement
public class ExampleConfiguration {

    @Bean
    public BookmarkManager bookmarkManager() {
        return new CaffeineBookmarkManager();
    }
}
Please make sure that Caffeine is on the class path before you use this configuration.
Every method annotated with @UseBookmark will then collect the bookmarks coming from the database at the end of transactions.
These bookmarks are then stored into a SDN managed context, and reused on later calls to other @UseBookmark annotated methods.
@UseBookmark has to be used on @Transactional annotated methods.
|
9.4.6. Miscellaneous
CDI integration
Instances of the repository interfaces are usually created by a container, which Spring is the most natural choice when working with Spring Data. There’s sophisticated support to easily set up Spring to create bean instances documented in Creating Repository Instances. Spring Data Neo4j ships with a custom CDI extension that allows using the repository abstraction in CDI environments. The extension is part of the JAR so all you need to do to activate it is dropping the Spring Data Neo4j JAR into your classpath.
You can now set up the infrastructure by implementing a CDI Producer for the SessionFactory and Session:
class sessionFactoryProducer {

  @Produces
  @ApplicationScoped
  public SessionFactory createSessionFactory() {
    return new SessionFactory("package");
  }

  public void close(@Disposes SessionFactory sessionFactory) {
    sessionFactory.close();
  }
}
The necessary setup can vary depending on the JavaEE environment you run in. It might also just be enough to redeclare a session as CDI bean as follows:
class CdiConfig {

  @Produces
  @RequestScoped
  @PersistenceContext
  public session session;
}
In this example, the container has to be capable of creating OGM Sessions itself. All the configuration does is re-exporting the OGM Session as CDI bean.
The Spring Data Neo4J CDI extension will pick up all sessions availables as CDI beans and create a proxy for a Spring Data repository whenever an bean of a repository type is requested by the container. Thus obtaining an instance of a Spring Data repository is a matter of declaring an @Injected property:
class RepositoryClient {

  @Inject
  PersonRepository repository;

  public void businessMethod() {
    List<Person> people = repository.findAll();
  }
}
JSR-303 (Bean Validation) Support
Spring Data Neo4J allows developers to use JSR-303 annotations like @NotNull etc. on their domain models.
While this is provided it’s not a best practice. It is highly recommended to create JSR-303 annotations on actual Java Beans,
similar to things like Data Transfer Objects (DTOs).
Conversion Service
It is possible to have Spring Data Neo4j use converters registered with Spring’s ConversionService.
In order to do this, provide org.springframework.data.neo4j.conversion.MetaDataDrivenConversionService as a Spring bean.
@Bean
public ConversionService conversionService() {
    return new MetaDataDrivenConversionService(getSessionFactory().metaData());
}
Then, instead of defining an implementation of org.neo4j.ogm.typeconversion.AttributeConverter on the @Convert annotation,
use the graphPropertyType attribute to define the type to convert to.
@NodeEntity
public class MyEntity {

    @Convert(graphPropertyType = Integer.class)
    private DecimalCurrencyAmount fundValue;

}
Spring Data Neo4j will look for converters registered with Spring’s ConversionService that can convert
both to and from the type specified by graphPropertyType and use them if they exist.
|
Default converters and those defined explicitly via an implementation of |
As of SDN 4, this Neo4jRepository<T, ID> should be the interface from which your entity repository interfaces inherit, with T being specified as the domain entity type to persist.
ID is defined by the field type annotated with @Id.
Examples of methods you get for free out of Neo4jRepository are as follows.
For all of these examples the ID parameter is a Long that matches the graph ID:
- Load an entity instance via an id
-
Optional<T> findById(id) - Check for existence of an id in the graph
-
boolean existsById(id) - Iterate over all nodes of a node entity type
-
Iterable<T> findAll()Iterable<T> findAll(Sort …)Page<T> findAll(Pageable …) - Count the instances of the repository entity type
-
Long count() - Save entities
-
T save(T)andIterable<T> saveAll(Iterable<T>) - Delete graph entities
-
void delete(T),void deleteAll(Iterable<T>), andvoid deleteAll()
For users coming from versions before 4.2.x, Neo4jRepository has replaced GraphRepository but essentially has the same features.
|
Projections
Spring Data Repositories usually return the domain model when using query methods. However, sometimes, you may need to alter the view of that model for various reasons. In this section, you will learn how to define projections to serve up simplified and reduced views of resources.
Look at the following domain model:
@NodeEntity
public class Cinema {

  private Long id;
  private String name, location;

  @Relationship(type = "VISITED", direction = Relationship.INCOMING)
  private Set<User> visited = new HashSet<>();

  @Relationship(type = "BLOCKBUSTER", direction = Relationship.OUTGOING)
  private Movie blockbusterOfTheWeek;
  …
}
This Cinema has several attributes:
-
idis the graph id -
nameandlocationare data attributes -
visitedandblockbusterOfTheWeekare links to other domain objects
Now assume we create a corresponding repository as follows:
public interface CinemaRepository extends Neo4jRepository<Cinema, Long> {

  Cinema findByName(String name);
}
Spring Data will return the domain object including all of its attributes, including all the users that visited this cinema. That can be a big amount of data and can lead to performance issues.
There are several ways to avoid that :
-
use a custom
depthfor loading (see Queries derived from finder-method names) -
use a custom annotated query (see Annotated queries)
-
use a projection
public interface CinemaNameAndBlockbuster {  (1)

	public String getName(); (2)
	public Movie getBlockbusterOfTheWeek();
}
This projection has the following details:
| 1 | A plain Java interface making it declarative. |
| 2 | Only some attributes of the entity are exported. |
The CinemaNameAndBlockbuster projection only has getters for name and blockbusterOfTheWeek meaning that it will not serve up any user information. The query method definition returns in this case CinemaNameAndBlockbuster instead of Cinema.
interface CinemaRepository extends Neo4jRepository<Cinema, Long> {

  CinemaNameAndBlockbuster findByName(String name);
}
Projections declare a contract between the underlying type and the method signatures related to the exposed properties. Hence it is required to name getter methods according to the property name of the underlying type. If the underlying property is named name, then the getter method must be named getName otherwise Spring Data is not able to look up the source property.
This type of projection is also called closed projection.
Closed projections expose a subset of properties that could be used to optimize the query in a way to reduce the selected fields from the data store. However, it is not implemented at the moment. For performance sensitive querying, you can still use custom queries with maps or QueryResult (see Mapping Query Results)
|
The other type is, as you might imagine, an open projection.
Remodelling data
So far, you have seen how projections can be used to reduce the information that is presented to the user. Projections can be used to adjust the exposed data model. You can add virtual properties to your projection. Look at the following projection interface:
interface RenamedProperty {    (1)

  @Value("#{target.name}")
  String getCinemaName();       (2)

  @Value("#{target.blockbusterOfTheWeek.name}")
  String getBlockbusterOfTheWeekName();            (3)
}
This projection has the following details:
| 1 | A plain Java interface making it declarative. |
| 2 | Expose the name attribute as a virtual property called cinemaName. |
| 3 | Export the name sub-property of the linked Movie entity as a virtual property. |
The backing domain model does not have these properties so we need to tell Spring Data from where they are obtained.
Virtual properties are the place where @Value comes into play. The cinemaName getter is annotated with @Value to use SpEL expressions pointing to the backing property name. You may have noticed name is prefixed with target which is the variable name pointing to the backing object. Using @Value on methods allows defining where and how the value is obtained.
@Value gives full access to the target object and its nested properties. SpEL expressions are extremely powerful as the definition is always applied to the projection method.
We could imagine this :
interface RenamedProperty {

  @Value("#{target.name} #{(target.location == null) ? '' : target.location}")
  String getNameAndLocation();
}
In this example, the location is appended to the cinema name only if it is available.
Auditing
Spring Data Neo4j integrates into the Spring Data auditing infrastructure to keep track of who created or changed an entity and the point in time this happened.
While Spring Data Neo4j uses the same annotations for auditing as all Spring Data modules do, auditing support itself has to be explicitly enabled.
To enable Spring Data Neo4j’s auditing, use @EnableNeo4jAuditing on a @Configuration-class as shown in Neo4jConfiguration.java.
import org.springframework.data.neo4j.annotation.EnableNeo4jAuditing;

@Configuration
@EnableNeo4jAuditing
public class Neo4jConfiguration {}
Please refer to the auditing section of the shared Spring Data reference for further details.
10. Neo4j OGM Reference Documentation
This chapter is taken from the Official Neo4j OGM Reference Documentation.
10.1. Introduction
Neo4j-OGM is a fast object-graph mapping library for Neo4j, optimised for server-based installations utilising Cypher.
It aims to simplify development with the Neo4j graph database and like JPA, it uses annotations on simple POJO domain objects to do so.
With a focus on performance, Neo4j-OGM introduces a number of innovations, including:
-
non-reflection based classpath scanning for much faster startup times;
-
variable-depth persistence to allow you to fine-tune requests according to the characteristics of your graph;
-
smart object-mapping to reduce redundant requests to the database, improve latency and minimise wasted CPU cycles; and
-
user-definable session lifetimes, helping you to strike a balance between memory-usage and server request efficiency in your applications.
10.1.1. Overview
This reference documentation is broken down into sections to help the user understand specifics of how Neo4j-OGM works.
- Getting started
-
Getting started can sometimes be a chore. What versions of Neo4j-OGM do you need? Where do you get them from? What build tool should you use? Getting Started is the perfect place to well… get started!
- Configuration
-
Drivers, logging, properties, configuration via Java. How to make sense of all the options? Configuration has got you covered.
- Annotating your Domain Objects
-
To get started with your Neo4j-OGM application, you need only your domain model and the annotations provided by the library. You use annotations to mark domain objects to be reflected by nodes and relationships of the graph database. For individual fields the annotations allow you to declare how they should be processed and mapped to the graph. For property fields and references to other entities this is straightforward. Because Neo4j is a schema-free database, Neo4j-OGM uses a simple mechanism to map Java types to Neo4j nodes using labels. Relationships between entities are first class citizens in a graph database and therefore worth a section of it’s own describing their usage in Neo4j-OGM.
- Connecting to the Database
-
Managing how you connect to the database is important. Connecting to the Database has all the details on what needs to happen to get you up and running.
- Indexing and Primary Constraints
-
Indexing is an important part of any database. Neo4j-OGM provides a variety of features to support the management of Indexes as well as the ability to query your domain objects by something other than the internal Neo4j id. Indexing has everything you will want to know when it comes to getting that working.
- Interacting with the Graph Model
-
Neo4j-OGM offers a session for interacting with the mapped entities and the Neo4j graph database. Neo4j uses transactions to guarantee the integrity of your data and Neo4j-OGM supports this fully. The implications of this are described in the transactions section. To use advanced functionality like Cypher queries, a basic understanding of the graph data model is required. The graph data model is explained in the chapter about in the introduction chapter.
- Type Conversion
-
Neo4j-OGM provides support for default and bespoke type conversions, which allow you to configure how certain data types are mapped to nodes or relationships in Neo4j. See Type Conversion for more details.
- Filtering your domain objects
-
Filters provides a simple API to append criteria to your stock
Session.loadX()behaviour. This is covered in more detail in Filters. - Reacting to Persistence events
-
The Events mechanism allows users to register event listeners for handling persistence events related both to top-level objects being saved as well as connected objects. Event handling discusses all the aspects of working with events.
- Testing in your application
-
Sometimes you want to be able to run your tests against an in-memory version of Neo4j-OGM. Testing goes into more detail of how to set that up.
- Support for High Availability
-
For those using Neo4j Enterprise, support for high availability is extremely important. The chapter on High Availability goes into all the options Neo4j-OGM provides to support this.
10.2. Getting Started
10.2.1. Versions
Consult the version table to determine which version of Neo4j-OGM to use with a particular version of Neo4j and related technologies.
Compatibility
| Neo4j-OGM Version | Neo4j Version1 |
|---|---|
3.2.x |
3.2.13, 3.3.9, 3.4.10, 3.5.0 |
3.1.x |
3.1.9, 3.2.13, 3.3.9, 3.4.10 |
3.0.x2 |
3.1.9, 3.2.12, 3.3.4, 3.4.4 |
2.1.x3 |
2.3.9, 3.0.11, 3.1.6 |
2.0.23 |
2.3.8, 3.0.7 |
2.0.13 |
2.2.x, 2.3.x |
1.1.53 |
2.1.x, 2.2.x, 2.3.x |
1 The latest supported bugfix versions.
2 These versions are no longer actively developed.
3 These versions are no longer actively developed or supported.
Transitive dependencies
The following table list transitive dependencies between specific versions of projects related to Neo4j-OGM.
When reporting issues or asking for help on StackOverflow or neo4j-users slack channel always
verify versions used (e.g through mvn dependency:tree) and report them as well.
| Spring Boot Version | Spring Data Release Train | Spring Data Neo4j Version | Neo4j-OGM Version |
|---|---|---|---|
2.1 |
Lovelace |
5.1 |
3.1 |
2.0 |
Kay |
5.0 |
3.0 |
1.5 |
Ingalls |
4.2 |
2.1 |
1.4 |
Hopper |
4.1 |
2.0 |
10.2.2. Dependency Management
For building an application, your build automation tool needs to be configured to include the Neo4j-OGM dependencies.
Neo4j-OGM dependencies consist of neo4j-ogm-core, together with the relevant dependency declarations on the driver you want to use.
Neo4j-OGM provides support for connecting to Neo4j by configuring one of the following Drivers:
-
neo4j-ogm-bolt-driver- Uses native Bolt protocol to communicate between Neo4j-OGM and a remote Neo4j instance. -
neo4j-ogm-bolt-native-types- Support for all of Neo4j’s property types through the Bolt protocol. -
neo4j-ogm-http-driver- Uses HTTP to communicate between Neo4j-OGM and a remote Neo4j instance. -
neo4j-ogm-embedded-driver- Creates an in-memory Neo4j instance and uses it. -
neo4j-ogm-embedded-native-types- Support for all of Neo4j’s property types in an embedded scenario.
Neo4j-OGM projects can be built using Maven, Gradle or any other build system that utilises Maven’s artifact repository structure.
Maven
In the <dependencies> section of your pom.xml add the following:
<dependency>
    <groupId>org.neo4j</groupId>
    <artifactId>neo4j-ogm-core</artifactId>
    <version>{ogm-version}</version>
    <scope>compile</scope>
</dependency>

<!-- Only add if you're using the Bolt driver -->
<dependency>
    <groupId>org.neo4j</groupId>
    <artifactId>neo4j-ogm-bolt-driver</artifactId>
    <version>{ogm-version}</version>
    <scope>runtime</scope>
</dependency>

<!-- Only add if you're using the HTTP driver -->
<dependency>
    <groupId>org.neo4j</groupId>
    <artifactId>neo4j-ogm-http-driver</artifactId>
    <version>{ogm-version}</version>
    <scope>runtime</scope>
</dependency>

<!-- Only add if you're using the Embedded driver -->
<dependency>
    <groupId>org.neo4j</groupId>
    <artifactId>neo4j-ogm-embedded-driver</artifactId>
    <version>{ogm-version}</version>
    <scope>runtime</scope>
</dependency>
<dependency>
    <groupId>org.neo4j</groupId>
    <artifactId>neo4j</artifactId>
    <version>{neo4j-version}</version>
    <scope>runtime</scope>
</dependency>
Please also have a look at the native type system to take advantage of Neo4j-OGM’s support for native temporal and spatial types
and how to use the modules neo4j-ogm-bolt-native-types and neo4j-ogm-embedded-native-types.
Gradle
Ensure the following dependencies are added to you build.gradle:
dependencies {
    compile 'org.neo4j:neo4j-ogm-core:{ogm-version}'
    runtime 'org.neo4j:neo4j-ogm-bolt-driver:{ogm-version}' // Only add if you're using the Bolt driver
    runtime 'org.neo4j:neo4j-ogm-http-driver:{ogm-version}' // Only add if you're using the HTTP driver
    runtime 'org.neo4j:neo4j-ogm-embedded-driver:{ogm-version}' //  Only add if you're using the Embedded driver
    runtime 'org.neo4j:neo4j:{neo4j-version}' //  Only add if you're using the Embedded driver
}
10.3. Configuration
10.3.1. Configuration method
There are several ways to supply configuration to Neo4j-OGM:
-
using a properties file
-
programmatically using Java
-
by providing an already configured Neo4j Java driver instance
These methods are described below. They are also available as code in the examples.
Using a properties file
Properties file on classpath:
ConfigurationSource props = new ClasspathConfigurationSource("my.properties");
Configuration configuration = new Configuration.Builder(props).build();
Properties file on filesystem:
ConfigurationSource props = new FileConfigurationSource("/etc/my.properties");
Configuration configuration = new Configuration.Builder(props).build();
Programmatically using Java
In cases where you are not be able to provide configuration via a properties file you can configure Neo4j-OGM programmatically instead.
The Configuration object provides a fluent API to set various configuration options.
This object then needs to be supplied to the SessionFactory constructor in order to be configured.
By providing a Neo4j driver instance
Just configure the driver as you would do for direct access to the database, and pass the driver instance to the session factory.
This method allows the greatest flexibility and gives you access to the full range of low level configuration options.
org.neo4j.driver.v1.Driver nativeDriver = ...;
DriverNeo4j-OGMDriver = new BoltDriver(nativeDriver);
new SessionFactory(ogmDriver, ...);
10.3.2. Driver Configuration
For configuration through properties file or configuration builder the driver is automatically inferred from given URI. Empty URI means embedded driver with impermanent database.
HTTP Driver
| ogm.properties | Java Configuration |
|---|---|
|
|
Bolt Driver
Note that for the URI, if no port is specified, the default Bolt port of 7687 is used.
Otherwise, a port can be specified with bolt://neo4j:password@localhost:1234.
Also, the bolt driver allows you to define a connection pool size, which refers to the maximum number of sessions per URL.
This property is optional and defaults to 50.
| ogm.properties | Java Configuration |
|---|---|
|
|
A timeout to the database with the Bolt driver can be set by updating your Database’s neo4j.conf.
The exact setting to change can be found here.
Embedded Driver
You should use the Embedded driver if you don’t want to use a client-server model, or if your application is running as a Neo4j Unmanaged Extension. You can specify a permanent data store location to provide durability of your data after your application shuts down, or you can use an impermanent data store, which will only exist while your application is running.
| As of 2.1.0 the Neo4j-OGM embedded driver no longer ships with the Neo4j kernel. Users are expected to provide this dependency through their dependency management system. See Getting Started for more details. |
| ogm.properties | Java Configuration |
|---|---|
|
|
To use an impermanent data store which will be deleted on shutdown of the JVM, you just omit the URI attribute.
| ogm.properties | Java Configuration |
|---|---|
|
|
Configuration of the embedded instance
The embedded instance of Neo4j can be configured through a standard neo4j.conf file.
A neo4j.conf file is a properties based configuration format.
Neo4j’s available configuration properties are listed in the product manual.
Not all of them are applicable to an embedded scenario.
You can pass the location of a configuration file either through ogm.properties or programmatically.
Both file and classpath-resources are supported.
Resource location without a protocol prefix are assumed to be classpath resources.
| ogm.properties | Java Configuration |
|---|---|
|
|
By setting dbms.config=HA in the configuration file for Neo4j, you can enable HA mode of the embedded instance.
You need to have the required enterpris dependencies on the classpath.
For Neo4j 3.4 those are org.neo4j:neo4j-ha and org.neo4j:neo4j-enterprise, for 3.5 it’s only com.neo4j:neo4j-enterprise.
|
Credentials
If you are using the HTTP or Bolt Driver you have a number of different ways to supply credentials to the Driver Configuration.
| ogm.properties | Java Configuration |
|---|---|
|
|
Note: Currently only Basic Authentication is supported by Neo4j-OGM. If you need to use more advanced authentication scheme, use the native driver configuration method.
Transport Layer Security (TLS/SSL)
The Bolt and HTTP drivers also allow you to connect to Neo4j over a secure channel. These rely on Transport Layer Security (aka TLS/SSL) and require the installation of a signed certificate on the server.
In certain situations (e.g. some cloud environments) it may not be possible to install a signed certificate even though you still want to use an encrypted connection.
To support this, both drivers have configuration settings allowing you to bypass certificate checking, although they differ in their implementation.
| Both of these strategies leave you vulnerable to a MITM attack. You should probably not use them unless your servers are behind a secure firewall. |
Bolt
| ogm.properties | Java Configuration |
|---|---|
|
|
TRUST_ON_FIRST_USE means that the Bolt Driver will trust the first connection to a host to be safe and intentional.
On subsequent connections, the driver will verify that the host is the same as on that first connection.
HTTP
| ogm.properties | Java Configuration |
|---|---|
|
|
The ACCEPT_UNSIGNED strategy permits the HTTP Driver to accept Neo4j’s default snakeoil.cert (and any other) unsigned certificate when connecting over HTTPS.
Bolt connection testing
In order to prevent some network problems while accessing a remote database, you may want to tell the Bolt driver to test connections from the connection pool.
This is particularly useful when there are firewalls between the application tier and the database.
You can do that with the connection liveness parameter which indicates the interval at which the connections will be tested. A value of 0 indicates that the connection will always be tested. A negative value indicates that the connection will never be tested.
| ogm.properties | Java Configuration |
|---|---|
|
|
Eager connection verification
OGM by default does not connect to Neo4j server on application startup.
This allows you to start the application and database independently and Neo4j will be accessed on first read/write.
To change this behaviour set the property verify.connection (or Builder.verifyConnection(boolean)) to true.
This settings is valid only for Bolt and HTTP drivers.
10.3.3. Logging
Neo4j-OGM uses SLF4J to log statements. In production, you can set the log level in a file called logback.xml to be found at the root of the classpath. Please see the Logback manual for further details.
10.4. Annotating Entities
10.4.1. @NodeEntity: The basic building block
The @NodeEntity annotation is used to declare that a POJO class is an entity backed by a node in the graph database.
Entities handled by Neo4j-OGM must have one empty public constructor to allow the library to construct the objects.
Fields on the entity are by default mapped to properties of the node. Fields referencing other node entities (or collections thereof) are linked with relationships.
@NodeEntity annotations are inherited from super-types and interfaces.
It is not necessary to annotate your domain objects at every inheritance level.
Entity fields can be annotated with annotations like @Property, @Id, @GeneratedValue, @Transient or @Relationship.
All annotations live in the org.neo4j.ogm.annotation package.
Marking a field with the transient modifier has the same effect as annotating it with @Transient; it won’t be persisted to the graph database.
@NodeEntity
public class Actor extends DomainObject {

   @Id @GeneratedValue
   private Long id;

   @Property(name="name")
   private String fullName;

   @Property("age") // using value attribute to have a shorter definition
   private int age;

   @Relationship(type="ACTED_IN", direction=Relationship.OUTGOING)
   private List<Movie> filmography;

}

@NodeEntity(label="Film")
public class Movie {

   @Id @GeneratedValue Long id;

   @Property(name="title")
   private String name;

}
The default label is the simple class name of the annotated entity. There are some rules to determine if parent classes also contribute their label to the child class:
-
the parent class is a non-abstract class (the existing of
@NodeEntityis optional) -
the parent class is an abstract class and has a
@NodeEntityannotation -
java.lang.Objectwill be ignored -
interfaces do not create an additional label
If the label (as you can see in the example above) or the value attribute of the @NodeEntity annotation is set it will replace the default label applied to the node in the database.
Saving a simple object graph containing one actor and one film using the above annotated objects would result in the following being persisted in Neo4j.
(:Actor:DomainObject {name:'Tom Cruise'})-[:ACTED_IN]->(:Film {title:'Mission Impossible'})When annotating your objects, you can choose to NOT apply the annotations on the fields. OGM will then use conventions to determine property names in the database for each field.
public class Actor extends DomainObject {

   private Long id;
   private String fullName;
   private List<Movie> filmography;

}

public class Movie {

   private Long id;
   private String name;

}
In this case, a graph similar to the following would be persisted.
(:Actor:DomainObject {fullName:'Tom Cruise'})-[:FILMOGRAPHY]->(:Movie {name:'Mission Impossible'})While this will map successfully to the database, it’s important to understand that the names of the properties and relationship types are tightly coupled to the class’s member names. Renaming any of these fields will cause parts of the graph to map incorrectly, hence the recommendation to use annotations.
Please read Non-annotated properties and best practices for more details and best practices on this.
@Properties: dynamically mapping properties to graph
A @Properties annotation tells Neo4j-OGM to map values of a Map field in a node or relationship entity to properties of
a node or a relationship in the graph.
The property names are derived from field name or prefix, delimiter and keys in the Map.
For example Map field with name address containing following entries:
"street" => "Downing Street"
"number" => 10
will map to following node/relationship properties
address.street=Downing Street
address.number=10
Supported types for keys in the Map are String and Enum.
The values in the Map can be of any Java type equivalent to Cypher types. If full type information is provided other Java types are also supported.
If annotation parameter allowCast is set to true then types that can be cast to corresponding Cypher types are allowed as well.
The original type cannot be deduced and the value will be deserialized to corresponding type - e.g.
when Integer instance is put to Map<String, Object> it will be deserialized as Long.
|
@NodeEntity
public class Student {

    @Properties
    private Map<String, Integer> properties = new HashMap<>();

    @Properties
    private Map<String, Object> properties = new HashMap<>();

}
Runtime managed labels
As stated above, the label applied to a node is the contents of the @NodeEntity label property, or if not specified, it will default to the simple class name of the entity.
Sometimes it might be necessary to add and remove additional labels to a node at runtime.
We can do this using the @Labels annotation.
Let’s provide a facility for adding additional labels to the Student entity:
@NodeEntity
public class Student {

    @Labels
    private List<String> labels = new ArrayList<>();

}
Now, upon save, the node’s labels will correspond to the entity’s class hierarchy plus whatever the contents of the backing field are.
We can use one @Labels field per class hierarchy - it should be exposed or hidden from sub-classes as appropriate.
Runtime labels must not conflict with static labels defined on node entities.
| In a typical situation Neo4j-OGM issues one request per node entity type when saving node entities to the database. Using many distinct labels will result into many requests to the database (one request per unique combination of labels). |
10.4.2. @Relationship: Connecting node entities
Every field of an entity that references one or more other node entities is backed by relationships in the graph. These relationships are managed by Neo4j-OGM automatically.
The simplest kind of relationship is a single object reference pointing to another entity (1:1).
In this case, the reference does not have to be annotated at all, although the annotation may be used to control the direction and type of the relationship.
When setting the reference, a relationship is created when the entity is persisted.
If the field is set to null, the relationship is removed.
@NodeEntity
public class Movie {
    ...
    private Actor topActor;
}
It is also possible to have fields that reference a set of entities (1:N). Neo4j-OGM supports the following types of entity collections:
-
java.util.Vector -
java.util.List, backed by ajava.util.ArrayList -
java.util.SortedSet, backed by ajava.util.TreeSet -
java.util.Set, backed by ajava.util.HashSet -
Arrays
@NodeEntity
public class Actor {
    ...
    @Relationship(type = "TOP_ACTOR", direction = Relationship.INCOMING)
    private Set<Movie> topActorIn;

    @Relationship("ACTS_IN") // same meaning as above but using the value attribute
    private Set<Movie> movies;
}
For graph to object mapping, the automatic transitive loading of related entities depends on the depth of the horizon specified on the call to Session.load().
The default depth of 1 implies that related node or relationship entities will be loaded and have their properties set, but none of their related entities will be populated.
If this Set of related entities is modified, the changes are reflected in the graph once the root object (Actor, in this case) is saved.
Relationships are added, removed or updated according to the differences between the root object that was loaded and the corresponding one that was saved..
Neo4j-OGM ensures by default that there is only one relationship of a given type between any two given entities.
The exception to this rule is when a relationship is specified as either OUTGOING or INCOMING between two entities of the same type.
In this case, it is possible to have two relationships of the given type between the two entities, one relationship in either direction.
If you don’t care about the direction then you can specify direction=Relationship.UNDIRECTED which will guarantee that the path between two node entities is navigable from either side.
For example, consider the PARTNER relationship between two companies, where (A)-[:PARTNER_OF]→(B) implies (B)-[:PARTNER_OF]→(A).
The direction of the relationship does not matter; only the fact that a PARTNER_OF relationship exists between these two companies is of importance.
Hence an UNDIRECTED relationship is the correct choice, ensuring that there is only one relationship of this type between two partners and navigating between them from either entity is possible.
|
The direction attribute on a |
Using more than one relationship of the same type
In some cases, you want to model two different aspects of a conceptual relationship using the same relationship type. Here is a canonical example:
@NodeEntity
class Person {
    private Long id;
    @Relationship(type="OWNS")
    private Car car;

    @Relationship(type="OWNS")
    private Pet pet;
...
}
This will work just fine, however, please be aware that this is only because the end node types (Car and Pet) are different types.
If you wanted a person to own two cars, for example, then you’d have to use a Collection of cars or use differently-named relationship types.
Ambiguity in relationships
In cases where the relationship mappings could be ambiguous, the recommendation is that:
-
The objects be navigable in both directions.
-
The
@Relationshipannotations are explicit.
Examples of ambiguous relationship mappings are multiple relationship types that resolve to the same types of entities, in a given direction, but whose domain objects are not navigable in both directions.
Ordering
Neo4j doesn’t have any ordering on relationships, so the relationships are fetched without any specific ordering. If you want to impose order on collections of relationships you have several options:
-
use a
SortedSetand implementComparable -
sort relationships in
@PostLoadannotated method
You can sort either by a property of a related node or by relationship property. To sort by relationship property you need to use a relationship entity. See @RelationshipEntity: Rich relationships.
10.4.3. @RelationshipEntity: Rich relationships
To access the full data model of graph relationships, POJOs can also be annotated with @RelationshipEntity, making them relationship entities.
Just as node entities represent nodes in the graph, relationship entities represent relationships.
Such POJOs allow you to access and manage properties on the underlying relationships in the graph.
Fields in relationship entities are similar to node entities, in that they’re persisted as properties on the relationship.
For accessing the two endpoints of the relationship, two special annotations are available: @StartNode and @EndNode.
A field annotated with one of these annotations will provide access to the corresponding endpoint, depending on the chosen annotation.
For controlling the relationship-type a String attribute called type is available on the @RelationshipEntity annotation.
Like the simple strategy for labelling node entities, if this is not provided then the name of the class is used to derive the relationship type,
although it’s converted into SNAKE_CASE to honour the naming conventions of Neo4j relationships.
As of the current version of Neo4j-OGM, the type must be specified on the @RelationshipEntity annotation as well as its corresponding @Relationship annotations.
This can also be done without naming the attribute but only providing the value.
|
You must include |
@NodeEntity
public class Actor {
    Long id;
    @Relationship(type="PLAYED_IN") private Role playedIn;
}

@RelationshipEntity(type = "PLAYED_IN")
public class Role {
    @Id @GeneratedValue   private Long relationshipId;
    @Property  private String title;
    @StartNode private Actor actor;
    @EndNode   private Movie movie;
}

@NodeEntity
public class Movie {
    private Long id;
    private String title;
}
Note that the Actor also contains a reference to a Role.
This is important for persistence, even when saving the Role directly, because paths in the graph are written starting with nodes first and then relationships are created between them.
Therefore, you need to structure your domain models so that relationship entities are reachable from node entities for this to work correctly.
Additionally, Neo4j-OGM will not persist a relationship entity that doesn’t have any properties defined.
If you don’t want to include properties in your relationship entity then you should use a plain @Relationship instead.
Multiple relationship entities which have the same property values and relate the same nodes are indistinguishable from each other and are represented as a single relationship by Neo4j-OGM.
|
The |
A note on JSON serialization
Looking at the example given above the circular dependency on the class level between the node and the rich relationship can easily be spotted.
It will not have any effect on your application as long as you do not serialize the objects.
One kind of serialization that is used today is JSON serialization using the Jackson mapper.
This mapper library is often used in connection with other frameworks like Spring or Java EE and their corresponding web modules.
Traversing the object tree it will hit the part when it visits a Role after visiting an Actor.
Obvious it will then find the Actor object and visit this again, and so on.
This will end up in a StackOverflowError.
To break this parsing cycle it is mandatory to support the mapper by providing annotation to your class(es).
This can be done by adding either @JsonIgnore on the property that causes the loop or @JsonIgnoreProperties.
@NodeEntity
public class Actor {
    Long id;

    // Needs knowledge about the attribute "title" in the relationship.
    // Applying JsonIgnoreProperties like this ignores properties of the attribute itself.
    @JsonIgnoreProperties("actor")
    @Relationship(type="PLAYED_IN") private Role playedIn;
}

@RelationshipEntity(type="PLAYED_IN")
public class Role {
    @Id @GeneratedValue private Long relationshipId;
    @Property private String title;

    // Direct way to suppress the serialization.
    // This ignores the whole actor attribute.
    @JsonIgnore
    @StartNode private Actor actor;

    @EndNode   private Movie movie;
}
10.4.4. Entity identifier
Every node and relationship persisted to the graph must have an ID. Neo4j-OGM uses this to identify and re-connect the entity to the graph in memory. Identifier may be either a primary id or a native graph id (the technical id attributed by Neo4j at node creation time).
For primary id use the @Id on a field of any supported type or a field with provided AttributeConverter.
A unique index is created for such property (if index creation is enabled).
User code should either set the id manually when the entity instance is created or id generation strategy should be used.
It is not possible to store an entity with null id value and no generation strategy.
|
Specifying primary id on a relationship entity is possible, but lookups by this id are slow, because Neo4j database doesn’t support schema indexes on relationships. |
For native graph id use @Id @GeneratedValue (with default strategy InternalIdStrategy).
The field type must be Long.
This id is assigned automatically upon saving the entity to the graph and user code should never assign a value to it.
|
It must not be a primitive type because then an object in a transient state cannot be represented, as the default value 0 would point to the reference node. |
|
Do not rely on this ID for long running applications. Neo4j will reuse deleted node ID’s. It is recommended users come up with their own unique identifier for their domain objects (or use a UUID). |
An entity can be looked up by this either type of id by using Session.load(Class<T>, ID) and Session.loadAll(Class<T>, Collection<ID>) methods.
It is possible to have both natural and native id in one entity. In such situation lookups prefer the primary id.
If the field of type Long is simply named 'id' then it is not necessary to annotate it with @Id @GeneratedValue as Neo4j-OGM will use it automatically as native id.
Entity Equality
Entity equality can be a grey area.
There are many debatable issues, such as whether natural keys or database identifiers best describe equality and the effects of versioning over time.
Neo4j-OGM does not impose a dependency upon a particular style of equals() or hashCode() implementation.
The native or custom id field are directly checked to see if two entities represent the same node and a 64-bit hash code is used for dirty checking, so you’re not forced to write your code in a certain way!
You should write your equals and hashCode in a domain specific way for managed entities. We strongly advise developers to not use the native id described by a Long field in combination with @Id @GeneratedValue in these methods.
This is because when you first persist an entity, its hashcode changes because Neo4j-OGM populates the database ID on save.
This causes problems if you had inserted the newly created entity into a hash-based collection before saving.
|
Id Generation Strategy
If the @Id annotation is used on its own it is expected that the field will be set by the application code.
To automatically generate and assign a value of the property the annotation @GeneratedValue can be used.
The @GeneratedValue annotation has optional parameter strategy, which can be used to provide a custom id generation strategy.
The class must implement org.neo4j.ogm.id.IdStrategy interface.
The strategy class can either supply no argument constructor - in which case Neo4j-OGM will create an instance of the strategy and call it.
For situations where some external context is needed an externally created instance can be registered with SessionFactory by using
SessionFactory.register(IdStrategy).
10.4.5. Optimistic locking with @Version annotation
Optimistic locking is supported by Neo4j-OGM to provide concurrency control.
To use optimistic locking define a field annotated with @Version annotation.
The field is then managed by Neo4j-OGM and used to perform optimistic locking checks when updating entities.
The type of the field must be Long and an entity may contain only one such field.
Typical scenario where optimistic locking is used then looks like follows:
-
new object is created, version field contains
nullvalue -
when the object is saved the version field is set to 0 by Neo4j-OGM
-
when a modified object is saved the version provided in the object is checked against a version in the database during the update, if successful then the version is incremented both in the object and in the database
-
if another transaction modified the object in the meantime (and therefore incremented the version) then this is detected and an
OptimisticLockingExceptionis thrown
Optimistic locking check is performed for
-
updating properties of nodes and relationship entities
-
deleting nodes via
Session.delete(T) -
deleting relationship entities via
Session.delete(T) -
deleting relationship entities detected through
Session.save(T)
When an optimistic locking failure happens following operations are performed on the Session:
-
object which failed the optimistic locking check is removed from the context so it can be reloaded
-
in case a default transaction is used it is rolled back
-
in case a manual transaction is used then it is not rolled back, but because the update may contain multiple statements which are checked eagerly it is not defined what updates were actually performed in the database and it is advised to rollback the transaction. If you know you updates consists of single modification you may however choose to reload the object and continue the transaction.
10.4.6. @Property: Optional annotation for property fields
As we touched on earlier, it is not necessary to annotate property fields as they are persisted by default.
Fields that are annotated as @Transient or with transient are exempted from persistence.
All fields that contain primitive values are persisted directly to the graph.
All fields convertible to a String using the conversion services will be stored as a string.
Neo4j-OGM includes default type converters for commonly used types, for a full list see Built-in type conversions.
Custom converters are also specified by using @Convert - this is discussed in detail later on.
Collections of primitive or convertible values are stored as well. They are converted to arrays of their type or strings respectively.
Node property names can be explicitly assigned by setting the name attribute.
For example @Property(name="last_name") String lastName.
The node property name defaults to the field name when not specified.
|
Property fields to be persisted to the graph must not be declared |
10.4.7. @PostLoad
A method annotated with @PostLoad will be called once the entity is loaded from the database.
10.4.8. Non-annotated properties and best practices
Neo4j-OGM supports mapping annotated and non-annotated objects models. It’s possible to save any POJO without annotations to the graph, as the framework applies conventions to decide what to do. This is useful in cases when you don’t have control over the classes that you want to persist. The recommended approach, however, is to use annotations wherever possible, since this gives greater control and means that code can be refactored safely without risking breaking changes to the labels and relationships in your graph.
| The support for non-annotated domain classes might be dropped in the future, to allow startup optimizations. |
Annotated and non-annotated objects can be used within the same project without issue.
The object graph mapping comes into play whenever an entity is constructed from a node or relationship.
This could be done explicitly during the lookup or create operations of the Session but also implicitly while executing any graph operation that returns nodes or relationships and expecting mapped entities to be returned.
Entities handled by Neo4j-OGM must have one empty public constructor to allow the library to construct the objects.
Unless annotations are used to specify otherwise, the framework will attempt to map any of an object’s "simple" fields to node properties and any rich composite objects to related nodes. A "simple" field is any primitive, boxed primitive or String or arrays thereof, essentially anything that naturally fits into a Neo4j node property. For related entities the type of a relationship is inferred by the bean property name.
10.5. Indexing
Indexing is used in Neo4j to quickly find nodes and relationships from which to start graph operations.
10.5.1. Indexes and Constraints
Indexes based on labels and properties are supported with the @Index annotation.
Any property field annotated with @Index will have an appropriate schema index created.
For @Index(unique=true) a constraint is created.
You may add as many indexes or constraints as you like to your class. A class outside any inheritance hierarchy leads to the creation of indexes for its annotated fields on its label. A class inheriting from a super-class and declaring an index on a field shadowing the same field of the super class leads to the creation of an index for that field on it’s own label. A non-abstract super-class will index that field on it’s corresponding label as well. In cases where there is no index definition in a sub-class at al, the first index-defining super class will define the index on its label in the database.
10.5.2. Primary Constraints
The primary property of the @Index annotation is deprecated since Neo4j-OGM 3 and should not be used.
The primary key is solely provided by the @Id annotation.
See Entity identifier for more information.
|
10.5.3. Composite Indexes and Node Key Constraints
Composite indexes based on label and multiple properties are supported with @CompositeIndex annotation.
The annotation is to be placed at the class level.
All properties specified must exist within the class or one of its superclasses.
It is possible to create multiple composite indexes by repeating the annotation.
Providing unique=true parameter will create a node key constraint instead of a composite index.
| This feature is only supported by Neo4j Enterprise 3.2 and higher. |
10.5.4. Existence constraints
Existence constraints for a property is supported with @Required annotation.
It is possible to annotate properties in both node entities and relationship entities.
For node entities the label of declaring class is used to create the constraint.
For relationship entities the relationship type is used - such type must be defined on leaf class.
| This feature is only supported by Neo4j Enterprise 3.1 and higher. |
10.5.5. Index Creation
By default index management is set to None.
If you would like Neo4j-OGM to manage your schema creation there are several ways to go about it.
Only classes marked with @Index, @CompositeIndex or @Required will be used.
Indexes will always be generated with the containing class’s label and the annotated property’s name.
An abstract class containing indexes or constraints must have @NodeEntity annotation present.
Index generation behaviour can be defined in ogm.properties by defining a property called: indexes.auto and providing a value of:
Below is a table of all options available for configuring Auto-Indexing.
| Option | Description | Properties Example | Java Example |
|---|---|---|---|
none (default) |
Nothing is done with index and constraint annotations. |
- |
- |
validate |
Make sure the connected database has all indexes and constraints in place before starting up |
indexes.auto=validate |
config.setAutoIndex("validate"); |
assert |
Drops all constraints and indexes on startup then builds indexes based on whatever is represented in Neo4j-OGM by |
indexes.auto=assert |
config.setAutoIndex("assert"); |
update |
Builds indexes based on whatever is represented in Neo4j-OGM by |
indexes.auto=update |
config.setAutoIndex("update"); |
dump |
Dumps the generated constraints and indexes to a file. Good for setting up environments. none: Default. Simply marks the field as using an index. |
indexes.auto=dump indexes.auto.dump.dir=<a directory> indexes.auto.dump.filename=<a filename> |
config.setAutoIndex("dump"); config.setDumpDir("XXX"); config.setDumpFilename("XXX"); |
10.6. Connecting to the Graph
In order to interact with mapped entities and the Neo4j graph, your application will require a Session, which is provided by the SessionFactory.
10.6.1. SessionFactory
The SessionFactory is needed by Neo4j-OGM to create instances of Session as required.
This also sets up the object-graph mapping metadata when constructed, which is then used across all Session objects that it creates.
The packages to scan for domain object metadata should be provided to the SessionFactory constructor.
The SessionFactory is an expensive object to create because it scans all the requested packages to build up metadata.
It should typically be set up once during life of your application.
|
Create SessionFactory with Configuration instance
As seen in the configuration section, this is done by providing the SessionFactory a configuration object:
SessionFactory sessionFactory = new SessionFactory(configuration, "com.mycompany.app.domainclasses");Create SessionFactory with Driver instance
This can be done by providing to the SessionFactory a driver instance:
SessionFactory sessionFactory = new SessionFactory(driver, "com.mycompany.app.domainclasses");Embedded driver instance
If a pre-configured embedded database is needed, it can be passed into the embedded driver. It is possible to either use a configuration file
GraphDatabaseService db = new GraphDatabaseFactory()
            .newEmbeddedDatabaseBuilder(new File(storeDir))
            .loadPropertiesFromFile(pathToConfigFile)
            .newDatabase();
or set the setting parameters programmatically.
GraphDatabaseService db = new GraphDatabaseFactory()
            .newEmbeddedDatabaseBuilder(new File(storeDir))
            .setConfig( GraphDatabaseSettings.pagecache_memory, "512M" )
            .newDatabase();
and pass them into the EmbeddedDriver.
EmbeddedDriver driver = new EmbeddedDriver(db)

SessionFactory sessionFactory = new SessionFactory(driver, "com.mycompany.app.domainclasses");
Multiple entity packages
Multiple packages may be provided as well. If you would rather just pass in specific classes you can also do that via an overloaded constructor.
SessionFactory sessionFactory = new SessionFactory(configuration, "first.package.domain", "second.package.domain",...);10.7. Using Neo4j-OGM Session
The Session provides the core functionality to persist objects to the graph and load them in a variety of ways.
10.7.1. Session Configuration
A Session is used to drive the object-graph mapping framework.
It keeps track of the changes that have been made to entities and their relationships.
The reason it does this is so that only entities and relationships that have changed get persisted on save, which is particularly efficient when working with large graphs.
Once an entity is tracked by the session, reloading this entity within the scope of the same session will result in the session cache returning the previously loaded entity.
However, the subgraph in the session will expand if the entity or its related entities retrieve additional relationships from the graph.
If you want to fetch fresh data from the graph, then this can be achieved by using a new session or clearing the current sessions context using Session.clear().
The lifetime of the Session can be managed in code.
For example, associated with single fetch-update-save cycle or unit of work.
If your application relies on long-running sessions then you may not see changes made from other users and find yourself working with outdated objects. On the other hand, if your sessions have a too narrow scope then your save operations can be unnecessarily expensive, as updates will be made to all objects if the session isn’t aware of the those that were originally loaded.
There’s therefore a trade off between the two approaches.
In general, the scope of a Session should correspond to a "unit of work" in your application.
10.7.2. Basic operations
Basic operations are limited to CRUD operations on entities and executing arbitrary Cypher queries; more low-level manipulation of the graph database is not possible.
| There is no way to manipulate relationship- and node-objects directly. |
Given that the Neo4j-OGM framework is driven by Cypher queries alone, there’s no way to work directly with Node and Relationship objects in remote server mode.
Similarly, Traversal Framework operations are not supported, again because the underlying query-driven model doesn’t handle it in an efficient way.
If you find yourself in trouble because of the omission of these features, then your best options are:
-
Write a Cypher query to perform the operations on the nodes/relationships instead.
-
Write a Neo4j server extension and call it over REST from your application.
Of course, there are pros and cons to both of these approaches, but these are largely outside the scope of this document. In general, for low-level, very high-performance operations like complex graph traversals you’ll get the best performance by writing a server-side extension. For most purposes, though, Cypher will be performant and expressive enough to perform the operations that you need.
10.7.3. Persisting entities
Session allows to save, load, loadAll and delete entities with transaction handling and exception translation managed for you.
The eagerness with which objects are retrieved is controlled by specifying the 'depth' argument to any of the load methods.
Entity persistence is performed through the save() method on the underlying Session object.
Under the bonnet, the implementation of Session has access to the MappingContext that keeps track of the data that has been loaded from Neo4j during the lifetime of the session.
Upon invocation of save() with an entity, it checks the given object graph for changes compared with the data that was loaded from the database.
The differences are used to construct a Cypher query that persists the deltas to Neo4j before repopulating it’s state based on the response from the database server.
Neo4j-OGM doesn’t automatically commit when a transaction closes, so an explicit call to save(…) is required in order to persist changes to the database.
@NodeEntity
public class Person {
   private String name;
   public Person(String name) {
      this.name = name;
   }
}

// Store Michael in the database.
Person p = new Person("Michael");
session.save(p);
Save depth
As mentioned previously, save(entity) is overloaded as save(entity, depth), where depth dictates the number of related entities to save starting from the given entity.
The default depth, -1, will persist properties of the specified entity as well as every modified entity in the object graph reachable from it.
This means that all affected objects in the entity model that are reachable from the root object being persisted will be modified in the graph.
This is the recommended approach because it means you can persist all your changes in one request.
Neo4j-OGM is able to detect which objects and relationships require changing, so you won’t flood Neo4j with a bunch of objects that don’t require modification.
You can change the persistence depth to any value, but you should not make it less than the value used to load the corresponding data or you run the risk of not having changes you expect to be made actually being persisted in the graph.
A depth of 0 will persist only the properties of the specified entity to the database.
Specifying the save depth is handy when it comes to dealing with complex collections, that could potentially be very expensive to load.
@NodeEntity
class Movie {
    String title;
    Actor topActor;
    public void setTopActor(Actor actor) {
        topActor = actor;
    }
}

@NodeEntity
class Actor {
    String name;
}

Movie movie = new Movie("Polar Express");
Actor actor = new Actor("Tom Hanks");

movie.setTopActor(actor);
Neither the actor nor the movie has been assigned a node in the graph.
If we were to call session.save(movie), then Neo4j-OGM would first create a node for the movie.
It would then note that there is a relationship to an actor, so it would save the actor in a cascading fashion.
Once the actor has been persisted, it will create the relationship from the movie to the actor.
All of this will be done atomically in one transaction.
The important thing to note here is that if session.save(actor) is called instead, then only the actor will be persisted.
The reason for this is that the actor entity knows nothing about the movie entity - it is the movie entity that has the reference to the actor.
Also note that this behaviour is not dependent on any configured relationship direction on the annotations.
It is a matter of Java references and is not related to the data model in the database.
In the following example, the actor and the movie are both managed entities, having both been previously persisted to the graph:
actor.setBirthyear(1956);
session.save(movie);|
In this case, even though the movie has a reference to the actor, the property change on the actor will be persisted by the call to |
In the example below, session.save(user,1) will persist all modified objects reachable from user up to one level deep.
This includes posts and groups but not entities related to them, namely author, comments, members or location.
A persistence depth of 0 i.e. session.save(user,0) will save only the properties on the user, ignoring any related entities.
In this case, fullName is persisted but not friends, posts or groups.
public class User  {

   private Long id;
   private String fullName;
   private List<Post> posts;
   private List<Group> groups;

}

public class Post {

   private Long id;
   private String name;
   private String content;
   private User author;
   private List<Comment> comments;

}

public class Group {

   private Long id;
   private String name;
   private List<User> members;
   private Location location;

}
10.7.4. Loading Entities
Entities can be loaded from Neo4j-OGM through the use of the session.loadXXX() methods or via session.query()/session.queryForObject() which will
accept your own Cypher queries (See section below on cypher queries).
Neo4j-OGM includes the concept of persistence horizon (depth).
On any individual request, the persistence horizon indicates how many relationships should be traversed in the graph when loading or saving data.
A horizon of zero means that only the root object’s properties will be loaded or saved, a horizon of 1 will include the root object and all its immediate neighbours, and so on.
This attribute is enabled via a depth argument available on all session methods, but Neo4j-OGM chooses sensible defaults so that you don’t have to specify the depth attribute unless you want change the default values.
Load depth
By default, loading an instance will map that object’s simple properties and its immediately-related objects (i.e. depth = 1). This helps to avoid accidentally loading the entire graph into memory, but allows a single request to fetch not only the object of immediate interest, but also its closest neighbours, which are likely also to be of interest. This strategy attempts to strike a balance between loading too much of the graph into memory and having to make repeated requests for data.
If parts of your graph structure are deep and not broad (for example a linked-list), you can increase the load horizon for those nodes accordingly. Finally, if your graph will fit into memory, and you’d like to load it all in one go, you can set the depth to -1.
On the other hand when fetching structures which are potentially very "bushy" (e.g. lists of things that themselves have many relationships), you may want to set the load horizon to 0 (depth = 0) to avoid loading thousands of objects most of which you won’t actually inspect.
|
When loading entities with a custom depth less than the one used previously to load the entity within the session, existing relationships will not be flushed from the session; only new entities and relationships are added.
This means that reloading entities will always result in retaining related objects loaded at the highest depth within the session for those entities.
If it is required to load entities with a lower depth than previously requested, this must be done on a new session, or after clearing your current session with |
Query Strategy
WhenNeo4j-OGM loads entities through load* methods (including ones with filters) it uses LoadStrategy to generate the RETURN part of the query.
Available load strategies are
-
schema load strategy - uses metadata on domain entities and pattern comprehensions to retrieve nodes and relationships (default since Neo4j-OGM 3.0)
-
path load strategy - uses paths from root node to fetch related nodes,
p=(n)-[0..]-()(default before Neo4j-OGM 3.0)
The strategy can be overridden globally by calling SessionFactory.setLoadStrategy(strategy) or for single session only
(e.g. when different strategy is more effective for given query) by calling Session.setLoadStrategy(strategy)
Cypher queries
Cypher is Neo4j’s powerful query language. It is understood by all the different drivers in Neo4j-OGM which means that your application code should run identically, whichever driver you choose to use. This makes application development much easier: you can use the Embedded Driver for your integration tests, and then plug in the HTTP Driver or the Bolt Driver when deploying your code into a production client-server environment.
The Session also allows execution of arbitrary Cypher queries via its query and queryForObject methods.
Cypher queries that return tabular results should be passed into the query method which returns an Result.
This consists of QueryStatistics representing statistics of modifying cypher statements if applicable, and an Iterable<Map<String,Object>> containing the raw data, which can be either used as-is or converted into a richer type if needed.
The keys in each Map correspond to the names listed in the return clause of the executed Cypher query.
queryForObject specifically queries for entities and as such, queries supplied to this method must return nodes and not individual properties.
Query methods that retrieve mapped objects may be used in cases where the query generated by load strategy does not have sufficient performance.
Such queries should return nodes and optionally relationships. For a relationship to be mapped both start and end node must be returned.
Query methods returning particular domain type collect the result from all result columns and nested structures in these
(e.g. collected lists, maps etc..) and return as single Iterable<T>.
Use Result Session.query(java.lang.String, java.util.Map<java.lang.String,?>) to retrieve only objects in particular column.
|
In the current version, custom queries do not support paging, sorting or a custom depth. In addition, it does not support mapping a path to domain entities, as such, a path should not be returned from a Cypher query. Instead, return nodes and relationships to have them mapped to domain entities. Modifications made to the graph via Cypher queries directly will not be reflected in your domain objects within the session. |
Sorting and paging
Neo4j-OGM supports Sorting and Paging of results when using the Session object. The Session object methods take independent arguments for Sorting and Pagination
Iterable<World> worlds = session.loadAll(World.class,
new Pagination(pageNumber,itemsPerPage), depth)Iterable<World> worlds = session.loadAll(World.class,
new SortOrder().add("name"), depth)Iterable<World> worlds = session.loadAll(World.class,
new SortOrder().add(SortOrder.Direction.DESC,"name"))Iterable<World> worlds = session.loadAll(World.class,
new SortOrder().add("name"), new Pagination(pageNumber,itemsPerPage))|
Neo4j-OGM does not yet support sorting and paging on custom queries. |
10.8. Type Conversion
The object-graph mapping framework provides support for default and bespoke type conversions, which allow you to configure how certain data types are mapped to nodes or relationships in Neo4j. If you start with a new Neo4j project on Neo4j 3.4+, you should consider using the native type support of OGM for all temporal types.
10.8.1. Built-in type conversions
Neo4j-OGM will automatically perform the following type conversions:
-
Any object that extends
java.lang.Number(includingjava.math.BigIntegerandjava.math.BigDecimal) to a String property -
binary data (as
byte[]orByte[]) to base-64 String as Cypher does not support byte arrays -
java.lang.Enumtypes using the enum’sname()method andEnum.valueOf() -
java.util.Dateto a String in the ISO 8601 format: "yyyy-MM-dd’T’HH:mm:ss.SSSXXX" (usingDateString.ISO_8601) -
java.time.Instantto a String in the ISO 8601 with timezone format: "yyyy-MM-dd’T’HH:mm:ss.SSSZ" (usingDateTimeFormatter.ISO_INSTANT) -
java.time.LocalDateto a String in the ISO 8601 with format: "yyyy-MM-dd" (usingDateTimeFormatter.ISO_LOCAL_DATE) -
java.time.LocalDateTimeto a String in the ISO 8601 with format: "yyyy-MM-dd’T’HH:mm:ss" (usingDateTimeFormatter.ISO_LOCAL_DATE_TIME) -
java.time.OffsetDateTimeto a String in the ISO 8601 with format: "YYYY-MM-dd’T’HH:mm:ss+01:00" / "YYYY-MM-dd’T’HH:mm:ss’Z'" (usingDateTimeFormatter.ISO_OFFSET_DATE_TIME)
java.time.Instant based dates are stored in the database using UTC.
Two dedicated annotations are provided to modify the date conversion:
-
@DateString -
@DateLong
They need to be applied to an attribute for a custom string format or in case you want to store a date or datetime value as long:
public class MyEntity {

    @DateString("yy-MM-dd")
    private Date entityDate;
}
Alternatively, if you want to store java.util.Date or java.time.Instant as long values, use the @DateLong annotation:
public class MyEntity {

    @DateLong
    private Date entityDate;
}
Collections of primitive or convertible values are also automatically mapped by converting them to arrays of their type or strings respectively.
Arrays are not supported for java.time.Instant, java.time.LocalDate, java.time.LocalDateTime, java.time.OffsetDateTime.
Collections are not supported for java.time.Instant.
|
Lenient conversion
It is possible to explicitly assign the build-in converter annotations to the corresponding fields.
This provides the advantage of being able to use the lenient attribute that will get be read by the converters.
The supported annotations are @DateString, @EnumString and @NumberString.
.Example of lenient converter usage
public class MyEntity {

    @DateString(lenient = true)
    private Date entityDate;
}
The lenient feature is currently only supported by string-based converters to allow the conversion of blank strings from the database.
10.8.2. Custom Type Conversion
In order to define bespoke type conversions for particular members, you can annotate a field with @Convert.
One of either two convert implementations can be used.
For simple cases where a single property maps to a single field, with type conversion, specify an implementation of AttributeConverter.
public class MoneyConverter implements AttributeConverter<DecimalCurrencyAmount, Integer> {

   @Override
   public Integer toGraphProperty(DecimalCurrencyAmount value) {
       return value.getFullUnits() * 100 + value.getSubUnits();
   }

   @Override
   public DecimalCurrencyAmount toEntityAttribute(Integer value) {
       return new DecimalCurrencyAmount(value / 100, value % 100);
   }

}
You could then apply this to your class as follows:
@NodeEntity
public class Invoice {

   @Convert(MoneyConverter.class)
   private DecimalCurrencyAmount value;
   ...
}
When more than one node property is to be mapped to a single field, use: CompositeAttributeConverter.
/**
* This class maps latitude and longitude properties onto a Location type that encapsulates both of these attributes.
*/
public class LocationConverter implements CompositeAttributeConverter<Location> {

    @Override
    public Map<String, ?> toGraphProperties(Location location) {
        Map<String, Double> properties = new HashMap<>();
        if (location != null)  {
            properties.put("latitude", location.getLatitude());
            properties.put("longitude", location.getLongitude());
        }
        return properties;
    }

    @Override
    public Location toEntityAttribute(Map<String, ?> map) {
        Double latitude = (Double) map.get("latitude");
        Double longitude = (Double) map.get("longitude");
        if (latitude != null && longitude != null) {
            return new Location(latitude, longitude);
        }
        return null;
    }

}
And just as with an AttributeConverter, a CompositeAttributeConverter could be applied to your class as follows:
@NodeEntity
public class Person {

   @Convert(LocationConverter.class)
   private Location location;
   ...
}
10.9. Filters
Filters provide a mechanism for customising the where clause of Cypher generated by Neo4j-OGM.
They can be chained together with boolean operators, and associated with a comparison operator.
Additionally, each filter contains a FilterFunction.
A filter function can be provided when the filter is instantiated, otherwise, by default a PropertyComparison is used.
In the example below, we’re return a collection containing any satellites that are manned.
Collection<Satellite> satellites = session.loadAll(Satellite.class, new Filter("manned", ComparisonOperator.EQUALS, true));Filter mannedFilter = new Filter("manned", ComparisonOperator.EQUALS, true);
Filter landedFilter = new Filter("landed", ComparisonOperator.EQUALS, false);
Filters satelliteFilter = mannedFilter.and(landedFilter);| The filters should be considered as immutable. In previous versions, you could change filter values after instantiation, this is not the case anymore. |
10.10. Events
Neo4j-OGM supports persistence events. This section describes how to intercept update and delete events.
You may also check the @PostLoad annotation which is described here.
10.10.1. Event types
There are four types of events:
Event.LIFECYCLE.PRE_SAVE
Event.LIFECYCLE.POST_SAVE
Event.LIFECYCLE.PRE_DELETE
Event.LIFECYCLE.POST_DELETE
Events are fired for every @NodeEntity or @RelationshipEntity object that is created, updated or deleted, or otherwise affected by a save or delete request.
This includes:
-
The top-level objects or objects being created, modified or deleted.
-
Any connected objects that have been modified, created or deleted.
-
Any objects affected by the creation, modification or removal of a relationship in the graph.
|
Events will only fire when one of the |
10.10.2. Interfaces
The Events mechanism introduces two new interfaces, Event and EventListener.
The Event interface
The Event interface is implemented by PersistenceEvent.
Whenever an application wishes to handle an event it will be given an instance of Event, which exposes the following methods:
public interface Event {

    Object getObject();
    LIFECYCLE getLifeCycle();

    enum LIFECYCLE {
        PRE_SAVE, POST_SAVE, PRE_DELETE, POST_DELETE
    }
}
The Event Listener interface
The EventListener interface provides methods allowing implementing classes to handle each of the different Event types:
public interface EventListener {

    void onPreSave(Event event);
    void onPostSave(Event event);
    void onPreDelete(Event event);
    void onPostDelete(Event event);

}|
Although the |
10.10.3. Registering an EventListener
There are two way to register an event listener:
-
on an individual
Session -
across multiple sessions by using a
SessionFactory
In this example we register an anonymous EventListener to inject a UUID onto new objects before they’re saved
class AddUuidPreSaveEventListener implements EventListener {

    void onPreSave(Event event) {
        DomainEntity entity = (DomainEntity) event.getObject():
        if (entity.getId() == null) {
            entity.setUUID(UUID.randomUUID());
        }
    }
    void onPostSave(Event event) {
    }
    void onPreDelete(Event event) {
    }
    void onPostDelete(Event event) {
}

EventListener eventListener = new AddUuidPreSaveEventListener();

// register it on an individual session
session.register(eventListener);

// remove it.
session.dispose(eventListener);

// register it across multiple sessions
sessionFactory.register(eventListener);

// remove it.
sessionFactory.deregister(eventListener);|
It’s possible and sometimes desirable to add several EventListener objects to the session, depending on the application’s requirements. For example, our business logic might require us to add a UUID to a new object, as well as manage wider concerns such as ensuring that a particular persistence event won’t leave our domain model in a logically inconsistent state. It’s usually a good idea to separate these concerns into different objects with specific responsibilities, rather than having one single object try to do everything. |
10.10.4. Using the EventListenerAdapter
The EventListener above is fine, but we’ve had to create three methods for events we don’t intend to handle.
It would be preferable if we didn’t have to do this each time we needed an EventListener.
The EventListenerAdapter is an abstract class providing a no-op implementation of the EventListener interface.
If you don’t need to handle all the different types of persistence event you can create a subclass of EventListenerAdapter instead and override just the methods for the event types you’re interested in.
For example:
class PreSaveEventListener extends EventListenerAdapter {
    @Override
    void onPreSave(Event event) {
        DomainEntity entity = (DomainEntity) event.getObject();
        if (entity.id == null) {
            entity.UUID = UUID.randomUUID();
        }
    }
}
10.10.5. Disposing of an EventListener
Something to bear in mind is that once an EventListener has been registered it will continue to respond to any and all persistence events.
Sometimes you may want only to handle events for a short period of time, rather than for the duration of the entire session.
If you’re done with an EventListener you can stop it from firing any more events by invoking session.dispose(…), passing in the EventListener to be disposed of.
|
The process of collecting persistence events prior to dispatching them to any EventListeners adds a small performance overhead to the persistence layer.
Consequently, Neo4j-OGM is configured to suppress the event collection phase if there are no EventListeners registered with the Session.
Using |
To remove an event listener across multiple sessions use the deregister method on the SessionFactory.
10.10.6. Connected objects
As mentioned previously, events are not only fired for the top-level objects being saved but for all their connected objects as well.
Connected objects are any objects reachable in the domain model from the top-level object being saved. Connected objects can be many levels deep in the domain model graph.
In this way, the Events mechanism allows us to capture events for objects that we didn’t explicitly save ourselves.
// initialise the graph
Folder folder = new Folder("folder");
Document a = new Document("a");
Document b = new Document("b");
folder.addDocuments(a, b);

session.save(folder);

// change the names of both documents and save one of them
a.setName("A");
b.setName("B");

// because `b` is reachable from `a` (via the common shared folder) they will both be persisted,
// with PRE_SAVE and POST_SAVE events being fired for each of them
session.save(a);
10.10.7. Events and types
When we delete a Type, all the nodes with a label corresponding to that Type are deleted in the graph.
The affected objects are not enumerated by the Events mechanism (they may not even be known).
Instead, _DELETE events will be raised for the Type:
    // 2 events will be fired when the type is deleted.
    // - PRE_DELETE Document.class
    // - POST_DELETE Document.class
    session.delete(Document.class);
10.10.8. Events and collections
When saving or deleting a collection of objects, separate events are fired for each object in the collection, rather than for the collection itself.
Document a = new Document("a");
Document b = new Document("b");

// 4 events will be fired when the collection is saved.
// - PRE_SAVE a
// - PRE_SAVE b
// - POST_SAVE a
// - POST_SAVE b

session.save(Arrays.asList(a, b));
10.10.9. Event ordering
Events are partially ordered.
PRE_ events are guaranteed to fire before any POST_ event within the same save or delete request.
However, the internal ordering of the PRE_ events and POST_ events with the request is undefined.
Document a = new Document("a");
Document b = new Document("b");

// Although the save order of objects is implied by the request, the PRE_SAVE event for `b`
// may be fired before the PRE_SAVE event for `a`, and similarly for the POST_SAVE events.
// However, all PRE_SAVE events will be fired before any POST_SAVE event.

session.save(Arrays.asList(a, b));
10.10.10. Relationship events
The previous examples show how events fire when the underlying node representing an entity is updated or deleted in the graph. Events are also fired when a save or delete request results in the modification, addition or deletion of a relationship in the graph.
For example, if you delete a Document object that is a member of a Folder’s documents collection, events will be fired for the Document as well as the Folder, to reflect the fact that the relationship between the folder and the document has been removed in the graph.
Folder folder = new Folder();
Document a = new Document("a");
folder.addDocuments(a);
session.save(folder);

// When we delete the document, the following events will be fired
// - PRE_DELETE a
// - POST_DELETE a
// - PRE_SAVE folder  (1)
// - POST_SAVE folder
session.delete(a);| 1 | Note that the folder events are _SAVE events, not _DELETE events.
The folder was not deleted. |
|
The event mechanism does not try to synchronise your domain model. In this example, the folder is still holding a reference to the Document, even though it no longer exists in the graph. As always, your code must take care of domain model synchronisation. |
10.10.11. Event uniqueness
The event mechanism guarantees to not fire more than one event of the same type for an object in a save or delete request.
 // Even though we're making changes to both the folder node, and its relationships,
 // only one PRE_SAVE and one POST_SAVE event will be fired.
 folder.removeDocument(a);
 folder.setName("newFolder");
 session.save(folder);
10.11. Testing
Doing integration testing with Neo4j-OGM requires a few basic steps :
-
Add the
org.neo4j.test:neo4j-harnessartifact to your Maven / Gradle configuration -
Declare the
Neo4jRuleJUnit rule, to setup a Neo4j test server -
Setup Neo4j-OGM configuration and
SessionFactory
An example of a full running configuration can be found in the issue templates
10.11.1. Log levels
When running unit tests, it can be useful to see what Neo4j-OGM is doing, and in particular to see the Cypher requests being transferred between your application and the database.
Neo4j-OGM uses slf4j along with Logback as its logging framework and by default the log level for all Neo4j-OGM components is set to WARN, which does not include any Cypher output.
To change Neo4j-OGM log level, create a file logback-test.xml in your test resources folder, configured as shown below:
<?xml version="1.0" encoding="UTF-8"?>
<configuration>

    <appender name="console" class="ch.qos.logback.core.ConsoleAppender">
        <encoder>
            <pattern>%d %5p %40.40c:%4L - %m%n</pattern>
        </encoder>
    </appender>

    <!--
      ~ Set the required log level for Neo4j-OGM components here.
      ~ To just see Cypher statements set the level to "info"
      ~ For finer-grained diagnostics, set the level to "debug".
    -->
    <logger name="org.neo4j.ogm" level="info" />

    <root level="warn">
        <appender-ref ref="console" />
    </root>

</configuration>
10.12. High Availability (HA) Support
| The clustering features are only available in Neo4j Enterprise Edition. |
Neo4j offers two separate solutions for ensuring redundancy and performance in a high-demand production environment:
-
Causal Clustering
-
Highly Available (HA) Cluster
Neo4j 3.1 introduced Causal Clustering – a brand-new architecture using the state-of-the-art Raft protocol – that enables support for ultra-large clusters and a wider range of cluster topologies for data center and cloud.
A Neo4j HA cluster is comprised of a single master instance and zero or more slave instances. All instances in the cluster have full copies of the data in their local database files. The basic cluster configuration usually consists of three instances.
10.12.1. Causal Clustering
To find out more about Causal Clustering architecture please see the reference.
Causal Clustering only works with the Neo4j Bolt Driver (1.1.0 onwards).
Trying to set this up with the HTTP or Embedded Driver will not work.
The Bolt driver will fully handle any load balancing, which operate in concert with the Causal Cluster to spread the workload.
New cluster-aware sessions, managed on the client-side by the Bolt drivers, alleviate complex infrastructure concerns for developers.
Configuring Neo4j-OGM
Not cluster specific side note: you may also want to configure connection testing.
To use clustering, simply configure your Bolt URI to use the bolt routing protocol:
URI=bolt+routing://instance0 (1)or
URIS=bolt+routing://instance0 (1)| 1 | instance0 must be one of your core cluster group (that accepts reads and writes). |
Design considerations for clustering
In this section we go through important points to be aware of when using causal clustering.
-
Review hardware and cluster configuration
-
Target replica servers when possible
-
Use bookmarks to read your own writes
-
Plan for failure
Cluster configuration
Please read the causal cluster reference to plan the best topology according to your needs.
You can provide additional core instances in URIS property, separated by a comma.
The URI property is optional as long as all URIs are provided in the URIS property.
Same credentials are used for all instances.
Please keep in mind that all listed instances must be core servers.
URI=bolt+routing://instance0
URIS=bolt+routing://instance1,bolt+routing://instance2
Target replica servers when possible
By default all Session 's Transaction s are set to read/write.
This means reads and writes will always hit the core cluster.
To offload the core servers and improve performance, it is advised if possible to route traffic to the replica servers.
This is done in the application code, by declaring sessions / transactions as read-only.
You can call session.beginTransaction(Transaction.Type) with READ to do that.
| This is not always possible. You may only do this if you can afford to read some slightly outdated data. |
Use bookmarks to read your own writes
Causal consistency allows you to specify guarantees around query ordering, including the ability to read your own writes, view the last data you read, and later on, committed writes from other users. The Bolt drivers collaborate with the core servers to ensure that all transactions are applied in the same order using a concept of a bookmark.
The cluster returns a bookmark when it commits an update transaction, so then the driver links a bookmark to the user’s next transaction. The server that received query starts this new bookmarked transaction only when its internal state reached the desired bookmark. This ensures that the view of related data is always consistent, that all servers are eventually updated, and that users reading and re-reading data always see the same — and the latest — data.
If you have multiple application tier JVM instances you will need to manage this state across them.
The Session object allows you to retrieve bookmarks through the use of Session.getLastBookmark() and
start new transactions with given bookmark through Session.beginTransaction(type, bookmarks).
| Do not generalize the use of bookmarks as they have impact on latency. |
Retry mechanisms
The driver does its best to ensure a stable communication between the application tier and the database. It handles low level failures (like connection loss), but cannot do much about higher level failures (like cluster unavailability). However, due to the nature of distributed platforms, failures arise. When the cluster is split among several datacenters, network issues can cause cluster instability. Cluster members not being able to talk to each other can make the cluster, for example, fall in read only mode, or trigger leader re-election.
For critical applications, these failures have to be anticipated, and also managed at the architecture or application level. Even if the driver handles some low level retries, it is not always enough in case of instability, as an application may involve complex business logic, and require coarse grained units of work.
Solutions like application retries or message queuing are good candidates to handle this kind of scenario.
10.12.2. Highly Available (HA) Cluster
A typical Neo4j HA cluster will consist of a master node and a couple of slave nodes for providing failover capability and optionally for handling reads. (Although it is possible to write to slaves, this is uncommon because it requires additional effort to synchronise a slave with the master node.)
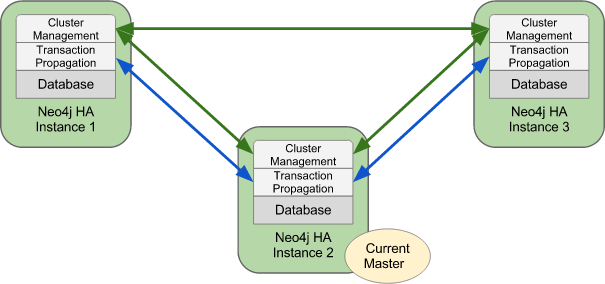
Transaction binding in HA mode
When operating in HA mode, Neo4j does not make open transactions available across all nodes in the cluster.
This means we must bind every request within a specific transaction to the same node in the cluster, or the commit will fail with 404 Not Found.
Read-only transactions
As of Version 2.0.5 read-only transactions are supported by Neo4j-OGM.
Drivers
The Drivers have been updated to transmit additional information about the transaction type of the current transaction to the server.
-
The HTTP Driver implementation sets a HTTP Header "X-WRITE" to "1" for READ_WRITE transactions (the default) or to "0" for READ_ONLY ones.
-
The Embedded Driver can support both READ_ONLY and READ_WRITE (as of version
2.1.0). -
The native Bolt Driver can support both READ_ONLY and READ_WRITE (as of version
2.1.0).
Dynamic binding via a load balancer
In the Neo4j HA architecture, a cluster is typically fronted by a load balancer.
The following example shows how to configure your application and set up HAProxy as a load balancer to route write requests to whichever machine in the cluster is currently identified as the master, with read requests being distributed to any available machine in the cluster on a round-robin basis.
This configuration will also ensure that requests against a specific transaction are directed to the server where the transaction was created.
Example cluster fronted by HAProxy
-
haproxy: 10.0.2.200
-
neo4j-server1: 10.0.1.10
-
neo4j-server2: 10.0.1.11
-
neo4j-server3: 10.0.1.12
new Configuration.Builder().uri("http://10.0.2.200").build();global
daemon
maxconn 256
defaults
mode http
timeout connect 5000ms
timeout client 50000ms
timeout server 50000ms
frontend http-in
bind *:80
acl write_hdr hdr_val(X-WRITE) eq 1
use_backend neo4j-master if write_hdr
default_backend neo4j-cluster
backend neo4j-cluster
balance roundrobin
# create a sticky table so that requests with a transaction id are always sent to the correct server
stick-table type integer size 1k expire 70s
stick match path,word(4,/)
stick store-response hdr(Location),word(6,/)
option httpchk GET /db/manage/server/ha/available
server s1 10.0.1.10:7474 maxconn 32
server s2 10.0.1.11:7474 maxconn 32
server s3 10.0.1.12:7474 maxconn 32
backend neo4j-master
option httpchk GET /db/manage/server/ha/master
server s1 10.0.1.10:7474 maxconn 32
server s2 10.0.1.11:7474 maxconn 32
server s3 10.0.1.12:7474 maxconn 32
listen admin
bind *:8080
stats enable11. Appendix
Appendix A: Namespace reference
The <repositories /> Element
The <repositories /> element triggers the setup of the Spring Data repository infrastructure. The most important attribute is base-package, which defines the package to scan for Spring Data repository interfaces. See “XML configuration”. The following table describes the attributes of the <repositories /> element:
| Name | Description |
|---|---|
|
Defines the package to be scanned for repository interfaces that extend |
|
Defines the postfix to autodetect custom repository implementations. Classes whose names end with the configured postfix are considered as candidates. Defaults to |
|
Determines the strategy to be used to create finder queries. See “Query Lookup Strategies” for details. Defaults to |
|
Defines the location to search for a Properties file containing externally defined queries. |
|
Whether nested repository interface definitions should be considered. Defaults to |
Appendix B: Populators namespace reference
The <populator /> element
The <populator /> element allows to populate the a data store via the Spring Data repository infrastructure.[1]
| Name | Description |
|---|---|
|
Where to find the files to read the objects from the repository shall be populated with. |
Appendix C: Repository query keywords
Supported query keywords
The following table lists the keywords generally supported by the Spring Data repository query derivation mechanism. However, consult the store-specific documentation for the exact list of supported keywords, because some keywords listed here might not be supported in a particular store.
| Logical keyword | Keyword expressions |
|---|---|
|
|
|
|
|
|
|
|
|
|
|
|
|
|
|
|
|
|
|
|
|
|
|
|
|
|
|
|
|
|
|
|
|
|
|
|
|
|
|
|
|
|
|
|
|
|
|
|
|
|
|
|
|
|
|
|
Appendix D: Repository query return types
Supported Query Return Types
The following table lists the return types generally supported by Spring Data repositories. However, consult the store-specific documentation for the exact list of supported return types, because some types listed here might not be supported in a particular store.
Geospatial types (such as GeoResult, GeoResults, and GeoPage) are available only for data stores that support geospatial queries.
|
| Return type | Description |
|---|---|
|
Denotes no return value. |
Primitives |
Java primitives. |
Wrapper types |
Java wrapper types. |
|
An unique entity. Expects the query method to return one result at most. If no result is found, |
|
An |
|
A |
|
A |
|
A Java 8 or Guava |
|
Either a Scala or Javaslang |
|
A Java 8 |
|
A |
|
A Java 8 |
|
A |
|
A sized chunk of data with an indication of whether there is more data available. Requires a |
|
A |
|
A result entry with additional information, such as the distance to a reference location. |
|
A list of |
|
A |
|
A Project Reactor |
|
A Project Reactor |
|
A RxJava |
|
A RxJava |
|
A RxJava |
Appendix E: Migration Guide
Migrating from 4.2 → 5.0
-
Base class for repositories
GraphRepositoryhas been renamedNeo4jRepositoryand parameter types change from<T>to<T, ID>. -
All Repository methods can return
Streams. -
The repository method naming scheme has changed for SD commons 2.0 as part of DATACMNS-944.
-
for example,
findOnerepository methods are renamedfindByIdand now returnOptional<T>. -
please check the javadoc of
org.springframework.data.repository.CrudRepository
-
-
Paged custom queries no longer accept queries without
countQueryattribute. -
The keywords
BetweenandIsBetweenin query methods now include the given limits in the query. Use a combination ofGreaterThan/isGreaterThanandLessThan/isLessThan(e.g.isGreaterThanLowerLimitAndIsLessThanUpperLimit) to keep the exclusive behavior. -
Id handling :
Longnative ids are not mandatory anymore. See GraphId field. -
Primary indexes are now deprecated and replaced by
@IdSee Entity identifier. -
Annotations on accessors are no longer valid. See Annotating entities.
-
Loading with depth
-1calls have to be reviewed (please see the OGM migration guide under Migration from 2.1 to 3.0 / Performance and unlimited load depth). -
The
ogm.propertiesfile and environment variable have been removed. You now have to provide explicitly the configuration file or configure programmatically. See the configuration section. -
The driver class name in the configuration is now inferred from connection URL.
-
Java 8 dates are now better supported ; the use of
java.util.Dateor converters is not required anymore. You may want to switch to more fine grained date types likeInstant. See conversions. -
The query filters are now immutable. See Filters.
Migrating from 4.0/4.1 → 4.2
Spring Data Neo4j 4.2 significantly reduces complexity of configuration for application developers.
There is no longer a need to extend from Neo4jConfiguration or define a Session bean. Configuration for various types
of applications are described here
-
Remove any subclassing of
Neo4jConfiguration -
Define the
sessionFactorybean with an instance ofSessionFactoryand thetransactionManagerbean with an instance ofNeo4jTransactionManager. Be sure to pass theSessionFactoryinto the constructor for the transaction manager.
Migrating from pre 4.0 → 4.2
Package Changes
Because the Neo4j Object Graph Mapper can be used independently of Spring Data Neo4j, the core annotations have been moved out of the spring framework packages:
org.springframework.data.neo4j.annotation → org.neo4j.ogm.annotation
|
The |
Annotation Changes
There have been some changes to the annotations that were used in previous versions of Spring Data Neo4j. Wherever possible we have tried to maintain the previous annotations verbatim, but in a few cases this has not been possible, usually for technical reasons but sometimes for aesthetic ones. Our goal has been to minimise the number of annotations you need to use as well as trying to make them more self-explanatory. The following annotations have been changed.
Old |
New |
|---|---|
|
|
|
|
|
|
|
|
|
|
|
|
Custom Type Conversion
SDN provides automatic type conversion for the obvious candidates: byte[] and Byte[] arrays, Dates, BigDecimal and
BigInteger types. In order to define bespoke type conversions for particular entity attribute, you can annotate a
field or method with @Convert to specify your own implementation of org.neo4j.ogm.typeconversion.AttributeConverter.
You can find out more about type conversions here: Custom Converters
Date Format Changes
The default Date converter is @DateString.
SDN 3.x and earlier represented Dates as a String value consisting of the number of milliseconds since January 1, 1970, 00:00:00 GMT.
If you are upgrading to SDN 4.x from these versions and your application used the default, then you need to annotate your Date
properties with @DateLong.
Moreover, the property values in the graph need to be converted to numbers.
MATCH (n:Foo) //All nodes which contain date properties to be migrated
WHERE NOT HAS(n.migrated)// Take the first 10k nodes that haven't been migrated yet
WITH n LIMIT 10000
SET n.dateProperty = toInt(n.dateProperty),n.migrated=1 //where dateProperty is the date with a String value to be migrated
RETURN count(n); //Run until the statement returns zero records
//Similar process to remove the migrated flag
However, if your application already represented Dates as @GraphProperty(propertyType = Long.class) then simply changing this to
@DateLong is sufficient.
Indexing
The best way to retrieve start nodes for traversals and queries is by using Neo4j’s integrated index facilities. SDN supports Index and Constraint management but differs in how it does this to previous versions.
Obsolete Annotations
The following annotations are no longer used, either because they are no longer needed, or cannot be supported via Cypher.
-
@GraphTraversal
-
@RelatedToVia
-
@RelatedTo
-
@TypeAlias
-
@Fetch
Features No Longer Supported
Some features of the previous annotations have been dropped.
- Overriding @Property Types
-
Support for overriding property types via arguments to @Property has been dropped. If your attribute requires a non-default conversion to and from a database property, you can use a Custom Converter instead.
- @Relationship enforceTargetType
-
In previous versions of Spring Data Neo4j, you would have to add an
enforceTargetTypeattribute into every clashing@Relationshipannotation. Thanks to changes in the underlying object-graph mapping mechanism, this is no longer necessary.
@NodeEntity
class Person {
    @Relationship(type="OWNS")
    private Car car;

    @Relationship(type="OWNS")
    private Pet pet;
...
}- Cross-store Persistence
-
Neo4j is dropping XA support and therefore SDN does not provide any capability for cross-store persistence
- TypeRepresentationStrategy
-
SDN 4 replaces the existing
TypeRepresentionStrategyconfiguration with a straightforward convention based on simple class-names or entities using@NodeEntity(label=…) - AspectJ Support
-
Support for AspectJ-based persistence has been removed from SDN 4 as the write-and-read-through approach only works with an integrated, embedded database, not Neo4j server. The performance improvements in SDN 4 should make their use as a performance optimisation unnecessary anyway.
Deprecation of Neo4jTemplate
It is highly recommended for users starting new SDN projects to use the OGM Session directly. Neo4jTemplate has been kept to give upgrading users a better experience.
The Neo4jTemplate has been slimmed-down significantly for SDN 4. It contains the exact same methods as Session. In fact Neo4jTemplate is just a very thin wrapper with an ability to support SDN Exception Translation.
Many of the operations are no longer needed or can be expressed with a straightforward Cypher query.
If you do use Neo4jTemplate, then you should code against its Neo4jOperations interface instead of the template class.
The following table shows the Neo4jTemplate functions that have been retained for version 4 of Spring Data Neo4j. In some cases the method names have changed but the same functionality is offered under the new version.
| Old Method Name | New Method Name | Notes |
|---|---|---|
|
|
Overloaded to take optional depth parameter |
|
|
Overloaded to take optional depth parameter, also now returns a |
|
|
Return type changed from |
|
|
|
|
|
|
|
|
No longer defines generic type parameters |
|
|
Indexes are not supported natively, but you can index node properties in your database setup and use this method to find by them |
To achieve the old template.fetch(entity) equivalent behaviour, you should call one of the load methods specifying the fetch depth as a parameter.
It’s also worth noting that exec(GraphCallback) and the create…() methods have been made obsolete by Cypher.
Instead, you should now issue a Cypher query to the new execute method to create the nodes or relationships that you need.
Dynamic labels, properties and relationship types are not supported as of this version, server extensions should be considered instead.
Built-In Query DSL Support
Previous versions of SDN allowed you to use a DSL to generate Cypher queries. There are many different DSL libraries available and you’re free to use which of these - or none - that you want. With Cypher changing on a regular basis, avoiding a DSL implementation in SDN means less ongoing maintenance and less likelihood of your code being incompatible with future versions of Neo4j.
Graph Traversal and Node/Relationship Manipulation
These features cannot be supported by Cypher and have therefore been dropped from Neo4jTemplate.
Please provide feedback on the new APIs of SDN 5 and the migration needs to [email protected] or via a JIRA issue
Appendix F: Frequently asked questions
-
What is the difference between Neo4j OGM and Spring Data Neo4j (SDN)?
Spring Data Neo4j (SDN) uses the OGM under the covers. It’s like Spring Data JPA, where JPA/Hibernate underly it. Most of the power of SDN actually comes from the OGM.
-
How do I set up my Spring Configuration with Spring WebMVC projects?
If you are using a Spring WebMVC application, the following configuration is all that’s required:
@Configuration
@EnableWebMvc
@ComponentScan({"org.neo4j.example.web"})
@EnableNeo4jRepositories("org.neo4j.example.repository")
@EnableTransactionManagement
public class MyWebAppConfiguration extends WebMvcConfigurerAdapter {

    @Bean
    public OpenSessionInViewInterceptor openSessionInViewInterceptor() {
        OpenSessionInViewInterceptor openSessionInViewInterceptor =
            new OpenSessionInViewInterceptor();
        openSessionInViewInterceptor.setSessionFactory(sessionFactory());
        return openSessionInViewInterceptor;
    }

    @Override
        public void addInterceptors(InterceptorRegistry registry) {
        registry.addWebRequestInterceptor(openSessionInViewInterceptor());
    }

    @Bean
    public SessionFactory sessionFactory() {
        // with domain entity base package(s)
        return new SessionFactory("org.neo4j.example.domain");
    }

    @Bean
    public Neo4jTransactionManager transactionManager() throws Exception {
        return new Neo4jTransactionManager(sessionFactory());
    }
}- How do I set up my Spring Configuration with a Java Servlet 3.x+ Container project?
-
If you are using a Java Servlet 3.x+ Container, you can configure a Servlet filter with Spring’s
AbstractAnnotationConfigDispatcherServletInitializer. The configuration below will open a new session for every web request then automatically close it on completion. SDN provides theorg.springframework.data.neo4j.web.support.OpenSessionInViewFilterto do this:
public class MyAppInitializer extends AbstractAnnotationConfigDispatcherServletInitializer {

  @Override
  protected void customizeRegistration(ServletRegistration.Dynamic registration) {
      registration.setInitParameter("throwExceptionIfNoHandlerFound", "true");
  }

  @Override
  protected Class<?>[] getRootConfigClasses() {
      return new Class[] {ApplicationConfiguration.class} // if you have broken up your configuration, this points to your non web application config/s.
  }

  @Override
  protected Class<?>[] getServletConfigClasses() {
      throw new Class[] {WebConfiguration.class}; // a configuration that extends the WebMvcConfigurerAdapter as seen above.
  }

  @Override
  protected String[] getServletMappings() {
    return new String[] {"/"};
  }

  protected Filter[] getServletFilters() {
    return return new Filter[] {new OpenSessionInViewFilter()};
  }

}