This chapter covers the Spring Framework implementation of the Inversion of Control (IoC) [1]principle. IoC is also known as dependency injection (DI). It is a process whereby objects define their dependencies, that is, the other objects they work with, only through constructor arguments, arguments to a factory method, or properties that are set on the object instance after it is constructed or returned from a factory method. The container then injects those dependencies when it creates the bean. This process is fundamentally the inverse, hence the name Inversion of Control (IoC), of the bean itself controlling the instantiation or location of its dependencies by using direct construction of classes, or a mechanism such as the Service Locator pattern.
The org.springframework.beans and
org.springframework.context packages are the basis for
Spring Framework's IoC container. The BeanFactory interface provides an advanced
configuration mechanism capable of managing any type of object.
ApplicationContext is a sub-interface of
BeanFactory. It adds easier integration
with Spring's AOP features; message resource handling (for use in
internationalization), event publication; and application-layer specific
contexts such as the WebApplicationContext
for use in web applications.
In short, the BeanFactory provides the
configuration framework and basic functionality, and the
ApplicationContext adds more
enterprise-specific functionality. The
ApplicationContext is a complete superset
of the BeanFactory, and is used exclusively
in this chapter in descriptions of Spring's IoC container.
For
more information on using the BeanFactory instead
of the ApplicationContext, refer to Section 4.15, “The BeanFactory”.
In Spring, the objects that form the backbone of your application and that are managed by the Spring IoC container are called beans. A bean is an object that is instantiated, assembled, and otherwise managed by a Spring IoC container. Otherwise, a bean is simply one of many objects in your application. Beans, and the dependencies among them, are reflected in the configuration metadata used by a container.
The interface
org.springframework.context.ApplicationContext
represents the Spring IoC container and is responsible for instantiating,
configuring, and assembling the aforementioned beans. The container gets
its instructions on what objects to instantiate, configure, and assemble
by reading configuration metadata. The configuration metadata is
represented in XML, Java annotations, or Java code. It allows you to
express the objects that compose your application and the rich
interdependencies between such objects.
Several implementations of the
ApplicationContext interface are supplied
out-of-the-box with Spring. In standalone applications it is common to
create an instance of ClassPathXmlApplicationContext or FileSystemXmlApplicationContext.
While XML has been the traditional format
for defining configuration metadata you can instruct the container to use
Java annotations or code as the metadata format by providng a small amount
of XML configuration to declaratively enable support for these additional
metadata formats.
In most application scenarios, explicit user code is not required to
instantiate one or more instances of a Spring IoC container. For example,
in a web application scenario, a simple eight (or so) lines of boilerplate
J2EE web descriptor XML in the web.xml file of the
application will typically suffice (see Section 4.14.4, “Convenient ApplicationContext
instantiation for web applications”).
If you are using the SpringSource Tool Suite Eclipse-powered development environment
or Spring Roo this
boilerplate configuration can be easily created with few mouse clicks or
keystrokes.
The following diagram is a high-level view of how Spring works. Your
application classes are combined with configuration metadata so that after
the ApplicationContext is created and initialized,
you have a fully configured and executable system or application.
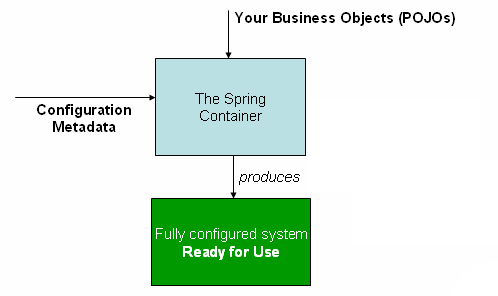
The Spring IoC container
As the preceding diagram shows, the Spring IoC container consumes a form of configuration metadata; this configuration metadata represents how you as an application developer tell the Spring container to instantiate, configure, and assemble the objects in your application.
Configuration metadata is traditionally supplied in a simple and intuitive XML format, which is what most of this chapter uses to convey key concepts and features of the Spring IoC container.
![[Note]](images/note.gif) | Note |
|---|---|
XML-based metadata is not the only allowed form of configuration metadata. The Spring IoC container itself is totally decoupled from the format in which this configuration metadata is actually written. |
For information about using other forms of metadata with the Spring container, see:
Annotation-based configuration: Spring 2.5 introduced support for annotation-based configuration metadata.
Java-based configuration: Starting with Spring 3.0, many features provided by the Spring JavaConfig project became part of the core Spring Framework. Thus you can define beans external to your application classes by using Java rather than XML files. To use these new features, see the
@Configuration,@Bean, @Importand@DependsOnannotations.
Spring configuration consists of at least one and typically more
than one bean definition that the container must manage. XML-based
configuration metadata shows these beans configured as
<bean/> elements inside a top-level
<beans/> element.
These bean definitions correspond to the actual objects that make up
your application. Typically you define service layer objects, data
access objects (DAOs), presentation objects such as Struts
Action instances, infrastructure objects
such as Hibernate SessionFactories, JMS
Queues, and so forth. Typically one does
not configure fine-grained domain objects in the container, because it
is usually the responsibility of DAOs and business logic to create and
load domain objects. However, you can use Spring's integration with
AspectJ to configure objects that have been created outside the control
of an IoC container. See Using
AspectJ to dependency-inject domain objects with Spring.
The following example shows the basic structure of XML-based configuration metadata:
<?xml version="1.0" encoding="UTF-8"?>
<beans xmlns="http://www.springframework.org/schema/beans"
       xmlns:xsi="http://www.w3.org/2001/XMLSchema-instance"
       xsi:schemaLocation="http://www.springframework.org/schema/beans
           http://www.springframework.org/schema/beans/spring-beans.xsd">

  <bean id="..." class="...">
    <!-- collaborators and configuration for this bean go here -->
  </bean>

  <bean id="..." class="...">
    <!-- collaborators and configuration for this bean go here -->
  </bean>

  <!-- more bean definitions go here -->

</beans>
The id attribute is a string that you use to
identify the individual bean definition. The class
attribute defines the type of the bean and uses the fully qualified
classname. The value of the id attribute refers to collaborating
objects. The XML for referring to collaborating objects is not shown in
this example; see Dependencies
for more information.
Instantiating a Spring IoC container is straightforward. The
location path or paths supplied to an
ApplicationContext constructor are
actually resource strings that allow the container to load configuration
metadata from a variety of external resources such as the local file
system, from the Java CLASSPATH, and so on.
ApplicationContext context =
new ClassPathXmlApplicationContext(new String[] {"services.xml", "daos.xml"}); | Note |
|---|---|
After you learn about Spring's IoC container, you may want to know
more about Spring's |
The following example shows the service layer objects
(services.xml) configuration file:
<?xml version="1.0" encoding="UTF-8"?>
<beans xmlns="http://www.springframework.org/schema/beans"
       xmlns:xsi="http://www.w3.org/2001/XMLSchema-instance"
       xsi:schemaLocation="http://www.springframework.org/schema/beans
           http://www.springframework.org/schema/beans/spring-beans.xsd">

  <!-- services -->

  <bean id="petStore"
        class="org.springframework.samples.jpetstore.services.PetStoreServiceImpl">
    <property name="accountDao" ref="accountDao"/>
    <property name="itemDao" ref="itemDao"/>
    <!-- additional collaborators and configuration for this bean go here -->
  </bean>

  <!-- more bean definitions for services go here -->

</beans>
The following example shows the data access objects
daos.xml file:
<?xml version="1.0" encoding="UTF-8"?>
<beans xmlns="http://www.springframework.org/schema/beans"
       xmlns:xsi="http://www.w3.org/2001/XMLSchema-instance"
       xsi:schemaLocation="http://www.springframework.org/schema/beans
           http://www.springframework.org/schema/beans/spring-beans.xsd">

  <bean id="accountDao"
      class="org.springframework.samples.jpetstore.dao.ibatis.SqlMapAccountDao">
    <!-- additional collaborators and configuration for this bean go here -->
  </bean>

  <bean id="itemDao" class="org.springframework.samples.jpetstore.dao.ibatis.SqlMapItemDao">
    <!-- additional collaborators and configuration for this bean go here -->
  </bean>

  <!-- more bean definitions for data access objects go here -->

</beans>
In the preceding example, the service layer consists of the class
PetStoreServiceImpl, and two data access objects
of the type SqlMapAccountDao and SqlMapItemDao
are based on the iBatis
Object/Relational mapping framework. The property
name element refers to the name of the JavaBean property, and
the ref element refers to the name of another bean
definition. This linkage between id and ref elements expresses the
dependency between collaborating objects. For details of configuring an
object's dependencies, see Dependencies.
It can be useful to have bean definitions span multiple XML files. Often each individual XML configuration file represents a logical layer or module in your architecture.
You can use the application context constructor to load bean
definitions from all these XML fragments. This constructor takes
multiple Resource locations, as was
shown in the previous section. Alternatively, use one or more
occurrences of the <import/> element to load
bean definitions from another file or files. For example:
<beans> <import resource="services.xml"/> <import resource="resources/messageSource.xml"/> <import resource="/resources/themeSource.xml"/> <bean id="bean1" class="..."/> <bean id="bean2" class="..."/> </beans>
In the preceding example, external bean definitions are loaded
from three files, services.xml,
messageSource.xml, and
themeSource.xml. All location paths are relative to
the definition file doing the importing, so
services.xml must be in the same directory or
classpath location as the file doing the importing, while
messageSource.xml and
themeSource.xml must be in a
resources location below the location of the
importing file. As you can see, a leading slash is ignored, but given
that these paths are relative, it is better form not to use the slash
at all. The contents of the files being imported, including the top
level <beans/> element, must be valid XML
bean definitions according to the Spring Schema or DTD.
| Note |
|---|---|
It is possible, but not recommended, to reference files in parent directories using a relative "../" path. Doing so creates a dependency on a file that is outside the current application. In particular, this reference is not recommended for "classpath:" URLs (for example, "classpath:../services.xml"), where the runtime resolution process chooses the "nearest" classpath root and then looks into its parent directory. Classpath configuration changes may lead to the choice of a different, incorrect directory. You can always use fully qualified resource locations instead of relative paths: for example, "file:C:/config/services.xml" or "classpath:/config/services.xml". However, be aware that you are coupling your application's configuration to specific absolute locations. It is generally preferable to keep an indirection for such absolute locations, for example, through "${...}" placeholders that are resolved against JVM system properties at runtime. |
The ApplicationContext is the
interface for an advanced factory capable of maintaining a registry of
different beans and their dependencies. Using the method T
getBean(String name, Class<T> requiredType) you can
retrieve instances of your beans.
The ApplicationContext enables you to
read bean definitions and access them as follows:
// create and configure beans ApplicationContext context = new ClassPathXmlApplicationContext(new String[] {"services.xml", "daos.xml"}); // retrieve configured instance PetStoreServiceImpl service = context.getBean("petStore", PetStoreServiceImpl.class); // use configured instance List userList service.getUsernameList();
You use getBean() to retrieve instances of
your beans. The ApplicationContext
interface has a few other methods for retrieving beans, but ideally your
application code should never use them. Indeed, your application code
should have no calls to the getBean() method at
all, and thus no dependency on Spring APIs at all. For example, Spring's
integration with web frameworks provides for dependency injection for
various web framework classes such as controllers and JSF-managed
beans.
A Spring IoC container manages one or more beans.
These beans are created with the configuration metadata that you supply to
the container, for example, in the form of XML
<bean/> definitions.
Within the container itself, these bean definitions are represented as
BeanDefinition objects, which contain
(among other information) the following metadata:
A package-qualified class name: typically the actual implementation class of the bean being defined.
Bean behavioral configuration elements, which state how the bean should behave in the container (scope, lifecycle callbacks, and so forth).
References to other beans that are needed for the bean to do its work; these references are also called collaborators or dependencies.
Other configuration settings to set in the newly created object, for example, the number of connections to use in a bean that manages a connection pool, or the size limit of the pool.
This metadata translates to a set of properties that make up each bean definition.
Table 4.1. The bean definition
| Property | Explained in... |
|---|---|
| class | |
| name | |
| scope | |
| constructor arguments | |
| properties | |
| autowiring mode | |
| lazy-initialization mode | |
| initialization method | |
| destruction method |
In addition to bean definitions that contain information on how to
create a specific bean, the
ApplicationContext implementations also
permit the registration of existing objects that are created outside the
container, by users. This is done by accessing the ApplicationContext's
BeanFactory via the method getBeanFactory() which
returns the BeanFactory implementation
DefaultListableBeanFactory.
DefaultListableBeanFactory supports this
registration through the methods
registerSingleton(..) and
registerBeanDefinition(..). However, typical
applications work solely with beans defined through metadata bean
definitions.
Every bean has one or more identifiers. These identifiers must be unique within the container that hosts the bean. A bean usually has only one identifier, but if it requires more than one, the extra ones can be considered aliases.
In XML-based configuration metadata, you use the
id and/or name attributes to
specify the bean identifier(s). The id attribute
allows you to specify exactly one id. Conventionally these names are
alphanumeric ('myBean', 'fooService', etc), but may special characters
as well. If you want to introduce other aliases to the bean, you can
also specify them in the name attribute, separated by
a comma (,), semicolon (;), or
white space. As a historical note, in versions prior to Spring 3.1, the
id attribute was typed as an
xsd:ID, which constrained possible characters. As of
3.1, it is now xsd:string. Note that bean id
uniqueness is still enforced by the container, though no longer by XML
parsers.
You are not required to supply a name or id for a bean. If no name
or id is supplied explicitly, the container generates a unique name for
that bean. However, if you want to refer to that bean by name, through
the use of the ref element or Service Locator style lookup,
you must provide a name. Motivations for not supplying a name are
related to using inner beans
and autowiring
collaborators.
In a bean definition itself, you can supply more than one name for
the bean, by using a combination of up to one name specified by the
id attribute, and any number of other names in the
name attribute. These names can be equivalent
aliases to the same bean, and are useful for some situations, such as
allowing each component in an application to refer to a common
dependency by using a bean name that is specific to that component
itself.
Specifying all aliases where the bean is actually defined is not
always adequate, however. It is sometimes desirable to introduce an
alias for a bean that is defined elsewhere. This is commonly the case
in large systems where configuration is split amongst each subsystem,
each subsystem having its own set of object definitions. In XML-based
configuration metadata, you can use the
<alias/> element to accomplish this.
<alias name="fromName" alias="toName"/>
In this case, a bean in the same container which is named
fromName, may also after the use of this alias
definition, be referred to as toName.
For example, the configuration metadata for subsystem A may refer to a DataSource via the name 'subsystemA-dataSource. The configuration metadata for subsystem B may refer to a DataSource via the name 'subsystemB-dataSource'. When composing the main application that uses both these subsystems the main application refers to the DataSource via the name 'myApp-dataSource'. To have all three names refer to the same object you add to the MyApp configuration metadata the following aliases definitions:
<alias name="subsystemA-dataSource" alias="subsystemB-dataSource"/> <alias name="subsystemA-dataSource" alias="myApp-dataSource" />
Now each component and the main application can refer to the dataSource through a name that is unique and guaranteed not to clash with any other definition (effectively creating a namespace), yet they refer to the same bean.
A bean definition essentially is a recipe for creating one or more objects. The container looks at the recipe for a named bean when asked, and uses the configuration metadata encapsulated by that bean definition to create (or acquire) an actual object.
If you use XML-based configuration metadata, you specify the type
(or class) of object that is to be instantiated in the
class attribute of the
<bean/> element. This class
attribute, which internally is a Class property
on a BeanDefinition instance, is usually
mandatory. (For exceptions, see Section 4.3.2.3, “Instantiation using an instance factory method” and Section 4.7, “Bean definition inheritance”.) You use the
Class property in one of two ways:
Typically, to specify the bean class to be constructed in the case where the container itself directly creates the bean by calling its constructor reflectively, somewhat equivalent to Java code using the
newoperator.
To specify the actual class containing the
staticfactory method that will be invoked to create the object, in the less common case where the container invokes astatic, factory method on a class to create the bean. The object type returned from the invocation of thestaticfactory method may be the same class or another class entirely.
When you create a bean by the constructor approach, all normal classes are usable by and compatible with Spring. That is, the class being developed does not need to implement any specific interfaces or to be coded in a specific fashion. Simply specifying the bean class should suffice. However, depending on what type of IoC you use for that specific bean, you may need a default (empty) constructor.
The Spring IoC container can manage virtually any class you want it to manage; it is not limited to managing true JavaBeans. Most Spring users prefer actual JavaBeans with only a default (no-argument) constructor and appropriate setters and getters modeled after the properties in the container. You can also have more exotic non-bean-style classes in your container. If, for example, you need to use a legacy connection pool that absolutely does not adhere to the JavaBean specification, Spring can manage it as well.
With XML-based configuration metadata you can specify your bean class as follows:
<bean id="exampleBean" class="examples.ExampleBean"/> <bean name="anotherExample" class="examples.ExampleBeanTwo"/>
For details about the mechanism for supplying arguments to the constructor (if required) and setting object instance properties after the object is constructed, see Injecting Dependencies.
When defining a bean that you create with a static factory method,
you use the class attribute to specify the class
containing the static factory method and an
attribute named factory-method to specify the name
of the factory method itself. You should be able to call this method
(with optional arguments as described later) and return a live object,
which subsequently is treated as if it had been created through a
constructor. One use for such a bean definition is to call
static factories in legacy code.
The following bean definition specifies that the bean will be
created by calling a factory-method. The definition does not specify
the type (class) of the returned object, only the class containing the
factory method. In this example, the
createInstance() method must be a
static method.
<bean id="clientService" class="examples.ClientService" factory-method="createInstance"/>
public class ClientService { private static ClientService clientService = new ClientService(); private ClientService() {} public static ClientService createInstance() { return clientService; } }
For details about the mechanism for supplying (optional) arguments to the factory method and setting object instance properties after the object is returned from the factory, see Dependencies and configuration in detail.
Similar to instantiation through a static factory
method, instantiation with an instance factory method invokes a
non-static method of an existing bean from the container to create a
new bean. To use this mechanism, leave the class
attribute empty, and in the factory-bean
attribute, specify the name of a bean in the current (or
parent/ancestor) container that contains the instance method that is
to be invoked to create the object. Set the name of the factory method
itself with the factory-method attribute.
<!-- the factory bean, which contains a method called createInstance() --> <bean id="serviceLocator" class="examples.DefaultServiceLocator"> <!-- inject any dependencies required by this locator bean --> </bean> <!-- the bean to be created via the factory bean --> <bean id="clientService" factory-bean="serviceLocator" factory-method="createClientServiceInstance"/>
public class DefaultServiceLocator { private static ClientService clientService = new ClientServiceImpl(); private DefaultServiceLocator() {} public ClientService createClientServiceInstance() { return clientService; } }
One factory class can also hold more than one factory method as shown here:
<bean id="serviceLocator" class="examples.DefaultServiceLocator"> <!-- inject any dependencies required by this locator bean --> </bean> <bean id="clientService" factory-bean="serviceLocator" factory-method="createClientServiceInstance"/> <bean id="accountService" factory-bean="serviceLocator" factory-method="createAccountServiceInstance"/>
public class DefaultServiceLocator { private static ClientService clientService = new ClientServiceImpl(); private static AccountService accountService = new AccountServiceImpl(); private DefaultServiceLocator() {} public ClientService createClientServiceInstance() { return clientService; } public AccountService createAccountServiceInstance() { return accountService; } }
This approach shows that the factory bean itself can be managed and configured through dependency injection (DI). See Dependencies and configuration in detail.
| Note |
|---|---|
In Spring documentation, factory bean
refers to a bean that is configured in the Spring container that
will create objects through an instance or static
factory method. By contrast,
|
A typical enterprise application does not consist of a single object (or bean in the Spring parlance). Even the simplest application has a few objects that work together to present what the end-user sees as a coherent application. This next section explains how you go from defining a number of bean definitions that stand alone to a fully realized application where objects collaborate to achieve a goal.
Dependency injection (DI) is a process whereby objects define their dependencies, that is, the other objects they work with, only through constructor arguments, arguments to a factory method, or properties that are set on the object instance after it is constructed or returned from a factory method. The container then injects those dependencies when it creates the bean. This process is fundamentally the inverse, hence the name Inversion of Control (IoC), of the bean itself controlling the instantiation or location of its dependencies on its own by using direct construction of classes, or the Service Locator pattern.
Code is cleaner with the DI principle and decoupling is more effective when objects are provided with their dependencies. The object does not look up its dependencies, and does not know the location or class of the dependencies. As such, your classes become easier to test, in particular when the dependencies are on interfaces or abstract base classes, which allow for stub or mock implementations to be used in unit tests.
DI exists in two major variants, Constructor-based dependency injection and Setter-based dependency injection.
Constructor-based DI is accomplished by the
container invoking a constructor with a number of arguments, each
representing a dependency. Calling a static factory
method with specific arguments to construct the bean is nearly
equivalent, and this discussion treats arguments to a constructor and to
a static factory method similarly. The following
example shows a class that can only be dependency-injected with
constructor injection. Notice that there is nothing
special about this class, it is a POJO that has no
dependencies on container specific interfaces, base classes or
annotations.
public class SimpleMovieLister { // the SimpleMovieLister has a dependency on a MovieFinder private MovieFinder movieFinder; // a constructor so that the Spring container can 'inject' a MovieFinder public SimpleMovieLister(MovieFinder movieFinder) { this.movieFinder = movieFinder; } // business logic that actually 'uses' the injected MovieFinder is omitted... }
Constructor argument resolution matching occurs using the argument's type. If no potential ambiguity exists in the constructor arguments of a bean definition, then the order in which the constructor arguments are defined in a bean definition is the order in which those arguments are supplied to the appropriate constructor when the bean is being instantiated. Consider the following class:
package x.y; public class Foo { public Foo(Bar bar, Baz baz) { // ... } }
No potential ambiguity exists, assuming that
Bar and Baz classes are
not related by inheritance. Thus the following configuration works
fine, and you do not need to specify the constructor argument indexes
and/or types explicitly in the
<constructor-arg/> element.
<beans> <bean id="foo" class="x.y.Foo"> <constructor-arg ref="bar"/> <constructor-arg ref="baz"/> </bean> <bean id="bar" class="x.y.Bar"/> <bean id="baz" class="x.y.Baz"/> </beans>
When another bean is referenced, the type is known, and matching
can occur (as was the case with the preceding example). When a simple
type is used, such as
<value>true<value>, Spring cannot
determine the type of the value, and so cannot match by type without
help. Consider the following class:
package examples; public class ExampleBean { // No. of years to the calculate the Ultimate Answer private int years; // The Answer to Life, the Universe, and Everything private String ultimateAnswer; public ExampleBean(int years, String ultimateAnswer) { this.years = years; this.ultimateAnswer = ultimateAnswer; } }
In the preceding scenario, the container
can use type matching with simple types if you
explicitly specify the type of the constructor argument using the
type attribute. For example:
<bean id="exampleBean" class="examples.ExampleBean"> <constructor-arg type="int" value="7500000"/> <constructor-arg type="java.lang.String" value="42"/> </bean>
Use the index attribute to specify explicitly
the index of constructor arguments. For example:
<bean id="exampleBean" class="examples.ExampleBean"> <constructor-arg index="0" value="7500000"/> <constructor-arg index="1" value="42"/> </bean>
In addition to resolving the ambiguity of multiple simple values, specifying an index resolves ambiguity where a constructor has two arguments of the same type. Note that the index is 0 based.
As of Spring 3.0 you can also use the constructor parameter name for value disambiguation:
<bean id="exampleBean" class="examples.ExampleBean"> <constructor-arg name="years" value="7500000"/> <constructor-arg name="ultimateanswer" value="42"/> </bean>
Keep in mind that to make this work out of the box your code
must be compiled with the debug flag enabled so that Spring can
look up the parameter name from the constructor. If you can't compile
your code with debug flag (or don't want to) you can use
@ConstructorProperties
JDK annotation to explicitly name your constructor arguments. The
sample class would then have to look as follows:
package examples; public class ExampleBean { // Fields omitted @ConstructorProperties({"years", "ultimateAnswer"}) public ExampleBean(int years, String ultimateAnswer) { this.years = years; this.ultimateAnswer = ultimateAnswer; } }
Setter-based DI is accomplished by the
container calling setter methods on your beans after invoking a
no-argument constructor or no-argument static factory
method to instantiate your bean.
The following example shows a class that can only be dependency-injected using pure setter injection. This class is conventional Java. It is a POJO that has no dependencies on container specific interfaces, base classes or annotations.
public class SimpleMovieLister { // the SimpleMovieLister has a dependency on the MovieFinder private MovieFinder movieFinder; // a setter method so that the Spring container can 'inject' a MovieFinder public void setMovieFinder(MovieFinder movieFinder) { this.movieFinder = movieFinder; } // business logic that actually 'uses' the injected MovieFinder is omitted... }
The ApplicationContext supports
constructor- and setter-based DI for the beans it manages. It also
supports setter-based DI after some dependencies are already injected
through the constructor approach. You configure the dependencies in the
form of a BeanDefinition, which you use
with PropertyEditor instances to convert
properties from one format to another. However, most Spring users do not
work with these classes directly (programmatically), but rather with an
XML definition file that is then converted internally into instances of
these classes, and used to load an entire Spring IoC container
instance.
The container performs bean dependency resolution as follows:
The
ApplicationContextis created and initialized with configuration metadata that describes all the beans. Configuration metadata can be specified via XML, Java code or annotations.For each bean, its dependencies are expressed in the form of properties, constructor arguments, or arguments to the static-factory method if you are using that instead of a normal constructor. These dependencies are provided to the bean, when the bean is actually created.
Each property or constructor argument is an actual definition of the value to set, or a reference to another bean in the container.
Each property or constructor argument which is a value is converted from its specified format to the actual type of that property or constructor argument. By default Spring can convert a value supplied in string format to all built-in types, such as
int,long,String,boolean, etc.
The Spring container validates the configuration of each bean as the container is created, including the validation of whether bean reference properties refer to valid beans. However, the bean properties themselves are not set until the bean is actually created. Beans that are singleton-scoped and set to be pre-instantiated (the default) are created when the container is created. Scopes are defined in Section 4.5, “Bean scopes” Otherwise, the bean is created only when it is requested. Creation of a bean potentially causes a graph of beans to be created, as the bean's dependencies and its dependencies' dependencies (and so on) are created and assigned.
You can generally trust Spring to do the right thing. It detects
configuration problems, such as references to non-existent beans and
circular dependencies, at container load-time. Spring sets properties
and resolves dependencies as late as possible, when the bean is actually
created. This means that a Spring container which has loaded correctly
can later generate an exception when you request an object if there is a
problem creating that object or one of its dependencies. For example,
the bean throws an exception as a result of a missing or invalid
property. This potentially delayed visibility of some configuration
issues is why ApplicationContext
implementations by default pre-instantiate singleton beans. At the cost
of some upfront time and memory to create these beans before they are
actually needed, you discover configuration issues when the
ApplicationContext is created, not later.
You can still override this default behavior so that singleton beans
will lazy-initialize, rather than be pre-instantiated.
If no circular dependencies exist, when one or more collaborating beans are being injected into a dependent bean, each collaborating bean is totally configured prior to being injected into the dependent bean. This means that if bean A has a dependency on bean B, the Spring IoC container completely configures bean B prior to invoking the setter method on bean A. In other words, the bean is instantiated (if not a pre-instantiated singleton), its dependencies are set, and the relevant lifecycle methods (such as a configured init method or the InitializingBean callback method) are invoked.
The following example uses XML-based configuration metadata for setter-based DI. A small part of a Spring XML configuration file specifies some bean definitions:
<bean id="exampleBean" class="examples.ExampleBean"> <!-- setter injection using the nested <ref/> element --> <property name="beanOne"><ref bean="anotherExampleBean"/></property> <!-- setter injection using the neater 'ref' attribute --> <property name="beanTwo" ref="yetAnotherBean"/> <property name="integerProperty" value="1"/> </bean> <bean id="anotherExampleBean" class="examples.AnotherBean"/> <bean id="yetAnotherBean" class="examples.YetAnotherBean"/>
public class ExampleBean { private AnotherBean beanOne; private YetAnotherBean beanTwo; private int i; public void setBeanOne(AnotherBean beanOne) { this.beanOne = beanOne; } public void setBeanTwo(YetAnotherBean beanTwo) { this.beanTwo = beanTwo; } public void setIntegerProperty(int i) { this.i = i; } }
In the preceding example, setters are declared to match against the properties specified in the XML file. The following example uses constructor-based DI:
<bean id="exampleBean" class="examples.ExampleBean"> <!-- constructor injection using the nested <ref/> element --> <constructor-arg> <ref bean="anotherExampleBean"/> </constructor-arg> <!-- constructor injection using the neater 'ref' attribute --> <constructor-arg ref="yetAnotherBean"/> <constructor-arg type="int" value="1"/> </bean> <bean id="anotherExampleBean" class="examples.AnotherBean"/> <bean id="yetAnotherBean" class="examples.YetAnotherBean"/>
public class ExampleBean { private AnotherBean beanOne; private YetAnotherBean beanTwo; private int i; public ExampleBean( AnotherBean anotherBean, YetAnotherBean yetAnotherBean, int i) { this.beanOne = anotherBean; this.beanTwo = yetAnotherBean; this.i = i; } }
The constructor arguments specified in the bean definition will be
used as arguments to the constructor of the
ExampleBean.
Now consider a variant of this example, where instead of using a
constructor, Spring is told to call a static factory
method to return an instance of the object:
<bean id="exampleBean" class="examples.ExampleBean" factory-method="createInstance"> <constructor-arg ref="anotherExampleBean"/> <constructor-arg ref="yetAnotherBean"/> <constructor-arg value="1"/> </bean> <bean id="anotherExampleBean" class="examples.AnotherBean"/> <bean id="yetAnotherBean" class="examples.YetAnotherBean"/>
public class ExampleBean { // a private constructor private ExampleBean(...) { ... } // a static factory method; the arguments to this method can be // considered the dependencies of the bean that is returned, // regardless of how those arguments are actually used. public static ExampleBean createInstance ( AnotherBean anotherBean, YetAnotherBean yetAnotherBean, int i) { ExampleBean eb = new ExampleBean (...); // some other operations... return eb; } }
Arguments to the static factory method are
supplied via <constructor-arg/> elements,
exactly the same as if a constructor had actually been used. The type of
the class being returned by the factory method does not have to be of
the same type as the class that contains the static
factory method, although in this example it is. An instance (non-static)
factory method would be used in an essentially identical fashion (aside
from the use of the factory-bean attribute instead of
the class attribute), so details will not be
discussed here.
As mentioned in the previous section, you can define bean properties
and constructor arguments as references to other managed beans
(collaborators), or as values defined inline. Spring's XML-based
configuration metadata supports sub-element types within its
<property/> and
<constructor-arg/> elements for this
purpose.
The value attribute of the
<property/> element specifies a property or
constructor argument as a human-readable string representation. As mentioned previously,
JavaBeans PropertyEditors are used to convert these
string values from a String to the actual type of
the property or argument.
<bean id="myDataSource" class="org.apache.commons.dbcp.BasicDataSource" destroy-method="close"> <!-- results in a setDriverClassName(String) call --> <property name="driverClassName" value="com.mysql.jdbc.Driver"/> <property name="url" value="jdbc:mysql://localhost:3306/mydb"/> <property name="username" value="root"/> <property name="password" value="masterkaoli"/> </bean>
The following example uses the p-namespace for even more succinct XML configuration.
<beans xmlns="http://www.springframework.org/schema/beans" xmlns:xsi="http://www.w3.org/2001/XMLSchema-instance" xmlns:p="http://www.springframework.org/schema/p" xsi:schemaLocation="http://www.springframework.org/schema/beans http://www.springframework.org/schema/beans/spring-beans.xsd"> <bean id="myDataSource" class="org.apache.commons.dbcp.BasicDataSource" destroy-method="close" p:driverClassName="com.mysql.jdbc.Driver" p:url="jdbc:mysql://localhost:3306/mydb" p:username="root" p:password="masterkaoli"/> </beans>
The preceding XML is more succinct; however, typos are discovered at runtime rather than design time, unless you use an IDE such as IntelliJ IDEA or the SpringSource Tool Suite (STS) that support automatic property completion when you create bean definitions. Such IDE assistance is highly recommended.
You can also configure a java.util.Properties
instance as:
<bean id="mappings" class="org.springframework.beans.factory.config.PropertyPlaceholderConfigurer"> <!-- typed as a java.util.Properties --> <property name="properties"> <value> jdbc.driver.className=com.mysql.jdbc.Driver jdbc.url=jdbc:mysql://localhost:3306/mydb </value> </property> </bean>
The Spring container converts the text inside the
<value/> element into a
java.util.Properties instance by using the
JavaBeans PropertyEditor mechanism. This
is a nice shortcut, and is one of a few places where the Spring team do
favor the use of the nested <value/> element
over the value attribute style.
The idref element is simply an error-proof way
to pass the id (string value - not a reference)
of another bean in the container to a
<constructor-arg/> or
<property/> element.
<bean id="theTargetBean" class="..."/> <bean id="theClientBean" class="..."> <property name="targetName"> <idref bean="theTargetBean" /> </property> </bean>
The above bean definition snippet is exactly equivalent (at runtime) to the following snippet:
<bean id="theTargetBean" class="..." /> <bean id="client" class="..."> <property name="targetName" value="theTargetBean" /> </bean>
The first form is preferable to the second, because using the
idref tag allows the container to validate
at deployment time that the referenced, named
bean actually exists. In the second variation, no validation is
performed on the value that is passed to the
targetName property of the
client bean. Typos are only discovered (with most
likely fatal results) when the client bean is
actually instantiated. If the client bean is a
prototype bean, this typo
and the resulting exception may only be discovered long after the
container is deployed.
Additionally, if the referenced bean is in the same XML unit, and
the bean name is the bean id, you can use the
local attribute, which allows the XML parser itself
to validate the bean id earlier, at XML document parse time.
<property name="targetName"> <!-- a bean with id 'theTargetBean' must exist; otherwise an exception will be thrown --> <idref local="theTargetBean"/> </property>
A common place (at least in versions earlier than Spring 2.0)
where the <idref/> element brings value is in the configuration
of AOP interceptors in a
ProxyFactoryBean bean definition. Using
<idref/> elements when you specify the interceptor names
prevents you from misspelling an interceptor id.
The ref element is the final element inside a
<constructor-arg/> or
<property/> definition element. Here you set
the value of the specified property of a bean to be a reference to
another bean (a collaborator) managed by the container. The referenced
bean is a dependency of the bean whose property will be set, and it is
initialized on demand as needed before the property is set. (If the
collaborator is a singleton bean, it may be initialized already by the
container.) All references are ultimately a reference to another object.
Scoping and validation depend on whether you specify the id/name of the
other object through the
bean, or
local,parent attributes.
Specifying the target bean through the bean
attribute of the <ref/> tag is the most general
form, and allows creation of a reference to any bean in the same
container or parent container, regardless of whether it is in the same
XML file. The value of the bean attribute may be the
same as the id attribute of the target bean, or as
one of the values in the name attribute of the target
bean.
<ref bean="someBean"/>
Specifying the target bean through the local
attribute leverages the ability of the XML parser to validate XML id
references within the same file. The value of the
local attribute must be the same as the
id attribute of the target bean. The XML parser
issues an error if no matching element is found in the same file. As
such, using the local variant is the best choice (in order to know about
errors as early as possible) if the target bean is in the same XML
file.
<ref local="someBean"/>
Specifying the target bean through the parent
attribute creates a reference to a bean that is in a parent container of
the current container. The value of the parent
attribute may be the same as either the id attribute
of the target bean, or one of the values in the name
attribute of the target bean, and the target bean must be in a parent
container of the current one. You use this bean reference variant mainly
when you have a hierarchy of containers and you want to wrap an existing
bean in a parent container with a proxy that will have the same name as
the parent bean.
<!-- in the parent context --> <bean id="accountService" class="com.foo.SimpleAccountService"> <!-- insert dependencies as required as here --> </bean>
<!-- in the child (descendant) context --> <bean id="accountService" <-- bean name is the same as the parent bean --> class="org.springframework.aop.framework.ProxyFactoryBean"> <property name="target"> <ref parent="accountService"/> <!-- notice how we refer to the parent bean --> </property> <!-- insert other configuration and dependencies as required here --> </bean>
A <bean/> element inside the
<property/> or
<constructor-arg/> elements defines a so-called
inner bean.
<bean id="outer" class="..."> <!-- instead of using a reference to a target bean, simply define the target bean inline --> <property name="target"> <bean class="com.example.Person"> <!-- this is the inner bean --> <property name="name" value="Fiona Apple"/> <property name="age" value="25"/> </bean> </property> </bean>
An inner bean definition does not require a defined id or name; the
container ignores these values. It also ignores the
scope flag. Inner beans are
always anonymous and they are
always scoped as prototypes. It is
not possible to inject inner beans into
collaborating beans other than into the enclosing bean.
In the <list/>,
<set/>, <map/>, and
<props/> elements, you set the properties and
arguments of the Java Collection types
List, Set,
Map, and
Properties, respectively.
<bean id="moreComplexObject" class="example.ComplexObject"> <!-- results in a setAdminEmails(java.util.Properties) call --> <property name="adminEmails"> <props> <prop key="administrator">[email protected]</prop> <prop key="support">[email protected]</prop> <prop key="development">[email protected]</prop> </props> </property> <!-- results in a setSomeList(java.util.List) call --> <property name="someList"> <list> <value>a list element followed by a reference</value> <ref bean="myDataSource" /> </list> </property> <!-- results in a setSomeMap(java.util.Map) call --> <property name="someMap"> <map> <entry key="an entry" value="just some string"/> <entry key ="a ref" value-ref="myDataSource"/> </map> </property> <!-- results in a setSomeSet(java.util.Set) call --> <property name="someSet"> <set> <value>just some string</value> <ref bean="myDataSource" /> </set> </property> </bean>
The value of a map key or value, or a set value, can also again be any of the following elements:
bean | ref | idref | list | set | map | props | value | null
As of Spring 2.0, the container supports the
merging of collections. An application developer
can define a parent-style <list/>,
<map/>, <set/> or
<props/> element, and have child-style
<list/>, <map/>,
<set/> or <props/>
elements inherit and override values from the parent collection. That
is, the child collection's values are the result of merging the
elements of the parent and child collections, with the child's
collection elements overriding values specified in the parent
collection.
This section on merging discusses the parent-child bean mechanism. Readers unfamiliar with parent and child bean definitions may wish to read the relevant section before continuing.
The following example demonstrates collection merging:
<beans> <bean id="parent" abstract="true" class="example.ComplexObject"> <property name="adminEmails"> <props> <prop key="administrator">[email protected]</prop> <prop key="support">[email protected]</prop> </props> </property> </bean> <bean id="child" parent="parent"> <property name="adminEmails"> <!-- the merge is specified on the *child* collection definition --> <props merge="true"> <prop key="sales">[email protected]</prop> <prop key="support">[email protected]</prop> </props> </property> </bean> <beans>
Notice the use of the merge=true attribute on
the <props/> element of the
adminEmails property of the
child bean definition. When the
child bean is resolved and instantiated by the
container, the resulting instance has an
adminEmails Properties
collection that contains the result of the merging of the child's
adminEmails collection with the parent's
adminEmails collection.
[email protected] [email protected] [email protected]
The child Properties collection's value set
inherits all property elements from the parent
<props/>, and the child's value for the
support value overrides the value in the parent
collection.
This merging behavior applies similarly to the
<list/>, <map/>, and
<set/> collection types. In the specific case
of the <list/> element, the semantics
associated with the List collection type, that
is, the notion of an ordered collection of values,
is maintained; the parent's values precede all of the child list's
values. In the case of the Map,
Set, and
Properties collection types, no
ordering exists. Hence no ordering semantics are in effect for the
collection types that underlie the associated
Map,
Set, and
Properties implementation types that
the container uses internally.
You cannot merge different collection types (such as a
Map and a
List), and if you do attempt to do so
an appropriate Exception is thrown. The
merge attribute must be specified on the lower,
inherited, child definition; specifying the merge
attribute on a parent collection definition is redundant and will not
result in the desired merging. The merging feature is available only
in Spring 2.0 and later.
In Java 5 and later, you can use strongly typed collections (using
generic types). That is, it is possible to declare a
Collection type such that it can only
contain String elements (for example). If you
are using Spring to dependency-inject a strongly-typed
Collection into a bean, you can take
advantage of Spring's type-conversion support such that the elements
of your strongly-typed Collection
instances are converted to the appropriate type prior to being added
to the Collection.
public class Foo { private Map<String, Float> accounts; public void setAccounts(Map<String, Float> accounts) { this.accounts = accounts; } }
<beans> <bean id="foo" class="x.y.Foo"> <property name="accounts"> <map> <entry key="one" value="9.99"/> <entry key="two" value="2.75"/> <entry key="six" value="3.99"/> </map> </property> </bean> </beans>
When the accounts property of the
foo bean is prepared for injection, the generics
information about the element type of the strongly-typed
Map<String, Float> is available by
reflection. Thus Spring's type conversion infrastructure recognizes
the various value elements as being of type
Float, and the string values 9.99,
2.75, and 3.99 are converted into an
actual Float type.
Spring
treats empty arguments for properties and the like as empty
Strings. The following XML-based configuration
metadata snippet sets the email property to the empty
String value ("")
<bean class="ExampleBean"> <property name="email" value=""/> </bean>
The preceding example is equivalent to the following Java code:
exampleBean.setEmail(""). The
<null/> element handles null
values. For example:
<bean class="ExampleBean"> <property name="email"><null/></property> </bean>
The above configuration is equivalent to the following Java code:
exampleBean.setEmail(null).
The p-namespace enables you to use the bean
element's attributes, instead of nested
<property/> elements, to describe your property
values and/or collaborating beans.
Spring 2.0 and later supports extensible configuration formats with namespaces, which are based on an XML
Schema definition. The beans configuration format
discussed in this chapter is defined in an XML Schema document. However,
the p-namespace is not defined in an XSD file and exists only in the
core of Spring.
The following example shows two XML snippets that resolve to the same result: The first uses standard XML format and the second uses the p-namespace.
<beans xmlns="http://www.springframework.org/schema/beans" xmlns:xsi="http://www.w3.org/2001/XMLSchema-instance" xmlns:p="http://www.springframework.org/schema/p" xsi:schemaLocation="http://www.springframework.org/schema/beans http://www.springframework.org/schema/beans/spring-beans.xsd"> <bean name="classic" class="com.example.ExampleBean"> <property name="email" value="[email protected]"/> </bean> <bean name="p-namespace" class="com.example.ExampleBean" p:email="[email protected]"/> </beans>
The example shows an attribute in the p-namespace called email in the bean definition. This tells Spring to include a property declaration. As previously mentioned, the p-namespace does not have a schema definition, so you can set the name of the attribute to the property name.
This next example includes two more bean definitions that both have a reference to another bean:
<beans xmlns="http://www.springframework.org/schema/beans" xmlns:xsi="http://www.w3.org/2001/XMLSchema-instance" xmlns:p="http://www.springframework.org/schema/p" xsi:schemaLocation="http://www.springframework.org/schema/beans http://www.springframework.org/schema/beans/spring-beans.xsd"> <bean name="john-classic" class="com.example.Person"> <property name="name" value="John Doe"/> <property name="spouse" ref="jane"/> </bean> <bean name="john-modern" class="com.example.Person" p:name="John Doe" p:spouse-ref="jane"/> <bean name="jane" class="com.example.Person"> <property name="name" value="Jane Doe"/> </bean> </beans>
As you can see, this example includes not only a property value
using the p-namespace, but also uses a special format to declare
property references. Whereas the first bean definition uses
<property name="spouse" ref="jane"/> to create
a reference from bean john to bean
jane, the second bean definition uses
p:spouse-ref="jane" as an attribute to do the exact
same thing. In this case spouse is the property name,
whereas the -ref part indicates that this is not a
straight value but rather a reference to another bean.
| Note |
|---|---|
The p-namespace is not as flexible as the standard XML format. For
example, the format for declaring property references clashes with
properties that end in |
Similar to the Section 4.4.2.6, “XML shortcut with the p-namespace”, the c-namespace, newly introduced in Spring 3.1,
allows usage of inlined attributes for configuring the constructor arguments rather then nested constructor-arg
elements.
Let's review the examples from Section 4.4.1.1, “Constructor-based dependency injection” with the c namespace:
<beans xmlns="http://www.springframework.org/schema/beans" xmlns:xsi="http://www.w3.org/2001/XMLSchema-instance" xmlns:c="http://www.springframework.org/schema/c" xsi:schemaLocation="http://www.springframework.org/schema/beans http://www.springframework.org/schema/beans/spring-beans.xsd"> <bean id="bar" class="x.y.Bar"/> <bean id="baz" class="x.y.Baz"/> <-- 'traditional' declaration --> <bean id="foo" class="x.y.Foo"> <constructor-arg ref="bar"/> <constructor-arg ref="baz"/> <constructor-arg value="[email protected]"/> </bean> <-- 'c-namespace' declaration --> <bean id="foo" class="x.y.Foo" c:bar-ref="bar" c:baz-ref="baz" c:email="[email protected]"> </beans>
The c: namespace uses the same conventions as the p: one (trailing -ref for bean references)
for setting the constructor arguments by their names. And just as well, it needs to be declared even though it is not defined in an XSD schema
(but it exists inside the Spring core).
For the rare cases where the constructor argument names are not available (usually if the bytecode was compiled without debugging information), one can use fallback to the argument indexes:
<-- 'c-namespace' index declaration --> <bean id="foo" class="x.y.Foo" c:_0-ref="bar" c:_1-ref="baz">
| Note |
|---|---|
| Due to the XML grammar, the index notation requires the presence of the leading _ as XML attribute names cannot start with a number (even though some IDE allow it). |
In practice, the constructor resolution mechanism is quite efficient in matching arguments so unless one really needs to, we recommend using the name notation through-out your configuration.
You can use compound or nested property names when you set bean
properties, as long as all components of the path except the final
property name are not null. Consider the following
bean definition.
<bean id="foo" class="foo.Bar">
<property name="fred.bob.sammy" value="123" />
</bean>
The foo bean has a fred
property, which has a bob property, which has a
sammy property, and that final
sammy property is being set to the value
123. In order for this to work, the
fred property of foo, and the
bob property of fred must not be
null after the bean is constructed, or a
NullPointerException is thrown.
If a bean is a dependency of another that usually means that one bean
is set as a property of another. Typically you accomplish this with the
<ref/>
element in XML-based configuration metadata. However, sometimes
dependencies between beans are less direct; for example, a static
initializer in a class needs to be triggered, such as database driver
registration. The depends-on attribute can explicitly
force one or more beans to be initialized before the bean using this
element is initialized. The following example uses the
depends-on attribute to express a dependency on a
single bean:
<bean id="beanOne" class="ExampleBean" depends-on="manager"/>

<bean id="manager" class="ManagerBean" />
To express a dependency on multiple beans, supply a list of bean names
as the value of the depends-on attribute, with commas,
whitespace and semicolons, used as valid delimiters:
<bean id="beanOne" class="ExampleBean" depends-on="manager,accountDao">
<property name="manager" ref="manager" />
</bean>

<bean id="manager" class="ManagerBean" />
<bean id="accountDao" class="x.y.jdbc.JdbcAccountDao" />
| Note |
|---|---|
The |
By default, ApplicationContext
implementations eagerly create and configure all singleton beans as part of
the initialization process. Generally, this pre-instantiation is
desirable, because errors in the configuration or surrounding environment
are discovered immediately, as opposed to hours or even days later. When
this behavior is not desirable, you can prevent
pre-instantiation of a singleton bean by marking the bean definition as
lazy-initialized. A lazy-initialized bean tells the IoC container to
create a bean instance when it is first requested, rather than at
startup.
In XML, this behavior is controlled by the
lazy-init attribute on the
<bean/> element; for example:
<bean id="lazy" class="com.foo.ExpensiveToCreateBean" lazy-init="true"/>

<bean name="not.lazy" class="com.foo.AnotherBean"/>
When the preceding configuration is consumed by an
ApplicationContext, the bean named
lazy is not eagerly pre-instantiated when the
ApplicationContext is starting up, whereas
the not.lazy bean is eagerly pre-instantiated.
However, when a lazy-initialized bean is a dependency of a singleton
bean that is not lazy-initialized, the
ApplicationContext creates the
lazy-initialized bean at startup, because it must satisfy the singleton's
dependencies. The lazy-initialized bean is injected into a singleton bean
elsewhere that is not lazy-initialized.
You can also control lazy-initialization at the container level by
using the default-lazy-init attribute on the
<beans/> element; for example:
<beans default-lazy-init="true">
  <!-- no beans will be pre-instantiated... -->
</beans>
The Spring container can autowire relationships
between collaborating beans. You can allow Spring to resolve collaborators
(other beans) automatically for your bean by inspecting the contents of
the ApplicationContext. Autowiring has the
following advantages:
Autowiring can significantly reduce the need to specify properties or constructor arguments. (Other mechanisms such as a bean template discussed elsewhere in this chapter are also valuable in this regard.)
Autowiring can update a configuration as your objects evolve. For example, if you need to add a dependency to a class, that dependency can be satisfied automatically without you needing to modify the configuration. Thus autowiring can be especially useful during development, without negating the option of switching to explicit wiring when the code base becomes more stable.
When using XML-based configuration metadata[2], you specify autowire mode for a bean definition with the
autowire attribute of the
<bean/> element. The autowiring functionality has
five modes. You specify autowiring per bean and thus
can choose which ones to autowire.
Table 4.2. Autowiring modes
| Mode | Explanation |
|---|---|
| no | (Default) No autowiring. Bean references must be
defined via a |
| byName | Autowiring by property name. Spring looks for a bean
with the same name as the property that needs to be autowired. For
example, if a bean definition is set to autowire by name, and it
contains a master property (that is, it has a
setMaster(..) method), Spring looks for a
bean definition named |
| byType | Allows a property to be autowired if exactly one bean of the property type exists in the container. If more than one exists, a fatal exception is thrown, which indicates that you may not use byType autowiring for that bean. If there are no matching beans, nothing happens; the property is not set. |
| constructor | Analogous to byType, but applies to constructor arguments. If there is not exactly one bean of the constructor argument type in the container, a fatal error is raised. |
With byType or constructor
autowiring mode, you can wire arrays and typed-collections. In such cases
all autowire candidates within the container that
match the expected type are provided to satisfy the dependency. You can
autowire strongly-typed Maps if the expected key type is
String. An autowired Maps values will consist of
all bean instances that match the expected type, and the Maps keys will
contain the corresponding bean names.
You can combine autowire behavior with dependency checking, which is performed after autowiring completes.
Autowiring works best when it is used consistently across a project. If autowiring is not used in general, it might be confusing to developers to use it to wire only one or two bean definitions.
Consider the limitations and disadvantages of autowiring:
Explicit dependencies in
propertyandconstructor-argsettings always override autowiring. You cannot autowire so-called simple properties such as primitives,Strings, andClasses(and arrays of such simple properties). This limitation is by-design.
Autowiring is less exact than explicit wiring. Although, as noted in the above table, Spring is careful to avoid guessing in case of ambiguity that might have unexpected results, the relationships between your Spring-managed objects are no longer documented explicitly.
Wiring information may not be available to tools that may generate documentation from a Spring container.
Multiple bean definitions within the container may match the type specified by the setter method or constructor argument to be autowired. For arrays, collections, or Maps, this is not necessarily a problem. However for dependencies that expect a single value, this ambiguity is not arbitrarily resolved. If no unique bean definition is available, an exception is thrown.
In the latter scenario, you have several options:
Abandon autowiring in favor of explicit wiring.
Avoid autowiring for a bean definition by setting its
autowire-candidateattributes tofalseas described in the next section.Designate a single bean definition as the primary candidate by setting the
primaryattribute of its<bean/>element totrue.If you are using Java 5 or later, implement the more fine-grained control available with annotation-based configuration, as described in Section 4.9, “Annotation-based container configuration”.
On a per-bean basis, you can exclude a bean from autowiring. In
Spring's XML format, set the autowire-candidate
attribute of the <bean/> element to
false; the container makes that specific bean
definition unavailable to the autowiring infrastructure (including
annotation style configurations such as @Autowired).
You can also limit autowire candidates based on pattern-matching
against bean names. The top-level <beans/>
element accepts one or more patterns within its
default-autowire-candidates attribute. For example,
to limit autowire candidate status to any bean whose name ends with
Repository, provide a value of *Repository. To
provide multiple patterns, define them in a comma-separated list. An
explicit value of true or false
for a bean definitions autowire-candidate attribute
always takes precedence, and for such beans, the pattern matching rules
do not apply.
These techniques are useful for beans that you never want to be injected into other beans by autowiring. It does not mean that an excluded bean cannot itself be configured using autowiring. Rather, the bean itself is not a candidate for autowiring other beans.
In most application scenarios, most beans in the container are singletons. When a singleton bean needs to collaborate with another singleton bean, or a non-singleton bean needs to collaborate with another non-singleton bean, you typically handle the dependency by defining one bean as a property of the other. A problem arises when the bean lifecycles are different. Suppose singleton bean A needs to use non-singleton (prototype) bean B, perhaps on each method invocation on A. The container only creates the singleton bean A once, and thus only gets one opportunity to set the properties. The container cannot provide bean A with a new instance of bean B every time one is needed.
A solution is to forego some inversion of control. You can make bean A aware of the container by
implementing the ApplicationContextAware
interface, and by making a
getBean("B") call to the container ask for (a typically new) bean B
instance every time bean A needs it. The following is an example of this
approach:
// a class that uses a stateful Command-style class to perform some processing
package fiona.apple;

// Spring-API imports
import org.springframework.beans.BeansException;
import org.springframework.context.ApplicationContext;
import org.springframework.context.ApplicationContextAware;

public class CommandManager implements ApplicationContextAware {

 private ApplicationContext applicationContext;

 public Object process(Map commandState) {
    // grab a new instance of the appropriate Command
    Command command = createCommand();
    // set the state on the (hopefully brand new) Command instance
    command.setState(commandState);
    return command.execute();
 }

 protected Command createCommand() {
    // notice the Spring API dependency!
    return this.applicationContext.getBean("command", Command.class);
 }

 public void setApplicationContext(ApplicationContext applicationContext)
                                                                  throws BeansException {
    this.applicationContext = applicationContext;
 }
}
The preceding is not desirable, because the business code is aware of and coupled to the Spring Framework. Method Injection, a somewhat advanced feature of the Spring IoC container, allows this use case to be handled in a clean fashion.
Lookup method injection is the ability of the container to override methods on container managed beans, to return the lookup result for another named bean in the container. The lookup typically involves a prototype bean as in the scenario described in the preceding section. The Spring Framework implements this method injection by using bytecode generation from the CGLIB library to generate dynamically a subclass that overrides the method.
| Note |
|---|---|
For this dynamic subclassing to work, you must have the CGLIB
jar(s) in your classpath. The class that the Spring container will
subclass cannot be |
Looking at the CommandManager class in the
previous code snippet, you see that the Spring container will
dynamically override the implementation of the
createCommand() method. Your
CommandManager class will not have any Spring
dependencies, as can be seen in the reworked example:
package fiona.apple;

// no more Spring imports!

public abstract class CommandManager {

 public Object process(Object commandState) {
    // grab a new instance of the appropriate Command interface
    Command command = createCommand();
    // set the state on the (hopefully brand new) Command instance
    command.setState(commandState);
    return command.execute();
 }

  // okay... but where is the implementation of this method?
 protected abstract Command createCommand();
}
In the client class containing the method to be injected (the
CommandManager in this case), the method to be
injected requires a signature of the following form:
<public|protected> [abstract] <return-type> theMethodName(no-arguments);
If the method is abstract, the
dynamically-generated subclass implements the method. Otherwise, the
dynamically-generated subclass overrides the concrete method defined in
the original class. For example:
<!-- a stateful bean deployed as a prototype (non-singleton) -->
<bean id="command" class="fiona.apple.AsyncCommand" scope="prototype">
<!-- inject dependencies here as required -->
</bean>

<!-- commandProcessor uses statefulCommandHelper -->
<bean id="commandManager" class="fiona.apple.CommandManager">
<lookup-method name="createCommand" bean="command"/>
</bean>
The bean identified as commandManager calls its
own method createCommand() whenever it needs a
new instance of the command bean. You must be
careful to deploy the command bean as a prototype, if
that is actually what is needed. If it is deployed as a singleton, the same
instance of the command bean is returned each
time.
![[Tip]](images/tip.gif) | Tip |
|---|---|
The interested reader may also find the
|
A less useful form of method injection than lookup method Injection is the ability to replace arbitrary methods in a managed bean with another method implementation. Users may safely skip the rest of this section until the functionality is actually needed.
With XML-based configuration metadata, you can use the
replaced-method element to replace an existing method
implementation with another, for a deployed bean. Consider the following
class, with a method computeValue, which we want to override:
public class MyValueCalculator {

public String computeValue(String input) {
  // some real code...
}

// some other methods...

}
A class implementing the
org.springframework.beans.factory.support.MethodReplacer
interface provides the new method definition.
/** meant to be used to override the existing computeValue(String)
  implementation in MyValueCalculator
*/
public class ReplacementComputeValue implements MethodReplacer {

  public Object reimplement(Object o, Method m, Object[] args) throws Throwable {
      // get the input value, work with it, and return a computed result
      String input = (String) args[0];
      ...
      return ...;
  }
}
The bean definition to deploy the original class and specify the method override would look like this:
<bean id="myValueCalculator" class="x.y.z.MyValueCalculator">

<!-- arbitrary method replacement -->
<replaced-method name="computeValue" replacer="replacementComputeValue">
  <arg-type>String</arg-type>
</replaced-method>
</bean>

<bean id="replacementComputeValue" class="a.b.c.ReplacementComputeValue"/>
You can use one or more contained
<arg-type/> elements within the
<replaced-method/> element to indicate the
method signature of the method being overridden. The signature for the
arguments is necessary only if the method is overloaded and multiple
variants exist within the class. For convenience, the type string for an
argument may be a substring of the fully qualified type name. For
example, the following all match
java.lang.String:
    java.lang.String
  String
  Str
Because the number of arguments is often enough to distinguish between each possible choice, this shortcut can save a lot of typing, by allowing you to type only the shortest string that will match an argument type.
When you create a bean definition, you create a recipe for creating actual instances of the class defined by that bean definition. The idea that a bean definition is a recipe is important, because it means that, as with a class, you can create many object instances from a single recipe.
You can control not only the various dependencies and configuration
values that are to be plugged into an object that is created from a
particular bean definition, but also the scope of the
objects created from a particular bean definition. This approach is powerful
and flexible in that you can choose the scope of the
objects you create through configuration instead of having to bake in the
scope of an object at the Java class level. Beans can be defined to be
deployed in one of a number of scopes: out of the box, the Spring Framework
supports five scopes, three of which are available only if you use a
web-aware ApplicationContext.
The following scopes are supported out of the box. You can also create a custom scope.
Table 4.3. Bean scopes
| Scope | Description |
|---|---|
(Default) Scopes a single bean definition to a single object instance per Spring IoC container. | |
Scopes a single bean definition to any number of object instances. | |
Scopes a single bean definition to the lifecycle of a
single HTTP request; that is, each HTTP request has its own instance
of a bean created off the back of a single bean definition. Only
valid in the context of a web-aware Spring
| |
Scopes a single bean definition to the lifecycle of an
HTTP | |
Scopes a single bean definition to the lifecycle of a
global HTTP |
| Thread-scoped beans |
|---|---|
As of Spring 3.0, a thread scope is available, but is not registered by default. For more information, see the documentation for SimpleThreadScope. For instructions on how to register this or any other custom scope, see Section 4.5.5.2, “Using a custom scope”. |
Only one shared instance of a singleton bean is managed, and all requests for beans with an id or ids matching that bean definition result in that one specific bean instance being returned by the Spring container.
To put it another way, when you define a bean definition and it is scoped as a singleton, the Spring IoC container creates exactly one instance of the object defined by that bean definition. This single instance is stored in a cache of such singleton beans, and all subsequent requests and references for that named bean return the cached object.
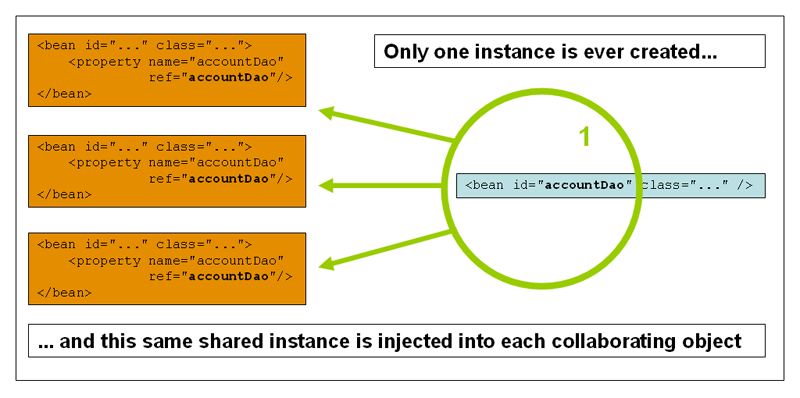
Spring's concept of a singleton bean differs from the Singleton
pattern as defined in the Gang of Four (GoF) patterns book. The GoF
Singleton hard-codes the scope of an object such that one and
only one instance of a particular class is created
per ClassLoader. The scope of the Spring
singleton is best described as per container and per
bean. This means that if you define one bean for a particular
class in a single Spring container, then the Spring container creates one
and only one instance of the class defined by that
bean definition. The singleton scope is the default scope in
Spring. To define a bean as a singleton in XML, you would
write, for example:
<bean id="accountService" class="com.foo.DefaultAccountService"/>

<!-- the following is equivalent, though redundant (singleton scope is the default) -->
<bean id="accountService" class="com.foo.DefaultAccountService" scope="singleton"/>
The non-singleton, prototype scope of bean deployment results in the
creation of a new bean instance every time a request
for that specific bean is made. That is, the bean is injected into another
bean or you request it through a getBean() method call
on the container. As a rule, use the prototype scope for all stateful
beans and the singleton scope for stateless beans.
The following diagram illustrates the Spring prototype scope. A data access object (DAO) is not typically configured as a prototype, because a typical DAO does not hold any conversational state; it was just easier for this author to reuse the core of the singleton diagram.

The following example defines a bean as a prototype in XML:
<!-- using spring-beans-2.0.dtd -->
<bean id="accountService" class="com.foo.DefaultAccountService" scope="prototype"/>
In contrast to the other scopes, Spring does not manage the complete lifecycle of a prototype bean: the container instantiates, configures, and otherwise assembles a prototype object, and hands it to the client, with no further record of that prototype instance. Thus, although initialization lifecycle callback methods are called on all objects regardless of scope, in the case of prototypes, configured destruction lifecycle callbacks are not called. The client code must clean up prototype-scoped objects and release expensive resources that the prototype bean(s) are holding. To get the Spring container to release resources held by prototype-scoped beans, try using a custom bean post-processor, which holds a reference to beans that need to be cleaned up.
In some respects, the Spring container's role in regard to a
prototype-scoped bean is a replacement for the Java new
operator. All lifecycle management past that point must be handled by the
client. (For details on the lifecycle of a bean in the Spring container,
see Section 4.6.1, “Lifecycle callbacks”.)
When you use singleton-scoped beans with dependencies on prototype beans, be aware that dependencies are resolved at instantiation time. Thus if you dependency-inject a prototype-scoped bean into a singleton-scoped bean, a new prototype bean is instantiated and then dependency-injected into the singleton bean. The prototype instance is the sole instance that is ever supplied to the singleton-scoped bean.
However, suppose you want the singleton-scoped bean to acquire a new instance of the prototype-scoped bean repeatedly at runtime. You cannot dependency-inject a prototype-scoped bean into your singleton bean, because that injection occurs only once, when the Spring container is instantiating the singleton bean and resolving and injecting its dependencies. If you need a new instance of a prototype bean at runtime more than once, see Section 4.4.6, “Method injection”
The request, session, and
global session scopes are only
available if you use a web-aware Spring
ApplicationContext implementation (such as
XmlWebApplicationContext). If you use these scopes
with regular Spring IoC containers such as the
ClassPathXmlApplicationContext, you get an
IllegalStateException complaining about an unknown
bean scope.
To support the scoping of beans at the request,
session, and global session levels
(web-scoped beans), some minor initial configuration is required before
you define your beans. (This initial setup is not
required for the standard scopes, singleton and prototype.)
How you accomplish this initial setup depends on your particular Servlet environment..
If you access scoped beans within Spring Web MVC, in effect, within
a request that is processed by the Spring
DispatcherServlet, or
DispatcherPortlet, then no special setup is
necessary: DispatcherServlet and
DispatcherPortlet already expose all relevant
state.
If you use a Servlet 2.4+ web container, with requests processed
outside of Spring's DispatcherServlet (for example, when using JSF or
Struts), you need to add the following
javax.servlet.ServletRequestListener to
the declarations in your web applications web.xml
file:
<web-app>
...
<listener>
  <listener-class>
      org.springframework.web.context.request.RequestContextListener
  </listener-class>
</listener>
...
</web-app>
If you use an older web container (Servlet 2.3), use the provided
javax.servlet.Filter implementation. The
following snippet of XML configuration must be included in the
web.xml file of your web application if you want to
access web-scoped beans in requests outside of Spring's
DispatcherServlet on a Servlet 2.3 container. (The filter mapping
depends on the surrounding web application configuration, so you must
change it as appropriate.)
<web-app>
..
<filter>
  <filter-name>requestContextFilter</filter-name>
  <filter-class>org.springframework.web.filter.RequestContextFilter</filter-class>
</filter>
<filter-mapping>
  <filter-name>requestContextFilter</filter-name>
  <url-pattern>/*</url-pattern>
</filter-mapping>
...
</web-app>
DispatcherServlet,
RequestContextListener and
RequestContextFilter all do exactly the same
thing, namely bind the HTTP request object to the
Thread that is servicing that request. This makes
beans that are request- and session-scoped available further down the
call chain.
Consider the following bean definition:
<bean id="loginAction" class="com.foo.LoginAction" scope="request"/>
The Spring container creates a new instance of the
LoginAction bean by using the
loginAction bean definition for each and every HTTP
request. That is, the loginAction bean is scoped at
the HTTP request level. You can change the internal state of the
instance that is created as much as you want, because other instances
created from the same loginAction bean definition
will not see these changes in state; they are particular to an
individual request. When the request completes processing, the bean that
is scoped to the request is discarded.
Consider the following bean definition:
<bean id="userPreferences" class="com.foo.UserPreferences" scope="session"/>
The Spring container creates a new instance of the
UserPreferences bean by using the
userPreferences bean definition for the lifetime of a
single HTTP Session. In other words, the
userPreferences bean is effectively scoped at the
HTTP Session level. As with
request-scoped beans, you can change the internal
state of the instance that is created as much as you want, knowing that
other HTTP Session instances that are
also using instances created from the same
userPreferences bean definition do not see these
changes in state, because they are particular to an individual HTTP
Session. When the HTTP
Session is eventually discarded, the bean
that is scoped to that particular HTTP
Session is also discarded.
Consider the following bean definition:
<bean id="userPreferences" class="com.foo.UserPreferences" scope="globalSession"/>
The global session scope is similar to the
standard HTTP Session scope (described above), and
applies only in the context of portlet-based web applications. The
portlet specification defines the notion of a global
Session that is shared among all portlets
that make up a single portlet web application. Beans defined at the
global session scope are scoped (or bound) to the
lifetime of the global portlet
Session.
If you write a standard Servlet-based web application and you define
one or more beans as having global session scope, the
standard HTTP Session scope is used, and
no error is raised.
The Spring IoC container manages not only the instantiation of your objects (beans), but also the wiring up of collaborators (or dependencies). If you want to inject (for example) an HTTP request scoped bean into another bean, you must inject an AOP proxy in place of the scoped bean. That is, you need to inject a proxy object that exposes the same public interface as the scoped object but that can also retrieve the real, target object from the relevant scope (for example, an HTTP request) and delegate method calls onto the real object.
| Note |
|---|---|
You do not need to use the
|
The configuration in the following example is only one line, but it is important to understand the “why” as well as the “how” behind it.
<?xml version="1.0" encoding="UTF-8"?>
<beans xmlns="http://www.springframework.org/schema/beans"
     xmlns:xsi="http://www.w3.org/2001/XMLSchema-instance"
     xmlns:aop="http://www.springframework.org/schema/aop"
     xsi:schemaLocation="http://www.springframework.org/schema/beans
         http://www.springframework.org/schema/beans/spring-beans.xsd
         http://www.springframework.org/schema/aop
         http://www.springframework.org/schema/aop/spring-aop.xsd">

  <!-- an HTTP Session-scoped bean exposed as a proxy -->
  <bean id="userPreferences" class="com.foo.UserPreferences" scope="session">

        <!-- instructs the container to proxy the surrounding bean -->
        <aop:scoped-proxy/>
  </bean>

  <!-- a singleton-scoped bean injected with a proxy to the above bean -->
  <bean id="userService" class="com.foo.SimpleUserService">

      <!-- a reference to the proxied userPreferences bean -->
      <property name="userPreferences" ref="userPreferences"/>

  </bean>
</beans>
To create such a proxy, you insert a child
<aop:scoped-proxy/> element into a scoped bean
definition.
(If
you choose class-based proxying, you also need the CGLIB library in your
classpath. See the section called “Choosing the type of proxy to create” and Appendix D, XML Schema-based configuration.) Why do definitions of beans scoped at the
request, session,
globalSession and custom-scope levels require the
<aop:scoped-proxy/> element ? Let's examine the
following singleton bean definition and contrast it with what you need
to define for the aforementioned scopes. (The following
userPreferences bean definition as it stands is
incomplete.)
<bean id="userPreferences" class="com.foo.UserPreferences" scope="session"/>

<bean id="userManager" class="com.foo.UserManager">
  <property name="userPreferences" ref="userPreferences"/>
</bean>
In the preceding example, the singleton bean
userManager is injected with a reference to the HTTP
Session-scoped bean
userPreferences. The salient point here is that the
userManager bean is a singleton: it will be
instantiated exactly once per container, and its
dependencies (in this case only one, the
userPreferences bean) are also injected only once.
This means that the userManager bean will only
operate on the exact same userPreferences object,
that is, the one that it was originally injected with.
This is not the behavior you want when
injecting a shorter-lived scoped bean into a longer-lived scoped bean,
for example injecting an HTTP
Session-scoped collaborating bean as a
dependency into singleton bean. Rather, you need a single
userManager object, and for the lifetime of an HTTP
Session, you need a
userPreferences object that is specific to said HTTP
Session. Thus the container creates an
object that exposes the exact same public interface as the
UserPreferences class (ideally an object that
is a UserPreferences
instance) which can fetch the real
UserPreferences object from the scoping mechanism
(HTTP request, Session, etc.). The
container injects this proxy object into the
userManager bean, which is unaware that this
UserPreferences reference is a proxy. In this
example, when a UserManager instance
invokes a method on the dependency-injected
UserPreferences object, it actually is invoking a
method on the proxy. The proxy then fetches the real
UserPreferences object from (in this case) the
HTTP Session, and delegates the method
invocation onto the retrieved real
UserPreferences object.
Thus you need the following, correct and complete, configuration
when injecting request-, session-,
and globalSession-scoped beans into collaborating
objects:
<bean id="userPreferences" class="com.foo.UserPreferences" scope="session">
  <aop:scoped-proxy/>
</bean>

<bean id="userManager" class="com.foo.UserManager">
  <property name="userPreferences" ref="userPreferences"/>
</bean>
By default, when the Spring container creates a proxy for a bean
that is marked up with the
<aop:scoped-proxy/> element, a
CGLIB-based class proxy is created. This means that you
need to have the CGLIB library in the classpath of your
application.
Note: CGLIB proxies only intercept public method calls! Do not call non-public methods on such a proxy; they will not be delegated to the scoped target object.
Alternatively, you can configure the Spring container to create
standard JDK interface-based proxies for such scoped beans, by
specifying false for the value of the
proxy-target-class attribute of the
<aop:scoped-proxy/> element. Using JDK
interface-based proxies means that you do not need additional
libraries in your application classpath to effect such proxying.
However, it also means that the class of the scoped bean must
implement at least one interface, and that all
collaborators into which the scoped bean is injected must reference
the bean through one of its interfaces.
<!-- DefaultUserPreferences implements the UserPreferences interface -->
<bean id="userPreferences" class="com.foo.DefaultUserPreferences" scope="session">
  <aop:scoped-proxy proxy-target-class="false"/>
</bean>

<bean id="userManager" class="com.foo.UserManager">
  <property name="userPreferences" ref="userPreferences"/>
</bean>
For more detailed information about choosing class-based or interface-based proxying, see Section 8.6, “Proxying mechanisms”.
As of Spring 2.0, the bean scoping mechanism is extensible. You can
define your own scopes, or even redefine existing scopes, although the
latter is considered bad practice and you cannot
override the built-in singleton and
prototype scopes.
To integrate your custom scope(s) into the Spring container, you
need to implement the
org.springframework.beans.factory.config.Scope
interface, which is described in this section. For an idea of how to
implement your own scopes, see the Scope
implementations that are supplied with the Spring Framework itself and
the Scope Javadoc, which explains the methods you need to implement
in more detail.
The Scope interface has four methods to get
objects from the scope, remove them from the scope, and allow them to be
destroyed.
The following method returns the object from the underlying scope. The session scope implementation, for example, returns the session-scoped bean (and if it does not exist, the method returns a new instance of the bean, after having bound it to the session for future reference).
Object get(String name, ObjectFactory objectFactory)
The following method removes the object from the underlying scope. The session scope implementation for example, removes the session-scoped bean from the underlying session. The object should be returned, but you can return null if the object with the specified name is not found.
Object remove(String name)
The following method registers the callbacks the scope should execute when it is destroyed or when the specified object in the scope is destroyed. Refer to the Javadoc or a Spring scope implementation for more information on destruction callbacks.
void registerDestructionCallback(String name, Runnable destructionCallback)The following method obtains the conversation identifier for the underlying scope. This identifier is different for each scope. For a session scoped implementation, this identifier can be the session identifier.
String getConversationId()
After you write and test one or more custom
Scope implementations, you need to make
the Spring container aware of your new scope(s). The following method is
the central method to register a new
Scope with the Spring container:
void registerScope(String scopeName, Scope scope);This method is declared on the
ConfigurableBeanFactory interface, which
is available on most of the concrete
ApplicationContext implementations that
ship with Spring via the BeanFactory property.
The first argument to the registerScope(..)
method is the unique name associated with a scope; examples of such
names in the Spring container itself are singleton
and prototype. The second argument to the
registerScope(..) method is an actual instance
of the custom Scope implementation that
you wish to register and use.
Suppose that you write your custom
Scope implementation, and then register
it as below.
| Note |
|---|---|
The example below uses |
Scope threadScope = new SimpleThreadScope();
beanFactory.registerScope("thread", threadScope);
You then create bean definitions that adhere to the scoping rules of
your custom Scope:
<bean id="..." class="..." scope="thread">
With a custom Scope implementation,
you are not limited to programmatic registration of the scope. You can
also do the Scope registration
declaratively, using the CustomScopeConfigurer
class:
<?xml version="1.0" encoding="UTF-8"?>
<beans xmlns="http://www.springframework.org/schema/beans"
     xmlns:xsi="http://www.w3.org/2001/XMLSchema-instance"
     xmlns:aop="http://www.springframework.org/schema/aop"
     xsi:schemaLocation="http://www.springframework.org/schema/beans
         http://www.springframework.org/schema/beans/spring-beans.xsd
         http://www.springframework.org/schema/aop
         http://www.springframework.org/schema/aop/spring-aop.xsd">

  <bean class="org.springframework.beans.factory.config.CustomScopeConfigurer">
      <property name="scopes">
          <map>
              <entry key="thread">
                  <bean class="org.springframework.context.support.SimpleThreadScope"/>
              </entry>
          </map>
      </property>
  </bean>

  <bean id="bar" class="x.y.Bar" scope="thread">
      <property name="name" value="Rick"/>
      <aop:scoped-proxy/>
  </bean>

  <bean id="foo" class="x.y.Foo">
      <property name="bar" ref="bar"/>
  </bean>

</beans>
| Note |
|---|---|
When you place <aop:scoped-proxy/> in a
|
To interact with the container's management of the bean lifecycle, you
can implement the Spring InitializingBean
and DisposableBean interfaces. The
container calls afterPropertiesSet() for the
former and destroy() for the latter to allow the
bean to perform certain actions upon initialization and destruction of
your beans. You can also achieve the same integration with the container
without coupling your classes to Spring interfaces through the use of
init-method and destroy method object definition metadata.
Internally, the Spring Framework uses
BeanPostProcessor implementations to
process any callback interfaces it can find and call the appropriate
methods. If you need custom features or other lifecycle behavior Spring
does not offer out-of-the-box, you can implement a
BeanPostProcessor yourself. For more
information, see Section 4.8, “Container Extension Points”.
In addition to the initialization and destruction callbacks,
Spring-managed objects may also implement the
Lifecycle interface so that those objects
can participate in the startup and shutdown process as driven by the
container's own lifecycle.
The lifecycle callback interfaces are described in this section.
The
org.springframework.beans.factory.InitializingBean
interface allows a bean to perform initialization work after all
necessary properties on the bean have been set by the container. The
InitializingBean interface specifies a
single method:
void afterPropertiesSet() throws Exception;
It is recommended that you do not use the
InitializingBean interface because it
unnecessarily couples the code to Spring. Alternatively, specify a POJO
initialization method. In the case of XML-based configuration metadata,
you use the init-method attribute to specify the name
of the method that has a void no-argument signature. For example, the
following definition:
<bean id="exampleInitBean" class="examples.ExampleBean" init-method="init"/>
public class ExampleBean {

  public void init() {
      // do some initialization work
  }
}
...is exactly the same as...
<bean id="exampleInitBean" class="examples.AnotherExampleBean"/>
public class AnotherExampleBean implements InitializingBean {

  public void afterPropertiesSet() {
      // do some initialization work
  }
}
... but does not couple the code to Spring.
Implementing the
org.springframework.beans.factory.DisposableBean
interface allows a bean to get a callback when the container containing
it is destroyed. The DisposableBean
interface specifies a single method:
void destroy() throws Exception;
It is recommended that you do not use the
DisposableBean callback interface because
it unnecessarily couples the code to Spring. Alternatively, specify a
generic method that is supported by bean definitions. With XML-based
configuration metadata, you use the destroy-method
attribute on the <bean/>. For example, the
following definition:
<bean id="exampleInitBean" class="examples.ExampleBean" destroy-method="cleanup"/>
public class ExampleBean {

  public void cleanup() {
      // do some destruction work (like releasing pooled connections)
  }
}
...is exactly the same as...
<bean id="exampleInitBean" class="examples.AnotherExampleBean"/>
public class AnotherExampleBean implements DisposableBean {

  public void destroy() {
      // do some destruction work (like releasing pooled connections)
  }
}
... but does not couple the code to Spring.
When you write initialization and destroy method callbacks that do
not use the Spring-specific
InitializingBean and
DisposableBean callback interfaces, you
typically write methods with names such as init(),
initialize(), dispose(), and so
on. Ideally, the names of such lifecycle callback methods are
standardized across a project so that all developers use the same method
names and ensure consistency.
You can configure the Spring container to look
for named initialization and destroy callback method names on
every bean. This means that you, as an application
developer, can write your application classes and use an initialization
callback called init(), without having to configure
an init-method="init" attribute with each bean
definition. The Spring IoC container calls that method when the bean is
created (and in accordance with the standard lifecycle callback contract
described previously). This feature also enforces a consistent naming
convention for initialization and destroy method callbacks.
Suppose that your initialization callback methods are named
init() and destroy callback methods are named
destroy(). Your class will resemble the class in the
following example.
public class DefaultBlogService implements BlogService {

  private BlogDao blogDao;

  public void setBlogDao(BlogDao blogDao) {
      this.blogDao = blogDao;
  }

  // this is (unsurprisingly) the initialization callback method
  public void init() {
      if (this.blogDao == null) {
          throw new IllegalStateException("The [blogDao] property must be set.");
      }
  }
}
<beans default-init-method="init">

  <bean id="blogService" class="com.foo.DefaultBlogService">
      <property name="blogDao" ref="blogDao" />
  </bean>

</beans>
The presence of the default-init-method attribute
on the top-level <beans/> element attribute
causes the Spring IoC container to recognize a method called
init on beans as the initialization method callback.
When a bean is created and assembled, if the bean class has such a
method, it is invoked at the appropriate time.
You configure destroy method callbacks similarly (in XML, that is)
by using the default-destroy-method attribute on the
top-level <beans/> element.
Where existing bean classes already have callback methods that are
named at variance with the convention, you can override the default by
specifying (in XML, that is) the method name using the
init-method and destroy-method
attributes of the <bean/> itself.
The Spring container guarantees that a configured initialization callback is called immediately after a bean is supplied with all dependencies. Thus the initialization callback is called on the raw bean reference, which means that AOP interceptors and so forth are not yet applied to the bean. A target bean is fully created first, then an AOP proxy (for example) with its interceptor chain is applied. If the target bean and the proxy are defined separately, your code can even interact with the raw target bean, bypassing the proxy. Hence, it would be inconsistent to apply the interceptors to the init method, because doing so would couple the lifecycle of the target bean with its proxy/interceptors and leave strange semantics when your code interacts directly to the raw target bean.
As of Spring 2.5, you have three options for controlling bean
lifecycle behavior: the InitializingBean and DisposableBean callback
interfaces; custom init() and
destroy() methods; and the @PostConstruct and
@PreDestroy annotations. You can
combine these mechanisms to control a given bean.
| Note |
|---|---|
If multiple lifecycle mechanisms are configured for a bean, and
each mechanism is configured with a different method name, then each
configured method is executed in the order listed below. However, if
the same method name is configured - for example,
|
Multiple lifecycle mechanisms configured for the same bean, with different initialization methods, are called as follows:
Methods annotated with
@PostConstructafterPropertiesSet()as defined by theInitializingBeancallback interfaceA custom configured
init()method
Destroy methods are called in the same order:
Methods annotated with
@PreDestroydestroy()as defined by theDisposableBeancallback interfaceA custom configured
destroy()method
The Lifecycle interface defines the
essential methods for any object that has its own lifecycle requirements
(e.g. starts and stops some background process):
public interface Lifecycle {

  void start();

  void stop();

  boolean isRunning();

}
Any Spring-managed object may implement that interface. Then, when
the ApplicationContext itself starts and stops, it will cascade those
calls to all Lifecycle implementations defined within that context. It
does this by delegating to a
LifecycleProcessor:
public interface LifecycleProcessor extends Lifecycle {

  void onRefresh();

  void onClose();

}
Notice that the LifecycleProcessor is
itself an extension of the Lifecycle
interface. It also adds two other methods for reacting to the context
being refreshed and closed.
The order of startup and shutdown invocations can be important. If a
"depends-on" relationship exists between any two objects, the dependent
side will start after its dependency, and it will
stop before its dependency. However, at times the
direct dependencies are unknown. You may only know that objects of a
certain type should start prior to objects of another type. In those
cases, the SmartLifecycle interface
defines another option, namely the getPhase()
method as defined on its super-interface,
Phased.
public interface Phased {

  int getPhase();

}


public interface SmartLifecycle extends Lifecycle, Phased {

  boolean isAutoStartup();

  void stop(Runnable callback);

}
When starting, the objects with the lowest phase start first, and
when stopping, the reverse order is followed. Therefore, an object that
implements SmartLifecycle and whose
getPhase() method returns Integer.MIN_VALUE would be
among the first to start and the last to stop. At the other end of the
spectrum, a phase value of Integer.MAX_VALUE would
indicate that the object should be started last and stopped first
(likely because it depends on other processes to be running). When
considering the phase value, it's also important to know that the
default phase for any "normal" Lifecycle
object that does not implement
SmartLifecycle would be 0. Therefore, any
negative phase value would indicate that an object should start before
those standard components (and stop after them), and vice versa for any
positive phase value.
As you can see the stop method defined by
SmartLifecycle accepts a callback. Any
implementation must invoke that callback's run()
method after that implementation's shutdown process is complete. That
enables asynchronous shutdown where necessary since the default
implementation of the LifecycleProcessor
interface, DefaultLifecycleProcessor, will wait
up to its timeout value for the group of objects within each phase to
invoke that callback. The default per-phase timeout is 30 seconds. You
can override the default lifecycle processor instance by defining a bean
named "lifecycleProcessor" within the context. If you only want to
modify the timeout, then defining the following would be
sufficient:
<bean id="lifecycleProcessor" class="org.springframework.context.support.DefaultLifecycleProcessor">
  <!-- timeout value in milliseconds -->
  <property name="timeoutPerShutdownPhase" value="10000"/>
</bean>
As mentioned, the LifecycleProcessor
interface defines callback methods for the refreshing and closing of the
context as well. The latter will simply drive the shutdown process as if
stop() had been called explicitly, but it will happen when the context
is closing. The 'refresh' callback on the other hand enables another
feature of SmartLifecycle beans. When the
context is refreshed (after all objects have been instantiated and
initialized), that callback will be invoked, and at that point the
default lifecycle processor will check the boolean value returned by
each SmartLifecycle object's
isAutoStartup() method. If "true", then that
object will be started at that point rather than waiting for an explicit
invocation of the context's or its own start() method (unlike the
context refresh, the context start does not happen automatically for a
standard context implementation). The "phase" value as well as any
"depends-on" relationships will determine the startup order in the same
way as described above.
| Note |
|---|---|
This section applies only to non-web applications. Spring's
web-based |
If you are using Spring's IoC container in a non-web application environment; for example, in a rich client desktop environment; you register a shutdown hook with the JVM. Doing so ensures a graceful shutdown and calls the relevant destroy methods on your singleton beans so that all resources are released. Of course, you must still configure and implement these destroy callbacks correctly.
To register a shutdown hook, you call the
registerShutdownHook() method that is declared
on the AbstractApplicationContext class:
import org.springframework.context.support.AbstractApplicationContext;
import org.springframework.context.support.ClassPathXmlApplicationContext;

public final class Boot {

  public static void main(final String[] args) throws Exception {
      AbstractApplicationContext ctx
          = new ClassPathXmlApplicationContext(new String []{"beans.xml"});

      // add a shutdown hook for the above context...
      ctx.registerShutdownHook();

      // app runs here...

      // main method exits, hook is called prior to the app shutting down...
  }
}
When an ApplicationContext creates a
class that implements the
org.springframework.context.ApplicationContextAware
interface, the class is provided with a reference to that
ApplicationContext.
public interface ApplicationContextAware {

  void setApplicationContext(ApplicationContext applicationContext) throws BeansException;
}
Thus beans can manipulate programmatically the
ApplicationContext that created them,
through the ApplicationContext interface,
or by casting the reference to a known subclass of this interface, such as
ConfigurableApplicationContext, which exposes
additional functionality. One use would be the programmatic retrieval of
other beans. Sometimes this capability is useful; however, in general you
should avoid it, because it couples the code to Spring and does not follow
the Inversion of Control style, where collaborators are provided to beans
as properties. Other methods of the ApplicationContext provide access to
file resources, publishing application events, and accessing a
MessageSource. These additional features are described in Section 4.14, “Additional Capabilities of the
ApplicationContext”
As of Spring 2.5, autowiring is another alternative to obtain
reference to the ApplicationContext. The
"traditional" constructor and byType
autowiring modes (as described in Section 4.4.5, “Autowiring collaborators”) can provide a dependency of type
ApplicationContext for a constructor
argument or setter method parameter, respectively. For more flexibility,
including the ability to autowire fields and multiple parameter methods,
use the new annotation-based autowiring features. If you do, the
ApplicationContext is autowired into a
field, constructor argument, or method parameter that is expecting the
ApplicationContext type if the field,
constructor, or method in question carries the
@Autowired annotation. For more
information, see Section 4.9.2, “@Autowired”.
When an ApplicationContext creates a class that implements the
org.springframework.beans.factory.BeanNameAware
interface, the class is provided with a reference to the name defined in
its associated object definition.
public interface BeanNameAware {

  void setBeanName(string name) throws BeansException;
}
The callback is invoked after population of normal bean properties but
before an initialization callback such as
InitializingBeans
afterPropertiesSet or a custom init-method.
Besides ApplicationContextAware and
BeanNameAware discussed above, Spring
offers a range of
Aware interfaces that
allow beans to indicate to the container that they require a certain
infrastructure dependency. The most important
Aware interfaces are summarized below - as
a general rule, the name is a good indication of the dependency
type:
Table 4.4. Aware interfaces
| Name | Injected Dependency | Explained in... |
|---|---|---|
| Declaring
| |
| Event publisher of the enclosing
| Section 4.14, “Additional Capabilities of the ApplicationContext” |
| Class loader used to load the bean classes. | |
| Declaring
| |
| Name of the declaring bean | |
| Resource adapter
| |
| Defined weaver for processing class definition at load time | Section 8.8.4, “Load-time weaving with AspectJ in the Spring Framework” |
| Configured strategy for resolving messages (with support for parametrization and internationalization) | Section 4.14, “Additional Capabilities of the ApplicationContext” |
| Spring JMX notification publisher | |
| Current | |
| Current | |
| Configured loader for low-level access to resources | |
| Current | |
| Current |
Note again that usage of these interfaces ties your code to the Spring API and does not follow the Inversion of Control style. As such, they are recommended for infrastructure beans that require programmatic access to the container.
A bean definition can contain a lot of configuration information, including constructor arguments, property values, and container-specific information such as initialization method, static factory method name, and so on. A child bean definition inherits configuration data from a parent definition. The child definition can override some values, or add others, as needed. Using parent and child bean definitions can save a lot of typing. Effectively, this is a form of templating.
If you work with an ApplicationContext
interface programmatically, child bean definitions are represented by the
ChildBeanDefinition class. Most users do not work
with them on this level, instead configuring bean definitions
declaratively in something like the
ClassPathXmlApplicationContext. When you use
XML-based configuration metadata, you indicate a child bean definition by
using the parent attribute, specifying the parent bean
as the value of this attribute.
<bean id="inheritedTestBean" abstract="true"
    class="org.springframework.beans.TestBean">
  <property name="name" value="parent"/>
  <property name="age" value="1"/>
</bean>

<bean id="inheritsWithDifferentClass"
      class="org.springframework.beans.DerivedTestBean"
      parent="inheritedTestBean" init-method="initialize">

  <property name="name" value="override"/>
  <!-- the age property value of 1 will be inherited from  parent -->

</bean>
A child bean definition uses the bean class from the parent definition if none is specified, but can also override it. In the latter case, the child bean class must be compatible with the parent, that is, it must accept the parent's property values.
A child bean definition inherits constructor argument values, property
values, and method overrides from the parent, with the option to add new
values. Any initialization method, destroy method, and/or
static factory method settings that you specify will
override the corresponding parent settings.
The remaining settings are always taken from the child definition: depends on, autowire mode, dependency check, singleton, scope, lazy init.
The preceding example explicitly marks the parent bean definition as
abstract by using the abstract attribute. If the parent
definition does not specify a class, explicitly marking the parent bean
definition as abstract is required, as follows:
<bean id="inheritedTestBeanWithoutClass" abstract="true">
    <property name="name" value="parent"/>
    <property name="age" value="1"/>
</bean>

<bean id="inheritsWithClass" class="org.springframework.beans.DerivedTestBean"
    parent="inheritedTestBeanWithoutClass" init-method="initialize">
  <property name="name" value="override"/>
  <!-- age will inherit the value of 1 from the parent bean definition-->
</bean>
The parent bean cannot be instantiated on its own because it is
incomplete, and it is also explicitly marked as
abstract. When a definition is
abstract like this, it is usable only as a pure
template bean definition that serves as a parent definition for child
definitions. Trying to use such an abstract parent bean
on its own, by referring to it as a ref property of another bean or doing
an explicit getBean() call with the parent bean
id, returns an error. Similarly, the container's internal
preInstantiateSingletons() method ignores bean
definitions that are defined as abstract.
| Note |
|---|---|
|
Typically, an application developer does not need to subclass
ApplicationContext implementation classes.
Instead, the Spring IoC container can be extended by plugging in
implementations of special integration interfaces. The next few sections
describe these integration interfaces.
The BeanPostProcessor interface defines
callback methods that you can implement to provide
your own (or override the container's default) instantiation logic,
dependency-resolution logic, and so forth. If you want to implement some
custom logic after the Spring container finishes instantiating,
configuring, and initializing a bean, you can plug in one or
more BeanPostProcessor
implementations.
You can configure multiple BeanPostProcessor
instances, and you can control the order in which these
BeanPostProcessors execute by setting the
order property. You can set this property only if the
BeanPostProcessor implements the
Ordered interface; if you write your own
BeanPostProcessor you should consider
implementing the Ordered interface too. For
further details, consult the Javadoc for the
BeanPostProcessor and
Ordered interfaces. See also the note below on
programmatic registration of BeanPostProcessors
| Note |
|---|---|
To change the actual bean definition (i.e., the
blueprint that defines the bean), you instead need to use a
|
The
org.springframework.beans.factory.config.BeanPostProcessor
interface consists of exactly two callback methods. When such a class is
registered as a post-processor with the container, for each bean instance
that is created by the container, the post-processor gets a callback from
the container both before container initialization
methods (such as InitializingBean's afterPropertiesSet()
and any declared init method) are called as well as after
any bean initialization callbacks. The post-processor can take
any action with the bean instance, including ignoring the callback
completely. A bean post-processor typically checks for callback
interfaces or may wrap a bean with a proxy. Some Spring AOP
infrastructure classes are implemented as bean post-processors in order
to provide proxy-wrapping logic.
An ApplicationContext
automatically detects any beans that are defined in
the configuration metadata which implement the
BeanPostProcessor interface. The
ApplicationContext registers these beans as
post-processors so that they can be called later upon bean creation.
Bean post-processors can be deployed in the container just like any other
beans.
| Programmatically registering BeanPostProcessors |
|---|---|
While the recommended approach for |
| BeanPostProcessors and AOP auto-proxying |
|---|---|
Classes that implement the
For any such bean, you should see an informational log message: “Bean foo is not eligible for getting processed by all BeanPostProcessor interfaces (for example: not eligible for auto-proxying)”. |
The following examples show how to write, register, and use
BeanPostProcessors in an
ApplicationContext.
This first example illustrates basic usage. The example shows a
custom BeanPostProcessor implementation
that invokes the toString() method of each bean
as it is created by the container and prints the resulting string to the
system console.
Find below the custom
BeanPostProcessor implementation class
definition:
package scripting;

import org.springframework.beans.factory.config.BeanPostProcessor;
import org.springframework.beans.BeansException;

public class InstantiationTracingBeanPostProcessor implements BeanPostProcessor {

  // simply return the instantiated bean as-is
  public Object postProcessBeforeInitialization(Object bean, String beanName)
                                                                     throws BeansException {
      return bean; // we could potentially return any object reference here...
  }

  public Object postProcessAfterInitialization(Object bean, String beanName)
                                                                     throws BeansException {
      System.out.println("Bean '" + beanName + "' created : " + bean.toString());
      return bean;
  }
}
<?xml version="1.0" encoding="UTF-8"?>
<beans xmlns="http://www.springframework.org/schema/beans"
     xmlns:xsi="http://www.w3.org/2001/XMLSchema-instance"
     xmlns:lang="http://www.springframework.org/schema/lang"
     xsi:schemaLocation="http://www.springframework.org/schema/beans
         http://www.springframework.org/schema/beans/spring-beans.xsd
         http://www.springframework.org/schema/lang
         http://www.springframework.org/schema/lang/spring-lang.xsd">

  <lang:groovy id="messenger"
        script-source="classpath:org/springframework/scripting/groovy/Messenger.groovy">
      <lang:property name="message" value="Fiona Apple Is Just So Dreamy."/>
  </lang:groovy>

  <!--
      when the above bean (messenger) is instantiated, this custom
      BeanPostProcessor implementation will output the fact to the system console
   -->
  <bean class="scripting.InstantiationTracingBeanPostProcessor"/>

</beans>
Notice how the
InstantiationTracingBeanPostProcessor is simply
defined. It does not even have a name, and because it is a bean it can
be dependency-injected just like any other bean. (The preceding
configuration also defines a bean that is backed by a Groovy script. The
Spring 2.0 dynamic language support is detailed in the chapter entitled
Chapter 27, Dynamic language support.)
The following simple Java application executes the preceding code and configuration:
import org.springframework.context.ApplicationContext;
import org.springframework.context.support.ClassPathXmlApplicationContext;
import org.springframework.scripting.Messenger;

public final class Boot {

  public static void main(final String[] args) throws Exception {
      ApplicationContext ctx = new ClassPathXmlApplicationContext("scripting/beans.xml");
      Messenger messenger = (Messenger) ctx.getBean("messenger");
      System.out.println(messenger);
  }
}
The output of the preceding application resembles the following:
Bean 'messenger' created : org.springframework.scripting.groovy.GroovyMessenger@272961
org.springframework.scripting.groovy.GroovyMessenger@272961
Using callback interfaces or annotations in conjunction with a
custom BeanPostProcessor implementation
is a common means of extending the Spring IoC container. An example is
Spring's RequiredAnnotationBeanPostProcessor — a
BeanPostProcessor implementation that
ships with the Spring distribution which ensures that JavaBean
properties on beans that are marked with an (arbitrary) annotation are
actually (configured to be) dependency-injected with a value.
The next extension point that we will look at is the
org.springframework.beans.factory.config.BeanFactoryPostProcessor.
The semantics of this interface are similar to those of the
BeanPostProcessor, with one major
difference: BeanFactoryPostProcessors operate on the
bean configuration metadata; that is, the Spring IoC
container allows BeanFactoryPostProcessors to read the
configuration metadata and potentially change it
before the container instantiates any beans other
than BeanFactoryPostProcessors.
You can configure multiple
BeanFactoryPostProcessors, and you can control the order in
which these BeanFactoryPostProcessors execute by
setting the order property. However, you can only set
this property if the
BeanFactoryPostProcessor implements the
Ordered interface. If you write your own
BeanFactoryPostProcessor, you should
consider implementing the Ordered interface
too. Consult the Javadoc for the
BeanFactoryPostProcessor and
Ordered interfaces for more details.
| Note |
|---|---|
If you want to change the actual bean instances
(i.e., the objects that are created from the configuration metadata), then you
instead need to use a Also, |
A bean factory post-processor is executed automatically when it is
declared inside an ApplicationContext,
in order to apply changes to the configuration metadata that define the
container. Spring includes a number of predefined bean factory
post-processors, such as PropertyOverrideConfigurer
and PropertyPlaceholderConfigurer. A custom
BeanFactoryPostProcessor can also be used,
for example, to register custom property editors.
An ApplicationContext automatically
detects any beans that are deployed into it that implement the
BeanFactoryPostProcessor interface. It
uses these beans as bean factory post-processors, at the
appropriate time. You can deploy these post-processor beans as you
would any other bean.
| Note |
|---|---|
As with |
You use the
PropertyPlaceholderConfigurer to
externalize property values from a bean definition in a separate
file using the standard Java Properties format.
Doing so enables the person deploying an application to customize
environment-specific properties such as database URLs and passwords,
without the complexity or risk of modifying the main XML definition file
or files for the container.
Consider the following XML-based configuration metadata fragment,
where a DataSource with placeholder
values is defined. The example shows properties configured from an
external Properties file. At runtime, a
PropertyPlaceholderConfigurer is applied to the
metadata that will replace some properties of the DataSource. The values
to replace are specified as placeholders of the form
${property-name} which follows the Ant / log4j / JSP EL style.
<bean class="org.springframework.beans.factory.config.PropertyPlaceholderConfigurer">
  <property name="locations" value="classpath:com/foo/jdbc.properties"/>
</bean>

<bean id="dataSource" destroy-method="close"
    class="org.apache.commons.dbcp.BasicDataSource">
  <property name="driverClassName" value="${jdbc.driverClassName}"/>
  <property name="url" value="${jdbc.url}"/>
  <property name="username" value="${jdbc.username}"/>
  <property name="password" value="${jdbc.password}"/>
</bean>
The actual values come from another file in the standard Java
Properties format:
jdbc.driverClassName=org.hsqldb.jdbcDriver
jdbc.url=jdbc:hsqldb:hsql://production:9002
jdbc.username=sa
jdbc.password=root
Therefore, the string ${jdbc.username} is replaced
at runtime with the value 'sa', and the same applies for other placeholder
values that match keys in the properties file. The
PropertyPlaceholderConfigurer checks for
placeholders in most properties and attributes of a bean definition.
Furthermore, the placeholder prefix and suffix can be customized.
With the context namespace introduced in Spring
2.5, it is possible to configure property placeholders with a dedicated
configuration element. One or more locations can be provided as a
comma-separated list in the location
attribute.
<context:property-placeholder location="classpath:com/foo/jdbc.properties"/>
The PropertyPlaceholderConfigurer not only
looks for properties in the Properties file
you specify. By default it also checks against the Java
System properties if it cannot find a property
in the specified properties files. You can customize this behavior by setting the
systemPropertiesMode property of the configurer with
one of the following three supported integer values:
never (0): Never check system properties
fallback (1): Check system properties if not resolvable in the specified properties files. This is the default.
override (2): Check system properties first, before trying the specified properties files. This allows system properties to override any other property source.
Consult the Javadoc for the PropertyPlaceholderConfigurer
for more information.
| Class name substitution |
|---|---|
You can use the
<bean class="org.springframework.beans.factory.config.PropertyPlaceholderConfigurer">
  <property name="locations">
      <value>classpath:com/foo/strategy.properties</value>
  </property>
  <property name="properties">
      <value>custom.strategy.class=com.foo.DefaultStrategy</value>
  </property>
</bean>

<bean id="serviceStrategy" class="${custom.strategy.class}"/>
If the class cannot be resolved at runtime to a valid class,
resolution of the bean fails when it is about to be created, which is
during the |
The PropertyOverrideConfigurer, another bean
factory post-processor, resembles the
PropertyPlaceholderConfigurer, but unlike
the latter, the original definitions can have default values or no
values at all for bean properties. If an overriding
Properties file does not have an entry for a
certain bean property, the default context definition is used.
Note that the bean definition is not aware of
being overridden, so it is not immediately obvious from the XML
definition file that the override configurer is being used. In case of
multiple PropertyOverrideConfigurer instances
that define different values for the same bean property, the last one
wins, due to the overriding mechanism.
Properties file configuration lines take this format:
beanName.property=value
For example:
dataSource.driverClassName=com.mysql.jdbc.Driver
dataSource.url=jdbc:mysql:mydb
This example file can be used with a container definition that contains a bean called dataSource, which has driver and url properties.
Compound property names are also supported, as long as every component of the path except the final property being overridden is already non-null (presumably initialized by the constructors). In this example...
foo.fred.bob.sammy=123
... the sammy property of the
bob property of the fred property
of the foo bean is set to the scalar value
123.
| Note |
|---|---|
Specified override values are always literal values; they are not translated into bean references. This convention also applies when the original value in the XML bean definition specifies a bean reference. |
With the context namespace introduced in Spring
2.5, it is possible to configure property overriding with a dedicated
configuration element:
<context:property-override location="classpath:override.properties"/>
Implement the
org.springframework.beans.factory.FactoryBean
interface for objects that are themselves
factories.
The FactoryBean interface is a point of
pluggability into the Spring IoC container's instantiation logic. If you
have complex initialization code that is better expressed in Java as
opposed to a (potentially) verbose amount of XML, you can create your own
FactoryBean, write the complex
initialization inside that class, and then plug your custom
FactoryBean into the container.
The FactoryBean interface provides
three methods:
Object getObject(): returns an instance of the object this factory creates. The instance can possibly be shared, depending on whether this factory returns singletons or prototypes.boolean isSingleton(): returnstrueif thisFactoryBeanreturns singletons,falseotherwise.Class getObjectType(): returns the object type returned by thegetObject()method ornullif the type is not known in advance.
The FactoryBean concept and interface
is used in a number of places within the Spring Framework; more than 50
implementations of the FactoryBean
interface ship with Spring itself.
When you need to ask a container for an actual
FactoryBean instance itself instead of the bean
it produces, preface the bean's id with the ampersand symbol
(&) when calling the
getBean() method of the
ApplicationContext. So for a given
FactoryBean with an id of
myBean, invoking getBean("myBean")
on the container returns the product of the
FactoryBean; whereas, invoking
getBean("&myBean") returns the
FactoryBean instance
itself.
An alternative to XML setups is provided by annotation-based
configuration which rely on the bytecode metadata for wiring up components
instead of angle-bracket declarations. Instead of using XML to describe a
bean wiring, the developer moves the configuration into the component class
itself by using annotations on the relevant class, method, or field
declaration. As mentioned in Section 4.8.1.2, “Example: The
RequiredAnnotationBeanPostProcessor”, using a
BeanPostProcessor in conjunction with
annotations is a common means of extending the Spring IoC container. For
example, Spring 2.0 introduced the possibility of enforcing required
properties with the @Required annotation. Spring 2.5 made it possible to follow
that same general approach to drive Spring's dependency injection.
Essentially, the @Autowired annotation
provides the same capabilities as described in Section 4.4.5, “Autowiring collaborators” but with more fine-grained control and
wider applicability. Spring 2.5 also added support for JSR-250 annotations
such as @PostConstruct, and
@PreDestroy. Spring 3.0 added support for
JSR-330 (Dependency Injection for Java) annotations contained in the
javax.inject package such as @Inject and
@Named. Details about those annotations can be found in the relevant section.
| Note |
|---|---|
| Annotation injection is performed before XML injection, thus the latter configuration will override the former for properties wired through both approaches. |
As always, you can register them as individual bean definitions, but
they can also be implicitly registered by including the following tag in an
XML-based Spring configuration (notice the inclusion of the
context namespace):
<?xml version="1.0" encoding="UTF-8"?>
<beans xmlns="http://www.springframework.org/schema/beans"
     xmlns:xsi="http://www.w3.org/2001/XMLSchema-instance"
     xmlns:context="http://www.springframework.org/schema/context"
     xsi:schemaLocation="http://www.springframework.org/schema/beans
         http://www.springframework.org/schema/beans/spring-beans.xsd
         http://www.springframework.org/schema/context
         http://www.springframework.org/schema/context/spring-context.xsd">

   <context:annotation-config/>

</beans>
(The implicitly registered post-processors include AutowiredAnnotationBeanPostProcessor, CommonAnnotationBeanPostProcessor, PersistenceAnnotationBeanPostProcessor, as
well as the aforementioned RequiredAnnotationBeanPostProcessor.)
| Note |
|---|---|
|
The @Required annotation applies to
bean property setter methods, as in the following example:
public class SimpleMovieLister {

  private MovieFinder movieFinder;

  @Required
  public void setMovieFinder(MovieFinder movieFinder) {
      this.movieFinder = movieFinder;
  }

  // ...
}
This annotation simply indicates that the affected bean property must
be populated at configuration time, through an explicit property value in
a bean definition or through autowiring. The container throws an exception
if the affected bean property has not been populated; this allows for
eager and explicit failure, avoiding
NullPointerExceptions or the like later on. It is
still recommended that you put assertions into the bean class itself, for
example, into an init method. Doing so enforces those required references
and values even when you use the class outside of a container.
As expected, you can apply the
@Autowired annotation to "traditional"
setter methods:
public class SimpleMovieLister {

  private MovieFinder movieFinder;

  @Autowired
  public void setMovieFinder(MovieFinder movieFinder) {
      this.movieFinder = movieFinder;
  }

  // ...
}
| Note |
|---|---|
JSR 330's @Inject annotation can be used in place of Spring's
|
You can also apply the annotation to methods with arbitrary names and/or multiple arguments:
public class MovieRecommender {

  private MovieCatalog movieCatalog;

  private CustomerPreferenceDao customerPreferenceDao;

  @Autowired
  public void prepare(MovieCatalog movieCatalog,
                      CustomerPreferenceDao customerPreferenceDao) {
      this.movieCatalog = movieCatalog;
      this.customerPreferenceDao = customerPreferenceDao;
  }

  // ...
}
You can apply @Autowired to
constructors and fields:
public class MovieRecommender {

  @Autowired
  private MovieCatalog movieCatalog;

  private CustomerPreferenceDao customerPreferenceDao;

  @Autowired
  public MovieRecommender(CustomerPreferenceDao customerPreferenceDao) {
      this.customerPreferenceDao = customerPreferenceDao;
  }

  // ...
}
It is also possible to provide all beans of a
particular type from the ApplicationContext
by adding the annotation to a field or method that expects an array of
that type:
public class MovieRecommender {

  @Autowired
  private MovieCatalog[] movieCatalogs;

  // ...
}
The same applies for typed collections:
public class MovieRecommender {

  private Set<MovieCatalog> movieCatalogs;

  @Autowired
  public void setMovieCatalogs(Set<MovieCatalog> movieCatalogs) {
      this.movieCatalogs = movieCatalogs;
  }

  // ...
}
Even typed Maps can be autowired as long as the expected key type is
String. The Map values will contain all beans of
the expected type, and the keys will contain the corresponding bean
names:
public class MovieRecommender {

  private Map<String, MovieCatalog> movieCatalogs;

  @Autowired
  public void setMovieCatalogs(Map<String, MovieCatalog> movieCatalogs) {
      this.movieCatalogs = movieCatalogs;
  }

  // ...
}
By default, the autowiring fails whenever zero candidate beans are available; the default behavior is to treat annotated methods, constructors, and fields as indicating required dependencies. This behavior can be changed as demonstrated below.
public class SimpleMovieLister {

  private MovieFinder movieFinder;

  @Autowired(required=false)
  public void setMovieFinder(MovieFinder movieFinder) {
      this.movieFinder = movieFinder;
  }

  // ...
}
| Note |
|---|---|
Only one annotated constructor per-class can be marked as required, but multiple non-required constructors can be annotated. In that case, each is considered among the candidates and Spring uses the greediest constructor whose dependencies can be satisfied, that is the constructor that has the largest number of arguments.
|
You can also use @Autowired for
interfaces that are well-known resolvable dependencies:
BeanFactory,
ApplicationContext,
Environment,
ResourceLoader,
ApplicationEventPublisher, and
MessageSource. These interfaces and their
extended interfaces, such as
ConfigurableApplicationContext or
ResourcePatternResolver, are automatically
resolved, with no special setup necessary.
public class MovieRecommender {

  @Autowired
  private ApplicationContext context;

  public MovieRecommender() {
  }

  // ...
}
| Note |
|---|---|
|
Because autowiring by type may lead to multiple candidates, it is
often necessary to have more control over the selection process. One way
to accomplish this is with Spring's
@Qualifier annotation. You can associate
qualifier values with specific arguments, narrowing the set of type
matches so that a specific bean is chosen for each argument. In the
simplest case, this can be a plain descriptive value:
public class MovieRecommender {

  @Autowired
  @Qualifier("main")
  private MovieCatalog movieCatalog;

  // ...
}
The @Qualifier annotation can also be
specified on individual constructor arguments or method parameters:
public class MovieRecommender {

  private MovieCatalog movieCatalog;

  private CustomerPreferenceDao customerPreferenceDao;

  @Autowired
  public void prepare(@Qualifier("main") MovieCatalog movieCatalog,
                      CustomerPreferenceDao customerPreferenceDao) {
      this.movieCatalog = movieCatalog;
      this.customerPreferenceDao = customerPreferenceDao;
  }

  // ...
}
The corresponding bean definitions appear as follows. The bean with qualifier value "main" is wired with the constructor argument that is qualified with the same value.
<?xml version="1.0" encoding="UTF-8"?>
<beans xmlns="http://www.springframework.org/schema/beans"
  xmlns:xsi="http://www.w3.org/2001/XMLSchema-instance"
  xmlns:context="http://www.springframework.org/schema/context"
  xsi:schemaLocation="http://www.springframework.org/schema/beans
      http://www.springframework.org/schema/beans/spring-beans.xsd
      http://www.springframework.org/schema/context
      http://www.springframework.org/schema/context/spring-context.xsd">

  <context:annotation-config/>

  <bean class="example.SimpleMovieCatalog">
      <qualifier value="main"/>
      <!-- inject any dependencies required by this bean -->
  </bean>

  <bean class="example.SimpleMovieCatalog">
      <qualifier value="action"/>
      <!-- inject any dependencies required by this bean -->
  </bean>

  <bean id="movieRecommender" class="example.MovieRecommender"/>

</beans>
For a fallback match, the bean name is considered a default qualifier
value. Thus you can define the bean with an id "main" instead of the
nested qualifier element, leading to the same matching result. However,
although you can use this convention to refer to specific beans by name,
@Autowired is fundamentally about
type-driven injection with optional semantic qualifiers. This means that
qualifier values, even with the bean name fallback, always have narrowing
semantics within the set of type matches; they do not semantically express
a reference to a unique bean id. Good qualifier values are "main" or
"EMEA" or "persistent", expressing characteristics of a specific component
that are independent from the bean id, which may be auto-generated in case
of an anonymous bean definition like the one in the preceding
example.
Qualifiers also apply to typed collections, as discussed above, for
example, to Set<MovieCatalog>. In this case, all
matching beans according to the declared qualifiers are injected as a
collection. This implies that qualifiers do not have to be unique; they
rather simply constitute filtering criteria. For example, you can define
multiple MovieCatalog beans with the same qualifier
value "action"; all of which would be injected into a
Set<MovieCatalog> annotated with
@Qualifier("action").
| Tip |
|---|---|
If you intend to express annotation-driven injection by name, do not
primarily use As a specific consequence of this semantic difference, beans that
are themselves defined as a collection or map type cannot be injected
through
|
You can create your own custom qualifier annotations. Simply define an
annotation and provide the @Qualifier
annotation within your definition:
@Target({ElementType.FIELD, ElementType.PARAMETER})
@Retention(RetentionPolicy.RUNTIME)
@Qualifier
public @interface Genre {

  String value();
}
Then you can provide the custom qualifier on autowired fields and parameters:
public class MovieRecommender {

  @Autowired
  @Genre("Action")
  private MovieCatalog actionCatalog;

  private MovieCatalog comedyCatalog;

  @Autowired
  public void setComedyCatalog(@Genre("Comedy") MovieCatalog comedyCatalog) {
      this.comedyCatalog = comedyCatalog;
  }

  // ...
}
Next, provide the information for the candidate bean definitions. You
can add <qualifier/> tags as sub-elements of the
<bean/> tag and then specify the
type and value to match your custom
qualifier annotations. The type is matched against the fully-qualified
class name of the annotation. Or, as a convenience if no risk of
conflicting names exists, you can use the short class name. Both
approaches are demonstrated in the following example.
<?xml version="1.0" encoding="UTF-8"?>
<beans xmlns="http://www.springframework.org/schema/beans"
  xmlns:xsi="http://www.w3.org/2001/XMLSchema-instance"
  xmlns:context="http://www.springframework.org/schema/context"
  xsi:schemaLocation="http://www.springframework.org/schema/beans
      http://www.springframework.org/schema/beans/spring-beans.xsd
      http://www.springframework.org/schema/context
      http://www.springframework.org/schema/context/spring-context.xsd">

  <context:annotation-config/>

  <bean class="example.SimpleMovieCatalog">
      <qualifier type="Genre" value="Action"/>
      <!-- inject any dependencies required by this bean -->
  </bean>

  <bean class="example.SimpleMovieCatalog">
      <qualifier type="example.Genre" value="Comedy"/>
      <!-- inject any dependencies required by this bean -->
  </bean>

  <bean id="movieRecommender" class="example.MovieRecommender"/>

</beans>
In Section 4.10, “Classpath scanning and managed components”, you will see an annotation-based alternative to providing the qualifier metadata in XML. Specifically, see Section 4.10.7, “Providing qualifier metadata with annotations”.
In some cases, it may be sufficient to use an annotation without a value. This may be useful when the annotation serves a more generic purpose and can be applied across several different types of dependencies. For example, you may provide an offline catalog that would be searched when no Internet connection is available. First define the simple annotation:
@Target({ElementType.FIELD, ElementType.PARAMETER})
@Retention(RetentionPolicy.RUNTIME)
@Qualifier
public @interface Offline {

}
Then add the annotation to the field or property to be autowired:
public class MovieRecommender {

  @Autowired
  @Offline
  private MovieCatalog offlineCatalog;

  // ...
}
Now the bean definition only needs a qualifier
type:
<bean class="example.SimpleMovieCatalog">
  <qualifier type="Offline"/>
  <!-- inject any dependencies required by this bean -->
</bean>
You can also define custom qualifier annotations that accept named
attributes in addition to or instead of the simple
value attribute. If multiple attribute values are then
specified on a field or parameter to be autowired, a bean definition must
match all such attribute values to be considered an
autowire candidate. As an example, consider the following annotation
definition:
@Target({ElementType.FIELD, ElementType.PARAMETER})
@Retention(RetentionPolicy.RUNTIME)
@Qualifier
public @interface MovieQualifier {

  String genre();

  Format format();
}
In this case Format is an enum:
public enum Format {

  VHS, DVD, BLURAY
}
The fields to be autowired are annotated with the custom qualifier and
include values for both attributes: genre and
format.
public class MovieRecommender {

  @Autowired
  @MovieQualifier(format=Format.VHS, genre="Action")
  private MovieCatalog actionVhsCatalog;

  @Autowired
  @MovieQualifier(format=Format.VHS, genre="Comedy")
  private MovieCatalog comedyVhsCatalog;

  @Autowired
  @MovieQualifier(format=Format.DVD, genre="Action")
  private MovieCatalog actionDvdCatalog;

  @Autowired
  @MovieQualifier(format=Format.BLURAY, genre="Comedy")
  private MovieCatalog comedyBluRayCatalog;

  // ...
}
Finally, the bean definitions should contain matching qualifier
values. This example also demonstrates that bean meta
attributes may be used instead of the
<qualifier/> sub-elements. If available, the
<qualifier/> and its attributes take precedence,
but the autowiring mechanism falls back on the values provided within the
<meta/> tags if no such qualifier is present, as
in the last two bean definitions in the following example.
<?xml version="1.0" encoding="UTF-8"?>
<beans xmlns="http://www.springframework.org/schema/beans"
  xmlns:xsi="http://www.w3.org/2001/XMLSchema-instance"
  xmlns:context="http://www.springframework.org/schema/context"
  xsi:schemaLocation="http://www.springframework.org/schema/beans
      http://www.springframework.org/schema/beans/spring-beans.xsd
      http://www.springframework.org/schema/context
      http://www.springframework.org/schema/context/spring-context.xsd">

  <context:annotation-config/>

  <bean class="example.SimpleMovieCatalog">
      <qualifier type="MovieQualifier">
          <attribute key="format" value="VHS"/>
          <attribute key="genre" value="Action"/>
      </qualifier>
      <!-- inject any dependencies required by this bean -->
  </bean>

  <bean class="example.SimpleMovieCatalog">
      <qualifier type="MovieQualifier">
          <attribute key="format" value="VHS"/>
          <attribute key="genre" value="Comedy"/>
      </qualifier>
      <!-- inject any dependencies required by this bean -->
  </bean>

  <bean class="example.SimpleMovieCatalog">
      <meta key="format" value="DVD"/>
      <meta key="genre" value="Action"/>
      <!-- inject any dependencies required by this bean -->
  </bean>

  <bean class="example.SimpleMovieCatalog">
      <meta key="format" value="BLURAY"/>
      <meta key="genre" value="Comedy"/>
      <!-- inject any dependencies required by this bean -->
  </bean>

</beans>
The CustomAutowireConfigurer is a
BeanFactoryPostProcessor that enables you
to register your own custom qualifier annotation types even if they are
not annotated with Spring's @Qualifier
annotation.
<bean id="customAutowireConfigurer"
     class="org.springframework.beans.factory.annotation.CustomAutowireConfigurer">
  <property name="customQualifierTypes">
      <set>
          <value>example.CustomQualifier</value>
      </set>
  </property>
</bean>
The particular implementation of
AutowireCandidateResolver that is activated
for the application context depends on the Java version. In versions
earlier than Java 5, the qualifier annotations are not supported, and
therefore autowire candidates are solely determined by the
autowire-candidate value of each bean definition as
well as by any default-autowire-candidates pattern(s)
available on the <beans/> element. In Java 5 or
later, the presence of @Qualifier
annotations and any custom annotations registered with the
CustomAutowireConfigurer will also play a
role.
Regardless of the Java version, when multiple beans qualify as
autowire candidates, the determination of a "primary" candidate is the
same: if exactly one bean definition among the candidates has a
primary attribute set to true, it
will be selected.
Spring also supports injection using the JSR-250
@Resource annotation on fields or bean
property setter methods. This is a common pattern in Java EE 5 and 6, for
example in JSF 1.2 managed beans or JAX-WS 2.0 endpoints. Spring supports
this pattern for Spring-managed objects as well.
@Resource takes a name attribute, and
by default Spring interprets that value as the bean name to be injected.
In other words, it follows by-name semantics, as
demonstrated in this example:
public class SimpleMovieLister {

  private MovieFinder movieFinder;

  @Resource(name="myMovieFinder")
  public void setMovieFinder(MovieFinder movieFinder) {
      this.movieFinder = movieFinder;
  }
}
If no name is specified explicitly, the default name is derived from the field name or setter method. In case of a field, it takes the field name; in case of a setter method, it takes the bean property name. So the following example is going to have the bean with name "movieFinder" injected into its setter method:
public class SimpleMovieLister {

  private MovieFinder movieFinder;

  @Resource
  public void setMovieFinder(MovieFinder movieFinder) {
      this.movieFinder = movieFinder;
  }
}
| Note |
|---|---|
The name provided with the annotation is resolved as a bean name by
the |
In the exclusive case of @Resource
usage with no explicit name specified, and similar to
@Autowired,
@Resource finds a primary type match
instead of a specific named bean and resolves well-known resolvable
dependencies: the
BeanFactory,
ApplicationContext, ResourceLoader,
ApplicationEventPublisher, and
MessageSource interfaces.
Thus in the following example, the
customerPreferenceDao field first looks for a bean
named customerPreferenceDao, then falls back to a primary type match for
the type CustomerPreferenceDao. The "context" field
is injected based on the known resolvable dependency type
ApplicationContext.
public class MovieRecommender {

  @Resource
  private CustomerPreferenceDao customerPreferenceDao;

  @Resource
  private ApplicationContext context;

  public MovieRecommender() {
  }

  // ...
}
The CommonAnnotationBeanPostProcessor not only
recognizes the @Resource annotation but
also the JSR-250 lifecycle annotations. Introduced in
Spring 2.5, the support for these annotations offers yet another
alternative to those described in initialization
callbacks and destruction
callbacks. Provided that the
CommonAnnotationBeanPostProcessor is registered
within the Spring ApplicationContext, a
method carrying one of these annotations is invoked at the same point in
the lifecycle as the corresponding Spring lifecycle interface method or
explicitly declared callback method. In the example below, the cache will
be pre-populated upon initialization and cleared upon destruction.
public class CachingMovieLister {

  @PostConstruct
  public void populateMovieCache() {
      // populates the movie cache upon initialization...
  }

  @PreDestroy
  public void clearMovieCache() {
      // clears the movie cache upon destruction...
  }
}
| Note |
|---|---|
For details about the effects of combining various lifecycle mechanisms, see Section 4.6.1.4, “Combining lifecycle mechanisms”. |
Most examples in this chapter use XML to specify the configuration
metadata that produces each BeanDefinition
within the Spring container. The previous section
(Section 4.9, “Annotation-based container configuration”) demonstrates how to provide a
lot of the configuration metadata through source-level annotations. Even
in those examples, however, the "base" bean definitions are explicitly
defined in the XML file, while the annotations only drive the dependency
injection. This section describes an option for implicitly detecting the
candidate components by scanning the classpath.
Candidate components are classes that match against a filter criteria and
have a corresponding bean definition registered with the container. This
removes the need to use XML to perform bean registration, instead you can
use annotations (for example @Component), AspectJ type expressions, or your
own custom filter criteria to select which classes will have bean
definitions registered with the container.
| Note |
|---|---|
Starting with Spring 3.0, many features provided by the Spring JavaConfig
project are part of the core Spring Framework. This allows you to
define beans using Java rather than using the traditional XML files. Take
a look at the |
In Spring 2.0 and later, the
@Repository annotation is a marker for any
class that fulfills the role or stereotype (also
known as Data Access Object or DAO) of a repository. Among the uses of
this marker is the automatic translation of exceptions as described in
Section 14.2.2, “Exception translation”.
Spring 2.5 introduces further stereotype annotations:
@Component,
@Service, and
@Controller.
@Component is a generic stereotype for any
Spring-managed component. @Repository,
@Service, and
@Controller are specializations of
@Component for more specific use cases, for
example, in the persistence, service, and presentation layers,
respectively. Therefore, you can annotate your component classes with
@Component, but by annotating them with
@Repository,
@Service, or
@Controller instead, your classes are more
properly suited for processing by tools or associating with aspects. For
example, these stereotype annotations make ideal targets for pointcuts. It
is also possible that @Repository,
@Service, and
@Controller may carry additional semantics
in future releases of the Spring Framework. Thus, if you are choosing
between using @Component or
@Service for your service layer,
@Service is clearly the better choice.
Similarly, as stated above, @Repository is
already supported as a marker for automatic exception translation in your
persistence layer.
Spring can automatically detect stereotyped classes and register
corresponding BeanDefinitions with the
ApplicationContext. For example, the
following two classes are eligible for such autodetection:
@Service
public class SimpleMovieLister {

  private MovieFinder movieFinder;

  @Autowired
  public SimpleMovieLister(MovieFinder movieFinder) {
      this.movieFinder = movieFinder;
  }
}
@Repository
public class JpaMovieFinder implements MovieFinder {
  // implementation elided for clarity
}
To autodetect these classes and register the corresponding beans, you need to include the following element in XML, where the base-package element is a common parent package for the two classes. (Alternatively, you can specify a comma-separated list that includes the parent package of each class.)
<?xml version="1.0" encoding="UTF-8"?>
<beans xmlns="http://www.springframework.org/schema/beans"
     xmlns:xsi="http://www.w3.org/2001/XMLSchema-instance"
     xmlns:context="http://www.springframework.org/schema/context"
     xsi:schemaLocation="http://www.springframework.org/schema/beans
         http://www.springframework.org/schema/beans/spring-beans.xsd
         http://www.springframework.org/schema/context
         http://www.springframework.org/schema/context/spring-context.xsd">

   <context:component-scan base-package="org.example"/>

</beans>
| Note |
|---|---|
The scanning of classpath packages requires the presence of corresponding directory entries in the classpath. When you build JARs with Ant, make sure that you do not activate the files-only switch of the JAR task. |
Furthermore, the
AutowiredAnnotationBeanPostProcessor and
CommonAnnotationBeanPostProcessor are both
included implicitly when you use the component-scan element. That means
that the two components are autodetected and wired
together - all without any bean configuration metadata provided in
XML.
| Note |
|---|---|
You can disable the registration of
|
By default, classes annotated with
@Component,
@Repository,
@Service,
@Controller, or a custom annotation that
itself is annotated with @Component are the
only detected candidate components. However, you can modify and extend
this behavior simply by applying custom filters. Add them as
include-filter or exclude-filter
sub-elements of the component-scan element. Each filter
element requires the type and
expression attributes. The following table describes
the filtering options.
Table 4.5. Filter Types
| Filter Type | Example Expression | Description |
|---|---|---|
| annotation | org.example.SomeAnnotation | An annotation to be present at the type level in target components. |
| assignable | org.example.SomeClass | A class (or interface) that the target components are assignable to (extend/implement). |
| aspectj | org.example..*Service+ | An AspectJ type expression to be matched by the target components. |
| regex | org\.example\.Default.* | A regex expression to be matched by the target components class names. |
| custom | org.example.MyTypeFilter | A custom implementation of the
org.springframework.core.type
              .TypeFilter
interface. |
The following example shows the XML configuration ignoring all
@Repository annotations and using "stub"
repositories instead.
<beans>

   <context:component-scan base-package="org.example">
      <context:include-filter type="regex" expression=".*Stub.*Repository"/>
      <context:exclude-filter type="annotation"
                              expression="org.springframework.stereotype.Repository"/>
   </context:component-scan>

</beans>
| Note |
|---|---|
You can also disable the default filters by providing
use-default-filters="false" as an attribute of the
<component-scan/> element. This will in effect disable automatic
detection of classes annotated with
|
Spring components can also contribute bean definition metadata to the
container. You do this with the same @Bean annotation
used to define bean metadata within @Configuration
annotated classes. Here is a simple example:
@Component
public class FactoryMethodComponent {

  @Bean @Qualifier("public")
  public TestBean publicInstance() {
      return new TestBean("publicInstance");
  }

  public void doWork() {
      // Component method implementation omitted
  }
}
This class is a Spring component that has application-specific code
contained in its doWork() method. However, it
also contributes a bean definition that has a factory method referring to
the method publicInstance(). The
@Bean annotation identifies the factory method and
other bean definition properties, such as a qualifier value through the
@Qualifier annotation. Other method level
annotations that can be specified are @Scope,
@Lazy, and custom qualifier annotations. Autowired
fields and methods are supported as previously discussed, with additional
support for autowiring of @Bean methods:
@Component
public class FactoryMethodComponent {

  private static int i;

  @Bean @Qualifier("public")
  public TestBean publicInstance() {
      return new TestBean("publicInstance");
  }

  // use of a custom qualifier and autowiring of method parameters

  @Bean
  protected TestBean protectedInstance(@Qualifier("public") TestBean spouse,
                                       @Value("#{privateInstance.age}") String country) {
      TestBean tb = new TestBean("protectedInstance", 1);
      tb.setSpouse(tb);
      tb.setCountry(country);
      return tb;
  }

  @Bean @Scope(BeanDefinition.SCOPE_SINGLETON)
  private TestBean privateInstance() {
      return new TestBean("privateInstance", i++);
  }

  @Bean @Scope(value = WebApplicationContext.SCOPE_SESSION,
               proxyMode = ScopedProxyMode.TARGET_CLASS)
  public TestBean requestScopedInstance() {
      return new TestBean("requestScopedInstance", 3);
  }
}
The example autowires the String method
parameter country to the value of the
Age property on another bean named
privateInstance. A Spring Expression Language element
defines the value of the property through the notation #{
<expression> }. For @Value annotations,
an expression resolver is preconfigured to look for bean names when
resolving expression text.
The @Bean methods in a Spring component are
processed differently than their counterparts inside a Spring
@Configuration class. The difference is that
@Component classes are not enhanced with CGLIB to
intercept the invocation of methods and fields. CGLIB proxying is the
means by which invoking methods or fields within
@Configuration classes @Bean methods
create bean metadata references to collaborating objects. Methods are
not invoked with normal Java semantics. In contrast,
calling a method or field within a @Component classes
@Bean method has standard Java
semantics.
When a component is autodetected as part of the scanning process, its
bean name is generated by the
BeanNameGenerator strategy known to that
scanner. By default, any Spring stereotype annotation
(@Component,
@Repository,
@Service, and
@Controller) that contains a
name value will thereby provide that name to the
corresponding bean definition.
If such an annotation contains no name value or for
any other detected component (such as those discovered by custom filters),
the default bean name generator returns the uncapitalized non-qualified
class name. For example, if the following two components were detected,
the names would be myMovieLister and movieFinderImpl:
@Service("myMovieLister")
public class SimpleMovieLister {
  // ...
}
@Repository
public class MovieFinderImpl implements MovieFinder {
  // ...
}
| Note |
|---|---|
If you do not want to rely on the default bean-naming strategy, you
can provide a custom bean-naming strategy. First, implement the |
<beans>

   <context:component-scan base-package="org.example"
                           name-generator="org.example.MyNameGenerator" />

</beans>
As a general rule, consider specifying the name with the annotation whenever other components may be making explicit references to it. On the other hand, the auto-generated names are adequate whenever the container is responsible for wiring.
As with Spring-managed components in general, the default and most
common scope for autodetected components is singleton. However, sometimes
you need other scopes, which Spring 2.5 provides with a new
@Scope annotation. Simply provide the name
of the scope within the annotation:
@Scope("prototype")
@Repository
public class MovieFinderImpl implements MovieFinder {
  // ...
}
| Note |
|---|---|
To provide a custom strategy for scope resolution rather than
relying on the annotation-based approach, implement the |
<beans>

   <context:component-scan base-package="org.example"
                           scope-resolver="org.example.MyScopeResolver" />

</beans>
When using certain non-singleton scopes, it may be necessary to generate proxies for the scoped objects. The reasoning is described in Section 4.5.4.5, “Scoped beans as dependencies”. For this purpose, a scoped-proxy attribute is available on the component-scan element. The three possible values are: no, interfaces, and targetClass. For example, the following configuration will result in standard JDK dynamic proxies:
<beans>

   <context:component-scan base-package="org.example"
                           scoped-proxy="interfaces" />

</beans>
The @Qualifier annotation is discussed
in Section 4.9.3, “Fine-tuning annotation-based autowiring with qualifiers”. The examples
in that section demonstrate the use of the
@Qualifier annotation and custom qualifier
annotations to provide fine-grained control when you resolve autowire
candidates. Because those examples were based on XML bean definitions, the
qualifier metadata was provided on the candidate bean definitions using
the qualifier or meta sub-elements
of the bean element in the XML. When relying upon
classpath scanning for autodetection of components, you provide the
qualifier metadata with type-level annotations on the candidate class. The
following three examples demonstrate this technique:
@Component
@Qualifier("Action")
public class ActionMovieCatalog implements MovieCatalog {
  // ...
}
@Component
@Genre("Action")
public class ActionMovieCatalog implements MovieCatalog {
  // ...
}
@Component
@Offline
public class CachingMovieCatalog implements MovieCatalog {
  // ...
}
| Note |
|---|---|
As with most annotation-based alternatives, keep in mind that the annotation metadata is bound to the class definition itself, while the use of XML allows for multiple beans of the same type to provide variations in their qualifier metadata, because that metadata is provided per-instance rather than per-class. |
Starting with Spring 3.0, Spring offers support for JSR-330 standard annotations (Dependency Injection). Those annotations are scanned in the same way as the Spring annotations. You just need to have the relevant jars in your classpath.
| Note |
|---|---|
If you are using Maven, the <dependency> <groupId>javax.inject</groupId> <artifactId>javax.inject</artifactId> <version>1</version> </dependency> |
Instead of @Autowired,
@javax.inject.Inject may be used as follows:
import javax.inject.Inject;

public class SimpleMovieLister {

  private MovieFinder movieFinder;

  @Inject
  public void setMovieFinder(MovieFinder movieFinder) {
      this.movieFinder = movieFinder;
  }
  // ...
}
As with @Autowired, it is possible to use @Inject
at the class-level, field-level, method-level and constructor-argument level.
If you would like to use a qualified name for the dependency that should be injected,
you should use the @Named annotation as follows:
import javax.inject.Inject;
import javax.inject.Named;

public class SimpleMovieLister {

  private MovieFinder movieFinder;

  @Inject
  public void setMovieFinder(@Named("main") MovieFinder movieFinder) {
      this.movieFinder = movieFinder;
  }
  // ...
}
Instead of @Component, @javax.inject.Named may be used as follows:
import javax.inject.Inject;
import javax.inject.Named;

@Named("movieListener")
public class SimpleMovieLister {

  private MovieFinder movieFinder;

  @Inject
  public void setMovieFinder(MovieFinder movieFinder) {
      this.movieFinder = movieFinder;
  }
  // ...
}
It is very common to use @Component without
specifying a name for the component. @Named
can be used in a similar fashion:
import javax.inject.Inject;
import javax.inject.Named;

@Named
public class SimpleMovieLister {

  private MovieFinder movieFinder;

  @Inject
  public void setMovieFinder(MovieFinder movieFinder) {
      this.movieFinder = movieFinder;
  }
  // ...
}
When using @Named, it is possible to use
component-scanning in the exact same way as when using Spring annotations:
<beans>
    <context:component-scan base-package="org.example"/>
</beans>
When working with standard annotations, it is important to know that some significant features are not available as shown in the table below:
Table 4.6. Spring annotations vs. standard annotations
| Spring | javax.inject.* | javax.inject restrictions / comments |
|---|---|---|
| @Autowired | @Inject | @Inject has no 'required' attribute |
| @Component | @Named | — |
| @Scope("singleton") | @Singleton |
The JSR-330 default scope is like Spring's
|
| @Qualifier | @Named | — |
| @Value | — | no equivalent |
| @Required | — | no equivalent |
| @Lazy | — | no equivalent |
The central artifact in Spring's new Java-configuration support is the
@Configuration-annotated class. These
classes consist principally of
@Bean-annotated methods that define
instantiation, configuration, and initialization logic for objects to be
managed by the Spring IoC container.
Annotating a class with the
@Configuration indicates that the class can
be used by the Spring IoC container as a source of bean definitions. The
simplest possible @Configuration class
would read as follows:
@Configuration
public class AppConfig {
  @Bean
  public MyService myService() {
      return new MyServiceImpl();
  }
}
For those more familiar with Spring <beans/>
XML, the AppConfig class above would be equivalent to:
<beans>
  <bean id="myService" class="com.acme.services.MyServiceImpl"/>
</beans>
As you can see, the @Bean annotation plays the same
role as the <bean/> element. The
@Bean annotation will be discussed in depth in the
sections below. First, however, we'll cover the various ways of creating a
spring container using Java-based configuration.
The sections below document Spring's
AnnotationConfigApplicationContext, new in Spring 3.0.
This versatile ApplicationContext implementation is
capable of accepting not only @Configuration classes as
input, but also plain @Component classes and classes
annotated with JSR-330 metadata.
When @Configuration classes are provided as input,
the @Configuration class itself is registered as a bean
definition, and all declared @Bean methods within the
class are also registered as bean definitions.
When @Component and JSR-330 classes are provided,
they are registered as bean definitions, and it is assumed that DI
metadata such as @Autowired or
@Inject are used within those classes where
necessary.
In much the same way that Spring XML files are used as input when
instantiating a ClassPathXmlApplicationContext,
@Configuration classes may be used as input when
instantiating an AnnotationConfigApplicationContext.
This allows for completely XML-free usage of the Spring container:
public static void main(String[] args) {
  ApplicationContext ctx = new AnnotationConfigApplicationContext(AppConfig.class);
  MyService myService = ctx.getBean(MyService.class);
  myService.doStuff();
}
As mentioned above,
AnnotationConfigApplicationContext is not limited to
working only with @Configuration classes. Any
@Component or JSR-330 annotated class may be supplied
as input to the constructor. For example:
public static void main(String[] args) {
  ApplicationContext ctx = new AnnotationConfigApplicationContext(MyServiceImpl.class, Dependency1.class, Dependency2.class);
  MyService myService = ctx.getBean(MyService.class);
  myService.doStuff();
}
The above assumes that MyServiceImpl,
Dependency1 and Dependency2 use
Spring dependency injection annotations such as
@Autowired.
An AnnotationConfigApplicationContext may be
instantiated using a no-arg constructor and then configured using the
register() method. This approach is particularly
useful when programmatically building an
AnnotationConfigApplicationContext.
public static void main(String[] args) {
  AnnotationConfigApplicationContext ctx = new AnnotationConfigApplicationContext();
  ctx.register(AppConfig.class, OtherConfig.class);
  ctx.register(AdditionalConfig.class);
  ctx.refresh();
  MyService myService = ctx.getBean(MyService.class);
  myService.doStuff();
}
Experienced Spring users will be familiar with the following
commonly-used XML declaration from Spring's context:
namespace
<beans>
  <context:component-scan base-package="com.acme"/>
</beans>
In the example above, the com.acme package will be
scanned, looking for any @Component-annotated
classes, and those classes will be registered as Spring bean definitions
within the container.
AnnotationConfigApplicationContext exposes the
scan(String...) method to allow for the same
component-scanning
functionality:
public static void main(String[] args) {
  AnnotationConfigApplicationContext ctx = new AnnotationConfigApplicationContext();
  ctx.scan("com.acme");
  ctx.refresh();
  MyService myService = ctx.getBean(MyService.class);
}
| Note |
|---|---|
Remember that |
A WebApplicationContext variant of
AnnotationConfigApplicationContext is available with
AnnotationConfigWebApplicationContext. This
implementation may be used when configuring the Spring
ContextLoaderListener servlet listener, Spring MVC
DispatcherServlet, etc. What follows is a
web.xml snippet that configures a typical Spring MVC
web application. Note the use of the contextClass
context-param and init-param:
<web-app>
  <!-- Configure ContextLoaderListener to use AnnotationConfigWebApplicationContext
       instead of the default XmlWebApplicationContext -->
  <context-param>
      <param-name>contextClass</param-name>
      <param-value>
          org.springframework.web.context.support.AnnotationConfigWebApplicationContext
      </param-value>
  </context-param>

  <!-- Configuration locations must consist of one or more comma- or space-delimited
       fully-qualified @Configuration classes. Fully-qualified packages may also be
       specified for component-scanning -->
  <context-param>
      <param-name>contextConfigLocation</param-name>
      <param-value>com.acme.AppConfig</param-value>
  </context-param>

  <!-- Bootstrap the root application context as usual using ContextLoaderListener -->
  <listener>
      <listener-class>org.springframework.web.context.ContextLoaderListener</listener-class>
  </listener>

  <!-- Declare a Spring MVC DispatcherServlet as usual -->
  <servlet>
      <servlet-name>dispatcher</servlet-name>
      <servlet-class>org.springframework.web.servlet.DispatcherServlet</servlet-class>
      <!-- Configure DispatcherServlet to use AnnotationConfigWebApplicationContext
           instead of the default XmlWebApplicationContext -->
      <init-param>
          <param-name>contextClass</param-name>
          <param-value>
              org.springframework.web.context.support.AnnotationConfigWebApplicationContext
          </param-value>
      </init-param>
      <!-- Again, config locations must consist of one or more comma- or space-delimited
           and fully-qualified @Configuration classes -->
      <init-param>
          <param-name>contextConfigLocation</param-name>
          <param-value>com.acme.web.MvcConfig</param-value>
      </init-param>
  </servlet>

  <!-- map all requests for /app/* to the dispatcher servlet -->
  <servlet-mapping>
      <servlet-name>dispatcher</servlet-name>
      <url-pattern>/app/*</url-pattern>
  </servlet-mapping>
</web-app>
Much as the <import/> element is used
within Spring XML files to aid in modularizing configurations, the
@Import annotation allows for loading
@Bean definitions from another configuration
class:
@Configuration
public class ConfigA {
  public @Bean A a() { return new A(); }
}

@Configuration
@Import(ConfigA.class)
public class ConfigB {
  public @Bean B b() { return new B(); }
}
Now, rather than needing to specify both
ConfigA.class and ConfigB.class
when instantiating the context, only ConfigB needs to
be supplied
explicitly:
public static void main(String[] args) {
  ApplicationContext ctx = new AnnotationConfigApplicationContext(ConfigB.class);

  // now both beans A and B will be available...
  A a = ctx.getBean(A.class);
  B b = ctx.getBean(B.class);
}
This approach simplifies container instantiation, as only one class
needs to be dealt with, rather than requiring the developer to remember
a potentially large number of @Configuration classes
during construction.
The example above works, but is simplistic. In most practical
scenarios, beans will have dependencies on one another across
configuration classes. When using XML, this is not an issue, per se,
because there is no compiler involved, and one can simply declare
ref="someBean" and trust that Spring will work it
out during container initialization. Of course, when using
@Configuration classes, the Java compiler places
constraints on the configuration model, in that references to other
beans must be valid Java syntax.
Fortunately, solving this problem is simple. Remember that
@Configuration classes are ultimately just another
bean in the container - this means that they can take advantage of
@Autowired injection metadata just like any other
bean!
Let's consider a more real-world scenario with several
@Configuration classes, each depending on beans
declared in the
others:
@Configuration
public class ServiceConfig {
  private @Autowired AccountRepository accountRepository;

  public @Bean TransferService transferService() {
      return new TransferServiceImpl(accountRepository);
  }
}

@Configuration
public class RepositoryConfig {
  private @Autowired DataSource dataSource;

  public @Bean AccountRepository accountRepository() {
      return new JdbcAccountRepository(dataSource);
  }
}

@Configuration
@Import({ServiceConfig.class, RepositoryConfig.class})
public class SystemTestConfig {
  public @Bean DataSource dataSource() { /* return new DataSource */ }
}

public static void main(String[] args) {
  ApplicationContext ctx = new AnnotationConfigApplicationContext(SystemTestConfig.class);
  // everything wires up across configuration classes...
  TransferService transferService = ctx.getBean(TransferService.class);
  transferService.transfer(100.00, "A123", "C456");
}
In the scenario above, using @Autowired works
well and provides the desired modularity, but determining exactly
where the autowired bean definitions are declared is still somewhat
ambiguous. For example, as a developer looking at
ServiceConfig, how do you know exactly where the
@Autowired AccountRepository bean is declared?
It's not explicit in the code, and this may be just fine. Remember
that the SpringSource Tool Suite provides tooling that can render
graphs showing how everything is wired up - that may be all you
need. Also, your Java IDE can easily find all declarations and uses
of the AccountRepository type, and will quickly
show you the location of @Bean methods that
return that type.
In cases where this ambiguity is not acceptable and you wish to
have direct navigation from within your IDE from one
@Configuration class to another, consider
autowiring the configuration classes themselves:
@Configuration
public class ServiceConfig {
  private @Autowired RepositoryConfig repositoryConfig;

  public @Bean TransferService transferService() {
      // navigate 'through' the config class to the @Bean method!
      return new TransferServiceImpl(repositoryConfig.accountRepository());
  }
}
In the situation above, it is completely explicit where
AccountRepository is defined. However,
ServiceConfig is now tightly coupled to
RepositoryConfig; that's the tradeoff. This tight
coupling can be somewhat mitigated by using interface-based or
abstract class-based @Configuration classes.
Consider the following:
@Configuration
public class ServiceConfig {
  private @Autowired RepositoryConfig repositoryConfig;

  public @Bean TransferService transferService() {
      return new TransferServiceImpl(repositoryConfig.accountRepository());
  }
}

@Configuration
public interface RepositoryConfig {
  @Bean AccountRepository accountRepository();
}

@Configuration
public class DefaultRepositoryConfig implements RepositoryConfig {
  public @Bean AccountRepository accountRepository() {
      return new JdbcAccountRepository(...);
  }
}

@Configuration
@Import({ServiceConfig.class, DefaultRepositoryConfig.class}) // import the concrete config!
public class SystemTestConfig {
  public @Bean DataSource dataSource() { /* return DataSource */ }
}

public static void main(String[] args) {
  ApplicationContext ctx = new AnnotationConfigApplicationContext(SystemTestConfig.class);
  TransferService transferService = ctx.getBean(TransferService.class);
  transferService.transfer(100.00, "A123", "C456");
}
Now ServiceConfig is loosely coupled with respect
to the concrete DefaultRepositoryConfig, and
built-in IDE tooling is still useful: it will be easy for the
developer to get a type hierarchy of
RepositoryConfig implementations. In this way,
navigating @Configuration classes and their
dependencies becomes no different than the usual process of
navigating interface-based code.
Spring's @Configuration class support does not
aim to be a 100% complete replacement for Spring XML. Some facilities
such as Spring XML namespaces remain an ideal way to configure the
container. In cases where XML is convenient or necessary, you have a
choice: either instantiate the container in an "XML-centric" way using,
for example, ClassPathXmlApplicationContext, or in a
"Java-centric" fashion using
AnnotationConfigApplicationContext and the
@ImportResource annotation to import XML as
needed.
It may be preferable to bootstrap the Spring container from XML
and include @Configuration classes in an ad-hoc
fashion. For example, in a large existing codebase that uses Spring
XML, it will be easier to create @Configuration
classes on an as-needed basis and include them from the existing XML
files. Below you'll find the options for using
@Configuration classes in this kind of
"XML-centric" situation.
Remember that @Configuration classes are
ultimately just bean definitions in the container. In this example,
we create a @Configuration class named
AppConfig and include it within
system-test-config.xml as a
<bean/>definition. Because
<context:annotation-config/> is switched
on, the container will recognize the
@Configuration annotation, and process the
@Bean methods declared in
AppConfig
properly.
@Configuration
public class AppConfig {
  private @Autowired DataSource dataSource;

  public @Bean AccountRepository accountRepository() {
      return new JdbcAccountRepository(dataSource);
  }

  public @Bean TransferService transferService() {
      return new TransferService(accountRepository());
  }
}
system-test-config.xml
<beans>
  <!-- enable processing of annotations such as @Autowired and @Configuration -->
  <context:annotation-config/>
  <context:property-placeholder location="classpath:/com/acme/jdbc.properties"/>

  <bean class="com.acme.AppConfig"/>

  <bean class="org.springframework.jdbc.datasource.DriverManagerDataSource">
      <property name="url" value="${jdbc.url}"/>
      <property name="username" value="${jdbc.username}"/>
      <property name="password" value="${jdbc.password}"/>
  </bean>
</beans>
jdbc.properties
jdbc.url=jdbc:hsqldb:hsql://localhost/xdb
jdbc.username=sa
jdbc.password=
public static void main(String[] args) {
  ApplicationContext ctx = new ClassPathXmlApplicationContext("classpath:/com/acme/system-test-config.xml");
  TransferService transferService = ctx.getBean(TransferService.class);
  // ...
}
| Note |
|---|---|
In |
Because @Configuration is meta-annotated with
@Component,
@Configuration-annotated classes are
automatically candidates for component scanning. Using the same
scenario as above, we can redefine
system-test-config.xml to take advantage of
component-scanning. Note that in this case, we don't need to
explicitly declare
<context:annotation-config/>, because
<context:component-scan/> enables all the
same
functionality.
system-test-config.xml
<beans>
  <!-- picks up and registers AppConfig as a bean definition -->
  <context:component-scan base-package="com.acme"/>
  <context:property-placeholder location="classpath:/com/acme/jdbc.properties"/>

  <bean class="org.springframework.jdbc.datasource.DriverManagerDataSource">
      <property name="url" value="${jdbc.url}"/>
      <property name="username" value="${jdbc.username}"/>
      <property name="password" value="${jdbc.password}"/>
  </bean>
</beans>
In applications where @Configuration classes
are the primary mechanism for configuring the container, it will still
likely be necessary to use at least some XML. In these scenarios,
simply use @ImportResource and define only as much
XML as is needed. Doing so achieves a "Java-centric" approach to
configuring the container and keeps XML to a bare minimum.
@Configuration
@ImportResource("classpath:/com/acme/properties-config.xml")
public class AppConfig {
  private @Value("${jdbc.url}") String url;
  private @Value("${jdbc.username}") String username;
  private @Value("${jdbc.password}") String password;

  public @Bean DataSource dataSource() {
      return new DriverManagerDataSource(url, username, password);
  }
}
properties-config.xml
<beans>
  <context:property-placeholder location="classpath:/com/acme/jdbc.properties"/>
</beans>
jdbc.properties
jdbc.url=jdbc:hsqldb:hsql://localhost/xdb
jdbc.username=sa
jdbc.password=
public static void main(String[] args) {
  ApplicationContext ctx = new AnnotationConfigApplicationContext(AppConfig.class);
  TransferService transferService = ctx.getBean(TransferService.class);
  // ...
}
@Bean is a method-level annotation and
a direct analog of the XML <bean/> element. The
annotation supports some of the attributes offered by
<bean/>, such as: init-method, destroy-method, autowiring and
name.
You can use the @Bean annotation in a
@Configuration-annotated or in a
@Component-annotated class.
To declare a bean, simply annotate a method with the
@Bean annotation. You use this method to
register a bean definition within an ApplicationContext of
the type specified as the method's return value. By default, the bean
name will be the same as the method name. The following is a simple
example of a @Bean method declaration:
@Configuration
public class AppConfig {

  @Bean
  public TransferService transferService() {
      return new TransferServiceImpl();
  }

}
The preceding configuration is exactly equivalent to the following Spring XML:
<beans>
  <bean id="transferService" class="com.acme.TransferServiceImpl"/>
</beans>
Both declarations make a bean named transferService
available in the ApplicationContext, bound to an object
instance of type TransferServiceImpl:
transferService -> com.acme.TransferServiceImpl
When @Beans have dependencies on one
another, expressing that dependency is as simple as having one bean
method call another:
@Configuration
public class AppConfig {

  @Bean
  public Foo foo() {
      return new Foo(bar());
  }

  @Bean
  public Bar bar() {
      return new Bar();
  }

}
In the example above, the foo bean receives a reference
to bar via constructor injection.
Beans declared in a
@Configuration-annotated class support
the regular lifecycle callbacks. Any classes defined with the
@Bean annotation can use the
@PostConstruct and @PreDestroy
annotations from JSR-250, see JSR-250
annotations for further details.
The regular Spring lifecycle callbacks are fully supported as well. If a bean
implements InitializingBean, DisposableBean,
or Lifecycle, their respective methods are called by the
container.
The standard set of *Aware interfaces such as
BeanFactoryAware,
BeanNameAware,
MessageSourceAware, ApplicationContextAware, and
so on are also fully supported.
The @Bean annotation supports
specifying arbitrary initialization and destruction callback methods,
much like Spring XML's init-method and
destroy-method attributes on the bean element:
public class Foo {
  public void init() {
      // initialization logic
  }
}

public class Bar {
  public void cleanup() {
      // destruction logic
  }
}

@Configuration
public class AppConfig {
  @Bean(initMethod = "init")
  public Foo foo() {
      return new Foo();
  }
  @Bean(destroyMethod = "cleanup")
  public Bar bar() {
      return new Bar();
  }
}
Of course, in the case of Foo above, it would be
equally as valid to call the init() method directly during
construction:
@Configuration
public class AppConfig {
  @Bean
  public Foo foo() {
      Foo foo = new Foo();
      foo.init();
      return foo;
  }

  // ...
}
| Tip |
|---|---|
When you work directly in Java, you can do anything you like with your objects and do not always need to rely on the container lifecycle! |
You can specify that your beans defined with the
@Bean annotation should have a specific
scope. You can use any of the standard scopes specified in the Bean Scopes section.
The default scope is singleton, but you can
override this with the @Scope
annotation:
@Configuration
public class MyConfiguration {
  @Bean
  @Scope("prototype")
  public Encryptor encryptor() {
      // ...
  }
}
Spring offers a convenient way of working with scoped dependencies
through scoped
proxies. The easiest way to create such a proxy when using the
XML configuration is the <aop:scoped-proxy/>
element. Configuring your beans in Java with a @Scope annotation
offers equivalent support with the proxyMode attribute. The default is
no proxy (ScopedProxyMode.NO), but you can specify
ScopedProxyMode.TARGET_CLASS or
ScopedProxyMode.INTERFACES.
If you port the scoped proxy example from the XML reference
documentation (see preceding link) to our
@Bean using Java, it would look like
the following:
// an HTTP Session-scoped bean exposed as a proxy
@Bean
@Scope(value = "session", proxyMode = ScopedProxyMode.TARGET_CLASS)
public UserPreferences userPreferences() {
 return new UserPreferences();
}

@Bean
public Service userService() {
 UserService service = new SimpleUserService();
 // a reference to the proxied userPreferences bean
 service.setUserPreferences(userPreferences());
 return service;
}
As noted earlier, lookup method injection is an advanced feature that you should use rarely. It is useful in cases where a singleton-scoped bean has a dependency on a prototype-scoped bean. Using Java for this type of configuration provides a natural means for implementing this pattern.
public abstract class CommandManager {
  public Object process(Object commandState) {
      // grab a new instance of the appropriate Command interface
      Command command = createCommand();

      // set the state on the (hopefully brand new) Command instance
      command.setState(commandState);
      return command.execute();
  }

  // okay... but where is the implementation of this method?
  protected abstract Command createCommand();
}
Using Java-configuration support , you can create a subclass of
CommandManager where the abstract
createCommand() method is overridden in such a way that
it looks up a new (prototype) command object:
@Bean
@Scope("prototype")
public AsyncCommand asyncCommand() {
  AsyncCommand command = new AsyncCommand();
  // inject dependencies here as required
  return command;
}

@Bean
public CommandManager commandManager() {
  // return new anonymous implementation of CommandManager with command() overridden
  // to return a new prototype Command object
  return new CommandManager() {
      protected Command createCommand() {
          return asyncCommand();
      }
  }
}
By default, configuration classes use a
@Bean method's name as the name of the
resulting bean. This functionality can be overridden, however, with the
name attribute.
@Configuration
public class AppConfig {

  @Bean(name = "myFoo")
  public Foo foo() {
      return new Foo();
  }

}
As discussed in Section 4.3.1, “Naming beans”, it is sometimes
desirable to give a single bean multiple names, otherwise known as
bean aliasing. The name
attribute of the @Bean annotation accepts a String
array for this purpose.
@Configuration
public class AppConfig {

  @Bean(name = { "dataSource", "subsystemA-dataSource", "subsystemB-dataSource" })
  public DataSource dataSource() {
      // instantiate, configure and return DataSource bean...
  }

}
The following example shows a @Bean annotated
method being called twice:
@Configuration
public class AppConfig {

  @Bean
  public ClientService clientService1() {
    ClientServiceImpl clientService = new ClientServiceImpl();
    clientService.setClientDao(clientDao());
    return clientService;
  }
  @Bean
  public ClientService clientService2() {
    ClientServiceImpl clientService = new ClientServiceImpl();
    clientService.setClientDao(clientDao());
    return clientService;
  }

  @Bean
  public ClientDao clientDao() {
    return new ClientDaoImpl();
  }
}
clientDao() has been called once in
clientService1() and once in
clientService2(). Since this method creates a new
instance of ClientDaoImpl and returns it, you would
normally expect having 2 instances (one for each service). That definitely
would be problematic: in Spring, instantiated beans have a
singleton scope by default. This is where the magic
comes in: All @Configuration classes are subclassed at
startup-time with CGLIB. In the subclass, the child
method checks the container first for any cached (scoped) beans before it
calls the parent method and creates a new instance.
| Note |
|---|---|
The behavior could be different according to the scope of your bean. We are talking about singletons here. |
| Note |
|---|---|
Beware that, in order for JavaConfig to work, you must include the CGLIB jar in your list of dependencies. |
| Note |
|---|---|
There are a few restrictions due to the fact that CGLIB dynamically adds features at startup-time:
|
The context namespace introduced in Spring 2.5
provides a load-time-weaver
element.
<beans>

     <context:load-time-weaver/>

</beans>
Adding this element to an XML-based Spring configuration file
activates a Spring LoadTimeWeaver for the
ApplicationContext. Any bean within that
ApplicationContext may implement
LoadTimeWeaverAware, thereby receiving a
reference to the load-time weaver instance. This is particularly useful in
combination with Spring's JPA support where
load-time weaving may be necessary for JPA class transformation. Consult
the LocalContainerEntityManagerFactoryBean Javadoc
for more detail. For more on AspectJ load-time weaving, see Section 8.8.4, “Load-time weaving with AspectJ in the Spring Framework”.
As was discussed in the chapter introduction, the
org.springframework.beans.factory package provides basic
functionality for managing and manipulating beans, including in a
programmatic way. The org.springframework.context package
adds the ApplicationContext interface, which
extends the BeanFactory interface, in
addition to extending other interfaces to provide additional functionality
in a more application framework-oriented style. Many
people use the ApplicationContext in a
completely declarative fashion, not even creating it programmatically, but
instead relying on support classes such as
ContextLoader to automatically instantiate an
ApplicationContext as part of the normal
startup process of a J2EE web application.
To enhance BeanFactory functionality in a
more framework-oriented style the context package also provides the
following functionality:
Access to messages in i18n-style, through the
MessageSourceinterface.Access to resources, such as URLs and files, through the
ResourceLoaderinterface.Event publication to beans implementing the
ApplicationListenerinterface, through the use of theApplicationEventPublisherinterface.Loading of multiple (hierarchical) contexts, allowing each to be focused on one particular layer, such as the web layer of an application, through the
HierarchicalBeanFactoryinterface.
The ApplicationContext interface
extends an interface called MessageSource,
and therefore provides internationalization (i18n) functionality. Spring
also provides the interface
HierarchicalMessageSource, which can resolve
messages hierarchically. Together these interfaces provide the foundation
upon which Spring effects message resolution. The methods defined on these
interfaces include:
String getMessage(String code, Object[] args, String
          default, Locale loc)
: The basic method used to retrieve a message from theMessageSource. When no message is found for the specified locale, the default message is used. Any arguments passed in become replacement values, using theMessageFormatfunctionality provided by the standard library.String getMessage(String code, Object[] args, Locale loc): Essentially the same as the previous method, but with one difference: no default message can be specified; if the message cannot be found, aNoSuchMessageExceptionis thrown.String getMessage(MessageSourceResolvable resolvable, Locale locale): All properties used in the preceding methods are also wrapped in a class namedMessageSourceResolvable, which you can use with this method.
When an ApplicationContext is loaded,
it automatically searches for a
MessageSource bean defined in the context.
The bean must have the name messageSource. If such a
bean is found, all calls to the preceding methods are delegated to the
message source. If no message source is found, the
ApplicationContext attempts to find a
parent containing a bean with the same name. If it does, it uses that bean
as the MessageSource. If the
ApplicationContext cannot find any source
for messages, an empty DelegatingMessageSource is
instantiated in order to be able to accept calls to the methods defined
above.
Spring provides two MessageSource
implementations, ResourceBundleMessageSource and
StaticMessageSource. Both implement
HierarchicalMessageSource in order to do
nested messaging. The StaticMessageSource is rarely
used but provides programmatic ways to add messages to the source. The
ResourceBundleMessageSource is shown in the
following example:
<beans>
<bean id="messageSource"
      class="org.springframework.context.support.ResourceBundleMessageSource">
  <property name="basenames">
    <list>
      <value>format</value>
      <value>exceptions</value>
      <value>windows</value>
    </list>
  </property>
</bean>
</beans>
In the example it is assumed you have three resource bundles defined
in your classpath called format,
exceptions and windows. Any request
to resolve a message will be handled in the JDK standard way of resolving
messages through ResourceBundles. For the purposes of the example, assume
the contents of two of the above resource bundle files are...
# in format.properties
message=Alligators rock!
# in exceptions.properties
argument.required=The '{0}' argument is required.
A program to execute the MessageSource
functionality is shown in the next example. Remember that all
ApplicationContext implementations are also
MessageSource implementations and so can be cast to
the MessageSource interface.
public static void main(String[] args) {
  MessageSource resources = new ClassPathXmlApplicationContext("beans.xml");
  String message = resources.getMessage("message", null, "Default", null);
  System.out.println(message);
}
The resulting output from the above program will be...
Alligators rock!
So to summarize, the MessageSource is defined
in a file called beans.xml, which exists at the root of
your classpath. The messageSource bean definition
refers to a number of resource bundles through its
basenames property. The three files that are passed in
the list to the basenames property exist as files at
the root of your classpath and are called
format.properties,
exceptions.properties, and
windows.properties respectively.
The next example shows arguments passed to the message lookup; these arguments will be converted into Strings and inserted into placeholders in the lookup message.
<beans>

  <!-- this MessageSource is being used in a web application -->
  <bean id="messageSource" class="org.springframework.context.support.ResourceBundleMessageSource">
      <property name="basename" value="exceptions"/>
  </bean>

  <!-- lets inject the above MessageSource into this POJO -->
  <bean id="example" class="com.foo.Example">
      <property name="messages" ref="messageSource"/>
  </bean>

</beans>
public class Example {

  private MessageSource messages;

  public void setMessages(MessageSource messages) {
      this.messages = messages;
  }

  public void execute() {
      String message = this.messages.getMessage("argument.required",
          new Object [] {"userDao"}, "Required", null);
      System.out.println(message);
  }

}
The resulting output from the invocation of the
execute() method will be...
The userDao argument is required.
With regard to internationalization (i18n), Spring's various
MessageResource implementations follow the same
locale resolution and fallback rules as the standard JDK
ResourceBundle. In short, and continuing with the
example messageSource defined previously, if you want
to resolve messages against the British (en-GB) locale, you would create
files called format_en_GB.properties,
exceptions_en_GB.properties, and
windows_en_GB.properties respectively.
Typically, locale resolution is managed by the surrounding environment of the application. In this example, the locale against which (British) messages will be resolved is specified manually.
# in exceptions_en_GB.properties
argument.required=Ebagum lad, the '{0}' argument is required, I say, required.
public static void main(final String[] args) { MessageSource resources = new ClassPathXmlApplicationContext("beans.xml"); String message = resources.getMessage("argument.required", new Object [] {"userDao"}, "Required", Locale.UK); System.out.println(message); }
The resulting output from the running of the above program will be...
Ebagum lad, the 'userDao' argument is required, I say, required.
You can also use the MessageSourceAware
interface to acquire a reference to any
MessageSource that has been defined. Any bean that
is defined in an ApplicationContext that implements
the MessageSourceAware interface is injected with
the application context's MessageSource when the
bean is created and configured.
| Note |
|---|---|
As an alternative to
|
Event handling in the
ApplicationContext is provided through the
ApplicationEvent class and
ApplicationListener interface. If a bean
that implements the ApplicationListener
interface is deployed into the context, every time an
ApplicationEvent gets published to the
ApplicationContext, that bean is notified.
Essentially, this is the standard Observer design
pattern. Spring provides the following standard events:
Table 4.7. Built-in Events
| Event | Explanation |
|---|---|
ContextRefreshedEvent | Published when the
ApplicationContext is initialized
or refreshed, for example, using the
refresh() method on the
ConfigurableApplicationContext
interface. "Initialized" here means that all beans are loaded,
post-processor beans are detected and activated, singletons are
pre-instantiated, and the
ApplicationContext object is ready
for use. As long as the context has not been closed, a refresh can
be triggered multiple times, provided that the chosen
ApplicationContext actually
supports such "hot" refreshes. For example,
XmlWebApplicationContext supports hot
refreshes, but GenericApplicationContext
does not. |
ContextStartedEvent | Published when the
ApplicationContext is started,
using the start() method on the
ConfigurableApplicationContext
interface. "Started" here means that all
Lifecycle beans receive an explicit
start signal. Typically this signal is used to restart beans after
an explicit stop, but it may also be used to start components that
have not been configured for autostart , for example, components
that have not already started on initialization. |
ContextStoppedEvent | Published when the
ApplicationContext is stopped,
using the stop() method on the
ConfigurableApplicationContext
interface. "Stopped" here means that all
Lifecycle beans receive an explicit
stop signal. A stopped context may be restarted through a
start() call. |
ContextClosedEvent | Published when the
ApplicationContext is closed, using
the close() method on the
ConfigurableApplicationContext
interface. "Closed" here means that all singleton beans are
destroyed. A closed context reaches its end of life; it cannot be
refreshed or restarted. |
RequestHandledEvent | A web-specific event telling all beans that an HTTP request
has been serviced. This event is published
after the request is complete. This event is
only applicable to web applications using Spring's
DispatcherServlet. |
You can also create and publish your own custom events. This example
demonstrates a simple class that extends Spring's
ApplicationEvent base class:
public class BlackListEvent extends ApplicationEvent {
  private final String address;
  private final String test;

  public BlackListEvent(Object source, String address, String test) {
      super(source);
      this.address = address;
      this.test = test;
  }

  // accessor and other methods...
}
To publish a custom ApplicationEvent, call the
publishEvent() method on an
ApplicationEventPublisher. Typically this
is done by creating a class that implements
ApplicationEventPublisherAware and
registering it as a Spring bean. The following example demonstrates such a
class:
public class EmailService implements ApplicationEventPublisherAware {

  private List<String> blackList;
  private ApplicationEventPublisher publisher;

  public void setBlackList(List<String> blackList) {
      this.blackList = blackList;
  }

  public void setApplicationEventPublisher(ApplicationEventPublisher publisher) {
      this.publisher = publisher;
  }

  public void sendEmail(String address, String text) {
      if (blackList.contains(address)) {
          BlackListEvent event = new BlackListEvent(this, address, text);
          publisher.publishEvent(event);
          return;
      }
      // send email...
  }
}
At configuration time, the Spring container will detect that
EmailService implements
ApplicationEventPublisherAware and will
automatically call
setApplicationEventPublisher(). In reality, the
parameter passed in will be the Spring container itself; you're simply
interacting with the application context via its
ApplicationEventPublisher interface.
To receive the custom ApplicationEvent, create
a class that implements ApplicationListener
and register it as a Spring bean. The following example demonstrates such
a class:
public class BlackListNotifier implements ApplicationListener<BlackListEvent> {

  private String notificationAddress;

  public void setNotificationAddress(String notificationAddress) {
      this.notificationAddress = notificationAddress;
  }

  public void onApplicationEvent(BlackListEvent event) {
        // notify appropriate parties via notificationAddress...
  }
}
Notice that ApplicationListener is
generically parameterized with the type of your custom event,
BlackListEvent. This means that the
onApplicationEvent() method can remain type-safe,
avoiding any need for downcasting. You may register as many event
listeners as you wish, but note that by default event listeners receive
events synchronously. This means the
publishEvent() method blocks until all listeners
have finished processing the event. One advantage of this synchronous and
single-threaded approach is that when a listener receives an event, it
operates inside the transaction context of the publisher if a transaction
context is available. If another strategy for event publication becomes
necessary, refer to the JavaDoc for Spring's
ApplicationEventMulticaster
interface.
The following example shows the bean definitions used to register and configure each of the classes above:
<bean id="emailService" class="example.EmailService"> <property name="blackList"> <list> <value>[email protected]</value> <value>[email protected]</value> <value>[email protected]</value> </list> </property> </bean> <bean id="blackListNotifier" class="example.BlackListNotifier"> <property name="notificationAddress" value="[email protected]"/> </bean>
Putting it all together, when the sendEmail()
method of the emailService bean is called, if there are
any emails that should be blacklisted, a custom event of type
BlackListEvent is published. The
blackListNotifier bean is registered as an
ApplicationListener and thus receives the
BlackListEvent, at which point it can notify
appropriate parties.
| Note |
|---|---|
Spring's eventing mechanism is designed for simple communication between Spring beans within the same application context. However, for more sophisticated enterprise integration needs, the separately-maintained Spring Integration project provides complete support for building lightweight, pattern-oriented, event-driven architectures that build upon the well-known Spring programming model. |
For optimal usage and understanding of application contexts, users
should generally familiarize themselves with Spring's
Resource abstraction, as described in the
chapter Chapter 5, Resources.
An application context is a
ResourceLoader, which can be used to load
Resources. A
Resource is essentially a more feature rich
version of the JDK class java.net.URL, in fact, the
implementations of the Resource wrap an
instance of java.net.URL where appropriate. A
Resource can obtain low-level resources
from almost any location in a transparent fashion, including from the
classpath, a filesystem location, anywhere describable with a standard
URL, and some other variations. If the resource location string is a
simple path without any special prefixes, where those resources come from
is specific and appropriate to the actual application context type.
You can configure a bean deployed into the application context to
implement the special callback interface,
ResourceLoaderAware, to be automatically
called back at initialization time with the application context itself
passed in as the ResourceLoader. You can
also expose properties of type Resource, to
be used to access static resources; they will be injected into it like any
other properties. You can specify those
Resource properties as simple String paths,
and rely on a special JavaBean
PropertyEditor that is automatically
registered by the context, to convert those text strings to actual
Resource objects when the bean is
deployed.
The location path or paths supplied to an
ApplicationContext constructor are actually
resource strings, and in simple form are treated appropriately to the
specific context implementation.
ClassPathXmlApplicationContext treats a simple
location path as a classpath location. You can also use location paths
(resource strings) with special prefixes to force loading of definitions
from the classpath or a URL, regardless of the actual context type.
You can create ApplicationContext
instances declaratively by using, for example, a
ContextLoader. Of course you can also create
ApplicationContext instances
programmatically by using one of the
ApplicationContext implementations.
The ContextLoader mechanism comes in two
flavors: the ContextLoaderListener and the
ContextLoaderServlet. They have the same
functionality but differ in that the listener version is not reliable in
Servlet 2.3 containers. In the Servlet 2.4 specification, Servlet context
listeners must execute immediately after the Servlet context for the web
application is created and is available to service the first request (and
also when the Servlet context is about to be shut down). As such a Servlet
context listener is an ideal place to initialize the Spring
ApplicationContext. All things being equal,
you should probably prefer ContextLoaderListener;
for more information on compatibility, have a look at the Javadoc for the
ContextLoaderServlet.
You can register an ApplicationContext
using the ContextLoaderListener as follows:
<context-param> <param-name>contextConfigLocation</param-name> <param-value>/WEB-INF/daoContext.xml /WEB-INF/applicationContext.xml</param-value> </context-param> <listener> <listener-class>org.springframework.web.context.ContextLoaderListener</listener-class> </listener> <!-- or use the ContextLoaderServlet instead of the above listener <servlet> <servlet-name>context</servlet-name> <servlet-class>org.springframework.web.context.ContextLoaderServlet</servlet-class> <load-on-startup>1</load-on-startup> </servlet> -->
The listener inspects the contextConfigLocation
parameter. If the parameter does not exist, the listener uses
/WEB-INF/applicationContext.xml as a default. When the
parameter does exist, the listener separates the
String by using predefined delimiters (comma, semicolon and whitespace)
and uses the values as locations where application contexts will be
searched. Ant-style path patterns are supported as well. Examples are
/WEB-INF/*Context.xml for all files with names ending
with "Context.xml", residing in the "WEB-INF" directory, and
/WEB-INF/**/*Context.xml, for all such files in any
subdirectory of "WEB-INF".
You can use ContextLoaderServlet instead of
ContextLoaderListener. The Servlet uses the
contextConfigLocation parameter just as the listener
does.
In Spring 2.5 and later, it is possible to deploy a Spring ApplicationContext as a RAR file, encapsulating the context and all of its required bean classes and library JARs in a J2EE RAR deployment unit. This is the equivalent of bootstrapping a standalone ApplicationContext, just hosted in J2EE environment, being able to access the J2EE servers facilities. RAR deployment is a more natural alternative to scenario of deploying a headless WAR file, in effect, a WAR file without any HTTP entry points that is used only for bootstrapping a Spring ApplicationContext in a J2EE environment.
RAR deployment is ideal for application contexts that do not need HTTP
entry points but rather consist only of message endpoints and scheduled
jobs. Beans in such a context can use application server resources such as
the JTA transaction manager and JNDI-bound JDBC DataSources and JMS
ConnectionFactory instances, and may also register with the platform's JMX
server - all through Spring's standard transaction management and JNDI and
JMX support facilities. Application components can also interact with the
application server's JCA WorkManager through Spring's
TaskExecutor abstraction.
Check out the JavaDoc of the SpringContextResourceAdapter class for the configuration details involved in RAR deployment.
For a simple deployment of a Spring ApplicationContext as a
J2EE RAR file: package all application classes into a RAR file,
which is a standard JAR file with a different file extension. Add all
required library JARs into the root of the RAR archive. Add a
"META-INF/ra.xml" deployment descriptor (as shown in
SpringContextResourceAdapters JavaDoc) and the
corresponding Spring XML bean definition file(s) (typically
"META-INF/applicationContext.xml"), and drop the resulting RAR file into
your application server's deployment directory.
| Note |
|---|---|
Such RAR deployment units are usually self-contained; they do not expose components to the outside world, not even to other modules of the same application. Interaction with a RAR-based ApplicationContext usually occurs through JMS destinations that it shares with other modules. A RAR-based ApplicationContext may also, for example, schedule some jobs, reacting to new files in the file system (or the like). If it needs to allow synchronous access from the outside, it could for example export RMI endpoints, which of course may be used by other application modules on the same machine. |
The BeanFactory provides the underlying basis
for Spring's IoC functionality but it is only used directly in integration
with other third-party frameworks and is now largely historical in nature
for most users of Spring. The BeanFactory and
related interfaces, such as BeanFactoryAware,
InitializingBean,
DisposableBean, are still present in Spring for the
purposes of backward compatibility with the large number of third-party
frameworks that integrate with Spring. Often third-party components that
can not use more modern equivalents such as @PostConstruct or
@PreDestroy in order to remain compatible with JDK 1.4 or to
avoid a dependency on JSR-250.
This section provides additional background into the differences
between the BeanFactory and
ApplicationContext and how one might access
the IoC container directly through a classic singleton lookup.
Use an ApplicationContext unless you
have a good reason for not doing so.
Because the ApplicationContext
includes all functionality of the
BeanFactory, it is generally recommended
over the BeanFactory, except for a few
situations such as in an Applet where memory
consumption might be critical and a few extra kilobytes might make a
difference. However, for most typical enterprise applications and
systems, the ApplicationContext is what
you will want to use. Spring 2.0 and later makes
heavy use of the BeanPostProcessor extension point
(to effect proxying and so on). If you use only a plain
BeanFactory, a fair amount of support
such as transactions and AOP will not take effect, at least not without
some extra steps on your part. This situation could be confusing because
nothing is actually wrong with the configuration.
The following table lists features provided by the
BeanFactory and
ApplicationContext interfaces and
implementations.
Table 4.8. Feature Matrix
| Feature | BeanFactory | ApplicationContext |
|---|---|---|
Bean instantiation/wiring | Yes | Yes |
Automatic
| No | Yes |
Automatic
| No | Yes |
Convenient
| No | Yes |
| No | Yes |
To explicitly register a bean post-processor with a
BeanFactory implementation, you must
write code like this:
ConfigurableBeanFactory factory = new XmlBeanFactory(...); // now register any needed BeanPostProcessor instances MyBeanPostProcessor postProcessor = new MyBeanPostProcessor(); factory.addBeanPostProcessor(postProcessor); // now start using the factory
To explicitly register a
BeanFactoryPostProcessor when using a
BeanFactory implementation, you must
write code like this:
XmlBeanFactory factory = new XmlBeanFactory(new FileSystemResource("beans.xml")); // bring in some property values from a Properties file PropertyPlaceholderConfigurer cfg = new PropertyPlaceholderConfigurer(); cfg.setLocation(new FileSystemResource("jdbc.properties")); // now actually do the replacement cfg.postProcessBeanFactory(factory);
In both cases, the explicit registration step is inconvenient, which
is one reason why the various
ApplicationContext implementations are
preferred above plain BeanFactory
implementations in the vast majority of Spring-backed applications,
especially when using BeanFactoryPostProcessors and
BeanPostProcessors. These mechanisms implement
important functionality such as property placeholder replacement and
AOP.
It is best to write most application code in a dependency-injection
(DI) style, where that code is served out of a Spring IoC container, has
its own dependencies supplied by the container when it is created, and
is completely unaware of the container. However, for the small glue
layers of code that are sometimes needed to tie other code together, you
sometimes need a singleton (or quasi-singleton) style access to a Spring
IoC container. For example, third-party code may try to construct new
objects directly (Class.forName() style), without the
ability to get these objects out of a Spring IoC container.
If
the object constructed by the third-party code is a small stub or proxy,
which then uses a singleton style access to a Spring IoC container to
get a real object to delegate to, then inversion of control has still
been achieved for the majority of the code (the object coming out of the
container). Thus most code is still unaware of the container or how it
is accessed, and remains decoupled from other code, with all ensuing
benefits. EJBs may also use this stub/proxy approach to delegate to a
plain Java implementation object, retrieved from a Spring IoC container.
While the Spring IoC container itself ideally does not have to be a
singleton, it may be unrealistic in terms of memory usage or
initialization times (when using beans in the Spring IoC container such
as a Hibernate SessionFactory) for each
bean to use its own, non-singleton Spring IoC container.
Looking up the application context in a service locator style is
sometimes the only option for accessing shared Spring-managed
components, such as in an EJB 2.1 environment, or when you want to share
a single ApplicationContext as a parent to WebApplicationContexts across
WAR files. In this case you should look into using the utility class
ContextSingletonBeanFactoryLocator
locator that is described in this SpringSource team blog entry.