Table of Contents
- I. Overview of Spring Integration Framework
- II. Core Messaging
- 2. Messaging Channels
- 3. Message Construction
- 4. Message Routing
- 5. Message Transformation
- 6. Messaging Endpoints
- 7. System Management
- III. Integration Adapters
- 8. Spring ApplicationEvent Support
- 9. Feed Adapter
- 10. File Support
- 11. FTP/FTPS Adapters
- 12. HTTP Support
- 13. HttpInvoker Support
- 14. Mail Support
- 15. TCP and UDP Support
- 16. JDBC Support
- 17. JMS Support
- 18. RMI Support
- 19. SFTP Adapters
- 20. Stream Support
- 21. Twitter Adapter
- 22. Web Services Support
- 23. XML Support - Dealing with XML Payloads
- 24. XMPP Support
- IV. Appendices
The Spring Integration Framework is a lightweight solution TODO
One of the key themes of the Spring Framework is inversion of control. In its broadest sense, this means that the framework handles responsibilities on behalf of the components that are managed within its context. The components themselves are simplified since they are relieved of those responsibilities. For example, dependency injection relieves the components of the responsibility of locating or creating their dependencies. Likewise, aspect-oriented programming relieves business components of generic cross-cutting concerns by modularizing them into reusable aspects. In each case, the end result is a system that is easier to test, understand, maintain, and extend.
Furthermore, the Spring framework and portfolio provide a comprehensive programming model for building enterprise applications. Developers benefit from the consistency of this model and especially the fact that it is based upon well-established best practices such as programming to interfaces and favoring composition over inheritance. Spring's simplified abstractions and powerful support libraries boost developer productivity while simultaneously increasing the level of testability and portability.
Spring Integration is a new member of the Spring portfolio motivated by these same goals and principles. It extends the Spring programming model into the messaging domain and builds upon Spring's existing enterprise integration support to provide an even higher level of abstraction. It supports message-driven architectures where inversion of control applies to runtime concerns, such as when certain business logic should execute and where the response should be sent. It supports routing and transformation of messages so that different transports and different data formats can be integrated without impacting testability. In other words, the messaging and integration concerns are handled by the framework, so business components are further isolated from the infrastructure and developers are relieved of complex integration responsibilities.
As an extension of the Spring programming model, Spring Integration provides a wide variety of configuration options including annotations, XML with namespace support, XML with generic "bean" elements, and of course direct usage of the underlying API. That API is based upon well-defined strategy interfaces and non-invasive, delegating adapters. Spring Integration's design is inspired by the recognition of a strong affinity between common patterns within Spring and the well-known Enterprise Integration Patterns as described in the book of the same name by Gregor Hohpe and Bobby Woolf (Addison Wesley, 2004). Developers who have read that book should be immediately comfortable with the Spring Integration concepts and terminology.
Spring Integration is motivated by the following goals:
-
Provide a simple model for implementing complex enterprise integration solutions.
-
Facilitate asynchronous, message-driven behavior within a Spring-based application.
-
Promote intuitive, incremental adoption for existing Spring users.
Spring Integration is guided by the following principles:
-
Components should be loosely coupled for modularity and testability.
-
The framework should enforce separation of concerns between business logic and integration logic.
-
Extension points should be abstract in nature but within well-defined boundaries to promote reuse and portability.
From the vertical perspective, a layered architecture facilitates separation of concerns, and interface-based contracts between layers promote loose coupling. Spring-based applications are typically designed this way, and the Spring framework and portfolio provide a strong foundation for following this best practice for the full-stack of an enterprise application. Message-driven architectures add a horizontal perspective, yet these same goals are still relevant. Just as "layered architecture" is an extremely generic and abstract paradigm, messaging systems typically follow the similarly abstract "pipes-and-filters" model. The "filters" represent any component that is capable of producing and/or consuming messages, and the "pipes" transport the messages between filters so that the components themselves remain loosely-coupled. It is important to note that these two high-level paradigms are not mutually exclusive. The underlying messaging infrastructure that supports the "pipes" should still be encapsulated in a layer whose contracts are defined as interfaces. Likewise, the "filters" themselves would typically be managed within a layer that is logically above the application's service layer, interacting with those services through interfaces much in the same way that a web-tier would.
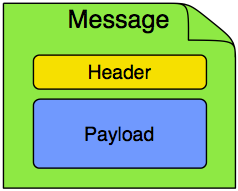
In Spring Integration, a Message is a generic wrapper for any Java object combined with metadata used by the framework while handling that object. It consists of a payload and headers. The payload can be of any type and the headers hold commonly required information such as id, timestamp, expiration, and return address. Headers are also used for passing values to and from connected transports. For example, when creating a Message from a received File, the file name may be stored in a header to be accessed by downstream components. Likewise, if a Message's content is ultimately going to be sent by an outbound Mail adapter, the various properties (to, from, cc, subject, etc.) may be configured as Message header values by an upstream component. Developers can also store any arbitrary key-value pairs in the headers.
A Message Channel represents the "pipe" of a pipes-and-filters architecture. Producers send Messages to a channel, and consumers receive Messages from a channel. The Message Channel therefore decouples the messaging components, and also provides a convenient point for interception and monitoring of Messages.

A Message Channel may follow either Point-to-Point or Publish/Subscribe semantics. With a Point-to-Point channel, at most one consumer can receive each Message sent to the channel. Publish/Subscribe channels, on the other hand, will attempt to broadcast each Message to all of its subscribers. Spring Integration supports both of these.
Whereas "Point-to-Point" and "Publish/Subscribe" define the two options for how many consumers will ultimately receive each Message, there is another important consideration: should the channel buffer messages? In Spring Integration, Pollable Channels are capable of buffering Messages within a queue. The advantage of buffering is that it allows for throttling the inbound Messages and thereby prevents overloading a consumer. However, as the name suggests, this also adds some complexity, since a consumer can only receive the Messages from such a channel if a poller is configured. On the other hand, a consumer connected to a Subscribable Channel is simply Message-driven. The variety of channel implementations available in Spring Integration will be discussed in detail in Section 2.1.2, “Message Channel Implementations”.
One of the primary goals of Spring Integration is to simplify the development of enterprise integration solutions through inversion of control. This means that you should not have to implement consumers and producers directly, and you should not even have to build Messages and invoke send or receive operations on a Message Channel. Instead, you should be able to focus on your specific domain model with an implementation based on plain Objects. Then, by providing declarative configuration, you can "connect" your domain-specific code to the messaging infrastructure provided by Spring Integration. The components responsible for these connections are Message Endpoints. This does not mean that you will necessarily connect your existing application code directly. Any real-world enterprise integration solution will require some amount of code focused upon integration concerns such as routing and transformation. The important thing is to achieve separation of concerns between such integration logic and business logic. In other words, as with the Model-View-Controller paradigm for web applications, the goal should be to provide a thin but dedicated layer that translates inbound requests into service layer invocations, and then translates service layer return values into outbound replies. The next section will provide an overview of the Message Endpoint types that handle these responsibilities, and in upcoming chapters, you will see how Spring Integration's declarative configuration options provide a non-invasive way to use each of these.
A Message Endpoint represents the "filter" of a pipes-and-filters architecture. As mentioned above, the endpoint's primary role is to connect application code to the messaging framework and to do so in a non-invasive manner. In other words, the application code should ideally have no awareness of the Message objects or the Message Channels. This is similar to the role of a Controller in the MVC paradigm. Just as a Controller handles HTTP requests, the Message Endpoint handles Messages. Just as Controllers are mapped to URL patterns, Message Endpoints are mapped to Message Channels. The goal is the same in both cases: isolate application code from the infrastructure. These concepts are discussed at length along with all of the patterns that follow in the Enterprise Integration Patterns book. Here, we provide only a high-level description of the main endpoint types supported by Spring Integration and their roles. The chapters that follow will elaborate and provide sample code as well as configuration examples.
A Message Transformer is responsible for converting a Message's content or structure and returning the modified Message. Probably the most common type of transformer is one that converts the payload of the Message from one format to another (e.g. from XML Document to java.lang.String). Similarly, a transformer may be used to add, remove, or modify the Message's header values.
A Message Filter determines whether a Message should be passed to an output channel at all. This simply requires a boolean test method that may check for a particular payload content type, a property value, the presence of a header, etc. If the Message is accepted, it is sent to the output channel, but if not it will be dropped (or for a more severe implementation, an Exception could be thrown). Message Filters are often used in conjunction with a Publish Subscribe channel, where multiple consumers may receive the same Message and use the filter to narrow down the set of Messages to be processed based on some criteria.
![[Note]](images/note.png) | Note |
|---|---|
| Be careful not to confuse the generic use of "filter" within the Pipes-and-Filters architectural pattern with this specific endpoint type that selectively narrows down the Messages flowing between two channels. The Pipes-and-Filters concept of "filter" matches more closely with Spring Integration's Message Endpoint: any component that can be connected to Message Channel(s) in order to send and/or receive Messages. |
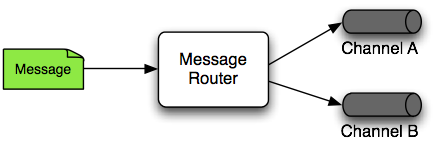
A Message Router is responsible for deciding what channel or channels should receive the Message next (if any). Typically the decision is based upon the Message's content and/or metadata available in the Message Headers. A Message Router is often used as a dynamic alternative to a statically configured output channel on a Service Activator or other endpoint capable of sending reply Messages. Likewise, a Message Router provides a proactive alternative to the reactive Message Filters used by multiple subscribers as described above.
A Splitter is another type of Message Endpoint whose responsibility is to accept a Message from its input channel, split that Message into multiple Messages, and then send each of those to its output channel. This is typically used for dividing a "composite" payload object into a group of Messages containing the sub-divided payloads.
Basically a mirror-image of the Splitter, the Aggregator is a type of Message Endpoint that receives multiple
Messages and combines them into a single Message. In fact, Aggregators are often downstream consumers in a
pipeline that includes a Splitter. Technically, the Aggregator is more complex than a Splitter, because it
is required to maintain state (the Messages to-be-aggregated), to decide when the complete group of Messages
is available, and to timeout if necessary. Furthermore, in case of a timeout, the Aggregator needs to know
whether to send the partial results or to discard them to a separate channel. Spring Integration provides
a CompletionStrategy as well as configurable settings for timeout, whether
to send partial results upon timeout, and the discard channel.
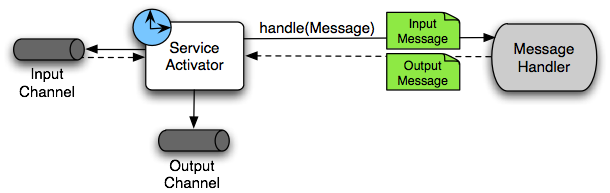
A Service Activator is a generic endpoint for connecting a service instance to the messaging system. The input Message Channel must be configured, and if the service method to be invoked is capable of returning a value, an output Message Channel may also be provided.
| Note |
|---|---|
| The output channel is optional, since each Message may also provide its own 'Return Address' header. This same rule applies for all consumer endpoints. |
The Service Activator invokes an operation on some service object to process the request Message, extracting the request Message's payload and converting if necessary (if the method does not expect a Message-typed parameter). Whenever the service object's method returns a value, that return value will likewise be converted to a reply Message if necessary (if it's not already a Message). That reply Message is sent to the output channel. If no output channel has been configured, then the reply will be sent to the channel specified in the Message's "return address" if available.
A Channel Adapter is an endpoint that connects a Message Channel to some other system or transport. Channel Adapters may be either inbound or outbound. Typically, the Channel Adapter will do some mapping between the Message and whatever object or resource is received-from or sent-to the other system (File, HTTP Request, JMS Message, etc). Depending on the transport, the Channel Adapter may also populate or extract Message header values. Spring Integration provides a number of Channel Adapters, and they will be described in upcoming chapters.


Core Messaging TODO
While the Message plays the crucial role of encapsulating data, it is the
MessageChannel that decouples message producers from message consumers.
Spring Integration's top-level MessageChannel interface is defined as follows.
public interface MessageChannel {

    String getName();

    boolean send(Message message);

    boolean send(Message message, long timeout);
}
When sending a message, the return value will be true if the message is sent successfully. If the send call times out or is interrupted, then it will return false.
Since Message Channels may or may not buffer Messages (as discussed in the overview), there are two
sub-interfaces defining the buffering (pollable) and non-buffering (subscribable) channel behavior. Here is the
definition of PollableChannel.
public interface PollableChannel extends MessageChannel {

    Message<?> receive();

    Message<?> receive(long timeout);

    List<Message<?>> clear();

    List<Message<?>> purge(MessageSelector selector);

}
Similar to the send methods, when receiving a message, the return value will be null in the case of a timeout or interrupt.
The SubscribableChannel base interface is implemented by channels that send
Messages directly to their subscribed MessageHandlers. Therefore, they do not
provide receive methods for polling, but instead define methods for managing those subscribers:
public interface SubscribableChannel extends MessageChannel {

    boolean subscribe(MessageHandler handler);

    boolean unsubscribe(MessageHandler handler);

}
Spring Integration provides several different Message Channel implementations. Each is briefly described in the sections below.
The PublishSubscribeChannel implementation broadcasts any Message
sent to it to all of its subscribed handlers. This is most often used for sending
Event Messages whose primary role is notification as opposed to
Document Messages which are generally intended to be processed by
a single handler. Note that the PublishSubscribeChannel is
intended for sending only. Since it broadcasts to its subscribers directly when its
send(Message) method is invoked, consumers cannot poll for
Messages (it does not implement PollableChannel and
therefore has no receive() method). Instead, any subscriber
must be a MessageHandler itself, and the subscriber's
handleMessage(Message) method will be invoked in turn.
The QueueChannel implementation wraps a queue. Unlike the
PublishSubscribeChannel, the QueueChannel has point-to-point
semantics. In other words, even if the channel has multiple consumers, only one of them should receive any
Message sent to that channel. It provides a default no-argument constructor (providing an essentially unbounded
capacity of Integer.MAX_VALUE) as well as a constructor that accepts the queue capacity:
public QueueChannel(int capacity)
A channel that has not reached its capacity limit will store messages in its internal queue, and the
send() method will return immediately even if no receiver is ready to handle the
message. If the queue has reached capacity, then the sender will block until room is available. Or, if using
the send call that accepts a timeout, it will block until either room is available or the timeout period
elapses, whichever occurs first. Likewise, a receive call will return immediately if a message is available
on the queue, but if the queue is empty, then a receive call may block until either a message is available
or the timeout elapses. In either case, it is possible to force an immediate return regardless of the
queue's state by passing a timeout value of 0. Note however, that calls to the no-arg versions of
send() and receive() will block indefinitely.
Whereas the QueueChannel enforces first-in/first-out (FIFO) ordering, the
PriorityChannel is an alternative implementation that allows for messages
to be ordered within the channel based upon a priority. By default the priority is determined by the
'priority' header within each message. However, for custom priority determination
logic, a comparator of type Comparator<Message<?>> can be provided
to the PriorityChannel's constructor.
The RendezvousChannel enables a "direct-handoff" scenario where a sender will block
until another party invokes the channel's receive() method or vice-versa. Internally,
this implementation is quite similar to the QueueChannel except that it uses a
SynchronousQueue (a zero-capacity implementation of
BlockingQueue). This works well in situations where the sender and receiver are
operating in different threads but simply dropping the message in a queue asynchronously is not appropriate.
In other words, with a RendezvousChannel at least the sender knows that some receiver
has accepted the message, whereas with a QueueChannel, the message would have been
stored to the internal queue and potentially never received.
![[Tip]](images/tip.png) | Tip |
|---|---|
|
Keep in mind that all of these queue-based channels are storing messages in-memory only. When persistence
is required, you can either invoke a database operation within a handler or use Spring Integration's
support for JMS-based Channel Adapters. The latter option allows you to take advantage of any JMS provider's
implementation for message persistence, and it will be discussed in Chapter 17, JMS Support. However, when
buffering in a queue is not necessary, the simplest approach is to rely upon the
|
The RendezvousChannel is also useful for implementing request-reply
operations. The sender can create a temporary, anonymous instance of RendezvousChannel
which it then sets as the 'replyChannel' header when building a Message. After sending that Message, the sender
can immediately call receive (optionally providing a timeout value) in order to block while waiting for a reply
Message. This is very similar to the implementation used internally by many of Spring Integration's
request-reply components.
The DirectChannel has point-to-point semantics but otherwise is more similar to the
PublishSubscribeChannel than any of the queue-based channel implementations described
above. It implements the SubscribableChannel interface instead of the
PollableChannel interface, so it dispatches Messages directly to a subscriber.
As a point-to-point channel, however, it differs from the PublishSubscribeChannel in
that it will only send each Message to a single subscribed
MessageHandler.
In addition to being the simplest point-to-point channel option, one of its most important features is that
it enables a single thread to perform the operations on "both sides" of the channel. For example, if a handler
is subscribed to a DirectChannel, then sending a Message to that channel will trigger
invocation of that handler's handleMessage(Message) method directly in the
sender's thread, before the send() method invocation can return.
The key motivation for providing a channel implementation with this behavior is to support transactions that must span across the channel while still benefiting from the abstraction and loose coupling that the channel provides. If the send call is invoked within the scope of a transaction, then the outcome of the handler's invocation (e.g. updating a database record) will play a role in determining the ultimate result of that transaction (commit or rollback).
| Note |
|---|---|
Since the DirectChannel is the simplest option and does not add any additional
overhead that would be required for scheduling and managing the threads of a poller, it is the default
channel type within Spring Integration. The general idea is to define the channels for an application and
then to consider which of those need to provide buffering or to throttle input, and then modify those to
be queue-based PollableChannels. Likewise, if a channel needs to broadcast
messages, it should not be a DirectChannel but rather a
PublishSubscribeChannel. Below you will see how each of these can be configured.
|
The DirectChannel internally delegates to a Message Dispatcher to invoke its
subscribed Message Handlers, and that dispatcher can have a load-balancing strategy. The load-balancer
determines how invocations will be ordered in the case that there are multiple handlers subscribed to the
same channel. When using the namespace support described below, the default strategy is
"round-robin" which essentially load-balances across the handlers in rotation.
| Note |
|---|---|
| The "round-robin" strategy is currently the only implementation available out-of-the-box in Spring Integration. Other strategy implementations may be added in future versions. |
The load-balancer also works in combination with a boolean failover property. If the "failover" value is true (the default), then the dispatcher will fall back to any subsequent handlers as necessary when preceding handlers throw Exceptions. The order is determined by an optional order value defined on the handlers themselves or, if no such value exists, the order in which the handlers are subscribed.
If a certain situation requires that the dispatcher always try to invoke the first handler, then fallback in the same fixed order sequence every time an error occurs, no load-balancing strategy should be provided. In other words, the dispatcher still supports the failover boolean property even when no load-balancing is enabled. Without load-balancing, however, the invocation of handlers will always begin with the first according to their order. For example, this approach works well when there is a clear definition of primary, secondary, tertiary, and so on. When using the namespace support, the "order" attribute on any endpoint will determine that order.
| Note |
|---|---|
| Keep in mind that load-balancing and failover only apply when a channel has more than one subscribed Message Handler. When using the namespace support, this means that more than one endpoint shares the same channel reference in the "input-channel" attribute. |
The ExecutorChannel is a point-to-point channel that supports
the same dispatcher configuration as DirectChannel (load-balancing strategy
and the failover boolean property). The key difference between these two dispatching channel types
is that the ExecutorChannel delegates to an instance of
TaskExecutor to perform the dispatch. This means that the send method
typically will not block, but it also means that the handler invocation may not occur in the sender's
thread. It therefore does not support transactions spanning the sender and receiving
handler.
| Tip |
|---|---|
Note that there are occasions where the sender may block. For example, when using a
TaskExecutor with a rejection-policy that throttles back on the client (such as the
ThreadPoolExecutor.CallerRunsPolicy), the sender's thread will execute
the method directly anytime the thread pool is at its maximum capacity and the
executor's work queue is full. Since that situation would only occur in a non-predictable
way, that obviously cannot be relied upon for transactions.
|
The final channel implementation type is ThreadLocalChannel. This channel also delegates
to a queue internally, but the queue is bound to the current thread. That way the thread that sends to the
channel will later be able to receive those same Messages, but no other thread would be able to access them.
While probably the least common type of channel, this is useful for situations where
DirectChannels are being used to enforce a single thread of operation but any reply
Messages should be sent to a "terminal" channel. If that terminal channel is a
ThreadLocalChannel, the original sending thread can collect its replies from it.
One of the advantages of a messaging architecture is the ability to provide common behavior and capture
meaningful information about the messages passing through the system in a non-invasive way. Since the
Messages are being sent to and received from
MessageChannels, those channels provide an opportunity for intercepting
the send and receive operations. The ChannelInterceptor strategy interface
provides methods for each of those operations:
public interface ChannelInterceptor {

    Message<?> preSend(Message<?> message, MessageChannel channel);

    void postSend(Message<?> message, MessageChannel channel, boolean sent);

    boolean preReceive(MessageChannel channel);

    Message<?> postReceive(Message<?> message, MessageChannel channel);
}
After implementing the interface, registering the interceptor with a channel is just a matter of calling:
channel.addInterceptor(someChannelInterceptor);
The methods that return a Message instance can be used for transforming the Message or can return 'null'
to prevent further processing (of course, any of the methods can throw a RuntimeException). Also, the
preReceive method can return 'false' to prevent the receive
operation from proceeding.
| Note |
|---|---|
Keep in mind that receive() calls are only relevant for
PollableChannels. In fact the
SubscribableChannel interface does not even define a
receive() method. The reason for this is that when a Message is sent to a
SubscribableChannel it will be sent directly to one or more subscribers
depending on the type of channel (e.g. a PublishSubscribeChannel sends to all of its subscribers). Therefore,
the preReceive(..) and postReceive(..) interceptor methods
are only invoked when the interceptor is applied to a PollableChannel.
|
Spring Integration also provides an implementation of the Wire Tap pattern. It is a simple interceptor that sends the Message to another channel without otherwise altering the existing flow. It can be very useful for debugging and monitoring. An example is shown in the section called “Wire Tap”.
Because it is rarely necessary to implement all of the interceptor methods, a
ChannelInterceptorAdapter class is also available for sub-classing. It provides no-op
methods (the void method is empty, the Message returning methods
return the Message as-is, and the boolean method returns true).
Therefore, it is often easiest to extend that class and just implement the method(s) that you need as in the
following example.
public class CountingChannelInterceptor extends ChannelInterceptorAdapter {

    private final AtomicInteger sendCount = new AtomicInteger();

    @Override
    public Message<?> preSend(Message<?> message, MessageChannel channel) {
        sendCount.incrementAndGet();
        return message;
    }
}
| Tip |
|---|---|
| The order of invocation for the interceptor methods depends on the type of channel. As described above, the queue-based channels are the only ones where the receive method is intercepted in the first place. Additionally, the relationship between send and receive interception depends on the timing of separate sender and receiver threads. For example, if a receiver is already blocked while waiting for a message the order could be: preSend, preReceive, postReceive, postSend. However, if a receiver polls after the sender has placed a message on the channel and already returned, the order would be: preSend, postSend, (some-time-elapses) preReceive, postReceive. The time that elapses in such a case depends on a number of factors and is therefore generally unpredictable (in fact, the receive may never happen!). Obviously, the type of queue also plays a role (e.g. rendezvous vs. priority). The bottom line is that you cannot rely on the order beyond the fact that preSend will precede postSend and preReceive will precede postReceive. |
As you will see when the endpoints and their various configuration options are introduced, Spring Integration
provides a foundation for messaging components that enables non-invasive invocation of your application code
from the messaging system. However, sometimes it is necessary to invoke the messaging system
from your application code. For convenience when implementing such use-cases, Spring
Integration provides a MessagingTemplate that supports a variety of operations across
the Message Channels, including request/reply scenarios. For example, it is possible to send a request
and wait for a reply.
MessagingTemplate template = new MessagingTemplate();

Message reply = template.sendAndReceive(new GenericMessage("test"), someChannel);
In that example, a temporary anonymous channel would be created internally by the template. The 'sendTimeout' and 'receiveTimeout' properties may also be set on the template, and other exchange types are also supported.
public boolean send(final Message<?> message, final MessageChannel channel) { ... }

public Message<?> sendAndReceive(final Message<?> request, final MessageChannel channel) { .. }

public Message<?> receive(final PollableChannel<?> channel) { ... }
| Note |
|---|---|
|
A less invasive approach that allows you to invoke simple interfaces with payload and/or header values instead of Message instances is described in Section 6.2.1, “GatewayProxyFactoryBean”. |
To create a Message Channel instance, you can use the 'channel' element:
<channel id="exampleChannel"/>
The default channel type is Point to Point. To create a Publish Subscribe channel, use the "publish-subscribe-channel" element:
<publish-subscribe-channel id="exampleChannel"/>
To create a Datatype Channel that only
accepts messages containing a certain payload type, provide the fully-qualified class name in the
channel element's datatype attribute:
<channel id="numberChannel" datatype="java.lang.Number"/>
Note that the type check passes for any type that is assignable to the channel's
datatype. In other words, the "numberChannel" above would accept messages whose payload is
java.lang.Integer or java.lang.Double. Multiple types can be
provided as a comma-delimited list:
<channel id="stringOrNumberChannel" datatype="java.lang.String,java.lang.Number"/>
When using the "channel" element without any sub-elements, it will create a DirectChannel
instance (a SubscribableChannel).
However, you can alternatively provide a variety of "queue" sub-elements to create any of the pollable channel types (as described in Section 2.1.2, “Message Channel Implementations”). Examples of each are shown below.
As mentioned above, DirectChannel is the default type.
<channel id="directChannel"/>
A default channel will have a round-robin load-balancer and will also have failover enabled (See the discussion in the section called “DirectChannel” for more detail). To disable one or both of these, add a <dispatcher/> sub-element and configure the attributes:
<channel id="failFastChannel">
    <dispatcher failover="false"/>
</channel>

<channel id="channelWithFixedOrderSequenceFailover">
    <dispatcher load-balancer="none"/>
</channel>
To create a QueueChannel, use the "queue" sub-element.
You may specify the channel's capacity:
<channel id="queueChannel">
    <queue capacity="25"/>
</channel>
| Note |
|---|---|
| If you do not provide a value for the 'capacity' attribute on this <queue/> sub-element, the resulting queue will be unbounded. To avoid issues such as OutOfMemoryErrors, it is highly recommended to set an explicit value for a bounded queue. |
To create a PublishSubscribeChannel, use the "publish-subscribe-channel" element.
When using this element, you can also specify the "task-executor" used for publishing
Messages (if none is specified it simply publishes in the sender's thread):
<publish-subscribe-channel id="pubsubChannel" task-executor="someExecutor"/>
If you are providing a Resequencer or Aggregator downstream
from a PublishSubscribeChannel, then you can set the 'apply-sequence' property
on the channel to true. That will indicate that the channel should set the sequence-size
and sequence-number Message headers as well as the correlation id prior to passing the Messages along.
For example, if there are 5 subscribers, the sequence-size would be set to 5, and the Messages would
have sequence-number header values ranging from 1 to 5.
<publish-subscribe-channel id="pubsubChannel" apply-sequence="true"/>
| Note |
|---|---|
The 'apply-sequence' value is false by default so that a Publish Subscribe Channel
can send the exact same Message instances to multiple outbound channels. Since Spring Integration
enforces immutability of the payload and header references, the channel creates new Message
instances with the same payload reference but different header values when the flag is set to
true.
|
To create an ExecutorChannel, add the <dispatcher> sub-element along
with a 'task-executor' attribute. Its value can reference any TaskExecutor
within the context. For example, this enables configuration of a thread-pool for dispatching messages
to subscribed handlers. As mentioned above, this does break the "single-threaded" execution context
between sender and receiver so that any active transaction context will not be shared by the invocation
of the handler (i.e. the handler may throw an Exception, but the send invocation has already returned
successfully).
<channel id="executorChannel">
    <dispatcher task-executor="someExecutor"/>
</channel>
| Note |
|---|---|
The "load-balancer" and "failover" options are also both available on the dispatcher sub-element
as described above in the section called “DirectChannel Configuration”. The same defaults
apply as well. So, the channel will have a round-robin load-balancing strategy with failover
enabled unless explicit configuration is provided for one or both of those attributes.
<channel id="executorChannelWithoutFailover"> <dispatcher task-executor="someExecutor" failover="false"/> </channel> |
To create a PriorityChannel, use the "priority-queue" sub-element:
<channel id="priorityChannel">
    <priority-queue capacity="20"/>
</channel>
By default, the channel will consult the MessagePriority header of the
message. However, a custom Comparator reference may be
provided instead. Also, note that the PriorityChannel (like the other types)
does support the "datatype" attribute. As with the QueueChannel, it also supports a "capacity" attribute.
The following example demonstrates all of these:
<channel id="priorityChannel" datatype="example.Widget">
    <priority-queue comparator="widgetComparator"
                    capacity="10"/>
</channel>
A RendezvousChannel is created when the queue sub-element is
a <rendezvous-queue>. It does not provide any additional configuration options to
those described above, and its queue does not accept any capacity value since it is a
0-capacity direct handoff queue.
<channel id="rendezvousChannel"/>
    <rendezvous-queue/>
</channel>
The ThreadLocalChannel does not provide any additional configuration options.
<thread-local-channel id="threadLocalChannel"/>
Message channels may also have interceptors as described in Section 2.1.3, “Channel Interceptors”. The
<interceptors> sub-element can be added within <channel> (or the more specific element
types). Provide the "ref" attribute to reference any Spring-managed object that implements the
ChannelInterceptor interface:
<channel id="exampleChannel">
    <interceptors>
        <ref bean="trafficMonitoringInterceptor"/>
    </interceptors>
</channel>
In general, it is a good idea to define the interceptor implementations in a separate location since they usually provide common behavior that can be reused across multiple channels.
Channel Interceptors allow you for a clean and concise way of applying cross-cutting behavior per individual channel. But what if the same behavior should be applied on multiple channels, configuring the same set of interceptors for each channel would not be the most efficient way. The better way would be to configure interceptors globally and apply them on multiple channels in one shot. Spring Integration provides capabilities to configure Global Interceptors and apply them on multiple channels. Look at the example below:
<int:channel-interceptor pattern="input*, bar*, foo" order="3">
    <bean class="foo.barSampleInterceptor"/>
</int:channel-interceptor>
or
<int:channel-interceptor ref="myInterceptor" pattern="input*, bar*, foo" order="3"/>

<bean id="myInterceptor" class="foo.barSampleInterceptor"/>
<channel-interceptor> element allows you to define a global interceptor which will be applied on all channels that match patterns defined via pattern attribute. In the above case the global interceptor will be applied on 'foo' channel and all other channels that begin with 'bar' and 'input'. The order attribute allows you to manage the place where this interceptor will be injected. For example, channel 'inputChannel' could have individual interceptors configured locally (see below):
<int:channel id="inputChannel">
  <int:interceptors>
    <int:wire-tap channel="logger"/>
  </int:interceptors>
</int:channel>
The reasonable question would be how global interceptor will be injected in relation to other interceptors configured locally or through other global interceptor definitions? Current implementation provides a very simple and clever mechanism of handling this. Positive number in the order attribute will ensure interceptor injection after existing interceptors and negative number will ensure that such interceptors injected before. This means that in the above example global interceptor will be injected AFTER (since its order is greater then 0) 'wire-tap' interceptor configured locally. If there was another global interceptor with matching pattern their order would be determined based on who's got the higher or lower value in order attribute. To inject global interceptor BEFORE the existing interceptors use negative value for the order attribute.
| Note |
|---|---|
| Note that order and pattern attributes are optional. The default value for order will be 0 and for pattern is '*' |
As mentioned above, Spring Integration provides a simple Wire Tap interceptor out of the box. You can configure a Wire Tap on any channel within an 'interceptors' element. This is especially useful for debugging, and can be used in conjunction with Spring Integration's logging Channel Adapter as follows:
 <channel id="in">
     <interceptors>
         <wire-tap channel="logger"/>
     </interceptors>
 </channel>

 <logging-channel-adapter id="logger" level="DEBUG"/>
| Tip |
|---|---|
| The 'logging-channel-adapter' also accepts a boolean attribute: 'log-full-message'. That is false by default so that only the payload is logged. Setting that to true enables logging of all headers in addition to the payload. |
A little more on Wite Tap
One of the common misconception about the wire tap and some time other similar components (Section 25.1, “Message Publishing Configuration”) that they are asynchronous in nature. Wire-tap as a component is neither sync nor async. In fact non of the components in SI are sync or async except for. . . well read on. What makes certain parts of the message flow sync or async is the Message Channel abstraction. That is why from the inception of the framework we always emphasize the need and the value of the Message Channel and that is why Spring Integration is the only framework at the time of writing where Message Channel is a "first class citizen" of the framework (not an internal realization of EIP pattern) fulle exposed to you - the end user. So, Wire-tap component is ONLY responsible to perform the following 3 tasks:
-
wire-tap into a message flow by tapping into a channel (e.g., channelA)
-
grab a copy of a message
-
send it to another channel (e.g., channelB)
Look at it as a variation of the Bridge (nothing more). But by bridging one channel with another wire-tap is essentially initiates (forks) another message flow. Is this flow synchronous or asynchronous? That is the ultimate question and the answer simply depends on the type of Message Channel 'channelB' is. And as you know we have: Direct Channel, Pollable Channel and Executor Channel. The last two do break the thread boundary making communication via such channels asynchronous simply because the dispatching of the message from the channel happens on the different thread then the one that sent the message to that channel and that is what is going to make your wire-tap flow sync or async. It is consistent with other components within the framework (e.g., Message Publisher) and if you think about it its in a way brings a level of simplicity by sparing you form worrying in advance (other then writing thread safe code) wether a particular piece of code should be implemented as sync or async. In fact its always neither, the code is just a function. The actual wiring of two pieces of code (component A and component B) via Message Channel is what's going to make their collaboration sync or async. You may even want to change from sync to async in the future and Message Channel is what's going to allow you to do it swiftly without ever touching the code
| Note |
|---|---|
|
If namespace support is enabled, there are also two special channels defined within the context by default:
|
A Channel Adapter is a Message Endpoint that enables connecting a single sender or receiver to a Message Channel. Spring Integration provides a number of adapters out of the box to support various transports, such as JMS, File, HTTP, Web Services, and Mail. Those will be discussed in upcoming chapters of this reference guide. However, this chapter focuses on the simple but flexible Method-invoking Channel Adapter support. There are both inbound and outbound adapters, and each may be configured with XML elements provided in the core namespace.
An "inbound-channel-adapter" element can invoke any method on a Spring-managed Object and send a non-null return
value to a MessageChannel after converting it to a Message.
When the adapter's subscription is activated, a poller will attempt to receive messages from the source. The
poller will be scheduled with the TaskScheduler according to the provided
configuration. To configure the polling interval or cron expression for an individual channel-adapter,
provide a 'poller' element with either an 'interval-trigger' (in milliseconds) or 'cron-trigger'
sub-element.
<inbound-channel-adapter ref="source1" method="method1" channel="channel1">
    <poller fixed-rate="5000"/>
</inbound-channel-adapter>

<inbound-channel-adapter ref="source2" method="method2" channel="channel2">
    <poller cron="30 * 9-17 * * MON-FRI"/>
</channel-adapter>
| Note |
|---|---|
If no poller is provided, then a single default poller must be registered within the context. See Section 6.1.4, “Namespace Support” for more detail. |
An "outbound-channel-adapter" element can also connect a MessageChannel to any POJO consumer
method that should be invoked with the payload of Messages sent to that channel.
<outbound-channel-adapter channel="channel1" ref="target1" method="method1"/>
If the channel being adapted is a PollableChannel, provide a poller sub-element:
<outbound-channel-adapter channel="channel2" ref="target2" method="method2">
    <poller fixed-rate="3000"/>

</outbound-channel-adapter>
<beans:bean id="target1" class="org.bar.Foo"/>
Using a "ref" attribute is generally recommended if the POJO consumer implementation can be reused
in other <outbound-channel-adapter> definitions. However if the consumer implementation
should be scoped to a single definition of the <outbound-channel-adapter>, you can define it as inner bean:
<outbound-channel-adapter channel="channel2" method="method2">
        <beans:bean class="org.bar.Foo"/>

</outbound-channel-adapter>
| Note |
|---|---|
Using both the "ref" attribute and an inner handler definition in the same |
Any Channel Adapter can be created without a "channel" reference in which case it will implicitly create an
instance of DirectChannel. The created channel's name will match the "id" attribute
of the <inbound-channel-adapter/> or <outbound-channel-adapter element. Therefore, if the "channel"
is not provided, the "id" is required.
A Messaging Bridge is a relatively trivial endpoint that simply connects two Message Channels or Channel
Adapters. For example, you may want to connect a PollableChannel to a
SubscribableChannel so that the subscribing endpoints do not have to worry
about any polling configuration. Instead, the Messaging Bridge provides the polling configuration.
By providing an intermediary poller between two channels, a Messaging Bridge can be used to throttle inbound Messages. The poller's trigger will determine the rate at which messages arrive on the second channel, and the poller's "maxMessagesPerPoll" property will enforce a limit on the throughput.
Another valid use for a Messaging Bridge is to connect two different systems. In such a scenario, Spring Integration's role would be limited to making the connection between these systems and managing a poller if necessary. It is probably more common to have at least a Transformer between the two systems to translate between their formats, and in that case, the channels would be provided as the 'input-channel' and 'output-channel' of a Transformer endpoint. If data format translation is not required, the Messaging Bridge may indeed be sufficient.
The <bridge> element is used to create a Messaging Bridge between two Message Channels or Channel Adapters. Simply provide the "input-channel" and "output-channel" attributes:
<bridge input-channel="input" output-channel="output"/>
As mentioned above, a common use case for the Messaging Bridge is to connect a
PollableChannel to a SubscribableChannel, and when
performing this role, the Messaging Bridge may also serve as a throttler:
 <bridge input-channel="pollable" output-channel="subscribable">
     <poller max-messages-per-poll="10" fixed-rate="5000"/>
 </bridge>
Connecting Channel Adapters is just as easy. Here is a simple echo example between the "stdin" and "stdout" adapters from Spring Integration's "stream" namespace.
 <stream:stdin-channel-adapter id="stdin"/>

 <stream:stdout-channel-adapter id="stdout"/>

 <bridge id="echo" input-channel="stdin" output-channel="stdout"/>
Of course, the configuration would be similar for other (potentially more useful) Channel Adapter bridges, such as File to JMS, or Mail to File. The various Channel Adapters will be discussed in upcoming chapters.
| Note |
|---|---|
|
If no 'output-channel' is defined on a bridge, the reply channel provided by the inbound Message will be used, if available. If neither output or reply channel is available, an Exception will be thrown. |
The Spring Integration Message is a generic container for data. Any object can
be provided as the payload, and each Message also includes headers containing
user-extensible properties as key-value pairs.
Here is the definition of the Message interface:
public interface Message<T> {

    T getPayload();

    MessageHeaders getHeaders();

}
The Message is obviously a very important part of the API. By encapsulating the
data in a generic wrapper, the messaging system can pass it around without any knowledge of the data's type. As
an application evolves to support new types, or when the types themselves are modified and/or extended, the
messaging system will not be affected by such changes. On the other hand, when some component in the messaging
system does require access to information about the Message,
such metadata can typically be stored to and retrieved from the metadata in the Message Headers.
Just as Spring Integration allows any Object to be used as the payload of a Message, it also supports any Object
types as header values. In fact, the MessageHeaders class implements the
java.util.Map interface:
public final class MessageHeaders implements Map<String, Object>, Serializable {
  ...
}
| Note |
|---|---|
Even though the MessageHeaders implements Map, it is effectively a read-only implementation. Any attempt to
put a value in the Map will result in an UnsupportedOperationException.
The same applies for remove and clear. Since Messages may be passed to
multiple consumers, the structure of the Map cannot be modified. Likewise, the Message's payload Object can not
be set after the initial creation. However, the mutability of the header values themselves
(or the payload Object) is intentionally left as a decision for the framework user.
|
As an implementation of Map, the headers can obviously be retrieved by calling get(..)
with the name of the header. Alternatively, you can provide the expected Class as an
additional parameter. Even better, when retrieving one of the pre-defined values, convenient getters are
available. Here is an example of each of these three options:
 Object someValue = message.getHeaders().get("someKey");

 CustomerId customerId = message.getHeaders().get("customerId", CustomerId.class);

 Long timestamp = message.getHeaders().getTimestamp();
The following Message headers are pre-defined:
Table 3.1. Pre-defined Message Headers
| Header Name | Header Type |
|---|---|
| ID | java.util.UUID |
| TIMESTAMP | java.lang.Long |
| EXPIRATION_DATE | java.lang.Long |
| CORRELATION_ID | java.lang.Object |
| REPLY_CHANNEL | java.lang.Object (can be a String or MessageChannel) |
| ERROR_CHANNEL | java.lang.Object (can be a String or MessageChannel) |
| SEQUENCE_NUMBER | java.lang.Integer |
| SEQUENCE_SIZE | java.lang.Integer |
| PRIORITY | MessagePriority (an enum) |
Many inbound and outbound adapter implementations will also provide and/or expect certain headers, and additional user-defined headers can also be configured.
The base implementation of the Message interface is
GenericMessage<T>, and it provides two constructors:
new GenericMessage<T>(T payload);

new GenericMessage<T>(T payload, Map<String, Object> headers)
When a Message is created, a random unique id will be generated. The constructor that accepts a Map of headers will copy the provided headers to the newly created Message.
There is also a convenient implementation of Message designed to communicate
error conditions. THis implementation takes Throwable object as its payload:
ErrorMessage message = new ErrorMessage(someThrowable);

Throwable t = message.getPayload();
Notice that this implementation takes advantage of the fact that the GenericMessage
base class is parameterized. Therefore, as shown in both examples, no casting is necessary when retrieving
the Message payload Object.
You may notice that the Message interface defines retrieval methods for its payload and headers but no setters.
The reason for this is that a Message cannot be modified after its initial creation. Therefore, when a Message
instance is sent to multiple consumers (e.g. through a Publish Subscribe Channel), if one of those consumers
needs to send a reply with a different payload type, it will need to create a new Message. As a result, the
other consumers are not affected by those changes. Keep in mind, that multiple consumers may access the same
payload instance or header value, and whether such an instance is itself immutable is a decision left to the
developer. In other words, the contract for Messages is similar to that of an
unmodifiable Collection, and the MessageHeaders' map further exemplifies that; even though
the MessageHeaders class implements java.util.Map, any attempt to invoke a
put operation (or 'remove' or 'clear') on the MessageHeaders will result in an
UnsupportedOperationException.
Rather than requiring the creation and population of a Map to pass into the GenericMessage constructor, Spring
Integration does provide a far more convenient way to construct Messages: MessageBuilder.
The MessageBuilder provides two factory methods for creating Messages from either an existing Message or with a
payload Object. When building from an existing Message, the headers and payload of that
Message will be copied to the new Message:
Message<String> message1 = MessageBuilder.withPayload("test")
        .setHeader("foo", "bar")
        .build();

Message<String> message2 = MessageBuilder.fromMessage(message1).build();

assertEquals("test", message2.getPayload());
assertEquals("bar", message2.getHeaders().get("foo"));
If you need to create a Message with a new payload but still want to copy the headers from an existing Message, you can use one of the 'copy' methods.
Message<String> message3 = MessageBuilder.withPayload("test3")
        .copyHeaders(message1.getHeaders())
        .build();

Message<String> message4 = MessageBuilder.withPayload("test4")
        .setHeader("foo", 123)
        .copyHeadersIfAbsent(message1.getHeaders())
        .build();

assertEquals("bar", message3.getHeaders().get("foo"));
assertEquals(123, message4.getHeaders().get("foo"));
Notice that the copyHeadersIfAbsent does not overwrite existing values. Also, in the
second example above, you can see how to set any user-defined header with setHeader.
Finally, there are set methods available for the predefined headers as well as a non-destructive method for
setting any header (MessageHeaders also defines constants for the pre-defined header names).
Message<Integer> importantMessage = MessageBuilder.withPayload(99)
        .setPriority(MessagePriority.HIGHEST)
        .build();

assertEquals(MessagePriority.HIGHEST, importantMessage.getHeaders().getPriority());

Message<Integer> anotherMessage = MessageBuilder.fromMessage(importantMessage)
        .setHeaderIfAbsent(MessageHeaders.PRIORITY, MessagePriority.LOW)
        .build();

assertEquals(MessagePriority.HIGHEST, anotherMessage.getHeaders().getPriority());
The MessagePriority is only considered when using a PriorityChannel
(as described in the next chapter). It is defined as an enum with five possible values:
public enum MessagePriority {
    HIGHEST,
    HIGH,
    NORMAL,
    LOW,
    LOWEST
}
Since content-based routing often requires some domain-specific logic, most use-cases will require Spring Integration's options for delegating to POJOs using the XML namespace support and/or Annotations. Both of these are discussed below, but first we present a couple implementations that are available out-of-the-box since they fulfill generic, but common, requirements.
A PayloadTypeRouter will send Messages to the channel as defined by payload-type
mappings.
<bean id="payloadTypeRouter" class="org.springframework.integration.router.PayloadTypeRouter">
    <property name="payloadTypeChannelMap">
        <map>
            <entry key="java.lang.String" value-ref="stringChannel"/>
            <entry key="java.lang.Integer" value-ref="integerChannel"/>
        </map>
    </property>
</bean>
Configuration of PayloadTypeRouter is also supported via the namespace provided by Spring Integration (see Section B.2, “Namespace Support”),
which essentially simplifies configuration by combining <router/> configuration and its corresponding implementation defined using <bean/> element
into a single and more concise configuration element.
The example below demonstrates PayloadTypeRouter configuration which is equivalent to the one above using Spring Integration's namespace support:
<payload-type-router input-channel="routingChannel">
  <mapping type="java.lang.String" channel="stringChannel" />
  <mapping type="java.lang.Integer" channel="integerChannel" />
</payload-type-router>
A HeaderValueRouter will send Messages to the channel based on the individual header value mappings.
When HeaderValueRouter is created it is initialized with the name of the header to be evaluated, using constructor-arg.
The value of the header could be one of two things:
1. Arbitrary value
2. Channel name
If arbitrary value, then a channelResolver should be provided to map header values to channel names.
The example below uses MapBasedChannelResolver to set up a map of header values to channel names.
 <bean id="myHeaderValueRouter"
    class="org.springframework.integration.router.HeaderValueRouter">
  <constructor-arg value="someHeaderName" />
  <property name="channelResolver">
    <bean class="org.springframework.integration.channel.MapBasedChannelResolver">
      <property name="channelMap">
        <map>
          <entry key="someHeaderValue" value-ref="channelA" />
          <entry key="someOtherHeaderValue" value-ref="channelB" />
        </map>
      </property>
    </bean>
  </property>
</bean>
If channelResolver is not specified, then the header value will be treated as a channel name
making configuration much simpler, where no channelResolver needs to be specified.
<bean id="myHeaderValueRouter"
  class="org.springframework.integration.router.HeaderValueRouter">
  <constructor-arg value="someHeaderName" />
</bean>
Similar to the PayloadTypeRouter, configuration of HeaderValueRouter is also supported via namespace support provided by Spring Integration (see Section B.2, “Namespace Support”).
The example below demonstrates two types of namespace-based configuration of HeaderValueRouter which are equivalent to the ones above using Spring Integration namespace support:
1. Configuration where mapping of header values to channels is required
<header-value-router input-channel="routingChannel" header-name="testHeader">
  <mapping value="someHeaderValue" channel="channelA" />
  <mapping value="someOtherHeaderValue" channel="channelB" />
</header-value-router>
2. Configuration where mapping of header values is not required if header values themselves represent the channel names
<header-value-router input-channel="routingChannel" header-name="testHeader"/>
| Note |
|---|---|
| The two router implementations shown above share some common properties, such as "defaultOutputChannel" and "resolutionRequired". If "resolutionRequired" is set to "true", and the router is unable to determine a target channel (e.g. there is no matching payload for a PayloadTypeRouter and no "defaultOutputChannel" has been specified), then an Exception will be thrown. |
A RecipientListRouter will send each received Message to a statically-defined
list of Message Channels:
<bean id="recipientListRouter" class="org.springframework.integration.router.RecipientListRouter">
    <property name="channels">
        <list>
            <ref bean="channel1"/>
            <ref bean="channel2"/>
            <ref bean="channel3"/>
        </list>
    </property>
</bean>
Configuration for RecipientListRouter is also supported via namespace support provided by Spring Integration (see Section B.2, “Namespace Support”).
The example below demonstrates namespace-based configuration of RecipientListRouter and all the supported attributes using Spring Integration namespace support:
<recipient-list-router id="customRouter" input-channel="routingChannel"
        timeout="1234"
        ignore-send-failures="true"
        apply-sequence="true">
  <recipient channel="channel1"/>
  <recipient channel="channel2"/>
</recipient-list-router>
| Note |
|---|---|
| The 'apply-sequence' flag here has the same affect as it does for a publish-subscribe-channel, and like publish-subscribe-channel it is disabled by default on the recipient-list-router. Refer to the section called “PublishSubscribeChannel Configuration” for more information. |
Another convenient option to configure Recipient List Router is to use Spring Expression Language (SpEL) support
<int:recipient-list-router id="customRouter" input-channel="routingChannel">
	<int:recipient channel="channel1" selector-expression="payload.equals('foo')"/>
	<int:recipient channel="channel2" selector-expression="headers.contains('bar')"/>
</int:recipient-list-router>
In the above configuration a SpEL expression identified by selector-expression attribute will be evaluated to determine if this recipient
should be included in the recipient list for a given input Message. The evaluation result of the expression must be a boolean. If this
attribute is not defined, the channel will always be among the list of recipients.
The "router" element provides a simple way to connect a router to an input channel, and also accepts the optional default output channel. The "ref" may provide the bean name of a custom Router implementation (extending AbstractMessageRouter):
<router ref="payloadTypeRouter" input-channel="input1" default-output-channel="defaultOutput1"/>

<router ref="recipientListRouter" input-channel="input2" default-output-channel="defaultOutput2"/>

<router ref="customRouter" input-channel="input3" default-output-channel="defaultOutput3"/>

<beans:bean id="customRouterBean class="org.foo.MyCustomRouter"/>
Alternatively, the "ref" may point to a simple Object that contains the @Router annotation (see below), or the "ref" may be combined with an explicit "method" name. When specifying a "method", the same behavior applies as described in the @Router annotation section below.
<router input-channel="input" ref="somePojo" method="someMethod"/>
Using a "ref" attribute is generally recommended if the custom router implementation can be reused in other
<router> definitions. However if the custom router implementation should be scoped to a
concrete definition of the <router>, you can provide an inner bean definition:
<router method="someMethod" input-channel="input3" default-output-channel="defaultOutput3">
  <beans:bean class="org.foo.MyCustomRouter"/>
</router>
| Note |
|---|---|
|
Using both the "ref" attribute and an inner handler definition in the same |
Routers and Spring Expression Language (SpEL)
Some times the routing logic may be simple and writing a separate class for it and configuring it as a bean may seem like an overkill. Since Spring Integration 2.0 we offer an alternative where you can now use SpEL (http://static.springsource.org/spring/docs/3.0.x/spring-framework-reference/html/expressions.html) to implement simple computations that otherwise were implemented in a custom POJO router.
<int:router input-channel="inChannel" expression="payload + 'Channel'"/>
In the above configuration the result channel will be computed by the SpEL expression which simply concatenates the value
of the payload with the literal 'Channel'
Another value of SpEL when it comes to configuring routers is that expression can actually return a Collection,
thus making every <router> a Recipient List Router. Whenever expression returns
multiple channel values Message will be forwarded to all such channels.
<int:router input-channel="inChannel" expression="headers.channels"/>
In the above configuration lets assume that you have a message header with the name 'channels' and the value being the List of channel names. Now, message will be sent to all channels in this list. You ,ay also fine Collection Projection and Collection Selection expressions usefull to select multiple channels. See (http://static.springsource.org/spring/docs/3.0.x/spring-framework-reference/html/expressions.html#d0e12084)
When using the @Router annotation, the annotated method can return either the
MessageChannel or String type. In the case of the latter,
the endpoint will resolve the channel name as it does for the default output. Additionally, the method can return
either a single value or a collection. When a collection is returned, the reply message will be sent to multiple
channels. To summarize, the following method signatures are all valid.
@Router
public MessageChannel route(Message message) {...}

@Router
public List<MessageChannel> route(Message message) {...}

@Router
public String route(Foo payload) {...}

@Router
public List<String> route(Foo payload) {...}
In addition to payload-based routing, a common requirement is to route based on metadata available within the
message header as either a property or attribute. Rather than requiring use of the
Message type as the method parameter, the @Router
annotation may also use the @Header parameter annotation that is documented in Section B.5, “Annotation Support”.
@Router
public List<String> route(@Header("orderStatus") OrderStatus status)
| Note |
|---|---|
| For routing of XML-based Messages, including XPath support, see Chapter 23, XML Support - Dealing with XML Payloads. |
So as you can see, Spring Integration provides quite a few different router configurations for most common
content-based routing use cases as well as the option of implementing custom routers as POJOs.
For example; Payload Type Router provides a simple way to configure a router which computes channels
based on the payload type of the incoming Message while Header Value Router provides the
same convenience in configuring a router which computes channels based on evaluating the value
of a particular Message Header. There is also an expression-based (SpEL) routers where the channel
is determined based on evaluating an expression which gives these type of routers some dynamic characteristics.
However these routers share one common attribute - static configuration. Even in the case of expression-based routers, the expression itself is defined as part of the router configuration which means that “the same expression operating on the same value will always result in the computation of the same channel”. This is good in most cases since such routes are well defined and therefore predictable. But there are times when we need to change router configurations dynamically so message flows could be routed to a different channel.
For example:
You might want to bring down some part of your system for maintenance. So, temporarily you want to re-reroute messages to a different message flow. Or you may want to introduce more granularity to your message flow by adding another route to handle a more concrete type of java.lang.Number (in cases of Payload Type Router).
Unfortunately with static router configuration to accomplish this you'd have to bring down your entire application, change the configuration of the router (change routes) and bring it back up. This is obviously not the solution.
Dynamic Router pattern describes the mechanisms by which one can change/configure routers dynamically without bringing down your system or individual routers.
Before we get into the specifics of how it is accomplished in Spring Integration lets quickly summarize the typical flow of the router, which consists of 3 simple steps:
-
Step 1 - Compute
channel identifierwhich is a value calculated by the router once it receives the Message. Typically it is aStringor and instance of the actualMessageChannel. -
Step 2 - Resolve
channel identifiertochannel name. We'll describe specifics of this process in a moment. -
Step 3 - Resolve
channel nameto the actualMessageChannel
There is not much that could be done with regard to router dynamics if Step 1 results in the actual instance of the
MessageChannel simply because MessageChannel is the final product of any
router's job. However, if Step 1 results in channel identifier that is not and instance of MessageChannel,
then there are quite a few possibilities to influence the process of calculating what will be the final instance of the Message Channel.
Lets look at couple of the examples in the context of the 3 steps mentioned above:
Payload Type Router
<payload-type-router input-channel="routingChannel">
  <mapping type="java.lang.String" channel="channel1" />
  <mapping type="java.lang.Integer" channel="channel2" />
</payload-type-router>
Within the context of the Payload Type Router the 3 steps mentioned above would be realized as:
-
Step 1 - Compute
channel identifierwhich is the fully qualified name of the payload type (e.g., java.lang.String). -
Step 2 - Resolve
channel identifiertochannel namewhere the result of the previous step is used to select the appropriate value from the payload type mapping defined viamappingelement. -
Step 3 - Resolve
channel nameto the actual instance of theMessageChannelwhere usingChannelResolverrouter will obtain a reference to a bean (which is hopefully aMessageChannel) identified by the result of the previous step.
In other words each step feeds the next step until thr process completes.
Header Value Router
<header-value-router input-channel="inputChannel" header-name="testHeader">
  <mapping value="foo" channel="fooChannel" />
  <mapping value="bar" channel="barChannel" />
</header-value-router>
Similar to the PayloadTypeRouter:
-
Step 1 - Compute
channel identifierwhich is the value of the header identified by theheader-nameattribute. -
Step 2 - Resolve
channel identifiertochannel namewhere the result of the previous step is used to select the appropriate value from the general mapping defined viamappingelement. -
Step 3 - Resolve
channel nameto the actual instance of theMessageChannelwhere usingChannelResolverrouter will obtain a reference to a bean (which is hopefully aMessageChannel) identified by the result of the previous step.
The above two configurations of two different router types look almost identical.
However if we look at the different configuration of the HeaderValueRouter we clearly see that
there is no mapping sub element:
<header-value-router input-channel="inputChannel" header-name="testHeader">But configuration is still perfectly valid. So the natural question is what about the maping in the Step 2?
What this means is that Step 2 is now an optional step. If mapping is not defined then the channel identifier
value computed in Step 1 will automatically be treated as the channel name which will now be resolved to the
actual MessageChannel in the Step 3. What it also means is that Step 2 is one of the key steps to
provide dynamic characteristics to the routers, since it introduces a process which
allows you to change the way 'channel identifier' resolves to 'channel name',
thus influencing the process of determining the final instance of the MessageChannel from the initial
channel identifier.
For Example:
In the above configuration lets assume that the testHeader value is 'kermit' which is now a channel identifier
(Step 1). Since there is no mapping in this router, resolving this channel identifier to a channel name
(Step 2) is impossible and this channel identifier is now treated as channel name. However what if
there was mapping but for a different value, the end result would still be the same and that is:
if new value can not be determined through the process of resolving 'channel identifier' to a 'channel name',
such 'channel identifier' becomes 'channel name'
So all that is left is for Step 3 to resolve channel name ('kermit') to an actual instance of the
MessageChannel identified by this name. That will be done via default
ChannelResolver implementation which is BeanFactoryChannelResolver which
basically does a bean lookup by the name provided. So now all messages which contain the header/value pair as testHeader=kermit
are going to be routed to a 'kermit' MessageChannel.
But what if you want to route these messages to 'simpson' channel? Obviously changing static configuration would work,
but would also require bringing your system down. However if you had access to channel identifier map, then you
could just introduce a new mapping where header/value pair is now kermit=simpson, thus allowing Step 2 to treat
'kermit' as channel identifier while resolving it to 'simpson' as channel name .
The same obviously applies for PayloadTypeRouter where you can now remap or remove a particular payload type
mapping, and every other router including expression-based routers since their computed value
will now have a chance to go through Step 2 to be aditionally resolved to the actual channel name.
In Spring Integration 2.0 routers hierarchy underwent major refactoring and now any router that is a subclass of the
AbstractMessageRouter (all framework defined routers) is a Dynamic Router simply because
channelIdentiferMap is defined at the AbstractMessageRouter with convenient accessors
and modifiers exposed as public methods allowing you to change/add/remove router mapping at runtime via JMX (see section section 29) or
ControlBus (see section section 29.7) functionality.
Control Bus
One of the way to manage the router mappings is through the Control Bus which exposes a Control Channel where you can send control messages to manage and monitor Spring Integration components which includes routers. For more information about the Control Bus see section 29.7. Typically you would send a control message asking to invoke a particular JMX operation on a particular managed component (e.g., router). The two managed operations (methods) that are specific to changing router resolution process are:
-
public void setChannelMapping(String channelIdentifier, String channelName) - will allow you to add new or modify existing mapping of
channel identifiertochannel name -
public void removeChannelMapping(String channelIdentifier) - will allow you to remove a particular channel mapping, thus disconnecting the relationship between
channel identifierandchannel name
There are obviously other managed operations, so please refer to an AbstractMessageRouter for more detail
You can also use your favorite JMX client (e.g., JConsole) and use those operations (methods) to change router configuration. For more information on Spring Integration management and monitoring please visit section 29 of this manual.
Message Filters are used to decide whether a Message should be passed along or dropped based on some criteria such as a Message Header value or even content within the Message itself. Therefore, a Message Filter is similar to a router, except that for each Message received from the filter's input channel, that same Message may or may not be sent to the filter's output channel. Unlike the router, it makes no decision regarding which Message Channel to send to but only decides whether to send.
| Note |
|---|---|
| As you will see momentarily, the Filter does also support a discard channel, so in certain cases it can play the role of a very simple router (or "switch") based on a boolean condition. |
In Spring Integration, a Message Filter may be configured as a Message Endpoint that delegates to some
implementation of the MessageSelector interface. That interface is itself quite
simple:
 public interface MessageSelector {

     boolean accept(Message<?> message);

 }
The MessageFilter constructor accepts a selector instance:
MessageFilter filter = new MessageFilter(someSelector);In combination with the namespace and SpEL very powerful filters can be configured with very little java code.
The <filter> element is used to create a Message-selecting endpoint. In addition to "input-channel" and "output-channel" attributes, it requires a "ref". The "ref" may point to a MessageSelector implementation:
 <filter input-channel="input" ref="selector" output-channel="output"/>

 <bean id="selector" class="example.MessageSelectorImpl"/>
Alternatively, the "method" attribute can be added at which point the "ref" may refer to any object.
The referenced method may expect either the Message type or the payload type of
inbound Messages. The return value of the method must be a boolean value. Any time the method returns 'true',
the Message will be passed along to the output-channel.
 <filter input-channel="input" output-channel="output"
         ref="exampleObject" method="someBooleanReturningMethod"/>

 <bean id="exampleObject" class="example.SomeObject"/>
If the selector or adapted POJO method returns false, there are a few settings that control the
fate of the rejected Message. By default (if configured like the example above), the rejected Messages will
be silently dropped. If rejection should instead indicate an error condition, then set the
'throw-exception-on-rejection' flag to true:
 <filter input-channel="input" ref="selector"
      output-channel="output" throw-exception-on-rejection="true"/>
If you want the rejected messages to go to a specific channel, provide that reference as the 'discard-channel':
 <filter input-channel="input" ref="selector"
      output-channel="output" discard-channel="rejectedMessages"/>
| Note |
|---|---|
| A common usage for Message Filters is in conjunction with a Publish Subscribe Channel. Many filter endpoints may be subscribed to the same channel, and they decide whether or not to pass the Message for the next endpoint which could be any of the supported types (e.g. Service Activator). This provides a reactive alternative to the more proactive approach of using a Message Router with a single Point-to-Point input channel and multiple output channels. |
Using a "ref" attribute is generally recommended if the custom filter implementation can be reused in other
<filter> definitions. However if the custom filter implementation should be scoped to a
single <filter> element, provide an inner bean definition:
<filter method="someMethod" input-channel="inChannel" output-channel="outChannel">
  <beans:bean class="org.foo.MyCustomFilter"/>
</filter>
| Note |
|---|---|
|
Using both the "ref" attribute and an inner handler definition in the same |
With the introduction of SpEL Spring Integration has added the expression attribute to the filter
element. It can be used to avoid Java entirely for simple filters.
<filter input-channel="input" expression="payload.equals(nonsense)"/>
The string passed as the expression attribute will be evaluated as a SpEL expression in the context of the message. If it is needed to include the result of an expression in the scope of the application context you can use the #{} notation as defined in the SpEL reference documentation SpEL reference documentation .
<filter input-channel="input" expression="payload.matches(#{filterPatterns.nonsensePattern})"/>
If the Expression itself needs to be dynamic, then an 'expression' sub-element may be used. That provides a level of indirection for resolving the Expression by its key from an ExpressionSource. That is a strategy interface that you can implement directly, or you can rely upon a version available in Spring Integration that loads Expressions from a "resource bundle" and can check for modifications after a given number of seconds. All of this is demonstrated in the following configuration sample where the Expression could be reloaded within one minute if the underlying file had been modified. If the ExpressionSource bean is named "expressionSource", then it is not necessary to provide the "source" attribute on the <expression> element, but in this case it's shown for completeness.
          <filter input-channel="input" output-channel="output">
      <expression key="filterPatterns.example" source="myExpressions"/>
  </filter>

  <beans:bean id="myExpressions" id="myExpressions"
          class="org.springframework.integration.expression.ReloadableResourceBundleExpressionSource">
      <beans:property name="basename" value="config/integration/expressions"/>
      <beans:property name="cacheSeconds" value="60"/>
  </beans:bean>
Then, the 'config/integration/expressions.properties' file (or any more specific version with a locale extension to be resolved in the typical way that resource-bundles are loaded) would contain a key/value pair:
filterPatterns.example=payload > 100
| Note |
|---|---|
| All of the examples that use "expression" as an attribute or sub-element can also be applied within transformer, router, splitter, service-activator, and header-enricher elements. Of course, the semantics/role of the given component type would affect the interpretation of the evaluation result in the same way that the return or a method-invocation would be interpreted. For example, an expression can return Strings that are to be treated as Message Channel names by a router component. |
The Splitter is a component whose role is to partition a message in several parts, and send the resulting messages to be processed independently. Very often, they are upstream producers in a pipeline that includes an Aggregator.
The API for performing splitting consists from one base class, AbstractMessageSplitter, which is a MessageHandler implementation, encapsulating features which are common to splitters, such as filling in the appropriate message headers CORRELATION_ID, SEQUENCE_SIZE, and SEQUENCE_NUMBER on the messages that are produced. This allows to track down the messages and the results of their processing (in a typical scenario, these headers would be copied over to the messages that are produced by the various transforming endpoints), and use them, for example, in a Composed Message Processor scenario.
An excerpt from AbstractMessageSplitter can be seen below:
public abstract class AbstractMessageSplitter
                extends AbstractReplyProducingMessageConsumer {
  ...
  protected abstract Object splitMessage(Message<?> message);

}
For implementing a specific Splitter in an application, a developer can extend AbstractMessageSplitter and implement the splitMessage method, thus defining the actual logic for splitting the messages. The return value can be one of the following:
-
a Collection (or subclass thereof) or an array of Message objects - in this case the messages will be sent as such (after the CORRELATION_ID, SEQUENCE_SIZE and SEQUENCE_NUMBER are populated). Using this approach gives more control to the developer, for example for populating custom message headers as part of the splitting process.
-
a Collection (or subclass thereof) or an array of non-Message objects - works like the prior case, except that each collection element will be used as a Message payload. Using this approach allows developers to focus on the domain objects without having to consider the Messaging system and produces code that is easier to test.
-
a Message or non-Message object (but not a Collection or an Array) - it works like the previous cases, except that there is a single message to be sent out.
In Spring Integration, any POJO can implement the splitting algorithm, provided that it defines a method that accepts a single argument and has a return value. In this case, the return value of the method will be interpreted as described above. The input argument might either be a Message or a simple POJO. In the latter case, the splitter will receive the payload of the incoming message. Since this decouples the code from the Spring Integration API and will typically be easier to test, it is the recommended approach.
A splitter can be configured through XML as follows:
<channel id="inputChannel"/> <splitter id="splitter"ref="splitterBean"
method="split"
input-channel="inputChannel"
output-channel="outputChannel"
/> <channel id="outputChannel"/> <beans:bean id="splitterBean" class="sample.PojoSplitter"/>
|
The id of the splitter is optional. |
|
A reference to a bean defined in the application context. The
bean must implement the splitting logic as described in the section
above. Optional.
If reference to a bean is not provided, then it is assumed that the payload of the Message that arrived on the |
|
The method (defined on the bean specified above) that implements the splitting logic. Optional. |
|
The input channel of the splitter. Required. |
|
The channel where the splitter will send the results of splitting the incoming message. Optional (because incoming messages can specify a reply channel themselves). |
Using a "ref" attribute is generally recommended if the custom splitter handler implementation can be reused in other
<splitter> definitions. However if the custom splitter handler implementation should be scoped to a
single definition of the <splitter>, you can configure an inner bean definition:
<splitter id="testSplitter" input-channel="inChannel" method="split"
                output-channel="outChannel">
  <beans:bean class="org.foo.TestSplitter"/>
</spliter>
| Note |
|---|---|
|
Using both a "ref" attribute and an inner handler definition in the same |
The @Splitter annotation is
applicable to methods that expect either the
Message type or the message payload type,
and the return values of the method should be a collection of any type. If
the returned values are not actual Message
objects, then each of them will be sent as the payload of a message. Those
messages will be sent to the output channel as designated for the endpoint
on which the @Splitter is defined.
@Splitter
List<LineItem> extractItems(Order order) {
    return order.getItems()
}
Basically a mirror-image of the Splitter, the Aggregator is a type of Message Handler that receives multiple Messages and combines them into a single Message. In fact, Aggregators are often downstream consumers in a pipeline that includes a Splitter.
Technically, the Aggregator is more complex than a Splitter, because it is required to maintain state (the Messages to be aggregated), to decide when the complete group of Messages is available. In order to do this it requires a MessageStore
The Aggregator combines a group of related messages, by correlating and storing them, until the group is deemed complete. At that point, the Aggregator will create a single message by processing the whole group, and will send that aggregated message as output.
An main aspect of implementing an Aggregator is providing the logic that has to be executed when the aggregation (creation of a single message out of many) takes place. The other two aspects are correlation and release
In Spring Integration, the grouping of the messages for aggregation (correlation) is done by default based on their CORRELATION_ID message header (i.e. the messages with the same CORRELATION_ID will be grouped together). However, this can be customized, and the users can opt for other ways of specifying how the messages should be grouped together, by using a CorrelationStrategy (see below).
To determine whether or not a group of messages may be processed, a ReleaseStrategy is consulted. The default release strategy for aggregator will release groups that have all messages from the sequence, but this can be entirely customized
The Aggregation API consists of a number of classes:
-
The interface
MessageGroupProcessorand related base classAbstractAggregatingMessageGroupProcessorand its subclassMethodInvokingAggregatingMessageGroupProcessor -
The
ReleaseStrategyinterface and its default implementationSequenceSizeReleaseStrategy -
The
CorrelationStrategyinterface and its default implementationHeaderAttributeCorrelationStrategy
The CorrelatingMessageHandler is a
MessageHandler implementation, encapsulating the common
functionalities of an Aggregator (and other correlating use cases),
which are:
-
correlating messages into a group to be aggregated
-
maintaining those messages in a MessageStore until the group may be released
-
deciding when the group is in fact may be released
-
processing the released group into a single aggregated message
-
recognizing and responding to an expired group
The responsibility of deciding how the messages should
be grouped together is delegated to a CorrelationStrategy
instance. The responsibility of deciding whether the message group can
be released is delegated to a ReleaseStrategy
instance.
Here is a brief highlight of the base
AbstractAggregatingMessageGroupProcessor (the
responsibility of implementing the aggregateMessages method is left to
the developer):
public abstract class AbstractAggregatingMessageGroupProcessor
              implements MessageGroupProcessor {

    protected Map<String, Object> aggregateHeaders(MessageGroup group) {
  ....
    }

  	protected abstract Object aggregatePayloads(MessageGroup group);

}
The CorrelationStrategy is owned by the
CorrelatingMessageHandler
and it has a default value based on the correlation ID message header:
private volatile CorrelationStrategy correlationStrategy =
          new HeaderAttributeCorrelationStrategy(MessageHeaders.CORRELATION_ID);
When appropriate, the simplest option is the
DefaultAggregatingMessageGroupProcessor. It creates a
single Message whose payload is a List of the payloads received for a
given group. It uses the default CorrelationStrategy and
CompletionStrategy as shown above. This works well for
simple Scatter Gather implementations with either a Splitter, Publish
Subscribe Channel, or Recipient List Router upstream.
| Note |
|---|---|
|
When using a Publish Subscribe Channel or Recipient List Router in this type of scenario, be sure to enable the flag to apply-sequence. That will add the necessary headers (correlation id, sequence number and sequence size). That behavior is enabled by default for Splitters in Spring Integration, but it is not enabled for the Publish Subscribe Channel or Recipient List Router because those components may be used in a variety of contexts where those headers are not necessary. |
When implementing a specific aggregator object for an application,
a developer can extend
AbstractAggregatingMessageGroupProcessor and implement the
aggregatePayloads method. However, there are better suited
(which reads, less coupled to the API) solutions for implementing the
aggregation logic, which can be configured easily either through XML or
through annotations.
In general, any ordinary Java class (i.e. POJO) can implement the aggregation algorithm. For doing so, it must provide a method that accepts as an argument a single java.util.List (parametrized lists are supported as well). This method will be invoked for aggregating messages, as follows:
-
if the argument is a parametrized java.util.List, and the parameter type is assignable to Message, then the whole list of messages accumulated for aggregation will be sent to the aggregator
-
if the argument is a non-parametrized java.util.List or the parameter type is not assignable to Message, then the method will receive the payloads of the accumulated messages
-
if the return type is not assignable to Message, then it will be treated as the payload for a Message that will be created automatically by the framework.
| Note |
|---|---|
|
In the interest of code simplicity, and promoting best practices such as low coupling, testability, etc., the preferred way of implementing the aggregation logic is through a POJO, and using the XML or annotation support for setting it up in the application. |
The ReleaseStrategy interface is defined as
follows:
public interface ReleaseStrategy {

  boolean canRelease(MessageGroup messages);

}
In general, any ordinary Java class (i.e. POJO) can implement the completion decision mechanism. For doing so, it must provide a method that accepts as an argument a single java.util.List (parametrized lists are supported as well), and returns a boolean value. This method will be invoked after the arrival of a new message, to decide whether the group is complete or not, as follows:
-
if the argument is a parametrized java.util.List, and the parameter type is assignable to Message, then the whole list of messages accumulated in the group will be sent to the method
-
if the argument is a non-parametrized java.util.List or the parameter type is not assignable to Message, then the method will receive the payloads of the accumulated messages
-
the method must return true if the message group is ready for aggregation, and false otherwise.
When the group is released for aggregation, all its unmarked
messages are processed and then marked so they will not be processed
again. If the group is also complete (i.e. if all messages from a
sequence have arrived or if there is no sequence defined) then the group
is removed from the message store. Partial sequences can be released, in
which case the next time the ReleaseStrategy is called it
will be presented with a group containing marked messages (already
processed) and unmarked messages (a potential new partial
sequence)
Spring Integration provides an out-of-the box implementation for
ReleaseStrategy, the
SequenceSizerReleaseStrategy. This implementation uses the
SEQUENCE_NUMBER and SEQUENCE_SIZE of the arriving messages for deciding
when a message group is complete and ready to be aggregated. As shown
above, it is also the default strategy.
The CorrelationStrategy interface is defined as
follows:
public interface CorrelationStrategy {

  Object getCorrelationKey(Message<?> message);

}
The method shall return an Object which represents the correlation key used for grouping messages together. The key must satisfy the criteria used for a key in a Map with respect to the implementation of equals() and hashCode().
In general, any ordinary Java class (i.e. POJO) can implement the
correlation decision mechanism, and the rules for mapping a message to a
method's argument (or arguments) are the same as for a
ServiceActivator (including support for @Header
annotations). The method must return a value, and the value must not be
null.
Spring Integration provides an out-of-the box implementation for
CorrelationStrategy, the
HeaderAttributeCorrelationStrategy. This implementation
returns the value of one of the message headers (whose name is specified
by a constructor argument) as the correlation key. By default, the
correlation strategy is a HeaderAttributeCorrelationStrategy returning
the value of the CORRELATION_ID header attribute.
Spring Integration supports the configuration of an aggregator via XML through the <aggregator/> element. Below you can see an example of an aggregator with all optional parameters defined.
<channel id="inputChannel"/>

<aggregator id="completelyDefinedAggregator"
    input-channel="inputChannel"
    output-channel="outputChannel"
    discard-channel="discardChannel"
    ref="aggregatorBean"
    method="add"
    release-strategy="releaseStrategyBean"
    release-strategy-method="canRelease"
    correlation-strategy="correlationStrategyBean"
    correlation-strategy-method="groupNumbersByLastDigit"
    message-store="messageStore"
    send-partial-result-on-expiry="true"
    send-timeout="86420000"
    expression="#this.toArray()" />

<channel id="outputChannel"/>

<bean id="aggregatorBean" class="sample.PojoAggregator"/>

<bean id="releaseStrategyBean" class="sample.PojoReleaseStrategy"/>

<bean id="correlationStrategyBean" class="sample.PojoCorrelationStrategy"/>
/>
<channel id="outputChannel"/>
<bean id="aggregatorBean" class="sample.PojoAggregator"/>
<bean id="releaseStrategyBean" class="sample.PojoReleaseStrategy"/>
<bean id="correlationStrategyBean" class="sample.PojoCorrelationStrategy"/>
|
The id of the aggregator is optional. |
|
The input channel of the aggregator. Required. |
|
The channel where the aggregator will send the aggregation results. Optional (because incoming messages can specify a reply channel themselves). |
|
The channel where the aggregator will send the messages that
timed out (if |
|
A reference to a bean defined in the application context. The bean must implement the aggregation logic as described above. Required. |
|
A method defined on the bean referenced by |
|
A reference to a bean that implements the decision algorithm as to whether a given message group is complete. The bean can be an implementation of the CompletionStrategy interface or a POJO. In the latter case the completion-strategy-method attribute must be defined as well. Optional (by default, the aggregator will use sequence size) . |
|
A method defined on the bean referenced by
|
|
A reference to a bean that implements the correlation strategy. The bean can be an implementation of the CorrelationStrategy interface or a POJO. In the latter case the correlation-strategy-method attribute must be defined as well. Optional (by default, the aggregator will use the correlation id header attribute) . |
|
A method defined on the bean referenced by
|
|
A reference to a | |
|
Whether upon the expiration of the message group, the aggregator will try to aggregate the messages that have already arrived. Optional (false by default). |
|
The timeout for sending the aggregated messages to the output or reply channel. Optional. |
|
SpEL expression to handle release strategy Optional. |
Using a "ref" attribute is generally recommended if a custom
aggregator handler implementation can be reused in other
<aggregator> definitions. However if a custom
aggregator handler implementation should be scoped to a concrete
definition of the <aggregator>, you can use an inner
bean definition (starting with version 1.0.3) for custom aggregator
handlers within the <aggregator> element:
<aggregator input-channel="input" method="sum" output-channel="output">
    <beans:bean class="org.foo.ExampleAggregator"/>
</aggregator>
| Note |
|---|---|
|
Using both a "ref" attribute and an inner bean definition in the
same |
An example implementation of the aggregator bean looks as follows:
public class PojoAggregator {

  public Long add(List<Long> results) {
    long total = 0l;
    for (long partialResult: results) {
      total += partialResult;
    }
    return total;
  }

}
An implementation of the completion strategy bean for the example above may be as follows:
public class PojoReleaseStrategy {
...
  public boolean canRelease(List<Long> numbers) {
    int sum = 0;
    for (long number: numbers) {
      sum += number;
    }
    return sum >= maxValue;
  }
}
| Note |
|---|---|
|
Wherever it makes sense, the release strategy method and the aggregator method can be combined in a single bean. |
An implementation of the correlation strategy bean for the example above may be as follows:
public class PojoCorrelationStrategy {
...
  public Long groupNumbersByLastDigit(Long number) {
    return number % 10;
  }
}
For example, this aggregator would group numbers by some criterion (in our case the remainder after dividing by 10) and will hold the group until the sum of the numbers which represents the payload exceeds a certain value.
| Note |
|---|---|
|
Wherever it makes sense, the release strategy method, correlation strategy method and the aggregator method can be combined in a single bean (all of them or any two). |
Aggregators and Spring Expression Language (SpEL)
Since Spring Integration 2.0, the release strategy may be handled with SpEL (http://static.springsource.org/spring/docs/3.0.x/spring-framework-reference/html/expressions.html) which would be recommend if the logic behind such release strategy is relatively simple. Let's say you have a legacy component which was designed to receive an array of objects. We know that default release strategy will assemble all aggregated messages in the List. So now we have two problems. First we need to extract individual messages form such list, extract payload of each message and assemble them into the array of objects (see code below)
public String[] processRelease(List<Message<String>> mesages){
		List<String> strList = new ArrayList<String>();
		for (Message<String> message : mesages) {
			strList.add(message.getPayload());
		}
		return strList.toArray(new String[]{});
}
However, with SpEL such requirement could actually be handled relatively easy with a simple one-line expression, thus sparing you from writing a custom class and configuring it as a bean.
<int:aggregator input-channel="aggrChannel"
	output-channel="replyChannel"
	expression="#this.![payload].toArray()"/>
In the above configuration we are using Collection Projection expression (http://static.springsource.org/spring/docs/3.0.x/spring-framework-reference/html/expressions.html#d0e12113) to assemble a new collection from the payloads of all messages in the list and then transforming it to an Array, thus achieving the same result as the java code above.
Aggregator (and some other patterns in Spring Integration) is a
stateful pattern that requires decisions to be made based on a group of
messages that have arrived over a period of time, all with the same
correlation key. The design of the interfaces in the stateful patterns
(e.g. ReleaseStrategy) is driven by the principle
that the components (framework and user) should be to remain stateless.
All state is carried by the MessageGroup and its
management is delegated to the
MessageGroupStore.
The MessageGroupStore accumulates state
information in MessageGroups, potentially forever.
So to prevent stale state from hanging around, and for volatile stores to
provide a hook for cleaning up when the application shots down, the
MessageGroupStore allows the user to register
callbacks to apply to MessageGroups when they
expire. The interface is very straighforward:
public interface MessageGroupCallback {

  void execute(MessageGroupStore messageGroupStore, MessageGroup group);

}
The callback has access directly to the store and the message group so it can manage the persistent state (e.g. by removing the group from the store entirely).
The MessageGroupStore maintains a list of these callbacks which it applies when asked to all messages whose timestamp is earlier than a time supplied as a parameter:
public interface MessageGroupStore {
   void registerMessageGroupExpiryCallback(MessageGroupCallback callback);
   int expireMessageGroups(long timeout);
}
The expireMessageGroups method can be called with a timeout value: any message older than the current time minus this value wiull be expired, and have the callbacks applied. Thus it is the user of the store that defines what is meant by message group "expiry".
As a convenience for users, Spring Integration provides a wrapper
for the message expiry in the form of a
MessageGroupStoreReaper:
<bean id="reaper" class="org...MessageGroupStoreReaper">
  <property name="messageGroupStore" ref="messageStore"/>
  <property name="timeout" value="10"/>
</bean>

<task:scheduled-tasks scheduler="scheduler">
  <task:scheduled ref="reaper" method="run" fixed-rate="10000"/>
</task:scheduled-tasks>
The reaper is a Runnable, and all that is happening is that the
message group store's expire method is being called in the sample above
once every 10 seconds. In addition to the reaper, the expiry callbacks are
invoked when the application shuts down via a lifecycle callback in the
CorrelatingMessageHandler.
The CorrelatingMessageHandler registers its
own expiry callback, and this is the link with the boolean flag
send-partial-result-on-expiry in the XML configuration of the
aggregator. If the flag is set to true, then when the expiry callback is
invoked then any unmarked messages in groups that are not yet released can
be sent on to the downstream channel.
An aggregator configured using annotations can look like this.
public class Waiter { ... @Aggregator
All of the configuration options provided by the xml element are also available for the @Aggregator annotation.
The aggregator can be either referenced explicitly from XML or, if the @MessageEndpoint is defined on the class, detected automatically through classpath scanning.
Related to the Aggregator, albeit different from a functional standpoint, is the Resequencer.
The Resequencer works in a similar way to the Aggregator, in the sense that it uses the CORRELATION_ID to store messages in groups, the difference being that the Resequencer does not process the messages in any way. It simply releases them in the order of their SEQUENCE_NUMBER header values.
With respect to that, the user might opt to release all messages at once (after the whole sequence, according to the SEQUENCE_SIZE, has been released), or as soon as a valid sequence is available.
Configuring a resequencer requires only including the appropriate element in XML.
A sample resequencer configuration is shown below.
<channel id="inputChannel"/> <channel id="outputChannel"/> <resequencer id="completelyDefinedResequencer"
|
The id of the resequencer is optional. | |
|
The input channel of the resequencer. Required. | |
|
The channel where the resequencer will send the reordered messages. Optional. | |
|
The channel where the resequencer will send the messages that
timed out (if | |
|
Whether to send out ordered sequences as soon as they are available, or only after the whole message group arrives. Optional (false by default). If this flag is not specified (so a complete sequence is defined by the sequence headers) then it can make sense to provide a customComparator
to be used to order the messages when sending (use the XML attribute
comparator
to point to a bean definition). If
release-partial-sequences
is true then there is no way with a custom comparator to define a partial sequence. To do that you would have to provide a
release-strategy
(also a reference to another bean definition, either a POJO or a
ReleaseStrategy
).
| |
|
A reference to a | |
|
Whether, upon the expiration of the group, the ordered group should be sent out (even if some of the messages are missing). Optional (false by default). See Section 4.4.5, “Managing State in an Aggregator: MessageGroupStore”. | |
|
The timeout for sending out messages. Optional. |
| Note |
|---|---|
| Since there is no custom behavior to be implemented in Java classes for resequencers, there is no annotation support for it. |
The MessageHandlerChain is an implementation of
MessageHandler that can be configured as a single Message Endpoint while
actually delegating to a chain of other handlers, such as Filters, Transformers, Splitters, and so on.
This can lead to a much simpler configuration when several handlers need to be connected in a fixed, linear
progression. For example, it is fairly common to provide a Transformer before other components. Similarly, when
providing a Filter before some other component in a chain, you are essentially creating a
Selective Consumer. In either case, the
chain only requires a single input-channel and a single output-channel as opposed to the configuration of
channels for each individual component.
| Tip |
|---|---|
| Spring Integration's Filter provides a boolean property 'throwExceptionOnRejection'. When providing multiple Selective Consumers on the same point-to-point channel with different acceptance criteria, this value should be set to 'true' (the default is false) so that the dispatcher will know that the Message was rejected and as a result will attempt to pass the Message on to other subscribers. If the Exception were not thrown, then it would appear to the dispatcher as if the Message had been passed on successfully even though the Filter had dropped the Message to prevent further processing. |
The handler chain simplifies configuration while internally maintaining the same degree of loose coupling between components, and it is trivial to modify the configuration if at some point a non-linear arrangement is required.
Internally, the chain will be expanded into a linear setup of the listed endpoints, separated by direct channels.
The reply channel header will not be taken into account within the chain: only after the last handler is invoked
will the resulting message be forwarded on to the reply channel or the chain's output channel. Because of this
setup all handlers except the last require a setOutputChannel implementation. The last
handler only needs an output channel if the outputChannel on the MessageHandlerChain is set.
| Note |
|---|---|
|
As with other endpoints, the output-channel is optional. If there is a reply Message at the end of the chain, the output-channel takes precedence, but if not available, the chain handler will check for a reply channel header on the inbound Message. |
In most cases there is no need to implement MessageHandlers yourself. The next section will focus on namespace
support for the chain element. Most Spring Integration endpoints, like Service Activators and Transformers, are
suitable for use within a MessageHandlerChain.
The <chain> element provides an 'input-channel' attribute, and if the last element in the chain is capable of producing reply messages (optional), it also supports an 'output-channel' attribute. The sub-elements are then filters, transformers, splitters, and service-activators. The last element may also be a router.
 <chain input-channel="input" output-channel="output">
     <filter ref="someSelector" throw-exception-on-rejection="true"/>
     <header-enricher error-channel="customErrorChannel">
         <header name="foo" value="bar"/>
     </header-enricher>
     <service-activator ref="someService" method="someMethod"/>
 </chain>
The <header-enricher> element used in the above example will set a message header with name "foo" and value "bar" on the message. A header enricher is a specialization of Transformer that touches only header values. You could obtain the same result by implementing a MessageHandler that did the header modifications and wiring that as a bean.
Some time you need to make a nested call to another chain from within the chain and then come back and continue execution within the original chain. To accomplish this you can utilize Messaging Gateway by including light-configuration via <gateway> element. For example:
   <si:chain id="main-chain" input-channel="inputA" output-channel="inputB">
    <si:header-enricher>
      <si:header name="name" value="Many" />
    </si:header-enricher>
    <si:service-activator>
      <bean class="org.foo.SampleService" />
    </si:service-activator>
    <si:gateway request-channel="inputC"/>
  </si:chain>
  <si:chain id="nested-chain-a" input-channel="inputC">
    <si:header-enricher>
      <si:header name="name" value="Moe" />
    </si:header-enricher>
    <si:gateway request-channel="inputD"/>
    <si:service-activator>
      <bean class="org.foo.SampleService" />
    </si:service-activator>
  </si:chain>
  <si:chain id="nested-chain-b" input-channel="inputD">
    <si:header-enricher>
      <si:header name="name" value="Jack" />
    </si:header-enricher>
    <si:service-activator>
      <bean class="org.foo.SampleService" />
    </si:service-activator>
  </si:chain>
In the above example the nested-chain-a will be called at the end of main-chain processing by the 'gateway' element
configured there. While in nested-chain-a a call to a nested-chain-b will be made after header enrichment and then it will
come back to finish execution in nested-chain-b finally getting back to the main-chain.
When light version of <gateway> element is defined in the chain SI will construct an instance SimpleMessagingGateway
(no need to provide 'service-interface' configuration) which will take the message in its current state and will place it on the channel defined via 'request-channel' attribute.
Upon processing Message will be returned to the gateway and continue its journey within the current chain.
Message Transformers play a very important role in enabling the loose-coupling of Message Producers and Message Consumers. Rather than requiring every Message-producing component to know what type is expected by the next consumer, Transformers can be added between those components. Generic transformers, such as one that converts a String to an XML Document, are also highly reusable.
For some systems, it may be best to provide a Canonical Data Model, but Spring Integration's general philosophy is not to require any particular format. Rather, for maximum flexibility, Spring Integration aims to provide the simplest possible model for extension. As with the other endpoint types, the use of declarative configuration in XML and/or Annotations enables simple POJOs to be adapted for the role of Message Transformers. These configuration options will be described below.
| Note |
|---|---|
| For the same reason of maximizing flexibility, Spring does not require XML-based Message payloads. Nevertheless, the framework does provide some convenient Transformers for dealing with XML-based payloads if that is indeed the right choice for your application. For more information on those transformers, see Chapter 23, XML Support - Dealing with XML Payloads. |
The <transformer> element is used to create a Message-transforming endpoint. In addition to "input-channel" and "output-channel" attributes, it requires a "ref". The "ref" may either point to an Object that contains the @Transformer annotation on a single method (see below) or it may be combined with an explicit method name value provided via the "method" attribute.
<transformer id="testTransformer" ref="testTransformerBean" input-channel="inChannel"
             method="transform" output-channel="outChannel"/>
<beans:bean id="testTransformerBean" class="org.foo.TestTransformer" />
Using a "ref" attribute is generally recommended if the custom transformer handler implementation can be reused in
other <transformer> definitions. However if the custom transformer handler implementation should
be scoped to a single definition of the <transformer>, you can define an inner bean definition:
<transformer id="testTransformer" input-channel="inChannel" method="transform"
                output-channel="outChannel">
  <beans:bean class="org.foo.TestTransformer"/>
</transformer>
| Note |
|---|---|
|
Using both the "ref" attribute and an inner handler definition in the same |
The method that is used for transformation may expect either the Message type or
the payload type of inbound Messages. It may also accept Message header values either individually or as a full
map by using the @Header and @Headers parameter annotations respectively. The return value of the method can be
any type. If the return value is itself a Message, that will be passed along to
the transformer's output channel. If the return type is a Map, and the original Message payload was
not a Map, the entries in that Map will be added to the Message headers of the original
Message (the keys must be Strings). If the return value is null, then no reply Message will
be sent (effectively the same behavior as a Message Filter returning false). Otherwise, the return value will be
sent as the payload of an outbound reply Message.
Transformers and Spring Expression Language (SpEL)
Just like Routers, Aggregators and other components, since Spring Integration 2.0 Transformers can also benefit from SpEL http://static.springsource.org/spring/docs/3.0.x/spring-framework-reference/html/expressions.html whenever transformation logic is relatively simple.
<int:transformer input-channel="inChannel"
	output-channel="outChannel"
	expression="payload.toUpperCase() + '- [' + T(java.lang.System).currentTimeMillis() + ']'"/>
In the above configuration we are achieving a simple transformation of the payload with a simple SpEL expression and without writing a custom transformer. Our payload (assuming String) will be upper-cased and concatenated with the current timestamp with some simple formatting.
Common Transformers
There are a also a few Transformer implementations available out of the box. Because, it is fairly common
to use the toString() representation of an Object, Spring Integration provides an
ObjectToStringTransformer whose output is a Message with a String payload. That String
is the result of invoking the toString operation on the inbound Message's payload.
<object-to-string-transformer input-channel="in" output-channel="out"/>
A potential example for this would be sending some arbitrary object to the 'outbound-channel-adapter' in the
file namespace. Whereas that Channel Adapter only supports String, byte-array, or
java.io.File payloads by default, adding this transformer immediately before the
adapter will handle the necessary conversion. Of course, that works fine as long as the result of the
toString() call is what you want to be written to the File. Otherwise, you can
just provide a custom POJO-based Transformer via the generic 'transformer' element shown previously.
| Tip |
|---|---|
| When debugging, this transformer is not typically necessary since the 'logging-channel-adapter' is capable of logging the Message payload. Refer to the section called “Wire Tap” for more detail. |
If you need to serialize an Object to a byte array or deserialize a byte array back into an Object, Spring Integration provides symmetrical serialization transformers.
 <payload-serializing-transformer input-channel="objectsIn" output-channel="bytesOut"/>

 <payload-deserializing-transformer input-channel="bytesIn" output-channel="objectsOut"/>
Object-to-Map Transformer
As added convenience, Spring Integration also provides Object-to-Map and Map-to-Object transformers which utilize Spring Expression Language (SpEL) to serialize and de-serialize the object graphs. Object hierarchy is introspected to the most primitive types (e.g., String, int etc.). The path to this type is described via SpEL, which becomes the keykey in the transformed Map with primitive type being the value.
For example:
public class Parent{
    private Child child;
    private String name;
    // setters and getters are omitted
}

public class Child{
   private String name;
   private List<String> nickNames;
   // setters and getters are omitted
}
... will be transformed to a Map which looks like this:
{person.name=George, person.child.name=Jenna, person.child.nickNames[0]=Bimbo . . . etc}
SpEL-based Map allows you to describe the object structure without sharing the actual types allowing you to restore/rebuild the object graph into a differently typed Object graph as long as you maintain the structure.
For example: The above structure could be easily restored back to the following Object graph via Map-to-Object transformer:
public class Father{
    private Kid child;
    private String name;
    // setters and getters are omitted
}

public class Kid{
   private String name;
   private List<String> nickNames;
   // setters and getters are omitted
}
To configure these transformers, Spring Integration provides namespace support Object-to-Map:
<object-to-map-transformer input-channel="directInput" output-channel="output"/>
Map-to-Object
<int:map-to-object-transformer input-channel="input"
                         output-channel="output"
                          type="org.foo.Person"/>
or
<int:map-to-object-transformer input-channel="inputA"
                                output-channel="outputA"
                                ref="person"/>
<bean id="person" class="org.foo.Person" scope="prototype"/>
| Note |
|---|---|
| NOTE: 'ref' and 'type' attributes are mutually exclusive. You can only use either one. Also, if using 'ref' attribute you must point to a 'prototype' scoped bean, otherwise BeanCreationException will be thrown. |
The @Transformer annotation can also be added to methods that expect either the
Message type or the message payload type. The return value will be handled in the
exact same way as described above in the section describing the <transformer> element.
@Transformer
Order generateOrder(String productId) {
    return new Order(productId);
}
Transformer methods may also accept the @Header and @Headers annotations that is documented in Section B.5, “Annotation Support”
@Transformer
Order generateOrder(String productId, @Header("customerName") String customer) {
    return new Order(productId, customer);
}
<int:header-filter input-channel="inputChannel"
		output-channel="outputChannel" header-names="lastName, state"/>
As you can see, configuration of Header Filter is quite simple. It is a typical endpoint with input/output channels and
header-names attribute which allows you to specify the names of the headers (delimited by coma if multiple)
that need to be removed. So, in the above example headers with the name 'lastName' and 'state' will be removed.
Some time you may have a requirement to enhance a request with more information then it was provided by the target system. Content Enricher pattern describes various scenarios as well as the component (Enricher), which allows you to address such requirements.
If you only need to add headers to a Message, and they are not dynamically determined by the Message content,
then referencing a custom implementation of the Transformer may be an overkill. For that reason,
Spring Integration provides the Header Enricher which is exposed via <header-enricher> element.
<int:header-enricher input-channel="in" output-channel="out">
     <int:header name="foo" value="123"/>
     <int:header name="bar" ref="someBean"/>
</int:header-enricher>
Header Enricher also provides helpful sub-elements to set well known header names.
<int:header-enricher input-channel="in" output-channel="out">
		<int:error-channel ref="applicationErrorChannel"/>
		<int:reply-channel ref="quoteReplyChannel"/>
		<int:correlation-id value="123"/>
		<int:priority value="HIGHEST"/>
		<int:header name="bar" ref="someBean"/>
</int:header-enricher>
In the above configuration you can clearly see that for well known headers such as errorChannel,
correlationId, priority, replyChanneletc., instead of using generic <header>
sub-element where you would have to provide both header 'name' and 'value', you can use convenient sub-elements
allowing you to set those values directly.
SpEL Support
In Spring Integration 2.0 we are introducing convenience of Spring Expression Language (SpEL) to help configure many different components. Header Enricher is one of them. A lot of times, header value cannot be defined statically and has to be computed dynamically. That is why Header Enricher allows you to also specify bean 'ref' and 'method' that will calculate the header value. Let's look at the following configuration:
<int:header-enricher input-channel="in" output-channel="out">
		<int:header name="foo" method="computeValue" ref="myBean"/>
</int:header-enricher>

<bean id="myBean" class="foo.bar.MyBean"/>
public class MyBean{
	public String computeValue(String payload){
		return payload.toUpperCase() + "_US";
	}
}
As you can see that the computation logic to determine the header value is actually pretty simple and the natural question would be is there a simpler way to accomplish this? And that is where SpEL shows its true power.
<int:header-enricher input-channel="in" output-channel="out">
	<int:header name="foo" expression="payload.toUpperCase() + '_US'"/>
</int:header-enricher>
As you can see, with SpEL for simple cases like above we no longer have to provide a separate class and configure it in the application context. All we need is to use expression attribute and provide a valid SpEL expression. You can also see that 'payload' and 'headers' are bound as variables to the SpEL Evaluation Context giving you full access to the incoming Message.
Adapter specific Header Enrichers
As you go through the manual you will see that as an added convenience Spring Integration provides adapter specific Header Enrichers (e.g., MAIL, XMPP, etc.)
In the earlier sections we've covered several Content Enricher type components that helps you deal with situations where a message is missing a piece of data. We also discussed Content Filtering which lets you remove uninteresting data items from a message. However there are times when we want to remove some data temporarily. For example; In a distributed system we may receive a Message with a very large payload. Some intermittent message processing steps may not need access to this payload and some may only need to access parts of the payload so carrying the large Message through each processing step may cause performance degradation and makes debugging harder.
Claim Check pattern describes mechanism that allows you to store data in a well known place while only maintaining a pointer (Claim Check) to where that data is and pass such pointer around as a payload of a new Message allowing any component within the message flow to get the actual data as soon as it needs it. This approach is very similar to the Certified Mail process where you'll get Claim Check in your mailbox and would have to go to the Post Office to claim your actual package or mail.
Spring Integration provides two types of Claim Check transformers - Incoming Claim Check Transformer and Outgoing Claim Check Transformer as well as convenient namespace-based mechanism to configure them.
Incoming Claim Check Transformer - will transform incoming Message by storing it in the Message Store
identified by message-store attribute.
<int:claim-check-in id="checkin"
		input-channel="checkinChannel"
		message-store="testMessageStore"
		output-channel="checkoutChannel"/>
In the above configuration the Message that is received on the input-channel will be persisted to the
Message Store identified with message-store attribute and indexed with generated ID. That ID is the Claim Check for that Message.
This Claim Check will also become the payload of the new (transformed) Message that will be sent to the output-channel.
Now, lets assume that at some point you do need access to the actual Message. You can of course access the Message Store manually and get the contents of the Message or you can use the same approach as before except now you will be transforming the Claim Check to the actual Message by using Outgoing Claim Check Transformer.
Incoming Claim Check Transformer allows you to transform a Message from the Message with just a Claim Check to the Message with the original content.
<claim-check-out id="checkout"
		input-channel="checkoutChannel"
		message-store="testMessageStore"/>
In the above configuration the Message that is received on the input-channel has a Claim Check as a payload
and Outgoing Claim Check Transformer will transform it into an original Message by simply querying the
Message store for a Message identified by a Claim Check provided and sending the new Message to the output-channel.
Although we rarely care about the protocol of the claim checks as long as they work, but it is still worth knowing that current implementation of the actual Claim Check (the pointer) in Spring Integration is UUID to ensure uniqueness.
A word on Message Store
org.springframework.integration.store.MessageStore is a strategy interface for storing and retrieving messages.
Spring Integration provides two convenient implementations of it. SimpleMessageStore - In memory Map-based
implementation (default, good for testing) and JdbcMessageStore - Implementation of MessageStore
that uses relational database via JDBC.
The first part of this chapter covers some background theory and reveals quite a bit about the underlying API that drives Spring Integration's various messaging components. This information can be helpful if you want to really understand what's going on behind the scenes. However, if you want to get up and running with the simplified namespace-based configuration of the various elements, feel free to skip ahead to Section 6.1.4, “Namespace Support” for now.
As mentioned in the overview, Message Endpoints are responsible for connecting the various messaging components to channels. Over the next several chapters, you will see a number of different components that consume Messages. Some of these are also capable of sending reply Messages. Sending Messages is quite straightforward. As shown above in Section 2.1, “Message Channels”, it's easy to send a Message to a Message Channel. However, receiving is a bit more complicated. The main reason is that there are two types of consumers: Polling Consumers and Event Driven Consumers.
Of the two, Event Driven Consumers are much simpler. Without any need to manage and schedule a separate poller thread, they are essentially just listeners with a callback method. When connecting to one of Spring Integration's subscribable Message Channels, this simple option works great. However, when connecting to a buffering, pollable Message Channel, some component has to schedule and manage the polling thread(s). Spring Integration provides two different endpoint implementations to accommodate these two types of consumers. Therefore, the consumers themselves can simply implement the callback interface. When polling is required, the endpoint acts as a "container" for the consumer instance. The benefit is similar to that of using a container for hosting Message Driven Beans, but since these consumers are simply Spring-managed Objects running within an ApplicationContext, it more closely resembles Spring's own MessageListener containers.
Spring Integration's MessageHandler interface is implemented by many of the
components within the framework. In other words, this is not part of the public API, and a developer would not
typically implement MessageHandler directly. Nevertheless, it is used by a Message
Consumer for actually handling the consumed Messages, and so being aware of this strategy interface does help in
terms of understanding the overall role of a consumer. The interface is defined as follows:
public interface MessageHandler {

    void handleMessage(Message<?> message);

}
Despite its simplicity, this provides the foundation for most of the components that will be covered in the following chapters (Routers, Transformers, Splitters, Aggregators, Service Activators, etc). Those components each perform very different functionality with the Messages they handle, but the requirements for actually receiving a Message are the same, and the choice between polling and event-driven behavior is also the same. Spring Integration provides two endpoint implementations that "host" these callback-based handlers and allow them to be connected to Message Channels.
Because it is the simpler of the two, we will cover the Event Driven Consumer endpoint first. You may recall that
the SubscribableChannel interface provides a subscribe()
method and that the method accepts a MessageHandler parameter (as shown in
the section called “SubscribableChannel”):
subscribableChannel.subscribe(messageHandler);
Since a handler that is subscribed to a channel does not have to actively poll that channel, this is an
Event Driven Consumer, and the implementation provided by Spring Integration accepts a
a SubscribableChannel and a MessageHandler:
SubscribableChannel channel = (SubscribableChannel) context.getBean("subscribableChannel");

EventDrivenConsumer consumer = new EventDrivenConsumer(channel, exampleHandler);
Spring Integration also provides a PollingConsumer, and it can be instantiated in
the same way except that the channel must implement PollableChannel:
PollableChannel channel = (PollableChannel) context.getBean("pollableChannel");

PollingConsumer consumer = new PollingConsumer(channel, exampleHandler);
There are many other configuration options for the Polling Consumer. For example, the trigger is a required property:
PollingConsumer consumer = new PollingConsumer(channel, handler);

consumer.setTrigger(new IntervalTrigger(30, TimeUnit.SECONDS));
Spring Integration currently provides two implementations of the Trigger
interface: IntervalTrigger and CronTrigger. The
IntervalTrigger is typically defined with a simple interval (in milliseconds), but
also supports an 'initialDelay' property and a boolean 'fixedRate' property (the default is false, i.e.
fixed delay):
IntervalTrigger trigger = new IntervalTrigger(1000);
trigger.setInitialDelay(5000);
trigger.setFixedRate(true);
The CronTrigger simply requires a valid cron expression (see the Javadoc for details):
CronTrigger trigger = new CronTrigger("*/10 * * * * MON-FRI");
In addition to the trigger, several other polling-related configuration properties may be specified:
PollingConsumer consumer = new PollingConsumer(channel, handler);

consumer.setMaxMessagesPerPoll(10);

consumer.setReceiveTimeout(5000);
The 'maxMessagesPerPoll' property specifies the maximum number of messages to receive within a given poll
operation. This means that the poller will continue calling receive() without waiting
until either null is returned or that max is reached. For example, if a poller has a 10 second
interval trigger and a 'maxMessagesPerPoll' setting of 25, and it is polling a channel that has 100 messages
in its queue, all 100 messages can be retrieved within 40 seconds. It grabs 25, waits 10 seconds, grabs the
next 25, and so on.
The 'receiveTimeout' property specifies the amount of time the poller should wait if no messages are available when it invokes the receive operation. For example, consider two options that seem similar on the surface but are actually quite different: the first has an interval trigger of 5 seconds and a receive timeout of 50 milliseconds while the second has an interval trigger of 50 milliseconds and a receive timeout of 5 seconds. The first one may receive a message up to 4950 milliseconds later than it arrived on the channel (if that message arrived immediately after one of its poll calls returned). On the other hand, the second configuration will never miss a message by more than 50 milliseconds. The difference is that the second option requires a thread to wait, but as a result it is able to respond much more quickly to arriving messages. This technique, known as "long polling", can be used to emulate event-driven behavior on a polled source.
A Polling Consumer may also delegate to a Spring TaskExecutor, and it can
be configured to participate in Spring-managed transactions. The following example shows the configuration of both:
PollingConsumer consumer = new PollingConsumer(channel, handler);

TaskExecutor taskExecutor = (TaskExecutor) context.getBean("exampleExecutor");
consumer.setTaskExecutor(taskExecutor);

PlatformTransactionManager txManager = (PlatformTransationManager) context.getBean("exampleTxManager");
consumer.setTransactionManager(txManager);
The examples above show dependency lookups, but keep in mind that these consumers will most often be configured
as Spring bean definitions. In fact, Spring Integration also provides a
FactoryBean that creates the appropriate consumer type based on the type of
channel, and there is full XML namespace support to even further hide those details. The namespace-based
configuration will be featured as each component type is introduced.
| Note |
|---|---|
Many of the MessageHandler implementations are also capable of generating reply
Messages. As mentioned above, sending Messages is trivial when compared to the Message reception. Nevertheless,
when and how many reply Messages are sent depends on the handler
type. For example, an Aggregator waits for a number of Messages to arrive and is often
configured as a downstream consumer for a Splitter which may generate multiple
replies for each Message it handles. When using the namespace configuration, you do not strictly need to know
all of the details, but it still might be worth knowing that several of these components share a common base
class, the AbstractReplyProducingMessageHandler, and it provides a
setOutputChannel(..) method.
|
Throughout the reference manual, you will see specific configuration examples for endpoint elements, such as
router, transformer, service-activator, and so on. Most of these will support an "input-channel" attribute and
many will support an "output-channel" attribute. After being parsed, these endpoint elements produce an instance
of either the PollingConsumer or the
EventDrivenConsumer depending on the type of the "input-channel" that is
referenced: PollableChannel or SubscribableChannel
respectively. When the channel is pollable, then the polling behavior is determined based on the endpoint
element's "poller" sub-element and its attributes. For example, a simple interval-based poller with a 1-second interval would be
configured like this:
 <transformer input-channel="pollable"
              ref="transformer"
              output-channel="output">
     <poller fixed-rate="1000"/>
</transformer>
As an alternative to 'fixed-rate' you cna also use 'fixed-delay' attribute.
For a poller based on a Cron expression, use the "cron" attribute instead:
 <transformer input-channel="pollable"
              ref="transformer"
              output-channel="output">
     <poller cron="*/10 * * * * MON-FRI"/>
 </transformer>
If the input channel is a PollableChannel, then the poller configuration is
required. Specifically, as mentioned above, the 'trigger' is a required property of the PollingConsumer class.
Therefore, if you omit the "poller" sub-element for a Polling Consumer endpoint's configuration, an Exception
may be thrown. The exception will also be thrown if you attempt to configure a poller on the element that is
connected to a non-pollable channel.
It is also possible to create top-level pollers in which case only a "ref" is required:
 <poller id="weekdayPoller" cron="*/10 * * * * MON-FRI"/>

 <transformer input-channel="pollable"
              ref="transformer"
              output-channel="output">
    <poller ref="weekdayPoller"/>
 </transformer>
In fact, to simplify the configuration, you can define a global default poller. A single top-level poller within
an ApplicationContext may have the default attribute with a value of "true". In that case, any
endpoint with a PollableChannel for its input-channel that is defined within the same ApplicationContext and has
no explicitly configured 'poller' sub-element will use that default.
 <poller id="defaultPoller" default="true" max-messages-per-poll="5" fixed-rate="3000"/>

 <!-- No <poller/> sub-element is necessary since there is a default -->
 <transformer input-channel="pollable"
              ref="transformer"
              output-channel="output"/>
Spring Integration also provides transaction support for the pollers so that each receive-and-forward operation can be performed as an atomic unit-of-work. To configure transactions for a poller, simply add the <transactional/> sub-element. The attributes for this element should be familiar to anyone who has experience with Spring's Transaction management:
<poller fixed-delay="1000">
    <transactional transaction-manager="txManager"
                   propagation="REQUIRED"
                   isolation="REPEATABLE_READ"
                   timeout="10000"
                   read-only="false"/>
</poller>
AOP Advice chains
Since Spring transaction support depends on the Proxy mechanism with TransactionInterceptor (AOP Advice) handling transactional
behavior of the message flow initiated by the poler, some times there is a need to provide extra Advice(s) to handle other
cross cutting behavior associated with the poller. For that poller defines an 'advice-chain' element allowing you to add
more advices - class that implements MethodInterceptor interface..
<service-activator id="advicedSa" input-channel="goodInputWithAdvice" ref="testBean"
		method="good" output-channel="output">
	<poller max-messages-per-poll="1" fixed-rate="10000">
		<transactional transaction-manager="txManager" />
		 <advice-chain>
			<ref bean="adviceA" />
			<beans:bean class="org.bar.SampleAdvice"/>
		</advice-chain>
	</poller>
</service-activator>
For more information on how to implement MethodInterceptor please refer to AOP sections of Spring reference manual (section 7 and 8). Advice chain can also be applied on the poller that does not have any transaction configuration essentially allowing you to enhance the behavior of the message flow initiated by the poller.
The polling threads may be executed by any instance of Spring's TaskExecutor
abstraction. This enables concurrency for an endpoint or group of endpoints. As of Spring 3.0, there is a "task"
namespace in the core Spring Framework, and its <executor/> element supports the creation of a simple thread
pool executor. That element accepts attributes for common concurrency settings such as pool-size and queue-capacity.
Configuring a thread-pooling executor can make a substantial difference in how the endpoint performs under load. These
settings are available per-endpoint since the performance of an endpoint is one of the major factors to consider
(the other major factor being the expected volume on the channel to which the endpoint subscribes). To enable
concurrency for a polling endpoint that is configured with the XML namespace support, provide the 'task-executor'
reference on its <poller/> element and then provide one or more of the properties shown below:
 <poller task-executor="pool" fixed-rate="1000"/>

 <task:executor id="pool"
                pool-size="5-25"
                queue-capacity="20"
                keep-alive="120"/>
If no 'task-executor' is provided, the consumer's handler will be invoked in the caller's thread. Note that the
"caller" is usually the default TaskScheduler
(see Section B.3, “Configuring the Task Scheduler”). Also, keep in mind that the 'task-executor' attribute can
provide a reference to any implementation of Spring's TaskExecutor interface by
specifying the bean name. The "executor" element above is simply provided for convenience.
As mentioned in the background section for Polling Consumers above, you can also configure a Polling Consumer in such a way as to emulate event-driven behavior. With a long receive-timeout and a short interval-trigger, you can ensure a very timely reaction to arriving messages even on a polled message source. Note that this will only apply to sources that have a blocking wait call with a timeout. For example, the File poller does not block, each receive() call returns immediately and either contains new files or not. Therefore, even if a poller contains a long receive-timeout, that value would never be usable in such a scenario. On the other hand when using Spring Integration's own queue-based channels, the timeout value does have a chance to participate. The following example demonstrates how a Polling Consumer will receive Messages nearly instantaneously.
 <service-activator input-channel="someQueueChannel"
        output-channel="output">
     <poller receive-timeout="30000" fixed-rate="10"/>

 </service-activator>
Using this approach does not carry much overhead since internally it is nothing more then a timed-wait thread which does not require nearly as much CPU resource usage as a thrashing, infinite while loop for example.
Throughout the reference manual, you will also see specific configuration and implementation examples of various endpoints
which can accept a Message or any arbitrary Object as an input parameter. In the case of an Object, such parameter will
be mapped to a Message payload or part of the payload or header (when using Spring Expression Language). However there
are times when the type of input parameter of the endpoint method does not match the type of the payload or its part.
In this scenario we need to perform type conversion. Spring Integration provides a convenient way for registering type
converters (using Spring 3.x ConversionService) within its own instance of the conversion service bean named integrationConversionService
which is automatically created as soon as the first converter is defined.
To register such converter all you need is to implement org.springframework.core.convert.converter.Converter and register via
cionvinient namespace support:
 <int:converter ref="sampleConverter"/>

	<bean id="sampleConverter" class="foo.bar.TestConverter"/>
or
 <int:converter>
		<bean class="org.springframework.integration.config.xml.ConverterParserTests$TestConverter3"/>
	</int:converter>
If you want the polling to be asynchronous, Poller can optionaly specify 'task-executor' attribute
pointing to an existing instance of TaskExecutor bean
(Spring 3.0 provides a convinient namespaces configuration via the task namespace). However, there are certain things
you must understand when configuring Poller with TaskExecutor.
The problem is that there are two configurations in place. The Poller and the TaskExecutor and they both have to be in tune with each other otherwise you might end up creating an artificial memory leak.
Let's look at the following configuration provided by one of the users on the Spring's forums (http://forum.springsource.org/showthread.php?t=94519):
<int:service-activator input-channel="publishChannel" ref="myService">
		<int:poller receive-timeout="5000" task-executor="taskExecutor" fixed-rate="50"/>
</si:service-activator>

<task:executor id="taskExecutor" pool-size="20" queue-capacity="20"/>
The above configuration demonstrates one of those out of tune configurations.
The poller keeps scheduling new tasks even though all the threads are blocked waiting for either a new message to arrive, or the timeout to expire. Given that there are 20 threads executing tasks with a 5 second timeout, they will be executed at a rate of 4 per second (5000/20 = 250ms). But, new tasks are being scheduled at a rate of 20 per second, so the internal queue in the task executor will grow at a rate of 16 per second (while the process is idle), so we essentially have a memory leak.
One of the ways to handle this is to set queue-capacity attribute of Task Executor to 0. You can also manage it by specifying what to do
with messages that can not be queued up by setting rejection-policy attribute of Task Executor (e.g., DISCARD). In other
words there are certain details you must understand with regard to configuring the TaskExecutor. Please refer
to - Section 25 - Task Execution and Scheduling of Spring reference manual.
Working with Objects instead of Messages is an improvement. However, it would be even better to have no
dependency on the Spring Integration API at all - including the gateway class. For that reason, Spring
Integration also provides a GatewayProxyFactoryBean that generates a proxy for
any interface and internally invokes the gateway methods shown above. Namespace support is also
provided as demonstrated by the following example.
<gateway id="fooService"
         service-interface="org.example.FooService"
         default-request-channel="requestChannel"
         default-reply-channel="replyChannel"/>
Then, the "fooService" can be injected into other beans, and the code that invokes the methods on that proxied instance of the FooService interface has no awareness of the Spring Integration API. The general approach is similar to that of Spring Remoting (RMI, HttpInvoker, etc.). See the "Samples" Appendix for an example that uses this "gateway" element (in the Cafe demo).
The reason that the attributes on the 'gateway' element are named 'default-request-channel' and 'default-reply-channel' is that you may also provide per-method channel references by using the @Gateway annotation.
 public interface Cafe {

     @Gateway(requestChannel="orders")
     void placeOrder(Order order);

 }
... as well as method sub element if yuo prefer XML configuration (see next paragraph)
It is also possible to pass values to be interpreted as Message headers on the Message that is created and sent to the request channel by using the @Header annotation:
 public interface FileWriter {

     @Gateway(requestChannel="filesOut")
     void write(byte[] content, @Header(FileHeaders.FILENAME) String filename);

 }
If you prefer XML way of configuring Gateway methods, you can provide method sub-elements to the gateway configuration (see below)
<si:gateway id="myGateway" service-interface="org.foo.bar.TestGateway"
      default-request-channel="inputC">
  <si:method name="echo" request-channel="inputA" reply-timeout="2" request-timeout="200"/>
      <si:method name="echoUpperCase" request-channel="inputB"/>
      <si:method name="echoViaDefault"/>
</si:gateway>
You can also provide individual headers per method invocation via XML.
This could be very useful if the headers you want to set are static in nature and you don't want
to embed them in the gateway's method signature via @Header annotations.
For example, in the Loan Broker example we want to influence how aggregation of the Loan quotes
will be done based on what type of request was initiated (single quote or all quotes). Determining the
type of the request by evaluating what gateway method was invoked, although possible would
violate the separation of concerns paradigm (method is a java artifact), but expressing your
intention (meta information) via Message headers is natural in a Messaging architecture.
<int:gateway id="loanBrokerGateway"
         service-interface="org.springframework.integration.loanbroker.LoanBrokerGateway">
  <int:method name="getLoanQuote" request-channel="loanBrokerPreProcessingChannel">
    <int:header name="RESPONSE_TYPE" value="BEST"/>
  </int:method>
  <int:method name="getAllLoanQuotes" request-channel="loanBrokerPreProcessingChannel">
    <int:header name="RESPONSE_TYPE" value="ALL"/>
  </int:method>
</int:gateway>
In the above case you can clearly see how a different header value will be set for the 'RESPONSE_TYPE' header based on the gateway's method.
As with anything else, Gateway invocation might result in errors. By default any error that has occurred downstream will be re-thrown as a MessagingExeption (RuntimeException) upon the Gateway's method invocation. However there are times when you may want to treat an Exception as a valid reply, by mapping it to a Message. To accomplish this our Gateway provides support for Exception mappers via the exception-mapper attribute.
<si:gateway id="sampleGateway"
    default-request-channel="gatewayChannel"
    service-interface="foo.bar.SimpleGateway"
    exception-mapper="exceptionMapper"/>

<bean id="exceptionMapper" class="foo.bar.SampleExceptionMapper"/>
foo.bar.SampleExceptionMapper is the implementation of
org.springframework.integration.message.InboundMessageMapper which only defines one method: toMessage(Object object).
public static class SampleExceptionMapper implements InboundMessageMapper<Throwable>{
  public Message<?> toMessage(Throwable object) throws Exception {
    MessageHandlingException ex = (MessageHandlingException) object;
    return MessageBuilder.withPayload("Error happened in message: " +
                ex.getFailedMessage().getPayload()).build();
  }

}
![[Important]](images/important.png) | Important |
|---|---|
| Exposing messaging system via POJO Gateway is obviously a great benefit, but it does come at the price so there are certain things you must be aware of. We want our Java method to return as quick as possible and not hang for infinite amount of time until they can return (void , exception or return value). When regular methods are used as a proxies in front of the Messaging system we have to take into account the asynchronous nature of the Messaging Systems. This means that there might be a chance that a Message hat was initiated by a Gateway could be dropped by a Filter, thus never reaching a component that is responsible to produce a reply. Some Service Activator method might result in the Exception, thus resulting in no-reply (as we don't generate Null messages).So as you can see there are multiple scenarios where reply message might not be coming which is perfectly natural in messaging systems. However think about the implication on the gateway method. The Gateway's method input arguments were incorporated into a Message and sent downstream. The reply Message would be converted to a return value of the Gateway's method. So you can see how ugly it could get if you can not guarantee that for each Gateway call there will alway be a reply Message. Basically your Gateway method will never return and will hang infinitely. (work in progress!!!!) One of the ways of handling this situation is via AsyncGateway (explained later in this section). Another way of handling it is to explicitly set the reply-timeout attribute. This way gateway will not hang for more then the time that was specified by the reply-timout and will return 'null'. |
As a pattern the Messaging Gateway is a very nice way to hide messaging-specific code while still exposing the full capabilities of the
messaging system. And GatewayProxyFactoryBean provides a convenient way to expose a Proxy over a service-interface
thus giving you a POJO-based access to a messaging system (based on objects in your own domain, or primitives/Strings, etc). But when a
gateway is exposed via simple POJO methods which return values it does imply that for each Request message (generated when the method is invoked)
there must be a Reply message (generated when the method has returned). Since Messaging systems naturally are asynchronous you may not always be
able to guarantee the contract where "for each request there will always be be a reply".
With Spring Integration 2.0 we are introducing support for an Asynchronous Gateway which is a convenient way to initiate
flows where you may not know if a reply is expected or how long will it take for it to arrive.
A natural way to handle these types of scenarios in Java would be relying upon java.util.concurrent.Future instances, and that is exactly what Spring Integration uses to support an Asynchronous Gateway.
From the XML configuration, there is nothing different and you still define Asynchronous Gateway the same way as a regular Gateway.
<int:gateway id="mathService"
     service-interface="org.springframework.integration.sample.gateway.futures.MathServiceGateway"
     default-request-channel="requestChannel"/>
However the Gateway Interface (service-interface) is a bit different.
public interface MathServiceGateway {
  Future<Integer> multiplyByTwo(int i);
}
As you can see from the example above the return type for the gateway method is Future. When
GatewayProxyFactoryBean sees that the
return type of the gateway method is Future, it immediately switches to the async mode by utilizing
an AsyncTaskExecutor. That is all. The call to a method always returns immediately with Future
encapsulating the interaction with the framework.
Now you can interact with the Future at your own pace to get the result, timeout, get the exception etc...
MathServiceGateway mathService = ac.getBean("mathService", MathServiceGateway.class);
Future<Integer> result = mathService.multiplyByTwo(number);
// do something else here since the reply might take a moment
int finalResult =  result.get(1000, TimeUnit.SECONDS);
For a more detailed example, please refer to the async-gateway sample distributed within the Spring Integration samples.
As it was explained earlier, Gateway provides a convenient way of interacting with Messaging system via POJO method invocations, but realizing that a typical method invocation, which is generally expected to always return (even with Exception), might not always map one-to-one to message exchanges (e.g., reply message might not be coming which is equivalent to method not returning), it is important to go over several scenarios especially in the Sync Gateway case and understand what the default behavior of the Gateway and how to deal with these scenarios to make Sync Gateway behavior more predictable regardless of the outcome of the message flow that was initialed from such Gateway.
There are certain attributes that could be configured to make Sync Gateway behavior more predictable, but some of them might not always work as you might have expected. One of them is reply-timeout. So, lets look at the reply-timeout attribute and see how it can/can't influence the behavior of the Sync Gateway in various scenarios. We will look at single-theraded scenario (all components downstream are connected via Direct Channel) and multi-theraded scenarios (e.g., somewhere downstream you may have Pollable or Executor Channel which breaks single-thread boundary)
Long running process downstream
Sync Gateway - single-threaded.
If a component downstream is still running (e.g., infinite loop or a very slow service), then setting reply-timeout
has no effect and Gateway method call will not return until such downstream service exits (e.g., return or exception).
Sync Gateway - multi-threaded.
If a component downstream is still running (e.g., infinite loop or a very slow service), in a multi-threaded message
flow setting reply-timeout will have an effect by allowing gateway method invocation to
return once the timeout has been reached, since GatewayProxyFactoryBean will simply
poll on the reply channel waiting for a message untill the timeout expires. However it could result in the 'null' return
from the Gateway method if the timeout has been reached before the actual reply was produced. It is also important to understand that
the reply message (if produced) will be sent to a reply channel after Gateway method invocation might have returned, so you must be aware of that
and design your flow with this in mind.
Downstream component returns 'null'
Sync Gateway - single-threaded. If a component downstream returns 'null' and no reply-timeout has been configured, the Gateway method call will hang indefinitely unless: a) reply-timeout has been configured or b) requires-reply attribute has been set on the downstream component (e.g., service-activator) that might return 'null'. In this case, the exception will be thrown and propagated to the Gateway. Sync Gateway - multi-threaded. Behavior is the same as above.
Downstream component return signature is 'void' while Gateway method signature is non-void
Sync Gateway - single-threaded. If a component downstream returns 'void' and no reply-timeout has been configured, the Gateway method call will hang indefinitely unless reply-timeout has been configured Sync Gateway - multi-threaded Behavior is the same as above.
Downstream component results in Runtime Exception (regardless of the method signature)
Sync Gateway - single-threaded. If a component downstream throws a Runtime Exception, such exception will be propagated via Error Message back to the gateway and re-thrown. Sync Gateway - multi-threaded Behavior is the same as above.
| Important |
|---|---|
|
It is also important to understand that by default reply-timout is unbounded which means that
if not explicitly set there are several scenarios (described above) where your Gateway method invocation might
hang indefinitely, so make sure you analyze your flow and if there is even a remote possibility of one of these
scenarios to occur, set the reply-timout attribute to a 'safe' value or better off
set the requires-reply attribute of the downstream component to 'true' to ensure a timely response.
But also, realize that there are some scenarios (see the very first one)
where reply-timout will not help which means it is also important to analyze your message
flow and decide when to use Sync Gateway vs Async Gateway where Gateway method invocation is always guaranteed
to return while giving you a more granular control over the results of the invocation via Java Futures.
Also, when dealing with Router you should remember that seeting resolution-required attribute to 'true' will result in the exception thrown by the router if it can not resolve a particular chanel. And when dealing with the filter you can also set throw-exception-on-rejection attribute. Both of these will help to ensure a timely response from the Gateway method invocation. |
The Service Activator is the endpoint type for connecting any Spring-managed Object to an input channel so that it may play the role of a service. If the service produces output, it may also be connected to an output channel. Alternatively, an output producing service may be located at the end of a processing pipeline or message flow in which case, the inbound Message's "replyChannel" header can be used. This is the default behavior if no output channel is defined, and as with most of the configuration options you'll see here, the same behavior actually applies for most of the other components we have seen.
To create a Service Activator, use the 'service-activator' element with the 'input-channel' and 'ref' attributes:
<service-activator input-channel="exampleChannel" ref="exampleHandler"/>
The configuration above assumes that "exampleHandler" either contains a single method annotated with the @ServiceActivator annotation or that it contains only one public method at all. To delegate to an explicitly defined method of any object, simply add the "method" attribute.
<service-activator input-channel="exampleChannel" ref="somePojo" method="someMethod"/>
In either case, when the service method returns a non-null value, the endpoint will attempt to send the reply message to an appropriate reply channel. To determine the reply channel, it will first check if an "output-channel" was provided in the endpoint configuration:
<service-activator input-channel="exampleChannel" output-channel="replyChannel"
                   ref="somePojo" method="someMethod"/>
If no "output-channel" is available, it will then check the Message's REPLY_CHANNEL header
value. If that value is available, it will then check its type. If it is a
MessageChannel, the reply message will be sent to that channel. If it is a
String, then the endpoint will attempt to resolve the channel name to a channel instance.
If the channel cannot be resolved, then a ChannelResolutionException will be thrown.
The argument in the service method could be either a Message or an arbitrary type. If the latter, then it will be assumed that it is a Message payload, which will be extracted from the message and injected into such service method. This is generally the recommended approach as it follows and promotes a POJO model when working with Spring Integration. Arguments may also have @Header, @Headers annotations as described in Section B.5, “Annotation Support”
| Note |
|---|---|
| Since v1.0.3 of Spring Integration, the service method is not required to have an argument at all, which means you can now implement event-style Service Activators, where all you care about is an invocation of the service method, not worrying about the contents of the message. Think of it as a NULL JMS message. An example use-case for such an implementation could be a simple counter/monitor of messages deposited on the input channel. |
Using a "ref" attribute is generally recommended if the custom Service Activator handler implementation can be reused
in other <service-activator> definitions. However if the custom Service Activator handler implementation
should be scoped to a single definition of the <service-activator>, you can use an inner bean definition:
<service-activator id="exampleServiceActivator" input-channel="inChannel"
            output-channel = "outChannel" method="foo">
    <beans:bean class="org.foo.ExampleServiceActivator"/>
</service-activator>
| Note |
|---|---|
|
Using both the "ref" attribute and an inner handler definition in the same |
Service Activators and Spring Expression Language (SpEL)
Since Spring Integration 2.0 Service Activators can also benefit from SpEL ()http://static.springsource.org/spring/docs/3.0.x/spring-framework-reference/html/expressions.html in several ways.
First, you may now invoke any bean method without pointing to this bean via ref attribute or including it as an
inner definition. For example:
<int:service-activator input-channel="in" output-channel="out"
	expression="@accountService.processAccount(payload)"/>

	<bean id="accountService" class="foo.bar.Account"/>
In the above configuration instead of injecting 'accountService' using ref or as inner bean we are simply using @beanId
notation and invoking a method which takes the type compatible with Message payload.
For simple scenarios your Service Activators do not even have to reference a bean if all logic can be encapsulated
by such expression.
<int:service-activator input-channel="in" output-channel="out" expression="payload * 2"/>
In the above configuration our service logic is to simply multiply the payload value by 2 and SpEL lets us handle it relatively easy.
A Delayer is a simple endpoint that allows a Message flow to be delayed by a certain interval. When
a Message is delayed, the original sender will not block. Instead, the delayed Messages will be
scheduled with an instance of java.util.concurrent.ScheduledExecutorService
to be sent to the output channel after the delay has passed. This approach is scalable even for
rather long delays, since it does not result in a large number of blocked sender Threads. On the
contrary, in the typical case a thread pool will be used for the actual execution of releasing the
Messages. Below you will find several examples of configuring a Delayer.
The <delayer> element is used to delay the Message flow between two Message Channels. As with the other endpoints, you can provide the "input-channel" and "output-channel" attributes, but the delayer also requires at least the 'default-delay' attribute with the number of milliseconds that each Message should be delayed.
<delayer input-channel="input" default-delay="3000" output-channel="output"/>
If you need per-Message determination of the delay, then you can also provide the name of a header within the 'delay-header-name' attribute:
 <delayer input-channel="input" output-channel="output"
          default-delay="3000" delay-header-name="delay"/>
In the example above the 3 second delay would only apply in the case that the header value is not present for a given inbound Message. If you only want to apply a delay to Messages that have an explicit header value, then you can set the 'default-delay' to 0. For any Message that has a delay of 0 (or less), the Message will be sent directly. In fact, if there is not a positive delay value for a Message, it will be sent to the output channel on the calling Thread.
| Tip |
|---|---|
The delay handler actually supports header values that represent an interval in milliseconds (any
Object whose toString() method produces a value that can be parsed into a
Long) as well as java.util.Date instances representing an absolute time.
In the former case, the milliseconds will be counted from the current time (e.g. a value of 5000
would delay the Message for at least 5 seconds from the time it is received by the Delayer). In
the latter case, with an actual Date instance, the Message will not be released until that Date
occurs. In either case, a value that equates to a non-positive delay, or a Date in the past, will
not result in any delay. Instead, it will be sent directly to the output channel in the original
sender's Thread.
|
The delayer delegates to an instance of Spring's TaskScheduler abstraction.
The default scheduler is a ThreadPoolTaskScheduler instance with a pool size of 1.
If you want to delegate to a different scheduler, you can provide a reference through the delayer element's
'scheduler' attribute:
 <delayer input-channel="input" output-channel="output"
          default-delay="0" delay-header-name="delay"
          scheduler="exampleTaskScheduler"/>

 <task:scheduler id="exampleTaskScheduler" pool-size="3"/>
With Spring Integration 2.0 we've added Groovy support allowing you to use Groovy scripting language to provide integration and business logic for various integration components similar to the way Spring Expression Language (SpEL) is use to implement routing, transformation and other integration concerns. For more information about Groovy please refer to Groovy documentation which you can find on the project website
Depending on the complexity of your integration requirements Groovy
scripts could be provided inline as CDATA in XML configuration or as a
reference to a file containing Groovy script. To enable Groovy support
Spring Integration defines
GroovyScriptExecutingMessageProcessor which will
create a groovy Binding object identifying Message Payload as
payload variable and Message Headers as headers
variable. All that is left for you to do is write script that uses these
variables. Below are couple of sample configurations:
Filter
<filter input-channel="referencedScriptInput">
   <groovy:script location="some/path/to/groovy/file/GroovyFilterTests.groovy"/>
</filter>

<filter input-channel="inlineScriptInput">
     <groovy:script><![CDATA[
     return payload == 'good'
   ]]></groovy:script>
</filter>
You see that script could be included inline
or via location attribute using the groovy namespace
sport.
Other supported elements are router, service-activator, transformer, splitter
Another interesting aspect of using Groovy support is framework's
ability to update (reload) scripts without restarting the Application
Context. To accomplish this all you need is specify
refresh-check-delay attribute on script
element. The reason for this attribute is to make reloading of the script
more efficient.
<groovy:script location="..." refresh-check-delay="5000"/>
In the above example for the next 5 seconds after you update the script you'll still be using the old script and after 5 seconds the context will be updated with the new script. This is a good example where 'near real time' is acceptable.
<groovy:script location="..." refresh-check-delay="0"/>
In the above example the context will be updated with the new script every time the script is modified. Basically this is the example of the 'real-time' and might not be the most efficient way.
<groovy:script location="..." refresh-check-delay="-1"/>
Any negative number value means the script will never be refreshed after initial initialization of application context. DEFAULT BEHAVIOR
| Important |
|---|---|
| Inline defined script can not be reloaded. |
As described in (EIP), the idea behind the Control Bus is that the same messaging system can be used for monitoring and managing the components within the framework as is used for "application-level" messaging. In Spring Integration we build upon the adapters described above so that it's possible to send Messages as a means of invoking exposed operations.
<groovy:control-bus input-channel="operationChannel"/>
The Control Bus has an input channel that can be accessed for invoking operations on the beans in the application context.
The groovy control bus executes messages on the input channel as Groovy scripts. It takes a message, compiles the body to a Script, customizes it with a GroovyObjectCustomizer, and then executes it. The default customizer just exposes all the beans in the application context as script context objects.
Spring Integration provides Channel Adapters for receiving and publishing JMX Notifications. There is also an inbound Channel Adapter for polling JMX MBean attribute values, and an outbound Channel Adapter for invoking JMX MBean operations.
The Notification-listening Channel Adapter requires a JMX ObjectName for the MBean that publishes Notifications to which this listener should be registered. A very simple configuration might look like this:
 <jmx:notification-listening-channel-adapter id="adapter"
                   channel="channel"
                   object-name="example.domain:name=publisher"/>
| Tip |
|---|---|
| The notification-listening-channel-adapter registers with an MBeanServer at startup, and the default bean name is "mbeanServer" which happens to be the same bean name generated when using Spring's <context:mbean-server/> element. If you need to use a different name be sure to include the "mbean-server" attribute. |
The adapter can also accept a reference to a NotificationFilter and a "handback" Object to provide some context that is passed back with each Notification. Both of those attributes are optional. Extending the above example to include those attributes as well as an explicit MBeanServer bean name would produce the following:
 <jmx:notification-listening-channel-adapter id="adapter"
                   channel="channel"
                   mbean-server="someServer"
                   object-name="example.domain:name=somePublisher"
                   notification-fliter="notificationFilter"
                   handback="myHandback"/>
Since the notification-listening adapter is registered with the MBeanServer directly, it is event-driven and does not require any poller configuration.
The Notification-publishing Channel Adapter is relatively simple. It only requires a JMX ObjectName in its configuration as shown below.
 <context:mbean:export/>

 <jmx:notification-publishing-channel-adapter id="adapter"
                              channel="channel"
                              object-name="example.domain:name=publisher"/>
It does also require that an MBeanExporter be present in the context. That is why the <context:mbean-export/> element is shown above as well.
When Messages are sent to the channel for this adapter, the Notification is created from the Message content. If the payload is a String it will be passed as the "message" text for the Notification. Any other payload type will be passed as the "userData" of the Notification.
JMX Notifications also have a "type", and it should be a dot-delimited String. There are two ways to provide the type. Precedence will always be given to a Message header value associated with the JmxHeaders.NOTIFICATION_TYPE key. On the other hand, you can rely on a fallback "default-notification-type" attribute provided in the configuration.
 <context:mbean:export/>

 <jmx:notification-publishing-channel-adapter id="adapter"
                              channel="channel"
                              object-name="example.domain:name=publisher"
                              default-notification-type="some.default.type"/>
The attribute polling adapter is useful when you have a requirement to periodically check on some value that is available through an MBean as a managed attribute. The poller can be configured in the same way as any other polling adapter in Spring Integration (or it's possible to rely on the default poller). The "object-name" and "attribute-name" are required. An MBeanServer reference is also required, but it will automatically check for a bean named "mbeanServer" by default just like the notification-listening-channel-adapter described above.
 <jmx:attribute-polling-channel-adapter id="adapter"
                channel="channel"
                object-name="example.domain:name=someService"
                attribute-name="InvocationCount">
     <si:poller max-messages-per-poll="1" fixed-rate="5000"/>
 </jmx:attribute-polling-channel-adapter>
The operation-invoking-channel-adapter enables Message-driven invocation of any managed operation exposed by an MBean. Each invocation requires the operation name to be invoked and the ObjectName of the target MBean. Both of these must be explicitly provided via adapter configuration:
 <jmx:operation-invoking-channel-adapter id="adapter"
                object-name="example.domain:name=TestBean"
                operation-name="ping"/>
Then the adapter only needs to be able to discover the "mbeanServer" bean. If a different bean name is required, then provide the "mbean-server" attribute with a reference.
The payload of the Message will be mapped to the parameters of the operation, if any. A Map-typed payload with String keys is treated as name/value pairs whereas a List or array would be passed as a simple argument list (with no explicit parameter names). If the operation requires a single parameter value, then the payload can represent that single value, and if the operation requires no parameters, then the payload would be ignored.
If you want to expose a channel for a single common operation to be invoked by Messages that need not contain headers, then that option works well.
Similar to operation-invoking-channel-adapter Spring Integration also provides operation-invoking-outbound-gateway which could be used when dealing with non-void operations and return value is required. Such return value will be sent as message payload to the 'reply-channel' specified by this Gateway.
 <jmx:operation-invoking-outbound-gateway request-channel="requestChannel"
   reply-channel="replyChannel"
   object-name="org.springframework.integration.jmx.config:type=TestBean,name=testBeanGateway"
   operation-name="testWithReturn"/>
Another way of
provideing the 'reply-channel' is by setting
MessageHeaders.REPLY_CHANNEL Message
Header
Spring Integration components themselves may be exposed as MBeans
when the IntegrationMBeanExporter is configured. To
create an instance of the IntegrationMBeanExporter,
define a bean and provide a reference to an MBeanServer and a domain name
(if desired). The domain can be left out in which case the default domain
is "org.springframework.integration".
 <jmx:mbean-exporter default-domain="my.company.domain" server="mbeanServer"/>

 <bean id="mbeanServer" class="org.springframework.jmx.support.MBeanServerFactoryBean">
     <property name="locateExistingServerIfPossible" value="true"/>
 </bean>
The MBean exporter is orthogonal to the one provided in Spring core
- it registers message channels and message handlers, but not itself. You
can expose the exporter itself, and certain other components in Spring
Integration, using the standard
<context:mbean-export/> tag.
The key benefit of messaging architecture is loose coupling where participating components do not maintain any awareness about one another. This fact alone makes you architecture extremely flexible allowing you to change components without affecting the rest of the flow, change messaging routs, message consuming styles (polling vs event driven) etc... However, this unassuming style of architecture could prove to be problematic when things go wrong. For example, if something happened you would probably like to get as much information about the message as you can (its origin, where it was etc.)
Message History is one of those patterns that could help by giving you an option to maintain some level of awareness of a message path either for debugging purposes or to maintain an audit trail. Spring integration provides a simple way to configure your message flows to maintain Message History by adding Message History header to a Message every time a message goes through a tracked component.
To enable Message History all you need is define message-history element in your configuration.
<int:message-history/>
Now every named component (component that has an 'id' defined) will be tracked.
The framework will set the '$history' header in your Message who's value is very simple - List<Properties>.
The need for this simple structure is mandated by the loosely coupled architecture of messaging systems where the framework
must not require you to share any dependencies outside of Java itself.
<int:gateway id="sampleGateway"
    service-interface="org.springframework.integration.history.sample.SampleGateway"
    default-request-channel="bridgeInChannel"/>

<int:chain id="sampleChain" input-channel="chainChannel" output-channel="filterChannel">
  <int:header-enricher>
    <int:header name="baz" value="baz"/>
  </int:header-enricher>
</int:chain>
The above configuration will produce a very simple Message History structure:
[{name=sampleGateway, type=gateway, timestamp=1283281668091},
 {name=sampleChain, type=chain, timestamp=1283281668094}]
To get access to Message History all you need is access the MessageHistory header. For example:
Iterator<Properties> historyIterator =
    message.getHeaders().get(MessageHistory.HEADER_NAME, MessageHistory.class).iterator();
assertTrue(historyIterator.hasNext());
Properties gatewayHistory = historyIterator.next();
assertEquals("sampleGateway", gatewayHistory.get("name"));
assertTrue(historyIterator.hasNext());
Properties chainHistory = historyIterator.next();
assertEquals("sampleChain", chainHistory.get("name"));
Some times you might not want to track all of the components. To accomplish this all you need is provide tracked-components attribute where you can specify
comma delimited list of component names and/or patterns you want to track.
<int:message-history tracked-components="*Gateway, sample*, foo"/>
In the above example, Message History will only be maintained for all of the components that end with 'Gateway', all components that start with 'sample' and 'foo' component.
| Note |
|---|---|
| Remember, that by definition History is immutable (you can't re-write history,although some try), therefore Message History can not be changed once written. Every attempt will end in exception. |
Adapters TODO
Spring Integration provides support for inbound and outbound ApplicationEvents
as defined by the underlying Spring Framework. For more information about Spring's support for events and listeners,
refer to the Spring Reference Manual.
To receive events and send them to a channel, simply define an instance of Spring Integration's
ApplicationEventListeningMessageProducer. This class is an implementation of
Spring's ApplicationListener interface. By default it will pass all
received events as Spring Integration Messages. To limit based on the type of event, configure the
list of event types that you want to receive with the 'eventTypes' property. If a received event
has a Message instance as its 'source', then that will be passed as-is. Otherwise, if a SpEL-based
"payloadExpression" has been provided, that will be evaluated against the ApplicationEvent instance.
If the event's source is not a Message instance and no "payloadExpression" has been provided, then
the ApplicationEvent itself will be passed as the payload.
For convenience namespace support is provided to configure an ApplicationEventListeningMessageProducer
via the inbound-channel-adapter element.
<int-event:inbound-channel-adapter channel="eventChannel" event-types="example.FooEvent, example.BarEvent"/>

<int:publish-subscribe-channel id="eventChannel"/>
In the above example, all Application Context events that match one of the types specified by the 'event-types' (optional) attribute will be delivered as Spring Integration Messages to the Message Channel named 'eventChannel'.
To send Spring ApplicationEvents, create an instance of the
ApplicationEventPublishingMessageHandler and register it within an endpoint.
This implementation of the MessageHandler interface also implements
Spring's ApplicationEventPublisherAware interface and thus acts as a
bridge between Spring Integration Messages and ApplicationEvents.
For convenience namespace support is provided to configure an ApplicationEventPublishingMessageHandler
via the outbound-channel-adapter element.
<int:channel id="eventChannel"/>

<int-event:outbound-channel-adapter channel="eventChannel"/>
If you are using a PollableChannel (e.g., Queue), you can also provide poller as a sub-element of the outbound-channel-adapter element. You can also optionally provide a task-executor reference for that poller. The following example demonstrates both.
<int:channel id="eventChannel">
  <int:queue/>
</int:channel>

<int-event:outbound-channel-adapter channel="eventChannel">
  <int:poller max-messages-per-poll="1" task-executor="executor" fixed-rate="100"/>
</int-event:outbound-channel-adapter>

<task:executor id="executor" pool-size="5"/>
In the above example, all messages sent to the 'eventChannel' channel will be published as ApplicationEvents to any relevant ApplicationListener instances that are registered within the same Spring ApplicationContext. If the payload of the Message is an ApplicationEvent, it will be passed as-is. Otherwise the Message itself will be wrapped in a MessagingEvent instance.
Spring Integration provides support for Syndication via Feed Adapters
As we know Web syndication is a form of syndication where material such as news items, press releases that is available to any website is also made available via we feeds such as RSS, ATOM etc.
Spring integration provides support for Web Syndication via FEED adapter which comes with a convenient namespace-based configuration. To configure FEED namespace include the following elements into the headers of your XML configuration file:
xmlns:int-feed="http://www.springframework.org/schema/integration/feed"
xsi:schemaLocation="http://www.springframework.org/schema/integration/feed
	http://www.springframework.org/schema/integration/feed/spring-integration-feed-2.0.xsd"
The only adapter that is really needed to provide support for retrieving feeds is an inbound channel adapter which allows you to subscribe to a particular URL. Below is the configuration for such adapter:
<int-feed:inbound-channel-adapter id="feedAdapter"
		channel="feedChannel"
		url="http://feeds.bbci.co.uk/news/rss.xml">
	<int:poller fixed-rate="10000" max-messages-per-poll="100" />
</int-feed:inbound-channel-adapter>
In the above configuration we are subscribing to a URL identified by url attribute.
As news items are retrieved they will be converted to a Message and sent to a channel identified by channel attribute.
The payload of such message will be com.sun.syndication.feed.synd.SyndEntry which encapsulates
various data (i.e., content, dates, authors etc.) about a news item.
You can also see that Inbound Feed Channel Adapter is a Polling consumer which means you have to
provide a poller configuration. However, one important thing you must understand with regard to Feed sinc its inner-workings
are slightly different then any other poling consumer. When Inbound Feed adapter is started it does the first poll and
receives com.sun.syndication.feed.synd.SyndEntryyFeed which is an object that contains multiple
SyndEntry objects. Each entry is stored in the local entry queue and is released based on
the value in the max-messages-per-poll attribute where each Message will contain a single entry.
If during retrieval of the entries from the entry queue the queue had become empty the adapter will attempt to update
the Feed populating the queue with more entries (SyndEntry) if available, otherwise the next attempt to poll for a feed will
be determined by the trigger of the poller (e.g., every 10 seconds in the above configuration).
Duplicate Entries
Polling for a Feed might result in the entries that have already been processed ("I already read that news item, why are you showing it to me again?").
Spring Integration provides a convenient mechanism to eliminate the need to worry about duplicate entries.
Each feed entry will have publish date field. Every time the new Message is generated and sent,
Spring Integration will store the value of the publish date in the instance of the
org.springframework.integration.store.MetadataStore which is a strategy interface designed to store various
types of meta-data (e.g., publish date of the last feed entry that has been processed) to help components such as Feed to deal with
duplicates.
The default rule for locating this meta-data store is as follows; Spring Integration will look for a bean of type
org.springframework.integration.store.MetadataStore in the ApplicationContext. If one found then it will be used,
otherwise it will create a new instance of SimpleMetadataStore which is a simple in-memory implementation that
will only persist meta-data within the life-cycle of the application context. This means that upon restart you may end up with
duplicate entries. If you need to persist meta-data between Application Context restarts, you may use
PropertiesPersistingMetadataStore which is a property file based persister or provide your own
implementation of the MetedataStore interface (e.g.,JdbcMetadatStore) and configure it as bean in the Application Context.
<bean class="org.springframework.integration.store.PropertiesPersistingMetadataStore"/>
Spring Integration's File support extends the Spring Integration Core with a dedicated vocabulary to deal with reading, writing, and transforming files. It provides a namespace that enables elements defining Channel Adapters dedicated to files and support for Transformers that can read file contents into strings or byte arrays.
This section will explain the workings of FileReadingMessageSource
and FileWritingMessageHandler and how to configure them as
beans. Also the support for dealing with files through file specific
implementations of Transformer will be discussed. Finally the
file specific namespace will be explained.
A FileReadingMessageSource can be used to consume files from the filesystem.
This is an implementation of MessageSource that creates messages from
a file system directory.
<bean id="pollableFileSource"
      class="org.springframework.integration.file.FileReadingMessageSource"
        p:inputDirectory="file:${input.directory}"/>
To prevent creating messages for certain files, you may supply a
FileListFilter. By default, an
AcceptOnceFileListFilter is used. This filter
ensures files are picked up only once from the directory.
<bean id="pollableFileSource"
      class="org.springframework.integration.file.FileReadingMessageSource"
        p:inputDirectory="file:${input.directory}"
        p:filter-ref="customFilterBean"/>
A common problem with reading files is that a file may be detected before
it is ready. The default AcceptOnceFileListFilter
does not prevent this. In most cases, this can be prevented if the
file-writing process renames each file as soon as it is ready for
reading. A pattern-matching filter that accepts only files that are
ready (e.g. based on a known suffix), composed with the default
AcceptOnceFileListFilter allows for this.
The CompositeFileListFilter enables the
composition.
<bean id="pollableFileSource"
      class="org.springframework.integration.file.FileReadingMessageSource"
        p:inputDirectory="file:${input.directory}"
        p:filter-ref="compositeFilter"/>
<bean id="compositeFilter" class="org.springframework.integration.file.filters.CompositeFileListFilter">
    <constructor-arg>
        <list>
            <bean class="org.springframework.integration.file.filters.AcceptOnceFileListFilter" />
            <bean class="org.springframework.integration.file.filters.PatternMatchingFileListFilter">
                <constructor-arg value="^test.*$"/>
            </bean>
        </list>
    </constructor-arg>
</bean>
The configuration can be simplified using the file specific namespace. To do this use the following template.
<?xml version="1.0" encoding="UTF-8"?>
<beans xmlns="http://www.springframework.org/schema/beans"
  xmlns:xsi="http://www.w3.org/2001/XMLSchema-instance"
  xmlns:integration="http://www.springframework.org/schema/integration"
  xmlns:file="http://www.springframework.org/schema/integration/file"
  xsi:schemaLocation="http://www.springframework.org/schema/beans
      http://www.springframework.org/schema/beans/spring-beans-3.0.xsd
      http://www.springframework.org/schema/integration
      http://www.springframework.org/schema/integration/spring-integration-2.0.xsd
      http://www.springframework.org/schema/integration/file
      http://www.springframework.org/schema/integration/file/spring-integration-file-2.0.xsd">
</beans>
Within this namespace you can reduce the FileReadingMessageSource and wrap it in an inbound Channel Adapter like this:
 <file:inbound-channel-adapter id="filesIn"
       directory="file:${input.directory}" prevent-duplicates="true"/>

 <file:inbound-channel-adapter id="filesIn"
        directory="file:${input.directory}"
        filter="customFilterBean" />

 <file:inbound-channel-adapter id="filesIn"
        directory="file:${input.directory}"
        filename-pattern="test*" />
The first channel adapter is relying on the default filter that just prevents
duplication, the second is using a custom filter, and the third is using the
filename-pattern attribute to add a AntPathMatcher
based filter to the FileReadingMessageSource.
The file-name-pattern and filter attributes are mutually exclusive, but
you can use a CompositeFileListFilter to use any combination of filters, including a
pattern based filter to fit your particular needs.
When multiple processes are reading from the same directory it can be desirable to lock files to prevent
them from being picked up concurrently. To do this you can use a FileLocker.
There is a java.nio based implementation available out of the box, but it is also possible to implement your
own locking scheme. The nio locker can be injected as follows
 <file:inbound-channel-adapter id="filesIn"
       directory="file:${input.directory}" prevent-duplicates="true">
    <file:nio-locker/>
  </file:inbound-channel-adapter>
A custom locker you can configure like this:
 <file:inbound-channel-adapter id="filesIn"
       directory="file:${input.directory}" prevent-duplicates="true">
    <file:locker ref="customLocker"/>
  </file:inbound-channel-adapter>
When filtering and locking files is not enough it might be needed to control the way files are listed entirely. To
implement this type of requirement you can use an implementation of DirectoryScanner.
This scanner allows you to determine entirely what files are listed each poll. This is also the interface
that Spring Integration uses internally to wire FileListFilters FileLocker to the FileReadingMessageSource.
A custom DirectoryScanner can be injected into the <file:inbound-channel-adapter/> on the scanner
attribute.
 <file:inbound-channel-adapter id="filesIn"
       directory="file:${input.directory}" prevent-duplicates="true" scanner="customDirectoryScanner"/>
This gives you full freedom to choose the ordering, listing and locking strategies.
To write messages to the file system you can use a
FileWritingMessageHandler. This class can deal with
File, String, or byte array payloads. In its simplest form the
FileWritingMessageHandler only requires a
destination directory for writing the files. The name of the file to be
written is determined by the handler's FileNameGenerator.
The default implementation looks for a Message header whose key matches
the constant defined as FileHeaders.FILENAME.
Additionally, you can configure the encoding and the charset that will be used in case of a String payload.
To make things easier you can configure the FileWritingMessageHandler as part of an outbound channel adapter using the namespace.
<file:outbound-channel-adapter id="filesOut" directory="file:${input.directory.property}"/>
The namespace based configuration also supports a delete-source-files attribute.
If set to true, it will trigger deletion of the original source files after writing
to a destination. The default value for that flag is false.
 <file:outbound-channel-adapter id="filesOut"
             directory="file:${output.directory}"
             delete-source-files="true"/>
| Note |
|---|---|
|
The |
In cases where you want to continue processing messages based on the written File you can use
the outbound-gateway instead. It plays a very similar role as the
outbound-channel-adapter. However after writing the File, it will also send it
to the reply channel as the payload of a Message.
 <file:outbound-gateway id="mover" request-channel="moveInput"
            reply-channel="output"
            directory="${output.directory}"
            delete-source-files="true"/>
| Note |
|---|---|
| The 'outbound-gateway' works well in cases where you want to first move a File and then send it through a processing pipeline. In such cases, you may connect the file namespace's 'inbound-channel-adapter' element to the 'outbound-gateway' and then connect that gateway's reply-channel to the beginning of the pipeline. |
If you have more elaborate requirements or need to support additional payload types as input
to be converted to file content you could extend the FileWritingMessageHandler, but a much
better option is to rely on a Transformer.
To transform data read from the file system to objects and the other way around you need
to do some work. Contrary to FileReadingMessageSource and to a
lesser extent FileWritingMessageHandler, it is very likely that you
will need your own mechanism to get the job done. For this you can implement the
Transformer interface. Or extend the
AbstractFilePayloadTransformer for inbound messages. Some obvious
implementations have been provided.
FileToByteArrayTransformer transforms Files into byte[]s using
Spring's FileCopyUtils. It is often better to use a sequence of
transformers than to put all transformations in a single class. In that case the File to
byte[] conversion might be a logical first step.
FileToStringTransformer will convert Files to Strings as the name
suggests. If nothing else, this can be useful for debugging (consider using with a Wire Tap).
To configure File specific transformers you can use the appropriate elements from the file namespace.
 <file-to-bytes-transformer input-channel="input" output-channel="output"
             delete-files="true"/>

 <file:file-to-string-transformer input-channel="input" output-channel="output
             delete-files="true" charset="UTF-8"/>
The delete-files option signals to the transformer that it should delete
the inbound File after the transformation is complete. This is in no way a replacement for using the
AcceptOnceFileListFilter when the FileReadingMessageSource is being used in a
multi-threaded environment (e.g. Spring Integration in general).
Spring Integration provides support for file transfer operations via FTP and FTPS
File Transfer Protocol (FTP) is a simple network protocol which allows you to transfer files between two computers on the Internet.
There are two actors when it comes to FTP communication - client and server. To transfer files with FTP/FTPS, you use client which initiates a connection to a remote computer running an FTP server software. After the connection is established, the client can choose to send and/or receive copies of files.
Spring Integration supports sending and receiving files over FTP/FTPS by providing two types of clients - Inbound Channel Adapters and Outbound Channel Adapters as well as convenient namespace configuration to define these clients.
FTP
xmlns:ftp="http://www.springframework.org/schema/integration/ftp"
xsi:schemaLocation="http://www.springframework.org/schema/integration/ftp
	http://www.springframework.org/schema/integration/ftp/spring-integration-ftp-2.0.xsd"
FTPS
xmlns:ftps="http://www.springframework.org/schema/integration/ftps"
xsi:schemaLocation="http://www.springframework.org/schema/integration/ftps
	http://www.springframework.org/schema/integration/ftp/spring-integration-ftps-2.0.xsd"
FTP Inbound Channel Adapter is a special listener that will connect to the FTP server and will listen for the remote directory events (e.g., new file created) at which point it will initiate a file transfer.
<ftp:inbound-channel-adapter
		remote-directory="/foo/bar/ftp/files"
		channel="ftpIn"
		host="localhost"
		auto-delete-remote-files-on-sync="false"
		username="user"
		password="password"
		port="21"
		filename-pattern=".*?txt">
	<int:poller fixed-rate="1000"/>
</ftp:inbound-channel-adapter>
As you can see form the configuration above you can configure FTP Inbound Channel Adapter via inbound-channel-adapter
element while also providing values for various attributes such as username and password to connect to an FTP server,
as well as other attributes. Please refer to the schema for more details on these attributes.
It is also important to understand that FTP Inbound Channel Adapter is a polling consumer and
therefore you must configure a poller (global or local).
Once the file has been transferred a Message with java.io.File being a payload will be generated and sent to the channel
identified with channel attribute.
FTPS Inbound Channel Adapter adds support for secured file receive operations with
FTP servers that support Transport Layer Security (TLS). Configuration of the adapter itself is very similar to the
FTP Inbound Channel Adapter and is use the same inbound-channel-adapter element but from the FTPS namespace.
<ftps:inbound-channel-adapter
		remote-directory="/foo/bar/ftp/files"
		channel="ftpIn"
		host="localhost"
		auto-delete-remote-files-on-sync="false"
		username="user"
		password="password"
		port="2222"
		filename-pattern=".*?txt">
	<int:poller fixed-rate="1000"/>
</ftps:inbound-channel-adapter>
FTP Outbound Channel Adapter is a special MessageHandler that will connect to the
FTP server and will initiate an FTP transfer for every file it will receive in the payload of the Message. It also supports several
representation of the File so you are not limited only to the File object. FTP Outbound Channel Adapter
supports the following payloads: 1) java.io.File - the actual file object;
2) byte[] - byte array that represents the file contents; 3) java.lang.String -
represents the file path.
<ftp:outbound-channel-adapter
			remote-directory="${ftp.remotedir}"
			channel="ftpOutbound"
			host="${ftp.host}"
			file-type="binary-file-type"
			username="${ftp.username}"
			password="${ftp.password}"
			port="2222"
			client-mode="passive-local-data-connection-mode"/>
As you can see form the configuration above you can configure FTP Outbound Channel Adapter via
outbound-channel-adapter element while also providing values for various attributes such as username
and password to connect to an FTP server, as well as other attributes. Please refer to the schema for
more details on these attributes.
FTPS Outbound Channel Adapter adds support for secured file send operations with FTP servers that support
Transport Layer Security (TLS). Configuration of the adapter itself is very similar to the
FTP Outbound Channel Adapter and is use the same outbound-channel-adapter element but
from the FTPS namespace:
| Note |
|---|---|
| A more practical way to configure these types of adapters would be via Spring's property placeholder (http://static.springsource.org/spring/docs/3.0.x/spring-framework-reference/html/beans.html#beans-factory-placeholderconfigurer) |
The HTTP support allows for the execution of HTTP requests and the processing of inbound HTTP requests. Because interaction over HTTP is always synchronous, even if all that is returned is a 200 status code, the HTTP support consists of two gateway implementations:
HttpInboundEndpoint and HttpRequestExecutingMessageHandler.
To receive messages over HTTP you need to use an HTTP inbound Channel Adapter or Gateway. In common with the HttpInvoker support the HTTP inbound adapters need to be deployed within a servlet container. The easiest way to do this is to provide a servlet definition in web.xml, see Section 13.2, “HttpInvoker Inbound Gateway” for further details. Below is an example bean definition for a simple HTTP inbound endpoint.
<bean id="httpInbound" class="org.springframework.integration.http.inbound.HttpRequestHandlingMessagingGateway">
  <property name="requestChannel" ref="httpRequestChannel" />
  <property name="replyChannel" ref="httpReplyChannel" />
</bean>
The HttpRequestHandlingMessagingGateway accepts a list of HttpMessageConverter instances or else
relies on a default list. The converters allow
customization of the mapping from HttpServletRequest to Message. The default converters
encapsulate simple strategies, which for
example will create a String message for a POST request where the content type starts with "text", see the Javadoc for
full details.
Starting with this release MultiPart File support was implemented. If the request has been wrapped as a
MultipartHttpServletRequest, when using the default converters, that request will be converted
to a Message payload that is a MultiValueMap containing values that may be byte arrays, Strings, or instances of
Spring's MultipartFile depending on the content type of the individual parts.
| Note |
|---|---|
| The HTTP inbound Endpoint will locate a MultipartResolver in the context if one exists with the bean name "multipartResolver" (the same name expected by Spring's DispatcherServlet). If it does in fact locate that bean, then the support for MultipartFiles will be enabled on the inbound request mapper. Otherwise, it will fail when trying to map a multipart-file request to a Spring Integration Message. For more on Spring's support for MultipartResolvers, refer to the Spring Reference Manual. |
In sending a response to the client there are a number of ways to customize the behavior of the gateway. By default the gateway will
simply acknowledge that the request was received by sending a 200 status code back. It is possible to customize this response by providing a
'viewName' to be resolved by the Spring MVC ViewResolver.
In the case that the gateway should expect a reply to the Message then setting the expectReply flag
(constructor argument) will cause
the gateway to wait for a reply Message before creating an HTTP response. Below is an example of a gateway
configured to serve as a Spring MVC Controller with a view name. Because of the constructor arg value of TRUE, it wait for a reply. This also shows
how to customize the HTTP methods accepted by the gateway, which
are POST and GET by default.
<bean id="httpInbound" class="org.springframework.integration.http.inbound.HttpRequestHandlingController">
  <constructor-arg value="true" /> <!-- indicates that a reply is expected -->
  <property name="requestChannel" ref="httpRequestChannel" />
  <property name="replyChannel" ref="httpReplyChannel" />
  <property name="viewName" value="jsonView" />
  <property name="supportedMethodNames" >
    <list>
      <value>GET</value>
      <value>DELETE</value>
    </list>
  </property>
  <property name="expectReply" value="true" />
</bean>
The reply message will be available in the Model map. The key that is used for that map entry by default is 'reply', but this can be overridden by setting the 'replyKey' property on the endpoint's configuration.
To configure the HttpRequestExecutingMessageHandler write a bean definition like this:
<bean id="httpOutbound" class="org.springframework.integration.http.outbound.HttpRequestExecutingMessageHandler" >
  <constructor-arg value="http://localhost:8080/example" />
  <property name="outputChannel" ref="responseChannel" />
</bean>
This bean definition will execute HTTP requests by delegating to a RestTemplate. That template in turn delegates
to a list of HttpMessageConverters to generate the HTTP request body from the Message payload. You can configure those converters as well
as the ClientHttpRequestFactory instance to use:
<bean id="httpOutbound" class="org.springframework.integration.http.outbound.HttpRequestExecutingMessageHandler" >
  <constructor-arg value="http://localhost:8080/example" />
  <property name="outputChannel" ref="responseChannel" />
  <property name="messageConverters" ref="messageConverterList" />
  <property name="requestFactory" ref="customRequestFactory" />
</bean>
By default the HTTP request will be generated using an instance of SimpleClientHttpRequestFactory which uses the JDK
HttpURLConnection. Use of the Apache Commons HTTP Client is also supported through the provided
CommonsClientHttpRequestFactory which can be injected as shown above.
Spring Integration provides an "http" namespace and schema definition. To include it in your configuration, simply provide the following URI within a namespace declaration: 'http://www.springframework.org/schema/integration/http'. The schema location should then map to 'http://www.springframework.org/schema/integration/http/spring-integration-http.xsd'.
To configure an inbound http channel adapter which is an instance of HttpInboundEndpoint configured
not to expect a response.
<http:inbound-channel-adapter id="httpChannelAdapter" channel="requests" supported-methods="PUT, DELETE"/>
To configure an inbound http gateway which expects a response.
<http:inbound-gateway id="inboundGateway" request-channel="requests" reply-channel="responses"/>
To configure the outbound gateway you can use the namespace support as well. The following code snippet shows the different configuration options for an outbound Http gateway. Most importantly, notice that the 'http-method' and 'expected-response-type' are provided. Those are two of the most commonly configured values. The
default http-method is POST, and the default response type is null. With a null response type, the payload of the reply Message would only
contain the status code (e.g. 200) as long as it's a successful status (non-successful status codes will throw Exceptions). If you are expecting a different
type, such as a String, then provide that fully-qualified class name as shown below.
<http:outbound-gateway id="example"
    request-channel="requests"
    url="http://localhost/test"
    http-method="POST"
    extract-request-payload="false"
    expected-response-type="java.lang.String"
    charset="UTF-8"
    request-factory="requestFactory"
    request-timeout="1234"
    reply-channel="replies"/>
If your outbound adapter is to be used in a unidirectional way, then you can use an outbound-channel-adapter instead. This means that a successful response will simply execute without sending any Messages to a reply channel. In the case of any non-successful response status code, it will throw an exception. The configuration looks very similar to the gateway:
<http:outbound-channel-adapter id="example"
      url="http://localhost/example"
      http-method="GET"
      channel="requests"
      charset="UTF-8"
      extract-payload="false"
      expected-response-type="java.lang.String"
      request-factory="someRequestFactory"
      order="3"
      auto-startup="false"/>
This example demonstrates how simple it is to send a Multipart HTTP request via Spring's RestTemplate and receive it by Spring Integration HTTP Inbound Adapter.
All we are doing is creating MultiValueMap and populating it with multi-part data. RestTemplate will take care of the rest
by converting it to MultipartHttpServletRequest
THis particular client will send a multipart Http Request which contains the name of the company as well as the image file with company logo.
RestTemplate template = new RestTemplate();
String uri = "http://localhost:8080/multipart-http/inboundAdapter.htm";
Resource s2logo =
   new ClassPathResource("org/springframework/integration/samples/multipart/spring09_logo.png");
MultiValueMap map = new LinkedMultiValueMap();
map.add("company", "SpringSource");
map.add("company-logo", s2logo);
HttpHeaders headers = new HttpHeaders();
headers.setContentType(new MediaType("multipart", "form-data"));
HttpEntity request = new HttpEntity(map, headers);
ResponseEntity<?> httpResponse = template.exchange(uri, HttpMethod.POST, request, null);
That is all for the client.
On the server side we have the following configuration:
<int-http:inbound-channel-adapter id="httpInboundAdapter"
  channel="receiveChannel"
  name="/inboundAdapter.htm"
  supported-methods="GET, POST" />

<int:channel id="receiveChannel"/>

<int:service-activator input-channel="receiveChannel">
  <bean class="org.springframework.integration.samples.multipart.MultipartReceiver"/>
</int:service-activator>

<bean id="multipartResolver"
    class="org.springframework.web.multipart.commons.CommonsMultipartResolver"/>
The 'httpInboundAdapter' will receive the request, convert it to a Message with a payload as LinkedMultiValueMap which
we are parsing in the 'multipartReceiver' service-activator;
public void receive(LinkedMultiValueMap<String, Object> multipartRequest){
  System.out.println("### Successfully received multipart request ###");
  for (String elementName : multipartRequest.keySet()) {
    if (elementName.equals("company")){
      System.out.println("\t" + elementName + " - " +
        ((String[]) multipartRequest.getFirst("company"))[0]);
    } else if (elementName.equals("company-logo")){
      System.out.println("\t" + elementName + " - as UploadedMultipartFile: " +
        ((UploadedMultipartFile) multipartRequest.getFirst("company-logo")).getOriginalFilename());
    }
  }
}
You should see the following output:
### Successfully received multipart request ###
   company - SpringSource
   company-logo - as UploadedMultipartFile: spring09_logo.png
HttpInvoker is a Spring-specific remoting option that essentially enables Remote Procedure Calls (RPC) over HTTP.
In order to accomplish this, an outbound representation of a method invocation is serialized using standard Java
serialization and then passed within an HTTP POST request. After being invoked on the target system, the method's
return value is then serialized and written to the HTTP response. There are two main requirements. First, you
must be using Spring on both sides since the marshalling to and from HTTP requests and responses is handled by
the client-side invoker and server-side exporter. Second, the Objects that you are passing must implement
Serializable and be available on both the client and server.
While traditional RPC provides physical decoupling, it does not offer nearly the same degree of logical decoupling as a messaging-based system. In other words, both participants in an RPC-based invocation must be aware of a specific interface and specific argument types. Interestingly, in Spring Integration, the "parameter" being sent is a Spring Integration Message, and the interface is an internal detail of Spring Integration's implementation. Therefore, the RPC mechanism is being used as a transport so that from the end user's perspective, it is not necessary to consider the interface and argument types. It's just another adapter to enable messaging between two systems.
To receive messages over http you can use an HttpInvokerInboundGateway. Here is an
example bean definition:
<bean id="inboundGateway"
      class="org.springframework.integration.httpinvoker.HttpInvokerInboundGateway">
    <property name="requestChannel" ref="requestChannel"/>
    <property name="replyChannel" ref="replyChannel"/>
    <property name="requestTimeout" value="30000"/>
    <property name="replyTimeout" value="10000"/>
</bean>
Because the inbound gateway must be able to receive HTTP requests, it must be configured within a Servlet container. The easiest way to do this is to provide a servlet definition in web.xml:
<servlet>
    <servlet-name>inboundGateway</servlet-name>
    <servlet-class>org.springframework.web.context.support.HttpRequestHandlerServlet</servlet-class>
</servlet>
Notice that the servlet name matches the bean name.
| Note |
|---|---|
| If you are running within a Spring MVC application and using the BeanNameHandlerMapping, then the servlet definition is not necessary. In that case, the bean name for your gateway can be matched against the URL path just like a Spring MVC Controller bean. |
To configure the HttpInvokerOutboundGateway write a bean definition like this:
<bean id="outboundGateway"
      class="org.springframework.integration.httpinvoker.HttpInvokerOutboundGateway">
    <property name="replyChannel" ref="replyChannel"/>
</bean>
The outbound gateway is a MessageHandler and can therefore be registered with
either a PollingConsumer or EventDrivenConsumer.
The URL must match that defined by an inbound HttpInvoker Gateway as described in the previous section.
Spring Integration provides an "httpinvoker" namespace and schema definition. To include it in your configuration, simply provide the following URI within a namespace declaration: 'http://www.springframework.org/schema/integration/httpinvoker'. The schema location should then map to 'http://www.springframework.org/schema/integration/httpinvoker/spring-integration-httpinvoker-2.0.xsd'.
To configure the inbound gateway you can choose to use the namespace support for it. The following code snippet shows the different configuration options that are supported.
<httpinvoker:inbound-gateway id="inboundGateway"
                             request-channel="requestChannel"
                             request-timeout="10000"
                             expect-reply="false"
                             reply-timeout="30000"/>
| Note |
|---|---|
| A 'reply-channel' may also be provided, but it is recommended to rely on the temporary anonymous channel that will be created automatically for handling replies. |
To configure the outbound gateway you can use the namespace support as well. The following code snippet shows the different configuration for an outbound HttpInvoker gateway. Only the 'url' and 'request-channel' are required.
<httpinvoker:outbound-gateway id="outboundGateway"
                              url="http://localhost:8080/example"
                              request-channel="requestChannel"
                              request-timeout="5000"
                              reply-channel="replyChannel"
                              reply-timeout="10000"/>
Spring Integration provides support for outbound email with the
MailSendingMessageHandler. It delegates to a configured instance of Spring's
JavaMailSender:
 JavaMailSender mailSender = (JavaMailSender) context.getBean("mailSender");

 MailSendingMessageHandler mailSendingHandler = new MailSendingMessageHandler(mailSender);
MailSendingMessageHandler has various mapping strategies that use Spring's
MailMessage abstraction. If the received Message's payload is already
a MailMessage instance, it will be sent directly.
Therefore, it is generally recommended to precede this
consumer with a Transformer for non-trivial MailMessage construction requirements. However, a few simple
Message mapping strategies are supported out-of-the-box. For example, if the message payload is a byte array,
then that will be mapped to an attachment. For simple text-based emails, you can provide a String-based
Message payload. In that case, a MailMessage will be created with that String as the text content. If you
are working with a Message payload type whose toString() method returns appropriate mail text content, then
consider adding Spring Integration's ObjectToStringTransformer prior to the outbound
Mail adapter (see the example within Section 5.1.2, “Namespace support for Transformer - <transformer> Element” for more detail).
The outbound MailMessage may also be configured with certain values from the
MessageHeaders. If available, values will be mapped to the outbound mail's
properties, such as the recipients (TO, CC, and BCC), the from/reply-to, and the subject. The header names are
defined by the following constants:
 MailHeaders.SUBJECT
 MailHeaders.TO
 MailHeaders.CC
 MailHeaders.BCC
 MailHeaders.FROM
 MailHeaders.REPLY_TO
| Note |
|---|---|
MailHeaders also allows you to override corresponding MailMessage values.
For example: If MailMessage.to is set to '[email protected]' and MailHeaders.TO
Message header is provided it will take precedence and override the corresponding value in MailMessage
|
Spring Integration also provides support for inbound email with the
MailReceivingMessageSource. It delegates to a configured instance of Spring
Integration's own MailReceiver interface, and there are two implementations:
Pop3MailReceiver and ImapMailReceiver. The easiest way to
instantiate either of these is by passing the 'uri' for a Mail store to the receiver's constructor. For example:
MailReceiver receiver = new Pop3MailReceiver("pop3://usr:pwd@localhost/INBOX");
Another option for receiving mail is the IMAP "idle" command (if supported by the mail server you are using).
Spring Integration provides the ImapIdleChannelAdapter which is itself a Message-producing
endpoint. It delegates to an instance of the ImapMailReceiver but enables asynchronous
reception of Mail Messages. There are examples in the next section of configuring both types of inbound Channel
Adapter with Spring Integration's namespace support in the 'mail' schema.
Spring Integration provides a namespace for mail-related configuration. To use it, configure the following schema locations.
<?xml version="1.0" encoding="UTF-8"?>
<beans xmlns="http://www.springframework.org/schema/schema/beans"
    xmlns:xsi="http://www.w3.org/2001/XMLSchema-instance"
    xmlns:mail="http://www.springframework.org/schema/integration/mail"
    xsi:schemaLocation="http://www.springframework.org/schema/beans
            http://www.springframework.org/schema/beans/spring-beans-3.0.xsd
            http://www.springframework.org/schema/integration/mail
            http://www.springframework.org/schema/integration/mail/spring-integration-mail-2.0.xsd">
To configure an outbound Channel Adapter, provide the channel to receive from, and the MailSender:
<mail:outbound-channel-adapter channel="outboundMail"
                              mail-sender="mailSender"/>
Alternatively, provide the host, username, and password:
<mail:outbound-channel-adapter channel="outboundMail"
                              host="somehost" username="someuser" password="somepassword"/>
| Note |
|---|---|
| Keep in mind, as with any outbound Channel Adapter, if the referenced channel is a PollableChannel, a <poller> sub-element should be provided with either an interval-trigger or cron-trigger. |
To configure an inbound Channel Adapter, you have the choice between polling or event-driven (assuming your mail server supports IMAP IDLE - if not, then polling is the only option). A polling Channel Adapter simply requires the store URI and the channel to send inbound Messages to. The URI may begin with "pop3" or "imap":
<int-mail:inbound-channel-adapter id="imapAdapter"
      store-uri="imaps://[username]:[password]@imap.gmail.com/INBOX"
      java-mail-properties="javaMailProperties"
      channel="recieveChannel"
      should-delete-messages="true"
      should-mark-messages-as-read="true"
      auto-startup="true">
      <int:poller max-messages-per-poll="1" fixed-rate="5000"/>
</int-mail:inbound-channel-adapter>
If you do have IMAP idle support, then you may want to configure the "imap-idle-channel-adapter" element instead. Since the "idle" command enables event-driven notifications, no poller is necessary for this adapter. It will send a Message to the specified channel as soon as it receives the notification that new mail is available:
<int-mail:imap-idle-channel-adapter id="customAdapter"
      store-uri="imaps://[username]:[password]@imap.gmail.com/INBOX"
      channel="recieveChannel"
      auto-startup="true"
      should-delete-messages="false"
      should-mark-messages-as-read="true"
      java-mail-properties="javaMailProperties"/>
... where javaMailProperties could be provided by creating and populating
a regular java.utils.Properties object. For example via util namespace
provided by Spring.
<util:properties id="javaMailProperties">
  <prop key="mail.imap.socketFactory.class">javax.net.ssl.SSLSocketFactory</prop>
  <prop key="mail.imap.socketFactory.fallback">false</prop>
  <prop key="mail.store.protocol">imaps</prop>
  <prop key="mail.debug">false</prop>
</util:properties>
| Important |
|---|---|
In both configurations channel and should-delete-messages are the REQUIRED
attributes. The important thing to understand is why should-delete-messages is required?
The issue is with POP3 protocol, which does NOT have any knowlege of messages that were READ. It can only know what's been read
within a single session. This means that when your POP3 mail adapter is running emails are successfully consumed as as they become available during each poll
and no single email message will be delivered more then once. However, as soon as you restart your adapter and begin a new session
all the email messages that might have been retreeved in the previous session will be retrieved again. That is the nature of POP3. Some might argue
that why not set should-delete-messages to TRUE by default? Becouse there are two valid amd mutually exclusive use cases
which makes it very hard pick the right default. You may want to configure your adapter as the only email receiever in which
case you want to be able to restart such adapter without fear that messages that were delivered before will not be redelivered again.
In this case setting should-delete-messages to TRUE would make most sence. However, you may have anoher use case where
you may want to have multiple adapters that simply monitor email servers and their content. In other words you just want to 'peek but not touch'.
Then setting should-delete-messages to FALSE would be much more appropriate. So since it is hard to choose what should be
the right default value for should-delete-messages attribute we simply made it required to be set - leaving it up to you
while also not letting you to forget that you must set it.
|
| Note |
|---|---|
| When configuring a polling adapter (e.g., inbound-channel-adapter) should-mark-messages-as-read be aware of the protocol you are configuring to retrieve messages. For example POP3 does not support this flag which means setting it to either value will have no effect as messages will NOT be marked as read |
When using the namespace support, a header-enricher Message Transformer is also available. This simplifies the application of the headers mentioned above to any Message prior to sending to the Mail-sending Channel Adapter.
<mail:header-enricher subject="Example Mail"
                     to="[email protected]"
                     cc="[email protected]"
                     bcc="[email protected]"
                     from="[email protected]"
                     reply-to="[email protected]"
                     overwrite="false"/>
Spring Integration provides Channel Adapters for receiving and sending messages over internet protocols. Both UDP (User Datagram Protocol) and TCP (Transmission Control Protocol) adapters are provided. Each adapter provides for one-way communication over the underlying protocol. In addition, simple inbound and outbound tcp gateways are provided. These are used when two-way communication is needed.
Two flavors each of UDP inbound and outbound adapters are provided UnicastSendingMessageHandler
sends a datagram packet to a single destination. UnicastReceivingChannelAdapter receives
incoming datagram packets. MulticastSendingMessageHandler sends (broadcasts) datagram packets to
a multicast address. MulticastReceivingChannelAdapter receives incoming datagram packets
by joining to a multicast address.
TCP inbound and outbound adapters are provided TcpSendingMessageHandler
sends messages over TCP. TcpReceivingChannelAdapter receives messages over TCP.
An inbound TCP gateway is provided; this allows for simple request/response processing. While the gateway can support any number of connections, each connection can only process serially. The thread that reads from the socket waits for, and sends, the response before reading again. If the connection factory is configured for single use connections, the connection is closed after the socket times out.
An outbound TCP gateway is provided; this allows for simple request/response processing. If the associated connection factory is configured for single use connections, a new connection is immediately created for each new request. Otherwise, if the connection is in use, the calling thread blocks on the connection until either a response is received or a timeout or I/O error occurs.
 <ip:udp-outbound-channel-adapter id="udpOut"
    host="somehost"
    port="11111"
    multicast="false"
    channel="exampleChannel" />
A simple UDP outbound channel adapter.
| Tip |
|---|---|
| When setting multicast to true, provide the multicast address in the host attribute. |
UDP is an efficient, but unreliable protocol. Two attributes are added to improve reliability. When check-length is set to true, the adapter precedes the message data with a length field (4 bytes in network byte order). This enables the receiving side to verify the length of the packet received. If a receiving system uses a buffer that is too short the contain the packet, the packet can be truncated. The length header provides a mechanism to detect this.
  <ip:udp-outbound-channel-adapter id="udpOut"
    host="somehost"
    port="11111"
    multicast="false"
    check-length="true"
    channel="exampleChannel" />
An outbound channel adapter that adds length checking to the datagram packets.
| Tip |
|---|---|
The recipient of the packet must also be configured to expect a length to precede the
actual data. For a Spring Integration UDP inbound channel adapter, set its
check-length attribute.
|
The second reliability improvement allows an application-level acknowledgment protocol to be used. The receiver must send an acknowledgment to the sender within a specified time.
  <ip:udp-outbound-channel-adapter id="udpOut"
    host="somehost"
    port="11111"
    multicast="false"
    check-length="true"
    acknowledge="true"
    ack-host="thishost"
    ack-port="22222"
    ack-timeout="10000"
    channel="exampleChannel" />
An outbound channel adapter that adds length checking to the datagram packets and waits for an acknowledgment.
| Tip |
|---|---|
| Setting acknowledge to true implies the recipient of the packet can interpret the header added to the packet containing acknowledgment data (host and port). Most likely, the recipient will be a Spring Integration inbound channel adapter. |
| Tip |
|---|---|
| When multicast is true, an additional attribute min-acks-for-success specifies how many acknowledgments must be received within the ack-timeout. |
For even more reliable networking, TCP can be used.
  <ip:udp-inbound-channel-adapter id="udpReceiver"
    channel="udpOutChannel"
    port="11111"
    receive-buffer-size="500"
    multicast="false"
    check-length="true" />
A basic unicast inbound udp channel adapter.
  <ip:udp-inbound-channel-adapter id="udpReceiver"
    channel="udpOutChannel"
    port="11111"
    receive-buffer-size="500"
    multicast="true"
    multicast-address="225.6.7.8"
    check-length="true" />
A basic multicast inbound udp channel adapter.
For TCP, the configuration of the underlying connection is provided using a Connection Factory. Two types of connection factory are provided; a client connection factory and a server connection factory. Client connection factories are used to establish outgoing connections; Server connection factories listen for incoming connections.
A client connection factory is used by an outbound channel adapter but a reference to a client connection factory can also be provided to an inbound channel adapter and that adapter will receive any incoming messages received on connections created by the outbound adapter.
A server connection factory is used by an inbound channel adapter or gateway (in fact the connection factory will not function without one). A reference to a server connection factory can also be provided to an outbound adapter; that adapter can then be used to send replies to incoming messages to the same connection.
| Tip |
|---|---|
|
Reply messages will only be routed to the connection if the reply contains the header ip_connection_id that was inserted into the original message by the connection factory. |
| Tip |
|---|---|
|
This is the extent of message correlation performed when sharing connection factories between inbound and outbound adapters. Such sharing allows for asynchronous two-way communication over TCP. Only payload information is transferred using TCP; therefore any message correlation must be performed by downstream components such as aggregators or other endpoints. For more information refer to Section 15.7, “TCP Message Correlation” |
A maximum of one adapter of each type may be given a reference to a connection factory.
Connection factories using java.net.Socket and
java.nio.channel.SocketChannel are provided.
  <ip:tcp-connection-factory id="server"
    type="server"
    port="1234"
  />
A simple server connection factory that uses java.net.Socket
connections.
  <ip:tcp-connection-factory id="server"
    type="server"
    port="1234"
                using-nio="true"
  />
A simple server connection factory that uses java.nio.channel.SocketChannel
connections.
  <ip:tcp-connection-factory id="client"
    type="client"
    host="localhost"
    port="1234"
    single-use="true"
    so-timeout="10000"
  />
A client connection factory that uses java.net.Socket
connections and creates a new connection for each message.
  <ip:tcp-connection-factory id="client"
    type="client"
    host="localhost"
    port="1234"
    single-use="true"
    so-timeout="10000"
                using-nio=true
  />
A client connection factory that uses java.nio.channel.Socket
connections and creates a new connection for each message.
TCP is a streaming protocol; this means that some structure has to be provided to data
transported over TCP, so the receiver can demarcate the data into discrete messages.
Connection factories are configured to use (de)serializers to convert between the message
payload and the bits that are sent over TCP. This is accomplished by providing a
deserializer and serializer for inbound and outbound messages respectively.
Four standard (de)serializers are provided; the first is ByteArrayCrlfSerializer,
which can convert a byte array to a stream of bytes followed by carriage
return and linefeed characters (\r\n). This is the default (de)serializer and can be used with
telnet as a client, for example. The second is is ByteArrayStxEtxSerializer,
which can convert a byte array to a stream of bytes preceded by an STX (0x02) and
followed by an ETX (0x03). The third is ByteArrayLengthHeaderSerializer,
which can convert a byte array to a stream of bytes preceded by a 4 byte binary
length in network byte order. Each of these is a subclass of
AbstractByteArraySerializer which implements both
org.springframework.core.serializer.Serializer and
org.springframework.core.serializer.Deserializer.
For backwards compatibility, connections using any subclass of
AbstractByteArraySerializer for serialization
will also accept a String which will be converted to a byte array first.
Each of these (de)serializers converts an input stream containing the
corresponding format to a byte array payload. The fourth standard serializer is
org.springframework.core.serializer.DefaultSerializer which can be
used to convert Serializable objects using java serialization.
org.springframework.core.serializer.DefaultDeserializer is provided for
inbound deserialization of streams containing Serializable objects.
To implement a custom (de)serializer pair, implement the
org.springframework.core.serializer.Deserializer and
org.springframework.core.serializer.Serializer interfaces. If you do not wish to use
the default (de)serializer (ByteArrayCrLfSerializer), you must supply
serializer and
deserializer attributes on the connection factory (example below).
        <bean id="javaSerializer"
              class="org.springframework.core.serializer.DefaultSerializer" />
        <bean id="javaDeserializer"
              class="org.springframework.core.serializer.DefaultDeserializer" />

  <ip:tcp-connection-factory id="server"
    type="server"
    port="1234"
                deserializer="JavaDeserializer"
                serializer="javaSerializer"
  />
A server connection factory that uses java.net.Socket
connections and uses Java serialization on the wire.
For full details of the attributes available on connection factories, see the reference at the end of this section.
Connection factories can be configured with a reference to a
TcpConnectionInterceptorFactoryChain. Interceptors can be used
to add behavior to connections, such as negotiation, security, and other setup.
No interceptors are currently provided by the framework but, for an example,
see the InterceptedSharedConnectionTests in the source
repository.
The HelloWorldInterceptor used in the test case works as follows:
When configured with a client connection factory, when the first message is sent over a connection that is intercepted, the interceptor sends 'Hello' over the connection, and expects to receive 'world!'. When that occurs, the negotiation is complete and the original message is sent; further messages that use the same connection are sent without any additional negotiation.
When configured with a server connection factory, the interceptor requires the first message to be 'Hello' and, if it is, returns 'world!'. Otherwise it throws an exception causing the connection to be closed.
All TcpConnection methods are intercepted.
Interceptor instances are created for each connection by an interceptor factory.
If an interceptor is stateful, the factory should create a new instance for each connection.
Interceptor
factories are added to the configuration of an interceptor factory chain, which is provided
to a connection factory using the interceptor-factory attribute.
Interceptors must implement the TcpConnectionInterceptor interface;
factories
must implement the TcpConnectionInterceptorFactory interface. A
convenience class AbstractTcpConnectionInterceptor is provided
with passthrough methods; by extending this class, you only need to implement those
methods you wish to intercept.
<bean id="helloWorldInterceptorFactory"
   class="org.springframework.integration.ip.tcp.connection.TcpConnectionInterceptorFactoryChain">
  <property name="interceptors">
    <array>
      <bean class="org.springframework.integration.ip.tcp.connection.HelloWorldInterceptorFactory"/>
    </array>
  </property>
</bean>

<int-ip:tcp-connection-factory id="server"
  type="server"
  port="12345"
  using-nio="true"
  single-use="true"
  interceptor-factory-chain="helloWorldInterceptorFactory"
/>

<int-ip:tcp-connection-factory id="client"
  type="client"
  host="localhost"
  port="12345"
  single-use="true"
  so-timeout="100000"
  using-nio="true"
  interceptor-factory-chain="helloWorldInterceptorFactory"
/>
Configuring a connection interceptor factory chain.
TCP inbound and outbound channel adapters that utilize the above connection
factories are provided. These adapters have just 2 attributes
connection-factory and channel.
The channel attribute specifies the channel on which messages arrive at an
outbound adapter and on which messages are placed by an inbound adapter.
The connection-factory attribute indicates which connection factory is to be used to
manage connections for the adapter. While both inbound and outbound adapters
can share a connection factory, server connection factories are always 'owned'
by an inbound adapter; client connection factories are always 'owned' by an
outbound adapter. One, and only one, adapter of each type may get a reference
to a connection factory.
  <bean id="javaSerializer"
              class="org.springframework.core.serializer.DefaultSerializer" />
  <bean id="javaDeserializer"
              class="org.springframework.core.serializer.DefaultDeserializer" />

  <int-ip:tcp-connection-factory id="server"
    type="server"
    port="1234"
    deserializer="javaDeserializer"
    serializer="javaSerializer"
    using-nio="true"
    single-use="true"
  />

  <int-ip:tcp-connection-factory id="client"
    type="client"
    host="localhost"
    port="#{server.port}"
    single-use="true"
    so-timeout="10000"
    deserializer="javaDeserializer"
    serializer="javaSerializer"
  />

  <int:channel id="input" />

  <int:channel id="replies">
    <int:queue/>
  </int:channel>

  <int-ip:tcp-outbound-channel-adapter id="outboundClient"
    channel="input"
    connection-factory="client"/>

  <int-ip:tcp-inbound-channel-adapter id="inboundClient"
    channel="replies"
    connection-factory="client"/>

  <int-ip:tcp-inbound-channel-adapter id="inboundServer"
    channel="loop"
    connection-factory="server"/>

  <int-ip:tcp-outbound-channel-adapter id="outboundServer"
    channel="loop"
    connection-factory="server"/>

  <int:channel id="loop" />
In this configuration, messages arriving in channel 'input' are serialized over connections created by 'client' received at the server and placed on channel 'loop'. Since 'loop' is the input channel for 'outboundServer' the message is simply looped back over the same connection and received by 'inboundClient' and deposited in channel 'replies'. Java serialization is used on the wire.
The inbound TCP gateway TcpInboundGateway
and oubound TCP gateway TcpOutboundGateway
use a server and client connection factory respectively. Each connection
can process a single request/response at a time.
The intbound gateway, after constructing a message with the incoming payload and sending it to the requestChannel, waits for a response and sends the payload from the response message by writing it to the connection.
The outbound gateway, after sending a message over the connection, waits for a response and constructs a response message and puts in on the reply channel. Communications over the connections are single-threaded. Users should be aware that only one message can be handled at a time and, if another thread attempts to send a message before the current response has been received, it will block until any previous requests are complete (or time out). If, however, the client connection factory is configured for single-use connections each new request gets its own connection and is processed immediately.
  <ip:tcp-inbound-gateway id="inGateway"
    request-channel="tcpChannel"
    reply-channel="replyChannel"
    connection-factory="cfServer"
    reply-timeout="10000"
        />
A simple inbound TCP gateway; if a connection factory configured with the default (de)serializer is used, messages will be \r\n delimited data and the gateway can be used by a simple client such as telnet.
  <ip:tcp-outbound-gateway id="outGateway"
    request-channel="tcpChannel"
    reply-channel="replyChannel"
    connection-factory="cfClient"
    request-timeout="10000"
    reply-timeout="10000"
    />
A simple oubound TCP gateway.
One goal of the IP Endpoints is to provide communication with systems other than another Spring Integration application. For this reason, only message payloads are sent and received. No message correlation is provided by the framework, except when using the gateways, or collaborating channel adapters on the server side. In the paragraphs below we discuss the various correlation techniques available to applications. In most cases, this requires specific application-level correlation of messages, even when message payloads contain some natural correlation data (such as an order number).
The gateways will automatically correlate messages. However, an outbound gateway should only be used for relatively low-volume use. When the connection factory is configured for a single shared connection to be used for all message pairs ('single-use="false"'), only one message can be processed at a time. A new message will have to wait until the reply to the previous message has been received. When a connection factory is configured for each new message to use a new connection ('single-use="true"'), the above restriction does not apply. While this may give higher throughput than a shared connection environment, it comes with the overhead of opening and closing a new connection for each message pair.
Therefore, for high-volume messages, consider using a collaborating pair of channel adapters. However, you will need to provide collaboration logic.
To achieve high-volume throughput (avoiding the pitfalls of using gateways as mentioned above) you may consider configuring a pair of collaborating outbound and inbound channel adapters. On the server side, message correlation is automatically handled by the adapters because the inbound adapter adds a header allowing the outbound adapter to determine which connection to use to send the reply message. On the client side, however, the application will have to provide its own correlation logic. This can be done in a number of ways.
If the message payload has some natural correlation data, such as a transaction id or an order number, AND there is no need to retain any information (such as a reply channel header) from the original outbound message, the correlation is simple and would done at the application level in any case.
If the message payload has some natural correlation data, such as a transaction id or an order number, but there is a need to retain some information (such as a reply channel header) from the original outbound message, you may need to retain a copy of the original outbound message (perhaps by using a publish-subscribe channel) and use an aggregator to recombine the necessary data.
For either of the previous two paragraphs, if the payload has no natural correlation data, you may need to provide a transformer upstream of the outbound channel adapter to enhance the payload with such data. Such a transformer may transform the original payload to a new object containing both the original payload and some subset of the message headers. Of course, live objects (such as reply channels) from the headers can not be included in the transformed payload.
If such a strategy is chosen you will need to ensure the connection factory
has an appropriate serializer/deserializer pair to handle such a payload,
such as the DefaultSerializer/Deserializer which use java
serialization, or a custom serializer and deserializer.
The ByteArray*Serializer options
mentioned in Section 15.3, “TCP Connection Factories”,
including the default ByteArrayCrLfSerializer,
do not support such payloads,
unless the transformed payload is a String or
byte[],
Table 15.1. Connection Factory Attributes
| Attribute Name | Client? | Server? | Allowed Values | Attribute Description |
|---|---|---|---|---|
| type | Y | Y | client, server | Determines whether the connection factory is a client or server. |
| host | Y | N | The host name or ip address of the destination. | |
| port | Y | Y | The port. | |
| serializer | Y | Y | An implementation of Serializer used to serialize
the payload. Defaults to ByteArrayCrLfSerializer | |
| deserializer | Y | Y | An implementation of Deserializer used to deserialize
the payload. Defaults to ByteArrayCrLfSerializer | |
| using-nio | Y | Y | true, false | Whether or not the tcp adapter is using NIO. Refer to the java.nio package for more information. Default false. |
| using-direct-buffers | Y | N | true, false | When using NIO, whether or not the tcp adapter uses direct buffers.
Refer to java.nio.ByteBuffer documentation for
more information. Must be false if using-nio is false. |
| so-timeout | Y | Y | See java.net.Socket
setSoTimeout() methods for more information. | |
| so-send-buffer-size | Y | Y | See java.net.Socket
setSendBufferSize() methods for more information. | |
| so-receive-buffer- size | Y | Y | See java.net.Socket
setReceiveBufferSize() methods for more information. | |
| so-keep-alive | Y | Y | true, false | See java.net.Socket. setKeepAlive(). |
| so-linger | Y | Y | Sets linger to true with supplied value.
See java.net.Socket. setSoLinger(). | |
| so-tcp-no-delay | Y | Y | true, false | See java.net.Socket. setTcpNoDelay(). |
| so-traffic-class | Y | Y | See java.net.Socket. setTrafficClass(). | |
| local-address | N | Y | On a multi-homed system, specifies an IP address for the interface to which the socket will be bound. | |
| task-executor | Y | Y | Specifies a specific Executor to be used for socket handling. If not supplied, an internal pooled executor will be used. Needed on some platforms that require the use of specific task executors such as a WorkManagerTaskExecutor. See pool-size for thread requirements, depending on other options. | |
| single-use | Y | Y | true, false | Specifies whether a connection can be used for multiple messages. If true, a new connection will be used for each message. |
| pool-size | Y | Y | Specifies the concurrency. For tcp, not using nio, specifies the number of concurrent connections supported by the adapter. For tcp, using nio, specifies the number of tcp fragments that are concurrently reassembled into complete messages. It only applies in this sense if task-executor is not configured. However, pool-size is also used for the server socket backlog, regardless of whether an external task executor is used. Defaults to 5. | |
| interceptor-factory-chain | Y | Y | Documentation to be supplied. |
Table 15.2. UDP Outbound Channel Adapter Attributes
| Attribute Name | Allowed Values | Attribute Description |
|---|---|---|
| host | The host name or ip address of the destination. For multicast udp adapters, the multicast address. | |
| port | The port on the destination. | |
| multicast | true, false | Whether or not the udp adapter uses multicast. |
| acknowledge | true, false | Whether or not a udp adapter requires an acknowledgment from the destination. when enabled, requires setting the following 4 attributes. |
| ack-host | When acknowledge is true, indicates the host or ip address to which the acknowledgment should be sent. Usually the current host, but may be different, for example when Network Address Transation (NAT) is being used. | |
| ack-port | When acknowledge is true, indicates the port to which the acknowledgment should be sent. The adapter listens on this port for acknowledgments. | |
| ack-timeout | When acknowledge is true, indicates the time in milliseconds that the adapter will wait for an acknowlegment. If an acknowlegment is not received in time, the adapter will throw an exception. | |
| min-acks-for- success | Defaults to 1. For multicast adapters, you can set this to a larger value, requiring acknowlegments from multiple destinations. | |
| check-length | true, false | Whether or not a udp adapter includes a data length field in the packet sent to the destination. |
| time-to-live | For multicast adapters, specifies the time to live attribute for
the MulticastSocket; controls the scope
of the multicasts. Refer to the Java API
documentation for more information. | |
| so-timeout | See java.net.DatagramSocket
setSoTimeout() methods for more information. | |
| so-send-buffer-size | See java.net.DatagramSocket
setSendBufferSize() methods for more information. | |
| so-receive-buffer- size | Used for udp acknowlegment packets. See java.net.DatagramSocket
setReceiveBufferSize() methods for more information. | |
| local-address | On a multi-homed system, for the UDP adapter, specifies an IP address for the interface to which the socket will be bound for reply messages. For a multicast adapter it is also used to determine which interface the multicast packets will be sent over. | |
| task-executor | Specifies a specific Executor to be used for acknowledgment handling. If not supplied, an internal single threaded executor will be used. Needed on some platforms that require the use of specific task executors such as a WorkManagerTaskExecutor. One thread will be dedicated to handling acknowledgments (if the acknowledge option is true). |
Table 15.3. UDP Inbound Channel Adapter Attributes
| Attribute Name | Allowed Values | Attribute Description |
|---|---|---|
| port | The port on which the adapter listens. | |
| multicast | true, false | Whether or not the udp adapter uses multicast. |
| multicast-address | When multicast is true, the multicast address to which the adapter joins. | |
| pool-size | Specifies the concurrency. Specifies how many packets can be handled concurrently. It only applies if task-executor is not configured. Defaults to 5. | |
| task-executor | Specifies a specific Executor to be used for socket handling. If not supplied, an internal pooled executor will be used. Needed on some platforms that require the use of specific task executors such as a WorkManagerTaskExecutor. See pool-size for thread requirements. | |
| receive-buffer-size | The size of the buffer used to receive DatagramPackets. Usually set to the MTU size. If a smaller buffer is used than the size of the sent packet, truncation can occur. This can be detected by means of the check-length attribute.. | |
| check-length | true, false | Whether or not a udp adapter expects a data length field in the packet received. Used to detect packet truncation. |
| so-timeout | See java.net.DatagramSocket
setSoTimeout() methods for more information. | |
| so-send-buffer-size | Used for udp acknowlegment packets. See java.net.DatagramSocket
setSendBufferSize() methods for more information. | |
| so-receive-buffer- size | See java.net.DatagramSocket
setReceiveBufferSize() for more information. | |
| local-address | On a multi-homed system, specifies an IP address for the interface to which the socket will be bound. |
Table 15.4. TCP Inbound Channel Adapter Attributes
| Attribute Name | Allowed Values | Attribute Description |
|---|---|---|
| channel | The channel to which inbound messages will be sent. | |
| connection-factory | If the connection factory has a type 'server', the factory is 'owned' by this adapter. If it has a type 'client', it is 'owned' by an outbound channel adapter and this adapter will receive any incoming messages on the connection created by the outbound adapter. |
Table 15.5. TCP Outbound Channel Adapter Attributes
| Attribute Name | Allowed Values | Attribute Description |
|---|---|---|
| channel | The channel on which outbound messages arrive. | |
| connection-factory | If the connection factory has a type 'client', the factory is 'owned' by this adapter. If it has a type 'server', it is 'owned' by an inbound channel adapter and this adapter will attempt to correlate messages to the connection on which an original inbound message was received. |
Table 15.6. TCP Inbound Gateway Attributes
| Attribute Name | Allowed Values | Attribute Description |
|---|---|---|
| connection-factory | The connection factory must be of type server. | |
| request-channel | The channel to which incoming messages will be sent. | |
| reply-channel | The channel on which reply messages may arrive. Usually replies will arrive on a temporary reply channel added to the inbound message header | |
| reply-timeout | The time in milliseconds for which the gateway will wait for a reply. |
Table 15.7. TCP Outbound Gateway Attributes
| Attribute Name | Allowed Values | Attribute Description |
|---|---|---|
| connection-factory | The connection factory must be of type client. | |
| request-channel | The channel on which outgoing messages will arrive. | |
| reply-channel | Optional. The channel to which reply messages may be sent if the original outbound message did not contain a reply channel header. | |
| reply-timeout | The time in milliseconds for which the gateway will wait for a reply. | |
| request-timeout | If a single-use connection factory is not being used, The time in milliseconds for which the gateway will wait to get access to the shared connection. |
Spring Integration provides Channel Adapters for receiving and sending messages via database queries.
The main function of an inbound Channel Adapter is to execute a SQL
SELECT query and turn the result set into a message. The
message payload is the whole result set, expressed as a
List, and the types of the items in the list
depends on the row-mapping strategy that is used. The default strategy is
a generic mapper that just returns a Map for each
row i nthe query. Optionally this can be changed by adding a reference to
requires a reference to a RowMapper instance (see
the Spring
JDBC documentation for more detailed information about row
mapping).
| Note |
|---|---|
|
If you want to convert rows in the SELECT query result to individual messages you can use a downstream splitter. |
The inbound adapter also requires a reference to either
JdbcTemplate instance or
DataSource.
As well as the SELECT statement to generate the
messages, the adapter above also has an UPDATE statement that
is being used to mark the records as processed, so they don't show up in
the next poll. The update can be parameterised by the list of ids from the
original select. This is done through a naming convention by default (a
column in the input result set called "id" is translated into a list in
the parameter map for the update called "id"). The following example
defines an inbound Channel Adapter with an update query and a
DataSource reference.
<jdbc:inbound-channel-adapter query="select * from item where status=2"
  channel="target" data-source="dataSource"
  update="update item set status=10 where id in (:id)" />
| Note |
|---|---|
| The parameters in the update query are specified with a colon (:) prefix to the name of a parameter (which in this case is an expression to be applied to each of the rows in the polled result set). This is a standard feature of the named parameter JDBC support in Spring JDBC combined with a convention (projection onto the polled result list) adopted in Spring Integration. The underlying Spring JDBC features limit the available expressions (e.g. most special characters other than period are disallowed), but since the target is usually a list of or an individual object addressable by simple bean paths this isn't unduly restrictive. |
To change the parameter generation strategy you can inject a
SqlParameterSourceFactory into the adapter to
override the default behaviour (the adapter has a
sql-parameter-source-factory attribute).
The inbound adapter accepts a regular Spring Integration poller as a sub element, so for instance the frequency of the polling can be controlled. A very important feature of the poller for JDBC usage is the option to wrap the poll operation in a transaction, for example:
<jdbc:inbound-channel-adapter query="..."
  channel="target" data-source="dataSource"
  update="...">
  <poller fixed-rate"1000">
    <transactional/>
  </poller>
</jdbc:inbound-channel-adapter>
| Note |
|---|---|
| If a poller is not explicitly specified a default value will be used (and as per normal with Spring Integration can be defined as a top level bean) |
In this example the database is polled every 1000 milliseconds, and the update and select queries are both executed in the same transaction. The transaction manager configuration is not shown, but as long as it is aware of the data source then the poll is transactional. A common use case is for the downstream channels to be direct channels (the default), so that the endpoints are invoked in the same thread, and hence the same transaction. then if any of them fails, the transaction rolls back and the input data are reverted to their original state.
The outbound Channel Adapter is the inverse of the inbound: its role is to handle a message and use it to execute a SQL query. The message payload and headers are available by default as input parameters to the query, for instance:
<jdbc:outbound-channel-adapter query="insert into foos (id, status, name) values (:headers[$id], 0, :payload[foo])" channel="input" data-source="dataSource"/>
In the
example above, messages arriving on the channel "input" have a payload of
a map with key "foo", so the [] operator dereferences that
value from the map. The headers are also accessed as a map.
| Note |
|---|---|
The parameters in the query above are bean property expressions on the incoming message (not Spring EL expressions). This behaviour is part of the
SqlParameterSource
which is the default source created by the outbound adapter. Other behaviour is possible in the adapter, and requires the user to inject a different
SqlParameterSourceFactory
.
|
The outbound adapter requires a reference to either a DataSource or
a JdbcTemplate. It can also have a
SqlParameterSourceFactory injected to control the
binding of incoming message to the query.
If the input channel is a direct channel then the outbound adapter runs its query in the same thread, and therefor ethe same transaction (if there is one) as the sender of the message.
The outbound Gateway is like a combination of the outbound and inbound adapters: its role is to handle a message and use it to execute a SQL query and then respond with the result sending it to a reply channel. The message payload and headers are available by default as input parameters to the query, for instance:
<jdbc:outbound-gateway update="insert into foos (id, status, name) values (:headers[$id], 0, :payload[foo])" request-channel="input" reply-channel="output" data-source="dataSource" />
The result of the above would be to insert a record into the "foos"
table and return a message to the output channel indicating the number of
rows affected (the payload is a map {UPDATED=1}.
If the update query is an insert with auto-generated keys, the reply
message can be populated with the generated keys by adding
keys-generated="true" to the above example (this is not
the default because it is not supported by some database platforms). For
example:
<jdbc:outbound-gateway update="insert into foos (status, name) values (0, :payload[foo])" request-channel="input" reply-channel="output" data-source="dataSource" keys-generated="true"/>
Instead of the update count or the generated keys, you can also provide a select query to execute and generate a reply message that way (like the inbound adapter), e.g:
<jdbc:outbound-gateway update="insert into foos (id, status, name) values (:headers[$id], 0, :payload[foo])" query="select * from foos where id=:headers[$id]" request-channel="input" reply-channel="output" data-source="dataSource" />
Like with the adapters there is also the option to provide
SqlParameterSourceFactory instances for request and
reply. The default is the same as for the outbound adapter, so the request
message is available as the root of an expression. If
keys-generated="true" then the root of the expression is the generated
keys (a map if there is only one or a list of maps if
multi-valued).
The outbound gateway requires a reference to either a DataSource or
a JdbcTemplate. It can also have a
SqlParameterSourceFactory injected to control the
binding of incoming message to the query.
The JDBC module provides an implementation of the Spring Integration
MessageStore (important in the Claim Check pattern)
and MessageGroupStore (important in stateful
patterns like Aggregator) backed by a database. Both interfaces are
implemented by the JdbcMessageStore and there is also support for
configuring store instances in XML. For example:
<jdbc:message-store id="messageStore" data-source="dataSource"/>
A JdbcTemplate can be specified instead of a
DataSource.
Other optional attributes are show in the next example:
<jdbc:message-store id="messageStore" data-source="dataSource" lob-handler="lobHandler" table-prefix="MY_INT_"/>
Here we
have specified a LobHandler for dealing with
messages as large objects (e.g. often necessary if using Oracle) and a
prefix for the table names in the queries generated by the store. The
table name prefix defaults to "INT_".
Spring Integration ships with some sample scripts that can be used
to initialize a database. In the spring-integration-jdbc JAR file you
will find scripts in the
org.springframework.integration.jdbc package:
there is a create and a drop script example for a range of common
database platforms. A common way to use these scripts is to reference
them in a Spring
JDBC data source initializer. Note that the scripts are provided
as samples or specifications of the the required table and column names.
You may find that you need to enhance them for production use (e.g. with
index declarations).
It is common to use a JdbcMessageStore as a
global store for a group of applications, or nodes in the same
application. To provide some portection against name clashes, and to
give control over the database meta-data configuration, the message
store allows the tables to be partitioned in two ways. One is to use
separate table names, by changing the prefix as described above, and the
other is to specify a "region" name for partitioning data within a
single table. An important use case for this is using the store to
manage persistent queues backing a Spring Integration channel. The
message data for a persistent channel is keyed in the store on the
channel name, so if the channel names are not globally unique then there
is the danger of channels picking up data that was not intended for
them. To avoid this the message store region can be used to keep data
separate for different physical channels that happen to have the same
logical name.
Spring Integration provides Channel Adapters for receiving and sending JMS messages. There are actually two
JMS-based inbound Channel Adapters. The first uses Spring's JmsTemplate to receive based on
a polling period. The second is "message-driven" and relies upon a Spring MessageListener container. There is also
an outbound Channel Adapter which uses the JmsTemplate to convert and send a JMS Message on
demand.
Whereas the JMS Channel Adapters are intended for unidirectional Messaging (send-only or receive-only), Spring Integration also provides inbound and outbound JMS Gateways for request/reply operations. The inbound gateway relies on one of Spring's MessageListener container implementations for Message-driven reception that is also capable of sending a return value to the "reply-to" Destination as provided by the received Message. The outbound Gateway sends a JMS Message to a "request-destination" and then receives a reply Message. The "reply-destination" reference (or "reply-destination-name") can be configured explicitly or else the outbound gateway will use a JMS TemporaryQueue.
The inbound Channel Adapter requires a reference to either a single JmsTemplate
instance or both ConnectionFactory and Destination
(a 'destinationName' can be provided in place of the 'destination' reference). The following example defines an
inbound Channel Adapter with a Destination reference.
<jms:inbound-channel-adapter id="jmsIn" destination="inQueue" channel="exampleChannel"> <integration:poller fixed-rate="30000"/> </jms:inbound-channel-adapter>
| Tip |
|---|---|
| Notice from the configuration that the inbound-channel-adapter is a Polling Consumer. That means that it invokes receive() when triggered. This should only be used in situations where polling is done relatively infrequently and timeliness is not important. For all other situations (a vast majority of JMS-based use-cases), the message-driven-channel-adapter described below is a better option. |
| Note |
|---|---|
| All of the JMS adapters that require a reference to the ConnectionFactory will automatically look for a bean named "connectionFactory" by default. That is why you don't see a "connection-factory" attribute in many of the examples. However, if your JMS ConnectionFactory has a different bean name, then you will need to provide that attribute. |
If 'extract-payload' is set to true (which is the default), the received JMS Message will be passed through the MessageConverter. When relying on the default SimpleMessageConverter, this means that the resulting Spring Integration Message will have the JMS Message's body as its payload. A JMS TextMessage will produce a String-based payload, a JMS BytesMessage will produce a byte array payload, and a JMS ObjectMessage's Serializable instance will become the Spring Integration Message's payload. If instead you prefer to have the raw JMS Message as the Spring Integration Message's payload, then set 'extract-payload' to false.
<jms:inbound-channel-adapter id="jmsIn" destination="inQueue" channel="exampleChannel" extract-payload="false"/> <integration:poller fixed-rate="30000"/> </jms:inbound-channel-adapter>
The "message-driven-channel-adapter" requires a reference to either an instance of a Spring MessageListener
container (any subclass of AbstractMessageListenerContainer) or both
ConnectionFactory and Destination
(a 'destinationName' can be provided in place of the 'destination' reference). The following example defines a
message-driven Channel Adapter with a Destination reference.
<jms:message-driven-channel-adapter id="jmsIn" destination="inQueue" channel="exampleChannel"/>
| Note |
|---|---|
| The Message-Driven adapter also accepts several properties that pertain to the MessageListener container. These values are only considered if you do not provide an actual 'container' reference. In that case, an instance of DefaultMessageListenerContainer will be created and configured based on these properties. For example, you can specify the "transaction-manager" reference, the "concurrent-consumers" value, and several other property references and values. Refer to the JavaDoc and Spring Integration's JMS Schema (spring-integration-jms-2.0.xsd) for more detail. |
The 'extract-payload' property has the same effect as described above, and once again its default value
is 'true'. The poller sub-element is not applicable for a message-driven
Channel Adapter, as it will be actively invoked. For most usage scenarios, the message-driven approach is better since the Messages will
be passed along to the MessageChannel as soon as they are received from the underlying
JMS consumer.
The JmsSendingMessageHandler implements the MessageHandler
interface and is capable of converting Spring Integration Messages to JMS messages
and then sending to a JMS destination. It requires either a 'jmsTemplate' reference or both 'connectionFactory' and
'destination' references (again, the 'destinationName' may be provided in place of the 'destination'). As with the
inbound Channel Adapter, the easiest way to configure this adapter is with the namespace support. The following
configuration will produce an adapter that receives Spring Integration Messages from the "exampleChannel" and then
converts those into JMS Messages and sends them to the JMS Destination reference whose bean name is "outQueue".
<jms:outbound-channel-adapter id="jmsOut" destination="outQueue" channel="exampleChannel"/>
As with the inbound Channel Adapters, there is an 'extract-payload' property. However, the meaning is reversed for the outbound adapter. Rather than applying to the JMS Message, the boolean property applies to the Spring Integration Message payload. In other words, the decision is whether to pass the Spring Integration Message itself as the JMS Message body or whether to pass the Spring Integration Message's payload as the JMS Message body. The default value is once again 'true'. Therefore, if you pass a Spring Integration Message whose payload is a String, a JMS TextMessage will be created. If on the other hand you want to send the actual Spring Integration Message to another system via JMS, then simply set this to 'false'.
| Note |
|---|---|
| Regardless of the boolean value for payload extraction, the Spring Integration MessageHeaders will map to JMS properties as long as you are relying on the default converter or provide a reference to another instance of HeaderMappingMessageConverter (the same holds true for 'inbound' adapters except that in those cases, it's the JMS properties mapping to Spring Integration MessageHeaders). |
Spring Integration's message-driven JMS inbound-gateway delegates to a
MessageListener container, supports dynamically adjusting concurrent consumers,
and can also handle replies. The inbound gateway requires references to a
ConnectionFactory, and a request Destination (or
'requestDestinationName'). The following example defines a JMS "inbound-gateway" that receives from the JMS
queue referenced by the bean id "inQueue" and sends to the Spring Integration channel named "exampleChannel".
<jms:inbound-gateway id="jmsInGateway" request-destination="inQueue" request-channel="exampleChannel"/>
Since the gateways provide request/reply behavior instead of unidirectional send or receive, they also have two distinct properties for the "payload extraction" (as discussed above for the Channel Adapters' 'extract-payload' setting). For an inbound-gateway, the 'extract-request-payload' property determines whether the received JMS Message body will be extracted. If 'false', the JMS Message itself will become the Spring Integration Message payload. The default is 'true'.
Similarly, for an inbound-gateway the 'extract-reply-payload' property applies to the Spring Integration Message that is going to be converted into a reply JMS Message. If you want to pass the whole Spring Integration Message (as the body of a JMS ObjectMessage) then set this to 'false'. By default, it is also 'true' such that the Spring Integration Message payload will be converted into a JMS Message (e.g. String payload becomes a JMS TextMessage).
As with anything else, Gateway invocation might result in error. By default Producer will not be notified of the errors thta might have occurredon ythe consumer side and will time out waiting for the reply. However there might be times when you to communicate error condition back to the consumer, in other words treat the Exception as a valid reply valid reply by mapping it to a Message. To accomplish this JMS Inbound Gateway provides support for Exception mappers via exception-mapper attribute.
<int-jms:inbound-gateway request-destination="requestQueue" request-channel="jmsinputchannel" exception-mapper="errorMessageMapper"/> <bean id="exceptionMapper" class="foo.bar.SampleExceptionMapper"/>
foo.bar.SampleExceptionMapper is the implementation of
org.springframework.integration.message.InboundMessageMapper which only defines one method toMessage(Object object).
public static class SampleExceptionMapper implements InboundMessageMapper<Throwable>{ public Message<?> toMessage(Throwable object) throws Exception { MessageHandlingException ex = (MessageHandlingException) object; return MessageBuilder.withPayload("Error happened in message: " + ex.getFailedMessage().getPayload()).build(); } }
The outbound Gateway creates JMS Messages from Spring Integration Messages and then sends to a 'request-destination'. It will then handle the JMS reply Message either by using a selector to receive from the 'reply-destination' that you configure, or if no 'reply-destination' is provided, it will create JMS TemporaryQueues. Notice that the "reply-channel" is also provided.
<jms:outbound-gateway id="jmsOutGateway" request-destination="outQueue" request-channel="outboundJmsRequests" reply-channel="jmsReplies"/>
The 'outbound-gateway' payload extraction properties are inversely related to those of the 'inbound-gateway' (see the discussion above). That means that the 'extract-request-payload' property value applies to the Spring Integration Message that is being converted into a JMS Message to be sent as a request, and the 'extract-reply-payload' property value applies to the JMS Message that is received as a reply and then converted into a Spring Integration Message to be subsequently sent to the 'reply-channel' as shown in the example configuration above.
If you need to convert the message, all JMS adapters and gateways, allow you to
provide a MessageConverter via message-converter attribute. Simply provide the
bean name of an instance of MessageConverter that is available within the same
ApplicationContext.
Also, to provide some consistency with Marshaller and Unmarshaller interfaces Spring provides MarshallingMessageConverter
which you can configure with your own custom Marshallers and Unmarshallers
<int-jms:inbound-gateway request-destination="requestQueue" request-channel="inbound-gateway-channel" message-converter="marshallingMessageConverter"/> <bean id="marshallingMessageConverter" class="org.springframework.jms.support.converter.MarshallingMessageConverter"> <constructor-arg> <bean class="org.bar.SampleMarshaller"/> </constructor-arg> <constructor-arg> <bean class="org.bar.SampleUnmarshaller"/> </constructor-arg> </bean>
| Note |
|---|---|
| Note, however, that when you provide your own MessageConverter instance, it will still be wrapped within the HeaderMappingMessageConverter. This means that the 'extract-request-payload' and 'extract-reply-payload' properties may effect what actual objects are passed to your converter. The HeaderMappingMessageConverter itself simply delegates to a target MessageConverter while also mapping the Spring Integration MessageHeaders to JMS Message properties and vice-versa. |
The Channel Adapters and Gateways featured above are all intended for applications that are integrating with other external systems. The inbound options assume that some other system is sending JMS Messages to the JMS Destination and the outbound options assume that some other system is receiving from the Destination. The other system may or may not be a Spring Integration application. Of course, when sending the Spring Integration Message instance as the body of the JMS Message itself (with the 'extract-payload' value set to false), it is assumed that the other system is based on Spring Integration. However, that is by no means a requirement. That flexibility is one of the benefits of using a Message-based integration option with the abstraction of "channels" or Destinations in the case of JMS.
There are cases where both the producer and consumer for a given JMS Destination are intended to be part of the same application, running within the same process. This could be accomplished by using a pair of inbound and outbound Channel Adapters. The problem with that approach is that two adapters are required even though conceptually the goal is to have a single Message Channel. A better option is supported as of Spring Integration version 2.0. Now it is possible to define a single "channel" when using the JMS namespace.
<jms:channel id="jmsChannel" queue="exampleQueue"/>
The channel in the above example will behave much like a normal <channel/> element from the main Spring Integration namespace. It can be referenced by both "input-channel" and "output-channel" attributes of any endpoint. The difference is that this channel is backed by a JMS Queue instance named "exampleQueue". This means that asynchronous messaging is possible between the producing and consuming endpoints, but unlike the simpler asynchronous Message Channels created by adding a <queue/> sub-element within a non-JMS <channel/> element, the Messages are not just stored in an in-memory queue. Instead those Messages are passed within a JMS Message body, and the full power of the underlying JMS provider is then available for that channel. Probably the most common rationale for using this alternative would be to take advantage of the persistence made available by the store and forward approach of JMS messaging. If configured properly, the JMS-backed Message Channel also supports transactions. In other words, a producer would not actually write to a transactional JMS-backed channel if its send operation is part of a transaction that rolls back. Likewise, a consumer would not physically remove a JMS Message from the channel if the reception of that Message is part of a transaction that rolls back. Note that the producer and consumer transactions are separate in such a scenario. This is significantly different than the propagation of a transactional context across the simple, synchronous <channel/> element that has no <queue/> sub-element.
Since the example above is referencing a JMS Queue instance, it will act as a point-to-point channel. If on the other hand, publish/subscribe behavior is needed, then a separate element can be used, and a JMS Topic can be referenced instead.
<jms:publish-subscribe-channel id="jmsChannel" topic="exampleTopic"/>
For either type of JMS-backed channel, the name of the destination may be provided instead of a reference.
<jms:channel id="jmsQueueChannel" queue-name="exampleQueueName"/> <jms:publish-subscribe-channel id="jmsTopicChannel" topic-name="exampleTopicName"/>
In the examples above, the Destination names would be resolved by Spring's default
DynamicDestinationResolver implementation, but any implementation of the
DestinationResolver interface could be provided. Also, the JMS
ConnectionFactory is a required property of the channel, but by default
the expected bean name would be "connectionFactory". The example below provides both a custom instance
for resolution of the JMS Destination names and a different name for the ConnectionFactory.
<jms:channel id="jmsChannel" queue-name="exampleQueueName" destination-resolver="customDestinationResolver" connection-factory="customConnectionFactory"/>
To experiment with these JMS adapters, check out the samples available within the "samples/jms" directory in the distribution. There are two samples included. One provides inbound and outbound Channel Adapters, and the other provides inbound and outbound Gateways. They are configured to run with an embedded ActiveMQ process, but the "common.xml" file can easily be modified to support either a different JMS provider or a standalone ActiveMQ process. In other words, you can split the configuration so that the inbound and outbound adapters are running in separate JVMs. If you have ActiveMQ installed, simply modify the "brokerURL" property within the configuration to use "tcp://localhost:61616" for example (instead of "vm://localhost"). Both of the samples accept input via stdin and then echo back to stdout. Look at the configuration to see how these messages are routed over JMS.
This Chapter explains how to use RMI specific channel adapters to distribute a system over multiple JVMs. The first section will deal with sending messages over RMI. The second section shows how to receive messages over RMI. The last section shows how to define rmi channel adapters through the namespace support.
To send messages from a channel over RMI, simply define an RmiOutboundGateway. This gateway will use Spring's RmiProxyFactoryBean internally to create a proxy for a remote gateway. Note that to invoke a remote interface that doesn't use Spring Integration you should use a service activator in combination with Spring's RmiProxyFactoryBean.
To configure the outbound gateway write a bean definition like this:
<bean id="rmiOutGateway" class=org.spf.integration.rmi.RmiOutboundGateway> <constructor-arg value="rmi://host"/> <property name="replyChannel" value="replies"/> </bean>
To receive messages over RMI you need to use a RmiInboundGateway. This gateway can be configured like this
<bean id="rmiOutGateway" class=org.spf.integration.rmi.RmiInboundGateway> <property name="requestChannel" value="requests"/> </bean>
To configure the inbound gateway you can choose to use the namespace support for it. The following code snippet shows the different configuration options that are supported.
<rmi:inbound-gateway id="gatewayWithDefaults" request-channel="testChannel"/> <rmi:inbound-gateway id="gatewayWithCustomProperties" request-channel="testChannel" expect-reply="false" request-timeout="123" reply-timeout="456"/> <rmi:inbound-gateway id="gatewayWithHost" request-channel="testChannel" registry-host="localhost"/> <rmi:inbound-gateway id="gatewayWithPort" request-channel="testChannel" registry-port="1234"/> <rmi:inbound-gateway id="gatewayWithExecutorRef" request-channel="testChannel" remote-invocation-executor="invocationExecutor"/>
To configure the outbound gateway you can use the namespace support as well. The following code snippet shows the different configuration for an outbound rmi gateway.
<rmi:outbound-gateway id="gateway" request-channel="localChannel" remote-channel="testChannel" host="localhost"/>
Spring Integration provides support for file transfer operations via SFTP
Secure File Transfer Protocol (SFTP) is a network protocol which allows you to transfer files between two computers on the Internet over any reliable stream.
Similar to FTP, SFTP requires two actors - client and server. The protocol also requires secure channel, such as SSH, as well as visibility to client's identity throughout SFTP session.
Spring Integration supports sending and receiving files over SFTP by providing two types of clients - Inbound Channel Adapters and Outbound Channel Adapters as well as convenient namespace configuration to define these clients.
xmlns:sftp="http://www.springframework.org/schema/integration/sftp" xsi:schemaLocation="http://www.springframework.org/schema/integration/sftp http://www.springframework.org/schema/integration/sftp/spring-integration-sftp-2.0.xsd"
SFTP Inbound Channel Adapter is a special listener that will connect to the FTP server and will listen for the remote directory events (e.g., new file created) at which point it will initiate a file transfer.
<sftp:inbound-channel-adapter id="sftpAdapterAutoCreate" channel="requestChannel" filter="filter" filename-pattern="foo*.txt" username="oleg" remote-directory="ftp://foo" local-directory-path="file:target/foo" host="localhost" password="hello" port="1234" key-file="ker.txt" key-file-password="hello" auto-create-directories="true" auto-delete-remote-files-on-sync="false"> <poller fixed-rate="1000"/> </sftp:inbound-channel-adapter>
As you can see form the configuration above you can configure SFTP Inbound Channel Adapter via
inbound-channel-adapter element while also providing values for various attributes such as username and
password to connect to an FTP server, key-file attributes as well as other attributes.
Please refer to the schema for more details on these attributes.
It is also important to understand that SFTP Inbound Channel Adapter is a polling consumer and therefore
you must configure a poller (global or local)
Once the file has been transferred a Message with java.io.File being a payload will be generated and sent to the channel
identified with channel attribute.
SFTP Outbound Channel Adapter is a special MessageHandler that will connect to the
FTP server and will initiate an FTP transfer for every file it will receive as a payload of the Message.
It also supports several representation of the File so you are not limited to the File object.
Similar to FTP outbound adapter SFTP Outbound Channel Adapter supports the following payloads:
1) java.io.File - the actual file object; 2) byte[] - byte array that represents
the file contents; 3) java.lang.String - represents the file path.
<sftp:outbound-channel-adapter id="sftpAdapterAutoCreate" channel="requestChannel" filter="filter" filename-pattern="foo*.txt" username="oleg" remote-directory="ftp://foo" local-directory-path="file:target/foo" host="localhost" password="hello" port="1234" key-file="ker.txt" key-file-password="hello" auto-create-directories="true" auto-delete-remote-files-on-sync="false"/>
As you can see form the configuration above you can configure SFTP Outbound Channel Adapter via
outbound-channel-adapter element while also providing values for various attributes such as username and
password to connect to an FTP server, key-file attributes as well as other attributes.
Please refer to the schema for more details on these attributes.
| Note |
|---|---|
| A more practical way to configure these types of adapters would be via Spring's property placeholder (http://static.springsource.org/spring/docs/3.0.x/spring-framework-reference/html/beans.html#beans-factory-placeholderconfigurer) |
In many cases application data is obtained from a stream. It is not recommended to send a reference to a Stream as a message payload to a consumer. Instead messages are created from data that is read from an input stream and message payloads are written to an output stream one by one.
Spring Integration provides two adapters for streams. Both ByteStreamReadingMessageSource and
CharacterStreamReadingMessageSource implement MessageSource.
By configuring one of these within a channel-adapter element, the polling period can be configured,
and the Message Bus can automatically detect and schedule them. The byte stream version requires an
InputStream, and the character stream version requires a Reader as
the single constructor argument. The ByteStreamReadingMessageSource also accepts the 'bytesPerMessage'
property to determine how many bytes it will attempt to read into each Message. The
default value is 1024
<bean class="org.springframework.integration.stream.ByteStreamReadingMessageSource"> <constructor-arg ref="someInputStream"/> <property name="bytesPerMessage" value="2048"/> </bean> <bean class="org.springframework.integration.stream.CharacterStreamReadingMessageSource"> <constructor-arg ref="someReader"/> </bean>
For target streams, there are also two implementations: ByteStreamWritingMessageHandler and
CharacterStreamWritingMessageHandler. Each requires a single constructor argument -
OutputStream for byte streams or Writer for character streams,
and each provides a second constructor that adds the optional 'bufferSize'. Since both of these
ultimately implement the MessageHandler interface, they can be referenced from a
channel-adapter configuration as described in more detail in
Section 2.2, “Channel Adapter”.
<bean class="org.springframework.integration.stream.ByteStreamWritingMessageHandler"> <constructor-arg ref="someOutputStream"/> <constructor-arg value="1024"/> </bean> <bean class="org.springframework.integration.stream.CharacterStreamWritingMessageHandler"> <constructor-arg ref="someWriter"/> </bean>
To reduce the configuration needed for stream related channel adapters there is a namespace defined. The following schema locations are needed to use it.
<?xml version="1.0" encoding="UTF-8"?> <beans:beans xmlns="http://www.springframework.org/schema/integration/stream" xmlns:xsi="http://www.w3.org/2001/XMLSchema-instance" xmlns:beans="http://www.springframework.org/schema/beans" xsi:schemaLocation="http://www.springframework.org/schema/beans http://www.springframework.org/schema/beans/spring-beans-3.0.xsd http://www.springframework.org/schema/integration/stream http://www.springframework.org/schema/integration/stream/spring-integration-stream-2.0.xsd">
To configure the inbound channel adapter the following code snippet shows the different configuration options that are supported.
<stdin-channel-adapter id="adapterWithDefaultCharset"/> <stdin-channel-adapter id="adapterWithProvidedCharset" charset="UTF-8"/>
To configure the outbound channel adapter you can use the namespace support as well. The following code snippet shows the different configuration for an outbound channel adapters.
<stdout-channel-adapter id="stdoutAdapterWithDefaultCharset" channel="testChannel"/> <stdout-channel-adapter id="stdoutAdapterWithProvidedCharset" charset="UTF-8" channel="testChannel"/> <stderr-channel-adapter id="stderrAdapter" channel="testChannel"/> <stdout-channel-adapter id="newlineAdapter" append-newline="true" channel="testChannel"/>
Spring Integration provides support for interacting with Twitter via Twitter adapters. With Twitter adapters you can both receive and send Twitter messages.
Twitter is a social networking and microblogging service that enables its users to send and read messages known as tweets. Tweets are text-based posts of up to 140 characters displayed on the author's profile page and delivered to the author's subscribers who are known as followers.
| Important |
|---|---|
| Current Twitter support is based on Twitter4J API, however future version will be changed to use Spring Social project as it is nearing its first release at the time of writing. |
Spring Integration provides a convenient namespace configuration to define Twitter artifacts.
xmlns:twitter="http://www.springframework.org/schema/integration/twitter" xsi:schemaLocation="http://www.springframework.org/schema/integration/twitter http://www.springframework.org/schema/integration/twitter/spring-integration-twitter-2.0.xsd"
Twitter API allows for both authenticated and anonymous operations. For authenticated operations Twitter uses OAuth - an authentication protocol that allows users to approve application to act on their behalf without sharing their password. More information can be found at http://oauth.net/ or in this article http://hueniverse.com/oauth/ from Hueniverse. Please also see OAuth FAQ for more information about OAuth and Twitter.
In order to use OAuth authentication/authorization with Twitter you must create new Application on Twitter Developers site. Follow the directions below to create a new application and obtain consumer keys and access token:
-
Go to http://dev.twitter.com/
-
Click on
Register an applink and fill out all required fields on the form provided; setApplication TypetoClientand depending on the nature of your application selectDefault Access Typeas Read & Write or Read-only and Submit the form. If everything is successful you'll be presented with theConsumer KeyandConsumer Secret. Copy both values in the safe place. -
On the same page you should see
My Access Tokenbutton on the side bar (right). Click on it and you'll be presented with two more values:Access TokenandAccess Token Secret. Copy these values in a safe place as well.
Spring Integration uses the same familiar template pattern to interact with Twitter. Since current Twitter support
is based on Twitter4J API and we provide Twiter4JTemplate.
For anonymous operation (e.g., search) you don't have to define Twitter4JTemplate explicitly, since the default
instance of it will be created and injected into the endpoint. However, for authenticated operation
(e.g., update status, send direct message etc.) you must configure Twitter4JTemplate as a bean and
inject it explicitly into the endpoint. Below is a sample configuration of Twitter4JTemplate:
<bean id="twitterTemplate" class="org.springframework.integration.twitter.core.Twitter4jTemplate"> <constructor-arg value="21691649-4XYZY5iJEOfz2A9qCFd9SjBRGb3HLmIm4HNE6AMv4""/> <constructor-arg value="AbRxUAvyNCtqQtvxFK8w5ZMtMj20KFhB6oEfTA0"/> <constructor-arg value="4XzBPabcJQxyBzzzH3TrRQ"/> <constructor-arg value="ab2piKdMfPu8bVa3ab6DAIvIWEVZyMDL0RSEN2I8"/> </bean>
| Note |
|---|---|
| The values above are not real |
As you can see form the configuration above all we need to do is to provide
OAuth attributes as constructor arguments filling them with values you have obtained in the previous step.
The order of constructor arguments is: 1) consumerKey; 2) consumerSecret;
3) accessToken; 4) accessTokenSecret;
However a more practical way to manage OAuth connection attributes would be via Spring's placeholder support by simply creating a property file (e.g., oauth.properties):
twitter.oauth.consumerKey=4XzBPabcJQxyBzzzH3TrRQ
twitter.oauth.consumerSecret=ab2piKdMfPu8bVa3ab6DAIvIWEVZyMDL0RSEN2I8
twitter.oauth.accessToken=21691649-4XYZY5iJEOfz2A9qCFd9SjBRGb3HLmIm4HNE6AMv4
twitter.oauth.accessTokenSecret=AbRxUAvyNCtqQtvxFK8w5ZMtMj20KFhB6oEfTA0
and configuring a property-placeholder pointing to he above property file:
<context:property-placeholder
location="classpath:oauth.properties"/>
<bean id="twitterTemplate" class="org.springframework.integration.twitter.core.Twitter4jTemplate">
<constructor-arg value="${twitter.oauth.consumerKey}"/>
<constructor-arg value="${twitter.oauth.consumerSecret}"/>
<constructor-arg value="${twitter.oauth.accessToken}"/>
<constructor-arg value="${twitter.oauth.accessTokenSecret}"/>
</bean>
Twitter inbound adapters allow you to receive Twitter Messages. There are several types of twitter messages - tweets
Current release of Spring Integration provides support for receiving tweets as Public Messages, Direct Messages, Mention Messages as well as perform Searches
Every Inbound Twitter Channel Adapter is a Polling consumer which means you have to provide a poller
configuration. However, one important thing you must understand with regard to Twitter since its inner-workings are slightly
different then any other poling consumer. Twitter defines a concept of Rate Limiting. You can read more about
it here: Rate Limiting . In the nutshell Rate Limiting
is the way Twitter manages how often an application can poll for updates. Luckily for you you don't have to worry about it
since the special Rate limit aware polling thread is created when any Twitter adapter is started. This thread will
poll Messages (Tweets) from the Twitter account at the rate allowed by Twitter at the time (it may change after every poll). The latest Tweet timestamp
will be stored in the instance of the org.springframework.integration.store.MetadataStore which is a
strategy interface designed for storing various types of metadata (e.g., last retrieved tweet) to help components such as Twitter
to deal with duplicates. By default, Spring Integration will look for a bean of type org.springframework.integration.store.MetadataStore
in the ApplicationContext. If one found then it will be used, otherwise it will create a new instance of SimpleMetadataStore
which is a simple in-memory implementation that will only persist meta-data within the life-cycle of the application context
which means upon restart you may end up with duplicate entries. If you need to persist meta-data between Application Context
restarts, you may use PropertiesPersistingMetadataStore (property file based persister) or provide your
own implementation of the MetedataStore interface (e.g., JdbcMetadatStore) and configure it
as bean in the Application Context.
<bean class="org.springframework.integration.store.PropertiesPersistingMetadataStore"/>
The Poller that is configured as part of the any Inbound Twitter Adapter (see below) will simply poll from this MetadataStore
This adapter allows you to receive updates from everyone you follow.
<twitter:inbound-channel-adapter twitter-template="twitterTemplate" channel="inChannel"> <poller fixed-rate="5000" max-messages-per-poll="3"/> </twitter:inbound-channel-adapter>
This adapter allows you to receive Twitter Messages that were sent directly to you
<twitter:dm-inbound-channel-adapter twitter-template="twiterTemplate" channel="inboundDmChannel"> <poller fixed-rate="5000" max-messages-per-poll="3"/> </twitter:dm-inbound-channel-adapter>
This adapter allows you to receive Twitter Messages that Mention you via @user
<twitter:mentions-inbound-channel-adapter twitter-template="twiterTemplate" channel="inboundMentionsChannel"> <poller fixed-rate="5000" max-messages-per-poll="3"/> </twitter:mentions-inbound-channel-adapter>
This adapter allows you to perform searches. As you can see it is not neccessery to define twitter-template since search could be performed anonymously, however an you must define a search query.
<twitter:search-inbound-channel-adapter query="#springintegration" channel="inboundMentionsChannel"> <poller fixed-rate="5000" max-messages-per-poll="3"/> </twitter:search-inbound-channel-adapter>
Here is a link that will help you learn more about Twitter queries: http://search.twitter.com/operators
As you can see the configuration of all of these adapters is very similar to other inbound adapters with one exception.
Some may need to be injected with the twitter-template. Once configured the Twitter Messages would be
encapsulated into a Spring Integration Message and sent to a channel specified via channel attribute.
Currently the Payload type of any Message is org.springframework.integration.twitter.core.Tweet
which is very similar to the object with the same name in Spring Social. As we migrate to Spring Social
we'll be depending on their API and some of the artifacts that ar currently in use will be obsolete, however we've already
made sure that the impact of such migration is minimal by alignning our API with the curent state (at the time of writing)
of Spring Social
To get the text from the org.springframework.integration.twitter.core.Tweet
simply invoke getText() method.
Twitter outbound channels adapters allow you to send Twitter Messages - tweets
Current release of Spring Integration supports sending Status Update Messages and Direct Messages.
Twitter outbound channels adapters as any other outbound adapter will take the Message payload and send it as
Twitter message. Currently the only supported payload type is String, so consider adding a transformer
if the payload of the incoming message is not a String.
This adapter allows you to send regular status updates by simply sending a Message to a channel
identified via channel attribute.
<twitter:outbound-channel-adapter twitter-template="twitterTemplate" channel="twitterChannel"/>
The only extra configuration that is required for this adapter is twitter-template
This adapter allows you to send Direct Twitter Messages (i.e., @user) by simply sending a Message to a channel
identified via channel attribute.
<twitter:dm-outbound-channel-adapter twitter-template="twitterTemplate" channel="twitterChannel"/>
The only extra configuration that is required for this adapter is twitter-template
| Important |
|---|---|
| Twitter does not allow you to post duplicate Messages. This is a common problem during testing when the same code works the first time but doesn't work the second time,so make sure to change the content of the Message. One thing that works good for testing is appent timestamp to the end of the message. |
To invoke a Web Service upon sending a message to a channel, there are two options - both of which build
upon the Spring Web Services
project: SimpleWebServiceOutboundGateway and
MarshallingWebServiceOutboundGateway. The former will accept either a
String or javax.xml.transform.Source as the message
payload. The latter provides support for any implementation of the Marshaller
and Unmarshaller interfaces. Both require a Spring Web Services
DestinationProvider for determining the URI of the Web Service to be
called.
simpleGateway = new SimpleWebServiceOutboundGateway(destinationProvider); marshallingGateway = new MarshallingWebServiceOutboundGateway(destinationProvider, marshaller);
| Note |
|---|---|
| When using the namespace support described below, you will only need to set a URI. Internally, the parser will configure a fixed URI DestinationProvider implementation. If you do need dynamic resolution of the URI at runtime, however, then the DestinationProvider can provide such behavior as looking up the URI from a registry. See the Spring Web Services javadoc for more information about the DestinationProvider strategy. |
For more detail on the inner workings, see the Spring Web Services reference guide's chapter covering client access as well as the chapter covering Object/XML mapping.
To send a message to a channel upon receiving a Web Service invocation, there are two options again: SimpleWebServiceInboundGateway and
MarshallingWebServiceInboundGateway. The former will extract a javax.xml.transform.Source
from the WebServiceMessage and set it as the message
payload. The latter provides support for implementation of the Marshaller
and Unmarshaller interfaces.
If the incoming web service message is a SOAP message the SOAP Action header will be added to the headers of the
Message that is forwarded onto the request channel.
simpleGateway = new SimpleWebServiceInboundGateway(); simpleGateway.setRequestChannel(forwardOntoThisChannel); simpleGateway.setReplyChannel(listenForResponseHere); //Optional marshallingGateway = new MarshallingWebServiceInboundGateway(marshaller); //set request and optionally reply channel
Both gateways implement the Spring Web Services MessageEndpoint
interface, so they can be configured with a MessageDispatcherServlet
as per standard Spring Web Services configuration.
For more detail on how to use these components, see the Spring Web Services reference guide's chapter covering creating a Web Service. The chapter covering Object/XML mapping is also applicable again.
To configure an outbound Web Service Gateway, use the "outbound-gateway" element from the "ws" namespace:
<ws:outbound-gateway id="simpleGateway" request-channel="inputChannel" uri="http://example.org"/>
| Note |
|---|---|
| Notice that this example does not provide a 'reply-channel'. If the Web Service were to return a non-empty response, the Message containing that response would be sent to the reply channel provided in the request Message's REPLY_CHANNEL header, and if that were not available a channel resolution Exception would be thrown. If you want to send the reply to another channel instead, then provide a 'reply-channel' attribute on the 'outbound-gateway' element. |
| Tip |
|---|---|
| When invoking a Web Service that returns an empty response after using a String payload for the request Message, no reply Message will be sent by default. Therefore you don't need to set a 'reply-channel' or have a REPLY_CHANNEL header in the request Message. If for any reason you actually do want to receive the empty response as a Message, then provide the 'ignore-empty-responses' attribute with a value of false (this only applies for Strings, because using a Source or Document object simply leads to a NULL response and will therefore never generate a reply Message). |
To set up an inbound Web Service Gateway, use the "inbound-gateway":
<ws:inbound-gateway id="simpleGateway" request-channel="inputChannel"/>
To use Spring OXM Marshallers and/or Unmarshallers, provide bean references. For outbound:
<ws:outbound-gateway id="marshallingGateway" request-channel="requestChannel" uri="http://example.org" marshaller="someMarshaller" unmarshaller="someUnmarshaller"/>
And for inbound:
<ws:inbound-gateway id="marshallingGateway" request-channel="requestChannel" marshaller="someMarshaller" unmarshaller="someUnmarshaller"/>
| Note |
|---|---|
Most Marshaller implementations also implement the
Unmarshaller interface. When using such a
Marshaller, only the "marshaller"
attribute is necessary. Even when using a Marshaller,
you may also provide a reference for the "request-callback" on the outbound gateways.
|
For either outbound gateway type, a "destination-provider" attribute can be specified instead of the "uri" (exactly one of them is required). You can then reference any Spring Web Services DestinationProvider implementation (e.g. to lookup the URI at runtime from a registry).
For either outbound gateway type, the "message-factory" attribute can also be configured with a reference to any
Spring Web Services WebServiceMessageFactory implementation.
For the simple inbound gateway type, the "extract-payload" attribute can be set to false to forward
the entire WebServiceMessage instead of just its payload as a
Message to the request channel. This might be useful, for example,
when a custom Transformer works against the WebServiceMessage directly.
Spring Integration's XML support extends the Spring Integration Core with
implementations of splitter, transformer, selector and router designed
to make working with xml messages in Spring Integration simple. The provided messaging
components are designed to work with xml represented in a range of formats including
instances of
java.lang.String, org.w3c.dom.Document
and javax.xml.transform.Source. It should be noted however that
where a DOM representation is required, for example in order to evaluate an XPath expression,
the String payload will be converted into the required type and then
converted back again to String. Components that require an instance of
DocumentBuilder will create a namespace aware instance if one is
not provided. Where greater control of the document being created is required an appropriately
configured instance of DocumentBuilder should be provided.
This section will explain the workings of
UnmarshallingTransformer,
MarshallingTransformer,
XsltPayloadTransformer
and how to configure them as
beans. All of the provided xml transformers extend
AbstractTransformer or AbstractPayloadTransformer
and therefore implement Transformer. When configuring xml
transformers as beans in Spring Integration you would normally configure the transformer
in conjunction with either a MessageTransformingChannelInterceptor or a
MessageTransformingHandler. This allows the transformer to be used as either an interceptor,
which transforms the message as it is sent or received to the channel, or as an endpoint. Finally the
namespace support will be discussed which allows for the simple configuration of the transformers as
elements in XML.
UnmarshallingTransformer allows an xml Source
to be unmarshalled using implementations of Spring OXM Unmarshaller.
Spring OXM provides several implementations supporting marshalling and unmarshalling using JAXB,
Castor and JiBX amongst others. Since the unmarshaller requires an instance of
Source where the message payload is not currently an instance of
Source, conversion will be attempted. Currently String
and org.w3c.dom.Document payloads are supported. Custom conversion to a
Source is also supported by injecting an implementation of
SourceFactory.
<bean id="unmarshallingTransformer" class="org.springframework.integration.xml.transformer.UnmarshallingTransformer"> <constructor-arg> <bean class="org.springframework.oxm.jaxb.Jaxb1Marshaller"> <property name="contextPath" value="org.example" /> </bean> </constructor-arg> </bean>
The MarshallingTransformer allows an object graph to be converted
into xml using a Spring OXM Marshaller. By default the
MarshallingTransformer will return a DomResult.
However the type of result can be controlled by configuring an alternative ResultFactory
such as StringResultFactory. In many cases it will be more convenient to transform
the payload into an alternative xml format. To achieve this configure a
ResultTransformer. Two implementations are provided, one which converts to
String and another which converts to Document.
<bean id="marshallingTransformer" class="org.springframework.integration.xml.transformer.MarshallingTransformer"> <constructor-arg> <bean class="org.springframework.oxm.jaxb.Jaxb1Marshaller"> <property name="contextPath" value="org.example" /> </bean> </constructor-arg> <constructor-arg> <bean class="org.springframework.integration.xml.transformer.ResultToDocumentTransformer" /> </constructor-arg> </bean>
By default, the MarshallingTransformer will pass the payload Object
to the Marshaller, but if its boolean "extractPayload" property
is set to "false", the entire Message instance will be passed
to the Marshaller instead. That may be useful for certain custom
implementations of the Marshaller interface, but typically the
payload is the appropriate source Object for marshalling when delegating to any of the various
out-of-the-box Marshaller implementations.
XsltPayloadTransformer transforms xml payloads using xsl.
The transformer requires an instance of either Resource or
Templates. Passing in a Templates instance
allows for greater configuration of the TransformerFactory used to create
the template instance. As in the case of XmlPayloadMarshallingTransformer
by default XsltPayloadTransformer will create a message with a
Result payload. This can be customised by providing a
ResultFactory and/or a ResultTransformer.
<bean id="xsltPayloadTransformer" class="org.springframework.integration.xml.transformer.XsltPayloadTransformer"> <constructor-arg value="classpath:org/example/xsl/transform.xsl" /> <constructor-arg> <bean class="org.springframework.integration.xml.transformer.ResultToDocumentTransformer" /> </constructor-arg> </bean>
Namespace support for all xml transformers is provided in the Spring Integration xml namespace,
a template for which can be seen below. The namespace support for transformers creates an instance of either
EventDrivenConsumer or PollingConsumer
according to the type of the provided input channel. The namespace support is designed
to reduce the amount of xml configuration by allowing the creation of an endpoint and transformer
using one element.
<?xml version="1.0" encoding="UTF-8"?> <beans xmlns="http://www.springframework.org/schema/beans" xmlns:xsi="http://www.w3.org/2001/XMLSchema-instance" xmlns:integration="http://www.springframework.org/schema/integration" xmlns:si-xml="http://www.springframework.org/schema/integration/xml" xsi:schemaLocation="http://www.springframework.org/schema/beans http://www.springframework.org/schema/beans/spring-beans-3.0.xsd http://www.springframework.org/schema/integration http://www.springframework.org/schema/integration/spring-integration-2.0.xsd http://www.springframework.org/schema/integration/xml http://www.springframework.org/schema/integration/xml/spring-integration-xml-2.0.xsd"> </beans>
The namespace support for UnmarshallingTransformer is shown below.
Since the namespace is now creating an endpoint instance rather than a transformer,
a poller can also be nested within the element to control the polling of the input channel.
<si-xml:unmarshalling-transformer id="defaultUnmarshaller" input-channel="input" output-channel="output" unmarshaller="unmarshaller"/> <si-xml:unmarshalling-transformer id="unmarshallerWithPoller" input-channel="input" output-channel="output" unmarshaller="unmarshaller"> <si:poller fixed-rate="2000"/> <si-xml:unmarshalling-transformer/>
The namespace support for the marshalling transformer requires an input channel, output channel and a
reference to a marshaller. The optional result-type attribute can be used to control the type of result created,
valid values are StringResult or DomResult (the default). Where the provided result types are not sufficient a
reference to a custom implementation of ResultFactory can be provided as an alternative
to setting the result-type attribute using the result-factory attribute. An optional result-transformer can also be
specified in order to convert the created Result after marshalling.
<si-xml:marshalling-transformer input-channel="marshallingTransformerStringResultFactory" output-channel="output" marshaller="marshaller" result-type="StringResult" /> <si-xml:marshalling-transformer input-channel="marshallingTransformerWithResultTransformer" output-channel="output" marshaller="marshaller" result-transformer="resultTransformer" /> <bean id="resultTransformer" class="org.springframework.integration.xml.transformer.ResultToStringTransformer"/>
Namespace support for the XsltPayloadTransformer allows either a resource to be passed in in order to create the
Templates instance or alternatively a precreated Templates
instance can be passed in as a reference. In common with the marshalling transformer the type of the result output can
be controlled by specifying either the result-factory or result-type attribute. A result-transfomer attribute can also
be used to reference an implementation of ResultTransfomer where conversion of the result
is required before sending.
<si-xml:xslt-transformer id="xsltTransformerWithResource" input-channel="withResourceIn" output-channel="output" xsl-resource="org/springframework/integration/xml/config/test.xsl"/> <si-xml:xslt-transformer id="xsltTransformerWithTemplatesAndResultTransformer" input-channel="withTemplatesAndResultTransformerIn" output-channel="output" xsl-templates="templates" result-transformer="resultTransformer"/>
Very often to assist with transformation you may need to have access to Message data (e.g., Message Headers). For example; you may need to get access to certain Message Headers and pass them on as parameters to a transformer (e.g., transformer.setParameter(..)). Spring Integration provides two convenient ways to accomplish this. Just look at the following XML snippet.
<si-xml:xslt-transformer id="paramHeadersCombo" input-channel="paramHeadersComboChannel" output-channel="output" xsl-resource="classpath:transformer.xslt" xslt-param-headers="testP*, *foo, bar, baz"> <int-xml:xslt-param name="helloParameter" value="hello"/> <int-xml:xslt-param name="firstName" expression="headers.fname"/> </int-xml:xslt-transformer>
If message header names match 1:1 to parameter names, you can simply use xslt-param-headers attribute. There you can also use wildcards for simple pattern matching which supports the following simple pattern styles: "xxx*", "*xxx", "*xxx*" and "xxx*yyy".
You can also configure individual xslt parameters via xslt-param sub element. There you can use expression or value attribute.
The expression attribute should be any valid SpEL expression with Message being the root object of the expression evaluation context.
The value attribute just like any value in Spring beans allows you to specify simple scalar vallue. YOu can also use property placeholders (e.g., ${some.value})
So as you can see, with the expression and value attribute xslt parameters could now be mapped to any accessible part of the Message as well as any literal value.
XPathMessageSplitter supports messages with either
String or Document payloads.
The splitter uses the provided XPath expression to split the payload into a number of
nodes. By default this will result in each Node instance
becoming the payload of a new message. Where it is preferred that each message be a Document
the createDocuments flag can be set. Where a String payload is passed
in the payload will be converted then split before being converted back to a number of String
messages. The XPath splitter implements MessageHandler and should
therefore be configured in conjunction with an appropriate endpoint (see the namespace support below
for a simpler configuration alternative).
<bean id="splittingEndpoint" class="org.springframework.integration.endpoint.EventDrivenConsumer"> <constructor-arg ref="orderChannel" /> <constructor-arg> <bean class="org.springframework.integration.xml.splitter.XPathMessageSplitter"> <constructor-arg value="/order/items" /> <property name="documentBuilder" ref="customisedDocumentBuilder" /> <property name="outputChannel" ref="orderItemsChannel" /> </bean> </constructor-arg> </bean>
Two Router implementations based on XPath are provided XPathSingleChannelRouter and
XPathMultiChannelRouter. The implementations differ in respect to how many channels
any given message may be routed to, exactly one in the case of the single channel version
or zero or more in the case of the multichannel router. Both evaluate an XPath
expression against the xml payload of the message, supported payload types by default
are Node, Document and
String. For other payload types a custom implementation
of XmlPayloadConverter can be provided. The router
implementations use ChannelResolver to convert the
result(s) of the XPath expression to a channel name. By default a
BeanFactoryChannelResolver strategy will be used, this means that the string returned by the XPath
evaluation should correspond directly to the name of a channel. Where this is not the case
an alternative implementation of ChannelResolver can
be used. Where there is a simple mapping from Xpath result to channel name
the provided MapBasedChannelResolver can be used.
<!-- Expects a channel for each value of order type to exist --> <bean id="singleChannelRoutingEndpoint" class="org.springframework.integration.endpoint.EventDrivenConsumer"> <constructor-arg ref="orderChannel" /> <constructor-arg> <bean class="org.springframework.integration.xml.router.XPathSingleChannelRouter"> <constructor-arg value="/order/@type" /> </bean> </constructor-arg> </bean> <!-- Multi channel router which uses a map channel resolver to resolve the channel name based on the XPath evaluation result Since the router is multi channel it may deliver message to one or both of the configured channels --> <bean id="multiChannelRoutingEndpoint" class="org.springframework.integration.endpoint.EventDrivenConsumer"> <constructor-arg ref="orderChannel" /> <constructor-arg> <bean class="org.springframework.integration.xml.router.XPathMultiChannelRouter"> <constructor-arg value="/order/recipient" /> <property name="channelResolver"> <bean class="org.springframework.integration.channel.MapBasedChannelResolver"> <constructor-arg> <map> <entry key="accounts" value-ref="accountConfirmationChannel" /> <entry key="humanResources" value-ref="humanResourcesConfirmationChannel" /> </map> </constructor-arg> </bean> </property> </bean> </constructor-arg> </bean>
Two MessageSelector implementations are provided,
BooleanTestXPathMessageSelector and StringValueTestXPathMessageSelector.
BooleanTestXPathMessageSelector requires an XPathExpression which evaluates to a boolean,
for example boolean(/one/two) which will only select messages which have an element named
two which is a child of a root element named one. StringValueTestXPathMessageSelector
evaluates any XPath expression as a String and compares the result with the provided value.
<!-- Interceptor which rejects messages that do not have a root element order --> <bean id="orderSelectingInterceptor" class="org.springframework.integration.channel.interceptor.MessageSelectingInterceptor"> <constructor-arg> <bean class="org.springframework.integration.xml.selector.BooleanTestXPathMessageSelector"> <constructor-arg value="boolean(/order)" /> </bean> </constructor-arg> </bean> <!-- Interceptor which rejects messages that are not version one orders --> <bean id="versionOneOrderSelectingInterceptor" class="org.springframework.integration.channel.interceptor.MessageSelectingInterceptor"> <constructor-arg> <bean class="org.springframework.integration.xml.selector.StringValueTestXPathMessageSelector"> <constructor-arg value="/order/@version" index="0"/> <constructor-arg value="1" index="1"/> </bean> </constructor-arg> </bean>
When it comes to message transformation XPath is a great way to transform Messages that have XML payloads by defining XPath transformers via xpath-transformer element.
Simple XPath transformation
Let's look at the following transformer configuration:
<xpath-transformer input-channel="inputChannel" output-channel="outputChannel" xpath-expression="/person/@name" />
. . . and Message
Message<?> message =
MessageBuilder.withPayload("<person name='John Doe' age='42' married='true'/>").build();After sending this message to the 'inputChannel' the XPath transformer configured above will transform this XML Message to a simple Message with payload of 'John Doe' all based on the simple XPath Expression specified in the xpath-expression attribute.
XPath also has capability to perform simple conversion of extracted elements
to a desired type. Valid return types are defined in XPathConstants and follows
the conversion rules specified by the XPath.
The following constants are defined by the XPathConstants: BOOLEAN, DOM_OBJECT_MODEL, NODE, NODESET, NUMBER, STRING
You can configure the desired type by simply using evaluation-type attribute of the xpath-transformer element.
<xpath-transformer input-channel="numberInput" xpath-expression="/person/@age" evaluation-type="NUMBER_RESULT" output-channel="output"/> <xpath-transformer input-channel="booleanInput" xpath-expression="/person/@married = 'true'" evaluation-type="BOOLEAN_RESULT" output-channel="output"/>
Node Mappers
If you need to provide custom mapping for the node extracted by the XPath expression simply provide a reference to the
implementation of the org.springframework.xml.xpath.NodeMapper - an interface used by
XPathOperations implementations for mapping Node objects on a per-node basis. To provide a
reference to a NodeMapper simply use node-mapper attribute:
<xpath-transformer input-channel="nodeMapperInput" xpath-expression="/person/@age" node-mapper="testNodeMapper" output-channel="output"/>
. . . and Sample NodeMapper implementation:
class TestNodeMapper implements NodeMapper { public Object mapNode(Node node, int nodeNum) throws DOMException { return node.getTextContent() + "-mapped"; } }
XML Payload Converter
You can also use implementation of the org.springframework.integration.xml.XmlPayloadConverter to
provide more granular transformation:
<xpath-transformer input-channel="customConverterInput" xpath-expression="/test/@type" converter="testXmlPayloadConverter" output-channel="output"/>
. . . and Sample XmlPayloadConverter implementation:
class TestXmlPayloadConverter implements XmlPayloadConverter { public Source convertToSource(Object object) { throw new UnsupportedOperationException(); } // public Node convertToNode(Object object) { try { return DocumentBuilderFactory.newInstance().newDocumentBuilder().parse( new InputSource(new StringReader("<test type='custom'/>"))); } catch (Exception e) { throw new IllegalStateException(e); } } // public Document convertToDocument(Object object) { throw new UnsupportedOperationException(); } }
Combination of SpEL and XPath expressions
You can also combine Spring Expression Language (SpEL) expressions with XPath expression and configure them using expression attribute:
xpath-expression id="testExpression" expression="/person/@age * 2"/>
In the above case the overall result of the expression will be the result of the XPathe expression multiplied by 2.
All XPath based components have namespace support allowing them to be configured as
Message Endpoints with the exception of the XPath selectors which are not designed to act as
endpoints. Each component allows the XPath to either be referenced at the top level or configured via a nested
xpath-expression element. So the following configurations of an xpath-selector are all valid and represent the general
form of XPath namespace support. All forms of XPath expression result in the creation of an
XPathExpression using the Spring XPathExpressionFactory
<si-xml:xpath-selector id="xpathRefSelector" xpath-expression="refToXpathExpression" evaluation-result-type="boolean" /> <si-xml:xpath-selector id="selectorWithNoNS" evaluation-result-type="boolean" > <si-xml:xpath-expression expression="/name"/> </si-xml:xpath-selector> <si-xml:xpath-selector id="selectorWithOneNS" evaluation-result-type="boolean" > <si-xml:xpath-expression expression="/ns1:name" ns-prefix="ns1" ns-uri="www.example.org" /> </si-xml:xpath-selector> <si-xml:xpath-selector id="selectorWithTwoNS" evaluation-result-type="boolean" > <si-xml:xpath-expression expression="/ns1:name/ns2:type"> <map> <entry key="ns1" value="www.example.org/one" /> <entry key="ns2" value="www.example.org/two" /> </map> </si-xml:xpath-expression> </si-xml:xpath-selector> <si-xml:xpath-selector id="selectorWithNamespaceMapRef" evaluation-result-type="boolean" > <si-xml:xpath-expression expression="/ns1:name/ns2:type" namespace-map="defaultNamespaces"/> </si-xml:xpath-selector> <util:map id="defaultNamespaces"> <util:entry key="ns1" value="www.example.org/one" /> <util:entry key="ns2" value="www.example.org/two" /> </util:map>
XPath splitter namespace support allows the creation of a Message Endpoint with an input channel and output channel.
<!-- Split the order into items creating a new message for each item node --> <si-xml:xpath-splitter id="orderItemSplitter" input-channel="orderChannel" output-channel="orderItemsChannel"> <si-xml:xpath-expression expression="/order/items"/> </si-xml:xpath-splitter> <!-- Split the order into items creating a new document for each item--> <si-xml:xpath-splitter id="orderItemDocumentSplitter" input-channel="orderChannel" output-channel="orderItemsChannel" create-documents="true"> <si-xml:xpath-expression expression="/order/items"/> <si:poller fixed-rate="2000"/> </si-xml:xpath-splitter>
XPath router namespace support allows for the creation of a Message Endpoint with an input channel but no output channel since the output channel is determined dynamically. The multi-channel attribute causes the creation of a multi channel router capable of routing a single message to many channels when true and a single channel router when false.
<!-- route the message according to exactly one order type channel --> <si-xml:xpath-router id="orderTypeRouter" input-channel="orderChannel" multi-channel="false"> <si-xml:xpath-expression expression="/order/type"/> </si-xml:xpath-router> <!-- route the order to all responders--> <si-xml:xpath-router id="responderRouter" input-channel="orderChannel" multi-channel="true"> <si-xml:xpath-expression expression="/request/responders"/> <si:poller fixed-rate="2000"/> </si-xml:xpath-router>
Spring Integration provides Channel Adapters for XMPP.
XMPP describes a way for multiple agents to communicate with each other in a distributed system. The canonical use case is to send and receive chat messages, though XMPP can be, and is, used for far more applications. XMPP is used to describe a network of actors. Within that network, actors may address each other directly, as well as broadcast status changes (e.g. "presence").
XMPP provides the messaging fabric that underlies some of the biggest Instant Messaging networks in the world, including Google Talk (GTalk) - which is also available from within GMail - and Facebook Chat. There are many good open-source XMPP servers available. Two popular implementations are Openfire and ejabberd
Spring integration provides support for XMPP via XMPP adapters which support sending and receiving both XMPP chat messages and presence changes from other entries in your roster. As many other adapters, XMPP adapters come with a convenient namespace-based configuration. To configure XMPP namespace include the following elements into the headers of your XML configuration file:
xmlns:xmpp="http://www.springframework.org/schema/integration/xmpp" xsi:schemaLocation="http://www.springframework.org/schema/integration/xmpp http://www.springframework.org/schema/integration/xmpp/spring-integration-xmpp-2.0.xsd"
Before using inbound or outbound XMPP adapters to participate in the XMPP network actor must establish XMPP connection. This
connection object could be shared by all XMPP adapters connected to a particular account. Typically this requires - at a minimum -
user, password, host.
To create a basic XMPP connection, you can utilize the convenience of the namespace.
<xmpp:xmpp-connection
id="myConnection"
user="user"
password="password"
host="host"
port="port"
resource="theNameOfTheResource"
subscription-mode="accept_all"/>
The Spring Integration adapters support receiving chat messages from other users in the system. To do this, the
Inbound Message Channel Adapter "logs in" as a user on your behalf and receives the messages sent to that user. Those messages are then
forwarded to your Spring Integration client.
The payload of the inbound Spring Integration message may be of the raw type
org.jivesoftware.smack.packet.Message, or of the type
java.lang.String if you set extract-payload value attribute to 'true'
when configuring an adapter.
Configuration support for the XMPP Inbound Message Channel Adapter is provided via the inbound-channel-adapter element.
<xmpp:inbound-channel-adapter id="xmppInboundAdapter" channel="xmppInbound" xmpp-connection="testConnection" extract-payload="false" auto-startup="true"/>
As you can see amongst the usual attributes this adapter also requires a reference to an XMPP Connection.
It is also important to mention that XMPP inbound adapter is an event driven adapter and a LifeCycle object.
When started it will register a PacketListener that will listen for the incoming XMPP Messages. It forwards those messages
to the underlying adapter which will convert them to Spring Integration Messages and send them to the channel. It will
unregister the PacketListener when it is stopped.
You may also send chat messages to other users on XMPP using the Outbound Message Channel Adapter.
Configuration support for the XMPP Outbound Message Channel Adapter is provided via the outbound-channel-adapter element.
<int-xmpp:outbound-channel-adapter id="outboundEventAdapter" channel="outboundEventChannel" xmpp-connection="testConnection"/>
The adapter expects as its input - at a minimum - a payload of type java.lang.String, and a header value
for XmppHeaders.CHAT_TO that specifies to which user the Message should be sent to. To
create a message you might use the following Java code:
Message<String> xmppOutboundMsg = MessageBuilder.withPayload("Hello, XMPP!" ) .setHeader(XmppHeaders.CHAT_TO, "userhandle") .build();
Another mechanism of setting such header is by using the XMPP enricher support. Here is an example using the enricher.
<int-xmpp:header-enricher input-channel="input" output-channel="output"> <int-xmpp:chat-to value="[email protected]"/> </int-xmpp:header-enricher>
XMPP also supports broadcasting state. You can use this capability to let people who have you on their roster see your state changes. This happens all the time with your IM clients - you change your away status, and then set an away message, and everybody who has you on their roster sees your icon or username change to reflect this new state, and additionally might see your new "away" message. If you would like to receive notification, or notify others, of state changes, you can use Spring Integration's "presence" adapters.
Spring Integration provides an Inbound Presence Message Channel Adapter which supports receiving Presence (Roster)
events from other users in the system. To do this, the adapter "logs in" as a user
on your behalf, registers a RosterListener and forwards received Presence update events as Messages to the channel
identified by the channel attribute. The payload of the Message will be a org.jivesoftware.smack.packet.Presence
object (see http://www.igniterealtime.org/builds/smack/docs/3.1.0/javadoc/org/jivesoftware/smack/packet/Presence.html).
Configuration support for the XMPP Inbound Presence Message Channel Adapter is provided via
the presence-inbound-channel-adapter element.
<int-xmpp:presence-inbound-channel-adapter channel="outChannel" xmpp-connection="testConnection" auto-startup="false"/>
As you can see amongst the usual attributes this adapter also requires a reference to an XMPP Connection.
It is also important to mention that this adapter is an event driven adapter and a LifeCycle object.
It will register RosterListener when started and will unregister RosterListener
when stopped.
Spring Integration also supports sending Presence (Roster) events to be seen by other users in the network. When you send a Message
to the Outbound Presence Message Channel Adapter it extracts the payload which is expected to be of
type org.jivesoftware.smack.packet.Presence
(see http://www.igniterealtime.org/builds/smack/docs/3.1.0/javadoc/org/jivesoftware/smack/packet/Presence.html) and sends it to
the XMPP Connection, thus advertising your presence events to the rest of the network.
Configuration support for the XMPP Outbound Presence Message Channel Adapter is provided via
the presence-outbound-channel-adapter element.
<int-xmpp:presence-outbound-channel-adapter id="eventOutboundPresenceChannel" xmpp-connection="testConnection"/>
It can also be a polling consumer (if it receives Messages from the Polling Channel) in which case you would need to register a Poller.
<int-xmpp:presence-outbound-channel-adapter id="pollingOutboundPresenceAdapter" xmpp-connection="testConnection" channel="pollingChannel"> <int:poller fixed-rate="1000" max-messages-per-poll="1"/> </int-xmpp:presence-outbound-channel-adapter>
Similar to its Inbound counterpart it requires a reference to an XMPP Connection.
Since Spring Integration XMPP support is based on Smack 3.1 API (http://www.igniterealtime.org/downloads/index.jsp), it is important to know a few details related to more complex configuration of XMPP Connection object.
As it was said earlier the xmpp-connection namespace support is designed to simplify basic connection configuration and
only supports few configuration attributes. However, org.jivesoftware.smack.ConnectionConfiguration object defines about 20
attributes, and there is no real value of adding namespace support for all of them. So, for more complex connection configurations,
simply configure XmppConnectionFactoryBean as a regular bean injecting
org.jivesoftware.smack.ConnectionConfiguration as a constructor argument and configuring every property
you may need. This way SSL or any other attributes could be set directly in a consistent Spring way. Example:
<bean id="xmppConnection" class="org.springframework.integration.xmpp.XmppConnectionFactoryBean"> <constructor-arg> <bean class="org.jivesoftware.smack.ConnectionConfiguration"> <constructor-arg value="myServiceName"/> <property name="truststorePath" value="..."/> <property name="socketFactory" ref="..."/> </bean> </constructor-arg> </bean> <int:channel id="outboundEventChannel"/> <int-xmpp:outbound-channel-adapter id="outboundEventAdapter" channel="outboundEventChannel" xmpp-connection="xmppConnection"/>
Another important aspect of Smack API is static initializers. For more complex cases (e.g., registering SASL Mechanism) you may need
to execute certain static initializers. One of those static initializers is SASLAuthentication which allows
you to register supported SASL mechanisms. For that level of complexity we would recommend Spring Javaconfig-style of XMPP Connection
configuration where you can configure the entire component through Java code and execute all other necessary Java code including
static initializers.
@Configuration public class CustomConnectionConfiguration { @Bean public XmppConnection knight() { SASLAuthentication.supportSASLMechanism("EXTERNAL", 0); // static initializer ConnectionConfiguration config = new ConnectionConfiguration("localhost", 5223); config.setTrustorePath("path_to_truststore.jks"); config.setSecurityEnabled(true); config.setSocketFactory(SSLSocketFactory.getDefault()); conn = new XMPPConnection(config); } }
For more information on Javaconfig style of Application Context configuration refere to the following section in Spring Reference Manual http://static.springsource.org/spring/docs/3.0.x/spring-framework-reference/html/beans.html#beans-java
Appendices TODO
The AOP Message Publishing feature allows you to construct and send a message as a by-product of method invocation. For example, imagine you have a component and every time the state of this component changes you would like to be notified via a Message. The easiest way to send such notifications would be to send a message to a dedicated channel, but how would you connect the method invocation that changes the state of the object to a message sending process, and how should the notification Message be structured? The AOP Message Publishing feature handles these responsibilities with a configuration-driven approach.
Spring Integration provides two approaches: XML and Annotation-driven.
The annotation-driven approach allows you to annotate any method with the @Publisher annotation, specifying 'channel' attribute.
The Message will be constructed from the return value of method invocation and sent to a channel specified by 'channel' attribute.
To further manage message structure you can also use a combination of both @Payload and @Header annotations.
Internally message publishing feature of Spring Integration uses both Spring AOP by defining PublisherAnnotationAdvisor and
Spring 3.0 Expression Language (SpEL) support, giving you considerable flexibility and control over the structure of the Message it will build.
PublisherAnnotationAdvisor defines and binds the following variables:
-
#return - will bind to a return value allowing you to reference it or its attributes (e.g., #return.foo where 'foo' is an attribute of the object bound to #return)
-
#exception - will bind to an exception if one is thrown by the method invocation.
-
#args - will bind to method arguments, so individual arguments could be extracted by name (e.g., #args.fname as in the above method)
Let's look at couple of examples:
@Publisher public String defaultPayload(String fname, String lname) { return fname + " " + lname; }
In the above example the Message will be constructed with the following structure:
-
Message payload - will be the return type and value of the method. This is the default.
-
A newly constructed message will be sent to a default publisher channel configured with annotation post processor (see the end of this section).
@Publisher(channel="testChannel") public String defaultPayload(String fname, @Header("last") String lname) { return fname + " " + lname; }
In this example everything is the same as above, however we are not using default publishing channel. Instead we are specifying the publishing channel via 'channel' attribute of @Publisher annotation. We are also adding @Header annotation which results in the Message header with the name 'last' and the value of 'lname' input parameter to be added to the newly constructed Message.
@Publisher(channel="testChannel") @Payload public String defaultPayloadButExplicitAnnotation(String fname, @Header String lname) { return fname + " " + lname; }
The above example is almost identical to the previous one. The only difference here is that we are using @Payload annotation on the method, thus explicitly specifying that the return value of the method should be used as a payload of the Message.
@Publisher(channel="testChannel") @Payload("#return + #args.lname") public String setName(String fname, String lname, @Header("x") int num) { return fname + " " + lname; }
Here we are expending on the previous configuration by using Spring Expression language in the @Payload annotation further instructing the framework on how the message should be constructed. In this particular case the message will be a concatenation of the return value of the method invocation and 'lname' input argument. Message header 'x' with value of 'num' input argument will be added to the newly constructed Message.
@Publisher(channel="testChannel") public String argumentAsPayload(@Payload String fname, @Header String lname) { return fname + " " + lname; }
In the above example you see another usage of @Payload annotation. Here we are annotating method argument which will become a payload of newly constructed message.
As with most other annotation-driven features in Spring, you will need to register a post-processor
(PublisherAnnotationBeanPostProcessor).
<bean class="org.springframework.integration.aop.PublisherAnnotationBeanPostProcessor"/>
You can also use namespace support for added convenience:
<si:annotation-config default-publisher-channel="defaultChannel"/>
Similar to other Spring annotations (e.g., @Controller), @Publisher is a meta-annotation, which means you can define your own annotations
that will be treated as @Publisher
@Target({ElementType.METHOD, ElementType.TYPE}) @Retention(RetentionPolicy.RUNTIME) @Publisher(channel="auditChannel") public @interface Audit { }
Here we defined @Audit annotation which itself is a @Publisher. Also note that you can define channel
attribute on the meta-annotation thus encapsulating the behavior of where messages will be sent inside of this annotation.
Now you can annotate any method:
@Audit public String test() { return "foo"; }
In the above example every invocation of test() method will result in Message with payload which is the return value of the method
invocation to be sent to auditChannel
You can also annotate the class which would mean that the properties of this annotation will be applied on every public method of this class
@Audit static class BankingOperationsImpl implements BankingOperations { public String debit(String amount) { . . . } public String credit(String amount) { . . . } }
The XML-based approach allows you to configure the same AOP-based Message Publishing functionality with
simple namespace-based configuration of a MessagePublishingInterceptor.
It certainly has some benefits over the annotation-driven approach since it
allows you to use AOP pointcut expressions, thus possibly intercepting multiple methods at once or
intercepting and publishing methods to which you don't have the source code.
To configure Message Publishing via XML, you only need to do the following two things:
-
Provide configuration for
MessagePublishingInterceptorvia the<publishing-interceptor>XML element. -
Provide AOP configuration to apply the
MessagePublishingInterceptorto managed objects.
<aop:config> <aop:advisor advice-ref="interceptor" pointcut="bean(testBean)" /> </aop:config> <publishing-interceptor id="interceptor" default-channel="defaultChannel"> <method pattern="echo" payload="'Echoing: ' + #return" channel="echoChannel"> <header name="foo" value="bar"/> </method> <method pattern="repl*" payload="'Echoing: ' + #return" channel="echoChannel"> <header name="foo" expression="'bar'.toUpperCase()"/> </method> <method pattern="echoDef*" payload="#return"/> </publishing-interceptor>
As you can see the <publishing-interceptor> configuration look rather similar to Annotation-based approach
and it also utilizes the power of the Spring 3.0 Expression Language.
In the above example the execution of the echo method of a testBean will
render a Message with the following structure:
-
The Message payload will be of type String and value of "Echoing: [value]" where
valueis the value returned by an executed method. -
The Message will have header with the key "foo" value "bar".
-
The Message will be sent to
echoChannel.
The second method is very similar to the first. Here every method that begins with 'repl' will render a Message with the following structure:
-
The Message payload will be the same as in the above sample
-
The Message will have header with the key "foo" and value that is the result of the SpEL expression
'bar'.toUpperCase(). -
The Message will be sent to
echoChannel.
The second method, mapping the execution of any method that begins with echoDef of testBean, will produce a
Message with the following structure.
-
The Message payload will be the value returned by an executed method.
-
Since the
channelattribute is not provided explicitly, the Message will be sent to thedefaultChanneldefined by the publisher.
For simple mapping rules you can rely on the publisher defaults. For example:
<publishing-interceptor id="anotherInterceptor"/>
This will map the return value of every method that matches the pointcut expression to a payload and will be sent to a default-channel. If the defaultChannelis not specified (as above) the messages will be sent to the global nullChannel.
Async Publishing
One important thing to understand is that publishing occurs in the same thread as your component's execution. So by default in is synchronous. This means that the entire message flow would have to wait until he publisher flow completes. However, quite often you want the complete opposite and that is to use Message publishing feature to initiate asynchronous sub-flows. For example, you might host a service (HTTP, WS etc.) which receives a remote request.You may want to send this request internally into a process that might take a while. However you may also want to reply to the user right away. So, instead of sending inbound request for processing via the output channel (the conventional way), you can simply use ''outout-channel or $replyChannel'' header to send simple acknowledgment-like reply back to the caller while using Message publisher feature to initiate a complex flow.
EXAMPLE: Here is the simple service that receives a complex payload, which needs to be sent further for processing, but it also need to reply to the caller with a simple acknowledgment.
public String echo(Object complexPayload){ return "ACK"; }
So instead of hooking up the complex flow to the output channel we use Message publishing feature instead configuring it to create a new Message using the input argument of the service method (above) and sending it to the 'localProcessChannel'. And to make sure this sub-flow is asynchronous all we need to do is make sure that we send it to any type of async channel (ExecutorChannel in this example).
<int:service-activator input-channel="inputChannel" output-channel="outputChannel" ref="sampleservice"/> <bean id="sampleservice" class="test.SampleService"/> <aop:config> <aop:advisor advice-ref="interceptor" pointcut="bean(sampleservice)" /> </aop:config> <int:publishing-interceptor id="interceptor" > <int:method pattern="echo" payload="#args[0]" channel="localProcessChannel"> <int:header name="sample_header" expression="'some sample value'"/> </int:method> </int:publishing-interceptor> <int:channel id="localProcessChannel"> <int:dispatcher task-executor="executor"/> </int:channel> <task:executor id="executor" pool-size="5"/>
Another way of handling thi type of scenario is through wire-tap
In the above sections we looked at the Message publishing feature of Spring Integration which constructs and publishes messages as by-products of Method invocations.
However in that case, you are still responsible for invoking the method.
In Spring Integration 2.0 we've added another related useful feature: support for scheduled Message producers/publishers via the new "expression" attribute
on the 'inbound-channel-adapter' element. Scheduling could be based on several triggers, any one of which may be configured on the 'poller' sub-element.
Currently we support cron, fixed-rate, fixed-delay as well as any custom trigger implemented by you.
As mentioned above, support for scheduled producers/publishers is provided via the <inbound-channel-adapter> xml element. Let's look at couple of examples:
<inbound-channel-adapter id="fixedDelayProducer" expression="'fixedDelayTest'" channel="fixedDelayChannel"> <poller fixed-delay="1000"/> </inbound-channel-adapter>
In the above example an inbound Channel Adapter will be created which will construct a Message with its payload being the result of the expression
defined in the expression attribute. Such message will be created and sent every time after the delay specified by the fixed-delay attribute.
<inbound-channel-adapter id="fixedRateProducer" expression="'fixedRateTest'" channel="fixedRateChannel"> <poller fixed-rate="1000"/> </inbound-channel-adapter>
This example is very similar to the previous one, except that we are using the fixed-rate attribute which will allow us to send messages at a fixed rate (measuring from the start time of each task).
<inbound-channel-adapter id="cronProducer" expression="'cronTest'" channel="cronChannel"> <poller cron="7 6 5 4 3 ?"/> </inbound-channel-adapter>
This example demonstrates how you can apply a Cron trigger with a value specified in the cron attribute.
<inbound-channel-adapter id="headerExpressionsProducer" expression="'headerExpressionsTest'" channel="headerExpressionsChannel" auto-startup="false"> <poller fixed-delay="5000"/> <header name="foo" expression="6 * 7"/> <header name="bar" value="x"/> </inbound-channel-adapter>
Here you can see that in a way very similar to the Message publishing feature we are enriching a newly constructed Message with extra Message headers which could take scalar values as well as the results of evaluating Spring expressions.
If you need to implement your own custom trigger you can use the trigger attribute to provide a reference to any spring configured
bean which implements the org.springframework.scheduling.Trigger interface.
<inbound-channel-adapter id="triggerRefProducer" expression="'triggerRefTest'" channel="triggerRefChannel"> <poller trigger="customTrigger"/> </inbound-channel-adapter> <beans:bean id="customTrigger" class="org.springframework.scheduling.support.PeriodicTrigger"> <beans:constructor-arg value="9999"/> </beans:bean>
Spring Integration exposes several hooks to address transactional needs of you message flows. But to better understand these hooks and how you can benefit from them we must first revisit the 6 mechanisms that could be used to initiate Message flows and see how transactional needs of these flows could be addressed within each of these mechanisms.
Here are the 6 mechanisms to initiate a Message flow and their short summary (details for each are provided throughout this manual):
-
Gateway Proxy - Your basic Messaging Gateway
-
MessageChannel - Direct interactions with MessageChannel methods (e.g., channel.send(message))
-
Message Publisher - the way to initiate message flow as a bi-product of method invocations on Spring beans
-
Inbound Channel Adapters/Gateways - the way to initiate message flow based on connecting third-party system with Spring Integration messaging system(e.g., [JmsMessage] -> Jms Inbound Adapter[SI Message] -> SI Channel)
-
Scheduler - the way to initiate message flow based on scheduling events distributed by a pre-configured Scheduler
-
Poller - similar to the Scheduler and is the way to initiate message flow based on scheduling or interval-based events distributed by a pre-configured Poller
These 6 cold be split in 2 general categories:
-
Message flows initiated by a USER process - Example scenarios in this category would be invoking a Gateway method or explicitly sending a Message to a MessageChannel. In other words these message flows depend on third party process (e.g., some code that we wrote) to be initiated
-
Message flows initiated by the DAEMON process - Example scenarios in this category would be a Poller polling for a Message queue to initiate a new Message flow with the polled Message or a Scheduler scheduling the process, by creating a new Message and initiating a message flow at a predefined time
Clearly the Gateway Proxy, MessageChannel.send(..) and MessagePublisher are all belong to the 1st category and Inbound Adapters/Gateways, Scheduler and Poller belong to the 2nd.
So, how do we address transactional needs in various scenarios within each category and is there a need for Spring Integration to provide something explicitly with regard to transaction for a particular scenario or Spring's Transaction Support could be leveraged instead?.
First of all, the first and obvious goal is NOT to re-invent something that has already been invented unless you can provide a beter solution. In our case Spring itself provides a first class support for transaction management. So our goal here is not to provide something new but rather delegate/use Spring to benefit from the existing support for transactions. In other words as a framework we must expose hooks to the Transaction management functionality provided by Spring. But since Spring Integration configuration is based on Spring Configuration it is not always neccessery to expose these hooks as they already expposed via Spring natively. Remeber every Spring Integration component is a Spring Bean after all.
With this goal in mind let's look at the two scenarios.
If you think about it, Message flows that are initiated by the USER process (Category 1) and obviously configured in Spring Application Context,
are subject to transactional configuration of such process and therefore don't need to be explicitly configured by Spring Integration to support transactions.
The transaction could and should be initiated by such process through standard Transaction support provided by Spring and Spring Integration message flow will honor
transactional semantics of the components naturally because it is Spring configured. For example; A Gateway or ServiceActivator methods could
be annotated with @Transactional or TransactionInterceptor could be configured in XML configuration
with point-cut expression pointing to specific methods that should be transactional.
The bottom line you have full control over transaction configuration and boundaries in these scenarios.
However, things are a bit different when it comes to Message flows initiated by the DAEMON process (Category 2). Although configured by the developer these flows do not directly involve human or some other process to be initiated. These are trigger-based flows that are initiated by a trigger process (DAEMON process) based on the configuration of such process. For example, we could have a Scheduler initiating a message flow every Friday night of every week. We can also configure a trigger that initiates a Message flow every second, etc. So, we obviously need the same way to let these trigger-based processes know of our intention to make these Message flows transactional so Transaction context could be created whenever a new Message flow is initiated. In other words we need to expose some Transaction configuration, but ONLY enough to delegate to Transaction support already provided by Spring (as we do in other scenarios).
Spring Integration provides transactional support for Pollers. Pollers are a special case comoponents becouse we can call receive() within that poller task against a resource that is itself transactional thus including receive() call in the the boundaries of the Transaction allowing it to be rolled back in case of a task failure. If we were to add the same support for channels, the added transactions would affect all downstream components starting with that send() call. That is providing a rather wide scope for transaction demarcation without any strong reason especially when Spring already provides several way to address transactional needs of any component downstream. However the receive() method being included in a transaction boundary is the "strong reason" for pollers.
Any time you configure a Poller you can provide transactional configuration via transactional element and its attributes:
<poller max-messages-per-poll="1" fixed-rate="1000"> <transactional transaction-manager="txManager" isolation="DEFAULT" propagation="REQUIRED" read-only="true" timeout="1000"/> </poller>
As you can see this configuration looks evry similar to native Spring transaction configuration. You must still provide reference to Transaction manager and specify
transaction attributes or rely on defauls (e.g., if 'transaction-manager'' attribute is not specified then it will default to the bean with the name 'transactionManager').
Internally the process would be wrapped in the Spring's native Transaction where TransactionInterceptor is responsible to handle transactions.
For more information on how to configure Transaction Manager, the types of Transaction Managers (e.g., JTA, Datasource etc.) and other details related to
transaction configuration please refer to Spring's Reference manual (Chapter 10 - Transaction Management).
With the above configuration all Message flows initiated by this poller will be transactional. For more information and details on Poller's transactional configuration please refer to section - 21.1.1. Polling and Transactions.
There times when besides transaction several more cross cutting concerns needs to be addressed when running Poller. To help with that, Poller element defines <advice-chain> sub-element which allows you to define a custom chain of Advices to be applied on the Poller. (see section 4.4 for more details) In Spring Integration 2.0 Poller went through the major refactoring effort and is now using proxy mechanism to address transactional concerns as well as other cross cutting concerns, one of the significant changes evolving from this effort is that we made <transactional> and <advice-chain> elements mutually exclusive. The rational behind this is; If you need more then one advice, and one of them is Transaction advice, then you can simply include it in the <advice-chain> with the same convenience as before but with much more control since you now have an option to position any advice in the desired order.
<poller max-messages-per-poll="1" fixed-rate="10000"> <advice-chain> <ref bean="txAdvice"/> <ref bean="someAotherAdviceBean" /> <beans:bean class="foo.bar.SampleAdvice"/> </advice-chain> </poller> <tx:advice id="txAdvice" transaction-manager="txManager"> <tx:attributes> <tx:method name="get*" read-only="true"/> <tx:method name="*"/> </tx:attributes> </tx:advice>
As yo can see from the example above, we have provided a very basic XML-based configuration of Spring Transaction advice - "txAdvice" and included it within the <advice-chain> defined by the Poller. And if you only need to address transactional concerns of the Poller, then you can still use <transactional> element as a convinience.
Another important factor that needs to be understood is the boundaries of the Transactions within the Message flow. When transaction is started, transaction context is bound to the current thread. So regardless of how many endpoints and channels you have in your Message flow you transaction context will be preserved as long as you are ensuring that the flow continues on the same thread. As soon as you break it by introducing a Pollable Channel or Executor Channel or initiate a new thread manually in some service, the Transactional boundary will be broken as well. Essentially the Transaction will END right there and if successfull hand of happened between the threads, the flow would be considered a success and COMMIT signal would be sent even though the flow might still result in the exception somewhere downstream. If such flow was synchronous the exception would be thrown back to the initiator of the Message flow who is also the initiator of the transactional context and transaction would result in a ROLLBACK.
Spring Integration provides integration with the Spring Security project to allow role based security checks to be applied to channel send and receive invocations.
Spring Integration provides the interceptor ChannelSecurityInterceptor, which extends
AbstractSecurityInterceptor and intercepts send and receive calls on the channel. Access decisions
are then made with reference to ChannelInvocationDefinitionSource which provides the definition of
the send and receive security constraints. The interceptor requires that a valid SecurityContext
has been established by authenticating with Spring Security, see the Spring Security reference documentation for details.
Namespace support is provided to allow easy configuration of security constraints. This consists of the secured channels tag which allows
definition of one or more channel name patterns in conjunction with a definition of the security configuration for send and receive. The pattern
is a java.util.regexp.Pattern.
<?xml version="1.0" encoding="UTF-8"?> <beans:beans xmlns="http://www.springframework.org/schema/integration" xmlns:si-security="http://www.springframework.org/schema/integration/security" xmlns:beans="http://www.springframework.org/schema/beans" xmlns:xsi="http://www.w3.org/2001/XMLSchema-instance" xmlns:security="http://www.springframework.org/schema/security" xsi:schemaLocation="http://www.springframework.org/schema/beans http://www.springframework.org/schema/beans/spring-beans-2.0.xsd http://www.springframework.org/schema/security http://www.springframework.org/schema/security/spring-security-2.0.xsd http://www.springframework.org/schema/integration http://www.springframework.org/schema/integration/spring-integration-2.0.xsd http://www.springframework.org/schema/integration/security http://www.springframework.org/schema/integration/security/spring-integration-security-2.0.xsd"> <si-security:secured-channels> <si-security:access-policy pattern="admin.*" send-access="ROLE_ADMIN"/> <si-security:access-policy pattern="user.*" receive-access="ROLE_USER"/> </si-security:secured-channels>
By default the secured-channels namespace element expects a bean named authenticationManager which implements
AuthenticationManager and a bean named accessDecisionManager which implements
AccessDecisionManager. Where this is not the case references to the appropriate beans can be configured
as attributes of the secured-channels element as below.
<si-security:secured-channels access-decision-manager="customAccessDecisionManager" authentication-manager="customAuthenticationManager"> <si-security:access-policy pattern="admin.*" send-access="ROLE_ADMIN"/> <si-security:access-policy pattern="user.*" receive-access="ROLE_USER"/> </si-security:secured-channels>
Starting with the current release of Spring Integration the samples are no longer included with Spring Integration distribution. Instead we've switched to a much simpler collaborative model that should promote better community participation and community contributions. Samples now have a dedicated Git SCM repository and a dedicated JIRA Issue Tracking system. Sample development will also have its own lifecycle which is not dependent on the lifecycle of the framework releases although the repository will still be tagged with each major release for compatibility reasons.
The great benefit to the community is that we can now add more samples and make them available to you right away without waiting for the release to get them out to you. Having its own JIRA that is not tied up to the the actual framework is also a great benefit. You now have a dedicated place to suggest samples as well as report issues with existing samples. Or you may want to submit a sample to us as an attachment through the JIRA and if we believe your sample adds value we would be more then glad to add it to a samples repository properly crediting the author.
To monitor samples development and to get more information on the repository you can visit the following URL: http://git.springsource.org/spring-integration/samples Since we are using Git SCM we should use the proper terminology as well when it comes to the tasks you need to perform to make samples available locally on your machine. For more information on Git SCM please visit their website: http://git-scm.com/
CLONE samples repository. (For those unfamiliar with Git, this is somewhat the equivalent of a checkout.)
This is the first step you should go through. You must have Git installed on your machine. There are many GUI-based products available for many platforms. Simple Google search will let you find them. To clone samples repository from command line:
> mkdir spring-itegration-samples > cd spring-itegration-samples > git clone git://git.springsource.org/spring-integration/samples.git
That is all you need to do. Now you have cloned the entire samples repository. Since samples repository is a live repository, you might want to perform periodic updates to get new samples as well as updates to the existing samples. To get the updates use git PULL command:
> git pull
Submit samples or sample requests
As mentioned earlier, Spring Integration samples have a dedicated JIRA Issue tracking system. To submit new sample request or to submit the actual sample (as an attachment) please visit our JIRA Issue Tracking system: https://jira.springframework.org/browse/INTSAMPLES
The structure of the samples changed as well. With plans for more samples we realized that some samples have different goals then others. While they all share the common goal of showing you how to apply and work with Spring Integration framework, they also defer in areas where some samples were meant to concentrate on a technical use case while others on the business use case and some samples are all about showcasing various techniques that could be applied to address certain scenarios (both technical and business). Categorization of samples will allow us better organize them based on the problem each sample addresses while giving you a simpler way of finding the right sample
Currently there are 4 categories. Within the samples repository each category has its own directory which is named after the category name:
BASIC (samples/basic)
This is a good place to get started. The samples here are technically motivated and demonstrate the bare minimum with regard to configuration and code, to help you to get started quickly by introducing you to the basic concepts, API and configuration of Spring Integration as well as Enterprise Integration Patterns (EIP). For example; If your are looking for an answer on how to implement and wire Service Activator to a Channel or how to use Messaging Gateway to your message exchange or how to get started with using MAIL or TCP/UDP modules etc., this would be the right place to find a good sample. The bottom line is this is a good place to get started.
INTERMEDIATE (samples/intermediate)
This category targets developers who are already familiar with Spring Integration framework (past getting started), but need some more guidance while resolving a more advanced technical problems one might deal with once switch to a Messaging architecture. For example; If you are looking for an answer on how to handle errors in various message exchange scenarios or how to properly configure the Aggregator for the situations where some messages might not ever arrive for aggregation etc,. and any other issue that goes beyond a basic implementation and configuration of a particular component and addresses "what else you can do with it" type of problem this would be the right place to find these type of samples.
ADVANCED (samples/advanced)
This category targets develoopers who are very familiar with Spring Integration framework but looking to extend it to address a specific custom need by using Spring Integration public API. For example; if you are looking for samples showing you how to implement a custom Channel or Consumer (event-based or polling-based), or you trying to figure out what is the most appropriate way to implement custom Bean parser on top of Spring Integration Bean parsers hierarchy when implementing custom name space for a custom component, this would be the right place to look. Here you can also find samples that will help you with Adapter development. Spring Integration comes with an extensive library of adapters to allow you to connect remote systems with Spring Integration messaging framework. However you might have a need to integrate with system for which the core framework does not provide an adapter. So you have to implement your own. This category would include samples showing you how to do it.
APPLICATIONS (samples/applications)
This category targets developers and architects who have a good understanding of the Messaging architecture, EIP and above average understanding of Spring and Spring Integration frameworks and are looking for samples that address a particular business problem. In other words the emphasis of samples in this category is business use cases and how it could be solved via Messaging Architecture and Spring Integration in particular. For example; If you are interested to see how a Loan Broker or Travel Agent process could be implemented and automated via Spring Integration this would be the right place to find these types of samples.
| Important |
|---|---|
|
Remember! Spring Integration is a community driven framework, therefore community participation is IMPORTANT. That includes Samples, so if you can't find what you are looking for let us know. |
Currently Spring Integration comes with quite a few samples and you can only expect more.
To help you better navigate through them, each sample comes with its own readme.txt file which coveres
sevaral details about the sample (e.g., what EIP patterns it addresses, what problem it is trying to solve, how to run sample etc.).
However, certain samples require a more detailed and some times graphical explanation. In these section you'll
find details on samples that we believe require special attention.
In this section, we will review a Loan Broker sample application that is included in the Spring Integration samples. This sample is inspired by one of the samples featured in Gregor Hohpe's Ramblings.
The diagram below represents the entire process
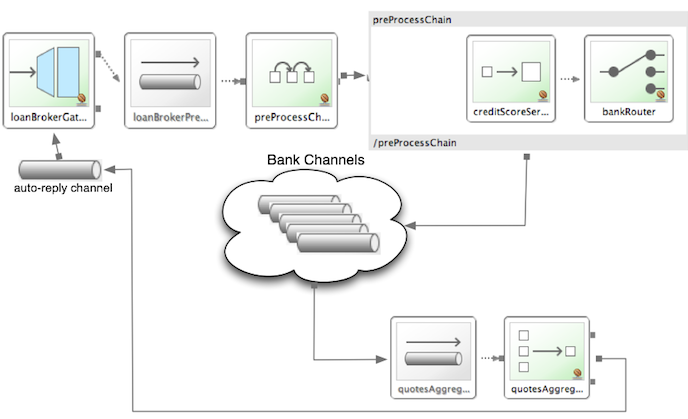
Now lets look at this process in more details
At the core of EIP architecture are the very simple yet powerful concepts of Pipes and Filters and Message. Endpoints (Filters) are connected with one another via Channels (Pipes). The producing endpoint sends Message to the Channel and the Message is retrieved by the Consuming endpoint. This architecture is meant to define various mechanisms that describe How information is exchanged between the endpoints, without any awareness of What those endpoints are or What information they are exchanging, thus providing for a very loosely coupled and flexible collaboration model while also, decoupling Integration concerns from Business concerns. EIP extends this architecture by further defining:
-
The types of pipes (Point-to-Point Channel, Publish-Subscribe Channel, Channel Adapter, etc.)
-
The core filters and patterns around how filters collaborate with pipes (Message Router, Splitters and Aggregators, various Message Transformation patterns, etc.)
The details and variations of this use case are very nicely described in Chapter 9 of the EIP Book, but here is the brief summary; A Consumer while shopping for the best Loan Quote(s) subscribes to the services of a Loan Broker, which handles details such as:
-
Consumer pre-screening (e.g., obtain and review the consumer's Credit history)
-
Determine the most appropriate Banks (e.g., based on consumer's credit history/score)
-
Send a Loan quote request to each selected Bank
-
Collect responses from each Bank
-
Filter responses and determine the best quote(s), based on consumer's requirements.
-
Pass the Loan quote(s) back to the consumer.
Obviously the real process of obtaining a loan quote is a bit more complex, but since our goal here is to demonstrate how Enterprise Integration Patterns are realized and implemented within SI, the use case has been simplified to concentrate only on the Integration aspects of the process. It is not an attempt to give you an advice in consumer finances.
As you can see, by hiring a Loan Broker, the consumer is isolated from the details of the Loan Broker's operations, and each Loan Broker's operations may defer from one another to maintain competitive advantage, so whatever we assemble/implement must be flexible so any changes could be introduced quickly and painlessly. Speaking of change, the Loan Broker sample does not actually talk to any 'imaginary' Banks or Credit bureaus. Those services are stubbed out. Our goal here is to assemble, orchestrate and test the integration aspect of the process as a whole. Only then can we start thinking about wiring such process to the real services. At that time the assembled process and its configuration will not change regardless of the number of Banks a particular Loan Broker is dealing with, or the type of communication media (or protocols) used (JMS, WS, TCP, etc.) to communicate with these Banks.
DESIGN
As you analyze the 6 requirements above you'll quickly see that they all fall into the category of Integration concerns. For example, in the consumer pre-screening step we need to gather additional information about the consumer and the consumer's desires and enrich the loan request with additional meta information. We then have to filter such information to select the most appropriate list of Banks, and so on. Enrich, filter, select – these are all integration concerns for which EIP defines a solution in the form of patterns. SI provides an implementation of these patterns.
Messaging Gateway
The Messaging Gateway pattern provides a simple mechanism to access messaging systems, including our Loan Broker. In SI you define the Gateway as a Plain Old Java Interface (no need to provide an implementation), configure it via the XML <gateway> element or via annotation and use it as any other Spring bean. SI will take care of delegating and mapping method invocations to the Messaging infrastructure by generating a Message (payload is mapped to an input parameter of the method) and sending it to the designated channel.
<gateway id="loanBrokerGateway" default-request-channel="loanBrokerPreProcessingChannel" service-interface="org.springframework.integration.samples.loanbroker.LoanBrokerGateway"> <method name="getBestLoanQuote"> <header name="RESPONSE_TYPE" value="BEST"/> </method> </gateway>
Our current Gateway provides two methods that could be invoked. One that will return the best single quote and another one that will return all quotes. Somehow downstream we need to know what type of reply the caller is looking for. The best way to achieve this in Messaging architecture is to enrich the content of the message with some meta-data describing your intentions. Content Enricher is one of the patterns that addresses this and although Spring Integration does provide a separate configuration element to enrich Message Headers with arbitrary data (we'll see it later), as a convenience, since Gateway element is responsible to construct the initial Message it provides embedded capability to enrich the newly created Message with arbitrary Message Headers. In our example we are adding header RESPONSE_TYPE with value 'BEST'' whenever the getBestQuote() method is invoked. For other method we are not adding any header. Now we can check downstream for an existence of this header and based on its presence and its value we can determine what type of reply the caller is looking for.
Based on the use case we also know there are some pre-screening steps that needs to be performed such as getting and evaluating the consumer's credit score, simply because some premiere Banks will only typically accept quote requests from consumers that meet a minimum credit score requirement. So it would be nice if the Message would be enriched with such information before it is forwarded to the Banks. It would also be nice if when several processes needs to be completed to provide such meta-information, those processes could be grouped in a single unit. In our use case we need to determine credit score and based on the credit score and some rule select a list of Message Channels (Bank Channels) we will sent quote request to.
Composed Message Processor
The Composed Message Processor pattern describes rules around building endpoints that maintain control over message flow which consists of multiple message processors. In Sprig Integration Composed Message Processor pattern is implemented via <chain> element.

As you can see from the above configuration we have a chain with inner header-enricher element which will further enrich the content of the Message with the header CREDIT_SCORE and value that will be determined by the call to a credit service (simple POJO spring bean identified by 'creditBureau' name) and then it will delegate to the Message Router
Message Router
There are several implementation of Message Routing pattern available in Spring Integration. Here we are using router that will determine a list of channels based on evaluating an expression (Spring Expression Language) which will look at the credit score that was determined is the previous step and will select the list of channels from the Map bean with id 'banks' whose values are 'premier' or 'secondary' based o the value of credit score. Once the list of Channels is selected, the Message will be routed to those Channels.
Now, one last thing the Loan Broker needs to to is to receive the loan quotes form the banks, aggregate them by consumer (we don't want to show quotes from one consumer to another), assemble the response based on the consumer's selection criteria (single best quote or all quotes) and reply back to the consumer.
Message Aggregator

An Aggregator pattern describes an endpoint which groups related Messages into a single Message. Criteria and rules can be provided to determine an aggregation and correlation strategy. SI provides several implementations of the Aggregator pattern as well as a convenient name-space based configuration.
<aggregator id="quotesAggregator" input-channel="quotesAggregationChannel" method="aggregateQuotes"> <beans:bean class="org.springframework.integration.samples.loanbroker.LoanQuoteAggregator"/> </aggregator>
Our Loan Broker defines a 'quotesAggregator' bean via the <aggregator> element which provides a default
aggregation and correlation strategy. The default correlation strategy correlates messages based on the $corelationId header
(see Correlation Identifier pattern). What's interesting is that we never provided the value for this header.
It was set earlier by the router automatically, when it generated a separate Message for each Bank channel.
Once the Messages are correlated they are released to the actual Aggregator implementation. Although default Aggregator is provided by SI, its strategy (gather the list of payloads from all Messages and construct a new Message with this List as payload) does not satisfy our requirement. The reason is that our consumer might require a single best quote or all quotes. To communicate the consumer's intention, earlier in the process we set the RESPONSE_TYPE header. Now we have to evaluate this header and return either all the quotes (the default aggregation strategy would work) or the best quote (the default aggregation strategy will not work because we have to determine which loan quote is the best).
Obviously selecting the best quote could be based on complex criteria and would influence the complexity of the aggregator implementation and
configuration, but for now we are making it simple. If consumer wants the best quote we will select a quote with the lowest interest
rate. To accomplish that the LoanQuoteAggregator.java will sort all the quotes and return the first one.
The LoanQuote.java implements Comparable which compares quotes based on the rate attribute.
Once the response Message is created it is sent to the default-reply-channel of the Messaging Gateway
(thus the consumer) which started the process. Our consumer got the Loan Quote!
Conclusion
As you can see a rather complex process was assembled based on POJO (read existing, legacy), light weight, embeddable messaging framework (Spring Integration) with a loosely coupled programming model intended to simplify integration of heterogeneous systems without requiring a heavy-weight ESB-like engine or proprietary development and deployment environment, becouse as a developer you should not be porting your Swing or console-based application to an ESB-like server or implementing proprietary interfaces just because you have an integration concern.
This and other samples in this section are build on top of Enterprise Integration Patterns that meant to describe "building blocks" for YOUR solution but not to be solutions in of themselves. Integration concerns exist in all types of applications (server based and not) and should not require change in design, testing and deployment strategy if such applications need to integrate with one another.
In this section, we will review a Cafe sample application that is included in the Spring Integration samples. This sample is inspired by another sample featured in Gregor Hohpe's Ramblings.
The domain is that of a Cafe, and the basic flow is depicted in the following diagram:
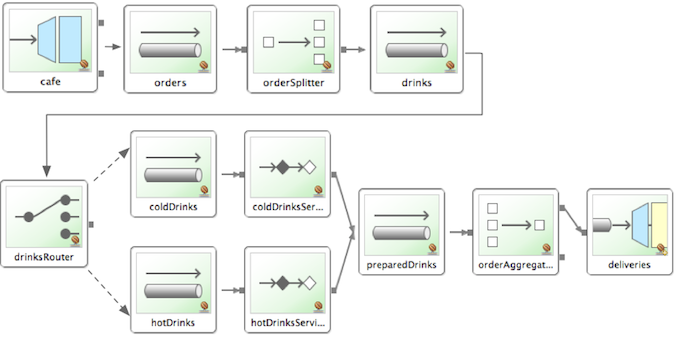
The Order object may contain multiple OrderItems. Once the order
is placed, a Splitter will break the composite order message into a single message per
drink. Each of these is then processed by a Router that determines whether the drink is hot
or cold (checking the OrderItem object's 'isIced' property). The
Barista prepares each drink, but hot and cold drink preparation are handled by two
distinct methods: 'prepareHotDrink' and 'prepareColdDrink'. The prepared drinks are then sent to the Waiter where
they are aggregated into a Delivery object.
Here is the XML configuration:
<?xml version="1.0" encoding="UTF-8"?> <beans:beans xmlns="http://www.springframework.org/schema/integration" xmlns:xsi="http://www.w3.org/2001/XMLSchema-instance" xmlns:beans="http://www.springframework.org/schema/beans" xmlns:stream="http://www.springframework.org/schema/integration/stream" xsi:schemaLocation="http://www.springframework.org/schema/beans http://www.springframework.org/schema/beans/spring-beans-3.0.xsd http://www.springframework.org/schema/integration http://www.springframework.org/schema/integration/spring-integration-2.0.xsd http://www.springframework.org/schema/integration/stream http://www.springframework.org/schema/integration/stream/spring-integration-stream-2.0.xsd"> <gateway id="cafe" service-interface="org.springframework.integration.samples.cafe.Cafe"/> <channel id="orders"/> <splitter input-channel="orders" ref="orderSplitter" method="split" output-channel="drinks"/> <channel id="drinks"/> <router input-channel="drinks" ref="drinkRouter" method="resolveOrderItemChannel"/> <channel id="coldDrinks"> <queue capacity="10"/> </channel> <service-activator input-channel="coldDrinks" ref="barista" method="prepareColdDrink" output-channel="preparedDrinks"/> <channel id="hotDrinks"> <queue capacity="10"/> </channel> <service-activator input-channel="hotDrinks" ref="barista" method="prepareHotDrink" output-channel="preparedDrinks"/> <channel id="preparedDrinks"/> <aggregator input-channel="preparedDrinks" ref="waiter" method="prepareDelivery" output-channel="deliveries"/> <stream:stdout-channel-adapter id="deliveries"/> <beans:bean id="orderSplitter" class="org.springframework.integration.samples.cafe.xml.OrderSplitter"/> <beans:bean id="drinkRouter" class="org.springframework.integration.samples.cafe.xml.DrinkRouter"/> <beans:bean id="barista" class="org.springframework.integration.samples.cafe.xml.Barista"/> <beans:bean id="waiter" class="org.springframework.integration.samples.cafe.xml.Waiter"/> <poller id="poller" default="true" fixed-rate="1000"/> </beans:beans>
As you can see, each Message Endpoint is connected to input and/or output channels. Each endpoint will manage its own Lifecycle (by default endpoints start automatically upon initialization - to prevent that add the "auto-startup" attribute with a value of "false"). Most importantly, notice that the objects are simple POJOs with strongly typed method arguments. For example, here is the Splitter:
public class OrderSplitter { public List<OrderItem> split(Order order) { return order.getItems(); } }
In the case of the Router, the return value does not have to be a MessageChannel
instance (although it can be). As you see in this example, a String-value representing the channel name is
returned instead.
public class DrinkRouter { public String resolveOrderItemChannel(OrderItem orderItem) { return (orderItem.isIced()) ? "coldDrinks" : "hotDrinks"; } }
Now turning back to the XML, you see that there are two <service-activator> elements. Each of these
is delegating to the same Barista instance but different methods: 'prepareHotDrink'
or 'prepareColdDrink' corresponding to the two channels where order items have been routed.
public class Barista { private long hotDrinkDelay = 5000; private long coldDrinkDelay = 1000; private AtomicInteger hotDrinkCounter = new AtomicInteger(); private AtomicInteger coldDrinkCounter = new AtomicInteger(); public void setHotDrinkDelay(long hotDrinkDelay) { this.hotDrinkDelay = hotDrinkDelay; } public void setColdDrinkDelay(long coldDrinkDelay) { this.coldDrinkDelay = coldDrinkDelay; } public Drink prepareHotDrink(OrderItem orderItem) { try { Thread.sleep(this.hotDrinkDelay); System.out.println(Thread.currentThread().getName() + " prepared hot drink #" + hotDrinkCounter.incrementAndGet() + " for order #" + orderItem.getOrder().getNumber() + ": " + orderItem); return new Drink(orderItem.getOrder().getNumber(), orderItem.getDrinkType(), orderItem.isIced(), orderItem.getShots()); } catch (InterruptedException e) { Thread.currentThread().interrupt(); return null; } } public Drink prepareColdDrink(OrderItem orderItem) { try { Thread.sleep(this.coldDrinkDelay); System.out.println(Thread.currentThread().getName() + " prepared cold drink #" + coldDrinkCounter.incrementAndGet() + " for order #" + orderItem.getOrder().getNumber() + ": " + orderItem); return new Drink(orderItem.getOrder().getNumber(), orderItem.getDrinkType(), orderItem.isIced(), orderItem.getShots()); } catch (InterruptedException e) { Thread.currentThread().interrupt(); return null; } } }
As you can see from the code excerpt above, the barista methods have different delays (the hot drinks take 5
times as long to prepare). This simulates work being completed at different rates. When the
CafeDemo 'main' method runs, it will loop 100 times sending a single hot drink and a
single cold drink each time. It actually sends the messages by invoking the 'placeOrder' method on the Cafe
interface. Above, you will see that the <gateway> element is specified in the configuration file. This
triggers the creation of a proxy that implements the given 'service-interface' and connects it to a channel.
The channel name is provided on the @Gateway annotation of the Cafe interface.
public interface Cafe { @Gateway(requestChannel="orders") void placeOrder(Order order); }
Finally, have a look at the main() method of the CafeDemo itself.
public static void main(String[] args) { AbstractApplicationContext context = null; if (args.length > 0) { context = new FileSystemXmlApplicationContext(args); } else { context = new ClassPathXmlApplicationContext("cafeDemo.xml", CafeDemo.class); } Cafe cafe = (Cafe) context.getBean("cafe"); for (int i = 1; i <= 100; i++) { Order order = new Order(i); order.addItem(DrinkType.LATTE, 2, false); order.addItem(DrinkType.MOCHA, 3, true); cafe.placeOrder(order); } }
| Tip |
|---|---|
To run this sample as well as 8 others, refer to the README.txt within the "samples" directory
of the main distribution as described at the beginning of this chapter.
|
When you run cafeDemo, you will see that the cold drinks are initially prepared more quickly than the hot drinks. Because there is an aggregator, the cold drinks are effectively limited by the rate of the hot drink preparation. This is to be expected based on their respective delays of 1000 and 5000 milliseconds. However, by configuring a poller with a concurrent task executor, you can dramatically change the results. For example, you could use a thread pool executor with 5 workers for the hot drink barista while keeping the cold drink barista as it is:
<service-activator input-channel="hotDrinks" ref="barista" method="prepareHotDrink" output-channel="preparedDrinks"/> <service-activator input-channel="hotDrinks" ref="barista" method="prepareHotDrink" output-channel="preparedDrinks"> <poller task-executor="pool" fixed-rate="1000"/> </service-activator> <task:executor id="pool" pool-size="5"/>
Also, notice that the worker thread name is displayed with each invocation. You will see that the hot drinks are prepared by the task-executor threads. If you provide a much shorter poller interval (such as 100 milliseconds), then you will notice that occasionally it throttles the input by forcing the task-scheduler (the caller) to invoke the operation.
| Note |
|---|---|
| In addition to experimenting with the poller's concurrency settings, you can also add the 'transactional' sub-element and then refer to any PlatformTransactionManager instance within the context. |
The xml messaging sample in the org.springframework.integration.samples.xml illustrates how to use some of the provided components which deal with xml payloads. The sample uses the idea of processing an order for books represented as xml.
First the order is split into a number of messages, each one representing a single order item using the XPath splitter component.
<si-xml:xpath-splitter id="orderItemSplitter" input-channel="ordersChannel" output-channel="stockCheckerChannel" create-documents="true"> <si-xml:xpath-expression expression="/orderNs:order/orderNs:orderItem" namespace-map="orderNamespaceMap" /> </si-xml:xpath-splitter>
A service activator is then used to pass the message into a stock checker POJO. The order item document is enriched with information
from the stock checker about order item stock level. This enriched order item message is then used to route the message. In the
case where the order item is in stock the message is routed to the warehouse. The XPath router makes use of a
MapBasedChannelResolver which maps the XPath evaluation result to a channel reference.
<si-xml:xpath-router id="instockRouter" channel-resolver="mapChannelResolver" input-channel="orderRoutingChannel" resolution-required="true"> <si-xml:xpath-expression expression="/orderNs:orderItem/@in-stock" namespace-map="orderNamespaceMap" /> </si-xml:xpath-router> <bean id="mapChannelResolver" class="org.springframework.integration.channel.MapBasedChannelResolver"> <property name="channelMap"> <map> <entry key="true" value-ref="warehouseDispatchChannel" /> <entry key="false" value-ref="outOfStockChannel" /> </map> </property> </bean>
Where the order item is not in stock the message is transformed using xslt into a format suitable for sending to the supplier.
<si-xml:xslt-transformer input-channel="outOfStockChannel" output-channel="resupplyOrderChannel" xsl-resource="classpath:org/springframework/integration/samples/xml/bigBooksSupplierTransformer.xsl"/>
Spring Integration offers a number of configuration options. Which option you choose depends upon your particular needs and at what level you prefer to work. As with the Spring framework in general, it is also possible to mix and match the various techniques according to the particular problem at hand. For example, you may choose the XSD-based namespace for the majority of configuration combined with a handful of objects that are configured with annotations. As much as possible, the two provide consistent naming. XML elements defined by the XSD schema will match the names of annotations, and the attributes of those XML elements will match the names of annotation properties. Direct usage of the API is of course always an option, but we expect that most users will choose one of the higher-level options, or a combination of the namespace-based and annotation-driven configuration.
Spring Integration components can be configured with XML elements that map directly to the terminology and concepts of enterprise integration. In many cases, the element names match those of the Enterprise Integration Patterns.
To enable Spring Integration's core namespace support within your Spring configuration files, add the following namespace reference and schema mapping in your top-level 'beans' element:
<beans xmlns="http://www.springframework.org/schema/beans" xmlns:xsi="http://www.w3.org/2001/XMLSchema-instance" xmlns:integration="http://www.springframework.org/schema/integration" xsi:schemaLocation="http://www.springframework.org/schema/beans http://www.springframework.org/schema/beans/spring-beans-3.0.xsd http://www.springframework.org/schema/integration http://www.springframework.org/schema/integration/spring-integration-2.0.xsd">
You can choose any name after "xmlns:"; integration is used here for clarity, but you might prefer a shorter abbreviation. Of course if you are using an XML-editor or IDE support, then the availability of auto-completion may convince you to keep the longer name for clarity. Alternatively, you can create configuration files that use the Spring Integration schema as the primary namespace:
<beans:beans xmlns="http://www.springframework.org/schema/integration" xmlns:xsi="http://www.w3.org/2001/XMLSchema-instance" xmlns:beans="http://www.springframework.org/schema/beans" xsi:schemaLocation="http://www.springframework.org/schema/beans http://www.springframework.org/schema/beans/spring-beans-3.0.xsd http://www.springframework.org/schema/integration http://www.springframework.org/schema/integration/spring-integration-2.0.xsd">
When using this alternative, no prefix is necessary for the Spring Integration elements. On the other hand, if you want to define a generic Spring "bean" within the same configuration file, then a prefix would be required for the bean element (<beans:bean ... />). Since it is generally a good idea to modularize the configuration files themselves based on responsibility and/or architectural layer, you may find it appropriate to use the latter approach in the integration-focused configuration files, since generic beans are seldom necessary within those same files. For purposes of this documentation, we will assume the "integration" namespace is primary.
Many other namespaces are provided within the Spring Integration distribution. In fact, each adapter type (JMS, File, etc.) that provides namespace support defines its elements within a separate schema. In order to use these elements, simply add the necessary namespaces with an "xmlns" entry and the corresponding "schemaLocation" mapping. For example, the following root element shows several of these namespace declarations:
<?xml version="1.0" encoding="UTF-8"?> <beans xmlns="http://www.springframework.org/schema/beans" xmlns:xsi="http://www.w3.org/2001/XMLSchema-instance" xmlns:integration="http://www.springframework.org/schema/integration" xmlns:file="http://www.springframework.org/schema/integration/file" xmlns:jms="http://www.springframework.org/schema/integration/jms" xmlns:mail="http://www.springframework.org/schema/integration/mail" xmlns:rmi="http://www.springframework.org/schema/integration/rmi" xmlns:ws="http://www.springframework.org/schema/integration/ws" xsi:schemaLocation="http://www.springframework.org/schema/beans http://www.springframework.org/schema/beans/spring-beans-3.0.xsd http://www.springframework.org/schema/integration http://www.springframework.org/schema/integration/spring-integration-2.0.xsd http://www.springframework.org/schema/integration/file http://www.springframework.org/schema/integration/file/spring-integration-file-2.0.xsd http://www.springframework.org/schema/integration/jms http://www.springframework.org/schema/integration/jms/spring-integration-jms-2.0.xsd http://www.springframework.org/schema/integration/mail http://www.springframework.org/schema/integration/mail/spring-integration-mail-2.0.xsd http://www.springframework.org/schema/integration/rmi http://www.springframework.org/schema/integration/rmi/spring-integration-rmi-2.0.xsd http://www.springframework.org/schema/integration/ws http://www.springframework.org/schema/integration/ws/spring-integration-ws-2.0.xsd"> ... </beans>
The reference manual provides specific examples of the various elements in their corresponding chapters. Here, the main thing to recognize is the consistency of the naming for each namespace URI and schema location.
In Spring Integration, the ApplicationContext plays the central role of a Message Bus, and there are only a couple configuration options to be aware of. First, you may want to control the central TaskScheduler instance. You can do so by providing a single bean with the name "taskScheduler". This is also defined as a constant:
IntegrationContextUtils.TASK_SCHEDULER_BEAN_NAME
By default Spring Integration uses the SimpleTaskScheduler implementation. That in turn
just delegates to any instance of Spring's TaskExecutor abstraction. Therefore,
it's rather trivial to supply your own configuration. The "taskScheduler" bean is then responsible for managing
all pollers. The TaskScheduler will startup automatically by default. If you provide your own instance of
SimpleTaskScheduler however, you can set the 'autoStartup' property to false instead.
When Polling Consumers provide an explicit task-executor reference in their configuration, the invocation of the handler methods will happen within that executor's thread pool and not the main scheduler pool. However, when no task-executor is provided for an endpoint's poller, it will be invoked by one of the main scheduler's threads.
| Note |
|---|---|
| An endpoint is a Polling Consumer if its input channel is one of the queue-based (i.e. pollable) channels. On the other hand, Event Driven Consumers are those whose input channels have dispatchers instead of queues (i.e. they are subscribable). Such endpoints have no poller configuration since their handlers will be invoked directly. |
The next section will describe what happens if Exceptions occur within the asynchronous invocations.
As described in the overview at the very beginning of this manual, one of the main motivations behind a Message-oriented framework like Spring Integration is to promote loose-coupling between components. The Message Channel plays an important role in that producers and consumers do not have to know about each other. However, the advantages also have some drawbacks. Some things become more complicated in a very loosely coupled environment, and one example is error handling.
When sending a Message to a channel, the component that ultimately handles that Message may or may not be operating within the same thread as the sender. If using a simple default DirectChannel (with the <channel> element that has no <queue> sub-element and no 'task-executor' attribute), the Message-handling will occur in the same thread as the Message-sending. In that case, if an Exception is thrown, it can be caught by the sender (or it may propagate past the sender if it is an uncaught RuntimeException). So far, everything is fine. This is the same behavior as an Exception-throwing operation in a normal call stack. However, when adding the asynchronous aspect, things become much more complicated. For instance, if the 'channel' element does provide a 'queue' sub-element, then the component that handles the Message will be operating in a different thread than the sender. The sender may have dropped the Message into the channel and moved on to other things. There is no way for the Exception to be thrown directly back to that sender using standard Exception throwing techniques. Instead, to handle errors for asynchronous processes requires an asynchronous error-handling mechanism as well.
Spring Integration supports error handling for its components by publishing errors to a Message Channel. Specifically, the Exception will become the payload of a Spring Integration Message. That Message will then be sent to a Message Channel that is resolved in a way that is similar to the 'replyChannel' resolution. First, if the request Message being handled at the time the Exception occurred contains an 'errorChannel' header (the header name is defined in the constant: MessageHeaders.ERROR_CHANNEL), the ErrorMessage will be sent to that channel. Otherwise, the error handler will send to a "global" channel whose bean name is "errorChannel" (this is also defined as a constant: IntegrationContextUtils.ERROR_CHANNEL_BEAN_NAME).
Whenever relying on Spring Integration's XML namespace support, a default "errorChannel" bean will be created behind the scenes. However, you can just as easily define your own if you want to control the settings.
<channel id="errorChannel"> <queue capacity="500"/> </channel>
| Note |
|---|---|
| The default "errorChannel" is a PublishSubscribeChannel. |
The most important thing to understand here is that the messaging-based error handling will only apply to Exceptions that are thrown by a Spring Integration task that is executing within a TaskExecutor. This does not apply to Exceptions thrown by a handler that is operating within the same thread as the sender (e.g. through a DirectChannel as described above).
| Note |
|---|---|
When Exceptions occur in a scheduled poller task's execution, those exceptions will be wrapped in
ErrorMessages and sent to the 'errorChannel' as well.
|
To enable global error handling, simply register a handler on that channel. For example, you can configure
Spring Integration's ErrorMessageExceptionTypeRouter as the handler of an endpoint
that is subscribed to the 'errorChannel'. That router can then spread the error messages across multiple
channels based on Exception type.
In addition to the XML namespace support for configuring Message Endpoints, it is also possible to use
annotations. First, Spring Integration provides the class-level @MessageEndpoint
as a stereotype annotation meaning that is itself annotated with Spring's @Component
annotation and therefore is recognized automatically as a bean definition when using Spring component-scanning.
Even more importantly are the various Method-level annotations that indicate the annotated method is capable of handling a message. The following example demonstrates both:
@MessageEndpoint public class FooService { @ServiceActivator public void processMessage(Message message) { ... } }
Exactly what it means for the method to "handle" the Message depends on the particular annotation. The following are available with Spring Integration, and the behavior of each is described in its own chapter or section within this reference: @Transformer, @Router, @Splitter, @Aggregator, @ServiceActivator, and @ChannelAdapter.
| Note |
|---|---|
| The @MessageEndpoint is not required if using XML configuration in combination with annotations. If you want to configure a POJO reference from the "ref" attribute of a <service-activator/> element, it is sufficient to provide the method-level annotations. In that case, the annotation prevents ambiguity even when no "method" attribute exists on the <service-activator/> element. |
In most cases, the annotated handler method should not require the Message type as its
parameter. Instead, the method parameter type can match the message's payload type.
public class FooService { @ServiceActivator public void bar(Foo foo) { ... } }
When the method parameter should be mapped from a value in the MessageHeaders, another
option is to use the parameter-level @Header annotation. In general, methods
annotated with the Spring Integration annotations can either accept the Message itself, the
message payload, or a header value (with @Header) as the parameter. In fact, the method can accept a combination,
such as:
public class FooService { @ServiceActivator public void bar(String payload, @Header("x") int valueX, @Header("y") int valueY) { ... } }
There is also a @Headers annotation that provides all of the Message headers as a Map:
public class FooService { @ServiceActivator public void bar(String payload, @Headers Map<String, Object> headerMap) { ... } }
For several of these annotations, when a Message-handling method returns a non-null value, the endpoint will attempt to send a reply. This is consistent across both configuration options (namespace and annotations) in that such an endpoint's output channel will be used if available, and the REPLY_CHANNEL message header value will be used as a fallback.
| Tip |
|---|---|
| The combination of output channels on endpoints and the reply channel message header enables a pipeline approach where multiple components have an output channel, and the final component simply allows the reply message to be forwarded to the reply channel as specified in the original request message. In other words, the final component depends on the information provided by the original sender and can dynamically support any number of clients as a result. This is an example of Return Address. |
In addition to the examples shown here, these annotations also support inputChannel and outputChannel properties.
public class FooService { @ServiceActivator(inputChannel="input", outputChannel="output") public void bar(String payload, @Headers Map<String, Object> headerMap) { ... } }
That provides a pure annotation-driven alternative to the XML configuration. However, it is generally recommended to use XML for the endpoints, since it is easier to keep track of the overall configuration in a single, external location (and besides the namespace-based XML configuration is not very verbose). If you do prefer to provide channels with the annotations however, you just need to enable a SI Annotations BeanPostProcessor. The following element should be added:
<int:annotation-config/>
| Note |
|---|---|
When configuring the "inputChannel" and "outputChannel" with annotations, the "inputChannel"
must be a reference to a SubscribableChannel instance.
Otherwise, it would be necessary to also provide the full poller configuration via annotations, and those
settings (e.g. the trigger for scheduling the poller) should be externalized rather than hard-coded within
an annotation. If the input channel that you want to receive Messages from is indeed a
PollableChannel instance, one option to consider is the Messaging Bridge.
Spring Integration's "bridge" element can be used to connect a PollableChannel directly to a
SubscribableChannel. Then, the polling metadata is externally configured, but the annotation option is
still available. For more detail see Section 2.3, “Messaging Bridge”.
|
Spring Integration implements a flexible facility to map Messages to Methods and their arguments without providing extra configuration by relying on some default rules as well as defining certain conventions.
Single un-annotated parameter (object or primitive) which is not a Map/Properties with non-void return type;
public String foo(Object o);
Details:
Input parameter is Message Payload. If parameter type is not compatible with Message Payload an attempt will be made to convert it using Conversion Service provided by Spring 3.0. The return value will be incorporated as a Payload of the returned Message
Single un-annotated parameter (object or primitive) which is not a Map/Properties with Message return type;
public Message foo(Object o);
Details:
Input parameter is Message Payload. If parameter type is not compatible with Message Payload an attempt will be made to convert it using Conversion Service provided by Spring 3.0. The return value is a newly constructed Message that will be sent to the next destination.
Single parameter which is a Message or its subclass with arbitrary object/primitive return type;
public int foo(Message msg);
Details:
Input parameter is Message itself. The return value will become a payload of the Message that will be sent to the next destination.
Single parameter which is a Message or its subclass with Message or its subclass as a return type;
public Message foo(Message msg);
Details:
Input parameter is Message itself. The return value is a newly constructed Message that will be sent to the next destination.
Single parameter which is of type Map or Properties with Message as a return type;
public Message foo(Map m);
Details:
This one is a bit interesting. Although at first it might seem like an easy mapping straight to Message Headers, the preference is always given to a Message Payload. This means that if Message Payload is of type Map, this input argument will represent Message Payload. However if Message Payload is not of type Map, then no conversion via Conversion Service will be attempted and the input argument will be mapped to Message Headers.
Two parameters where one of them is arbitrary non-Map/Properties type object/primitive and another is Map/Properties type object (regardless of the return)
public Message foo(Map h, <T> t);
Details:
This combination contains two input parameters where one of them is of type Map. Naturally the non-Map parameters (regardless of the order) will be mapped to a Message Payload and the Map/Properties (regardless of the order) will be mapped to Message Headers giving you a nice POJO way of interacting with Message structure.
No parameters (regardless of the return)
public String foo();
Details:
This Message Handler method will be invoked based on the Message sent to the input channel this handler is hooked up to, however no Message data will be mapped, thus making Message act as event/trigger to invoke such handlerThe output will be mapped according to the rules above
No parameters, void return
public void foo();
Details:
Same as above, but no output
Annotation based mappings
Annotation based mapping is the safest and least ambiguous approach to map Messages to Methods. There wil be many pointers to annotation based mapping throughout this manual, however here are couple of examples:
public String foo(@Payload String s, @Header("foo") String b)
Very simple and explicite way of mapping Messages to method. As you'll see later on without annotation this signature would result in the ambiguous condition, however by explicitly mapping first argument to a Message Payload and second argument to a value of the 'foo' Message Header we have avoided ambiguity.
public String foo(@Payload String s, @RequestParam("foo") String b)
Looks almost identical to the previous example, however @RequestMapping or any other non-SI mapping annotation is irrelevant and therefore will be ignored leaving the second parameter unmapped. And although the second parameters could easily be mapped to a Payload, there can only be one Payload, therefore this method becomes ambiguous.
public String foo(String s, @Header("foo") String b)
The same as above. The only difference is that the first argument will be mapped to Message Payload implicitly.
public String foo(@Headers Map m, @Header("foo")Map f, @Header("bar") String bar)
Yet another signature that would definitely be treated as ambiguous because it has more then 2 arguments, plus two of them are Maps, however with annotation-based mapping ambiguity is easily avoided. In this example the first argument is mapped to all the Message Headers, while second and third argument map to the values of Message Headers 'foo' and 'bar'.
Multiple parameters:
Multiple parameters could create a lot of ambiguity with regards to determining the appropriate mappings. The general advice is to annotate your method parameters with @Payload and/or @Header/@Headers Below are some of the examples of ambiguous conditions which result in exception being raised.
public String foo(String s, int i)
- the two parameters are equal in weight, therefore no way to determine which one is a payload and what to do with another.
public String foo(String s, Map m, String b)
- almost the same as above. Although Map could be easily mapped to Message Headers, there is no way to determine what to do with two Strings.
public String foo(Map m, Map f)
- although one might argue that one Map could be mapped to Message Payload and another one to Message Headers, it would be unreasonable to rely on the order (e.g., first is Payload, second Headers)
| Tip |
|---|---|
| Basically any method signature with more then one method argument which is not (Map, <T>) and those parameters are not annotated will result in the ambiguous condition thus triggering an exception. |
Multiple methods:
Message Handlers with multiple methods are mapped based on the same rules that are described above, however some scenarios might still look confusing.
Multiple methods (same or different name) with legal (mappable) signatures:
public class Foo{ public String foo(String str, Map m); public String foo(Map m) }
As you can see, the Message could be mapped to either method. The first method would be invoked where Message Payload could be mapped to 'str' and Message Headers could be mapped to 'm'. The second method could easily also be a candidate where only Message Headers are mapped to 'm'. To make meters worse both methods have the same name which at first might look very ambiguous considering the following configuration:
<si:service-activator input-channel="input" output-channel="output" method="foo"> <bean class="org.bar.Foo"/> </si:service-activator>
At this point it would be important to understand Spring Integration mapping Conventions where at the very core, mappings are based on Payload first and everything else next. In other words the method whose argument could be mapped to a Payload will take precedence over all other methods.
On the other hand let's look at slightly different example:
public class Foo{ public String foo(String str, Map m); public String foo(String str) }
If you look at it you can probably see a truly an ambiguous condition. In this example since both methods have signatures that could be mapped to a Message Payload. They also have the same name. Such handler will trigger an exception. However if method names were different you could influence the mapping with 'method' attribute (see below):
public class Foo{ public String foo(String str, Map m); public String bar(String str) }
<si:service-activator input-channel="input" output-channel="output" method="bar"> <bean class="org.bar.Foo"/> </si:service-activator>
Now there is no ambiguity since the configuration explicitly maps to 'bar' method which has no name conflicts.
The definitive source of information about Spring Integration is the Spring Integration Home at http://www.springsource.org. That site serves as a hub of information and is the best place to find up-to-date announcements about the project as well as links to articles, blogs, and new sample applications.