4.0.4.RELEASE
Copyright © 2004-2015
Table of Contents
- I. Preface
- II. Getting Started
- 1. Introduction
- 2. What’s new in Spring Security 4.0
- 3. Java Configuration
- 4. Security Namespace Configuration
- 4.1. Introduction
- 4.2. Getting Started with Security Namespace Configuration
- 4.3. Advanced Web Features
- 4.4. Method Security
- 4.5. The Default AccessDecisionManager
- 4.6. The Authentication Manager and the Namespace
- 5. Sample Applications
- 6. Spring Security Community
- III. Architecture and Implementation
- 7. Technical Overview
- 8. Core Services
- IV. Testing
- V. Web Application Security
- 11. The Security Filter Chain
- 12. Core Security Filters
- 13. Servlet API integration
- 14. Basic and Digest Authentication
- 15. Remember-Me Authentication
- 16. Cross Site Request Forgery (CSRF)
- 17. Security HTTP Response Headers
- 18. Session Management
- 19. Anonymous Authentication
- 20. WebSocket Security
- VI. Authorization
- VII. Additional Topics
- 24. Domain Object Security (ACLs)
- 25. Pre-Authentication Scenarios
- 26. LDAP Authentication
- 26.1. Overview
- 26.2. Using LDAP with Spring Security
- 26.3. Configuring an LDAP Server
- 26.4. Implementation Classes
- 26.5. Active Directory Authentication
- 27. JSP Tag Libraries
- 28. Java Authentication and Authorization Service (JAAS) Provider
- 29. CAS Authentication
- 30. X.509 Authentication
- 31. Run-As Authentication Replacement
- 32. Spring Security Crypto Module
- 33. Concurrency Support
- 34. Spring MVC Integration
- VIII. Spring Data Integration
- IX. Appendix
- 37. Security Database Schema
- 38. The Security Namespace
- 38.1. Web Application Security
- 38.1.1. <debug>
- 38.1.2. <http>
- 38.1.3. <access-denied-handler>
- 38.1.4. <headers>
- 38.1.5. <cache-control>
- 38.1.6. <hsts>
- 38.1.7. <frame-options>
- 38.1.8. <xss-protection>
- 38.1.9. <content-type-options>
- 38.1.10. <header>
- 38.1.11. <anonymous>
- 38.1.12. <csrf>
- 38.1.13. <custom-filter>
- 38.1.14. <expression-handler>
- 38.1.15. <form-login>
- 38.1.16. <http-basic>
- 38.1.17. <http-firewall> Element
- 38.1.18. <intercept-url>
- 38.1.19. <jee>
- 38.1.20. <logout>
- 38.1.21. <openid-login>
- 38.1.22. <attribute-exchange>
- 38.1.23. <openid-attribute>
- 38.1.24. <port-mappings>
- 38.1.25. <port-mapping>
- 38.1.26. <remember-me>
- 38.1.27. <request-cache> Element
- 38.1.28. <session-management>
- 38.1.29. <concurrency-control>
- 38.1.30. <x509>
- 38.1.31. <filter-chain-map>
- 38.1.32. <filter-chain>
- 38.1.33. <filter-security-metadata-source>
- 38.2. WebSocket Security
- 38.3. Authentication Services
- 38.4. Method Security
- 38.4.1. <global-method-security>
- 38.4.2. <after-invocation-provider>
- 38.4.3. <pre-post-annotation-handling>
- 38.4.4. <invocation-attribute-factory>
- 38.4.5. <post-invocation-advice>
- 38.4.6. <pre-invocation-advice>
- 38.4.7. Securing Methods using
- 38.4.8. <intercept-methods>
- 38.4.9. <method-security-metadata-source>
- 38.4.10. <protect>
- 38.5. LDAP Namespace Options
- 39. Spring Security Dependencies
Spring Security is a powerful and highly customizable authentication and access-control framework. It is the de-facto standard for securing Spring-based applications.
Spring Security provides a comprehensive security solution for Java EE-based enterprise software applications. As you will discover as you venture through this reference guide, we have tried to provide you a useful and highly configurable security system.
Security is an ever-moving target, and it’s important to pursue a comprehensive, system-wide approach. In security circles we encourage you to adopt "layers of security", so that each layer tries to be as secure as possible in its own right, with successive layers providing additional security. The "tighter" the security of each layer, the more robust and safe your application will be. At the bottom level you’ll need to deal with issues such as transport security and system identification, in order to mitigate man-in-the-middle attacks. Next you’ll generally utilise firewalls, perhaps with VPNs or IP security to ensure only authorised systems can attempt to connect. In corporate environments you may deploy a DMZ to separate public-facing servers from backend database and application servers. Your operating system will also play a critical part, addressing issues such as running processes as non-privileged users and maximising file system security. An operating system will usually also be configured with its own firewall. Hopefully somewhere along the way you’ll be trying to prevent denial of service and brute force attacks against the system. An intrusion detection system will also be especially useful for monitoring and responding to attacks, with such systems able to take protective action such as blocking offending TCP/IP addresses in real-time. Moving to the higher layers, your Java Virtual Machine will hopefully be configured to minimize the permissions granted to different Java types, and then your application will add its own problem domain-specific security configuration. Spring Security makes this latter area - application security - much easier.
Of course, you will need to properly address all security layers mentioned above, together with managerial factors that encompass every layer. A non-exhaustive list of such managerial factors would include security bulletin monitoring, patching, personnel vetting, audits, change control, engineering management systems, data backup, disaster recovery, performance benchmarking, load monitoring, centralised logging, incident response procedures etc.
With Spring Security being focused on helping you with the enterprise application security layer, you will find that there are as many different requirements as there are business problem domains. A banking application has different needs from an ecommerce application. An ecommerce application has different needs from a corporate sales force automation tool. These custom requirements make application security interesting, challenging and rewarding.
Please read Part II, “Getting Started”, in its entirety to begin with. This will introduce you to the framework and the namespace-based configuration system with which you can get up and running quite quickly. To get more of an understanding of how Spring Security works, and some of the classes you might need to use, you should then read Part III, “Architecture and Implementation”. The remaining parts of this guide are structured in a more traditional reference style, designed to be read on an as-required basis. We’d also recommend that you read up as much as possible on application security issues in general. Spring Security is not a panacea which will solve all security issues. It is important that the application is designed with security in mind from the start. Attempting to retrofit it is not a good idea. In particular, if you are building a web application, you should be aware of the many potential vulnerabilities such as cross-site scripting, request-forgery and session-hijacking which you should be taking into account from the start. The OWASP web site (http://www.owasp.org/) maintains a top ten list of web application vulnerabilities as well as a lot of useful reference information.
We hope that you find this reference guide useful, and we welcome your feedback and suggestions.
Finally, welcome to the Spring Security community.
The later parts of this guide provide an in-depth discussion of the framework architecture and implementation classes, which you need to understand if you want to do any serious customization. In this part, we’ll introduce Spring Security 3.0, give a brief overview of the project’s history and take a slightly gentler look at how to get started using the framework. In particular, we’ll look at namespace configuration which provides a much simpler way of securing your application compared to the traditional Spring bean approach where you have to wire up all the implementation classes individually.
We’ll also take a look at the sample applications that are available. It’s worth trying to run these and experimenting with them a bit even before you read the later sections - you can dip back into them as your understanding of the framework increases. Please also check out the project website as it has useful information on building the project, plus links to articles, videos and tutorials.
Spring Security provides comprehensive security services for Java EE-based enterprise software applications. There is a particular emphasis on supporting projects built using The Spring Framework, which is the leading Java EE solution for enterprise software development. If you’re not using Spring for developing enterprise applications, we warmly encourage you to take a closer look at it. Some familiarity with Spring - and in particular dependency injection principles - will help you get up to speed with Spring Security more easily.
People use Spring Security for many reasons, but most are drawn to the project after finding the security features of Java EE’s Servlet Specification or EJB Specification lack the depth required for typical enterprise application scenarios. Whilst mentioning these standards, it’s important to recognise that they are not portable at a WAR or EAR level. Therefore, if you switch server environments, it is typically a lot of work to reconfigure your application’s security in the new target environment. Using Spring Security overcomes these problems, and also brings you dozens of other useful, customisable security features.
As you probably know two major areas of application security are "authentication" and "authorization" (or "access-control"). These are the two main areas that Spring Security targets. "Authentication" is the process of establishing a principal is who they claim to be (a "principal" generally means a user, device or some other system which can perform an action in your application)."Authorization" refers to the process of deciding whether a principal is allowed to perform an action within your application. To arrive at the point where an authorization decision is needed, the identity of the principal has already been established by the authentication process. These concepts are common, and not at all specific to Spring Security.
At an authentication level, Spring Security supports a wide range of authentication models. Most of these authentication models are either provided by third parties, or are developed by relevant standards bodies such as the Internet Engineering Task Force. In addition, Spring Security provides its own set of authentication features. Specifically, Spring Security currently supports authentication integration with all of these technologies:
- HTTP BASIC authentication headers (an IETF RFC-based standard)
- HTTP Digest authentication headers (an IETF RFC-based standard)
- HTTP X.509 client certificate exchange (an IETF RFC-based standard)
- LDAP (a very common approach to cross-platform authentication needs, especially in large environments)
- Form-based authentication (for simple user interface needs)
- OpenID authentication
- Authentication based on pre-established request headers (such as Computer Associates Siteminder)
- JA-SIG Central Authentication Service (otherwise known as CAS, which is a popular open source single sign-on system)
- Transparent authentication context propagation for Remote Method Invocation (RMI) and HttpInvoker (a Spring remoting protocol)
- Automatic "remember-me" authentication (so you can tick a box to avoid re-authentication for a predetermined period of time)
- Anonymous authentication (allowing every unauthenticated call to automatically assume a particular security identity)
- Run-as authentication (which is useful if one call should proceed with a different security identity)
- Java Authentication and Authorization Service (JAAS)
- JEE container autentication (so you can still use Container Managed Authentication if desired)
- Kerberos
- Java Open Source Single Sign On (JOSSO) *
- OpenNMS Network Management Platform *
- AppFuse *
- AndroMDA *
- Mule ESB *
- Direct Web Request (DWR) *
- Grails *
- Tapestry *
- JTrac *
- Jasypt *
- Roller *
- Elastic Path *
- Atlassian Crowd *
- Your own authentication systems (see below)
(* Denotes provided by a third party
Many independent software vendors (ISVs) adopt Spring Security because of this significant choice of flexible authentication models. Doing so allows them to quickly integrate their solutions with whatever their end clients need, without undertaking a lot of engineering or requiring the client to change their environment. If none of the above authentication mechanisms suit your needs, Spring Security is an open platform and it is quite simple to write your own authentication mechanism. Many corporate users of Spring Security need to integrate with "legacy" systems that don’t follow any particular security standards, and Spring Security is happy to "play nicely" with such systems.
Irrespective of the authentication mechanism, Spring Security provides a deep set of authorization capabilities. There are three main areas of interest - authorizing web requests, authorizing whether methods can be invoked, and authorizing access to individual domain object instances. To help you understand the differences, consider the authorization capabilities found in the Servlet Specification web pattern security, EJB Container Managed Security and file system security respectively. Spring Security provides deep capabilities in all of these important areas, which we’ll explore later in this reference guide.
Spring Security began in late 2003 as "The Acegi Security System for Spring". A question was posed on the Spring Developers' mailing list asking whether there had been any consideration given to a Spring-based security implementation. At the time the Spring community was relatively small (especially compared with the size today!), and indeed Spring itself had only existed as a SourceForge project from early 2003. The response to the question was that it was a worthwhile area, although a lack of time currently prevented its exploration.
With that in mind, a simple security implementation was built and not released. A few weeks later another member of the Spring community inquired about security, and at the time this code was offered to them. Several other requests followed, and by January 2004 around twenty people were using the code. These pioneering users were joined by others who suggested a SourceForge project was in order, which was duly established in March 2004.
In those early days, the project didn’t have any of its own authentication modules. Container Managed Security was relied upon for the authentication process, with Acegi Security instead focusing on authorization. This was suitable at first, but as more and more users requested additional container support, the fundamental limitation of container-specific authentication realm interfaces became clear. There was also a related issue of adding new JARs to the container’s classpath, which was a common source of end user confusion and misconfiguration.
Acegi Security-specific authentication services were subsequently introduced. Around a year later, Acegi Security became an official Spring Framework subproject. The 1.0.0 final release was published in May 2006 - after more than two and a half years of active use in numerous production software projects and many hundreds of improvements and community contributions.
Acegi Security became an official Spring Portfolio project towards the end of 2007 and was rebranded as "Spring Security".
Today Spring Security enjoys a strong and active open source community. There are thousands of messages about Spring Security on the support forums. There is an active core of developers who work on the code itself and an active community which also regularly share patches and support their peers.
It is useful to understand how Spring Security release numbers work, as it will help you identify the effort (or lack thereof) involved in migrating to future releases of the project. Each release uses a standard triplet of integers: MAJOR.MINOR.PATCH. The intent is that MAJOR versions are incompatible, large-scale upgrades of the API. MINOR versions should largely retain source and binary compatibility with older minor versions, thought there may be some design changes and incompatible updates. PATCH level should be perfectly compatible, forwards and backwards, with the possible exception of changes which are to fix bugs and defects.
The extent to which you are affected by changes will depend on how tightly integrated your code is. If you are doing a lot of customization you are more likely to be affected than if you are using a simple namespace configuration.
You should always test your application thoroughly before rolling out a new version.
You can get hold of Spring Security in several ways. You can download a packaged distribution from the main Spring Security page, download individual jars from the Maven Central repository (or a SpringSource Maven repository for snapshot and milestone releases) or, alternatively, you can build the project from source yourself.
A minimal Spring Security Maven set of dependencies typically looks like the following:
pom.xml.
<dependencies>
<!-- ... other dependency elements ... -->
<dependency>
	<groupId>org.springframework.security</groupId>
	<artifactId>spring-security-web</artifactId>
	<version>4.0.4.RELEASE</version>
</dependency>
<dependency>
	<groupId>org.springframework.security</groupId>
	<artifactId>spring-security-config</artifactId>
	<version>4.0.4.RELEASE</version>
</dependency>
</dependencies>
If you are using additional features like LDAP, OpenID, etc. you will need to also include the appropriate Section 1.4.3, “Project Modules”.
All GA releases (i.e. versions ending in .RELEASE) are deployed to Maven Central, so no additional Maven repositories need to be declared in your pom.
If you are using a SNAPSHOT version, you will need to ensure you have the Spring Snapshot repository defined as shown below:
pom.xml.
<repositories>
<!-- ... possibly other repository elements ... -->
<repository>
	<id>spring-snapshot</id>
	<name>Spring Snapshot Repository</name>
	<url>http://repo.springsource.org/snapshot</url>
</repository>
</repositories>
If you are using a milestone or release candidate version, you will need to ensure you have the Spring Milestone repository defined as shown below:
pom.xml.
<repositories>
<!-- ... possibly other repository elements ... -->
<repository>
	<id>spring-milestone</id>
	<name>Spring Milestone Repository</name>
	<url>http://repo.springsource.org/milestone</url>
</repository>
</repositories>
Spring Security builds against Spring Framework 4.2.5.RELEASE, but should work with 4.0.x. The problem that many users will have is that Spring Security’s transitive dependencies resolve Spring Framework 4.2.5.RELEASE which can cause strange classpath problems.
One (tedious) way to circumvent this issue would be to include all the Spring Framework modules in a <dependencyManagement> section of your pom. An alternative approach is to include the spring-framework-bom within your <dependencyManagement> section of your pom.xml as shown below:
pom.xml.
<dependencyManagement>
	<dependencies>
	<dependency>
		<groupId>org.springframework</groupId>
		<artifactId>spring-framework-bom</artifactId>
		<version>4.2.5.RELEASE</version>
		<type>pom</type>
		<scope>import</scope>
	</dependency>
	</dependencies>
</dependencyManagement>
This will ensure that all the transitive dependencies of Spring Security use the Spring 4.2.5.RELEASE modules.
![[Note]](images/note.png) | Note |
|---|---|
|
This approach uses Maven’s "bill of materials" (BOM) concept and is only available in Maven 2.0.9+. For additional details about how dependencies are resolved refer to Maven’s Introduction to the Dependency Mechanism documentation. |
A minimal Spring Security Gradle set of dependencies typically looks like the following:
build.gradle.
dependencies {
	compile 'org.springframework.security:spring-security-web:4.0.4.RELEASE'
	compile 'org.springframework.security:spring-security-config:4.0.4.RELEASE'
}
If you are using additional features like LDAP, OpenID, etc. you will need to also include the appropriate Section 1.4.3, “Project Modules”.
All GA releases (i.e. versions ending in .RELEASE) are deployed to Maven Central, so using the mavenCentral() repository is sufficient for GA releases.
build.gradle.
repositories {
	mavenCentral()
}
If you are using a SNAPSHOT version, you will need to ensure you have the Spring Snapshot repository defined as shown below:
build.gradle.
repositories {
	maven { url 'https://repo.spring.io/snapshot' }
}
If you are using a milestone or release candidate version, you will need to ensure you have the Spring Milestone repository defined as shown below:
build.gradle.
repositories {
	maven { url 'https://repo.spring.io/milestone' }
}
By default Gradle will use the newest version when resolving transitive versions. This means that often times no additional work is necessary when running Spring Security 4.0.4.RELEASE with Spring Framework 4.2.5.RELEASE. However, at times there can be issues that come up so it is best to mitigate this using Gradle’s ResolutionStrategy as shown below:
build.gradle.
configurations.all {
	resolutionStrategy.eachDependency { DependencyResolveDetails details ->
		if (details.requested.group == 'org.springframework') {
			details.useVersion '4.2.5.RELEASE'
		}
	}
}
This will ensure that all the transitive dependencies of Spring Security use the Spring 4.2.5.RELEASE modules.
| Note |
|---|---|
|
This example uses Gradle 1.9, but may need modifications to work in future versions of Gradle since this is an incubating feature within Gradle. |
In Spring Security 3.0, the codebase has been sub-divided into separate jars which more clearly separate different functionaltiy areas and third-party dependencies. If you are using Maven to build your project, then these are the modules you will add to your pom.xml. Even if you’re not using Maven, we’d recommend that you consult the pom.xml files to get an idea of third-party dependencies and versions. Alternatively, a good idea is to examine the libraries that are included in the sample applications.
Contains core authentication and access-contol classes and interfaces, remoting support and basic provisioning APIs. Required by any application which uses Spring Security. Supports standalone applications, remote clients, method (service layer) security and JDBC user provisioning. Contains the top-level packages:
-
org.springframework.security.core -
org.springframework.security.access -
org.springframework.security.authentication -
org.springframework.security.provisioning
Provides intergration with Spring Remoting. You don’t need this unless you are writing a remote client which uses Spring Remoting. The main package is org.springframework.security.remoting.
Contains filters and related web-security infrastructure code. Anything with a servlet API dependency. You’ll need it if you require Spring Security web authentication services and URL-based access-control. The main package is org.springframework.security.web.
Contains the security namespace parsing code. You need it if you are using the Spring Security XML namespace for configuration. The main package is org.springframework.security.config. None of the classes are intended for direct use in an application.
LDAP authentication and provisioning code. Required if you need to use LDAP authentication or manage LDAP user entries. The top-level package is org.springframework.security.ldap.
Specialized domain object ACL implementation. Used to apply security to specific domain object instances within your application. The top-level package is org.springframework.security.acls.
Spring Security’s CAS client integration. If you want to use Spring Security web authentication with a CAS single sign-on server. The top-level package is org.springframework.security.cas.
Since Spring Security is an Open Source project, we’d strongly encourage you to check out the source code using git. This will give you full access to all the sample applications and you can build the most up to date version of the project easily. Having the source for a project is also a huge help in debugging. Exception stack traces are no longer obscure black-box issues but you can get straight to the line that’s causing the problem and work out what’s happening. The source is the ultimate documentation for a project and often the simplest place to find out how something actually works.
To obtain the source for the project, use the following git command:
git clone https://github.com/spring-projects/spring-security.git
This will give you access to the entire project history (including all releases and branches) on your local machine.
There are 175+ tickets resolved with the Spring Security 4.0 release.
Below are the highlights of the new features found in Spring Security 4.0.
- Web Socket Support
- Test Support
- Spring Data Integration
- CSRF Token Argument Resolver
- More Secure Defaults
-
Methods with role in them do not require ROLE_ For example, previously the following would be required within XML configuration:
<intercept-url pattern="/**" access="hasRole('ROLE_USER')"/>
Now you can optionally omit the ROLE_ prefix. We do this to remove duplication. Specifically, since the expression hasRole already defines the value as a role it automatically adds the prefix if it is not there. For example, the following is the same as the previous configuration:
<intercept-url pattern="/**" access="hasRole('USER')"/>
Similarly, the following configuration:
@PreAuthorize("hasRole('ROLE_USER')")is the same as this more concise configuration:
@PreAuthorize("hasRole('USER')") - Many Integration Tests Added to Samples
-
Deprecate @EnableWebMvcSecurity - by updating the minimum Spring Version, we can now allow defaulting MVC integration with
@EnableWebSecuritybut still allow it to be overridden
As exploits against applications evolve, so must Spring Security. As a major release version, the Spring Security team took the opportunity to make some non-passive changes which focus on:
- Ensuring Spring Security is more secure by default
- Minimizing Information Leakage
- Removing deprecated APIs
For complete details on migrating from Spring Security 3 to Spring Security 4 refer to one of the guides below:
General support for Java Configuration was added to Spring framework in Spring 3.1. Since Spring Security 3.2 there has been Spring Security Java Configuration support which enables users to easily configure Spring Security without the use of any XML.
If you are familiar with the Chapter 4, Security Namespace Configuration then you should find quite a few similarities between it and the Security Java Configuration support.
| Note |
|---|---|
|
Spring Security provides lots of sample applications that end in |
The first step is to create our Spring Security Java Configuration. The configuration creates a Servlet Filter known as the springSecurityFilterChain which is responsible for all the security (protecting the application URLs, validating submitted username and passwords, redirecting to the log in form, etc) within your application. You can find the most basic example of a Spring Security Java configuration below:
import org.springframework.beans.factory.annotation.Autowired;

import org.springframework.context.annotation.*;
import org.springframework.security.config.annotation.authentication.builders.*;
import org.springframework.security.config.annotation.web.configuration.*;

@EnableWebSecurity
public class SecurityConfig extends WebSecurityConfigurerAdapter {

	@Autowired
	public void configureGlobal(AuthenticationManagerBuilder auth) throws Exception {
		auth
			.inMemoryAuthentication()
				.withUser("user").password("password").roles("USER");
	}
}
| Note |
|---|---|
|
The name of the configureGlobal method is not important. However, it is important to only configure AuthenticationManagerBuilder in a class annotated with either |
There really isn’t much to this configuration, but it does a lot. You can find a summary of the features below:
- Require authentication to every URL in your application
- Generate a login form for you
- Allow the user with the Username user and the Password password to authenticate with form based authentication
- Allow the user to logout
- CSRF attack prevention
- Session Fixation protection
-
Security Header integration
- HTTP Strict Transport Security for secure requests
- X-Content-Type-Options integration
- Cache Control (can be overridden later by your application to allow caching of your static resources)
- X-XSS-Protection integration
- X-Frame-Options integration to help prevent Clickjacking
-
Integrate with the following Servlet API methods
The next step is to register the springSecurityFilterChain with the war. This can be done in Java Configuration with Spring’s WebApplicationInitializer support in a Servlet 3.0+ environment. Not suprisingly, Spring Security provides a base class AbstractSecurityWebApplicationInitializer that will ensure the springSecurityFilterChain gets registered for you. The way in which we use AbstractSecurityWebApplicationInitializer differs depending on if we are already using Spring or if Spring Security is the only Spring component in our application.
- Section 3.1.2, “AbstractSecurityWebApplicationInitializer without Existing Spring” - Use these instructions if you are not using Spring already
- Section 3.1.3, “AbstractSecurityWebApplicationInitializer with Spring MVC” - Use these instructions if you are already using Spring
If you are not using Spring or Spring MVC, you will need to pass in the SecurityConfig into the superclass to ensure the configuration is picked up. You can find an example below:
import org.springframework.security.web.context.*;

public class SecurityWebApplicationInitializer
	extends AbstractSecurityWebApplicationInitializer {

	public SecurityWebApplicationInitializer() {
		super(SecurityConfig.class);
	}
}
The SecurityWebApplicationInitializer will do the following things:
- Automatically register the springSecurityFilterChain Filter for every URL in your application
- Add a ContextLoaderListener that loads the SecurityConfig.
If we were using Spring elsewhere in our application we probably already had a WebApplicationInitializer that is loading our Spring Configuration. If we use the previous configuration we would get an error. Instead, we should register Spring Security with the existing ApplicationContext. For example, if we were using Spring MVC our SecurityWebApplicationInitializer would look something like the following:
import org.springframework.security.web.context.*;

public class SecurityWebApplicationInitializer
	extends AbstractSecurityWebApplicationInitializer {

}
This would simply only register the springSecurityFilterChain Filter for every URL in your application. After that we would ensure that SecurityConfig was loaded in our existing ApplicationInitializer. For example, if we were using Spring MVC it would be added in the getRootConfigClasses()
public class MvcWebApplicationInitializer extends
		AbstractAnnotationConfigDispatcherServletInitializer {

	@Override
	protected Class<?>[] getRootConfigClasses() {
		return new Class[] { SecurityConfig.class };
	}

	// ... other overrides ...
}
Thus far our SecurityConfig only contains information about how to authenticate our users. How does Spring Security know that we want to require all users to be authenticated? How does Spring Security know we want to support form based authentication? The reason for this is that the WebSecurityConfigurerAdapter provides a default configuration in the configure(HttpSecurity http) method that looks like:
protected void configure(HttpSecurity http) throws Exception {
	http
		.authorizeRequests()
			.anyRequest().authenticated()
			.and()
		.formLogin()
			.and()
		.httpBasic();
}
The default configuration above:
- Ensures that any request to our application requires the user to be authenticated
- Allows users to authenticate with form based login
- Allows users to authenticate with HTTP Basic authentication
You will notice that this configuration is quite similar the XML Namespace configuration:
<http>
	<intercept-url pattern="/**" access="authenticated"/>
	<form-login />
	<http-basic />
</http>
The Java Configuration equivalent of closing an XML tag is expressed using the and() method which allows us to continue configuring the parent. If you read the code it also makes sense. I want to configure authorized requests and configure form login and configure HTTP Basic authentication.
However, Java configuration has different defaults URLs and parameters. Keep this in mind when creating custom login pages. The result is that our URLs are more RESTful. Additionally, it is not quite so obvious we are using Spring Security which helps to prevent information leaks. For example:
You might be wondering where the login form came from when you were prompted to log in, since we made no mention of any HTML files or JSPs. Since Spring Security’s default configuration does not explicitly set a URL for the login page, Spring Security generates one automatically, based on the features that are enabled and using standard values for the URL which processes the submitted login, the default target URL the user will be sent to after logging in and so on.
While the automatically generated log in page is convenient to get up and running quickly, most applications will want to provide their own log in page. To do so we can update our configuration as seen below:
protected void configure(HttpSecurity http) throws Exception { http .authorizeRequests() .anyRequest().authenticated() .and() .formLogin() .loginPage("/login").permitAll();
}
|
The updated configuration specifies the location of the log in page. |
|
We must grant all users (i.e. unauthenticated users) access to our log in page. The |
An example log in page implemented with JSPs for our current configuration can be seen below:
| Note |
|---|---|
|
The login page below represents our current configuration. We could easily update our configuration if some of the defaults do not meet our needs. |
<c:url value="/login" var="loginUrl"/> <form action="${loginUrl}" method="post"><p> You have been logged out. </p> </c:if> <p> <label for="username">Username</label> <input type="text" id="username" name="username"/>
</p> <p> <label for="password">Password</label> <input type="password" id="password" name="password"/>
</p> <input type="hidden"
name="${_csrf.parameterName}" value="${_csrf.token}"/> <button type="submit" class="btn">Log in</button> </form>
|
A POST to the |
|
If the query parameter |
|
If the query parameter |
|
The username must be present as the HTTP parameter named username |
|
The password must be present as the HTTP parameter named password |
|
We must Section 16.4.3, “Include the CSRF Token” To learn more read the Chapter 16, Cross Site Request Forgery (CSRF) section of the reference |
Our examples have only required users to be authenticated and have done so for every URL in our application. We can specify custom requirements for our URLs by adding multiple children to our http.authorizeRequests() method. For example:
protected void configure(HttpSecurity http) throws Exception { http .authorizeRequests()
|
There are multiple children to the |
|
We specified multiple URL patterns that any user can access. Specifically, any user can access a request if the URL starts with "/resources/", equals "/signup", or equals "/about". |
|
Any URL that starts with "/admin/" will be resticted to users who have the role "ROLE_ADMIN". You will notice that since we are invoking the |
|
Any URL that starts with "/db/" requires the user to have both "ROLE_ADMIN" and "ROLE_DBA". You will notice that since we are using the |
|
Any URL that has not already been matched on only requires that the user be authenticated |
When using the
WebSecurityConfigurerAdapter,
logout capabilities are automatically applied. The default is that accessing the
URL /logout will log the user out by:
- Invalidating the HTTP Session
- Cleaning up any RememberMe authentication that was configured
-
Clearing the
SecurityContextHolder -
Redirect to
/login?success
Similar to configuring login capabilities, however, you also have various options to further customize your logout requirements:
protected void configure(HttpSecurity http) throws Exception { http .logout().and() ... }
|
Provides logout support. This is automatically applied when using |
|
The URL that triggers log out to occur (default is |
|
The URL to redirect to after logout has occurred. The default is |
|
Let’s you specify a custom |
|
Specify whether to invalidate the |
|
Adds a |
|
Allows specifying the names of cookies to be removed on logout success. This is a shortcut for adding a |
| Note |
|---|---|
|
Logouts can of course also be configured using the XML Namespace notation. Please see the documentation for the logout element in the Spring Security XML Namespace section for further details. |
Generally, in order to customize logout functionality, you can add
LogoutHandler
and/or
LogoutSuccessHandler
implementations. For many common scenarios, these handlers are applied under the
covers when using the fluent API.
Generally, LogoutHandler
implementations indicate classes that are able to participate in logout handling.
They are expected to be invoked to perform necessary cleanup. As such they should
not throw exceptions. Various implementations are provided:
Please see Section 15.4, “Remember-Me Interfaces and Implementations” for details.
Instead of providing LogoutHandler implementations directly, the fluent API
also provides shortcuts that provide the respective LogoutHandler implementations
under the covers. E.g. deleteCookies() allows specifying the names of one or
more cookies to be removed on logout success. This is a shortcut compared to adding a
CookieClearingLogoutHandler.
The LogoutSuccessHandler is called after a successful logout by the LogoutFilter,
to handle e.g. redirection or forwarding to the appropriate destination. Note that the
interface is almost the same as the LogoutHandler but may raise an exception.
The following implementations are provided:
- SimpleUrlLogoutSuccessHandler
- HttpStatusReturningLogoutSuccessHandler
As mentioned above, you don’t need to specify the SimpleUrlLogoutSuccessHandler directly.
Instead, the fluent API provides a shortcut by setting the logoutSuccessUrl().
This will setup the SimpleUrlLogoutSuccessHandler under the covers. The provided URL will
be redirected to after a logout has occurred. The default is /login?logout.
The HttpStatusReturningLogoutSuccessHandler can be interesting in REST API type
scenarios. Instead of redirecting to a URL upon the successful logout, this LogoutSuccessHandler
allows you to provide a plain HTTP status code to be returned. If not configured
a status code 200 will be returned by default.
- Logout Handling
- Testing Logout
- HttpServletRequest.logout()
- Section 15.4, “Remember-Me Interfaces and Implementations”
- Logging Out in section CSRF Caveats
- Section Single Logout (CAS protocol)
- Documentation for the logout element in the Spring Security XML Namespace section
Thus far we have only taken a look at the most basic authentication configuration. Let’s take a look at a few slightly more advanced options for configuring authentication.
We have already seen an example of configuring in memory authentication for a single user. Below is an example to configure multiple users:
@Autowired
public void configureGlobal(AuthenticationManagerBuilder auth) throws Exception {
	auth
		.inMemoryAuthentication()
			.withUser("user").password("password").roles("USER").and()
			.withUser("admin").password("password").roles("USER", "ADMIN");
}
You can find the updates to suppport JDBC based authentication. The example below assumes that you have already defined a DataSource within your application. The jdbc-jc sample provides a complete example of using JDBC based authentication.
@Autowired
private DataSource dataSource;

@Autowired
public void configureGlobal(AuthenticationManagerBuilder auth) throws Exception {
	auth
		.jdbcAuthentication()
			.dataSource(dataSource)
			.withDefaultSchema()
			.withUser("user").password("password").roles("USER").and()
			.withUser("admin").password("password").roles("USER", "ADMIN");
}
You can find the updates to suppport LDAP based authentication. The ldap-jc sample provides a complete example of using LDAP based authentication.
@Autowired
private DataSource dataSource;

@Autowired
public void configureGlobal(AuthenticationManagerBuilder auth) throws Exception {
	auth
		.ldapAuthentication()
			.userDnPatterns("uid={0},ou=people")
			.groupSearchBase("ou=groups");
}
The example above uses the following LDIF and an embedded Apache DS LDAP instance.
users.ldif.
dn: ou=groups,dc=springframework,dc=org
objectclass: top
objectclass: organizationalUnit
ou: groups

dn: ou=people,dc=springframework,dc=org
objectclass: top
objectclass: organizationalUnit
ou: people

dn: uid=admin,ou=people,dc=springframework,dc=org
objectclass: top
objectclass: person
objectclass: organizationalPerson
objectclass: inetOrgPerson
cn: Rod Johnson
sn: Johnson
uid: admin
userPassword: password

dn: uid=user,ou=people,dc=springframework,dc=org
objectclass: top
objectclass: person
objectclass: organizationalPerson
objectclass: inetOrgPerson
cn: Dianne Emu
sn: Emu
uid: user
userPassword: password

dn: cn=user,ou=groups,dc=springframework,dc=org
objectclass: top
objectclass: groupOfNames
cn: user
uniqueMember: uid=admin,ou=people,dc=springframework,dc=org
uniqueMember: uid=user,ou=people,dc=springframework,dc=org

dn: cn=admin,ou=groups,dc=springframework,dc=org
objectclass: top
objectclass: groupOfNames
cn: admin
uniqueMember: uid=admin,ou=people,dc=springframework,dc=org
We can configure multiple HttpSecurity instances just as we can have multiple <http> blocks. The key is to extend the WebSecurityConfigurationAdapter multiple times. For example, the following is an example of having a different configuration for URL’s that start with /api/.
@EnableWebSecurity public class MultiHttpSecurityConfig { @Autowired public void configureGlobal(AuthenticationManagerBuilder auth) {
|
Configure Authentication as normal |
|
Create an instance of |
|
The |
|
Create another instance of |
From version 2.0 onwards Spring Security has improved support substantially for adding security to your service layer methods. It provides support for JSR-250 annotation security as well as the framework���s original @Secured annotation. From 3.0 you can also make use of new expression-based annotations. You can apply security to a single bean, using the intercept-methods element to decorate the bean declaration, or you can secure multiple beans across the entire service layer using the AspectJ style pointcuts.
We can enable annotation-based security using the @EnableGlobalMethodSecurity annotation on any @Configuration instance. For example, the following would enable Spring Security’s @Secured annotation.
@EnableGlobalMethodSecurity(securedEnabled = true)
public class MethodSecurityConfig {
// ...
}
Adding an annotation to a method (on an class or interface) would then limit the access to that method accordingly. Spring Security’s native annotation support defines a set of attributes for the method. These will be passed to the AccessDecisionManager for it to make the actual decision:
public interface BankService {

@Secured("IS_AUTHENTICATED_ANONYMOUSLY")
public Account readAccount(Long id);

@Secured("IS_AUTHENTICATED_ANONYMOUSLY")
public Account[] findAccounts();

@Secured("ROLE_TELLER")
public Account post(Account account, double amount);
}
Support for JSR-250 annotations can be enabled using
@EnableGlobalMethodSecurity(jsr250Enabled = true)
public class MethodSecurityConfig {
// ...
}
These are standards-based and allow simple role-based constraints to be applied but do not have the power Spring Security’s native annotations. To use the new expression-based syntax, you would use
@EnableGlobalMethodSecurity(prePostEnabled = true)
public class MethodSecurityConfig {
// ...
}
and the equivalent Java code would be
public interface BankService {

@PreAuthorize("isAnonymous()")
public Account readAccount(Long id);

@PreAuthorize("isAnonymous()")
public Account[] findAccounts();

@PreAuthorize("hasAuthority('ROLE_TELLER')")
public Account post(Account account, double amount);
}
Sometimes you may need to perform operations that are more complicated than are possible with the @EnableGlobalMethodSecurity annotation allow. For these instances, you can extend the GlobalMethodSecurityConfiguration ensuring that the @EnableGlobalMethodSecurity annotation is present on your subclass. For example, if you wanted to provide a custom MethodSecurityExpressionHander, you could use the following configuration:
@EnableGlobalMethodSecurity(prePostEnabled = true)
public class MethodSecurityConfig extends GlobalMethodSecurityConfiguration {
	@Override
	protected MethodSecurityExpressionHandler createExpressionHandler() {
		// ... create and return custom MethodSecurityExpressionHandler ...
		return expressionHander;
	}
}
For additional information about methods that can be overriden, refer to the GlobalMethodSecurityConfiguration Javadoc.
Spring Security’s Java Configuration does not expose every property of every object that it configures. This simplifies the configuration for a majority of users. Afterall, if every property was exposed, users could use standard bean configuration.
While there are good reasons to not directly expose every property, users may still need more advanced configuration options. To address this Spring Security introduces the concept of an ObjectPostProcessor which can used to modify or replace many of the Object instances created by the Java Configuration. For example, if you wanted to configure the filterSecurityPublishAuthorizationSuccess property on FilterSecurityInterceptor you could use the following:
@Override
protected void configure(HttpSecurity http) throws Exception {
	http
		.authorizeRequests()
			.anyRequest().authenticated()
			.withObjectPostProcessor(new ObjectPostProcessor<FilterSecurityInterceptor>() {
				public <O extends FilterSecurityInterceptor> O postProcess(
						O fsi) {
					fsi.setPublishAuthorizationSuccess(true);
					return fsi;
				}
			});
}
Namespace configuration has been available since version 2.0 of the Spring framework. It allows you to supplement the traditional Spring beans application context syntax with elements from additional XML schema. You can find more information in the Spring Reference Documentation. A namespace element can be used simply to allow a more concise way of configuring an individual bean or, more powerfully, to define an alternative configuration syntax which more closely matches the problem domain and hides the underlying complexity from the user. A simple element may conceal the fact that multiple beans and processing steps are being added to the application context. For example, adding the following element from the security namespace to an application context will start up an embedded LDAP server for testing use within the application:
<security:ldap-server />
This is much simpler than wiring up the equivalent Apache Directory Server beans. The most common alternative configuration requirements are supported by attributes on the ldap-server element and the user is isolated
from worrying about which beans they need to create and what the bean property names are. [1]. Use of a good XML
editor while editing the application context file should provide information on the attributes and elements that are available. We would recommend that you try out the
SpringSource Tool Suite as it has special features for working with standard Spring namespaces.
To start using the security namespace in your application context, you need to have the spring-security-config jar on your classpath. Then all you need to do is add the schema declaration to your application context file:
<beans xmlns="http://www.springframework.org/schema/beans"
xmlns:security="http://www.springframework.org/schema/security"
xmlns:xsi="http://www.w3.org/2001/XMLSchema-instance"
xsi:schemaLocation="http://www.springframework.org/schema/beans
		http://www.springframework.org/schema/beans/spring-beans-3.0.xsd
		http://www.springframework.org/schema/security
		http://www.springframework.org/schema/security/spring-security.xsd">
	...
</beans>
In many of the examples you will see (and in the sample) applications, we will often use "security" as the default namespace rather than "beans", which means we can omit the prefix on all the security namespace elements, making the content easier to read. You may also want to do this if you have your application context divided up into separate files and have most of your security configuration in one of them. Your security application context file would then start like this
<beans:beans xmlns="http://www.springframework.org/schema/security"
xmlns:beans="http://www.springframework.org/schema/beans"
xmlns:xsi="http://www.w3.org/2001/XMLSchema-instance"
xsi:schemaLocation="http://www.springframework.org/schema/beans
		http://www.springframework.org/schema/beans/spring-beans-3.0.xsd
		http://www.springframework.org/schema/security
		http://www.springframework.org/schema/security/spring-security.xsd">
	...
</beans:beans>
We’ll assume this syntax is being used from now on in this chapter.
The namespace is designed to capture the most common uses of the framework and provide a simplified and concise syntax for enabling them within an application. The design is based around the large-scale dependencies within the framework, and can be divided up into the following areas:
- Web/HTTP Security - the most complex part. Sets up the filters and related service beans used to apply the framework authentication mechanisms, to secure URLs, render login and error pages and much more.
- Business Object (Method) Security - options for securing the service layer.
- AuthenticationManager - handles authentication requests from other parts of the framework.
- AccessDecisionManager - provides access decisions for web and method security. A default one will be registered, but you can also choose to use a custom one, declared using normal Spring bean syntax.
- AuthenticationProviders - mechanisms against which the authentication manager authenticates users. The namespace provides supports for several standard options and also a means of adding custom beans declared using a traditional syntax.
- UserDetailsService - closely related to authentication providers, but often also required by other beans.
We’ll see how to configure these in the following sections.
In this section, we’ll look at how you can build up a namespace configuration to use some of the main features of the framework. Let’s assume you initially want to get up and running as quickly as possible and add authentication support and access control to an existing web application, with a few test logins. Then we’ll look at how to change over to authenticating against a database or other security repository. In later sections we’ll introduce more advanced namespace configuration options.
The first thing you need to do is add the following filter declaration to your web.xml file:
<filter>
<filter-name>springSecurityFilterChain</filter-name>
<filter-class>org.springframework.web.filter.DelegatingFilterProxy</filter-class>
</filter>

<filter-mapping>
<filter-name>springSecurityFilterChain</filter-name>
<url-pattern>/*</url-pattern>
</filter-mapping>
This provides a hook into the Spring Security web infrastructure. DelegatingFilterProxy is a Spring Framework class which delegates to a filter implementation which is defined as a Spring bean in your application
context. In this case, the bean is named "springSecurityFilterChain", which is an internal infrastructure bean created by the namespace to handle web security. Note that you should not use this bean name yourself. Once
you’ve added this to your web.xml, you’re ready to start editing your application context file. Web security services are configured using the <http> element.
All you need to enable web security to begin with is
<http>
<intercept-url pattern="/**" access="hasRole('USER')" />
<form-login />
<logout />
</http>
Which says that we want all URLs within our application to be secured, requiring the role ROLE_USER to access them, we want to log in to the application using a form with username and password, and that we want a
logout URL registered which will allow us to log out of the application. <http> element is the parent for all web-related namespace functionality. The <intercept-url> element defines a pattern which is matched
against the URLs of incoming requests using an ant path style syntax [2]. You can also use regular-expression matching as an alternative (see the namespace appendix for more details). The access attribute defines the access requirements for requests matching
the given pattern. With the default configuration, this is typically a comma-separated list of roles, one of which a user must have to be allowed to make the request. The prefix"ROLE_" is a marker which indicates that a
simple comparison with the user’s authorities should be made. In other words, a normal role-based check should be used. Access-control in Spring Security is not limited to the use of simple roles (hence the use of the
prefix to differentiate between different types of security attributes). We’ll see later how the interpretation can vary footnote:[The interpretation of the comma-separated values in the access attribute depends on the
implementation of the –1— which is used. In Spring Security 3.0, the attribute can also be populated with an –2—.
| Note |
|---|---|
|
You can use multiple |
To add some users, you can define a set of test data directly in the namespace:
<authentication-manager>
<authentication-provider>
	<user-service>
	<user name="jimi" password="jimispassword" authorities="ROLE_USER, ROLE_ADMIN" />
	<user name="bob" password="bobspassword" authorities="ROLE_USER" />
	</user-service>
</authentication-provider>
</authentication-manager>
The configuration above defines two users, their passwords and their roles within the application (which will be used for access control). It is also possible to load user information from a standard properties file using the properties attribute on user-service. See the section on in-memory authentication for more details on the file format. Using the <authentication-provider> element means that the user information will be used by the authentication manager to process authentication requests. You can have multiple <authentication-provider> elements to define different authentication sources and each will be consulted in turn.
At this point you should be able to start up your application and you will be required to log in to proceed. Try it out, or try experimenting with the"tutorial" sample application that comes with the project.
You might be wondering where the login form came from when you were prompted to log in, since we made no mention of any HTML files or JSPs. In fact, since we didn’t explicitly set a URL for the login page, Spring Security generates one automatically, based on the features that are enabled and using standard values for the URL which processes the submitted login, the default target URL the user will be sent to after logging in and so on. However, the namespace offers plenty of support to allow you to customize these options. For example, if you want to supply your own login page, you could use:
<http>
<intercept-url pattern="/login.jsp*" access="IS_AUTHENTICATED_ANONYMOUSLY"/>
<intercept-url pattern="/**" access="ROLE_USER" />
<form-login login-page='/login.jsp'/>
</http>
Also note that we’ve added an extra intercept-url element to say that any requests for the login page should be available to anonymous users [3] and also
the AuthenticatedVoter class for more details on how the value IS_AUTHENTICATED_ANONYMOUSLY is processed.]. Otherwise the request would be matched by the pattern /** and it wouldn’t be
possible to access the login page itself! This is a common configuration error and will result in an infinite loop in the application. Spring Security will emit a warning in the log if your login page appears to be
secured. It is also possible to have all requests matching a particular pattern bypass the security filter chain completely, by defining a separate http element for the pattern like this:
<http pattern="/css/**" security="none"/>
<http pattern="/login.jsp*" security="none"/>

<http use-expressions="false">
<intercept-url pattern="/**" access="ROLE_USER" />
<form-login login-page='/login.jsp'/>
</http>
From Spring Security 3.1 it is now possible to use multiple http elements to define separate security filter chain configurations for different request patterns. If the pattern attribute is omitted from an http element, it matches all requests. Creating an unsecured pattern is a simple example of this syntax, where the pattern is mapped to an empty filter chain [4]. We’ll look at this new syntax in more detail in the chapter on the Security Filter Chain.
It’s important to realise that these unsecured requests will be completely oblivious to any Spring Security web-related configuration or additional attributes such as requires-channel, so you will not be able to access information on the current user or call secured methods during the request. Use access='IS_AUTHENTICATED_ANONYMOUSLY' as an alternative if you still want the security filter chain to be applied.
If you want to use basic authentication instead of form login, then change the configuration to
<http use-expressions="false">
<intercept-url pattern="/**" access="ROLE_USER" />
<http-basic />
</http>
Basic authentication will then take precedence and will be used to prompt for a login when a user attempts to access a protected resource. Form login is still available in this configuration if you wish to use it, for example through a login form embedded in another web page.
If a form login isn’t prompted by an attempt to access a protected resource, the default-target-url option comes into play. This is the URL the user will be taken to after successfully logging in, and defaults to "/". You can also configure things so that the user always ends up at this page (regardless of whether the login was "on-demand" or they explicitly chose to log in) by setting the always-use-default-target attribute to "true". This is useful if your application always requires that the user starts at a "home" page, for example:
<http pattern="/login.htm*" security="none"/>
<http use-expressions="false">
<intercept-url pattern='/**' access='ROLE_USER' />
<form-login login-page='/login.htm' default-target-url='/home.htm'
		always-use-default-target='true' />
</http>
For even more control over the destination, you can use the authentication-success-handler-ref attribute as an alternative to default-target-url. The referenced bean should be an instance of AuthenticationSuccessHandler. You’ll find more on this in the Core Filters chapter and also in the namespace appendix, as well as information on how to customize the flow when authentication fails.
The logout element adds support for logging out by navigating to a particular URL. The default logout URL is /logout, but you can set it to something else using the logout-url attribute. More information on other available attributes may be found in the namespace appendix.
In practice you will need a more scalable source of user information than a few names added to the application context file. Most likely you will want to store your user information in something like a database or an LDAP server. LDAP namespace configuration is dealt with in the LDAP chapter, so we won’t cover it here. If you have a custom implementation of Spring Security’s UserDetailsService, called "myUserDetailsService" in your application context, then you can authenticate against this using
<authentication-manager>
	<authentication-provider user-service-ref='myUserDetailsService'/>
</authentication-manager>
If you want to use a database, then you can use
<authentication-manager>
<authentication-provider>
	<jdbc-user-service data-source-ref="securityDataSource"/>
</authentication-provider>
</authentication-manager>
Where "securityDataSource" is the name of a DataSource bean in the application context, pointing at a database containing the standard Spring Security user data tables. Alternatively, you could configure a Spring Security JdbcDaoImpl bean and point at that using the user-service-ref attribute:
<authentication-manager>
<authentication-provider user-service-ref='myUserDetailsService'/>
</authentication-manager>

<beans:bean id="myUserDetailsService"
	class="org.springframework.security.core.userdetails.jdbc.JdbcDaoImpl">
<beans:property name="dataSource" ref="dataSource"/>
</beans:bean>
You can also use standard AuthenticationProvider beans as follows
<authentication-manager>
	<authentication-provider ref='myAuthenticationProvider'/>
</authentication-manager>
where myAuthenticationProvider is the name of a bean in your application context which implements AuthenticationProvider. You can use multiple authentication-provider elements, in which case the providers will be queried in the order they are declared. See Section 4.6, “The Authentication Manager and the Namespace” for more on information on how the Spring Security AuthenticationManager is configured using the namespace.
Passwords should always be encoded using a secure hashing algorithm designed for the purpose (not a standard algorithm like SHA or MD5). This is supported by the <password-encoder> element. With bcrypt encoded passwords, the original authentication provider configuration would look like this:
<beans:bean name="bcryptEncoder"
	class="org.springframework.security.crypto.bcrypt.BCryptPasswordEncoder"/>

<authentication-manager>
<authentication-provider>
	<password-encoder ref="bcryptEncoder"/>
	<user-service>
	<user name="jimi" password="d7e6351eaa13189a5a3641bab846c8e8c69ba39f"
			authorities="ROLE_USER, ROLE_ADMIN" />
	<user name="bob" password="4e7421b1b8765d8f9406d87e7cc6aa784c4ab97f"
			authorities="ROLE_USER" />
	</user-service>
</authentication-provider>
</authentication-manager>
Bcrypt is a good choice for most cases, unless you have a legacy system which forces you to use a different algorithm. If you are using a simple hashing algorithm or, even worse, storing plain text passwords, then you should consider migrating to a more secure option like bcrypt.
See the separate Remember-Me chapter for information on remember-me namespace configuration.
If your application supports both HTTP and HTTPS, and you require that particular URLs can only be accessed over HTTPS, then this is directly supported using the requires-channel attribute on <intercept-url>:
<http>
<intercept-url pattern="/secure/**" access="ROLE_USER" requires-channel="https"/>
<intercept-url pattern="/**" access="ROLE_USER" requires-channel="any"/>
...
</http>
With this configuration in place, if a user attempts to access anything matching the "/secure/**" pattern using HTTP, they will first be redirected to an HTTPS URL [5]. The available options are "http", "https" or "any". Using the value "any" means that either HTTP or HTTPS can be used.
If your application uses non-standard ports for HTTP and/or HTTPS, you can specify a list of port mappings as follows:
<http>
...
<port-mappings>
	<port-mapping http="9080" https="9443"/>
</port-mappings>
</http>
Note that in order to be truly secure, an application should not use HTTP at all or switch between HTTP and HTTPS. It should start in HTTPS (with the user entering an HTTPS URL) and use a secure connection throughout to avoid any possibility of man-in-the-middle attacks.
You can configure Spring Security to detect the submission of an invalid session ID and redirect the user to an appropriate URL. This is achieved through the session-management element:
<http>
...
<session-management invalid-session-url="/invalidSession.htm" />
</http>
Note that if you use this mechanism to detect session timeouts, it may falsely report an error if the user logs out and then logs back in without closing the browser. This is because the session cookie is not cleared when you invalidate the session and will be resubmitted even if the user has logged out. You may be able to explicitly delete the JSESSIONID cookie on logging out, for example by using the following syntax in the logout handler:
<http>
<logout delete-cookies="JSESSIONID" />
</http>
Unfortunately this can’t be guaranteed to work with every servlet container, so you will need to test it in your environment
| Note |
|---|---|
|
If you are running your application behind a proxy, you may also be able to remove the session cookie by configuring the proxy server. For example, using Apache HTTPD’s mod_headers, the following directive would delete the <LocationMatch "/tutorial/logout"> Header always set Set-Cookie "JSESSIONID=;Path=/tutorial;Expires=Thu, 01 Jan 1970 00:00:00 GMT" </LocationMatch> |
If you wish to place constraints on a single user’s ability to log in to your application, Spring Security supports this out of the box with the following simple additions. First you need to add the following listener to your web.xml file to keep Spring Security updated about session lifecycle events:
<listener>
<listener-class>
	org.springframework.security.web.session.HttpSessionEventPublisher
</listener-class>
</listener>
Then add the following lines to your application context:
<http>
...
<session-management>
	<concurrency-control max-sessions="1" />
</session-management>
</http>
This will prevent a user from logging in multiple times - a second login will cause the first to be invalidated. Often you would prefer to prevent a second login, in which case you can use
<http>
...
<session-management>
	<concurrency-control max-sessions="1" error-if-maximum-exceeded="true" />
</session-management>
</http>
The second login will then be rejected. By "rejected", we mean that the user will be sent to the authentication-failure-url if form-based login is being used. If the second authentication takes place through another non-interactive mechanism, such as "remember-me", an "unauthorized" (401) error will be sent to the client. If instead you want to use an error page, you can add the attribute session-authentication-error-url to the session-management element.
If you are using a customized authentication filter for form-based login, then you have to configure concurrent session control support explicitly. More details can be found in the Session Management chapter.
Session fixation attacks are a potential risk where it is possible for a malicious attacker to create a session by accessing a site, then persuade another user to log in with the same session (by sending them a link containing the session identifier as a parameter, for example). Spring Security protects against this automatically by creating a new session or otherwise changing the session ID when a user logs in. If you don’t require this protection, or it conflicts with some other requirement, you can control the behavior using the session-fixation-protection attribute on <session-management>, which has four options
-
none- Don’t do anything. The original session will be retained. -
newSession- Create a new "clean" session, without copying the existing session data (Spring Security-related attributes will still be copied). -
migrateSession- Create a new session and copy all existing session attributes to the new session. This is the default in Servlet 3.0 or older containers. -
changeSessionId- Do not create a new session. Instead, use the session fixation protection provided by the Servlet container (HttpServletRequest#changeSessionId()). This option is only available in Servlet 3.1 (Java EE 7) and newer containers. Specifying it in older containers will result in an exception. This is the default in Servlet 3.1 and newer containers.
When session fixation protection occurs, it results in a SessionFixationProtectionEvent being published in the application context. If you use changeSessionId, this protection will also result in any javax.servlet.http.HttpSessionIdListener s being notified, so use caution if your code listens for both events. See the Session Management chapter for additional information.
The namespace supports OpenID login either instead of, or in addition to normal form-based login, with a simple change:
<http>
<intercept-url pattern="/**" access="ROLE_USER" />
<openid-login />
</http>
You should then register yourself with an OpenID provider (such as myopenid.com), and add the user information to your in-memory <user-service> :
<user name="http://jimi.hendrix.myopenid.com/" authorities="ROLE_USER" />
You should be able to login using the myopenid.com site to authenticate. It is also possible to select a specific UserDetailsService bean for use OpenID by setting the user-service-ref attribute on the openid-login element. See the previous section on authentication providers for more information. Note that we have omitted the password attribute from the above user configuration, since this set of user data is only being used to load the authorities for the user. A random password will be generate internally, preventing you from accidentally using this user data as an authentication source elsewhere in your configuration.
Support for OpenID attribute exchange. As an example, the following configuration would attempt to retrieve the email and full name from the OpenID provider, for use by the application:
<openid-login>
<attribute-exchange>
	<openid-attribute name="email" type="http://axschema.org/contact/email" required="true"/>
	<openid-attribute name="name" type="http://axschema.org/namePerson"/>
</attribute-exchange>
</openid-login>
The "type" of each OpenID attribute is a URI, determined by a particular schema, in this case http://axschema.org/. If an attribute must be retrieved for successful authentication, the required attribute can be set. The exact schema and attributes supported will depend on your OpenID provider. The attribute values are returned as part of the authentication process and can be accessed afterwards using the following code:
OpenIDAuthenticationToken token =
	(OpenIDAuthenticationToken)SecurityContextHolder.getContext().getAuthentication();
List<OpenIDAttribute> attributes = token.getAttributes();
The OpenIDAttribute contains the attribute type and the retrieved value (or values in the case of multi-valued attributes). We’ll see more about how the SecurityContextHolder class is used when we look at core Spring Security components in the technical overview chapter. Multiple attribute exchange configurations are also be supported, if you wish to use multiple identity providers. You can supply multiple attribute-exchange elements, using an identifier-matcher attribute on each. This contains a regular expression which will be matched against the OpenID identifier supplied by the user. See the OpenID sample application in the codebase for an example configuration, providing different attribute lists for the Google, Yahoo and MyOpenID providers.
For additional information on how to customize the headers element refer to the Chapter 17, Security HTTP Response Headers section of the reference.
If you’ve used Spring Security before, you’ll know that the framework maintains a chain of filters in order to apply its services. You may want to add your own filters to the stack at particular locations or use a Spring Security filter for which there isn’t currently a namespace configuration option (CAS, for example). Or you might want to use a customized version of a standard namespace filter, such as the UsernamePasswordAuthenticationFilter which is created by the <form-login> element, taking advantage of some of the extra configuration options which are available by using the bean explicitly. How can you do this with namespace configuration, since the filter chain is not directly exposed?
The order of the filters is always strictly enforced when using the namespace. When the application context is being created, the filter beans are sorted by the namespace handling code and the standard Spring Security filters each have an alias in the namespace and a well-known position.
| Note |
|---|---|
|
In previous versions, the sorting took place after the filter instances had been created, during post-processing of the application context. In version 3.0+ the sorting is now done at the bean metadata level, before the classes have been instantiated. This has implications for how you add your own filters to the stack as the entire filter list must be known during the parsing of the |
The filters, aliases and namespace elements/attributes which create the filters are shown in Table 4.1, “Standard Filter Aliases and Ordering”. The filters are listed in the order in which they occur in the filter chain.
Table 4.1. Standard Filter Aliases and Ordering
| Alias | Filter Class | Namespace Element or Attribute |
|---|---|---|
CHANNEL_FILTER |
|
|
SECURITY_CONTEXT_FILTER |
|
|
CONCURRENT_SESSION_FILTER |
|
|
HEADERS_FILTER |
|
|
CSRF_FILTER |
|
|
LOGOUT_FILTER |
|
|
X509_FILTER |
|
|
PRE_AUTH_FILTER |
| N/A |
CAS_FILTER |
| N/A |
FORM_LOGIN_FILTER |
|
|
BASIC_AUTH_FILTER |
|
|
SERVLET_API_SUPPORT_FILTER |
|
|
JAAS_API_SUPPORT_FILTER |
|
|
REMEMBER_ME_FILTER |
|
|
ANONYMOUS_FILTER |
|
|
SESSION_MANAGEMENT_FILTER |
|
|
EXCEPTION_TRANSLATION_FILTER |
|
|
FILTER_SECURITY_INTERCEPTOR |
|
|
SWITCH_USER_FILTER |
| N/A |
You can add your own filter to the stack, using the custom-filter element and one of these names to specify the position your filter should appear at:
<http>
<custom-filter position="FORM_LOGIN_FILTER" ref="myFilter" />
</http>

<beans:bean id="myFilter" class="com.mycompany.MySpecialAuthenticationFilter"/>
You can also use the after or before attributes if you want your filter to be inserted before or after another filter in the stack. The names "FIRST" and "LAST" can be used with the position attribute to indicate that you want your filter to appear before or after the entire stack, respectively.
![[Tip]](images/tip.png) | Avoiding filter position conflicts |
|---|---|
|
If you are inserting a custom filter which may occupy the same position as one of the standard filters created by the namespace then it’s important that you don’t include the namespace versions by mistake. Remove any elements which create filters whose functionality you want to replace. Note that you can’t replace filters which are created by the use of the |
If you’re replacing a namespace filter which requires an authentication entry point (i.e. where the authentication process is triggered by an attempt by an unauthenticated user to access to a secured resource), you will need to add a custom entry point bean too.
If you aren’t using form login, OpenID or basic authentication through the namespace, you may want to define an authentication filter and entry point using a traditional bean syntax and link them into the namespace, as we’ve just seen. The corresponding AuthenticationEntryPoint can be set using the entry-point-ref attribute on the <http> element.
The CAS sample application is a good example of the use of custom beans with the namespace, including this syntax. If you aren’t familiar with authentication entry points, they are discussed in the technical overview chapter.
From version 2.0 onwards Spring Security has improved support substantially for adding security to your service layer methods. It provides support for JSR-250 annotation security as well as the framework’s original @Secured annotation. From 3.0 you can also make use of new expression-based annotations. You can apply security to a single bean, using the intercept-methods element to decorate the bean declaration, or you can secure multiple beans across the entire service layer using the AspectJ style pointcuts.
This element is used to enable annotation-based security in your application (by setting the appropriate attributes on the element), and also to group together security pointcut declarations which will be applied across your entire application context. You should only declare one <global-method-security> element. The following declaration would enable support for Spring Security’s @Secured:
<global-method-security secured-annotations="enabled" />
Adding an annotation to a method (on an class or interface) would then limit the access to that method accordingly. Spring Security’s native annotation support defines a set of attributes for the method. These will be passed to the AccessDecisionManager for it to make the actual decision:
public interface BankService {

@Secured("IS_AUTHENTICATED_ANONYMOUSLY")
public Account readAccount(Long id);

@Secured("IS_AUTHENTICATED_ANONYMOUSLY")
public Account[] findAccounts();

@Secured("ROLE_TELLER")
public Account post(Account account, double amount);
}
Support for JSR-250 annotations can be enabled using
<global-method-security jsr250-annotations="enabled" />
These are standards-based and allow simple role-based constraints to be applied but do not have the power Spring Security’s native annotations. To use the new expression-based syntax, you would use
<global-method-security pre-post-annotations="enabled" />
and the equivalent Java code would be
public interface BankService {

@PreAuthorize("isAnonymous()")
public Account readAccount(Long id);

@PreAuthorize("isAnonymous()")
public Account[] findAccounts();

@PreAuthorize("hasAuthority('ROLE_TELLER')")
public Account post(Account account, double amount);
}
Expression-based annotations are a good choice if you need to define simple rules that go beyond checking the role names against the user’s list of authorities.
| Note |
|---|---|
|
The annotated methods will only be secured for instances which are defined as Spring beans (in the same application context in which method-security is enabled). If you want to secure instances which are not created by Spring (using the |
| Note |
|---|---|
|
You can enable more than one type of annotation in the same application, but only one type should be used for any interface or class as the behaviour will not be well-defined otherwise. If two annotations are found which apply to a particular method, then only one of them will be applied. |
The use of protect-pointcut is particularly powerful, as it allows you to apply security to many beans with only a simple declaration. Consider the following example:
<global-method-security>
<protect-pointcut expression="execution(* com.mycompany.*Service.*(..))"
	access="ROLE_USER"/>
</global-method-security>
This will protect all methods on beans declared in the application context whose classes are in the com.mycompany package and whose class names end in "Service". Only users with the ROLE_USER role will be able to invoke these methods. As with URL matching, the most specific matches must come first in the list of pointcuts, as the first matching expression will be used. Security annotations take precedence over pointcuts.
This section assumes you have some knowledge of the underlying architecture for access-control within Spring Security. If you don’t you can skip it and come back to it later, as this section is only really relevant for people who need to do some customization in order to use more than simple role-based security.
When you use a namespace configuration, a default instance of AccessDecisionManager is automatically registered for you and will be used for making access decisions for method invocations and web URL access, based on the access attributes you specify in your intercept-url and protect-pointcut declarations (and in annotations if you are using annotation secured methods).
The default strategy is to use an AffirmativeBased AccessDecisionManager with a RoleVoter and an AuthenticatedVoter. You can find out more about these in the chapter on authorization.
If you need to use a more complicated access control strategy then it is easy to set an alternative for both method and web security.
For method security, you do this by setting the access-decision-manager-ref attribute on global-method-security to the id of the appropriate AccessDecisionManager bean in the application context:
<global-method-security access-decision-manager-ref="myAccessDecisionManagerBean">
...
</global-method-security>
The syntax for web security is the same, but on the http element:
<http access-decision-manager-ref="myAccessDecisionManagerBean">
...
</http>
The main interface which provides authentication services in Spring Security is the AuthenticationManager. This is usually an instance of Spring Security’s ProviderManager class, which you may already be familiar with if you’ve used the framework before. If not, it will be covered later, in the technical overview chapter. The bean instance is registered using the authentication-manager namespace element. You can’t use a custom AuthenticationManager if you are using either HTTP or method security through the namespace, but this should not be a problem as you have full control over the AuthenticationProvider s that are used.
You may want to register additional AuthenticationProvider beans with the ProviderManager and you can do this using the <authentication-provider> element with the ref attribute, where the value of the attribute is the name of the provider bean you want to add. For example:
<authentication-manager>
<authentication-provider ref="casAuthenticationProvider"/>
</authentication-manager>

<bean id="casAuthenticationProvider"
	class="org.springframework.security.cas.authentication.CasAuthenticationProvider">
...
</bean>
Another common requirement is that another bean in the context may require a reference to the AuthenticationManager. You can easily register an alias for the AuthenticationManager and use this name elsewhere in your application context.
<security:authentication-manager alias="authenticationManager">
...
</security:authentication-manager>

<bean id="customizedFormLoginFilter"
	class="com.somecompany.security.web.CustomFormLoginFilter">
<property name="authenticationManager" ref="authenticationManager"/>
...
</bean>
[1] You can find out more about the use of the ldap-server element in the chapter on Chapter 26, LDAP Authentication.
[2] See the section on Section 11.4, “Request Matching and HttpFirewall” in the Web Application Infrastructure chapter for more details on how matches are actually performed.
[3] See the chapter on Chapter 19, Anonymous Authentication
[4] The use of multiple <http> elements is an important feature, allowing the namespace to simultaneously support both stateful and stateless paths within the same application, for example. The previous syntax, using the attribute filters="none" on an intercept-url element is incompatible with this change and is no longer supported in 3.1.
[5] For more details on how channel-processing is implemented, see the Javadoc for ChannelProcessingFilter and related classes.
There are several sample web applications that are available with the project. To avoid an overly large download, only the "tutorial" and "contacts" samples are included in the distribution zip file. The others can be built directly from the source which you can obtain as described in the introduction. It’s easy to build the project yourself and there’s more information on the project web site at http://spring.io/spring-security/. All paths referred to in this chapter are relative to the project source directory.
The tutorial sample is a nice basic example to get you started. It uses simple namespace configuration throughout. The compiled application is included in the distribution zip file, ready to be deployed into your web container (spring-security-samples-tutorial-3.1.x.war). The form-based authentication mechanism is used in combination with the commonly-used remember-me authentication provider to automatically remember the login using cookies.
We recommend you start with the tutorial sample, as the XML is minimal and easy to follow. Most importantly, you can easily add this one XML file (and its corresponding web.xml entries) to your existing application. Only when this basic integration is achieved do we suggest you attempt adding in method authorization or domain object security.
The Contacts Sample is an advanced example in that it illustrates the more powerful features of domain object access control lists (ACLs) in addition to basic application security. The application provides an interface with which the users are able to administer a simple database of contacts (the domain objects).
To deploy, simply copy the WAR file from Spring Security distribution into your container’s webapps directory. The war should be called spring-security-samples-contacts-3.1.x.war (the appended version number will vary depending on what release you are using).
After starting your container, check the application can load. Visit http://localhost:8080/contacts (or whichever URL is appropriate for your web container and the WAR you deployed).
Next, click "Debug". You will be prompted to authenticate, and a series of usernames and passwords are suggested on that page. Simply authenticate with any of these and view the resulting page. It should contain a success message similar to the following:
Security Debug Information

Authentication object is of type:
org.springframework.security.authentication.UsernamePasswordAuthenticationToken

Authentication object as a String:

org.springframework.security.authentication.UsernamePasswordAuthenticationToken@1f127853:
Principal: org.springframework.security.core.userdetails.User@b07ed00: Username: rod; \
Password: [PROTECTED]; Enabled: true; AccountNonExpired: true;
credentialsNonExpired: true; AccountNonLocked: true; \
Granted Authorities: ROLE_SUPERVISOR, ROLE_USER; \
Password: [PROTECTED]; Authenticated: true; \
Details: org.springframework.security.web.authentication.WebAuthenticationDetails@0: \
RemoteIpAddress: 127.0.0.1; SessionId: 8fkp8t83ohar; \
Granted Authorities: ROLE_SUPERVISOR, ROLE_USER

Authentication object holds the following granted authorities:

ROLE_SUPERVISOR (getAuthority(): ROLE_SUPERVISOR)
ROLE_USER (getAuthority(): ROLE_USER)

Success! Your web filters appear to be properly configured!
Once you successfully receive the above message, return to the sample application’s home page and click "Manage". You can then try out the application. Notice that only the contacts available to the currently logged on user are displayed, and only users with ROLE_SUPERVISOR are granted access to delete their contacts. Behind the scenes, the MethodSecurityInterceptor is securing the business objects.
The application allows you to modify the access control lists associated with different contacts. Be sure to give this a try and understand how it works by reviewing the application context XML files.
The LDAP sample application provides a basic configuration and sets up both a namespace configuration and an equivalent configuration using traditional beans, both in the same application context file. This means there are actually two identical authentication providers configured in this application.
The OpenID sample demonstrates how to use the namespace to configure OpenID and how to set up attribute exchange configurations for Google, Yahoo and MyOpenID identity providers (you can experiment with adding others if you wish). It uses the JQuery-based openid-selector project to provide a user-friendly login page which allows the user to easily select a provider, rather than typing in the full OpenID identifier.
The application differs from normal authentication scenarios in that it allows any user to access the site (provided their OpenID authentication is successful). The first time you login, you will get a "Welcome [your name]"" message. If you logout and log back in (with the same OpenID identity) then this should change to "Welcome Back". This is achieved by using a custom UserDetailsService which assigns a standard role to any user and stores the identities internally in a map. Obviously a real application would use a database instead. Have a look at the source form more information. This class also takes into account the fact that different attributes may be returned from different providers and builds the name with which it addresses the user accordingly.
The CAS sample requires that you run both a CAS server and CAS client. It isn’t included in the distribution so you should check out the project code as described in the introduction. You’ll find the relevant files under the sample/cas directory. There’s also a Readme.txt file in there which explains how to run both the server and the client directly from the source tree, complete with SSL support.
The JAAS sample is very simple example of how to use a JAAS LoginModule with Spring Security. The provided LoginModule will successfully authenticate a user if the username equals the password otherwise a LoginException is thrown. The AuthorityGranter used in this example always grants the role ROLE_USER. The sample application also demonstrates how to run as the JAAS Subject returned by the LoginModule by setting jaas-api-provision equal to "true".
This sample application demonstrates how to wire up beans from the pre-authentication framework to make use of login information from a Java EE container. The user name and roles are those setup by the container.
The code is in samples/preauth.
Spring Security uses JIRA to manage bug reports and enhancement requests. If you find a bug, please log a report using JIRA. Do not log it on the support forum, mailing list or by emailing the project’s developers. Such approaches are ad-hoc and we prefer to manage bugs using a more formal process.
If possible, in your issue report please provide a JUnit test that demonstrates any incorrect behaviour. Or, better yet, provide a patch that corrects the issue. Similarly, enhancements are welcome to be logged in the issue tracker, although we only accept enhancement requests if you include corresponding unit tests. This is necessary to ensure project test coverage is adequately maintained.
You can access the issue tracker at http://jira.springsource.org/browse/SEC.
We welcome your involvement in the Spring Security project. There are many ways of contributing, including reading the forum and responding to questions from other people, writing new code, improving existing code, assisting with documentation, developing samples or tutorials, or simply making suggestions.
Questions and comments on Spring Security are welcome. You can use the Spring Community Forum web site at http://forum.springsource.org to discuss Spring Security with other users of the framework. Remember to use JIRA for bug reports, as explained above.
Once you are familiar with setting up and running some namespace-configuration based applications, you may wish to develop more of an understanding of how the framework actually works behind the namespace facade. Like most software, Spring Security has certain central interfaces, classes and conceptual abstractions that are commonly used throughout the framework. In this part of the reference guide we will look at some of these and see how they work together to support authentication and access-control within Spring Security.
Spring Security 3.0 requires a Java 5.0 Runtime Environment or higher. As Spring Security aims to operate in a self-contained manner, there is no need to place any special configuration files into your Java Runtime Environment. In particular, there is no need to configure a special Java Authentication and Authorization Service (JAAS) policy file or place Spring Security into common classpath locations.
Similarly, if you are using an EJB Container or Servlet Container there is no need to put any special configuration files anywhere, nor include Spring Security in a server classloader. All the required files will be contained within your application.
This design offers maximum deployment time flexibility, as you can simply copy your target artifact (be it a JAR, WAR or EAR) from one system to another and it will immediately work.
In Spring Security 3.0, the contents of the spring-security-core jar were stripped down to the bare minimum. It no longer contains any code related to web-application security, LDAP or namespace configuration. We’ll take a look here at some of the Java types that you’ll find in the core module. They represent the building blocks of the the framework, so if you ever need to go beyond a simple namespace configuration then it’s important that you understand what they are, even if you don’t actually need to interact with them directly.
The most fundamental object is SecurityContextHolder. This is where we store details of the present security context of the application, which includes details of the principal currently using the application. By default the SecurityContextHolder uses a ThreadLocal to store these details, which means that the security context is always available to methods in the same thread of execution, even if the security context is not explicitly passed around as an argument to those methods. Using a ThreadLocal in this way is quite safe if care is taken to clear the thread after the present principal’s request is processed. Of course, Spring Security takes care of this for you automatically so there is no need to worry about it.
Some applications aren’t entirely suitable for using a ThreadLocal, because of the specific way they work with threads. For example, a Swing client might want all threads in a Java Virtual Machine to use the same security context. SecurityContextHolder can be configured with a strategy on startup to specify how you would like the context to be stored. For a standalone application you would use the SecurityContextHolder.MODE_GLOBAL strategy. Other applications might want to have threads spawned by the secure thread also assume the same security identity. This is achieved by using SecurityContextHolder.MODE_INHERITABLETHREADLOCAL. You can change the mode from the default SecurityContextHolder.MODE_THREADLOCAL in two ways. The first is to set a system property, the second is to call a static method on SecurityContextHolder. Most applications won’t need to change from the default, but if you do, take a look at the JavaDocs for SecurityContextHolder to learn more.
Inside the SecurityContextHolder we store details of the principal currently interacting with the application. Spring Security uses an Authentication object to represent this information. You won’t normally need to create an Authentication object yourself, but it is fairly common for users to query the Authentication object. You can use the following code block - from anywhere in your application - to obtain the name of the currently authenticated user, for example:
Object principal = SecurityContextHolder.getContext().getAuthentication().getPrincipal();

if (principal instanceof UserDetails) {
String username = ((UserDetails)principal).getUsername();
} else {
String username = principal.toString();
}
The object returned by the call to getContext() is an instance of the SecurityContext interface. This is the object that is kept in thread-local storage. As we’ll see below, most authentication mechanisms withing Spring Security return an instance of UserDetails as the principal.
Another item to note from the above code fragment is that you can obtain a principal from the Authentication object. The principal is just an Object. Most of the time this can be cast into a UserDetails object. UserDetails is a core interface in Spring Security. It represents a principal, but in an extensible and application-specific way. Think of UserDetails as the adapter between your own user database and what Spring Security needs inside the SecurityContextHolder. Being a representation of something from your own user database, quite often you will cast the UserDetails to the original object that your application provided, so you can call business-specific methods (like`getEmail(), `getEmployeeNumber() and so on).
By now you’re probably wondering, so when do I provide a UserDetails object? How do I do that? I thought you said this thing was declarative and I didn’t need to write any Java code - what gives? The short answer is that there is a special interface called UserDetailsService. The only method on this interface accepts a String-based username argument and returns a UserDetails:
UserDetails loadUserByUsername(String username) throws UsernameNotFoundException;
This is the most common approach to loading information for a user within Spring Security and you will see it used throughout the framework whenever information on a user is required.
On successful authentication, UserDetails is used to build the Authentication object that is stored in the SecurityContextHolder (more on this below). The good news is that we provide a number of UserDetailsService implementations, including one that uses an in-memory map (InMemoryDaoImpl) and another that uses JDBC (JdbcDaoImpl). Most users tend to write their own, though, with their implementations often simply sitting on top of an existing Data Access Object (DAO) that represents their employees, customers, or other users of the application. Remember the advantage that whatever your UserDetailsService returns can always be obtained from the SecurityContextHolder using the above code fragment.
| Note |
|---|---|
|
There is often some confusion about |
Besides the principal, another important method provided by Authentication is getAuthorities(). This method provides an array of GrantedAuthority objects. A GrantedAuthority is, not surprisingly, an authority that is granted to the principal. Such authorities are usually "roles", such as ROLE_ADMINISTRATOR or ROLE_HR_SUPERVISOR. These roles are later on configured for web authorization, method authorization and domain object authorization. Other parts of Spring Security are capable of interpreting these authorities, and expect them to be present. GrantedAuthority objects are usually loaded by the UserDetailsService.
Usually the GrantedAuthority objects are application-wide permissions. They are not specific to a given domain object. Thus, you wouldn’t likely have a GrantedAuthority to represent a permission to Employee object number 54, because if there are thousands of such authorities you would quickly run out of memory (or, at the very least, cause the application to take a long time to authenticate a user). Of course, Spring Security is expressly designed to handle this common requirement, but you’d instead use the project’s domain object security capabilities for this purpose.
Just to recap, the major building blocks of Spring Security that we’ve seen so far are:
-
SecurityContextHolder, to provide access to theSecurityContext. -
SecurityContext, to hold theAuthenticationand possibly request-specific security information. -
Authentication, to represent the principal in a Spring Security-specific manner. -
GrantedAuthority, to reflect the application-wide permissions granted to a principal. -
UserDetails, to provide the necessary information to build an Authentication object from your application’s DAOs or other source of security data. -
UserDetailsService, to create aUserDetailswhen passed in aString-based username (or certificate ID or the like).
Now that you’ve gained an understanding of these repeatedly-used components, let’s take a closer look at the process of authentication.
Spring Security can participate in many different authentication environments. While we recommend people use Spring Security for authentication and not integrate with existing Container Managed Authentication, it is nevertheless supported - as is integrating with your own proprietary authentication system.
Let’s consider a standard authentication scenario that everyone is familiar with.
- A user is prompted to log in with a username and password.
- The system (successfully) verifies that the password is correct for the username.
- The context information for that user is obtained (their list of roles and so on).
- A security context is established for the user
- The user proceeds, potentially to perform some operation which is potentially protected by an access control mechanism which checks the required permissions for the operation against the current security context information.
The first three items constitute the authentication process so we’ll take a look at how these take place within Spring Security.
-
The username and password are obtained and combined into an instance of
UsernamePasswordAuthenticationToken(an instance of theAuthenticationinterface, which we saw earlier). -
The token is passed to an instance of
AuthenticationManagerfor validation. -
The
AuthenticationManagerreturns a fully populatedAuthenticationinstance on successful authentication. -
The security context is established by calling
SecurityContextHolder.getContext().setAuthentication(…), passing in the returned authentication object.
From that point on, the user is considered to be authenticated. Let’s look at some code as an example.
import org.springframework.security.authentication.*;
import org.springframework.security.core.*;
import org.springframework.security.core.authority.SimpleGrantedAuthority;
import org.springframework.security.core.context.SecurityContextHolder;

public class AuthenticationExample {
private static AuthenticationManager am = new SampleAuthenticationManager();

public static void main(String[] args) throws Exception {
	BufferedReader in = new BufferedReader(new InputStreamReader(System.in));

	while(true) {
	System.out.println("Please enter your username:");
	String name = in.readLine();
	System.out.println("Please enter your password:");
	String password = in.readLine();
	try {
		Authentication request = new UsernamePasswordAuthenticationToken(name, password);
		Authentication result = am.authenticate(request);
		SecurityContextHolder.getContext().setAuthentication(result);
		break;
	} catch(AuthenticationException e) {
		System.out.println("Authentication failed: " + e.getMessage());
	}
	}
	System.out.println("Successfully authenticated. Security context contains: " +
			SecurityContextHolder.getContext().getAuthentication());
}
}

class SampleAuthenticationManager implements AuthenticationManager {
static final List<GrantedAuthority> AUTHORITIES = new ArrayList<GrantedAuthority>();

static {
	AUTHORITIES.add(new SimpleGrantedAuthority("ROLE_USER"));
}

public Authentication authenticate(Authentication auth) throws AuthenticationException {
	if (auth.getName().equals(auth.getCredentials())) {
	return new UsernamePasswordAuthenticationToken(auth.getName(),
		auth.getCredentials(), AUTHORITIES);
	}
	throw new BadCredentialsException("Bad Credentials");
}
}
Here
we have written a little program that asks the user to enter a username and password
and performs the above sequence. The
AuthenticationManager which we’ve implemented here will authenticate any user whose username and password are the same. It assigns a single role to every user. The output from the above will be something like:
Please enter your username:
bob
Please enter your password:
password
Authentication failed: Bad Credentials
Please enter your username:
bob
Please enter your password:
bob
Successfully authenticated. Security context contains: \
org.springframework.security.authentication.UsernamePasswordAuthenticationToken@441d0230: \
Principal: bob; Password: [PROTECTED]; \
Authenticated: true; Details: null; \
Granted Authorities: ROLE_USER
Note that you don’t normally need to write any code like this. The process will normally occur internally, in a web authentication filter for example. We’ve just included the code here to show that the question of what actually constitutes authentication in Spring Security has quite a simple answer. A user is authenticated when the SecurityContextHolder contains a fully populated Authentication object.
In fact, Spring Security doesn’t mind how you put the Authentication object inside the SecurityContextHolder. The only critical requirement is that the SecurityContextHolder contains an Authentication which represents a principal before the AbstractSecurityInterceptor (which we’ll see more about later) needs to authorize a user operation.
You can (and many users do) write their own filters or MVC controllers to provide interoperability with authentication systems that are not based on Spring Security. For example, you might be using Container-Managed Authentication which makes the current user available from a ThreadLocal or JNDI location. Or you might work for a company that has a legacy proprietary authentication system, which is a corporate "standard" over which you have little control. In situations like this it’s quite easy to get Spring Security to work, and still provide authorization capabilities. All you need to do is write a filter (or equivalent) that reads the third-party user information from a location, build a Spring Security-specific Authentication object, and put it into the SecurityContextHolder. In this case you also need to think about things which are normally taken care of automatically by the built-in authentication infrastructure. For example, you might need to pre-emptively create an HTTP session to cache the context between requests, before you write the response to the client footnote:[It isn’t possible to create a session once the response has been committed.
If you’re wondering how the AuthenticationManager is implemented in a real world example, we’ll look at that in the core services chapter.
Now let’s explore the situation where you are using Spring Security in a web application (without web.xml security enabled). How is a user authenticated and the security context established?
Consider a typical web application’s authentication process:
- You visit the home page, and click on a link.
- A request goes to the server, and the server decides that you’ve asked for a protected resource.
- As you’re not presently authenticated, the server sends back a response indicating that you must authenticate. The response will either be an HTTP response code, or a redirect to a particular web page.
- Depending on the authentication mechanism, your browser will either redirect to the specific web page so that you can fill out the form, or the browser will somehow retrieve your identity (via a BASIC authentication dialogue box, a cookie, a X.509 certificate etc.).
- The browser will send back a response to the server. This will either be an HTTP POST containing the contents of the form that you filled out, or an HTTP header containing your authentication details.
- Next the server will decide whether or not the presented credentials are valid. If they’re valid, the next step will happen. If they’re invalid, usually your browser will be asked to try again (so you return to step two above).
- The original request that you made to cause the authentication process will be retried. Hopefully you’ve authenticated with sufficient granted authorities to access the protected resource. If you have sufficient access, the request will be successful. Otherwise, you’ll receive back an HTTP error code 403, which means "forbidden".
Spring Security has distinct classes responsible for most of the steps described above. The main participants (in the order that they are used) are the ExceptionTranslationFilter, an AuthenticationEntryPoint and an "authentication mechanism", which is responsible for calling the AuthenticationManager which we saw in the previous section.
ExceptionTranslationFilter is a Spring Security filter that has responsibility for detecting any Spring Security exceptions that are thrown. Such exceptions will generally be thrown by an AbstractSecurityInterceptor, which is the main provider of authorization services. We will discuss AbstractSecurityInterceptor in the next section, but for now we just need to know that it produces Java exceptions and knows nothing about HTTP or how to go about authenticating a principal. Instead the ExceptionTranslationFilter offers this service, with specific responsibility for either returning error code 403 (if the principal has been authenticated and therefore simply lacks sufficient access - as per step seven above), or launching an AuthenticationEntryPoint (if the principal has not been authenticated and therefore we need to go commence step three).
The AuthenticationEntryPoint is responsible for step three in the above list. As you can imagine, each web application will have a default authentication strategy (well, this can be configured like nearly everything else in Spring Security, but let’s keep it simple for now). Each major authentication system will have its own AuthenticationEntryPoint implementation, which typically performs one of the actions described in step 3.
Once your browser submits your authentication credentials (either as an HTTP form post or HTTP header) there needs to be something on the server that"collects" these authentication details. By now we’re at step six in the above list. In Spring Security we have a special name for the function of collecting authentication details from a user agent (usually a web browser), referring to it as the "authentication mechanism". Examples are form-base login and Basic authentication. Once the authentication details have been collected from the user agent, an Authentication`"request" object is built and then presented to the `AuthenticationManager.
After the authentication mechanism receives back the fully-populated Authentication object, it will deem the request valid, put the Authentication into the SecurityContextHolder, and cause the original request to be retried (step seven above). If, on the other hand, the AuthenticationManager rejected the request, the authentication mechanism will ask the user agent to retry (step two above).
Depending on the type of application, there may need to be a strategy in place to store the security context between user operations. In a typical web application, a user logs in once and is subsequently identified by their session Id. The server caches the principal information for the duration session. In Spring Security, the responsibility for storing the SecurityContext between requests falls to the SecurityContextPersistenceFilter, which by default stores the context as an HttpSession attribute between HTTP requests. It restores the context to the SecurityContextHolder for each request and, crucially, clears the SecurityContextHolder when the request completes. You shouldn’t interact directly with the HttpSession for security purposes. There is simply no justification for doing so - always use the SecurityContextHolder instead.
Many other types of application (for example, a stateless RESTful web service) do not use HTTP sessions and will re-authenticate on every request. However, it is still important that the SecurityContextPersistenceFilter is included in the chain to make sure that the SecurityContextHolder is cleared after each request.
| Note |
|---|---|
|
In an application which receives concurrent requests in a single session, the same |
The main interface responsible for making access-control decisions in Spring Security is the AccessDecisionManager. It has a decide method which takes an Authentication object representing the principal requesting access, a "secure object" (see below) and a list of security metadata attributes which apply for the object (such as a list of roles which are required for access to be granted).
If you’re familiar with AOP, you’d be aware there are different types of advice available: before, after, throws and around. An around advice is very useful, because an advisor can elect whether or not to proceed with a method invocation, whether or not to modify the response, and whether or not to throw an exception. Spring Security provides an around advice for method invocations as well as web requests. We achieve an around advice for method invocations using Spring’s standard AOP support and we achieve an around advice for web requests using a standard Filter.
For those not familiar with AOP, the key point to understand is that Spring Security can help you protect method invocations as well as web requests. Most people are interested in securing method invocations on their services layer. This is because the services layer is where most business logic resides in current-generation Java EE applications. If you just need to secure method invocations in the services layer, Spring’s standard AOP will be adequate. If you need to secure domain objects directly, you will likely find that AspectJ is worth considering.
You can elect to perform method authorization using AspectJ or Spring AOP, or you can elect to perform web request authorization using filters. You can use zero, one, two or three of these approaches together. The mainstream usage pattern is to perform some web request authorization, coupled with some Spring AOP method invocation authorization on the services layer.
So what is a "secure object" anyway? Spring Security uses the term to refer to any object that can have security (such as an authorization decision) applied to it. The most common examples are method invocations and web requests.
Each supported secure object type has its own interceptor class, which is a subclass of AbstractSecurityInterceptor. Importantly, by the time the AbstractSecurityInterceptor is called, the SecurityContextHolder will contain a valid Authentication if the principal has been authenticated.
AbstractSecurityInterceptor provides a consistent workflow for handling secure object requests, typically:
- Look up the "configuration attributes" associated with the present request
-
Submitting the secure object, current
Authenticationand configuration attributes to theAccessDecisionManagerfor an authorization decision -
Optionally change the
Authenticationunder which the invocation takes place - Allow the secure object invocation to proceed (assuming access was granted)
-
Call the
AfterInvocationManagerif configured, once the invocation has returned. If the invocation raised an exception, theAfterInvocationManagerwill not be invoked.
A "configuration attribute" can be thought of as a String that has special meaning to the classes used by AbstractSecurityInterceptor. They are represented by the interface ConfigAttribute within the framework. They may be simple role names or have more complex meaning, depending on the how sophisticated the AccessDecisionManager implementation is. The AbstractSecurityInterceptor is configured with a SecurityMetadataSource which it uses to look up the attributes for a secure object. Usually this configuration will be hidden from the user. Configuration attributes will be entered as annotations on secured methods or as access attributes on secured URLs. For example, when we saw something like <intercept-url pattern='/secure/**' access='ROLE_A,ROLE_B'/> in the namespace introduction, this is saying that the configuration attributes ROLE_A and ROLE_B apply to web requests matching the given pattern. In practice, with the default AccessDecisionManager configuration, this means that anyone who has a GrantedAuthority matching either of these two attributes will be allowed access. Strictly speaking though, they are just attributes and the interpretation is dependent on the AccessDecisionManager implementation. The use of the prefix ROLE_ is a marker to indicate that these attributes are roles and should be consumed by Spring Security’s`RoleVoter`. This is only relevant when a voter-based AccessDecisionManager is in use. We’ll see how the AccessDecisionManager is implemented in the authorization chapter.
Assuming AccessDecisionManager decides to allow the request, the AbstractSecurityInterceptor will normally just proceed with the request. Having said that, on rare occasions users may want to replace the Authentication inside the SecurityContext with a different Authentication, which is handled by the AccessDecisionManager calling a RunAsManager. This might be useful in reasonably unusual situations, such as if a services layer method needs to call a remote system and present a different identity. Because Spring Security automatically propagates security identity from one server to another (assuming you’re using a properly-configured RMI or HttpInvoker remoting protocol client), this may be useful.
Following the secure object invocation proceeding and then returning - which may mean a method invocation completing or a filter chain proceeding - the AbstractSecurityInterceptor gets one final chance to handle the invocation. At this stage the AbstractSecurityInterceptor is interested in possibly modifying the return object. We might want this to happen because an authorization decision couldn’t be made "on the way in" to a secure object invocation. Being highly pluggable, AbstractSecurityInterceptor will pass control to an AfterInvocationManager to actually modify the object if needed. This class can even entirely replace the object, or throw an exception, or not change it in any way as it chooses. The after-invocation checks will only be executed if the invocation is successful. If an exception occurs, the additional checks will be skipped.
AbstractSecurityInterceptor and its related objects are shown in Figure 7.1, “Security interceptors and the "secure object" model”
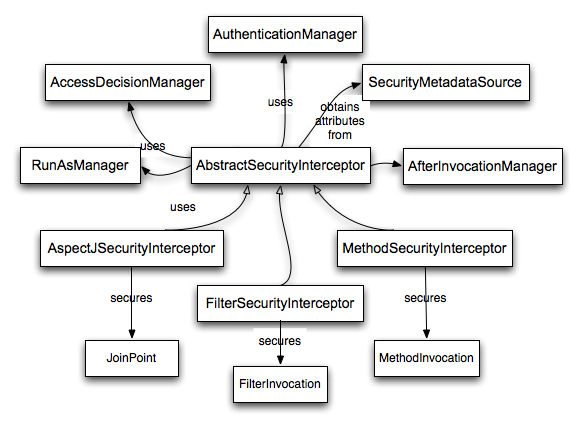
Only developers contemplating an entirely new way of intercepting and authorizing requests would need to use secure objects directly. For example, it would be possible to build a new secure object to secure calls to a messaging system. Anything that requires security and also provides a way of intercepting a call (like the AOP around advice semantics) is capable of being made into a secure object. Having said that, most Spring applications will simply use the three currently supported secure object types (AOP Alliance MethodInvocation, AspectJ JoinPoint and web request FilterInvocation) with complete transparency.
Spring Security supports localization of exception messages that end users are likely to see. If your application is designed for English-speaking users, you don’t need to do anything as by default all Security Security messages are in English. If you need to support other locales, everything you need to know is contained in this section.
All exception messages can be localized, including messages related to authentication failures and access being denied (authorization failures). Exceptions and logging messages that are focused on developers or system deployers (including incorrect attributes, interface contract violations, using incorrect constructors, startup time validation, debug-level logging) are not localized and instead are hard-coded in English within Spring Security’s code.
Shipping in the spring-security-core-xx.jar you will find an org.springframework.security package that in turn contains a messages.properties file, as well as localized versions for some common languages. This should be referred to by your`ApplicationContext`, as Spring Security classes implement Spring’s MessageSourceAware interface and expect the message resolver to be dependency injected at application context startup time. Usually all you need to do is register a bean inside your application context to refer to the messages. An example is shown below:
<bean id="messageSource"
	class="org.springframework.context.support.ReloadableResourceBundleMessageSource">
<property name="basename" value="classpath:org/springframework/security/messages"/>
</bean>
The messages.properties is named in accordance with standard resource bundles and represents the default language supported by Spring Security messages. This default file is in English.
If you wish to customize the messages.properties file, or support other languages, you should copy the file, rename it accordingly, and register it inside the above bean definition. There are not a large number of message keys inside this file, so localization should not be considered a major initiative. If you do perform localization of this file, please consider sharing your work with the community by logging a JIRA task and attaching your appropriately-named localized version of messages.properties.
Spring Security relies on Spring’s localization support in order to actually lookup the appropriate message. In order for this to work, you have to make sure that the locale from the incoming request is stored in Spring’s org.springframework.context.i18n.LocaleContextHolder. Spring MVC’s DispatcherServlet does this for your application automatically, but since Spring Security’s filters are invoked before this, the LocaleContextHolder needs to be set up to contain the correct Locale before the filters are called. You can either do this in a filter yourself (which must come before the Spring Security filters in`web.xml`) or you can use Spring’s RequestContextFilter. Please refer to the Spring Framework documentation for further details on using localization with Spring.
The "contacts" sample application is set up to use localized messages.
Now that we have a high-level overview of the Spring Security architecture and its core classes, let’s take a closer look at one or two of the core interfaces and their implementations, in particular the AuthenticationManager, UserDetailsService and the AccessDecisionManager. These crop up regularly throughout the remainder of this document so it’s important you know how they are configured and how they operate.
The AuthenticationManager is just an interface, so the implementation can be anything we choose, but how does it work in practice? What if we need to check multiple authentication databases or a combination of different authentication services such as a database and an LDAP server?
The default implementation in Spring Security is called ProviderManager and rather than handling the authentication request itself, it delegates to a list of configured AuthenticationProvider s, each of which is queried in turn to see if it can perform the authentication. Each provider will either throw an exception or return a fully populated Authentication object. Remember our good friends, UserDetails and UserDetailsService? If not, head back to the previous chapter and refresh your memory. The most common approach to verifying an authentication request is to load the corresponding UserDetails and check the loaded password against the one that has been entered by the user. This is the approach used by the DaoAuthenticationProvider (see below). The loaded UserDetails object - and particularly the GrantedAuthority s it contains - will be used when building the fully populated Authentication object which is returned from a successful authentication and stored in the SecurityContext.
If you are using the namespace, an instance of ProviderManager is created and maintained internally, and you add providers to it by using the namespace authentication provider elements (see the namespace chapter). In this case, you should not declare a ProviderManager bean in your application context. However, if you are not using the namespace then you would declare it like so:
<bean id="authenticationManager"
		class="org.springframework.security.authentication.ProviderManager">
	<constructor-arg>
		<list>
			<ref local="daoAuthenticationProvider"/>
			<ref local="anonymousAuthenticationProvider"/>
			<ref local="ldapAuthenticationProvider"/>
		</list>
	</constructor-arg>
</bean>
In the above example we have three providers. They are tried in the order shown (which is implied by the use of a List), with each provider able to attempt authentication, or skip authentication by simply returning null. If all implementations return null, the ProviderManager will throw a ProviderNotFoundException. If you’re interested in learning more about chaining providers, please refer to the ProviderManager JavaDocs.
Authentication mechanisms such as a web form-login processing filter are injected with a reference to the ProviderManager and will call it to handle their authentication requests. The providers you require will sometimes be interchangeable with the authentication mechanisms, while at other times they will depend on a specific authentication mechanism. For example, DaoAuthenticationProvider and LdapAuthenticationProvider are compatible with any mechanism which submits a simple username/password authentication request and so will work with form-based logins or HTTP Basic authentication. On the other hand, some authentication mechanisms create an authentication request object which can only be interpreted by a single type of AuthenticationProvider. An example of this would be JA-SIG CAS, which uses the notion of a service ticket and so can therefore only be authenticated by a CasAuthenticationProvider. You needn’t be too concerned about this, because if you forget to register a suitable provider, you’ll simply receive a ProviderNotFoundException when an attempt to authenticate is made.
By default (from Spring Security 3.1 onwards) the ProviderManager will attempt to clear any sensitive credentials information from the Authentication object which is returned by a successful authentication request. This prevents information like passwords being retained longer than necessary.
This may cause issues when you are using a cache of user objects, for example, to improve performance in a stateless application. If the Authentication contains a reference to an object in the cache (such as a UserDetails instance) and this has its credentials removed, then it will no longer be possible to authenticate against the cached value. You need to take this into account if you are using a cache. An obvious solution is to make a copy of the object first, either in the cache implementation or in the AuthenticationProvider which creates the returned Authentication object. Alternatively, you can disable the eraseCredentialsAfterAuthentication property on ProviderManager. See the Javadoc for more information.
The simplest AuthenticationProvider implemented by Spring Security is DaoAuthenticationProvider, which is also one of the earliest supported by the framework. It leverages a UserDetailsService (as a DAO) in order to lookup the username, password and GrantedAuthority s. It authenticates the user simply by comparing the password submitted in a UsernamePasswordAuthenticationToken against the one loaded by the UserDetailsService. Configuring the provider is quite simple:
<bean id="daoAuthenticationProvider"
	class="org.springframework.security.authentication.dao.DaoAuthenticationProvider">
<property name="userDetailsService" ref="inMemoryDaoImpl"/>
<property name="passwordEncoder" ref="passwordEncoder"/>
</bean>
The PasswordEncoder is optional. A PasswordEncoder provides encoding and decoding of passwords presented in the UserDetails object that is returned from the configured UserDetailsService. This will be discussed in more detail below.
As mentioned in the earlier in this reference guide, most authentication providers take advantage of the UserDetails and UserDetailsService interfaces. Recall that the contract for UserDetailsService is a single method:
UserDetails loadUserByUsername(String username) throws UsernameNotFoundException;
The returned UserDetails is an interface that provides getters that guarantee non-null provision of authentication information such as the username, password, granted authorities and whether the user account is enabled or disabled. Most authentication providers will use a`UserDetailsService`, even if the username and password are not actually used as part of the authentication decision. They may use the returned UserDetails object just for its GrantedAuthority information, because some other system (like LDAP or X.509 or CAS etc) has undertaken the responsibility of actually validating the credentials.
Given UserDetailsService is so simple to implement, it should be easy for users to retrieve authentication information using a persistence strategy of their choice. Having said that, Spring Security does include a couple of useful base implementations, which we’ll look at below.
Is easy to use create a custom UserDetailsService implementation that extracts information from a persistence engine of choice, but many applications do not require such complexity. This is particularly true if you’re building a prototype application or just starting integrating Spring Security, when you don’t really want to spend time configuring databases or writing UserDetailsService implementations. For this sort of situation, a simple option is to use the user-service element from the security namespace:
<user-service id="userDetailsService">
<user name="jimi" password="jimispassword" authorities="ROLE_USER, ROLE_ADMIN" />
<user name="bob" password="bobspassword" authorities="ROLE_USER" />
</user-service>
This also supports the use of an external properties file:
<user-service id="userDetailsService" properties="users.properties"/>
The properties file should contain entries in the form
username=password,grantedAuthority[,grantedAuthority][,enabled|disabled]
For example
jimi=jimispassword,ROLE_USER,ROLE_ADMIN,enabled
bob=bobspassword,ROLE_USER,enabled
Spring Security also includes a UserDetailsService that can obtain authentication information from a JDBC data source. Internally Spring JDBC is used, so it avoids the complexity of a fully-featured object relational mapper (ORM) just to store user details. If your application does use an ORM tool, you might prefer to write a custom UserDetailsService to reuse the mapping files you’ve probably already created. Returning to JdbcDaoImpl, an example configuration is shown below:
<bean id="dataSource" class="org.springframework.jdbc.datasource.DriverManagerDataSource">
<property name="driverClassName" value="org.hsqldb.jdbcDriver"/>
<property name="url" value="jdbc:hsqldb:hsql://localhost:9001"/>
<property name="username" value="sa"/>
<property name="password" value=""/>
</bean>

<bean id="userDetailsService"
	class="org.springframework.security.core.userdetails.jdbc.JdbcDaoImpl">
<property name="dataSource" ref="dataSource"/>
</bean>
You can use different relational database management systems by modifying the DriverManagerDataSource shown above. You can also use a global data source obtained from JNDI, as with any other Spring configuration.
By default, JdbcDaoImpl loads the authorities for a single user with the assumption that the authorities are mapped directly to users (see the database schema appendix). An alternative approach is to partition the authorities into groups and assign groups to the user. Some people prefer this approach as a means of administering user rights. See the JdbcDaoImpl Javadoc for more information on how to enable the use of group authorities. The group schema is also included in the appendix.
Spring Security’s PasswordEncoder interface is used to support the use of passwords which are encoded in some way in persistent storage. You should never store passwords in plain text. Always use a one-way password hashing algorithm such as bcrypt which uses a built-in salt value which is different for each stored password. Do not use a plain hash function such as MD5 or SHA, or even a salted version. Bcrypt is deliberately designed to be slow and to hinder offline password cracking, whereas standard hash algorithms are fast and can easily be used to test thousands of passwords in parallel on custom hardware. You might think this doesn’t apply to you since your password database is secure and offline attacks aren’t a risk. If so, do some research and read up on all the high-profile sites which have been compromised in this way and have been pilloried for storing their passwords insecurely. It’s best to be on the safe side. Using org.springframework.security.crypto.bcrypt.BCryptPasswordEncoder" is a good choice for security. There are also compatible implementations in other common programming languages so it a good choice for interoperability too.
If you are using a legacy system which already has hashed passwords, then you will need to use an encoder which matches your current algorithm, at least until you can migrate your users to a more secure scheme (usually this will involve asking the user to set a new password, since hashes are irreversible). Spring Security has a package containing legacy password encoding implementation, namely, org.springframework.security.authentication.encoding. The DaoAuthenticationProvider can be injected with either the new or legacy PasswordEncoder types.
Password hashing is not unique to Spring Security but is a common source of confusion for users who are not familiar with the concept. A hash (or digest) algorithm is a one-way function which produces a piece of fixed-length output data (the hash) from some input data, such as a password. As an example, the MD5 hash of the string "password" (in hexadecimal) is
5f4dcc3b5aa765d61d8327deb882cf99
A hash is "one-way" in the sense that it is very difficult (effectively impossible) to obtain the original input given the hash value, or indeed any possible input which would produce that hash value. This property makes hash values very useful for authentication purposes. They can be stored in your user database as an alternative to plaintext passwords and even if the values are compromised they do not immediately reveal a password which can be used to login. Note that this also means you have no way of recovering the password once it is encoded.
One potential problem with the use of password hashes that it is relatively easy to get round the one-way property of the hash if a common word is used for the input. People tend to choose similar passwords and huge dictionaries of these from previously hacked sites are available online. For example, if you search for the hash value 5f4dcc3b5aa765d61d8327deb882cf99 using google, you will quickly find the original word "password". In a similar way, an attacker can build a dictionary of hashes from a standard word list and use this to lookup the original password. One way to help prevent this is to have a suitably strong password policy to try to prevent common words from being used. Another is to use a"salt" when calculating the hashes. This is an additional string of known data for each user which is combined with the password before calculating the hash. Ideally the data should be as random as possible, but in practice any salt value is usually preferable to none. Using a salt means that an attacker has to build a separate dictionary of hashes for each salt value, making the attack more complicated (but not impossible).
Bcrypt automatically generates a random salt value for each password when it is encoded, and stores it in the bcrypt string in a standard format.
| Note |
|---|---|
|
The legacy approach to handling salt was to inject a |
When an authentication provider (such as Spring Security’s DaoAuthenticationProvider) needs to check the password in a submitted authentication request against the known value for a user, and the stored password is encoded in some way, then the submitted value must be encoded using exactly the same algorithm. It’s up to you to check that these are compatible as Spring Security has no control over the persistent values. If you add password hashing to your authentication configuration in Spring Security, and your database contains plaintext passwords, then there is no way authentication can succeed. Even if you are aware that your database is using MD5 to encode the passwords, for example, and your application is configured to use Spring Security’s Md5PasswordEncoder, there are still things that can go wrong. The database may have the passwords encoded in Base 64, for example while the encoder is using hexadecimal strings (the default). Alternatively your database may be using upper-case while the output from the encoder is lower-case. Make sure you write a test to check the output from your configured password encoder with a known password and salt combination and check that it matches the database value before going further and attempting to authenticate through your application. Using a standard like bcrypt will avoid these issues.
If you want to generate encoded passwords directly in Java for storage in your user database, then you can use the encode method on the PasswordEncoder.
This section demonstrates how to use Spring Security’s Test support to test method based security.
We first introduce a MessageService that requires the user to be authenticated in order to access it.
public class HelloMessageService implements MessageService {

	@PreAuthorize("authenticated")
	public String getMessage() {
		Authentication authentication = SecurityContextHolder.getContext()
															 .getAuthentication();
		return "Hello " + authentication;
	}
}
The result of getMessage is a String saying "Hello" to the current Spring Security Authentication.
An example of the output is displayed below.
Hello org.springframework.security.authentication.UsernamePasswordAuthenticationToken@ca25360: Principal: org.springframework.security.core.userdetails.User@36ebcb: Username: user; Password: [PROTECTED]; Enabled: true; AccountNonExpired: true; credentialsNonExpired: true; AccountNonLocked: true; Granted Authorities: ROLE_USER; Credentials: [PROTECTED]; Authenticated: true; Details: null; Granted Authorities: ROLE_USER
Before we can use Spring Security Test support, we must perform some setup. An example can be seen below:
@RunWith(SpringJUnit4ClassRunner.class)
This is a basic example of how to setup Spring Security Test. The highlights are:
|
|
|
|
| Note |
|---|---|
|
Spring Security hooks into Spring Test support using the |
Remember we added the @PreAuthorize annotation to our HelloMessageService and so it requires an authenticated user to invoke it.
If we ran the following test, we would expect the following test will pass:
@Test(expected = AuthenticationCredentialsNotFoundException.class)
public void getMessageUnauthenticated() {
	messageService.getMessage();
}
The question is "How could we most easily run the test as a specific user?"
The answer is to use @WithMockUser.
The following test will be ran as a user with the username "user", the password "password", and the roles "ROLE_USER".
@Test
@WithMockUser
public void getMessageWithMockUser() {
String message = messageService.getMessage();
...
}
Specifically the following is true:
- The user with the username "user" does not have to exist since we are mocking the user
-
The
Authenticationthat is populated in theSecurityContextis of typeUsernamePasswordAuthenticationToken -
The principal on the
Authenticationis Spring Security’sUserobject -
The
Userwill have the username of "user", the password "password", and a singleGrantedAuthoritynamed "ROLE_USER" is used.
Our example is nice because we are able to leverage a lot of defaults. What if we wanted to run the test with a different username? The following test would run with the username "customUser". Again, the user does not need to actually exist.
@Test
@WithMockUser("customUsername")
public void getMessageWithMockUserCustomUsername() {
	String message = messageService.getMessage();
...
}
We can also easily customize the roles. For example, this test will be invoked with the username "admin" and the roles "ROLE_USER" and "ROLE_ADMIN".
@Test
@WithMockUser(username="admin",roles={"USER","ADMIN"})
public void getMessageWithMockUserCustomUser() {
	String message = messageService.getMessage();
	...
}
If we do not want the value to automatically be prefixed with ROLE_ we can leverage the authorities attribute. For example, this test will be invoked with the username "admin" and the authorities "USER" and "ADMIN".
@Test
@WithMockUser(username = "admin", authorities = { "ADMIN", "USER" })
public void getMessageWithMockUserCustomAuthorities() {
	String message = messageService.getMessage();
	...
}
Of course it can be a bit tedious placing the annotation on every test method. Instead, we can place the annotation at the class level and every test will use the specified user. For example, the following would run every test with a user with the username "admin", the password "password", and the roles "ROLE_USER" and "ROLE_ADMIN".
@RunWith(SpringJUnit4ClassRunner.class)
@ContextConfiguration
@WithMockUser(username="admin",roles={"USER","ADMIN"})
public class WithMockUserTests {
While @WithMockUser is a very convenient way to get started, it may not work in all instances.
For example, it is common for applications to expect that the Authentication principal be of a specific type.
This is done so that the application can refer to the principal as the custom type and reduce coupling on Spring Security.
The custom principal is often times returned by a custom UserDetailsService that returns an object that implements both UserDetails and the custom type.
For situations like this, it is useful to create the test user using the custom UserDetailsService.
That is exactly what @WithUserDetails does.
Assuming we have a UserDetailsService exposed as a bean, the following test will be invoked with an Authentication of type UsernamePasswordAuthenticationToken and a principal that is returned from the UserDetailsService with the username of "user".
@Test
@WithUserDetails
public void getMessageWithUserDetails() {
	String message = messageService.getMessage();
	...
}
We can also customize the username used to lookup the user from our UserDetailsService.
For example, this test would be executed with a principal that is returned from the UserDetailsService with the username of "customUsername".
@Test
@WithUserDetails("customUsername")
public void getMessageWithUserDetailsCustomUsername() {
	String message = messageService.getMessage();
	...
}
Like @WithMockUser we can also place our annotation at the class level so that every test uses the same user.
However unlike @WithMockUser, @WithUserDetails requires the user to exist.
We have seen that @WithMockUser is an excellent choice if we are not using a custom Authentication principal.
Next we discovered that @WithUserDetails would allow us to use a custom UserDetailsService to create our Authentication principal but required the user to exist.
We will now see an option that allows the most flexibility.
We can create our own annotation that uses the @WithSecurityContext to create any SecurityContext we want.
For example, we might create an annotation named @WithMockCustomUser as shown below:
@Retention(RetentionPolicy.RUNTIME)
@WithSecurityContext(factory = WithMockCustomUserSecurityContextFactory.class)
public @interface WithMockCustomUser {

	String username() default "rob";

	String name() default "Rob Winch";
}
You can see that @WithMockCustomUser is annotated with the @WithSecurityContext annotation.
This is what signals to Spring Security Test support that we intend to create a SecurityContext for the test.
The @WithSecurityContext annotation requires we specify a SecurityContextFactory that will create a new SecurityContext given our @WithMockCustomUser annotation.
You can find our WithMockCustomUserSecurityContextFactory implementation below:
public class WithMockCustomUserSecurityContextFactory
	implements WithSecurityContextFactory<WithMockCustomUser> {
	@Override
	public SecurityContext createSecurityContext(WithMockCustomUser customUser) {
		SecurityContext context = SecurityContextHolder.createEmptyContext();

		CustomUserDetails principal =
			new CustomUserDetails(customUser.name(), customUser.username());
		Authentication auth =
			new UsernamePasswordAuthenticationToken(principal, "password", principal.getAuthorities());
		context.setAuthentication(auth);
		return context;
	}
}
We can now annotate a test class or a test method with our new annotation and Spring Security’s WithSecurityContextTestExcecutionListener will ensure that our SecurityContext is populated appropriately.
When creating your own WithSecurityContextFactory implementations, it is nice to know that they can be annotated with standard Spring annotations.
For example, the WithUserDetailsSecurityContextFactory uses the @Autowired annotation to acquire the UserDetailsService:
final class WithUserDetailsSecurityContextFactory
	implements WithSecurityContextFactory<WithUserDetails> {

	private UserDetailsService userDetailsService;

	@Autowired
	public WithUserDetailsSecurityContextFactory(UserDetailsService userDetailsService) {
		this.userDetailsService = userDetailsService;
	}

	public SecurityContext createSecurityContext(WithUserDetails withUser) {
		String username = withUser.value();
		Assert.hasLength(username, "value() must be non empty String");
		UserDetails principal = userDetailsService.loadUserByUsername(username);
		Authentication authentication = new UsernamePasswordAuthenticationToken(principal, principal.getPassword(), principal.getAuthorities());
		SecurityContext context = SecurityContextHolder.createEmptyContext();
		context.setAuthentication(authentication);
		return context;
	}
}
Spring Security provides comprehensive integration with Spring MVC Test
In order to use Spring Security with Spring MVC Test it is necessary to add the Spring Security FilterChainProxy as a Filter.
It is also necessary to add Spring Security’s TestSecurityContextHolderPostProcessor to support Running as a User in Spring MVC Test with Annotations.
This can be done using Spring Security’s SecurityMockMvcConfigurers.springSecurity().
For example:
| Note |
|---|---|
|
Spring Security’s testing support requires spring-test-4.1.3.RELEASE or greater. |
import static org.springframework.security.test.web.servlet.setup.SecurityMockMvcConfigurers.*; @RunWith(SpringJUnit4ClassRunner.class) @ContextConfiguration @WebAppConfiguration public class CsrfShowcaseTests { @Autowired private WebApplicationContext context; private MockMvc mvc; @Before public void setup() { mvc = MockMvcBuilders .webAppContextSetup(context) .apply(springSecurity())
|
|
Spring MVC Test provides a convenient interface called a RequestPostProcessor that can be used to modify a request.
Spring Security provides a number of RequestPostProcessor implementations that make testing easier.
In order to use Spring Security’s RequestPostProcessor implementations ensure the following static import is used:
import static org.springframework.security.test.web.servlet.request.SecurityMockMvcRequestPostProcessors.*;
When testing any non safe HTTP methods and using Spring Security’s CSRF protection, you must be sure to include a valid CSRF Token in the request. To specify a valid CSRF token as a request parameter using the following:
mvc
	.perform(post("/").with(csrf()))
If you like you can include CSRF token in the header instead:
mvc
	.perform(post("/").with(csrf().asHeader()))
You can also test providing an invalid CSRF token using the following:
mvc
	.perform(post("/").with(csrf().useInvalidToken()))
It is often desirable to run tests as a specific user. There are two simple ways of populating the user:
There are a number of options available to populate a test user. For example, the following will run as a user (which does not need to exist) with the username "user", the password "password", and the role "ROLE_USER":
mvc
	.perform(get("/").with(user("user")))
You can easily make customizations. For example, the following will run as a user (which does not need to exist) with the username "admin", the password "pass", and the roles "ROLE_USER" and "ROLE_ADMIN".
mvc
	.perform(get("/admin").with(user("admin").password("pass").roles("USER","ADMIN")))
If you have a custom UserDetails that you would like to use, you can easily specify that as well.
For example, the following will use the specified UserDetails (which does not need to exist) to run with a UsernamePasswordAuthenticationToken that has a principal of the specified UserDetails:
mvc
	.perform(get("/").with(user(userDetails)))
If you want a custom Authentication (which does not need to exist) you can do so using the following:
mvc
	.perform(get("/").with(authentication(authentication)))
You can even customize the SecurityContext using the following:
mvc
	.perform(get("/").with(securityContext(securityContext)))
We can also ensure to run as a specific user for every request by using `MockMvcBuilders’s default request. For example, the following will run as a user (which does not need to exist) with the username "admin", the password "password", and the role "ROLE_ADMIN":
mvc = MockMvcBuilders
		.webAppContextSetup(context)
		.defaultRequest(get("/").with(user("user").roles("ADMIN")))
		.apply(springSecurity())
		.build();
If you find you are using the same user in many of your tests, it is recommended to move the user to a method.
For example, you can specify the following in your own class named CustomSecurityMockMvcRequestPostProcessors:
public static RequestPostProcessor rob() {
	return user("rob").roles("ADMIN");
}
Now you can perform a static import on SecurityMockMvcRequestPostProcessors and use that within your tests:
import static sample.CustomSecurityMockMvcRequestPostProcessors.*;

...

mvc
	.perform(get("/").with(rob()))
As an alternative to using a RequestPostProcessor to create your user, you can use annotations described in Chapter 9, Testing Method Security.
For example, the following will run the test with the user with username "user", password "password", and role "ROLE_USER":
@Test
@WithMockUser
public void requestProtectedUrlWithUser() throws Exception {
mvc
	  .perform(get("/"))
	  ...
}
Alternatively, the following will run the test with the user with username "user", password "password", and role "ROLE_ADMIN":
@Test
@WithMockUser(roles="ADMIN")
public void requestProtectedUrlWithUser() throws Exception {
mvc
	  .perform(get("/"))
	  ...
}
While it has always been possible to authenticate with HTTP Basic, it was a bit tedious to remember the header name, format, and encode the values.
Now this can be done using Spring Security’s httpBasic RequestPostProcessor.
For example, the snippet below:
mvc
	.perform(get("/").with(httpBasic("user","password")))
will attempt to use HTTP Basic to authenticate a user with the username "user" and the password "password" by ensuring the following header is populated on the HTTP Request:
Authorization: Basic dXNlcjpwYXNzd29yZA==
Spring MVC Test also provides a RequestBuilder interface that can be used to create the MockHttpServletRequest used in your test.
Spring Security provides a few RequestBuilder implementations that can be used to make testing easier.
In order to use Spring Security’s RequestBuilder implementations ensure the following static import is used:
import static org.springframework.security.test.web.servlet.request.SecurityMockMvcRequestBuilders.*;
You can easily create a request to test a form based authentication using Spring Security’s testing support. For example, the following will submit a POST to "/login" with the username "user", the password "password", and a valid CSRF token:
mvc
	.perform(formLogin())
It is easy to customize the request. For example, the following will submit a POST to "/auth" with the username "admin", the password "pass", and a valid CSRF token:
mvc
	.perform(formLogin("/auth").user("admin").password("pass"))
We can also customize the parameters names that the username and password are included on. For example, this is the above request modified to include the username on the HTTP parameter "u" and the password on the HTTP parameter "p".
mvc
	.perform(formLogin("/auth").user("u","admin").password("p","pass"))
While fairly trivial using standard Spring MVC Test, you can use Spring Security’s testing support to make testing log out easier. For example, the following will submit a POST to "/logout" with a valid CSRF token:
mvc
	.perform(logout())
You can also customize the URL to post to. For example, the snippet below will submit a POST to "/signout" with a valid CSRF token:
mvc
	.perform(logout("/signout"))
At times it is desirable to make various security related assertions about a request.
To accommodate this need, Spring Security Test support implements Spring MVC Test’s ResultMatcher interface.
In order to use Spring Security’s ResultMatcher implementations ensure the following static import is used:
import static org.springframework.security.test.web.servlet.response.SecurityMockMvcResultMatchers.*;
At times it may be valuable to assert that there is no authenticated user associated with the result of a MockMvc invocation.
For example, you might want to test submitting an invalid username and password and verify that no user is authenticated.
You can easily do this with Spring Security’s testing support using something like the following:
mvc
	.perform(formLogin().password("invalid"))
	.andExpect(unauthenticated());
It is often times that we must assert that an authenticated user exists. For example, we may want to verify that we authenticated successfully. We could verify that a form based login was successful with the following snippet of code:
mvc
	.perform(formLogin())
	.andExpect(authenticated());
If we wanted to assert the roles of the user, we could refine our previous code as shown below:
mvc
	.perform(formLogin().user("admin"))
	.andExpect(authenticated().withRoles("USER","ADMIN"));
Alternatively, we could verify the username:
mvc
	.perform(formLogin().user("admin"))
	.andExpect(authenticated().withUsername("admin"));
We can also combine the assertions:
mvc
	.perform(formLogin().user("admin").roles("USER","ADMIN"))
	.andExpect(authenticated().withUsername("admin"));
Most Spring Security users will be using the framework in applications which make user of HTTP and the Servlet API. In this part, we’ll take a look at how Spring Security provides authentication and access-control features for the web layer of an application. We’ll look behind the facade of the namespace and see which classes and interfaces are actually assembled to provide web-layer security. In some situations it is necessary to use traditional bean configuration to provide full control over the configuration, so we’ll also see how to configure these classes directly without the namespace.
Spring Security’s web infrastructure is based entirely on standard servlet filters. It doesn’t use servlets or any other servlet-based frameworks (such as Spring MVC) internally, so it has no strong links to any particular web technology. It deals in HttpServletRequest s and HttpServletResponse s and doesn’t care whether the requests come from a browser, a web service client, an HttpInvoker or an AJAX application.
Spring Security maintains a filter chain internally where each of the filters has a particular responsibility and filters are added or removed from the configuration depending on which services are required. The ordering of the filters is important as there are dependencies between them. If you have been using namespace configuration, then the filters are automatically configured for you and you don’t have to define any Spring beans explicitly but here may be times when you want full control over the security filter chain, either because you are using features which aren’t supported in the namespace, or you are using your own customized versions of classes.
When using servlet filters, you obviously need to declare them in your web.xml, or they will be ignored by the servlet container. In Spring Security, the filter classes are also Spring beans defined in the application context and thus able to take advantage of Spring’s rich dependency-injection facilities and lifecycle interfaces. Spring’s DelegatingFilterProxy provides the link between web.xml and the application context.
When using DelegatingFilterProxy, you will see something like this in the web.xml file:
<filter>
<filter-name>myFilter</filter-name>
<filter-class>org.springframework.web.filter.DelegatingFilterProxy</filter-class>
</filter>

<filter-mapping>
<filter-name>myFilter</filter-name>
<url-pattern>/*</url-pattern>
</filter-mapping>
Notice that the filter is actually a DelegatingFilterProxy, and not the class that will actually implement the logic of the filter. What DelegatingFilterProxy does is delegate the Filter’s methods through to a bean which is obtained from the Spring application context. This enables the bean to benefit from the Spring web application context lifecycle support and configuration flexibility. The bean must implement `javax.servlet.Filter and it must have the same name as that in the filter-name element. Read the Javadoc for DelegatingFilterProxy for more information
Spring Security’s web infrastructure should only be used by delegating to an instance of FilterChainProxy. The security filters should not be used by themselves. In theory you could declare each Spring Security filter bean that you require in your application context file and add a corresponding DelegatingFilterProxy entry to web.xml for each filter, making sure that they are ordered correctly, but this would be cumbersome and would clutter up the web.xml file quickly if you have a lot of filters. FilterChainProxy lets us add a single entry to web.xml and deal entirely with the application context file for managing our web security beans. It is wired using a DelegatingFilterProxy, just like in the example above, but with the filter-name set to the bean name "filterChainProxy". The filter chain is then declared in the application context with the same bean name. Here’s an example:
<bean id="filterChainProxy" class="org.springframework.security.web.FilterChainProxy">
<constructor-arg>
	<list>
	<sec:filter-chain pattern="/restful/**" filters="
		securityContextPersistenceFilterWithASCFalse,
		basicAuthenticationFilter,
		exceptionTranslationFilter,
		filterSecurityInterceptor" />
	<sec:filter-chain pattern="/**" filters="
		securityContextPersistenceFilterWithASCTrue,
		formLoginFilter,
		exceptionTranslationFilter,
		filterSecurityInterceptor" />
	</list>
</constructor-arg>
</bean>
The namespace element filter-chain is used for convenience to set up the security filter chain(s) which are required within the application. [6]. It maps a particular URL pattern to a list of filters built up from the bean names specified in the filters element, and combines them in a bean of type SecurityFilterChain. The pattern attribute takes an Ant Paths and the most specific URIs should appear first [7]. At runtime the FilterChainProxy will locate the first URI pattern that matches the current web request and the list of filter beans specified by the filters attribute will be applied to that request. The filters will be invoked in the order they are defined, so you have complete control over the filter chain which is applied to a particular URL.
You may have noticed we have declared two SecurityContextPersistenceFilter s in the filter chain ( ASC is short for allowSessionCreation, a property of SecurityContextPersistenceFilter). As web services will never present a jsessionid on future requests, creating HttpSession s for such user agents would be wasteful. If you had a high-volume application which required maximum scalability, we recommend you use the approach shown above. For smaller applications, using a single SecurityContextPersistenceFilter (with its default allowSessionCreation as true) would likely be sufficient.
Note that FilterChainProxy does not invoke standard filter lifecycle methods on the filters it is configured with. We recommend you use Spring’s application context lifecycle interfaces as an alternative, just as you would for any other Spring bean.
When we looked at how to set up web security using namespace configuration, we used a DelegatingFilterProxy with the name "springSecurityFilterChain". You should now be able to see that this is the name of the FilterChainProxy which is created by the namespace.
You can use the attribute filters = "none" as an alternative to supplying a filter bean list. This will omit the request pattern from the security filter chain entirely. Note that anything matching this path will then have no authentication or authorization services applied and will be freely accessible. If you want to make use of the contents of the SecurityContext contents during a request, then it must have passed through the security filter chain. Otherwise the SecurityContextHolder will not have been populated and the contents will be null.
The order that filters are defined in the chain is very important. Irrespective of which filters you are actually using, the order should be as follows:
-
ChannelProcessingFilter, because it might need to redirect to a different protocol -
SecurityContextPersistenceFilter, so aSecurityContextcan be set up in theSecurityContextHolderat the beginning of a web request, and any changes to theSecurityContextcan be copied to theHttpSessionwhen the web request ends (ready for use with the next web request) -
ConcurrentSessionFilter, because it uses theSecurityContextHolderfunctionality and needs to update theSessionRegistryto reflect ongoing requests from the principal -
Authentication processing mechanisms -
UsernamePasswordAuthenticationFilter,CasAuthenticationFilter,BasicAuthenticationFilteretc - so that theSecurityContextHoldercan be modified to contain a validAuthenticationrequest token -
The
SecurityContextHolderAwareRequestFilter, if you are using it to install a Spring Security awareHttpServletRequestWrapperinto your servlet container -
The
JaasApiIntegrationFilter, if aJaasAuthenticationTokenis in theSecurityContextHolderthis will process theFilterChainas theSubjectin theJaasAuthenticationToken -
RememberMeAuthenticationFilter, so that if no earlier authentication processing mechanism updated theSecurityContextHolder, and the request presents a cookie that enables remember-me services to take place, a suitable rememberedAuthenticationobject will be put there -
AnonymousAuthenticationFilter, so that if no earlier authentication processing mechanism updated theSecurityContextHolder, an anonymousAuthenticationobject will be put there -
ExceptionTranslationFilter, to catch any Spring Security exceptions so that either an HTTP error response can be returned or an appropriateAuthenticationEntryPointcan be launched -
FilterSecurityInterceptor, to protect web URIs and raise exceptions when access is denied
Spring Security has several areas where patterns you have defined are tested against incoming requests in order to decide how the request should be handled. This occurs when the FilterChainProxy decides which filter chain a request should be passed through and also when the FilterSecurityInterceptor decides which security constraints apply to a request. It’s important to understand what the mechanism is and what URL value is used when testing against the patterns that you define.
The Servlet Specification defines several properties for the HttpServletRequest which are accessible via getter methods, and which we might want to match against. These are the contextPath, servletPath, pathInfo and queryString. Spring Security is only interested in securing paths within the application, so the contextPath is ignored. Unfortunately, the servlet spec does not define exactly what the values of servletPath and pathInfo will contain for a particular request URI. For example, each path segment of a URL may contain parameters, as defined in RFC 2396 [8]. The Specification does not clearly state whether these should be included in the servletPath and pathInfo values and the behaviour varies between different servlet containers. There is a danger that when an application is deployed in a container which does not strip path parameters from these values, an attacker could add them to the requested URL in order to cause a pattern match to succeed or fail unexpectedly. [9]. Other variations in the incoming URL are also possible. For example, it could contain path-traversal sequences (like /../) or multiple forward slashes (//) which could also cause pattern-matches to fail. Some containers normalize these out before performing the servlet mapping, but others don’t. To protect against issues like these, FilterChainProxy uses an HttpFirewall strategy to check and wrap the request. Un-normalized requests are automatically rejected by default, and path parameters and duplicate slashes are removed for matching purposes. [10]. It is therefore essential that a FilterChainProxy is used to manage the security filter chain. Note that the servletPath and pathInfo values are decoded by the container, so your application should not have any valid paths which contain semi-colons, as these parts will be removed for matching purposes.
As mentioned above, the default strategy is to use Ant-style paths for matching and this is likely to be the best choice for most users. The strategy is implemented in the class AntPathRequestMatcher which uses Spring’s AntPathMatcher to perform a case-insensitive match of the pattern against the concatenated servletPath and pathInfo, ignoring the queryString.
If for some reason, you need a more powerful matching strategy, you can use regular expressions. The strategy implementation is then`RegexRequestMatcher`. See the Javadoc for this class for more information.
In practice we recommend that you use method security at your service layer, to control access to your application, and do not rely entirely on the use of security constraints defined at the web-application level. URLs change and it is difficult to take account of all the possible URLs that an application might support and how requests might be manipulated. You should try and restrict yourself to using a few simple ant paths which are simple to understand. Always try to use a"deny-by-default" approach where you have a catch-all wildcard ( / or ) defined last and denying access.
Security defined at the service layer is much more robust and harder to bypass, so you should always take advantage of Spring Security’s method security options.
If you’re using some other framework that is also filter-based, then you need to make sure that the Spring Security filters come first. This enables the SecurityContextHolder to be populated in time for use by the other filters. Examples are the use of SiteMesh to decorate your web pages or a web framework like Wicket which uses a filter to handle its requests.
As we saw earlier in the namespace chapter, it’s possible to use multiple http elements to define different security configurations for different URL patterns. Each element creates a filter chain within the internal FilterChainProxy and the URL pattern that should be mapped to it. The elements will be added in the order they are declared, so the most specific patterns must again be declared first. Here’s another example, for a similar situation to that above, where the application supports both a stateless RESTful API and also a normal web application which users log into using a form.
<!-- Stateless RESTful service using Basic authentication -->
<http pattern="/restful/**" create-session="stateless">
<intercept-url pattern='/**' access="hasRole('REMOTE')" />
<http-basic />
</http>

<!-- Empty filter chain for the login page -->
<http pattern="/login.htm*" security="none"/>

<!-- Additional filter chain for normal users, matching all other requests -->
<http>
<intercept-url pattern='/**' access="hasRole('USER')" />
<form-login login-page='/login.htm' default-target-url="/home.htm"/>
<logout />
</http>
[6] Note that you’ll need to include the security namespace in your application context XML file in order to use this syntax. The older syntax which used a filter-chain-map is still supported, but is deprecated in favour of the constructor argument injection.
[7] Instead of a path pattern, the request-matcher-ref attribute can be used to specify a RequestMatcher instance for more powerful matching
[8] You have probably seen this when a browser doesn’t support cookies and the jsessionid parameter is appended to the URL after a semi-colon. However the RFC allows the presence of these parameters in any path segment of the URL
[9] The original values will be returned once the request leaves the FilterChainProxy, so will still be available to the application.
[10] So, for example, an original request path /secure;hack=1/somefile.html;hack=2 will be returned as /secure/somefile.html.
There are some key filters which will always be used in a web application which uses Spring Security, so we’ll look at these and their supporting classes and interfaces first. We won’t cover every feature, so be sure to look at the Javadoc for them if you want to get the complete picture.
We’ve already seen FilterSecurityInterceptor briefly when discussing access-control in general, and we’ve already used it with the namespace where the <intercept-url> elements are combined to configure it internally. Now we’ll see how to explicitly configure it for use with a`FilterChainProxy`, along with its companion filter ExceptionTranslationFilter. A typical configuration example is shown below:
<bean id="filterSecurityInterceptor"
	class="org.springframework.security.web.access.intercept.FilterSecurityInterceptor">
<property name="authenticationManager" ref="authenticationManager"/>
<property name="accessDecisionManager" ref="accessDecisionManager"/>
<property name="securityMetadataSource">
	<security:filter-security-metadata-source>
	<security:intercept-url pattern="/secure/super/**" access="ROLE_WE_DONT_HAVE"/>
	<security:intercept-url pattern="/secure/**" access="ROLE_SUPERVISOR,ROLE_TELLER"/>
	</security:filter-security-metadata-source>
</property>
</bean>
FilterSecurityInterceptor is responsible for handling the security of HTTP resources. It requires a reference to an AuthenticationManager and an AccessDecisionManager. It is also supplied with configuration attributes that apply to different HTTP URL requests. Refer back to the original discussion on these in the technical introduction.
The FilterSecurityInterceptor can be configured with configuration attributes in two ways. The first, which is shown above, is using the <filter-security-metadata-source> namespace element. This is similar to the <http> element from the namespace chapter but the <intercept-url> child elements only use the pattern and access attributes. Commas are used to delimit the different configuration attributes that apply to each HTTP URL. The second option is to write your own`SecurityMetadataSource`, but this is beyond the scope of this document. Irrespective of the approach used, the SecurityMetadataSource is responsible for returning a List<ConfigAttribute> containing all of the configuration attributes associated with a single secure HTTP URL.
It should be noted that the FilterSecurityInterceptor.setSecurityMetadataSource() method actually expects an instance of FilterInvocationSecurityMetadataSource. This is a marker interface which subclasses`SecurityMetadataSource`. It simply denotes the SecurityMetadataSource understands FilterInvocation s. In the interests of simplicity we’ll continue to refer to the FilterInvocationSecurityMetadataSource as a SecurityMetadataSource, as the distinction is of little relevance to most users.
The SecurityMetadataSource created by the namespace syntax obtains the configuration attributes for a particular FilterInvocation by matching the request URL against the configured pattern attributes. This behaves in the same way as it does for namespace configuration. The default is to treat all expressions as Apache Ant paths and regular expressions are also supported for more complex cases. The request-matcher attribute is used to specify the type of pattern being used. It is not possible to mix expression syntaxes within the same definition. As an example, the previous configuration using regular expressions instead of Ant paths would be written as follows:
<bean id="filterInvocationInterceptor"
	class="org.springframework.security.web.access.intercept.FilterSecurityInterceptor">
<property name="authenticationManager" ref="authenticationManager"/>
<property name="accessDecisionManager" ref="accessDecisionManager"/>
<property name="runAsManager" ref="runAsManager"/>
<property name="securityMetadataSource">
	<security:filter-security-metadata-source request-matcher="regex">
	<security:intercept-url pattern="\A/secure/super/.*\Z" access="ROLE_WE_DONT_HAVE"/>
	<security:intercept-url pattern="\A/secure/.*\" access="ROLE_SUPERVISOR,ROLE_TELLER"/>
	</security:filter-security-metadata-source>
</property>
</bean>
Patterns are always evaluated in the order they are defined. Thus it is important that more specific patterns are defined higher in the list than less specific patterns. This is reflected in our example above, where the more specific /secure/super/ pattern appears higher than the less specific /secure/ pattern. If they were reversed, the /secure/ pattern would always match and the /secure/super/ pattern would never be evaluated.
The ExceptionTranslationFilter sits above the FilterSecurityInterceptor in the security filter stack. It doesn’t do any actual security enforcement itself, but handles exceptions thrown by the security interceptors and provides suitable and HTTP responses.
<bean id="exceptionTranslationFilter"
class="org.springframework.security.web.access.ExceptionTranslationFilter">
<property name="authenticationEntryPoint" ref="authenticationEntryPoint"/>
<property name="accessDeniedHandler" ref="accessDeniedHandler"/>
</bean>

<bean id="authenticationEntryPoint"
class="org.springframework.security.web.authentication.LoginUrlAuthenticationEntryPoint">
<property name="loginFormUrl" value="/login.jsp"/>
</bean>

<bean id="accessDeniedHandler"
	class="org.springframework.security.web.access.AccessDeniedHandlerImpl">
<property name="errorPage" value="/accessDenied.htm"/>
</bean>
The AuthenticationEntryPoint will be called if the user requests a secure HTTP resource but they are not authenticated. An appropriate AuthenticationException or AccessDeniedException will be thrown by a security interceptor further down the call stack, triggering the commence method on the entry point. This does the job of presenting the appropriate response to the user so that authentication can begin. The one we’ve used here is LoginUrlAuthenticationEntryPoint, which redirects the request to a different URL (typically a login page). The actual implementation used will depend on the authentication mechanism you want to be used in your application.
What happens if a user is already authenticated and they try to access a protected resource? In normal usage, this shouldn’t happen because the application workflow should be restricted to operations to which a user has access. For example, an HTML link to an administration page might be hidden from users who do not have an admin role. You can’t rely on hiding links for security though, as there’s always a possibility that a user will just enter the URL directly in an attempt to bypass the restrictions. Or they might modify a RESTful URL to change some of the argument values. Your application must be protected against these scenarios or it will definitely be insecure. You will typically use simple web layer security to apply constraints to basic URLs and use more specific method-based security on your service layer interfaces to really nail down what is permissible.
If an AccessDeniedException is thrown and a user has already been authenticated, then this means that an operation has been attempted for which they don’t have enough permissions. In this case, ExceptionTranslationFilter will invoke a second strategy, the AccessDeniedHandler. By default, an AccessDeniedHandlerImpl is used, which just sends a 403 (Forbidden) response to the client. Alternatively you can configure an instance explicitly (as in the above example) and set an error page URL which it will forwards the request to [11]. This can be a simple "access denied" page, such as a JSP, or it could be a more complex handler such as an MVC controller. And of course, you can implement the interface yourself and use your own implementation.
It’s also possible to supply a custom AccessDeniedHandler when you’re using the namespace to configure your application. See the namespace appendix for more details.
Another of ExceptionTranslationFilter’s responsibilities is to save the current request before invoking the `AuthenticationEntryPoint. This allows the request to be restored after the use has authenticated (see previous overview of web authentication). A typical example would be where the user logs in with a form, and is then redirected to the original URL by the default SavedRequestAwareAuthenticationSuccessHandler (see below).
The RequestCache encapsulates the functionality required for storing and retrieving HttpServletRequest instances. By default the HttpSessionRequestCache is used, which stores the request in the HttpSession. The RequestCacheFilter has the job of actually restoring the saved request from the cache when the user is redirected to the original URL.
Under normal circumstances, you shouldn’t need to modify any of this functionality, but the saved-request handling is a "best-effort" approach and there may be situations which the default configuration isn’t able to handle. The use of these interfaces makes it fully pluggable from Spring Security 3.0 onwards.
We covered the purpose of this all-important filter in the Technical Overview chapter so you might want to re-read that section at this point. Let’s first take a look at how you would configure it for use with a FilterChainProxy. A basic configuration only requires the bean itself
<bean id="securityContextPersistenceFilter"
class="org.springframework.security.web.context.SecurityContextPersistenceFilter"/>
As we saw previously, this filter has two main tasks. It is responsible for storage of the SecurityContext contents between HTTP requests and for clearing the SecurityContextHolder when a request is completed. Clearing the ThreadLocal in which the context is stored is essential, as it might otherwise be possible for a thread to be replaced into the servlet container’s thread pool, with the security context for a particular user still attached. This thread might then be used at a later stage, performing operations with the wrong credentials.
From Spring Security 3.0, the job of loading and storing the security context is now delegated to a separate strategy interface:
public interface SecurityContextRepository {

SecurityContext loadContext(HttpRequestResponseHolder requestResponseHolder);

void saveContext(SecurityContext context, HttpServletRequest request,
		HttpServletResponse response);
}
The HttpRequestResponseHolder is simply a container for the incoming request and response objects, allowing the implementation to replace these with wrapper classes. The returned contents will be passed to the filter chain.
The default implementation is HttpSessionSecurityContextRepository, which stores the security context as an HttpSession attribute [12]. The most important configuration parameter for this implementation is the allowSessionCreation property, which defaults to true, thus allowing the class to create a session if it needs one to store the security context for an authenticated user (it won’t create one unless authentication has taken place and the contents of the security context have changed). If you don’t want a session to be created, then you can set this property to false:
<bean id="securityContextPersistenceFilter"
	class="org.springframework.security.web.context.SecurityContextPersistenceFilter">
<property name='securityContextRepository'>
	<bean class='org.springframework.security.web.context.HttpSessionSecurityContextRepository'>
	<property name='allowSessionCreation' value='false' />
	</bean>
</property>
</bean>
Alternatively you could provide an instance of NullSecurityContextRepository, a "http://en.wikipedia.org/wiki/Null_Object_pattern[null object]" implementation, which will prevent the security context from being stored, even if a session has already been created during the request.
We’ve now seen the three main filters which are always present in a Spring Security web configuration. These are also the three which are automatically created by the namespace <http> element and cannot be substituted with alternatives. The only thing that’s missing now is an actual authentication mechanism, something that will allow a user to authenticate. This filter is the most commonly used authentication filter and the one that is most often customized [13]. It also provides the implementation used by the <form-login> element from the namespace. There are three stages required to configure it.
-
Configure a
LoginUrlAuthenticationEntryPointwith the URL of the login page, just as we did above, and set it on theExceptionTranslationFilter. - Implement the login page (using a JSP or MVC controller).
-
Configure an instance of
UsernamePasswordAuthenticationFilterin the application context - Add the filter bean to your filter chain proxy (making sure you pay attention to the order).
The login form simply contains username and password input fields, and posts to the URL that is monitored by the filter (by default this is /login). The basic filter configuration looks something like this:
<bean id="authenticationFilter" class=
"org.springframework.security.web.authentication.UsernamePasswordAuthenticationFilter">
<property name="authenticationManager" ref="authenticationManager"/>
</bean>
The filter calls the configured AuthenticationManager to process each authentication request. The destination following a successful authentication or an authentication failure is controlled by the AuthenticationSuccessHandler and AuthenticationFailureHandler strategy interfaces, respectively. The filter has properties which allow you to set these so you can customize the behaviour completely [14]. Some standard implementations are supplied such as SimpleUrlAuthenticationSuccessHandler, SavedRequestAwareAuthenticationSuccessHandler, SimpleUrlAuthenticationFailureHandler and ExceptionMappingAuthenticationFailureHandler. Have a look at the Javadoc for these classes and also for AbstractAuthenticationProcessingFilter to get an overview of how they work and the supported features.
If authentication is successful, the resulting Authentication object will be placed into the SecurityContextHolder. The configured AuthenticationSuccessHandler will then be called to either redirect or forward the user to the appropriate destination. By default a SavedRequestAwareAuthenticationSuccessHandler is used, which means that the user will be redirected to the original destination they requested before they were asked to login.
| Note |
|---|---|
|
The |
If authentication fails, the configured AuthenticationFailureHandler will be invoked.
[11] We use a forward so that the SecurityContextHolder still contains details of the principal, which may be useful for displaying to the user. In old releases of Spring Security we relied upon the servlet container to handle a 403 error message, which lacked this useful contextual information.
[12] In Spring Security 2.0 and earlier, this filter was called HttpSessionContextIntegrationFilter and performed all the work of storing the context was performed by the filter itself. If you were familiar with this class, then most of the configuration options which were available can now be found on`HttpSessionSecurityContextRepository`.
[13] For historical reasons, prior to Spring Security 3.0, this filter was called AuthenticationProcessingFilter and the entry point was called AuthenticationProcessingFilterEntryPoint. Since the framework now supports many different forms of authentication, they have both been given more specific names in 3.0.
[14] In versions prior to 3.0, the application flow at this point had evolved to a stage was controlled by a mix of properties on this class and strategy plugins. The decision was made for 3.0 to refactor the code to make these two strategies entirely responsible.
This section describes how Spring Security is integrated with the Servlet API. The servletapi-xml sample application demonstrates the usage of each of these methods.
The HttpServletRequest.getRemoteUser() will return the result of SecurityContextHolder.getContext().getAuthentication().getName() which is typically the current username. This can be useful if you want to display the current username in your application. Additionally, checking if this is null can be used to indicate if a user has authenticated or is anonymous. Knowing if the user is authenticated or not can be useful for determining if certain UI elements should be shown or not (i.e. a log out link should only be displayed if the user is authenticated).
The HttpServletRequest.getUserPrincipal() will return the result of SecurityContextHolder.getContext().getAuthentication(). This means it is an Authentication which is typically an instance of UsernamePasswordAuthenticationToken when using username and password based authentication. This can be useful if you need additional information about your user. For example, you might have created a custom UserDetailsService that returns a custom UserDetails containing a first and last name for your user. You could obtain this information with the following:
Authentication auth = httpServletRequest.getUserPrincipal();
// assume integrated custom UserDetails called MyCustomUserDetails
// by default, typically instance of UserDetails
MyCustomUserDetails userDetails = (MyCustomUserDetails) auth.getPrincipal();
String firstName = userDetails.getFirstName();
String lastName = userDetails.getLastName();
| Note |
|---|---|
|
It should be noted that it is typically bad practice to perform so much logic throughout your application. Instead, one should centralize it to reduce any coupling of Spring Security and the Servlet API’s. |
The HttpServletRequest.isUserInRole(String) will determine if SecurityContextHolder.getContext().getAuthentication().getAuthorities() contains a GrantedAuthority with the role passed into isUserInRole(String). Typically users should not pass in the "ROLE_" prefix into this method since it is added automatically. For example, if you want to determine if the current user has the authority "ROLE_ADMIN", you could use the the following:
boolean isAdmin = httpServletRequest.isUserInRole("ADMIN");
This might be useful to determine if certain UI components should be displayed. For example, you might display admin links only if the current user is an admin.
The following section describes the Servlet 3 methods that Spring Security integrates with.
The HttpServletRequest.authenticate(HttpServletRequest,HttpServletResponse) method can be used to ensure that a user is authenticated. If they are not authenticated, the configured AuthenticationEntryPoint will be used to request the user to authenticate (i.e. redirect to the login page).
The HttpServletRequest.login(String,String) method can be used to authenticate the user with the current AuthenticationManager. For example, the following would attempt to authenticate with the username "user" and password "password":
try {
httpServletRequest.login("user","password");
} catch(ServletException e) {
// fail to authenticate
}
| Note |
|---|---|
|
It is not necessary to catch the ServletException if you want Spring Security to process the failed authentication attempt. |
The HttpServletRequest.logout() method can be used to log the current user out.
Typically this means that the SecurityContextHolder will be cleared out, the HttpSession will be invalidated, any "Remember Me" authentication will be cleaned up, etc. However, the configured LogoutHandler implementations will vary depending on your Spring Security configuration. It is important to note that after HttpServletRequest.logout() has been invoked, you are still in charge of writing a response out. Typically this would involve a redirect to the welcome page.
The AsynchContext.start(Runnable) method that ensures your credentials will be propagated to the new Thread. Using Spring Security’s concurrency support, Spring Security overrides the AsyncContext.start(Runnable) to ensure that the current SecurityContext is used when processing the Runnable. For example, the following would output the current user’s Authentication:
final AsyncContext async = httpServletRequest.startAsync();
async.start(new Runnable() {
	public void run() {
		Authentication authentication = SecurityContextHolder.getContext().getAuthentication();
		try {
			final HttpServletResponse asyncResponse = (HttpServletResponse) async.getResponse();
			asyncResponse.setStatus(HttpServletResponse.SC_OK);
			asyncResponse.getWriter().write(String.valueOf(authentication));
			async.complete();
		} catch(Exception e) {
			throw new RuntimeException(e);
		}
	}
});
If you are using Java Based configuration, you are ready to go. If you are using XML configuration, there are a few updates that are necessary. The first step is to ensure you have updated your web.xml to use at least the 3.0 schema as shown below:
<web-app xmlns="http://java.sun.com/xml/ns/javaee"
xmlns:xsi="http://www.w3.org/2001/XMLSchema-instance"
xsi:schemaLocation="http://java.sun.com/xml/ns/javaee http://java.sun.com/xml/ns/javaee/web-app_3_0.xsd"
version="3.0">

</web-app>
Next you need to ensure that your springSecurityFilterChain is setup for processing asynchronous requests.
<filter>
<filter-name>springSecurityFilterChain</filter-name>
<filter-class>
	org.springframework.web.filter.DelegatingFilterProxy
</filter-class>
<async-supported>true</async-supported>
</filter>
<filter-mapping>
<filter-name>springSecurityFilterChain</filter-name>
<url-pattern>/*</url-pattern>
<dispatcher>REQUEST</dispatcher>
<dispatcher>ASYNC</dispatcher>
</filter-mapping>
That’s it! Now Spring Security will ensure that your SecurityContext is propagated on asynchronous requests too.
So how does it work? If you are not really interested, feel free to skip the remainder of this section, otherwise read on. Most of this is built into the Servlet specification, but there is a little bit of tweaking that Spring Security does to ensure things work with asynchronous requests properly. Prior to Spring Security 3.2, the SecurityContext from the SecurityContextHolder was automatically saved as soon as the HttpServletResponse was committed. This can cause issues in a Async environment. For example, consider the following:
httpServletRequest.startAsync();
new Thread("AsyncThread") {
	@Override
	public void run() {
		try {
			// Do work
			TimeUnit.SECONDS.sleep(1);

			// Write to and commit the httpServletResponse
			httpServletResponse.getOutputStream().flush();
		} catch (Exception e) {
			e.printStackTrace();
		}
	}
}.start();
The issue is that this Thread is not known to Spring Security, so the SecurityContext is not propagated to it. This means when we commit the HttpServletResponse there is no SecuriytContext. When Spring Security automatically saved the SecurityContext on committing the HttpServletResponse it would lose our logged in user.
Since version 3.2, Spring Security is smart enough to no longer automatically save the SecurityContext on commiting the HttpServletResponse as soon as HttpServletRequest.startAsync() is invoked.
The following section describes the Servlet 3.1 methods that Spring Security integrates with.
The HttpServletRequest.changeSessionId() is the default method for protecting against Session Fixation attacks in Servlet 3.1 and higher.
Basic and digest authentiation are alternative authentication mechanisms which are popular in web applications. Basic authentication is often used with stateless clients which pass their credentials on each request. It’s quite common to use it in combination with form-based authentication where an application is used through both a browser-based user interface and as a web-service. However, basic authentication transmits the password as plain text so it should only really be used over an encrypted transport layer such as HTTPS.
BasicAuthenticationFilter is responsible for processing basic authentication credentials presented in HTTP headers. This can be used for authenticating calls made by Spring remoting protocols (such as Hessian and Burlap), as well as normal browser user agents (such as Firefox and Internet Explorer). The standard governing HTTP Basic Authentication is defined by RFC 1945, Section 11, and BasicAuthenticationFilter conforms with this RFC. Basic Authentication is an attractive approach to authentication, because it is very widely deployed in user agents and implementation is extremely simple (it’s just a Base64 encoding of the username:password, specified in an HTTP header).
To implement HTTP Basic Authentication, you need to add a BasicAuthenticationFilter to your filter chain. The application context should contain BasicAuthenticationFilter and its required collaborator:
<bean id="basicAuthenticationFilter"
class="org.springframework.security.web.authentication.www.BasicAuthenticationFilter">
<property name="authenticationManager" ref="authenticationManager"/>
<property name="authenticationEntryPoint" ref="authenticationEntryPoint"/>
</bean>

<bean id="authenticationEntryPoint"
class="org.springframework.security.web.authentication.www.BasicAuthenticationEntryPoint">
<property name="realmName" value="Name Of Your Realm"/>
</bean>
The configured AuthenticationManager processes each authentication request. If authentication fails, the configured AuthenticationEntryPoint will be used to retry the authentication process. Usually you will use the filter in combination with a`BasicAuthenticationEntryPoint`, which returns a 401 response with a suitable header to retry HTTP Basic authentication. If authentication is successful, the resulting Authentication object will be placed into the SecurityContextHolder as usual.
If the authentication event was successful, or authentication was not attempted because the HTTP header did not contain a supported authentication request, the filter chain will continue as normal. The only time the filter chain will be interrupted is if authentication fails and the AuthenticationEntryPoint is called.
DigestAuthenticationFilter is capable of processing digest authentication credentials presented in HTTP headers. Digest Authentication attempts to solve many of the weaknesses of Basic authentication, specifically by ensuring credentials are never sent in clear text across the wire. Many user agents support Digest Authentication, including FireFox and Internet Explorer. The standard governing HTTP Digest Authentication is defined by RFC 2617, which updates an earlier version of the Digest Authentication standard prescribed by RFC 2069. Most user agents implement RFC 2617. Spring Security’s DigestAuthenticationFilter is compatible with the “auth” quality of protection (qop) prescribed by RFC 2617, which also provides backward compatibility with RFC 2069. Digest Authentication is a more attractive option if you need to use unencrypted HTTP (i.e. no TLS/HTTPS) and wish to maximise security of the authentication process. Indeed Digest Authentication is a mandatory requirement for the WebDAV protocol, as noted by RFC 2518 Section 17.1.
Digest Authentication is definitely the most secure choice between Form Authentication, Basic Authentication and Digest Authentication, although extra security also means more complex user agent implementations. Central to Digest Authentication is a "nonce". This is a value the server generates. Spring Security’s nonce adopts the following format:
base64(expirationTime + ":" + md5Hex(expirationTime + ":" + key))
expirationTime:   The date and time when the nonce expires, expressed in milliseconds
key:              A private key to prevent modification of the nonce token
The DigestAuthenticatonEntryPoint has a property specifying the key used for generating the nonce tokens, along with a nonceValiditySeconds property for determining the expiration time (default 300, which equals five minutes). Whist ever the nonce is valid, the digest is computed by concatenating various strings including the username, password, nonce, URI being requested, a client-generated nonce (merely a random value which the user agent generates each request), the realm name etc, then performing an MD5 hash. Both the server and user agent perform this digest computation, resulting in different hash codes if they disagree on an included value (eg password). In Spring Security implementation, if the server-generated nonce has merely expired (but the digest was otherwise valid), the DigestAuthenticationEntryPoint will send a "stale=true" header. This tells the user agent there is no need to disturb the user (as the password and username etc is correct), but simply to try again using a new nonce.
An appropriate value for DigestAuthenticationEntryPoint’s `nonceValiditySeconds parameter will depend on your application. Extremely secure applications should note that an intercepted authentication header can be used to impersonate the principal until the expirationTime contained in the nonce is reached. This is the key principle when selecting an appropriate setting, but it would be unusual for immensely secure applications to not be running over TLS/HTTPS in the first instance.
Because of the more complex implementation of Digest Authentication, there are often user agent issues. For example, Internet Explorer fails to present an “opaque” token on subsequent requests in the same session. Spring Security filters therefore encapsulate all state information into the “nonce” token instead. In our testing, Spring Security’s implementation works reliably with FireFox and Internet Explorer, correctly handling nonce timeouts etc.
Now that we’ve reviewed the theory, let’s see how to use it. To implement HTTP Digest Authentication, it is necessary to define DigestAuthenticationFilter in the filter chain. The application context will need to define the DigestAuthenticationFilter and its required collaborators:
<bean id="digestFilter" class=
	"org.springframework.security.web.authentication.www.DigestAuthenticationFilter">
<property name="userDetailsService" ref="jdbcDaoImpl"/>
<property name="authenticationEntryPoint" ref="digestEntryPoint"/>
<property name="userCache" ref="userCache"/>
</bean>

<bean id="digestEntryPoint" class=
	"org.springframework.security.web.authentication.www.DigestAuthenticationEntryPoint">
<property name="realmName" value="Contacts Realm via Digest Authentication"/>
<property name="key" value="acegi"/>
<property name="nonceValiditySeconds" value="10"/>
</bean>
The configured UserDetailsService is needed because DigestAuthenticationFilter must have direct access to the clear text password of a user. Digest Authentication will NOT work if you are using encoded passwords in your DAO [15]. The DAO collaborator, along with the UserCache, are typically shared directly with a DaoAuthenticationProvider. The authenticationEntryPoint property must be DigestAuthenticationEntryPoint, so that DigestAuthenticationFilter can obtain the correct realmName and key for digest calculations.
Like BasicAuthenticationFilter, if authentication is successful an Authentication request token will be placed into the SecurityContextHolder. If the authentication event was successful, or authentication was not attempted because the HTTP header did not contain a Digest Authentication request, the filter chain will continue as normal. The only time the filter chain will be interrupted is if authentication fails and the AuthenticationEntryPoint is called, as discussed in the previous paragraph.
Digest Authentication’s RFC offers a range of additional features to further increase security. For example, the nonce can be changed on every request. Despite this, Spring Security implementation was designed to minimise the complexity of the implementation (and the doubtless user agent incompatibilities that would emerge), and avoid needing to store server-side state. You are invited to review RFC 2617 if you wish to explore these features in more detail. As far as we are aware, Spring Security’s implementation does comply with the minimum standards of this RFC.
[15] It is possible to encode the password in the format HEX( MD5(username:realm:password) ) provided the DigestAuthenticationFilter.passwordAlreadyEncoded is set to true. However, other password encodings will not work with digest authentication.
Remember-me or persistent-login authentication refers to web sites being able to remember the identity of a principal between sessions. This is typically accomplished by sending a cookie to the browser, with the cookie being detected during future sessions and causing automated login to take place. Spring Security provides the necessary hooks for these operations to take place, and has two concrete remember-me implementations. One uses hashing to preserve the security of cookie-based tokens and the other uses a database or other persistent storage mechanism to store the generated tokens.
Note that both implemementations require a UserDetailsService. If you are using an authentication provider which doesn’t use a UserDetailsService (for example, the LDAP provider) then it won’t work unless you also have a UserDetailsService bean in your application context.
This approach uses hashing to achieve a useful remember-me strategy. In essence a cookie is sent to the browser upon successful interactive authentication, with the cookie being composed as follows:
base64(username + ":" + expirationTime + ":" +
md5Hex(username + ":" + expirationTime + ":" password + ":" + key))

username:          As identifiable to the `UserDetailsService`
password:          That matches the one in the retrieved UserDetails
expirationTime:    The date and time when the remember-me token expires, expressed in milliseconds
key:               A private key to prevent modification of the remember-me token
As such the remember-me token is valid only for the period specified, and provided that the username, password and key does not change. Notably, this has a potential security issue in that a captured remember-me token will be usable from any user agent until such time as the token expires. This is the same issue as with digest authentication. If a principal is aware a token has been captured, they can easily change their password and immediately invalidate all remember-me tokens on issue. If more significant security is needed you should use the approach described in the next section. Alternatively remember-me services should simply not be used at all.
If you are familiar with the topics discussed in the chapter on namespace configuration, you can enable remember-me authentication just by adding the <remember-me> element:
<http>
...
<remember-me key="myAppKey"/>
</http>
The UserDetailsService will normally be selected automatically. If you have more than one in your application context, you need to specify which one should be used with the user-service-ref attribute, where the value is the name of your UserDetailsService bean.
This approach is based on the article http://jaspan.com/improved_persistent_login_cookie_best_practice with some minor modifications [16]. To use the this approach with namespace configuration, you would supply a datasource reference:
<http>
...
<remember-me data-source-ref="someDataSource"/>
</http>
The database should contain a persistent_logins table, created using the following SQL (or equivalent):
create table persistent_logins (username varchar(64) not null,
								series varchar(64) primary key,
								token varchar(64) not null,
								last_used timestamp not null)
Remember-me is used with UsernamePasswordAuthenticationFilter, and is implemented via hooks in the AbstractAuthenticationProcessingFilter superclass.
It is also used within BasicAuthenticationFilter.
The hooks will invoke a concrete RememberMeServices at the appropriate times.
The interface looks like this:
Authentication autoLogin(HttpServletRequest request, HttpServletResponse response);

void loginFail(HttpServletRequest request, HttpServletResponse response);

void loginSuccess(HttpServletRequest request, HttpServletResponse response,
	Authentication successfulAuthentication);
Please refer to the JavaDocs for a fuller discussion on what the methods do, although note at this stage that AbstractAuthenticationProcessingFilter only calls the loginFail() and loginSuccess() methods. The autoLogin() method is called by RememberMeAuthenticationFilter whenever the SecurityContextHolder does not contain an Authentication. This interface therefore provides the underlying remember-me implementation with sufficient notification of authentication-related events, and delegates to the implementation whenever a candidate web request might contain a cookie and wish to be remembered. This design allows any number of remember-me implementation strategies. We’ve seen above that Spring Security provides two implementations. We’ll look at these in turn.
This implementation supports the simpler approach described in Section 15.2, “Simple Hash-Based Token Approach”. TokenBasedRememberMeServices generates a RememberMeAuthenticationToken, which is processed by RememberMeAuthenticationProvider. A key is shared between this authentication provider and the TokenBasedRememberMeServices. In addition, TokenBasedRememberMeServices requires A UserDetailsService from which it can retrieve the username and password for signature comparison purposes, and generate the RememberMeAuthenticationToken to contain the correct GrantedAuthority s. Some sort of logout command should be provided by the application that invalidates the cookie if the user requests this. TokenBasedRememberMeServices also implements Spring Security’s LogoutHandler interface so can be used with LogoutFilter to have the cookie cleared automatically.
The beans required in an application context to enable remember-me services are as follows:
<bean id="rememberMeFilter" class=
"org.springframework.security.web.authentication.rememberme.RememberMeAuthenticationFilter">
<property name="rememberMeServices" ref="rememberMeServices"/>
<property name="authenticationManager" ref="theAuthenticationManager" />
</bean>

<bean id="rememberMeServices" class=
"org.springframework.security.web.authentication.rememberme.TokenBasedRememberMeServices">
<property name="userDetailsService" ref="myUserDetailsService"/>
<property name="key" value="springRocks"/>
</bean>

<bean id="rememberMeAuthenticationProvider" class=
"org.springframework.security.authentication.RememberMeAuthenticationProvider">
<property name="key" value="springRocks"/>
</bean>
Don’t forget to add your RememberMeServices implementation to your UsernamePasswordAuthenticationFilter.setRememberMeServices() property, include the RememberMeAuthenticationProvider in your AuthenticationManager.setProviders() list, and add RememberMeAuthenticationFilter into your FilterChainProxy (typically immediately after your UsernamePasswordAuthenticationFilter).
This class can be used in the same way as TokenBasedRememberMeServices, but it additionally needs to be configured with a PersistentTokenRepository to store the tokens. There are two standard implementations.
-
InMemoryTokenRepositoryImplwhich is intended for testing only. -
JdbcTokenRepositoryImplwhich stores the tokens in a database.
The database schema is described above in Section 15.3, “Persistent Token Approach”.
[16] Essentially, the username is not included in the cookie, to prevent exposing a valid login name unecessarily. There is a discussion on this in the comments section of this article.
This section discusses Spring Security’s Cross Site Request Forgery (CSRF) support.
Before we discuss how Spring Security can protect applications from CSRF attacks, we will explain what a CSRF attack is. Let’s take a look at a concrete example to get a better understanding.
Assume that your bank’s website provides a form that allows transferring money from the currently logged in user to another bank account. For example, the HTTP request might look like:
POST /transfer HTTP/1.1
Host: bank.example.com
Cookie: JSESSIONID=randomid; Domain=bank.example.com; Secure; HttpOnly
Content-Type: application/x-www-form-urlencoded

amount=100.00&routingNumber=1234&account=9876
Now pretend you authenticate to your bank’s website and then, without logging out, visit an evil website. The evil website contains an HTML page with the following form:
<form action="https://bank.example.com/transfer" method="post">
<input type="hidden"
	name="amount"
	value="100.00"/>
<input type="hidden"
	name="routingNumber"
	value="evilsRoutingNumber"/>
<input type="hidden"
	name="account"
	value="evilsAccountNumber"/>
<input type="submit"
	value="Win Money!"/>
</form>
You like to win money, so you click on the submit button. In the process, you have unintentionally transferred $100 to a malicious user. This happens because, while the evil website cannot see your cookies, the cookies associated with your bank are still sent along with the request.
Worst yet, this whole process could have been automated using JavaScript. This means you didn’t even need to click on the button. So how do we protect ourselves from such attacks?
The issue is that the HTTP request from the bank’s website and the request from the evil website are exactly the same. This means there is no way to reject requests coming from the evil website and allow requests coming from the bank’s website. To protect against CSRF attacks we need to ensure there is something in the request that the evil site is unable to provide.
One solution is to use the Synchronizer Token Pattern. This solution is to ensure that each request requires, in addition to our session cookie, a randomly generated token as an HTTP parameter. When a request is submitted, the server must look up the expected value for the parameter and compare it against the actual value in the request. If the values do not match, the request should fail.
We can relax the expectations to only require the token for each HTTP request that updates state. This can be safely done since the same origin policy ensures the evil site cannot read the response. Additionally, we do not want to include the random token in HTTP GET as this can cause the tokens to be leaked.
Let’s take a look at how our example would change. Assume the randomly generated token is present in an HTTP parameter named _csrf. For example, the request to transfer money would look like this:
POST /transfer HTTP/1.1
Host: bank.example.com
Cookie: JSESSIONID=randomid; Domain=bank.example.com; Secure; HttpOnly
Content-Type: application/x-www-form-urlencoded

amount=100.00&routingNumber=1234&account=9876&_csrf=<secure-random>
You will notice that we added the _csrf parameter with a random value. Now the evil website will not be able to guess the correct value for the _csrf parameter (which must be explicitly provided on the evil website) and the transfer will fail when the server compares the actual token to the expected token.
When should you use CSRF protection? Our recommendation is to use CSRF protection for any request that could be processed by a browser by normal users. If you are only creating a service that is used by non-browser clients, you will likely want to disable CSRF protection.
A common question is "do I need to protect JSON requests made by javascript?" The short answer is, it depends. However, you must be very careful as there are CSRF exploits that can impact JSON requests. For example, a malicious user can create a CSRF with JSON using the following form:
<form action="https://bank.example.com/transfer" method="post" enctype="text/plain">
<input name='{"amount":100,"routingNumber":"evilsRoutingNumber","account":"evilsAccountNumber", "ignore_me":"' value='test"}' type='hidden'>
<input type="submit"
	value="Win Money!"/>
</form>
This will produce the following JSON structure
{ "amount": 100,
"routingNumber": "evilsRoutingNumber",
"account": "evilsAccountNumber",
"ignore_me": "=test"
}
If an application were not validating the Content-Type, then it would be exposed to this exploit. Depending on the setup, a Spring MVC application that validates the Content-Type could still be exploited by updating the URL suffix to end with ".json" as shown below:
<form action="https://bank.example.com/transfer.json" method="post" enctype="text/plain">
<input name='{"amount":100,"routingNumber":"evilsRoutingNumber","account":"evilsAccountNumber", "ignore_me":"' value='test"}' type='hidden'>
<input type="submit"
	value="Win Money!"/>
</form>
What if my application is stateless? That doesn’t necessarily mean you are protected. In fact, if a user does not need to perform any actions in the web browser for a given request, they are likely still vulnerable to CSRF attacks.
For example, consider an application uses a custom cookie that contains all the state within it for authentication instead of the JSESSIONID. When the CSRF attack is made the custom cookie will be sent with the request in the same manner that the JSESSIONID cookie was sent in our previous example.
Users using basic authentication are also vulnerable to CSRF attacks since the browser will automatically include the username password in any requests in the same manner that the JSESSIONID cookie was sent in our previous example.
So what are the steps necessary to use Spring Security’s to protect our site against CSRF attacks? The steps to using Spring Security’s CSRF protection are outlined below:
The first step to protecting against CSRF attacks is to ensure your website uses proper HTTP verbs. Specifically, before Spring Security’s CSRF support can be of use, you need to be certain that your application is using PATCH, POST, PUT, and/or DELETE for anything that modifies state.
This is not a limitation of Spring Security’s support, but instead a general requirement for proper CSRF prevention. The reason is that including private information in an HTTP GET can cause the information to be leaked. See RFC 2616 Section 15.1.3 Encoding Sensitive Information in URI’s for general guidance on using POST instead of GET for sensitive information.
The next step is to include Spring Security’s CSRF protection within your application. Some frameworks handle invalid CSRF tokens by invaliding the user’s session, but this causes its own problems. Instead by default Spring Security’s CSRF protection will produce an HTTP 403 access denied. This can be customized by configuring the AccessDeniedHandler to process InvalidCsrfTokenException differently.
As of Spring Security 4.0, CSRF protection is enabled by default with XML configuration. If you would like to disable CSRF protection, the corresponding XML configuration can be seen below.
<http>
	<!-- ... -->
	<csrf disabled="true"/>
</http>
CSRF protection is enabled by default with Java configuration. If you would like to disable CSRF, the corresponding Java configuration can be seen below. Refer to the Javadoc of csrf() for additional customizations in how CSRF protection is configured.
@EnableWebSecurity
public class WebSecurityConfig extends
WebSecurityConfigurerAdapter {

@Override
protected void configure(HttpSecurity http) throws Exception {
	http
	.csrf().disable();
}
}
The last step is to ensure that you include the CSRF token in all PATCH, POST, PUT, and DELETE methods. One way to approach this is to use the _csrf request attribute to obtain the current CsrfToken. An example of doing this with a JSP is shown below:
<c:url var="logoutUrl" value="/logout"/>
<form action="${logoutUrl}"
	method="post">
<input type="submit"
	value="Log out" />
<input type="hidden"
	name="${_csrf.parameterName}"
	value="${_csrf.token}"/>
</form>
An easier approach is to use the csrfInput tag from the Spring Security JSP tag library.
| Note |
|---|---|
|
If you are using Spring MVC |
If you are using JSON, then it is not possible to submit the CSRF token within an HTTP parameter. Instead you can submit the token within a HTTP header. A typical pattern would be to include the CSRF token within your meta tags. An example with a JSP is shown below:
<html>
<head>
	<meta name="_csrf" content="${_csrf.token}"/>
	<!-- default header name is X-CSRF-TOKEN -->
	<meta name="_csrf_header" content="${_csrf.headerName}"/>
	<!-- ... -->
</head>
<!-- ... -->
Instead of manually creating the meta tags, you can use the simpler csrfMetaTags tag from the Spring Security JSP tag library.
You can then include the token within all your Ajax requests. If you were using jQuery, this could be done with the following:
$(function () {
var token = $("meta[name='_csrf']").attr("content");
var header = $("meta[name='_csrf_header']").attr("content");
$(document).ajaxSend(function(e, xhr, options) {
	xhr.setRequestHeader(header, token);
});
});
As an alternative to jQuery, we recommend using cujoJS’s rest.js. The rest.js module provides advanced support for working with HTTP requests and responses in RESTful ways. A core capability is the ability to contextualize the HTTP client adding behavior as needed by chaining interceptors on to the client.
var client = rest.chain(csrf, {
token: $("meta[name='_csrf']").attr("content"),
name: $("meta[name='_csrf_header']").attr("content")
});
The configured client can be shared with any component of the application that needs to make a request to the CSRF protected resource. One significant different between rest.js and jQuery is that only requests made with the configured client will contain the CSRF token, vs jQuery where all requests will include the token. The ability to scope which requests receive the token helps guard against leaking the CSRF token to a third party. Please refer to the rest.js reference documentation for more information on rest.js.
There are a few caveats when implementing CSRF.
One issue is that the expected CSRF token is stored in the HttpSession, so as soon as the HttpSession expires your configured AccessDeniedHandler will receive a InvalidCsrfTokenException. If you are using the default AccessDeniedHandler, the browser will get an HTTP 403 and display a poor error message.
| Note |
|---|---|
|
One might ask why the expected |
A simple way to mitigate an active user experiencing a timeout is to have some JavaScript that lets the user know their session is about to expire. The user can click a button to continue and refresh the session.
Alternatively, specifying a custom AccessDeniedHandler allows you to process the InvalidCsrfTokenException any way you like. For an example of how to customize the AccessDeniedHandler refer to the provided links for both xml and Java configuration.
In order to protect against forging log in requests the log in form should be protected against CSRF attacks too. Since the CsrfToken is stored in HttpSession, this means an HttpSession will be created as soon as CsrfToken token attribute is accessed. While this sounds bad in a RESTful / stateless architecture the reality is that state is necessary to implement practical security. Without state, we have nothing we can do if a token is compromised. Practically speaking, the CSRF token is quite small in size and should have a negligible impact on our architecture.
Adding CSRF will update the LogoutFilter to only use HTTP POST. This ensures that log out requires a CSRF token and that a malicious user cannot forcibly log out your users.
One approach is to use a form for log out. If you really want a link, you can use JavaScript to have the link perform a POST (i.e. maybe on a hidden form). For browsers with JavaScript that is disabled, you can optionally have the link take the user to a log out confirmation page that will perform the POST.
If you really want to use HTTP GET with logout you can do so, but remember this is generally not recommended. For example, the following Java Configuration will perform logout with the URL /logout is requested with any HTTP method:
@EnableWebSecurity
public class WebSecurityConfig extends
WebSecurityConfigurerAdapter {

	@Override
	protected void configure(HttpSecurity http) throws Exception {
		http
			.logout()
				.logoutRequestMatcher(new AntPathRequestMatcher("/logout"));
	}
}
There are two options to using CSRF protection with multipart/form-data. Each option has its tradeoffs.
| Note |
|---|---|
|
Before you integrate Spring Security’s CSRF protection with multipart file upload, ensure that you can upload without the CSRF protection first. More information about using multipart forms with Spring can be found within the 17.10 Spring’s multipart (file upload) support section of the Spring reference and the MultipartFilter javadoc. |
The first option is to ensure that the MultipartFilter is specified before the Spring Security filter. Specifying the MultipartFilter before the Spring Security filter means that there is no authorization for invoking the MultipartFilter which means anyone can place temporary files on your server. However, only authorized users will be able to submit a File that is processed by your application. In general, this is the recommended approach because the temporary file upload should have a negligble impact on most servers.
To ensure MultipartFilter is specified before the Spring Security filter with java configuration, users can override beforeSpringSecurityFilterChain as shown below:
public class SecurityApplicationInitializer extends AbstractSecurityWebApplicationInitializer {

	@Override
	protected void beforeSpringSecurityFilterChain(ServletContext servletContext) {
		insertFilters(servletContext, new MultipartFilter());
	}
}
To ensure MultipartFilter is specified before the Spring Security filter with XML configuration, users can ensure the <filter-mapping> element of the MultipartFilter is placed before the springSecurityFilterChain within the web.xml as shown below:
<filter>
	<filter-name>MultipartFilter</filter-name>
	<filter-class>org.springframework.web.multipart.support.MultipartFilter</filter-class>
</filter>
<filter>
	<filter-name>springSecurityFilterChain</filter-name>
	<filter-class>org.springframework.web.filter.DelegatingFilterProxy</filter-class>
</filter>
<filter-mapping>
	<filter-name>MultipartFilter</filter-name>
	<url-pattern>/*</url-pattern>
</filter-mapping>
<filter-mapping>
	<filter-name>springSecurityFilterChain</filter-name>
	<url-pattern>/*</url-pattern>
</filter-mapping>
If allowing unauthorized users to upload temporariy files is not acceptable, an alternative is to place the MultipartFilter after the Spring Security filter and include the CSRF as a query parameter in the action attribute of the form. An example with a jsp is shown below
<form action="./upload?${_csrf.parameterName}=${_csrf.token}" method="post" enctype="multipart/form-data">
The disadvantage to this approach is that query parameters can be leaked. More genearlly, it is considered best practice to place sensitive data within the body or headers to ensure it is not leaked. Additional information can be found in RFC 2616 Section 15.1.3 Encoding Sensitive Information in URI’s.
The HiddenHttpMethodFilter should be placed before the Spring Security filter. In general this is true, but it could have additional implications when protecting against CSRF attacks.
Note that the HiddenHttpMethodFilter only overrides the HTTP method on a POST, so this is actually unlikely to cause any real problems. However, it is still best practice to ensure it is placed before Spring Security’s filters.
Spring Security’s goal is to provide defaults that protect your users from exploits. This does not mean that you are forced to accept all of its defaults.
For example, you can provide a custom CsrfTokenRepository to override the way in which the CsrfToken is stored.
You can also specify a custom RequestMatcher to determine which requests are protected by CSRF (i.e. perhaps you don’t care if log out is exploited). In short, if Spring Security’s CSRF protection doesn’t behave exactly as you want it, you are able to customize the behavior. Refer to the Section 38.1.12, “<csrf>” documentation for details on how to make these customizations with XML and the CsrfConfigurer javadoc for details on how to make these customizations when using Java configuration.
This section discusses Spring Security’s support for adding various security headers to the response.
Spring Security allows users to easily inject the default security headers to assist in protecting their application. The default for Spring Security is to include the following headers:
Cache-Control: no-cache, no-store, max-age=0, must-revalidate
Pragma: no-cache
Expires: 0
X-Content-Type-Options: nosniff
Strict-Transport-Security: max-age=31536000 ; includeSubDomains
X-Frame-Options: DENY
X-XSS-Protection: 1; mode=block
| Note |
|---|---|
|
Strict-Transport-Security is only added on HTTPS requests |
For additional details on each of these headers, refer to the corresponding sections:
While each of these headers are considered best practice, it should be noted that not all clients utilize the headers, so additional testing is encouraged.
You can customize specific headers. For example, assume that want your HTTP response headers to look like the following:
Cache-Control: no-cache, no-store, max-age=0, must-revalidate
Pragma: no-cache
Expires: 0
X-Content-Type-Options: nosniff
X-Frame-Options: SAMEORIGIN
X-XSS-Protection: 1; mode=block
Specifically, you want all of the default headers with the following customizations:
- X-Frame-Options to allow any request from same domain
- HTTP Strict Transport Security (HSTS) will not be addded to the response
You can easily do this with the following Java Configuration:
@EnableWebSecurity
public class WebSecurityConfig extends
		WebSecurityConfigurerAdapter {

	@Override
	protected void configure(HttpSecurity http) throws Exception {
		http
			// ...
			.headers()
				.frameOptions().sameOrigin()
				.httpStrictTransportSecurity().disable();
	}
}
Alternatively, if you are using Spring Security XML Configuration, you can use the following:
<http>
	<!-- ... -->

	<headers>
		<frame-options policy="SAMEORIGIN" />
		<hsts disable="true"/>
	</headers>
</http>
If you do not want the defaults to be added and want explicit control over what should be used, you can disable the defaults. An example for both Java and XML based configuration is provided below:
If you are using Spring Security’s Java Configuration the following will only add Cache Control.
@EnableWebSecurity
public class WebSecurityConfig extends
WebSecurityConfigurerAdapter {

@Override
protected void configure(HttpSecurity http) throws Exception {
	http
	// ...
	.headers()
		// do not use any default headers unless explicitly listed
		.defaultsDisabled()
		.cacheControl();
}
}
The following XML will only add Cache Control.
<http>
	<!-- ... -->

	<headers defaults-disabled="true">
		<cache-control/>
	</headers>
</http>
If necessary, you can disable all of the HTTP Security response headers with the following Java Configuration:
@EnableWebSecurity
public class WebSecurityConfig extends
WebSecurityConfigurerAdapter {

@Override
protected void configure(HttpSecurity http) throws Exception {
	http
	// ...
	.headers().disable();
}
}
If necessary, you can disable all of the HTTP Security response headers with the following XML configuration below:
<http>
	<!-- ... -->

	<headers disabled="true" />
</http>
In the past Spring Security required you to provide your own cache control for your web application. This seemed reasonable at the time, but browser caches have evolved to include caches for secure connections as well. This means that a user may view an authenticated page, log out, and then a malicious user can use the browser history to view the cached page. To help mitigate this Spring Security has added cache control support which will insert the following headers into you response.
Cache-Control: no-cache, no-store, max-age=0, must-revalidate
Pragma: no-cache
Expires: 0
Simply adding the <headers> element with no child elements will automatically add Cache Control and quite a few other protections. However, if you only want cache control, you can enable this feature using Spring Security’s XML namespace with the <cache-control> element and the headers@defaults-disabled attribute.
<http>
	<!-- ... -->

	<headers defaults-disable="true">
		<cache-control />
	</headers>
</http>
Similarly, you can enable only cache control within Java Configuration with the following:
@EnableWebSecurity
public class WebSecurityConfig extends
WebSecurityConfigurerAdapter {

@Override
protected void configure(HttpSecurity http) throws Exception {
	http
	// ...
	.headers()
		.defaultsDisabled()
		.cacheControl();
}
}
If you actually want to cache specific responses, your application can selectively invoke HttpServletResponse.setHeader(String,String) to override the header set by Spring Security. This is useful to ensure things like CSS, JavaScript, and images are properly cached.
When using Spring Web MVC, this is typically done within your configuration. For example, the following configuration will ensure that the cache headers are set for all of your resources:
@EnableWebMvc
public class WebMvcConfiguration extends WebMvcConfigurerAdapter {

	@Override
	public void addResourceHandlers(ResourceHandlerRegistry registry) {
		registry
			.addResourceHandler("/resources/**")
			.addResourceLocations("/resources/")
			.setCachePeriod(31556926);
	}

	// ...
}
Historically browsers, including Internet Explorer, would try to guess the content type of a request using content sniffing. This allowed browsers to improve the user experience by guessing the content type on resources that had not specified the content type. For example, if a browser encountered a JavaScript file that did not have the content type specified, it would be able to guess the content type and then execute it.
| Note |
|---|---|
|
There are many additional things one should do (i.e. only display the document in a distinct domain, ensure Content-Type header is set, sanitize the document, etc) when allowing content to be uploaded. However, these measures are out of the scope of what Spring Security provides. It is also important to point out when disabling content sniffing, you must specify the content type in order for things to work properly. |
The problem with content sniffing is that this allowed malicious users to use polyglots (i.e. a file that is valid as multiple content types) to execute XSS attacks. For example, some sites may allow users to submit a valid postscript document to a website and view it. A malicious user might create a postscript document that is also a valid JavaScript file and execute a XSS attack with it.
Content sniffing can be disabled by adding the following header to our response:
X-Content-Type-Options: nosniff
Just as with the cache control element, the nosniff directive is added by default when using the <headers> element with no child elements. However, if you want more control over which headers are added you can use the <content-type-options> element and the headers@defaults-disabled attribute as shown below:
<http>
	<!-- ... -->

	<headers defaults-disabled="true">
		<content-type-options />
	</headers>
</http>
The X-Content-Type-Options header is added by default with Spring Security Java configuration. If you want more control over the headers, you can explicitly specify the content type options with the following:
@EnableWebSecurity
public class WebSecurityConfig extends
WebSecurityConfigurerAdapter {

@Override
protected void configure(HttpSecurity http) throws Exception {
	http
	// ...
	.headers()
		.defaultsDisabled()
		.contentTypeOptions();
}
}
When you type in your bank’s website, do you enter mybank.example.com or do you enter https://mybank.example.com? If you omit the https protocol, you are potentially vulnerable to Man in the Middle attacks. Even if the website performs a redirect to https://mybank.example.com a malicious user could intercept the initial HTTP request and manipulate the response (i.e. redirect to https://mibank.example.com and steal their credentials).
Many users omit the https protocol and this is why HTTP Strict Transport Security (HSTS) was created. Once mybank.example.com is added as a HSTS host, a browser can know ahead of time that any request to mybank.example.com should be interpreted as https://mybank.example.com. This greatly reduces the possibility of a Man in the Middle attack occurring.
| Note |
|---|---|
|
In accordance with RFC6797, the HSTS header is only injected into HTTPS responses. In order for the browser to acknowledge the header, the browser must first trust the CA that signed the SSL certificate used to make the connection (not just the SSL certificate). |
One way for a site to be marked as a HSTS host is to have the host preloaded into the browser. Another is to add the "Strict-Transport-Security" header to the response. For example the following would instruct the browser to treat the domain as an HSTS host for a year (there are approximately 31536000 seconds in a year):
Strict-Transport-Security: max-age=31536000 ; includeSubDomains
The optional includeSubDomains directive instructs Spring Security that subdomains (i.e. secure.mybank.example.com) should also be treated as an HSTS domain.
As with the other headers, Spring Security adds HSTS by default. You can customize HSTS headers with the <hsts> element as shown below:
<http>
	<!-- ... -->

	<headers>
		<hsts
			include-subdomains="true"
			max-age-seconds="31536000" />
	</headers>
</http>
Similarly, you can enable only HSTS headers with Java Configuration:
@EnableWebSecurity
public class WebSecurityConfig extends
WebSecurityConfigurerAdapter {

@Override
protected void configure(HttpSecurity http) throws Exception {
	http
	// ...
	.headers()
		.httpStrictTransportSecurity()
			.includeSubdomains(true)
			.maxAgeSeconds(31536000);
}
}
Allowing your website to be added to a frame can be a security issue. For example, using clever CSS styling users could be tricked into clicking on something that they were not intending (video demo). For example, a user that is logged into their bank might click a button that grants access to other users. This sort of attack is known as Clickjacking.
| Note |
|---|---|
|
Another modern approach to dealing with clickjacking is using a Content Security Policy. Spring Security does not provide support for this as the specification is not released and it is quite a bit more complicated. However, you could use the static headers feature to implement this. To stay up to date with this issue and to see how you can implement it with Spring Security refer to SEC-2117 |
There are a number ways to mitigate clickjacking attacks. For example, to protect legacy browsers from clickjacking attacks you can use frame breaking code. While not perfect, the frame breaking code is the best you can do for the legacy browsers.
A more modern approach to address clickjacking is to use X-Frame-Options header:
X-Frame-Options: DENY
The X-Frame-Options response header instructs the browser to prevent any site with this header in the response from being rendered within a frame. By default, Spring Security disables rendering within an iframe.
You can customize X-Frame-Options with the frame-options element. For example, the following will instruct Spring Security to use "X-Frame-Options: SAMEORIGIN" which allows iframes within the same domain:
<http>
	<!-- ... -->

	<headers>
		<frame-options
		policy="SAMEORIGIN" />
	</headers>
</http>
Similarly, you can customize frame options to use the same origin within Java Configuration using the following:
@EnableWebSecurity
public class WebSecurityConfig extends
WebSecurityConfigurerAdapter {

@Override
protected void configure(HttpSecurity http) throws Exception {
	http
	// ...
	.headers()
		.frameOptions()
			.sameOrigin();
}
}
Some browsers have built in support for filtering out reflected XSS attacks. This is by no means full proof, but does assist in XSS protection.
The filtering is typically enabled by default, so adding the header typically just ensures it is enabled and instructs the browser what to do when a XSS attack is detected. For example, the filter might try to change the content in the least invasive way to still render everything. At times, this type of replacement can become a XSS vulnerability in itself. Instead, it is best to block the content rather than attempt to fix it. To do this we can add the following header:
X-XSS-Protection: 1; mode=block
This header is included by default. However, we can customize it if we wanted. For example:
<http>
	<!-- ... -->

	<headers>
		<xss-protection block="false"/>
	</headers>
</http>
Similarly, you can customize xss protection within Java Configuration with the following:
@EnableWebSecurity
public class WebSecurityConfig extends
WebSecurityConfigurerAdapter {

@Override
protected void configure(HttpSecurity http) throws Exception {
	http
	// ...
	.headers()
		.xssProtection()
			.block(false);
}
}
Spring Security has mechanisms to make it convenient to add the more common security headers to your application. However, it also provides hooks to enable adding custom headers.
There may be times you wish to inject custom security headers into your application that are not supported out of the box. For example, perhaps you wish to have early support for Content Security Policy in order to ensure that resources are only loaded from the same origin. Since support for Content Security Policy has not been finalized, browsers use one of two common extension headers to implement the feature. This means we will need to inject the policy twice. An example of the headers can be seen below:
X-Content-Security-Policy: default-src 'self'
X-WebKit-CSP: default-src 'self'
When using the XML namespace, these headers can be added to the response using the <header> element as shown below:
<http>
	<!-- ... -->

	<headers>
		<header name="X-Content-Security-Policy" value="default-src 'self'"/>
		<header name="X-WebKit-CSP" value="default-src 'self'"/>
	</headers>
</http>
Similarly, the headers could be added to the response using Java Configuration as shown in the following:
@EnableWebSecurity
public class WebSecurityConfig extends
WebSecurityConfigurerAdapter {

@Override
protected void configure(HttpSecurity http) throws Exception {
	http
	// ...
	.headers()
		.addHeaderWriter(new StaticHeadersWriter("X-Content-Security-Policy","default-src 'self'"))
		.addHeaderWriter(new StaticHeadersWriter("X-WebKit-CSP","default-src 'self'"));
}
}
When the namespace or Java configuration does not support the headers you want, you can create a custom HeadersWriter instance or even provide a custom implementation of the HeadersWriter.
Let’s take a look at an example of using an custom instance of XFrameOptionsHeaderWriter. Perhaps you want to allow framing of content for the same origin. This is easily supported by setting the policy attribute to "SAMEORIGIN", but let’s take a look at a more explicit example using the ref attribute.
<http>
	<!-- ... -->

	<headers>
		<header ref="frameOptionsWriter"/>
	</headers>
</http>
<!-- Requires the c-namespace.
See http://static.springsource.org/spring/docs/3.2.x/spring-framework-reference/html/beans.html#beans-c-namespace
-->
<beans:bean id="frameOptionsWriter"
	class="org.springframework.security.web.header.writers.frameoptions.XFrameOptionsHeaderWriter"
	c:frameOptionsMode="SAMEORIGIN"/>
We could also restrict framing of content to the same origin with Java configuration:
@EnableWebSecurity
public class WebSecurityConfig extends
WebSecurityConfigurerAdapter {

@Override
protected void configure(HttpSecurity http) throws Exception {
	http
	// ...
	.headers()
		.addHeaderWriter(new XFrameOptionsHeaderWriter(XFrameOptionsMode.SAMEORIGIN));
}
}
At times you may want to only write a header for certain requests. For example, perhaps you want to only protect your log in page from being framed. You could use the DelegatingRequestMatcherHeaderWriter to do so. When using the XML namespace configuration, this can be done with the following:
<http>
	<!-- ... -->

	<headers>
		<frame-options disabled="true"/>
		<header ref="headerWriter"/>
	</headers>
</http>

<beans:bean id="headerWriter"
	class="org.springframework.security.web.header.writers.DelegatingRequestMatcherHeaderWriter">
	<beans:constructor-arg>
		<bean class="org.springframework.security.web.util.matcher.AntPathRequestMatcher"
			c:pattern="/login"/>
	</beans:constructor-arg>
	<beans:constructor-arg>
		<beans:bean
			class="org.springframework.security.web.header.writers.frameoptions.XFrameOptionsHeaderWriter"/>
	</beans:constructor-arg>
</beans:bean>
We could also prevent framing of content to the log in page using java configuration:
@EnableWebSecurity
public class WebSecurityConfig extends
WebSecurityConfigurerAdapter {

@Override
protected void configure(HttpSecurity http) throws Exception {
	RequestMatcher matcher = new AntPathRequestMatcher("/login");
	DelegatingRequestMatcherHeaderWriter headerWriter =
		new DelegatingRequestMatcherHeaderWriter(matcher,new XFrameOptionsHeaderWriter());
	http
	// ...
	.headers()
		.frameOptions().disabled()
		.addHeaderWriter(headerWriter);
}
}
HTTP session related functonality is handled by a combination of the SessionManagementFilter and the SessionAuthenticationStrategy interface, which the filter delegates to. Typical usage includes session-fixation protection attack prevention, detection of session timeouts and restrictions on how many sessions an authenticated user may have open concurrently.
The SessionManagementFilter checks the contents of the SecurityContextRepository against the current contents of the SecurityContextHolder to determine whether a user has been authenticated during the current request, typically by a non-interactive authentication mechanism, such as pre-authentication or remember-me [17]. If the repository contains a security context, the filter does nothing. If it doesn’t, and the thread-local SecurityContext contains a (non-anonymous) Authentication object, the filter assumes they have been authenticated by a previous filter in the stack. It will then invoke the configured SessionAuthenticationStrategy.
If the user is not currently authenticated, the filter will check whether an invalid session ID has been requested (because of a timeout, for example) and will invoke the configured`InvalidSessionStrategy`, if one is set. The most common behaviour is just to redirect to a fixed URL and this is encapsulated in the standard implementation`SimpleRedirectInvalidSessionStrategy`. The latter is also used when configuring an invalid session URL through the namespace,as described earlier.
SessionAuthenticationStrategy is used by both SessionManagementFilter and AbstractAuthenticationProcessingFilter, so if you are using a customized form-login class, for example, you will need to inject it into both of these. In this case, a typical configuration, combining the namespace and custom beans might look like this:
<http>
<custom-filter position="FORM_LOGIN_FILTER" ref="myAuthFilter" />
<session-management session-authentication-strategy-ref="sas"/>
</http>

<beans:bean id="myAuthFilter" class=
"org.springframework.security.web.authentication.UsernamePasswordAuthenticationFilter">
	<beans:property name="sessionAuthenticationStrategy" ref="sas" />
	...
</beans:bean>

<beans:bean id="sas" class=
"org.springframework.security.web.authentication.session.SessionFixationProtectionStrategy" />
Note that the use of the default, SessionFixationProtectionStrategy may cause issues if you are storing beans in the session which implement HttpSessionBindingListener, including Spring session-scoped beans. See the Javadoc for this class for more information.
Spring Security is able to prevent a principal from concurrently authenticating to the same application more than a specified number of times. Many ISVs take advantage of this to enforce licensing, whilst network administrators like this feature because it helps prevent people from sharing login names. You can, for example, stop user"Batman" from logging onto the web application from two different sessions. You can either expire their previous login or you can report an error when they try to log in again, preventing the second login. Note that if you are using the second approach, a user who has not explicitly logged out (but who has just closed their browser, for example) will not be able to log in again until their original session expires.
Concurrency control is supported by the namespace, so please check the earlier namespace chapter for the simplest configuration. Sometimes you need to customize things though.
The implementation uses a specialized version of SessionAuthenticationStrategy, called ConcurrentSessionControlAuthenticationStrategy.
| Note |
|---|---|
|
Previously the concurrent authentication check was made by the |
To use concurrent session support, you’ll need to add the following to web.xml:
<listener>
	<listener-class>
	org.springframework.security.web.session.HttpSessionEventPublisher
	</listener-class>
</listener>
In addition, you will need to add the ConcurrentSessionFilter to your FilterChainProxy. The ConcurrentSessionFilter requires two properties, sessionRegistry, which generally points to an instance of SessionRegistryImpl, and expiredUrl, which points to the page to display when a session has expired. A configuration using the namespace to create the FilterChainProxy and other default beans might look like this:
<http>
<custom-filter position="CONCURRENT_SESSION_FILTER" ref="concurrencyFilter" />
<custom-filter position="FORM_LOGIN_FILTER" ref="myAuthFilter" />

<session-management session-authentication-strategy-ref="sas"/>
</http>

<beans:bean id="concurrencyFilter"
class="org.springframework.security.web.session.ConcurrentSessionFilter">
<beans:property name="sessionRegistry" ref="sessionRegistry" />
<beans:property name="expiredUrl" value="/session-expired.htm" />
</beans:bean>

<beans:bean id="myAuthFilter" class=
"org.springframework.security.web.authentication.UsernamePasswordAuthenticationFilter">
<beans:property name="sessionAuthenticationStrategy" ref="sas" />
<beans:property name="authenticationManager" ref="authenticationManager" />
</beans:bean>

<beans:bean id="sas" class="org.springframework.security.web.authentication.session.CompositeSessionAuthenticationStrategy">
<beans:constructor-arg>
	<beans:list>
	<beans:bean class="org.springframework.security.web.authentication.session.ConcurrentSessionControlAuthenticationStrategy">
		<beans:constructor-arg ref="sessionRegistry"/>
		<beans:property name="maximumSessions" value="1" />
		<beans:property name="exceptionIfMaximumExceeded" value="true" />
	</beans:bean>
	<beans:bean class="org.springframework.security.web.authentication.session.SessionFixationProtectionStrategy">
	</beans:bean>
	<beans:bean class="org.springframework.security.web.authentication.session.RegisterSessionAuthenticationStrategy">
		<beans:constructor-arg ref="sessionRegistry"/>
	</beans:bean>
	</beans:list>
</beans:constructor-arg>
</beans:bean>

<beans:bean id="sessionRegistry"
	class="org.springframework.security.core.session.SessionRegistryImpl" />
Adding the listener to web.xml causes an ApplicationEvent to be published to the Spring ApplicationContext every time a HttpSession commences or terminates. This is critical, as it allows the SessionRegistryImpl to be notified when a session ends. Without it, a user will never be able to log back in again once they have exceeded their session allowance, even if they log out of another session or it times out.
Setting up concurrency-control, either through the namespace or using plain beans has the useful side effect of providing you with a reference to the SessionRegistry which you can use directly within your application, so even if you don’t want to restrict the number of sessions a user may have, it may be worth setting up the infrastructure anyway. You can set the maximumSession property to -1 to allow unlimited sessions. If you’re using the namespace, you can set an alias for the internally-created SessionRegistry using the session-registry-alias attribute, providing a reference which you can inject into your own beans.
The getAllPrincipals() method supplies you with a list of the currently authenticated users. You can list a user’s sessions by calling the getAllSessions(Object principal, boolean includeExpiredSessions) method, which returns a list of SessionInformation objects. You can also expire a user’s session by calling expireNow() on a SessionInformation instance. When the user returns to the application, they will be prevented from proceeding. You may find these methods useful in an administration application, for example. Have a look at the Javadoc for more information.
[17] Authentication by mechanisms which perform a redirect after authenticating (such as form-login) will not be detected by`SessionManagementFilter`, as the filter will not be invoked during the authenticating request. Session-management functionality has to be handled separately in these cases.
It’s generally considered good security practice to adopt a "deny-by-default" where you explicitly specify what is allowed and disallow everything else. Defining what is accessible to unauthenticated users is a similar situation, particularly for web applications. Many sites require that users must be authenticated for anything other than a few URLs (for example the home and login pages). In this case it is easiest to define access configuration attributes for these specific URLs rather than have for every secured resource. Put differently, sometimes it is nice to say ROLE_SOMETHING is required by default and only allow certain exceptions to this rule, such as for login, logout and home pages of an application. You could also omit these pages from the filter chain entirely, thus bypassing the access control checks, but this may be undesirable for other reasons, particularly if the pages behave differently for authenticated users.
This is what we mean by anonymous authentication. Note that there is no real conceptual difference between a user who is "anonymously authenticated" and an unauthenticated user. Spring Security’s anonymous authentication just gives you a more convenient way to configure your access-control attributes. Calls to servlet API calls such as getCallerPrincipal, for example, will still return null even though there is actually an anonymous authentication object in the SecurityContextHolder.
There are other situations where anonymous authentication is useful, such as when an auditing interceptor queries the SecurityContextHolder to identify which principal was responsible for a given operation. Classes can be authored more robustly if they know the SecurityContextHolder always contains an Authentication object, and never null.
Anonymous authentication support is provided automatically when using the HTTP configuration Spring Security 3.0 and can be customized (or disabled) using the <anonymous> element. You don’t need to configure the beans described here unless you are using traditional bean configuration.
Three classes that together provide the anonymous authentication feature. AnonymousAuthenticationToken is an implementation of Authentication, and stores the GrantedAuthority s which apply to the anonymous principal. There is a corresponding AnonymousAuthenticationProvider, which is chained into the ProviderManager so that AnonymousAuthenticationToken s are accepted. Finally, there is an AnonymousAuthenticationFilter, which is chained after the normal authentication mechanisms and automatically adds an AnonymousAuthenticationToken to the SecurityContextHolder if there is no existing Authentication held there. The definition of the filter and authentication provider appears as follows:
<bean id="anonymousAuthFilter"
	class="org.springframework.security.web.authentication.AnonymousAuthenticationFilter">
<property name="key" value="foobar"/>
<property name="userAttribute" value="anonymousUser,ROLE_ANONYMOUS"/>
</bean>

<bean id="anonymousAuthenticationProvider"
	class="org.springframework.security.authentication.AnonymousAuthenticationProvider">
<property name="key" value="foobar"/>
</bean>
The key is shared between the filter and authentication provider, so that tokens created by the former are accepted by the latter [18]. The userAttribute is expressed in the form of usernameInTheAuthenticationToken,grantedAuthority[,grantedAuthority]. This is the same syntax as used after the equals sign for`InMemoryDaoImpl’s userMap property.
As explained earlier, the benefit of anonymous authentication is that all URI patterns can have security applied to them. For example:
<bean id="filterSecurityInterceptor"
	class="org.springframework.security.web.access.intercept.FilterSecurityInterceptor">
<property name="authenticationManager" ref="authenticationManager"/>
<property name="accessDecisionManager" ref="httpRequestAccessDecisionManager"/>
<property name="securityMetadata">
	<security:filter-security-metadata-source>
	<security:intercept-url pattern='/index.jsp' access='ROLE_ANONYMOUS,ROLE_USER'/>
	<security:intercept-url pattern='/hello.htm' access='ROLE_ANONYMOUS,ROLE_USER'/>
	<security:intercept-url pattern='/logoff.jsp' access='ROLE_ANONYMOUS,ROLE_USER'/>
	<security:intercept-url pattern='/login.jsp' access='ROLE_ANONYMOUS,ROLE_USER'/>
	<security:intercept-url pattern='/**' access='ROLE_USER'/>
	</security:filter-security-metadata-source>" +
</property>
</bean>
Rounding out the anonymous authentication discussion is the AuthenticationTrustResolver interface, with its corresponding AuthenticationTrustResolverImpl implementation. This interface provides an isAnonymous(Authentication) method, which allows interested classes to take into account this special type of authentication status. The ExceptionTranslationFilter uses this interface in processing AccessDeniedException s. If an AccessDeniedException is thrown, and the authentication is of an anonymous type, instead of throwing a 403 (forbidden) response, the filter will instead commence the AuthenticationEntryPoint so the principal can authenticate properly. This is a necessary distinction, otherwise principals would always be deemed "authenticated" and never be given an opportunity to login via form, basic, digest or some other normal authentication mechanism.
You will often see the ROLE_ANONYMOUS attribute in the above interceptor configuration replaced with IS_AUTHENTICATED_ANONYMOUSLY, which is effectively the same thing when defining access controls. This is an example of the use of the AuthenticatedVoter which we will see in the authorization chapter. It uses an AuthenticationTrustResolver to process this particular configuration attribute and grant access to anonymous users. the AuthenticatedVoter approach is more powerful, since it allows you to differentiate between anonymous, remember-me and fully-authenticated users. If you don’t need this functionality though, then you can stick with ROLE_ANONYMOUS, which will be processed by Spring Security’s standard RoleVoter.
[18] The use of the key property should not be regarded as providing any real security here. It is merely a book-keeping exercise. If you are sharing a ProviderManager which contains an AnonymousAuthenticationProvider in a scenario where it is possible for an authenticating client to construct the Authentication object (such as with RMI invocations), then a malicious client could submit an AnonymousAuthenticationToken which it had created itself (with chosen username and authority list). If the key is guessable or can be found out, then the token would be accepted by the anonymous provider. This isn’t a problem with normal usage but if you are using RMI you would be best to use a customized ProviderManager which omits the anonymous provider rather than sharing the one you use for your HTTP authentication mechanisms.
Spring Security 4 added support for securing Spring’s WebSocket support. This section describes how to use Spring Security’s WebSocket support.
| Note |
|---|---|
|
You can find a complete working sample of WebSocket security in samples/chat-jc. |
Spring Security 4.0 has introduced authorization support for WebSockets through the Spring Messaging abstraction.
To configure authorization using Java Configuration, simply extend the AbstractSecurityWebSocketMessageBrokerConfigurer and configure the MessageSecurityMetadataSourceRegistry.
For example:
@Configuration public class WebSocketSecurityConfig extends AbstractSecurityWebSocketMessageBrokerConfigurer {
This will ensure that:
|
Any inbound CONNECT message requires a valid CSRF token to enforce Same Origin Policy |
|
The SecurityContextHolder is populated with the user within the simpUser header attribute for any inbound request. |
|
Our messages require the proper authorization. Specifically, any inbound message that starts with "/user/" will require ROLE_USER. Additional details on authorization can be found in Section 20.3, “WebSocket Authorization” |
Spring Security also provides XML Namespace support for securing WebSockets. A comparable XML based configuration looks like the following:
<websocket-message-broker>
This will ensure that:
|
Any inbound CONNECT message requires a valid CSRF token to enforce Same Origin Policy |
|
The SecurityContextHolder is populated with the user within the simpUser header attribute for any inbound request. |
|
Our messages require the proper authorization. Specifically, any inbound message that starts with "/user/" will require ROLE_USER. Additional details on authorization can be found in Section 20.3, “WebSocket Authorization” |
WebSockets reuse the same authentication information that is found in the HTTP request when the WebSocket connection was made.
This means that the Principal on the HttpServletRequest will be handed off to WebSockets.
If you are using Spring Security, the Principal on the HttpServletRequest is overridden automatically.
More concretely, to ensure a user has authenticated to your WebSocket application, all that is necessary is to ensure that you setup Spring Security to authenticate your HTTP based web application.
Spring Security 4.0 has introduced authorization support for WebSockets through the Spring Messaging abstraction.
To configure authorization using Java Configuration, simply extend the AbstractSecurityWebSocketMessageBrokerConfigurer and configure the MessageSecurityMetadataSourceRegistry.
For example:
@Configuration public class WebSocketSecurityConfig extends AbstractSecurityWebSocketMessageBrokerConfigurer { @Override protected void configureInbound(MessageSecurityMetadataSourceRegistry messages) { messages .nullDestMatcher().authenticated()
This will ensure that:
|
Any message without a destination (i.e. anything other that Message type of MESSAGE or SUBSCRIBE) will require the user to be authenticated |
|
Anyone can subscribe to /user/queue/errors |
|
Any message that has a destination starting with "/app/" will be require the user to have the role ROLE_USER |
|
Any message that starts with "/user/" or "/topic/friends/" that is of type SUBSCRIBE will require ROLE_USER |
|
Any other message of type MESSAGE or SUBSCRIBE is rejected. Due to 6 we do not need this step, but it illustrates how one can match on specific message types. |
|
Any other Message is rejected. This is a good idea to ensure that you do not miss any messages. |
Spring Security also provides XML Namespace support for securing WebSockets. A comparable XML based configuration looks like the following:
<websocket-message-broker>
This will ensure that:
|
Any message of type CONNECT, UNSUBSCRIBE, or DISCONNECT will require the user to be authenticated |
|
Anyone can subscribe to /user/queue/errors |
|
Any message that has a destination starting with "/app/" will be require the user to have the role ROLE_USER |
|
Any message that starts with "/user/" or "/topic/friends/" that is of type SUBSCRIBE will require ROLE_USER |
|
Any other message of type MESSAGE or SUBSCRIBE is rejected. Due to 6 we do not need this step, but it illustrates how one can match on specific message types. |
|
Any other message with a destination is rejected. This is a good idea to ensure that you do not miss any messages. |
In order to properly secure your application it is important to understand Spring’s WebSocket support.
It is important to understand the distinction between SUBSCRIBE and MESSAGE types of messages and how it works within Spring.
Consider a chat application.
- The system can send notifications MESSAGE to all users through a destination of "/topic/system/notifications"
- Clients can receive notifications by SUBSCRIBE to the "/topic/system/notifications".
While we want clients to be able to SUBSCRIBE to "/topic/system/notifications", we do not want to enable them to send a MESSAGE to that destination. If we allowed sending a MESSAGE to "/topic/system/notifications", then clients could send a message directly to that endpoint and impersonate the system.
In general, it is common for applications to deny any MESSAGE sent to a message that starts with the broker prefix (i.e. "/topic/" or "/queue/").
It is also is important to understand how destinations are transformed.
Consider a chat application.
- User’s can send messages to a specific user by sending a message to the destination of "/app/chat".
- The application sees the message, ensures that the "from" attribute is specified as the current user (we cannot trust the client).
-
The application then sends the message to the recipient using
SimpMessageSendingOperations.convertAndSendToUser("toUser", "/queue/messages", message). - The message gets turned into the destination of "/queue/user/messages-<sessionid>"
With the application above, we want to allow our client to listen to "/user/queue" which is transformed into "/queue/user/messages-<sessionid>". However, we do not want the client to be able to listen to "/queue/*" because that would allow the client to see messages for every user.
In general, it is common for applications to deny any SUBSCRIBE sent to a message that starts with the broker prefix (i.e. "/topic/" or "/queue/"). Of course we may provide exceptions to account for things like
Spring contains a section titled Flow of Messages that describes how messages flow through the system.
It is important to note that Spring Security only secures the clientInboundChannel.
Spring Security does not attempt to secure the clientOutboundChannel.
The most important reason for this is performance. For every message that goes in, there are typically many many more that go out. Instead of securing the outbound messages, we encourage securing the subscription to the endpoints.
It is important to emphasize that the browser does not enforce the Same Origin Policy for WebSocket connections. This is an extremely important consideration.
Consider the following scenario. A user visits bank.com and authenticates to their account. The same user opens another tab in their browser and visits evil.com. The Same Origin Policy ensures that evil.com cannot read or write data to bank.com.
With WebSockets the Same Origin Policy does not apply. In fact, unless bank.com explicitly forbids it, evil.com can read and write data on behalf of the user. This means that anything the user can do over the websocket (i.e. transfer money), evil.com can do on that users behalf.
Since SockJS tries to emulate WebSockets it also bypasses the Same Origin Policy. This means developers need to explicitly protect their applications from external domains when using SockJS.
Fortunately, since Spring 4.1.5 Spring’s WebSocket and SockJS support restricts access to the current domain. Spring Security adds an additional layer of protection to provide defence in depth.
By default Spring Security requires the CSRF token in any CONNECT message type. This ensures that only a site that has access to the CSRF token can connect. Since only the Same Origin can access the CSRF token, external domains are not allowed to make a connection.
Typically we need to include the CSRF token in an HTTP header or an HTTP parameter. However, SockJS does not allow for these options. Instead, we must include the token in the Stomp headers
Applications can obtain a CSRF token by accessing the request attribute named _csrf.
For example, the following will allow accessing the CsrfToken in a JSP:
var headerName = "${_csrf.headerName}";
var token = "${_csrf.token}";
If you are using static HTML, you can expose the CsrfToken on a REST endpoint.
For example, the following would expose the CsrfToken on the URL /csrf
@RestController
public class CsrfController {

    @RequestMapping("/csrf")
    public CsrfToken csrf(CsrfToken token) {
        return token;
    }
}
The javascript can make a REST call to the endpoint and use the response to populate the headerName and the token.
We can now include the token in our Stomp client. For example:
...
var headers = {};
headers[headerName] = token;
stompClient.connect(headers, function(frame) {
  ...

}
If you want to allow other domains to access your site, you can disable Spring Security’s protection. For example, in Java Configuration you can use the following:
@Configuration
public class WebSocketSecurityConfig extends AbstractSecurityWebSocketMessageBrokerConfigurer {

    ...

    @Override
    protected boolean sameOriginDisabled() {
        return true;
    }
}
SockJS provides fallback transports to support older browsers. When using the fallback options we need to relax a few security constraints to allow SockJS to work with Spring Security.
SockJS may use an transport that leverages an iframe. By default Spring Security will deny the site from being framed to prevent Clickjacking attacks. To allow SockJS frame based transports to work, we need to configure Spring Security to allow the same origin to frame the content.
You can customize X-Frame-Options with the frame-options element. For example, the following will instruct Spring Security to use "X-Frame-Options: SAMEORIGIN" which allows iframes within the same domain:
<http>
    <!-- ... -->

    <headers>
        <frame-options
          policy="SAMEORIGIN" />
    </headers>
</http>
Similarly, you can customize frame options to use the same origin within Java Configuration using the following:
@EnableWebSecurity
public class WebSecurityConfig extends
   WebSecurityConfigurerAdapter {

  @Override
  protected void configure(HttpSecurity http) throws Exception {
    http
      // ...
      .headers()
        .frameOptions()
            .sameOrigin();
  }
}
SockJS uses a POST on the CONNECT messages for any HTTP based transport. Typically we need to include the CSRF token in an HTTP header or an HTTP parameter. However, SockJS does not allow for these options. Instead, we must include the token in the Stomp headers as described in Section 20.4.3, “Adding CSRF to Stomp Headers”.
It also means we need to relax our CSRF protection with the web layer. Specifically, we want to disable CSRF protection for our connect URLs. We do NOT want to disable CSRF protection for every URL. Otherwise our site will be vulnerable to CSRF attacks.
We can easily achieve this by providing a CSRF RequestMatcher. Our Java Configuration makes this extremely easy. For example, if our stomp endpoint is "/chat" we can disable CSRF protection for only URLs that start with "/chat/" using the following configuration:
@Configuration
@EnableWebSecurity
public class WebSecurityConfig
    extends WebSecurityConfigurerAdapter {

    @Override
    protected void configure(HttpSecurity http) throws Exception {

        http
            .csrf()
                // ignore our stomp endpoints since they are protected using Stomp headers
                .ignoringAntMatchers("/chat/**")
                .and()
            .headers()
                // allow same origin to frame our site to support iframe SockJS
                .frameOptions().sameOrigin()
                .and()
            .authorizeRequests()

            ...
If we are using XML based configuration, we can use the csrf@request-matcher-ref. For example:
<http ...>
    <csrf request-matcher-ref="csrfMatcher"/>

    <headers>
        <frame-options policy="SAMEORIGIN"/>
    </headers>

    ...
</http>

<b:bean id="csrfMatcher"
    class="AndRequestMatcher">
    <b:constructor-arg value="#{T(org.springframework.security.web.csrf.CsrfFilter).DEFAULT_CSRF_MATCHER}"/>
    <b:constructor-arg>
        <b:bean class="org.springframework.security.web.util.matcher.NegatedRequestMatcher">
          <b:bean class="org.springframework.security.web.util.matcher.AntPathRequestMatcher">
            <b:constructor-arg value="/chat/**"/>
          </b:bean>
        </b:bean>
    </b:constructor-arg>
</b:bean>
The advanced authorization capabilities within Spring Security represent one of the most compelling reasons for its popularity. Irrespective of how you choose to authenticate - whether using a Spring Security-provided mechanism and provider, or integrating with a container or other non-Spring Security authentication authority - you will find the authorization services can be used within your application in a consistent and simple way.
In this part we’ll explore the different AbstractSecurityInterceptor implementations, which were introduced in Part I. We then move on to explore how to fine-tune authorization through use of domain access control lists.
As we saw in the technical overview, all Authentication implementations store a list of GrantedAuthority objects. These represent the authorities that have been granted to the principal. the GrantedAuthority objects are inserted into the Authentication object by the AuthenticationManager and are later read by AccessDecisionManager s when making authorization decisions.
GrantedAuthority is an interface with only one method:
String getAuthority();
This method allows
AccessDecisionManager s to obtain a precise String representation of the GrantedAuthority. By returning a representation as a String, a GrantedAuthority can be easily "read" by most AccessDecisionManager s. If a GrantedAuthority cannot be precisely represented as a String, the GrantedAuthority is considered "complex" and getAuthority() must return null.
An example of a "complex" GrantedAuthority would be an implementation that stores a list of operations and authority thresholds that apply to different customer account numbers. Representing this complex GrantedAuthority as a String would be quite difficult, and as a result the getAuthority() method should return null. This will indicate to any AccessDecisionManager that it will need to specifically support the GrantedAuthority implementation in order to understand its contents.
Spring Security includes one concrete GrantedAuthority implementation, GrantedAuthorityImpl. This allows any user-specified String to be converted into a GrantedAuthority. All AuthenticationProvider s included with the security architecture use GrantedAuthorityImpl to populate the Authentication object.
As we’ve also seen in the Technical Overview chapter, Spring Security provides interceptors which control access to secure objects such as method invocations or web requests. A pre-invocation decision on whether the invocation is allowed to proceed is made by the AccessDecisionManager.
The AccessDecisionManager is called by the AbstractSecurityInterceptor and is responsible for making final access control decisions. the AccessDecisionManager interface contains three methods:
void decide(Authentication authentication, Object secureObject,
	Collection<ConfigAttribute> attrs) throws AccessDeniedException;

boolean supports(ConfigAttribute attribute);

boolean supports(Class clazz);
The AccessDecisionManager’s `decide method is passed all the relevant information it needs in order to make an authorization decision. In particular, passing the secure Object enables those arguments contained in the actual secure object invocation to be inspected. For example, let’s assume the secure object was a`MethodInvocation`. It would be easy to query the MethodInvocation for any Customer argument, and then implement some sort of security logic in the AccessDecisionManager to ensure the principal is permitted to operate on that customer. Implementations are expected to throw an AccessDeniedException if access is denied.
The supports(ConfigAttribute) method is called by the AbstractSecurityInterceptor at startup time to determine if the AccessDecisionManager can process the passed ConfigAttribute. The supports(Class) method is called by a security interceptor implementation to ensure the configured AccessDecisionManager supports the type of secure object that the security interceptor will present.
Whilst users can implement their own AccessDecisionManager to control all aspects of authorization, Spring Security includes several AccessDecisionManager implementations that are based on voting. Figure 21.1, “Voting Decision Manager” illustrates the relevant classes.
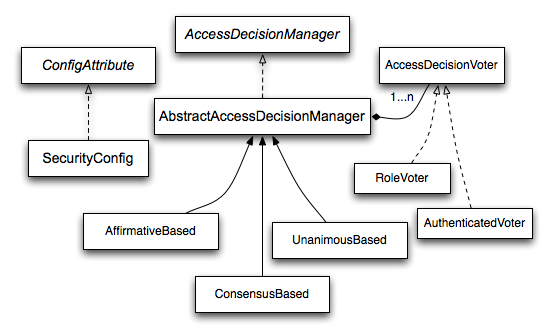
Using this approach, a series of AccessDecisionVoter implementations are polled on an authorization decision. The AccessDecisionManager then decides whether or not to throw an AccessDeniedException based on its assessment of the votes.
The AccessDecisionVoter interface has three methods:
int vote(Authentication authentication, Object object, Collection<ConfigAttribute> attrs);

boolean supports(ConfigAttribute attribute);

boolean supports(Class clazz);
Concrete implementations return an int, with possible values being reflected in the AccessDecisionVoter static fields ACCESS_ABSTAIN, ACCESS_DENIED and ACCESS_GRANTED. A voting implementation will return ACCESS_ABSTAIN if it has no opinion on an authorization decision. If it does have an opinion, it must return either ACCESS_DENIED or ACCESS_GRANTED.
There are three concrete AccessDecisionManager s provided with Spring Security that tally the votes. the ConsensusBased implementation will grant or deny access based on the consensus of non-abstain votes. Properties are provided to control behavior in the event of an equality of votes or if all votes are abstain. The AffirmativeBased implementation will grant access if one or more ACCESS_GRANTED votes were received (i.e. a deny vote will be ignored, provided there was at least one grant vote). Like the ConsensusBased implementation, there is a parameter that controls the behavior if all voters abstain. The UnanimousBased provider expects unanimous ACCESS_GRANTED votes in order to grant access, ignoring abstains. It will deny access if there is any ACCESS_DENIED vote. Like the other implementations, there is a parameter that controls the behaviour if all voters abstain.
It is possible to implement a custom AccessDecisionManager that tallies votes differently. For example, votes from a particular AccessDecisionVoter might receive additional weighting, whilst a deny vote from a particular voter may have a veto effect.
The most commonly used AccessDecisionVoter provided with Spring Security is the simple RoleVoter, which treats configuration attributes as simple role names and votes to grant access if the user has been assigned that role.
It will vote if any ConfigAttribute begins with the prefix ROLE_. It will vote to grant access if there is a GrantedAuthority which returns a String representation (via the getAuthority() method) exactly equal to one or more ConfigAttributes starting with the prefix ROLE_. If there is no exact match of any ConfigAttribute starting with ROLE_, the RoleVoter will vote to deny access. If no ConfigAttribute begins with ROLE_, the voter will abstain.
Another voter which we’ve implicitly seen is the AuthenticatedVoter, which can be used to differentiate between anonymous, fully-authenticated and remember-me authenticated users. Many sites allow certain limited access under remember-me authentication, but require a user to confirm their identity by logging in for full access.
When we’ve used the attribute IS_AUTHENTICATED_ANONYMOUSLY to grant anonymous access, this attribute was being processed by the AuthenticatedVoter. See the Javadoc for this class for more information.
Obviously, you can also implement a custom AccessDecisionVoter and you can put just about any access-control logic you want in it. It might be specific to your application (business-logic related) or it might implement some security administration logic. For example, you’ll find a blog article on the SpringSource web site which describes how to use a voter to deny access in real-time to users whose accounts have been suspended.
Whilst the AccessDecisionManager is called by the AbstractSecurityInterceptor before proceeding with the secure object invocation, some applications need a way of modifying the object actually returned by the secure object invocation. Whilst you could easily implement your own AOP concern to achieve this, Spring Security provides a convenient hook that has several concrete implementations that integrate with its ACL capabilities.
Figure 21.2, “After Invocation Implementation” illustrates Spring Security’s AfterInvocationManager and its concrete implementations.

Like many other parts of Spring Security, AfterInvocationManager has a single concrete implementation, AfterInvocationProviderManager, which polls a list of AfterInvocationProvider s. Each AfterInvocationProvider is allowed to modify the return object or throw an AccessDeniedException. Indeed multiple providers can modify the object, as the result of the previous provider is passed to the next in the list.
Please be aware that if you’re using AfterInvocationManager, you will still need configuration attributes that allow the MethodSecurityInterceptor’s `AccessDecisionManager to allow an operation. If you’re using the typical Spring Security included AccessDecisionManager implementations, having no configuration attributes defined for a particular secure method invocation will cause each AccessDecisionVoter to abstain from voting. In turn, if the AccessDecisionManager property “allowIfAllAbstainDecisions” is false, an AccessDeniedException will be thrown. You may avoid this potential issue by either (i) setting “allowIfAllAbstainDecisions” to true (although this is generally not recommended) or (ii) simply ensure that there is at least one configuration attribute that an AccessDecisionVoter will vote to grant access for. This latter (recommended) approach is usually achieved through a ROLE_USER or ROLE_AUTHENTICATED configuration attribute.
It is a common requirement that a particular role in an application should automatically "include" other roles. For example, in an application which has the concept of an "admin" and a "user" role, you may want an admin to be able to do everything a normal user can. To achieve this, you can either make sure that all admin users are also assigned the "user" role. Alternatively, you can modify every access constraint which requires the "user" role to also include the "admin" role. This can get quite complicated if you have a lot of different roles in your application.
The use of a role-hierarchy allows you to configure which roles (or authorities) should include others. An extended version of Spring Security’s RoleVoter, RoleHierarchyVoter, is configured with a RoleHierarchy, from which it obtains all the "reachable authorities" which the user is assigned. A typical configuration might look like this:
<bean id="roleVoter" class="org.springframework.security.access.vote.RoleHierarchyVoter">
	<constructor-arg ref="roleHierarchy" />
</bean>
<bean id="roleHierarchy"
		class="org.springframework.security.access.hierarchicalroles.RoleHierarchyImpl">
	<property name="hierarchy">
		<value>
			ROLE_ADMIN > ROLE_STAFF
			ROLE_STAFF > ROLE_USER
			ROLE_USER > ROLE_GUEST
		</value>
	</property>
</bean>
Here we have four roles in a hierarchy ROLE_ADMIN ⇒ ROLE_STAFF ⇒ ROLE_USER ⇒ ROLE_GUEST. A user who is authenticated with ROLE_ADMIN, will behave as if they have all four roles when security contraints are evaluated against an AccessDecisionManager cconfigured with the above RoleHierarchyVoter. The > symbol can be thought of as meaning "includes".
Role hierarchies offer a convenient means of simplifying the access-control configuration data for your application and/or reducing the number of authorities which you need to assign to a user. For more complex requirements you may wish to define a logical mapping between the specific access-rights your application requires and the roles that are assigned to users, translating between the two when loading the user information.
Prior to Spring Security 2.0, securing MethodInvocation s needed quite a lot of boiler plate configuration. Now the recommended approach for method security is to use namespace configuration. This way the method security infrastructure beans are configured automatically for you so you don’t really need to know about the implementation classes. We’ll just provide a quick overview of the classes that are involved here.
Method security in enforced using a MethodSecurityInterceptor, which secures MethodInvocation s. Depending on the configuration approach, an interceptor may be specific to a single bean or shared between multiple beans. The interceptor uses a MethodSecurityMetadataSource instance to obtain the configuration attributes that apply to a particular method invocation. MapBasedMethodSecurityMetadataSource is used to store configuration attributes keyed by method names (which can be wildcarded) and will be used internally when the attributes are defined in the application context using the <intercept-methods> or <protect-point> elements. Other implementations will be used to handle annotation-based configuration.
You can of course configure a MethodSecurityIterceptor directly in your application context for use with one of Spring AOP’s proxying mechanisms:
<bean id="bankManagerSecurity" class=
	"org.springframework.security.access.intercept.aopalliance.MethodSecurityInterceptor">
<property name="authenticationManager" ref="authenticationManager"/>
<property name="accessDecisionManager" ref="accessDecisionManager"/>
<property name="afterInvocationManager" ref="afterInvocationManager"/>
<property name="securityMetadataSource">
	<sec:method-security-metadata-source>
	<sec:protect method="com.mycompany.BankManager.delete*" access="ROLE_SUPERVISOR"/>
	<sec:protect method="com.mycompany.BankManager.getBalance" access="ROLE_TELLER,ROLE_SUPERVISOR"/>
	</sec:method-security-metadata-source>
</property>
</bean>
The AspectJ security interceptor is very similar to the AOP Alliance security interceptor discussed in the previous section. Indeed we will only discuss the differences in this section.
The AspectJ interceptor is named AspectJSecurityInterceptor. Unlike the AOP Alliance security interceptor, which relies on the Spring application context to weave in the security interceptor via proxying, the AspectJSecurityInterceptor is weaved in via the AspectJ compiler. It would not be uncommon to use both types of security interceptors in the same application, with AspectJSecurityInterceptor being used for domain object instance security and the AOP Alliance MethodSecurityInterceptor being used for services layer security.
Let’s first consider how the AspectJSecurityInterceptor is configured in the Spring application context:
<bean id="bankManagerSecurity" class= "org.springframework.security.access.intercept.aspectj.AspectJMethodSecurityInterceptor"> <property name="authenticationManager" ref="authenticationManager"/> <property name="accessDecisionManager" ref="accessDecisionManager"/> <property name="afterInvocationManager" ref="afterInvocationManager"/> <property name="securityMetadataSource"> <sec:method-security-metadata-source> <sec:protect method="com.mycompany.BankManager.delete*" access="ROLE_SUPERVISOR"/> <sec:protect method="com.mycompany.BankManager.getBalance" access="ROLE_TELLER,ROLE_SUPERVISOR"/> </sec:method-security-metadata-source> </property> </bean>
As you can see, aside from the class name, the AspectJSecurityInterceptor is exactly the same as the AOP Alliance security interceptor. Indeed the two interceptors can share the same`securityMetadataSource`, as the SecurityMetadataSource works with java.lang.reflect.Method s rather than an AOP library-specific class. Of course, your access decisions have access to the relevant AOP library-specific invocation (ie MethodInvocation or JoinPoint) and as such can consider a range of addition criteria when making access decisions (such as method arguments).
Next you’ll need to define an AspectJ aspect. For example:
package org.springframework.security.samples.aspectj; import org.springframework.security.access.intercept.aspectj.AspectJSecurityInterceptor; import org.springframework.security.access.intercept.aspectj.AspectJCallback; import org.springframework.beans.factory.InitializingBean; public aspect DomainObjectInstanceSecurityAspect implements InitializingBean { private AspectJSecurityInterceptor securityInterceptor; pointcut domainObjectInstanceExecution(): target(PersistableEntity) && execution(public * *(..)) && !within(DomainObjectInstanceSecurityAspect); Object around(): domainObjectInstanceExecution() { if (this.securityInterceptor == null) { return proceed(); } AspectJCallback callback = new AspectJCallback() { public Object proceedWithObject() { return proceed(); } }; return this.securityInterceptor.invoke(thisJoinPoint, callback); } public AspectJSecurityInterceptor getSecurityInterceptor() { return securityInterceptor; } public void setSecurityInterceptor(AspectJSecurityInterceptor securityInterceptor) { this.securityInterceptor = securityInterceptor; } public void afterPropertiesSet() throws Exception { if (this.securityInterceptor == null) throw new IllegalArgumentException("securityInterceptor required"); } } }
In the above example, the security interceptor will be applied to every instance of PersistableEntity, which is an abstract class not shown (you can use any other class or pointcut expression you like). For those curious, AspectJCallback is needed because the proceed(); statement has special meaning only within an around() body. The AspectJSecurityInterceptor calls this anonymous AspectJCallback class when it wants the target object to continue.
You will need to configure Spring to load the aspect and wire it with the AspectJSecurityInterceptor. A bean declaration which achieves this is shown below:
<bean id="domainObjectInstanceSecurityAspect" class="security.samples.aspectj.DomainObjectInstanceSecurityAspect" factory-method="aspectOf"> <property name="securityInterceptor" ref="bankManagerSecurity"/> </bean>
That’s it! Now you can create your beans from anywhere within your application, using whatever means you think fit (eg new Person();) and they will have the security interceptor applied.
Spring Security 3.0 introduced the ability to use Spring EL expressions as an authorization mechanism in addition to the simple use of configuration attributes and access-decision voters which have seen before. Expression-based access control is built on the same architecture but allows complicated boolean logic to be encapsulated in a single expression.
Spring Security uses Spring EL for expression support and you should look at how that works if you are interested in understanding the topic in more depth. Expressions are evaluated with a "root object" as part of the evaluation context. Spring Security uses specific classes for web and method security as the root object, in order to provide built-in expressions and access to values such as the current principal.
The base class for expression root objects is SecurityExpressionRoot. This provides some common expressions which are available in both web and method security.
Table 23.1. Common built-in expressions
| Expression | Description |
|---|---|
| Returns |
| Returns |
| Returns |
| Returns |
| Allows direct access to the principal object representing the current user |
| Allows direct access to the current |
| Always evaluates to |
| Always evaluates to |
| Returns |
| Returns |
| Returns |
| Returns |
| Returns |
| Returns |
To use expressions to secure individual URLs, you would first need to set the use-expressions attribute in the <http> element to true. Spring Security will then expect the access attributes of the <intercept-url> elements to contain Spring EL expressions. The expressions should evaluate to a boolean, defining whether access should be allowed or not. For example:
<http> <intercept-url pattern="/admin*" access="hasRole('admin') and hasIpAddress('192.168.1.0/24')"/> ... </http>
Here we have defined that the "admin" area of an application (defined by the URL pattern) should only be available to users who have the granted authority "admin" and whose IP address matches a local subnet. We’ve already seen the built-in hasRole expression in the previous section. The expression hasIpAddress is an additional built-in expression which is specific to web security. It is defined by the WebSecurityExpressionRoot class, an instance of which is used as the expression root object when evaluation web-access expressions. This object also directly exposed the HttpServletRequest object under the name request so you can invoke the request directly in an expressio
If expressions are being used, a WebExpressionVoter will be added to the AccessDecisionManager which is used by the namespace. So if you aren’t using the namespace and want to use expressions, you will have to add one of these to your configuration.
Method security is a bit more complicated than a simple allow or deny rule. Spring Security 3.0 introduced some new annotations in order to allow comprehensive support for the use of expressions.
There are four annotations which support expression attributes to allow pre and post-invocation authorization checks and also to support filtering of submitted collection arguments or return values. They are @PreAuthorize, @PreFilter, @PostAuthorize and @PostFilter. Their use is enabled through the global-method-security namespace element:
<global-method-security pre-post-annotations="enabled"/>
The most obviously useful annotation is @PreAuthorize which decides whether a method can actually be invoked or not. For example (from the"Contacts" sample application)
@PreAuthorize("hasRole('USER')") public void create(Contact contact);
which means that access will only be allowed for users with the role "ROLE_USER". Obviously the same thing could easily be achieved using a traditional configuration and a simple configuration attribute for the required role. But what about:
@PreAuthorize("hasPermission(#contact, 'admin')") public void deletePermission(Contact contact, Sid recipient, Permission permission);
Here we’re actually using a method argument as part of the expression to decide whether the current user has the "admin"permission for the given contact. The built-in hasPermission() expression is linked into the Spring Security ACL module through the application context, as we’llsee below. You can access any of the method arguments by name as expression variables.
There are a number of ways in which Spring Security can resolve the method arguments. Spring Security uses DefaultSecurityParameterNameDiscoverer to discover the parameter names. By default, the following options are tried for a method as a whole.
-
If Spring Security’s
@Pannotation is present on a single argument to the method, the value will be used. This is useful for interfaces compiled with a JDK prior to JDK 8 which do not contain any information about the parameter names. For example:import org.springframework.security.access.method.P; ... @PreAuthorize("#c.name == authentication.name") public void doSomething(@P("c") Contact contact);
Behind the scenes this use implemented using
AnnotationParameterNameDiscovererwhich can be customized to support the value attribute of any specified annotation. -
If Spring Data’s
@Paramannotation is present on at least one parameter for the method, the value will be used. This is useful for interfaces compiled with a JDK prior to JDK 8 which do not contain any information about the parameter names. For example:import org.springframework.data.repository.query.Param; ... @PreAuthorize("#n == authentication.name") Contact findContactByName(@Param("n") String name);
Behind the scenes this use implemented using
AnnotationParameterNameDiscovererwhich can be customized to support the value attribute of any specified annotation. - If JDK 8 was used to compile the source with the -parameters argument and Spring 4+ is being used, then the standard JDK reflection API is used to discover the parameter names. This works on both classes and interfaces.
- Last, if the code was compiled with the debug symbols, the parameter names will be discovered using the debug symbols. This will not work for interfaces since they do not have debug information about the parameter names. For interfaces, annotations or the JDK 8 approach must be used.
Any Spring-EL functionality is available within the expression, so you can also access properties on the arguments. For example, if you wanted a particular method to only allow access to a user whose username matched that of the contact, you could write
@PreAuthorize("#contact.name == authentication.name") public void doSomething(Contact contact);
Here we are accessing another built-in expression, authentication, which is the Authentication stored in the security context. You can also access its "principal" property directly, using the expression principal. The value will often be a UserDetails instance, so you might use an expression like principal.username or principal.enabled.
Less commonly, you may wish to perform an access-control check after the method has been invoked. This can be achieved using the @PostAuthorize annotation. To access the return value from a method, use the built-in name returnObject in the expression.
As you may already be aware, Spring Security supports filtering of collections and arrays and this can now be achieved using expressions. This is most commonly performed on the return value of a method. For example:
@PreAuthorize("hasRole('USER')") @PostFilter("hasPermission(filterObject, 'read') or hasPermission(filterObject, 'admin')") public List<Contact> getAll();
When using the @PostFilter annotation, Spring Security iterates through the returned collection and removes any elements for which the supplied expression is false. The name filterObject refers to the current object in the collection. You can also filter before the method call, using @PreFilter, though this is a less common requirement. The syntax is just the same, but if there is more than one argument which is a collection type then you have to select one by name using the filterTarget property of this annotation.
Note that filtering is obviously not a substitute for tuning your data retrieval queries. If you are filtering large collections and removing many of the entries then this is likely to be inefficient.
There are some built-in expressions which are specific to method security, which we have already seen in use above. The filterTarget and returnValue values are simple enough, but the use of the hasPermission() expression warrants a closer look.
hasPermission() expressions are delegated to an instance of PermissionEvaluator. It is intended to bridge between the expression system and Spring Security’s ACL system, allowing you to specify authorization constraints on domain objects, based on abstract permissions. It has no explicit dependencies on the ACL module, so you could swap that out for an alternative implementation if required. The interface has two methods:
boolean hasPermission(Authentication authentication, Object targetDomainObject, Object permission); boolean hasPermission(Authentication authentication, Serializable targetId, String targetType, Object permission);
which map directly to the available versions of the expression, with the exception that the first argument (the Authentication object) is not supplied. The first is used in situations where the domain object, to which access is being controlled, is already loaded. Then expression will return true if the current user has the given permission for that object. The second version is used in cases where the object is not loaded, but its identifier is known. An abstract "type" specifier for the domain object is also required, allowing the correct ACL permissions to be loaded. This has traditionally been the Java class of the object, but does not have to be as long as it is consistent with how the permissions are loaded.
To use hasPermission() expressions, you have to explicitly configure a PermissionEvaluator in your application context. This would look something like this:
<security:global-method-security pre-post-annotations="enabled"> <security:expression-handler ref="expressionHandler"/> </security:global-method-security> <bean id="expressionHandler" class= "org.springframework.security.access.expression.method.DefaultMethodSecurityExpressionHandler"> <property name="permissionEvaluator" ref="myPermissionEvaluator"/> </bean>
Where myPermissionEvaluator is the bean which implements PermissionEvaluator. Usually this will be the implementation from the ACL module which is called`AclPermissionEvaluator`. See the "Contacts" sample application configuration for more details.
In this part we cover features which require a knowledge of previous chapters as well as some of the more advanced and less-commonly used features of the framework.
Complex applications often will find the need to define access permissions not simply at a web request or method invocation level. Instead, security decisions need to comprise both who (Authentication), where (MethodInvocation) and what (SomeDomainObject). In other words, authorization decisions also need to consider the actual domain object instance subject of a method invocation.
Imagine you’re designing an application for a pet clinic. There will be two main groups of users of your Spring-based application: staff of the pet clinic, as well as the pet clinic’s customers. The staff will have access to all of the data, whilst your customers will only be able to see their own customer records. To make it a little more interesting, your customers can allow other users to see their customer records, such as their "puppy preschool" mentor or president of their local "Pony Club". Using Spring Security as the foundation, you have several approaches that can be used:
-
Write your business methods to enforce the security. You could consult a collection within the
Customerdomain object instance to determine which users have access. By using theSecurityContextHolder.getContext().getAuthentication(), you’ll be able to access theAuthenticationobject. -
Write an
AccessDecisionVoterto enforce the security from theGrantedAuthority[]s stored in theAuthenticationobject. This would mean yourAuthenticationManagerwould need to populate theAuthenticationwith customGrantedAuthority[]s representing each of theCustomerdomain object instances the principal has access to. -
Write an
AccessDecisionVoterto enforce the security and open the targetCustomerdomain object directly. This would mean your voter needs access to a DAO that allows it to retrieve theCustomerobject. It would then access theCustomerobject’s collection of approved users and make the appropriate decision.
Each one of these approaches is perfectly legitimate. However, the first couples your authorization checking to your business code. The main problems with this include the enhanced difficulty of unit testing and the fact it would be more difficult to reuse the Customer authorization logic elsewhere. Obtaining the GrantedAuthority[] s from the Authentication object is also fine, but will not scale to large numbers of Customer s. If a user might be able to access 5,000 Customer s (unlikely in this case, but imagine if it were a popular vet for a large Pony Club!) the amount of memory consumed and time required to construct the Authentication object would be undesirable. The final method, opening the Customer directly from external code, is probably the best of the three. It achieves separation of concerns, and doesn’t misuse memory or CPU cycles, but it is still inefficient in that both the AccessDecisionVoter and the eventual business method itself will perform a call to the DAO responsible for retrieving the Customer object. Two accesses per method invocation is clearly undesirable. In addition, with every approach listed you’ll need to write your own access control list (ACL) persistence and business logic from scratch.
Fortunately, there is another alternative, which we’ll talk about below.
Spring Security’s ACL services are shipped in the spring-security-acl-xxx.jar. You will need to add this JAR to your classpath to use Spring Security’s domain object instance security capabilities.
Spring Security’s domain object instance security capabilities centre on the concept of an access control list (ACL). Every domain object instance in your system has its own ACL, and the ACL records details of who can and can’t work with that domain object. With this in mind, Spring Security delivers three main ACL-related capabilities to your application:
- A way of efficiently retrieving ACL entries for all of your domain objects (and modifying those ACLs)
- A way of ensuring a given principal is permitted to work with your objects, before methods are called
- A way of ensuring a given principal is permitted to work with your objects (or something they return), after methods are called
As indicated by the first bullet point, one of the main capabilities of the Spring Security ACL module is providing a high-performance way of retrieving ACLs. This ACL repository capability is extremely important, because every domain object instance in your system might have several access control entries, and each ACL might inherit from other ACLs in a tree-like structure (this is supported out-of-the-box by Spring Security, and is very commonly used). Spring Security’s ACL capability has been carefully designed to provide high performance retrieval of ACLs, together with pluggable caching, deadlock-minimizing database updates, independence from ORM frameworks (we use JDBC directly), proper encapsulation, and transparent database updating.
Given databases are central to the operation of the ACL module, let’s explore the four main tables used by default in the implementation. The tables are presented below in order of size in a typical Spring Security ACL deployment, with the table with the most rows listed last:
-
ACL_SID allows us to uniquely identify any principal or authority in the system ("SID" stands for "security identity"). The only columns are the ID, a textual representation of the SID, and a flag to indicate whether the textual representation refers to a principal name or a
GrantedAuthority. Thus, there is a single row for each unique principal orGrantedAuthority. When used in the context of receiving a permission, a SID is generally called a "recipient". - ACL_CLASS allows us to uniquely identify any domain object class in the system. The only columns are the ID and the Java class name. Thus, there is a single row for each unique Class we wish to store ACL permissions for.
- ACL_OBJECT_IDENTITY stores information for each unique domain object instance in the system. Columns include the ID, a foreign key to the ACL_CLASS table, a unique identifier so we know which ACL_CLASS instance we’re providing information for, the parent, a foreign key to the ACL_SID table to represent the owner of the domain object instance, and whether we allow ACL entries to inherit from any parent ACL. We have a single row for every domain object instance we’re storing ACL permissions for.
- Finally, ACL_ENTRY stores the individual permissions assigned to each recipient. Columns include a foreign key to the ACL_OBJECT_IDENTITY, the recipient (ie a foreign key to ACL_SID), whether we’ll be auditing or not, and the integer bit mask that represents the actual permission being granted or denied. We have a single row for every recipient that receives a permission to work with a domain object.
As mentioned in the last paragraph, the ACL system uses integer bit masking. Don’t worry, you need not be aware of the finer points of bit shifting to use the ACL system, but suffice to say that we have 32 bits we can switch on or off. Each of these bits represents a permission, and by default the permissions are read (bit 0), write (bit 1), create (bit 2), delete (bit 3) and administer (bit 4). It’s easy to implement your own Permission instance if you wish to use other permissions, and the remainder of the ACL framework will operate without knowledge of your extensions.
It is important to understand that the number of domain objects in your system has absolutely no bearing on the fact we’ve chosen to use integer bit masking. Whilst you have 32 bits available for permissions, you could have billions of domain object instances (which will mean billions of rows in ACL_OBJECT_IDENTITY and quite probably ACL_ENTRY). We make this point because we’ve found sometimes people mistakenly believe they need a bit for each potential domain object, which is not the case.
Now that we’ve provided a basic overview of what the ACL system does, and what it looks like at a table structure, let’s explore the key interfaces. The key interfaces are:
-
Acl: Every domain object has one and only oneAclobject, which internally holds theAccessControlEntrys as well as knows the owner of theAcl. An Acl does not refer directly to the domain object, but instead to anObjectIdentity. TheAclis stored in the ACL_OBJECT_IDENTITY table. -
AccessControlEntry: AnAclholds multipleAccessControlEntrys, which are often abbreviated as ACEs in the framework. Each ACE refers to a specific tuple of`Permission`,SidandAcl. An ACE can also be granting or non-granting and contain audit settings. The ACE is stored in the ACL_ENTRY table. -
Permission: A permission represents a particular immutable bit mask, and offers convenience functions for bit masking and outputting information. The basic permissions presented above (bits 0 through 4) are contained in theBasePermissionclass. -
Sid: The ACL module needs to refer to principals andGrantedAuthority[]s. A level of indirection is provided by theSidinterface, which is an abbreviation of "security identity". Common classes includePrincipalSid(to represent the principal inside anAuthenticationobject) andGrantedAuthoritySid. The security identity information is stored in the ACL_SID table. -
ObjectIdentity: Each domain object is represented internally within the ACL module by anObjectIdentity. The default implementation is calledObjectIdentityImpl. -
AclService: Retrieves theAclapplicable for a givenObjectIdentity. In the included implementation (JdbcAclService), retrieval operations are delegated to aLookupStrategy. TheLookupStrategyprovides a highly optimized strategy for retrieving ACL information, using batched retrievals(BasicLookupStrategy) and supporting custom implementations that leverage materialized views, hierarchical queries and similar performance-centric, non-ANSI SQL capabilities. -
MutableAclService: Allows a modifiedAclto be presented for persistence. It is not essential to use this interface if you do not wish.
Please note that our out-of-the-box AclService and related database classes all use ANSI SQL. This should therefore work with all major databases. At the time of writing, the system had been successfully tested using Hypersonic SQL, PostgreSQL, Microsoft SQL Server and Oracle.
Two samples ship with Spring Security that demonstrate the ACL module. The first is the Contacts Sample, and the other is the Document Management System (DMS) Sample. We suggest taking a look over these for examples.
To get starting using Spring Security’s ACL capability, you will need to store your ACL information somewhere. This necessitates the instantiation of a DataSource using Spring. The DataSource is then injected into a JdbcMutableAclService and BasicLookupStrategy instance. The latter provides high-performance ACL retrieval capabilities, and the former provides mutator capabilities. Refer to one of the samples that ship with Spring Security for an example configuration. You’ll also need to populate the database with the four ACL-specific tables listed in the last section (refer to the ACL samples for the appropriate SQL statements).
Once you’ve created the required schema and instantiated JdbcMutableAclService, you’ll next need to ensure your domain model supports interoperability with the Spring Security ACL package. Hopefully ObjectIdentityImpl will prove sufficient, as it provides a large number of ways in which it can be used. Most people will have domain objects that contain a public Serializable getId() method. If the return type is long, or compatible with long (eg an int), you will find you need not give further consideration to ObjectIdentity issues. Many parts of the ACL module rely on long identifiers. If you’re not using long (or an int, byte etc), there is a very good chance you’ll need to reimplement a number of classes. We do not intend to support non-long identifiers in Spring Security’s ACL module, as longs are already compatible with all database sequences, the most common identifier data type, and are of sufficient length to accommodate all common usage scenarios.
The following fragment of code shows how to create an Acl, or modify an existing`Acl`:
// Prepare the information we'd like in our access control entry (ACE) ObjectIdentity oi = new ObjectIdentityImpl(Foo.class, new Long(44)); Sid sid = new PrincipalSid("Samantha"); Permission p = BasePermission.ADMINISTRATION; // Create or update the relevant ACL MutableAcl acl = null; try { acl = (MutableAcl) aclService.readAclById(oi); } catch (NotFoundException nfe) { acl = aclService.createAcl(oi); } // Now grant some permissions via an access control entry (ACE) acl.insertAce(acl.getEntries().length, p, sid, true); aclService.updateAcl(acl);
In the example above, we’re retrieving the ACL associated with the "Foo" domain object with identifier number 44. We’re then adding an ACE so that a principal named "Samantha" can "administer" the object. The code fragment is relatively self-explanatory, except the insertAce method. The first argument to the insertAce method is determining at what position in the Acl the new entry will be inserted. In the example above, we’re just putting the new ACE at the end of the existing ACEs. The final argument is a boolean indicating whether the ACE is granting or denying. Most of the time it will be granting (true), but if it is denying (false), the permissions are effectively being blocked.
Spring Security does not provide any special integration to automatically create, update or delete ACLs as part of your DAO or repository operations. Instead, you will need to write code like shown above for your individual domain objects. It’s worth considering using AOP on your services layer to automatically integrate the ACL information with your services layer operations. We’ve found this quite an effective approach in the past.
Once you’ve used the above techniques to store some ACL information in the database, the next step is to actually use the ACL information as part of authorization decision logic. You have a number of choices here. You could write your own AccessDecisionVoter or AfterInvocationProvider that respectively fires before or after a method invocation. Such classes would use AclService to retrieve the relevant ACL and then call Acl.isGranted(Permission[] permission, Sid[] sids, boolean administrativeMode) to decide whether permission is granted or denied. Alternately, you could use our AclEntryVoter, AclEntryAfterInvocationProvider or AclEntryAfterInvocationCollectionFilteringProvider classes. All of these classes provide a declarative-based approach to evaluating ACL information at runtime, freeing you from needing to write any code. Please refer to the sample applications to learn how to use these classes.
There are situations where you want to use Spring Security for authorization, but the user has already been reliably authenticated by some external system prior to accessing the application. We refer to these situations as "pre-authenticated" scenarios. Examples include X.509, Siteminder and authentication by the Java EE container in which the application is running. When using pre-authentication, Spring Security has to
- Identify the user making the request.
- Obtain the authorities for the user.
The details will depend on the external authentication mechanism. A user might be identified by their certificate information in the case of X.509, or by an HTTP request header in the case of Siteminder. If relying on container authentication, the user will be identified by calling the getUserPrincipal() method on the incoming HTTP request. In some cases, the external mechanism may supply role/authority information for the user but in others the authorities must be obtained from a separate source, such as a UserDetailsService.
Because most pre-authentication mechanisms follow the same pattern, Spring Security has a set of classes which provide an internal framework for implementing pre-authenticated authentication providers. This removes duplication and allows new implementations to be added in a structured fashion, without having to write everything from scratch. You don’t need to know about these classes if you want to use something like X.509 authentication, as it already has a namespace configuration option which is simpler to use and get started with. If you need to use explicit bean configuration or are planning on writing your own implementation then an understanding of how the provided implementations work will be useful. You will find classes under the org.springframework.security.web.authentication.preauth. We just provide an outline here so you should consult the Javadoc and source where appropriate.
This class will check the current contents of the security context and, if empty, it will attempt to extract user information from the HTTP request and submit it to the AuthenticationManager. Subclasses override the following methods to obtain this information:
protected abstract Object getPreAuthenticatedPrincipal(HttpServletRequest request); protected abstract Object getPreAuthenticatedCredentials(HttpServletRequest request);
After calling these, the filter will create a PreAuthenticatedAuthenticationToken containing the returned data and submit it for authentication. By "authentication" here, we really just mean further processing to perhaps load the user’s authorities, but the standard Spring Security authentication architecture is followed.
Like other Spring Security authentication filters, the pre-authentication filter has an authenticationDetailsSource property which by default will create a WebAuthenticationDetails object to store additional information such as the session-identifier and originating IP address in the details property of the Authentication object. In cases where user role information can be obtained from the pre-authentication mechanism, the data is also stored in this property, with the details implementing the GrantedAuthoritiesContainer interface. This enables the authentication provider to read the authorities which were externally allocated to the user. We’ll look at a concrete example next.
If the filter is configured with an authenticationDetailsSource which is an instance of this class, the authority information is obtained by calling the isUserInRole(String role) method for each of a pre-determined set of "mappable roles". The class gets these from a configured MappableAttributesRetriever. Possible implementations include hard-coding a list in the application context and reading the role information from the <security-role> information in a web.xml file. The pre-authentication sample application uses the latter approach.
There is an additional stage where the roles (or attributes) are mapped to Spring Security GrantedAuthority objects using a configured Attributes2GrantedAuthoritiesMapper. The default will just add the usual ROLE_ prefix to the names, but it gives you full control over the behaviour.
The pre-authenticated provider has little more to do than load the UserDetails object for the user. It does this by delegating to a AuthenticationUserDetailsService. The latter is similar to the standard UserDetailsService but takes an Authentication object rather than just user name:
public interface AuthenticationUserDetailsService { UserDetails loadUserDetails(Authentication token) throws UsernameNotFoundException; }
This interface may have also other uses but with pre-authentication it allows access to the authorities which were packaged in the Authentication object, as we saw in the previous section. the PreAuthenticatedGrantedAuthoritiesUserDetailsService class does this. Alternatively, it may delegate to a standard UserDetailsService via the UserDetailsByNameServiceWrapper implementation.
The AuthenticationEntryPoint was discussed in the technical overview chapter. Normally it is responsible for kick-starting the authentication process for an unauthenticated user (when they try to access a protected resource), but in the pre-authenticated case this doesn’t apply. You would only configure the ExceptionTranslationFilter with an instance of this class if you aren’t using pre-authentication in combination with other authentication mechanisms. It will be called if the user is rejected by the AbstractPreAuthenticatedProcessingFilter resulting in a null authentication. It always returns a 403-forbidden response code if called.
X.509 authentication is covered in its own chapter. Here we’ll look at some classes which provide support for other pre-authenticated scenarios.
An external authentication system may supply information to the application by setting specific headers on the HTTP request. A well known example of this is Siteminder, which passes the username in a header called SM_USER. This mechanism is supported by the class RequestHeaderAuthenticationFilter which simply extracts the username from the header. It defaults to using the name SM_USER as the header name. See the Javadoc for more details.
| Tip |
|---|---|
|
Note that when using a system like this, the framework performs no authentication checks at all and it is extremely important that the external system is configured properly and protects all access to the application. If an attacker is able to forge the headers in their original request without this being detected then they could potentially choose any username they wished. |
A typical configuration using this filter would look like this:
<security:http> <!-- Additional http configuration omitted --> <security:custom-filter position="PRE_AUTH_FILTER" ref="siteminderFilter" /> </security:http> <bean id="siteminderFilter" class="org.springframework.security.web.authentication.preauth.RequestHeaderAuthenticationFilter"> <property name="principalRequestHeader" value="SM_USER"/> <property name="authenticationManager" ref="authenticationManager" /> </bean> <bean id="preauthAuthProvider" class="org.springframework.security.web.authentication.preauth.PreAuthenticatedAuthenticationProvider"> <property name="preAuthenticatedUserDetailsService"> <bean id="userDetailsServiceWrapper" class="org.springframework.security.core.userdetails.UserDetailsByNameServiceWrapper"> <property name="userDetailsService" ref="userDetailsService"/> </bean> </property> </bean> <security:authentication-manager alias="authenticationManager"> <security:authentication-provider ref="preauthAuthProvider" /> </security:authentication-manager>
We’ve assumed here that the security namespace is being used for configuration. It’s also assumed that you have added a UserDetailsService (called "userDetailsService") to your configuration to load the user’s roles.
The class J2eePreAuthenticatedProcessingFilter will extract the username from the userPrincipal property of the HttpServletRequest. Use of this filter would usually be combined with the use of Java EE roles as described above in the section called “J2eeBasedPreAuthenticatedWebAuthenticationDetailsSource”.
There is a sample application in the codebase which uses this approach, so get hold of the code from subversion and have a look at the application context file if you are interested. The code is in the samples/preauth directory.
LDAP is often used by organizations as a central repository for user information and as an authentication service. It can also be used to store the role information for application users.
There are many different scenarios for how an LDAP server may be configured so Spring Security’s LDAP provider is fully configurable. It uses separate strategy interfaces for authentication and role retrieval and provides default implementations which can be configured to handle a wide range of situations.
You should be familiar with LDAP before trying to use it with Spring Security. The following link provides a good introduction to the concepts involved and a guide to setting up a directory using the free LDAP server OpenLDAP: http://www.zytrax.com/books/ldap/. Some familiarity with the JNDI APIs used to access LDAP from Java may also be useful. We don’t use any third-party LDAP libraries (Mozilla, JLDAP etc.) in the LDAP provider, but extensive use is made of Spring LDAP, so some familiarity with that project may be useful if you plan on adding your own customizations.
When using LDAP authentication, it is important to ensure that you configure LDAP connection pooling properly. If you are unfamiliar with how to do this, you can refer to the Java LDAP documentation.
LDAP authentication in Spring Security can be roughly divided into the following stages.
- Obtaining the unique LDAP "Distinguished Name", or DN, from the login name. This will often mean performing a search in the directory, unless the exact mapping of usernames to DNs is known in advance. So a user might enter the name "joe" when logging in, but the actual name used to authenticate to LDAP will be the full DN, such as`uid=joe,ou=users,dc=springsource,dc=com`.
- Authenticating the user, either by "binding" as that user or by performing a remote "compare" operation of the user’s password against the password attribute in the directory entry for the DN.
- Loading the list of authorities for the user.
The exception is when the LDAP directory is just being used to retrieve user information and authenticate against it locally. This may not be possible as directories are often set up with limited read access for attributes such as user passwords.
We will look at some configuration scenarios below. For full information on available configuration options, please consult the security namespace schema (information from which should be available in your XML editor).
The first thing you need to do is configure the server against which authentication should take place. This is done using the <ldap-server> element from the security namespace. This can be configured to point at an external LDAP server, using the url attribute:
<ldap-server url="ldap://springframework.org:389/dc=springframework,dc=org" />
The <ldap-server> element can also be used to create an embedded server, which can be very useful for testing and demonstrations. In this case you use it without the url attribute:
<ldap-server root="dc=springframework,dc=org"/>
Here we’ve specified that the root DIT of the directory should be "dc=springframework,dc=org", which is the default. Used this way, the namespace parser will create an embedded Apache Directory server and scan the classpath for any LDIF files, which it will attempt to load into the server. You can customize this behaviour using the ldif attribute, which defines an LDIF resource to be loaded:
<ldap-server ldif="classpath:users.ldif" />
This makes it a lot easier to get up and running with LDAP, since it can be inconvenient to work all the time with an external server. It also insulates the user from the complex bean configuration needed to wire up an Apache Directory server. Using plain Spring Beans the configuration would be much more cluttered. You must have the necessary Apache Directory dependency jars available for your application to use. These can be obtained from the LDAP sample application.
This is the most common LDAP authentication scenario.
<ldap-authentication-provider user-dn-pattern="uid={0},ou=people"/>
This simple example would obtain the DN for the user by substituting the user login name in the supplied pattern and attempting to bind as that user with the login password. This is OK if all your users are stored under a single node in the directory. If instead you wished to configure an LDAP search filter to locate the user, you could use the following:
<ldap-authentication-provider user-search-filter="(uid={0})" user-search-base="ou=people"/>
If used with the server definition above, this would perform a search under the DN ou=people,dc=springframework,dc=org using the value of the user-search-filter attribute as a filter. Again the user login name is substituted for the parameter in the filter name, so it will search for an entry with the uid attribute equal to the user name. If user-search-base isn’t supplied, the search will be performed from the root.
How authorities are loaded from groups in the LDAP directory is controlled by the following attributes.
-
group-search-base. Defines the part of the directory tree under which group searches should be performed. -
group-role-attribute. The attribute which contains the name of the authority defined by the group entry. Defaults to`cn` -
group-search-filter. The filter which is used to search for group membership. The default is`uniqueMember={0}`, corresponding to thegroupOfUniqueNamesLDAP class [19]. In this case, the substituted parameter is the full distinguished name of the user. The parameter{1}can be used if you want to filter on the login name.
So if we used the following configuration
<ldap-authentication-provider user-dn-pattern="uid={0},ou=people" group-search-base="ou=groups" />
and authenticated successfully as user "ben", the subsequent loading of authorities would perform a search under the directory entry`ou=groups,dc=springframework,dc=org`, looking for entries which contain the attribute uniqueMember with value uid=ben,ou=people,dc=springframework,dc=org. By default the authority names will have the prefix ROLE_ prepended. You can change this using the role-prefix attribute. If you don’t want any prefix, use role-prefix="none". For more information on loading authorities, see the Javadoc for the DefaultLdapAuthoritiesPopulator class.
The namespace configuration options we’ve used above are simple to use and much more concise than using Spring beans explicitly. There are situations when you may need to know how to configure Spring Security LDAP directly in your application context. You may wish to customize the behaviour of some of the classes, for example. If you’re happy using namespace configuration then you can skip this section and the next one.
The main LDAP provider class, LdapAuthenticationProvider, doesn’t actually do much itself but delegates the work to two other beans, an LdapAuthenticator and an LdapAuthoritiesPopulator which are responsible for authenticating the user and retrieving the user’s set of GrantedAuthority s respectively.
The authenticator is also responsible for retrieving any required user attributes. This is because the permissions on the attributes may depend on the type of authentication being used. For example, if binding as the user, it may be necessary to read them with the user’s own permissions.
There are currently two authentication strategies supplied with Spring Security:
- Authentication directly to the LDAP server ("bind" authentication).
- Password comparison, where the password supplied by the user is compared with the one stored in the repository. This can either be done by retrieving the value of the password attribute and checking it locally or by performing an LDAP "compare" operation, where the supplied password is passed to the server for comparison and the real password value is never retrieved.
Before it is possible to authenticate a user (by either strategy), the distinguished name (DN) has to be obtained from the login name supplied to the application. This can be done either by simple pattern-matching (by setting the setUserDnPatterns array property) or by setting the userSearch property. For the DN pattern-matching approach, a standard Java pattern format is used, and the login name will be substituted for the parameter {0}. The pattern should be relative to the DN that the configured SpringSecurityContextSource will bind to (see the section on connecting to the LDAP server for more information on this). For example, if you are using an LDAP server with the URL`ldap://monkeymachine.co.uk/dc=springframework,dc=org`, and have a pattern uid={0},ou=greatapes, then a login name of "gorilla" will map to a DN`uid=gorilla,ou=greatapes,dc=springframework,dc=org`. Each configured DN pattern will be tried in turn until a match is found. For information on using a search, see the section on search objects below. A combination of the two approaches can also be used - the patterns will be checked first and if no matching DN is found, the search will be used.
The class BindAuthenticator in the package org.springframework.security.ldap.authentication implements the bind authentication strategy. It simply attempts to bind as the user.
The beans discussed above have to be able to connect to the server. They both have to be supplied with a SpringSecurityContextSource which is an extension of Spring LDAP’s ContextSource. Unless you have special requirements, you will usually configure a DefaultSpringSecurityContextSource bean, which can be configured with the URL of your LDAP server and optionally with the username and password of a "manager" user which will be used by default when binding to the server (instead of binding anonymously). For more information read the Javadoc for this class and for Spring LDAP’s AbstractContextSource.
Often a more complicated strategy than simple DN-matching is required to locate a user entry in the directory. This can be encapsulated in an LdapUserSearch instance which can be supplied to the authenticator implementations, for example, to allow them to locate a user. The supplied implementation is FilterBasedLdapUserSearch.
This bean uses an LDAP filter to match the user object in the directory. The process is explained in the Javadoc for the corresponding search method on the JDK DirContext class. As explained there, the search filter can be supplied with parameters. For this class, the only valid parameter is {0} which will be replaced with the user’s login name.
After authenticating the user successfully, the LdapAuthenticationProvider will attempt to load a set of authorities for the user by calling the configured LdapAuthoritiesPopulator bean. The DefaultLdapAuthoritiesPopulator is an implementation which will load the authorities by searching the directory for groups of which the user is a member (typically these will be groupOfNames or groupOfUniqueNames entries in the directory). Consult the Javadoc for this class for more details on how it works.
If you want to use LDAP only for authentication, but load the authorities from a difference source (such as a database) then you can provide your own implementation of this interface and inject that instead.
A typical configuration, using some of the beans we’ve discussed here, might look like this:
<bean id="contextSource" class="org.springframework.security.ldap.DefaultSpringSecurityContextSource"> <constructor-arg value="ldap://monkeymachine:389/dc=springframework,dc=org"/> <property name="userDn" value="cn=manager,dc=springframework,dc=org"/> <property name="password" value="password"/> </bean> <bean id="ldapAuthProvider" class="org.springframework.security.ldap.authentication.LdapAuthenticationProvider"> <constructor-arg> <bean class="org.springframework.security.ldap.authentication.BindAuthenticator"> <constructor-arg ref="contextSource"/> <property name="userDnPatterns"> <list><value>uid={0},ou=people</value></list> </property> </bean> </constructor-arg> <constructor-arg> <bean class="org.springframework.security.ldap.userdetails.DefaultLdapAuthoritiesPopulator"> <constructor-arg ref="contextSource"/> <constructor-arg value="ou=groups"/> <property name="groupRoleAttribute" value="ou"/> </bean> </constructor-arg> </bean>
This would set up the provider to access an LDAP server with URL ldap://monkeymachine:389/dc=springframework,dc=org. Authentication will be performed by attempting to bind with the DN`uid=<user-login-name>,ou=people,dc=springframework,dc=org`. After successful authentication, roles will be assigned to the user by searching under the DN ou=groups,dc=springframework,dc=org with the default filter (member=<user’s-DN>). The role name will be taken from the "ou" attribute of each match.
To configure a user search object, which uses the filter (uid=<user-login-name>) for use instead of the DN-pattern (or in addition to it), you would configure the following bean
<bean id="userSearch" class="org.springframework.security.ldap.search.FilterBasedLdapUserSearch"> <constructor-arg index="0" value=""/> <constructor-arg index="1" value="(uid={0})"/> <constructor-arg index="2" ref="contextSource" /> </bean>
and use it by setting the BindAuthenticator bean’s userSearch property. The authenticator would then call the search object to obtain the correct user’s DN before attempting to bind as this user.
The net result of an authentication using LdapAuthenticationProvider is the same as a normal Spring Security authentication using the standard UserDetailsService interface. A UserDetails object is created and stored in the returned Authentication object. As with using a UserDetailsService, a common requirement is to be able to customize this implementation and add extra properties. When using LDAP, these will normally be attributes from the user entry. The creation of the UserDetails object is controlled by the provider’s UserDetailsContextMapper strategy, which is responsible for mapping user objects to and from LDAP context data:
public interface UserDetailsContextMapper { UserDetails mapUserFromContext(DirContextOperations ctx, String username, Collection<GrantedAuthority> authorities); void mapUserToContext(UserDetails user, DirContextAdapter ctx); }
Only the first method is relevant for authentication. If you provide an implementation of this interface and inject it into the LdapAuthenticationProvider, you have control over exactly how the UserDetails object is created. The first parameter is an instance of Spring LDAP’s DirContextOperations which gives you access to the LDAP attributes which were loaded during authentication. the username parameter is the name used to authenticate and the final parameter is the collection of authorities loaded for the user by the configured`LdapAuthoritiesPopulator`.
The way the context data is loaded varies slightly depending on the type of authentication you are using. With the BindAuthenticator, the context returned from the bind operation will be used to read the attributes, otherwise the data will be read using the standard context obtained from the configured ContextSource (when a search is configured to locate the user, this will be the data returned by the search object).
Active Directory supports its own non-standard authentication options, and the normal usage pattern doesn’t fit too cleanly with the standard LdapAuthenticationProvider. Typically authentication is performed using the domain username (in the form user@domain), rather than using an LDAP distinguished name. To make this easier, Spring Security 3.1 has an authentication provider which is customized for a typical Active Directory setup.
Configuring ActiveDirectoryLdapAuthenticationProvider is quite straightforward. You just need to supply the domain name and an LDAP URL supplying the address of the server [20]. An example configuration would then look like this:
<bean id="adAuthenticationProvider" class="org.springframework.security.ldap.authentication.ad.ActiveDirectoryLdapAuthenticationProvider"> <constructor-arg value="mydomain.com" /> <constructor-arg value="ldap://adserver.mydomain.com/" /> </bean> }
Note that there is no need to specify a separate ContextSource in order to define the server location - the bean is completely self-contained. A user named "Sharon", for example, would then be able to authenticate by entering either the username sharon or the full Active Directory userPrincipalName, namely [email protected]. The user’s directory entry will then be located, and the attributes returned for possible use in customizing the created UserDetails object (a UserDetailsContextMapper can be injected for this purpose, as described above). All interaction with the directory takes place with the identity of the user themselves. There is no concept of a "manager" user.
By default, the user authorities are obtained from the memberOf attribute values of the user entry. The authorities allocated to the user can again be customized using a UserDetailsContextMapper. You can also inject a GrantedAuthoritiesMapper into the provider instance to control the authorities which end up in the Authentication object.
By default, a failed result will cause a standard Spring Security BadCredentialsException. If you set the property convertSubErrorCodesToExceptions to true, the exception messages will be parsed to attempt to extract the Active Directory-specific error code and raise a more specific exception. Check the class Javadoc for more information.
Spring Security has its own taglib which provides basic support for accessing security information and applying security constraints in JSPs.
To use any of the tags, you must have the security taglib declared in your JSP:
<%@ taglib prefix="sec" uri="http://www.springframework.org/security/tags" %>
This tag is used to determine whether its contents should be evaluated or not. In Spring Security 3.0, it can be used in two ways [21]. The first approach uses a web-security expression, specified in the access attribute of the tag. The expression evaluation will be delegated to the SecurityExpressionHandler<FilterInvocation> defined in the application context (you should have web expressions enabled in your <http> namespace configuration to make sure this service is available). So, for example, you might have
<sec:authorize access="hasRole('supervisor')"> This content will only be visible to users who have the "supervisor" authority in their list of <tt>GrantedAuthority</tt>s. </sec:authorize>
When used in conjuction with Spring Security’s PermissionEvaluator, the tag can also be used to check permissions. For example:
<sec:authorize access="hasPermission(#domain,'read') or hasPermission(#domain,'write')"> This content will only be visible to users who have read or write permission to the Object found as a request attribute named "domain". </sec:authorize>
A common requirement is to only show a particular link, if the user is actually allowed to click it. How can we determine in advance whether something will be allowed? This tag can also operate in an alternative mode which allows you to define a particular URL as an attribute. If the user is allowed to invoke that URL, then the tag body will be evaluated, otherwise it will be skipped. So you might have something like
<sec:authorize url="/admin"> This content will only be visible to users who are authorized to send requests to the "/admin" URL. </sec:authorize>
To use this tag there must also be an instance of WebInvocationPrivilegeEvaluator in your application context. If you are using the namespace, one will automatically be registered. This is an instance of DefaultWebInvocationPrivilegeEvaluator, which creates a dummy web request for the supplied URL and invokes the security interceptor to see whether the request would succeed or fail. This allows you to delegate to the access-control setup you defined using intercept-url declarations within the <http> namespace configuration and saves having to duplicate the information (such as the required roles) within your JSPs. This approach can also be combined with a method attribute, supplying the HTTP method, for a more specific match.
The boolean result of evaluating the tag (whether it grants or denies access) can be stored in a page context scope variable by setting the var attribute to the variable name, avoiding the need for duplicating and re-evaluating the condition at other points in the page.
Hiding a link in a page for unauthorized users doesn’t prevent them from accessing the URL. They could just type it into their browser directly, for example. As part of your testing process, you may want to reveal the hidden areas in order to check that links really are secured at the back end. If you set the system property spring.security.disableUISecurity to true, the authorize tag will still run but will not hide its contents. By default it will also surround the content with <span class="securityHiddenUI">…</span> tags. This allows you to display "hidden" content with a particular CSS style such as a different background colour. Try running the "tutorial" sample application with this property enabled, for example.
You can also set the properties spring.security.securedUIPrefix and spring.security.securedUISuffix if you want to change surrounding text from the default span tags (or use empty strings to remove it completely).
This tag allows access to the current Authentication object stored in the security context. It renders a property of the object directly in the JSP. So, for example, if the principal property of the Authentication is an instance of Spring Security’s UserDetails object, then using <sec:authentication property="principal.username" /> will render the name of the current user.
Of course, it isn’t necessary to use JSP tags for this kind of thing and some people prefer to keep as little logic as possible in the view. You can access the Authentication object in your MVC controller (by calling SecurityContextHolder.getContext().getAuthentication()) and add the data directly to your model for rendering by the view.
This tag is only valid when used with Spring Security’s ACL module. It checks a comma-separated list of required permissions for a specified domain object. If the current user has all of those permissions, then the tag body will be evaluated. If they don’t, it will be skipped. An example might be
![[Caution]](images/caution.png) | Caution |
|---|---|
|
In general this tag should be considered deprecated. Instead use the Section 27.2, “The authorize Tag”. |
<sec:accesscontrollist hasPermission="1,2" domainObject="${someObject}"> This will be shown if the user has all of the permissions represented by the values "1" or "2" on the given object. </sec:accesscontrollist>
The permissions are passed to the PermissionFactory defined in the application context, converting them to ACL Permission instances, so they may be any format which is supported by the factory - they don’t have to be integers, they could be strings like READ or WRITE. If no PermissionFactory is found, an instance of DefaultPermissionFactory will be used. The AclService from the application context will be used to load the Acl instance for the supplied object. The Acl will be invoked with the required permissions to check if all of them are granted.
This tag also supports the var attribute, in the same way as the authorize tag.
If CSRF protection is enabled, this tag inserts a hidden form field with the correct name and value for the CSRF protection token. If CSRF protection is not enabled, this tag outputs nothing.
Normally Spring Security automatically inserts a CSRF form field for any <form:form> tags you use, but if for some reason you cannot use <form:form>, csrfInput is a handy replacement.
You should place this tag within an HTML <form></form> block, where you would normally place other input fields. Do NOT place this tag within a Spring <form:form></form:form> block—Spring Security handles Spring forms automatically.
<form method="post" action="/do/something"> <sec:csrfInput /> Name:<br /> <input type="text" name="name" /> ... </form>
If CSRF protection is enabled, this tag inserts meta tags containing the CSRF protection token form field and header names and CSRF protection token value. These meta tags are useful for employing CSRF protection within JavaScript in your applications.
You should place csrfMetaTags within an HTML <head></head> block, where you would normally place other meta tags. Once you use this tag, you can access the form field name, header name, and token value easily using JavaScript. JQuery is used in this example to make the task easier.
<!DOCTYPE html> <html> <head> <title>CSRF Protected JavaScript Page</title> <meta name="description" content="This is the description for this page" /> <sec:csrfMetaTags /> <script type="text/javascript" language="javascript"> var csrfParameter = $("meta[name='_csrf_parameter']").attr("content"); var csrfHeader = $("meta[name='_csrf_header']").attr("content"); var csrfToken = $("meta[name='_csrf']").attr("content"); // using XMLHttpRequest directly to send an x-www-form-urlencoded request var ajax = new XMLHttpRequest(); ajax.open("POST", "http://www.example.org/do/something", true); ajax.setRequestHeader("Content-Type", "application/x-www-form-urlencoded data"); ajax.send(csrfParameter + "=" + csrfToken + "&name=John&..."); // using XMLHttpRequest directly to send a non-x-www-form-urlencoded request var ajax = new XMLHttpRequest(); ajax.open("POST", "http://www.example.org/do/something", true); ajax.setRequestHeader(csrfHeader, csrfToken); ajax.send("..."); // using JQuery to send an x-www-form-urlencoded request var data = {}; data[csrfParameter] = csrfToken; data["name"] = "John"; ... $.ajax({ url: "http://www.example.org/do/something", type: "POST", data: data, ... }); // using JQuery to send a non-x-www-form-urlencoded request var headers = {}; headers[csrfHeader] = csrfToken; $.ajax({ url: "http://www.example.org/do/something", type: "POST", headers: headers, ... }); <script> </head> <body> ... </body> </html>
If CSRF protection is not enabled, csrfMetaTags outputs nothing.
Spring Security provides a package able to delegate authentication requests to the Java Authentication and Authorization Service (JAAS). This package is discussed in detail below.
The AbstractJaasAuthenticationProvider is the basis for the provided JAAS AuthenticationProvider implementations. Subclasses must implement a method that creates the LoginContext. The AbstractJaasAuthenticationProvider has a number of dependencies that can be injected into it that are discussed below.
Most JAAS LoginModule s require a callback of some sort. These callbacks are usually used to obtain the username and password from the user.
In a Spring Security deployment, Spring Security is responsible for this user interaction (via the authentication mechanism). Thus, by the time the authentication request is delegated through to JAAS, Spring Security’s authentication mechanism will already have fully-populated an Authentication object containing all the information required by the JAAS LoginModule.
Therefore, the JAAS package for Spring Security provides two default callback handlers, JaasNameCallbackHandler and JaasPasswordCallbackHandler. Each of these callback handlers implement JaasAuthenticationCallbackHandler. In most cases these callback handlers can simply be used without understanding the internal mechanics.
For those needing full control over the callback behavior, internally AbstractJaasAuthenticationProvider wraps these JaasAuthenticationCallbackHandler s with an InternalCallbackHandler. The InternalCallbackHandler is the class that actually implements JAAS normal CallbackHandler interface. Any time that the JAAS LoginModule is used, it is passed a list of application context configured InternalCallbackHandler s. If the LoginModule requests a callback against the InternalCallbackHandler s, the callback is in-turn passed to the JaasAuthenticationCallbackHandler s being wrapped.
JAAS works with principals. Even "roles" are represented as principals in JAAS. Spring Security, on the other hand, works with Authentication objects. Each Authentication object contains a single principal, and multiple GrantedAuthority s. To facilitate mapping between these different concepts, Spring Security’s JAAS package includes an AuthorityGranter interface.
An AuthorityGranter is responsible for inspecting a JAAS principal and returning a set of String s, representing the authorities assigned to the principal. For each returned authority string, the AbstractJaasAuthenticationProvider creates a JaasGrantedAuthority (which implements Spring Security’s GrantedAuthority interface) containing the authority string and the JAAS principal that the AuthorityGranter was passed. The AbstractJaasAuthenticationProvider obtains the JAAS principals by firstly successfully authenticating the user’s credentials using the JAAS LoginModule, and then accessing the LoginContext it returns. A call to LoginContext.getSubject().getPrincipals() is made, with each resulting principal passed to each AuthorityGranter defined against the AbstractJaasAuthenticationProvider.setAuthorityGranters(List) property.
Spring Security does not include any production AuthorityGranter s given that every JAAS principal has an implementation-specific meaning. However, there is a TestAuthorityGranter in the unit tests that demonstrates a simple AuthorityGranter implementation.
The DefaultJaasAuthenticationProvider allows a JAAS Configuration object to be injected into it as a dependency. It then creates a LoginContext using the injected JAAS Configuration. This means that DefaultJaasAuthenticationProvider is not bound any particular implementation of Configuration as JaasAuthenticationProvider is.
In order to make it easy to inject a Configuration into DefaultJaasAuthenticationProvider, a default in memory implementation named InMemoryConfiguration is provided. The implementation constructor accepts a Map where each key represents a login configuration name and the value represents an Array of AppConfigurationEntry s. InMemoryConfiguration also supports a default Array of AppConfigurationEntry objects that will be used if no mapping is found within the provided Map. For details, refer to the class level javadoc of InMemoryConfiguration.
While the Spring configuration for InMemoryConfiguration can be more verbose than the standarad JAAS configuration files, using it in conjuction with DefaultJaasAuthenticationProvider is more flexible than JaasAuthenticationProvider since it not dependant on the default Configuration implementation.
An example configuration of DefaultJaasAuthenticationProvider using InMemoryConfiguration is provided below. Note that custom implementations of Configuration can easily be injected into DefaultJaasAuthenticationProvider as well.
<bean id="jaasAuthProvider" class="org.springframework.security.authentication.jaas.DefaultJaasAuthenticationProvider"> <property name="configuration"> <bean class="org.springframework.security.authentication.jaas.memory.InMemoryConfiguration"> <constructor-arg> <map> <!-- SPRINGSECURITY is the default loginContextName for AbstractJaasAuthenticationProvider --> <entry key="SPRINGSECURITY"> <array> <bean class="javax.security.auth.login.AppConfigurationEntry"> <constructor-arg value="sample.SampleLoginModule" /> <constructor-arg> <util:constant static-field= "javax.security.auth.login.AppConfigurationEntry$LoginModuleControlFlag.REQUIRED"/> </constructor-arg> <constructor-arg> <map></map> </constructor-arg> </bean> </array> </entry> </map> </constructor-arg> </bean> </property> <property name="authorityGranters"> <list> <!-- You will need to write your own implementation of AuthorityGranter --> <bean class="org.springframework.security.authentication.jaas.TestAuthorityGranter"/> </list> </property> </bean>
The JaasAuthenticationProvider assumes the default Configuration is an instance of ConfigFile. This assumption is made in order to attempt to update the Configuration. The JaasAuthenticationProvider then uses the default Configuration to create the LoginContext.
Let’s assume we have a JAAS login configuration file, /WEB-INF/login.conf, with the following contents:
JAASTest {
sample.SampleLoginModule required;
};
Like all Spring Security beans, the JaasAuthenticationProvider is configured via the application context. The following definitions would correspond to the above JAAS login configuration file:
<bean id="jaasAuthenticationProvider" class="org.springframework.security.authentication.jaas.JaasAuthenticationProvider"> <property name="loginConfig" value="/WEB-INF/login.conf"/> <property name="loginContextName" value="JAASTest"/> <property name="callbackHandlers"> <list> <bean class="org.springframework.security.authentication.jaas.JaasNameCallbackHandler"/> <bean class="org.springframework.security.authentication.jaas.JaasPasswordCallbackHandler"/> </list> </property> <property name="authorityGranters"> <list> <bean class="org.springframework.security.authentication.jaas.TestAuthorityGranter"/> </list> </property> </bean>
If configured, the JaasApiIntegrationFilter will attempt to run as the Subject on the JaasAuthenticationToken. This means that the Subject can be accessed using:
Subject subject = Subject.getSubject(AccessController.getContext());
This integration can easily be configured using the jaas-api-provision attribute. This feature is useful when integrating with legacy or external API’s that rely on the JAAS Subject being populated.
JA-SIG produces an enterprise-wide single sign on system known as CAS. Unlike other initiatives, JA-SIG’s Central Authentication Service is open source, widely used, simple to understand, platform independent, and supports proxy capabilities. Spring Security fully supports CAS, and provides an easy migration path from single-application deployments of Spring Security through to multiple-application deployments secured by an enterprise-wide CAS server.
You can learn more about CAS at http://www.ja-sig.org/cas. You will also need to visit this site to download the CAS Server files.
Whilst the CAS web site contains documents that detail the architecture of CAS, we present the general overview again here within the context of Spring Security. Spring Security 3.x supports CAS 3. At the time of writing, the CAS server was at version 3.4.
Somewhere in your enterprise you will need to setup a CAS server. The CAS server is simply a standard WAR file, so there isn’t anything difficult about setting up your server. Inside the WAR file you will customise the login and other single sign on pages displayed to users.
When deploying a CAS 3.4 server, you will also need to specify an AuthenticationHandler in the deployerConfigContext.xml included with CAS. The AuthenticationHandler has a simple method that returns a boolean as to whether a given set of Credentials is valid. Your AuthenticationHandler implementation will need to link into some type of backend authentication repository, such as an LDAP server or database. CAS itself includes numerous AuthenticationHandler s out of the box to assist with this. When you download and deploy the server war file, it is set up to successfully authenticate users who enter a password matching their username, which is useful for testing.
Apart from the CAS server itself, the other key players are of course the secure web applications deployed throughout your enterprise. These web applications are known as "services". There are three types of services. Those that authenticate service tickets, those that can obtain proxy tickets, and those that authenticate proxy tickets. Authenticating a proxy ticket differs because the list of proxies must be validated and often times a proxy ticket can be reused.
The basic interaction between a web browser, CAS server and a Spring Security-secured service is as follows:
- The web user is browsing the service’s public pages. CAS or Spring Security is not involved.
-
The user eventually requests a page that is either secure or one of the beans it uses is secure. Spring Security’s
ExceptionTranslationFilterwill detect theAccessDeniedExceptionorAuthenticationException. -
Because the user’s
Authenticationobject (or lack thereof) caused anAuthenticationException, theExceptionTranslationFilterwill call the configuredAuthenticationEntryPoint. If using CAS, this will be theCasAuthenticationEntryPointclass. -
The
CasAuthenticationEntryPointwill redirect the user’s browser to the CAS server. It will also indicate aserviceparameter, which is the callback URL for the Spring Security service (your application). For example, the URL to which the browser is redirected might be https://my.company.com/cas/login?service=https%3A%2F%2Fserver3.company.com%2Fwebapp%2Flogin/cas. -
After the user’s browser redirects to CAS, they will be prompted for their username and password. If the user presents a session cookie which indicates they’ve previously logged on, they will not be prompted to login again (there is an exception to this procedure, which we’ll cover later). CAS will use the
PasswordHandler(orAuthenticationHandlerif using CAS 3.0) discussed above to decide whether the username and password is valid. -
Upon successful login, CAS will redirect the user’s browser back to the original service. It will also include a
ticketparameter, which is an opaque string representing the "service ticket". Continuing our earlier example, the URL the browser is redirected to might be https://server3.company.com/webapp/login/cas?ticket=ST-0-ER94xMJmn6pha35CQRoZ. -
Back in the service web application, the
CasAuthenticationFilteris always listening for requests to/login/cas(this is configurable, but we’ll use the defaults in this introduction). The processing filter will construct aUsernamePasswordAuthenticationTokenrepresenting the service ticket. The principal will be equal toCasAuthenticationFilter.CAS_STATEFUL_IDENTIFIER, whilst the credentials will be the service ticket opaque value. This authentication request will then be handed to the configuredAuthenticationManager. -
The
AuthenticationManagerimplementation will be theProviderManager, which is in turn configured with theCasAuthenticationProvider. TheCasAuthenticationProvideronly responds toUsernamePasswordAuthenticationTokens containing the CAS-specific principal (such asCasAuthenticationFilter.CAS_STATEFUL_IDENTIFIER) andCasAuthenticationTokens (discussed later). -
CasAuthenticationProviderwill validate the service ticket using aTicketValidatorimplementation. This will typically be aCas20ServiceTicketValidatorwhich is one of the classes included in the CAS client library. In the event the application needs to validate proxy tickets, theCas20ProxyTicketValidatoris used. TheTicketValidatormakes an HTTPS request to the CAS server in order to validate the service ticket. It may also include a proxy callback URL, which is included in this example: https://my.company.com/cas/proxyValidate?service=https%3A%2F%2Fserver3.company.com%2Fwebapp%2Flogin/cas&ticket=ST-0-ER94xMJmn6pha35CQRoZ&pgtUrl=https://server3.company.com/webapp/login/cas/proxyreceptor. - Back on the CAS server, the validation request will be received. If the presented service ticket matches the service URL the ticket was issued to, CAS will provide an affirmative response in XML indicating the username. If any proxy was involved in the authentication (discussed below), the list of proxies is also included in the XML response.
-
[OPTIONAL] If the request to the CAS validation service included the proxy callback URL (in the
pgtUrlparameter), CAS will include apgtIoustring in the XML response. ThispgtIourepresents a proxy-granting ticket IOU. The CAS server will then create its own HTTPS connection back to thepgtUrl. This is to mutually authenticate the CAS server and the claimed service URL. The HTTPS connection will be used to send a proxy granting ticket to the original web application. For example, https://server3.company.com/webapp/login/cas/proxyreceptor?pgtIou=PGTIOU-0-R0zlgrl4pdAQwBvJWO3vnNpevwqStbSGcq3vKB2SqSFFRnjPHt&pgtId=PGT-1-si9YkkHLrtACBo64rmsi3v2nf7cpCResXg5MpESZFArbaZiOKH. -
The
Cas20TicketValidatorwill parse the XML received from the CAS server. It will return to theCasAuthenticationProvideraTicketResponse, which includes the username (mandatory), proxy list (if any were involved), and proxy-granting ticket IOU (if the proxy callback was requested). -
Next
CasAuthenticationProviderwill call a configuredCasProxyDecider. TheCasProxyDeciderindicates whether the proxy list in theTicketResponseis acceptable to the service. Several implementations are provided with Spring Security:RejectProxyTickets,AcceptAnyCasProxyandNamedCasProxyDecider. These names are largely self-explanatory, exceptNamedCasProxyDeciderwhich allows aListof trusted proxies to be provided. -
CasAuthenticationProviderwill next request aAuthenticationUserDetailsServiceto load theGrantedAuthorityobjects that apply to the user contained in theAssertion. -
If there were no problems,
CasAuthenticationProviderconstructs aCasAuthenticationTokenincluding the details contained in theTicketResponseand the `GrantedAuthority`s. -
Control then returns to
CasAuthenticationFilter, which places the createdCasAuthenticationTokenin the security context. -
The user’s browser is redirected to the original page that caused the
AuthenticationException(or a custom destination depending on the configuration).
It’s good that you’re still here! Let’s now look at how this is configured
The web application side of CAS is made easy due to Spring Security. It is assumed you already know the basics of using Spring Security, so these are not covered again below. We’ll assume a namespace based configuration is being used and add in the CAS beans as required. Each section builds upon the previous section. A fullCAS sample application can be found in the Spring Security Samples.
This section describes how to setup Spring Security to authenticate Service Tickets. Often times this is all a web application requires. You will need to add a ServiceProperties bean to your application context. This represents your CAS service:
<bean id="serviceProperties" class="org.springframework.security.cas.ServiceProperties"> <property name="service" value="https://localhost:8443/cas-sample/login/cas"/> <property name="sendRenew" value="false"/> </bean>
The service must equal a URL that will be monitored by the CasAuthenticationFilter. The sendRenew defaults to false, but should be set to true if your application is particularly sensitive. What this parameter does is tell the CAS login service that a single sign on login is unacceptable. Instead, the user will need to re-enter their username and password in order to gain access to the service.
The following beans should be configured to commence the CAS authentication process (assuming you’re using a namespace configuration):
<security:http entry-point-ref="casEntryPoint"> ... <security:custom-filter position="CAS_FILTER" ref="casFilter" /> </security:http> <bean id="casFilter" class="org.springframework.security.cas.web.CasAuthenticationFilter"> <property name="authenticationManager" ref="authenticationManager"/> </bean> <bean id="casEntryPoint" class="org.springframework.security.cas.web.CasAuthenticationEntryPoint"> <property name="loginUrl" value="https://localhost:9443/cas/login"/> <property name="serviceProperties" ref="serviceProperties"/> </bean>
For CAS to operate, the ExceptionTranslationFilter must have its authenticationEntryPoint property set to the CasAuthenticationEntryPoint bean. This can easily be done using entry-point-ref as is done in the example above. The CasAuthenticationEntryPoint must refer to the ServiceProperties bean (discussed above), which provides the URL to the enterprise’s CAS login server. This is where the user’s browser will be redirected.
The CasAuthenticationFilter has very similar properties to the UsernamePasswordAuthenticationFilter (used for form-based logins). You can use these properties to customize things like behavior for authentication success and failure.
Next you need to add a CasAuthenticationProvider and its collaborators:
<security:authentication-manager alias="authenticationManager"> <security:authentication-provider ref="casAuthenticationProvider" /> </security:authentication-manager> <bean id="casAuthenticationProvider" class="org.springframework.security.cas.authentication.CasAuthenticationProvider"> <property name="authenticationUserDetailsService"> <bean class="org.springframework.security.core.userdetails.UserDetailsByNameServiceWrapper"> <constructor-arg ref="userService" /> </bean> </property> <property name="serviceProperties" ref="serviceProperties" /> <property name="ticketValidator"> <bean class="org.jasig.cas.client.validation.Cas20ServiceTicketValidator"> <constructor-arg index="0" value="https://localhost:9443/cas" /> </bean> </property> <property name="key" value="an_id_for_this_auth_provider_only"/> </bean> <security:user-service id="userService"> <security:user name="joe" password="joe" authorities="ROLE_USER" /> ... </security:user-service>
The CasAuthenticationProvider uses a UserDetailsService instance to load the authorities for a user, once they have been authenticated by CAS. We’ve shown a simple in-memory setup here. Note that the CasAuthenticationProvider does not actually use the password for authentication, but it does use the authorities.
The beans are all reasonably self-explanatory if you refer back to the How CAS Works section.
This completes the most basic configuration for CAS. If you haven’t made any mistakes, your web application should happily work within the framework of CAS single sign on. No other parts of Spring Security need to be concerned about the fact CAS handled authentication. In the following sections we will discuss some (optional) more advanced configurations.
The CAS protocol supports Single Logout and can be easily added to your Spring Security configuration. Below are updates to the Spring Security configuration that handle Single Logout
<security:http entry-point-ref="casEntryPoint"> ... <security:logout logout-success-url="/cas-logout.jsp"/> <security:custom-filter ref="requestSingleLogoutFilter" before="LOGOUT_FILTER"/> <security:custom-filter ref="singleLogoutFilter" before="CAS_FILTER"/> </security:http> <!-- This filter handles a Single Logout Request from the CAS Server --> <bean id="singleLogoutFilter" class="org.jasig.cas.client.session.SingleSignOutFilter"/> <!-- This filter redirects to the CAS Server to signal Single Logout should be performed --> <bean id="requestSingleLogoutFilter" class="org.springframework.security.web.authentication.logout.LogoutFilter"> <constructor-arg value="https://localhost:9443/cas/logout"/> <constructor-arg> <bean class= "org.springframework.security.web.authentication.logout.SecurityContextLogoutHandler"/> </constructor-arg> <property name="filterProcessesUrl" value="/logout/cas"/> </bean>
The logout element logs the user out of the local application, but does not terminate the session with the CAS server or any other applications that have been logged into. The requestSingleLogoutFilter filter will allow the url of /spring_security_cas_logout to be requested to redirect the application to the configured CAS Server logout url. Then the CAS Server will send a Single Logout request to all the services that were signed into. The singleLogoutFilter handles the Single Logout request by looking up the HttpSession in a static Map and then invalidating it.
It might be confusing why both the logout element and the singleLogoutFilter are needed. It is considered best practice to logout locally first since the SingleSignOutFilter just stores the HttpSession in a static Map in order to call invalidate on it. With the configuration above, the flow of logout would be:
-
The user requests
/logoutwhich would log the user out of the local application and send the user to the logout success page. -
The logout success page,
/cas-logout.jsp, should instruct the user to click a link pointing to/logout/casin order to logout out of all applications. - When the user clicks the link, the user is redirected to the CAS single logout URL (https://localhost:9443/cas/logout).
-
On the CAS Server side, the CAS single logout URL then submits single logout requests to all the CAS Services. On the CAS Service side, JASIG’s
SingleSignOutFilterprocesses the logout request by invaliditing the original session.
The next step is to add the following to your web.xml
<filter> <filter-name>characterEncodingFilter</filter-name> <filter-class> org.springframework.web.filter.CharacterEncodingFilter </filter-class> <init-param> <param-name>encoding</param-name> <param-value>UTF-8</param-value> </init-param> </filter> <filter-mapping> <filter-name>characterEncodingFilter</filter-name> <url-pattern>/*</url-pattern> </filter-mapping> <listener> <listener-class> org.jasig.cas.client.session.SingleSignOutHttpSessionListener </listener-class> </listener>
When using the SingleSignOutFilter you might encounter some encoding issues. Therefore it is recommended to add the CharacterEncodingFilter to ensure that the character encoding is correct when using the SingleSignOutFilter. Again, refer to JASIG’s documentation for details. The SingleSignOutHttpSessionListener ensures that when an HttpSession expires, the mapping used for single logout is removed.
This section describes how to authenticate to a service using CAS. In other words, this section discusses how to setup a client that uses a service that authenticates with CAS. The next section describes how to setup a stateless service to Authenticate using CAS.
In order to authenticate to a stateless service, the application needs to obtain a proxy granting ticket (PGT). This section describes how to configure Spring Security to obtain a PGT building upon thencas-st[Service Ticket Authentication] configuration.
The first step is to include a ProxyGrantingTicketStorage in your Spring Security configuration. This is used to store PGT’s that are obtained by the CasAuthenticationFilter so that they can be used to obtain proxy tickets. An example configuration is shown below
<!-- NOTE: In a real application you should not use an in memory implementation. You will also want to ensure to clean up expired tickets by calling ProxyGrantingTicketStorage.cleanup() --> <bean id="pgtStorage" class="org.jasig.cas.client.proxy.ProxyGrantingTicketStorageImpl"/>
The next step is to update the CasAuthenticationProvider to be able to obtain proxy tickets. To do this replace the Cas20ServiceTicketValidator with a Cas20ProxyTicketValidator. The proxyCallbackUrl should be set to a URL that the application will receive PGT’s at. Last, the configuration should also reference the ProxyGrantingTicketStorage so it can use a PGT to obtain proxy tickets. You can find an example of the configuration changes that should be made below.
<bean id="casAuthenticationProvider" class="org.springframework.security.cas.authentication.CasAuthenticationProvider"> ... <property name="ticketValidator"> <bean class="org.jasig.cas.client.validation.Cas20ProxyTicketValidator"> <constructor-arg value="https://localhost:9443/cas"/> <property name="proxyCallbackUrl" value="https://localhost:8443/cas-sample/login/cas/proxyreceptor"/> <property name="proxyGrantingTicketStorage" ref="pgtStorage"/> </bean> </property> </bean>
The last step is to update the CasAuthenticationFilter to accept PGT and to store them in the ProxyGrantingTicketStorage. It is important the the proxyReceptorUrl matches the proxyCallbackUrl of the Cas20ProxyTicketValidator. An example configuration is shown below.
<bean id="casFilter" class="org.springframework.security.cas.web.CasAuthenticationFilter"> ... <property name="proxyGrantingTicketStorage" ref="pgtStorage"/> <property name="proxyReceptorUrl" value="/login/cas/proxyreceptor"/> </bean>
Now that Spring Security obtains PGTs, you can use them to create proxy tickets which can be used to authenticate to a stateless service. The CAS sample application contains a working example in the ProxyTicketSampleServlet. Example code can be found below:
protected void doGet(HttpServletRequest request, HttpServletResponse response) throws ServletException, IOException { // NOTE: The CasAuthenticationToken can also be obtained using // SecurityContextHolder.getContext().getAuthentication() final CasAuthenticationToken token = (CasAuthenticationToken) request.getUserPrincipal(); // proxyTicket could be reused to make calls to the CAS service even if the // target url differs final String proxyTicket = token.getAssertion().getPrincipal().getProxyTicketFor(targetUrl); // Make a remote call using the proxy ticket final String serviceUrl = targetUrl+"?ticket="+URLEncoder.encode(proxyTicket, "UTF-8"); String proxyResponse = CommonUtils.getResponseFromServer(serviceUrl, "UTF-8"); ... }
The CasAuthenticationProvider distinguishes between stateful and stateless clients. A stateful client is considered any that submits to the filterProcessUrl of the CasAuthenticationFilter. A stateless client is any that presents an authentication request to CasAuthenticationFilter on a URL other than the filterProcessUrl.
Because remoting protocols have no way of presenting themselves within the context of an HttpSession, it isn’t possible to rely on the default practice of storing the security context in the session between requests. Furthermore, because the CAS server invalidates a ticket after it has been validated by the TicketValidator, presenting the same proxy ticket on subsequent requests will not work.
One obvious option is to not use CAS at all for remoting protocol clients. However, this would eliminate many of the desirable features of CAS. As a middle-ground, the CasAuthenticationProvider uses a StatelessTicketCache. This is used solely for stateless clients which use a principal equal to CasAuthenticationFilter.CAS_STATELESS_IDENTIFIER. What happens is the CasAuthenticationProvider will store the resulting CasAuthenticationToken in the StatelessTicketCache, keyed on the proxy ticket. Accordingly, remoting protocol clients can present the same proxy ticket and the CasAuthenticationProvider will not need to contact the CAS server for validation (aside from the first request). Once authenticated, the proxy ticket could be used for URLs other than the original target service.
This section builds upon the previous sections to accomodate proxy ticket authentication. The first step is to specify to authenticate all artifacts as shown below.
<bean id="serviceProperties" class="org.springframework.security.cas.ServiceProperties"> ... <property name="authenticateAllArtifacts" value="true"/> </bean>
The next step is to specify serviceProperties and the authenticationDetailsSource for the CasAuthenticationFilter. The serviceProperties property instructs the CasAuthenticationFilter to attempt to authenticate all artifacts instead of only ones present on the filterProcessUrl. The ServiceAuthenticationDetailsSource creates a ServiceAuthenticationDetails that ensures the current URL, based upon the HttpServletRequest, is used as the service URL when validating the ticket. The method for generating the service URL can be customized by injecting a custom AuthenticationDetailsSource that returns a custom ServiceAuthenticationDetails.
<bean id="casFilter" class="org.springframework.security.cas.web.CasAuthenticationFilter"> ... <property name="serviceProperties" ref="serviceProperties"/> <property name="authenticationDetailsSource"> <bean class= "org.springframework.security.cas.web.authentication.ServiceAuthenticationDetailsSource"> <constructor-arg ref="serviceProperties"/> </bean> </property> </bean>
You will also need to update the CasAuthenticationProvider to handle proxy tickets. To do this replace the Cas20ServiceTicketValidator with a Cas20ProxyTicketValidator. You will need to configure the statelessTicketCache and which proxies you want to accept. You can find an example of the updates required to accept all proxies below.
<bean id="casAuthenticationProvider" class="org.springframework.security.cas.authentication.CasAuthenticationProvider"> ... <property name="ticketValidator"> <bean class="org.jasig.cas.client.validation.Cas20ProxyTicketValidator"> <constructor-arg value="https://localhost:9443/cas"/> <property name="acceptAnyProxy" value="true"/> </bean> </property> <property name="statelessTicketCache"> <bean class="org.springframework.security.cas.authentication.EhCacheBasedTicketCache"> <property name="cache"> <bean class="net.sf.ehcache.Cache" init-method="initialise" destroy-method="dispose"> <constructor-arg value="casTickets"/> <constructor-arg value="50"/> <constructor-arg value="true"/> <constructor-arg value="false"/> <constructor-arg value="3600"/> <constructor-arg value="900"/> </bean> </property> </bean> </property> </bean>
The most common use of X.509 certificate authentication is in verifying the identity of a server when using SSL, most commonly when using HTTPS from a browser. The browser will automatically check that the certificate presented by a server has been issued (ie digitally signed) by one of a list of trusted certificate authorities which it maintains.
You can also use SSL with "mutual authentication"; the server will then request a valid certificate from the client as part of the SSL handshake. The server will authenticate the client by checking that its certificate is signed by an acceptable authority. If a valid certificate has been provided, it can be obtained through the servlet API in an application. Spring Security X.509 module extracts the certificate using a filter. It maps the certificate to an application user and loads that user’s set of granted authorities for use with the standard Spring Security infrastructure.
You should be familiar with using certificates and setting up client authentication for your servlet container before attempting to use it with Spring Security. Most of the work is in creating and installing suitable certificates and keys. For example, if you’re using Tomcat then read the instructions here http://tomcat.apache.org/tomcat-6.0-doc/ssl-howto.html. It’s important that you get this working before trying it out with Spring Security
Enabling X.509 client authentication is very straightforward. Just add the <x509/> element to your http security namespace configuration.
<http> ... <x509 subject-principal-regex="CN=(.*?)," user-service-ref="userService"/>; </http>
The element has two optional attributes:
-
subject-principal-regex. The regular expression used to extract a username from the certificate’s subject name. The default value is shown above. This is the username which will be passed to theUserDetailsServiceto load the authorities for the user. -
user-service-ref. This is the bean Id of theUserDetailsServiceto be used with X.509. It isn’t needed if there is only one defined in your application context.
The subject-principal-regex should contain a single group. For example the default expression "CN=(.*?)," matches the common name field. So if the subject name in the certificate is "CN=Jimi Hendrix, OU=…", this will give a user name of "Jimi Hendrix". The matches are case insensitive. So "emailAddress=(.?)," will match "EMAILADDRESS=[email protected],CN=…" giving a user name "[email protected]". If the client presents a certificate and a valid username is successfully extracted, then there should be a valid Authentication object in the security context. If no certificate is found, or no corresponding user could be found then the security context will remain empty. This means that you can easily use X.509 authentication with other options such as a form-based login.
There are some pre-generated certificates in the samples/certificate directory in the Spring Security project. You can use these to enable SSL for testing if you don’t want to generate your own. The file server.jks contains the server certificate, private key and the issuing certificate authority certificate. There are also some client certificate files for the users from the sample applications. You can install these in your browser to enable SSL client authentication.
To run tomcat with SSL support, drop the server.jks file into the tomcat conf directory and add the following connector to the server.xml file
<Connector port="8443" protocol="HTTP/1.1" SSLEnabled="true" scheme="https" secure="true" clientAuth="true" sslProtocol="TLS" keystoreFile="${catalina.home}/conf/server.jks" keystoreType="JKS" keystorePass="password" truststoreFile="${catalina.home}/conf/server.jks" truststoreType="JKS" truststorePass="password" />
clientAuth can also be set to want if you still want SSL connections to succeed even if the client doesn’t provide a certificate. Clients which don’t present a certificate won’t be able to access any objects secured by Spring Security unless you use a non-X.509 authentication mechanism, such as form authentication.
The AbstractSecurityInterceptor is able to temporarily replace the Authentication object in the SecurityContext and SecurityContextHolder during the secure object callback phase. This only occurs if the original Authentication object was successfully processed by the AuthenticationManager and AccessDecisionManager. The RunAsManager will indicate the replacement Authentication object, if any, that should be used during the SecurityInterceptorCallback.
By temporarily replacing the Authentication object during the secure object callback phase, the secured invocation will be able to call other objects which require different authentication and authorization credentials. It will also be able to perform any internal security checks for specific GrantedAuthority objects. Because Spring Security provides a number of helper classes that automatically configure remoting protocols based on the contents of the SecurityContextHolder, these run-as replacements are particularly useful when calling remote web services
A RunAsManager interface is provided by Spring Security:
Authentication buildRunAs(Authentication authentication, Object object, List<ConfigAttribute> config); boolean supports(ConfigAttribute attribute); boolean supports(Class clazz);
The first method returns the Authentication object that should replace the existing Authentication object for the duration of the method invocation. If the method returns null, it indicates no replacement should be made. The second method is used by the AbstractSecurityInterceptor as part of its startup validation of configuration attributes. The supports(Class) method is called by a security interceptor implementation to ensure the configured RunAsManager supports the type of secure object that the security interceptor will present.
One concrete implementation of a RunAsManager is provided with Spring Security. The RunAsManagerImpl class returns a replacement RunAsUserToken if any ConfigAttribute starts with RUN_AS_. If any such ConfigAttribute is found, the replacement RunAsUserToken will contain the same principal, credentials and granted authorities as the original Authentication object, along with a new GrantedAuthorityImpl for each RUN_AS_ ConfigAttribute. Each new GrantedAuthorityImpl will be prefixed with ROLE_, followed by the RUN_AS ConfigAttribute. For example, a RUN_AS_SERVER will result in the replacement RunAsUserToken containing a ROLE_RUN_AS_SERVER granted authority.
The replacement RunAsUserToken is just like any other Authentication object. It needs to be authenticated by the AuthenticationManager, probably via delegation to a suitable AuthenticationProvider. The RunAsImplAuthenticationProvider performs such authentication. It simply accepts as valid any RunAsUserToken presented.
To ensure malicious code does not create a RunAsUserToken and present it for guaranteed acceptance by the RunAsImplAuthenticationProvider, the hash of a key is stored in all generated tokens. The RunAsManagerImpl and RunAsImplAuthenticationProvider is created in the bean context with the same key:
<bean id="runAsManager" class="org.springframework.security.access.intercept.RunAsManagerImpl"> <property name="key" value="my_run_as_password"/> </bean> <bean id="runAsAuthenticationProvider" class="org.springframework.security.access.intercept.RunAsImplAuthenticationProvider"> <property name="key" value="my_run_as_password"/> </bean>
By using the same key, each RunAsUserToken can be validated it was created by an approved RunAsManagerImpl. The RunAsUserToken is immutable after creation for security reasons
The Spring Security Crypto module provides support for symmetric encryption, key generation, and password encoding. The code is distributed as part of the core module but has no dependencies on any other Spring Security (or Spring) code.
The Encryptors class provides factory methods for constructing symmetric encryptors. Using this class, you can create ByteEncryptors to encrypt data in raw byte[] form. You can also construct TextEncryptors to encrypt text strings. Encryptors are thread safe.
Use the Encryptors.standard factory method to construct a "standard" BytesEncryptor:
Encryptors.standard("password", "salt");
The "standard" encryption method is 256-bit AES using PKCS #5’s PBKDF2 (Password-Based Key Derivation Function #2). This method requires Java 6. The password used to generate the SecretKey should be kept in a secure place and not be shared. The salt is used to prevent dictionary attacks against the key in the event your encrypted data is compromised. A 16-byte random initialization vector is also applied so each encrypted message is unique.
The provided salt should be in hex-encoded String form, be random, and be at least 8 bytes in length. Such a salt may be generated using a KeyGenerator:
String salt = KeyGenerators.string().generateKey(); // generates a random 8-byte salt that is then hex-encoded
Use the Encryptors.text factory method to construct a standard TextEncryptor:
Encryptors.text("password", "salt");
A TextEncryptor uses a standard BytesEncryptor to encrypt text data. Encrypted results are returned as hex-encoded strings for easy storage on the filesystem or in the database.
Use the Encryptors.queryableText factory method to construct a "queryable" TextEncryptor:
Encryptors.queryableText("password", "salt");
The difference between a queryable TextEncryptor and a standard TextEncryptor has to do with initialization vector (iv) handling. The iv used in a queryable TextEncryptor#encrypt operation is shared, or constant, and is not randomly generated. This means the same text encrypted multiple times will always produce the same encryption result. This is less secure, but necessary for encrypted data that needs to be queried against. An example of queryable encrypted text would be an OAuth apiKey.
The KeyGenerators class provides a number of convenience factory methods for constructing different types of key generators. Using this class, you can create a BytesKeyGenerator to generate byte[] keys. You can also construct a StringKeyGenerator to generate string keys. KeyGenerators are thread safe.
Use the KeyGenerators.secureRandom factory methods to generate a BytesKeyGenerator backed by a SecureRandom instance:
KeyGenerator generator = KeyGenerators.secureRandom();
byte[] key = generator.generateKey();
The default key length is 8 bytes. There is also a KeyGenerators.secureRandom variant that provides control over the key length:
KeyGenerators.secureRandom(16);
Use the KeyGenerators.shared factory method to construct a BytesKeyGenerator that always returns the same key on every invocation:
KeyGenerators.shared(16);
The password package of the spring-security-crypto module provides support for encoding passwords. PasswordEncoder is the central service interface and has the following signature:
public interface PasswordEncoder { String encode(String rawPassword); boolean matches(String rawPassword, String encodedPassword); }
The matches method returns true if the rawPassword, once encoded, equals the encodedPassword. This method is designed to support password-based authentication schemes.
The BCryptPasswordEncoder implementation uses the widely supported "bcrypt" algorithm to hash the passwords. Bcrypt uses a random 16 byte salt value and is a deliberately slow algorithm, in order to hinder password crackers. The amount of work it does can be tuned using the "strength" parameter which takes values from 4 to 31. The higher the value, the more work has to be done to calculate the hash. The default value is 10. You can change this value in your deployed system without affecting existing passwords, as the value is also stored in the encoded hash.
// Create an encoder with strength 16 BCryptPasswordEncoder encoder = new BCryptPasswordEncoder(16); String result = encoder.encode("myPassword"); assertTrue(encoder.matches("myPassword", result));
In most environments, Security is stored on a per Thread basis. This means that when work is done on a new Thread, the SecurityContext is lost. Spring Security provides some infrastructure to help make this much easier for users. Spring Security provides low level abstractions for working with Spring Security in multi threaded environments. In fact, this is what Spring Security builds on to integration with Section 13.2.4, “AsyncContext.start(Runnable)” and Section 34.3, “Spring MVC Async Integration”.
One of the most fundamental building blocks within Spring Security’s concurrency support is the DelegatingSecurityContextRunnable. It wraps a delegate Runnable in order to initialize the SecurityContextHolder with a specified SecurityContext for the delegate. It then invokes the delegate Runnable ensuring to clear the SecurityContextHolder afterwards. The DelegatingSecurityContextRunnable looks something like this:
public void run() { try { SecurityContextHolder.setContext(securityContext); delegate.run(); } finally { SecurityContextHolder.clearContext(); } }
While very simple, it makes it seamless to transfer the SecurityContext from one Thread to another. This is important since, in most cases, the SecurityContextHolder acts on a per Thread basis. For example, you might have used Spring Security’s Section 38.4.1, “<global-method-security>” support to secure one of your services. You can now easily transfer the SecurityContext of the current Thread to the Thread that invokes the secured service. An example of how you might do this can be found below:
Runnable originalRunnable = new Runnable() { public void run() { // invoke secured service } }; SecurityContext context = SecurityContextHolder.getContext(); DelegatingSecurityContextRunnable wrappedRunnable = new DelegatingSecurityContextRunnable(originalRunnable, context); new Thread(wrappedRunnable).start();
The code above performs the following steps:
-
Creates a
Runnablethat will be invoking our secured service. Notice that it is not aware of Spring Security -
Obtains the
SecurityContextthat we wish to use from theSecurityContextHolderand initializes theDelegatingSecurityContextRunnable -
Use the
DelegatingSecurityContextRunnableto create a Thread - Start the Thread we created
Since it is quite common to create a DelegatingSecurityContextRunnable with the SecurityContext from the SecurityContextHolder there is a shortcut constructor for it. The following code is the same as the code above:
Runnable originalRunnable = new Runnable() { public void run() { // invoke secured service } }; DelegatingSecurityContextRunnable wrappedRunnable = new DelegatingSecurityContextRunnable(originalRunnable); new Thread(wrappedRunnable).start();
The code we have is simple to use, but it still requires knowledge that we are using Spring Security. In the next section we will take a look at how we can utilize DelegatingSecurityContextExecutor to hide the fact that we are using Spring Security.
In the previous section we found that it was easy to use the DelegatingSecurityContextRunnable, but it was not ideal since we had to be aware of Spring Security in order to use it. Let’s take a look at how DelegatingSecurityContextExecutor can shield our code from any knowledge that we are using Spring Security.
The design of DelegatingSecurityContextExecutor is very similar to that of DelegatingSecurityContextRunnable except it accepts a delegate Executor instead of a delegate Runnable. You can see an example of how it might be used below:
SecurityContext context = SecurityContextHolder.createEmptyContext(); Authentication authentication = new UsernamePasswordAuthenticationToken("user","doesnotmatter", AuthorityUtils.createAuthorityList("ROLE_USER")); context.setAuthentication(authentication); SimpleAsyncTaskExecutor delegateExecutor = new SimpleAsyncTaskExecutor(); DelegatingSecurityContextExecutor executor = new DelegatingSecurityContextExecutor(delegateExecutor, context); Runnable originalRunnable = new Runnable() { public void run() { // invoke secured service } }; executor.execute(originalRunnable);
The code performs the following steps:
-
Creates the
SecurityContextto be used for ourDelegatingSecurityContextExecutor. Note that in this example we simply create theSecurityContextby hand. However, it does not matter where or how we get theSecurityContext(i.e. we could obtain it from theSecurityContextHolderif we wanted). - Creates a delegateExecutor that is in charge of executing submitted `Runnable`s
-
Finally we create a
DelegatingSecurityContextExecutorwhich is in charge of wrapping any Runnable that is passed into the execute method with aDelegatingSecurityContextRunnable. It then passes the wrapped Runnable to the delegateExecutor. In this instance, the sameSecurityContextwill be used for every Runnable submitted to ourDelegatingSecurityContextExecutor. This is nice if we are running background tasks that need to be run by a user with elevated privileges. -
At this point you may be asking yourself "How does this shield my code of any knowledge of Spring Security?" Instead of creating the
SecurityContextand theDelegatingSecurityContextExecutorin our own code, we can inject an already initialized instance ofDelegatingSecurityContextExecutor.
@Autowired private Executor executor; // becomes an instance of our DelegatingSecurityContextExecutor public void submitRunnable() { Runnable originalRunnable = new Runnable() { public void run() { // invoke secured service } }; executor.execute(originalRunnable); }
Now our code is unaware that the SecurityContext is being propagated to the Thread, then the originalRunnable is executed, and then the SecurityContextHolder is cleared out. In this example, the same user is being used to execute each Thread. What if we wanted to use the user from SecurityContextHolder at the time we invoked executor.execute(Runnable) (i.e. the currently logged in user) to process originalRunnable? This can be done by removing the SecurityContext argument from our DelegatingSecurityContextExecutor constructor. For example:
SimpleAsyncTaskExecutor delegateExecutor = new SimpleAsyncTaskExecutor(); DelegatingSecurityContextExecutor executor = new DelegatingSecurityContextExecutor(delegateExecutor);
Now anytime executor.execute(Runnable) is executed the SecurityContext is first obtained by the SecurityContextHolder and then that SecurityContext is used to create our DelegatingSecurityContextRunnable. This means that we are executing our Runnable with the same user that was used to invoke the executor.execute(Runnable) code.
Refer to the Javadoc for additional integrations with both the Java concurrent APIs and the Spring Task abstractions. They are quite self explanatory once you understand the previous code.
- DelegatingSecurityContextCallable
- DelegatingSecurityContextExecutor
- DelegatingSecurityContextExecutorService
- DelegatingSecurityContextRunnable
- DelegatingSecurityContextScheduledExecutorService
- DelegatingSecurityContextSchedulingTaskExecutor
- DelegatingSecurityContextAsyncTaskExecutor
- DelegatingSecurityContextTaskExecutor
Spring Security provides a number of optional integrations with Spring MVC. This section covers the integration in further detail.
| Note |
|---|---|
|
As of Spring Security 4.0, |
To enable Spring Security integration with Spring MVC add the @EnableWebSecurity annotation to your configuration.
| Note |
|---|---|
|
Spring Security provides the configuration using Spring MVC’s WebMvcConfigurerAdapter. This means that if you are using more advanced options, like integrating with |
Spring Security provides AuthenticationPrincipalArgumentResolver which can automatically resolve the current Authentication.getPrincipal() for Spring MVC arguments. By using Section 34.1, “@EnableWebMvcSecurity” you will automatically have this added to your Spring MVC configuration. If you use XML based configuraiton, you must add this yourself.
Once AuthenticationPrincipalArgumentResolver is properly configured, you can be entirely decoupled from Spring Security in your Spring MVC layer.
Consider a situation where a custom UserDetailsService that returns an Object that implements UserDetails and your own CustomUser Object. The CustomUser of the currently authenticated user could be accessed using the following code:
import org.springframework.security.web.bind.annotation.AuthenticationPrincipal; // ... @RequestMapping("/messages/inbox") public ModelAndView findMessagesForUser() { Authentication authentication = SecurityContextHolder.getContext().getAuthentication(); CustomUser custom = (CustomUser) authentication == null ? null : authentication.getPrincipal(); // .. find messags for this user and return them ... }
As of Spring Security 3.2 we can resolve the argument more directly by adding an annotation. For example:
@RequestMapping("/messages/inbox") public ModelAndView findMessagesForUser(@AuthenticationPrincipal CustomUser customUser) { // .. find messags for this user and return them ... }
We can further remove our dependency on Spring Security by making @AuthenticationPrincipal a meta annotation on our own annotation. Below we demonstrate how we could do this on an annotation named @CurrentUser.
| Note |
|---|---|
|
It is important to realize that in order to remove the dependency on Spring Security, it is the consuming application that would create |
@Target({ElementType.PARAMETER, ElementType.TYPE}) @Retention(RetentionPolicy.RUNTIME) @Documented @AuthenticationPrincipal public @interface CurrentUser {}
Now that @CurrentUser has been specified, we can use it to signal to resolve our CustomUser of the currently authenticated user. We have also isolated our dependency on Spring Security to a single file.
@RequestMapping("/messages/inbox") public ModelAndView findMessagesForUser(@CurrentUser CustomUser customUser) { // .. find messags for this user and return them ... }
Spring Web MVC 3.2+ has excellent support for Asynchronous Request Processing. With no additional configuration, Spring Security will automatically setup the SecurityContext to the Thread that executes a Callable returned by your controllers. For example, the following method will automatically have its Callable executed with the SecurityContext that was available when the Callable was created:
@RequestMapping(method=RequestMethod.POST) public Callable<String> processUpload(final MultipartFile file) { return new Callable<String>() { public Object call() throws Exception { // ... return "someView"; } }; }
| Associating SecurityContext to Callable’s |
|---|---|
|
More technically speaking, Spring Security integrates with |
There is no automatic integration with a DeferredResult that is returned by controllers.
This is because DeferredResult is processed by the users and thus there is no way of automatically integrating with it.
However, you can still use Concurrency Support to provide transparent integration with Spring Security.
Spring Security will automatically include the CSRF Token within forms that use the Spring MVC form tag. For example, the following JSP:
<jsp:root xmlns:jsp="http://java.sun.com/JSP/Page" xmlns:c="http://java.sun.com/jsp/jstl/core" xmlns:form="http://www.springframework.org/tags/form" version="2.0"> <jsp:directive.page language="java" contentType="text/html" /> <html xmlns="http://www.w3.org/1999/xhtml" lang="en" xml:lang="en"> <!-- ... --> <c:url var="logoutUrl" value="/logout"/> <form:form action="${logoutUrl}" method="post"> <input type="submit" value="Log out" /> <input type="hidden" name="${_csrf.parameterName}" value="${_csrf.token}"/> </form:form> <!-- ... --> </html> </jsp:root>
Will output HTML that is similar to the following:
<!-- ... --> <form action="/context/logout" method="post"> <input type="submit" value="Log out"/> <input type="hidden" name="_csrf" value="f81d4fae-7dec-11d0-a765-00a0c91e6bf6"/> </form> <!-- ... -->
Spring Security provides CsrfTokenResolver which can automatically resolve the current CsrfToken for Spring MVC arguments.
By using @EnableWebSecurity you will automatically have this added to your Spring MVC configuration.
If you use XML based configuraiton, you must add this yourself.
Once CsrfTokenResolver is properly configured, you can expose the CsrfToken to your static HTML based application.
@RestController public class CsrfController { @RequestMapping("/csrf") public CsrfToken csrf(CsrfToken token) { return token; } }
It is important to keep the CsrfToken a secret from other domains.
This means if you are using Cross Origin Sharing (CORS), you should NOT expose the CsrfToken to any external domains.
Spring Security provides Spring Data integration that allows referring to the current user within your queries. It is not only useful but necessary to include the user in the queries to support paged results since filtering the results afterwards would not scale.
To use this support, provide a bean of type SecurityEvaluationContextExtension.
In Java Configuration, this would look like:
@Bean public SecurityEvaluationContextExtension securityEvaluationContextExtension() { return new SecurityEvaluationContextExtension(); }
In XML Configuration, this would look like:
<bean class="org.springframework.security.data.repository.query.SecurityEvaluationContextExtension"/>
Now Spring Security can be used within your queries. For example:
@Repository public interface MessageRepository extends PagingAndSortingRepository<Message,Long> { @Query("select m from Message m where m.to.id = ?#{ principal?.id }") Page<Message> findInbox(Pageable pageable); }
This checks to see if the Authentication.getPrincipal().getId() is equal to the recipient of the Message.
Note that this example assumes you have customized the principal to be an Object that has an id property.
By exposing the SecurityEvaluationContextExtension bean, all of the Common Security Expressions are available within the Query.
There are various database schema used by the framework and this appendix provides a single reference point to them all. You only need to provide the tables for the areas of functonality you require.
DDL statements are given for the HSQLDB database. You can use these as a guideline for defining the schema for the database you are using.
The standard JDBC implementation of the UserDetailsService (JdbcDaoImpl) requires tables to load the password, account status (enabled or disabled) and a list of authorities (roles) for the user. You will need to adjust this schema to match the database dialect you are using.
create table users( username varchar_ignorecase(50) not null primary key, password varchar_ignorecase(50) not null, enabled boolean not null ); create table authorities ( username varchar_ignorecase(50) not null, authority varchar_ignorecase(50) not null, constraint fk_authorities_users foreign key(username) references users(username) ); create unique index ix_auth_username on authorities (username,authority);
Spring Security 2.0 introduced support for group authorities in JdbcDaoImpl. The table structure if groups are enabled is as follows. You will need to adjust this schema to match the database dialect you are using.
create table groups ( id bigint generated by default as identity(start with 0) primary key, group_name varchar_ignorecase(50) not null ); create table group_authorities ( group_id bigint not null, authority varchar(50) not null, constraint fk_group_authorities_group foreign key(group_id) references groups(id) ); create table group_members ( id bigint generated by default as identity(start with 0) primary key, username varchar(50) not null, group_id bigint not null, constraint fk_group_members_group foreign key(group_id) references groups(id) );
Remember that these tables are only required if you are using the provided JDBC UserDetailsService implementation. If you write your own or choose to implement AuthenticationProvider without a UserDetailsService, then you have complete freedom over how you store the data, as long as the interface contract is satisfied.
This table is used to store data used by the more secure persistent token remember-me implementation. If you are using JdbcTokenRepositoryImpl either directly or through the namespace, then you will need this table. Remember to adjust this schema to match the database dialect you are using.
create table persistent_logins ( username varchar(64) not null, series varchar(64) primary key, token varchar(64) not null, last_used timestamp not null );
There are four tables used by the Spring Security ACL implementation.
-
acl_sidstores the security identities recognised by the ACL system. These can be unique principals or authorities which may apply to multiple principals. -
acl_classdefines the domain object types to which ACLs apply. Theclasscolumn stores the Java class name of the object. -
acl_object_identitystores the object identity definitions of specific domai objects. -
acl_entrystores the ACL permissions which apply to a specific object identity and security identity.
It is assumed that the database will auto-generate the primary keys for each of the identities. The JdbcMutableAclService has to be able to retrieve these when it has created a new row in the acl_sid or acl_class tables. It has two properties which define the SQL needed to retrieve these values classIdentityQuery and sidIdentityQuery. Both of these default to call identity()
The ACL artifact JAR contains files for creating the ACL schema in HyperSQL (HSQLDB), PostgreSQL, MySQL/MariaDB, Microsoft SQL Server, and Oracle Database. These schemas are also demonstrated in the following sections.
The default schema works with the embedded HSQLDB database that is used in unit tests within the framework.
create table acl_sid( id bigint generated by default as identity(start with 100) not null primary key, principal boolean not null, sid varchar_ignorecase(100) not null, constraint unique_uk_1 unique(sid,principal) ); create table acl_class( id bigint generated by default as identity(start with 100) not null primary key, class varchar_ignorecase(100) not null, constraint unique_uk_2 unique(class) ); create table acl_object_identity( id bigint generated by default as identity(start with 100) not null primary key, object_id_class bigint not null, object_id_identity bigint not null, parent_object bigint, owner_sid bigint, entries_inheriting boolean not null, constraint unique_uk_3 unique(object_id_class,object_id_identity), constraint foreign_fk_1 foreign key(parent_object)references acl_object_identity(id), constraint foreign_fk_2 foreign key(object_id_class)references acl_class(id), constraint foreign_fk_3 foreign key(owner_sid)references acl_sid(id) ); create table acl_entry( id bigint generated by default as identity(start with 100) not null primary key, acl_object_identity bigint not null, ace_order int not null, sid bigint not null, mask integer not null, granting boolean not null, audit_success boolean not null, audit_failure boolean not null, constraint unique_uk_4 unique(acl_object_identity,ace_order), constraint foreign_fk_4 foreign key(acl_object_identity) references acl_object_identity(id), constraint foreign_fk_5 foreign key(sid) references acl_sid(id) );
create table acl_sid( id bigserial not null primary key, principal boolean not null, sid varchar(100) not null, constraint unique_uk_1 unique(sid,principal) ); create table acl_class( id bigserial not null primary key, class varchar(100) not null, constraint unique_uk_2 unique(class) ); create table acl_object_identity( id bigserial primary key, object_id_class bigint not null, object_id_identity bigint not null, parent_object bigint, owner_sid bigint, entries_inheriting boolean not null, constraint unique_uk_3 unique(object_id_class,object_id_identity), constraint foreign_fk_1 foreign key(parent_object)references acl_object_identity(id), constraint foreign_fk_2 foreign key(object_id_class)references acl_class(id), constraint foreign_fk_3 foreign key(owner_sid)references acl_sid(id) ); create table acl_entry( id bigserial primary key, acl_object_identity bigint not null, ace_order int not null, sid bigint not null, mask integer not null, granting boolean not null, audit_success boolean not null, audit_failure boolean not null, constraint unique_uk_4 unique(acl_object_identity,ace_order), constraint foreign_fk_4 foreign key(acl_object_identity) references acl_object_identity(id), constraint foreign_fk_5 foreign key(sid) references acl_sid(id) );
You will have to set the classIdentityQuery and sidIdentityQuery properties of JdbcMutableAclService to the following values, respectively:
-
select currval(pg_get_serial_sequence('acl_class', 'id')) -
select currval(pg_get_serial_sequence('acl_sid', 'id'))
CREATE TABLE acl_sid ( id BIGINT UNSIGNED NOT NULL AUTO_INCREMENT PRIMARY KEY, principal BOOLEAN NOT NULL, sid VARCHAR(100) NOT NULL, UNIQUE KEY unique_acl_sid (sid, principal) ) ENGINE=InnoDB; CREATE TABLE acl_class ( id BIGINT UNSIGNED NOT NULL AUTO_INCREMENT PRIMARY KEY, class VARCHAR(100) NOT NULL, UNIQUE KEY uk_acl_class (class) ) ENGINE=InnoDB; CREATE TABLE acl_object_identity ( id BIGINT UNSIGNED NOT NULL AUTO_INCREMENT PRIMARY KEY, object_id_class BIGINT UNSIGNED NOT NULL, object_id_identity BIGINT NOT NULL, parent_object BIGINT UNSIGNED, owner_sid BIGINT UNSIGNED, entries_inheriting BOOLEAN NOT NULL, UNIQUE KEY uk_acl_object_identity (object_id_class, object_id_identity), CONSTRAINT fk_acl_object_identity_parent FOREIGN KEY (parent_object) REFERENCES acl_object_identity (id), CONSTRAINT fk_acl_object_identity_class FOREIGN KEY (object_id_class) REFERENCES acl_class (id), CONSTRAINT fk_acl_object_identity_owner FOREIGN KEY (owner_sid) REFERENCES acl_sid (id) ) ENGINE=InnoDB; CREATE TABLE acl_entry ( id BIGINT UNSIGNED NOT NULL AUTO_INCREMENT PRIMARY KEY, acl_object_identity BIGINT UNSIGNED NOT NULL, ace_order INTEGER NOT NULL, sid BIGINT UNSIGNED NOT NULL, mask INTEGER UNSIGNED NOT NULL, granting BOOLEAN NOT NULL, audit_success BOOLEAN NOT NULL, audit_failure BOOLEAN NOT NULL, UNIQUE KEY unique_acl_entry (acl_object_identity, ace_order), CONSTRAINT fk_acl_entry_object FOREIGN KEY (acl_object_identity) REFERENCES acl_object_identity (id), CONSTRAINT fk_acl_entry_acl FOREIGN KEY (sid) REFERENCES acl_sid (id) ) ENGINE=InnoDB;
CREATE TABLE acl_sid ( id BIGINT NOT NULL IDENTITY PRIMARY KEY, principal BIT NOT NULL, sid VARCHAR(100) NOT NULL, CONSTRAINT unique_acl_sid UNIQUE (sid, principal) ); CREATE TABLE acl_class ( id BIGINT NOT NULL IDENTITY PRIMARY KEY, class VARCHAR(100) NOT NULL, CONSTRAINT uk_acl_class UNIQUE (class) ); CREATE TABLE acl_object_identity ( id BIGINT NOT NULL IDENTITY PRIMARY KEY, object_id_class BIGINT NOT NULL, object_id_identity BIGINT NOT NULL, parent_object BIGINT, owner_sid BIGINT, entries_inheriting BIT NOT NULL, CONSTRAINT uk_acl_object_identity UNIQUE (object_id_class, object_id_identity), CONSTRAINT fk_acl_object_identity_parent FOREIGN KEY (parent_object) REFERENCES acl_object_identity (id), CONSTRAINT fk_acl_object_identity_class FOREIGN KEY (object_id_class) REFERENCES acl_class (id), CONSTRAINT fk_acl_object_identity_owner FOREIGN KEY (owner_sid) REFERENCES acl_sid (id) ); CREATE TABLE acl_entry ( id BIGINT NOT NULL IDENTITY PRIMARY KEY, acl_object_identity BIGINT NOT NULL, ace_order INTEGER NOT NULL, sid BIGINT NOT NULL, mask INTEGER NOT NULL, granting BIT NOT NULL, audit_success BIT NOT NULL, audit_failure BIT NOT NULL, CONSTRAINT unique_acl_entry UNIQUE (acl_object_identity, ace_order), CONSTRAINT fk_acl_entry_object FOREIGN KEY (acl_object_identity) REFERENCES acl_object_identity (id), CONSTRAINT fk_acl_entry_acl FOREIGN KEY (sid) REFERENCES acl_sid (id) );
CREATE TABLE acl_sid ( id NUMBER(38) NOT NULL PRIMARY KEY, principal NUMBER(1) NOT NULL CHECK (principal in (0, 1)), sid NVARCHAR2(100) NOT NULL, CONSTRAINT unique_acl_sid UNIQUE (sid, principal) ); CREATE SEQUENCE acl_sid_sequence START WITH 1 INCREMENT BY 1 NOMAXVALUE; CREATE OR REPLACE TRIGGER acl_sid_id_trigger BEFORE INSERT ON acl_sid FOR EACH ROW BEGIN SELECT acl_sid_sequence.nextval INTO :new.id FROM dual; END; CREATE TABLE acl_class ( id NUMBER(38) NOT NULL PRIMARY KEY, class NVARCHAR2(100) NOT NULL, CONSTRAINT uk_acl_class UNIQUE (class) ); CREATE SEQUENCE acl_class_sequence START WITH 1 INCREMENT BY 1 NOMAXVALUE; CREATE OR REPLACE TRIGGER acl_class_id_trigger BEFORE INSERT ON acl_class FOR EACH ROW BEGIN SELECT acl_class_sequence.nextval INTO :new.id FROM dual; END; CREATE TABLE acl_object_identity ( id NUMBER(38) NOT NULL PRIMARY KEY, object_id_class NUMBER(38) NOT NULL, object_id_identity NUMBER(38) NOT NULL, parent_object NUMBER(38), owner_sid NUMBER(38), entries_inheriting NUMBER(1) NOT NULL CHECK (entries_inheriting in (0, 1)), CONSTRAINT uk_acl_object_identity UNIQUE (object_id_class, object_id_identity), CONSTRAINT fk_acl_object_identity_parent FOREIGN KEY (parent_object) REFERENCES acl_object_identity (id), CONSTRAINT fk_acl_object_identity_class FOREIGN KEY (object_id_class) REFERENCES acl_class (id), CONSTRAINT fk_acl_object_identity_owner FOREIGN KEY (owner_sid) REFERENCES acl_sid (id) ); CREATE SEQUENCE acl_object_identity_sequence START WITH 1 INCREMENT BY 1 NOMAXVALUE; CREATE OR REPLACE TRIGGER acl_object_identity_id_trigger BEFORE INSERT ON acl_object_identity FOR EACH ROW BEGIN SELECT acl_object_identity_sequence.nextval INTO :new.id FROM dual; END; CREATE TABLE acl_entry ( id NUMBER(38) NOT NULL PRIMARY KEY, acl_object_identity NUMBER(38) NOT NULL, ace_order INTEGER NOT NULL, sid NUMBER(38) NOT NULL, mask INTEGER NOT NULL, granting NUMBER(1) NOT NULL CHECK (granting in (0, 1)), audit_success NUMBER(1) NOT NULL CHECK (audit_success in (0, 1)), audit_failure NUMBER(1) NOT NULL CHECK (audit_failure in (0, 1)), CONSTRAINT unique_acl_entry UNIQUE (acl_object_identity, ace_order), CONSTRAINT fk_acl_entry_object FOREIGN KEY (acl_object_identity) REFERENCES acl_object_identity (id), CONSTRAINT fk_acl_entry_acl FOREIGN KEY (sid) REFERENCES acl_sid (id) ); CREATE SEQUENCE acl_entry_sequence START WITH 1 INCREMENT BY 1 NOMAXVALUE; CREATE OR REPLACE TRIGGER acl_entry_id_trigger BEFORE INSERT ON acl_entry FOR EACH ROW BEGIN SELECT acl_entry_sequence.nextval INTO :new.id FROM dual; END;
This appendix provides a reference to the elements available in the security namespace and information on the underlying beans they create (a knowledge of the individual classes and how they work together is assumed - you can find more information in the project Javadoc and elsewhere in this document). If you haven’t used the namespace before, please read the introductory chapter on namespace configuration, as this is intended as a supplement to the information there. Using a good quality XML editor while editing a configuration based on the schema is recommended as this will provide contextual information on which elements and attributes are available as well as comments explaining their purpose. The namespace is written in RELAX NG Compact format and later converted into an XSD schema. If you are familiar with this format, you may wish to examine the schema file directly.
Enables Spring Security debugging infrastructure. This will provide human-readable (multi-line) debugging information to monitor requests coming into the security filters. This may include sensitive information, such as request parameters or headers, and should only be used in a development environment.
If you use an <http> element within your application, a FilterChainProxy bean named "springSecurityFilterChain" is created and the configuration within the element is used to build a filter chain within
FilterChainProxy. As of Spring Security 3.1, additional http elements can be used to add extra filter chains [22].
Some core filters are always created in a filter chain and others will be added to the stack depending on the attributes and child elements which are present. The positions of the standard filters are fixed (see
the filter order table in the namespace introduction), removing a common source of errors with previous versions of the framework when users had to configure the filter chain explicitly in the
FilterChainProxy bean. You can, of course, still do this if you need full control of the configuration.
All filters which require a reference to the AuthenticationManager will be automatically injected with the internal instance created by the namespace configuration (see the introductory chapter for more on the AuthenticationManager).
Each <http> namespace block always creates an SecurityContextPersistenceFilter, an ExceptionTranslationFilter and a FilterSecurityInterceptor. These are fixed and cannot be replaced with alternatives.
The attributes on the <http> element control some of the properties on the core filters.
-
access-decision-manager-ref
Optional attribute specifying the ID of the
AccessDecisionManagerimplementation which should be used for authorizing HTTP requests. By default anAffirmativeBasedimplementation is used for with aRoleVoterand anAuthenticatedVoter.
-
authentication-manager-ref
A reference to the
AuthenticationManagerused for theFilterChaincreated by this http element.
- auto-config Automatically registers a login form, BASIC authentication, logout services. If set to "true", all of these capabilities are added (although you can still customize the configuration of each by providing the respective element). If unspecified, defaults to "false". Use of this attribute is not recommended. Use explicit configuration elements instead to avoid confusion.
-
create-session Controls the eagerness with which an HTTP session is created by Spring Security classes. Options include:
-
always- Spring Security will proactively create a session if one does not exist. -
ifRequired- Spring Security will only create a session only if one is required (default value). -
never- Spring Security will never create a session, but will make use of one if the application does. -
stateless- Spring Security will not create a session and ignore the session for obtaining a SpringAuthentication.
-
-
disable-url-rewriting
Prevents session IDs from being appended to URLs in the application. Clients must use cookies if this attribute is set to
true. The default istrue.
-
entry-point-ref
Normally the
AuthenticationEntryPointused will be set depending on which authentication mechanisms have been configured. This attribute allows this behaviour to be overridden by defining a customizedAuthenticationEntryPointbean which will start the authentication process.
-
jaas-api-provision
If available, runs the request as the
Subjectacquired from theJaasAuthenticationTokenwhich is implemented by adding aJaasApiIntegrationFilterbean to the stack. Defaults tofalse.
-
once-per-request
Corresponds to the
observeOncePerRequestproperty ofFilterSecurityInterceptor. Defaults totrue.
- pattern Defining a pattern for the http element controls the requests which will be filtered through the list of filters which it defines. The interpretation is dependent on the configured request-matcher. If no pattern is defined, all requests will be matched, so the most specific patterns should be declared first.
-
realm
Sets the realm name used for basic authentication (if enabled). Corresponds to the
realmNameproperty onBasicAuthenticationEntryPoint.
-
request-matcher
Defines the
RequestMatcherstrategy used in theFilterChainProxyand the beans created by theintercept-urlto match incoming requests. Options are currentlyant,regexandciRegex, for ant, regular-expression and case-insensitive regular-expression repsectively. A separate instance is created for eachintercept-url element using its pattern and method attributes. Ant paths are matched using anAntPathRequestMatcherand regular expressions are matched using aRegexRequestMatcher. See the Javadoc for these classes for more details on exactly how the matching is preformed. Ant paths are the default strategy.
-
request-matcher-ref
A referenece to a bean that implements
RequestMatcherthat will determine if thisFilterChainshould be used. This is a more powerful alternative to pattern.
-
security
A request pattern can be mapped to an empty filter chain, by setting this attribute to
none. No security will be applied and none of Spring Security’s features will be available.
-
security-context-repository-ref
Allows injection of a custom
SecurityContextRepositoryinto theSecurityContextPersistenceFilter.
-
servlet-api-provision
Provides versions of
HttpServletRequestsecurity methods such asisUserInRole()andgetPrincipal()which are implemented by adding aSecurityContextHolderAwareRequestFilterbean to the stack. Defaults totrue.
-
use-expressions
Enables EL-expressions in the
accessattribute, as described in the chapter on expression-based access-control. The default value is true.
This element allows you to set the errorPage property for the default AccessDeniedHandler used by the ExceptionTranslationFilter, using the error-page attribute, or to supply your own implementation using theref attribute. This is discussed in more detail in the section on the ExceptionTranslationFilter.
This element allows for configuring additional (security) headers to be send with the response. It enables easy configuration for several headers and also allows for setting custom headers through the header element. Additional information, can be found in the Security Headers section of the reference.
-
Cache-Control,Pragma, andExpires- Can be set using the cache-control element. This ensures that the browser does not cache your secured pages. -
Strict-Transport-Security- Can be set using the hsts element. This ensures that the browser automatically requests HTTPS for future requests. -
X-Frame-Options- Can be set using the frame-options element. The X-Frame-Options header can be used to prevent clickjacking attacks. -
X-XSS-Protection- Can be set using the xss-protection element. The X-XSS-Protection header can be used by browser to do basic control. -
X-Content-Type-Options- Can be set using the content-type-options element. The X-Content-Type-Options header prevents Internet Explorer from MIME-sniffing a response away from the declared content-type. This also applies to Google Chrome, when downloading extensions.
The attributes on the <headers> element control the headers element.
Adds Cache-Control, Pragma, and Expires headers to ensure that the browser does not cache your secured pages.
When enabled adds the Strict-Transport-Security header to the response for any secure request. This allows the server to instruct browsers to automatically use HTTPS for future requests.
When enabled adds the X-Frame-Options header to the response, this allows newer browsers to do some security checks and prevent clickjacking attacks.
-
policy
-
DENYThe page cannot be displayed in a frame, regardless of the site attempting to do so. This is the default when frame-options-policy is specified. -
SAMEORIGINThe page can only be displayed in a frame on the same origin as the page itself -
ALLOW-FROMorigin The page can only be displayed in a frame on the specified origin.
In other words, if you specify DENY, not only will attempts to load the page in a frame fail when loaded from other sites, attempts to do so will fail when loaded from the same site. On the other hand, if you specify SAMEORIGIN, you can still use the page in a frame as long as the site including it in a frame it is the same as the one serving the page.
-
-
strategy Select the
AllowFromStrategyto use when using the ALLOW-FROM policy.-
staticUse a single static ALLOW-FROM value. The value can be set through the value attribute. -
regexpUse a regelur expression to validate incoming requests and if they are allowed. The regular expression can be set through the value attribute. The request parameter used to retrieve the value to validate can be specified using the from-parameter. -
whitelistA comma-seperated list containing the allowed domains. The comma-seperated list can be set through the value attribute. The request parameter used to retrieve the value to validate can be specified using the from-parameter.
-
-
ref
Instead of using one of the predefined strategies it is also possible to use a custom
AllowFromStrategy. The reference to this bean can be specified through this ref attribute.
- value The value to use when ALLOW-FROM is used a strategy.
Adds the X-XSS-Protection header to the response to assist in protecting against reflected / Type-1 Cross-Site Scripting (XSS) attacks. This is in no-way a full protection to XSS attacks!
- xss-protection-disabled Do not include the header for reflected / Type-1 Cross-Site Scripting (XSS) protection.
- xss-protection-enabled Explicitly enable or eisable reflected / Type-1 Cross-Site Scripting (XSS) protection.
- xss-protection-block When true and xss-protection-enabled is true, adds mode=block to the header. This indicates to the browser that the page should not be loaded at all. When false and xss-protection-enabled is true, the page will still be rendered when an reflected attack is detected but the response will be modified to protect against the attack. Note that there are sometimes ways of bypassing this mode which can often times make blocking the page more desirable.
Add the X-Content-Type-Options header with the value of nosniff to the response. This disables MIME-sniffing for IE8+ and Chrome extensions.
Add additional headers to the response, both the name and value need to be specified.
Adds an AnonymousAuthenticationFilter to the stack and an AnonymousAuthenticationProvider. Required if you are using the IS_AUTHENTICATED_ANONYMOUSLY attribute.
- enabled With the default namespace setup, the anonymous "authentication" facility is automatically enabled. You can disable it using this property.
-
granted-authority
The granted authority that should be assigned to the anonymous request. Commonly this is used to assign the anonymous request particular roles, which can subsequently be used in authorization decisions. If unset, defaults to
ROLE_ANONYMOUS.
- key The key shared between the provider and filter. This generally does not need to be set. If unset, it will default to a secure randomly generated value. This means setting this value can improve startup time when using the anonymous functionality since secure random values can take a while to be generated.
This element will add Cross Site Request Forger (CSRF) protection to the application. It also updates the default RequestCache to only replay "GET" requests upon successful authentication. Additional information can be found in the Cross Site Request Forgery (CSRF) section of the reference.
This element is used to add a filter to the filter chain. It doesn’t create any additional beans but is used to select a bean of type javax.servlet.Filter which is already defined in the application context and add that at a particular position in the filter chain maintained by Spring Security. Full details can be found in the namespace chapter.
- after The filter immediately after which the custom-filter should be placed in the chain. This feature will only be needed by advanced users who wish to mix their own filters into the security filter chain and have some knowledge of the standard Spring Security filters. The filter names map to specific Spring Security implementation filters.
Defines the SecurityExpressionHandler instance which will be used if expression-based access-control is enabled. A default implementation (with no ACL support) will be used if not supplied.
Used to add an UsernamePasswordAuthenticationFilter to the filter stack and an LoginUrlAuthenticationEntryPoint to the application context to provide authentication on demand. This will always take precedence over other namespace-created entry points. If no attributes are supplied, a login page will be generated automatically at the URL "/login" [23] The behaviour can be customized using the <form-login> Attributes.
-
always-use-default-target
If set to
true, the user will always start at the value given by default-target-url, regardless of how they arrived at the login page. Maps to thealwaysUseDefaultTargetUrlproperty ofUsernamePasswordAuthenticationFilter. Default value isfalse.
-
authentication-details-source-ref
Reference to an
AuthenticationDetailsSourcewhich will be used by the authentication filter
-
authentication-failure-handler-ref
Can be used as an alternative to authentication-failure-url, giving you full control over the navigation flow after an authentication failure. The value should be he name of an
AuthenticationFailureHandlerbean in the application context.
-
authentication-failure-url
Maps to the
authenticationFailureUrlproperty ofUsernamePasswordAuthenticationFilter. Defines the URL the browser will be redirected to on login failure. Defaults to/login?error, which will be automatically handled by the automatic login page generator, re-rendering the login page with an error message.
-
authentication-success-handler-ref
This can be used as an alternative to default-target-url and always-use-default-target, giving you full control over the navigation flow after a successful authentication. The value should be the name of an
AuthenticationSuccessHandlerbean in the application context. By default, an implementation ofSavedRequestAwareAuthenticationSuccessHandleris used and injected with the default-target-url.
-
default-target-url
Maps to the
defaultTargetUrlproperty ofUsernamePasswordAuthenticationFilter. If not set, the default value is "/" (the application root). A user will be taken to this URL after logging in, provided they were not asked to login while attempting to access a secured resource, when they will be taken to the originally requested URL.
-
login-page
The URL that should be used to render the login page. Maps to the
loginFormUrlproperty of theLoginUrlAuthenticationEntryPoint. Defaults to "/login".
-
login-processing-url
Maps to the
filterProcessesUrlproperty ofUsernamePasswordAuthenticationFilter. The default value is "/login".
Adds a BasicAuthenticationFilter and BasicAuthenticationEntryPoint to the configuration. The latter will only be used as the configuration entry point if form-based login is not enabled.
This is a top-level element which can be used to inject a custom implementation of HttpFirewall into the FilterChainProxy created by the namespace. The default implementation should be suitable for most applications.
This element is used to define the set of URL patterns that the application is interested in and to configure how they should be handled. It is used to construct the FilterInvocationSecurityMetadataSource used by the FilterSecurityInterceptor. It is also responsible for configuring a ChannelProcessingFilter if particular URLs need to be accessed by HTTPS, for example. When matching the specified patterns against an incoming request, the matching is done in the order in which the elements are declared. So the most specific matches patterns should come first and the most general should come last.
-
access
Lists the access attributes which will be stored in the
FilterInvocationSecurityMetadataSourcefor the defined URL pattern/method combination. This should be a comma-separated list of the security configuration attributes (such as role names).
-
filters
Can only take the value "none". This will cause any matching request to bypass the Spring Security filter chain entirely. None of the rest of the
<http>configuration will have any effect on the request and there will be no security context available for its duration. Access to secured methods during the request will fail.
| Note |
|---|---|
|
This property is invalid for filter-security-metadata-source |
- method The HTTP Method which will be used in combination with the pattern to match an incoming request. If omitted, any method will match. If an identical pattern is specified with and without a method, the method-specific match will take precedence.
-
pattern
The pattern which defines the URL path. The content will depend on the
request-matcherattribute from the containing http element, so will default to ant path syntax.
-
requires-channel
Can be "http" or "https" depending on whether a particular URL pattern should be accessed over HTTP or HTTPS respectively. Alternatively the value "any" can be used when there is no preference. If this attribute is present on any
<intercept-url>element, then aChannelProcessingFilterwill be added to the filter stack and its additional dependencies added to the application context.
If a <port-mappings> configuration is added, this will be used to by the SecureChannelProcessor and InsecureChannelProcessor beans to determine the ports used for redirecting to HTTP/HTTPS.
| Note |
|---|---|
|
This property is invalid for filter-security-metadata-source |
Adds a J2eePreAuthenticatedProcessingFilter to the filter chain to provide integration with container authentication.
Adds a LogoutFilter to the filter stack. This is configured with a SecurityContextLogoutHandler.
- delete-cookies A comma-separated list of the names of cookies which should be deleted when the user logs out.
-
invalidate-session
Maps to the
invalidateHttpSessionof theSecurityContextLogoutHandler. Defaults to "true", so the session will be invalidated on logout.
-
logout-success-url The destination URL which the user will be taken to after logging out. Defaults to <form-login-login-page>/?logout (i.e. /login?logout)
Setting this attribute will inject the
SessionManagementFilterwith aSimpleRedirectInvalidSessionStrategyconfigured with the attribute value. When an invalid session ID is submitted, the strategy will be invoked, redirecting to the configured URL.
Similar to <form-login> and has the same attributes. The default value for login-processing-url is "/login/openid". An OpenIDAuthenticationFilter and OpenIDAuthenticationProvider will be registered. The latter requires a reference to a UserDetailsService. Again, this can be specified by id, using the user-service-ref attribute, or will be located automatically in the application context.
- always-use-default-target Whether the user should always be redirected to the default-target-url after login.
- authentication-details-source-ref Reference to an AuthenticationDetailsSource which will be used by the authentication filter
- authentication-failure-handler-ref Reference to an AuthenticationFailureHandler bean which should be used to handle a failed authentication request. Should not be used in combination with authentication-failure-url as the implementation should always deal with navigation to the subsequent destination
- authentication-failure-url The URL for the login failure page. If no login failure URL is specified, Spring Security will automatically create a failure login URL at /login?login_error and a corresponding filter to render that login failure URL when requested.
- authentication-success-handler-ref Reference to an AuthenticationSuccessHandler bean which should be used to handle a successful authentication request. Should not be used in combination with default-target-url (or always-use-default-target) as the implementation should always deal with navigation to the subsequent destination
- default-target-url The URL that will be redirected to after successful authentication, if the user’s previous action could not be resumed. This generally happens if the user visits a login page without having first requested a secured operation that triggers authentication. If unspecified, defaults to the root of the application.
- login-page The URL for the login page. If no login URL is specified, Spring Security will automatically create a login URL at /login and a corresponding filter to render that login URL when requested.
- login-processing-url The URL that the login form is posted to. If unspecified, it defaults to /login.
The attribute-exchange element defines the list of attributes which should be requested from the identity provider. An example can be found in the OpenID Support section of the namespace configuration chapter. More than one can be used, in which case each must have an identifier-match attribute, containing a regular expression which is matched against the supplied OpenID identifier. This allows different attribute lists to be fetched from different providers (Google, Yahoo etc).
Attributes used when making an OpenID AX Fetch Request
- count Specifies the number of attributes that you wish to get back. For example, return 3 emails. The default value is 1.
- required Specifies if this attribute is required to the OP, but does not error out if the OP does not return the attribute. Default is false.
- type Specifies the attribute type. For example, http://axschema.org/contact/email. See your OP’s documentation for valid attribute types.
By default, an instance of PortMapperImpl will be added to the configuration for use in redirecting to secure and insecure URLs. This element can optionally be used to override the default mappings which that class defines. Each child <port-mapping> element defines a pair of HTTP:HTTPS ports. The default mappings are 80:443 and 8080:8443. An example of overriding these can be found in the namespace introduction.
Provides a method to map http ports to https ports when forcing a redirect.
Adds the RememberMeAuthenticationFilter to the stack. This in turn will be configured with either a TokenBasedRememberMeServices, a PersistentTokenBasedRememberMeServices or a user-specified bean implementing RememberMeServices depending on the attribute settings.
-
authentication-success-handler-ref
Sets the
authenticationSuccessHandlerproperty on theRememberMeAuthenticationFilterif custom navigation is required. The value should be the name of aAuthenticationSuccessHandlerbean in the application context.
-
data-source-ref
A reference to a
DataSourcebean. If this is set,PersistentTokenBasedRememberMeServiceswill be used and configured with aJdbcTokenRepositoryImplinstance.
-
remember-me-parameter
The name of the request parameter which toggles remember-me authentication. Defaults to "remember-me". Maps to the "parameter" property of
AbstractRememberMeServices.
-
remember-me-cookie
The name of cookie which store the token for remember-me authentication. Defaults to "remember-me". Maps to the "cookieName" property of
AbstractRememberMeServices.
-
key
Maps to the "key" property of
AbstractRememberMeServices. Should be set to a unique value to ensure that remember-me cookies are only valid within the one application [24]. If this is not set a secure random value will be generated. Since generating secure random values can take a while, setting this value explicitly can help improve startup times when using the remember me functionality.
-
services-alias
Exports the internally defined
RememberMeServicesas a bean alias, allowing it to be used by other beans in the application context.
-
services-ref
Allows complete control of the
RememberMeServicesimplementation that will be used by the filter. The value should be theidof a bean in the application context which implements this interface. Should also implementLogoutHandlerif a logout filter is in use.
-
token-repository-ref
Configures a
PersistentTokenBasedRememberMeServicesbut allows the use of a customPersistentTokenRepositorybean.
-
token-validity-seconds
Maps to the
tokenValiditySecondsproperty ofAbstractRememberMeServices. Specifies the period in seconds for which the remember-me cookie should be valid. By default it will be valid for 14 days.
-
use-secure-cookie
It is recommended that remember-me cookies are only submitted over HTTPS and thus should be flagged as "secure". By default, a secure cookie will be used if the connection over which the login request is made is secure (as it should be). If you set this property to
false, secure cookies will not be used. Setting it totruewill always set the secure flag on the cookie. This attribute maps to theuseSecureCookieproperty ofAbstractRememberMeServices.
-
user-service-ref
The remember-me services implementations require access to a
UserDetailsService, so there has to be one defined in the application context. If there is only one, it will be selected and used automatically by the namespace configuration. If there are multiple instances, you can specify a beanidexplicitly using this attribute.
Sets the RequestCache instance which will be used by the ExceptionTranslationFilter to store request information before invoking an AuthenticationEntryPoint.
Session-management related functionality is implemented by the addition of a SessionManagementFilter to the filter stack.
-
invalid-session-url
Setting this attribute will inject the
SessionManagementFilterwith aSimpleRedirectInvalidSessionStrategyconfigured with the attribute value. When an invalid session ID is submitted, the strategy will be invoked, redirecting to the configured URL.
- session-authentication-error-url Defines the URL of the error page which should be shown when the SessionAuthenticationStrategy raises an exception. If not set, an unauthorized (401) error code will be returned to the client. Note that this attribute doesn’t apply if the error occurs during a form-based login, where the URL for authentication failure will take precedence.
- session-authentication-strategy-ref Allows injection of the SessionAuthenticationStrategy instance used by the SessionManagementFilter
-
session-fixation-protection Indicates how session fixation protection will be applied when a user authenticates. If set to "none", no protection will be applied. "newSession" will create a new empty session, with only Spring Security-related attributes migrated. "migrateSession" will create a new session and copy all session attributes to the new session. In Servlet 3.1 (Java EE 7) and newer containers, specifying "changeSessionId" will keep the existing session and use the container-supplied session fixation protection (HttpServletRequest#changeSessionId()). Defaults to "changeSessionId" in Servlet 3.1 and newer containers, "migrateSession" in older containers. Throws an exception if "changeSessionId" is used in older containers.
If session fixation protection is enabled, the
SessionManagementFilteris injected with an appropriately configuredDefaultSessionAuthenticationStrategy. See the Javadoc for this class for more details.
Adds support for concurrent session control, allowing limits to be placed on the number of active sessions a user can have. A ConcurrentSessionFilter will be created, and a ConcurrentSessionControlAuthenticationStrategy will be used with the SessionManagementFilter. If a form-login element has been declared, the strategy object will also be injected into the created authentication filter. An instance of SessionRegistry (a SessionRegistryImpl instance unless the user wishes to use a custom bean) will be created for use by the strategy.
-
error-if-maximum-exceeded
If set to "true" a
SessionAuthenticationExceptionwill be raised when a user attempts to exceed the maximum allowed number of sessions. The default behaviour is to expire the original session.
-
expired-url
The URL a user will be redirected to if they attempt to use a session which has been "expired" by the concurrent session controller because the user has exceeded the number of allowed sessions and has logged in again elsewhere. Should be set unless
exception-if-maximum-exceededis set. If no value is supplied, an expiry message will just be written directly back to the response.
-
max-sessions
Maps to the
maximumSessionsproperty ofConcurrentSessionControlAuthenticationStrategy.
Adds support for X.509 authentication. An X509AuthenticationFilter will be added to the stack and an Http403ForbiddenEntryPoint bean will be created. The latter will only be used if no other authentication mechanisms are in use (its only functionality is to return an HTTP 403 error code). A PreAuthenticatedAuthenticationProvider will also be created which delegates the loading of user authorities to a UserDetailsService.
Used to explicitly configure a FilterChainProxy instance with a FilterChainMap
Used within to define a specific URL pattern and the list of filters which apply to the URLs matching that pattern. When multiple filter-chain elements are assembled in a list in order to configure a FilterChainProxy, the most specific patterns must be placed at the top of the list, with most general ones at the bottom.
-
filters
A comma separated list of references to Spring beans that implement
Filter. The value "none" means that noFilter’s should be used for this `FilterChain.
- pattern A-pattern that creates RequestMatcher in combination with the request-matcher
Used to explicitly configure a FilterSecurityMetadataSource bean for use with a FilterSecurityInterceptor. Usually only needed if you are configuring a FilterChainProxy explicitly, rather than using the<http> element. The intercept-url elements used should only contain pattern, method and access attributes. Any others will result in a configuration error.
- request-matcher Defines the strategy use for matching incoming requests. Currently the options are 'ant' (for ant path patterns), 'regex' for regular expressions and 'ciRegex' for case-insensitive regular expressions.
- use-expressions Enables the use of expressions in the 'access' attributes in <intercept-url> elements rather than the traditional list of configuration attributes. Defaults to 'true'. If enabled, each attribute should contain a single boolean expression. If the expression evaluates to 'true', access will be granted.
Spring Security 4.0+ provides support for authorizing messages. One concrete example of where this is useful is to provide authorization in WebSocket based applications.
The websocket-message-broker element has two different modes. If the websocket-message-broker@id is not specified, then it will do the following things:
-
Ensure that any SimpAnnotationMethodMessageHandler has the AuthenticationPrincipalArgumentResolver registered as a custom argument resolver. This allows the use of
@AuthenticationPrincipalto resolve the principal of the currentAuthentication - Ensures that the SecurityContextChannelInterceptor is automatically registered for the clientInboundChannel. This populates the SecurityContextHolder with the user that is found in the Message
- Ensures that a ChannelSecurityInterceptor is registered with the clientInboundChannel. This allows authorization rules to be specified for a message.
- Ensures that a CsrfChannelInterceptor is registered with the clientInboundChannel. This ensures that only requests from the original domain are enabled.
- Ensures that a CsrfTokenHandshakeInterceptor is registered with WebSocketHttpRequestHandler, TransportHandlingSockJsService, or DefaultSockJsService. This ensures that the expected CsrfToken from the HttpServletRequest is copied into the WebSocket Session attributes.
If additional control is necessary, the id can be specified and a ChannelSecurityInterceptor will be assigned to the specified id. All the wiring with Spring’s messaging infrastructure can then be done manually. This is more cumbersome, but provides greater control over the configuration.
- id A bean identifier, used for referring to the ChannelSecurityInterceptor bean elsewhere in the context. If specified, Spring Security requires explicit configuration within Spring Messaging. If not specified, Spring Security will automatically integrate with the messaging infrastructure as described in Section 38.2.1, “<websocket-message-broker>”
Defines an authorization rule for a message.
- pattern An ant based pattern that matches on the Message destination. For example, "/" matches any Message with a destination; "/admin/" matches any Message that has a destination that starts with "/admin/**".
Before Spring Security 3.0, an AuthenticationManager was automatically registered internally. Now you must register one explicitly using the <authentication-manager> element. This creates an instance of Spring Security’s ProviderManager class, which needs to be configured with a list of one or more AuthenticationProvider instances. These can either be created using syntax elements provided by the namespace, or they can be standard bean definitions, marked for addition to the list using the authentication-provider element.
Every Spring Security application which uses the namespace must have include this element somewhere. It is responsible for registering the AuthenticationManager which provides authentication services to the application. All elements which create AuthenticationProvider instances should be children of this element.
- alias This attribute allows you to define an alias name for the internal instance for use in your own configuration. Its use is described in thenamespace introduction.
-
erase-credentials
If set to true, the AuthenticationManger will attempt to clear any credentials data in the returned Authentication object, once the user has been authenticated. Literally it maps to the
eraseCredentialsAfterAuthenticationproperty of theProviderManager. This is discussed in the Core Services chapter.
Unless used with a ref attribute, this element is shorthand for configuring a DaoAuthenticationProvider. DaoAuthenticationProvider loads user information from a UserDetailsService and compares the username/password combination with the values supplied at login. The UserDetailsService instance can be defined either by using an available namespace element ( jdbc-user-service or by using the user-service-ref attribute to point to a bean defined elsewhere in the application context). You can find examples of these variations in the namespace introduction.
If you have written your own AuthenticationProvider implementation (or want to configure one of Spring Security’s own implementations as a traditional bean for some reason, then you can use the following syntax to add it to the internal `ProviderManager’s list:
<security:authentication-manager> <security:authentication-provider ref="myAuthenticationProvider" /> </security:authentication-manager> <bean id="myAuthenticationProvider" class="com.something.MyAuthenticationProvider"/>
Causes creation of a JDBC-based UserDetailsService.
- authorities-by-username-query An SQL statement to query for a user’s granted authorities given a username.
The default is
select username, authority from authorities where username = ?
-
group-authorities-by-username-query An SQL statement to query user’s group authorities given a username. The default is
select g.id, g.group_name, ga.authority from groups g, group_members gm, group_authorities ga where gm.username = ? and g.id = ga.group_id and g.id = gm.group_id
Authentication providers can optionally be configured to use a password encoder as described in the namespace introduction. This will result in the bean being injected with the appropriate PasswordEncoder instance, potentially with an accompanying SaltSource bean to provide salt values for hashing.
Password salting strategy. A system-wide constant or a property from the UserDetails object can be used.
Creates an in-memory UserDetailsService from a properties file or a list of "user" child elements. Usernames are converted to lower-case internally to allow for case-insensitive lookups, so this should not be used if case-sensitivity is required.
Represents a user in the application.
- authorities One of more authorities granted to the user. Separate authorities with a comma (but no space). For example, "ROLE_USER,ROLE_ADMINISTRATOR"
- password The password assigned to the user. This may be hashed if the corresponding authentication provider supports hashing (remember to set the "hash" attribute of the "user-service" element). This attribute be omitted in the case where the data will not be used for authentication, but only for accessing authorities. If omitted, the namespace will generate a random value, preventing its accidental use for authentication. Cannot be empty.
This element is the primary means of adding support for securing methods on Spring Security beans. Methods can be secured by the use of annotations (defined at the interface or class level) or by defining a set of pointcuts as child elements, using AspectJ syntax.
-
access-decision-manager-ref
Method security uses the same
AccessDecisionManagerconfiguration as web security, but this can be overridden using this attribute. By default an AffirmativeBased implementation is used for with a RoleVoter and an AuthenticatedVoter.
-
authentication-manager-ref
A reference to an
AuthenticationManagerthat should be used for method security.
-
jsr250-annotations
Specifies whether JSR-250 style attributes are to be used (for example "RolesAllowed"). This will require the javax.annotation.security classes on the classpath. Setting this to true also adds a
Jsr250Voterto theAccessDecisionManager, so you need to make sure you do this if you are using a custom implementation and want to use these annotations.
-
metadata-source-ref
An external
MethodSecurityMetadataSourceinstance can be supplied which will take priority over other sources (such as the default annotations).
-
mode
This attribute can be set to "aspectj" to specify that AspectJ should be used instead of the default Spring AOP. Secured methods must be woven with the
AnnotationSecurityAspectfrom thespring-security-aspectsmodule.
It is important to note that AspectJ follows Java’s rule that annotations on interfaces are not inherited. This means that methods that define the Security annotaitons on the interface will not be secured. Instead, you must place the Security annotation on the class when using AspectJ.
- pre-post-annotations Specifies whether the use of Spring Security’s pre and post invocation annotations (@PreFilter, @PreAuthorize, @PostFilter, @PostAuthorize) should be enabled for this application context. Defaults to "disabled".
This element can be used to decorate an AfterInvocationProvider for use by the security interceptor maintained by the <global-method-security> namespace. You can define zero or more of these within the global-method-security element, each with a ref attribute pointing to an AfterInvocationProvider bean instance within your application context.
Allows the default expression-based mechanism for handling Spring Security’s pre and post invocation annotations (@PreFilter, @PreAuthorize, @PostFilter, @PostAuthorize) to be replace entirely. Only applies if these annotations are enabled.
Defines the PrePostInvocationAttributeFactory instance which is used to generate pre and post invocation metadata from the annotated methods.
Customizes the PostInvocationAdviceProvider with the ref as the PostInvocationAuthorizationAdvice for the <pre-post-annotation-handling> element.
Customizes the PreInvocationAuthorizationAdviceVoter with the ref as the PreInvocationAuthorizationAdviceVoter for the <pre-post-annotation-handling> element.
<protect-pointcut>
Rather than defining security attributes on an individual method or class basis using the @Secured annotation, you can define cross-cutting security constraints across whole sets of methods and interfaces in your service layer using the <protect-pointcut> element. You can find an example in the namespace introduction.
Can be used inside a bean definition to add a security interceptor to the bean and set up access configuration attributes for the bean’s methods
Creates a MethodSecurityMetadataSource instance
- use-expressions Enables the use of expressions in the 'access' attributes in <intercept-url> elements rather than the traditional list of configuration attributes. Defaults to 'false'. If enabled, each attribute should contain a single boolean expression. If the expression evaluates to 'true', access will be granted.
Defines a protected method and the access control configuration attributes that apply to it. We strongly advise you NOT to mix "protect" declarations with any services provided "global-method-security".
LDAP is covered in some details in its own chapter. We will expand on that here with some explanation of how the namespace options map to Spring beans. The LDAP implementation uses Spring LDAP extensively, so some familiarity with that project’s API may be useful.
<ldap-server> Element
This element sets up a Spring LDAP ContextSource for use by the other LDAP beans, defining the location of the LDAP server and other information (such as a username and password, if it doesn’t allow anonymous access) for connecting to it. It can also be used to create an embedded server for testing. Details of the syntax for both options are covered in the LDAP chapter. The actual ContextSource implementation is DefaultSpringSecurityContextSource which extends Spring LDAP’s LdapContextSource class. The manager-dn and manager-password attributes map to the latter’s userDn and password properties respectively.
If you only have one server defined in your application context, the other LDAP namespace-defined beans will use it automatically. Otherwise, you can give the element an "id" attribute and refer to it from other namespace beans using the server-ref attribute. This is actually the bean id of the ContextSource instance, if you want to use it in other traditional Spring beans.
- ldif Explicitly specifies an ldif file resource to load into an embedded LDAP server. The ldiff is should be a Spring resource pattern (i.e. classpath:init.ldiff). The default is classpath*:*.ldiff
- manager-dn Username (DN) of the "manager" user identity which will be used to authenticate to a (non-embedded) LDAP server. If omitted, anonymous access will be used.
This element is shorthand for the creation of an LdapAuthenticationProvider instance. By default this will be configured with a BindAuthenticator instance and a DefaultAuthoritiesPopulator. As with all namespace authentication providers, it must be included as a child of the authentication-provider element.
-
group-role-attribute
The LDAP attribute name which contains the role name which will be used within Spring Security. Maps to the
DefaultLdapAuthoritiesPopulator’s `groupRoleAttributeproperty. Defaults to "cn".
-
group-search-base
Search base for group membership searches. Maps to the
DefaultLdapAuthoritiesPopulator’s `groupSearchBaseconstructor argument. Defaults to "" (searching from the root).
-
group-search-filter
Group search filter. Maps to the
DefaultLdapAuthoritiesPopulator’s `groupSearchFilterproperty. Defaults to (uniqueMember={0}). The substituted parameter is the DN of the user.
-
role-prefix
A non-empty string prefix that will be added to role strings loaded from persistent. Maps to the
DefaultLdapAuthoritiesPopulator’s `rolePrefixproperty. Defaults to "ROLE_". Use the value "none" for no prefix in cases where the default is non-empty.
- server-ref The optional server to use. If omitted, and a default LDAP server is registered (using <ldap-server> with no Id), that server will be used.
- user-context-mapper-ref Allows explicit customization of the loaded user object by specifying a UserDetailsContextMapper bean which will be called with the context information from the user’s directory entry
- user-details-class Allows the objectClass of the user entry to be specified. If set, the framework will attempt to load standard attributes for the defined class into the returned UserDetails object
-
user-dn-pattern
If your users are at a fixed location in the directory (i.e. you can work out the DN directly from the username without doing a directory search), you can use this attribute to map directly to the DN. It maps directly to the
userDnPatternsproperty ofAbstractLdapAuthenticator. The value is a specific pattern used to build the user’s DN, for example "uid={0},ou=people". The key "{0}" must be present and will be substituted with the username.
-
user-search-base Search base for user searches. Defaults to "". Only used with a 'user-search-filter'.
If you need to perform a search to locate the user in the directory, then you can set these attributes to control the search. The
BindAuthenticatorwill be configured with aFilterBasedLdapUserSearchand the attribute values map directly to the first two arguments of that bean’s constructor. If these attributes aren’t set and nouser-dn-patternhas been supplied as an alternative, then the default search values ofuser-search-filter="(uid={0})"anduser-search-base=""will be used.
-
user-search-filter The LDAP filter used to search for users (optional). For example "(uid={0})". The substituted parameter is the user’s login name.
If you need to perform a search to locate the user in the directory, then you can set these attributes to control the search. The
BindAuthenticatorwill be configured with aFilterBasedLdapUserSearchand the attribute values map directly to the first two arguments of that bean’s constructor. If these attributes aren’t set and nouser-dn-patternhas been supplied as an alternative, then the default search values ofuser-search-filter="(uid={0})"anduser-search-base=""will be used.
This is used as child element to <ldap-provider> and switches the authentication strategy from BindAuthenticator to PasswordComparisonAuthenticator.
This element configures an LDAP UserDetailsService. The class used is LdapUserDetailsService which is a combination of a FilterBasedLdapUserSearch and a DefaultLdapAuthoritiesPopulator. The attributes it supports have the same usage as in <ldap-provider>.
- group-role-attribute The LDAP attribute name which contains the role name which will be used within Spring Security. Defaults to "cn".
- group-search-base Search base for group membership searches. Defaults to "" (searching from the root).
- group-search-filter Group search filter. Defaults to (uniqueMember={0}). The substituted parameter is the DN of the user.
- role-prefix A non-empty string prefix that will be added to role strings loaded from persistent storage (e.g. "ROLE_"). Use the value "none" for no prefix in cases where the default is non-empty.
- server-ref The optional server to use. If omitted, and a default LDAP server is registered (using <ldap-server> with no Id), that server will be used.
- user-context-mapper-ref Allows explicit customization of the loaded user object by specifying a UserDetailsContextMapper bean which will be called with the context information from the user’s directory entry
- user-details-class Allows the objectClass of the user entry to be specified. If set, the framework will attempt to load standard attributes for the defined class into the returned UserDetails object
[22] See the introductory chapter for how to set up the mapping from your web.xml
[23] This feature is really just provided for convenience and is not intended for production (where a view technology will have been chosen and can be used to render a customized login page). The class DefaultLoginPageGeneratingFilter is responsible for rendering the login page and will provide login forms for both normal form login and/or OpenID if required.
[24] This doesn’t affect the use of PersistentTokenBasedRememberMeServices, where the tokens are stored on the server side.
This appendix provides a reference of the modules in Spring Security and the additional dependencies that they require in order to function in a running application. We don’t include dependenices that are only used when building or testing Spring Security itself. Nor do we include transitive dependencies which are required by external dependencies.
The version of Spring required is listed on the project website, so the specific versions are omitted for Spring dependencies below. Note that some of the dependencies listed as"optional" below may still be required for other non-security functionality in a Spring application. Also dependencies listed as "optional" may not actually be marked as such in the project’s Maven pom files if they are used in most applications. They are"optional" only in the sense that you don’t need them unless you are using the specified functionality.
Where a module depends on another Spring Security module, the non-optional dependencies of the module it depends on are also assumed to be required and are not listed separately.
The core module must be included in any project using Spring Security.
Table 39.1. Core Depenendencies
| Dependency | Version | Description |
|---|---|---|
aopalliance | 1.0 | Required for method security implementation. |
ehcache | 1.6.2 | Required if the ehcache-based user cache implementation is used (optional). |
spring-aop | Method security is based on Spring AOP | |
spring-beans | Required for Spring configuration | |
spring-expression | Required for expression-based method security (optional) | |
spring-jdbc | Required if using a database to store user data (optional). | |
spring-tx | Required if using a database to store user data (optional). | |
aspectjrt | 1.6.10 | Required if using AspectJ support (optional). |
jsr250-api | 1.0 | Required if you are using JSR-250 method-security annotations (optional). |
This module is typically required in web applications which use the Servlet API.
Table 39.2. Remoting Dependencies
| Dependency | Version | Description |
|---|---|---|
spring-security-core | ||
spring-web | Required for clients which use HTTP remoting support. |
This module is typically required in web applications which use the Servlet API.
Table 39.3. Web Dependencies
| Dependency | Version | Description |
|---|---|---|
spring-security-core | ||
spring-web | Spring web support classes are used extensively. | |
spring-jdbc | Required for JDBC-based persistent remember-me token repository (optional). | |
spring-tx | Required by remember-me persistent token repository implementations (optional). |
This module is only required if you are using LDAP authentication.
Table 39.4. LDAP Dependencies
| Dependency | Version | Description |
|---|---|---|
spring-security-core | ||
spring-ldap-core | 1.3.0 | LDAP support is based on Spring LDAP. |
spring-tx | Data exception classes are required. | |
apache-ds [1] | 1.5.5 | Required if you are using an embedded LDAP server (optional). |
shared-ldap | 0.9.15 | Required if you are using an embedded LDAP server (optional). |
ldapsdk | 4.1 | Mozilla LdapSDK. Used for decoding LDAP password policy controls if you are using password-policy functionality with OpenLDAP, for example. |
[1] The modules | ||
This module is required if you are using Spring Security namespace configuration.
Table 39.5. Config Dependencies
| Dependency | Version | Description |
|---|---|---|
spring-security-core | ||
spring-security-web | Required if you are using any web-related namespace configuration (optional). | |
spring-security-ldap | Required if you are using the LDAP namespace options (optional). | |
spring-security-openid | Required if you are using OpenID authentication (optional). | |
aspectjweaver | 1.6.10 | Required if using the protect-pointcut namespace syntax (optional). |
The ACL module.
Table 39.6. ACL Dependencies
| Dependency | Version | Description |
|---|---|---|
spring-security-core | ||
ehcache | 1.6.2 | Required if the ehcache-based ACL cache implementation is used (optional if you are using your own implementation). |
spring-jdbc | Required if you are using the default JDBC-based AclService (optional if you implement your own). | |
spring-tx | Required if you are using the default JDBC-based AclService (optional if you implement your own). |
The CAS module provides integration with JA-SIG CAS.
Table 39.7. CAS Dependencies
| Dependency | Version | Description |
|---|---|---|
spring-security-core | ||
spring-security-web | ||
cas-client-core | 3.1.12 | The JA-SIG CAS Client. This is the basis of the Spring Security integration. |
ehcache | 1.6.2 | Required if you are using the ehcache-based ticket cache (optional). |
The OpenID module.
Table 39.8. OpenID Dependencies
| Dependency | Version | Description |
|---|---|---|
spring-security-core | ||
spring-security-web | ||
openid4java-nodeps | 0.9.6 | Spring Security’s OpenID integration uses OpenID4Java. |
httpclient | 4.1.1 | openid4java-nodeps depends on HttpClient 4. |
guice | 2.0 | openid4java-nodeps depends on Guice 2. |
Provides Spring Security’s JSP tag implementations.
Table 39.9. Taglib Dependencies
| Dependency | Version | Description |
|---|---|---|
spring-security-core | ||
spring-security-web | ||
spring-security-acl | Required if you are using the | |
spring-expression | Required if you are using SPEL expressions in your tag access constraints. |