In Chapter 2, Service Provider 'Connect' Framework, you learned how Spring Social's Service Provider 'Connect' Framework can be used to manage user connections that link your application's user accounts with accounts on external service providers. In this chapter, you'll learn how to control the connect flow in a web application environment.
Spring Social's spring-social-web module includes ConnectController, a Spring MVC controller that coordinates the connection flow between an application and service providers.
ConnectController takes care of redirecting the user to the service provider for authorization and responding to the callback after authorization.
As ConnectController directs the overall connection flow, it depends on several other objects to do its job.
Before getting into those, first we'll define a single Java @Configuration class where the various Spring Social objects, including ConnectController, will be configured:
@Configuration
public class SocialConfig {

}
Now, ConnectController first delegates to one or more ConnectionFactory instances to establish connections to providers on behalf of users.
Once a connection has been established, it delegates to a ConnectionRepository to persist user connection data.
Each of the Spring Social provider modules includes a ConnectionFactory implementation:
org.springframework.social.twitter.connect.TwitterConnectionFactoryorg.springframework.social.facebook.connect.FacebookConnectionFactoryorg.springframework.social.linkedin.connect.LinkedInConnectionFactoryorg.springframework.social.tripit.connect.TripItConnectionFactoryorg.springframework.social.github.connect.GitHubConnectionFactory
To register one or more ConnectionFactories, simply define a ConnectionFactoryLocator @Bean as follows:
@Configuration
public class SocialConfig {

    @Bean
    public ConnectionFactoryLocator connectionFactoryLocator() {
        ConnectionFactoryRegistry registry = new ConnectionFactoryRegistry();

        registry.addConnectionFactory(new FacebookConnectionFactory(
            environment.getProperty("facebook.clientId"),
            environment.getProperty("facebook.clientSecret")));

        registry.addConnectionFactory(new TwitterConnectionFactory(
            environment.getProperty("twitter.consumerKey"),
            environment.getProperty("twitter.consumerSecret")));

        return registry;
    }

    @Inject
    private Environment environment;

}
Above, two connection factories, one for Facebook and one for Twitter, have been registered. If you would like to support other providers, simply register their connection factories here. Because client ids and secrets may be different across environments (e.g., test, production, etc), we recommend you externalize these values.
As discussed in Section 2.3, “Persisting connections”, ConnectionRepository defines operations for persisting and restoring connections for a specific user.
Therefore, when configuring a ConnectionRepository bean for use by ConnectController, it must be scoped such that it can be created on a per-user basis.
The following Java-based configuration shows how to construct an proxy to a request-scoped ConnectionRepository instance for the currently authenticated user:
@Configuration
public class SocialConfig {

    @Bean
    @Scope(value="request", proxyMode=ScopedProxyMode.INTERFACES)
    public ConnectionRepository connectionRepository(
        Authentication authentication = SecurityContextHolder.getContext().getAuthentication();
        if (authentication == null) {
            throw new IllegalStateException("Unable to get a ConnectionRepository: no user signed in");
        }
        return usersConnectionRepository().createConnectionRepository(authentication.getName());
    }

}
The @Bean method above is injected with a Principal representing the current user's identity.
This is passed to UsersConnectionRepository to construct a ConnectionRepository instance for that user.
This means that we're also going to need to configure a UsersConnectionRepository @Bean:
@Configuration
public class SocialConfig {

    @Bean
    public UsersConnectionRepository usersConnectionRepository() {
        return new JdbcUsersConnectionRepository(dataSource, connectionFactoryLocator(),
            textEncryptor);
    }

    @Inject
    private DataSource dataSource;

    @Inject
    private TextEncryptor textEncryptor;
}
UsersConnectionRepository is a singleton data store for connections across all users.
JdbcUsersConnectionRepository is the RDMS-based implementation and needs a DataSource, ConnectionFactoryLocator, and TextEncryptor to do its job.
It will use the DataSource to access the RDBMS when persisting and restoring connections.
When restoring connections, it will use the ConnectionFactoryLocator to locate ConnectionFactory instances.
JdbcUsersConnectionRepository uses the TextEncryptor to encrypt credentials when persisting connections.
Spring Security 3.1 makes a few useful text encryptors available via static factory methods in its Encryptors class.
For example, a no-op text encryptor is useful at development time and can be configured like this:
@Configuration
public class SecurityConfig {

    @Configuration
    @Profile("dev")
    static class Dev {

        @Bean
        public TextEncryptor textEncryptor() {
            return Encryptors.noOpText();
        }

    }

}
Notice that the inner configuration class is annotated with @Profile("dev").
Spring 3.1 introduced the profile concept where certain beans will only be created when certain profiles are active.
Here, the @Profile annotation ensures that this TextEncryptor will only be created when "dev" is an active profile.
For production-time purposes, a stronger text encryptor is recommended and can be created when the "production" profile is active:
@Configuration
public class SecurityConfig {

    @Configuration
    @Profile("prod")
    static class Prod {

        @Bean
        public TextEncryptor textEncryptor() {
            return Encryptors.queryableText(environment.getProperty("security.encryptPassword"),
                environment.getProperty("security.encryptSalt"));
        }

        @Inject
        private Environment environment;

    }

}
Up to this point, the connection support configuration has been done using Spring's Java-based configuration style.
But you can configure it in either Java configuration or XML.
Here's the XML equivalent of the ConnectionFactoryRegistry configuration:
<bean id="connectionFactoryLocator"
      class="org.springframework.social.connect.support.ConnectionFactoryRegistry">
    <property name="connectionFactories">
        <list>
            <bean class="org.springframework.social.twitter.connect.TwitterConnectionFactory">
                <constructor-arg value="${twitter.consumerKey}" />
                <constructor-arg value="${twitter.consumerSecret}" />
            </bean>
            <bean class="org.springframework.social.facebook.connect.FacebookConnectionFactory">
                <constructor-arg value="${facebook.clientId}" />
                <constructor-arg value="${facebook.clientSecret}" />
            </bean>
        </list>
    </property>
</bean>
This is functionally equivalent to the Java-based configuration of ConnectionFactoryRegistry shown before.
Here's an XML equivalent of the JdbcUsersConnectionRepository and ConnectionRepository configurations shown before:
<bean id="usersConnectionRepository"
      class="org.springframework.social.connect.jdbc.JdbcUsersConnectionRepository">
    <constructor-arg ref="dataSource" />
    <constructor-arg ref="connectionFactoryLocator" />
    <constructor-arg ref="textEncryptor" />
</bean>

<bean id="connectionRepository" factory-method="createConnectionRepository"
      factory-bean="usersConnectionRepository" scope="request">
    <constructor-arg value="#{request.userPrincipal.name}" />
    <aop:scoped-proxy proxy-target-class="false" />
</bean>
Likewise, here is the equivalent configuration of the TextEncryptor beans:
<?xml version="1.0" encoding="UTF-8"?>
<beans xmlns="http://www.springframework.org/schema/beans"
    xmlns:xsi="http://www.w3.org/2001/XMLSchema-instance"
    xsi:schemaLocation="http://www.springframework.org/schema/beans
        http://www.springframework.org/schema/beans/spring-beans-3.1.xsd">

    <beans profile="dev">
        <bean id="textEncryptor" class="org.springframework.security.crypto.encrypt.Encryptors"
            factory-method="noOpText" />
    </beans>

    <beans profile="prod">
        <bean id="textEncryptor" class="org.springframework.security.crypto.encrypt.Encryptors"
                factory-method="text">
            <constructor-arg value="${security.encryptPassword}" />
            <constructor-arg value="${security.encryptSalt}" />
        </bean>
    </beans>

</beans>
Just like the Java-based configuration, profiles are used to select which of the text encryptors will be created.
With its dependencies configured, ConnectController now has what it needs to allow users to establish connections with registered service providers.
Now, simply add it to your Social @Configuration:
@Configuration
public class SocialConfig {

    @Bean
    public ConnectController connectController() {
        return new ConnectController(connectionFactoryLocator(),
            connectionRepository());
    }

}
Or, if you prefer Spring's XML-based configuration, then you can configure ConnectController like this:
<bean class="org.springframework.social.connect.web.ConnectController">
    <!-- relies on by-type autowiring for the constructor-args -->
</bean>
ConnectController supports authorization flows for OAuth 1 and OAuth 2, relying on OAuth1Operations or OAuth2Operations to handle the specifics for each protocol.
ConnectController will obtain the appropriate OAuth operations interface from one of the provider connection factories registered with ConnectionFactoryRegistry.
It will select a specific ConnectionFactory to use by matching the connection factory's ID with the URL path.
The path pattern that ConnectController handles is "/connect/{providerId}".
Therefore, if ConnectController is handling a request for "/connect/twitter", then the ConnectionFactory whose getProviderId() returns "twitter" will be used.
(As configured in the previous section, TwitterConnectionFactory will be chosen.)
When coordinating a connection with a service provider, ConnectController constructs a callback URL for the provider to redirect to after the user grants authorization.
By default ConnectController uses information from the request to determine the protocol, host name, and port number to use when creating the callback URL.
This is fine in many cases, but if your application is hosted behind a proxy those details may point to an internal server and will not be suitable for constructing a public callback URL.
If you have this problem, you can set the applicationUrl property to the base external URL of your application.
ConnectController will use that URL to construct the callback URL instead of using information from the request.
For example:
@Configuration
public class SocialConfig {

    @Bean
    public ConnectController connectController() {
        ConnectController controller = new ConnectController(
            connectionFactoryLocator(), connectionRepository());
        controller.setApplicationUrl(environment.getProperty("application.url");
        return controller;
    }

}
Or if you prefer XML configuration:
<bean class="org.springframework.social.connect.web.ConnectController">
    <!-- relies on by-type autowiring for the constructor-args -->
    <property name="applicationUrl" value="${application.url}" />
</bean>
Just as with the authorization keys and secrets, we recommend that you externalize the application URL because it will likely vary across different deployment environments.
The flow that ConnectController follows is slightly different, depending on which authorization protocol is supported by the service provider.
For OAuth 2-based providers, the flow is as follows:
GET /connect- Displays a web page showing connection status for all providers.GET /connect/{providerId}- Displays a web page showing connection status to the provider.POST /connect/{providerId}- Initiates the connection flow with the provider.GET /connect/{providerId}?code={code}- Receives the authorization callback from the provider, accepting an authorization code. Uses the code to request an access token and complete the connection.DELETE /connect/{providerId}- Severs all of the user's connection with the provider.DELETE /connect/{providerId}/{providerUserId}- Severs a specific connection with the provider, based on the user's provider user ID.
For an OAuth 1 provider, the flow is very similar, with only a subtle difference in how the callback is handled:
GET /connect- Displays a web page showing connection status for all providers.GET /connect/{providerId}- Displays a web page showing connection status to the provider.POST /connect/{providerId}- Initiates the connection flow with the provider.-
GET /connect/{providerId}?oauth_token={request token}&oauth_verifier={verifier}- Receives the authorization callback from the provider, accepting a verification code. Exchanges this verification code along with the request token for an access token and completes the connection. Theoauth_verifierparameter is optional and is only used for providers implementing OAuth 1.0a. DELETE /connect/{providerId}- Severs all of the user's connection with the provider.DELETE /connect/{providerId}/{providerUserId}- Severs a specific connection with the provider, based on the user's provider user ID.
Before the connection flow starts in earnest, a web application may choose to show a page that offers the user information on their connection status.
This page would offer them the opportunity to create a connection between their account and their social profile.
ConnectController can display such a page if the browser navigates to /connect/{provider}.
For example, to display a connection status page for Twitter, where the provider name is "twitter", your application should provide a link similar to this:
<a href="<c:url value="/connect/twitter" />">Connect to Twitter</a>
ConnectController will respond to this request by first checking to see if a connection already exists between the user's account and Twitter.
If not, then it will with a view that should offer the user an opportunity to create the connection.
Otherwise, it will respond with a view to inform the user that a connection already exists.
The view names that ConnectController responds with are based on the provider's name.
In this case, since the provider name is "twitter", the view names are "connect/twitterConnect" and "connect/twitterConnected".
Optionally, you may choose to display a page that shows connection status for all providers. In that case, the link might look like this:
<a href="<c:url value="/connect" />">Your connections</a>
The view name that ConnectController responds with for this URL is "connect/status".
To kick off the connection flow, the application should POST to /connect/{providerId}.
Continuing with the Twitter example, a JSP view resolved from "connect/twitterConnect" might include the following form:
<form action="<c:url value="/connect/twitter" />" method="POST">
    <p>You haven't created any connections with Twitter yet. Click the button to create
       a connection between your account and your Twitter profile.
       (You'll be redirected to Twitter where you'll be asked to authorize the connection.)</p>
    <p><button type="submit"><img src="<c:url value="/resources/social/twitter/signin.png" />"/>
    </button></p>
</form>
When ConnectController handles the request, it will redirect the browser to the provider's authorization page.
In the case of an OAuth 1 provider, it will first fetch a request token from the provider and pass it along as a parameter to the authorization page.
Request tokens aren't used in OAuth 2, however, so instead it passes the application's client ID and redirect URI as parameters to the authorization page.
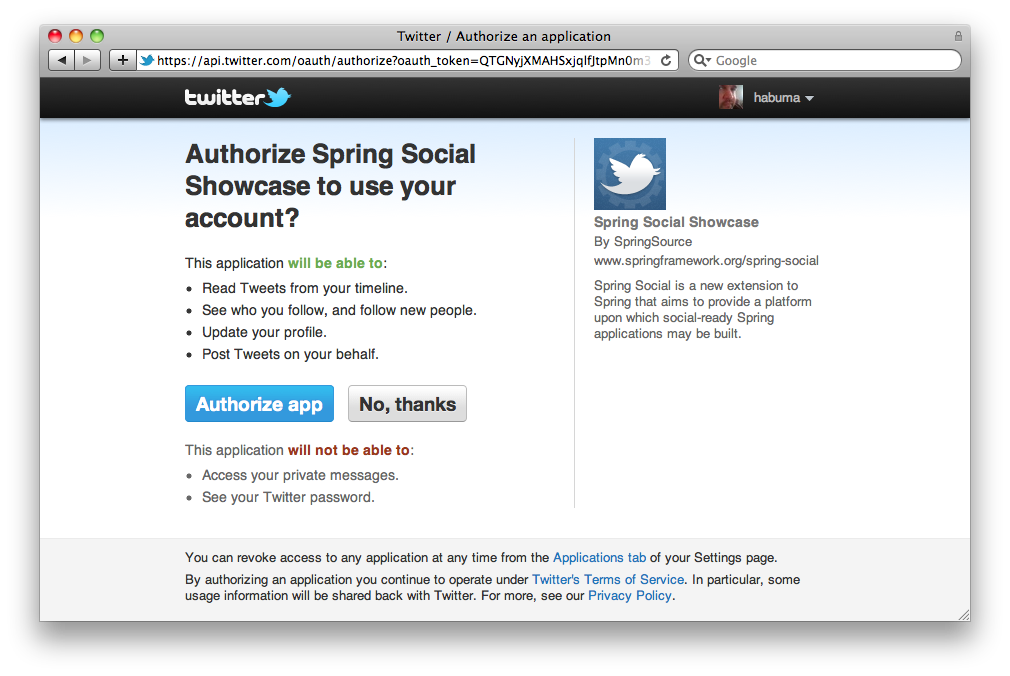
For example, Twitter's authorization URL has the following pattern:
https://twitter.com/oauth/authorize?oauth_token={token}
If the application's request token were "vPyVSe"[1], then the browser would be redirected to https://twitter.com/oauth/authorize?oauth_token=vPyVSe and a page similar to the following would be displayed to the user (from Twitter)[2]:
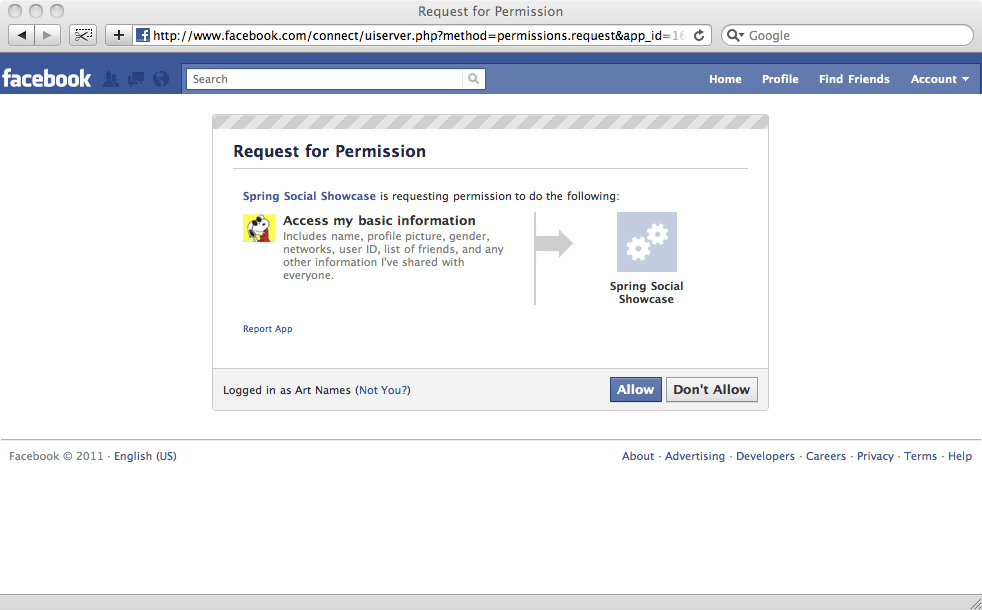
In contrast, Facebook is an OAuth 2 provider, so its authorization URL takes a slightly different pattern:
https://graph.facebook.com/oauth/authorize?client_id={clientId}&redirect_uri={redirectUri}
Thus, if the application's Facebook client ID is "0b754" and it's redirect URI is "http://www.mycoolapp.com/connect/facebook", then the browser would be redirected to https://graph.facebook.com/oauth/authorize?client_id=0b754&redirect_uri=http://www.mycoolapp.com/connect/facebook and Facebook would display the following authorization page to the user:
If the user clicks the "Allow" button to authorize access, the provider will redirect the browser back to the authorization callback URL where ConnectController will be waiting to complete the connection.
The behavior varies from provider to provider when the user denies the authorization. For instance, Twitter will simply show a page telling the user that they denied the application access and does not redirect back to the application's callback URL. Facebook, on the other hand, will redirect back to the callback URL with error information as request parameters.
In the previous example of authorizing an application to interact with a user's Facebook profile, you notice that the application is only requesting access to the user's basic profile information. But there's much more that an application can do on behalf of a user with Facebook than simply harvest their profile data. For example, how can an application gain authorization to post to a user's Facebook wall?
OAuth 2 authorization may optionally include a scope parameter that indicates the type of authorization being requested. On the provider, the "scope" parameter should be passed along to the authorization URL. In the case of Facebook, that means that the Facebook authorization URL pattern should be as follows:
https://graph.facebook.com/oauth/authorize?client_id={clientId}&redirect_uri={redirectUri}&scope={scope}
ConnectController accepts a "scope" parameter at authorization and passes its value along to the provider's authorization URL.
For example, to request permission to post to a user's Facebook wall, the connect form might look like this:
<form action="<c:url value="/connect/twitter" />" method="POST">
    <input type="hidden" name="scope" value="publish_stream,offline_access" />
    <p>You haven't created any connections with Twitter yet. Click the button to create
       a connection between your account and your Twitter profile.
       (You'll be redirected to Twitter where you'll be asked to authorize the connection.)</p>
    <p><button type="submit"><img src="<c:url value="/resources/social/twitter/signin.png" />"/>
    </button></p>
</form>
The hidden "scope" field contains the scope values to be passed along in the scope> parameter to Facebook's authorization URL.
In this case, "publish_stream" requests permission to post to a user's wall.
In addition, "offline_access" requests permission to access Facebook on behalf of a user even when the user isn't using the application.
![[Note]](images/note.png) | Note |
|---|---|
|
OAuth 2 access tokens typically expire after some period of time. Per the OAuth 2 specification, an application may continue accessing a provider after a token expires by using a refresh token to either renew an expired access token or receive a new access token (all without troubling the user to re-authorize the application). Facebook does not currently support refresh tokens. Moreover, Facebook access tokens expire after about 2 hours. So, to avoid having to ask your users to re-authorize ever 2 hours, the best way to keep a long-lived access token is to request "offline_access". |
When asking for "publish_stream,offline_access" authorization, the user will be prompted with the following authorization page from Facebook:

Scope values are provider-specific, so check with the service provider's documentation for the available scopes. Facebook scopes are documented at http://developers.facebook.com/docs/authentication/permissions.
After the user agrees to allow the application have access to their profile on the provider, the provider will redirect their browser back to the application's authorization URL with a code that can be exchanged for an access token.
For OAuth 1.0a providers, the callback URL is expected to receive the code (known as a verifier in OAuth 1 terms) in an oauth_verifier parameter.
For OAuth 2, the code will be in a code parameter.
ConnectController will handle the callback request and trade in the verifier/code for an access token.
Once the access token has been received, the OAuth dance is complete and the application may use the access token to interact with the provider on behalf of the user.
The last thing that ConnectController does is to hand off the access token to the ServiceProvider implementation to be stored for future use.
To delete a connection via ConnectController, submit a DELETE request to "/connect/{provider}".
In order to support this through a form in a web browser, you'll need to have Spring's HiddenHttpMethodFilter configured in your application's web.xml.
Then you can provide a disconnect button via a form like this:
<form action="<c:url value="/connect/twitter" />" method="post">
  <div class="formInfo">
    <p>
      Spring Social Showcase is connected to your Twitter account.
      Click the button if you wish to disconnect.
    </p>
  </div>
  <button type="submit">Disconnect</button>
  <input type="hidden" name="_method" value="delete" />
</form>
When this form is submitted, ConnectController will disconnect the user's account from the provider.
It does this by calling the disconnect() method on each of the Connections returned by the provider's getConnections() method.
In the course of creating a connection with a service provider, you may want to inject additional functionality into the connection flow. For instance, perhaps you'd like to automatically post a tweet to a user's Twitter timeline immediately upon creating the connection.
ConnectController may be configured with one or more connection interceptors that it will call at points in the connection flow.
These interceptors are defined by the ConnectInterceptor interface:
public interface ConnectInterceptor<A> {

    void preConnect(ConnectionFactory<A> connectionFactory, MultiValueMap<String, String> parameters, WebRequest request);

    void postConnect(Connection<A> connection, WebRequest request);

}
The preConnect() method will be called by ConnectController just before redirecting the browser to the provider's authorization page.
Custom authorization parameters may be added to the provided parameter map.
postConnect() will be called immediately after a connection has been persisted linking the user's local account with the provider profile.
For example, suppose that after connecting a user account with their Twitter profile you want to immediately post a tweet about that connection to the user's Twitter timeline. To accomplish that, you might write the following connection interceptor:
public class TweetAfterConnectInterceptor implements ConnectInterceptor<Twitter> {

    public void preConnect(ConnectionFactory<TwitterApi> provider, MultiValueMap<String, String> parameters, WebRequest request) {
        // nothing to do
    }

    public void postConnect(Connection<TwitterApi> connection, WebRequest request) {
        connection.updateStatus("I've connected with the Spring Social Showcase!");
    }
}
This interceptor can then be injected into ConnectController when it is created:
@Bean
public ConnectController connectController() {
    ConnectController controller = new ConnectController(connectionFactoryLocator(),
        connectionRepository());
    controller.addInterceptor(new TweetAfterConnectInterceptor());
    return controller;
}
Or, as configured in XML:
<bean class="org.springframework.social.connect.web.ConnectController">
    <property name="interceptors">
        <list>
            <bean class="org.springframework.social.showcase.twitter.TweetAfterConnectInterceptor" />
        </list>
    </property>
</bean>
Note that the interceptors property is a list and can take as many interceptors as you'd like to wire into it.
When it comes time for ConnectController to call into the interceptors, it will only invoke the interceptor methods for those interceptors whose service operations type matches the service provider's operations type.
In the example given here, only connections made through a service provider whose operation type is TwitterApi will trigger the interceptor's methods.