GreenPages: a demonstration
 |
2.0.0.M1
Abstract
Spring application programmers are introduced to SpringSource® dm Server™ by installing dm Server and developing a small application called GreenPages. Despite its simplicity, GreenPages is designed to demonstrate many different dm Server features and to act as a template from which other modular applications can be built.
Copyright 2009, SpringSource.
Licensed Under the Apache License, Version 2.0 (the “License”); you may not use this file except in compliance with the License.
You may obtain a copy of the License at http://www.apache.org/licenses/LICENSE-2.0 .
Unless required by applicable law or agreed to in writing, software distributed under the License is distributed on an “AS IS” BASIS, WITHOUT WARRANTIES OR CONDITIONS OF ANY KIND, either express or implied. See the License for the specific language governing permissions and limitations under the License.
Trademarks. SpringSource and dm Server are trademarks or registered trademarks of SpringSource, Inc.
Java, Sun, and Sun Microsystems are trademarks or registered trademarks of Sun Microsystems, Inc. in the United States and other countries.
OSGi is a trademark or a registered trademark of the OSGi Alliance in the United States, other countries, or both.
Eclipse is a trademark of Eclipse Foundation, Inc.
UNIX is a registered trademark of The Open Group.
Windows is a registered trademark of Microsoft Corporation in the United States and other countries.
Mac and Mac OS are trademarks of Apple Inc., registered in the U.S. and other countries.
Table of Contents
This Guide explains how to install SpringSource® dm Server™ and the associated Eclipse™ tools and how to develop and test a small application.
It is intended for Spring application programmers and assumes little or no understanding of OSGi™ or SpringSource dm Server.
Questions about dm Server and dm Server Tools (or this Guide) may be posted to the dm Server Community Forums (http://forum.springframework.org/forumdisplay.php?f=53).
SpringSource dm Server is a Java application server composed from a
collection of modules which supports applications which are also composed from a
collection of modules.
These may be traditional Java web applications packaged as Web ARchive (.war)
files as well as other modular applications.
This chapter introduces concepts necessary for developing dm Server applications. These concepts will become clearer as the GreenPages application is explored in later chapters.
Modules in dm Server are represented using a standard Java module system known as OSGi. Modules consist of programs and resources organised by Java package together with metadata which declares imported and exported packages. A module exports a package to make the corresponding programs and resources available for use by other modules. A module imports a package to use the corresponding programs and resources of another module.
Representing a program as a collection of modules makes it easier for the programmer to manage it and modify it and for teams of programmers to divide responsibilities between themselves. A module is similar to a Java class in this respect. Rules similar to those for organising data and programs into classes can be applied to organising applications into modules.
An industry consortium known as the OSGi Alliance (see the appendix Projects) develops the OSGi specification, reference implementation, and compliance tests. dm Server is built on the Equinox OSGi framework which is also the reference implementation for OSGi.
Modules in OSGi are known as bundles.
Each bundle conforms to the JAR file format and
can contain Java classes, a manifest (in META-INF/MANIFEST.MF),
and further resource files.
The OSGi framework enables bundles to be installed and run.
Bundles are identified by OSGi in two distinct ways: by symbolic name and by bundle id.
A bundle usually declares its symbolic name in its manifest, like this:
Bundle-SymbolicName: org.foo.bundle
Additionally, the OSGi framework
assigns a number, known as a bundle id, to each bundle
as it is installed.
The OSGi framework itself resides in a
bundle with bundle id 0.
The
dependencies between bundles are expressed statically in terms of packages and
dynamically in terms of services. A package is familiar to Java programmers.
For example, a Java program may depend on a class org.foo.X
and a bundle
containing that program
would either need to contain org.foo.X or depend on the
package org.foo.
Package dependencies are specified in the bundle manifest, for example:
Import-Package: org.foo
A bundle which provides a package for use by other bundles must export the package in its manifest. For example:
Export-Package: org.foo
The OSGi framework ensures that a given bundle’s package dependencies can be satisfied before the bundle runs. This process is known as resolution.
After a bundle is resolved, its classes and resources are available for loading. In OSGi, bundles and their packages do not appear on the application classpath. Instead, each bundle has a class loader which loads its own classes and loads classes belonging to each of its imported packages by deferring to the bundle class loader that exported the package.
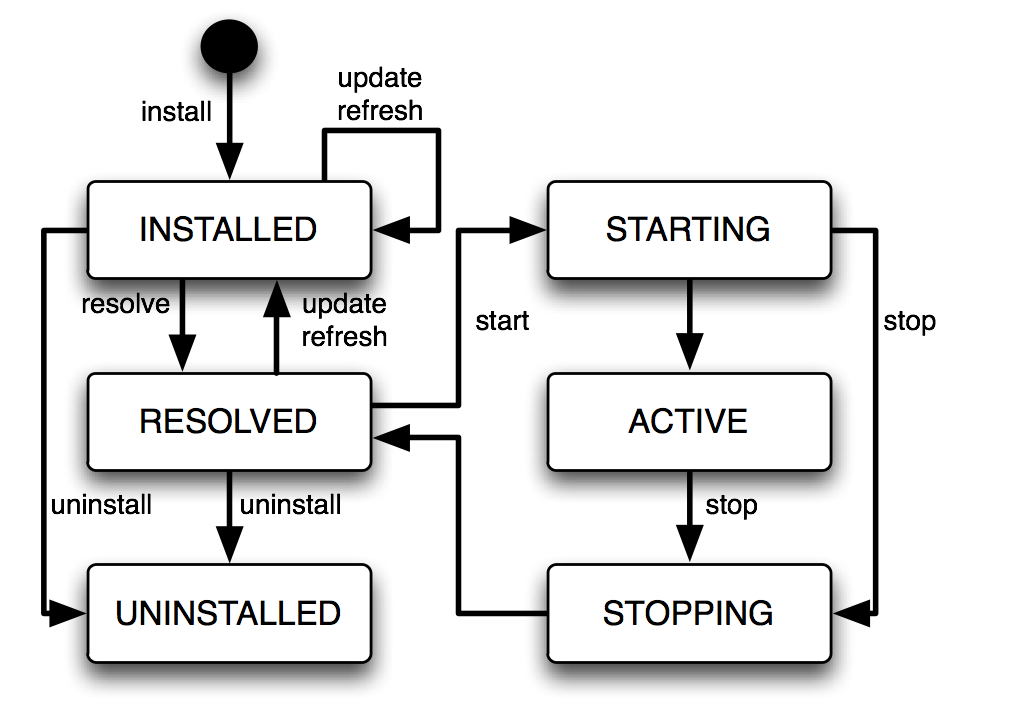
The OSGi framework manages the life cycle of each bundle. A bundle is first of all installed and will be in the INSTALLED state. If a request is made to start the bundle, the OSGi framework resolves the bundle and, if resolution was successful, will subsequently move the bundle to the ACTIVE state. If a request is made to stop the bundle, the OSGi framework will move the bundle back to the INSTALLED state. A request may then be made to uninstall the bundle.
While the bundle is INSTALLED or ACTIVE, it may be updated to pick up some changes. These changes are not detected by bundles which were depending on the bundle before it was updated. A “refresh packages” operation may be performed to ripple the changes out to those bundles. (See Services concepts.)
The life cycle of a bundle is best summarised as a state transition diagram. This diagram shows some more of the intermediate states of a bundle not described in the overview above:
Bundles may publish Java objects, known as services, to a registry managed by the OSGi framework. Other bundles running in the same OSGi framework can then find and use those services. Services are typically instances of some shared Java interface. A bundle which provides a service need not export the package containing the implementation class of the service.
For example, a bundle could export a package containing the interface
org.bar.SomeInterface, thus:
Export-Package: org.bar
implement the interface with a class SomeImpl:
package org.bar.impl;

class SomeImpl implements SomeInterface {
	…
}
create an instance of SomeImpland
then publish this instance (as an instance of the interface SomeInterface).
OSGi specifies a number of standard services. For example, the Package Admin service provides the “refresh packages” life cycle operation mentioned above.
OSGi provides an API which can be used to publish and find services, but it is much simpler to use Spring DM to accomplish this. (See Spring DM concepts.)
OSGi supports versioning of bundles, packages, and several other entities, and provides some mechanisms for managing these versions.
An OSGi version number consists of up to three numeric components
or exactly three
numeric components followed by a string component. The components are
separated by a period (“.”) and
are called the major, minor, micro,
and qualifier components, respectively.
For example, the version 2.4.1.ga has major component 2, minor component
4, micro component 1,
and a qualifier component ga. (There are restrictions on the characters that can appear in
a qualifier. For example, letters, digits, underscores and hyphens are allowed; periods and commas are not.)
Trailing components may be omitted along with their . So, for example, the version
numbers 2, 2.0, and 2.0.0
are all equal. This example demonstrates that 0 is assumed if a numeric component is omitted,
and the empty string is assumed for an omitted qualifier.
Dependencies on bundles and packages have an associated version range
which is specified using an interval notation: a square bracket
“[” or “]” denotes
an inclusive end of the range and a round bracket
“(” or “)” denotes
an exclusive end of the range. Where one end of the range is to be included and the other excluded, it is permitted to
pair a round bracket with a square bracket.
The examples below make this clear.
If a single version number is used where a version range is required this does not indicate a single version, but the range starting from that version and including all higher versions.
There are three common cases:
A “strict” version range, such as
[1.2,1.2], which denotes one version and only that version.A “half-open” range, such as
[1.2,2), which has an inclusive lower limit and an exclusive upper limit, denoting all versions from version1.2up to version2.0.0but not including version2.0.0.An “unbounded” version range, such as
1.2, which contains version1.2and all higher versions.
A versioning policy is a way of using version numbers to indicate compatible and incompatible changes. OSGi does not mandate a particular versioning policy. Instead a specific versioning policy may be implemented using version ranges.
Strict and half-open version ranges are most useful in representing versioning policies. Unbounded version ranges can lead to problems as they assume that compatibility will be preserved indefinitely.
For example, a conservative versioning policy may assume that any change other than
in the qualifier component of a version implies an incompatible
change to the object.
Such a policy would employ version ranges such as [1.2.1.beta,1.2.2)
which accept any version from 1.2.1.beta inclusive to
1.2.2 exclusive.
For another example, a relaxed versioning policy may assume that only changes in the major component of
a version denote an incompatible change.
Such a policy would employ version ranges such as [1.2,2).
Each bundle has a version.
The bundle’s version may be specified in the manifest using a
Bundle-Version header:
Bundle-Version: 1.4.3.BUILD-20090302
If not specified the bundle version is assumed to be 0.
Each exported package has a version. The exported package’s version may be specified on the Export-Package manifest header. For example
Export-Package: org.foo;version="2.9",org.bar;version="1"
exports two packages: org.foo, at version 2.9.0 and
org.bar, at version 1.0.0.
If the version attribute is omitted the version is assumed to be 0.
Each package import has a version range.
The package import version range may be specified on the Import-Package manifest header.
If interval notation is used, the version range must be enclosed in double quotes, for example:
Import-Package: org.foo;version="[2,3)",org.bar;version="[1,1]"
seeks to import a package org.foo in the range [2.0.0,3.0.0) and a package
org.bar with the (exact) version 1.0.0.
If a version range is not specified on an import, the range 0 is assumed, meaning that
any version of this package would satisfy the import.
Bundle manifests have a version which is 1 by default,
indicating OSGi Release 3 semantics.
dm Server is based on OSGi Release 4 and therefore expects bundle manifests to be
at version 2, indicating OSGi Release 4 semantics. (See the appendix Projects.)
The bundle manifest’s version should be specified on the Bundle-ManifestVersion manifest header, exactly as follows:
Bundle-ManifestVersion: 2
Manifests themselves also have a version which must be specified as 1.0.
This is not an OSGi definition but part of the JAR file specification
(http://java.sun.com/javase/6/docs/technotes/guides/jar/jar.html).
Manifest-Version: 1.0
Spring DM is a project which enables services to be published and consumed using descriptions written in XML. dm Server has Spring DM built-in.
The XML descriptions reside in files with extension .xml in the
bundle’s META-INF/spring sub-directory.
To publish a service, an <osgi:service> tag is used, specifying the
implementation class of the service and the interface class to be used.
Spring DM constructs an instance of the implementation class like any other
Spring bean and then publishes that instance in the OSGi service registry under the interface when the bundle is started.
To consume a service, an <osgi:reference> tag is used and the
service may be passed into other Spring beans using Spring’s dependency
injection facilities.
Spring DM automatically creates proxies for OSGi services so that the actual service object may come and go at runtime. If a service disappears, any proxies to the service will wait for the service to re-appear. This effect is known as damping.
When a bundle is started, Spring DM builds the application contexts specified by the XML descriptions, creates proxies for the specified services, and publishes the specified services to the OSGi service registry.
When a bundle is stopped, Spring DM retracts any services it published on behalf of the bundle and closes the bundle’s application contexts. dm Server turns off damping of a service proxy while the proxy’s application context is being closed.
Several dm Server concepts are essential for developing an application.
dm Server provides a way of grouping together a collection
of OSGi bundles which comprise a single application.
These bundles are placed in a JAR file with extension “.par”. This is called a PAR file.
All the bundles in a PAR file are resolved together and so mutual dependencies are permitted.
At runtime a PAR file provides a scope in the sense that bundles inside the PAR file may depend on packages and services outside the PAR file, but bundles outside the PAR file may not depend on packages and services provided by the PAR file.
PAR files or individual bundles are deployed into dm Server by dropping them into a “pickup” directory or using the Administration Console web application provided with dm Server. During deployment, the bundle or bundles are installed into OSGi, resolved together, and then started together.
dm Server supports multiple application programming models known as personalities. Each bundle of an application has a personality. For example, a bundle providing a servlet has either the web or the war personality. Bundles which provide packages and services using the OSGi and Spring DM programming models have the bundle personality.
When a bundle is deployed into dm Server, personality-specific transformations are applied to the bundle’s contents, including its manifest, and the bundle is made available for use in a personality-specific way. For example, a bundle with the web personality has some package imports added to its manifest and its servlet is automatically made available for dispatching from HTTP requests.
Web ARchive (.war) files are identified as having the war personality by the file extension.
Bundles with a .jar extension could have any personality, so
dm Server enables the personality to be specified using the Module-Type manifest header, for example:
Module-Type: web
The default Module-Type is bundle.
Before developing an application with dm Server, it is essential to install dm Server, the Eclipse Integrated Development Environment (IDE), the Eclipse-based dm Server Tools, and a build system integrated with Eclipse. The present document uses Apache Maven and the Eclipse plugin Q for Eclipse to integrate the IDE with the build system.
Before proceeding, ensure that a Java™ Standard Edition Development Kit
for Java 5 or later is installed and that the JAVA_HOME environment variable is set to the correct value.
To verify this, issue the command "%JAVA_HOME%"\bin\java -version from
a command prompt on Windows or $JAVA_HOME/bin/java -version from a terminal window on UNIX and ensure that
the command completes successfully and reports
a Java version 1.5 (denoting Java 5) or greater.
Also issue the
command "%JAVA_HOME%"\bin\jar to ensure that there is a means of extracting files from zip archives.
If the jar command is
unavailable, download and install a suitable zip program such as 7zip,
gzip, or WinZip. This is most relevant for Windows
operating systems where the inbuilt zip extraction utility may mishandle long pathnames.
Although the steps are similar, the details of installing dm Server depend on the operating system.
First download the free Community Edition of dm Server from the dm Server download site (http://www.springsource.com/download/dmserver).
Unzip the download of dm Server to the root directory of
a drive (this will avoid possible problems with long pathnames).
Set an environment variable %DMS_HOME% to refer to the unzipped folder.
cd C:\
"%JAVA_HOME%"\bin\jar xf \path\to\springsource-dm-server-1.0.2.RELEASE.zip
set DMS_HOME=C:\springsource-dm-server-1.0.2.RELEASE
To verify the installation, issue the command:
"%DMS_HOME%"\bin\startup.bat and ensure a message numbered SPPM0002I is displayed.
(Timestamps have been removed.)
main                     <SPKB0001I> Server starting.
main                     <SPOF0001I> OSGi telnet console available on port 2401.
main                     <SPKE0000I> Boot subsystems installed.
main                     <SPKE0001I> Base subsystems installed.
server-dm-10             <SPPM0000I> Installing profile 'web'.
server-dm-10             <SPPM0001I> Installed profile 'web'.
server-dm-8              <SPSC0001I> Creating HTTP/1.1 connector with scheme http on port 8080.
server-dm-8              <SPSC0001I> Creating HTTP/1.1 connector with scheme https on port 8443.
server-dm-8              <SPSC0001I> Creating AJP/1.3 connector with scheme http on port 8009.
server-dm-8              <SPSC0000I> Starting ServletContainer.
server-dm-10             <SPPM0002I> Server open for business with profile 'web'.
…
Shut down the server by pressing Ctrl-C.
Unzip the download of dm Server to a suitable location on the file system, such
as the home directory. (If the download was automatically unzipped by the operating
system, simply move the unzipped directory to the chosen location.)
Set an environment variable $DMS_HOME to refer to the unzipped folder.
mkdir /path/to/home/springsource
cd /path/to/home/springsource
unzip /path/to/springsource-dm-server-1.0.2.RELEASE.zip
export DMS_HOME=/path/to/home/springsource/springsource-dm-server-1.0.2.RELEASE
To verify the installation, use a terminal window to issue the command:
$DMS_HOME/bin/startup.sh and ensure a message numbered SPPM0002I is displayed.
(Timestamps have been removed.)
main                     <SPKB0001I> Server starting.
main                     <SPOF0001I> OSGi telnet console available on port 2401.
main                     <SPKE0000I> Boot subsystems installed.
main                     <SPKE0001I> Base subsystems installed.
server-dm-3              <SPPM0000I> Installing profile 'web'.
server-dm-3              <SPPM0001I> Installed profile 'web'.
server-dm-5              <SPSC0001I> Creating HTTP/1.1 connector with scheme http on port 8080.
server-dm-5              <SPSC0001I> Creating HTTP/1.1 connector with scheme https on port 8443.
server-dm-5              <SPSC0001I> Creating AJP/1.3 connector with scheme http on port 8009.
server-dm-5              <SPSC0000I> Starting ServletContainer.
server-dm-3              <SPPM0002I> Server open for business with profile 'web'.
…
Shut down the server by pressing Ctrl-C.
Although the steps are similar, the details of installing Eclipse depend on the operating system.
Go to the Eclipse download site (http://www.eclipse.org/downloads) and download the variant appropriate to the operating system of the Eclipse IDE for Java EE Developers (based on Eclipse 3.4.2).
Unzip the download of Eclipse to the root directory of a drive (this will avoid possible problems with long pathnames).
cd C:\
"%JAVA_HOME%"\bin\jar xf \path\to\eclipse-jee-ganymede-SR2-win32.zip
To verify the installation, run the eclipse.exe executable in the unzipped directory
and check that Eclipse displays a welcome panel.
Unpack the download of Eclipse to a suitable location on the file system, such
as /opt or, if root access is not available, the home directory.
(If the download was automatically unpacked by the operating
system, simply move the unpacked directory to the chosen location.)
To verify the installation, run the Eclipse executable (Eclipse.app on Mac OS X)
in the unpacked directory
and check that Eclipse displays a welcome panel.
The dm Server Tools are a collection of Eclipse plugins for developing dm Server applications.
To install dm Server Tools, start Eclipse and navigate to the dialogue for installing and updating software features ( → ). From the Software Updates and Add-ons dialog press the Add Site… button on the Available Software tab to add the following new update site URL to the Eclipse update mechanism:
http://www.springsource.org/update/e3.4
After closing the Add Site dialog by pressing the OK button a new update site entitled SpringSource Update Site for Eclipse 3.4 (or similar) will appear in the list of enabled update sites. (Another update site for AJDT may also appear.)
Select all features available from the SpringSource Update Site for Eclipse 3.4 update site and press Install….
Eclipse will calculate dependencies and then display a list of items to be installed. Press the Next> button, review the licenses of the items to be installed and, if they are acceptable, select the option to accept the license terms and press the Finish button.
Eclipse will download and install the items. If prompted, restart Eclipse to complete the installation.
To verify the installation, start Eclipse and check there is a “Spring IDE” icon in the Eclipse “About” dialog.
Q for Eclipse, or Q4E for short, is an Eclipse plugin which integrates Eclipse with the Apache Maven build system.
To install Q4E, start Eclipse and navigate to the dialogue for installing and updating software features ( → ). From the Software Updates and Add-ons dialog use the Add Site… button on the Available Software tab to add the following new update site URL to the Eclipse update mechanism:
http://q4e.googlecode.com/svn/trunk/updatesite
After closing the Add Site dialog by pressing the OK button
a new update site entitled
http://q4e.googlecode.com/svn/trunk/updatesite will appear in the list of enabled update sites.
Select the Q for Eclipse feature in the Community section of the update site and press Install…. Eclipse will calculate dependencies and display a list containing the item to be installed. Press the Next> button, review the licenses of the items to be installed and, if they are acceptable, select the option to accept the license terms and press the Finish button.
Eclipse will download and install the items. If prompted, restart Eclipse to complete the installation.
To verify the installation, start Eclipse, open the Preferences… panel, and check that there is a Maven section.
Apache Maven, or Maven for short, is a software project management and comprehension tool
which uses a central Project Object Model (POM) to manage a project’s build, reporting
and documentation generation. The POM files (pom.xml) are included in the solution projects for
GreenPages.
To install Maven, visit the Maven website (http://maven.apache.org) and follow the download instructions from there.
This document has been written and tested with Maven version 2.0.6. The rest of the document assumes that the Maven
commands (mvn …) are available from the command line.
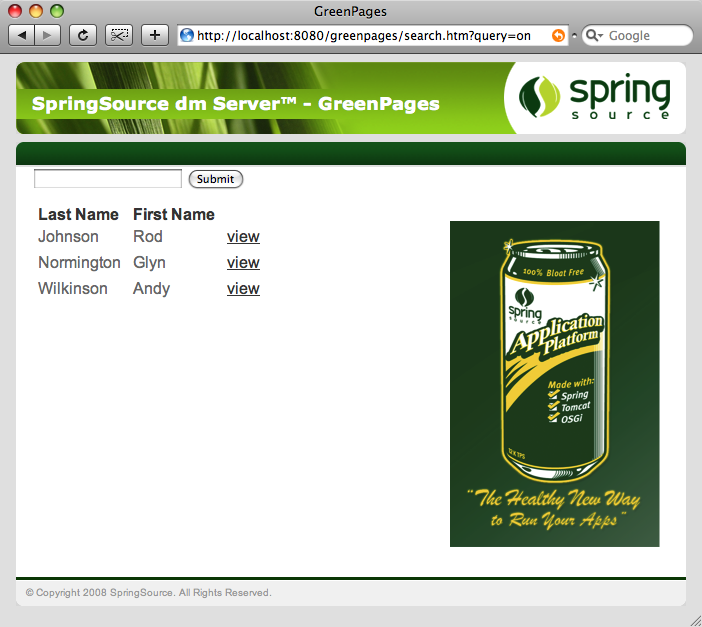
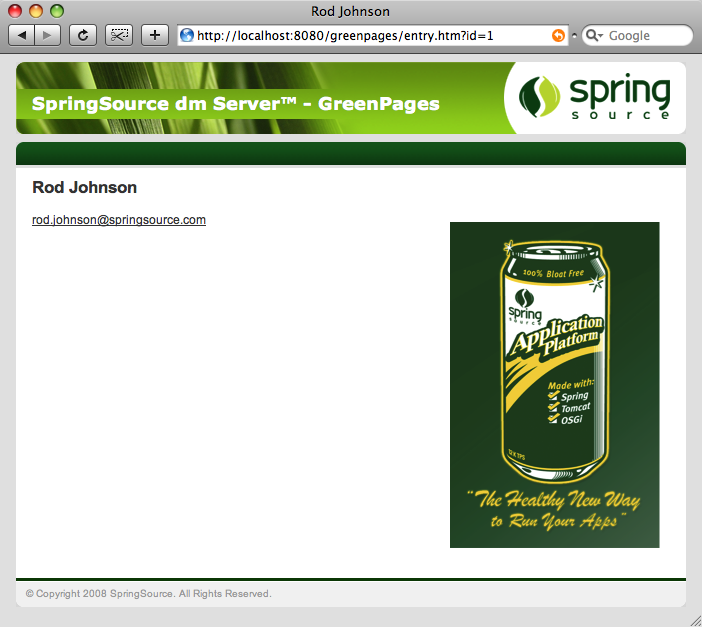
GreenPages is a simple application that allow users to search an online email address directory. Each listing in the directory details the relevant email addresses and the name of the owner. GreenPages has only three screens: the search screen, the results screen and the listing detail screen.
In the search screen, users can enter search criteria to be matched against the listings in the directory. The result screen displays any listings that match the criteria entered by the user. The listing detail screen shows all the data known about a given listing.
Despite its simplicity, GreenPages is designed to demonstrate many different dm Server features and to act as a template from which other modular applications can be built. In particular, GreenPages demonstrates:
module dependencies with
Import-Package,load-time weaving with JPA and AspectJ,
bundle classpath scanning, and
service export, lookup and injection.
In addition to demonstrating common dm Server features, GreenPages demonstrates integration with:
Spring Framework 2.5;
FreeMarker 2.3;
EclipseLink 1.0.1;
H2 1.0.71; and
Commons DBCP 1.2.2.
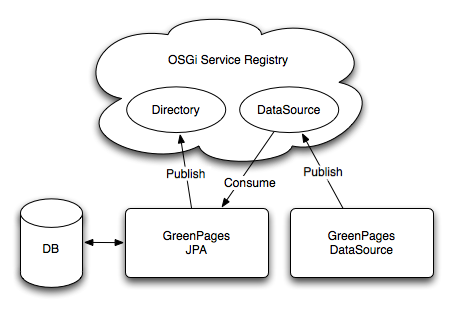
The GreenPages application is packaged as a PAR file containing four modules.
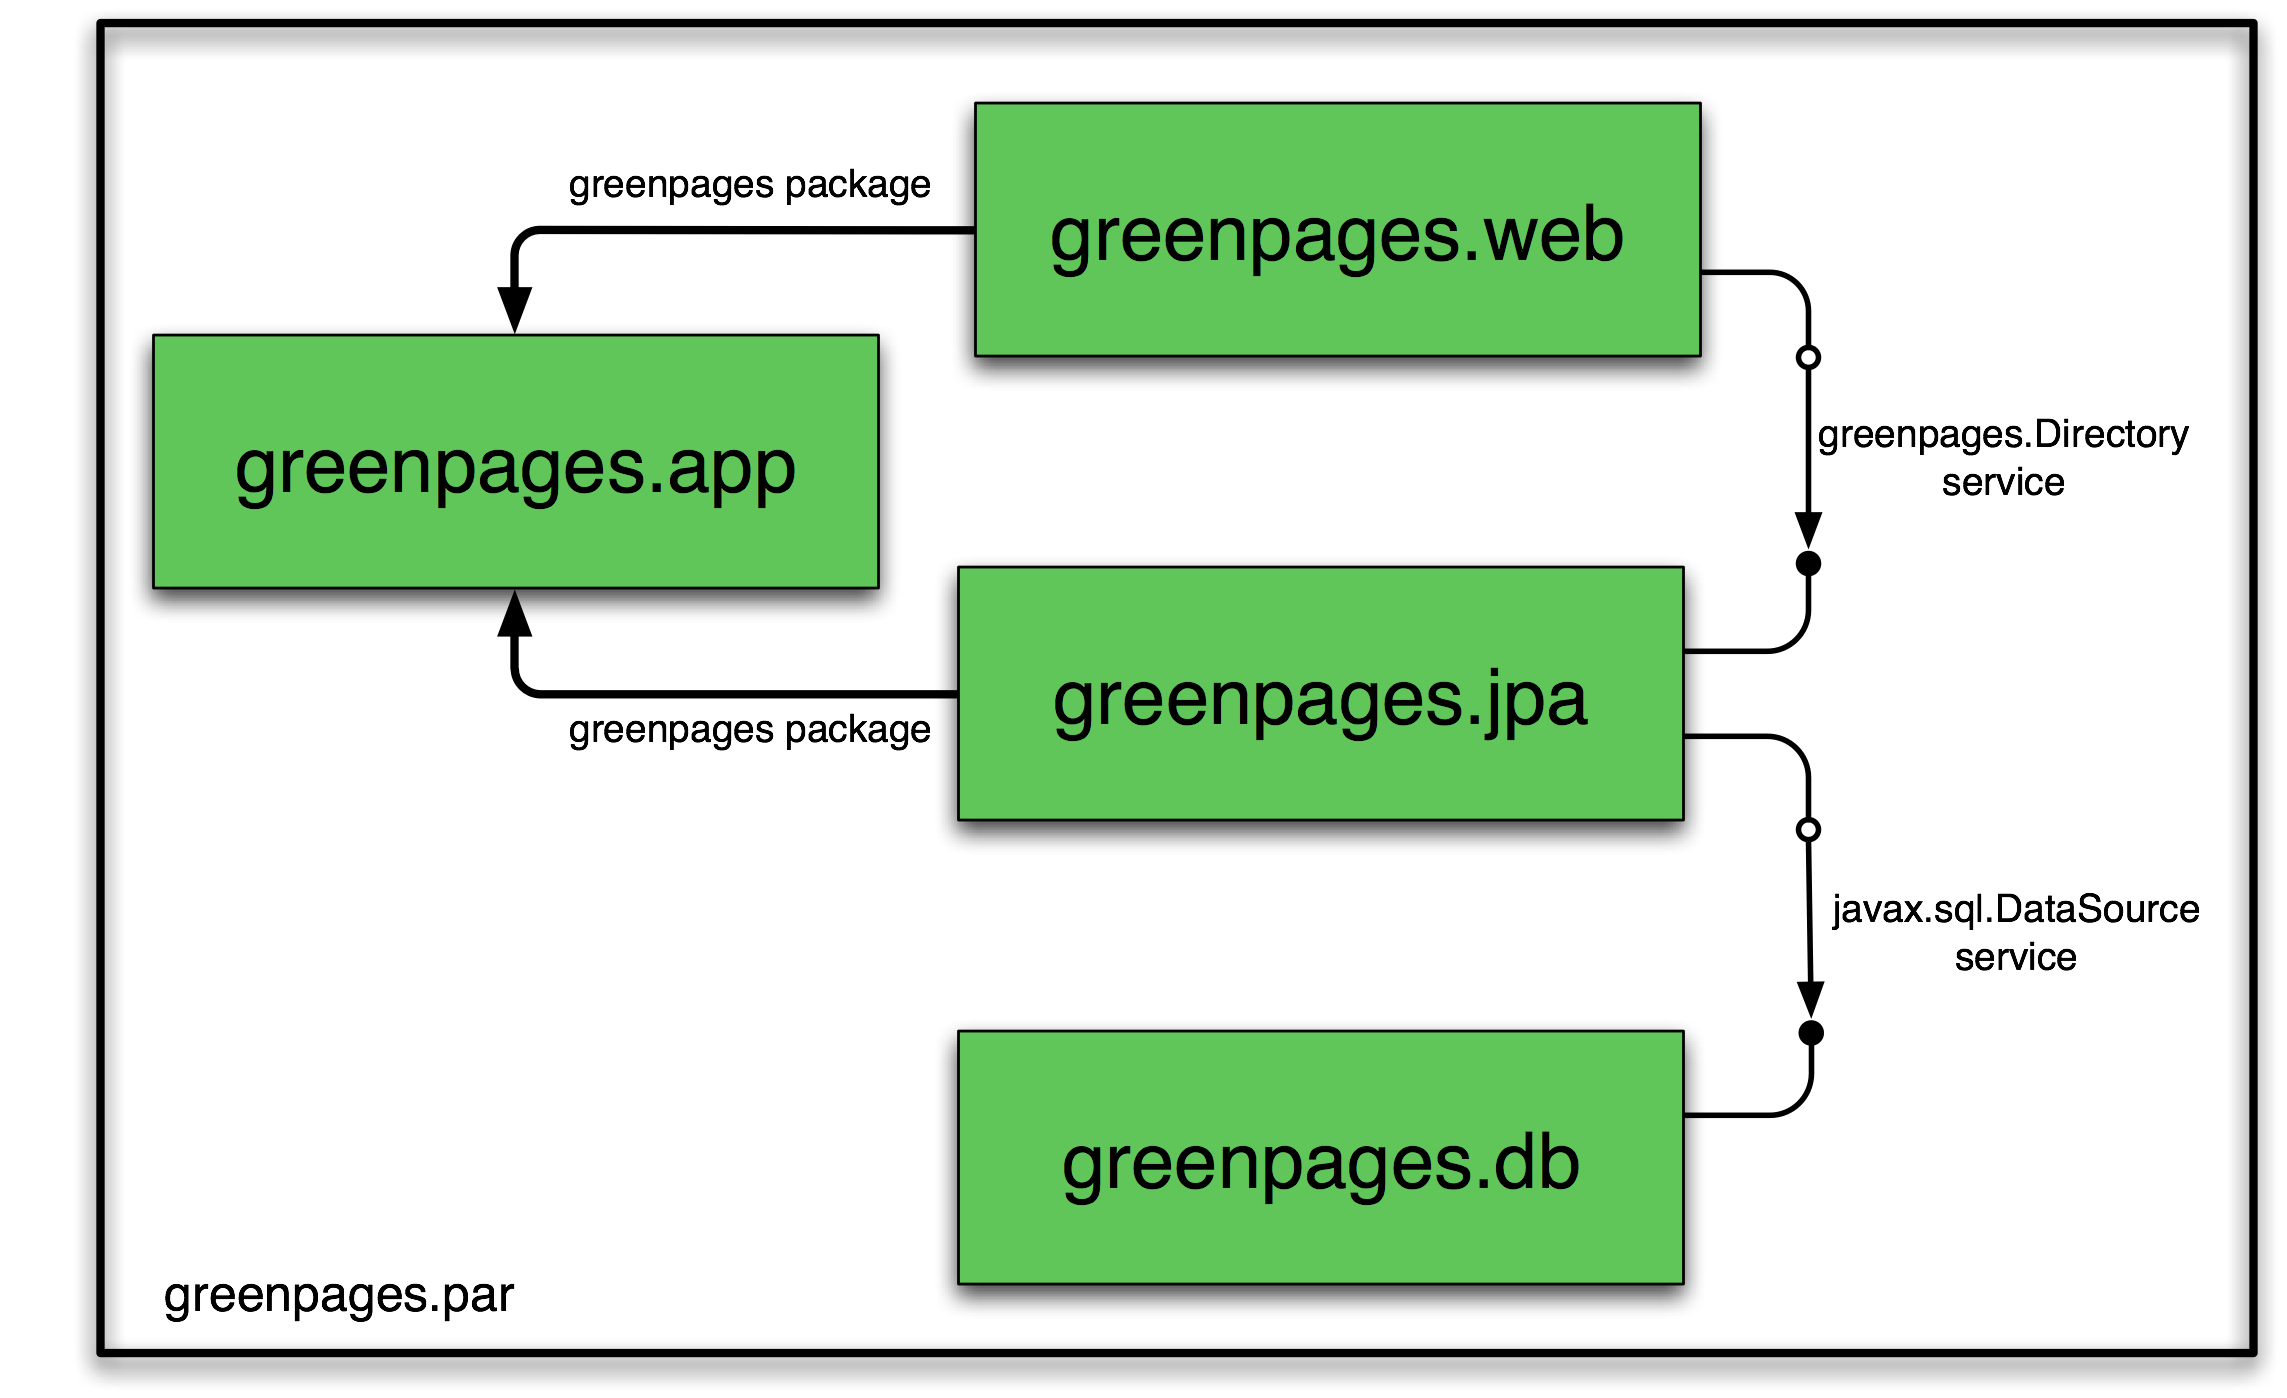 |
The greenpages.db module provides access to an external database and publishes a
javax.sql.DataSource service.
The greenpages.app module exports a greenpages package containing
Directory and Listing interfaces.
The greenpages.jpa module imports the greenpages package and
uses the javax.sql.DataSource service to
access the external database and publishes its contents as a greenpages.Directory service.
The greenpages.web module imports the greenpages package and uses the
greenpages.Directory service to respond to web requests.
This document provides step-by-step instructions for building the GreenPages application with dm Server and the SpringSource dm Server Tools. In addition, the complete application is available as a ZIP file that can be built and installed into dm Server.
To get the completed GreenPages application and the starter projects to build GreenPages by steps:
download the ZIP file from http://dist.springframework.org/release/DMSS/greenpages-1.0.0.RELEASE.zip, and
extract all the files from the ZIP file to a convenient directory (preserving the directory structure).
To extract the files on Windows:
mkdir c:\springsource\samples
cd c:\springsource\samples
jar xf c:\path\to\greenpages-1.0.0.RELEASE.zip
set GREENPAGES_HOME=c:\springsource\samples\greenpages-1.0.0.RELEASE
To extract the files on Unix systems:
mkdir -p /opt/springsource/samples
cd /opt/springsource/samples
unzip /path/to/greenpages-1.0.0.RELEASE.zip
export GREENPAGES_HOME=/opt/springsource/samples/greenpages-1.0.0.RELEASE
The environment variable GREENPAGES_HOME set here is not used by the projects, but is used as a shorthand
in the instructions that follow.
The GreenPages zip file contains two main directories called solution and start.
The solution directory contains the completed application which can be built and tested (as described below).
The start directory contains the initial skeleton of the GreenPages application upon which the step-by-step
creation instructions build.
To follow the step-by-step instructions start at Chapter 4, The Web Module.
GreenPages uses Apache Maven as its primary build system. Each module of the application can be built separately and the entire application can built and assembled into a PAR file from a single location. To build the PAR file:
Make
$GREENPAGES_HOME/solutionthe current directory.Run the command
mvn package. The first time this is run quite a lot of files will be downloaded from Maven repositories and SpringSource repositories. Subsequent runs will not need to do this.Verify that the
greenpages-1.0.0.SNAPSHOT.parfile exists in$GREENPAGES_HOME/greenpages/target.
Building on Windows:
cd %GREENPAGES_HOME%\solution
mvn package
Building on UNIX:
cd $GREENPAGES_HOME/solution
mvn package
Unlike traditional Java EE applications, GreenPages does not package all of its dependencies inside its deployment unit. Instead, it relies on the mechanisms of OSGi to locate its dependencies at runtime. When running an OSGi application on dm Server, these dependencies can be loaded into memory as needed, but first they must be made available to dm Server.
The Maven build included with GreenPages uses the dependency:copy-dependencies plugin to gather
all the artifacts that GreenPages depends on that are not supplied by the OSGi runtime. These dependencies
can then be installed into the dm Server repository. Dependencies are gathered automatically during the package
phase. These dependencies can be found in $GREENPAGES_HOME/greenpages/target/par-provided.
To install dependencies
simply copy all the bundles from this directory into $DMS_HOME/repository/bundles/usr.
Installing dependencies on Windows:
cd %GREENPAGES_HOME%\solution\greenpages
copy target\par-provided\* %DMS_HOME%\repository\bundles\usr
Installing Dependencies on UNIX:
cd $GREENPAGES_HOME/solution/greenpages
cp target/par-provided/* $DMS_HOME/repository/bundles/usr
GreenPages uses the H2 database to store all its data. Before the application can be started, the database server must be started and the database populated with data.
Make
$GREENPAGES_HOME/dbthe current directory.Run the database startup script appropriate to the operating system.
Run the data population script appropriate to the operating system.
Starting and configuring the database on Windows:
cd %GREENPAGES_HOME%\db
run
data
Starting and configuring the database on UNIX:
cd $GREENPAGES_HOME/db
./run.sh &

./data.sh
After ./run.sh & press Return to continue.
These instructions need only be run once to start a database server for H2; this will continue to run in the background. A browser window offering a connection to the database may open: this should be closed.
To install the GreenPages PAR into dm Server and start it:
Copy the GreenPages PAR to the
$DMS_HOME/pickupdirectory.Start dm Server.
Verify that GreenPages starts correctly by checking in the dm Server output for the log message:
<SPDE0010I> Deployment of 'greenpages' version '1.0.0.SNAPSHOT' completed.
Installing and starting GreenPages on Windows:
cd %DMS_HOME%
copy %GREENPAGES_HOME%\solution\greenpages\target\greenpages-1.0.0.SNAPSHOT.par pickup\
bin/startup.bat
Installing and starting GreenPages on UNIX:
cd $DMS_HOME
cp $GREENPAGES_HOME/solution/greenpages/target/greenpages-1.0.0.SNAPSHOT.par pickup/
bin/startup.sh
Once installed and started, the GreenPages application can be accessed with a web browser using the address http://localhost:8080/greenpages/home.htm.
From the home page, a search query can be entered into the search box:
 |
After entering a query into the search box, the results page shows all the matches from the directory:
 |
Clicking on a match in the search listing displays the full details for that listing:
 |
Using Eclipse and the dm Server tools, it is possible to run applications directly from the IDE. As changes are made to the application in the IDE, they can be automatically applied to the running application allowing for rapid feedback of changes in function.
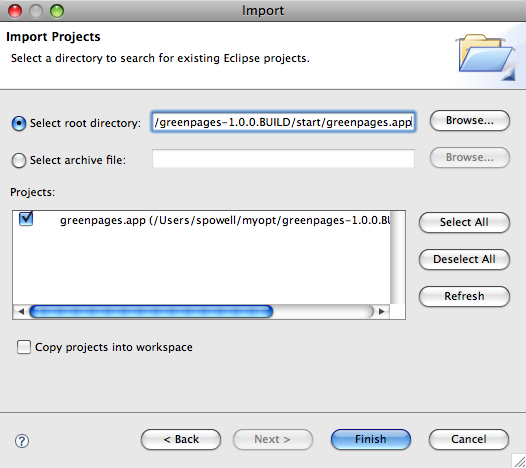
Before the GreenPages application can be started from Eclipse, the projects need to be imported. To import the projects into Eclipse:
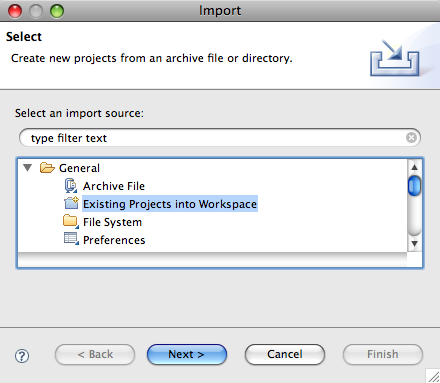
Open the Import Wizard using → .
From the Import Wizard select → and click Next:
Click and select
$GREENPAGES_HOME/solutionas the root directory.In the Import Projects window, select all the projects and click Finish:

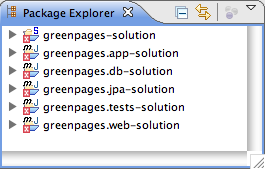
Validate that the imported projects appear in Package Explorer:
There may be compilation errors at this stage.
Projects for dm Server are associated with a dm Server runtime environment in Eclipse. This is to allow launching and testing from within Eclipse, and also to allow classpath construction in Eclipse to mirror the dynamic classpath in the dm Server runtime.
Compilation errors in the previous step will be resolved here.
To configure a dm Server runtime environment:
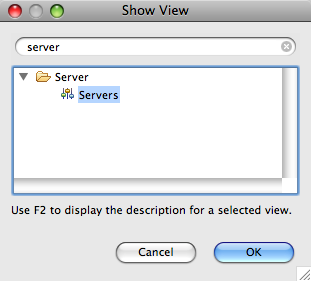
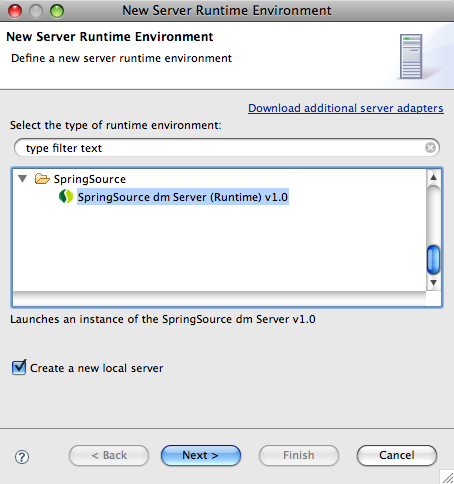
Open → → .
In the Show View dialog choose → to make the servers view visible:
Right-click in the (empty) Servers view and select → .
In the New Server dialog, choose → and click Next.
Click and select the
$DMS_HOMEdirectory. Click to complete creation of the server: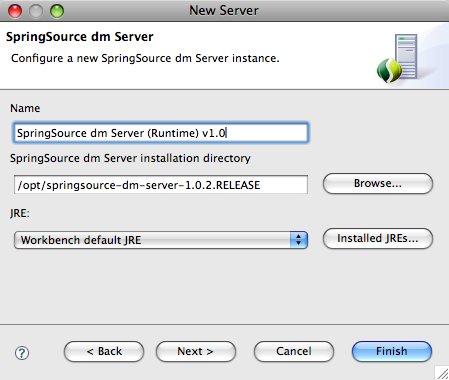
Close and reopen all projects. Select all projects in Package Explorer. Right-click on the projects and choose and then .
It is possible that there remain spurious build errors from Eclipse (see the Problems view), in which case a project clean build may clear the problems. Select → from the main menu, and choose to Clean all projects. This process is known as the “Eclipse dance”. It may be necessary to repeat this on a few projects.
Despite the dance steps outlined, there will remain a Warning like this:
 |
It is safe to ignore this warning.
Now that GreenPages is successfully imported into Eclipse, the project can be run directly from within the IDE. Before doing so, remove a GreenPages PAR that may currently be deployed in dm Server.
To run GreenPages from within Eclipse:
Drag the PAR project from the Package Explorer onto the dm Server node in the Servers window:

To start dm Server from within Eclipse right-click on the dm Server node in the Servers window and choose .
Verify that GreenPages is installed correctly by checking for
<SPDE0010I> Deployment of 'greenpages' version '1' completedin the Console window.
In common with most Enterprise Java applications GreenPages uses a web-based interface for user interactions. The following steps show how to create the controller for the application, implement that controller using a service from the OSGi Service Registry, and deploy both bundles to the dm Server instance.
It is assumed that the instructions in Chapter 2, Installation have been followed already
and that the GreenPages
zip file has been downloaded and unzipped as described in Chapter 3, Installing and exploring GreenPages.
Rather than working with the fully completed application a skeleton version of the
projects (found in $GREENPAGES_HOME/start) is used to demonstrate how to build the
application in stages.
Before beginning development, configure the development environment to work with the application. In the case of GreenPages this means Maven and Eclipse.
The GreenPages application uses Maven for dependency management in Eclipse and for building at the command line. Since Maven downloads needed dependencies, it is helpful to tell dm Server to use the local Maven cache as a repository. In this step the dm Server configuration is modified to search the local Maven cache for bundles.
Open $DMS_HOME/config/repository.config. In this file add a new repository to the
repositories section.
…

"libraries-usr" : {
  "type" : "external",
  "searchPattern" : "repository/libraries/usr/{library}"
},
"bundles-m2" : {
  "type" : "external",
  "searchPattern" : "${user.home}/.m2/repository/**/{bundle}"
}
Next add the bundles-m2 repository to the repositoryChain.
"repositoryChain" : [
  "bundles-subsystems",
  "bundles-ext",
  "bundles-usr",
  "bundles-m2",
  "libraries-ext",
  "libraries-usr"
]
Errors in this configuration may cause the dm Server instance to fail to start later. Ensure that this is entered correctly (cut and paste would be ideal) before proceeding.
When this is complete save the file and go to the next step.
The following instructions are most easily followed using the Java perspective rather than the Java EE perspective. If not already in the Java perspective, switch to the Java perspective in Eclipse using the Open Perspective menu:
 |
The GreenPages application also uses the SpringSource dm Server Tools. These tools integrate with the instance of dm Server that was modified earlier. In this step an instance of the dm Server runtime in Eclipse is created that the GreenPages application will integrate with.
In Eclipse open → → . Select Add… to create a new instance of the dm Server. In the dialog that opens, select the SpringSource dm Server runtime environment and check the box to create a new local server. When complete, press Next.
 |
In the next dialog, set the SpringSource dm Server installation directory field to the
value of $DMS_HOME and press Finish.
 |
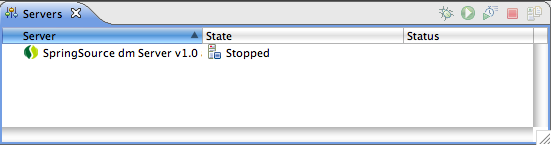
After returning to the Preferences window, press OK to return to Eclipse. The Servers view has opened and now shows an instance of SpringSource dm Server in it.
 |
Proceed to the next step.
The GreenPages application uses Spring’s @MVC style of web application development. A central type of this development style is the controller class.
The GreenPages application is divided up into a number of OSGi bundles that are represented as Eclipse
projects. In this step the starting version of the greenpages.web project is imported.
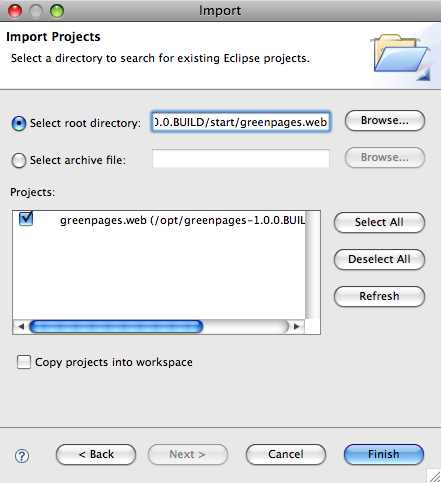
Right-click in the Package Explorer view and select Import…. In
the dialog that opens, choose → and select
Next. In the following dialog set the root directory
field to the
value of $GREENPAGES_HOME/start/greenpages.web and press Finish.
Initially this project will have compile failures in it; this is to be expected.
 |
When Eclipse finishes importing the project, go to the next step.
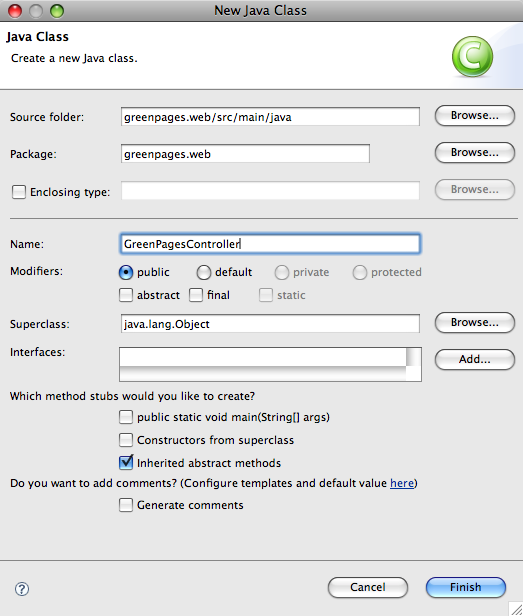
Create a new class by right-clicking on the greenpages.web
package in
the src/main/java source folder and selecting
→ .
(If Class is not offered on the
menu, then the Java perspective may not be being used.
Look for the Class option under
Other… in the Java section.)
Name the new class
GreenPagesController and press Finish.
 |
Next add the following code to the GreenPagesController class.
@Controller
public class GreenPagesController {

    @RequestMapping("/home.htm")
    public void home() {
    }
}
This will not compile.
Eclipse will offer (as a Quick Fix) to insert imports for Spring Framework annotations
Controller and RequestMapping; these should be accepted.
After these changes, save the file and go to the next step.
Once the controller is written, Spring needs to be told to instantiate a bean of the controller type. In
this step you enable Spring’s component scanning to detect the
GreenPagesController class.
Open the META-INF/spring/module-context.xml file in the
src/main/resources source folder. Switch to the Source pane:
 |
In this file add the following line.
<context:component-scan base-package="greenpages.web"/>
When this is complete save the file and go to the next step.
During development time, it can be helpful to run an application inside of the deployment container. In the case
of Greenpages, this means deploying the greenpages.web bundle to the SpringSource dm Server.
The dm Server can be used while inside of Eclipse. In this step you will deploy the
greenpages.web bundle and start the dm Server instance.
Drag the greenpages.web project from the Package Explorer and drop it
on the dm Server instance in the Servers view. Expand the dm Server instance and the bundle will
be shown as a child of the dm Server.
 |
Right-click on the dm Server instance and select Start. If deployment has gone successfully
the console will print <SPDE0010I> Deployment of 'greenpages.web' version '1'
completed.
(If the server fails to start, re-check that the modifications to
server.config were entered correctly in section the section called “Setting up dm Server”.)
When this message is displayed, leave the server instance running and go to the next step.
The dm Server has special knowledge of the web application bundles. In this step web module metadata is added to the bundle and a web browser is used to navigate to it.
Open a web browser and navigate to http://localhost:8080/greenpages/home.htm. The link is not currently served by any bundle in the dm Server so there will be an error displayed:
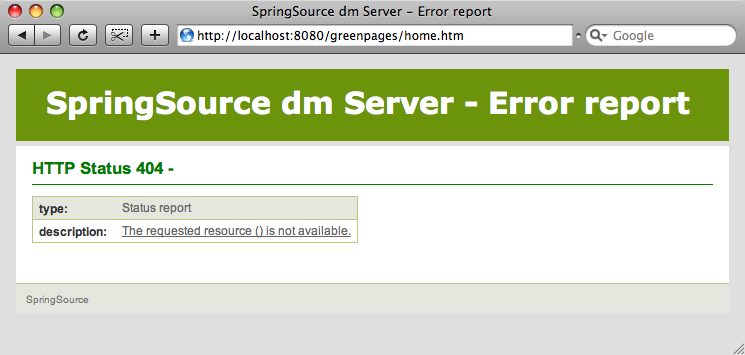 |
To fix this issue the greenpages.web bundle must be declared to be a web module and a
context path can be defined.
Open the template.mf file (at the top level under the greenpages.web project)
and add (and save) the following entries (using the template.mf pane of the editor):
Module-Type: web
Web-ContextPath: greenpages
Be careful not to insert any blank lines or trailing spaces in this file.
Once added, right-click on the greenpages.web project and select
→ .
This will use a tool called Bundlor to update the OSGi metadata in the
MANIFEST.MF file. Once Bundlor has finished running, open the
META-INF/MANIFEST.MF file in the src/main/resources source folder.
It should look like the following:
Manifest-Version: 1.0
Bundle-Name: GreenPages Web
Bundle-Classpath: .
Web-ContextPath: greenpages
Import-Package: org.springframework.stereotype,org.springframework.web
 .bind.annotation,org.springframework.web.servlet.mvc.annotation,org.s
 pringframework.web.servlet.view.freemarker
Bundle-ManifestVersion: 2
Bundle-Vendor: SpringSource Inc.
Module-Type: web
Bundle-SymbolicName: greenpages.web
Export-Package: greenpages.web;version="1.0";uses:="org.springframewor
 k.stereotype,org.springframework.web.bind.annotation"
Bundle-Version: 1.0
By default, Bundlor generates Import-Package entries with no version range specified. In
the absence of a version range, the OSGi default (of any version) is used. While this is very flexible
it is generally a good idea to restrict an import by specifying a narrower range. This can be achieved by
providing Bundlor with some additional information in the manifest template.
Add and save the following entry to the template.mf file:
Import-Template:
 org.springframework.*;version="[2.5.6.A, 3.0.0)"
(Again, be careful not to leave trailing spaces on lines or insert blank lines in this file.)
Re-run the MANIFEST.MF generation as described earlier.
In the MANIFEST.MF file the Import-Package entry
should now have version ranges on each of its packages:
Import-Package: org.springframework.stereotype;version="[2.5.6.A, 3.0.
 0)",org.springframework.web.bind.annotation;version="[2.5.6.A, 3.0.0)
 ",org.springframework.web.servlet.mvc.annotation;version="[2.5.6.A, 3
 .0.0)",org.springframework.web.servlet.view.freemarker;version="[2.5.
 6.A, 3.0.0)"
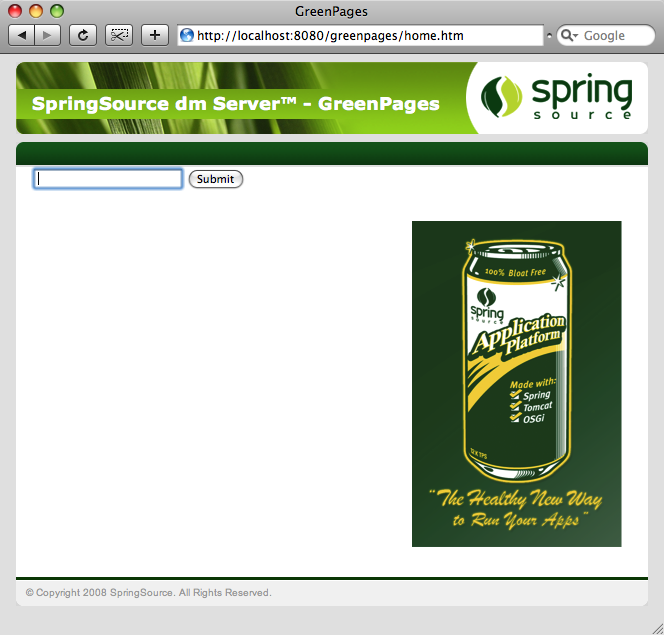
Behind the scenes the dm Server Tools have refreshed the deployed bundle as changes were made. Once again navigate to http://localhost:8080/greenpages/home.htm. This page now displays an entry field.
 |
Put any characters into the entry field and press Submit.
This should display a “404” page again, similar to before.
This is because there is no search page (search.htm) to process this request yet.
The next section will address this.
At the end of the previous step, the dm Server instance was started
and the greenpages.web bundle deployed.
This bundle shows a static home page but a search value causes an error. This error appears because the URL for
that search was not serviced by the controller.
The logic behind the search request is not in the greenpages.web project but
in another project called greenpages.app. This section creates the greenpages.app project
and then combines the two projects into a PAR so as to be able to deploy them together as a single unit.
While executing these instructions it is not necessary to remove bundles from the dm Server instance,
nor to stop the instance. As changes are made the bundle will be refreshed (or redeployed) and the server instance
may report errors if the changes are incomplete. These may safely be ignored.
Alternatively, the greenpages.web bundle can be removed from the dm Server instance,
or the server can be stopped while these changes are made.
In this step, the greenpages.app project is imported which contains the business
interfaces (and stub implementations of these interfaces).
In the same way that the starting greenpages.web project was imported
(in section the section called “Importing the greenpages.web project”)
import the $GREENPAGES_HOME/start/greenpages.app project.
 |
When Eclipse finishes importing the project, go to the next step.
The controller implementation will depend on the Directory and
Listing interfaces found in the greenpages.app project. In
this step, the implementation is added.
Open the GreenPagesController class. Add the following field and methods to the
class:
@Autowired
private Directory directory;

@RequestMapping("/search.htm")
public List<Listing> search(@RequestParam("query") String query) {
  return this.directory.search(query);
}

@RequestMapping("/entry.htm")
public Listing entry(@RequestParam("id") int id) {
  return this.directory.findListing(id);
}
Add the (Quick Fix) suggested imports for the annotations Autowired and RequestParam,
and choose the import for List< > from java.util.List.
Eclipse will not be able to suggest import statements for the
Listing and Directory types. This is because
the greenpages.web and greenpages.app projects are not linked together
and therefore cannot see each other’s types.
Proceed to the next step.
In dm Server, applications consisting of multiple bundles can be packaged as part of a PAR.
In this step a PAR project
containing the greenpages.web and greenpages.app bundles is
created and deployed to the server.
Right-click in the Package Explorer and select → . In the dialog that opens select → and press Next:
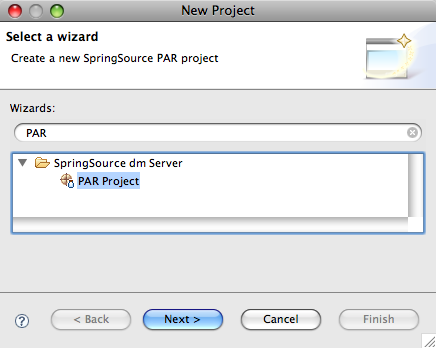 |
In the New PAR Project dialog, ensure the Use default location option is unchecked,
name the project greenpages, set the location to
$GREENPAGES_HOME/start/greenpages and press Next.
 |
In the next dialog, some of the PAR properties are pre-populated. Ensure that the Target Runtime is set to SpringSource dm Server (Runtime) and press Next.
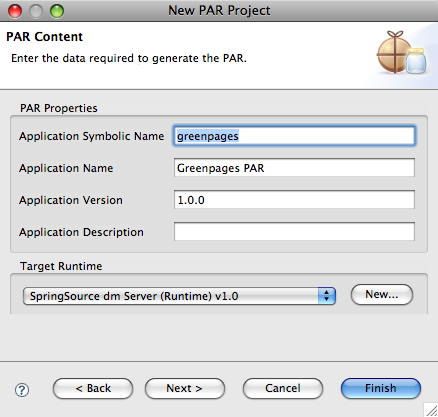 |
In the next dialog, select the greenpages.app and greenpages.web
bundles so that they are contained in the PAR and press Finish.
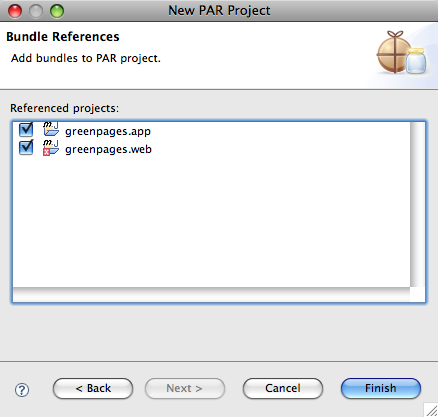 |
greenpages.web still has errors these are soon to be fixed.
The package explorer view will now show the following:
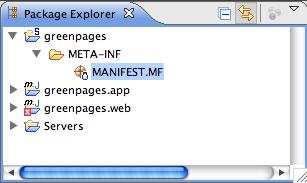 |
PAR project creation is complete, go to the next section.
In an OSGi-based application, the business logic behind a controller is typically accessed through the OSGi Service Registry.
By default, Bundlor detects and exports all packages in a bundle. In this step Bundlor is told what to
export from the greenpages.app bundle and which types from those packages to use in the
greenpages.web bundle.
Add and save the following entry to the template.mf file in the
greenpages.app project and then run the MANIFEST.MF generation on the project as
explained in the section called “Creating web module metadata”.
Excluded-Exports:
 greenpages.internal
(As before, be careful not to leave trailing spaces on the ends of lines and not to add any blank lines to the file.)
Check that the package is no longer exported in the greenpages.app MANIFEST.MF file
which should look like this:
Manifest-Version: 1.0
Bundle-Name: GreenPages Service
Bundle-Classpath: .
Import-Package: org.springframework.stereotype;version="[2.5.6.A,3.0.0)"
Bundle-ManifestVersion: 2
Bundle-Vendor: SpringSource Inc.
Bundle-SymbolicName: greenpages
Export-Package: greenpages;version="1.0"
Bundle-Version: 1.0
Once Bundlor has done this, go to the next step.
Now that the greenpages.app bundle exports the package that the
Directory and Listing interfaces reside in,
the greenpages.web bundle must import it. In this step you will update the Maven
pom.xml file to depend on the greenpages.app bundle and import the
package.
Open the pom.xml file in the greenpages.web project. In this file add
the following entry (between the <dependencies> tags):
<dependency>
  <groupId>com.springsource.dmserver</groupId>
  <artifactId>greenpages.app</artifactId>
  <version>${project.version}</version>
</dependency>
Open the GreenPagesController class and import the Listing and
Directory types. Eclipse should now offer these as a Quick Fix.
The class should now compile cleanly.
The following imports should now have been added to the GreenPagesController class:
import java.util.List;

import greenpages.Directory;
import greenpages.Listing;

import org.springframework.beans.factory.annotation.Autowired;
import org.springframework.stereotype.Controller;
import org.springframework.web.bind.annotation.RequestMapping;
import org.springframework.web.bind.annotation.RequestParam;
Add the following package clause to the Import-Template entry in the
template.mf file in the greenpages.web project. When added run the
MANIFEST.MF generation on the project as described in the section called “Creating web module metadata”.
greenpages.*;version="[1.0.0, 1.0.1)"
Be careful to include the “.*” in the package pattern.
Once Bundlor has finished, go to the next step.
Currently the dm Server instance has a single web module bundle deployed. In this step, the
greenpages.web bundle is undeployed and greenpages PAR is deployed.
Right-click on the dm Server in the Servers view, and select
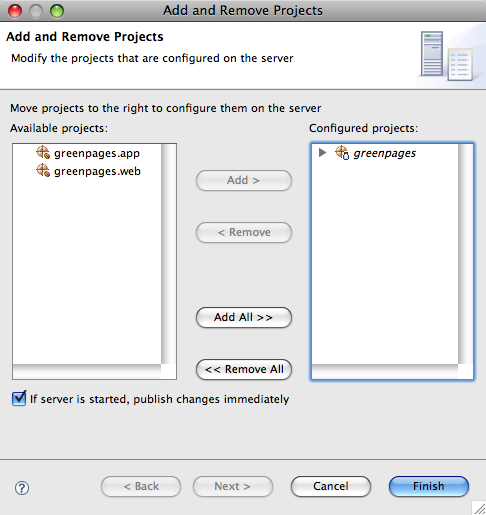
Add and Remove Projects…. In the dialog that opens, remove the
greenpages.web bundle and add the greenpages PAR to the server. When
the configuration is complete, press Finish.
 |
Eclipse automatically undeploys the greenpages.web bundle and deploys the
greenpages PAR. When this happens, the deployment fails with an error. One of the exceptions
in the exception list that is included is similar to:
Caused by: org.springframework.beans.factory.NoSuchBeanDefinitionException: No unique bean of type
    [greenpages.Directory] is defined: Unsatisfied dependency of type [interface greenpages.Directory]:
    expected at least 1 matching bean
This error is caused by there being no instance of Directory to inject into the controller.
The next section will supply one.
There is no instance of Directory to be
injected into the controller. In the GreenPages application, it is intended that this
implementation is used through an interface in
the OSGi Service Registry. Using a service in the Service Registry enables
another bundle to
provide an implementation without revealing the implementation or the provider to all clients of the
service. dm Server supports the use of the Spring DM namespace for
referencing elements in the OSGi Service Registry.
This step adds an OSGi Service Reference to an implementation of the
Directory interface.
In the META-INF/spring/osgi-context.xml file in the greenpages.web
project add a reference to a
greenpages.Directory instance in the OSGi service registry using
the <osgi:reference/> tag as follows:
<osgi:reference id="directory" interface="greenpages.Directory"/>
The tools will automatically redeploy the greenpages.web bundle when the change to the
bean definition has been saved. As the redploy happens, the following error will occur:
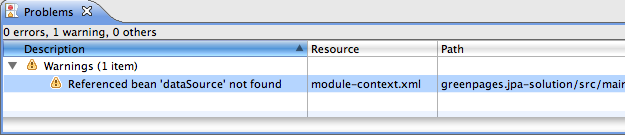
<SPCC0001W> Mandatory reference '&directory' in bundle
  'greenpages-1-greenpages.web' version '1.0.0' is waiting for service with filter
  '(&(objectClass=greenpages.Directory)(!(com.springsource.server.app.name=*)))'.
This error indicates that there is no provider of a greenpages.Directory in
the Service Registry. The next step will address this.
The error is re-issued as the dm Server instance waits for the service to be supplied. After about five minutes the server will “time-out” and the deploy will be abandoned. This same error (and time-out) will occur each time the PAR is redeployed as each change is made.
Stop the server instance by right-clicking on the server in the Servers view and selecting Stop. This will avoid unnecessary delays as changes are made.
At the end of the previous step, a dependency was created on an OSGi Service Registry exposed instance of
greenpages.Directory. The application would not start because no other bundle was
contributing an instance of this service to the Service Registry.
Stop the server instance before proceeding.
In this step Spring’s context scanning is added which will create an instance of the
DirectoryImpl class.
Open the greenpages.internal.DirectoryImpl class in the greenpages.app
project. Add the @Component annotation to the class:
@Component("directory")
public class DirectoryImpl implements Directory {
…
generating imports with Eclipse’s help if necessary.
Open the META-INF/spring/module-context.xml in the greenpages.app
project. Add component scanning to this file:
<context:component-scan base-package="greenpages.internal"/>
When complete, go to the next step.
In this step the DirectoryImpl instance is published to the OSGi Service
Registry.
Open the META-INF/spring/osgi-context.xml file. Add the
<osgi:service/> tag to publish the directory bean with an
interface of greenpages.Directory.
<osgi:service ref="directory" interface="greenpages.Directory"/>
Start (or restart) the dm Server instance from the Servers view. If
the GreenPages PAR was not removed before, it will be automatically deployed, otherwise deploy it as before.
There should be no errors reported.
When GreenPages is deployed
succesfully, open a web browser and navigate to
http://localhost:8080/greenpages/home.htm. On
the home page type johnson into the search field and press Submit.
Unlike the previous attempt, this should return a list (of size 1) of search results. From here, select
view to get the “detailed” listing.
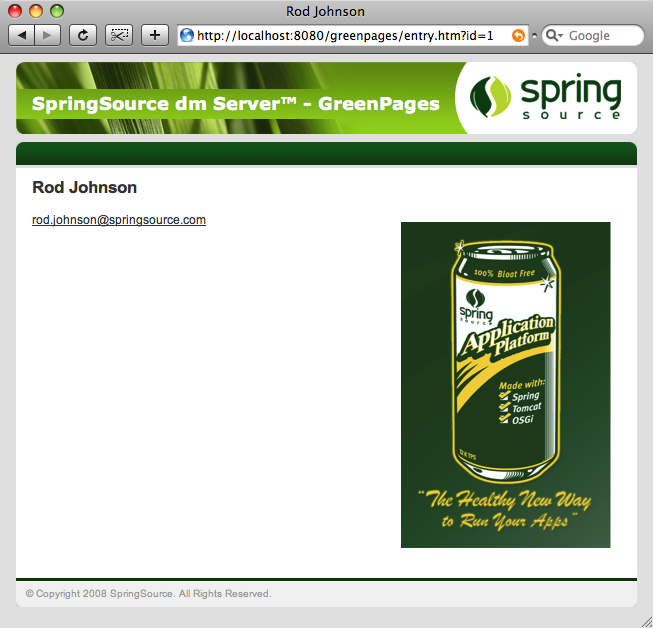 |
Directory interface which only knows about “Rod Johnson”.
The web interface is complete enough. Go to the next chapter to see the middle tier implementation.
GreenPages’ middle-tier provides implementations of the Directory and Listing
interfaces that can be used by the web module.
The implementation will use EclipseLink JPA to access a database via a DataSource published in the
OSGi service registry.
The GreenPages application uses a very simple database that contains a single table.
The table, named LISTING, consists of four columns:
| LISTING_NUMBER | FIRST_NAME | LAST_NAME | EMAIL_ADDRESS |
Scripts are provided with the sample source code (in $GREENPAGES_HOME/db) to start, create, and populate the database.
These will be used during the creation of the middle tier.
The middle tier will provide JPA-based implementations of the Directory and Listing interfaces with the four
attributes of a Listing (first name, last name, email address, and id) being mapped to the corresponding columns in the
LISTING.
JPA will be used to implement the queries that search the database and return Listings.
This section describes how to use
the bundle project creation wizard to create a new Bundle Project. The project’s Spring bean
definition files will also be created using the Spring bean configuration file creation wizard.
Create a new project by right-clicking in the Package Explorer view and selecting → . In the resulting dialog select → and press Next:
 |
In the New Bundle Project dialog, name the project greenpages.db.
Choose the create the project from an existing source location and specify a location that will place the new
greenpages.db alongside the project skeletons that were imported into the workspace
earlier. If the start directory of the GreenPages sample is being used this will
be $GREENPAGES_HOME/start/greenpages.db. Click Next.
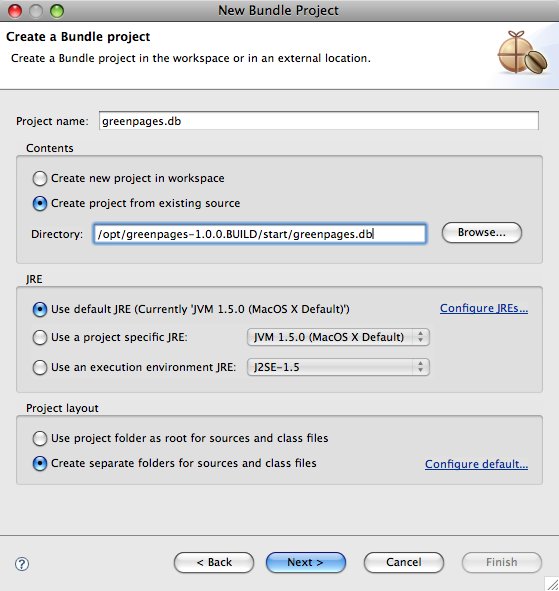 |
In this page of the wizard, many of the Bundle Properties are already populated. The
Bundle-SymbolicName is the name of the project. The Bundle-Name is
derived from the Bundle-SymbolicName. The Bundle-Version is
set to 1.0.0, and there is no Bundle-Description.
Change the Bundle-Name to “GreenPages DataSource” to more accurately
describe the bundle’s purpose. Lastly, check the target runtime JVM version is appropriately configured; it
should specify a JVM version of 1.5 or later. Click Finish.
 |
The greenpages.db project appears in the Package Explorer view.
By default, a bundle project is configured with a Bundle Classpath Container. This classpath container derives its contents from the bundle’s manifest. Rather than using each bundle’s manifest to control the classpath, the GreenPages application uses Maven POM files. To this end the Bundle Classpath Container must be replaced by a Maven Classpath Container that is populated from the Maven POM.
Right-click the greenpages.db project in the Package Explorer view and then select
Properties. Select Java Build Path on the left-hand side and
then switch to the Libraries tab on the right-hand side. Select the entry
named Bundle Dependencies and click on Remove. Click
OK to remove the Properties dialog.
 |
Before a Maven Classpath Container can be added to the project, a pom.xml file must
be created. Create a new file in the root of the greenpages.db project named
pom.xml and add the following contents to it:
<?xml version="1.0" encoding="UTF-8"?>
<project
	xmlns="http://maven.apache.org/POM/4.0.0"
	xmlns:xsi="http://www.w3.org/2001/XMLSchema-instance"
	xsi:schemaLocation="http://maven.apache.org/POM/4.0.0 http://maven.apache.org/maven-v4_0_0.xsd">

	<parent>
		<groupId>com.springsource.dmserver</groupId>
		<artifactId>greenpages.parent</artifactId>
		<version>1.0.0.SNAPSHOT</version>
		<relativePath>../parent</relativePath>
	</parent>

	<modelVersion>4.0.0</modelVersion>
	<groupId>com.springsource.dmserver</groupId>
	<artifactId>greenpages.db</artifactId>
	<name>greenpages.db</name>
	<packaging>jar</packaging>

	<dependencies>
	</dependencies>

</project>
Save the file.
A Maven Classpath Container can now be added to the project. Right-click the
greenpages.db project in the Package Explorer and select
→ .
Eclipse will perform some workspace building, and the greenpages.db project will now be marked as a Maven project.
The last part of the setup of the project is to configure its source folders. Return to the Properties dialog of
the greenpages.db project (from the Package Explorer view).
Select Java Build Path on the left-hand side and the Source tab
on the right-hand side. Remove both of the pre-configured source folders by selecting them and
clicking Remove.
Now click Add folder and then
Create new folder…. Specify src/main/resources as the folder
name and click Finish, then OK and OK again.
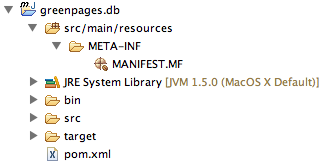
The final change to be made is to drag the META-INF folder from src
to src/main/resources. Once these changes have been made the project will appear
similar to the following in the Package Explorer view:
 |
The DataSource bundle’s main rôle is to configure and create a DataSource object and to
publish this to the OSGi service registry. This will be done by creating
a handful of Spring beans.
By default, Spring DM looks for application context files in a bundle’s META-INF/spring
directory. Create a new folder named spring in the greenpages.db
project’s META-INF folder. Having created the new folder, right-click it in the
Package Explorer and select
→ .
This will open the wizard for creating Spring bean configuration files.
In the wizard enter a File name of module-context.xml and click
Next:
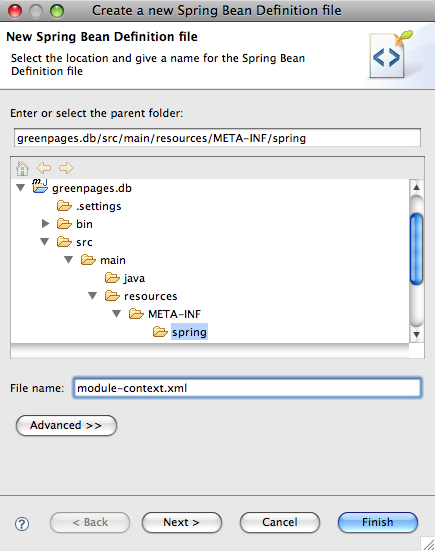 |
Add the p - http://ww.springframework.org/schema/p namespace declaration to the pre-selected beans declaration and then click Finish.
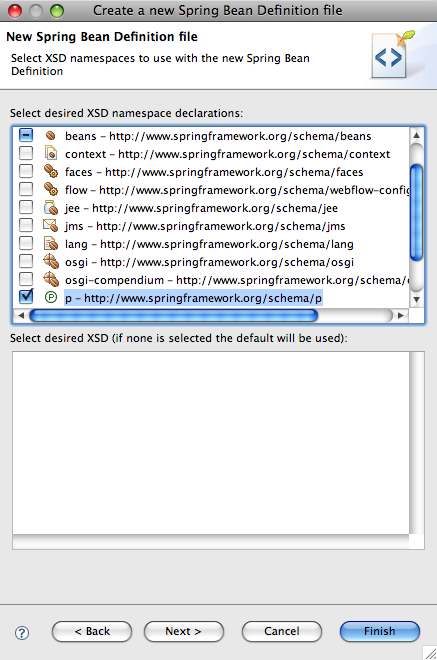 |
Update the newly-created file (which is opened by Eclipse) to declare a bean that defines the DataSource
object that will be used to access the GreenPages database.
Do this by adding the following bean declaration:
    <bean id="dataSource" class="org.apache.commons.dbcp.BasicDataSource"
        p:driverClassName="org.h2.Driver"
        p:url="jdbc:h2:~/greenpages-db/greenpages"
        p:username="greenpages"
        p:password="pass"
        init-method="createDataSource"
        destroy-method="close" />
The new bean has introduced a dependency on Commons DBCP, which will cause an error to be reported by Eclipse.
This dependency must be recorded in the project’s pom file. Open the pom file for greenpages.db and add
the following dependency between the <dependencies> tags:
        <dependency>
            <groupId>org.apache.commons</groupId>
            <artifactId>com.springsource.org.apache.commons.dbcp</artifactId>
        </dependency>
Save the updated pom and then switch back to the editor for module-context.xml. Save the updated file and
observe that the previously reported problem has now been resolved as Commons DBCP is available on the classpath.
(If this is not resolved automatically, it may be necessary to close and open the greenpages.db project
in the Package Explorer view.)
Now that the DataSource bean is available, it can be published into the OSGi service registry.
Right-click the spring folder and select
→ . This time specify
a name of osgi-context.xml, click Next, and add the osgi
namespace declaration. Click Finish and then add the following to the new file to publish the
DataSource as a service:
    <!--
        export the dataSource bean to the OSGi service registry under the
        DataSource interface
    -->
    <osgi:service ref="dataSource" interface="javax.sql.DataSource" />
Bundlor uses a manifest template to control the contents of the generated manifest.
Create a new file named
template.mf in the root of the greenpages.db project.
Open the existing
MANIFEST.MF and switch to the MANIFEST.MF tab to view its source. Copy
the contents. Switch to the editor for template.mf, switch to the
template.mf tab and paste the contents from MANIFEST.MF. These entries
will tell Bundlor what the resulting manifest’s bundle symbolic name, bundle version, etc. should be. Save the
updated template.
Still in the template.mf editor switch to the Overview tab
and click Update MANIFEST.MF which is under the “Bundle Actions” section.
At this point Bundlor will scan the project to determine its
dependencies. It will scan both module-context.xml and osgi-context.xml
looking for references to classes. For each class to which it finds a reference, an import for the class’s
package will be added to the resulting manifest.
In this case, Bundlor will generate imports for
both javax.sql and org.apache.commons.dbcp. The import for
org.apache.commons.dbcp will result in an error as the package cannot be resolved.
(javax.sql may also be unresolved.)
The greenpages.db project needs to be associated with a dm Server instance which has the
Commons DBCP bundle in its repository. This is achieved in the next step by adding the greenpages.db
project to the GreenPages PAR, this will result in it inheriting the PAR project’s targetted runtime
configuration.
Double-click the MANIFEST.MF file in the greenpages project in the
Package Explorer view.
Switch to the Dependencies tab and click Add….
Select greenpages.db and click OK. Save the updated file. The
problem concerning the org.apache.commons.dbcp dependency should now be resolved
(along with any other resolution errors) and (if the server is
running) the
GreenPages application will be redeployed due to the addition of the greenpages.db
module. Start the server if it is not already running and observe that this deployment fails.
The deployment will fail because the org.h2.Driver class that is referenced in the
DataSource bean’s definition in module-context.xml is not available to
the bundle. (Check for the exception org.springframework.beans.factory.BeanCreationException with
text: “Error creating bean with name 'dataSource' defined in URL [bundleentry://84/META-INF/spring/module-context.xml]:
Invocation of init method failed; nested exception is org.apache.commons.dbcp.SQLNestedException:
Cannot load JDBC driver class 'org.h2.Driver'”.)
There are a few cases where Bundlor will not identify a dependency on a class and, at the moment, this is one of them, although this is an area of Bundlor that is being improved all the time. Thankfully it’s easy to add the required import by making a simple update to the template.
Open the editor for the
template.mf file in the greenpages.db project and add the following
Import-Package header and save the updated manifest:
Import-Package: org.h2;version="[1.0.71,1.0.71]"
Saving the manifest will trigger a redeployment (or click on Update MANIFEST.MF as before) which will fail if the H2 database is not available. (Refer to the section the section called “Starting and configuring the database” in Chapter 3, Installing and exploring GreenPages to run and configure the database.)
If the database is running the GreenPages application should correctly deploy. Although the application web front-end will run, the database contents is
not visible, of course, because we are still running with the stub version of the search method on the controller.
The implementation of the Directory service needs to be changed to exploit the database.
In this section the JPA module in GreenPages is created, building upon an existing skeleton. JPA and its metadata are configured, and a JPA-based Directory service implementation is published which is then consumed by the application’s Web module.
The greenpages.jpa starter project provides the beginnings of a JPA-based implementation of
Directory named JpaDirectory. Import the greenpages.jpa project
from the $GREENPAGES_HOME/start directory.
Open the JpaDirectory.java source file
in the greenpages.jpa package of greenpages.jpa project (under src/main/java).
The source file
contains a Java Persistence Query Language (JPQL) search query that will be used to retrieves listings from the database and empty
implementations of the search and findListing methods.
First add an EntityManager to it. Before the new field
can be added, EntityManager must be available on the classpath. Open the pom for
greenpages.jpa and add the following dependency:
        <dependency>
            <groupId>javax.persistence</groupId>
            <artifactId>com.springsource.javax.persistence</artifactId>
        </dependency>
Now return to JpaDirectory and add the following field to the class along with an
import for javax.persistence.EntityManager (which should be suggested by Eclipse):
private EntityManager em;
This EntityManager can now be used to implement the search and
findListing methods. Update the implementations of these two methods to match the
following implementations and then save the updated class:
   public Listing findListing(int id) {
        return em.find(JpaListing.class, id);
    }

    @SuppressWarnings("unchecked")
    public List<Listing> search(String term) {
        return em.createQuery(SEARCH_QUERY).setParameter("term",
                "%" + term.toUpperCase() + "%").getResultList();
    }
(Warnings from Eclipse should now be absent.)
The application context now needs to be updated to create JpaDirectory and to create
an EntityManager that can be injected into JpaDirectory.
Open
module-context.xml in the META-INF/spring folder of the
greenpages.jpa. Add the following beans that will create JpaDirectory
and an EntityManager, enable load-time weaving that is required by JPA, and enable
annotation-based configuration that will allow the EntityManager to be injected into
JpaDirectory:
    <!--
        Activates a load-time weaver for the context. Any bean within the
        context that implements LoadTimeWeaverAware (such as
        LocalContainerEntityManagerFactoryBean) will receive a reference to
        the autodetected load-time weaver.
    -->
    <context:load-time-weaver aspectj-weaving="on" />

    <!-- JPA EntityManagerFactory -->
    <bean id="entityManagerFactory"
        class="org.springframework.orm.jpa.LocalContainerEntityManagerFactoryBean"
        p:dataSource-ref="dataSource">
        <property name="jpaVendorAdapter">
            <bean id="jpaVendorAdapter"
                class="org.springframework.orm.jpa.vendor.EclipseLinkJpaVendorAdapter"
                p:databasePlatform="org.eclipse.persistence.platform.database.HSQLPlatform"
                p:showSql="true" />
        </property>
    </bean>

    <!--
        Activates various annotations to be detected in bean classes: Spring's
        @Required and @Autowired, as well as JSR 250's @PostConstruct,
        @PreDestroy and @Resource (if available) and JPA's @PersistenceContext
        and @PersistenceUnit (if available).
    -->
    <context:annotation-config />

    <bean id="directory" class="greenpages.jpa.JpaDirectory" />
The addition of the new beans to the context has introduced a new dependency upon Spring’s ORM support and upon
EclipseLink and its JPA implementation. Add the following dependencies to the pom file for
greenpages.jpa and save it:
        <dependency>
            <groupId>org.springframework</groupId>
            <artifactId>org.springframework.spring-library</artifactId>
            <type>libd</type>
        </dependency>
        <dependency>
            <groupId>org.eclipse.persistence</groupId>
            <artifactId>com.springsource.org.eclipse.persistence</artifactId>
        </dependency>
        <dependency>
            <groupId>org.eclipse.persistence</groupId>
            <artifactId>com.springsource.org.eclipse.persistence.jpa</artifactId>
        </dependency>
Now switch back to module-context.xml for greenpages.jpa and observe
that the errors relating to Spring’s ORM types have now been resolved. Save
module-context.xml.
The application context now contains a factory that will create an EntityManager and is
configured for annotation-based configuration. The last step in completing JpaDirectory
is to annotate the EntityManager field so that Spring will inject the
EntityManager created by the factory into the field.
Open JpaDirectory.java again and add an annotation @PersistenceContext to the
EntityManager field.
@PersistenceContext
private EntityManager em;
Eclipse will suggest an import for
javax.persistence.PersistenceContext; accept this and save the file.
JPA uses a file named META-INF/persistence.xml to describe persistence units.
persistence.xml refers to a second file, typically named
META-INF/orm.xml, to define entity mappings. In the case of GreenPages the
persistence.xml file specifies a single persistence unit that points to the
greenpages.JpaListing class. The specified mapping file
(META-INF/orm.xml) tells the JPA implementation how to map
JpaListing to the LISTING database table described above.
(For more information on JPA consult the Documentation section in the appendix.)
Create a new file named persistence.xml in the META-INF folder of
the greenpages.jpa project. Add the following contents to the new file and then save it:
<?xml version="1.0" encoding="UTF-8" ?>
<persistence xmlns="http://java.sun.com/xml/ns/persistence"
    xmlns:xsi="http://www.w3.org/2001/XMLSchema-instance"
    xsi:schemaLocation="http://java.sun.com/xml/ns/persistence
                        http://java.sun.com/xml/ns/persistence/persistence_1_0.xsd"
    version="1.0">

    <persistence-unit name="GreenPages" transaction-type="RESOURCE_LOCAL">
        <class>greenpages.jpa.JpaListing</class>
    </persistence-unit>

</persistence>
Now create a new file named orm.xml in the same folder as
persistence.xml. Add the following contents to the new file and then save it:
<?xml version="1.0" encoding="UTF-8" ?>
<entity-mappings xmlns="http://java.sun.com/xml/ns/persistence/orm"
    xmlns:xsi="http://www.w3.org/2001/XMLSchema-instance"
    xsi:schemaLocation="http://java.sun.com/xml/ns/persistence/orm
                        http://java.sun.com/xml/ns/persistence/orm_1_0.xsd"
    version="1.0">
    <package>greenpages.jpa</package>
    <entity class="greenpages.jpa.JpaListing" name="Listing">
        <table name="LISTING" />
        <attributes>
            <id name="listingNumber">
                <column name="LISTING_NUMBER" />
                <generated-value strategy="TABLE" />
            </id>
            <basic name="firstName">
                <column name="FIRST_NAME" />
            </basic>
            <basic name="lastName">
                <column name="LAST_NAME" />
            </basic>
            <basic name="emailAddress">
                <column name="EMAIL_ADDRESS" />
            </basic>
        </attributes>
    </entity>
</entity-mappings>
The entityManagerFactory bean that was added earlier depends upon a bean named
dataSource which it will use to connect the EntityManager
to the GreenPages database. The greenpages.db module already publishes a
DataSource to the service registry. greenpages.jpa must now be
updated to consume this dataSource.
Open osgi-context.xml in the META-INF/spring folder of the
greenpages.jpa project and add the following:
    <!-- import the DataSource from the OSGi service registry -->
    <osgi:reference id="dataSource" interface="javax.sql.DataSource" />
This will result in a bean being created in the application context that is named dataSource.
The bean will be of type javax.sql.DataSource and will be backed by a service found in the
OSGi service registry that implements the javax.sql.DataSource interface.
To make the JPA-based Directory implementation available to GreenPages’
Web module it must be “published” to the OSGi service registry.
Open osgi-context.xml in the META-INF/spring folder of the
greenpages.jpa project, add the following and then save the updated file:
    <!--
        export the directory bean to the OSGi service registry under the
        Directory interface
    -->
    <osgi:service ref="directory" interface="greenpages.Directory" />
Open the template.mf file in the root of the greenpages.jpa
project and switch to the template.mf tab. Add the following entries to the template
and save it.
Import-Bundle: com.springsource.org.eclipse.persistence;version="[1.0.0,1.0.0]",
 com.springsource.org.eclipse.persistence.jpa;version="[1.0.0,1.0.0]"
Import-Package: org.springframework.context.weaving;version="[2.5.6.A,3.0.0)",
 org.springframework.transaction.aspectj;version="[2.5.6.A,3.0.0)"
Excluded-Exports: greenpages.jpa
The Excluded-Exports header tells Bundlor that the
greenpages.jpa should not be exported from the greenpages.jpa
bundle.
The Import-Package entries for
org.springframework.context.weaving and
org.springframework.transaction.aspectj are needed as Bundlor cannot, yet,
detect that these packages are required based on the contents of the bundle’s application context.
Lastly, the Import-Bundle entries for EclipseLink and its JPA implementation
are needed as Bundlor cannot, yet, detect that EclipseLink is the JPA implementation that is
being used by GreenPages.
Switch to the Overview tab and click Update MANIFEST.MF.
As with greenpages.db before, this update will result in some errors being
reported in the manifest as the project is not associated with a targetted runtime. Double-click the
MANIFEST.MF file in the greenpages project in the Package Explorer.
Switch to the Dependencies tab and click Add…. Select
greenpages.jpa and click OK. Save the updated file. The
problems in the manifest should now be resolved and the GreenPages application should be redeployed
due to the addition of the greenpages.jpa module. This redeployment should succeed
and it’s now time to try the application again.
Open a Web browser and navigate to http://localhost/greenpages/home.htm.
Click the Submit button. Unfortunately the search will not return any results
as the
Web module is still using the stub Directory implementation provided by the
greenpages.app module, rather than the JPA-based implementation that is provided
by greenpages.jpa. This can be confirmed by using the OSGi console.
Open a command prompt and enter
telnet localhost 2401
At the resulting prompt, enter ss (for short status) and press return. This will return a list of all of the bundles currently running in dm Server. Something like this:
69      ACTIVE      com.springsource.server.web.dm_1.0.2.RELEASE
70      ACTIVE      org.springframework.web.servlet_2.5.6.A
71      ACTIVE      com.springsource.freemarker_2.3.12
72      ACTIVE      com.springsource.org.apache.commons.fileupload_1.2.0
73      ACTIVE      com.springsource.org.apache.commons.io_1.4.0
74      ACTIVE      org.springframework.context.support_2.5.6.A
75      ACTIVE      greenpages-1-greenpages-synthetic.context_1.0.0
76      ACTIVE      greenpages-1-greenpages_1.0.0
77      ACTIVE      greenpages-1-greenpages.db_1.0.0
78      ACTIVE      greenpages-1-greenpages.jpa_1.0.0
79      ACTIVE      greenpages-1-greenpages.web_1.0.0
80      ACTIVE      com.springsource.org.h2_1.0.71
81      ACTIVE      com.springsource.org.apache.commons.dbcp_1.2.2.osgi
82      ACTIVE      org.springframework.aspects_2.5.6.A
The bundle that is of primary interest is the Web module (greenpages-1-greenpages.web_1.0.0).
In the example
above this is bundle 79. Enter a command of bundle <web-module-bundle-id>, that
is bundle 79 for the case above. There will be several lines of output.
Towards the top of the generated output will be details of the services which are being used by the Web module:
  Services in use:
    {greenpages.Directory}={org.springframework.osgi.bean.name=directory,
        Bundle-SymbolicName=greenpages-1-greenpages,
        Bundle-Version=1.0, com.springsource.server.app.name=greenpages-1, service.id=129}
    {org.osgi.service.packageadmin.PackageAdmin}={service.ranking=2147483647,
        service.pid=0.com.springsource.server.osgi.framework.equinox.EquinoxOsgiFramework$LockEnforcingPackageAdmin,
        service.vendor=Eclipse.org, service.id=1}
    {org.xml.sax.EntityResolver}={service.id=32}
    {org.springframework.beans.factory.xml.NamespaceHandlerResolver}={service.id=31}
As can be seen in this output the greenpages.Directory service is being provided by a bundle
with a symbolic name of greenpages-1-greenpages: the service is coming from the
greenpages.app bundle, rather than the greenpages.jpa bundle.
The service which is being used by the Web module can be changed at runtime without having to restart the
application or dm Server. This can be achieved changing greenpages.app so that it no longer
publishes its Directory implementation. As a result of this Directory
service no longer being available, the Web module will automatically switch to using the JPA-based
implementation.
Open the osgi-context.xml file in the META-INF/spring folder of the
greenpages.app project and comment out the publication of the directory service:
<!-- <osgi:service interface="greenpages.Directory" ref="directory"/> -->
Now save the updated file which will cause the application to be updated and refreshed on the server. Switch back to the Web browser and click Submit again.
This time eight results should be returned. Clicking on any of the View links will display the listing’s details. The application is now working. All that remains is to apply some best practices to the middle tier.
While the application middle tier now works as required, it does not observe a few Spring-related best practices.
At the moment, the middle tier does not make any use of transactions. This isn’t a problem while the database access methods are only running single queries, but could lead to problems in the future if the application is made more complex. Thankfully, adding the use of transactions to the middle tier is simple.
Open module-context.xml in the META-INF/spring folder of
greenpages.jpa. Add the following bean definition to create a transaction manager and
associate it with the context’s EntityManager:
    <!--
        Transaction manager for a single JPA EntityManagerFactory (alternative to JTA)
    -->
    <bean id="transactionManager" class="org.springframework.orm.jpa.JpaTransactionManager"
        p:entityManagerFactory-ref="entityManagerFactory" />
(Save it, and the greenpages.jpa module will be refreshed.)
Next, Spring must be told to enable transaction management. In keeping with the use of annotation-based configuration
for the EntityManager, annotation-based transaction configuration will also be used. Add the following
to enable AspectJ-powered transaction demarcation for appropriately annotated beans:
    <!--
        Instruct Spring to perform declarative transaction management
        automatically on annotated classes.
    -->
    <tx:annotation-driven mode="aspectj" />
Save the updated file which will trigger (another) successful refresh of greenpages.jpa.
Lastly, JpaDirectory needs to be annotated so that it is identified as requiring Spring-based
transaction management. Open JpaDirectory.java in greenpages.jpa.
Annotate the class with
@Transactional and add an
import for org.springframework.transaction.annotation.Transactional, which Eclipse should suggest:
import org.springframework.transaction.annotation.Transactional;

@Transactional
final class JpaDirectory implements Directory {
…
Save the updated file triggering another successful refresh: JpaDirectory is now
transactional.
When using JPA, the standard exceptions are somewhat out of keeping with Spring’s exception
model. Spring provides support for automatically translating these exceptions into Spring’s
DataAccessException hierarchy.
Open module-context.xml for greenpages.jpa again and add the
following bean definition to add the exception translator to the application context:
<!-- Post-processor to perform exception translation on @Repository classes (from native exceptions such as JPA PersistenceExceptions to Spring’s DataAccessException hierarchy). --> <bean class="org.springframework.dao.annotation.PersistenceExceptionTranslationPostProcessor" />
Save the updated file. The translation will only occur on classes that are annotated with
Spring’s @Repository stereotype annotation.
JpaDirectory needs to have this annotation added to it complete the
enabling of the exception translation.
Open JpaDirectory.java again, annotate the class with
@Repository and add an import for
org.springframework.stereotype.Repository:
import org.springframework.stereotype.Repository;

@Transactional
@Repository
final class JpaDirectory implements Directory {
Save the updated file.
At this point the redeploy of the GreenPages application may fail with an error similar to this:
<SPDE0100E> The class with name 'org.springframework.dao.annotation.PersistenceExceptionTranslationPostProcessor',
referenced by bean 'org.springframework.dao.annotation.PersistenceExceptionTranslationPostProcessor#0',
could not be loaded by class loader 'ServerBundleClassLoader: [bundle=greenpages-1-greenpages.jpa_1.0.0]':
…
which indicates that there is some package (org.springframework.dao.annotation) which is not
available to the “BundleClassLoader” for bundle greenpages-1-greenpages.jpa_1.0.0.
We should look in the MANIFEST.MF file for this bundle, and see that this package is not
imported (in the Import-Package header). Since Bundlor generated this file (controlled by the
template file template.mf) we should check that the manifest was re-generated on our last change.
Open template.mf in greenpages.jpa and,
in the Overview pane, click on Update MANIFEST.MF in the
Bundle Actions section. The MANIFEST.MF file is updated,
and the application is redeployed, this time successfully. It might be worthwhile checking the
option Automatically update MANIFEST.MF in the background on
the template.mf Overview pane.
By default, Bundlor generates Import-Package entries with no version range
specified. In the absence of a version range, the OSGi default of “any version” is used.
Whilst this is very flexible it’s generally a good idea to restrict an import by
specifying a narrower range. This can be achieved by providing Bundlor with some additional
information in the manifest template.
Open template.mf for greenpages.jpa and add the following
Import-Template header:
Import-Template: org.springframework.*;version="[2.5.6.A,3.0)",
 greenpages;version="[1.0,1.1)",
 javax.persistence;version="[1.0.0,1.0.0]"
This header tells Bundlor that all imports of org.springframework packages
should be in the range 2.5.6.A inclusive to 3.0
exclusive, that an import of the greenpages package should be in the
range 1.0
inclusive to 1.1 exclusive, and that an import of
javax.persistence should be at exactly version 1.0.0.
Bundlor has also generated an import for the javax.sql package due to
the greenpages.jpa module’s use of javax.sql.DataSource.
This class is provided by the JRE and as such is generally considered to be unversioned, that is it
has the default OSGi version of zero. If version zero is precisely what is required
then add the following to the Import-Template header:
,javax.sql;version="[0,0]"
but if “any” version is acceptable add the following instead:
,javax.sql;version="0"
Either of these will successfully allow GreenPages to deploy and work correctly. The difference is in the level of flexibility allowed with the external dependency, something which is probably irrelevant in this case, but with other package sources might be important.
Testing is one of the most important aspects of software development. Without testing it would be difficult to determine if a piece of code worked properly, changes would have undetected consequences, and the quality of products would generally be lower.
There are two major categories of testing generally recognised today: unit testing and integration testing. In the context of the GreenPages application, unit testing means testing a single class in isolation from other application code. This type of testing does not change at all when developing for dm Server.
In our application integration testing means testing an application or portion of an application with other code. This kind of testing does look a bit different when developing for dm Server. In most cases dm Server applications are made up of small bundles that consume services through the OSGi registry. In the following steps a single bundle and the entire GreenPages application will be integration tested outside the container.
One of the most common forms of integration testing is ensuring that the object relational mapping in an
application is working properly. This kind of testing typically uses a data access object to retrieve data
from a live database. In this step a test case for the JpaDirectory
class is created.
Open the greenpages.jpa.JpaDirectorySpringContextTests class in the
src/test/java source folder of the greenpages.jpa project. This
class contains a method that uses JUnit to test that a search completes
correctly. Rather than instantiate
this class directly in the test, the Spring Test Framework is used to instantiate and inject a
JpaDirectory based on the META-INF/spring/module-context.xml file.
Add Spring Test Framework declarations to the test class. These declarations run the test with the
SpringJunit4ClassRunner and configure the test with the
classpath:/META-INF/spring/module-context.xml file:
@RunWith(SpringJUnit4ClassRunner.class)
@ContextConfiguration(locations = "classpath:/META-INF/spring/module-context.xml")
@TestExecutionListeners(value = DependencyInjectionTestExecutionListener.class)
public class JpaDirectorySpringContextTests {
…
Use Eclipse to suggest the necessary imports until there are no errors.
When this configuration is complete, click on the Run drop-down menu and select Run Configurations…. In the the dialog that opens select → and press Run.
 |
This test run will fail because there is no DataSource bean to be injected;
it is typically sourced from the OSGi service registry at runtime:
Caused by: org.springframework.beans.factory.NoSuchBeanDefinitionException:
    No bean named 'dataSource' is defined
The next step will correct this error.
In the previous step the JpaDirectorySpringContextTests test failed because it did
not have a DataSource to be injected. In this step, you will instantiate an
“in-process” database for testing and populate it with data.
Open the test-context.xml file in the
src/test/resources META-INF/spring folder.
In this file, define two beans; a
DataSource and a TestDataPopulator.
These two beans
will provide a test DataSource complete with test data.
    <bean id="dataSource" class="org.apache.commons.dbcp.BasicDataSource"
        p:driverClassName="org.h2.Driver" p:url="jdbc:h2:.~/greenpages-db/greenpages"
        p:username="greenpages" p:password="pass" init-method="createDataSource"
        destroy-method="close" />

    <bean class="greenpages.jpa.TestDataPopulator" init-method="populate">
        <constructor-arg ref="dataSource" />
        <constructor-arg value="file:../../db/db.sql" />
    </bean>
Open the JpaDirectorySpringContextTests class and update the
ContextConfiguration annotation to point at both the
module-context.xml file and the test-context.xml file:
@ContextConfiguration(locations = {
        "classpath:/META-INF/spring/module-context.xml",
        "classpath:/META-INF/spring/test-context.xml" })
Once again use the JpaDirectorySpringContextTests JUnit profile to run the test class.
Now that there is a DataSource being contributed, the test will pass
Proceed to the next step.
Earlier a single bundle was integration tested by providing a test implementation of its
DataSource dependency. When integration testing it is often a good idea to
test the entire application outside of the container. In this step you will create a test case for the
entire GreenPages application starting with the GreenPagesController class
and descending
all the way to a database.
Following the import instructions in the section called “Importing the greenpages.web project”, import the
$GREENPAGES_HOME/start/greenpages.tests project. Initially this project will have
compile failures in it; this is to be expected.
Since this project will be testing the GreenPages application as a whole, it needs to depend on the bundles
that make up the application. Open its pom.xml file and add dependency declarations for
the greenpages.app, greenpages.jpa, and
greenpages.web bundles:
        <dependency>
            <groupId>com.springsource.dmserver</groupId>
            <artifactId>greenpages.app</artifactId>
            <version>${project.version}</version>
        </dependency>
        <dependency>
            <groupId>com.springsource.dmserver</groupId>
            <artifactId>greenpages.jpa</artifactId>
            <version>${project.version}</version>
        </dependency>
        <dependency>
            <groupId>com.springsource.dmserver</groupId>
            <artifactId>greenpages.web</artifactId>
            <version>${project.version}</version>
        </dependency>
Open the GreenPagesSpringContextTests class (in greenpages.tests)
and add the Spring Test
Framework declarations. These declarations should run the test with the
SpringJunit4ClassRunner and configure the test with the
classpath*:/META-INF/spring/module-context.xml and
classpath:/META-INF/spring/test-context.xml files. Note the use of
classpath*: with respect to the module-context.xml path. This will
cause Spring to look for files that match that path in all of the bundles on the classpath meaning that all
the application beans will be instantiated:
@RunWith(SpringJUnit4ClassRunner.class)
@ContextConfiguration(locations = {
        "classpath*:/META-INF/spring/module-context.xml",
        "classpath:/META-INF/spring/test-context.xml" })
@TestExecutionListeners(value = DependencyInjectionTestExecutionListener.class)
public class GreenPagesSpringContextTests {
…
It may be necessary to update the MANIFEST.MF from the template overview pane, before Eclipse will suggest
all the right imports here.
When this configuration is complete, click on the Run drop-down and select Run Configurations…. In the the dialog that opens select → and press Run;
 |
When this test is run, Spring creates an ApplicationContext that is built
from the module-context.xml configuration files from all of the bundles. Because of
this all of the internal dependencies are satisfied by the beans created directly by the bundles.
There are warnings output by this test concerning log4j:
log4j:WARN No appenders could be found for logger
                                (org.springframework.test.context.junit4.SpringJUnit4ClassRunner).
log4j:WARN Please initialize the log4j system properly.
These warnings are benign, and do not influence the tests in any way.
The next chapter constructs an automated build system that might be used to build GreenPages (and run its tests) outside of an interactive development environment.
One of the most important components in application development is the automated build. This permits application artifacts to be created outside of the developer’s IDE. The application can be created and tested in a variety of environments including continuous integration.
Before building and deploying from the command line, it is important to clean up the artifacts that Eclipse has deployed. In this section the GreenPages application will be undeployed within Eclipse and all of the GreenPages bundles built from the command line.
Right-click on the greenpages application in the Servers view and
select Remove. Once this is complete close Eclipse: it is no longer needed.
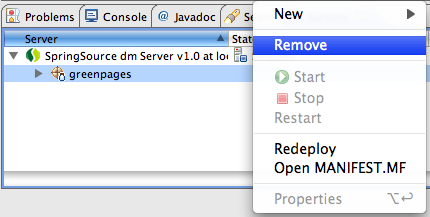 |
Run the following command from a command prompt with the $GREENPAGES_HOME/start as the current directory. This will build
the individual bundles that make up the GreenPages application:
mvn clean install
The first time this is run will cause Maven to download quite a few packages. It is likely also that
this does not build successfully on the first try, due to warnings from Bundlor. These warnings are due to
the lack of information regarding some of the packages required by greenpages.db and greenpages.web.
For example the following warnings may be issued:
[WARNING] Bundlor Warnings:
[WARNING]     <SB0001W>: The import of package javax.sql does not specify a version.
[WARNING]     <SB0001W>: The import of package org.apache.commons.dbcp does not specify a version.
[INFO] ------------------------------------------------------------------------
[ERROR] BUILD ERROR
[INFO] ------------------------------------------------------------------------
[INFO] Bundle transformer returned warnings.
  Please fix manifest template at '/opt/greenpages-1.0.0.BUILD/start/greenpages.db/template.mf' and try again.
which indicate that there is no information in the template.mf file in the greenpages.db project
to inform Bundlor what version of these packages to generate in the MANIFEST.MF for that bundle.
To correct these problems add the following lines to the template.mf file for
the greenpages.db bundle:
Import-Template: javax.sql;version="0",
 org.apache.commons.dbcp;version="0"
When the mvn command returns successfully, go to the next step.
All of the projects except the PAR project have Maven POM files for building. In this step an initial POM file for the PAR is created.
Using a text editor create a file called $GREENPAGES_HOME/start/greenpages/pom.xml.
Open this file and add the following skeleton to it.
<?xml version="1.0" encoding="UTF-8"?>
<project
    xmlns="http://maven.apache.org/POM/4.0.0"
    xmlns:xsi="http://www.w3.org/2001/XMLSchema-instance"
    xsi:schemaLocation="http://maven.apache.org/POM/4.0.0 http://maven.apache.org/maven-v4_0_0.xsd">

  <parent>
    <groupId>com.springsource.dmserver</groupId>
    <artifactId>greenpages.parent</artifactId>
    <version>1.0.0.SNAPSHOT</version>
    <relativePath>../parent</relativePath>
  </parent>

  <modelVersion>4.0.0</modelVersion>
  <groupId>com.springsource.dmserver</groupId>
  <artifactId>greenpages</artifactId>
  <name>GreenPages PAR</name>
  <packaging>par</packaging>

  <dependencies>
  </dependencies>

  <build>
    <plugins>
    </plugins>
  </build>

</project>
This skeleton defines a basic configuration with a parent POM. Notice that the packaging
type is par. When you have created this file execute the following command from the
$GREENPAGES_HOME/start/greenpages directory.
mvn clean package
This command returns an error indicating that Maven does not know how to build a PAR:
[INFO] ------------------------------------------------------------------------
[ERROR] BUILD ERROR
[INFO] ------------------------------------------------------------------------
[INFO] The plugin 'org.apache.maven.plugins:maven-par-plugin' does not exist
[INFO] or no valid version could be found
[INFO] ------------------------------------------------------------------------
The next step will correct this.
Thorsten Maus (see Section A.2, “Documentation”) has developed a Maven plugin that builds a PAR file from a list of dependencies. In this step
the Maven par plugin is added to properly build a PAR artifact type.
Add a <pluginRepository/> declaration to the greenpages POM file so that Maven can find the
par plugin:
<pluginRepositories>
  <pluginRepository>
    <id>steademy</id>
    <name>Steademy repository</name>
    <url>http://repo.steademy.com/beta/maven2</url>
  </pluginRepository>
</pluginRepositories>
In the <build><plugins>…</plugins></build> section, add a plugin declaration for the
par plugin.
<plugin>
  <groupId>org.apache.maven.plugins</groupId>
  <artifactId>maven-par-plugin</artifactId>
  <version>0.2.0</version>
  <configuration>
    <fqn>true</fqn>
    <applicationSymbolicName>greenpages</applicationSymbolicName>
    <applicationVersion>${project.version}</applicationVersion>
    <applicationDescription>GreenPages PAR</applicationDescription>
    <applicationName>GreenPages PAR</applicationName>
  </configuration>
</plugin>
Declare the list of bundles to be packaged in the PAR as dependencies of the PAR project.
<dependency>
  <groupId>com.springsource.dmserver</groupId>
  <artifactId>greenpages.app</artifactId>
  <version>${project.version}</version>
</dependency>
<dependency>
  <groupId>com.springsource.dmserver</groupId>
  <artifactId>greenpages.jpa</artifactId>
  <version>${project.version}</version>
</dependency>
<dependency>
  <groupId>com.springsource.dmserver</groupId>
  <artifactId>greenpages.db</artifactId>
  <version>${project.version}</version>
</dependency>
<dependency>
  <groupId>com.springsource.dmserver</groupId>
  <artifactId>greenpages.web</artifactId>
  <version>${project.version}</version>
</dependency>
Run the following command.
mvn clean package
This command will now complete successfully and build a PAR into target/. Proceed to
the next step.
[INFO] [par:par]
[INFO] assembling artifacts for par package
[INFO] greenpages
[INFO] artifact greenpages.app is copied with fully qualified name
                                                    com.springsource.dmserver.greenpages.app-1.0.0.SNAPSHOT
[INFO] artifact greenpages.jpa is copied with fully qualified name
                                                    com.springsource.dmserver.greenpages.jpa-1.0.0.SNAPSHOT
[INFO] artifact greenpages.db is copied with fully qualified name
                                                    com.springsource.dmserver.greenpages.db-1.0.0.SNAPSHOT
[INFO] artifact greenpages.web is copied with fully qualified name
                                                    com.springsource.dmserver.greenpages.web-1.0.0.SNAPSHOT
[INFO] added com.springsource.dmserver.greenpages.app-1.0.0.SNAPSHOT.jar
[INFO] added com.springsource.dmserver.greenpages.db-1.0.0.SNAPSHOT.jar
[INFO] added com.springsource.dmserver.greenpages.jpa-1.0.0.SNAPSHOT.jar
[INFO] added com.springsource.dmserver.greenpages.web-1.0.0.SNAPSHOT.jar
Maven now successfully builds the PAR for your application. However, the dependecies of the PAR
are not apparent. In this step the Maven dependency plugin is added to
collect the transitive dependency graph for the PAR.
In the <build><plugins>…</plugins></build> section (after the par plugin
declaration), add a plugin declaration for the dependency plugin.
<plugin>
  <groupId>org.apache.maven.plugins</groupId>
  <artifactId>maven-dependency-plugin</artifactId>
  <executions>
    <execution>
      <id>copy-dependencies</id>
      <phase>package</phase>
      <goals>
        <goal>copy-dependencies</goal>
      </goals>
      <configuration>
        <outputDirectory>${project.build.directory}/par-provided</outputDirectory>
        <overWriteIfNewer>true</overWriteIfNewer>
        <excludeGroupIds>com.springsource.dmserver</excludeGroupIds>
      </configuration>
    </execution>
  </executions>
</plugin>
Run the following command.
mvn clean package
When the command has completed, it will have copied all of the PAR’s dependencies into the
target/par-provided directory.
The output from Maven should include lines like these (these lines are wrapped for this document):
[INFO] [dependency:copy-dependencies {execution: copy-dependencies}]
[INFO] Copying com.springsource.javax.persistence-1.0.0.jar to
/opt/greenpages-1.0.0.BUILD/start/greenpages/target/par-provided/com.springsource.javax.persistence-1.0.0.jar
[INFO] Copying com.springsource.org.apache.commons.dbcp-1.2.2.osgi.jar to
/opt/greenpages-1.0.0.BUILD/start/greenpages/target/par-provided/com.springsource.org.apache.commons.dbcp-1.2.2.osgi.jar
[INFO] Copying com.springsource.org.apache.commons.pool-1.3.0.jar to
/opt/greenpages-1.0.0.BUILD/start/greenpages/target/par-provided/com.springsource.org.apache.commons.pool-1.3.0.jar
[INFO] Copying com.springsource.org.apache.log4j-1.2.15.jar to
/opt/greenpages-1.0.0.BUILD/start/greenpages/target/par-provided/com.springsource.org.apache.log4j-1.2.15.jar
[INFO] Copying com.springsource.org.eclipse.persistence-1.0.0.jar to
/opt/greenpages-1.0.0.BUILD/start/greenpages/target/par-provided/com.springsource.org.eclipse.persistence-1.0.0.jar
[INFO] Copying com.springsource.org.eclipse.persistence.antlr-1.0.0.jar to
/opt/greenpages-1.0.0.BUILD/start/greenpages/target/par-provided/com.springsource.org.eclipse.persistence.antlr-1.0.0.jar
[INFO] Copying com.springsource.org.eclipse.persistence.asm-1.0.0.jar to
/opt/greenpages-1.0.0.BUILD/start/greenpages/target/par-provided/com.springsource.org.eclipse.persistence.asm-1.0.0.jar
[INFO] Copying com.springsource.org.eclipse.persistence.jpa-1.0.0.jar to
/opt/greenpages-1.0.0.BUILD/start/greenpages/target/par-provided/com.springsource.org.eclipse.persistence.jpa-1.0.0.jar
[INFO] Copying com.springsource.freemarker-2.3.12.jar to
/opt/greenpages-1.0.0.BUILD/start/greenpages/target/par-provided/com.springsource.freemarker-2.3.12.jar
If the dependencies are produced, proceed to the next step.
Maven can now build both the PAR application and the collection of dependencies required for the application. In this step the PAR and dependencies are copied to the dm Server and the PAR is started.
Copy the JARs in the target/par-provided directory into the
$DMS_HOME/repository/bundles/usr/ directory.
Copy the PAR (greenpages-1.0.0.SNAPSHOT.par) in the target/ directory
into the $DMS_HOME/pickup directory.
Start the dm Server. The server may issue warnings, for example:
<SPDE0010I> Deployment of 'greenpages' version '1.0.0.SNAPSHOT' completed.
Once deployment of the GreenPages application has completed, navigate to http://localhost:8080/greenpages/home.htm.
<SPDE0010I> Deployment of 'greenpages' version '1.0.0.SNAPSHOT' completed.
The GreenPages application has been built (and automatically tested) from the command line, with a complete dependency set generated for independent deployment.
The automated build procedure is to run mvn clean install from the
base directory, generating the component bundles, and then to run mvn clean package from
the greenpages directory
to generate the par and produce all its dependencies.
SpringSource.org (http://www.springsource.org) — homepage for SpringSource dm Server and Spring Framework.
OSGi (http://www.osgi.org) — homepage for OSGi.
H2 Database (http://www.h2database.com — homepage for the H2 database.
FreeMarker (http://freemarker.sourceforge.net) — homepage for FreeMarker templating engine.
Commons DBCP (http://commons.apache.org/dbcp) — homepage for Commons DBCP.
Eclipse IDE (http://www.eclipse.org/eclipse) — homepage for Eclipse IDE.
EclipseLink (http://www.eclipse.org/eclipselink) — homepage for Ecli≥pseLink JPA.
SpringSource dm Server User’s Guide (http://static.springsource.com/projects/dm-server/1.0.x/user-guide/html/).
SpringSource dm Server Programmer’s Guide (http://static.springsource.com/projects/dm-server/1.0.x/programmer-guide/html/).
Spring DM Reference Guide (http://static.springframework.org/osgi/docs/1.1.3/reference/html/).
Spring Framework 2.5 documentation (http://static.springframework.org/spring/docs/2.5.x/reference/index.html).
FreeMarker documentation (http://freemarker.sourceforge.net/docs).
Eclipse IDE documentation (http://www.eclipse.org/documentation).
EclipseLink documentation wiki (http://wiki.eclipse.org/EclipseLink/UserManual).
Maven PAR plugin from Thorsten Maus (http://blog.steademy.com/2008/05/29/maven-par-plugin/).