Table of Contents
Increasing complexity in modern enterprise applications is a fact of life. You not only have to deal with complex business logic, but also a myriad of other concerns such as security, auditing, exposing business functionality to external applications, and managing the evolution of that functionality and technologies. The Spring Framework and Spring Portfolio products address these needs by offering a Plain-Old Java Object (POJO) based solution that lets you focus on your business logic.
Complex applications pose problems that go beyond using the right set of technologies. You need to take into account other considerations such as a simplified development process, easy deployment, monitoring deployed applications, and managing changes in response to changing business needs. This is where the SpringSource Application Platform comes into play. It offers a simple yet comprehensive platform to develop, deploy, and service enterprise applications. In this Programmer Guide, we explore the runtime portion of the SpringSource Application Platform, the SpringSource dm Server, and learn how to develop applications to benefit from its capabilities.
The SpringSource dm Server requires Java SE 5 or later to be installed. Java is available from Sun and elsewhere.
To make effective use of the SpringSource dm Server, you should also refer to the following guides:
In this chapter, we provide an overview of the SpringSource dm Server focusing on what it is, what benefits it provides to developers and administrators, and why you should use it.
The SpringSource dm Server, or dm Server for short, is the runtime portion of the SpringSource Application Platform. It is a lightweight, modular, OSGi-based runtime that provides a complete packaged solution for developing, deploying, and managing enterprise applications. By leveraging several best-of-breed technologies and improving upon them, the dm Server offers a compelling solution to develop and deploy enterprise applications.
The SpringSource dm Server is built on top of the following core technologies:
- Spring Framework, obviously!
- Tomcat as the web container.
- OSGi R4.1.
- Equinox as the OSGi implementation.
- Spring Dynamic Modules for OSGi for working with OSGi in a Spring application.
- SpringSource Tool Suite for developing applications.
- Spring Application Management Suite for monitoring the SpringSource dm Server and the applications that have been deployed to it.
Note, however, that the SpringSource dm Server isn't just a combination of these technologies. Rather, it integrates and extends these technologies to provide many features essential for developing, deploying, and managing today's enterprise Java applications.
The following diagram presents a high-level overview of the dm Server's architecture.
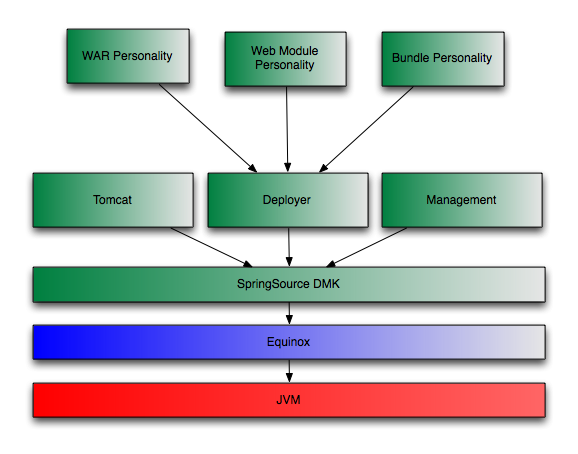
At the heart of the SpringSource dm Server is the SpringSource Dynamic Module Kernel (DMK). The DMK is an OSGi-based kernel that takes full advantage of the modularity and versioning of the OSGi platform. The DMK builds on Equinox and extends its capabilities for provisioning and library management, as well as providing core functionality for the dm Server.
To maintain a minimal runtime footprint, OSGi bundles are installed on demand by the DMK provisioning subsystem. This allows for an application to be installed into a running dm Server and for its dependencies to be satisfied from an external repository. Not only does this remove the need to manually install all your application dependencies, which would be tedious, but it also keeps memory usage to a minimum.
As shown in the figure, SpringSource DMK runs on top of Equinox within a standard Java Virtual Machine. Above the DMK is a layer of subsystems which contribute functionality to the dm Server. Subsystems are configured to run for various profiles and typically provide additional services to the basic OSGi container such as serviceability, management, and personality-specific deployment.
In the SpringSource dm Server, applications are modular and each module has a personality that describes what kind of module it is: web, batch, web service, etc. The dm Server deploys modules of each personality in a personality-specific manner. For example, web modules are configured in Tomcat with web context. Each module in the application can be updated independently of the other modules whilst retaining the identity of being part of the larger application. Whatever kind of application you are building, the programming model remains standard Spring and Spring DM.
Version 2.0.0.M2 of the SpringSource dm Server supports the bundle, web, and WAR personalities, which enable you to build sophisticated web applications. The WAR personality includes support for standard Java EE WARs, "shared library" WARs, and "shared services" WARs, each of which will be covered in greater detail in Chapter 3, Deployment Architecture. Future releases will include support for more personalities such as batch, web services, etc.
You could deploy a web application in a stand-alone servlet engine or application server. Or you could even deploy directly in an OSGi container such as Equinox. However, deploying in the SpringSource dm Server offers a number of key benefits that make it both more appealing and more suitable for enterprise application development.
While many applications deployed in the SpringSource dm Server will take advantage of OSGi capabilities, not all applications need such sophistication. For example, development teams may initially choose to continue packaging existing web applications as standard WAR files and then gradually migrate toward a fully OSGi-based packaging and deployment model. The SpringSource dm Server makes such migrations easy for developers by supporting multiple packaging and deployment formats. These formats and migration strategies are discussed in greater detail in Chapter 5, Migrating to OSGi and Chapter 6, Case study: Migrating the Form Tags sample application.
Prior to the release of the SpringSource dm Server, developing and deploying OSGi applications involved inherent complexity such as:
- Obtaining OSGi bundles for popular Java libraries: For optimal benefits, every technology you use in an OSGi application must be packaged as OSGi bundles. Currently, this involves manually converting JAR files into bundles and making sure that any libraries needed by those bundles are also available as OSGi bundles.
- Package management complexity:
OSGi bundles use other bundles through
Import-Packagemanifest headers. Many applications use a set of common technologies (e.g., an ORM solution, a web framework, etc.). Combining these two characteristics leads to duplicated configuration in the form of repeated and verboseImport-Packagestatements. - Lack of application-level isolation:
In OSGi everything is a bundle, and all bundles share the same OSGi Service Registry.
To highlight how conflicts can arise between applications and their services in this
shared service registry, consider the following scenarios.
-
Application
Ais comprised of bundlesBandC. In a standard OSGi environment, if you attempt to install two instances of the same version of applicationA(i.e., two sets of bundlesBandC), a clash will occur, because you cannot deploy multiple bundles with the sameBundle-SymbolicNameandBundle-Versioncombination. -
Application
A1is comprised of bundlesB1andC1. Similarly, applicationA2is comprised of bundlesB2andC2. Each bundle has a unique combination ofBundle-SymbolicNameandBundle-Version. BundlesB1andB2both export serviceSwhich is imported by bothC1andC2. In contrast to the previous example, there is no conflict resulting from duplicateBundle-SymbolicName/Bundle-Versioncombinations; however, there is a clash for the exported serviceS. Which serviceSwill bundlesC1andC2end up using once they are installed? Assuming bundlesB1andC1are intended to work together, you would not want bundleC1to get a reference to serviceSfrom bundleB2, because it is installed in a different logical application. On the contrary, you typically want bundleC1to get a reference to serviceSexported by bundleB1, but in a standard OSGi environment this may not be the case.
-
Application
Furthermore, since standard OSGi does not define a notion of an application as a set of bundles, you cannot deploy or undeploy an application and its constituent bundles as a single unit.
The SpringSource dm Server introduces a number of features to solve these issues:
- A full set of OSGi bundles for many popular Java libraries to get you started quickly with creating OSGi applications.
-
An OSGi library concept that obviates the need to
duplicate verbose
Import-Packagestatements. - The PAR packaging format which offers application-level isolation and deployment.
- The concept of a plan, which is an XML file that lists a collection of bundles that should load together as a single application. Conceptually, plans are very like PARs, except that a plan describes the contents of the application rather than a PAR that actually contains them.
Identifying why an application won't deploy or which particular library dependencies are unsatisfied is the cause of many headaches! Similarly, production time errors that don't identify the root cause are all too familiar to Java developers. The dm Server was designed from the ground up to enable tracing and First Failure Data Capture (FFDC) that empower developers with precise information at the point of failure to fix the problem quickly.
The SpringSource dm Server offers several choices when it comes to deploying applications. Each choice offers certain advantages, and it is important to understand those in order to make the right choice for your application. In this chapter, we take a closer look at the choices offered, compare them, and provide guidelines in choosing the right one based on your specific needs.
The dm Server supports standard self-contained WAR files thus allowing you to use the SpringSource dm Server as an enhanced web server. The dm Server also supports the Shared Libraries WAR format which allows for slimmer WAR files that depend on OSGi bundles instead of including JAR files inside the WAR. The Shared Services WAR format allows developers to further reduce the complexity of standard WARs by deploying services and infrastructure bundles alongside the WAR. A shared services WAR will then consume the services published by those bundles. To complete the picture, the dm Server supports a new OSGi-based Web Module deployment format for web applications that builds on the benefits provided by a shared services WAR and provides additional conveniences for developing and deploying Spring MVC based web applications.
For applications consisting of multiple bundles and web applications, plans and the PAR format are the primary deployment models that take advantage of OSGi capabilities. We will explore all of these formats and their suitability later in this guide.
The SpringSource dm Server supports applications packaged in the following formats:
When you deploy an application to the dm Server, each deployment artifact (e.g., a single bundle, WAR, PAR, or plan) passes through a deployment pipeline. This deployment pipeline supports the notion of personality-specific deployers which are responsible for processing an application with a certain personality (i.e., application type). The 2.0.0.M2 release of the dm Server natively supports personality-specific deployers analogous to each of the aforementioned packaging options. Furthermore, the deployment pipeline can be extended with additional personality deployers, and future releases of the dm Server will provide support for personalities such as Batch, Web Services, etc.
Let's take a closer look now at each of the supported deployment and packaging options to explore which one is best suited for your applications.
At its core, the SpringSource dm Server is an OSGi container. Thus any OSGi-compliant bundle can be deployed directly on the dm Server unmodified. You'll typically deploy an application as a single bundle or a set of stand-alone bundles if you'd like to publish or consume services globally within the container via the OSGi Service Registry.
For Web Application Archives (WAR), the SpringSource dm Server provides support for the following three formats.
Each of these formats plays a distinct role in the incremental migration path from a standard Java EE WAR to an OSGi-ified web application.
Standard WAR files are supported directly in the dm Server. At deployment time, the WAR file is transformed into an OSGi bundle and installed into Tomcat. All the standard WAR contracts are honored, and your existing WAR files should just drop in and deploy without change. Support for standard, unmodified WAR files allows you to try out the SpringSource dm Server on your existing web applications and then gradually migrate toward the Shared Libraries WAR , Shared Services WAR , and Web Module formats.
In addition to the standard support for WARs that you would expect from Tomcat, the dm Server also enables the following features:
Spring-driven load-time weaving (see Section 6.8.4, “Load-time weaving with AspectJ in the Spring Framework").
Diagnostic information such as FFDC (first failure data capture)
The main benefit of this application style is familiarity -- everyone knows how to create a WAR file! You can take advantage of the dm Server's added feature set without modifying the application. The application can also be deployed on other Servlet containers or Java EE application servers.
You may choose this application style if the application is fairly simple and small. You may also prefer this style even for large and complex applications as a starting point and migrate to the other styles over time as discussed in Chapter 5, Migrating to OSGi .
If you have experience with developing and packaging web applications using the standard WAR format, you're
certainly familiar with the pains of library bloat. So, unless you're installing shared libraries in a common
library folder for your Servlet container, you have to pack all JARs required by your web application in
/WEB-INF/lib
. Prior to the release of the SpringSource dm Server, such library bloat has essentially been the norm for web applications, but
now there is a better solution! The Shared Libraries WAR format reduces your application's deployment footprint and
eradicates library bloat by allowing you to declare dependencies on libraries via standard OSGi manifest headers
such as
Import-Package
and
Require-Bundle
. The dm Server provides additional support for simplifying dependency management via the
Import-Library
and
Import-Bundle
manifest headers which are essentially macros that get expanded into OSGi-compliant
Import-Package
statements.
![[Tip]](images/tip.gif) | Tip |
|---|---|
For detailed information on which libraries are already available, check out the SpringSource Enterprise Bundle Repository"> . |
Once you've begun taking advantage of declarative dependency management with a Shared Libraries WAR, you'll likely
find yourself wanting to take the next step toward reaping further benefits of an OSGi container: sharing services
between your OSGi-compliant bundles and your web applications. By building on the power and simplicity of
Spring-DM, the
Shared Services WAR
format puts the OSGi Service Registry at your finger tips. As a best practice you'll typically publish services
from your domain, service, and infrastructure bundles via
<osgi:service ... />
and then consume them in your web application's ApplicationContext via
<osgi:reference ... />.
Doing so promotes programming to interfaces and allows you to completely decouple your web-specific deployment
artifacts from your domain model, service layer, etc., and that's certainly a step in the right direction. Of the
three supported WAR deployment formats, the Shared Services WAR is by far the most attractive in terms of
modularity and reduced overall footprint of your web applications.
Above and beyond WAR-based deployment formats, the SpringSource dm Server
introduces a deployment and packaging option for OSGi-compliant web applications, the
Web Module
format. Web modules have a structure similar to a Shared Services WAR and can therefore take full advantage of all
three WAR deployment formats. In addition, web modules benefit from reduced configuration for Spring MVC based
applications via new OSGi manifest headers such as Web-DispatcherServletUrlPatterns
and Web-FilterMappings. For further details on these and other Web-* manifest
headers, please consult the section called “Web Module Manifest Headers”.
If you're building a Spring MVC based web application as a web module, you won't need to worry about configuring a
root WebApplicationContext or an ApplicationContext
for your DispatcherServlet. Based on metadata in your web module's /META-INF/MANIFEST.MF,
the dm Server will auto-generate an appropriately configured web.xml
for you on-the-fly, and your application will use the ApplicationContext created for your web module by Spring-DM.
Future releases of the dm Server will add additional support to simplify configuration of
Spring Web Flow
based web applications as well.
A PAR is a standard JAR which contains all of the modules of your application (e.g., service, domain, and infrastructure bundles as well as a WAR or web module for web applications) in a single deployment unit. This allows you to deploy, refresh, and undeploy your entire application as a single entity. If you are familiar with Java EE, it is worth noting that a PAR can be considered a replacement for an EAR (Enterprise Archive) within the context of an OSGi container. As an added bonus, modules within a PAR can be refreshed independently and on-the-fly, for example via the SpringSource dm Server Tool Suite (see Chapter 7, Tooling).
Many of the benefits of the PAR format are due to the underlying OSGi infrastructure, including:
Fundamentally modularized applications: instead of relying on fuzzy boundaries between logical modules in a monolithic application, this style promotes physically separated modules in the form of OSGi bundles. Then each module may be developed separately, promoting parallel development and loose coupling.
Robust versioning of various modules: the versioning capability offered by OSGi is much more comprehensive than any alternatives. Each module can specify a version range for each of its dependencies. Bundles are isolated from each other in such a way that multiple versions of a bundle may be used simultaneously in an application.
Improved serviceability: each bundle may be deployed or undeployed in a running application. This allows modifying the existing application to fix bugs, improve performance, and even to add new features without having to restart the application.
Furthermore, PARs scope the modules of your application within the dm Server. Scoping provides both a physical and logical application boundary, effectively shielding the internals of your application from other PARs deployed within the dm Server. This means your application doesn't have to worry about clashing with other running applications (e.g., in the OSGi Service Registry). You get support for load-time weaving, classpath scanning, context class loading, etc., and the dm Server does the heavy lifting for you to make all this work seamlessly in an OSGi environment. If you want to take full advantage of all that the SpringSource dm Server and OSGi have to offer, packaging and deploying your applications as a PAR is a good choice, although plans are an even better one, as described in the next section.
| OSGi != multiple JARs |
|---|---|
Note that while physically separated modules can, in theory, be implemented simply using multiple JARs, complex versioning requirements often make this impractical. For example, consider the situation depicted in the diagram below.
Suppose that versions 1.0.0 and 2.0.0 of bundle C are neither backward nor forward compatible. Traditional monolithic applications cannot handle such situations: either bundle A or bundle B would need reworking which undermines truly independent development. OSGi's versioning scheme enables this scenario to be implemented in a robust manner. If it is desirable to rework the application to share a single version of C, then this can be planned in and is not forced. 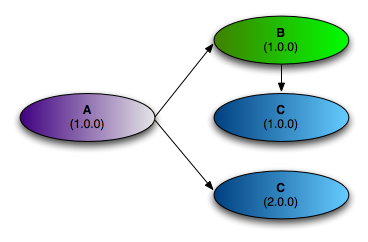 |
A plan is similar to a PAR in that it encapsulates all of the artifacts of your application in a single deployment unit. The main difference, however, is that a plan is simply an XML file that lists the artifacts of your application; a PAR, by contrast, is an actual JAR file that physically contains the artifacts. Just like a PAR, you deploy, refresh, and undeploy a plan as a single entity. SpringSource highly recommends the use of plans for creating applications.
When you create a plan, you can specify that the included bundles and services are in a scope that isolates them from the rest of SpringSource dm Server and its deployments. This scoping ensures that the bundles wire to each other and see each other's services in preference to services from outside the scope. Scoping also prevents application code from leaking into the global scope or scope of another application. In addition, a plan can link the lifecycle of a group of bundles together atomically, which ensures that install, start, stop, and uninstall events on a single artifact in the plan are escalated to all artifacts in the plan. You can, however, disable both of these features by simply updating an attribute in the plan.
The general benefits of using plans are similar to those of using PARs; see PAR for details. Plans offer added benefits, however, such as the ability to control the deployment order of your application: the order in which you list artifacts in the plan's XML file is the order in which dm Server deploys them. Additionally, because plans specify the artifacts that make up an application by reference, it is easier to share content between plans as well as update individual parts of a plan without having to physically repackage (re-JAR) it.
In an OSGi environment, there are two kinds of dependencies between various bundles: type dependency and service dependency.
Type dependency: A bundle may depend on a type exported by another bundle thus creating a type dependency. Type dependencies are managed through
Import-PackageandExport-Packagedirectives in the OSGi manifest. This kind of dependency is similar to a JAR file using types in other JAR files from the classpath. However, as we've seen earlier, there are significant differences.Service dependency: A bundle may also publish services (preferably using Spring-DM), and other bundles may consume those services. If two bundles depend on the same service, both will be communicating effectively to the same object. More specifically, any state for that service will be shared between all the clients of that service. This kind of arrangement is similar to the commonly seen client-server interaction through mechanisms such as RMI or Web Services.
So what makes a good application suitable for deployment on the SpringSource dm Server? Since OSGi is at the heart of the dm Server, modular applications consisting of bundles, which each represent distinct functionality and well-defined boundaries, can take maximum advantage of the OSGi container's capabilities. The core ideas behind forming bundles require following good software engineering practices: separation of concerns, minimum coupling, and communication through clear interfaces. In this section, we look at a few approaches that you may use to create modular applications for SpringSource dm Server deployment. Please consider the following discussion as guidelines and not as rules.
Bundles can be formed along horizontal slices of layering and vertical slices of function. The objective is to enable independent development of each bundle and minimize the skills required to develop each bundle.
For example, an application could have the following bundles: infrastructure, domain, repository, service, and web as shown in the following diagram.
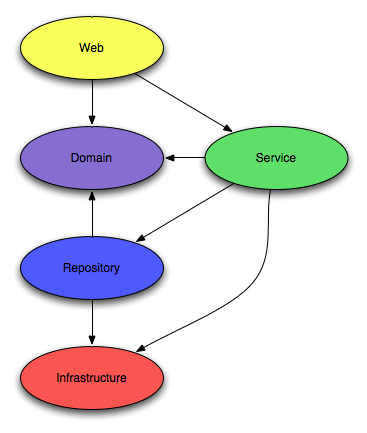
Each bundle consists of types appropriate for that layer and exports packages and services to be used by other layers. Let's examine each bundle in more details:
Table 3.1. Bundles across layers
| Bundles | Imported Packages | Exported Packages | Consumed Services | Published Services |
|---|---|---|---|---|
| Infrastructure | Third-party libraries | Infrastructure interfaces | None | None |
| Domain | Depends: for example, if JPA is used to annotate persistent types, then JPA packages. | Public domain types | None | None |
| Web | Domain, Service | None | Service beans | None |
| Service | Domain, Infrastructure, Repository | Service interfaces | Repository beans | Service beans |
| Repository | Domain, Third-party libraries, ORM bundles, etc. | Repository interfaces | DataSources, ORM session/entity managers, etc. | Repository beans |
Within each layer, you may create bundles for each subsystem representing a vertical slice of business functionality. For example, as shown in the following figure, the service layer is divided into two bundles each representing separate business functionalities.
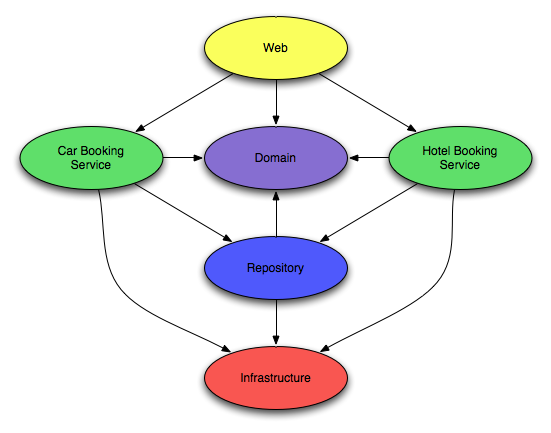
You can similarly separate the repositories, domain classes, and web controllers based on the business role they play.
Applications that take advantage of the OSGi capabilities of the SpringSource dm Server are typically comprised of multiple bundles. Each bundle may have dependencies on other bundles. Furthermore, each bundle exposes only certain packages and services. In this chapter, we look at how to create bundles, import and export appropriate functionality, and create artifacts to deploy web applications on the SpringSource dm Server.
| Tip |
|---|---|
This is an abbreviated introduction to OSGi bundles. Please refer to the Spring Dynamic Modules for OSGi documentation for full details. |
An OSGi bundle is simply a jar file with metadata that describe additional characteristics such as version and imported and exported packages.
A bundle exports types and publishes services to be used by other bundles:
Types: via the OSGi
Export-Packagedirective,Services: via Spring-DM's
<service ... />XML namespace element.
A bundle may import types and services exported by other bundles:
Types: via the OSGi
Import-Packagedirective,Services: via Spring-DM's
<reference ... />XML namespace element.
Let's see an example from the PetClinic sample application. The following listing shows the
MANIFEST.MF file for the org.springframework.petclinic.infrastructure.hsqldb bundle.
Manifest-Version: 1.0
Bundle-ManifestVersion: 2
Bundle-Name: PetClinic HSQL Database Infrastructure
Bundle-SymbolicName: org.springframework.petclinic.infrastructure.hsqldb
Bundle-Version: 1.0
Bundle-Vendor: SpringSource Inc.
Import-Library: org.springframework.spring;version="[2.5,2.6]"
Import-Bundle: com.springsource.org.apache.commons.dbcp;version="[1.2.2.osgi,1.2.2.osgi]",
 com.springsource.org.hsqldb;version="[1.8.0.9,1.8.0.9]"
Import-Package: javax.sql
Export-Package: org.springframework.petclinic.infrastructure
The org.springframework.petclinic.infrastructure.hsqldb bundle expresses its dependencies on
the javax.sql package, the Commons DBCP and HSQLDB bundles, and the Spring library (we will examine
the details of the library artifact in the section called “Defining libraries”). The Commons DBCP
bundle is imported at a version of exactly 1.2.2.osgi and the HSQLDB bundle is imported at a version of exactly
1.8.0.9. The Spring library is imported at a version between 2.5 inclusive and 2.6 exclusive.
Note that you do not specify the bundle that will provide the imported packages. The SpringSource dm Server will examine the available bundles and satisfy the required dependencies.
The following osgi-context.xml file from the PetClinic sample's
org.springframework.petclinic.repository.jdbc bundle declares a service published by the bundle and
references a service published by another bundle.
<?xml version="1.0" encoding="UTF-8"?>
<beans:beans xmlns="http://www.springframework.org/schema/osgi" xmlns:xsi="http://www.w3.org/2001/XMLSchema-instance"
    xmlns:beans="http://www.springframework.org/schema/beans"
    xsi:schemaLocation="http://www.springframework.org/schema/osgi
        http://www.springframework.org/schema/osgi/spring-osgi.xsd
        http://www.springframework.org/schema/beans
        http://www.springframework.org/schema/beans/spring-beans.xsd">

    <service id="osgiClinic" ref="clinic" interface="org.springframework.petclinic.repository.Clinic" />
    <reference id="dataSource" interface="javax.sql.DataSource"/>

</beans:beans>
The service element publishes the clinic bean
(a regular Spring bean declared in the module-context.xml file) and specifies
org.springframework.petclinic.repository.Clinic as the type
of the published service.
The reference elements define a dataSource bean that references
a service published by another bundle with a an interface type of javax.sql.DataSource.
The SpringSource dm Server supports two OSGi-oriented ways of packaging applications: the PAR format and application modules (including personality-specific modules). The dm Server also supports three distinct WAR deployment and packaging formats: standard Java EE WAR, Shared Libraries WAR, Shared Services WAR.
The also supports plans as a way to describe an application. This method is similar to a PAR in that it encapsulates all the artifacts of an application as a single unit, but differs in that a plan simply lists the bundles in an XML file rather than packaging all the bundles in a single JAR file. The use of plans offers additional benefits to using PARs; for this reason, SpringSource recommends their use. For details, see Creating Plans.
An OSGi application is packaged as a JAR file, with extension .par. A PAR artifact offers several benefits:
- A PAR file has an application name, version, symbolic name, and description.
- The modules of a PAR file are scoped so that they cannot be shared accidentally by other applications. The scope forms a boundary for automatic propagation of load time weaving and bundle refresh.
- The modules of a PAR have their exported packages imported by the
synthetic context bundle which is used for thread context class loading. So,
for example, hibernate will be able to load classes of any of the exported
packages of the modules in a PAR file using
Class.forName()(or equivalent). - The PAR file is visible to management interfaces.
- The PAR file can be undeployed and redeployed as a unit.
A PAR includes one or more application bundles and its manifest specifies the following manifest headers:
Table 4.1. PAR file headers
| Header | Description |
|---|---|
Application-SymbolicName | Identifier for the application which, in combination with Application-Version, uniquely identifies an application |
Application-Name | Human readable name of the application |
Application-Version | Version of the application |
Application-Description | Short description of the application |
The following code shows an example MANIFEST.MF in a PAR file:
Application-SymbolicName: com.example.shop
Application-Version: 1.0
Application-Name: Online Shop
Application-Description: Example.com's Online Shopping Application
A module offers OSGi-oriented packaging that supports specific application personalities.
In this release, the only supported application personality is "Web ".
The most common type of application deployed in the SpringSource dm Server is, not surprisingly, the web application. The dm Server, therefore, supports the concept of a Web Module. A Web module is an OSGi bundle whose manifest includes directives to support various options pertinent to a web application.
Web modules have the following advantages over standard Java EE WAR files:
Dependencies can be referenced rather than bundled in
WEB-INF/lib.Dependencies are accessed via an export signature and so their internals can be controlled.
External dependencies can be installed once, thus reducing the overall footprint and deployment overhead of the web module.
Web modules have explicit identifying metadata and so can be handled straightforwardly as exploded directories.
Web modules are OSGi bundles and so can benefit from dynamic updates, fragment attachment for I18N, etc.
Web modules are Spring-DM powered.
Web modules are standard OSGi bundles with the following characteristics:
Packaged as an OSGi bundle with a
.jarextension, either stand-alone or within a PAR.Required bundle manifest headers:
Module-Type: Web.Optional bundle manifest headers (see Web Module Manifest Headers).
ApplicationContext:
A web module must publish an
ApplicationContextconfigured via standard Spring-DM extender semantics (e.g., /META-INF/spring/*.xml).This application context will actually be an OSGi-aware implementation of
ConfigurableWebApplicationContext.In addition, this application context will be used as the
WebApplicationContextfor aDispatcherServletwhich will be automatically configured. Thus, the context configuration files loaded by Spring-DM must contain all web related components (e.g., Spring MVC Controllers, Filters, SWF, Spring Security, etc.).There is no need for a
WEB-INF/applicationContext.xmlorWEB-INF/<dispatcher servlet name>-servlet.xml, because:-
A web module will not have a root
WebApplicationContext -
A
DispatcherServletwill be automatically configured to use theWebApplicationContextcreated by Spring-DM for the web module
-
A web module will not have a root
-
Web modules are not required to contain a
web.xmldeployment descriptor, since an appropriateweb.xmlwill be automatically generated for the web module based on the supplied web module manifest headers. When manifest headers alone do not suffice, however, a web module may be configured via aweb.xmlfragment which will be merged with any automatically generated elements. For further details, consult the discussion on web.xml fragments later in this chapter. New OSGi-centric web application directory structure.
Web Module - Directory Structure
MODULE-INFdirectory: For web modules, any artifacts which would typically reside in the root of a standard WAR are placed in a special directory calledMODULE-INF, which resides in the root of the bundle. This directory serves as the root of theServletContextand thus provides a central location for artifacts which should be publicly accessible via standard HTTP requests (e.g., images, CSS files JavaScript files, etc.). Similar to a standard WAR,MODULE-INFis also the directory in which you should placeWEB-INFand related subdirectories (e.g.,libandclasses).Public web resources: Web resources which are intended to be publicly visible via HTTP requests should be packaged underneath
/MODULE-INF. This is analogous to the root of a standard Java EE WAR and excludes anything packaged underneath/MODULE-INF/WEB-INF.Private web resources: Consistent with standard Java EE WAR deployments, web resources which are not intended to be publicly visible via HTTP requests should be packaged underneath
/MODULE-INF/WEB-INF, for example: JSP fragments, templates, configuration files, etc.Classes: For consistency with raw OSGi bundles, Java classes (i.e., .class files) and packages should typically be packaged in the root of the bundle.
![[Note]](images/note.gif)
Note For backwards compatibility with the standard WAR format, Java classes may be packaged underneath
/MODULE-INF/WEB-INF/classes; however, this is not recommended for web modules, since doing so diverges from OSGi conventions.Class-path resources: Class-path resources such as properties files, XML configuration files, etc. should also be packaged in the root of the bundle.
Libraries: Any third-party libraries (i.e., JARs) used by your web application which are not referenced via the dm Server's repository using
Import-Package,Import-Library,Import-Bundle, etc. should be packaged in root of the bundle and added to theBundle-ClassPathaccordingly.Note For backwards compatibility with the standard WAR format, third-party libraries may be packaged in
/MODULE-INF/WEB-INF/lib. Note, however, that the use of/MODULE-INF/WEB-INF/libin a web module is strongly discouraged.
| Note |
|---|---|
For Web Modules, the SpringSource dm Server introspects the contents of the deployed artifact and
automatically adds |
Web modules support the following manifest headers for configuring the bundle's web application.
Table 4.2. Web module manifest headers
| Header | Description | Default |
|---|---|---|
Web-ContextPath |
Used to configure the unique context path under which the web module or WAR is deployed in the Servlet Container. Syntax: standard Servlet syntax rules for context paths apply.
To deploy a web application as the root context, supply a context path
consisting of a single forward slash, | The module's file name minus the extension. |
Web-FilterMappings |
Used to declare a
Syntax: comma-separated list of (note: white space added for legibility):
| N/A |
Web-DispatcherServletUrlPatterns |
Used for mapping request URLs to the auto-configured
Syntax: comma-separated list of | *.htm |
Web-AccessLog |
Used for opt-in participation in per-application access logging.
Syntax: | enabled=false and the default log format specified in the servletContainer's configuration |
Let's take a look at the use of these headers in an example:
Manifest-Version: 1.0
Bundle-ManifestVersion: 2
Bundle-SymbolicName: org.springframework.showcase.formtags
Bundle-Version: 2.0.8
Bundle-Name: Spring Form Tags - Sample Web Application
Bundle-Description: Sample web application which demonstrates the use of Spring 2.0's
 custom form tag library
Import-Package: org.springframework.osgi.web.context,
 org.springframework.osgi.web.servlet,
 org.springframework.showcase.formtags.domain;version="2.0.8",
 org.springframework.showcase.formtags.service;version="2.0.8",
 org.springframework.showcase.formtags.validation;version="2.0.8",
 org.springframework.showcase.formtags.web;version="2.0.8"
Import-Library: org.springframework.spring;version="2.5.4"
Module-Type: Web
Web-ContextPath: formtags
Web-DispatcherServletUrlPatterns: *.htm
Web-FilterMappings: securityFilter;url-patterns:="*.htm,*.jsp",
Web-AccessLog: enabled="true";format="%h %l %u %t \"%r\" %s %b \"%{Referer}i\" \"%{User-Agent}i\""
 imageFilter;url-patterns:="/image/*"
In addition to the aforementioned Web-* manifest headers, the SpringSource dm Server
also supports configuration of web modules via web.xml fragments.
If necessary, a web module may contain an existing /MODULE-INF/WEB-INF/web.xml
fragment which will be merged with the automatically generated elements.
Such fragments allow developers to configure web.xml in ways that are not supported by web manifest
headers alone, thus providing greater flexibility as well as the full feature set of web.xml
configuration options.
To use a web.xml fragment, simply configure /MODULE-INF/WEB-INF/web.xml as you normally would
for a standard Java EE WAR. Then, if there are elements that you wish to be auto-configured for your
web module -- for example, an auto-configured DispatcherServlet or DelegatingFilterProxy
element -- configure those via Web-* manifest headers (e.g.,
Web-DispatcherServletUrlPatterns and Web-FilterMappings, respectively),
and the elements in the provided web.xml fragment will then be merged with the auto-configured elements.
The following three listings demonstrate how Web-* manifest headers and a
web.xml fragment can be combined to configure a version of the Form Tags show case application's
web module. The first listing displays the web module's /META-INF/MANIFEST.MF file.
Manifest-Version: 1.0
Bundle-ManifestVersion: 2
Bundle-SymbolicName: formtags-web
Bundle-Version: 2.0.8
Import-Package: org.springframework.showcase.formtags.domain;version="
 2.0.8",org.springframework.showcase.formtags.service;version="2.0.8",
 org.springframework.showcase.formtags.validation;version="2.0.8",org.
 osgi.framework,org.springframework.osgi.context
Import-Library: org.springframework.spring;version="2.5.4"
Module-Type: Web
Web-ContextPath: formTagsParWithWebModuleAndWebXmlFragment
Web-DispatcherServletUrlPatterns: *.htm
The second listing displays the /MODULE-INF/WEB-INF/web.xml fragment for the
web module.
<?xml version="1.0" encoding="ISO-8859-1"?>
<web-app version="2.5"
    xmlns="http://java.sun.com/xml/ns/javaee"
    xmlns:xsi="http://www.w3.org/1999/XMLSchema-instance"
    xsi:schemaLocation="
        http://java.sun.com/xml/ns/javaee
        http://java.sun.com/xml/ns/javaee/web-app_2_5.xsd">

    <display-name>Spring Form Tags - Sample Web Application</display-name>

    <description>
        Sample web application which demonstrates the use of Spring 2.0's
        custom form tag library
    </description>

    <filter>
        <filter-name>imageFilter</filter-name>
        <filter-class>com.example.filter.ImageFilter</filter-class>
    </filter>

    <filter-mapping>
        <filter-name>imageFilter</filter-name>
        <url-pattern>/images/*</url-pattern>
    </filter-mapping>

    <session-config>
        <session-timeout>5</session-timeout>
    </session-config>

    <welcome-file-list>
        <welcome-file>index.jsp</welcome-file>
        <welcome-file>index.htm</welcome-file>
    </welcome-file-list>

</web-app>
The third listing displays the resulting merged web.xml
deployment descriptor with which the web application will be deployed on the dm Server.
<?xml version="1.0" encoding="ISO-8859-1"?>
<web-app version="2.5"
    xmlns="http://java.sun.com/xml/ns/javaee"
    xmlns:xsi="http://www.w3.org/1999/XMLSchema-instance"
    xsi:schemaLocation="
        http://java.sun.com/xml/ns/javaee
        http://java.sun.com/xml/ns/javaee/web-app_2_5.xsd">

    <servlet>
        <servlet-name>formtags-web-DispatcherServlet</servlet-name>
        <servlet-class>org.springframework.web.servlet.DispatcherServlet</servlet-class>
        <load-on-startup>2</load-on-startup>
        <init-param>
            <param-name>contextAttribute</param-name>
            <param-value>formtags-web-ApplicationContext</param-value>
        </init-param>
    </servlet>

    <servlet-mapping>
        <servlet-name>formtags-web-DispatcherServlet</servlet-name>
        <url-pattern>*.htm</url-pattern>
    </servlet-mapping>

    <display-name>Spring Form Tags - Sample Web Application</display-name>

    <description>
        Sample web application which demonstrates the use of Spring 2.0's
        custom form tag library
    </description>

    <filter>
        <filter-name>imageFilter</filter-name>
        <filter-class>com.example.filter.ImageFilter</filter-class>
    </filter>

    <filter-mapping>
        <filter-name>imageFilter</filter-name>
        <url-pattern>/images/*</url-pattern>
    </filter-mapping>

    <session-config>
        <session-timeout>5</session-timeout>
    </session-config>

    <welcome-file-list>
        <welcome-file>index.jsp</welcome-file>
        <welcome-file>index.htm</welcome-file>
    </welcome-file-list>

</web-app>
As you can see in the above listing, the SpringSource dm Server processes the
Web-* manifest headers in the web module's
/META-INF/MANIFEST.MF file, auto-generates the
necessary web.xml elements -- which are configured to access the web
module's Spring-DM powered WebApplicationContext --
and inserts the auto-generated elements into the merged deployment
descriptor. The results of the auto-generation process are then merged
with the elements supplied in the /MODULE-INF/WEB-INF/web.xml
fragment unmodified.
When packaging WARs for deployment on the SpringSource dm Server, the following should serve as general guidelines.
Context Path: As with web modules, the unique context path under which a WAR is deployed in the Servlet Container can be configured via the
Web-ContextPathmanifest header. If no context path is explicitly configured, the file name of the WAR minus the.warextension will be used by default.Standard Java EE WAR: you can deploy a standard WAR "as is" on the dm Server. There is typically no need to modify it in any way.
Shared Libraries WAR: a Shared Libraries WAR has exactly the same structure as a standard WAR. The only difference is that shared libraries, which were previously stored in
/WEB-INF/libor in a centralized location for the Servlet container, are now installed in the dm Server as OSGi bundles and referenced viaImport-Package,Import-Bundle, etc.Shared Services WAR: in terms of packaging and the physical structure of the deployment artifact, everything that applies to a Shared Libraries WAR equally applies to a Shared Services WAR. To enable service lookup from a Spring MVC based web application, however, you will need to configure an OSGi-enabled
WebApplicationContextin your WAR's/WEB-INF/web.xmldeployment descriptor. The SpringSource dm Server provides theServerOsgiBundleXmlWebApplicationContextclass, which is suited exactly for this purpose. The following code listing demonstrates how to configureServerOsgiBundleXmlWebApplicationContextfor your rootWebApplicationContext.<context-param> <param-name>contextClass</param-name> <param-value>com.springsource.server.web.dm.ServerOsgiBundleXmlWebApplicationContext</param-value> </context-param> <listener> <listener-class>org.springframework.web.context.ContextLoaderListener</listener-class> </listener>
The recommended approach for interacting with the OSGi Service Registry in a Shared Services WAR is to use Spring-DM's
<osgi:reference ... />and related XML namespace elements but to limit such usage to your rootWebApplicationContext. It is therefore not typically recommended that you interact with the OSGi Service Registry, for example, from within aWebApplicationContextfor a particularDispatcherServlet. If necessary, however, you may also configure a Spring MVCDispatcherServletto create an OSGi-enabledWebApplicationContextas follows.<servlet> <servlet-name>dispatcherServlet</servlet-name> <servlet-class>org.springframework.web.servlet.DispatcherServlet</servlet-class> <init-param> <param-name>contextClass</param-name> <param-value>com.springsource.server.web.dm.ServerOsgiBundleXmlWebApplicationContext</param-value> </init-param> </servlet>
Plans are similar to PARs in that they encapsulate the bundles of an application as a single unit. As a consequence, they have similar benefits; for details of the benefits common to PARs and plans, see PARs.
Plans have the following additional benefits, which is why SpringSource recommends that you use plans rather than PARs when defining an application:
- deploys the artifacts in the plan in the order in which they are listed in the XML file, which gives you complete control over deployment order. With a PAR, the order of deployment of the included artifacts is not guaranteed.
- Plans describe their contents by reference (using an XML file) as opposed to PARs that are JAR files that physically contain the included artifacts. For this reasons, it is easier to share content between plans as well as update individual parts of a plan without having to physically repackage (re-JAR) it.
- You can enable or disable whether a plan is scoped or atomic; PARs are always scoped and atomic.
Plans are XML files that have a .plan file extension, such as myapplication.plan. The structure of the XML file is simple: the root element is <plan> with attributes specifying the name of the plan, the version, atomicity, and scoping. Then, for each artifact that makes up your application, you add a <artifact> element, using its attributes to specify the type of artifact and its name and version. The following is a simple example of a plan's XML file:
<?xml version="1.0" encoding="UTF-8"?> <plan name="multi-artifact.plan" version="1.0.0" scoped="true" atomic="true" xmlns="http://www.springsource.org/schema/dm-server/plan" xmlns:xsi="http://www.w3.org/2001/XMLSchema-instance" xsi:schemaLocation=" http://www.springsource.org/schema/dm-server/plan http://www.springsource.org/schema/dm-server/plan/springsource-dm-server-plan.xsd"> <artifact type="bundle" name="simple.bundle.one" version="[1.0.0, 2.0.0)"/> <artifact type="bundle" name="simple.bundle.two" version="[2.0.0, 3.1.0)"/> </plan>
In the preceding example, the name of the plan is multi-artifact.plan and its version is 1.0.0. The plan is both scoped and atomic. The plan contains two artifacts, both of which are bundles.
The following table describes the attributes of the <plan> element.
Table 4.3. Attributes of the <plan> Element
| Attribute | Description | Required? |
|---|---|---|
name | Specifies the name of this plan. uses the name as one component of the unique identifier of this plan. | Yes. |
version | Specifies the version of this plan. You must use OSGi version specification syntax, such as 2.1.0. uses the version as one component of the unique identifier of this plan. | Yes. |
scoped | Specifies whether should install the artifacts into plan-specific scope so that only the application described by this plan has access to the artifacts. If you disable scoping, then installs the artifacts into the global scope, which means they are then available for access by all other deployed artifacts. Set the attribute to true to enable scoping or false to disable it. | Yes. |
atomic | Specifies whether you want to tie together the lifecycle of the artifacts in this plan. Making a plan atomic means that if you install, start, stop, or uninstall a single artifact in the plan, escalates the event to all artifacts in the plan. Also, in an atomic plan, prevents artifacts from being in inconsistent states. For example, if one artifact should fail to start, then stops all artifacts in the plan. Set this attribute to true to enable atomicity or false to disable it. | Yes. |
The following table describes the attributes of the <artifact> element.
Table 4.4. Attributes of the <artifact> Element
| Attribute | Description | Required? |
|---|---|---|
type | Specifies the type of the artifact. In this release, the only valid value is bundle which specifies that the artifact is an OSGi bundle. | Yes. |
name | Specifies the name of the artifact. | Yes. |
version | Specifies the version or range of versions of this artifact that should look up in its repositories and then install and deploy. You must use OSGi version specification syntax, such as [1.0.0, 2.0.0). | No. If not specified, defaults to 0, which in OSGi means 0 to infinity, or any version. |
Because a plan is a list of artifacts, rather than a physical file that contains the artifacts, there are a few additional steps you must perform before you deploy it to .
Copy the bundles that make up the plan to the
bundles-usrrepository, which by default is the$DMS_HOME/repository/bundles/usrdirectory, where$DMS_HOMErefers to the top-level installation directory of . Note that you might have configured the server differently; in which case, copy the bundles to your custom repository directory.Restart .
After the server has started, copy the plan's XML file into the
$DMS_HOME/pickupdirectory.This results in deploying the plan with the same semantics as a PAR file.
To undeploy the plan, simply delete it from the
$DMS_HOME/pickupdirectory.
Module personalities typically provide automatic access to features specific to the personality via custom manifest headers or other configuration mechanisms. There may be situations, however, for which programmatic access to such features is desirable or necessary. This section describes how to programmatically access personality-specific features from application code in a module.
The SpringSource dm Server automatically creates a WebApplicationContext
for Web Modules and appropriately configured Shared Services WARs which
have Spring-DM powered ApplicationContext XML configuration files.
For Web Modules in particular, a WebApplicationContext
will be created which is typically used in conjunction with
an auto-configured Spring MVC DispatcherServlet.
In such scenarios, there is generally no need to access the
WebApplicationContext programmatically,
since all components of the web application are configured
within the scope of the WebApplicationContext
itself. For Shared Services WARs, or for Web Modules which do
not directly rely on Spring MVC, you can alternatively access
the Spring-DM powered WebApplicationContext
via the web application's ServletContext.
The Web Personality subsystem stores the bundle's
WebApplicationContext in the ServletContext under
the attribute name "BSN-ApplicationContext", where
BSN is the Bundle-SymbolicName
of your Shared Services WAR or Web Module. Thus, for a Web Module,
you can use Spring MVC's WebApplicationContextUtils'
getWebApplicationContext(servletContext, attributeName)
method (or other means) to programmatically retrieve a reference to the
WebApplicationContext, which is an instance
of ServerOsgiBundleXmlWebApplicationContext.
For Shared Services WARs, you can programmatically retrieve
the WebApplicationContext directly from the
ServletContext.
Alternatively, since the Web Personality subsystem also stores the
WebApplicationContext under the attribute name
with the value of the WebApplicationContext.ROOT_WEB_APPLICATION_CONTEXT_ATTRIBUTE
constant, you may choose to use Spring MVC's WebApplicationContextUtils'
getWebApplicationContext(servletContext)
or
getRequiredWebApplicationContext(servletContext)
methods to access the WebApplicationContext without providing
an explicit attribute name.
Similar to programmatic access to the ApplicationContext
as described above, you can access the BundleContext
of your Shared Services WAR or Web Module via the web application's
ServletContext. The Web Personality subsystem
stores the bundle context under the attribute name with the value of the
ServerOsgiBundleXmlWebApplicationContext.BUNDLE_CONTEXT_ATTRIBUTE
constant.
| Note |
|---|---|
|
The SpringSource dm Server generates automatic package imports (e.g., via the
Import-Package manifest header) for various
module personalities. This section lists which packages are automatically
generated for each personality.
All deployment artifacts supported by the Web personality (i.e.,
all WAR variants and Web Modules) will have the following
packages automatically added to their bundle manifest via
the appropriate Import-Package statements.
com.springsource.server.web.dmjavax.annotationjavax.annotation.securityjavax.ejbjavax.eljavax.managementjavax.management.loadingjavax.management.modelmbeanjavax.management.monitorjavax.management.openmbeanjavax.management.relationjavax.management.remotejavax.management.remote.rmijavax.management.timerjavax.namingjavax.naming.directoryjavax.naming.eventjavax.naming.ldapjavax.naming.spijavax.netjavax.net.ssljavax.persistencejavax.rmijavax.rmi.CORBAjavax.rmi.ssljavax.servletjavax.servlet.httpjavax.servlet.jspjavax.servlet.jsp.eljavax.servlet.jsp.jstl.corejavax.servlet.jsp.jstl.fmtjavax.servlet.jsp.jstl.sqljavax.servlet.jsp.jstl.tlvjavax.servlet.jsp.resourcesjavax.servlet.jsp.tagextjavax.servlet.resourcesjavax.xml.wsorg.apache.elorg.apache.el.langorg.apache.el.parserorg.apache.el.util
In addition, to ensure compatibility for existing, standard Java EE WARs,
the dm Server automatically imports all packages exported by the
OSGi system bundle, excluding any packages which begin with
"org.eclipse" or "com.springsource".
The resulting set of filtered system bundle exports will be
automatically imported for all WAR variants but not for Web Modules;
however, for all web deployment artifacts it is recommended that all known
dependencies be explicitly specified in MANIFEST.MF
via the appropriate Import-Package statements.
| System Bundle Package Exports |
|---|---|
For further details on which packages are exported by the
OSGi system bundle, consult the |
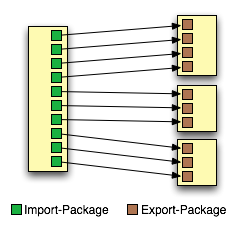
Complex enterprise frameworks such a Spring and Hibernate are typically divided into many, many different packages. Traditionally, if an OSGi bundle wished to make extensive use of such a framework its manifest would have to import a huge number of different packages. This can be an error-prone and tedious process. Furthermore, application developers are used to thinking in terms of their application using a framework, such as Spring, as a whole, rather than a long list of all the different packages that comprise the framework.
The following figure provides a simple illustration of the complexity of only using Import-Package:
The SpringSource dm Server reduces the need for long lists of imported packages by introducing two new manifest
headers; Import-Bundle and Import-Library. The following figure provides an
illustration of the simplification that these new headers offer:
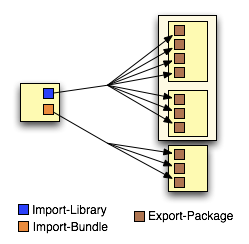
As you can see, use of Import-Bundle and Import-Library can lead to a dramatic reduction
in the number of imports that you need to include in an application bundle's manifest. Furthermore, Import-Bundle
and Import-Library are simply aliases for Import-Package; at deployment time Import-Bundle
and Import-Library header entries are automatically expanded into numerous Import-Package entries. This
means that you retain the exact same semantics of using Import-Package, without having to go through the labourious
process of doing so.
A bundle in an application can declare a dependency on a library by using the
SpringSource dm Server-specific Import-Library header. This header specifies a
comma-separated list of library symbolic names and version ranges that determine which libraries
are imported. By default a dependency on a library is mandatory but this can be
controlled through use of the resolution directive in exactly the same way as
it can with Import-Package.
Import-Library: org.springframework.spring;version="[2.5.4, 3.0)",
org.aspectj;version="[1.6.0,1.6.0]";resolution:="optional"
This example Import-Library header declares a mandatory dependency on the Spring
library at a version from 2.5.4 inclusive to 3.0 exclusive. It also declares an
optional dependency on the AspectJ library at exactly 1.6.0.
A bundle in an application can declare a dependency on a bundle by using the
SpringSource dm Server-specific Import-Bundle header. The header specifies a comma-separated
list of bundle symbolic names, version ranges, and scope declarmations that determine which bundles are imported and the scope of their dependency. By default a dependency
on a bundle is mandatory but this can be controlled through use of the resolution directive in exactly
the same way as it can with Import-Package.
Import-Bundle: com.springsource.org.apache.commons.dbcp;version="[1.2.2.osgi, 1.2.2.osgi]"
This example Import-Bundle header declares a mandatory dependency on the Apache Commons
DBCP bundle at exactly 1.2.2.osgi.
When working with a scoped application, such as a PAR file or a plan, you might run into a situation where one of the bundles in the application (call it bundleA) depends on another bundle (bundleB) that performs a runtime task (such as class generation) that a third bundle (bundleC) might need to know about, although bundleC does not explicitly depend on bundleB.
For example, Hibernate uses CGLIB (code generation library) at runtime to generate proxies for persistent classes. Assume that a domain bundle in your application uses Hibernate for its persistent objects, and thus its Import-Bundle manifest header includes the Hibernate bundle. Further assume that a separate Web bundle uses reflection in its data-binding code, and thus needs to reflect on the persistent classes generated by Hibernate at runtime. The Web bundle now has an indirect dependency on the Hibernate bundle because of these dynamically generated classes, although the Web bundle does not typically care about the details of how these classes are persisted. One way to solve this dependency problem is to explicitly add the Hibernate bundle to the Import-Bundle header of the Web bundle; however, this type of explicit-specified dependency breaks the modularity of the application and is not a programming best practice.
A better way to solve this problem is to specify that itself dynamically import the bundle (Hibernate in the example above) to all bundles in the application at runtime. You do this by adding the import-scope:=application directive to the Import-Bundle header of the bundle that has the direct dependency (the domain bundle in our example). At runtime, although the Web bundle does not explicitly import the Hibernate bundle, implicitly imports it and thus its classes are available to the Web module. This mechanism allows you to declare the dependencies you need to make your application run, without having to make changes to your application that might limit its flexibility.
The following example shows how to use the import-scope directive with the Import-Bundle header:
Import-Bundle: com.springsource.org.hibernate;version="[3.2.6.ga,3.2.6.ga]";import-scope:=application
You can also set the import-scope directive to the (default) value bundle; in this case, the scope of the bundle is just the bundle itself and thus does not perform any implicit importing into other bundles of the application.
Note that use of the import-scope:=application directive of the Import-Bundle header only makes sense when the bundle is part of a scoped application (PAR or plan); if the bundle is not part of a scoped application, then this directive has no effect.
Finally, because import-scope:=application implicitly adds a bundle import to each bundle of the PAR or plan, the impact of subsequently refreshing the imported bundle is, in general, broader than it would have been if you had not used import-scope:=application. This may well affect the performance of refresh.
Libraries are defined in a simple text file, typically with a .libd suffix. This file identifies the
library and lists all of its constituent bundles. For example, the following is the library definition for
Spring 2.5.4:
Library-SymbolicName: org.springframework.spring Library-Version: 2.5.4 Library-Name: Spring Framework Import-Bundle: org.springframework.core;version="[2.5.4,2.5.5)", org.springframework.beans;version="[2.5.4,2.5.5)", org.springframework.context;version="[2.5.4,2.5.5)", org.springframework.aop;version="[2.5.4,2.5.5)", org.springframework.web;version="[2.5.4,2.5.5)", org.springframework.web.servlet;version="[2.5.4,2.5.5)", org.springframework.jdbc;version="[2.5.4,2.5.5)", org.springframework.orm;version="[2.5.4,2.5.5)", org.springframework.transaction;version="[2.5.4,2.5.5)", org.springframework.context.support;version="[2.5.4,2.5.5)", org.springframework.aspects;version="[2.5.4,2.5.5)", com.springsource.org.aopalliance;version="1.0"
The following table lists all of the headers that may be used in a library definition:
Table 4.5. Library definition headers
| Header | Description |
|---|---|
| Library-SymbolicName | Identifier for the library |
| Library-Version | Version number for the library |
| Import-Bundle | A comma separated list of bundle symbolic names. Each entry may optionally specify a version (using the version= directive) and the scope of the import (using the import-scope directive). |
| Library-Name | Optional. The human-readable name of the library |
| Library-Description | Optional. A human-readable description of the library |
Rather than encouraging the packaging of all an application's dependencies within the application itself, SpringSource dm Server uses a local provisioning repository of bundles and libraries upon which an application can depend. When the SpringSource dm Server encounters an application with a particular dependency, it will automatically provide, from its provisioning repository, the appropriate bundle or library.
Making a dependency available for provisioning is simply a matter of copying it to the appropriate location in the
dm Server's local provisioning repository. By default this is
SERVER_HOME/repository/bundles/usr for bundles, and
SERVER_HOME/repository/libraries/usr for libraries. A more detailed discussion of the provisioning
repository can be found in the User Guide.
As described in the User Guide SpringSource dm Server provides support for
per-application trace. SpringSource dm Server provides SLF4J-based implementations of both Commons Logging and Log4J which allow
trace generated by applications using those APIs to be captured and included in the application trace file. This use of
SLF4J-based replacement implementations means that the standard configuration mechanisms for Commons Logging and Log4J
cannot be used. Instead, application trace is configured via the use of the Application-TraceLevels
header in the application's manifest as described in the User Guide.
If you do not wish to take advantage of the SpringSource dm Server's built-in support for per-application trace, it is possible to force your application to utilise vanilla Log4J rather than the SLF4J-based implementation that is provided in the SpringSource dm Server. This can be achieved by specifying the bundle symbolic name of the vanilla Log4J bundle when importing the Log4J package in your application's manifests. E.g.:
Import-Package: org.apache.log4j;bundle-symbolic-name="com.springsource.org.apache.log4j"
In much the same way that individual OSGi bundles can be versioned, SpringSource dm Server allows applications to be versioned. How exactly you do this depends on how you have packaged the application:
- If you package your application using a PAR, you version the application by using the
Application-Versionheader in theMANIFEST.MFfile of the PAR file. - If you use a plan to describe the artifacts that make up your application, you version it by using the
versionattribute of the<plan>root element of the plan's XML file. - If your application consists of a single bundle, you version it in the standard OSGi way: by using the
Bundle-Versionheader of theMANIFEST.MFfile of the bundle.
SpringSource dm Server uses an application's version to prevent clashes when multiple versions of the same application are deployed at the same time. For example, the application trace support described in Section 4.7, “Application trace”, includes the application's name and version in the trace file path. This ensures that each version of the same application has its own trace file.
Taking on a new technology such as OSGi may seem a bit daunting at first, but a proven set of migration steps can help ease the journey. Teams wishing to migrate existing applications to run on the SpringSource dm Server will find that their applications typically fall into one of the following categories.
Web Application: for web applications, this chapter provides an overview of the steps required to migrate from a Standard WAR to a Web Module. Furthermore, the following chapter provides a detailed case study involving the migration of the Spring 2.0 Form Tags show case application.
Anything else: for any other type of application, you will typically either deploy your application as multiple individual bundles, as a single PAR file, or as a plan, which is the recommended approach for deploying applications on the SpringSource dm Server. See Section 5.2, “Migrating to a Plan or a PAR” for details.
Many applications may start with the standard WAR format for web applications and gradually migrate to a more OSGi-oriented architecture. Since the SpringSource dm Server offers several benefits to all supported deployment formats, it provides a smooth migration path. Of course, depending on your application's complexity and your experience with OSGi, you may choose to start immediately with an OSGi-based architecture.
If you are not yet familiar with OSGi or simply want to deploy an existing web application on the SpringSource dm Server, you can deploy a standard WAR and leverage the dm Server with a minimal learning curve. In fact reading the SpringSource dm Server User Guide is pretty much all that you need to do to get started. Furthermore, you will gain familiarity with the SpringSource dm Server, while preparing to take advantage of the other formats.
The Shared Libraries WAR format is the first step to reaping the benefits of OSGi. In this phase, you dip your toes into OSGi-based dependency management by removing JAR files from the WAR and declaring dependencies on corresponding OSGi bundles.
In this phase, you take the next step toward a fully OSGi-based architecture by separating your web artifacts (e.g., Servlets, Controllers, etc.) from the services they depend on.
The final step in migrating a WAR is to convert it to a Web Module. As mentioned in the section called “Web Modules”, this format has a structure similar to that of a Shared Services WAR and adds additional benefits of reduced configuration for Spring MVC based applications via new OSGi manifest headers.
The following diagram graphically depicts the migration path from a Standard WAR to a Web Module. As you can see, the libraries (libs) move from within the deployment artifact to the Bundle Repository. Similarly, the services move from within the WAR to external bundles and are accessed via the OSGi Service Registry. In addition, the overall footprint of the deployment artifact decreases as you move towards a Web Module.

The first steps to migrating an existing application to a plan or a PAR are the same: deciding on the bundles that make up the application and ensuring that their Import-Package, Import-Library, and Import-Bundle manifest headers are correct. Once you have the list of bundles that make up your application, you then decide whether you want to JAR them all into a single application file (PAR) or create a plan that simply lists the bundles by reference. Creating a plan is the recommend way to create an application, although PARs also have benefits that might suit your needs better, as described in the section called “Plan or PAR?”.
When migrating an existing application to the PAR packaging and deployment format or a plan, you consider modularity as the prime objective. Following the ideas discussed in Section 3.3, “A guide to forming bundles”, you refactor the application into multiple bundles. You may start conservatively with a small number of bundles and then further refactor those bundles.
If the original code is crafted following good software practices such as separation of concerns and use of well-defined interfaces, migration may involve modifying only configuration and packaging. In other words, your Java sources will remain unchanged. Even configuration is likely to change only slightly.
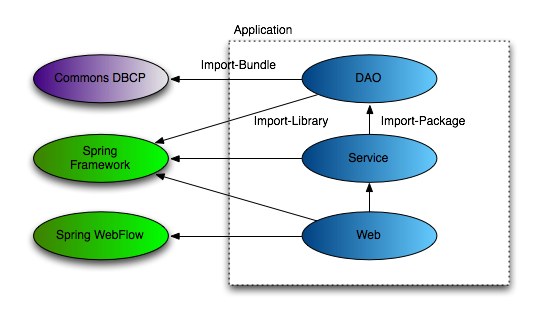
For example, the following diagram depicts a typical web application that has been refactored and
packaged as a PAR. The blue elements within the Application box constitute
the bundles of the application. Each of these bundles imports types from other bundles within
the PAR using Import-Package. The green elements in the left column represent
libraries installed on the dm Server. The PAR's bundles reference these
libraries using Import-Library. The purple element in the left column
represents a bundle within the dm Server's bundle repository which is imported by the DAO
bundle using Import-Bundle. In contrast to a traditional, monolithic
WAR deployment, the PAR format provides both a logical and physical application boundary
and simultaneously allows the application to benefit from both the OSGi container and the SpringSource dm Server.
Once you have refactored your existing application into separate OSGi bundles, you then must decide whether to package the bundles into a single PAR file or create a plan that lists the bundles by reference. As described in more detail in preceding sections of this guides, PARs and plans have similar benefits, such as:
- Scoping
- Atomicity, or the ability to deploy and control the bundles as a single unit
- Versioning
- Improved serviceability
Plans, the method most recommended by SpringSource to create your application, has the following added benefits:
- Guaranteed order of deployment, based on the order in which they are listed in the plan's XML file
- Ease of sharing content between plans and updating individual plans without having to physically repackage, due to the artifacts being listed by reference.
- Ability to disable scoping and atomicity, if desired.
The main benefit of PARS is that, because they physically contain all the required artifacts, you know exactly what bundles are deployed when you deploy the PAR file, in contrast to plans that allow content to be substituted or lost.
For details about creating plans and PARs, see Section 4.3, “Creating Plans” and Section 4.2, “Creating PARs, Web Modules, and WARs”, respectively.
In this chapter we will walk through the steps needed to migrate the Form Tags sample application from a standard Java EE WAR to a fully OSGi compliant web module within a PAR. The migration involves four packaging and deployment formats:
Each of these migration steps will produce a web application that can be deployed and run on the dm Server.
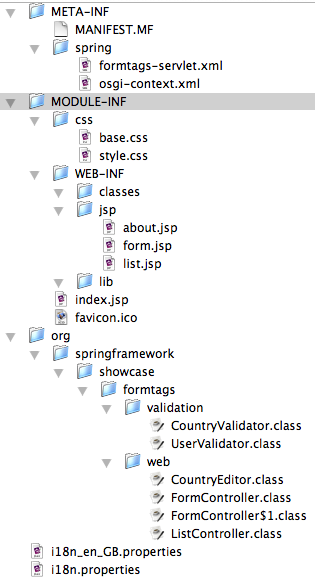
The following image displays the directory structure you should have
after installing the Form Tags sample. Note however that the release tag
will typically resemble 1.0.0.RELEASE.

The dist directory contains the distributables,
and the projects directory contains the source code
and build scripts.
For simplicity, this chapter will focus on the distributables -- which are built using Spring-Build -- rather than on configuring a project in an IDE.
| Tip |
|---|---|
Pre-packaged distributables are made available in the dist directory;
however, if you would like to modify the samples or build them from scratch, you may
do so using Spring-Build. Take a look at
the README.TXT file in each of the folders under
the projects directory in the
dm-server-formtags samples directories for instructions.
|
The sample that we will be using is the Form Tags show case sample which was provided with Spring 2.0. The Form Tags application has been removed from the official Spring 2.5.x distributions; however, since it is relatively simple but still contains enough ingredients to demonstrate the various considerations required during a migration, we have chosen to use it for these examples.
The purpose of the Form Tags show case sample was to demonstrate how
the Spring specific form: tags, released
in Spring 2.0, make view development with JSPs and tag libraries easier.
The Form Tags application consists of a single UserService which returns a list
of Users. Furthermore, the application demonstrates how to list, view,
and edit Users in a simple Spring MVC based web application using JSP
and JSTL.
We begin with a standard WAR deployment.
| Note |
|---|---|
| The SpringSource dm Server supports the standard Java EE WAR packaging and deployment format as a first-class citizen, and there are many benefits to deploying a standard WAR file on the dm Server including, but not limited to: tooling support, runtime error diagnostics, FFDC (i.e., first failure data capture), etc. In addition, support for standard WAR deployment provides an easy on-ramp for trying out the SpringSource dm Server with existing web applications. |
The following screen shot displays the directory structure of the
Form Tags application using the standard WAR format. As you can see,
there is no deviation from the standard structure and layout, and as
you would expect, all of the web application's third-party dependencies
(e.g., Spring. Commons Logging, etc.) are packaged as JARs in
WEB-INF/lib.

To deploy this application, simply copy dist/formtags-war-1.0.0.*.war to
the SERVER_HOME/pickup directory for hot deployment.
You should then see the dm Server produce console output similar to the following:
| Note |
|---|---|
The console output has been reformatted to fit this document. |
[2008-05-13 13:19:30.972] fs-watcher
<SPSC1000I> Creating web application '/formtags-war-1.0.0.RELEASE'.
[2008-05-13 13:19:31.045] async-delivery-thread-1
<SPSC1001I> Starting web application '/formtags-war-1.0.0.RELEASE'.
[2008-05-13 13:19:31.697] fs-watcher
<SPDE0010I> Deployment of 'formtags-war-1.0.0.RELEASE.war' version '0' completed.
Navigate to http://localhost:8080/ plus the web application context path,
which in the above case is
formtags-war-1.0.0.RELEASE. Thus navigating to
http://localhost:8080/formtags-war-1.0.0.RELEASE
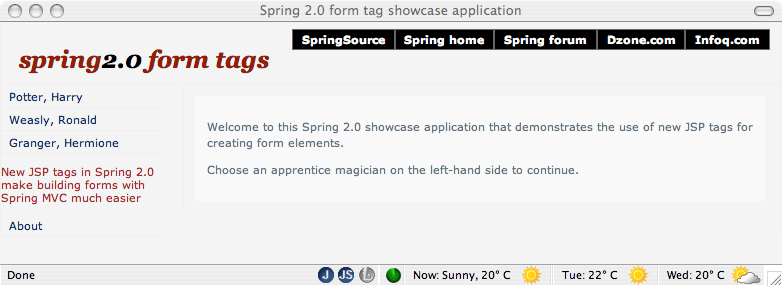
should render the sample application's welcome page, as displayed in the screen
shot below.
| Tip |
|---|---|
For WARs, the default web context path is the name of the WAR file
without the .war extension. You can optionally
specify a context path using the Web-ContextPath bundle
manifest header, which will be described in further detail later.
|
As mentioned above, a standard WAR file typically packages of all its required
dependencies in WEB-INF/lib. The servlet container will
then add all of the JARs in WEB-INF/lib to the application's
classpath.
The first step of the migration towards benefiting from an OSGi container is to continue using a WAR but retrieve the dependencies from the dm Server's bundle repository at runtime. This can significantly reduce the time it takes to build and deploy the application. It also enables the enforcement of policies regarding the use of third-party libraries.
The way in which dependencies are declared in an OSGi environment is
via manifest headers in a bundle's /META-INF/MANIFEST.MF.
As mentioned in Chapter 4, Developing Applications, there are
three ways of expressing dependencies: Import-Package,
Import-Bundle and Import-Library.
The Form Tags application uses JSTL standard tag libraries.
Thus, you need to choose a JSTL provider, for example the
Apache implementation which comes with the dm Server. To use the
Apache implementation of JSTL, you need to express your dependency
as outlined in the following manifest listing.
Because it is a single bundle, Import-Bundle is
the simplest and therefore preferred manifest header to use.
The Form Tags application requires commons-logging and Spring.
It would be very painful to have to list all the Spring packages one by one.
Equally, considering the number of bundles that make up the
Spring framework, it would be verbose to list each bundle. Therefore
Import-Library is the preferred approach
for expressing the dependency on the Spring framework.
| Tip |
|---|---|
How do you determine the name of a library definition provided by the SpringSource dm Server? Use the SpringSource Enterprise Bundle Repository">. |
Examine the /META-INF/MANIFEST.MF in
/dist/formtags-shared-libs-*.war:
Manifest-Version: 1.0 Ant-Version: Apache Ant 1.7.0 Created-By: 1.5.0_13-119 (Apple Inc.) Bundle-ManifestVersion: 2 Bundle-SymbolicName: org.springframework.showcase.formtags-shared-libs Bundle-Vendor: SpringSource Inc. Import-Library: org.springframework.spring;version="[2.5.4,3.0.0)" Import-Bundle: com.springsource.org.apache.taglibs.standard;version="1 .1.2"
You can see the Import-Library and Import-Bundle
directives that instruct the dm Server to add the appropriate package imports to the bundle
classpath used by this WAR file.
Deploying the shared libraries WAR onto the dm Server should result in console output similar to the following:
| Note |
|---|---|
The console output has been reformatted to fit this document. |
[2008-05-13 13:23:00.520] fs-watcher
<SPSC1000I> Creating web application '/formtags-shared-libs-1.0.0.RELEASE'.
[2008-05-13 13:23:00.524] async-delivery-thread-1
<SPSC1001I> Starting web application '/formtags-shared-libs-1.0.0.RELEASE'.
[2008-05-13 13:23:00.894] fs-watcher
<SPDE0010I> Deployment of 'formtags-shared-libs-1.0.0.RELEASE.war' version '0' completed.
Navigating to http://localhost:8080/formtags-shared-libs-BUILDTAG
should render the welcome page. Note that for the pre-packaged distributable,
the BUILDTAG should be similar to 1.0.0.RELEASE;
whereas, for a local build the -BUILDTAG may be completely
omitted. Please consult the console output, web-based admin console, or log
to determine the exact context path under which the web application has been deployed.
The next step in the migration is to deploy the services as a separate
OSGi bundle which the WAR then references.
The Form Tags sample has a single service UserManager.
This scenario has two separate deployables, the service bundle and the WAR file.
The following image shows the two separate source trees:
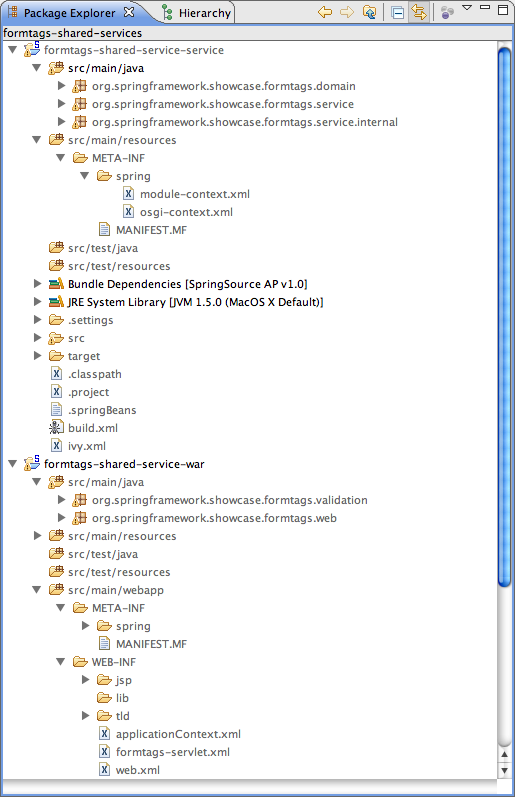
| Note |
|---|---|
Note that the WAR does not contain the .domain or
.service packages as these will be imported from the separate service bundle.
|
The responsibility of the first bundle (formtags-shared-services-service)
is to provide the API of the formtags service. This includes both the
domain and the service API. In the same way that imports are defined
in the /META-INF/MANIFEST.MF, so are exports.
The following is the /META-INF/MANIFEST.MF listing from the service bundle.
Manifest-Version: 1.0
Ant-Version: Apache Ant 1.7.0
Created-By: 1.5.0_13-119 (Apple Inc.)
Bundle-ManifestVersion: 2
Bundle-Name: FormTags Service (and implementation)
Bundle-SymbolicName: org.springframework.showcase.formtags.service-sha
red-services
Bundle-Vendor: SpringSource Inc.
Export-Package: org.springframework.showcase.formtags.service,org.spri
ngframework.showcase.formtags.domain
Import-Library: org.springframework.spring;version="[2.5.4,3.0.0)"
Bundle-Version: 1.0.0.BUILD-20080509155958
The symbolic name of this bundle is
org.springframework.showcase.formtags.service-shared-services.
Note that the name of the bundle typically describes the package
that the bundle primarily exports.
If you take a look at the repository/bundles/ext in the dm Server
directory, you'll see that names are almost always indicative of the contents of the bundle.
For this example, however, we have also appended
"-shared-services"
in order to avoid possible clashes with other bundle symbolic names.
You will see later that the PAR also contains a service bundle.
| Note |
|---|---|
In OSGi, the combination of Bundle-SymbolicName
and Bundle-Version is used to uniquely identify
a bundle within the OSGi container. Furthermore, when you deploy
a bundle to the SpringSource dm Server, for example via the pickup
directory, a bundle's filename is also used to uniquely identify it for
the purpose of supporting hot deployment via
the file system.
|
As well as exporting types (i.e. the domain classes and service
API), the service bundle also publishes an implementation of the
UserManager. The actual implementation is
StubUserManager; however, that should remain an
implementation detail of this bundle.
The fact that this bundle publishes a service is not captured in
the /META-INF/MANIFEST.MF, as it is a Spring-DM concept.
The following image is of src/main/resources/spring.
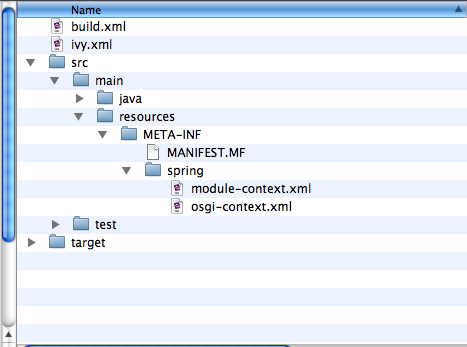
As you can see there are two Spring configuration files: module-context.xml and
osgi-context.xml.
| Tip |
|---|---|
These names are abitrary; however, they follow an informal convention:
module-context.xml typically bootstraps the Spring context
(usually delegating to smaller fine grained context files inside another directory), whilst
osgi-context.xml contains all the OSGi service exports and references.
|
The following is a listing of module-context.xml.
<?xml version="1.0" encoding="UTF-8"?> <beans xmlns="http://www.springframework.org/schema/beans" xmlns:xsi="http://www.w3.org/2001/XMLSchema-instance" xsi:schemaLocation=" http://www.springframework.org/schema/beans http://www.springframework.org/schema/beans/spring-beans-2.5.xsd"> <bean id="userManager" class="org.springframework.showcase.formtags.service.internal.StubUserManager"/> </beans>
As you can see, this simply defines a bean called userManager.
The following is a listing of osgi-context.xml.
<?xml version="1.0" encoding="UTF-8"?> <beans:beans xmlns="http://www.springframework.org/schema/osgi" xmlns:xsi="http://www.w3.org/2001/XMLSchema-instance" xmlns:beans="http://www.springframework.org/schema/beans" xsi:schemaLocation="http://www.springframework.org/schema/osgi http://www.springframework.org/schema/osgi/spring-osgi.xsd http://www.springframework.org/schema/beans http://www.springframework.org/schema/beans/spring-beans.xsd"> <service ref="userManager" interface="org.springframework.showcase.formtags.service.UserManager"/> </beans:beans>
This single bean definition exports the userManager
defined in module-context.xml to the
OSGi service registry and makes it available under the public
org.springframework.showcase.formtags.service.UserManager API.
The service bundle should now be ready to deploy on the dm Server.
So copy /dist/formtags-shared-services-services*
to the SERVER_HOME/pickup directory.
Output similar to the following should appear in the dm Server's console:
| Note |
|---|---|
The console output has been reformatted to fit this document. |
[2008-05-13 13:25:49.415] fs-watcher
<SPDE0010I> Deployment of 'formtags-shared-services-service-1.0.0.RELEASE.jar' version '0' completed.
The WAR file now needs to access the types and service exported
by the service bundle. The following listing is the WAR's
/META-INF/MANIFEST.MF which imports the types
exported by the service bundle. The Import-Bundle
statement has also been extended to import org.springframework.osgi.core,
which is necessary in order to load an OSGi-enabled WebApplicationContext.
Manifest-Version: 1.0 Ant-Version: Apache Ant 1.7.0 Created-By: 1.5.0_13-119 (Apple Inc.) Bundle-ManifestVersion: 2 Bundle-SymbolicName: org.springframework.showcase.formtags.web-shared- services Bundle-Vendor: SpringSource Inc. Import-Package: org.springframework.showcase.formtags.domain,org.sprin gframework.showcase.formtags.service Import-Library: org.springframework.spring;version="[2.5.4,3.0.0)" Import-Bundle: com.springsource.org.apache.taglibs.standard;version="1 .1.2",org.springframework.osgi.core
In addition to importing the exported types of the service bundle,
the WAR must also obtain a reference to the UserManager
published by the service bundle. The following image shows the directory
structure of the Shared Services WAR.
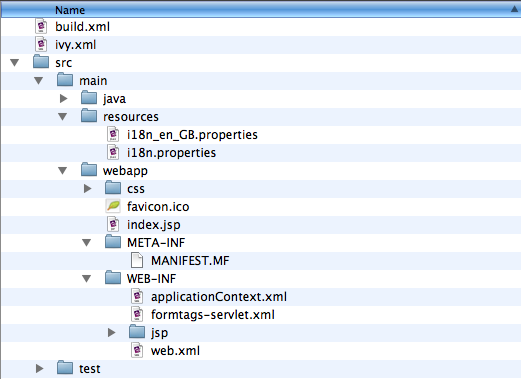
As you can see in the above image, the Form Tags Shared Services WAR's
/WEB-INF/web.xml directory contains a standard web.xml
deployment descriptor, applicationContext.xml which defines the configuration
for the root WebApplicationContext, and
formtags-servlet.xml which defines the configuration specific to the
configured formtags DispatcherServlet.
As is typical for Spring MVC based web applications, you configure a ContextLoaderListener
in web.xml to load your root WebApplicationContext; however, to enable your
WebApplicationContext to be able to reference services from the OSGi Service Registry,
you must explicitly set the contextClass Servlet context parameter to the fully qualified
class name of a ConfigurableWebApplicationContext which is OSGi-enabled. When deploying
Shared Services WARs to the SpringSource dm Server, you should use
com.springsource.server.web.dm.ServerOsgiBundleXmlWebApplicationContext. This will
then enable the use of Spring-DM's <reference ... /> within your root
WebApplicationContext (i.e., in applicationContext.xml).
The following listing is an excerpt from /WEB-INF/web.xml.
<context-param>
  <param-name>contextClass</param-name>
  <param-value>com.springsource.server.web.dm.ServerOsgiBundleXmlWebApplicationContext</param-value>
</context-param>

<listener>
  <listener-class>org.springframework.web.context.ContextLoaderListener</listener-class>
</listener>
The Form Tags Shared Services WAR contains a /WEB-INF/applicationContext.xml
file which is the default configuration location used to create the root
WebApplicationContext for Spring MVC's ContextLoaderListener.
| Note |
|---|---|
As already mentioned, in the OSGi world, bundle configuration
takes place in the root /META-INF/ directory.
Typically Spring-DM powered configuration files will live
there as well (e.g., in /META-INF/spring/*.xml).
In a WAR, however, the root WebApplicationContext
loaded by ContextLoaderListener and the DispatcherServlet's
application context typically live in /WEB-INF/.
In contrast, the construction of Spring ApplicationContexts
is addressed slightly differently in the context of a
SpringSource dm Server-based web module, as you
will see later.
|
The following is the listing of the WAR's /WEB-INF/applicationContext.xml.
<?xml version="1.0" encoding="UTF-8"?>
<beans:beans
   xmlns="http://www.springframework.org/schema/osgi"
   xmlns:xsi="http://www.w3.org/2001/XMLSchema-instance"
   xmlns:beans="http://www.springframework.org/schema/beans"
   xsi:schemaLocation="http://www.springframework.org/schema/osgi
       http://www.springframework.org/schema/osgi/spring-osgi.xsd
       http://www.springframework.org/schema/beans
       http://www.springframework.org/schema/beans/spring-beans.xsd">

    <reference id="userManager"
        interface="org.springframework.showcase.formtags.service.UserManager"/>

</beans:beans>
The single bean declaration is retrieving a service that implements
the org.springframework.showcase.formtags.service.UserManager
API from the OSGi Service Registry.
| Tip |
|---|---|
| You might have been expecting a reference to the service bundle, but that isn't how OSGi works. OSGi provides a service registry, and this bean definition is accessing a service in that registry that meets the specified restriction (i.e. implements the specified interface). This leads to a very loosely coupled programming model: the WAR really doesn't care where the implementation comes from. |
| Tip |
|---|---|
| What happens if there is no service at runtime? What if there are multiple services that match the criteria? Spring-DM provides a lot of configuration options, including whether or not the reference is mandatory, how long to wait for a service reference, etc. Please consult the Spring Dynamic Modules for OSGi home page for further information. |
One of the benefits of programming to interfaces is that you are decoupled from the actual implementation; Spring-DM provides a proxy. This has enormous benefits including the ability to dynamically refresh individual bundles without cascading that refresh to unrelated bundles.
To deploy the WAR, copy /dist/formtags-shared-services-war*
to the SERVER_HOME/pickup directory.
You should then see console output similar to the following:
| Note |
|---|---|
The console output has been reformatted to fit this document. |
[2008-05-13 13:26:37.995] fs-watcher
    <SPSC1000I> Creating web application '/formtags-shared-services-war-1.0.0.RELEASE'.
[2008-05-13 13:26:37.998] async-delivery-thread-1
    <SPSC1001I> Starting web application '/formtags-shared-services-war-1.0.0.RELEASE'.
[2008-05-13 13:26:38.394] fs-watcher
    <SPDE0010I> Deployment of 'formtags-shared-services-war-1.0.0.RELEASE.war' version '0' completed.
Navigating to the appropriate link should render the welcome page.
The final step in the migration is that of a full blown
OSGi application with web support. The SpringSource dm Server introduces a
new packaging and deployment format: the PAR.
A PAR is a standard JAR with a ".par"
file extension which contains all of the modules of your
application (e.g., service, domain, and infrastructure bundles
as well as a WAR or Web Module for web
applications) in a single deployment unit. Moreover, a PAR defines
both a physical and logical application boundary.
For web support above and beyond WAR-based deployment formats, the
SpringSource dm Server introduces a new deployment and packaging option for
OSGi-compliant web applications, the Web Module
format. Web modules have a structure similar to a Shared Services WAR
and therefore build on the support for all three WAR deployment formats.
In addition, web modules benefit from reduced configuration for Spring
MVC based web applications.
The PAR sample is comprised of four directories, as shown below.
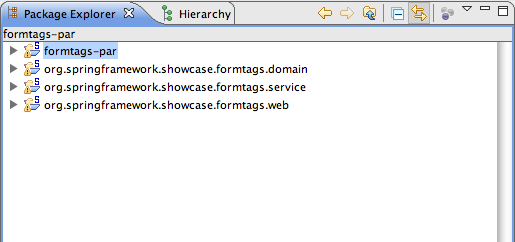
The formtags-par directory is a Spring-Build project that
understands how to create the PAR from its constituent bundles.
Achieving the appropriate level of granularity for your OSGi application is more of an art than a science. It helps to look at the different requirements:
Table 6.1. Granularity drivers
| Requirement | Description |
|---|---|
| Domain/Technical Layering | Applications can be split either by domain (i.e., by use case or vertically) or by their technical layers (i.e., horizontally). Since the Form Tags application essentially has only a single use case, the bundles are split by technical layering (i.e., domain, service, and web). |
| Refreshability | A major benefit of OSGi is that of refreshability: if one bundle is changed, only bundles that have a dependency upon the exported types need to be refreshed. This has a high impact on development time costs as well as production costs. However, this can lead to lots of smaller, fine grained bundles. An example of this granularity would be to separate out the service API and implementation into two different bundles. This means that a change in the implementation wouldn't require any other bundles to be refreshed. |
Ultimately the right level of granularity will depend upon your particular application and team.
| Note |
|---|---|
| This topic will be revisited in greater detail later in the Programmer Guide in a chapter covering how to build a PAR from scratch. |
The service bundle is identical (except for the Bundle-SymbolicName) to that
in the shared-services variation of the sample.
The PAR has also separated out the domain classes into their own bundle.
When layering by technical considerations, it is again
somewhat of an unofficial convention to have a
.domain bundle.
A web module is a SpringSource dm Server construct which is both a web tier artifact and a valid OSGi bundle.
The following image is of the exploded web module JAR
(located inside the distributable /dist/formtags-par.*.jar).

As you can see, at its core, a web module follows the conventions for an OSGi
bundle: the root of the bundle contains the META-INF
folder as well as compiled Java classes and class-path resources.
In addition, the web module contains a MODULE-INF
folder in the root of the bundle, which serves as the root for the
ServletContext for the deployed web application.
The MODULE-INF folder is therefore analogous to the
root of a standard WAR file. Note that there is no web.xml
deployment descriptor present in the /MODULE-INF/WEB-INF
folder, since the dm Server will automatically generate an appropriate
web.xml based on web manifest headers.
Because a web module is an OSGi artifact, it follows that information about the
bundle should be in the /META-INF/MANIFEST.MF.
In addition, in order to differentiate a web module from any other
type of bundle, you need to specify the Module-Type
manifest header and set its value to Web.
Without this manifest header, the dm Server's deployment infrastructure
would simply deploy a web module as a standard bundle. The following
is the /META-INF/MANIFEST.MF for the Form Tags
web module.
Manifest-Version: 1.0
Bundle-ManifestVersion: 2
Bundle-Name: FormTags Web Module
Bundle-SymbolicName: org.springframework.showcase.formtags.web-par
Bundle-Vendor: SpringSource Inc.
Import-Package: org.springframework.showcase.formtags.domain,
 org.springframework.showcase.formtags.service
Import-Bundle: com.springsource.org.apache.taglibs.standard;version="1.1.2"
Import-Library: org.springframework.spring;version="[2.5.4,3.0.0)"
Module-Type: Web
Web-ContextPath: formtags-par
Contrast this to the original web.xml:
<?xml version="1.0" encoding="UTF-8"?>
<web-app version="2.4"
     xmlns="http://java.sun.com/xml/ns/j2ee"
     xmlns:xsi="http://www.w3.org/2001/XMLSchema-instance"
     xsi:schemaLocation="
         http://java.sun.com/xml/ns/j2ee
         http://java.sun.com/xml/ns/j2ee/web-app_2_4.xsd">

    <listener>
        <listener-class>org.springframework.web.context.ContextLoaderListener</listener-class>
    </listener>

    <servlet>
        <servlet-name>formtags</servlet-name>
        <servlet-class>org.springframework.web.servlet.DispatcherServlet</servlet-class>
    </servlet>

    <servlet-mapping>
        <servlet-name>formtags</servlet-name>
        <url-pattern>*.htm</url-pattern>
    </servlet-mapping>

    <welcome-file-list>
        <welcome-file>index.jsp</welcome-file>
    </welcome-file-list>

    <jsp-config>
        <taglib>
            <taglib-uri>http://java.sun.com/jsp/jstl/core</taglib-uri>
            <taglib-location>/WEB-INF/tld/c.tld</taglib-location>
        </taglib>
        <taglib>
            <taglib-uri>http://java.sun.com/jsp/jstl/fmt</taglib-uri>
            <taglib-location>/WEB-INF/tld/fmt.tld</taglib-location>
        </taglib>
    </jsp-config>

</web-app>
The same instructions are specified in the /META-INF/MANIFEST.MF,
but they are much more concise. Please read the section called “Web Module Manifest Headers”
for detailed information on the requirements of a web module's /META-INF/MANIFEST.MF
and supported manifest headers.
| Tip |
|---|---|
The <jsp-config... fragments are not needed by modern day
Servlet containers, but they are left in the above listing
for consistency with the original
web.xml from the Standard WAR sample.
|
Notice that there are no configuration options in the /META-INF/MANIFEST.MF
to indicate the location of the Spring configuration files. This is because, by default, a single
WebApplicationContext will be created from all the Spring configuration files
in /META-INF/spring/*.xml. This shouldn't be surprising as this is normal
behavior for any Spring-DM powered bundle.
Finally we need to construct the PAR itself. The following are the contents of the exploded PAR.

You can see that the PAR itself doesn't contain any resources or Java classes: it simply packages together a related set of bundles as a single, logical unit.
The PAR does however, contain its own /META-INF/MANIFEST.MF.
Manifest-Version: 1.0
Application-SymbolicName: org.springframework.showcase.formtags-par
Application-Version: 1.0.0
Application-Name: FormTags Showcase Application (PAR)
For more information on the contents of the PAR's
/META-INF/MANIFEST.MF, please consult
Chapter 4, Developing Applications.
You can now deploy the PAR on the dm Server, for example by copying
/dist/formtags-par*.par to the dm Server's
pickup directory.
You should then see console output similar to the following:
| Note |
|---|---|
The console output has been reformatted to fit this document. |
[2008-05-13 13:28:57.309] fs-watcher
    <SPSC1000I> Creating web application '/formtags-par'.
[2008-05-13 13:28:57.539] async-delivery-thread-1
    <SPSC1001I> Starting web application '/formtags-par'.
[2008-05-13 13:28:58.016] fs-watcher
    <SPDE0010I> Deployment of 'formtags-par' version '1.0.0.RELEASE' completed.
Navigate to http://localhost:8080/formtags-par to see the welcome page.
| Tip |
|---|---|
Note that the web application's context path is explicitly defined via the
Web-ContextPath manifest header in
/META-INF/MANIFEST.MF of the web module within
the PAR.
|
The SpringSource dm Server provides out-of-the-box support for deploying standard Java EE WAR files. In addition support for Shared Libraries and Shared Services WAR formats provides a logical migration path away from standard, monolithic WARs toward OSGi-enable Web Modules. The PAR packaging and deployment format enables truly fine grained, loosely coupled, and efficient application development. In general, the migration steps presented in this chapter are fairly straightforward, but developers should set aside time for some up-front design of the bundles themselves.
It is recommended that you take another sample application or indeed your own small application and go through this migration process yourself. This will help you better understand the concepts and principles at work. In addition, it is highly recommended that you familiarize yourself with the Eclipse-based SpringSource dm Server Tools support which is discussed in Chapter 7, Tooling.
SpringSource provides a set of plug-ins for the Eclipse IDE that streamline the development lifecycle of OSGi bundles and PAR applications. The SpringSource dm Server Tools build on top of the Eclipse Web Tools Project (WTP) and Spring IDE, the open-source Spring development tool set.
The SpringSource dm Server Tools support the creation of new OSGi bundle and PAR projects within Eclipse, and the conversion of existing projects into OSGi bundle projects. Projects can then be deployed and debugged on a running dm Server from within Eclipse.
Currently the Tools support Eclipse 3.3 and Eclipse 3.4 with the corresponding version of WTP. Downloading and unzipping the Eclipse IDE for Java EE Developers is the easiest way to start.
Execute the following steps to install the Tools into your Eclipse environment.
Install Spring IDE 2.1.0 from http://springide.org/updatesite/ using the Eclipse Update Manager.
Note Don't try to install the "Spring IDE Dependencies (only for Eclipse 3.2.x)" from the "Dependency" category on Eclipse 3.3. This feature is intended only for Eclipse 3.2 and is to keep Spring IDE backward-compatible. You will not be able to continue with the installation if you select this feature on Eclipse 3.3. Install the Tools from http://static.springsource.com/projects/sts-dm-server/update/ using the Eclipse Update Manager.
After installing the Tools from the update site outlined in the previous section, you will be able to configure an instance of the dm Server inside Eclipse.
To do so bring up the WTP Servers view (i.e., → → → → ). You can now right-click in the view and select " → ". This will bring up a "New Server" dialog. Select "SpringSource dm Server v1.0 Server" in the "SpringSource" category and click "".
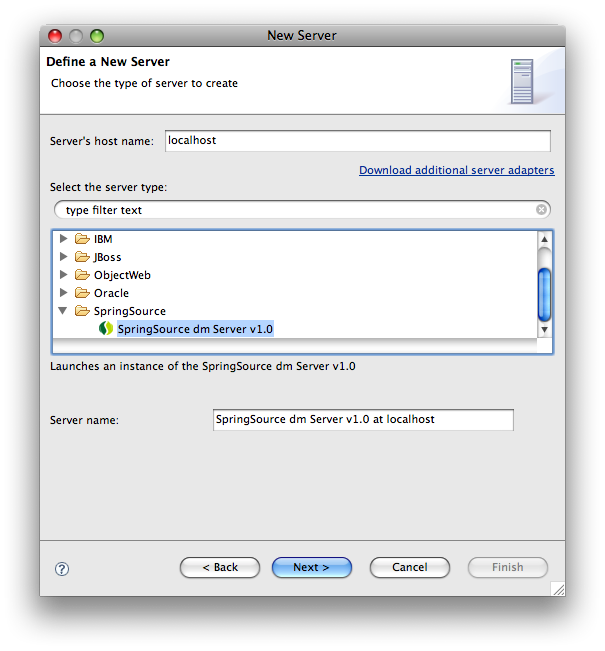
Within the "New Server Wizard" point to the installation directory of the SpringSource dm Server and finish the wizard. After finishing the wizard you should see a SpringSource dm Server entry in the Servers view.
To start, stop, and debug the created SpringSource dm Server instance use the toolbar or the context menu actions of the Servers view.
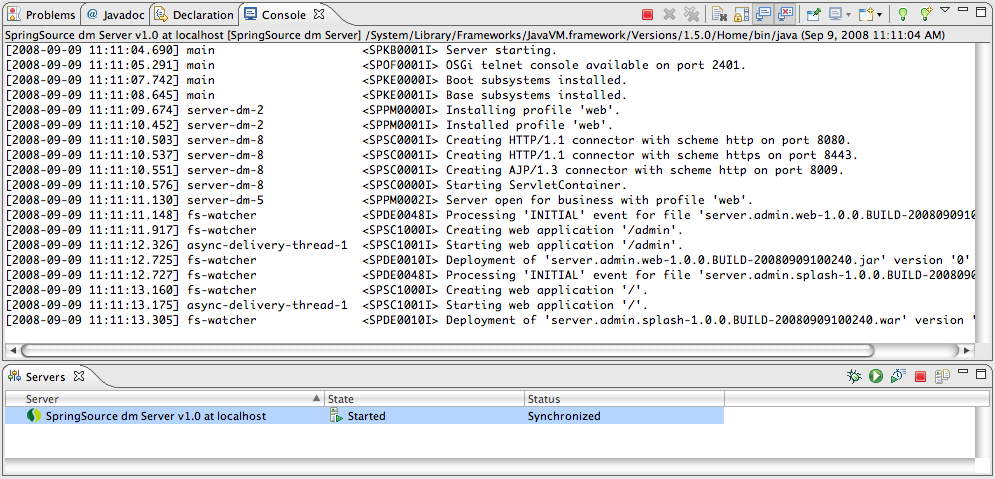
After successful configuration of an instance of the SpringSource dm Server in Eclipse you can use the Repository Browser to very easily install bundles and libraries from the remote SpringSource Enterprise Bundle Repository.
To open the Repository Browser double-click a SpringSource dm Server instance in the Servers view and select the "Repository" tab in the server editor. Please note that opening of the Editor may take a few seconds as the contents of the local repository needs to be indexed before opening.
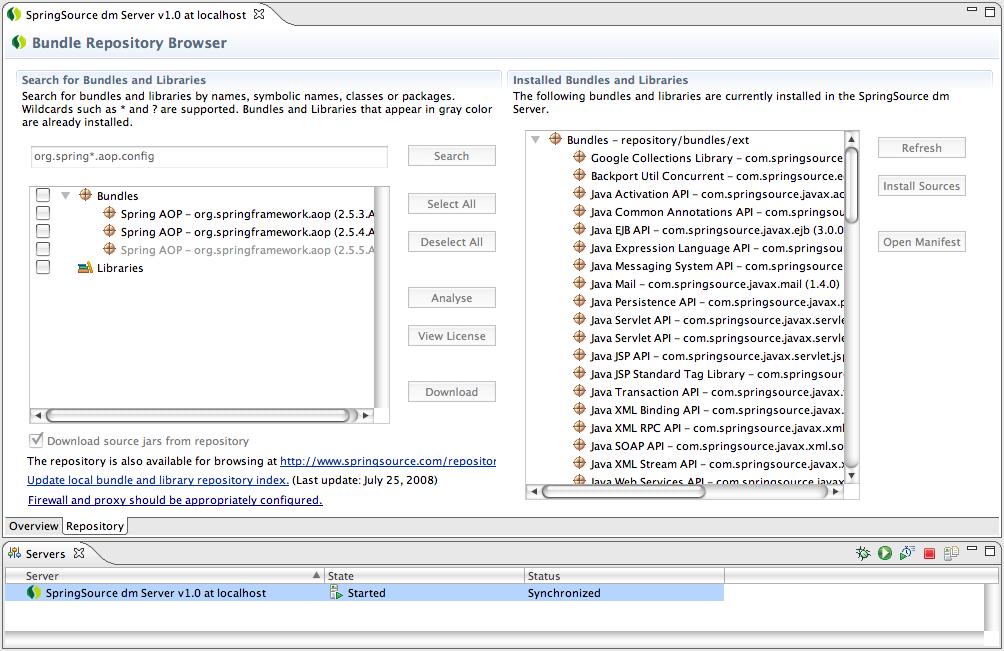
The left section of the Repository Browser allows the user to run searches against the SpringSource Enterprise Bundle Repository"> and displays matching results. The search can take parts of bundle symbolic names, class or package names and allows wildcards such as '?' and '*'. By selecting the checkbox left to a matching bundle and/or library and clicking the "Download" button it is very easy to install new bundles in the SpringSource dm Server. For your convenience JARs containing the bundle source code can be automatically downloaded as well.
Clicking the "Download" button will trigger an Eclipse background job that will download the selected repository artifacts and -- if desired -- the source JARs one after another.
The section on the right displays the currently installed bundles and libraries. Bundles with available sources are visually marked. You can very easily download missing source JARs by using the "Install Sources" button.
The SpringSource dm Server supports different deployment units as discussed earlier in this guide. The Tools define specific project types to support the development of OSGi and PAR projects.
There are two New Project Wizards available within Eclipse that allow for creating new OSGi bundle and PAR projects. The projects created by the wizards are deployable to the integrated dm Server instance without requiring any additional steps.

Those wizards create the required MANIFEST.MF file and appropriate manifest
headers.
To migrate an existing Java Project to be used with the dm Server, the Tools provide a migration action that adds the required meta data to the project. The migration will not change your project's source layout.
Use the context menu action of a project in the Package or Project Explorer and select " → ".
The Tools provide functionality that makes developing OSGi bundles, especially the editing of MANIFEST.MF files, easier.
While working with OSGi bundles, one of the most interesting and challenging aspects is defining
the package, bundle, and library imports in the manifest and then keeping this in sync
with your compile classpath either in Ant and Maven or Eclipse. In most cases you would typically
be required to manually set up the Eclipse classpath. Ultimately, the Eclipse compile
classpath is still different from the bundle runtime classpath, as normally an entire
JAR file is being made available on the Eclipse classpath but not necessarily at runtime
due to the explicit visibility rules defined in Import-Package headers.
The Tools address this problem by providing an Eclipse classpath container that
uses an SpringSource dm Server-specific dependency resolution mechanism. This classpath
container makes resolved dependencies available on the project's classpath but allows
only access to those package that are imported explicitly (e.g., via Import-Package)
or implicitly by using Import-Library or Import-Bundle.
To use the automatic dependency resolution, an OSGi bundle or PAR project needs to be targeted to a configured SpringSource dm Server instance. This can be done from the project's preferences by selecting the runtime on the "Targeted Runtimes" preference page.
| Note |
|---|---|
| In most scenarios it is sufficient to target the PAR project to a runtime. The nested bundles will then automatically inherit this setting. |

After targeting the project or PAR you will see a "Bundle Dependencies" classpath container in your Java project. It is now safe to remove any manually configured classpath entries.
The classpath container will automatically attach Java source code to the classpath entries by looking for source JARs next to the binary JARs in the SpringSource dm Server's repository. You can also manually override the source code attachment by using the properties dialog on a single JAR entry. This manual attachment will always override the convention-based attachment.
The Tools provide a Bundle Manifest Editor that assists the developer to create and
edit MANIFEST.MF files. The editor understands the SpringSource dm Server specific headers
like Import-Library and Import-Bundle and provides content
assist features while editing source code. Furthermore a Eclipse Form-based UI is also
available.
To open the Bundle Manifest Editor right click a MANIFEST.MF file and select "Bundle Manifest Editor" from the "Open With" menu.
| Note |
|---|---|
| Please note that the SpringSource dm Server specific manifest headers appear in green color to distinguish them from those headers defined in the OSGi specification. This also makes navigating much easier. |
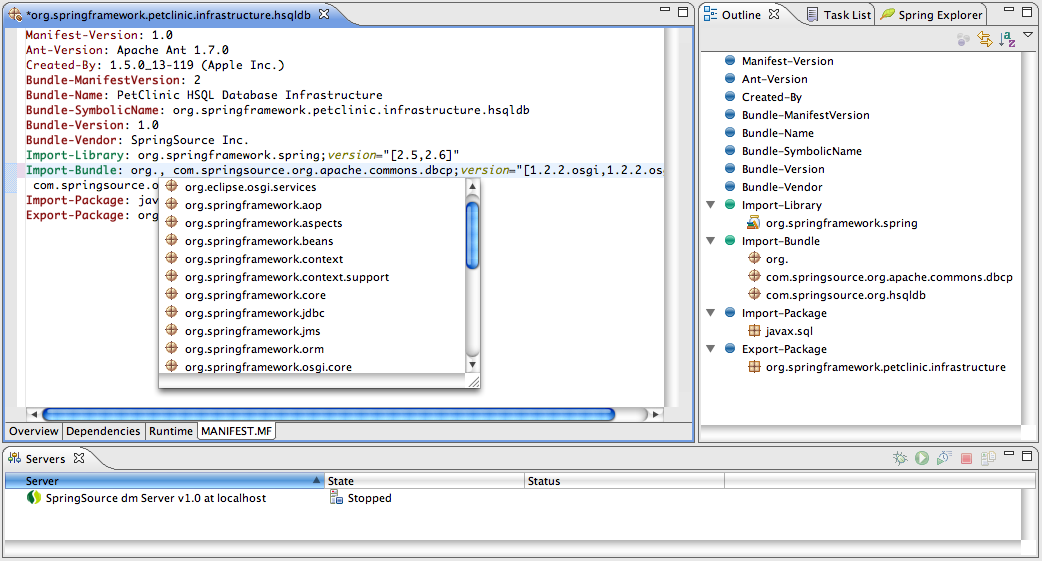
The content assist proposals in the source tab as well as in the UI-based tabs are resolved from the bundle and library repository of an installed and configured SpringSource dm Server. Therefore it is important to target the project or PAR to a specific dm Server instance to indicate to the tooling which bundle repository to use.
| Note |
|---|---|
| If a OSGi bundle project is not targeted to a dm Server instance, either directory or indirectly via a PAR project's targetting, the manifest editor will not be able to provide content assist for importing packages, bundles, and libraries. |
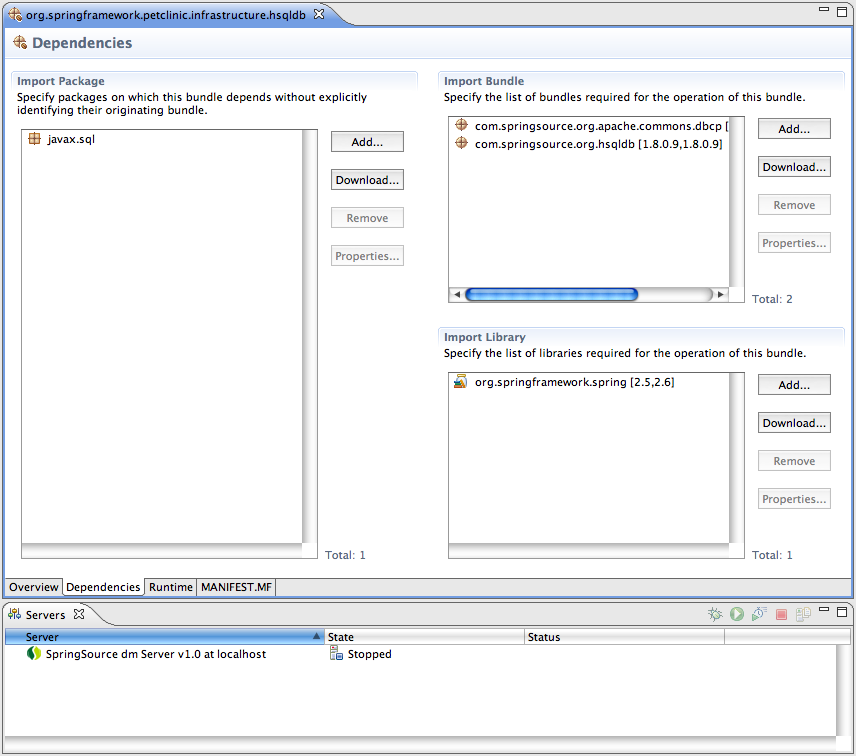
The Dependencies tab of the Bundle Manifest Editor enables the user to easily download and install bundles and libraries from the SpringSource Enterprise Bundle Repository"> by using the "Download..." buttons next to the "Import Bundle" and "Import Library" sections.
Currently the Tools support direct deployment of WTP Dynamic Web Projects, OSGi bundle and PAR projects to the dm Server from directly within Eclipse.
To deploy an application to the SpringSource dm Server just bring up the context menu on the configured dm Server runtime in the Servers view and choose "Add or Remove Projects...". In the dialog, select the desired project and add it to the list of "Configured projects".
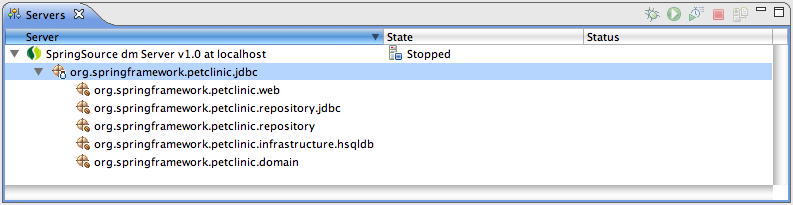
| Note |
|---|---|
Deploying and undeploying an application from the dm Server certainly works while the SpringSource dm Server is running, but you can also add or remove projects if the dm Server is not running. |
Once an application is deployed on the SpringSource dm Server the tooling support will automatically pick up any change to source files -- for example, Java and XML context files -- and refresh the deployed application on the dm Server.
The wait time between a change and the actual refresh can be configured in the configuration editor of the runtime. To bring up that editor, double-click on the configured SpringSource dm Server instance in the Servers view.
Hibernate uses CGLIB to dynamically create subclasses of your entity types at
runtime. To guarantee that Hibernate and CGLIB can correctly see the types,
you must add an Import-Library or Import-Bundle for the Hibernate library or bundle
into any bundle that uses Hibernate directly.
Additionally, if other bundles in your application contain types to be persisted by Hibernate, then be sure to specify the import-scope directive of the Import-Bundle header in the bundle that uses Hibernate directly. The import-scope directive tells to implicitly import the bundle into all other bundles that make up the application; this ensures that bundles that indirectly depend on the generated Hibernate classes have access to them, but you do not have to explicitly update their Import-Bundle header, ensuring modularity. For example:
Import-Bundle: com.springsource.org.hibernate;version="[3.2.6.ga,3.2.6.ga]";import-scope:=application
The import-scope directive works only for the bundles in a scoped application (PARs or plans.)
Many DataSource implementations use the DriverManager
class which is incompatible with typical OSGi class loading semantics. To get around this,
use a DataSource implementation that does not rely on
DriverManager. Versions of the following
DataSources that are known to work in an OSGi environment are available in the
SpringSource Enterprise Bundle Repository">.
SimpleDriverDataSource available in Spring JDBC 2.5.5 and later
When using a library that performs bytecode weaving or instrumentation, such as AspectJ,
OpenJPA or EclipseLink, any types that are woven must be able to see the library doing
the weaving. This is accomplished by adding an Import-Library for the
weaving library into all bundles that are to be woven.
Weaving is often used by JPA implementations to transform persisted types. When using a
JPA provider that uses load-time weaving, an Import-Library for the
provider is needed in the bundles containing the persisted types.
When using tag libraries within a WAR or Web Module, be sure to include an
Import-Bundle or Import-Library for the tag library
bundle(s). This will ensure that your module can see the TLD definition and implementing types.
For example, to use the Apache implementation of JSTL, add the following to your bundle's
/META-INF/MANIFEST.MF:
Import-Bundle: com.springsource.org.apache.taglibs.standard;version="1.1.2"
Classpath scanning for JPA entities annotated with @Entity does
not work. Describing entities with @Entity will work, but the
entities need to be listed explicitly.
When creating proxies at runtime, there are circumstances where ClassNotFoundErrors
can be generated. These errors happen because the proxy creating bundle does not have visibility into every
type on the interface of the proxy. You can either put in import statements for all the relevant types or
add use a service (with visibility of all pertinent types) to create the proxy. Please see
this blog entry
for more details.
In traditional Java EE applications user types are loaded by the same ClassLoader as
CGLIB. This allows CGLIB to proxy package-protected types. In OSGi environments, user types and CGLIB will
most likely be packaged in separate bundles. This results in the user types and CGLIB being loaded by
different ClassLoaders. This prevents CGLIB from proxying any package-protected types.
The workaround for this issue is to make all types that require proxying public.