Table of Contents
The SpringSource dm Server requires Java SE 5 or later to be installed. Java is available from Sun and elsewhere.
SpringSource dm Server is distributed as a ZIP file. This can be downloaded from here. Follow the instructions to obtain a username and password.
To install the SpringSource dm Server on Linux, unzip the distribution package to the desired installation directory.
For example, to install into /opt:
prompt$ unzip springsource-dm-server-2.0.0.M2.zip -d /opt
This creates a directory called springsource-dm-server-2.0.0.M2 under /opt.
SpringSource dm Server requires write access to the installation directory, in this case /opt/springsource-dm-server-2.0.0.M2.
Typically this means it must be run as the user that installed it, or the installation directory's ownership must be changed.
To install the SpringSource dm Server on Windows, unzip the distribution package to the desired installation directory. You should use a zip application such as 7zip, not the built-in folder decompression. Note that both Windows and Java 5 have some issues with long file names and file paths, so we recommend installing to the root directory of your chosen drive.
The SpringSource dm Server uses the JAVA_HOME environment variable to locate the java
executable. Configure this environment variable to point to the home directory of the Java 5 or Java 6 installation on your computer.
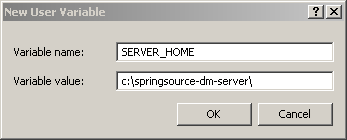
As a convenience it is recommended that you create an environment variable that points
to the SpringSource dm Server installation directory. Note that the SpringSource dm Server does not require that
such an environment variable has been set. This variable may have any name of your
choosing. The SpringSource dm Server's documentation assumes that the variable is named
SERVER_HOME.
Edit the .profile file in your home directory to
add the SERVER_HOME and JAVA_HOME environment variables. For
example, if you installed into /opt:
export SERVER_HOME=/opt/springsource-dm-server-2.0.0.M2/
export JAVA_HOME=/user/java/jdk1.6.0_17
export PATH=$JAVA_HOME/bin:$PATH
This section shows how to add SERVER_HOME as a system variable on Windows. Follow the same procedure to add or update the JAVA_HOME environment variable.
From the Start menu, open the Control Panel and double-click on 'System'.
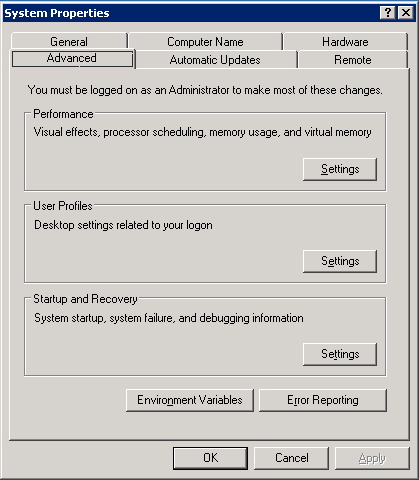
Click the 'Advanced' tab and select 'Environment Variables'. Next, click the 'Edit' button in the 'System Variables' section.

This will display the 'Edit System Variable' window. Enter
SERVER_HOME as the 'Variable name' and
the installation directory as the 'Variable value'. Click OK.
To start SpringSource dm Server run the startup.sh (Linux) or startup.bat (Windows) script. For both platforms, the script is located in the SERVER_HOME/bin directory.
To start SpringSource dm Server, open a terminal window and run startup.sh:
prompt$ cd $SERVER_HOME
prompt$ bin/startup.sh
Once SpringSource dm Server has started, the console will display a log message similar to the one shown below, along with other status messages:
[2009-03-30 12:12:12.111] Deployer Recovery <SPPM0002I> Server open for business with profile 'web'.
To start SpringSource dm Server, open a command-window and run startup.bat:
prompt> cd %SERVER_HOME%
prompt> bin\startup.bat
Once SpringSource dm Server has started console will display a log message similar to the one shown below:
[2009-03-30 12:12:12.111] Deployer Recovery <SPPM0002I> Server open for business with profile 'web'.
When you start dm Server in clean mode, the startup script removes the SERVER_HOME/work directory (and hence all
running applications) as well as all trace, log and dump files. It leaves the
SERVER_HOME/repository and SERVER_HOME/pickup directories untouched,
which means that any applications previously hot deployed will be automatically reinstalled.
To start SpringSource dm Server in clean mode, open a terminal window and run startup.sh -clean:
prompt$ cd $SERVER_HOME
prompt$ bin/startup.sh -clean
To start SpringSource dm Server in debug mode, run
startup.sh passing in the
-debug argument:
prompt$ cd $SERVER_HOME
prompt$ bin/startup.sh -debug
This will start the debug agent listening on port
8000 which is the default remote debug port used
by Eclipse. To start in debug mode with a specific port number, pass
this in as the value for the -debug argument:
prompt$ cd $SERVER_HOME
prompt$ bin/startup.sh -debug 8001
This will start the debug agent listening on port
8001. To start in debug mode and suspend the VM
until a debugger attaches, pass in the -suspend
argument along with the -debug argument:
prompt$ cd $SERVER_HOME
prompt$ bin/startup.sh -debug -suspend
This starts the debug agent, but prevents SpringSource dm Server from actually starting until a debugger attaches to the agent. This can be useful when trying to diagnose problems that occur during startup.
To start SpringSource dm Server in debug mode, run
startup.bat passing in the
-debug argument:
prompt> cd %SERVER_HOME%
prompt> bin\startup.bat -debug
This will start the debug agent listening on port
8000 which is the default remote debug port used
by Eclipse. To start in debug mode with a specific port number, pass
this in as the value for the -debug argument:
prompt> cd %SERVER_HOME%
prompt> bin\startup.bat -debug 8001
This will start the debug agent listening on port
8001. To start in debug mode and suspend the VM
until a debugger attaches, pass in the -suspend
argument along with the -debug argument:
prompt> cd %SERVER_HOME%
prompt> bin\startup.bat -debug -suspend
This starts the debug agent, but prevents SpringSource dm Server from actually starting until a debugger attaches to the agent. This can be useful when trying to diagnose problems that occur during startup.
9875 and the default username and password are admin and springsource.
To start SpringSource dm Server with default JMX access enabled, run startup.sh passing
in no arguments:
prompt$ cd $SERVER_HOME
prompt$ bin/startup.sh
To start JConsole, run the jconsole.sh script, located in the bin directory, as shown:
prompt$ cd $SERVER_HOME
prompt$ bin/jconsole.sh
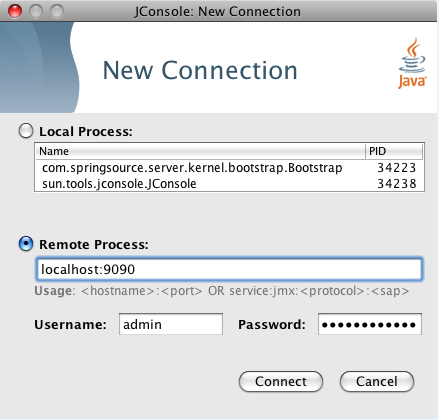
The following image shows how to specify a local connection using JConsole.

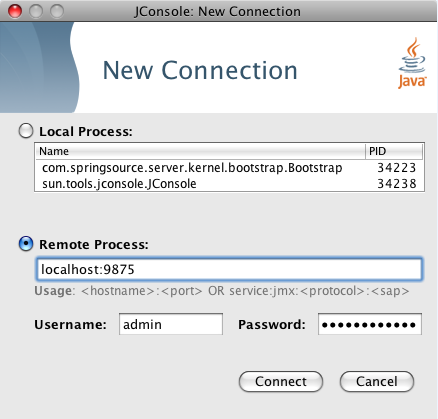
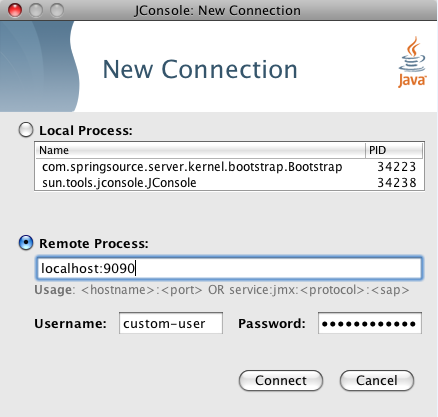
The following image shows how to specify a remote connection in JConsole that uses SSL with the default username/password (admin/springsource and default secure port of 9875).
To start with the JMX remote access on a specific port number other than the default 9875, pass this port number in as the value
of the -jmxport argument:
prompt$ cd $SERVER_HOME
prompt$ bin/startup.sh -jmxport 9009
This will start the SpringSource dm Server with JMX enabled for remote connections on port 9009.
To start the JMX remote access with a custom username and password edit the files located at
$SERVER_HOME/config/management/jmxremote.password and
$SERVER_HOME/config/management/jmxremote.access. Add the username, along with their permissions (either readonly or readwrite) to the jmxremote.access file. Then add a corresponding line to the jmxremote.password file that specifies the user's password. The specify the custom username in JConsole as shown.
To start the JMX remote access using a custom SSL certificate, edit the file located at
$SERVER_HOME/config/management/keystore. If you wish to use a different keystore,
pass this filename in as the value for the -keystore argument and the keystore
password in as the value for the -keystorePassword argument:
prompt$ cd $SERVER_HOME
prompt$ bin/startup.sh -keystore customKeystore -keystorePassword customKeystorePassword
This will start the SpringSource dm Server with JMX enabled for remote connections using an SSL certificate from
customKeystore with a password of customKeystorePassword.
To start SpringSource dm Server with default JMX access enabled, run startup.bat passing
in no arguments:
prompt> cd %SERVER_HOME%
prompt> bin\startup.bat
To start JConsole, run the jconsole.bat script, located in the bin directory, as shown:
prompt> cd %SERVER_HOME%
prompt> bin\jconsole.bat
The following image shows how to specify a local connection using JConsole.
The following image shows how to specify a remote connection in JConsole that uses SSL with the default username/password (admin/springsource and default secure port of 9875).
To start with the JMX remote access on a specific port number other than the default 9875, pass this port number in as the value of the -jmxport argument:
prompt> cd %SERVER_HOME%
prompt> bin\startup.bat -jmxport 9009
This will start the SpringSource dm Server with JMX enabled for remote connections on port
9009.
To start the JMX remote access with a custom username and password edit the files located at
%SERVER_HOME%/config\management\jmxremote.password and
%SERVER_HOME%\config\management\jmxremote.access. Add the username, along with their permissions (either readonly or readwrite) to the jmxremote.access file. Then add a corresponding line to the jmxremote.password file that specifies the user's password. The specify the custom username in JConsole as shown.
To start the JMX remote access using a custom SSL certificate, edit the file located at
%SERVER_HOME%\config\management\keystore. If you wish to use a different
keystore, pass this filename in as the value for the -keystore argument and the
keystore password in as the value for the -keystorePassword argument:
prompt> cd %SERVER_HOME%
prompt> bin\startup.bat -keystore customKeystore -keystorePassword customKeystorePassword
This will start the SpringSource dm Server with JMX enabled for remote attach using an SSL certificate from
customKeystore with a password of customKeystorePassword.
Use the -configDir option to specify an alternate config directory, different from the
default SERVER_HOME/config directory. This option allows you to use the same SpringSource dm Server
installation to run multiple instances of dm Server . Simply create a config directory for each
instance, specify unique port numbers, logging and tracing directories, and so on. and then specify that directory
when starting SpringSource dm Server.
If you specify a relative path for the -configDir parameter, the startup script interprets the path as relative to the root of the SpringSource dm Server installation, and not relative to the directory from which you execute the startup script.
/config/node1:
prompt$ cd $SERVER_HOME
prompt$ bin/startup.sh -configDir /config/node1
To stop a running instance of SpringSource dm Server, start a new terminal window and the run shutdown.sh script:
prompt$ cd $SERVER_HOME
prompt$ bin/shutdown.sh
To stop a running instance of SpringSource dm Server immediately, bypassing normal shutdown
processing, run shutdown.sh with the -immediate option:
prompt$ cd $SERVER_HOME
prompt$ bin/shutdown.sh -immediate
If, when you started the dm Server instance, you used the -jmxport option to specify a non-default JMX port number, then you must pass this port number to the -port of the shutdown.sh script to gracefully shut it down. For example, if you specified 9009 as the JMX port, use the following to shut down the dm Server instance:
prompt$ cd $SERVER_HOME
prompt$ bin/shutdown.sh -port 9009
To stop a running instance of SpringSource dm Server, start a new console window and run the shutdown.bat script:
prompt> cd %SERVER_HOME%
prompt> bin\shutdown.bat
To stop a running instance of SpringSource dm Server immediately, bypassing normal shutdown
processing, run shutdown.bat with the -immediate option:
prompt> cd %SERVER_HOME%
prompt> bin\shutdown.bat -immediate
If, when you started the dm Server instance, you used the -jmxport option to specify a non-default JMX port number, then you must pass this port number to the -port of the shutdown.bat script to gracefully shut it down. For example, if you specified 9009 as the JMX port, use the following to shut down the dm Server instance:
prompt> cd %SERVER_HOME%
prompt> bin\shutdown.bat -port 9009
To use the SpringSource Admin Console, start the SpringSource dm Server and then enter the following URL in your browser of choice.
http://localhost:8080/admin
Replace localhost with the hostname of the computer on which the
SpringSource dm Server is running if it is not the same as the computer on which you are running your browser. The
Admin Console uses basic authentication, therefore you will need to enter the default administration ID and password.
ID: admin
Password: springsource
To change the ID and password for the Admin Console, update the SERVER_HOME/config/servlet/tomcat-users.xml file, which is in the standard Tomcat users-file format.
Change the values of the username and password attributes of the <user> element with the admin role. For example, if you want change the administration username to hamlet with password tobeornottobe change the file as follows:
<user username="hamlet" password="tobeornottobe" roles="admin">
The Admin Console runs against the admin role, therefore this cannot be changed.
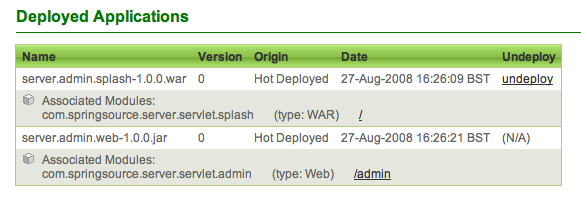
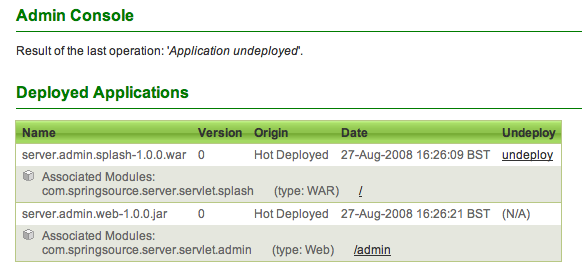
The main Admin Console page displays several sections. The Deployed Applications section shows a list of all the deployed artifacts and the modules that comprise them. When you first install dm Server, there will be two artifacts deployed: the Admin Console itself and a splash screen application. As these artifacts both contain Web components, the Admin Console provides a link so you can quickly view them in your browser. The Admin Console provides a similar link for all deployed artifacts that contain Web components.
The other fields in the table give the 'Name' of the
artifact, which is the name of the actual file if no specific name is
supplied. The 'Origin' describes how the artifact was
deployed. The possible values are Hot Deployed if the artifact was dropped in the pickup directory, Admin Console if deployed using the
console and Programmatic if deployed programmatically,
that is, through the integrated artifact deployer in the
SpringSource dm Server Tools. The version is 0 if no specific version is
supplied by the artifact. The 'Date' column shows when the
artifact was last deployed to dm Server.
In the Deploy an Application section, you can upload a file that will be deployed automatically to the SpringSource dm Server. Once the artifact is deployed it will appear in the Deployed Applications table. You can use the Browse button to browse your local computer for the file. Note that the specific GUI for uploading varies according to your browser and platform.

When clicked, the 'Upload' button reloads the page. This may
take a few seconds while the file is uploaded and
deployed. If any problems occurred, the Admin Console
outputs a status message at the top of the page. If
the file deployed with no problems, the messages says
Application deployed.
For more information on how to work with artifacts see Chapter 6, Working with Applications.
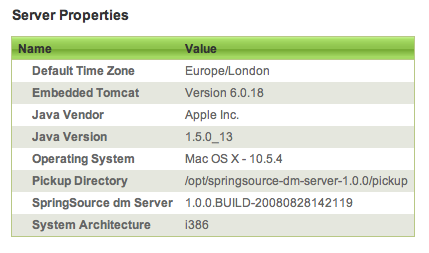
At the bottom of the main page, the Information section provides details of the dm Server you have accessed. This is useful for verifying that you have accessed the correct dm Server instance. The Server Properties table lists basic properties of the dm Server instance, such as the version of the embedded Tomcat server and the operation system on which the dm Server instance is running. The Serviceability Destinations table lists the locations of the dump, log, and trace files.
In SpringSource dm Server, all third-party dependencies needed by your applications, such as Spring Framework and Hibernate, are stored in the provisioning repository. All of these dependencies are stored as valid OSGi bundles in the provisioning repository. Dependencies that are not valid OSGi bundles are not supported.
When an application is installed, if it has a dependency that cannot be satisfied from the bundles that have already been installed,
the SpringSource dm Server will search the repository for a bundle that can satisfy that dependency. Dependencies between applications
and third-party libraries are typically expressed using Import-Package or Import-Library
(see Programmer's Guide).
Some third-party dependencies consist of multiple bundles but are logically one unit. To support this, the SpringSource dm Server introduces the concept of a library. A library is a collection of related bundles that can be referenced as a whole. More details on the creation and usage of libraries can be found in the Programmer's Guide.
Making a third-party dependency available to your application is simply a matter of adding its bundle or library to the appropriate location in the provisioning repository.
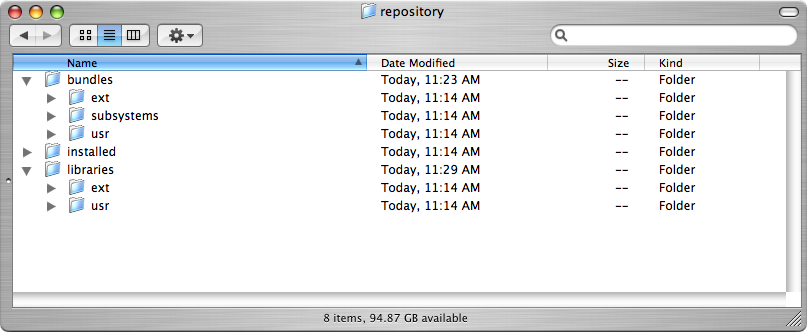
By default, the provisioning repository is located at $SERVER_HOME/repository and consists of three main directories:
bundles, libraries and installed.
The bundles directory contains all the bundles available in the repository. The libraries directory contains
all the library definitions. Note that libraries reference bundles that are installed elsewhere in the repository, e.g. by default under the
bundles directory. The installed directory is used by the SpringSource dm Server at runtime, and should not contain
used bundles or libraries.
The bundles directory is further subdivided into three directories: ext, subsystems and
usr.
The ext and usr directories are intended to contain third-party bundles, with ext containing
bundles supplied with the SpringSource dm Server and usr containing bundles installed by the end user. The subsystems
directory is for internal use only.
The libraries directory is similarly organized, with an ext and usr directory. As with bundles,
new libraries should be installed into libraries/usr.
To install a bundle into the bundle repository, copy it into the $SERVER_HOME/repository/bundles/usr directory. Bundles must
have unique names so it is considered best practice to include the version number in the file name, allowing for multiple versions of the
bundle to be installed.
In some cases the SpringSource dm Server manages to automatically detect changes in its provisioning repository at runtime, thereby avoiding the need to restart the dm Server.
Of specific relevance during development is picking up changes to an application's direct dependencies during deployment of the application. For example, if you deploy an application and receive a message that a dependency is missing, you can simply add the dependency to the repository and then redeploy the application. The redeploy will cause the new dependency to be picked up, allowing progress to be made without restarting the dm Server. For other changes such as addition of indirect dependencies, the SpringSource dm Server must be restarted to pick up any changes to the provisioning repository.
To install a library, copy its definition into the $SERVER_HOME/repository/libraries/usr directory. Ensure that all referenced
bundles have been installed as well.
The SpringSource Enterprise Bundle Repository is located here.
You can find bundles in the repository using a number of options. You use the 'Search' facility by typing in a keyword. The matching criteria returned can be explored by name, symbolic name, class, package or resource.
There is also the option of clicking on 'Browse by Bundle'. This gives an alphabetical list of bundles. You can select the desired bundle to see details and find the download link. Finally, you can also choose to 'Browse by Library', which allows you to browse the alphabetical list of libraries in the repository.
Details of how to configure a SpringSource dm Server installation's provisioning repository can be found in the Configuration chapter.
Log files are low-volume logs of important events in SpringSource dm Server. Each message written to a log file is accompanied by a 9-digit log code enclosed in angle brackets. An example is shown below:
[2008-03-08 17:25:28.007] server-dm-13 <SPSC0000I> - Creating ServletContainer on port 8080
For a breakdown of the code meanings, see the Section 9.1, “Log Codes”.
By default, log files are stored in
$SERVER_HOME/serviceability/logs.
The SpringSource dm Server's trace support serve two main purposes:
-
It provides global trace files that capture high-volume information regarding the SpringSource dm Server's internal events. The files are intended
for use by support personnel to diagnose runtime problems. The default trace file is called
SERVER_HOME/serviceability/trace/trace.log. -
It provides application trace files that contain application-generated output. This includes output generated using popular logging and
tracing APIs, as well as output generated by calls to
System.outandSystem.err. These files are intended for use by application developers and system administrators.
Entries in trace files are of the form <timestamp> <thread-name> <source> <level> <entry-text>. For example:
[2008-05-15 09:09:46.940] server-dm-2 org.apache.coyote.http11.Http11Protocol I Initializing Coyote HTTP/1.1 on http-48080
By default, trace files are stored in $SERVER_HOME/serviceability/trace.
SpringSource dm Server provides advanced support for capturing and tracing application-generated output. It automatically partitions trace on a
per-application basis and will also capture any System.out and System.err output and direct it to the generating application's
trace.log file.
SpringSource dm Server uses SLF4J-based implementations of both Commons Logging and Log4J to route output generated by applications
using those APIs to its trace files. In addition to appending such output to the global trace.log it will also
append it to an application-specific trace file.
SpringSource dm Server writes application-specific trace to a file in a subdirectory of the configured trace directory. As described
above this directory is, by default, SERVER_HOME/serviceability/trace. The subdirectory's name is of
the form <application-name>-<version>. So, for example, an application named com.myapp at
version 1 will write its trace to a file in SERVER_HOME/serviceability/trace/com.myapp-1/.
You configure the levels used to filter per-application trace by specifying a header in the application's MANIFEST.MF file that includes
a comma-separated list of package and class names. For example:
Application-TraceLevels: *=info,com.myapp.*=verbose
This sample MANIFEST.MF header enables info level tracing for everything except the classes in the com.myapp package for which
verbose level tracing is enabled.
SpringSource dm Server captures, and traces, all output generated via System.out and System.err.
This means that such output will be written to both the global trace.log file and to the trace file specific
to the application that generated the output. The trace entries for System.out and System.err
output are of the form:
[2008-05-16 09:28:45.874] server-tomcat-thread-1 System.out I Hello world!
[2008-05-16 09:28:45.874] server-tomcat-thread-1 System.err E Hello world!
The third column indicates where the output came from (System.out or System.err)
and, as indicated by the fourth column, System.out is traced at the info level, and System.err is
traced at the error level.
A service dump is triggered when one of the following events occurs:
A failure is detected in the SpringSource dm Server code
A thread deadlock is detected
A service dump contains a snapshot of all the important state from the running SpringSource dm Server instance. This snapshot is not intended for end user consumption but is useful for service personnel.
By default, service dumps are created in
$SERVER_HOME/serviceability/dump.
You can deploy artifacts to SpringSource dm Server using either the hot-deploy directory on the file system or by using the Admin Console.
To hot deploy an artifact, copy it into the
pickup directory (by default $SERVER_HOME/pickup):
prompt$ cp myapp.par $SERVER_HOME/pickup
When the artifact is hot deployed, a message similar to the following appears in the log file:
[2009-03-08 17:00:00.000] fs-watcher <SPDE0010I> - Deployment of 'myapp.par' version '0' completed.
If there is a problem with the deployment the console and log both show an error message to help you with troubleshooting.
The Admin Console allows you to upload a file, which will be deployed automatically, from your local file system to the SpringSource dm Server. As soon as SpringSource dm Server deploys the artifact, it appears in the list of artifacts in the Admin Console. Note that the GUI for uploading varies according to the browser and operating system you use.
When clicked, the 'Upload' button reloads the page. This
may take a few seconds while the file is transmitted and
deployed. The Admin Console displays a status message at the top of the page after it completes the deployment; if there were no problems,
the displayed message is
Application deployed. The following image shows three deployed artifacts.

See Chapter 3, The Web based Administration Console for additional details on using the Admin Console and the meaning of the displayed information.
When you deploy an artifact, either using hot-deployment or the Admin Console, dm Server copies the file to its work directory (SERVER_HOME/work by default) and registers it in its internal registry.
The server then checks any dependencies the artifact might have to see if
deployment can go ahead, and if all dependencies are resolved, SpringSource dm Server starts the artifact.
Because of all these additional internal activities, you should NOT simply copy the artifact into the work directory and assume it will be deployed, because SpringSource dm Server will not do so.
When deploying bundles that have dependencies, it is important that you deploy them in the correct order. SpringSource dm Server honors this ordering when it redeploys the artifacts on startup.
If you use hot deployment to deploy your artifacts, be sure to copy the corresponding files into the pickup
directory one-by-one. Copying the files in one group, for example by using a single cp command. provides no guarantees of ordering.
You can undeploy artifacts from SpringSource dm Server using either the hot-deploy directory on the file system, or by using the Admin Console.
To hot-undeploy an artifact, remove the corresponding
file from the pickup directory (by default
$SERVER_HOME/pickup):
prompt$ cd $SERVER_HOME/pickup
prompt$ rm myapp.par
When SpringSource dm Server completes the undeployment of the artifact, a message similar to the following appears in the log:
[2009-03-08 17:00:05.000] fs-watcher <SPDE0012I> - Undeployment of 'myapp.war' version '0' completed.
You can undeploy only whole artifacts from the Admin Console, or in other words, you cannot undeploy the separate modules or bundles that make up an artifact. Each artifact that
can be undeployed has an undeploy link to the right of its name in the list of Deployed Applications. As soon as you click the undeploy link, the page
reloads with that artifact removed from the
list.
The only artifact that you cannot undeploy from the
Admin Console is the Admin Console itself. If you need to undeploy this application, you must remove it from the pickup directory (by default SERVER_HOME/pickup); the name of the application is com.springsource.server.servlet.admin.
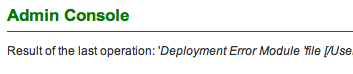
If any problems have occurred the status message at the top of the page will report the error, as shown in the following image.
The serviceability subsystem of the SpringSource dm Server
is configured in the serviceability.config file found
in the SERVER_HOME/config directory of the dm Server
installation. Any relative paths in this file are relative to the root
of the installation, SERVER_HOME.
You can configure tracing at either a global or trickle level. Each level, in turn, provides two configurable settings. For the global level, you can set the directory to which the trace logs are written and the level of tracing (debug, error, info, and so on) for classes and packages. For the trickle level, you can set the window size of trace information as well as the level of tracing. For example:
"trace": {
     "global" : {
         "directory": "serviceability/trace",
         "levels": {
             "*" : "warn"
             "com.foo.*" : "verbose",
             "com.foo.TheClass" : "debug",
             "com.bar.AnotherClass" : "verbose"
         }
     },
     "trickle": {
         "windowSize": 10000,
         "levels": {
             "*" : "debug",
             "org.apache.commons.digester.*" : "warn"
          }
     }
}
In this example, the global tracing component will write its output to the
$SERVER_HOME/serviceability/trace
directory. The trace component provides five different levels at which trace can be output. These are, in descending
order of severity: error, warn, info, debug, and verbose. The configured levels govern what trace is outputted and what
trace is filtered out. Trace levels can be configured for individual classes or for entire packages and package trees.
In this example, every class has info level tracing enabled except for those in the com.foo package and its subpackages
which have verbose level tracing enabled, com.foo.TheClass which has debug level tracing enabled, and
com.bar.AnotherClass which has verbose level tracing enabled. When determining what level of trace is enabled for any
given class, the tracing component will use the level of the most specific match, for example, com.foo.TheClass is a more specific
match than com.foo.*. Any classes that are not matched by any of the configured levels will have trace disabled.
The logging component provides a single configurable setting. For example:
"logs": {
    "directory": "serviceability/logs"
}
In this example the logging component will write its output to the
$SERVER_HOME/serviceability/logs directory.
You configure dumps using two components: the dump component specifies the directory in which dm Server should write the dump files and the heapDump component specifies whether to enable or disable the dumping of heaps when a problem with dm Server occurs. For example:
"dump": {
    "directory": "serviceability/dump"
},
"heapDump": {
    "enabled": false
}
In this example, the dump file component will write its output to the
$SERVER_HOME/serviceability/dump directory. Additionally, heap dumps are disabled.
The SpringSource dm Server
embeds an OSGi-enhanced version of the Tomcat Servlet Container
in order to provide support for deploying Java EE WARs and Web Modules.
The embedded Servlet container can be configured via the servletContainer.config file
located in the $SERVER_HOME/config directory. The following listing displays
the default configuration distributed with the dm Server.
{
"servletContainer": {
    "version": 1.0,
    /* configDir should be either an absolute path or relative to the SERVER_HOME directory */
    "configDir": "config/servlet",
    "hostName": "localhost",
    "jvmRoute": "jvm1",
    "realm" : {
        "className" : "org.apache.catalina.realm.MemoryRealm",
        "pathname" : "tomcat-users.xml"
    },
    "listeners": [
        {
            /*
             * APR library loader.
             * Documentation at http://tomcat.apache.org/tomcat-6.0-doc/apr.html
             */
            "enabled": true,
            "className": "org.apache.catalina.core.AprLifecycleListener",
            "SSLEngine": "on"
        },
        {
            /*
             * Initialize Jasper prior to loading webapps.
             * Documentation at http://tomcat.apache.org/tomcat-6.0-doc/jasper-howto.html
             */
            "enabled": true,
            "className": "org.apache.catalina.core.JasperListener"
        }
    ],
    "connectors": [
        {
            /*
             * HTTP Connector.
             * Documentation at http://tomcat.apache.org/tomcat-6.0-doc/config/http.html
             */
            "enabled": true,
            "port": 8080,
            "protocol": "HTTP/1.1",
            "connectionTimeout": 20000,
            "maxThreads": 150,
            "emptySessionPath": false,
            "redirectPort": 8443
        },
        {
            /*
             * HTTPS Connector.
             * Documentation at http://tomcat.apache.org/tomcat-6.0-doc/config/http.html
             * and http://tomcat.apache.org/tomcat-6.0-doc/ssl-howto.html
             */
            "enabled": true,
            "port": 8443,
            "protocol": "HTTP/1.1",
            "scheme": "https",
            "connectionTimeout": 20000,
            "maxThreads": 150,
            "emptySessionPath": false,
            "clientAuth": false,
            /* keystoreFile should be a path relative to the configured value for servletContainer:configDir */
            "keystoreFile": "../../config/management/keystore",
            "keystorePass": "changeit",
            "secure": true,
            "SSLEnabled": true,
            "sslProtocol": "TLS"
        },
        {
            /*
             * AJP Connector.
             * Documentation at http://tomcat.apache.org/tomcat-6.0-doc/config/ajp.html
             */
            "enabled": true,
            "port": 8009,
            "protocol": "AJP/1.3",
            "connectionTimeout": 20000,
            "redirectPort": 8443
        }
    ],
    "logs": {
        /* accessLogDir should be either an absolute path or relative to the SERVER_HOME directory */
        "accessLogDir": "serviceability/logs/access",
        "defaultAccessLogFormat": "%h %l %u %t \"%r\" %s %b \"%{Referer}i\" \"%{User-Agent}i\"",
        "globalAccessLogging": true,
        "perApplicationAccessLogging": true
    },
    "threadPool": {
        "minSize": 25,
        "maxSize": 200,
        "keepAlivePeriod": 60000
    }
    /*
     * The next section of this file is configuration for Tomcat clustering.  By default this is disabled.
     */
    /*,
    "cluster": {
        "className": "org.apache.catalina.ha.tcp.SimpleTcpCluster",
        "channelSendOptions": 8,
        "heartbeatBackgroundEnabled": false,
        "manager": {
            "className": "org.apache.catalina.ha.session.DeltaManager",
            "expireSessionsOnShutdown": false,
            "notifyListenersOnReplication": true
        },
        "channel": {
            "className": "org.apache.catalina.tribes.group.GroupChannel",
            "membership": {
                "className": "org.apache.catalina.tribes.membership.McastService",
                "address": "228.0.0.4",
                "port": 45564,
                "frequency": 500,
                "dropTime": 3000
            },
            "receiver": {
                "className": "org.apache.catalina.tribes.transport.nio.NioReceiver",
                "address": "auto",
                "port": 4000,
                "autoBind": 100,
                "selectorTimeout": 5000,
                "maxThreads": 6
            },
            "sender": {
                "className": "org.apache.catalina.tribes.transport.ReplicationTransmitter",
                "transport": {
                    "className": "org.apache.catalina.tribes.transport.nio.PooledParallelSender"
                }
            },
            "interceptors": [
                {
                    "className": "org.apache.catalina.tribes.group.interceptors.TcpFailureDetector"
                },
                {
                    "className": "org.apache.catalina.tribes.group.interceptors.MessageDispatch15Interceptor"
                }
            ]
        },
        "valves": [
            {
                "className": "org.apache.catalina.ha.tcp.ReplicationValve",
                "filter": ""
            },
            {
                "className": "org.apache.catalina.ha.session.JvmRouteBinderValve"
            }
        ],
        "deployer": {
            "className": "org.apache.catalina.ha.deploy.FarmWarDeployer",
            "tempDir": "/tmp/war-temp/",
            "deployDir": "/tmp/war-deploy/",
            "watchDir": "/tmp/war-listen/",
            "watchEnabled": false
        },
        "clusterListeners": [
            {
                "className": "org.apache.catalina.ha.session.JvmRouteSessionIDBinderListener"
            },
            {
                "className": "org.apache.catalina.ha.session.ClusterSessionListener"
            }
        ]
    }*/
}
}![[Tip]](images/tip.gif) | Disabling configuration elements |
|---|---|
Listener and Connector configuration elements can be disabled by
setting the |
The following table lists all top-level options for configuring the embedded Servlet container.
| Relative paths |
|---|---|
If the configured path to a directory or file does not represent an absolute path,
it will typically be interpreted as a path relative to the
|
Table 7.1. Servlet Container Configuration Values
| Entry | Description | Supported Values | Default Value |
|---|---|---|---|
version |
The configuration schema version. | 1.0 | N/A |
configDir |
The path to the Servlet container's config directory. This directory serves as the central location for implementation-specific configuration files. The config directory also serves as the base directory for any relative-path-based configuration resources for the Servlet container.
If the configured value does not represent an absolute path,
it will be interpreted as a directory relative to the
| config/servlet | N/A |
hostName |
The host name to use for the Servlet container's default host. | Any valid hostname for the system on which the dm Server is running. | localhost |
jvmRoute | A unique identifier for the Servlet container instance, used to configure a JVM route for load balancing. | A unique text value, typically purely alpha-numeric. | jvm1 |
listeners |
A list of LifecycleListener configuration elements. Consult the official
Tomcat documentation
for further information on available listeners.
| N/A | N/A |
connectors |
A list of Connector configuration elements.
See the connector configuration
section for details.
| N/A | N/A |
logs - accessLogDir |
The path to the access log directory where HTTP requests to the Servlet container will be logged.
If the configured value does not represent an absolute path, it will be
interpreted as a directory relative to the
| (see description) | serviceability/logs/access |
logs - defaultAccessLogFormat |
The style to use for formatting the access log. | Any legal Tomcat log format string | %h %l %u %t \"%r\" %s %b \"%{Referer}i\" \"%{User-Agent}i\" |
logs - globalAccessLogging |
Boolean flag for enabling the global access logging for web all applications on the server. | true or false | true |
logs - perApplicationAccessLogging |
Boolean flag for enabling access logging on a per-application basis. Once enabled
applications will still need to opt into per-application access logging using the
| true or false | true |
threadPool - minSize |
The minimum number of threads to be kept in the Servlet Container's threadpool. | Any positive int | 25 |
threadPool - maxSize |
The maximum number of threads to be kept in the Servlet Container's threadpool. | Any positive int | 200 |
threadPool - keepAlivePeriod |
The period of time, in milliseconds, that an idle thread will be kept alive in the Servlet Container's threadpool. | Any positive int | 60000 |
The SpringSource dm Server supports JSON-based configuration of any connector
supported by Apache Tomcat. See the default configuration above for syntax examples, and
for further details on the configuration properties supported for various
Connector implementations, consult the official
Tomcat HTTP Connector
documentation.
| Configuring SSL for Tomcat |
|---|---|
The SpringSource dm Server distribution includes a preconfigured |
The SpringSource dm Server supports JSON-based configuration of the load balancing supported by Tomcat. See the default configuration for syntax examples.
The SpringSource dm Server supports JSON-based configuration of the clustering supported by Apache Tomcat. See the default configuration
(which is disabled) for syntax examples, and for further details on the configuration properties support for
Cluster implementations, consult the official
Tomcat Clustering/Session Replication HOW-TO
documentation.
In addition to the aforementioned configuration options, various parts of the
embedded Tomcat Servlet container can be configured via the following files
located in the Servlet container's configuration directory (see
configDir above). The syntax and usage of each file
comply with that of a standard Tomcat installation.
context.xml: XML based configuration file which will be loaded for each web application
Contextdeployed on the dm Server.tomcat-users.xml: XML based configuration file used to manage users, passwords, and roles for an in-memory security realm. This file is used by the dm Server to configure a
MemoryRealmfor the embedded Tomcat Servlet container.web.xml: The default
web.xmldeployment descriptor used for all web applications deployed on the dm Server. As each web application is deployed, this file is processed, followed by the/WEB-INF/web.xmldeployment descriptor packaged with the web application itself, if present.
You can configure the telnet console of Equinox by updating the osgi.config file in the $SERVER_HOME/config directory and editing the enabled and port entries of the osgiConsole component. By default the console is enabled and listens on port 2401:
"osgiConsole" : {
    "enabled" : true,
    "port" : 2401
}
You can configure two properties of deployment: the pickup directory into which you copy applications for hot-deployment and the deployment timeout. To change either of these properties, edit the deployer.config file in the $SERVER_HOME/config directory and change the value of the pickupDir or deploymentTimeoutSeconds options. The following listing displays the default configuration distributed with the dm Server.
{
    "deployer" : {
        "pickupDir" : "pickup",
        "version" : 1.0,
        "deploymentTimeoutSeconds" : 300
    }
}
As the default configuration shows, the default pickup directory is SERVER_HOME/pickup and the deployment timeout is 300 seconds. If you want to disable deployment timeout, set the option to 0.
The version option is for internal SpringSource dm Server use; do not change that value.
You configure the locations that SpringSource dm Server includes in its repository by editing the repository.config file in the $SERVER_HOME/config directory. This file inclues the following two components: repositories and respositoryChain.
The repository component specifies the actual directories, or searchpaths, for the different types of bundles or libraries that can live in the repository, such as sub-system bundles or user-defined libraries. Each of the searchpaths is given a name, such as bundles-subsystems or libraries-user and whether the searchpath is external or internal. The repositoryChain component specifies the order in which SpringSource dm Server searches the directories when it looks for dependencies. The repositoryChain component uses the names of the searthpaths as specified in the repositories component.
The default configuration is as follows:
"repositories" : {
   "bundles-subsystems" : {
        "type" : "external",
        "searchPattern" : "repository/bundles/subsystems/{subsystem}/{component}"
   },
   "bundles-ext" : {
         "type" : "external",
         "searchPattern" : "repository/bundles/ext/{bundle}"
   },
   "bundles-usr" : {
         "type" : "external",
         "searchPattern" : "repository/bundles/usr/{bundle}"
   },
   "libraries-ext" : {
         "type" : "external",
         "searchPattern" : "repository/libraries/ext/{library}"
   },
   "libraries-usr" : {
         "type" : "external",
         "searchPattern" : "repository/libraries/usr/{library}"
   }
},
"repositoryChain" : [
          "bundles-subsystems",
          "bundles-ext",
          "bundles-usr",
          "libraries-ext",
          "libraries-usr"
]
This default configuration shown above has five paths, each of which will be searched when locating entries for inclusion in the repository. The respositoryChain component shows the order in which the paths are searched.
SpringSource dm Server requires that you always include the bundles-subsystem, bundles-ext, and libraries-ext searchpaths, as shown above, in your repository configuration. You can configure the user-related paths as you wish.
Each search path defines a location that is included in that SpringSource dm Server's repository and will therefore be searched when looking for a
library or bundle dependency. If a search path is relative its location is taken as being relative to the root of the installation, i.e. the
SERVER_HOME directory.
Search paths provide support for wildcards. In the entries above, the path segments surrounded by curly braces, e.g. {bundle} and
{library}, are wildcards entries for a directory with any name. Allowing wildcards to be named in this way is intended to improve
the readability of search path configuration.
In addition to supporting the above-described form of wildcards, SpringSource dm Server also supports Ant-style paths, i.e. * and
** can be used to represent any directory and any series of directories respectively. For example,
repository/bundles/usr/{bundle} and repository/bundles/usr/* are directly equivalent.
A common usage of the ** wildcard is to allow dependencies stored in a directory structure of varying depth, such as a local Maven repository, to be provisioned by the SpringSource dm Server.
In addition to support for wildcards, system properties can also be used within a search path. System properties are referenced as ${system.property.name}; for example, a search path of ${user.home}/repository/bundles will reference the repository/bundles directory in the user's home directory.
The following examples provide sample configuration that could be used for some common use cases. The examples show only the repository component of the respository.config file.
"repositories" : {
   "bundles-subsystems" : {
        "type" : "external",
        "searchPattern" : "repository/bundles/subsystems/{subsystem}/{component}"
   },
   "bundles-ext" : {
         "type" : "external",
         "searchPattern" : "repository/bundles/ext/{bundle}"
   },
   "bundles-usr" : {
         "type" : "external",
         "searchPattern" : "${user.home}/.ivy2/cache/{org}/{name}/{version}/{bundle}.jar",
   },
   "libraries-ext" : {
         "type" : "external",
         "searchPattern" : "repository/libraries/ext/{library}"
   },
   "libraries-usr" : {
         "type" : "external",
         "searchPattern" : "repository/libraries/usr/{library}"
   }
}
"repositories" : {
   "bundles-subsystems" : {
        "type" : "external",
        "searchPattern" : "repository/bundles/subsystems/{subsystem}/{component}"
   },
   "bundles-ext" : {
         "type" : "external",
         "searchPattern" : "repository/bundles/ext/{bundle}"
   },
   "bundles-usr" : {
         "type" : "external",
         "searchPattern" : "${user.home}/.maven/repository/**/{bundle}.jar",
   },
   "libraries-ext" : {
         "type" : "external",
         "searchPattern" : "repository/libraries/ext/{library}"
   },
   "libraries-usr" : {
         "type" : "external",
         "searchPattern" : "repository/libraries/usr/{library}"
   }
}
SpringSource dm Server uses a work directory for internal work; by default this directory is SERVER_HOME/work. You can change this directory by updating the SERVER_HOME/config/io.config file and changing the value of the workDirectory option; as always, relative paths are relative to the root SERVER_HOME directory. The following listing show the default contents of the io.config file:
{
    "io" : {
        "workDirectory" : "work"
    }
}
The dm Server will fail to start correctly if it is prevented from
connecting to needed ports by the firewall. Typically this manifests
as error SPPM0003E . Configuring the firewall to
allow the dm Server process to bind to the necessary ports will prevent
this error from occurring.
As a result of Sun Java bug
4957990,
the SpringSource dm Server may consume more PermGen space than expected when running with the
server HotSpot compiler. This problem may be resolved by configuring the
JAVA_OPTS environment variable to specify an increased
MaxPermSize, for example -XX:MaxPermSize=128M.
Each log message is accompanied by a log code which is useful in understanding the current state
of the dm Server. Log codes are of the form: 'SPXY1234L', where
SP stands for Spring Server,
XY stands for the subsystem code, 1234 represents the
error number, and L conveys the level of severity of the event being logged.
Below is the list of subsystem codes and their corresponding subsystems:
CC - ConcurrentCN - ControlCO - ConfigDE - DeployerFF - FFDCKB - BootstrapKE - KernelOP - OSGiPM - ProfileSC - ServletWE - Web
The error numbers start from 0000 and typically increase by 1.
There is no upper limit for error numbers.
E - ErrorW - WarnI - Info
Error denotes that there are problems in the dm Server, such as incorrect
behaviour of the system. This is the most serious of the log events.
Warn denotes that errors exist, but they are not critical and may be overlooked.
Info provides information about events in the system that may be useful in diagnosing
warnings and errors. Such events are not severe.
In each instance where they appear, %s represents a variable which will be substituted with
a string, and %d represents a variable which will be substituted with a number.
Table 9.1. Concurrent Log Codes
| Code | Message |
|---|---|
CC0000E |
|
Table 9.2. Control Log Codes
| Code | Message | ||||
|---|---|---|---|---|---|
CN0000E |
| ||||
CN0001E |
| ||||
CN0002E |
| ||||
CN0003E |
| ||||
CN0004I |
|
Table 9.3. Config Log Codes
| Code | Message | ||||
|---|---|---|---|---|---|
CO0000E |
| ||||
CO0001E |
| ||||
CO0002E |
| ||||
CO0003E |
| ||||
CO0004E |
| ||||
CO0005E |
| ||||
CO0006E |
| ||||
CO0007E |
| ||||
CO0008E |
| ||||
CO0009E |
| ||||
CO0010W |
| ||||
CO0011E |
| ||||
CO0012W |
| ||||
CO1000E |
| ||||
CO1001E |
| ||||
CO1002E |
| ||||
CO1003E |
| ||||
CO1004E |
| ||||
CO1005E |
| ||||
CO1006E |
| ||||
CO1007E |
| ||||
CO1008E |
| ||||
CO1009E |
| ||||
CO1010E |
| ||||
CO1011E |
| ||||
CO1100E |
|
Table 9.4. Deployer Log Codes
| Code | Message | ||||
|---|---|---|---|---|---|
DE0000E |
| ||||
DE0002E |
| ||||
DE0003E |
| ||||
DE0004E |
| ||||
DE0005E |
| ||||
DE0006E |
| ||||
DE0007E |
| ||||
DE0008E |
| ||||
DE0009E |
| ||||
DE0010I |
| ||||
DE0011E |
| ||||
DE0012I |
| ||||
DE0013E |
| ||||
DE0014I |
| ||||
DE0015E |
| ||||
DE0016E |
| ||||
DE0017W |
| ||||
DE0018E |
| ||||
DE0019I |
| ||||
DE0020E |
| ||||
DE0021E |
| ||||
DE0022E |
| ||||
DE0023E |
| ||||
DE0024E |
| ||||
DE0025E |
| ||||
DE0026E |
| ||||
DE0027E |
| ||||
DE0028E |
| ||||
DE0029E |
| ||||
DE0030E |
| ||||
DE0031E |
| ||||
DE0032E |
| ||||
DE0033E |
| ||||
DE0034E |
| ||||
DE0035E |
| ||||
DE0036E |
| ||||
DE0037E |
| ||||
DE0038E |
| ||||
DE0039E |
| ||||
DE0040E |
| ||||
DE0041E |
| ||||
DE0042E |
| ||||
DE0043E |
| ||||
DE0044E |
| ||||
DE0045E |
| ||||
DE0046E |
| ||||
DE0047E |
| ||||
DE1000E |
| ||||
DE1001E |
| ||||
DE1002E |
| ||||
DE1003E |
| ||||
DE1004E |
| ||||
DE1005E |
| ||||
DE1006E |
| ||||
DE1007E |
| ||||
DE1008E |
| ||||
DE1009E |
| ||||
DE1025W |
| ||||
DE1026W |
| ||||
DE1027W |
| ||||
DE1028W |
| ||||
DE1029W |
| ||||
DE1030W |
| ||||
DE1031W |
| ||||
DE1032W |
| ||||
DE1033W |
| ||||
DE1034W |
| ||||
DE1050I |
| ||||
DE1051I |
| ||||
DE1052I |
| ||||
DE1053I |
| ||||
DE1054I |
| ||||
DE1055I |
| ||||
DE1056I |
| ||||
DE1057I |
| ||||
DE1058I |
| ||||
DE1059I |
| ||||
DE1085E |
|
Table 9.5. FFDC Log Codes
| Code | Message | ||||
|---|---|---|---|---|---|
FF0000E |
| ||||
FF0001I |
| ||||
FF0002I |
| ||||
FF0003E |
|
Table 9.7. Kernel Log Codes
| Code | Message | ||||
|---|---|---|---|---|---|
KE0000I |
| ||||
KE0001I |
| ||||
KE0051E |
|
Table 9.8. OSGi Log Codes
| Code | Message | ||||
|---|---|---|---|---|---|
OP0001W |
| ||||
OP0002W |
| ||||
OP0003W |
| ||||
OP0004W |
|
Table 9.9. Profile Log Codes
| Code | Message | ||||
|---|---|---|---|---|---|
PM0000I |
| ||||
PM0001I |
| ||||
PM0002I |
| ||||
PM0003E |
| ||||
PM0004W |
|
Table 9.10. Servlet Log Codes
| Code | Message | ||||
|---|---|---|---|---|---|
SC0000I |
| ||||
SC0001I |
| ||||
SC0002I |
| ||||
SC0003E |
| ||||
SC0004E |
| ||||
SC1000I |
| ||||
SC1001I |
| ||||
SC1002I |
| ||||
SC1003E |
| ||||
SC1004E |
| ||||
SC2000E |
|
Table 9.11. Web Log Codes
| Code | Message | ||||
|---|---|---|---|---|---|
WE1000E |
| ||||
WE1001E |
|