During development time, it can be helpful to run an application inside of the deployment container. In the case
of GreenPages, this means deploying the greenpages.web bundle to the SpringSource dm Server.
The dm Server can be used while working in Eclipse.
In this step the greenpages.web bundle is deployed and the dm Server instance is started.
Drag the greenpages.web project from the Package Explorer and drop it
on the dm Server instance in the Servers view.
Because greenpages.web is a web bundle the server will start automatically, and
a browser window will open.
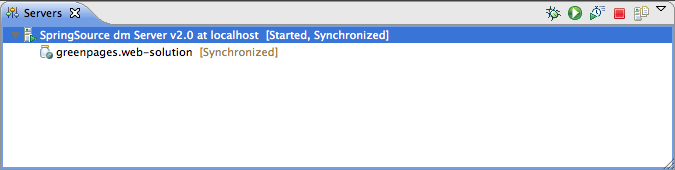
Expand the dm Server instance and the bundle will be listed as a child.
Eclipse will open its internal web browser as this is a web project. An external browser can be used if preferred.
If deployment is successful the console will contain the message
<SPDE0010I> Deployment of 'greenpages.web' version '2' completed.
Eclipse will open its built-in browser window
and attempt to show the first page of the application. If correct the URL would be redirected
to …/greenpages/app/home.htm.
Leave the server instance running and go to the next step.
The dm Server has special knowledge of the web application bundles. In this step web bundle metadata is added to the bundle and a web browser is used to navigate to it.
Open a web browser and navigate to http://localhost:8080/greenpages. The link is not currently served by any bundle in the dm Server so there will be an error displayed:
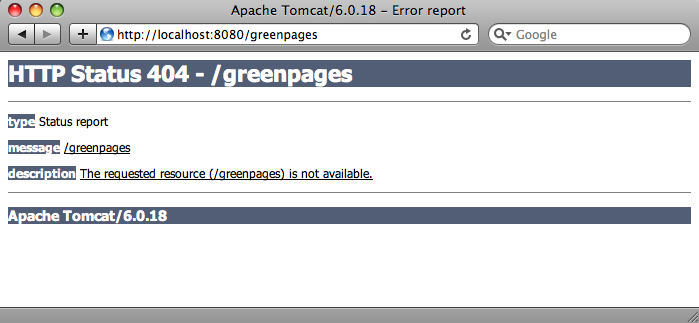
This is the same error as is displayed in the built-in web browser.
To fix this issue the greenpages.web bundle must be declared to be a web bundle and a
context path defined.
Open the template.mf file (at the top level under the greenpages.web project)
and add (and save) the following entries (using the template.mf pane of the editor):
Module-Type: web
Web-ContextPath: greenpages
Be careful not to insert any blank lines or trailing spaces in this file.
Once added, right-click on the greenpages.web project and select
→ .
This will use a tool called Bundlor (included in STS) to update the OSGi metadata in the
MANIFEST.MF file. Once Bundlor has finished running, open the
META-INF/MANIFEST.MF file in the src/main/webapp folder.
It should look like the following:
Manifest-Version: 1.0
Import-Bundle: com.springsource.org.apache.taglibs.standard;version="[
 1.1.2,1.3)"
Bundle-Vendor: SpringSource Inc.
Module-Type: web
Bundle-Version: 2.0
Tool: Bundlor 1.0.0.BUILD-20090616142719
Bundle-Name: GreenPages Web
Import-Library: org.springframework.spring;version="[3.0, 3.1)"
Bundle-ManifestVersion: 2
Bundle-SymbolicName: greenpages.web
Web-ContextPath: greenpages
Import-Package: com.springsource.server.web.dm;version="[2.0.0, 3.0.0)
 ",freemarker.cache;version="[2.3.15,2.3.15]",javax.servlet.jsp.jstl.c
 ore;version="[1.1.2,1.2.0)",javax.sql,org.apache.commons.dbcp,org.spr
 ingframework.core.io,org.springframework.web.context
By default, Bundlor generates Import-Package entries with no version range specified. In
the absence of a version range, the OSGi default (of any version) is used. While this is very flexible
it is generally a good idea to restrict an import by specifying a narrower range. This can be achieved by
providing Bundlor with some additional information in the manifest template.
Add and save the following entry to the template.mf file:
Import-Template: org.springframework.*;version="[3.0.0, 3.1.0)"
(Again, be careful not to leave trailing spaces on lines or insert blank lines in this file.)
Re-run the MANIFEST.MF generation as described earlier.
In the MANIFEST.MF file the Import-Package entry
should now have version ranges on each of its packages:
Import-Package: com.springsource.server.web.dm;version="[2.0.0, 3.0.0)
 ",freemarker.cache;version="[2.3.15,2.3.15]",javax.servlet.jsp.jstl.c
 ore;version="[1.1.2,1.2.0)",javax.sql,org.apache.commons.dbcp,org.spr
 ingframework.core.io;version="[3.0, 3.1)",org.springframework.web.con
 text;version="[3.0, 3.1)"
Behind the scenes the dm Server Tools have refreshed the deployed bundle as changes were made. Once again navigate to http://localhost:8080/greenpages. This page now displays an entry field.
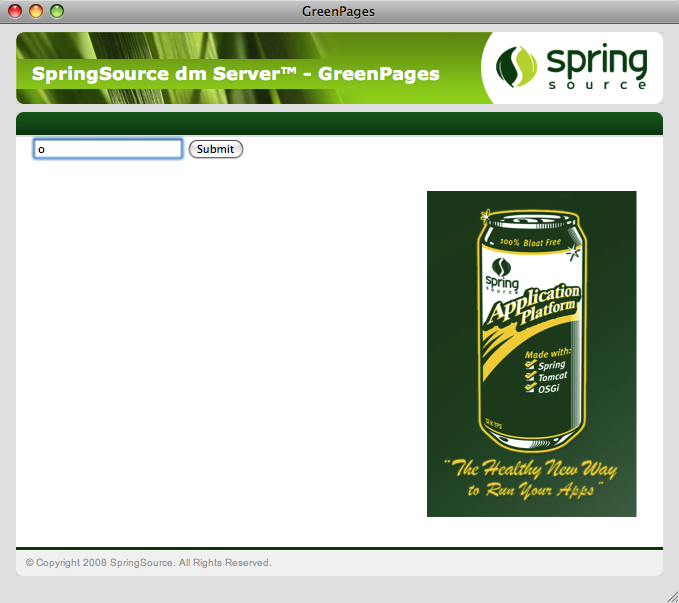
Put any characters into the entry field and press Submit.
This should display a “404” error page again, similar to before.
This is because there is no search page (search.htm) to process this request yet.
The next section will address this.