Table of Contents
The SpringSource dm Server requires Java SE 6 or later to be installed. Java is available from Sun and elsewhere.
SpringSource dm Server is distributed as a ZIP file. This can be downloaded from here. Follow the instructions to obtain a username and password.
To install the SpringSource dm Server on Linux, unzip the distribution package to the desired installation directory.
For example, to install into /opt:
prompt$ unzip springsource-dm-server-2.0.0.M5.zip -d /opt
This creates a directory called springsource-dm-server-2.0.0.M5 under /opt.
SpringSource dm Server requires write access to the installation directory, in this case /opt/springsource-dm-server-2.0.0.M5.
Typically this means it must be run as the user that installed it, or the installation directory’s ownership must be changed.
To install the SpringSource dm Server on Windows, unzip the distribution package to the desired installation directory. You should use a zip application such as 7zip, not the built-in folder decompression. Note that both Windows and Java 5 have some issues with long file names and file paths, so we recommend installing to the root directory of your chosen drive.
The SpringSource dm Server uses the JAVA_HOME environment variable to locate the java
executable. Configure this environment variable to point to the home directory of the Java 5 or Java 6 installation on your computer.
As a convenience it is recommended that you create an environment variable that points
to the SpringSource dm Server installation directory. Note that the SpringSource dm Server does not require that
such an environment variable has been set. This variable may have any name of your
choosing. The SpringSource dm Server’s documentation assumes that the variable is named
SERVER_HOME.
Edit the .profile file in your home directory to
add the SERVER_HOME and JAVA_HOME environment variables. For
example, if you installed into /opt:
export SERVER_HOME=/opt/springsource-dm-server-2.0.0.M5/
export JAVA_HOME=/user/java/jdk1.6.0_17
export PATH=$JAVA_HOME/bin:$PATH
This section shows how to add SERVER_HOME as a system variable on Windows. Follow the same procedure to add or update the JAVA_HOME environment variable.
From the Start menu, open the Control Panel and double-click on ‘System’.
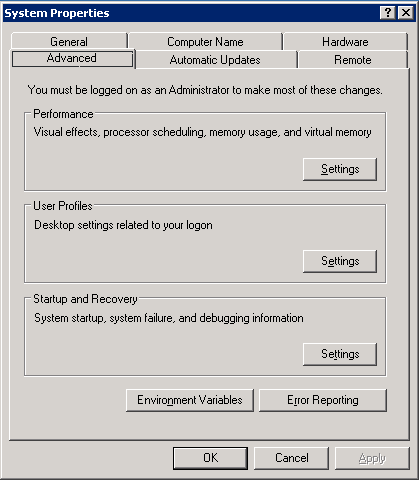
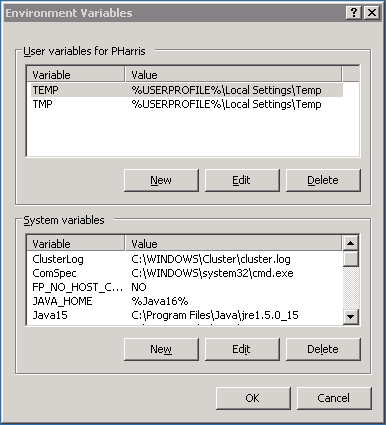
Click the ‘Advanced’ tab and select ‘Environment Variables’. Next, click the ‘Edit’ button in the ‘System Variables’ section.
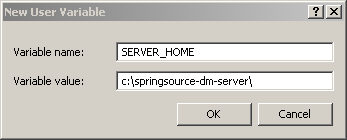
This will display the ‘Edit System Variable’ window. Enter
SERVER_HOME as the ‘Variable name’ and
the installation directory as the ‘Variable value’. Click OK.
To start SpringSource dm Server run the startup.sh (Linux) or startup.bat (Windows) script.
For both platforms, the script is located in the SERVER_HOME/bin directory.
To start SpringSource dm Server, open a terminal window and run startup.sh:
prompt$ cd $SERVER_HOME
prompt$ bin/startup.sh
Once SpringSource dm Server has started, the console will display a log message similar to the one shown below, along with other status messages:
[2009-03-30 12:12:12.111] Deployer Recovery <SPPM0002I> Server open for business with profile 'web'.
To start SpringSource dm Server, open a command-window and run startup.bat:
prompt> cd %SERVER_HOME%
prompt> bin\startup.bat
Once SpringSource dm Server has started console will display a log message similar to the one shown below:
[2009-03-30 12:12:12.111] Deployer Recovery <SPPM0002I> Server open for business with profile 'web'.
When you start dm Server in clean mode, the startup script removes the SERVER_HOME/work directory (and hence all
running applications) as well as all trace, log and dump files. It leaves the
SERVER_HOME/repository and SERVER_HOME/pickup directories untouched,
which means that any applications previously hot deployed will be automatically reinstalled.
To start SpringSource dm Server in clean mode, open a terminal window and run startup.sh -clean:
prompt$ cd $SERVER_HOME
prompt$ bin/startup.sh -clean
To start SpringSource dm Server in debug mode, run
startup.sh passing in the
-debug argument:
prompt$ cd $SERVER_HOME
prompt$ bin/startup.sh -debug
This will start the debug agent listening on port
8000 which is the default remote debug port used
by Eclipse. To start in debug mode with a specific port number, pass
this in as the value for the -debug argument:
prompt$ cd $SERVER_HOME
prompt$ bin/startup.sh -debug 8001
This will start the debug agent listening on port
8001. To start in debug mode and suspend the VM
until a debugger attaches, pass in the -suspend
argument along with the -debug argument:
prompt$ cd $SERVER_HOME
prompt$ bin/startup.sh -debug -suspend
This starts the debug agent, but prevents SpringSource dm Server from actually starting until a debugger attaches to the agent. This can be useful when trying to diagnose problems that occur during startup.
To start SpringSource dm Server in debug mode, run
startup.bat passing in the
-debug argument:
prompt> cd %SERVER_HOME%
prompt> bin\startup.bat -debug
This will start the debug agent listening on port
8000 which is the default remote debug port used
by Eclipse. To start in debug mode with a specific port number, pass
this in as the value for the -debug argument:
prompt> cd %SERVER_HOME%
prompt> bin\startup.bat -debug 8001
This will start the debug agent listening on port
8001. To start in debug mode and suspend the VM
until a debugger attaches, pass in the -suspend
argument along with the -debug argument:
prompt> cd %SERVER_HOME%
prompt> bin\startup.bat -debug -suspend
This starts the debug agent, but prevents SpringSource dm Server from actually starting until a debugger attaches to the agent. This can be useful when trying to diagnose problems that occur during startup.
9875
and the default username and password are admin and springsource.
To start SpringSource dm Server with default JMX access enabled, run startup.sh passing
in no arguments:
prompt$ cd $SERVER_HOME
prompt$ bin/startup.sh
To start JConsole, run the jconsole.sh script, located in the bin directory, as shown:
prompt$ cd $SERVER_HOME
prompt$ bin/jconsole.sh
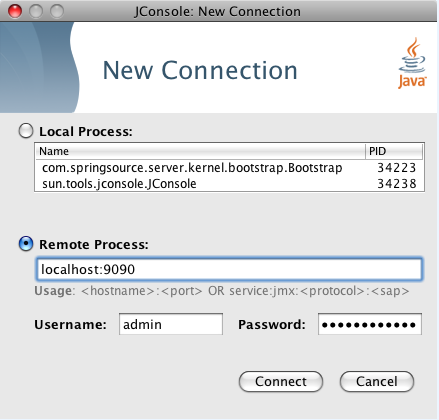
The following image shows how to specify a local connection using JConsole.

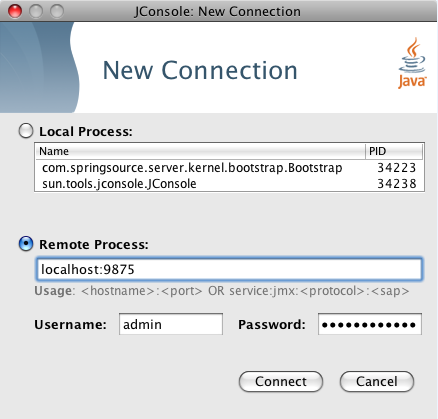
The following image shows how to specify a remote connection in JConsole that uses SSL with the default
username/password (admin/springsource and default secure port of 9875).
To start with the JMX remote access on a specific port number other than the default 9875,
pass this port number in as the value
of the -jmxport argument:
prompt$ cd $SERVER_HOME
prompt$ bin/startup.sh -jmxport 9009
This will start the SpringSource dm Server with JMX enabled for remote connections on port 9009.
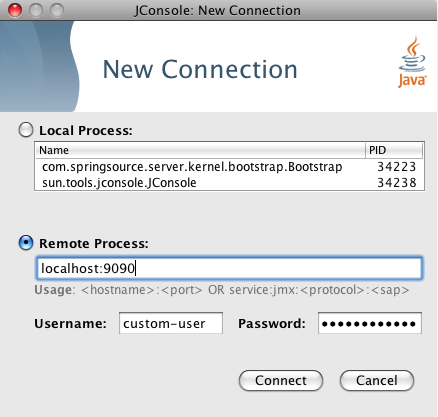
To start the JMX remote access with a custom username and password edit the files located at
$SERVER_HOME/config/management/jmxremote.password and
$SERVER_HOME/config/management/jmxremote.access.
Add the username, along with their permissions (either readonly or readwrite)
to the jmxremote.access file.
Then add a corresponding line to the jmxremote.password file that specifies the user’s password.
The specify the custom username in JConsole as shown.
To start the JMX remote access using a custom SSL certificate, edit the file located at
$SERVER_HOME/config/management/keystore. If you wish to use a different keystore,
pass this filename in as the value for the -keystore argument and the keystore
password in as the value for the -keystorePassword argument:
prompt$ cd $SERVER_HOME
prompt$ bin/startup.sh -keystore customKeystore -keystorePassword customKeystorePassword
This will start the SpringSource dm Server with JMX enabled for remote connections using an SSL certificate from
customKeystore with a password of customKeystorePassword.
To start SpringSource dm Server with default JMX access enabled, run startup.bat passing
in no arguments:
prompt> cd %SERVER_HOME%
prompt> bin\startup.bat
To start JConsole, run the jconsole.bat script, located in the bin directory, as shown:
prompt> cd %SERVER_HOME%
prompt> bin\jconsole.bat
The following image shows how to specify a local connection using JConsole.
The following image shows how to specify a remote connection in JConsole that uses SSL with the default
username/password (admin/springsource and default secure port of 9875).
To start with the JMX remote access on a specific port number other than the default 9875,
pass this port number in as the value of the -jmxport argument:
prompt> cd %SERVER_HOME%
prompt> bin\startup.bat -jmxport 9009
This will start the SpringSource dm Server with JMX enabled for remote connections on port
9009.
To start the JMX remote access with a custom username and password edit the files located at
%SERVER_HOME%/config\management\jmxremote.password and
%SERVER_HOME%\config\management\jmxremote.access.
Add the username, along with their permissions (either readonly or readwrite)
to the jmxremote.access file.
Then add a corresponding line to the jmxremote.password file that specifies the user’s password.
The specify the custom username in JConsole as shown.
To start the JMX remote access using a custom SSL certificate, edit the file located at
%SERVER_HOME%\config\management\keystore. If you wish to use a different
keystore, pass this filename in as the value for the -keystore argument and the
keystore password in as the value for the -keystorePassword argument:
prompt> cd %SERVER_HOME%
prompt> bin\startup.bat -keystore customKeystore -keystorePassword customKeystorePassword
This will start the SpringSource dm Server with JMX enabled for remote attach using an SSL certificate from
customKeystore with a password of customKeystorePassword.
Use the -configDir option to specify an alternate config directory, different from the
default SERVER_HOME/config directory. This option allows you to use the same SpringSource dm Server
installation to run multiple instances of dm Server . Simply create a config directory for each
instance, specify unique port numbers, logging and tracing directories, and so on. and then specify that directory
when starting SpringSource dm Server.
If you specify a relative path for the -configDir parameter,
the startup script interprets the path as relative to the root of the SpringSource dm Server installation,
and not relative to the directory from which you execute the startup script.
/config/node1:
prompt$ cd $SERVER_HOME
prompt$ bin/startup.sh -configDir /config/node1
To stop a running instance of SpringSource dm Server, start a new terminal window and the run shutdown.sh script:
prompt$ cd $SERVER_HOME
prompt$ bin/shutdown.sh
To stop a running instance of SpringSource dm Server immediately, bypassing normal shutdown
processing, run shutdown.sh with the -immediate option:
prompt$ cd $SERVER_HOME
prompt$ bin/shutdown.sh -immediate
If, when you started the dm Server instance, you used the -jmxport option to specify a non-default JMX port number,
then you must pass this port number to the -jmxport of the shutdown.sh script
to gracefully shut it down.
For example, if you specified 9009 as the JMX port, use the following to shut down the dm Server instance:
prompt$ cd $SERVER_HOME
prompt$ bin/shutdown.sh -jmxport 9009
To stop a running instance of SpringSource dm Server, start a new console window and run the shutdown.bat script:
prompt> cd %SERVER_HOME%
prompt> bin\shutdown.bat
To stop a running instance of SpringSource dm Server immediately, bypassing normal shutdown
processing, run shutdown.bat with the -immediate option:
prompt> cd %SERVER_HOME%
prompt> bin\shutdown.bat -immediate
If, when you started the dm Server instance, you used the -jmxport option to specify a non-default JMX port number,
then you must pass this port number to the -jmxport of the shutdown.bat script to gracefully shut it down.
For example, if you specified 9009 as the JMX port, use the following to shut down the dm Server instance:
prompt> cd %SERVER_HOME%
prompt> bin\shutdown.bat -jmxport 9009
To use the SpringSource Admin Console, start the SpringSource dm Server and then enter the following URL in your browser of choice.
http://localhost:8080/admin
Replace localhost with the hostname of the computer on which the
SpringSource dm Server is running if it is not the same as the computer on which you are running your browser. The
Admin Console uses basic authentication, therefore you will need to enter the default administration ID and password.
ID: admin
Password: springsource
To change the ID and password for the Admin Console, update the SERVER_HOME/config/servlet/tomcat-users.xml file, which is in the standard Tomcat users-file format.
Change the values of the username and password attributes of the <user> element with the admin role. For example, if you want change the administration username to hamlet with password tobeornottobe change the file as follows:
<user username="hamlet" password="tobeornottobe" roles="admin">
The Admin Console runs against the admin role, therefore this cannot be changed.
The main Admin Console page displays several sections. The Deployed Applications section shows a list of all the deployed artifacts and the modules that comprise them. When you first install dm Server, there will be two artifacts deployed: the Admin Console itself and a splash screen application. As these artifacts both contain Web components, the Admin Console provides a link so you can quickly view them in your browser. The Admin Console provides a similar link for all deployed artifacts that contain Web components.
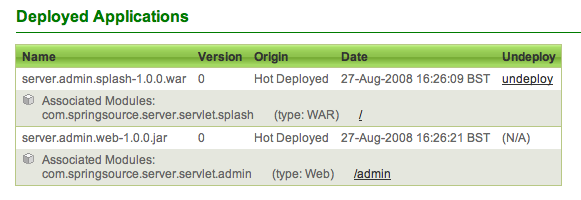
The other fields in the table give the ‘Name’ of the
artifact, which is the name of the actual file if no specific name is
supplied. The ‘Origin’ describes how the artifact was
deployed. The possible values are Hot Deployed if the artifact was dropped in the pickup directory, Admin Console if deployed using the
console and Programmatic if deployed programmatically,
that is, through the integrated artifact deployer in the
SpringSource dm Server Tools. The version is 0 if no specific version is
supplied by the artifact. The ‘Date’ column shows when the
artifact was last deployed to dm Server.
In the Deploy an Application section, you can upload a file that will be deployed automatically to the SpringSource dm Server. Once the artifact is deployed it will appear in the Deployed Applications table. You can use the Browse button to browse your local computer for the file. Note that the specific GUI for uploading varies according to your browser and platform.

When clicked, the ‘Upload’ button reloads the page. This may
take a few seconds while the file is uploaded and
deployed. If any problems occurred, the Admin Console
outputs a status message at the top of the page. If
the file deployed with no problems, the messages says
Application deployed.
For more information on how to work with artifacts see Chapter 6, Working with Applications.
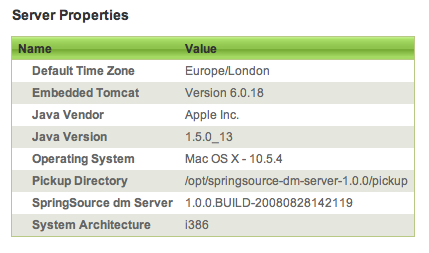
At the bottom of the main page, the Information section provides details of the dm Server you have accessed. This is useful for verifying that you have accessed the correct dm Server instance. The Server Properties table lists basic properties of the dm Server instance, such as the version of the embedded Tomcat server and the operation system on which the dm Server instance is running.
This section describes the provisioning repository feature of SpringSource dm Server, the reasons for using it, and how to configure it.
In most use cases, your application includes dependencies on third-party libraries, such as Spring Framework and Hibernate.
You typically express the dependencies between your application and third-party libraries
using the Import-Package or Import-Library manifest header
in the MANIFEST.MF file of your application.
The Import-Package header is standard to OSGi;
however, Import-Library is specific to SpringSource dm Server.
Some third-party dependencies consist of multiple bundles but are logically one unit.
To support this, the SpringSource dm Server introduces the concept of a library.
A library is a collection of related bundles that can be referenced as a whole.
For additional details about the creation and usage of libraries, as well as general information about dependencies,
see Programmer’s Guide.
In SpringSource dm Server, you store all third-party dependencies needed by your applications, such as Spring Framework and Hibernate, as valid OSGi bundles in the provisioning repository. SpringSource dm Server supports only dependencies that are valid OSGi bundles.
When you deploy your application, SpringSource dm Server installs the bundle in which it is packaged to the dm Server runtime; part of this internal installation procedure is to satisfy all the application’s dependencies. If your application has a dependency that cannot be satisfied from the bundles that you have already deployed (and dm Server has thus installed), the dm Server searches the provisioning repository for a bundle that can satisfy that dependency.
The provisioning repository for a particular instance of SpringSource dm Server can include bundles in the following general locations:
- Local: This means that bundles have been physically installed in the provisioning repository directory structure
of the local SpringSource dm Server instance.
The bundles in a local repository include installed third-party libraries,
bundles supplied by dm Server,
bundles supplied by an end user,
and internal bundles used only by dm Server.
You can further categorize this location into
externaldirectories that adhere to a specified search pattern and are scanned by dm Server just at startup, orwatcheddirectories that point to a single directory location and dm Server scans on a regular basis. - Remote: This means that a local instance of SpringSource dm Server gets the bundle from a remotely-hosted repository that is physically located on a remote SpringSource dm Server instance.
You configure the provisioning repository using the SERVER_HOME/config/repository.properties file.
As previously implied, a particular instance of SpringSource dm Server can itself also act as a repository host
for remote server instances to use when satisfying the dependencies of the applications deployed to it.
In this case, you configure a hosted repository using the SERVER_HOME/config/hostedRepository.properties file.
Typically, only remote clients use hosted repositories and their contents; the SpringSource dm Server instance that actually
hosts the repository does not typically use the bundles in it. Rather, it uses bundles in its local repository.
Making a third-party dependency available to your application is simply a matter of adding its bundle or library to the appropriate location in the provisioning repository. This could be either in the local directories or the remote ones if you are getting bundles from a remotely-hosted repository.
When you first install SpringSource dm Server, the local provisioning repository is
located at $SERVER_HOME/repository by default
and consists of three main directories: bundles, libraries and installed.
The bundles directory contains all the bundles available in the repository.
The libraries directory contains all the library definitions.
Note that libraries reference bundles that are installed elsewhere in the repository;
by default, these bundles are installed under the bundles directory,
but you can customize this behavior.
The installed directory is used by the SpringSource dm Server at runtime;
you should never install bundles or libraries used by your applications into the installed directory.
The bundles directory is further subdivided into three directories:
ext, usr and subsystems.
You install third-party bundles into the ext and usr directories;
typically, the ext directory contains bundles supplied with the SpringSource dm Server
and usr contains bundles installed by the end user.
The subsystems directory is for internal use only; do not install any bundles in this directory.
The libraries directory is similarly organized,
with an ext and usr directory.
As with bundles, you install your own new libraries into libraries/usr.
The following graphic shows the default SpringSource dm Server provisioning repository directory structure right after installation.

To install a bundle into the default bundle repository,
simply copy it into the $SERVER_HOME/repository/bundles/usr directory.
Similarly, to install a library, copy its definition into the $SERVER_HOME/repository/libraries/usr directory.
If you have configured additional watched or external repositories
(additional, that is, to the default ones already configured in a freshly-installed dm Server instance),
you install bundles and libraries in the same way: simply copy the files to the configured directories.
You configure additional watched or external repositories in the same file as the default repositories:
repository.properties.
When you install a library, you must ensure that all referenced bundles within the library have been installed as well.
Bundles must have unique names so it is considered best practice to include the version number in the file name,
allowing for multiple versions of the bundle to be installed at the same time.
For example, a bundle file name might be my-exciting-bundle.2.1.0.jar.
In some cases the SpringSource dm Server manages to automatically detect changes in its provisioning repository at runtime, thereby avoiding the need to restart the dm Server.
Of specific relevance during development is picking up changes to an application’s direct dependencies during deployment of the application. For example, if you deploy an application and receive a message that a dependency is missing, you can simply add the dependency to the repository and then redeploy the application. The redeploy will cause the new dependency to be picked up, allowing progress to be made without restarting the dm Server. For other changes such as addition of indirect dependencies, the SpringSource dm Server must be restarted to pick up any changes to the provisioning repository.
The SpringSource Enterprise Bundle Repository is a public collection of open source libraries commonly used for developing enterprise Java applications with the Spring Framework and dm Server. It contains more than 400 of the most popular enterprise Java libraries made available for general use in an OSGi-ready format. You can browse the collection and then download the bundles that you need into your own local repository.
The SpringSource Enterprise Bundle Repository is located here.
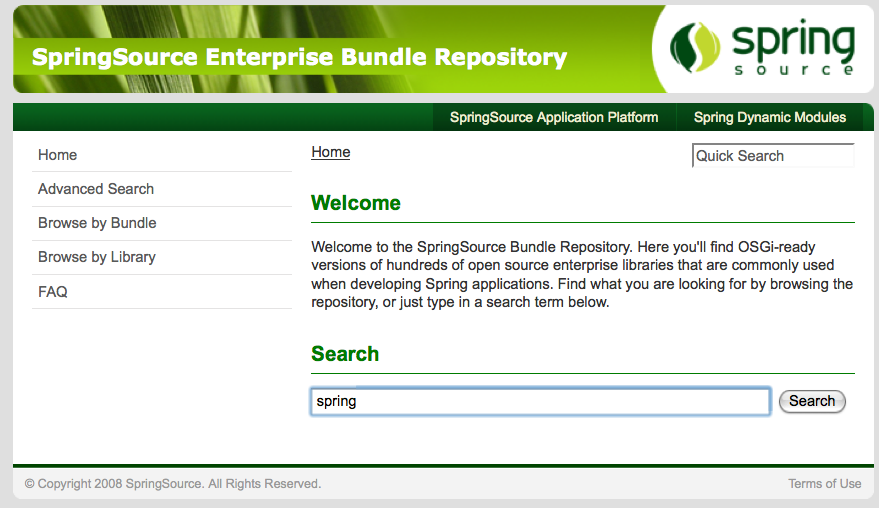
You can find bundles in the repository using a number of options. You use the ‘Search’ facility by typing in a keyword. The matching criteria returned can be explored by name, symbolic name, class, package or resource.
There is also the option of clicking on ‘Browse by Bundle’. This gives an alphabetical list of bundles. You can select the desired bundle to see details and find the download link. Finally, you can also choose to ‘Browse by Library’, which allows you to browse the alphabetical list of libraries in the repository.
Details of how to configure a SpringSource dm Server installation’s provisioning repository can be found in Configuring the Provisioning Repository. See Configuring a Hosted Repository for details on how to configure a repository that remote clients can access, also called a hosted repository.
The two configuration chapters describe the format of the repository properties files of SpringSource dm Server, how to add new directories to the local repository, how to configure the repository to get bundles from a remote repository hosted on a remote dm Server, instance, and how to configure the local dm Server instance to itself host a repository that other remote servers access.
Logging (both event logging and trace logging) in dm Server comes in two forms: application logging and server logging.
Both are configured together in the serviceability.xml file in the config directory.
This takes the form of a Logback configuration—dm Server
uses a Logback implementation behind the SLF4J logging interface.
What was previously referred to as Logging, is now referred to as Event Logging, and what was previously referred to as Trace logging (or Tracing) is now simply Logging.
Event log files are low-volume logs of important events in SpringSource dm Server. Each server message written to an event log file is accompanied by a code enclosed in angle brackets. An example is shown below:
[2009-08-25 15:04:57.044] server-dm-7 <OF0001I> OSGi telnet console available on port 2401.
(For a description of the log code syntax, see Appendix A, Event log codes.) The format of event log messages from the server is fully configurable.
By default, event log messages are stored in
$SERVER_HOME/serviceability/eventlogs/eventlog_i.log and output to the console.
The index i varies from 1 to 4, at 10Mb boundaries. An examination of the Logback configuration will
show these defaults being set. They may be modified.
For a description of the syntax and facilities provided by this file see the Logback documentation (referenced in Appendix C, Further Reading ).
The SpringSource dm Server’s logging (trace) support serves two main purposes:
- It provides global trace files that capture high-volume information regarding the SpringSource dm Server’s internal events. The files are intended for use by support personnel to diagnose runtime problems.
-
It provides application trace files that contain application-generated output.
This includes output generated using popular logging and
tracing APIs, as well as output generated by calls to
System.outandSystem.err. These files are intended for use by application developers and system administrators.
By default, the dm Server trace file is called
$SERVER_HOME/serviceability/logs/dm-server/log_i.log,
and, again by default, the application trace files are called
$SERVER_HOME/serviceability/logs/application_name/log_i.log,
where application_name is automatically set by dm Server for each application artifact installed and run
(it is a combination of the artifact name and the version).
The index i varies from 1 to 4, on a rolling basis, as each log file exceeds 10Mb.
Entries in trace files are by default of the form <timestamp> <thread-name> <source> <level> <entry-text>. For example:
[2008-05-15 09:09:46.940] server-dm-2 org.apache.coyote.http11.Http11Protocol I Initializing Coyote HTTP/1.1 on http-48080
although this format is completely determined by the Logback configuration file serviceability.xml.
SpringSource dm Server provides advanced support for capturing and tracing application-generated output by automatically separating trace output on a
per-application basis and will also capture any System.out and System.err output.
SpringSource dm Server uses SLF4J interfaces to Logback, and the root logger (by default) captures all logging output
and appends it to the application-specific trace files as described above.
To modify this, define application-specific loggers in the serviceability.xml file in the normal way.
System.out and System.err output from applications is, by default, captured in the
application’s trace file.
This happens because the output streams are intercepted and written to the loggers named
System.out at INFO level
and System.err at ERROR level respectively.
Since there are no explicit loggers defined with these names in the serviceability.xml file,
this output is logged by the root logger (which captures INFO level and above).
The trace entries for System.out and System.err
output are of the form:
[2008-05-16 09:28:45.874] server-tomcat-thread-1 System.out I Hello world!
[2008-05-16 09:28:45.874] server-tomcat-thread-1 System.err E Hello world!
The third column indicates where the output came from (System.out or System.err)
and, as indicated by the fourth column, System.out is traced at the info level, and System.err is
traced at the error level.
To over-ride this behaviour, simply define explicit loggers named System.out
and/or System.err in the configuration file to send this output to an appender of your choice.
Be aware that all applications’ output streams will be caught by these loggers, and that a sifting appender might be useful to separate them.
A service dump is triggered when one of the following events occurs:
A failure is detected in the SpringSource dm Server code, or
a thread deadlock is detected.
A service dump contains a snapshot of all the important state from the running SpringSource dm Server instance. This snapshot is not intended for end user consumption but is useful for service personnel.
By default, service dumps are created in
$SERVER_HOME/serviceability/dump.
You can deploy artifacts to SpringSource dm Server using either the hot-deploy directory on the file system or by using the Admin Console.
To hot deploy an artifact, copy it into the
pickup directory (by default $SERVER_HOME/pickup):
prompt$ cp myapp.par $SERVER_HOME/pickup
When the artifact is hot deployed, a message similar to the following appears in the log file:
[2009-03-08 17:00:00.000] fs-watcher <SPDE0010I> - Deployment of 'myapp.par' version '0' completed.
If there is a problem with the deployment the console and log both show an error message to help you with troubleshooting.
The Admin Console allows you to upload a file, which will be deployed automatically, from your local file system to the SpringSource dm Server. As soon as SpringSource dm Server deploys the artifact, it appears in the list of artifacts in the Admin Console. Note that the GUI for uploading varies according to the browser and operating system you use.
When clicked, the ‘Upload’ button reloads the page. This
may take a few seconds while the file is transmitted and
deployed. The Admin Console displays a status message at the top of the page after it completes the deployment; if there were no problems,
the displayed message is
Application deployed. The following image shows three deployed artifacts.
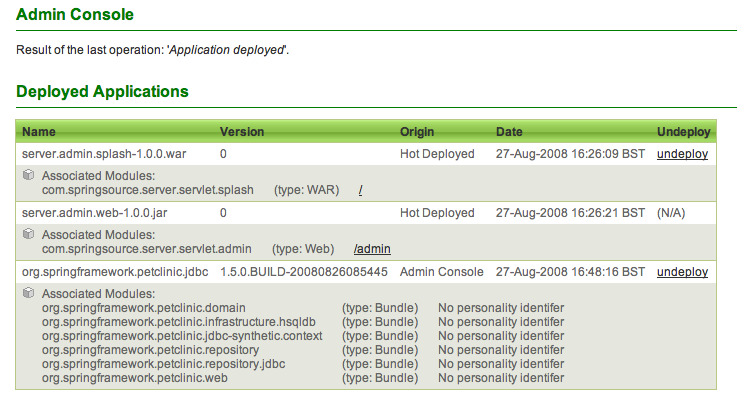
See Chapter 3, The Web based Administration Console for additional details on using the Admin Console and the meaning of the displayed information.
When you deploy an artifact, either using hot-deployment or the Admin Console, dm Server copies the file to its work directory (SERVER_HOME/work by default) and registers it in its internal registry.
The server then checks any dependencies the artifact might have to see if
deployment can go ahead, and if all dependencies are resolved, SpringSource dm Server starts the artifact.
Because of all these additional internal activities, you should NOT simply copy the artifact into the work directory and assume it will be deployed, because SpringSource dm Server will not do so.
When deploying bundles that have dependencies, it is important that you deploy them in the correct order. SpringSource dm Server honors this ordering when it redeploys the artifacts on startup.
If you use hot deployment to deploy your artifacts, be sure to copy the corresponding files into the pickup
directory one-by-one. Copying the files in one group, for example by using a single cp command. provides no guarantees of ordering.
You can undeploy artifacts from SpringSource dm Server using either the hot-deploy directory on the file system, or by using the Admin Console.
To hot-undeploy an artifact, remove the corresponding
file from the pickup directory (by default
$SERVER_HOME/pickup):
prompt$ cd $SERVER_HOME/pickup
prompt$ rm myapp.par
When SpringSource dm Server completes the undeployment of the artifact, a message similar to the following appears in the log:
[2009-03-08 17:00:05.000] fs-watcher <SPDE0012I> - Undeployment of 'myapp.war' version '0' completed.
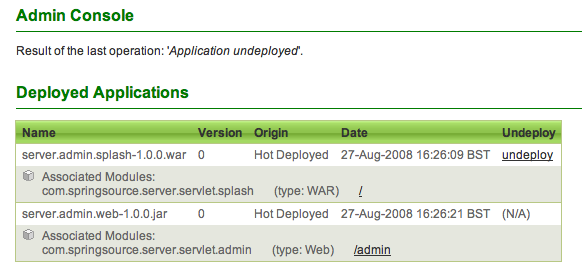
You can undeploy only whole artifacts from the Admin Console, or in other words, you cannot undeploy the separate modules or bundles that make up an artifact. Each artifact that
can be undeployed has an undeploy link to the right of its name in the list of Deployed Applications. As soon as you click the undeploy link, the page
reloads with that artifact removed from the
list.
The only artifact that you cannot undeploy from the
Admin Console is the Admin Console itself. If you need to undeploy this application, you must remove it from the pickup directory (by default SERVER_HOME/pickup); the name of the application is com.springsource.server.servlet.admin.
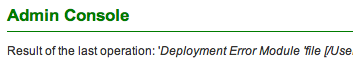
If any problems have occurred the status message at the top of the page will report the error, as shown in the following image.
SpringSource dm Server uses properties files in the SERVER_HOME/config directory to configure most of its subsystems. Each subsystem has its own properties file, as described in the following table.
Table 7.1. Subsystem Configuration Properties Files
| Property File | Description |
|---|---|
kernel.properties | Configures the dm Server kernel, in particular the deployment behavior of the server, its work directory, the Equinox telnet console, and profiles. See Configuring the dm Server Kernel for more information. |
repository.properties | Configures the locations that dm Server includes in its provisioning repository. See Configuring the Provisioning Repository for more information. |
hostedRepository.properties | Configures a hosted repository. See Configuring a Hosted Repository for more information. |
There are two subsystems that do not use properties files:
- The embedded Tomcat servlet container uses the standard Apache Tomcat configuration file, located in the
SERVER_HOME/configdirectory. For clarity, however, SpringSource dm Server renames the filetomcat-server.xml(rather thanserver.xml), but the format is the same as the standard Apache Tomcat. See Configuring the Embedded Tomcat Servlet Container for more information. - The serviceability subsystem uses the Logback
serviceability.xmlconfiguration file in theconfigdirectory. See Configuring Serviceability for more information.
This section provides information about configuring the dm Server kernel by updating the file SERVER_HOME/config/kernel.properties. Topics include:
You can configure three properties of deployment: the pickup directory into which you copy applications for hot-deployment, the deployment timeout, and whether automatic cloning of deployed bundles is enabled.
To change any of these properties, edit the SERVER_HOME/config/kernel.properties file and change the properties that begin with the deployer. prefix. The following table describes these properties.
Table 7.2. Deployment Configuration Properties
| Property | Description |
|---|---|
deployer.timeout | Specifies the amount of time, in seconds, after which dm Server times out while trying to deploy a bundle, library, or plan. The default value is 300. If you want to disable deployment timeout, specify 0. |
deployer.pickupDirectory | Specifies the absolute or relative path to the pickup directory to which you copy applications for hot-deployment. Relative paths are relative to SERVER_HOME. The default value is ./target/pickup.. |
deployer.autoClone | Specifies whether auto-cloning of deployed applications is enabled. Valid values are true or false. Default value is true.
When you enable this property, and you deploy an application, dm Server automatically
clones a dependency of the application when required.
This requirement might occur, for example, when the dependency (call it |
The following listing displays the default configuration distributed with the dm Server; only relevant sections of the kernel.properties file are shown.
deployer.timeout=300
deployer.pickupDirectory=pickup
As the default configuration shows, the default pickup directory is SERVER_HOME/pickup, the deployment timeout is 300 seconds, and auto-cloning is enabled.
SpringSource dm Server uses a work directory for internal work; by default this directory is SERVER_HOME/work. You can change this directory by updating the SERVER_HOME/config/kernel.properties file and changing the value of the io.workDirectory property; as always, relative paths are relative to the root SERVER_HOME directory. The following listing show the default configuration of the io.workDirectory property:
io.workDirectory=work
You can configure three properties of the SpringSource dm Server’s profile: the profile’s name, the list of required subsystems, and the list of optional subsystems.
To change any of these properties, edit the SERVER_HOME/config/kernel.properties file and change the properties that begin with the profile. prefix. The following table describes these properties.
Table 7.3. Profile Configuration Properties
| Property | Description |
|---|---|
profile.name | Specifies a human readable name for this profile. This value is used in log output and for management tools. The default value is web. |
profile.subsystems | Specifies a comma-delimited list of subsystems that are required to be present when the profile is started. If they are not present, startup will fail. The default value is com.springsource.server.web. |
profile.optionalSubsystems | Specifies a comma-delimited list of subsystems that can be loaded when the profile started if they are present. If they are not present, startup will continue without them. The default value is an empty list. |
You configure the telnet console of Equinox by updating the kernel.properties file in the $SERVER_HOME/config directory and editing the properties described in the following table.
Table 7.4. Equinox Configuration Properties
| Property | Description |
|---|---|
shell.enabled | Specifies whether the OSGI shell is enabled or not. Valid values are true or false. |
shell.port | Defines the port on which you can remotely access the OSGI shell. If not set, the shell is only available from stdout of the dm Server process. |
The following example shows the default OSGI Equinox configuration in a freshly-installed kernel.properties file; only the relevant section of the file is shown.
shell.enabled=true
shell.port=2401
The example shows that the Equinox telnet console is enabled by default, and you connect to it remotely using the port 2401.
The serviceability subsystem of the SpringSource dm Server
is configured in the serviceability.xml file found in the config directory.
This is a Logback configuration file, and is explained in some more detail in Chapter 5, Serviceability.
SpringSource dm Server
embeds an OSGi-enhanced version of the Tomcat Servlet Container
in order to provide support for deploying Java EE WARs and Web Bundles.
You configure the embedded Servlet container using the standard Apache Tomcat configuration. The main difference is that the configuration file is called tomcat-server.xml rather than server.xml. As with the other dm Server configuration files, the tomcat-server.xml file is located in the $SERVER_HOME/config directory.
The following listing displays the default configuration distributed with the dm Server; for clarity, the listing does not include the standard Apache License.
<?xml version='1.0' encoding='utf-8'?>

<Server port="8005" shutdown="SHUTDOWN">

  <Listener className="org.apache.catalina.core.AprLifecycleListener" SSLEngine="on" />
  <Listener className="org.apache.catalina.core.JasperListener" />
  <Listener className="org.apache.catalina.mbeans.ServerLifecycleListener" />
  <Listener className="org.apache.catalina.mbeans.GlobalResourcesLifecycleListener" />

  <Listener className="com.springsource.server.web.tomcat.ServerLifecycleLoggingListener"/>

  <GlobalNamingResources>
    <Resource name="UserDatabase" auth="Container"
              type="org.apache.catalina.UserDatabase"
              description="User database that can be updated and saved"
              factory="org.apache.catalina.users.MemoryUserDatabaseFactory"
              pathname="config/tomcat-users.xml" />
  </GlobalNamingResources>

  <Service name="Catalina">

    <Connector port="8080" protocol="HTTP/1.1"
               connectionTimeout="20000"
               redirectPort="8443" />

    <Connector port="8443" protocol="HTTP/1.1" SSLEnabled="true"
               maxThreads="150" scheme="https" secure="true"
               clientAuth="false" sslProtocol="TLS"
               keystoreFile="config/management/keystore"
               keystorePass="changeit"/>


    <Connector port="8009" protocol="AJP/1.3" redirectPort="8443" />

    <Engine name="Catalina" defaultHost="localhost">

      <Realm className="org.apache.catalina.realm.UserDatabaseRealm"
             resourceName="UserDatabase"/>

      <Host name="localhost"  appBase="webapps"
            unpackWARs="true" autoDeploy="true"
            xmlValidation="false" xmlNamespaceAware="false">

         <Valve className="org.apache.catalina.valves.AccessLogValve"
               directory="serviceability/logs/access"
               prefix="localhost_access_log." suffix=".txt" pattern="common"
               resolveHosts="false"/>
      </Host>
    </Engine>
  </Service>
</Server>
The following bullets describe the main elements and attributes in the default tomcat-server.xml file; for details about updating this file to further configure the embedded Apache Tomcat server, see the Apache Tomcat Configuration Reference.
![[Tip]](images/tip.gif) | Relative paths |
|---|---|
If the configured path to a directory or file does not represent an absolute path, dm Server typically interprets it as a path relative to the |
The root element of the
tomcat-server.xmlfile is<Server>. The attributes of this element represent the characteristics of the entire embedded Tomcat servlet container. Theshutdownattribute specifies the command string that the shutdown port number receives via a TCP/IP connection in order to shut down the servlet container. Theportattribute specifies the TCP/IP port number that listens for a shutdown message.The
<Listener>XML elements specify the list of lifecycle listeners that monitor and manage the embedded Tomcat servlet container. Each listener class is a Java Management Extensions (JMX) MBean that listens to a specific component of the servlet container and has been programmed to do something at certain lifecycle events of the component, such as before starting up, after stopping, and so on.The first four
<Listener>elements configure standard Tomcat lifecycle listeners. The listener implemented by thecom.springsource.server.web.tomcat.ServerLifecycleLoggingListenerclass is specific to SpringSource dm Server and manages server lifecycle logging.The
<GlobalNamingResources>XML element groups together the global JNDI resources that Web applications deployed to the servlet container can use. The<Resource>element defines the database used to load the users and roles from theSERVER_HOME/config/tomcat-users.xmlfile into an in-memory data structure. This resource will be later referenced by the<Engine>XML element so that Web applications deployed to the servlet container can query the database for the list of users and the roles they are mapped to, as well as update the file.The
<Service>XML element groups together one or more connectors and a single engine. Connectors define a transport mechanism, such as HTTP, that clients use to to send and receive messages to and from the associated service. There are many transports that a client can use, which is why a<Service>element can have many<Connector>elements. The engine then defines how these requests and responses that the connector receives and sends are in turn handled by the servlet container; you can defined only a single<Engine>element for any given<Service>element.The sample
tomcat-server.xmlfile above includes three<Connector>elements: one for the HTTP transport, one for the HTTPS transport, and one for the AJP transport. The file also includes a single<Engine>element, as required.The first connector listens for HTTP requests at the
8080TCP/IP port. The connector, after accepting a connection from a client, waits for a maximum of 20000 milliseconds for a request URI; if it does not receive one from the client by then, the connector times out. If this connector receives a request from the client that requires the SSL transport, the servlet container automatically redirects the request to port8443.The second connector is for HTTPS requests. The TCP/IP port that users specify as the secure connection port is
8443. Be sure that you set the value of theredirectPortattribute of your non-SSL connectors to this value to ensure that users that require a secure connection are redirected to the secure port, even if they initially start at the non-secure port. TheSSLEnabledattribute specifies that SSL is enabled for this connector. Thesecureattribute ensures that a call torequest.isSecure()from the connecting client always returnstrue. Theschemeattribute ensures that a call torequest.getScheme()from the connecting client always returnshttpswhen clients use this connector.The
maxThreadsattribute specifies that the servlet container creates a maximum of 150 request processing threads, which determines the maximum number of simultaneous requests that can be handled. TheclientAuthattribute specifies that the servlet container does not require a certificate chain unless the client requests a resource protected by a security constraint that uses CLIENT-CERT authentication.The
keystoreFileattribute specifies the name of the file that contains the servlet container’s private key and public certificate used in the SSL handshake, encryption, and decryption. You use an alias and password to access this information. In the example, this file isSERVER_HOME/config/management/keystore. ThekeystorePassattributes specify the password used to access the keystore.The third AJP Connector element represents a Connector component that communicates with a web connector via the AJP protocol.
The engine has a logical name of
Catalina; this is the name used in all log and error messages so you can easily identify problems. The value of thedefaultHostattribute refers to the name of a<Host>child element of<Engine>; this host processes requests directed to host names on this servlet container.The
<Realm>child element of<Engine>represents a database of users, passwords, and mapped roles used for authentication in this service. By default, the realm simply references theUserDatabaseresource, defined by the<Resource>child element of<GlobalNamingResources>.The
<Host>child element represents a virtual host, which is an association of a network name for a server (such aswww.mycompany.com) with the particular server on which Catalina is running. The servlet container unpacks Web applications into a directory hierarchy if they are deployed as WAR files. ThexmlValidationattribute specifies that the servlet container does not validate XML files when parsing them, or in other words, it accepts invalid XML. ThexmlNamespaceAwareattribute specifies that the servlet container does not take namespaces into account when reading XML files.Finally, the
org.apache.catalina.valves.AccessLogValvevalve creates log files in the same format as those created by standard web servers. The servlet container creates the log files in theSERVER_HOME/serviceability/logs/accessdirectory. The log files are prefixed with the stringlocalhost_access_log., have a suffix of.txt, use a standard format for identifying what should be logged, and do not include DNS lookups of the IP address of the remote host.
The SpringSource dm Server supports JSON-based configuration of any connector supported by Apache Tomcat.
See the default configuration above for syntax examples, and for further details on the configuration properties
supported for various <Connector> implementations,
consult the official Tomcat HTTP Connector documentation.
| Configuring SSL for Tomcat |
|---|---|
The SpringSource dm Server distribution includes a preconfigured |
SpringSource dm Server supports JSON-based configuration of the load balancing supported by Tomcat.
SpringSource dm Server supports JSON-based configuration of the clustering supported by Apache Tomcat. By default, clustering of the embedded servlet container is disabled, and the default configuration does not include any clustering information. See Tomcat Clustering/Session Replication HOW-TO for detailed information about enabling and configuring clustering.
In addition to the aforementioned configuration options, various parts of the embedded Tomcat Servlet container can be configured via the following files located in the Servlet container’s configuration directory. The syntax and usage of each file comply with that of a standard Tomcat installation.
context.xml: XML based configuration file which will be loaded for each web application
Contextdeployed to dm Server.tomcat-users.xml: XML based configuration file used to manage users, passwords, and roles for an in-memory security realm. This file is used by the dm Server to configure a
MemoryRealmfor the embedded Tomcat Servlet container.web.xml: The default
web.xmldeployment descriptor used for all web applications deployed on the dm Server. As each web application is deployed, this file is processed, followed by the/WEB-INF/web.xmldeployment descriptor packaged with the web application itself, if present.
You configure the locations that SpringSource dm Server includes in its provisioning repository
by editing the repository.properties file in the $SERVER_HOME/config directory.
When you specify a property in the file, use the format repository-name.property=value, where:
repository-namerefers to the name of the local repository.propertyrefers to the name of a particular property.valuerefers to the value of the property.
For example, bundles-usr.type=external specifies that the type property of the repository
with name bundles-usr is external.
For each specific repository, you configure a number of properties, such as its type (external, watched, or remote) and its searchpath, watched directory, or URI that specifies the actual location of the bundles and libraries. The particular properties that configure these options are listed in the table after the example.
The chain property specifies the order in which SpringSource dm Server searches the searchpaths
when it looks for dependencies;
the first path listed specifies the first actual directory that SpringSource dm Server searches, until the last listed path.
The chain property uses the names of the searchpaths as specified in the individual repository properties;
for example, in the property bundles-usr.type=external, the name of the repository is bundles-usr.
The default repository configuration for a newly installed SpringSource dm Server is as follows:
bundles-subsystems.type=external
bundles-subsystems.searchPattern=repository/bundles/subsystems/{subsystem}/{component}

bundles-ext.type=external
bundles-ext.searchPattern=repository/bundles/ext/{bundle}

bundles-usr.type=external
bundles-usr.searchPattern=repository/bundles/usr/{bundle}

libraries-ext.type=external
libraries-ext.searchPattern=repository/libraries/ext/{library}

libraries-usr.type=external
libraries-usr.searchPattern=repository/libraries/usr/{library}

chain=bundles-subsystems,bundles-ext,bundles-usr,libraries-ext,libraries-usr
The default configuration shown above has five searchpaths, each of which SpringSource dm Server searches when locating entries
for inclusion in the repository.
The chain property shows the order in which SpringSource dm Server searches the searchpaths.
SpringSource dm Server requires that you always include the bundles-subsystem,
bundles-ext, and libraries-ext searchpaths, as shown above, in your repository configuration.
You can configure the user-related searchpaths as you wish.
The following table lists all the available properties that you can use to describe a named path and the
repository search chain in the repository.properties file.
Table 7.5. Repository Properties in repository.properties
| Property | Description |
|---|---|
repository-name.type |
Specifies the type of path. You can set this property to one of the following three valid values:
See Watched or External Repository? for additional information about when to configure watched or external repositories for your particular environment. |
repository-name.searchPattern | Specifies the pattern that an external repository uses when deciding which local directories it should search
when identifying artifacts. Use this property together with |
repository-name.watchDirectory | Specifies the single directory of a watched repository.
You can specify either an absolute or relative pathname for the directory.
If you specify a relative pathname, it is relative to the root of the dm Server installation ( |
repository-name.watchInterval | Specifies the interval in seconds between checks of a watched directory by a watched repository.
This property is optional, if it is not specified the default interval of 5 seconds is used.
Use this property together with |
repository-name.uri | Specifies the URI of the hosted repository to which a remote repository connects. The value of this property takes the following format:
where:
Use this property together with |
repository-name.indexRefreshInterval |
Specifies the interval in seconds between checks by a remote repository that its local copy of the hosted repository index is up-to-date (a remote repository acts as a proxy for a hosted repository and thus it holds a local copy of the hosted repository’s index). This property is optional, if it is not specified the default interval of 5 seconds is used. Use this property together with |
The main difference between a watched and an external repository is that SpringSource dm Server regularly scans watched directories
and automatically picks up any changed bundles or libraries,
while dm Server scans external directories only at startup, and then only if there is no cached index available.
This means that dm Server always performs a scan of an external repository when you start the server
with the -clean (as this deletes the index) and only scans during a normal startup if the index isn’t there because,
for example, this is the first time you start the server.
There is a performance cost associated with using a watched repository due to dm Server using resources to scan the directory at the configured interval. The cost is small if the watched repository contains just a few artifacts; however, the performance cost increases as the number of artifacts increases.
For this reason, SpringSource recommends that you put most of your dependencies in external repositories,
even when in development mode.
If you make any changes to the artifacts in the external repositories,
remember to restart dm Server with the -clean option so that the server picks up any changes.
Use watched directories for artifacts that you are prototyping, actively updating, or when adding new dependencies
so that dm Server quickly and easily picks them up.
To increase performance even during development, however, you can use an external repository for most of your dependencies,
in particular the ones that are fairly static.
In production environments, where dependencies should not change, SpringSource recommends that you use only external repositories.
The repository-name.searchPattern and
repository-name.watchDirectory properties specify search paths
for external and watched repositories, respectively,
that define a physical location that SpringSource dm Server searches when looking for a library or bundle dependency.
If a search path is relative, its location is relative to the root of the installation,
in other words, the SERVER_HOME directory.
Search paths specified with the repository-name.searchPattern property
provide support for wildcards.
In the entries above, the path segments surrounded by curly braces,
for example {bundle} and {library},
are wildcards entries for a directory with any name.
Allowing wildcards to be named in this way is intended to improve the readability of search path configuration.
In addition to supporting the above-described form of wildcards, SpringSource dm Server also supports Ant-style paths,
that is * and ** can be used to represent any directory and
any series of directories, respectively.
For example, repository/bundles/usr/{bundle} and repository/bundles/usr/*
are directly equivalent.
A common usage of the ** wildcard is to allow dependencies stored in a directory structure of varying depth,
such as a local Maven repository, to be provisioned by the SpringSource dm Server.
You can use system properties when specifying the values of the repository-name.searchPattern,
repository-name.watchDirectory,
repository-name.watchInterval repository-name.uri,
and repository-name.indexRefreshInterval
properties.
You reference system properties as ${system.property.name};
for example, a search path of ${user.home}/repository/bundles references the
repository/bundles directory in the user’s home directory.
The following examples provide sample configuration that could be used for some common use cases.
bundles-subsystems.type=external
bundles-subsystems.searchPattern=repository/bundles/subsystems/{subsystem}/{component}

bundles-ext.type=external
bundles-ext.searchPattern=repository/bundles/ext/{bundle}

bundles-usr.type=external
bundles-usr.searchPattern=${user.home}/.ivy2/cache/{org}/{name}/{version}/{bundle}.jar

libraries-ext.type=external
libraries-ext.searchPattern=repository/libraries/ext/{library}

libraries-usr.type=external
libraries-usr.searchPattern=repository/libraries/usr/{library}

chain=bundles-subsystems,bundles-ext,bundles-usr,libraries-ext,libraries-usrbundles-subsystems.type=external
bundles-subsystems.searchPattern=repository/bundles/subsystems/{subsystem}/{component}
bundles-ext.type=external
bundles-ext.searchPattern=repository/bundles/ext/{bundle}
bundles-usr.type=external
bundles-usr.searchPattern=${user.home}/.m2/repository/**/{bundle}.jar
libraries-ext.type=external
libraries-ext.searchPattern=repository/libraries/ext/{library}
libraries-usr.type=external
libraries-usr.searchPattern=repository/libraries/usr/{library}
chain=bundles-subsystems,bundles-ext,bundles-usr,libraries-ext,libraries-usrThe following example shows the default repository.properties file
from a freshly-installed dm Server, but then updated to include new remote and watched repositories.
Both of these repositories are part of the repository chain.
The remote repository is called remote-repo.
The URI of the hosted repository from which remote-repo gets its artifacts is
http://my-host:8080/com.springsource.server.repository/my-hosted-repo;
this means that there is a dm Server instance running on host my-host
whose Tomcat server listens at the default port, 8080,
and this server instance hosts a repository called my-hosted-repo,
configured in the hostedRepository.properties file of the remote server instance.
The remote repository checks for changes in the hosted repository every 30 seconds.
The watched repository is called watched-repo and the directory that holds the artifacts
is repository/watched,
relative to the installation directory of the dm Server instance.
The server checks for changes in this watched repository every 5 seconds.
bundles-subsystems.type=external
bundles-subsystems.searchPattern=repository/bundles/subsystems/{subsystem}/{component}

bundles-ext.type=external
bundles-ext.searchPattern=repository/bundles/ext/{bundle}

bundles-usr.type=external
bundles-usr.searchPattern=repository/bundles/usr/{bundle}

libraries-ext.type=external
libraries-ext.searchPattern=repository/libraries/ext/{library}

libraries-usr.type=external
libraries-usr.searchPattern=repository/libraries/usr/{library}

remote-repo.type=remote
remote-repo.uri=http://my-host:8080/com.springsource.server.repository/my-hosted-repo
remote-repo.indexRefreshInterval=30

watched-repo.type=watched
watched-repo.watchedDirectory=repository/watched
watched-repo.watchedInterval=5

chain=bundles-subsystems,bundles-ext,bundles-usr,libraries-ext,libraries-usr,remote-repo,watched-repoYou configure a dm Server instance to host a repository
by editing the config/hostedRepository.properties file;
remote clients can then access the artifacts in this hosted repository and use them locally.
When you specify a property in the file, use the format repository-name.property=value, where:
repository-namerefers to the name of the hosted repository.propertyrefers to the name of a particular property.valuerefers to the value of the property.
For example, my-hosted-repo.type=external specifies that the type property
of the my-hosted-repository repository is external.
The following table lists the properties that you can include in the hostedRepository.properties file.
Table 7.6. Hosted Repository Properties
| Property | Description |
|---|---|
repository-name.type | Specifies the type of path of the hosted repository.
All paths are local to the current dm Server instance.
You can set this property to one of the following valid values:
See Watched or External Repository? for additional information about when to configure watched or external repositories for your particular environment. |
repository-name.searchPattern | Specifies the pattern that an external hosted repository uses when deciding which
local directories it should search when identifying artifacts.
Use this property when |
repository-name.watchDirectory | Specifies the single directory of a watched hosted repository.
You can specify either an absolute or relative pathname for the directory.
If you specify a relative pathname, it is relative to the root of the dm Server installation ( |
repository-name.watchInterval | Specifies the interval in seconds between checks of a watched directory by a watched hosted repository.
This property is optional. Use this property when |
The following sample shows a hostedRepository.properties file with a single external repository
called my-hosted-repo with search pattern SERVER_HOME/repository/hosted/*.
my-hosted-repo.type=external
my-hosted-repo.searchPattern=repository/hosted/*
See Example of watched and remote repositories for details on how a local repository can remotely access the artifacts in this hosted repository.
Event log codes issued by dm Server have the general syntax
<XXnnnnL> where:
XX | is a two-letter code (upper-case) identifying the region of the dm Server code which issued the log message; |
nnnn | is a four-digit message number; and |
L | is a single-letter (upper-case) code identifying the level of the message. |
The two-letter codes are (this list is not complete):
CC | com.springsource.kernel.services.concurrent |
DE | com.springsource.kernel.deployer.core the Deployer |
HD | com.springsource.kernel.deployer.hot the Hot Deployer |
KD | com.springsource.kernel.dm |
KE | com.springsource.kernel.core the Kernel |
OF | com.springsource.kernel.osgi Osgi Framework |
OP | com.springsource.kernel.osgi.provisioning Osgi Provisioning |
RP | com.springsource.repository the Repository |
The four-digit numbers identify the message text (with placeholders for inserted values). These are not listed here, but can be discovered by examining the files called
EventLogMessages.properties, found in the relevant packages.
The single-digit level code is one of:
E | Error level: enabled if level is ERROR. |
W | Warning level: enabled if level is WARNING or above. |
I | Info level: enabled if level is INFO or above. |
D | Debug level: enabled if level is DEBUG or above. |
T | Trace level: always enabled. |
There are never two messages with the same prefix and number, but with different levels.
The dm Server will fail to start correctly if it is prevented from
connecting to needed ports by the firewall. Typically this manifests
as error SPPM0003E . Configuring the firewall to
allow the dm Server process to bind to the necessary ports will prevent
this error from occurring.
As a result of Sun Java bug
4957990,
the SpringSource dm Server may consume more PermGen space than expected when running with the
server HotSpot compiler. This problem may be resolved by configuring the
JAVA_OPTS environment variable to specify an increased
MaxPermSize, for example -XX:MaxPermSize=128M.