Spring Batch Integration
Spring Batch Integration Introduction
Many users of Spring Batch may encounter requirements that are outside the scope of Spring Batch but that may be efficiently and concisely implemented by using Spring Integration. Conversely, Spring Integration users may encounter Spring Batch requirements and need a way to efficiently integrate both frameworks. In this context, several patterns and use-cases emerge, and Spring Batch Integration addresses those requirements.
The line between Spring Batch and Spring Integration is not always clear, but two pieces of advice can help: Think about granularity, and apply common patterns. Some of those common patterns are described in this reference manual section.
Adding messaging to a batch process enables automation of operations and also separation and strategizing of key concerns. For example, a message might trigger a job to execute, and then the sending of the message can be exposed in a variety of ways. Alternatively, when a job completes or fails, that event might trigger a message to be sent, and the consumers of those messages might have operational concerns that have nothing to do with the application itself. Messaging can also be embedded in a job (for example reading or writing items for processing via channels). Remote partitioning and remote chunking provide methods to distribute workloads over a number of workers.
This section covers the following key concepts:
Namespace Support
Since Spring Batch Integration 1.3, dedicated XML Namespace support was added, with the aim to provide an easier configuration experience. In order to activate the namespace, add the following namespace declarations to your Spring XML Application Context file:
<beans xmlns="http://www.springframework.org/schema/beans"
  xmlns:xsi="http://www.w3.org/2001/XMLSchema-instance"
  xmlns:batch-int="http://www.springframework.org/schema/batch-integration"
  xsi:schemaLocation="
    http://www.springframework.org/schema/batch-integration
    https://www.springframework.org/schema/batch-integration/spring-batch-integration.xsd">

    ...

</beans>
A fully configured Spring XML Application Context file for Spring Batch Integration may look like the following:
<beans xmlns="http://www.springframework.org/schema/beans"
  xmlns:xsi="http://www.w3.org/2001/XMLSchema-instance"
  xmlns:int="http://www.springframework.org/schema/integration"
  xmlns:batch="http://www.springframework.org/schema/batch"
  xmlns:batch-int="http://www.springframework.org/schema/batch-integration"
  xsi:schemaLocation="
    http://www.springframework.org/schema/batch-integration
    https://www.springframework.org/schema/batch-integration/spring-batch-integration.xsd
    http://www.springframework.org/schema/batch
    https://www.springframework.org/schema/batch/spring-batch.xsd
    http://www.springframework.org/schema/beans
    https://www.springframework.org/schema/beans/spring-beans.xsd
    http://www.springframework.org/schema/integration
    https://www.springframework.org/schema/integration/spring-integration.xsd">

    ...

</beans>
Appending version numbers to the referenced XSD file is also allowed, but, as a version-less declaration always uses the latest schema, we generally do not recommend appending the version number to the XSD name. Adding a version number could possibly create issues when updating the Spring Batch Integration dependencies, as they may require more recent versions of the XML schema.
Launching Batch Jobs through Messages
When starting batch jobs by using the core Spring Batch API, you basically have 2 options:
-
From the command line, with the
CommandLineJobRunner -
Programmatically, with either
JobOperator.start()orJobLauncher.run()
For example, you may want to use the
CommandLineJobRunner when invoking Batch Jobs by
using a shell script. Alternatively, you may use the
JobOperator directly (for example, when using
Spring Batch as part of a web application). However, what about
more complex use cases? Maybe you need to poll a remote (S)FTP
server to retrieve the data for the Batch Job or your application
has to support multiple different data sources simultaneously. For
example, you may receive data files not only from the web, but also from
FTP and other sources. Maybe additional transformation of the input files is
needed before invoking Spring Batch.
Therefore, it would be much more powerful to execute the batch job
using Spring Integration and its numerous adapters. For example,
you can use a File Inbound Channel Adapter to
monitor a directory in the file-system and start the Batch Job as
soon as the input file arrives. Additionally, you can create Spring
Integration flows that use multiple different adapters to easily
ingest data for your batch jobs from multiple sources
simultaneously using only configuration. Implementing all these
scenarios with Spring Integration is easy, as it allows for
decoupled, event-driven execution of the
JobLauncher.
Spring Batch Integration provides the
JobLaunchingMessageHandler class that you can
use to launch batch jobs. The input for the
JobLaunchingMessageHandler is provided by a
Spring Integration message, which has a payload of type
JobLaunchRequest. This class is a wrapper around the Job
that needs to be launched and around the JobParameters
necessary to launch the Batch job.
The following image illustrates the typical Spring Integration message flow in order to start a Batch job. The EIP (Enterprise Integration Patterns) website provides a full overview of messaging icons and their descriptions.
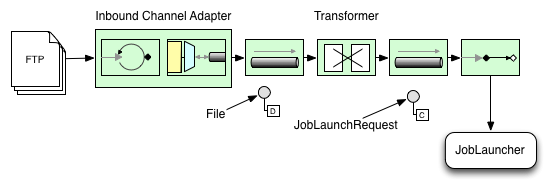
Transforming a file into a JobLaunchRequest
package io.spring.sbi;

import org.springframework.batch.core.Job;
import org.springframework.batch.core.JobParametersBuilder;
import org.springframework.batch.integration.launch.JobLaunchRequest;
import org.springframework.integration.annotation.Transformer;
import org.springframework.messaging.Message;

import java.io.File;

public class FileMessageToJobRequest {
    private Job job;
    private String fileParameterName;

    public void setFileParameterName(String fileParameterName) {
        this.fileParameterName = fileParameterName;
    }

    public void setJob(Job job) {
        this.job = job;
    }

    @Transformer
    public JobLaunchRequest toRequest(Message<File> message) {
        JobParametersBuilder jobParametersBuilder =
            new JobParametersBuilder();

        jobParametersBuilder.addString(fileParameterName,
            message.getPayload().getAbsolutePath());

        return new JobLaunchRequest(job, jobParametersBuilder.toJobParameters());
    }
}
The JobExecution Response
When a batch job is being executed, a
JobExecution instance is returned. This
instance can be used to determine the status of an execution. If
a JobExecution is able to be created
successfully, it is always returned, regardless of whether
or not the actual execution is successful.
The exact behavior on how the JobExecution
instance is returned depends on the provided
TaskExecutor. If a
synchronous (single-threaded)
TaskExecutor implementation is used, the
JobExecution response is returned only
after the job completes. When using an
asynchronous
TaskExecutor, the
JobExecution instance is returned
immediately. Users can then take the id of
JobExecution instance
(with JobExecution.getJobId()) and query the
JobRepository for the job’s updated status
using the JobExplorer. For more
information, please refer to the Spring
Batch reference documentation on
Querying the Repository.
Spring Batch Integration Configuration
The following configuration creates a file
inbound-channel-adapter to listen for CSV
files in the provided directory, hand them off to our
transformer (FileMessageToJobRequest),
launch the job via the Job Launching Gateway, and then log the output of the
JobExecution with the
logging-channel-adapter.
<int:channel id="inboundFileChannel"/>
<int:channel id="outboundJobRequestChannel"/>
<int:channel id="jobLaunchReplyChannel"/>

<int-file:inbound-channel-adapter id="filePoller"
    channel="inboundFileChannel"
    directory="file:/tmp/myfiles/"
    filename-pattern="*.csv">
  <int:poller fixed-rate="1000"/>
</int-file:inbound-channel-adapter>

<int:transformer input-channel="inboundFileChannel"
    output-channel="outboundJobRequestChannel">
  <bean class="io.spring.sbi.FileMessageToJobRequest">
    <property name="job" ref="personJob"/>
    <property name="fileParameterName" value="input.file.name"/>
  </bean>
</int:transformer>

<batch-int:job-launching-gateway request-channel="outboundJobRequestChannel"
    reply-channel="jobLaunchReplyChannel"/>

<int:logging-channel-adapter channel="jobLaunchReplyChannel"/>@Bean
public FileMessageToJobRequest fileMessageToJobRequest() {
FileMessageToJobRequest fileMessageToJobRequest = new FileMessageToJobRequest();
fileMessageToJobRequest.setFileParameterName("input.file.name");
fileMessageToJobRequest.setJob(personJob());
return fileMessageToJobRequest;
}
@Bean
public JobLaunchingGateway jobLaunchingGateway() {
SimpleJobLauncher simpleJobLauncher = new SimpleJobLauncher();
simpleJobLauncher.setJobRepository(jobRepository);
simpleJobLauncher.setTaskExecutor(new SyncTaskExecutor());
JobLaunchingGateway jobLaunchingGateway = new JobLaunchingGateway(simpleJobLauncher);
return jobLaunchingGateway;
}
@Bean
public IntegrationFlow integrationFlow(JobLaunchingGateway jobLaunchingGateway) {
return IntegrationFlows.from(Files.inboundAdapter(new File("/tmp/myfiles")).
filter(new SimplePatternFileListFilter("*.csv")),
c -> c.poller(Pollers.fixedRate(1000).maxMessagesPerPoll(1))).
transform(fileMessageToJobRequest()).
handle(jobLaunchingGateway).
log(LoggingHandler.Level.WARN, "headers.id + ': ' + payload").
get();
}Example ItemReader Configuration
Now that we are polling for files and launching jobs, we need to
configure our Spring Batch
ItemReader (for example) to use the files found at the location defined
by the job parameter called "input.file.name", as shown in the following bean configuration:
<bean id="itemReader" class="org.springframework.batch.item.file.FlatFileItemReader"
    scope="step">
  <property name="resource" value="file://#{jobParameters['input.file.name']}"/>
    ...
</bean>@Bean
@StepScope
public ItemReader sampleReader(@Value("#{jobParameters[input.file.name]}") String resource) {
...
FlatFileItemReader flatFileItemReader = new FlatFileItemReader();
flatFileItemReader.setResource(new FileSystemResource(resource));
...
return flatFileItemReader;
}The main points of interest in the preceding example are injecting the value of
#{jobParameters['input.file.name']}
as the Resource property value and setting the ItemReader bean
to have Step scope. Setting the bean to have Step scope takes advantage of
the late binding support, which allows access to the
jobParameters variable.
Available Attributes of the Job-Launching Gateway
The job-launching gateway has the following attributes that you can set to control a job:
-
id: Identifies the underlying Spring bean definition, which is an instance of either:-
EventDrivenConsumer -
PollingConsumer(The exact implementation depends on whether the component’s input channel is aSubscribableChannelorPollableChannel.)
-
-
auto-startup: Boolean flag to indicate that the endpoint should start automatically on startup. The default is true. -
request-channel: The inputMessageChannelof this endpoint. -
reply-channel:MessageChannelto which the resultingJobExecutionpayload is sent. -
reply-timeout: Lets you specify how long (in milliseconds) this gateway waits for the reply message to be sent successfully to the reply channel before throwing an exception. This attribute only applies when the channel might block (for example, when using a bounded queue channel that is currently full). Also, keep in mind that, when sending to aDirectChannel, the invocation occurs in the sender’s thread. Therefore, the failing of the send operation may be caused by other components further downstream. Thereply-timeoutattribute maps to thesendTimeoutproperty of the underlyingMessagingTemplateinstance. If not specified, the attribute defaults to<emphasis>-1</emphasis>, meaning that, by default, theGatewaywaits indefinitely. -
job-launcher: Optional. Accepts a customJobLauncherbean reference. If not specified the adapter re-uses the instance that is registered under theidofjobLauncher. If no default instance exists, an exception is thrown. -
order: Specifies the order of invocation when this endpoint is connected as a subscriber to aSubscribableChannel.
Sub-Elements
When this Gateway is receiving messages from a
PollableChannel, you must either provide
a global default Poller or provide a Poller sub-element to the
Job Launching Gateway, as shown in the following example:
<batch-int:job-launching-gateway request-channel="queueChannel"
    reply-channel="replyChannel" job-launcher="jobLauncher">
  <int:poller fixed-rate="1000">
</batch-int:job-launching-gateway>@Bean
@ServiceActivator(inputChannel = "queueChannel", poller = @Poller(fixedRate="1000"))
public JobLaunchingGateway sampleJobLaunchingGateway() {
JobLaunchingGateway jobLaunchingGateway = new JobLaunchingGateway(jobLauncher());
jobLaunchingGateway.setOutputChannel(replyChannel());
return jobLaunchingGateway;
}Providing Feedback with Informational Messages
As Spring Batch jobs can run for long times, providing progress information is often critical. For example, stake-holders may want to be notified if some or all parts of a batch job have failed. Spring Batch provides support for this information being gathered through:
-
Active polling
-
Event-driven listeners
When starting a Spring Batch job asynchronously (for example, by using the
Job Launching Gateway), a
JobExecution instance is returned. Thus,
JobExecution.getJobId() can be used to
continuously poll for status updates by retrieving updated
instances of the JobExecution from the
JobRepository by using the
JobExplorer. However, this is considered
sub-optimal, and an event-driven approach should be preferred.
Therefore, Spring Batch provides listeners, including the three most commonly used listeners:
-
StepListener
-
ChunkListener
-
JobExecutionListener
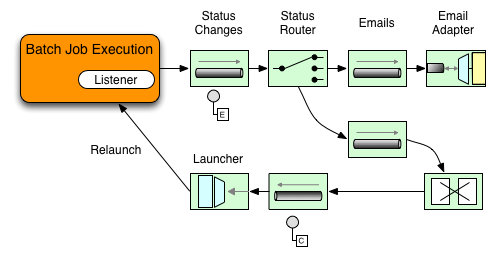
In the example shown in the following image, a Spring Batch job has been configured with a
StepExecutionListener. Thus, Spring
Integration receives and processes any step before or after
events. For example, the received
StepExecution can be inspected by using a
Router. Based on the results of that
inspection, various things can occur (such as routing a message
to a Mail Outbound Channel Adapter), so that an Email notification
can be sent out based on some condition.
The following two-part example shows how a listener is configured to send a
message to a Gateway for a
StepExecution events and log its output to a
logging-channel-adapter.
First, create the notification integration beans:
<int:channel id="stepExecutionsChannel"/>

<int:gateway id="notificationExecutionsListener"
    service-interface="org.springframework.batch.core.StepExecutionListener"
    default-request-channel="stepExecutionsChannel"/>

<int:logging-channel-adapter channel="stepExecutionsChannel"/>@Bean
@ServiceActivator(inputChannel = "stepExecutionsChannel")
public LoggingHandler loggingHandler() {
LoggingHandler adapter = new LoggingHandler(LoggingHandler.Level.WARN);
adapter.setLoggerName("TEST_LOGGER");
adapter.setLogExpressionString("headers.id + ': ' + payload");
return adapter;
}
@MessagingGateway(name = "notificationExecutionsListener", defaultRequestChannel = "stepExecutionsChannel")
public interface NotificationExecutionListener extends StepExecutionListener {}
You will need to add the @IntegrationComponentScan annotation to your configuration.
|
Second, modify your job to add a step-level listener:
<job id="importPayments">
    <step id="step1">
        <tasklet ../>
            <chunk ../>
            <listeners>
                <listener ref="notificationExecutionsListener"/>
            </listeners>
        </tasklet>
        ...
    </step>
</job>public Job importPaymentsJob() {
return jobBuilderFactory.get("importPayments")
.start(stepBuilderFactory.get("step1")
.chunk(200)
.listener(notificationExecutionsListener())
...
}Asynchronous Processors
Asynchronous Processors help you to scale the processing of
items. In the asynchronous processor use case, an
AsyncItemProcessor serves as a dispatcher,
executing the logic of the ItemProcessor for an
item on a new thread. Once the item completes, the Future is passed to
the AsynchItemWriter to be written.
Therefore, you can increase performance by using asynchronous item
processing, basically allowing you to implement
fork-join scenarios. The
AsyncItemWriter gathers the results and
writes back the chunk as soon as all the results become available.
The following example shows how to configuration the AsyncItemProcessor:
<bean id="processor"
    class="org.springframework.batch.integration.async.AsyncItemProcessor">
  <property name="delegate">
    <bean class="your.ItemProcessor"/>
  </property>
  <property name="taskExecutor">
    <bean class="org.springframework.core.task.SimpleAsyncTaskExecutor"/>
  </property>
</bean>@Bean
public AsyncItemProcessor processor(ItemProcessor itemProcessor, TaskExecutor taskExecutor) {
AsyncItemProcessor asyncItemProcessor = new AsyncItemProcessor();
asyncItemProcessor.setTaskExecutor(taskExecutor);
asyncItemProcessor.setDelegate(itemProcessor);
return asyncItemProcessor;
}The delegate property refers
to your ItemProcessor bean, and
the taskExecutor property
refers to the TaskExecutor of your choice.
The following example shows how to configure the AsyncItemWriter:
<bean id="itemWriter"
    class="org.springframework.batch.integration.async.AsyncItemWriter">
  <property name="delegate">
    <bean id="itemWriter" class="your.ItemWriter"/>
  </property>
</bean>@Bean
public AsyncItemWriter writer(ItemWriter itemWriter) {
AsyncItemWriter asyncItemWriter = new AsyncItemWriter();
asyncItemWriter.setDelegate(itemWriter);
return asyncItemWriter;
}Again, the delegate property is
actually a reference to your ItemWriter bean.
Externalizing Batch Process Execution
The integration approaches discussed so far suggest use cases where Spring Integration wraps Spring Batch like an outer-shell. However, Spring Batch can also use Spring Integration internally. Using this approach, Spring Batch users can delegate the processing of items or even chunks to outside processes. This allows you to offload complex processing. Spring Batch Integration provides dedicated support for:
-
Remote Chunking
-
Remote Partitioning
Remote Chunking

Taking things one step further, one can also externalize the
chunk processing by using the
ChunkMessageChannelItemWriter
(provided by Spring Batch Integration), which sends items out
and collects the result. Once sent, Spring Batch continues the
process of reading and grouping items, without waiting for the results.
Rather, it is the responsibility of the ChunkMessageChannelItemWriter
to gather the results and integrate them back into the Spring Batch process.
With Spring Integration, you have full
control over the concurrency of your processes (for instance, by
using a QueueChannel instead of a
DirectChannel). Furthermore, by relying on
Spring Integration’s rich collection of Channel Adapters (such as
JMS and AMQP), you can distribute chunks of a Batch job to
external systems for processing.
A simple job with a step to be remotely chunked might have a configuration similar to the following:
<job id="personJob">
  <step id="step1">
    <tasklet>
      <chunk reader="itemReader" writer="itemWriter" commit-interval="200"/>
    </tasklet>
    ...
  </step>
</job>public Job chunkJob() {
return jobBuilderFactory.get("personJob")
.start(stepBuilderFactory.get("step1")
.<Person, Person>chunk(200)
.reader(itemReader())
.writer(itemWriter())
.build())
.build();
}The ItemReader reference points to the bean you want
to use for reading data on the manager. The ItemWriter reference
points to a special ItemWriter
(called ChunkMessageChannelItemWriter),
as described above. The processor (if any) is left off the
manager configuration, as it is configured on the worker. The
following configuration provides a basic manager setup. You
should check any additional component properties, such as
throttle limits and so on, when implementing your use case.
<bean id="connectionFactory" class="org.apache.activemq.ActiveMQConnectionFactory">
  <property name="brokerURL" value="tcp://localhost:61616"/>
</bean>

<int-jms:outbound-channel-adapter id="jmsRequests" destination-name="requests"/>

<bean id="messagingTemplate"
    class="org.springframework.integration.core.MessagingTemplate">
  <property name="defaultChannel" ref="requests"/>
  <property name="receiveTimeout" value="2000"/>
</bean>

<bean id="itemWriter"
    class="org.springframework.batch.integration.chunk.ChunkMessageChannelItemWriter"
    scope="step">
  <property name="messagingOperations" ref="messagingTemplate"/>
  <property name="replyChannel" ref="replies"/>
</bean>

<int:channel id="replies">
  <int:queue/>
</int:channel>

<int-jms:message-driven-channel-adapter id="jmsReplies"
    destination-name="replies"
channel="replies"/>@Bean
public org.apache.activemq.ActiveMQConnectionFactory connectionFactory() {
ActiveMQConnectionFactory factory = new ActiveMQConnectionFactory();
factory.setBrokerURL("tcp://localhost:61616");
return factory;
}
/*
* Configure outbound flow (requests going to workers)
*/
@Bean
public DirectChannel requests() {
return new DirectChannel();
}
@Bean
public IntegrationFlow outboundFlow(ActiveMQConnectionFactory connectionFactory) {
return IntegrationFlows
.from(requests())
.handle(Jms.outboundAdapter(connectionFactory).destination("requests"))
.get();
}
/*
* Configure inbound flow (replies coming from workers)
*/
@Bean
public QueueChannel replies() {
return new QueueChannel();
}
@Bean
public IntegrationFlow inboundFlow(ActiveMQConnectionFactory connectionFactory) {
return IntegrationFlows
.from(Jms.messageDrivenChannelAdapter(connectionFactory).destination("replies"))
.channel(replies())
.get();
}
/*
* Configure the ChunkMessageChannelItemWriter
*/
@Bean
public ItemWriter<Integer> itemWriter() {
MessagingTemplate messagingTemplate = new MessagingTemplate();
messagingTemplate.setDefaultChannel(requests());
messagingTemplate.setReceiveTimeout(2000);
ChunkMessageChannelItemWriter<Integer> chunkMessageChannelItemWriter
= new ChunkMessageChannelItemWriter<>();
chunkMessageChannelItemWriter.setMessagingOperations(messagingTemplate);
chunkMessageChannelItemWriter.setReplyChannel(replies());
return chunkMessageChannelItemWriter;
}The preceding configuration provides us with a number of beans. We
configure our messaging middleware using ActiveMQ and the
inbound/outbound JMS adapters provided by Spring Integration. As
shown, our itemWriter bean, which is
referenced by our job step, uses the
ChunkMessageChannelItemWriter for writing chunks over the
configured middleware.
Now we can move on to the worker configuration, as shown in the following example:
<bean id="connectionFactory" class="org.apache.activemq.ActiveMQConnectionFactory">
  <property name="brokerURL" value="tcp://localhost:61616"/>
</bean>

<int:channel id="requests"/>
<int:channel id="replies"/>

<int-jms:message-driven-channel-adapter id="incomingRequests"
    destination-name="requests"
    channel="requests"/>

<int-jms:outbound-channel-adapter id="outgoingReplies"
    destination-name="replies"
    channel="replies">
</int-jms:outbound-channel-adapter>

<int:service-activator id="serviceActivator"
    input-channel="requests"
    output-channel="replies"
    ref="chunkProcessorChunkHandler"
    method="handleChunk"/>

<bean id="chunkProcessorChunkHandler"
    class="org.springframework.batch.integration.chunk.ChunkProcessorChunkHandler">
  <property name="chunkProcessor">
    <bean class="org.springframework.batch.core.step.item.SimpleChunkProcessor">
      <property name="itemWriter">
        <bean class="io.spring.sbi.PersonItemWriter"/>
      </property>
      <property name="itemProcessor">
        <bean class="io.spring.sbi.PersonItemProcessor"/>
      </property>
    </bean>
  </property>
</bean>@Bean
public org.apache.activemq.ActiveMQConnectionFactory connectionFactory() {
ActiveMQConnectionFactory factory = new ActiveMQConnectionFactory();
factory.setBrokerURL("tcp://localhost:61616");
return factory;
}
/*
* Configure inbound flow (requests coming from the manager)
*/
@Bean
public DirectChannel requests() {
return new DirectChannel();
}
@Bean
public IntegrationFlow inboundFlow(ActiveMQConnectionFactory connectionFactory) {
return IntegrationFlows
.from(Jms.messageDrivenChannelAdapter(connectionFactory).destination("requests"))
.channel(requests())
.get();
}
/*
* Configure outbound flow (replies going to the manager)
*/
@Bean
public DirectChannel replies() {
return new DirectChannel();
}
@Bean
public IntegrationFlow outboundFlow(ActiveMQConnectionFactory connectionFactory) {
return IntegrationFlows
.from(replies())
.handle(Jms.outboundAdapter(connectionFactory).destination("replies"))
.get();
}
/*
* Configure the ChunkProcessorChunkHandler
*/
@Bean
@ServiceActivator(inputChannel = "requests", outputChannel = "replies")
public ChunkProcessorChunkHandler<Integer> chunkProcessorChunkHandler() {
ChunkProcessor<Integer> chunkProcessor
= new SimpleChunkProcessor<>(itemProcessor(), itemWriter());
ChunkProcessorChunkHandler<Integer> chunkProcessorChunkHandler
= new ChunkProcessorChunkHandler<>();
chunkProcessorChunkHandler.setChunkProcessor(chunkProcessor);
return chunkProcessorChunkHandler;
}Most of these configuration items should look familiar from the
manager configuration. Workers do not need access to
the Spring Batch JobRepository nor
to the actual job configuration file. The main bean of interest
is the chunkProcessorChunkHandler. The
chunkProcessor property of ChunkProcessorChunkHandler takes a
configured SimpleChunkProcessor, which is where you would provide a reference to your
ItemWriter (and, optionally, your
ItemProcessor) that will run on the worker
when it receives chunks from the manager.
For more information, see the section of the "Scalability" chapter on Remote Chunking.
Starting from version 4.1, Spring Batch Integration introduces the @EnableBatchIntegration
annotation that can be used to simplify a remote chunking setup. This annotation provides
two beans that can be autowired in the application context:
-
RemoteChunkingManagerStepBuilderFactory: used to configure the manager step -
RemoteChunkingWorkerBuilder: used to configure the remote worker integration flow
These APIs take care of configuring a number of components as described in the following diagram:
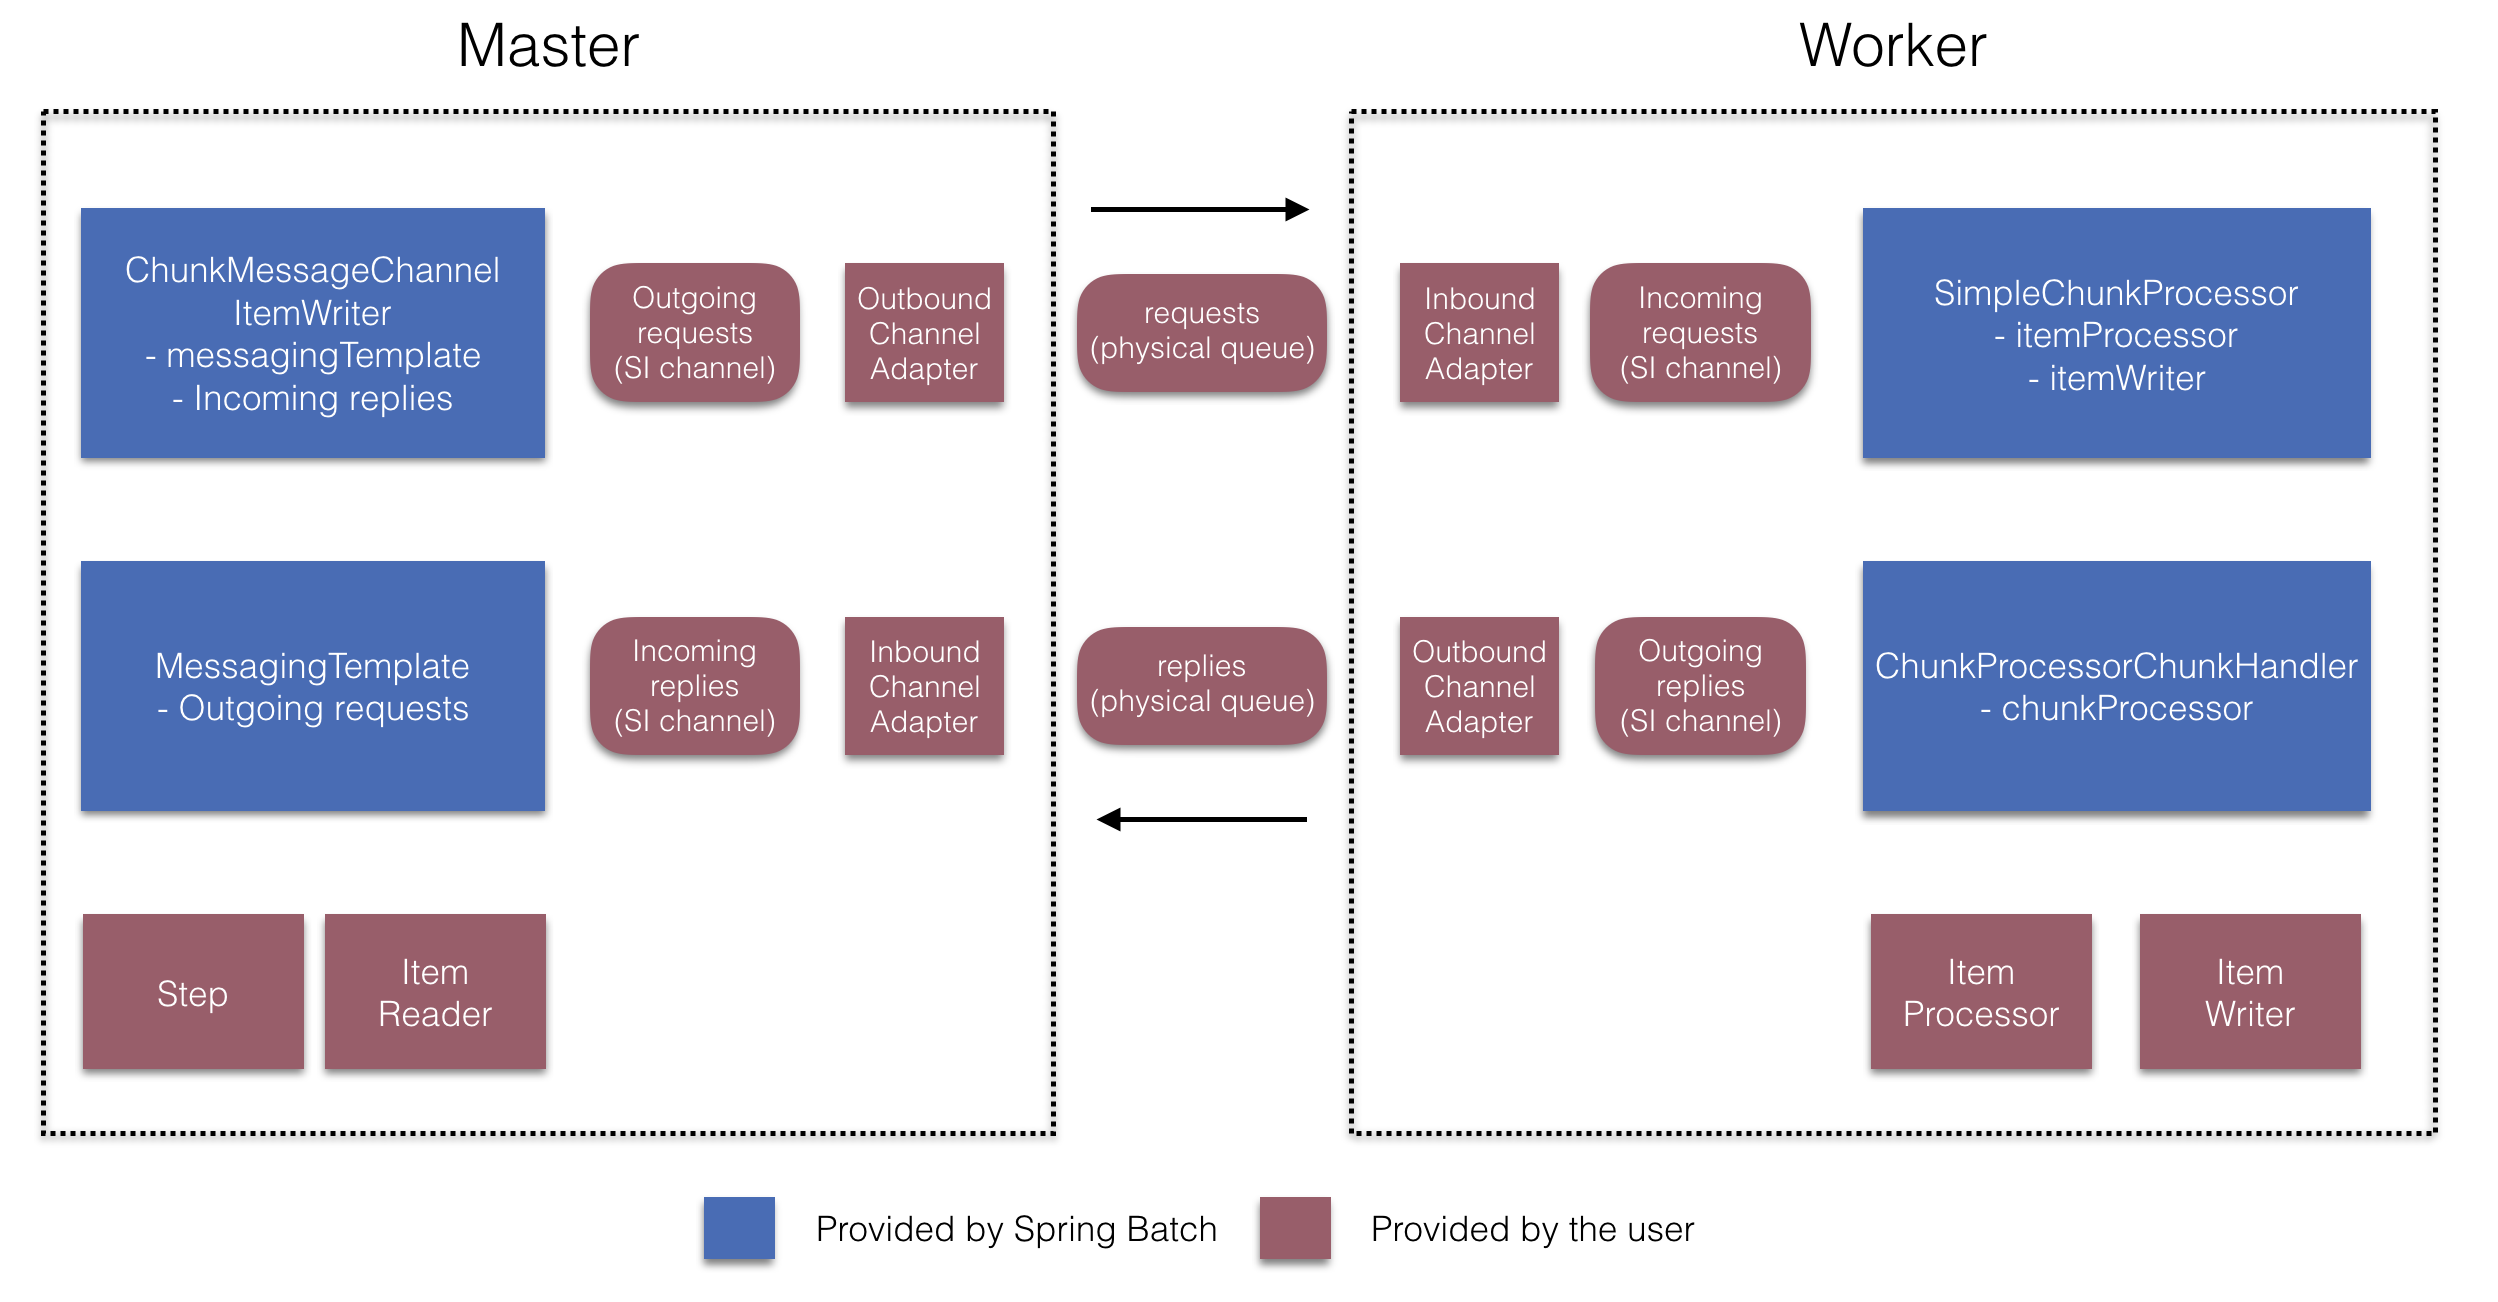
On the manager side, the RemoteChunkingManagerStepBuilderFactory lets you
configure a manager step by declaring:
-
the item reader to read items and send them to workers
-
the output channel ("Outgoing requests") to send requests to workers
-
the input channel ("Incoming replies") to receive replies from workers
A ChunkMessageChannelItemWriter and the MessagingTemplate are not needed to be explicitly configured
(Those can still be explicitly configured if required).
On the worker side, the RemoteChunkingWorkerBuilder allows you to configure a worker to:
-
listen to requests sent by the manager on the input channel ("Incoming requests")
-
call the
handleChunkmethod ofChunkProcessorChunkHandlerfor each request with the configuredItemProcessorandItemWriter -
send replies on the output channel ("Outgoing replies") to the manager
There is no need to explicitly configure the SimpleChunkProcessor
and the ChunkProcessorChunkHandler (Those can be explicitly configured if required).
The following example shows how to use these APIs:
@EnableBatchIntegration
@EnableBatchProcessing
public class RemoteChunkingJobConfiguration {

    @Configuration
    public static class ManagerConfiguration {

        @Autowired
        private RemoteChunkingManagerStepBuilderFactory managerStepBuilderFactory;

        @Bean
        public TaskletStep managerStep() {
            return this.managerStepBuilderFactory.get("managerStep")
                       .chunk(100)
                       .reader(itemReader())
                       .outputChannel(requests()) // requests sent to workers
                       .inputChannel(replies())   // replies received from workers
                       .build();
        }

        // Middleware beans setup omitted

    }

    @Configuration
    public static class WorkerConfiguration {

        @Autowired
        private RemoteChunkingWorkerBuilder workerBuilder;

        @Bean
        public IntegrationFlow workerFlow() {
            return this.workerBuilder
                       .itemProcessor(itemProcessor())
                       .itemWriter(itemWriter())
                       .inputChannel(requests()) // requests received from the manager
                       .outputChannel(replies()) // replies sent to the manager
                       .build();
        }

        // Middleware beans setup omitted

    }

}
You can find a complete example of a remote chunking job here.
Remote Partitioning
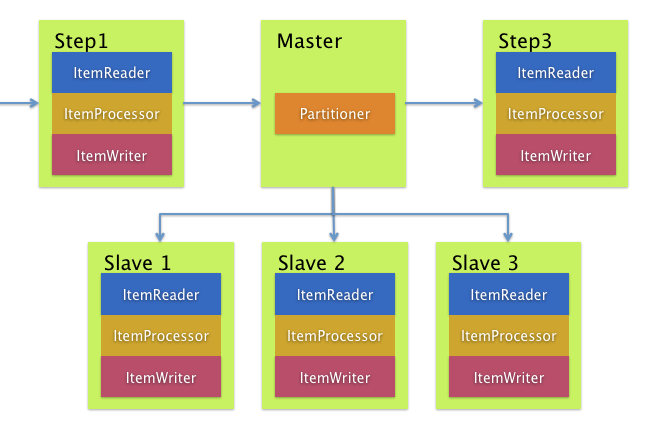
Remote Partitioning, on the other hand, is useful when it
is not the processing of items but rather the associated I/O that
causes the bottleneck. Using Remote Partitioning, work can
be farmed out to workers that execute complete Spring Batch
steps. Thus, each worker has its own ItemReader, ItemProcessor, and
ItemWriter. For this purpose, Spring Batch
Integration provides the MessageChannelPartitionHandler.
This implementation of the PartitionHandler
interface uses MessageChannel instances to
send instructions to remote workers and receive their responses.
This provides a nice abstraction from the transports (such as JMS
and AMQP) being used to communicate with the remote workers.
The section of the "Scalability" chapter that addresses
remote partitioning provides an overview of the concepts and
components needed to configure remote partitioning and shows an
example of using the default
TaskExecutorPartitionHandler to partition
in separate local threads of execution. For remote partitioning
to multiple JVMs, two additional components are required:
-
A remoting fabric or grid environment
-
A
PartitionHandlerimplementation that supports the desired remoting fabric or grid environment
Similar to remote chunking, JMS can be used as the "remoting
fabric". In that case, use a MessageChannelPartitionHandler instance as the PartitionHandler implementation,
as described above.
The following example
assumes an existing partitioned job and focuses on
the MessageChannelPartitionHandler and JMS
configuration:
<bean id="partitionHandler"
   class="org.springframework.batch.integration.partition.MessageChannelPartitionHandler">
  <property name="stepName" value="step1"/>
  <property name="gridSize" value="3"/>
  <property name="replyChannel" ref="outbound-replies"/>
  <property name="messagingOperations">
    <bean class="org.springframework.integration.core.MessagingTemplate">
      <property name="defaultChannel" ref="outbound-requests"/>
      <property name="receiveTimeout" value="100000"/>
    </bean>
  </property>
</bean>

<int:channel id="outbound-requests"/>
<int-jms:outbound-channel-adapter destination="requestsQueue"
    channel="outbound-requests"/>

<int:channel id="inbound-requests"/>
<int-jms:message-driven-channel-adapter destination="requestsQueue"
    channel="inbound-requests"/>

<bean id="stepExecutionRequestHandler"
    class="org.springframework.batch.integration.partition.StepExecutionRequestHandler">
  <property name="jobExplorer" ref="jobExplorer"/>
  <property name="stepLocator" ref="stepLocator"/>
</bean>

<int:service-activator ref="stepExecutionRequestHandler" input-channel="inbound-requests"
    output-channel="outbound-staging"/>

<int:channel id="outbound-staging"/>
<int-jms:outbound-channel-adapter destination="stagingQueue"
    channel="outbound-staging"/>

<int:channel id="inbound-staging"/>
<int-jms:message-driven-channel-adapter destination="stagingQueue"
    channel="inbound-staging"/>

<int:aggregator ref="partitionHandler" input-channel="inbound-staging"
    output-channel="outbound-replies"/>

<int:channel id="outbound-replies">
  <int:queue/>
</int:channel>

<bean id="stepLocator"
class="org.springframework.batch.integration.partition.BeanFactoryStepLocator" />/*
* Configuration of the manager side
*/
@Bean
public PartitionHandler partitionHandler() {
MessageChannelPartitionHandler partitionHandler = new MessageChannelPartitionHandler();
partitionHandler.setStepName("step1");
partitionHandler.setGridSize(3);
partitionHandler.setReplyChannel(outboundReplies());
MessagingTemplate template = new MessagingTemplate();
template.setDefaultChannel(outboundRequests());
template.setReceiveTimeout(100000);
partitionHandler.setMessagingOperations(template);
return partitionHandler;
}
@Bean
public QueueChannel outboundReplies() {
return new QueueChannel();
}
@Bean
public DirectChannel outboundRequests() {
return new DirectChannel();
}
@Bean
public IntegrationFlow outboundJmsRequests() {
return IntegrationFlows.from("outboundRequests")
.handle(Jms.outboundGateway(connectionFactory())
.requestDestination("requestsQueue"))
.get();
}
@Bean
@ServiceActivator(inputChannel = "inboundStaging")
public AggregatorFactoryBean partitioningMessageHandler() throws Exception {
AggregatorFactoryBean aggregatorFactoryBean = new AggregatorFactoryBean();
aggregatorFactoryBean.setProcessorBean(partitionHandler());
aggregatorFactoryBean.setOutputChannel(outboundReplies());
// configure other propeties of the aggregatorFactoryBean
return aggregatorFactoryBean;
}
@Bean
public DirectChannel inboundStaging() {
return new DirectChannel();
}
@Bean
public IntegrationFlow inboundJmsStaging() {
return IntegrationFlows
.from(Jms.messageDrivenChannelAdapter(connectionFactory())
.configureListenerContainer(c -> c.subscriptionDurable(false))
.destination("stagingQueue"))
.channel(inboundStaging())
.get();
}
/*
* Configuration of the worker side
*/
@Bean
public StepExecutionRequestHandler stepExecutionRequestHandler() {
StepExecutionRequestHandler stepExecutionRequestHandler = new StepExecutionRequestHandler();
stepExecutionRequestHandler.setJobExplorer(jobExplorer);
stepExecutionRequestHandler.setStepLocator(stepLocator());
return stepExecutionRequestHandler;
}
@Bean
@ServiceActivator(inputChannel = "inboundRequests", outputChannel = "outboundStaging")
public StepExecutionRequestHandler serviceActivator() throws Exception {
return stepExecutionRequestHandler();
}
@Bean
public DirectChannel inboundRequests() {
return new DirectChannel();
}
public IntegrationFlow inboundJmsRequests() {
return IntegrationFlows
.from(Jms.messageDrivenChannelAdapter(connectionFactory())
.configureListenerContainer(c -> c.subscriptionDurable(false))
.destination("requestsQueue"))
.channel(inboundRequests())
.get();
}
@Bean
public DirectChannel outboundStaging() {
return new DirectChannel();
}
@Bean
public IntegrationFlow outboundJmsStaging() {
return IntegrationFlows.from("outboundStaging")
.handle(Jms.outboundGateway(connectionFactory())
.requestDestination("stagingQueue"))
.get();
}You must also ensure that the partition handler attribute maps to the partitionHandler bean, as shown in the following example:
<job id="personJob">
  <step id="step1.manager">
    <partition partitioner="partitioner" handler="partitionHandler"/>
    ...
  </step>
</job> public Job personJob() {
return jobBuilderFactory.get("personJob")
.start(stepBuilderFactory.get("step1.manager")
.partitioner("step1.worker", partitioner())
.partitionHandler(partitionHandler())
.build())
.build();
}You can find a complete example of a remote partitioning job here.
The @EnableBatchIntegration annotation that can be used to simplify a remote
partitioning setup. This annotation provides two beans useful for remote partitioning:
-
RemotePartitioningManagerStepBuilderFactory: used to configure the manager step -
RemotePartitioningWorkerStepBuilderFactory: used to configure the worker step
These APIs take care of configuring a number of components as described in the following diagram:
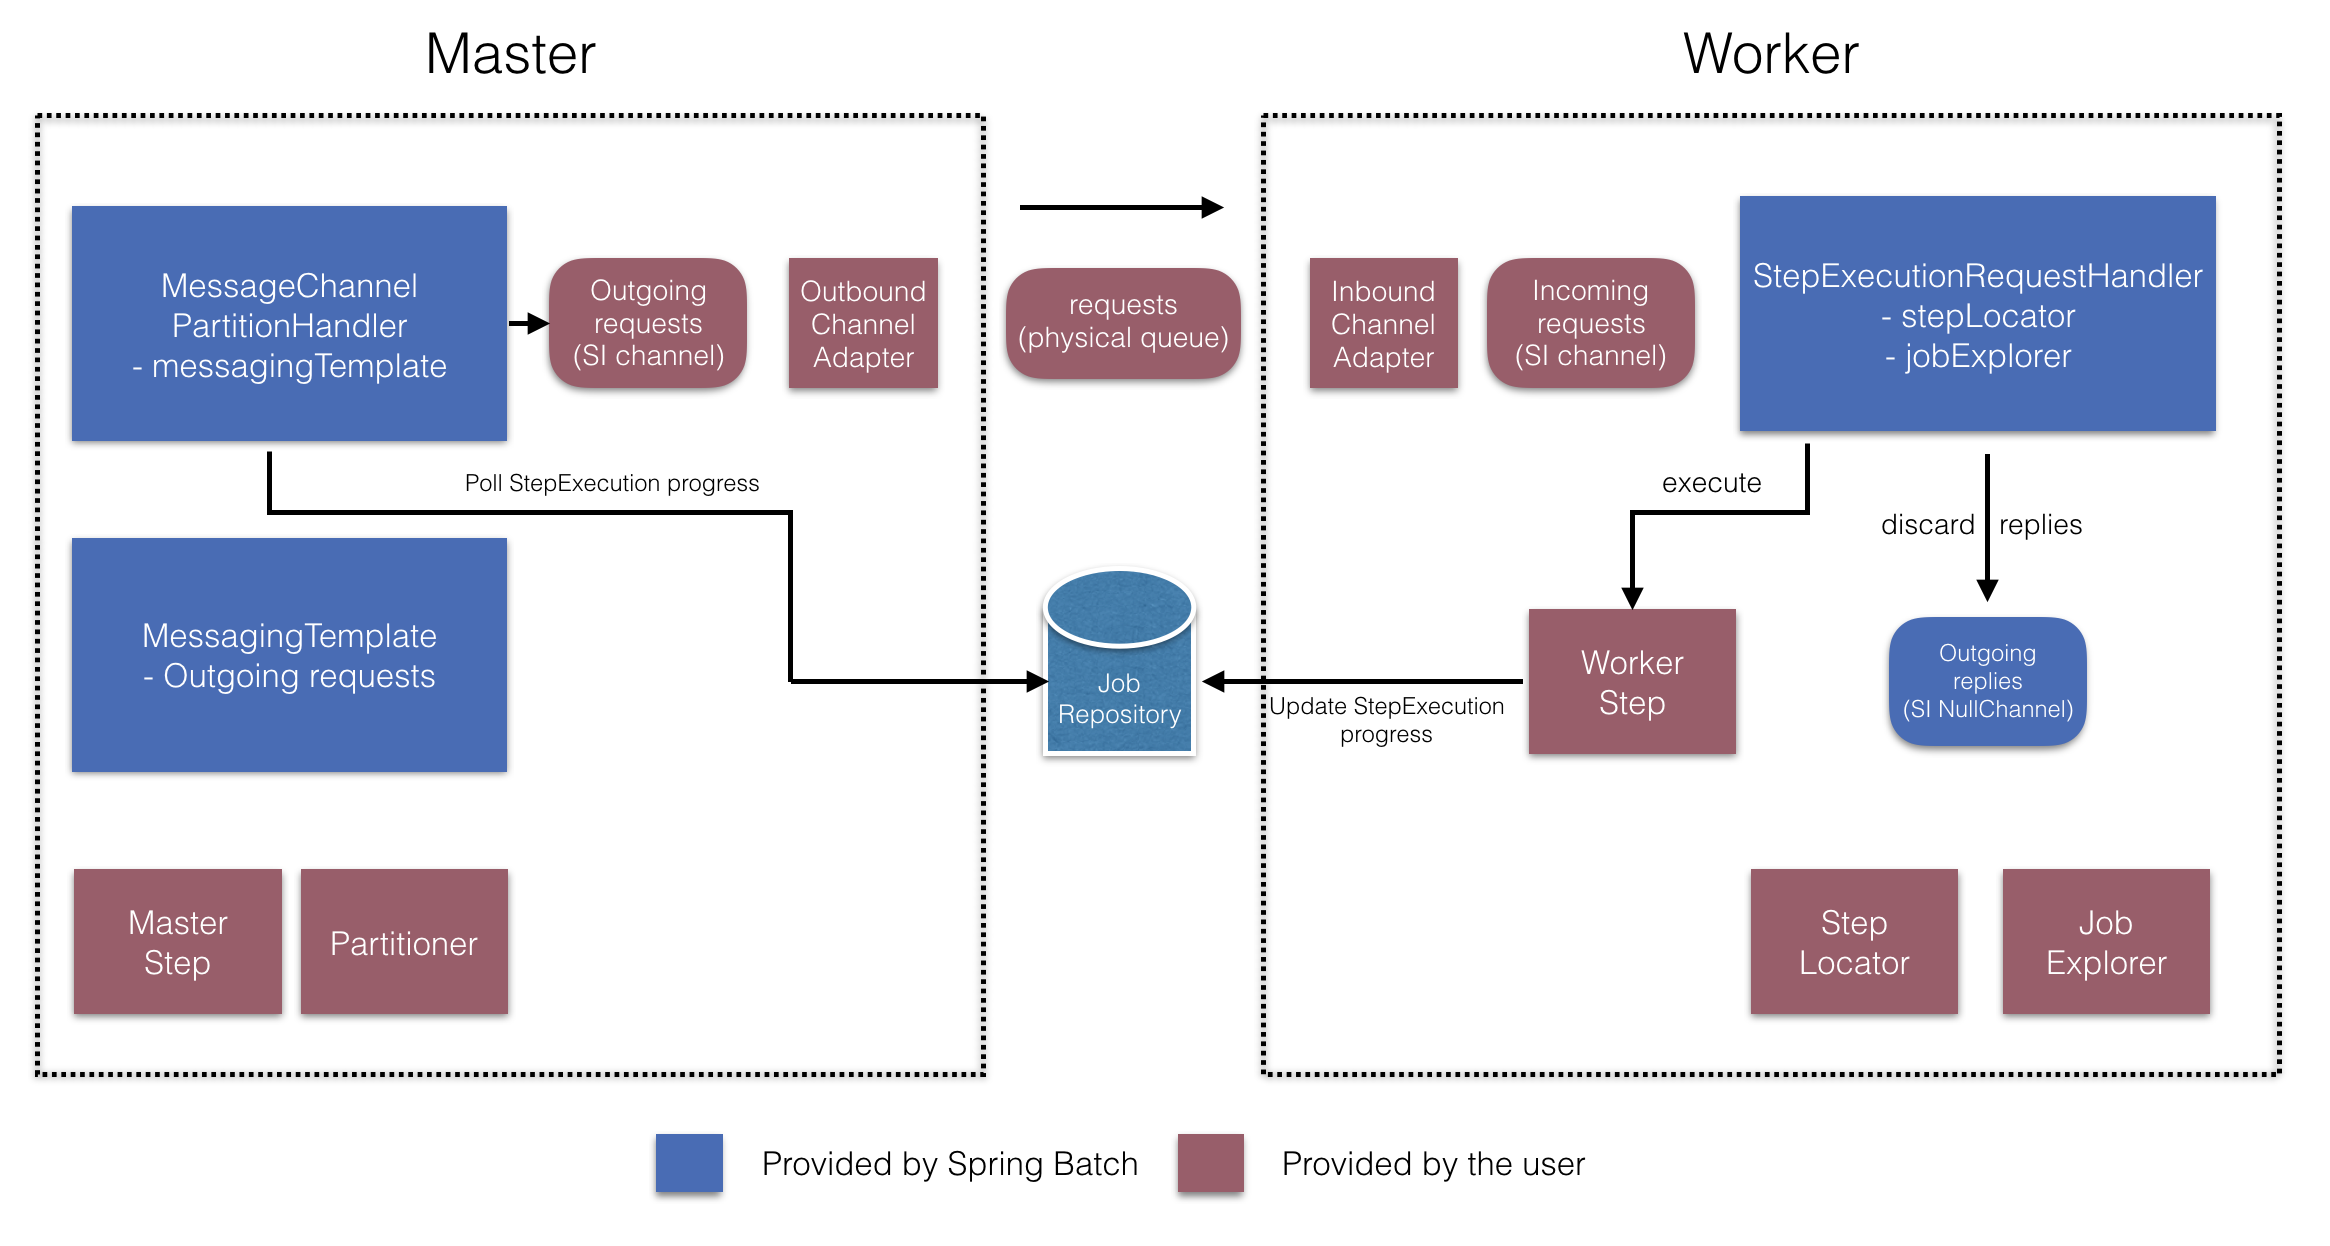
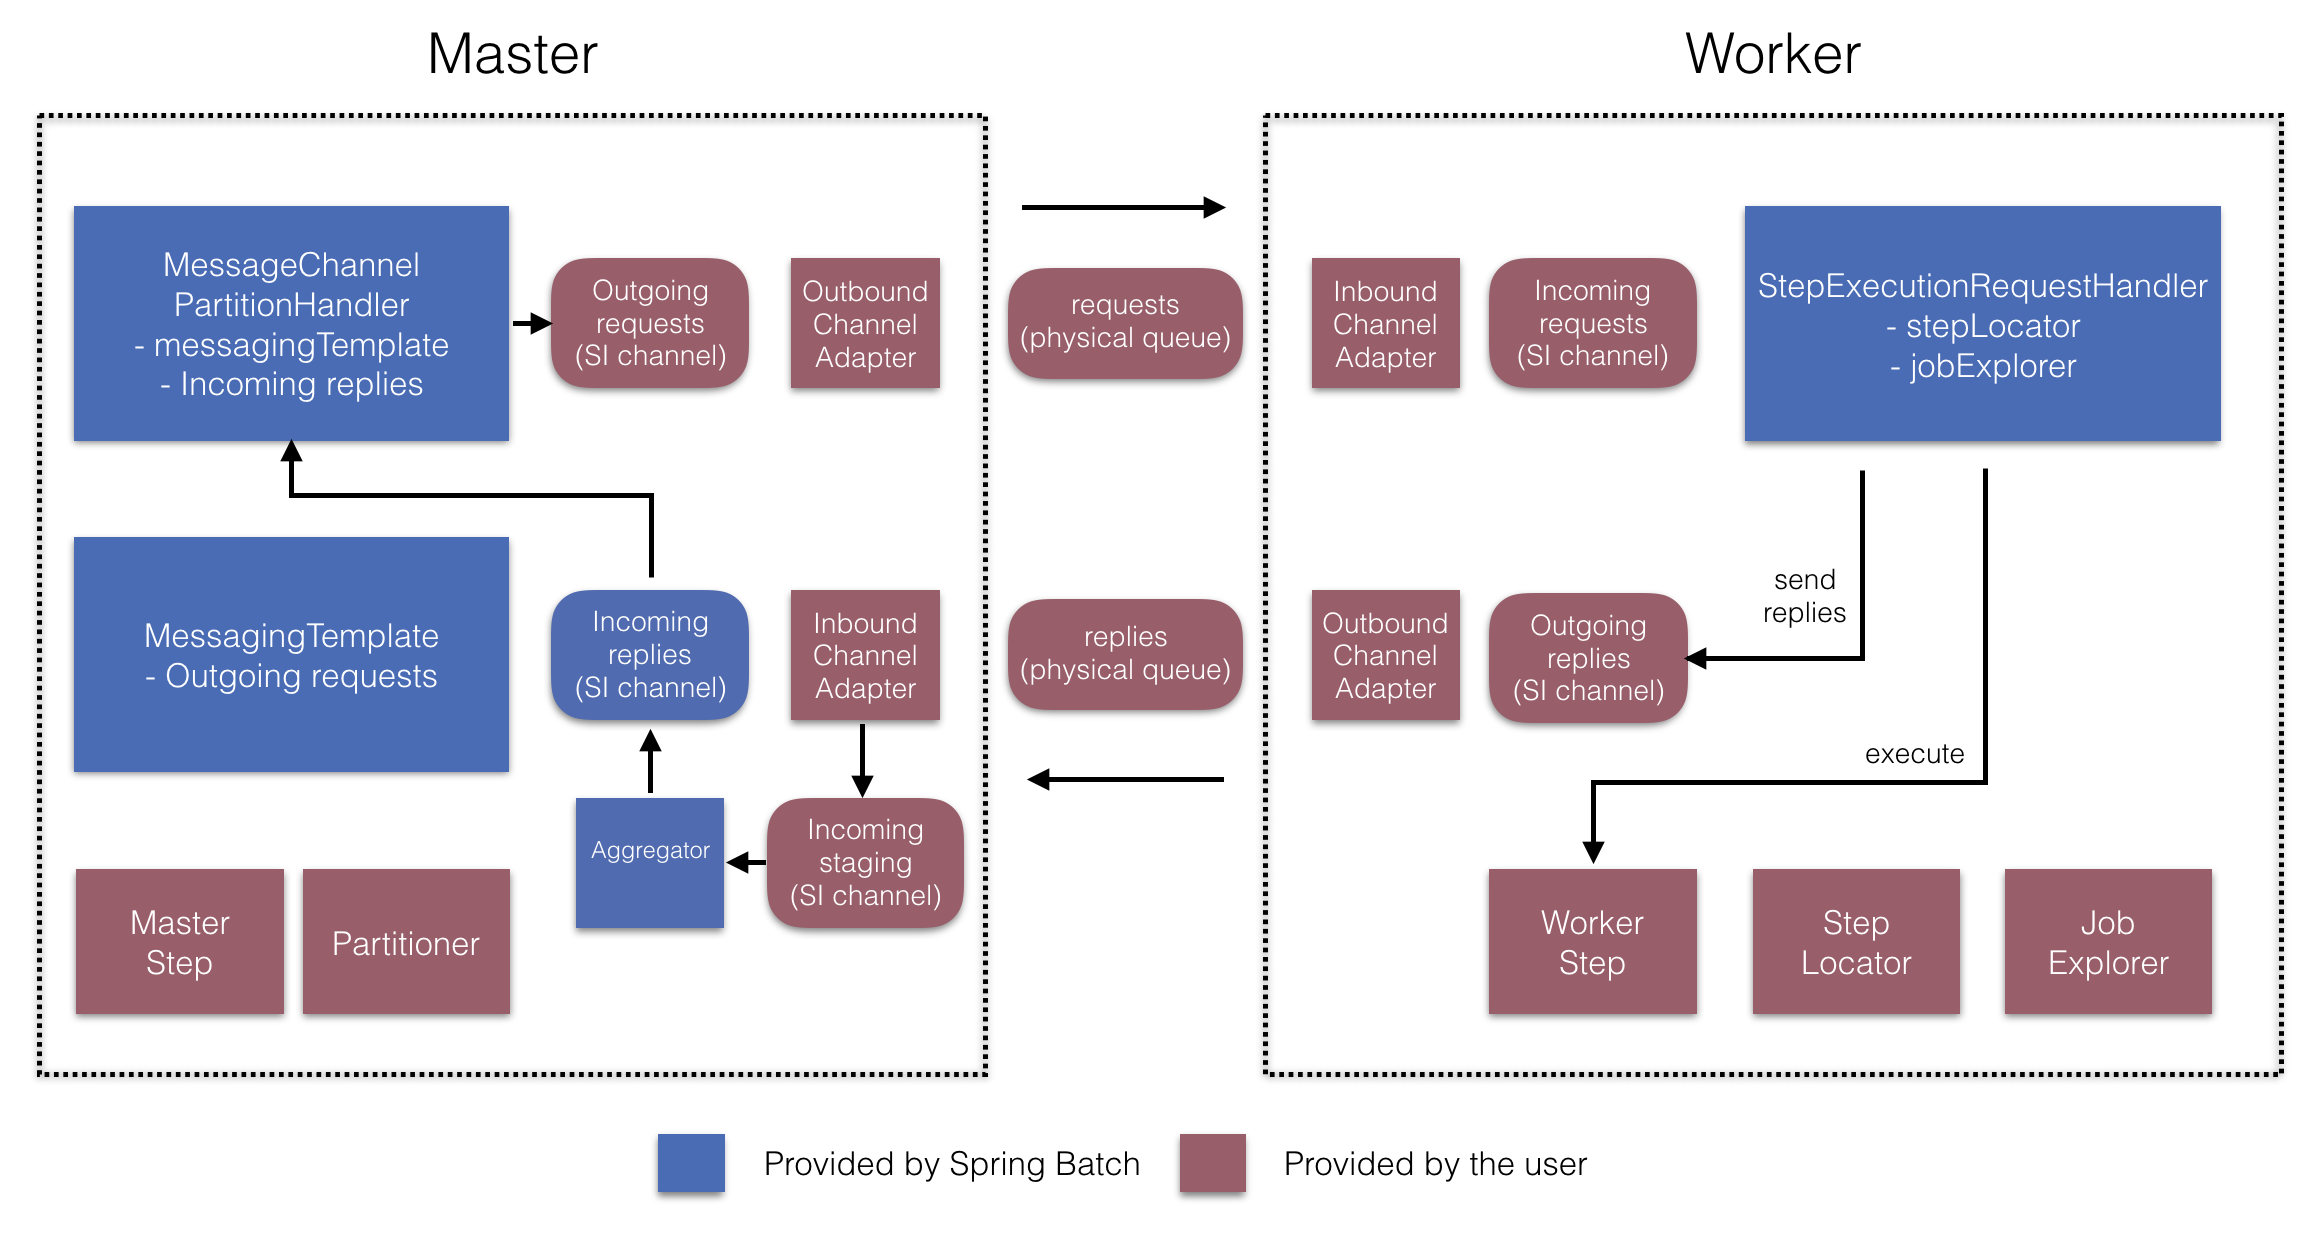
On the manager side, the RemotePartitioningManagerStepBuilderFactory allows you to
configure a manager step by declaring:
-
the
Partitionerused to partition data -
the output channel ("Outgoing requests") to send requests to workers
-
the input channel ("Incoming replies") to receive replies from workers (when configuring replies aggregation)
-
the poll interval and timeout parameters (when configuring job repository polling)
The MessageChannelPartitionHandler and the MessagingTemplate are not needed to be explicitly configured
(Those can still be explicitly configured if required).
On the worker side, the RemotePartitioningWorkerStepBuilderFactory allows you to configure a worker to:
-
listen to requests sent by the manager on the input channel ("Incoming requests")
-
call the
handlemethod ofStepExecutionRequestHandlerfor each request -
send replies on the output channel ("Outgoing replies") to the manager
There is no need to explicitly configure the StepExecutionRequestHandler (which can be explicitly configured if required).
The following example shows how to use these APIs:
@Configuration
@EnableBatchProcessing
@EnableBatchIntegration
public class RemotePartitioningJobConfiguration {

    @Configuration
    public static class ManagerConfiguration {

        @Autowired
        private RemotePartitioningManagerStepBuilderFactory managerStepBuilderFactory;

        @Bean
        public Step managerStep() {
                 return this.managerStepBuilderFactory
                    .get("managerStep")
                    .partitioner("workerStep", partitioner())
                    .gridSize(10)
                    .outputChannel(outgoingRequestsToWorkers())
                    .inputChannel(incomingRepliesFromWorkers())
                    .build();
        }

        // Middleware beans setup omitted

    }

    @Configuration
    public static class WorkerConfiguration {

        @Autowired
        private RemotePartitioningWorkerStepBuilderFactory workerStepBuilderFactory;

        @Bean
        public Step workerStep() {
                 return this.workerStepBuilderFactory
                    .get("workerStep")
                    .inputChannel(incomingRequestsFromManager())
                    .outputChannel(outgoingRepliesToManager())
                    .chunk(100)
                    .reader(itemReader())
                    .processor(itemProcessor())
                    .writer(itemWriter())
                    .build();
        }

        // Middleware beans setup omitted

    }

}