Configuring and Running a Job
In the domain section , the overall architecture design was discussed, using the following diagram as a guide:
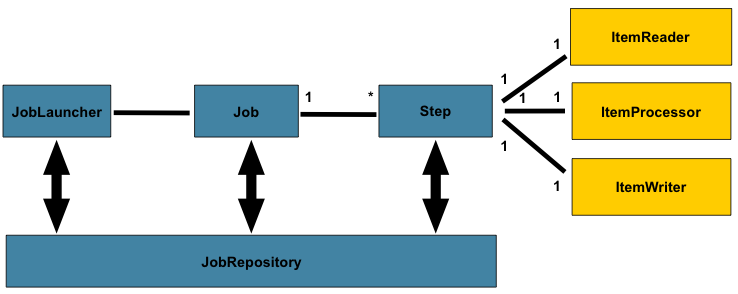
While the Job object may seem like a simple
container for steps, you must be aware of many configuration options.
Furthermore, you must consider many options about
how a Job can be run and how its meta-data can be
stored during that run. This chapter explains the various configuration
options and runtime concerns of a Job.
Configuring a Job
There are multiple implementations of the Job interface. However,
builders abstract away the difference in configuration.
The following example creates a footballJob:
@Bean
public Job footballJob() {
    return this.jobBuilderFactory.get("footballJob")
                     .start(playerLoad())
                     .next(gameLoad())
                     .next(playerSummarization())
                     .build();
}
A Job (and, typically, any Step within it) requires a JobRepository. The
configuration of the JobRepository is handled through the BatchConfigurer.
The preceding example illustrates a Job that consists of three Step instances. The job related
builders can also contain other elements that help with parallelisation (Split),
declarative flow control (Decision), and externalization of flow definitions (Flow).
Whether you use Java or XML, there are multiple implementations of the Job
interface. However, the namespace abstracts away the differences in configuration. It has
only three required dependencies: a name, JobRepository , and a list of Step instances.
<job id="footballJob">
    <step id="playerload"          parent="s1" next="gameLoad"/>
    <step id="gameLoad"            parent="s2" next="playerSummarization"/>
    <step id="playerSummarization" parent="s3"/>
</job>
The examples here use a parent bean definition to create the steps.
See the section on step configuration
for more options when declaring specific step details inline. The XML namespace
defaults to referencing a repository with an ID of jobRepository, which
is a sensible default. However, you can explicitly override it:
<job id="footballJob" job-repository="specialRepository">
    <step id="playerload"          parent="s1" next="gameLoad"/>
    <step id="gameLoad"            parent="s3" next="playerSummarization"/>
    <step id="playerSummarization" parent="s3"/>
</job>
In addition to steps, a job configuration can contain other elements that help with
parallelization (<split>), declarative flow control (<decision>) and externalization
of flow definitions (<flow/>).
Restartability
One key issue when executing a batch job concerns the behavior of a Job when it is
restarted. The launching of a Job is considered to be a “restart” if a JobExecution
already exists for the particular JobInstance. Ideally, all jobs should be able to start
up where they left off, but there are scenarios where this is not possible.
In this scenario, it is entirely up to the developer to ensure that a new JobInstance is created.
However, Spring Batch does provide some help. If a Job should never be
restarted but should always be run as part of a new JobInstance, you can set the
restartable property to false.
The following example shows how to set the restartable field to false in XML:
<job id="footballJob" restartable="false">
    ...
</job>
The following example shows how to set the restartable field to false in Java:
@Bean
public Job footballJob() {
    return this.jobBuilderFactory.get("footballJob")
                     .preventRestart()
                     ...
                     .build();
}
To phrase it another way, setting restartable to false means “this
Job does not support being started again”. Restarting a Job that is not
restartable causes a JobRestartException to
be thrown.
The following Junit code causes the exception to be thrown:
Job job = new SimpleJob();
job.setRestartable(false);

JobParameters jobParameters = new JobParameters();

JobExecution firstExecution = jobRepository.createJobExecution(job, jobParameters);
jobRepository.saveOrUpdate(firstExecution);

try {
    jobRepository.createJobExecution(job, jobParameters);
    fail();
}
catch (JobRestartException e) {
    // expected
}
The first attempt to create a
JobExecution for a non-restartable
job causes no issues. However, the second
attempt throws a JobRestartException.
Intercepting Job Execution
During the course of the execution of a
Job, it may be useful to be notified of various
events in its lifecycle so that custom code can be run.
SimpleJob allows for this by calling a
JobListener at the appropriate time:
public interface JobExecutionListener {

    void beforeJob(JobExecution jobExecution);

    void afterJob(JobExecution jobExecution);
}
You can add JobListeners to a SimpleJob by setting listeners on the job.
The following example shows how to add a listener element to an XML job definition:
<job id="footballJob">
    <step id="playerload"          parent="s1" next="gameLoad"/>
    <step id="gameLoad"            parent="s2" next="playerSummarization"/>
    <step id="playerSummarization" parent="s3"/>
    <listeners>
        <listener ref="sampleListener"/>
    </listeners>
</job>
The following example shows how to add a listener method to a Java job definition:
@Bean
public Job footballJob() {
    return this.jobBuilderFactory.get("footballJob")
                     .listener(sampleListener())
                     ...
                     .build();
}
Noted that the afterJob method is called regardless of the success or
failure of the Job. If you need to determine success or failure, you can get that information
from the JobExecution:
public void afterJob(JobExecution jobExecution){
    if (jobExecution.getStatus() == BatchStatus.COMPLETED ) {
        //job success
    }
    else if (jobExecution.getStatus() == BatchStatus.FAILED) {
        //job failure
    }
}
The annotations corresponding to this interface are:
-
@BeforeJob -
@AfterJob
Inheriting from a Parent Job
If a group of Jobs share similar but not
identical configurations, it may help to define a “parent”
Job from which the concrete
Job instances may inherit properties. Similar to class
inheritance in Java, a “child” Job combines
its elements and attributes with the parent’s.
In the following example, baseJob is an abstract
Job definition that defines only a list of
listeners. The Job (job1) is a concrete
definition that inherits the list of listeners from baseJob and merges
it with its own list of listeners to produce a
Job with two listeners and one
Step, step1.
<job id="baseJob" abstract="true">
    <listeners>
        <listener ref="listenerOne"/>
    <listeners>
</job>

<job id="job1" parent="baseJob">
    <step id="step1" parent="standaloneStep"/>

    <listeners merge="true">
        <listener ref="listenerTwo"/>
    <listeners>
</job>
See the section on Inheriting from a Parent Step for more detailed information.
JobParametersValidator
A job declared in the XML namespace or using any subclass of
AbstractJob can optionally declare a validator for the job parameters at
runtime. This is useful when, for instance, you need to assert that a job
is started with all its mandatory parameters. There is a
DefaultJobParametersValidator that you can use to constrain combinations
of simple mandatory and optional parameters. For more complex
constraints, you can implement the interface yourself.
The configuration of a validator is supported through the XML namespace through a child element of the job, as shown in the following example:
<job id="job1" parent="baseJob3">
    <step id="step1" parent="standaloneStep"/>
    <validator ref="parametersValidator"/>
</job>
You can specify the validator as a reference (as shown earlier) or as a nested bean
definition in the beans namespace.
The configuration of a validator is supported through the Java builders:
@Bean
public Job job1() {
    return this.jobBuilderFactory.get("job1")
                     .validator(parametersValidator())
                     ...
                     .build();
}
Java Configuration
Spring 3 brought the ability to configure applications with java instead of XML. As of
Spring Batch 2.2.0, you can configure batch jobs by using the same Java configuration.
There are three components for the Java-based configuration: the @EnableBatchProcessing
annotation and two builders.
The @EnableBatchProcessing annotation works similarly to the other @Enable* annotations in the
Spring family. In this case, @EnableBatchProcessing provides a base configuration for
building batch jobs. Within this base configuration, an instance of StepScope is
created in addition to a number of beans being made available to be autowired:
-
JobRepository: a bean namedjobRepository -
JobLauncher: a bean namedjobLauncher -
JobRegistry: a bean namedjobRegistry -
PlatformTransactionManager: a bean namedtransactionManager -
JobBuilderFactory: a bean namedjobBuilders -
StepBuilderFactory: a bean namedstepBuilders
The core interface for this configuration is the BatchConfigurer. The default
implementation provides the beans mentioned in the preceding list and requires a DataSource
to be provided as a bean within the context. This data source is used by the JobRepository instance.
You can customize any of these beans
by creating a custom implementation of the BatchConfigurer interface.
Typically, extending the DefaultBatchConfigurer (which is provided if a
BatchConfigurer is not found) and overriding the required getter is sufficient.
However, you may need to implement your own from scratch. The following
example shows how to provide a custom transaction manager:
@Bean
public BatchConfigurer batchConfigurer(DataSource dataSource) {
	return new DefaultBatchConfigurer(dataSource) {
		@Override
		public PlatformTransactionManager getTransactionManager() {
			return new MyTransactionManager();
		}
	};
}|
Only one configuration class needs to have the |
With the base configuration in place, you can use the provided builder factories to
configure a job. The following example shows a two-step job configured with the
JobBuilderFactory and the StepBuilderFactory:
@Configuration
@EnableBatchProcessing
@Import(DataSourceConfiguration.class)
public class AppConfig {

    @Autowired
    private JobBuilderFactory jobs;

    @Autowired
    private StepBuilderFactory steps;

    @Bean
    public Job job(@Qualifier("step1") Step step1, @Qualifier("step2") Step step2) {
        return jobs.get("myJob").start(step1).next(step2).build();
    }

    @Bean
    protected Step step1(ItemReader<Person> reader,
                         ItemProcessor<Person, Person> processor,
                         ItemWriter<Person> writer) {
        return steps.get("step1")
            .<Person, Person> chunk(10)
            .reader(reader)
            .processor(processor)
            .writer(writer)
            .build();
    }

    @Bean
    protected Step step2(Tasklet tasklet) {
        return steps.get("step2")
            .tasklet(tasklet)
            .build();
    }
}
Configuring a JobRepository
When using @EnableBatchProcessing, a JobRepository is provided for you.
This section describes how to configure your own.
As described earlier, the JobRepository is used for basic CRUD operations of the various persisted
domain objects within Spring Batch, such as
JobExecution and
StepExecution. It is required by many of the major
framework features, such as the JobLauncher,
Job, and Step.
The batch namespace abstracts away many of the implementation details of the
JobRepository implementations and their collaborators. However, there are still a few
configuration options available, as shown in the following example:
<job-repository id="jobRepository"
    data-source="dataSource"
    transaction-manager="transactionManager"
    isolation-level-for-create="SERIALIZABLE"
    table-prefix="BATCH_"
	max-varchar-length="1000"/>
Other than the id, none of the configuration options listed earlier are required. If they are
not set, the defaults shown earlier are used.
The max-varchar-length defaults to 2500, which is the length of the long
VARCHAR columns in the sample schema
scripts.
When you use Java configuration, a JobRepository is provided for you. A JDBC-based one is
provided if a DataSource is provided, and the Map-based one is provided if no DataSource is provided. However,
you can customize the configuration of the JobRepository through an implementation of the
BatchConfigurer interface, as the following example shows:
...
// This would reside in your BatchConfigurer implementation
@Override
protected JobRepository createJobRepository() throws Exception {
    JobRepositoryFactoryBean factory = new JobRepositoryFactoryBean();
    factory.setDataSource(dataSource);
    factory.setTransactionManager(transactionManager);
    factory.setIsolationLevelForCreate("ISOLATION_SERIALIZABLE");
    factory.setTablePrefix("BATCH_");
    factory.setMaxVarCharLength(1000);
    return factory.getObject();
}
...
Other than the dataSource and the transactionManager, none of the configuration options listed earlier are required.
If they are not set, the defaults shown earlier
are used. The
max varchar length defaults to 2500, which is the
length of the long VARCHAR columns in the
sample schema scripts
Transaction Configuration for the JobRepository
If the namespace or the provided FactoryBean is used, transactional advice is
automatically created around the repository. This is to ensure that the batch metadata,
including state that is necessary for restarts after a failure, is persisted correctly.
The behavior of the framework is not well defined if the repository methods are not
transactional. The isolation level in the create* method attributes is specified
separately to ensure that, when jobs are launched, if two processes try to launch
the same job at the same time, only one succeeds. The default isolation level for that
method is SERIALIZABLE, which is quite aggressive. READ_COMMITTED usually works just as
well. READ_UNCOMMITTED is fine if two processes are not likely to collide in this
way. However, since a call to the create* method is quite short, it is unlikely that
SERIALIZED causes problems, as long as the database platform supports it. However, you
can override this setting.
The following example shows how to override the isolation level in XML:
<job-repository id="jobRepository"
                isolation-level-for-create="REPEATABLE_READ" />
The following example shows how to override the isolation level in Java:
// This would reside in your BatchConfigurer implementation
@Override
protected JobRepository createJobRepository() throws Exception {
    JobRepositoryFactoryBean factory = new JobRepositoryFactoryBean();
    factory.setDataSource(dataSource);
    factory.setTransactionManager(transactionManager);
    factory.setIsolationLevelForCreate("ISOLATION_REPEATABLE_READ");
    return factory.getObject();
}
If the namespace or factory beans are not used, you must also configure the transactional behavior of the repository using AOP.
The following example shows how to configure the transactional behavior of the repository in XML:
<aop:config>
    <aop:advisor
           pointcut="execution(* org.springframework.batch.core..*Repository+.*(..))"/>
    <advice-ref="txAdvice" />
</aop:config>

<tx:advice id="txAdvice" transaction-manager="transactionManager">
    <tx:attributes>
        <tx:method name="*" />
    </tx:attributes>
</tx:advice>
You can use the preceding fragment nearly as is, with almost no changes. Remember also to
include the appropriate namespace declarations and to make sure spring-tx and spring-aop
(or the whole of Spring) are on the classpath.
The following example shows how to configure the transactional behavior of the repository in Java:
@Bean
public TransactionProxyFactoryBean baseProxy() {
	TransactionProxyFactoryBean transactionProxyFactoryBean = new TransactionProxyFactoryBean();
	Properties transactionAttributes = new Properties();
	transactionAttributes.setProperty("*", "PROPAGATION_REQUIRED");
	transactionProxyFactoryBean.setTransactionAttributes(transactionAttributes);
	transactionProxyFactoryBean.setTarget(jobRepository());
	transactionProxyFactoryBean.setTransactionManager(transactionManager());
	return transactionProxyFactoryBean;
}
Changing the Table Prefix
Another modifiable property of the JobRepository is the table prefix of the meta-data
tables. By default, they are all prefaced with BATCH_. BATCH_JOB_EXECUTION and
BATCH_STEP_EXECUTION are two examples. However, there are potential reasons to modify this
prefix. If the schema names need to be prepended to the table names or if more than one
set of metadata tables is needed within the same schema, the table prefix needs to
be changed.
The following example shows how to change the table prefix in XML:
<job-repository id="jobRepository"
                table-prefix="SYSTEM.TEST_" />
The following example shows how to change the table prefix in Java:
// This would reside in your BatchConfigurer implementation
@Override
protected JobRepository createJobRepository() throws Exception {
    JobRepositoryFactoryBean factory = new JobRepositoryFactoryBean();
    factory.setDataSource(dataSource);
    factory.setTransactionManager(transactionManager);
    factory.setTablePrefix("SYSTEM.TEST_");
    return factory.getObject();
}
Given the preceding changes, every query to the metadata tables is prefixed with
SYSTEM.TEST_. BATCH_JOB_EXECUTION is referred to as SYSTEM.TEST_JOB_EXECUTION.
|
Only the table prefix is configurable. The table and column names are not. |
Non-standard Database Types in a Repository
If you are using a database platform that is not in the list of supported platforms, you
may be able to use one of the supported types, if the SQL variant is close enough. To do
this, you can use the raw JobRepositoryFactoryBean instead of the namespace shortcut and
use it to set the database type to the closest match.
The following example shows how to use JobRepositoryFactoryBean to set the database type
to the closest match in XML:
<bean id="jobRepository" class="org...JobRepositoryFactoryBean">
    <property name="databaseType" value="db2"/>
    <property name="dataSource" ref="dataSource"/>
</bean>
The following example shows how to use JobRepositoryFactoryBean to set the database type
to the closest match in Java:
// This would reside in your BatchConfigurer implementation
@Override
protected JobRepository createJobRepository() throws Exception {
    JobRepositoryFactoryBean factory = new JobRepositoryFactoryBean();
    factory.setDataSource(dataSource);
    factory.setDatabaseType("db2");
    factory.setTransactionManager(transactionManager);
    return factory.getObject();
}
If the database type is not specified, the JobRepositoryFactoryBean tries to
auto-detect the database type from the DataSource.
The major differences between platforms are
mainly accounted for by the strategy for incrementing primary keys, so
it is often be necessary to override the
incrementerFactory as well (by using one of the standard
implementations from the Spring Framework).
If even that does not work or if you are not using an RDBMS, the
only option may be to implement the various Dao
interfaces that the SimpleJobRepository depends
on and wire one up manually in the normal Spring way.
Configuring a JobLauncher
When you use @EnableBatchProcessing, a JobRegistry is provided for you.
This section describes how to configure your own.
The most basic implementation of the JobLauncher interface is the SimpleJobLauncher.
Its only required dependency is a JobRepository (needed to obtain an execution).
The following example shows a SimpleJobLauncher in XML:
<bean id="jobLauncher"
      class="org.springframework.batch.core.launch.support.SimpleJobLauncher">
    <property name="jobRepository" ref="jobRepository" />
</bean>
The following example shows a SimpleJobLauncher in Java:
...
// This would reside in your BatchConfigurer implementation
@Override
protected JobLauncher createJobLauncher() throws Exception {
	SimpleJobLauncher jobLauncher = new SimpleJobLauncher();
	jobLauncher.setJobRepository(jobRepository);
	jobLauncher.afterPropertiesSet();
	return jobLauncher;
}
...
Once a JobExecution is obtained, it is passed to the
execute method of Job, ultimately returning the JobExecution to the caller, as shown
in the following image:
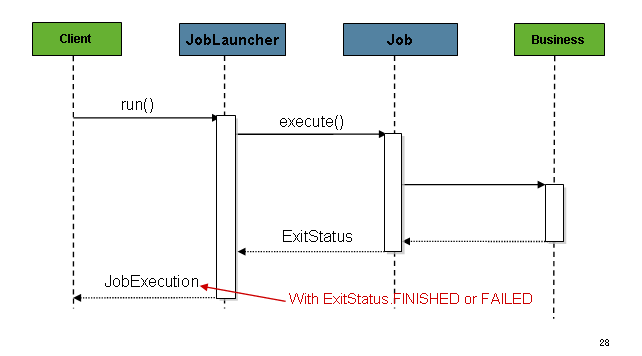
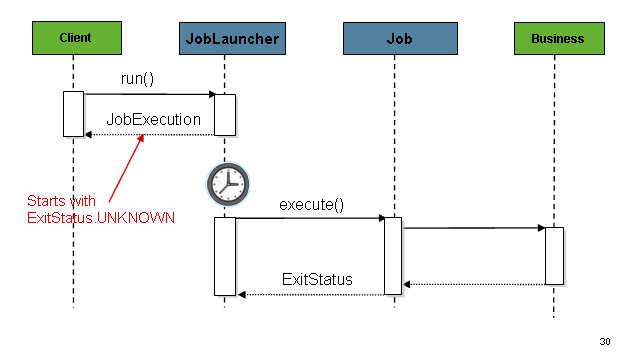
The sequence is straightforward and works well when launched from a scheduler. However,
issues arise when trying to launch from an HTTP request. In this scenario, the launching
needs to be done asynchronously so that the SimpleJobLauncher returns immediately to its
caller. This is because it is not good practice to keep an HTTP request open for the
amount of time needed by long running processes (such as batch jobs). The following image shows
an example sequence:
You can configure the SimpleJobLauncher to allow for this scenario by configuring a
TaskExecutor.
The following XML example shows a SimpleJobLauncher configured to return immediately:
<bean id="jobLauncher"
      class="org.springframework.batch.core.launch.support.SimpleJobLauncher">
    <property name="jobRepository" ref="jobRepository" />
    <property name="taskExecutor">
        <bean class="org.springframework.core.task.SimpleAsyncTaskExecutor" />
    </property>
</bean>
The following Java example shows a SimpleJobLauncher configured to return immediately:
@Bean
public JobLauncher jobLauncher() {
	SimpleJobLauncher jobLauncher = new SimpleJobLauncher();
	jobLauncher.setJobRepository(jobRepository());
	jobLauncher.setTaskExecutor(new SimpleAsyncTaskExecutor());
	jobLauncher.afterPropertiesSet();
	return jobLauncher;
}
Any implementation of the spring TaskExecutor
interface can be used to control how jobs are asynchronously
executed.
Running a Job
At a minimum, launching a batch job requires two things: the
Job to be launched and a
JobLauncher. Both can be contained within the same
context or different contexts. For example, if you launch jobs from the
command line, a new JVM is instantiated for each Job. Thus, every
job has its own JobLauncher. However, if
you run from within a web container within the scope of an
HttpRequest, there is usually one
JobLauncher (configured for asynchronous job
launching) that multiple requests invoke to launch their jobs.
Running Jobs from the Command Line
For users that want to run their jobs from an enterprise
scheduler, the command line is the primary interface. This is because
most schedulers (with the exception of Quartz, unless using
NativeJob) work directly with operating system
processes, primarily kicked off with shell scripts. There are many ways
to launch a Java process besides a shell script, such as Perl, Ruby, or
even build tools, such as ant or maven. However, because most people
are familiar with shell scripts, this example focuses on them.
The CommandLineJobRunner
Because the script launching the job must kick off a Java
Virtual Machine, there needs to be a class with a main method to act
as the primary entry point. Spring Batch provides an implementation
that serves this purpose:
CommandLineJobRunner. Note
that this is just one way to bootstrap your application. There are
many ways to launch a Java process, and this class should in no way be
viewed as definitive. The CommandLineJobRunner
performs four tasks:
-
Load the appropriate
ApplicationContext -
Parse command line arguments into
JobParameters -
Locate the appropriate job based on arguments
-
Use the
JobLauncherprovided in the application context to launch the job.
All of these tasks are accomplished using only the arguments passed in. The following table describes the required arguments:
|
The location of the XML file that is used to
create an |
|
The name of the job to be run. |
These arguments must be passed in with the path first and the name second. All arguments
after these are considered to be job parameters, are turned into a JobParameters object,
and must be in the format of name=value.
The following example shows a date passed as a job parameter to a job defined in XML:
<bash$ java CommandLineJobRunner endOfDayJob.xml endOfDay schedule.date(date)=2007/05/05The following example shows a date passed as a job parameter to a job defined in Java:
<bash$ java CommandLineJobRunner io.spring.EndOfDayJobConfiguration endOfDay schedule.date(date)=2007/05/05|
By default, the In the following example, |
<bash$ java CommandLineJobRunner endOfDayJob.xml endOfDay \
                                 +schedule.date(date)=2007/05/05 -vendor.id=123
<bash$ java CommandLineJobRunner io.spring.EndOfDayJobConfiguration endOfDay \
+schedule.date(date)=2007/05/05 -vendor.id=123You can override this behavior by using a custom JobParametersConverter.
In most cases, you would want to use a manifest to declare your main class in a jar. However,
for simplicity, the class was used directly. This example uses the same EndOfDay
example from the The Domain Language of Batch. The first
argument is endOfDayJob.xml, which is the Spring ApplicationContext that contains the
Job. The second argument, endOfDay, represents the job name. The final argument,
schedule.date(date)=2007/05/05, is converted into a JobParameters object.
The following example shows a sample configuration for endOfDay in XML:
<job id="endOfDay">
    <step id="step1" parent="simpleStep" />
</job>

<!-- Launcher details removed for clarity -->
<beans:bean id="jobLauncher"
         class="org.springframework.batch.core.launch.support.SimpleJobLauncher" />
In most cases, you would want to use a manifest to declare your main class in a jar. However,
for simplicity, the class was used directly. This example uses the same EndOfDay
example from the The Domain Language of Batch. The first
argument is io.spring.EndOfDayJobConfiguration, which is the fully qualified class name
to the configuration class that contains the Job. The second argument, endOfDay, represents
the job name. The final argument, schedule.date(date)=2007/05/05, is converted into a
JobParameters object.
The following example shows a sample configuration for endOfDay in Java:
@Configuration
@EnableBatchProcessing
public class EndOfDayJobConfiguration {

    @Autowired
    private JobBuilderFactory jobBuilderFactory;

    @Autowired
    private StepBuilderFactory stepBuilderFactory;

    @Bean
    public Job endOfDay() {
        return this.jobBuilderFactory.get("endOfDay")
    				.start(step1())
    				.build();
    }

    @Bean
    public Step step1() {
        return this.stepBuilderFactory.get("step1")
    				.tasklet((contribution, chunkContext) -> null)
    				.build();
    }
}
The preceding example is overly simplistic, since there are many more requirements to a
run a batch job in Spring Batch in general, but it serves to show the two main
requirements of the CommandLineJobRunner: Job and JobLauncher.
Exit Codes
When launching a batch job from the command-line, an enterprise
scheduler is often used. Most schedulers are fairly dumb and work only
at the process level. This means that they only know about some
operating system process (such as a shell script that they invoke).
In this scenario, the only way to communicate back to the scheduler
about the success or failure of a job is through return codes. A
return code is a number that is returned to a scheduler by the process
to indicate the result of the run. In the simplest case, 0 is
success and 1 is failure. However, there may be more complex
scenarios, such as “If job A returns 4, kick off job B, and, if it returns 5, kick
off job C.” This type of behavior is configured at the scheduler level,
but it is important that a processing framework such as Spring Batch
provide a way to return a numeric representation of the exit code
for a particular batch job. In Spring Batch, this is encapsulated
within an ExitStatus, which is covered in more
detail in Chapter 5. For the purposes of discussing exit codes, the
only important thing to know is that an
ExitStatus has an exit code property that is
set by the framework (or the developer) and is returned as part of the
JobExecution returned from the
JobLauncher. The
CommandLineJobRunner converts this string value
to a number by using the ExitCodeMapper
interface:
public interface ExitCodeMapper {

    public int intValue(String exitCode);

}
The essential contract of an
ExitCodeMapper is that, given a string exit
code, a number representation will be returned. The default
implementation used by the job runner is the SimpleJvmExitCodeMapper
that returns 0 for completion, 1 for generic errors, and 2 for any job
runner errors such as not being able to find a
Job in the provided context. If anything more
complex than the 3 values above is needed, then a custom
implementation of the ExitCodeMapper interface
must be supplied. Because the
CommandLineJobRunner is the class that creates
an ApplicationContext, and thus cannot be
'wired together', any values that need to be overwritten must be
autowired. This means that if an implementation of
ExitCodeMapper is found within the BeanFactory,
it will be injected into the runner after the context is created. All
that needs to be done to provide your own
ExitCodeMapper is to declare the implementation
as a root level bean and ensure that it is part of the
ApplicationContext that is loaded by the
runner.
Running Jobs from within a Web Container
Historically, offline processing (such as batch jobs) has been
launched from the command-line, as described earlier. However, there are
many cases where launching from an HttpRequest is
a better option. Many such use cases include reporting, ad-hoc job
running, and web application support. Because a batch job (by definition)
is long running, the most important concern is ensuring to launch the
job asynchronously:
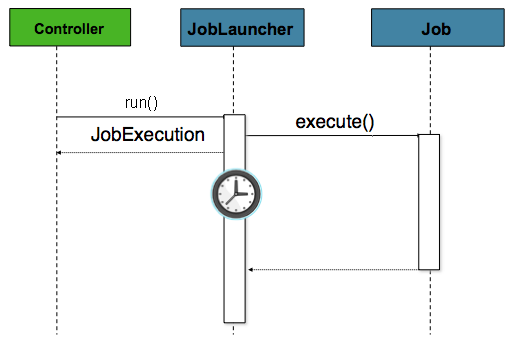
The controller in this case is a Spring MVC controller. See the
Spring Framework Reference Guide for more about Spring MVC.
The controller launches a Job by using a
JobLauncher that has been configured to launch
asynchronously, which
immediately returns a JobExecution. The
Job is likely still running. However, this
nonblocking behavior lets the controller return immediately, which
is required when handling an HttpRequest. The following listing
shows an example:
@Controller
public class JobLauncherController {

    @Autowired
    JobLauncher jobLauncher;

    @Autowired
    Job job;

    @RequestMapping("/jobLauncher.html")
    public void handle() throws Exception{
        jobLauncher.run(job, new JobParameters());
    }
}
Advanced Metadata Usage
So far, both the JobLauncher and JobRepository interfaces have been
discussed. Together, they represent the simple launching of a job and basic
CRUD operations of batch domain objects:
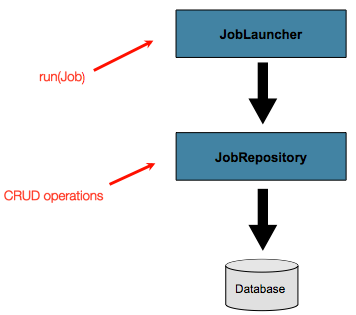
A JobLauncher uses the
JobRepository to create new
JobExecution objects and run them.
Job and Step implementations
later use the same JobRepository for basic updates
of the same executions during the running of a Job.
The basic operations suffice for simple scenarios. However, in a large batch
environment with hundreds of batch jobs and complex scheduling
requirements, more advanced access to the metadata is required:
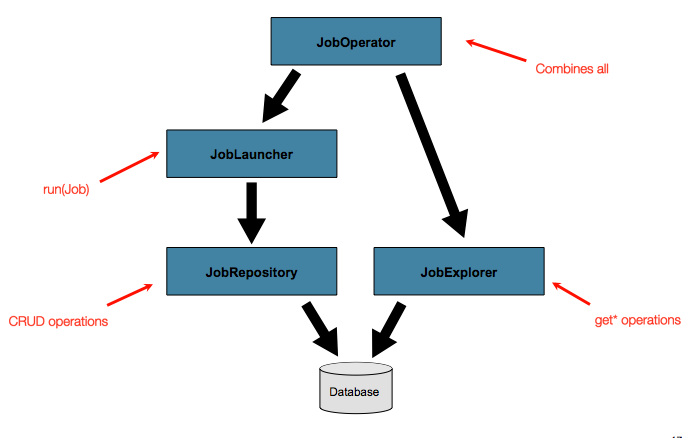
The JobExplorer and
JobOperator interfaces, which are discussed
in the coming sections, add additional functionality for querying and controlling the metadata.
Querying the Repository
The most basic need before any advanced features is the ability to
query the repository for existing executions. This functionality is
provided by the JobExplorer interface:
public interface JobExplorer {

    List<JobInstance> getJobInstances(String jobName, int start, int count);

    JobExecution getJobExecution(Long executionId);

    StepExecution getStepExecution(Long jobExecutionId, Long stepExecutionId);

    JobInstance getJobInstance(Long instanceId);

    List<JobExecution> getJobExecutions(JobInstance jobInstance);

    Set<JobExecution> findRunningJobExecutions(String jobName);
}
As is evident from its method signatures, JobExplorer is a read-only version of
the JobRepository, and, like the JobRepository, it can be easily configured by using a
factory bean.
The following example shows how to configure a JobExplorer in XML:
<bean id="jobExplorer" class="org.spr...JobExplorerFactoryBean"
      p:dataSource-ref="dataSource" />
The following example shows how to configure a JobExplorer in Java:
...
// This would reside in your BatchConfigurer implementation
@Override
public JobExplorer getJobExplorer() throws Exception {
	JobExplorerFactoryBean factoryBean = new JobExplorerFactoryBean();
	factoryBean.setDataSource(this.dataSource);
	return factoryBean.getObject();
}
...
Earlier in this chapter, we noted that you can modify the table prefix
of the JobRepository to allow for different versions or schemas. Because
the JobExplorer works with the same tables, it also needs the ability to set a prefix.
The following example shows how to set the table prefix for a JobExplorer in XML:
<bean id="jobExplorer" class="org.spr...JobExplorerFactoryBean"
		p:tablePrefix="SYSTEM."/>
The following example shows how to set the table prefix for a JobExplorer in Java:
...
// This would reside in your BatchConfigurer implementation
@Override
public JobExplorer getJobExplorer() throws Exception {
	JobExplorerFactoryBean factoryBean = new JobExplorerFactoryBean();
	factoryBean.setDataSource(this.dataSource);
	factoryBean.setTablePrefix("SYSTEM.");
	return factoryBean.getObject();
}
...
JobRegistry
A JobRegistry (and its parent interface, JobLocator) is not mandatory, but it can be
useful if you want to keep track of which jobs are available in the context. It is also
useful for collecting jobs centrally in an application context when they have been created
elsewhere (for example, in child contexts). You can also use custom JobRegistry implementations
to manipulate the names and other properties of the jobs that are registered.
There is only one implementation provided by the framework and this is based on a simple
map from job name to job instance.
The following example shows how to include a JobRegistry for a job defined in XML:
<bean id="jobRegistry" class="org.springframework.batch.core.configuration.support.MapJobRegistry" />When using @EnableBatchProcessing, a JobRegistry is provided for you.
The following example shows how to configure your own JobRegistry:
...
// This is already provided via the @EnableBatchProcessing but can be customized via
// overriding the getter in the SimpleBatchConfiguration
@Override
@Bean
public JobRegistry jobRegistry() throws Exception {
	return new MapJobRegistry();
}
...
You can populate a JobRegistry in either of two ways: by using
a bean post processor or by using a registrar lifecycle component. The coming
sections describe these two mechanisms.
JobRegistryBeanPostProcessor
This is a bean post-processor that can register all jobs as they are created.
The following example shows how to include the JobRegistryBeanPostProcessor for a job
defined in XML:
<bean id="jobRegistryBeanPostProcessor" class="org.spr...JobRegistryBeanPostProcessor">
    <property name="jobRegistry" ref="jobRegistry"/>
</bean>
The following example shows how to include the JobRegistryBeanPostProcessor for a job
defined in Java:
@Bean
public JobRegistryBeanPostProcessor jobRegistryBeanPostProcessor() {
    JobRegistryBeanPostProcessor postProcessor = new JobRegistryBeanPostProcessor();
    postProcessor.setJobRegistry(jobRegistry());
    return postProcessor;
}
Although it is not strictly necessary, the post-processor in the
example has been given an id so that it can be included in child
contexts (for example, as a parent bean definition) and cause all jobs created
there to also be registered automatically.
AutomaticJobRegistrar
This is a lifecycle component that creates child contexts and registers jobs from those
contexts as they are created. One advantage of doing this is that, while the job names in
the child contexts still have to be globally unique in the registry, their dependencies
can have “natural” names. So, for example, you can create a set of XML configuration files
that each have only one Job but that all have different definitions of an ItemReader with the
same bean name, such as reader. If all those files were imported into the same context,
the reader definitions would clash and override one another, but, with the automatic
registrar, this is avoided. This makes it easier to integrate jobs that have been contributed from
separate modules of an application.
The following example shows how to include the AutomaticJobRegistrar for a job defined
in XML:
<bean class="org.spr...AutomaticJobRegistrar">
   <property name="applicationContextFactories">
      <bean class="org.spr...ClasspathXmlApplicationContextsFactoryBean">
         <property name="resources" value="classpath*:/config/job*.xml" />
      </bean>
   </property>
   <property name="jobLoader">
      <bean class="org.spr...DefaultJobLoader">
         <property name="jobRegistry" ref="jobRegistry" />
      </bean>
   </property>
</bean>
The following example shows how to include the AutomaticJobRegistrar for a job defined
in Java:
@Bean
public AutomaticJobRegistrar registrar() {

    AutomaticJobRegistrar registrar = new AutomaticJobRegistrar();
    registrar.setJobLoader(jobLoader());
    registrar.setApplicationContextFactories(applicationContextFactories());
    registrar.afterPropertiesSet();
    return registrar;

}
The registrar has two mandatory properties: an array of
ApplicationContextFactory (created from a
convenient factory bean in the preceding example) and a
JobLoader. The JobLoader
is responsible for managing the lifecycle of the child contexts and
registering jobs in the JobRegistry.
The ApplicationContextFactory is
responsible for creating the child context. The most common usage
is (as in the preceding example) to use a
ClassPathXmlApplicationContextFactory. One of
the features of this factory is that, by default, it copies some of the
configuration down from the parent context to the child. So, for
instance, you need not redefine the
PropertyPlaceholderConfigurer or AOP
configuration in the child, provided it should be the same as the
parent.
You can use AutomaticJobRegistrar in
conjunction with a JobRegistryBeanPostProcessor
(as long as you also use DefaultJobLoader).
For instance, this might be desirable if there are jobs
defined in the main parent context as well as in the child
locations.
JobOperator
As previously discussed, the JobRepository
provides CRUD operations on the meta-data, and the
JobExplorer provides read-only operations on the
meta-data. However, those operations are most useful when used together
to perform common monitoring tasks such as stopping, restarting, or
summarizing a Job, as is commonly done by batch operators. Spring Batch
provides these types of operations via the
JobOperator interface:
public interface JobOperator {

    List<Long> getExecutions(long instanceId) throws NoSuchJobInstanceException;

    List<Long> getJobInstances(String jobName, int start, int count)
          throws NoSuchJobException;

    Set<Long> getRunningExecutions(String jobName) throws NoSuchJobException;

    String getParameters(long executionId) throws NoSuchJobExecutionException;

    Long start(String jobName, String parameters)
          throws NoSuchJobException, JobInstanceAlreadyExistsException;

    Long restart(long executionId)
          throws JobInstanceAlreadyCompleteException, NoSuchJobExecutionException,
                  NoSuchJobException, JobRestartException;

    Long startNextInstance(String jobName)
          throws NoSuchJobException, JobParametersNotFoundException, JobRestartException,
                 JobExecutionAlreadyRunningException, JobInstanceAlreadyCompleteException;

    boolean stop(long executionId)
          throws NoSuchJobExecutionException, JobExecutionNotRunningException;

    String getSummary(long executionId) throws NoSuchJobExecutionException;

    Map<Long, String> getStepExecutionSummaries(long executionId)
          throws NoSuchJobExecutionException;

    Set<String> getJobNames();

}
The above operations represent methods from many different interfaces, such as
JobLauncher, JobRepository, JobExplorer, and JobRegistry. For this reason, the
provided implementation of JobOperator (SimpleJobOperator) has many dependencies.
The following example shows a typical bean definition for SimpleJobOperator in XML:
<bean id="jobOperator" class="org.spr...SimpleJobOperator">
    <property name="jobExplorer">
        <bean class="org.spr...JobExplorerFactoryBean">
            <property name="dataSource" ref="dataSource" />
        </bean>
    </property>
    <property name="jobRepository" ref="jobRepository" />
    <property name="jobRegistry" ref="jobRegistry" />
    <property name="jobLauncher" ref="jobLauncher" />
</bean>
The following example shows a typical bean definition for SimpleJobOperator in Java:
 /**
  * All injected dependencies for this bean are provided by the @EnableBatchProcessing
  * infrastructure out of the box.
  */
 @Bean
 public SimpleJobOperator jobOperator(JobExplorer jobExplorer,
                                JobRepository jobRepository,
                                JobRegistry jobRegistry) {

	SimpleJobOperator jobOperator = new SimpleJobOperator();

	jobOperator.setJobExplorer(jobExplorer);
	jobOperator.setJobRepository(jobRepository);
	jobOperator.setJobRegistry(jobRegistry);
	jobOperator.setJobLauncher(jobLauncher);

	return jobOperator;
}| If you set the table prefix on the job repository, don’t forget to set it on the job explorer as well. |
JobParametersIncrementer
Most of the methods on JobOperator are
self-explanatory, and you can find more detailed explanations in the
javadoc of the interface. However, the
startNextInstance method is worth noting. This
method always starts a new instance of a Job.
This can be extremely useful if there are serious issues in a
JobExecution and the Job
needs to be started over again from the beginning. Unlike
JobLauncher (which requires a new
JobParameters object that triggers a new
JobInstance), if the parameters are different from
any previous set of parameters, the
startNextInstance method uses the
JobParametersIncrementer tied to the
Job to force the Job to a
new instance:
public interface JobParametersIncrementer {

    JobParameters getNext(JobParameters parameters);

}
The contract of JobParametersIncrementer is
that, given a JobParameters
object, it returns the 'next' JobParameters
object by incrementing any necessary values it may contain. This
strategy is useful because the framework has no way of knowing what
changes to the JobParameters make it the “next”
instance. For example, if the only value in
JobParameters is a date and the next instance
should be created, should that value be incremented by one day? Or one
week (if the job is weekly, for instance)? The same can be said for any
numerical values that help to identify the Job,
as the following example shows:
public class SampleIncrementer implements JobParametersIncrementer {

    public JobParameters getNext(JobParameters parameters) {
        if (parameters==null || parameters.isEmpty()) {
            return new JobParametersBuilder().addLong("run.id", 1L).toJobParameters();
        }
        long id = parameters.getLong("run.id",1L) + 1;
        return new JobParametersBuilder().addLong("run.id", id).toJobParameters();
    }
}
In this example, the value with a key of 'run.id' is used to
discriminate between JobInstances. If the
JobParameters passed in is null, it can be
assumed that the Job has never been run before
and thus its initial state can be returned. However, if not, the old
value is obtained, incremented by one, and returned.
For jobs defined in XML, you can associate an incrementer with a Job through the
incrementer attribute in the namespace, as follows:
<job id="footballJob" incrementer="sampleIncrementer">
    ...
</job>
For jobs defined in Java, you can associate an incrementer with a Job through the
incrementer method provided in the builders, as follows:
@Bean
public Job footballJob() {
    return this.jobBuilderFactory.get("footballJob")
    				 .incrementer(sampleIncrementer())
    				 ...
                     .build();
}
Stopping a Job
One of the most common use cases of
JobOperator is gracefully stopping a
Job:
Set<Long> executions = jobOperator.getRunningExecutions("sampleJob");
jobOperator.stop(executions.iterator().next());
The shutdown is not immediate, since there is no way to force
immediate shutdown, especially if the execution is currently in
developer code that the framework has no control over, such as a
business service. However, as soon as control is returned back to the
framework, it sets the status of the current
StepExecution to
BatchStatus.STOPPED, saves it, and then does the same
for the JobExecution before finishing.
Aborting a Job
A job execution that is FAILED can be
restarted (if the Job is restartable). A job execution whose status is
ABANDONED cannot be restarted by the framework.
The ABANDONED status is also used in step
executions to mark them as skippable in a restarted job execution. If a
job is running and encounters a step that has been marked
ABANDONED in the previous failed job execution, it
moves on to the next step (as determined by the job flow definition
and the step execution exit status).
If the process died ("kill -9" or server
failure) the job is, of course, not running, but the JobRepository has
no way of knowing because no one told it before the process died. You
have to tell it manually that you know that the execution either failed
or should be considered aborted (change its status to
FAILED or ABANDONED). This is
a business decision, and there is no way to automate it. Change the
status to FAILED only if it is not restartable or if
you know the restart data is valid.