This guide walks you through building a simple Spring Boot application using Spring Session backed by Apache Geode to manage HTTP Session state.
It is assumed that the reader is familiar with the Spring programming model as well as the Java Servlet API. No prior knowledge of Spring Session or Apache Geode is required to utilize HTTP Session State Caching in your Spring Boot applications.
Let’s begin.
1. Background
HTTP Session Caching is one of the most used forms of caching in enterprise applications, especially given the proliferation of Web applications in the enterprise.
HTTP Sessions are primarily used to manage conversational state with users of your Web applications between HTTP requests given that HTTP is a stateless protocol. This is due to the fact that HTTP connections are not persistent. When an HTTP client makes a request, the client opens a connection to the server, sends an HTTP request, waits for the server to process the request and respond, and then closes the connection. Each time an HTTP request is sent, the same procedure is followed.
Of course, there are alternatives to HTTP when making remote Web Service requests. For instance, if you are using WebSockets in your applications, then you would have persistent connections and would most likely be using either the STOMP or WAMP protocols.
| The core Spring Framework has first-class support for WebSockets over the STOMP protocol. |
| Spring Session additionally supports Session State Management for WebSockets. |
As mentioned above, it is useful to use the HTTP Session to manage conversational state with users of your applications so that they can experience continuity between separate interactions (i.e. HTTP requests). In order to maintain that continuity and provide a consistent, uninterrupted experience, the HTTP Session must be preserved in a reliable manner.
One way to do this is to employ a data management solution in your application architecture that 1) makes the HTTP Session highly available and 2) makes the HTTP Session resilient to failures in the system architecture.
Apache Geode is ideal for managing HTTP Session state given that it can distribute data/state across a scaled-out, highly-available architecture by replicating data in a redundant and organized (partitioned) manner, thereby making the data resilient to network and hardware failures.
This is ideal in a cloud environment given that you will most likely be running multiple instances of your application in order to serve the demand, especially during peak loads. In these cases, you will undoubtedly face failures and each application instance will need to be prepared to take over in a moments notice to provide the consistent, uninterrupted experience to which we alluded to above. These applications instances will need access to the same HTTP Session state.
An application architecture with HTTP Session State Caching appears as follows:
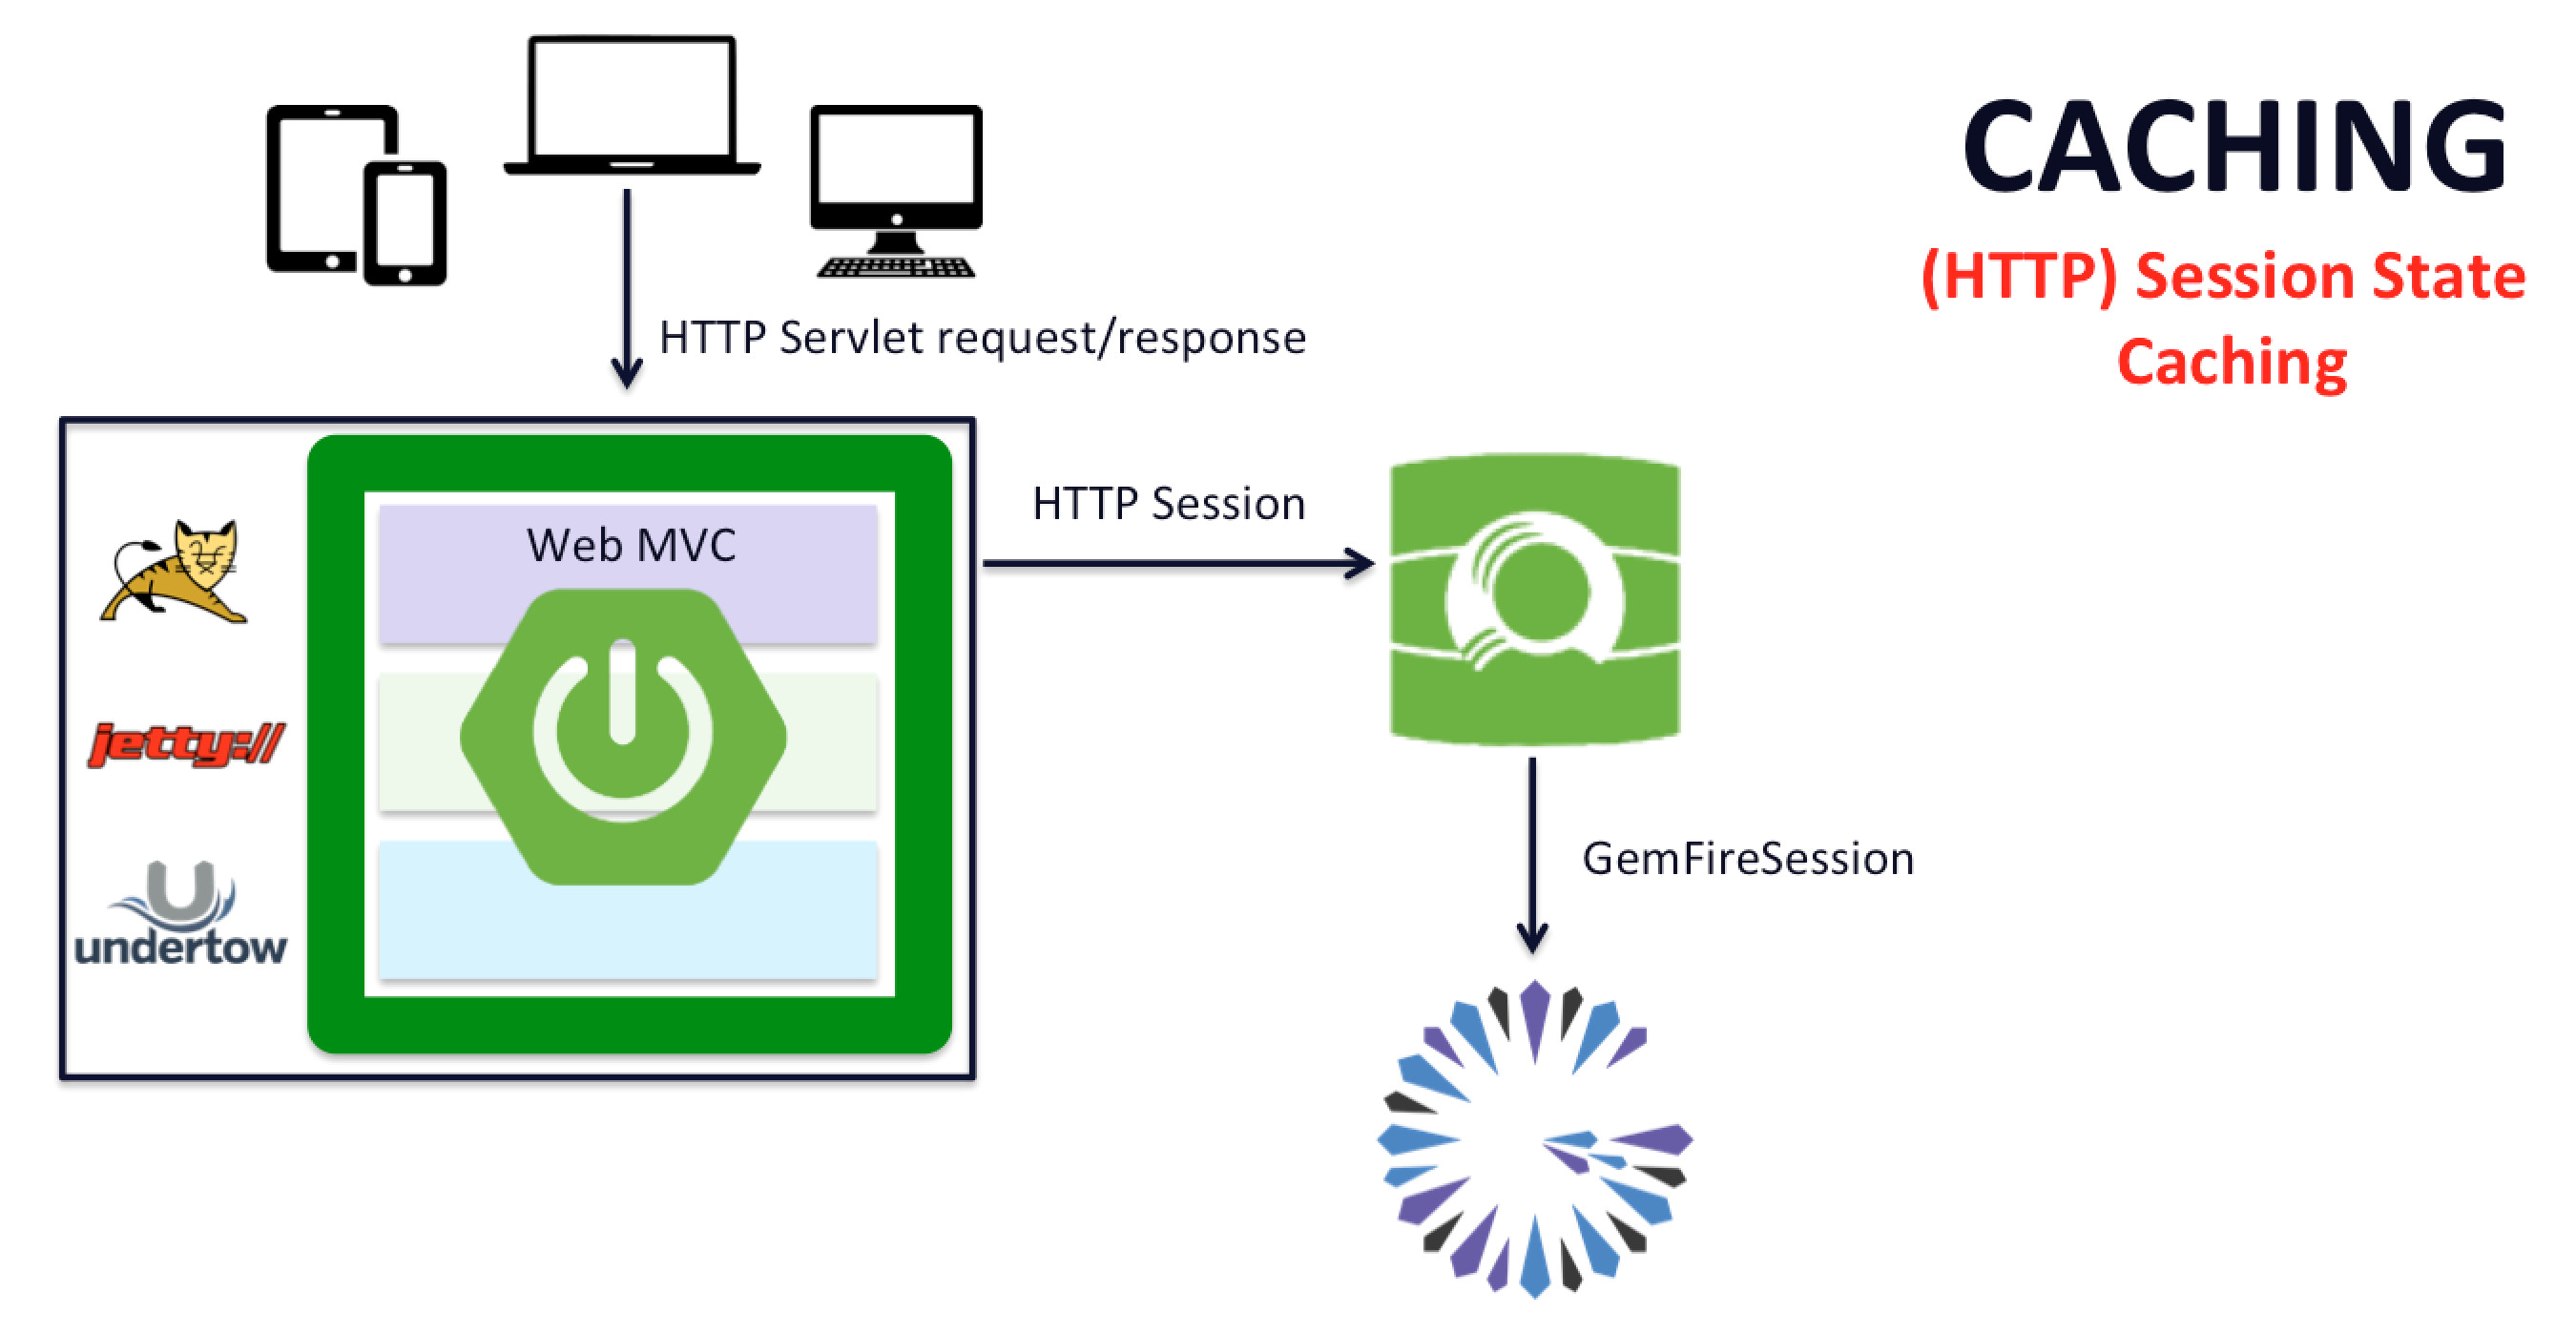
Essentially, anytime an HTTP Session is requested by your Spring Boot, Web Application, the Servlet Container
(e.g. Apache Tomcat) delegates to Spring Session to provide the implementation of javax.servlet.http.HttpSession.
After all, javax.servlet.http.HttpServlet is an interface that can have many implementations.
Effectively, Spring Session provides it’s own implementation of the javax.servlet.http.HttpSession interface through
a Servlet Filter that gets registered by Spring Session programmatically when Spring Session is on the application
classpath.
Spring Session’s implementation of the javax.servlet.http.HttpSession interface can backed by many different providers
that implement the Spring Session framework’s SessionRepository interface.
Spring Session’s architecture can be depicted as follows:
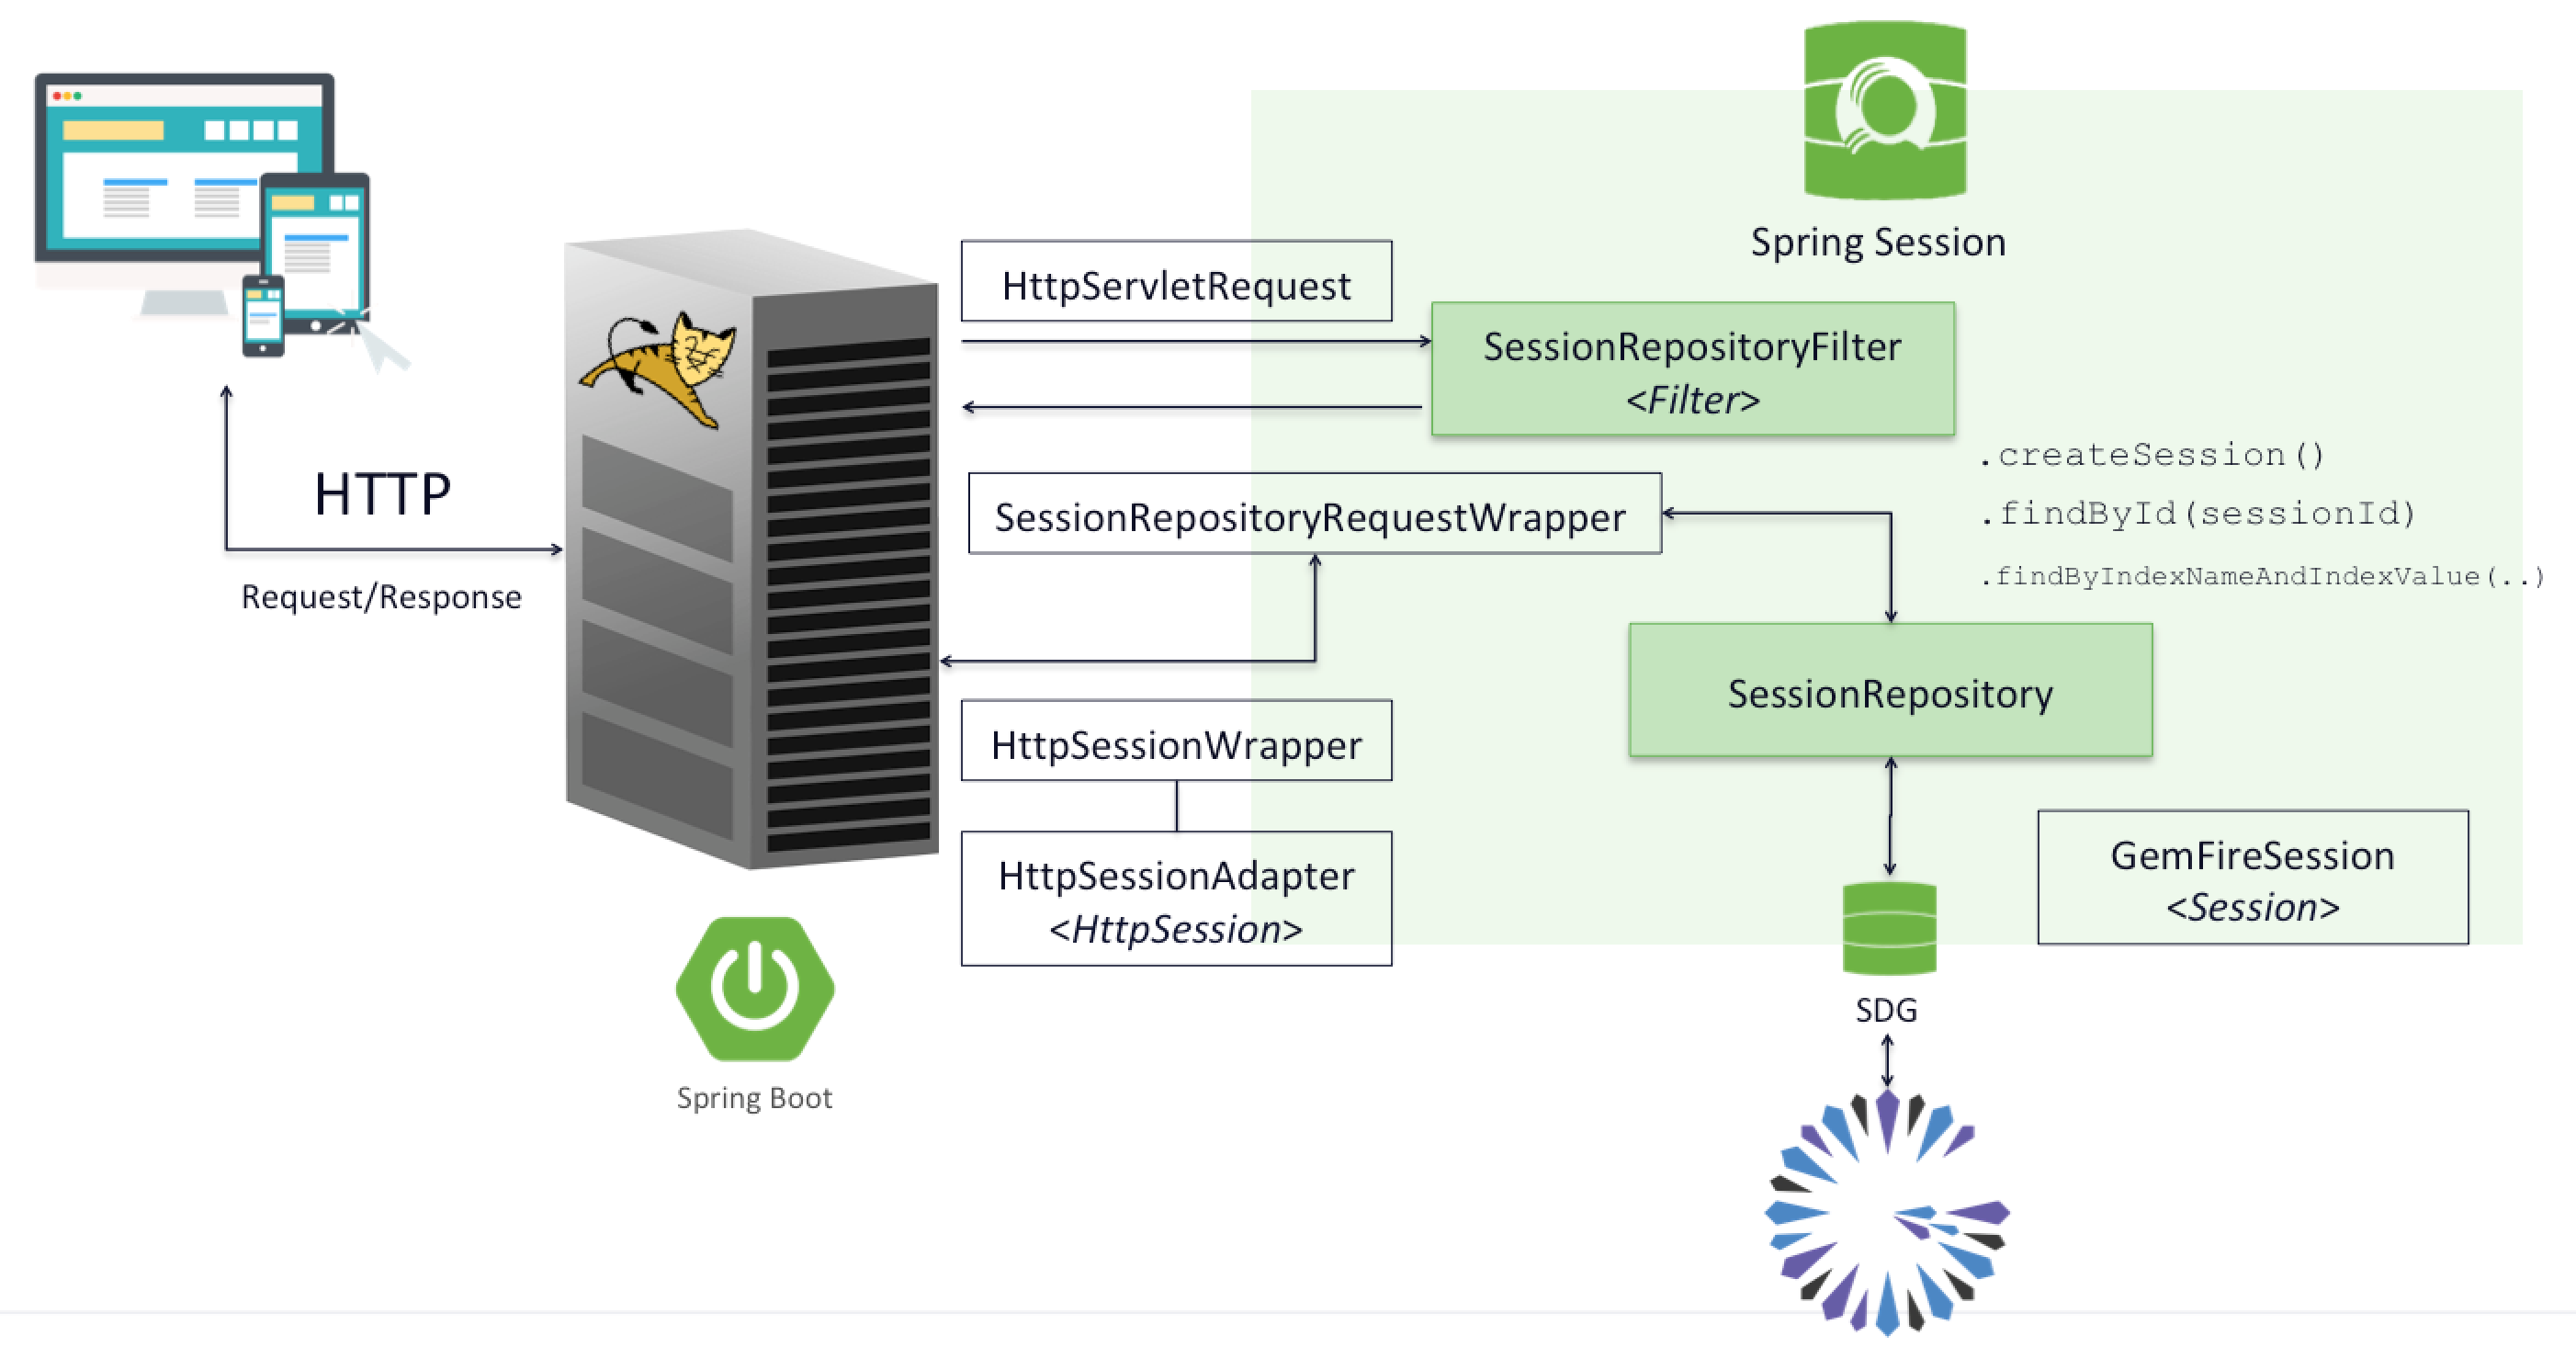
Again, the SessionRepository interface is the central component of the framework enabling any backend data store
to be adapted and serve as a provider for managing the HTTP Sessions.
This is effectively how Spring Session for Apache Geode & Pivotal GemFire works.
2. Example
For our example, we are going to keep the Web application relatively simple. Essentially, we just want to show you how easy it is to use Spring Session in your Spring Boot, Web applications, to manage the HTTP Session state.
So, we are going to switch from Servlet Container (e.g. Apache Tomcat) to Spring Session managed HTTP Sessions with a single-line configuration change.
First, let’s introduce the Spring Web MVC Controller in our Spring Boot, Web application.
2.1. Controller
Our Spring Web MVC Controller class is implemented as follows:
@Controller
public class CounterController {
public static final String INDEX_TEMPLATE_VIEW_NAME = "index";
private final Set<String> sessionIds = new ConcurrentHashSet<>();
@GetMapping("/")
@ResponseBody
public String home() {
return format("HTTP Session Caching Example");
}
@GetMapping("/ping")
@ResponseBody
public String ping() {
return format("PONG");
}
@GetMapping("/session")
public ModelAndView sessionRequestCounts(HttpSession session) {
this.sessionIds.add(session.getId());
Map<String, Object> model = new HashMap<>();
model.put("sessionType", session.getClass().getName());
model.put("sessionCount", this.sessionIds.size());
model.put("requestCount", getRequestCount(session));
return new ModelAndView(INDEX_TEMPLATE_VIEW_NAME, model);
}
private Object getRequestCount(HttpSession session) {
Integer requestCount = (Integer) session.getAttribute("requestCount");
requestCount = requestCount != null ? requestCount : 0;
requestCount++;
session.setAttribute("requestCount", requestCount);
return requestCount;
}
private String format(String value) {
return String.format("<h1>%s</h1>", value);
}
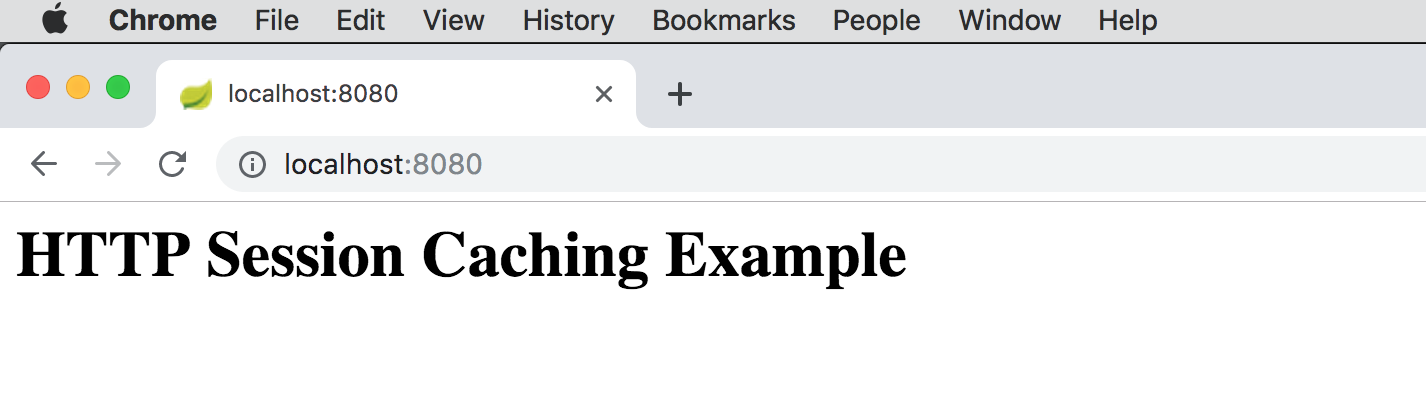
}The main Web Service endpoint in our Spring Boot, Web application is the /session endpoint, which is accessible from
http//:localhost:8080/session[].
The /session endpoint outputs 3 bits of information:
-
The
javax.servlet.http.HttpSessionclass type. -
Current HTTP Session count.
-
Current HTTP Request count.
The HttpSession class type lets us know which implementation (e.g. Servlet Container vs. Spring Session) is being used
to manage the HTTP Session state.
The HTTP Request count is simply incremented every time a client HTTP Request is made to the HTTP server (e.g. Servlet Container) before the HTTP Session expires. If the HTTP Session expires before another client HTTP Request is made, then the HTTP Session count is incremented and the HTTP Request count resets to 1.
2.2. Configuration
# Spring Boot application.properties for the HTTP Session State Caching Example application.

spring.application.name=HttpSessionCachingApplication
spring.data.gemfire.cache.log-level=error
spring.session.data.gemfire.cache.client.pool.name=DEFAULT
spring.session.data.gemfire.cache.client.region.shortcut=LOCAL
spring.session.data.gemfire.session.region.name=Sessions
server.servlet.session.timeout=15
The configuration is quite simple. In this case, we have set the HTTP Session timeout, using the
server.servlet.session.timeout property, to 15 seconds. This property is used to configure the HTTP Session timeout
regardless of whether the HTTP Session is being managed by the Servlet Container or by Spring Session.
Additionally, we have configured the data management policy used by Apache Geode to manage the HTTP Session state
in a LOCAL only cache (a.k.a. Region). This was done by setting the
spring.session.data.gemfire.cache.client.region.shortcut property to LOCAL.
The other configuration properties in Spring Boot’s application.properties file were not strictly necessary.
| In most production deployments, you will likely be using a client/server topology, where the HTTP Session is managed by a cluster of Apache Geode or Pivotal GemFire servers so that the HTTP Session can be shared across multiple instances of the Spring Boot, Web application. This would be especially true in a cloud environment when utilizing a Microservices architecture. However, for example purposes, we tried to keep the sample as simple as possible. |
The default data management policy for the client cache (a.k.a. Region) used to manage HTTP Session state is a
PROXY, which is the basis for the client/server topology. Therefore, the default configuration assumes you will be
using the client/server topology in most of your arrangements.
|
2.3. Classpath
The only essential components of the application classpath is a compile-time dependency on spring-boot-starter-web:
spring-boot-starter-web compile-time dependency declaration<dependency>
<groupId>org.springframework.boot</groupId>
<artifactId>spring-boot-starter-web</artifactId>
</dependency>Along with a runtime dependency on spring-boot-starter-tomcat (or another Servlet Container, e.g.
spring-boot-starter-jetty):
spring-boot-starter-tomcat runtime dependency declaration<dependency>
<groupId>org.springframework.boot</groupId>
<artifactId>spring-boot-starter-tomcat</artifactId>
</dependency>Spring Boot will detect Apache Tomcat on the application classpath and bootstrap an embedded, Apache Tomcat Servlet
Container using a derived WebApplicationContext.
3. Run the Example
Let’s run the example:
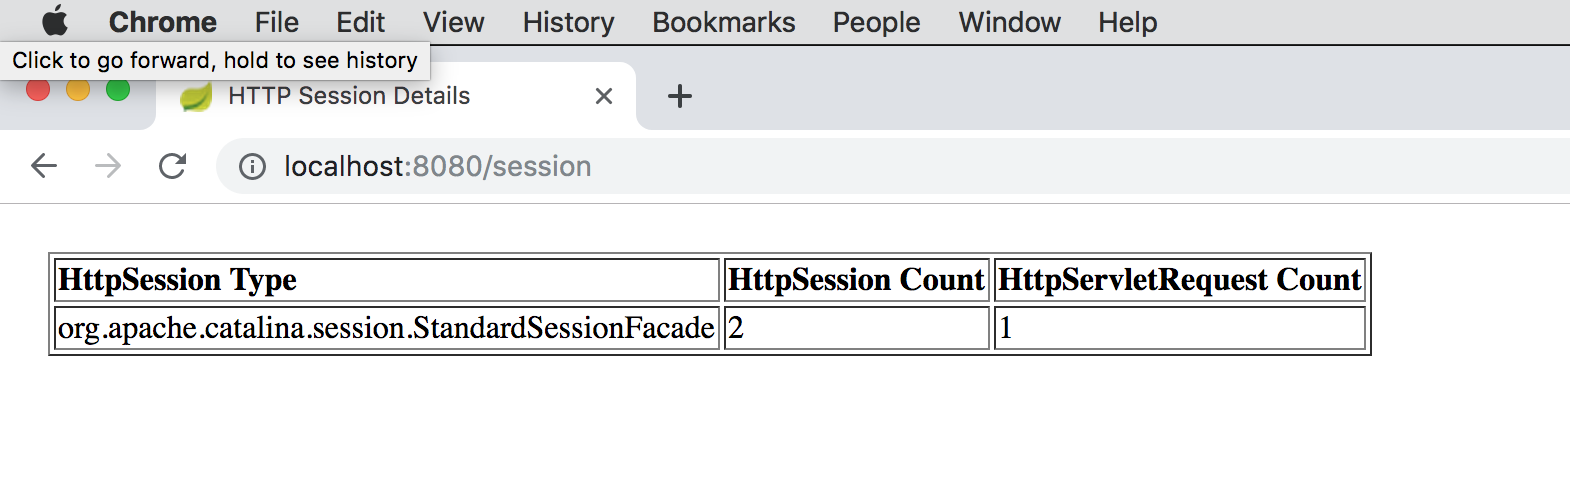
When we navigate to the /session Web service endpoint:
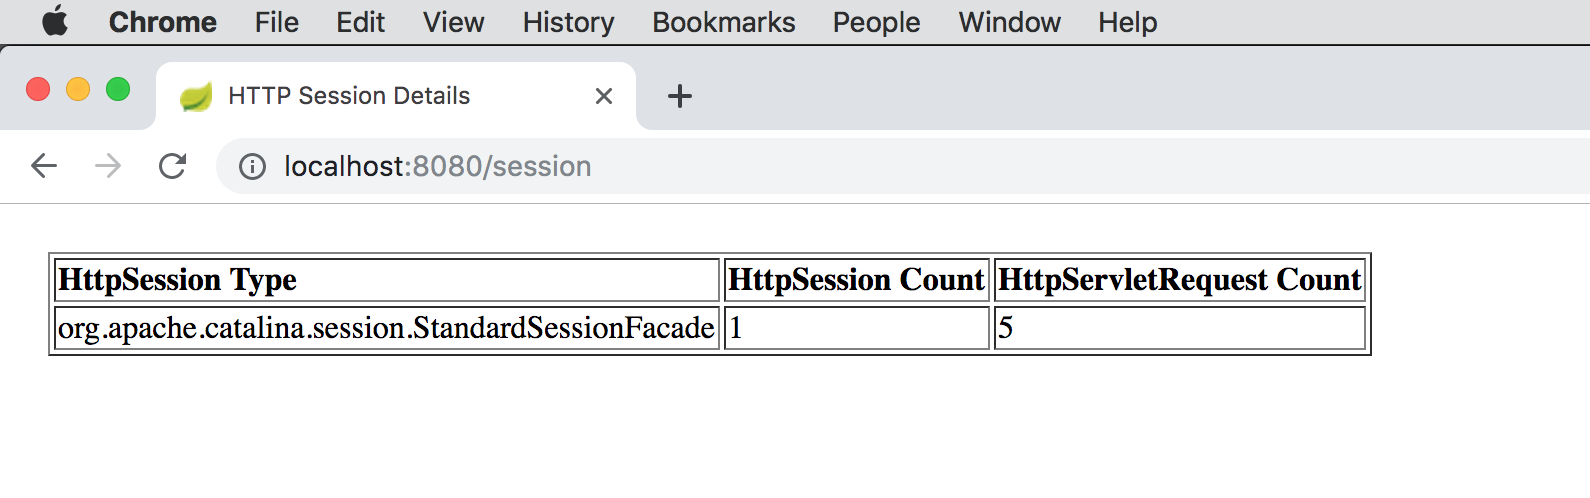
We see that the Servlet Container’s implementing class for the javax.servlet.http.HttpSession interface is
org.apache.catalina.session.StandardSession.
If we continue to hit refresh in the Web browser, thereby causing additional client HTTP requests to be made to the HTTP server, then our HTTP Request count increments. If we wait for 15 seconds, then the HTTP Session will expire, and we will see the HTTP Session count increment along with the HTTP Request count reset to 1:
Now, we can repeat this same exercise, but this time, using Spring Session.
3.1. Run the Example with Spring Session
First, we must add Spring Session to the application’s classpath. We do this simply by adding the
spring-geode-starter-session runtime dependency to the classpath of our example application:
spring-geode-starter-session runtime dependency declaration<dependency>
<groupId>org.springframework.geode</groupId>
<artifactId>spring-geode-starter-session</artifactId>
<scope>runtime</scope>
</dependency>The spring-geode-starter-session dependency adds Spring Session to the application’s classpath at runtime
and positions Apache Geode as the provider used to manage the HTTP Session state.
With Apache Geode, we gain all the benefits of using a highly concurrent, highly distributed data management solution that provides high availability (HA) and resiliency in a cloud environment.
That’s it! This is all we have to do to replace the Servlet’s Container’s HTTP Session management facilities with a robust, highly available, highly resilient, clustered solution provided by Spring Session.
When we run the example again, and access the /session Web service endpoint, we will see:

Now we see that the implementing class for the javax.servlet.http.HttpSession is
org.springframework.session.web.http.SessionRepositoryFilter$SessionRepositoryRequestWrapper$HttpSessionWrapper.
Easy!
Of course, the ability to scale-out and optimize the data management policies for HTTP Session management is very provider-specific (e.g. Apache Geode) and highly dependent on the use case as well a application requirements, therefore is beyond the scope of this guide.
4. Summary
Spring Session is a powerful framework for managing your HTTP Session state. Not only does it allow you to plugin different backend data management providers (as of this writing):
Spring Session also allows you to manage different types of Sessions depending on the context:
Therefore, it makes it a simple matter to switch providers, or adopt additional Session management capabilities as your application requirements change and/or your use cases grow.
HTTP Session state caching is one of the most effective and common ways to utilize caching in your Spring Boot, Web applications, and ensure the users experience is first-class.