1. Pivotal CloudFoundry
In most cases, when you "push" (i.e. "deploy") your Spring Boot applications to Pivotal CloudFoundry (PCF) you will bind your app to 1 or more instances of the Pivotal Cloud Cache (PCC) service.
In a nutshell, {pivotal-cloudcache-website}[Pivotal Cloud Cache] is a managed version of {pivotal-gemfire-website}[Pivotal GemFire] running in {pivotal-cloudfoundry-website}[Pivotal CloudFoundry]. When running in or across cloud environments (e.g. AWS, Azure, GCP or PWS), PCC with PCF offers several advantages over trying to run and manage your own standalone Apache Geode or Pivotal GemFir clusters. It handles many of the infrastructure-related, operational concerns so you do not have to.
1.1. Running Spring Boot applications as a specific user
By default, Spring Boot applications run as a "cluster_operator" Role-based user in Pivotal CloudFoundry (PCF) when the app is bound to a Pivotal Cloud Cache (PCC) service instance.
A "cluster_operator" has full system privileges (i.e. Authorization) to do whatever that user wishes to involving the PCC service instance. A "cluster_operator" has read/write access to all the data, can modify the schema (e.g. create/destroy Regions, add/remove Indexes, change eviction or expiration policies, etc), start and stop servers in the PCC cluster, or even modify permissions.
However…
With great power comes great responsibility. - Uncle Ben
Not all Spring Boot applications using PCC will need to change the schema, or even modify data. Rather, certain apps may only need read access. Therefore, it is ideal to be able to configure your Spring Boot applications to run with a different user at runtime other than the auto-configured "cluster_operator", by default.
A prerequisite for running a Spring Boot application using PCC with a specific user is to create a user with restricted permissions using Pivotal CloudFoundry AppsManager while provisioning the PCC service instance to which the Spring Boot application will be bound.
Configuration metadata for the PCC service instance might appear as follows:
{
  "p-cloudcache":[{
    "credentials": {
      "distributed_system_id": "0",
      "locators": [ "localhost[55221]" ],
      "urls": {
        "gfsh": "https://cloudcache-12345.services.cf.pws.com/gemfire/v1",
        "pulse": "https://cloudcache-12345.services.cf.pws.com/pulse"
      },
      "users": [{
        "password": "*****",
        "roles": [ "cluster_operator" ],
        "username": "cluster_operator_user"
      }, {
        "password": "*****",
        "roles": [ "developer" ],
        "username": "developer_user"
      },
      }, {
        "password": "*****",
        "roles": [ "read-only-user" ],
        "username": "guest"
      }],
      "wan": {
        "sender_credentials": {
          "active": {
            "password": "*****",
            "username": "gateway-sender-user"
          }
        }
      }
    },
    ...
    "name": "jblum-pcc",
    "plan": "small",
    "tags": [ "gemfire", "cloudcache", "database", "pivotal" ]
  }]
}
In the PCC service instance configuration metadata above, we see a "guest" user with the "read-only-user" Role. If the "read-only-user" Role is properly configured with "read-only" permissions as the name implies, then we could configure our Spring Boot application to run as "guest" with read-only access using:
# Spring Boot application.properties for PCF when using PCC

spring.data.gemfire.security.username=guest
The spring.data.gemfire.security.username property corresponds directly to the SDG @EnableSecurity annotation,
securityUsername attribute.
See the {spring-data-geode-javadoc}/org/springframework/data/gemfire/config/annotation/EnableSecurity.html#securityUsername--[Javadoc]
for more details.
|
The spring.data.gemfire.security.username property is the same property used by Spring Data for Apache Geode
and Pivotal GemFire (SDG) to configure the runtime user of your Spring Data application when connecting to either
an externally managed Apache Geode or Pivotal GemFire cluster.
In this case, SBDG simply uses the configured username to lookup the authentication credentials of the user to set
the username and password used by the Spring Boot, ClientCache app when connecting to PCC while running in PCF.
If the username is not valid, then an IllegalStateException is thrown.
By using {spring-boot-docs-html}/#boot-features-profiles[Spring Profiles], it would be a simple matter to configure the Spring Boot application to run with a different user depending on environment.
See the Pivotal Cloud Cache documentation on {pivotal-cloudcache-docs}/security.html[Security] for configuring users with assigned roles & permissions.
1.1.1. Overriding Authentication Auto-configuration
It should be generally understood that auto-configuration for client authentication is only available for managed environments, like Pivotal CloudFoundry. When running in externally managed environments, you must explicitly set a username and password to authenticate, as described here.
To completely override the auto-configuration of client authentication, simply set both a username and password:
# Spring Boot application.properties

spring.data.gemfire.security.username=MyUser
spring.data.gemfire.security.password=MyPassword
In this case, SBDG’s auto-configuration for authentication is effectively disabled and security credentials will not be extracted from the environment.
1.2. Targeting Specific Pivotal Cloud Cache Service Instances
It is possible to provision multiple instances of the Pivotal Cloud Cache service in your Pivotal CloudFoundry environment. You can then bind multiple PCC service instances to your Spring Boot app.
However, Spring Boot for Apache Geode & Pivotal GemFire (SBDG) will only auto-configure 1 PCC service instance for your Spring Boot application. This does not mean it is not possible to use multiple PCC service instances with your Spring Boot app, just that SBDG only "auto-configures" 1 service instance for you.
You must select which PCC service instance your Spring Boot app will auto-configure for you automatically when you have multiple instances and want to target a specific PCC service instance to use.
To do so, declare the following SBDG property in Spring Boot application.properties:
# Spring Boot application.properties

spring.boot.data.gemfire.cloud.cloudfoundry.service.cloudcache.name=pccServiceInstanceTwo
The spring.boot.data.gemfire.cloud.cloudfoundry.service.cloudcache.name property tells SBDG which PCC service instance
to auto-configure.
If the named PCC service instance identified by the property does not exist, then SBDG will throw
an IllegalStateException stating the PCC service instance by name could not be found.
If you did not set the property and your Spring Boot app is bound to multiple PCC service instances, then SBDG will auto-configure the first PCC service instance it finds by name, alphabetically.
If you did not set the property and no PCC service instance is found, then SBDG will log a warning.
1.3. Using Multiple Pivotal Cloud Cache Service Instances
If you want to use multiple PCC service instances with your Spring Boot application, then you need to configure
multiple connection Pools connected to each PCC service instance used by your Spring Boot application.
The configuration would be similar to the following:
@Configuration
@EnablePools(pools = {
  @EnablePool(name = "PccOne"),
  @EnablePool(name = "PccTwo"),
  ...,
  @EnablePool(name = "PccN")
})
class PccConfiguration {
  ...
}
You would then externalize the configuration for the individually declared Pools in Spring Boot
application.properties:
# Spring Boot `application.properties`

spring.data.gemfire.pool.pccone.locators=pccOneHost1[port1], pccOneHost2[port2], ..., pccOneHostN[portN]

spring.data.gemfire.pool.pcctwo.locators=pccTwoHost1[port1], pccTwoHost2[port2], ..., pccTwoHostN[portN]
Though less common, you can also configure the Pool of connections to target specific servers in the cluster
using the spring.data.gemfire.pool.<named-pool>.severs property.
|
Keep in mind that properties in Spring Boot application.properties can refer to other properties like so:
property=${otherProperty}. This allows you to further externalize properties using Java System properties
or Environment Variables.
|
Of course, a client Region is then assigned the Pool of connections that are used to send data to/from the specific PCC service instance (cluster):
@Bean("Example")
ClientRegionFactoryBean exampleRegion(GemFireCache gemfireCache,
        @Qualifier("PccTwo") Pool poolForPccTwo) {

    ClientRegionFactoryBean exampleRegion = new ClientRegionFactoryBean();

    exampleRegion.setCache(gemfireCache);
    exampleRegion.setPool(poolForPccTwo);
    exampleRegion.setShortcut(ClientRegionShortcut.PROXY);

    return exampleRegion;
}
You can configure as many Pools and client Regions as needed by your application. Again, the Pool determines
which Pivotal Cloud Cache service instance and cluster the data for the client Region will reside.
By default, SBDG configures all Pools declared in a Spring Boot, ClientCache application to connect to
and use a single PCC service instance. This may be a targeted PCC service instance when using the
spring.boot.data.gemfire.cloud.cloudfoundry.service.cloudcache.name property
as discussed above.
|
1.4. Hybrid Pivotal CloudFoundry & Apache Geode Spring Boot Applications
Sometimes, it is desirable to deploy (i.e. "push") and run your Spring Boot applications in Pivotal CloudFoundry, but still connect your Spring Boot applications to an externally managed, standalone Apache Geode or Pivotal GemFire cluster.
Spring Boot for Apache Geode & Pivotal GemFire (SBDG) makes this a non-event and honors its "little to no code or configuration changes necessary" goal, regardless of your runtime choice, "it should just work!"
To help guide you through this process, we will cover the following topics:
-
Install and Run PCFDev.
-
Start an Apache Geode cluster.
-
Create a User-Provided Service (CUPS).
-
Push and Bind a Spring Boot application.
-
Run the Spring Boot application.
1.4.1. Running PCFDev
For this exercise, we will be using PCF Dev.
PCF Dev, much like PCF, is an elastic application runtime for deploying, running and managing your Spring Boot applications. However, it does so in the confines of your local development environment, i.e. your workstation.
Additionally, PCF Dev provides several services out-of-the-box, such as MySQL, Redis and RabbitMQ. These services can be bound and used by your Spring Boot application to accomplish its tasks.
However, PCF Dev lacks the Pivotal Cloud Cache (PCC) service that is available in PCF. This is actually ideal for this little exercise since we are trying to build and run Spring Boot applications in a PCF environment but connect to an externally managed, standalone Apache Geode or Pivotal GemFire cluster.
As a prerequisite, you will need to follow the steps outlined in the tutorial to get PCF Dev setup and running on your workstation.
To run PCF Dev, you will execute the following cf CLI command, replacing the path to the TGZ file
with the file you acquired from the download:
$ cf dev start -f ~/Downloads/Pivotal/CloudFoundry/Dev/pcfdev-v1.2.0-darwin.tgzYou should see output similar to:
Downloading Network Helper...
Progress: |====================>| 100.0%
Installing cfdevd network helper (requires administrator privileges)...
Password:
Setting up IP aliases for the BOSH Director & CF Router (requires administrator privileges)
Downloading Resources...
Progress: |====================>| 100.0%
Setting State...
WARNING: PCF Dev requires 8192 MB of RAM to run. This machine may not have enough free RAM.
Creating the VM...
Starting VPNKit...
Waiting for the VM...
Deploying the BOSH Director...

Deploying PAS...
  Done (14m34s)
Deploying Apps-Manager...
  Done (1m41s)

 	 ██████╗  ██████╗███████╗██████╗ ███████╗██╗   ██╗
 	 ██╔══██╗██╔════╝██╔════╝██╔══██╗██╔════╝██║   ██║
 	 ██████╔╝██║     █████╗  ██║  ██║█████╗  ██║   ██║
 	 ██╔═══╝ ██║     ██╔══╝  ██║  ██║██╔══╝  ╚██╗ ██╔╝
 	 ██║     ╚██████╗██║     ██████╔╝███████╗ ╚████╔╝
 	 ╚═╝      ╚═════╝╚═╝     ╚═════╝ ╚══════╝  ╚═══╝
 	             is now running!

 	To begin using PCF Dev, please run:
 	    cf login -a https://api.dev.cfdev.sh --skip-ssl-validation

 	Admin user => Email: admin / Password: admin
 	Regular user => Email: user / Password: pass

 	To access Apps Manager, navigate here: https://apps.dev.cfdev.sh

 	To deploy a particular service, please run:
 	    cf dev deploy-service <service-name> [Available services: mysql,redis,rabbitmq,scs]
To use the cf CLI tool, you must login to the PCF Dev environment:
cf CLI$ cf login -a https://api.dev.cfdev.sh --skip-ssl-validationYou can also access the PCF Dev Apps Manager tool from your Web browser at the following URL:
Apps Manager provides a nice UI to manage your org, space, services and apps. It lets you push and update apps, create services, bind apps to the services and start and stop your deployed applications, among many other things.
1.4.2. Running an Apache Geode Cluster
Now that PCF Dev is setup and running, we need to start an external, standalone Apache Geode cluster that our Spring Boot application will connect to and use to manage its data.
You will need to install a {apache-geode-website}/releases/[distribution] of Apache Geode on your workstation.
Then you must set the $GEODE environment variable. It is also convenient to add $GEODE/bin to your system $PATH.
Afterward, you can launch the Geode Shell (Gfsh) tool:
$ echo $GEODE
/Users/jblum/pivdev/apache-geode-1.6.0

$ gfsh
    _________________________     __
   / _____/ ______/ ______/ /____/ /
  / /  __/ /___  /_____  / _____  /
 / /__/ / ____/  _____/ / /    / /
/______/_/      /______/_/    /_/    1.6.0

Monitor and Manage Apache Geode
gfsh>
We have conveniently provided the Gfsh shell script used to start the Apache Geode cluster:
#!/bin/gfsh
# Gfsh shell script to configure and bootstrap an Apache Geode cluster.

start locator --name=LocatorOne --log-level=config --classpath=@project-dir@/apache-geode-extensions/build/libs/apache-geode-extensions-@[email protected] --J=-Dgemfire.security-manager=org.springframework.geode.security.TestSecurityManager --J=-Dgemfire.http-service-port=8080

start server --name=ServerOne --log-level=config --user=admin --password=admin --classpath=@project-dir@/apache-geode-extensions/build/libs/apache-geode-extensions-@[email protected]
The start-cluster.gfsh shell script starts one Geode Locator and one Geode Server.
A Locator is used by clients to discover and connect to servers in the cluster to manage its data. A Locator is also used by new servers joining a cluster as a peer member, which allows the cluster to be elastically scaled-out (or scaled-down, as needed). A Geode Server stores the data for the application.
You can start as many Locators or Servers as necessary to meet the availability and load demands of your application. Obviously, the more Locators and Servers your cluster has, the more resilient it is to failure. However, you should size your cluster accordingly, based on your application’s needs since there is overhead relative to the cluster size.
You will see output similar to the following when starting the Locator and Server:
gfsh>start locator --name=LocatorOne --log-level=config --classpath=/Users/jblum/pivdev/spring-boot-data-geode/apache-geode-extensions/build/libs/apache-geode-extensions-1.1.0.BUILD-SNAPSHOT.jar --J=-Dgemfire.security-manager=org.springframework.geode.security.TestSecurityManager --J=-Dgemfire.http-service-port=8080
Starting a Geode Locator in /Users/jblum/pivdev/lab/LocatorOne...
..
Locator in /Users/jblum/pivdev/lab/LocatorOne on 10.99.199.24[10334] as LocatorOne is currently online.
Process ID: 14358
Uptime: 1 minute 1 second
Geode Version: 1.6.0
Java Version: 1.8.0_192
Log File: /Users/jblum/pivdev/lab/LocatorOne/LocatorOne.log
JVM Arguments: -Dgemfire.enable-cluster-configuration=true -Dgemfire.load-cluster-configuration-from-dir=false -Dgemfire.log-level=config -Dgemfire.security-manager=org.springframework.geode.security.TestSecurityManager -Dgemfire.http-service-port=8080 -Dgemfire.launcher.registerSignalHandlers=true -Djava.awt.headless=true -Dsun.rmi.dgc.server.gcInterval=9223372036854775806
Class-Path: /Users/jblum/pivdev/apache-geode-1.6.0/lib/geode-core-1.6.0.jar:/Users/jblum/pivdev/spring-boot-data-geode/apache-geode-extensions/build/libs/apache-geode-extensions-1.1.0.BUILD-SNAPSHOT.jar:/Users/jblum/pivdev/apache-geode-1.6.0/lib/geode-dependencies.jar

Security Manager is enabled - unable to auto-connect. Please use "connect --locator=10.99.199.24[10334] --user --password" to connect Gfsh to the locator.

Authentication required to connect to the Manager.

gfsh>connect
Connecting to Locator at [host=localhost, port=10334] ..
Connecting to Manager at [host=10.99.199.24, port=1099] ..
user: admin
password: *****
Successfully connected to: [host=10.99.199.24, port=1099]

gfsh>start server --name=ServerOne --log-level=config --user=admin --password=admin --classpath=/Users/jblum/pivdev/spring-boot-data-geode/apache-geode-extensions/build/libs/apache-geode-extensions-1.1.0.BUILD-SNAPSHOT.jar
Starting a Geode Server in /Users/jblum/pivdev/lab/ServerOne...
....
Server in /Users/jblum/pivdev/lab/ServerOne on 10.99.199.24[40404] as ServerOne is currently online.
Process ID: 14401
Uptime: 3 seconds
Geode Version: 1.6.0
Java Version: 1.8.0_192
Log File: /Users/jblum/pivdev/lab/ServerOne/ServerOne.log
JVM Arguments: -Dgemfire.default.locators=10.99.199.24[10334] -Dgemfire.security-username=admin -Dgemfire.start-dev-rest-api=false -Dgemfire.security-password=******** -Dgemfire.use-cluster-configuration=true -Dgemfire.log-level=config -XX:OnOutOfMemoryError=kill -KILL %p -Dgemfire.launcher.registerSignalHandlers=true -Djava.awt.headless=true -Dsun.rmi.dgc.server.gcInterval=9223372036854775806
Class-Path: /Users/jblum/pivdev/apache-geode-1.6.0/lib/geode-core-1.6.0.jar:/Users/jblum/pivdev/spring-boot-data-geode/apache-geode-extensions/build/libs/apache-geode-extensions-1.1.0.BUILD-SNAPSHOT.jar:/Users/jblum/pivdev/apache-geode-1.6.0/lib/geode-dependencies.jar
Once the cluster has been started successfully, you can list the members:
gfsh>list members
   Name    | Id
---------- | -----------------------------------------------------------------
LocatorOne | 10.99.199.24(LocatorOne:14358:locator)<ec><v0>:1024 [Coordinator]
ServerOne  | 10.99.199.24(ServerOne:14401)<v1>:1025
Currently, we have not defined any Regions in which to store our application’s data:
gfsh>list regions
No Regions Found
This is deliberate since we are going to let the application drive its schema structure, both on the client (app) as well as on the server-side (cluster). More on this below.
1.4.3. Creating a User-Provided Service
Now that we have PCF Dev and a small Apache Geode cluster up and running, it is time to create a User-Provided Service to the external, standalone Apache Geode cluster that we started in step 2.
As mentioned, PCF Dev offers the MySQL, Redis and RabbitMQ services out-of-the-box. However, to use Apache Geode (or Pivotal GemFire) in the same capacity as you would Pivotal Cloud Cache when running in a production-grade, PCF environment, you need to create a User-Provided Service for the standalone Apache Geode cluster.
To do so, execute the following cf CLI command:
$ cf cups <service-name> -t "gemfire, cloudcache, database, pivotal" -p '<service-credentials-in-json>'
It is important that you specify the tags ("gemfire, cloudcache, database, pivotal") exactly as shown
in the cf CLI command above.
|
The argument passed to the -p command-line option is a JSON document (object) containing the "credentials"
for our User-Provided Service.
The JSON object is as follows:
{
	"locators": [ "<hostname>[<port>]" ],
	"urls": { "gfsh": "https://<hostname>/gemfire/v1" },
	"users": [{ "password": "<password>", "roles": [ "cluster_operator" ], "username": "<username>" }]
}
The complete cf CLI command would be similar to the following:
cf cups commandcf cups apacheGeodeService -t "gemfire, cloudcache, database, pivotal" \
-p '{ "locators": [ "10.99.199.24[10334]" ], "urls": { "gfsh": "https://10.99.199.24/gemfire/v1" }, "users": [{ "password": "admin", "roles": [ "cluster_operator" ], "username": "admin" }] }'We replaced the <hostname> placeholder tag with the IP address of our external Apache Geode Locator. The IP address
can be found in the Gfsh start locator output above.
Additionally, the <port> placeholder tag has been replaced with the default Locator port, 10334,
Finally, we set the username and password accordingly.
| Spring Boot for Apache Geode (SBDG) provides template files in the /opt/jenkins/data/workspace/spring-boot-data-geode_1.2.x/spring-geode-docs/src/main/resources directory. |
Once the service has been created, you can query the details from the cf CLI:
$ cf services
Getting services in org cfdev-org / space cfdev-space as admin...

name                 service         plan   bound apps      last operation   broker
apacheGeodeService   user-provided          boot-pcc-demo


$ cf service apacheGeodeService
Showing info of service apacheGeodeService in org cfdev-org / space cfdev-space as admin...

name:      apacheGeodeService
service:   user-provided
tags:      gemfire, cloudcache, database, pivotal

bound apps:
name            binding name   status             message
boot-pcc-demo                  create succeeded
You can also view the "apacheGeodeService" from Apps Manager, starting from the Service tab in your org and space:
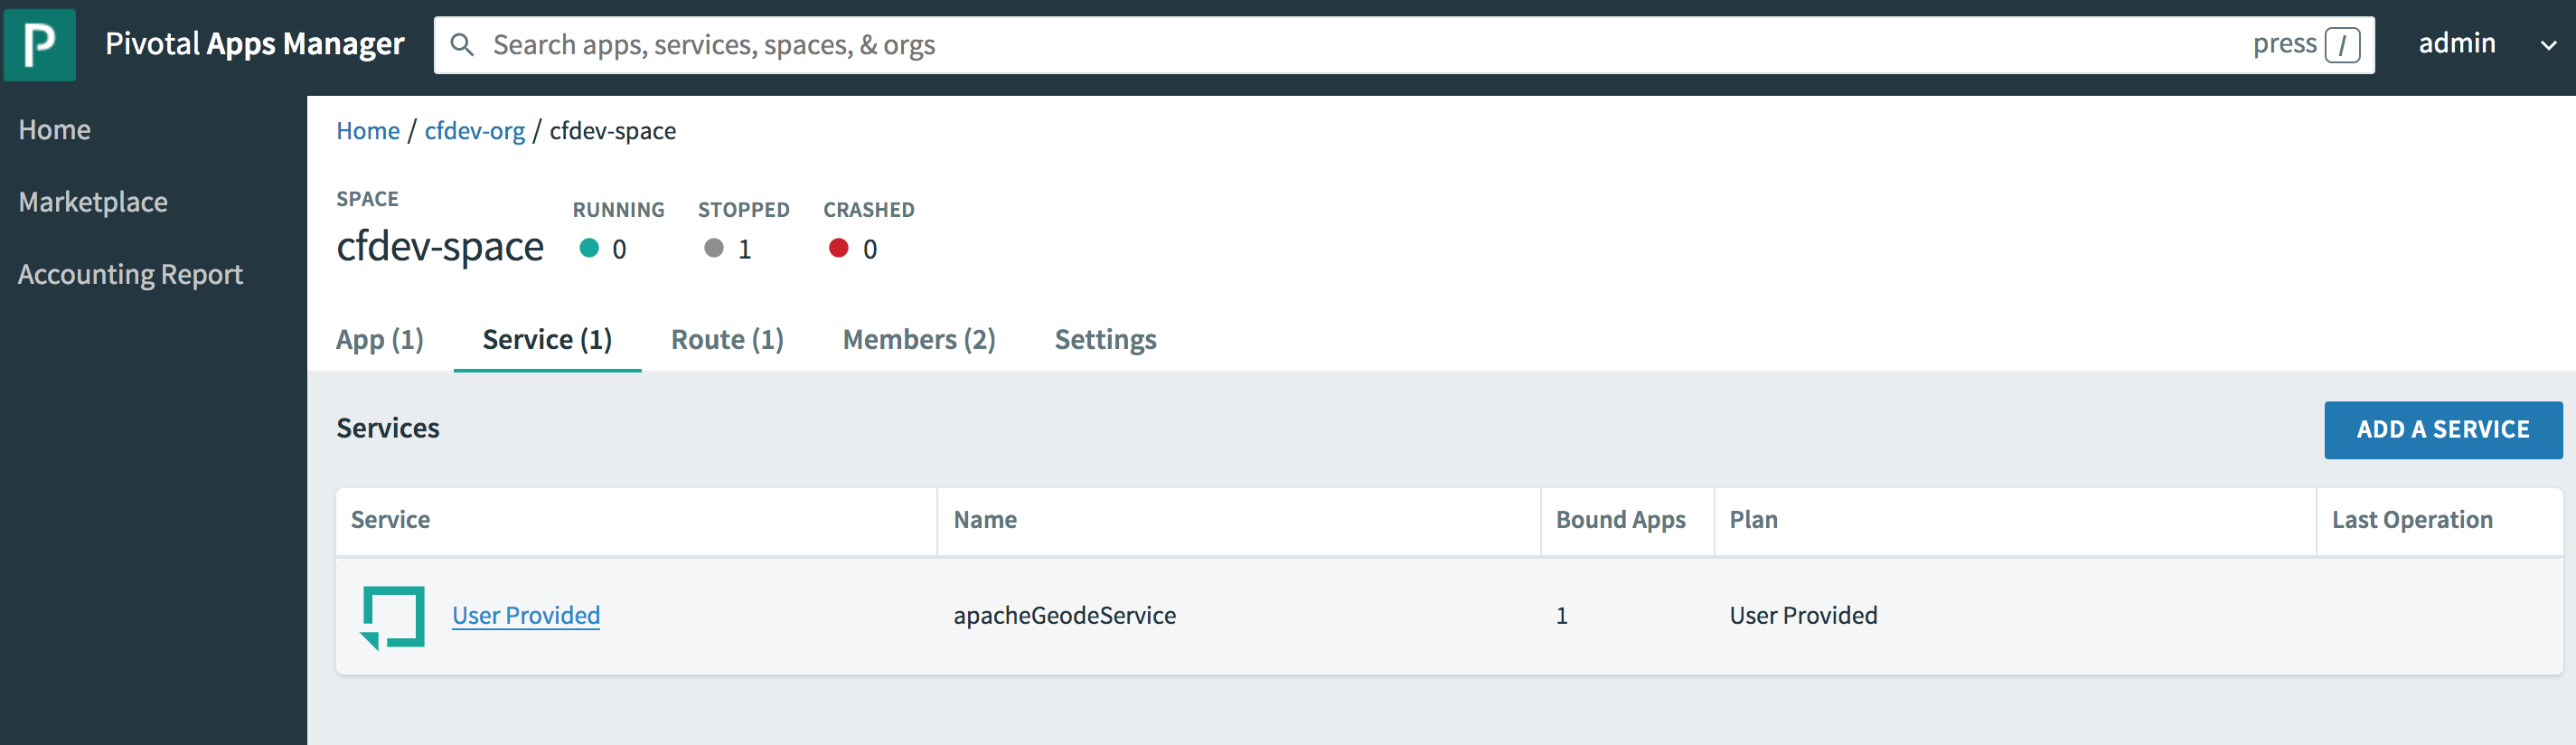
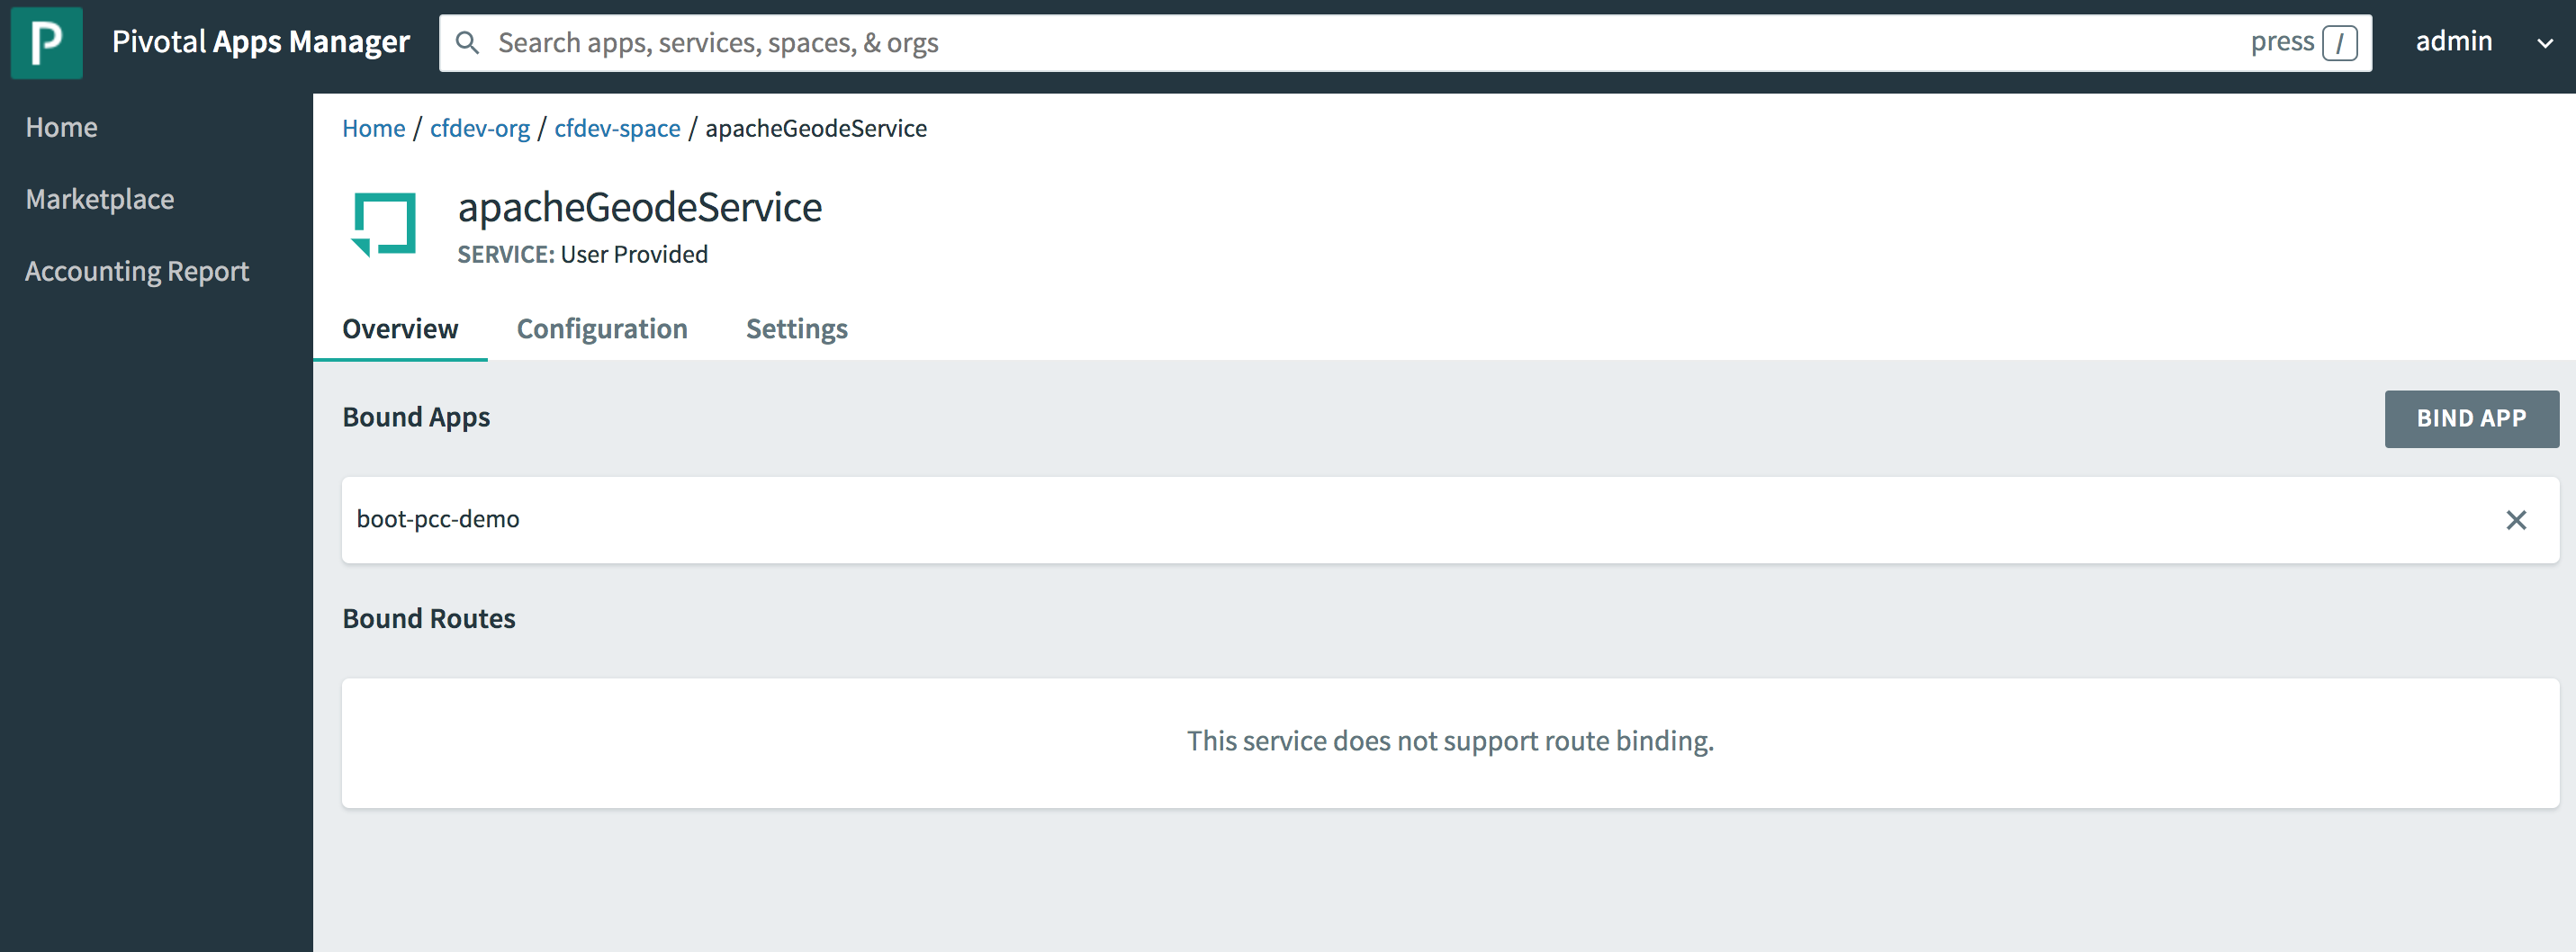
By clicking on the "apacheGeodeService" service entry in the table you can get all the service details, such the bound apps:
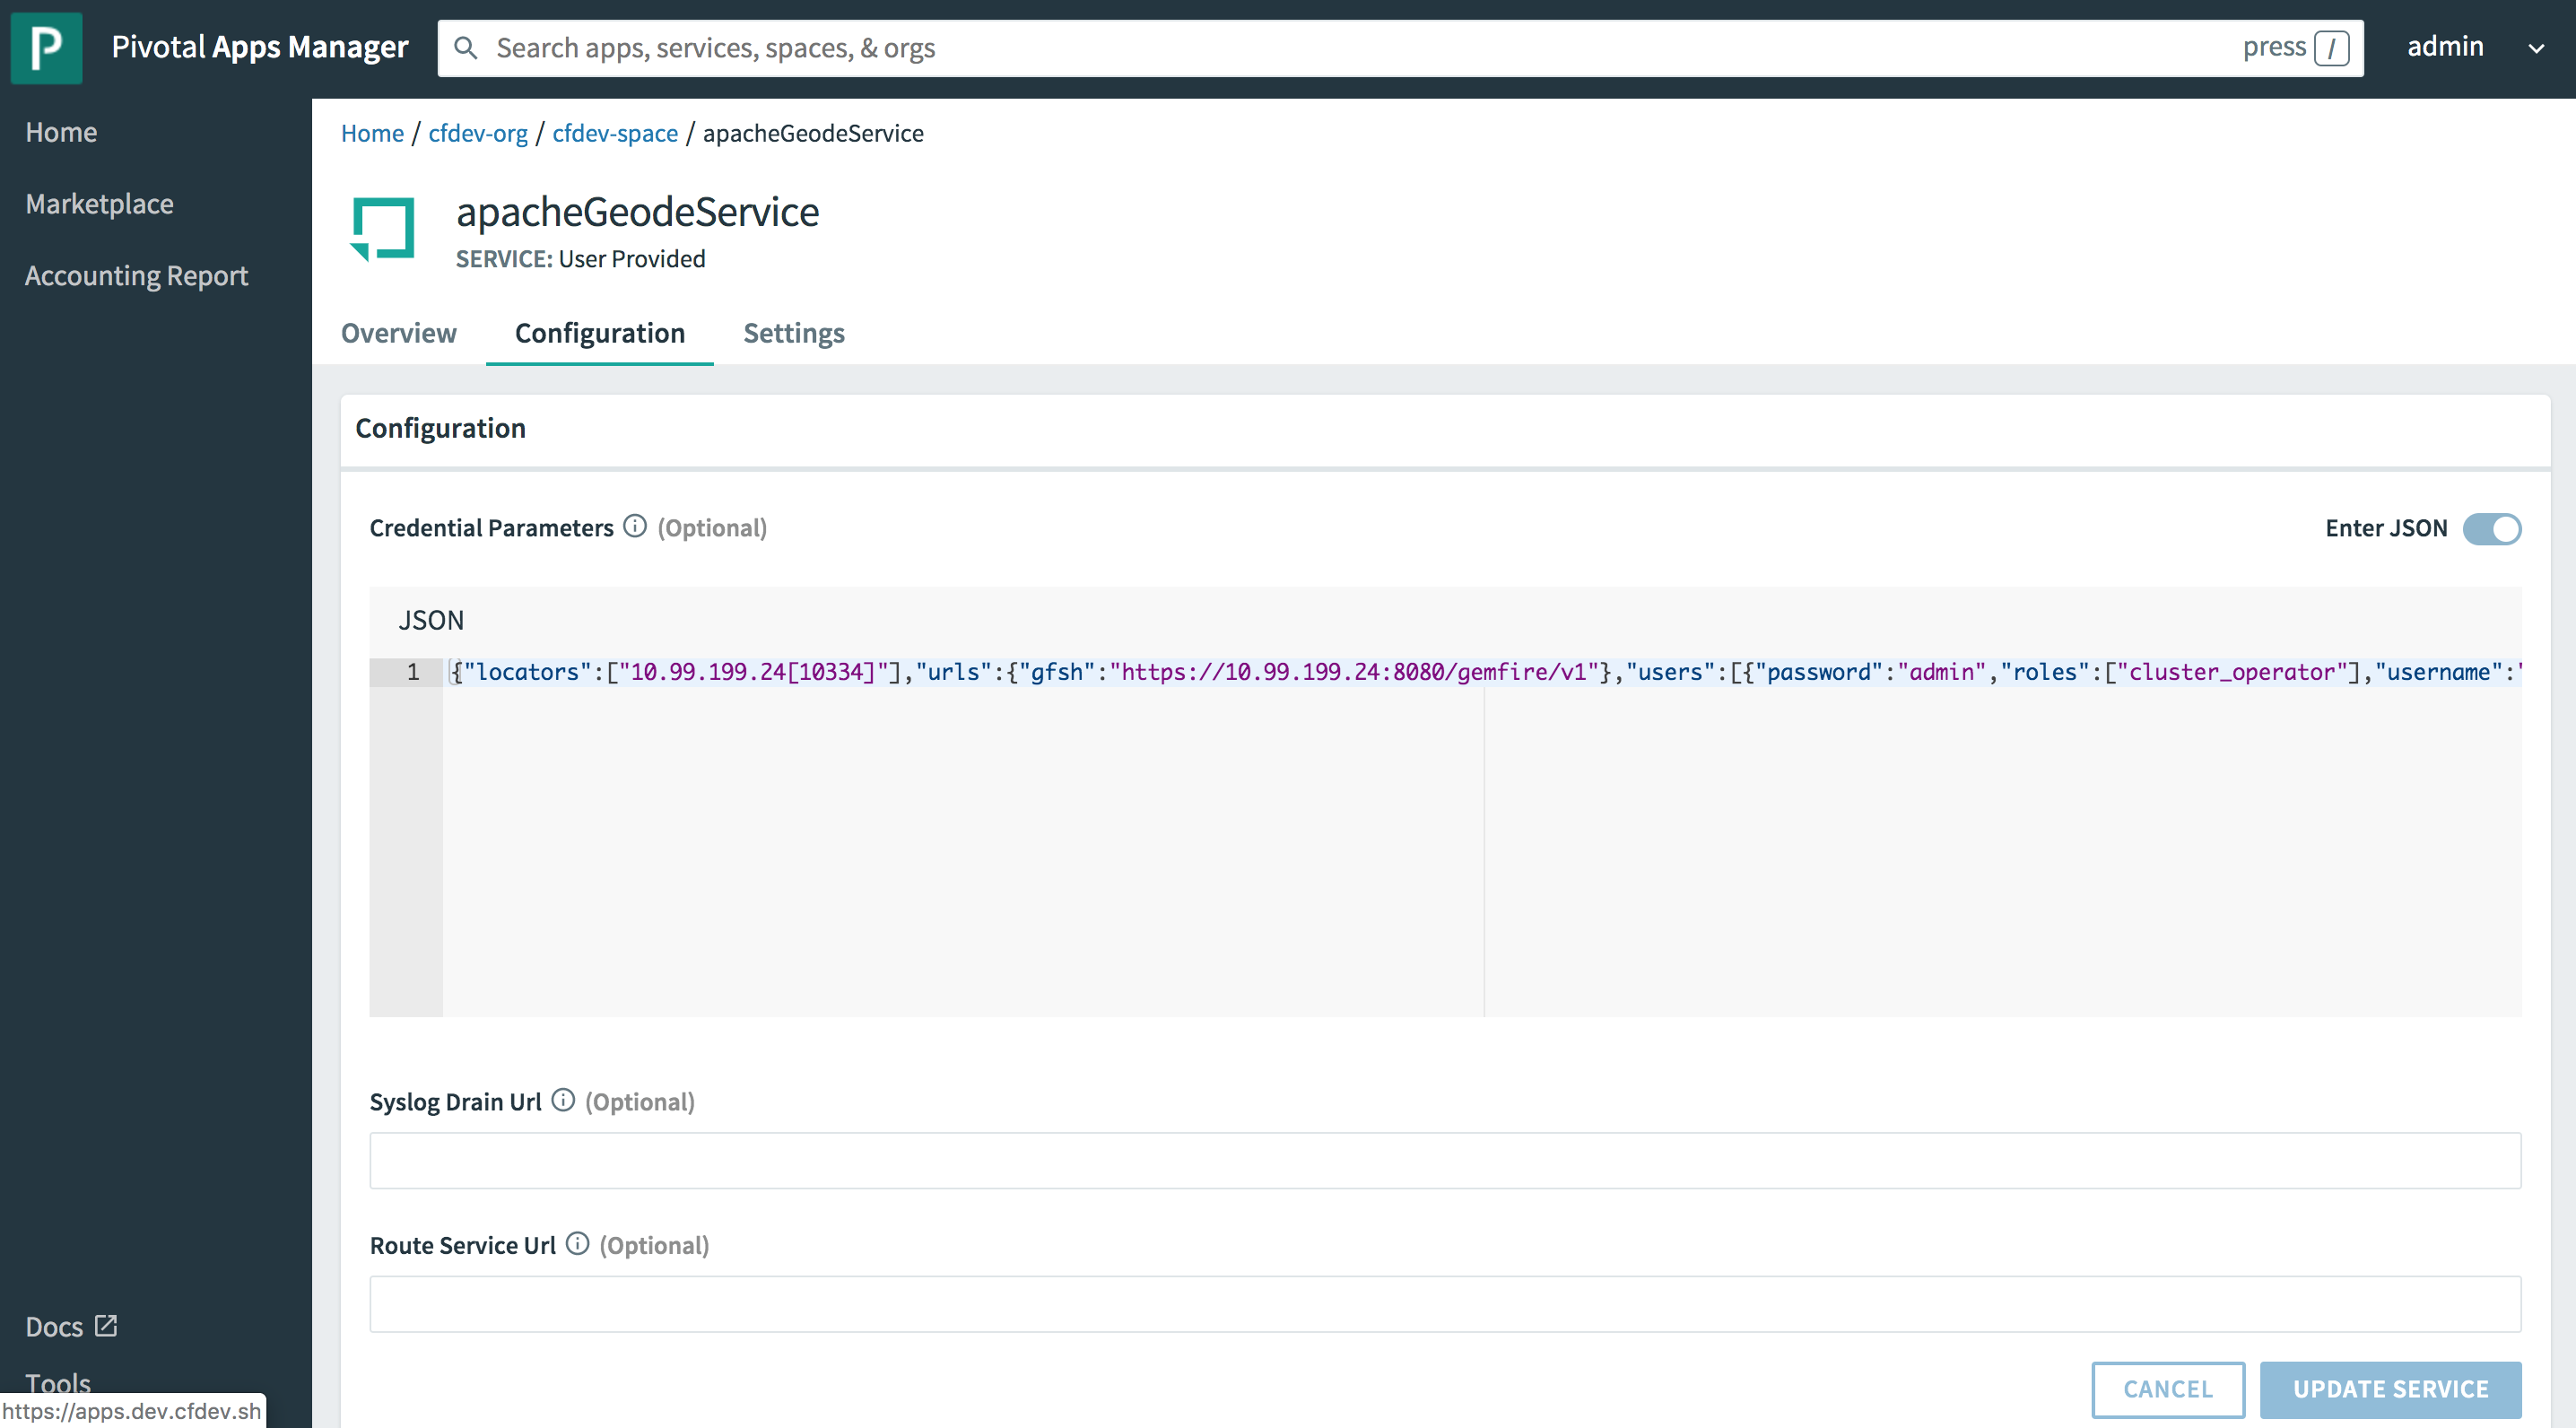
Configuration:
And so on.
| You can learn more about CUPS in the PCF documentation, {pivotal-cloudfoundry-docs}/devguide/services/user-provided.html[here]. |
1.4.4. Push & Bind a Spring Boot application
Now it is time to push a Spring Boot application to PCF Dev and bind the app to the "apacheGeodeService".
Any Spring Boot ClientCache application using SBDG will do. For this example, we will use
the PCCDemo application, available in GitHub.
After cloning the project to your workstation, you must perform a build to produce the artifact to push to PCF Dev:
$ mvn clean packageThen, you can push the app to PCF Dev with the following cf CLI command:
$ cf push boot-pcc-demo -u none --no-start -p target/client-0.0.1-SNAPSHOT.jarOnce the app has been successfully deployed to PCF Dev, you can get app details:
$ cf apps
Getting apps in org cfdev-org / space cfdev-space as admin...
OK

name            requested state   instances   memory   disk   urls
boot-pcc-demo   stopped           0/1         768M     1G     boot-pcc-demo.dev.cfdev.sh


$ cf app boot-pcc-demo
Showing health and status for app boot-pcc-demo in org cfdev-org / space cfdev-space as admin...

name:              boot-pcc-demo
requested state:   stopped
routes:            boot-pcc-demo.dev.cfdev.sh
last uploaded:     Tue 02 Jul 00:34:09 PDT 2019
stack:             cflinuxfs3
buildpacks:        https://github.com/cloudfoundry/java-buildpack.git

type:           web
instances:      0/1
memory usage:   768M
     state   since                  cpu    memory   disk     details
#0   down    2019-07-02T21:48:25Z   0.0%   0 of 0   0 of 0

type:           task
instances:      0/0
memory usage:   256M

There are no running instances of this process.
You can either bind the PPCDemo app to the "apacheGeodeService" using the cf CLI command:
cf bind-service boot-pcc-demo apacheGeodeServiceOr, alternatively, you can create a YAML file (manifest.yml in src/main/resources) containing the
deployment descriptor:
\---
applications:
- name: boot-pcc-demo
memory: 768M
instances: 1
path: ./target/client-0.0.1-SNAPSHOT.jar
services:
- apacheGeodeService
buildpacks:
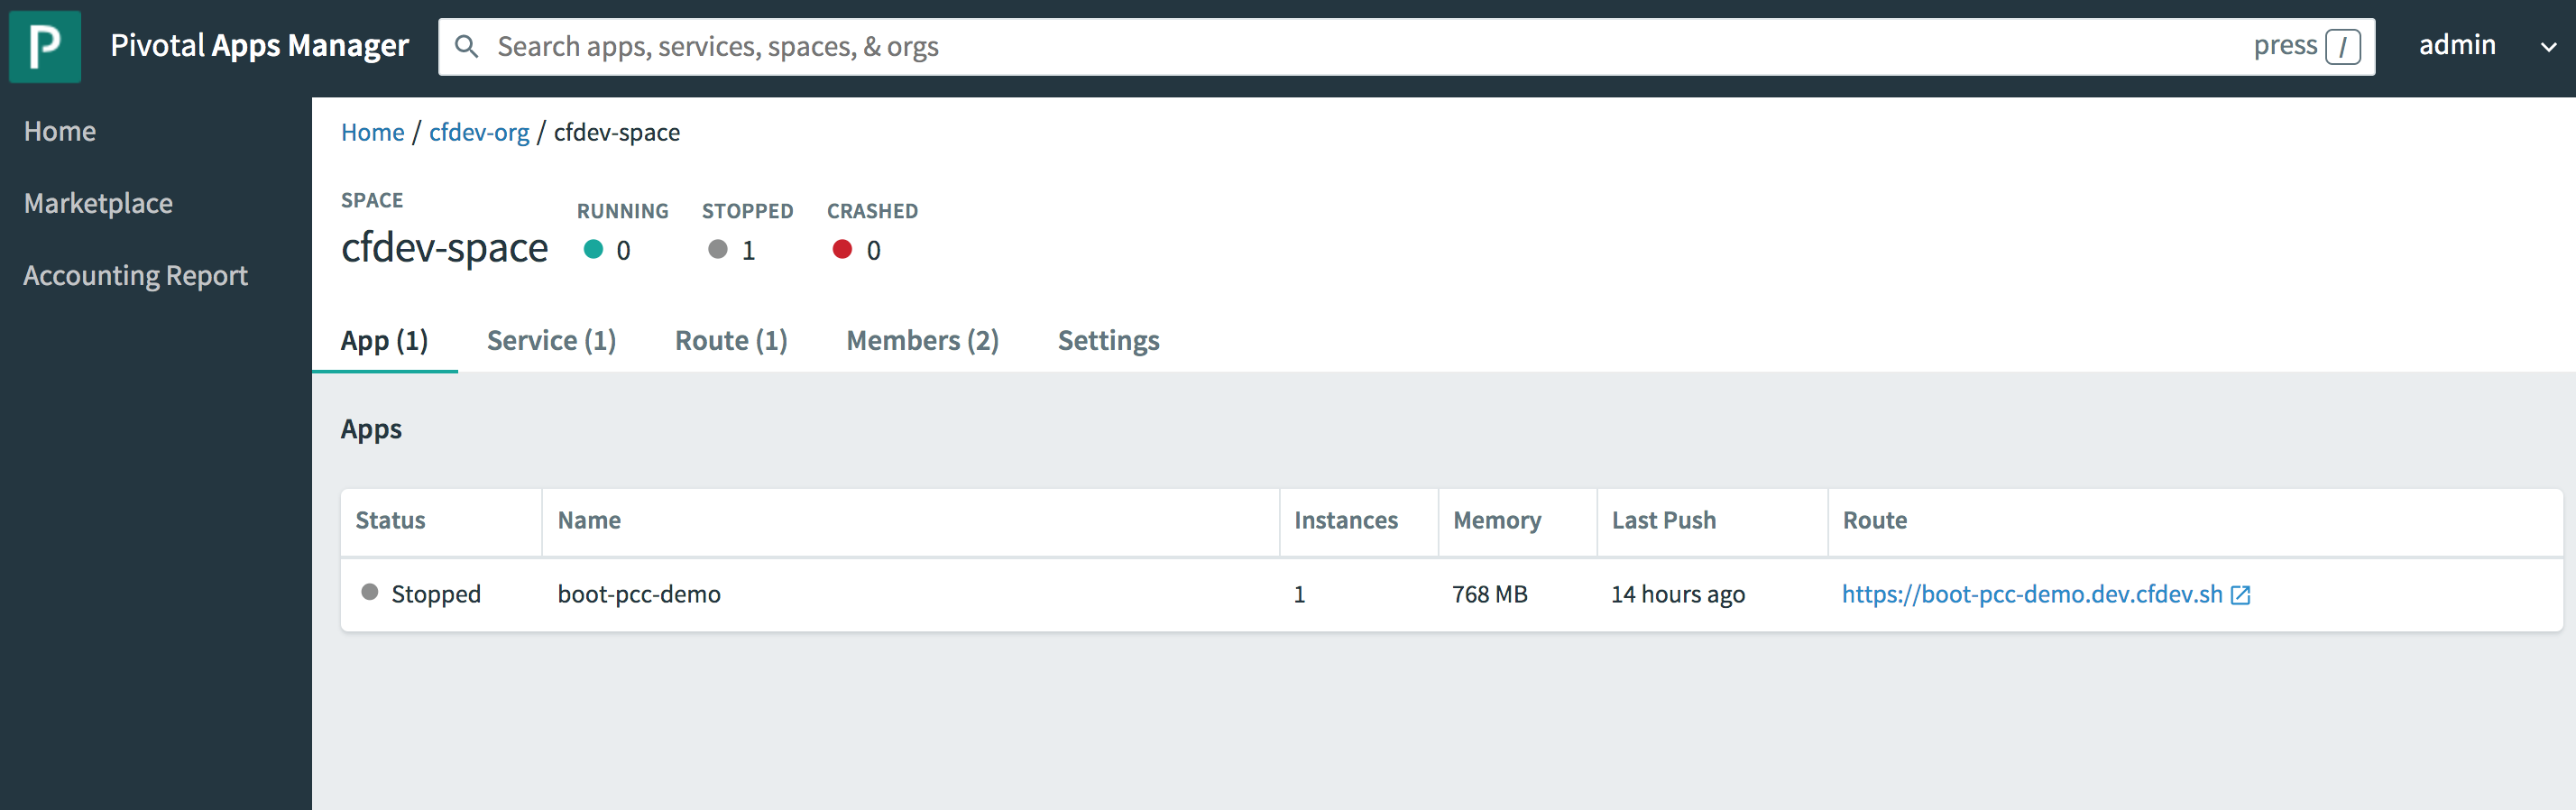
- https://github.com/cloudfoundry/java-buildpack.gitYou can also use Apps Manager to view app details and un/bind additional services. Start by navigating to
the App tab under your org and space:
From there, you can click on the desired app and navigate to the Overview:
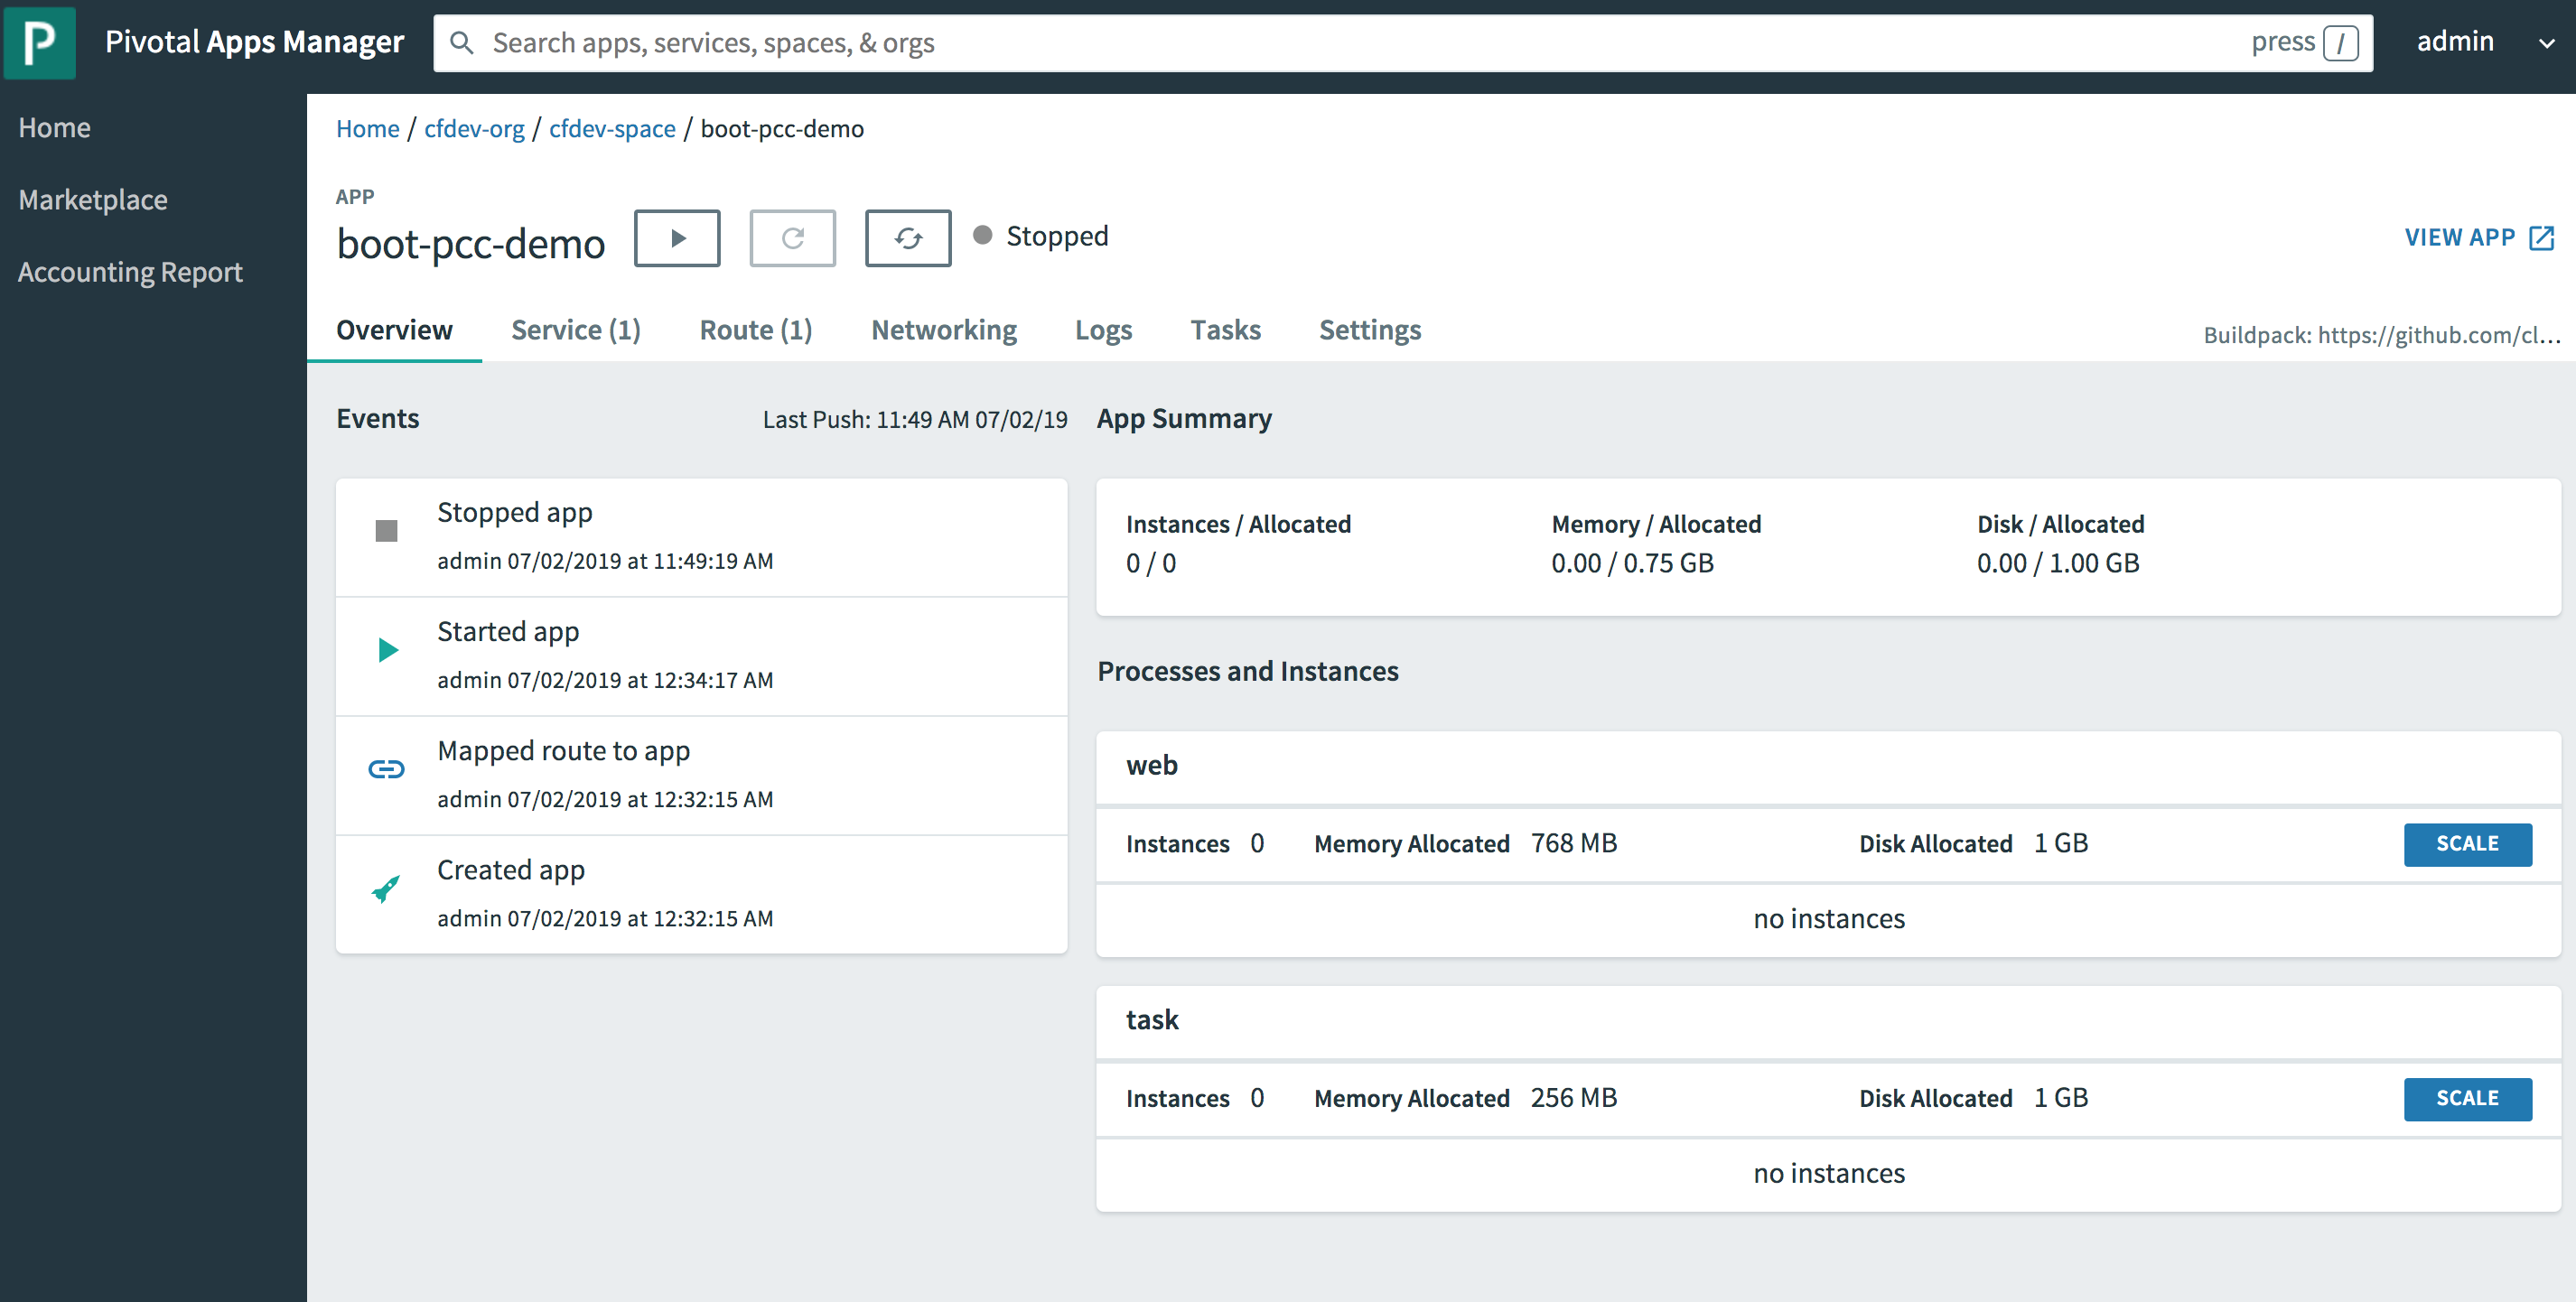
You can also review the app Settings. Specifically, we are looking at the configuration of the app once bound to
the "apacheGeodeService" as seen in the VCAP_SERVICES Environment Variable:
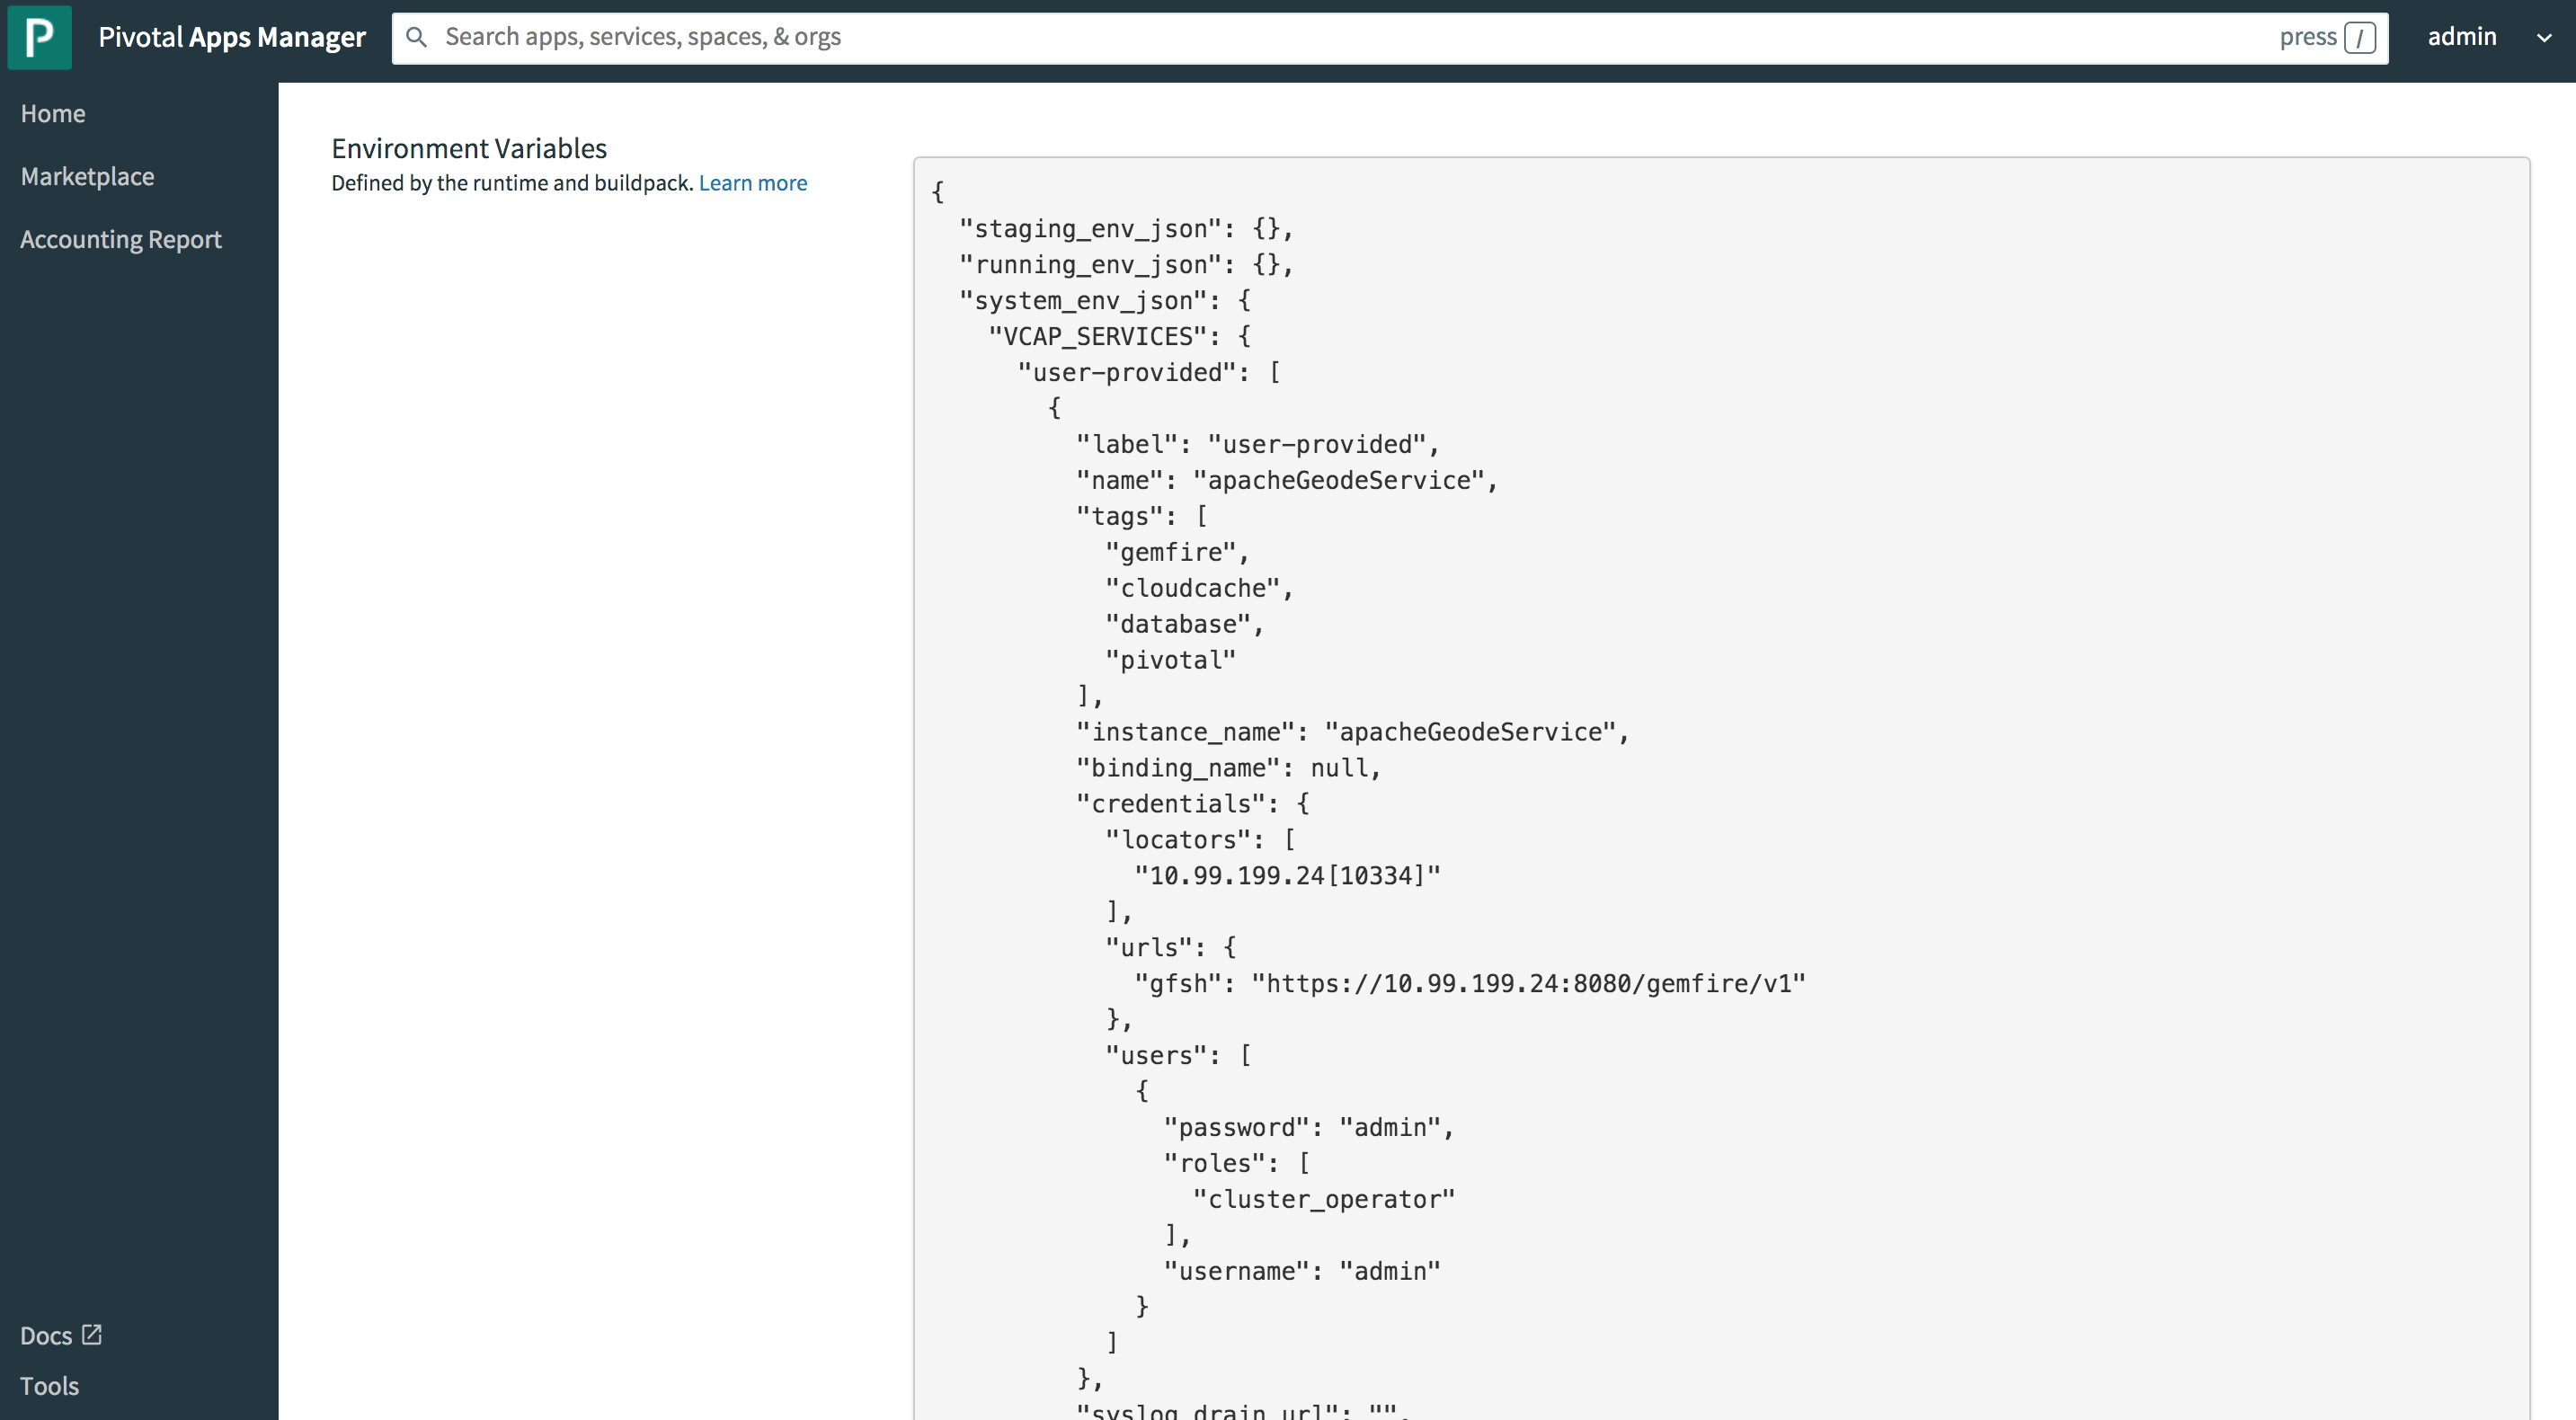
This JSON document structure is not unlike the configuration used to bind your Spring Boot, ClientCache application
to the Pivotal Cloud Cache service when deploying the same app to Pivotal CloudFoundry. This is actually very key
if you want to minimize the amount of boilerplate code and configuration changes when migrating between different
CloudFoundry environments, even Open Source CloudFoundry.
Again, SBDG’s entire goal is to simply the effort for you, as a developer, to build, run and manage your application, in whatever context your application lands, even if it changes later. If you follow the steps in this documentation, that goal will be realized.
1.4.5. Running the Spring Boot application
All that is left to do now is run the app.
You can start the PCCDemo app from the cf CLI using the following command:
$ cf start boot-pcc-demoAlternatively, you can also start the app from Apps Manager. This is convenient since then you can tail and monitor the application log file.
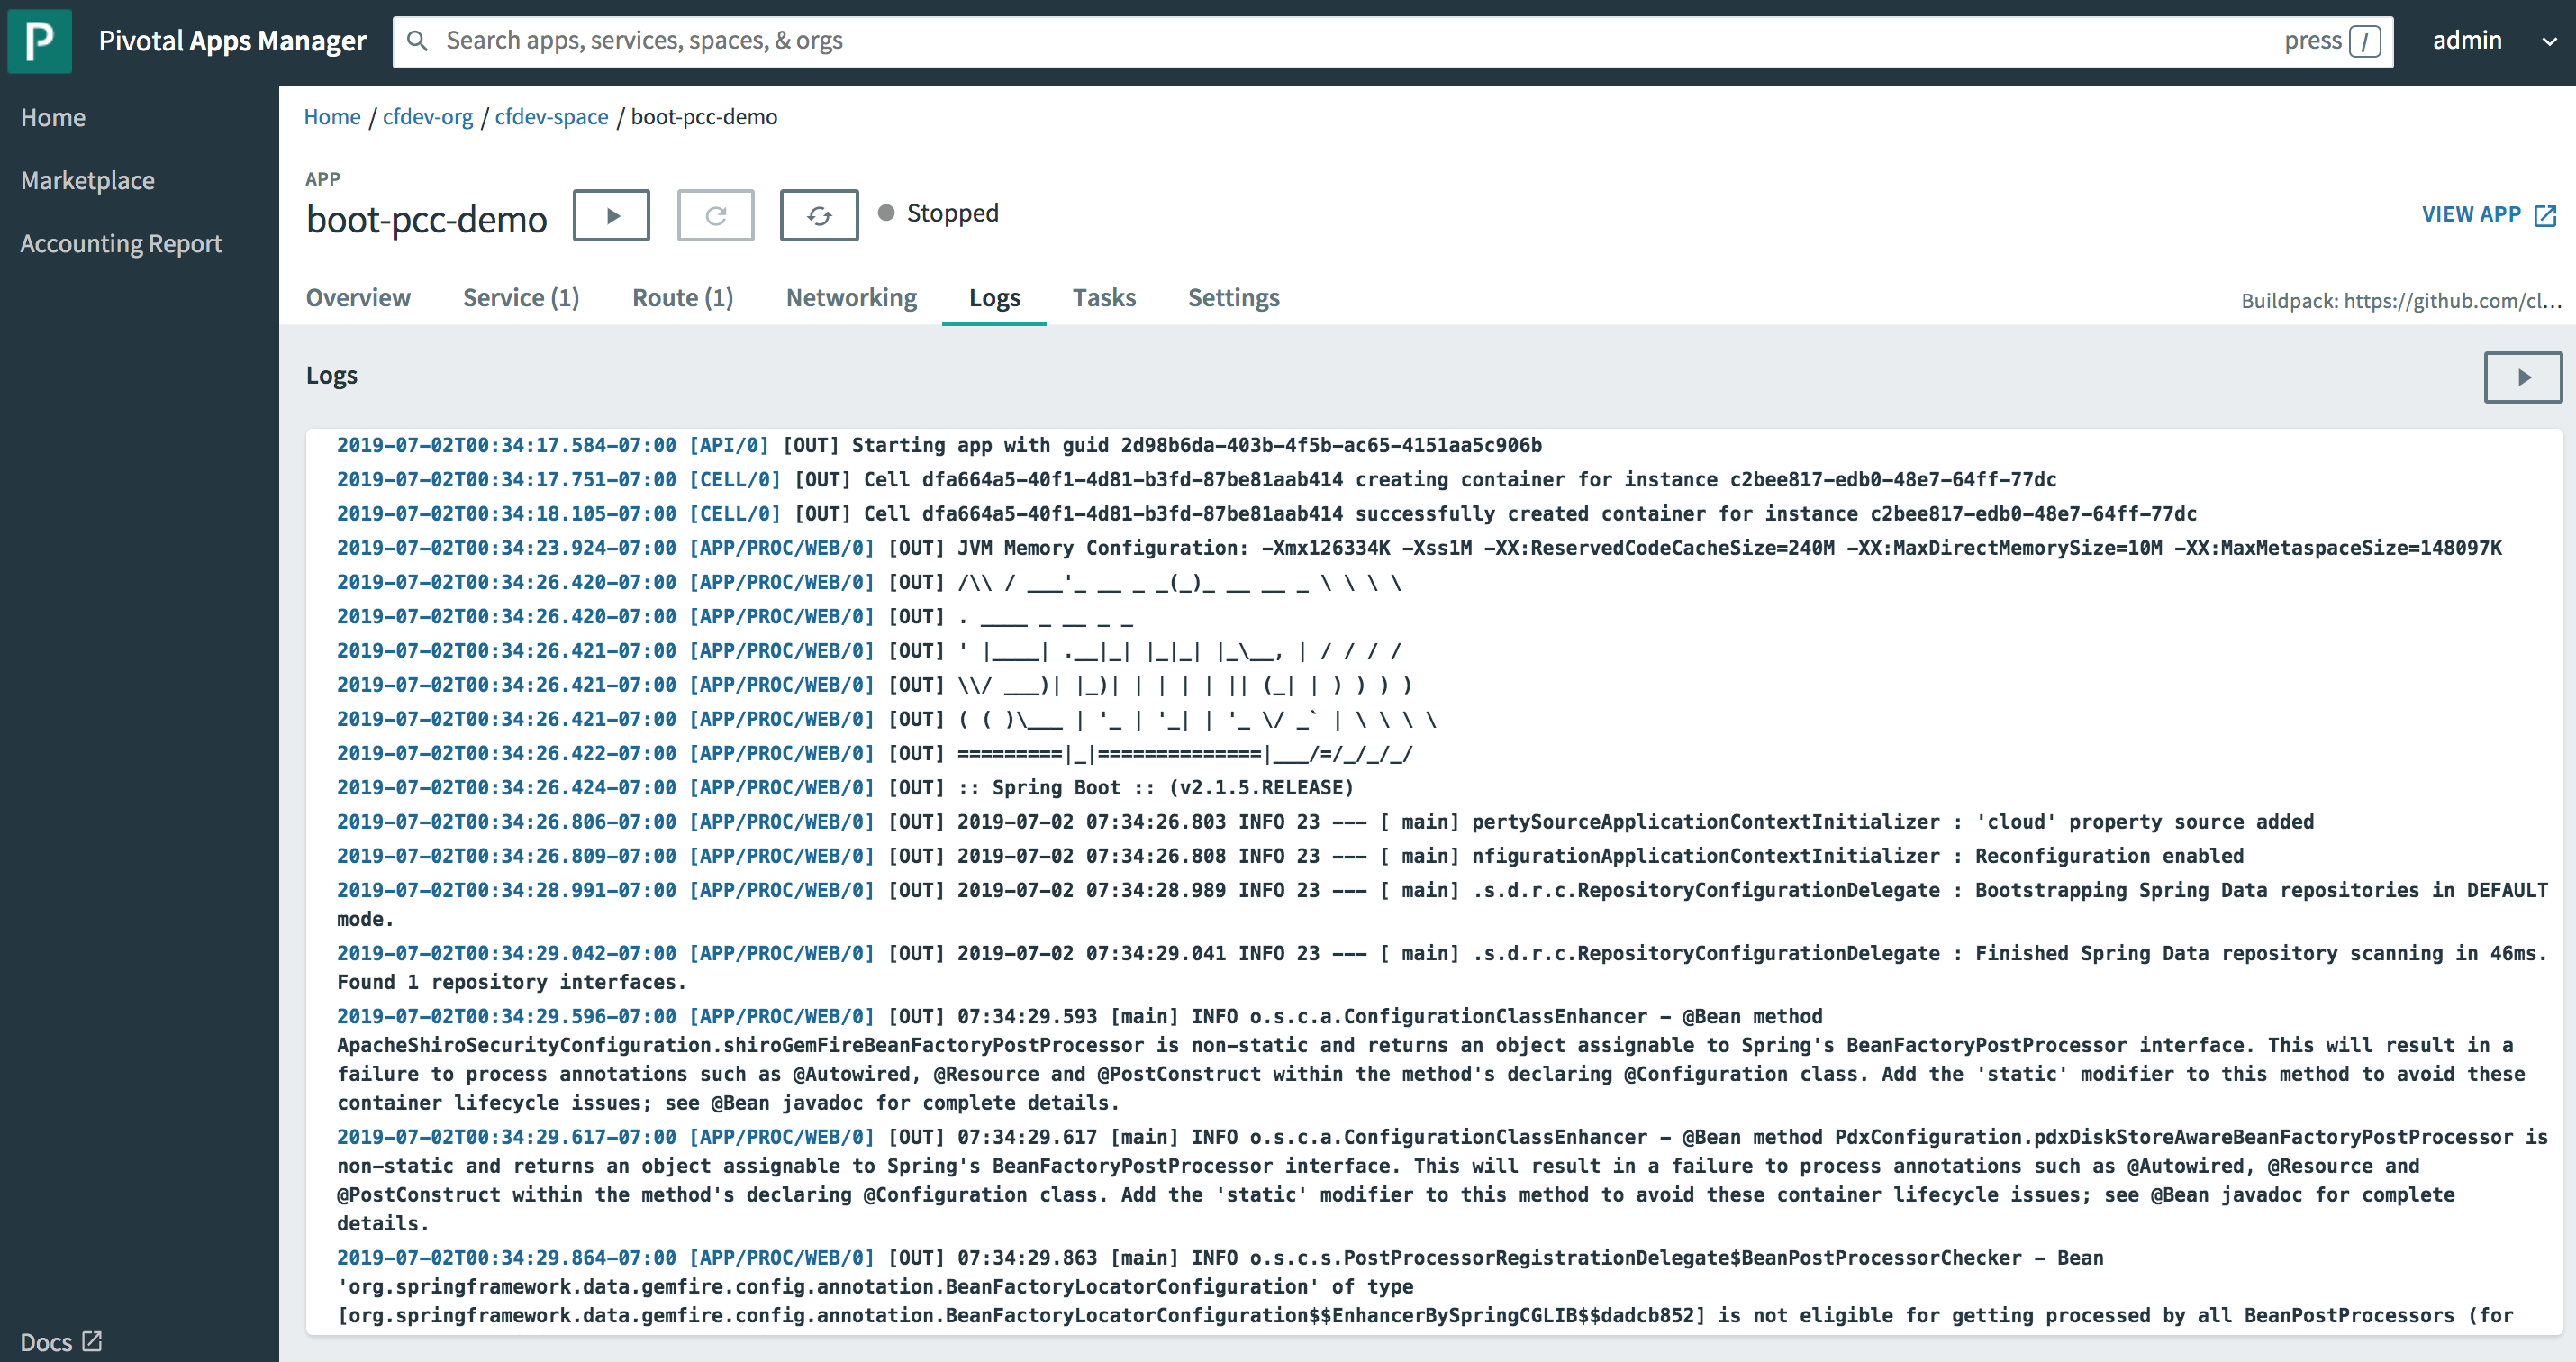
Once the app has started, you can click the VIEW APP link
in the upper right corner of the APP screen.
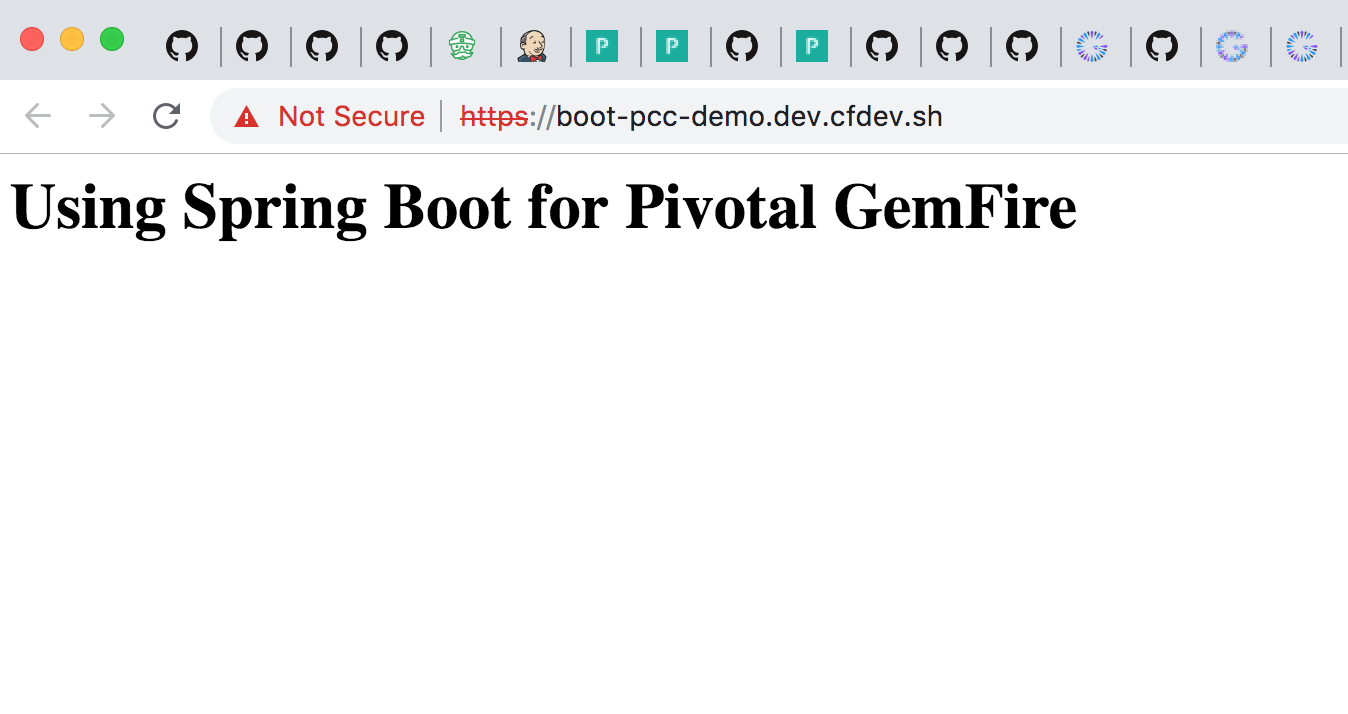
You can navigate to any of the application Web Service, Controller endpoints. For example, if you know the ISBN of a Book, you can access it from the Web browser:
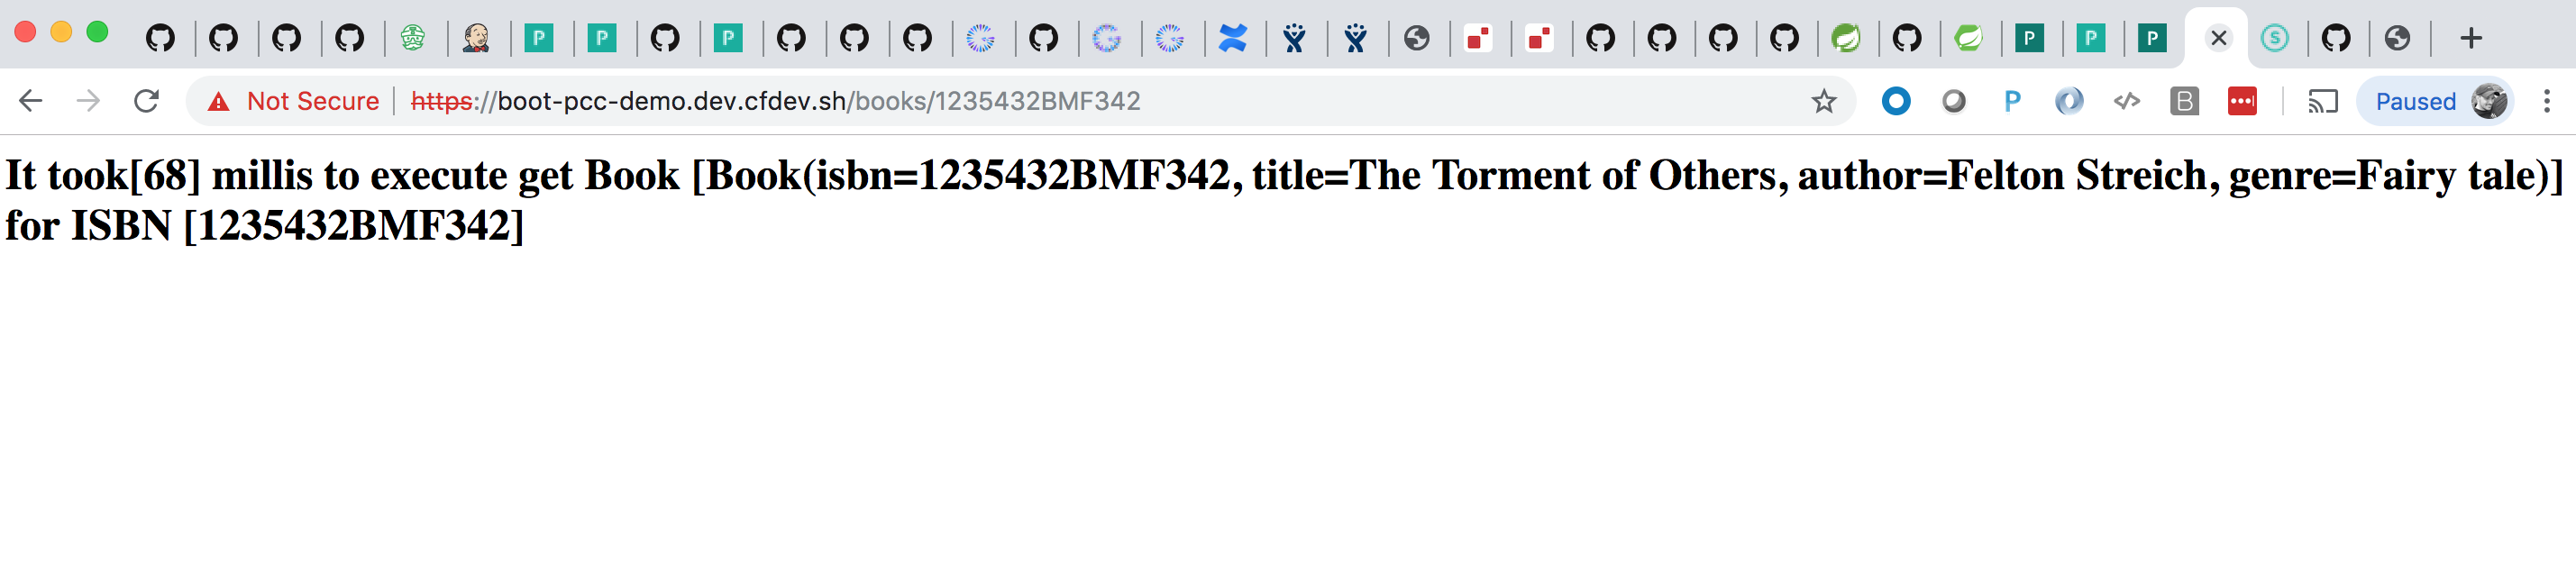
You can also access the same data from the Gfsh command-line tool. However, the first thing to observe is that our application informed the cluster that it needed a Region called "Books":
gfsh>list regions
List of regions
---------------
Books


gfsh>describe region --name=/Books
..........................................................
Name            : Books
Data Policy     : partition
Hosting Members : ServerOne

Non-Default Attributes Shared By Hosting Members

 Type  |    Name     | Value
------ | ----------- | ---------
Region | size        | 1
       | data-policy | PARTITION
The PCCDemo app creates fake data on startup, which we can query in Gfsh like so:
gfsh>query --query="SELECT book.isbn, book.title FROM /Books book"
Result : true
Limit  : 100
Rows   : 1

    isbn      | title
------------- | ---------------------
1235432BMF342 | The Torment of Others
1.5. Summary
There you have it!
The ability to deploy Spring Boot, Apache Geode or Pivotal GemFire ClientCache applications to Pivotal CloudFoundry,
yet connect your app to a externally managed, standalone Apache Geode or Pivotal GemFire cluster.
Indeed, this is will be a useful arrangement and stepping stone for many users as they begin their journey towards a Cloud-Native platform like Pivotal CloudFoundry (PCF) and using services like Pivotal Cloud Cache (PCC).
Later, when the time comes and your need is very real, you can simply migrate your Spring Boot applications to a fully managed and production-grade Pivotal CloudFoundry environment and SBDG will figure out what to do, leaving you to focus entirely on your application.