This guide walks through using Spring Boot Actuator to assess the state of your running Apache Geode, Spring Boot application.
The goal for SBDG’s Spring Boot Actuator integration is to enable users to effectively manage and monitor their Spring Boot applications using Apache Geode in a production environment.
In particular, SBDG’s integration with Spring Boot Actuator currently focuses on enabling Health Information for your application. In the future, SBDG will provide dedicated support for Micrometer metrics.
This guide assumes you are already familiar with Spring Boot and Apache Geode.
| Refer to the Spring Boot Actuator chapter in the reference documentation for more information. |
1. Example Application
This guide additionally provides a working example application to review some of the Actuator Health Endpoints.
The example application is a simple Temperature Monitoring Service, simulating a real-world, Internet of Things (IOT) Use Case (UC). Essentially, the application collects temperature readings from different temperature sensors (devices) and uses the readings to monitor fluctuations in temperatures so that someone or something can respond accordingly. The sensor devices could be located around the world in multiple locations in the planet’s oceans.
1.1. TemperatureReading
First, we start by modeling a temperature reading, which stores the temperature in Fahrenheit along with a timestamp for when the reading was measured.
Clearly, a more practical example would store the temperature measurement as a double or BigDecimal along with
the ability to support different scales (Celsius, Fahrenheit, Kelvin).
However in this case, we simply model the TemperatureReading as:
@Data
@Region("TemperatureReadings")
@RequiredArgsConstructor(staticName = "newTemperatureReading")
@SuppressWarnings("unused")
public class TemperatureReading {

	private static final int BOILING_TEMPERATURE = 212;
	private static final int FREEZING_TEMPERATURE = 32;

	@Id
	private Long timestamp = System.currentTimeMillis();

	@NonNull
	private final Integer temperature;

	@Transient
	public boolean isBoiling() {

		Integer temperature = getTemperature();

		return temperature != null && temperature >= BOILING_TEMPERATURE;
	}

	@Transient
	public boolean isFreezing() {

		Integer temperature = getTemperature();

		return temperature != null && temperature <= FREEZING_TEMPERATURE;
	}

	@Transient
	public boolean isNormal() {
		return !(isBoiling() || isFreezing());
	}

	@Override
	public String toString() {
		return String.format("%d °F", getTemperature());
	}
}
The TemperatureReading class is annotated with SDG’s @Region mapping annotation to declare the Apache Geode Region
in which TemperatureReadings will be persisted.
1.2. TemperatureEvent
A key concern of our application is to "monitor" temperature readings. Therefore, we need some way to capture temperature change events.
For that, we introduce the simple TemperatureEvent base class:
public class TemperatureEvent extends ApplicationEvent {

	@Getter
	private final TemperatureReading temperatureReading;

	public TemperatureEvent(Object source, TemperatureReading temperatureReading) {

		super(source);

		this.temperatureReading = temperatureReading;
	}
}
TemperatureEvent is a Spring ApplicationEvent capable of being published to to Spring @EventListeners registered
in the Spring application context.
Additionally, we provide 2 subclasses: BoilingTemperatureEvent and FreezingTemperatureEvent to further classify
temperature changes.
1.3. TemperatureReadingRepository
To perform basic data access operations (e.g. CRUD) and simple queries on TemperatureReadings, we create
a Spring Data Repository:
public interface TemperatureReadingRepository extends CrudRepository<TemperatureReading, Long> {

	List<TemperatureReading> findByTimestampGreaterThanAndTimestampLessThan(
		Long timestampLowerBound, Long timestampUpperBound);

	@Query("SELECT count(*) FROM /TemperatureReadings WHERE temperature >= 212")
	Integer countBoilingTemperatureReadings();

	@Query("SELECT count(*) FROM /TemperatureReadings WHERE temperature <= 32")
	Integer countFreezingTemperatureReadings();

}
The Repository showcases a an example, derived query methods, findByTimestampGreaterThanAndTimestampLessThan(..)
along with 2 @Query annotated query methods using raw OQL queries.
1.4. TemperatureMonitor service class
To receive temperature change events, we need a class to monitor changes. This capability is built on Apache Geode’s Continuous Query (CQ) functionality.
With Apache Geode you can register an (OQL) Query with the servers in the cluster that runs continuously, sending notifications back to the client anytime data changes to match the predicate in our query, or queries.
For our purposes, we will simply monitor the temperature anytime it rises above boiling (212 °F) or drops below freezing (32 °F):
@Service
@SuppressWarnings("unused")
public class TemperatureMonitor {

	private final ApplicationEventPublisher applicationEventPublisher;

	public TemperatureMonitor(ApplicationEventPublisher applicationEventPublisher) {

		Assert.notNull(applicationEventPublisher, "ApplicationEventPublisher is required");

		this.applicationEventPublisher = applicationEventPublisher;
	}

	@ContinuousQuery(name = "BoilingTemperatureMonitor",
		query = "SELECT * FROM /TemperatureReadings WHERE temperature >= 212")
	public void boilingTemperatureReadings(CqEvent event) {

		Optional.ofNullable(event)
			.map(CqEvent::getNewValue)
			.filter(TemperatureReading.class::isInstance)
			.map(TemperatureReading.class::cast)
			.map(it -> new BoilingTemperatureEvent(this, it))
			.ifPresent(this.applicationEventPublisher::publishEvent);
	}

	@ContinuousQuery(name = "FreezingTemperatureMonitor",
		query = "SELECT * FROM /TemperatureReadings WHERE temperature <= 32")
	public void freezingTemperatureReadings(CqEvent event) {

		Optional.ofNullable(event)
			.map(CqEvent::getNewValue)
			.filter(TemperatureReading.class::isInstance)
			.map(TemperatureReading.class::cast)
			.map(it -> new FreezingTemperatureEvent(this, it))
			.ifPresent(this.applicationEventPublisher::publishEvent);
	}
}
When the temperature changes, triggering our queries, we receive an event and publish an appropriate TemperatureEvent
by using the Spring container’s ApplicationEventPublisher, which has been injected into the monitor class.
The 2 OQL queries have been defined to query the "TemperatureReadings" Region and fire anytime the temperature rises is above boiling (212 °F) or drops below freezing (32 °F).
1.5. TemperatureSensor service class
Of course, we need a simulator to generate temperatures.
For that we have the TemperatureSensor class:
@Service
@SuppressWarnings("unused")
public class TemperatureSensor {

	private final PrimitiveIterator.OfInt temperatureStream =
		new Random(System.currentTimeMillis())
			.ints(-100, 400)
			.iterator();

	private final TemperatureReadingRepository repository;

	public TemperatureSensor(TemperatureReadingRepository repository) {

		Assert.notNull(repository, "TemperatureReadingRepository is required");

		this.repository = repository;
	}

	@Scheduled(fixedRateString = "${example.app.temp.sensor.reading.schedule.rate:1000}")
	public void readTemperature() {

		TemperatureReading temperatureReading =
			TemperatureReading.newTemperatureReading(temperatureStream.nextInt());

		this.repository.save(log(temperatureReading));
	}

	private TemperatureReading log(TemperatureReading temperatureReading) {

		PrintStream out = temperatureReading.isNormal() ? System.out : System.err;

		out.printf("TEMPERATURE READING [%s]%n", temperatureReading);

		return temperatureReading;
	}
}
To generate a stream of temperatures, we use Spring’s Scheduling Service
along with a Random stream of ints provided via an Iterator, as seen in the readTemperature() method.
The readTemperature() method is then storing the new TemperatureReading in the "TemperatureReadings" Region
as designated by our TemperatureReading model class’s, @Region annotation declaration:
@Region("TemperatureReadings")
public class TemperatureReading {  }
Additionally, the readTempeature() method uses our TemperatureReadingRepository to perform the necessary
data access operations.
1.6. Server
Now, we need a couple of main application classes to actually have the application do something useful.
We start with an Spring Boot, Apache Geode Server application functioning as the temperature sensor (device)
using the TemperatureSensor class:
@SpringBootApplication
@CacheServerApplication(name = "TemperatureServiceServer")
@EnableEntityDefinedRegions(basePackageClasses = TemperatureReading.class)
@EnableGemfireRepositories(basePackageClasses = TemperatureReadingRepository.class)
@EnableScheduling
@EnableStatistics
@UseGroups("TemperatureSensors")
@SuppressWarnings("unused")
public class BootGeodeServerApplication {

	public static void main(String[] args) {

		new SpringApplicationBuilder(BootGeodeServerApplication.class)
			.web(WebApplicationType.SERVLET)
			.build()
			.run(args);
	}

	@Bean
	TemperatureSensor temperatureSensor(TemperatureReadingRepository repository) {
		return new TemperatureSensor(repository);
	}

	@Bean
	RegionConfigurer temperatureReadingsConfigurer() {

		return new RegionConfigurer() {

			@Override
			public void configure(String beanName, PeerRegionFactoryBean<?, ?> regionBean) {

				Optional.ofNullable(beanName)
					.filter("TemperatureReadings"::equals)
					.ifPresent(it -> regionBean.setStatisticsEnabled(true));
			}
		};
	}

	@Bean
	@DependsOn("TemperatureReadings")
	IndexFactoryBean temperatureReadingTemperatureIndex(GemFireCache gemfireCache) {

		IndexFactoryBean temperatureTimestampIndex = new IndexFactoryBean();

		temperatureTimestampIndex.setCache(gemfireCache);
		temperatureTimestampIndex.setExpression("temperature");
		temperatureTimestampIndex.setFrom("/TemperatureReadings");
		temperatureTimestampIndex.setName("TemperatureReadingTemperatureIdx");

		return temperatureTimestampIndex;
	}

	@Bean
	@DependsOn("TemperatureReadings")
	IndexFactoryBean temperatureReadingTimestampIndex(GemFireCache gemfireCache) {

		IndexFactoryBean temperatureTimestampIndex = new IndexFactoryBean();

		temperatureTimestampIndex.setCache(gemfireCache);
		temperatureTimestampIndex.setExpression("timestamp");
		temperatureTimestampIndex.setFrom("/TemperatureReadings");
		temperatureTimestampIndex.setName("TemperatureReadingTimestampIdx");

		return temperatureTimestampIndex;
	}
}
This class is annotated with @SpringBootApplication making it a proper Spring Boot application. It uses Spring Boot’s
SpringApplicationBuilder to configure and bootstrap the server application.
This class is also annotated with SDG’s @CacheServerApplication making it a proper Apache Geode Server with a peer
Cache instance along with a CacheServer to accept client connections. This effectively overrides SBDG’s default
ClientCache instance.
Additionally, the class enables several other features, such as Spring’s Scheduling Service, Apache Geode Statistics, and entity-defined Regions making the creation of our server-side, partitioned "TemperatureReadings" Region simple.
By enabling Apache Geode statistics, we allow Spring Boot’s Actuator, HealthIndicators to collect metrics about
our running Apache Geode Server as well.
Because we have enabled scheduling (with @EnableScheduling) and declared the TemperatureSensor class as a bean
in the Spring application context, the application will immediately start generating temperature readings, which are
recorded to the "TemperatureReadings" Region.
Finally, our class registers a couple Apache Geode Region Indexes to make the Actuator HealthIndicator information
more interesting, particularly since we are running continuous queries.
This is a Servlet-based application as well since our Actuator, HealthIndicator endpoints are exposed via HTTP.
| There are multiple ways to configure and bootstrap an Apache Geode Server, and the server-side of our application. Using Spring Boot is one of the easier ways. |
1.7. Client
Next, we need a client functioning as the "monitor" in our Temperature Service application.
@SpringBootApplication
@EnableClusterAware
@EnableEntityDefinedRegions(basePackageClasses = TemperatureReading.class)
@UseGroups("TemperatureMonitors")
@UseMemberName("TemperatureMonitoringService")
@SuppressWarnings("unused")
public class BootGeodeClientApplication {

	public static void main(String[] args) {

		new SpringApplicationBuilder(BootGeodeClientApplication.class)
			.web(WebApplicationType.SERVLET)
			.build()
			.run(args);
	}

	@Bean
	TemperatureMonitor temperatureMonitor(ApplicationEventPublisher applicationEventPublisher) {
		return new TemperatureMonitor(applicationEventPublisher);
	}

	@EventListener(classes = { BoilingTemperatureEvent.class, FreezingTemperatureEvent.class })
	public void temperatureEventHandler(TemperatureEvent temperatureEvent) {

		System.err.printf("%1$s TEMPERATURE READING [%2$s]%n",
			temperatureEvent instanceof BoilingTemperatureEvent ? "HOT" : "COLD",
				temperatureEvent.getTemperatureReading());
	}
}
Again, this class is also annotated with @SpringBootApplication making it a proper Spring Boot application. It too
uses Spring Boot’s SpringApplicationBuilder class to configure and bootstrap the client application.
Unlike our server, this class is not annotated with any SDG @*Cache*Application annotations since SBDG provides us
a ClientCache instance by default. We want this application to be a client in our setup.
Like our server, we enable entity-defined Regions to easily and quickly create the client PROXY Region
for "TemperatureReadings", which will send/receive data to/from the server-side Region by the same name.
And, like our server application, we declare a bean of type TemperatureMonitor in the Spring application context
to receive the TemperatureReading events. This enables the CQ registration and event handlers
to sets things in motion.
Probably the most interesting part is that we an @EventListener to receive the TemperatureEvents to log
the TemperatureReadings to System.err.
2. Run the Example
It is time to run the example.
First, we need to start the server.
You can run the server from your IDE (e.g. IntelliJ IDEA) by creating a run profile configuration for the
example.app.temp.geode.server.BootGeodeServerApplication class. Make sure to set the JVM argument to activate the
"server" Spring Profile: -Dspring.profiles.active=server.
Alternatively, you can run the server from the command-line using the gradlew command:
$ gradlew :spring-geode-samples-boot-actuator:runServer
The gradlew command and runServer Gradle Task sets the configuration (e.g. Spring Profile) for you. The gradlew
command is ran in the directory where you cloned the spring-boot-data-geode project (not in
spring-boot-data-geode/spring-geode-samples/boot/actuator/).
If you wish to adjust the log levels of Apache Geode or Spring Boot while running the client and server applications,
then you can set the log levels of the individual Loggers (i.e. org.apache and org.springframework)
in src/main/resources/logback.xml:
<?xml version="1.0" encoding="UTF-8"?>
<configuration debug="false">

	<statusListener class="ch.qos.logback.core.status.NopStatusListener"/>

	<appender name="console" class="ch.qos.logback.core.ConsoleAppender">
		<encoder>
			<pattern>%d %5p %40.40c:%4L - %m%n</pattern>
		</encoder>
	</appender>

	<logger name="ch.qos.logback" level="${logback.log.level:-ERROR}"/>

	<logger name="org.apache" level="${logback.log.level:-ERROR}"/>

	<logger name="org.springframework" level="${logback.log.level:-ERROR}"/>

	<root level="${logback.log.level:-ERROR}">
		<appender-ref ref="console"/>
	</root>

</configuration>
Running the server from your IDE:
/Library/Java/JavaVirtualMachines/jdk1.8.0_192.jdk/Contents/Home/bin/java -server -ea -Dspring.profiles.active=server
  ... example.app.temp.geode.server.BootGeodeServerApplication

  .   ____          _            __ _ _
 /\\ / ___'_ __ _ _(_)_ __  __ _ \ \ \ \
( ( )\___ | '_ | '_| | '_ \/ _` | \ \ \ \
 \\/  ___)| |_)| | | | | || (_| |  ) ) ) )
  '  |____| .__|_| |_|_| |_\__, | / / / /
 =========|_|==============|___/=/_/_/_/
 :: Spring Boot ::        (v2.0.9.RELEASE)

TEMPERATURE READING [99 °F]
TEMPERATURE READING [-17 °F]
TEMPERATURE READING [67 °F]
TEMPERATURE READING [9 °F]
TEMPERATURE READING [102 °F]
TEMPERATURE READING [10 °F]
...
After the server starts and begins to log temperature readings (as shown above), then start the client.
The client can be ran in the same manner as the server, from your IDE or from the command-line using gradlew.
To run the client in your IDE (e.g. IntelliJ IDEA) then create a run profile configuration for the
example.app.temp.geode.client.BootGeodeClientApplication and set the JVM argument to activate the "client"
Spring Profile: `-Dspring.profiles.active=client".
Alternatively, you can run the client from the command-line using the following command:
$ gradlew :spring-geode-samples-boot-actuator:bootRun
The client must be run in a separate terminal, unless you ran the server as a background process with the &
on Linux/UNIX based systems. See here
for more details.
|
Running the client from your IDE:
/Library/Java/JavaVirtualMachines/jdk1.8.0_192.jdk/Contents/Home/bin/java -server -ea -Dspring.profiles.active=client
  ... example.app.temp.geode.client.BootGeodeClientApplication

  .   ____          _            __ _ _
 /\\ / ___'_ __ _ _(_)_ __  __ _ \ \ \ \
( ( )\___ | '_ | '_| | '_ \/ _` | \ \ \ \
 \\/  ___)| |_)| | | | | || (_| |  ) ) ) )
  '  |____| .__|_| |_|_| |_\__, | / / / /
 =========|_|==============|___/=/_/_/_/
 :: Spring Boot ::        (v2.0.9.RELEASE)

COLD TEMPERATURE READING [-22 °F]
COLD TEMPERATURE READING [25 °F]
HOT TEMPERATURE READING [305 °F]
COLD TEMPERATURE READING [-82 °F]
HOT TEMPERATURE READING [295 °F]
HOT TEMPERATURE READING [326 °F]
HOT TEMPERATURE READING [378 °F]
COLD TEMPERATURE READING [-4 °F]
...
You should only see boiling and freezing temperatures logged to the client’s console. This is because our client only "monitors" and logs temperature readings above or below a certain threshold (boiling/freezing), as defined by the Continuous Queries (CQ).
Both the server and client will continue to run, generating and logging temperatures, until you stop the JVM processes.
3. Monitoring our Example with Spring Boot Actuator, HealthIndicator Endpoints
After the application has been running for some time, we can inspect the Spring Boot Actuator, HealthIndicator Endpoints provided by SBDG to monitor our application’s health and runtime performance in addition to basic configuration meta-data used to configure Apache Geode at runtime.
3.1. Client Health Information
To navigate to the client applications Actuator Health endpoints, open a Web Browser (e.g. Google Chrome) to:
This will output a JSON document similar to:
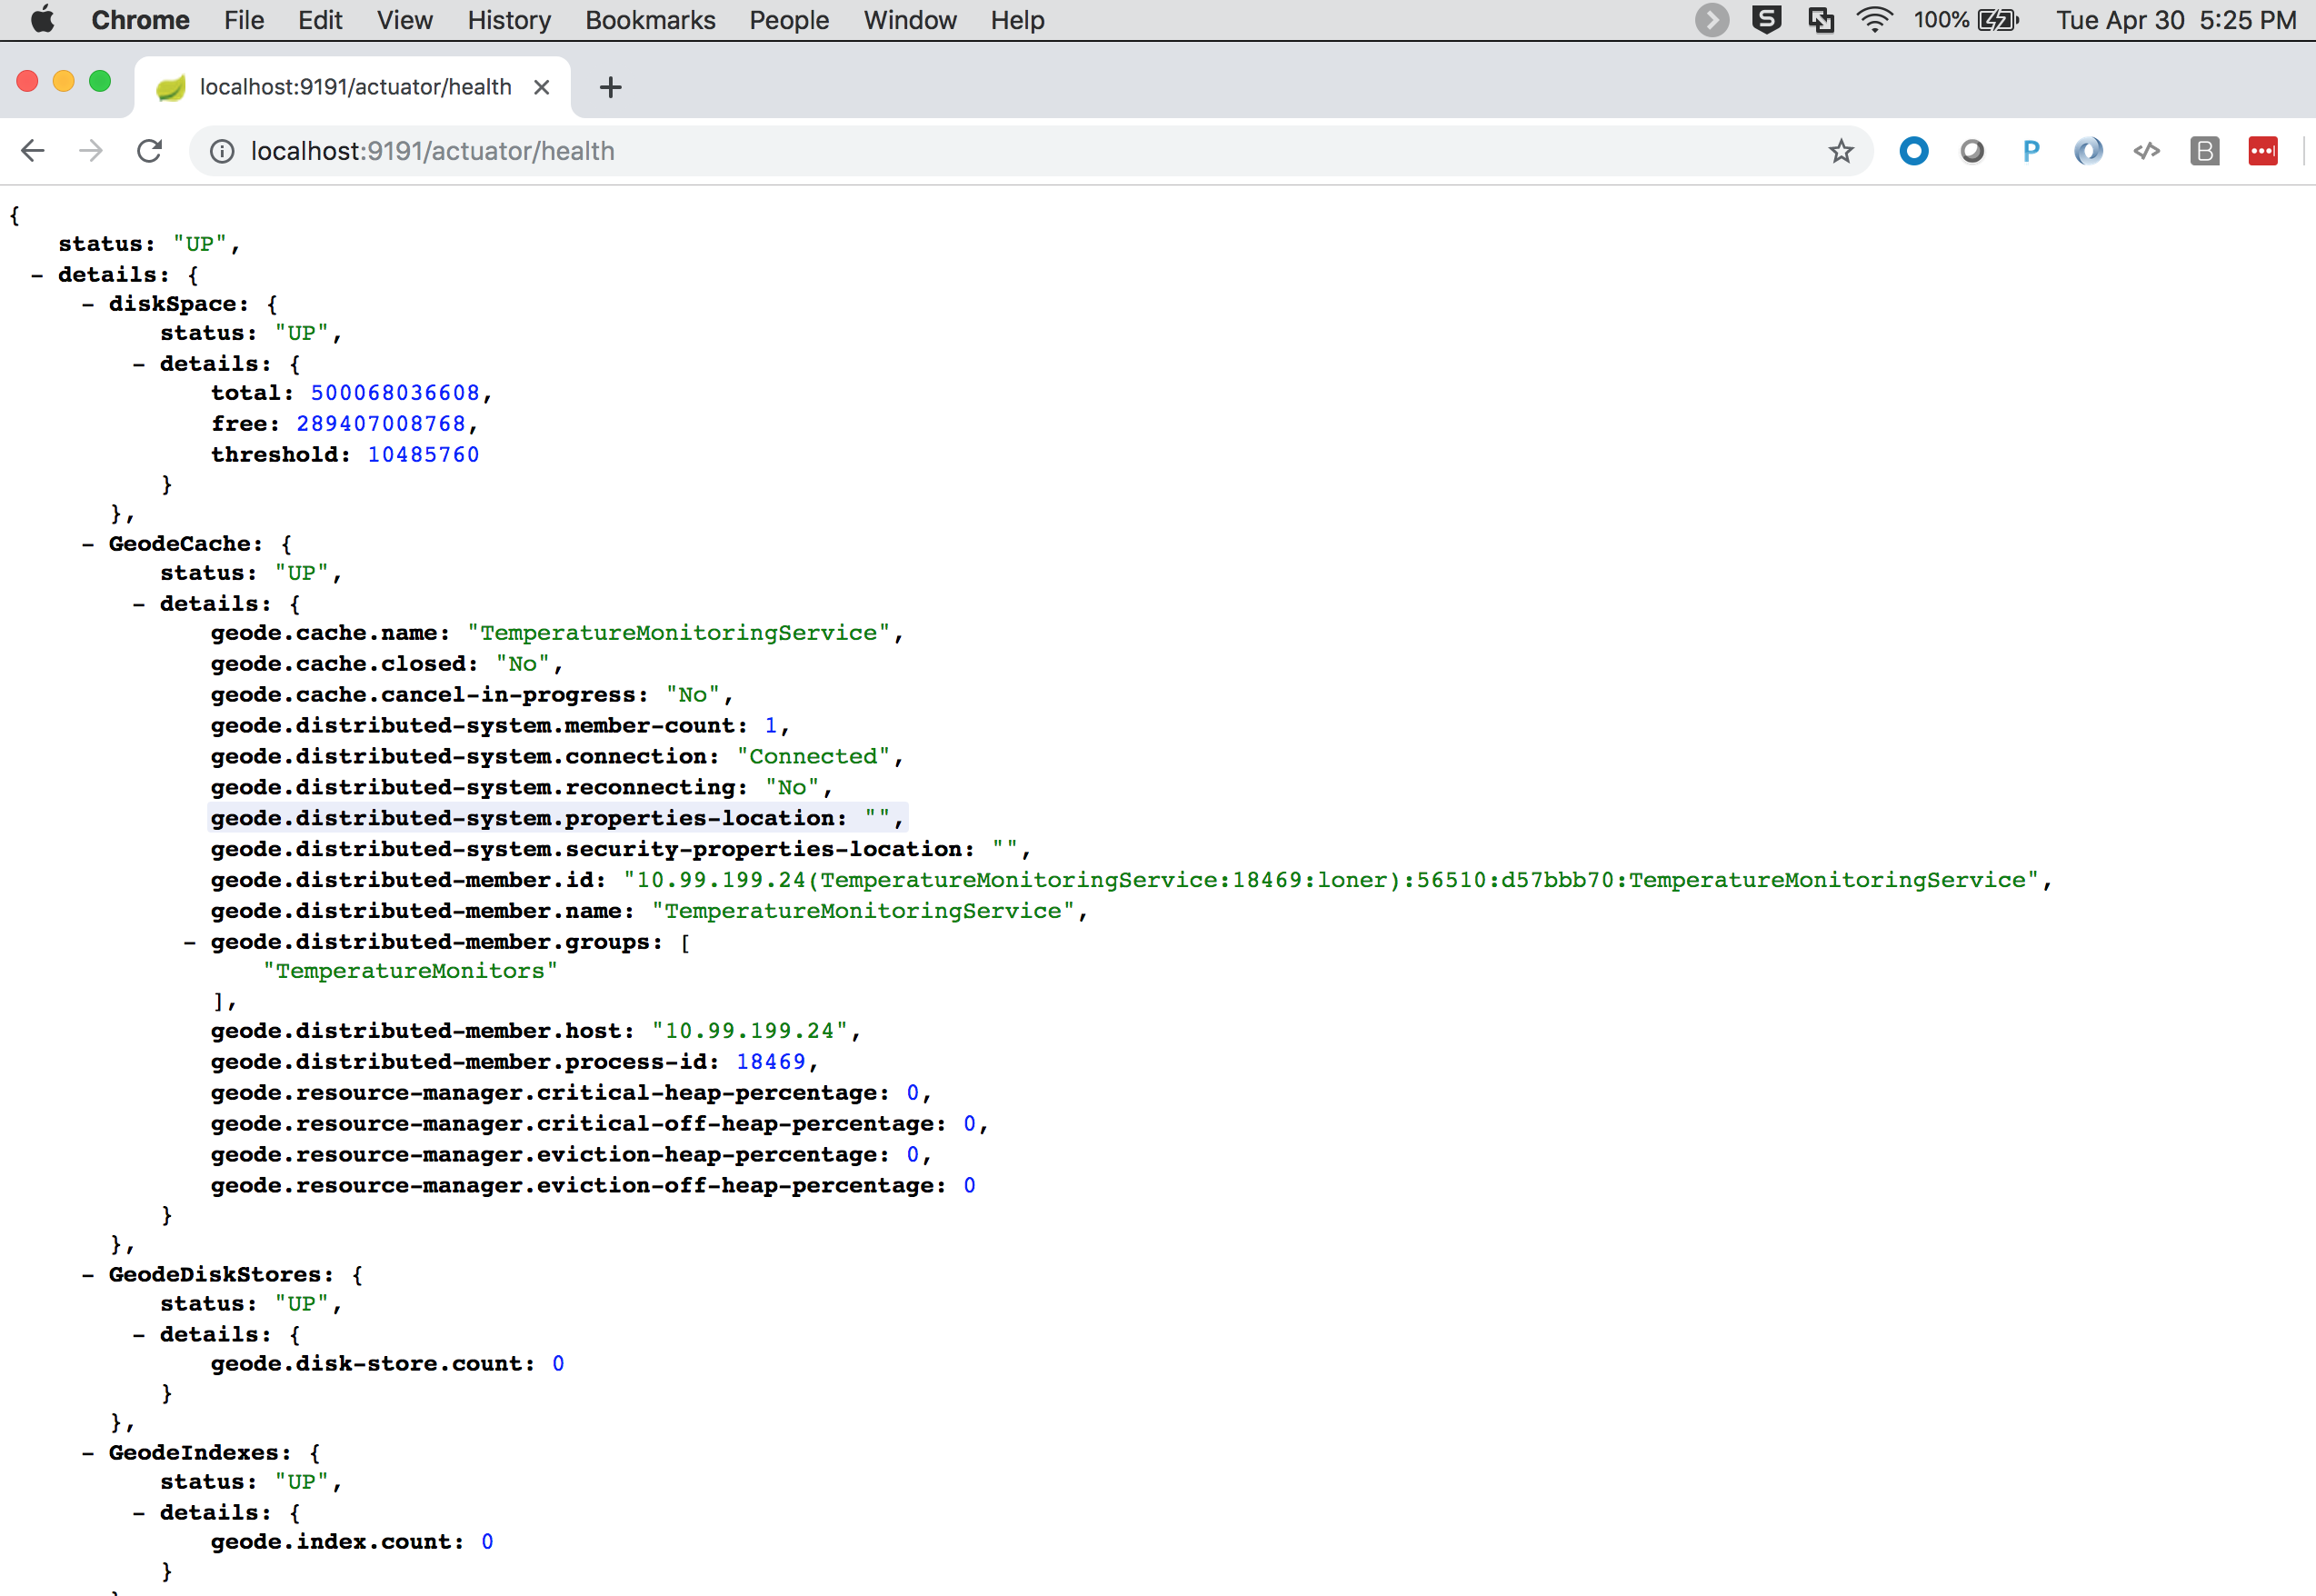
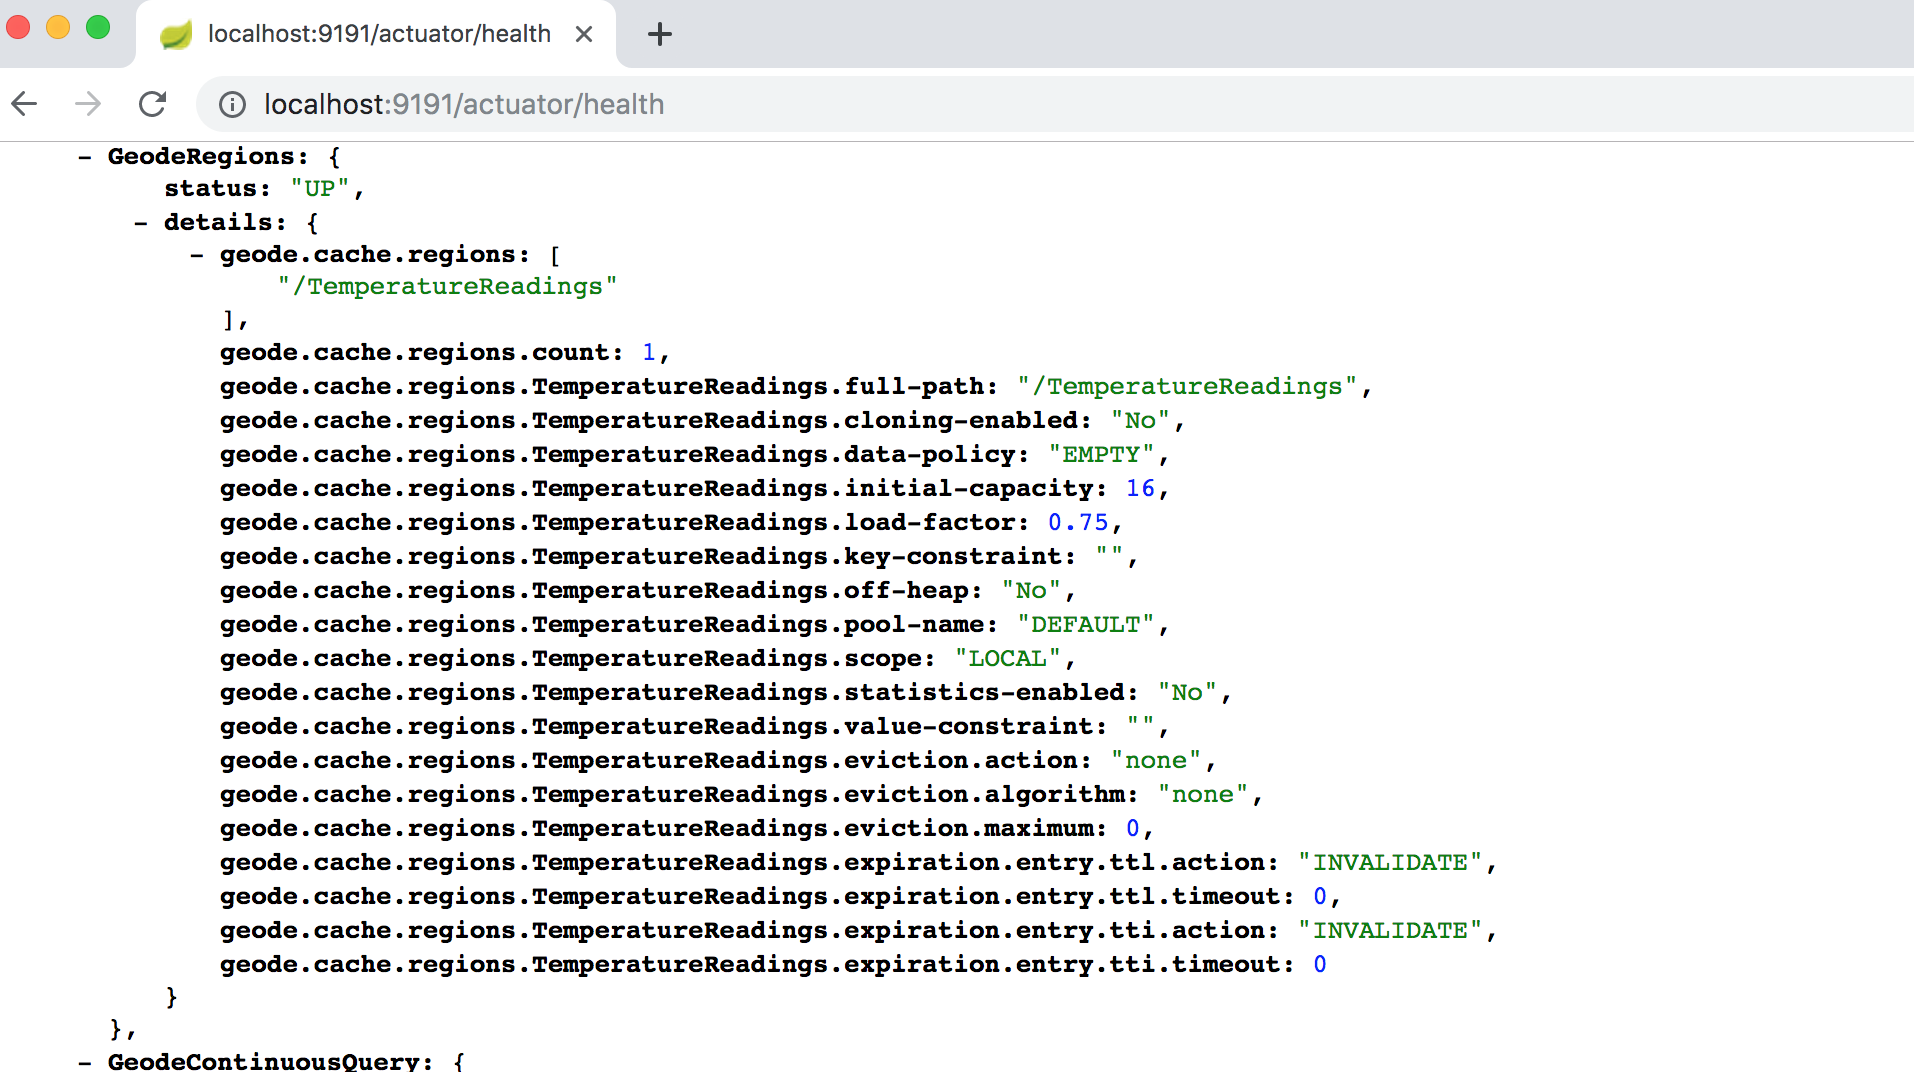
We can see details on our client "TemperatureReadings" Region:
As well as our CQs:
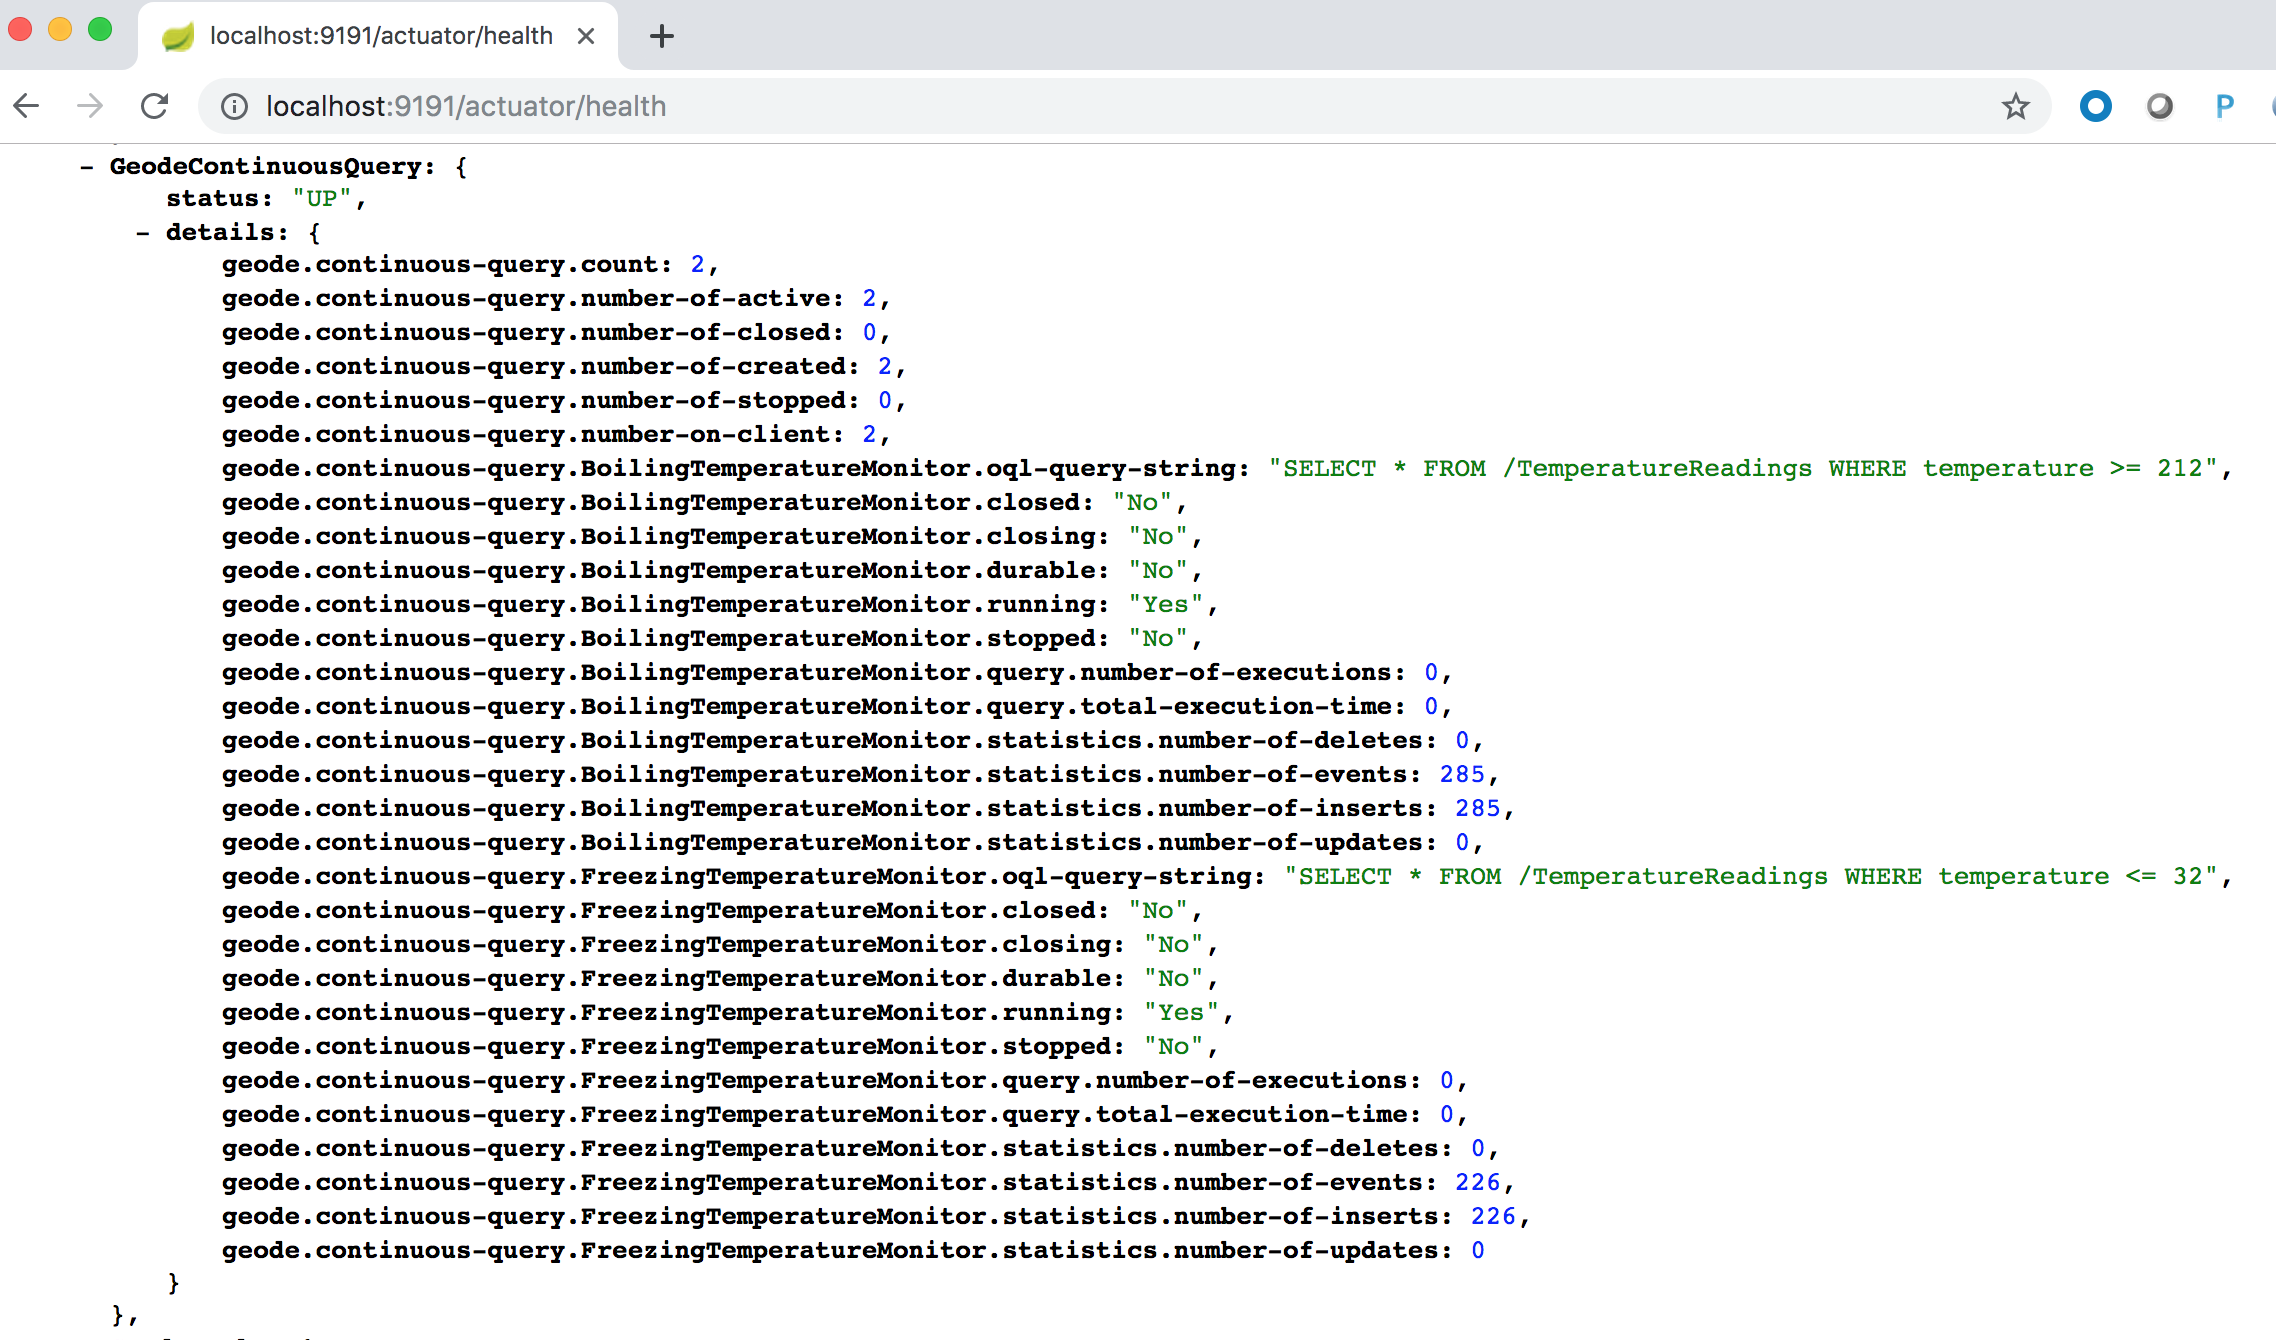
When you hit refresh, the metrics will update.
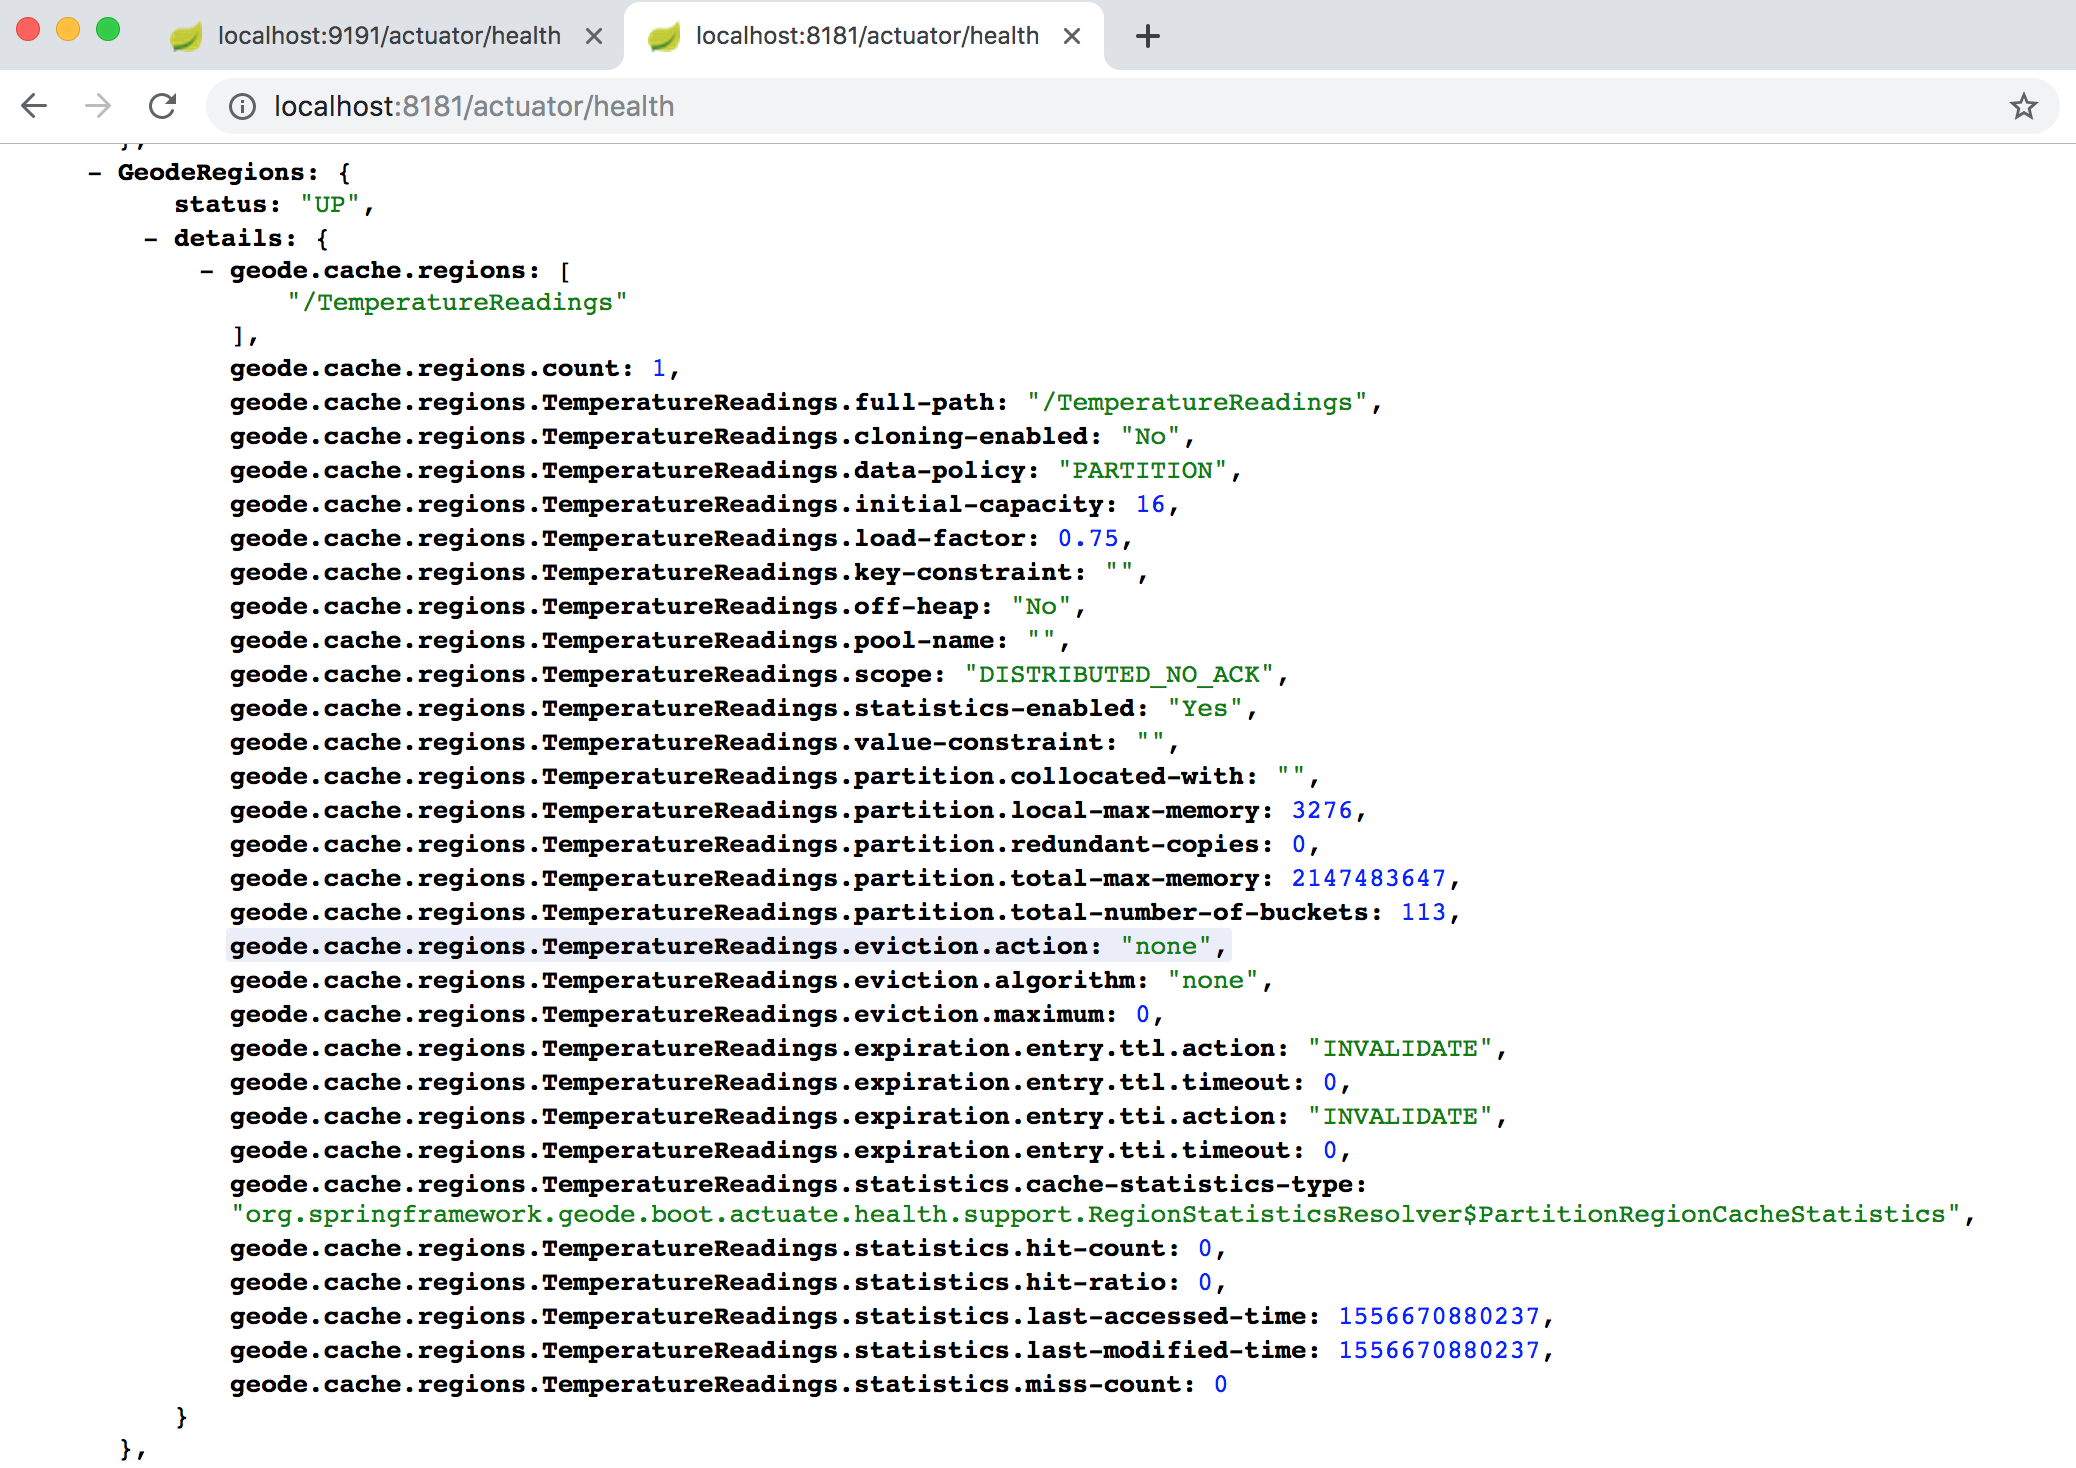
3.2. Server Health Information
To navigate to the server applications Actuator Health endpoint, open a Web Browser (e.g. Google Chrome) to:
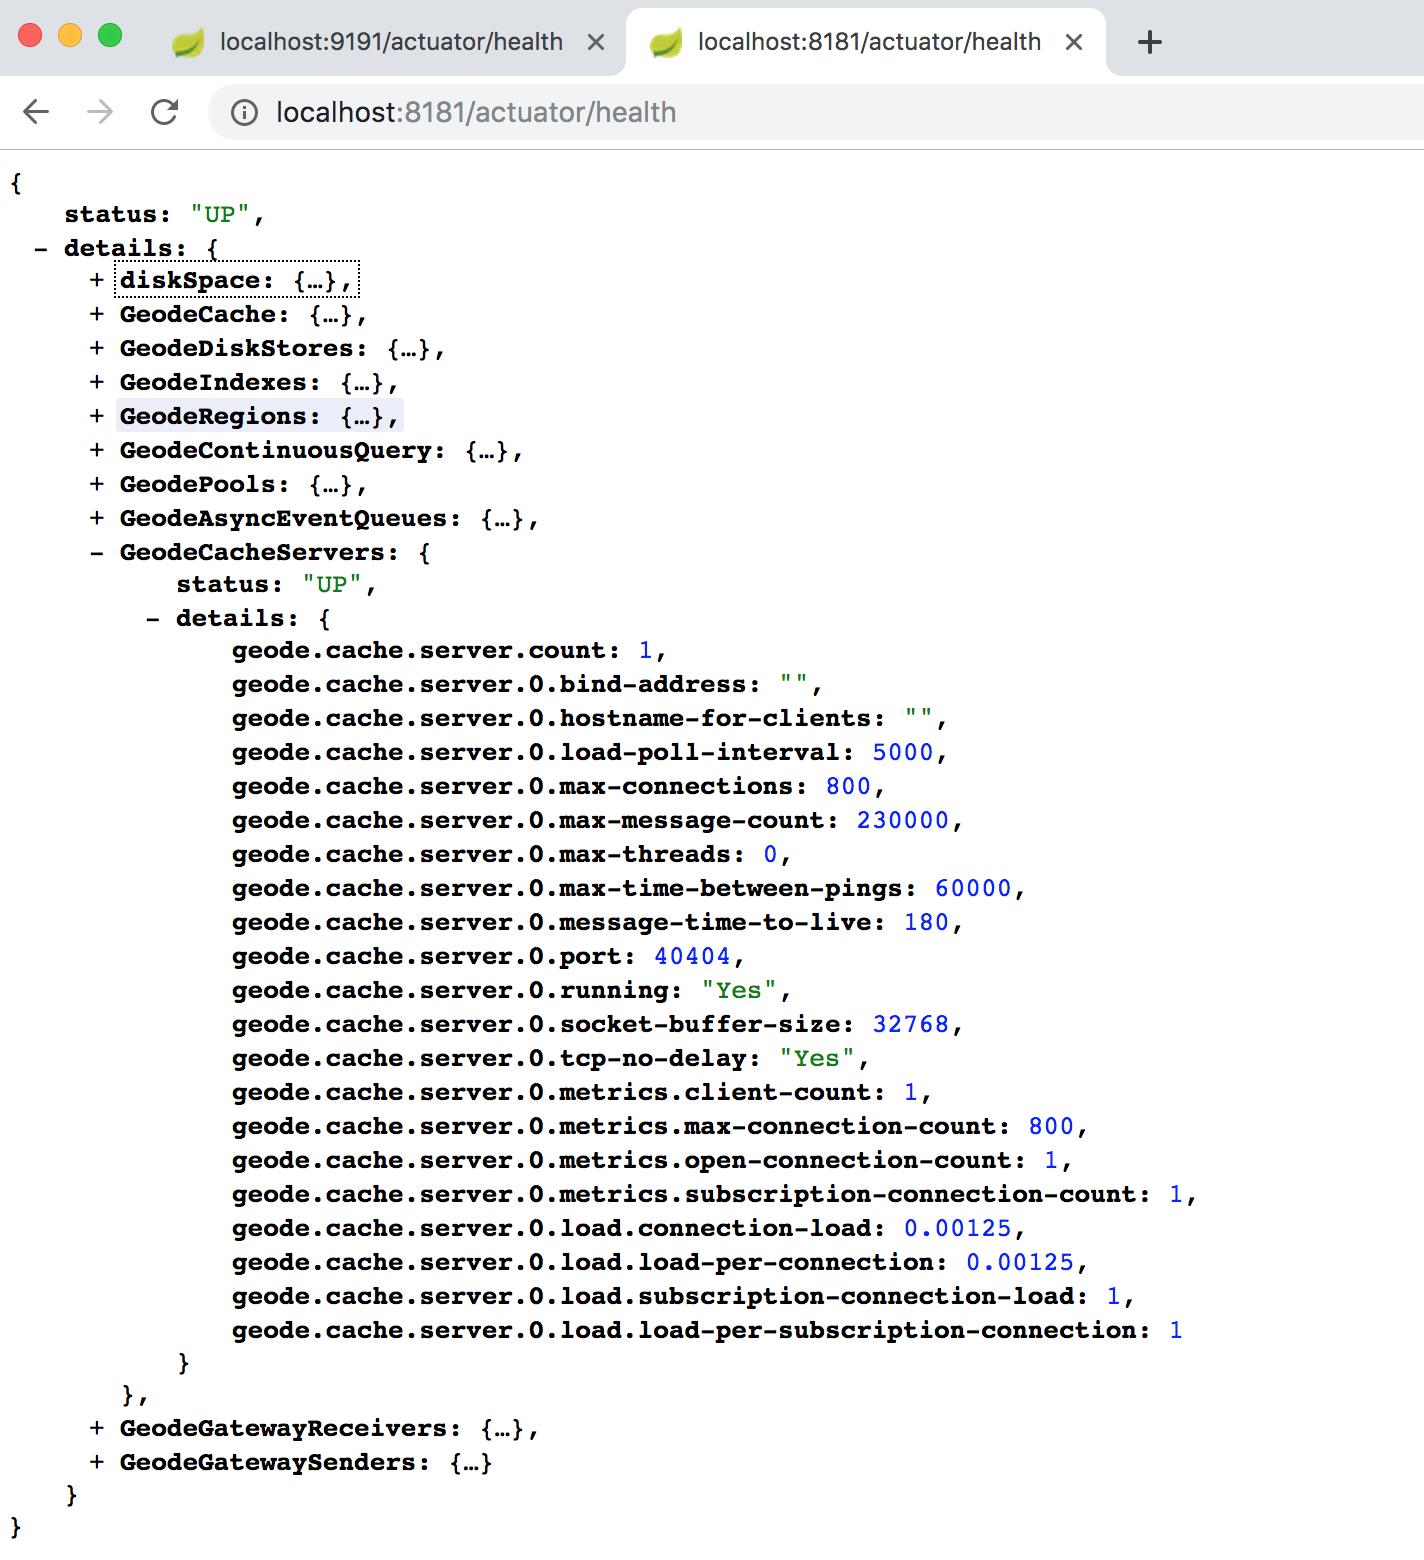
This will output a JSON document similar to:
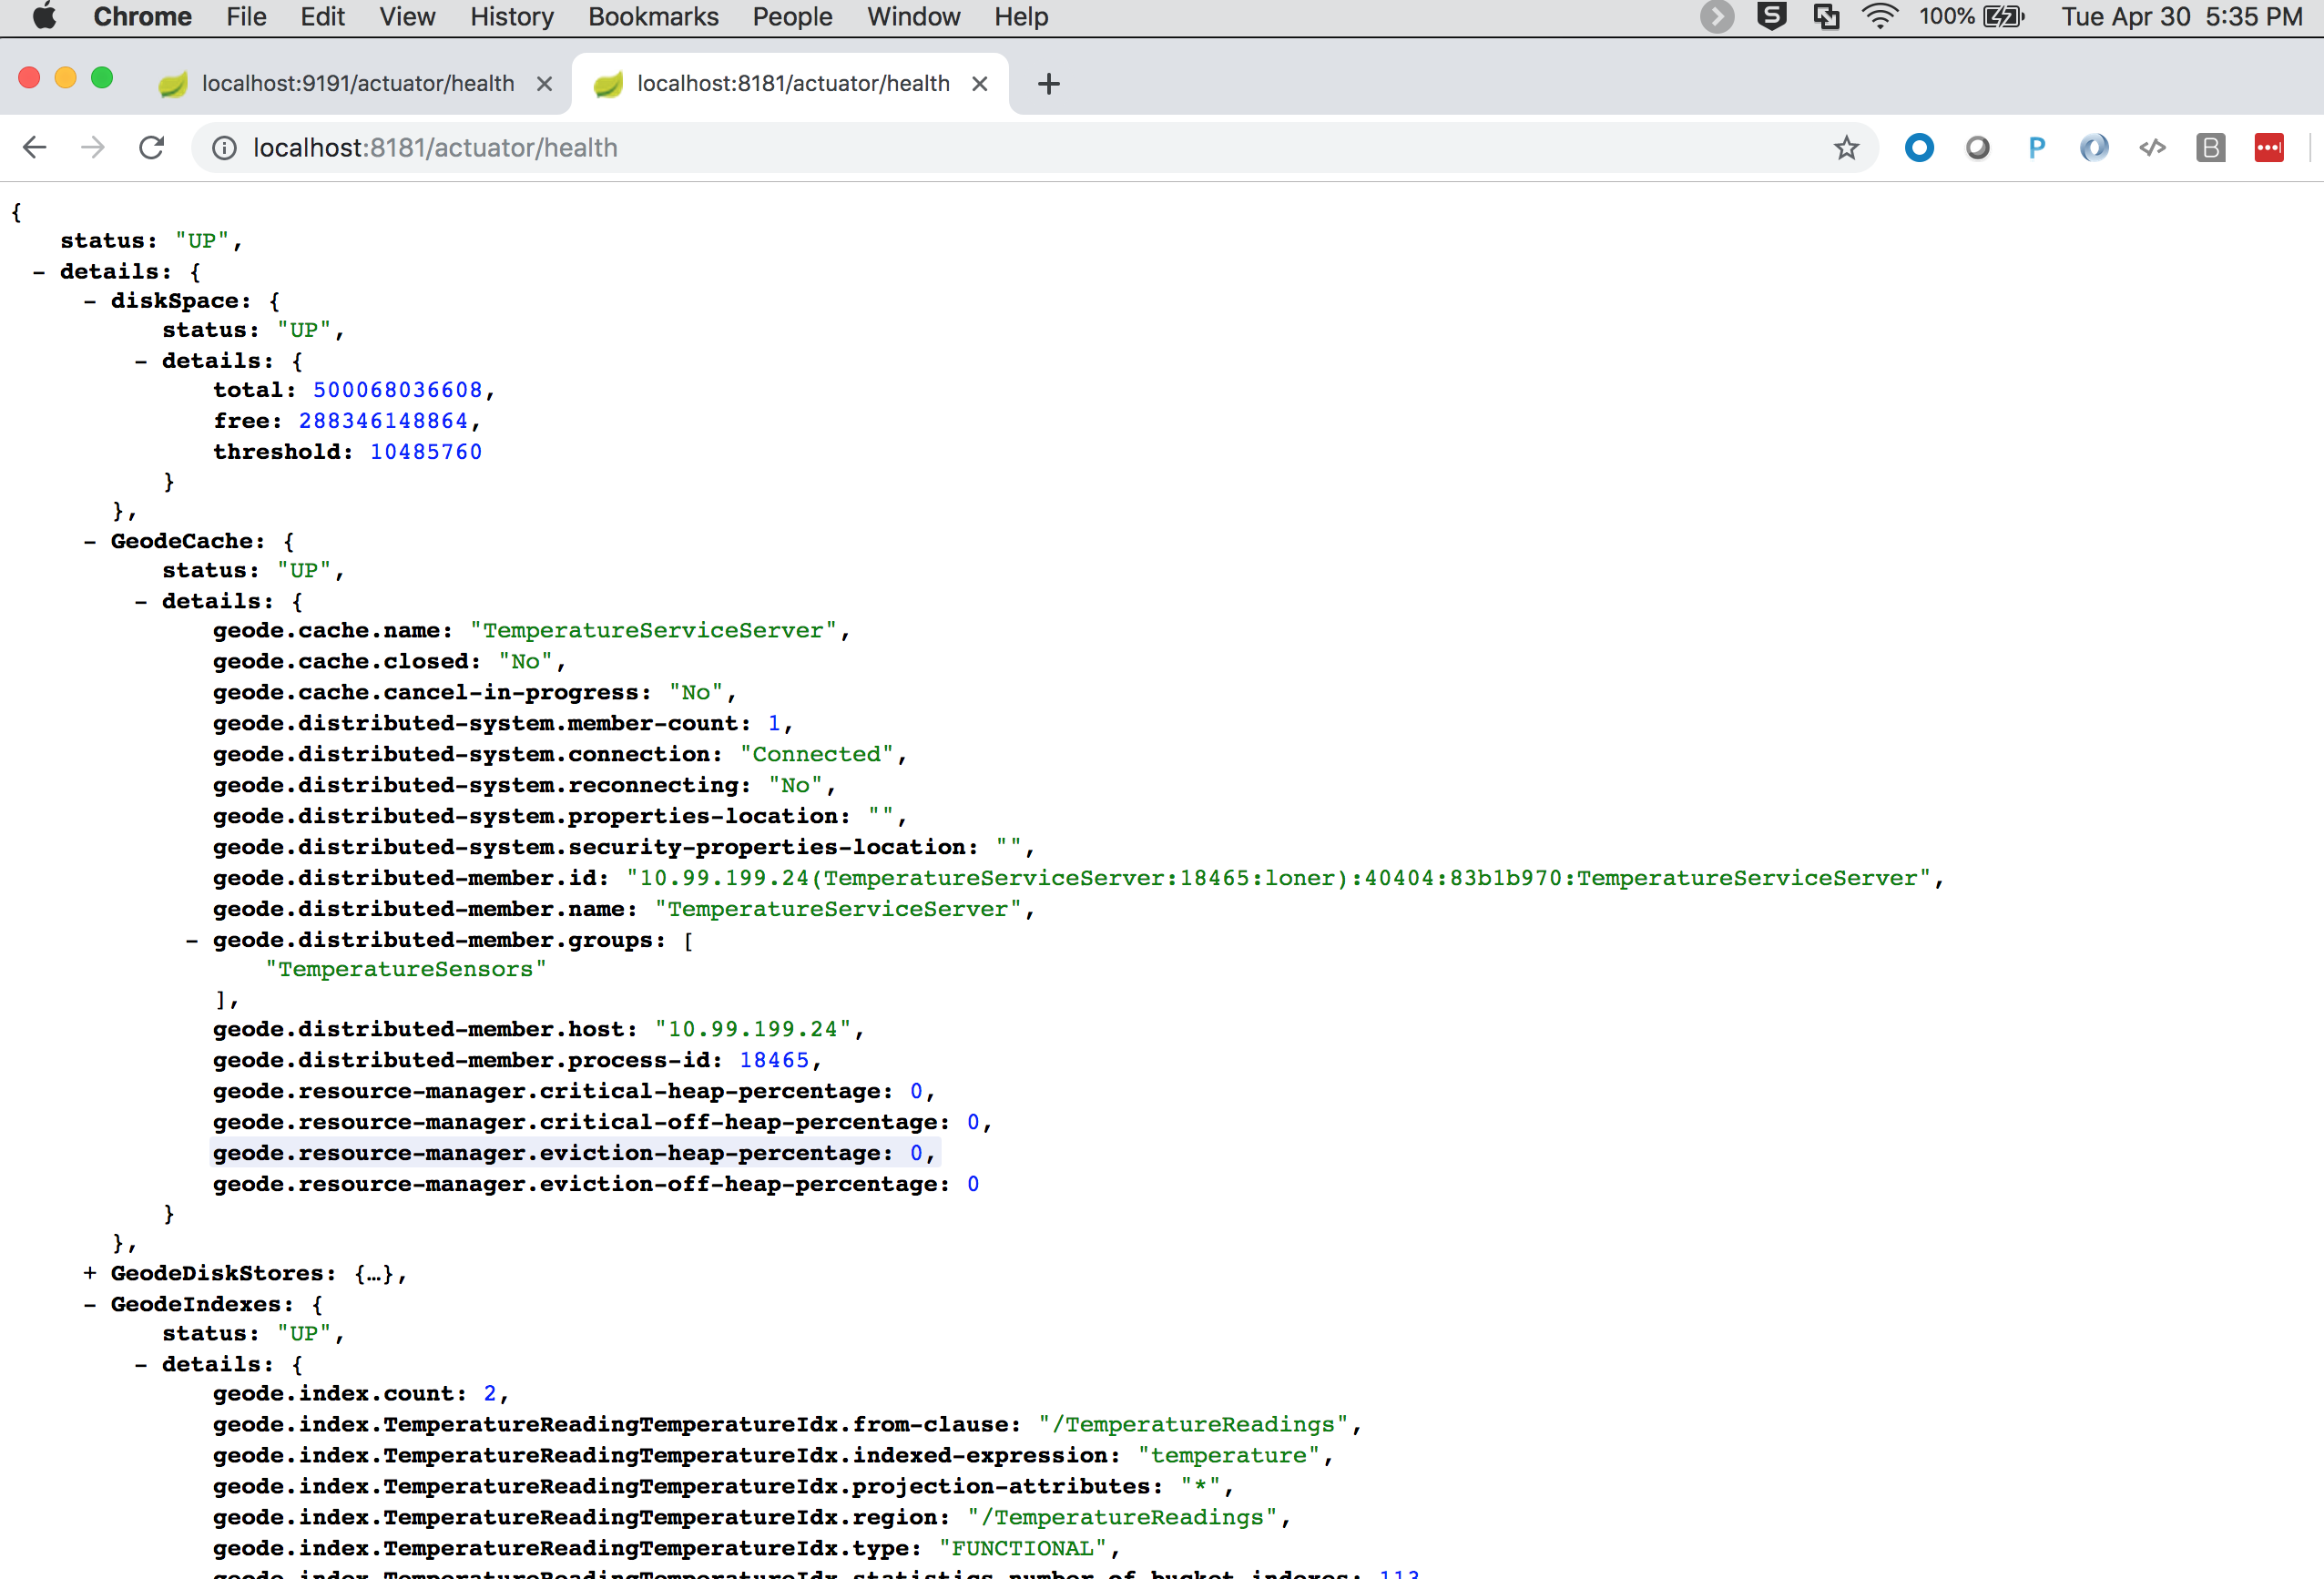
We can see details of the server "TemperatureReadings" Region:
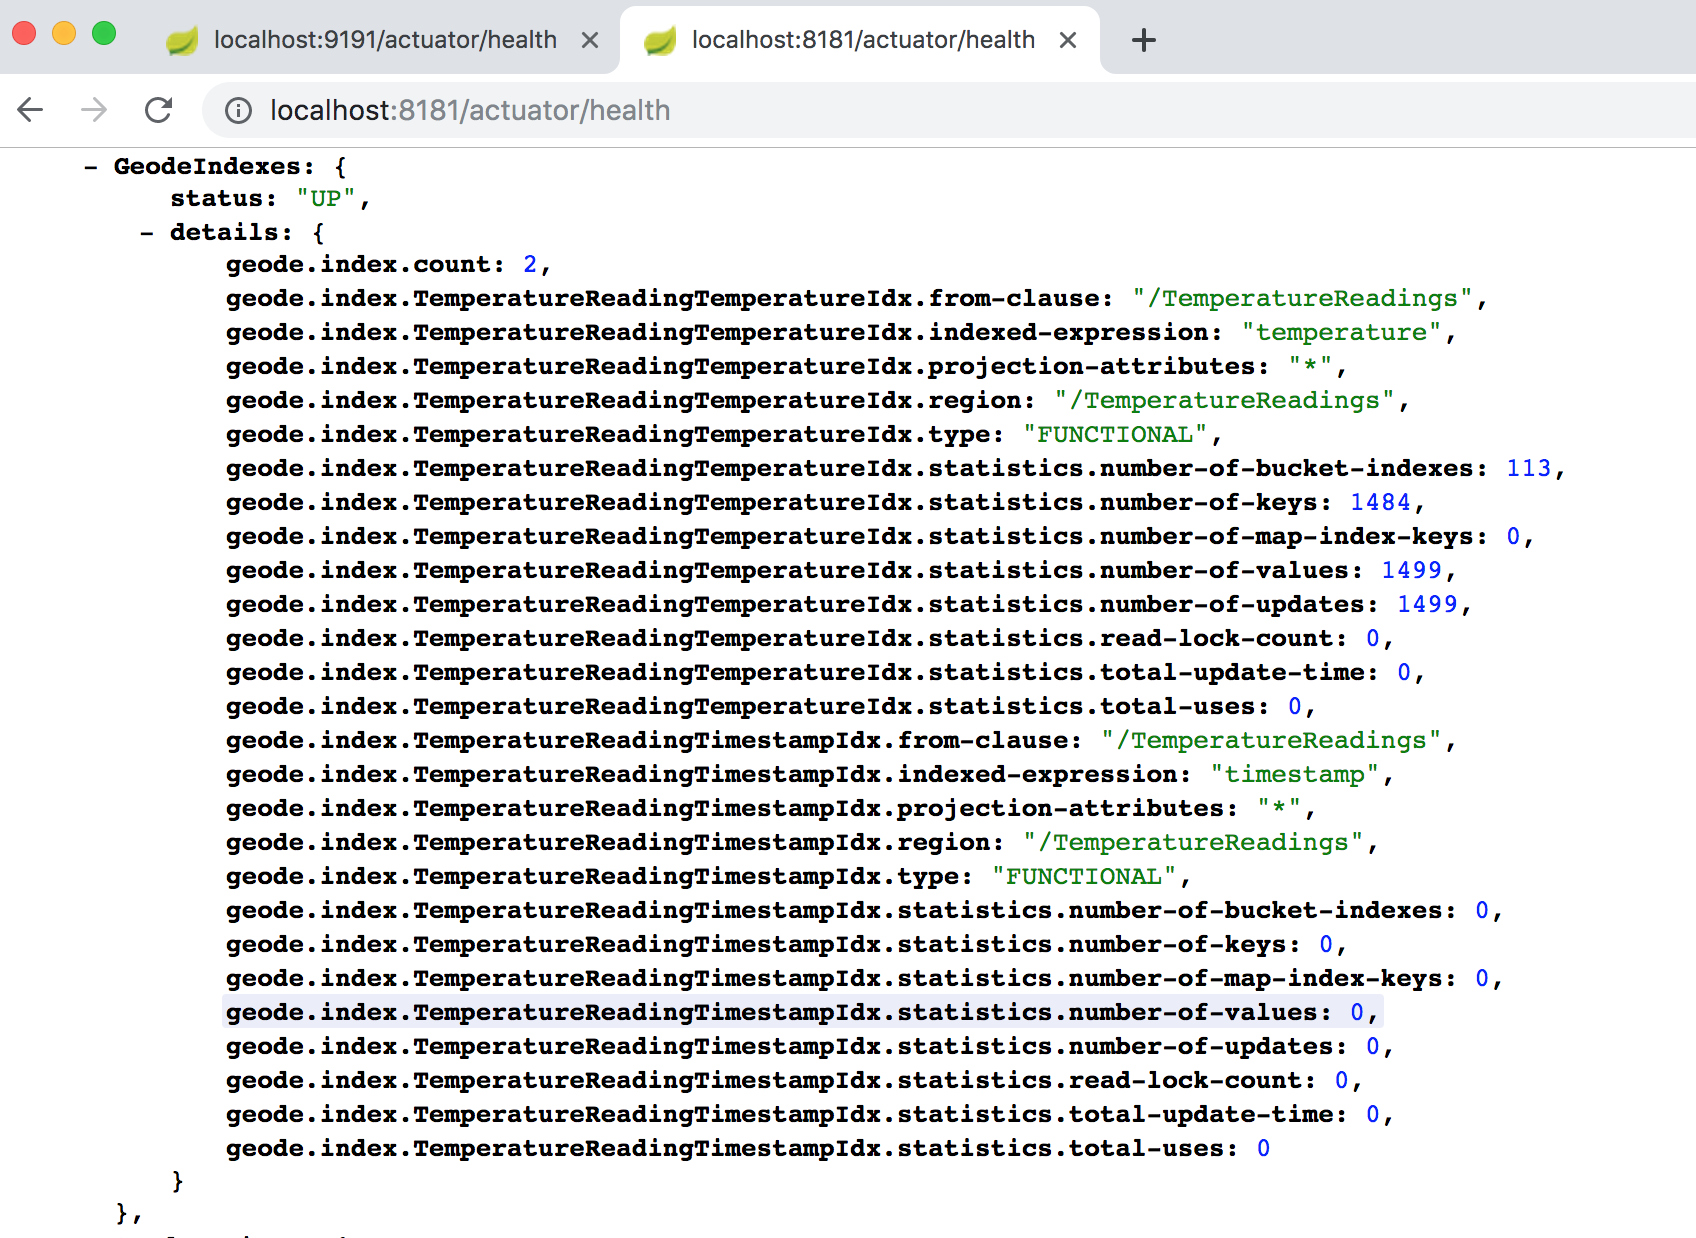
As well as our Indexes:
And our CacheServer serving clients:
When you hit refresh, the metrics will update.
4. Enabling Spring Boot Actuator
All of this was made possible by including the following dependency on our application classpath:
<dependency>
  <groupId>org.springframework.geode</groupId>
  <artifactId>spring-geode-starter-actuator</artifactId>
</dependency>
Additionally, in Spring Boot application.properties, you must enable the following:
application.propertiesmanagement.endpoint.health.show-details=always5. Conclusion
Hopefully this guide has shown you how to use the Spring Boot Actuator feature for Apache Geode.
You are encouraged to read more about Spring Boot’s Actuator functionality.
Additionally, you can find out more about Apache Geode Statistics in the User Guide.