If you are getting started with Spring Cloud Contract or Spring in general, start by reading this section. It answers the basic “what?”, “how?” and “why?” questions. It includes an introduction to Spring Cloud Contract, along with installation instructions. We then walk you through building your first Spring Cloud Contract application, discussing some core principles as we go.
1. Introducing Spring Cloud Contract
Spring Cloud Contract moves TDD to the level of software architecture. It lets you perform consumer-driven and producer-driven contract testing.
1.1. History
Before becoming Spring Cloud Contract, this project was called Accurest. It was created by Marcin Grzejszczak and Jakub Kubrynski from (Codearte).
The 0.1.0 release took place on 26 Jan 2015, and it became stable with 1.0.0 release on 29 Feb 2016.
1.1.1. Why Do You Need It?
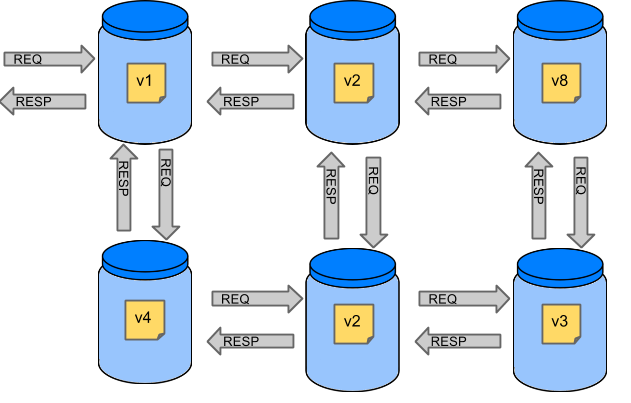
Assume that we have a system that consists of multiple microservices, as the following image shows:
1.1.2. Testing Issues
If we want to test the application in the top left corner of the image in the preceding section to determine whether it can communicate with other services, we could do one of two things:
-
Deploy all microservices and perform end-to-end tests.
-
Mock other microservices in unit and integration tests.
Both have their advantages but also a lot of disadvantages.
Deploy all microservices and perform end-to-end tests
Advantages:
-
Simulates production.
-
Tests real communication between services.
Disadvantages:
-
To test one microservice, we have to deploy six microservices, a couple of databases, and other items.
-
The environment where the tests run is locked for a single suite of tests (nobody else would be able to run the tests in the meantime).
-
They take a long time to run.
-
The feedback comes very late in the process.
-
They are extremely hard to debug.
Mock other microservices in unit and integration tests
Advantages:
-
They provide very fast feedback.
-
They have no infrastructure requirements.
Disadvantages:
-
The implementor of the service creates stubs that might have nothing to do with reality.
-
You can go to production with passing tests and failing production.
To solve the aforementioned issues, Spring Cloud Contract was created. The main idea is to give you very fast feedback, without the need to set up the whole world of microservices. If you work on stubs, then the only applications you need are those that your application directly uses. The following image shows the relationship of stubs to an application:
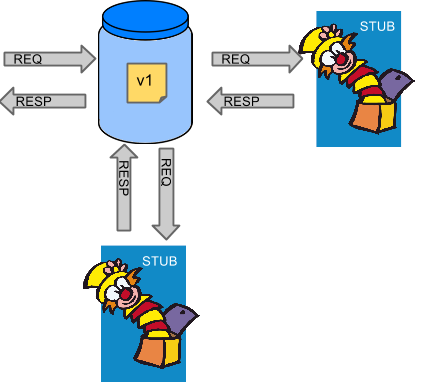
Spring Cloud Contract gives you the certainty that the stubs that you use were created by the service that you call. Also, if you can use them, it means that they were tested against the producer’s side. In short, you can trust those stubs.
1.2. Purposes
The main purposes of Spring Cloud Contract are:
-
To ensure that HTTP and messaging stubs (used when developing the client) do exactly what the actual server-side implementation does.
-
To promote the ATDD (acceptance test-driven development) method, and the microservices architectural style.
-
To provide a way to publish changes in contracts that are immediately visible on both sides.
-
To generate boilerplate test code to be used on the server side.
By default, Spring Cloud Contract integrates with Wiremock as the HTTP server stub.
| Spring Cloud Contract’s purpose is NOT to start writing business features in the contracts. Assume that we have a business use case of fraud check. If a user can be a fraud for 100 different reasons, we would assume that you would create two contracts, one for the positive case and one for the negative case. Contract tests are used to test contracts between applications, not to simulate full behavior. |
1.3. What Is a Contract?
As consumers of services, we need to define what exactly we want to achieve. We need to formulate our expectations. That is why we write contracts. In other words, a contract is an agreement on how the API or message communication should look. Consider the following example:
Assume that you want to send a request that contains the ID of a client company and the
amount it wants to borrow from us. You also want to send it to the /fraudcheck URL by using
the PUT method. The following listing shows a contract to check whether a client should
be marked as a fraud in both Groovy and YAML:
/*
 * Copyright 2013-2020 the original author or authors.
 *
 * Licensed under the Apache License, Version 2.0 (the "License");
 * you may not use this file except in compliance with the License.
 * You may obtain a copy of the License at
 *
 *      https://www.apache.org/licenses/LICENSE-2.0
 *
 * Unless required by applicable law or agreed to in writing, software
 * distributed under the License is distributed on an "AS IS" BASIS,
 * WITHOUT WARRANTIES OR CONDITIONS OF ANY KIND, either express or implied.
 * See the License for the specific language governing permissions and
 * limitations under the License.
 */

package contracts

org.springframework.cloud.contract.spec.Contract.make {
    request { // (1)
        method 'PUT' // (2)
        url '/fraudcheck' // (3)
        body([ // (4)
               "client.id": $(regex('[0-9]{10}')),
               loanAmount : 99999
        ])
        headers { // (5)
            contentType('application/json')
        }
    }
    response { // (6)
        status OK() // (7)
        body([ // (8)
               fraudCheckStatus  : "FRAUD",
               "rejection.reason": "Amount too high"
        ])
        headers { // (9)
            contentType('application/json')
        }
    }
}

/*
From the Consumer perspective, when shooting a request in the integration test:

(1) - If the consumer sends a request
(2) - With the "PUT" method
(3) - to the URL "/fraudcheck"
(4) - with the JSON body that
 * has a field `client.id` that matches a regular expression `[0-9]{10}`
 * has a field `loanAmount` that is equal to `99999`
(5) - with header `Content-Type` equal to `application/json`
(6) - then the response will be sent with
(7) - status equal `200`
(8) - and JSON body equal to
 { "fraudCheckStatus": "FRAUD", "rejectionReason": "Amount too high" }
(9) - with header `Content-Type` equal to `application/json`

From the Producer perspective, in the autogenerated producer-side test:

(1) - A request will be sent to the producer
(2) - With the "PUT" method
(3) - to the URL "/fraudcheck"
(4) - with the JSON body that
 * has a field `client.id` that will have a generated value that matches a regular expression `[0-9]{10}`
 * has a field `loanAmount` that is equal to `99999`
(5) - with header `Content-Type` equal to `application/json`
(6) - then the test will assert if the response has been sent with
(7) - status equal `200`
(8) - and JSON body equal to
 { "fraudCheckStatus": "FRAUD", "rejectionReason": "Amount too high" }
(9) - with header `Content-Type` matching `application/json.*`
 */
request: # (1)
  method: PUT # (2)
  url: /yamlfraudcheck # (3)
  body: # (4)
    "client.id": 1234567890
    loanAmount: 99999
  headers: # (5)
    Content-Type: application/json
  matchers:
    body:
      - path: $.['client.id'] # (6)
        type: by_regex
        value: "[0-9]{10}"
response: # (7)
  status: 200 # (8)
  body:  # (9)
    fraudCheckStatus: "FRAUD"
    "rejection.reason": "Amount too high"
  headers: # (10)
    Content-Type: application/json


#From the Consumer perspective, when shooting a request in the integration test:
#
#(1) - If the consumer sends a request
#(2) - With the "PUT" method
#(3) - to the URL "/yamlfraudcheck"
#(4) - with the JSON body that
# * has a field `client.id`
# * has a field `loanAmount` that is equal to `99999`
#(5) - with header `Content-Type` equal to `application/json`
#(6) - and a `client.id` json entry matches the regular expression `[0-9]{10}`
#(7) - then the response will be sent with
#(8) - status equal `200`
#(9) - and JSON body equal to
# { "fraudCheckStatus": "FRAUD", "rejectionReason": "Amount too high" }
#(10) - with header `Content-Type` equal to `application/json`
#
#From the Producer perspective, in the autogenerated producer-side test:
#
#(1) - A request will be sent to the producer
#(2) - With the "PUT" method
#(3) - to the URL "/yamlfraudcheck"
#(4) - with the JSON body that
# * has a field `client.id` `1234567890`
# * has a field `loanAmount` that is equal to `99999`
#(5) - with header `Content-Type` equal to `application/json`
#(7) - then the test will assert if the response has been sent with
#(8) - status equal `200`
#(9) - and JSON body equal to
# { "fraudCheckStatus": "FRAUD", "rejectionReason": "Amount too high" }
#(10) - with header `Content-Type` equal to `application/json`| It is expected that contracts are coming from a trusted source. You should never download nor interact with contracts coming from untrusted locations. |
2. A Three-second Tour
This very brief tour walks through using Spring Cloud Contract. It consists of the following topics:
You can find a somewhat longer tour here.
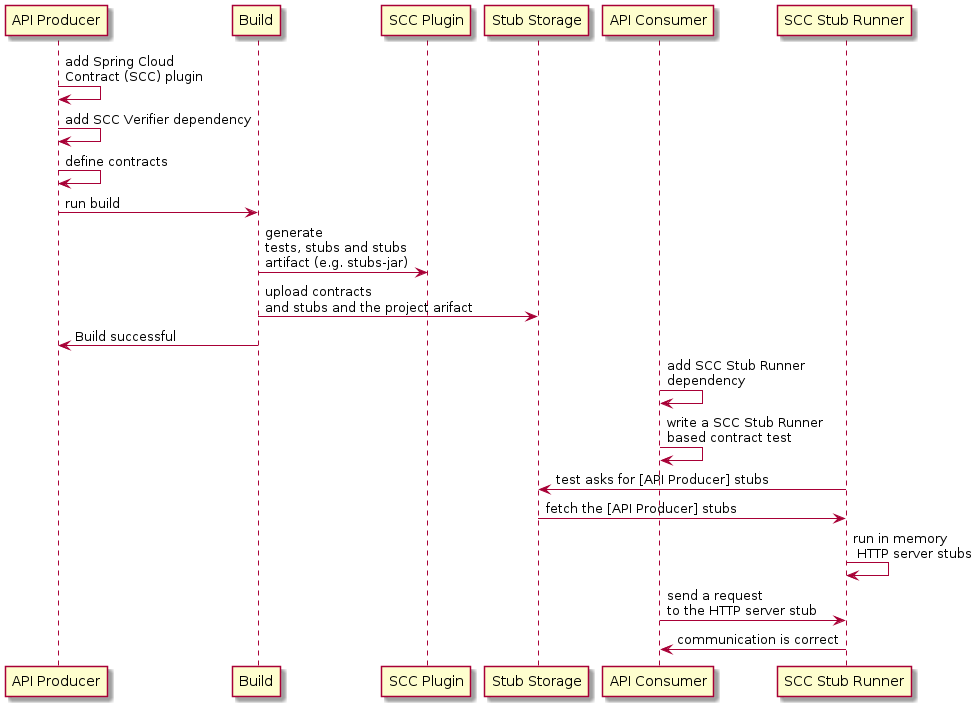
The following UML diagram shows the relationship of the parts within Spring Cloud Contract:
2.1. On the Producer Side
To start working with Spring Cloud Contract, you can add files with REST or messaging contracts
expressed in either Groovy DSL or YAML to the contracts directory, which is set by the
contractsDslDir property. By default, it is $rootDir/src/test/resources/contracts.
Then you can add the Spring Cloud Contract Verifier dependency and plugin to your build file, as the following example shows:
<dependency>
    <groupId>org.springframework.cloud</groupId>
    <artifactId>spring-cloud-starter-contract-verifier</artifactId>
    <scope>test</scope>
</dependency>
The following listing shows how to add the plugin, which should go in the build/plugins portion of the file:
<plugin>
    <groupId>org.springframework.cloud</groupId>
    <artifactId>spring-cloud-contract-maven-plugin</artifactId>
    <version>${spring-cloud-contract.version}</version>
    <extensions>true</extensions>
</plugin>
Running ./mvnw clean install automatically generates tests that verify the application
compliance with the added contracts. By default, the tests get generated under
org.springframework.cloud.contract.verifier.tests..
As the implementation of the functionalities described by the contracts is not yet present, the tests fail.
To make them pass, you must add the correct implementation of either handling HTTP
requests or messages. Also, you must add a base test class for auto-generated
tests to the project. This class is extended by all the auto-generated tests, and it
should contain all the setup information necessary to run them (for example RestAssuredMockMvc
controller setup or messaging test setup).
The following example, from pom.xml, shows how to specify the base test class:
<build>
        <plugins>
            <plugin>
                <groupId>org.springframework.cloud</groupId>
                <artifactId>spring-cloud-contract-maven-plugin</artifactId>
                <version>2.1.2.RELEASE</version>
                <extensions>true</extensions>
                <configuration>
                    <baseClassForTests>com.example.contractTest.BaseTestClass</baseClassForTests> (1)
                </configuration>
            </plugin>
            <plugin>
                <groupId>org.springframework.boot</groupId>
                <artifactId>spring-boot-maven-plugin</artifactId>
            </plugin>
        </plugins>
</build>| 1 | The baseClassForTests element lets you specify your base test class. It must be a child
of a configuration element within spring-cloud-contract-maven-plugin. |
Once the implementation and the test base class are in place, the tests pass, and both the application and the stub artifacts are built and installed in the local Maven repository. You can now merge the changes, and you can publish both the application and the stub artifacts in an online repository.
2.2. On the Consumer Side
You can use Spring Cloud Contract Stub Runner in the integration tests to get a running
WireMock instance or messaging route that simulates the actual service.
To do so, add the dependency to Spring Cloud Contract Stub Runner, as the
following example shows:
<dependency>
    <groupId>org.springframework.cloud</groupId>
    <artifactId>spring-cloud-starter-contract-stub-runner</artifactId>
    <scope>test</scope>
</dependency>
You can get the Producer-side stubs installed in your Maven repository in either of two ways:
-
By checking out the Producer side repository and adding contracts and generating the stubs by running the following commands:
$ cd local-http-server-repo
$ ./mvnw clean install -DskipTests
| The tests are being skipped because the producer-side contract implementation is not in place yet, so the automatically-generated contract tests fail. |
-
By getting already-existing producer service stubs from a remote repository. To do so, pass the stub artifact IDs and artifact repository URL as
Spring Cloud Contract
Stub Runner
properties, as the following example shows:stubrunner: ids: 'com.example:http-server-dsl:+:stubs:8080' repositoryRoot: https://repo.spring.io/libs-snapshot
Now you can annotate your test class with @AutoConfigureStubRunner. In the annotation,
provide the group-id and artifact-id values for Spring Cloud Contract Stub Runner to
run the collaborators' stubs for you, as the following example shows:
@RunWith(SpringRunner.class)
@SpringBootTest(webEnvironment=WebEnvironment.NONE)
@AutoConfigureStubRunner(ids = {"com.example:http-server-dsl:+:stubs:6565"},
stubsMode = StubRunnerProperties.StubsMode.LOCAL)
public class LoanApplicationServiceTests {
. . .
}
Use the REMOTE stubsMode when downloading stubs from an online repository and
LOCAL for offline work.
|
Now, in your integration test, you can receive stubbed versions of HTTP responses or messages that are expected to be emitted by the collaborator service.
3. Developing Your First Spring Cloud Contract-based Application
This brief tour walks through using Spring Cloud Contract. It consists of the following topics:
You can find an even more brief tour here.
For the sake of this example, the Stub Storage is Nexus/Artifactory.
The following UML diagram shows the relationship of the parts of Spring Cloud Contract:

3.1. On the Producer Side
To start working with Spring Cloud Contract, you can add the Spring Cloud Contract Verifier
dependency and plugin to your build file, as the following example shows:
<dependency>
<groupId>org.springframework.cloud</groupId>
<artifactId>spring-cloud-starter-contract-verifier</artifactId>
<scope>test</scope>
</dependency>The following listing shows how to add the plugin, which should go in the build/plugins portion of the file:
<plugin>
<groupId>org.springframework.cloud</groupId>
<artifactId>spring-cloud-contract-maven-plugin</artifactId>
<version>${spring-cloud-contract.version}</version>
<extensions>true</extensions>
</plugin>|
The easiest way to get started is to go to the Spring Initializr
and add “Web” and “Contract Verifier” as dependencies. Doing so pulls in the previously
mentioned dependencies and everything else you need in the 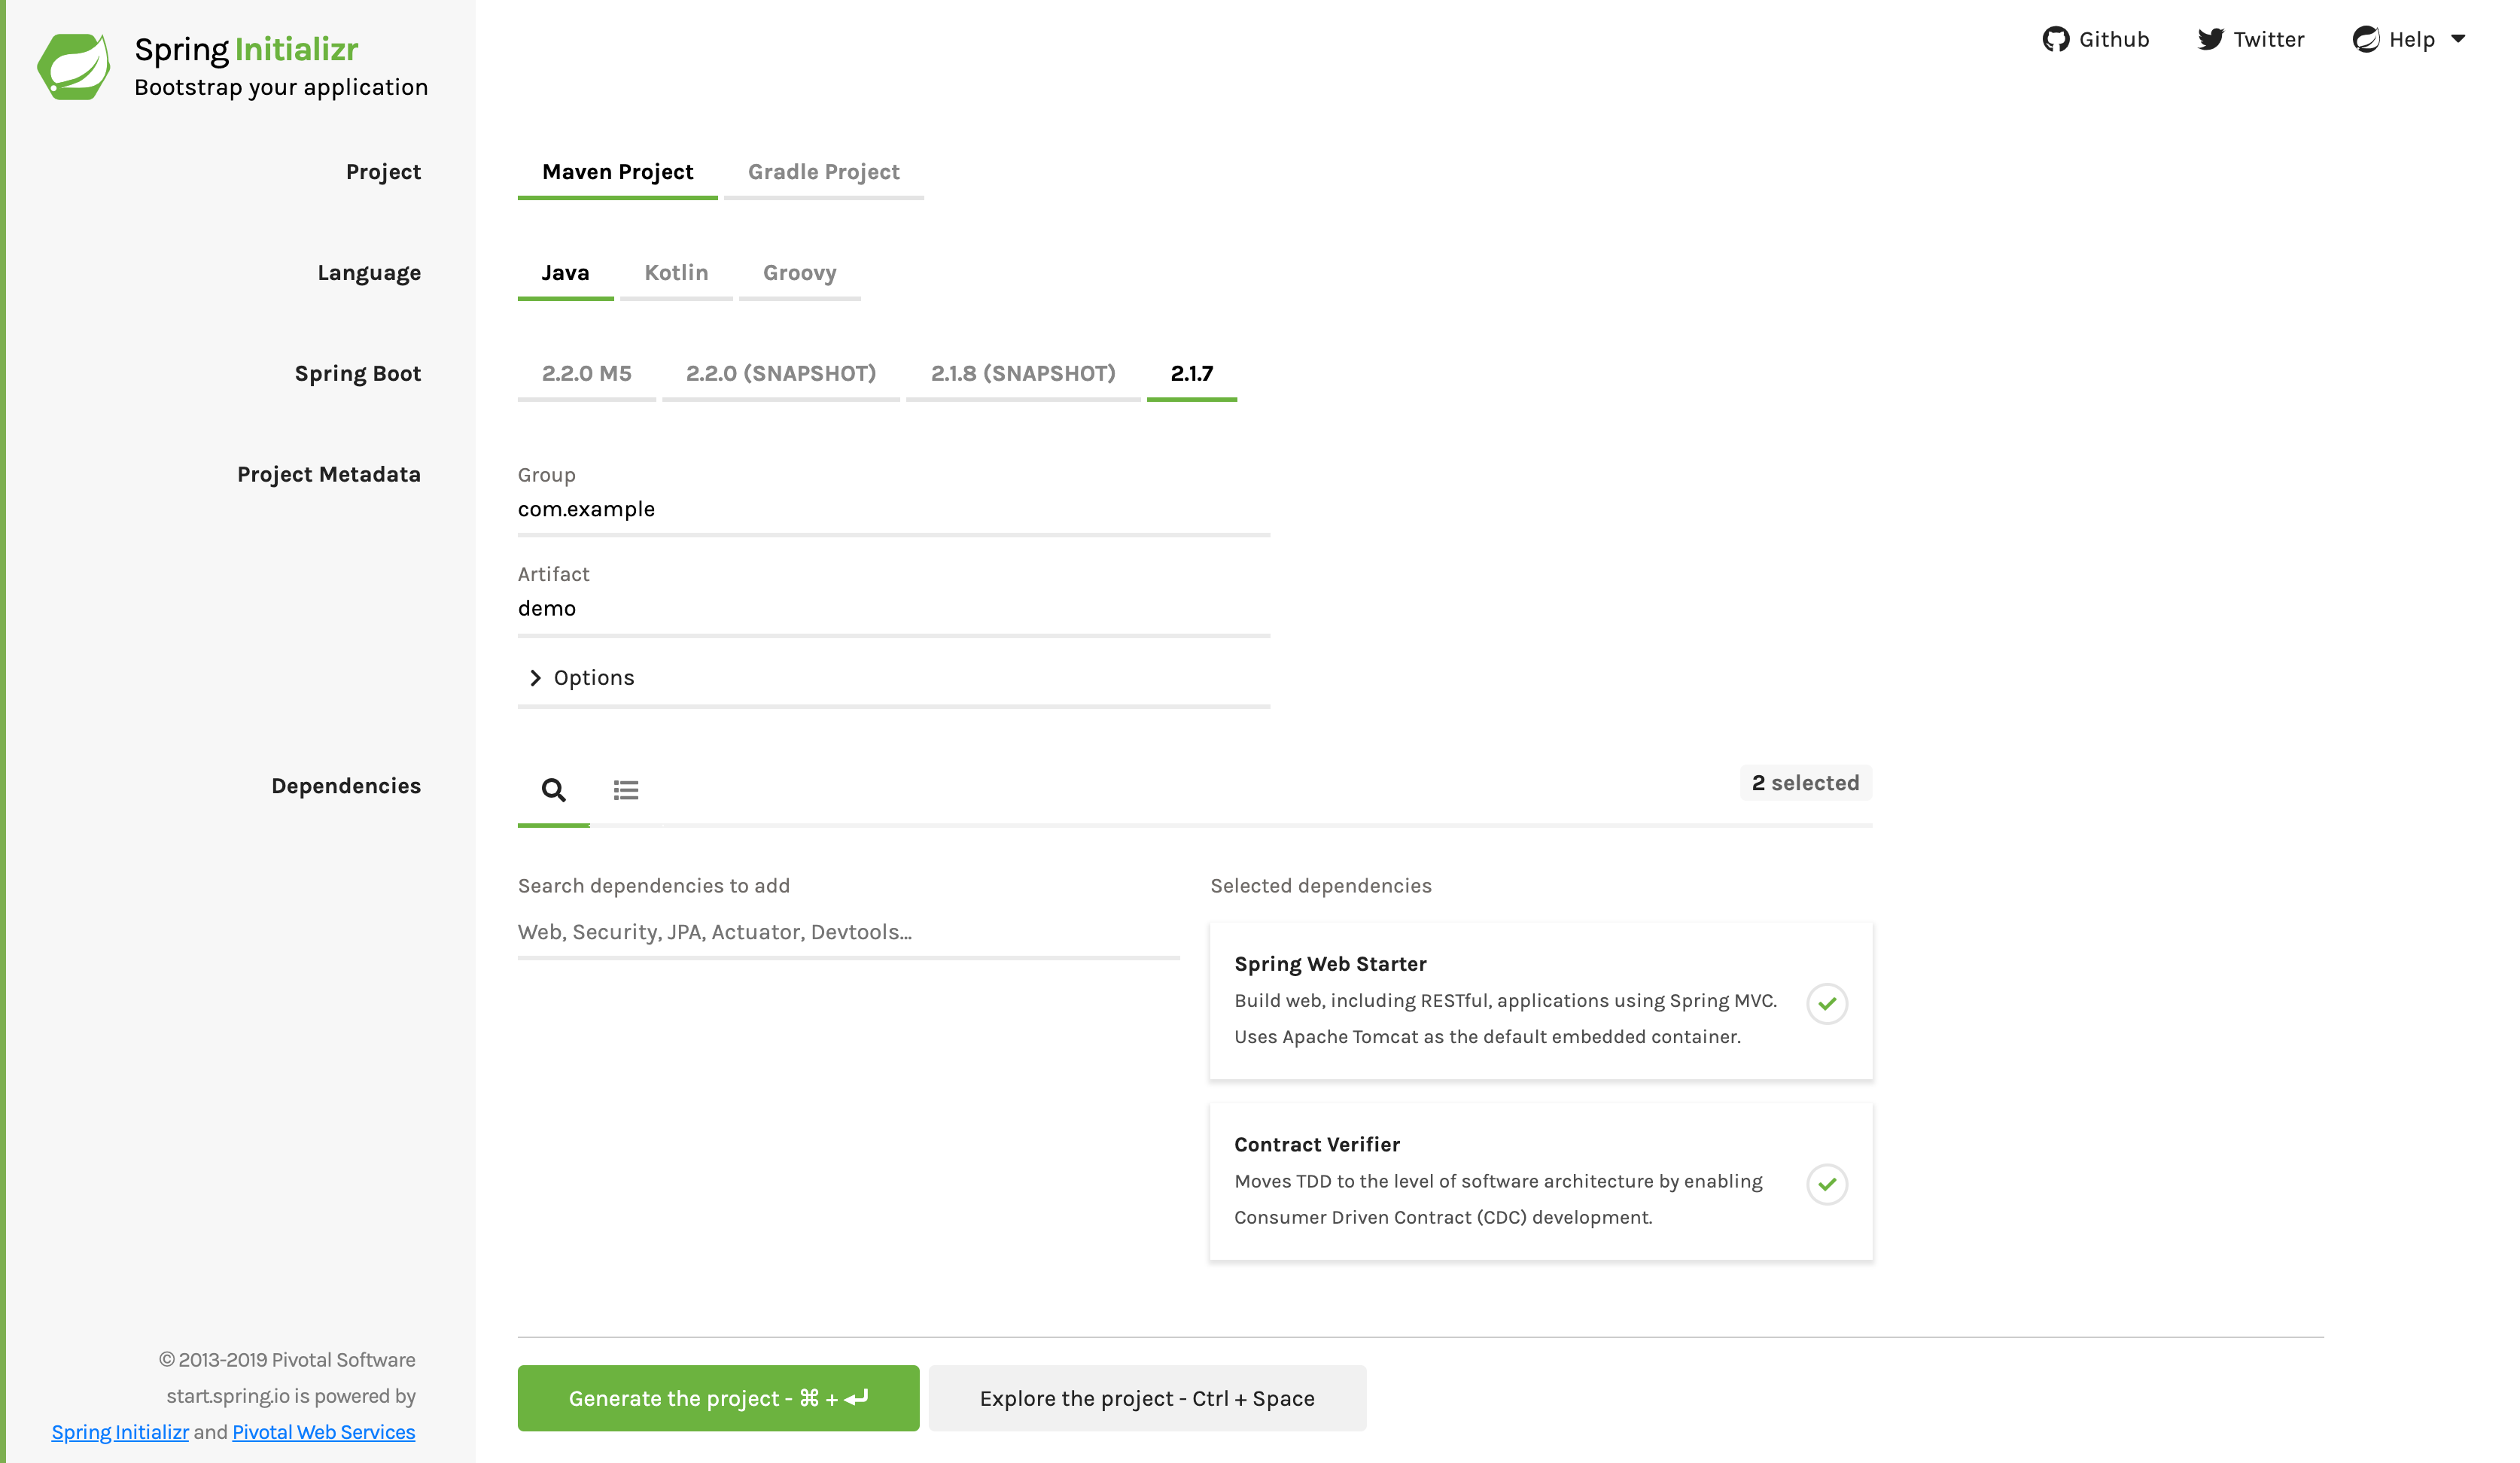
|
Now you can add files with REST/ messaging contracts
expressed in either Groovy DSL or YAML to the contracts directory, which is set by the
contractsDslDir property. By default, it is $rootDir/src/test/resources/contracts.
Note that the file name does not matter. You can organize your contracts within this
directory with whatever naming scheme you like.
For the HTTP stubs, a contract defines what kind of response should be returned for a given request (taking into account the HTTP methods, URLs, headers, status codes, and so on). The following example shows an HTTP stub contract in both Groovy and YAML:
package contracts
org.springframework.cloud.contract.spec.Contract.make {
request {
method 'PUT'
url '/fraudcheck'
body([
"client.id": $(regex('[0-9]{10}')),
loanAmount: 99999
])
headers {
contentType('application/json')
}
}
response {
status OK()
body([
fraudCheckStatus: "FRAUD",
"rejection.reason": "Amount too high"
])
headers {
contentType('application/json')
}
}
}
request:
method: PUT
url: /fraudcheck
body:
"client.id": 1234567890
loanAmount: 99999
headers:
Content-Type: application/json
matchers:
body:
- path: $.['client.id']
type: by_regex
value: "[0-9]{10}"
response:
status: 200
body:
fraudCheckStatus: "FRAUD"
"rejection.reason": "Amount too high"
headers:
Content-Type: application/json;charset=UTF-8If you need to use messaging, you can define:
-
The input and output messages (taking into account from where it was sent, the message body, and the header).
-
The methods that should be called after the message is received.
-
The methods that, when called, should trigger a message.
The following example shows a Camel messaging contract:
def contractDsl = Contract.make {
name "foo"
label 'some_label'
input {
messageFrom('jms:delete')
messageBody([
bookName: 'foo'
])
messageHeaders {
header('sample', 'header')
}
assertThat('bookWasDeleted()')
}
}
label: some_label
input:
messageFrom: jms:delete
messageBody:
bookName: 'foo'
messageHeaders:
sample: header
assertThat: bookWasDeleted()Running ./mvnw clean install automatically generates tests that verify the application
compliance with the added contracts. By default, the generated tests are under
org.springframework.cloud.contract.verifier.tests..
The generated tests may differ, depending on which framework and test type you have set up in your plugin.
In the next listing, you can find:
-
The default test mode for HTTP contracts in
MockMvc -
A JAX-RS client with the
JAXRStest mode -
A
WebTestClient-based test (this is particularly recommended while working with Reactive,Web-Flux-based applications) set with theWEBTESTCLIENTtest mode -
A Spock-based test with the
testFrameworkproperty set toSPOCK
| You need only one of these test frameworks. MockMvc is the default. To use one of the other frameworks, add its library to your classpath. |
The following listing shows samples for all frameworks:
@Test
public void validate_shouldMarkClientAsFraud() throws Exception {
// given:
MockMvcRequestSpecification request = given()
.header("Content-Type", "application/vnd.fraud.v1+json")
.body("{\"client.id\":\"1234567890\",\"loanAmount\":99999}");
// when:
ResponseOptions response = given().spec(request)
.put("/fraudcheck");
// then:
assertThat(response.statusCode()).isEqualTo(200);
assertThat(response.header("Content-Type")).matches("application/vnd.fraud.v1.json.*");
// and:
DocumentContext parsedJson = JsonPath.parse(response.getBody().asString());
assertThatJson(parsedJson).field("['fraudCheckStatus']").matches("[A-Z]{5}");
assertThatJson(parsedJson).field("['rejection.reason']").isEqualTo("Amount too high");
}
public class FooTest {
WebTarget webTarget;
@Test
public void validate_() throws Exception {
// when:
Response response = webTarget
.path("/users")
.queryParam("limit", "10")
.queryParam("offset", "20")
.queryParam("filter", "email")
.queryParam("sort", "name")
.queryParam("search", "55")
.queryParam("age", "99")
.queryParam("name", "Denis.Stepanov")
.queryParam("email", "[email protected]")
.request()
.build("GET")
.invoke();
String responseAsString = response.readEntity(String.class);
// then:
assertThat(response.getStatus()).isEqualTo(200);
// and:
DocumentContext parsedJson = JsonPath.parse(responseAsString);
assertThatJson(parsedJson).field("['property1']").isEqualTo("a");
}
}
@Test
public void validate_shouldRejectABeerIfTooYoung() throws Exception {
// given:
WebTestClientRequestSpecification request = given()
.header("Content-Type", "application/json")
.body("{\"age\":10}");
// when:
WebTestClientResponse response = given().spec(request)
.post("/check");
// then:
assertThat(response.statusCode()).isEqualTo(200);
assertThat(response.header("Content-Type")).matches("application/json.*");
// and:
DocumentContext parsedJson = JsonPath.parse(response.getBody().asString());
assertThatJson(parsedJson).field("['status']").isEqualTo("NOT_OK");
}
given:
ContractVerifierMessage inputMessage = contractVerifierMessaging.create(
\'\'\'{"bookName":"foo"}\'\'\',
['sample': 'header']
)
when:
contractVerifierMessaging.send(inputMessage, 'jms:delete')
then:
noExceptionThrown()
bookWasDeleted()
As the implementation of the functionalities described by the contracts is not yet present, the tests fail.
To make them pass, you must add the correct implementation of handling either HTTP
requests or messages. Also, you must add a base test class for auto-generated
tests to the project. This class is extended by all the auto-generated tests and should
contain all the setup necessary information needed to run them (for example,
RestAssuredMockMvc controller setup or messaging test setup).
The following example, from pom.xml, shows how to specify the base test class:
<build>
<plugins>
<plugin>
<groupId>org.springframework.cloud</groupId>
<artifactId>spring-cloud-contract-maven-plugin</artifactId>
<version>2.1.2.RELEASE</version>
<extensions>true</extensions>
<configuration>
<baseClassForTests>com.example.contractTest.BaseTestClass</baseClassForTests> (1)
</configuration>
</plugin>
<plugin>
<groupId>org.springframework.boot</groupId>
<artifactId>spring-boot-maven-plugin</artifactId>
</plugin>
</plugins>
</build>| 1 | The baseClassForTests element lets you specify your base test class. It must be a child
of a configuration element within spring-cloud-contract-maven-plugin. |
The following example shows a minimal (but functional) base test class:
package com.example.contractTest;
public class BaseTestClass {
@Before
public void setup() {
RestAssuredMockMvc.standaloneSetup(new FraudController());
}
}
This minimal class really is all you need to get your tests to work. It serves as a starting place to which the automatically generated tests attach.
Now we can move on to the implementation. For that, we first need a data class, which we then use in our controller. The following listing shows the data class:
package com.example.Test;
public class LoanRequest {
@JsonProperty("client.id")
private String clientId;
private Long loanAmount;
public String getClientId() {
return clientId;
}
public void setClientId(String clientId) {
this.clientId = clientId;
}
public Long getLoanAmount() {
return loanAmount;
}
public void setLoanRequestAmount(Long loanAmount) {
this.loanAmount = loanAmount;
}
}
The preceding class provides an object in which we can store the parameters. Because the
client ID in the contract is called client.id, we need to use the
@JsonProperty("client.id") parameter to map it to the clientId field.
Now we can move along to the controller, which the following listing shows:
package com.example.docTest;
@RestController
public class FraudController {
@PutMapping(value = "/fraudcheck", consumes="application/json", produces="application/json")
public String check(@RequestBody LoanRequest loanRequest) { (1)
if (loanRequest.getLoanAmount() > 10000) { (2)
return "{fraudCheckStatus: FRAUD, rejection.reason: Amount too high}"; (3)
} else {
return "{fraudCheckStatus: OK, acceptance.reason: Amount OK}"; (4)
}
}
}
| 1 | We map the incoming parameters to a LoanRequest object. |
| 2 | We check the requested loan amount to see if it is too much. |
| 3 | If it is too much, we return the JSON (created with a simple string here) that the test expects. |
| 4 | If we had a test to catch when the amount is allowable, we could match it to this output. |
The FraudController is about as simple as things get. You can do much more, including
logging, validating the client ID, and so on.
Once the implementation and the test base class are in place, the tests pass, and both the application and the stub artifacts are built and installed in the local Maven repository. Information about installing the stubs jar to the local repository appears in the logs, as the following example shows:
[INFO] --- spring-cloud-contract-maven-plugin:1.0.0.BUILD-SNAPSHOT:generateStubs (default-generateStubs) @ http-server ---
[INFO] Building jar: /some/path/http-server/target/http-server-0.0.1-SNAPSHOT-stubs.jar
[INFO]
[INFO] --- maven-jar-plugin:2.6:jar (default-jar) @ http-server ---
[INFO] Building jar: /some/path/http-server/target/http-server-0.0.1-SNAPSHOT.jar
[INFO]
[INFO] --- spring-boot-maven-plugin:1.5.5.BUILD-SNAPSHOT:repackage (default) @ http-server ---
[INFO]
[INFO] --- maven-install-plugin:2.5.2:install (default-install) @ http-server ---
[INFO] Installing /some/path/http-server/target/http-server-0.0.1-SNAPSHOT.jar to /path/to/your/.m2/repository/com/example/http-server/0.0.1-SNAPSHOT/http-server-0.0.1-SNAPSHOT.jar
[INFO] Installing /some/path/http-server/pom.xml to /path/to/your/.m2/repository/com/example/http-server/0.0.1-SNAPSHOT/http-server-0.0.1-SNAPSHOT.pom
[INFO] Installing /some/path/http-server/target/http-server-0.0.1-SNAPSHOT-stubs.jar to /path/to/your/.m2/repository/com/example/http-server/0.0.1-SNAPSHOT/http-server-0.0.1-SNAPSHOT-stubs.jarYou can now merge the changes and publish both the application and the stub artifacts in an online repository.
3.2. On the Consumer Side
You can use Spring Cloud Contract Stub Runner in the integration tests to get a running WireMock instance or messaging route that simulates the actual service.
To get started, add the dependency to Spring Cloud Contract Stub Runner, as follows:
<dependency>
<groupId>org.springframework.cloud</groupId>
<artifactId>spring-cloud-starter-contract-stub-runner</artifactId>
<scope>test</scope>
</dependency>You can get the Producer-side stubs installed in your Maven repository in either of two ways:
-
By checking out the Producer side repository and adding contracts and generating the stubs by running the following commands:
$ cd local-http-server-repo $ ./mvnw clean install -DskipTestsThe tests are skipped because the Producer-side contract implementation is not yet in place, so the automatically-generated contract tests fail. -
By getting existing producer service stubs from a remote repository. To do so, pass the stub artifact IDs and artifact repository URL as
Spring Cloud Contract Stub Runnerproperties, as the following example shows:stubrunner: ids: 'com.example:http-server-dsl:+:stubs:8080' repositoryRoot: https://repo.spring.io/libs-snapshot
Now you can annotate your test class with @AutoConfigureStubRunner. In the annotation,
provide the group-id and artifact-id for Spring Cloud Contract Stub Runner to run
the collaborators' stubs for you, as the following example shows:
@RunWith(SpringRunner.class)
@SpringBootTest(webEnvironment=WebEnvironment.NONE)
@AutoConfigureStubRunner(ids = {"com.example:http-server-dsl:+:stubs:6565"},
stubsMode = StubRunnerProperties.StubsMode.LOCAL)
public class LoanApplicationServiceTests {
. . .
}
Use the REMOTE stubsMode when downloading stubs from an online repository and
LOCAL for offline work.
|
In your integration test, you can receive stubbed versions of HTTP responses or messages that are expected to be emitted by the collaborator service. You can see entries similar to the following in the build logs:
2016-07-19 14:22:25.403 INFO 41050 --- [ main] o.s.c.c.stubrunner.AetherStubDownloader : Desired version is + - will try to resolve the latest version
2016-07-19 14:22:25.438 INFO 41050 --- [ main] o.s.c.c.stubrunner.AetherStubDownloader : Resolved version is 0.0.1-SNAPSHOT
2016-07-19 14:22:25.439 INFO 41050 --- [ main] o.s.c.c.stubrunner.AetherStubDownloader : Resolving artifact com.example:http-server:jar:stubs:0.0.1-SNAPSHOT using remote repositories []
2016-07-19 14:22:25.451 INFO 41050 --- [ main] o.s.c.c.stubrunner.AetherStubDownloader : Resolved artifact com.example:http-server:jar:stubs:0.0.1-SNAPSHOT to /path/to/your/.m2/repository/com/example/http-server/0.0.1-SNAPSHOT/http-server-0.0.1-SNAPSHOT-stubs.jar
2016-07-19 14:22:25.465 INFO 41050 --- [ main] o.s.c.c.stubrunner.AetherStubDownloader : Unpacking stub from JAR [URI: file:/path/to/your/.m2/repository/com/example/http-server/0.0.1-SNAPSHOT/http-server-0.0.1-SNAPSHOT-stubs.jar]
2016-07-19 14:22:25.475 INFO 41050 --- [ main] o.s.c.c.stubrunner.AetherStubDownloader : Unpacked file to [/var/folders/0p/xwq47sq106x1_g3dtv6qfm940000gq/T/contracts100276532569594265]
2016-07-19 14:22:27.737 INFO 41050 --- [ main] o.s.c.c.stubrunner.StubRunnerExecutor : All stubs are now running RunningStubs [namesAndPorts={com.example:http-server:0.0.1-SNAPSHOT:stubs=8080}]4. Step-by-step Guide to Consumer Driven Contracts (CDC) with Contracts on the Producer Side
Consider an example of fraud detection and the loan issuance process. The business scenario is such that we want to issue loans to people but do not want them to steal from us. The current implementation of our system grants loans to everybody.
Assume that Loan Issuance is a client to the Fraud Detection server. In the current
sprint, we must develop a new feature: if a client wants to borrow too much money,
we mark the client as a fraud.
Technical remarks
-
Fraud Detection has an
artifact-idofhttp-server. -
Loan Issuance has an
artifact-idofhttp-client. -
Both have a
group-idofcom.example. -
For the sake of this example, the
Stub Storageis Nexus/Artifactory.
Social remarks
-
Both the client and the server development teams need to communicate directly and discuss changes while going through the process.
-
CDC is all about communication.
The server-side code is available under Spring Cloud Contract’s repository samples/standalone/dsl/http-server path, and the client-side code is available under Spring Cloud Contract’s repository samples/standalone/dsl/http-client path.
| In this case, the producer owns the contracts. Physically, all the contracts are in the producer’s repository. |
4.1. Technical Note
If you use the SNAPSHOT, Milestone, or Release Candidate versions, you need to add the following section to your build:
<repositories>
<repository>
<id>spring-snapshots</id>
<name>Spring Snapshots</name>
<url>https://repo.spring.io/snapshot</url>
<snapshots>
<enabled>true</enabled>
</snapshots>
</repository>
<repository>
<id>spring-milestones</id>
<name>Spring Milestones</name>
<url>https://repo.spring.io/milestone</url>
<snapshots>
<enabled>false</enabled>
</snapshots>
</repository>
<!--<repository>
<id>spring-releases</id>
<name>Spring Releases</name>
<url>https://repo.spring.io/release</url>
<snapshots>
<enabled>false</enabled>
</snapshots>
</repository>-->
</repositories>
<pluginRepositories>
<pluginRepository>
<id>spring-snapshots</id>
<name>Spring Snapshots</name>
<url>https://repo.spring.io/snapshot</url>
<snapshots>
<enabled>true</enabled>
</snapshots>
</pluginRepository>
<pluginRepository>
<id>spring-milestones</id>
<name>Spring Milestones</name>
<url>https://repo.spring.io/milestone</url>
<snapshots>
<enabled>false</enabled>
</snapshots>
</pluginRepository>
<!--<pluginRepository>
<id>spring-releases</id>
<name>Spring Releases</name>
<url>https://repo.spring.io/release</url>
<snapshots>
<enabled>false</enabled>
</snapshots>
</pluginRepository>-->
</pluginRepositories>repositories {
mavenCentral()
mavenLocal()
maven { url "https://repo.spring.io/snapshot" }
maven { url "https://repo.spring.io/milestone" }
maven { url "https://repo.spring.io/release" }
}
For simplicity, we use the following acronyms:
-
Loan Issuance (LI): The HTTP client
-
Fraud Detection (FD): The HTTP server
-
SCC: Spring Cloud Contract
4.2. The Consumer Side (Loan Issuance)
As a developer of the Loan Issuance service (a consumer of the Fraud Detection server), you might do the following steps:
-
Start doing TDD by writing a test for your feature.
-
Write the missing implementation.
-
Clone the Fraud Detection service repository locally.
-
Define the contract locally in the repository of the fraud detection service.
-
Add the Spring Cloud Contract (SCC) plugin.
-
Run the integration tests.
-
File a pull request.
-
Create an initial implementation.
-
Take over the pull request.
-
Write the missing implementation.
-
Deploy your application.
-
Work online.
We start with the loan issuance flow, which the following UML diagram shows:
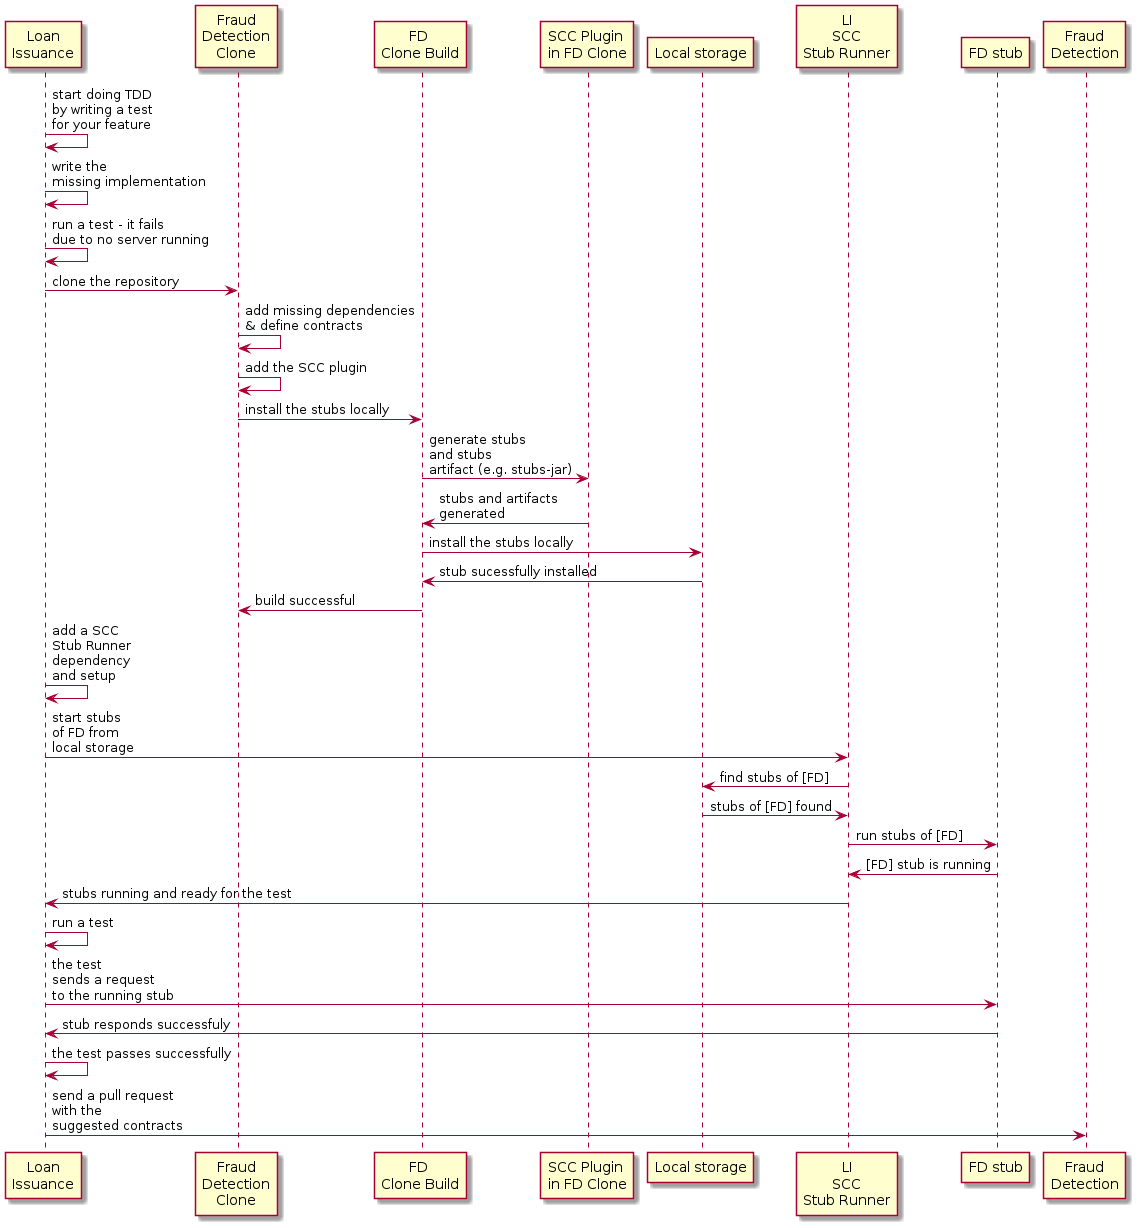
4.2.1. Start Doing TDD by Writing a Test for Your Feature
The following listing shows a test that we might use to check whether a loan amount is too large:
@Test
public void shouldBeRejectedDueToAbnormalLoanAmount() {
// given:
LoanApplication application = new LoanApplication(new Client("1234567890"),
99999);
// when:
LoanApplicationResult loanApplication = service.loanApplication(application);
// then:
assertThat(loanApplication.getLoanApplicationStatus())
.isEqualTo(LoanApplicationStatus.LOAN_APPLICATION_REJECTED);
assertThat(loanApplication.getRejectionReason()).isEqualTo("Amount too high");
}
Assume that you have written a test of your new feature. If a loan application for a big amount is received, the system should reject that loan application with some description.
4.2.2. Write the Missing Implementation
At some point in time, you need to send a request to the Fraud Detection service. Assume
that you need to send the request containing the ID of the client and the amount the
client wants to borrow. You want to send it to the /fraudcheck URL by using the PUT method.
To do so, you might use code similar to the following:
ResponseEntity<FraudServiceResponse> response = restTemplate.exchange(
"http://localhost:" + port + fraudCheck(), HttpMethod.PUT,
new HttpEntity<>(request, httpHeaders), FraudServiceResponse.class);
For simplicity, the port of the Fraud Detection service is set to 8080, and the
application runs on 8090.
If you start the test at this point, it breaks, because no service currently runs on port
8080.
|
4.2.3. Clone the Fraud Detection service repository locally
You can start by playing around with the server side contract. To do so, you must first clone it, by running the following command:
$ git clone https://your-git-server.com/server-side.git local-http-server-repo4.2.4. Define the Contract Locally in the Repository of the Fraud Detection Service
As a consumer, you need to define what exactly you want to achieve. You need to formulate your expectations. To do so, write the following contract:
Place the contract in the src/test/resources/contracts/fraud folder. The fraud folder
is important because the producer’s test base class name references that folder.
|
The following example shows our contract, in both Groovy and YAML:
/*
* Copyright 2013-2020 the original author or authors.
*
* Licensed under the Apache License, Version 2.0 (the "License");
* you may not use this file except in compliance with the License.
* You may obtain a copy of the License at
*
* https://www.apache.org/licenses/LICENSE-2.0
*
* Unless required by applicable law or agreed to in writing, software
* distributed under the License is distributed on an "AS IS" BASIS,
* WITHOUT WARRANTIES OR CONDITIONS OF ANY KIND, either express or implied.
* See the License for the specific language governing permissions and
* limitations under the License.
*/
package contracts
org.springframework.cloud.contract.spec.Contract.make {
request { // (1)
method 'PUT' // (2)
url '/fraudcheck' // (3)
body([ // (4)
"client.id": $(regex('[0-9]{10}')),
loanAmount : 99999
])
headers { // (5)
contentType('application/json')
}
}
response { // (6)
status OK() // (7)
body([ // (8)
fraudCheckStatus : "FRAUD",
"rejection.reason": "Amount too high"
])
headers { // (9)
contentType('application/json')
}
}
}
/*
From the Consumer perspective, when shooting a request in the integration test:
(1) - If the consumer sends a request
(2) - With the "PUT" method
(3) - to the URL "/fraudcheck"
(4) - with the JSON body that
* has a field `client.id` that matches a regular expression `[0-9]{10}`
* has a field `loanAmount` that is equal to `99999`
(5) - with header `Content-Type` equal to `application/json`
(6) - then the response will be sent with
(7) - status equal `200`
(8) - and JSON body equal to
{ "fraudCheckStatus": "FRAUD", "rejectionReason": "Amount too high" }
(9) - with header `Content-Type` equal to `application/json`
From the Producer perspective, in the autogenerated producer-side test:
(1) - A request will be sent to the producer
(2) - With the "PUT" method
(3) - to the URL "/fraudcheck"
(4) - with the JSON body that
* has a field `client.id` that will have a generated value that matches a regular expression `[0-9]{10}`
* has a field `loanAmount` that is equal to `99999`
(5) - with header `Content-Type` equal to `application/json`
(6) - then the test will assert if the response has been sent with
(7) - status equal `200`
(8) - and JSON body equal to
{ "fraudCheckStatus": "FRAUD", "rejectionReason": "Amount too high" }
(9) - with header `Content-Type` matching `application/json.*`
*/
request: # (1)
method: PUT # (2)
url: /yamlfraudcheck # (3)
body: # (4)
"client.id": 1234567890
loanAmount: 99999
headers: # (5)
Content-Type: application/json
matchers:
body:
- path: $.['client.id'] # (6)
type: by_regex
value: "[0-9]{10}"
response: # (7)
status: 200 # (8)
body: # (9)
fraudCheckStatus: "FRAUD"
"rejection.reason": "Amount too high"
headers: # (10)
Content-Type: application/json
#From the Consumer perspective, when shooting a request in the integration test:
#
#(1) - If the consumer sends a request
#(2) - With the "PUT" method
#(3) - to the URL "/yamlfraudcheck"
#(4) - with the JSON body that
# * has a field `client.id`
# * has a field `loanAmount` that is equal to `99999`
#(5) - with header `Content-Type` equal to `application/json`
#(6) - and a `client.id` json entry matches the regular expression `[0-9]{10}`
#(7) - then the response will be sent with
#(8) - status equal `200`
#(9) - and JSON body equal to
# { "fraudCheckStatus": "FRAUD", "rejectionReason": "Amount too high" }
#(10) - with header `Content-Type` equal to `application/json`
#
#From the Producer perspective, in the autogenerated producer-side test:
#
#(1) - A request will be sent to the producer
#(2) - With the "PUT" method
#(3) - to the URL "/yamlfraudcheck"
#(4) - with the JSON body that
# * has a field `client.id` `1234567890`
# * has a field `loanAmount` that is equal to `99999`
#(5) - with header `Content-Type` equal to `application/json`
#(7) - then the test will assert if the response has been sent with
#(8) - status equal `200`
#(9) - and JSON body equal to
# { "fraudCheckStatus": "FRAUD", "rejectionReason": "Amount too high" }
#(10) - with header `Content-Type` equal to `application/json`The YML contract is quite straightforward. However, when you take a look at the contract
written with a statically typed Groovy DSL, you might wonder what the
value(client(…), server(…)) parts are. By using this notation, Spring Cloud
Contract lets you define parts of a JSON block, a URL, or other structure that is dynamic. In the case
of an identifier or a timestamp, you need not hardcode a value. You want to allow some
different ranges of values. To enable ranges of values, you can set regular expressions
that match those values for the consumer side. You can provide the body by means of either
a map notation or a String with interpolations. We highly recommend using the map notation.
| To set up contracts, you must understand the map notation. See the Groovy docs regarding JSON. |
The previously shown contract is an agreement between two sides that:
-
If an HTTP request is sent with all of:
-
A
PUTmethod on the/fraudcheckendpoint -
A JSON body with a
client.idthat matches the regular expression[0-9]{10}andloanAmountequal to99999 -
A
Content-Typeheader with a value ofapplication/vnd.fraud.v1+json
-
-
Then an HTTP response is sent to the consumer that
-
Has status
200 -
Contains a JSON body with the
fraudCheckStatusfield containing a value ofFRAUDand therejectionReasonfield having a value ofAmount too high -
Has a
Content-Typeheader with a value ofapplication/vnd.fraud.v1+json
-
Once you are ready to check the API in practice in the integration tests, you need to install the stubs locally.
4.2.5. Add the Spring Cloud Contract Verifier Plugin
We can add either a Maven or a Gradle plugin. In this example, we show how to add Maven.
First, we add the Spring Cloud Contract BOM, as the following example shows:
<dependencyManagement>
<dependencies>
<dependency>
<groupId>org.springframework.cloud</groupId>
<artifactId>spring-cloud-dependencies</artifactId>
<version>${spring-cloud-release.version}</version>
<type>pom</type>
<scope>import</scope>
</dependency>
</dependencies>
</dependencyManagement>Next, add the Spring Cloud Contract Verifier Maven plugin, as the following example shows:
<plugin>
<groupId>org.springframework.cloud</groupId>
<artifactId>spring-cloud-contract-maven-plugin</artifactId>
<version>${spring-cloud-contract.version}</version>
<extensions>true</extensions>
<configuration>
<packageWithBaseClasses>com.example.fraud</packageWithBaseClasses>
<!-- <convertToYaml>true</convertToYaml>-->
</configuration>
<!-- if additional dependencies are needed e.g. for Pact -->
<dependencies>
<dependency>
<groupId>org.springframework.cloud</groupId>
<artifactId>spring-cloud-contract-pact</artifactId>
<version>${spring-cloud-contract.version}</version>
</dependency>
</dependencies>
</plugin>Since the plugin was added, you get the Spring Cloud Contract Verifier features, which,
from the provided contracts:
-
Generate and run tests
-
Produce and install stubs
You do not want to generate tests, since you, as the consumer, want only to play with the stubs. You need to skip the test generation and invokation. To do so, run the following commands:
$ cd local-http-server-repo
$ ./mvnw clean install -DskipTestsOnce you run those commands, you should you see something like the following content in the logs:
[INFO] --- spring-cloud-contract-maven-plugin:1.0.0.BUILD-SNAPSHOT:generateStubs (default-generateStubs) @ http-server ---
[INFO] Building jar: /some/path/http-server/target/http-server-0.0.1-SNAPSHOT-stubs.jar
[INFO]
[INFO] --- maven-jar-plugin:2.6:jar (default-jar) @ http-server ---
[INFO] Building jar: /some/path/http-server/target/http-server-0.0.1-SNAPSHOT.jar
[INFO]
[INFO] --- spring-boot-maven-plugin:1.5.5.BUILD-SNAPSHOT:repackage (default) @ http-server ---
[INFO]
[INFO] --- maven-install-plugin:2.5.2:install (default-install) @ http-server ---
[INFO] Installing /some/path/http-server/target/http-server-0.0.1-SNAPSHOT.jar to /path/to/your/.m2/repository/com/example/http-server/0.0.1-SNAPSHOT/http-server-0.0.1-SNAPSHOT.jar
[INFO] Installing /some/path/http-server/pom.xml to /path/to/your/.m2/repository/com/example/http-server/0.0.1-SNAPSHOT/http-server-0.0.1-SNAPSHOT.pom
[INFO] Installing /some/path/http-server/target/http-server-0.0.1-SNAPSHOT-stubs.jar to /path/to/your/.m2/repository/com/example/http-server/0.0.1-SNAPSHOT/http-server-0.0.1-SNAPSHOT-stubs.jarThe following line is extremely important:
[INFO] Installing /some/path/http-server/target/http-server-0.0.1-SNAPSHOT-stubs.jar to /path/to/your/.m2/repository/com/example/http-server/0.0.1-SNAPSHOT/http-server-0.0.1-SNAPSHOT-stubs.jarIt confirms that the stubs of the http-server have been installed in the local
repository.
4.2.6. Running the Integration Tests
In order to profit from the Spring Cloud Contract Stub Runner functionality of automatic
stub downloading, you must do the following in your consumer side project (Loan
Application service):
-
Add the
Spring Cloud ContractBOM, as follows:<dependencyManagement> <dependencies> <dependency> <groupId>org.springframework.cloud</groupId> <artifactId>spring-cloud-dependencies</artifactId> <version>${spring-cloud-release-train.version}</version> <type>pom</type> <scope>import</scope> </dependency> </dependencies> </dependencyManagement> -
Add the dependency to
Spring Cloud Contract Stub Runner, as follows:<dependency> <groupId>org.springframework.cloud</groupId> <artifactId>spring-cloud-starter-contract-stub-runner</artifactId> <scope>test</scope> </dependency> -
Annotate your test class with
@AutoConfigureStubRunner. In the annotation, provide thegroup-idandartifact-idfor the Stub Runner to download the stubs of your collaborators.@SpringBootTest(webEnvironment = WebEnvironment.NONE) @AutoConfigureStubRunner(ids = { "com.example:http-server-dsl:0.0.1:stubs"}, stubsMode = StubRunnerProperties.StubsMode.LOCAL) public class LoanApplicationServiceTests { -
(Optional) Because you are playing with the collaborators offline, you can also provide the offline work switch (
StubRunnerProperties.StubsMode.LOCAL).
Now, when you run your tests, you see something like the following output in the logs:
2016-07-19 14:22:25.403 INFO 41050 --- [ main] o.s.c.c.stubrunner.AetherStubDownloader : Desired version is + - will try to resolve the latest version
2016-07-19 14:22:25.438 INFO 41050 --- [ main] o.s.c.c.stubrunner.AetherStubDownloader : Resolved version is 0.0.1-SNAPSHOT
2016-07-19 14:22:25.439 INFO 41050 --- [ main] o.s.c.c.stubrunner.AetherStubDownloader : Resolving artifact com.example:http-server:jar:stubs:0.0.1-SNAPSHOT using remote repositories []
2016-07-19 14:22:25.451 INFO 41050 --- [ main] o.s.c.c.stubrunner.AetherStubDownloader : Resolved artifact com.example:http-server:jar:stubs:0.0.1-SNAPSHOT to /path/to/your/.m2/repository/com/example/http-server/0.0.1-SNAPSHOT/http-server-0.0.1-SNAPSHOT-stubs.jar
2016-07-19 14:22:25.465 INFO 41050 --- [ main] o.s.c.c.stubrunner.AetherStubDownloader : Unpacking stub from JAR [URI: file:/path/to/your/.m2/repository/com/example/http-server/0.0.1-SNAPSHOT/http-server-0.0.1-SNAPSHOT-stubs.jar]
2016-07-19 14:22:25.475 INFO 41050 --- [ main] o.s.c.c.stubrunner.AetherStubDownloader : Unpacked file to [/var/folders/0p/xwq47sq106x1_g3dtv6qfm940000gq/T/contracts100276532569594265]
2016-07-19 14:22:27.737 INFO 41050 --- [ main] o.s.c.c.stubrunner.StubRunnerExecutor : All stubs are now running RunningStubs [namesAndPorts={com.example:http-server:0.0.1-SNAPSHOT:stubs=8080}]This output means that Stub Runner has found your stubs and started a server for your application
with a group ID of com.example and an artifact ID of http-server with version 0.0.1-SNAPSHOT of
the stubs and with the stubs classifier on port 8080.
4.2.7. Filing a Pull Request
What you have done until now is an iterative process. You can play around with the contract, install it locally, and work on the consumer side until the contract works as you wish.
Once you are satisfied with the results and the test passes, you can publish a pull request to the server side. Currently, the consumer side work is done.
4.3. The Producer Side (Fraud Detection server)
As a developer of the Fraud Detection server (a server to the Loan Issuance service), you might want to:
-
Take over the pull request
-
Write the missing implementation
-
Deploy the application
The following UML diagram shows the fraud detection flow:
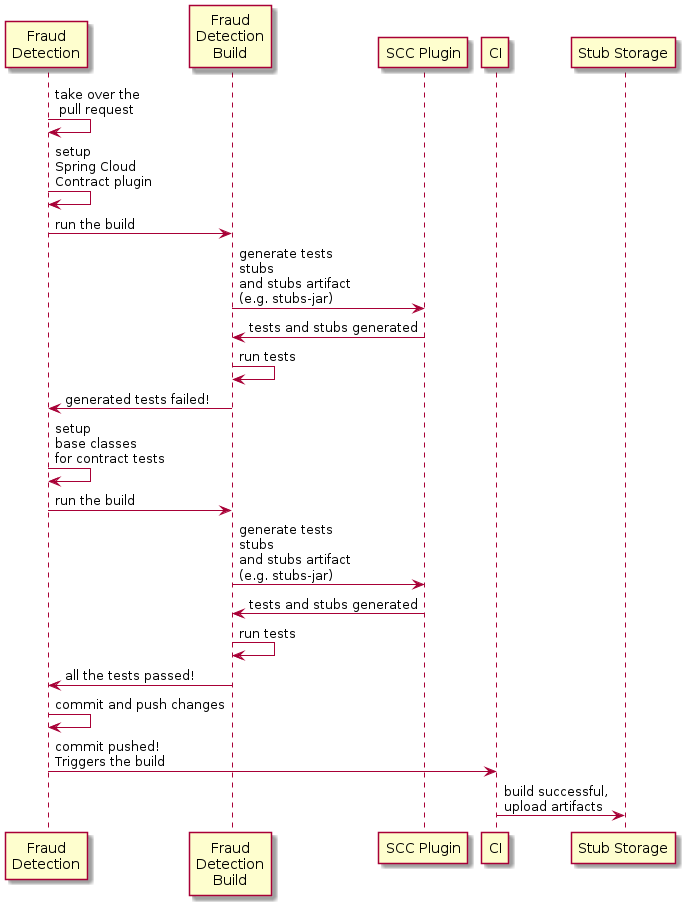
4.3.1. Taking over the Pull Request
As a reminder, the following listing shows the initial implementation:
@RequestMapping(value = "/fraudcheck", method = PUT)
public FraudCheckResult fraudCheck(@RequestBody FraudCheck fraudCheck) {
return new FraudCheckResult(FraudCheckStatus.OK, NO_REASON);
}
Then you can run the following commands:
$ git checkout -b contract-change-pr master
$ git pull https://your-git-server.com/server-side-fork.git contract-change-prYou must add the dependencies needed by the autogenerated tests, as follows:
<dependency>
<groupId>org.springframework.cloud</groupId>
<artifactId>spring-cloud-starter-contract-verifier</artifactId>
<scope>test</scope>
</dependency>In the configuration of the Maven plugin, you must pass the packageWithBaseClasses property, as follows:
<plugin>
<groupId>org.springframework.cloud</groupId>
<artifactId>spring-cloud-contract-maven-plugin</artifactId>
<version>${spring-cloud-contract.version}</version>
<extensions>true</extensions>
<configuration>
<packageWithBaseClasses>com.example.fraud</packageWithBaseClasses>
<!-- <convertToYaml>true</convertToYaml>-->
</configuration>
<!-- if additional dependencies are needed e.g. for Pact -->
<dependencies>
<dependency>
<groupId>org.springframework.cloud</groupId>
<artifactId>spring-cloud-contract-pact</artifactId>
<version>${spring-cloud-contract.version}</version>
</dependency>
</dependencies>
</plugin>
This example uses “convention-based” naming by setting the
packageWithBaseClasses property. Doing so means that the two last packages combine to
make the name of the base test class. In our case, the contracts were placed under
src/test/resources/contracts/fraud. Since you do not have two packages starting from
the contracts folder, pick only one, which should be fraud. Add the Base suffix and
capitalize fraud. That gives you the FraudBase test class name.
|
All the generated tests extend that class. Over there, you can set up your Spring Context
or whatever is necessary. In this case, you should use Rest Assured MVC to
start the server side FraudDetectionController. The following listing shows the
FraudBase class:
/*
* Copyright 2013-2020 the original author or authors.
*
* Licensed under the Apache License, Version 2.0 (the "License");
* you may not use this file except in compliance with the License.
* You may obtain a copy of the License at
*
* https://www.apache.org/licenses/LICENSE-2.0
*
* Unless required by applicable law or agreed to in writing, software
* distributed under the License is distributed on an "AS IS" BASIS,
* WITHOUT WARRANTIES OR CONDITIONS OF ANY KIND, either express or implied.
* See the License for the specific language governing permissions and
* limitations under the License.
*/
package com.example.fraud;
public class FraudBase {
@BeforeEach
public void setup() {
RestAssuredMockMvc.standaloneSetup(new FraudDetectionController(),
new FraudStatsController(stubbedStatsProvider()));
}
private StatsProvider stubbedStatsProvider() {
return fraudType -> {
switch (fraudType) {
case DRUNKS:
return 100;
case ALL:
return 200;
}
return 0;
};
}
public void assertThatRejectionReasonIsNull(Object rejectionReason) {
assert rejectionReason == null;
}
}
Now, if you run the ./mvnw clean install, you get something like the following output:
Results :
Tests in error:
ContractVerifierTest.validate_shouldMarkClientAsFraud:32 » IllegalState Parsed...This error occurs because you have a new contract from which a test was generated, and it failed since you have not implemented the feature. The auto-generated test would look like the following test method:
@Test
public void validate_shouldMarkClientAsFraud() throws Exception {
// given:
MockMvcRequestSpecification request = given()
.header("Content-Type", "application/vnd.fraud.v1+json")
.body("{\"client.id\":\"1234567890\",\"loanAmount\":99999}");
// when:
ResponseOptions response = given().spec(request)
.put("/fraudcheck");
// then:
assertThat(response.statusCode()).isEqualTo(200);
assertThat(response.header("Content-Type")).matches("application/vnd.fraud.v1.json.*");
// and:
DocumentContext parsedJson = JsonPath.parse(response.getBody().asString());
assertThatJson(parsedJson).field("['fraudCheckStatus']").matches("[A-Z]{5}");
assertThatJson(parsedJson).field("['rejection.reason']").isEqualTo("Amount too high");
}
If you used the Groovy DSL, you can see that all the producer() parts of the Contract that were present in the
value(consumer(…), producer(…)) blocks got injected into the test.
If you use YAML, the same applies for the matchers sections of the response.
Note that, on the producer side, you are also doing TDD. The expectations are expressed
in the form of a test. This test sends a request to our own application with the URL,
headers, and body defined in the contract. It also expects precisely defined values
in the response. In other words, you have the red part of red, green, and
refactor. It is time to convert the red into the green.
4.3.2. Write the Missing Implementation
Because you know the expected input and expected output, you can write the missing implementation as follows:
@RequestMapping(value = "/fraudcheck", method = PUT)
public FraudCheckResult fraudCheck(@RequestBody FraudCheck fraudCheck) {
if (amountGreaterThanThreshold(fraudCheck)) {
return new FraudCheckResult(FraudCheckStatus.FRAUD, AMOUNT_TOO_HIGH);
}
return new FraudCheckResult(FraudCheckStatus.OK, NO_REASON);
}
When you run ./mvnw clean install again, the tests pass. Since the Spring Cloud
Contract Verifier plugin adds the tests to the generated-test-sources, you can
actually run those tests from your IDE.
4.3.3. Deploying Your Application
Once you finish your work, you can deploy your changes. To do so, you must first merge the branch by running the following commands:
$ git checkout master
$ git merge --no-ff contract-change-pr
$ git push origin masterYour CI might run a command such as ./mvnw clean deploy, which would publish both the
application and the stub artifacts.
4.4. Consumer Side (Loan Issuance), Final Step
As a developer of the loan issuance service (a consumer of the Fraud Detection server), you need to:
-
Merge our feature branch to
master -
Switch to online mode of working
The following UML diagram shows the final state of the process:
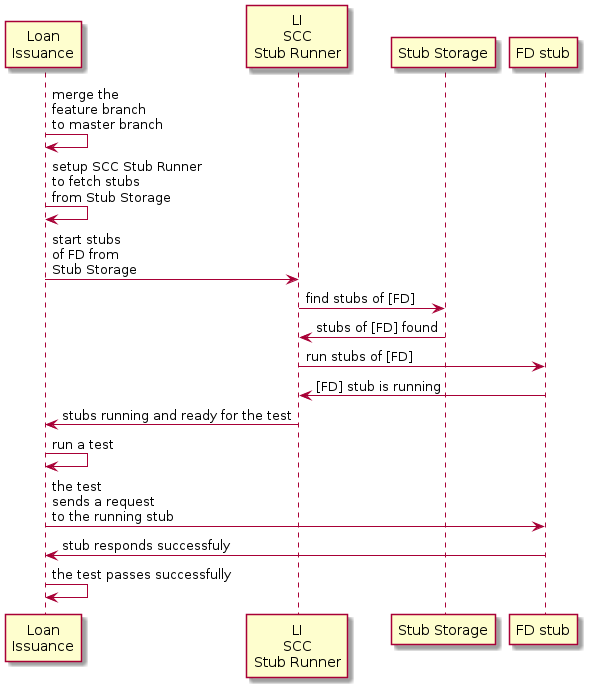
4.4.1. Merging a Branch to Master
The following commands show one way to merge a branch into master with Git:
$ git checkout master
$ git merge --no-ff contract-change-pr4.4.2. Working Online
Now you can disable the offline work for Spring Cloud Contract Stub Runner and indicate
where the repository with your stubs is located. At this moment, the stubs of the server
side are automatically downloaded from Nexus/Artifactory. You can set the value of
stubsMode to REMOTE. The following code shows an example of
achieving the same thing by changing the properties:
stubrunner:
  ids: 'com.example:http-server-dsl:+:stubs:8080'
repositoryRoot: https://repo.spring.io/libs-snapshotThat’s it. You have finished the tutorial.
5. Next Steps
Hopefully, this section provided some of the Spring Cloud Contract basics and got you on your way to writing your own applications. If you are a task-oriented type of developer, you might want to jump over to spring.io and check out some getting started guides that solve specific “How do I do that with Spring?” problems. We also have Spring Cloud Contract-specific “how-to” reference documentation.
Otherwise, the next logical step is to read Using Spring Cloud Contract. If you are really impatient, you could also jump ahead and read about Spring Cloud Contract features.
In addition, you can check out the following videos:
-
"Consumer Driven Contracts and Your Microservice Architecture" by Olga Maciaszek-Sharma and Marcin Grzejszczak
-
"Contract Tests in the Enterprise" by Marcin Grzejszczak
-
"Why Contract Tests Matter?" by Marcin Grzejszczak
You can find the default project samples at samples.