Version 1.0.0.BUILD-SNAPSHOT
© 2012-2018 Pivotal Software, Inc.
Copies of this document may be made for your own use and for distribution to others, provided that you do not charge any fee for such copies and further provided that each copy contains this Copyright Notice, whether distributed in print or electronically.
1. Overview
This guide contains samples and demonstrations of how to build data pipelines with Spring Cloud Data Flow.
2. Java DSL
2.1. Deploying a stream programmaticaly
This sample shows the two usage styles of the Java DSL to create and deploy a stream. You should look in the source code to get a feel for the different styles.
2.1.1. Step 1 Build the sample application
./mvnw clean packageWith no command line options, the application will deploy the stream http --server.port=9900 | splitter --expression=payload.split(' ') | log using the URI localhost:9393 to connect to the Data Flow server.
There is also a command line option --style whose value can be either definition or fluent.
This options picks which JavaDSL style will execute.
Both are identical in terms of behavior.
The spring-cloud-dataflow-rest-client project provides auto-configuration for DataFlowOperations and StreamBuilder
The properties in DataFlowClientProperties can be used to configure the connection to the Data Flow server. The common property to start using is spring.cloud.dataflow.client.uri
@Autowired
private DataFlowOperations dataFlowOperations;

@Autowired
private StreamBuilder builder;
You can use those beans to build streams as well as work directly with `DataFlowOperations" REST client.
The definition style has code of the style
Stream woodchuck = builder
        .name("woodchuck")
        .definition("http --server.port=9900 | splitter --expression=payload.split(' ') | log")
        .create()
        .deploy(deploymentProperties);
while the fluent style has code of the style
Stream woodchuck = builder.name("woodchuck")
        .source(source)
        .processor(processor)
        .sink(sink)
        .create()
        .deploy(deploymentProperties);
where source, processor, and sink variables were defined as @Bean`s of the type `StreamApplication
@Bean
public StreamApplication source() {
  return new StreamApplication("http").addProperty("server.port", 9900);
}
Another useful class is the DeploymentPropertiesBuilder which aids in the creation of the Map of properties required to deploy stream applications.
	private Map<String, String> createDeploymentProperties() {
		DeploymentPropertiesBuilder propertiesBuilder = new DeploymentPropertiesBuilder();
		propertiesBuilder.memory("log", 512);
		propertiesBuilder.count("log",2);
		propertiesBuilder.put("app.splitter.producer.partitionKeyExpression", "payload");
		return propertiesBuilder.build();
	}
2.1.2. Step 2 Start Data Flow and run the sample application
This sample demonstrates the use of the local Data Flow Server, but you can pass in the option --uri to point to another Data Flow server instance that is running elsewhere.
$ java -jar target/scdfdsl-0.0.1-SNAPSHOT.jarYou will then see the following output.
Deploying stream.
Wating for deployment of stream.
Wating for deployment of stream.
Wating for deployment of stream.
Wating for deployment of stream.
Wating for deployment of stream.
Letting the stream run for 2 minutes.
To verify that the application has been deployed successfully, will tail the logs of one of the log sinks and post some data to the http source. You can find the location for the logs of one of the log sink applications by looking in the Data Flow server’s log file.
2.1.3. Step 3 Post some data to the server
curl http://localhost:9900 -H "Content-Type:text/plain" -X POST -d "how much wood would a woodchuck chuck if a woodchuck could chuck wood"2.1.4. Step 4 Verify the output
Tailing the log file of the first instance
cd /tmp/spring-cloud-dataflow-4323595028663837160/woodchuck-1511390696355/woodchuck.log
tail -f stdout_0.log
2017-11-22 18:04:08.631 INFO 26652 --- [r.woodchuck-0-1] log-sink : how
2017-11-22 18:04:08.632 INFO 26652 --- [r.woodchuck-0-1] log-sink : chuck
2017-11-22 18:04:08.634 INFO 26652 --- [r.woodchuck-0-1] log-sink : chuckTailing the log file of the second instance
cd /tmp/spring-cloud-dataflow-4323595028663837160/woodchuck-1511390696355/woodchuck.log
tail -f stdout_1.log
You should see the output
$ tail -f stdout_1.log
2017-11-22 18:04:08.636  INFO 26655 --- [r.woodchuck-1-1] log-sink          : much
2017-11-22 18:04:08.638  INFO 26655 --- [r.woodchuck-1-1] log-sink          : wood
2017-11-22 18:04:08.639  INFO 26655 --- [r.woodchuck-1-1] log-sink          : would
2017-11-22 18:04:08.640  INFO 26655 --- [r.woodchuck-1-1] log-sink          : a
2017-11-22 18:04:08.641  INFO 26655 --- [r.woodchuck-1-1] log-sink          : woodchuck
2017-11-22 18:04:08.642  INFO 26655 --- [r.woodchuck-1-1] log-sink          : if
2017-11-22 18:04:08.644  INFO 26655 --- [r.woodchuck-1-1] log-sink          : a
2017-11-22 18:04:08.645  INFO 26655 --- [r.woodchuck-1-1] log-sink          : woodchuck
2017-11-22 18:04:08.646  INFO 26655 --- [r.woodchuck-1-1] log-sink          : could
2017-11-22 18:04:08.647  INFO 26655 --- [r.woodchuck-1-1] log-sink          : wood
Note that the partitioning is done based on the hash of the java.lang.String object.
2.1.5. Step 5 Use Authentication
Optionally, if you have enabled authentication in SCDF, there are three different ways to authorize the sample application (i.e. the client).
Use basic authentication:
$ java -jar target/scdfdsl-0.0.1-SNAPSHOT.jar \
  --spring.cloud.dataflow.client.authentication.basic.username=user \
  --spring.cloud.dataflow.client.authentication.basic.password=password
Use OAuth client settings (UAA is used as the identity provider in this sample):
$ java -jar target/scdfdsl-0.0.1-SNAPSHOT.jar \
  --spring.cloud.dataflow.client.authentication.client-id=dataflow \
  --spring.cloud.dataflow.client.authentication.client-secret=secret \
  --spring.cloud.dataflow.client.authentication.token-uri=http://localhost:8080/uaa/oauth/token \
  --spring.cloud.dataflow.client.authentication.scope=dataflow.create,dataflow.deploy,dataflow.destroy,dataflow.manage,dataflow.modify,dataflow.schedule,dataflow.view
Use OAuth access token:
$ java -jar target/scdfdsl-0.0.1-SNAPSHOT.jar \
  --spring.cloud.dataflow.client.authentication.access-token=849228ed663e450ab5051c998eb71a4a
For example, if you’re using UAA as the identity provider backend, the access token can be requested with the following command:
$ curl 'http://localhost:8080/uaa/oauth/token' -i -X POST \
    -H 'Content-Type: application/x-www-form-urlencoded' \
    -H 'Accept: application/json' \
    -d 'client_id=dataflow&client_secret=secret&grant_type=password&username=user&password=password&token_format=opaque'

{
  "access_token":"849228ed663e450ab5051c998eb71a4a",
  ...
}
3. Streaming
3.1. HTTP to Cassandra Demo
In this demonstration, you will learn how to build a data pipeline using Spring Cloud Data Flow to consume data from an HTTP endpoint and write the payload to a Cassandra database.
We will take you through the steps to configure and Spring Cloud Data Flow server in either a local or Cloud Foundry environment.
3.1.1. Prerequisites
-
A Running Data Flow Shell
the Spring Cloud Data Flow Shell and Local server implementation are in the same repository and are both built by running ./mvnw install from the project root directory. If you have already run the build, use the jar in spring-cloud-dataflow-shell/target
|
To run the Shell open a new terminal session:
$ cd <PATH/TO/SPRING-CLOUD-DATAFLOW-SHELL-JAR>
$ java -jar spring-cloud-dataflow-shell-<VERSION>.jar
  ____                              ____ _                __
 / ___| _ __  _ __(_)_ __   __ _   / ___| | ___  _   _  __| |
 \___ \| '_ \| '__| | '_ \ / _` | | |   | |/ _ \| | | |/ _` |
  ___) | |_) | |  | | | | | (_| | | |___| | (_) | |_| | (_| |
 |____/| .__/|_|  |_|_| |_|\__, |  \____|_|\___/ \__,_|\__,_|
  ____ |_|    _          __|___/                 __________
 |  _ \  __ _| |_ __ _  |  ___| | _____      __  \ \ \ \ \ \
 | | | |/ _` | __/ _` | | |_  | |/ _ \ \ /\ / /   \ \ \ \ \ \
 | |_| | (_| | || (_| | |  _| | | (_) \ V  V /    / / / / / /
 |____/ \__,_|\__\__,_| |_|   |_|\___/ \_/\_/    /_/_/_/_/_/


Welcome to the Spring Cloud Data Flow shell. For assistance hit TAB or type "help".
dataflow:>| The Spring Cloud Data Flow Shell is a Spring Boot application that connects to the Data Flow Server’s REST API and supports a DSL that simplifies the process of defining a stream or task and managing its lifecycle. Most of these samples use the shell. If you prefer, you can use the Data Flow UI localhost:9393/dashboard, (or wherever it the server is hosted) to perform equivalent operations. |
3.1.2. Running Locally
Additional Prerequisites
-
Spring Cloud Data Flow installed locally Follow the installation instructions to run Spring Cloud Data Flow on a local host.
-
Running instance of Kafka
-
Running instance of Apache Cassandra
-
A database utility tool such as DBeaver to connect to the Cassandra instance. You might have to provide
host,port,usernameandpassworddepending on the Cassandra configuration you are using. -
Create a keyspace and a
booktable in Cassandra using:
CREATE KEYSPACE clouddata WITH REPLICATION = { 'class' : 'org.apache.cassandra.locator.SimpleStrategy', 'replication_factor': '1' } AND DURABLE_WRITES = true;
USE clouddata;
CREATE TABLE book  (
    id          uuid PRIMARY KEY,
    isbn        text,
    author      text,
    title       text
);
Building and Running the Demo
-
Register the out-of-the-box applications for the Kafka binder
These samples assume that the Data Flow Server can access a remote Maven repository, repo.spring.io/libs-releaseby default. If your Data Flow server is running behind a firewall, or you are using a maven proxy preventing access to public repositories, you will need to install the sample apps in your internal Maven repository and configure the server accordingly. The sample applications are typically registered using Data Flow’s bulk import facility. For example, the Shell commanddataflow:>app import --uri dataflow.spring.io/rabbitmq-maven-latest(The actual URI is release and binder specific so refer to the sample instructions for the actual URL). The bulk import URI references a plain text file containing entries for all of the publicly available Spring Cloud Stream and Task applications published torepo.spring.io. For example,source.http=maven://org.springframework.cloud.stream.app:http-source-rabbit:2.1.0.RELEASEregisters thehttpsource app at the corresponding Maven address, relative to the remote repository(ies) configured for the Data Flow server. The format ismaven://<groupId>:<artifactId>:<version>You will need to download the required apps or build them and then install them in your Maven repository, using whatever group, artifact, and version you choose. If you do this, register individual apps usingdataflow:>app register…using themaven://resource URI format corresponding to your installed app.dataflow:>app import --uri https://dataflow.spring.io/kafka-maven-latest -
Create the stream
dataflow:>stream create cassandrastream --definition "http --server.port=8888 --spring.cloud.stream.bindings.output.contentType='application/json' | cassandra --ingestQuery='insert into book (id, isbn, title, author) values (uuid(), ?, ?, ?)' --keyspace=clouddata" --deploy

Created and deployed new stream 'cassandrastream'
If Cassandra isn’t running on default port on localhostor if you need username and password to connect, use one of the following options to specify the necessary connection parameters:--username='<USERNAME>' --password='<PASSWORD>' --port=<PORT> --contact-points=<LIST-OF-HOSTS> -
Verify the stream is successfully deployed
dataflow:>stream list -
Notice that
cassandrastream-httpandcassandrastream-cassandraSpring Cloud Stream applications are running as Spring Boot applications within theserveras a collocated process.2015-12-15 15:52:31.576 INFO 18337 --- [nio-9393-exec-1] o.s.c.d.a.s.l.OutOfProcessModuleDeployer : deploying module org.springframework.cloud.stream.module:cassandra-sink:jar:exec:1.0.0.BUILD-SNAPSHOT instance 0 Logs will be in /var/folders/c3/ctx7_rns6x30tq7rb76wzqwr0000gp/T/spring-cloud-data-flow-284240942697761420/cassandrastream.cassandra 2015-12-15 15:52:31.583 INFO 18337 --- [nio-9393-exec-1] o.s.c.d.a.s.l.OutOfProcessModuleDeployer : deploying module org.springframework.cloud.stream.module:http-source:jar:exec:1.0.0.BUILD-SNAPSHOT instance 0 Logs will be in /var/folders/c3/ctx7_rns6x30tq7rb76wzqwr0000gp/T/spring-cloud-data-flow-284240942697761420/cassandrastream.http -
Post sample data pointing to the
httpendpoint:localhost:8888(8888is theserver.portwe specified for thehttpsource in this case)dataflow:>http post --contentType 'application/json' --data '{"isbn": "1599869772", "title": "The Art of War", "author": "Sun Tzu"}' --target http://localhost:8888 > POST (application/json;charset=UTF-8) http://localhost:8888 {"isbn": "1599869772", "title": "The Art of War", "author": "Sun Tzu"} > 202 ACCEPTED -
Connect to the Cassandra instance and query the table
clouddata.bookto list the persisted recordsselect * from clouddata.book; -
You’re done!
3.1.3. Running on Cloud Foundry
Additional Prerequisites
-
Cloud Foundry instance
-
A
rabbitservice instance -
A Running instance of
cassandrain Cloud Foundry or from another Cloud provider -
A database utility tool such as DBeaver to connect to the Cassandra instance. You might have to provide
host,port,usernameandpassworddepending on the Cassandra configuration you are using. -
Create a
booktable in your Cassandra keyspace using:CREATE TABLE book ( id uuid PRIMARY KEY, isbn text, author text, title text ); -
Spring Cloud Data Flow installed on Cloud Foundry
Follow the installation instructions to run Spring Cloud Data Flow on Cloud Foundry.
Running the Demo
The source code for the Batch File Ingest batch job is located in batch/file-ingest
-
Register the out-of-the-box applications for the Rabbit binder
These samples assume that the Data Flow Server can access a remote Maven repository, repo.spring.io/libs-releaseby default. If your Data Flow server is running behind a firewall, or you are using a maven proxy preventing access to public repositories, you will need to install the sample apps in your internal Maven repository and configure the server accordingly. The sample applications are typically registered using Data Flow’s bulk import facility. For example, the Shell commanddataflow:>app import --uri dataflow.spring.io/rabbitmq-maven-latest(The actual URI is release and binder specific so refer to the sample instructions for the actual URL). The bulk import URI references a plain text file containing entries for all of the publicly available Spring Cloud Stream and Task applications published torepo.spring.io. For example,source.http=maven://org.springframework.cloud.stream.app:http-source-rabbit:2.1.0.RELEASEregisters thehttpsource app at the corresponding Maven address, relative to the remote repository(ies) configured for the Data Flow server. The format ismaven://<groupId>:<artifactId>:<version>You will need to download the required apps or build them and then install them in your Maven repository, using whatever group, artifact, and version you choose. If you do this, register individual apps usingdataflow:>app register…using themaven://resource URI format corresponding to your installed app.dataflow:>app import --uri https://dataflow.spring.io/rabbitmq-maven-latest -
Create the stream
dataflow:>stream create cassandrastream --definition "http --spring.cloud.stream.bindings.output.contentType='application/json' | cassandra --ingestQuery='insert into book (id, isbn, title, author) values (uuid(), ?, ?, ?)' --username='<USERNAME>' --password='<PASSWORD>' --port=<PORT> --contact-points=<HOST> --keyspace='<KEYSPACE>'" --deploy

Created and deployed new stream 'cassandrastream'
You may want to change the cassandrastream name in PCF if you have enabled random application name prefix, you could run into issues with the route name being too long.
+ . Verify the stream is successfully deployed
+
dataflow:>stream list+
. Notice that cassandrastream-http and cassandrastream-cassandra Spring Cloud Stream applications are running as cloud-native (microservice) applications in Cloud Foundry
+
$ cf apps
Getting apps in org [your-org] / space [your-space] as user...
OK

name                        requested state   instances   memory   disk   urls
cassandrastream-cassandra   started           1/1         1G       1G     cassandrastream-cassandra.app.io
cassandrastream-http        started           1/1         1G       1G     cassandrastream-http.app.io
dataflow-server             started           1/1         1G       1G     dataflow-server.app.io
+
. Lookup the url for cassandrastream-http application from the list above. Post sample data pointing to the http endpoint: <YOUR-cassandrastream-http-APP-URL>
+
http post --contentType 'application/json' --data '{"isbn": "1599869772", "title": "The Art of War", "author": "Sun Tzu"}' --target http://<YOUR-cassandrastream-http-APP-URL>
> POST (application/json;charset=UTF-8) https://cassandrastream-http.app.io {"isbn": "1599869772", "title": "The Art of War", "author": "Sun Tzu"}
> 202 ACCEPTED
+
. Connect to the Cassandra instance and query the table book to list the data inserted
+
select * from book;+
. Now, let’s try to take advantage of Pivotal Cloud Foundry’s platform capability. Let’s scale the cassandrastream-http application from 1 to 3 instances
+
$ cf scale cassandrastream-http -i 3
Scaling app cassandrastream-http in org user-dataflow / space development as user...
OK
+ . Verify App instances (3/3) running successfully
+
$ cf apps
Getting apps in org user-dataflow / space development as user...
OK

name                        requested state   instances   memory   disk   urls
cassandrastream-cassandra   started           1/1         1G       1G     cassandrastream-cassandra.app.io
cassandrastream-http        started           3/3         1G       1G     cassandrastream-http.app.io
dataflow-server             started           1/1         1G       1G     dataflow-server.app.io
+ . You’re done!
3.1.4. Summary
In this sample, you have learned:
-
How to use Spring Cloud Data Flow’s
LocalandCloud Foundryservers -
How to use Spring Cloud Data Flow’s
shell -
How to create streaming data pipeline to connect and write to
Cassandra -
How to scale applications on
Pivotal Cloud Foundry:sectnums: :docs_dir: ../../..
3.2. HTTP to MySQL Demo
In this demonstration, you will learn how to build a data pipeline using Spring Cloud Data Flow to consume data from an http endpoint and write to MySQL database using jdbc sink.
We will take you through the steps to configure and Spring Cloud Data Flow server in either a local or Cloud Foundry environment.
3.2.1. Prerequisites
-
A Running Data Flow Shell
the Spring Cloud Data Flow Shell and Local server implementation are in the same repository and are both built by running ./mvnw install from the project root directory. If you have already run the build, use the jar in spring-cloud-dataflow-shell/target
|
To run the Shell open a new terminal session:
$ cd <PATH/TO/SPRING-CLOUD-DATAFLOW-SHELL-JAR>
$ java -jar spring-cloud-dataflow-shell-<VERSION>.jar
  ____                              ____ _                __
 / ___| _ __  _ __(_)_ __   __ _   / ___| | ___  _   _  __| |
 \___ \| '_ \| '__| | '_ \ / _` | | |   | |/ _ \| | | |/ _` |
  ___) | |_) | |  | | | | | (_| | | |___| | (_) | |_| | (_| |
 |____/| .__/|_|  |_|_| |_|\__, |  \____|_|\___/ \__,_|\__,_|
  ____ |_|    _          __|___/                 __________
 |  _ \  __ _| |_ __ _  |  ___| | _____      __  \ \ \ \ \ \
 | | | |/ _` | __/ _` | | |_  | |/ _ \ \ /\ / /   \ \ \ \ \ \
 | |_| | (_| | || (_| | |  _| | | (_) \ V  V /    / / / / / /
 |____/ \__,_|\__\__,_| |_|   |_|\___/ \_/\_/    /_/_/_/_/_/


Welcome to the Spring Cloud Data Flow shell. For assistance hit TAB or type "help".
dataflow:>| The Spring Cloud Data Flow Shell is a Spring Boot application that connects to the Data Flow Server’s REST API and supports a DSL that simplifies the process of defining a stream or task and managing its lifecycle. Most of these samples use the shell. If you prefer, you can use the Data Flow UI localhost:9393/dashboard, (or wherever it the server is hosted) to perform equivalent operations. |
3.2.2. Running Locally
Additional Prerequisites
-
Spring Cloud Data Flow installed locally Follow the installation instructions to run Spring Cloud Data Flow on a local host.
-
Running instance of Kafka
-
Running instance of MySQL
-
A database utility tool such as DBeaver or DbVisualizer
-
Create the
testdatabase with anamestable (in MySQL) using:CREATE DATABASE test; USE test; CREATE TABLE names ( name varchar(255) );
Building and Running the Demo
-
Register the out-of-the-box applications for the Kafka binder
These samples assume that the Data Flow Server can access a remote Maven repository, repo.spring.io/libs-releaseby default. If your Data Flow server is running behind a firewall, or you are using a maven proxy preventing access to public repositories, you will need to install the sample apps in your internal Maven repository and configure the server accordingly. The sample applications are typically registered using Data Flow’s bulk import facility. For example, the Shell commanddataflow:>app import --uri dataflow.spring.io/rabbitmq-maven-latest(The actual URI is release and binder specific so refer to the sample instructions for the actual URL). The bulk import URI references a plain text file containing entries for all of the publicly available Spring Cloud Stream and Task applications published torepo.spring.io. For example,source.http=maven://org.springframework.cloud.stream.app:http-source-rabbit:2.1.0.RELEASEregisters thehttpsource app at the corresponding Maven address, relative to the remote repository(ies) configured for the Data Flow server. The format ismaven://<groupId>:<artifactId>:<version>You will need to download the required apps or build them and then install them in your Maven repository, using whatever group, artifact, and version you choose. If you do this, register individual apps usingdataflow:>app register…using themaven://resource URI format corresponding to your installed app.dataflow:>app import --uri https://dataflow.spring.io/kafka-maven-latest -
Create the stream
dataflow:>stream create --name mysqlstream --definition "http --server.port=8787 | jdbc --tableName=names --columns=name --spring.datasource.driver-class-name=org.mariadb.jdbc.Driver --spring.datasource.url='jdbc:mysql://localhost:3306/test'" --deploy

Created and deployed new stream 'mysqlstream'
If MySQL isn’t running on default port on localhostor if you need username and password to connect, use one of the following options to specify the necessary connection parameters:--spring.datasource.url='jdbc:mysql://<HOST>:<PORT>/<NAME>' --spring.datasource.username=<USERNAME> --spring.datasource.password=<PASSWORD> -
Verify the stream is successfully deployed
dataflow:>stream list -
Notice that
mysqlstream-httpandmysqlstream-jdbcSpring Cloud Stream applications are running as Spring Boot applications within the Localserveras collocated processes.2016-05-03 09:29:55.918 INFO 65162 --- [nio-9393-exec-3] o.s.c.d.spi.local.LocalAppDeployer : deploying app mysqlstream.jdbc instance 0 Logs will be in /var/folders/c3/ctx7_rns6x30tq7rb76wzqwr0000gp/T/spring-cloud-dataflow-6850863945840320040/mysqlstream1-1462292995903/mysqlstream.jdbc 2016-05-03 09:29:55.939 INFO 65162 --- [nio-9393-exec-3] o.s.c.d.spi.local.LocalAppDeployer : deploying app mysqlstream.http instance 0 Logs will be in /var/folders/c3/ctx7_rns6x30tq7rb76wzqwr0000gp/T/spring-cloud-dataflow-6850863945840320040/mysqlstream-1462292995934/mysqlstream.http -
Post sample data pointing to the
httpendpoint:localhost:8787[8787is theserver.portwe specified for thehttpsource in this case]dataflow:>http post --contentType 'application/json' --target http://localhost:8787 --data "{\"name\": \"Foo\"}" > POST (application/json;charset=UTF-8) http://localhost:8787 {"name": "Spring Boot"} > 202 ACCEPTED -
Connect to the MySQL instance and query the table
test.namesto list the new rows:select * from test.names; -
You’re done!
3.2.3. Running on Cloud Foundry
Additional Prerequisites
-
Cloud Foundry instance
-
Running instance of
rabbitin Cloud Foundry -
Running instance of
mysqlin Cloud Foundry -
A database utility tool such as DBeaver or DbVisualizer
-
Create the
namestable (in MySQL) using:CREATE TABLE names ( name varchar(255) ); -
Spring Cloud Data Flow installed on Cloud Foundry
Follow the installation instructions to run Spring Cloud Data Flow on Cloud Foundry.
Building and Running the Demo
-
Register the out-of-the-box applications for the Rabbit binder
These samples assume that the Data Flow Server can access a remote Maven repository, repo.spring.io/libs-releaseby default. If your Data Flow server is running behind a firewall, or you are using a maven proxy preventing access to public repositories, you will need to install the sample apps in your internal Maven repository and configure the server accordingly. The sample applications are typically registered using Data Flow’s bulk import facility. For example, the Shell commanddataflow:>app import --uri dataflow.spring.io/rabbitmq-maven-latest(The actual URI is release and binder specific so refer to the sample instructions for the actual URL). The bulk import URI references a plain text file containing entries for all of the publicly available Spring Cloud Stream and Task applications published torepo.spring.io. For example,source.http=maven://org.springframework.cloud.stream.app:http-source-rabbit:2.1.0.RELEASEregisters thehttpsource app at the corresponding Maven address, relative to the remote repository(ies) configured for the Data Flow server. The format ismaven://<groupId>:<artifactId>:<version>You will need to download the required apps or build them and then install them in your Maven repository, using whatever group, artifact, and version you choose. If you do this, register individual apps usingdataflow:>app register…using themaven://resource URI format corresponding to your installed app.dataflow:>app import --uri https://dataflow.spring.io/rabbitmq-maven-latest -
Create the stream
dataflow:>stream create --name mysqlstream --definition "http | jdbc --tableName=names --columns=name"
Created new stream 'mysqlstream'

dataflow:>stream deploy --name mysqlstream --properties "deployer.jdbc.cloudfoundry.services=mysql"
Deployed stream 'mysqlstream'
By supplying the deployer.jdbc.cloudfoundry.services=mysqlproperty, we are deploying the stream withjdbc-sinkto automatically bind tomysqlservice and only this application in the stream gets the service binding. This also eliminates the requirement to supplydatasourcecredentials in stream definition. -
Verify the stream is successfully deployed
dataflow:>stream list -
Notice that
mysqlstream-httpandmysqlstream-jdbcSpring Cloud Stream applications are running as cloud-native (microservice) applications in Cloud Foundry$ cf apps Getting apps in org user-dataflow / space development as user... OK name requested state instances memory disk urls mysqlstream-http started 1/1 1G 1G mysqlstream-http.app.io mysqlstream-jdbc started 1/1 1G 1G mysqlstream-jdbc.app.io dataflow-server started 1/1 1G 1G dataflow-server.app.io -
Lookup the
urlformysqlstream-httpapplication from the list above. Post sample data pointing to thehttpendpoint:<YOUR-mysqlstream-http-APP-URL>http post --contentType 'application/json' --data "{\"name\": \"Bar"} --target https://mysqlstream-http.app.io " > POST (application/json;charset=UTF-8) https://mysqlstream-http.app.io {"name": "Bar"} > 202 ACCEPTED -
Connect to the MySQL instance and query the table
namesto list the new rows:select * from names; -
Now, let’s take advantage of Pivotal Cloud Foundry’s platform capability. Let’s scale the
mysqlstream-httpapplication from 1 to 3 instances$ cf scale mysqlstream-http -i 3 Scaling app mysqlstream-http in org user-dataflow / space development as user... OK -
Verify App instances (3/3) running successfully
$ cf apps Getting apps in org user-dataflow / space development as user... OK name requested state instances memory disk urls mysqlstream-http started 3/3 1G 1G mysqlstream-http.app.io mysqlstream-jdbc started 1/1 1G 1G mysqlstream-jdbc.app.io dataflow-server started 1/1 1G 1G dataflow-server.app.io -
You’re done!
3.2.4. Summary
In this sample, you have learned:
-
How to use Spring Cloud Data Flow’s
LocalandCloud Foundryservers -
How to use Spring Cloud Data Flow’s
shell -
How to create streaming data pipeline to connect and write to
MySQL -
How to scale applications on
Pivotal Cloud Foundry:sectnums: :docs_dir: ../../..
3.3. HTTP to Gemfire Demo
In this demonstration, you will learn how to build a data pipeline using Spring Cloud Data Flow to consume data from an http endpoint and write to Gemfire using the gemfire sink.
We will take you through the steps to configure and run Spring Cloud Data Flow server in either a local or Cloud Foundry environment.
For legacy reasons the gemfire Spring Cloud Stream Apps are named after Pivotal GemFire. The code base for the commercial product has since been open sourced as Apache Geode. These samples should work with compatible versions of Pivotal GemFire or Apache Geode. Herein we will refer to the installed IMDG simply as Geode.
|
3.3.1. Prerequisites
-
A Running Data Flow Shell
the Spring Cloud Data Flow Shell and Local server implementation are in the same repository and are both built by running ./mvnw install from the project root directory. If you have already run the build, use the jar in spring-cloud-dataflow-shell/target
|
To run the Shell open a new terminal session:
$ cd <PATH/TO/SPRING-CLOUD-DATAFLOW-SHELL-JAR>
$ java -jar spring-cloud-dataflow-shell-<VERSION>.jar
  ____                              ____ _                __
 / ___| _ __  _ __(_)_ __   __ _   / ___| | ___  _   _  __| |
 \___ \| '_ \| '__| | '_ \ / _` | | |   | |/ _ \| | | |/ _` |
  ___) | |_) | |  | | | | | (_| | | |___| | (_) | |_| | (_| |
 |____/| .__/|_|  |_|_| |_|\__, |  \____|_|\___/ \__,_|\__,_|
  ____ |_|    _          __|___/                 __________
 |  _ \  __ _| |_ __ _  |  ___| | _____      __  \ \ \ \ \ \
 | | | |/ _` | __/ _` | | |_  | |/ _ \ \ /\ / /   \ \ \ \ \ \
 | |_| | (_| | || (_| | |  _| | | (_) \ V  V /    / / / / / /
 |____/ \__,_|\__\__,_| |_|   |_|\___/ \_/\_/    /_/_/_/_/_/


Welcome to the Spring Cloud Data Flow shell. For assistance hit TAB or type "help".
dataflow:>| The Spring Cloud Data Flow Shell is a Spring Boot application that connects to the Data Flow Server’s REST API and supports a DSL that simplifies the process of defining a stream or task and managing its lifecycle. Most of these samples use the shell. If you prefer, you can use the Data Flow UI localhost:9393/dashboard, (or wherever it the server is hosted) to perform equivalent operations. |
-
A Geode installation with a locator and cache server running
If you do not have access an existing Geode installation, install Apache Geode or
Pivotal Gemfire and start the gfsh CLI in a separate terminal.
    _________________________     __
   / _____/ ______/ ______/ /____/ /
  / /  __/ /___  /_____  / _____  /
 / /__/ / ____/  _____/ / /    / /
/______/_/      /______/_/    /_/    1.8.0

Monitor and Manage Apache Geode
gfsh>
3.3.2. Running Locally
Additional Prerequisites
-
Spring Cloud Data Flow installed locally Follow the installation instructions to run Spring Cloud Data Flow on a local host.
-
A running instance of Rabbit MQ
Building and Running the Demo
-
Use gfsh to start a locator and server
gfsh>start locator --name=locator1 gfsh>start server --name=server1 -
Create a region called
Stocksgfsh>create region --name Stocks --type=REPLICATEUse the Shell to create the sample stream
-
Register the out-of-the-box applications for the Rabbit binder
These samples assume that the Data Flow Server can access a remote Maven repository, repo.spring.io/libs-releaseby default. If your Data Flow server is running behind a firewall, or you are using a maven proxy preventing access to public repositories, you will need to install the sample apps in your internal Maven repository and configure the server accordingly. The sample applications are typically registered using Data Flow’s bulk import facility. For example, the Shell commanddataflow:>app import --uri dataflow.spring.io/rabbitmq-maven-latest(The actual URI is release and binder specific so refer to the sample instructions for the actual URL). The bulk import URI references a plain text file containing entries for all of the publicly available Spring Cloud Stream and Task applications published torepo.spring.io. For example,source.http=maven://org.springframework.cloud.stream.app:http-source-rabbit:2.1.0.RELEASEregisters thehttpsource app at the corresponding Maven address, relative to the remote repository(ies) configured for the Data Flow server. The format ismaven://<groupId>:<artifactId>:<version>You will need to download the required apps or build them and then install them in your Maven repository, using whatever group, artifact, and version you choose. If you do this, register individual apps usingdataflow:>app register…using themaven://resource URI format corresponding to your installed app.dataflow:>app import --uri https://dataflow.spring.io/rabbitmq-maven-latest -
Create the stream
This example creates an http endpoint to which we will post stock prices as a JSON document containing
symbolandpricefields. The property--json=trueto enable Geode’s JSON support and configures the sink to convert JSON String payloads to PdxInstance, the recommended way to store JSON documents in Geode. ThekeyExpressionproperty is a SpEL expression used to extract thesymbolvalue the PdxInstance to use as an entry key.PDX serialization is very efficient and supports OQL queries without requiring a custom domain class. Use of custom domain types requires these classes to be in the class path of both the stream apps and the cache server. For this reason, the use of custom payload types is generally discouraged. dataflow:>stream create --name stocks --definition "http --port=9090 | gemfire --json=true --regionName=Stocks --keyExpression=payload.getField('symbol')" --deploy Created and deployed new stream 'stocks'If the Geode locator isn’t running on default port on localhost, add the options--connect-type=locator --host-addresses=<host>:<port>. If there are multiple locators, you can provide a comma separated list of locator addresses. This is not necessary for the sample but is typical for production environments to enable fail-over. -
Verify the stream is successfully deployed
dataflow:>stream list -
Post sample data pointing to the
httpendpoint:localhost:9090(9090is theportwe specified for thehttpsource)dataflow:>http post --target http://localhost:9090 --contentType application/json --data '{"symbol":"VMW","price":117.06}' > POST (application/json) http://localhost:9090 {"symbol":"VMW","price":117.06} > 202 ACCEPTED -
Using
gfsh, connect to the locator if not already connected, and verify the cache entry was created.gfsh>get --key='VMW' --region=/Stocks Result : true Key Class : java.lang.String Key : VMW Value Class : org.apache.geode.pdx.internal.PdxInstanceImpl symbol | price ------ | ------ VMW | 117.06 -
You’re done!
3.3.3. Running on Cloud Foundry
Additional Prerequisites
-
A Cloud Foundry instance
-
Running instance of a
rabbitservice in Cloud Foundry -
Running instance of the Pivotal Cloud Cache for PCF (PCC) service
cloudcachein Cloud Foundry. -
Spring Cloud Data Flow installed on Cloud Foundry Follow the installation instructions to run Spring Cloud Data Flow on Cloud Foundry.
Building and Running the Demo
-
Register the out-of-the-box applications for the Rabbit binder
These samples assume that the Data Flow Server can access a remote Maven repository, repo.spring.io/libs-releaseby default. If your Data Flow server is running behind a firewall, or you are using a maven proxy preventing access to public repositories, you will need to install the sample apps in your internal Maven repository and configure the server accordingly. The sample applications are typically registered using Data Flow’s bulk import facility. For example, the Shell commanddataflow:>app import --uri dataflow.spring.io/rabbitmq-maven-latest(The actual URI is release and binder specific so refer to the sample instructions for the actual URL). The bulk import URI references a plain text file containing entries for all of the publicly available Spring Cloud Stream and Task applications published torepo.spring.io. For example,source.http=maven://org.springframework.cloud.stream.app:http-source-rabbit:2.1.0.RELEASEregisters thehttpsource app at the corresponding Maven address, relative to the remote repository(ies) configured for the Data Flow server. The format ismaven://<groupId>:<artifactId>:<version>You will need to download the required apps or build them and then install them in your Maven repository, using whatever group, artifact, and version you choose. If you do this, register individual apps usingdataflow:>app register…using themaven://resource URI format corresponding to your installed app.dataflow:>app import --uri https://dataflow.spring.io/rabbitmq-maven-latest -
Get the PCC connection information
$ cf service-key cloudcache my-service-key Getting key my-service-key for service instance cloudcache as <user>... { "locators": [ "10.0.16.9[55221]", "10.0.16.11[55221]", "10.0.16.10[55221]" ], "urls": { "gfsh": "http://...", "pulse": "https://.../pulse" }, "users": [ { "password": <password>, "username": "cluster_operator" }, { "password": <password>, "username": "developer" } ] } -
Using
gfsh, connect to the PCC instance ascluster_operatorusing the service key values and create the Stocks region.gfsh>connect --use-http --url=<gfsh-url> --user=cluster_operator --password=<cluster_operator_password> gfsh>create region --name Stocks --type=REPLICATE -
Create the stream, connecting to the PCC instance as developer
This example creates an http endpoint to which we will post stock prices as a JSON document containing
symbolandpricefields. The property--json=trueto enable Geode’s JSON support and configures the sink to convert JSON String payloads to PdxInstance, the recommended way to store JSON documents in Geode. ThekeyExpressionproperty is a SpEL expression used to extract thesymbolvalue the PdxInstance to use as an entry key.PDX serialization is very efficient and supports OQL queries without requiring a custom domain class. Use of custom domain types requires these classes to be in the class path of both the stream apps and the cache server. For this reason, the use of custom payload types is generally discouraged. dataflow:>stream create --name stocks --definition "http --security.basic.enabled=false | gemfire --username=developer --password=<developer-password> --connect-type=locator --host-addresses=10.0.16.9:55221 --json=true --regionName=Stocks --keyExpression=payload.getField('symbol')" --deploy -
Verify the stream is successfully deployed
dataflow:>stream list -
Post sample data pointing to the
httpendpointGet the url of the http source using
cf appsdataflow:>http post --target http://<http source url> --contentType application/json --data '{"symbol":"VMW","price":117.06}' > POST (application/json) http://... {"symbol":"VMW","price":117.06} > 202 ACCEPTED -
Using
gfsh, connect to the PCC instance ascluster_operatorusing the service key values.gfsh>connect --use-http --url=<gfsh-url> --user=cluster_operator --password=<cluster_operator_password> gfsh>get --key='VMW' --region=/Stocks Result : true Key Class : java.lang.String Key : VMW Value Class : org.apache.geode.pdx.internal.PdxInstanceImpl symbol | price ------ | ------ VMW | 117.06 -
You’re done!
3.3.4. Summary
In this sample, you have learned:
-
How to use Spring Cloud Data Flow’s
LocalandCloud Foundryservers -
How to use Spring Cloud Data Flow’s
shell -
How to create streaming data pipeline to connect and write to
gemfire:sectnums: :docs_dir: ../../..
3.4. Gemfire CQ to Log Demo
In this demonstration, you will learn how to build a data pipeline using Spring Cloud Data Flow to consume data from a gemfire-cq (Continuous Query) endpoint and write to a log using the log sink.
The gemfire-cq source creates a Continuous Query to monitor events for a region that match the query’s result set and publish a message whenever such an event is emitted. In this example, we simulate monitoring orders to trigger a process whenever
the quantity ordered is above a defined limit.
We will take you through the steps to configure and run Spring Cloud Data Flow server in either a local or Cloud Foundry environment.
For legacy reasons the gemfire Spring Cloud Stream Apps are named after Pivotal GemFire. The code base for the commercial product has since been open sourced as Apache Geode. These samples should work with compatible versions of Pivotal GemFire or Apache Geode. Herein we will refer to the installed IMDG simply as Geode.
|
3.4.1. Prerequisites
-
A Running Data Flow Shell
the Spring Cloud Data Flow Shell and Local server implementation are in the same repository and are both built by running ./mvnw install from the project root directory. If you have already run the build, use the jar in spring-cloud-dataflow-shell/target
|
To run the Shell open a new terminal session:
$ cd <PATH/TO/SPRING-CLOUD-DATAFLOW-SHELL-JAR>
$ java -jar spring-cloud-dataflow-shell-<VERSION>.jar
  ____                              ____ _                __
 / ___| _ __  _ __(_)_ __   __ _   / ___| | ___  _   _  __| |
 \___ \| '_ \| '__| | '_ \ / _` | | |   | |/ _ \| | | |/ _` |
  ___) | |_) | |  | | | | | (_| | | |___| | (_) | |_| | (_| |
 |____/| .__/|_|  |_|_| |_|\__, |  \____|_|\___/ \__,_|\__,_|
  ____ |_|    _          __|___/                 __________
 |  _ \  __ _| |_ __ _  |  ___| | _____      __  \ \ \ \ \ \
 | | | |/ _` | __/ _` | | |_  | |/ _ \ \ /\ / /   \ \ \ \ \ \
 | |_| | (_| | || (_| | |  _| | | (_) \ V  V /    / / / / / /
 |____/ \__,_|\__\__,_| |_|   |_|\___/ \_/\_/    /_/_/_/_/_/


Welcome to the Spring Cloud Data Flow shell. For assistance hit TAB or type "help".
dataflow:>| The Spring Cloud Data Flow Shell is a Spring Boot application that connects to the Data Flow Server’s REST API and supports a DSL that simplifies the process of defining a stream or task and managing its lifecycle. Most of these samples use the shell. If you prefer, you can use the Data Flow UI localhost:9393/dashboard, (or wherever it the server is hosted) to perform equivalent operations. |
-
A Geode installation with a locator and cache server running
If you do not have access an existing Geode installation, install Apache Geode or
Pivotal Gemfire and start the gfsh CLI in a separate terminal.
    _________________________     __
   / _____/ ______/ ______/ /____/ /
  / /  __/ /___  /_____  / _____  /
 / /__/ / ____/  _____/ / /    / /
/______/_/      /______/_/    /_/    1.8.0

Monitor and Manage Apache Geode
gfsh>
3.4.2. Running Locally
Additional Prerequisites
-
Spring Cloud Data Flow installed locally Follow the installation instructions to run Spring Cloud Data Flow on a local host.
-
A running instance of Rabbit MQ
Building and Running the Demo
-
Use gfsh to start a locator and server
gfsh>start locator --name=locator1 gfsh>start server --name=server1 -
Create a region called
Ordersgfsh>create region --name Orders --type=REPLICATEUse the Shell to create the sample stream
-
Register the out-of-the-box applications for the Rabbit binder
These samples assume that the Data Flow Server can access a remote Maven repository, repo.spring.io/libs-releaseby default. If your Data Flow server is running behind a firewall, or you are using a maven proxy preventing access to public repositories, you will need to install the sample apps in your internal Maven repository and configure the server accordingly. The sample applications are typically registered using Data Flow’s bulk import facility. For example, the Shell commanddataflow:>app import --uri dataflow.spring.io/rabbitmq-maven-latest(The actual URI is release and binder specific so refer to the sample instructions for the actual URL). The bulk import URI references a plain text file containing entries for all of the publicly available Spring Cloud Stream and Task applications published torepo.spring.io. For example,source.http=maven://org.springframework.cloud.stream.app:http-source-rabbit:2.1.0.RELEASEregisters thehttpsource app at the corresponding Maven address, relative to the remote repository(ies) configured for the Data Flow server. The format ismaven://<groupId>:<artifactId>:<version>You will need to download the required apps or build them and then install them in your Maven repository, using whatever group, artifact, and version you choose. If you do this, register individual apps usingdataflow:>app register…using themaven://resource URI format corresponding to your installed app.dataflow:>app import --uri https://dataflow.spring.io/rabbitmq-maven-latest -
Create the stream
This example creates an gemfire-cq source to which will publish events matching a query criteria on a region. In this case we will monitor the
Ordersregion. For simplicity, we will avoid creating a data structure for the order. Each cache entry contains an integer value representing the quantity of the ordered item. This stream will fire a message whenever the value>999. By default, the source emits only the value. Here we will override that using thecq-event-expressionproperty. This accepts a SpEL expression bound to a CQEvent. To reference the entire CQEvent instance, we use#this. In order to display the contents in the log, we will invoketoString()on the instance.dataflow:>stream create --name orders --definition " gemfire-cq --query='SELECT * from /Orders o where o > 999' --cq-event-expression=#this.toString() | log" --deployIf the Geode locator isn’t running on default port on localhost, add the options--connect-type=locator --host-addresses=<host>:<port>. If there are multiple locators, you can provide a comma separated list of locator addresses. This is not necessary for the sample but is typical for production environments to enable fail-over. -
Verify the stream is successfully deployed
dataflow:>stream list -
Monitor stdout for the log sink. When you deploy the stream, you will see log messages in the Data Flow server console like this
2017-10-30 09:39:36.283  INFO 8167 --- [nio-9393-exec-5] o.s.c.d.spi.local.LocalAppDeployer       : Deploying app with deploymentId orders.log instance 0.
   Logs will be in /var/folders/hd/5yqz2v2d3sxd3n879f4sg4gr0000gn/T/spring-cloud-dataflow-5375107584795488581/orders-1509370775940/orders.log
Copy the location of the
logsink logs. This is a directory that ends inorders.log. The log files will be instdout_0.logunder this directory. You can monitor the output of the log sink usingtail, or something similar:$tail -f /var/folders/hd/5yqz2v2d3sxd3n879f4sg4gr0000gn/T/spring-cloud-dataflow-5375107584795488581/orders-1509370775940/orders.log/stdout_0.log -
Using
gfsh, create and update some cache entriesgfsh>put --region Orders --value-class java.lang.Integer --key 01234 --value 1000 gfsh>put --region Orders --value-class java.lang.Integer --key 11234 --value 1005 gfsh>put --region Orders --value-class java.lang.Integer --key 21234 --value 100 gfsh>put --region Orders --value-class java.lang.Integer --key 31234 --value 999 gfsh>put --region Orders --value-class java.lang.Integer --key 21234 --value 1000 -
Observe the log output You should see messages like:
2017-10-30 09:53:02.231 INFO 8563 --- [ire-cq.orders-1] log-sink : CqEvent [CqName=GfCq1; base operation=CREATE; cq operation=CREATE; key=01234; value=1000] 2017-10-30 09:53:19.732 INFO 8563 --- [ire-cq.orders-1] log-sink : CqEvent [CqName=GfCq1; base operation=CREATE; cq operation=CREATE; key=11234; value=1005] 2017-10-30 09:53:53.242 INFO 8563 --- [ire-cq.orders-1] log-sink : CqEvent [CqName=GfCq1; base operation=UPDATE; cq operation=CREATE; key=21234; value=1000] -
Another interesting demonstration combines
gemfire-cqwith the http-gemfire example.
dataflow:> stream create --name stocks --definition "http --port=9090 | gemfire-json-server --regionName=Stocks --keyExpression=payload.getField('symbol')" --deploy
dataflow:> stream create --name stock_watch --definition "gemfire-cq --query='Select * from /Stocks where symbol=''VMW''' | log" --deploy-
You’re done!
3.4.3. Running on Cloud Foundry
Additional Prerequisites
-
A Cloud Foundry instance
-
Running instance of a
rabbitservice in Cloud Foundry -
Running instance of the Pivotal Cloud Cache for PCF (PCC) service
cloudcachein Cloud Foundry. -
Spring Cloud Data Flow installed on Cloud Foundry
Follow the installation instructions to run Spring Cloud Data Flow on Cloud Foundry.
Building and Running the Demo
-
Register the out-of-the-box applications for the Rabbit binder
These samples assume that the Data Flow Server can access a remote Maven repository, repo.spring.io/libs-releaseby default. If your Data Flow server is running behind a firewall, or you are using a maven proxy preventing access to public repositories, you will need to install the sample apps in your internal Maven repository and configure the server accordingly. The sample applications are typically registered using Data Flow’s bulk import facility. For example, the Shell commanddataflow:>app import --uri dataflow.spring.io/rabbitmq-maven-latest(The actual URI is release and binder specific so refer to the sample instructions for the actual URL). The bulk import URI references a plain text file containing entries for all of the publicly available Spring Cloud Stream and Task applications published torepo.spring.io. For example,source.http=maven://org.springframework.cloud.stream.app:http-source-rabbit:2.1.0.RELEASEregisters thehttpsource app at the corresponding Maven address, relative to the remote repository(ies) configured for the Data Flow server. The format ismaven://<groupId>:<artifactId>:<version>You will need to download the required apps or build them and then install them in your Maven repository, using whatever group, artifact, and version you choose. If you do this, register individual apps usingdataflow:>app register…using themaven://resource URI format corresponding to your installed app.dataflow:>app import --uri https://dataflow.spring.io/rabbitmq-maven-latest -
Get the PCC connection information
$ cf service-key cloudcache my-service-key Getting key my-service-key for service instance cloudcache as <user>... { "locators": [ "10.0.16.9[55221]", "10.0.16.11[55221]", "10.0.16.10[55221]" ], "urls": { "gfsh": "http://...", "pulse": "https://.../pulse" }, "users": [ { "password": <password>, "username": "cluster_operator" }, { "password": <password>, "username": "developer" } ] } -
Using
gfsh, connect to the PCC instance ascluster_operatorusing the service key values and create the Test region.gfsh>connect --use-http --url=<gfsh-url> --user=cluster_operator --password=<cluster_operator_password> gfsh>create region --name Orders --type=REPLICATE -
Create the stream using the Data Flow Shell
This example creates an gemfire-cq source to which will publish events matching a query criteria on a region. In this case we will monitor the
Ordersregion. For simplicity, we will avoid creating a data structure for the order. Each cache entry contains an integer value representing the quantity of the ordered item. This stream will fire a message whenever the value>999. By default, the source emits only the value. Here we will override that using thecq-event-expressionproperty. This accepts a SpEL expression bound to a CQEvent. To reference the entire CQEvent instance, we use#this. In order to display the contents in the log, we will invoketoString()on the instance.dataflow:>stream create --name orders --definition " gemfire-cq --username=developer --password=<developer-password> --connect-type=locator --host-addresses=10.0.16.9:55221 --query='SELECT * from /Orders o where o > 999' --cq-event-expression=#this.toString() | log" --deploy Created and deployed new stream 'events' -
Verify the stream is successfully deployed
dataflow:>stream list -
Monitor stdout for the log sink
cf logs <log-sink-app-name> -
Using
gfsh, create and update some cache entriesgfsh>connect --use-http --url=<gfsh-url> --user=cluster_operator --password=<cluster_operator_password> gfsh>put --region Orders --value-class java.lang.Integer --key 01234 --value 1000 gfsh>put --region Orders --value-class java.lang.Integer --key 11234 --value 1005 gfsh>put --region Orders --value-class java.lang.Integer --key 21234 --value 100 gfsh>put --region Orders --value-class java.lang.Integer --key 31234 --value 999 gfsh>put --region Orders --value-class java.lang.Integer --key 21234 --value 1000 -
Observe the log output You should see messages like:
2017-10-30 09:53:02.231 INFO 8563 --- [ire-cq.orders-1] log-sink : CqEvent [CqName=GfCq1; base operation=CREATE; cq operation=CREATE; key=01234; value=1000] 2017-10-30 09:53:19.732 INFO 8563 --- [ire-cq.orders-1] log-sink : CqEvent [CqName=GfCq1; base operation=CREATE; cq operation=CREATE; key=11234; value=1005] 2017-10-30 09:53:53.242 INFO 8563 --- [ire-cq.orders-1] log-sink : CqEvent [CqName=GfCq1; base operation=UPDATE; cq operation=CREATE; key=21234; value=1000] -
Another interesting demonstration combines
gemfire-cqwith the http-gemfire example.dataflow:>stream create --name stocks --definition "http --security.basic.enabled=false | gemfire --json=true --username=developer --password=<developer-password> --connect-type=locator --host-addresses=10.0.16.25:55221 --regionName=Stocks --keyExpression=payload.getField('symbol')" --deploy dataflow:>stream create --name stock_watch --definition "gemfire-cq --username=developer --password=<developer-password> --connect-type=locator --host-addresses=10.0.16.25:55221 --query='SELECT * from /Stocks where symbol=''VMW''' --cq-event-expression=#this.toString() | log" --deploy dataflow:>http post --target http://data-flow-server-dpvuo77-stocks-http.apps.scdf-gcp.springapps.io/ --contentType application/json --data '{"symbol":"VMW","price":117.06}' -
You’re done!
3.4.4. Summary
In this sample, you have learned:
-
How to use Spring Cloud Data Flow’s
LocalandCloud Foundryservers -
How to use Spring Cloud Data Flow’s
shell -
How to create streaming data pipeline to connect and publish CQ events from
gemfire:sectnums: :docs_dir: ../../..
3.5. Gemfire to Log Demo
In this demonstration, you will learn how to build a data pipeline using Spring Cloud Data Flow to consume data from a gemfire endpoint and write to a log using the log sink.
The gemfire source creates a CacheListener to monitor events for a region and publish a message whenever an entry is changed.
We will take you through the steps to configure and run Spring Cloud Data Flow server in either a local or Cloud Foundry environment.
For legacy reasons the gemfire Spring Cloud Stream Apps are named after Pivotal GemFire. The code base for the commercial product has since been open sourced as Apache Geode. These samples should work with compatible versions of Pivotal GemFire or Apache Geode. Herein we will refer to the installed IMDG simply as Geode.
|
3.5.1. Prerequisites
-
A Running Data Flow Shell
the Spring Cloud Data Flow Shell and Local server implementation are in the same repository and are both built by running ./mvnw install from the project root directory. If you have already run the build, use the jar in spring-cloud-dataflow-shell/target
|
To run the Shell open a new terminal session:
$ cd <PATH/TO/SPRING-CLOUD-DATAFLOW-SHELL-JAR>
$ java -jar spring-cloud-dataflow-shell-<VERSION>.jar
  ____                              ____ _                __
 / ___| _ __  _ __(_)_ __   __ _   / ___| | ___  _   _  __| |
 \___ \| '_ \| '__| | '_ \ / _` | | |   | |/ _ \| | | |/ _` |
  ___) | |_) | |  | | | | | (_| | | |___| | (_) | |_| | (_| |
 |____/| .__/|_|  |_|_| |_|\__, |  \____|_|\___/ \__,_|\__,_|
  ____ |_|    _          __|___/                 __________
 |  _ \  __ _| |_ __ _  |  ___| | _____      __  \ \ \ \ \ \
 | | | |/ _` | __/ _` | | |_  | |/ _ \ \ /\ / /   \ \ \ \ \ \
 | |_| | (_| | || (_| | |  _| | | (_) \ V  V /    / / / / / /
 |____/ \__,_|\__\__,_| |_|   |_|\___/ \_/\_/    /_/_/_/_/_/


Welcome to the Spring Cloud Data Flow shell. For assistance hit TAB or type "help".
dataflow:>| The Spring Cloud Data Flow Shell is a Spring Boot application that connects to the Data Flow Server’s REST API and supports a DSL that simplifies the process of defining a stream or task and managing its lifecycle. Most of these samples use the shell. If you prefer, you can use the Data Flow UI localhost:9393/dashboard, (or wherever it the server is hosted) to perform equivalent operations. |
-
A Geode installation with a locator and cache server running
If you do not have access an existing Geode installation, install Apache Geode or
Pivotal Gemfire and start the gfsh CLI in a separate terminal.
    _________________________     __
   / _____/ ______/ ______/ /____/ /
  / /  __/ /___  /_____  / _____  /
 / /__/ / ____/  _____/ / /    / /
/______/_/      /______/_/    /_/    1.8.0

Monitor and Manage Apache Geode
gfsh>
3.5.2. Running Locally
Additional Prerequisites
-
Spring Cloud Data Flow installed locally Follow the installation instructions to run Spring Cloud Data Flow on a local host.
-
A running instance of Rabbit MQ
Building and Running the Demo
-
Use gfsh to start a locator and server
gfsh>start locator --name=locator1 gfsh>start server --name=server1 -
Create a region called
Testgfsh>create region --name Test --type=REPLICATEUse the Shell to create the sample stream
-
Register the out-of-the-box applications for the Rabbit binder
These samples assume that the Data Flow Server can access a remote Maven repository, repo.spring.io/libs-releaseby default. If your Data Flow server is running behind a firewall, or you are using a maven proxy preventing access to public repositories, you will need to install the sample apps in your internal Maven repository and configure the server accordingly. The sample applications are typically registered using Data Flow’s bulk import facility. For example, the Shell commanddataflow:>app import --uri dataflow.spring.io/rabbitmq-maven-latest(The actual URI is release and binder specific so refer to the sample instructions for the actual URL). The bulk import URI references a plain text file containing entries for all of the publicly available Spring Cloud Stream and Task applications published torepo.spring.io. For example,source.http=maven://org.springframework.cloud.stream.app:http-source-rabbit:2.1.0.RELEASEregisters thehttpsource app at the corresponding Maven address, relative to the remote repository(ies) configured for the Data Flow server. The format ismaven://<groupId>:<artifactId>:<version>You will need to download the required apps or build them and then install them in your Maven repository, using whatever group, artifact, and version you choose. If you do this, register individual apps usingdataflow:>app register…using themaven://resource URI format corresponding to your installed app.dataflow:>app import --uri https://dataflow.spring.io/rabbitmq-maven-latest -
Create the stream
This example creates an gemfire source to which will publish events on a region
dataflow:>stream create --name events --definition " gemfire --regionName=Test | log" --deploy
Created and deployed new stream 'events'
If the Geode locator isn’t running on default port on localhost, add the options--connect-type=locator --host-addresses=<host>:<port>. If there are multiple locators, you can provide a comma separated list of locator addresses. This is not necessary for the sample but is typical for production environments to enable fail-over. -
Verify the stream is successfully deployed
dataflow:>stream list -
Monitor stdout for the log sink. When you deploy the stream, you will see log messages in the Data Flow server console like this
2017-10-28 17:28:23.275  INFO 15603 --- [nio-9393-exec-2] o.s.c.d.spi.local.LocalAppDeployer       : Deploying app with deploymentId events.log instance 0.
   Logs will be in /var/folders/hd/5yqz2v2d3sxd3n879f4sg4gr0000gn/T/spring-cloud-dataflow-4093992067314402881/events-1509226103269/events.log
2017-10-28 17:28:23.277  INFO 15603 --- [nio-9393-exec-2] o.s.c.d.s.c.StreamDeploymentController   : Downloading resource URI [maven://org.springframework.cloud.stream.app:gemfire-source-rabbit:1.2.0.RELEASE]
2017-10-28 17:28:23.311  INFO 15603 --- [nio-9393-exec-2] o.s.c.d.s.c.StreamDeploymentController   : Deploying application named [gemfire] as part of stream named [events] with resource URI [maven://org.springframework.cloud.stream.app:gemfire-source-rabbit:1.2.0.RELEASE]
2017-10-28 17:28:23.318  INFO 15603 --- [nio-9393-exec-2] o.s.c.d.spi.local.LocalAppDeployer       : Deploying app with deploymentId events.gemfire instance 0.
   Logs will be in /var/folders/hd/5yqz2v2d3sxd3n879f4sg4gr0000gn/T/spring-cloud-dataflow-4093992067314402881/events-1509226103311/events.gemfire
Copy the location of the
logsink logs. This is a directory that ends inevents.log. The log files will be instdout_0.logunder this directory. You can monitor the output of the log sink usingtail, or something similar:$tail -f /var/folders/hd/5yqz2v2d3sxd3n879f4sg4gr0000gn/T/spring-cloud-dataflow-4093992067314402881/events-1509226103269/events.log/stdout_0.log -
Using
gfsh, create and update some cache entriesgfsh>put --region /Test --key 1 --value "value 1" gfsh>put --region /Test --key 2 --value "value 2" gfsh>put --region /Test --key 3 --value "value 3" gfsh>put --region /Test --key 1 --value "new value 1" -
Observe the log output You should see messages like:
2017-10-28 17:28:52.893  INFO 18986 --- [emfire.events-1] log sink                               : value 1"
2017-10-28 17:28:52.893  INFO 18986 --- [emfire.events-1] log sink                               : value 2"
2017-10-28 17:28:52.893  INFO 18986 --- [emfire.events-1] log sink                               : value 3"
2017-10-28 17:28:52.893  INFO 18986 --- [emfire.events-1] log sink                               : new value 1"
By default, the message payload contains the updated value. Depending on your application, you may need additional information. The data comes from EntryEvent. You can access any fields using the source’s
cache-event-expressionproperty. This takes a SpEL expression bound to the EntryEvent. Try something like--cache-event-expression='{key:'+key+',new_value:'+newValue+'}'(HINT: You will need to destroy the stream and recreate it to add this property, an exercise left to the reader). Now you should see log messages like:2017-10-28 17:28:52.893 INFO 18986 --- [emfire.events-1] log-sink : {key:1,new_value:value 1} 2017-10-28 17:41:24.466 INFO 18986 --- [emfire.events-1] log-sink : {key:2,new_value:value 2} -
You’re done!
3.5.3. Running on Cloud Foundry
Additional Prerequisites
-
A Cloud Foundry instance
-
Running instance of a
rabbitservice in Cloud Foundry -
Running instance of the Pivotal Cloud Cache for PCF (PCC) service
cloudcachein Cloud Foundry. -
Spring Cloud Data Flow installed on Cloud Foundry
Follow the installation instructions to run Spring Cloud Data Flow on Cloud Foundry.
Building and Running the Demo
-
Register the out-of-the-box applications for the Rabbit binder
These samples assume that the Data Flow Server can access a remote Maven repository, repo.spring.io/libs-releaseby default. If your Data Flow server is running behind a firewall, or you are using a maven proxy preventing access to public repositories, you will need to install the sample apps in your internal Maven repository and configure the server accordingly. The sample applications are typically registered using Data Flow’s bulk import facility. For example, the Shell commanddataflow:>app import --uri dataflow.spring.io/rabbitmq-maven-latest(The actual URI is release and binder specific so refer to the sample instructions for the actual URL). The bulk import URI references a plain text file containing entries for all of the publicly available Spring Cloud Stream and Task applications published torepo.spring.io. For example,source.http=maven://org.springframework.cloud.stream.app:http-source-rabbit:2.1.0.RELEASEregisters thehttpsource app at the corresponding Maven address, relative to the remote repository(ies) configured for the Data Flow server. The format ismaven://<groupId>:<artifactId>:<version>You will need to download the required apps or build them and then install them in your Maven repository, using whatever group, artifact, and version you choose. If you do this, register individual apps usingdataflow:>app register…using themaven://resource URI format corresponding to your installed app.dataflow:>app import --uri https://dataflow.spring.io/rabbitmq-maven-latest -
Get the PCC connection information
$ cf service-key cloudcache my-service-key Getting key my-service-key for service instance cloudcache as <user>... { "locators": [ "10.0.16.9[55221]", "10.0.16.11[55221]", "10.0.16.10[55221]" ], "urls": { "gfsh": "http://...", "pulse": "https://.../pulse" }, "users": [ { "password": <password>, "username": "cluster_operator" }, { "password": <password>, "username": "developer" } ] } -
Using
gfsh, connect to the PCC instance ascluster_operatorusing the service key values and create the Test region.gfsh>connect --use-http --url=<gfsh-url> --user=cluster_operator --password=<cluster_operator_password> gfsh>create region --name Test --type=REPLICATE -
Create the stream, connecting to the PCC instance as developer. This example creates an gemfire source to which will publish events on a region
dataflow>stream create --name events --definition " gemfire --username=developer --password=<developer-password> --connect-type=locator --host-addresses=10.0.16.9:55221 --regionName=Test | log" --deploy -
Verify the stream is successfully deployed
dataflow:>stream list -
Monitor stdout for the log sink
cf logs <log-sink-app-name> -
Using
gfsh, create and update some cache entriesgfsh>connect --use-http --url=<gfsh-url> --user=cluster_operator --password=<cluster_operator_password> gfsh>put --region /Test --key 1 --value "value 1" gfsh>put --region /Test --key 2 --value "value 2" gfsh>put --region /Test --key 3 --value "value 3" gfsh>put --region /Test --key 1 --value "new value 1" -
Observe the log output
You should see messages like:
2017-10-28 17:28:52.893  INFO 18986 --- [emfire.events-1] log sink                               : value 1"
2017-10-28 17:28:52.893  INFO 18986 --- [emfire.events-1] log sink                               : value 2"
2017-10-28 17:28:52.893  INFO 18986 --- [emfire.events-1] log sink                               : value 3"
2017-10-28 17:28:52.893  INFO 18986 --- [emfire.events-1] log sink                               : new value 1"
By default, the message payload contains the updated value. Depending on your application, you may need additional information. The data comes from EntryEvent. You can access any fields using the source’s
cache-event-expressionproperty. This takes a SpEL expression bound to the EntryEvent. Try something like--cache-event-expression='{key:'+key+',new_value:'+newValue+'}'(HINT: You will need to destroy the stream and recreate it to add this property, an exercise left to the reader). Now you should see log messages like:2017-10-28 17:28:52.893 INFO 18986 --- [emfire.events-1] log-sink : {key:1,new_value:value 1} 2017-10-28 17:41:24.466 INFO 18986 --- [emfire.events-1] log-sink : {key:2,new_value:value 2} -
You’re done!
3.5.4. Summary
In this sample, you have learned:
-
How to use Spring Cloud Data Flow’s
LocalandCloud Foundryservers -
How to use Spring Cloud Data Flow’s
shell -
How to create streaming data pipeline to connect and publish events from
gemfire:sectnums: :docs_dir: ../../..
3.6. Custom Spring Cloud Stream Processor
3.6.1. Prerequisites
-
A Running Data Flow Shell
the Spring Cloud Data Flow Shell and Local server implementation are in the same repository and are both built by running ./mvnw install from the project root directory. If you have already run the build, use the jar in spring-cloud-dataflow-shell/target
|
To run the Shell open a new terminal session:
$ cd <PATH/TO/SPRING-CLOUD-DATAFLOW-SHELL-JAR>
$ java -jar spring-cloud-dataflow-shell-<VERSION>.jar
  ____                              ____ _                __
 / ___| _ __  _ __(_)_ __   __ _   / ___| | ___  _   _  __| |
 \___ \| '_ \| '__| | '_ \ / _` | | |   | |/ _ \| | | |/ _` |
  ___) | |_) | |  | | | | | (_| | | |___| | (_) | |_| | (_| |
 |____/| .__/|_|  |_|_| |_|\__, |  \____|_|\___/ \__,_|\__,_|
  ____ |_|    _          __|___/                 __________
 |  _ \  __ _| |_ __ _  |  ___| | _____      __  \ \ \ \ \ \
 | | | |/ _` | __/ _` | | |_  | |/ _ \ \ /\ / /   \ \ \ \ \ \
 | |_| | (_| | || (_| | |  _| | | (_) \ V  V /    / / / / / /
 |____/ \__,_|\__\__,_| |_|   |_|\___/ \_/\_/    /_/_/_/_/_/


Welcome to the Spring Cloud Data Flow shell. For assistance hit TAB or type "help".
dataflow:>| The Spring Cloud Data Flow Shell is a Spring Boot application that connects to the Data Flow Server’s REST API and supports a DSL that simplifies the process of defining a stream or task and managing its lifecycle. Most of these samples use the shell. If you prefer, you can use the Data Flow UI localhost:9393/dashboard, (or wherever it the server is hosted) to perform equivalent operations. |
-
A running local Data Flow Server Follow the installation instructions to run Spring Cloud Data Flow on a local host.
-
A Java IDE
-
Maven Installed
-
A running instance of Rabbit MQ
3.6.2. Creating the Custom Stream App
We will create a custom Spring Cloud Stream application and run it on Spring Cloud Data Flow. We’ll go through the steps to make a simple processor that converts temperature from Fahrenheit to Celsius. We will be running the demo locally, but all the steps will work in a Cloud Foundry environment as well.
-
Create a new spring cloud stream project
-
Create a Spring initializer project
-
Set the group to
demo.celsius.converterand the artifact name ascelsius-converter-processor -
Choose a message transport binding as a dependency for the custom app There are options for choosing
Rabbit MQorKafkaas the message transport. For this demo, we will userabbit. Type rabbit in the search bar under Search for dependencies and selectStream Rabbit. -
Hit the generate project button and open the new project in an IDE of your choice
-
-
Develop the app
We can now create our custom app. Our Spring Cloud Stream application is a Spring Boot application that runs as an executable jar. The application will include two Java classes:
-
CelsiusConverterProcessorAplication.java- the main Spring Boot application class, generated by Spring initializr -
CelsiusConverterProcessorConfiguration.java- the Spring Cloud Stream code that we will writeWe are creating a transformer that takes a Fahrenheit input and converts it to Celsius. Following the same naming convention as the application file, create a new Java class in the same package called
CelsiusConverterProcessorConfiguration.java.CelsiusConverterProcessorConfiguration.java@EnableBinding(Processor.class) public class CelsiusConverterProcessorConfiguration { @Transformer(inputChannel = Processor.INPUT, outputChannel = Processor.OUTPUT) public int convertToCelsius(String payload) { int fahrenheitTemperature = Integer.parseInt(payload); return (farenheitTemperature-32)*5/9; } }Here we introduced two important Spring annotations. First we annotated the class with
@EnableBinding(Processor.class). Second we created a method and annotated it with@Transformer(inputChannel = Processor.INPUT, outputChannel = Processor.OUTPUT). By adding these two annotations we have configured this stream app as aProcessor(as opposed to aSourceor aSink). This means that the application receives input from an upstream application via theProcessor.INPUTchannel and sends its output to a downstream application via theProcessor.OUTPUTchannel.The
convertToCelsiusmethod takes aStringas input for Fahrenheit and then returns the converted Celsius as an integer. This method is very simple, but that is also the beauty of this programming style. We can add as much logic as we want to this method to enrich this processor. As long as we annotate it properly and return valid output, it works as a Spring Cloud Stream Processor. Also note that it is straightforward to unit test this code.
-
-
Build the Spring Boot application with Maven
$cd <PROJECT_DIR> $./mvnw clean package -
Run the Application standalone
java -jar target/celsius-converter-processor-0.0.1-SNAPSHOT.jarIf all goes well, we should have a running standalone Spring Boot Application. Once we verify that the app is started and running without any errors, we can stop it.
3.6.3. Deploying the App to Spring Cloud Data Flow
-
Register the out-of-the-box applications for the Rabbit binder
These samples assume that the Data Flow Server can access a remote Maven repository, repo.spring.io/libs-releaseby default. If your Data Flow server is running behind a firewall, or you are using a maven proxy preventing access to public repositories, you will need to install the sample apps in your internal Maven repository and configure the server accordingly. The sample applications are typically registered using Data Flow’s bulk import facility. For example, the Shell commanddataflow:>app import --uri dataflow.spring.io/rabbitmq-maven-latest(The actual URI is release and binder specific so refer to the sample instructions for the actual URL). The bulk import URI references a plain text file containing entries for all of the publicly available Spring Cloud Stream and Task applications published torepo.spring.io. For example,source.http=maven://org.springframework.cloud.stream.app:http-source-rabbit:2.1.0.RELEASEregisters thehttpsource app at the corresponding Maven address, relative to the remote repository(ies) configured for the Data Flow server. The format ismaven://<groupId>:<artifactId>:<version>You will need to download the required apps or build them and then install them in your Maven repository, using whatever group, artifact, and version you choose. If you do this, register individual apps usingdataflow:>app register…using themaven://resource URI format corresponding to your installed app.dataflow:>app import --uri https://dataflow.spring.io/rabbitmq-maven-latest -
Register the custom processor
app register --type processor --name convertToCelsius --uri <File URL of the jar file on the local filesystem where you built the project above> --force -
Create the stream
We will create a stream that uses the out of the box
httpsource andlogsink and our custom transformer.dataflow:>stream create --name convertToCelsiusStream --definition "http --port=9090 | convertToCelsius | log" --deploy Created and deployed new stream 'convertToCelsiusStream' -
Verify the stream is successfully deployed
dataflow:>stream list -
Verify that the apps have successfully deployed
dataflow:>runtime apps2016-09-27 10:03:11.988 INFO 95234 --- [nio-9393-exec-9] o.s.c.d.spi.local.LocalAppDeployer : deploying app convertToCelsiusStream.log instance 0 Logs will be in /var/folders/2q/krqwcbhj2d58csmthyq_n1nw0000gp/T/spring-cloud-dataflow-3236898888473815319/convertToCelsiusStream-1474984991968/convertToCelsiusStream.log 2016-09-27 10:03:12.397 INFO 95234 --- [nio-9393-exec-9] o.s.c.d.spi.local.LocalAppDeployer : deploying app convertToCelsiusStream.convertToCelsius instance 0 Logs will be in /var/folders/2q/krqwcbhj2d58csmthyq_n1nw0000gp/T/spring-cloud-dataflow-3236898888473815319/convertToCelsiusStream-1474984992392/convertToCelsiusStream.convertToCelsius 2016-09-27 10:03:14.445 INFO 95234 --- [nio-9393-exec-9] o.s.c.d.spi.local.LocalAppDeployer : deploying app convertToCelsiusStream.http instance 0 Logs will be in /var/folders/2q/krqwcbhj2d58csmthyq_n1nw0000gp/T/spring-cloud-dataflow-3236898888473815319/convertToCelsiusStream-1474984994440/convertToCelsiusStream.http -
Post sample data to the
httpendpoint:localhost:9090(9090is theportwe specified for thehttpsource in this case)dataflow:>http post --target http://localhost:9090 --data 76 > POST (text/plain;Charset=UTF-8) http://localhost:9090 76 > 202 ACCEPTED -
Open the log file for the
convertToCelsiusStream.logapp to see the output of our streamtail -f /var/folders/2q/krqwcbhj2d58csmthyq_n1nw0000gp/T/spring-cloud-dataflow-7563139704229890655/convertToCelsiusStream-1474990317406/convertToCelsiusStream.log/stdout_0.logYou should see the temperature you posted converted to Celsius!
2016-09-27 10:05:34.933 INFO 95616 --- [CelsiusStream-1] log.sink : 243.6.4. Summary
In this sample, you have learned:
-
How to write a custom
Processorstream application -
How to use Spring Cloud Data Flow’s
Localserver -
How to use Spring Cloud Data Flow’s
shellapplication
4. Task / Batch
4.1. Batch Job on Cloud Foundry
In this demonstration, you will learn how to orchestrate short-lived data processing application (eg: Spring Batch Jobs) using Spring Cloud Task and Spring Cloud Data Flow on Cloud Foundry.
4.1.1. Prerequisites
the Spring Cloud Data Flow Shell and Local server implementation are in the same repository and are both built by running ./mvnw install from the project root directory. If you have already run the build, use the jar in spring-cloud-dataflow-shell/target
|
To run the Shell open a new terminal session:
$ cd <PATH/TO/SPRING-CLOUD-DATAFLOW-SHELL-JAR>
$ java -jar spring-cloud-dataflow-shell-<VERSION>.jar
  ____                              ____ _                __
 / ___| _ __  _ __(_)_ __   __ _   / ___| | ___  _   _  __| |
 \___ \| '_ \| '__| | '_ \ / _` | | |   | |/ _ \| | | |/ _` |
  ___) | |_) | |  | | | | | (_| | | |___| | (_) | |_| | (_| |
 |____/| .__/|_|  |_|_| |_|\__, |  \____|_|\___/ \__,_|\__,_|
  ____ |_|    _          __|___/                 __________
 |  _ \  __ _| |_ __ _  |  ___| | _____      __  \ \ \ \ \ \
 | | | |/ _` | __/ _` | | |_  | |/ _ \ \ /\ / /   \ \ \ \ \ \
 | |_| | (_| | || (_| | |  _| | | (_) \ V  V /    / / / / / /
 |____/ \__,_|\__\__,_| |_|   |_|\___/ \_/\_/    /_/_/_/_/_/


Welcome to the Spring Cloud Data Flow shell. For assistance hit TAB or type "help".
dataflow:>| The Spring Cloud Data Flow Shell is a Spring Boot application that connects to the Data Flow Server’s REST API and supports a DSL that simplifies the process of defining a stream or task and managing its lifecycle. Most of these samples use the shell. If you prefer, you can use the Data Flow UI localhost:9393/dashboard, (or wherever it the server is hosted) to perform equivalent operations. |
-
Spring Cloud Data Flow installed on Cloud Foundry Follow the installation instructions to run Spring Cloud Data Flow on Cloud Foundry.
4.1.2. Building and Running the Demo
| PCF 1.7.12 or greater is required to run Tasks on Spring Cloud Data Flow. As of this writing, PCFDev and PWS supports builds upon this version. |
-
Task support needs to be enabled on pcf-dev. Being logged as
admin, issue the following command:cf enable-feature-flag task_creation Setting status of task_creation as admin... OK Feature task_creation Enabled.For this sample, all you need is the mysqlservice and in PCFDev, themysqlservice comes with a different plan. From CF CLI, create the service by:cf create-service p-mysql 512mb mysqland bind this service todataflow-serverby:cf bind-service dataflow-server mysql.All the apps deployed to PCFDev start with low memory by default. It is recommended to change it to at least 768MB for dataflow-server. Ditto for every app spawned by Spring Cloud Data Flow. Change the memory by:cf set-env dataflow-server SPRING_CLOUD_DEPLOYER_CLOUDFOUNDRY_MEMORY 512. Likewise, we would have to skip SSL validation by:cf set-env dataflow-server SPRING_CLOUD_DEPLOYER_CLOUDFOUNDRY_SKIP_SSL_VALIDATION true. -
Tasks in Spring Cloud Data Flow require an RDBMS to host "task repository" (see here for more details), so let’s instruct the Spring Cloud Data Flow server to bind the
mysqlservice to each deployed task:$ cf set-env dataflow-server SPRING_CLOUD_DEPLOYER_CLOUDFOUNDRY_TASK_SERVICES mysql $ cf restage dataflow-serverWe only need mysqlservice for this sample. -
As a recap, here is what you should see as configuration for the Spring Cloud Data Flow server:
cf env dataflow-server .... User-Provided: SPRING_CLOUD_DEPLOYER_CLOUDFOUNDRY_DOMAIN: local.pcfdev.io SPRING_CLOUD_DEPLOYER_CLOUDFOUNDRY_MEMORY: 512 SPRING_CLOUD_DEPLOYER_CLOUDFOUNDRY_ORG: pcfdev-org SPRING_CLOUD_DEPLOYER_CLOUDFOUNDRY_PASSWORD: pass SPRING_CLOUD_DEPLOYER_CLOUDFOUNDRY_SKIP_SSL_VALIDATION: false SPRING_CLOUD_DEPLOYER_CLOUDFOUNDRY_SPACE: pcfdev-space SPRING_CLOUD_DEPLOYER_CLOUDFOUNDRY_TASK_SERVICES: mysql SPRING_CLOUD_DEPLOYER_CLOUDFOUNDRY_URL: https://api.local.pcfdev.io SPRING_CLOUD_DEPLOYER_CLOUDFOUNDRY_USERNAME: user No running env variables have been set No staging env variables have been set -
Notice that
dataflow-serverapplication is started and ready for interaction viadataflow-server.local.pcfdev.ioendpoint -
Build and register the batch-job example from Spring Cloud Task samples. For convenience, the final uber-jar artifact is provided with this sample.
dataflow:>app register --type task --name simple_batch_job --uri https://github.com/spring-cloud/spring-cloud-dataflow-samples/raw/master/src/main/asciidoc/tasks/simple-batch-job/batch-job-1.3.0.BUILD-SNAPSHOT.jar -
Create the task with
simple-batch-jobapplicationdataflow:>task create foo --definition "simple_batch_job"Unlike Streams, the Task definitions don’t require explicit deployment. They can be launched on-demand, scheduled, or triggered by streams. -
Verify there’s still no Task applications running on PCFDev - they are listed only after the initial launch/staging attempt on PCF
$ cf apps Getting apps in org pcfdev-org / space pcfdev-space as user... OK name requested state instances memory disk urls dataflow-server started 1/1 768M 512M dataflow-server.local.pcfdev.io -
Let’s launch
foodataflow:>task launch foo -
Verify the execution of
fooby tailing the logs$ cf logs foo Retrieving logs for app foo in org pcfdev-org / space pcfdev-space as user... 2016-08-14T18:48:54.22-0700 [APP/TASK/foo/0]OUT Creating container 2016-08-14T18:48:55.47-0700 [APP/TASK/foo/0]OUT 2016-08-14T18:49:06.59-0700 [APP/TASK/foo/0]OUT 2016-08-15 01:49:06.598 INFO 14 --- [ main] o.s.b.c.l.support.SimpleJobLauncher : Job: [SimpleJob: [name=job1]] launched with the following parameters: [{}] ... ... 2016-08-14T18:49:06.78-0700 [APP/TASK/foo/0]OUT 2016-08-15 01:49:06.785 INFO 14 --- [ main] o.s.b.c.l.support.SimpleJobLauncher : Job: [SimpleJob: [name=job1]] completed with the following parameters: [{}] and the following status: [COMPLETED] ... ... 2016-08-14T18:49:07.36-0700 [APP/TASK/foo/0]OUT 2016-08-15 01:49:07.363 INFO 14 --- [ main] o.s.b.c.l.support.SimpleJobLauncher : Job: [SimpleJob: [name=job2]] launched with the following parameters: [{}] ... ... 2016-08-14T18:49:07.53-0700 [APP/TASK/foo/0]OUT 2016-08-15 01:49:07.536 INFO 14 --- [ main] o.s.b.c.l.support.SimpleJobLauncher : Job: [SimpleJob: [name=job2]] completed with the following parameters: [{}] and the following status: [COMPLETED] ... ... 2016-08-14T18:49:07.71-0700 [APP/TASK/foo/0]OUT Exit status 0 2016-08-14T18:49:07.78-0700 [APP/TASK/foo/0]OUT Destroying container 2016-08-14T18:49:08.47-0700 [APP/TASK/foo/0]OUT Successfully destroyed containerVerify job1andjob2operations embedded insimple-batch-jobapplication are launched independently and they returned with the statusCOMPLETED.Unlike LRPs in Cloud Foundry, tasks are short-lived, so the logs aren’t always available. They are generated only when the Task application runs; at the end of Task operation, the container that ran the Task application is destroyed to free-up resources. -
List Tasks in Cloud Foundry
$ cf apps Getting apps in org pcfdev-org / space pcfdev-space as user... OK name requested state instances memory disk urls dataflow-server started 1/1 768M 512M dataflow-server.local.pcfdev.io foo stopped 0/1 1G 1G -
Verify Task execution details
dataflow:>task execution list ╔══════════════════════════╤══╤════════════════════════════╤════════════════════════════╤═════════╗ ║ Task Name │ID│ Start Time │ End Time │Exit Code║ ╠══════════════════════════╪══╪════════════════════════════╪════════════════════════════╪═════════╣ ║foo │1 │Sun Aug 14 18:49:05 PDT 2016│Sun Aug 14 18:49:07 PDT 2016│0 ║ ╚══════════════════════════╧══╧════════════════════════════╧════════════════════════════╧═════════╝ -
Verify Job execution details
dataflow:>job execution list
╔═══╤═══════╤═════════╤════════════════════════════╤═════════════════════╤══════════════════╗
║ID │Task ID│Job Name │         Start Time         │Step Execution Count │Definition Status ║
╠═══╪═══════╪═════════╪════════════════════════════╪═════════════════════╪══════════════════╣
║2  │1      │job2     │Sun Aug 14 18:49:07 PDT 2016│1                    │Destroyed         ║
║1  │1      │job1     │Sun Aug 14 18:49:06 PDT 2016│1                    │Destroyed         ║
╚═══╧═══════╧═════════╧════════════════════════════╧═════════════════════╧══════════════════╝
4.1.3. Summary
In this sample, you have learned:
-
How to register and orchestrate Spring Batch jobs in Spring Cloud Data Flow
-
How to use the
cfCLI in the context of Task applications orchestrated by Spring Cloud Data Flow -
How to verify task executions and task repository
4.2. Batch File Ingest
In this demonstration, you will learn how to create a data processing application using Spring Batch which will then be run within Spring Cloud Data Flow.
4.2.1. Prerequisites
-
A Running Data Flow Server Follow the installation instructions to run Spring Cloud Data Flow on a local host.
-
A Running Data Flow Shell
the Spring Cloud Data Flow Shell and Local server implementation are in the same repository and are both built by running ./mvnw install from the project root directory. If you have already run the build, use the jar in spring-cloud-dataflow-shell/target
|
To run the Shell open a new terminal session:
$ cd <PATH/TO/SPRING-CLOUD-DATAFLOW-SHELL-JAR>
$ java -jar spring-cloud-dataflow-shell-<VERSION>.jar
  ____                              ____ _                __
 / ___| _ __  _ __(_)_ __   __ _   / ___| | ___  _   _  __| |
 \___ \| '_ \| '__| | '_ \ / _` | | |   | |/ _ \| | | |/ _` |
  ___) | |_) | |  | | | | | (_| | | |___| | (_) | |_| | (_| |
 |____/| .__/|_|  |_|_| |_|\__, |  \____|_|\___/ \__,_|\__,_|
  ____ |_|    _          __|___/                 __________
 |  _ \  __ _| |_ __ _  |  ___| | _____      __  \ \ \ \ \ \
 | | | |/ _` | __/ _` | | |_  | |/ _ \ \ /\ / /   \ \ \ \ \ \
 | |_| | (_| | || (_| | |  _| | | (_) \ V  V /    / / / / / /
 |____/ \__,_|\__\__,_| |_|   |_|\___/ \_/\_/    /_/_/_/_/_/


Welcome to the Spring Cloud Data Flow shell. For assistance hit TAB or type "help".
dataflow:>| The Spring Cloud Data Flow Shell is a Spring Boot application that connects to the Data Flow Server’s REST API and supports a DSL that simplifies the process of defining a stream or task and managing its lifecycle. Most of these samples use the shell. If you prefer, you can use the Data Flow UI localhost:9393/dashboard, (or wherever it the server is hosted) to perform equivalent operations. |
4.2.2. Batch File Ingest Demo Overview
The source for the demo project is located in here. The sample is a Spring Boot application that demonstrates how to read data from a flat file, perform processing on the records, and store the transformed data into a database using Spring Batch.
The key classes for creating the batch job are:
-
BatchConfiguration.java- this is where we define our batch job, the step and components that are used read, process, and write our data. In the sample we use aFlatFileItemReaderwhich reads a delimited file, a customPersonItemProcessorto transform the data, and aJdbcBatchItemWriterto write our data to a database. -
Person.java- the domain object representing the data we are reading and processing in our batch job. The sample data contains records made up of a persons first and last name. -
PersonItemProcessor.java- this class is anItemProcessorimplementation which receives records after they have been read and before they are written. This allows us to transform the data between these two steps. In our sampleItemProcessorimplementation, we simply transform the first and last name of eachPersonto uppercase characters. -
Application.java- the main entry point into the Spring Boot application which is used to launch the batch job
Resource files are included to set up the database and provide sample data:
-
schema-all.sql- this is the database schema that will be created when the application starts up. In this sample, an in-memory database is created on start up and destroyed when the application exits. -
data.csv- sample data file containing person records used in the demo
| This example expects to use the Spring Cloud Data Flow Server’s embedded H2 database. If you wish to use another repository, be sure to add the correct dependencies to the pom.xml and update the schema-all.sql. |
4.2.3. Building and Running the Demo
-
Build the demo JAR
$ mvn clean package -
Register the task
dataflow:>app register --name fileIngest --type task --uri file:///path/to/target/ingest-X.X.X.jar Successfully registered application 'task:fileIngest' dataflow:> -
Create the task
dataflow:>task create fileIngestTask --definition fileIngest Created new task 'fileIngestTask' dataflow:> -
Launch the task
dataflow:>task launch fileIngestTask --arguments "localFilePath=classpath:data.csv" Launched task 'fileIngestTask' dataflow:> -
Inspect logs
The log file path for the launched task can be found in the local server output, for example:
2017-10-27 14:58:18.112 INFO 19485 --- [nio-9393-exec-6] o.s.c.d.spi.local.LocalTaskLauncher : launching task fileIngestTask-8932f73d-f17a-4bba-b44d-3fd9df042ac0 Logs will be in /var/folders/6x/tgtx9xbn0x16xq2sx1j2rld80000gn/T/spring-cloud-dataflow-983191515779755562/fileIngestTask-1509130698071/fileIngestTask-8932f73d-f17a-4bba-b44d-3fd9df042ac0 -
Verify Task execution details
dataflow:>task execution list ╔══════════════╤══╤════════════════════════════╤════════════════════════════╤═════════╗ ║ Task Name │ID│ Start Time │ End Time │Exit Code║ ╠══════════════╪══╪════════════════════════════╪════════════════════════════╪═════════╣ ║fileIngestTask│1 │Fri Oct 27 14:58:20 EDT 2017│Fri Oct 27 14:58:20 EDT 2017│0 ║ ╚══════════════╧══╧════════════════════════════╧════════════════════════════╧═════════╝ -
Verify Job execution details
dataflow:>job execution list
╔═══╤═══════╤═════════╤════════════════════════════╤═════════════════════╤══════════════════╗
║ID │Task ID│Job Name │         Start Time         │Step Execution Count │Definition Status ║
╠═══╪═══════╪═════════╪════════════════════════════╪═════════════════════╪══════════════════╣
║1  │1      │ingestJob│Fri Oct 27 14:58:20 EDT 2017│1                    │Created           ║
╚═══╧═══════╧═════════╧════════════════════════════╧═════════════════════╧══════════════════╝
4.2.4. Summary
In this sample, you have learned:
-
How to create a data processing batch job application
-
How to register and orchestrate Spring Batch jobs in Spring Cloud Data Flow
-
How to verify status via logs and shell commands
5. Stream Launching Batch Job
5.1. Batch File Ingest - SFTP Demo
In the Batch File Ingest sample we built a Spring Batch application that Spring Cloud Data Flow launched as a task to process a file. This time we will build on that sample to create and deploy a stream that launches that task. The stream will poll an SFTP server and, for each new file that it finds, will download the file and launch the batch job to process it.
The source for the demo project is located in the batch/file-ingest directory at the top-level of this repository.
5.1.1. Prerequisites
-
A Running Data Flow Shell
the Spring Cloud Data Flow Shell and Local server implementation are in the same repository and are both built by running ./mvnw install from the project root directory. If you have already run the build, use the jar in spring-cloud-dataflow-shell/target
|
To run the Shell open a new terminal session:
$ cd <PATH/TO/SPRING-CLOUD-DATAFLOW-SHELL-JAR>
$ java -jar spring-cloud-dataflow-shell-<VERSION>.jar
  ____                              ____ _                __
 / ___| _ __  _ __(_)_ __   __ _   / ___| | ___  _   _  __| |
 \___ \| '_ \| '__| | '_ \ / _` | | |   | |/ _ \| | | |/ _` |
  ___) | |_) | |  | | | | | (_| | | |___| | (_) | |_| | (_| |
 |____/| .__/|_|  |_|_| |_|\__, |  \____|_|\___/ \__,_|\__,_|
  ____ |_|    _          __|___/                 __________
 |  _ \  __ _| |_ __ _  |  ___| | _____      __  \ \ \ \ \ \
 | | | |/ _` | __/ _` | | |_  | |/ _ \ \ /\ / /   \ \ \ \ \ \
 | |_| | (_| | || (_| | |  _| | | (_) \ V  V /    / / / / / /
 |____/ \__,_|\__\__,_| |_|   |_|\___/ \_/\_/    /_/_/_/_/_/


Welcome to the Spring Cloud Data Flow shell. For assistance hit TAB or type "help".
dataflow:>| The Spring Cloud Data Flow Shell is a Spring Boot application that connects to the Data Flow Server’s REST API and supports a DSL that simplifies the process of defining a stream or task and managing its lifecycle. Most of these samples use the shell. If you prefer, you can use the Data Flow UI localhost:9393/dashboard, (or wherever it the server is hosted) to perform equivalent operations. |
5.1.2. Running Locally
Additional Prerequisites
-
Spring Cloud Data Flow installed locally
Follow the installation instructions to run Spring Cloud Data Flow on a local host.
| To simplify the dependencies and configuration in this example, we will use our local machine acting as an SFTP server. |
Building and Running the Demo
-
Build the demo JAR
From the root of this project:
$ cd batch/file-ingest
$ mvn clean package
For convenience, you can skip this step. The jar is published to the Spring Maven repository -
Create the data directories
Now we create a remote directory on the SFTP server and a local directory where the batch job expects to find files.
If you are using a remote SFTP server, create the remote directory on the SFTP server. Since we are using the local machine as the SFTP server, we will create both the local and remote directories on the local machine. $ mkdir -p /tmp/remote-files /tmp/local-files -
Register the
sftp-dataflowsource and thetask-launcher-dataflowsinkWith our Spring Cloud Data Flow server running, we register the
sftp-dataflowsource andtask-launcher-dataflowsink. Thesftp-dataflowsource application will do the work of polling the remote directory for new files and downloading them to the local directory. As each file is received, it emits a message for thetask-launcher-dataflowsink to launch the task to process the data from that file.In the Spring Cloud Data Flow shell:
dataflow:>app register --name sftp --type source --uri maven://org.springframework.cloud.stream.app:sftp-dataflow-source-kafka:2.1.0.RELEASE Successfully registered application 'source:sftp' dataflow:>app register --name task-launcher --type sink --uri maven://org.springframework.cloud.stream.app:task-launcher-dataflow-sink-kafka:1.0.1.RELEASE Successfully registered application 'sink:task-launcher' -
Register and create the file ingest task. If you’re using the published jar, set
--uri maven://io.spring.cloud.dataflow.ingest:ingest:1.0.0.BUILD-SNAPSHOT:dataflow:>app register --name fileIngest --type task --uri file:///path/to/target/ingest-X.X.X.jar Successfully registered application 'task:fileIngest' dataflow:>task create fileIngestTask --definition fileIngest Created new task 'fileIngestTask' -
Create and deploy the stream
Now lets create and deploy the stream. Once deployed, the stream will start polling the SFTP server and, when new files arrive, launch the batch job.
Replace <user>and '<pass>` below. The<username>and<password>values are the credentials for the local (or remote) user. If not using a local SFTP server, specify the host using the--host, and optionally--port, parameters. If not defined,hostdefaults to127.0.0.1andportdefaults to22.dataflow:>stream create --name inboundSftp --definition "sftp --username=<user> --password=<pass> --allow-unknown-keys=true --task.launch.request.taskName=fileIngestTask --remote-dir=/tmp/remote-files/ --local-dir=/tmp/local-files/ | task-launcher" --deploy Created new stream 'inboundSftp' Deployment request has been sent -
Verify Stream deployment
We can see the status of the streams to be deployed with
stream list, for example:dataflow:>stream list ╔═══════════╤════════════════════════════════════════════════════════════════════════════════════════════════════════════════════════════════════╤════════════════════════════╗ ║Stream Name│ Stream Definition │ Status ║ ╠═══════════╪════════════════════════════════════════════════════════════════════════════════════════════════════════════════════════════════════╪════════════════════════════╣ ║inboundSftp│sftp --password='******' --remote-dir=/tmp/remote-files/ --local-dir=/tmp/local-files/ --task.launch.request.taskName=fileIngestTask│The stream has been ║ ║ │--allow-unknown-keys=true --username=<user> | task-launcher │successfully deployed ║ ╚═══════════╧════════════════════════════════════════════════════════════════════════════════════════════════════════════════════════════════════╧════════════════════════════╝ -
Inspect logs
In the event the stream failed to deploy, or you would like to inspect the logs for any reason, you can get the location of the logs to applications created for the
inboundSftpstream using theruntime appscommand:dataflow:>runtime apps ╔═══════════════════════════╤═══════════╤════════════════════════════════════════════════════════════════════════════════════════════════════════════════════════════════════════════════════════════════════════╗ ║ App Id / Instance Id │Unit Status│ No. of Instances / Attributes ║ ╠═══════════════════════════╪═══════════╪════════════════════════════════════════════════════════════════════════════════════════════════════════════════════════════════════════════════════════════════════════╣ ║inboundSftp.sftp │ deployed │ 1 ║ ╟┈┈┈┈┈┈┈┈┈┈┈┈┈┈┈┈┈┈┈┈┈┈┈┈┈┈┈┼┈┈┈┈┈┈┈┈┈┈┈┼┈┈┈┈┈┈┈┈┈┈┈┈┈┈┈┈┈┈┈┈┈┈┈┈┈┈┈┈┈┈┈┈┈┈┈┈┈┈┈┈┈┈┈┈┈┈┈┈┈┈┈┈┈┈┈┈┈┈┈┈┈┈┈┈┈┈┈┈┈┈┈┈┈┈┈┈┈┈┈┈┈┈┈┈┈┈┈┈┈┈┈┈┈┈┈┈┈┈┈┈┈┈┈┈┈┈┈┈┈┈┈┈┈┈┈┈┈┈┈┈┈┈┈┈┈┈┈┈┈┈┈┈┈┈┈┈┈┈┈┈┈┈┈┈┈┈┈┈┈┈┈┈┈┈┈┈┈┈┈┈┈┈┈┈┈┈┈┈╢ ║ │ │ guid = 23057 ║ ║ │ │ pid = 71927 ║ ║ │ │ port = 23057 ║ ║inboundSftp.sftp-0 │ deployed │ stderr = /var/folders/hd/5yqz2v2d3sxd3n879f4sg4gr0000gn/T/spring-cloud-deployer-120915912946760306/inboundSftp-1540821009913/inboundSftp.sftp/stderr_0.log ║ ║ │ │ stdout = /var/folders/hd/5yqz2v2d3sxd3n879f4sg4gr0000gn/T/spring-cloud-deployer-120915912946760306/inboundSftp-1540821009913/inboundSftp.sftp/stdout_0.log ║ ║ │ │ url = https://192.168.64.1:23057 ║ ║ │ │working.dir = /var/folders/hd/5yqz2v2d3sxd3n879f4sg4gr0000gn/T/spring-cloud-deployer-120915912946760306/inboundSftp-1540821009913/inboundSftp.sftp ║ ╟───────────────────────────┼───────────┼────────────────────────────────────────────────────────────────────────────────────────────────────────────────────────────────────────────────────────────────────────╢ ║inboundSftp.task-launcher │ deployed │ 1 ║ ╟┈┈┈┈┈┈┈┈┈┈┈┈┈┈┈┈┈┈┈┈┈┈┈┈┈┈┈┼┈┈┈┈┈┈┈┈┈┈┈┼┈┈┈┈┈┈┈┈┈┈┈┈┈┈┈┈┈┈┈┈┈┈┈┈┈┈┈┈┈┈┈┈┈┈┈┈┈┈┈┈┈┈┈┈┈┈┈┈┈┈┈┈┈┈┈┈┈┈┈┈┈┈┈┈┈┈┈┈┈┈┈┈┈┈┈┈┈┈┈┈┈┈┈┈┈┈┈┈┈┈┈┈┈┈┈┈┈┈┈┈┈┈┈┈┈┈┈┈┈┈┈┈┈┈┈┈┈┈┈┈┈┈┈┈┈┈┈┈┈┈┈┈┈┈┈┈┈┈┈┈┈┈┈┈┈┈┈┈┈┈┈┈┈┈┈┈┈┈┈┈┈┈┈┈┈┈┈┈╢ ║ │ │ guid = 60081 ║ ║ │ │ pid = 71926 ║ ║ │ │ port = 60081 ║ ║inboundSftp.task-launcher-0│ deployed │ stderr = /var/folders/hd/5yqz2v2d3sxd3n879f4sg4gr0000gn/T/spring-cloud-deployer-120915912946760306/inboundSftp-1540820991695/inboundSftp.task-launcher/stderr_0.log║ ║ │ │ stdout = /var/folders/hd/5yqz2v2d3sxd3n879f4sg4gr0000gn/T/spring-cloud-deployer-120915912946760306/inboundSftp-1540820991695/inboundSftp.task-launcher/stdout_0.log║ ║ │ │ url = https://192.168.64.1:60081 ║ ║ │ │working.dir = /var/folders/hd/5yqz2v2d3sxd3n879f4sg4gr0000gn/T/spring-cloud-deployer-120915912946760306/inboundSftp-1540820991695/inboundSftp.task-launcher ║ ╚═══════════════════════════╧═══════════╧════════════════════════════════════════════════════════════════════════════════════════════════════════════════════════════════════════════════════════════════════════╝ -
Add data
Normally data would be uploaded to an SFTP server. We will simulate this by copying a file into the directory specified by
--remote-dir. Sample data can be found in thedata/directory of the Batch File Ingest project.Copy
data/name-list.csvinto the/tmp/remote-filesdirectory which the SFTP source is monitoring. When this file is detected, thesftpsource will download it to the/tmp/local-filesdirectory specified by--local-dir, and emit a Task Launch Request. The Task Launch Request includes the name of the task to launch along with the local file path, given as the command line argumentlocalFilePath. Spring Batch binds each command line argument to a corresponding JobParameter. The FileIngestTask job processes the file given by the JobParameter namedlocalFilePath. Thetask-launchersink polls for messages using an exponential back-off. Since there have not been any recent requests, the task will launch within 30 seconds after the request is published.$ cp data/name-list.csv /tmp/remote-filesWhen the batch job launches, you will see something like this in the SCDF console log:
2018-10-26 16:47:24.879 INFO 86034 --- [nio-9393-exec-7] o.s.c.d.spi.local.LocalTaskLauncher : Command to be executed: /Library/Java/JavaVirtualMachines/jdk1.8.0_60.jdk/Contents/Home/jre/bin/java -jar <path-to>/batch/file-ingest/target/ingest-1.0.0.jar localFilePath=/tmp/local-files/name-list.csv --spring.cloud.task.executionid=1 2018-10-26 16:47:25.100 INFO 86034 --- [nio-9393-exec-7] o.s.c.d.spi.local.LocalTaskLauncher : launching task fileIngestTask-8852d94d-9dd8-4760-b0e4-90f75ee028de Logs will be in /var/folders/hd/5yqz2v2d3sxd3n879f4sg4gr0000gn/T/fileIngestTask3100511340216074735/1540586844871/fileIngestTask-8852d94d-9dd8-4760-b0e4-90f75ee028de -
Inspect Job Executions
After data is received and the batch job runs, it will be recorded as a Job Execution. We can view job executions by for example issuing the following command in the Spring Cloud Data Flow shell:
dataflow:>job execution list
╔═══╤═══════╤═════════╤════════════════════════════╤═════════════════════╤══════════════════╗
║ID │Task ID│Job Name │         Start Time         │Step Execution Count │Definition Status ║
╠═══╪═══════╪═════════╪════════════════════════════╪═════════════════════╪══════════════════╣
║1  │1      │ingestJob│Tue May 01 23:34:05 EDT 2018│1                    │Created           ║
╚═══╧═══════╧═════════╧════════════════════════════╧═════════════════════╧══════════════════╝
As well as list more details about that specific job execution:
dataflow:>job execution display --id 1 ╔═══════════════════════════════════════╤══════════════════════════════╗ ║ Key │ Value ║ ╠═══════════════════════════════════════╪══════════════════════════════╣ ║Job Execution Id │1 ║ ║Task Execution Id │1 ║ ║Task Instance Id │1 ║ ║Job Name │ingestJob ║ ║Create Time │Fri Oct 26 16:57:51 EDT 2018 ║ ║Start Time │Fri Oct 26 16:57:51 EDT 2018 ║ ║End Time │Fri Oct 26 16:57:53 EDT 2018 ║ ║Running │false ║ ║Stopping │false ║ ║Step Execution Count │1 ║ ║Execution Status │COMPLETED ║ ║Exit Status │COMPLETED ║ ║Exit Message │ ║ ║Definition Status │Created ║ ║Job Parameters │ ║ ║-spring.cloud.task.executionid(STRING) │1 ║ ║run.id(LONG) │1 ║ ║localFilePath(STRING) │/tmp/local-files/name-list.csv║ ╚═══════════════════════════════════════╧══════════════════════════════╝ -
Verify data
When the the batch job runs, it processes the file in the local directory
/tmp/local-filesand transforms each item to uppercase names and inserts it into the database.You may use any database tool that supports the H2 database to inspect the data. In this example we use the database tool
DBeaver. Lets inspect the table to ensure our data was processed correctly.Within DBeaver, create a connection to the database using the JDBC URL
jdbc:h2:tcp://localhost:19092/mem:dataflow, and usersawith no password. When connected, expand thePUBLICschema, then expandTablesand then double click on the tablePEOPLE. When the table data loads, click the "Data" tab to view the data. -
You’re done!
5.1.3. Running on Cloud Foundry
Additional Prerequisites
Running this demo in Cloud Foundry requires a shared file system that is accessed by apps running in different containers.
This feature is provided by NFS Volume Services.
To use Volume Services with SCDF, it is required that we provide nfs configuration via cf create-service rather than cf bind-service.
Cloud Foundry introduced the cf create-service configuration option for Volume Services in version 2.3.
|
-
A Cloud Foundry instance v2.3+ with NFS Volume Services enabled
-
An SFTP server accessible from the Cloud Foundry instance
-
An
nfsservice instance properly configured
For this example, we use an NFS host configured to allow read-write access to the Cloud Foundry instance.
Create the nfs service instance using a command as below, where share specifies the NFS host and shared directory(/export), uid an gid specify an account that has read-write access to the shared directory, and mount is the container’s mount path for each application bound to nfs:
|
$ cf create-service nfs Existing nfs -c '{"share":"<nfs_host_ip>/export","uid":"<uid>","gid":"<gid>", "mount":"/var/scdf"}'-
A
mysqlservice instance -
A
rabbitservice instance -
PivotalMySQLWeb or another database tool to view the data
-
Spring Cloud Data Flow installed on Cloud Foundry
Follow the installation instructions to run Spring Cloud Data Flow on Cloud Foundry.
Configuring the SCDF and Skipper servers
For convenience, we will configure the SCDF server to bind all stream and task apps to the nfs service. Using the Cloud Foundry CLI,
set the following environment variables (or set them in the manifest):
cf set-env <dataflow-server-app-name> SPRING_CLOUD_DATAFLOW_TASK_PLATFORM_CLOUDFOUNDRY_ACCOUNTS[default]_DEPLOYMENT_SERVICES: mysql,nfsFor the Skipper server:
cf set-env <skipper-server-app-name> SPRING_CLOUD_SKIPPER_SERVER_PLATFORM_CLOUDFOUNDRY_ACCOUNTS[default]_DEPLOYMENT_SERVICES: rabbit,nfs| Normally, for security and operational efficiency, we may want more fine grained control of which apps bind to the nfs service. One way to do this is to set deployment properties when creating and deploying the stream, as shown below. |
Running the Demo
The source code for the Batch File Ingest batch job is located in batch/file-ingest.
The resulting executable jar file must be available in a location that is accessible to your Cloud Foundry instance, such as an HTTP server or Maven repository.
For convenience, the jar is published to the Spring Maven repository
-
Create the remote directory
Create a directory on the SFTP server where the
sftpsource will detect files and download them for processing. This path must exist prior to running the demo and can be any location that is accessible by the configured SFTP user. On the SFTP server create a directory calledremote-files, for example:sftp> mkdir remote-files -
Create a shared NFS directory
Create a directory on the NFS server that is accessible to the user, specified by
uidandgid, used to create the nfs service:$ sudo mkdir /export/shared-files $ sudo chown <uid>:<gid> /export/shared-files -
Register the
sftp-dataflowsource and thetasklauncher-dataflowsinkWith our Spring Cloud Data Flow server running, we register the
sftp-dataflowsource andtask-launcher-dataflowsink. Thesftp-dataflowsource application will do the work of polling the remote directory for new files and downloading them to the local directory. As each file is received, it emits a message for thetask-launcher-dataflowsink to launch the task to process the data from that file.In the Spring Cloud Data Flow shell:
dataflow:>app register --name sftp --type source --uri maven://org.springframework.cloud.stream.app:sftp-dataflow-source-rabbit:2.1.0.RELEASE Successfully registered application 'source:sftp' dataflow:>app register --name task-launcher --type sink --uri maven://org.springframework.cloud.stream.app:task-launcher-dataflow-sink-rabbit:1.0.1.RELEASE Successfully registered application 'sink:task-launcher' -
Register and create the file ingest task:
dataflow:>app register --name fileIngest --type task --uri maven://io.spring.cloud.dataflow.ingest:ingest:1.0.0.BUILD-SNAPSHOT Successfully registered application 'task:fileIngest' dataflow:>task create fileIngestTask --definition fileIngest Created new task 'fileIngestTask' -
Create and deploy the stream
Now lets create and deploy the stream. Once deployed, the stream will start polling the SFTP server and, when new files arrive, launch the batch job.
Replace <user>, '<pass>`, and<host>below. The<host>is the SFTP server host,<user>and<password>values are the credentials for the remote user. Additionally, replace--spring.cloud.dataflow.client.server-uri=http://<dataflow-server-route>with the URL of your dataflow server, as shown bycf apps. If you have security enabled for the SCDF server, set the appropriatespring.cloud.dataflow.clientoptions.dataflow:> app info --name task-launcher --type sink ╔══════════════════════════════╤══════════════════════════════╤══════════════════════════════╤══════════════════════════════╗ ║ Option Name │ Description │ Default │ Type ║ ╠══════════════════════════════╪══════════════════════════════╪══════════════════════════════╪══════════════════════════════╣ ║platform-name │The Spring Cloud Data Flow │default │java.lang.String ║ ║ │platform to use for launching │ │ ║ ║ │tasks. | ║ ║spring.cloud.dataflow.client.a│The login username. │<none> │java.lang.String ║ ║uthentication.basic.username │ │ │ ║ ║spring.cloud.dataflow.client.a│The login password. │<none> │java.lang.String ║ ║uthentication.basic.password │ │ │ ║ ║trigger.max-period │The maximum polling period in │30000 │java.lang.Integer ║ ║ │milliseconds. Will be set to │ │ ║ ║ │period if period > maxPeriod. │ │ ║ ║trigger.period │The polling period in │1000 │java.lang.Integer ║ ║ │milliseconds. │ │ ║ ║trigger.initial-delay │The initial delay in │1000 │java.lang.Integer ║ ║ │milliseconds. │ │ ║ ║spring.cloud.dataflow.client.s│Skip Ssl validation. │true │java.lang.Boolean ║ ║kip-ssl-validation │ │ │ ║ ║spring.cloud.dataflow.client.e│Enable Data Flow DSL access. │false │java.lang.Boolean ║ ║nable-dsl │ │ │ ║ ║spring.cloud.dataflow.client.s│The Data Flow server URI. │http://localhost:9393 │java.lang.String ║ ║erver-uri │ │ │ ║ ╚══════════════════════════════╧══════════════════════════════╧══════════════════════════════╧══════════════════════════════╝Since we configured the SCDF server to bind all stream and task apps to the
nfsservice, no deployment parameters are required.dataflow:>stream create inboundSftp --definition "sftp --username=<user> --password=<pass> --host=<host> --allow-unknown-keys=true --remote-dir=remote-files --local-dir=/var/scdf/shared-files/ --task.launch.request.taskName=fileIngestTask | task-launcher --spring.cloud.dataflow.client.server-uri=http://<dataflow-server-route>" Created new stream 'inboundSftp' dataflow:>stream deploy inboundSftp Deployment request has been sent for stream 'inboundSftp'Alternatively, we can bind the
nfsservice to thefileIngestTaskby passing deployment properties to the task via the task launch request in the stream definition:--task.launch.request.deployment-properties=deployer.*.cloudfoundry.services=nfsdataflow:>stream deploy inboundSftp --properties "deployer.sftp.cloudfoundry.services=nfs" -
Verify Stream deployment
The status of the stream to be deployed can be queried with
stream list, for example:dataflow:>stream list ╔═══════════╤═══════════════════════════════════════════════════════════════════════════════════════════════════════════════════════════════════════════════════╤══════════════════╗ ║Stream Name│ Stream Definition │ Status ║ ╠═══════════╪═══════════════════════════════════════════════════════════════════════════════════════════════════════════════════════════════════════════════════╪══════════════════╣ ║inboundSftp│sftp --task.launch.request.deployment-properties='deployer.*.cloudfoundry.services=nfs' --password='******' --host=<host> │The stream has ║ ║ │--remote-dir=remote-files --local-dir=/var/scdf/shared-files/ --task.launch.request.taskName=fileIngestTask --allow-unknown-keys=true │been successfully ║ ║ │--username=<user> | task-launcher --spring.cloud.dataflow.client.server-uri=http://<dataflow-server-route> │deployed ║ ╚═══════════╧═══════════════════════════════════════════════════════════════════════════════════════════════════════════════════════════════════════════════════╧══════════════════╝ -
Inspect logs
In the event the stream failed to deploy, or you would like to inspect the logs for any reason, the logs can be obtained from individual applications. First list the deployed apps:
$ cf apps
Getting apps in org cf_org / space cf_space as cf_user...
OK

name                                   requested state   instances   memory   disk   urls
skipper-server                         started           1/1         1G       1G     skipper-server.cfapps.io
data-flow-server                       started           1/1         2G       2G     data-flow-server.cfapps.io
fileIngestTask                         stopped           0/1         1G       1G
bxZZ5Yv-inboundSftp-task-launcher-v1   started           1/1         2G       1G     bxZZ5Yv-inboundSftp-task-launcher-v1.cfapps.io
bxZZ5Yv-inboundSftp-sftp-v1            started           1/1         2G       1G     bxZZ5Yv-inboundSftp-sftp-v1.cfapps.io
In this example, the logs for the
sftpapplication can be viewed by:cf logs bxZZ5Yv-inboundSftp-sftp-v1 --recentThe log files of this application would be useful to debug issues such as SFTP connection failures.
Additionally, the logs for the
task-launcherapplication can be viewed by:cf logs bxZZ5Yv-inboundSftp-task-launcher-v1 --recent -
Add data
Sample data can be found in the
data/directory of the Batch File Ingest project. Connect to the SFTP server and uploaddata/name-list.csvinto theremote-filesdirectory. Copydata/name-list.csvinto the/remote-filesdirectory which the SFTP source is monitoring. When this file is detected, thesftpsource will download it to the/var/scdf/shared-filesdirectory specified by--local-dir, and emit a Task Launch Request. The Task Launch Request includes the name of the task to launch along with the local file path, given as a command line argument. Spring Batch binds each command line argument to a corresponding JobParameter. The FileIngestTask job processes the file given by the JobParameter namedlocalFilePath. Thetask-launchersink polls for messages using an exponential back-off. Since there have not been any recent requests, the task will launch within 30 seconds after the request is published. -
Inspect Job Executions
After data is received and the batch job runs, it will be recorded as a Job Execution. We can view job executions by for example issuing the following command in the Spring Cloud Data Flow shell:
dataflow:>job execution list
╔═══╤═══════╤═════════╤════════════════════════════╤═════════════════════╤══════════════════╗
║ID │Task ID│Job Name │         Start Time         │Step Execution Count │Definition Status ║
╠═══╪═══════╪═════════╪════════════════════════════╪═════════════════════╪══════════════════╣
║1  │1      │ingestJob│Thu Jun 07 13:46:42 EDT 2018│1                    │Created           ║
╚═══╧═══════╧═════════╧════════════════════════════╧═════════════════════╧══════════════════╝
As well as list more details about that specific job execution:
dataflow:>job execution display --id 1 ╔═══════════════════════════════════════════╤════════════════════════════════════╗ ║ Key │ Value ║ ╠═══════════════════════════════════════════╪════════════════════════════════════╣ ║Job Execution Id │1 ║ ║Task Execution Id │1 ║ ║Task Instance Id │1 ║ ║Job Name │ingestJob ║ ║Create Time │Wed Oct 31 03:17:34 EDT 2018 ║ ║Start Time │Wed Oct 31 03:17:34 EDT 2018 ║ ║End Time │Wed Oct 31 03:17:34 EDT 2018 ║ ║Running │false ║ ║Stopping │false ║ ║Step Execution Count │1 ║ ║Execution Status │COMPLETED ║ ║Exit Status │COMPLETED ║ ║Exit Message │ ║ ║Definition Status │Created ║ ║Job Parameters │ ║ ║-spring.cloud.task.executionid(STRING) │1 ║ ║run.id(LONG) │1 ║ ║localFilePath(STRING) │/var/scdf/shared-files/name_list.csv║ ╚═══════════════════════════════════════════╧════════════════════════════════════╝ -
Verify data
When the the batch job runs, it processes the file in the local directory
/var/scdf/shared-filesand transforms each item to uppercase names and inserts it into the database.Use PivotalMySQLWeb to inspect the data.
-
You’re done!
5.1.4. Running on Kubernetes
Additional Prerequisites
-
A Kubernetes cluster
-
A database tool such as DBeaver to inspect the database contents
-
An SFTP server accessible from the Kubernetes cluster
-
An NFS server accessible from the Kubernetes cluster
| For this example, we use an NFS host configured to allow read-write access. |
-
Spring Cloud Data Flow installed on Kubernetes
Follow the installation instructions to run Spring Cloud Data Flow on Kubernetes.
-
Configure a Kubernetes Persistent Volume named
nfsusing the Host IP of the NFS server and the shared directory path:apiVersion: v1 kind: PersistentVolume metadata: name: nfs spec: capacity: storage: 50Gi accessModes: - ReadWriteMany nfs: server: <NFS_SERVER_IP> path: <NFS_SHARED_PATH>Copy and save the above to
pv-nfs.yamland replace<NFS_SERVER_IP>with the IP address of the NFS Server and <NFS_SHARED_PATH> with a shared directory on the server, e.g./export. Create the resource:$kubectl apply -f pv-nfs.yaml persistentvolume/nfs created -
Configure a Persistent Volume Claim on the
nfspersistent volume. We will also name the PVCnfs. Later, we will configure our apps to use this to mount the NFS shared directory.apiVersion: v1 kind: PersistentVolumeClaim metadata: name: nfs spec: accessModes: - ReadWriteMany resources: requests: storage: 5GiCopy and save the above to
pvc-nsf.yamland create the PVC resource:$kubectl apply -f pvc-nsf.yaml persistentvolumeclaim/nfs created
Running the Demo
The source code for the Batch File Ingest batch job is located in batch/file-ingest.
We will need to build a Docker image for this app and publish it to a Docker registry
accessible to your Kubernetes cluster.
For your convenience, the Docker image is available at
springcloud/ingest.
-
Build and publish the Docker image
Skip this step if you are using the pre-built image. We are using the
fabric8Maven docker plugin. which will push images to Docker Hub by default. You will need to have a Docker Hub account for this. Note the-Pkubernetesflag adds a dependency to provide the required Maria DB JDBC driver.$cd batch/file-ingest $mvn clean package docker:build docker:push -Ddocker.org=<DOCKER_ORG> -Ddocker.username=<DOCKER_USERNAME> -Ddocker.password=<DOCKER_PASSWORD> -Pkubernetes -
Create the remote directory
Create a directory on the SFTP server where the
sftpsource will detect files and download them for processing. This path must exist prior to running the demo and can be any location that is accessible by the configured SFTP user. On the SFTP server create a directory calledremote-files, for example:sftp> mkdir remote-files -
Create a shared NFS directory
Create a read/write directory on the NFS server.
$ sudo mkdir /export/shared-files $ sudo chmod 0777 /export/shared-files -
Register the
sftp-dataflowsource and thetasklauncher-dataflowsinkWith our Spring Cloud Data Flow server running, we register the
sftp-dataflowsource andtask-launcher-dataflowsink. Thesftp-dataflowsource application will do the work of polling the remote directory for new files and downloading them to the local directory. As each file is received, it emits a message for thetask-launcher-dataflowsink to launch the task to process the data from that file.In the Spring Cloud Data Flow shell:
dataflow:>app register --name sftp --type source --uri docker:springcloud/sftp-dataflow-source-kafka --metadata-uri maven://org.springframework.cloud.stream.app:sftp-dataflow-source-kafka:jar:metadata:2.1.0.RELEASE Successfully registered application 'source:sftp' dataflow:>app register --name task-launcher --type sink --uri docker:springcloud/task-launcher-dataflow-sink-kafka --metadata-uri maven://org.springframework.cloud.stream.app:task-launcher-dataflow-sink-kafka:jar:metadata:1.0.1.RELEASE Successfully registered application 'sink:task-launcher' -
Register and create the file ingest task:
dataflow:>app register --name fileIngest --type task --uri docker:springcloud/ingest Successfully registered application 'task:fileIngest' dataflow:>task create fileIngestTask --definition fileIngest Created new task 'fileIngestTask' -
Create and deploy the stream
Now lets create the stream. Once deployed, the stream will start polling the SFTP server and, when new files arrive, launch the batch job.
dataflow:>stream create inboundSftp --definition "sftp --host=<host> --username=<user> --password=<password> --allow-unknown-keys=true --remote-dir=/remote-files --local-dir=/staging/shared-files --task.launch.request.taskName=fileIngestTask --task.launch.request.deployment-properties="deployer.*.kubernetes.volumes=[{'name':'staging','persistentVolumeClaim':{'claimName':'nfs'}}],deployer.*.kubernetes.volumeMounts=[{'mountPath':'/staging','name':'staging'}]"| task-launcher --spring.cloud.dataflow.client.server-uri=http://<dataflow-server-ip>"Replace <user>, '<pass>`, and<host>above. The<host>is the SFTP server host,<user>and<password>values are the credentials for the remote user. Additionally, replace--spring.cloud.dataflow.client.server-uri=http://<dataflow-server-ip>with the Cluster IP (External IP should work as well) of your dataflow server, as shown bykubectl get svc/scdf-server. The default Data Flow server credentials areuserandpassword.Here we use the Kubernetes Persistent Volume Claim(PVC) resource that we created earlier. In the stream definition, the PVC and the associated Volume Mount are passed to the task via --task.launch.request.deployment-properties. Thedeployer.*.kubernetes…properties provide native Kubernetes specs as JSON to instruct the Data Flow server’s deployer to add this configuration to the container configuration for the pod that will run the batch job. We mount the NFS shared directory that we configured in thenfsPersistent Volume(PV) as/stagingin the pod’s local file system. ThenfsPVC allows the pod to allocate space on the PV. The corresponding configuration, targeting thesftpsource is used to deploy the stream. This enables thesftpsource to share NFS mounted files with the launched task.Now let’s deploy the stream.
dataflow:>stream deploy inboundSftp --properties "deployer.sftp.kubernetes.volumes=[{'name':'staging','persistentVolumeClaim':{'claimName':'nfs'}}],deployer.sftp.kubernetes.volumeMounts=[{'mountPath':'/staging','name':'staging'}]" -
Verify Stream deployment
The status of the stream to be deployed can be queried with
stream list, for example:dataflow:>stream list ╔═══════════╤═══════════════════════════════════════════════════════════════════════════════════════════════════════════════════════════════════════════════════════════════════════════════════════════════════════════════════════════╤════════════╗ ║Stream Name│ Stream Definition │ Status ║ ╠═══════════╪═══════════════════════════════════════════════════════════════════════════════════════════════════════════════════════════════════════════════════════════════════════════════════════════════════════════════════════════╪════════════╣ ║inboundSftp│sftp │The stream ║ ║ │--task.launch.request.deployment-properties="deployer.*.kubernetes.volumes=[{'name':'staging','persistentVolumeClaim':{'claimName':'nfs'}}],deployer.*.kubernetes.volumeMounts=[{'mountPath':'/staging','name':'staging'}]"│has been ║ ║ │--password='******' --local-dir=/staging/shared-files --host=<host> --remote-dir=/remote-files --task.launch.request.taskName=fileIngestTask --allow-unknown-keys=true --username=<user> | task-launcher │successfully║ ║ │--spring.cloud.dataflow.client.server-uri=http://<dataflow-server-ip> --spring.cloud.dataflow.client.authentication.basic.username=user --spring.cloud.dataflow.client.authentication.basic.password='******' │deployed ║ ╚═══════════╧═══════════════════════════════════════════════════════════════════════════════════════════════════════════════════════════════════════════════════════════════════════════════════════════════════════════════════════════╧════════════╝ -
Inspect logs
In the event the stream failed to deploy, or you would like to inspect the logs for any reason, the logs can be obtained from individual applications. First list the pods. The following shows all are in a healthy state.:
$ kubectl get pods
NAME                                         READY   STATUS      RESTARTS   AGE
inboundsftp-sftp-7c44b54cc4-jd65c            1/1     Running     0          1m
inboundsftp-task-launcher-768d8f45bd-2s4wc   1/1     Running     0          1m
kafka-broker-696786c8f7-4chnn                1/1     Running     0          1d
kafka-zk-5f9bff7d5-4tbb7                     1/1     Running     0          1d
mysql-f878678df-ml5vd                        1/1     Running     0          1d
redis-748db48b4f-zz2ht                       1/1     Running     0          1d
scdf-server-64fb996ffb-dmwpj                 1/1     Running     0          1d
In this example, the logs for the
sftpapplication can be viewed by:$kubectl logs -f inboundsftp-sftp-7c44b54cc4-jd65cThe log files of this application would be useful to debug issues such as SFTP connection failures.
Additionally, the logs for the
task-launcherapplication can be viewed by:$kubectl logs -f inboundsftp-task-launcher-768d8f45bd-2s4wcAnother way to access pods is via metadata labels. The SCDF deployer configures some useful labels, such as spring-app-id=<stream-name>-<app-name>, converted to lowercase. Sokubectl logs -lspring-app-id=inboundsftp-sftp, for example, will also work. -
Add data
Sample data can be found in the
data/directory of the Batch File Ingest project. Connect to the SFTP server and uploaddata/name-list.csvinto theremote-filesdirectory. Copydata/name-list.csvinto the/remote-filesdirectory which the SFTP source is monitoring. When this file is detected, thesftpsource will download it to the/staging/shared-filesdirectory specified by--local-dir, and emit a Task Launch Request. The Task Launch Request includes the name of the task to launch along with the local file path, given as a command line argument. Spring Batch binds each command line argument to a corresponding JobParameter. The FileIngestTask job processes the file given by the JobParameter namedlocalFilePath. Thetask-launchersink polls for messages using an exponential back-off. Since there have not been any recent requests, the task will launch within 30 seconds after the request is published. -
Inspect Job Executions
After data is received and the batch job runs, it will be recorded as a Job Execution. We can view job executions by for example issuing the following command in the Spring Cloud Data Flow shell:
dataflow:>job execution list
╔═══╤═══════╤═════════╤════════════════════════════╤═════════════════════╤══════════════════╗
║ID │Task ID│Job Name │         Start Time         │Step Execution Count │Definition Status ║
╠═══╪═══════╪═════════╪════════════════════════════╪═════════════════════╪══════════════════╣
║1  │1      │ingestJob│Fri Nov 30 15:45:29 EST 2018│1                    │Created           ║
╚═══╧═══════╧═════════╧════════════════════════════╧═════════════════════╧══════════════════╝
As well as list more details about that specific job execution:
dataflow:>job execution display --id 1 ╔═══════════════════════════════════════════╤══════════════════════════════════════╗ ║ Key │ Value ║ ╠═══════════════════════════════════════════╪══════════════════════════════════════╣ ║Job Execution Id │1 ║ ║Task Execution Id │3 ║ ║Task Instance Id │1 ║ ║Job Name │ingestJob ║ ║Create Time │Fri Nov 30 13:52:38 EST 2018 ║ ║Start Time │Fri Nov 30 13:52:38 EST 2018 ║ ║End Time │Fri Nov 30 13:52:38 EST 2018 ║ ║Running │false ║ ║Stopping │false ║ ║Step Execution Count │1 ║ ║Execution Status │COMPLETED ║ ║Exit Status │COMPLETED ║ ║Exit Message │ ║ ║Definition Status │Created ║ ║Job Parameters │ ║ ║-spring.cloud.task.executionid(STRING) │1 ║ ║run.id(LONG) │1 ║ ║-spring.datasource.username(STRING) │root ║ ║-spring.cloud.task.name(STRING) │fileIngestTask ║ ║-spring.datasource.password(STRING) │****************** ║ ║-spring.datasource.driverClassName(STRING) │org.mariadb.jdbc.Driver ║ ║localFilePath(STRING) │classpath:data.csv ║ ║-spring.datasource.url(STRING) │jdbc:mysql://10.100.200.152:3306/mysql║ ╚═══════════════════════════════════════════╧══════════════════════════════════════╝ -
Verify data
When the the batch job runs, it processes the file in the local directory
/staging/shared-filesand transforms each item to uppercase names and inserts it into the database. In this case, we are using the same database that SCDF uses to store task execution and job execution status. We can use port forwarding to access the mysql server on a local port.$ kubectl get pods NAME READY STATUS RESTARTS AGE inboundsftp-sftp-7c44b54cc4-jd65c 1/1 Running 0 1m inboundsftp-task-launcher-768d8f45bd-2s4wc 1/1 Running 0 1m kafka-broker-696786c8f7-4chnn 1/1 Running 0 1d kafka-zk-5f9bff7d5-4tbb7 1/1 Running 0 1d mysql-f878678df-ml5vd 1/1 Running 0 1d redis-748db48b4f-zz2ht 1/1 Running 0 1d scdf-server-64fb996ffb-dmwpj 1/1 Running 0 1d$kubectl port-forward pod/mysql-f878678df-ml5vd 3306:3306 &
You may use any database tool that supports the MySQL database to inspect the data. In this example we use the database tool
DBeaver. Lets inspect the table to ensure our data was processed correctly.Within DBeaver, create a connection to the database using the JDBC URL
jdbc:mysql://localhost:3306/mysql, and userrootwith passwordyourpassword, the default for themysqldeployment. When connected, expand themysqlschema, then expandTablesand then double click on the tablepeople. When the table data loads, click the "Data" tab to view the data. -
You’re done!
5.1.5. Limiting Concurrent Task Executions
The Batch File Ingest - SFTP Demo processes a single file with 5000+ items. What if we copy 100 files to the remote directory? The sftp source will process them immediately, generating 100 task launch requests. The Dataflow Server launches tasks asynchronously so this could potentially overwhelm the resources of the runtime platform. For example, when running the Data Flow server on your local machine, each launched task creates a new JVM. In Cloud Foundry, each task creates a new container instance.
Fortunately, Spring Cloud Data Flow provides configuration settings to limit the number of concurrently running tasks. We can use this demo to see how this works.
Configuring the SCDF server
Set the maximum concurrent tasks to 3.
For running tasks on a local server, restart the server, adding a command line argument spring.cloud.dataflow.task.platform.local.accounts[default].maximum-concurrent-tasks=3.
If running on Cloud Foundry, cf set-env <dataflow-server> SPRING_CLOUD_DATAFLOW_TASK_PLATFORM_CLOUDFOUNDRY_ACCOUNTS[DEFAULT]_DEPLOYMENT_MAXIMUMCONCURRENTTASKS 3, and restage.
Running the demo
Follow the main demo instructions but change the Add Data step, as described below.
-
Monitor the task launcher
Tail the logs on the
task-launcherapp.If there are no requests in the input queue, you will see something like:
07:42:51.760  INFO  o.s.c.s.a.t.l.d.s.LaunchRequestConsumer  : No task launch request received- increasing polling period to 2 seconds.
07:42:53.768  INFO  o.s.c.s.a.t.l.d.s.LaunchRequestConsumer  : No task launch request received- increasing polling period to 4 seconds.
07:42:57.780  INFO  o.s.c.s.a.t.l.d.s.LaunchRequestConsumer  : No task launch request received- increasing polling period to 8 seconds.
07:43:05.791  INFO  o.s.c.s.a.t.l.d.s.LaunchRequestConsumer  : No task launch request received- increasing polling period to 16 seconds.
07:43:21.801  INFO  o.s.c.s.a.t.l.d.s.LaunchRequestConsumer  : No task launch request received- increasing polling period to 30 seconds.
07:43:51.811  INFO  o.s.c.s.a.t.l.d.s.LaunchRequestConsumer  : No task launch request received
07:44:21.824  INFO  o.s.c.s.a.t.l.d.s.LaunchRequestConsumer  : No task launch request received
07:44:51.834  INFO  o.s.c.s.a.t.l.d.s.LaunchRequestConsumer  : No task launch request received
The first three messages show the exponential backoff at start up or after processing the final request. The the last three message show the task launcher in a steady state of polling for messages every 30 seconds. Of course, these values are configurable.
The task launcher sink polls the input destination. The polling period adjusts according to the presence of task launch requests and also to the number of currently running tasks reported via the Data Flow server’s
tasks/executions/currentREST endpoint. The sink queries this endpoint and will pause polling the input for new requests if the number of concurrent tasks is at its limit. This introduces a 1-30 second lag between the creation of the task launch request and the execution of the request, sacrificing some performance for resilience. Task launch requests will never be sent to a dead letter queue because the server is busy or unavailable. The exponential backoff also prevents the app from querying the server excessively when there are no task launch requests.You can also monitor the Data Flow server:
$ watch curl <dataflow-server-url>/tasks/executions/current Every 2.0s: curl http://localhost:9393/tasks/executions/current ultrafox.local: Wed Oct 31 08:38:53 2018 % Total % Received % Xferd Average Speed Time Time Time Current Dload Upload Total Spent Left Speed 0 0 0 0 0 0 0 0 --:--:-- --:--:-- --:--:-- 0100 53 0 53 0 0 53 0 --:--:-- --:--:-- --:--:-- 5888 {"maximumTaskExecutions":3,"runningExecutionCount":0} -
Add Data
The directory
batch/file-ingest/data/splitcontains the contents ofbatch/file-ingest/data/name-list.csvsplit into 20 files, not 100 but enough to illustrate the concept. Upload these files to the SFTP remote directory, e.g.,
sftp>cd remote-files
sftp>lcd batch/file-ingest/data/split
sftp>mput *
Or if using the local machine as the SFTP server:
>cp * /tmp/remote-filesIn the task-launcher logs, you should now see:
INFO o.s.c.s.a.t.l.d.s.LaunchRequestConsumer  : Polling period reset to 1000 ms.
INFO o.s.c.s.a.t.l.d.s.LaunchRequestConsumer  : Launching Task fileIngestTask
WARN o.s.c.s.a.t.l.d.s.LaunchRequestConsumer  : Data Flow server has reached its concurrent task execution limit: (3)
INFO o.s.c.s.a.t.l.d.s.LaunchRequestConsumer  : Polling paused- increasing polling period to 2 seconds.
INFO o.s.c.s.a.t.l.d.s.LaunchRequestConsumer  : Polling resumed
INFO o.s.c.s.a.t.l.d.s.LaunchRequestConsumer  : Launching Task fileIngestTask
INFO o.s.c.s.a.t.l.d.s.LaunchRequestConsumer  : Polling period reset to 1000 ms.
INFO o.s.c.s.a.t.l.d.s.LaunchRequestConsumer  : Launching Task fileIngestTask
INFO o.s.c.s.a.t.l.d.s.LaunchRequestConsumer  : Launching Task fileIngestTask
WARN o.s.c.s.a.t.l.d.s.LaunchRequestConsumer  : Data Flow server has reached its concurrent task execution limit: (3)
INFO o.s.c.s.a.t.l.d.s.LaunchRequestConsumer  : Polling paused- increasing polling period to 2 seconds.
...
5.1.6. Avoid Duplicate Processing
The sftp source will not process files that it has already seen.
It uses a Metadata Store to keep track of files by extracting content from messages at runtime.
Out of the box, it uses an in-memory Metadata Store.
Thus, if we re-deploy the stream, this state is lost and files will be reprocessed.
Thanks to the magic of Spring, we can inject one of the available persistent Metadata Stores.
In this example, we will use the JDBC Metadata Store since we are already using a database.
-
Configure and Build the SFTP source
For this we add some JDBC dependencies to the
sftp-dataflowsource.Clone the sftp stream app starter. From the sftp directory. Replace <binder> below with
kafkaorrabbitas appropriate for your configuration:$ ./mvnw clean install -DskipTests -PgenerateApps $ cd apps/sftp-dataflow-source-<binder>Add the following dependencies to
pom.xml:<dependency> <groupId>org.springframework.integration</groupId> <artifactId>spring-integration-jdbc</artifactId> </dependency> <dependency> <groupId>org.springframework.boot</groupId> <artifactId>spring-boot-starter-jdbc</artifactId> </dependency> <dependency> <groupId>com.h2database</groupId> <artifactId>h2</artifactId> </dependency>If you are running on a local server with the in memory H2 database, set the JDBC url in
src/main/resources/application.propertiesto use the Data Flow server’s database:spring.datasource.url=jdbc:h2:tcp://localhost:19092/mem:dataflowIf you are running in Cloud Foundry, we will bind the source to the
mysqlservice. Add the following property tosrc/main/resources/application.properties:spring.integration.jdbc.initialize-schema=alwaysBuild the app:
$./mvnw clean package -
Register the jar
If running in Cloud Foundry, the resulting executable jar file must be available in a location that is accessible to your Cloud Foundry instance, such as an HTTP server or Maven repository. If running on a local server:
dataflow>app register --name sftp --type source --uri file:<project-directory>/sftp/apps/sftp-dataflow-source-kafka/target/sftp-dataflow-source-kafka-X.X.X.jar --force -
Run the Demo
Follow the instructions for building and running the main SFTP File Ingest demo, for your preferred platform, up to the
Add Data Step. If you have already completed the main exercise, restore the data to its initial state, and redeploy the stream:-
Clean the data directories (e.g.,
tmp/local-filesandtmp/remote-files) -
Execute the SQL command
DROP TABLE PEOPLE;in the database -
Undeploy the stream, and deploy it again to run the updated
sftpsourceIf you are running in Cloud Foundry, set the deployment properties to bind
sftpto themysqlservice. For example:dataflow>stream deploy inboundSftp --properties "deployer.sftp.cloudfoundry.services=nfs,mysql"
-
-
Add Data
Let’s use one small file for this. The directory
batch/file-ingest/data/splitcontains the contents ofbatch/file-ingest/data/name-list.csvsplit into 20 files. Upload one of them:sftp>cd remote-files sftp>lcd batch/file-ingest/data/split sftp>put names_aa.csvOr if using the local machine as the SFTP server:
$cp names_aa.csv truncate INT_METADATA_STORE; -
Inspect data
Using a Database browser, as described in the main demo, view the contents of the
INT_METADATA_STOREtable. Figure 1. JDBC Metadata Store
Note that there is a single key-value pair, where the key identies the file name (the prefix
sftpSource/provides a namespace for thesftpsource app) and the value is a timestamp indicating when the message was received. The metadata store tracks files that have already been processed. This prevents the same files from being pulled every from the remote directory on every polling cycle. Only new files, or files that have been updated will be processed. Since there are no uniqueness constraints on the data, a file processed multiple times by our batch job will result in duplicate entries.If we view the
PEOPLEtable, it should look something like this: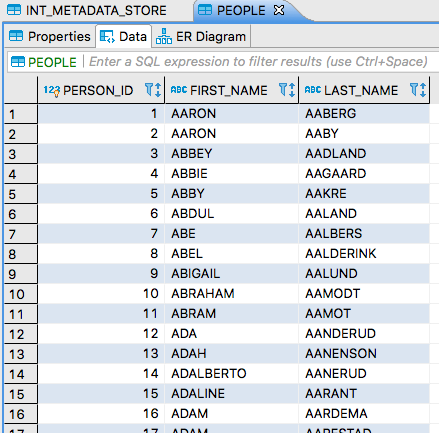 Figure 2. People Data
Now let’s update the remote file, using SFTP
putor if using the local machine as an SFTP server:$touch /tmp/remote-files/names_aa.csvNow the
PEOPLEtable will have duplicate data. If youORDER BY FIRST_NAME, you will see something like this: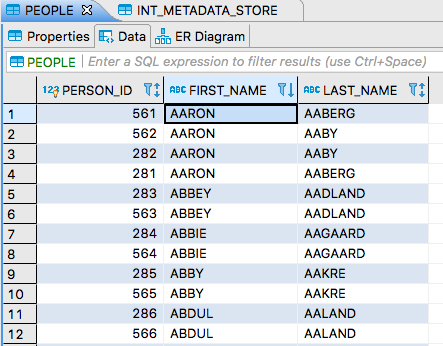 Figure 3. People Data with Duplicates
Of course, if we drop another one of files into the remote directory, that will processed and we will see another entry in the Metadata Store.
5.1.7. Summary
In this sample, you have learned:
-
How to process SFTP files with a batch job
-
How to create a stream to poll files on an SFTP server and launch a batch job
-
How to verify job status via logs and shell commands
-
How the Data Flow Task Launcher limits concurrent task executions
-
How to avoid duplicate processing of files
6. Analytics
6.1. Twitter Analytics
In this demonstration, you will learn how to build a data pipeline using Spring Cloud Data Flow to consume data from TwitterStream, compute analytics over data-in-transit using Analytics-Counter. Use Prometheus for storing and data aggregation analysis and Grafana for visualizing the computed data.
We will take you through the steps to configure Spring Cloud Data Flow’s Local server.
6.1.1. Prerequisites
-
A running Local Data Flow Server with enabled Prometheus and Grafana monitoring.
On Linux/Mac, installation instructions would look like this:
$ wget https://raw.githubusercontent.com/spring-cloud/spring-cloud-dataflow/v2.8.1/src/docker-compose/docker-compose-prometheus.yml
$ wget https://raw.githubusercontent.com/spring-cloud/spring-cloud-dataflow/v2.8.1/src/docker-compose/docker-compose.yml

$ export STREAM_APPS_URI=https://dataflow.spring.io/kafka-maven-einstein

$ docker-compose -f ./docker-compose.yml -f ./docker-compose-prometheus.yml up
This sample requires the 2.x (e.g. Einstein) pre-build applications! Depending on the platform (local, k8s or CF) and the binder (RabbitMQ or Kafka) one can install (or set via the STREAM_APPS_URIvariable for local installations) apps from the following pre-build lists: (1) Kafka:dataflow.spring.io/kafka-docker-einstein,dataflow.spring.io/kafka-maven-einstein, (2) RabbitMQ:dataflow.spring.io/rabbitmq-docker-einstein,dataflow.spring.io/rabbitmq-maven-einstein. -
A running Data Flow Shell
$ wget https://repo.spring.io/release/org/springframework/cloud/spring-cloud-dataflow-shell/2.8.1/spring-cloud-dataflow-shell-2.8.1.jar
$ java -jar spring-cloud-dataflow-shell-2.8.1.jar

Welcome to the Spring Cloud Data Flow shell. For assistance hit TAB or type "help".
dataflow:>
The Shell connects to the Data Flow Server’s REST API and supports a DSL for stream or task lifecycle managing.
If you prefer, you can use the Data Flow UI: localhost:9393/dashboard, (or wherever it the server is hosted) to perform equivalent operations.
-
Twitter credentials from Twitter Developers site
6.1.2. Building and Running the Demo
-
Create and deploy the following streams
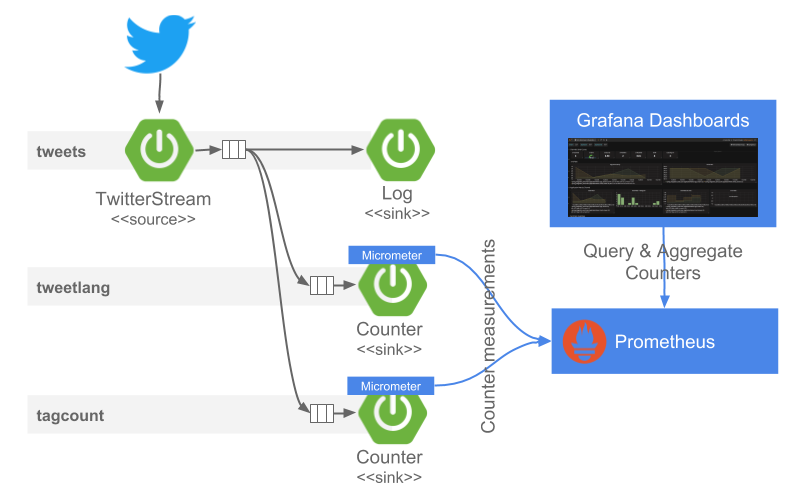
The
tweetsstream subscribes to the provided twitter account, reads the incoming JSON tweets and logs their content to the log.dataflow:>stream create tweets --definition "twitterstream --consumerKey=<CONSUMER_KEY> --consumerSecret=<CONSUMER_SECRET> --accessToken=<ACCESS_TOKEN> --accessTokenSecret=<ACCESS_TOKEN_SECRET> | log"To get a consumerKey and consumerSecret you need to register a twitter application. If you don’t already have one set up, you can create an app at the Twitter Developers site to get these credentials. The tokens <CONSUMER_KEY>,<CONSUMER_SECRET>,<ACCESS_TOKEN>, and<ACCESS_TOKEN_SECRET>are required to be replaced with your account credentials.The received tweet messages would have a JSON format similar to this:
{
  "created_at": "Thu Apr 06 15:24:15 +0000 2017",
  "id_str": "850006245121695744",
  "text": "Today we are sharing our vision for the future of the Twitter API platform!",
  "user": {
    "id": 2244994945,
    "name": "Twitter Dev",
    "screen_name": "TwitterDev",
	"lang": "en"
  },
  "place": {},
  "entities": {
    "hashtags": [
		{
		  "text": "documentation",
		  "indices": [211, 225]
		},
		{
		  "text": "GeoTagged",
		  "indices": [239, 249]
		}
    ],
    ....
  }
}
The JsonPath SpEL expressions can help to extract the attributes to be analysed. For example the
#jsonPath(payload,'$..lang')expression extracts all values of thelangattributes in the tweet. The Analytics Counter Sink maps the extracted values to custom Micrometer tags/dimensions attached to every measurement send. Thetweetlangstream created below, extracts and counts the languages found in the tweets. The counter, namedlanguage, applies the--counter.tag.expression.lang=#jsonPath(payload,'$..lang')to extract the language values and map them to a Micrometer tag named:lang. This counter generates thelanguage_totaltime-series send to Prometheus.dataflow:>stream create tweetlang --definition ":tweets.twitterstream > counter --counter.name=language --counter.tag.expression.lang=#jsonPath(payload,'$..lang')" --deploySimilarly, we can use the
#jsonPath(payload,'$.entities.hashtags[*].text')expression to extract and count the hastags in the incoming tweets. The following stream uses the counter-sink to compute real-time counts (named ashashtags) and thehtagattribute incounter.tag.expression.htagindicate to Micrometer in what tag to hold the extracted hashtag values from the incoming tweets.dataflow:>stream create tagcount --definition ":tweets.twitterstream > counter --counter.name=hashtags --counter.tag.expression.htag=#jsonPath(payload,'$.entities.hashtags[*].text')" --deployNow we can deploy the
tweetsstream to start tweet analysis.dataflow:>stream deploy tweets -
Verify the streams are successfully deployed. Where: (1) is the primary pipeline; (2) and (3) are tapping the primary pipeline with the DSL syntax
<stream-name>.<label/app name>[e.x.:tweets.twitterstream]; and (4) is the final deployment of primary pipelinedataflow:>stream list -
Notice that
tweetlang.counter,tagcount.counter,tweets.logandtweets.twitterstreamSpring Cloud Stream applications are running as Spring Boot applications within thelocal-server. -
Go to
Grafana Dashboardaccessible atlocalhost:3000, login asadmin:`admin`. Import the grafana-twitter-scdf-analytics.json dashboard.
you can import it directly using the following dashboard code: 14800.
|
You will see a dashboard similar to this:
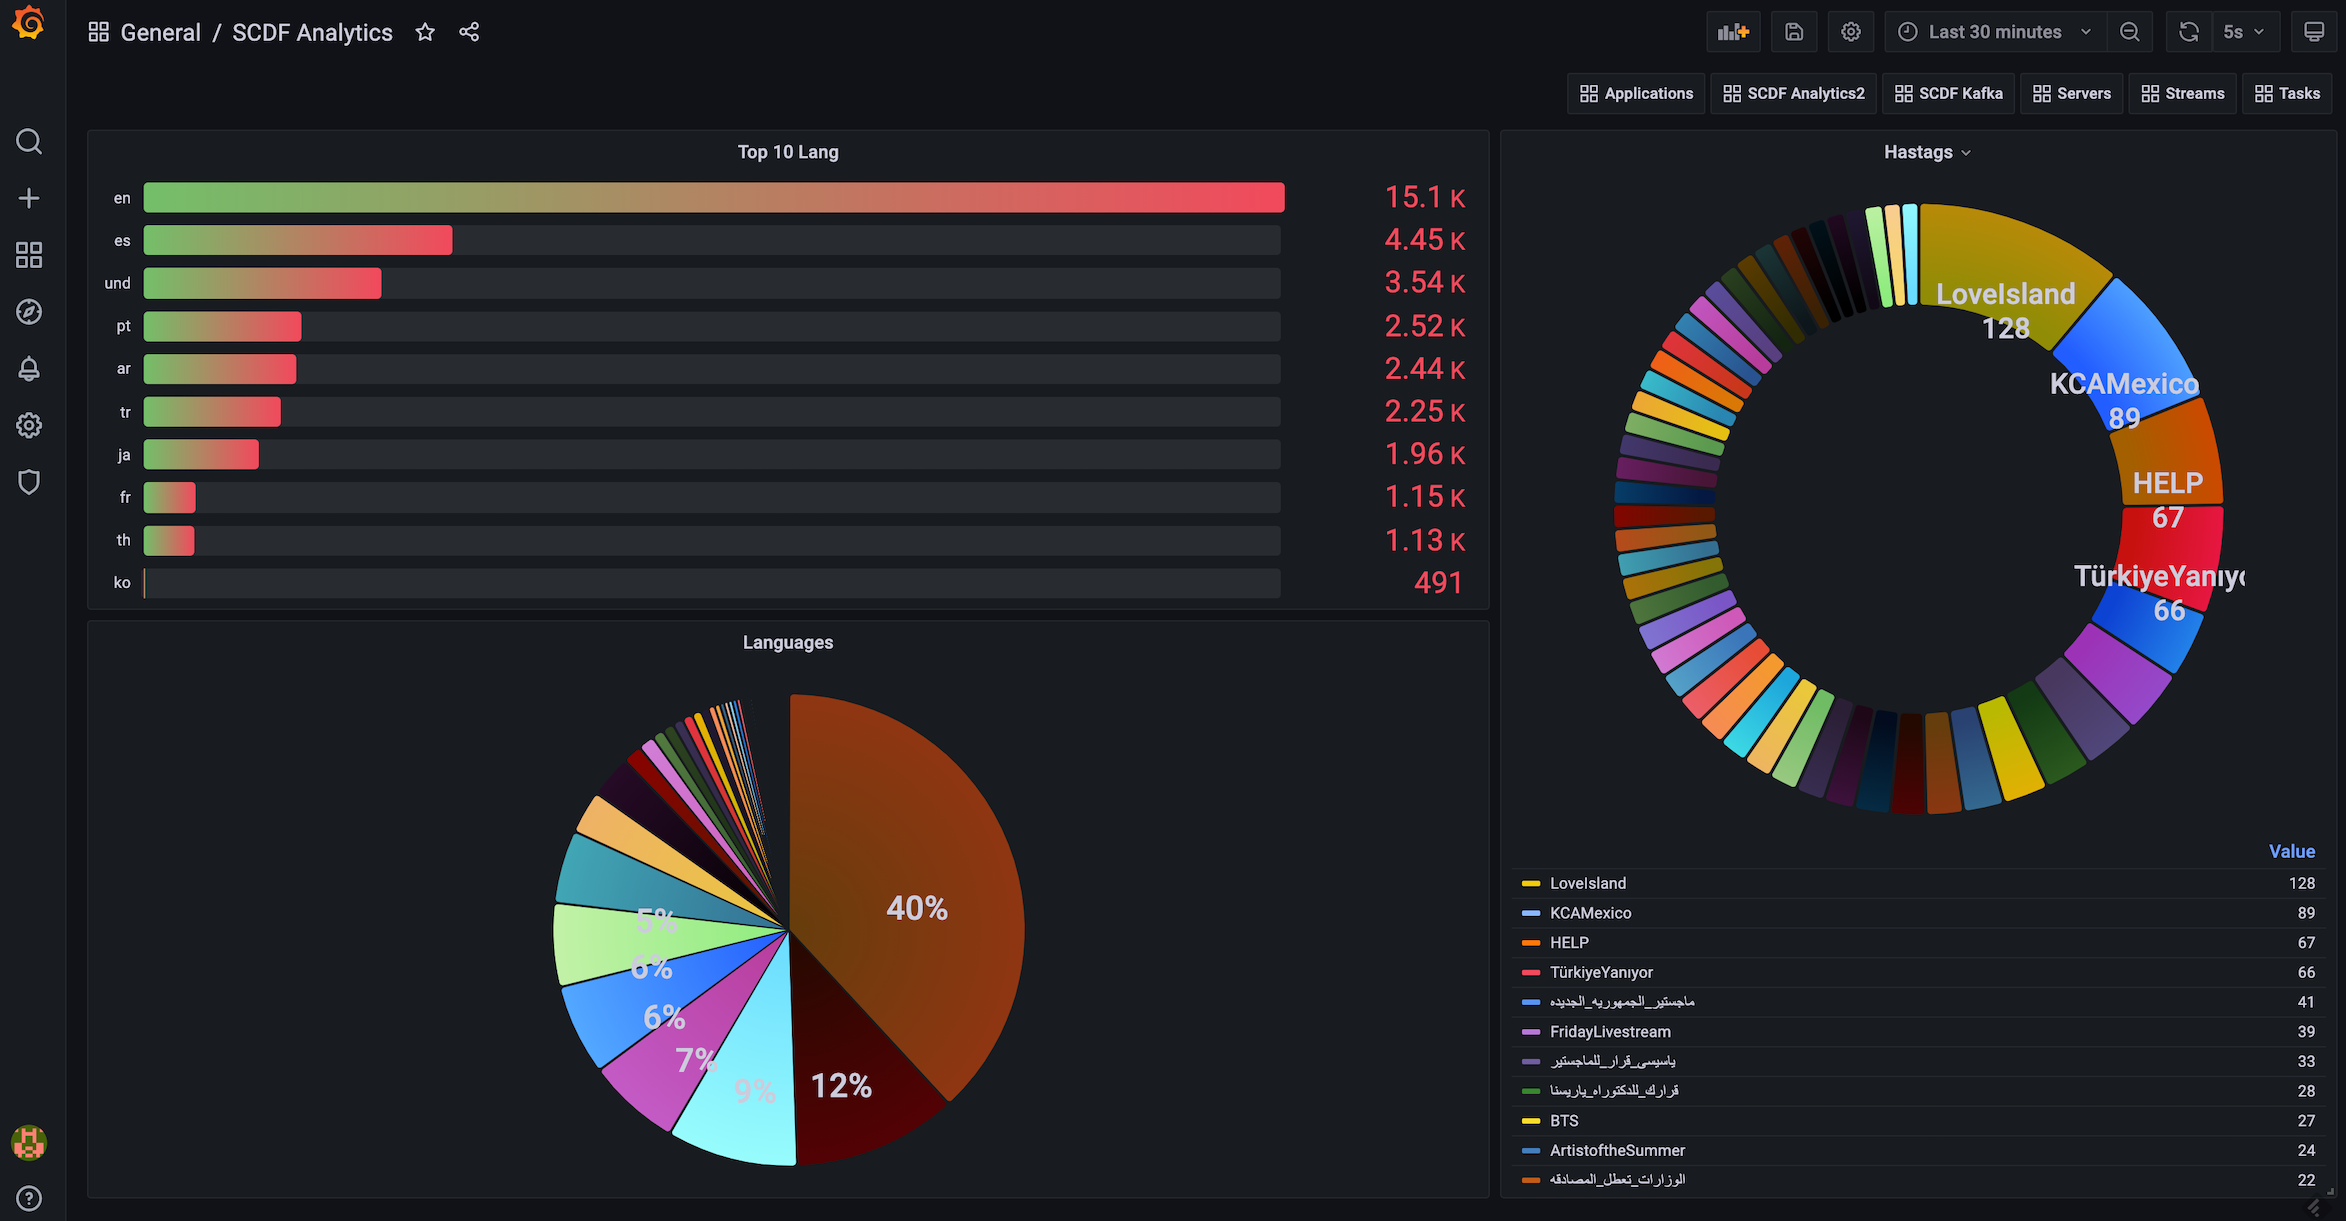
The following Prometheus queries have been used to aggregate the lang and htag data persisted in Prometheus, which can be visualized through Grafana dashboard:
sort_desc(topk(10, sum(language_total) by (lang)))
sort_desc(topk(100, sum(hashtags_total) by (htag)))
6.1.3. Summary
In this sample, you have learned:
-
How to use Spring Cloud Data Flow’s
Localserver -
How to use Spring Cloud Data Flow’s
shellapplication -
How to use Prometheus and Grafana with Spring Cloud Data Flow’s
Localserver -
How to create streaming data pipeline to compute simple analytics using
Twitter StreamandAnalytics Counterapplications
7. Data Science
7.1. Species Prediction
In this demonstration, you will learn how to use PMML model in the context of streaming data pipeline orchestrated by Spring Cloud Data Flow.
We will present the steps to prep, configure and rub Spring Cloud Data Flow’s Local server, a Spring Boot application.
7.1.1. Prerequisites
-
A Running Data Flow Shell
the Spring Cloud Data Flow Shell and Local server implementation are in the same repository and are both built by running ./mvnw install from the project root directory. If you have already run the build, use the jar in spring-cloud-dataflow-shell/target
|
To run the Shell open a new terminal session:
$ cd <PATH/TO/SPRING-CLOUD-DATAFLOW-SHELL-JAR>
$ java -jar spring-cloud-dataflow-shell-<VERSION>.jar
  ____                              ____ _                __
 / ___| _ __  _ __(_)_ __   __ _   / ___| | ___  _   _  __| |
 \___ \| '_ \| '__| | '_ \ / _` | | |   | |/ _ \| | | |/ _` |
  ___) | |_) | |  | | | | | (_| | | |___| | (_) | |_| | (_| |
 |____/| .__/|_|  |_|_| |_|\__, |  \____|_|\___/ \__,_|\__,_|
  ____ |_|    _          __|___/                 __________
 |  _ \  __ _| |_ __ _  |  ___| | _____      __  \ \ \ \ \ \
 | | | |/ _` | __/ _` | | |_  | |/ _ \ \ /\ / /   \ \ \ \ \ \
 | |_| | (_| | || (_| | |  _| | | (_) \ V  V /    / / / / / /
 |____/ \__,_|\__\__,_| |_|   |_|\___/ \_/\_/    /_/_/_/_/_/


Welcome to the Spring Cloud Data Flow shell. For assistance hit TAB or type "help".
dataflow:>| The Spring Cloud Data Flow Shell is a Spring Boot application that connects to the Data Flow Server’s REST API and supports a DSL that simplifies the process of defining a stream or task and managing its lifecycle. Most of these samples use the shell. If you prefer, you can use the Data Flow UI localhost:9393/dashboard, (or wherever it the server is hosted) to perform equivalent operations. |
-
A running local Data Flow Server Follow the installation instructions to run Spring Cloud Data Flow on a local host.
-
Running instance of Kafka
7.1.2. Building and Running the Demo
-
Register the out-of-the-box applications for the Kafka binder
These samples assume that the Data Flow Server can access a remote Maven repository, repo.spring.io/libs-releaseby default. If your Data Flow server is running behind a firewall, or you are using a maven proxy preventing access to public repositories, you will need to install the sample apps in your internal Maven repository and configure the server accordingly. The sample applications are typically registered using Data Flow’s bulk import facility. For example, the Shell commanddataflow:>app import --uri dataflow.spring.io/rabbitmq-maven-latest(The actual URI is release and binder specific so refer to the sample instructions for the actual URL). The bulk import URI references a plain text file containing entries for all of the publicly available Spring Cloud Stream and Task applications published torepo.spring.io. For example,source.http=maven://org.springframework.cloud.stream.app:http-source-rabbit:2.1.0.RELEASEregisters thehttpsource app at the corresponding Maven address, relative to the remote repository(ies) configured for the Data Flow server. The format ismaven://<groupId>:<artifactId>:<version>You will need to download the required apps or build them and then install them in your Maven repository, using whatever group, artifact, and version you choose. If you do this, register individual apps usingdataflow:>app register…using themaven://resource URI format corresponding to your installed app.dataflow:>app import --uri https://dataflow.spring.io/kafka-maven-latest -
Create and deploy the following stream
dataflow:>stream create --name pmmlTest --definition "http --server.port=9001 | pmml --modelLocation=https://raw.githubusercontent.com/spring-cloud/spring-cloud-stream-modules/master/pmml-processor/src/test/resources/iris-flower-classification-naive-bayes-1.pmml.xml --inputs='Sepal.Length=payload.sepalLength,Sepal.Width=payload.sepalWidth,Petal.Length=payload.petalLength,Petal.Width=payload.petalWidth' --outputs='Predicted_Species=payload.predictedSpecies' --inputType='application/x-spring-tuple' --outputType='application/json'| log" --deploy
Created and deployed new stream 'pmmlTest'
The built-in pmmlprocessor will load the given PMML model definition and create an internal object representation that can be evaluated quickly. When the stream receives the data, it will be used as the input for the evaluation of the analytical modeliris-flower-classifier-1contained in the PMML document. The result of this evaluation is a new fieldpredictedSpeciesthat was created from thepmmlprocessor by applying a classifier that uses the naiveBayes algorithm. -
Verify the stream is successfully deployed
dataflow:>stream list -
Notice that
pmmlTest.http,pmmlTest.pmml, andpmmlTest.logSpring Cloud Stream applications are running within thelocal-server.2016-02-18 06:36:45.396 INFO 31194 --- [nio-9393-exec-1] o.s.c.d.d.l.OutOfProcessModuleDeployer : deploying module org.springframework.cloud.stream.module:log-sink:jar:exec:1.0.0.BUILD-SNAPSHOT instance 0 Logs will be in /var/folders/c3/ctx7_rns6x30tq7rb76wzqwr0000gp/T/spring-cloud-data-flow-3038434123335455382/pmmlTest-1455806205386/pmmlTest.log 2016-02-18 06:36:45.402 INFO 31194 --- [nio-9393-exec-1] o.s.c.d.d.l.OutOfProcessModuleDeployer : deploying module org.springframework.cloud.stream.module:pmml-processor:jar:exec:1.0.0.BUILD-SNAPSHOT instance 0 Logs will be in /var/folders/c3/ctx7_rns6x30tq7rb76wzqwr0000gp/T/spring-cloud-data-flow-3038434123335455382/pmmlTest-1455806205386/pmmlTest.pmml 2016-02-18 06:36:45.407 INFO 31194 --- [nio-9393-exec-1] o.s.c.d.d.l.OutOfProcessModuleDeployer : deploying module org.springframework.cloud.stream.module:http-source:jar:exec:1.0.0.BUILD-SNAPSHOT instance 0 Logs will be in /var/folders/c3/ctx7_rns6x30tq7rb76wzqwr0000gp/T/spring-cloud-data-flow-3038434123335455382/pmmlTest-1455806205386/pmmlTest.http -
Post sample data to the
httpendpoint:localhost:9001(9001is theportwe specified for thehttpsource in this case)dataflow:>http post --target http://localhost:9001 --contentType application/json --data "{ \"sepalLength\": 6.4, \"sepalWidth\": 3.2, \"petalLength\":4.5, \"petalWidth\":1.5 }" > POST (application/json;charset=UTF-8) http://localhost:9001 { "sepalLength": 6.4, "sepalWidth": 3.2, "petalLength":4.5, "petalWidth":1.5 } > 202 ACCEPTED -
Verify the predicted outcome by tailing
<PATH/TO/LOGAPP/pmmlTest.log/stdout_0.logfile. ThepredictedSpeciesin this case isversicolor.{ "sepalLength": 6.4, "sepalWidth": 3.2, "petalLength": 4.5, "petalWidth": 1.5, "Species": { "result": "versicolor", "type": "PROBABILITY", "categoryValues": [ "setosa", "versicolor", "virginica" ] }, "predictedSpecies": "versicolor", "Probability_setosa": 4.728207706362856E-9, "Probability_versicolor": 0.9133639504608079, "Probability_virginica": 0.0866360448109845 } -
Let’s post with a slight variation in data.
dataflow:>http post --target http://localhost:9001 --contentType application/json --data "{ \"sepalLength\": 6.4, \"sepalWidth\": 3.2, \"petalLength\":4.5, \"petalWidth\":1.8 }" > POST (application/json;charset=UTF-8) http://localhost:9001 { "sepalLength": 6.4, "sepalWidth": 3.2, "petalLength":4.5, "petalWidth":1.8 } > 202 ACCEPTEDpetalWidthvalue changed from1.5to1.8 -
The
predictedSpecieswill now be listed asvirginica.{ "sepalLength": 6.4, "sepalWidth": 3.2, "petalLength": 4.5, "petalWidth": 1.8, "Species": { "result": "virginica", "type": "PROBABILITY", "categoryValues": [ "setosa", "versicolor", "virginica" ] }, "predictedSpecies": "virginica", "Probability_setosa": 1.0443898084700813E-8, "Probability_versicolor": 0.1750120333571921, "Probability_virginica": 0.8249879561989097 }
7.1.3. Summary
In this sample, you have learned:
-
How to use Spring Cloud Data Flow’s
Localserver -
How to use Spring Cloud Data Flow’s
shellapplication -
How to use
pmmlprocessor to compute real-time predictions
8. Functions
8.1. Functions in Spring Cloud Data Flow
This is a experiment to run Spring Cloud Function workload in Spring Cloud Data Flow. The current release of function-runner used in this sample is at 1.0 M1 release and it is not recommended to be used in production.
In this sample, you will learn how to use Spring Cloud Function based streaming applications in Spring Cloud Data Flow. To learn more about Spring Cloud Function, check out the project page.
8.1.1. Prerequisites
-
A Running Data Flow Shell
the Spring Cloud Data Flow Shell and Local server implementation are in the same repository and are both built by running ./mvnw install from the project root directory. If you have already run the build, use the jar in spring-cloud-dataflow-shell/target
|
To run the Shell open a new terminal session:
$ cd <PATH/TO/SPRING-CLOUD-DATAFLOW-SHELL-JAR>
$ java -jar spring-cloud-dataflow-shell-<VERSION>.jar
  ____                              ____ _                __
 / ___| _ __  _ __(_)_ __   __ _   / ___| | ___  _   _  __| |
 \___ \| '_ \| '__| | '_ \ / _` | | |   | |/ _ \| | | |/ _` |
  ___) | |_) | |  | | | | | (_| | | |___| | (_) | |_| | (_| |
 |____/| .__/|_|  |_|_| |_|\__, |  \____|_|\___/ \__,_|\__,_|
  ____ |_|    _          __|___/                 __________
 |  _ \  __ _| |_ __ _  |  ___| | _____      __  \ \ \ \ \ \
 | | | |/ _` | __/ _` | | |_  | |/ _ \ \ /\ / /   \ \ \ \ \ \
 | |_| | (_| | || (_| | |  _| | | (_) \ V  V /    / / / / / /
 |____/ \__,_|\__\__,_| |_|   |_|\___/ \_/\_/    /_/_/_/_/_/


Welcome to the Spring Cloud Data Flow shell. For assistance hit TAB or type "help".
dataflow:>| The Spring Cloud Data Flow Shell is a Spring Boot application that connects to the Data Flow Server’s REST API and supports a DSL that simplifies the process of defining a stream or task and managing its lifecycle. Most of these samples use the shell. If you prefer, you can use the Data Flow UI localhost:9393/dashboard, (or wherever it the server is hosted) to perform equivalent operations. |
-
A running local Data Flow Server Follow the installation instructions to run Spring Cloud Data Flow on a local host.
This sample requires access to both Spring’s snapshot and milestone repos. Please follow how-to-guides on how to set repo.spring.io/libs-release and repo.spring.io/libs-milestone as remote repositories in SCDF.
|
-
A local build of Spring Cloud Function
-
A running instance of Rabbit MQ
-
General understanding of the out-of-the-box function-runner application
8.1.2. Building and Running the Demo
-
Register the out-of-the-box applications for the Rabbit binder
These samples assume that the Data Flow Server can access a remote Maven repository, repo.spring.io/libs-releaseby default. If your Data Flow server is running behind a firewall, or you are using a maven proxy preventing access to public repositories, you will need to install the sample apps in your internal Maven repository and configure the server accordingly. The sample applications are typically registered using Data Flow’s bulk import facility. For example, the Shell commanddataflow:>app import --uri dataflow.spring.io/rabbitmq-maven-latest(The actual URI is release and binder specific so refer to the sample instructions for the actual URL). The bulk import URI references a plain text file containing entries for all of the publicly available Spring Cloud Stream and Task applications published torepo.spring.io. For example,source.http=maven://org.springframework.cloud.stream.app:http-source-rabbit:2.1.0.RELEASEregisters thehttpsource app at the corresponding Maven address, relative to the remote repository(ies) configured for the Data Flow server. The format ismaven://<groupId>:<artifactId>:<version>You will need to download the required apps or build them and then install them in your Maven repository, using whatever group, artifact, and version you choose. If you do this, register individual apps usingdataflow:>app register…using themaven://resource URI format corresponding to your installed app.dataflow:>app import --uri https://dataflow.spring.io/rabbitmq-maven-latest -
Register the out-of-the-box function-runner application (current release is at 1.0.0.M1)
dataflow:>app register --name function-runner --type processor --uri maven://org.springframework.cloud.stream.app:function-app-rabbit:1.0.0.M1 --metadata-uri maven://org.springframework.cloud.stream.app:function-app-rabbit:jar:metadata:1.0.0.M1 -
Create and deploy the following stream
dataflow:>stream create foo --definition "http --server.port=9001 | function-runner --function.className=com.example.functions.CharCounter --function.location=file:///<PATH/TO/SPRING-CLOUD-FUNCTION>/spring-cloud-function-samples/function-sample/target/spring-cloud-function-sample-1.0.0.BUILD-SNAPSHOT.jar | log" --deployReplace the <PATH/TO/SPRING-CLOUD-FUNCTION>with the correct path.The source core of CharCounterfunction is in Spring cloud Function’s samples repo. -
Verify the stream is successfully deployed.
dataflow:>stream list -
Notice that
foo-http,foo-function-runner, andfoo-logSpring Cloud Stream applications are running as Spring Boot applications and the log locations will be printed in the Local-server console..... .... 2017-10-17 11:43:03.714 INFO 18409 --- [nio-9393-exec-7] o.s.c.d.s.s.AppDeployerStreamDeployer : Deploying application named [log] as part of stream named [foo] with resource URI [maven://org.springframework.cloud.stream.app:log-sink-rabbit:jar:1.2.0.RELEASE] 2017-10-17 11:43:04.379 INFO 18409 --- [nio-9393-exec-7] o.s.c.d.spi.local.LocalAppDeployer : Deploying app with deploymentId foo.log instance 0. Logs will be in /var/folders/c3/ctx7_rns6x30tq7rb76wzqwr0000gs/T/spring-cloud-dataflow-6549025456609489200/foo-1508265783715/foo.log 2017-10-17 11:43:04.380 INFO 18409 --- [nio-9393-exec-7] o.s.c.d.s.s.AppDeployerStreamDeployer : Deploying application named [function-runner] as part of stream named [foo] with resource URI [file:/var/folders/c3/ctx7_rns6x30tq7rb76wzqwr0000gs/T/deployer-resource-cache8941581850579153886/http-c73a62adae0abd7ec0dee91d891575709f02f8c9] 2017-10-17 11:43:04.384 INFO 18409 --- [nio-9393-exec-7] o.s.c.d.spi.local.LocalAppDeployer : Deploying app with deploymentId foo.function-runner instance 0. Logs will be in /var/folders/c3/ctx7_rns6x30tq7rb76wzqwr0000gs/T/spring-cloud-dataflow-6549025456609489200/foo-1508265784380/foo.function-runner 2017-10-17 11:43:04.385 INFO 18409 --- [nio-9393-exec-7] o.s.c.d.s.s.AppDeployerStreamDeployer : Deploying application named [http] as part of stream named [foo] with resource URI [maven://org.springframework.cloud.stream.app:http-source-rabbit:jar:1.2.0.RELEASE] 2017-10-17 11:43:04.391 INFO 18409 --- [nio-9393-exec-7] o.s.c.d.spi.local.LocalAppDeployer : Deploying app with deploymentId foo.http instance 0. Logs will be in /var/folders/c3/ctx7_rns6x30tq7rb76wzqwr0000gs/T/spring-cloud-dataflow-6549025456609489200/foo-1508265784385/foo.http .... .... -
Post sample data to the
httpendpoint:localhost:9001(9001is theportwe specified for thehttpsource in this case)dataflow:>http post --target http://localhost:9001 --data "hello world" > POST (text/plain) http://localhost:9001 hello world > 202 ACCEPTED dataflow:>http post --target http://localhost:9001 --data "hmm, yeah, it works now!" > POST (text/plain) http://localhost:9001 hmm, yeah, it works now! > 202 ACCEPTED -
Tail the log-sink’s standard-out logs to see the character counts
$ tail -f /var/folders/c3/ctx7_rns6x30tq7rb76wzqwr0000gs/T/spring-cloud-dataflow-6549025456609489200/foo-1508265783715/foo.log/stdout_0.log

....
....
....
....
2017-10-17 11:45:39.363  INFO 19193 --- [on-runner.foo-1] log-sink       : 11
2017-10-17 11:46:40.997  INFO 19193 --- [on-runner.foo-1] log-sink       : 24
....
....
8.1.3. Summary
In this sample, you have learned:
-
How to use Spring Cloud Data Flow’s
Localserver -
How to use Spring Cloud Data Flow’s
shellapplication -
How to use the out-of-the-box
function-runnerapplication in Spring Cloud Data Flow
9. Monitoring
9.1. Spring Cloud Data Flow Monitoring
The Data Flow Monitoring Architecture is designed around the Micrometer library and is configured to support two of the most popular monitoring systems, InfluxDB, Prometheus. To help you get started monitoring Streams and Tasks, Data Flow provides Grafana Dashboards that you can customize for your needs.
Following links will provide you with information about installing, enabling and using the monitoring across the Local, Kubernetes and Cloud Foundry platforms for Streams and Tasks:
All provided Stream application starters are configured for Prometheus and InfluxDB.
To integrate custom applications with the Data Flow Monitoring you can follow the monitoring-samples projects:
-
The stream-apps shows how to enable monitoring for custom built source, processor and sink apps.
-
The task-apps sample shows how to enable monitoring for custom built task apps.
10. Security
10.1. LDAP Security and UAA Example
This example provides an example on running Spring Cloud Data Flow with a CloudFoundry User Account and Authentication (UAA) Server (UAA) backed by Lightweight Directory Access Protocol (LDAP) security.
This repository provides an embedded LDAP server, powered by Apache Directory Server (ApacheDS) and Spring Boot, running on port 40000 with pre-configured users. In this example we will use 2 users.
First user with all roles:
-
username: marlene
-
password: supersecret
-
assigned LDAP groups: create, deploy, destroy, manage, modify, schedule, view
Second user with view and manage roles only:
-
username: joe
-
password: joespassword
-
assigned LDAP groups: view, manage
In order to get everything running we need to setup the following server instances:
-
LDAP Server (port
40000) -
UAA Server (port
8080) -
Spring Cloud Skipper (secured by UAA, port
7577) -
Spring Cloud Data Flow (secured by UAA, port
9393)
10.1.1. Requirements
Please ensure you have the following 3 items installed:
-
Java 8
10.1.2. Build + Start LDAP Server
$ git clone https://github.com/spring-cloud/spring-cloud-dataflow-samples.git
$ cd spring-cloud-dataflow-samples/security-ldap-uaa-example
$ ./mvnw clean package
$ java -jar target/ldapserver-uaa-1.0.0.BUILD-SNAPSHOT.jar
10.1.3. Download + Start UAA Server
Since by default the UAA Server is available as a war file only, we will use a custom Spring Boot based version that wraps the UAA war file but makes for an easier startup experience:
$ git clone https://github.com/pivotal/uaa-bundled.git
$ cd uaa-bundled
$ export CLOUD_FOUNDRY_CONFIG_PATH=/path/to/dev/security-ldap-uaa-example
$ ./mvnw clean package
$ java -jar target/uaa-bundled-1.0.0.BUILD-SNAPSHOT.jar
10.1.4. Prepare UAA Server
Simply execute the BASH script ./setup-uaa.sh. It will execute the following
commands:
uaac token client get admin -s adminsecret

uaac group add "dataflow.view"
uaac group add "dataflow.create"
uaac group add "dataflow.manage"

uaac group map "cn=view,ou=groups,dc=springframework,dc=org" --name="dataflow.view" --origin=ldap
uaac group map "cn=create,ou=groups,dc=springframework,dc=org" --name="dataflow.create" --origin=ldap
uaac group map "cn=manage,ou=groups,dc=springframework,dc=org" --name="dataflow.manage" --origin=ldap

uaac client add dataflow \
  --name dataflow \
  --scope cloud_controller.read,cloud_controller.write,openid,password.write,scim.userids,dataflow.view,dataflow.create,dataflow.manage \
  --authorized_grant_types password,authorization_code,client_credentials,refresh_token \
  --authorities uaa.resource \
  --redirect_uri http://localhost:9393/login \
  --autoapprove openid \
  --secret dataflow \

uaac client add skipper \
  --name skipper \
  --scope cloud_controller.read,cloud_controller.write,openid,password.write,scim.userids,dataflow.view,dataflow.create,dataflow.manage \
  --authorized_grant_types password,authorization_code,client_credentials,refresh_token \
  --authorities uaa.resource \
  --redirect_uri http://localhost:7577/login \
  --autoapprove openid \
  --secret skipper \
10.1.5. Quick Test Using Curl
$ curl -v -d"username=marlene&password=supersecret&client_id=dataflow&grant_type=password" -u "dataflow:dataflow" http://localhost:8080/uaa/oauth/token

$ curl -v -d"username=joe&password=joespassword&client_id=skipper&grant_type=password" -u "skipper:skipper" http://localhost:8080/uaa/oauth/token
This should yield output similar to the following:
*   Trying ::1...
* TCP_NODELAY set
* Connected to localhost (::1) port 8080 (#0)
* Server auth using Basic with user 'dataflow'
> POST /uaa/oauth/token HTTP/1.1
> Host: localhost:8080
> Authorization: Basic ZGF0YWZsb3c6ZGF0YWZsb3c=
> User-Agent: curl/7.54.0
> Accept: */*
> Content-Length: 76
> Content-Type: application/x-www-form-urlencoded
>
* upload completely sent off: 76 out of 76 bytes
< HTTP/1.1 200
< Cache-Control: no-store
< Pragma: no-cache
< X-XSS-Protection: 1; mode=block
< X-Frame-Options: DENY
< X-Content-Type-Options: nosniff
< Content-Type: application/json;charset=UTF-8
< Transfer-Encoding: chunked
< Date: Thu, 20 Dec 2018 20:09:27 GMT
<
* Connection #0 to host localhost left intact
{"access_token":"eyJhbGciOiJSUzI1NiIsImprdSI6Imh0dHBzOi8vbG9jYWxob3N0OjgwODAvdWFhL3Rva2VuX2tleXMiLCJraWQiOiJrZXktaWQtMSIsInR5cCI6IkpXVCJ9.eyJqdGkiOiI2MjQxMTIwNDc1YTA0NzZmYjhmMmQwZWJmOGZhNmJmZSIsInN1YiI6IjMyMTMzMmExLTZmZjAtNGQ1Yy1hYjMzLTE3YzIzYjk4MzcxNSIsInNjb3BlIjpbImRhdGFmbG93LnZpZXciLCJzY2ltLnVzZXJpZHMiLCJvcGVuaWQiLCJjbG91ZF9jb250cm9sbGVyLnJlYWQiLCJwYXNzd29yZC53cml0ZSIsImRhdGFmbG93Lm1hbmFnZSIsImNsb3VkX2NvbnRyb2xsZXIud3JpdGUiLCJkYXRhZmxvdy5jcmVhdGUiXSwiY2xpZW50X2lkIjoiZGF0YWZsb3ciLCJjaWQiOiJkYXRhZmxvdyIsImF6cCI6ImRhdGFmbG93IiwiZ3JhbnRfdHlwZSI6InBhc3N3b3JkIiwidXNlcl9pZCI6IjMyMTMzMmExLTZmZjAtNGQ1Yy1hYjMzLTE3YzIzYjk4MzcxNSIsIm9yaWdpbiI6ImxkYXAiLCJ1c2VyX25hbWUiOiJtYXJsZW5lIiwiZW1haWwiOiJtYXJsZW5lQHVzZXIuZnJvbS5sZGFwLmNmIiwiYXV0aF90aW1lIjoxNTQ1MzM2NTY3LCJyZXZfc2lnIjoiZjg3NjU2MTUiLCJpYXQiOjE1NDUzMzY1NjcsImV4cCI6MTU0NTM0MDE2NywiaXNzIjoiaHR0cDovL2xvY2FsaG9zdDo4MDgwL3VhYS9vYXV0aC90b2tlbiIsInppZCI6InVhYSIsImF1ZCI6WyJzY2ltIiwiY2xvdWRfY29udHJvbGxlciIsInBhc3N3b3JkIiwiZGF0YWZsb3ciLCJvcGVuaWQiXX0.OrV_UzlfGtv5ME6jgp0Xg_DKptUXyCalV7yNlUL0PxYonECJsfej1yzG3twIBuNJ8LGvNAkUIhIokdbBsRx1bVnn-tudaRxahihZDgbrOBOeTsG6MOOK8DrwyNqI9QksuPseh2IaQ8Q0RaPkwLTa_tmNJvZYpYmVaGSImhNsSvYnmVuxFXLALy0XhkLMhSf_ViTbA9-uyYw8n7u9Gsb46_pU3uGKUh-mSA4dETZvXqjFIalV07BBFJj0NhQ7jQPn3URRkKBULQVga1GWBuQkw18jwOF8Q6PA1ENmOOO6PJfqGJUXV0sCWDUC0TQhYSxLbpDodQOwAHVoqJ2M0lD78g","token_type":"bearer","id_token":"eyJhbGciOiJSUzI1NiIsImprdSI6Imh0dHBzOi8vbG9jYWxob3N0OjgwODAvdWFhL3Rva2VuX2tleXMiLCJraWQiOiJrZXktaWQtMSIsInR5cCI6IkpXVCJ9.eyJzdWIiOiIzMjEzMzJhMS02ZmYwLTRkNWMtYWIzMy0xN2MyM2I5ODM3MTUiLCJhdWQiOlsiZGF0YWZsb3ciXSwiaXNzIjoiaHR0cDovL2xvY2FsaG9zdDo4MDgwL3VhYS9vYXV0aC90b2tlbiIsImV4cCI6MTU0NTM0MDE2NywiaWF0IjoxNTQ1MzM2NTY3LCJhbXIiOlsiZXh0IiwicHdkIl0sImF6cCI6ImRhdGFmbG93Iiwic2NvcGUiOlsib3BlbmlkIl0sImVtYWlsIjoibWFybGVuZUB1c2VyLmZyb20ubGRhcC5jZiIsInppZCI6InVhYSIsIm9yaWdpbiI6ImxkYXAiLCJqdGkiOiI2MjQxMTIwNDc1YTA0NzZmYjhmMmQwZWJmOGZhNmJmZSIsInByZXZpb3VzX2xvZ29uX3RpbWUiOjE1NDUzMzQyMTY1MzYsImVtYWlsX3ZlcmlmaWVkIjpmYWxzZSwiY2xpZW50X2lkIjoiZGF0YWZsb3ciLCJjaWQiOiJkYXRhZmxvdyIsImdyYW50X3R5cGUiOiJwYXNzd29yZCIsInVzZXJfbmFtZSI6Im1hcmxlbmUiLCJyZXZfc2lnIjoiZjg3NjU2MTUiLCJ1c2VyX2lkIjoiMzIxMzMyYTEtNmZmMC00ZDVjLWFiMzMtMTdjMjNiOTgzNzE1IiwiYXV0aF90aW1lIjoxNTQ1MzM2NTY3fQ.JOa9oNiMKIu-bE0C9su2Kaw-Mbl8Pr6r-ALFfMIvFS_iaI9c5_OIrE-wNAFjtPhGvQkVoLL2d_fSdgtv5GyjWIJ0pCjZb-VJdX2AGauNynnumsR7ct6F6nI9CGrTtCS2Khe6Tp54Nu1wxumk09jd42CaPXA1S2pmUcudQBZEa8AELpESjnjnwOYEbPiKba03cnacGJvqPtbMl3jfWGRMmGqxQEM0A-5CKCqQpMzhkAeokUkPnirVOuNsQHQXNERy1gygO7fji9nReRaOiaFKNYL9aS-hKjY_i3uuAawvY_qpe5qRZ3-xCEesi-TqOItqy2I3BBREDp99t9cfAr2UXQ","expires_in":3599,"scope":"dataflow.view scim.userids openid cloud_controller.read password.write dataflow.manage cloud_controller.write dataflow.create","jti":"6241120475a0476fb8f2d0ebf8fa6bfe"}
10.1.6. Download + Start Spring Cloud Skipper
$ wget https://repo.spring.io/snapshot/org/springframework/cloud/spring-cloud-skipper-server/2.0.0.BUILD-SNAPSHOT/spring-cloud-skipper-server-2.0.0.BUILD-SNAPSHOT.jar
$ java -jar spring-cloud-skipper-server-2.0.0.BUILD-SNAPSHOT.jar \
  --spring.config.additional-location=/path/to/ldap-uaa-example/skipper.yml
10.1.7. Download + Start Spring Cloud Data Flow
$ wget https://repo.spring.io/milestone/org/springframework/cloud/spring-cloud-dataflow-server-local/2.0.0.BUILD-SNAPSHOT/spring-cloud-dataflow-server-local-2.0.0.BUILD-SNAPSHOT.jar
$ wget https://repo.spring.io/milestone/org/springframework/cloud/spring-cloud-dataflow-shell/2.0.0.BUILD-SNAPSHOT/spring-cloud-dataflow-shell-2.0.0.BUILD-SNAPSHOT.jar
$ java -jar spring-cloud-dataflow-server-local-2.0.0.BUILD-SNAPSHOT.jar --spring.config.additional-location=/path/to/ldap-uaa-example/dataflow.yml
10.1.8. Helper Utility
In case you want to experiment with LDAP users and make changes to them, be aware that users are cached in UAA. In that case you can use the following helper BASH script that will reload the user and display the UAA data as well:
$ ./reload-user.sh <username> <password>10.1.9. Configure and run a Composed Task
First start the Spring Cloud Data Flow Shell:
$ java -jar spring-cloud-dataflow-shell-2.0.0.BUILD-SNAPSHOT.jar --dataflow.username=marlene --dataflow.password=supersecretNow we need to import the Composed Task Runner and the Spring Cloud Task App Starters:
dataflow:> app import https://dataflow.spring.io/task-maven-latestIf you want to import just the Composed Task Runner applications:
dataflow:> app register --name composed-task-runner --type task --uri maven://org.springframework.cloud.task.app:composedtaskrunner-task:2.0.0.RELEASEIt is important that use the latest task app starters, so we end up having at
least Composed Task Runner version 2.0.0.RELEASE. The earlier versions
had [short-comings](github.com/spring-cloud-task-app-starters/composed-task-runner/issues/41)
in regards to security. Therefore, don’t use the app starters from the Clark
release train.
Create + Run the Composed Task:
dataflow:> task create my-composed-task --definition "timestamp && timestamp-batch"
dataflow:> task launch my-composed-task --arguments "--dataflow-server-username=marlene --dataflow-server-password=supersecret"
This should execute the composed task successfully and yield task executions that look similar to the following:
dataflow:>task execution list
╔════════════════════════════════╤══╤════════════════════════════╤════════════════════════════╤═════════╗
║           Task Name            │ID│         Start Time         │          End Time          │Exit Code║
╠════════════════════════════════╪══╪════════════════════════════╪════════════════════════════╪═════════╣
║my-composed-task-timestamp-batch│3 │Thu Dec 20 09:30:41 HST 2018│Thu Dec 20 09:30:41 HST 2018│0        ║
║my-composed-task-timestamp      │2 │Thu Dec 20 09:30:26 HST 2018│Thu Dec 20 09:30:26 HST 2018│0        ║
║my-composed-task                │1 │Thu Dec 20 09:30:18 HST 2018│Thu Dec 20 09:30:47 HST 2018│0        ║
╚════════════════════════════════╧══╧════════════════════════════╧════════════════════════════╧═════════╝

dataflow:>
Using the Dashboard, you should see task execution similar to these: