Spring Cloud Data Flow allows a user to create a directed graph where each node of the graph is a task application. This is done by using the DSL for composed tasks. A composed task can be created via the RESTful API, the Spring Cloud Data Flow Shell, or the Spring Cloud Data Flow UI.
Composed tasks are executed via a task application called the Composed Task Runner.
Out of the box the Composed Task Runner application is not registered with Spring Cloud Data Flow. So, to launch composed tasks we must first register the Composed Task Runner as an application with Spring Cloud Data Flow as follows:
app register --name composed-task-runner --type task --uri maven://org.springframework.cloud.task.app:composedtaskrunner-task:<DESIRED_VERSION>
You can also configure Spring Cloud Data Flow to use a different task definition
name for the composed task runner. This can be done by setting the
spring.cloud.dataflow.task.composedTaskRunnerName property to the name
of your choice. You can then register the composed task runner application with
the name you set using that property.
The Composed Task Runner application has a dataflow.server.uri property that is used for validation and for launching child tasks. This defaults
to localhost:9393. If you run a distributed Spring Cloud Data Flow server, like you would do if you deploy the server on Cloud Foundry,
YARN or Kubernetes, then you need to provide the URI that can be used to access the server. You can either provide this dataflow.server.uri
property for the Composed Task Runner application when launching a composed task, or you can provide a spring.cloud.dataflow.server.uri property
for the Spring Cloud Data Flow server when it is started. For the latter case the dataflow.server.uri Composed Task Runner application property
will be automatically set when a composed task is launched.
The DSL for the composed tasks is used when creating a task definition via the task create command. For example:
dataflow:> app register --name timestamp --type task --uri maven://org.springframework.cloud.task.app:timestamp-task:<DESIRED_VERSION>
dataflow:> app register --name mytaskapp --type task --uri file:///home/tasks/mytask.jar
dataflow:> task create my-composed-task --definition "mytaskapp && timestamp"
dataflow:> task launch my-composed-task
In the example above we assume that the applications to be used by our composed task have not been registered yet. So the first two steps we register two task applications. We then create our composed task definition by using the task create command. The composed task DSL in the example above will, when launched, execute mytaskapp and then execute the timestamp application.
But before we launch the my-composed-task definition, we can view what Spring Cloud Data Flow generated for us. This can be done by executing the task list command.
dataflow:>task list
╔══════════════════════════╤═══════════════════════════════════════════════════════════════
║        Task Name         │                      Task Definition
╠══════════════════════════╪═══════════════════════════════════════════════════════════════
║my-composed-task          │mytaskapp && timestamp
║my-composed-task-mytaskapp│mytaskapp
║my-composed-task-timestamp│timestamp
Spring Cloud Data Flow created three task definitions, one for each of the
applications that comprises our composed task (my-composed-task-mytaskapp and
my-composed-task-timestamp) as well as the composed task (my-composed-task)
definition. We also see that each of the generated
names for the child tasks is comprised of the name of the composed task and
the name of the application separated by a dash -. i.e. my-composed-task -
mytaskapp.
Launching a composed task is done the same way as launching a stand-alone task. i.e.
task launch my-composed-task
Once the task is launched and assuming all the tasks complete successfully you will
see three task executions when executing a task execution list. For example:
dataflow:>task execution list
╔══════════════════════════╤═══╤════════════════════════════╤════════════════════════════╤═════════╗
║        Task Name         │ID │         Start Time         │          End Time          │Exit Code║
╠══════════════════════════╪═══╪════════════════════════════╪════════════════════════════╪═════════╣
║my-composed-task-timestamp│713│Wed Apr 12 16:43:07 EDT 2017│Wed Apr 12 16:43:07 EDT 2017│0        ║
║my-composed-task-mytaskapp│712│Wed Apr 12 16:42:57 EDT 2017│Wed Apr 12 16:42:57 EDT 2017│0        ║
║my-composed-task          │711│Wed Apr 12 16:42:55 EDT 2017│Wed Apr 12 16:43:15 EDT 2017│0        ║
╚══════════════════════════╧═══╧════════════════════════════╧════════════════════════════╧═════════╝
In the example above we see that my-compose-task launched and it also launched
the other tasks in sequential order and all of them executed successfully with
"Exit Code" as 0.
The following list shows how the Exit Status will be set for each step (task) contained in the composed task following each step execution.
- If the
TaskExecutionhas anExitMessagethat will be used as theExitStatus - If no
ExitMessageis present and theExitCodeis set to zero then theExitStatusfor the step will beCOMPLETED. - If no
ExitMessageis present and theExitCodeis set to any non zero number then theExitStatusfor the step will beFAILED.
The same command used to destroy a stand-alone task is the same as destroying a composed task. The only difference is that destroying a composed task will also destroy the child tasks associated with it. For example
dataflow:>task list
╔══════════════════════════╤═══════════════════════════════════════════════════════════════
║        Task Name         │                      Task Definition
╠══════════════════════════╪═══════════════════════════════════════════════════════════════
║my-composed-task          │mytaskapp && timestamp
║my-composed-task-mytaskapp│mytaskapp
║my-composed-task-timestamp│timestamp

...
dataflow:>task destroy my-composed-task
dataflow:>task list
╔══════════════════════════╤═══════════════════════════════════════════════════════════════
║        Task Name         │                      Task Definition
╠══════════════════════════╪═══════════════════════════════════════════════════════════════
╚══════════════════════════╧═══════════════════════════════════════════════════════════════
In cases where a composed task execution needs to be stopped. This can be done via the:
- RESTful API
- Spring Cloud Data Flow Dashboard by selecting the Job’s tab and then clicking the stop button by the job execution that needs to be stopped.
The composed task run will be stopped
when the currently running child task completes. The step associated with the
child task that was running at the time that the composed task was stopped will
be marked as STOPPED as well as the composed task job execution.
In cases where a composed task fails during execution and the status of the
composed task is FAILED then the task can be restarted. This can be done
via the:
- RESTful API
- Shell by launching the task using the same parameters
- Spring Cloud Data Flow Dashboard by selecting the Job’s tab and then clicking the restart button by the job execution that needs to be restarted.
![[Note]](images/note.png) | Note |
|---|---|
Restarting a Composed Task job that has been stopped (via the
Spring Cloud Data Flow Dashboard or RESTful API), will relaunch the
|
Conditional execution is expressed using a double ampersand symbol &&.
This allows each task in the sequence to be launched only if the previous task
successfully completed. For example:
task create my-composed-task --definition "foo && bar"
When the composed task my-composed-task is launched, it will launch the
task foo and if it completes successfully, then the task bar will be
launched. If the foo task fails, then the task bar will not launch.
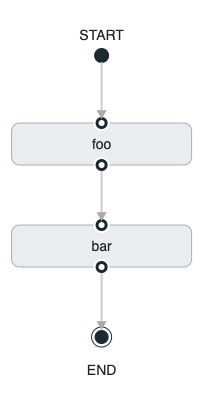
You can also use the Spring Cloud Data Flow Dashboard to create your conditional execution. By using the designer to drag and drop applications that are required, and connecting them together to create your directed graph. For example:
The diagram above is a screen capture of the directed graph as it being created using the Spring Cloud Data Flow Dashboard. We see that are 4 components in the diagram that comprise a conditional execution:
- Start icon - All directed graphs start from this symbol. There will only be one.
- Task icon - Represents each task in the directed graph.
- End icon - Represents the termination of a directed graph.
Solid line arrow - Represents the flow conditional execution flow between:
- Two applications
- The start control node and an application
- An application and the end control node
![[Note]](images/note.png) | Note |
|---|---|
You can view a diagram of your directed graph by clicking the detail button next to the composed task definition on the definitions tab. |
The DSL supports fine grained control over the transitions taken during the
execution of the directed graph. Transitions are specified by providing a
condition for equality based on the exit status of the previous task.
A task transition is represented by the following symbol ->.
A basic transition would look like the following:
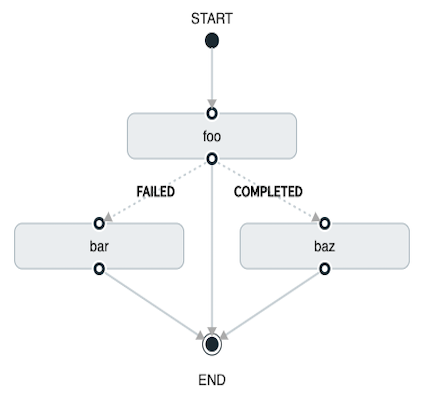
task create my-transition-composed-task --definition "foo 'FAILED' -> bar 'COMPLETED' -> baz"
In the example above foo would launch and if it had an exit status of FAILED,
then the bar task would launch. If the exit status of foo was COMPLETED
then baz would launch. All other statuses returned by foo will have no effect
and task would terminate normally.
Using the Spring Cloud Data Flow Dashboard to create the same "basic transition" would look like:
The diagram above is a screen capture of the directed graph as it being created using the Spring Cloud Data Flow Dashboard. Notice that there are 2 different types of connectors:
- Dashed line - Is the line used to represent transitions from the application to one of the possible destination applications.
- Solid line - Used to connect applications in a conditional execution or a connection between the application and a control node (end, start).
When creating a transition, link the application to each of possible destination using the connector. Once complete go to each connection and select it by clicking it. A bolt icon should appear, click that icon and enter the exit status required for that connector. The solid line for that connector will turn to a dashed line.
Wildcards are supported for transitions by the DSL for example:
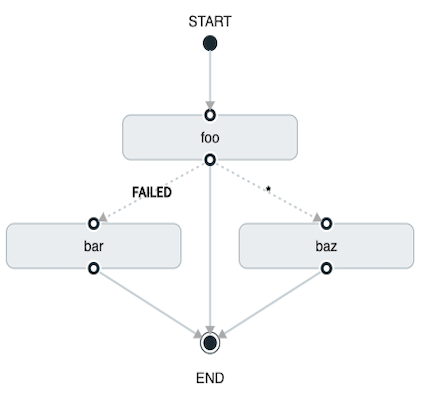
task create my-transition-composed-task --definition "foo 'FAILED' -> bar '*' -> baz"
In the example above foo would launch and if it had an exit status of FAILED,
then the bar task would launch. Any exit status of foo other than FAILED
then baz would launch.
Using the Spring Cloud Data Flow Dashboard to create the same "transition with wildcard" would look like:
A transition can be followed by a conditional execution so long as the wildcard is not used. For example:
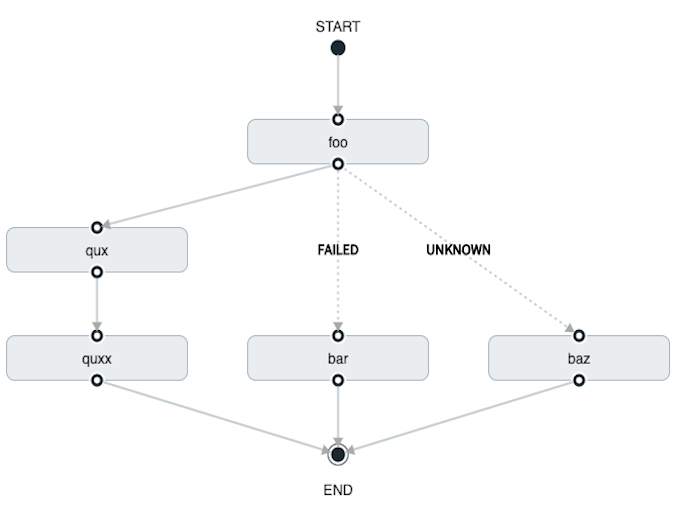
task create my-transition-conditional-execution-task --definition "foo 'FAILED' -> bar 'UNKNOWN' -> baz && qux && quux"
In the example above foo would launch and if it had an exit status of FAILED,
then the bar task would launch. If foo had an exit status of UNKNOWN then
baz would launch. Any exit status of foo other than FAILED or UNKNOWN
then qux would launch and upon successful completion quux would launch.
Using the Spring Cloud Data Flow Dashboard to create the same "transition with conditional execution" would look like:
![[Note]](images/note.png) | Note |
|---|---|
In this diagram we see the dashed line (transition) connecting the |
Splits allow for multiple tasks within a composed task to be run in parallel.
It is denoted by using angle brackets <> to group tasks and flows that are to
be run in parallel. These tasks and flows are separated by the double pipe ||
. For example:
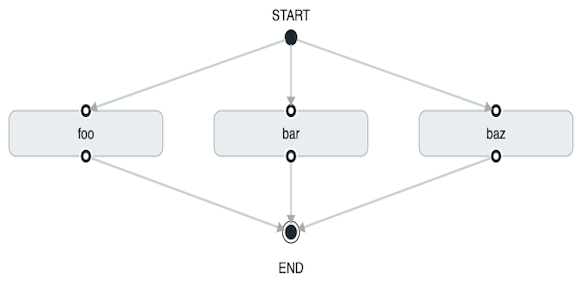
task create my-split-task --definition "<foo || bar || baz>"
The example above will launch tasks foo, bar and baz in parallel.
Using the Spring Cloud Data Flow Dashboard to create the same "split execution" would look like:
With the task DSL a user may also execute multiple split groups in succession. For example:
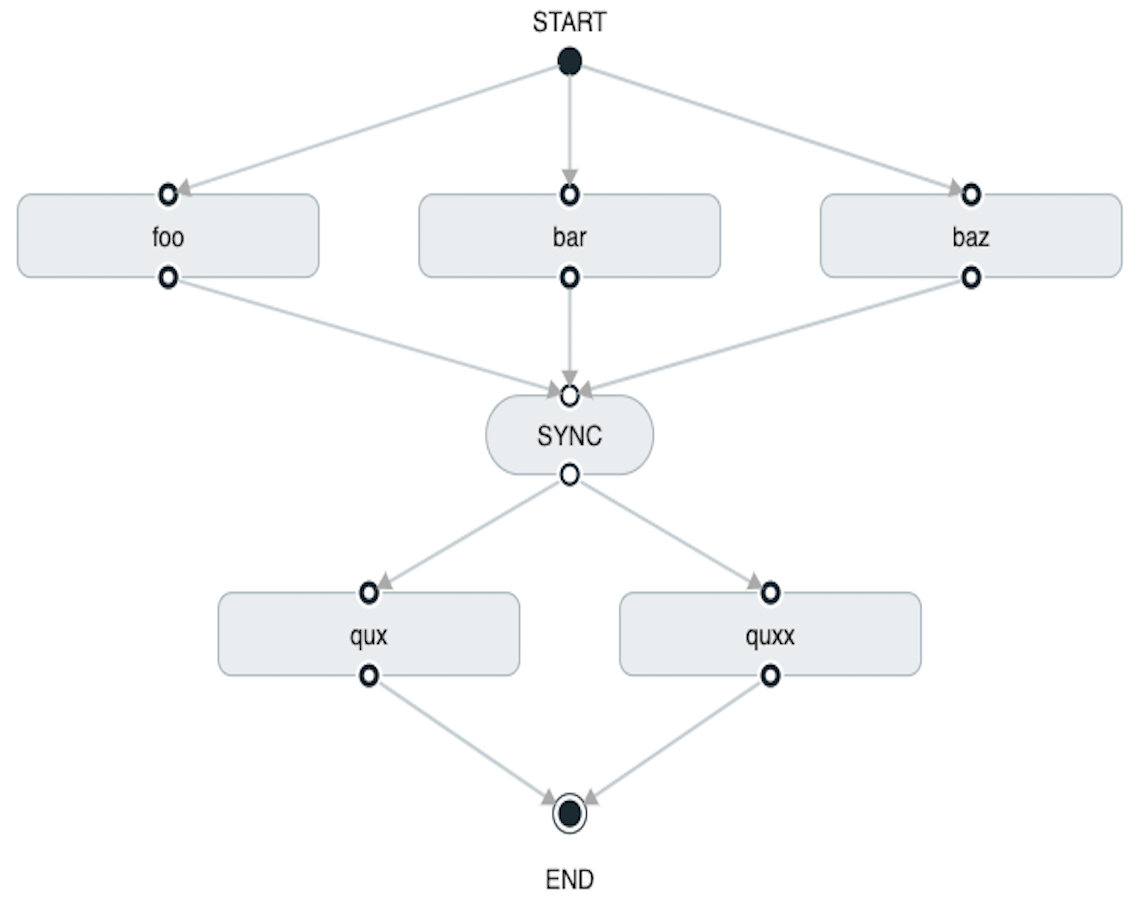
task create my-split-task --definition "<foo || bar || baz> && <qux || quux>"
In the example above tasks foo, bar and baz will be launched in parallel,
once they all complete then tasks qux, quux will be launched in parallel.
Once they complete the composed task will end. However if foo, bar, or
baz fails then, the split containing qux and quux will not launch.
Using the Spring Cloud Data Flow Dashboard to create the same "split with multiple groups" would look like:
Notice that there is a SYNC control node that is by the designer when
connecting two consecutive splits.
A split can also have a conditional execution within the angle brackets. For example:
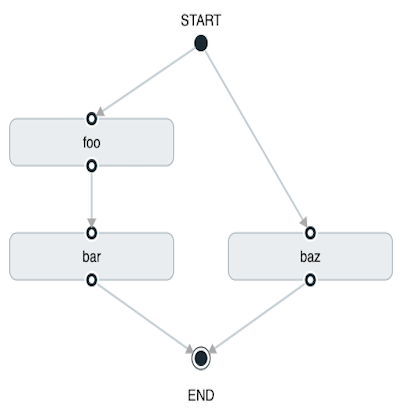
task create my-split-task --definition "<foo && bar || baz>"
In the example above we see that foo and baz will be launched in parallel,
however bar will not launch until foo completes successfully.
Using the Spring Cloud Data Flow Dashboard to create the same "split containing conditional execution" would look like:
