1.0.0.M4
Copyright © 2013-2016 Pivotal Software, Inc.
Table of Contents
The Spring Cloud Stream project allows a user to develop and run messaging microservices using Spring Integration.
Just add @EnableBinding and run your app as a Spring Boot app (single application context).
Spring Cloud Stream applications connect to the physical broker through bindings, which link Spring Integration
channels to physical broker destinations, for either input (consumer bindings) or output (producer bindings).
The creation of the bindings, and therefore their broker-specific implementation is handled by a binder, which is
another important abstraction of Spring Cloud Stream. Binders abstract out the broker-specific implementation details.
In order to connect to a specific type of broker (e.g. Rabbit or Kafka) you just need to have the relevant binder
implementation on the classpath.
Here’s a sample source app (output channel only):
@SpringBootApplication
public class StreamApplication {

  public static void main(String[] args) {
    SpringApplication.run(StreamApplication.class, args);
  }
}

@EnableBinding(Source.class)
public class TimerSource {

  @Value("${format}")
  private String format;

  @Bean
  @InboundChannelAdapter(value = Source.OUTPUT, poller = @Poller(fixedDelay = "${fixedDelay}", maxMessagesPerPoll = "1"))
  public MessageSource<String> timerMessageSource() {
    return () -> new GenericMessage<>(new SimpleDateFormat(format).format(new Date()));
  }
}
@EnableBinding is parameterized by one or more interfaces (in this case a single Source interface), which declares
input and/or output channels. The interfaces Source, Sink and Processor are provided off the shelf, but you can
define others. Here’s the definition of Source:
public interface Source {
  String OUTPUT = "output";

  @Output(Source.OUTPUT)
  MessageChannel output();
}
The @Output annotation is used to identify output channels (messages leaving the app), and @Input is used to
identify input channels (messages entering the app). It is optionally parameterized by a channel name - if the name is
not provided the method name is used instead. An implementation of the interface is created for you and can be used in
the application context by autowiring it, e.g. into a test case:
@RunWith(SpringJUnit4ClassRunner.class)
@SpringApplicationConfiguration(classes = StreamApplication.class)
@WebAppConfiguration
@DirtiesContext
public class StreamApplicationTests {

  @Autowired
  private Source source

  @Test
  public void contextLoads() {
    assertNotNull(this.source.output());
  }
}
![[Note]](images/note.png) | Note |
|---|---|
In this case there is only one |
A stream app can have multiple input or output channels defined as @Input and @Output methods in an interface.
Instead of just one channel named "input" or "output", you can add multiple MessageChannel methods annotated with
@Input or @Output, and their names will be converted to external destination names on the broker. It is common to
specify the channel names at runtime in order to have multiple applications communicate over well known destination
names. Channel names can be specified as properties that consist of the channel names prefixed with
spring.cloud.stream.bindings (e.g. spring.cloud.stream.bindings.input or spring.cloud.stream.bindings.output).
These properties can be specified though environment variables, the application YAML file, or any of the other
mechanisms supported by Spring Boot.
For example, you can have two MessageChannels called "default" and "tap" in an application with
spring.cloud.stream.bindings.default.destination=foo and spring.cloud.stream.bindings.tap.destination=bar,
and the result is 2 bindings to an external broker with destinations called "foo" and "bar".
While Spring Cloud Stream makes it easy for individual boot apps to connect to messaging systems, the typical scenario for Spring Cloud Stream is the creation of multi-app pipelines, where microservice apps are sending data to each other. This can be achieved by correlating the input and output destinations of adjacent apps, as in the following example.
Supposing that the design calls for the time-source app to send data to the log-sink app, we will use a
common destination named ticktock for bindings within both apps. time-source will set
spring.cloud.stream.bindings.output.destination=ticktock, and log-sink will set
spring.cloud.stream.bindings.input.destination=ticktock.
Spring Cloud Stream is a library focusing on building message-driven microservices, and more specifically stream processing applications. In such scenarios, communication between different logical applications follows a publish-subscribe pattern, with data being broadcast through a shared topic, but at the same time, it is important to be able to scale up by creating multiple instances of a given application, which are in a competing consumer relationship with each other.
Spring Cloud Stream models this behavior through the concept of a consumer group, which is similar to the notion of
consumer groups in Kafka. Each consumer binding can specify a group name such as
spring.cloud.stream.bindings.input.group=foo (the actual name of the binding may vary). Each consumer group bound to
a given destination will receive a copy of the published data, but within the group, only one application will receive
each specific message.
If no consumer group is specified for a given binding, then the binding is treated as if belonging to an anonymous, independent, single-member consumer group. Otherwise said, if no consumer group is specified for a binding, it will be in a publish-subscribe relationship with any other consumer groups.
In general, it is preferable to always specify a consumer group when binding an application to a given destination. When scaling up a Spring Cloud Stream application, a consumer group must be specified for each of its input bindings, in order to prevent its instances from receiving duplicate messages (unless that behavior is desired, which is a less common use case).
| Note |
|---|---|
This feature has been introduced since version 1.0.0.M4. |
When scaling up Spring Cloud Stream applications, each instance can receive information about how many other instances
of the same application exist and what its own instance index is. This is done through the
spring.cloud.stream.instanceCount and spring.cloud.stream.instanceIndex properties. For example, if there are 3
instances of the HDFS sink application, all three will have spring.cloud.stream.instanceCount set to 3, and the
applications will have spring.cloud.stream.instanceIndex set to 0, 1 and 2, respectively. When Spring Cloud Stream
applications are deployed via Spring Cloud Data Flow, these properties are configured automatically, but when Spring
Cloud Stream applications are launched independently, these properties must be set correctly. By default
spring.cloud.stream.instanceCount is 1, and spring.cloud.stream.instanceIndex is 0.
Setting up the two properties correctly on scale up scenarios is important for addressing partitioning behavior in general (see below), and they are always required by certain types of binders (e.g. the Kafka binder) in order to ensure that data is split correctly across multiple consumer instances.
The input and output destination names are the primary properties to set in order to have Spring Cloud Stream
applications communicate with each other as their channels are bound to an external message broker automatically.
However, there are a number of scenarios where it is required to configure other attributes besides the destination
name. This is done using the following naming scheme:
spring.cloud.stream.bindings.<channelName>.<attributeName>=<attributeValue>. The destination attribute is one such
example: spring.cloud.stream.bindings.input.destination=foo. A shorthand equivalent can be used as follows:
spring.cloud.stream.bindings.input=foo, but that shorthand can only be used only when there are no other attributes
to set on the binding. In other words,
spring.cloud.stream.bindings.input.destination=foo,spring.cloud.stream.bindings.input.partitioned=true is a valid
setup, whereas spring.cloud.stream.bindings.input=foo,spring.cloud.stream.bindings.input.partitioned=true is not.
Spring Cloud Stream provides support for partitioning data between multiple instances of a given application. In a partitioned scenario, one or more producer apps will send data to one or more consumer apps, ensuring that data with common characteristics is processed by the same consumer instance. The physical communication medium (i.e. the broker topic or queue) is viewed as structured into multiple partitions. Regardless of whether the broker type is naturally partitioned (e.g. Kafka) or not (e.g. Rabbit), Spring Cloud Stream provides a common abstraction for implementing partitioned processing use cases in a uniform fashion.
Setting up a partitioned processing scenario requires configuring both the data producing and the data consuming end.
An output binding is configured to send partitioned data, by setting one and only one of its partitionKeyExpression
or partitionKeyExtractorClass properties, as well as its partitionCount property. For example, setting
spring.cloud.stream.bindings.output.partitionKeyExpression=payload.id,spring.cloud.stream.bindings.output.partitionCount=5
is a valid and typical configuration.
Based on this configuration, the data will be sent to the target partition using the following logic. A partition key’s
value is calculated for each message sent to a partitioned output channel based on the partitionKeyExpression. The
partitionKeyExpression is a SpEL expression that is evaluated against the outbound message for extracting the
partitioning key. If a SpEL expression is not sufficient for your needs, you can instead calculate the partition key
value by setting the property partitionKeyExtractorClass. This class must implement the interface
org.springframework.cloud.stream.binder.PartitionKeyExtractorStrategy. While, in general, the SpEL expression should
suffice, more complex cases may use the custom implementation strategy.
Once the message key is calculated, the partition selection process will determine the target partition as a value
between 0 and partitionCount - 1. The default calculation, applicable in most scenarios is based on the formula
key.hashCode() % partitionCount. This can be customized on the binding, either by setting a SpEL expression to be
evaluated against the key via the partitionSelectorExpression property, or by setting a
org.springframework.cloud.stream.binder.PartitionSelectorStrategy implementation via the partitionSelectorClass
property.
Additional properties can be configured for more advanced scenarios, as described in the following section.
An input binding is configured to receive partitioned data by setting its partitioned property, as well as the
instance index and instance count properties on the app itself, as follows:
spring.cloud.stream.bindings.input.partitioned=true,spring.cloud.stream.instanceIndex=3,spring.cloud.stream.instanceCount=5.
The instance count value represents the total number of app instances between which the data needs to be partitioned,
whereas instance index must be a unique value across the multiple instances, between 0 and instanceCount - 1. The
instance index helps each app instance to identify the unique partition (or in the case of Kafka, the partition set)
from which it receives data. It is important that both values are set correctly in order to ensure that all the data is
consumed, and that the app instances receive mutually exclusive datasets.
While setting up multiple instances for partitioned data processing may be complex in the standalone case, Spring Cloud Data Flow can simplify the process significantly, by populating both the input and output values correctly, as well as relying on the runtime infrastructure to provide information about the instance index and instance count.
Spring Cloud Stream relies on implementations of the Binder SPI to perform the task of connecting channels to message brokers. Each Binder implementation typically connects to one type of messaging system. Spring Cloud Stream provides out of the box binders for Kafka, RabbitMQ and Redis.
By default, Spring Cloud Stream relies on Spring Boot’s auto-configuration to configure the binding process. If a single binder implementation is found on the classpath, Spring Cloud Stream will use it automatically. So, for example, a Spring Cloud Stream project that aims to bind only to RabbitMQ can simply add the following dependency:
<dependency>
  <groupId>org.springframework.cloud</groupId>
  <artifactId>spring-cloud-stream-binder-rabbit</artifactId>
</dependency>
When multiple binders are present on the classpath, the application must indicate which binder is to be used for each
channel binding. Each binder configuration contains a META-INF/spring.binders, which is a simple properties file:
rabbit:\
org.springframework.cloud.stream.binder.rabbit.config.RabbitServiceAutoConfiguration
Similar files exist for the other binder implementations (i.e. Kafka and Redis), and it is expected that custom binder
implementations will provide them, too. The key represents an identifying name for the binder implementation, whereas
the value is a comma-separated list of configuration classes that contain one and only one bean definition of the type
org.springframework.cloud.stream.binder.Binder.
Selecting the binder can be done globally by either using the spring.cloud.stream.defaultBinder property, e.g.
spring.cloud.stream.defaultBinder=rabbit, or by individually configuring them on each channel binding.
For instance, a processor app that reads from Kafka and writes to Rabbit can specify the following configuration:
spring.cloud.stream.bindings.input.binder=kafka,spring.cloud.stream.bindings.output.binder=rabbit.
By default, binders share the Spring Boot auto-configuration of the application and create one instance of each binder found on the classpath. In scenarios where an application should connect to more than one broker of the same type, Spring Cloud Stream allows you to specify multiple binder configurations, with different environment settings. Please note that turning on explicit binder configuration will disable the default binder configuration process altogether, so all the binders in use must be included in the configuration.
For example, this is the typical configuration for a processor that connects to two RabbitMQ broker instances:
spring:
  cloud:
    stream:
      bindings:
        input:
          destination: foo
          binder: rabbit1
        output:
          destination: bar
          binder: rabbit2
      binders:
        rabbit1:
          type: rabbit
          environment:
            spring:
              rabbit:
                host: <host1>
        rabbit2:
          type: rabbit
          environment:
            spring:
              rabbit:
host: <host2>Code using the Spring Cloud Stream library can be deployed as a standalone application or be used as a Spring Cloud Data Flow module. In standalone mode, your application will run happily as a service or in any PaaS (Cloud Foundry, Heroku, Azure, etc.). Spring Cloud Data Flow helps orchestrate the communication between instances, so the aspects of configuration that deal with application interconnection will be configured transparently.
You can run in standalone mode from your IDE for testing. To run in production you can create an executable (or "fat") JAR using the standard Spring Boot tooling provided for Maven or Gradle.
As described above, Spring Cloud Stream provides a binder abstraction for connecting to physical destinations. This section will provide more information about the main concepts behind the Binder SPI, its main components, as well as details specific to different implementations.
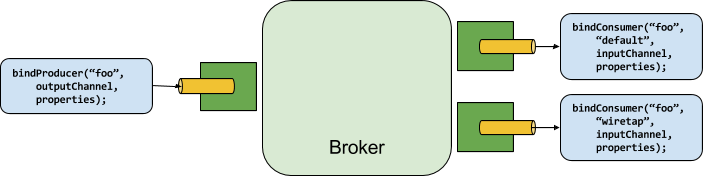
A producer is any component that sends messages to a channel. That channel can be bound to an external message broker
via a Binder implementation for that broker. When invoking the bindProducer method, the first parameter is the name
of the destination within that broker. The second parameter is the local channel instance to which the producer will be
sending messages, and the third parameter contains properties to be used within the adapter that is created for that
channel, such as a partition key expression.
A consumer is any component that receives messages from a channel. As with the producer, the consumer’s channel can be
bound to an external message broker, and the first parameter for the bindConsumer method is the destination name.
However, on the consumer side, a second parameter provides the name of a logical group of consumers. Each group
represented by consumer bindings for a given destination will receive a copy of each message that a producer sends to
that destination (i.e. pub/sub semantics). If there are multiple consumer instances bound using the same group name,
then messages will be load balanced across those consumer instances so that each message sent by a producer would only
be consumed by a single consumer instance within each group (i.e. queue semantics).
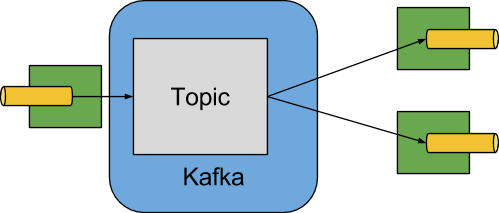
The Kafka Binder implementation maps the destination to a Kafka topic, and the consumer group maps directly to the same Kafka concept. Spring Cloud Stream does not use the high level consumer, but implements a similar concept for the simple consumer.
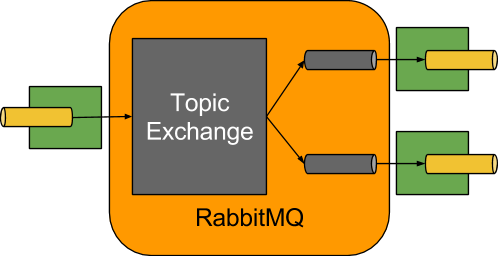
The RabbitMQ Binder implementation maps the destination to a TopicExchange, and for each consumer group, a Queue
will be bound to that TopicExchange. Each consumer instance that binds will trigger creation of a corresponding
RabbitMQ Consumer instance for its group’s Queue.
| Note |
|---|---|
we recommend only using the Redis Binder for development |
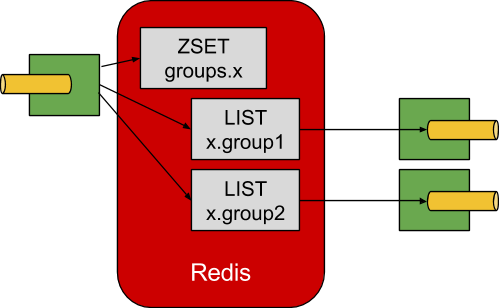
The Redis Binder creates a LIST (which performs the role of a queue) for each consumer group. A consumer binding will
trigger BRPOP operations on its group’s LIST. A producer binding will consult a ZSET to determine what groups
currently have active consumers, and then for each message being sent, an LPUSH operation will be executed on each of
those group’s LISTs.
There are several samples, all running on the redis transport (so you need redis running locally to test them).
sourceis a Java config version of the classic "timer" module from Spring XD. It has a "fixedDelay" option (in milliseconds) for the period between emitting messages.sinkis a Java config version of the classic "log" module from Spring XD. It has no options (but some could easily be added), and just logs incoming messages at INFO level.transformis a simple pass through logging transformer (just logs the incoming message and passes it on).doubleis a combination of 2 modules defined locally (a source and a sink, so the whole app is self contained).extendedis a multi-module mashup ofsource | transform | transform | sink, where the modules are defined in the other samples and referred to in this app just as dependencies.multibinderis a sample application that shows how an application could use multiple binders. In this case, the processor’s input/output channels connect to different brokers using their own binder configurations.multibinder-differentsystemsshows how an application could use same binder implementation but different configurations for its channels. In this case, a processor’s input/output channels connect to same binder implementation but with two separate broker configurations.
If you run the source and the sink and point them at the same redis instance (e.g. do nothing to get the one on localhost, or the one they are both bound to as a service on Cloud Foundry) then they will form a "stream" and start talking to each other. All the samples have friendly JMX and Actuator endpoints for inspecting what is going on in the system.
To build the source you will need to install JDK 1.7.
The build uses the Maven wrapper so you don’t have to install a specific version of Maven. To enable the tests for Redis, Rabbit, and Kafka bindings you should have those servers running before building. See below for more information on running the servers.
The main build command is
$ ./mvnw clean install
You can also add '-DskipTests' if you like, to avoid running the tests.
| Note |
|---|---|
You can also install Maven (>=3.3.3) yourself and run the |
| Note |
|---|---|
Be aware that you might need to increase the amount of memory
available to Maven by setting a |
The projects that require middleware generally include a
docker-compose.yml, so consider using
Docker Compose to run the middeware servers
in Docker containers. See the README in the
scripts demo
repository for specific instructions about the common cases of mongo,
rabbit and redis.
If you don’t have an IDE preference we would recommend that you use Spring Tools Suite or Eclipse when working with the code. We use the m2eclipe eclipse plugin for maven support. Other IDEs and tools should also work without issue.
We recommend the m2eclipe eclipse plugin when working with eclipse. If you don’t already have m2eclipse installed it is available from the "eclipse marketplace".
Unfortunately m2e does not yet support Maven 3.3, so once the projects
are imported into Eclipse you will also need to tell m2eclipse to use
the .settings.xml file for the projects. If you do not do this you
may see many different errors related to the POMs in the
projects. Open your Eclipse preferences, expand the Maven
preferences, and select User Settings. In the User Settings field
click Browse and navigate to the Spring Cloud project you imported
selecting the .settings.xml file in that project. Click Apply and
then OK to save the preference changes.
| Note |
|---|---|
Alternatively you can copy the repository settings from |
If you prefer not to use m2eclipse you can generate eclipse project metadata using the following command:
$ ./mvnw eclipse:eclipse
The generated eclipse projects can be imported by selecting import existing projects
from the file menu.
[[contributing]
== Contributing
Spring Cloud is released under the non-restrictive Apache 2.0 license, and follows a very standard Github development process, using Github tracker for issues and merging pull requests into master. If you want to contribute even something trivial please do not hesitate, but follow the guidelines below.
Before we accept a non-trivial patch or pull request we will need you to sign the contributor’s agreement. Signing the contributor’s agreement does not grant anyone commit rights to the main repository, but it does mean that we can accept your contributions, and you will get an author credit if we do. Active contributors might be asked to join the core team, and given the ability to merge pull requests.
None of these is essential for a pull request, but they will all help. They can also be added after the original pull request but before a merge.
- Use the Spring Framework code format conventions. If you use Eclipse
you can import formatter settings using the
eclipse-code-formatter.xmlfile from the Spring Cloud Build project. If using IntelliJ, you can use the Eclipse Code Formatter Plugin to import the same file. - Make sure all new
.javafiles to have a simple Javadoc class comment with at least an@authortag identifying you, and preferably at least a paragraph on what the class is for. - Add the ASF license header comment to all new
.javafiles (copy from existing files in the project) - Add yourself as an
@authorto the .java files that you modify substantially (more than cosmetic changes). - Add some Javadocs and, if you change the namespace, some XSD doc elements.
- A few unit tests would help a lot as well — someone has to do it.
- If no-one else is using your branch, please rebase it against the current master (or other target branch in the main project).
- When writing a commit message please follow these conventions,
if you are fixing an existing issue please add
Fixes gh-XXXXat the end of the commit message (where XXXX is the issue number).