1.0.3.RELEASE
Copyright © 2013-2016 Pivotal Software, Inc.
Table of Contents
- I. Reference Guide
- 1. Introducing Spring Cloud Stream
- 2. Main Concepts
- 3. Programming Model
- 4. Binders
- 5. Configuration Options
- 6. Binder-Specific Configuration
- 7. Content Type and Transformation
- 8. Inter-Application Communication
- 9. Testing
- 10. Health Indicator
- 11. Samples
- 12. Getting Started
- II. Appendices
This section goes into more detail about how you can work with Spring Cloud Stream. It covers topics such as creating and running stream applications.
Spring Cloud Stream is a framework for building message-driven microservice applications. Spring Cloud Stream builds upon Spring Boot to create standalone, production-grade Spring applications, and uses Spring Integration to provide connectivity to message brokers. It provides opinionated configuration of middleware from several vendors, introducing the concepts of persistent publish-subscribe semantics, consumer groups, and partitions.
You can add the @EnableBinding annotation to your application to get immediate connectivity to a message broker, and you can add @StreamListener to a method to cause it to receive events for stream processing.
The following is a simple sink application which receives external messages.
@SpringBootApplication
public class StreamApplication {

  public static void main(String[] args) {
    SpringApplication.run(StreamApplication.class, args);
  }
}

@EnableBinding(Sink.class)
public class TimerSource {

  ...

  @StreamListener(Sink.INPUT)
  public void processVote(Vote vote) {
      votingService.recordVote(vote);
  }
}
The @EnableBinding annotation takes one or more interfaces as parameters (in this case, the parameter is a single Sink interface).
An interface declares input and/or output channels.
Spring Cloud Stream provides the interfaces Source, Sink, and Processor; you can also define your own interfaces.
The following is the definition of the Source interface:
public interface Sink {
  String INPUT = "input";

  @Input(Sink.INPUT)
  SubscribableChannel input();
}
The @Input annotation identifies an input channel, through which received messages enter the application; the @Output annotation identifies an output channel, through which published messages leave the application.
The @Input and @Output annotations can take a channel name as a parameter; if a name is not provided, the name of the annotated method will be used.
Spring Cloud Stream will create an implementation of the interface for you. You can use this in the application by autowiring it, as in the following example of a test case.
@RunWith(SpringJUnit4ClassRunner.class)
@SpringApplicationConfiguration(classes = StreamApplication.class)
@WebAppConfiguration
@DirtiesContext
public class StreamApplicationTests {

  @Autowired
  private Sink sink;

  @Test
  public void contextLoads() {
    assertNotNull(this.sink.input());
  }
}
Spring Cloud Stream provides a number of abstractions and primitives that simplify the writing of message-driven microservice applications. This section gives an overview of the following:
- Spring Cloud Stream’s application model
- The Binder abstraction
- Persistent publish-subscribe support
- Consumer group support
- Partitioning support
- A pluggable Binder API
A Spring Cloud Stream application consists of a middleware-neutral core. The application communicates with the outside world through input and output channels injected into it by Spring Cloud Stream. Channels are connected to external brokers through middleware-specific Binder implementations.
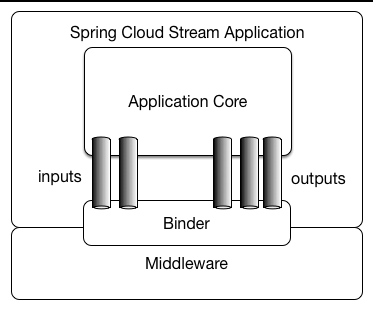
Spring Cloud Stream provides Binder implementations for Kafka, Rabbit MQ, Redis, and Gemfire. Spring Cloud Stream also includes a TestSupportBinder, which leaves a channel unmodified so that tests can interact with channels directly and reliably assert on what is received. You can use the extensible API to write your own Binder.
Spring Cloud Stream uses Spring Boot for configuration, and the Binder abstraction makes it possible for a Spring Cloud Stream application to be flexible in how it connects to middleware.
For example, deployers can dynamically choose, at runtime, the destinations (e.g., the Kafka topics or RabbitMQ exchanges) to which channels connect.
Such configuration can be provided through external configuration properties and in any form supported by Spring Boot (including application arguments, environment variables, and application.yml or application.properties files).
In the sink example from the Chapter 1, Introducing Spring Cloud Stream section, setting the application property spring.cloud.stream.bindings.input.destination to raw-sensor-data will cause it to read from the raw-sensor-data Kafka topic, or from a queue bound to the raw-sensor-data RabbitMQ exchange.
Spring Cloud Stream automatically detects and uses a binder found on the classpath. You can easily use different types of middleware with the same code: just include a different binder at build time. For more complex use cases, you can also package multiple binders with your application and have it choose the binder, and even whether to use different binders for different channels, at runtime.
Communication between applications follows a publish-subscribe model, where data is broadcast through shared topics. This can be seen in the following figure, which shows a typical deployment for a set of interacting Spring Cloud Stream applications.
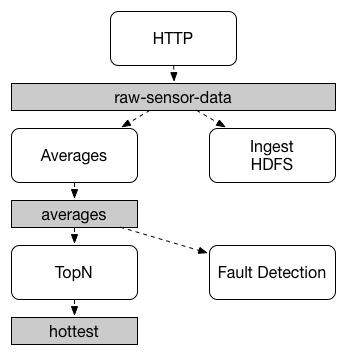
Data reported by sensors to an HTTP endpoint is sent to a common destination named raw-sensor-data.
From the destination, it is independently processed by a microservice application that computes time-windowed averages and by another microservice application that ingests the raw data into HDFS.
In order to process the data, both applications declare the topic as their input at runtime.
The publish-subscribe communication model reduces the complexity of both the producer and the consumer, and allows new applications to be added to the topology without disruption of the existing flow. For example, downstream from the average-calculating application, you can add an application that calculates the highest temperature values for display and monitoring. You can then add another application that interprets the same flow of averages for fault detection. Doing all communication through shared topics rather than point-to-point queues reduces coupling between microservices.
While the concept of publish-subscribe messaging is not new, Spring Cloud Stream takes the extra step of making it an opinionated choice for its application model. By using native middleware support, Spring Cloud Stream also simplifies use of the publish-subscribe model across different platforms.
While the publish-subscribe model makes it easy to connect applications through shared topics, the ability to scale up by creating multiple instances of a given application is equally important. When doing this, different instances of an application are placed in a competing consumer relationship, where only one of the instances is expected to handle a given message.
Spring Cloud Stream models this behavior through the concept of a consumer group.
(Spring Cloud Stream consumer groups are similar to and inspired by Kafka consumer groups.)
Each consumer binding can use the spring.cloud.stream.bindings.input.group property to specify a group name.
For the consumers shown in the following figure, this property would be set as spring.cloud.stream.bindings.input.group=hdfsWrite or spring.cloud.stream.bindings.input.group=average.
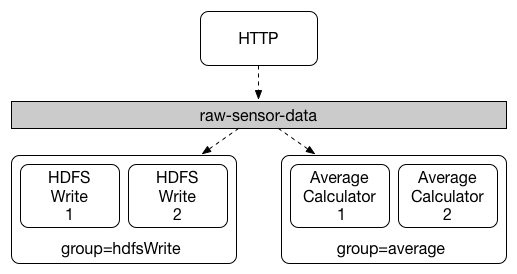
All groups which subscribe to a given destination receive a copy of published data, but only one member of each group receives a given message from that destination. By default, when a group is not specified, Spring Cloud Stream assigns the application to an anonymous and independent single-member consumer group that is in a publish-subscribe relationship with all other consumer groups.
Consistent with the opinionated application model of Spring Cloud Stream, consumer group subscriptions are durable. That is, a binder implementation ensures that group subscriptions are persistent, and once at least one subscription for a group has been created, the group will receive messages, even if they are sent while all applications in the group are stopped.
![[Note]](images/note.png) | Note |
|---|---|
Anonymous subscriptions are non-durable by nature. For some binder implementations (e.g., RabbitMQ), it is possible to have non-durable group subscriptions. |
In general, it is preferable to always specify a consumer group when binding an application to a given destination. When scaling up a Spring Cloud Stream application, you must specify a consumer group for each of its input bindings. This prevents the application’s instances from receiving duplicate messages (unless that behavior is desired, which is unusual).
Spring Cloud Stream provides support for partitioning data between multiple instances of a given application. In a partitioned scenario, the physical communication medium (e.g., the broker topic) is viewed as being structured into multiple partitions. One or more producer application instances send data to multiple consumer application instances and ensure that data identified by common characteristics are processed by the same consumer instance.
Spring Cloud Stream provides a common abstraction for implementing partitioned processing use cases in a uniform fashion. Partitioning can thus be used whether the broker itself is naturally partitioned (e.g., Kafka) or not (e.g., RabbitMQ).
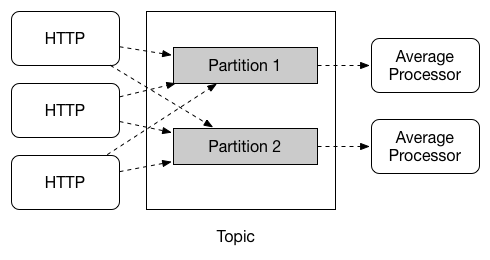
Partitioning is a critical concept in stateful processing, where it is critiical, for either performance or consistency reasons, to ensure that all related data is processed together. For example, in the time-windowed average calculation example, it is important that all measurements from any given sensor are processed by the same application instance.
| Note |
|---|---|
To set up a partitioned processing scenario, you must configure both the data-producing and the data-consuming ends. |
This section describes Spring Cloud Stream’s programming model. Spring Cloud Stream provides a number of predefined annotations for declaring bound input and output channels as well as how to listen to channels.
You can turn a Spring application into a Spring Cloud Stream application by applying the @EnableBinding annotation to one of the application’s configuration classes.
The @EnableBinding annotation itself is meta-annotated with @Configuration and triggers the configuration of Spring Cloud Stream infrastructure:
...
@Import(...)
@Configuration
@EnableIntegration
public @interface EnableBinding {
    ...
    Class<?>[] value() default {};
}
The @EnableBinding annotation can take as parameters one or more interface classes that contain methods which represent bindable components (typically message channels).
| Note |
|---|---|
In Spring Cloud Stream 1.0, the only supported bindable components are the Spring Messaging |
A Spring Cloud Stream application can have an arbitrary number of input and output channels defined in an interface as @Input and @Output methods:
public interface Barista {

    @Input
    SubscribableChannel orders();

    @Output
    MessageChannel hotDrinks();

    @Output
    MessageChannel coldDrinks();
}
Using this interface as a parameter to @EnableBinding will trigger the creation of three bound channels named orders, hotDrinks, and coldDrinks, respectively.
@EnableBinding(Barista.class)
public class CafeConfiguration {

   ...
}
Using the @Input and @Output annotations, you can specify a customized channel name for the channel, as shown in the following example:
public interface Barista {
    ...
    @Input("inboundOrders")
    SubscribableChannel orders();
}
In this example, the created bound channel will be named inboundOrders.
For easy addressing of the most common use cases, which involve either an input channel, an output channel, or both, Spring Cloud Stream provides three predefined interfaces out of the box.
Source can be used for an application which has a single outbound channel.
public interface Source {

  String OUTPUT = "output";

  @Output(Source.OUTPUT)
  MessageChannel output();

}
Sink can be used for an application which has a single inbound channel.
public interface Sink {

  String INPUT = "input";

  @Input(Sink.INPUT)
  SubscribableChannel input();

}
Processor can be used for an application which has both an inbound channel and an outbound channel.
public interface Processor extends Source, Sink {
}
Spring Cloud Stream provides no special handling for any of these interfaces; they are only provided out of the box.
For each bound interface, Spring Cloud Stream will generate a bean that implements the interface.
Invoking a @Input-annotated or @Output-annotated method of one of these beans will return the relevant bound channel.
The bean in the following example sends a message on the output channel when its hello method is invoked.
It invokes output() on the injected Source bean to retrieve the target channel.
@Component
public class SendingBean {

    private Source source;

    @Autowired
    public SendingBean(Source source) {
        this.source = source;
    }

    public void sayHello(String name) {
         source.output().send(MessageBuilder.withPayload(body).build());
    }
}
Bound channels can be also injected directly:
@Component
public class SendingBean {

    private MessageChannel output;

    @Autowired
    public SendingBean(MessageChannel output) {
        this.output = output;
    }

    public void sayHello(String name) {
         output.send(MessageBuilder.withPayload(body).build());
    }
}
If the name of the channel is customized on the declaring annotation, that name should be used instead of the method name. Given the following declaration:
public interface CustomSource {
    ...
    @Output("customOutput")
    MessageChannel output();
}
The channel will be injected as shown in the following example:
@Component
public class SendingBean {

    @Autowired
    private MessageChannel output;

    @Autowired @Qualifier("customOutput")
    public SendingBean(MessageChannel output) {
        this.output = output;
    }

    public void sayHello(String name) {
         customOutput.send(MessageBuilder.withPayload(body).build());
    }
}
You can write a Spring Cloud Stream application using either Spring Integration annotations or Spring Cloud Stream’s @StreamListener annotation.
The @StreamListener annotation is modeled after other Spring Messaging annotations (such as @MessageMapping, @JmsListener, @RabbitListener, etc.) but adds content type management and type coercion features.
Because Spring Cloud Stream is based on Spring Integration, Stream completely inherits Integration’s foundation and infrastructure as well as the component itself.
For example, you can attach the output channel of a Source to a MessageSource:
@EnableBinding(Source.class)
public class TimerSource {

  @Value("${format}")
  private String format;

  @Bean
  @InboundChannelAdapter(value = Source.OUTPUT, poller = @Poller(fixedDelay = "${fixedDelay}", maxMessagesPerPoll = "1"))
  public MessageSource<String> timerMessageSource() {
    return () -> new GenericMessage<>(new SimpleDateFormat(format).format(new Date()));
  }
}
Or you can use a processor’s channels in a transformer:
@EnableBinding(Processor.class)
public class TransformProcessor {
  @Transformer(inputChannel = Processor.INPUT, outputChannel = Processor.OUTPUT)
  public Object transform(String message) {
    return message.toUpper();
  }
}
Complementary to its Spring Integration support, Spring Cloud Stream provides its own @StreamListener annotation, modeled after other Spring Messaging annotations (e.g. @MessageMapping, @JmsListener, @RabbitListener, etc.).
The @StreamListener annotation provides a simpler model for handling inbound messages, especially when dealing with use cases that involve content type management and type coercion.
Spring Cloud Stream provides an extensible MessageConverter mechanism for handling data conversion by bound channels and for, in this case, dispatching to methods annotated with @StreamListener.
The following is an example of an application which processes external Vote events:
@EnableBinding(Sink.class)
public class VoteHandler {

  @Autowired
  VotingService votingService;

  @StreamListener(Sink.INPUT)
  public void handle(Vote vote) {
    votingService.record(vote);
  }
}
The distinction between @StreamListener and a Spring Integration @ServiceActivator is seen when considering an inbound Message that has a String payload and a contentType header of application/json.
In the case of @StreamListener, the MessageConverter mechanism will use the contentType header to parse the String payload into a Vote object.
As with other Spring Messaging methods, method arguments can be annotated with @Payload, @Headers and @Header.
| Note |
|---|---|
For methods which return data, you must use the @EnableBinding(Processor.class) public class TransformProcessor { @Autowired VotingService votingService; @StreamListener(Processor.INPUT) @SendTo(Processor.OUTPUT) public VoteResult handle(Vote vote) { return votingService.record(vote); } } |
| Note |
|---|---|
In the case of RabbitMQ, content type headers can be set by external applications. Spring Cloud Stream supports them as part of an extended internal protocol used for any type of transport (including transports, such as Kafka, that do not normally support headers). |
Spring Cloud Stream provides support for aggregating multiple applications together, connecting their input and output channels directly and avoiding the additional cost of exchanging messages via a broker. As of version 1.0 of Spring Cloud Stream, aggregation is supported only for the following types of applications:
- sources - applications with a single output channel named
output, typically having a single binding of the typeorg.springframework.cloud.stream.messaging.Source - sinks - applications with a single input channel named
input, typically having a single binding of the typeorg.springframework.cloud.stream.messaging.Sink - processors - applications with a single input channel named
inputand a single output channel namedoutput, typically having a single binding of the typeorg.springframework.cloud.stream.messaging.Processor.
They can be aggregated together by creating a sequence of interconnected applications, in which the output channel of an element in the sequence is connected to the input channel of the next element, if it exists. A sequence can start with either a source or a processor, it can contain an arbitrary number of processors and must end with either a processor or a sink.
Depending on the nature of the starting and ending element, the sequence may have one or more bindable channels, as follows:
- if the sequence starts with a source and ends with a sink, all communication between the applications is direct and no channels will be bound
- if the sequence starts with a processor, then its input channel will become the
inputchannel of the aggregate and will be bound accordingly - if the sequence ends with a processor, then its output channel will become the
outputchannel of the aggregate and will be bound accordingly
Aggregation is performed using the AggregateApplicationBuilder utility class, as in the following example.
Let’s consider a project in which we have source, processor and a sink, which may be defined in the project, or may be contained in one of the project’s dependencies.
@SpringBootApplication
@EnableBinding(Sink.class)
public class SinkApplication {

	private static Logger logger = LoggerFactory.getLogger(SinkModuleDefinition.class);

	@ServiceActivator(inputChannel=Sink.INPUT)
	public void loggerSink(Object payload) {
		logger.info("Received: " + payload);
	}
}
@SpringBootApplication
@EnableBinding(Processor.class)
public class ProcessorApplication {

	@Transformer
	public String loggerSink(String payload) {
		return payload.toUpperCase();
	}
}
@SpringBootApplication
@EnableBinding(Source.class)
public class SourceApplication {

	@Bean
	@InboundChannelAdapter(value = Source.OUTPUT)
	public String timerMessageSource() {
		return new SimpleDateFormat().format(new Date());
	}
}
Each configuration can be used for running a separate component, but in this case they can be aggregated together as follows:
@SpringBootApplication
public class SampleAggregateApplication {

	public static void main(String[] args) {
		new AggregateApplicationBuilder()
			.from(SourceApplication.class).args("--fixedDelay=5000")
			.via(ProcessorApplication.class)
			.to(SinkApplication.class).args("--debug=true").run(args);
	}
}
The starting component of the sequence is provided as argument to the from() method.
The ending component of the sequence is provided as argument to the to() method.
Intermediate processors are provided as argument to the via() method.
Multiple processors of the same type can be chained together (e.g. for pipelining transformations with different configurations).
For each component, the builder can provide runtime arguments for Spring Boot configuration.
Spring Cloud Stream provides support for RxJava-based processors through the RxJavaProcessor available in spring-cloud-stream-rxjava.
public interface RxJavaProcessor<I, O> {
	Observable<O> process(Observable<I> input);
}
An implementation of RxJavaProcessor will receive Observable as an input that represents the flow of inbound message payloads.
The process method is invoked once at startup for setting up the data flow.
You can enable the use of RxJava-based processors and use them in your processor application by using the @EnableRxJavaProcessor annotation.
@EnableRxJavaProcessor is meta-annotated with @EnableBinding(Processor.class) and will create the Processor binding.
Here is an example of an RxJava-based processor:
@EnableRxJavaProcessor
public class RxJavaTransformer {

	private static Logger logger = LoggerFactory.getLogger(RxJavaTransformer.class);

	@Bean
	public RxJavaProcessor<String,String> processor() {
		return inputStream -> inputStream.map(data -> {
			logger.info("Got data = " + data);
			return data;
		})
		.buffer(5)
		.map(data -> String.valueOf(avg(data)));
	}

	private static Double avg(List<String> data) {
		double sum = 0;
		double count = 0;
		for(String d : data) {
			count++;
			sum += Double.valueOf(d);
		}
		return sum/count;
	}
}
| Note |
|---|---|
When implementing an RxJava processor, it is important to handle exceptions as part of your processing flow.
Uncaught exceptions will be treated as errors by RxJava and will cause the |
Spring Cloud Stream provides a Binder abstraction for use in connecting to physical destinations at the external middleware. This section provides information about the main concepts behind the Binder SPI, its main components, and implementation-specific details.
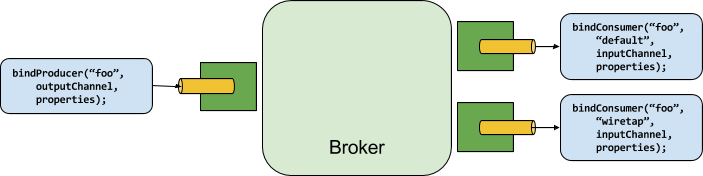
A producer is any component that sends messages to a channel.
The channel can be bound to an external message broker via a Binder implementation for that broker.
When invoking the bindProducer() method, the first parameter is the name of the destination within the broker, the second parameter is the local channel instance to which the producer will send messages, and the third parameter contains properties (such as a partition key expression) to be used within the adapter that is created for that channel.
A consumer is any component that receives messages from a channel.
As with a producer, the consumer’s channel can be bound to an external message broker.
When invoking the bindConsumer() method, the first parameter is the destination name, and a second parameter provides the name of a logical group of consumers.
Each group that is represented by consumer bindings for a given destination receives a copy of each message that a producer sends to that destination (i.e., publish-subscribe semantics).
If there are multiple consumer instances bound using the same group name, then messages will be load-balanced across those consumer instances so that each message sent by a producer is consumed by only a single consumer instance within each group (i.e., queueing semantics).
The Binder SPI consists of a number of interfaces, out-of-the box utility classes and discovery strategies that provide a pluggable mechanism for connecting to external middleware.
The key point of the SPI is the Binder interface which is a strategy for connecting inputs and outputs to external middleware.
public interface Binder<T, C extends ConsumerProperties, P extends ProducerProperties> {
	Binding<T> bindConsumer(String name, String group, T inboundBindTarget, C consumerProperties);

	Binding<T> bindProducer(String name, T outboundBindTarget, P producerProperties);
}
The interface is parameterized, offering a number of extension points:
- input and output bind targets - as of version 1.0, only
MessageChannelis supported, but this is intended to be used as an extension point in the future; - extended consumer and producer properties - allowing specific Binder implementations to add supplemental properties which can be supported in a type-safe manner.
A typical binder implementation consists of the following
- a class that implements the
Binderinterface; - a Spring
@Configurationclass that creates a bean of the type above along with the middleware connection infrastructure; - a
META-INF/spring.bindersfile found on the classpath containing one or more binder definitions, e.g.
kafka:\
org.springframework.cloud.stream.binder.kafka.config.KafkaBinderConfiguration
Spring Cloud Stream relies on implementations of the Binder SPI to perform the task of connecting channels to message brokers. Each Binder implementation typically connects to one type of messaging system. Out of the box, Spring Cloud Stream provides binders for Kafka, RabbitMQ, and Redis.
By default, Spring Cloud Stream relies on Spring Boot’s auto-configuration to configure the binding process. If a single Binder implementation is found on the classpath, Spring Cloud Stream will use it automatically. For example, a Spring Cloud Stream project that aims to bind only to RabbitMQ can simply add the following dependency:
<dependency>
  <groupId>org.springframework.cloud</groupId>
  <artifactId>spring-cloud-stream-binder-rabbit</artifactId>
</dependency>
When multiple binders are present on the classpath, the application must indicate which binder is to be used for each channel binding.
Each binder configuration contains a META-INF/spring.binders, which is a simple properties file:
rabbit:\
org.springframework.cloud.stream.binder.rabbit.config.RabbitServiceAutoConfiguration
Similar files exist for the other provided binder implementations (e.g., Kafka), and custom binder implementations are expected to provide them, as well.
The key represents an identifying name for the binder implementation, whereas the value is a comma-separated list of configuration classes that each contain one and only one bean definition of type org.springframework.cloud.stream.binder.Binder.
Binder selection can either be performed globally, using the spring.cloud.stream.defaultBinder property (e.g., spring.cloud.stream.defaultBinder=rabbit) or individually, by configuring the binder on each channel binding.
For instance, a processor application which reads from Kafka and writes to RabbitMQ can specify the following configuration:
spring.cloud.stream.bindings.input.binder=kafka
spring.cloud.stream.bindings.output.binder=rabbit
By default, binders share the application’s Spring Boot auto-configuration, so that one instance of each binder found on the classpath will be created. If your application should connect to more than one broker of the same type, you can specify multiple binder configurations, each with different environment settings.
| Note |
|---|---|
Turning on explicit binder configuration will disable the default binder configuration process altogether.
If you do this, all binders in use must be included in the configuration.
Frameworks that intend to use Spring Cloud Stream transparently may create binder configurations that can be referenced by name, but will not affect the default binder configuration.
In order to do so, a binder configuration may have its |
For example, this is the typical configuration for a processor application which connects to two RabbitMQ broker instances:
spring:
  cloud:
    stream:
      bindings:
        input:
          destination: foo
          binder: rabbit1
        output:
          destination: bar
          binder: rabbit2
      binders:
        rabbit1:
          type: rabbit
          environment:
            spring:
              rabbitmq:
                host: <host1>
        rabbit2:
          type: rabbit
          environment:
            spring:
              rabbitmq:
host: <host2>The following properties are available when creating custom binder configurations.
They must be prefixed with spring.cloud.stream.binders.<configurationName>.
- type
The binder type. It typically references one of the binders found on the classpath, in particular a key in a
META-INF/spring.bindersfile.By default, it has the same value as the configuration name.
- inheritEnvironment
Whether the configuration will inherit the environment of the application itself.
Default
true.- environment
Root for a set of properties that can be used to customize the environment of the binder. When this is configured, the context in which the binder is being created is not a child of the application context. This allows for complete separation between the binder components and the application components.
Default
empty.- defaultCandidate
Whether the binder configuration is a candidate for being considered a default binder, or can be used only when explicitly referenced. This allows adding binder configurations without interfering with the default processing.
Default
true.
This section details the binder implementation strategies for Kafka and Rabbit MQ, in what concerns mapping the Spring Cloud Stream concepts onto the middleware concepts.
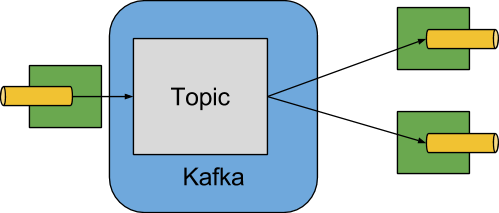
The Kafka Binder implementation maps the destination to a Kafka topic. The consumer group maps directly to the same Kafka concept. Spring Cloud Stream does not use the high-level consumer, but implements a similar concept for the simple consumer.
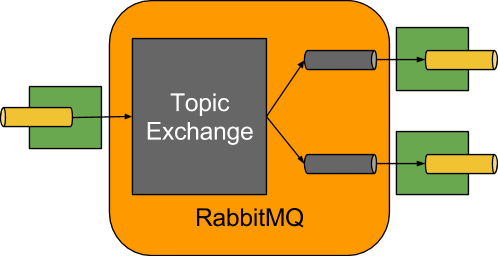
The RabbitMQ Binder implementation maps the destination to a TopicExchange.
For each consumer group, a Queue will be bound to that TopicExchange.
Each consumer instance that binds will trigger creation of a corresponding RabbitMQ Consumer instance for its group’s Queue.
Spring Cloud Stream supports general configuration options as well as configuration for bindings and binders. Some binders allow additional binding properties to support middleware-specific features.
Configuration options can be provided to Spring Cloud Stream applications via any mechanism supported by Spring Boot. This includes application arguments, environment variables, and YAML or .properties files.
- spring.cloud.stream.instanceCount
The number of deployed instances of an application. Must be set for partitioning and if using Kafka.
Default:
1.- spring.cloud.stream.instanceIndex
- The instance index of the application: a number from
0toinstanceCount-1. Used for partitioning and with Kafka. Automatically set in Cloud Foundry to match the application’s instance index. - spring.cloud.stream.dynamicDestinations
A list of destinations that can be bound dynamically (for example, in a dynamic routing scenario). If set, only listed destinations can be bound.
Default: empty (allowing any destination to be bound).
- spring.cloud.stream.defaultBinder
The default binder to use, if multiple binders are configured. See Multiple Binders on the Classpath.
Default: empty.
- spring.cloud.stream.overrideCloudConnectors
This property is only applicable when the
cloudprofile is active and Spring Cloud Connectors are provided with the application. If the property is false (the default), the binder will detect a suitable bound service (e.g. a RabbitMQ service bound in Cloud Foundry for the RabbitMQ binder) and will use it for creating connections (usually via Spring Cloud Connectors). When set to true, this property instructs binders to completely ignore the bound services and rely on Spring Boot properties (e.g. relying on thespring.rabbitmq.*properties provided in the environment for the RabbitMQ binder). The typical usage of this property is to be nested in a customized environment when connecting to multiple systems.Default: false.
Binding properties are supplied using the format spring.cloud.stream.bindings.<channelName>.<property>=<value>.
The <channelName> represents the name of the channel being configured (e.g., output for a Source).
In what follows, we indicate where we have omitted the spring.cloud.stream.bindings.<channelName>. prefix and focus just on the property name, with the understanding that the prefix will be included at runtime.
The following binding properties are available for both input and output bindings and
must be prefixed with spring.cloud.stream.bindings.<channelName>..
- destination
- The target destination of a channel on the bound middleware (e.g., the RabbitMQ exchange or Kafka topic). If the channel is bound as a consumer, it could be bound to multiple destinations and the destination names can be specified as comma separated String values. If not set, the channel name is used instead.
- group
The consumer group of the channel. Applies only to inbound bindings. See Consumer Groups.
Default: null (indicating an anonymous consumer).
- contentType
The content type of the channel. //See ???.
Default: null (so that no type coercion is performed).
- binder
The binder used by this binding. See Section 4.4, “Multiple Binders on the Classpath” for details.
Default: null (the default binder will be used, if one exists).
The following binding properties are available for input bindings only and must be prefixed with spring.cloud.stream.bindings.<channelName>.consumer..
- concurrency
The concurrency of the inbound consumer.
Default:
1.- partitioned
Whether the consumer receives data from a partitioned producer.
Default:
false.- headerMode
When set to
raw, disables header parsing on input. Effective only for messaging middleware that does not support message headers natively and requires header embedding. Useful when inbound data is coming from outside Spring Cloud Stream applications.Default:
embeddedHeaders.- maxAttempts
The number of attempts of re-processing an inbound message.
Default:
3.- backOffInitialInterval
The backoff initial interval on retry.
Default:
1000.- backOffMaxInterval
The maximum backoff interval.
Default:
10000.- backOffMultiplier
The backoff multiplier.
Default:
2.0.
The following binding properties are available for output bindings only and must be prefixed with spring.cloud.stream.bindings.<channelName>.producer..
- partitionKeyExpression
A SpEL expression that determines how to partition outbound data. If set, or if
partitionKeyExtractorClassis set, outbound data on this channel will be partitioned, andpartitionCountmust be set to a value greater than 1 to be effective. The two options are mutually exclusive. See Section 2.5, “Partitioning Support”.Default: null.
- partitionKeyExtractorClass
A
PartitionKeyExtractorStrategyimplementation. If set, or ifpartitionKeyExpressionis set, outbound data on this channel will be partitioned, andpartitionCountmust be set to a value greater than 1 to be effective. The two options are mutually exclusive. See Section 2.5, “Partitioning Support”.Default: null.
- partitionSelectorClass
A
PartitionSelectorStrategyimplementation. Mutually exclusive withpartitionSelectorExpression. If neither is set, the partition will be selected as thehashCode(key) % partitionCount, wherekeyis computed via eitherpartitionKeyExpressionorpartitionKeyExtractorClass.Default: null.
- partitionSelectorExpression
A SpEL expression for customizing partition selection. Mutually exclusive with
partitionSelectorClass. If neither is set, the partition will be selected as thehashCode(key) % partitionCount, wherekeyis computed via eitherpartitionKeyExpressionorpartitionKeyExtractorClass.Default: null.
- partitionCount
The number of target partitions for the data, if partitioning is enabled. Must be set to a value greater than 1 if the producer is partitioned. On Kafka, interpreted as a hint; the larger of this and the partition count of the target topic is used instead.
Default:
1.- requiredGroups
- A comma-separated list of groups to which the producer must ensure message delivery even if they start after it has been created (e.g., by pre-creating durable queues in RabbitMQ).
- headerMode
When set to
raw, disables header embedding on output. Effective only for messaging middleware that does not support message headers natively and requires header embedding. Useful when producing data for non-Spring Cloud Stream applications.Default:
embeddedHeaders.
The following binder, consumer, and producer properties are specific to binder implementations.
By default, the RabbitMQ binder uses Spring Boot’s ConnectionFactory, and it therefore supports all Spring Boot configuration options for RabbitMQ.
(For reference, consult the Spring Boot documentation.) RabbitMQ configuration options use the spring.rabbitmq prefix.
In addition to the Spring Boot options, the RabbitMQ binder supports the following properties:
- spring.cloud.stream.rabbit.binder.adminAddresses
A comma-separated list of RabbitMQ management plugin URLs. Only used when
nodescontains more than one entry. Each entry in this list must have a corresponding entry inspring.rabbitmq.addresses.Default: empty.
- spring.cloud.stream.rabbit.binder.nodes
A comma-separated list of RabbitMQ node names. When more than one entry, used to locate the server address where a queue is located. Each entry in this list must have a corresponding entry in
spring.rabbitmq.addresses.Default: empty.
- spring.cloud.stream.rabbit.binder.compressionLevel
Compression level for compressed bindings. See
java.util.zip.Deflater.Default:
1(BEST_LEVEL).
The following properties are available for Rabbit consumers only and
must be prefixed with spring.cloud.stream.rabbit.bindings.<channelName>.consumer..
- acknowledgeMode
The acknowledge mode.
Default:
AUTO.- autoBindDlq
Whether to automatically declare the DLQ and bind it to the binder DLX.
Default:
false.- durableSubscription
Whether subscription should be durable. Only effective if
groupis also set.Default:
true.- maxConcurrency
- Default:
1. - prefetch
Prefetch count.
Default:
1.- prefix
A prefix to be added to the name of the
destinationand queues.Default: "".
- recoveryInterval
The interval between connection recovery attempts, in milliseconds.
Default:
5000.- requeueRejected
Whether delivery failures should be requeued.
Default:
true.- requestHeaderPatterns
The request headers to be transported.
Default:
[STANDARD_REQUEST_HEADERS,'*'].- replyHeaderPatterns
The reply headers to be transported.
Default:
[STANDARD_REPLY_HEADERS,'*'].- republishToDlq
- By default, messages which fail after retries are exhausted are rejected.
If a dead-letter queue (DLQ) is configured, RabbitMQ will route the failed message (unchanged) to the DLQ.
If set to
true, the bus will republish failed messages to the DLQ with additional headers, including the exception message and stack trace from the cause of the final failure. - transacted
Whether to use transacted channels.
Default:
false.- txSize
The number of deliveries between acks.
Default:
1.
The following properties are available for Rabbit producers only and
must be prefixed with spring.cloud.stream.rabbit.bindings.<channelName>.producer..
- autoBindDlq
Whether to automatically declare the DLQ and bind it to the binder DLX.
Default:
false.- batchingEnabled
Whether to enable message batching by producers.
Default:
false.- batchSize
The number of messages to buffer when batching is enabled.
Default:
100.- batchBufferLimit
- Default:
10000. - batchTimeout
- Default:
5000. - compress
Whether data should be compressed when sent.
Default:
false.- deliveryMode
Delivery mode.
Default:
PERSISTENT.- prefix
A prefix to be added to the name of the
destinationexchange.Default: "".
- requestHeaderPatterns
The request headers to be transported.
Default:
[STANDARD_REQUEST_HEADERS,'*'].- replyHeaderPatterns
The reply headers to be transported.
Default:
[STANDARD_REPLY_HEADERS,'*'].
- spring.cloud.stream.kafka.binder.brokers
A list of brokers to which the Kafka binder will connect.
Default:
localhost.- spring.cloud.stream.kafka.binder.defaultBrokerPort
brokersallows hosts specified with or without port information (e.g.,host1,host2:port2). This sets the default port when no port is configured in the broker list.Default:
9092.- spring.cloud.stream.kafka.binder.zkNodes
A list of ZooKeeper nodes to which the Kafka binder can connect.
Default:
localhost.- spring.cloud.stream.kafka.binder.defaultZkPort
zkNodesallows hosts specified with or without port information (e.g.,host1,host2:port2). This sets the default port when no port is configured in the node list.Default:
2181.- spring.cloud.stream.kafka.binder.headers
The list of custom headers that will be transported by the binder.
Default: empty.
- spring.cloud.stream.kafka.binder.offsetUpdateTimeWindow
The frequency, in milliseconds, with which offsets are saved. Ignored if
0.Default:
10000.- spring.cloud.stream.kafka.binder.offsetUpdateCount
The frequency, in number of updates, which which consumed offsets are persisted. Ignored if
0. Mutually exclusive withoffsetUpdateTimeWindow.Default:
0.- spring.cloud.stream.kafka.binder.requiredAcks
The number of required acks on the broker.
Default:
1.- spring.cloud.stream.kafka.binder.minPartitionCount
Effective only if
autoCreateTopicsorautoAddPartitionsis set. The global minimum number of partitions that the binder will configure on topics on which it produces/consumes data. It can be superseded by thepartitionCountsetting of the producer or by the value ofinstanceCount*concurrencysettings of the producer (if either is larger).Default:
1.- spring.cloud.stream.kafka.binder.replicationFactor
The replication factor of auto-created topics if
autoCreateTopicsis active.Default:
1.- spring.cloud.stream.kafka.binder.autoCreateTopics
If set to
true, the binder will create new topics automatically. If set tofalse, the binder will rely on the topics being already configured. In the latter case, if the topics do not exist, the binder will fail to start. Of note, this setting is independent of theauto.topic.create.enablesetting of the broker and it does not influence it: if the server is set to auto-create topics, they may be created as part of the metadata retrieval request, with default broker settings.Default:
true.- spring.cloud.stream.kafka.binder.autoAddPartitions
If set to
true, the binder will create add new partitions if required. If set tofalse, the binder will rely on the partition size of the topic being already configured. If the partition count of the target topic is smaller than the expected value, the binder will fail to start.Default:
false.- spring.cloud.stream.kafka.binder.socketBufferSize
Size (in bytes) of the socket buffer to be used by the Kafka consumers.
Default:
2097152.
The following properties are available for Kafka consumers only and
must be prefixed with spring.cloud.stream.kafka.bindings.<channelName>.consumer..
- autoCommitOffset
Whether to autocommit offsets when a message has been processed. If set to
false, anAcknowledgmentheader will be available in the message headers for late acknowledgment.Default:
true.- autoCommitOnError
Effective only if
autoCommitOffsetis set totrue. If set tofalseit suppresses auto-commits for messages that result in errors, and will commit only for successful messages, allows a stream to automatically replay from the last successfully processed message, in case of persistent failures. If set totrue, it will always auto-commit (if auto-commit is enabled). If not set (default), it effectively has the same value asenableDlq, auto-committing erroneous messages if they are sent to a DLQ, and not committing them otherwise.Default: not set.
- recoveryInterval
The interval between connection recovery attempts, in milliseconds.
Default:
5000.- resetOffsets
Whether to reset offsets on the consumer to the value provided by
startOffset.Default:
false.- startOffset
The starting offset for new groups, or when
resetOffsetsistrue. Allowed values:earliest,latest.Default: null (equivalent to
earliest).- enableDlq
When set to true, it will send enable DLQ behavior for the consumer. Messages that result in errors will be forwarded to a topic named
error.<destination>.<group>. This provides an alternative option to the more common Kafka replay scenario for the case when the number of errors is relatively small and replaying the entire original topic may be too cumbersome.Default:
false.
The following properties are available for Kafka producers only and
must be prefixed with spring.cloud.stream.kafka.bindings.<channelName>.producer..
- bufferSize
Upper limit, in bytes, of how much data the Kafka producer will attempt to batch before sending.
Default:
16384.- sync
Whether the producer is synchronous.
Default:
false.- batchTimeout
How long the producer will wait before sending in order to allow more messages to accumulate in the same batch. (Normally the producer does not wait at all, and simply sends all the messages that accumulated while the previous send was in progress.) A non-zero value may increase throughput at the expense of latency.
Default:
0.- maxRequestSize
The maximum size of a message sending request.
Default:
1048576.- configuration
Map with a key/value pair containing generic Kafka producer properties.
Default: Empty map.
To allow you to propagate information about the content type of produced messages, Spring Cloud Stream attaches, by default, a contentType header to outbound messages.
For middleware that does not directly support headers, Spring Cloud Stream provides its own mechanism of automatically wrapping outbound messages in an envelope of its own.
For middleware that does support headers, Spring Cloud Stream applications may receive messages with a given content type from non-Spring Cloud Stream applications.
Spring Cloud Stream can handle messages based on this information in two ways:
- Through its
contentTypesettings on inbound and outbound channels - Through its argument mapping performed for methods annotated with
@StreamListener
Spring Cloud Stream allows you to declaratively configure type conversion for inputs and outputs using the content-type property of a binding.
Note that general type conversion may also be accomplished easily by using a transformer inside your application.
Currently, Spring Cloud Stream natively supports the following type conversions commonly used in streams:
- JSON to/from POJO
- JSON to/from org.springframework.tuple.Tuple
- Object to/from byte[] : Either the raw bytes serialized for remote transport, bytes emitted by an application, or converted to bytes using Java serialization(requires the object to be Serializable)
- String to/from byte[]
- Object to plain text (invokes the object’s toString() method)
Where JSON represents either a byte array or String payload containing JSON. Currently, Objects may be converted from a JSON byte array or String. Converting to JSON always produces a String.
content-type values are parsed as media types, e.g., application/json or text/plain;charset=UTF-8.
MIME types are especially useful for indicating how to convert to String or byte[] content.
Spring Cloud Stream also uses MIME type format to represent Java types, using the general type application/x-java-object with a type parameter.
For example, application/x-java-object;type=java.util.Map or application/x-java-object;type=com.bar.Foo can be set as the content-type property of an input binding.
In addition, Spring Cloud Stream provides custom MIME types, notably, application/x-spring-tuple to specify a Tuple.
The type conversions Spring Cloud Stream provides out of the box are summarized in the following table:
| Source Payload | Target Payload | content-type header | content-type | Comments |
|---|---|---|---|---|
POJO | JSON String | ignored | application/json | |
Tuple | JSON String | ignored | application/json | JSON is tailored for Tuple |
POJO | String (toString()) | ignored | text/plain, java.lang.String | |
POJO | byte[] (java.io serialized) | ignored | application/x-java-serialized-object | |
JSON byte[] or String | POJO | application/json (or none) | application/x-java-object | |
byte[] or String | Serializable | application/x-java-serialized-object | application/x-java-object | |
JSON byte[] or String | Tuple | application/json (or none) | application/x-spring-tuple | |
byte[] | String | any | text/plain, java.lang.String | will apply any Charset specified in the content-type header |
String | byte[] | any | application/octet-stream | will apply any Charset specified in the content-type header |
Conversion applies to payloads that require type conversion. For example, if a module produces an XML string with outputType=application/json, the payload will not be converted from XML to JSON. This is because the payload at the module’s output channel is already a String so no conversion will be applied at runtime.
While conversion is supported for both input and output channels, it is especially recommended to be used for the conversion of outbound messages.
For the conversion of inbound messages, especially when the target is a POJO, the @StreamListener support will perform the conversion automatically.
The @StreamListener annotation provides a convenient way for converting incoming messages without the need to specify the content type of an input channel.
During the dispatching process to methods annotated with @StreamListener, a conversion will be applied automatically if the argument requires it.
For example, let’s consider a message with the String content {"greeting":"Hello, world"} and a content-type header of application/json is received on the input channel.
Let us consider the following application that receives it:
public class GreetingMessage {

  String greeting;

  public String getGreeting() {
    return greeting;
  }

  public void setGreeting(String greeting) {
    this.greeting = greeting;
  }
}

@EnableBinding(Sink.class)
@EnableAutoConfiguration
public static class GreetingSink {

		@StreamListener(Sink.INPUT)
		public void receive(Greeting greeting) {
			// handle Greeting
		}
	}
The argument of the method will be populated automatically with the POJO containing the unmarshalled form of the JSON String.
While Spring Cloud Stream makes it easy for individual Spring Boot applications to connect to messaging systems, the typical scenario for Spring Cloud Stream is the creation of multi-application pipelines, where microservice applications send data to each other. You can achieve this scenario by correlating the input and output destinations of adjacent applications.
Supposing that a design calls for the Time Source application to send data to the Log Sink application, you can use a common destination named ticktock for bindings within both applications.
Time Source will set the following property:
spring.cloud.stream.bindings.output.destination=ticktock
Log Sink will set the following property:
spring.cloud.stream.bindings.input.destination=ticktock
When scaling up Spring Cloud Stream applications, each instance can receive information about how many other instances of the same application exist and what its own instance index is.
Spring Cloud Stream does this through the spring.cloud.stream.instanceCount and spring.cloud.stream.instanceIndex properties.
For example, if there are three instances of a HDFS sink application, all three instances will have spring.cloud.stream.instanceCount set to 3, and the individual applications will have spring.cloud.stream.instanceIndex set to 0, 1, and 2, respectively.
When Spring Cloud Stream applications are deployed via Spring Cloud Data Flow, these properties are configured automatically; when Spring Cloud Stream applications are launched independently, these properties must be set correctly.
By default, spring.cloud.stream.instanceCount is 1, and spring.cloud.stream.instanceIndex is 0.
In a scaled-up scenario, correct configuration of these two properties is important for addressing partitioning behavior (see below) in general, and the two properties are always required by certain binders (e.g., the Kafka binder) in order to ensure that data are split correctly across multiple consumer instances.
An output binding is configured to send partitioned data by setting one and only one of its partitionKeyExpression or partitionKeyExtractorClass properties, as well as its partitionCount property.
For example, the following is a valid and typical configuration:
spring.cloud.stream.bindings.output.producer.partitionKeyExpression=payload.id
spring.cloud.stream.bindings.output.producer.partitionCount=5
Based on the above example configuration, data will be sent to the target partition using the following logic.
A partition key’s value is calculated for each message sent to a partitioned output channel based on the partitionKeyExpression.
The partitionKeyExpression is a SpEL expression which is evaluated against the outbound message for extracting the partitioning key.
![[Tip]](images/tip.png) | Tip |
|---|---|
If a SpEL expression is not sufficient for your needs, you can instead calculate the partition key value by setting the property |
Once the message key is calculated, the partition selection process will determine the target partition as a value between 0 and partitionCount - 1.
The default calculation, applicable in most scenarios, is based on the formula key.hashCode() % partitionCount.
This can be customized on the binding, either by setting a SpEL expression to be evaluated against the key (via the partitionSelectorExpression property) or by setting a org.springframework.cloud.stream.binder.PartitionSelectorStrategy implementation (via the partitionSelectorClass property).
Additional properties can be configured for more advanced scenarios, as described in the following section.
| Note |
|---|---|
The Kafka binder will use the |
An input binding is configured to receive partitioned data by setting its partitioned property, as well as the instanceIndex and instanceCount properties on the application itself, as in the following example:
spring.cloud.stream.bindings.input.consumer.partitioned=true
spring.cloud.stream.instanceIndex=3
spring.cloud.stream.instanceCount=5
The instanceCount value represents the total number of application instances between which the data need to be partitioned, and the instanceIndex must be a unique value across the multiple instances, between 0 and instanceCount - 1.
The instance index helps each application instance to identify the unique partition (or, in the case of Kafka, the partition set) from which it receives data.
It is important to set both values correctly in order to ensure that all of the data is consumed and that the application instances receive mutually exclusive datasets.
While a scenario which using multiple instances for partitioned data processing may be complex to set up in a standalone case, Spring Cloud Dataflow can simplify the process significantly by populating both the input and output values correctly as well as relying on the runtime infrastructure to provide information about the instance index and instance count.
Spring Cloud Stream provides support for testing your microservice applications without connecting to a messaging system.
You can do that by using the TestSupportBinder.
This is useful especially for unit testing your microservices.
The TestSupportBinder allows users to interact with the bound channels and inspect what messages are sent and received by the application
For outbound message channels, the TestSupportBinder registers a single subscriber and retains the messages emitted by the application in a MessageCollector.
They can be retrieved during tests and have assertions made against them.
The user can also send messages to inbound message channels, so that the consumer application can consume the messages. The following example shows how to test both input and output channels on a processor.
@RunWith(SpringJUnit4ClassRunner.class)
@SpringApplicationConfiguration(classes = ExampleTest.MyProcessor.class)
@IntegrationTest({"server.port=-1"})
@DirtiesContext
public class ExampleTest {

  @Autowired
  private Processor processor;

  @Autowired
  private BinderFactory<MessageChannel> binderFactory;

  @Autowired
  private MessageCollector messageCollector;

  @Test
  @SuppressWarnings("unchecked")
  public void testWiring() {
    Message<String> message = new GenericMessage<>("hello");
    processor.input().send(message);
    Message<String> received = (Message<String>) messageCollector.forChannel(processor.output()).poll();
    assertThat(received.getPayload(), equalTo("hello world"));
  }


  @SpringBootApplication
  @EnableBinding(Processor.class)
  public static class MyProcessor {

    @Autowired
    private Processor channels;

    @Transformer(inputChannel = Processor.INPUT, outputChannel = Processor.OUTPUT)
    public String transform(String in) {
      return in + " world";
    }
  }
}
In the example above, we are creating an application that has an input and an output channel, bound through the Processor interface.
The bound interface is injected into the test so we can have access to both channels.
We are sending a message on the input channel and we are using the MessageCollector provided by Spring Cloud Stream’s test support to capture the message has been sent to the output channel as a result.
Once we have received the message, we can validate that the component functions correctly.
Spring Cloud Stream provides a health indicator for binders.
It is registered under the name of binders and can be enabled or disabled by setting the management.health.binders.enabled property.
For Spring Cloud Stream samples, please refer to the spring-cloud-stream-samples repository on GitHub.
To get started with creating Spring Cloud Stream applications, visit the Spring Initializr and create a new Maven project named "GreetingSource". Select Spring Boot version 1.3.4 SNAPSHOT and search or tick the checkbox for Stream Kafka (we will be using Kafka for messaging).
Next, create a new class, GreetingSource, in the same package as the GreetingSourceApplication class.
Give it the following code:
import org.springframework.cloud.stream.annotation.EnableBinding;
import org.springframework.cloud.stream.messaging.Source;
import org.springframework.integration.annotation.InboundChannelAdapter;

@EnableBinding(Source.class)
public class GreetingSource {

    @InboundChannelAdapter(Source.OUTPUT)
    public String greet() {
        return "hello world " + System.currentTimeMillis();
    }
}
The @EnableBinding annotation is what triggers the creation of Spring Integration infrastructure components.
Specifically, it will create a Kafka connection factory, a Kafka outbound channel adapter, and the message channel defined inside the Source interface:
public interface Source {

  String OUTPUT = "output";

  @Output(Source.OUTPUT)
  MessageChannel output();

}
The auto-configuration also creates a default poller, so that the greet() method will be invoked once per second.
The standard Spring Integration @InboundChannelAdapter annotation sends a message to the source’s output channel, using the return value as the payload of the message.
To test-drive this setup, run a Kafka message broker. An easy way to do this is to use a Docker image:
# On OS X
$ docker run -p 2181:2181 -p 9092:9092 --env ADVERTISED_HOST=`docker-machine ip \`docker-machine active\`` --env ADVERTISED_PORT=9092 spotify/kafka

# On Linux
$ docker run -p 2181:2181 -p 9092:9092 --env ADVERTISED_HOST=localhost --env ADVERTISED_PORT=9092 spotify/kafka
Build the application:
./mvnw clean package
The consumer application is coded in a similar manner.
Go back to Initializr and create another project, named LoggingSink.
Then create a new class, LoggingSink, in the same package as the class LoggingSinkApplication and with the following code:
import org.springframework.cloud.stream.annotation.EnableBinding;
import org.springframework.cloud.stream.annotation.StreamListener;
import org.springframework.cloud.stream.messaging.Sink;

@EnableBinding(Sink.class)
public class LoggingSink {

    @StreamListener(Sink.INPUT)
    public void log(String message) {
        System.out.println(message);
    }
}
Build the application:
./mvnw clean package
To connect the GreetingSource application to the LoggingSink application, each application must share the same destination name. Starting up both applications as shown below, you will see the consumer application printing "hello world" and a timestamp to the console:
cd GreetingSource
java -jar target/GreetingSource-0.0.1-SNAPSHOT.jar --spring.cloud.stream.bindings.output.destination=mydest

cd LoggingSink
java -jar target/LoggingSink-0.0.1-SNAPSHOT.jar --server.port=8090 --spring.cloud.stream.bindings.input.destination=mydest
(The different server port prevents collisions of the HTTP port used to service the Spring Boot Actuator endpoints in the two applications.)
The output of the LoggingSink application will look something like the following:
[           main] s.b.c.e.t.TomcatEmbeddedServletContainer : Tomcat started on port(s): 8090 (http)
[           main] com.example.LoggingSinkApplication       : Started LoggingSinkApplication in 6.828 seconds (JVM running for 7.371)
hello world 1458595076731
hello world 1458595077732
hello world 1458595078733
hello world 1458595079734
hello world 1458595080735
To build the source you will need to install JDK 1.7.
The build uses the Maven wrapper so you don’t have to install a specific version of Maven. To enable the tests for Redis, Rabbit, and Kafka bindings you should have those servers running before building. See below for more information on running the servers.
The main build command is
$ ./mvnw clean install
You can also add '-DskipTests' if you like, to avoid running the tests.
| Note |
|---|---|
You can also install Maven (>=3.3.3) yourself and run the |
| Note |
|---|---|
Be aware that you might need to increase the amount of memory
available to Maven by setting a |
The projects that require middleware generally include a
docker-compose.yml, so consider using
Docker Compose to run the middeware servers
in Docker containers. See the README in the
scripts demo
repository for specific instructions about the common cases of mongo,
rabbit and redis.
If you don’t have an IDE preference we would recommend that you use Spring Tools Suite or Eclipse when working with the code. We use the m2eclipe eclipse plugin for maven support. Other IDEs and tools should also work without issue.
We recommend the m2eclipe eclipse plugin when working with eclipse. If you don’t already have m2eclipse installed it is available from the "eclipse marketplace".
Unfortunately m2e does not yet support Maven 3.3, so once the projects
are imported into Eclipse you will also need to tell m2eclipse to use
the .settings.xml file for the projects. If you do not do this you
may see many different errors related to the POMs in the
projects. Open your Eclipse preferences, expand the Maven
preferences, and select User Settings. In the User Settings field
click Browse and navigate to the Spring Cloud project you imported
selecting the .settings.xml file in that project. Click Apply and
then OK to save the preference changes.
| Note |
|---|---|
Alternatively you can copy the repository settings from |
If you prefer not to use m2eclipse you can generate eclipse project metadata using the following command:
$ ./mvnw eclipse:eclipse
The generated eclipse projects can be imported by selecting import existing projects
from the file menu.
[[contributing]
== Contributing
Spring Cloud is released under the non-restrictive Apache 2.0 license, and follows a very standard Github development process, using Github tracker for issues and merging pull requests into master. If you want to contribute even something trivial please do not hesitate, but follow the guidelines below.
Before we accept a non-trivial patch or pull request we will need you to sign the contributor’s agreement. Signing the contributor’s agreement does not grant anyone commit rights to the main repository, but it does mean that we can accept your contributions, and you will get an author credit if we do. Active contributors might be asked to join the core team, and given the ability to merge pull requests.
None of these is essential for a pull request, but they will all help. They can also be added after the original pull request but before a merge.
- Use the Spring Framework code format conventions. If you use Eclipse
you can import formatter settings using the
eclipse-code-formatter.xmlfile from the Spring Cloud Build project. If using IntelliJ, you can use the Eclipse Code Formatter Plugin to import the same file. - Make sure all new
.javafiles to have a simple Javadoc class comment with at least an@authortag identifying you, and preferably at least a paragraph on what the class is for. - Add the ASF license header comment to all new
.javafiles (copy from existing files in the project) - Add yourself as an
@authorto the .java files that you modify substantially (more than cosmetic changes). - Add some Javadocs and, if you change the namespace, some XSD doc elements.
- A few unit tests would help a lot as well — someone has to do it.
- If no-one else is using your branch, please rebase it against the current master (or other target branch in the main project).
- When writing a commit message please follow these conventions,
if you are fixing an existing issue please add
Fixes gh-XXXXat the end of the commit message (where XXXX is the issue number).