Elston.RELEASE
Copyright © 2013-2019 Pivotal Software, Inc.
Table of Contents
This section goes into more detail about how you can work with Spring Cloud Task Starters as standalone applications or with Spring Cloud Data Flow. It assumes familiarity with general Spring Cloud Task concepts, which can be found in the Spring Cloud Task reference documentation.
Spring Cloud Task Application Starters provide you with predefined Spring Cloud Task applications that you can run independently or with Spring Cloud Data Flow. You can also use the starters as a basis for creating your own applications. They include commonly used tasks that can run as is or be modified to your needs.
As a user of Spring Cloud Task Application Starters you have access to two types of artifacts.
Starters are libraries that contain the complete configuration of a Spring Cloud Task application with a specific role (e.g. an JDBC HDFS that migrates data from a JDBC Repository via sql query to a file on hdfs). Starters are not executable applications, and are intended to be included in other Spring Boot applications.
Prebuilt applications are Spring Boot applications that include the starters. Prebuilt applications are uberjars and include minimal code required to execute standalone.
![[Note]](images/note.png) | Note |
|---|---|
Only starters are present in the source code of the project. Prebuilt applications are generated according to the Maven plugin configuration. |
Starters are available as Maven artifacts in the Spring repositories. You can add them as dependencies to your application, as follows:
<dependency>
  <group>org.springframework.cloud.task.app</group>
  <artifactId>spring-cloud-starter-task-timestamp</artifactId>
  <version>1.0.0.BUILD-SNAPSHOT</version>
</dependency>
From this, you can infer the coordinates for other starters found in this guide.
While the version may vary, the group will always remain org.springframework.cloud.task.app and the artifact id follows the naming convention spring-cloud-starter-task-<functionality>.
Prebuilt applications are available as Maven artifacts too.
It is not encouraged to use them directly as dependencies, as starters should be used instead.
Following the typical Maven <group>:<artifactId>:<version> convention, they can be referenced for example as:
org.springframework.cloud.task.app:timestamp-task:1.0.0.BUILD-SNAPSHOT
Just as with the starters, you can infer the coordinates for other prebuilt applications found in the guide.
The group will be always org.springframework.cloud.task.app.
The version may vary.
The artifact id follows the format <functionality>-task.
Docker
The Docker versions of the applications are available in Docker Hub, at hub.docker.com/r/springcloudtask/. Naming and versioning follows the same general conventions as Maven, e.g.
docker pull springcloudtask/timestamp-task
will pull the latest Docker image of the timestamp task.
You can also build the project and generate the artifacts (including the prebuilt applications) on your own. This is useful if you want to deploy the artifacts locally, for example for adding a new starter.
First, you need to generate the prebuilt applications. There is a maven profile available do do this.
./mvnw clean install -PgenerateApps
Then build the applications:
cd apps

mvn clean install
Each of the generated applications will contain:
pom.xmlfile with the required dependencies- a class that contains the
mainmethod of the application and imports the predefined configuration - generated integration test code that exercises the component.
In this section we will describe how to create your own application.
Spring Cloud Task Application Starters consist of regular Spring Cloud Task applications with some additional conventions that facilitate generating prebuilt applications. Sometimes, your solution may require additional applications that are not in the scope of Spring Cloud Task Application Starters, or require additional tweaks and enhancements. In this section we will show you how to create custom applications that can be part of your solution, along with Spring Cloud Task application starters. You have the following options:
- create new Spring Cloud Task applications;
- use the starters to create customized versions;
If you want to add your own custom applications to your solution, you can simply create a new Spring Cloud Task project and run it the same way as the applications provided by Spring Cloud Task Application Starters, independently or via Spring Cloud Data Flow. The process is described in the Getting Started Guide of Spring Cloud Task.
You can also reuse the starters provided by Spring Cloud Task Application Starters to create custom components, enriching the behavior of the application. For example, you can add a special behavior to your jdbc hdfs task, to do some post processing following the migration of the data. As a reminder, this involves:
- adding the starter to your project for example:
<dependencies>
  <!- other dependencies -->
  <dependencies>
    <dependency>
      <groupId>org.springframework.cloud.task.app</groupId>
      <artifactId>spring-cloud-starter-task-timestamp</artifactId>
    </dependency>
</dependencies>- adding the main class and importing the starter configuration for example:
package org.springframework.cloud.task.app.timestamp;

import org.springframework.boot.SpringApplication;
import org.springframework.boot.autoconfigure.SpringBootApplication;
import org.springframework.context.annotation.Import;


@SpringBootApplication
@Import(org.springframework.cloud.task.app.timestamp.TimestampTaskConfiguration.class)
public class TimestampTaskApplication {

        public static void main(String[] args) {
                SpringApplication.run(TimestampTaskApplication.class, args);
        }
}
After doing so, you can simply add the additional configuration for the extra features of your application.
In this section, we will explain how to develop a custom task application and then generate maven and docker artifacts for it using the existing tooling provided by the spring cloud task app starter infrastructure. For explanation purposes, we will assume that we are creating a new task application for a technology named foobar.
- Create a new top level module named spring-cloud-starter-task-foobar (preferably in a new empty directory)
Have this module inherit from the task-app-starters-build in the official spring cloud task app starters.
Please look into the existing starters for how to design and structure a new one. Ensure that you name the
main @Configuration class of your starter as FoobarTaskConfiguration as this is the default convention used by
the app generation later. The default package for the class with @Configuration is org.springfamework.cloud.task.app.foobar.
If you have a different class/package name, see below for how to override that in the app generator.
The technology name for which the app starter is created can be a hyphenated stream of strings such as in timestamp-batch
This starter module for this needs to be spring-cloud-starter-task-timestamp-batch.
The starters in spring-cloud-task-app-starters are slightly different from the other starters in spring-boot and
spring-cloud in that here we don’t provide a way to auto configure any configuration through spring factories mechanism.
Rather, we delegate this responsibility to the maven plugin that is generating the binder based apps. Therefore, you don’t
have to provide a spring.factories file that lists all your configuration classes.
- Add the new foobar task starter module to the root pom.xml
- You need to add the new starter dependency to a bill of material (BOM) called
foobar-task-app-dependenciesin the dependency management section. For example,
<dependencyManagement>
...
...
    <dependency>
        <groupId>org.springframework.cloud.task.app</groupId>
        <artifactId>spring-cloud-starter-task-foobar</artifactId>
        <version>1.0.0.BUILD-SNAPSHOT</version>
    </dependency>
...
...
- Please ensure that the bom inherits from
spring-cloud-dependencies-parent - Add the BOM to the root pom.xml
- Please add the following xml snippet to the pom.xml file of spring-cloud-starter-task-foobar.
<build>
        <plugins>
            <plugin>
                <groupId>org.springframework.cloud</groupId>
                <artifactId>spring-cloud-app-starter-doc-maven-plugin</artifactId>
            </plugin>
            <plugin>
                <groupId>org.springframework.cloud.stream.app.plugin</groupId>
                <artifactId>spring-cloud-stream-app-maven-plugin</artifactId>
                <configuration>
                    <generatedProjectHome>${session.executionRootDirectory}/apps</generatedProjectHome>
                    <generatedProjectVersion>${project.version}</generatedProjectVersion>
                    <bom>
                        <name>scs-bom</name>
                        <groupId>org.springframework.cloud.task.app</groupId>
                        <artifactId>foobar-task-app-dependencies</artifactId>
                        <version>${project.version}</version>
                    </bom>
                    <generatedApps>
                        <foobar-task/>
                    </generatedApps>
                </configuration>
            </plugin>
        </plugins>
    </build>
More information about the maven plugin used above can be found here.
If you did not follow the default convention expected by the plugin of where it is looking for the main configuration
class, which is org.springfamework.cloud.task.app.foobar.FoobarTaskConfiguration, you can override that in
the configuration for the plugin. For example, if your main configuration class is foo.bar.SpecialFooBarTaskConfiguration.class,
this is how you can tell the plugin to override the default.
<foobar-task>
    <autoConfigClass>foo.bar.SpecialFooBarTaskConfiguration.class</autoConfigClass>
</foobar-task>
- At this point, you can build the project and generate the apps.
mvn clean install -PgenerateApps
This will generate the foobar task app in a directory named apps at the root of the project.
If you want to change the location where the apps are generated, for instance /tmp/task-apps, you can do it in the
configuration section of the plugin.
<configuration>
    ...
    <generatedProjectHome>/tmp/task-apps</generatedProjectHome>
    ...
</configuration
If you have an artifact that is only available through a private internal maven repository (may be an enterprise wide Nexus repo that you use globally across teams), and you need that for your app, you can define that as part of the maven plugin configuration.
For example,
<configuration>
...
    <extraRepositories>
        <repository>
            <id>private-internal-nexus</id>
            <url>.../</url>
            <name>...</name>
            <snapshotEnabled>...</snapshotEnabled>
        </repository>
    </extraRepositories>
</configuration>
Then you can define this as part of your app tag:
<foobar-task>
    <extraRepositories>
        <private-internal-nexus />
    </extraRepositories>
</foobar-task>
- cd into the directory where you generated the apps (
appsat the root of the repository by default, unless you changed it elsewhere as described above).
Here you will see foobar-task along with all the other out of the box apps that is generated.
If you only care about the foobar-task apps and nothing else, you can cd into that directory
and import it directly into your IDE of choice. Each of them is a self contained spring boot application project.
For all the generated apps, the parent is spring-boot-starter-parent as is required by Spring Initializr, the library
used under the hood to generate the apps.
You can cd into these custom foobar-task directories and do the following to build the apps:
cd foobar-task
mvn clean install
This will install the foobar-task into your local maven cache (~/.m2 by default).
The app generation phase adds an integration test to the app project that ensures all the spring
components and contexts are loaded properly. However, these tests are not run by default when you do a mvn install.
You can force the running of these tests by doing the following:
mvn clean install -DskipTests=false
- Now that you built the applications, they are available under the
targetdirectories of the respective apps and also as maven artifacts in your local maven repository. Go to thetargetdirectory and run the following:
java -jar foobar-task.jar
It should start the application up.
- The generated apps also support the creation of docker images. You can cd into one of the foobar-task app and do the following:
mvn clean package docker:build
This creates the docker image under the target/docker/springcloudtask directory. Please ensure that the Docker
container is up and running and DOCKER_HOST environment variable is properly set before you try docker:build.
All the generated apps from the repository are uploaded to Docker Hub
However, for a custom app that you build, this won’t be uploaded to docker hub under springcloudtask repository.
If you think that there is a general need for this app, you should contribute this starter to the main repository
and upon review, this app then can be uploaded to the above location in docker hub.
If you still need to push this to docker hub under a different repository you can take the following steps.
Go to the pom.xml of the generated app [ example - foobar-task/pom.xml]
Search for springcloudtask. Replace with your repository name.
Then do this:
mvn clean package docker:build docker:push -Ddocker.username=[provide your username] -Ddocker.password=[provide password]
This will upload the docker image to the docker hub in your custom repository.
A task that prints a timestamp to stdout. Intended to primarily be used for testing.
The timestamp task has the following options:
- timestamp.format
- The timestamp format, "yyyy-MM-dd HH:mm:ss.SSS" by default. (String, default:
yyyy-MM-dd HH:mm:ss.SSS)
$ ./mvnw clean install -PgenerateApps
$ cd apps/timestamp-task
$ ./mvnw clean package
We welcome contributions! Follow this link for more information on how to contribute.
A task that executes a tasks in a directed graph as specified by a DSL that is
passed in via the --graph command line argument.
The Composed Task Runner parses the graph DSL and for each node in the graph it will execute a restful call against a specified Spring Cloud Data Flow instance to launch the associated task definition. For each task definition that is executed the Composed Task Runner will poll the database to verify that the task completed. Once complete the Composed Task Runner will either continue to the next task in the graph or fail based on how the DSL specified the sequence of tasks should be executed.
The Graph DSL is comprised of Task Definitions that have been defined within the Spring Cloud Data Flow server referenced by the data-flow-uri (default: localhost:9393). These definitions can be placed into a derived graph based on a DSL through the use of sequences, transitions, splits, or a combination therein.
Composed Task Runner is built using
Spring Batch
to execute the directed graph. As such each node in the graph is a
Step.
As discussed in the overview, each step in the graph will post a request to a
Spring Cloud Data Flow Server to execute a task definition. If the task launched by
the step fails to complete within the time specified by the maxWaitTime
property, a
org.springframework.cloud.task.app.composedtaskrunner.support.TimeoutException
will be thrown. Once task launched by the step completes,
the ComposedTaskRunner will set the ExitStatus of that step based on the following rules:
- If the
TaskExecutionhas anExitMessagethat will be used as theExitStatus - If no
ExitMessageis present and theExitCodeis set to 0 then theExitStatusfor the step will beCOMPLETED. - If no
ExitMessageis present and theExitCodeis set to 1 then theExitStatusfor the step will beFAILED.
If the state of any step in the graph is set to FAILED and is not handled by the DSL the Directed Graph execution will terminate.
The Composed Task Runner supports the ability to traverse sequences of task
definitions. This is represented by a task definition name followed by the
&& symbol then the next task definition to be launched.
For example if we have tasks AAA, BBB and CCC to be launched in sequence it
will look like this:
AAA && BBB && CCC

You can execute the same task multiple times in a sequence. For example:
AAA && AAA && AAA

If an ExitStatus 'FAILED' is returned in a sequence the Composed Task
Runner will terminate. For example if AAA && BBB && CCC composed task is
executed and BBB fails. Then CCC will not be launched.
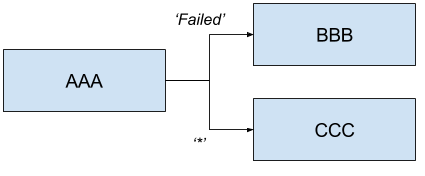
The Composed Task Runner supports the ability to control what tasks get
executed based on the ExitStatus of the previous task. This is
done by specifying ExitStatus after the task definition followed by
the → operator and the task definition that should be launched based on
the result. For example:
AAA 'FAILED' -> BBB 'COMPLETED' -> CCC
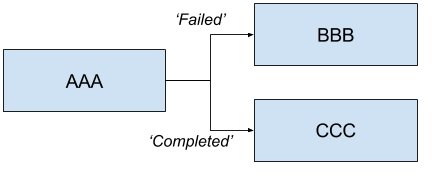
Will launch AAA and if AAA fails then BBB will be launched. Else if AAA completes successfully then CCC will launch.
You can also have a sequence that follows a transition. For example:
AAA 'FAILED' -> BBB && CCC && DDD
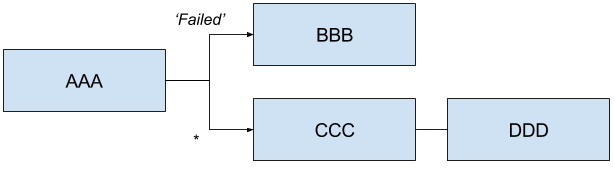
Will launch AAA and for any ExitStatus that is returned other than 'FAILED' then
CCC && DDD will be launched. However if AAA returns 'FAILED' then BBB will
be launched, but CCC && DDD will not.
Allows a user to execute tasks in parallel. For example:
<AAA || BBB || CCC>
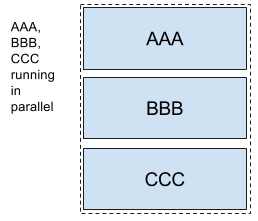
Will launch AAA, BBB and CCC in parallel. When launching splits as a part of a composed task all elements of the split must finish successfully before the next task definition can be launched for example:
<AAA || BBB || CCC> && DDD && EEE
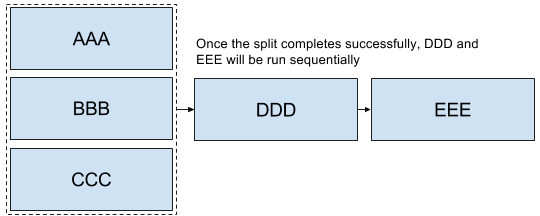
In the case above once AAA, BBB and CCC complete sucessfully then DDD and EEE will be launched in the sequence enumerated above. However if one of the task definitions fails in the split then DDD and EEE will not fire. For example if BBB fails then AAA and CCC will be marked successful and BBB will be marked a failure and DDD and EEE will not be launched.
The ComposedTaskRunner task has the following options:
- composed-task-arguments
- The arguments to be used for each of the tasks. (String, default:
<none>) - composed-task-properties
- The properties to be used for each of the tasks as well as their deployments. (String, default:
<none>) - dataflow-server-password
- The optional password for the dataflow server that will receive task launch requests. Used to access the the dataflow server using Basic Authentication. (String, default:
<none>) - dataflow-server-uri
- The URI for the dataflow server that will receive task launch requests. Default is http://localhost:9393; (URI, default:
<none>) - dataflow-server-username
- The optional username for the dataflow server that will receive task launch requests. Used to access the the dataflow server using Basic Authentication. (String, default:
<none>) - graph
- The DSL for the composed task directed graph. (String, default:
<none>) - increment-instance-enabled
- Allows a single ComposedTaskRunner instance to be re-executed without changing the parameters. Default is false which means a ComposedTaskRunner instance can only be executed once with a given set of parameters, if true it can be re-executed. (Boolean, default:
false) - interval-time-between-checks
- The amount of time in millis that the ComposedTaskRunner will wait between checks of the database to see if a task has completed. (Integer, default:
10000) - max-wait-time
- The maximum amount of time in millis that a individual step can run before the execution of the Composed task is failed. (Integer, default:
0) - split-thread-allow-core-thread-timeout
- Specifies whether to allow split core threads to timeout. Default is false; (Boolean, default:
false) - split-thread-core-pool-size
- Split's core pool size. Default is 4; (Integer, default:
4) - split-thread-keep-alive-seconds
- Split's thread keep alive seconds. Default is 60. (Integer, default:
60) - split-thread-max-pool-size
- Split's maximum pool size. Default is {@code Integer.MAX_VALUE}. (Integer, default:
<none>) - split-thread-queue-capacity
- Capacity for Split's BlockingQueue. Default is {@code Integer.MAX_VALUE}. (Integer, default:
<none>) - split-thread-wait-for-tasks-to-complete-on-shutdown
- Whether to wait for scheduled tasks to complete on shutdown, not interrupting running tasks and executing all tasks in the queue. Default is false; (Boolean, default:
false)
| Note |
|---|---|
when using the options above as environment variables, remove the |
$ ./mvnw clean install -PgenerateApps
$ cd apps/composedtaskrunner-task
$ ./mvnw clean package
We welcome contributions! Follow this link for more information on how to contribute.
A batch job task that executes 2 jobs each job prints out the job name and a timestamp to stdout. Intended to primarily be used for testing.
The timestamp task has the following options:
- timestamp.format
- The timestamp format, "yyyy-MM-dd HH:mm:ss.SSS" by default. (String, default:
yyyy-MM-dd HH:mm:ss.SSS)
$ ./mvnw clean install -PgenerateApps
$ cd apps/timestamp-batch-task
$ ./mvnw clean package
We welcome contributions! Follow this github.com/spring-cloud-task-app-starters/app-starters-release/blob/master/spring-cloud-task-app-starters-
To build the source you will need to install JDK 1.7.
The build uses the Maven wrapper so you don’t have to install a specific version of Maven. To enable the tests for Redis you should run the server before bulding. See below for more information on how run Redis.
The main build command is
$ ./mvnw clean install
You can also add '-DskipTests' if you like, to avoid running the tests.
| Note |
|---|---|
You can also install Maven (>=3.3.3) yourself and run the |
| Note |
|---|---|
Be aware that you might need to increase the amount of memory
available to Maven by setting a |
The projects that require middleware generally include a
docker-compose.yml, so consider using
Docker Compose to run the middeware servers
in Docker containers. See the README in the
scripts demo
repository for specific instructions about the common cases of mongo,
rabbit and redis.
There is a "full" profile that will generate documentation. You can build just the documentation by executing
$ ./mvnw package -DskipTests=true -P full -pl spring-cloud-task-app-starters-docs -am
If you don’t have an IDE preference we would recommend that you use Spring Tools Suite or Eclipse when working with the code. We use the m2eclipe eclipse plugin for maven support. Other IDEs and tools should also work without issue.
We recommend the m2eclipe eclipse plugin when working with eclipse. If you don’t already have m2eclipse installed it is available from the "eclipse marketplace".
Unfortunately m2e does not yet support Maven 3.3, so once the projects
are imported into Eclipse you will also need to tell m2eclipse to use
the .settings.xml file for the projects. If you do not do this you
may see many different errors related to the POMs in the
projects. Open your Eclipse preferences, expand the Maven
preferences, and select User Settings. In the User Settings field
click Browse and navigate to the Spring Cloud project you imported
selecting the .settings.xml file in that project. Click Apply and
then OK to save the preference changes.
| Note |
|---|---|
Alternatively you can copy the repository settings from |
Spring Cloud is released under the non-restrictive Apache 2.0 license and follows a very standard Github development process, using Github tracker for issues and merging pull requests into master. If you want to contribute even something trivial, please do not hesitate, but follow the guidelines below.
Before we accept a non-trivial patch or pull request, we need you to sign the contributor’s agreement. Signing the contributor’s agreement does not grant anyone commit rights to the main repository, but it does mean that we can accept your contributions, and you will get an author credit if we do. Active contributors might be asked to join the core team and be given the ability to merge pull requests.
None of the following guidelines is essential for a pull request, but they all help your fellow developers understand and work with your code. They can also be added after the original pull request but before a merge.
- Use the Spring Framework code format conventions. If you use Eclipse, you can import formatter settings by using the
eclipse-code-formatter.xmlfile from the Spring Cloud Build project. If using IntelliJ, you can use the Eclipse Code Formatter Plugin to import the same file. - Make sure all new
.javafiles have a simple Javadoc class comment with at least an@authortag identifying you, and preferably at least a paragraph describing the class’s purpose. - Add the ASF license header comment to all new
.javafiles (to do so, copy from existing files in the project). - Add yourself as an
@authorto the .java files that you modify substantially (more than cosmetic changes). - Add some Javadocs and, if you change the namespace, some XSD doc elements.
- A few unit tests would help a lot as well. Someone has to do it, and your fellow developers appreciate the effort.
- If no one else uses your branch, rebase it against the current master (or other target branch in the main project).
- When writing a commit message, follow these conventions.
If you fix an existing issue, add
Fixes gh-XXXX(where XXXX is the issue number) at the end of the commit message.