© 2012-2021 Original authors
| Copies of this document may be made for your own use and for distribution to others, provided that you do not charge any fee for such copies and further provided that each copy contains this Copyright Notice, whether distributed in print or electronically. |
Preface
Project Metadata
-
Version control: https://github.com/spring-projects/spring-data-rest
-
Bugtracker: https://github.com/spring-projects/spring-data-rest/issues
-
Project page: https://spring.io/projects/spring-data-rest
-
Release repository: https://repo.spring.io/release
-
Milestone repository: https://repo.spring.io/milestone
-
Snapshot repository: https://repo.spring.io/snapshot
1. Dependencies
Due to the different inception dates of individual Spring Data modules, most of them carry different major and minor version numbers. The easiest way to find compatible ones is to rely on the Spring Data Release Train BOM that we ship with the compatible versions defined. In a Maven project, you would declare this dependency in the <dependencyManagement /> section of your POM as follows:
<dependencyManagement>
  <dependencies>
    <dependency>
      <groupId>org.springframework.data</groupId>
      <artifactId>spring-data-bom</artifactId>
      <version>2021.0.0</version>
      <scope>import</scope>
      <type>pom</type>
    </dependency>
  </dependencies>
</dependencyManagement>
The current release train version is 2021.0.0. The train version uses calver with the pattern YYYY.MINOR.MICRO.
The version name follows ${calver} for GA releases and service releases and the following pattern for all other versions: ${calver}-${modifier}, where modifier can be one of the following:
-
SNAPSHOT: Current snapshots -
M1,M2, and so on: Milestones -
RC1,RC2, and so on: Release candidates
You can find a working example of using the BOMs in our Spring Data examples repository. With that in place, you can declare the Spring Data modules you would like to use without a version in the <dependencies /> block, as follows:
<dependencies>
  <dependency>
    <groupId>org.springframework.data</groupId>
    <artifactId>spring-data-jpa</artifactId>
  </dependency>
<dependencies>
1.1. Dependency Management with Spring Boot
Spring Boot selects a recent version of Spring Data modules for you. If you still want to upgrade to a newer version, set
the spring-data-releasetrain.version property to the train version and iteration you would like to use.
Reference Documentation
2. Introduction
REST web services have become the number one means for application integration on the web. In its core, REST defines that a system that consists of resources with which clients interact. These resources are implemented in a hypermedia-driven way. Spring MVC and Spring WebFlux each offer a solid foundation to build theses kinds of services. However, implementing even the simplest tenet of REST web services for a multi-domain object system can be quite tedious and result in a lot of boilerplate code.
Spring Data REST builds on top of the Spring Data repositories and automatically exports those as REST resources. It leverages hypermedia to let clients automatically find functionality exposed by the repositories and integrate these resources into related hypermedia-based functionality.
3. Getting started
Spring Data REST is itself a Spring MVC application and is designed in such a way that it should integrate with your existing Spring MVC applications with little effort. An existing (or future) layer of services can run alongside Spring Data REST with only minor additional work.
3.1. Adding Spring Data REST to a Spring Boot Project
The simplest way to get to started is to build a Spring Boot application because Spring Boot has a starter for Spring Data REST and uses auto-configuration. The following example shows how to use Gradle to include Spring Data Rest in a Spring Boot project:
dependencies {
  ...
  compile("org.springframework.boot:spring-boot-starter-data-rest")
  ...
}
The following example shows how to use Maven to include Spring Data Rest in a Spring Boot project:
<dependencies>
  ...
  <dependency>
    <groupId>org.springframework.boot</groupId>
    <artifactId>spring-boot-starter-data-rest</artifactId>
  </dependency>
  ...
</dependencies>| You need not supply the version number if you use the Spring Boot Gradle plugin or the Spring Boot Maven plugin. |
When you use Spring Boot, Spring Data REST gets configured automatically.
3.2. Adding Spring Data REST to a Gradle project
To add Spring Data REST to a Gradle-based project, add the spring-data-rest-webmvc artifact to your compile-time dependencies, as follows:
dependencies {
  … other project dependencies
  compile("org.springframework.data:spring-data-rest-webmvc:3.5.0")
}
3.3. Adding Spring Data REST to a Maven project
To add Spring Data REST to a Maven-based project, add the spring-data-rest-webmvc artifact to your compile-time dependencies, as follows:
<dependency>
  <groupId>org.springframework.data</groupId>
  <artifactId>spring-data-rest-webmvc</artifactId>
  <version>3.5.0</version>
</dependency>
3.4. Configuring Spring Data REST
To install Spring Data REST alongside your existing Spring MVC application, you need to include the appropriate MVC configuration.
Spring Data REST configuration is defined in a class called RepositoryRestMvcConfiguration and you can import that class into your application’s configuration.
This step is unnecessary if you use Spring Boot’s auto-configuration. Spring Boot automatically enables Spring Data REST when you include spring-boot-starter-data-rest and, in your list of dependencies, your app is flagged with either @SpringBootApplication or @EnableAutoConfiguration.
|
To customize the configuration, register a RepositoryRestConfigurer and implement or override the configure…-methods relevant to your use case.
Make sure you also configure Spring Data repositories for the store you use. For details on that, see the reference documentation for the corresponding Spring Data module.
3.5. Basic Settings for Spring Data REST
This section covers the basic settings that you can manipulate when you configure a Spring Data REST application, including:
3.5.1. Setting the Repository Detection Strategy
Spring Data REST uses a RepositoryDetectionStrategy to determine whether a repository is exported as a REST resource. The RepositoryDiscoveryStrategies enumeration includes the following values:
Name |
Description |
|
Exposes all public repository interfaces but considers the |
|
Exposes all repositories independently of type visibility and annotations. |
|
Only repositories annotated with |
|
Only public repositories annotated are exposed. |
3.5.2. Changing the Base URI
By default, Spring Data REST serves up REST resources at the root URI, '/'. There are multiple ways to change the base path.
With Spring Boot 1.2 and later versions, you can do change the base URI by setting a single property in application.properties, as follows:
spring.data.rest.basePath=/apiWith Spring Boot 1.1 or earlier, or if you are not using Spring Boot, you can do the following:
@Configuration
class CustomRestMvcConfiguration {

  @Bean
  public RepositoryRestConfigurer repositoryRestConfigurer() {

    return new RepositoryRestConfigurer() {

      @Override
      public void configureRepositoryRestConfiguration(RepositoryRestConfiguration config, CorsRegistry cors) {
        config.setBasePath("/api");
      }
    };
  }
}
Alternatively, you can register a custom implementation of RepositoryRestConfigurer as a Spring bean and make sure it gets picked up by component scanning, as follows:
@Component
public class CustomizedRestMvcConfiguration extends RepositoryRestConfigurer {

  @Override
  public void configureRepositoryRestConfiguration(RepositoryRestConfiguration config, CorsRegistry cors) {
    config.setBasePath("/api");
  }
}
Both of the preceding approaches change the base path to /api.
3.5.3. Changing Other Spring Data REST Properties
You can alter the following properties:
Property |
Description |
|
the root URI for Spring Data REST |
|
change the default for the number of items served in a single page |
|
change the maximum number of items in a single page |
|
change the name of the query parameter for selecting pages |
|
change the name of the query parameter for the number of items to show in a page |
|
change the name of the query parameter for sorting |
|
change the default media type to use when none is specified |
|
change whether a body should be returned when creating a new entity |
|
change whether a body should be returned when updating an entity |
3.6. Starting the Application
At this point, you must also configure your key data store.
Spring Data REST officially supports:
The following Getting Started guides can help you get up and running quickly:
These linked guides introduce how to add dependencies for the related data store, configure domain objects, and define repositories.
You can run your application as either a Spring Boot app (with the links shown earlier) or configure it as a classic Spring MVC app.
| In general, Spring Data REST does not add functionality to a given data store. This means that, by definition, it should work with any Spring Data project that supports the repository programming model. The data stores listed above are the ones for which we have written integration tests to verify that Spring Data REST works with them. |
From this point, you can customize Spring Data REST with various options.
4. Repository resources
4.1. Fundamentals
The core functionality of Spring Data REST is to export resources for Spring Data repositories. Thus, the core artifact to look at and potentially customize the way the exporting works is the repository interface. Consider the following repository interface:
public interface OrderRepository extends CrudRepository<Order, Long> { }For this repository, Spring Data REST exposes a collection resource at /orders. The path is derived from the uncapitalized, pluralized, simple class name of the domain class being managed. It also exposes an item resource for each of the items managed by the repository under the URI template /orders/{id}.
By default the HTTP methods to interact with these resources map to the according methods of CrudRepository. Read more on that in the sections on collection resources and item resources.
4.1.1. Repository methods exposure
Which HTTP resources are exposed for a certain repository is mostly driven by the structure of the repository.
In other words, the resource exposure will follow which methods you have exposed on the repository.
If you extend CrudRepository you usually expose all methods required to expose all HTTP resources we can register by default.
Each of the resources listed below will define which of the methods need to be present so that a particular HTTP method can be exposed for each of the resources.
That means, that repositories that are not exposing those methods — either by not declaring them at all or explicitly using @RestResource(exported = false) — won’t expose those HTTP methods on those resources.
For details on how to tweak the default method exposure or dedicated HTTP methods individually see
4.1.2. Default Status Codes
For the resources exposed, we use a set of default status codes:
-
200 OK: For plainGETrequests. -
201 Created: ForPOSTandPUTrequests that create new resources. -
204 No Content: ForPUT,PATCH, andDELETErequests when the configuration is set to not return response bodies for resource updates (RepositoryRestConfiguration.returnBodyOnUpdate). If the configuration value is set to include responses forPUT,200 OKis returned for updates, and201 Createdis returned for resource created throughPUT.
If the configuration values (RepositoryRestConfiguration.returnBodyOnUpdate and RepositoryRestConfiguration.returnBodyCreate) are explicitly set to null, the presence of the HTTP Accept header is used to determine the response code.
4.1.3. Resource Discoverability
A core principle of HATEOAS is that resources should be discoverable through the publication of links that point to the available resources. There are a few competing de-facto standards of how to represent links in JSON. By default, Spring Data REST uses HAL to render responses. HAL defines the links to be contained in a property of the returned document.
Resource discovery starts at the top level of the application. By issuing a request to the root URL under which the Spring Data REST application is deployed, the client can extract, from the returned JSON object, a set of links that represent the next level of resources that are available to the client.
For example, to discover what resources are available at the root of the application, issue an HTTP GET to the root URL, as follows:
curl -v http://localhost:8080/

< HTTP/1.1 200 OK
< Content-Type: application/hal+json

{ "_links" : {
    "orders" : {
      "href" : "http://localhost:8080/orders"
    },
    "profile" : {
      "href" : "http://localhost:8080/api/alps"
    }
  }
}
The property of the result document is an object that consists of keys representing the relation type, with nested link objects as specified in HAL.
For more details about the profile link, see Application-Level Profile Semantics (ALPS).
|
4.2. The Collection Resource
Spring Data REST exposes a collection resource named after the uncapitalized, pluralized version of the domain class the exported repository is handling. Both the name of the resource and the path can be customized by using @RepositoryRestResource on the repository interface.
4.2.1. Supported HTTP Methods
Collections resources support both GET and POST. All other HTTP methods cause a 405 Method Not Allowed.
GET
Returns all entities the repository servers through its findAll(…) method.
If the repository is a paging repository we include the pagination links if necessary and additional page metadata.
Methods used for invocation
The following methods are used if present (decending order):
-
findAll(Pageable) -
findAll(Sort) -
findAll()
For more information on the default exposure of methods, see Repository methods exposure.
Parameters
If the repository has pagination capabilities, the resource takes the following parameters:
-
page: The page number to access (0 indexed, defaults to 0). -
size: The page size requested (defaults to 20). -
sort: A collection of sort directives in the format($propertyname,)+[asc|desc]?.
Custom Status Codes
The GET method has only one custom status code:
-
405 Method Not Allowed: If thefindAll(…)methods were not exported (through@RestResource(exported = false)) or are not present in the repository.
Supported Media Types
The GET method supports the following media types:
-
application/hal+json -
application/json
Related Resources
The GET method supports a single link for discovering related resources:
-
search: A search resource is exposed if the backing repository exposes query methods.
HEAD
The HEAD method returns whether the collection resource is available. It has no status codes, media types, or related resources.
Methods used for invocation
The following methods are used if present (decending order):
-
findAll(Pageable) -
findAll(Sort) -
findAll()
For more information on the default exposure of methods, see Repository methods exposure.
POST
The POST method creates a new entity from the given request body.
Methods used for invocation
The following methods are used if present (decending order):
-
save(…)
For more information on the default exposure of methods, see Repository methods exposure.
Custom Status Codes
The POST method has only one custom status code:
-
405 Method Not Allowed: If thesave(…)methods were not exported (through@RestResource(exported = false)) or are not present in the repository at all.
Supported Media Types
The POST method supports the following media types:
-
application/hal+json
-
application/json
4.3. The Item Resource
Spring Data REST exposes a resource for individual collection items as sub-resources of the collection resource.
4.3.1. Supported HTTP Methods
Item resources generally support GET, PUT, PATCH, and DELETE, unless explicit configuration prevents that (see “The Association Resource” for details).
GET
The GET method returns a single entity.
Methods used for invocation
The following methods are used if present (decending order):
-
findById(…)
For more information on the default exposure of methods, see Repository methods exposure.
Custom Status Codes
The GET method has only one custom status code:
-
405 Method Not Allowed: If thefindOne(…)methods were not exported (through@RestResource(exported = false)) or are not present in the repository.
Supported Media Types
The GET method supports the following media types:
-
application/hal+json
-
application/json
Related Resources
For every association of the domain type, we expose links named after the association property. You can customize this behavior by using @RestResource on the property. The related resources are of the association resource type.
HEAD
The HEAD method returns whether the item resource is available. It has no status codes, media types, or related resources.
Methods used for invocation
The following methods are used if present (decending order):
-
findById(…)
For more information on the default exposure of methods, see Repository methods exposure.
PUT
The PUT method replaces the state of the target resource with the supplied request body.
Methods used for invocation
The following methods are used if present (decending order):
-
save(…)
For more information on the default exposure of methods, see Repository methods exposure.
Custom Status Codes
The PUT method has only one custom status code:
-
405 Method Not Allowed: If thesave(…)methods were not exported (through@RestResource(exported = false)) or is not present in the repository at all.
Supported Media Types
The PUT method supports the following media types:
-
application/hal+json
-
application/json
PATCH
The PATCH method is similar to the PUT method but partially updates the resources state.
Methods used for invocation
The following methods are used if present (decending order):
-
save(…)
For more information on the default exposure of methods, see Repository methods exposure.
Custom Status Codes
The PATCH method has only one custom status code:
-
405 Method Not Allowed: If thesave(…)methods were not exported (through@RestResource(exported = false)) or are not present in the repository.
Supported Media Types
The PATCH method supports the following media types:
-
application/hal+json
-
application/json
DELETE
The DELETE method deletes the resource exposed.
Methods used for invocation
The following methods are used if present (decending order):
-
delete(T) -
delete(ID) -
delete(Iterable)
For more information on the default exposure of methods, see Repository methods exposure.
Custom Status Codes
The DELETE method has only one custom status code:
-
405 Method Not Allowed: If thedelete(…)methods were not exported (through@RestResource(exported = false)) or are not present in the repository.
4.4. The Association Resource
Spring Data REST exposes sub-resources of every item resource for each of the associations the item resource has. The name and path of the resource defaults to the name of the association property and can be customized by using @RestResource on the association property.
4.4.1. Supported HTTP Methods
The association resource supports the following media types:
-
GET
-
PUT
-
POST
-
DELETE
GET
The GET method returns the state of the association resource.
Supported Media Types
The GET method supports the following media types:
-
application/hal+json
-
application/json
PUT
The PUT method binds the resource pointed to by the given URI(s) to the resource. This
Custom Status Codes
The PUT method has only one custom status code:
-
400 Bad Request: When multiple URIs were given for a to-one-association.
Supported Media Types
The PUT method supports only one media type:
-
text/uri-list: URIs pointing to the resource to bind to the association.
POST
The POST method is supported only for collection associations. It adds a new element to the collection.
Supported Media Types
The POST method supports only one media type:
-
text/uri-list: URIs pointing to the resource to add to the association.
DELETE
The DELETE method unbinds the association.
Custom Status Codes
The POST method has only one custom status code:
-
405 Method Not Allowed: When the association is non-optional.
4.5. The Search Resource
The search resource returns links for all query methods exposed by a repository. The path and name of the query method resources can be modified using @RestResource on the method declaration.
4.5.1. Supported HTTP Methods
As the search resource is a read-only resource, it supports only the GET method.
GET
The GET method returns a list of links pointing to the individual query method resources.
Supported Media Types
The GET method supports the following media types:
-
application/hal+json
-
application/json
Related Resources
For every query method declared in the repository, we expose a query method resource. If the resource supports pagination, the URI pointing to it is a URI template containing the pagination parameters.
HEAD
The HEAD method returns whether the search resource is available. A 404 return code indicates no query method resources are available.
4.6. The Query Method Resource
The query method resource runs the exposed query through an individual query method on the repository interface.
4.6.1. Supported HTTP Methods
As the search resource is a read-only resource, it supports GET only.
GET
The GET method returns the result of the query execution.
Parameters
If the query method has pagination capabilities (indicated in the URI template pointing to the resource) the resource takes the following parameters:
-
page: The page number to access (0 indexed, defaults to 0). -
size: The page size requested (defaults to 20). -
sort: A collection of sort directives in the format($propertyname,)+[asc|desc]?.
Supported Media Types
The GET method supports the following media types:
-
application/hal+json -
application/json
HEAD
The HEAD method returns whether a query method resource is available.
5. Paging and Sorting
This section documents Spring Data REST’s usage of the Spring Data Repository paging and sorting abstractions. To familiarize yourself with those features, see the Spring Data documentation for the repository implementation you use (such as Spring Data JPA).
5.1. Paging
Rather than return everything from a large result set, Spring Data REST recognizes some URL parameters that influence the page size and the starting page number.
If you extend PagingAndSortingRepository<T, ID> and access the list of all entities, you get links to the first 20 entities. To set the page size to any other number, add a size parameter, as follows:
http://localhost:8080/people/?size=5
The preceding example sets the page size to 5.
To use paging in your own query methods, you need to change the method signature to accept an additional Pageable parameter and return a Page rather than a List. For example, the following query method is exported to /people/search/nameStartsWith and supports paging:
@RestResource(path = "nameStartsWith", rel = "nameStartsWith")
public Page findByNameStartsWith(@Param("name") String name, Pageable p);
The Spring Data REST exporter recognizes the returned Page and gives you the results in the body of the response, just as it would with a non-paged response, but additional links are added to the resource to represent the previous and next pages of data.
5.1.1. Previous and Next Links
Each paged response returns links to the previous and next pages of results based on the current page by using the IANA-defined link relations prev and next. If you are currently at the first page of results, however, no prev link is rendered. For the last page of results, no next link is rendered.
Consider the following example, where we set the page size to 5:
curl localhost:8080/people?size=5
{
  "_links" : {
    "self" : {
      "href" : "http://localhost:8080/persons{&sort,page,size}", (1)
      "templated" : true
    },
    "next" : {
      "href" : "http://localhost:8080/persons?page=1&size=5{&sort}", (2)
      "templated" : true
    }
  },
  "_embedded" : {
  	... data ...
  },
  "page" : { (3)
    "size" : 5,
    "totalElements" : 50,
    "totalPages" : 10,
    "number" : 0
  }
}
At the top, we see _links:
| 1 | The self link serves up the whole collection with some options. |
| 2 | The next link points to the next page, assuming the same page size. |
| 3 | At the bottom is extra data about the page settings, including the size of a page, total elements, total pages, and the page number you are currently viewing. |
When using tools such as curl on the command line, if you have a ampersand (&) in your statement, you need to wrap the whole URI in quotation marks.
|
Note that the self and next URIs are, in fact, URI templates. They accept not only size, but also page and sort as optional flags.
As mentioned earlier, the bottom of the HAL document includes a collection of details about the page. This extra information makes it easy for you to configure UI tools like sliders or indicators to reflect the user’s overall position when they view the data. For example, the document in the preceding example shows we are looking at the first page (with page numbers starting at 0).
The following example shows What happens when we follow the next link:
$ curl "http://localhost:8080/persons?page=1&size=5"
{
  "_links" : {
    "self" : {
      "href" : "http://localhost:8080/persons{&sort,projection,page,size}",
      "templated" : true
    },
    "next" : {
      "href" : "http://localhost:8080/persons?page=2&size=5{&sort,projection}", (1)
      "templated" : true
    },
    "prev" : {
      "href" : "http://localhost:8080/persons?page=0&size=5{&sort,projection}", (2)
      "templated" : true
    }
  },
  "_embedded" : {
	... data ...
  },
  "page" : {
    "size" : 5,
    "totalElements" : 50,
    "totalPages" : 10,
    "number" : 1 (3)
  }
}
This looks very similar, except for the following differences:
| 1 | The next link now points to yet another page, indicating its relative perspective to the self link. |
| 2 | A prev link now appears, giving us a path to the previous page. |
| 3 | The current number is now 1 (indicating the second page). |
This feature lets you map optional buttons on the screen to these hypermedia controls, letting you implement navigational features for the UI experience without having to hard code the URIs. In fact, the user can be empowered to pick from a list of page sizes, dynamically changing the content served, without having to rewrite the next and `prev controls at the top or bottom.
5.2. Sorting
Spring Data REST recognizes sorting parameters that use the repository sorting support.
To have your results sorted on a particular property, add a sort URL parameter with the name of the property on which you want to sort the results. You can control the direction of the sort by appending a comma (,) to the the property name plus either asc or desc. The following would use the findByNameStartsWith query method defined on the PersonRepository for all Person entities with names starting with the letter “K” and add sort data that orders the results on the name property in descending order:
curl -v "http://localhost:8080/people/search/nameStartsWith?name=K&sort=name,desc"
To sort the results by more than one property, keep adding as many sort=PROPERTY parameters as you need. They are added to the Pageable in the order in which they appear in the query string. Results can be sorted by top-level and nested properties. Use property path notation to express a nested sort property. Sorting by linkable associations (that is, links to top-level resources) is not supported.
6. Domain Object Representations (Object Mapping)
Spring Data REST returns a representation of a domain object that corresponds to the Accept type specified in the HTTP request.
Currently, only JSON representations are supported. Other representation types can be supported in the future by adding an appropriate converter and updating the controller methods with the appropriate content-type.
Sometimes, the behavior of the Spring Data REST ObjectMapper (which has been specially configured to use intelligent serializers that can turn domain objects into links and back again) may not handle your domain model correctly. There are so many ways you can structure your data that you may find your own domain model is not translated to JSON correctly. It is also sometimes not practical in these cases to try and support a complex domain model in a generic way. Sometimes, depending on the complexity, it is not even possible to offer a generic solution.
6.1. Adding Custom Serializers and Deserializers to Jackson’s ObjectMapper
To accommodate the largest percentage of use cases, Spring Data REST tries very hard to render your object graph correctly. It tries to serialize unmanaged beans as normal POJOs, and it tries to create links to managed beans where necessary. However, if your domain model does not easily lend itself to reading or writing plain JSON, you may want to configure Jackson’s ObjectMapper with your own custom mappings, serializers, and deserializers.
6.1.1. Abstract Class Registration
One key configuration point you might need to hook into is when you use an abstract class (or an interface) in your domain model. By default, Jackson does not know what implementation to create for an interface. Consider the following example:
@Entity
public class MyEntity {
  @OneToMany
  private List<MyInterface> interfaces;
}
In a default configuration, Jackson has no idea what class to instantiate when POSTing new data to the exporter. This is something you need to tell Jackson either through an annotation, or (more cleanly) by registering a type mapping by using a Module.
To add your own Jackson configuration to the ObjectMapper used by Spring Data REST, override the configureJacksonObjectMapper method. That method is passed an ObjectMapper instance that has a special module to handle serializing and deserializing PersistentEntity objects. You can register your own modules as well, as the following example shows:
@Override
protected void configureJacksonObjectMapper(ObjectMapper objectMapper) {
    objectMapper.registerModule(new SimpleModule("MyCustomModule") {
        @Override
        public void setupModule(SetupContext context) {
            context.addAbstractTypeResolver(
                new SimpleAbstractTypeResolver().addMapping(MyInterface.class,
                                                            MyInterfaceImpl.class)
            );
        }
    });
}
Once you have access to the SetupContext object in your Module, you can do all sorts of cool things to configure Jackson’s JSON mapping. You can read more about how Module instances work on Jackson’s wiki.
6.1.2. Adding Custom Serializers for Domain Types
If you want to serialize or deserialize a domain type in a special way, you can register your own implementations with Jackson’s ObjectMapper, and the Spring Data REST exporter transparently handles those domain objects correctly. To add serializers from your setupModule method implementation, you can do something like the following:
@Override
public void setupModule(SetupContext context) {
  SimpleSerializers serializers = new SimpleSerializers();
  SimpleDeserializers deserializers = new SimpleDeserializers();

  serializers.addSerializer(MyEntity.class, new MyEntitySerializer());
  deserializers.addDeserializer(MyEntity.class, new MyEntityDeserializer());

  context.addSerializers(serializers);
  context.addDeserializers(deserializers);
}
7. Projections and Excerpts
Spring Data REST presents a default view of the domain model you export. However, sometimes, you may need to alter the view of that model for various reasons. This section covers how to define projections and excerpts to serve up simplified and reduced views of resources.
7.1. Projections
Consider the following domain model:
@Entity
public class Person {

  @Id @GeneratedValue
  private Long id;
  private String firstName, lastName;

  @OneToOne
  private Address address;
  …
}
The Person object in the preceding example has several attributes:
-
idis the primary key. -
firstNameandlastNameare data attributes. -
addressis a link to another domain object.
Now assume that we create a corresponding repository, as follows:
interface PersonRepository extends CrudRepository<Person, Long> {}By default, Spring Data REST exports this domain object, including all of its attributes. firstName and lastName are exported as the plain data objects that they are. There are two options regarding the address attribute. One option is to also define a repository for Address objects, as follows:
interface AddressRepository extends CrudRepository<Address, Long> {}In this situation, a Person resource renders the address attribute as a URI to its corresponding Address resource. If we were to look up “Frodo” in the system, we could expect to see a HAL document like this:
{
  "firstName" : "Frodo",
  "lastName" : "Baggins",
  "_links" : {
    "self" : {
      "href" : "http://localhost:8080/persons/1"
    },
    "address" : {
      "href" : "http://localhost:8080/persons/1/address"
    }
  }
}
There is another way. If the Address domain object does not have its own repository definition, Spring Data REST includes the data fields inside the Person resource, as the following example shows:
{
  "firstName" : "Frodo",
  "lastName" : "Baggins",
  "address" : {
    "street": "Bag End",
    "state": "The Shire",
    "country": "Middle Earth"
  },
  "_links" : {
    "self" : {
      "href" : "http://localhost:8080/persons/1"
    }
  }
}
But what if you do not want address details at all? Again, by default, Spring Data REST exports all of its attributes (except the id). You can offer the consumer of your REST service an alternative by defining one or more projections. The following example shows a projection that does not include the address:
@Projection(name = "noAddresses", types = { Person.class }) (1)
interface NoAddresses { (2)

  String getFirstName(); (3)

  String getLastName(); (4)
}| 1 | The @Projection annotation flags this as a projection. The name attribute provides
the name of the projection, which we cover in more detail shortly. The types attributes targets this projection to apply only to Person objects. |
| 2 | It is a Java interface, making it declarative. |
| 3 | It exports the firstName. |
| 4 | It exports the lastName. |
The NoAddresses projection only has getters for firstName and lastName, meaning that it does not serve up any address information. Assuming you have a separate repository for Address resources, the default view from Spring Data REST differs slightly from the previous representation, as the following example shows:
{
  "firstName" : "Frodo",
  "lastName" : "Baggins",
  "_links" : {
    "self" : {
      "href" : "http://localhost:8080/persons/1{?projection}", (1)
      "templated" : true (2)
    },
    "address" : {
      "href" : "http://localhost:8080/persons/1/address"
    }
  }
}| 1 | This resource has a new option: {?projection}. |
| 2 | The self URI is a URI Template. |
To view the projection to the resource, look up http://localhost:8080/persons/1?projection=noAddresses.
The value supplied to the projection query parameter is the same as that specified in @Projection(name = "noAddress"). It has nothing to do with the name of the projection’s interface.
|
You can have multiple projections.
| See Projections to see an example project. We encourage you to experiment with it. |
Spring Data REST finds projection definitions as follows:
-
Any
@Projectioninterface found in the same package as your entity definitions (or one of its sub-packages) is registered. -
You can manually register a projection by using
RepositoryRestConfiguration.getProjectionConfiguration().addProjection(…).
In either case, the projection interface must have the @Projection annotation.
7.1.1. Finding Existing Projections
Spring Data REST exposes Application-Level Profile Semantics (ALPS) documents, a micro metadata format. To view the ALPS metadata, follow the profile link exposed by the root resource. If you navigate down to the ALPS document for Person resources (which would be /alps/persons), you can find many details about Person resources. Projections are listed, along with the details about the GET REST transition, in blocks similar to the following example:
{ …
  "id" : "get-person", (1)
  "name" : "person",
  "type" : "SAFE",
  "rt" : "#person-representation",
  "descriptors" : [ {
    "name" : "projection", (2)
    "doc" : {
      "value" : "The projection that shall be applied when rendering the response. Acceptable values available in nested descriptors.",
      "format" : "TEXT"
    },
    "type" : "SEMANTIC",
    "descriptors" : [ {
      "name" : "noAddresses", (3)
      "type" : "SEMANTIC",
      "descriptors" : [ {
        "name" : "firstName", (4)
        "type" : "SEMANTIC"
      }, {
        "name" : "lastName", (4)
        "type" : "SEMANTIC"
      } ]
    } ]
  } ]
},
…| 1 | This part of the ALPS document shows details about GET and Person resources. |
| 2 | This part contais the projection options. |
| 3 | This part contains the noAddresses projection. |
| 4 | The actual attributes served up by this projection include firstName and lastName. |
|
Projection definitions are picked up and made available for clients if they are:
|
7.1.2. Bringing in Hidden Data
So far in this section, we have covered how projections can be used to reduce the information that is presented to the user. Projections can also bring in normally unseen data. For example, Spring Data REST ignores fields or getters that are marked up with @JsonIgnore annotations. Consider the following domain object:
@Entity
public class User {

	@Id @GeneratedValue
	private Long id;
	private String name;

	@JsonIgnore private String password; (1)

	private String[] roles;
…| 1 | Jackson’s @JsonIgnore is used to prevent the password field from being serialized into JSON. |
The User class in the preceding example can be used to store user information as well as integration with Spring Security. If you create a UserRepository, the password field would normally have been exported, which is not good. In the preceding example, we prevent that from happening by applying Jackson’s @JsonIgnore on the password field.
Jackson also does not serialize the field into JSON if @JsonIgnore is on the field’s corresponding getter function.
|
However, projections introduce the ability to still serve this field. It is possible to create the following projection:
@Projection(name = "passwords", types = { User.class })
interface PasswordProjection {

  String getPassword();
}
If such a projection is created and used, it sidesteps the @JsonIgnore directive placed on User.password.
| This example may seem a bit contrived, but it is possible, with a richer domain model and many projections, to accidentally leak such details. Since Spring Data REST cannot discern the sensitivity of such data, it is up to you to avoid such situations. |
Projections can also generate virtual data. Imagine you had the following entity definition:
@Entity
public class Person {

  ...
  private String firstName;
  private String lastName;

  ...
}
You can create a projection that combines the two data fields in the preceding example together, as follows:
@Projection(name = "virtual", types = { Person.class })
public interface VirtualProjection {

  @Value("#{target.firstName} #{target.lastName}") (1)
  String getFullName();

}| 1 | Spring’s @Value annotation lets you plug in a SpEL expression that takes the target object and splices together its firstName and lastName attributes to render a read-only fullName. |
7.2. Excerpts
An excerpt is a projection that is automatically applied to a resource collection. For example, you can alter the PersonRepository as follows:
@RepositoryRestResource(excerptProjection = NoAddresses.class)
interface PersonRepository extends CrudRepository<Person, Long> {}
The preceding example directs Spring Data REST to use the NoAddresses projection when embedding Person resources into collections or related resources.
| Excerpt projections are not automatically applied to single resources. They have to be applied deliberately. Excerpt projections are meant to provide a default preview of collection data but not when fetching individual resources. See Why is an excerpt projection not applied automatically for a Spring Data REST item resource? for a discussion on the subject. |
In addition to altering the default rendering, excerpts have additional rendering options as shown in the next section.
7.2.1. Excerpting Commonly Accessed Data
A common situation with REST services arises when you compose domain objects. For example, a Person is stored in one table and their related Address is stored in another. By default, Spring Data REST serves up the person’s address as a URI the client must navigate. But if it is common for consumers to always fetch this extra piece of data, an excerpt projection can put this extra piece of data inline, saving you an extra GET. To do so, you can define another excerpt projection, as follows:
@Projection(name = "inlineAddress", types = { Person.class }) (1)
interface InlineAddress {

  String getFirstName();

  String getLastName();

  Address getAddress(); (2)
}| 1 | This projection has been named inlineAddress. |
| 2 | This projection adds getAddress, which returns the Address field. When used inside a projection, it causes the information to be included inline. |
You can plug it into the PersonRepository definition, as follows:
@RepositoryRestResource(excerptProjection = InlineAddress.class)
interface PersonRepository extends CrudRepository<Person, Long> {}
Doing so causes the HAL document to appear as follows:
{
  "firstName" : "Frodo",
  "lastName" : "Baggins",
  "address" : { (1)
    "street": "Bag End",
    "state": "The Shire",
    "country": "Middle Earth"
  },
  "_links" : {
    "self" : {
      "href" : "http://localhost:8080/persons/1"
    },
    "address" : { (2)
      "href" : "http://localhost:8080/persons/1/address"
    }
  }
}| 1 | The address data is directly included inline, so you do not have to navigate to get it. |
| 2 | The link to the Address resource is still provided, making it still possible to navigate to its own resource. |
Note that the preceding example is a mix of the examples shown earlier in this chapter. You may want to read back through them to follow the progression to the final example.
Configuring @RepositoryRestResource(excerptProjection=…) for a repository alters the default behavior. This can potentially cause breaking changes to consumers of your service if you have already made a release.
|
8. Conditional Operations with Headers
This section shows how Spring Data REST uses standard HTTP headers to enhance performance, conditionalize operations, and contribute to a more sophisticated frontend.
8.1. ETag, If-Match, and If-None-Match Headers
The ETag header provides a way to tag resources. This can prevent clients from overriding each other while also making it possible to reduce unnecessary calls.
Consider the following example:
public class Sample {

	@Version Long version; (1)

	Sample(Long version) {
		this.version = version;
	}
}| 1 | The @Version annotation (the JPA one in case you’re using Spring Data JPA, the Spring Data org.springframework.data.annotation.Version one for all other modules) flags this field as a version marker. |
The POJO in the preceding example, when served up as a REST resource by Spring Data REST, has an ETag header with the value of the version field.
We can conditionally PUT, PATCH, or DELETE that resource if we supply a If-Match header such as the following:
curl -v -X PATCH -H 'If-Match: <value of previous ETag>' ...
Only if the resource’s current ETag state matches the If-Match header is the operation carried out. This safeguard prevents clients from stomping on each other. Two different clients can fetch the resource and have an identical ETag. If one client updates the resource, it gets a new ETag in the response. But the first client still has the old header. If that client attempts an update with the If-Match header, the update fails because they no longer match. Instead, that client receives an HTTP 412 Precondition Failed message to be sent back. The client can then catch up however is necessary.
The term, “version,” may carry different semantics with different data stores and even different semantics within your application. Spring Data REST effectively delegates to the data store’s metamodel to discern if a field is versioned and, if so, only allows the listed updates if ETag elements match.
|
The If-None-Match header provides an alternative. Instead of conditional updates, If-None-Match allows conditional queries. Consider the following example:
curl -v -H 'If-None-Match: <value of previous etag>' ...
The preceding command (by default) executes a GET. Spring Data REST checks for If-None-Match headers while doing a GET. If the header matches the ETag, it concludes that nothing has changed and, instead of sending a copy of the resource, sends back an HTTP 304 Not Modified status code. Semantically, it reads “If this supplied header value does not match the server-side version, send the whole resource. Otherwise, do not send anything.”
This POJO is from an ETag-based unit test, so it does not have @Entity (JPA) or @Document (MongoDB) annotations, as expected in application code. It focuses solely on how a field with @Version results in an ETag header.
|
8.2. If-Modified-Since header
The If-Modified-Since header provides a way to check whether a resource has been updated since the last request, which lets applications avoid resending the same data. Consider the following example:
@Document
public class Receipt {

	public @Id String id;
	public @Version Long version;
	public @LastModifiedDate Date date;  (1)

	public String saleItem;
	public BigDecimal amount;

}| 1 | Spring Data Commons’s @LastModifiedDate annotation allows capturing this information in multiple formats (JodaTime’s DateTime, legacy Java Date and Calendar, JDK8 date/time types, and long/Long). |
With the date field in the preceding example, Spring Data REST returns a Last-Modified header similar to the following:
Last-Modified: Wed, 24 Jun 2015 20:28:15 GMT
This value can be captured and used for subsequent queries to avoid fetching the same data twice when it has not been updated, as the following example shows:
curl -H "If-Modified-Since: Wed, 24 Jun 2015 20:28:15 GMT" ...
With the preceding command, you are asking that a resource be fetched only if it has changed since the specified time. If so, you get a revised Last-Modified header with which to update the client. If not, you receive an HTTP 304 Not Modified status code.
The header is perfectly formatted to send back for a future query.
| Do not mix and match header value with different queries. Results could be disastrous. Use the header values ONLY when you request the exact same URI and parameters. |
8.3. Architecting a More Efficient Front End
ETag elements, combined with the If-Match and If-None-Match headers, let you build a front end that is more friendly to consumers' data plans and mobile battery lives. To do so:
-
Identify the entities that need locking and add a version attribute.
HTML5 nicely supports
data-*attributes, so store the version in the DOM (somewhere such as andata-etagattribute). -
Identify the entries that would benefit from tracking the most recent updates. When fetching these resources, store the
Last-Modifiedvalue in the DOM (data-last-modifiedperhaps). -
When fetching resources, also embed
selfURIs in your DOM nodes (perhapsdata-uriordata-self) so that it is easy to go back to the resource. -
Adjust
PUT/PATCH/DELETEoperations to useIf-Matchand also handle HTTP412 Precondition Failedstatus codes. -
Adjust
GEToperations to useIf-None-MatchandIf-Modified-Sinceand handle HTTP304 Not Modifiedstatus codes.
By embedding ETag elements and Last-Modified values in your DOM (or perhaps elsewhere for a native mobile app), you can then reduce the consumption of data and battery power by not retrieving the same thing over and over. You can also avoid colliding with other clients and, instead, be alerted when you need to reconcile differences.
In this fashion, with just a little tweaking on your front end and some entity-level edits, the backend serves up time-sensitive details you can cash in on when building a customer-friendly client.
9. Validation
There are two ways to register a Validator instance in Spring Data REST: wire it by bean name or register the validator manually. For the majority of cases, the simple bean name prefix style is sufficient.
In order to tell Spring Data REST you want a particular Validator assigned to a particular event, prefix the bean name with the event in question. For example, to validate instances of the Person class before new ones are saved into the repository, you would declare an instance of a Validator<Person> in your ApplicationContext with a bean name of beforeCreatePersonValidator. Since the beforeCreate prefix matches a known Spring Data REST event, that validator is wired to the correct event.
9.1. Assigning Validators Manually
If you would rather not use the bean name prefix approach, you need to register an instance of your validator with the bean whose job it is to invoke validators after the correct event. In your configuration that implements RepositoryRestConfigurer, override the configureValidatingRepositoryEventListener method and call addValidator on the ValidatingRepositoryEventListener, passing the event on which you want this validator to be triggered and an instance of the validator. The following example shows how to do so:
@Override
void configureValidatingRepositoryEventListener(ValidatingRepositoryEventListener v) {
  v.addValidator("beforeSave", new BeforeSaveValidator());
}
10. Events
The REST exporter emits eight different events throughout the process of working with an entity:
-
BeforeCreateEvent -
AfterCreateEvent -
BeforeSaveEvent -
AfterSaveEvent -
BeforeLinkSaveEvent -
AfterLinkSaveEvent -
BeforeDeleteEvent -
AfterDeleteEvent
10.1. Writing an ApplicationListener
You can subclass an abstract class that listens for these kinds of events and calls the appropriate method based on the event type. To do so, override the methods for the events in question, as follows:
public class BeforeSaveEventListener extends AbstractRepositoryEventListener {

  @Override
  public void onBeforeSave(Object entity) {
    ... logic to handle inspecting the entity before the Repository saves it
  }

  @Override
  public void onAfterDelete(Object entity) {
    ... send a message that this entity has been deleted
  }
}
One thing to note with this approach, however, is that it makes no distinction based on the type of the entity. You have to inspect that yourself.
10.2. Writing an Annotated Handler
Another approach is to use an annotated handler, which filters events based on domain type.
To declare a handler, create a POJO and put the @RepositoryEventHandler annotation on it. This tells the BeanPostProcessor that this class needs to be inspected for handler methods.
Once the BeanPostProcessor finds a bean with this annotation, it iterates over the exposed methods and looks for annotations that correspond to the event in question. For example, to handle BeforeSaveEvent instances in an annotated POJO for different kinds of domain types, you could define your class as follows:
@RepositoryEventHandler (1)
public class PersonEventHandler {

  @HandleBeforeSave
  public void handlePersonSave(Person p) {
    // … you can now deal with Person in a type-safe way
  }

  @HandleBeforeSave
  public void handleProfileSave(Profile p) {
    // … you can now deal with Profile in a type-safe way
  }
}| 1 | It’s possible to narrow the types to which this handler applies by using (for example) @RepositoryEventHandler(Person.class). |
The domain type whose events you are interested in is determined from the type of the first parameter of the annotated methods.
To register your event handler, either mark the class with one of Spring’s @Component stereotypes (so that it can be picked up by @SpringBootApplication or @ComponentScan) or declare an instance of your annotated bean in your ApplicationContext. Then the BeanPostProcessor that is created in RepositoryRestMvcConfiguration inspects the bean for handlers and wires them to the correct events. The following example shows how to create an event handler for the Person class:
@Configuration
public class RepositoryConfiguration {

  @Bean
  PersonEventHandler personEventHandler() {
    return new PersonEventHandler();
  }
}| Spring Data REST events are customized Spring application events. By default, Spring events are synchronous, unless they get republished across a boundary (such as issuing a WebSocket event or crossing into a thread). |
11. Integration
This section details various ways to integrate with Spring Data REST components, whether from a Spring application that is using Spring Data REST or from other means.
11.1. Programmatic Links
Sometimes you need to add links to exported resources in your own custom-built Spring MVC controllers. There are three basic levels of linking available:
-
Manually assembling links.
-
Using Spring HATEOAS’s
LinkBuilderwithlinkTo(),slash(), and so on. -
Using Spring Data REST’s implementation of
RepositoryEntityLinks.
The first suggestion is terrible and should be avoided at all costs. It makes your code brittle and high-risk. The second is handy when creating links to other hand-written Spring MVC controllers. The last one, which we explore in the rest of this section, is good for looking up resource links that are exported by Spring Data REST.
Consider the following class ,which uses Spring’s autowiring:
public class MyWebApp {

	private RepositoryEntityLinks entityLinks;

	@Autowired
	public MyWebApp(RepositoryEntityLinks entityLinks) {
		this.entityLinks = entityLinks;
	}
}
With the class in the preceding example, you can use the following operations:
| Method | Description |
|---|---|
|
Provide a link to the collection resource of the specified type ( |
|
Provide a link to a single resource. |
|
Provide a link to a paged resource. |
|
Provides a list of links for all the finder methods exposed by the corresponding repository. |
|
Provide a finder link by |
All of the search-based links support extra parameters for paging and sorting. See RepositoryEntityLinks for the details. There is also linkFor(Class<?> type), but that returns a Spring HATEOAS LinkBuilder, which returns you to the lower level API. Try to use the other ones first.
|
12. Metadata
This section details the various forms of metadata provided by a Spring Data REST-based application.
12.1. Application-Level Profile Semantics (ALPS)
ALPS is a data format for defining simple descriptions of application-level semantics, similar in complexity to HTML microformats. An ALPS document can be used as a profile to explain the application semantics of a document with an application-agnostic media type (such as HTML, HAL, Collection+JSON, Siren, etc.). This increases the reusability of profile documents across media types.
https://tools.ietf.org/html/draft-amundsen-richardson-foster-alps-00
Spring Data REST provides an ALPS document for every exported repository. It contains information about both the RESTful transitions and the attributes of each repository.
At the root of a Spring Data REST app is a profile link. Assuming you had an app with both persons and related addresses, the root
document would be as follows:
{
  "_links" : {
    "persons" : {
      "href" : "http://localhost:8080/persons"
    },
    "addresses" : {
      "href" : "http://localhost:8080/addresses"
    },
    "profile" : {
      "href" : "http://localhost:8080/profile"
    }
  }
}
A profile link, as defined in RFC 6906, is a place to include application-level details. The ALPS draft spec is meant to define a particular profile format, which we explore later in this section.
If you navigate into the profile link at localhost:8080/profile, you see content resembling the following:
{
  "_links" : {
    "self" : {
      "href" : "http://localhost:8080/profile"
    },
    "persons" : {
      "href" : "http://localhost:8080/profile/persons"
    },
    "addresses" : {
      "href" : "http://localhost:8080/profile/addresses"
    }
  }
}
At the root level, profile is a single link and cannot serve up more than one application profile. That
is why you must navigate to /profile to find a link for each resource’s metadata.
|
If you navigate to /profile/persons and look at the profile data for a Person resource, you see content resembling the following example:
{
  "version" : "1.0",
  "descriptors" : [ {
    "id" : "person-representation", (1)
    "descriptors" : [ {
      "name" : "firstName",
      "type" : "SEMANTIC"
    }, {
      "name" : "lastName",
      "type" : "SEMANTIC"
    }, {
      "name" : "id",
      "type" : "SEMANTIC"
    }, {
      "name" : "address",
      "type" : "SAFE",
      "rt" : "http://localhost:8080/profile/addresses#address"
    } ]
  }, {
    "id" : "create-persons", (2)
    "name" : "persons", (3)
    "type" : "UNSAFE", (4)
    "rt" : "#person-representation" (5)
  }, {
    "id" : "get-persons",
    "name" : "persons",
    "type" : "SAFE",
    "rt" : "#person-representation"
  }, {
    "id" : "delete-person",
    "name" : "person",
    "type" : "IDEMPOTENT",
    "rt" : "#person-representation"
  }, {
    "id" : "patch-person",
    "name" : "person",
    "type" : "UNSAFE",
    "rt" : "#person-representation"
  }, {
    "id" : "update-person",
    "name" : "person",
    "type" : "IDEMPOTENT",
    "rt" : "#person-representation"
  }, {
    "id" : "get-person",
    "name" : "person",
    "type" : "SAFE",
    "rt" : "#person-representation"
  } ]
}| 1 | A detailed listing of the attributes of a Person resource, identified as #person-representation, lists the names
of the attributes. |
| 2 | The supported operations. This one indicates how to create a new Person. |
| 3 | The name is persons, which indicates (because it is plural) that a POST should be applied to the whole collection, not a single person. |
| 4 | The type is UNSAFE, because this operation can alter the state of the system. |
This JSON document has a media type of application/alps+json. This is different from the previous JSON document, which had
a media type of application/hal+json. These formats are different and governed by different specs.
|
You can also find a profile link in the collection of _links when you examine a collection resource, as the following example shows:
{
  "_links" : {
    "self" : {
      "href" : "http://localhost:8080/persons" (1)
    },
    ... other links ...
    "profile" : {
      "href" : "http://localhost:8080/profile/persons" (2)
    }
  },
  ...
}| 1 | This HAL document respresents the Person collection. |
| 2 | It has a profile link to the same URI for metadata. |
Again, by default, the profile link serves up ALPS. However, if you use an Accept header, it can serve application/alps+json.
12.1.1. Hypermedia Control Types
ALPS displays types for each hypermedia control. They include:
| Type | Description |
|---|---|
SEMANTIC |
A state element (such as |
SAFE |
A hypermedia control that triggers a safe, idempotent state transition (such as |
IDEMPOTENT |
A hypermedia control that triggers an unsafe, idempotent state transition (such as |
UNSAFE |
A hypermedia control that triggers an unsafe, non-idempotent state transition (such as |
In the representation section shown earlier, bits of data from the application are marked as being SEMANTIC. The address field
is a link that involves a safe GET to retrieve. Consequently, it is marked as being SAFE. Hypermedia operations themselves map onto the types as
shown in the preceding table.
12.1.2. ALPS with Projections
If you define any projections, they are also listed in the ALPS metadata. Assuming we also defined inlineAddress and noAddresses, they
would appear inside the relevant operations. (See “Projections” for the definitions and discussion of these two projections.) That is GET would appear in the operations for the whole collection, and GET would appear in the operations for a single resource. The following example shows
the alternate version of the get-persons subsection:
...
  {
    "id" : "get-persons",
    "name" : "persons",
    "type" : "SAFE",
    "rt" : "#person-representation",
    "descriptors" : [ { (1)
      "name" : "projection",
      "doc" : {
        "value" : "The projection that shall be applied when rendering the response. Acceptable values available in nested descriptors.",
        "format" : "TEXT"
      },
      "type" : "SEMANTIC",
      "descriptors" : [ {
        "name" : "inlineAddress", (2)
        "type" : "SEMANTIC",
        "descriptors" : [ {
          "name" : "address",
          "type" : "SEMANTIC"
        }, {
          "name" : "firstName",
          "type" : "SEMANTIC"
        }, {
          "name" : "lastName",
          "type" : "SEMANTIC"
        } ]
      }, {
        "name" : "noAddresses", (3)
        "type" : "SEMANTIC",
        "descriptors" : [ {
          "name" : "firstName",
          "type" : "SEMANTIC"
        }, {
          "name" : "lastName",
          "type" : "SEMANTIC"
        } ]
      } ]
    } ]
  }
...| 1 | A new attribute, descriptors, appears, containing an array with one entry, projection. |
| 2 | Inside the projection.descriptors, we can see inLineAddress. It render address, firstName, and lastName.
Relationships rendered inside a projection result in including the data fields inline. |
| 3 | noAddresses serves up a subset that contains firstName and lastName. |
With all this information, a client can deduce not only the available RESTful transitions but also, to some degree, the data elements needed to interact with the back end.
12.1.3. Adding Custom Details to Your ALPS Descriptions
You can create custom messages that appear in your ALPS metadata. To do so, create rest-messages.properties, as follows:
rest.description.person=A collection of people
rest.description.person.id=primary key used internally to store a person (not for RESTful usage)
rest.description.person.firstName=Person's first name
rest.description.person.lastName=Person's last name
rest.description.person.address=Person's address
These rest.description.* properties define details to display for a Person resource. They alter the ALPS format of the person-representation, as follows:
...
  {
    "id" : "person-representation",
    "doc" : {
      "value" : "A collection of people", (1)
      "format" : "TEXT"
    },
    "descriptors" : [ {
      "name" : "firstName",
      "doc" : {
        "value" : "Person's first name", (2)
        "format" : "TEXT"
      },
      "type" : "SEMANTIC"
    }, {
      "name" : "lastName",
      "doc" : {
        "value" : "Person's last name", (3)
        "format" : "TEXT"
      },
      "type" : "SEMANTIC"
    }, {
      "name" : "id",
      "doc" : {
        "value" : "primary key used internally to store a person (not for RESTful usage)", (4)
        "format" : "TEXT"
      },
      "type" : "SEMANTIC"
    }, {
      "name" : "address",
      "doc" : {
        "value" : "Person's address", (5)
        "format" : "TEXT"
      },
      "type" : "SAFE",
      "rt" : "http://localhost:8080/profile/addresses#address"
    } ]
  }
...| 1 | The value of rest.description.person maps into the whole representation. |
| 2 | The value of rest.description.person.firstName maps to the firstName attribute. |
| 3 | The value of rest.description.person.lastName maps to the lastName attribute. |
| 4 | The value of rest.description.person.id maps to the id attribute, a field not normally displayed. |
| 5 | The value of rest.description.person.address maps to the address attribute. |
Supplying these property settings causes each field to have an extra doc attribute.
| Spring MVC (which is the essence of a Spring Data REST application) supports locales, meaning you can bundle up multiple properties files with different messages. |
12.2. JSON Schema
JSON Schema is another form of metadata supported by Spring Data REST. Per their website, JSON Schema has the following advantages:
-
Describes your existing data format
-
Clear, human- and machine-readable documentation
-
Complete structural validation, useful for automated testing and validating client-submitted data
As shown in the previous section, you can reach this data by navigating from the root URI to the profile link.
{
  "_links" : {
    "self" : {
      "href" : "http://localhost:8080/profile"
    },
    "persons" : {
      "href" : "http://localhost:8080/profile/persons"
    },
    "addresses" : {
      "href" : "http://localhost:8080/profile/addresses"
    }
  }
}
These links are the same as shown earlier. To retrieve JSON Schema, you can invoke them with the following Accept header: application/schema+json.
In this case, if you executed curl -H 'Accept:application/schema+json' http://localhost:8080/profile/persons, you would see output resembling the following:
{
  "title" : "org.springframework.data.rest.webmvc.jpa.Person", (1)
  "properties" : { (2)
    "firstName" : {
      "readOnly" : false,
      "type" : "string"
    },
    "lastName" : {
      "readOnly" : false,
      "type" : "string"
    },
    "siblings" : {
      "readOnly" : false,
      "type" : "string",
      "format" : "uri"
    },
    "created" : {
      "readOnly" : false,
      "type" : "string",
      "format" : "date-time"
    },
    "father" : {
      "readOnly" : false,
      "type" : "string",
      "format" : "uri"
    },
    "weight" : {
      "readOnly" : false,
      "type" : "integer"
    },
    "height" : {
      "readOnly" : false,
      "type" : "integer"
    }
  },
  "descriptors" : { },
  "type" : "object",
  "$schema" : "https://json-schema.org/draft-04/schema#"
}| 1 | The type that was exported |
| 2 | A listing of properties |
There are more details if your resources have links to other resources.
You can also find a profile link in the collection of _links when you examine a collection resource, as the following example shows:
{
  "_links" : {
    "self" : {
      "href" : "http://localhost:8080/persons" (1)
    },
    ... other links ...
    "profile" : {
      "href" : "http://localhost:8080/profile/persons" (2)
    }
  },
  ...
}| 1 | This HAL document respresents the Person collection. |
| 2 | It has a profile link to the same URI for metadata. |
Again, the profile link serves ALPS by default. If you supply it with an Accept header of application/schema+json, it renders the JSON Schema representation.
13. Security
Spring Data REST works quite well with Spring Security. This section shows examples of how to secure your Spring Data REST services with method-level security.
13.1. @Pre and @Post Security
The following example from Spring Data REST’s test suite shows Spring Security’s PreAuthorization model (the most sophisticated security model):
@PreAuthorize("hasRole('ROLE_USER')") (1)
public interface PreAuthorizedOrderRepository extends CrudRepository<Order, UUID> {

	@PreAuthorize("hasRole('ROLE_ADMIN')") (2)
	@Override
	void deleteById(UUID aLong);

	@PreAuthorize("hasRole('ROLE_ADMIN')")
	@Override
	void delete(Order order);

	@PreAuthorize("hasRole('ROLE_ADMIN')")
	@Override
	void deleteAll(Iterable<? extends Order> orders);

	@PreAuthorize("hasRole('ROLE_ADMIN')")
	@Override
	void deleteAll();
}| 1 | This Spring Security annotation secures the entire repository. The Spring Security SpEL expression indicates that the principal must have ROLE_USER in its collection of roles. |
| 2 | To change method-level settings, you must override the method signature and apply a Spring Security annotation. In this case, the method overrides the repository-level settings with the requirement that the user have ROLE_ADMIN to perform a delete. |
The preceding example shows a standard Spring Data repository definition extending CrudRepository with some key changes: the specification of particular roles to access the various methods:
| Repository and method level security settings do not combine. Instead, method-level settings override repository level settings. |
The previous example illustrates that CrudRepository, in fact, has four delete methods. You must override all delete methods to properly secure it.
13.2. @Secured security
The following example shows Spring Security’s older @Secured annotation, which is purely role-based:
@Secured("ROLE_USER") (1)
@RepositoryRestResource(collectionResourceRel = "people", path = "people")
public interface SecuredPersonRepository extends CrudRepository<Person, UUID> {

	@Secured("ROLE_ADMIN") (2)
	@Override
	void deleteById(UUID aLong);

	@Secured("ROLE_ADMIN")
	@Override
	void delete(Person person);

	@Secured("ROLE_ADMIN")
	@Override
	void deleteAll(Iterable<? extends Person> persons);

	@Secured("ROLE_ADMIN")
	@Override
	void deleteAll();
}| 1 | This results in the same security check as the previous example but has less flexibility. It allows only roles as the means to restrict access. |
| 2 | Again, this shows that delete methods require ROLE_ADMIN. |
If you start with a new project or first apply Spring Security, @PreAuthorize is the recommended solution. If are already using Spring Security with @Secured in other parts of your app, you can continue on that path without rewriting everything.
|
13.3. Enabling Method-level Security
To configure method-level security, here is a brief snippet from Spring Data REST’s test suite:
@Configuration (1)
@EnableWebSecurity
@EnableGlobalMethodSecurity(securedEnabled = true, prePostEnabled = true) (2)
public class SecurityConfiguration extends WebSecurityConfigurerAdapter { (3)
	...
}| 1 | This is a Spring configuration class. |
| 2 | It uses Spring Security’s @EnableGlobalMethodSecurity annotation to enable both @Secured and @Pre/@Post support. NOTE: You don’t have to use both. This particular case is used to prove both versions work with Spring Data REST. |
| 3 | This class extends Spring Security’s WebSecurityConfigurerAdapter which is used for pure Java configuration of security. |
The rest of the configuration class is not listed, because it follows standard practices that you can read about in the Spring Security reference docs.
14. Tools
14.1. The HAL Browser
The developer of the HAL specification has a useful application: the HAL Browser. It is a web application that stirs in a little HAL-powered JavaScript. You can point it at any Spring Data REST API and use it to navigate the app and create new resources.
Instead of pulling down the files, embedding them in your application, and crafting a Spring MVC controller to serve them up, all you need to do is add a single dependency.
The following listing shows how to add the dependency in Maven:
<dependencies>
    <dependency>
        <groupId>org.springframework.data</groupId>
        <artifactId>spring-data-rest-hal-browser</artifactId>
    </dependency>
</dependencies>
The following listing shows how to add the dependency in Gradle:
dependencies {
    compile 'org.springframework.data:spring-data-rest-hal-browser'
}| If you use Spring Boot or the Spring Data BOM (bill of materials), you do not need to specify the version. |
This dependency auto-configures the HAL Browser to be served up when you visit your application’s root URI in a browser. (NOTE: http://localhost:8080 was plugged into the browser, and it redirected to the URL shown in the following image.)
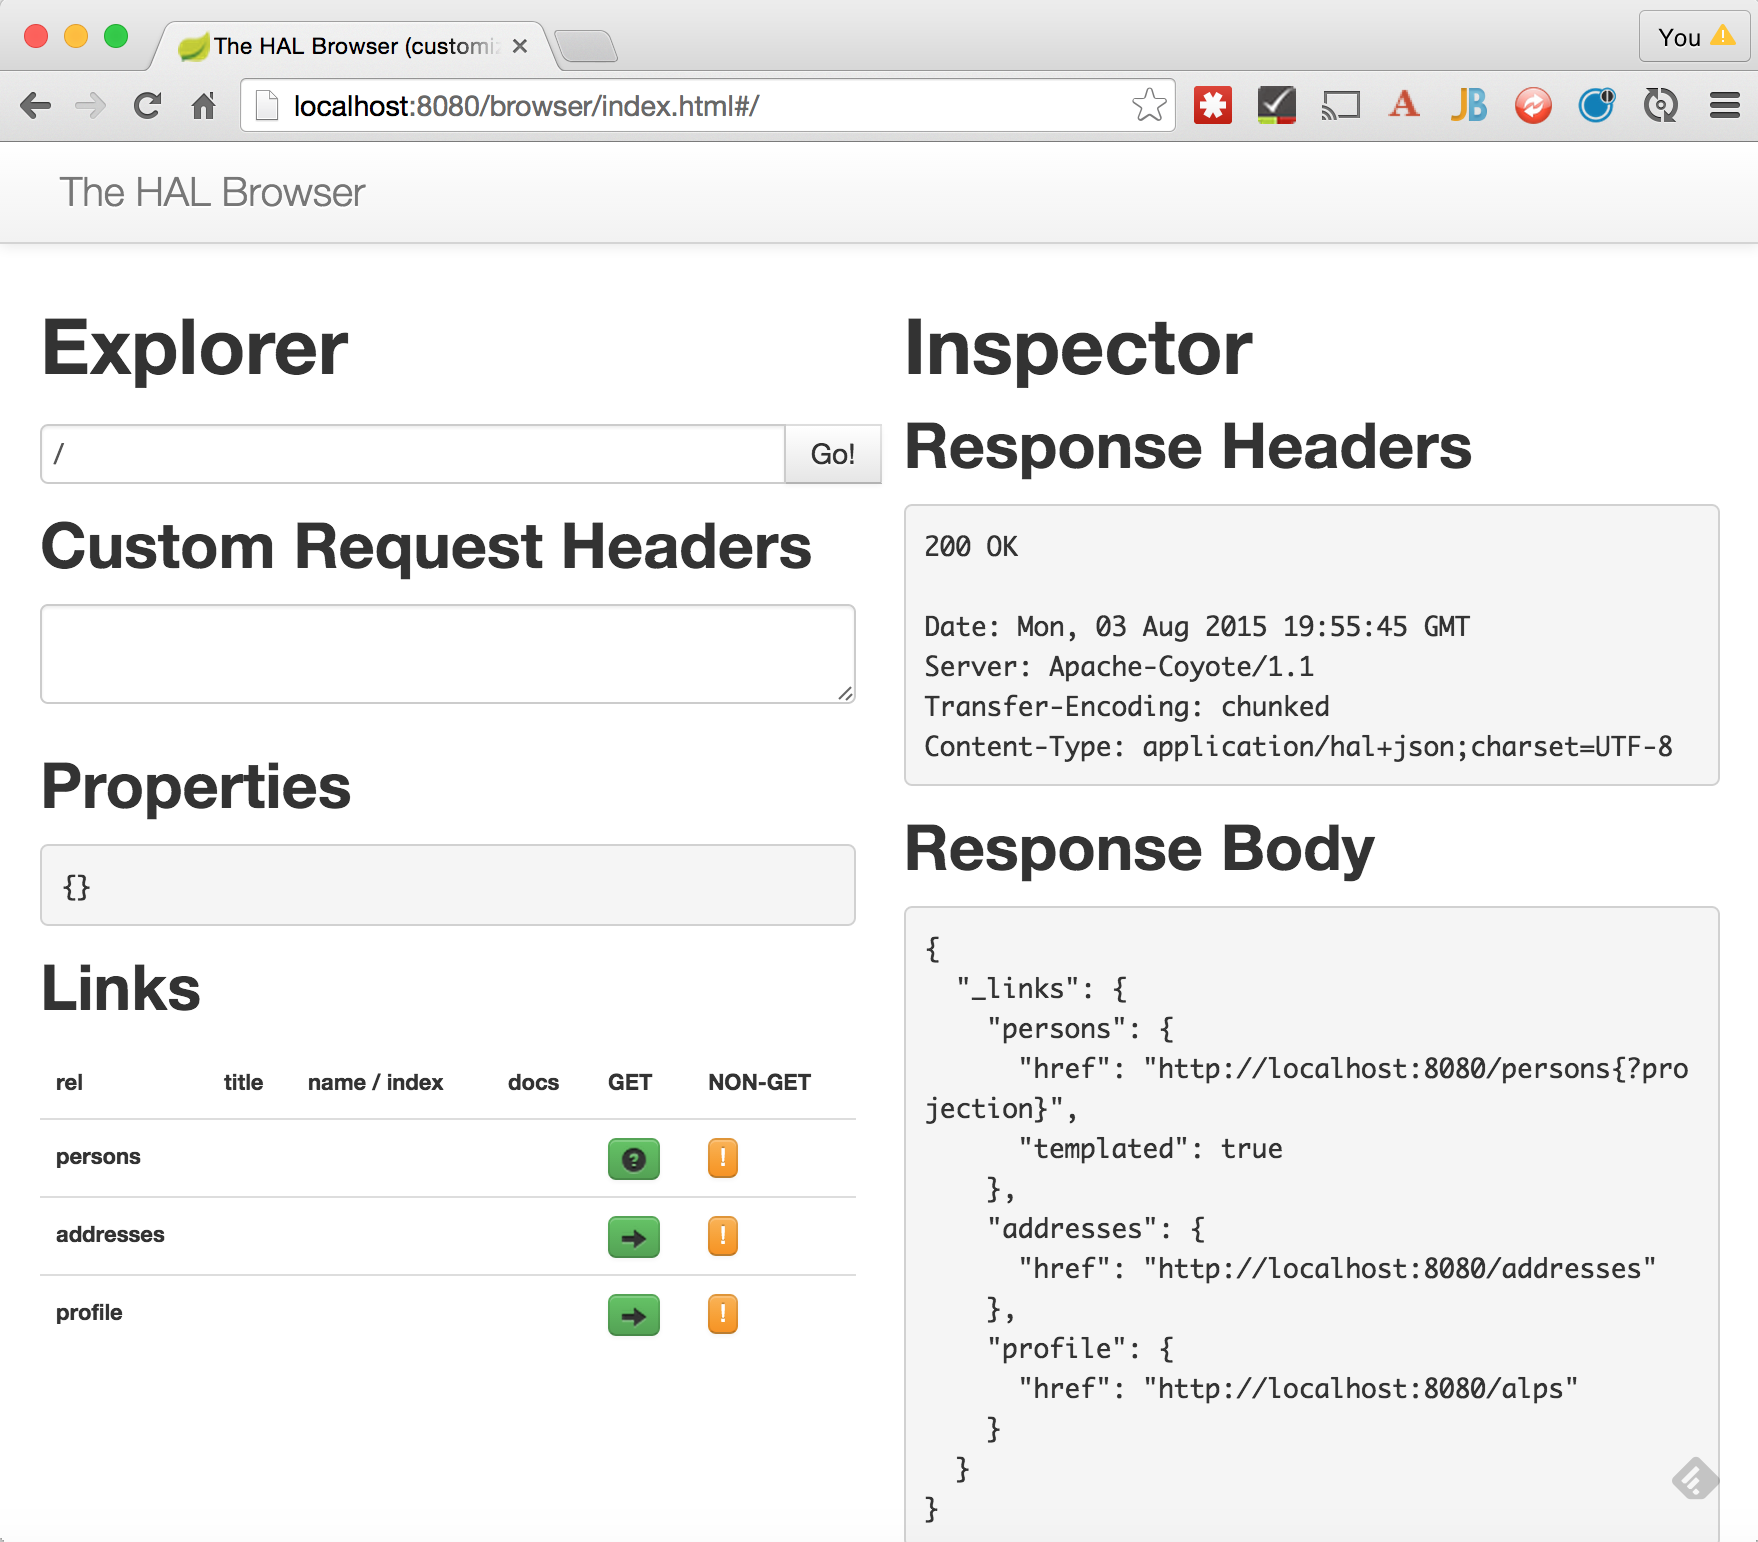
The preceding screen shot shows the root path of the API. On the right side are details from the response, including headers and the body (a HAL document).
The HAL Browser reads the links from the response and puts them in a list on the left side. You can either click on the GET button and navigate to one of the collections, or click on the NON-GET option to make changes.
The HAL Browser speaks URI Template. Above the GET button and next to persons, the UI has a question mark icon. An expansion dialog pops up if you choose to navigate to it, as follows:
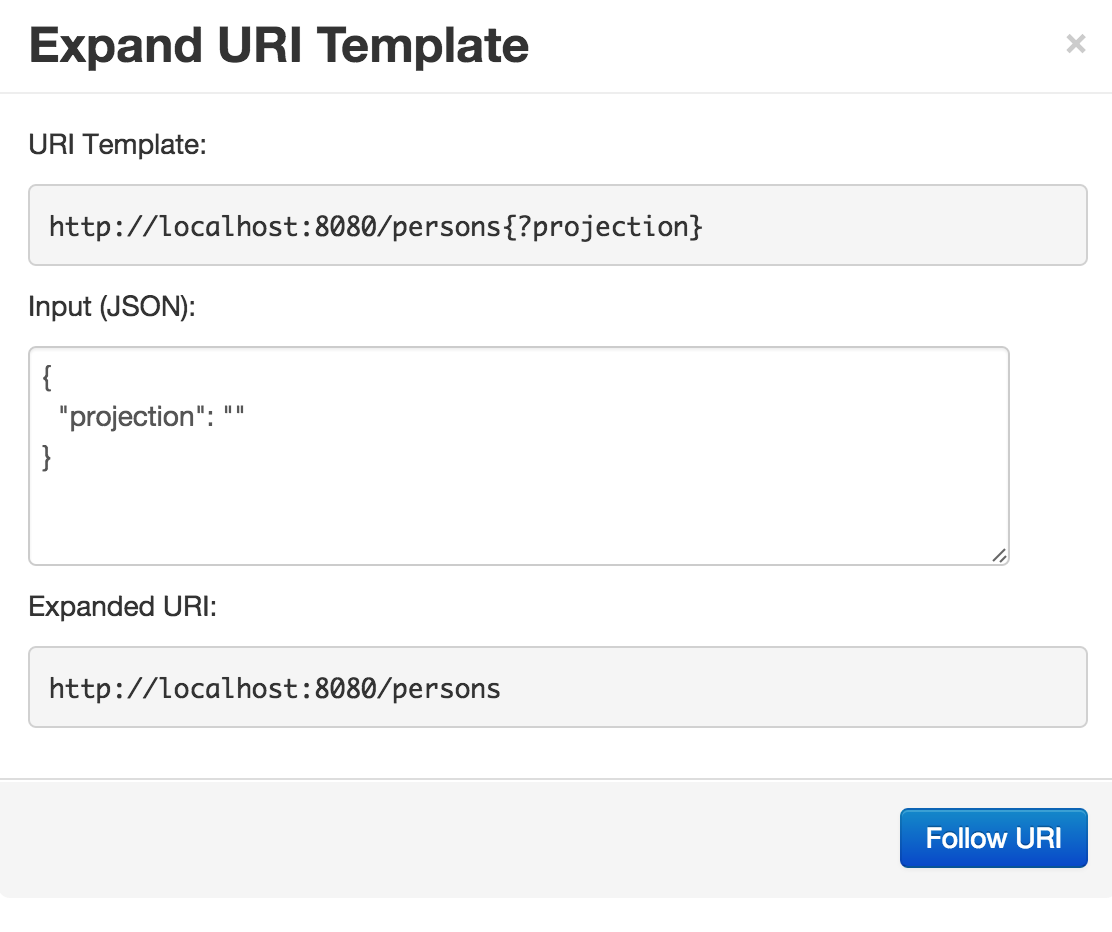
If you click Follow URI without entering anything, the variables are essentially ignored. For situations like Projections and Excerpts or Paging and Sorting, this can be useful.
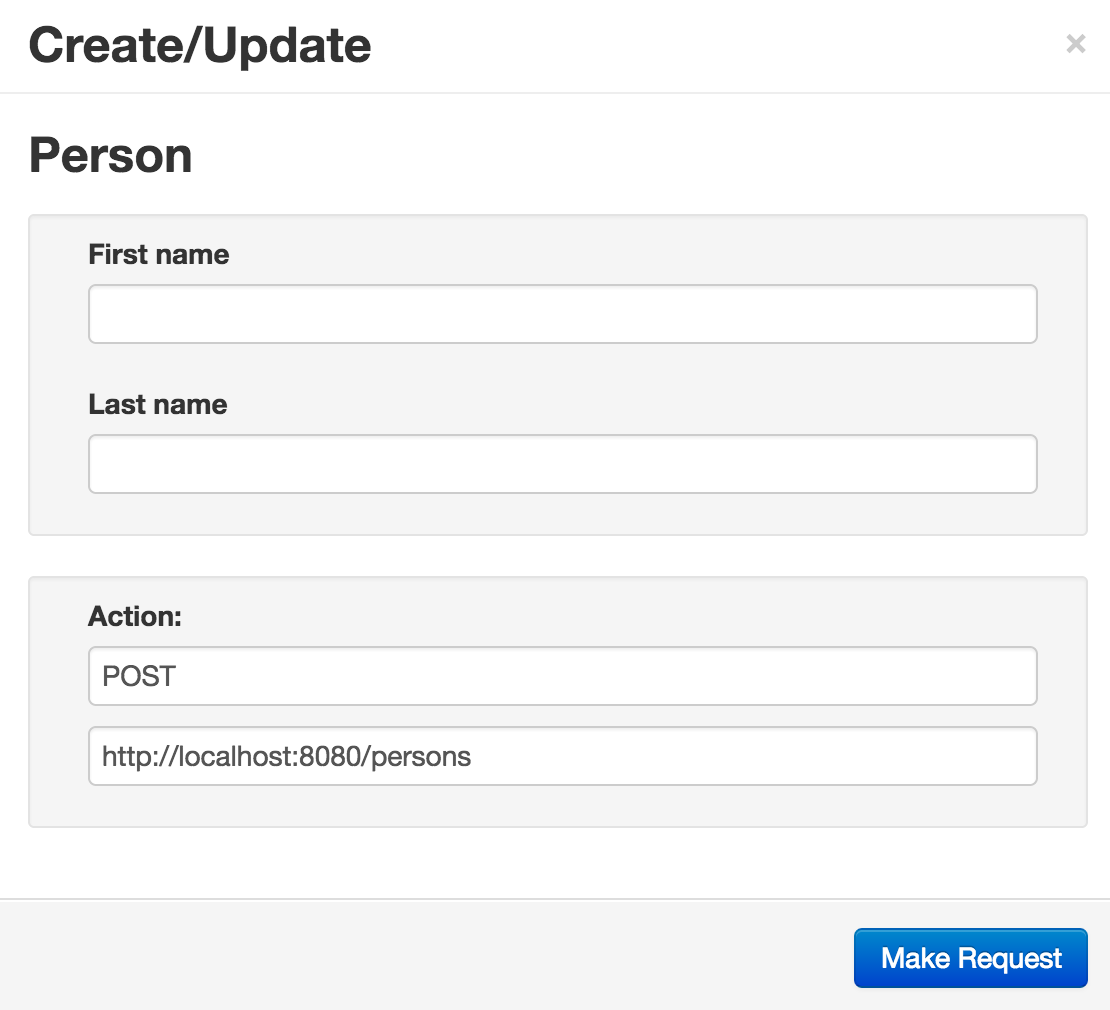
When you click on a NON-GET button, a pop-up dialog appears. By default, it shows POST. This field can be adjusted to either PUT or PATCH. The headers are filled out to properly to submit a new JSON document.
Below the URI, method, and headers are the fields. These are automatically supplied, depending on the metadata of the resources, which was automatically generated by Spring Data REST. If you update your domain objects, the pop-up reflects it, as the following image shows:
15. Customizing Spring Data REST
There are many options to tailor Spring Data REST. These subsections show how.
15.1. Customizing Item Resource URIs
By default, the URI for item resources are comprised of the path segment used for the collection resource with the database identifier appended.
That lets you use the repository’s findOne(…) method to lookup entity instances.
As of Spring Data REST 2.5, this can be customized by using configuration API on RepositoryRestConfiguration (preferred on Java 8) or by registering an implementation of EntityLookup as a Spring bean in your application.
Spring Data REST picks those up and tweaks the URI generation according to their implementation.
Assume a User with a username property that uniquely identifies it.
Further assume that we have a Optional<User> findByUsername(String username) method on the corresponding repository.
On Java 8, we can register the mapping methods as method references to tweak the URI creation, as follows:
@Component
public class SpringDataRestCustomization implements RepositoryRestConfigurer {

  @Override
  public void configureRepositoryRestConfiguration(RepositoryRestConfiguration config) {
    config.withEntityLookup()
      .forRepository(UserRepository.class)
      .withIdMapping(User::getUsername)
      .withLookup(UserRepository::findByUsername);
  }
}
forRepository(…) takes the repository type as the first argument, a method reference mapping the repositories domain type to some target type as the second argument, and another method reference to map that value back by using the repository mentioned as the first argument.
If you are not running Java 8 or better, you could use the method, but it would require a few quite verbose anonymous inner classes.
On older Java versions, you should probably prefer implementing a UserEntityLookup that resembles the following:
@Component
public class UserEntityLookup extends EntityLookupSupport<User> {

    private final UserRepository repository;

    public UserEntityLookup(UserRepository repository) {
        this.repository = repository;
    }

    @Override
    public Serializable getResourceIdentifier(User entity) {
        return entity.getUsername();
    }

    @Override
    public Object lookupEntity(Serializable id) {
        return repository.findByUsername(id.toString());
    }
}
Notice how getResourceIdentifier(…) returns the username to be used by the URI creation. To load entity instances by the value returned from that method, we now implement lookupEntity(…) by using the query method available on the UserRepository.
15.2. Customizing repository exposure
By default, all public Spring Data repositories are used to expose HTTP resources as described in Repository resources.
Package protected repository interfaces are excluded from this list, as you express its functionality is only visible to the package internally.
This can be customized by explicitly setting a RepositoryDetectionStrategy (usually through the enum RepositoryDetectionStrategies) on RepositoryRestConfiguration.
The following values can be configured:
-
ALL— exposes all Spring Data repositories regardless of their Java visibility or annotation configuration. -
DEFAULT— exposes public Spring Data repositories or ones explicitly annotated with@RepositoryRestResourceand itsexportedattribute not set tofalse. -
VISIBILITY— exposes only public Spring Data repositories regardless of annotation configuration. -
ANNOTATED— only exposes Spring Data repositories explicitly annotated with@RepositoryRestResourceand itsexportedattribute not set tofalse.
If you need custom rules to apply, simply implement RepositoryDetectionStrategy manually.
15.3. Customizing supported HTTP methods
15.3.1. Customizing default exposure
By default, Spring Data REST exposes HTTP resources and methods as described in Repository resources based on which CRUD methods the repository exposes.
The repositories don’t need to extend CrudRepository but can also selectively declare methods described in aforementioned section and the resource exposure will follow.
E.g. if a repository does not expose a delete(…) method, an HTTP DELETE will not be supported for item resources.
If you need to declare a method for internal use but don’t want it to trigger the HTTP method exposure, the repository method can be annotated with @RestResource(exported = false).
Which methods to annotate like that to remove support for which HTTP method is described in Repository resources.
Sometimes managing the exposure on the method level is not fine-grained enough.
E.g. the save(…) method is used to back POST on collection resources, as well as PUT and PATCH on item resources.
To selectively define which HTTP methods are supposed to be exposed, you can use RepositoryRestConfiguration.getExposureConfiguration().
The class exposes a Lambda based API to define both global and type-based rules:
ExposureConfiguration config = repositoryRestConfiguration.getExposureConfiguration();

config.forDomainType(User.class).disablePutForCreation(); (1)
config.withItemExposure((metadata, httpMethods) -> httpMethods.disable(HttpMethod.PATCH)); (2)| 1 | Disables the support for HTTP PUT to create item resources directly. |
| 2 | Disables the support for HTTP PATCH on all item resources. |
15.4. Configuring the REST URL Path
You can configure the segments of the URL path under which the resources of a JPA repository are exported. To do so, add an annotation at the class level or at the query method level.
By default, the exporter exposes your CrudRepository by using the name of the domain class. Spring Data REST also applies the Evo Inflector to pluralize this word. Consider the following repository definition:
interface PersonRepository extends CrudRepository<Person, Long> {}The repository defined by the preceding example is exposed at http://localhost:8080/persons/.
To change how the repository is exported, add a @RestResource annotation at the class level, as the following example shows:
@RepositoryRestResource(path = "people")
interface PersonRepository extends CrudRepository<Person, Long> {}
The repository defined by the preceding example is accessible at http://localhost:8080/people/.
If you have query methods defined, those also default to being exposed by their name, as the following example shows:
interface PersonRepository extends CrudRepository<Person, Long> {

  List<Person> findByName(String name);
}
The method in the preceding example is exposed at http://localhost:8080/persons/search/findByName.
All query method resources are exposed under the search resource.
|
To change the segment of the URL under which this query method is exposed, you can use the @RestResource annotation again, as the following example shows:
@RepositoryRestResource(path = "people")
interface PersonRepository extends CrudRepository<Person, Long> {

  @RestResource(path = "names")
  List<Person> findByName(String name);
}
Now the query method in the preceding example is exposed at http://localhost:8080/people/search/names.
15.4.1. Handling rel Attributes
Since these resources are all discoverable, you can also affect how the rel attribute is displayed in the links sent out by the exporter.
For instance, in the default configuration, if you issue a request to http://localhost:8080/persons/search to find out what query methods are exposed, you get back a list of links similar to the following:
{
  "_links" : {
    "findByName" : {
      "href" : "http://localhost:8080/persons/search/findByName"
    }
  }
}
To change the rel value, use the rel property on the @RestResource annotation, as the following example shows:
@RepositoryRestResource(path = "people")
interface PersonRepository extends CrudRepository<Person, Long> {

  @RestResource(path = "names", rel = "names")
  List<Person> findByName(String name);
}
The preceding example results in the following link value:
{
  "_links" : {
    "names" : {
      "href" : "http://localhost:8080/persons/search/names"
    }
  }
}
These snippets of JSON assume you use Spring Data REST’s default format of HAL. You can turn off HAL, which would cause the output to look different. However, your ability to override rel names is totally independent of the rendering format.
|
You can change the rel of a repository, as the following example shows:
@RepositoryRestResource(path = "people", rel = "people")
interface PersonRepository extends CrudRepository<Person, Long> {

  @RestResource(path = "names", rel = "names")
  List<Person> findByName(String name);
}
Altering the rel of a repository changes the top-level name, as the following example output shows:
{
  "_links" : {
    "people" : {
      "href" : "http://localhost:8080/people"
    },
    …
  }
}
In the top level fragment shown in the preceding output:
-
path = "people"changed the value inhreffrom/personsto/people. -
rel = "people"changed the name of that link frompersonstopeople.
When you navigate to the search resource of this repository, the finder method’s @RestResource annotation has altered the path, as follows:
{
  "_links" : {
    "names" : {
      "href" : "http://localhost:8080/people/search/names"
    }
  }
}
This collection of annotations in your repository definition has caused the following changes:
-
The Repository-level annotation’s
path = "people"is reflected in the base URI with/people. -
The inclusion of a finder method provides you with
/people/search. -
path = "names"creates a URI of/people/search/names. -
rel = "names"changes the name of that link fromfindByNamestonames.
15.4.2. Hiding Certain Repositories, Query Methods, or Fields
You may not want a certain repository, a query method on a repository, or a field of your entity to be exported at all. Examples include hiding fields like password on a User object and similar sensitive data. To tell the exporter to not export these items, annotate them with @RestResource and set exported = false.
For example, to skip exporting a repository, you could create a repository definition similar to the following example:
@RepositoryRestResource(exported = false)
interface PersonRepository extends CrudRepository<Person, Long> {}
To skip exporting a query method, you can annotate the query method with @RestResource(exported = false), as follows:
@RepositoryRestResource(path = "people", rel = "people")
interface PersonRepository extends CrudRepository<Person, Long> {

  @RestResource(exported = false)
  List<Person> findByName(String name);
}
Similarly, to skip exporting a field, you can annotate the field with @RestResource(exported = false), as follows:
@Entity
public class Person {

  @Id @GeneratedValue private Long id;

  @OneToMany
  @RestResource(exported = false)
  private Map<String, Profile> profiles;
}| Projections provide the means to change what is exported and effectively side-step these settings. If you create any projections against the same domain object, be sure to NOT export the fields. |
15.4.3. Hiding Repository CRUD Methods
If you do not want to expose a save or delete method on your CrudRepository, you can use the @RestResource(exported = false) setting by overriding the method you want to turn off and placing the annotation on the overridden version. For example, to prevent HTTP users from invoking the delete methods of CrudRepository, override all of them and add the annotation to the overridden methods, as follows:
@RepositoryRestResource(path = "people", rel = "people")
interface PersonRepository extends CrudRepository<Person, Long> {

  @Override
  @RestResource(exported = false)
  void delete(Long id);

  @Override
  @RestResource(exported = false)
  void delete(Person entity);
}
It is important that you override both delete methods. In the interest of faster runtime performance, the exporter currently uses a somewhat naive algorithm for determining which CRUD method to use. You cannot currently turn off the version of delete that takes an ID but export the version that takes an entity instance. For the time being, you can either export the delete methods or not. If you want turn them off, keep in mind that you have to annotate both versions with exported = false.
|
15.5. Adding Spring Data REST to an Existing Spring MVC Application
The following steps are unnecessary if you use Spring Boot. For Boot applications, adding spring-boot-starter-data-rest automatically adds Spring Data REST to your application.
|
You can integrate Spring Data REST with an existing Spring MVC application. In your Spring MVC configuration (most likely where you configure your MVC resources), add a bean reference to the Java configuration class that is responsible for configuring the RepositoryRestController. The class name is org.springframework.data.rest.webmvc.RepositoryRestMvcConfiguration. The following example shows how to use an @Import annotation to add the proper reference:
In Java, this would look like:
import org.springframework.context.annotation.Import;
import org.springframework.data.rest.webmvc.RepositoryRestMvcConfiguration;

@Configuration
@Import(RepositoryRestMvcConfiguration.class)
public class MyApplicationConfiguration {

  …
}
The following example shows the corresponding XML configuration:
<bean class="org.springframework.data.rest.webmvc.config.RepositoryRestMvcConfiguration"/>When your ApplicationContext comes across this bean definition, it bootstraps the necessary Spring MVC resources to fully configure the controller for exporting the repositories it finds in that ApplicationContext and any parent contexts.
15.5.1. More on Required Configuration
Spring Data REST depends on a couple Spring MVC resources that must be configured correctly for it to work inside an existing Spring MVC application. We tried to isolate those resources from whatever similar resources already exist within your application, but it may be that you want to customize some of the behavior of Spring Data REST by modifying these MVC components.
You should pay special attention to configuring RepositoryRestHandlerMapping, covered in the next section.
RepositoryRestHandlerMapping
We register a custom HandlerMapping instance that responds only to the RepositoryRestController and only if a path is meant to be handled by Spring Data REST. In order to keep paths that are meant to be handled by your application separate from those handled by Spring Data REST, this custom HandlerMapping class inspects the URL path and checks to see if a repository has been exported under that name. If it has, the custom HandlerMapping class lets the request be handled by Spring Data REST. If there is no Repository exported under that name, it returns null, which means “let other HandlerMapping instances try to service this request”.
The Spring Data REST HandlerMapping is configured with order=(Ordered.LOWEST_PRECEDENCE - 100), which means it is usually first in line when it comes time to map a URL path. Your existing application never gets a chance to service a request that is meant for a repository. For example, if you have a repository exported under the name of person, then all requests to your application that start with /person are handled by Spring Data REST, and your application never sees that request. If your repository is exported under a different name (such as people), however, then requests to /people go to Spring Data REST and requests to /person are handled by your application.
15.6. Overriding Spring Data REST Response Handlers
Sometimes, you may want to write a custom handler for a specific resource. To take advantage of Spring Data REST’s settings, message converters, exception handling, and more, use the @RepositoryRestController annotation instead of a standard Spring MVC @Controller or @RestController. Controllers annotated with @RepositoryRestController are served from the API base path defined in RepositoryRestConfiguration.setBasePath, which is used by all other RESTful endpoints (for example, /api). The following example shows how to use the @RepositoryRestController annotation:
@RepositoryRestController
public class ScannerController {

    private final ScannerRepository repository;

    @Autowired
    public ScannerController(ScannerRepository repo) { (1)
        repository = repo;
    }

    @RequestMapping(method = GET, value = "/scanners/search/listProducers") (2)
    public @ResponseBody ResponseEntity<?> getProducers() {
        List<String> producers = repository.listProducers(); (3)

        //
        // do some intermediate processing, logging, etc. with the producers
        //

        CollectionModel<String> resources = CollectionModel.of(producers); (4)

        resources.add(linkTo(methodOn(ScannerController.class).getProducers()).withSelfRel()); (5)

        // add other links as needed

        return ResponseEntity.ok(resources); (6)
    }

}| 1 | This example uses constructor injection. |
| 2 | This handler plugs in a custom handler for a Spring Data finder method. |
| 3 | This handler uses the underlying repository to fetch data, but then does some form of post processing before returning the final data set to the client. |
| 4 | The results of type T need to be wrapped up in a Spring HATEOAS CollectionModel<T> object to return a collection. EntityModel<T> or RepresentationModel<T> are suitable wrappers for a single item, respectively. |
| 5 | Add a link back to this exact method as a self link. |
| 6 | Returning the collection by using Spring MVC’s ResponseEntity wrapper ensures that the collection is properly wrapped and rendered in the proper accept type. |
CollectionModel is for a collection, while EntityModel — or the more general class RepresentationModel — is for a single item. These types can be combined. If you know the links for each item in a collection, use CollectionModel<EntityModel<String>> (or whatever the core domain type is rather than String). Doing so lets you assemble links for each item as well as for the whole collection.
In this example, the combined path is RepositoryRestConfiguration.getBasePath() + /scanners/search/listProducers.
|
15.6.1. @RepositoryRestResource VS. @BasePathAwareController
If you are not interested in entity-specific operations but still want to build custom operations underneath basePath, such as Spring MVC views, resources, and others, use @BasePathAwareController.
If you’re using @RepositoryRestController on your custom controller, it will only handle the request if your request mappings blend into the URI space used by the repository.
It will also apply the following extra functionality to the controller methods:
-
CORS configuration according as defined for the repository mapped to the base path segment used in the request mapping of the handler method.
-
Apply an
OpenEntityManagerInViewInterceptorif JPA is used to make sure you can access properties marked as to be resolved lazily.
If you use @Controller or @RestController for anything, that code is totally outside the scope of Spring Data REST. This extends to request handling, message converters, exception handling, and other uses.
|
15.7. Customizing the JSON Output
Sometimes in your application, you need to provide links to other resources from a particular entity. For example, a Customer response might be enriched with links to a current shopping cart or links to manage resources related to that entity. Spring Data REST provides integration with Spring HATEOAS and provides an extension hook that lets you alter the representation of resources that go out to the client.
15.7.1. The RepresentationModelProcessor Interface
Spring HATEOAS defines a RepresentationModelProcessor<> interface for processing entities. All beans of type RepresentationModelProcessor<EntityModel<T>> are automatically picked up by the Spring Data REST exporter and triggered when serializing an entity of type T.
For example, to define a processor for a Person entity, add a @Bean similar to the following (which is taken from the Spring Data REST tests) to your ApplicationContext:
@Bean
public RepresentationModelProcessor<EntityModel<Person>> personProcessor() {

   return new RepresentationModelProcessor<EntityModel<Person>>() {

     @Override
     public EntityModel<Person> process(EntityModel<Person> model) {

      model.add(new Link("http://localhost:8080/people", "added-link"));
      return model;
     }
   };
}
The preceding example hard codes a link to http://localhost:8080/people. If you have a Spring MVC endpoint inside your app to which you wish to link, consider using Spring HATEOAS’s linkTo(…) method to avoid managing the URL.
|
15.7.2. Adding Links
You can add links to the default representation of an entity by calling model.add(Link), as the preceding example shows. Any links you add to the EntityModel are added to the final output.
15.7.3. Customizing the Representation
The Spring Data REST exporter executes any discovered RepresentationModelProcessor instances before it creates the output representation. It does so by registering a Converter<Entity, EntityModel> instance with an internal ConversionService. This is the component responsible for creating the links to referenced entities (such as those objects under the _links property in the object’s JSON representation). It takes an @Entity and iterates over its properties, creating links for those properties that are managed by a Repository and copying across any embedded or simple properties.
If your project needs to have output in a different format, however, you can completely replace the default outgoing JSON representation with your own. If you register your own ConversionService in the ApplicationContext and register your own Converter<Entity, EntityModel>, you can return a EntityModel implementation of your choosing.
15.8. Adding Custom Serializers and Deserializers to Jackson’s ObjectMapper
Sometimes, the behavior of the Spring Data REST ObjectMapper (which has been specially configured to use intelligent serializers that can turn domain objects into links and back again) may not handle your domain model correctly. You can structure your data in so many ways that you may find your own domain model does not correctly translate to JSON. It is also sometimes not practical in these cases to support a complex domain model in a generic way. Sometimes, depending on the complexity, it is not even possible to offer a generic solution.
To accommodate the largest percentage of the use cases, Spring Data REST tries to render your object graph correctly. It tries to serialize unmanaged beans as normal POJOs, and tries to create links to managed beans where necessary. However, if your domain model does not easily lend itself to reading or writing plain JSON, you may want to configure Jackson’s ObjectMapper with your own custom type mappings and (de)serializers.
15.8.1. Abstract Class Registration
One key configuration point you might need to hook into is when you use an abstract class (or an interface) in your domain model. Jackson does not, by default, know what implementation to create for an interface. Consider the following example:
@Entity
public class MyEntity {

  @OneToMany
  private List<MyInterface> interfaces;
}
In a default configuration, Jackson has no idea what class to instantiate when POSTing new data to the exporter. You need to tell Jackson either through an annotation or, more cleanly, by registering a type mapping by using a Module.
Any Module bean declared within the scope of your ApplicationContext is picked up by the exporter and registered with its ObjectMapper. To add this special abstract class type mapping, you can create a Module bean and, in the setupModule method, add an appropriate TypeResolver, as follows:
public class MyCustomModule extends SimpleModule {

  private MyCustomModule() {
    super("MyCustomModule", new Version(1, 0, 0, "SNAPSHOT"));
  }

  @Override
  public void setupModule(SetupContext context) {
    context.addAbstractTypeResolver(
      new SimpleAbstractTypeResolver().addMapping(MyInterface.class,
        MyInterfaceImpl.class));
  }
}
Once you have access to the SetupContext object in your Module, you can do all sorts of cool things to configure Jackon’s JSON mapping. You can read more about how Modules work on Jackson’s wiki.
15.8.2. Adding Custom Serializers for Domain Types
If you want to serialize or deserialize a domain type in a special way, you can register your own implementations with Jackson’s ObjectMapper. Then the Spring Data REST exporter transparently handles those domain objects correctly.
To add serializers from your setupModule method implementation, you can do something like the following:
public class MyCustomModule extends SimpleModule {

  …

  @Override
  public void setupModule(SetupContext context) {

    SimpleSerializers serializers = new SimpleSerializers();
    SimpleDeserializers deserializers = new SimpleDeserializers();

    serializers.addSerializer(MyEntity.class, new MyEntitySerializer());
    deserializers.addDeserializer(MyEntity.class, new MyEntityDeserializer());

    context.addSerializers(serializers);
    context.addDeserializers(deserializers);
  }
}
Thanks to the custom module shown in the preceding example, Spring Data REST correctly handles your domain objects when they are too complex for the 80% generic use case that Spring Data REST tries to cover.
15.9. Configuring CORS
For security reasons, browsers prohibit AJAX calls to resources residing outside the current origin. When working with client-side HTTP requests issued by a browser, you want to enable specific HTTP resources to be accessible.
Spring Data REST, as of 2.6, supports Cross-Origin Resource Sharing (CORS) through Spring’s CORS support.
15.9.1. Repository Interface CORS Configuration
You can add a @CrossOrigin annotation to your repository interfaces to enable CORS for the whole repository. By default, @CrossOrigin allows all origins and HTTP methods. The following example shows a cross-origin repository interface definition:
@CrossOrigin
interface PersonRepository extends CrudRepository<Person, Long> {}
In the preceding example, CORS support is enabled for the whole PersonRepository. @CrossOrigin provides attributes to configure CORS support, as the following example shows:
@CrossOrigin(origins = "http://domain2.example",
  methods = { RequestMethod.GET, RequestMethod.POST, RequestMethod.DELETE },
  maxAge = 3600)
interface PersonRepository extends CrudRepository<Person, Long> {}
The preceding example enables CORS support for the whole PersonRepository by providing one origin, restricted to the GET, POST, and DELETE methods and with a max age of 3600 seconds.
15.9.2. Repository REST Controller Method CORS Configuration
Spring Data REST fully supports Spring Web MVC’s controller method configuration on custom REST controllers that share repository base paths, as the following example shows:
@RepositoryRestController
public class PersonController {

  @CrossOrigin(maxAge = 3600)
  @RequestMapping(path = "/people/xml/{id}", method = RequestMethod.GET, produces = MediaType.APPLICATION_XML_VALUE)
  public Person retrieve(@PathVariable Long id) {
    // …
  }
}
Controllers annotated with @RepositoryRestController inherit @CrossOrigin configuration from their associated repositories.
|
15.9.3. Global CORS Configuration
In addition to fine-grained, annotation-based configuration, you probably want to define some global CORS configuration as well. This is similar to Spring Web MVC’S CORS configuration but can be declared within Spring Data REST and combined with fine-grained @CrossOrigin configuration. By default, all origins and GET, HEAD, and POST methods are allowed.
| Existing Spring Web MVC CORS configuration is not applied to Spring Data REST. |
The following example sets an allowed origin, adds the PUT and DELETE HTTP methods, adds and exposes some headers, and sets a maximum age of an hour:
@Component
public class SpringDataRestCustomization implements RepositoryRestConfigurer {

  @Override
  public void configureRepositoryRestConfiguration(RepositoryRestConfiguration config, CorsRegistry cors) {

    cors.addMapping("/person/**")
      .allowedOrigins("http://domain2.example")
      .allowedMethods("PUT", "DELETE")
      .allowedHeaders("header1", "header2", "header3")
      .exposedHeaders("header1", "header2")
      .allowCredentials(false).maxAge(3600);
  }
}
Appendix
Appendix A: Using cURL to talk to Spring Data REST
This appendix contains a list of guides that demonstrate interacting with a Spring Data REST service over cURL:
Appendix B: Spring Data REST example projects
This appendix contains a list of Spring Data REST sample applications. The exact version of each example is not guaranteed to match the version of this reference manual.
To get them all, visit https://github.com/spring-projects/spring-data-examples and either clone or download a zipball. Doing so gives you example applications for all supported Spring Data projects. To see them, navigate to spring-data-examples/rest.
|
Multi-store Example
This example shows how to mix together several underlying Spring Data projects.
Projections
This example contains more detailed code you can use to explore projections.
Spring Data REST with Spring Security
This example shows how to secure a Spring Data REST application in multiple ways with Spring Security.
Starbucks example
This example exposes 10,843 Starbucks coffee shops through a RESTful API that allows access to the stores in a hypermedia-based way and exposes a resource to execute a geo-location search for coffee shops.