This part of the reference documentation covers all of those technologies that are absolutely integral to the Spring Framework.
Foremost amongst these is the Spring Framework’s Inversion of Control (IoC) container. A thorough treatment of the Spring Framework’s IoC container is closely followed by comprehensive coverage of Spring’s Aspect-Oriented Programming (AOP) technologies. The Spring Framework has its own AOP framework, which is conceptually easy to understand, and which successfully addresses the 80% sweet spot of AOP requirements in Java enterprise programming.
Coverage of Spring’s integration with AspectJ (currently the richest - in terms of features - and certainly most mature AOP implementation in the Java enterprise space) is also provided.
1. The IoC container
1.1. Introduction to the Spring IoC container and beans
This chapter covers the Spring Framework implementation of the Inversion of Control (IoC) [1] principle. IoC is also known as dependency injection (DI). It is a process whereby objects define their dependencies, that is, the other objects they work with, only through constructor arguments, arguments to a factory method, or properties that are set on the object instance after it is constructed or returned from a factory method. The container then injects those dependencies when it creates the bean. This process is fundamentally the inverse, hence the name Inversion of Control (IoC), of the bean itself controlling the instantiation or location of its dependencies by using direct construction of classes, or a mechanism such as the Service Locator pattern.
The org.springframework.beans and org.springframework.context packages are the basis
for Spring Framework’s IoC container. The
BeanFactory
interface provides an advanced configuration mechanism capable of managing any type of
object.
ApplicationContext
is a sub-interface of BeanFactory. It adds easier integration with Spring’s AOP
features; message resource handling (for use in internationalization), event
publication; and application-layer specific contexts such as the WebApplicationContext
for use in web applications.
In short, the BeanFactory provides the configuration framework and basic
functionality, and the ApplicationContext adds more enterprise-specific functionality.
The ApplicationContext is a complete superset of the BeanFactory, and is used
exclusively in this chapter in descriptions of Spring’s IoC container. For more
information on using the BeanFactory instead of the ApplicationContext, refer to
The BeanFactory.
In Spring, the objects that form the backbone of your application and that are managed by the Spring IoC container are called beans. A bean is an object that is instantiated, assembled, and otherwise managed by a Spring IoC container. Otherwise, a bean is simply one of many objects in your application. Beans, and the dependencies among them, are reflected in the configuration metadata used by a container.
1.2. Container overview
The interface org.springframework.context.ApplicationContext represents the Spring IoC
container and is responsible for instantiating, configuring, and assembling the
aforementioned beans. The container gets its instructions on what objects to
instantiate, configure, and assemble by reading configuration metadata. The
configuration metadata is represented in XML, Java annotations, or Java code. It allows
you to express the objects that compose your application and the rich interdependencies
between such objects.
Several implementations of the ApplicationContext interface are supplied
out-of-the-box with Spring. In standalone applications it is common to create an
instance of
ClassPathXmlApplicationContext
or FileSystemXmlApplicationContext.
While XML has been the traditional format for defining configuration metadata you can
instruct the container to use Java annotations or code as the metadata format by
providing a small amount of XML configuration to declaratively enable support for these
additional metadata formats.
In most application scenarios, explicit user code is not required to instantiate one or
more instances of a Spring IoC container. For example, in a web application scenario, a
simple eight (or so) lines of boilerplate web descriptor XML in the web.xml file
of the application will typically suffice (see Convenient ApplicationContext instantiation for web applications). If you are using the
Spring Tool Suite Eclipse-powered development
environment this boilerplate configuration can be easily created with few mouse clicks or
keystrokes.
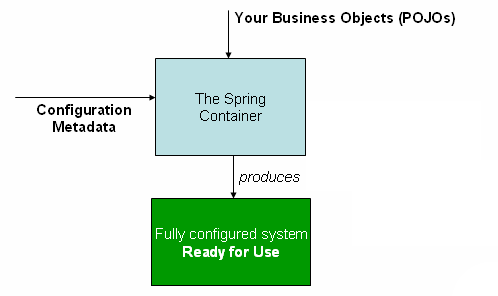
The following diagram is a high-level view of how Spring works. Your application classes
are combined with configuration metadata so that after the ApplicationContext is
created and initialized, you have a fully configured and executable system or
application.
1.2.1. Configuration metadata
As the preceding diagram shows, the Spring IoC container consumes a form of configuration metadata; this configuration metadata represents how you as an application developer tell the Spring container to instantiate, configure, and assemble the objects in your application.
Configuration metadata is traditionally supplied in a simple and intuitive XML format, which is what most of this chapter uses to convey key concepts and features of the Spring IoC container.
|
XML-based metadata is not the only allowed form of configuration metadata. The Spring IoC container itself is totally decoupled from the format in which this configuration metadata is actually written. These days many developers choose Java-based configuration for their Spring applications. |
For information about using other forms of metadata with the Spring container, see:
-
Annotation-based configuration: Spring 2.5 introduced support for annotation-based configuration metadata.
-
Java-based configuration: Starting with Spring 3.0, many features provided by the Spring JavaConfig project became part of the core Spring Framework. Thus you can define beans external to your application classes by using Java rather than XML files. To use these new features, see the
@Configuration,@Bean,@Importand@DependsOnannotations.
Spring configuration consists of at least one and typically more than one bean
definition that the container must manage. XML-based configuration metadata shows these
beans configured as <bean/> elements inside a top-level <beans/> element. Java
configuration typically uses @Bean annotated methods within a @Configuration class.
These bean definitions correspond to the actual objects that make up your application.
Typically you define service layer objects, data access objects (DAOs), presentation
objects such as Struts Action instances, infrastructure objects such as Hibernate
SessionFactories, JMS Queues, and so forth. Typically one does not configure
fine-grained domain objects in the container, because it is usually the responsibility
of DAOs and business logic to create and load domain objects. However, you can use
Spring’s integration with AspectJ to configure objects that have been created outside
the control of an IoC container. See Using AspectJ to
dependency-inject domain objects with Spring.
The following example shows the basic structure of XML-based configuration metadata:
<?xml version="1.0" encoding="UTF-8"?>
<beans xmlns="http://www.springframework.org/schema/beans"
    xmlns:xsi="http://www.w3.org/2001/XMLSchema-instance"
    xsi:schemaLocation="http://www.springframework.org/schema/beans
        http://www.springframework.org/schema/beans/spring-beans.xsd">

    <bean id="..." class="...">
        <!-- collaborators and configuration for this bean go here -->
    </bean>

    <bean id="..." class="...">
        <!-- collaborators and configuration for this bean go here -->
    </bean>

    <!-- more bean definitions go here -->

</beans>
The id attribute is a string that you use to identify the individual bean definition.
The class attribute defines the type of the bean and uses the fully qualified
classname. The value of the id attribute refers to collaborating objects. The XML for
referring to collaborating objects is not shown in this example; see
Dependencies for more information.
1.2.2. Instantiating a container
Instantiating a Spring IoC container is straightforward. The location path or paths
supplied to an ApplicationContext constructor are actually resource strings that allow
the container to load configuration metadata from a variety of external resources such
as the local file system, from the Java CLASSPATH, and so on.
ApplicationContext context = new ClassPathXmlApplicationContext("services.xml", "daos.xml");|
After you learn about Spring’s IoC container, you may want to know more about Spring’s
|
The following example shows the service layer objects (services.xml) configuration file:
<?xml version="1.0" encoding="UTF-8"?>
<beans xmlns="http://www.springframework.org/schema/beans"
    xmlns:xsi="http://www.w3.org/2001/XMLSchema-instance"
    xsi:schemaLocation="http://www.springframework.org/schema/beans
        http://www.springframework.org/schema/beans/spring-beans.xsd">

    <!-- services -->

    <bean id="petStore" class="org.springframework.samples.jpetstore.services.PetStoreServiceImpl">
        <property name="accountDao" ref="accountDao"/>
        <property name="itemDao" ref="itemDao"/>
        <!-- additional collaborators and configuration for this bean go here -->
    </bean>

    <!-- more bean definitions for services go here -->

</beans>
The following example shows the data access objects daos.xml file:
<?xml version="1.0" encoding="UTF-8"?>
<beans xmlns="http://www.springframework.org/schema/beans"
    xmlns:xsi="http://www.w3.org/2001/XMLSchema-instance"
    xsi:schemaLocation="http://www.springframework.org/schema/beans
        http://www.springframework.org/schema/beans/spring-beans.xsd">

    <bean id="accountDao"
        class="org.springframework.samples.jpetstore.dao.jpa.JpaAccountDao">
        <!-- additional collaborators and configuration for this bean go here -->
    </bean>

    <bean id="itemDao" class="org.springframework.samples.jpetstore.dao.jpa.JpaItemDao">
        <!-- additional collaborators and configuration for this bean go here -->
    </bean>

    <!-- more bean definitions for data access objects go here -->

</beans>
In the preceding example, the service layer consists of the class PetStoreServiceImpl,
and two data access objects of the type JpaAccountDao and JpaItemDao (based
on the JPA Object/Relational mapping standard). The property name element refers to the
name of the JavaBean property, and the ref element refers to the name of another bean
definition. This linkage between id and ref elements expresses the dependency between
collaborating objects. For details of configuring an object’s dependencies, see
Dependencies.
Composing XML-based configuration metadata
It can be useful to have bean definitions span multiple XML files. Often each individual XML configuration file represents a logical layer or module in your architecture.
You can use the application context constructor to load bean definitions from all these
XML fragments. This constructor takes multiple Resource locations, as was shown in the
previous section. Alternatively, use one or more occurrences of the <import/> element
to load bean definitions from another file or files. For example:
<beans>
    <import resource="services.xml"/>
    <import resource="resources/messageSource.xml"/>
    <import resource="/resources/themeSource.xml"/>

    <bean id="bean1" class="..."/>
    <bean id="bean2" class="..."/>
</beans>
In the preceding example, external bean definitions are loaded from three files:
services.xml, messageSource.xml, and themeSource.xml. All location paths are
relative to the definition file doing the importing, so services.xml must be in the
same directory or classpath location as the file doing the importing, while
messageSource.xml and themeSource.xml must be in a resources location below the
location of the importing file. As you can see, a leading slash is ignored, but given
that these paths are relative, it is better form not to use the slash at all. The
contents of the files being imported, including the top level <beans/> element, must
be valid XML bean definitions according to the Spring Schema.
|
It is possible, but not recommended, to reference files in parent directories using a relative "../" path. Doing so creates a dependency on a file that is outside the current application. In particular, this reference is not recommended for "classpath:" URLs (for example, "classpath:../services.xml"), where the runtime resolution process chooses the "nearest" classpath root and then looks into its parent directory. Classpath configuration changes may lead to the choice of a different, incorrect directory. You can always use fully qualified resource locations instead of relative paths: for example, "file:C:/config/services.xml" or "classpath:/config/services.xml". However, be aware that you are coupling your application’s configuration to specific absolute locations. It is generally preferable to keep an indirection for such absolute locations, for example, through "${…}" placeholders that are resolved against JVM system properties at runtime. |
The import directive is a feature provided by the beans namespace itself. Further configuration features beyond plain bean definitions are available in a selection of XML namespaces provided by Spring, e.g. the "context" and the "util" namespace.
The Groovy Bean Definition DSL
As a further example for externalized configuration metadata, bean definitions can also be expressed in Spring’s Groovy Bean Definition DSL, as known from the Grails framework. Typically, such configuration will live in a ".groovy" file with a structure as follows:
beans {
    dataSource(BasicDataSource) {
        driverClassName = "org.hsqldb.jdbcDriver"
        url = "jdbc:hsqldb:mem:grailsDB"
        username = "sa"
        password = ""
        settings = [mynew:"setting"]
    }
    sessionFactory(SessionFactory) {
        dataSource = dataSource
    }
    myService(MyService) {
        nestedBean = { AnotherBean bean ->
            dataSource = dataSource
        }
    }
}
This configuration style is largely equivalent to XML bean definitions and even supports Spring’s XML configuration namespaces. It also allows for importing XML bean definition files through an "importBeans" directive.
1.2.3. Using the container
The ApplicationContext is the interface for an advanced factory capable of maintaining
a registry of different beans and their dependencies. Using the method T getBean(String
name, Class<T> requiredType) you can retrieve instances of your beans.
The ApplicationContext enables you to read bean definitions and access them as follows:
// create and configure beans
ApplicationContext context = new ClassPathXmlApplicationContext("services.xml", "daos.xml");

// retrieve configured instance
PetStoreService service = context.getBean("petStore", PetStoreService.class);

// use configured instance
List<String> userList = service.getUsernameList();
With Groovy configuration, bootstrapping looks very similar, just a different context implementation class which is Groovy-aware (but also understands XML bean definitions):
ApplicationContext context = new GenericGroovyApplicationContext("services.groovy", "daos.groovy");The most flexible variant is GenericApplicationContext in combination with reader
delegates, e.g. with XmlBeanDefinitionReader for XML files:
GenericApplicationContext context = new GenericApplicationContext();
new XmlBeanDefinitionReader(context).loadBeanDefinitions("services.xml", "daos.xml");
context.refresh();
Or with GroovyBeanDefinitionReader for Groovy files:
GenericApplicationContext context = new GenericApplicationContext();
new GroovyBeanDefinitionReader(context).loadBeanDefinitions("services.groovy", "daos.groovy");
context.refresh();
Such reader delegates can be mixed and matched on the same ApplicationContext,
reading bean definitions from diverse configuration sources, if desired.
You can then use getBean to retrieve instances of your beans. The ApplicationContext
interface has a few other methods for retrieving beans, but ideally your application
code should never use them. Indeed, your application code should have no calls to the
getBean() method at all, and thus no dependency on Spring APIs at all. For example,
Spring’s integration with web frameworks provides dependency injection for various web
framework components such as controllers and JSF-managed beans, allowing you to declare
a dependency on a specific bean through metadata (e.g. an autowiring annotation).
1.3. Bean overview
A Spring IoC container manages one or more beans. These beans are created with the
configuration metadata that you supply to the container, for example, in the form of XML
<bean/> definitions.
Within the container itself, these bean definitions are represented as BeanDefinition
objects, which contain (among other information) the following metadata:
-
A package-qualified class name: typically the actual implementation class of the bean being defined.
-
Bean behavioral configuration elements, which state how the bean should behave in the container (scope, lifecycle callbacks, and so forth).
-
References to other beans that are needed for the bean to do its work; these references are also called collaborators or dependencies.
-
Other configuration settings to set in the newly created object, for example, the number of connections to use in a bean that manages a connection pool, or the size limit of the pool.
This metadata translates to a set of properties that make up each bean definition.
| Property | Explained in… |
|---|---|
class |
|
name |
|
scope |
|
constructor arguments |
|
properties |
|
autowiring mode |
|
lazy-initialization mode |
|
initialization method |
|
destruction method |
In addition to bean definitions that contain information on how to create a specific
bean, the ApplicationContext implementations also permit the registration of existing
objects that are created outside the container, by users. This is done by accessing the
ApplicationContext’s BeanFactory via the method getBeanFactory() which returns the
BeanFactory implementation DefaultListableBeanFactory. DefaultListableBeanFactory
supports this registration through the methods registerSingleton(..) and
registerBeanDefinition(..). However, typical applications work solely with beans
defined through metadata bean definitions.
|
Bean metadata and manually supplied singleton instances need to be registered as early as possible, in order for the container to properly reason about them during autowiring and other introspection steps. While overriding of existing metadata and existing singleton instances is supported to some degree, the registration of new beans at runtime (concurrently with live access to factory) is not officially supported and may lead to concurrent access exceptions and/or inconsistent state in the bean container. |
1.3.1. Naming beans
Every bean has one or more identifiers. These identifiers must be unique within the container that hosts the bean. A bean usually has only one identifier, but if it requires more than one, the extra ones can be considered aliases.
In XML-based configuration metadata, you use the id and/or name attributes
to specify the bean identifier(s). The id attribute allows you to specify
exactly one id. Conventionally these names are alphanumeric ('myBean',
'fooService', etc.), but may contain special characters as well. If you want to
introduce other aliases to the bean, you can also specify them in the name
attribute, separated by a comma (,), semicolon (;), or white space. As a
historical note, in versions prior to Spring 3.1, the id attribute was
defined as an xsd:ID type, which constrained possible characters. As of 3.1,
it is defined as an xsd:string type. Note that bean id uniqueness is still
enforced by the container, though no longer by XML parsers.
You are not required to supply a name or id for a bean. If no name or id is supplied
explicitly, the container generates a unique name for that bean. However, if you want to
refer to that bean by name, through the use of the ref element or
Service Locator style lookup, you must provide a name.
Motivations for not supplying a name are related to using inner
beans and autowiring collaborators.
|
With component scanning in the classpath, Spring generates bean names for unnamed
components, following the rules above: essentially, taking the simple class name
and turning its initial character to lower-case. However, in the (unusual) special
case when there is more than one character and both the first and second characters
are upper case, the original casing gets preserved. These are the same rules as
defined by |
Aliasing a bean outside the bean definition
In a bean definition itself, you can supply more than one name for the bean, by using a
combination of up to one name specified by the id attribute, and any number of other
names in the name attribute. These names can be equivalent aliases to the same bean,
and are useful for some situations, such as allowing each component in an application to
refer to a common dependency by using a bean name that is specific to that component
itself.
Specifying all aliases where the bean is actually defined is not always adequate,
however. It is sometimes desirable to introduce an alias for a bean that is defined
elsewhere. This is commonly the case in large systems where configuration is split
amongst each subsystem, each subsystem having its own set of object definitions. In
XML-based configuration metadata, you can use the <alias/> element to accomplish this.
<alias name="fromName" alias="toName"/>In this case, a bean in the same container which is named fromName, may also,
after the use of this alias definition, be referred to as toName.
For example, the configuration metadata for subsystem A may refer to a DataSource via
the name subsystemA-dataSource. The configuration metadata for subsystem B may refer to
a DataSource via the name subsystemB-dataSource. When composing the main application
that uses both these subsystems the main application refers to the DataSource via the
name myApp-dataSource. To have all three names refer to the same object you add to the
MyApp configuration metadata the following aliases definitions:
<alias name="subsystemA-dataSource" alias="subsystemB-dataSource"/>
<alias name="subsystemA-dataSource" alias="myApp-dataSource" />
Now each component and the main application can refer to the dataSource through a name that is unique and guaranteed not to clash with any other definition (effectively creating a namespace), yet they refer to the same bean.
1.3.2. Instantiating beans
A bean definition essentially is a recipe for creating one or more objects. The container looks at the recipe for a named bean when asked, and uses the configuration metadata encapsulated by that bean definition to create (or acquire) an actual object.
If you use XML-based configuration metadata, you specify the type (or class) of object
that is to be instantiated in the class attribute of the <bean/> element. This
class attribute, which internally is a Class property on a BeanDefinition
instance, is usually mandatory. (For exceptions, see
Instantiation using an instance factory method and Bean definition inheritance.)
You use the Class property in one of two ways:
-
Typically, to specify the bean class to be constructed in the case where the container itself directly creates the bean by calling its constructor reflectively, somewhat equivalent to Java code using the
newoperator. -
To specify the actual class containing the
staticfactory method that will be invoked to create the object, in the less common case where the container invokes astaticfactory method on a class to create the bean. The object type returned from the invocation of thestaticfactory method may be the same class or another class entirely.
Instantiation with a constructor
When you create a bean by the constructor approach, all normal classes are usable by and compatible with Spring. That is, the class being developed does not need to implement any specific interfaces or to be coded in a specific fashion. Simply specifying the bean class should suffice. However, depending on what type of IoC you use for that specific bean, you may need a default (empty) constructor.
The Spring IoC container can manage virtually any class you want it to manage; it is not limited to managing true JavaBeans. Most Spring users prefer actual JavaBeans with only a default (no-argument) constructor and appropriate setters and getters modeled after the properties in the container. You can also have more exotic non-bean-style classes in your container. If, for example, you need to use a legacy connection pool that absolutely does not adhere to the JavaBean specification, Spring can manage it as well.
With XML-based configuration metadata you can specify your bean class as follows:
<bean id="exampleBean" class="examples.ExampleBean"/>

<bean name="anotherExample" class="examples.ExampleBeanTwo"/>
For details about the mechanism for supplying arguments to the constructor (if required) and setting object instance properties after the object is constructed, see Injecting Dependencies.
Instantiation with a static factory method
When defining a bean that you create with a static factory method, you use the class
attribute to specify the class containing the static factory method and an attribute
named factory-method to specify the name of the factory method itself. You should be
able to call this method (with optional arguments as described later) and return a live
object, which subsequently is treated as if it had been created through a constructor.
One use for such a bean definition is to call static factories in legacy code.
The following bean definition specifies that the bean will be created by calling a
factory-method. The definition does not specify the type (class) of the returned object,
only the class containing the factory method. In this example, the createInstance()
method must be a static method.
<bean id="clientService"
    class="examples.ClientService"
    factory-method="createInstance"/>
public class ClientService {
private static ClientService clientService = new ClientService();
private ClientService() {}
public static ClientService createInstance() {
return clientService;
}
}For details about the mechanism for supplying (optional) arguments to the factory method and setting object instance properties after the object is returned from the factory, see Dependencies and configuration in detail.
Instantiation using an instance factory method
Similar to instantiation through a static
factory method, instantiation with an instance factory method invokes a non-static
method of an existing bean from the container to create a new bean. To use this
mechanism, leave the class attribute empty, and in the factory-bean attribute,
specify the name of a bean in the current (or parent/ancestor) container that contains
the instance method that is to be invoked to create the object. Set the name of the
factory method itself with the factory-method attribute.
<!-- the factory bean, which contains a method called createInstance() -->
<bean id="serviceLocator" class="examples.DefaultServiceLocator">
    <!-- inject any dependencies required by this locator bean -->
</bean>

<!-- the bean to be created via the factory bean -->
<bean id="clientService"
    factory-bean="serviceLocator"
    factory-method="createClientServiceInstance"/>
public class DefaultServiceLocator {
private static ClientService clientService = new ClientServiceImpl();
public ClientService createClientServiceInstance() {
return clientService;
}
}One factory class can also hold more than one factory method as shown here:
<bean id="serviceLocator" class="examples.DefaultServiceLocator">
    <!-- inject any dependencies required by this locator bean -->
</bean>

<bean id="clientService"
    factory-bean="serviceLocator"
    factory-method="createClientServiceInstance"/>

<bean id="accountService"
    factory-bean="serviceLocator"
    factory-method="createAccountServiceInstance"/>
public class DefaultServiceLocator {
private static ClientService clientService = new ClientServiceImpl();
private static AccountService accountService = new AccountServiceImpl();
public ClientService createClientServiceInstance() {
return clientService;
}
public AccountService createAccountServiceInstance() {
return accountService;
}
}This approach shows that the factory bean itself can be managed and configured through dependency injection (DI). See Dependencies and configuration in detail.
|
In Spring documentation, factory bean refers to a bean that is configured in the
Spring container that will create objects through an
instance or
static factory method. By contrast,
|
1.4. Dependencies
A typical enterprise application does not consist of a single object (or bean in the Spring parlance). Even the simplest application has a few objects that work together to present what the end-user sees as a coherent application. This next section explains how you go from defining a number of bean definitions that stand alone to a fully realized application where objects collaborate to achieve a goal.
1.4.1. Dependency Injection
Dependency injection (DI) is a process whereby objects define their dependencies, that is, the other objects they work with, only through constructor arguments, arguments to a factory method, or properties that are set on the object instance after it is constructed or returned from a factory method. The container then injects those dependencies when it creates the bean. This process is fundamentally the inverse, hence the name Inversion of Control (IoC), of the bean itself controlling the instantiation or location of its dependencies on its own by using direct construction of classes, or the Service Locator pattern.
Code is cleaner with the DI principle and decoupling is more effective when objects are provided with their dependencies. The object does not look up its dependencies, and does not know the location or class of the dependencies. As such, your classes become easier to test, in particular when the dependencies are on interfaces or abstract base classes, which allow for stub or mock implementations to be used in unit tests.
DI exists in two major variants, Constructor-based dependency injection and Setter-based dependency injection.
Constructor-based dependency injection
Constructor-based DI is accomplished by the container invoking a constructor with a
number of arguments, each representing a dependency. Calling a static factory method
with specific arguments to construct the bean is nearly equivalent, and this discussion
treats arguments to a constructor and to a static factory method similarly. The
following example shows a class that can only be dependency-injected with constructor
injection. Notice that there is nothing special about this class, it is a POJO that
has no dependencies on container specific interfaces, base classes or annotations.
public class SimpleMovieLister {

    // the SimpleMovieLister has a dependency on a MovieFinder
    private MovieFinder movieFinder;

    // a constructor so that the Spring container can inject a MovieFinder
    public SimpleMovieLister(MovieFinder movieFinder) {
        this.movieFinder = movieFinder;
    }

    // business logic that actually uses the injected MovieFinder is omitted...
}
Constructor argument resolution
Constructor argument resolution matching occurs using the argument’s type. If no potential ambiguity exists in the constructor arguments of a bean definition, then the order in which the constructor arguments are defined in a bean definition is the order in which those arguments are supplied to the appropriate constructor when the bean is being instantiated. Consider the following class:
package x.y;

public class Foo {

    public Foo(Bar bar, Baz baz) {
        // ...
    }
}
No potential ambiguity exists, assuming that Bar and Baz classes are not related by
inheritance. Thus the following configuration works fine, and you do not need to specify
the constructor argument indexes and/or types explicitly in the <constructor-arg/>
element.
<beans>
    <bean id="foo" class="x.y.Foo">
        <constructor-arg ref="bar"/>
        <constructor-arg ref="baz"/>
    </bean>

    <bean id="bar" class="x.y.Bar"/>

    <bean id="baz" class="x.y.Baz"/>
</beans>
When another bean is referenced, the type is known, and matching can occur (as was the
case with the preceding example). When a simple type is used, such as
<value>true</value>, Spring cannot determine the type of the value, and so cannot match
by type without help. Consider the following class:
package examples;

public class ExampleBean {

    // Number of years to calculate the Ultimate Answer
    private int years;

    // The Answer to Life, the Universe, and Everything
    private String ultimateAnswer;

    public ExampleBean(int years, String ultimateAnswer) {
        this.years = years;
        this.ultimateAnswer = ultimateAnswer;
    }
}In the preceding scenario, the container can use type matching with simple types if
you explicitly specify the type of the constructor argument using the type attribute.
For example:
<bean id="exampleBean" class="examples.ExampleBean">
    <constructor-arg type="int" value="7500000"/>
    <constructor-arg type="java.lang.String" value="42"/>
</bean>Use the index attribute to specify explicitly the index of constructor arguments. For
example:
<bean id="exampleBean" class="examples.ExampleBean">
    <constructor-arg index="0" value="7500000"/>
    <constructor-arg index="1" value="42"/>
</bean>
In addition to resolving the ambiguity of multiple simple values, specifying an index resolves ambiguity where a constructor has two arguments of the same type. Note that the index is 0 based.
You can also use the constructor parameter name for value disambiguation:
<bean id="exampleBean" class="examples.ExampleBean">
    <constructor-arg name="years" value="7500000"/>
    <constructor-arg name="ultimateAnswer" value="42"/>
</bean>
Keep in mind that to make this work out of the box your code must be compiled with the debug flag enabled so that Spring can look up the parameter name from the constructor. If you can’t compile your code with debug flag (or don’t want to) you can use @ConstructorProperties JDK annotation to explicitly name your constructor arguments. The sample class would then have to look as follows:
package examples;

public class ExampleBean {

    // Fields omitted

    @ConstructorProperties({"years", "ultimateAnswer"})
    public ExampleBean(int years, String ultimateAnswer) {
        this.years = years;
        this.ultimateAnswer = ultimateAnswer;
    }
}
Setter-based dependency injection
Setter-based DI is accomplished by the container calling setter methods on your
beans after invoking a no-argument constructor or no-argument static factory method to
instantiate your bean.
The following example shows a class that can only be dependency-injected using pure setter injection. This class is conventional Java. It is a POJO that has no dependencies on container specific interfaces, base classes or annotations.
public class SimpleMovieLister {

    // the SimpleMovieLister has a dependency on the MovieFinder
    private MovieFinder movieFinder;

    // a setter method so that the Spring container can inject a MovieFinder
    public void setMovieFinder(MovieFinder movieFinder) {
        this.movieFinder = movieFinder;
    }

    // business logic that actually uses the injected MovieFinder is omitted...
}
The ApplicationContext supports constructor-based and setter-based DI for the beans it
manages. It also supports setter-based DI after some dependencies have already been
injected through the constructor approach. You configure the dependencies in the form of
a BeanDefinition, which you use in conjunction with PropertyEditor instances to
convert properties from one format to another. However, most Spring users do not work
with these classes directly (i.e., programmatically) but rather with XML bean
definitions, annotated components (i.e., classes annotated with @Component,
@Controller, etc.), or @Bean methods in Java-based @Configuration classes. These
sources are then converted internally into instances of BeanDefinition and used to
load an entire Spring IoC container instance.
Dependency resolution process
The container performs bean dependency resolution as follows:
-
The
ApplicationContextis created and initialized with configuration metadata that describes all the beans. Configuration metadata can be specified via XML, Java code, or annotations. -
For each bean, its dependencies are expressed in the form of properties, constructor arguments, or arguments to the static-factory method if you are using that instead of a normal constructor. These dependencies are provided to the bean, when the bean is actually created.
-
Each property or constructor argument is an actual definition of the value to set, or a reference to another bean in the container.
-
Each property or constructor argument which is a value is converted from its specified format to the actual type of that property or constructor argument. By default Spring can convert a value supplied in string format to all built-in types, such as
int,long,String,boolean, etc.
The Spring container validates the configuration of each bean as the container is created. However, the bean properties themselves are not set until the bean is actually created. Beans that are singleton-scoped and set to be pre-instantiated (the default) are created when the container is created. Scopes are defined in Bean scopes. Otherwise, the bean is created only when it is requested. Creation of a bean potentially causes a graph of beans to be created, as the bean’s dependencies and its dependencies' dependencies (and so on) are created and assigned. Note that resolution mismatches among those dependencies may show up late, i.e. on first creation of the affected bean.
You can generally trust Spring to do the right thing. It detects configuration problems,
such as references to non-existent beans and circular dependencies, at container
load-time. Spring sets properties and resolves dependencies as late as possible, when
the bean is actually created. This means that a Spring container which has loaded
correctly can later generate an exception when you request an object if there is a
problem creating that object or one of its dependencies. For example, the bean throws an
exception as a result of a missing or invalid property. This potentially delayed
visibility of some configuration issues is why ApplicationContext implementations by
default pre-instantiate singleton beans. At the cost of some upfront time and memory to
create these beans before they are actually needed, you discover configuration issues
when the ApplicationContext is created, not later. You can still override this default
behavior so that singleton beans will lazy-initialize, rather than be pre-instantiated.
If no circular dependencies exist, when one or more collaborating beans are being injected into a dependent bean, each collaborating bean is totally configured prior to being injected into the dependent bean. This means that if bean A has a dependency on bean B, the Spring IoC container completely configures bean B prior to invoking the setter method on bean A. In other words, the bean is instantiated (if not a pre-instantiated singleton), its dependencies are set, and the relevant lifecycle methods (such as a configured init method or the InitializingBean callback method) are invoked.
Examples of dependency injection
The following example uses XML-based configuration metadata for setter-based DI. A small part of a Spring XML configuration file specifies some bean definitions:
<bean id="exampleBean" class="examples.ExampleBean">
    <!-- setter injection using the nested ref element -->
    <property name="beanOne">
        <ref bean="anotherExampleBean"/>
    </property>

    <!-- setter injection using the neater ref attribute -->
    <property name="beanTwo" ref="yetAnotherBean"/>
    <property name="integerProperty" value="1"/>
</bean>

<bean id="anotherExampleBean" class="examples.AnotherBean"/>
<bean id="yetAnotherBean" class="examples.YetAnotherBean"/>
public class ExampleBean {
private AnotherBean beanOne;
private YetAnotherBean beanTwo;
private int i;
public void setBeanOne(AnotherBean beanOne) {
this.beanOne = beanOne;
}
public void setBeanTwo(YetAnotherBean beanTwo) {
this.beanTwo = beanTwo;
}
public void setIntegerProperty(int i) {
this.i = i;
}
}In the preceding example, setters are declared to match against the properties specified in the XML file. The following example uses constructor-based DI:
<bean id="exampleBean" class="examples.ExampleBean">
    <!-- constructor injection using the nested ref element -->
    <constructor-arg>
        <ref bean="anotherExampleBean"/>
    </constructor-arg>

    <!-- constructor injection using the neater ref attribute -->
    <constructor-arg ref="yetAnotherBean"/>

    <constructor-arg type="int" value="1"/>
</bean>

<bean id="anotherExampleBean" class="examples.AnotherBean"/>
<bean id="yetAnotherBean" class="examples.YetAnotherBean"/>
public class ExampleBean {
private AnotherBean beanOne;
private YetAnotherBean beanTwo;
private int i;
public ExampleBean(
AnotherBean anotherBean, YetAnotherBean yetAnotherBean, int i) {
this.beanOne = anotherBean;
this.beanTwo = yetAnotherBean;
this.i = i;
}
}The constructor arguments specified in the bean definition will be used as arguments to
the constructor of the ExampleBean.
Now consider a variant of this example, where instead of using a constructor, Spring is
told to call a static factory method to return an instance of the object:
<bean id="exampleBean" class="examples.ExampleBean" factory-method="createInstance">
    <constructor-arg ref="anotherExampleBean"/>
    <constructor-arg ref="yetAnotherBean"/>
    <constructor-arg value="1"/>
</bean>

<bean id="anotherExampleBean" class="examples.AnotherBean"/>
<bean id="yetAnotherBean" class="examples.YetAnotherBean"/>
public class ExampleBean {
// a private constructor
private ExampleBean(...) {
...
}
// a static factory method; the arguments to this method can be
// considered the dependencies of the bean that is returned,
// regardless of how those arguments are actually used.
public static ExampleBean createInstance (
AnotherBean anotherBean, YetAnotherBean yetAnotherBean, int i) {
ExampleBean eb = new ExampleBean (...);
// some other operations...
return eb;
}
}Arguments to the static factory method are supplied via <constructor-arg/> elements,
exactly the same as if a constructor had actually been used. The type of the class being
returned by the factory method does not have to be of the same type as the class that
contains the static factory method, although in this example it is. An instance
(non-static) factory method would be used in an essentially identical fashion (aside
from the use of the factory-bean attribute instead of the class attribute), so
details will not be discussed here.
1.4.2. Dependencies and configuration in detail
As mentioned in the previous section, you can define bean properties and constructor
arguments as references to other managed beans (collaborators), or as values defined
inline. Spring’s XML-based configuration metadata supports sub-element types within its
<property/> and <constructor-arg/> elements for this purpose.
Straight values (primitives, Strings, and so on)
The value attribute of the <property/> element specifies a property or constructor
argument as a human-readable string representation. Spring’s
conversion service is used to convert these
values from a String to the actual type of the property or argument.
<bean id="myDataSource" class="org.apache.commons.dbcp.BasicDataSource" destroy-method="close">
    <!-- results in a setDriverClassName(String) call -->
    <property name="driverClassName" value="com.mysql.jdbc.Driver"/>
    <property name="url" value="jdbc:mysql://localhost:3306/mydb"/>
    <property name="username" value="root"/>
    <property name="password" value="masterkaoli"/>
</bean>
The following example uses the p-namespace for even more succinct XML configuration.
<beans xmlns="http://www.springframework.org/schema/beans"
    xmlns:xsi="http://www.w3.org/2001/XMLSchema-instance"
    xmlns:p="http://www.springframework.org/schema/p"
    xsi:schemaLocation="http://www.springframework.org/schema/beans
    http://www.springframework.org/schema/beans/spring-beans.xsd">

    <bean id="myDataSource" class="org.apache.commons.dbcp.BasicDataSource"
        destroy-method="close"
        p:driverClassName="com.mysql.jdbc.Driver"
        p:url="jdbc:mysql://localhost:3306/mydb"
        p:username="root"
        p:password="masterkaoli"/>

</beans>
The preceding XML is more succinct; however, typos are discovered at runtime rather than design time, unless you use an IDE such as IntelliJ IDEA or the Spring Tool Suite (STS) that support automatic property completion when you create bean definitions. Such IDE assistance is highly recommended.
You can also configure a java.util.Properties instance as:
<bean id="mappings"
    class="org.springframework.beans.factory.config.PropertyPlaceholderConfigurer">

    <!-- typed as a java.util.Properties -->
    <property name="properties">
        <value>
            jdbc.driver.className=com.mysql.jdbc.Driver
            jdbc.url=jdbc:mysql://localhost:3306/mydb
        </value>
    </property>
</bean>
The Spring container converts the text inside the <value/> element into a
java.util.Properties instance by using the JavaBeans PropertyEditor mechanism. This
is a nice shortcut, and is one of a few places where the Spring team do favor the use of
the nested <value/> element over the value attribute style.
The idref element
The idref element is simply an error-proof way to pass the id (string value - not
a reference) of another bean in the container to a <constructor-arg/> or <property/>
element.
<bean id="theTargetBean" class="..."/>

<bean id="theClientBean" class="...">
    <property name="targetName">
        <idref bean="theTargetBean"/>
    </property>
</bean>
The above bean definition snippet is exactly equivalent (at runtime) to the following snippet:
<bean id="theTargetBean" class="..." />

<bean id="client" class="...">
    <property name="targetName" value="theTargetBean"/>
</bean>
The first form is preferable to the second, because using the idref tag allows the
container to validate at deployment time that the referenced, named bean actually
exists. In the second variation, no validation is performed on the value that is passed
to the targetName property of the client bean. Typos are only discovered (with most
likely fatal results) when the client bean is actually instantiated. If the client
bean is a prototype bean, this typo and the resulting exception
may only be discovered long after the container is deployed.
|
The |
A common place (at least in versions earlier than Spring 2.0) where the <idref/> element
brings value is in the configuration of AOP interceptors in a
ProxyFactoryBean bean definition. Using <idref/> elements when you specify the
interceptor names prevents you from misspelling an interceptor id.
References to other beans (collaborators)
The ref element is the final element inside a <constructor-arg/> or <property/>
definition element. Here you set the value of the specified property of a bean to be a
reference to another bean (a collaborator) managed by the container. The referenced bean
is a dependency of the bean whose property will be set, and it is initialized on demand
as needed before the property is set. (If the collaborator is a singleton bean, it may
be initialized already by the container.) All references are ultimately a reference to
another object. Scoping and validation depend on whether you specify the id/name of the
other object through the bean, local, or parent attributes.
Specifying the target bean through the bean attribute of the <ref/> tag is the most
general form, and allows creation of a reference to any bean in the same container or
parent container, regardless of whether it is in the same XML file. The value of the
bean attribute may be the same as the id attribute of the target bean, or as one of
the values in the name attribute of the target bean.
<ref bean="someBean"/>Specifying the target bean through the parent attribute creates a reference to a bean
that is in a parent container of the current container. The value of the parent
attribute may be the same as either the id attribute of the target bean, or one of the
values in the name attribute of the target bean, and the target bean must be in a
parent container of the current one. You use this bean reference variant mainly when you
have a hierarchy of containers and you want to wrap an existing bean in a parent
container with a proxy that will have the same name as the parent bean.
<!-- in the parent context -->
<bean id="accountService" class="com.foo.SimpleAccountService">
    <!-- insert dependencies as required as here -->
</bean>
<!-- in the child (descendant) context -->
<bean id="accountService" <!-- bean name is the same as the parent bean -->
class="org.springframework.aop.framework.ProxyFactoryBean">
<property name="target">
<ref parent="accountService"/> <!-- notice how we refer to the parent bean -->
</property>
<!-- insert other configuration and dependencies as required here -->
</bean>|
The |
Inner beans
A <bean/> element inside the <property/> or <constructor-arg/> elements defines a
so-called inner bean.
<bean id="outer" class="...">
    <!-- instead of using a reference to a target bean, simply define the target bean inline -->
    <property name="target">
        <bean class="com.example.Person"> <!-- this is the inner bean -->
            <property name="name" value="Fiona Apple"/>
            <property name="age" value="25"/>
        </bean>
    </property>
</bean>
An inner bean definition does not require a defined id or name; if specified, the container
does not use such a value as an identifier. The container also ignores the scope flag on
creation: Inner beans are always anonymous and they are always created with the outer
bean. It is not possible to inject inner beans into collaborating beans other than into
the enclosing bean or to access them independently.
As a corner case, it is possible to receive destruction callbacks from a custom scope, e.g. for a request-scoped inner bean contained within a singleton bean: The creation of the inner bean instance will be tied to its containing bean, but destruction callbacks allow it to participate in the request scope’s lifecycle. This is not a common scenario; inner beans typically simply share their containing bean’s scope.
Collections
In the <list/>, <set/>, <map/>, and <props/> elements, you set the properties
and arguments of the Java Collection types List, Set, Map, and Properties,
respectively.
<bean id="moreComplexObject" class="example.ComplexObject">
    <!-- results in a setAdminEmails(java.util.Properties) call -->
    <property name="adminEmails">
        <props>
            <prop key="administrator">[email protected]</prop>
            <prop key="support">[email protected]</prop>
            <prop key="development">[email protected]</prop>
        </props>
    </property>
    <!-- results in a setSomeList(java.util.List) call -->
    <property name="someList">
        <list>
            <value>a list element followed by a reference</value>
            <ref bean="myDataSource" />
        </list>
    </property>
    <!-- results in a setSomeMap(java.util.Map) call -->
    <property name="someMap">
        <map>
            <entry key="an entry" value="just some string"/>
            <entry key ="a ref" value-ref="myDataSource"/>
        </map>
    </property>
    <!-- results in a setSomeSet(java.util.Set) call -->
    <property name="someSet">
        <set>
            <value>just some string</value>
            <ref bean="myDataSource" />
        </set>
    </property>
</bean>
The value of a map key or value, or a set value, can also again be any of the following elements:
bean | ref | idref | list | set | map | props | value | nullCollection merging
The Spring container also supports the merging of collections. An application
developer can define a parent-style <list/>, <map/>, <set/> or <props/> element,
and have child-style <list/>, <map/>, <set/> or <props/> elements inherit and
override values from the parent collection. That is, the child collection’s values are
the result of merging the elements of the parent and child collections, with the child’s
collection elements overriding values specified in the parent collection.
This section on merging discusses the parent-child bean mechanism. Readers unfamiliar with parent and child bean definitions may wish to read the relevant section before continuing.
The following example demonstrates collection merging:
<beans>
    <bean id="parent" abstract="true" class="example.ComplexObject">
        <property name="adminEmails">
            <props>
                <prop key="administrator">[email protected]</prop>
                <prop key="support">[email protected]</prop>
            </props>
        </property>
    </bean>
    <bean id="child" parent="parent">
        <property name="adminEmails">
            <!-- the merge is specified on the child collection definition -->
            <props merge="true">
                <prop key="sales">[email protected]</prop>
                <prop key="support">[email protected]</prop>
            </props>
        </property>
    </bean>
<beans>
Notice the use of the merge=true attribute on the <props/> element of the
adminEmails property of the child bean definition. When the child bean is resolved
and instantiated by the container, the resulting instance has an adminEmails
Properties collection that contains the result of the merging of the child’s
adminEmails collection with the parent’s adminEmails collection.
The child Properties collection’s value set inherits all property elements from the
parent <props/>, and the child’s value for the support value overrides the value in
the parent collection.
This merging behavior applies similarly to the <list/>, <map/>, and <set/>
collection types. In the specific case of the <list/> element, the semantics
associated with the List collection type, that is, the notion of an ordered
collection of values, is maintained; the parent’s values precede all of the child list’s
values. In the case of the Map, Set, and Properties collection types, no ordering
exists. Hence no ordering semantics are in effect for the collection types that underlie
the associated Map, Set, and Properties implementation types that the container
uses internally.
Limitations of collection merging
You cannot merge different collection types (such as a Map and a List), and if you
do attempt to do so an appropriate Exception is thrown. The merge attribute must be
specified on the lower, inherited, child definition; specifying the merge attribute on
a parent collection definition is redundant and will not result in the desired merging.
Strongly-typed collection
With the introduction of generic types in Java 5, you can use strongly typed collections.
That is, it is possible to declare a Collection type such that it can only contain
String elements (for example). If you are using Spring to dependency-inject a
strongly-typed Collection into a bean, you can take advantage of Spring’s
type-conversion support such that the elements of your strongly-typed Collection
instances are converted to the appropriate type prior to being added to the Collection.
public class Foo {

    private Map<String, Float> accounts;

    public void setAccounts(Map<String, Float> accounts) {
        this.accounts = accounts;
    }
}
<beans>
<bean id="foo" class="x.y.Foo">
<property name="accounts">
<map>
<entry key="one" value="9.99"/>
<entry key="two" value="2.75"/>
<entry key="six" value="3.99"/>
</map>
</property>
</bean>
</beans>When the accounts property of the foo bean is prepared for injection, the generics
information about the element type of the strongly-typed Map<String, Float> is
available by reflection. Thus Spring’s type conversion infrastructure recognizes the
various value elements as being of type Float, and the string values 9.99, 2.75, and
3.99 are converted into an actual Float type.
Null and empty string values
Spring treats empty arguments for properties and the like as empty Strings. The
following XML-based configuration metadata snippet sets the email property to the empty
String value ("").
<bean class="ExampleBean">
    <property name="email" value=""/>
</bean>
The preceding example is equivalent to the following Java code:
exampleBean.setEmail("");The <null/> element handles null values. For example:
<bean class="ExampleBean">
    <property name="email">
        <null/>
    </property>
</bean>
The above configuration is equivalent to the following Java code:
exampleBean.setEmail(null);XML shortcut with the p-namespace
The p-namespace enables you to use the bean element’s attributes, instead of nested
<property/> elements, to describe your property values and/or collaborating beans.
Spring supports extensible configuration formats
with namespaces,
which are based on an XML Schema definition. The beans configuration format discussed in this
chapter is defined in an XML Schema document. However, the p-namespace is not defined in
an XSD file and exists only in the core of Spring.
The following example shows two XML snippets that resolve to the same result: The first uses standard XML format and the second uses the p-namespace.
<beans xmlns="http://www.springframework.org/schema/beans"
    xmlns:xsi="http://www.w3.org/2001/XMLSchema-instance"
    xmlns:p="http://www.springframework.org/schema/p"
    xsi:schemaLocation="http://www.springframework.org/schema/beans
        http://www.springframework.org/schema/beans/spring-beans.xsd">

    <bean name="classic" class="com.example.ExampleBean">
        <property name="email" value="[email protected]"/>
    </bean>

    <bean name="p-namespace" class="com.example.ExampleBean"
        p:email="[email protected]"/>
</beans>
The example shows an attribute in the p-namespace called email in the bean definition. This tells Spring to include a property declaration. As previously mentioned, the p-namespace does not have a schema definition, so you can set the name of the attribute to the property name.
This next example includes two more bean definitions that both have a reference to another bean:
<beans xmlns="http://www.springframework.org/schema/beans"
    xmlns:xsi="http://www.w3.org/2001/XMLSchema-instance"
    xmlns:p="http://www.springframework.org/schema/p"
    xsi:schemaLocation="http://www.springframework.org/schema/beans
        http://www.springframework.org/schema/beans/spring-beans.xsd">

    <bean name="john-classic" class="com.example.Person">
        <property name="name" value="John Doe"/>
        <property name="spouse" ref="jane"/>
    </bean>

    <bean name="john-modern"
        class="com.example.Person"
        p:name="John Doe"
        p:spouse-ref="jane"/>

    <bean name="jane" class="com.example.Person">
        <property name="name" value="Jane Doe"/>
    </bean>
</beans>
As you can see, this example includes not only a property value using the p-namespace,
but also uses a special format to declare property references. Whereas the first bean
definition uses <property name="spouse" ref="jane"/> to create a reference from bean
john to bean jane, the second bean definition uses p:spouse-ref="jane" as an
attribute to do the exact same thing. In this case spouse is the property name,
whereas the -ref part indicates that this is not a straight value but rather a
reference to another bean.
|
The p-namespace is not as flexible as the standard XML format. For example, the format
for declaring property references clashes with properties that end in |
XML shortcut with the c-namespace
Similar to the XML shortcut with the p-namespace, the c-namespace, newly introduced in Spring
3.1, allows usage of inlined attributes for configuring the constructor arguments rather
then nested constructor-arg elements.
Let’s review the examples from Constructor-based dependency injection with the c: namespace:
<beans xmlns="http://www.springframework.org/schema/beans"
    xmlns:xsi="http://www.w3.org/2001/XMLSchema-instance"
    xmlns:c="http://www.springframework.org/schema/c"
    xsi:schemaLocation="http://www.springframework.org/schema/beans
        http://www.springframework.org/schema/beans/spring-beans.xsd">

    <bean id="bar" class="x.y.Bar"/>
    <bean id="baz" class="x.y.Baz"/>

    <!-- traditional declaration -->
    <bean id="foo" class="x.y.Foo">
        <constructor-arg ref="bar"/>
        <constructor-arg ref="baz"/>
        <constructor-arg value="[email protected]"/>
    </bean>

    <!-- c-namespace declaration -->
    <bean id="foo" class="x.y.Foo" c:bar-ref="bar" c:baz-ref="baz" c:email="[email protected]"/>

</beans>
The c: namespace uses the same conventions as the p: one (trailing -ref for bean
references) for setting the constructor arguments by their names. And just as well, it
needs to be declared even though it is not defined in an XSD schema (but it exists
inside the Spring core).
For the rare cases where the constructor argument names are not available (usually if the bytecode was compiled without debugging information), one can use fallback to the argument indexes:
<!-- c-namespace index declaration -->
<bean id="foo" class="x.y.Foo" c:_0-ref="bar" c:_1-ref="baz"/>|
Due to the XML grammar, the index notation requires the presence of the leading |
In practice, the constructor resolution mechanism is quite efficient in matching arguments so unless one really needs to, we recommend using the name notation through-out your configuration.
Compound property names
You can use compound or nested property names when you set bean properties, as long as
all components of the path except the final property name are not null. Consider the
following bean definition.
<bean id="foo" class="foo.Bar">
    <property name="fred.bob.sammy" value="123" />
</bean>
The foo bean has a fred property, which has a bob property, which has a sammy
property, and that final sammy property is being set to the value 123. In order for
this to work, the fred property of foo, and the bob property of fred must not be
null after the bean is constructed, or a NullPointerException is thrown.
1.4.3. Using depends-on
If a bean is a dependency of another that usually means that one bean is set as a
property of another. Typically you accomplish this with the <ref/>
element in XML-based configuration metadata. However, sometimes dependencies between
beans are less direct; for example, a static initializer in a class needs to be
triggered, such as database driver registration. The depends-on attribute can
explicitly force one or more beans to be initialized before the bean using this element
is initialized. The following example uses the depends-on attribute to express a
dependency on a single bean:
<bean id="beanOne" class="ExampleBean" depends-on="manager"/>
<bean id="manager" class="ManagerBean" />
To express a dependency on multiple beans, supply a list of bean names as the value of
the depends-on attribute, with commas, whitespace and semicolons, used as valid
delimiters:
<bean id="beanOne" class="ExampleBean" depends-on="manager,accountDao">
    <property name="manager" ref="manager" />
</bean>

<bean id="manager" class="ManagerBean" />
<bean id="accountDao" class="x.y.jdbc.JdbcAccountDao" />|
The |
1.4.4. Lazy-initialized beans
By default, ApplicationContext implementations eagerly create and configure all
singleton beans as part of the initialization
process. Generally, this pre-instantiation is desirable, because errors in the
configuration or surrounding environment are discovered immediately, as opposed to hours
or even days later. When this behavior is not desirable, you can prevent
pre-instantiation of a singleton bean by marking the bean definition as
lazy-initialized. A lazy-initialized bean tells the IoC container to create a bean
instance when it is first requested, rather than at startup.
In XML, this behavior is controlled by the lazy-init attribute on the <bean/>
element; for example:
<bean id="lazy" class="com.foo.ExpensiveToCreateBean" lazy-init="true"/>
<bean name="not.lazy" class="com.foo.AnotherBean"/>
When the preceding configuration is consumed by an ApplicationContext, the bean named
lazy is not eagerly pre-instantiated when the ApplicationContext is starting up,
whereas the not.lazy bean is eagerly pre-instantiated.
However, when a lazy-initialized bean is a dependency of a singleton bean that is
not lazy-initialized, the ApplicationContext creates the lazy-initialized bean at
startup, because it must satisfy the singleton’s dependencies. The lazy-initialized bean
is injected into a singleton bean elsewhere that is not lazy-initialized.
You can also control lazy-initialization at the container level by using the
default-lazy-init attribute on the <beans/> element; for example:
<beans default-lazy-init="true">
    <!-- no beans will be pre-instantiated... -->
</beans>
1.4.5. Autowiring collaborators
The Spring container can autowire relationships between collaborating beans. You can
allow Spring to resolve collaborators (other beans) automatically for your bean by
inspecting the contents of the ApplicationContext. Autowiring has the following
advantages:
-
Autowiring can significantly reduce the need to specify properties or constructor arguments. (Other mechanisms such as a bean template discussed elsewhere in this chapter are also valuable in this regard.)
-
Autowiring can update a configuration as your objects evolve. For example, if you need to add a dependency to a class, that dependency can be satisfied automatically without you needing to modify the configuration. Thus autowiring can be especially useful during development, without negating the option of switching to explicit wiring when the code base becomes more stable.
When using XML-based configuration metadata [2], you specify autowire
mode for a bean definition with the autowire attribute of the <bean/> element. The
autowiring functionality has four modes. You specify autowiring per bean and thus
can choose which ones to autowire.
| Mode | Explanation |
|---|---|
no |
(Default) No autowiring. Bean references must be defined via a |
byName |
Autowiring by property name. Spring looks for a bean with the same name as the
property that needs to be autowired. For example, if a bean definition is set to
autowire by name, and it contains a master property (that is, it has a
setMaster(..) method), Spring looks for a bean definition named |
byType |
Allows a property to be autowired if exactly one bean of the property type exists in the container. If more than one exists, a fatal exception is thrown, which indicates that you may not use byType autowiring for that bean. If there are no matching beans, nothing happens; the property is not set. |
constructor |
Analogous to byType, but applies to constructor arguments. If there is not exactly one bean of the constructor argument type in the container, a fatal error is raised. |
With byType or constructor autowiring mode, you can wire arrays and
typed-collections. In such cases all autowire candidates within the container that
match the expected type are provided to satisfy the dependency. You can autowire
strongly-typed Maps if the expected key type is String. An autowired Maps values will
consist of all bean instances that match the expected type, and the Maps keys will
contain the corresponding bean names.
You can combine autowire behavior with dependency checking, which is performed after autowiring completes.
Limitations and disadvantages of autowiring
Autowiring works best when it is used consistently across a project. If autowiring is not used in general, it might be confusing to developers to use it to wire only one or two bean definitions.
Consider the limitations and disadvantages of autowiring:
-
Explicit dependencies in
propertyandconstructor-argsettings always override autowiring. You cannot autowire so-called simple properties such as primitives,Strings, andClasses(and arrays of such simple properties). This limitation is by-design. -
Autowiring is less exact than explicit wiring. Although, as noted in the above table, Spring is careful to avoid guessing in case of ambiguity that might have unexpected results, the relationships between your Spring-managed objects are no longer documented explicitly.
-
Wiring information may not be available to tools that may generate documentation from a Spring container.
-
Multiple bean definitions within the container may match the type specified by the setter method or constructor argument to be autowired. For arrays, collections, or Maps, this is not necessarily a problem. However for dependencies that expect a single value, this ambiguity is not arbitrarily resolved. If no unique bean definition is available, an exception is thrown.
In the latter scenario, you have several options:
-
Abandon autowiring in favor of explicit wiring.
-
Avoid autowiring for a bean definition by setting its
autowire-candidateattributes tofalseas described in the next section. -
Designate a single bean definition as the primary candidate by setting the
primaryattribute of its<bean/>element totrue. -
Implement the more fine-grained control available with annotation-based configuration, as described in Annotation-based container configuration.
Excluding a bean from autowiring
On a per-bean basis, you can exclude a bean from autowiring. In Spring’s XML format, set
the autowire-candidate attribute of the <bean/> element to false; the container
makes that specific bean definition unavailable to the autowiring infrastructure
(including annotation style configurations such as @Autowired).
|
The |
You can also limit autowire candidates based on pattern-matching against bean names. The
top-level <beans/> element accepts one or more patterns within its
default-autowire-candidates attribute. For example, to limit autowire candidate status
to any bean whose name ends with Repository, provide a value of *Repository. To
provide multiple patterns, define them in a comma-separated list. An explicit value of
true or false for a bean definitions autowire-candidate attribute always takes
precedence, and for such beans, the pattern matching rules do not apply.
These techniques are useful for beans that you never want to be injected into other beans by autowiring. It does not mean that an excluded bean cannot itself be configured using autowiring. Rather, the bean itself is not a candidate for autowiring other beans.
1.4.6. Method injection
In most application scenarios, most beans in the container are singletons. When a singleton bean needs to collaborate with another singleton bean, or a non-singleton bean needs to collaborate with another non-singleton bean, you typically handle the dependency by defining one bean as a property of the other. A problem arises when the bean lifecycles are different. Suppose singleton bean A needs to use non-singleton (prototype) bean B, perhaps on each method invocation on A. The container only creates the singleton bean A once, and thus only gets one opportunity to set the properties. The container cannot provide bean A with a new instance of bean B every time one is needed.
A solution is to forego some inversion of control. You can make
bean A aware of the container by implementing the ApplicationContextAware interface,
and by making a getBean("B") call to the container ask for (a
typically new) bean B instance every time bean A needs it. The following is an example
of this approach:
// a class that uses a stateful Command-style class to perform some processing
package fiona.apple;

// Spring-API imports
import org.springframework.beans.BeansException;
import org.springframework.context.ApplicationContext;
import org.springframework.context.ApplicationContextAware;

public class CommandManager implements ApplicationContextAware {

    private ApplicationContext applicationContext;

    public Object process(Map commandState) {
        // grab a new instance of the appropriate Command
        Command command = createCommand();
        // set the state on the (hopefully brand new) Command instance
        command.setState(commandState);
        return command.execute();
    }

    protected Command createCommand() {
        // notice the Spring API dependency!
        return this.applicationContext.getBean("command", Command.class);
    }

    public void setApplicationContext(
            ApplicationContext applicationContext) throws BeansException {
        this.applicationContext = applicationContext;
    }
}
The preceding is not desirable, because the business code is aware of and coupled to the Spring Framework. Method Injection, a somewhat advanced feature of the Spring IoC container, allows this use case to be handled in a clean fashion.
Lookup method injection
Lookup method injection is the ability of the container to override methods on container managed beans, to return the lookup result for another named bean in the container. The lookup typically involves a prototype bean as in the scenario described in the preceding section. The Spring Framework implements this method injection by using bytecode generation from the CGLIB library to generate dynamically a subclass that overrides the method.
|
Looking at the CommandManager class in the previous code snippet, you see that the
Spring container will dynamically override the implementation of the createCommand()
method. Your CommandManager class will not have any Spring dependencies, as can be
seen in the reworked example:
package fiona.apple;

// no more Spring imports!

public abstract class CommandManager {

    public Object process(Object commandState) {
        // grab a new instance of the appropriate Command interface
        Command command = createCommand();
        // set the state on the (hopefully brand new) Command instance
        command.setState(commandState);
        return command.execute();
    }

    // okay... but where is the implementation of this method?
    protected abstract Command createCommand();
}
In the client class containing the method to be injected (the CommandManager in this
case), the method to be injected requires a signature of the following form:
<public|protected> [abstract] <return-type> theMethodName(no-arguments);If the method is abstract, the dynamically-generated subclass implements the method.
Otherwise, the dynamically-generated subclass overrides the concrete method defined in
the original class. For example:
<!-- a stateful bean deployed as a prototype (non-singleton) -->
<bean id="myCommand" class="fiona.apple.AsyncCommand" scope="prototype">
    <!-- inject dependencies here as required -->
</bean>

<!-- commandProcessor uses statefulCommandHelper -->
<bean id="commandManager" class="fiona.apple.CommandManager">
    <lookup-method name="createCommand" bean="myCommand"/>
</bean>
The bean identified as commandManager calls its own method createCommand()
whenever it needs a new instance of the myCommand bean. You must be careful to deploy
the myCommand bean as a prototype, if that is actually what is needed. If it is
as a singleton, the same instance of the myCommand
bean is returned each time.
Alternatively, within the annotation-based component model, you may declare a lookup
method through the @Lookup annotation:
public abstract class CommandManager {

    public Object process(Object commandState) {
        Command command = createCommand();
        command.setState(commandState);
        return command.execute();
    }

    @Lookup("myCommand")
    protected abstract Command createCommand();
}
Or, more idiomatically, you may rely on the target bean getting resolved against the declared return type of the lookup method:
public abstract class CommandManager {

    public Object process(Object commandState) {
        MyCommand command = createCommand();
        command.setState(commandState);
        return command.execute();
    }

    @Lookup
    protected abstract MyCommand createCommand();
}
Note that you will typically declare such annotated lookup methods with a concrete stub implementation, in order for them to be compatible with Spring’s component scanning rules where abstract classes get ignored by default. This limitation does not apply in case of explicitly registered or explicitly imported bean classes.
|
Another way of accessing differently scoped target beans is an The interested reader may also find the |
Arbitrary method replacement
A less useful form of method injection than lookup method injection is the ability to replace arbitrary methods in a managed bean with another method implementation. Users may safely skip the rest of this section until the functionality is actually needed.
With XML-based configuration metadata, you can use the replaced-method element to
replace an existing method implementation with another, for a deployed bean. Consider
the following class, with a method computeValue, which we want to override:
public class MyValueCalculator {

    public String computeValue(String input) {
        // some real code...
    }

    // some other methods...
}
A class implementing the org.springframework.beans.factory.support.MethodReplacer
interface provides the new method definition.
/**
 * meant to be used to override the existing computeValue(String)
 * implementation in MyValueCalculator
 */
public class ReplacementComputeValue implements MethodReplacer {

    public Object reimplement(Object o, Method m, Object[] args) throws Throwable {
        // get the input value, work with it, and return a computed result
        String input = (String) args[0];
        ...
        return ...;
    }
}
The bean definition to deploy the original class and specify the method override would look like this:
<bean id="myValueCalculator" class="x.y.z.MyValueCalculator">
    <!-- arbitrary method replacement -->
    <replaced-method name="computeValue" replacer="replacementComputeValue">
        <arg-type>String</arg-type>
    </replaced-method>
</bean>

<bean id="replacementComputeValue" class="a.b.c.ReplacementComputeValue"/>
You can use one or more contained <arg-type/> elements within the <replaced-method/>
element to indicate the method signature of the method being overridden. The signature
for the arguments is necessary only if the method is overloaded and multiple variants
exist within the class. For convenience, the type string for an argument may be a
substring of the fully qualified type name. For example, the following all match
java.lang.String:
java.lang.String
String
Str
Because the number of arguments is often enough to distinguish between each possible choice, this shortcut can save a lot of typing, by allowing you to type only the shortest string that will match an argument type.
1.5. Bean scopes
When you create a bean definition, you create a recipe for creating actual instances of the class defined by that bean definition. The idea that a bean definition is a recipe is important, because it means that, as with a class, you can create many object instances from a single recipe.
You can control not only the various dependencies and configuration values that are to
be plugged into an object that is created from a particular bean definition, but also
the scope of the objects created from a particular bean definition. This approach is
powerful and flexible in that you can choose the scope of the objects you create
through configuration instead of having to bake in the scope of an object at the Java
class level. Beans can be defined to be deployed in one of a number of scopes: out of
the box, the Spring Framework supports six scopes, four of which are available only if
you use a web-aware ApplicationContext.
The following scopes are supported out of the box. You can also create a custom scope.
| Scope | Description |
|---|---|
(Default) Scopes a single bean definition to a single object instance per Spring IoC container. |
|
Scopes a single bean definition to any number of object instances. |
|
Scopes a single bean definition to the lifecycle of a single HTTP request; that is,
each HTTP request has its own instance of a bean created off the back of a single bean
definition. Only valid in the context of a web-aware Spring |
|
Scopes a single bean definition to the lifecycle of an HTTP |
|
Scopes a single bean definition to the lifecycle of a |
|
Scopes a single bean definition to the lifecycle of a |
|
As of Spring 3.0, a thread scope is available, but is not registered by default. For
more information, see the documentation for
|
1.5.1. The singleton scope
Only one shared instance of a singleton bean is managed, and all requests for beans with an id or ids matching that bean definition result in that one specific bean instance being returned by the Spring container.
To put it another way, when you define a bean definition and it is scoped as a singleton, the Spring IoC container creates exactly one instance of the object defined by that bean definition. This single instance is stored in a cache of such singleton beans, and all subsequent requests and references for that named bean return the cached object.
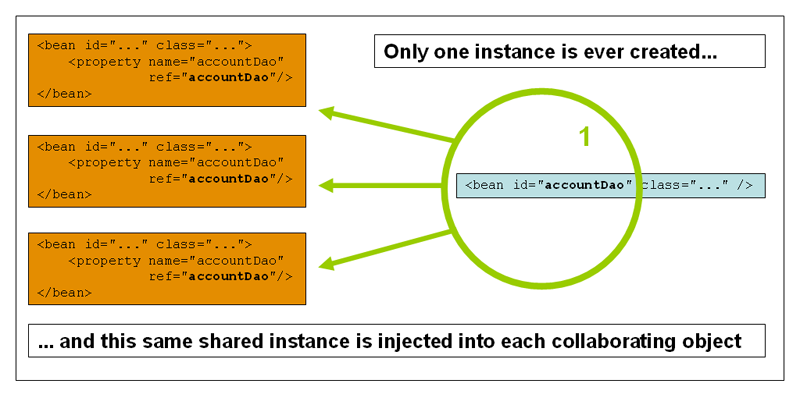
Spring’s concept of a singleton bean differs from the Singleton pattern as defined in the Gang of Four (GoF) patterns book. The GoF Singleton hard-codes the scope of an object such that one and only one instance of a particular class is created per ClassLoader. The scope of the Spring singleton is best described as per container and per bean. This means that if you define one bean for a particular class in a single Spring container, then the Spring container creates one and only one instance of the class defined by that bean definition. The singleton scope is the default scope in Spring. To define a bean as a singleton in XML, you would write, for example:
<bean id="accountService" class="com.foo.DefaultAccountService"/>

<!-- the following is equivalent, though redundant (singleton scope is the default) -->
<bean id="accountService" class="com.foo.DefaultAccountService" scope="singleton"/>
1.5.2. The prototype scope
The non-singleton, prototype scope of bean deployment results in the creation of a new
bean instance every time a request for that specific bean is made. That is, the bean
is injected into another bean or you request it through a getBean() method call on the
container. As a rule, use the prototype scope for all stateful beans and the singleton
scope for stateless beans.
The following diagram illustrates the Spring prototype scope. A data access object (DAO) is not typically configured as a prototype, because a typical DAO does not hold any conversational state; it was just easier for this author to reuse the core of the singleton diagram.
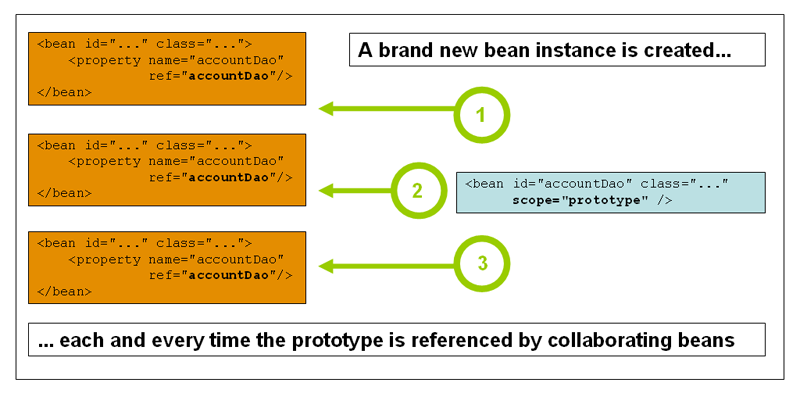
The following example defines a bean as a prototype in XML:
<bean id="accountService" class="com.foo.DefaultAccountService" scope="prototype"/>In contrast to the other scopes, Spring does not manage the complete lifecycle of a prototype bean: the container instantiates, configures, and otherwise assembles a prototype object, and hands it to the client, with no further record of that prototype instance. Thus, although initialization lifecycle callback methods are called on all objects regardless of scope, in the case of prototypes, configured destruction lifecycle callbacks are not called. The client code must clean up prototype-scoped objects and release expensive resources that the prototype bean(s) are holding. To get the Spring container to release resources held by prototype-scoped beans, try using a custom bean post-processor, which holds a reference to beans that need to be cleaned up.
In some respects, the Spring container’s role in regard to a prototype-scoped bean is a
replacement for the Java new operator. All lifecycle management past that point must
be handled by the client. (For details on the lifecycle of a bean in the Spring
container, see Lifecycle callbacks.)
1.5.3. Singleton beans with prototype-bean dependencies
When you use singleton-scoped beans with dependencies on prototype beans, be aware that dependencies are resolved at instantiation time. Thus if you dependency-inject a prototype-scoped bean into a singleton-scoped bean, a new prototype bean is instantiated and then dependency-injected into the singleton bean. The prototype instance is the sole instance that is ever supplied to the singleton-scoped bean.
However, suppose you want the singleton-scoped bean to acquire a new instance of the prototype-scoped bean repeatedly at runtime. You cannot dependency-inject a prototype-scoped bean into your singleton bean, because that injection occurs only once, when the Spring container is instantiating the singleton bean and resolving and injecting its dependencies. If you need a new instance of a prototype bean at runtime more than once, see Method injection
1.5.4. Request, session, application, and WebSocket scopes
The request, session, application, and websocket scopes are only available
if you use a web-aware Spring ApplicationContext implementation (such as
XmlWebApplicationContext). If you use these scopes with regular Spring IoC containers
such as the ClassPathXmlApplicationContext, an IllegalStateException will be thrown
complaining about an unknown bean scope.
Initial web configuration
To support the scoping of beans at the request, session, application, and
websocket levels (web-scoped beans), some minor initial configuration is
required before you define your beans. (This initial setup is not required
for the standard scopes, singleton and prototype.)
How you accomplish this initial setup depends on your particular Servlet environment.
If you access scoped beans within Spring Web MVC, in effect, within a request that is
processed by the Spring DispatcherServlet, then no special setup is necessary:
DispatcherServlet already exposes all relevant state.
If you use a Servlet 2.5 web container, with requests processed outside of Spring’s
DispatcherServlet (for example, when using JSF or Struts), you need to register the
org.springframework.web.context.request.RequestContextListener ServletRequestListener.
For Servlet 3.0+, this can be done programmatically via the WebApplicationInitializer
interface. Alternatively, or for older containers, add the following declaration to
your web application’s web.xml file:
<web-app>
    ...
    <listener>
        <listener-class>
            org.springframework.web.context.request.RequestContextListener
        </listener-class>
    </listener>
    ...
</web-app>
Alternatively, if there are issues with your listener setup, consider using Spring’s
RequestContextFilter. The filter mapping depends on the surrounding web
application configuration, so you have to change it as appropriate.
<web-app>
    ...
    <filter>
        <filter-name>requestContextFilter</filter-name>
        <filter-class>org.springframework.web.filter.RequestContextFilter</filter-class>
    </filter>
    <filter-mapping>
        <filter-name>requestContextFilter</filter-name>
        <url-pattern>/*</url-pattern>
    </filter-mapping>
    ...
</web-app>DispatcherServlet, RequestContextListener, and RequestContextFilter all do exactly
the same thing, namely bind the HTTP request object to the Thread that is servicing
that request. This makes beans that are request- and session-scoped available further
down the call chain.
Request scope
Consider the following XML configuration for a bean definition:
<bean id="loginAction" class="com.foo.LoginAction" scope="request"/>The Spring container creates a new instance of the LoginAction bean by using the
loginAction bean definition for each and every HTTP request. That is, the
loginAction bean is scoped at the HTTP request level. You can change the internal
state of the instance that is created as much as you want, because other instances
created from the same loginAction bean definition will not see these changes in state;
they are particular to an individual request. When the request completes processing, the
bean that is scoped to the request is discarded.
When using annotation-driven components or Java Config, the @RequestScope annotation
can be used to assign a component to the request scope.
@RequestScope
@Component
public class LoginAction {
    // ...
}
Session scope
Consider the following XML configuration for a bean definition:
<bean id="userPreferences" class="com.foo.UserPreferences" scope="session"/>The Spring container creates a new instance of the UserPreferences bean by using the
userPreferences bean definition for the lifetime of a single HTTP Session. In other
words, the userPreferences bean is effectively scoped at the HTTP Session level. As
with request-scoped beans, you can change the internal state of the instance that is
created as much as you want, knowing that other HTTP Session instances that are also
using instances created from the same userPreferences bean definition do not see these
changes in state, because they are particular to an individual HTTP Session. When the
HTTP Session is eventually discarded, the bean that is scoped to that particular HTTP
Session is also discarded.
When using annotation-driven components or Java Config, the @SessionScope annotation
can be used to assign a component to the session scope.
@SessionScope
@Component
public class UserPreferences {
    // ...
}
Application scope
Consider the following XML configuration for a bean definition:
<bean id="appPreferences" class="com.foo.AppPreferences" scope="application"/>The Spring container creates a new instance of the AppPreferences bean by using the
appPreferences bean definition once for the entire web application. That is, the
appPreferences bean is scoped at the ServletContext level, stored as a regular
ServletContext attribute. This is somewhat similar to a Spring singleton bean but
differs in two important ways: It is a singleton per ServletContext, not per Spring
'ApplicationContext' (for which there may be several in any given web application),
and it is actually exposed and therefore visible as a ServletContext attribute.
When using annotation-driven components or Java Config, the @ApplicationScope
annotation can be used to assign a component to the application scope.
@ApplicationScope
@Component
public class AppPreferences {
    // ...
}
Scoped beans as dependencies
The Spring IoC container manages not only the instantiation of your objects (beans), but also the wiring up of collaborators (or dependencies). If you want to inject (for example) an HTTP request scoped bean into another bean of a longer-lived scope, you may choose to inject an AOP proxy in place of the scoped bean. That is, you need to inject a proxy object that exposes the same public interface as the scoped object but that can also retrieve the real target object from the relevant scope (such as an HTTP request) and delegate method calls onto the real object.
|
You may also use When declaring Also, scoped proxies are not the only way to access beans from shorter scopes in a
lifecycle-safe fashion. You may also simply declare your injection point (i.e. the
constructor/setter argument or autowired field) as As an extended variant, you may declare The JSR-330 variant of this is called |
The configuration in the following example is only one line, but it is important to understand the "why" as well as the "how" behind it.
<?xml version="1.0" encoding="UTF-8"?>
<beans xmlns="http://www.springframework.org/schema/beans"
    xmlns:xsi="http://www.w3.org/2001/XMLSchema-instance"
    xmlns:aop="http://www.springframework.org/schema/aop"
    xsi:schemaLocation="http://www.springframework.org/schema/beans
        http://www.springframework.org/schema/beans/spring-beans.xsd
        http://www.springframework.org/schema/aop
        http://www.springframework.org/schema/aop/spring-aop.xsd">

    <!-- an HTTP Session-scoped bean exposed as a proxy -->
    <bean id="userPreferences" class="com.foo.UserPreferences" scope="session">
        <!-- instructs the container to proxy the surrounding bean -->
        <aop:scoped-proxy/>
    </bean>

    <!-- a singleton-scoped bean injected with a proxy to the above bean -->
    <bean id="userService" class="com.foo.SimpleUserService">
        <!-- a reference to the proxied userPreferences bean -->
        <property name="userPreferences" ref="userPreferences"/>
    </bean>
</beans>
To create such a proxy, you insert a child <aop:scoped-proxy/> element into a scoped
bean definition (see Choosing the type of proxy to create and
XML Schema-based configuration).
Why do definitions of beans scoped at the request, session and custom-scope
levels require the <aop:scoped-proxy/> element?
Let’s examine the following singleton bean definition and contrast it with
what you need to define for the aforementioned scopes (note that the following
userPreferences bean definition as it stands is incomplete).
<bean id="userPreferences" class="com.foo.UserPreferences" scope="session"/>

<bean id="userManager" class="com.foo.UserManager">
    <property name="userPreferences" ref="userPreferences"/>
</bean>
In the preceding example, the singleton bean userManager is injected with a reference
to the HTTP Session-scoped bean userPreferences. The salient point here is that the
userManager bean is a singleton: it will be instantiated exactly once per
container, and its dependencies (in this case only one, the userPreferences bean) are
also injected only once. This means that the userManager bean will only operate on the
exact same userPreferences object, that is, the one that it was originally injected
with.
This is not the behavior you want when injecting a shorter-lived scoped bean into a
longer-lived scoped bean, for example injecting an HTTP Session-scoped collaborating
bean as a dependency into singleton bean. Rather, you need a single userManager
object, and for the lifetime of an HTTP Session, you need a userPreferences object
that is specific to said HTTP Session. Thus the container creates an object that
exposes the exact same public interface as the UserPreferences class (ideally an
object that is a UserPreferences instance) which can fetch the real
UserPreferences object from the scoping mechanism (HTTP request, Session, etc.). The
container injects this proxy object into the userManager bean, which is unaware that
this UserPreferences reference is a proxy. In this example, when a UserManager
instance invokes a method on the dependency-injected UserPreferences object, it
actually is invoking a method on the proxy. The proxy then fetches the real
UserPreferences object from (in this case) the HTTP Session, and delegates the
method invocation onto the retrieved real UserPreferences object.
Thus you need the following, correct and complete, configuration when injecting
request- and session-scoped beans into collaborating objects:
<bean id="userPreferences" class="com.foo.UserPreferences" scope="session">
    <aop:scoped-proxy/>
</bean>

<bean id="userManager" class="com.foo.UserManager">
    <property name="userPreferences" ref="userPreferences"/>
</bean>
Choosing the type of proxy to create
By default, when the Spring container creates a proxy for a bean that is marked up with
the <aop:scoped-proxy/> element, a CGLIB-based class proxy is created.
|
CGLIB proxies only intercept public method calls! Do not call non-public methods on such a proxy; they will not be delegated to the actual scoped target object. |
Alternatively, you can configure the Spring container to create standard JDK
interface-based proxies for such scoped beans, by specifying false for the value of
the proxy-target-class attribute of the <aop:scoped-proxy/> element. Using JDK
interface-based proxies means that you do not need additional libraries in your
application classpath to effect such proxying. However, it also means that the class of
the scoped bean must implement at least one interface, and that all collaborators
into which the scoped bean is injected must reference the bean through one of its
interfaces.
<!-- DefaultUserPreferences implements the UserPreferences interface -->
<bean id="userPreferences" class="com.foo.DefaultUserPreferences" scope="session">
    <aop:scoped-proxy proxy-target-class="false"/>
</bean>

<bean id="userManager" class="com.foo.UserManager">
    <property name="userPreferences" ref="userPreferences"/>
</bean>
For more detailed information about choosing class-based or interface-based proxying, see Proxying mechanisms.
1.5.5. Custom scopes
The bean scoping mechanism is extensible; You can define your own
scopes, or even redefine existing scopes, although the latter is considered bad practice
and you cannot override the built-in singleton and prototype scopes.
Creating a custom scope
To integrate your custom scope(s) into the Spring container, you need to implement the
org.springframework.beans.factory.config.Scope interface, which is described in this
section. For an idea of how to implement your own scopes, see the Scope
implementations that are supplied with the Spring Framework itself and the
Scope javadocs,
which explains the methods you need to implement in more detail.
The Scope interface has four methods to get objects from the scope, remove them from
the scope, and allow them to be destroyed.
The following method returns the object from the underlying scope. The session scope implementation, for example, returns the session-scoped bean (and if it does not exist, the method returns a new instance of the bean, after having bound it to the session for future reference).
Object get(String name, ObjectFactory objectFactory)The following method removes the object from the underlying scope. The session scope implementation for example, removes the session-scoped bean from the underlying session. The object should be returned, but you can return null if the object with the specified name is not found.
Object remove(String name)The following method registers the callbacks the scope should execute when it is destroyed or when the specified object in the scope is destroyed. Refer to the javadocs or a Spring scope implementation for more information on destruction callbacks.
void registerDestructionCallback(String name, Runnable destructionCallback)The following method obtains the conversation identifier for the underlying scope. This identifier is different for each scope. For a session scoped implementation, this identifier can be the session identifier.
String getConversationId()Using a custom scope
After you write and test one or more custom Scope implementations, you need to make
the Spring container aware of your new scope(s). The following method is the central
method to register a new Scope with the Spring container:
void registerScope(String scopeName, Scope scope);This method is declared on the ConfigurableBeanFactory interface, which is available
on most of the concrete ApplicationContext implementations that ship with Spring via
the BeanFactory property.
The first argument to the registerScope(..) method is the unique name associated with
a scope; examples of such names in the Spring container itself are singleton and
prototype. The second argument to the registerScope(..) method is an actual instance
of the custom Scope implementation that you wish to register and use.
Suppose that you write your custom Scope implementation, and then register it as below.
|
The example below uses |
Scope threadScope = new SimpleThreadScope();
beanFactory.registerScope("thread", threadScope);
You then create bean definitions that adhere to the scoping rules of your custom Scope:
<bean id="..." class="..." scope="thread">With a custom Scope implementation, you are not limited to programmatic registration
of the scope. You can also do the Scope registration declaratively, using the
CustomScopeConfigurer class:
<?xml version="1.0" encoding="UTF-8"?>
<beans xmlns="http://www.springframework.org/schema/beans"
    xmlns:xsi="http://www.w3.org/2001/XMLSchema-instance"
    xmlns:aop="http://www.springframework.org/schema/aop"
    xsi:schemaLocation="http://www.springframework.org/schema/beans
        http://www.springframework.org/schema/beans/spring-beans.xsd
        http://www.springframework.org/schema/aop
        http://www.springframework.org/schema/aop/spring-aop.xsd">

    <bean class="org.springframework.beans.factory.config.CustomScopeConfigurer">
        <property name="scopes">
            <map>
                <entry key="thread">
                    <bean class="org.springframework.context.support.SimpleThreadScope"/>
                </entry>
            </map>
        </property>
    </bean>

    <bean id="bar" class="x.y.Bar" scope="thread">
        <property name="name" value="Rick"/>
        <aop:scoped-proxy/>
    </bean>

    <bean id="foo" class="x.y.Foo">
        <property name="bar" ref="bar"/>
    </bean>

</beans>|
When you place |
1.6. Customizing the nature of a bean
1.6.1. Lifecycle callbacks
To interact with the container’s management of the bean lifecycle, you can implement the
Spring InitializingBean and DisposableBean interfaces. The container calls
afterPropertiesSet() for the former and destroy() for the latter to allow the bean
to perform certain actions upon initialization and destruction of your beans.
|
The JSR-250 If you don’t want to use the JSR-250 annotations but you are still looking to remove coupling consider the use of init-method and destroy-method object definition metadata. |
Internally, the Spring Framework uses BeanPostProcessor implementations to process any
callback interfaces it can find and call the appropriate methods. If you need custom
features or other lifecycle behavior Spring does not offer out-of-the-box, you can
implement a BeanPostProcessor yourself. For more information, see
Container Extension Points.
In addition to the initialization and destruction callbacks, Spring-managed objects may
also implement the Lifecycle interface so that those objects can participate in the
startup and shutdown process as driven by the container’s own lifecycle.
The lifecycle callback interfaces are described in this section.
Initialization callbacks
The org.springframework.beans.factory.InitializingBean interface allows a bean to
perform initialization work after all necessary properties on the bean have been set by
the container. The InitializingBean interface specifies a single method:
void afterPropertiesSet() throws Exception;It is recommended that you do not use the InitializingBean interface because it
unnecessarily couples the code to Spring. Alternatively, use
the @PostConstruct annotation or
specify a POJO initialization method. In the case of XML-based configuration metadata,
you use the init-method attribute to specify the name of the method that has a void
no-argument signature. With Java config, you use the initMethod attribute of @Bean,
see Receiving lifecycle callbacks. For example, the following:
<bean id="exampleInitBean" class="examples.ExampleBean" init-method="init"/>public class ExampleBean {
public void init() {
// do some initialization work
}
}…is exactly the same as…
<bean id="exampleInitBean" class="examples.AnotherExampleBean"/>public class AnotherExampleBean implements InitializingBean {
public void afterPropertiesSet() {
// do some initialization work
}
}but does not couple the code to Spring.
Destruction callbacks
Implementing the org.springframework.beans.factory.DisposableBean interface allows a
bean to get a callback when the container containing it is destroyed. The
DisposableBean interface specifies a single method:
void destroy() throws Exception;It is recommended that you do not use the DisposableBean callback interface because it
unnecessarily couples the code to Spring. Alternatively, use
the @PreDestroy annotation or
specify a generic method that is supported by bean definitions. With XML-based
configuration metadata, you use the destroy-method attribute on the <bean/>.
With Java config, you use the destroyMethod attribute of @Bean, see
Receiving lifecycle callbacks. For example, the following definition:
<bean id="exampleInitBean" class="examples.ExampleBean" destroy-method="cleanup"/>public class ExampleBean {
public void cleanup() {
// do some destruction work (like releasing pooled connections)
}
}is exactly the same as:
<bean id="exampleInitBean" class="examples.AnotherExampleBean"/>public class AnotherExampleBean implements DisposableBean {
public void destroy() {
// do some destruction work (like releasing pooled connections)
}
}but does not couple the code to Spring.
|
The |
Default initialization and destroy methods
When you write initialization and destroy method callbacks that do not use the
Spring-specific InitializingBean and DisposableBean callback interfaces, you
typically write methods with names such as init(), initialize(), dispose(), and so
on. Ideally, the names of such lifecycle callback methods are standardized across a
project so that all developers use the same method names and ensure consistency.
You can configure the Spring container to look for named initialization and destroy
callback method names on every bean. This means that you, as an application
developer, can write your application classes and use an initialization callback called
init(), without having to configure an init-method="init" attribute with each bean
definition. The Spring IoC container calls that method when the bean is created (and in
accordance with the standard lifecycle callback contract described previously). This
feature also enforces a consistent naming convention for initialization and destroy
method callbacks.
Suppose that your initialization callback methods are named init() and destroy
callback methods are named destroy(). Your class will resemble the class in the
following example.
public class DefaultBlogService implements BlogService {

    private BlogDao blogDao;

    public void setBlogDao(BlogDao blogDao) {
        this.blogDao = blogDao;
    }

    // this is (unsurprisingly) the initialization callback method
    public void init() {
        if (this.blogDao == null) {
            throw new IllegalStateException("The [blogDao] property must be set.");
        }
    }
}
<beans default-init-method="init">
<bean id="blogService" class="com.foo.DefaultBlogService">
<property name="blogDao" ref="blogDao" />
</bean>
</beans>The presence of the default-init-method attribute on the top-level <beans/> element
attribute causes the Spring IoC container to recognize a method called init on beans
as the initialization method callback. When a bean is created and assembled, if the bean
class has such a method, it is invoked at the appropriate time.
You configure destroy method callbacks similarly (in XML, that is) by using the
default-destroy-method attribute on the top-level <beans/> element.
Where existing bean classes already have callback methods that are named at variance
with the convention, you can override the default by specifying (in XML, that is) the
method name using the init-method and destroy-method attributes of the <bean/>
itself.
The Spring container guarantees that a configured initialization callback is called immediately after a bean is supplied with all dependencies. Thus the initialization callback is called on the raw bean reference, which means that AOP interceptors and so forth are not yet applied to the bean. A target bean is fully created first, then an AOP proxy (for example) with its interceptor chain is applied. If the target bean and the proxy are defined separately, your code can even interact with the raw target bean, bypassing the proxy. Hence, it would be inconsistent to apply the interceptors to the init method, because doing so would couple the lifecycle of the target bean with its proxy/interceptors and leave strange semantics when your code interacts directly to the raw target bean.
Combining lifecycle mechanisms
As of Spring 2.5, you have three options for controlling bean lifecycle behavior: the
InitializingBean and
DisposableBean callback interfaces; custom
init() and destroy() methods; and the
@PostConstruct and @PreDestroy
annotations. You can combine these mechanisms to control a given bean.
|
If multiple lifecycle mechanisms are configured for a bean, and each mechanism is
configured with a different method name, then each configured method is executed in the
order listed below. However, if the same method name is configured - for example,
|
Multiple lifecycle mechanisms configured for the same bean, with different initialization methods, are called as follows:
-
Methods annotated with
@PostConstruct -
afterPropertiesSet()as defined by theInitializingBeancallback interface -
A custom configured
init()method
Destroy methods are called in the same order:
-
Methods annotated with
@PreDestroy -
destroy()as defined by theDisposableBeancallback interface -
A custom configured
destroy()method
Startup and shutdown callbacks
The Lifecycle interface defines the essential methods for any object that has its own
lifecycle requirements (e.g. starts and stops some background process):
public interface Lifecycle {

    void start();

    void stop();

    boolean isRunning();
}
Any Spring-managed object may implement that interface. Then, when the
ApplicationContext itself receives start and stop signals, e.g. for a stop/restart
scenario at runtime, it will cascade those calls to all Lifecycle implementations
defined within that context. It does this by delegating to a LifecycleProcessor:
public interface LifecycleProcessor extends Lifecycle {

    void onRefresh();

    void onClose();
}
Notice that the LifecycleProcessor is itself an extension of the Lifecycle
interface. It also adds two other methods for reacting to the context being refreshed
and closed.
|
Note that the regular |
The order of startup and shutdown invocations can be important. If a "depends-on"
relationship exists between any two objects, the dependent side will start after its
dependency, and it will stop before its dependency. However, at times the direct
dependencies are unknown. You may only know that objects of a certain type should start
prior to objects of another type. In those cases, the SmartLifecycle interface defines
another option, namely the getPhase() method as defined on its super-interface,
Phased.
public interface Phased {

    int getPhase();
}
public interface SmartLifecycle extends Lifecycle, Phased {
boolean isAutoStartup();
void stop(Runnable callback);
}When starting, the objects with the lowest phase start first, and when stopping, the
reverse order is followed. Therefore, an object that implements SmartLifecycle and
whose getPhase() method returns Integer.MIN_VALUE would be among the first to start
and the last to stop. At the other end of the spectrum, a phase value of
Integer.MAX_VALUE would indicate that the object should be started last and stopped
first (likely because it depends on other processes to be running). When considering the
phase value, it’s also important to know that the default phase for any "normal"
Lifecycle object that does not implement SmartLifecycle would be 0. Therefore, any
negative phase value would indicate that an object should start before those standard
components (and stop after them), and vice versa for any positive phase value.
As you can see the stop method defined by SmartLifecycle accepts a callback. Any
implementation must invoke that callback’s run() method after that implementation’s
shutdown process is complete. That enables asynchronous shutdown where necessary since
the default implementation of the LifecycleProcessor interface,
DefaultLifecycleProcessor, will wait up to its timeout value for the group of objects
within each phase to invoke that callback. The default per-phase timeout is 30 seconds.
You can override the default lifecycle processor instance by defining a bean named
"lifecycleProcessor" within the context. If you only want to modify the timeout, then
defining the following would be sufficient:
<bean id="lifecycleProcessor" class="org.springframework.context.support.DefaultLifecycleProcessor">
    <!-- timeout value in milliseconds -->
    <property name="timeoutPerShutdownPhase" value="10000"/>
</bean>
As mentioned, the LifecycleProcessor interface defines callback methods for the
refreshing and closing of the context as well. The latter will simply drive the shutdown
process as if stop() had been called explicitly, but it will happen when the context is
closing. The 'refresh' callback on the other hand enables another feature of
SmartLifecycle beans. When the context is refreshed (after all objects have been
instantiated and initialized), that callback will be invoked, and at that point the
default lifecycle processor will check the boolean value returned by each
SmartLifecycle object’s isAutoStartup() method. If "true", then that object will be
started at that point rather than waiting for an explicit invocation of the context’s or
its own start() method (unlike the context refresh, the context start does not happen
automatically for a standard context implementation). The "phase" value as well as any
"depends-on" relationships will determine the startup order in the same way as described
above.
Shutting down the Spring IoC container gracefully in non-web applications
|
This section applies only to non-web applications. Spring’s web-based
|
If you are using Spring’s IoC container in a non-web application environment; for example, in a rich client desktop environment; you register a shutdown hook with the JVM. Doing so ensures a graceful shutdown and calls the relevant destroy methods on your singleton beans so that all resources are released. Of course, you must still configure and implement these destroy callbacks correctly.
To register a shutdown hook, you call the registerShutdownHook() method that is
declared on the ConfigurableApplicationContext interface:
import org.springframework.context.ConfigurableApplicationContext;
import org.springframework.context.support.ClassPathXmlApplicationContext;

public final class Boot {

    public static void main(final String[] args) throws Exception {
        ConfigurableApplicationContext ctx = new ClassPathXmlApplicationContext("beans.xml");

        // add a shutdown hook for the above context...
        ctx.registerShutdownHook();

        // app runs here...

        // main method exits, hook is called prior to the app shutting down...
    }
}
1.6.2. ApplicationContextAware and BeanNameAware
When an ApplicationContext creates an object instance that implements the
org.springframework.context.ApplicationContextAware interface, the instance is provided
with a reference to that ApplicationContext.
public interface ApplicationContextAware {

    void setApplicationContext(ApplicationContext applicationContext) throws BeansException;
}
Thus beans can manipulate programmatically the ApplicationContext that created them,
through the ApplicationContext interface, or by casting the reference to a known
subclass of this interface, such as ConfigurableApplicationContext, which exposes
additional functionality. One use would be the programmatic retrieval of other beans.
Sometimes this capability is useful; however, in general you should avoid it, because it
couples the code to Spring and does not follow the Inversion of Control style, where
collaborators are provided to beans as properties. Other methods of the
ApplicationContext provide access to file resources, publishing application events, and
accessing a MessageSource. These additional features are described in
Additional capabilities of the ApplicationContext
As of Spring 2.5, autowiring is another alternative to obtain reference to the
ApplicationContext. The "traditional" constructor and byType autowiring modes (as
described in Autowiring collaborators) can provide a dependency of type
ApplicationContext for a constructor argument or setter method parameter,
respectively. For more flexibility, including the ability to autowire fields and
multiple parameter methods, use the new annotation-based autowiring features. If you do,
the ApplicationContext is autowired into a field, constructor argument, or method
parameter that is expecting the ApplicationContext type if the field, constructor, or
method in question carries the @Autowired annotation. For more information, see
@Autowired.
When an ApplicationContext creates a class that implements the
org.springframework.beans.factory.BeanNameAware interface, the class is provided with
a reference to the name defined in its associated object definition.
public interface BeanNameAware {

    void setBeanName(String name) throws BeansException;
}
The callback is invoked after population of normal bean properties but before an
initialization callback such as InitializingBean afterPropertiesSet or a custom
init-method.
1.6.3. Other Aware interfaces
Besides ApplicationContextAware and BeanNameAware discussed above, Spring offers a
range of Aware interfaces that allow beans to indicate to the container that they
require a certain infrastructure dependency. The most important Aware interfaces
are summarized below - as a general rule, the name is a good indication of the
dependency type:
| Name | Injected Dependency | Explained in… |
|---|---|---|
|
Declaring |
|
|
Event publisher of the enclosing |
|
|
Class loader used to load the bean classes. |
|
|
Declaring |
|
|
Name of the declaring bean |
|
|
Resource adapter |
|
|
Defined weaver for processing class definition at load time |
|
|
Configured strategy for resolving messages (with support for parametrization and internationalization) |
|
|
Spring JMX notification publisher |
|
|
Configured loader for low-level access to resources |
|
|
Current |
|
|
Current |
Note again that usage of these interfaces ties your code to the Spring API and does not follow the Inversion of Control style. As such, they are recommended for infrastructure beans that require programmatic access to the container.
1.7. Bean definition inheritance
A bean definition can contain a lot of configuration information, including constructor arguments, property values, and container-specific information such as initialization method, static factory method name, and so on. A child bean definition inherits configuration data from a parent definition. The child definition can override some values, or add others, as needed. Using parent and child bean definitions can save a lot of typing. Effectively, this is a form of templating.
If you work with an ApplicationContext interface programmatically, child bean
definitions are represented by the ChildBeanDefinition class. Most users do not work
with them on this level, instead configuring bean definitions declaratively in something
like the ClassPathXmlApplicationContext. When you use XML-based configuration
metadata, you indicate a child bean definition by using the parent attribute,
specifying the parent bean as the value of this attribute.
<bean id="inheritedTestBean" abstract="true"
        class="org.springframework.beans.TestBean">
    <property name="name" value="parent"/>
    <property name="age" value="1"/>
</bean>

<bean id="inheritsWithDifferentClass"
        class="org.springframework.beans.DerivedTestBean"
        parent="inheritedTestBean" init-method="initialize">
    <property name="name" value="override"/>
    <!-- the age property value of 1 will be inherited from parent -->
</bean>
A child bean definition uses the bean class from the parent definition if none is specified, but can also override it. In the latter case, the child bean class must be compatible with the parent, that is, it must accept the parent’s property values.
A child bean definition inherits scope, constructor argument values, property values, and
method overrides from the parent, with the option to add new values. Any scope, initialization
method, destroy method, and/or static factory method settings that you specify will
override the corresponding parent settings.
The remaining settings are always taken from the child definition: depends on, autowire mode, dependency check, singleton, lazy init.
The preceding example explicitly marks the parent bean definition as abstract by using
the abstract attribute. If the parent definition does not specify a class, explicitly
marking the parent bean definition as abstract is required, as follows:
<bean id="inheritedTestBeanWithoutClass" abstract="true">
    <property name="name" value="parent"/>
    <property name="age" value="1"/>
</bean>

<bean id="inheritsWithClass" class="org.springframework.beans.DerivedTestBean"
        parent="inheritedTestBeanWithoutClass" init-method="initialize">
    <property name="name" value="override"/>
    <!-- age will inherit the value of 1 from the parent bean definition-->
</bean>
The parent bean cannot be instantiated on its own because it is incomplete, and it is
also explicitly marked as abstract. When a definition is abstract like this, it is
usable only as a pure template bean definition that serves as a parent definition for
child definitions. Trying to use such an abstract parent bean on its own, by referring
to it as a ref property of another bean or doing an explicit getBean() call with the
parent bean id, returns an error. Similarly, the container’s internal
preInstantiateSingletons() method ignores bean definitions that are defined as
abstract.
|
|
1.8. Container Extension Points
Typically, an application developer does not need to subclass ApplicationContext
implementation classes. Instead, the Spring IoC container can be extended by plugging in
implementations of special integration interfaces. The next few sections describe these
integration interfaces.
1.8.1. Customizing beans using a BeanPostProcessor
The BeanPostProcessor interface defines callback methods that you can implement to
provide your own (or override the container’s default) instantiation logic,
dependency-resolution logic, and so forth. If you want to implement some custom logic
after the Spring container finishes instantiating, configuring, and initializing a bean,
you can plug in one or more BeanPostProcessor implementations.
You can configure multiple BeanPostProcessor instances, and you can control the order
in which these BeanPostProcessors execute by setting the order property. You can
set this property only if the BeanPostProcessor implements the Ordered interface; if
you write your own BeanPostProcessor you should consider implementing the Ordered
interface too. For further details, consult the javadocs of the BeanPostProcessor and
Ordered interfaces. See also the note below on
programmatic
registration of BeanPostProcessors.
|
To change the actual bean definition (i.e., the blueprint that defines the bean),
you instead need to use a |
The org.springframework.beans.factory.config.BeanPostProcessor interface consists of
exactly two callback methods. When such a class is registered as a post-processor with
the container, for each bean instance that is created by the container, the
post-processor gets a callback from the container both before container
initialization methods (such as InitializingBean’s afterPropertiesSet() and any
declared init method) are called as well as after any bean initialization callbacks.
The post-processor can take any action with the bean instance, including ignoring the
callback completely. A bean post-processor typically checks for callback interfaces or
may wrap a bean with a proxy. Some Spring AOP infrastructure classes are implemented as
bean post-processors in order to provide proxy-wrapping logic.
An ApplicationContext automatically detects any beans that are defined in the
configuration metadata which implement the BeanPostProcessor interface. The
ApplicationContext registers these beans as post-processors so that they can be called
later upon bean creation. Bean post-processors can be deployed in the container just
like any other beans.
Note that when declaring a BeanPostProcessor using an @Bean factory method on a
configuration class, the return type of the factory method should be the implementation
class itself or at least the org.springframework.beans.factory.config.BeanPostProcessor
interface, clearly indicating the post-processor nature of that bean. Otherwise, the
ApplicationContext won’t be able to autodetect it by type before fully creating it.
Since a BeanPostProcessor needs to be instantiated early in order to apply to the
initialization of other beans in the context, this early type detection is critical.
|
Programmatically registering BeanPostProcessors
While the recommended approach for |
|
BeanPostProcessors and AOP auto-proxying
Classes that implement the For any such bean, you should see an informational log message: "Bean foo is not eligible for getting processed by all BeanPostProcessor interfaces (for example: not eligible for auto-proxying)". Note that if you have beans wired into your |
The following examples show how to write, register, and use BeanPostProcessors in an
ApplicationContext.
Example: Hello World, BeanPostProcessor-style
This first example illustrates basic usage. The example shows a custom
BeanPostProcessor implementation that invokes the toString() method of each bean as
it is created by the container and prints the resulting string to the system console.
Find below the custom BeanPostProcessor implementation class definition:
package scripting;

import org.springframework.beans.factory.config.BeanPostProcessor;

public class InstantiationTracingBeanPostProcessor implements BeanPostProcessor {

    // simply return the instantiated bean as-is
    public Object postProcessBeforeInitialization(Object bean, String beanName) {
        return bean; // we could potentially return any object reference here...
    }

    public Object postProcessAfterInitialization(Object bean, String beanName) {
        System.out.println("Bean '" + beanName + "' created : " + bean.toString());
        return bean;
    }
}
<?xml version="1.0" encoding="UTF-8"?>
<beans xmlns="http://www.springframework.org/schema/beans"
xmlns:xsi="http://www.w3.org/2001/XMLSchema-instance"
xmlns:lang="http://www.springframework.org/schema/lang"
xsi:schemaLocation="http://www.springframework.org/schema/beans
http://www.springframework.org/schema/beans/spring-beans.xsd
http://www.springframework.org/schema/lang
http://www.springframework.org/schema/lang/spring-lang.xsd">
<lang:groovy id="messenger"
script-source="classpath:org/springframework/scripting/groovy/Messenger.groovy">
<lang:property name="message" value="Fiona Apple Is Just So Dreamy."/>
</lang:groovy>
<!--
when the above bean (messenger) is instantiated, this custom
BeanPostProcessor implementation will output the fact to the system console
-->
<bean class="scripting.InstantiationTracingBeanPostProcessor"/>
</beans>Notice how the InstantiationTracingBeanPostProcessor is simply defined. It does not
even have a name, and because it is a bean it can be dependency-injected just like any
other bean. (The preceding configuration also defines a bean that is backed by a Groovy
script. The Spring dynamic language support is detailed in the chapter entitled
Dynamic language support.)
The following simple Java application executes the preceding code and configuration:
import org.springframework.context.ApplicationContext;
import org.springframework.context.support.ClassPathXmlApplicationContext;
import org.springframework.scripting.Messenger;

public final class Boot {

    public static void main(final String[] args) throws Exception {
        ApplicationContext ctx = new ClassPathXmlApplicationContext("scripting/beans.xml");
        Messenger messenger = (Messenger) ctx.getBean("messenger");
        System.out.println(messenger);
    }

}
The output of the preceding application resembles the following:
Bean 'messenger' created : org.springframework.scripting.groovy.GroovyMessenger@272961
org.springframework.scripting.groovy.GroovyMessenger@272961
Example: The RequiredAnnotationBeanPostProcessor
Using callback interfaces or annotations in conjunction with a custom
BeanPostProcessor implementation is a common means of extending the Spring IoC
container. An example is Spring’s RequiredAnnotationBeanPostProcessor - a
BeanPostProcessor implementation that ships with the Spring distribution which ensures
that JavaBean properties on beans that are marked with an (arbitrary) annotation are
actually (configured to be) dependency-injected with a value.
1.8.2. Customizing configuration metadata with a BeanFactoryPostProcessor
The next extension point that we will look at is the
org.springframework.beans.factory.config.BeanFactoryPostProcessor. The semantics of
this interface are similar to those of the BeanPostProcessor, with one major
difference: BeanFactoryPostProcessor operates on the bean configuration metadata;
that is, the Spring IoC container allows a BeanFactoryPostProcessor to read the
configuration metadata and potentially change it before the container instantiates
any beans other than BeanFactoryPostProcessors.
You can configure multiple BeanFactoryPostProcessors, and you can control the order in
which these BeanFactoryPostProcessors execute by setting the order property.
However, you can only set this property if the BeanFactoryPostProcessor implements the
Ordered interface. If you write your own BeanFactoryPostProcessor, you should
consider implementing the Ordered interface too. Consult the javadocs of the
BeanFactoryPostProcessor and Ordered interfaces for more details.
|
If you want to change the actual bean instances (i.e., the objects that are created
from the configuration metadata), then you instead need to use a Also, |
A bean factory post-processor is executed automatically when it is declared inside an
ApplicationContext, in order to apply changes to the configuration metadata that
define the container. Spring includes a number of predefined bean factory
post-processors, such as PropertyOverrideConfigurer and
PropertyPlaceholderConfigurer. A custom BeanFactoryPostProcessor can also be used,
for example, to register custom property editors.
An ApplicationContext automatically detects any beans that are deployed into it that
implement the BeanFactoryPostProcessor interface. It uses these beans as bean factory
post-processors, at the appropriate time. You can deploy these post-processor beans as
you would any other bean.
|
As with |
Example: the Class name substitution PropertyPlaceholderConfigurer
You use the PropertyPlaceholderConfigurer to externalize property values from a bean
definition in a separate file using the standard Java Properties format. Doing so
enables the person deploying an application to customize environment-specific properties
such as database URLs and passwords, without the complexity or risk of modifying the
main XML definition file or files for the container.
Consider the following XML-based configuration metadata fragment, where a DataSource
with placeholder values is defined. The example shows properties configured from an
external Properties file. At runtime, a PropertyPlaceholderConfigurer is applied to
the metadata that will replace some properties of the DataSource. The values to replace
are specified as placeholders of the form ${property-name} which follows the Ant /
log4j / JSP EL style.
<bean class="org.springframework.beans.factory.config.PropertyPlaceholderConfigurer">
    <property name="locations" value="classpath:com/foo/jdbc.properties"/>
</bean>

<bean id="dataSource" destroy-method="close"
        class="org.apache.commons.dbcp.BasicDataSource">
    <property name="driverClassName" value="${jdbc.driverClassName}"/>
    <property name="url" value="${jdbc.url}"/>
    <property name="username" value="${jdbc.username}"/>
    <property name="password" value="${jdbc.password}"/>
</bean>
The actual values come from another file in the standard Java Properties format:
jdbc.driverClassName=org.hsqldb.jdbcDriver
jdbc.url=jdbc:hsqldb:hsql://production:9002
jdbc.username=sa
jdbc.password=root
Therefore, the string ${jdbc.username} is replaced at runtime with the value 'sa', and
the same applies for other placeholder values that match keys in the properties file.
The PropertyPlaceholderConfigurer checks for placeholders in most properties and
attributes of a bean definition. Furthermore, the placeholder prefix and suffix can be
customized.
With the context namespace introduced in Spring 2.5, it is possible to configure
property placeholders with a dedicated configuration element. One or more locations can
be provided as a comma-separated list in the location attribute.
<context:property-placeholder location="classpath:com/foo/jdbc.properties"/>The PropertyPlaceholderConfigurer not only looks for properties in the Properties
file you specify. By default it also checks against the Java System properties if it
cannot find a property in the specified properties files. You can customize this
behavior by setting the systemPropertiesMode property of the configurer with one of
the following three supported integer values:
-
never (0): Never check system properties
-
fallback (1): Check system properties if not resolvable in the specified properties files. This is the default.
-
override (2): Check system properties first, before trying the specified properties files. This allows system properties to override any other property source.
Consult the PropertyPlaceholderConfigurer javadocs for more information.
|
You can use the If the class cannot be resolved at runtime to a valid class, resolution of the bean
fails when it is about to be created, which is during the |
Example: the PropertyOverrideConfigurer
The PropertyOverrideConfigurer, another bean factory post-processor, resembles the
PropertyPlaceholderConfigurer, but unlike the latter, the original definitions can
have default values or no values at all for bean properties. If an overriding
Properties file does not have an entry for a certain bean property, the default
context definition is used.
Note that the bean definition is not aware of being overridden, so it is not
immediately obvious from the XML definition file that the override configurer is being
used. In case of multiple PropertyOverrideConfigurer instances that define different
values for the same bean property, the last one wins, due to the overriding mechanism.
Properties file configuration lines take this format:
beanName.property=value
For example:
dataSource.driverClassName=com.mysql.jdbc.Driver
dataSource.url=jdbc:mysql:mydb
This example file can be used with a container definition that contains a bean called dataSource, which has driver and url properties.
Compound property names are also supported, as long as every component of the path except the final property being overridden is already non-null (presumably initialized by the constructors). In this example…
foo.fred.bob.sammy=123
-
the
sammyproperty of thebobproperty of thefredproperty of thefoobean is set to the scalar value123.
|
Specified override values are always literal values; they are not translated into bean references. This convention also applies when the original value in the XML bean definition specifies a bean reference. |
With the context namespace introduced in Spring 2.5, it is possible to configure
property overriding with a dedicated configuration element:
<context:property-override location="classpath:override.properties"/>1.8.3. Customizing instantiation logic with a FactoryBean
Implement the org.springframework.beans.factory.FactoryBean interface for objects that
are themselves factories.
The FactoryBean interface is a point of pluggability into the Spring IoC container’s
instantiation logic. If you have complex initialization code that is better expressed in
Java as opposed to a (potentially) verbose amount of XML, you can create your own
FactoryBean, write the complex initialization inside that class, and then plug your
custom FactoryBean into the container.
The FactoryBean interface provides three methods:
-
Object getObject(): returns an instance of the object this factory creates. The instance can possibly be shared, depending on whether this factory returns singletons or prototypes. -
boolean isSingleton(): returnstrueif thisFactoryBeanreturns singletons,falseotherwise. -
Class getObjectType(): returns the object type returned by thegetObject()method ornullif the type is not known in advance.
The FactoryBean concept and interface is used in a number of places within the Spring
Framework; more than 50 implementations of the FactoryBean interface ship with Spring
itself.
When you need to ask a container for an actual FactoryBean instance itself instead of
the bean it produces, preface the bean’s id with the ampersand symbol ( &) when
calling the getBean() method of the ApplicationContext. So for a given FactoryBean
with an id of myBean, invoking getBean("myBean") on the container returns the
product of the FactoryBean; whereas, invoking getBean("&myBean") returns the
FactoryBean instance itself.
1.9. Annotation-based container configuration
An alternative to XML setups is provided by annotation-based configuration which rely on
the bytecode metadata for wiring up components instead of angle-bracket declarations.
Instead of using XML to describe a bean wiring, the developer moves the configuration
into the component class itself by using annotations on the relevant class, method, or
field declaration. As mentioned in Example: The RequiredAnnotationBeanPostProcessor, using
a BeanPostProcessor in conjunction with annotations is a common means of extending the
Spring IoC container. For example, Spring 2.0 introduced the possibility of enforcing
required properties with the @Required annotation. Spring
2.5 made it possible to follow that same general approach to drive Spring’s dependency
injection. Essentially, the @Autowired annotation provides the same capabilities as
described in Autowiring collaborators but with more fine-grained control and wider
applicability. Spring 2.5 also added support for JSR-250 annotations such as
@PostConstruct, and @PreDestroy. Spring 3.0 added support for JSR-330 (Dependency
Injection for Java) annotations contained in the javax.inject package such as @Inject
and @Named. Details about those annotations can be found in the
relevant section.
|
Annotation injection is performed before XML injection, thus the latter configuration will override the former for properties wired through both approaches. |
As always, you can register them as individual bean definitions, but they can also be
implicitly registered by including the following tag in an XML-based Spring
configuration (notice the inclusion of the context namespace):
<?xml version="1.0" encoding="UTF-8"?>
<beans xmlns="http://www.springframework.org/schema/beans"
    xmlns:xsi="http://www.w3.org/2001/XMLSchema-instance"
    xmlns:context="http://www.springframework.org/schema/context"
    xsi:schemaLocation="http://www.springframework.org/schema/beans
        http://www.springframework.org/schema/beans/spring-beans.xsd
        http://www.springframework.org/schema/context
        http://www.springframework.org/schema/context/spring-context.xsd">

    <context:annotation-config/>

</beans>
(The implicitly registered post-processors include
AutowiredAnnotationBeanPostProcessor,
CommonAnnotationBeanPostProcessor,
PersistenceAnnotationBeanPostProcessor,
as well as the aforementioned
RequiredAnnotationBeanPostProcessor.)
|
|
1.9.1. @Required
The @Required annotation applies to bean property setter methods, as in the following
example:
public class SimpleMovieLister {

    private MovieFinder movieFinder;

    @Required
    public void setMovieFinder(MovieFinder movieFinder) {
        this.movieFinder = movieFinder;
    }

    // ...
}
This annotation simply indicates that the affected bean property must be populated at
configuration time, through an explicit property value in a bean definition or through
autowiring. The container throws an exception if the affected bean property has not been
populated; this allows for eager and explicit failure, avoiding NullPointerExceptions
or the like later on. It is still recommended that you put assertions into the bean
class itself, for example, into an init method. Doing so enforces those required
references and values even when you use the class outside of a container.
1.9.2. @Autowired
|
JSR 330’s |
You can apply the @Autowired annotation to constructors:
public class MovieRecommender {

    private final CustomerPreferenceDao customerPreferenceDao;

    @Autowired
    public MovieRecommender(CustomerPreferenceDao customerPreferenceDao) {
        this.customerPreferenceDao = customerPreferenceDao;
    }

    // ...
}|
As of Spring Framework 4.3, an |
As expected, you can also apply the @Autowired annotation to "traditional" setter
methods:
public class SimpleMovieLister {

    private MovieFinder movieFinder;

    @Autowired
    public void setMovieFinder(MovieFinder movieFinder) {
        this.movieFinder = movieFinder;
    }

    // ...
}
You can also apply the annotation to methods with arbitrary names and/or multiple arguments:
public class MovieRecommender {

    private MovieCatalog movieCatalog;

    private CustomerPreferenceDao customerPreferenceDao;

    @Autowired
    public void prepare(MovieCatalog movieCatalog,
            CustomerPreferenceDao customerPreferenceDao) {
        this.movieCatalog = movieCatalog;
        this.customerPreferenceDao = customerPreferenceDao;
    }

    // ...
}
You can apply @Autowired to fields as well and even mix it with constructors:
public class MovieRecommender {

    private final CustomerPreferenceDao customerPreferenceDao;

    @Autowired
    private MovieCatalog movieCatalog;

    @Autowired
    public MovieRecommender(CustomerPreferenceDao customerPreferenceDao) {
        this.customerPreferenceDao = customerPreferenceDao;
    }

    // ...
}|
Make sure that your target components (e.g. For XML-defined beans or component classes found through a classpath scan, the container
usually knows the concrete type upfront. However, for |
It is also possible to provide all beans of a particular type from the
ApplicationContext by adding the annotation to a field or method that expects an array
of that type:
public class MovieRecommender {

    @Autowired
    private MovieCatalog[] movieCatalogs;

    // ...
}
The same applies for typed collections:
public class MovieRecommender {

    private Set<MovieCatalog> movieCatalogs;

    @Autowired
    public void setMovieCatalogs(Set<MovieCatalog> movieCatalogs) {
        this.movieCatalogs = movieCatalogs;
    }

    // ...
}|
Your target beans can implement the The Note that the standard |
Even typed Maps can be autowired as long as the expected key type is String. The Map
values will contain all beans of the expected type, and the keys will contain the
corresponding bean names:
public class MovieRecommender {

    private Map<String, MovieCatalog> movieCatalogs;

    @Autowired
    public void setMovieCatalogs(Map<String, MovieCatalog> movieCatalogs) {
        this.movieCatalogs = movieCatalogs;
    }

    // ...
}
By default, the autowiring fails whenever zero candidate beans are available; the default behavior is to treat annotated methods, constructors, and fields as indicating required dependencies. This behavior can be changed as demonstrated below.
public class SimpleMovieLister {

    private MovieFinder movieFinder;

    @Autowired(required = false)
    public void setMovieFinder(MovieFinder movieFinder) {
        this.movieFinder = movieFinder;
    }

    // ...
}|
Only one annotated constructor per-class can be marked as required, but multiple non-required constructors can be annotated. In that case, each is considered among the candidates and Spring uses the greediest constructor whose dependencies can be satisfied, that is the constructor that has the largest number of arguments. The required attribute of |
Alternatively, you may express the non-required nature of a particular dependency
through Java 8’s java.util.Optional:
public class SimpleMovieLister {

    @Autowired
    public void setMovieFinder(Optional<MovieFinder> movieFinder) {
        ...
    }
}
As of Spring Framework 5.0, you may also use an @Nullable annotation (of any kind
in any package, e.g. javax.annotation.Nullable from JSR-305):
public class SimpleMovieLister {

    @Autowired
    public void setMovieFinder(@Nullable MovieFinder movieFinder) {
        ...
    }
}
You can also use @Autowired for interfaces that are well-known resolvable
dependencies: BeanFactory, ApplicationContext, Environment, ResourceLoader,
ApplicationEventPublisher, and MessageSource. These interfaces and their extended
interfaces, such as ConfigurableApplicationContext or ResourcePatternResolver, are
automatically resolved, with no special setup necessary.
public class MovieRecommender {

    @Autowired
    private ApplicationContext context;

    public MovieRecommender() {
    }

    // ...
}|
|
1.9.3. Fine-tuning annotation-based autowiring with @Primary
Because autowiring by type may lead to multiple candidates, it is often necessary to have
more control over the selection process. One way to accomplish this is with Spring’s
@Primary annotation. @Primary indicates that a particular bean should be given
preference when multiple beans are candidates to be autowired to a single-valued
dependency. If exactly one 'primary' bean exists among the candidates, it will be the
autowired value.
Let’s assume we have the following configuration that defines firstMovieCatalog as the
primary MovieCatalog.
@Configuration
public class MovieConfiguration {

    @Bean
    @Primary
    public MovieCatalog firstMovieCatalog() { ... }

    @Bean
    public MovieCatalog secondMovieCatalog() { ... }

    // ...
}
With such configuration, the following MovieRecommender will be autowired with the
firstMovieCatalog.
public class MovieRecommender {

    @Autowired
    private MovieCatalog movieCatalog;

    // ...
}
The corresponding bean definitions appear as follows.
<?xml version="1.0" encoding="UTF-8"?>
<beans xmlns="http://www.springframework.org/schema/beans"
    xmlns:xsi="http://www.w3.org/2001/XMLSchema-instance"
    xmlns:context="http://www.springframework.org/schema/context"
    xsi:schemaLocation="http://www.springframework.org/schema/beans
        http://www.springframework.org/schema/beans/spring-beans.xsd
        http://www.springframework.org/schema/context
        http://www.springframework.org/schema/context/spring-context.xsd">

    <context:annotation-config/>

    <bean class="example.SimpleMovieCatalog" primary="true">
        <!-- inject any dependencies required by this bean -->
    </bean>

    <bean class="example.SimpleMovieCatalog">
        <!-- inject any dependencies required by this bean -->
    </bean>

    <bean id="movieRecommender" class="example.MovieRecommender"/>

</beans>
1.9.4. Fine-tuning annotation-based autowiring with qualifiers
@Primary is an effective way to use autowiring by type with several instances when one
primary candidate can be determined. When more control over the selection process is
required, Spring’s @Qualifier annotation can be used. You can associate qualifier values
with specific arguments, narrowing the set of type matches so that a specific bean is
chosen for each argument. In the simplest case, this can be a plain descriptive value:
public class MovieRecommender {

    @Autowired
    @Qualifier("main")
    private MovieCatalog movieCatalog;

    // ...
}
The @Qualifier annotation can also be specified on individual constructor arguments or
method parameters:
public class MovieRecommender {

    private MovieCatalog movieCatalog;

    private CustomerPreferenceDao customerPreferenceDao;

    @Autowired
    public void prepare(@Qualifier("main")MovieCatalog movieCatalog,
            CustomerPreferenceDao customerPreferenceDao) {
        this.movieCatalog = movieCatalog;
        this.customerPreferenceDao = customerPreferenceDao;
    }

    // ...
}
The corresponding bean definitions appear as follows. The bean with qualifier value "main" is wired with the constructor argument that is qualified with the same value.
<?xml version="1.0" encoding="UTF-8"?>
<beans xmlns="http://www.springframework.org/schema/beans"
    xmlns:xsi="http://www.w3.org/2001/XMLSchema-instance"
    xmlns:context="http://www.springframework.org/schema/context"
    xsi:schemaLocation="http://www.springframework.org/schema/beans
        http://www.springframework.org/schema/beans/spring-beans.xsd
        http://www.springframework.org/schema/context
        http://www.springframework.org/schema/context/spring-context.xsd">

    <context:annotation-config/>

    <bean class="example.SimpleMovieCatalog">
        <qualifier value="main"/>

        <!-- inject any dependencies required by this bean -->
    </bean>

    <bean class="example.SimpleMovieCatalog">
        <qualifier value="action"/>

        <!-- inject any dependencies required by this bean -->
    </bean>

    <bean id="movieRecommender" class="example.MovieRecommender"/>

</beans>
For a fallback match, the bean name is considered a default qualifier value. Thus you
can define the bean with an id "main" instead of the nested qualifier element, leading
to the same matching result. However, although you can use this convention to refer to
specific beans by name, @Autowired is fundamentally about type-driven injection with
optional semantic qualifiers. This means that qualifier values, even with the bean name
fallback, always have narrowing semantics within the set of type matches; they do not
semantically express a reference to a unique bean id. Good qualifier values are "main"
or "EMEA" or "persistent", expressing characteristics of a specific component that are
independent from the bean id, which may be auto-generated in case of an anonymous bean
definition like the one in the preceding example.
Qualifiers also apply to typed collections, as discussed above, for example, to
Set<MovieCatalog>. In this case, all matching beans according to the declared
qualifiers are injected as a collection. This implies that qualifiers do not have to be
unique; they rather simply constitute filtering criteria. For example, you can define
multiple MovieCatalog beans with the same qualifier value "action", all of which would
be injected into a Set<MovieCatalog> annotated with @Qualifier("action").
|
Letting qualifier values select against target bean names, within the type-matching
candidates, doesn’t even require a That said, if you intend to express annotation-driven injection by name, do not
primarily use For beans that are themselves defined as a collection/map or array type, As of 4.3,
|
You can create your own custom qualifier annotations. Simply define an annotation and
provide the @Qualifier annotation within your definition:
@Target({ElementType.FIELD, ElementType.PARAMETER})
@Retention(RetentionPolicy.RUNTIME)
@Qualifier
public @interface Genre {

    String value();
}
Then you can provide the custom qualifier on autowired fields and parameters:
public class MovieRecommender {

    @Autowired
    @Genre("Action")
    private MovieCatalog actionCatalog;

    private MovieCatalog comedyCatalog;

    @Autowired
    public void setComedyCatalog(@Genre("Comedy") MovieCatalog comedyCatalog) {
        this.comedyCatalog = comedyCatalog;
    }

    // ...
}
Next, provide the information for the candidate bean definitions. You can add
<qualifier/> tags as sub-elements of the <bean/> tag and then specify the type and
value to match your custom qualifier annotations. The type is matched against the
fully-qualified class name of the annotation. Or, as a convenience if no risk of
conflicting names exists, you can use the short class name. Both approaches are
demonstrated in the following example.
<?xml version="1.0" encoding="UTF-8"?>
<beans xmlns="http://www.springframework.org/schema/beans"
    xmlns:xsi="http://www.w3.org/2001/XMLSchema-instance"
    xmlns:context="http://www.springframework.org/schema/context"
    xsi:schemaLocation="http://www.springframework.org/schema/beans
        http://www.springframework.org/schema/beans/spring-beans.xsd
        http://www.springframework.org/schema/context
        http://www.springframework.org/schema/context/spring-context.xsd">

    <context:annotation-config/>

    <bean class="example.SimpleMovieCatalog">
        <qualifier type="Genre" value="Action"/>
        <!-- inject any dependencies required by this bean -->
    </bean>

    <bean class="example.SimpleMovieCatalog">
        <qualifier type="example.Genre" value="Comedy"/>
        <!-- inject any dependencies required by this bean -->
    </bean>

    <bean id="movieRecommender" class="example.MovieRecommender"/>

</beans>
In Classpath scanning and managed components, you will see an annotation-based alternative to providing the qualifier metadata in XML. Specifically, see Providing qualifier metadata with annotations.
In some cases, it may be sufficient to use an annotation without a value. This may be useful when the annotation serves a more generic purpose and can be applied across several different types of dependencies. For example, you may provide an offline catalog that would be searched when no Internet connection is available. First define the simple annotation:
@Target({ElementType.FIELD, ElementType.PARAMETER})
@Retention(RetentionPolicy.RUNTIME)
@Qualifier
public @interface Offline {

}
Then add the annotation to the field or property to be autowired:
public class MovieRecommender {

    @Autowired
    @Offline
    private MovieCatalog offlineCatalog;

    // ...
}
Now the bean definition only needs a qualifier type:
<bean class="example.SimpleMovieCatalog">
    <qualifier type="Offline"/>
    <!-- inject any dependencies required by this bean -->
</bean>
You can also define custom qualifier annotations that accept named attributes in
addition to or instead of the simple value attribute. If multiple attribute values are
then specified on a field or parameter to be autowired, a bean definition must match
all such attribute values to be considered an autowire candidate. As an example,
consider the following annotation definition:
@Target({ElementType.FIELD, ElementType.PARAMETER})
@Retention(RetentionPolicy.RUNTIME)
@Qualifier
public @interface MovieQualifier {

    String genre();

    Format format();
}
In this case Format is an enum:
public enum Format {
    VHS, DVD, BLURAY
}
The fields to be autowired are annotated with the custom qualifier and include values
for both attributes: genre and format.
public class MovieRecommender {

    @Autowired
    @MovieQualifier(format=Format.VHS, genre="Action")
    private MovieCatalog actionVhsCatalog;

    @Autowired
    @MovieQualifier(format=Format.VHS, genre="Comedy")
    private MovieCatalog comedyVhsCatalog;

    @Autowired
    @MovieQualifier(format=Format.DVD, genre="Action")
    private MovieCatalog actionDvdCatalog;

    @Autowired
    @MovieQualifier(format=Format.BLURAY, genre="Comedy")
    private MovieCatalog comedyBluRayCatalog;

    // ...
}
Finally, the bean definitions should contain matching qualifier values. This example
also demonstrates that bean meta attributes may be used instead of the
<qualifier/> sub-elements. If available, the <qualifier/> and its attributes take
precedence, but the autowiring mechanism falls back on the values provided within the
<meta/> tags if no such qualifier is present, as in the last two bean definitions in
the following example.
<?xml version="1.0" encoding="UTF-8"?>
<beans xmlns="http://www.springframework.org/schema/beans"
    xmlns:xsi="http://www.w3.org/2001/XMLSchema-instance"
    xmlns:context="http://www.springframework.org/schema/context"
    xsi:schemaLocation="http://www.springframework.org/schema/beans
        http://www.springframework.org/schema/beans/spring-beans.xsd
        http://www.springframework.org/schema/context
        http://www.springframework.org/schema/context/spring-context.xsd">

    <context:annotation-config/>

    <bean class="example.SimpleMovieCatalog">
        <qualifier type="MovieQualifier">
            <attribute key="format" value="VHS"/>
            <attribute key="genre" value="Action"/>
        </qualifier>
        <!-- inject any dependencies required by this bean -->
    </bean>

    <bean class="example.SimpleMovieCatalog">
        <qualifier type="MovieQualifier">
            <attribute key="format" value="VHS"/>
            <attribute key="genre" value="Comedy"/>
        </qualifier>
        <!-- inject any dependencies required by this bean -->
    </bean>

    <bean class="example.SimpleMovieCatalog">
        <meta key="format" value="DVD"/>
        <meta key="genre" value="Action"/>
        <!-- inject any dependencies required by this bean -->
    </bean>

    <bean class="example.SimpleMovieCatalog">
        <meta key="format" value="BLURAY"/>
        <meta key="genre" value="Comedy"/>
        <!-- inject any dependencies required by this bean -->
    </bean>

</beans>
1.9.5. Using generics as autowiring qualifiers
In addition to the @Qualifier annotation, it is also possible to use Java generic types
as an implicit form of qualification. For example, suppose you have the following
configuration:
@Configuration
public class MyConfiguration {

    @Bean
    public StringStore stringStore() {
        return new StringStore();
    }

    @Bean
    public IntegerStore integerStore() {
        return new IntegerStore();
    }
}
Assuming that beans above implement a generic interface, i.e. Store<String> and
Store<Integer>, you can @Autowire the Store interface and the generic will
be used as a qualifier:
@Autowired
private Store<String> s1; // <String> qualifier, injects the stringStore bean

@Autowired
private Store<Integer> s2; // <Integer> qualifier, injects the integerStore bean
Generic qualifiers also apply when autowiring Lists, Maps and Arrays:
// Inject all Store beans as long as they have an <Integer> generic
// Store<String> beans will not appear in this list
@Autowired
private List<Store<Integer>> s;
1.9.6. CustomAutowireConfigurer
The
CustomAutowireConfigurer
is a BeanFactoryPostProcessor that enables you to register your own custom qualifier
annotation types even if they are not annotated with Spring’s @Qualifier annotation.
<bean id="customAutowireConfigurer"
        class="org.springframework.beans.factory.annotation.CustomAutowireConfigurer">
    <property name="customQualifierTypes">
        <set>
            <value>example.CustomQualifier</value>
        </set>
    </property>
</bean>
The AutowireCandidateResolver determines autowire candidates by:
-
the
autowire-candidatevalue of each bean definition -
any
default-autowire-candidatespattern(s) available on the<beans/>element -
the presence of
@Qualifierannotations and any custom annotations registered with theCustomAutowireConfigurer
When multiple beans qualify as autowire candidates, the determination of a "primary" is
the following: if exactly one bean definition among the candidates has a primary
attribute set to true, it will be selected.
1.9.7. @Resource
Spring also supports injection using the JSR-250 @Resource annotation on fields or
bean property setter methods. This is a common pattern in Java EE 5 and 6, for example
in JSF 1.2 managed beans or JAX-WS 2.0 endpoints. Spring supports this pattern for
Spring-managed objects as well.
@Resource takes a name attribute, and by default Spring interprets that value as the
bean name to be injected. In other words, it follows by-name semantics, as
demonstrated in this example:
public class SimpleMovieLister {

    private MovieFinder movieFinder;

    @Resource(name="myMovieFinder")
    public void setMovieFinder(MovieFinder movieFinder) {
        this.movieFinder = movieFinder;
    }
}
If no name is specified explicitly, the default name is derived from the field name or setter method. In case of a field, it takes the field name; in case of a setter method, it takes the bean property name. So the following example is going to have the bean with name "movieFinder" injected into its setter method:
public class SimpleMovieLister {

    private MovieFinder movieFinder;

    @Resource
    public void setMovieFinder(MovieFinder movieFinder) {
        this.movieFinder = movieFinder;
    }
}|
The name provided with the annotation is resolved as a bean name by the
|
In the exclusive case of @Resource usage with no explicit name specified, and similar
to @Autowired, @Resource finds a primary type match instead of a specific named bean
and resolves well-known resolvable dependencies: the BeanFactory,
ApplicationContext, ResourceLoader, ApplicationEventPublisher, and MessageSource
interfaces.
Thus in the following example, the customerPreferenceDao field first looks for a bean
named customerPreferenceDao, then falls back to a primary type match for the type
CustomerPreferenceDao. The "context" field is injected based on the known resolvable
dependency type ApplicationContext.
public class MovieRecommender {

    @Resource
    private CustomerPreferenceDao customerPreferenceDao;

    @Resource
    private ApplicationContext context;

    public MovieRecommender() {
    }

    // ...
}
1.9.8. @PostConstruct and @PreDestroy
The CommonAnnotationBeanPostProcessor not only recognizes the @Resource annotation
but also the JSR-250 lifecycle annotations. Introduced in Spring 2.5, the support
for these annotations offers yet another alternative to those described in
initialization callbacks and
destruction callbacks. Provided that the
CommonAnnotationBeanPostProcessor is registered within the Spring
ApplicationContext, a method carrying one of these annotations is invoked at the same
point in the lifecycle as the corresponding Spring lifecycle interface method or
explicitly declared callback method. In the example below, the cache will be
pre-populated upon initialization and cleared upon destruction.
public class CachingMovieLister {

    @PostConstruct
    public void populateMovieCache() {
        // populates the movie cache upon initialization...
    }

    @PreDestroy
    public void clearMovieCache() {
        // clears the movie cache upon destruction...
    }
}|
For details about the effects of combining various lifecycle mechanisms, see Combining lifecycle mechanisms. |
1.10. Classpath scanning and managed components
Most examples in this chapter use XML to specify the configuration metadata that produces
each BeanDefinition within the Spring container. The previous section
(Annotation-based container configuration) demonstrates how to provide a lot of the configuration
metadata through source-level annotations. Even in those examples, however, the "base"
bean definitions are explicitly defined in the XML file, while the annotations only drive
the dependency injection. This section describes an option for implicitly detecting the
candidate components by scanning the classpath. Candidate components are classes that
match against a filter criteria and have a corresponding bean definition registered with
the container. This removes the need to use XML to perform bean registration; instead you
can use annotations (for example @Component), AspectJ type expressions, or your own
custom filter criteria to select which classes will have bean definitions registered with
the container.
|
Starting with Spring 3.0, many features provided by the Spring JavaConfig project are
part of the core Spring Framework. This allows you to define beans using Java rather
than using the traditional XML files. Take a look at the |
1.10.1. @Component and further stereotype annotations
The @Repository annotation is a marker for any class that fulfills the role or
stereotype of a repository (also known as Data Access Object or DAO). Among the uses
of this marker is the automatic translation of exceptions as described in
Exception translation.
Spring provides further stereotype annotations: @Component, @Service, and
@Controller. @Component is a generic stereotype for any Spring-managed component.
@Repository, @Service, and @Controller are specializations of @Component for
more specific use cases, for example, in the persistence, service, and presentation
layers, respectively. Therefore, you can annotate your component classes with
@Component, but by annotating them with @Repository, @Service, or @Controller
instead, your classes are more properly suited for processing by tools or associating
with aspects. For example, these stereotype annotations make ideal targets for
pointcuts. It is also possible that @Repository, @Service, and @Controller may
carry additional semantics in future releases of the Spring Framework. Thus, if you are
choosing between using @Component or @Service for your service layer, @Service is
clearly the better choice. Similarly, as stated above, @Repository is already
supported as a marker for automatic exception translation in your persistence layer.
1.10.2. Meta-annotations
Many of the annotations provided by Spring can be used as meta-annotations in your
own code. A meta-annotation is simply an annotation that can be applied to another
annotation. For example, the @Service annotation mentioned above is meta-annotated with
@Component:
@Target(ElementType.TYPE)
@Retention(RetentionPolicy.RUNTIME)
@Documented
@Component // Spring will see this and treat @Service in the same way as @Component
public @interface Service {

    // ....
}
Meta-annotations can also be combined to create composed annotations. For example,
the @RestController annotation from Spring MVC is composed of @Controller and
@ResponseBody.
In addition, composed annotations may optionally redeclare attributes from
meta-annotations to allow user customization. This can be particularly useful when you
want to only expose a subset of the meta-annotation’s attributes. For example, Spring’s
@SessionScope annotation hardcodes the scope name to session but still allows
customization of the proxyMode.
@Target({ElementType.TYPE, ElementType.METHOD})
@Retention(RetentionPolicy.RUNTIME)
@Documented
@Scope(WebApplicationContext.SCOPE_SESSION)
public @interface SessionScope {

    /**
     * Alias for {@link Scope#proxyMode}.
     * <p>Defaults to {@link ScopedProxyMode#TARGET_CLASS}.
     */
    @AliasFor(annotation = Scope.class)
    ScopedProxyMode proxyMode() default ScopedProxyMode.TARGET_CLASS;

}
@SessionScope can then be used without declaring the proxyMode as follows:
@Service
@SessionScope
public class SessionScopedService {
    // ...
}
Or with an overridden value for the proxyMode as follows:
@Service
@SessionScope(proxyMode = ScopedProxyMode.INTERFACES)
public class SessionScopedUserService implements UserService {
    // ...
}
For further details, consult the Spring Annotation Programming Model wiki page.
1.10.3. Automatically detecting classes and registering bean definitions
Spring can automatically detect stereotyped classes and register corresponding
BeanDefinitions with the ApplicationContext. For example, the following two classes
are eligible for such autodetection:
@Service
public class SimpleMovieLister {

    private MovieFinder movieFinder;

    @Autowired
    public SimpleMovieLister(MovieFinder movieFinder) {
        this.movieFinder = movieFinder;
    }
}
@Repository
public class JpaMovieFinder implements MovieFinder {
// implementation elided for clarity
}To autodetect these classes and register the corresponding beans, you need to add
@ComponentScan to your @Configuration class, where the basePackages attribute
is a common parent package for the two classes. (Alternatively, you can specify a
comma/semicolon/space-separated list that includes the parent package of each class.)
@Configuration
@ComponentScan(basePackages = "org.example")
public class AppConfig  {
    ...
}|
For concision, the above may have used the |
The following is an alternative using XML
<?xml version="1.0" encoding="UTF-8"?>
<beans xmlns="http://www.springframework.org/schema/beans"
    xmlns:xsi="http://www.w3.org/2001/XMLSchema-instance"
    xmlns:context="http://www.springframework.org/schema/context"
    xsi:schemaLocation="http://www.springframework.org/schema/beans
        http://www.springframework.org/schema/beans/spring-beans.xsd
        http://www.springframework.org/schema/context
        http://www.springframework.org/schema/context/spring-context.xsd">

    <context:component-scan base-package="org.example"/>

</beans>|
The use of |
|
The scanning of classpath packages requires the presence of corresponding directory entries in the classpath. When you build JARs with Ant, make sure that you do not activate the files-only switch of the JAR task. Also, classpath directories may not get exposed based on security policies in some environments, e.g. standalone apps on JDK 1.7.0_45 and higher (which requires 'Trusted-Library' setup in your manifests; see http://stackoverflow.com/questions/19394570/java-jre-7u45-breaks-classloader-getresources). On JDK 9’s module path (Jigsaw), Spring’s classpath scanning generally works as expected.
However, please make sure that your component classes are exported in your |
Furthermore, the AutowiredAnnotationBeanPostProcessor and
CommonAnnotationBeanPostProcessor are both included implicitly when you use the
component-scan element. That means that the two components are autodetected and
wired together - all without any bean configuration metadata provided in XML.
|
You can disable the registration of |
1.10.4. Using filters to customize scanning
By default, classes annotated with @Component, @Repository, @Service,
@Controller, or a custom annotation that itself is annotated with @Component are the
only detected candidate components. However, you can modify and extend this behavior
simply by applying custom filters. Add them as includeFilters or excludeFilters
parameters of the @ComponentScan annotation (or as include-filter or exclude-filter
sub-elements of the component-scan element). Each filter element requires the type
and expression attributes. The following table describes the filtering options.
| Filter Type | Example Expression | Description |
|---|---|---|
annotation (default) |
|
An annotation to be present at the type level in target components. |
assignable |
|
A class (or interface) that the target components are assignable to (extend/implement). |
aspectj |
|
An AspectJ type expression to be matched by the target components. |
regex |
|
A regex expression to be matched by the target components class names. |
custom |
|
A custom implementation of the |
The following example shows the configuration ignoring all @Repository annotations
and using "stub" repositories instead.
@Configuration
@ComponentScan(basePackages = "org.example",
        includeFilters = @Filter(type = FilterType.REGEX, pattern = ".*Stub.*Repository"),
        excludeFilters = @Filter(Repository.class))
public class AppConfig {
    ...
}
and the equivalent using XML
<beans>
    <context:component-scan base-package="org.example">
        <context:include-filter type="regex"
                expression=".*Stub.*Repository"/>
        <context:exclude-filter type="annotation"
                expression="org.springframework.stereotype.Repository"/>
    </context:component-scan>
</beans>|
You can also disable the default filters by setting |
1.10.5. Defining bean metadata within components
Spring components can also contribute bean definition metadata to the container. You do
this with the same @Bean annotation used to define bean metadata within @Configuration
annotated classes. Here is a simple example:
@Component
public class FactoryMethodComponent {

    @Bean
    @Qualifier("public")
    public TestBean publicInstance() {
        return new TestBean("publicInstance");
    }

    public void doWork() {
        // Component method implementation omitted
    }
}
This class is a Spring component that has application-specific code contained in its
doWork() method. However, it also contributes a bean definition that has a factory
method referring to the method publicInstance(). The @Bean annotation identifies the
factory method and other bean definition properties, such as a qualifier value through
the @Qualifier annotation. Other method level annotations that can be specified are
@Scope, @Lazy, and custom qualifier annotations.
|
In addition to its role for component initialization, the |
Autowired fields and methods are supported as previously discussed, with additional
support for autowiring of @Bean methods:
@Component
public class FactoryMethodComponent {

    private static int i;

    @Bean
    @Qualifier("public")
    public TestBean publicInstance() {
        return new TestBean("publicInstance");
    }

    // use of a custom qualifier and autowiring of method parameters
    @Bean
    protected TestBean protectedInstance(
            @Qualifier("public") TestBean spouse,
            @Value("#{privateInstance.age}") String country) {
        TestBean tb = new TestBean("protectedInstance", 1);
        tb.setSpouse(spouse);
        tb.setCountry(country);
        return tb;
    }

    @Bean
    private TestBean privateInstance() {
        return new TestBean("privateInstance", i++);
    }

    @Bean
    @RequestScope
    public TestBean requestScopedInstance() {
        return new TestBean("requestScopedInstance", 3);
    }
}
The example autowires the String method parameter country to the value of the Age
property on another bean named privateInstance. A Spring Expression Language element
defines the value of the property through the notation #{ <expression> }. For @Value
annotations, an expression resolver is preconfigured to look for bean names when
resolving expression text.
As of Spring Framework 4.3, you may also declare a factory method parameter of type
InjectionPoint (or its more specific subclass DependencyDescriptor) in order to
access the requesting injection point that triggers the creation of the current bean.
Note that this will only apply to the actual creation of bean instances, not to the
injection of existing instances. As a consequence, this feature makes most sense for
beans of prototype scope. For other scopes, the factory method will only ever see the
injection point which triggered the creation of a new bean instance in the given scope:
for example, the dependency that triggered the creation of a lazy singleton bean.
Use the provided injection point metadata with semantic care in such scenarios.
@Component
public class FactoryMethodComponent {

    @Bean @Scope("prototype")
    public TestBean prototypeInstance(InjectionPoint injectionPoint) {
        return new TestBean("prototypeInstance for " + injectionPoint.getMember());
    }
}
The @Bean methods in a regular Spring component are processed differently than their
counterparts inside a Spring @Configuration class. The difference is that @Component
classes are not enhanced with CGLIB to intercept the invocation of methods and fields.
CGLIB proxying is the means by which invoking methods or fields within @Bean methods
in @Configuration classes creates bean metadata references to collaborating objects;
such methods are not invoked with normal Java semantics but rather go through the
container in order to provide the usual lifecycle management and proxying of Spring
beans even when referring to other beans via programmatic calls to @Bean methods.
In contrast, invoking a method or field in an @Bean method within a plain @Component
class has standard Java semantics, with no special CGLIB processing or other
constraints applying.
|
You may declare Note that calls to static The Java language visibility of
Finally, note that a single class may hold multiple |
1.10.6. Naming autodetected components
When a component is autodetected as part of the scanning process, its bean name is
generated by the BeanNameGenerator strategy known to that scanner. By default, any
Spring stereotype annotation (@Component, @Repository, @Service, and
@Controller) that contains a name value will thereby provide that name to the
corresponding bean definition.
If such an annotation contains no name value or for any other detected component (such
as those discovered by custom filters), the default bean name generator returns the
uncapitalized non-qualified class name. For example, if the following two components
were detected, the names would be myMovieLister and movieFinderImpl:
@Service("myMovieLister")
public class SimpleMovieLister {
    // ...
}
@Repository
public class MovieFinderImpl implements MovieFinder {
// ...
}|
If you do not want to rely on the default bean-naming strategy, you can provide a custom
bean-naming strategy. First, implement the
|
@Configuration
@ComponentScan(basePackages = "org.example", nameGenerator = MyNameGenerator.class)
public class AppConfig {
...
}<beans>
<context:component-scan base-package="org.example"
name-generator="org.example.MyNameGenerator" />
</beans>As a general rule, consider specifying the name with the annotation whenever other components may be making explicit references to it. On the other hand, the auto-generated names are adequate whenever the container is responsible for wiring.
1.10.7. Providing a scope for autodetected components
As with Spring-managed components in general, the default and most common scope for
autodetected components is singleton. However, sometimes you need a different scope
which can be specified via the @Scope annotation. Simply provide the name of the scope
within the annotation:
@Scope("prototype")
@Repository
public class MovieFinderImpl implements MovieFinder {
    // ...
}For details on web-specific scopes, see Request, session, application, and WebSocket scopes.
|
To provide a custom strategy for scope resolution rather than relying on the
annotation-based approach, implement the
|
@Configuration
@ComponentScan(basePackages = "org.example", scopeResolver = MyScopeResolver.class)
public class AppConfig {
    ...
}
<beans>
<context:component-scan base-package="org.example"
scope-resolver="org.example.MyScopeResolver" />
</beans>When using certain non-singleton scopes, it may be necessary to generate proxies for the scoped objects. The reasoning is described in Scoped beans as dependencies. For this purpose, a scoped-proxy attribute is available on the component-scan element. The three possible values are: no, interfaces, and targetClass. For example, the following configuration will result in standard JDK dynamic proxies:
@Configuration
@ComponentScan(basePackages = "org.example", scopedProxy = ScopedProxyMode.INTERFACES)
public class AppConfig {
    ...
}
<beans>
<context:component-scan base-package="org.example"
scoped-proxy="interfaces" />
</beans>1.10.8. Providing qualifier metadata with annotations
The @Qualifier annotation is discussed in Fine-tuning annotation-based autowiring with qualifiers.
The examples in that section demonstrate the use of the @Qualifier annotation and
custom qualifier annotations to provide fine-grained control when you resolve autowire
candidates. Because those examples were based on XML bean definitions, the qualifier
metadata was provided on the candidate bean definitions using the qualifier or meta
sub-elements of the bean element in the XML. When relying upon classpath scanning for
autodetection of components, you provide the qualifier metadata with type-level
annotations on the candidate class. The following three examples demonstrate this
technique:
@Component
@Qualifier("Action")
public class ActionMovieCatalog implements MovieCatalog {
    // ...
}
@Component
@Genre("Action")
public class ActionMovieCatalog implements MovieCatalog {
// ...
}@Component
@Offline
public class CachingMovieCatalog implements MovieCatalog {
// ...
}|
As with most annotation-based alternatives, keep in mind that the annotation metadata is bound to the class definition itself, while the use of XML allows for multiple beans of the same type to provide variations in their qualifier metadata, because that metadata is provided per-instance rather than per-class. |
1.10.9. Generating an index of candidate components
While classpath scanning is very fast, it is possible to improve the startup performance
of large applications by creating a static list of candidates at compilation time. In this
mode, all modules of the application must use this mechanism as, when the
ApplicationContext detects such index, it will automatically use it rather than scanning
the classpath.
To generate the index, simply add an additional dependency to each module that contains components that are target for component scan directives:
<dependencies>
    <dependency>
        <groupId>org.springframework</groupId>
        <artifactId>spring-context-indexer</artifactId>
        <version>5.0.3.RELEASE</version>
        <optional>true</optional>
    </dependency>
</dependencies>
Or, using Gradle:
dependencies {
    compileOnly("org.springframework:spring-context-indexer:5.0.3.RELEASE")
}
That process will generate a META-INF/spring.components file that is going to be
included in the jar.
|
When working with this mode in your IDE, the |
|
The index is enabled automatically when a |
1.11. Using JSR 330 Standard Annotations
Starting with Spring 3.0, Spring offers support for JSR-330 standard annotations (Dependency Injection). Those annotations are scanned in the same way as the Spring annotations. You just need to have the relevant jars in your classpath.
|
If you are using Maven, the |
1.11.1. Dependency Injection with @Inject and @Named
Instead of @Autowired, @javax.inject.Inject may be used as follows:
import javax.inject.Inject;

public class SimpleMovieLister {

    private MovieFinder movieFinder;

    @Inject
    public void setMovieFinder(MovieFinder movieFinder) {
        this.movieFinder = movieFinder;
    }

    public void listMovies() {
        this.movieFinder.findMovies(...);
        ...
    }
}
As with @Autowired, it is possible to use @Inject at the field level, method level
and constructor-argument level. Furthermore, you may declare your injection point as a
Provider, allowing for on-demand access to beans of shorter scopes or lazy access to
other beans through a Provider.get() call. As a variant of the example above:
import javax.inject.Inject;
import javax.inject.Provider;

public class SimpleMovieLister {

    private Provider<MovieFinder> movieFinder;

    @Inject
    public void setMovieFinder(Provider<MovieFinder> movieFinder) {
        this.movieFinder = movieFinder;
    }

    public void listMovies() {
        this.movieFinder.get().findMovies(...);
        ...
    }
}
If you would like to use a qualified name for the dependency that should be injected,
you should use the @Named annotation as follows:
import javax.inject.Inject;
import javax.inject.Named;

public class SimpleMovieLister {

    private MovieFinder movieFinder;

    @Inject
    public void setMovieFinder(@Named("main") MovieFinder movieFinder) {
        this.movieFinder = movieFinder;
    }

    // ...
}
Like @Autowired, @Inject can also be used with java.util.Optional or
@Nullable. This is even more applicable here since @Inject does not have
a required attribute.
public class SimpleMovieLister {

    @Inject
    public void setMovieFinder(Optional<MovieFinder> movieFinder) {
        ...
    }
}
public class SimpleMovieLister {
@Inject
public void setMovieFinder(@Nullable MovieFinder movieFinder) {
...
}
}1.11.2. @Named and @ManagedBean: standard equivalents to the @Component annotation
Instead of @Component, @javax.inject.Named or javax.annotation.ManagedBean may be
used as follows:
import javax.inject.Inject;
import javax.inject.Named;

@Named("movieListener")  // @ManagedBean("movieListener") could be used as well
public class SimpleMovieLister {

    private MovieFinder movieFinder;

    @Inject
    public void setMovieFinder(MovieFinder movieFinder) {
        this.movieFinder = movieFinder;
    }

    // ...
}
It is very common to use @Component without specifying a name for the component.
@Named can be used in a similar fashion:
import javax.inject.Inject;
import javax.inject.Named;

@Named
public class SimpleMovieLister {

    private MovieFinder movieFinder;

    @Inject
    public void setMovieFinder(MovieFinder movieFinder) {
        this.movieFinder = movieFinder;
    }

    // ...
}
When using @Named or @ManagedBean, it is possible to use component scanning in the
exact same way as when using Spring annotations:
@Configuration
@ComponentScan(basePackages = "org.example")
public class AppConfig  {
    ...
}|
In contrast to |
1.11.3. Limitations of JSR-330 standard annotations
When working with standard annotations, it is important to know that some significant features are not available as shown in the table below:
| Spring | javax.inject.* | javax.inject restrictions / comments |
|---|---|---|
@Autowired |
@Inject |
|
@Component |
@Named / @ManagedBean |
JSR-330 does not provide a composable model, just a way to identify named components. |
@Scope("singleton") |
@Singleton |
The JSR-330 default scope is like Spring’s |
@Qualifier |
@Qualifier / @Named |
|
@Value |
- |
no equivalent |
@Required |
- |
no equivalent |
@Lazy |
- |
no equivalent |
ObjectFactory |
Provider |
|
1.12. Java-based container configuration
1.12.1. Basic concepts: @Bean and @Configuration
The central artifacts in Spring’s new Java-configuration support are
@Configuration-annotated classes and @Bean-annotated methods.
The @Bean annotation is used to indicate that a method instantiates, configures and
initializes a new object to be managed by the Spring IoC container. For those familiar
with Spring’s <beans/> XML configuration the @Bean annotation plays the same role as
the <bean/> element. You can use @Bean annotated methods with any Spring
@Component, however, they are most often used with @Configuration beans.
Annotating a class with @Configuration indicates that its primary purpose is as a
source of bean definitions. Furthermore, @Configuration classes allow inter-bean
dependencies to be defined by simply calling other @Bean methods in the same class.
The simplest possible @Configuration class would read as follows:
@Configuration
public class AppConfig {

    @Bean
    public MyService myService() {
        return new MyServiceImpl();
    }
}
The AppConfig class above would be equivalent to the following Spring <beans/> XML:
<beans>
    <bean id="myService" class="com.acme.services.MyServiceImpl"/>
</beans>The @Bean and @Configuration annotations will be discussed in depth in the sections
below. First, however, we’ll cover the various ways of creating a spring container using
Java-based configuration.
1.12.2. Instantiating the Spring container using AnnotationConfigApplicationContext
The sections below document Spring’s AnnotationConfigApplicationContext, new in Spring
3.0. This versatile ApplicationContext implementation is capable of accepting not only
@Configuration classes as input, but also plain @Component classes and classes
annotated with JSR-330 metadata.
When @Configuration classes are provided as input, the @Configuration class itself
is registered as a bean definition, and all declared @Bean methods within the class
are also registered as bean definitions.
When @Component and JSR-330 classes are provided, they are registered as bean
definitions, and it is assumed that DI metadata such as @Autowired or @Inject are
used within those classes where necessary.
Simple construction
In much the same way that Spring XML files are used as input when instantiating a
ClassPathXmlApplicationContext, @Configuration classes may be used as input when
instantiating an AnnotationConfigApplicationContext. This allows for completely
XML-free usage of the Spring container:
public static void main(String[] args) {
    ApplicationContext ctx = new AnnotationConfigApplicationContext(AppConfig.class);
    MyService myService = ctx.getBean(MyService.class);
    myService.doStuff();
}
As mentioned above, AnnotationConfigApplicationContext is not limited to working only
with @Configuration classes. Any @Component or JSR-330 annotated class may be supplied
as input to the constructor. For example:
public static void main(String[] args) {
    ApplicationContext ctx = new AnnotationConfigApplicationContext(MyServiceImpl.class, Dependency1.class, Dependency2.class);
    MyService myService = ctx.getBean(MyService.class);
    myService.doStuff();
}
The above assumes that MyServiceImpl, Dependency1 and Dependency2 use Spring
dependency injection annotations such as @Autowired.
Building the container programmatically using register(Class<?>…)
An AnnotationConfigApplicationContext may be instantiated using a no-arg constructor
and then configured using the register() method. This approach is particularly useful
when programmatically building an AnnotationConfigApplicationContext.
public static void main(String[] args) {
    AnnotationConfigApplicationContext ctx = new AnnotationConfigApplicationContext();
    ctx.register(AppConfig.class, OtherConfig.class);
    ctx.register(AdditionalConfig.class);
    ctx.refresh();
    MyService myService = ctx.getBean(MyService.class);
    myService.doStuff();
}
Enabling component scanning with scan(String…)
To enable component scanning, just annotate your @Configuration class as follows:
@Configuration
@ComponentScan(basePackages = "com.acme")
public class AppConfig  {
    ...
}|
Experienced Spring users will be familiar with the XML declaration equivalent from
Spring’s |
In the example above, the com.acme package will be scanned, looking for any
@Component-annotated classes, and those classes will be registered as Spring bean
definitions within the container. AnnotationConfigApplicationContext exposes the
scan(String…) method to allow for the same component-scanning functionality:
public static void main(String[] args) {
    AnnotationConfigApplicationContext ctx = new AnnotationConfigApplicationContext();
    ctx.scan("com.acme");
    ctx.refresh();
    MyService myService = ctx.getBean(MyService.class);
}|
Remember that |
Support for web applications with AnnotationConfigWebApplicationContext
A WebApplicationContext variant of AnnotationConfigApplicationContext is available
with AnnotationConfigWebApplicationContext. This implementation may be used when
configuring the Spring ContextLoaderListener servlet listener, Spring MVC
DispatcherServlet, etc. What follows is a web.xml snippet that configures a typical
Spring MVC web application. Note the use of the contextClass context-param and
init-param:
<web-app>
    <!-- Configure ContextLoaderListener to use AnnotationConfigWebApplicationContext
        instead of the default XmlWebApplicationContext -->
    <context-param>
        <param-name>contextClass</param-name>
        <param-value>
            org.springframework.web.context.support.AnnotationConfigWebApplicationContext
        </param-value>
    </context-param>

    <!-- Configuration locations must consist of one or more comma- or space-delimited
        fully-qualified @Configuration classes. Fully-qualified packages may also be
        specified for component-scanning -->
    <context-param>
        <param-name>contextConfigLocation</param-name>
        <param-value>com.acme.AppConfig</param-value>
    </context-param>

    <!-- Bootstrap the root application context as usual using ContextLoaderListener -->
    <listener>
        <listener-class>org.springframework.web.context.ContextLoaderListener</listener-class>
    </listener>

    <!-- Declare a Spring MVC DispatcherServlet as usual -->
    <servlet>
        <servlet-name>dispatcher</servlet-name>
        <servlet-class>org.springframework.web.servlet.DispatcherServlet</servlet-class>
        <!-- Configure DispatcherServlet to use AnnotationConfigWebApplicationContext
            instead of the default XmlWebApplicationContext -->
        <init-param>
            <param-name>contextClass</param-name>
            <param-value>
                org.springframework.web.context.support.AnnotationConfigWebApplicationContext
            </param-value>
        </init-param>
        <!-- Again, config locations must consist of one or more comma- or space-delimited
            and fully-qualified @Configuration classes -->
        <init-param>
            <param-name>contextConfigLocation</param-name>
            <param-value>com.acme.web.MvcConfig</param-value>
        </init-param>
    </servlet>

    <!-- map all requests for /app/* to the dispatcher servlet -->
    <servlet-mapping>
        <servlet-name>dispatcher</servlet-name>
        <url-pattern>/app/*</url-pattern>
    </servlet-mapping>
</web-app>
1.12.3. Using the @Bean annotation
@Bean is a method-level annotation and a direct analog of the XML <bean/> element.
The annotation supports some of the attributes offered by <bean/>, such as:
init-method,
destroy-method,
autowiring and name.
You can use the @Bean annotation in a @Configuration-annotated or in a
@Component-annotated class.
Declaring a bean
To declare a bean, simply annotate a method with the @Bean annotation. You use this
method to register a bean definition within an ApplicationContext of the type
specified as the method’s return value. By default, the bean name will be the same as
the method name. The following is a simple example of a @Bean method declaration:
@Configuration
public class AppConfig {

    @Bean
    public TransferServiceImpl transferService() {
        return new TransferServiceImpl();
    }
}
The preceding configuration is exactly equivalent to the following Spring XML:
<beans>
    <bean id="transferService" class="com.acme.TransferServiceImpl"/>
</beans>
Both declarations make a bean named transferService available in the
ApplicationContext, bound to an object instance of type TransferServiceImpl:
transferService -> com.acme.TransferServiceImpl
You may also declare your @Bean method with an interface (or base class)
return type:
@Configuration
public class AppConfig {

    @Bean
    public TransferService transferService() {
        return new TransferServiceImpl();
    }
}
However, this limits the visibility for advance type prediction to the specified
interface type (TransferService) then, with the full type (TransferServiceImpl)
only known to the container once the affected singleton bean has been instantiated.
Non-lazy singleton beans get instantiated according to their declaration order,
so you may see different type matching results depending on when another component
tries to match by a non-declared type (such as @Autowired TransferServiceImpl
which will only resolve once the "transferService" bean has been instantiated).
|
If you consistently refer to your types by a declared service interface, your
|
Bean dependencies
A @Bean annotated method can have an arbitrary number of parameters describing the
dependencies required to build that bean. For instance if our TransferService
requires an AccountRepository we can materialize that dependency via a method
parameter:
@Configuration
public class AppConfig {

    @Bean
    public TransferService transferService(AccountRepository accountRepository) {
        return new TransferServiceImpl(accountRepository);
    }
}
The resolution mechanism is pretty much identical to constructor-based dependency injection, see the relevant section for more details.
Receiving lifecycle callbacks
Any classes defined with the @Bean annotation support the regular lifecycle callbacks
and can use the @PostConstruct and @PreDestroy annotations from JSR-250, see
JSR-250 annotations for further
details.
The regular Spring lifecycle callbacks are fully supported as
well. If a bean implements InitializingBean, DisposableBean, or Lifecycle, their
respective methods are called by the container.
The standard set of *Aware interfaces such as BeanFactoryAware,
BeanNameAware,
MessageSourceAware,
ApplicationContextAware, and so on are also fully supported.
The @Bean annotation supports specifying arbitrary initialization and destruction
callback methods, much like Spring XML’s init-method and destroy-method attributes
on the bean element:
public class Foo {

    public void init() {
        // initialization logic
    }
}

public class Bar {

    public void cleanup() {
        // destruction logic
    }
}

@Configuration
public class AppConfig {

    @Bean(initMethod = "init")
    public Foo foo() {
        return new Foo();
    }

    @Bean(destroyMethod = "cleanup")
    public Bar bar() {
        return new Bar();
    }
}|
By default, beans defined using Java config that have a public You may want to do that by default for a resource that you acquire via JNDI as its
lifecycle is managed outside the application. In particular, make sure to always do it
for a Also, with |
Of course, in the case of Foo above, it would be equally as valid to call the init()
method directly during construction:
@Configuration
public class AppConfig {

    @Bean
    public Foo foo() {
        Foo foo = new Foo();
        foo.init();
        return foo;
    }

    // ...
}|
When you work directly in Java, you can do anything you like with your objects and do not always need to rely on the container lifecycle! |
Specifying bean scope
Using the @Scope annotation
You can specify that your beans defined with the @Bean annotation should have a
specific scope. You can use any of the standard scopes specified in the
Bean Scopes section.
The default scope is singleton, but you can override this with the @Scope annotation:
@Configuration
public class MyConfiguration {

    @Bean
    @Scope("prototype")
    public Encryptor encryptor() {
        // ...
    }
}
@Scope and scoped-proxy
Spring offers a convenient way of working with scoped dependencies through
scoped proxies. The easiest way to create such
a proxy when using the XML configuration is the <aop:scoped-proxy/> element.
Configuring your beans in Java with a @Scope annotation offers equivalent support with
the proxyMode attribute. The default is no proxy ( ScopedProxyMode.NO), but you can
specify ScopedProxyMode.TARGET_CLASS or ScopedProxyMode.INTERFACES.
If you port the scoped proxy example from the XML reference documentation (see preceding
link) to our @Bean using Java, it would look like the following:
// an HTTP Session-scoped bean exposed as a proxy
@Bean
@SessionScope
public UserPreferences userPreferences() {
    return new UserPreferences();
}

@Bean
public Service userService() {
    UserService service = new SimpleUserService();
    // a reference to the proxied userPreferences bean
    service.setUserPreferences(userPreferences());
    return service;
}
Customizing bean naming
By default, configuration classes use a @Bean method’s name as the name of the
resulting bean. This functionality can be overridden, however, with the name attribute.
@Configuration
public class AppConfig {

    @Bean(name = "myFoo")
    public Foo foo() {
        return new Foo();
    }
}
Bean aliasing
As discussed in Naming beans, it is sometimes desirable to give a single bean
multiple names, otherwise known as bean aliasing. The name attribute of the @Bean
annotation accepts a String array for this purpose.
@Configuration
public class AppConfig {

    @Bean(name = { "dataSource", "subsystemA-dataSource", "subsystemB-dataSource" })
    public DataSource dataSource() {
        // instantiate, configure and return DataSource bean...
    }
}
Bean description
Sometimes it is helpful to provide a more detailed textual description of a bean. This can be particularly useful when beans are exposed (perhaps via JMX) for monitoring purposes.
To add a description to a @Bean the
@Description
annotation can be used:
@Configuration
public class AppConfig {

    @Bean
    @Description("Provides a basic example of a bean")
    public Foo foo() {
        return new Foo();
    }
}
1.12.4. Using the @Configuration annotation
@Configuration is a class-level annotation indicating that an object is a source of
bean definitions. @Configuration classes declare beans via public @Bean annotated
methods. Calls to @Bean methods on @Configuration classes can also be used to define
inter-bean dependencies. See Basic concepts: @Bean and @Configuration for a general introduction.
Injecting inter-bean dependencies
When @Beans have dependencies on one another, expressing that dependency is as simple
as having one bean method call another:
@Configuration
public class AppConfig {

    @Bean
    public Foo foo() {
        return new Foo(bar());
    }

    @Bean
    public Bar bar() {
        return new Bar();
    }
}
In the example above, the foo bean receives a reference to bar via constructor
injection.
|
This method of declaring inter-bean dependencies only works when the |
Lookup method injection
As noted earlier, lookup method injection is an advanced feature that you should use rarely. It is useful in cases where a singleton-scoped bean has a dependency on a prototype-scoped bean. Using Java for this type of configuration provides a natural means for implementing this pattern.
public abstract class CommandManager {
    public Object process(Object commandState) {
        // grab a new instance of the appropriate Command interface
        Command command = createCommand();
        // set the state on the (hopefully brand new) Command instance
        command.setState(commandState);
        return command.execute();
    }

    // okay... but where is the implementation of this method?
    protected abstract Command createCommand();
}
Using Java-configuration support , you can create a subclass of CommandManager where
the abstract createCommand() method is overridden in such a way that it looks up a new
(prototype) command object:
@Bean
@Scope("prototype")
public AsyncCommand asyncCommand() {
    AsyncCommand command = new AsyncCommand();
    // inject dependencies here as required
    return command;
}

@Bean
public CommandManager commandManager() {
    // return new anonymous implementation of CommandManager with command() overridden
    // to return a new prototype Command object
    return new CommandManager() {
        protected Command createCommand() {
            return asyncCommand();
        }
    }
}
Further information about how Java-based configuration works internally
The following example shows a @Bean annotated method being called twice:
@Configuration
public class AppConfig {

    @Bean
    public ClientService clientService1() {
        ClientServiceImpl clientService = new ClientServiceImpl();
        clientService.setClientDao(clientDao());
        return clientService;
    }

    @Bean
    public ClientService clientService2() {
        ClientServiceImpl clientService = new ClientServiceImpl();
        clientService.setClientDao(clientDao());
        return clientService;
    }

    @Bean
    public ClientDao clientDao() {
        return new ClientDaoImpl();
    }
}
clientDao() has been called once in clientService1() and once in clientService2().
Since this method creates a new instance of ClientDaoImpl and returns it, you would
normally expect having 2 instances (one for each service). That definitely would be
problematic: in Spring, instantiated beans have a singleton scope by default. This is
where the magic comes in: All @Configuration classes are subclassed at startup-time
with CGLIB. In the subclass, the child method checks the container first for any
cached (scoped) beans before it calls the parent method and creates a new instance. Note
that as of Spring 3.2, it is no longer necessary to add CGLIB to your classpath because
CGLIB classes have been repackaged under org.springframework.cglib and included directly
within the spring-core JAR.
|
The behavior could be different according to the scope of your bean. We are talking about singletons here. |
|
There are a few restrictions due to the fact that CGLIB dynamically adds features at
startup-time, in particular that configuration classes must not be final. However, as
of 4.3, any constructors are allowed on configuration classes, including the use of
If you prefer to avoid any CGLIB-imposed limitations, consider declaring your |
1.12.5. Composing Java-based configurations
Using the @Import annotation
Much as the <import/> element is used within Spring XML files to aid in modularizing
configurations, the @Import annotation allows for loading @Bean definitions from
another configuration class:
@Configuration
public class ConfigA {

    @Bean
    public A a() {
        return new A();
    }
}

@Configuration
@Import(ConfigA.class)
public class ConfigB {

    @Bean
    public B b() {
        return new B();
    }
}
Now, rather than needing to specify both ConfigA.class and ConfigB.class when
instantiating the context, only ConfigB needs to be supplied explicitly:
public static void main(String[] args) {
ApplicationContext ctx = new AnnotationConfigApplicationContext(ConfigB.class);
// now both beans A and B will be available...
A a = ctx.getBean(A.class);
B b = ctx.getBean(B.class);
}This approach simplifies container instantiation, as only one class needs to be dealt
with, rather than requiring the developer to remember a potentially large number of
@Configuration classes during construction.
|
As of Spring Framework 4.2, |
Injecting dependencies on imported @Bean definitions
The example above works, but is simplistic. In most practical scenarios, beans will have
dependencies on one another across configuration classes. When using XML, this is not an
issue, per se, because there is no compiler involved, and one can simply declare
ref="someBean" and trust that Spring will work it out during container initialization.
Of course, when using @Configuration classes, the Java compiler places constraints on
the configuration model, in that references to other beans must be valid Java syntax.
Fortunately, solving this problem is simple. As we already discussed,
@Bean method can have an arbitrary number of parameters describing the bean
dependencies. Let’s consider a more real-world scenario with several @Configuration
classes, each depending on beans declared in the others:
@Configuration
public class ServiceConfig {
@Bean
public TransferService transferService(AccountRepository accountRepository) {
return new TransferServiceImpl(accountRepository);
}
}
@Configuration
public class RepositoryConfig {
@Bean
public AccountRepository accountRepository(DataSource dataSource) {
return new JdbcAccountRepository(dataSource);
}
}
@Configuration
@Import({ServiceConfig.class, RepositoryConfig.class})
public class SystemTestConfig {
@Bean
public DataSource dataSource() {
// return new DataSource
}
}
public static void main(String[] args) {
ApplicationContext ctx = new AnnotationConfigApplicationContext(SystemTestConfig.class);
// everything wires up across configuration classes...
TransferService transferService = ctx.getBean(TransferService.class);
transferService.transfer(100.00, "A123", "C456");
}There is another way to achieve the same result. Remember that @Configuration classes are
ultimately just another bean in the container: This means that they can take advantage of
@Autowired and @Value injection etc just like any other bean!
|
Make sure that the dependencies you inject that way are of the simplest kind only. Also, be particularly careful with |
@Configuration
public class ServiceConfig {
@Autowired
private AccountRepository accountRepository;
@Bean
public TransferService transferService() {
return new TransferServiceImpl(accountRepository);
}
}
@Configuration
public class RepositoryConfig {
private final DataSource dataSource;
@Autowired
public RepositoryConfig(DataSource dataSource) {
this.dataSource = dataSource;
}
@Bean
public AccountRepository accountRepository() {
return new JdbcAccountRepository(dataSource);
}
}
@Configuration
@Import({ServiceConfig.class, RepositoryConfig.class})
public class SystemTestConfig {
@Bean
public DataSource dataSource() {
// return new DataSource
}
}
public static void main(String[] args) {
ApplicationContext ctx = new AnnotationConfigApplicationContext(SystemTestConfig.class);
// everything wires up across configuration classes...
TransferService transferService = ctx.getBean(TransferService.class);
transferService.transfer(100.00, "A123", "C456");
}|
Constructor injection in |
In the scenario above, using @Autowired works well and provides the desired
modularity, but determining exactly where the autowired bean definitions are declared is
still somewhat ambiguous. For example, as a developer looking at ServiceConfig, how do
you know exactly where the @Autowired AccountRepository bean is declared? It’s not
explicit in the code, and this may be just fine. Remember that the
Spring Tool Suite provides tooling that
can render graphs showing how everything is wired up - that may be all you need. Also,
your Java IDE can easily find all declarations and uses of the AccountRepository type,
and will quickly show you the location of @Bean methods that return that type.
In cases where this ambiguity is not acceptable and you wish to have direct navigation
from within your IDE from one @Configuration class to another, consider autowiring the
configuration classes themselves:
@Configuration
public class ServiceConfig {
@Autowired
private RepositoryConfig repositoryConfig;
@Bean
public TransferService transferService() {
// navigate 'through' the config class to the @Bean method!
return new TransferServiceImpl(repositoryConfig.accountRepository());
}
}In the situation above, it is completely explicit where AccountRepository is defined.
However, ServiceConfig is now tightly coupled to RepositoryConfig; that’s the
tradeoff. This tight coupling can be somewhat mitigated by using interface-based or
abstract class-based @Configuration classes. Consider the following:
@Configuration
public class ServiceConfig {
@Autowired
private RepositoryConfig repositoryConfig;
@Bean
public TransferService transferService() {
return new TransferServiceImpl(repositoryConfig.accountRepository());
}
}
@Configuration
public interface RepositoryConfig {
@Bean
AccountRepository accountRepository();
}
@Configuration
public class DefaultRepositoryConfig implements RepositoryConfig {
@Bean
public AccountRepository accountRepository() {
return new JdbcAccountRepository(...);
}
}
@Configuration
@Import({ServiceConfig.class, DefaultRepositoryConfig.class}) // import the concrete config!
public class SystemTestConfig {
@Bean
public DataSource dataSource() {
// return DataSource
}
}
public static void main(String[] args) {
ApplicationContext ctx = new AnnotationConfigApplicationContext(SystemTestConfig.class);
TransferService transferService = ctx.getBean(TransferService.class);
transferService.transfer(100.00, "A123", "C456");
}Now ServiceConfig is loosely coupled with respect to the concrete
DefaultRepositoryConfig, and built-in IDE tooling is still useful: it will be easy for
the developer to get a type hierarchy of RepositoryConfig implementations. In this
way, navigating @Configuration classes and their dependencies becomes no different
than the usual process of navigating interface-based code.
|
If you would like to influence the startup creation order of certain beans, consider
declaring some of them as |
Conditionally include @Configuration classes or @Bean methods
It is often useful to conditionally enable or disable a complete @Configuration class,
or even individual @Bean methods, based on some arbitrary system state. One common
example of this is to use the @Profile annotation to activate beans only when a specific
profile has been enabled in the Spring Environment (see Bean definition profiles
for details).
The @Profile annotation is actually implemented using a much more flexible annotation
called @Conditional.
The @Conditional annotation indicates specific
org.springframework.context.annotation.Condition implementations that should be
consulted before a @Bean is registered.
Implementations of the Condition interface simply provide a matches(…)
method that returns true or false. For example, here is the actual
Condition implementation used for @Profile:
@Override
public boolean matches(ConditionContext context, AnnotatedTypeMetadata metadata) {
if (context.getEnvironment() != null) {
// Read the @Profile annotation attributes
MultiValueMap<String, Object> attrs = metadata.getAllAnnotationAttributes(Profile.class.getName());
if (attrs != null) {
for (Object value : attrs.get("value")) {
if (context.getEnvironment().acceptsProfiles(((String[]) value))) {
return true;
}
}
return false;
}
}
return true;
}See the
@Conditional javadocs for more detail.
Combining Java and XML configuration
Spring’s @Configuration class support does not aim to be a 100% complete replacement
for Spring XML. Some facilities such as Spring XML namespaces remain an ideal way to
configure the container. In cases where XML is convenient or necessary, you have a
choice: either instantiate the container in an "XML-centric" way using, for example,
ClassPathXmlApplicationContext, or in a "Java-centric" fashion using
AnnotationConfigApplicationContext and the @ImportResource annotation to import XML
as needed.
XML-centric use of @Configuration classes
It may be preferable to bootstrap the Spring container from XML and include
@Configuration classes in an ad-hoc fashion. For example, in a large existing codebase
that uses Spring XML, it will be easier to create @Configuration classes on an
as-needed basis and include them from the existing XML files. Below you’ll find the
options for using @Configuration classes in this kind of "XML-centric" situation.
Remember that @Configuration classes are ultimately just bean definitions in the
container. In this example, we create a @Configuration class named AppConfig and
include it within system-test-config.xml as a <bean/> definition. Because
<context:annotation-config/> is switched on, the container will recognize the
@Configuration annotation and process the @Bean methods declared in AppConfig
properly.
@Configuration
public class AppConfig {
@Autowired
private DataSource dataSource;
@Bean
public AccountRepository accountRepository() {
return new JdbcAccountRepository(dataSource);
}
@Bean
public TransferService transferService() {
return new TransferService(accountRepository());
}
}system-test-config.xml:
<beans>
<!-- enable processing of annotations such as @Autowired and @Configuration -->
<context:annotation-config/>
<context:property-placeholder location="classpath:/com/acme/jdbc.properties"/>
<bean class="com.acme.AppConfig"/>
<bean class="org.springframework.jdbc.datasource.DriverManagerDataSource">
<property name="url" value="${jdbc.url}"/>
<property name="username" value="${jdbc.username}"/>
<property name="password" value="${jdbc.password}"/>
</bean>
</beans>jdbc.properties:
jdbc.url=jdbc:hsqldb:hsql://localhost/xdb jdbc.username=sa jdbc.password=
public static void main(String[] args) {
ApplicationContext ctx = new ClassPathXmlApplicationContext("classpath:/com/acme/system-test-config.xml");
TransferService transferService = ctx.getBean(TransferService.class);
// ...
}|
In |
Because @Configuration is meta-annotated with @Component, @Configuration-annotated
classes are automatically candidates for component scanning. Using the same scenario as
above, we can redefine system-test-config.xml to take advantage of component-scanning.
Note that in this case, we don’t need to explicitly declare
<context:annotation-config/>, because <context:component-scan/> enables the same
functionality.
system-test-config.xml:
<beans>
<!-- picks up and registers AppConfig as a bean definition -->
<context:component-scan base-package="com.acme"/>
<context:property-placeholder location="classpath:/com/acme/jdbc.properties"/>
<bean class="org.springframework.jdbc.datasource.DriverManagerDataSource">
<property name="url" value="${jdbc.url}"/>
<property name="username" value="${jdbc.username}"/>
<property name="password" value="${jdbc.password}"/>
</bean>
</beans>@Configuration class-centric use of XML with @ImportResource
In applications where @Configuration classes are the primary mechanism for configuring
the container, it will still likely be necessary to use at least some XML. In these
scenarios, simply use @ImportResource and define only as much XML as is needed. Doing
so achieves a "Java-centric" approach to configuring the container and keeps XML to a
bare minimum.
@Configuration
@ImportResource("classpath:/com/acme/properties-config.xml")
public class AppConfig {
@Value("${jdbc.url}")
private String url;
@Value("${jdbc.username}")
private String username;
@Value("${jdbc.password}")
private String password;
@Bean
public DataSource dataSource() {
return new DriverManagerDataSource(url, username, password);
}
}properties-config.xml
<beans>
<context:property-placeholder location="classpath:/com/acme/jdbc.properties"/>
</beans>jdbc.properties jdbc.url=jdbc:hsqldb:hsql://localhost/xdb jdbc.username=sa jdbc.password=
public static void main(String[] args) {
ApplicationContext ctx = new AnnotationConfigApplicationContext(AppConfig.class);
TransferService transferService = ctx.getBean(TransferService.class);
// ...
}1.13. Environment abstraction
The Environment
is an abstraction integrated in the container that models two key
aspects of the application environment: profiles
and properties.
A profile is a named, logical group of bean definitions to be registered with the
container only if the given profile is active. Beans may be assigned to a profile
whether defined in XML or via annotations. The role of the Environment object with
relation to profiles is in determining which profiles (if any) are currently active,
and which profiles (if any) should be active by default.
Properties play an important role in almost all applications, and may originate from
a variety of sources: properties files, JVM system properties, system environment
variables, JNDI, servlet context parameters, ad-hoc Properties objects, Maps, and so
on. The role of the Environment object with relation to properties is to provide the
user with a convenient service interface for configuring property sources and resolving
properties from them.
1.13.1. Bean definition profiles
Bean definition profiles is a mechanism in the core container that allows for registration of different beans in different environments. The word environment can mean different things to different users and this feature can help with many use cases, including:
-
working against an in-memory datasource in development vs looking up that same datasource from JNDI when in QA or production
-
registering monitoring infrastructure only when deploying an application into a performance environment
-
registering customized implementations of beans for customer A vs. customer B deployments
Let’s consider the first use case in a practical application that requires a
DataSource. In a test environment, the configuration may look like this:
@Bean
public DataSource dataSource() {
return new EmbeddedDatabaseBuilder()
.setType(EmbeddedDatabaseType.HSQL)
.addScript("my-schema.sql")
.addScript("my-test-data.sql")
.build();
}Let’s now consider how this application will be deployed into a QA or production
environment, assuming that the datasource for the application will be registered
with the production application server’s JNDI directory. Our dataSource bean
now looks like this:
@Bean(destroyMethod="")
public DataSource dataSource() throws Exception {
Context ctx = new InitialContext();
return (DataSource) ctx.lookup("java:comp/env/jdbc/datasource");
}The problem is how to switch between using these two variations based on the
current environment. Over time, Spring users have devised a number of ways to
get this done, usually relying on a combination of system environment variables
and XML <import/> statements containing ${placeholder} tokens that resolve
to the correct configuration file path depending on the value of an environment
variable. Bean definition profiles is a core container feature that provides a
solution to this problem.
If we generalize the example use case above of environment-specific bean definitions, we end up with the need to register certain bean definitions in certain contexts, while not in others. You could say that you want to register a certain profile of bean definitions in situation A, and a different profile in situation B. Let’s first see how we can update our configuration to reflect this need.
@Profile
The @Profile
annotation allows you to indicate that a component is eligible for registration
when one or more specified profiles are active. Using our example above, we
can rewrite the dataSource configuration as follows:
@Configuration
@Profile("development")
public class StandaloneDataConfig {
@Bean
public DataSource dataSource() {
return new EmbeddedDatabaseBuilder()
.setType(EmbeddedDatabaseType.HSQL)
.addScript("classpath:com/bank/config/sql/schema.sql")
.addScript("classpath:com/bank/config/sql/test-data.sql")
.build();
}
}@Configuration
@Profile("production")
public class JndiDataConfig {
@Bean(destroyMethod="")
public DataSource dataSource() throws Exception {
Context ctx = new InitialContext();
return (DataSource) ctx.lookup("java:comp/env/jdbc/datasource");
}
}|
As mentioned before, with |
@Profile can be used as a meta-annotation for the purpose
of creating a custom composed annotation. The following example defines a custom
@Production annotation that can be used as a drop-in replacement for
@Profile("production"):
@Target(ElementType.TYPE)
@Retention(RetentionPolicy.RUNTIME)
@Profile("production")
public @interface Production {
}|
If a |
@Profile can also be declared at the method level to include only one particular bean
of a configuration class, e.g. for alternative variants of a particular bean:
@Configuration
public class AppConfig {
@Bean("dataSource")
@Profile("development")
public DataSource standaloneDataSource() {
return new EmbeddedDatabaseBuilder()
.setType(EmbeddedDatabaseType.HSQL)
.addScript("classpath:com/bank/config/sql/schema.sql")
.addScript("classpath:com/bank/config/sql/test-data.sql")
.build();
}
@Bean("dataSource")
@Profile("production")
public DataSource jndiDataSource() throws Exception {
Context ctx = new InitialContext();
return (DataSource) ctx.lookup("java:comp/env/jdbc/datasource");
}
}|
With If you would like to define alternative beans with different profile conditions,
use distinct Java method names pointing to the same bean name via the |
XML bean definition profiles
The XML counterpart is the profile attribute of the <beans> element. Our sample
configuration above can be rewritten in two XML files as follows:
<beans profile="development"
xmlns="http://www.springframework.org/schema/beans"
xmlns:xsi="http://www.w3.org/2001/XMLSchema-instance"
xmlns:jdbc="http://www.springframework.org/schema/jdbc"
xsi:schemaLocation="...">
<jdbc:embedded-database id="dataSource">
<jdbc:script location="classpath:com/bank/config/sql/schema.sql"/>
<jdbc:script location="classpath:com/bank/config/sql/test-data.sql"/>
</jdbc:embedded-database>
</beans><beans profile="production"
xmlns="http://www.springframework.org/schema/beans"
xmlns:xsi="http://www.w3.org/2001/XMLSchema-instance"
xmlns:jee="http://www.springframework.org/schema/jee"
xsi:schemaLocation="...">
<jee:jndi-lookup id="dataSource" jndi-name="java:comp/env/jdbc/datasource"/>
</beans>It is also possible to avoid that split and nest <beans/> elements within the same file:
<beans xmlns="http://www.springframework.org/schema/beans"
xmlns:xsi="http://www.w3.org/2001/XMLSchema-instance"
xmlns:jdbc="http://www.springframework.org/schema/jdbc"
xmlns:jee="http://www.springframework.org/schema/jee"
xsi:schemaLocation="...">
<!-- other bean definitions -->
<beans profile="development">
<jdbc:embedded-database id="dataSource">
<jdbc:script location="classpath:com/bank/config/sql/schema.sql"/>
<jdbc:script location="classpath:com/bank/config/sql/test-data.sql"/>
</jdbc:embedded-database>
</beans>
<beans profile="production">
<jee:jndi-lookup id="dataSource" jndi-name="java:comp/env/jdbc/datasource"/>
</beans>
</beans>The spring-bean.xsd has been constrained to allow such elements only as the
last ones in the file. This should help provide flexibility without incurring
clutter in the XML files.
Activating a profile
Now that we have updated our configuration, we still need to instruct Spring which
profile is active. If we started our sample application right now, we would see
a NoSuchBeanDefinitionException thrown, because the container could not find
the Spring bean named dataSource.
Activating a profile can be done in several ways, but the most straightforward is to do
it programmatically against the Environment API which is available via an
ApplicationContext:
AnnotationConfigApplicationContext ctx = new AnnotationConfigApplicationContext();
ctx.getEnvironment().setActiveProfiles("development");
ctx.register(SomeConfig.class, StandaloneDataConfig.class, JndiDataConfig.class);
ctx.refresh();In addition, profiles may also be activated declaratively through the
spring.profiles.active property which may be specified through system environment
variables, JVM system properties, servlet context parameters in web.xml, or even as an
entry in JNDI (see PropertySource abstraction). In integration tests, active
profiles can be declared via the @ActiveProfiles annotation in the spring-test module
(see Context configuration with environment profiles).
Note that profiles are not an "either-or" proposition; it is possible to activate multiple
profiles at once. Programmatically, simply provide multiple profile names to the
setActiveProfiles() method, which accepts String… varargs:
ctx.getEnvironment().setActiveProfiles("profile1", "profile2");Declaratively, spring.profiles.active may accept a comma-separated list of profile names:
-Dspring.profiles.active="profile1,profile2"Default profile
The default profile represents the profile that is enabled by default. Consider the following:
@Configuration
@Profile("default")
public class DefaultDataConfig {
@Bean
public DataSource dataSource() {
return new EmbeddedDatabaseBuilder()
.setType(EmbeddedDatabaseType.HSQL)
.addScript("classpath:com/bank/config/sql/schema.sql")
.build();
}
}If no profile is active, the dataSource above will be created; this can be
seen as a way to provide a default definition for one or more beans. If any
profile is enabled, the default profile will not apply.
The name of the default profile can be changed using setDefaultProfiles() on
the Environment or declaratively using the spring.profiles.default property.
1.13.2. PropertySource abstraction
Spring’s Environment abstraction provides search operations over a configurable
hierarchy of property sources. To explain fully, consider the following:
ApplicationContext ctx = new GenericApplicationContext();
Environment env = ctx.getEnvironment();
boolean containsFoo = env.containsProperty("foo");
System.out.println("Does my environment contain the 'foo' property? " + containsFoo);In the snippet above, we see a high-level way of asking Spring whether the foo property is
defined for the current environment. To answer this question, the Environment object performs
a search over a set of PropertySource
objects. A PropertySource is a simple abstraction over any source of key-value pairs, and
Spring’s StandardEnvironment
is configured with two PropertySource objects — one representing the set of JVM system properties
(a la System.getProperties()) and one representing the set of system environment variables
(a la System.getenv()).
|
These default property sources are present for |
Concretely, when using the StandardEnvironment, the call to env.containsProperty("foo")
will return true if a foo system property or foo environment variable is present at
runtime.
|
The search performed is hierarchical. By default, system properties have precedence over
environment variables, so if the For a common
|
Most importantly, the entire mechanism is configurable. Perhaps you have a custom source
of properties that you’d like to integrate into this search. No problem — simply implement
and instantiate your own PropertySource and add it to the set of PropertySources for the
current Environment:
ConfigurableApplicationContext ctx = new GenericApplicationContext();
MutablePropertySources sources = ctx.getEnvironment().getPropertySources();
sources.addFirst(new MyPropertySource());In the code above, MyPropertySource has been added with highest precedence in the
search. If it contains a foo property, it will be detected and returned ahead of
any foo property in any other PropertySource. The
MutablePropertySources
API exposes a number of methods that allow for precise manipulation of the set of
property sources.
1.13.3. @PropertySource
The @PropertySource
annotation provides a convenient and declarative mechanism for adding a PropertySource
to Spring’s Environment.
Given a file "app.properties" containing the key/value pair testbean.name=myTestBean,
the following @Configuration class uses @PropertySource in such a way that
a call to testBean.getName() will return "myTestBean".
@Configuration
@PropertySource("classpath:/com/myco/app.properties")
public class AppConfig {
@Autowired
Environment env;
@Bean
public TestBean testBean() {
TestBean testBean = new TestBean();
testBean.setName(env.getProperty("testbean.name"));
return testBean;
}
}Any ${…} placeholders present in a @PropertySource resource location will
be resolved against the set of property sources already registered against the
environment. For example:
@Configuration
@PropertySource("classpath:/com/${my.placeholder:default/path}/app.properties")
public class AppConfig {
@Autowired
Environment env;
@Bean
public TestBean testBean() {
TestBean testBean = new TestBean();
testBean.setName(env.getProperty("testbean.name"));
return testBean;
}
}Assuming that "my.placeholder" is present in one of the property sources already
registered, e.g. system properties or environment variables, the placeholder will
be resolved to the corresponding value. If not, then "default/path" will be used
as a default. If no default is specified and a property cannot be resolved, an
IllegalArgumentException will be thrown.
1.13.4. Placeholder resolution in statements
Historically, the value of placeholders in elements could be resolved only against JVM system properties or environment variables. No longer is this the case. Because the Environment abstraction is integrated throughout the container, it’s easy to route resolution of placeholders through it. This means that you may configure the resolution process in any way you like: change the precedence of searching through system properties and environment variables, or remove them entirely; add your own property sources to the mix as appropriate.
Concretely, the following statement works regardless of where the customer
property is defined, as long as it is available in the Environment:
<beans>
<import resource="com/bank/service/${customer}-config.xml"/>
</beans>1.14. Registering a LoadTimeWeaver
The LoadTimeWeaver is used by Spring to dynamically transform classes as they are
loaded into the Java virtual machine (JVM).
To enable load-time weaving add the @EnableLoadTimeWeaving to one of your
@Configuration classes:
@Configuration
@EnableLoadTimeWeaving
public class AppConfig {
}Alternatively for XML configuration use the context:load-time-weaver element:
<beans>
<context:load-time-weaver/>
</beans>Once configured for the ApplicationContext. Any bean within that ApplicationContext
may implement LoadTimeWeaverAware, thereby receiving a reference to the load-time
weaver instance. This is particularly useful in combination with
Spring’s JPA support where load-time weaving may be necessary
for JPA class transformation.
Consult the LocalContainerEntityManagerFactoryBean javadocs for more detail. For more on
AspectJ load-time weaving, see Load-time weaving with AspectJ in the Spring Framework.
1.15. Additional capabilities of the ApplicationContext
As was discussed in the chapter introduction, the org.springframework.beans.factory
package provides basic functionality for managing and manipulating beans, including in a
programmatic way. The org.springframework.context package adds the
ApplicationContext
interface, which extends the BeanFactory interface, in addition to extending other
interfaces to provide additional functionality in a more application
framework-oriented style. Many people use the ApplicationContext in a completely
declarative fashion, not even creating it programmatically, but instead relying on
support classes such as ContextLoader to automatically instantiate an
ApplicationContext as part of the normal startup process of a Java EE web application.
To enhance BeanFactory functionality in a more framework-oriented style the context
package also provides the following functionality:
-
Access to messages in i18n-style, through the
MessageSourceinterface. -
Access to resources, such as URLs and files, through the
ResourceLoaderinterface. -
Event publication to namely beans implementing the
ApplicationListenerinterface, through the use of theApplicationEventPublisherinterface. -
Loading of multiple (hierarchical) contexts, allowing each to be focused on one particular layer, such as the web layer of an application, through the
HierarchicalBeanFactoryinterface.
1.15.1. Internationalization using MessageSource
The ApplicationContext interface extends an interface called MessageSource, and
therefore provides internationalization (i18n) functionality. Spring also provides the
interface HierarchicalMessageSource, which can resolve messages hierarchically.
Together these interfaces provide the foundation upon which Spring effects message
resolution. The methods defined on these interfaces include:
-
String getMessage(String code, Object[] args, String default, Locale loc): The basic method used to retrieve a message from theMessageSource. When no message is found for the specified locale, the default message is used. Any arguments passed in become replacement values, using theMessageFormatfunctionality provided by the standard library. -
String getMessage(String code, Object[] args, Locale loc): Essentially the same as the previous method, but with one difference: no default message can be specified; if the message cannot be found, aNoSuchMessageExceptionis thrown. -
String getMessage(MessageSourceResolvable resolvable, Locale locale): All properties used in the preceding methods are also wrapped in a class namedMessageSourceResolvable, which you can use with this method.
When an ApplicationContext is loaded, it automatically searches for a MessageSource
bean defined in the context. The bean must have the name messageSource. If such a bean
is found, all calls to the preceding methods are delegated to the message source. If no
message source is found, the ApplicationContext attempts to find a parent containing a
bean with the same name. If it does, it uses that bean as the MessageSource. If the
ApplicationContext cannot find any source for messages, an empty
DelegatingMessageSource is instantiated in order to be able to accept calls to the
methods defined above.
Spring provides two MessageSource implementations, ResourceBundleMessageSource and
StaticMessageSource. Both implement HierarchicalMessageSource in order to do nested
messaging. The StaticMessageSource is rarely used but provides programmatic ways to
add messages to the source. The ResourceBundleMessageSource is shown in the following
example:
<beans>
<bean id="messageSource"
class="org.springframework.context.support.ResourceBundleMessageSource">
<property name="basenames">
<list>
<value>format</value>
<value>exceptions</value>
<value>windows</value>
</list>
</property>
</bean>
</beans>In the example it is assumed you have three resource bundles defined in your classpath
called format, exceptions and windows. Any request to resolve a message will be
handled in the JDK standard way of resolving messages through ResourceBundles. For the
purposes of the example, assume the contents of two of the above resource bundle files
are…
# in format.properties
message=Alligators rock!# in exceptions.properties
argument.required=The {0} argument is required.A program to execute the MessageSource functionality is shown in the next example.
Remember that all ApplicationContext implementations are also MessageSource
implementations and so can be cast to the MessageSource interface.
public static void main(String[] args) {
MessageSource resources = new ClassPathXmlApplicationContext("beans.xml");
String message = resources.getMessage("message", null, "Default", null);
System.out.println(message);
}The resulting output from the above program will be…
Alligators rock!
So to summarize, the MessageSource is defined in a file called beans.xml, which
exists at the root of your classpath. The messageSource bean definition refers to a
number of resource bundles through its basenames property. The three files that are
passed in the list to the basenames property exist as files at the root of your
classpath and are called format.properties, exceptions.properties, and
windows.properties respectively.
The next example shows arguments passed to the message lookup; these arguments will be converted into Strings and inserted into placeholders in the lookup message.
<beans>
<!-- this MessageSource is being used in a web application -->
<bean id="messageSource" class="org.springframework.context.support.ResourceBundleMessageSource">
<property name="basename" value="exceptions"/>
</bean>
<!-- lets inject the above MessageSource into this POJO -->
<bean id="example" class="com.foo.Example">
<property name="messages" ref="messageSource"/>
</bean>
</beans>public class Example {
private MessageSource messages;
public void setMessages(MessageSource messages) {
this.messages = messages;
}
public void execute() {
String message = this.messages.getMessage("argument.required",
new Object [] {"userDao"}, "Required", null);
System.out.println(message);
}
}The resulting output from the invocation of the execute() method will be…
The userDao argument is required.
With regard to internationalization (i18n), Spring’s various MessageSource
implementations follow the same locale resolution and fallback rules as the standard JDK
ResourceBundle. In short, and continuing with the example messageSource defined
previously, if you want to resolve messages against the British (en-GB) locale, you
would create files called format_en_GB.properties, exceptions_en_GB.properties, and
windows_en_GB.properties respectively.
Typically, locale resolution is managed by the surrounding environment of the application. In this example, the locale against which (British) messages will be resolved is specified manually.
# in exceptions_en_GB.properties
argument.required=Ebagum lad, the {0} argument is required, I say, required.
public static void main(final String[] args) {
MessageSource resources = new ClassPathXmlApplicationContext("beans.xml");
String message = resources.getMessage("argument.required",
new Object [] {"userDao"}, "Required", Locale.UK);
System.out.println(message);
}The resulting output from the running of the above program will be…
Ebagum lad, the 'userDao' argument is required, I say, required.
You can also use the MessageSourceAware interface to acquire a reference to any
MessageSource that has been defined. Any bean that is defined in an
ApplicationContext that implements the MessageSourceAware interface is injected with
the application context’s MessageSource when the bean is created and configured.
|
As an alternative to |
1.15.2. Standard and custom events
Event handling in the ApplicationContext is provided through the ApplicationEvent
class and ApplicationListener interface. If a bean that implements the
ApplicationListener interface is deployed into the context, every time an
ApplicationEvent gets published to the ApplicationContext, that bean is notified.
Essentially, this is the standard Observer design pattern.
|
As of Spring 4.2, the event infrastructure has been significantly improved and offer
an annotation-based model as well as the
ability to publish any arbitrary event, that is an object that does not necessarily
extend from |
Spring provides the following standard events:
| Event | Explanation |
|---|---|
|
Published when the |
|
Published when the |
|
Published when the |
|
Published when the |
|
A web-specific event telling all beans that an HTTP request has been serviced. This
event is published after the request is complete. This event is only applicable to
web applications using Spring’s |
You can also create and publish your own custom events. This example demonstrates a
simple class that extends Spring’s ApplicationEvent base class:
public class BlackListEvent extends ApplicationEvent {
private final String address;
private final String test;
public BlackListEvent(Object source, String address, String test) {
super(source);
this.address = address;
this.test = test;
}
// accessor and other methods...
}To publish a custom ApplicationEvent, call the publishEvent() method on an
ApplicationEventPublisher. Typically this is done by creating a class that implements
ApplicationEventPublisherAware and registering it as a Spring bean. The following
example demonstrates such a class:
public class EmailService implements ApplicationEventPublisherAware {
private List<String> blackList;
private ApplicationEventPublisher publisher;
public void setBlackList(List<String> blackList) {
this.blackList = blackList;
}
public void setApplicationEventPublisher(ApplicationEventPublisher publisher) {
this.publisher = publisher;
}
public void sendEmail(String address, String text) {
if (blackList.contains(address)) {
BlackListEvent event = new BlackListEvent(this, address, text);
publisher.publishEvent(event);
return;
}
// send email...
}
}At configuration time, the Spring container will detect that EmailService implements
ApplicationEventPublisherAware and will automatically call
setApplicationEventPublisher(). In reality, the parameter passed in will be the Spring
container itself; you’re simply interacting with the application context via its
ApplicationEventPublisher interface.
To receive the custom ApplicationEvent, create a class that implements
ApplicationListener and register it as a Spring bean. The following example
demonstrates such a class:
public class BlackListNotifier implements ApplicationListener<BlackListEvent> {
private String notificationAddress;
public void setNotificationAddress(String notificationAddress) {
this.notificationAddress = notificationAddress;
}
public void onApplicationEvent(BlackListEvent event) {
// notify appropriate parties via notificationAddress...
}
}Notice that ApplicationListener is generically parameterized with the type of your
custom event, BlackListEvent. This means that the onApplicationEvent() method can
remain type-safe, avoiding any need for downcasting. You may register as many event
listeners as you wish, but note that by default event listeners receive events
synchronously. This means the publishEvent() method blocks until all listeners have
finished processing the event. One advantage of this synchronous and single-threaded
approach is that when a listener receives an event, it operates inside the transaction
context of the publisher if a transaction context is available. If another strategy for
event publication becomes necessary, refer to the javadoc for Spring’s
ApplicationEventMulticaster interface.
The following example shows the bean definitions used to register and configure each of the classes above:
<bean id="emailService" class="example.EmailService">
<property name="blackList">
<list>
<value>[email protected]</value>
<value>[email protected]</value>
<value>[email protected]</value>
</list>
</property>
</bean>
<bean id="blackListNotifier" class="example.BlackListNotifier">
<property name="notificationAddress" value="[email protected]"/>
</bean>Putting it all together, when the sendEmail() method of the emailService bean is
called, if there are any emails that should be blacklisted, a custom event of type
BlackListEvent is published. The blackListNotifier bean is registered as an
ApplicationListener and thus receives the BlackListEvent, at which point it can
notify appropriate parties.
|
Spring’s eventing mechanism is designed for simple communication between Spring beans within the same application context. However, for more sophisticated enterprise integration needs, the separately-maintained Spring Integration project provides complete support for building lightweight, pattern-oriented, event-driven architectures that build upon the well-known Spring programming model. |
Annotation-based event listeners
As of Spring 4.2, an event listener can be registered on any public method of a managed
bean via the EventListener annotation. The BlackListNotifier can be rewritten as
follows:
public class BlackListNotifier {
private String notificationAddress;
public void setNotificationAddress(String notificationAddress) {
this.notificationAddress = notificationAddress;
}
@EventListener
public void processBlackListEvent(BlackListEvent event) {
// notify appropriate parties via notificationAddress...
}
}As you can see above, the method signature once again declares the event type it listens to, but this time with a flexible name and without implementing a specific listener interface. The event type can also be narrowed through generics as long as the actual event type resolves your generic parameter in its implementation hierarchy.
If your method should listen to several events or if you want to define it with no parameter at all, the event type(s) can also be specified on the annotation itself:
@EventListener({ContextStartedEvent.class, ContextRefreshedEvent.class})
public void handleContextStart() {
...
}It is also possible to add additional runtime filtering via the condition attribute of the
annotation that defines a SpEL expression that should match to actually invoke
the method for a particular event.
For instance, our notifier can be rewritten to be only invoked if the test attribute of the
event is equal to foo:
@EventListener(condition = "#blEvent.test == 'foo'")
public void processBlackListEvent(BlackListEvent blEvent) {
// notify appropriate parties via notificationAddress...
}Each SpEL expression evaluates again a dedicated context. The next table lists the items made
available to the context so one can use them for conditional event processing:
| Name | Location | Description | Example |
|---|---|---|---|
Event |
root object |
The actual |
|
Arguments array |
root object |
The arguments (as array) used for invoking the target |
|
Argument name |
evaluation context |
Name of any of the method arguments. If for some reason the names are not available
(e.g. no debug information), the argument names are also available under the |
|
Note that #root.event allows you to access to the underlying event, even if your method
signature actually refers to an arbitrary object that was published.
If you need to publish an event as the result of processing another, just change the method signature to return the event that should be published, something like:
@EventListener
public ListUpdateEvent handleBlackListEvent(BlackListEvent event) {
// notify appropriate parties via notificationAddress and
// then publish a ListUpdateEvent...
}| This feature is not supported for asynchronous listeners. |
This new method will publish a new ListUpdateEvent for every BlackListEvent handled
by the method above. If you need to publish several events, just return a Collection of
events instead.
Asynchronous Listeners
If you want a particular listener to process events asynchronously, simply reuse the
regular @Async support:
@EventListener
@Async
public void processBlackListEvent(BlackListEvent event) {
// BlackListEvent is processed in a separate thread
}Be aware of the following limitations when using asynchronous events:
-
If the event listener throws an
Exceptionit will not be propagated to the caller, checkAsyncUncaughtExceptionHandlerfor more details. -
Such event listener cannot send replies. If you need to send another event as the result of the processing, inject
ApplicationEventPublisherto send the event manually.
Ordering listeners
If you need the listener to be invoked before another one, just add the @Order
annotation to the method declaration:
@EventListener
@Order(42)
public void processBlackListEvent(BlackListEvent event) {
// notify appropriate parties via notificationAddress...
}Generic events
You may also use generics to further define the structure of your event. Consider an
EntityCreatedEvent<T> where T is the type of the actual entity that got created. You
can create the following listener definition to only receive EntityCreatedEvent for a
Person:
@EventListener
public void onPersonCreated(EntityCreatedEvent<Person> event) {
...
}Due to type erasure, this will only work if the event that is fired resolves the generic
parameter(s) on which the event listener filters on (that is something like
class PersonCreatedEvent extends EntityCreatedEvent<Person> { … }).
In certain circumstances, this may become quite tedious if all events follow the same
structure (as it should be the case for the event above). In such a case, you can
implement ResolvableTypeProvider to guide the framework beyond what the runtime
environment provides:
public class EntityCreatedEvent<T>
extends ApplicationEvent implements ResolvableTypeProvider {
public EntityCreatedEvent(T entity) {
super(entity);
}
@Override
public ResolvableType getResolvableType() {
return ResolvableType.forClassWithGenerics(getClass(),
ResolvableType.forInstance(getSource()));
}
}|
This works not only for |
1.15.3. Convenient access to low-level resources
For optimal usage and understanding of application contexts, users should generally
familiarize themselves with Spring’s Resource abstraction, as described in the chapter
Resources.
An application context is a ResourceLoader, which can be used to load Resources. A
Resource is essentially a more feature rich version of the JDK class java.net.URL,
in fact, the implementations of the Resource wrap an instance of java.net.URL where
appropriate. A Resource can obtain low-level resources from almost any location in a
transparent fashion, including from the classpath, a filesystem location, anywhere
describable with a standard URL, and some other variations. If the resource location
string is a simple path without any special prefixes, where those resources come from is
specific and appropriate to the actual application context type.
You can configure a bean deployed into the application context to implement the special
callback interface, ResourceLoaderAware, to be automatically called back at
initialization time with the application context itself passed in as the
ResourceLoader. You can also expose properties of type Resource, to be used to
access static resources; they will be injected into it like any other properties. You
can specify those Resource properties as simple String paths, and rely on a special
JavaBean PropertyEditor that is automatically registered by the context, to convert
those text strings to actual Resource objects when the bean is deployed.
The location path or paths supplied to an ApplicationContext constructor are actually
resource strings, and in simple form are treated appropriately to the specific context
implementation. ClassPathXmlApplicationContext treats a simple location path as a
classpath location. You can also use location paths (resource strings) with special
prefixes to force loading of definitions from the classpath or a URL, regardless of the
actual context type.
1.15.4. Convenient ApplicationContext instantiation for web applications
You can create ApplicationContext instances declaratively by using, for example, a
ContextLoader. Of course you can also create ApplicationContext instances
programmatically by using one of the ApplicationContext implementations.
You can register an ApplicationContext using the ContextLoaderListener as follows:
<context-param>
<param-name>contextConfigLocation</param-name>
<param-value>/WEB-INF/daoContext.xml /WEB-INF/applicationContext.xml</param-value>
</context-param>
<listener>
<listener-class>org.springframework.web.context.ContextLoaderListener</listener-class>
</listener>The listener inspects the contextConfigLocation parameter. If the parameter does not
exist, the listener uses /WEB-INF/applicationContext.xml as a default. When the
parameter does exist, the listener separates the String by using predefined
delimiters (comma, semicolon and whitespace) and uses the values as locations where
application contexts will be searched. Ant-style path patterns are supported as well.
Examples are /WEB-INF/*Context.xml for all files with names ending with "Context.xml",
residing in the "WEB-INF" directory, and /WEB-INF/**/*Context.xml, for all such files
in any subdirectory of "WEB-INF".
1.15.5. Deploying a Spring ApplicationContext as a Java EE RAR file
It is possible to deploy a Spring ApplicationContext as a RAR file, encapsulating the context and all of its required bean classes and library JARs in a Java EE RAR deployment unit. This is the equivalent of bootstrapping a standalone ApplicationContext, just hosted in Java EE environment, being able to access the Java EE servers facilities. RAR deployment is more natural alternative to scenario of deploying a headless WAR file, in effect, a WAR file without any HTTP entry points that is used only for bootstrapping a Spring ApplicationContext in a Java EE environment.
RAR deployment is ideal for application contexts that do not need HTTP entry points but
rather consist only of message endpoints and scheduled jobs. Beans in such a context can
use application server resources such as the JTA transaction manager and JNDI-bound JDBC
DataSources and JMS ConnectionFactory instances, and may also register with the
platform’s JMX server - all through Spring’s standard transaction management and JNDI
and JMX support facilities. Application components can also interact with the
application server’s JCA WorkManager through Spring’s TaskExecutor abstraction.
Check out the javadoc of the
SpringContextResourceAdapter
class for the configuration details involved in RAR deployment.
For a simple deployment of a Spring ApplicationContext as a Java EE RAR file: package
all application classes into a RAR file, which is a standard JAR file with a different
file extension. Add all required library JARs into the root of the RAR archive. Add a
"META-INF/ra.xml" deployment descriptor (as shown in SpringContextResourceAdapters
javadoc) and the corresponding Spring XML bean definition file(s) (typically
"META-INF/applicationContext.xml"), and drop the resulting RAR file into your
application server’s deployment directory.
|
Such RAR deployment units are usually self-contained; they do not expose components to the outside world, not even to other modules of the same application. Interaction with a RAR-based ApplicationContext usually occurs through JMS destinations that it shares with other modules. A RAR-based ApplicationContext may also, for example, schedule some jobs, reacting to new files in the file system (or the like). If it needs to allow synchronous access from the outside, it could for example export RMI endpoints, which of course may be used by other application modules on the same machine. |
1.16. The BeanFactory
The BeanFactory provides the underlying basis for Spring’s IoC functionality but it is
only used directly in integration with other third-party frameworks and is now largely
historical in nature for most users of Spring. The BeanFactory and related interfaces,
such as BeanFactoryAware, InitializingBean, DisposableBean, are still present in
Spring for the purposes of backward compatibility with the large number of third-party
frameworks that integrate with Spring. Often third-party components that can not use
more modern equivalents such as @PostConstruct or @PreDestroy in order to avoid a
dependency on JSR-250.
This section provides additional background into the differences between the
BeanFactory and ApplicationContext and how one might access the IoC container
directly through a classic singleton lookup.
1.16.1. BeanFactory or ApplicationContext?
Use an ApplicationContext unless you have a good reason for not doing so.
Because the ApplicationContext includes all functionality of the BeanFactory, it is
generally recommended over the BeanFactory, except for a few situations such as in
embedded applications running on resource-constrained devices where memory consumption
might be critical and a few extra kilobytes might make a difference. However, for
most typical enterprise applications and systems, the ApplicationContext is what you
will want to use. Spring makes heavy use of the BeanPostProcessor extension point (to effect proxying and so on). If you use only a
plain BeanFactory, a fair amount of support such as transactions and AOP will not take
effect, at least not without some extra steps on your part. This situation could be
confusing because nothing is actually wrong with the configuration.
The following table lists features provided by the BeanFactory and
ApplicationContext interfaces and implementations.
| Feature | BeanFactory |
ApplicationContext |
|---|---|---|
Bean instantiation/wiring |
Yes |
Yes |
Automatic |
No |
Yes |
Automatic |
No |
Yes |
Convenient |
No |
Yes |
|
No |
Yes |
To explicitly register a bean post-processor with a BeanFactory implementation,
you need to write code like this:
DefaultListableBeanFactory factory = new DefaultListableBeanFactory();
// populate the factory with bean definitions
// now register any needed BeanPostProcessor instances
MyBeanPostProcessor postProcessor = new MyBeanPostProcessor();
factory.addBeanPostProcessor(postProcessor);
// now start using the factoryTo explicitly register a BeanFactoryPostProcessor when using a BeanFactory
implementation, you must write code like this:
DefaultListableBeanFactory factory = new DefaultListableBeanFactory();
XmlBeanDefinitionReader reader = new XmlBeanDefinitionReader(factory);
reader.loadBeanDefinitions(new FileSystemResource("beans.xml"));
// bring in some property values from a Properties file
PropertyPlaceholderConfigurer cfg = new PropertyPlaceholderConfigurer();
cfg.setLocation(new FileSystemResource("jdbc.properties"));
// now actually do the replacement
cfg.postProcessBeanFactory(factory);In both cases, the explicit registration step is inconvenient, which is one reason why
the various ApplicationContext implementations are preferred above plain BeanFactory
implementations in the vast majority of Spring-backed applications, especially when
using BeanFactoryPostProcessors and BeanPostProcessors. These mechanisms implement
important functionality such as property placeholder replacement and AOP.
2. Resources
2.1. Introduction
Java’s standard java.net.URL class and standard handlers for various URL prefixes
unfortunately are not quite adequate enough for all access to low-level resources. For
example, there is no standardized URL implementation that may be used to access a
resource that needs to be obtained from the classpath, or relative to a
ServletContext. While it is possible to register new handlers for specialized URL
prefixes (similar to existing handlers for prefixes such as http:), this is generally
quite complicated, and the URL interface still lacks some desirable functionality,
such as a method to check for the existence of the resource being pointed to.
2.2. The Resource interface
Spring’s Resource interface is meant to be a more capable interface for abstracting
access to low-level resources.
public interface Resource extends InputStreamSource {
boolean exists();
boolean isOpen();
URL getURL() throws IOException;
File getFile() throws IOException;
Resource createRelative(String relativePath) throws IOException;
String getFilename();
String getDescription();
}public interface InputStreamSource {
InputStream getInputStream() throws IOException;
}Some of the most important methods from the Resource interface are:
-
getInputStream(): locates and opens the resource, returning anInputStreamfor reading from the resource. It is expected that each invocation returns a freshInputStream. It is the responsibility of the caller to close the stream. -
exists(): returns abooleanindicating whether this resource actually exists in physical form. -
isOpen(): returns abooleanindicating whether this resource represents a handle with an open stream. Iftrue, theInputStreamcannot be read multiple times, and must be read once only and then closed to avoid resource leaks. Will befalsefor all usual resource implementations, with the exception ofInputStreamResource. -
getDescription(): returns a description for this resource, to be used for error output when working with the resource. This is often the fully qualified file name or the actual URL of the resource.
Other methods allow you to obtain an actual URL or File object representing the
resource (if the underlying implementation is compatible, and supports that
functionality).
The Resource abstraction is used extensively in Spring itself, as an argument type in
many method signatures when a resource is needed. Other methods in some Spring APIs
(such as the constructors to various ApplicationContext implementations), take a
String which in unadorned or simple form is used to create a Resource appropriate to
that context implementation, or via special prefixes on the String path, allow the
caller to specify that a specific Resource implementation must be created and used.
While the Resource interface is used a lot with Spring and by Spring, it’s actually
very useful to use as a general utility class by itself in your own code, for access to
resources, even when your code doesn’t know or care about any other parts of Spring.
While this couples your code to Spring, it really only couples it to this small set of
utility classes, which are serving as a more capable replacement for URL, and can be
considered equivalent to any other library you would use for this purpose.
It is important to note that the Resource abstraction does not replace functionality:
it wraps it where possible. For example, a UrlResource wraps a URL, and uses the
wrapped URL to do its work.
2.3. Built-in Resource implementations
There are a number of Resource implementations that come supplied straight out of the
box in Spring:
2.3.1. UrlResource
The UrlResource wraps a java.net.URL, and may be used to access any object that is
normally accessible via a URL, such as files, an HTTP target, an FTP target, etc. All
URLs have a standardized String representation, such that appropriate standardized
prefixes are used to indicate one URL type from another. This includes file: for
accessing filesystem paths, http: for accessing resources via the HTTP protocol,
ftp: for accessing resources via FTP, etc.
A UrlResource is created by Java code explicitly using the UrlResource constructor,
but will often be created implicitly when you call an API method which takes a String
argument which is meant to represent a path. For the latter case, a JavaBeans
PropertyEditor will ultimately decide which type of Resource to create. If the path
string contains a few well-known (to it, that is) prefixes such as classpath:, it will
create an appropriate specialized Resource for that prefix. However, if it doesn’t
recognize the prefix, it will assume the this is just a standard URL string, and will
create a UrlResource.
2.3.2. ClassPathResource
This class represents a resource which should be obtained from the classpath. This uses either the thread context class loader, a given class loader, or a given class for loading resources.
This Resource implementation supports resolution as java.io.File if the class path
resource resides in the file system, but not for classpath resources which reside in a
jar and have not been expanded (by the servlet engine, or whatever the environment is)
to the filesystem. To address this the various Resource implementations always support
resolution as a java.net.URL.
A ClassPathResource is created by Java code explicitly using the ClassPathResource
constructor, but will often be created implicitly when you call an API method which
takes a String argument which is meant to represent a path. For the latter case, a
JavaBeans PropertyEditor will recognize the special prefix classpath: on the string
path, and create a ClassPathResource in that case.
2.3.3. FileSystemResource
This is a Resource implementation for java.io.File handles. It obviously supports
resolution as a File, and as a URL.
2.3.4. ServletContextResource
This is a Resource implementation for ServletContext resources, interpreting
relative paths within the relevant web application’s root directory.
This always supports stream access and URL access, but only allows java.io.File access
when the web application archive is expanded and the resource is physically on the
filesystem. Whether or not it’s expanded and on the filesystem like this, or accessed
directly from the JAR or somewhere else like a DB (it’s conceivable) is actually
dependent on the Servlet container.
2.3.5. InputStreamResource
A Resource implementation for a given InputStream. This should only be used if no
specific Resource implementation is applicable. In particular, prefer
ByteArrayResource or any of the file-based Resource implementations where possible.
In contrast to other Resource implementations, this is a descriptor for an already
opened resource - therefore returning true from isOpen(). Do not use it if you need
to keep the resource descriptor somewhere, or if you need to read a stream multiple
times.
2.4. The ResourceLoader
The ResourceLoader interface is meant to be implemented by objects that can return
(i.e. load) Resource instances.
public interface ResourceLoader {
Resource getResource(String location);
}All application contexts implement the ResourceLoader interface, and therefore all
application contexts may be used to obtain Resource instances.
When you call getResource() on a specific application context, and the location path
specified doesn’t have a specific prefix, you will get back a Resource type that is
appropriate to that particular application context. For example, assume the following
snippet of code was executed against a ClassPathXmlApplicationContext instance:
Resource template = ctx.getResource("some/resource/path/myTemplate.txt");What would be returned would be a ClassPathResource; if the same method was executed
against a FileSystemXmlApplicationContext instance, you’d get back a
FileSystemResource. For a WebApplicationContext, you’d get back a
ServletContextResource, and so on.
As such, you can load resources in a fashion appropriate to the particular application context.
On the other hand, you may also force ClassPathResource to be used, regardless of the
application context type, by specifying the special classpath: prefix:
Resource template = ctx.getResource("classpath:some/resource/path/myTemplate.txt");Similarly, one can force a UrlResource to be used by specifying any of the standard
java.net.URL prefixes:
Resource template = ctx.getResource("file:///some/resource/path/myTemplate.txt");Resource template = ctx.getResource("http://myhost.com/resource/path/myTemplate.txt");The following table summarizes the strategy for converting Strings to Resources:
| Prefix | Example | Explanation |
|---|---|---|
classpath: |
|
Loaded from the classpath. |
file: |
Loaded as a |
|
http: |
Loaded as a |
|
(none) |
|
Depends on the underlying |
2.5. The ResourceLoaderAware interface
The ResourceLoaderAware interface is a special marker interface, identifying objects
that expect to be provided with a ResourceLoader reference.
public interface ResourceLoaderAware {
void setResourceLoader(ResourceLoader resourceLoader);
}When a class implements ResourceLoaderAware and is deployed into an application
context (as a Spring-managed bean), it is recognized as ResourceLoaderAware by the
application context. The application context will then invoke the
setResourceLoader(ResourceLoader), supplying itself as the argument (remember, all
application contexts in Spring implement the ResourceLoader interface).
Of course, since an ApplicationContext is a ResourceLoader, the bean could also
implement the ApplicationContextAware interface and use the supplied application
context directly to load resources, but in general, it’s better to use the specialized
ResourceLoader interface if that’s all that’s needed. The code would just be coupled
to the resource loading interface, which can be considered a utility interface, and not
the whole Spring ApplicationContext interface.
As of Spring 2.5, you can rely upon autowiring of the ResourceLoader as an alternative
to implementing the ResourceLoaderAware interface. The "traditional" constructor and
byType autowiring modes (as described in Autowiring collaborators) are now capable
of providing a dependency of type ResourceLoader for either a constructor argument or
setter method parameter respectively. For more flexibility (including the ability to
autowire fields and multiple parameter methods), consider using the new annotation-based
autowiring features. In that case, the ResourceLoader will be autowired into a field,
constructor argument, or method parameter that is expecting the ResourceLoader type as
long as the field, constructor, or method in question carries the @Autowired
annotation. For more information, see @Autowired.
2.6. Resources as dependencies
If the bean itself is going to determine and supply the resource path through some sort
of dynamic process, it probably makes sense for the bean to use the ResourceLoader
interface to load resources. Consider as an example the loading of a template of some
sort, where the specific resource that is needed depends on the role of the user. If the
resources are static, it makes sense to eliminate the use of the ResourceLoader
interface completely, and just have the bean expose the Resource properties it needs,
and expect that they will be injected into it.
What makes it trivial to then inject these properties, is that all application contexts
register and use a special JavaBeans PropertyEditor which can convert String paths
to Resource objects. So if myBean has a template property of type Resource, it can
be configured with a simple string for that resource, as follows:
<bean id="myBean" class="...">
<property name="template" value="some/resource/path/myTemplate.txt"/>
</bean>Note that the resource path has no prefix, so because the application context itself is
going to be used as the ResourceLoader, the resource itself will be loaded via a
ClassPathResource, FileSystemResource, or ServletContextResource (as appropriate)
depending on the exact type of the context.
If there is a need to force a specific Resource type to be used, then a prefix may be
used. The following two examples show how to force a ClassPathResource and a
UrlResource (the latter being used to access a filesystem file).
<property name="template" value="classpath:some/resource/path/myTemplate.txt"><property name="template" value="file:///some/resource/path/myTemplate.txt"/>2.7. Application contexts and Resource paths
2.7.1. Constructing application contexts
An application context constructor (for a specific application context type) generally takes a string or array of strings as the location path(s) of the resource(s) such as XML files that make up the definition of the context.
When such a location path doesn’t have a prefix, the specific Resource type built from
that path and used to load the bean definitions, depends on and is appropriate to the
specific application context. For example, if you create a
ClassPathXmlApplicationContext as follows:
ApplicationContext ctx = new ClassPathXmlApplicationContext("conf/appContext.xml");The bean definitions will be loaded from the classpath, as a ClassPathResource will be
used. But if you create a FileSystemXmlApplicationContext as follows:
ApplicationContext ctx =
new FileSystemXmlApplicationContext("conf/appContext.xml");The bean definition will be loaded from a filesystem location, in this case relative to the current working directory.
Note that the use of the special classpath prefix or a standard URL prefix on the
location path will override the default type of Resource created to load the
definition. So this FileSystemXmlApplicationContext…
ApplicationContext ctx =
new FileSystemXmlApplicationContext("classpath:conf/appContext.xml");-
will actually load its bean definitions from the classpath. However, it is still a
FileSystemXmlApplicationContext. If it is subsequently used as aResourceLoader, any unprefixed paths will still be treated as filesystem paths.
Constructing ClassPathXmlApplicationContext instances - shortcuts
The ClassPathXmlApplicationContext exposes a number of constructors to enable
convenient instantiation. The basic idea is that one supplies merely a string array
containing just the filenames of the XML files themselves (without the leading path
information), and one also supplies a Class; the ClassPathXmlApplicationContext
will derive the path information from the supplied class.
An example will hopefully make this clear. Consider a directory layout that looks like this:
com/
foo/
services.xml
daos.xml
MessengerService.class
A ClassPathXmlApplicationContext instance composed of the beans defined in the
'services.xml' and 'daos.xml' could be instantiated like so…
ApplicationContext ctx = new ClassPathXmlApplicationContext(
new String[] {"services.xml", "daos.xml"}, MessengerService.class);Please do consult the ClassPathXmlApplicationContext javadocs for details
on the various constructors.
2.7.2. Wildcards in application context constructor resource paths
The resource paths in application context constructor values may be a simple path (as
shown above) which has a one-to-one mapping to a target Resource, or alternately may
contain the special "classpath*:" prefix and/or internal Ant-style regular expressions
(matched using Spring’s PathMatcher utility). Both of the latter are effectively
wildcards
One use for this mechanism is when doing component-style application assembly. All
components can 'publish' context definition fragments to a well-known location path, and
when the final application context is created using the same path prefixed via
classpath*:, all component fragments will be picked up automatically.
Note that this wildcarding is specific to use of resource paths in application context
constructors (or when using the PathMatcher utility class hierarchy directly), and is
resolved at construction time. It has nothing to do with the Resource type itself.
It’s not possible to use the classpath*: prefix to construct an actual Resource, as
a resource points to just one resource at a time.
Ant-style Patterns
When the path location contains an Ant-style pattern, for example:
/WEB-INF/*-context.xml com/mycompany/**/applicationContext.xml file:C:/some/path/*-context.xml classpath:com/mycompany/**/applicationContext.xml
The resolver follows a more complex but defined procedure to try to resolve the
wildcard. It produces a Resource for the path up to the last non-wildcard segment and
obtains a URL from it. If this URL is not a jar: URL or container-specific variant
(e.g. zip: in WebLogic, wsjar in WebSphere, etc.), then a java.io.File is
obtained from it and used to resolve the wildcard by traversing the filesystem. In the
case of a jar URL, the resolver either gets a java.net.JarURLConnection from it or
manually parses the jar URL and then traverses the contents of the jar file to resolve
the wildcards.
Implications on portability
If the specified path is already a file URL (either explicitly, or implicitly because
the base ResourceLoader is a filesystem one, then wildcarding is guaranteed to work in
a completely portable fashion.
If the specified path is a classpath location, then the resolver must obtain the last
non-wildcard path segment URL via a Classloader.getResource() call. Since this is just
a node of the path (not the file at the end) it is actually undefined (in the
ClassLoader javadocs) exactly what sort of a URL is returned in this case. In
practice, it is always a java.io.File representing the directory, where the classpath
resource resolves to a filesystem location, or a jar URL of some sort, where the
classpath resource resolves to a jar location. Still, there is a portability concern on
this operation.
If a jar URL is obtained for the last non-wildcard segment, the resolver must be able to
get a java.net.JarURLConnection from it, or manually parse the jar URL, to be able to
walk the contents of the jar, and resolve the wildcard. This will work in most
environments, but will fail in others, and it is strongly recommended that the wildcard
resolution of resources coming from jars be thoroughly tested in your specific
environment before you rely on it.
The classpath*: prefix
When constructing an XML-based application context, a location string may use the
special classpath*: prefix:
ApplicationContext ctx =
new ClassPathXmlApplicationContext("classpath*:conf/appContext.xml");This special prefix specifies that all classpath resources that match the given name
must be obtained (internally, this essentially happens via a
ClassLoader.getResources(…) call), and then merged to form the final application
context definition.
|
The wildcard classpath relies on the |
The classpath*: prefix can also be combined with a PathMatcher pattern in the
rest of the location path, for example classpath*:META-INF/*-beans.xml. In this
case, the resolution strategy is fairly simple: a ClassLoader.getResources() call is
used on the last non-wildcard path segment to get all the matching resources in the
class loader hierarchy, and then off each resource the same PathMatcher resolution
strategy described above is used for the wildcard subpath.
Other notes relating to wildcards
Please note that classpath*: when combined with Ant-style patterns will only work
reliably with at least one root directory before the pattern starts, unless the actual
target files reside in the file system. This means that a pattern like
classpath*:*.xml might not retrieve files from the root of jar files but rather only
from the root of expanded directories.
Spring’s ability to retrieve classpath entries originates from the JDK’s
ClassLoader.getResources() method which only returns file system locations for a
passed-in empty string (indicating potential roots to search). Spring evaluates
URLClassLoader runtime configuration and the "java.class.path" manifest in jar files
as well but this is not guaranteed to lead to portable behavior.
|
The scanning of classpath packages requires the presence of corresponding directory entries in the classpath. When you build JARs with Ant, make sure that you do not activate the files-only switch of the JAR task. Also, classpath directories may not get exposed based on security policies in some environments, e.g. standalone apps on JDK 1.7.0_45 and higher (which requires 'Trusted-Library' setup in your manifests; see http://stackoverflow.com/questions/19394570/java-jre-7u45-breaks-classloader-getresources). On JDK 9’s module path (Jigsaw), Spring’s classpath scanning generally works as expected. Putting resources into a dedicated directory is highly recommendable here as well, avoiding the aforementioned portability problems with searching the jar file root level. |
Ant-style patterns with classpath: resources are not guaranteed to find matching
resources if the root package to search is available in multiple class path locations.
This is because a resource such as
com/mycompany/package1/service-context.xml
may be in only one location, but when a path such as
classpath:com/mycompany/**/service-context.xml
is used to try to resolve it, the resolver will work off the (first) URL returned by
getResource("com/mycompany");. If this base package node exists in multiple
classloader locations, the actual end resource may not be underneath. Therefore,
preferably, use " `classpath*:`" with the same Ant-style pattern in such a case, which
will search all class path locations that contain the root package.
2.7.3. FileSystemResource caveats
A FileSystemResource that is not attached to a FileSystemApplicationContext (that
is, a FileSystemApplicationContext is not the actual ResourceLoader) will treat
absolute vs. relative paths as you would expect. Relative paths are relative to the
current working directory, while absolute paths are relative to the root of the
filesystem.
For backwards compatibility (historical) reasons however, this changes when the
FileSystemApplicationContext is the ResourceLoader. The
FileSystemApplicationContext simply forces all attached FileSystemResource instances
to treat all location paths as relative, whether they start with a leading slash or not.
In practice, this means the following are equivalent:
ApplicationContext ctx =
new FileSystemXmlApplicationContext("conf/context.xml");ApplicationContext ctx =
new FileSystemXmlApplicationContext("/conf/context.xml");As are the following: (Even though it would make sense for them to be different, as one case is relative and the other absolute.)
FileSystemXmlApplicationContext ctx = ...;
ctx.getResource("some/resource/path/myTemplate.txt");FileSystemXmlApplicationContext ctx = ...;
ctx.getResource("/some/resource/path/myTemplate.txt");In practice, if true absolute filesystem paths are needed, it is better to forgo the use
of absolute paths with FileSystemResource / FileSystemXmlApplicationContext, and
just force the use of a UrlResource, by using the file: URL prefix.
// actual context type doesn't matter, the Resource will always be UrlResource
ctx.getResource("file:///some/resource/path/myTemplate.txt");// force this FileSystemXmlApplicationContext to load its definition via a UrlResource
ApplicationContext ctx =
new FileSystemXmlApplicationContext("file:///conf/context.xml");3. Validation, Data Binding, and Type Conversion
3.1. Introduction
There are pros and cons for considering validation as business logic, and Spring offers
a design for validation (and data binding) that does not exclude either one of them.
Specifically validation should not be tied to the web tier, should be easy to localize
and it should be possible to plug in any validator available. Considering the above,
Spring has come up with a Validator interface that is both basic and eminently usable
in every layer of an application.
Data binding is useful for allowing user input to be dynamically bound to the domain
model of an application (or whatever objects you use to process user input). Spring
provides the so-called DataBinder to do exactly that. The Validator and the
DataBinder make up the validation package, which is primarily used in but not
limited to the MVC framework.
The BeanWrapper is a fundamental concept in the Spring Framework and is used in a lot
of places. However, you probably will not have the need to use the BeanWrapper
directly. Because this is reference documentation however, we felt that some explanation
might be in order. We will explain the BeanWrapper in this chapter since, if you were
going to use it at all, you would most likely do so when trying to bind data to objects.
Spring’s DataBinder and the lower-level BeanWrapper both use PropertyEditors to parse
and format property values. The PropertyEditor concept is part of the JavaBeans
specification, and is also explained in this chapter. Spring 3 introduces a
"core.convert" package that provides a general type conversion facility, as well as a
higher-level "format" package for formatting UI field values. These new packages may be
used as simpler alternatives to PropertyEditors, and will also be discussed in this
chapter.
3.2. Validation using Spring’s Validator interface
Spring features a Validator interface that you can use to validate objects. The
Validator interface works using an Errors object so that while validating,
validators can report validation failures to the Errors object.
Let’s consider a small data object:
public class Person {
private String name;
private int age;
// the usual getters and setters...
}We’re going to provide validation behavior for the Person class by implementing the
following two methods of the org.springframework.validation.Validator interface:
-
supports(Class)- Can thisValidatorvalidate instances of the suppliedClass? -
validate(Object, org.springframework.validation.Errors)- validates the given object and in case of validation errors, registers those with the givenErrorsobject
Implementing a Validator is fairly straightforward, especially when you know of the
ValidationUtils helper class that the Spring Framework also provides.
public class PersonValidator implements Validator {
/**
* This Validator validates *just* Person instances
*/
public boolean supports(Class clazz) {
return Person.class.equals(clazz);
}
public void validate(Object obj, Errors e) {
ValidationUtils.rejectIfEmpty(e, "name", "name.empty");
Person p = (Person) obj;
if (p.getAge() < 0) {
e.rejectValue("age", "negativevalue");
} else if (p.getAge() > 110) {
e.rejectValue("age", "too.darn.old");
}
}
}As you can see, the static rejectIfEmpty(..) method on the ValidationUtils class
is used to reject the 'name' property if it is null or the empty string. Have a look
at the ValidationUtils javadocs to see what functionality it provides besides the
example shown previously.
While it is certainly possible to implement a single Validator class to validate each
of the nested objects in a rich object, it may be better to encapsulate the validation
logic for each nested class of object in its own Validator implementation. A simple
example of a 'rich' object would be a Customer that is composed of two String
properties (a first and second name) and a complex Address object. Address objects
may be used independently of Customer objects, and so a distinct AddressValidator
has been implemented. If you want your CustomerValidator to reuse the logic contained
within the AddressValidator class without resorting to copy-and-paste, you can
dependency-inject or instantiate an AddressValidator within your CustomerValidator,
and use it like so:
public class CustomerValidator implements Validator {
private final Validator addressValidator;
public CustomerValidator(Validator addressValidator) {
if (addressValidator == null) {
throw new IllegalArgumentException("The supplied [Validator] is " +
"required and must not be null.");
}
if (!addressValidator.supports(Address.class)) {
throw new IllegalArgumentException("The supplied [Validator] must " +
"support the validation of [Address] instances.");
}
this.addressValidator = addressValidator;
}
/**
* This Validator validates Customer instances, and any subclasses of Customer too
*/
public boolean supports(Class clazz) {
return Customer.class.isAssignableFrom(clazz);
}
public void validate(Object target, Errors errors) {
ValidationUtils.rejectIfEmptyOrWhitespace(errors, "firstName", "field.required");
ValidationUtils.rejectIfEmptyOrWhitespace(errors, "surname", "field.required");
Customer customer = (Customer) target;
try {
errors.pushNestedPath("address");
ValidationUtils.invokeValidator(this.addressValidator, customer.getAddress(), errors);
} finally {
errors.popNestedPath();
}
}
}Validation errors are reported to the Errors object passed to the validator. In case
of Spring Web MVC you can use <spring:bind/> tag to inspect the error messages, but of
course you can also inspect the errors object yourself. More information about the
methods it offers can be found in the javadocs.
3.3. Resolving codes to error messages
We’ve talked about databinding and validation. Outputting messages corresponding to
validation errors is the last thing we need to discuss. In the example we’ve shown
above, we rejected the name and the age field. If we’re going to output the error
messages by using a MessageSource, we will do so using the error code we’ve given when
rejecting the field ('name' and 'age' in this case). When you call (either directly, or
indirectly, using for example the ValidationUtils class) rejectValue or one of the
other reject methods from the Errors interface, the underlying implementation will
not only register the code you’ve passed in, but also a number of additional error
codes. What error codes it registers is determined by the MessageCodesResolver that is
used. By default, the DefaultMessageCodesResolver is used, which for example not only
registers a message with the code you gave, but also messages that include the field
name you passed to the reject method. So in case you reject a field using
rejectValue("age", "too.darn.old"), apart from the too.darn.old code, Spring will
also register too.darn.old.age and too.darn.old.age.int (so the first will include
the field name and the second will include the type of the field); this is done as a
convenience to aid developers in targeting error messages and suchlike.
More information on the MessageCodesResolver and the default strategy can be found
online in the javadocs of
MessageCodesResolver
and
DefaultMessageCodesResolver,
respectively.
3.4. Bean manipulation and the BeanWrapper
The org.springframework.beans package adheres to the JavaBeans standard provided by
Oracle. A JavaBean is simply a class with a default no-argument constructor, which follows
a naming convention where (by way of an example) a property named bingoMadness would
have a setter method setBingoMadness(..) and a getter method getBingoMadness(). For
more information about JavaBeans and the specification, please refer to Oracle’s website (
javabeans).
One quite important class in the beans package is the BeanWrapper interface and its
corresponding implementation ( BeanWrapperImpl). As quoted from the javadocs, the
BeanWrapper offers functionality to set and get property values (individually or in
bulk), get property descriptors, and to query properties to determine if they are
readable or writable. Also, the BeanWrapper offers support for nested properties,
enabling the setting of properties on sub-properties to an unlimited depth. Then, the
BeanWrapper supports the ability to add standard JavaBeans PropertyChangeListeners
and VetoableChangeListeners, without the need for supporting code in the target class.
Last but not least, the BeanWrapper provides support for the setting of indexed
properties. The BeanWrapper usually isn’t used by application code directly, but by
the DataBinder and the BeanFactory.
The way the BeanWrapper works is partly indicated by its name: it wraps a bean to
perform actions on that bean, like setting and retrieving properties.
3.4.1. Setting and getting basic and nested properties
Setting and getting properties is done using the setPropertyValue(s) and
getPropertyValue(s) methods that both come with a couple of overloaded variants.
They’re all described in more detail in the javadocs Spring comes with. What’s important
to know is that there are a couple of conventions for indicating properties of an
object. A couple of examples:
| Expression | Explanation |
|---|---|
|
Indicates the property |
|
Indicates the nested property |
|
Indicates the third element of the indexed property |
|
Indicates the value of the map entry indexed by the key COMPANYNAME of the Map
property |
Below you’ll find some examples of working with the BeanWrapper to get and set
properties.
(This next section is not vitally important to you if you’re not planning to work with
the BeanWrapper directly. If you’re just using the DataBinder and the BeanFactory
and their out-of-the-box implementation, you should skip ahead to the section about
PropertyEditors.)
Consider the following two classes:
public class Company {
private String name;
private Employee managingDirector;
public String getName() {
return this.name;
}
public void setName(String name) {
this.name = name;
}
public Employee getManagingDirector() {
return this.managingDirector;
}
public void setManagingDirector(Employee managingDirector) {
this.managingDirector = managingDirector;
}
}public class Employee {
private String name;
private float salary;
public String getName() {
return this.name;
}
public void setName(String name) {
this.name = name;
}
public float getSalary() {
return salary;
}
public void setSalary(float salary) {
this.salary = salary;
}
}The following code snippets show some examples of how to retrieve and manipulate some of
the properties of instantiated Companies and Employees:
BeanWrapper company = new BeanWrapperImpl(new Company());
// setting the company name..
company.setPropertyValue("name", "Some Company Inc.");
// ... can also be done like this:
PropertyValue value = new PropertyValue("name", "Some Company Inc.");
company.setPropertyValue(value);
// ok, let's create the director and tie it to the company:
BeanWrapper jim = new BeanWrapperImpl(new Employee());
jim.setPropertyValue("name", "Jim Stravinsky");
company.setPropertyValue("managingDirector", jim.getWrappedInstance());
// retrieving the salary of the managingDirector through the company
Float salary = (Float) company.getPropertyValue("managingDirector.salary");3.4.2. Built-in PropertyEditor implementations
Spring uses the concept of PropertyEditors to effect the conversion between an
Object and a String. If you think about it, it sometimes might be handy to be able
to represent properties in a different way than the object itself. For example, a Date
can be represented in a human readable way (as the String '2007-14-09'), while
we’re still able to convert the human readable form back to the original date (or even
better: convert any date entered in a human readable form, back to Date objects). This
behavior can be achieved by registering custom editors, of type
java.beans.PropertyEditor. Registering custom editors on a BeanWrapper or
alternately in a specific IoC container as mentioned in the previous chapter, gives it
the knowledge of how to convert properties to the desired type. Read more about
PropertyEditors in the javadocs of the java.beans package provided by Oracle.
A couple of examples where property editing is used in Spring:
-
setting properties on beans is done using
PropertyEditors. When mentioningjava.lang.Stringas the value of a property of some bean you’re declaring in XML file, Spring will (if the setter of the corresponding property has aClass-parameter) use theClassEditorto try to resolve the parameter to aClassobject. -
parsing HTTP request parameters in Spring’s MVC framework is done using all kinds of
PropertyEditorsthat you can manually bind in all subclasses of theCommandController.
Spring has a number of built-in PropertyEditors to make life easy. Each of those is
listed below and they are all located in the org.springframework.beans.propertyeditors
package. Most, but not all (as indicated below), are registered by default by
BeanWrapperImpl. Where the property editor is configurable in some fashion, you can of
course still register your own variant to override the default one:
| Class | Explanation |
|---|---|
|
Editor for byte arrays. Strings will simply be converted to their corresponding byte
representations. Registered by default by |
|
Parses Strings representing classes to actual classes and the other way around. When a
class is not found, an |
|
Customizable property editor for |
|
Property editor for Collections, converting any source |
|
Customizable property editor for java.util.Date, supporting a custom DateFormat. NOT registered by default. Must be user registered as needed with appropriate format. |
|
Customizable property editor for any Number subclass like |
|
Capable of resolving Strings to |
|
One-way property editor, capable of taking a text string and producing (via an
intermediate |
|
Capable of resolving Strings to |
|
Capable of resolving Strings to |
|
Capable of converting Strings (formatted using the format as defined in the javadocs
of the |
|
Property editor that trims Strings. Optionally allows transforming an empty string
into a |
|
Capable of resolving a String representation of a URL to an actual |
Spring uses the java.beans.PropertyEditorManager to set the search path for property
editors that might be needed. The search path also includes sun.bean.editors, which
includes PropertyEditor implementations for types such as Font, Color, and most of
the primitive types. Note also that the standard JavaBeans infrastructure will
automatically discover PropertyEditor classes (without you having to register them
explicitly) if they are in the same package as the class they handle, and have the same
name as that class, with 'Editor' appended; for example, one could have the following
class and package structure, which would be sufficient for the FooEditor class to be
recognized and used as the PropertyEditor for Foo-typed properties.
com
chank
pop
Foo
FooEditor // the PropertyEditor for the Foo class
Note that you can also use the standard BeanInfo JavaBeans mechanism here as well
(described
in
not-amazing-detail here). Find below an example of using the BeanInfo mechanism for
explicitly registering one or more PropertyEditor instances with the properties of an
associated class.
com
chank
pop
Foo
FooBeanInfo // the BeanInfo for the Foo class
Here is the Java source code for the referenced FooBeanInfo class. This would
associate a CustomNumberEditor with the age property of the Foo class.
public class FooBeanInfo extends SimpleBeanInfo {
public PropertyDescriptor[] getPropertyDescriptors() {
try {
final PropertyEditor numberPE = new CustomNumberEditor(Integer.class, true);
PropertyDescriptor ageDescriptor = new PropertyDescriptor("age", Foo.class) {
public PropertyEditor createPropertyEditor(Object bean) {
return numberPE;
};
};
return new PropertyDescriptor[] { ageDescriptor };
}
catch (IntrospectionException ex) {
throw new Error(ex.toString());
}
}
}Registering additional custom PropertyEditors
When setting bean properties as a string value, a Spring IoC container ultimately uses
standard JavaBeans PropertyEditors to convert these Strings to the complex type of the
property. Spring pre-registers a number of custom PropertyEditors (for example, to
convert a classname expressed as a string into a real Class object). Additionally,
Java’s standard JavaBeans PropertyEditor lookup mechanism allows a PropertyEditor
for a class simply to be named appropriately and placed in the same package as the class
it provides support for, to be found automatically.
If there is a need to register other custom PropertyEditors, there are several
mechanisms available. The most manual approach, which is not normally convenient or
recommended, is to simply use the registerCustomEditor() method of the
ConfigurableBeanFactory interface, assuming you have a BeanFactory reference.
Another, slightly more convenient, mechanism is to use a special bean factory
post-processor called CustomEditorConfigurer. Although bean factory post-processors
can be used with BeanFactory implementations, the CustomEditorConfigurer has a
nested property setup, so it is strongly recommended that it is used with the
ApplicationContext, where it may be deployed in similar fashion to any other bean, and
automatically detected and applied.
Note that all bean factories and application contexts automatically use a number of
built-in property editors, through their use of something called a BeanWrapper to
handle property conversions. The standard property editors that the BeanWrapper
registers are listed in the previous section. Additionally,
ApplicationContexts also override or add an additional number of editors to handle
resource lookups in a manner appropriate to the specific application context type.
Standard JavaBeans PropertyEditor instances are used to convert property values
expressed as strings to the actual complex type of the property.
CustomEditorConfigurer, a bean factory post-processor, may be used to conveniently add
support for additional PropertyEditor instances to an ApplicationContext.
Consider a user class ExoticType, and another class DependsOnExoticType which needs
ExoticType set as a property:
package example;
public class ExoticType {
private String name;
public ExoticType(String name) {
this.name = name;
}
}
public class DependsOnExoticType {
private ExoticType type;
public void setType(ExoticType type) {
this.type = type;
}
}When things are properly set up, we want to be able to assign the type property as a
string, which a PropertyEditor will behind the scenes convert into an actual
ExoticType instance:
<bean id="sample" class="example.DependsOnExoticType">
<property name="type" value="aNameForExoticType"/>
</bean>The PropertyEditor implementation could look similar to this:
// converts string representation to ExoticType object
package example;
public class ExoticTypeEditor extends PropertyEditorSupport {
public void setAsText(String text) {
setValue(new ExoticType(text.toUpperCase()));
}
}Finally, we use CustomEditorConfigurer to register the new PropertyEditor with the
ApplicationContext, which will then be able to use it as needed:
<bean class="org.springframework.beans.factory.config.CustomEditorConfigurer">
<property name="customEditors">
<map>
<entry key="example.ExoticType" value="example.ExoticTypeEditor"/>
</map>
</property>
</bean>Using PropertyEditorRegistrars
Another mechanism for registering property editors with the Spring container is to
create and use a PropertyEditorRegistrar. This interface is particularly useful when
you need to use the same set of property editors in several different situations: write
a corresponding registrar and reuse that in each case. PropertyEditorRegistrars work
in conjunction with an interface called PropertyEditorRegistry, an interface that is
implemented by the Spring BeanWrapper (and DataBinder). PropertyEditorRegistrars
are particularly convenient when used in conjunction with the CustomEditorConfigurer
(introduced here), which exposes a
property called setPropertyEditorRegistrars(..): PropertyEditorRegistrars added to a
CustomEditorConfigurer in this fashion can easily be shared with DataBinder and
Spring MVC Controllers. Furthermore, it avoids the need for synchronization on custom
editors: a PropertyEditorRegistrar is expected to create fresh PropertyEditor
instances for each bean creation attempt.
Using a PropertyEditorRegistrar is perhaps best illustrated with an example. First
off, you need to create your own PropertyEditorRegistrar implementation:
package com.foo.editors.spring;
public final class CustomPropertyEditorRegistrar implements PropertyEditorRegistrar {
public void registerCustomEditors(PropertyEditorRegistry registry) {
// it is expected that new PropertyEditor instances are created
registry.registerCustomEditor(ExoticType.class, new ExoticTypeEditor());
// you could register as many custom property editors as are required here...
}
}See also the org.springframework.beans.support.ResourceEditorRegistrar for an example
PropertyEditorRegistrar implementation. Notice how in its implementation of the
registerCustomEditors(..) method it creates new instances of each property editor.
Next we configure a CustomEditorConfigurer and inject an instance of our
CustomPropertyEditorRegistrar into it:
<bean class="org.springframework.beans.factory.config.CustomEditorConfigurer">
<property name="propertyEditorRegistrars">
<list>
<ref bean="customPropertyEditorRegistrar"/>
</list>
</property>
</bean>
<bean id="customPropertyEditorRegistrar"
class="com.foo.editors.spring.CustomPropertyEditorRegistrar"/>Finally, and in a bit of a departure from the focus of this chapter, for those of you
using Spring’s MVC web framework, using PropertyEditorRegistrars in
conjunction with data-binding Controllers (such as SimpleFormController) can be very
convenient. Find below an example of using a PropertyEditorRegistrar in the
implementation of an initBinder(..) method:
public final class RegisterUserController extends SimpleFormController {
private final PropertyEditorRegistrar customPropertyEditorRegistrar;
public RegisterUserController(PropertyEditorRegistrar propertyEditorRegistrar) {
this.customPropertyEditorRegistrar = propertyEditorRegistrar;
}
protected void initBinder(HttpServletRequest request,
ServletRequestDataBinder binder) throws Exception {
this.customPropertyEditorRegistrar.registerCustomEditors(binder);
}
// other methods to do with registering a User
}This style of PropertyEditor registration can lead to concise code (the implementation
of initBinder(..) is just one line long!), and allows common PropertyEditor
registration code to be encapsulated in a class and then shared amongst as many
Controllers as needed.
3.5. Spring Type Conversion
Spring 3 introduces a core.convert package that provides a general type conversion
system. The system defines an SPI to implement type conversion logic, as well as an API
to execute type conversions at runtime. Within a Spring container, this system can be
used as an alternative to PropertyEditors to convert externalized bean property value
strings to required property types. The public API may also be used anywhere in your
application where type conversion is needed.
3.5.1. Converter SPI
The SPI to implement type conversion logic is simple and strongly typed:
package org.springframework.core.convert.converter;
public interface Converter<S, T> {
T convert(S source);
}To create your own converter, simply implement the interface above. Parameterize S
as the type you are converting from, and T as the type you are converting to. Such a
converter can also be applied transparently if a collection or array of S needs to be
converted to an array or collection of T, provided that a delegating array/collection
converter has been registered as well (which DefaultConversionService does by default).
For each call to convert(S), the source argument is guaranteed to be NOT null. Your
Converter may throw any unchecked exception if conversion fails; specifically, an
IllegalArgumentException should be thrown to report an invalid source value.
Take care to ensure that your Converter implementation is thread-safe.
Several converter implementations are provided in the core.convert.support package as
a convenience. These include converters from Strings to Numbers and other common types.
Consider StringToInteger as an example for a typical Converter implementation:
package org.springframework.core.convert.support;
final class StringToInteger implements Converter<String, Integer> {
public Integer convert(String source) {
return Integer.valueOf(source);
}
}3.5.2. ConverterFactory
When you need to centralize the conversion logic for an entire class hierarchy, for
example, when converting from String to java.lang.Enum objects, implement
ConverterFactory:
package org.springframework.core.convert.converter;
public interface ConverterFactory<S, R> {
<T extends R> Converter<S, T> getConverter(Class<T> targetType);
}Parameterize S to be the type you are converting from and R to be the base type defining the range of classes you can convert to. Then implement getConverter(Class<T>), where T is a subclass of R.
Consider the StringToEnum ConverterFactory as an example:
package org.springframework.core.convert.support;
final class StringToEnumConverterFactory implements ConverterFactory<String, Enum> {
public <T extends Enum> Converter<String, T> getConverter(Class<T> targetType) {
return new StringToEnumConverter(targetType);
}
private final class StringToEnumConverter<T extends Enum> implements Converter<String, T> {
private Class<T> enumType;
public StringToEnumConverter(Class<T> enumType) {
this.enumType = enumType;
}
public T convert(String source) {
return (T) Enum.valueOf(this.enumType, source.trim());
}
}
}3.5.3. GenericConverter
When you require a sophisticated Converter implementation, consider the GenericConverter interface. With a more flexible but less strongly typed signature, a GenericConverter supports converting between multiple source and target types. In addition, a GenericConverter makes available source and target field context you can use when implementing your conversion logic. Such context allows a type conversion to be driven by a field annotation, or generic information declared on a field signature.
package org.springframework.core.convert.converter;
public interface GenericConverter {
public Set<ConvertiblePair> getConvertibleTypes();
Object convert(Object source, TypeDescriptor sourceType, TypeDescriptor targetType);
}To implement a GenericConverter, have getConvertibleTypes() return the supported source→target type pairs. Then implement convert(Object, TypeDescriptor, TypeDescriptor) to implement your conversion logic. The source TypeDescriptor provides access to the source field holding the value being converted. The target TypeDescriptor provides access to the target field where the converted value will be set.
A good example of a GenericConverter is a converter that converts between a Java Array and a Collection. Such an ArrayToCollectionConverter introspects the field that declares the target Collection type to resolve the Collection’s element type. This allows each element in the source array to be converted to the Collection element type before the Collection is set on the target field.
|
Because GenericConverter is a more complex SPI interface, only use it when you need it. Favor Converter or ConverterFactory for basic type conversion needs. |
ConditionalGenericConverter
Sometimes you only want a Converter to execute if a specific condition holds true. For
example, you might only want to execute a Converter if a specific annotation is present
on the target field. Or you might only want to execute a Converter if a specific method,
such as a static valueOf method, is defined on the target class.
ConditionalGenericConverter is the union of the GenericConverter and
ConditionalConverter interfaces that allows you to define such custom matching criteria:
public interface ConditionalConverter {
boolean matches(TypeDescriptor sourceType, TypeDescriptor targetType);
}
public interface ConditionalGenericConverter
extends GenericConverter, ConditionalConverter {
}A good example of a ConditionalGenericConverter is an EntityConverter that converts
between an persistent entity identifier and an entity reference. Such a EntityConverter
might only match if the target entity type declares a static finder method e.g.
findAccount(Long). You would perform such a finder method check in the implementation of
matches(TypeDescriptor, TypeDescriptor).
3.5.4. ConversionService API
The ConversionService defines a unified API for executing type conversion logic at runtime. Converters are often executed behind this facade interface:
package org.springframework.core.convert;
public interface ConversionService {
boolean canConvert(Class<?> sourceType, Class<?> targetType);
<T> T convert(Object source, Class<T> targetType);
boolean canConvert(TypeDescriptor sourceType, TypeDescriptor targetType);
Object convert(Object source, TypeDescriptor sourceType, TypeDescriptor targetType);
}Most ConversionService implementations also implement ConverterRegistry, which
provides an SPI for registering converters. Internally, a ConversionService
implementation delegates to its registered converters to carry out type conversion logic.
A robust ConversionService implementation is provided in the core.convert.support
package. GenericConversionService is the general-purpose implementation suitable for
use in most environments. ConversionServiceFactory provides a convenient factory for
creating common ConversionService configurations.
3.5.5. Configuring a ConversionService
A ConversionService is a stateless object designed to be instantiated at application startup, then shared between multiple threads. In a Spring application, you typically configure a ConversionService instance per Spring container (or ApplicationContext). That ConversionService will be picked up by Spring and then used whenever a type conversion needs to be performed by the framework. You may also inject this ConversionService into any of your beans and invoke it directly.
|
If no ConversionService is registered with Spring, the original PropertyEditor-based system is used. |
To register a default ConversionService with Spring, add the following bean definition
with id conversionService:
<bean id="conversionService"
class="org.springframework.context.support.ConversionServiceFactoryBean"/>A default ConversionService can convert between strings, numbers, enums, collections,
maps, and other common types. To supplement or override the default converters with your
own custom converter(s), set the converters property. Property values may implement
either of the Converter, ConverterFactory, or GenericConverter interfaces.
<bean id="conversionService"
class="org.springframework.context.support.ConversionServiceFactoryBean">
<property name="converters">
<set>
<bean class="example.MyCustomConverter"/>
</set>
</property>
</bean>It is also common to use a ConversionService within a Spring MVC application. See Conversion and Formatting in the Spring MVC chapter.
In certain situations you may wish to apply formatting during conversion. See
FormatterRegistry SPI for details on using
FormattingConversionServiceFactoryBean.
3.5.6. Using a ConversionService programmatically
To work with a ConversionService instance programmatically, simply inject a reference to it like you would for any other bean:
@Service
public class MyService {
@Autowired
public MyService(ConversionService conversionService) {
this.conversionService = conversionService;
}
public void doIt() {
this.conversionService.convert(...)
}
}For most use cases, the convert method specifying the targetType can be used but it
will not work with more complex types such as a collection of a parameterized element.
If you want to convert a List of Integer to a List of String programmatically,
for instance, you need to provide a formal definition of the source and target types.
Fortunately, TypeDescriptor provides various options to make that straightforward:
DefaultConversionService cs = new DefaultConversionService();
List<Integer> input = ....
cs.convert(input,
TypeDescriptor.forObject(input), // List<Integer> type descriptor
TypeDescriptor.collection(List.class, TypeDescriptor.valueOf(String.class)));Note that DefaultConversionService registers converters automatically which are
appropriate for most environments. This includes collection converters, scalar
converters, and also basic Object to String converters. The same converters can
be registered with any ConverterRegistry using the static addDefaultConverters
method on the DefaultConversionService class.
Converters for value types will be reused for arrays and collections, so there is
no need to create a specific converter to convert from a Collection of S to a
Collection of T, assuming that standard collection handling is appropriate.
3.6. Spring Field Formatting
As discussed in the previous section, core.convert is a
general-purpose type conversion system. It provides a unified ConversionService API as
well as a strongly-typed Converter SPI for implementing conversion logic from one type
to another. A Spring Container uses this system to bind bean property values. In
addition, both the Spring Expression Language (SpEL) and DataBinder use this system to
bind field values. For example, when SpEL needs to coerce a Short to a Long to
complete an expression.setValue(Object bean, Object value) attempt, the core.convert
system performs the coercion.
Now consider the type conversion requirements of a typical client environment such as a web or desktop application. In such environments, you typically convert from String to support the client postback process, as well as back to String to support the view rendering process. In addition, you often need to localize String values. The more general core.convert Converter SPI does not address such formatting requirements directly. To directly address them, Spring 3 introduces a convenient Formatter SPI that provides a simple and robust alternative to PropertyEditors for client environments.
In general, use the Converter SPI when you need to implement general-purpose type conversion logic; for example, for converting between a java.util.Date and and java.lang.Long. Use the Formatter SPI when you’re working in a client environment, such as a web application, and need to parse and print localized field values. The ConversionService provides a unified type conversion API for both SPIs.
3.6.1. Formatter SPI
The Formatter SPI to implement field formatting logic is simple and strongly typed:
package org.springframework.format;
public interface Formatter<T> extends Printer<T>, Parser<T> {
}Where Formatter extends from the Printer and Parser building-block interfaces:
public interface Printer<T> {
String print(T fieldValue, Locale locale);
}import java.text.ParseException;
public interface Parser<T> {
T parse(String clientValue, Locale locale) throws ParseException;
}To create your own Formatter, simply implement the Formatter interface above.
Parameterize T to be the type of object you wish to format, for example,
java.util.Date. Implement the print() operation to print an instance of T for
display in the client locale. Implement the parse() operation to parse an instance of
T from the formatted representation returned from the client locale. Your Formatter
should throw a ParseException or IllegalArgumentException if a parse attempt fails. Take
care to ensure your Formatter implementation is thread-safe.
Several Formatter implementations are provided in format subpackages as a convenience.
The number package provides a NumberFormatter, CurrencyFormatter, and
PercentFormatter to format java.lang.Number objects using a java.text.NumberFormat.
The datetime package provides a DateFormatter to format java.util.Date objects with
a java.text.DateFormat. The datetime.joda package provides comprehensive datetime
formatting support based on the Joda Time library.
Consider DateFormatter as an example Formatter implementation:
package org.springframework.format.datetime;
public final class DateFormatter implements Formatter<Date> {
private String pattern;
public DateFormatter(String pattern) {
this.pattern = pattern;
}
public String print(Date date, Locale locale) {
if (date == null) {
return "";
}
return getDateFormat(locale).format(date);
}
public Date parse(String formatted, Locale locale) throws ParseException {
if (formatted.length() == 0) {
return null;
}
return getDateFormat(locale).parse(formatted);
}
protected DateFormat getDateFormat(Locale locale) {
DateFormat dateFormat = new SimpleDateFormat(this.pattern, locale);
dateFormat.setLenient(false);
return dateFormat;
}
}The Spring team welcomes community-driven Formatter contributions; see
jira.spring.io to contribute.
3.6.2. Annotation-driven Formatting
As you will see, field formatting can be configured by field type or annotation. To bind an Annotation to a formatter, implement AnnotationFormatterFactory:
package org.springframework.format;
public interface AnnotationFormatterFactory<A extends Annotation> {
Set<Class<?>> getFieldTypes();
Printer<?> getPrinter(A annotation, Class<?> fieldType);
Parser<?> getParser(A annotation, Class<?> fieldType);
}Parameterize A to be the field annotationType you wish to associate formatting logic
with, for example org.springframework.format.annotation.DateTimeFormat. Have
getFieldTypes() return the types of fields the annotation may be used on. Have
getPrinter() return a Printer to print the value of an annotated field. Have
getParser() return a Parser to parse a clientValue for an annotated field.
The example AnnotationFormatterFactory implementation below binds the @NumberFormat Annotation to a formatter. This annotation allows either a number style or pattern to be specified:
public final class NumberFormatAnnotationFormatterFactory
implements AnnotationFormatterFactory<NumberFormat> {
public Set<Class<?>> getFieldTypes() {
return new HashSet<Class<?>>(asList(new Class<?>[] {
Short.class, Integer.class, Long.class, Float.class,
Double.class, BigDecimal.class, BigInteger.class }));
}
public Printer<Number> getPrinter(NumberFormat annotation, Class<?> fieldType) {
return configureFormatterFrom(annotation, fieldType);
}
public Parser<Number> getParser(NumberFormat annotation, Class<?> fieldType) {
return configureFormatterFrom(annotation, fieldType);
}
private Formatter<Number> configureFormatterFrom(NumberFormat annotation,
Class<?> fieldType) {
if (!annotation.pattern().isEmpty()) {
return new NumberFormatter(annotation.pattern());
} else {
Style style = annotation.style();
if (style == Style.PERCENT) {
return new PercentFormatter();
} else if (style == Style.CURRENCY) {
return new CurrencyFormatter();
} else {
return new NumberFormatter();
}
}
}
}To trigger formatting, simply annotate fields with @NumberFormat:
public class MyModel {
@NumberFormat(style=Style.CURRENCY)
private BigDecimal decimal;
}Format Annotation API
A portable format annotation API exists in the org.springframework.format.annotation
package. Use @NumberFormat to format java.lang.Number fields. Use @DateTimeFormat to
format java.util.Date, java.util.Calendar, java.util.Long, or Joda Time fields.
The example below uses @DateTimeFormat to format a java.util.Date as a ISO Date (yyyy-MM-dd):
public class MyModel {
@DateTimeFormat(iso=ISO.DATE)
private Date date;
}3.6.3. FormatterRegistry SPI
The FormatterRegistry is an SPI for registering formatters and converters.
FormattingConversionService is an implementation of FormatterRegistry suitable for
most environments. This implementation may be configured programmatically or
declaratively as a Spring bean using FormattingConversionServiceFactoryBean. Because
this implementation also implements ConversionService, it can be directly configured
for use with Spring’s DataBinder and the Spring Expression Language (SpEL).
Review the FormatterRegistry SPI below:
package org.springframework.format;
public interface FormatterRegistry extends ConverterRegistry {
void addFormatterForFieldType(Class<?> fieldType, Printer<?> printer, Parser<?> parser);
void addFormatterForFieldType(Class<?> fieldType, Formatter<?> formatter);
void addFormatterForFieldType(Formatter<?> formatter);
void addFormatterForAnnotation(AnnotationFormatterFactory<?, ?> factory);
}As shown above, Formatters can be registered by fieldType or annotation.
The FormatterRegistry SPI allows you to configure Formatting rules centrally, instead of duplicating such configuration across your Controllers. For example, you might want to enforce that all Date fields are formatted a certain way, or fields with a specific annotation are formatted in a certain way. With a shared FormatterRegistry, you define these rules once and they are applied whenever formatting is needed.
3.6.4. FormatterRegistrar SPI
The FormatterRegistrar is an SPI for registering formatters and converters through the FormatterRegistry:
package org.springframework.format;
public interface FormatterRegistrar {
void registerFormatters(FormatterRegistry registry);
}A FormatterRegistrar is useful when registering multiple related converters and formatters for a given formatting category, such as Date formatting. It can also be useful where declarative registration is insufficient. For example when a formatter needs to be indexed under a specific field type different from its own <T> or when registering a Printer/Parser pair. The next section provides more information on converter and formatter registration.
3.6.5. Configuring Formatting in Spring MVC
See Conversion and Formatting in the Spring MVC chapter.
3.7. Configuring a global date & time format
By default, date and time fields that are not annotated with @DateTimeFormat are
converted from strings using the DateFormat.SHORT style. If you prefer, you can
change this by defining your own global format.
You will need to ensure that Spring does not register default formatters, and instead
you should register all formatters manually. Use the
org.springframework.format.datetime.joda.JodaTimeFormatterRegistrar or
org.springframework.format.datetime.DateFormatterRegistrar class depending on whether
you use the Joda Time library.
For example, the following Java configuration will register a global ' `yyyyMMdd’ format. This example does not depend on the Joda Time library:
@Configuration
public class AppConfig {
@Bean
public FormattingConversionService conversionService() {
// Use the DefaultFormattingConversionService but do not register defaults
DefaultFormattingConversionService conversionService = new DefaultFormattingConversionService(false);
// Ensure @NumberFormat is still supported
conversionService.addFormatterForFieldAnnotation(new NumberFormatAnnotationFormatterFactory());
// Register date conversion with a specific global format
DateFormatterRegistrar registrar = new DateFormatterRegistrar();
registrar.setFormatter(new DateFormatter("yyyyMMdd"));
registrar.registerFormatters(conversionService);
return conversionService;
}
}If you prefer XML based configuration you can use a
FormattingConversionServiceFactoryBean. Here is the same example, this time using Joda
Time:
<?xml version="1.0" encoding="UTF-8"?>
<beans xmlns="http://www.springframework.org/schema/beans"
xmlns:xsi="http://www.w3.org/2001/XMLSchema-instance"
xsi:schemaLocation="
http://www.springframework.org/schema/beans
http://www.springframework.org/schema/beans/spring-beans.xsd>
<bean id="conversionService" class="org.springframework.format.support.FormattingConversionServiceFactoryBean">
<property name="registerDefaultFormatters" value="false" />
<property name="formatters">
<set>
<bean class="org.springframework.format.number.NumberFormatAnnotationFormatterFactory" />
</set>
</property>
<property name="formatterRegistrars">
<set>
<bean class="org.springframework.format.datetime.joda.JodaTimeFormatterRegistrar">
<property name="dateFormatter">
<bean class="org.springframework.format.datetime.joda.DateTimeFormatterFactoryBean">
<property name="pattern" value="yyyyMMdd"/>
</bean>
</property>
</bean>
</set>
</property>
</bean>
</beans>|
Joda Time provides separate distinct types to represent |
If you are using Spring MVC remember to explicitly configure the conversion service that
is used. For Java based @Configuration this means extending the
WebMvcConfigurationSupport class and overriding the mvcConversionService() method.
For XML you should use the 'conversion-service' attribute of the
mvc:annotation-driven element.
See Conversion and Formatting for details.
3.8. Spring Validation
Spring 3 introduces several enhancements to its validation support. First, the JSR-303
Bean Validation API is now fully supported. Second, when used programmatically, Spring’s
DataBinder can now validate objects as well as bind to them. Third, Spring MVC now has
support for declaratively validating @Controller inputs.
3.8.1. Overview of the JSR-303 Bean Validation API
JSR-303 standardizes validation constraint declaration and metadata for the Java platform. Using this API, you annotate domain model properties with declarative validation constraints and the runtime enforces them. There are a number of built-in constraints you can take advantage of. You may also define your own custom constraints.
To illustrate, consider a simple PersonForm model with two properties:
public class PersonForm {
private String name;
private int age;
}JSR-303 allows you to define declarative validation constraints against such properties:
public class PersonForm {
@NotNull
@Size(max=64)
private String name;
@Min(0)
private int age;
}When an instance of this class is validated by a JSR-303 Validator, these constraints will be enforced.
For general information on JSR-303/JSR-349, see the Bean Validation website. For information on the specific capabilities of the default reference implementation, see the Hibernate Validator documentation. To learn how to setup a Bean Validation provider as a Spring bean, keep reading.
3.8.2. Configuring a Bean Validation Provider
Spring provides full support for the Bean Validation API. This includes convenient
support for bootstrapping a JSR-303/JSR-349 Bean Validation provider as a Spring bean.
This allows for a javax.validation.ValidatorFactory or javax.validation.Validator to
be injected wherever validation is needed in your application.
Use the LocalValidatorFactoryBean to configure a default Validator as a Spring bean:
<bean id="validator"
class="org.springframework.validation.beanvalidation.LocalValidatorFactoryBean"/>The basic configuration above will trigger Bean Validation to initialize using its default bootstrap mechanism. A JSR-303/JSR-349 provider, such as Hibernate Validator, is expected to be present in the classpath and will be detected automatically.
Injecting a Validator
LocalValidatorFactoryBean implements both javax.validation.ValidatorFactory and
javax.validation.Validator, as well as Spring’s
org.springframework.validation.Validator. You may inject a reference to either of
these interfaces into beans that need to invoke validation logic.
Inject a reference to javax.validation.Validator if you prefer to work with the Bean
Validation API directly:
import javax.validation.Validator;
@Service
public class MyService {
@Autowired
private Validator validator;Inject a reference to org.springframework.validation.Validator if your bean requires
the Spring Validation API:
import org.springframework.validation.Validator;
@Service
public class MyService {
@Autowired
private Validator validator;
}Configuring Custom Constraints
Each Bean Validation constraint consists of two parts. First, a @Constraint annotation
that declares the constraint and its configurable properties. Second, an implementation
of the javax.validation.ConstraintValidator interface that implements the constraint’s
behavior. To associate a declaration with an implementation, each @Constraint annotation
references a corresponding ValidationConstraint implementation class. At runtime, a
ConstraintValidatorFactory instantiates the referenced implementation when the
constraint annotation is encountered in your domain model.
By default, the LocalValidatorFactoryBean configures a SpringConstraintValidatorFactory
that uses Spring to create ConstraintValidator instances. This allows your custom
ConstraintValidators to benefit from dependency injection like any other Spring bean.
Shown below is an example of a custom @Constraint declaration, followed by an associated
ConstraintValidator implementation that uses Spring for dependency injection:
@Target({ElementType.METHOD, ElementType.FIELD})
@Retention(RetentionPolicy.RUNTIME)
@Constraint(validatedBy=MyConstraintValidator.class)
public @interface MyConstraint {
}import javax.validation.ConstraintValidator;
public class MyConstraintValidator implements ConstraintValidator {
@Autowired;
private Foo aDependency;
...
}As you can see, a ConstraintValidator implementation may have its dependencies @Autowired like any other Spring bean.
Spring-driven Method Validation
The method validation feature supported by Bean Validation 1.1, and as a custom
extension also by Hibernate Validator 4.3, can be integrated into a Spring context
through a MethodValidationPostProcessor bean definition:
<bean class="org.springframework.validation.beanvalidation.MethodValidationPostProcessor"/>In order to be eligible for Spring-driven method validation, all target classes need
to be annotated with Spring’s @Validated annotation, optionally declaring the
validation groups to use. Check out the MethodValidationPostProcessor javadocs
for setup details with Hibernate Validator and Bean Validation 1.1 providers.
Additional Configuration Options
The default LocalValidatorFactoryBean configuration should prove sufficient for most
cases. There are a number of configuration options for various Bean Validation
constructs, from message interpolation to traversal resolution. See the
LocalValidatorFactoryBean javadocs for more information on these options.
3.8.3. Configuring a DataBinder
Since Spring 3, a DataBinder instance can be configured with a Validator. Once
configured, the Validator may be invoked by calling binder.validate(). Any validation
Errors are automatically added to the binder’s BindingResult.
When working with the DataBinder programmatically, this can be used to invoke validation logic after binding to a target object:
Foo target = new Foo();
DataBinder binder = new DataBinder(target);
binder.setValidator(new FooValidator());
// bind to the target object
binder.bind(propertyValues);
// validate the target object
binder.validate();
// get BindingResult that includes any validation errors
BindingResult results = binder.getBindingResult();A DataBinder can also be configured with multiple Validator instances via
dataBinder.addValidators and dataBinder.replaceValidators. This is useful when
combining globally configured Bean Validation with a Spring Validator configured
locally on a DataBinder instance. See [validation-mvc-configuring].
3.8.4. Spring MVC 3 Validation
See Validation in the Spring MVC chapter.
4. Spring Expression Language (SpEL)
4.1. Introduction
The Spring Expression Language (SpEL for short) is a powerful expression language that supports querying and manipulating an object graph at runtime. The language syntax is similar to Unified EL but offers additional features, most notably method invocation and basic string templating functionality.
While there are several other Java expression languages available, OGNL, MVEL, and JBoss EL, to name a few, the Spring Expression Language was created to provide the Spring community with a single well supported expression language that can be used across all the products in the Spring portfolio. Its language features are driven by the requirements of the projects in the Spring portfolio, including tooling requirements for code completion support within the eclipse based Spring Tool Suite. That said, SpEL is based on a technology agnostic API allowing other expression language implementations to be integrated should the need arise.
While SpEL serves as the foundation for expression evaluation within the Spring portfolio, it is not directly tied to Spring and can be used independently. In order to be self contained, many of the examples in this chapter use SpEL as if it were an independent expression language. This requires creating a few bootstrapping infrastructure classes such as the parser. Most Spring users will not need to deal with this infrastructure and will instead only author expression strings for evaluation. An example of this typical use is the integration of SpEL into creating XML or annotated based bean definitions as shown in the section Expression support for defining bean definitions.
This chapter covers the features of the expression language, its API, and its language syntax. In several places an Inventor and Inventor’s Society class are used as the target objects for expression evaluation. These class declarations and the data used to populate them are listed at the end of the chapter.
4.2. Feature overview
The expression language supports the following functionality
-
Literal expressions
-
Boolean and relational operators
-
Regular expressions
-
Class expressions
-
Accessing properties, arrays, lists, maps
-
Method invocation
-
Relational operators
-
Assignment
-
Calling constructors
-
Bean references
-
Array construction
-
Inline lists
-
Inline maps
-
Ternary operator
-
Variables
-
User defined functions
-
Collection projection
-
Collection selection
-
Templated expressions
4.3. Expression evaluation using Spring’s Expression interface
This section introduces the simple use of SpEL interfaces and its expression language. The complete language reference can be found in the section Language Reference.
The following code introduces the SpEL API to evaluate the literal string expression 'Hello World'.
ExpressionParser parser = new SpelExpressionParser();
Expression exp = parser.parseExpression("'Hello World'");
String message = (String) exp.getValue();The value of the message variable is simply 'Hello World'.
The SpEL classes and interfaces you are most likely to use are located in the packages
org.springframework.expression and its sub packages and spel.support.
The interface ExpressionParser is responsible for parsing an expression string. In
this example the expression string is a string literal denoted by the surrounding single
quotes. The interface Expression is responsible for evaluating the previously defined
expression string. There are two exceptions that can be thrown, ParseException and
EvaluationException when calling parser.parseExpression and exp.getValue
respectively.
SpEL supports a wide range of features, such as calling methods, accessing properties, and calling constructors.
As an example of method invocation, we call the concat method on the string literal.
ExpressionParser parser = new SpelExpressionParser();
Expression exp = parser.parseExpression("'Hello World'.concat('!')");
String message = (String) exp.getValue();The value of message is now 'Hello World!'.
As an example of calling a JavaBean property, the String property Bytes can be called
as shown below.
ExpressionParser parser = new SpelExpressionParser();
// invokes 'getBytes()'
Expression exp = parser.parseExpression("'Hello World'.bytes");
byte[] bytes = (byte[]) exp.getValue();SpEL also supports nested properties using standard dot notation, i.e. prop1.prop2.prop3 and the setting of property values
Public fields may also be accessed.
ExpressionParser parser = new SpelExpressionParser();
// invokes 'getBytes().length'
Expression exp = parser.parseExpression("'Hello World'.bytes.length");
int length = (Integer) exp.getValue();The String’s constructor can be called instead of using a string literal.
ExpressionParser parser = new SpelExpressionParser();
Expression exp = parser.parseExpression("new String('hello world').toUpperCase()");
String message = exp.getValue(String.class);Note the use of the generic method public <T> T getValue(Class<T> desiredResultType).
Using this method removes the need to cast the value of the expression to the desired
result type. An EvaluationException will be thrown if the value cannot be cast to the
type T or converted using the registered type converter.
The more common usage of SpEL is to provide an expression string that is evaluated
against a specific object instance (called the root object). There are two options here
and which to choose depends on whether the object against which the expression is being
evaluated will be changing with each call to evaluate the expression. In the following
example we retrieve the name property from an instance of the Inventor class.
// Create and set a calendar
GregorianCalendar c = new GregorianCalendar();
c.set(1856, 7, 9);
// The constructor arguments are name, birthday, and nationality.
Inventor tesla = new Inventor("Nikola Tesla", c.getTime(), "Serbian");
ExpressionParser parser = new SpelExpressionParser();
Expression exp = parser.parseExpression("name");
EvaluationContext context = new StandardEvaluationContext(tesla);
String name = (String) exp.getValue(context);In the last line, the value of the string variable name will be set to "Nikola Tesla".
The class StandardEvaluationContext is where you can specify which object the "name"
property will be evaluated against. This is the mechanism to use if the root object is
unlikely to change, it can simply be set once in the evaluation context. If the root
object is likely to change repeatedly, it can be supplied on each call to getValue, as
this next example shows:
/ Create and set a calendar
GregorianCalendar c = new GregorianCalendar();
c.set(1856, 7, 9);
// The constructor arguments are name, birthday, and nationality.
Inventor tesla = new Inventor("Nikola Tesla", c.getTime(), "Serbian");
ExpressionParser parser = new SpelExpressionParser();
Expression exp = parser.parseExpression("name");
String name = (String) exp.getValue(tesla);In this case the inventor tesla has been supplied directly to getValue and the
expression evaluation infrastructure creates and manages a default evaluation context
internally - it did not require one to be supplied.
The StandardEvaluationContext is relatively expensive to construct and during repeated usage it builds up cached state that enables subsequent expression evaluations to be performed more quickly. For this reason it is better to cache and reuse them where possible, rather than construct a new one for each expression evaluation.
In some cases it can be desirable to use a configured evaluation context and yet still
supply a different root object on each call to getValue. getValue allows both to be
specified on the same call. In these situations the root object passed on the call is
considered to override any (which maybe null) specified on the evaluation context.
|
In standalone usage of SpEL there is a need to create the parser, parse expressions and perhaps provide evaluation contexts and a root context object. However, more common usage is to provide only the SpEL expression string as part of a configuration file, for example for Spring bean or Spring Web Flow definitions. In this case, the parser, evaluation context, root object and any predefined variables are all set up implicitly, requiring the user to specify nothing other than the expressions. |
As a final introductory example, the use of a boolean operator is shown using the Inventor object in the previous example.
Expression exp = parser.parseExpression("name == 'Nikola Tesla'");
boolean result = exp.getValue(context, Boolean.class); // evaluates to true4.3.1. The EvaluationContext interface
The interface EvaluationContext is used when evaluating an expression to resolve
properties, methods, fields, and to help perform type conversion. The out-of-the-box
implementation, StandardEvaluationContext, uses reflection to manipulate the object,
caching java.lang.reflect.Method, java.lang.reflect.Field, and
java.lang.reflect.Constructor instances for increased performance.
The StandardEvaluationContext is where you may specify the root object to evaluate
against via the method setRootObject() or passing the root object into the
constructor. You can also specify variables and functions that will be used in the
expression using the methods setVariable() and registerFunction(). The use of
variables and functions are described in the language reference sections
Variables and Functions. The
StandardEvaluationContext is also where you can register custom
ConstructorResolvers, MethodResolvers, and PropertyAccessors to extend how SpEL
evaluates expressions. Please refer to the javadoc of these classes for more details.
Type conversion
By default SpEL uses the conversion service available in Spring core (
org.springframework.core.convert.ConversionService). This conversion service comes
with many converters built in for common conversions but is also fully extensible so
custom conversions between types can be added. Additionally it has the key capability
that it is generics aware. This means that when working with generic types in
expressions, SpEL will attempt conversions to maintain type correctness for any objects
it encounters.
What does this mean in practice? Suppose assignment, using setValue(), is being used
to set a List property. The type of the property is actually List<Boolean>. SpEL
will recognize that the elements of the list need to be converted to Boolean before
being placed in it. A simple example:
class Simple {
public List<Boolean> booleanList = new ArrayList<Boolean>();
}
Simple simple = new Simple();
simple.booleanList.add(true);
StandardEvaluationContext simpleContext = new StandardEvaluationContext(simple);
// false is passed in here as a string. SpEL and the conversion service will
// correctly recognize that it needs to be a Boolean and convert it
parser.parseExpression("booleanList[0]").setValue(simpleContext, "false");
// b will be false
Boolean b = simple.booleanList.get(0);4.3.2. Parser configuration
It is possible to configure the SpEL expression parser using a parser configuration object
(org.springframework.expression.spel.SpelParserConfiguration). The configuration
object controls the behavior of some of the expression components. For example, if
indexing into an array or collection and the element at the specified index is null
it is possible to automatically create the element. This is useful when using expressions made up of a
chain of property references. If indexing into an array or list
and specifying an index that is beyond the end of the current size of the array or
list it is possible to automatically grow the array or list to accommodate that index.
class Demo {
public List<String> list;
}
// Turn on:
// - auto null reference initialization
// - auto collection growing
SpelParserConfiguration config = new SpelParserConfiguration(true,true);
ExpressionParser parser = new SpelExpressionParser(config);
Expression expression = parser.parseExpression("list[3]");
Demo demo = new Demo();
Object o = expression.getValue(demo);
// demo.list will now be a real collection of 4 entries
// Each entry is a new empty StringIt is also possible to configure the behaviour of the SpEL expression compiler.
4.3.3. SpEL compilation
Spring Framework 4.1 includes a basic expression compiler. Expressions are usually interpreted which provides a lot of dynamic flexibility during evaluation but does not provide the optimum performance. For occasional expression usage this is fine, but when used by other components like Spring Integration, performance can be very important and there is no real need for the dynamism.
The new SpEL compiler is intended to address this need. The compiler will generate a real Java class on the fly during evaluation that embodies the expression behavior and use that to achieve much faster expression evaluation. Due to the lack of typing around expressions the compiler uses information gathered during the interpreted evaluations of an expression when performing compilation. For example, it does not know the type of a property reference purely from the expression but during the first interpreted evaluation it will find out what it is. Of course, basing the compilation on this information could cause trouble later if the types of the various expression elements change over time. For this reason compilation is best suited to expressions whose type information is not going to change on repeated evaluations.
For a basic expression like this:
someArray[0].someProperty.someOtherProperty < 0.1
which involves array access, some property derefencing and numeric operations, the performance gain can be very noticeable. In an example micro benchmark run of 50000 iterations, it was taking 75ms to evaluate using only the interpreter and just 3ms using the compiled version of the expression.
Compiler configuration
The compiler is not turned on by default, but there are two ways to turn it on. It can be turned on using the parser configuration process discussed earlier or via a system property when SpEL usage is embedded inside another component. This section discusses both of these options.
It is important to understand that there are a few modes the compiler can operate in, captured
in an enum (org.springframework.expression.spel.SpelCompilerMode). The modes are as follows:
-
OFF- The compiler is switched off; this is the default. -
IMMEDIATE- In immediate mode the expressions are compiled as soon as possible. This is typically after the first interpreted evaluation. If the compiled expression fails (typically due to a type changing, as described above) then the caller of the expression evaluation will receive an exception. -
MIXED- In mixed mode the expressions silently switch between interpreted and compiled mode over time. After some number of interpreted runs they will switch to compiled form and if something goes wrong with the compiled form (like a type changing, as described above) then the expression will automatically switch back to interpreted form again. Sometime later it may generate another compiled form and switch to it. Basically the exception that the user gets inIMMEDIATEmode is instead handled internally.
IMMEDIATE mode exists because MIXED mode could cause issues for expressions that
have side effects. If a compiled expression blows up after partially succeeding it
may have already done something that has affected the state of the system. If this
has happened the caller may not want it to silently re-run in interpreted mode
since part of the expression may be running twice.
After selecting a mode, use the SpelParserConfiguration to configure the parser:
SpelParserConfiguration config = new SpelParserConfiguration(SpelCompilerMode.IMMEDIATE,
this.getClass().getClassLoader());
SpelExpressionParser parser = new SpelExpressionParser(config);
Expression expr = parser.parseExpression("payload");
MyMessage message = new MyMessage();
Object payload = expr.getValue(message);When specifying the compiler mode it is also possible to specify a classloader (passing null is allowed). Compiled expressions will be defined in a child classloader created under any that is supplied. It is important to ensure if a classloader is specified it can see all the types involved in the expression evaluation process. If none is specified then a default classloader will be used (typically the context classloader for the thread that is running during expression evaluation).
The second way to configure the compiler is for use when SpEL is embedded inside some other
component and it may not be possible to configure via a configuration object.
In these cases it is possible to use a system property. The property
spring.expression.compiler.mode can be set to one of the SpelCompilerMode
enum values (off, immediate, or mixed).
Compiler limitations
With Spring Framework 4.1 the basic compilation framework is in place. However, the framework does not yet support compiling every kind of expression. The initial focus has been on the common expressions that are likely to be used in performance critical contexts. These kinds of expression cannot be compiled at the moment:
-
expressions involving assignment
-
expressions relying on the conversion service
-
expressions using custom resolvers or accessors
-
expressions using selection or projection
More and more types of expression will be compilable in the future.
4.4. Expression support for defining bean definitions
SpEL expressions can be used with XML or annotation-based configuration metadata for
defining BeanDefinitions. In both cases the syntax to define the expression is of the
form #{ <expression string> }.
4.4.1. XML based configuration
A property or constructor-arg value can be set using expressions as shown below.
<bean id="numberGuess" class="org.spring.samples.NumberGuess">
<property name="randomNumber" value="#{ T(java.lang.Math).random() * 100.0 }"/>
<!-- other properties -->
</bean>The variable systemProperties is predefined, so you can use it in your expressions as
shown below. Note that you do not have to prefix the predefined variable with the #
symbol in this context.
<bean id="taxCalculator" class="org.spring.samples.TaxCalculator">
<property name="defaultLocale" value="#{ systemProperties['user.region'] }"/>
<!-- other properties -->
</bean>You can also refer to other bean properties by name, for example.
<bean id="numberGuess" class="org.spring.samples.NumberGuess">
<property name="randomNumber" value="#{ T(java.lang.Math).random() * 100.0 }"/>
<!-- other properties -->
</bean>
<bean id="shapeGuess" class="org.spring.samples.ShapeGuess">
<property name="initialShapeSeed" value="#{ numberGuess.randomNumber }"/>
<!-- other properties -->
</bean>4.4.2. Annotation-based configuration
The @Value annotation can be placed on fields, methods and method/constructor
parameters to specify a default value.
Here is an example to set the default value of a field variable.
public static class FieldValueTestBean
@Value("#{ systemProperties['user.region'] }")
private String defaultLocale;
public void setDefaultLocale(String defaultLocale) {
this.defaultLocale = defaultLocale;
}
public String getDefaultLocale() {
return this.defaultLocale;
}
}The equivalent but on a property setter method is shown below.
public static class PropertyValueTestBean
private String defaultLocale;
@Value("#{ systemProperties['user.region'] }")
public void setDefaultLocale(String defaultLocale) {
this.defaultLocale = defaultLocale;
}
public String getDefaultLocale() {
return this.defaultLocale;
}
}Autowired methods and constructors can also use the @Value annotation.
public class SimpleMovieLister {
private MovieFinder movieFinder;
private String defaultLocale;
@Autowired
public void configure(MovieFinder movieFinder,
@Value("#{ systemProperties['user.region'] }") String defaultLocale) {
this.movieFinder = movieFinder;
this.defaultLocale = defaultLocale;
}
// ...
}public class MovieRecommender {
private String defaultLocale;
private CustomerPreferenceDao customerPreferenceDao;
@Autowired
public MovieRecommender(CustomerPreferenceDao customerPreferenceDao,
@Value("#{systemProperties['user.country']}") String defaultLocale) {
this.customerPreferenceDao = customerPreferenceDao;
this.defaultLocale = defaultLocale;
}
// ...
}4.5. Language Reference
4.5.1. Literal expressions
The types of literal expressions supported are strings, numeric values (int, real, hex), boolean and null. Strings are delimited by single quotes. To put a single quote itself in a string, use two single quote characters.
The following listing shows simple usage of literals. Typically they would not be used in isolation like this but rather as part of a more complex expression, for example using a literal on one side of a logical comparison operator.
ExpressionParser parser = new SpelExpressionParser();
// evals to "Hello World"
String helloWorld = (String) parser.parseExpression("'Hello World'").getValue();
double avogadrosNumber = (Double) parser.parseExpression("6.0221415E+23").getValue();
// evals to 2147483647
int maxValue = (Integer) parser.parseExpression("0x7FFFFFFF").getValue();
boolean trueValue = (Boolean) parser.parseExpression("true").getValue();
Object nullValue = parser.parseExpression("null").getValue();Numbers support the use of the negative sign, exponential notation, and decimal points. By default real numbers are parsed using Double.parseDouble().
4.5.2. Properties, Arrays, Lists, Maps, Indexers
Navigating with property references is easy: just use a period to indicate a nested
property value. The instances of the Inventor class, pupin, and tesla, were populated with
data listed in the section Classes used in the examples.
To navigate "down" and get Tesla’s year of birth and Pupin’s city of birth the following
expressions are used.
// evals to 1856
int year = (Integer) parser.parseExpression("Birthdate.Year + 1900").getValue(context);
String city = (String) parser.parseExpression("placeOfBirth.City").getValue(context);Case insensitivity is allowed for the first letter of property names. The contents of arrays and lists are obtained using square bracket notation.
ExpressionParser parser = new SpelExpressionParser();
// Inventions Array
StandardEvaluationContext teslaContext = new StandardEvaluationContext(tesla);
// evaluates to "Induction motor"
String invention = parser.parseExpression("inventions[3]").getValue(
teslaContext, String.class);
// Members List
StandardEvaluationContext societyContext = new StandardEvaluationContext(ieee);
// evaluates to "Nikola Tesla"
String name = parser.parseExpression("Members[0].Name").getValue(
societyContext, String.class);
// List and Array navigation
// evaluates to "Wireless communication"
String invention = parser.parseExpression("Members[0].Inventions[6]").getValue(
societyContext, String.class);The contents of maps are obtained by specifying the literal key value within the brackets. In this case, because keys for the Officers map are strings, we can specify string literals.
// Officer's Dictionary
Inventor pupin = parser.parseExpression("Officers['president']").getValue(
societyContext, Inventor.class);
// evaluates to "Idvor"
String city = parser.parseExpression("Officers['president'].PlaceOfBirth.City").getValue(
societyContext, String.class);
// setting values
parser.parseExpression("Officers['advisors'][0].PlaceOfBirth.Country").setValue(
societyContext, "Croatia");4.5.3. Inline lists
Lists can be expressed directly in an expression using {} notation.
// evaluates to a Java list containing the four numbers
List numbers = (List) parser.parseExpression("{1,2,3,4}").getValue(context);
List listOfLists = (List) parser.parseExpression("{{'a','b'},{'x','y'}}").getValue(context);{} by itself means an empty list. For performance reasons, if the list is itself
entirely composed of fixed literals then a constant list is created to represent the
expression, rather than building a new list on each evaluation.
4.5.4. Inline Maps
Maps can also be expressed directly in an expression using {key:value} notation.
// evaluates to a Java map containing the two entries
Map inventorInfo = (Map) parser.parseExpression("{name:'Nikola',dob:'10-July-1856'}").getValue(context);
Map mapOfMaps = (Map) parser.parseExpression("{name:{first:'Nikola',last:'Tesla'},dob:{day:10,month:'July',year:1856}}").getValue(context);{:} by itself means an empty map. For performance reasons, if the map is itself composed
of fixed literals or other nested constant structures (lists or maps) then a constant map is created
to represent the expression, rather than building a new map on each evaluation. Quoting of the map keys
is optional, the examples above are not using quoted keys.
4.5.5. Array construction
Arrays can be built using the familiar Java syntax, optionally supplying an initializer to have the array populated at construction time.
int[] numbers1 = (int[]) parser.parseExpression("new int[4]").getValue(context);
// Array with initializer
int[] numbers2 = (int[]) parser.parseExpression("new int[]{1,2,3}").getValue(context);
// Multi dimensional array
int[][] numbers3 = (int[][]) parser.parseExpression("new int[4][5]").getValue(context);It is not currently allowed to supply an initializer when constructing a multi-dimensional array.
4.5.6. Methods
Methods are invoked using typical Java programming syntax. You may also invoke methods on literals. Varargs are also supported.
// string literal, evaluates to "bc"
String bc = parser.parseExpression("'abc'.substring(1, 3)").getValue(String.class);
// evaluates to true
boolean isMember = parser.parseExpression("isMember('Mihajlo Pupin')").getValue(
societyContext, Boolean.class);4.5.7. Operators
Relational operators
The relational operators; equal, not equal, less than, less than or equal, greater than, and greater than or equal are supported using standard operator notation.
// evaluates to true
boolean trueValue = parser.parseExpression("2 == 2").getValue(Boolean.class);
// evaluates to false
boolean falseValue = parser.parseExpression("2 < -5.0").getValue(Boolean.class);
// evaluates to true
boolean trueValue = parser.parseExpression("'black' < 'block'").getValue(Boolean.class);|
Greater/less-than comparisons against If you prefer numeric comparisons instead, please avoid number-based |
In addition to standard relational operators SpEL supports the instanceof and regular
expression based matches operator.
// evaluates to false
boolean falseValue = parser.parseExpression(
"'xyz' instanceof T(Integer)").getValue(Boolean.class);
// evaluates to true
boolean trueValue = parser.parseExpression(
"'5.00' matches '\^-?\\d+(\\.\\d{2})?$'").getValue(Boolean.class);
//evaluates to false
boolean falseValue = parser.parseExpression(
"'5.0067' matches '\^-?\\d+(\\.\\d{2})?$'").getValue(Boolean.class);|
Be careful with primitive types as they are immediately boxed up to the wrapper type,
so |
Each symbolic operator can also be specified as a purely alphabetic equivalent. This
avoids problems where the symbols used have special meaning for the document type in
which the expression is embedded (eg. an XML document). The textual equivalents are
shown here: lt (<), gt (>), le (⇐), ge (>=), eq (==),
ne (!=), div (/), mod (%), not (!). These are case insensitive.
Logical operators
The logical operators that are supported are and, or, and not. Their use is demonstrated below.
// -- AND --
// evaluates to false
boolean falseValue = parser.parseExpression("true and false").getValue(Boolean.class);
// evaluates to true
String expression = "isMember('Nikola Tesla') and isMember('Mihajlo Pupin')";
boolean trueValue = parser.parseExpression(expression).getValue(societyContext, Boolean.class);
// -- OR --
// evaluates to true
boolean trueValue = parser.parseExpression("true or false").getValue(Boolean.class);
// evaluates to true
String expression = "isMember('Nikola Tesla') or isMember('Albert Einstein')";
boolean trueValue = parser.parseExpression(expression).getValue(societyContext, Boolean.class);
// -- NOT --
// evaluates to false
boolean falseValue = parser.parseExpression("!true").getValue(Boolean.class);
// -- AND and NOT --
String expression = "isMember('Nikola Tesla') and !isMember('Mihajlo Pupin')";
boolean falseValue = parser.parseExpression(expression).getValue(societyContext, Boolean.class);Mathematical operators
The addition operator can be used on both numbers and strings. Subtraction, multiplication and division can be used only on numbers. Other mathematical operators supported are modulus (%) and exponential power (^). Standard operator precedence is enforced. These operators are demonstrated below.
// Addition
int two = parser.parseExpression("1 + 1").getValue(Integer.class); // 2
String testString = parser.parseExpression(
"'test' + ' ' + 'string'").getValue(String.class); // 'test string'
// Subtraction
int four = parser.parseExpression("1 - -3").getValue(Integer.class); // 4
double d = parser.parseExpression("1000.00 - 1e4").getValue(Double.class); // -9000
// Multiplication
int six = parser.parseExpression("-2 * -3").getValue(Integer.class); // 6
double twentyFour = parser.parseExpression("2.0 * 3e0 * 4").getValue(Double.class); // 24.0
// Division
int minusTwo = parser.parseExpression("6 / -3").getValue(Integer.class); // -2
double one = parser.parseExpression("8.0 / 4e0 / 2").getValue(Double.class); // 1.0
// Modulus
int three = parser.parseExpression("7 % 4").getValue(Integer.class); // 3
int one = parser.parseExpression("8 / 5 % 2").getValue(Integer.class); // 1
// Operator precedence
int minusTwentyOne = parser.parseExpression("1+2-3*8").getValue(Integer.class); // -214.5.8. Assignment
Setting of a property is done by using the assignment operator. This would typically be
done within a call to setValue but can also be done inside a call to getValue.
Inventor inventor = new Inventor();
StandardEvaluationContext inventorContext = new StandardEvaluationContext(inventor);
parser.parseExpression("Name").setValue(inventorContext, "Alexander Seovic2");
// alternatively
String aleks = parser.parseExpression(
"Name = 'Alexandar Seovic'").getValue(inventorContext, String.class);4.5.9. Types
The special T operator can be used to specify an instance of java.lang.Class (the
type). Static methods are invoked using this operator as well. The
StandardEvaluationContext uses a TypeLocator to find types and the
StandardTypeLocator (which can be replaced) is built with an understanding of the
java.lang package. This means T() references to types within java.lang do not need to be
fully qualified, but all other type references must be.
Class dateClass = parser.parseExpression("T(java.util.Date)").getValue(Class.class);
Class stringClass = parser.parseExpression("T(String)").getValue(Class.class);
boolean trueValue = parser.parseExpression(
"T(java.math.RoundingMode).CEILING < T(java.math.RoundingMode).FLOOR")
.getValue(Boolean.class);4.5.10. Constructors
Constructors can be invoked using the new operator. The fully qualified class name should be used for all but the primitive type and String (where int, float, etc, can be used).
Inventor einstein = p.parseExpression(
"new org.spring.samples.spel.inventor.Inventor('Albert Einstein', 'German')")
.getValue(Inventor.class);
//create new inventor instance within add method of List
p.parseExpression(
"Members.add(new org.spring.samples.spel.inventor.Inventor(
'Albert Einstein', 'German'))").getValue(societyContext);4.5.11. Variables
Variables can be referenced in the expression using the syntax #variableName. Variables
are set using the method setVariable on the StandardEvaluationContext.
Inventor tesla = new Inventor("Nikola Tesla", "Serbian");
StandardEvaluationContext context = new StandardEvaluationContext(tesla);
context.setVariable("newName", "Mike Tesla");
parser.parseExpression("Name = #newName").getValue(context);
System.out.println(tesla.getName()) // "Mike Tesla"The #this and #root variables
The variable #this is always defined and refers to the current evaluation object (against which unqualified references are resolved). The variable #root is always defined and refers to the root context object. Although #this may vary as components of an expression are evaluated, #root always refers to the root.
// create an array of integers
List<Integer> primes = new ArrayList<Integer>();
primes.addAll(Arrays.asList(2,3,5,7,11,13,17));
// create parser and set variable 'primes' as the array of integers
ExpressionParser parser = new SpelExpressionParser();
StandardEvaluationContext context = new StandardEvaluationContext();
context.setVariable("primes",primes);
// all prime numbers > 10 from the list (using selection ?{...})
// evaluates to [11, 13, 17]
List<Integer> primesGreaterThanTen = (List<Integer>) parser.parseExpression(
"#primes.?[#this>10]").getValue(context);4.5.12. Functions
You can extend SpEL by registering user defined functions that can be called within the
expression string. The function is registered with the StandardEvaluationContext using
the method.
public void registerFunction(String name, Method m)A reference to a Java Method provides the implementation of the function. For example, a utility method to reverse a string is shown below.
public abstract class StringUtils {
public static String reverseString(String input) {
StringBuilder backwards = new StringBuilder();
for (int i = 0; i < input.length(); i++)
backwards.append(input.charAt(input.length() - 1 - i));
}
return backwards.toString();
}
}This method is then registered with the evaluation context and can be used within an expression string.
ExpressionParser parser = new SpelExpressionParser();
StandardEvaluationContext context = new StandardEvaluationContext();
context.registerFunction("reverseString",
StringUtils.class.getDeclaredMethod("reverseString", new Class[] { String.class }));
String helloWorldReversed = parser.parseExpression(
"#reverseString('hello')").getValue(context, String.class);4.5.13. Bean references
If the evaluation context has been configured with a bean resolver it is possible to lookup beans from an expression using the (@) symbol.
ExpressionParser parser = new SpelExpressionParser();
StandardEvaluationContext context = new StandardEvaluationContext();
context.setBeanResolver(new MyBeanResolver());
// This will end up calling resolve(context,"foo") on MyBeanResolver during evaluation
Object bean = parser.parseExpression("@foo").getValue(context);To access a factory bean itself, the bean name should instead be prefixed with a (&) symbol.
ExpressionParser parser = new SpelExpressionParser();
StandardEvaluationContext context = new StandardEvaluationContext();
context.setBeanResolver(new MyBeanResolver());
// This will end up calling resolve(context,"&foo") on MyBeanResolver during evaluation
Object bean = parser.parseExpression("&foo").getValue(context);4.5.14. Ternary Operator (If-Then-Else)
You can use the ternary operator for performing if-then-else conditional logic inside the expression. A minimal example is:
String falseString = parser.parseExpression(
"false ? 'trueExp' : 'falseExp'").getValue(String.class);In this case, the boolean false results in returning the string value 'falseExp'. A more realistic example is shown below.
parser.parseExpression("Name").setValue(societyContext, "IEEE");
societyContext.setVariable("queryName", "Nikola Tesla");
expression = "isMember(#queryName)? #queryName + ' is a member of the ' " +
"+ Name + ' Society' : #queryName + ' is not a member of the ' + Name + ' Society'";
String queryResultString = parser.parseExpression(expression)
.getValue(societyContext, String.class);
// queryResultString = "Nikola Tesla is a member of the IEEE Society"Also see the next section on the Elvis operator for an even shorter syntax for the ternary operator.
4.5.15. The Elvis Operator
The Elvis operator is a shortening of the ternary operator syntax and is used in the Groovy language. With the ternary operator syntax you usually have to repeat a variable twice, for example:
String name = "Elvis Presley";
String displayName = name != null ? name : "Unknown";Instead you can use the Elvis operator, named for the resemblance to Elvis' hair style.
ExpressionParser parser = new SpelExpressionParser();
String name = parser.parseExpression("name?:'Unknown'").getValue(String.class);
System.out.println(name); // 'Unknown'Here is a more complex example.
ExpressionParser parser = new SpelExpressionParser();
Inventor tesla = new Inventor("Nikola Tesla", "Serbian");
StandardEvaluationContext context = new StandardEvaluationContext(tesla);
String name = parser.parseExpression("Name?:'Elvis Presley'").getValue(context, String.class);
System.out.println(name); // Nikola Tesla
tesla.setName(null);
name = parser.parseExpression("Name?:'Elvis Presley'").getValue(context, String.class);
System.out.println(name); // Elvis Presley4.5.16. Safe Navigation operator
The Safe Navigation operator is used to avoid a NullPointerException and comes from
the Groovy
language. Typically when you have a reference to an object you might need to verify that
it is not null before accessing methods or properties of the object. To avoid this, the
safe navigation operator will simply return null instead of throwing an exception.
ExpressionParser parser = new SpelExpressionParser();
Inventor tesla = new Inventor("Nikola Tesla", "Serbian");
tesla.setPlaceOfBirth(new PlaceOfBirth("Smiljan"));
StandardEvaluationContext context = new StandardEvaluationContext(tesla);
String city = parser.parseExpression("PlaceOfBirth?.City").getValue(context, String.class);
System.out.println(city); // Smiljan
tesla.setPlaceOfBirth(null);
city = parser.parseExpression("PlaceOfBirth?.City").getValue(context, String.class);
System.out.println(city); // null - does not throw NullPointerException!!!|
The Elvis operator can be used to apply default values in expressions, e.g. in an
This will inject a system property |
4.5.17. Collection Selection
Selection is a powerful expression language feature that allows you to transform some source collection into another by selecting from its entries.
Selection uses the syntax .?[selectionExpression]. This will filter the collection and
return a new collection containing a subset of the original elements. For example,
selection would allow us to easily get a list of Serbian inventors:
List<Inventor> list = (List<Inventor>) parser.parseExpression(
"Members.?[Nationality == 'Serbian']").getValue(societyContext);Selection is possible upon both lists and maps. In the former case the selection
criteria is evaluated against each individual list element whilst against a map the
selection criteria is evaluated against each map entry (objects of the Java type
Map.Entry). Map entries have their key and value accessible as properties for use in
the selection.
This expression will return a new map consisting of those elements of the original map where the entry value is less than 27.
Map newMap = parser.parseExpression("map.?[value<27]").getValue();In addition to returning all the selected elements, it is possible to retrieve just the
first or the last value. To obtain the first entry matching the selection the syntax is
^[…] whilst to obtain the last matching selection the syntax is $[…].
4.5.18. Collection Projection
Projection allows a collection to drive the evaluation of a sub-expression and the
result is a new collection. The syntax for projection is ![projectionExpression]. Most
easily understood by example, suppose we have a list of inventors but want the list of
cities where they were born. Effectively we want to evaluate 'placeOfBirth.city' for
every entry in the inventor list. Using projection:
// returns ['Smiljan', 'Idvor' ]
List placesOfBirth = (List)parser.parseExpression("Members.![placeOfBirth.city]");A map can also be used to drive projection and in this case the projection expression is
evaluated against each entry in the map (represented as a Java Map.Entry). The result
of a projection across a map is a list consisting of the evaluation of the projection
expression against each map entry.
4.5.19. Expression templating
Expression templates allow a mixing of literal text with one or more evaluation blocks.
Each evaluation block is delimited with prefix and suffix characters that you can
define, a common choice is to use #{ } as the delimiters. For example,
String randomPhrase = parser.parseExpression(
"random number is #{T(java.lang.Math).random()}",
new TemplateParserContext()).getValue(String.class);
// evaluates to "random number is 0.7038186818312008"The string is evaluated by concatenating the literal text 'random number is ' with the
result of evaluating the expression inside the #{ } delimiter, in this case the result
of calling that random() method. The second argument to the method parseExpression()
is of the type ParserContext. The ParserContext interface is used to influence how
the expression is parsed in order to support the expression templating functionality.
The definition of TemplateParserContext is shown below.
public class TemplateParserContext implements ParserContext {
public String getExpressionPrefix() {
return "#{";
}
public String getExpressionSuffix() {
return "}";
}
public boolean isTemplate() {
return true;
}
}4.6. Classes used in the examples
Inventor.java
package org.spring.samples.spel.inventor;
import java.util.Date;
import java.util.GregorianCalendar;
public class Inventor {
private String name;
private String nationality;
private String[] inventions;
private Date birthdate;
private PlaceOfBirth placeOfBirth;
public Inventor(String name, String nationality) {
GregorianCalendar c= new GregorianCalendar();
this.name = name;
this.nationality = nationality;
this.birthdate = c.getTime();
}
public Inventor(String name, Date birthdate, String nationality) {
this.name = name;
this.nationality = nationality;
this.birthdate = birthdate;
}
public Inventor() {
}
public String getName() {
return name;
}
public void setName(String name) {
this.name = name;
}
public String getNationality() {
return nationality;
}
public void setNationality(String nationality) {
this.nationality = nationality;
}
public Date getBirthdate() {
return birthdate;
}
public void setBirthdate(Date birthdate) {
this.birthdate = birthdate;
}
public PlaceOfBirth getPlaceOfBirth() {
return placeOfBirth;
}
public void setPlaceOfBirth(PlaceOfBirth placeOfBirth) {
this.placeOfBirth = placeOfBirth;
}
public void setInventions(String[] inventions) {
this.inventions = inventions;
}
public String[] getInventions() {
return inventions;
}
}PlaceOfBirth.java
package org.spring.samples.spel.inventor;
public class PlaceOfBirth {
private String city;
private String country;
public PlaceOfBirth(String city) {
this.city=city;
}
public PlaceOfBirth(String city, String country) {
this(city);
this.country = country;
}
public String getCity() {
return city;
}
public void setCity(String s) {
this.city = s;
}
public String getCountry() {
return country;
}
public void setCountry(String country) {
this.country = country;
}
}Society.java
package org.spring.samples.spel.inventor;
import java.util.*;
public class Society {
private String name;
public static String Advisors = "advisors";
public static String President = "president";
private List<Inventor> members = new ArrayList<Inventor>();
private Map officers = new HashMap();
public List getMembers() {
return members;
}
public Map getOfficers() {
return officers;
}
public String getName() {
return name;
}
public void setName(String name) {
this.name = name;
}
public boolean isMember(String name) {
for (Inventor inventor : members) {
if (inventor.getName().equals(name)) {
return true;
}
}
return false;
}
}5. Aspect Oriented Programming with Spring
5.1. Introduction
Aspect-Oriented Programming (AOP) complements Object-Oriented Programming (OOP) by providing another way of thinking about program structure. The key unit of modularity in OOP is the class, whereas in AOP the unit of modularity is the aspect. Aspects enable the modularization of concerns such as transaction management that cut across multiple types and objects. (Such concerns are often termed crosscutting concerns in AOP literature.)
One of the key components of Spring is the AOP framework. While the Spring IoC container does not depend on AOP, meaning you do not need to use AOP if you don’t want to, AOP complements Spring IoC to provide a very capable middleware solution.
AOP is used in the Spring Framework to…
-
… provide declarative enterprise services, especially as a replacement for EJB declarative services. The most important such service is declarative transaction management.
-
… allow users to implement custom aspects, complementing their use of OOP with AOP.
|
If you are interested only in generic declarative services or other pre-packaged declarative middleware services such as pooling, you do not need to work directly with Spring AOP, and can skip most of this chapter. |
5.1.1. AOP concepts
Let us begin by defining some central AOP concepts and terminology. These terms are not Spring-specific… unfortunately, AOP terminology is not particularly intuitive; however, it would be even more confusing if Spring used its own terminology.
-
Aspect: a modularization of a concern that cuts across multiple classes. Transaction management is a good example of a crosscutting concern in enterprise Java applications. In Spring AOP, aspects are implemented using regular classes (the schema-based approach) or regular classes annotated with the
@Aspectannotation (the@AspectJstyle). -
Join point: a point during the execution of a program, such as the execution of a method or the handling of an exception. In Spring AOP, a join point always represents a method execution.
-
Advice: action taken by an aspect at a particular join point. Different types of advice include "around," "before" and "after" advice. (Advice types are discussed below.) Many AOP frameworks, including Spring, model an advice as an interceptor, maintaining a chain of interceptors around the join point.
-
Pointcut: a predicate that matches join points. Advice is associated with a pointcut expression and runs at any join point matched by the pointcut (for example, the execution of a method with a certain name). The concept of join points as matched by pointcut expressions is central to AOP, and Spring uses the AspectJ pointcut expression language by default.
-
Introduction: declaring additional methods or fields on behalf of a type. Spring AOP allows you to introduce new interfaces (and a corresponding implementation) to any advised object. For example, you could use an introduction to make a bean implement an
IsModifiedinterface, to simplify caching. (An introduction is known as an inter-type declaration in the AspectJ community.) -
Target object: object being advised by one or more aspects. Also referred to as the advised object. Since Spring AOP is implemented using runtime proxies, this object will always be a proxied object.
-
AOP proxy: an object created by the AOP framework in order to implement the aspect contracts (advise method executions and so on). In the Spring Framework, an AOP proxy will be a JDK dynamic proxy or a CGLIB proxy.
-
Weaving: linking aspects with other application types or objects to create an advised object. This can be done at compile time (using the AspectJ compiler, for example), load time, or at runtime. Spring AOP, like other pure Java AOP frameworks, performs weaving at runtime.
Types of advice:
-
Before advice: Advice that executes before a join point, but which does not have the ability to prevent execution flow proceeding to the join point (unless it throws an exception).
-
After returning advice: Advice to be executed after a join point completes normally: for example, if a method returns without throwing an exception.
-
After throwing advice: Advice to be executed if a method exits by throwing an exception.
-
After (finally) advice: Advice to be executed regardless of the means by which a join point exits (normal or exceptional return).
-
Around advice: Advice that surrounds a join point such as a method invocation. This is the most powerful kind of advice. Around advice can perform custom behavior before and after the method invocation. It is also responsible for choosing whether to proceed to the join point or to shortcut the advised method execution by returning its own return value or throwing an exception.
Around advice is the most general kind of advice. Since Spring AOP, like AspectJ,
provides a full range of advice types, we recommend that you use the least powerful
advice type that can implement the required behavior. For example, if you need only to
update a cache with the return value of a method, you are better off implementing an
after returning advice than an around advice, although an around advice can accomplish
the same thing. Using the most specific advice type provides a simpler programming model
with less potential for errors. For example, you do not need to invoke the proceed()
method on the JoinPoint used for around advice, and hence cannot fail to invoke it.
In Spring 2.0, all advice parameters are statically typed, so that you work with advice
parameters of the appropriate type (the type of the return value from a method execution
for example) rather than Object arrays.
The concept of join points, matched by pointcuts, is the key to AOP which distinguishes it from older technologies offering only interception. Pointcuts enable advice to be targeted independently of the Object-Oriented hierarchy. For example, an around advice providing declarative transaction management can be applied to a set of methods spanning multiple objects (such as all business operations in the service layer).
5.1.2. Spring AOP capabilities and goals
Spring AOP is implemented in pure Java. There is no need for a special compilation process. Spring AOP does not need to control the class loader hierarchy, and is thus suitable for use in a Servlet container or application server.
Spring AOP currently supports only method execution join points (advising the execution of methods on Spring beans). Field interception is not implemented, although support for field interception could be added without breaking the core Spring AOP APIs. If you need to advise field access and update join points, consider a language such as AspectJ.
Spring AOP’s approach to AOP differs from that of most other AOP frameworks. The aim is not to provide the most complete AOP implementation (although Spring AOP is quite capable); it is rather to provide a close integration between AOP implementation and Spring IoC to help solve common problems in enterprise applications.
Thus, for example, the Spring Framework’s AOP functionality is normally used in conjunction with the Spring IoC container. Aspects are configured using normal bean definition syntax (although this allows powerful "autoproxying" capabilities): this is a crucial difference from other AOP implementations. There are some things you cannot do easily or efficiently with Spring AOP, such as advise very fine-grained objects (such as domain objects typically): AspectJ is the best choice in such cases. However, our experience is that Spring AOP provides an excellent solution to most problems in enterprise Java applications that are amenable to AOP.
Spring AOP will never strive to compete with AspectJ to provide a comprehensive AOP solution. We believe that both proxy-based frameworks like Spring AOP and full-blown frameworks such as AspectJ are valuable, and that they are complementary, rather than in competition. Spring seamlessly integrates Spring AOP and IoC with AspectJ, to enable all uses of AOP to be catered for within a consistent Spring-based application architecture. This integration does not affect the Spring AOP API or the AOP Alliance API: Spring AOP remains backward-compatible. See the following chapter for a discussion of the Spring AOP APIs.
|
One of the central tenets of the Spring Framework is that of non-invasiveness; this is the idea that you should not be forced to introduce framework-specific classes and interfaces into your business/domain model. However, in some places the Spring Framework does give you the option to introduce Spring Framework-specific dependencies into your codebase: the rationale in giving you such options is because in certain scenarios it might be just plain easier to read or code some specific piece of functionality in such a way. The Spring Framework (almost) always offers you the choice though: you have the freedom to make an informed decision as to which option best suits your particular use case or scenario. One such choice that is relevant to this chapter is that of which AOP framework (and which AOP style) to choose. You have the choice of AspectJ and/or Spring AOP, and you also have the choice of either the @AspectJ annotation-style approach or the Spring XML configuration-style approach. The fact that this chapter chooses to introduce the @AspectJ-style approach first should not be taken as an indication that the Spring team favors the @AspectJ annotation-style approach over the Spring XML configuration-style. See Choosing which AOP declaration style to use for a more complete discussion of the whys and wherefores of each style. |
5.1.3. AOP Proxies
Spring AOP defaults to using standard JDK dynamic proxies for AOP proxies. This enables any interface (or set of interfaces) to be proxied.
Spring AOP can also use CGLIB proxies. This is necessary to proxy classes rather than interfaces. CGLIB is used by default if a business object does not implement an interface. As it is good practice to program to interfaces rather than classes; business classes normally will implement one or more business interfaces. It is possible to force the use of CGLIB, in those (hopefully rare) cases where you need to advise a method that is not declared on an interface, or where you need to pass a proxied object to a method as a concrete type.
It is important to grasp the fact that Spring AOP is proxy-based. See Understanding AOP proxies for a thorough examination of exactly what this implementation detail actually means.
5.2. @AspectJ support
@AspectJ refers to a style of declaring aspects as regular Java classes annotated with annotations. The @AspectJ style was introduced by the AspectJ project as part of the AspectJ 5 release. Spring interprets the same annotations as AspectJ 5, using a library supplied by AspectJ for pointcut parsing and matching. The AOP runtime is still pure Spring AOP though, and there is no dependency on the AspectJ compiler or weaver.
|
Using the AspectJ compiler and weaver enables use of the full AspectJ language, and is discussed in Using AspectJ with Spring applications. |
5.2.1. Enabling @AspectJ Support
To use @AspectJ aspects in a Spring configuration you need to enable Spring support for configuring Spring AOP based on @AspectJ aspects, and autoproxying beans based on whether or not they are advised by those aspects. By autoproxying we mean that if Spring determines that a bean is advised by one or more aspects, it will automatically generate a proxy for that bean to intercept method invocations and ensure that advice is executed as needed.
The @AspectJ support can be enabled with XML or Java style configuration. In either
case you will also need to ensure that AspectJ’s aspectjweaver.jar library is on the
classpath of your application (version 1.6.8 or later). This library is available in the
'lib' directory of an AspectJ distribution or via the Maven Central repository.
Enabling @AspectJ Support with Java configuration
To enable @AspectJ support with Java @Configuration add the @EnableAspectJAutoProxy
annotation:
@Configuration
@EnableAspectJAutoProxy
public class AppConfig {
}Enabling @AspectJ Support with XML configuration
To enable @AspectJ support with XML based configuration use the aop:aspectj-autoproxy
element:
<aop:aspectj-autoproxy/>This assumes that you are using schema support as described in
XML Schema-based configuration. See
the AOP schema for how to import the tags in the aop
namespace.
5.2.2. Declaring an aspect
With the @AspectJ support enabled, any bean defined in your application context with a
class that is an @AspectJ aspect (has the @Aspect annotation) will be automatically
detected by Spring and used to configure Spring AOP. The following example shows the
minimal definition required for a not-very-useful aspect:
A regular bean definition in the application context, pointing to a bean class that has
the @Aspect annotation:
<bean id="myAspect" class="org.xyz.NotVeryUsefulAspect">
<!-- configure properties of aspect here as normal -->
</bean>And the NotVeryUsefulAspect class definition, annotated with
org.aspectj.lang.annotation.Aspect annotation;
package org.xyz;
import org.aspectj.lang.annotation.Aspect;
@Aspect
public class NotVeryUsefulAspect {
}Aspects (classes annotated with @Aspect) may have methods and fields just like any
other class. They may also contain pointcut, advice, and introduction (inter-type)
declarations.
|
Autodetecting aspects through component scanning
You may register aspect classes as regular beans in your Spring XML configuration, or autodetect them through classpath scanning - just like any other Spring-managed bean. However, note that the @Aspect annotation is not sufficient for autodetection in the classpath: For that purpose, you need to add a separate @Component annotation (or alternatively a custom stereotype annotation that qualifies, as per the rules of Spring’s component scanner). |
|
Advising aspects with other aspects?
In Spring AOP, it is not possible to have aspects themselves be the target of advice from other aspects. The @Aspect annotation on a class marks it as an aspect, and hence excludes it from auto-proxying. |
5.2.3. Declaring a pointcut
Recall that pointcuts determine join points of interest, and thus enable us to control
when advice executes. Spring AOP only supports method execution join points for Spring
beans, so you can think of a pointcut as matching the execution of methods on Spring
beans. A pointcut declaration has two parts: a signature comprising a name and any
parameters, and a pointcut expression that determines exactly which method
executions we are interested in. In the @AspectJ annotation-style of AOP, a pointcut
signature is provided by a regular method definition, and the pointcut expression is
indicated using the @Pointcut annotation (the method serving as the pointcut signature
must have a void return type).
An example will help make this distinction between a pointcut signature and a pointcut
expression clear. The following example defines a pointcut named 'anyOldTransfer' that
will match the execution of any method named 'transfer':
@Pointcut("execution(* transfer(..))")// the pointcut expression
private void anyOldTransfer() {}// the pointcut signatureThe pointcut expression that forms the value of the @Pointcut annotation is a regular
AspectJ 5 pointcut expression. For a full discussion of AspectJ’s pointcut language, see
the AspectJ
Programming Guide (and for extensions, the
AspectJ 5
Developers Notebook) or one of the books on AspectJ such as "Eclipse AspectJ" by Colyer
et. al. or "AspectJ in Action" by Ramnivas Laddad.
Supported Pointcut Designators
Spring AOP supports the following AspectJ pointcut designators (PCD) for use in pointcut expressions:
-
execution - for matching method execution join points, this is the primary pointcut designator you will use when working with Spring AOP
-
within - limits matching to join points within certain types (simply the execution of a method declared within a matching type when using Spring AOP)
-
this - limits matching to join points (the execution of methods when using Spring AOP) where the bean reference (Spring AOP proxy) is an instance of the given type
-
target - limits matching to join points (the execution of methods when using Spring AOP) where the target object (application object being proxied) is an instance of the given type
-
args - limits matching to join points (the execution of methods when using Spring AOP) where the arguments are instances of the given types
-
@target - limits matching to join points (the execution of methods when using Spring AOP) where the class of the executing object has an annotation of the given type
-
@args - limits matching to join points (the execution of methods when using Spring AOP) where the runtime type of the actual arguments passed have annotations of the given type(s)
-
@within - limits matching to join points within types that have the given annotation (the execution of methods declared in types with the given annotation when using Spring AOP)
-
@annotation - limits matching to join points where the subject of the join point (method being executed in Spring AOP) has the given annotation
Because Spring AOP limits matching to only method execution join points, the discussion
of the pointcut designators above gives a narrower definition than you will find in the
AspectJ programming guide. In addition, AspectJ itself has type-based semantics and at
an execution join point both this and target refer to the same object - the
object executing the method. Spring AOP is a proxy-based system and differentiates
between the proxy object itself (bound to this) and the target object behind the
proxy (bound to target).
|
Due to the proxy-based nature of Spring’s AOP framework, calls within the target object are by definition not intercepted. For JDK proxies, only public interface method calls on the proxy can be intercepted. With CGLIB, public and protected method calls on the proxy will be intercepted, and even package-visible methods if necessary. However, common interactions through proxies should always be designed through public signatures. Note that pointcut definitions are generally matched against any intercepted method. If a pointcut is strictly meant to be public-only, even in a CGLIB proxy scenario with potential non-public interactions through proxies, it needs to be defined accordingly. If your interception needs include method calls or even constructors within the target class, consider the use of Spring-driven native AspectJ weaving instead of Spring’s proxy-based AOP framework. This constitutes a different mode of AOP usage with different characteristics, so be sure to make yourself familiar with weaving first before making a decision. |
Spring AOP also supports an additional PCD named bean. This PCD allows you to limit
the matching of join points to a particular named Spring bean, or to a set of named
Spring beans (when using wildcards). The bean PCD has the following form:
bean(idOrNameOfBean)The idOrNameOfBean token can be the name of any Spring bean: limited wildcard
support using the * character is provided, so if you establish some naming
conventions for your Spring beans you can quite easily write a bean PCD expression
to pick them out. As is the case with other pointcut designators, the bean PCD can
be &&'ed, ||'ed, and ! (negated) too.
|
Please note that the The |
Combining pointcut expressions
Pointcut expressions can be combined using '&&', '||' and '!'. It is also possible to
refer to pointcut expressions by name. The following example shows three pointcut
expressions: anyPublicOperation (which matches if a method execution join point
represents the execution of any public method); inTrading (which matches if a method
execution is in the trading module), and tradingOperation (which matches if a method
execution represents any public method in the trading module).
@Pointcut("execution(public * *(..))")
private void anyPublicOperation() {}
@Pointcut("within(com.xyz.someapp.trading..*)")
private void inTrading() {}
@Pointcut("anyPublicOperation() && inTrading()")
private void tradingOperation() {}It is a best practice to build more complex pointcut expressions out of smaller named components as shown above. When referring to pointcuts by name, normal Java visibility rules apply (you can see private pointcuts in the same type, protected pointcuts in the hierarchy, public pointcuts anywhere and so on). Visibility does not affect pointcut matching.
Sharing common pointcut definitions
When working with enterprise applications, you often want to refer to modules of the application and particular sets of operations from within several aspects. We recommend defining a "SystemArchitecture" aspect that captures common pointcut expressions for this purpose. A typical such aspect would look as follows:
package com.xyz.someapp;
import org.aspectj.lang.annotation.Aspect;
import org.aspectj.lang.annotation.Pointcut;
@Aspect
public class SystemArchitecture {
/**
* A join point is in the web layer if the method is defined
* in a type in the com.xyz.someapp.web package or any sub-package
* under that.
*/
@Pointcut("within(com.xyz.someapp.web..*)")
public void inWebLayer() {}
/**
* A join point is in the service layer if the method is defined
* in a type in the com.xyz.someapp.service package or any sub-package
* under that.
*/
@Pointcut("within(com.xyz.someapp.service..*)")
public void inServiceLayer() {}
/**
* A join point is in the data access layer if the method is defined
* in a type in the com.xyz.someapp.dao package or any sub-package
* under that.
*/
@Pointcut("within(com.xyz.someapp.dao..*)")
public void inDataAccessLayer() {}
/**
* A business service is the execution of any method defined on a service
* interface. This definition assumes that interfaces are placed in the
* "service" package, and that implementation types are in sub-packages.
*
* If you group service interfaces by functional area (for example,
* in packages com.xyz.someapp.abc.service and com.xyz.someapp.def.service) then
* the pointcut expression "execution(* com.xyz.someapp..service.*.*(..))"
* could be used instead.
*
* Alternatively, you can write the expression using the 'bean'
* PCD, like so "bean(*Service)". (This assumes that you have
* named your Spring service beans in a consistent fashion.)
*/
@Pointcut("execution(* com.xyz.someapp..service.*.*(..))")
public void businessService() {}
/**
* A data access operation is the execution of any method defined on a
* dao interface. This definition assumes that interfaces are placed in the
* "dao" package, and that implementation types are in sub-packages.
*/
@Pointcut("execution(* com.xyz.someapp.dao.*.*(..))")
public void dataAccessOperation() {}
}The pointcuts defined in such an aspect can be referred to anywhere that you need a pointcut expression. For example, to make the service layer transactional, you could write:
<aop:config>
<aop:advisor
pointcut="com.xyz.someapp.SystemArchitecture.businessService()"
advice-ref="tx-advice"/>
</aop:config>
<tx:advice id="tx-advice">
<tx:attributes>
<tx:method name="*" propagation="REQUIRED"/>
</tx:attributes>
</tx:advice>The <aop:config> and <aop:advisor> elements are discussed in Schema-based AOP support. The
transaction elements are discussed in Transaction Management.
Examples
Spring AOP users are likely to use the execution pointcut designator the most often.
The format of an execution expression is:
execution(modifiers-pattern? ret-type-pattern declaring-type-pattern?name-pattern(param-pattern)
throws-pattern?)All parts except the returning type pattern (ret-type-pattern in the snippet above),
name pattern, and parameters pattern are optional. The returning type pattern determines
what the return type of the method must be in order for a join point to be matched. Most
frequently you will use * as the returning type pattern, which matches any return
type. A fully-qualified type name will match only when the method returns the given
type. The name pattern matches the method name. You can use the * wildcard as all or
part of a name pattern. If specifying a declaring type pattern
then include a trailing . to join it to the name pattern component.
The parameters pattern is slightly more complex: () matches a
method that takes no parameters, whereas (..) matches any number of parameters (zero
or more). The pattern (*) matches a method taking one parameter of any type,
(*,String) matches a method taking two parameters, the first can be of any type, the
second must be a String. Consult the
Language
Semantics section of the AspectJ Programming Guide for more information.
Some examples of common pointcut expressions are given below.
-
the execution of any public method:
execution(public * *(..))-
the execution of any method with a name beginning with "set":
execution(* set*(..))-
the execution of any method defined by the
AccountServiceinterface:
execution(* com.xyz.service.AccountService.*(..))-
the execution of any method defined in the service package:
execution(* com.xyz.service.*.*(..))-
the execution of any method defined in the service package or a sub-package:
execution(* com.xyz.service..*.*(..))-
any join point (method execution only in Spring AOP) within the service package:
within(com.xyz.service.*)-
any join point (method execution only in Spring AOP) within the service package or a sub-package:
within(com.xyz.service..*)-
any join point (method execution only in Spring AOP) where the proxy implements the
AccountServiceinterface:
this(com.xyz.service.AccountService)|
'this' is more commonly used in a binding form :- see the following section on advice for how to make the proxy object available in the advice body. |
-
any join point (method execution only in Spring AOP) where the target object implements the
AccountServiceinterface:
target(com.xyz.service.AccountService)|
'target' is more commonly used in a binding form :- see the following section on advice for how to make the target object available in the advice body. |
-
any join point (method execution only in Spring AOP) which takes a single parameter, and where the argument passed at runtime is
Serializable:
args(java.io.Serializable)|
'args' is more commonly used in a binding form :- see the following section on advice for how to make the method arguments available in the advice body. |
Note that the pointcut given in this example is different to execution(*
*(java.io.Serializable)): the args version matches if the argument passed at runtime is
Serializable, the execution version matches if the method signature declares a single
parameter of type Serializable.
-
any join point (method execution only in Spring AOP) where the target object has an
@Transactionalannotation:
@target(org.springframework.transaction.annotation.Transactional)|
'@target' can also be used in a binding form :- see the following section on advice for how to make the annotation object available in the advice body. |
-
any join point (method execution only in Spring AOP) where the declared type of the target object has an
@Transactionalannotation:
@within(org.springframework.transaction.annotation.Transactional)|
'@within' can also be used in a binding form :- see the following section on advice for how to make the annotation object available in the advice body. |
-
any join point (method execution only in Spring AOP) where the executing method has an
@Transactionalannotation:
@annotation(org.springframework.transaction.annotation.Transactional)|
'@annotation' can also be used in a binding form :- see the following section on advice for how to make the annotation object available in the advice body. |
-
any join point (method execution only in Spring AOP) which takes a single parameter, and where the runtime type of the argument passed has the
@Classifiedannotation:
@args(com.xyz.security.Classified)|
'@args' can also be used in a binding form :- see the following section on advice for how to make the annotation object(s) available in the advice body. |
-
any join point (method execution only in Spring AOP) on a Spring bean named
tradeService:
bean(tradeService)-
any join point (method execution only in Spring AOP) on Spring beans having names that match the wildcard expression
*Service:
bean(*Service)Writing good pointcuts
During compilation, AspectJ processes pointcuts in order to try and optimize matching performance. Examining code and determining if each join point matches (statically or dynamically) a given pointcut is a costly process. (A dynamic match means the match cannot be fully determined from static analysis and a test will be placed in the code to determine if there is an actual match when the code is running). On first encountering a pointcut declaration, AspectJ will rewrite it into an optimal form for the matching process. What does this mean? Basically pointcuts are rewritten in DNF (Disjunctive Normal Form) and the components of the pointcut are sorted such that those components that are cheaper to evaluate are checked first. This means you do not have to worry about understanding the performance of various pointcut designators and may supply them in any order in a pointcut declaration.
However, AspectJ can only work with what it is told, and for optimal performance of matching you should think about what they are trying to achieve and narrow the search space for matches as much as possible in the definition. The existing designators naturally fall into one of three groups: kinded, scoping and context:
-
Kinded designators are those which select a particular kind of join point. For example: execution, get, set, call, handler
-
Scoping designators are those which select a group of join points of interest (of probably many kinds). For example: within, withincode
-
Contextual designators are those that match (and optionally bind) based on context. For example: this, target, @annotation
A well written pointcut should try and include at least the first two types (kinded and scoping), whilst the contextual designators may be included if wishing to match based on join point context, or bind that context for use in the advice. Supplying either just a kinded designator or just a contextual designator will work but could affect weaving performance (time and memory used) due to all the extra processing and analysis. Scoping designators are very fast to match and their usage means AspectJ can very quickly dismiss groups of join points that should not be further processed - that is why a good pointcut should always include one if possible.
5.2.4. Declaring advice
Advice is associated with a pointcut expression, and runs before, after, or around method executions matched by the pointcut. The pointcut expression may be either a simple reference to a named pointcut, or a pointcut expression declared in place.
Before advice
Before advice is declared in an aspect using the @Before annotation:
import org.aspectj.lang.annotation.Aspect;
import org.aspectj.lang.annotation.Before;
@Aspect
public class BeforeExample {
@Before("com.xyz.myapp.SystemArchitecture.dataAccessOperation()")
public void doAccessCheck() {
// ...
}
}If using an in-place pointcut expression we could rewrite the above example as:
import org.aspectj.lang.annotation.Aspect;
import org.aspectj.lang.annotation.Before;
@Aspect
public class BeforeExample {
@Before("execution(* com.xyz.myapp.dao.*.*(..))")
public void doAccessCheck() {
// ...
}
}After returning advice
After returning advice runs when a matched method execution returns normally. It is
declared using the @AfterReturning annotation:
import org.aspectj.lang.annotation.Aspect;
import org.aspectj.lang.annotation.AfterReturning;
@Aspect
public class AfterReturningExample {
@AfterReturning("com.xyz.myapp.SystemArchitecture.dataAccessOperation()")
public void doAccessCheck() {
// ...
}
}|
Note: it is of course possible to have multiple advice declarations, and other members as well, all inside the same aspect. We’re just showing a single advice declaration in these examples to focus on the issue under discussion at the time. |
Sometimes you need access in the advice body to the actual value that was returned. You
can use the form of @AfterReturning that binds the return value for this:
import org.aspectj.lang.annotation.Aspect;
import org.aspectj.lang.annotation.AfterReturning;
@Aspect
public class AfterReturningExample {
@AfterReturning(
pointcut="com.xyz.myapp.SystemArchitecture.dataAccessOperation()",
returning="retVal")
public void doAccessCheck(Object retVal) {
// ...
}
}The name used in the returning attribute must correspond to the name of a parameter in
the advice method. When a method execution returns, the return value will be passed to
the advice method as the corresponding argument value. A returning clause also
restricts matching to only those method executions that return a value of the specified
type ( Object in this case, which will match any return value).
Please note that it is not possible to return a totally different reference when using after-returning advice.
After throwing advice
After throwing advice runs when a matched method execution exits by throwing an
exception. It is declared using the @AfterThrowing annotation:
import org.aspectj.lang.annotation.Aspect;
import org.aspectj.lang.annotation.AfterThrowing;
@Aspect
public class AfterThrowingExample {
@AfterThrowing("com.xyz.myapp.SystemArchitecture.dataAccessOperation()")
public void doRecoveryActions() {
// ...
}
}Often you want the advice to run only when exceptions of a given type are thrown, and
you also often need access to the thrown exception in the advice body. Use the
throwing attribute to both restrict matching (if desired, use Throwable as the
exception type otherwise) and bind the thrown exception to an advice parameter.
import org.aspectj.lang.annotation.Aspect;
import org.aspectj.lang.annotation.AfterThrowing;
@Aspect
public class AfterThrowingExample {
@AfterThrowing(
pointcut="com.xyz.myapp.SystemArchitecture.dataAccessOperation()",
throwing="ex")
public void doRecoveryActions(DataAccessException ex) {
// ...
}
}The name used in the throwing attribute must correspond to the name of a parameter in
the advice method. When a method execution exits by throwing an exception, the exception
will be passed to the advice method as the corresponding argument value. A throwing
clause also restricts matching to only those method executions that throw an exception
of the specified type ( DataAccessException in this case).
After (finally) advice
After (finally) advice runs however a matched method execution exits. It is declared
using the @After annotation. After advice must be prepared to handle both normal and
exception return conditions. It is typically used for releasing resources, etc.
import org.aspectj.lang.annotation.Aspect;
import org.aspectj.lang.annotation.After;
@Aspect
public class AfterFinallyExample {
@After("com.xyz.myapp.SystemArchitecture.dataAccessOperation()")
public void doReleaseLock() {
// ...
}
}Around advice
The final kind of advice is around advice. Around advice runs "around" a matched method execution. It has the opportunity to do work both before and after the method executes, and to determine when, how, and even if, the method actually gets to execute at all. Around advice is often used if you need to share state before and after a method execution in a thread-safe manner (starting and stopping a timer for example). Always use the least powerful form of advice that meets your requirements (i.e. don’t use around advice if simple before advice would do).
Around advice is declared using the @Around annotation. The first parameter of the
advice method must be of type ProceedingJoinPoint. Within the body of the advice,
calling proceed() on the ProceedingJoinPoint causes the underlying method to
execute. The proceed method may also be called passing in an Object[] - the values
in the array will be used as the arguments to the method execution when it proceeds.
|
The behavior of proceed when called with an Object[] is a little different than the behavior of proceed for around advice compiled by the AspectJ compiler. For around advice written using the traditional AspectJ language, the number of arguments passed to proceed must match the number of arguments passed to the around advice (not the number of arguments taken by the underlying join point), and the value passed to proceed in a given argument position supplants the original value at the join point for the entity the value was bound to (Don’t worry if this doesn’t make sense right now!). The approach taken by Spring is simpler and a better match to its proxy-based, execution only semantics. You only need to be aware of this difference if you are compiling @AspectJ aspects written for Spring and using proceed with arguments with the AspectJ compiler and weaver. There is a way to write such aspects that is 100% compatible across both Spring AOP and AspectJ, and this is discussed in the following section on advice parameters. |
import org.aspectj.lang.annotation.Aspect;
import org.aspectj.lang.annotation.Around;
import org.aspectj.lang.ProceedingJoinPoint;
@Aspect
public class AroundExample {
@Around("com.xyz.myapp.SystemArchitecture.businessService()")
public Object doBasicProfiling(ProceedingJoinPoint pjp) throws Throwable {
// start stopwatch
Object retVal = pjp.proceed();
// stop stopwatch
return retVal;
}
}The value returned by the around advice will be the return value seen by the caller of the method. A simple caching aspect for example could return a value from a cache if it has one, and invoke proceed() if it does not. Note that proceed may be invoked once, many times, or not at all within the body of the around advice, all of these are quite legal.
Advice parameters
Spring offers fully typed advice - meaning that you declare the parameters you need
in the advice signature (as we saw for the returning and throwing examples above) rather
than work with Object[] arrays all the time. We’ll see how to make argument and other
contextual values available to the advice body in a moment. First let’s take a look at
how to write generic advice that can find out about the method the advice is currently
advising.
Access to the current JoinPoint
Any advice method may declare as its first parameter, a parameter of type
org.aspectj.lang.JoinPoint (please note that around advice is required to declare
a first parameter of type ProceedingJoinPoint, which is a subclass of JoinPoint. The
JoinPoint interface provides a number of useful methods such as getArgs() (returns
the method arguments), getThis() (returns the proxy object), getTarget() (returns
the target object), getSignature() (returns a description of the method that is being
advised) and toString() (prints a useful description of the method being advised).
Please do consult the javadocs for full details.
Passing parameters to advice
We’ve already seen how to bind the returned value or exception value (using after
returning and after throwing advice). To make argument values available to the advice
body, you can use the binding form of args. If a parameter name is used in place of a
type name in an args expression, then the value of the corresponding argument will be
passed as the parameter value when the advice is invoked. An example should make this
clearer. Suppose you want to advise the execution of dao operations that take an Account
object as the first parameter, and you need access to the account in the advice body.
You could write the following:
@Before("com.xyz.myapp.SystemArchitecture.dataAccessOperation() && args(account,..)")
public void validateAccount(Account account) {
// ...
}The args(account,..) part of the pointcut expression serves two purposes: firstly, it
restricts matching to only those method executions where the method takes at least one
parameter, and the argument passed to that parameter is an instance of Account;
secondly, it makes the actual Account object available to the advice via the account
parameter.
Another way of writing this is to declare a pointcut that "provides" the Account
object value when it matches a join point, and then just refer to the named pointcut
from the advice. This would look as follows:
@Pointcut("com.xyz.myapp.SystemArchitecture.dataAccessOperation() && args(account,..)")
private void accountDataAccessOperation(Account account) {}
@Before("accountDataAccessOperation(account)")
public void validateAccount(Account account) {
// ...
}The interested reader is once more referred to the AspectJ programming guide for more details.
The proxy object ( this), target object ( target), and annotations ( @within,
@target, @annotation, @args) can all be bound in a similar fashion. The following
example shows how you could match the execution of methods annotated with an
@Auditable annotation, and extract the audit code.
First the definition of the @Auditable annotation:
@Retention(RetentionPolicy.RUNTIME)
@Target(ElementType.METHOD)
public @interface Auditable {
AuditCode value();
}And then the advice that matches the execution of @Auditable methods:
@Before("com.xyz.lib.Pointcuts.anyPublicMethod() && @annotation(auditable)")
public void audit(Auditable auditable) {
AuditCode code = auditable.value();
// ...
}Advice parameters and generics
Spring AOP can handle generics used in class declarations and method parameters. Suppose you have a generic type like this:
public interface Sample<T> {
void sampleGenericMethod(T param);
void sampleGenericCollectionMethod(Collection<T> param);
}You can restrict interception of method types to certain parameter types by simply typing the advice parameter to the parameter type you want to intercept the method for:
@Before("execution(* ..Sample+.sampleGenericMethod(*)) && args(param)")
public void beforeSampleMethod(MyType param) {
// Advice implementation
}That this works is pretty obvious as we already discussed above. However, it’s worth pointing out that this won’t work for generic collections. So you cannot define a pointcut like this:
@Before("execution(* ..Sample+.sampleGenericCollectionMethod(*)) && args(param)")
public void beforeSampleMethod(Collection<MyType> param) {
// Advice implementation
}To make this work we would have to inspect every element of the collection, which is not
reasonable as we also cannot decide how to treat null values in general. To achieve
something similar to this you have to type the parameter to Collection<?> and manually
check the type of the elements.
Determining argument names
The parameter binding in advice invocations relies on matching names used in pointcut expressions to declared parameter names in (advice and pointcut) method signatures. Parameter names are not available through Java reflection, so Spring AOP uses the following strategies to determine parameter names:
-
If the parameter names have been specified by the user explicitly, then the specified parameter names are used: both the advice and the pointcut annotations have an optional "argNames" attribute which can be used to specify the argument names of the annotated method - these argument names are available at runtime. For example:
@Before(value="com.xyz.lib.Pointcuts.anyPublicMethod() && target(bean) && @annotation(auditable)",
argNames="bean,auditable")
public void audit(Object bean, Auditable auditable) {
AuditCode code = auditable.value();
// ... use code and bean
}If the first parameter is of the JoinPoint, ProceedingJoinPoint, or
JoinPoint.StaticPart type, you may leave out the name of the parameter from the value
of the "argNames" attribute. For example, if you modify the preceding advice to receive
the join point object, the "argNames" attribute need not include it:
@Before(value="com.xyz.lib.Pointcuts.anyPublicMethod() && target(bean) && @annotation(auditable)",
argNames="bean,auditable")
public void audit(JoinPoint jp, Object bean, Auditable auditable) {
AuditCode code = auditable.value();
// ... use code, bean, and jp
}The special treatment given to the first parameter of the JoinPoint,
ProceedingJoinPoint, and JoinPoint.StaticPart types is particularly convenient for
advice that do not collect any other join point context. In such situations, you may
simply omit the "argNames" attribute. For example, the following advice need not declare
the "argNames" attribute:
@Before("com.xyz.lib.Pointcuts.anyPublicMethod()")
public void audit(JoinPoint jp) {
// ... use jp
}-
Using the
'argNames'attribute is a little clumsy, so if the'argNames'attribute has not been specified, then Spring AOP will look at the debug information for the class and try to determine the parameter names from the local variable table. This information will be present as long as the classes have been compiled with debug information ('-g:vars'at a minimum). The consequences of compiling with this flag on are: (1) your code will be slightly easier to understand (reverse engineer), (2) the class file sizes will be very slightly bigger (typically inconsequential), (3) the optimization to remove unused local variables will not be applied by your compiler. In other words, you should encounter no difficulties building with this flag on.
|
If an @AspectJ aspect has been compiled by the AspectJ compiler (ajc) even without the debug information then there is no need to add the argNames attribute as the compiler will retain the needed information. |
-
If the code has been compiled without the necessary debug information, then Spring AOP will attempt to deduce the pairing of binding variables to parameters (for example, if only one variable is bound in the pointcut expression, and the advice method only takes one parameter, the pairing is obvious!). If the binding of variables is ambiguous given the available information, then an
AmbiguousBindingExceptionwill be thrown. -
If all of the above strategies fail then an
IllegalArgumentExceptionwill be thrown.
Proceeding with arguments
We remarked earlier that we would describe how to write a proceed call with arguments that works consistently across Spring AOP and AspectJ. The solution is simply to ensure that the advice signature binds each of the method parameters in order. For example:
@Around("execution(List<Account> find*(..)) && " +
"com.xyz.myapp.SystemArchitecture.inDataAccessLayer() && " +
"args(accountHolderNamePattern)")
public Object preProcessQueryPattern(ProceedingJoinPoint pjp,
String accountHolderNamePattern) throws Throwable {
String newPattern = preProcess(accountHolderNamePattern);
return pjp.proceed(new Object[] {newPattern});
}In many cases you will be doing this binding anyway (as in the example above).
Advice ordering
What happens when multiple pieces of advice all want to run at the same join point? Spring AOP follows the same precedence rules as AspectJ to determine the order of advice execution. The highest precedence advice runs first "on the way in" (so given two pieces of before advice, the one with highest precedence runs first). "On the way out" from a join point, the highest precedence advice runs last (so given two pieces of after advice, the one with the highest precedence will run second).
When two pieces of advice defined in different aspects both need to run at the same
join point, unless you specify otherwise the order of execution is undefined. You can
control the order of execution by specifying precedence. This is done in the normal
Spring way by either implementing the org.springframework.core.Ordered interface in
the aspect class or annotating it with the Order annotation. Given two aspects, the
aspect returning the lower value from Ordered.getValue() (or the annotation value) has
the higher precedence.
When two pieces of advice defined in the same aspect both need to run at the same join point, the ordering is undefined (since there is no way to retrieve the declaration order via reflection for javac-compiled classes). Consider collapsing such advice methods into one advice method per join point in each aspect class, or refactor the pieces of advice into separate aspect classes - which can be ordered at the aspect level.
5.2.5. Introductions
Introductions (known as inter-type declarations in AspectJ) enable an aspect to declare that advised objects implement a given interface, and to provide an implementation of that interface on behalf of those objects.
An introduction is made using the @DeclareParents annotation. This annotation is used
to declare that matching types have a new parent (hence the name). For example, given an
interface UsageTracked, and an implementation of that interface DefaultUsageTracked,
the following aspect declares that all implementors of service interfaces also implement
the UsageTracked interface. (In order to expose statistics via JMX for example.)
@Aspect
public class UsageTracking {
@DeclareParents(value="com.xzy.myapp.service.*+", defaultImpl=DefaultUsageTracked.class)
public static UsageTracked mixin;
@Before("com.xyz.myapp.SystemArchitecture.businessService() && this(usageTracked)")
public void recordUsage(UsageTracked usageTracked) {
usageTracked.incrementUseCount();
}
}The interface to be implemented is determined by the type of the annotated field. The
value attribute of the @DeclareParents annotation is an AspectJ type pattern :- any
bean of a matching type will implement the UsageTracked interface. Note that in the
before advice of the above example, service beans can be directly used as
implementations of the UsageTracked interface. If accessing a bean programmatically
you would write the following:
UsageTracked usageTracked = (UsageTracked) context.getBean("myService");5.2.6. Aspect instantiation models
|
(This is an advanced topic, so if you are just starting out with AOP you can safely skip it until later.) |
By default there will be a single instance of each aspect within the application
context. AspectJ calls this the singleton instantiation model. It is possible to define
aspects with alternate lifecycles :- Spring supports AspectJ’s perthis and pertarget
instantiation models ( percflow, percflowbelow, and pertypewithin are not currently
supported).
A "perthis" aspect is declared by specifying a perthis clause in the @Aspect
annotation. Let’s look at an example, and then we’ll explain how it works.
@Aspect("perthis(com.xyz.myapp.SystemArchitecture.businessService())")
public class MyAspect {
private int someState;
@Before(com.xyz.myapp.SystemArchitecture.businessService())
public void recordServiceUsage() {
// ...
}
}The effect of the 'perthis' clause is that one aspect instance will be created for
each unique service object executing a business service (each unique object bound to
'this' at join points matched by the pointcut expression). The aspect instance is
created the first time that a method is invoked on the service object. The aspect goes
out of scope when the service object goes out of scope. Before the aspect instance is
created, none of the advice within it executes. As soon as the aspect instance has been
created, the advice declared within it will execute at matched join points, but only
when the service object is the one this aspect is associated with. See the AspectJ
programming guide for more information on per-clauses.
The 'pertarget' instantiation model works in exactly the same way as perthis, but
creates one aspect instance for each unique target object at matched join points.
5.2.7. Example
Now that you have seen how all the constituent parts work, let’s put them together to do something useful!
The execution of business services can sometimes fail due to concurrency issues (for
example, deadlock loser). If the operation is retried, it is quite likely to succeed
next time round. For business services where it is appropriate to retry in such
conditions (idempotent operations that don’t need to go back to the user for conflict
resolution), we’d like to transparently retry the operation to avoid the client seeing a
PessimisticLockingFailureException. This is a requirement that clearly cuts across
multiple services in the service layer, and hence is ideal for implementing via an
aspect.
Because we want to retry the operation, we will need to use around advice so that we can call proceed multiple times. Here’s how the basic aspect implementation looks:
@Aspect
public class ConcurrentOperationExecutor implements Ordered {
private static final int DEFAULT_MAX_RETRIES = 2;
private int maxRetries = DEFAULT_MAX_RETRIES;
private int order = 1;
public void setMaxRetries(int maxRetries) {
this.maxRetries = maxRetries;
}
public int getOrder() {
return this.order;
}
public void setOrder(int order) {
this.order = order;
}
@Around("com.xyz.myapp.SystemArchitecture.businessService()")
public Object doConcurrentOperation(ProceedingJoinPoint pjp) throws Throwable {
int numAttempts = 0;
PessimisticLockingFailureException lockFailureException;
do {
numAttempts++;
try {
return pjp.proceed();
}
catch(PessimisticLockingFailureException ex) {
lockFailureException = ex;
}
} while(numAttempts <= this.maxRetries);
throw lockFailureException;
}
}Note that the aspect implements the Ordered interface so we can set the precedence of
the aspect higher than the transaction advice (we want a fresh transaction each time we
retry). The maxRetries and order properties will both be configured by Spring. The
main action happens in the doConcurrentOperation around advice. Notice that for the
moment we’re applying the retry logic to all businessService()s. We try to proceed,
and if we fail with an PessimisticLockingFailureException we simply try again unless
we have exhausted all of our retry attempts.
The corresponding Spring configuration is:
<aop:aspectj-autoproxy/>
<bean id="concurrentOperationExecutor" class="com.xyz.myapp.service.impl.ConcurrentOperationExecutor">
<property name="maxRetries" value="3"/>
<property name="order" value="100"/>
</bean>To refine the aspect so that it only retries idempotent operations, we might define an
Idempotent annotation:
@Retention(RetentionPolicy.RUNTIME)
public @interface Idempotent {
// marker annotation
}and use the annotation to annotate the implementation of service operations. The change
to the aspect to only retry idempotent operations simply involves refining the pointcut
expression so that only @Idempotent operations match:
@Around("com.xyz.myapp.SystemArchitecture.businessService() && " +
"@annotation(com.xyz.myapp.service.Idempotent)")
public Object doConcurrentOperation(ProceedingJoinPoint pjp) throws Throwable {
...
}5.3. Schema-based AOP support
If you prefer an XML-based format, then Spring also offers support for defining aspects using the new "aop" namespace tags. The exact same pointcut expressions and advice kinds are supported as when using the @AspectJ style, hence in this section we will focus on the new syntax and refer the reader to the discussion in the previous section (@AspectJ support) for an understanding of writing pointcut expressions and the binding of advice parameters.
To use the aop namespace tags described in this section, you need to import the
spring-aop schema as described in XML Schema-based configuration.
See the AOP schema
for how to import the tags in the aop namespace.
Within your Spring configurations, all aspect and advisor elements must be placed within
an <aop:config> element (you can have more than one <aop:config> element in an
application context configuration). An <aop:config> element can contain pointcut,
advisor, and aspect elements (note these must be declared in that order).
|
The |
5.3.1. Declaring an aspect
Using the schema support, an aspect is simply a regular Java object defined as a bean in your Spring application context. The state and behavior is captured in the fields and methods of the object, and the pointcut and advice information is captured in the XML.
An aspect is declared using the <aop:aspect> element, and the backing bean is referenced
using the ref attribute:
<aop:config>
<aop:aspect id="myAspect" ref="aBean">
...
</aop:aspect>
</aop:config>
<bean id="aBean" class="...">
...
</bean>The bean backing the aspect (" `aBean`" in this case) can of course be configured and dependency injected just like any other Spring bean.
5.3.2. Declaring a pointcut
A named pointcut can be declared inside an <aop:config> element, enabling the pointcut definition to be shared across several aspects and advisors.
A pointcut representing the execution of any business service in the service layer could be defined as follows:
<aop:config>
<aop:pointcut id="businessService"
expression="execution(* com.xyz.myapp.service.*.*(..))"/>
</aop:config>Note that the pointcut expression itself is using the same AspectJ pointcut expression language as described in @AspectJ support. If you are using the schema based declaration style, you can refer to named pointcuts defined in types (@Aspects) within the pointcut expression. Another way of defining the above pointcut would be:
<aop:config>
<aop:pointcut id="businessService"
expression="com.xyz.myapp.SystemArchitecture.businessService()"/>
</aop:config>Assuming you have a SystemArchitecture aspect as described in Sharing common pointcut definitions.
Declaring a pointcut inside an aspect is very similar to declaring a top-level pointcut:
<aop:config>
<aop:aspect id="myAspect" ref="aBean">
<aop:pointcut id="businessService"
expression="execution(* com.xyz.myapp.service.*.*(..))"/>
...
</aop:aspect>
</aop:config>Much the same way in an @AspectJ aspect, pointcuts declared using the schema based definition style may collect join point context. For example, the following pointcut collects the 'this' object as the join point context and passes it to advice:
<aop:config>
<aop:aspect id="myAspect" ref="aBean">
<aop:pointcut id="businessService"
expression="execution(* com.xyz.myapp.service.*.*(..)) && this(service)"/>
<aop:before pointcut-ref="businessService" method="monitor"/>
...
</aop:aspect>
</aop:config>The advice must be declared to receive the collected join point context by including parameters of the matching names:
public void monitor(Object service) {
...
}When combining pointcut sub-expressions, '&&' is awkward within an XML document, and so the keywords 'and', 'or' and 'not' can be used in place of '&&', '||' and '!' respectively. For example, the previous pointcut may be better written as:
<aop:config>
<aop:aspect id="myAspect" ref="aBean">
<aop:pointcut id="businessService"
expression="execution(* com.xyz.myapp.service.*.*(..)) **and** this(service)"/>
<aop:before pointcut-ref="businessService" method="monitor"/>
...
</aop:aspect>
</aop:config>Note that pointcuts defined in this way are referred to by their XML id and cannot be used as named pointcuts to form composite pointcuts. The named pointcut support in the schema based definition style is thus more limited than that offered by the @AspectJ style.
5.3.3. Declaring advice
The same five advice kinds are supported as for the @AspectJ style, and they have exactly the same semantics.
Before advice
Before advice runs before a matched method execution. It is declared inside an
<aop:aspect> using the <aop:before> element.
<aop:aspect id="beforeExample" ref="aBean">
<aop:before
pointcut-ref="dataAccessOperation"
method="doAccessCheck"/>
...
</aop:aspect>Here dataAccessOperation is the id of a pointcut defined at the top ( <aop:config>)
level. To define the pointcut inline instead, replace the pointcut-ref attribute with
a pointcut attribute:
<aop:aspect id="beforeExample" ref="aBean">
<aop:before
pointcut="execution(* com.xyz.myapp.dao.*.*(..))"
method="doAccessCheck"/>
...
</aop:aspect>As we noted in the discussion of the @AspectJ style, using named pointcuts can significantly improve the readability of your code.
The method attribute identifies a method ( doAccessCheck) that provides the body of
the advice. This method must be defined for the bean referenced by the aspect element
containing the advice. Before a data access operation is executed (a method execution
join point matched by the pointcut expression), the "doAccessCheck" method on the aspect
bean will be invoked.
After returning advice
After returning advice runs when a matched method execution completes normally. It is
declared inside an <aop:aspect> in the same way as before advice. For example:
<aop:aspect id="afterReturningExample" ref="aBean">
<aop:after-returning
pointcut-ref="dataAccessOperation"
method="doAccessCheck"/>
...
</aop:aspect>Just as in the @AspectJ style, it is possible to get hold of the return value within the advice body. Use the returning attribute to specify the name of the parameter to which the return value should be passed:
<aop:aspect id="afterReturningExample" ref="aBean">
<aop:after-returning
pointcut-ref="dataAccessOperation"
returning="retVal"
method="doAccessCheck"/>
...
</aop:aspect>The doAccessCheck method must declare a parameter named retVal. The type of this
parameter constrains matching in the same way as described for @AfterReturning. For
example, the method signature may be declared as:
public void doAccessCheck(Object retVal) {...After throwing advice
After throwing advice executes when a matched method execution exits by throwing an
exception. It is declared inside an <aop:aspect> using the after-throwing element:
<aop:aspect id="afterThrowingExample" ref="aBean">
<aop:after-throwing
pointcut-ref="dataAccessOperation"
method="doRecoveryActions"/>
...
</aop:aspect>Just as in the @AspectJ style, it is possible to get hold of the thrown exception within the advice body. Use the throwing attribute to specify the name of the parameter to which the exception should be passed:
<aop:aspect id="afterThrowingExample" ref="aBean">
<aop:after-throwing
pointcut-ref="dataAccessOperation"
throwing="dataAccessEx"
method="doRecoveryActions"/>
...
</aop:aspect>The doRecoveryActions method must declare a parameter named dataAccessEx. The type of
this parameter constrains matching in the same way as described for @AfterThrowing. For
example, the method signature may be declared as:
public void doRecoveryActions(DataAccessException dataAccessEx) {...After (finally) advice
After (finally) advice runs however a matched method execution exits. It is declared
using the after element:
<aop:aspect id="afterFinallyExample" ref="aBean">
<aop:after
pointcut-ref="dataAccessOperation"
method="doReleaseLock"/>
...
</aop:aspect>Around advice
The final kind of advice is around advice. Around advice runs "around" a matched method execution. It has the opportunity to do work both before and after the method executes, and to determine when, how, and even if, the method actually gets to execute at all. Around advice is often used if you need to share state before and after a method execution in a thread-safe manner (starting and stopping a timer for example). Always use the least powerful form of advice that meets your requirements; don’t use around advice if simple before advice would do.
Around advice is declared using the aop:around element. The first parameter of the
advice method must be of type ProceedingJoinPoint. Within the body of the advice,
calling proceed() on the ProceedingJoinPoint causes the underlying method to
execute. The proceed method may also be calling passing in an Object[] - the values
in the array will be used as the arguments to the method execution when it proceeds. See
Around advice for notes on calling proceed with an Object[].
<aop:aspect id="aroundExample" ref="aBean">
<aop:around
pointcut-ref="businessService"
method="doBasicProfiling"/>
...
</aop:aspect>The implementation of the doBasicProfiling advice would be exactly the same as in the
@AspectJ example (minus the annotation of course):
public Object doBasicProfiling(ProceedingJoinPoint pjp) throws Throwable {
// start stopwatch
Object retVal = pjp.proceed();
// stop stopwatch
return retVal;
}Advice parameters
The schema based declaration style supports fully typed advice in the same way as
described for the @AspectJ support - by matching pointcut parameters by name against
advice method parameters. See Advice parameters for details. If you wish
to explicitly specify argument names for the advice methods (not relying on the
detection strategies previously described) then this is done using the arg-names
attribute of the advice element, which is treated in the same manner to the "argNames"
attribute in an advice annotation as described in Determining argument names.
For example:
<aop:before
pointcut="com.xyz.lib.Pointcuts.anyPublicMethod() and @annotation(auditable)"
method="audit"
arg-names="auditable"/>The arg-names attribute accepts a comma-delimited list of parameter names.
Find below a slightly more involved example of the XSD-based approach that illustrates some around advice used in conjunction with a number of strongly typed parameters.
package x.y.service;
public interface FooService {
Foo getFoo(String fooName, int age);
}
public class DefaultFooService implements FooService {
public Foo getFoo(String name, int age) {
return new Foo(name, age);
}
}Next up is the aspect. Notice the fact that the profile(..) method accepts a number of
strongly-typed parameters, the first of which happens to be the join point used to
proceed with the method call: the presence of this parameter is an indication that the
profile(..) is to be used as around advice:
package x.y;
import org.aspectj.lang.ProceedingJoinPoint;
import org.springframework.util.StopWatch;
public class SimpleProfiler {
public Object profile(ProceedingJoinPoint call, String name, int age) throws Throwable {
StopWatch clock = new StopWatch("Profiling for '" + name + "' and '" + age + "'");
try {
clock.start(call.toShortString());
return call.proceed();
} finally {
clock.stop();
System.out.println(clock.prettyPrint());
}
}
}Finally, here is the XML configuration that is required to effect the execution of the above advice for a particular join point:
<beans xmlns="http://www.springframework.org/schema/beans"
xmlns:xsi="http://www.w3.org/2001/XMLSchema-instance"
xmlns:aop="http://www.springframework.org/schema/aop"
xsi:schemaLocation="
http://www.springframework.org/schema/beans http://www.springframework.org/schema/beans/spring-beans.xsd
http://www.springframework.org/schema/aop http://www.springframework.org/schema/aop/spring-aop.xsd">
<!-- this is the object that will be proxied by Spring's AOP infrastructure -->
<bean id="fooService" class="x.y.service.DefaultFooService"/>
<!-- this is the actual advice itself -->
<bean id="profiler" class="x.y.SimpleProfiler"/>
<aop:config>
<aop:aspect ref="profiler">
<aop:pointcut id="theExecutionOfSomeFooServiceMethod"
expression="execution(* x.y.service.FooService.getFoo(String,int))
and args(name, age)"/>
<aop:around pointcut-ref="theExecutionOfSomeFooServiceMethod"
method="profile"/>
</aop:aspect>
</aop:config>
</beans>If we had the following driver script, we would get output something like this on standard output:
import org.springframework.beans.factory.BeanFactory;
import org.springframework.context.support.ClassPathXmlApplicationContext;
import x.y.service.FooService;
public final class Boot {
public static void main(final String[] args) throws Exception {
BeanFactory ctx = new ClassPathXmlApplicationContext("x/y/plain.xml");
FooService foo = (FooService) ctx.getBean("fooService");
foo.getFoo("Pengo", 12);
}
}StopWatch 'Profiling for 'Pengo' and '12'': running time (millis) = 0 ----------------------------------------- ms % Task name ----------------------------------------- 00000 ? execution(getFoo)
Advice ordering
When multiple advice needs to execute at the same join point (executing method) the
ordering rules are as described in Advice ordering. The precedence
between aspects is determined by either adding the Order annotation to the bean
backing the aspect or by having the bean implement the Ordered interface.
5.3.4. Introductions
Introductions (known as inter-type declarations in AspectJ) enable an aspect to declare that advised objects implement a given interface, and to provide an implementation of that interface on behalf of those objects.
An introduction is made using the aop:declare-parents element inside an aop:aspect
This element is used to declare that matching types have a new parent (hence the name).
For example, given an interface UsageTracked, and an implementation of that interface
DefaultUsageTracked, the following aspect declares that all implementors of service
interfaces also implement the UsageTracked interface. (In order to expose statistics
via JMX for example.)
<aop:aspect id="usageTrackerAspect" ref="usageTracking">
<aop:declare-parents
types-matching="com.xzy.myapp.service.*+"
implement-interface="com.xyz.myapp.service.tracking.UsageTracked"
default-impl="com.xyz.myapp.service.tracking.DefaultUsageTracked"/>
<aop:before
pointcut="com.xyz.myapp.SystemArchitecture.businessService()
and this(usageTracked)"
method="recordUsage"/>
</aop:aspect>The class backing the usageTracking bean would contain the method:
public void recordUsage(UsageTracked usageTracked) {
usageTracked.incrementUseCount();
}The interface to be implemented is determined by implement-interface attribute. The
value of the types-matching attribute is an AspectJ type pattern :- any bean of a
matching type will implement the UsageTracked interface. Note that in the before
advice of the above example, service beans can be directly used as implementations of
the UsageTracked interface. If accessing a bean programmatically you would write the
following:
UsageTracked usageTracked = (UsageTracked) context.getBean("myService");5.3.5. Aspect instantiation models
The only supported instantiation model for schema-defined aspects is the singleton model. Other instantiation models may be supported in future releases.
5.3.6. Advisors
The concept of "advisors" is brought forward from the AOP support defined in Spring and does not have a direct equivalent in AspectJ. An advisor is like a small self-contained aspect that has a single piece of advice. The advice itself is represented by a bean, and must implement one of the advice interfaces described in Advice types in Spring. Advisors can take advantage of AspectJ pointcut expressions though.
Spring supports the advisor concept with the <aop:advisor> element. You will most
commonly see it used in conjunction with transactional advice, which also has its own
namespace support in Spring. Here’s how it looks:
<aop:config>
<aop:pointcut id="businessService"
expression="execution(* com.xyz.myapp.service.*.*(..))"/>
<aop:advisor
pointcut-ref="businessService"
advice-ref="tx-advice"/>
</aop:config>
<tx:advice id="tx-advice">
<tx:attributes>
<tx:method name="*" propagation="REQUIRED"/>
</tx:attributes>
</tx:advice>As well as the pointcut-ref attribute used in the above example, you can also use the
pointcut attribute to define a pointcut expression inline.
To define the precedence of an advisor so that the advice can participate in ordering,
use the order attribute to define the Ordered value of the advisor.
5.3.7. Example
Let’s see how the concurrent locking failure retry example from Example looks when rewritten using the schema support.
The execution of business services can sometimes fail due to concurrency issues (for
example, deadlock loser). If the operation is retried, it is quite likely it will
succeed next time round. For business services where it is appropriate to retry in such
conditions (idempotent operations that don’t need to go back to the user for conflict
resolution), we’d like to transparently retry the operation to avoid the client seeing a
PessimisticLockingFailureException. This is a requirement that clearly cuts across
multiple services in the service layer, and hence is ideal for implementing via an
aspect.
Because we want to retry the operation, we’ll need to use around advice so that we can call proceed multiple times. Here’s how the basic aspect implementation looks (it’s just a regular Java class using the schema support):
public class ConcurrentOperationExecutor implements Ordered {
private static final int DEFAULT_MAX_RETRIES = 2;
private int maxRetries = DEFAULT_MAX_RETRIES;
private int order = 1;
public void setMaxRetries(int maxRetries) {
this.maxRetries = maxRetries;
}
public int getOrder() {
return this.order;
}
public void setOrder(int order) {
this.order = order;
}
public Object doConcurrentOperation(ProceedingJoinPoint pjp) throws Throwable {
int numAttempts = 0;
PessimisticLockingFailureException lockFailureException;
do {
numAttempts++;
try {
return pjp.proceed();
}
catch(PessimisticLockingFailureException ex) {
lockFailureException = ex;
}
} while(numAttempts <= this.maxRetries);
throw lockFailureException;
}
}Note that the aspect implements the Ordered interface so we can set the precedence of
the aspect higher than the transaction advice (we want a fresh transaction each time we
retry). The maxRetries and order properties will both be configured by Spring. The
main action happens in the doConcurrentOperation around advice method. We try to
proceed, and if we fail with a PessimisticLockingFailureException we simply try again
unless we have exhausted all of our retry attempts.
|
This class is identical to the one used in the @AspectJ example, but with the annotations removed. |
The corresponding Spring configuration is:
<aop:config>
<aop:aspect id="concurrentOperationRetry" ref="concurrentOperationExecutor">
<aop:pointcut id="idempotentOperation"
expression="execution(* com.xyz.myapp.service.*.*(..))"/>
<aop:around
pointcut-ref="idempotentOperation"
method="doConcurrentOperation"/>
</aop:aspect>
</aop:config>
<bean id="concurrentOperationExecutor"
class="com.xyz.myapp.service.impl.ConcurrentOperationExecutor">
<property name="maxRetries" value="3"/>
<property name="order" value="100"/>
</bean>Notice that for the time being we assume that all business services are idempotent. If
this is not the case we can refine the aspect so that it only retries genuinely
idempotent operations, by introducing an Idempotent annotation:
@Retention(RetentionPolicy.RUNTIME)
public @interface Idempotent {
// marker annotation
}and using the annotation to annotate the implementation of service operations. The
change to the aspect to retry only idempotent operations simply involves refining the
pointcut expression so that only @Idempotent operations match:
<aop:pointcut id="idempotentOperation"
expression="execution(* com.xyz.myapp.service.*.*(..)) and
@annotation(com.xyz.myapp.service.Idempotent)"/>5.4. Choosing which AOP declaration style to use
Once you have decided that an aspect is the best approach for implementing a given requirement, how do you decide between using Spring AOP or AspectJ, and between the Aspect language (code) style, @AspectJ annotation style, or the Spring XML style? These decisions are influenced by a number of factors including application requirements, development tools, and team familiarity with AOP.
5.4.1. Spring AOP or full AspectJ?
Use the simplest thing that can work. Spring AOP is simpler than using full AspectJ as there is no requirement to introduce the AspectJ compiler / weaver into your development and build processes. If you only need to advise the execution of operations on Spring beans, then Spring AOP is the right choice. If you need to advise objects not managed by the Spring container (such as domain objects typically), then you will need to use AspectJ. You will also need to use AspectJ if you wish to advise join points other than simple method executions (for example, field get or set join points, and so on).
When using AspectJ, you have the choice of the AspectJ language syntax (also known as the "code style") or the @AspectJ annotation style. Clearly, if you are not using Java 5+ then the choice has been made for you… use the code style. If aspects play a large role in your design, and you are able to use the AspectJ Development Tools (AJDT) plugin for Eclipse, then the AspectJ language syntax is the preferred option: it is cleaner and simpler because the language was purposefully designed for writing aspects. If you are not using Eclipse, or have only a few aspects that do not play a major role in your application, then you may want to consider using the @AspectJ style and sticking with a regular Java compilation in your IDE, and adding an aspect weaving phase to your build script.
5.4.2. @AspectJ or XML for Spring AOP?
If you have chosen to use Spring AOP, then you have a choice of @AspectJ or XML style. There are various tradeoffs to consider.
The XML style will be most familiar to existing Spring users and it is backed by genuine POJOs. When using AOP as a tool to configure enterprise services then XML can be a good choice (a good test is whether you consider the pointcut expression to be a part of your configuration you might want to change independently). With the XML style arguably it is clearer from your configuration what aspects are present in the system.
The XML style has two disadvantages. Firstly it does not fully encapsulate the implementation of the requirement it addresses in a single place. The DRY principle says that there should be a single, unambiguous, authoritative representation of any piece of knowledge within a system. When using the XML style, the knowledge of how a requirement is implemented is split across the declaration of the backing bean class, and the XML in the configuration file. When using the @AspectJ style there is a single module - the aspect - in which this information is encapsulated. Secondly, the XML style is slightly more limited in what it can express than the @AspectJ style: only the "singleton" aspect instantiation model is supported, and it is not possible to combine named pointcuts declared in XML. For example, in the @AspectJ style you can write something like:
@Pointcut(execution(* get*()))
public void propertyAccess() {}
@Pointcut(execution(org.xyz.Account+ *(..))
public void operationReturningAnAccount() {}
@Pointcut(propertyAccess() && operationReturningAnAccount())
public void accountPropertyAccess() {}In the XML style I can declare the first two pointcuts:
<aop:pointcut id="propertyAccess"
expression="execution(* get*())"/>
<aop:pointcut id="operationReturningAnAccount"
expression="execution(org.xyz.Account+ *(..))"/>The downside of the XML approach is that you cannot define the
accountPropertyAccess pointcut by combining these definitions.
The @AspectJ style supports additional instantiation models, and richer pointcut composition. It has the advantage of keeping the aspect as a modular unit. It also has the advantage the @AspectJ aspects can be understood (and thus consumed) both by Spring AOP and by AspectJ - so if you later decide you need the capabilities of AspectJ to implement additional requirements then it is very easy to migrate to an AspectJ-based approach. On balance the Spring team prefer the @AspectJ style whenever you have aspects that do more than simple "configuration" of enterprise services.
5.5. Mixing aspect types
It is perfectly possible to mix @AspectJ style aspects using the autoproxying support,
schema-defined <aop:aspect> aspects, <aop:advisor> declared advisors and even
proxies and interceptors defined using the Spring 1.2 style in the same configuration.
All of these are implemented using the same underlying support mechanism and will
co-exist without any difficulty.
5.6. Proxying mechanisms
Spring AOP uses either JDK dynamic proxies or CGLIB to create the proxy for a given target object. (JDK dynamic proxies are preferred whenever you have a choice).
If the target object to be proxied implements at least one interface then a JDK dynamic proxy will be used. All of the interfaces implemented by the target type will be proxied. If the target object does not implement any interfaces then a CGLIB proxy will be created.
If you want to force the use of CGLIB proxying (for example, to proxy every method defined for the target object, not just those implemented by its interfaces) you can do so. However, there are some issues to consider:
-
finalmethods cannot be advised, as they cannot be overridden. -
As of Spring 3.2, it is no longer necessary to add CGLIB to your project classpath, as CGLIB classes are repackaged under org.springframework and included directly in the spring-core JAR. This means that CGLIB-based proxy support 'just works' in the same way that JDK dynamic proxies always have.
-
As of Spring 4.0, the constructor of your proxied object will NOT be called twice anymore since the CGLIB proxy instance will be created via Objenesis. Only if your JVM does not allow for constructor bypassing, you might see double invocations and corresponding debug log entries from Spring’s AOP support.
To force the use of CGLIB proxies set the value of the proxy-target-class attribute of
the <aop:config> element to true:
<aop:config proxy-target-class="true">
<!-- other beans defined here... -->
</aop:config>To force CGLIB proxying when using the @AspectJ autoproxy support, set the
'proxy-target-class' attribute of the <aop:aspectj-autoproxy> element to true:
<aop:aspectj-autoproxy proxy-target-class="true"/>|
Multiple To be clear: using |
5.6.1. Understanding AOP proxies
Spring AOP is proxy-based. It is vitally important that you grasp the semantics of what that last statement actually means before you write your own aspects or use any of the Spring AOP-based aspects supplied with the Spring Framework.
Consider first the scenario where you have a plain-vanilla, un-proxied, nothing-special-about-it, straight object reference, as illustrated by the following code snippet.
public class SimplePojo implements Pojo {
public void foo() {
// this next method invocation is a direct call on the 'this' reference
this.bar();
}
public void bar() {
// some logic...
}
}If you invoke a method on an object reference, the method is invoked directly on that object reference, as can be seen below.
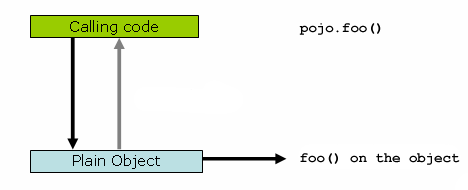
public class Main {
public static void main(String[] args) {
Pojo pojo = new SimplePojo();
// this is a direct method call on the 'pojo' reference
pojo.foo();
}
}Things change slightly when the reference that client code has is a proxy. Consider the following diagram and code snippet.
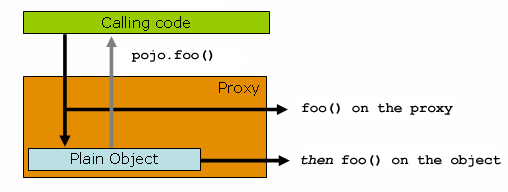
public class Main {
public static void main(String[] args) {
ProxyFactory factory = new ProxyFactory(new SimplePojo());
factory.addInterface(Pojo.class);
factory.addAdvice(new RetryAdvice());
Pojo pojo = (Pojo) factory.getProxy();
// this is a method call on the proxy!
pojo.foo();
}
}The key thing to understand here is that the client code inside the main(..) of the
Main class has a reference to the proxy. This means that method calls on that
object reference will be calls on the proxy, and as such the proxy will be able to
delegate to all of the interceptors (advice) that are relevant to that particular method
call. However, once the call has finally reached the target object, the SimplePojo
reference in this case, any method calls that it may make on itself, such as
this.bar() or this.foo(), are going to be invoked against the this reference,
and not the proxy. This has important implications. It means that self-invocation is
not going to result in the advice associated with a method invocation getting a
chance to execute.
Okay, so what is to be done about this? The best approach (the term best is used loosely here) is to refactor your code such that the self-invocation does not happen. For sure, this does entail some work on your part, but it is the best, least-invasive approach. The next approach is absolutely horrendous, and I am almost reticent to point it out precisely because it is so horrendous. You can (choke!) totally tie the logic within your class to Spring AOP by doing this:
public class SimplePojo implements Pojo {
public void foo() {
// this works, but... gah!
((Pojo) AopContext.currentProxy()).bar();
}
public void bar() {
// some logic...
}
}This totally couples your code to Spring AOP, and it makes the class itself aware of the fact that it is being used in an AOP context, which flies in the face of AOP. It also requires some additional configuration when the proxy is being created:
public class Main {
public static void main(String[] args) {
ProxyFactory factory = new ProxyFactory(new SimplePojo());
factory.adddInterface(Pojo.class);
factory.addAdvice(new RetryAdvice());
factory.setExposeProxy(true);
Pojo pojo = (Pojo) factory.getProxy();
// this is a method call on the proxy!
pojo.foo();
}
}Finally, it must be noted that AspectJ does not have this self-invocation issue because it is not a proxy-based AOP framework.
5.7. Programmatic creation of @AspectJ Proxies
In addition to declaring aspects in your configuration using either <aop:config> or
<aop:aspectj-autoproxy>, it is also possible programmatically to create proxies that
advise target objects. For the full details of Spring’s AOP API, see the next chapter.
Here we want to focus on the ability to automatically create proxies using @AspectJ
aspects.
The class org.springframework.aop.aspectj.annotation.AspectJProxyFactory can be used
to create a proxy for a target object that is advised by one or more @AspectJ aspects.
Basic usage for this class is very simple, as illustrated below. See the javadocs for
full information.
// create a factory that can generate a proxy for the given target object
AspectJProxyFactory factory = new AspectJProxyFactory(targetObject);
// add an aspect, the class must be an @AspectJ aspect
// you can call this as many times as you need with different aspects
factory.addAspect(SecurityManager.class);
// you can also add existing aspect instances, the type of the object supplied must be an @AspectJ aspect
factory.addAspect(usageTracker);
// now get the proxy object...
MyInterfaceType proxy = factory.getProxy();5.8. Using AspectJ with Spring applications
Everything we’ve covered so far in this chapter is pure Spring AOP. In this section, we’re going to look at how you can use the AspectJ compiler/weaver instead of, or in addition to, Spring AOP if your needs go beyond the facilities offered by Spring AOP alone.
Spring ships with a small AspectJ aspect library, which is available standalone in your
distribution as spring-aspects.jar; you’ll need to add this to your classpath in order
to use the aspects in it. Using AspectJ to dependency inject domain objects with Spring and Other Spring aspects for AspectJ discuss the
content of this library and how you can use it. Configuring AspectJ aspects using Spring IoC discusses how to
dependency inject AspectJ aspects that are woven using the AspectJ compiler. Finally,
Load-time weaving with AspectJ in the Spring Framework provides an introduction to load-time weaving for Spring applications
using AspectJ.
5.8.1. Using AspectJ to dependency inject domain objects with Spring
The Spring container instantiates and configures beans defined in your application
context. It is also possible to ask a bean factory to configure a pre-existing
object given the name of a bean definition containing the configuration to be applied.
The spring-aspects.jar contains an annotation-driven aspect that exploits this
capability to allow dependency injection of any object. The support is intended to
be used for objects created outside of the control of any container. Domain objects
often fall into this category because they are often created programmatically using the
new operator, or by an ORM tool as a result of a database query.
The @Configurable annotation marks a class as eligible for Spring-driven
configuration. In the simplest case it can be used just as a marker annotation:
package com.xyz.myapp.domain;
import org.springframework.beans.factory.annotation.Configurable;
@Configurable
public class Account {
// ...
}When used as a marker interface in this way, Spring will configure new instances of the
annotated type ( Account in this case) using a bean definition (typically
prototype-scoped) with the same name as the fully-qualified type name (
com.xyz.myapp.domain.Account). Since the default name for a bean is the
fully-qualified name of its type, a convenient way to declare the prototype definition
is simply to omit the id attribute:
<bean class="com.xyz.myapp.domain.Account" scope="prototype">
<property name="fundsTransferService" ref="fundsTransferService"/>
</bean>If you want to explicitly specify the name of the prototype bean definition to use, you can do so directly in the annotation:
package com.xyz.myapp.domain;
import org.springframework.beans.factory.annotation.Configurable;
@Configurable("account")
public class Account {
// ...
}Spring will now look for a bean definition named "account" and use that as the
definition to configure new Account instances.
You can also use autowiring to avoid having to specify a dedicated bean definition at
all. To have Spring apply autowiring use the autowire property of the
@Configurable annotation: specify either @Configurable(autowire=Autowire.BY_TYPE) or
@Configurable(autowire=Autowire.BY_NAME for autowiring by type or by name
respectively. As an alternative, as of Spring 2.5 it is preferable to specify explicit,
annotation-driven dependency injection for your @Configurable beans by using
@Autowired or @Inject at the field or method level (see Annotation-based container configuration
for further details).
Finally you can enable Spring dependency checking for the object references in the newly
created and configured object by using the dependencyCheck attribute (for example:
@Configurable(autowire=Autowire.BY_NAME,dependencyCheck=true)). If this attribute is
set to true, then Spring will validate after configuration that all properties (which
are not primitives or collections) have been set.
Using the annotation on its own does nothing of course. It is the
AnnotationBeanConfigurerAspect in spring-aspects.jar that acts on the presence of
the annotation. In essence the aspect says "after returning from the initialization of a
new object of a type annotated with @Configurable, configure the newly created object
using Spring in accordance with the properties of the annotation". In this context,
initialization refers to newly instantiated objects (e.g., objects instantiated with
the new operator) as well as to Serializable objects that are undergoing
deserialization (e.g., via
readResolve()).
|
One of the key phrases in the above paragraph is 'in essence'. For most cases, the
exact semantics of 'after returning from the initialization of a new object' will be
fine… in this context, 'after initialization' means that the dependencies will be
injected after the object has been constructed - this means that the dependencies
will not be available for use in the constructor bodies of the class. If you want the
dependencies to be injected before the constructor bodies execute, and thus be
available for use in the body of the constructors, then you need to define this on the
You can find out more information about the language semantics of the various pointcut types in AspectJ in this appendix of the AspectJ Programming Guide. |
For this to work the annotated types must be woven with the AspectJ weaver - you can
either use a build-time Ant or Maven task to do this (see for example the
AspectJ Development
Environment Guide) or load-time weaving (see Load-time weaving with AspectJ in the Spring Framework). The
AnnotationBeanConfigurerAspect itself needs configuring by Spring (in order to obtain
a reference to the bean factory that is to be used to configure new objects). If you are
using Java based configuration simply add @EnableSpringConfigured to any
@Configuration class.
@Configuration
@EnableSpringConfigured
public class AppConfig {
}If you prefer XML based configuration, the Spring
context namespace
defines a convenient context:spring-configured element:
<context:spring-configured/>Instances of @Configurable objects created before the aspect has been configured
will result in a message being issued to the debug log and no configuration of the
object taking place. An example might be a bean in the Spring configuration that creates
domain objects when it is initialized by Spring. In this case you can use the
"depends-on" bean attribute to manually specify that the bean depends on the
configuration aspect.
<bean id="myService"
class="com.xzy.myapp.service.MyService"
depends-on="org.springframework.beans.factory.aspectj.AnnotationBeanConfigurerAspect">
<!-- ... -->
</bean>|
Do not activate |
Unit testing @Configurable objects
One of the goals of the @Configurable support is to enable independent unit testing of
domain objects without the difficulties associated with hard-coded lookups. If
@Configurable types have not been woven by AspectJ then the annotation has no affect
during unit testing, and you can simply set mock or stub property references in the
object under test and proceed as normal. If @Configurable types have been woven by
AspectJ then you can still unit test outside of the container as normal, but you will
see a warning message each time that you construct an @Configurable object indicating
that it has not been configured by Spring.
Working with multiple application contexts
The AnnotationBeanConfigurerAspect used to implement the @Configurable support is an
AspectJ singleton aspect. The scope of a singleton aspect is the same as the scope of
static members, that is to say there is one aspect instance per classloader that
defines the type. This means that if you define multiple application contexts within the
same classloader hierarchy you need to consider where to define the
@EnableSpringConfigured bean and where to place spring-aspects.jar on the classpath.
Consider a typical Spring web-app configuration with a shared parent application context
defining common business services and everything needed to support them, and one child
application context per servlet containing definitions particular to that servlet. All
of these contexts will co-exist within the same classloader hierarchy, and so the
AnnotationBeanConfigurerAspect can only hold a reference to one of them. In this case
we recommend defining the @EnableSpringConfigured bean in the shared (parent)
application context: this defines the services that you are likely to want to inject
into domain objects. A consequence is that you cannot configure domain objects with
references to beans defined in the child (servlet-specific) contexts using the
@Configurable mechanism (probably not something you want to do anyway!).
When deploying multiple web-apps within the same container, ensure that each
web-application loads the types in spring-aspects.jar using its own classloader (for
example, by placing spring-aspects.jar in 'WEB-INF/lib'). If spring-aspects.jar is
only added to the container wide classpath (and hence loaded by the shared parent
classloader), all web applications will share the same aspect instance which is probably
not what you want.
5.8.2. Other Spring aspects for AspectJ
In addition to the @Configurable aspect, spring-aspects.jar contains an AspectJ
aspect that can be used to drive Spring’s transaction management for types and methods
annotated with the @Transactional annotation. This is primarily intended for users who
want to use the Spring Framework’s transaction support outside of the Spring container.
The aspect that interprets @Transactional annotations is the
AnnotationTransactionAspect. When using this aspect, you must annotate the
implementation class (and/or methods within that class), not the interface (if
any) that the class implements. AspectJ follows Java’s rule that annotations on
interfaces are not inherited.
A @Transactional annotation on a class specifies the default transaction semantics for
the execution of any public operation in the class.
A @Transactional annotation on a method within the class overrides the default
transaction semantics given by the class annotation (if present). Methods of any
visibility may be annotated, including private methods. Annotating non-public methods
directly is the only way to get transaction demarcation for the execution of such methods.
|
Since Spring Framework 4.2, |
For AspectJ programmers that want to use the Spring configuration and transaction
management support but don’t want to (or cannot) use annotations, spring-aspects.jar
also contains abstract aspects you can extend to provide your own pointcut
definitions. See the sources for the AbstractBeanConfigurerAspect and
AbstractTransactionAspect aspects for more information. As an example, the following
excerpt shows how you could write an aspect to configure all instances of objects
defined in the domain model using prototype bean definitions that match the
fully-qualified class names:
public aspect DomainObjectConfiguration extends AbstractBeanConfigurerAspect {
public DomainObjectConfiguration() {
setBeanWiringInfoResolver(new ClassNameBeanWiringInfoResolver());
}
// the creation of a new bean (any object in the domain model)
protected pointcut beanCreation(Object beanInstance) :
initialization(new(..)) &&
SystemArchitecture.inDomainModel() &&
this(beanInstance);
}5.8.3. Configuring AspectJ aspects using Spring IoC
When using AspectJ aspects with Spring applications, it is natural to both want and
expect to be able to configure such aspects using Spring. The AspectJ runtime itself is
responsible for aspect creation, and the means of configuring the AspectJ created
aspects via Spring depends on the AspectJ instantiation model (the per-xxx clause)
used by the aspect.
The majority of AspectJ aspects are singleton aspects. Configuration of these
aspects is very easy: simply create a bean definition referencing the aspect type as
normal, and include the bean attribute 'factory-method="aspectOf"'. This ensures that
Spring obtains the aspect instance by asking AspectJ for it rather than trying to create
an instance itself. For example:
<bean id="profiler" class="com.xyz.profiler.Profiler"
factory-method="aspectOf">
<property name="profilingStrategy" ref="jamonProfilingStrategy"/>
</bean>Non-singleton aspects are harder to configure: however it is possible to do so by
creating prototype bean definitions and using the @Configurable support from
spring-aspects.jar to configure the aspect instances once they have bean created by
the AspectJ runtime.
If you have some @AspectJ aspects that you want to weave with AspectJ (for example,
using load-time weaving for domain model types) and other @AspectJ aspects that you want
to use with Spring AOP, and these aspects are all configured using Spring, then you will
need to tell the Spring AOP @AspectJ autoproxying support which exact subset of the
@AspectJ aspects defined in the configuration should be used for autoproxying. You can
do this by using one or more <include/> elements inside the <aop:aspectj-autoproxy/>
declaration. Each <include/> element specifies a name pattern, and only beans with
names matched by at least one of the patterns will be used for Spring AOP autoproxy
configuration:
<aop:aspectj-autoproxy>
<aop:include name="thisBean"/>
<aop:include name="thatBean"/>
</aop:aspectj-autoproxy>|
Do not be misled by the name of the |
5.8.4. Load-time weaving with AspectJ in the Spring Framework
Load-time weaving (LTW) refers to the process of weaving AspectJ aspects into an application’s class files as they are being loaded into the Java virtual machine (JVM). The focus of this section is on configuring and using LTW in the specific context of the Spring Framework: this section is not an introduction to LTW though. For full details on the specifics of LTW and configuring LTW with just AspectJ (with Spring not being involved at all), see the LTW section of the AspectJ Development Environment Guide.
The value-add that the Spring Framework brings to AspectJ LTW is in enabling much finer-grained control over the weaving process. 'Vanilla' AspectJ LTW is effected using a Java (5+) agent, which is switched on by specifying a VM argument when starting up a JVM. It is thus a JVM-wide setting, which may be fine in some situations, but often is a little too coarse. Spring-enabled LTW enables you to switch on LTW on a per-ClassLoader basis, which obviously is more fine-grained and which can make more sense in a 'single-JVM-multiple-application' environment (such as is found in a typical application server environment).
Further, in certain environments, this support enables
load-time weaving without making any modifications to the application server’s launch
script that will be needed to add -javaagent:path/to/aspectjweaver.jar or (as we
describe later in this section)
-javaagent:path/to/org.springframework.instrument-{version}.jar (previously named
spring-agent.jar). Developers simply modify one or more files that form the
application context to enable load-time weaving instead of relying on administrators who
typically are in charge of the deployment configuration such as the launch script.
Now that the sales pitch is over, let us first walk through a quick example of AspectJ LTW using Spring, followed by detailed specifics about elements introduced in the following example. For a complete example, please see the Petclinic sample application.
A first example
Let us assume that you are an application developer who has been tasked with diagnosing the cause of some performance problems in a system. Rather than break out a profiling tool, what we are going to do is switch on a simple profiling aspect that will enable us to very quickly get some performance metrics, so that we can then apply a finer-grained profiling tool to that specific area immediately afterwards.
|
The example presented here uses XML style configuration, it is also possible to
configure and use @AspectJ with Java Configuration.
Specifically the |
Here is the profiling aspect. Nothing too fancy, just a quick-and-dirty time-based profiler, using the @AspectJ-style of aspect declaration.
package foo;
import org.aspectj.lang.ProceedingJoinPoint;
import org.aspectj.lang.annotation.Aspect;
import org.aspectj.lang.annotation.Around;
import org.aspectj.lang.annotation.Pointcut;
import org.springframework.util.StopWatch;
import org.springframework.core.annotation.Order;
@Aspect
public class ProfilingAspect {
@Around("methodsToBeProfiled()")
public Object profile(ProceedingJoinPoint pjp) throws Throwable {
StopWatch sw = new StopWatch(getClass().getSimpleName());
try {
sw.start(pjp.getSignature().getName());
return pjp.proceed();
} finally {
sw.stop();
System.out.println(sw.prettyPrint());
}
}
@Pointcut("execution(public * foo..*.*(..))")
public void methodsToBeProfiled(){}
}We will also need to create an META-INF/aop.xml file, to inform the AspectJ weaver
that we want to weave our ProfilingAspect into our classes. This file convention,
namely the presence of a file (or files) on the Java classpath called
META-INF/aop.xml is standard AspectJ.
<!DOCTYPE aspectj PUBLIC "-//AspectJ//DTD//EN" "http://www.eclipse.org/aspectj/dtd/aspectj.dtd">
<aspectj>
<weaver>
<!-- only weave classes in our application-specific packages -->
<include within="foo.*"/>
</weaver>
<aspects>
<!-- weave in just this aspect -->
<aspect name="foo.ProfilingAspect"/>
</aspects>
</aspectj>Now to the Spring-specific portion of the configuration. We need to configure a
LoadTimeWeaver (all explained later, just take it on trust for now). This load-time
weaver is the essential component responsible for weaving the aspect configuration in
one or more META-INF/aop.xml files into the classes in your application. The good
thing is that it does not require a lot of configuration, as can be seen below (there
are some more options that you can specify, but these are detailed later).
<?xml version="1.0" encoding="UTF-8"?>
<beans xmlns="http://www.springframework.org/schema/beans"
xmlns:xsi="http://www.w3.org/2001/XMLSchema-instance"
xmlns:context="http://www.springframework.org/schema/context"
xsi:schemaLocation="
http://www.springframework.org/schema/beans
http://www.springframework.org/schema/beans/spring-beans.xsd
http://www.springframework.org/schema/context
http://www.springframework.org/schema/context/spring-context.xsd">
<!-- a service object; we will be profiling its methods -->
<bean id="entitlementCalculationService"
class="foo.StubEntitlementCalculationService"/>
<!-- this switches on the load-time weaving -->
<context:load-time-weaver/>
</beans>Now that all the required artifacts are in place - the aspect, the META-INF/aop.xml
file, and the Spring configuration -, let us create a simple driver class with a
main(..) method to demonstrate the LTW in action.
package foo;
import org.springframework.context.support.ClassPathXmlApplicationContext;
public final class Main {
public static void main(String[] args) {
ApplicationContext ctx = new ClassPathXmlApplicationContext("beans.xml", Main.class);
EntitlementCalculationService entitlementCalculationService
= (EntitlementCalculationService) ctx.getBean("entitlementCalculationService");
// the profiling aspect is 'woven' around this method execution
entitlementCalculationService.calculateEntitlement();
}
}There is one last thing to do. The introduction to this section did say that one could
switch on LTW selectively on a per- ClassLoader basis with Spring, and this is true.
However, just for this example, we are going to use a Java agent (supplied with Spring)
to switch on the LTW. This is the command line we will use to run the above Main class:
java -javaagent:C:/projects/foo/lib/global/spring-instrument.jar foo.Main
The -javaagent is a flag for specifying and enabling
agents
to instrument programs running on the JVM. The Spring Framework ships with such an
agent, the InstrumentationSavingAgent, which is packaged in the
spring-instrument.jar that was supplied as the value of the -javaagent argument in
the above example.
The output from the execution of the Main program will look something like that below.
(I have introduced a Thread.sleep(..) statement into the calculateEntitlement()
implementation so that the profiler actually captures something other than 0
milliseconds - the 01234 milliseconds is not an overhead introduced by the AOP :) )
Calculating entitlement StopWatch 'ProfilingAspect': running time (millis) = 1234 ------ ----- ---------------------------- ms % Task name ------ ----- ---------------------------- 01234 100% calculateEntitlement
Since this LTW is effected using full-blown AspectJ, we are not just limited to advising
Spring beans; the following slight variation on the Main program will yield the same
result.
package foo;
import org.springframework.context.support.ClassPathXmlApplicationContext;
public final class Main {
public static void main(String[] args) {
new ClassPathXmlApplicationContext("beans.xml", Main.class);
EntitlementCalculationService entitlementCalculationService =
new StubEntitlementCalculationService();
// the profiling aspect will be 'woven' around this method execution
entitlementCalculationService.calculateEntitlement();
}
}Notice how in the above program we are simply bootstrapping the Spring container, and
then creating a new instance of the StubEntitlementCalculationService totally outside
the context of Spring… the profiling advice still gets woven in.
The example admittedly is simplistic… however the basics of the LTW support in Spring have all been introduced in the above example, and the rest of this section will explain the 'why' behind each bit of configuration and usage in detail.
|
The |
Aspects
The aspects that you use in LTW have to be AspectJ aspects. They can be written in either the AspectJ language itself or you can write your aspects in the @AspectJ-style. It means that your aspects are then both valid AspectJ and Spring AOP aspects. Furthermore, the compiled aspect classes need to be available on the classpath.
'META-INF/aop.xml'
The AspectJ LTW infrastructure is configured using one or more META-INF/aop.xml
files, that are on the Java classpath (either directly, or more typically in jar files).
The structure and contents of this file is detailed in the main AspectJ reference
documentation, and the interested reader is
referred to
that resource. (I appreciate that this section is brief, but the aop.xml file is
100% AspectJ - there is no Spring-specific information or semantics that apply to it,
and so there is no extra value that I can contribute either as a result), so rather than
rehash the quite satisfactory section that the AspectJ developers wrote, I am just
directing you there.)
Required libraries (JARS)
At a minimum you will need the following libraries to use the Spring Framework’s support for AspectJ LTW:
-
spring-aop.jar(version 2.5 or later, plus all mandatory dependencies) -
aspectjweaver.jar(version 1.6.8 or later)
If you are using the Spring-provided agent to enable instrumentation, you will also need:
-
spring-instrument.jar
Spring configuration
The key component in Spring’s LTW support is the LoadTimeWeaver interface (in the
org.springframework.instrument.classloading package), and the numerous implementations
of it that ship with the Spring distribution. A LoadTimeWeaver is responsible for
adding one or more java.lang.instrument.ClassFileTransformers to a ClassLoader at
runtime, which opens the door to all manner of interesting applications, one of which
happens to be the LTW of aspects.
|
If you are unfamiliar with the idea of runtime class file transformation, you are
encouraged to read the javadoc API documentation for the |
Configuring a LoadTimeWeaver for a particular ApplicationContext can be as easy as
adding one line. (Please note that you almost certainly will need to be using an
ApplicationContext as your Spring container - typically a BeanFactory will not be
enough because the LTW support makes use of BeanFactoryPostProcessors.)
To enable the Spring Framework’s LTW support, you need to configure a LoadTimeWeaver,
which typically is done using the @EnableLoadTimeWeaving annotation.
@Configuration
@EnableLoadTimeWeaving
public class AppConfig {
}Alternatively, if you prefer XML based configuration, use the
<context:load-time-weaver/> element. Note that the element is defined in the
context namespace.
<?xml version="1.0" encoding="UTF-8"?>
<beans xmlns="http://www.springframework.org/schema/beans"
xmlns:xsi="http://www.w3.org/2001/XMLSchema-instance"
xmlns:context="http://www.springframework.org/schema/context"
xsi:schemaLocation="
http://www.springframework.org/schema/beans
http://www.springframework.org/schema/beans/spring-beans.xsd
http://www.springframework.org/schema/context
http://www.springframework.org/schema/context/spring-context.xsd">
<context:load-time-weaver/>
</beans>The above configuration will define and register a number of LTW-specific infrastructure
beans for you automatically, such as a LoadTimeWeaver and an AspectJWeavingEnabler.
The default LoadTimeWeaver is the DefaultContextLoadTimeWeaver class, which attempts
to decorate an automatically detected LoadTimeWeaver: the exact type of
LoadTimeWeaver that will be 'automatically detected' is dependent upon your runtime
environment (summarized in the following table).
| Runtime Environment | LoadTimeWeaver implementation |
|---|---|
Running in Oracle’s WebLogic |
|
Running in Oracle’s GlassFish |
|
Running in Apache Tomcat |
|
|
|
Running in IBM’s WebSphere |
|
JVM started with Spring |
|
Fallback, expecting the underlying ClassLoader to follow common conventions (e.g.
applicable to |
|
Note that these are just the LoadTimeWeavers that are autodetected when using the
DefaultContextLoadTimeWeaver: it is of course possible to specify exactly which
LoadTimeWeaver implementation that you wish to use.
To specify a specific LoadTimeWeaver with Java configuration implement the
LoadTimeWeavingConfigurer interface and override the getLoadTimeWeaver() method:
@Configuration
@EnableLoadTimeWeaving
public class AppConfig implements LoadTimeWeavingConfigurer {
@Override
public LoadTimeWeaver getLoadTimeWeaver() {
return new ReflectiveLoadTimeWeaver();
}
}If you are using XML based configuration you can specify the fully-qualified classname
as the value of the weaver-class attribute on the <context:load-time-weaver/>
element:
<?xml version="1.0" encoding="UTF-8"?>
<beans xmlns="http://www.springframework.org/schema/beans"
xmlns:xsi="http://www.w3.org/2001/XMLSchema-instance"
xmlns:context="http://www.springframework.org/schema/context"
xsi:schemaLocation="
http://www.springframework.org/schema/beans
http://www.springframework.org/schema/beans/spring-beans.xsd
http://www.springframework.org/schema/context
http://www.springframework.org/schema/context/spring-context.xsd">
<context:load-time-weaver
weaver-class="org.springframework.instrument.classloading.ReflectiveLoadTimeWeaver"/>
</beans>The LoadTimeWeaver that is defined and registered by the configuration can be later
retrieved from the Spring container using the well-known name loadTimeWeaver.
Remember that the LoadTimeWeaver exists just as a mechanism for Spring’s LTW
infrastructure to add one or more ClassFileTransformers. The actual
ClassFileTransformer that does the LTW is the ClassPreProcessorAgentAdapter (from
the org.aspectj.weaver.loadtime package) class. See the class-level javadocs of the
ClassPreProcessorAgentAdapter class for further details, because the specifics of how
the weaving is actually effected is beyond the scope of this section.
There is one final attribute of the configuration left to discuss: the
aspectjWeaving attribute (or aspectj-weaving if you are using XML). This is a
simple attribute that controls whether LTW is enabled or not; it is as simple as that.
It accepts one of three possible values, summarized below, with the default value being
autodetect if the attribute is not present.
| Annotation Value | XML Value | Explanation |
|---|---|---|
|
|
AspectJ weaving is on, and aspects will be woven at load-time as appropriate. |
|
|
LTW is off… no aspect will be woven at load-time. |
|
|
If the Spring LTW infrastructure can find at least one |
Environment-specific configuration
This last section contains any additional settings and configuration that you will need when using Spring’s LTW support in environments such as application servers and web containers.
Tomcat
Historically, Apache Tomcat's default class loader did not
support class transformation which is why Spring provides an enhanced implementation
that addresses this need. Named TomcatInstrumentableClassLoader, the loader works on
Tomcat 6.0 and above.
|
Do not define |
If you still need to use TomcatInstrumentableClassLoader, it can be registered
individually for each web application as follows:
-
Copy
org.springframework.instrument.tomcat.jarinto $CATALINA_HOME/lib, where $CATALINA_HOME represents the root of the Tomcat installation) -
Instruct Tomcat to use the custom class loader (instead of the default) by editing the web application context file:
<Context path="/myWebApp" docBase="/my/webApp/location">
<Loader
loaderClass="org.springframework.instrument.classloading.tomcat.TomcatInstrumentableClassLoader"/>
</Context>Apache Tomcat (6.0+) supports several context locations:
-
server configuration file - $CATALINA_HOME/conf/server.xml
-
default context configuration - $CATALINA_HOME/conf/context.xml - that affects all deployed web applications
-
per-web application configuration which can be deployed either on the server-side at $CATALINA_HOME/conf/[enginename]/[hostname]/[webapp]-context.xml or embedded inside the web-app archive at META-INF/context.xml
For efficiency, the embedded per-web-app configuration style is recommended because it will impact only applications that use the custom class loader and does not require any changes to the server configuration. See the Tomcat 6.0.x documentation for more details about available context locations.
Alternatively, consider the use of the Spring-provided generic VM agent, to be specified in Tomcat’s launch script (see above). This will make instrumentation available to all deployed web applications, no matter what ClassLoader they happen to run on.
WebLogic, WebSphere, Resin, GlassFish, JBoss
Recent versions of WebLogic Server (version 10 and above), IBM WebSphere Application
Server (version 7 and above), Resin (3.1 and above) and JBoss (6.x or above) provide a
ClassLoader that is capable of local instrumentation. Spring’s native LTW leverages such
ClassLoaders to enable AspectJ weaving. You can enable LTW by simply activating
load-time weaving as described earlier. Specifically, you do not need to modify the
launch script to add -javaagent:path/to/spring-instrument.jar.
Note that GlassFish instrumentation-capable ClassLoader is available only in its EAR environment. For GlassFish web applications, follow the Tomcat setup instructions as outlined above.
Note that on JBoss 6.x, the app server scanning needs to be disabled to prevent it from
loading the classes before the application actually starts. A quick workaround is to add
to your artifact a file named WEB-INF/jboss-scanning.xml with the following content:
<scanning xmlns="urn:jboss:scanning:1.0"/>Generic Java applications
When class instrumentation is required in environments that do not support or are not
supported by the existing LoadTimeWeaver implementations, a JDK agent can be the only
solution. For such cases, Spring provides InstrumentationLoadTimeWeaver, which
requires a Spring-specific (but very general) VM agent,
org.springframework.instrument-{version}.jar (previously named spring-agent.jar).
To use it, you must start the virtual machine with the Spring agent, by supplying the following JVM options:
-javaagent:/path/to/org.springframework.instrument-{version}.jar
Note that this requires modification of the VM launch script which may prevent you from using this in application server environments (depending on your operation policies). Additionally, the JDK agent will instrument the entire VM which can prove expensive.
For performance reasons, it is recommended to use this configuration only if your target environment (such as Jetty) does not have (or does not support) a dedicated LTW.
5.9. Further Resources
More information on AspectJ can be found on the AspectJ website.
The book Eclipse AspectJ by Adrian Colyer et. al. (Addison-Wesley, 2005) provides a comprehensive introduction and reference for the AspectJ language.
The book AspectJ in Action, Second Edition by Ramnivas Laddad (Manning, 2009) comes highly recommended; the focus of the book is on AspectJ, but a lot of general AOP themes are explored (in some depth).
6. Spring AOP APIs
6.1. Introduction
The previous chapter described the Spring’s support for AOP using @AspectJ and schema-based aspect definitions. In this chapter we discuss the lower-level Spring AOP APIs and the AOP support typically used in Spring 1.2 applications. For new applications, we recommend the use of the Spring 2.0 and later AOP support described in the previous chapter, but when working with existing applications, or when reading books and articles, you may come across Spring 1.2 style examples. Spring 5 remains backwards compatible with Spring 1.2 and everything described in this chapter is fully supported in Spring 5.
6.2. Pointcut API in Spring
Let’s look at how Spring handles the crucial pointcut concept.
6.2.1. Concepts
Spring’s pointcut model enables pointcut reuse independent of advice types. It’s possible to target different advice using the same pointcut.
The org.springframework.aop.Pointcut interface is the central interface, used to
target advices to particular classes and methods. The complete interface is shown below:
public interface Pointcut {
ClassFilter getClassFilter();
MethodMatcher getMethodMatcher();
}Splitting the Pointcut interface into two parts allows reuse of class and method
matching parts, and fine-grained composition operations (such as performing a "union"
with another method matcher).
The ClassFilter interface is used to restrict the pointcut to a given set of target
classes. If the matches() method always returns true, all target classes will be
matched:
public interface ClassFilter {
boolean matches(Class clazz);
}The MethodMatcher interface is normally more important. The complete interface is
shown below:
public interface MethodMatcher {
boolean matches(Method m, Class targetClass);
boolean isRuntime();
boolean matches(Method m, Class targetClass, Object[] args);
}The matches(Method, Class) method is used to test whether this pointcut will ever
match a given method on a target class. This evaluation can be performed when an AOP
proxy is created, to avoid the need for a test on every method invocation. If the
2-argument matches method returns true for a given method, and the isRuntime() method
for the MethodMatcher returns true, the 3-argument matches method will be invoked on
every method invocation. This enables a pointcut to look at the arguments passed to the
method invocation immediately before the target advice is to execute.
Most MethodMatchers are static, meaning that their isRuntime() method returns false.
In this case, the 3-argument matches method will never be invoked.
|
If possible, try to make pointcuts static, allowing the AOP framework to cache the results of pointcut evaluation when an AOP proxy is created. |
6.2.2. Operations on pointcuts
Spring supports operations on pointcuts: notably, union and intersection.
-
Union means the methods that either pointcut matches.
-
Intersection means the methods that both pointcuts match.
-
Union is usually more useful.
-
Pointcuts can be composed using the static methods in the org.springframework.aop.support.Pointcuts class, or using the ComposablePointcut class in the same package. However, using AspectJ pointcut expressions is usually a simpler approach.
6.2.3. AspectJ expression pointcuts
Since 2.0, the most important type of pointcut used by Spring is
org.springframework.aop.aspectj.AspectJExpressionPointcut. This is a pointcut that
uses an AspectJ supplied library to parse an AspectJ pointcut expression string.
See the previous chapter for a discussion of supported AspectJ pointcut primitives.
6.2.4. Convenience pointcut implementations
Spring provides several convenient pointcut implementations. Some can be used out of the box; others are intended to be subclassed in application-specific pointcuts.
Static pointcuts
Static pointcuts are based on method and target class, and cannot take into account the method’s arguments. Static pointcuts are sufficient - and best - for most usages. It’s possible for Spring to evaluate a static pointcut only once, when a method is first invoked: after that, there is no need to evaluate the pointcut again with each method invocation.
Let’s consider some static pointcut implementations included with Spring.
Regular expression pointcuts
One obvious way to specify static pointcuts is regular expressions. Several AOP
frameworks besides Spring make this possible.
org.springframework.aop.support.JdkRegexpMethodPointcut is a generic regular
expression pointcut, using the regular expression support in the JDK.
Using the JdkRegexpMethodPointcut class, you can provide a list of pattern Strings. If
any of these is a match, the pointcut will evaluate to true. (So the result is
effectively the union of these pointcuts.)
The usage is shown below:
<bean id="settersAndAbsquatulatePointcut"
class="org.springframework.aop.support.JdkRegexpMethodPointcut">
<property name="patterns">
<list>
<value>.*set.*</value>
<value>.*absquatulate</value>
</list>
</property>
</bean>Spring provides a convenience class, RegexpMethodPointcutAdvisor, that allows us to
also reference an Advice (remember that an Advice can be an interceptor, before advice,
throws advice etc.). Behind the scenes, Spring will use a JdkRegexpMethodPointcut.
Using RegexpMethodPointcutAdvisor simplifies wiring, as the one bean encapsulates both
pointcut and advice, as shown below:
<bean id="settersAndAbsquatulateAdvisor"
class="org.springframework.aop.support.RegexpMethodPointcutAdvisor">
<property name="advice">
<ref bean="beanNameOfAopAllianceInterceptor"/>
</property>
<property name="patterns">
<list>
<value>.*set.*</value>
<value>.*absquatulate</value>
</list>
</property>
</bean>RegexpMethodPointcutAdvisor can be used with any Advice type.
Dynamic pointcuts
Dynamic pointcuts are costlier to evaluate than static pointcuts. They take into account method arguments, as well as static information. This means that they must be evaluated with every method invocation; the result cannot be cached, as arguments will vary.
The main example is the control flow pointcut.
Control flow pointcuts
Spring control flow pointcuts are conceptually similar to AspectJ cflow pointcuts,
although less powerful. (There is currently no way to specify that a pointcut executes
below a join point matched by another pointcut.) A control flow pointcut matches the
current call stack. For example, it might fire if the join point was invoked by a method
in the com.mycompany.web package, or by the SomeCaller class. Control flow pointcuts
are specified using the org.springframework.aop.support.ControlFlowPointcut class.
|
Control flow pointcuts are significantly more expensive to evaluate at runtime than even other dynamic pointcuts. In Java 1.4, the cost is about 5 times that of other dynamic pointcuts. |
6.2.5. Pointcut superclasses
Spring provides useful pointcut superclasses to help you to implement your own pointcuts.
Because static pointcuts are most useful, you’ll probably subclass StaticMethodMatcherPointcut, as shown below. This requires implementing just one abstract method (although it’s possible to override other methods to customize behavior):
class TestStaticPointcut extends StaticMethodMatcherPointcut {
public boolean matches(Method m, Class targetClass) {
// return true if custom criteria match
}
}There are also superclasses for dynamic pointcuts.
You can use custom pointcuts with any advice type in Spring 1.0 RC2 and above.
6.2.6. Custom pointcuts
Because pointcuts in Spring AOP are Java classes, rather than language features (as in AspectJ) it’s possible to declare custom pointcuts, whether static or dynamic. Custom pointcuts in Spring can be arbitrarily complex. However, using the AspectJ pointcut expression language is recommended if possible.
|
Later versions of Spring may offer support for "semantic pointcuts" as offered by JAC: for example, "all methods that change instance variables in the target object." |
6.3. Advice API in Spring
Let’s now look at how Spring AOP handles advice.
6.3.1. Advice lifecycles
Each advice is a Spring bean. An advice instance can be shared across all advised objects, or unique to each advised object. This corresponds to per-class or per-instance advice.
Per-class advice is used most often. It is appropriate for generic advice such as transaction advisors. These do not depend on the state of the proxied object or add new state; they merely act on the method and arguments.
Per-instance advice is appropriate for introductions, to support mixins. In this case, the advice adds state to the proxied object.
It’s possible to use a mix of shared and per-instance advice in the same AOP proxy.
6.3.2. Advice types in Spring
Spring provides several advice types out of the box, and is extensible to support arbitrary advice types. Let us look at the basic concepts and standard advice types.
Interception around advice
The most fundamental advice type in Spring is interception around advice.
Spring is compliant with the AOP Alliance interface for around advice using method interception. MethodInterceptors implementing around advice should implement the following interface:
public interface MethodInterceptor extends Interceptor {
Object invoke(MethodInvocation invocation) throws Throwable;
}The MethodInvocation argument to the invoke() method exposes the method being
invoked; the target join point; the AOP proxy; and the arguments to the method. The
invoke() method should return the invocation’s result: the return value of the join
point.
A simple MethodInterceptor implementation looks as follows:
public class DebugInterceptor implements MethodInterceptor {
public Object invoke(MethodInvocation invocation) throws Throwable {
System.out.println("Before: invocation=[" + invocation + "]");
Object rval = invocation.proceed();
System.out.println("Invocation returned");
return rval;
}
}Note the call to the MethodInvocation’s proceed() method. This proceeds down the
interceptor chain towards the join point. Most interceptors will invoke this method, and
return its return value. However, a MethodInterceptor, like any around advice, can
return a different value or throw an exception rather than invoke the proceed method.
However, you don’t want to do this without good reason!
|
MethodInterceptors offer interoperability with other AOP Alliance-compliant AOP implementations. The other advice types discussed in the remainder of this section implement common AOP concepts, but in a Spring-specific way. While there is an advantage in using the most specific advice type, stick with MethodInterceptor around advice if you are likely to want to run the aspect in another AOP framework. Note that pointcuts are not currently interoperable between frameworks, and the AOP Alliance does not currently define pointcut interfaces. |
Before advice
A simpler advice type is a before advice. This does not need a MethodInvocation
object, since it will only be called before entering the method.
The main advantage of a before advice is that there is no need to invoke the proceed()
method, and therefore no possibility of inadvertently failing to proceed down the
interceptor chain.
The MethodBeforeAdvice interface is shown below. (Spring’s API design would allow for
field before advice, although the usual objects apply to field interception and it’s
unlikely that Spring will ever implement it).
public interface MethodBeforeAdvice extends BeforeAdvice {
void before(Method m, Object[] args, Object target) throws Throwable;
}Note the return type is void. Before advice can insert custom behavior before the join
point executes, but cannot change the return value. If a before advice throws an
exception, this will abort further execution of the interceptor chain. The exception
will propagate back up the interceptor chain. If it is unchecked, or on the signature of
the invoked method, it will be passed directly to the client; otherwise it will be
wrapped in an unchecked exception by the AOP proxy.
An example of a before advice in Spring, which counts all method invocations:
public class CountingBeforeAdvice implements MethodBeforeAdvice {
private int count;
public void before(Method m, Object[] args, Object target) throws Throwable {
++count;
}
public int getCount() {
return count;
}
}|
Before advice can be used with any pointcut. |
Throws advice
Throws advice is invoked after the return of the join point if the join point threw
an exception. Spring offers typed throws advice. Note that this means that the
org.springframework.aop.ThrowsAdvice interface does not contain any methods: It is a
tag interface identifying that the given object implements one or more typed throws
advice methods. These should be in the form of:
afterThrowing([Method, args, target], subclassOfThrowable)Only the last argument is required. The method signatures may have either one or four arguments, depending on whether the advice method is interested in the method and arguments. The following classes are examples of throws advice.
The advice below is invoked if a RemoteException is thrown (including subclasses):
public class RemoteThrowsAdvice implements ThrowsAdvice {
public void afterThrowing(RemoteException ex) throws Throwable {
// Do something with remote exception
}
}The following advice is invoked if a ServletException is thrown. Unlike the above
advice, it declares 4 arguments, so that it has access to the invoked method, method
arguments and target object:
public class ServletThrowsAdviceWithArguments implements ThrowsAdvice {
public void afterThrowing(Method m, Object[] args, Object target, ServletException ex) {
// Do something with all arguments
}
}The final example illustrates how these two methods could be used in a single class,
which handles both RemoteException and ServletException. Any number of throws advice
methods can be combined in a single class.
public static class CombinedThrowsAdvice implements ThrowsAdvice {
public void afterThrowing(RemoteException ex) throws Throwable {
// Do something with remote exception
}
public void afterThrowing(Method m, Object[] args, Object target, ServletException ex) {
// Do something with all arguments
}
}|
If a throws-advice method throws an exception itself, it will override the original exception (i.e. change the exception thrown to the user). The overriding exception will typically be a RuntimeException; this is compatible with any method signature. However, if a throws-advice method throws a checked exception, it will have to match the declared exceptions of the target method and is hence to some degree coupled to specific target method signatures. Do not throw an undeclared checked exception that is incompatible with the target method’s signature! |
|
Throws advice can be used with any pointcut. |
After Returning advice
An after returning advice in Spring must implement the org.springframework.aop.AfterReturningAdvice interface, shown below:
public interface AfterReturningAdvice extends Advice {
void afterReturning(Object returnValue, Method m, Object[] args, Object target)
throws Throwable;
}An after returning advice has access to the return value (which it cannot modify), invoked method, methods arguments and target.
The following after returning advice counts all successful method invocations that have not thrown exceptions:
public class CountingAfterReturningAdvice implements AfterReturningAdvice {
private int count;
public void afterReturning(Object returnValue, Method m, Object[] args, Object target)
throws Throwable {
++count;
}
public int getCount() {
return count;
}
}This advice doesn’t change the execution path. If it throws an exception, this will be thrown up the interceptor chain instead of the return value.
|
After returning advice can be used with any pointcut. |
Introduction advice
Spring treats introduction advice as a special kind of interception advice.
Introduction requires an IntroductionAdvisor, and an IntroductionInterceptor,
implementing the following interface:
public interface IntroductionInterceptor extends MethodInterceptor {
boolean implementsInterface(Class intf);
}The invoke() method inherited from the AOP Alliance MethodInterceptor interface must
implement the introduction: that is, if the invoked method is on an introduced
interface, the introduction interceptor is responsible for handling the method call - it
cannot invoke proceed().
Introduction advice cannot be used with any pointcut, as it applies only at class,
rather than method, level. You can only use introduction advice with the
IntroductionAdvisor, which has the following methods:
public interface IntroductionAdvisor extends Advisor, IntroductionInfo {
ClassFilter getClassFilter();
void validateInterfaces() throws IllegalArgumentException;
}
public interface IntroductionInfo {
Class[] getInterfaces();
}There is no MethodMatcher, and hence no Pointcut, associated with introduction
advice. Only class filtering is logical.
The getInterfaces() method returns the interfaces introduced by this advisor.
The validateInterfaces() method is used internally to see whether or not the
introduced interfaces can be implemented by the configured IntroductionInterceptor.
Let’s look at a simple example from the Spring test suite. Let’s suppose we want to introduce the following interface to one or more objects:
public interface Lockable {
void lock();
void unlock();
boolean locked();
}This illustrates a mixin. We want to be able to cast advised objects to Lockable,
whatever their type, and call lock and unlock methods. If we call the lock() method, we
want all setter methods to throw a LockedException. Thus we can add an aspect that
provides the ability to make objects immutable, without them having any knowledge of it:
a good example of AOP.
Firstly, we’ll need an IntroductionInterceptor that does the heavy lifting. In this
case, we extend the org.springframework.aop.support.DelegatingIntroductionInterceptor
convenience class. We could implement IntroductionInterceptor directly, but using
DelegatingIntroductionInterceptor is best for most cases.
The DelegatingIntroductionInterceptor is designed to delegate an introduction to an
actual implementation of the introduced interface(s), concealing the use of interception
to do so. The delegate can be set to any object using a constructor argument; the
default delegate (when the no-arg constructor is used) is this. Thus in the example
below, the delegate is the LockMixin subclass of DelegatingIntroductionInterceptor.
Given a delegate (by default itself), a DelegatingIntroductionInterceptor instance
looks for all interfaces implemented by the delegate (other than
IntroductionInterceptor), and will support introductions against any of them. It’s
possible for subclasses such as LockMixin to call the suppressInterface(Class intf)
method to suppress interfaces that should not be exposed. However, no matter how many
interfaces an IntroductionInterceptor is prepared to support, the
IntroductionAdvisor used will control which interfaces are actually exposed. An
introduced interface will conceal any implementation of the same interface by the target.
Thus LockMixin extends DelegatingIntroductionInterceptor and implements Lockable
itself. The superclass automatically picks up that Lockable can be supported for
introduction, so we don’t need to specify that. We could introduce any number of
interfaces in this way.
Note the use of the locked instance variable. This effectively adds additional state
to that held in the target object.
public class LockMixin extends DelegatingIntroductionInterceptor implements Lockable {
private boolean locked;
public void lock() {
this.locked = true;
}
public void unlock() {
this.locked = false;
}
public boolean locked() {
return this.locked;
}
public Object invoke(MethodInvocation invocation) throws Throwable {
if (locked() && invocation.getMethod().getName().indexOf("set") == 0) {
throw new LockedException();
}
return super.invoke(invocation);
}
}Often it isn’t necessary to override the invoke() method: the
DelegatingIntroductionInterceptor implementation - which calls the delegate method if
the method is introduced, otherwise proceeds towards the join point - is usually
sufficient. In the present case, we need to add a check: no setter method can be invoked
if in locked mode.
The introduction advisor required is simple. All it needs to do is hold a distinct
LockMixin instance, and specify the introduced interfaces - in this case, just
Lockable. A more complex example might take a reference to the introduction
interceptor (which would be defined as a prototype): in this case, there’s no
configuration relevant for a LockMixin, so we simply create it using new.
public class LockMixinAdvisor extends DefaultIntroductionAdvisor {
public LockMixinAdvisor() {
super(new LockMixin(), Lockable.class);
}
}We can apply this advisor very simply: it requires no configuration. (However, it is
necessary: It’s impossible to use an IntroductionInterceptor without an
IntroductionAdvisor.) As usual with introductions, the advisor must be per-instance,
as it is stateful. We need a different instance of LockMixinAdvisor, and hence
LockMixin, for each advised object. The advisor comprises part of the advised object’s
state.
We can apply this advisor programmatically, using the Advised.addAdvisor() method, or
(the recommended way) in XML configuration, like any other advisor. All proxy creation
choices discussed below, including "auto proxy creators," correctly handle introductions
and stateful mixins.
6.4. Advisor API in Spring
In Spring, an Advisor is an aspect that contains just a single advice object associated with a pointcut expression.
Apart from the special case of introductions, any advisor can be used with any advice.
org.springframework.aop.support.DefaultPointcutAdvisor is the most commonly used
advisor class. For example, it can be used with a MethodInterceptor, BeforeAdvice or
ThrowsAdvice.
It is possible to mix advisor and advice types in Spring in the same AOP proxy. For example, you could use a interception around advice, throws advice and before advice in one proxy configuration: Spring will automatically create the necessary interceptor chain.
6.5. Using the ProxyFactoryBean to create AOP proxies
If you’re using the Spring IoC container (an ApplicationContext or BeanFactory) for your business objects - and you should be! - you will want to use one of Spring’s AOP FactoryBeans. (Remember that a factory bean introduces a layer of indirection, enabling it to create objects of a different type.)
|
The Spring AOP support also uses factory beans under the covers. |
The basic way to create an AOP proxy in Spring is to use the org.springframework.aop.framework.ProxyFactoryBean. This gives complete control over the pointcuts and advice that will apply, and their ordering. However, there are simpler options that are preferable if you don’t need such control.
6.5.1. Basics
The ProxyFactoryBean, like other Spring FactoryBean implementations, introduces a
level of indirection. If you define a ProxyFactoryBean with name foo, what objects
referencing foo see is not the ProxyFactoryBean instance itself, but an object
created by the ProxyFactoryBean's implementation of the getObject() method. This
method will create an AOP proxy wrapping a target object.
One of the most important benefits of using a ProxyFactoryBean or another IoC-aware
class to create AOP proxies, is that it means that advices and pointcuts can also be
managed by IoC. This is a powerful feature, enabling certain approaches that are hard to
achieve with other AOP frameworks. For example, an advice may itself reference
application objects (besides the target, which should be available in any AOP
framework), benefiting from all the pluggability provided by Dependency Injection.
6.5.2. JavaBean properties
In common with most FactoryBean implementations provided with Spring, the
ProxyFactoryBean class is itself a JavaBean. Its properties are used to:
-
Specify the target you want to proxy.
-
Specify whether to use CGLIB (see below and also JDK- and CGLIB-based proxies).
Some key properties are inherited from org.springframework.aop.framework.ProxyConfig
(the superclass for all AOP proxy factories in Spring). These key properties include:
-
proxyTargetClass:trueif the target class is to be proxied, rather than the target class' interfaces. If this property value is set totrue, then CGLIB proxies will be created (but see also JDK- and CGLIB-based proxies). -
optimize: controls whether or not aggressive optimizations are applied to proxies created via CGLIB. One should not blithely use this setting unless one fully understands how the relevant AOP proxy handles optimization. This is currently used only for CGLIB proxies; it has no effect with JDK dynamic proxies. -
frozen: if a proxy configuration isfrozen, then changes to the configuration are no longer allowed. This is useful both as a slight optimization and for those cases when you don’t want callers to be able to manipulate the proxy (via theAdvisedinterface) after the proxy has been created. The default value of this property isfalse, so changes such as adding additional advice are allowed. -
exposeProxy: determines whether or not the current proxy should be exposed in aThreadLocalso that it can be accessed by the target. If a target needs to obtain the proxy and theexposeProxyproperty is set totrue, the target can use theAopContext.currentProxy()method.
Other properties specific to ProxyFactoryBean include:
-
proxyInterfaces: array of String interface names. If this isn’t supplied, a CGLIB proxy for the target class will be used (but see also JDK- and CGLIB-based proxies). -
interceptorNames: String array ofAdvisor, interceptor or other advice names to apply. Ordering is significant, on a first come-first served basis. That is to say that the first interceptor in the list will be the first to be able to intercept the invocation.
The names are bean names in the current factory, including bean names from ancestor
factories. You can’t mention bean references here since doing so would result in the
ProxyFactoryBean ignoring the singleton setting of the advice.
You can append an interceptor name with an asterisk ( *). This will result in the
application of all advisor beans with names starting with the part before the asterisk
to be applied. An example of using this feature can be found in Using 'global' advisors.
-
singleton: whether or not the factory should return a single object, no matter how often the
getObject()method is called. SeveralFactoryBeanimplementations offer such a method. The default value istrue. If you want to use stateful advice - for example, for stateful mixins - use prototype advices along with a singleton value offalse.
6.5.3. JDK- and CGLIB-based proxies
This section serves as the definitive documentation on how the ProxyFactoryBean
chooses to create one of either a JDK- and CGLIB-based proxy for a particular target
object (that is to be proxied).
|
The behavior of the |
If the class of a target object that is to be proxied (hereafter simply referred to as
the target class) doesn’t implement any interfaces, then a CGLIB-based proxy will be
created. This is the easiest scenario, because JDK proxies are interface based, and no
interfaces means JDK proxying isn’t even possible. One simply plugs in the target bean,
and specifies the list of interceptors via the interceptorNames property. Note that a
CGLIB-based proxy will be created even if the proxyTargetClass property of the
ProxyFactoryBean has been set to false. (Obviously this makes no sense, and is best
removed from the bean definition because it is at best redundant, and at worst
confusing.)
If the target class implements one (or more) interfaces, then the type of proxy that is
created depends on the configuration of the ProxyFactoryBean.
If the proxyTargetClass property of the ProxyFactoryBean has been set to true,
then a CGLIB-based proxy will be created. This makes sense, and is in keeping with the
principle of least surprise. Even if the proxyInterfaces property of the
ProxyFactoryBean has been set to one or more fully qualified interface names, the fact
that the proxyTargetClass property is set to true will cause CGLIB-based
proxying to be in effect.
If the proxyInterfaces property of the ProxyFactoryBean has been set to one or more
fully qualified interface names, then a JDK-based proxy will be created. The created
proxy will implement all of the interfaces that were specified in the proxyInterfaces
property; if the target class happens to implement a whole lot more interfaces than
those specified in the proxyInterfaces property, that is all well and good but those
additional interfaces will not be implemented by the returned proxy.
If the proxyInterfaces property of the ProxyFactoryBean has not been set, but
the target class does implement one (or more) interfaces, then the
ProxyFactoryBean will auto-detect the fact that the target class does actually
implement at least one interface, and a JDK-based proxy will be created. The interfaces
that are actually proxied will be all of the interfaces that the target class
implements; in effect, this is the same as simply supplying a list of each and every
interface that the target class implements to the proxyInterfaces property. However,
it is significantly less work, and less prone to typos.
6.5.4. Proxying interfaces
Let’s look at a simple example of ProxyFactoryBean in action. This example involves:
-
A target bean that will be proxied. This is the "personTarget" bean definition in the example below.
-
An Advisor and an Interceptor used to provide advice.
-
An AOP proxy bean definition specifying the target object (the personTarget bean) and the interfaces to proxy, along with the advices to apply.
<bean id="personTarget" class="com.mycompany.PersonImpl">
<property name="name" value="Tony"/>
<property name="age" value="51"/>
</bean>
<bean id="myAdvisor" class="com.mycompany.MyAdvisor">
<property name="someProperty" value="Custom string property value"/>
</bean>
<bean id="debugInterceptor" class="org.springframework.aop.interceptor.DebugInterceptor">
</bean>
<bean id="person"
class="org.springframework.aop.framework.ProxyFactoryBean">
<property name="proxyInterfaces" value="com.mycompany.Person"/>
<property name="target" ref="personTarget"/>
<property name="interceptorNames">
<list>
<value>myAdvisor</value>
<value>debugInterceptor</value>
</list>
</property>
</bean>Note that the interceptorNames property takes a list of String: the bean names of the
interceptor or advisors in the current factory. Advisors, interceptors, before, after
returning and throws advice objects can be used. The ordering of advisors is significant.
|
You might be wondering why the list doesn’t hold bean references. The reason for this is that if the ProxyFactoryBean’s singleton property is set to false, it must be able to return independent proxy instances. If any of the advisors is itself a prototype, an independent instance would need to be returned, so it’s necessary to be able to obtain an instance of the prototype from the factory; holding a reference isn’t sufficient. |
The "person" bean definition above can be used in place of a Person implementation, as follows:
Person person = (Person) factory.getBean("person");Other beans in the same IoC context can express a strongly typed dependency on it, as with an ordinary Java object:
<bean id="personUser" class="com.mycompany.PersonUser">
<property name="person"><ref bean="person"/></property>
</bean>The PersonUser class in this example would expose a property of type Person. As far as
it’s concerned, the AOP proxy can be used transparently in place of a "real" person
implementation. However, its class would be a dynamic proxy class. It would be possible
to cast it to the Advised interface (discussed below).
It’s possible to conceal the distinction between target and proxy using an anonymous
inner bean, as follows. Only the ProxyFactoryBean definition is different; the
advice is included only for completeness:
<bean id="myAdvisor" class="com.mycompany.MyAdvisor">
<property name="someProperty" value="Custom string property value"/>
</bean>
<bean id="debugInterceptor" class="org.springframework.aop.interceptor.DebugInterceptor"/>
<bean id="person" class="org.springframework.aop.framework.ProxyFactoryBean">
<property name="proxyInterfaces" value="com.mycompany.Person"/>
<!-- Use inner bean, not local reference to target -->
<property name="target">
<bean class="com.mycompany.PersonImpl">
<property name="name" value="Tony"/>
<property name="age" value="51"/>
</bean>
</property>
<property name="interceptorNames">
<list>
<value>myAdvisor</value>
<value>debugInterceptor</value>
</list>
</property>
</bean>This has the advantage that there’s only one object of type Person: useful if we want
to prevent users of the application context from obtaining a reference to the un-advised
object, or need to avoid any ambiguity with Spring IoC autowiring. There’s also
arguably an advantage in that the ProxyFactoryBean definition is self-contained.
However, there are times when being able to obtain the un-advised target from the
factory might actually be an advantage: for example, in certain test scenarios.
6.5.5. Proxying classes
What if you need to proxy a class, rather than one or more interfaces?
Imagine that in our example above, there was no Person interface: we needed to advise
a class called Person that didn’t implement any business interface. In this case, you
can configure Spring to use CGLIB proxying, rather than dynamic proxies. Simply set the
proxyTargetClass property on the ProxyFactoryBean above to true. While it’s best to
program to interfaces, rather than classes, the ability to advise classes that don’t
implement interfaces can be useful when working with legacy code. (In general, Spring
isn’t prescriptive. While it makes it easy to apply good practices, it avoids forcing a
particular approach.)
If you want to, you can force the use of CGLIB in any case, even if you do have interfaces.
CGLIB proxying works by generating a subclass of the target class at runtime. Spring configures this generated subclass to delegate method calls to the original target: the subclass is used to implement the Decorator pattern, weaving in the advice.
CGLIB proxying should generally be transparent to users. However, there are some issues to consider:
-
Finalmethods can’t be advised, as they can’t be overridden. -
There is no need to add CGLIB to your classpath. As of Spring 3.2, CGLIB is repackaged and included in the spring-core JAR. In other words, CGLIB-based AOP will work "out of the box" just as do JDK dynamic proxies.
There’s little performance difference between CGLIB proxying and dynamic proxies. As of Spring 1.0, dynamic proxies are slightly faster. However, this may change in the future. Performance should not be a decisive consideration in this case.
6.5.6. Using 'global' advisors
By appending an asterisk to an interceptor name, all advisors with bean names matching the part before the asterisk, will be added to the advisor chain. This can come in handy if you need to add a standard set of 'global' advisors:
<bean id="proxy" class="org.springframework.aop.framework.ProxyFactoryBean">
<property name="target" ref="service"/>
<property name="interceptorNames">
<list>
<value>global*</value>
</list>
</property>
</bean>
<bean id="global_debug" class="org.springframework.aop.interceptor.DebugInterceptor"/>
<bean id="global_performance" class="org.springframework.aop.interceptor.PerformanceMonitorInterceptor"/>6.6. Concise proxy definitions
Especially when defining transactional proxies, you may end up with many similar proxy definitions. The use of parent and child bean definitions, along with inner bean definitions, can result in much cleaner and more concise proxy definitions.
First a parent, template, bean definition is created for the proxy:
<bean id="txProxyTemplate" abstract="true"
class="org.springframework.transaction.interceptor.TransactionProxyFactoryBean">
<property name="transactionManager" ref="transactionManager"/>
<property name="transactionAttributes">
<props>
<prop key="*">PROPAGATION_REQUIRED</prop>
</props>
</property>
</bean>This will never be instantiated itself, so may actually be incomplete. Then each proxy which needs to be created is just a child bean definition, which wraps the target of the proxy as an inner bean definition, since the target will never be used on its own anyway.
<bean id="myService" parent="txProxyTemplate">
<property name="target">
<bean class="org.springframework.samples.MyServiceImpl">
</bean>
</property>
</bean>It is of course possible to override properties from the parent template, such as in this case, the transaction propagation settings:
<bean id="mySpecialService" parent="txProxyTemplate">
<property name="target">
<bean class="org.springframework.samples.MySpecialServiceImpl">
</bean>
</property>
<property name="transactionAttributes">
<props>
<prop key="get*">PROPAGATION_REQUIRED,readOnly</prop>
<prop key="find*">PROPAGATION_REQUIRED,readOnly</prop>
<prop key="load*">PROPAGATION_REQUIRED,readOnly</prop>
<prop key="store*">PROPAGATION_REQUIRED</prop>
</props>
</property>
</bean>Note that in the example above, we have explicitly marked the parent bean definition as abstract by using the abstract attribute, as described previously, so that it may not actually ever be instantiated. Application contexts (but not simple bean factories) will by default pre-instantiate all singletons. It is therefore important (at least for singleton beans) that if you have a (parent) bean definition which you intend to use only as a template, and this definition specifies a class, you must make sure to set the abstract attribute to true, otherwise the application context will actually try to pre-instantiate it.
6.7. Creating AOP proxies programmatically with the ProxyFactory
It’s easy to create AOP proxies programmatically using Spring. This enables you to use Spring AOP without dependency on Spring IoC.
The following listing shows creation of a proxy for a target object, with one interceptor and one advisor. The interfaces implemented by the target object will automatically be proxied:
ProxyFactory factory = new ProxyFactory(myBusinessInterfaceImpl);
factory.addAdvice(myMethodInterceptor);
factory.addAdvisor(myAdvisor);
MyBusinessInterface tb = (MyBusinessInterface) factory.getProxy();The first step is to construct an object of type
org.springframework.aop.framework.ProxyFactory. You can create this with a target
object, as in the above example, or specify the interfaces to be proxied in an alternate
constructor.
You can add advices (with interceptors as a specialized kind of advice) and/or advisors, and manipulate them for the life of the ProxyFactory. If you add an IntroductionInterceptionAroundAdvisor, you can cause the proxy to implement additional interfaces.
There are also convenience methods on ProxyFactory (inherited from AdvisedSupport)
which allow you to add other advice types such as before and throws advice.
AdvisedSupport is the superclass of both ProxyFactory and ProxyFactoryBean.
|
Integrating AOP proxy creation with the IoC framework is best practice in most applications. We recommend that you externalize configuration from Java code with AOP, as in general. |
6.8. Manipulating advised objects
However you create AOP proxies, you can manipulate them using the
org.springframework.aop.framework.Advised interface. Any AOP proxy can be cast to this
interface, whichever other interfaces it implements. This interface includes the
following methods:
Advisor[] getAdvisors();
void addAdvice(Advice advice) throws AopConfigException;
void addAdvice(int pos, Advice advice) throws AopConfigException;
void addAdvisor(Advisor advisor) throws AopConfigException;
void addAdvisor(int pos, Advisor advisor) throws AopConfigException;
int indexOf(Advisor advisor);
boolean removeAdvisor(Advisor advisor) throws AopConfigException;
void removeAdvisor(int index) throws AopConfigException;
boolean replaceAdvisor(Advisor a, Advisor b) throws AopConfigException;
boolean isFrozen();The getAdvisors() method will return an Advisor for every advisor, interceptor or
other advice type that has been added to the factory. If you added an Advisor, the
returned advisor at this index will be the object that you added. If you added an
interceptor or other advice type, Spring will have wrapped this in an advisor with a
pointcut that always returns true. Thus if you added a MethodInterceptor, the advisor
returned for this index will be an DefaultPointcutAdvisor returning your
MethodInterceptor and a pointcut that matches all classes and methods.
The addAdvisor() methods can be used to add any Advisor. Usually the advisor holding
pointcut and advice will be the generic DefaultPointcutAdvisor, which can be used with
any advice or pointcut (but not for introductions).
By default, it’s possible to add or remove advisors or interceptors even once a proxy has been created. The only restriction is that it’s impossible to add or remove an introduction advisor, as existing proxies from the factory will not show the interface change. (You can obtain a new proxy from the factory to avoid this problem.)
A simple example of casting an AOP proxy to the Advised interface and examining and
manipulating its advice:
Advised advised = (Advised) myObject;
Advisor[] advisors = advised.getAdvisors();
int oldAdvisorCount = advisors.length;
System.out.println(oldAdvisorCount + " advisors");
// Add an advice like an interceptor without a pointcut
// Will match all proxied methods
// Can use for interceptors, before, after returning or throws advice
advised.addAdvice(new DebugInterceptor());
// Add selective advice using a pointcut
advised.addAdvisor(new DefaultPointcutAdvisor(mySpecialPointcut, myAdvice));
assertEquals("Added two advisors", oldAdvisorCount + 2, advised.getAdvisors().length);|
It’s questionable whether it’s advisable (no pun intended) to modify advice on a business object in production, although there are no doubt legitimate usage cases. However, it can be very useful in development: for example, in tests. I have sometimes found it very useful to be able to add test code in the form of an interceptor or other advice, getting inside a method invocation I want to test. (For example, the advice can get inside a transaction created for that method: for example, to run SQL to check that a database was correctly updated, before marking the transaction for roll back.) |
Depending on how you created the proxy, you can usually set a frozen flag, in which
case the Advised isFrozen() method will return true, and any attempts to modify
advice through addition or removal will result in an AopConfigException. The ability
to freeze the state of an advised object is useful in some cases, for example, to
prevent calling code removing a security interceptor. It may also be used in Spring 1.1
to allow aggressive optimization if runtime advice modification is known not to be
required.
6.9. Using the "auto-proxy" facility
So far we’ve considered explicit creation of AOP proxies using a ProxyFactoryBean or
similar factory bean.
Spring also allows us to use "auto-proxy" bean definitions, which can automatically proxy selected bean definitions. This is built on Spring "bean post processor" infrastructure, which enables modification of any bean definition as the container loads.
In this model, you set up some special bean definitions in your XML bean definition file
to configure the auto proxy infrastructure. This allows you just to declare the targets
eligible for auto-proxying: you don’t need to use ProxyFactoryBean.
There are two ways to do this:
-
Using an auto-proxy creator that refers to specific beans in the current context.
-
A special case of auto-proxy creation that deserves to be considered separately; auto-proxy creation driven by source-level metadata attributes.
6.9.1. Autoproxy bean definitions
The org.springframework.aop.framework.autoproxy package provides the following
standard auto-proxy creators.
BeanNameAutoProxyCreator
The BeanNameAutoProxyCreator class is a BeanPostProcessor that automatically creates
AOP proxies for beans with names matching literal values or wildcards.
<bean class="org.springframework.aop.framework.autoproxy.BeanNameAutoProxyCreator">
<property name="beanNames" value="jdk*,onlyJdk"/>
<property name="interceptorNames">
<list>
<value>myInterceptor</value>
</list>
</property>
</bean>As with ProxyFactoryBean, there is an interceptorNames property rather than a list
of interceptors, to allow correct behavior for prototype advisors. Named "interceptors"
can be advisors or any advice type.
As with auto proxying in general, the main point of using BeanNameAutoProxyCreator is
to apply the same configuration consistently to multiple objects, with minimal volume of
configuration. It is a popular choice for applying declarative transactions to multiple
objects.
Bean definitions whose names match, such as "jdkMyBean" and "onlyJdk" in the above
example, are plain old bean definitions with the target class. An AOP proxy will be
created automatically by the BeanNameAutoProxyCreator. The same advice will be applied
to all matching beans. Note that if advisors are used (rather than the interceptor in
the above example), the pointcuts may apply differently to different beans.
DefaultAdvisorAutoProxyCreator
A more general and extremely powerful auto proxy creator is
DefaultAdvisorAutoProxyCreator. This will automagically apply eligible advisors in the
current context, without the need to include specific bean names in the auto-proxy
advisor’s bean definition. It offers the same merit of consistent configuration and
avoidance of duplication as BeanNameAutoProxyCreator.
Using this mechanism involves:
-
Specifying a
DefaultAdvisorAutoProxyCreatorbean definition. -
Specifying any number of Advisors in the same or related contexts. Note that these must be Advisors, not just interceptors or other advices. This is necessary because there must be a pointcut to evaluate, to check the eligibility of each advice to candidate bean definitions.
The DefaultAdvisorAutoProxyCreator will automatically evaluate the pointcut contained
in each advisor, to see what (if any) advice it should apply to each business object
(such as "businessObject1" and "businessObject2" in the example).
This means that any number of advisors can be applied automatically to each business object. If no pointcut in any of the advisors matches any method in a business object, the object will not be proxied. As bean definitions are added for new business objects, they will automatically be proxied if necessary.
Autoproxying in general has the advantage of making it impossible for callers or dependencies to obtain an un-advised object. Calling getBean("businessObject1") on this ApplicationContext will return an AOP proxy, not the target business object. (The "inner bean" idiom shown earlier also offers this benefit.)
<bean class="org.springframework.aop.framework.autoproxy.DefaultAdvisorAutoProxyCreator"/>
<bean class="org.springframework.transaction.interceptor.TransactionAttributeSourceAdvisor">
<property name="transactionInterceptor" ref="transactionInterceptor"/>
</bean>
<bean id="customAdvisor" class="com.mycompany.MyAdvisor"/>
<bean id="businessObject1" class="com.mycompany.BusinessObject1">
<!-- Properties omitted -->
</bean>
<bean id="businessObject2" class="com.mycompany.BusinessObject2"/>The DefaultAdvisorAutoProxyCreator is very useful if you want to apply the same advice
consistently to many business objects. Once the infrastructure definitions are in place,
you can simply add new business objects without including specific proxy configuration.
You can also drop in additional aspects very easily - for example, tracing or
performance monitoring aspects - with minimal change to configuration.
The DefaultAdvisorAutoProxyCreator offers support for filtering (using a naming
convention so that only certain advisors are evaluated, allowing use of multiple,
differently configured, AdvisorAutoProxyCreators in the same factory) and ordering.
Advisors can implement the org.springframework.core.Ordered interface to ensure
correct ordering if this is an issue. The TransactionAttributeSourceAdvisor used in the
above example has a configurable order value; the default setting is unordered.
6.10. Using TargetSources
Spring offers the concept of a TargetSource, expressed in the
org.springframework.aop.TargetSource interface. This interface is responsible for
returning the "target object" implementing the join point. The TargetSource
implementation is asked for a target instance each time the AOP proxy handles a method
invocation.
Developers using Spring AOP don’t normally need to work directly with TargetSources, but this provides a powerful means of supporting pooling, hot swappable and other sophisticated targets. For example, a pooling TargetSource can return a different target instance for each invocation, using a pool to manage instances.
If you do not specify a TargetSource, a default implementation is used that wraps a local object. The same target is returned for each invocation (as you would expect).
Let’s look at the standard target sources provided with Spring, and how you can use them.
|
When using a custom target source, your target will usually need to be a prototype rather than a singleton bean definition. This allows Spring to create a new target instance when required. |
6.10.1. Hot swappable target sources
The org.springframework.aop.target.HotSwappableTargetSource exists to allow the target
of an AOP proxy to be switched while allowing callers to keep their references to it.
Changing the target source’s target takes effect immediately. The
HotSwappableTargetSource is threadsafe.
You can change the target via the swap() method on HotSwappableTargetSource as follows:
HotSwappableTargetSource swapper = (HotSwappableTargetSource) beanFactory.getBean("swapper");
Object oldTarget = swapper.swap(newTarget);The XML definitions required look as follows:
<bean id="initialTarget" class="mycompany.OldTarget"/>
<bean id="swapper" class="org.springframework.aop.target.HotSwappableTargetSource">
<constructor-arg ref="initialTarget"/>
</bean>
<bean id="swappable" class="org.springframework.aop.framework.ProxyFactoryBean">
<property name="targetSource" ref="swapper"/>
</bean>The above swap() call changes the target of the swappable bean. Clients who hold a
reference to that bean will be unaware of the change, but will immediately start hitting
the new target.
Although this example doesn’t add any advice - and it’s not necessary to add advice to
use a TargetSource - of course any TargetSource can be used in conjunction with
arbitrary advice.
6.10.2. Pooling target sources
Using a pooling target source provides a similar programming model to stateless session EJBs, in which a pool of identical instances is maintained, with method invocations going to free objects in the pool.
A crucial difference between Spring pooling and SLSB pooling is that Spring pooling can be applied to any POJO. As with Spring in general, this service can be applied in a non-invasive way.
Spring provides out-of-the-box support for Commons Pool 2.2, which provides a
fairly efficient pooling implementation. You’ll need the commons-pool Jar on your
application’s classpath to use this feature. It’s also possible to subclass
org.springframework.aop.target.AbstractPoolingTargetSource to support any other
pooling API.
|
Commons Pool 1.5+ is also supported but deprecated as of Spring Framework 4.2. |
Sample configuration is shown below:
<bean id="businessObjectTarget" class="com.mycompany.MyBusinessObject"
scope="prototype">
... properties omitted
</bean>
<bean id="poolTargetSource" class="org.springframework.aop.target.CommonsPool2TargetSource">
<property name="targetBeanName" value="businessObjectTarget"/>
<property name="maxSize" value="25"/>
</bean>
<bean id="businessObject" class="org.springframework.aop.framework.ProxyFactoryBean">
<property name="targetSource" ref="poolTargetSource"/>
<property name="interceptorNames" value="myInterceptor"/>
</bean>Note that the target object - "businessObjectTarget" in the example - must be a
prototype. This allows the PoolingTargetSource implementation to create new instances
of the target to grow the pool as necessary. See the javadocs of
AbstractPoolingTargetSource and the concrete subclass you wish to use for information
about its properties: "maxSize" is the most basic, and always guaranteed to be present.
In this case, "myInterceptor" is the name of an interceptor that would need to be defined in the same IoC context. However, it isn’t necessary to specify interceptors to use pooling. If you want only pooling, and no other advice, don’t set the interceptorNames property at all.
It’s possible to configure Spring so as to be able to cast any pooled object to the
org.springframework.aop.target.PoolingConfig interface, which exposes information
about the configuration and current size of the pool through an introduction. You’ll
need to define an advisor like this:
<bean id="poolConfigAdvisor" class="org.springframework.beans.factory.config.MethodInvokingFactoryBean">
<property name="targetObject" ref="poolTargetSource"/>
<property name="targetMethod" value="getPoolingConfigMixin"/>
</bean>This advisor is obtained by calling a convenience method on the
AbstractPoolingTargetSource class, hence the use of MethodInvokingFactoryBean. This
advisor’s name ("poolConfigAdvisor" here) must be in the list of interceptors names in
the ProxyFactoryBean exposing the pooled object.
The cast will look as follows:
PoolingConfig conf = (PoolingConfig) beanFactory.getBean("businessObject");
System.out.println("Max pool size is " + conf.getMaxSize());|
Pooling stateless service objects is not usually necessary. We don’t believe it should be the default choice, as most stateless objects are naturally thread safe, and instance pooling is problematic if resources are cached. |
Simpler pooling is available using auto-proxying. It’s possible to set the TargetSources used by any auto-proxy creator.
6.10.3. Prototype target sources
Setting up a "prototype" target source is similar to a pooling TargetSource. In this case, a new instance of the target will be created on every method invocation. Although the cost of creating a new object isn’t high in a modern JVM, the cost of wiring up the new object (satisfying its IoC dependencies) may be more expensive. Thus you shouldn’t use this approach without very good reason.
To do this, you could modify the poolTargetSource definition shown above as follows.
(I’ve also changed the name, for clarity.)
<bean id="prototypeTargetSource" class="org.springframework.aop.target.PrototypeTargetSource">
<property name="targetBeanName" ref="businessObjectTarget"/>
</bean>There’s only one property: the name of the target bean. Inheritance is used in the TargetSource implementations to ensure consistent naming. As with the pooling target source, the target bean must be a prototype bean definition.
6.10.4. ThreadLocal target sources
ThreadLocal target sources are useful if you need an object to be created for each
incoming request (per thread that is). The concept of a ThreadLocal provide a JDK-wide
facility to transparently store resource alongside a thread. Setting up a
ThreadLocalTargetSource is pretty much the same as was explained for the other types
of target source:
<bean id="threadlocalTargetSource" class="org.springframework.aop.target.ThreadLocalTargetSource">
<property name="targetBeanName" value="businessObjectTarget"/>
</bean>|
ThreadLocals come with serious issues (potentially resulting in memory leaks) when
incorrectly using them in a multi-threaded and multi-classloader environments. One
should always consider wrapping a threadlocal in some other class and never directly use
the |
6.11. Defining new Advice types
Spring AOP is designed to be extensible. While the interception implementation strategy is presently used internally, it is possible to support arbitrary advice types in addition to the out-of-the-box interception around advice, before, throws advice and after returning advice.
The org.springframework.aop.framework.adapter package is an SPI package allowing
support for new custom advice types to be added without changing the core framework.
The only constraint on a custom Advice type is that it must implement the
org.aopalliance.aop.Advice marker interface.
Please refer to the org.springframework.aop.framework.adapter javadocs for further
information.
7. Null-safety
Although Java does not allow to express null-safety with its type system, Spring Framework
now provides following annotations in the org.springframework.lang package to declare
nullability of APIs and fields:
-
@NonNullannotation where specific parameter, return value or field cannot benull(not needed on parameter and return value where@NonNullApiand@NonNullFieldsapply) . -
@Nullableannotation where specific parameter, return value or field can benull. -
@NonNullApiannotation at package level declares non-null as the default behavior for parameters and return values. -
@NonNullFieldsannotation at package level declares non-null as the default behavior for fields.
Spring Framework leverages itself these annotations, but they can also be used in any Spring based Java project to declare null-safe APIs and optionally null-safe fields. Generic type arguments, varargs and array elements nullability are not supported yet, but should be in an upcoming release, see SPR-15942 for up-to-date information. Nullability declaration are expected to be fine-tuned between Spring Framework release, including minor ones. Nullability of types used inside method bodies is outside of the scope of this feature.
|
Libraries like Reactor or Spring Data provide null-safe APIs leveraging this feature. |
7.1. Use cases
In addition to providing an explicit declaration for Spring Framework API nullability,
these annotation can be used by IDE (such as IDEA or Eclipse) to provide useful
warnings to Java developers related to null-safety in order to avoid NullPointerException
at runtime.
They are also used to make Spring API null-safe in Kotlin projects since Kotlin natively supports null-safety. More details are available in Kotlin support documentation.
7.2. JSR 305 meta-annotations
Spring annotations are meta-annotated with JSR 305 annotations (a dormant but widely spread JSR). JSR 305 meta-annotations allows tooling vendors like IDEA or Kotlin to provide null-safety support in a generic way, without having to hard-code support for Spring annotations.
It is not necessary nor recommended to add JSR 305 dependency in project classpath to
take advantage of Spring null-safe API. Only projects like
Spring-based libraries using null-safety annotations in their codebase should add
com.google.code.findbugs:jsr305:3.0.2 with compileOnly Gradle configuration or Maven
provided scope to avoid compile warnings.
8. Data Buffers and Codecs
8.1. Introduction
The DataBuffer interface defines an abstraction over byte buffers.
The main reason for introducing it, and not use the standard java.nio.ByteBuffer instead, is Netty.
Netty does not use ByteBuffer, but instead offers ByteBuf as an alternative.
Spring’s DataBuffer is a simple abstraction over ByteBuf that can also be used on non-Netty
platforms (i.e. Servlet 3.1+).
8.2. DataBufferFactory
The DataBufferFactory offers functionality to allocate new data buffers, as well as to wrap
existing data.
The allocate methods allocate a new data buffer, with a default or given capacity.
Though DataBuffer implementation grow and shrink on demand, it is more efficient to give the
capacity upfront, if known.
The wrap methods decorate an existing ByteBuffer or byte array.
Wrapping does not involve allocation: it simply decorates the given data with a DataBuffer
implementation.
There are two implementation of DataBufferFactory: the NettyDataBufferFactory which is meant
to be used on Netty platforms, such as Reactor Netty.
The other implementation, the DefaultDataBufferFactory, is used on other platforms, such as
Servlet 3.1+ servers.
8.3. The DataBuffer interface
The DataBuffer interface is similar to ByteBuffer, but offers a number of advantages.
Similar to Netty’s ByteBuf, the DataBuffer abstraction offers independent read and write
positions.
This is different from the JDK’s ByteBuffer, which only exposes one position for both reading and
writing, and a separate flip() operation to switch between the two I/O operations.
In general, the following invariant holds for the read position, write position, and the capacity:
`0` <= _read position_ <= _write position_ <= _capacity_
When reading bytes from the DataBuffer, the read position is automatically updated in accordance with
the amount of data read from the buffer.
Similarly, when writing bytes to the DataBuffer, the write position is updated with the amount of
data written to the buffer.
Also, when writing data, the capacity of a DataBuffer is automatically expanded, just like StringBuilder,
ArrayList, and similar types.
Besides the reading and writing functionality mentioned above, the DataBuffer also has methods to
view a (slice of a) buffer as ByteBuffer, InputStream, or OutputStream.
Additionally, it offers methods to determine the index of a given byte.
There are two implementation of DataBuffer: the NettyDataBuffer which is meant to be used on
Netty platforms, such as Reactor Netty.
The other implementation, the DefaultDataBuffer, is used on other platforms, such as Servlet 3.1+
servers.
8.3.1. PooledDataBuffer
The PooledDataBuffer is an extension to DataBuffer that adds methods for reference counting.
The retain method increases the reference count by one.
The release method decreases the count by one, and releases the buffer’s memory when the count
reaches 0.
Both of these methods are related to reference counting, a mechanism that is explained below.
Note that DataBufferUtils offers useful utility methods for releasing and retaining pooled data
buffers.
These methods take a plain DataBuffer as parameter, but only call retain or release if the
passed data buffer is an instance of PooledDataBuffer.
Reference Counting
Reference counting is not a common technique in Java; it is much more common in other programming
languages such as Object C and C++.
In and of itself, reference counting is not complex: it basically involves tracking the number of
references that apply to an object.
The reference count of a PooledDataBuffer starts at 1, is incremented by calling retain,
and decremented by calling release.
As long as the buffer’s reference count is larger than 0 the buffer will not be released.
When the number decreases to 0, the instance will be released.
In practice, this means that the reserved memory captured by the buffer will be returned back to
the memory pool, ready to be used for future allocations.
In general, the last component to access a DataBuffer is responsible for releasing it.
Withing Spring, there are two sorts of components that release buffers: decoders and transports.
Decoders are responsible for transforming a stream of buffers into other types (see Codecs below),
and transports are responsible for sending buffers across a network boundary, typically as an HTTP message.
This means that if you allocate data buffers for the purpose of putting them into an outbound HTTP
message (i.e. client-side request or server-side response), they do not have to be released.
The other consequence of this rule is that if you allocate data buffers that do not end up in the
body, for instance because of a thrown exception, you will have to release them yourself.
The following snippet shows a typical DataBuffer usage scenario when dealing with methods that
throw exceptions:
DataBufferFactory factory = ...
DataBuffer buffer = factory.allocateBuffer(); (1)
boolean release = true; (2)
try {
writeDataToBuffer(buffer); (3)
putBufferInHttpBody(buffer);
release = false; (4)
}
finally {
if (release) {
DataBufferUtils.release(buffer); (5)
}
}
private void writeDataToBuffer(DataBuffer buffer) throws IOException { (3)
...
}| 1 | A new buffer is allocated. |
| 2 | A boolean flag indicates whether the allocated buffer should be released. |
| 3 | This example method loads data into the buffer. Note that the method can throw an IOException,
and therefore a finally block to release the buffer is required. |
| 4 | If no exception occurred, we switch the release flag to false as the buffer will now be
released as part of sending the HTTP body across the wire. |
| 5 | If an exception did occur, the flag is still set to true, and the buffer will be released
here. |
8.3.2. DataBufferUtils
DataBufferUtils contains various utility methods that operate on data buffers.
It contains methods for reading a Flux of DataBuffer objects from an InputStream or NIO
Channel, and methods for writing a data buffer Flux to an OutputStream or Channel.
DataBufferUtils also exposes retain and release methods that operate on plain DataBuffer
instances (so that casting to a PooledDataBuffer is not required).
Additionally, DataBufferUtils exposes compose, which merges a stream of data buffers into one.
For instance, this method can be used to convert the entire HTTP body into a single buffer (and
from that, a String, or InputStream).
This is particularly useful when dealing with older, blocking APIs.
Note, however, that this puts the entire body in memory, and therefore uses more memory than a pure
streaming solution would.
Codecs
The org.springframework.core.codec package contains the two main abstractions for converting a
stream of bytes into a stream of objects, or vice-versa.
The Encoder is a strategy interface that encodes a stream of objects into an output stream of
data buffers.
The Decoder does the reverse: it turns a stream of data buffers into a stream of objects.
Note that a decoder instance needs to consider reference counting.
Spring comes with a wide array of default codecs, capable of converting from/to String,
ByteBuffer, byte arrays, and also codecs that support marshalling libraries such as JAXB and
Jackson (with Jackson 2.9+ support for non-blocking parsing).
Withing the context of Spring WebFlux, codecs are used to convert the request body into a
@RequestMapping parameter, or to convert the return type into the response body that is sent back
to the client.
The default codecs are configured in the WebFluxConfigurationSupport class, and can easily be
changed by overriding the configureHttpMessageCodecs when inheriting from that class.
For more information about using codecs in WebFlux, see this section.
9. Appendix
9.1. XML Schemas
This part of the appendix lists XML schemas related to the core container.
9.1.1. The util schema
As the name implies, the util tags deal with common, utility configuration
issues, such as configuring collections, referencing constants, and suchlike.
To use the tags in the util schema, you need to have the following preamble at the top
of your Spring XML configuration file; the text in the snippet below references the
correct schema so that the tags in the util namespace are available to you.
<?xml version="1.0" encoding="UTF-8"?>
<beans xmlns="http://www.springframework.org/schema/beans"
xmlns:xsi="http://www.w3.org/2001/XMLSchema-instance"
xmlns:util="http://www.springframework.org/schema/util" xsi:schemaLocation="
http://www.springframework.org/schema/beans http://www.springframework.org/schema/beans/spring-beans.xsd
http://www.springframework.org/schema/util http://www.springframework.org/schema/util/spring-util.xsd"> <!-- bean definitions here -->
</beans><util:constant/>
Before…
<bean id="..." class="...">
<property name="isolation">
<bean id="java.sql.Connection.TRANSACTION_SERIALIZABLE"
class="org.springframework.beans.factory.config.FieldRetrievingFactoryBean" />
</property>
</bean>The above configuration uses a Spring FactoryBean implementation, the
FieldRetrievingFactoryBean, to set the value of the isolation property on a bean
to the value of the java.sql.Connection.TRANSACTION_SERIALIZABLE constant. This is
all well and good, but it is a tad verbose and (unnecessarily) exposes Spring’s internal
plumbing to the end user.
The following XML Schema-based version is more concise and clearly expresses the developer’s intent ('inject this constant value'), and it just reads better.
<bean id="..." class="...">
<property name="isolation">
<util:constant static-field="java.sql.Connection.TRANSACTION_SERIALIZABLE"/>
</property>
</bean>Setting a bean property or constructor arg from a field value
FieldRetrievingFactoryBean
is a FactoryBean which retrieves a static or non-static field value. It is typically
used for retrieving public static final constants, which may then be used to set a
property value or constructor arg for another bean.
Find below an example which shows how a static field is exposed, by using the
staticField
property:
<bean id="myField"
class="org.springframework.beans.factory.config.FieldRetrievingFactoryBean">
<property name="staticField" value="java.sql.Connection.TRANSACTION_SERIALIZABLE"/>
</bean>There is also a convenience usage form where the static field is specified as the bean
name:
<bean id="java.sql.Connection.TRANSACTION_SERIALIZABLE"
class="org.springframework.beans.factory.config.FieldRetrievingFactoryBean"/>This does mean that there is no longer any choice in what the bean id is (so any other bean that refers to it will also have to use this longer name), but this form is very concise to define, and very convenient to use as an inner bean since the id doesn’t have to be specified for the bean reference:
<bean id="..." class="...">
<property name="isolation">
<bean id="java.sql.Connection.TRANSACTION_SERIALIZABLE"
class="org.springframework.beans.factory.config.FieldRetrievingFactoryBean" />
</property>
</bean>It is also possible to access a non-static (instance) field of another bean, as
described in the API documentation for the
FieldRetrievingFactoryBean
class.
Injecting enum values into beans as either property or constructor arguments is very
easy to do in Spring, in that you don’t actually have to do anything or know
anything about the Spring internals (or even about classes such as the
FieldRetrievingFactoryBean). Let’s look at an example to see how easy injecting an
enum value is; consider this enum:
package javax.persistence;
public enum PersistenceContextType {
TRANSACTION,
EXTENDED
}Now consider a setter of type PersistenceContextType:
package example;
public class Client {
private PersistenceContextType persistenceContextType;
public void setPersistenceContextType(PersistenceContextType type) {
this.persistenceContextType = type;
}
}-
and the corresponding bean definition:
<bean class="example.Client">
<property name="persistenceContextType" value="TRANSACTION"/>
</bean><util:property-path/>
Before…
<!-- target bean to be referenced by name -->
<bean id="testBean" class="org.springframework.beans.TestBean" scope="prototype">
<property name="age" value="10"/>
<property name="spouse">
<bean class="org.springframework.beans.TestBean">
<property name="age" value="11"/>
</bean>
</property>
</bean>
<!-- will result in 10, which is the value of property 'age' of bean 'testBean' -->
<bean id="testBean.age" class="org.springframework.beans.factory.config.PropertyPathFactoryBean"/>The above configuration uses a Spring FactoryBean implementation, the
PropertyPathFactoryBean, to create a bean (of type int) called testBean.age that
has a value equal to the age property of the testBean bean.
After…
<!-- target bean to be referenced by name -->
<bean id="testBean" class="org.springframework.beans.TestBean" scope="prototype">
<property name="age" value="10"/>
<property name="spouse">
<bean class="org.springframework.beans.TestBean">
<property name="age" value="11"/>
</bean>
</property>
</bean>
<!-- will result in 10, which is the value of property 'age' of bean 'testBean' -->
<util:property-path id="name" path="testBean.age"/>The value of the path attribute of the <property-path/> tag follows the form
beanName.beanProperty.
Using <util:property-path/> to set a bean property or constructor-argument
PropertyPathFactoryBean is a FactoryBean that evaluates a property path on a given
target object. The target object can be specified directly or via a bean name. This
value may then be used in another bean definition as a property value or constructor
argument.
Here’s an example where a path is used against another bean, by name:
// target bean to be referenced by name
<bean id="person" class="org.springframework.beans.TestBean" scope="prototype">
<property name="age" value="10"/>
<property name="spouse">
<bean class="org.springframework.beans.TestBean">
<property name="age" value="11"/>
</bean>
</property>
</bean>
// will result in 11, which is the value of property 'spouse.age' of bean 'person'
<bean id="theAge"
class="org.springframework.beans.factory.config.PropertyPathFactoryBean">
<property name="targetBeanName" value="person"/>
<property name="propertyPath" value="spouse.age"/>
</bean>In this example, a path is evaluated against an inner bean:
<!-- will result in 12, which is the value of property 'age' of the inner bean -->
<bean id="theAge"
class="org.springframework.beans.factory.config.PropertyPathFactoryBean">
<property name="targetObject">
<bean class="org.springframework.beans.TestBean">
<property name="age" value="12"/>
</bean>
</property>
<property name="propertyPath" value="age"/>
</bean>There is also a shortcut form, where the bean name is the property path.
<!-- will result in 10, which is the value of property 'age' of bean 'person' -->
<bean id="person.age"
class="org.springframework.beans.factory.config.PropertyPathFactoryBean"/>This form does mean that there is no choice in the name of the bean. Any reference to it will also have to use the same id, which is the path. Of course, if used as an inner bean, there is no need to refer to it at all:
<bean id="..." class="...">
<property name="age">
<bean id="person.age"
class="org.springframework.beans.factory.config.PropertyPathFactoryBean"/>
</property>
</bean>The result type may be specifically set in the actual definition. This is not necessary for most use cases, but can be of use for some. Please see the Javadocs for more info on this feature.
<util:properties/>
Before…
<!-- creates a java.util.Properties instance with values loaded from the supplied location -->
<bean id="jdbcConfiguration" class="org.springframework.beans.factory.config.PropertiesFactoryBean">
<property name="location" value="classpath:com/foo/jdbc-production.properties"/>
</bean>The above configuration uses a Spring FactoryBean implementation, the
PropertiesFactoryBean, to instantiate a java.util.Properties instance with values
loaded from the supplied Resource location).
After…
<!-- creates a java.util.Properties instance with values loaded from the supplied location -->
<util:properties id="jdbcConfiguration" location="classpath:com/foo/jdbc-production.properties"/><util:list/>
Before…
<!-- creates a java.util.List instance with values loaded from the supplied 'sourceList' -->
<bean id="emails" class="org.springframework.beans.factory.config.ListFactoryBean">
<property name="sourceList">
<list>
<value>[email protected]</value>
<value>[email protected]</value>
<value>[email protected]</value>
<value>[email protected]</value>
</list>
</property>
</bean>The above configuration uses a Spring FactoryBean implementation, the
ListFactoryBean, to create a java.util.List instance initialized with values taken
from the supplied sourceList.
After…
<!-- creates a java.util.List instance with the supplied values -->
<util:list id="emails">
<value>[email protected]</value>
<value>[email protected]</value>
<value>[email protected]</value>
<value>[email protected]</value>
</util:list>You can also explicitly control the exact type of List that will be instantiated and
populated via the use of the list-class attribute on the <util:list/> element. For
example, if we really need a java.util.LinkedList to be instantiated, we could use the
following configuration:
<util:list id="emails" list-class="java.util.LinkedList">
<value>[email protected]</value>
<value>[email protected]</value>
<value>[email protected]</value>
<value>d'[email protected]</value>
</util:list>If no list-class attribute is supplied, a List implementation will be chosen by
the container.
<util:map/>
Before…
<!-- creates a java.util.Map instance with values loaded from the supplied 'sourceMap' -->
<bean id="emails" class="org.springframework.beans.factory.config.MapFactoryBean">
<property name="sourceMap">
<map>
<entry key="pechorin" value="[email protected]"/>
<entry key="raskolnikov" value="[email protected]"/>
<entry key="stavrogin" value="[email protected]"/>
<entry key="porfiry" value="[email protected]"/>
</map>
</property>
</bean>The above configuration uses a Spring FactoryBean implementation, the
MapFactoryBean, to create a java.util.Map instance initialized with key-value pairs
taken from the supplied 'sourceMap'.
After…
<!-- creates a java.util.Map instance with the supplied key-value pairs -->
<util:map id="emails">
<entry key="pechorin" value="[email protected]"/>
<entry key="raskolnikov" value="[email protected]"/>
<entry key="stavrogin" value="[email protected]"/>
<entry key="porfiry" value="[email protected]"/>
</util:map>You can also explicitly control the exact type of Map that will be instantiated and
populated via the use of the 'map-class' attribute on the <util:map/> element. For
example, if we really need a java.util.TreeMap to be instantiated, we could use the
following configuration:
<util:map id="emails" map-class="java.util.TreeMap">
<entry key="pechorin" value="[email protected]"/>
<entry key="raskolnikov" value="[email protected]"/>
<entry key="stavrogin" value="[email protected]"/>
<entry key="porfiry" value="[email protected]"/>
</util:map>If no 'map-class' attribute is supplied, a Map implementation will be chosen by the
container.
<util:set/>
Before…
<!-- creates a java.util.Set instance with values loaded from the supplied 'sourceSet' -->
<bean id="emails" class="org.springframework.beans.factory.config.SetFactoryBean">
<property name="sourceSet">
<set>
<value>[email protected]</value>
<value>[email protected]</value>
<value>[email protected]</value>
<value>[email protected]</value>
</set>
</property>
</bean>The above configuration uses a Spring FactoryBean implementation, the
SetFactoryBean, to create a java.util.Set instance initialized with values taken
from the supplied 'sourceSet'.
After…
<!-- creates a java.util.Set instance with the supplied values -->
<util:set id="emails">
<value>[email protected]</value>
<value>[email protected]</value>
<value>[email protected]</value>
<value>[email protected]</value>
</util:set>You can also explicitly control the exact type of Set that will be instantiated and
populated via the use of the 'set-class' attribute on the <util:set/> element. For
example, if we really need a java.util.TreeSet to be instantiated, we could use the
following configuration:
<util:set id="emails" set-class="java.util.TreeSet">
<value>[email protected]</value>
<value>[email protected]</value>
<value>[email protected]</value>
<value>[email protected]</value>
</util:set>If no 'set-class' attribute is supplied, a Set implementation will be chosen by the
container.
9.1.2. The aop schema
The aop tags deal with configuring all things AOP in Spring: this includes Spring’s
own proxy-based AOP framework and Spring’s integration with the AspectJ AOP framework.
These tags are comprehensively covered in the chapter entitled Aspect Oriented Programming with Spring.
In the interest of completeness, to use the tags in the aop schema, you need to have
the following preamble at the top of your Spring XML configuration file; the text in the
following snippet references the correct schema so that the tags in the aop namespace
are available to you.
<?xml version="1.0" encoding="UTF-8"?>
<beans xmlns="http://www.springframework.org/schema/beans"
xmlns:xsi="http://www.w3.org/2001/XMLSchema-instance"
xmlns:aop="http://www.springframework.org/schema/aop" xsi:schemaLocation="
http://www.springframework.org/schema/beans http://www.springframework.org/schema/beans/spring-beans.xsd
http://www.springframework.org/schema/aop http://www.springframework.org/schema/aop/spring-aop.xsd"> <!-- bean definitions here -->
</beans>9.1.3. The context schema
The context tags deal with ApplicationContext configuration that relates to plumbing
- that is, not usually beans that are important to an end-user but rather beans that do
a lot of grunt work in Spring, such as BeanfactoryPostProcessors. The following
snippet references the correct schema so that the tags in the context namespace are
available to you.
<?xml version="1.0" encoding="UTF-8"?>
<beans xmlns="http://www.springframework.org/schema/beans"
xmlns:xsi="http://www.w3.org/2001/XMLSchema-instance"
xmlns:context="http://www.springframework.org/schema/context" xsi:schemaLocation="
http://www.springframework.org/schema/beans http://www.springframework.org/schema/beans/spring-beans.xsd
http://www.springframework.org/schema/context http://www.springframework.org/schema/context/spring-context.xsd"> <!-- bean definitions here -->
</beans><property-placeholder/>
This element activates the replacement of ${…} placeholders, resolved against the
specified properties file (as a Spring resource location). This element is
a convenience mechanism that sets up aPropertyPlaceholderConfigurer for you; if you need more control over the
PropertyPlaceholderConfigurer, just define one yourself explicitly.
<annotation-config/>
Activates the Spring infrastructure for various annotations to be detected in bean
classes: Spring’s @Required and
@Autowired, as well as JSR 250’s @PostConstruct,
@PreDestroy and @Resource (if available), and JPA’s @PersistenceContext and
@PersistenceUnit (if available). Alternatively, you can choose to activate the
individual BeanPostProcessors for those annotations explicitly.
|
This element does not activate processing of Spring’s
|
<component-scan/>
This element is detailed in Annotation-based container configuration.
<load-time-weaver/>
This element is detailed in Load-time weaving with AspectJ in the Spring Framework.
<spring-configured/>
This element is detailed in Using AspectJ to dependency inject domain objects with Spring.
<mbean-export/>
This element is detailed in Configuring annotation based MBean export.
9.1.4. The beans schema
Last but not least we have the tags in the beans schema. These are the same tags that
have been in Spring since the very dawn of the framework. Examples of the various tags
in the beans schema are not shown here because they are quite comprehensively covered
in Dependencies and configuration in detail
(and indeed in that entire chapter).
Note that it is possible to add zero or more key / value pairs to <bean/> XML definitions.
What, if anything, is done with this extra metadata is totally up to your own custom
logic (and so is typically only of use if you are writing your own custom tags as described
in the appendix entitled XML Schema Authoring).
Find below an example of the <meta/> tag in the context of a surrounding <bean/>
(please note that without any logic to interpret it the metadata is effectively useless
as-is).
<?xml version="1.0" encoding="UTF-8"?>
<beans xmlns="http://www.springframework.org/schema/beans"
xmlns:xsi="http://www.w3.org/2001/XMLSchema-instance"
xsi:schemaLocation="
http://www.springframework.org/schema/beans http://www.springframework.org/schema/beans/spring-beans.xsd">
<bean id="foo" class="x.y.Foo">
<meta key="cacheName" value="foo"/>
<property name="name" value="Rick"/>
</bean>
</beans>In the case of the above example, you would assume that there is some logic that will consume the bean definition and set up some caching infrastructure using the supplied metadata.
9.2. XML Schema Authoring
9.2.1. Introduction
Since version 2.0, Spring has featured a mechanism for schema-based extensions to the basic Spring XML format for defining and configuring beans. This section is devoted to detailing how you would go about writing your own custom XML bean definition parsers and integrating such parsers into the Spring IoC container.
To facilitate the authoring of configuration files using a schema-aware XML editor, Spring’s extensible XML configuration mechanism is based on XML Schema. If you are not familiar with Spring’s current XML configuration extensions that come with the standard Spring distribution, please first read the appendix entitled[xsd-config].
Creating new XML configuration extensions can be done by following these (relatively) simple steps:
-
Authoring an XML schema to describe your custom element(s).
-
Coding a custom
NamespaceHandlerimplementation (this is an easy step, don’t worry). -
Coding one or more
BeanDefinitionParserimplementations (this is where the real work is done). -
Registering the above artifacts with Spring (this too is an easy step).
What follows is a description of each of these steps. For the example, we will create an
XML extension (a custom XML element) that allows us to configure objects of the type
SimpleDateFormat (from the java.text package) in an easy manner. When we are done,
we will be able to define bean definitions of type SimpleDateFormat like this:
<myns:dateformat id="dateFormat"
pattern="yyyy-MM-dd HH:mm"
lenient="true"/>(Don’t worry about the fact that this example is very simple; much more detailed examples follow afterwards. The intent in this first simple example is to walk you through the basic steps involved.)
9.2.2. Authoring the schema
Creating an XML configuration extension for use with Spring’s IoC container starts with
authoring an XML Schema to describe the extension. What follows is the schema we’ll use
to configure SimpleDateFormat objects.
<!-- myns.xsd (inside package org/springframework/samples/xml) -->
<?xml version="1.0" encoding="UTF-8"?>
<xsd:schema xmlns="http://www.mycompany.com/schema/myns"
xmlns:xsd="http://www.w3.org/2001/XMLSchema"
xmlns:beans="http://www.springframework.org/schema/beans"
targetNamespace="http://www.mycompany.com/schema/myns"
elementFormDefault="qualified"
attributeFormDefault="unqualified">
<xsd:import namespace="http://www.springframework.org/schema/beans"/>
<xsd:element name="dateformat">
<xsd:complexType>
<xsd:complexContent>
<xsd:extension base="beans:identifiedType">
<xsd:attribute name="lenient" type="xsd:boolean"/>
<xsd:attribute name="pattern" type="xsd:string" use="required"/>
</xsd:extension>
</xsd:complexContent>
</xsd:complexType>
</xsd:element>
</xsd:schema>(The emphasized line contains an extension base for all tags that will be identifiable
(meaning they have an id attribute that will be used as the bean identifier in the
container). We are able to use this attribute because we imported the Spring-provided
'beans' namespace.)
The above schema will be used to configure SimpleDateFormat objects, directly in an
XML application context file using the <myns:dateformat/> element.
<myns:dateformat id="dateFormat"
pattern="yyyy-MM-dd HH:mm"
lenient="true"/>Note that after we’ve created the infrastructure classes, the above snippet of XML will
essentially be exactly the same as the following XML snippet. In other words, we’re just
creating a bean in the container, identified by the name 'dateFormat' of type
SimpleDateFormat, with a couple of properties set.
<bean id="dateFormat" class="java.text.SimpleDateFormat">
<constructor-arg value="yyyy-HH-dd HH:mm"/>
<property name="lenient" value="true"/>
</bean>|
The schema-based approach to creating configuration format allows for tight integration with an IDE that has a schema-aware XML editor. Using a properly authored schema, you can use autocompletion to have a user choose between several configuration options defined in the enumeration. |
9.2.3. Coding a NamespaceHandler
In addition to the schema, we need a NamespaceHandler that will parse all elements of
this specific namespace Spring encounters while parsing configuration files. The
NamespaceHandler should in our case take care of the parsing of the myns:dateformat
element.
The NamespaceHandler interface is pretty simple in that it features just three methods:
-
init()- allows for initialization of theNamespaceHandlerand will be called by Spring before the handler is used -
BeanDefinition parse(Element, ParserContext)- called when Spring encounters a top-level element (not nested inside a bean definition or a different namespace). This method can register bean definitions itself and/or return a bean definition. -
BeanDefinitionHolder decorate(Node, BeanDefinitionHolder, ParserContext)- called when Spring encounters an attribute or nested element of a different namespace. The decoration of one or more bean definitions is used for example with the out-of-the-box scopes Spring supports. We’ll start by highlighting a simple example, without using decoration, after which we will show decoration in a somewhat more advanced example.
Although it is perfectly possible to code your own NamespaceHandler for the entire
namespace (and hence provide code that parses each and every element in the namespace),
it is often the case that each top-level XML element in a Spring XML configuration file
results in a single bean definition (as in our case, where a single <myns:dateformat/>
element results in a single SimpleDateFormat bean definition). Spring features a
number of convenience classes that support this scenario. In this example, we’ll make
use the NamespaceHandlerSupport class:
package org.springframework.samples.xml;
import org.springframework.beans.factory.xml.NamespaceHandlerSupport;
public class MyNamespaceHandler extends NamespaceHandlerSupport {
public void init() {
registerBeanDefinitionParser("dateformat", new SimpleDateFormatBeanDefinitionParser());
}
}The observant reader will notice that there isn’t actually a whole lot of parsing logic
in this class. Indeed… the NamespaceHandlerSupport class has a built in notion of
delegation. It supports the registration of any number of BeanDefinitionParser
instances, to which it will delegate to when it needs to parse an element in its
namespace. This clean separation of concerns allows a NamespaceHandler to handle the
orchestration of the parsing of all of the custom elements in its namespace, while
delegating to BeanDefinitionParsers to do the grunt work of the XML parsing; this
means that each BeanDefinitionParser will contain just the logic for parsing a single
custom element, as we can see in the next step
9.2.4. BeanDefinitionParser
A BeanDefinitionParser will be used if the NamespaceHandler encounters an XML
element of the type that has been mapped to the specific bean definition parser (which
is 'dateformat' in this case). In other words, the BeanDefinitionParser is
responsible for parsing one distinct top-level XML element defined in the schema. In
the parser, we’ll have access to the XML element (and thus its subelements too) so that
we can parse our custom XML content, as can be seen in the following example:
package org.springframework.samples.xml;
import org.springframework.beans.factory.support.BeanDefinitionBuilder;
import org.springframework.beans.factory.xml.AbstractSingleBeanDefinitionParser;
import org.springframework.util.StringUtils;
import org.w3c.dom.Element;
import java.text.SimpleDateFormat;
public class SimpleDateFormatBeanDefinitionParser extends AbstractSingleBeanDefinitionParser { (1)
protected Class getBeanClass(Element element) {
return SimpleDateFormat.class; (2)
}
protected void doParse(Element element, BeanDefinitionBuilder bean) {
// this will never be null since the schema explicitly requires that a value be supplied
String pattern = element.getAttribute("pattern");
bean.addConstructorArg(pattern);
// this however is an optional property
String lenient = element.getAttribute("lenient");
if (StringUtils.hasText(lenient)) {
bean.addPropertyValue("lenient", Boolean.valueOf(lenient));
}
}
}| 1 | We use the Spring-provided AbstractSingleBeanDefinitionParser to handle a lot of
the basic grunt work of creating a single BeanDefinition. |
| 2 | We supply the AbstractSingleBeanDefinitionParser superclass with the type that our
single BeanDefinition will represent. |
In this simple case, this is all that we need to do. The creation of our single
BeanDefinition is handled by the AbstractSingleBeanDefinitionParser superclass, as
is the extraction and setting of the bean definition’s unique identifier.
9.2.5. Registering the handler and the schema
The coding is finished! All that remains to be done is to somehow make the Spring XML
parsing infrastructure aware of our custom element; we do this by registering our custom
namespaceHandler and custom XSD file in two special purpose properties files. These
properties files are both placed in a 'META-INF' directory in your application, and
can, for example, be distributed alongside your binary classes in a JAR file. The Spring
XML parsing infrastructure will automatically pick up your new extension by consuming
these special properties files, the formats of which are detailed below.
'META-INF/spring.handlers'
The properties file called 'spring.handlers' contains a mapping of XML Schema URIs to
namespace handler classes. So for our example, we need to write the following:
http\://www.mycompany.com/schema/myns=org.springframework.samples.xml.MyNamespaceHandler
(The ':' character is a valid delimiter in the Java properties format, and so the
':' character in the URI needs to be escaped with a backslash.)
The first part (the key) of the key-value pair is the URI associated with your custom
namespace extension, and needs to match exactly the value of the 'targetNamespace'
attribute as specified in your custom XSD schema.
'META-INF/spring.schemas'
The properties file called 'spring.schemas' contains a mapping of XML Schema locations
(referred to along with the schema declaration in XML files that use the schema as part
of the 'xsi:schemaLocation' attribute) to classpath resources. This file is needed
to prevent Spring from absolutely having to use a default EntityResolver that requires
Internet access to retrieve the schema file. If you specify the mapping in this
properties file, Spring will search for the schema on the classpath (in this case
'myns.xsd' in the 'org.springframework.samples.xml' package):
http\://www.mycompany.com/schema/myns/myns.xsd=org/springframework/samples/xml/myns.xsd
The upshot of this is that you are encouraged to deploy your XSD file(s) right alongside
the NamespaceHandler and BeanDefinitionParser classes on the classpath.
9.2.6. Using a custom extension in your Spring XML configuration
Using a custom extension that you yourself have implemented is no different from using
one of the 'custom' extensions that Spring provides straight out of the box. Find below
an example of using the custom <dateformat/> element developed in the previous steps
in a Spring XML configuration file.
<?xml version="1.0" encoding="UTF-8"?>
<beans xmlns="http://www.springframework.org/schema/beans"
xmlns:xsi="http://www.w3.org/2001/XMLSchema-instance"
xmlns:myns="http://www.mycompany.com/schema/myns"
xsi:schemaLocation="
http://www.springframework.org/schema/beans http://www.springframework.org/schema/beans/spring-beans.xsd
http://www.mycompany.com/schema/myns http://www.mycompany.com/schema/myns/myns.xsd">
<!-- as a top-level bean -->
<myns:dateformat id="defaultDateFormat" pattern="yyyy-MM-dd HH:mm" lenient="true"/>
<bean id="jobDetailTemplate" abstract="true">
<property name="dateFormat">
<!-- as an inner bean -->
<myns:dateformat pattern="HH:mm MM-dd-yyyy"/>
</property>
</bean>
</beans>9.2.7. Meatier examples
Find below some much meatier examples of custom XML extensions.
Nesting custom tags within custom tags
This example illustrates how you might go about writing the various artifacts required to satisfy a target of the following configuration:
<?xml version="1.0" encoding="UTF-8"?>
<beans xmlns="http://www.springframework.org/schema/beans"
xmlns:xsi="http://www.w3.org/2001/XMLSchema-instance"
xmlns:foo="http://www.foo.com/schema/component"
xsi:schemaLocation="
http://www.springframework.org/schema/beans http://www.springframework.org/schema/beans/spring-beans.xsd
http://www.foo.com/schema/component http://www.foo.com/schema/component/component.xsd">
<foo:component id="bionic-family" name="Bionic-1">
<foo:component name="Mother-1">
<foo:component name="Karate-1"/>
<foo:component name="Sport-1"/>
</foo:component>
<foo:component name="Rock-1"/>
</foo:component>
</beans>The above configuration actually nests custom extensions within each other. The class
that is actually configured by the above <foo:component/> element is the Component
class (shown directly below). Notice how the Component class does not expose a
setter method for the 'components' property; this makes it hard (or rather impossible)
to configure a bean definition for the Component class using setter injection.
package com.foo;
import java.util.ArrayList;
import java.util.List;
public class Component {
private String name;
private List<Component> components = new ArrayList<Component> ();
// mmm, there is no setter method for the 'components'
public void addComponent(Component component) {
this.components.add(component);
}
public List<Component> getComponents() {
return components;
}
public String getName() {
return name;
}
public void setName(String name) {
this.name = name;
}
}The typical solution to this issue is to create a custom FactoryBean that exposes a
setter property for the 'components' property.
package com.foo;
import org.springframework.beans.factory.FactoryBean;
import java.util.List;
public class ComponentFactoryBean implements FactoryBean<Component> {
private Component parent;
private List<Component> children;
public void setParent(Component parent) {
this.parent = parent;
}
public void setChildren(List<Component> children) {
this.children = children;
}
public Component getObject() throws Exception {
if (this.children != null && this.children.size() > 0) {
for (Component child : children) {
this.parent.addComponent(child);
}
}
return this.parent;
}
public Class<Component> getObjectType() {
return Component.class;
}
public boolean isSingleton() {
return true;
}
}This is all very well, and does work nicely, but exposes a lot of Spring plumbing to the end user. What we are going to do is write a custom extension that hides away all of this Spring plumbing. If we stick to the steps described previously, we’ll start off by creating the XSD schema to define the structure of our custom tag.
<?xml version="1.0" encoding="UTF-8" standalone="no"?>
<xsd:schema xmlns="http://www.foo.com/schema/component"
xmlns:xsd="http://www.w3.org/2001/XMLSchema"
targetNamespace="http://www.foo.com/schema/component"
elementFormDefault="qualified"
attributeFormDefault="unqualified">
<xsd:element name="component">
<xsd:complexType>
<xsd:choice minOccurs="0" maxOccurs="unbounded">
<xsd:element ref="component"/>
</xsd:choice>
<xsd:attribute name="id" type="xsd:ID"/>
<xsd:attribute name="name" use="required" type="xsd:string"/>
</xsd:complexType>
</xsd:element>
</xsd:schema>We’ll then create a custom NamespaceHandler.
package com.foo;
import org.springframework.beans.factory.xml.NamespaceHandlerSupport;
public class ComponentNamespaceHandler extends NamespaceHandlerSupport {
public void init() {
registerBeanDefinitionParser("component", new ComponentBeanDefinitionParser());
}
}Next up is the custom BeanDefinitionParser. Remember that what we are creating is a
BeanDefinition describing a ComponentFactoryBean.
package com.foo;
import org.springframework.beans.factory.config.BeanDefinition;
import org.springframework.beans.factory.support.AbstractBeanDefinition;
import org.springframework.beans.factory.support.BeanDefinitionBuilder;
import org.springframework.beans.factory.support.ManagedList;
import org.springframework.beans.factory.xml.AbstractBeanDefinitionParser;
import org.springframework.beans.factory.xml.ParserContext;
import org.springframework.util.xml.DomUtils;
import org.w3c.dom.Element;
import java.util.List;
public class ComponentBeanDefinitionParser extends AbstractBeanDefinitionParser {
protected AbstractBeanDefinition parseInternal(Element element, ParserContext parserContext) {
return parseComponentElement(element);
}
private static AbstractBeanDefinition parseComponentElement(Element element) {
BeanDefinitionBuilder factory = BeanDefinitionBuilder.rootBeanDefinition(ComponentFactoryBean.class);
factory.addPropertyValue("parent", parseComponent(element));
List<Element> childElements = DomUtils.getChildElementsByTagName(element, "component");
if (childElements != null && childElements.size() > 0) {
parseChildComponents(childElements, factory);
}
return factory.getBeanDefinition();
}
private static BeanDefinition parseComponent(Element element) {
BeanDefinitionBuilder component = BeanDefinitionBuilder.rootBeanDefinition(Component.class);
component.addPropertyValue("name", element.getAttribute("name"));
return component.getBeanDefinition();
}
private static void parseChildComponents(List<Element> childElements, BeanDefinitionBuilder factory) {
ManagedList<BeanDefinition> children = new ManagedList<BeanDefinition>(childElements.size());
for (Element element : childElements) {
children.add(parseComponentElement(element));
}
factory.addPropertyValue("children", children);
}
}Lastly, the various artifacts need to be registered with the Spring XML infrastructure.
# in 'META-INF/spring.handlers' http\://www.foo.com/schema/component=com.foo.ComponentNamespaceHandler
# in 'META-INF/spring.schemas' http\://www.foo.com/schema/component/component.xsd=com/foo/component.xsd
Custom attributes on 'normal' elements
Writing your own custom parser and the associated artifacts isn’t hard, but sometimes it is not the right thing to do. Consider the scenario where you need to add metadata to already existing bean definitions. In this case you certainly don’t want to have to go off and write your own entire custom extension; rather you just want to add an additional attribute to the existing bean definition element.
By way of another example, let’s say that the service class that you are defining a bean definition for a service object that will (unknown to it) be accessing a clustered JCache, and you want to ensure that the named JCache instance is eagerly started within the surrounding cluster:
<bean id="checkingAccountService" class="com.foo.DefaultCheckingAccountService"
jcache:cache-name="checking.account">
<!-- other dependencies here... -->
</bean>What we are going to do here is create another BeanDefinition when the
'jcache:cache-name' attribute is parsed; this BeanDefinition will then initialize
the named JCache for us. We will also modify the existing BeanDefinition for the
'checkingAccountService' so that it will have a dependency on this new
JCache-initializing BeanDefinition.
package com.foo;
public class JCacheInitializer {
private String name;
public JCacheInitializer(String name) {
this.name = name;
}
public void initialize() {
// lots of JCache API calls to initialize the named cache...
}
}Now onto the custom extension. Firstly, the authoring of the XSD schema describing the custom attribute (quite easy in this case).
<?xml version="1.0" encoding="UTF-8" standalone="no"?>
<xsd:schema xmlns="http://www.foo.com/schema/jcache"
xmlns:xsd="http://www.w3.org/2001/XMLSchema"
targetNamespace="http://www.foo.com/schema/jcache"
elementFormDefault="qualified">
<xsd:attribute name="cache-name" type="xsd:string"/>
</xsd:schema>Next, the associated NamespaceHandler.
package com.foo;
import org.springframework.beans.factory.xml.NamespaceHandlerSupport;
public class JCacheNamespaceHandler extends NamespaceHandlerSupport {
public void init() {
super.registerBeanDefinitionDecoratorForAttribute("cache-name",
new JCacheInitializingBeanDefinitionDecorator());
}
}Next, the parser. Note that in this case, because we are going to be parsing an XML
attribute, we write a BeanDefinitionDecorator rather than a BeanDefinitionParser.
package com.foo;
import org.springframework.beans.factory.config.BeanDefinitionHolder;
import org.springframework.beans.factory.support.AbstractBeanDefinition;
import org.springframework.beans.factory.support.BeanDefinitionBuilder;
import org.springframework.beans.factory.xml.BeanDefinitionDecorator;
import org.springframework.beans.factory.xml.ParserContext;
import org.w3c.dom.Attr;
import org.w3c.dom.Node;
import java.util.ArrayList;
import java.util.Arrays;
import java.util.List;
public class JCacheInitializingBeanDefinitionDecorator implements BeanDefinitionDecorator {
private static final String[] EMPTY_STRING_ARRAY = new String[0];
public BeanDefinitionHolder decorate(Node source, BeanDefinitionHolder holder,
ParserContext ctx) {
String initializerBeanName = registerJCacheInitializer(source, ctx);
createDependencyOnJCacheInitializer(holder, initializerBeanName);
return holder;
}
private void createDependencyOnJCacheInitializer(BeanDefinitionHolder holder,
String initializerBeanName) {
AbstractBeanDefinition definition = ((AbstractBeanDefinition) holder.getBeanDefinition());
String[] dependsOn = definition.getDependsOn();
if (dependsOn == null) {
dependsOn = new String[]{initializerBeanName};
} else {
List dependencies = new ArrayList(Arrays.asList(dependsOn));
dependencies.add(initializerBeanName);
dependsOn = (String[]) dependencies.toArray(EMPTY_STRING_ARRAY);
}
definition.setDependsOn(dependsOn);
}
private String registerJCacheInitializer(Node source, ParserContext ctx) {
String cacheName = ((Attr) source).getValue();
String beanName = cacheName + "-initializer";
if (!ctx.getRegistry().containsBeanDefinition(beanName)) {
BeanDefinitionBuilder initializer = BeanDefinitionBuilder.rootBeanDefinition(JCacheInitializer.class);
initializer.addConstructorArg(cacheName);
ctx.getRegistry().registerBeanDefinition(beanName, initializer.getBeanDefinition());
}
return beanName;
}
}Lastly, the various artifacts need to be registered with the Spring XML infrastructure.
# in 'META-INF/spring.handlers' http\://www.foo.com/schema/jcache=com.foo.JCacheNamespaceHandler
# in 'META-INF/spring.schemas' http\://www.foo.com/schema/jcache/jcache.xsd=com/foo/jcache.xsd