This part of the reference documentation is concerned with data access and the interaction between the data access layer and the business or service layer.
Spring’s comprehensive transaction management support is covered in some detail, followed by thorough coverage of the various data access frameworks and technologies with which the Spring Framework integrates.
1. Transaction Management
Comprehensive transaction support is among the most compelling reasons to use the Spring Framework. The Spring Framework provides a consistent abstraction for transaction management that delivers the following benefits:
-
A consistent programming model across different transaction APIs, such as Java Transaction API (JTA), JDBC, Hibernate, and the Java Persistence API (JPA).
-
Support for declarative transaction management.
-
A simpler API for programmatic transaction management than complex transaction APIs, such as JTA.
-
Excellent integration with Spring’s data access abstractions.
The following sections describe the Spring Framework’s transaction features and technologies:
-
Advantages of the Spring Framework’s transaction support model describes why you would use the Spring Framework’s transaction abstraction instead of EJB Container-Managed Transactions (CMT) or choosing to drive local transactions through a proprietary API, such as Hibernate.
-
Understanding the Spring Framework transaction abstraction outlines the core classes and describes how to configure and obtain
DataSourceinstances from a variety of sources. -
Synchronizing resources with transactions describes how the application code ensures that resources are created, reused, and cleaned up properly.
-
Declarative transaction management describes support for declarative transaction management.
-
Programmatic transaction management covers support for programmatic (that is, explicitly coded) transaction management.
-
Transaction bound event describes how you could use application events within a transaction.
(The chapter also includes discussions of best practices, application server integration, and solutions to common problems.)
1.1. Advantages of the Spring Framework’s Transaction Support Model
Traditionally, Java EE developers have had two choices for transaction management: global or local transactions, both of which have profound limitations. Global and local transaction management is reviewed in the next two sections, followed by a discussion of how the Spring Framework’s transaction management support addresses the limitations of the global and local transaction models.
1.1.1. Global Transactions
Global transactions let you work with multiple transactional resources, typically
relational databases and message queues. The application server manages global
transactions through the JTA, which is a cumbersome API (partly due to its
exception model). Furthermore, a JTA UserTransaction normally needs to be sourced from
JNDI, meaning that you also need to use JNDI in order to use JTA. The use
of global transactions limits any potential reuse of application code, as JTA is
normally only available in an application server environment.
Previously, the preferred way to use global transactions was through EJB CMT (Container Managed Transaction). CMT is a form of declarative transaction management (as distinguished from programmatic transaction management). EJB CMT removes the need for transaction-related JNDI lookups, although the use of EJB itself necessitates the use of JNDI. It removes most but not all of the need to write Java code to control transactions. The significant downside is that CMT is tied to JTA and an application server environment. Also, it is only available if one chooses to implement business logic in EJBs (or at least behind a transactional EJB facade). The negatives of EJB in general are so great that this is not an attractive proposition, especially in the face of compelling alternatives for declarative transaction management.
1.1.2. Local Transactions
Local transactions are resource-specific, such as a transaction associated with a JDBC connection. Local transactions may be easier to use but have a significant disadvantage: They cannot work across multiple transactional resources. For example, code that manages transactions by using a JDBC connection cannot run within a global JTA transaction. Because the application server is not involved in transaction management, it cannot help ensure correctness across multiple resources. (It is worth noting that most applications use a single transaction resource.) Another downside is that local transactions are invasive to the programming model.
1.1.3. Spring Framework’s Consistent Programming Model
Spring resolves the disadvantages of global and local transactions. It lets application developers use a consistent programming model in any environment. You write your code once, and it can benefit from different transaction management strategies in different environments. The Spring Framework provides both declarative and programmatic transaction management. Most users prefer declarative transaction management, which we recommend in most cases.
With programmatic transaction management, developers work with the Spring Framework transaction abstraction, which can run over any underlying transaction infrastructure. With the preferred declarative model, developers typically write little or no code related to transaction management and, hence, do not depend on the Spring Framework transaction API or any other transaction API.
1.2. Understanding the Spring Framework Transaction Abstraction
The key to the Spring transaction abstraction is the notion of a transaction
strategy. A transaction strategy is defined by the
org.springframework.transaction.PlatformTransactionManager interface, which the following listing shows:
public interface PlatformTransactionManager {

    TransactionStatus getTransaction(TransactionDefinition definition) throws TransactionException;

    void commit(TransactionStatus status) throws TransactionException;

    void rollback(TransactionStatus status) throws TransactionException;
}
This is primarily a service provider interface (SPI), although you can use it
programmatically from your application code. Because
PlatformTransactionManager is an interface, it can be easily mocked or stubbed as
necessary. It is not tied to a lookup strategy, such as JNDI.
PlatformTransactionManager implementations are defined like any other object (or bean)
in the Spring Framework IoC container. This benefit alone makes Spring Framework
transactions a worthwhile abstraction, even when you work with JTA. You can test transactional code
much more easily than if it used JTA directly.
Again, in keeping with Spring’s philosophy, the TransactionException that can be thrown
by any of the PlatformTransactionManager interface’s methods is unchecked (that
is, it extends the java.lang.RuntimeException class). Transaction infrastructure
failures are almost invariably fatal. In rare cases where application code can actually
recover from a transaction failure, the application developer can still choose to catch
and handle TransactionException. The salient point is that developers are not
forced to do so.
The getTransaction(..) method returns a TransactionStatus object, depending on a
TransactionDefinition parameter. The returned TransactionStatus might represent a
new transaction or can represent an existing transaction, if a matching transaction
exists in the current call stack. The implication in this latter case is that, as with
Java EE transaction contexts, a TransactionStatus is associated with a thread of
execution.
The TransactionDefinition interface specifies:
-
Propagation: Typically, all code executed within a transaction scope runs in that transaction. However, you can specify the behavior if a transactional method is executed when a transaction context already exists. For example, code can continue running in the existing transaction (the common case), or the existing transaction can be suspended and a new transaction created. Spring offers all of the transaction propagation options familiar from EJB CMT. To read about the semantics of transaction propagation in Spring, see Transaction Propagation.
-
Isolation: The degree to which this transaction is isolated from the work of other transactions. For example, can this transaction see uncommitted writes from other transactions?
-
Timeout: How long this transaction runs before timing out and being automatically rolled back by the underlying transaction infrastructure.
-
Read-only status: You can use a read-only transaction when your code reads but does not modify data. Read-only transactions can be a useful optimization in some cases, such as when you use Hibernate.
These settings reflect standard transactional concepts. If necessary, refer to resources that discuss transaction isolation levels and other core transaction concepts. Understanding these concepts is essential to using the Spring Framework or any transaction management solution.
The TransactionStatus interface provides a simple way for transactional code to
control transaction execution and query transaction status. The concepts should be
familiar, as they are common to all transaction APIs. The following listing shows the
TransactionStatus interface:
public interface TransactionStatus extends SavepointManager {

    boolean isNewTransaction();

    boolean hasSavepoint();

    void setRollbackOnly();

    boolean isRollbackOnly();

    void flush();

    boolean isCompleted();

}
Regardless of whether you opt for declarative or programmatic transaction management in
Spring, defining the correct PlatformTransactionManager implementation is absolutely
essential. You typically define this implementation through dependency injection.
PlatformTransactionManager implementations normally require knowledge of the
environment in which they work: JDBC, JTA, Hibernate, and so on. The following examples
show how you can define a local PlatformTransactionManager implementation (in this case,
with plain JDBC.)
You can define a JDBC DataSource by creating a bean similar to the following:
<bean id="dataSource" class="org.apache.commons.dbcp.BasicDataSource" destroy-method="close">
    <property name="driverClassName" value="${jdbc.driverClassName}" />
    <property name="url" value="${jdbc.url}" />
    <property name="username" value="${jdbc.username}" />
    <property name="password" value="${jdbc.password}" />
</bean>
The related PlatformTransactionManager bean definition then has a reference to
the DataSource definition. It should resemble the following example:
<bean id="txManager" class="org.springframework.jdbc.datasource.DataSourceTransactionManager">
    <property name="dataSource" ref="dataSource"/>
</bean>
If you use JTA in a Java EE container, then you use a container DataSource, obtained
through JNDI, in conjunction with Spring’s JtaTransactionManager. The following example shows what the JTA
and JNDI lookup version would look like:
<?xml version="1.0" encoding="UTF-8"?>
<beans xmlns="http://www.springframework.org/schema/beans"
    xmlns:xsi="http://www.w3.org/2001/XMLSchema-instance"
    xmlns:jee="http://www.springframework.org/schema/jee"
    xsi:schemaLocation="
        http://www.springframework.org/schema/beans
        http://www.springframework.org/schema/beans/spring-beans.xsd
        http://www.springframework.org/schema/jee
        http://www.springframework.org/schema/jee/spring-jee.xsd">

    <jee:jndi-lookup id="dataSource" jndi-name="jdbc/jpetstore"/>

    <bean id="txManager" class="org.springframework.transaction.jta.JtaTransactionManager" />

    <!-- other <bean/> definitions here -->

</beans>
The JtaTransactionManager does not need to know about the DataSource (or any other
specific resources) because it uses the container’s global transaction management
infrastructure.
The preceding definition of the dataSource bean uses the <jndi-lookup/> tag from the
jee namespace. For more information see
The JEE Schema.
|
You can also use easily Hibernate local transactions, as shown in the following
examples. In this case, you need to define a Hibernate LocalSessionFactoryBean,
which your application code can use to obtain Hibernate Session instances.
The DataSource bean definition is similar to the local JDBC example shown
previously and, thus, is not shown in the following example.
If the DataSource (used by any non-JTA transaction manager) is looked up through JNDI and
managed by a Java EE container, it should be non-transactional, because the Spring
Framework (rather than the Java EE container) manages the transactions.
|
The txManager bean in this case is of the HibernateTransactionManager type. In the
same way as the DataSourceTransactionManager needs a reference to the DataSource,
the HibernateTransactionManager needs a reference to the SessionFactory.
The following example declares sessionFactory and txManager beans:
<bean id="sessionFactory" class="org.springframework.orm.hibernate5.LocalSessionFactoryBean">
    <property name="dataSource" ref="dataSource"/>
    <property name="mappingResources">
        <list>
            <value>org/springframework/samples/petclinic/hibernate/petclinic.hbm.xml</value>
        </list>
    </property>
    <property name="hibernateProperties">
        <value>
            hibernate.dialect=${hibernate.dialect}
        </value>
    </property>
</bean>

<bean id="txManager" class="org.springframework.orm.hibernate5.HibernateTransactionManager">
    <property name="sessionFactory" ref="sessionFactory"/>
</bean>
If you use Hibernate and Java EE container-managed JTA transactions, you
should use the same JtaTransactionManager as in the previous JTA example for
JDBC, as the following example shows:
<bean id="txManager" class="org.springframework.transaction.jta.JtaTransactionManager"/>| If you use JTA, your transaction manager definition should look the same, regardless of what data access technology you use, be it JDBC, Hibernate JPA, or any other supported technology. This is due to the fact that JTA transactions are global transactions, which can enlist any transactional resource. |
In all these cases, application code does not need to change. You can change how transactions are managed merely by changing configuration, even if that change means moving from local to global transactions or vice versa.
1.3. Synchronizing Resources with Transactions
How to create different transaction managers and how they are linked to related resources
that need to be synchronized to transactions (for example DataSourceTransactionManager
to a JDBC DataSource, HibernateTransactionManager to a Hibernate SessionFactory,
and so forth) should now be clear. This section describes how the application code
(directly or indirectly, by using a persistence API such as JDBC, Hibernate, or JPA)
ensures that these resources are created, reused, and cleaned up properly. The section
also discusses how transaction synchronization is (optionally) triggered through the
relevant PlatformTransactionManager.
1.3.1. High-level Synchronization Approach
The preferred approach is to use Spring’s highest-level template based persistence
integration APIs or to use native ORM APIs with transaction-aware factory beans or
proxies for managing the native resource factories. These transaction-aware solutions
internally handle resource creation and reuse, cleanup, optional transaction
synchronization of the resources, and exception mapping. Thus, user data access code does
not have to address these tasks but can focus purely on non-boilerplate
persistence logic. Generally, you use the native ORM API or take a template approach
for JDBC access by using the JdbcTemplate. These solutions are detailed in subsequent
chapters of this reference documentation.
1.3.2. Low-level Synchronization Approach
Classes such as DataSourceUtils (for JDBC), EntityManagerFactoryUtils (for JPA),
SessionFactoryUtils (for Hibernate), and so on exist at a lower level. When you want the
application code to deal directly with the resource types of the native persistence APIs,
you use these classes to ensure that proper Spring Framework-managed instances are obtained,
transactions are (optionally) synchronized, and exceptions that occur in the process are
properly mapped to a consistent API.
For example, in the case of JDBC, instead of the traditional JDBC approach of calling
the getConnection() method on the DataSource, you can instead use Spring’s
org.springframework.jdbc.datasource.DataSourceUtils class, as follows:
Connection conn = DataSourceUtils.getConnection(dataSource);If an existing transaction already has a connection synchronized (linked) to it, that
instance is returned. Otherwise, the method call triggers the creation of a new
connection, which is (optionally) synchronized to any existing transaction and made
available for subsequent reuse in that same transaction. As mentioned earlier, any
SQLException is wrapped in a Spring Framework CannotGetJdbcConnectionException, one
of the Spring Framework’s hierarchy of unchecked DataAccessException types. This approach
gives you more information than can be obtained easily from the SQLException and
ensures portability across databases and even across different persistence technologies.
This approach also works without Spring transaction management (transaction synchronization is optional), so you can use it whether or not you use Spring for transaction management.
Of course, once you have used Spring’s JDBC support, JPA support, or Hibernate support,
you generally prefer not to use DataSourceUtils or the other helper classes,
because you are much happier working through the Spring abstraction than directly
with the relevant APIs. For example, if you use the Spring JdbcTemplate or
jdbc.object package to simplify your use of JDBC, correct connection retrieval occurs
behind the scenes and you need not write any special code.
1.3.3. TransactionAwareDataSourceProxy
At the very lowest level exists the TransactionAwareDataSourceProxy class. This is a
proxy for a target DataSource, which wraps the target DataSource to add awareness of
Spring-managed transactions. In this respect, it is similar to a transactional JNDI
DataSource, as provided by a Java EE server.
You should almost never need or want to use this class, except when existing
code must be called and passed a standard JDBC DataSource interface implementation. In
that case, it is possible that this code is usable but is participating in Spring-managed
transactions. You can write your new code by using the higher-level
abstractions mentioned earlier.
1.4. Declarative transaction management
| Most Spring Framework users choose declarative transaction management. This option has the least impact on application code and, hence, is most consistent with the ideals of a non-invasive lightweight container. |
The Spring Framework’s declarative transaction management is made possible with Spring aspect-oriented programming (AOP). However, as the transactional aspects code comes with the Spring Framework distribution and may be used in a boilerplate fashion, AOP concepts do not generally have to be understood to make effective use of this code.
The Spring Framework’s declarative transaction management is similar to EJB CMT, in that
you can specify transaction behavior (or lack of it) down to the individual method level.
You can make a setRollbackOnly() call within a transaction context, if
necessary. The differences between the two types of transaction management are:
-
Unlike EJB CMT, which is tied to JTA, the Spring Framework’s declarative transaction management works in any environment. It can work with JTA transactions or local transactions by using JDBC, JPA, or Hibernate by adjusting the configuration files.
-
You can apply the Spring Framework declarative transaction management to any class, not merely special classes such as EJBs.
-
The Spring Framework offers declarative rollback rules, a feature with no EJB equivalent. Both programmatic and declarative support for rollback rules is provided.
-
The Spring Framework lets you customize transactional behavior by using AOP. For example, you can insert custom behavior in the case of transaction rollback. You can also add arbitrary advice, along with transactional advice. With EJB CMT, you cannot influence the container’s transaction management, except with
setRollbackOnly(). -
The Spring Framework does not support propagation of transaction contexts across remote calls, as high-end application servers do. If you need this feature, we recommend that you use EJB. However, consider carefully before using such a feature, because, normally, one does not want transactions to span remote calls.
The concept of rollback rules is important. They let you specify which exceptions
(and throwables) should cause automatic rollback. You can specify this declaratively, in
configuration, not in Java code. So, although you can still call setRollbackOnly() on
the TransactionStatus object to roll back the current transaction back, most often you
can specify a rule that MyApplicationException must always result in rollback. The
significant advantage to this option is that business objects do not depend on the
transaction infrastructure. For example, they typically do not need to import Spring
transaction APIs or other Spring APIs.
Although EJB container default behavior automatically rolls back the transaction on a
system exception (usually a runtime exception), EJB CMT does not roll back the
transaction automatically on an application exception (that is, a checked exception
other than java.rmi.RemoteException). While the Spring default behavior for
declarative transaction management follows EJB convention (roll back is automatic only
on unchecked exceptions), it is often useful to customize this behavior.
1.4.1. Understanding the Spring Framework’s Declarative Transaction Implementation
It is not sufficient merely to tell you to annotate your classes with the
@Transactional annotation, add @EnableTransactionManagement to your configuration,
and expect you to understand how it all works. To provide a deeper understanding,
this section explains the inner workings of the Spring Framework’s declarative
transaction infrastructure in the event of transaction-related issues.
The most important concepts to grasp with regard to the Spring Framework’s declarative
transaction support are that this support is enabled
via AOP proxies and that the transactional
advice is driven by metadata (currently XML- or annotation-based). The combination of
AOP with transactional metadata yields an AOP proxy that uses a TransactionInterceptor
in conjunction with an appropriate PlatformTransactionManager implementation to drive
transactions around method invocations.
| Spring AOP is covered in the AOP section. |
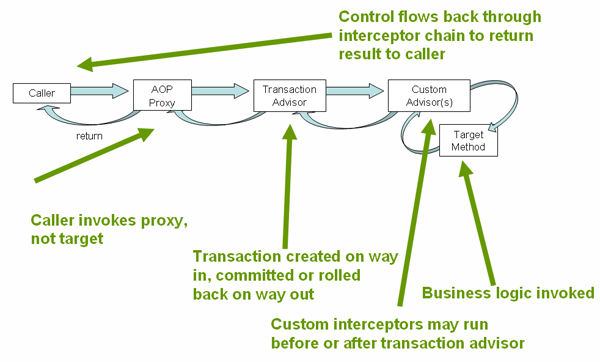
The following images shows a Conceptual view of calling a method on a transactional proxy:
1.4.2. Example of Declarative Transaction Implementation
Consider the following interface and its attendant implementation. This example uses
Foo and Bar classes as placeholders so that you can concentrate on the transaction
usage without focusing on a particular domain model. For the purposes of this example,
the fact that the DefaultFooService class throws UnsupportedOperationException
instances in the body of each implemented method is good. That behavior lets you see
transactions be created and then rolled back in response to the
UnsupportedOperationException instance. The following listing shows the FooService interface:
// the service interface that we want to make transactional

package x.y.service;

public interface FooService {

    Foo getFoo(String fooName);

    Foo getFoo(String fooName, String barName);

    void insertFoo(Foo foo);

    void updateFoo(Foo foo);

}
The following example shows an implementation of the preceding interface:
package x.y.service;

public class DefaultFooService implements FooService {

    public Foo getFoo(String fooName) {
        throw new UnsupportedOperationException();
    }

    public Foo getFoo(String fooName, String barName) {
        throw new UnsupportedOperationException();
    }

    public void insertFoo(Foo foo) {
        throw new UnsupportedOperationException();
    }

    public void updateFoo(Foo foo) {
        throw new UnsupportedOperationException();
    }

}
Assume that the first two methods of the FooService interface, getFoo(String) and
getFoo(String, String), must execute in the context of a transaction with read-only
semantics, and that the other methods, insertFoo(Foo) and updateFoo(Foo), must
execute in the context of a transaction with read-write semantics. The following
configuration is explained in detail in the next few paragraphs:
<!-- from the file 'context.xml' -->
<?xml version="1.0" encoding="UTF-8"?>
<beans xmlns="http://www.springframework.org/schema/beans"
    xmlns:xsi="http://www.w3.org/2001/XMLSchema-instance"
    xmlns:aop="http://www.springframework.org/schema/aop"
    xmlns:tx="http://www.springframework.org/schema/tx"
    xsi:schemaLocation="
        http://www.springframework.org/schema/beans
        http://www.springframework.org/schema/beans/spring-beans.xsd
        http://www.springframework.org/schema/tx
        http://www.springframework.org/schema/tx/spring-tx.xsd
        http://www.springframework.org/schema/aop
        http://www.springframework.org/schema/aop/spring-aop.xsd">

    <!-- this is the service object that we want to make transactional -->
    <bean id="fooService" class="x.y.service.DefaultFooService"/>

    <!-- the transactional advice (what 'happens'; see the <aop:advisor/> bean below) -->
    <tx:advice id="txAdvice" transaction-manager="txManager">
        <!-- the transactional semantics... -->
        <tx:attributes>
            <!-- all methods starting with 'get' are read-only -->
            <tx:method name="get*" read-only="true"/>
            <!-- other methods use the default transaction settings (see below) -->
            <tx:method name="*"/>
        </tx:attributes>
    </tx:advice>

    <!-- ensure that the above transactional advice runs for any execution
        of an operation defined by the FooService interface -->
    <aop:config>
        <aop:pointcut id="fooServiceOperation" expression="execution(* x.y.service.FooService.*(..))"/>
        <aop:advisor advice-ref="txAdvice" pointcut-ref="fooServiceOperation"/>
    </aop:config>

    <!-- don't forget the DataSource -->
    <bean id="dataSource" class="org.apache.commons.dbcp.BasicDataSource" destroy-method="close">
        <property name="driverClassName" value="oracle.jdbc.driver.OracleDriver"/>
        <property name="url" value="jdbc:oracle:thin:@rj-t42:1521:elvis"/>
        <property name="username" value="scott"/>
        <property name="password" value="tiger"/>
    </bean>

    <!-- similarly, don't forget the PlatformTransactionManager -->
    <bean id="txManager" class="org.springframework.jdbc.datasource.DataSourceTransactionManager">
        <property name="dataSource" ref="dataSource"/>
    </bean>

    <!-- other <bean/> definitions here -->

</beans>
Examine the preceding configuration. It assumes that you want to make a service object, the fooService
bean, transactional. The transaction semantics to apply are encapsulated in the
<tx:advice/> definition. The <tx:advice/> definition reads as “all methods, on
starting with get, are to execute in the context of a read-only transaction, and all
other methods are to execute with the default transaction semantics”. The
transaction-manager attribute of the <tx:advice/> tag is set to the name of the
PlatformTransactionManager bean that is going to drive the transactions (in this
case, the txManager bean).
You can omit the transaction-manager attribute in the transactional advice
(<tx:advice/>) if the bean name of the PlatformTransactionManager that you want to
wire in has the name transactionManager. If the PlatformTransactionManager bean that
you want to wire in has any other name, you must use the transaction-manager
attribute explicitly, as in the preceding example.
|
The <aop:config/> definition ensures that the transactional advice defined by the
txAdvice bean executes at the appropriate points in the program. First, you define a
pointcut that matches the execution of any operation defined in the FooService
interface ( fooServiceOperation). Then you associate the pointcut with the txAdvice
by using an advisor. The result indicates that, at the execution of a fooServiceOperation,
the advice defined by txAdvice is run.
The expression defined within the <aop:pointcut/> element is an AspectJ pointcut
expression. See the AOP section for more details on pointcut expressions in Spring.
A common requirement is to make an entire service layer transactional. The best way to do this is to change the pointcut expression to match any operation in your service layer. The following example shows how to do so:
<aop:config>
    <aop:pointcut id="fooServiceMethods" expression="execution(* x.y.service.*.*(..))"/>
    <aop:advisor advice-ref="txAdvice" pointcut-ref="fooServiceMethods"/>
</aop:config>
In the preceding example, it is assumed that all your service interfaces are defined in the
x.y.service package. See the AOP section for more details.
|
Now that we have analyzed the configuration, you may be asking yourself, “What does all this configuration actually do?”
The configuration shown earlier is used to create a transactional proxy around the object
that is created from the fooService bean definition. The proxy is configured with
the transactional advice so that, when an appropriate method is invoked on the
proxy, a transaction is started, suspended, marked as read-only, and so on, depending
on the transaction configuration associated with that method. Consider the following
program that test drives the configuration shown earlier:
public final class Boot {

    public static void main(final String[] args) throws Exception {
        ApplicationContext ctx = new ClassPathXmlApplicationContext("context.xml", Boot.class);
        FooService fooService = (FooService) ctx.getBean("fooService");
        fooService.insertFoo (new Foo());
    }
}
The output from running the preceding program should resemble the following (the Log4J output and the stack trace from the UnsupportedOperationException thrown by the insertFoo(..) method of the DefaultFooService class have been truncated for clarity):
<!-- the Spring container is starting up... -->
[AspectJInvocationContextExposingAdvisorAutoProxyCreator] - Creating implicit proxy for bean 'fooService' with 0 common interceptors and 1 specific interceptors

<!-- the DefaultFooService is actually proxied -->
[JdkDynamicAopProxy] - Creating JDK dynamic proxy for [x.y.service.DefaultFooService]

<!-- ... the insertFoo(..) method is now being invoked on the proxy -->
[TransactionInterceptor] - Getting transaction for x.y.service.FooService.insertFoo

<!-- the transactional advice kicks in here... -->
[DataSourceTransactionManager] - Creating new transaction with name [x.y.service.FooService.insertFoo]
[DataSourceTransactionManager] - Acquired Connection [org.apache.commons.dbcp.PoolableConnection@a53de4] for JDBC transaction

<!-- the insertFoo(..) method from DefaultFooService throws an exception... -->
[RuleBasedTransactionAttribute] - Applying rules to determine whether transaction should rollback on java.lang.UnsupportedOperationException
[TransactionInterceptor] - Invoking rollback for transaction on x.y.service.FooService.insertFoo due to throwable [java.lang.UnsupportedOperationException]

<!-- and the transaction is rolled back (by default, RuntimeException instances cause rollback) -->
[DataSourceTransactionManager] - Rolling back JDBC transaction on Connection [org.apache.commons.dbcp.PoolableConnection@a53de4]
[DataSourceTransactionManager] - Releasing JDBC Connection after transaction
[DataSourceUtils] - Returning JDBC Connection to DataSource

Exception in thread "main" java.lang.UnsupportedOperationException at x.y.service.DefaultFooService.insertFoo(DefaultFooService.java:14)
<!-- AOP infrastructure stack trace elements removed for clarity -->
at $Proxy0.insertFoo(Unknown Source)
at Boot.main(Boot.java:11)
1.4.3. Rolling Back a Declarative Transaction
The previous section outlined the basics of how to specify transactional settings for classes, typically service layer classes, declaratively in your application. This section describes how you can control the rollback of transactions in a simple, declarative fashion.
The recommended way to indicate to the Spring Framework’s transaction infrastructure
that a transaction’s work is to be rolled back is to throw an Exception from code that
is currently executing in the context of a transaction. The Spring Framework’s
transaction infrastructure code catches any unhandled Exception as it bubbles up
the call stack and makes a determination whether to mark the transaction for rollback.
In its default configuration, the Spring Framework’s transaction infrastructure code
marks a transaction for rollback only in the case of runtime, unchecked exceptions.
That is, when the thrown exception is an instance or subclass of RuntimeException. (
Error instances also, by default, result in a rollback). Checked exceptions that are
thrown from a transactional method do not result in rollback in the default
configuration.
You can configure exactly which Exception types mark a transaction for rollback,
including checked exceptions. The following XML snippet demonstrates how you configure
rollback for a checked, application-specific Exception type:
<tx:advice id="txAdvice" transaction-manager="txManager">
    <tx:attributes>
    <tx:method name="get*" read-only="true" rollback-for="NoProductInStockException"/>
    <tx:method name="*"/>
    </tx:attributes>
</tx:advice>
If you do not want a transaction rolled
back when an exception is thrown, you can also specify 'no rollback rules'. The following example tells the Spring Framework’s
transaction infrastructure to commit the attendant transaction even in the face of an
unhandled InstrumentNotFoundException:
<tx:advice id="txAdvice">
    <tx:attributes>
    <tx:method name="updateStock" no-rollback-for="InstrumentNotFoundException"/>
    <tx:method name="*"/>
    </tx:attributes>
</tx:advice>
When the Spring Framework’s transaction infrastructure catches an exception and it
consults the configured rollback rules to determine whether to mark the transaction for
rollback, the strongest matching rule wins. So, in the case of the following
configuration, any exception other than an InstrumentNotFoundException results in a
rollback of the attendant transaction:
<tx:advice id="txAdvice">
    <tx:attributes>
    <tx:method name="*" rollback-for="Throwable" no-rollback-for="InstrumentNotFoundException"/>
    </tx:attributes>
</tx:advice>
You can also indicate a required rollback programmatically. Although simple, this process is quite invasive and tightly couples your code to the Spring Framework’s transaction infrastructure. The following example shows how to programmatically indicate a required rollback:
public void resolvePosition() {
    try {
        // some business logic...
    } catch (NoProductInStockException ex) {
        // trigger rollback programmatically
        TransactionAspectSupport.currentTransactionStatus().setRollbackOnly();
    }
}
You are strongly encouraged to use the declarative approach to rollback, if at all possible. Programmatic rollback is available should you absolutely need it, but its usage flies in the face of achieving a clean POJO-based architecture.
1.4.4. Configuring Different Transactional Semantics for Different Beans
Consider the scenario where you have a number of service layer objects, and you want to
apply a totally different transactional configuration to each of them. You can do so
by defining distinct <aop:advisor/> elements with differing pointcut and
advice-ref attribute values.
As a point of comparison, first assume that all of your service layer classes are
defined in a root x.y.service package. To make all beans that are instances of classes
defined in that package (or in subpackages) and that have names ending in Service have
the default transactional configuration, you could write the following:
<?xml version="1.0" encoding="UTF-8"?>
<beans xmlns="http://www.springframework.org/schema/beans"
    xmlns:xsi="http://www.w3.org/2001/XMLSchema-instance"
    xmlns:aop="http://www.springframework.org/schema/aop"
    xmlns:tx="http://www.springframework.org/schema/tx"
    xsi:schemaLocation="
        http://www.springframework.org/schema/beans
        http://www.springframework.org/schema/beans/spring-beans.xsd
        http://www.springframework.org/schema/tx
        http://www.springframework.org/schema/tx/spring-tx.xsd
        http://www.springframework.org/schema/aop
        http://www.springframework.org/schema/aop/spring-aop.xsd">

    <aop:config>

        <aop:pointcut id="serviceOperation"
                expression="execution(* x.y.service..*Service.*(..))"/>

        <aop:advisor pointcut-ref="serviceOperation" advice-ref="txAdvice"/>

    </aop:config>

    <!-- these two beans will be transactional... -->
    <bean id="fooService" class="x.y.service.DefaultFooService"/>
    <bean id="barService" class="x.y.service.extras.SimpleBarService"/>

    <!-- ... and these two beans won't -->
    <bean id="anotherService" class="org.xyz.SomeService"/> <!-- (not in the right package) -->
    <bean id="barManager" class="x.y.service.SimpleBarManager"/> <!-- (doesn't end in 'Service') -->

    <tx:advice id="txAdvice">
        <tx:attributes>
            <tx:method name="get*" read-only="true"/>
            <tx:method name="*"/>
        </tx:attributes>
    </tx:advice>

    <!-- other transaction infrastructure beans such as a PlatformTransactionManager omitted... -->

</beans>
The following example shows how to configure two distinct beans with totally different transactional settings:
<?xml version="1.0" encoding="UTF-8"?>
<beans xmlns="http://www.springframework.org/schema/beans"
    xmlns:xsi="http://www.w3.org/2001/XMLSchema-instance"
    xmlns:aop="http://www.springframework.org/schema/aop"
    xmlns:tx="http://www.springframework.org/schema/tx"
    xsi:schemaLocation="
        http://www.springframework.org/schema/beans
        http://www.springframework.org/schema/beans/spring-beans.xsd
        http://www.springframework.org/schema/tx
        http://www.springframework.org/schema/tx/spring-tx.xsd
        http://www.springframework.org/schema/aop
        http://www.springframework.org/schema/aop/spring-aop.xsd">

    <aop:config>

        <aop:pointcut id="defaultServiceOperation"
                expression="execution(* x.y.service.*Service.*(..))"/>

        <aop:pointcut id="noTxServiceOperation"
                expression="execution(* x.y.service.ddl.DefaultDdlManager.*(..))"/>

        <aop:advisor pointcut-ref="defaultServiceOperation" advice-ref="defaultTxAdvice"/>

        <aop:advisor pointcut-ref="noTxServiceOperation" advice-ref="noTxAdvice"/>

    </aop:config>

    <!-- this bean will be transactional (see the 'defaultServiceOperation' pointcut) -->
    <bean id="fooService" class="x.y.service.DefaultFooService"/>

    <!-- this bean will also be transactional, but with totally different transactional settings -->
    <bean id="anotherFooService" class="x.y.service.ddl.DefaultDdlManager"/>

    <tx:advice id="defaultTxAdvice">
        <tx:attributes>
            <tx:method name="get*" read-only="true"/>
            <tx:method name="*"/>
        </tx:attributes>
    </tx:advice>

    <tx:advice id="noTxAdvice">
        <tx:attributes>
            <tx:method name="*" propagation="NEVER"/>
        </tx:attributes>
    </tx:advice>

    <!-- other transaction infrastructure beans such as a PlatformTransactionManager omitted... -->

</beans>
1.4.5. <tx:advice/> Settings
This section summarizes the various transactional settings that you can specify by using
the <tx:advice/> tag. The default <tx:advice/> settings are:
-
The propagation setting is
REQUIRED. -
The isolation level is
DEFAULT. -
The transaction is read-write.
-
The transaction timeout defaults to the default timeout of the underlying transaction system or none if timeouts are not supported.
-
Any
RuntimeExceptiontriggers rollback, and any checkedExceptiondoes not.
You can change these default settings. The following table summarizes the various attributes of the <tx:method/> tags
that are nested within <tx:advice/> and <tx:attributes/> tags:
| Attribute | Required? | Default | Description |
|---|---|---|---|
|
Yes |
Method names with which the transaction attributes are to be associated. The
wildcard (*) character can be used to associate the same transaction attribute
settings with a number of methods (for example, |
|
|
No |
|
Transaction propagation behavior. |
|
No |
|
Transaction isolation level. Only applicable to propagation settings of |
|
No |
-1 |
Transaction timeout (seconds). Only applicable to propagation |
|
No |
false |
Read-write versus read-only transaction. Applies only to |
|
No |
Comma-delimited list of |
|
|
No |
Comma-delimited list of |
1.4.6. Using @Transactional
In addition to the XML-based declarative approach to transaction configuration, you can use an annotation-based approach. Declaring transaction semantics directly in the Java source code puts the declarations much closer to the affected code. There is not much danger of undue coupling, because code that is meant to be used transactionally is almost always deployed that way anyway.
The standard javax.transaction.Transactional annotation is also supported as a
drop-in replacement to Spring’s own annotation. Please refer to JTA 1.2 documentation
for more details.
|
The ease-of-use afforded by the use of the @Transactional annotation is best
illustrated with an example, which is explained in the text that follows.
Consider the following class definition:
// the service class that we want to make transactional
@Transactional
public class DefaultFooService implements FooService {

    Foo getFoo(String fooName);

    Foo getFoo(String fooName, String barName);

    void insertFoo(Foo foo);

    void updateFoo(Foo foo);
}
Used at the class level as above, the annotation indicates a default for all methods of the declaring class (as well as its subclasses). Alternatively, each method can get annotated individually. Note that a class-level annotation does not apply to ancestor classes up the class hierarchy; in such a scenario, methods need to be locally redeclared in order to participate in a subclass-level annotation.
When a POJO class such as the one above is defined as a bean in a Spring context,
you can make the bean instance transactional through an @EnableTransactionManagement
annotation in a @Configuration class. See the
javadoc
for full details.
In XML configuration, the <tx:annotation-driven/> tag provides similar convenience:
<!-- from the file 'context.xml' -->
<?xml version="1.0" encoding="UTF-8"?>
<beans xmlns="http://www.springframework.org/schema/beans"
    xmlns:xsi="http://www.w3.org/2001/XMLSchema-instance"
    xmlns:aop="http://www.springframework.org/schema/aop"
    xmlns:tx="http://www.springframework.org/schema/tx"
    xsi:schemaLocation="
        http://www.springframework.org/schema/beans
        http://www.springframework.org/schema/beans/spring-beans.xsd
        http://www.springframework.org/schema/tx
        http://www.springframework.org/schema/tx/spring-tx.xsd
        http://www.springframework.org/schema/aop
        http://www.springframework.org/schema/aop/spring-aop.xsd">

    <!-- this is the service object that we want to make transactional -->
    <bean id="fooService" class="x.y.service.DefaultFooService"/>

    <!-- enable the configuration of transactional behavior based on annotations -->
    <tx:annotation-driven transaction-manager="txManager"/><!-- a PlatformTransactionManager is still required --> (1)

    <bean id="txManager" class="org.springframework.jdbc.datasource.DataSourceTransactionManager">
        <!-- (this dependency is defined somewhere else) -->
        <property name="dataSource" ref="dataSource"/>
    </bean>

    <!-- other <bean/> definitions here -->

</beans>| 1 | The line that makes the bean instance transactional. |
You can omit the transaction-manager attribute in the <tx:annotation-driven/> tag
if the bean name of the PlatformTransactionManager that you want to wire in has the name,
transactionManager. If the PlatformTransactionManager bean that you want to
dependency-inject has any other name, you have to use the transaction-manager attribute,
as in the preceding example.
|
You can apply the @Transactional annotation to an interface definition, a method
on an interface, a class definition, or a public method on a class. However, the
mere presence of the @Transactional annotation is not enough to activate the
transactional behavior. The @Transactional annotation is merely metadata that can
be consumed by some runtime infrastructure that is @Transactional-aware and that
can use the metadata to configure the appropriate beans with transactional behavior.
In the preceding example, the <tx:annotation-driven/> element switches on the
transactional behavior.
The Spring team recommends that you annotate only concrete classes (and methods of
concrete classes) with the @Transactional annotation, as opposed to annotating interfaces.
You certainly can place the @Transactional annotation on an interface (or an interface
method), but this works only as you would expect it to if you use interface-based
proxies. The fact that Java annotations are not inherited from interfaces means that,
if you use class-based proxies (proxy-target-class="true") or the weaving-based
aspect (mode="aspectj"), the transaction settings are not recognized by the proxying
and weaving infrastructure, and the object is not wrapped in a transactional proxy.
|
In proxy mode (which is the default), only external method calls coming in through
the proxy are intercepted. This means that self-invocation (in effect, a method within
the target object calling another method of the target object) does not lead to an actual
transaction at runtime even if the invoked method is marked with @Transactional. Also,
the proxy must be fully initialized to provide the expected behavior, so you should not
rely on this feature in your initialization code (that is, @PostConstruct).
|
Consider using of AspectJ mode (see the mode attribute in the following table) if you
expect self-invocations to be wrapped with transactions as well. In this case, there no
proxy in the first place. Instead, the target class is woven (that is, its byte code is
modified) to turn @Transactional into runtime behavior on any kind of method.
| XML Attribute | Annotation Attribute | Default | Description |
|---|---|---|---|
|
N/A (see |
|
Name of the transaction manager to use. Required only if the name of the transaction
manager is not |
|
|
|
The default mode ( |
|
|
|
Applies to |
|
|
|
Defines the order of the transaction advice that is applied to beans annotated with
|
The default advice mode for processing @Transactional annotations is proxy,
which allows for interception of calls through the proxy only. Local calls within the
same class cannot get intercepted that way. For a more advanced mode of interception,
consider switching to aspectj mode in combination with compile-time or load-time weaving.
|
The proxy-target-class attribute controls what type of transactional proxies are
created for classes annotated with the @Transactional annotation. If
proxy-target-class is set to true, class-based proxies are created. If
proxy-target-class is false or if the attribute is omitted, standard JDK
interface-based proxies are created. (See [aop-proxying] for a discussion of the
different proxy types.)
|
@EnableTransactionManagement and <tx:annotation-driven/> looks for
@Transactional only on beans in the same application context in which they are defined.
This means that, if you put annotation-driven configuration in a WebApplicationContext
for a DispatcherServlet, it checks for @Transactional beans only in your controllers
and not your services. See MVC for more information.
|
The most derived location takes precedence when evaluating the transactional settings
for a method. In the case of the following example, the DefaultFooService class is
annotated at the class level with the settings for a read-only transaction, but the
@Transactional annotation on the updateFoo(Foo) method in the same class takes
precedence over the transactional settings defined at the class level.
@Transactional(readOnly = true)
public class DefaultFooService implements FooService {

    public Foo getFoo(String fooName) {
        // do something
    }

    // these settings have precedence for this method
    @Transactional(readOnly = false, propagation = Propagation.REQUIRES_NEW)
    public void updateFoo(Foo foo) {
        // do something
    }
}
@Transactional Settings
The @Transactional annotation is metadata that specifies that an interface, class,
or method must have transactional semantics (for example, “start a brand new read-only
transaction when this method is invoked, suspending any existing transaction”).
The default @Transactional settings are as follows:
-
The propagation setting is
PROPAGATION_REQUIRED. -
The isolation level is
ISOLATION_DEFAULT. -
The transaction is read-write.
-
The transaction timeout defaults to the default timeout of the underlying transaction system, or to none if timeouts are not supported.
-
Any
RuntimeExceptiontriggers rollback, and any checkedExceptiondoes not.
You can change these default settings. The following table summarizes the various
properties of the @Transactional annotation:
| Property | Type | Description |
|---|---|---|
|
Optional qualifier that specifies the transaction manager to be used. |
|
|
Optional propagation setting. |
|
|
|
Optional isolation level. Applies only to propagation values of |
|
|
Optional transaction timeout. Applies only to propagation values of |
|
|
Read-write versus read-only transaction. Only applicable to values of |
|
Array of |
Optional array of exception classes that must cause rollback. |
|
Array of class names. The classes must be derived from |
Optional array of names of exception classes that must cause rollback. |
|
Array of |
Optional array of exception classes that must not cause rollback. |
|
Array of |
Optional array of names of exception classes that must not cause rollback. |
Currently, you cannot have explicit control over the name of a transaction, where 'name'
means the transaction name that appears in a transaction monitor, if applicable
(for example, WebLogic’s transaction monitor), and in logging output. For declarative
transactions, the transaction name is always the fully-qualified class name + .
+ the method name of the transactionally advised class. For example, if the
handlePayment(..) method of the BusinessService class started a transaction, the
name of the transaction would be: com.example.BusinessService.handlePayment.
Multiple Transaction Managers with @Transactional
Most Spring applications need only a single transaction manager, but there may be
situations where you want multiple independent transaction managers in a single
application. You can use the value attribute of the @Transactional annotation to
optionally specify the identity of the PlatformTransactionManager to be used.
This can either be the bean name or the qualifier value of the transaction manager bean.
For example, using the qualifier notation, you can combine the following Java code with
the following transaction manager bean declarations in the application context:
public class TransactionalService {

    @Transactional("order")
    public void setSomething(String name) { ... }

    @Transactional("account")
    public void doSomething() { ... }
}
The following listing shows the bean declarations:
<tx:annotation-driven/>

    <bean id="transactionManager1" class="org.springframework.jdbc.datasource.DataSourceTransactionManager">
        ...
        <qualifier value="order"/>
    </bean>

    <bean id="transactionManager2" class="org.springframework.jdbc.datasource.DataSourceTransactionManager">
        ...
        <qualifier value="account"/>
    </bean>
In this case, the two methods on TransactionalService run under separate transaction
managers, differentiated by the order and account qualifiers. The default
<tx:annotation-driven> target bean name, transactionManager, is still used if no
specifically qualified PlatformTransactionManager bean is found.
Custom Shortcut Annotations
If you find you repeatedly use the same attributes with @Transactional on many different
methods, Spring’s meta-annotation support lets you
define custom shortcut annotations for your specific use cases. For example, consider the
following annotation definitions:
@Target({ElementType.METHOD, ElementType.TYPE})
@Retention(RetentionPolicy.RUNTIME)
@Transactional("order")
public @interface OrderTx {
}

@Target({ElementType.METHOD, ElementType.TYPE})
@Retention(RetentionPolicy.RUNTIME)
@Transactional("account")
public @interface AccountTx {
}
The preceding annotations lets us write the example from the previous section as follows:
public class TransactionalService {

    @OrderTx
    public void setSomething(String name) { ... }

    @AccountTx
    public void doSomething() { ... }
}
In the preceding example, we used the syntax to define the transaction manager qualifier, but we could also have included propagation behavior, rollback rules, timeouts, and other features.
1.4.7. Transaction Propagation
This section describes some semantics of transaction propagation in Spring. Note that this section is not an introduction to transaction propagation proper. Rather, it details some of the semantics regarding transaction propagation in Spring.
In Spring-managed transactions, be aware of the difference between physical and logical transactions, and how the propagation setting applies to this difference.
Understanding PROPAGATION_REQUIRED

PROPAGATION_REQUIRED enforces a physical transaction, either locally for the current
scope if no transaction exists yet or participating in an existing 'outer' transaction
defined for a larger scope. This is a fine default in common call stack arrangements
within the same thread (for example, a service facade that delegates to several repository methods
where all the underlying resources have to participate in the service-level transaction).
By default, a participating transaction joins the characteristics of the outer scope,
silently ignoring the local isolation level, timeout value, or read-only flag (if any).
Consider switching the validateExistingTransactions flag to true on your transaction
manager if you want isolation level declarations to be rejected when participating in
an existing transaction with a different isolation level. This non-lenient mode also
rejects read-only mismatches (that is, an inner read-write transaction that tries to participate
in a read-only outer scope).
|
When the propagation setting is PROPAGATION_REQUIRED, a logical transaction scope
is created for each method upon which the setting is applied. Each such logical
transaction scope can determine rollback-only status individually, with an outer
transaction scope being logically independent from the inner transaction scope.
In the case of standard PROPAGATION_REQUIRED behavior, all these scopes are
mapped to the same physical transaction. So a rollback-only marker set in the inner
transaction scope does affect the outer transaction’s chance to actually commit.
However, in the case where an inner transaction scope sets the rollback-only marker, the
outer transaction has not decided on the rollback itself, so the rollback (silently
triggered by the inner transaction scope) is unexpected. A corresponding
UnexpectedRollbackException is thrown at that point. This is expected behavior so
that the caller of a transaction can never be misled to assume that a commit was
performed when it really was not. So, if an inner transaction (of which the outer caller
is not aware) silently marks a transaction as rollback-only, the outer caller still
calls commit. The outer caller needs to receive an UnexpectedRollbackException to
indicate clearly that a rollback was performed instead.
Understanding PROPAGATION_REQUIRES_NEW
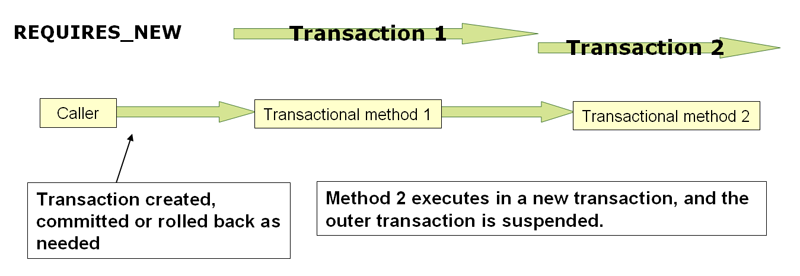
PROPAGATION_REQUIRES_NEW, in contrast to PROPAGATION_REQUIRED, always uses an
independent physical transaction for each affected transaction scope, never
participating in an existing transaction for an outer scope. In such an arrangement,
the underlying resource transactions are different and, hence, can commit or roll back
independently, with an outer transaction not affected by an inner transaction’s rollback
status and with an inner transaction’s locks released immediately after its completion.
Such an independent inner transaction can also declare its own isolation level, timeout,
and read-only settings and not inherit an outer transaction’s characteristics.
Understanding PROPAGATION_NESTED
PROPAGATION_NESTED uses a single physical transaction with multiple savepoints
that it can roll back to. Such partial rollbacks let an inner transaction scope
trigger a rollback for its scope, with the outer transaction being able to continue
the physical transaction despite some operations having been rolled back. This setting
is typically mapped onto JDBC savepoints, so it works only with JDBC resource
transactions. See Spring’s DataSourceTransactionManager.
1.4.8. Advising Transactional Operations
Suppose you want to execute both transactional operations and some basic profiling advice.
How do you effect this in the context of <tx:annotation-driven/>?
When you invoke the updateFoo(Foo) method, you want to see the following actions:
-
The configured profiling aspect starts.
-
The transactional advice executes.
-
The method on the advised object executes.
-
The transaction commits.
-
The profiling aspect reports the exact duration of the whole transactional method invocation.
| This chapter is not concerned with explaining AOP in any great detail (except as it applies to transactions). See AOP for detailed coverage of the AOP configuration and AOP in general. |
The following code shows the simple profiling aspect discussed earlier:
package x.y;

import org.aspectj.lang.ProceedingJoinPoint;
import org.springframework.util.StopWatch;
import org.springframework.core.Ordered;

public class SimpleProfiler implements Ordered {

    private int order;

    // allows us to control the ordering of advice
    public int getOrder() {
        return this.order;
    }

    public void setOrder(int order) {
        this.order = order;
    }

    // this method is the around advice
    public Object profile(ProceedingJoinPoint call) throws Throwable {
        Object returnValue;
        StopWatch clock = new StopWatch(getClass().getName());
        try {
            clock.start(call.toShortString());
            returnValue = call.proceed();
        } finally {
            clock.stop();
            System.out.println(clock.prettyPrint());
        }
        return returnValue;
    }
}
The ordering of advice
is controlled through the Ordered interface. For full details on advice ordering, see
Advice ordering.
The following configuration creates a fooService bean that has profiling and
transactional aspects applied to it in the desired order:
<?xml version="1.0" encoding="UTF-8"?>
<beans xmlns="http://www.springframework.org/schema/beans"
    xmlns:xsi="http://www.w3.org/2001/XMLSchema-instance"
    xmlns:aop="http://www.springframework.org/schema/aop"
    xmlns:tx="http://www.springframework.org/schema/tx"
    xsi:schemaLocation="
        http://www.springframework.org/schema/beans
        http://www.springframework.org/schema/beans/spring-beans.xsd
        http://www.springframework.org/schema/tx
        http://www.springframework.org/schema/tx/spring-tx.xsd
        http://www.springframework.org/schema/aop
        http://www.springframework.org/schema/aop/spring-aop.xsd">

    <bean id="fooService" class="x.y.service.DefaultFooService"/>

    <!-- this is the aspect -->
    <bean id="profiler" class="x.y.SimpleProfiler">
        <!-- execute before the transactional advice (hence the lower order number) -->
        <property name="order" value="1"/>
    </bean>

    <tx:annotation-driven transaction-manager="txManager" order="200"/>

    <aop:config>
            <!-- this advice will execute around the transactional advice -->
            <aop:aspect id="profilingAspect" ref="profiler">
                <aop:pointcut id="serviceMethodWithReturnValue"
                        expression="execution(!void x.y..*Service.*(..))"/>
                <aop:around method="profile" pointcut-ref="serviceMethodWithReturnValue"/>
            </aop:aspect>
    </aop:config>

    <bean id="dataSource" class="org.apache.commons.dbcp.BasicDataSource" destroy-method="close">
        <property name="driverClassName" value="oracle.jdbc.driver.OracleDriver"/>
        <property name="url" value="jdbc:oracle:thin:@rj-t42:1521:elvis"/>
        <property name="username" value="scott"/>
        <property name="password" value="tiger"/>
    </bean>

    <bean id="txManager" class="org.springframework.jdbc.datasource.DataSourceTransactionManager">
        <property name="dataSource" ref="dataSource"/>
    </bean>

</beans>
You can configure any number of additional aspects in similar fashion.
The following example creates the same setup as the previous two examples but uses the purely XML declarative approach:
<?xml version="1.0" encoding="UTF-8"?>
<beans xmlns="http://www.springframework.org/schema/beans"
    xmlns:xsi="http://www.w3.org/2001/XMLSchema-instance"
    xmlns:aop="http://www.springframework.org/schema/aop"
    xmlns:tx="http://www.springframework.org/schema/tx"
    xsi:schemaLocation="
        http://www.springframework.org/schema/beans
        http://www.springframework.org/schema/beans/spring-beans.xsd
        http://www.springframework.org/schema/tx
        http://www.springframework.org/schema/tx/spring-tx.xsd
        http://www.springframework.org/schema/aop
        http://www.springframework.org/schema/aop/spring-aop.xsd">

    <bean id="fooService" class="x.y.service.DefaultFooService"/>

    <!-- the profiling advice -->
    <bean id="profiler" class="x.y.SimpleProfiler">
        <!-- execute before the transactional advice (hence the lower order number) -->
        <property name="order" value="1"/>
    </bean>

    <aop:config>
        <aop:pointcut id="entryPointMethod" expression="execution(* x.y..*Service.*(..))"/>
        <!-- will execute after the profiling advice (c.f. the order attribute) -->

        <aop:advisor advice-ref="txAdvice" pointcut-ref="entryPointMethod" order="2"/>
        <!-- order value is higher than the profiling aspect -->

        <aop:aspect id="profilingAspect" ref="profiler">
            <aop:pointcut id="serviceMethodWithReturnValue"
                    expression="execution(!void x.y..*Service.*(..))"/>
            <aop:around method="profile" pointcut-ref="serviceMethodWithReturnValue"/>
        </aop:aspect>

    </aop:config>

    <tx:advice id="txAdvice" transaction-manager="txManager">
        <tx:attributes>
            <tx:method name="get*" read-only="true"/>
            <tx:method name="*"/>
        </tx:attributes>
    </tx:advice>

    <!-- other <bean/> definitions such as a DataSource and a PlatformTransactionManager here -->

</beans>
The result of the preceding configuration is a fooService bean that has profiling and
transactional aspects applied to it in that order. If you want the profiling advice
to execute after the transactional advice on the way in and before the
transactional advice on the way out, you can swap the value of the profiling
aspect bean’s order property so that it is higher than the transactional advice’s
order value.
You can configure additional aspects in similar fashion.
1.4.9. Using @Transactional with AspectJ
You can also use the Spring Framework’s @Transactional support outside of a Spring
container by means of an AspectJ aspect. To do so, first annotate your classes
(and optionally your classes' methods) with the @Transactional annotation,
and then link (weave) your application with the
org.springframework.transaction.aspectj.AnnotationTransactionAspect defined in the
spring-aspects.jar file. You must also configure The aspect with a transaction
manager. You can use the Spring Framework’s IoC container to take care of
dependency-injecting the aspect. The simplest way to configure the transaction
management aspect is to use the <tx:annotation-driven/> element and specify the mode
attribute to aspectj as described in Using @Transactional. Because
we focus here on applications that run outside of a Spring container, we show
you how to do it programmatically.
Prior to continuing, you may want to read Using @Transactional and
AOP respectively.
|
The following example shows how to create a transaction manager and configure the
AnnotationTransactionAspect to use it:
// construct an appropriate transaction manager
DataSourceTransactionManager txManager = new DataSourceTransactionManager(getDataSource());

// configure the AnnotationTransactionAspect to use it; this must be done before executing any transactional methods
AnnotationTransactionAspect.aspectOf().setTransactionManager(txManager);| When you use this aspect, you must annotate the implementation class (or the methods within that class or both), not the interface (if any) that the class implements. AspectJ follows Java’s rule that annotations on interfaces are not inherited. |
The @Transactional annotation on a class specifies the default transaction semantics
for the execution of any public method in the class.
The @Transactional annotation on a method within the class overrides the default
transaction semantics given by the class annotation (if present). You can annotate any method,
regardless of visibility.
To weave your applications with the AnnotationTransactionAspect, you must either build
your application with AspectJ (see the
AspectJ Development
Guide) or use load-time weaving. See Load-time weaving with
AspectJ in the Spring Framework for a discussion of load-time weaving with AspectJ.
1.5. Programmatic Transaction Management
The Spring Framework provides two means of programmatic transaction management, by using:
-
The
TransactionTemplate. -
A
PlatformTransactionManagerimplementation directly.
The Spring team generally recommends the TransactionTemplate for programmatic
transaction management. The second approach is similar to using the JTA
UserTransaction API, although exception handling is less cumbersome.
1.5.1. Using the TransactionTemplate
The TransactionTemplate adopts the same approach as other Spring templates, such as
the JdbcTemplate. It uses a callback approach (to free application code from having to
do the boilerplate acquisition and release transactional resources) and results in
code that is intention driven, in that your code focuses solely on what
you want to do.
As the examples that follow show, using the TransactionTemplate absolutely
couples you to Spring’s transaction infrastructure and APIs. Whether or not programmatic
transaction management is suitable for your development needs is a decision that you
have to make yourself.
|
Application code that must execute in a transactional context and that explicitly uses the
TransactionTemplate resembles the next example. You, as an application
developer, can write a TransactionCallback implementation (typically expressed as an
anonymous inner class) that contains the code that you need to execute in the context of
a transaction. You can then pass an instance of your custom TransactionCallback to the
execute(..) method exposed on the TransactionTemplate. The following example shows how to do so:
public class SimpleService implements Service {

    // single TransactionTemplate shared amongst all methods in this instance
    private final TransactionTemplate transactionTemplate;

    // use constructor-injection to supply the PlatformTransactionManager
    public SimpleService(PlatformTransactionManager transactionManager) {
        this.transactionTemplate = new TransactionTemplate(transactionManager);
    }

    public Object someServiceMethod() {
        return transactionTemplate.execute(new TransactionCallback() {
            // the code in this method executes in a transactional context
            public Object doInTransaction(TransactionStatus status) {
                updateOperation1();
                return resultOfUpdateOperation2();
            }
        });
    }
}
If there is no return value, you can use the convenient TransactionCallbackWithoutResult class
with an anonymous class, as follows:
transactionTemplate.execute(new TransactionCallbackWithoutResult() {
    protected void doInTransactionWithoutResult(TransactionStatus status) {
        updateOperation1();
        updateOperation2();
    }
});
Code within the callback can roll the transaction back by calling the
setRollbackOnly() method on the supplied TransactionStatus object, as follows:
transactionTemplate.execute(new TransactionCallbackWithoutResult() {

    protected void doInTransactionWithoutResult(TransactionStatus status) {
        try {
            updateOperation1();
            updateOperation2();
        } catch (SomeBusinessException ex) {
            status.setRollbackOnly();
        }
    }
});
Specifying Transaction Settings
You can specify transaction settings (such as the propagation mode, the isolation level,
the timeout, and so forth) on the TransactionTemplate either programmatically or in
configuration. By default, TransactionTemplate instances have the
default transactional settings. The
following example shows the programmatic customization of the transactional settings for
a specific TransactionTemplate:
public class SimpleService implements Service {

    private final TransactionTemplate transactionTemplate;

    public SimpleService(PlatformTransactionManager transactionManager) {
        this.transactionTemplate = new TransactionTemplate(transactionManager);

        // the transaction settings can be set here explicitly if so desired
        this.transactionTemplate.setIsolationLevel(TransactionDefinition.ISOLATION_READ_UNCOMMITTED);
        this.transactionTemplate.setTimeout(30); // 30 seconds
        // and so forth...
    }
}
The following example defines a TransactionTemplate with some custom transactional
settings by using Spring XML configuration:
<bean id="sharedTransactionTemplate"
        class="org.springframework.transaction.support.TransactionTemplate">
    <property name="isolationLevelName" value="ISOLATION_READ_UNCOMMITTED"/>
    <property name="timeout" value="30"/>
</bean>"
You can then inject the sharedTransactionTemplate
into as many services as are required.
Finally, instances of the TransactionTemplate class are thread-safe, in that instances
do not maintain any conversational state. TransactionTemplate instances do, however,
maintain configuration state. So, while a number of classes may share a single instance
of a TransactionTemplate, if a class needs to use a TransactionTemplate with
different settings (for example, a different isolation level), you need to create
two distinct TransactionTemplate instances.
1.5.2. Using the PlatformTransactionManager
You can also use the org.springframework.transaction.PlatformTransactionManager
directly to manage your transaction. To do so, pass the implementation of the
PlatformTransactionManager you use to your bean through a bean reference. Then,
by using the TransactionDefinition and TransactionStatus objects, you can initiate
transactions, roll back, and commit. The following example shows how to do so:
DefaultTransactionDefinition def = new DefaultTransactionDefinition();
// explicitly setting the transaction name is something that can be done only programmatically
def.setName("SomeTxName");
def.setPropagationBehavior(TransactionDefinition.PROPAGATION_REQUIRED);

TransactionStatus status = txManager.getTransaction(def);
try {
    // execute your business logic here
}
catch (MyException ex) {
    txManager.rollback(status);
    throw ex;
}
txManager.commit(status);
1.6. Choosing Between Programmatic and Declarative Transaction Management
Programmatic transaction management is usually a good idea only if you have a small
number of transactional operations. For example, if you have a web application that
requires transactions only for certain update operations, you may not want to set up
transactional proxies by using Spring or any other technology. In this case, using the
TransactionTemplate may be a good approach. Being able to set the transaction name
explicitly is also something that can be done only by using the programmatic approach to
transaction management.
On the other hand, if your application has numerous transactional operations, declarative transaction management is usually worthwhile. It keeps transaction management out of business logic and is not difficult to configure. When using the Spring Framework, rather than EJB CMT, the configuration cost of declarative transaction management is greatly reduced.
1.7. Transaction-bound Events
As of Spring 4.2, the listener of an event can be bound to a phase of the transaction. The typical example is to handle the event when the transaction has completed successfully. Doing so lets events be used with more flexibility when the outcome of the current transaction actually matters to the listener.
You can register a regular event listener by using the @EventListener annotation. If you need
to bind it to the transaction, use @TransactionalEventListener. When you do so, the listener
is bound to the commit phase of the transaction by default.
The next example shows this concept. Assume that a component publishes an order-created event and that we want to define a listener that should only handle that event once the transaction in which it has been published has committed successfully. The following example sets up such an event listener:
@Component
public class MyComponent {

    @TransactionalEventListener
    public void handleOrderCreatedEvent(CreationEvent<Order> creationEvent) {
        ...
    }
}
The @TransactionalEventListener annotation exposes a phase attribute that lets you customize
the phase of the transaction to which the listener should be bound. The valid phases are BEFORE_COMMIT,
AFTER_COMMIT (default), AFTER_ROLLBACK, and AFTER_COMPLETION that aggregates the transaction
completion (be it a commit or a rollback).
If no transaction is running, the listener is not invoked at all, since we cannot honor the required
semantics. You can, however, override that behavior by setting the fallbackExecution attribute
of the annotation to true.
1.8. Application server-specific integration
Spring’s transaction abstraction is generally application server-agnostic. Additionally,
Spring’s JtaTransactionManager class (which can optionally perform a JNDI lookup for
the JTA UserTransaction and TransactionManager objects) autodetects the location for
the latter object, which varies by application server. Having access to the JTA
TransactionManager allows for enhanced transaction semantics — in particular,
supporting transaction suspension. See the
JtaTransactionManager
javadoc for details.
Spring’s JtaTransactionManager is the standard choice to run on Java EE application
servers and is known to work on all common servers. Advanced functionality, such as
transaction suspension, works on many servers as well (including GlassFish, JBoss and
Geronimo) without any special configuration required. However, for fully supported
transaction suspension and further advanced integration, Spring includes special adapters
for WebLogic Server and WebSphere. These adapters are discussed in the following
sections.
For standard scenarios, including WebLogic Server and WebSphere, consider using the
convenient <tx:jta-transaction-manager/> configuration element. When configured,
this element automatically detects the underlying server and chooses the best
transaction manager available for the platform. This means that you need not explicitly
configure server-specific adapter classes (as discussed in the following sections).
Rather, they are chosen automatically, with the standard
JtaTransactionManager as the default fallback.
1.8.1. IBM WebSphere
On WebSphere 6.1.0.9 and above, the recommended Spring JTA transaction manager to use is
WebSphereUowTransactionManager. This special adapter uses IBM’s UOWManager API,
which is available in WebSphere Application Server 6.1.0.9 and later. With this adapter,
Spring-driven transaction suspension (suspend and resume as initiated by
PROPAGATION_REQUIRES_NEW) is officially supported by IBM.
1.8.2. Oracle WebLogic Server
On WebLogic Server 9.0 or above, you would typically use the
WebLogicJtaTransactionManager instead of the stock JtaTransactionManager class. This
special WebLogic-specific subclass of the normal JtaTransactionManager supports the
full power of Spring’s transaction definitions in a WebLogic-managed transaction
environment, beyond standard JTA semantics. Features include transaction names,
per-transaction isolation levels, and proper resuming of transactions in all cases.
1.9. Solutions to Common Problems
This section describes solutions to some common problems.
1.9.1. Using the Wrong Transaction Manager for a Specific DataSource
Use the correct PlatformTransactionManager implementation based on your choice of
transactional technologies and requirements. Used properly, the Spring Framework merely
provides a straightforward and portable abstraction. If you use global
transactions, you must use the
org.springframework.transaction.jta.JtaTransactionManager class (or an
application server-specific subclass of
it) for all your transactional operations. Otherwise, the transaction infrastructure
tries to perform local transactions on such resources as container DataSource
instances. Such local transactions do not make sense, and a good application server
treats them as errors.
1.10. Further Resources
For more information about the Spring Framework’s transaction support, see:
-
Distributed transactions in Spring, with and without XA is a JavaWorld presentation in which Spring’s David Syer guides you through seven patterns for distributed transactions in Spring applications, three of them with XA and four without.
-
Java Transaction Design Strategies is a book available from InfoQ that provides a well-paced introduction to transactions in Java. It also includes side-by-side examples of how to configure and use transactions with both the Spring Framework and EJB3.
2. DAO Support
The Data Access Object (DAO) support in Spring is aimed at making it easy to work with data access technologies (such as JDBC, Hibernate, or JPA) in a consistent way. This lets you switch between the aforementioned persistence technologies fairly easily, and it also lets you code without worrying about catching exceptions that are specific to each technology.
2.1. Consistent Exception Hierarchy
Spring provides a convenient translation from technology-specific exceptions, such as
SQLException to its own exception class hierarchy, which has DataAccessException as
the root exception. These exceptions wrap the original exception so that there is never any
risk that you might lose any information about what might have gone wrong.
In addition to JDBC exceptions, Spring can also wrap JPA- and Hibernate-specific exceptions, converting them to a set of focused runtime exceptions. This lets you handle most non-recoverable persistence exceptions in only the appropriate layers, without having annoying boilerplate catch-and-throw blocks and exception declarations in your DAOs. (You can still trap and handle exceptions anywhere you need to though.) As mentioned above, JDBC exceptions (including database-specific dialects) are also converted to the same hierarchy, meaning that you can perform some operations with JDBC within a consistent programming model.
The preceding discussion holds true for the various template classes in Spring’s support for various ORM
frameworks. If you use the interceptor-based classes, the application must care
about handling HibernateExceptions and PersistenceExceptions itself, preferably by
delegating to the convertHibernateAccessException(..) or
convertJpaAccessException() methods, respectively, of SessionFactoryUtils. These methods convert the exceptions
to exceptions that are compatible with the exceptions in the org.springframework.dao
exception hierarchy. As PersistenceExceptions are unchecked, they can get
thrown, too (sacrificing generic DAO abstraction in terms of exceptions, though).
The following image shows the exception hierarchy that Spring provides. (Note that the
class hierarchy detailed in the image shows only a subset of the entire
DataAccessException hierarchy.)
2.2. Annotations Used to Configure DAO or Repository Classes
The best way to guarantee that your Data Access Objects (DAOs) or repositories provide
exception translation is to use the @Repository annotation. This annotation also
lets the component scanning support find and configure your DAOs and repositories
without having to provide XML configuration entries for them. The following example shows
how to use the @Repository annotation:
@Repository (1)
public class SomeMovieFinder implements MovieFinder {
    // ...
}| 1 | The @Repository annotation. |
Any DAO or repository implementation needs access to a persistence resource,
depending on the persistence technology used. For example, a JDBC-based repository
needs access to a JDBC DataSource, and a JPA-based repository needs access to an
EntityManager. The easiest way to accomplish this is to have this resource dependency
injected by using one of the @Autowired, @Inject, @Resource or @PersistenceContext
annotations. The following example works for a JPA repository:
@Repository
public class JpaMovieFinder implements MovieFinder {

    @PersistenceContext
    private EntityManager entityManager;

    // ...

}
If you use the classic Hibernate APIs, you can inject SessionFactory, as the following
example shows:
@Repository
public class HibernateMovieFinder implements MovieFinder {

    private SessionFactory sessionFactory;

    @Autowired
    public void setSessionFactory(SessionFactory sessionFactory) {
        this.sessionFactory = sessionFactory;
    }

    // ...

}
The last example we show here is for typical JDBC support. You could have the
DataSource injected into an initialization method, where you would create a
JdbcTemplate and other data access support classes (such as SimpleJdbcCall and others) by using
this DataSource. The following example autowires a DataSource:
@Repository
public class JdbcMovieFinder implements MovieFinder {

    private JdbcTemplate jdbcTemplate;

    @Autowired
    public void init(DataSource dataSource) {
        this.jdbcTemplate = new JdbcTemplate(dataSource);
    }

    // ...

}| See the specific coverage of each persistence technology for details on how to configure the application context to take advantage of these annotations. |
3. Data Access with JDBC
The value provided by the Spring Framework JDBC abstraction is perhaps best shown by the sequence of actions outlined in the following table below. The table shows which actions Spring takes care of and which actions are your responsibility.
| Action | Spring | You |
|---|---|---|
Define connection parameters. |
X |
|
Open the connection. |
X |
|
Specify the SQL statement. |
X |
|
Declare parameters and provide parameter values |
X |
|
Prepare and execute the statement. |
X |
|
Set up the loop to iterate through the results (if any). |
X |
|
Do the work for each iteration. |
X |
|
Process any exception. |
X |
|
Handle transactions. |
X |
|
Close the connection, the statement, and the resultset. |
X |
The Spring Framework takes care of all the low-level details that can make JDBC such a tedious API.
3.1. Choosing an Approach for JDBC Database Access
You can choose among several approaches to form the basis for your JDBC database access.
In addition to three flavors of JdbcTemplate, a new SimpleJdbcInsert and
SimpleJdbcCall approach optimizes database metadata, and the RDBMS Object style takes a
more object-oriented approach similar to that of JDO Query design. Once you start using
one of these approaches, you can still mix and match to include a feature from a
different approach. All approaches require a JDBC 2.0-compliant driver, and some
advanced features require a JDBC 3.0 driver.
-
JdbcTemplateis the classic and most popular Spring JDBC approach. This “lowest-level” approach and all others use a JdbcTemplate under the covers. -
NamedParameterJdbcTemplatewraps aJdbcTemplateto provide named parameters instead of the traditional JDBC?placeholders. This approach provides better documentation and ease of use when you have multiple parameters for an SQL statement. -
SimpleJdbcInsertandSimpleJdbcCalloptimize database metadata to limit the amount of necessary configuration. This approach simplifies coding so that you need to provide only the name of the table or procedure and provide a map of parameters matching the column names. This works only if the database provides adequate metadata. If the database does not provide this metadata, you have to provide explicit configuration of the parameters. -
RDBMS objects, including
MappingSqlQuery,SqlUpdateandStoredProcedure, require you to create reusable and thread-safe objects during initialization of your data-access layer. This approach is modeled after JDO Query, wherein you define your query string, declare parameters, and compile the query. Once you do that, execute methods can be called multiple times with various parameter values.
3.2. Package Hierarchy
The Spring Framework’s JDBC abstraction framework consists of four different packages:
-
core: Theorg.springframework.jdbc.corepackage contains theJdbcTemplateclass and its various callback interfaces, plus a variety of related classes. A subpackage namedorg.springframework.jdbc.core.simplecontains theSimpleJdbcInsertandSimpleJdbcCallclasses. Another subpackage namedorg.springframework.jdbc.core.namedparamcontains theNamedParameterJdbcTemplateclass and the related support classes. See Using the JDBC Core Classes to Control Basic JDBC Processing and Error Handling, JDBC Batch Operations, and Simplifying JDBC Operations with theSimpleJdbcClasses. -
datasource: Theorg.springframework.jdbc.datasourcepackage contains a utility class for easyDataSourceaccess and various simpleDataSourceimplementations that you can use for testing and running unmodified JDBC code outside of a Java EE container. A subpackage namedorg.springfamework.jdbc.datasource.embeddedprovides support for creating embedded databases by using Java database engines, such as HSQL, H2, and Derby. See Controlling Database Connections and Embedded Database Support.
object: The org.springframework.jdbc.object package contains classes that represent RDBMS
queries, updates, and stored procedures as thread-safe, reusable objects. See
Modeling JDBC Operations as Java Objects. This approach is modeled by JDO, although objects returned by queries
are naturally disconnected from the database. This higher-level of JDBC abstraction
depends on the lower-level abstraction in the org.springframework.jdbc.core package.
support: The org.springframework.jdbc.support package provides SQLException translation
functionality and some utility classes. Exceptions thrown during JDBC processing are
translated to exceptions defined in the org.springframework.dao package. This means
that code using the Spring JDBC abstraction layer does not need to implement JDBC or
RDBMS-specific error handling. All translated exceptions are unchecked, which gives you
the option of catching the exceptions from which you can recover while letting other
exceptions be propagated to the caller. See Using SQLExceptionTranslator.
3.3. Using the JDBC Core Classes to Control Basic JDBC Processing and Error Handling
This section covers how to use the JDBC core classes to control basic JDBC processing, including error handling. It includes the following topics:
3.3.1. Using JdbcTemplate
JdbcTemplate is the central class in the JDBC core package. It handles the
creation and release of resources, which helps you avoid common errors, such as
forgetting to close the connection. It performs the basic tasks of the core JDBC
workflow (such as statement creation and execution), leaving application code to provide
SQL and extract results. The JdbcTemplate class:
-
Runs SQL queries
-
Updates statements and stored procedure calls
-
Performs iteration over
ResultSetinstances and extraction of returned parameter values. -
Catches JDBC exceptions and translates them to the generic, more informative, exception hierarchy defined in the
org.springframework.daopackage. (See Consistent Exception Hierarchy.)
When you use the JdbcTemplate for your code, you need only to implement callback
interfaces, giving them a clearly defined contract. Given a Connection provided by the
JdbcTemplate class, the PreparedStatementCreator
callback interface creates a prepared statement, providing SQL and any necessary parameters. The same is true for the
CallableStatementCreator interface, which creates callable statements. The
RowCallbackHandler interface extracts values from each row of a ResultSet.
You can use JdbcTemplate within a DAO implementation through direct instantiation
with a DataSource reference, or you can configure it in a Spring IoC container and give it to
DAOs as a bean reference.
The DataSource should always be configured as a bean in the Spring IoC container. In
the first case the bean is given to the service directly; in the second case it is given
to the prepared template.
|
All SQL issued by this class is logged at the DEBUG level under the category
corresponding to the fully qualified class name of the template instance (typically
JdbcTemplate, but it may be different if you use a custom subclass of the
JdbcTemplate class).
The following sections provide some examples of JdbcTemplate usage. These examples
are not an exhaustive list of all of the functionality exposed by the JdbcTemplate.
See the attendant javadoc for that.
Querying (SELECT)
The following query gets the number of rows in a relation:
int rowCount = this.jdbcTemplate.queryForObject("select count(*) from t_actor", Integer.class);The following query uses a bind variable:
int countOfActorsNamedJoe = this.jdbcTemplate.queryForObject(
        "select count(*) from t_actor where first_name = ?", Integer.class, "Joe");
The following query looks for a String:
String lastName = this.jdbcTemplate.queryForObject(
        "select last_name from t_actor where id = ?",
        new Object[]{1212L}, String.class);
The following query finds and populates a single domain object:
Actor actor = this.jdbcTemplate.queryForObject(
        "select first_name, last_name from t_actor where id = ?",
        new Object[]{1212L},
        new RowMapper<Actor>() {
            public Actor mapRow(ResultSet rs, int rowNum) throws SQLException {
                Actor actor = new Actor();
                actor.setFirstName(rs.getString("first_name"));
                actor.setLastName(rs.getString("last_name"));
                return actor;
            }
        });
The following query finds and populates a number of domain objects:
List<Actor> actors = this.jdbcTemplate.query(
        "select first_name, last_name from t_actor",
        new RowMapper<Actor>() {
            public Actor mapRow(ResultSet rs, int rowNum) throws SQLException {
                Actor actor = new Actor();
                actor.setFirstName(rs.getString("first_name"));
                actor.setLastName(rs.getString("last_name"));
                return actor;
            }
        });
If the last two snippets of code actually existed in the same application, it would make
sense to remove the duplication present in the two RowMapper anonymous inner classes
and extract them out into a single class (typically a static nested class) that could
then be referenced by DAO methods as needed. For example, it may be better to write the
preceding code snippet as follows:
public List<Actor> findAllActors() {
    return this.jdbcTemplate.query( "select first_name, last_name from t_actor", new ActorMapper());
}

private static final class ActorMapper implements RowMapper<Actor> {

    public Actor mapRow(ResultSet rs, int rowNum) throws SQLException {
        Actor actor = new Actor();
        actor.setFirstName(rs.getString("first_name"));
        actor.setLastName(rs.getString("last_name"));
        return actor;
    }
}
Updating (INSERT, UPDATE, and DELETE) with JdbcTemplate
You can use the update(..) method to perform insert, update, and delete operations.
Parameter values are usually provided as variable arguments or, alternatively, as an object array.
The following example inserts a new entry:
this.jdbcTemplate.update(
        "insert into t_actor (first_name, last_name) values (?, ?)",
        "Leonor", "Watling");
The following example updates an existing entry:
this.jdbcTemplate.update(
        "update t_actor set last_name = ? where id = ?",
        "Banjo", 5276L);
The following example deletes an entry:
this.jdbcTemplate.update(
        "delete from actor where id = ?",
        Long.valueOf(actorId));
Other JdbcTemplate Operations
You can use the execute(..) method to run any arbitrary SQL. Consequently, the
method is often used for DDL statements. It is heavily overloaded with variants that take
callback interfaces, binding variable arrays, and so on. The following example creates a
table:
this.jdbcTemplate.execute("create table mytable (id integer, name varchar(100))");The following example invokes a stored procedure:
this.jdbcTemplate.update(
        "call SUPPORT.REFRESH_ACTORS_SUMMARY(?)",
        Long.valueOf(unionId));
More sophisticated stored procedure support is covered later.
JdbcTemplate Best Practices
Instances of the JdbcTemplate class are thread-safe, once configured. This is
important because it means that you can configure a single instance of a JdbcTemplate
and then safely inject this shared reference into multiple DAOs (or repositories).
The JdbcTemplate is stateful, in that it maintains a reference to a DataSource, but
this state is not conversational state.
A common practice when using the JdbcTemplate class (and the associated
NamedParameterJdbcTemplate class) is to
configure a DataSource in your Spring configuration file and then dependency-inject
that shared DataSource bean into your DAO classes. The JdbcTemplate is created in
the setter for the DataSource. This leads to DAOs that resemble the following:
public class JdbcCorporateEventDao implements CorporateEventDao {

    private JdbcTemplate jdbcTemplate;

    public void setDataSource(DataSource dataSource) {
        this.jdbcTemplate = new JdbcTemplate(dataSource);
    }

    // JDBC-backed implementations of the methods on the CorporateEventDao follow...
}
The following example shows the corresponding XML configuration:
<?xml version="1.0" encoding="UTF-8"?>
<beans xmlns="http://www.springframework.org/schema/beans"
    xmlns:xsi="http://www.w3.org/2001/XMLSchema-instance"
    xmlns:context="http://www.springframework.org/schema/context"
    xsi:schemaLocation="
        http://www.springframework.org/schema/beans
        http://www.springframework.org/schema/beans/spring-beans.xsd
        http://www.springframework.org/schema/context
        http://www.springframework.org/schema/context/spring-context.xsd">

    <bean id="corporateEventDao" class="com.example.JdbcCorporateEventDao">
        <property name="dataSource" ref="dataSource"/>
    </bean>

    <bean id="dataSource" class="org.apache.commons.dbcp.BasicDataSource" destroy-method="close">
        <property name="driverClassName" value="${jdbc.driverClassName}"/>
        <property name="url" value="${jdbc.url}"/>
        <property name="username" value="${jdbc.username}"/>
        <property name="password" value="${jdbc.password}"/>
    </bean>

    <context:property-placeholder location="jdbc.properties"/>

</beans>
An alternative to explicit configuration is to use component-scanning and annotation
support for dependency injection. In this case, you can annotate the class with @Repository
(which makes it a candidate for component-scanning) and annotate the DataSource setter
method with @Autowired. The following example shows how to do so:
@Repository (1)
public class JdbcCorporateEventDao implements CorporateEventDao {

    private JdbcTemplate jdbcTemplate;

    @Autowired (2)
    public void setDataSource(DataSource dataSource) {
        this.jdbcTemplate = new JdbcTemplate(dataSource); (3)
    }

    // JDBC-backed implementations of the methods on the CorporateEventDao follow...
}| 1 | Annotate the class with @Repository. |
| 2 | annotate the DataSource setter method with @Autowired. |
| 3 | Create a new JdbcTemplate with the DataSource. |
The following example shows the corresponding XML configuration:
<?xml version="1.0" encoding="UTF-8"?>
<beans xmlns="http://www.springframework.org/schema/beans"
    xmlns:xsi="http://www.w3.org/2001/XMLSchema-instance"
    xmlns:context="http://www.springframework.org/schema/context"
    xsi:schemaLocation="
        http://www.springframework.org/schema/beans
        http://www.springframework.org/schema/beans/spring-beans.xsd
        http://www.springframework.org/schema/context
        http://www.springframework.org/schema/context/spring-context.xsd">

    <!-- Scans within the base package of the application for @Component classes to configure as beans -->
    <context:component-scan base-package="org.springframework.docs.test" />

    <bean id="dataSource" class="org.apache.commons.dbcp.BasicDataSource" destroy-method="close">
        <property name="driverClassName" value="${jdbc.driverClassName}"/>
        <property name="url" value="${jdbc.url}"/>
        <property name="username" value="${jdbc.username}"/>
        <property name="password" value="${jdbc.password}"/>
    </bean>

    <context:property-placeholder location="jdbc.properties"/>

</beans>
If you use Spring’s JdbcDaoSupport class and your various JDBC-backed DAO classes
extend from it, your sub-class inherits a setDataSource(..) method from the
JdbcDaoSupport class. You can choose whether to inherit from this class. The
JdbcDaoSupport class is provided as a convenience only.
Regardless of which of the above template initialization styles you choose to use (or
not), it is seldom necessary to create a new instance of a JdbcTemplate class each
time you want to run SQL. Once configured, a JdbcTemplate instance is thread-safe.
If your application accesses multiple
databases, you may want multiple JdbcTemplate instances, which requires multiple DataSources and, subsequently, multiple differently
configured JdbcTemplate instances.
3.3.2. Using NamedParameterJdbcTemplate
The NamedParameterJdbcTemplate class adds support for programming JDBC statements
by using named parameters, as opposed to programming JDBC statements using only classic
placeholder ( '?') arguments. The NamedParameterJdbcTemplate class wraps a
JdbcTemplate and delegates to the wrapped JdbcTemplate to do much of its work. This
section describes only those areas of the NamedParameterJdbcTemplate class that differ
from the JdbcTemplate itself — namely, programming JDBC statements by using named
parameters. The following example shows how to use NamedParameterJdbcTemplate:
// some JDBC-backed DAO class...
private NamedParameterJdbcTemplate namedParameterJdbcTemplate;

public void setDataSource(DataSource dataSource) {
    this.namedParameterJdbcTemplate = new NamedParameterJdbcTemplate(dataSource);
}

public int countOfActorsByFirstName(String firstName) {

    String sql = "select count(*) from T_ACTOR where first_name = :first_name";

    SqlParameterSource namedParameters = new MapSqlParameterSource("first_name", firstName);

    return this.namedParameterJdbcTemplate.queryForObject(sql, namedParameters, Integer.class);
}
Notice the use of the named parameter notation in the value assigned to the sql
variable and the corresponding value that is plugged into the namedParameters
variable (of type MapSqlParameterSource).
Alternatively, you can pass along named parameters and their corresponding values to a
NamedParameterJdbcTemplate instance by using the Map-based style.The remaining
methods exposed by the NamedParameterJdbcOperations and implemented by the
NamedParameterJdbcTemplate class follow a similar pattern and are not covered here.
The following example shows the use of the Map-based style:
// some JDBC-backed DAO class...
private NamedParameterJdbcTemplate namedParameterJdbcTemplate;

public void setDataSource(DataSource dataSource) {
    this.namedParameterJdbcTemplate = new NamedParameterJdbcTemplate(dataSource);
}

public int countOfActorsByFirstName(String firstName) {

    String sql = "select count(*) from T_ACTOR where first_name = :first_name";

    Map<String, String> namedParameters = Collections.singletonMap("first_name", firstName);

    return this.namedParameterJdbcTemplate.queryForObject(sql, namedParameters,  Integer.class);
}
One nice feature related to the NamedParameterJdbcTemplate (and existing in the same
Java package) is the SqlParameterSource interface. You have already seen an example of
an implementation of this interface in one of the previous code snippets (the
MapSqlParameterSource class). An SqlParameterSource is a source of named parameter
values to a NamedParameterJdbcTemplate. The MapSqlParameterSource class is a
simple implementation that is an adapter around a java.util.Map, where the keys
are the parameter names and the values are the parameter values.
Another SqlParameterSource implementation is the BeanPropertySqlParameterSource
class. This class wraps an arbitrary JavaBean (that is, an instance of a class that
adheres to the
JavaBean conventions) and uses the properties of the wrapped JavaBean as the source
of named parameter values.
The following example shows a typical JavaBean:
public class Actor {

    private Long id;
    private String firstName;
    private String lastName;

    public String getFirstName() {
        return this.firstName;
    }

    public String getLastName() {
        return this.lastName;
    }

    public Long getId() {
        return this.id;
    }

    // setters omitted...

}
The following example uses a NamedParameterJdbcTemplate to return the count of the
members of the class shown in the preceding example:
// some JDBC-backed DAO class...
private NamedParameterJdbcTemplate namedParameterJdbcTemplate;

public void setDataSource(DataSource dataSource) {
    this.namedParameterJdbcTemplate = new NamedParameterJdbcTemplate(dataSource);
}

public int countOfActors(Actor exampleActor) {

    // notice how the named parameters match the properties of the above 'Actor' class
    String sql = "select count(*) from T_ACTOR where first_name = :firstName and last_name = :lastName";

    SqlParameterSource namedParameters = new BeanPropertySqlParameterSource(exampleActor);

    return this.namedParameterJdbcTemplate.queryForObject(sql, namedParameters, Integer.class);
}
Remember that the NamedParameterJdbcTemplate class wraps a classic JdbcTemplate
template. If you need access to the wrapped JdbcTemplate instance to access
functionality that is present only in the JdbcTemplate class, you can use the
getJdbcOperations() method to access the wrapped JdbcTemplate through the
JdbcOperations interface.
See also JdbcTemplate Best Practices for guidelines on using the
NamedParameterJdbcTemplate class in the context of an application.
3.3.3. Using SQLExceptionTranslator
SQLExceptionTranslator is an interface to be implemented by classes that can translate
between SQLExceptions and Spring’s own org.springframework.dao.DataAccessException,
which is agnostic in regard to data access strategy. Implementations can be generic (for
example, using SQLState codes for JDBC) or proprietary (for example, using Oracle error
codes) for greater precision.
SQLErrorCodeSQLExceptionTranslator is the implementation of SQLExceptionTranslator
that is used by default. This implementation uses specific vendor codes. It is more
precise than the SQLState implementation. The error code translations are based on
codes held in a JavaBean type class called SQLErrorCodes. This class is created and
populated by an SQLErrorCodesFactory, which (as the name suggests) is a factory for
creating SQLErrorCodes based on the contents of a configuration file named
sql-error-codes.xml. This file is populated with vendor codes and based on the
DatabaseProductName taken from DatabaseMetaData. The codes for the actual
database you are using are used.
The SQLErrorCodeSQLExceptionTranslator applies matching rules in the following sequence:
-
Any custom translation implemented by a subclass. Normally, the provided concrete
SQLErrorCodeSQLExceptionTranslatoris used, so this rule does not apply. It applies only if you have actually provided a subclass implementation. -
Any custom implementation of the
SQLExceptionTranslatorinterface that is provided as thecustomSqlExceptionTranslatorproperty of theSQLErrorCodesclass. -
The list of instances of the
CustomSQLErrorCodesTranslationclass (provided for thecustomTranslationsproperty of theSQLErrorCodesclass) are searched for a match. -
Error code matching is applied.
-
Use the fallback translator.
SQLExceptionSubclassTranslatoris the default fallback translator. If this translation is not available, the next fallback translator is theSQLStateSQLExceptionTranslator.
The SQLErrorCodesFactory is used by default to define Error codes and custom exception
translations. They are looked up in a file named sql-error-codes.xml from the
classpath, and the matching SQLErrorCodes instance is located based on the database
name from the database metadata of the database in use.
|
You can extend SQLErrorCodeSQLExceptionTranslator, as the following example shows:
public class CustomSQLErrorCodesTranslator extends SQLErrorCodeSQLExceptionTranslator {

    protected DataAccessException customTranslate(String task, String sql, SQLException sqlex) {
        if (sqlex.getErrorCode() == -12345) {
            return new DeadlockLoserDataAccessException(task, sqlex);
        }
        return null;
    }
}
In the preceding example, the specific error code (-12345) is translated, while other errors are
left to be translated by the default translator implementation. To use this custom
translator, you must pass it to the JdbcTemplate through the method
setExceptionTranslator, and you must use this JdbcTemplate for all of the data access
processing where this translator is needed. The following example shows how you can use this custom
translator:
private JdbcTemplate jdbcTemplate;

public void setDataSource(DataSource dataSource) {

    // create a JdbcTemplate and set data source
    this.jdbcTemplate = new JdbcTemplate();
    this.jdbcTemplate.setDataSource(dataSource);

    // create a custom translator and set the DataSource for the default translation lookup
    CustomSQLErrorCodesTranslator tr = new CustomSQLErrorCodesTranslator();
    tr.setDataSource(dataSource);
    this.jdbcTemplate.setExceptionTranslator(tr);

}

public void updateShippingCharge(long orderId, long pct) {
    // use the prepared JdbcTemplate for this update
    this.jdbcTemplate.update("update orders" +
        " set shipping_charge = shipping_charge * ? / 100" +
        " where id = ?", pct, orderId);
}
The custom translator is passed a data source in order to look up the error codes in
sql-error-codes.xml.
3.3.4. Running Statements
Running an SQL statement requires very little code. You need a DataSource and a
JdbcTemplate, including the convenience methods that are provided with the
JdbcTemplate. The following example shows what you need to include for a minimal but
fully functional class that creates a new table:
import javax.sql.DataSource;
import org.springframework.jdbc.core.JdbcTemplate;

public class ExecuteAStatement {

    private JdbcTemplate jdbcTemplate;

    public void setDataSource(DataSource dataSource) {
        this.jdbcTemplate = new JdbcTemplate(dataSource);
    }

    public void doExecute() {
        this.jdbcTemplate.execute("create table mytable (id integer, name varchar(100))");
    }
}
3.3.5. Running Queries
Some query methods return a single value. To retrieve a count or a specific value from
one row, use queryForObject(..). The latter converts the returned JDBC Type to the
Java class that is passed in as an argument. If the type conversion is invalid, an
InvalidDataAccessApiUsageException is thrown. The following example contains two
query methods, one for an int and one that queries for a String:
import javax.sql.DataSource;
import org.springframework.jdbc.core.JdbcTemplate;

public class RunAQuery {

    private JdbcTemplate jdbcTemplate;

    public void setDataSource(DataSource dataSource) {
        this.jdbcTemplate = new JdbcTemplate(dataSource);
    }

    public int getCount() {
        return this.jdbcTemplate.queryForObject("select count(*) from mytable", Integer.class);
    }

    public String getName() {
        return this.jdbcTemplate.queryForObject("select name from mytable", String.class);
    }
}
In addition to the single result query methods, several methods return a list with an
entry for each row that the query returned. The most generic method is queryForList(..),
which returns a List where each element is a Map containing one entry for each column,
using the column name as the key. If you add a method to the preceding example to retrieve a
list of all the rows, it might be as follows:
private JdbcTemplate jdbcTemplate;

public void setDataSource(DataSource dataSource) {
    this.jdbcTemplate = new JdbcTemplate(dataSource);
}

public List<Map<String, Object>> getList() {
    return this.jdbcTemplate.queryForList("select * from mytable");
}
The returned list would resemble the following:
[{name=Bob, id=1}, {name=Mary, id=2}]
3.3.6. Updating the Database
The following example updates a column for a certain primary key:
import javax.sql.DataSource;
import org.springframework.jdbc.core.JdbcTemplate;

public class ExecuteAnUpdate {

    private JdbcTemplate jdbcTemplate;

    public void setDataSource(DataSource dataSource) {
        this.jdbcTemplate = new JdbcTemplate(dataSource);
    }

    public void setName(int id, String name) {
        this.jdbcTemplate.update("update mytable set name = ? where id = ?", name, id);
    }
}
In the preceding example, an SQL statement has placeholders for row parameters. You can pass the parameter values in as varargs or ,alternatively, as an array of objects. Thus, you should explicitly wrap primitives in the primitive wrapper classes, or you should use auto-boxing.
3.3.7. Retrieving Auto-generated Keys
An update() convenience method supports the retrieval of primary keys generated by the
database. This support is part of the JDBC 3.0 standard. See Chapter 13.6 of the
specification for details. The method takes a PreparedStatementCreator as its first
argument, and this is the way the required insert statement is specified. The other
argument is a KeyHolder, which contains the generated key on successful return from the
update. There is no standard single way to create an appropriate PreparedStatement
(which explains why the method signature is the way it is). The following example works
on Oracle but may not work on other platforms:
final String INSERT_SQL = "insert into my_test (name) values(?)";
final String name = "Rob";

KeyHolder keyHolder = new GeneratedKeyHolder();
jdbcTemplate.update(
    new PreparedStatementCreator() {
        public PreparedStatement createPreparedStatement(Connection connection) throws SQLException {
            PreparedStatement ps = connection.prepareStatement(INSERT_SQL, new String[] {"id"});
            ps.setString(1, name);
            return ps;
        }
    },
    keyHolder);

// keyHolder.getKey() now contains the generated key
3.4. Controlling Database Connections
This section covers:
3.4.1. Using DataSource
Spring obtains a connection to the database through a DataSource. A DataSource is
part of the JDBC specification and is a generalized connection factory. It lets a
container or a framework hide connection pooling and transaction management issues
from the application code. As a developer, you need not know details about how to
connect to the database. That is the responsibility of the administrator who sets up
the datasource. You most likely fill both roles as you develop and test code, but you do
not necessarily have to know how the production data source is configured.
When you use Spring’s JDBC layer, you can obtain a data source from JNDI, or you can configure your own with a connection pool implementation provided by a third party. Popular implementations are Apache Jakarta Commons DBCP and C3P0. Implementations in the Spring distribution are meant only for testing purposes and do not provide pooling.
This section uses Spring’s DriverManagerDataSource implementation, and several
additional implementations are covered later.
You should use the DriverManagerDataSource class only for testing purposes,
since it does not provide pooling and performs poorly when multiple requests for a
connection are made.
|
To configure a DriverManagerDataSource:
-
Obtain a connection with
DriverManagerDataSourceas you typically obtain a JDBC connection. -
Specify the fully qualified classname of the JDBC driver so that the
DriverManagercan load the driver class. -
Provide a URL that varies between JDBC drivers. (See the documentation for your driver for the correct value.)
-
Provide a username and a password to connect to the database.
The following example shows how to configure a DriverManagerDataSource in Java:
DriverManagerDataSource dataSource = new DriverManagerDataSource();
dataSource.setDriverClassName("org.hsqldb.jdbcDriver");
dataSource.setUrl("jdbc:hsqldb:hsql://localhost:");
dataSource.setUsername("sa");
dataSource.setPassword("");
The following example shows the corresponding XML configuration:
<bean id="dataSource" class="org.springframework.jdbc.datasource.DriverManagerDataSource">
    <property name="driverClassName" value="${jdbc.driverClassName}"/>
    <property name="url" value="${jdbc.url}"/>
    <property name="username" value="${jdbc.username}"/>
    <property name="password" value="${jdbc.password}"/>
</bean>

<context:property-placeholder location="jdbc.properties"/>
The next two examples show the basic connectivity and configuration for DBCP and C3P0. To learn about more options that help control the pooling features, see the product documentation for the respective connection pooling implementations.
The following example shows DBCP configuration:
<bean id="dataSource" class="org.apache.commons.dbcp.BasicDataSource" destroy-method="close">
    <property name="driverClassName" value="${jdbc.driverClassName}"/>
    <property name="url" value="${jdbc.url}"/>
    <property name="username" value="${jdbc.username}"/>
    <property name="password" value="${jdbc.password}"/>
</bean>

<context:property-placeholder location="jdbc.properties"/>
The following example shows C3P0 configuration:
<bean id="dataSource" class="com.mchange.v2.c3p0.ComboPooledDataSource" destroy-method="close">
    <property name="driverClass" value="${jdbc.driverClassName}"/>
    <property name="jdbcUrl" value="${jdbc.url}"/>
    <property name="user" value="${jdbc.username}"/>
    <property name="password" value="${jdbc.password}"/>
</bean>

<context:property-placeholder location="jdbc.properties"/>
3.4.2. Using DataSourceUtils
The DataSourceUtils class is a convenient and powerful helper class that provides
static methods to obtain connections from JNDI and close connections if necessary. It
supports thread-bound connections with, for example, DataSourceTransactionManager.
3.4.3. Implementing SmartDataSource
The SmartDataSource interface should be implemented by classes that can provide a
connection to a relational database. It extends the DataSource interface to let
classes that use it query whether the connection should be closed after a given
operation. This usage is efficient when you know that you need to reuse a connection.
3.4.4. Extending AbstractDataSource
AbstractDataSource is an abstract base class for Spring’s DataSource
implementations. It implements code that is common to all DataSource implementations.
You should extend the AbstractDataSource class if you write your own DataSource
implementation.
3.4.5. Using SingleConnectionDataSource
The SingleConnectionDataSource class is an implementation of the SmartDataSource
interface that wraps a single Connection that is not closed after each use.
This is not multi-threading capable.
If any client code calls close on the assumption of a pooled connection (as when using
persistence tools), you should set the suppressClose property to true. This setting returns a
close-suppressing proxy that wraps the physical connection. Note that you can no longer
cast this to a native Oracle Connection or a similar object.
SingleConnectionDataSource is primarily a test class. For example, it enables easy testing of code outside an
application server, in conjunction with a simple JNDI environment. In contrast to
DriverManagerDataSource, it reuses the same connection all the time, avoiding
excessive creation of physical connections.
3.4.6. Using DriverManagerDataSource
The DriverManagerDataSource class is an implementation of the standard DataSource
interface that configures a plain JDBC driver through bean properties and returns a new
Connection every time.
This implementation is useful for test and stand-alone environments outside of a Java EE
container, either as a DataSource bean in a Spring IoC container or in conjunction
with a simple JNDI environment. Pool-assuming Connection.close() calls
close the connection, so any DataSource-aware persistence code should work. However,
using JavaBean-style connection pools (such as commons-dbcp) is so easy, even in a test
environment, that it is almost always preferable to use such a connection pool over
DriverManagerDataSource.
3.4.7. Using TransactionAwareDataSourceProxy
TransactionAwareDataSourceProxy is a proxy for a target DataSource. The proxy wraps that
target DataSource to add awareness of Spring-managed transactions. In this respect, it
is similar to a transactional JNDI DataSource, as provided by a Java EE server.
It is rarely desirable to use this class, except when already existing code must be
called and passed a standard JDBC DataSource interface implementation. In this case,
you can still have this code be usable and, at the same time, have this code
participating in Spring managed transactions. It is generally preferable to write your
own new code by using the higher level abstractions for resource management, such as
JdbcTemplate or DataSourceUtils.
|
See the TransactionAwareDataSourceProxy
javadoc for more details.
3.4.8. Using DataSourceTransactionManager
The DataSourceTransactionManager class is a PlatformTransactionManager
implementation for single JDBC datasources. It binds a JDBC connection from the
specified data source to the currently executing thread, potentially allowing for one
thread connection per data source.
Application code is required to retrieve the JDBC connection through
DataSourceUtils.getConnection(DataSource) instead of Java EE’s standard
DataSource.getConnection. It throws unchecked org.springframework.dao exceptions
instead of checked SQLExceptions. All framework classes (such as JdbcTemplate) use this
strategy implicitly. If not used with this transaction manager, the lookup strategy
behaves exactly like the common one. Thus, it can be used in any case.
The DataSourceTransactionManager class supports custom isolation levels and timeouts
that get applied as appropriate JDBC statement query timeouts. To support the latter,
application code must either use JdbcTemplate or call the
DataSourceUtils.applyTransactionTimeout(..) method for each created statement.
You can use this implementation instead of JtaTransactionManager in the single-resource
case, as it does not require the container to support JTA. Switching between
both is just a matter of configuration, provided you stick to the required connection lookup
pattern. JTA does not support custom isolation levels.
3.5. JDBC Batch Operations
Most JDBC drivers provide improved performance if you batch multiple calls to the same prepared statement. By grouping updates into batches, you limit the number of round trips to the database.
3.5.1. Basic Batch Operations with JdbcTemplate
You accomplish JdbcTemplate batch processing by implementing two methods of a special
interface, BatchPreparedStatementSetter, and passing that implementation in as the second parameter
in your batchUpdate method call. You can use the getBatchSize method to provide the size of
the current batch. You can use the setValues method to set the values for the parameters of
the prepared statement. This method is called the number of times that you
specified in the getBatchSize call. The following example updates the actor table
based on entries in a list, and the entire list is used as the batch:
public class JdbcActorDao implements ActorDao {

    private JdbcTemplate jdbcTemplate;

    public void setDataSource(DataSource dataSource) {
        this.jdbcTemplate = new JdbcTemplate(dataSource);
    }

    public int[] batchUpdate(final List<Actor> actors) {
        return this.jdbcTemplate.batchUpdate(
                "update t_actor set first_name = ?, last_name = ? where id = ?",
                new BatchPreparedStatementSetter() {
                    public void setValues(PreparedStatement ps, int i) throws SQLException {
                        ps.setString(1, actors.get(i).getFirstName());
                        ps.setString(2, actors.get(i).getLastName());
                        ps.setLong(3, actors.get(i).getId().longValue());
                    }
                    public int getBatchSize() {
                        return actors.size();
                    }
                });
    }

    // ... additional methods
}
If you process a stream of updates or reading from a file, you might have a
preferred batch size, but the last batch might not have that number of entries. In this
case, you can use the InterruptibleBatchPreparedStatementSetter interface, which lets
you interrupt a batch once the input source is exhausted. The isBatchExhausted method
lets you signal the end of the batch.
3.5.2. Batch Operations with a List of Objects
Both the JdbcTemplate and the NamedParameterJdbcTemplate provides an alternate way
of providing the batch update. Instead of implementing a special batch interface, you
provide all parameter values in the call as a list. The framework loops over these
values and uses an internal prepared statement setter. The API varies, depending on
whether you use named parameters. For the named parameters, you provide an array of
SqlParameterSource, one entry for each member of the batch. You can use the
SqlParameterSourceUtils.createBatch convenience methods to create this array, passing
in an array of bean-style objects (with getter methods corresponding to parameters),
String-keyed Map instances (containing the corresponding parameters as values), or a mix of both.
The following example shows a batch update using named parameters:
public class JdbcActorDao implements ActorDao {

    private NamedParameterTemplate namedParameterJdbcTemplate;

    public void setDataSource(DataSource dataSource) {
        this.namedParameterJdbcTemplate = new NamedParameterJdbcTemplate(dataSource);
    }

    public int[] batchUpdate(List<Actor> actors) {
        return this.namedParameterJdbcTemplate.batchUpdate(
                "update t_actor set first_name = :firstName, last_name = :lastName where id = :id",
                SqlParameterSourceUtils.createBatch(actors));
    }

    // ... additional methods
}
For an SQL statement that uses the classic ? placeholders, you pass in a list
containing an object array with the update values. This object array must have one entry
for each placeholder in the SQL statement, and they must be in the same order as they are
defined in the SQL statement.
The following example is the same as the preceding example, except that it uses classic
JDBC ? placeholders:
public class JdbcActorDao implements ActorDao {

    private JdbcTemplate jdbcTemplate;

    public void setDataSource(DataSource dataSource) {
        this.jdbcTemplate = new JdbcTemplate(dataSource);
    }

    public int[] batchUpdate(final List<Actor> actors) {
        List<Object[]> batch = new ArrayList<Object[]>();
        for (Actor actor : actors) {
            Object[] values = new Object[] {
                    actor.getFirstName(), actor.getLastName(), actor.getId()};
            batch.add(values);
        }
        return this.jdbcTemplate.batchUpdate(
                "update t_actor set first_name = ?, last_name = ? where id = ?",
                batch);
    }

    // ... additional methods
}
All of the batch update methods that we described earlier return an int array
containing the number of affected rows for each batch entry. This count is reported by
the JDBC driver. If the count is not available, the JDBC driver returns a value of -2.
|
In such a scenario, with automatic setting of values on an underlying Alternatively, you might consider specifying the corresponding JDBC types explicitly, either through a 'BatchPreparedStatementSetter' (as shown earlier), through an explicit type array given to a 'List<Object[]>' based call, through 'registerSqlType' calls on a custom 'MapSqlParameterSource' instance, or through a 'BeanPropertySqlParameterSource' that derives the SQL type from the Java-declared property type even for a null value. |
3.5.3. Batch Operations with Multiple Batches
The preceding example of a batch update deals with batches that are so large that you want to
break them up into several smaller batches. You can do this with the methods
mentioned earlier by making multiple calls to the batchUpdate method, but there is now a
more convenient method. This method takes, in addition to the SQL statement, a
Collection of objects that contain the parameters, the number of updates to make for each
batch, and a ParameterizedPreparedStatementSetter to set the values for the parameters
of the prepared statement. The framework loops over the provided values and breaks the
update calls into batches of the size specified.
The following example shows a batch update that uses a batch size of 100:
public class JdbcActorDao implements ActorDao {

    private JdbcTemplate jdbcTemplate;

    public void setDataSource(DataSource dataSource) {
        this.jdbcTemplate = new JdbcTemplate(dataSource);
    }

    public int[][] batchUpdate(final Collection<Actor> actors) {
        int[][] updateCounts = jdbcTemplate.batchUpdate(
                "update t_actor set first_name = ?, last_name = ? where id = ?",
                actors,
                100,
                new ParameterizedPreparedStatementSetter<Actor>() {
                    public void setValues(PreparedStatement ps, Actor argument) throws SQLException {
                        ps.setString(1, argument.getFirstName());
                        ps.setString(2, argument.getLastName());
                        ps.setLong(3, argument.getId().longValue());
                    }
                });
        return updateCounts;
    }

    // ... additional methods
}
The batch update methods for this call returns an array of int arrays that contain an array
entry for each batch with an array of the number of affected rows for each update. The top
level array’s length indicates the number of batches executed and the second level array’s
length indicates the number of updates in that batch. The number of updates in each batch
should be the batch size provided for all batches (except that the last one that might
be less), depending on the total number of update objects provided. The update count for
each update statement is the one reported by the JDBC driver. If the count is not
available, the JDBC driver returns a value of -2.
3.6. Simplifying JDBC Operations with the SimpleJdbc Classes
The SimpleJdbcInsert and SimpleJdbcCall classes provide a simplified configuration
by taking advantage of database metadata that can be retrieved through the JDBC driver.
This means that you have less to configure up front, although you can override or turn off
the metadata processing if you prefer to provide all the details in your code.
3.6.1. Inserting Data by Using SimpleJdbcInsert
We start by looking at the SimpleJdbcInsert class with the minimal amount of
configuration options. You should instantiate the SimpleJdbcInsert in the data access
layer’s initialization method. For this example, the initializing method is the
setDataSource method. You do not need to subclass the SimpleJdbcInsert class. Instead,
you can create a new instance and set the table name by using the withTableName method.
Configuration methods for this class follow the fluid style that returns the instance
of the SimpleJdbcInsert, which lets you chain all configuration methods. The following
example uses only one configuration method (we show examples of multiple methods later):
public class JdbcActorDao implements ActorDao {

    private JdbcTemplate jdbcTemplate;
    private SimpleJdbcInsert insertActor;

    public void setDataSource(DataSource dataSource) {
        this.jdbcTemplate = new JdbcTemplate(dataSource);
        this.insertActor = new SimpleJdbcInsert(dataSource).withTableName("t_actor");
    }

    public void add(Actor actor) {
        Map<String, Object> parameters = new HashMap<String, Object>(3);
        parameters.put("id", actor.getId());
        parameters.put("first_name", actor.getFirstName());
        parameters.put("last_name", actor.getLastName());
        insertActor.execute(parameters);
    }

    // ... additional methods
}
The execute method used here takes a plain java.util.Map as its only parameter. The
important thing to note here is that the keys used for the Map must match the column
names of the table, as defined in the database. This is because we read the metadata
to construct the actual insert statement.
3.6.2. Retrieving Auto-generated Keys by Using SimpleJdbcInsert
The next example uses the same insert as the preceding example, but, instead of passing in the id, it
retrieves the auto-generated key and sets it on the new Actor object. When it creates
the SimpleJdbcInsert, in addition to specifying the table name, it specifies the name
of the generated key column with the usingGeneratedKeyColumns method. The following
listing shows how it works:
public class JdbcActorDao implements ActorDao {

    private JdbcTemplate jdbcTemplate;
    private SimpleJdbcInsert insertActor;

    public void setDataSource(DataSource dataSource) {
        this.jdbcTemplate = new JdbcTemplate(dataSource);
        this.insertActor = new SimpleJdbcInsert(dataSource)
                .withTableName("t_actor")
                .usingGeneratedKeyColumns("id");
    }

    public void add(Actor actor) {
        Map<String, Object> parameters = new HashMap<String, Object>(2);
        parameters.put("first_name", actor.getFirstName());
        parameters.put("last_name", actor.getLastName());
        Number newId = insertActor.executeAndReturnKey(parameters);
        actor.setId(newId.longValue());
    }

    // ... additional methods
}
The main difference when you run the insert by using this second approach is that you do not
add the id to the Map, and you call the executeAndReturnKey method. This returns a
java.lang.Number object with which you can create an instance of the numerical type that
is used in your domain class. You cannot rely on all databases to return a specific Java
class here. java.lang.Number is the base class that you can rely on. If you have
multiple auto-generated columns or the generated values are non-numeric, you can
use a KeyHolder that is returned from the executeAndReturnKeyHolder method.
3.6.3. Specifying Columns for a SimpleJdbcInsert
You can limit the columns for an insert by specifying a list of column names with the
usingColumns method, as the following example shows:
public class JdbcActorDao implements ActorDao {

    private JdbcTemplate jdbcTemplate;
    private SimpleJdbcInsert insertActor;

    public void setDataSource(DataSource dataSource) {
        this.jdbcTemplate = new JdbcTemplate(dataSource);
        this.insertActor = new SimpleJdbcInsert(dataSource)
                .withTableName("t_actor")
                .usingColumns("first_name", "last_name")
                .usingGeneratedKeyColumns("id");
    }

    public void add(Actor actor) {
        Map<String, Object> parameters = new HashMap<String, Object>(2);
        parameters.put("first_name", actor.getFirstName());
        parameters.put("last_name", actor.getLastName());
        Number newId = insertActor.executeAndReturnKey(parameters);
        actor.setId(newId.longValue());
    }

    // ... additional methods
}
The execution of the insert is the same as if you had relied on the metadata to determine which columns to use.
3.6.4. Using SqlParameterSource to Provide Parameter Values
Using a Map to provide parameter values works fine, but it is not the most convenient
class to use. Spring provides a couple of implementations of the SqlParameterSource
interface that you can use instead. The first one is BeanPropertySqlParameterSource,
which is a very convenient class if you have a JavaBean-compliant class that contains
your values. It uses the corresponding getter method to extract the parameter
values. The following example shows how to use BeanPropertySqlParameterSource:
public class JdbcActorDao implements ActorDao {

    private JdbcTemplate jdbcTemplate;
    private SimpleJdbcInsert insertActor;

    public void setDataSource(DataSource dataSource) {
        this.jdbcTemplate = new JdbcTemplate(dataSource);
        this.insertActor = new SimpleJdbcInsert(dataSource)
                .withTableName("t_actor")
                .usingGeneratedKeyColumns("id");
    }

    public void add(Actor actor) {
        SqlParameterSource parameters = new BeanPropertySqlParameterSource(actor);
        Number newId = insertActor.executeAndReturnKey(parameters);
        actor.setId(newId.longValue());
    }

    // ... additional methods
}
Another option is the MapSqlParameterSource that resembles a Map but provides a more
convenient addValue method that can be chained. The following example shows how to use it:
public class JdbcActorDao implements ActorDao {

    private JdbcTemplate jdbcTemplate;
    private SimpleJdbcInsert insertActor;

    public void setDataSource(DataSource dataSource) {
        this.jdbcTemplate = new JdbcTemplate(dataSource);
        this.insertActor = new SimpleJdbcInsert(dataSource)
                .withTableName("t_actor")
                .usingGeneratedKeyColumns("id");
    }

    public void add(Actor actor) {
        SqlParameterSource parameters = new MapSqlParameterSource()
                .addValue("first_name", actor.getFirstName())
                .addValue("last_name", actor.getLastName());
        Number newId = insertActor.executeAndReturnKey(parameters);
        actor.setId(newId.longValue());
    }

    // ... additional methods
}
As you can see, the configuration is the same. Only the executing code has to change to use these alternative input classes.
3.6.5. Calling a Stored Procedure with SimpleJdbcCall
The SimpleJdbcCall class uses metadata in the database to look up names of in
and out parameters so that you do not have to explicitly declare them. You can
declare parameters if you prefer to do that or if you have parameters (such as ARRAY
or STRUCT) that do not have an automatic mapping to a Java class. The first example
shows a simple procedure that returns only scalar values in VARCHAR and DATE format
from a MySQL database. The example procedure reads a specified actor entry and returns
first_name, last_name, and birth_date columns in the form of out parameters.
The following listing shows the first example:
CREATE PROCEDURE read_actor (
    IN in_id INTEGER,
    OUT out_first_name VARCHAR(100),
    OUT out_last_name VARCHAR(100),
    OUT out_birth_date DATE)
BEGIN
    SELECT first_name, last_name, birth_date
    INTO out_first_name, out_last_name, out_birth_date
    FROM t_actor where id = in_id;
END;
The in_id parameter contains the id of the actor that you are looking up. The out
parameters return the data read from the table.
You can declare SimpleJdbcCall in a manner similar to declaring SimpleJdbcInsert. You
should instantiate and configure the class in the initialization method of your data-access
layer. Compared to the StoredProcedure class, you need not create a subclass
and you need not to declare parameters that can be looked up in the database metadata.
The following example of a SimpleJdbcCall configuration uses the preceding stored
procedure (the only configuration option, in addition to the DataSource, is the name
of the stored procedure):
public class JdbcActorDao implements ActorDao {

    private JdbcTemplate jdbcTemplate;
    private SimpleJdbcCall procReadActor;

    public void setDataSource(DataSource dataSource) {
        this.jdbcTemplate = new JdbcTemplate(dataSource);
        this.procReadActor = new SimpleJdbcCall(dataSource)
                .withProcedureName("read_actor");
    }

    public Actor readActor(Long id) {
        SqlParameterSource in = new MapSqlParameterSource()
                .addValue("in_id", id);
        Map out = procReadActor.execute(in);
        Actor actor = new Actor();
        actor.setId(id);
        actor.setFirstName((String) out.get("out_first_name"));
        actor.setLastName((String) out.get("out_last_name"));
        actor.setBirthDate((Date) out.get("out_birth_date"));
        return actor;
    }

    // ... additional methods
}
The code you write for the execution of the call involves creating an SqlParameterSource
containing the IN parameter. You must match the name provided for the input value
with that of the parameter name declared in the stored procedure. The case does not have
to match because you use metadata to determine how database objects should be referred to
in a stored procedure. What is specified in the source for the stored procedure is not
necessarily the way it is stored in the database. Some databases transform names to all
upper case, while others use lower case or use the case as specified.
The execute method takes the IN parameters and returns a Map that contains any out
parameters keyed by the name, as specified in the stored procedure. In this case, they are
out_first_name, out_last_name, and out_birth_date.
The last part of the execute method creates an Actor instance to use to return the
data retrieved. Again, it is important to use the names of the out parameters as they
are declared in the stored procedure. Also, the case in the names of the out
parameters stored in the results map matches that of the out parameter names in the
database, which could vary between databases. To make your code more portable, you should
do a case-insensitive lookup or instruct Spring to use a LinkedCaseInsensitiveMap.
To do the latter, you can create your own JdbcTemplate and set the setResultsMapCaseInsensitive
property to true. Then you can pass this customized JdbcTemplate instance into
the constructor of your SimpleJdbcCall. The following example shows this configuration:
public class JdbcActorDao implements ActorDao {

    private SimpleJdbcCall procReadActor;

    public void setDataSource(DataSource dataSource) {
        JdbcTemplate jdbcTemplate = new JdbcTemplate(dataSource);
        jdbcTemplate.setResultsMapCaseInsensitive(true);
        this.procReadActor = new SimpleJdbcCall(jdbcTemplate)
                .withProcedureName("read_actor");
    }

    // ... additional methods
}
By taking this action, you avoid conflicts in the case used for the names of your
returned out parameters.
3.6.6. Explicitly Declaring Parameters to Use for a SimpleJdbcCall
Earlier in this chapter, we described how parameters are deduced from metadata, but you can declare them
explicitly if you wish. You can do so by creating and configuring SimpleJdbcCall with
the declareParameters method, which takes a variable number of SqlParameter objects
as input. See the next section for details on how to define an SqlParameter.
| Explicit declarations are necessary if the database you use is not a Spring-supported database. Currently, Spring supports metadata lookup of stored procedure calls for the following databases: Apache Derby, DB2, MySQL, Microsoft SQL Server, Oracle, and Sybase. We also support metadata lookup of stored functions for MySQL, Microsoft SQL Server, and Oracle. |
You can opt to explicitly declare one, some, or all of the parameters. The parameter
metadata is still used where you do not explicitly declare parameters. To bypass all
processing of metadata lookups for potential parameters and use only the declared
parameters, you can call the method withoutProcedureColumnMetaDataAccess as part of the
declaration. Suppose that you have two or more different call signatures declared for a
database function. In this case, you call useInParameterNames to specify the list
of IN parameter names to include for a given signature.
The following example shows a fully declared procedure call and uses the information from the preceding example:
public class JdbcActorDao implements ActorDao {

    private SimpleJdbcCall procReadActor;

    public void setDataSource(DataSource dataSource) {
        JdbcTemplate jdbcTemplate = new JdbcTemplate(dataSource);
        jdbcTemplate.setResultsMapCaseInsensitive(true);
        this.procReadActor = new SimpleJdbcCall(jdbcTemplate)
                .withProcedureName("read_actor")
                .withoutProcedureColumnMetaDataAccess()
                .useInParameterNames("in_id")
                .declareParameters(
                        new SqlParameter("in_id", Types.NUMERIC),
                        new SqlOutParameter("out_first_name", Types.VARCHAR),
                        new SqlOutParameter("out_last_name", Types.VARCHAR),
                        new SqlOutParameter("out_birth_date", Types.DATE)
                );
    }

    // ... additional methods
}
The execution and end results of the two examples are the same. The second example specifies all details explicitly rather than relying on metadata.
3.6.7. How to Define SqlParameters
To define a parameter for the SimpleJdbc classes and also for the RDBMS operations
classes (covered in Modeling JDBC Operations as Java Objects) you can use SqlParameter or one of its subclasses.
To do so, you typically specify the parameter name and SQL type in the constructor. The SQL type
is specified by using the java.sql.Types constants. Earlier in this chapter, we saw declarations
similar to the following:
new SqlParameter("in_id", Types.NUMERIC),
new SqlOutParameter("out_first_name", Types.VARCHAR),
The first line with the SqlParameter declares an IN parameter. You can use IN parameters
for both stored procedure calls and for queries by using the SqlQuery and its
subclasses (covered in Understanding SqlQuery).
The second line (with the SqlOutParameter) declares an out parameter to be used in a
stored procedure call. There is also an SqlInOutParameter for InOut parameters
(parameters that provide an IN value to the procedure and that also return a value).
Only parameters declared as SqlParameter and SqlInOutParameter are used to
provide input values. This is different from the StoredProcedure class, which (for
backwards compatibility reasons) lets input values be provided for parameters
declared as SqlOutParameter.
|
For IN parameters, in addition to the name and the SQL type, you can specify a scale for
numeric data or a type name for custom database types. For out parameters, you can
provide a RowMapper to handle mapping of rows returned from a REF cursor. Another
option is to specify an SqlReturnType that provides an opportunity to define
customized handling of the return values.
3.6.8. Calling a Stored Function by Using SimpleJdbcCall
You can call a stored function in almost the same way as you call a stored procedure, except
that you provide a function name rather than a procedure name. You use the
withFunctionName method as part of the configuration to indicate that you want to make
a call to a function, and the corresponding string for a function call is generated. A
specialized execute call (executeFunction) is used to execute the function, and it
returns the function return value as an object of a specified type, which means you do
not have to retrieve the return value from the results map. A similar convenience method
(named executeObject) is also available for stored procedures that have only one out
parameter. The following example (for MySQL) is based on a stored function named get_actor_name
that returns an actor’s full name:
CREATE FUNCTION get_actor_name (in_id INTEGER)
RETURNS VARCHAR(200) READS SQL DATA
BEGIN
    DECLARE out_name VARCHAR(200);
    SELECT concat(first_name, ' ', last_name)
        INTO out_name
        FROM t_actor where id = in_id;
    RETURN out_name;
END;
To call this function, we again create a SimpleJdbcCall in the initialization method,
as the following example shows:
public class JdbcActorDao implements ActorDao {

    private JdbcTemplate jdbcTemplate;
    private SimpleJdbcCall funcGetActorName;

    public void setDataSource(DataSource dataSource) {
        this.jdbcTemplate = new JdbcTemplate(dataSource);
        JdbcTemplate jdbcTemplate = new JdbcTemplate(dataSource);
        jdbcTemplate.setResultsMapCaseInsensitive(true);
        this.funcGetActorName = new SimpleJdbcCall(jdbcTemplate)
                .withFunctionName("get_actor_name");
    }

    public String getActorName(Long id) {
        SqlParameterSource in = new MapSqlParameterSource()
                .addValue("in_id", id);
        String name = funcGetActorName.executeFunction(String.class, in);
        return name;
    }

    // ... additional methods
}
The executeFunction method used returns a String that contains the return value from the
function call.
3.6.9. Returning a ResultSet or REF Cursor from a SimpleJdbcCall
Calling a stored procedure or function that returns a result set is a bit tricky. Some
databases return result sets during the JDBC results processing, while others require an
explicitly registered out parameter of a specific type. Both approaches need
additional processing to loop over the result set and process the returned rows. With
the SimpleJdbcCall, you can use the returningResultSet method and declare a RowMapper
implementation to be used for a specific parameter. If the result set is
returned during the results processing, there are no names defined, so the returned
results must match the order in which you declare the RowMapper
implementations. The name specified is still used to store the processed list of results
in the results map that is returned from the execute statement.
The next example (for MySQL) uses a stored procedure that takes no IN parameters and returns
all rows from the t_actor table:
CREATE PROCEDURE read_all_actors()
BEGIN
 SELECT a.id, a.first_name, a.last_name, a.birth_date FROM t_actor a;
END;
To call this procedure, you can declare the RowMapper. Because the class to which you want
to map follows the JavaBean rules, you can use a BeanPropertyRowMapper that is created by
passing in the required class to map to in the newInstance method.
The following example shows how to do so:
public class JdbcActorDao implements ActorDao {

    private SimpleJdbcCall procReadAllActors;

    public void setDataSource(DataSource dataSource) {
        JdbcTemplate jdbcTemplate = new JdbcTemplate(dataSource);
        jdbcTemplate.setResultsMapCaseInsensitive(true);
        this.procReadAllActors = new SimpleJdbcCall(jdbcTemplate)
                .withProcedureName("read_all_actors")
                .returningResultSet("actors",
                BeanPropertyRowMapper.newInstance(Actor.class));
    }

    public List getActorsList() {
        Map m = procReadAllActors.execute(new HashMap<String, Object>(0));
        return (List) m.get("actors");
    }

    // ... additional methods
}
The execute call passes in an empty Map, because this call does not take any parameters.
The list of actors is then retrieved from the results map and returned to the caller.
3.7. Modeling JDBC Operations as Java Objects
The org.springframework.jdbc.object package contains classes that let you access
the database in a more object-oriented manner. As an example, you can execute queries
and get the results back as a list that contains business objects with the relational
column data mapped to the properties of the business object. You can also run stored
procedures and run update, delete, and insert statements.
|
Many Spring developers believe that the various RDBMS operation classes described below
(with the exception of the However, if you are getting measurable value from using the RDBMS operation classes, you should continue to use these classes. |
3.7.1. Understanding SqlQuery
SqlQuery is a reusable, thread-safe class that encapsulates an SQL query. Subclasses
must implement the newRowMapper(..) method to provide a RowMapper instance that can
create one object per row obtained from iterating over the ResultSet that is created
during the execution of the query. The SqlQuery class is rarely used directly, because
the MappingSqlQuery subclass provides a much more convenient implementation for
mapping rows to Java classes. Other implementations that extend SqlQuery are
MappingSqlQueryWithParameters and UpdatableSqlQuery.
3.7.2. Using MappingSqlQuery
MappingSqlQuery is a reusable query in which concrete subclasses must implement the
abstract mapRow(..) method to convert each row of the supplied ResultSet into an
object of the type specified. The following example shows a custom query that maps the
data from the t_actor relation to an instance of the Actor class:
public class ActorMappingQuery extends MappingSqlQuery<Actor> {

    public ActorMappingQuery(DataSource ds) {
        super(ds, "select id, first_name, last_name from t_actor where id = ?");
        declareParameter(new SqlParameter("id", Types.INTEGER));
        compile();
    }

    @Override
    protected Actor mapRow(ResultSet rs, int rowNumber) throws SQLException {
        Actor actor = new Actor();
        actor.setId(rs.getLong("id"));
        actor.setFirstName(rs.getString("first_name"));
        actor.setLastName(rs.getString("last_name"));
        return actor;
    }

}
The class extends MappingSqlQuery parameterized with the Actor type. The constructor
for this customer query takes a DataSource as the only parameter. In this
constructor, you can call the constructor on the superclass with the DataSource and the SQL
that should be executed to retrieve the rows for this query. This SQL is used to
create a PreparedStatement, so it may contain placeholders for any parameters to be
passed in during execution. You must declare each parameter by using the declareParameter
method passing in an SqlParameter. The SqlParameter takes a name, and the JDBC type
as defined in java.sql.Types. After you define all parameters, you can call the
compile() method so that the statement can be prepared and later run. This class is
thread-safe after it is compiled, so, as long as these instances are created when the DAO
is initialized, they can be kept as instance variables and be reused. The following
example shows how to define such a class:
private ActorMappingQuery actorMappingQuery;

@Autowired
public void setDataSource(DataSource dataSource) {
    this.actorMappingQuery = new ActorMappingQuery(dataSource);
}

public Customer getCustomer(Long id) {
    return actorMappingQuery.findObject(id);
}
The method in the preceding example retrieves the customer with the id that is passed in as the
only parameter. Since we want only one object to be returned, we call the findObject convenience
method with the id as the parameter. If we had instead a query that returned a
list of objects and took additional parameters, we would use one of the execute
methods that takes an array of parameter values passed in as varargs. The following
example shows such a method:
public List<Actor> searchForActors(int age, String namePattern) {
    List<Actor> actors = actorSearchMappingQuery.execute(age, namePattern);
    return actors;
}
3.7.3. Using SqlUpdate
The SqlUpdate class encapsulates an SQL update. As with a query, an update object is
reusable, and, as with all RdbmsOperation classes, an update can have parameters and is
defined in SQL. This class provides a number of update(..) methods analogous to the
execute(..) methods of query objects. The SQLUpdate class is concrete. It can be
subclassed — for example, to add a custom update method.
However, you do not have to subclass the SqlUpdate
class, since it can easily be parameterized by setting SQL and declaring parameters.
The following example creates a custom update method named execute:
import java.sql.Types;
import javax.sql.DataSource;
import org.springframework.jdbc.core.SqlParameter;
import org.springframework.jdbc.object.SqlUpdate;

public class UpdateCreditRating extends SqlUpdate {

    public UpdateCreditRating(DataSource ds) {
        setDataSource(ds);
        setSql("update customer set credit_rating = ? where id = ?");
        declareParameter(new SqlParameter("creditRating", Types.NUMERIC));
        declareParameter(new SqlParameter("id", Types.NUMERIC));
        compile();
    }

    /**
     * @param id for the Customer to be updated
     * @param rating the new value for credit rating
     * @return number of rows updated
     */
    public int execute(int id, int rating) {
        return update(rating, id);
    }
}
3.7.4. Using StoredProcedure
The StoredProcedure class is a superclass for object abstractions of RDBMS stored
procedures. This class is abstract, and its various execute(..) methods have
protected access, preventing use other than through a subclass that offers tighter
typing.
The inherited sql property is the name of the stored procedure in the RDBMS.
To define a parameter for the StoredProcedure class, you can use an SqlParameter or one
of its subclasses. You must specify the parameter name and SQL type in the constructor,
as the following code snippet shows:
new SqlParameter("in_id", Types.NUMERIC),
new SqlOutParameter("out_first_name", Types.VARCHAR),
The SQL type is specified using the java.sql.Types constants.
The first line (with the SqlParameter) declares an IN parameter. You can use IN parameters
both for stored procedure calls and for queries using the SqlQuery and its
subclasses (covered in Understanding SqlQuery).
The second line (with the SqlOutParameter) declares an out parameter to be used in the
stored procedure call. There is also an SqlInOutParameter for InOut parameters
(parameters that provide an in value to the procedure and that also return a value).
For in parameters, in addition to the name and the SQL type, you can specify a
scale for numeric data or a type name for custom database types. For out parameters,
you can provide a RowMapper to handle mapping of rows returned from a REF cursor.
Another option is to specify an SqlReturnType that lets you define customized
handling of the return values.
The next example of a simple DAO uses a StoredProcedure to call a function
(sysdate()), which comes with any Oracle database. To use the stored procedure
functionality, you have to create a class that extends StoredProcedure. In this
example, the StoredProcedure class is an inner class. However, if you need to reuse the
StoredProcedure, you can declare it as a top-level class. This example has no input
parameters, but an output parameter is declared as a date type by using the
SqlOutParameter class. The execute() method runs the procedure and extracts the
returned date from the results Map. The results Map has an entry for each declared
output parameter (in this case, only one) by using the parameter name as the key.
The following listing shows our custom StoredProcedure class:
import java.sql.Types;
import java.util.Date;
import java.util.HashMap;
import java.util.Map;
import javax.sql.DataSource;
import org.springframework.beans.factory.annotation.Autowired;
import org.springframework.jdbc.core.SqlOutParameter;
import org.springframework.jdbc.object.StoredProcedure;

public class StoredProcedureDao {

    private GetSysdateProcedure getSysdate;

    @Autowired
    public void init(DataSource dataSource) {
        this.getSysdate = new GetSysdateProcedure(dataSource);
    }

    public Date getSysdate() {
        return getSysdate.execute();
    }

    private class GetSysdateProcedure extends StoredProcedure {

        private static final String SQL = "sysdate";

        public GetSysdateProcedure(DataSource dataSource) {
            setDataSource(dataSource);
            setFunction(true);
            setSql(SQL);
            declareParameter(new SqlOutParameter("date", Types.DATE));
            compile();
        }

        public Date execute() {
            // the 'sysdate' sproc has no input parameters, so an empty Map is supplied...
            Map<String, Object> results = execute(new HashMap<String, Object>());
            Date sysdate = (Date) results.get("date");
            return sysdate;
        }
    }

}
The following example of a StoredProcedure has two output parameters (in this case,
Oracle REF cursors):
import java.util.HashMap;
import java.util.Map;
import javax.sql.DataSource;
import oracle.jdbc.OracleTypes;
import org.springframework.jdbc.core.SqlOutParameter;
import org.springframework.jdbc.object.StoredProcedure;

public class TitlesAndGenresStoredProcedure extends StoredProcedure {

    private static final String SPROC_NAME = "AllTitlesAndGenres";

    public TitlesAndGenresStoredProcedure(DataSource dataSource) {
        super(dataSource, SPROC_NAME);
        declareParameter(new SqlOutParameter("titles", OracleTypes.CURSOR, new TitleMapper()));
        declareParameter(new SqlOutParameter("genres", OracleTypes.CURSOR, new GenreMapper()));
        compile();
    }

    public Map<String, Object> execute() {
        // again, this sproc has no input parameters, so an empty Map is supplied
        return super.execute(new HashMap<String, Object>());
    }
}
Notice how the overloaded variants of the declareParameter(..) method that have been
used in the TitlesAndGenresStoredProcedure constructor are passed RowMapper
implementation instances. This is a very convenient and powerful way to reuse existing
functionality. The next two examples provide code for the two RowMapper implementations.
The TitleMapper class maps a ResultSet to a Title domain object for each row in
the supplied ResultSet, as follows:
import java.sql.ResultSet;
import java.sql.SQLException;
import com.foo.domain.Title;
import org.springframework.jdbc.core.RowMapper;

public final class TitleMapper implements RowMapper<Title> {

    public Title mapRow(ResultSet rs, int rowNum) throws SQLException {
        Title title = new Title();
        title.setId(rs.getLong("id"));
        title.setName(rs.getString("name"));
        return title;
    }
}
The GenreMapper class maps a ResultSet to a Genre domain object for each row in
the supplied ResultSet, as follows:
import java.sql.ResultSet;
import java.sql.SQLException;
import com.foo.domain.Genre;
import org.springframework.jdbc.core.RowMapper;

public final class GenreMapper implements RowMapper<Genre> {

    public Genre mapRow(ResultSet rs, int rowNum) throws SQLException {
        return new Genre(rs.getString("name"));
    }
}
To pass parameters to a stored procedure that has one or more input parameters in its
definition in the RDBMS, you can code a strongly typed execute(..) method that would
delegate to the untyped execute(Map) method in the superclass, as the following example shows:
import java.sql.Types;
import java.util.Date;
import java.util.HashMap;
import java.util.Map;
import javax.sql.DataSource;
import oracle.jdbc.OracleTypes;
import org.springframework.jdbc.core.SqlOutParameter;
import org.springframework.jdbc.core.SqlParameter;
import org.springframework.jdbc.object.StoredProcedure;

public class TitlesAfterDateStoredProcedure extends StoredProcedure {

    private static final String SPROC_NAME = "TitlesAfterDate";
    private static final String CUTOFF_DATE_PARAM = "cutoffDate";

    public TitlesAfterDateStoredProcedure(DataSource dataSource) {
        super(dataSource, SPROC_NAME);
        declareParameter(new SqlParameter(CUTOFF_DATE_PARAM, Types.DATE);
        declareParameter(new SqlOutParameter("titles", OracleTypes.CURSOR, new TitleMapper()));
        compile();
    }

    public Map<String, Object> execute(Date cutoffDate) {
        Map<String, Object> inputs = new HashMap<String, Object>();
        inputs.put(CUTOFF_DATE_PARAM, cutoffDate);
        return super.execute(inputs);
    }
}
3.8. Common Problems with Parameter and Data Value Handling
Common problems with parameters and data values exist in the different approaches provided by Spring Framework’s JDBC support. This section covers how to address them.
3.8.1. Providing SQL Type Information for Parameters
Usually, Spring determines the SQL type of the parameters based on the type of parameter
passed in. It is possible to explicitly provide the SQL type to be used when setting
parameter values. This is sometimes necessary to correctly set NULL values.
You can provide SQL type information in several ways:
-
Many update and query methods of the
JdbcTemplatetake an additional parameter in the form of anintarray. This array is used to indicate the SQL type of the corresponding parameter by using constant values from thejava.sql.Typesclass. Provide one entry for each parameter. -
You can use the
SqlParameterValueclass to wrap the parameter value that needs this additional information. To do so, create a new instance for each value and pass in the SQL type and the parameter value in the constructor. You can also provide an optional scale parameter for numeric values. -
For methods that work with named parameters, you can use the
SqlParameterSourceclasses,BeanPropertySqlParameterSourceorMapSqlParameterSource. They both have methods for registering the SQL type for any of the named parameter values.
3.8.2. Handling BLOB and CLOB objects
You can store images, other binary data, and large chunks of text in the database. These
large objects are called BLOBs (Binary Large OBject) for binary data and CLOBs (Character
Large OBject) for character data. In Spring, you can handle these large objects by using
the JdbcTemplate directly and also when using the higher abstractions provided by RDBMS
Objects and the SimpleJdbc classes. All of these approaches use an implementation of
the LobHandler interface for the actual management of the LOB (Large OBject) data.
LobHandler provides access to a LobCreator class, through the getLobCreator method,
that is used for creating new LOB objects to be inserted.
LobCreator and LobHandler provide the following support for LOB input and output:
-
BLOB
-
byte[]:getBlobAsBytesandsetBlobAsBytes -
InputStream:getBlobAsBinaryStreamandsetBlobAsBinaryStream
-
-
CLOB
-
String:getClobAsStringandsetClobAsString -
InputStream:getClobAsAsciiStreamandsetClobAsAsciiStream -
Reader:getClobAsCharacterStreamandsetClobAsCharacterStream
-
The next example shows how to create and insert a BLOB. Later we show how to read it back from the database.
This example uses a JdbcTemplate and an implementation of the
AbstractLobCreatingPreparedStatementCallback. It implements one method,
setValues. This method provides a LobCreator that we use to set the values for the
LOB columns in your SQL insert statement.
For this example, we assume that there is a variable, lobHandler, that is already
set to an instance of a DefaultLobHandler. You typically set this value through
dependency injection.
The following example shows how to create and insert a BLOB:
final File blobIn = new File("spring2004.jpg");
final InputStream blobIs = new FileInputStream(blobIn);
final File clobIn = new File("large.txt");
final InputStream clobIs = new FileInputStream(clobIn);
final InputStreamReader clobReader = new InputStreamReader(clobIs);

jdbcTemplate.execute(
    "INSERT INTO lob_table (id, a_clob, a_blob) VALUES (?, ?, ?)",
    new AbstractLobCreatingPreparedStatementCallback(lobHandler) {  (1)
        protected void setValues(PreparedStatement ps, LobCreator lobCreator) throws SQLException {
            ps.setLong(1, 1L);
            lobCreator.setClobAsCharacterStream(ps, 2, clobReader, (int)clobIn.length());  (2)
            lobCreator.setBlobAsBinaryStream(ps, 3, blobIs, (int)blobIn.length());  (3)
        }
    }
);

blobIs.close();
clobReader.close();| 1 | Pass in the lobHandler that (in this example) is a plain DefaultLobHandler. |
| 2 | Using the method setClobAsCharacterStream to pass in the contents of the CLOB. |
| 3 | Using the method setBlobAsBinaryStream to pass in the contents of the BLOB. |
|
If you invoke the See the documentation for the JDBC driver you use to verify that it supports streaming a LOB without providing the content length. |
Now it is time to read the LOB data from the database. Again, you use a JdbcTemplate
with the same instance variable lobHandler and a reference to a DefaultLobHandler.
The following example shows how to do so:
List<Map<String, Object>> l = jdbcTemplate.query("select id, a_clob, a_blob from lob_table",
    new RowMapper<Map<String, Object>>() {
        public Map<String, Object> mapRow(ResultSet rs, int i) throws SQLException {
            Map<String, Object> results = new HashMap<String, Object>();
            String clobText = lobHandler.getClobAsString(rs, "a_clob");  (1)
            results.put("CLOB", clobText);
            byte[] blobBytes = lobHandler.getBlobAsBytes(rs, "a_blob");  (2)
            results.put("BLOB", blobBytes);
            return results;
        }
});| 1 | Using the method getClobAsString to retrieve the contents of the CLOB. |
| 2 | Using the method getBlobAsBytes to retrieve the contents of the BLOB. |
3.8.3. Passing in Lists of Values for IN Clause
The SQL standard allows for selecting rows based on an expression that includes a
variable list of values. A typical example would be select * from T_ACTOR where id in
(1, 2, 3). This variable list is not directly supported for prepared statements by the
JDBC standard. You cannot declare a variable number of placeholders. You need a number
of variations with the desired number of placeholders prepared, or you need to generate
the SQL string dynamically once you know how many placeholders are required. The named
parameter support provided in the NamedParameterJdbcTemplate and JdbcTemplate takes
the latter approach. You can pass in the values as a java.util.List of primitive objects. This
list is used to insert the required placeholders and pass in the values during
statement execution.
Be careful when passing in many values. The JDBC standard does not guarantee that you
can use more than 100 values for an in expression list. Various databases exceed this
number, but they usually have a hard limit for how many values are allowed. For example, Oracle’s
limit is 1000.
|
In addition to the primitive values in the value list, you can create a java.util.List
of object arrays. This list can support multiple expressions being defined for the in
clause, such as select * from T_ACTOR where (id, last_name) in ((1, 'Johnson'), (2,
'Harrop'\)). This, of course, requires that your database supports this syntax.
3.8.4. Handling Complex Types for Stored Procedure Calls
When you call stored procedures, you can sometimes use complex types specific to the
database. To accommodate these types, Spring provides a SqlReturnType for handling
them when they are returned from the stored procedure call and SqlTypeValue when they
are passed in as a parameter to the stored procedure.
The SqlReturnType interface has a single method (named
getTypeValue) that must be implemented. This interface is used as part of the
declaration of an SqlOutParameter. The following example shows returning the value of an Oracle STRUCT object of the user
declared type ITEM_TYPE:
public class TestItemStoredProcedure extends StoredProcedure {

    public TestItemStoredProcedure(DataSource dataSource) {
        ...
        declareParameter(new SqlOutParameter("item", OracleTypes.STRUCT, "ITEM_TYPE",
            new SqlReturnType() {
                public Object getTypeValue(CallableStatement cs, int colIndx, int sqlType, String typeName) throws SQLException {
                    STRUCT struct = (STRUCT) cs.getObject(colIndx);
                    Object[] attr = struct.getAttributes();
                    TestItem item = new TestItem();
                    item.setId(((Number) attr[0]).longValue());
                    item.setDescription((String) attr[1]);
                    item.setExpirationDate((java.util.Date) attr[2]);
                    return item;
                }
            }));
        ...
    }
You can use SqlTypeValue to pass the value of a Java object (such as TestItem) to a
stored procedure. The SqlTypeValue interface has a single method (named
createTypeValue) that you must implement. The active connection is passed in, and you
can use it to create database-specific objects, such as StructDescriptor instances
or ArrayDescriptor instances. The following example creates a StructDescriptor instance:
final TestItem testItem = new TestItem(123L, "A test item",
        new SimpleDateFormat("yyyy-M-d").parse("2010-12-31"));

SqlTypeValue value = new AbstractSqlTypeValue() {
    protected Object createTypeValue(Connection conn, int sqlType, String typeName) throws SQLException {
        StructDescriptor itemDescriptor = new StructDescriptor(typeName, conn);
        Struct item = new STRUCT(itemDescriptor, conn,
        new Object[] {
            testItem.getId(),
            testItem.getDescription(),
            new java.sql.Date(testItem.getExpirationDate().getTime())
        });
        return item;
    }
};
You can now add this SqlTypeValue to the Map that contains the input parameters for the
execute call of the stored procedure.
Another use for the SqlTypeValue is passing in an array of values to an Oracle stored
procedure. Oracle has its own internal ARRAY class that must be used in this case, and
you can use the SqlTypeValue to create an instance of the Oracle ARRAY and populate
it with values from the Java ARRAY, as the following example shows:
final Long[] ids = new Long[] {1L, 2L};

SqlTypeValue value = new AbstractSqlTypeValue() {
    protected Object createTypeValue(Connection conn, int sqlType, String typeName) throws SQLException {
        ArrayDescriptor arrayDescriptor = new ArrayDescriptor(typeName, conn);
        ARRAY idArray = new ARRAY(arrayDescriptor, conn, ids);
        return idArray;
    }
};
3.9. Embedded Database Support
The org.springframework.jdbc.datasource.embedded package provides support for embedded
Java database engines. Support for HSQL,
H2, and Derby is provided
natively. You can also use an extensible API to plug in new embedded database types and
DataSource implementations.
3.9.1. Why Use an Embedded Database?
An embedded database can be useful during the development phase of a project because of its lightweight nature. Benefits include ease of configuration, quick startup time, testability, and the ability to rapidly evolve your SQL during development.
3.9.2. Creating an Embedded Database by Using Spring XML
If you want to expose an embedded database instance as a bean in a Spring
ApplicationContext, you can use the embedded-database tag in the spring-jdbc namespace:
<jdbc:embedded-database id="dataSource" generate-name="true">
    <jdbc:script location="classpath:schema.sql"/>
    <jdbc:script location="classpath:test-data.sql"/>
</jdbc:embedded-database>
The preceding configuration creates an embedded HSQL database that is populated with SQL from
the schema.sql and test-data.sql resources in the root of the classpath. In addition, as
a best practice, the embedded database is assigned a uniquely generated name. The
embedded database is made available to the Spring container as a bean of type
javax.sql.DataSource that can then be injected into data access objects as needed.
3.9.3. Creating an Embedded Database Programmatically
The EmbeddedDatabaseBuilder class provides a fluent API for constructing an embedded
database programmatically. You can use this when you need to create an embedded database in a
stand-alone environment or in a stand-alone integration test, as in the following example:
EmbeddedDatabase db = new EmbeddedDatabaseBuilder()
        .generateUniqueName(true)
        .setType(H2)
        .setScriptEncoding("UTF-8")
        .ignoreFailedDrops(true)
        .addScript("schema.sql")
        .addScripts("user_data.sql", "country_data.sql")
        .build();

// perform actions against the db (EmbeddedDatabase extends javax.sql.DataSource)

db.shutdown()
See the javadoc for EmbeddedDatabaseBuilder
for further details on all supported options.
You can also use the EmbeddedDatabaseBuilder to create an embedded database by using Java
configuration, as the following example shows:
@Configuration
public class DataSourceConfig {

    @Bean
    public DataSource dataSource() {
        return new EmbeddedDatabaseBuilder()
                .generateUniqueName(true)
                .setType(H2)
                .setScriptEncoding("UTF-8")
                .ignoreFailedDrops(true)
                .addScript("schema.sql")
                .addScripts("user_data.sql", "country_data.sql")
                .build();
    }
}
3.9.4. Selecting the Embedded Database Type
This section covers how to select one of the three embedded databases that Spring supports. It includes the following topics:
Using HSQL
Spring supports HSQL 1.8.0 and above. HSQL is the default embedded database if no type is
explicitly specified. To specify HSQL explicitly, set the type attribute of the
embedded-database tag to HSQL. If you use the builder API, call the
setType(EmbeddedDatabaseType) method with EmbeddedDatabaseType.HSQL.
3.9.5. Testing Data Access Logic with an Embedded Database
Embedded databases provide a lightweight way to test data access code. The next example is a
data access integration test template that uses an embedded database. Using such a template
can be useful for one-offs when the embedded database does not need to be
reused across test classes. However, if you wish to create an embedded database that is
shared within a test suite, consider using the Spring TestContext
Framework and configuring the embedded database as a bean in the Spring
ApplicationContext as described in Creating an Embedded Database by Using Spring XML and
Creating an Embedded Database Programmatically. The following listing shows the test template:
public class DataAccessIntegrationTestTemplate {

    private EmbeddedDatabase db;

    @Before
    public void setUp() {
        // creates an HSQL in-memory database populated from default scripts
        // classpath:schema.sql and classpath:data.sql
        db = new EmbeddedDatabaseBuilder()
                .generateUniqueName(true)
                .addDefaultScripts()
                .build();
    }

    @Test
    public void testDataAccess() {
        JdbcTemplate template = new JdbcTemplate(db);
        template.query( /* ... */ );
    }

    @After
    public void tearDown() {
        db.shutdown();
    }

}
3.9.6. Generating Unique Names for Embedded Databases
Development teams often encounter errors with embedded databases if their test suite
inadvertently attempts to recreate additional instances of the same database. This can
happen quite easily if an XML configuration file or @Configuration class is responsible
for creating an embedded database and the corresponding configuration is then reused
across multiple testing scenarios within the same test suite (that is, within the same JVM
process) — for example, integration tests against embedded databases whose
ApplicationContext configuration differs only with regard to which bean definition
profiles are active.
The root cause of such errors is the fact that Spring’s EmbeddedDatabaseFactory (used
internally by both the <jdbc:embedded-database> XML namespace element and the
EmbeddedDatabaseBuilder for Java configuration) sets the name of the embedded database to
testdb if not otherwise specified. For the case of <jdbc:embedded-database>, the
embedded database is typically assigned a name equal to the bean’s id (often,
something like dataSource). Thus, subsequent attempts to create an embedded database
do not result in a new database. Instead, the same JDBC connection URL is reused,
and attempts to create a new embedded database actually point to an existing
embedded database created from the same configuration.
To address this common issue, Spring Framework 4.2 provides support for generating unique names for embedded databases. To enable the use of generated names, use one of the following options.
-
EmbeddedDatabaseFactory.setGenerateUniqueDatabaseName() -
EmbeddedDatabaseBuilder.generateUniqueName() -
<jdbc:embedded-database generate-name="true" … >
3.9.7. Extending the Embedded Database Support
You can extend Spring JDBC embedded database support in two ways:
-
Implement
EmbeddedDatabaseConfigurerto support a new embedded database type. -
Implement
DataSourceFactoryto support a newDataSourceimplementation, such as a connection pool to manage embedded database connections.
We encourage you to contribute extensions to the Spring community at jira.spring.io.
3.10. Initializing a DataSource
The org.springframework.jdbc.datasource.init package provides support for initializing
an existing DataSource. The embedded database support provides one option for creating
and initializing a DataSource for an application. However, you may sometimes need to initialize
an instance that runs on a server somewhere.
3.10.1. Initializing a Database by Using Spring XML
If you want to initialize a database and you can provide a reference to a DataSource
bean, you can use the initialize-database tag in the spring-jdbc namespace:
<jdbc:initialize-database data-source="dataSource">
    <jdbc:script location="classpath:com/foo/sql/db-schema.sql"/>
    <jdbc:script location="classpath:com/foo/sql/db-test-data.sql"/>
</jdbc:initialize-database>
The preceding example runs the two specified scripts against the database. The first
script creates a schema, and the second populates tables with a test data set. The script
locations can also be patterns with wildcards in the usual Ant style used for resources
in Spring (for example,
classpath*:/com/foo/**/sql/*-data.sql). If you use a
pattern, the scripts are run in the lexical order of their URL or filename.
The default behavior of the database initializer is to unconditionally run the provided scripts. This may not always be what you want — for instance, if you run the scripts against a database that already has test data in it. The likelihood of accidentally deleting data is reduced by following the common pattern (shown earlier) of creating the tables first and then inserting the data. The first step fails if the tables already exist.
However, to gain more control over the creation and deletion of existing data, the XML namespace provides a few additional options. The first is a flag to switch the initialization on and off. You can set this according to the environment (such as pulling a boolean value from system properties or from an environment bean). The following example gets a value from a system property:
<jdbc:initialize-database data-source="dataSource"
    enabled="#{systemProperties.INITIALIZE_DATABASE}"> (1)
    <jdbc:script location="..."/>
</jdbc:initialize-database>| 1 | Get the value for enabled from a system property called INITIALIZE_DATABASE. |
The second option to control what happens with existing data is to be more tolerant of failures. To this end, you can control the ability of the initializer to ignore certain errors in the SQL it executes from the scripts, as the following example shows:
<jdbc:initialize-database data-source="dataSource" ignore-failures="DROPS">
    <jdbc:script location="..."/>
</jdbc:initialize-database>
In the preceding example, we are saying that we expect that, sometimes, the scripts are run
against an empty database, and there are some DROP statements in the scripts that
would, therefore, fail. So failed SQL DROP statements will be ignored, but other failures
will cause an exception. This is useful if your SQL dialect doesn’t support DROP … IF
EXISTS (or similar) but you want to unconditionally remove all test data before
re-creating it. In that case the first script is usually a set of DROP statements,
followed by a set of CREATE statements.
The ignore-failures option can be set to NONE (the default), DROPS (ignore failed
drops), or ALL (ignore all failures).
Each statement should be separated by ; or a new line if the ; character is not
present at all in the script. You can control that globally or script by script, as the
following example shows:
<jdbc:initialize-database data-source="dataSource" separator="@@"> (1)
    <jdbc:script location="classpath:com/myapp/sql/db-schema.sql" separator=";"/> (2)
    <jdbc:script location="classpath:com/myapp/sql/db-test-data-1.sql"/>
    <jdbc:script location="classpath:com/myapp/sql/db-test-data-2.sql"/>
</jdbc:initialize-database>| 1 | Set the separator scripts to @@. |
| 2 | Set the separator for db-schema.sql to ;. |
In this example, the two test-data scripts use @@ as statement separator and only
the db-schema.sql uses ;. This configuration specifies that the default separator
is @@ and overrides that default for the db-schema script.
If you need more control than you get from the XML namespace, you can use the
DataSourceInitializer directly and define it as a component in your application.
Initialization of Other Components that Depend on the Database
A large class of applications (those that do not use the database until after the Spring context has started) can use the database initializer with no further complications. If your application is not one of those, you might need to read the rest of this section.
The database initializer depends on a DataSource instance and runs the scripts
provided in its initialization callback (analogous to an init-method in an XML bean
definition, a @PostConstruct method in a component, or the afterPropertiesSet()
method in a component that implements InitializingBean). If other beans depend on the
same data source and use the data source in an initialization callback, there
might be a problem because the data has not yet been initialized. A common example of
this is a cache that initializes eagerly and loads data from the database on application
startup.
To get around this issue, you have two options: change your cache initialization strategy to a later phase or ensure that the database initializer is initialized first.
Changing your cache initialization strategy might be easy if the application is in your control and not otherwise. Some suggestions for how to implement this include:
-
Make the cache initialize lazily on first usage, which improves application startup time.
-
Have your cache or a separate component that initializes the cache implement
LifecycleorSmartLifecycle. When the application context starts, you can automatically start aSmartLifecycleby setting itsautoStartupflag, and you can manually start aLifecycleby callingConfigurableApplicationContext.start()on the enclosing context. -
Use a Spring
ApplicationEventor similar custom observer mechanism to trigger the cache initialization.ContextRefreshedEventis always published by the context when it is ready for use (after all beans have been initialized), so that is often a useful hook (this is how theSmartLifecycleworks by default).
Ensuring that the database initializer is initialized first can also be easy. Some suggestions on how to implement this include:
-
Rely on the default behavior of the Spring
BeanFactory, which is that beans are initialized in registration order. You can easily arrange that by adopting the common practice of a set of<import/>elements in XML configuration that order your application modules and ensuring that the database and database initialization are listed first. -
Separate the
DataSourceand the business components that use it and control their startup order by putting them in separateApplicationContextinstances (for example, the parent context contains theDataSource, and the child context contains the business components). This structure is common in Spring web applications but can be more generally applied.
4. Object Relational Mapping (ORM) Data Access
This section covers data access when you use Object Relational Mapping (ORM).
4.1. Introduction to ORM with Spring
The Spring Framework supports integration with the Java Persistence API (JPA) and supports native Hibernate for resource management, data access object (DAO) implementations, and transaction strategies. For example, for Hibernate, there is first-class support with several convenient IoC features that address many typical Hibernate integration issues. You can configure all of the supported features for OR (object relational) mapping tools through Dependency Injection. They can participate in Spring’s resource and transaction management, and they comply with Spring’s generic transaction and DAO exception hierarchies. The recommended integration style is to code DAOs against plain Hibernate or JPA APIs.
Spring adds significant enhancements to the ORM layer of your choice when you create data access applications. You can leverage as much of the integration support as you wish, and you should compare this integration effort with the cost and risk of building a similar infrastructure in-house. You can use much of the ORM support as you would a library, regardless of technology, because everything is designed as a set of reusable JavaBeans. ORM in a Spring IoC container facilitates configuration and deployment. Thus, most examples in this section show configuration inside a Spring container.
The benefits of using the Spring Framework to create your ORM DAOs include:
-
Easier testing. Spring’s IoC approach makes it easy to swap the implementations and configuration locations of Hibernate
SessionFactoryinstances, JDBCDataSourceinstances, transaction managers, and mapped object implementations (if needed). This in turn makes it much easier to test each piece of persistence-related code in isolation. -
Common data access exceptions. Spring can wrap exceptions from your ORM tool, converting them from proprietary (potentially checked) exceptions to a common runtime
DataAccessExceptionhierarchy. This feature lets you handle most persistence exceptions, which are non-recoverable, only in the appropriate layers, without annoying boilerplate catches, throws, and exception declarations. You can still trap and handle exceptions as necessary. Remember that JDBC exceptions (including DB-specific dialects) are also converted to the same hierarchy, meaning that you can perform some operations with JDBC within a consistent programming model. -
General resource management. Spring application contexts can handle the location and configuration of Hibernate
SessionFactoryinstances, JPAEntityManagerFactoryinstances, JDBCDataSourceinstances, and other related resources. This makes these values easy to manage and change. Spring offers efficient, easy, and safe handling of persistence resources. For example, related code that uses Hibernate generally needs to use the same HibernateSessionto ensure efficiency and proper transaction handling. Spring makes it easy to create and bind aSessionto the current thread transparently, by exposing a currentSessionthrough the HibernateSessionFactory. Thus, Spring solves many chronic problems of typical Hibernate usage, for any local or JTA transaction environment. -
Integrated transaction management. You can wrap your ORM code with a declarative, aspect-oriented programming (AOP) style method interceptor either through the
@Transactionalannotation or by explicitly configuring the transaction AOP advice in an XML configuration file. In both cases, transaction semantics and exception handling (rollback and so on) are handled for you. As discussed in Resource and Transaction Management, you can also swap various transaction managers, without affecting your ORM-related code. For example, you can swap between local transactions and JTA, with the same full services (such as declarative transactions) available in both scenarios. Additionally, JDBC-related code can fully integrate transactionally with the code you use to do ORM. This is useful for data access that is not suitable for ORM (such as batch processing and BLOB streaming) but that still needs to share common transactions with ORM operations.
| For more comprehensive ORM support, including support for alternative database technologies such as MongoDB, you might want to check out the Spring Data suite of projects. If you are a JPA user, the Getting Started Accessing Data with JPA guide from https://spring.io provides a great introduction. |
4.2. General ORM Integration Considerations
This section highlights considerations that apply to all ORM technologies. The Hibernate section provides more details and also show these features and configurations in a concrete context.
The major goal of Spring’s ORM integration is clear application layering (with any data access and transaction technology) and for loose coupling of application objects — no more business service dependencies on the data access or transaction strategy, no more hard-coded resource lookups, no more hard-to-replace singletons, no more custom service registries. The goal is to have one simple and consistent approach to wiring up application objects, keeping them as reusable and free from container dependencies as possible. All the individual data access features are usable on their own but integrate nicely with Spring’s application context concept, providing XML-based configuration and cross-referencing of plain JavaBean instances that need not be Spring-aware. In a typical Spring application, many important objects are JavaBeans: data access templates, data access objects, transaction managers, business services that use the data access objects and transaction managers, web view resolvers, web controllers that use the business services, and so on.
4.2.1. Resource and Transaction Management
Typical business applications are cluttered with repetitive resource management code. Many projects try to invent their own solutions, sometimes sacrificing proper handling of failures for programming convenience. Spring advocates simple solutions for proper resource handling, namely IoC through templating in the case of JDBC and applying AOP interceptors for the ORM technologies.
The infrastructure provides proper resource handling and appropriate conversion of
specific API exceptions to an unchecked infrastructure exception hierarchy. Spring
introduces a DAO exception hierarchy, applicable to any data access strategy. For direct
JDBC, the JdbcTemplate class mentioned in a previous section provides connection
handling and proper conversion of SQLException to the DataAccessException hierarchy,
including translation of database-specific SQL error codes to meaningful exception
classes. For ORM technologies, see the next section for how to get the same exception
translation benefits.
When it comes to transaction management, the JdbcTemplate class hooks in to the Spring
transaction support and supports both JTA and JDBC transactions, through respective
Spring transaction managers. For the supported ORM technologies, Spring offers Hibernate
and JPA support through the Hibernate and JPA transaction managers as well as JTA support.
For details on transaction support, see the Transaction Management chapter.
4.2.2. Exception Translation
When you use Hibernate or JPA in a DAO, you must decide how to handle the persistence
technology’s native exception classes. The DAO throws a subclass of a HibernateException
or PersistenceException, depending on the technology. These exceptions are all runtime
exceptions and do not have to be declared or caught. You may also have to deal with
IllegalArgumentException and IllegalStateException. This means that callers can only
treat exceptions as being generally fatal, unless they want to depend on the persistence
technology’s own exception structure. Catching specific causes (such as an optimistic
locking failure) is not possible without tying the caller to the implementation strategy.
This trade-off might be acceptable to applications that are strongly ORM-based or
do not need any special exception treatment (or both). However, Spring lets exception
translation be applied transparently through the @Repository annotation. The following
examples (one for Java configuration and one for XML configuration) show how to do so:
@Repository
public class ProductDaoImpl implements ProductDao {

    // class body here...

}
<beans>
<!-- Exception translation bean post processor -->
<bean class="org.springframework.dao.annotation.PersistenceExceptionTranslationPostProcessor"/>
<bean id="myProductDao" class="product.ProductDaoImpl"/>
</beans>The postprocessor automatically looks for all exception translators (implementations of
the PersistenceExceptionTranslator interface) and advises all beans marked with the
@Repository annotation so that the discovered translators can intercept and apply the
appropriate translation on the thrown exceptions.
In summary, you can implement DAOs based on the plain persistence technology’s API and annotations while still benefiting from Spring-managed transactions, dependency injection, and transparent exception conversion (if desired) to Spring’s custom exception hierarchies.
4.3. Hibernate
We start with a coverage of Hibernate 5 in a Spring environment, using it to demonstrate the approach that Spring takes towards integrating OR mappers. This section covers many issues in detail and shows different variations of DAO implementations and transaction demarcation. Most of these patterns can be directly translated to all other supported ORM tools. The later sections in this chapter then cover the other ORM technologies and show brief examples.
| As of Spring Framework 5.0, Spring requires Hibernate ORM 4.3 or later for JPA support and even Hibernate ORM 5.0+ for programming against the native Hibernate Session API. Note that the Hibernate team does not maintain any versions prior to 5.1 anymore and is likely to focus on 5.3+ exclusively soon. |
4.3.1. SessionFactory Setup in a Spring Container
To avoid tying application objects to hard-coded resource lookups, you can define
resources (such as a JDBC DataSource or a Hibernate SessionFactory) as beans in the
Spring container. Application objects that need to access resources receive references
to such predefined instances through bean references, as illustrated in the DAO
definition in the next section.
The following excerpt from an XML application context definition shows how to set up a
JDBC DataSource and a Hibernate SessionFactory on top of it:
<beans>

    <bean id="myDataSource" class="org.apache.commons.dbcp.BasicDataSource" destroy-method="close">
        <property name="driverClassName" value="org.hsqldb.jdbcDriver"/>
        <property name="url" value="jdbc:hsqldb:hsql://localhost:9001"/>
        <property name="username" value="sa"/>
        <property name="password" value=""/>
    </bean>

    <bean id="mySessionFactory" class="org.springframework.orm.hibernate5.LocalSessionFactoryBean">
        <property name="dataSource" ref="myDataSource"/>
        <property name="mappingResources">
            <list>
                <value>product.hbm.xml</value>
            </list>
        </property>
        <property name="hibernateProperties">
            <value>
                hibernate.dialect=org.hibernate.dialect.HSQLDialect
            </value>
        </property>
    </bean>

</beans>
Switching from a local Jakarta Commons DBCP BasicDataSource to a JNDI-located
DataSource (usually managed by an application server) is only a matter of
configuration, as the following example shows:
<beans>
    <jee:jndi-lookup id="myDataSource" jndi-name="java:comp/env/jdbc/myds"/>
</beans>
You can also access a JNDI-located SessionFactory, using Spring’s
JndiObjectFactoryBean / <jee:jndi-lookup> to retrieve and expose it.
However, that is typically not common outside of an EJB context.
|
Spring also provides a Both As of Spring Framework 5.1, such a native Hibernate setup can also expose a JPA
|
4.3.2. Implementing DAOs Based on the Plain Hibernate API
Hibernate has a feature called contextual sessions, wherein Hibernate itself manages
one current Session per transaction. This is roughly equivalent to Spring’s
synchronization of one Hibernate Session per transaction. A corresponding DAO
implementation resembles the following example, based on the plain Hibernate API:
public class ProductDaoImpl implements ProductDao {

    private SessionFactory sessionFactory;

    public void setSessionFactory(SessionFactory sessionFactory) {
        this.sessionFactory = sessionFactory;
    }

    public Collection loadProductsByCategory(String category) {
        return this.sessionFactory.getCurrentSession()
                .createQuery("from test.Product product where product.category=?")
                .setParameter(0, category)
                .list();
    }
}
This style is similar to that of the Hibernate reference documentation and examples,
except for holding the SessionFactory in an instance variable. We strongly recommend
such an instance-based setup over the old-school static HibernateUtil class from
Hibernate’s CaveatEmptor sample application. (In general, do not keep any resources in
static variables unless absolutely necessary.)
The preceding DAO example follows the dependency injection pattern. It fits nicely into a Spring IoC
container, as it would if coded against Spring’s HibernateTemplate.
You can also set up such a DAO in plain Java (for example, in unit tests). To do so,
instantiate it and call setSessionFactory(..) with the desired factory reference. As a
Spring bean definition, the DAO would resemble the following:
<beans>

    <bean id="myProductDao" class="product.ProductDaoImpl">
        <property name="sessionFactory" ref="mySessionFactory"/>
    </bean>

</beans>
The main advantage of this DAO style is that it depends on Hibernate API only. No import of any Spring class is required. This is appealing from a non-invasiveness perspective and may feel more natural to Hibernate developers.
However, the DAO throws plain HibernateException (which is unchecked, so it does not have
to be declared or caught), which means that callers can treat exceptions only as being
generally fatal — unless they want to depend on Hibernate’s own exception hierarchy.
Catching specific causes (such as an optimistic locking failure) is not possible without
tying the caller to the implementation strategy. This trade off might be acceptable to
applications that are strongly Hibernate-based, do not need any special exception
treatment, or both.
Fortunately, Spring’s LocalSessionFactoryBean supports Hibernate’s
SessionFactory.getCurrentSession() method for any Spring transaction strategy,
returning the current Spring-managed transactional Session, even with
HibernateTransactionManager. The standard behavior of that method remains
to return the current Session associated with the ongoing JTA transaction, if any.
This behavior applies regardless of whether you use Spring’s
JtaTransactionManager, EJB container managed transactions (CMTs), or JTA.
In summary, you can implement DAOs based on the plain Hibernate API, while still being able to participate in Spring-managed transactions.
4.3.3. Declarative Transaction Demarcation
We recommend that you use Spring’s declarative transaction support, which lets you replace explicit transaction demarcation API calls in your Java code with an AOP transaction interceptor. You can configure this transaction interceptor in a Spring container by using either Java annotations or XML. This declarative transaction capability lets you keep business services free of repetitive transaction demarcation code and focus on adding business logic, which is the real value of your application.
| Before you continue, we are strongly encourage you to read Declarative transaction management if you have not already done so. |
You can annotate the service layer with @Transactional annotations and instruct the
Spring container to find these annotations and provide transactional semantics for
these annotated methods. The following example shows how to do so:
public class ProductServiceImpl implements ProductService {

    private ProductDao productDao;

    public void setProductDao(ProductDao productDao) {
        this.productDao = productDao;
    }

    @Transactional
    public void increasePriceOfAllProductsInCategory(final String category) {
        List productsToChange = this.productDao.loadProductsByCategory(category);
        // ...
    }

    @Transactional(readOnly = true)
    public List<Product> findAllProducts() {
        return this.productDao.findAllProducts();
    }

}
In the container, you need to set up the PlatformTransactionManager implementation
(as a bean) and a <tx:annotation-driven/> entry, opting into @Transactional
processing at runtime. The following example shows how to do so:
<?xml version="1.0" encoding="UTF-8"?>
<beans xmlns="http://www.springframework.org/schema/beans"
    xmlns:xsi="http://www.w3.org/2001/XMLSchema-instance"
    xmlns:aop="http://www.springframework.org/schema/aop"
    xmlns:tx="http://www.springframework.org/schema/tx"
    xsi:schemaLocation="
        http://www.springframework.org/schema/beans
        http://www.springframework.org/schema/beans/spring-beans.xsd
        http://www.springframework.org/schema/tx
        http://www.springframework.org/schema/tx/spring-tx.xsd
        http://www.springframework.org/schema/aop
        http://www.springframework.org/schema/aop/spring-aop.xsd">

    <!-- SessionFactory, DataSource, etc. omitted -->

    <bean id="transactionManager"
            class="org.springframework.orm.hibernate5.HibernateTransactionManager">
        <property name="sessionFactory" ref="sessionFactory"/>
    </bean>

    <tx:annotation-driven/>

    <bean id="myProductService" class="product.SimpleProductService">
        <property name="productDao" ref="myProductDao"/>
    </bean>

</beans>
4.3.4. Programmatic Transaction Demarcation
You can demarcate transactions in a higher level of the application, on top of
lower-level data access services that span any number of operations. Nor do restrictions
exist on the implementation of the surrounding business service. It needs only a Spring
PlatformTransactionManager. Again, the latter can come from anywhere, but preferably
as a bean reference through a setTransactionManager(..) method. Also, the
productDAO should be set by a setProductDao(..) method. The following pair of snippets show
a transaction manager and a business service definition in a Spring application context
and an example for a business method implementation:
<beans>

    <bean id="myTxManager" class="org.springframework.orm.hibernate5.HibernateTransactionManager">
        <property name="sessionFactory" ref="mySessionFactory"/>
    </bean>

    <bean id="myProductService" class="product.ProductServiceImpl">
        <property name="transactionManager" ref="myTxManager"/>
        <property name="productDao" ref="myProductDao"/>
    </bean>

</beans>
public class ProductServiceImpl implements ProductService {
private TransactionTemplate transactionTemplate;
private ProductDao productDao;
public void setTransactionManager(PlatformTransactionManager transactionManager) {
this.transactionTemplate = new TransactionTemplate(transactionManager);
}
public void setProductDao(ProductDao productDao) {
this.productDao = productDao;
}
public void increasePriceOfAllProductsInCategory(final String category) {
this.transactionTemplate.execute(new TransactionCallbackWithoutResult() {
public void doInTransactionWithoutResult(TransactionStatus status) {
List productsToChange = this.productDao.loadProductsByCategory(category);
// do the price increase...
}
});
}
}Spring’s TransactionInterceptor lets any checked application exception be thrown
with the callback code, while TransactionTemplate is restricted to unchecked
exceptions within the callback. TransactionTemplate triggers a rollback in case of
an unchecked application exception or if the transaction is marked rollback-only by
the application (by setting TransactionStatus). By default, TransactionInterceptor
behaves the same way but allows configurable rollback policies per method.
4.3.5. Transaction Management Strategies
Both TransactionTemplate and TransactionInterceptor delegate the actual transaction
handling to a PlatformTransactionManager instance (which can be a
HibernateTransactionManager (for a single Hibernate SessionFactory) by using a
ThreadLocal Session under the hood) or a JtaTransactionManager (delegating to the
JTA subsystem of the container) for Hibernate applications. You can even use a custom
PlatformTransactionManager implementation. Switching from native Hibernate transaction
management to JTA (such as when facing distributed transaction requirements for certain
deployments of your application) is only a matter of configuration. You can replace
the Hibernate transaction manager with Spring’s JTA transaction implementation. Both
transaction demarcation and data access code work without changes, because they
use the generic transaction management APIs.
For distributed transactions across multiple Hibernate session factories, you can combine
JtaTransactionManager as a transaction strategy with multiple
LocalSessionFactoryBean definitions. Each DAO then gets one specific SessionFactory
reference passed into its corresponding bean property. If all underlying JDBC data
sources are transactional container ones, a business service can demarcate transactions
across any number of DAOs and any number of session factories without special regard, as
long as it uses JtaTransactionManager as the strategy.
Both HibernateTransactionManager and JtaTransactionManager allow for proper
JVM-level cache handling with Hibernate, without container-specific transaction manager
lookup or a JCA connector (if you do not use EJB to initiate transactions).
HibernateTransactionManager can export the Hibernate JDBC Connection to plain JDBC
access code for a specific DataSource. This ability allows for high-level
transaction demarcation with mixed Hibernate and JDBC data access completely without
JTA, provided you access only one database. HibernateTransactionManager automatically
exposes the Hibernate transaction as a JDBC transaction if you have set up the passed-in
SessionFactory with a DataSource through the dataSource property of the
LocalSessionFactoryBean class. Alternatively, you can specify explicitly the
DataSource for which the transactions are supposed to be exposed through the
dataSource property of the HibernateTransactionManager class.
4.3.6. Comparing Container-managed and Locally Defined Resources
You can switch between a container-managed JNDI SessionFactory and a locally defined
one without having to change a single line of application code. Whether to keep
resource definitions in the container or locally within the application is mainly a
matter of the transaction strategy that you use. Compared to a Spring-defined local
SessionFactory, a manually registered JNDI SessionFactory does not provide any
benefits. Deploying a SessionFactory through Hibernate’s JCA connector provides the
added value of participating in the Java EE server’s management infrastructure, but does
not add actual value beyond that.
Spring’s transaction support is not bound to a container. When configured with any strategy
other than JTA, transaction support also works in a stand-alone or test environment.
Especially in the typical case of single-database transactions, Spring’s single-resource
local transaction support is a lightweight and powerful alternative to JTA. When you use
local EJB stateless session beans to drive transactions, you depend both on an EJB
container and on JTA, even if you access only a single database and use only stateless
session beans to provide declarative transactions through container-managed
transactions. Direct use of JTA programmatically also requires a Java EE environment.
JTA does not involve only container dependencies in terms of JTA itself and of
JNDI DataSource instances. For non-Spring, JTA-driven Hibernate transactions, you have
to use the Hibernate JCA connector or extra Hibernate transaction code with the
TransactionManagerLookup configured for proper JVM-level caching.
Spring-driven transactions can work as well with a locally defined Hibernate
SessionFactory as they do with a local JDBC DataSource, provided they access a
single database. Thus, you need only use Spring’s JTA transaction strategy when you
have distributed transaction requirements. A JCA connector requires container-specific
deployment steps, and (obviously) JCA support in the first place. This configuration
requires more work than deploying a simple web application with local resource
definitions and Spring-driven transactions. Also, you often need the Enterprise Edition
of your container if you use, for example, WebLogic Express, which does not
provide JCA. A Spring application with local resources and transactions that span one
single database works in any Java EE web container (without JTA, JCA, or EJB), such as
Tomcat, Resin, or even plain Jetty. Additionally, you can easily reuse such a middle
tier in desktop applications or test suites.
All things considered, if you do not use EJBs, stick with local SessionFactory setup
and Spring’s HibernateTransactionManager or JtaTransactionManager. You get all of
the benefits, including proper transactional JVM-level caching and distributed
transactions, without the inconvenience of container deployment. JNDI registration of a
Hibernate SessionFactory through the JCA connector adds value only when used in
conjunction with EJBs.
4.3.7. Spurious Application Server Warnings with Hibernate
In some JTA environments with very strict XADataSource implementations (currently
only some WebLogic Server and WebSphere versions), when Hibernate is configured without
regard to the JTA PlatformTransactionManager object for that environment,
spurious warning or exceptions can show up in the application server log.
These warnings or exceptions indicate that the connection being accessed is no longer
valid or JDBC access is no longer valid, possibly because the transaction is no longer
active. As an example, here is an actual exception from WebLogic:
java.sql.SQLException: The transaction is no longer active - status: 'Committed'. No
further JDBC access is allowed within this transaction.
You can resolve this warning by making Hibernate aware of the JTA
PlatformTransactionManager instance, to which it synchronizes (along with Spring).
You have two options for doing this:
-
If, in your application context, you already directly obtain the JTA
PlatformTransactionManagerobject (presumably from JNDI throughJndiObjectFactoryBeanor<jee:jndi-lookup>) and feed it, for example, to Spring’sJtaTransactionManager, the easiest way is to specify a reference to the bean that defines this JTAPlatformTransactionManagerinstance as the value of thejtaTransactionManagerproperty forLocalSessionFactoryBean.Spring then makes the object available to Hibernate. -
More likely, you do not already have the JTA
PlatformTransactionManagerinstance, because Spring’sJtaTransactionManagercan find it itself. Thus, you need to configure Hibernate to look up JTAPlatformTransactionManagerdirectly. You do this by configuring an application server-specificTransactionManagerLookupclass in the Hibernate configuration, as described in the Hibernate manual.
The remainder of this section describes the sequence of events that occur with and
without Hibernate’s awareness of the JTA PlatformTransactionManager.
When Hibernate is not configured with any awareness of the JTA
PlatformTransactionManager, the following events occur when a JTA transaction commits:
-
The JTA transaction commits.
-
Spring’s
JtaTransactionManageris synchronized to the JTA transaction, so it is called back through anafterCompletioncallback by the JTA transaction manager. -
Among other activities, this synchronization can trigger a callback by Spring to Hibernate, through Hibernate’s
afterTransactionCompletioncallback (used to clear the Hibernate cache), followed by an explicitclose()call on the Hibernate session, which causes Hibernate to attempt toclose()the JDBC Connection. -
In some environments, this
Connection.close()call then triggers the warning or error, as the application server no longer considers theConnectionto be usable, because the transaction has already been committed.
When Hibernate is configured with awareness of the JTA PlatformTransactionManager, the
following events occur when a JTA transaction commits:
-
The JTA transaction is ready to commit.
-
Spring’s
JtaTransactionManageris synchronized to the JTA transaction, so the transaction is called back through abeforeCompletioncallback by the JTA transaction manager. -
Spring is aware that Hibernate itself is synchronized to the JTA transaction and behaves differently than in the previous scenario. Assuming the Hibernate
Sessionneeds to be closed at all, Spring closes it now. -
The JTA transaction commits.
-
Hibernate is synchronized to the JTA transaction, so the transaction is called back through an
afterCompletioncallback by the JTA transaction manager and can properly clear its cache.
4.4. JPA
The Spring JPA, available under the org.springframework.orm.jpa package, offers
comprehensive support for the
Java Persistence
API in a manner similar to the integration with Hibernate while being aware of
the underlying implementation in order to provide additional features.
4.4.1. Three Options for JPA Setup in a Spring Environment
The Spring JPA support offers three ways of setting up the JPA EntityManagerFactory
that is used by the application to obtain an entity manager.
Using LocalEntityManagerFactoryBean
You can use this option only in simple deployment environments such as stand-alone applications and integration tests.
The LocalEntityManagerFactoryBean creates an EntityManagerFactory suitable for
simple deployment environments where the application uses only JPA for data access. The
factory bean uses the JPA PersistenceProvider auto-detection mechanism (according to
JPA’s Java SE bootstrapping) and, in most cases, requires you to specify only the
persistence unit name. The following XML example configures such a bean:
<beans>
    <bean id="myEmf" class="org.springframework.orm.jpa.LocalEntityManagerFactoryBean">
        <property name="persistenceUnitName" value="myPersistenceUnit"/>
    </bean>
</beans>
This form of JPA deployment is the simplest and the most limited. You cannot refer to an
existing JDBC DataSource bean definition, and no support for global transactions
exists. Furthermore, weaving (byte-code transformation) of persistent classes is
provider-specific, often requiring a specific JVM agent to specified on startup. This
option is sufficient only for stand-alone applications and test environments, for which
the JPA specification is designed.
Obtaining an EntityManagerFactory from JNDI
You can use this option when deploying to a Java EE server. Check your server’s documentation on how to deploy a custom JPA provider into your server, allowing for a different provider than the server’s default.
Obtaining an EntityManagerFactory from JNDI (for example in a Java EE environment),
is a matter of changing the XML configuration, as the following example shows:
<beans>
    <jee:jndi-lookup id="myEmf" jndi-name="persistence/myPersistenceUnit"/>
</beans>
This action assumes standard Java EE bootstrapping. The Java EE server auto-detects
persistence units (in effect, META-INF/persistence.xml files in application jars) and
persistence-unit-ref entries in the Java EE deployment descriptor (for example,
web.xml) and defines environment naming context locations for those persistence units.
In such a scenario, the entire persistence unit deployment, including the weaving
(byte-code transformation) of persistent classes, is up to the Java EE server. The JDBC
DataSource is defined through a JNDI location in the META-INF/persistence.xml file.
EntityManager transactions are integrated with the server’s JTA subsystem. Spring merely
uses the obtained EntityManagerFactory, passing it on to application objects through
dependency injection and managing transactions for the persistence unit (typically
through JtaTransactionManager).
If you use multiple persistence units in the same application, the bean names of such
JNDI-retrieved persistence units should match the persistence unit names that the
application uses to refer to them (for example, in @PersistenceUnit and
@PersistenceContext annotations).
Using LocalContainerEntityManagerFactoryBean
You can use this option for full JPA capabilities in a Spring-based application environment. This includes web containers such as Tomcat, stand-alone applications, and integration tests with sophisticated persistence requirements.
If you want to specifically configure a Hibernate setup, an immediate alternative is
to go with Hibernate 5.2 or 5.3 and set up a native Hibernate LocalSessionFactoryBean
instead of a plain JPA LocalContainerEntityManagerFactoryBean, letting it interact
with JPA access code as well as native Hibernate access code.
See Native Hibernate setup for JPA interaction for details.
|
The LocalContainerEntityManagerFactoryBean gives full control over
EntityManagerFactory configuration and is appropriate for environments where
fine-grained customization is required. The LocalContainerEntityManagerFactoryBean
creates a PersistenceUnitInfo instance based on the persistence.xml file, the
supplied dataSourceLookup strategy, and the specified loadTimeWeaver. It is, thus,
possible to work with custom data sources outside of JNDI and to control the weaving
process. The following example shows a typical bean definition for a
LocalContainerEntityManagerFactoryBean:
<beans>
    <bean id="myEmf" class="org.springframework.orm.jpa.LocalContainerEntityManagerFactoryBean">
        <property name="dataSource" ref="someDataSource"/>
        <property name="loadTimeWeaver">
            <bean class="org.springframework.instrument.classloading.InstrumentationLoadTimeWeaver"/>
        </property>
    </bean>
</beans>
The following example shows a typical persistence.xml file:
<persistence xmlns="http://java.sun.com/xml/ns/persistence" version="1.0">
    <persistence-unit name="myUnit" transaction-type="RESOURCE_LOCAL">
        <mapping-file>META-INF/orm.xml</mapping-file>
        <exclude-unlisted-classes/>
    </persistence-unit>
</persistence>
The <exclude-unlisted-classes/> shortcut indicates that no scanning for
annotated entity classes is supposed to occur. An explicit 'true' value
(<exclude-unlisted-classes>true</exclude-unlisted-classes/>) also means no scan.
<exclude-unlisted-classes>false</exclude-unlisted-classes/> does trigger a scan.
However, we recommend omitting the exclude-unlisted-classes element
if you want entity class scanning to occur.
|
Using the LocalContainerEntityManagerFactoryBean is the most powerful JPA setup
option, allowing for flexible local configuration within the application. It supports
links to an existing JDBC DataSource, supports both local and global transactions, and
so on. However, it also imposes requirements on the runtime environment, such as the
availability of a weaving-capable class loader if the persistence provider demands
byte-code transformation.
This option may conflict with the built-in JPA capabilities of a Java EE server. In a
full Java EE environment, consider obtaining your EntityManagerFactory from JNDI.
Alternatively, specify a custom persistenceXmlLocation on your
LocalContainerEntityManagerFactoryBean definition (for example,
META-INF/my-persistence.xml) and include only a descriptor with that name in your
application jar files. Because the Java EE server looks only for default
META-INF/persistence.xml files, it ignores such custom persistence units and, hence,
avoids conflicts with a Spring-driven JPA setup upfront. (This applies to Resin 3.1, for
example.)
The LoadTimeWeaver interface is a Spring-provided class that lets JPA
ClassTransformer instances be plugged in a specific manner, depending on whether the
environment is a web container or application server. Hooking ClassTransformers
through an
agent
is typically not efficient. The agents work against the entire virtual machine and
inspect every class that is loaded, which is usually undesirable in a production
server environment.
Spring provides a number of LoadTimeWeaver implementations for various environments,
letting ClassTransformer instances be applied only for each class loader and not
for each VM.
See Spring configuration in the AOP chapter for
more insight regarding the LoadTimeWeaver implementations and their setup, either
generic or customized to various platforms (such as Tomcat, WebLogic, GlassFish,
Resin, and JBoss).
As described in Spring configuration, you can configure a context-wide
LoadTimeWeaver by using the @EnableLoadTimeWeaving annotation of the
context:load-time-weaver XML element. Such a global weaver is automatically picked up by all JPA
LocalContainerEntityManagerFactoryBean instances. The following example shows the preferred way of
setting up a load-time weaver, delivering auto-detection of the platform (WebLogic,
GlassFish, Tomcat, Resin, JBoss, or VM agent) and automatic propagation of the weaver to
all weaver-aware beans:
<context:load-time-weaver/>
<bean id="emf" class="org.springframework.orm.jpa.LocalContainerEntityManagerFactoryBean">
    ...
</bean>
However, you can, if needed, manually specify a dedicated weaver through the
loadTimeWeaver property, as the following example shows:
<bean id="emf" class="org.springframework.orm.jpa.LocalContainerEntityManagerFactoryBean">
    <property name="loadTimeWeaver">
        <bean class="org.springframework.instrument.classloading.ReflectiveLoadTimeWeaver"/>
    </property>
</bean>
No matter how the LTW is configured, by using this technique, JPA applications relying on instrumentation can run in the target platform (for example, Tomcat) without needing an agent. This is especially important when the hosting applications rely on different JPA implementations, because the JPA transformers are applied only at the class-loader level and are, thus, isolated from each other.
Dealing with Multiple Persistence Units
For applications that rely on multiple persistence units locations (stored in various
JARS in the classpath, for example), Spring offers the PersistenceUnitManager to act as
a central repository and to avoid the persistence units discovery process, which can be
expensive. The default implementation lets multiple locations be specified. These locations are
parsed and later retrieved through the persistence unit name. (By default, the classpath
is searched for META-INF/persistence.xml files.) The following example configures
multiple locations:
<bean id="pum" class="org.springframework.orm.jpa.persistenceunit.DefaultPersistenceUnitManager">
    <property name="persistenceXmlLocations">
        <list>
            <value>org/springframework/orm/jpa/domain/persistence-multi.xml</value>
            <value>classpath:/my/package/**/custom-persistence.xml</value>
            <value>classpath*:META-INF/persistence.xml</value>
        </list>
    </property>
    <property name="dataSources">
        <map>
            <entry key="localDataSource" value-ref="local-db"/>
            <entry key="remoteDataSource" value-ref="remote-db"/>
        </map>
    </property>
    <!-- if no datasource is specified, use this one -->
    <property name="defaultDataSource" ref="remoteDataSource"/>
</bean>

<bean id="emf" class="org.springframework.orm.jpa.LocalContainerEntityManagerFactoryBean">
    <property name="persistenceUnitManager" ref="pum"/>
    <property name="persistenceUnitName" value="myCustomUnit"/>
</bean>
The default implementation allows customization of the PersistenceUnitInfo instances
(before they are fed to the JPA provider) either declaratively (through its properties, which
affect all hosted units) or programmatically (through the
PersistenceUnitPostProcessor, which allows persistence unit selection). If no
PersistenceUnitManager is specified, one is created and used internally by
LocalContainerEntityManagerFactoryBean.
Background Bootstrapping
LocalContainerEntityManagerFactoryBean supports background bootstrapping through
the bootstrapExecutor property, as the following example shows:
<bean id="emf" class="org.springframework.orm.jpa.LocalContainerEntityManagerFactoryBean">
    <property name="bootstrapExecutor">
        <bean class="org.springframework.core.task.SimpleAsyncTaskExecutor"/>
    </property>
</bean>
The actual JPA provider bootstrapping is handed off to the specified executor and then,
running in parallel, to the application bootstrap thread. The exposed EntityManagerFactory
proxy can be injected into other application components and is even able to respond to
EntityManagerFactoryInfo configuration inspection. However, once the actual JPA provider
is being accessed by other components (for example, calling createEntityManager), those calls
block until the background bootstrapping has completed. In particular, when you use
Spring Data JPA, make sure to set up deferred bootstrapping for its repositories as well.
4.4.2. Implementing DAOs Based on JPA: EntityManagerFactory and EntityManager
Although EntityManagerFactory instances are thread-safe, EntityManager instances are
not. The injected JPA EntityManager behaves like an EntityManager fetched from an
application server’s JNDI environment, as defined by the JPA specification. It delegates
all calls to the current transactional EntityManager, if any. Otherwise, it falls back
to a newly created EntityManager per operation, in effect making its usage thread-safe.
|
It is possible to write code against the plain JPA without any Spring dependencies, by
using an injected EntityManagerFactory or EntityManager. Spring can understand the
@PersistenceUnit and @PersistenceContext annotations both at the field and the method level
if a PersistenceAnnotationBeanPostProcessor is enabled. The following example shows a plain JPA DAO implementation
that uses the @PersistenceUnit annotation:
public class ProductDaoImpl implements ProductDao {

    private EntityManagerFactory emf;

    @PersistenceUnit
    public void setEntityManagerFactory(EntityManagerFactory emf) {
        this.emf = emf;
    }

    public Collection loadProductsByCategory(String category) {
        EntityManager em = this.emf.createEntityManager();
        try {
            Query query = em.createQuery("from Product as p where p.category = ?1");
            query.setParameter(1, category);
            return query.getResultList();
        }
        finally {
            if (em != null) {
                em.close();
            }
        }
    }
}
The preceding DAO has no dependency on Spring and still fits nicely into a Spring
application context. Moreover, the DAO takes advantage of annotations to require the
injection of the default EntityManagerFactory, as the following example bean definition shows:
<beans>

    <!-- bean post-processor for JPA annotations -->
    <bean class="org.springframework.orm.jpa.support.PersistenceAnnotationBeanPostProcessor"/>

    <bean id="myProductDao" class="product.ProductDaoImpl"/>

</beans>
As an alternative to explicitly defining a PersistenceAnnotationBeanPostProcessor,
consider using the Spring context:annotation-config XML element in your application
context configuration. Doing so automatically registers all Spring standard
post-processors for annotation-based configuration, including
CommonAnnotationBeanPostProcessor and so on.
Consider the following example:
<beans>

    <!-- post-processors for all standard config annotations -->
    <context:annotation-config/>

    <bean id="myProductDao" class="product.ProductDaoImpl"/>

</beans>
The main problem with such a DAO is that it always creates a new EntityManager through
the factory. You can avoid this by requesting a transactional EntityManager (also
called a “shared EntityManager” because it is a shared, thread-safe proxy for the actual
transactional EntityManager) to be injected instead of the factory. The following example shows how to do so:
public class ProductDaoImpl implements ProductDao {

    @PersistenceContext
    private EntityManager em;

    public Collection loadProductsByCategory(String category) {
        Query query = em.createQuery("from Product as p where p.category = :category");
        query.setParameter("category", category);
        return query.getResultList();
    }
}
The @PersistenceContext annotation has an optional attribute called type, which defaults to
PersistenceContextType.TRANSACTION. You can use this default to receive a shared
EntityManager proxy. The alternative, PersistenceContextType.EXTENDED, is a completely
different affair. This results in a so-called extended EntityManager, which is not
thread-safe and, hence, must not be used in a concurrently accessed component, such as a
Spring-managed singleton bean. Extended EntityManager instances are only supposed to be used in
stateful components that, for example, reside in a session, with the lifecycle of the
EntityManager not tied to a current transaction but rather being completely up to the
application.
The injected EntityManager is Spring-managed (aware of the ongoing transaction).
Even though the new DAO implementation uses method-level
injection of an EntityManager instead of an EntityManagerFactory, no change is
required in the application context XML, due to annotation usage.
The main advantage of this DAO style is that it depends only on the Java Persistence API. No import of any Spring class is required. Moreover, as the JPA annotations are understood, the injections are applied automatically by the Spring container. This is appealing from a non-invasiveness perspective and can feel more natural to JPA developers.
4.4.3. Spring-driven JPA transactions
| We strongly encourage you to read Declarative transaction management, if you have not already done so, to get more detailed coverage of Spring’s declarative transaction support. |
The recommended strategy for JPA is local transactions through JPA’s native transaction
support. Spring’s JpaTransactionManager provides many capabilities known from local
JDBC transactions (such as transaction-specific isolation levels and resource-level
read-only optimizations) against any regular JDBC connection pool (no XA requirement).
Spring JPA also lets a configured JpaTransactionManager expose a JPA transaction
to JDBC access code that accesses the same DataSource, provided that the registered
JpaDialect supports retrieval of the underlying JDBC Connection.
Spring provides dialects for the EclipseLink and Hibernate JPA implementations.
See the next section for details on the JpaDialect mechanism.
As an immediate alternative, Spring’s native HibernateTransactionManager is capable
of interacting with JPA access code as of Spring Framework 5.1 and Hibernate 5.2/5.3,
adapting to several Hibernate specifics and providing JDBC interaction.
This makes particular sense in combination with LocalSessionFactoryBean setup.
See Native Hibernate Setup for JPA Interaction for details.
|
4.4.4. Understanding JpaDialect and JpaVendorAdapter
As an advanced feature, JpaTransactionManager and subclasses of
AbstractEntityManagerFactoryBean allow a custom JpaDialect to be passed into the
jpaDialect bean property. A JpaDialect implementation can enable the following advanced
features supported by Spring, usually in a vendor-specific manner:
-
Applying specific transaction semantics (such as custom isolation level or transaction timeout)
-
Retrieving the transactional JDBC
Connection(for exposure to JDBC-based DAOs) -
Advanced translation of
PersistenceExceptionsto SpringDataAccessExceptions
This is particularly valuable for special transaction semantics and for advanced
translation of exception. The default implementation (DefaultJpaDialect) does
not provide any special abilities and, if the features listed earlier are required, you have
to specify the appropriate dialect.
As an even broader provider adaptation facility primarily for Spring’s full-featured
LocalContainerEntityManagerFactoryBean setup, JpaVendorAdapter combines the
capabilities of JpaDialect with other provider-specific defaults. Specifying a
HibernateJpaVendorAdapter or EclipseLinkJpaVendorAdapter is the most convenient
way of auto-configuring an EntityManagerFactory setup for Hibernate or EclipseLink,
respectively. Note that those provider adapters are primarily designed for use with
Spring-driven transaction management (that is, for use with JpaTransactionManager).
|
See the JpaDialect and
JpaVendorAdapter javadoc for
more details of its operations and how they are used within Spring’s JPA support.
4.4.5. Setting up JPA with JTA Transaction Management
As an alternative to JpaTransactionManager, Spring also allows for multi-resource
transaction coordination through JTA, either in a Java EE environment or with a
stand-alone transaction coordinator, such as Atomikos. Aside from choosing Spring’s
JtaTransactionManager instead of JpaTransactionManager, you need to take few further
steps:
-
The underlying JDBC connection pools need to be XA-capable and be integrated with your transaction coordinator. This is usually straightforward in a Java EE environment, exposing a different kind of
DataSourcethrough JNDI. See your application server documentation for details. Analogously, a standalone transaction coordinator usually comes with special XA-integratedDataSourceimplementations. Again, check its documentation. -
The JPA
EntityManagerFactorysetup needs to be configured for JTA. This is provider-specific, typically through special properties to be specified asjpaPropertiesonLocalContainerEntityManagerFactoryBean. In the case of Hibernate, these properties are even version-specific. See your Hibernate documentation for details. -
Spring’s
HibernateJpaVendorAdapterenforces certain Spring-oriented defaults, such as the connection release mode,on-close, which matches Hibernate’s own default in Hibernate 5.0 but not any more in 5.1/5.2. For a JTA setup, either do not declareHibernateJpaVendorAdapterto begin with or turn off itsprepareConnectionflag. Alternatively, set Hibernate 5.2’shibernate.connection.handling_modeproperty toDELAYED_ACQUISITION_AND_RELEASE_AFTER_STATEMENTto restore Hibernate’s own default. See Spurious Application Server Warnings with Hibernate for a related note about WebLogic. -
Alternatively, consider obtaining the
EntityManagerFactoryfrom your application server itself (that is, through a JNDI lookup instead of a locally declaredLocalContainerEntityManagerFactoryBean). A server-providedEntityManagerFactorymight require special definitions in your server configuration (making the deployment less portable) but is set up for the server’s JTA environment.
4.4.6. Native Hibernate Setup and Native Hibernate Transactions for JPA Interaction
As of Spring Framework 5.1 and Hibernate 5.2/5.3, a native LocalSessionFactoryBean
setup in combination with HibernateTransactionManager allows for interaction with
@PersistenceContext and other JPA access code. A Hibernate
SessionFactory natively implements JPA’s EntityManagerFactory interface now
and a Hibernate Session handle natively is a JPA EntityManager.
Spring’s JPA support facilities automatically detect native Hibernate sessions.
Such native Hibernate setup can, therefore, serve as a replacement for a standard JPA
LocalContainerEntityManagerFactoryBean and JpaTransactionManager combination
in many scenarios, allowing for interaction with SessionFactory.getCurrentSession()
(and also HibernateTemplate) next to @PersistenceContext EntityManager within
the same local transaction. Such a setup also provides stronger Hibernate integration
and more configuration flexibility, because it is not constrained by JPA bootstrap contracts.
You do not need HibernateJpaVendorAdapter configuration in such a scenario,
since Spring’s native Hibernate setup provides even more features
(for example, custom Hibernate Integrator setup, Hibernate 5.3 bean container integration,
and stronger optimizations for read-only transactions). Last but not least, you can also
express native Hibernate setup through LocalSessionFactoryBuilder,
seamlessly integrating with @Bean style configuration (no FactoryBean involved).
|
On |
5. Marshalling XML by Using Object-XML Mappers
5.1. Introduction
This chapter, describes Spring’s Object-XML Mapping support. Object-XML Mapping (O-X mapping for short) is the act of converting an XML document to and from an object. This conversion process is also known as XML Marshalling, or XML Serialization. This chapter uses these terms interchangeably.
Within the field of O-X mapping, a marshaller is responsible for serializing an object (graph) to XML. In similar fashion, an unmarshaller deserializes the XML to an object graph. This XML can take the form of a DOM document, an input or output stream, or a SAX handler.
Some of the benefits of using Spring for your O/X mapping needs are:
5.1.1. Ease of configuration
Spring’s bean factory makes it easy to configure marshallers, without needing to construct JAXB context, JiBX binding factories, and so on. You can configure the marshallers as you would any other bean in your application context. Additionally, XML namespace-based configuration is available for a number of marshallers, making the configuration even simpler.
5.1.2. Consistent Interfaces
Spring’s O-X mapping operates through two global interfaces: Marshaller and
Unmarshaller. These abstractions let you switch O-X mapping frameworks
with relative ease, with little or no change required on the classes that do the
marshalling. This approach has the additional benefit of making it possible to do XML
marshalling with a mix-and-match approach (for example, some marshalling performed using JAXB
and some by Castor) in a non-intrusive fashion, letting you use the strength of each
technology.
5.2. Marshaller and Unmarshaller
As stated in the introduction, a marshaller serializes an object to XML, and an unmarshaller deserializes XML stream to an object. This section describes the two Spring interfaces used for this purpose.
5.2.1. Understanding Marshaller
Spring abstracts all marshalling operations behind the
org.springframework.oxm.Marshaller interface, the main method of which follows:
public interface Marshaller {

    /**
     * Marshal the object graph with the given root into the provided Result.
     */
    void marshal(Object graph, Result result) throws XmlMappingException, IOException;
}
The Marshaller interface has one main method, which marshals the given object to a
given javax.xml.transform.Result. The result is a tagging interface that basically
represents an XML output abstraction. Concrete implementations wrap various XML
representations, as the following table indicates:
| Result implementation | Wraps XML representation |
|---|---|
|
|
|
|
|
|
Although the marshal() method accepts a plain object as its first parameter, most
Marshaller implementations cannot handle arbitrary objects. Instead, an object class
must be mapped in a mapping file, be marked with an annotation, be registered with the
marshaller, or have a common base class. Refer to the later sections in this chapter
to determine how your O-X technology manages this.
|
5.2.2. Understanding Unmarshaller
Similar to the Marshaller, we have the org.springframework.oxm.Unmarshaller
interface, which the following listing shows:
public interface Unmarshaller {

    /**
     * Unmarshal the given provided Source into an object graph.
     */
    Object unmarshal(Source source) throws XmlMappingException, IOException;
}
This interface also has one method, which reads from the given
javax.xml.transform.Source (an XML input abstraction) and returns the object read. As
with Result, Source is a tagging interface that has three concrete implementations. Each
wraps a different XML representation, as the following table indicates:
| Source implementation | Wraps XML representation |
|---|---|
|
|
|
|
|
|
Even though there are two separate marshalling interfaces (Marshaller and
Unmarshaller), all implementations in Spring-WS implement both in one class.
This means that you can wire up one marshaller class and refer to it both as a
marshaller and as an unmarshaller in your applicationContext.xml.
5.2.3. Understanding XmlMappingException
Spring converts exceptions from the underlying O-X mapping tool to its own exception
hierarchy with the XmlMappingException as the root exception.
These runtime exceptions wrap the original exception so that no information will be lost.
Additionally, the MarshallingFailureException and UnmarshallingFailureException
provide a distinction between marshalling and unmarshalling operations, even though the
underlying O-X mapping tool does not do so.
The O-X Mapping exception hierarchy is shown in the following figure:
5.3. Using Marshaller and Unmarshaller
You can use Spring’s OXM for a wide variety of situations. In the following example, we use it to marshal the settings of a Spring-managed application as an XML file. In the following example, we use a simple JavaBean to represent the settings:
public class Settings {

    private boolean fooEnabled;

    public boolean isFooEnabled() {
        return fooEnabled;
    }

    public void setFooEnabled(boolean fooEnabled) {
        this.fooEnabled = fooEnabled;
    }
}
The application class uses this bean to store its settings. Besides a main method, the
class has two methods: saveSettings() saves the settings bean to a file named
settings.xml, and loadSettings() loads these settings again. The following main() method
constructs a Spring application context and calls these two methods:
import java.io.FileInputStream;
import java.io.FileOutputStream;
import java.io.IOException;
import javax.xml.transform.stream.StreamResult;
import javax.xml.transform.stream.StreamSource;
import org.springframework.context.ApplicationContext;
import org.springframework.context.support.ClassPathXmlApplicationContext;
import org.springframework.oxm.Marshaller;
import org.springframework.oxm.Unmarshaller;

public class Application {

    private static final String FILE_NAME = "settings.xml";
    private Settings settings = new Settings();
    private Marshaller marshaller;
    private Unmarshaller unmarshaller;

    public void setMarshaller(Marshaller marshaller) {
        this.marshaller = marshaller;
    }

    public void setUnmarshaller(Unmarshaller unmarshaller) {
        this.unmarshaller = unmarshaller;
    }

    public void saveSettings() throws IOException {
        FileOutputStream os = null;
        try {
            os = new FileOutputStream(FILE_NAME);
            this.marshaller.marshal(settings, new StreamResult(os));
        } finally {
            if (os != null) {
                os.close();
            }
        }
    }

    public void loadSettings() throws IOException {
        FileInputStream is = null;
        try {
            is = new FileInputStream(FILE_NAME);
            this.settings = (Settings) this.unmarshaller.unmarshal(new StreamSource(is));
        } finally {
            if (is != null) {
                is.close();
            }
        }
    }

    public static void main(String[] args) throws IOException {
        ApplicationContext appContext =
                new ClassPathXmlApplicationContext("applicationContext.xml");
        Application application = (Application) appContext.getBean("application");
        application.saveSettings();
        application.loadSettings();
    }
}
The Application requires both a marshaller and an unmarshaller property to be set. We
can do so by using the following applicationContext.xml:
<beans>
    <bean id="application" class="Application">
        <property name="marshaller" ref="castorMarshaller" />
        <property name="unmarshaller" ref="castorMarshaller" />
    </bean>
    <bean id="castorMarshaller" class="org.springframework.oxm.castor.CastorMarshaller"/>
</beans>
This application context uses Castor, but we could have used any of the other marshaller
instances described later in this chapter. Note that, by default, Castor does not require any further
configuration, so the bean definition is rather simple. Also note that the
CastorMarshaller implements both Marshaller and Unmarshaller, so we can refer to the
castorMarshaller bean in both the marshaller and unmarshaller property of the
application.
This sample application produces the following settings.xml file:
<?xml version="1.0" encoding="UTF-8"?>
<settings foo-enabled="false"/>
5.4. XML Configuration Namespace
You can configure marshallers more concisely by using tags from the OXM namespace. To make these tags available, you must first reference the appropriate schema in the preamble of the XML configuration file. The following example shows how to do so:
<?xml version="1.0" encoding="UTF-8"?>
<beans xmlns="http://www.springframework.org/schema/beans"
    xmlns:xsi="http://www.w3.org/2001/XMLSchema-instance"
    xmlns:oxm="http://www.springframework.org/schema/oxm" (1)
xsi:schemaLocation="http://www.springframework.org/schema/beans
  http://www.springframework.org/schema/beans/spring-beans.xsd
http://www.springframework.org/schema/oxm http://www.springframework.org/schema/oxm/spring-oxm.xsd"> (2)| 1 | Reference the oxm schema. |
| 2 | Specify the oxm schema location. |
Currently, the schema makes the following elements available:
Each tag is explained in its respective marshaller’s section. As an example, though, the configuration of a JAXB2 marshaller might resemble the following:
<oxm:jaxb2-marshaller id="marshaller" contextPath="org.springframework.ws.samples.airline.schema"/>5.5. JAXB
The JAXB binding compiler translates a W3C XML Schema into one or more Java classes, a
jaxb.properties file, and possibly some resource files. JAXB also offers a way to
generate a schema from annotated Java classes.
Spring supports the JAXB 2.0 API as XML marshalling strategies, following the
Marshaller and Unmarshaller interfaces described in Marshaller and Unmarshaller.
The corresponding integration classes reside in the org.springframework.oxm.jaxb
package.
5.5.1. Using Jaxb2Marshaller
The Jaxb2Marshaller class implements both of Spring’s Marshaller and Unmarshaller
interfaces. It requires a context path to operate. You can set the context path by setting the
contextPath property. The context path is a list of colon-separated Java package
names that contain schema derived classes. It also offers a classesToBeBound property,
which allows you to set an array of classes to be supported by the marshaller. Schema
validation is performed by specifying one or more schema resources to the bean, as the following example shows:
<beans>
    <bean id="jaxb2Marshaller" class="org.springframework.oxm.jaxb.Jaxb2Marshaller">
        <property name="classesToBeBound">
            <list>
                <value>org.springframework.oxm.jaxb.Flight</value>
                <value>org.springframework.oxm.jaxb.Flights</value>
            </list>
        </property>
        <property name="schema" value="classpath:org/springframework/oxm/schema.xsd"/>
    </bean>

    ...

</beans>
XML Configuration Namespace
The jaxb2-marshaller element configures a org.springframework.oxm.jaxb.Jaxb2Marshaller,
as the following example shows:
<oxm:jaxb2-marshaller id="marshaller" contextPath="org.springframework.ws.samples.airline.schema"/>Alternatively, you can provide the list of classes to bind to the marshaller by using the
class-to-be-bound child element:
<oxm:jaxb2-marshaller id="marshaller">
    <oxm:class-to-be-bound name="org.springframework.ws.samples.airline.schema.Airport"/>
    <oxm:class-to-be-bound name="org.springframework.ws.samples.airline.schema.Flight"/>
    ...
</oxm:jaxb2-marshaller>
The following table describes the available attributes:
| Attribute | Description | Required |
|---|---|---|
|
The ID of the marshaller |
No |
|
The JAXB Context path |
No |
5.6. Castor
Castor XML mapping is an open source XML binding framework. It lets you transform the data contained in a Java object model to and from an XML document. By default, it does not require any further configuration, though you can use a mapping file to have more control over the behavior of Castor.
For more information on Castor, see the
Castor web site. The Spring
integration classes reside in the org.springframework.oxm.castor package.
5.6.1. Using CastorMarshaller
As with JAXB, the CastorMarshaller implements both the Marshaller and Unmarshaller
interface. It can be wired up as follows:
<beans>
    <bean id="castorMarshaller" class="org.springframework.oxm.castor.CastorMarshaller" />
    ...
</beans>
5.6.2. Mapping
Although it is possible to rely on Castor’s default marshalling behavior, it might be necessary to have more control over it. You can get more control by using a Castor mapping file. For more information, see Castor XML Mapping.
You can set the mapping by using the mappingLocation resource property, indicated in the following example
with a classpath resource:
<beans>
    <bean id="castorMarshaller" class="org.springframework.oxm.castor.CastorMarshaller" >
        <property name="mappingLocation" value="classpath:mapping.xml" />
    </bean>
</beans>
XML Configuration Namespace
The castor-marshaller tag configures a
org.springframework.oxm.castor.CastorMarshaller, as the following example shows:
<oxm:castor-marshaller id="marshaller" mapping-location="classpath:org/springframework/oxm/castor/mapping.xml"/>You can configure the marshaller instance in two ways: by specifying either the location
of a mapping file (through the mapping-location property) or by identifying Java
POJOs (through the target-class or target-package properties) for which there exist
corresponding XML descriptor classes. The latter way is usually used in conjunction with
XML code generation from XML schemas.
The following table describes the available attributes:
| Attribute | Description | Required |
|---|---|---|
|
The ID of the marshaller |
No |
|
The encoding to use for unmarshalling from XML |
No |
|
A Java class name for a POJO for which an XML class descriptor is available (as generated through code generation) |
No |
|
A Java package name that identifies a package that contains POJOs and their corresponding Castor XML descriptor classes (as generated through code generation from XML schemas) |
No |
|
Location of a Castor XML mapping file |
No |
5.7. JiBX
The JiBX framework offers a solution similar to that which Hibernate provides for ORM: A binding definition defines the rules for how your Java objects are converted to or from XML. After preparing the binding and compiling the classes, a JiBX binding compiler enhances the class files and adds code to handle converting instances of the classes from or to XML.
For more information on JiBX, see the JiBX web
site. The Spring integration classes reside in the org.springframework.oxm.jibx
package.
5.7.1. Using JibxMarshaller
The JibxMarshaller class implements both the Marshaller and Unmarshaller
interface. To operate, it requires the name of the class to marshal in, which you can
set using the targetClass property. Optionally, you can set the binding name by setting the
bindingName property. In the following example, we bind the Flights class:
<beans>
    <bean id="jibxFlightsMarshaller" class="org.springframework.oxm.jibx.JibxMarshaller">
        <property name="targetClass">org.springframework.oxm.jibx.Flights</property>
    </bean>
    ...
</beans>
A JibxMarshaller is configured for a single class. If you want to marshal multiple
classes, you have to configure multiple JibxMarshaller instances with different targetClass
property values.
XML Configuration Namespace
The jibx-marshaller tag configures a org.springframework.oxm.jibx.JibxMarshaller,
as the following example shows:
<oxm:jibx-marshaller id="marshaller" target-class="org.springframework.ws.samples.airline.schema.Flight"/>The following table describes the available attributes:
| Attribute | Description | Required |
|---|---|---|
|
The ID of the marshaller |
No |
|
The target class for this marshaller |
Yes |
|
The binding name used by this marshaller |
No |
5.8. XStream
XStream is a simple library to serialize objects to XML and back again. It does not require any mapping and generates clean XML.
For more information on XStream, see the XStream
web site. The Spring integration classes reside in the
org.springframework.oxm.xstream package.
5.8.1. Using XStreamMarshaller
The XStreamMarshaller does not require any configuration and can be configured in an
application context directly. To further customize the XML, you can set an alias map,
which consists of string aliases mapped to classes, as the following example shows:
<beans>
    <bean id="xstreamMarshaller" class="org.springframework.oxm.xstream.XStreamMarshaller">
        <property name="aliases">
            <props>
                <prop key="Flight">org.springframework.oxm.xstream.Flight</prop>
            </props>
        </property>
    </bean>
    ...
</beans>|
By default, XStream lets arbitrary classes be unmarshalled, which can lead to
unsafe Java serialization effects. As such, we do not recommend using the
If you choose to use the Doing so ensures that only the registered classes are eligible for unmarshalling. Additionally, you can register
custom
converters to make sure that only your supported classes can be unmarshalled. You might
want to add a |
| Note that XStream is an XML serialization library, not a data binding library. Therefore, it has limited namespace support. As a result, it is rather unsuitable for usage within Web services. |
6. Appendix
6.1. XML Schemas
This part of the appendix lists XML schemas for data access, including the following:
6.1.1. The tx Schema
The tx tags deal with configuring all of those beans in Spring’s comprehensive support
for transactions. These tags are covered in the chapter entitled
Transaction Management.
We strongly encourage you to look at the 'spring-tx.xsd' file that ships with the
Spring distribution. This file contains the XML Schema for Spring’s transaction
configuration and covers all of the various elements in the tx namespace, including
attribute defaults and similar information. This file is documented inline, and, thus,
the information is not repeated here in the interests of adhering to the DRY (Don’t
Repeat Yourself) principle.
|
In the interest of completeness, to use the elements in the tx schema, you need to have
the following preamble at the top of your Spring XML configuration file. The text in the
following snippet references the correct schema so that the tags in the tx namespace
are available to you:
<?xml version="1.0" encoding="UTF-8"?>
<beans xmlns="http://www.springframework.org/schema/beans"
    xmlns:xsi="http://www.w3.org/2001/XMLSchema-instance"
    xmlns:aop="http://www.springframework.org/schema/aop"
    xmlns:tx="http://www.springframework.org/schema/tx" (1)
    xsi:schemaLocation="
        http://www.springframework.org/schema/beans http://www.springframework.org/schema/beans/spring-beans.xsd
        http://www.springframework.org/schema/tx http://www.springframework.org/schema/tx/spring-tx.xsd (2)
        http://www.springframework.org/schema/aop http://www.springframework.org/schema/aop/spring-aop.xsd">

    <!-- bean definitions here -->

</beans>| 1 | Declare usage of the tx namespace. |
| 2 | Specify the location (with other schema locations). |
Often, when you use the elements in the tx namespace, you are also using the
elements from the aop namespace (since the declarative transaction support in Spring is
implemented by using AOP). The preceding XML snippet contains the relevant lines needed
to reference the aop schema so that the elements in the aop namespace are available
to you.
|
6.1.2. The jdbc Schema
The jdbc elements let you quickly configure an embedded database or initialize an
existing data source. These elements are documented in
Embedded Database Support and
Initializing a DataSource, respectively.
To use the elements in the jdbc schema, you need to have the following preamble at the
top of your Spring XML configuration file. The text in the following snippet references
the correct schema so that the elements in the jdbc namespace are available to you:
<?xml version="1.0" encoding="UTF-8"?>
<beans xmlns="http://www.springframework.org/schema/beans"
    xmlns:xsi="http://www.w3.org/2001/XMLSchema-instance"
    xmlns:jdbc="http://www.springframework.org/schema/jdbc" (1)
    xsi:schemaLocation="
        http://www.springframework.org/schema/beans http://www.springframework.org/schema/beans/spring-beans.xsd
        http://www.springframework.org/schema/jdbc http://www.springframework.org/schema/jdbc/spring-jdbc.xsd"> (2)

    <!-- bean definitions here -->

</beans>| 1 | Declare usage of the jdbc namespace. |
| 2 | Specify the location (with other schema locations). |