5.0.0.RELEASE
Copyright © 2009, 2010, 2011, 2012, 2013, 2014, 2015, 2016, 2017 Pivotal Software, Inc. All Rights Reserved.
Table of Contents
- I. Preface
- II. What’s new?
- 2. What’s new in Spring Integration 5.0?
- 2.1. New Components
- 2.2. General Changes
- 2.2.1. Core Changes
- 2.2.2. Gateway Changes
- 2.2.3. Aggregator Performance Changes
- 2.2.4. Splitter Changes
- 2.2.5. JMS Changes
- 2.2.6. Mail Changes
- 2.2.7. Feed Changes
- 2.2.8. File Changes
- 2.2.9. (S)FTP Changes
- 2.2.10. Integration Properties
- 2.2.11. Stream Changes
- 2.2.12. Barrier Changes
- 2.2.13. AMQP Changes
- 2.2.14. HTTP Changes
- 2.2.15. MQTT Changes
- 2.2.16. STOMP Changes
- 2.2.17. Web Services Changes
- 2.2.18. Redis Changes
- 2.2.19. TCP Changes
- 2.2.20. Gemfire Changes
- 2.2.21. Jdbc Changes
- III. Overview of Spring Integration Framework
- IV. Core Messaging
- 4. Messaging Channels
- 4.1. Message Channels
- 4.1.1. The MessageChannel Interface
- 4.1.2. Message Channel Implementations
- 4.1.3. Channel Interceptors
- 4.1.4. MessagingTemplate
- 4.1.5. Configuring Message Channels
- DirectChannel Configuration
- Datatype Channel Configuration
- QueueChannel Configuration
- PublishSubscribeChannel Configuration
- ExecutorChannel
- PriorityChannel Configuration
- RendezvousChannel Configuration
- Scoped Channel Configuration
- Channel Interceptor Configuration
- Global Channel Interceptor Configuration
- Wire Tap
- Conditional Wire Taps
- Global Wire Tap Configuration
- 4.1.6. Special Channels
- 4.2. Poller
- 4.3. Channel Adapter
- 4.4. Messaging Bridge
- 5. Message Construction
- 6. Message Routing
- 6.1. Routers
- 6.2. Filter
- 6.3. Splitter
- 6.4. Aggregator
- 6.5. Resequencer
- 6.6. Message Handler Chain
- 6.7. Scatter-Gather
- 6.8. Thread Barrier
- 7. Message Transformation
- 8. Messaging Endpoints
- 8.1. Message Endpoints
- 8.2. Endpoint Roles
- 8.3. Leadership Event Handling
- 8.4. Messaging Gateways
- 8.4.1. Enter the GatewayProxyFactoryBean
- 8.4.2. Gateway XML Namespace Support
- 8.4.3. Setting the Default Reply Channel
- 8.4.4. Gateway Configuration with Annotations and/or XML
- 8.4.5. Mapping Method Arguments to a Message
- 8.4.6. @MessagingGateway Annotation
- 8.4.7. Invoking No-Argument Methods
- 8.4.8. Error Handling
- 8.4.9. Gateway Timeouts
- 8.4.10. Asynchronous Gateway
- 8.4.11. Gateway behavior when no response arrives
- 8.5. Service Activator
- 8.6. Delayer
- 8.7. Scripting support
- 8.8. Groovy support
- 8.9. Adding Behavior to Endpoints
- 8.9.1. Introduction
- 8.9.2. Provided Advice Classes
- 8.9.3. Custom Advice Classes
- 8.9.4. Other Advice Chain Elements
- 8.9.5. Handle Message Advice
- 8.9.6. Transaction Support
- 8.9.7. Advising Filters
- 8.9.8. Advising Endpoints Using Annotations
- 8.9.9. Ordering Advices within an Advice Chain
- 8.9.10. Advised Handler Properties
- 8.9.11. Idempotent Receiver Enterprise Integration Pattern
- 8.10. Logging Channel Adapter
- 9. Java DSL
- 9.1. Example Configurations
- 9.2. Introduction
- 9.3. DSL Basics
- 9.4. Message Channels
- 9.5. Pollers
- 9.6. DSL and Endpoint Configuration
- 9.7. Transformers
- 9.8. Inbound Channel Adapters
- 9.9. Message Routers
- 9.10. Splitters
- 9.11. Aggregators and Resequencers
- 9.12. ServiceActivators (.handle())
- 9.13. Operator log()
- 9.14. MessageChannelSpec.wireTap()
- 9.15. Working With Message Flows
- 9.16. FunctionExpression
- 9.17. Sub Flows support
- 9.18. Using Protocol Adapters
- 9.19. IntegrationFlowAdapter
- 9.20. Dynamic and runtime Integration Flows
- 9.21. IntegrationFlow as Gateway
- 10. System Management
- 10.1. Metrics and Management
- 10.2. JMX Support
- 10.3. Message History
- 10.4. Message Store
- 10.5. Metadata Store
- 10.6. Control Bus
- 10.7. Orderly Shutdown
- 10.8. Integration Graph
- 10.9. Integration Graph Controller
- V. Integration Endpoints
- 11. Endpoint Quick Reference Table
- 12. AMQP Support
- 12.1. Introduction
- 12.2. Inbound Channel Adapter
- 12.3. Inbound Gateway
- 12.4. Inbound Endpoint Acknowledge Mode
- 12.5. Outbound Channel Adapter
- 12.6. Outbound Gateway
- 12.7. Async Outbound Gateway
- 12.8. Outbound Message Conversion
- 12.9. Outbound User Id
- 12.10. Delayed Message Exchange
- 12.11. AMQP Backed Message Channels
- 12.12. AMQP Message Headers
- 12.13. AMQP Samples
- 13. Spring ApplicationEvent Support
- 14. Feed Adapter
- 15. File Support
- 15.1. Introduction
- 15.2. Reading Files
- 15.3. Writing files
- 15.3.1. Generating File Names
- 15.3.2. Specifying the Output Directory
- 15.3.3. Dealing with Existing Destination Files
- 15.3.4. Flushing Files When using APPEND_NO_FLUSH
- 15.3.5. File Timestamps
- 15.3.6. File Permissions
- 15.3.7. File Outbound Channel Adapter
- 15.3.8. Outbound Gateway
- 15.3.9. Configuring with Java Configuration
- 15.3.10. Configuring with the Java DSL
- 15.4. File Transformers
- 15.5. File Splitter
- 16. FTP/FTPS Adapters
- 16.1. Introduction
- 16.2. FTP Session Factory
- 16.3. Delegating Session Factory
- 16.4. FTP Inbound Channel Adapter
- 16.5. FTP Streaming Inbound Channel Adapter
- 16.6. Inbound Channel Adapters: Controlling Remote File Fetching
- 16.7. FTP Outbound Channel Adapter
- 16.8. FTP Outbound Gateway
- 16.9. FTP Session Caching
- 16.10. RemoteFileTemplate
- 16.11. MessageSessionCallback
- 17. GemFire Support
- 18. HTTP Support
- 19. JDBC Support
- 19.1. Inbound Channel Adapter
- 19.2. Outbound Channel Adapter
- 19.3. Outbound Gateway
- 19.4. JDBC Message Store
- 19.5. Stored Procedures
- 19.5.1. Supported Databases
- 19.5.2. Configuration
- 19.5.3. Common Configuration Attributes
- 19.5.4. Common Configuration Sub-Elements
- 19.5.5. Defining Parameter Sources
- 19.5.6. Stored Procedure Inbound Channel Adapter
- 19.5.7. Stored Procedure Outbound Channel Adapter
- 19.5.8. Stored Procedure Outbound Gateway
- 19.5.9. Examples
- 19.6. JDBC Lock Registry
- 19.7. JDBC Metadata Store
- 20. JPA Support
- 20.1. Supported Persistence Providers
- 20.2. Java Implementation
- 20.3. Namespace Support
- 20.4. Inbound Channel Adapter
- 20.5. Outbound Channel Adapter
- 20.6. Outbound Gateways
- 20.6.1. Common Configuration Parameters
- 20.6.2. Updating Outbound Gateway
- 20.6.3. Configuring with Java Configuration
- 20.6.4. Configuring with the Java DSL
- 20.6.5. Retrieving Outbound Gateway
- 20.6.6. Configuring with Java Configuration
- 20.6.7. Configuring with the Java DSL
- 20.6.8. JPA Outbound Gateway Samples
- 21. JMS Support
- 21.1. Inbound Channel Adapter
- 21.2. Message-Driven Channel Adapter
- 21.3. Outbound Channel Adapter
- 21.4. Inbound Gateway
- 21.5. Outbound Gateway
- 21.6. Mapping Message Headers to/from JMS Message
- 21.7. Message Conversion, Marshalling and Unmarshalling
- 21.8. JMS Backed Message Channels
- 21.9. Using JMS Message Selectors
- 21.10. JMS Samples
- 22. Mail Support
- 23. MongoDb Support
- 24. MQTT Support
- 25. Redis Support
- 25.1. Introduction
- 25.2. Connecting to Redis
- 25.3. Messaging with Redis
- 25.4. Redis Message Store
- 25.5. Redis Metadata Store
- 25.6. RedisStore Inbound Channel Adapter
- 25.7. RedisStore Outbound Channel Adapter
- 25.8. Redis Outbound Command Gateway
- 25.9. Redis Queue Outbound Gateway
- 25.10. Redis Queue Inbound Gateway
- 25.11. Redis Lock Registry
- 26. Resource Support
- 27. RMI Support
- 28. SFTP Adapters
- 28.1. Introduction
- 28.2. SFTP Session Factory
- 28.3. Proxy Factory Bean
- 28.4. Delegating Session Factory
- 28.5. SFTP Session Caching
- 28.6. RemoteFileTemplate
- 28.7. SFTP Inbound Channel Adapter
- 28.8. SFTP Streaming Inbound Channel Adapter
- 28.9. Inbound Channel Adapters: Controlling Remote File Fetching
- 28.10. SFTP Outbound Channel Adapter
- 28.11. SFTP Outbound Gateway
- 28.12. SFTP/JSCH Logging
- 28.13. MessageSessionCallback
- 29. STOMP Support
- 30. Stream Support
- 31. Syslog Support
- 32. TCP and UDP Support
- 32.1. Introduction
- 32.2. UDP Adapters
- 32.3. TCP Connection Factories
- 32.4. TCP Connection Interceptors
- 32.5. TCP Connection Events
- 32.6. TCP Adapters
- 32.7. TCP Gateways
- 32.8. TCP Message Correlation
- 32.9. A Note About NIO
- 32.10. SSL/TLS Support
- 32.11. Advanced Techniques
- 32.12. IP Configuration Attributes
- 32.13. IP Message Headers
- 32.14. Annotation-Based Configuration
- 33. Twitter Support
- 34. WebFlux Support
- 35. WebSockets Support
- 36. Web Services Support
- 37. XML Support - Dealing with XML Payloads
- 38. XMPP Support
- 39. Zookeeper Support
- VI. Appendices
- A. Spring Expression Language (SpEL)
- B. Message Publishing
- C. Transaction Support
- D. Security in Spring Integration
- E. Configuration
- F. Testing support
- G. Spring Integration Samples
- H. Additional Resources
- I. Change History
- I.1. Changes between 4.2 and 4.3
- I.2. New Components
- I.3. General Changes
- I.3.1. Core Changes
- I.3.2. Mail Changes
- I.3.3. JMS Changes
- I.3.4. Aggregator Changes
- I.3.5. TCP/UDP Changes
- I.3.6. File Changes
- I.3.7. AMQP Changes
- I.3.8. Redis Changes
- I.3.9. HTTP Changes
- I.3.10. SFTP Changes
- I.3.11. FTP Changes
- I.3.12. Router Changes
- I.3.13. Header Mapping
- I.3.14. Groovy Scripts
- I.3.15. @InboundChannelAdapter
- I.3.16. XMPP changes
- I.3.17. WireTap Late Binding
- I.3.18. ChannelMessageStoreQueryProvider
- I.3.19. WebSocket Changes
- I.4. Changes between 4.1 and 4.2
- I.5. New Components
- I.6. General Changes
- I.6.1. Wire Tap
- I.6.2. File Changes
- I.6.3. Class Package Change
- I.6.4. TCP Changes
- I.6.5. @InboundChannelAdapter
- I.6.6. API Changes
- I.6.7. JMS Changes
- I.6.8. Conditional Pollers
- I.6.9. AMQP Changes
- I.6.10. XPath Splitter Improvements
- I.6.11. HTTP Changes
- I.6.12. Gateway Changes
- I.6.13. Aggregator Changes
- I.6.14. (S)FTP Changes
- I.6.15. Websocket Changes
- I.6.16. Application Event Adapters changes
- I.7. Changes between 4.0 and 4.1
- I.7.1. New Components
- I.7.2. General Changes
- AMQP Inbound Endpoints, Channel
- AMQP Outbound Endpoints
- SimpleMessageStore
- Web Service Outbound Gateway: encode-uri
- Http Inbound Channel Adapter and StatusCode
- MQTT Adapter Changes
- FTP/SFTP Adapter Changes
- Splitter and Iterator
- Aggregator
- Content Enricher Improvements
- Header Channel Registry
- Orderly Shutdown
- Management for RecipientListRouter
- AbstractHeaderMapper: NON_STANDARD_HEADERS token
- AMQP Channels: template-channel-transacted
- Syslog Adapter
- Async Gateway
- Aggregator Advice Chain
- Outbound Channel Adapter and Scripts
- Resequencer Changes
- Optional POJO method parameter
- QueueChannel: backed Queue type
- ChannelInterceptor Changes
- IMAP PEEK
- I.8. Changes between 3.0 and 4.0
- I.8.1. New Components
- MQTT Channel Adapters
- @EnableIntegration
- @IntegrationComponentScan
- @EnableMessageHistory
- @MessagingGateway
- Spring Boot @EnableAutoConfiguration
- @GlobalChannelInterceptor
- @IntegrationConverter
- @EnablePublisher
- Redis Channel Message Stores
- MongodDB Channel Message Store
- @EnableIntegrationMBeanExport
- ChannelSecurityInterceptorFactoryBean
- Redis Command Gateway
- RedisLockRegistry and GemfireLockRegistry
- @Poller
- @InboundChannelAdapter and SmartLifecycle for Annotated Endpoints
- Twitter Search Outbound Gateway
- Gemfire Metadata Store
- @BridgeFrom and @BridgeTo Annotations
- Meta Messaging Annotations
- I.8.2. General Changes
- Requires Spring Framework 4.0
- Header Type for XPath Header Enricher
- Object To Json Transformer: Node Result
- JMS Header Mapping
- JMS Outbound Channel Adapter
- JMS Inbound Channel Adapter
- Datatype Channels
- Simpler Retry Advice Configuration
- Correlation Endpoint: Time-based Release Strategy
- Redis Metadata Store
- JdbcChannelMessageStore and PriorityChannel
- AMQP Endpoints Delivery Mode
- FTP Timeouts
- Twitter: StatusUpdatingMessageHandler
- JPA Retrieving Gateway: id-expression
- TCP Deserialization Events
- Messaging Annotations on @Bean Definitions
- I.9. Changes Between 2.2 and 3.0
- I.9.1. New Components
- HTTP Request Mapping
- Spring Expression Language (SpEL) Configuration
- SpEL Functions Support
- SpEL PropertyAccessors Support
- Redis: New Components
- Header Channel Registry
- MongoDB support: New ConfigurableMongoDbMessageStore
- Syslog Support
- Tail Support
- JMX Support
- TCP/IP Connection Events and Connection Management
- Inbound Channel Adapter Script Support
- Content Enricher: Headers Enrichment Support
- I.9.2. General Changes
- Message ID Generation
- <gateway> Changes
- HTTP Endpoint Changes
- Jackson Support (JSON)
- Chain Elements id Attribute
- Aggregator empty-group-min-timeout property
- Persistent File List Filters (file, (S)FTP)
- Scripting Support: Variables Changes
- Direct Channel Load Balancing configuration
- PublishSubscribeChannel Behavior
- FTP, SFTP and FTPS Changes
- requires-reply Attribute for Outbound Gateways
- AMQP Outbound Gateway Header Mapping
- Stored Procedure Components Improvements
- Web Service Outbound URI Configuration
- Redis Adapter Changes
- Advising Filters
- Advising Endpoints using Annotations
- ObjectToStringTransformer Improvements
- JPA Support Changes
- Delayer: delay expression
- JDBC Message Store Improvements
- IMAP Idle Connection Exceptions
- Message Headers and TCP
- JMS Message Driven Channel Adapter
- RMI Inbound Gateway
- XsltPayloadTransformer
- I.10. Changes between 2.1 and 2.2
- I.10.1. New Components
- I.10.2. General Changes
- Spring 3.1 Used by Default
- Adding Behavior to Endpoints
- Transaction Synchronization and Pseudo Transactions
- File Adapter - Improved File Overwrite/Append Handling
- Reply-Timeout added to more Outbound Gateways
- Spring-AMQP 1.1
- JDBC Support - Stored Procedures Components
- JDBC Support - Outbound Gateway
- JDBC Support - Channel-specific Message Store Implementation
- Orderly Shutdown
- JMS Oubound Gateway Improvements
- object-to-json-transformer
- HTTP Support
- I.11. Changes between 2.0 and 2.1
- I.12. Changes between 1.0 and 2.0
- I.12.1. Spring 3 support
- I.12.2. Enterprise Integration Pattern Additions
- I.12.3. New Channel Adapters and Gateways
- I.12.4. Other Additions
- I.12.5. Framework Refactoring
- I.12.6. New Source Control Management and Build Infrastructure
- I.12.7. New Spring Integration Samples
- I.12.8. Spring Tool Suite Visual Editor for Spring Integration
This section details the compatible Java and Spring Framework versions.
For Spring Integration 5.0.x, the minimum compatible Java version is Java SE 8. Older versions of Java are not supported.
Spring Integration 5.0.x requires Spring Framework 5.0 or later.
The Spring Framework 2.0 introduced support for namespaces, which simplifies the XML configuration of the application context, and consequently Spring Integration provides broad namespace support. This reference guide applies the following conventions for all code examples that use namespace support:
The int namespace prefix will be used for Spring Integration’s core namespace support. Each Spring Integration adapter type (module) will provide its own namespace, which is configured using the following convention:
int- followed by the name of the module, e.g. int-twitter, int-stream, …
<?xml version="1.0" encoding="UTF-8"?>
<beans xmlns="http://www.springframework.org/schema/beans"
  xmlns:xsi="http://www.w3.org/2001/XMLSchema-instance"
  xmlns:int="http://www.springframework.org/schema/integration"
  xmlns:int-twitter="http://www.springframework.org/schema/integration/twitter"
  xmlns:int-stream="http://www.springframework.org/schema/integration/stream"
  xsi:schemaLocation="
   http://www.springframework.org/schema/beans
   http://www.springframework.org/schema/beans/spring-beans.xsd
   http://www.springframework.org/schema/integration
   http://www.springframework.org/schema/integration/spring-integration.xsd
   http://www.springframework.org/schema/integration/twitter
   http://www.springframework.org/schema/integration/twitter/spring-integration-twitter.xsd
   http://www.springframework.org/schema/integration/stream
   http://www.springframework.org/schema/integration/stream/spring-integration-stream.xsd">
…
</beans>
For a detailed explanation regarding Spring Integration’s namespace support see Section E.2, “Namespace Support”.
![[Note]](images/note.png) | Note |
|---|---|
|
Please note that the namespace prefix can be freely chosen. You may even choose not to use any namespace prefixes at all. Therefore, apply the convention that suits your application needs best. Be aware, though, that SpringSource Tool Suite™ (STS) uses the same namespace conventions for Spring Integration as used in this reference guide. |
For those who are already familiar with Spring Integration, this chapter provides a brief overview of the new features of version 5.0. If you are interested in the changes and features, that were introduced in earlier versions, please see chapter: Appendix I, Change History
This chapter provides an overview of the new features and improvements that have been introduced with Spring Integration 5.0. If you are interested in more details, please see the Issue Tracker tickets that were resolved as part of the 5.0 development process.
The separate Spring Integration Java DSL project has now been merged into the core Spring Integration project.
The IntegrationComponentSpec implementations for channel adapters and gateways are distributed to their specific modules.
See Chapter 9, Java DSL for more information about Java DSL support.
Also see the 4.3 to 5.0 Migration Guide for the required steps to move to Spring Integration 5.0.
A new Spring Integration Test Framework has been created to assist with testing Spring Integration applications.
Now, with the @SpringIntegrationTest annotation on test class and MockIntegration factory you can make your JUnit tests for integration flows somewhat easier.
See Appendix F, Testing support for more information.
The new MongoDbOutboundGateway allows you to make queries to the database on demand by sending a message to its request channel.
See Section 23.6, “MongoDB Outbound Gateway” for more information.
The new WebFlux support module has been introduced for Spring WebFlux Framework gateways and channel adapters.
See Chapter 34, WebFlux Support for more information.
Now that we use the new InvocableHandlerMethod -based infrastructure for service method invocations, we can perform contentType conversion from payload to target method argument.
See Section 8.1.7, “Content Type Conversion” for more information.
The ErrorMessagePublisher and the ErrorMessageStrategy are provided for creating ErrorMessage instances.
See Section E.4, “Error Handling” for more information.
A JDBC implementation of MetadataStore implementation is now provided.
This is useful when it is necessary to ensure transactional boundaries for metadata.
See Section 19.7, “JDBC Metadata Store” for more information.
Spring Integration is now fully based on Spring Framework 5.0 and Project Reactor 3.1.
Previous Project Reactor versions are no longer supported.
The @Poller annotation now has the errorChannel attribute for easier configuration of the underlying MessagePublishingErrorHandler.
See Section E.6, “Annotation Support” for more information.
All the request-reply endpoints (based on AbstractReplyProducingMessageHandler) can now start transaction and, therefore, make the whole downstream flow transactional.
See Section 8.9.6, “Transaction Support” for more information.
The SmartLifecycleRoleController now provides methods to obtain status of endpoints in roles.
See Section 8.2, “Endpoint Roles” for more information.
POJO methods are now invoked using an InvocableHandlerMethod by default, but can be configured to use SpEL as before.
See Section 3.8, “POJO Method invocation” for more information.
When targeting POJO methods as message handlers, one of the service methods can now be marked with the @Default annotation to provide a fallback mechanism for non-matched conditions.
See Section 8.5.2, “Configuring Service Activator” for more information.
A simple PassThroughTransactionSynchronizationFactory is provided to always store a polled message in the current transaction context.
That message is used as a failedMessage property of the MessagingException which wraps a raw exception thrown during transaction completion.
See Section C.3, “Transaction Synchronization” for more information.
The aggregator expression-based ReleaseStrategy now evaluates the expression against the MessageGroup instead of just the collection of Message<?>.
See the section called “Aggregators and Spring Expression Language (SpEL)” for more information.
The ObjectToMapTransformer can now be supplied with a customised JsonObjectMapper.
See the section called “Aggregators and Spring Expression Language (SpEL)” for more information.
The @GlobalChannelInterceptor annotation and <int:channel-interceptor> now support negative patterns (via ! prepending) for component names matching.
See the section called “Global Channel Interceptor Configuration” for more information.
A new OnFailedToAcquireMutexEvent is emitted now via DefaultLeaderEventPublisher by the LockRegistryLeaderInitiator, when candidate is failed to acquire the lock.
See Section 8.3, “Leadership Event Handling” for more information.
The gateway now correctly sets the errorChannel header when the gateway method has a void return type and an error channel is provided.
Previously, the header was not populated.
This had the effect that synchronous downstream flows (running on the calling thread) would send the exception to the configured channel but an exception on an async downstream flow would be sent to the default errorChannel instead.
The RequestReplyExchanger interface now has a throws MessagingException clause to meet all the proposed messages exchange contract.
The request and reply timeouts can now be specified as SpEL expressions.
See Section 8.4, “Messaging Gateways” for more information.
Aggregators now use a SimpleSequenceSizeReleaseStrategy by default, which is more efficient, especially with large groups.
Empty groups are now scheduled for removal after empty-group-min-timeout.
See Section 6.4, “Aggregator” for more information.
The Splitter component now can handle and split Java Stream and Reactive Streams Publisher objects.
If the output channel is a ReactiveStreamsSubscribableChannel, the AbstractMessageSplitter builds a Flux for subsequent iteration instead of a regular Iterator independent of object being split.
In addition, AbstractMessageSplitter provides protected obtainSizeIfPossible() methods to allow the determination of the size of the Iterable and Iterator objects if that is possible.
See Section 6.3, “Splitter” for more information.
Previously, Spring Integration JMS XML configuration used a default bean name connectionFactory for the JMS Connection Factory, allowing the property to be omitted from component definitions.
It has now been renamed to jmsConnectionFactory, which is the bean name used by Spring Boot to auto-configure the JMS Connection Factory bean.
If your application is relying on the previous behavior, rename your connectionFactory bean to jmsConnectionFactory, or specifically configure your components to use your bean using its current name.
See Chapter 21, JMS Support for more information.
Some inconsistencies with rendering IMAP mail content have been resolved.
See the note in the Mail-Receiving Channel Adapter Section for more information.
Instead of the com.rometools.fetcher.FeedFetcher, which is deprecated in ROME, a new Resource property has been introduced to the FeedEntryMessageSource.
See Chapter 14, Feed Adapter for more information.
The new FileHeaders.RELATIVE_PATH Message header has been introduced to represent relative path in the FileReadingMessageSource.
The tail adapter now supports idleEventInterval to emit events when there is no data in the file during that period.
The flush predicates for the FileWritingMessageHandler now have an additional parameter.
The file outbound channel adapter and gateway (FileWritingMessageHandler) now support the REPLACE_IF_MODIFIED FileExistsMode.
They also now support setting file permissions on the newly written file.
A new FileSystemMarkerFilePresentFileListFilter is now available; see Section 15.2.7, “Dealing With Incomplete Data” for more information.
The FileSplitter now provides a firstLineAsHeader option to carry the first line of content as a header in the messages emitted for the remaining lines.
See Chapter 15, File Support for more information.
The Inbound Channel Adapters now have a property max-fetch-size which is used to limit the number of files fetched during a poll when there are no files currently in the local directory.
They also are configured with a FileSystemPersistentAcceptOnceFileListFilter in the local-filter by default.
You can also provide a custom DirectoryScanner implementation to Inbound Channel Adapters via the newly introduced scanner attribute.
The regex and pattern filters can now be configured to always pass directories. This can be useful when using recursion in the outbound gateways.
All the Inbound Channel Adapters (streaming and synchronization-based) now use an appropriate AbstractPersistentAcceptOnceFileListFilter implementation by default to prevent remote files duplicate downloads.
The FTP and SFTP outbound gateways now support the REPLACE_IF_MODIFIED FileExistsMode when fetching remote files.
The (S)FTP streaming inbound channel adapters now add remote file information in a message header.
The FTP and SFTP outbound channel adapters, as well as PUT command of the outbound gateways, now support InputStream as payload, too.
The inbound channel adapters now can build file tree locally using a newly introduced RecursiveDirectoryScanner.
See scanner option for injection.
Also these adapters can now be switched to the WatchService instead.
The NLST command has been added to the AbstractRemoteFileOutboundGateway to perform only list files names remote command.
The FtpOutboundGateway can now be supplied with workingDirExpression to change the FTP client working directory for the current request message.
The RemoteFileTemplate is supplied now with the invoke(OperationsCallback<F, T> action) to perform several RemoteFileOperations calls in the scope of the same, thread-bounded, Session.
New filters for detecting incomplete remote files are now provided.
The FtpOutboundGateway and SftpOutboundGateway now support an option to remove the remote file after a successful transfer using the GET or MGET commands.
See Chapter 16, FTP/FTPS Adapters and Chapter 28, SFTP Adapters for more information.
Since version 4.3.2 a new spring.integration.readOnly.headers global property has been added to customize the list of headers which should not be copied to a newly created Message by the MessageBuilder.
See Section E.5, “Global Properties” for more information.
There is a new option on the CharacterStreamReadingMessageSource to allow it to be used to "pipe" stdin and publish an application event when the pipe is closed.
See Section 30.2, “Reading from streams” for more information.
The BarrierMessageHandler now supports a discard channel to which late-arriving trigger messages are sent.
See Section 6.8, “Thread Barrier” for more information.
The AMQP outbound endpoints now support setting a delay expression for when using the RabbitMQ Delayed Message Exchange plugin.
The inbound endpoints now support the Spring AMQP DirectMessageListenerContainer.
Pollable AMQP-backed channels now block the poller thread for the poller’s configured receiveTimeout (default 1 second).
Headers, such as contentType that are added to message properties by the message converter are now used in the final message; previously, it depended on the converter type as to which headers/message properties appeared in the final message.
To override headers set by the converter, set the headersMappedLast property to true.
See Chapter 12, AMQP Support for more information.
The DefaultHttpHeaderMapper.userDefinedHeaderPrefix property is now an empty string by default instead of X-.
See Section 18.8, “HTTP Header Mappings” for more information.
Inbound messages are now mapped with headers RECEIVED_TOPIC, RECEIVED_QOS and RECEIVED_RETAINED to avoid inadvertent propagation to outbound messages when an application is relaying messages.
The outbound channel adapter now supports expressions for the topic, qos and retained properties; the defaults remain the same.
See Chapter 24, MQTT Support for more information.
The STOMP module has been changed to use ReactorNettyTcpStompClient, based on the Project Reactor 3.1 and reactor-netty extension.
The Reactor2TcpStompSessionManager has been renamed to the ReactorNettyTcpStompSessionManager according to the ReactorNettyTcpStompClient foundation.
See Chapter 29, STOMP Support for more information.
-
The
WebServiceOutboundGateways can now be supplied with an externally configuredWebServiceTemplateinstances. -
The
DefaultSoapHeaderMappercan now map ajavax.xml.transform.Sourceuser-defined header to a SOAP header element. -
Simple WebService Inbound and Outbound gateways can now deal with the complete
WebServiceMessageas apayload, allowing the manipulation of MTOM attachments.
See Chapter 36, Web Services Support for more information.
The RedisStoreWritingMessageHandler is supplied now with additional String-based setters for SpEL expressions - for convenience with Java configuration.
The zsetIncrementExpression can now be configured on the RedisStoreWritingMessageHandler, as well.
In addition this property has been changed from true to false since INCR option on ZADD Redis command is optional.
The RedisInboundChannelAdapter can now be supplied with an Executor for executing Redis listener invokers.
In addition the received messages now contains a RedisHeaders.MESSAGE_SOURCE header to indicate the source of the message - topic or pattern.
See Chapter 25, Redis Support for more information.
A new ThreadAffinityClientConnectionFactory is provided that binds TCP connections to threads.
You can now configure the TCP connection factories to support PushbackInputStream s, allowing deserializers to "unread" (push back) bytes after "reading ahead".
A ByteArrayElasticRawDeserializer has been added without maxMessageSize control and buffer incoming data as needed.
See Chapter 32, TCP and UDP Support for more information.
The GemfireMetadataStore now implements ListenableMetadataStore, allowing users to listen to cache events by providing MetadataStoreListener instances to the store.
See Chapter 17, GemFire Support for more information.
The JdbcMessageChannelStore now provides setter for the ChannelMessageStorePreparedStatementSetter allowing users to customize a message insertion in the store.
The ExpressionEvaluatingSqlParameterSourceFactory now provides setter for the sqlParameterTypes allowing users to customize sql types of the parameters.
See Chapter 19, JDBC Support for more information.
Spring Integration provides an extension of the Spring programming model to support the well-known Enterprise Integration Patterns. It enables lightweight messaging within Spring-based applications and supports integration with external systems via declarative adapters. Those adapters provide a higher-level of abstraction over Spring’s support for remoting, messaging, and scheduling. Spring Integration’s primary goal is to provide a simple model for building enterprise integration solutions while maintaining the separation of concerns that is essential for producing maintainable, testable code.
One of the key themes of the Spring Framework is inversion of control. In its broadest sense, this means that the framework handles responsibilities on behalf of the components that are managed within its context. The components themselves are simplified since they are relieved of those responsibilities. For example, dependency injection relieves the components of the responsibility of locating or creating their dependencies. Likewise, aspect-oriented programming relieves business components of generic cross-cutting concerns by modularizing them into reusable aspects. In each case, the end result is a system that is easier to test, understand, maintain, and extend.
Furthermore, the Spring framework and portfolio provide a comprehensive programming model for building enterprise applications. Developers benefit from the consistency of this model and especially the fact that it is based upon well-established best practices such as programming to interfaces and favoring composition over inheritance. Spring’s simplified abstractions and powerful support libraries boost developer productivity while simultaneously increasing the level of testability and portability.
Spring Integration is motivated by these same goals and principles. It extends the Spring programming model into the messaging domain and builds upon Spring’s existing enterprise integration support to provide an even higher level of abstraction. It supports message-driven architectures where inversion of control applies to runtime concerns, such as when certain business logic should execute and where the response should be sent. It supports routing and transformation of messages so that different transports and different data formats can be integrated without impacting testability. In other words, the messaging and integration concerns are handled by the framework, so business components are further isolated from the infrastructure and developers are relieved of complex integration responsibilities.
As an extension of the Spring programming model, Spring Integration provides a wide variety of configuration options including annotations, XML with namespace support, XML with generic "bean" elements, and of course direct usage of the underlying API. That API is based upon well-defined strategy interfaces and non-invasive, delegating adapters. Spring Integration’s design is inspired by the recognition of a strong affinity between common patterns within Spring and the well-known Enterprise Integration Patterns as described in the book of the same name by Gregor Hohpe and Bobby Woolf (Addison Wesley, 2004). Developers who have read that book should be immediately comfortable with the Spring Integration concepts and terminology.
Spring Integration is motivated by the following goals:
- Provide a simple model for implementing complex enterprise integration solutions.
- Facilitate asynchronous, message-driven behavior within a Spring-based application.
- Promote intuitive, incremental adoption for existing Spring users.
Spring Integration is guided by the following principles:
- Components should be loosely coupled for modularity and testability.
- The framework should enforce separation of concerns between business logic and integration logic.
- Extension points should be abstract in nature but within well-defined boundaries to promote reuse and portability.
From the vertical perspective, a layered architecture facilitates separation of concerns, and interface-based contracts between layers promote loose coupling. Spring-based applications are typically designed this way, and the Spring framework and portfolio provide a strong foundation for following this best practice for the full-stack of an enterprise application. Message-driven architectures add a horizontal perspective, yet these same goals are still relevant. Just as "layered architecture" is an extremely generic and abstract paradigm, messaging systems typically follow the similarly abstract "pipes-and-filters" model. The "filters" represent any component that is capable of producing and/or consuming messages, and the "pipes" transport the messages between filters so that the components themselves remain loosely-coupled. It is important to note that these two high-level paradigms are not mutually exclusive. The underlying messaging infrastructure that supports the "pipes" should still be encapsulated in a layer whose contracts are defined as interfaces. Likewise, the "filters" themselves would typically be managed within a layer that is logically above the application’s service layer, interacting with those services through interfaces much in the same way that a web-tier would.
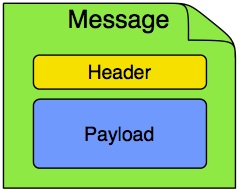
In Spring Integration, a Message is a generic wrapper for any Java object combined with metadata used by the framework while handling that object. It consists of a payload and headers. The payload can be of any type and the headers hold commonly required information such as id, timestamp, correlation id, and return address. Headers are also used for passing values to and from connected transports. For example, when creating a Message from a received File, the file name may be stored in a header to be accessed by downstream components. Likewise, if a Message’s content is ultimately going to be sent by an outbound Mail adapter, the various properties (to, from, cc, subject, etc.) may be configured as Message header values by an upstream component. Developers can also store any arbitrary key-value pairs in the headers.
A Message Channel represents the "pipe" of a pipes-and-filters architecture. Producers send Messages to a channel, and consumers receive Messages from a channel. The Message Channel therefore decouples the messaging components, and also provides a convenient point for interception and monitoring of Messages.

A Message Channel may follow either Point-to-Point or Publish/Subscribe semantics. With a Point-to-Point channel, at most one consumer can receive each Message sent to the channel. Publish/Subscribe channels, on the other hand, will attempt to broadcast each Message to all of its subscribers. Spring Integration supports both of these.
Whereas "Point-to-Point" and "Publish/Subscribe" define the two options for how many consumers will ultimately receive each Message, there is another important consideration: should the channel buffer messages? In Spring Integration, Pollable Channels are capable of buffering Messages within a queue. The advantage of buffering is that it allows for throttling the inbound Messages and thereby prevents overloading a consumer. However, as the name suggests, this also adds some complexity, since a consumer can only receive the Messages from such a channel if a poller is configured. On the other hand, a consumer connected to a Subscribable Channel is simply Message-driven. The variety of channel implementations available in Spring Integration will be discussed in detail in Section 4.1.2, “Message Channel Implementations”.
One of the primary goals of Spring Integration is to simplify the development of enterprise integration solutions through inversion of control. This means that you should not have to implement consumers and producers directly, and you should not even have to build Messages and invoke send or receive operations on a Message Channel. Instead, you should be able to focus on your specific domain model with an implementation based on plain Objects. Then, by providing declarative configuration, you can "connect" your domain-specific code to the messaging infrastructure provided by Spring Integration. The components responsible for these connections are Message Endpoints. This does not mean that you will necessarily connect your existing application code directly. Any real-world enterprise integration solution will require some amount of code focused upon integration concerns such as routing and transformation. The important thing is to achieve separation of concerns between such integration logic and business logic. In other words, as with the Model-View-Controller paradigm for web applications, the goal should be to provide a thin but dedicated layer that translates inbound requests into service layer invocations, and then translates service layer return values into outbound replies. The next section will provide an overview of the Message Endpoint types that handle these responsibilities, and in upcoming chapters, you will see how Spring Integration’s declarative configuration options provide a non-invasive way to use each of these.
A Message Endpoint represents the "filter" of a pipes-and-filters architecture. As mentioned above, the endpoint’s primary role is to connect application code to the messaging framework and to do so in a non-invasive manner. In other words, the application code should ideally have no awareness of the Message objects or the Message Channels. This is similar to the role of a Controller in the MVC paradigm. Just as a Controller handles HTTP requests, the Message Endpoint handles Messages. Just as Controllers are mapped to URL patterns, Message Endpoints are mapped to Message Channels. The goal is the same in both cases: isolate application code from the infrastructure. These concepts are discussed at length along with all of the patterns that follow in the Enterprise Integration Patterns book. Here, we provide only a high-level description of the main endpoint types supported by Spring Integration and their roles. The chapters that follow will elaborate and provide sample code as well as configuration examples.
A Message Transformer is responsible for converting a Message’s content or structure and returning the modified Message. Probably the most common type of transformer is one that converts the payload of the Message from one format to another (e.g. from XML Document to java.lang.String). Similarly, a transformer may be used to add, remove, or modify the Message’s header values.
A Message Filter determines whether a Message should be passed to an output channel at all. This simply requires a boolean test method that may check for a particular payload content type, a property value, the presence of a header, etc. If the Message is accepted, it is sent to the output channel, but if not it will be dropped (or for a more severe implementation, an Exception could be thrown). Message Filters are often used in conjunction with a Publish Subscribe channel, where multiple consumers may receive the same Message and use the filter to narrow down the set of Messages to be processed based on some criteria.
| Note |
|---|---|
|
Be careful not to confuse the generic use of "filter" within the Pipes-and-Filters architectural pattern with this specific endpoint type that selectively narrows down the Messages flowing between two channels. The Pipes-and-Filters concept of "filter" matches more closely with Spring Integration’s Message Endpoint: any component that can be connected to Message Channel(s) in order to send and/or receive Messages. |
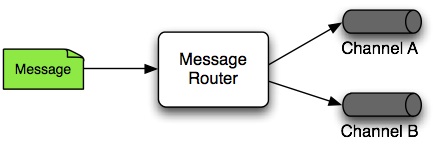
A Message Router is responsible for deciding what channel or channels should receive the Message next (if any). Typically the decision is based upon the Message’s content and/or metadata available in the Message Headers. A Message Router is often used as a dynamic alternative to a statically configured output channel on a Service Activator or other endpoint capable of sending reply Messages. Likewise, a Message Router provides a proactive alternative to the reactive Message Filters used by multiple subscribers as described above.
A Splitter is another type of Message Endpoint whose responsibility is to accept a Message from its input channel, split that Message into multiple Messages, and then send each of those to its output channel. This is typically used for dividing a "composite" payload object into a group of Messages containing the sub-divided payloads.
Basically a mirror-image of the Splitter, the Aggregator is a type of Message Endpoint that receives multiple Messages and combines them into a single Message.
In fact, Aggregators are often downstream consumers in a pipeline that includes a Splitter.
Technically, the Aggregator is more complex than a Splitter, because it is required to maintain state (the Messages to-be-aggregated), to decide when the complete group of Messages is available, and to timeout if necessary.
Furthermore, in case of a timeout, the Aggregator needs to know whether to send the partial results or to discard them to a separate channel.
Spring Integration provides a CorrelationStrategy, a ReleaseStrategy and configurable settings for: timeout, whether
to send partial results upon timeout, and a discard channel.
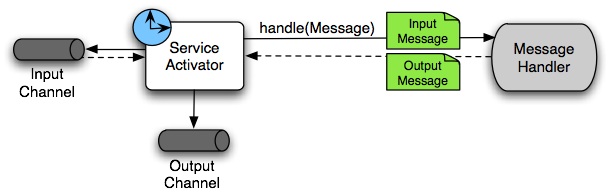
A Service Activator is a generic endpoint for connecting a service instance to the messaging system. The input Message Channel must be configured, and if the service method to be invoked is capable of returning a value, an output Message Channel may also be provided.
| Note |
|---|---|
|
The output channel is optional, since each Message may also provide its own Return Address header. This same rule applies for all consumer endpoints. |
The Service Activator invokes an operation on some service object to process the request Message, extracting the request Message’s payload and converting if necessary (if the method does not expect a Message-typed parameter). Whenever the service object’s method returns a value, that return value will likewise be converted to a reply Message if necessary (if it’s not already a Message). That reply Message is sent to the output channel. If no output channel has been configured, then the reply will be sent to the channel specified in the Message’s "return address" if available.
A request-reply "Service Activator" endpoint connects a target object’s method to input and output Message Channels.
| Note |
|---|---|
|
As discussed in Message Channel above, channels can be Pollable or Subscribable; in this diagram, this is depicted by the "clock" symbol and the solid arrow (poll) and the dotted arrow (subscribe). |
A Channel Adapter is an endpoint that connects a Message Channel to some other system or transport. Channel Adapters may be either inbound or outbound. Typically, the Channel Adapter will do some mapping between the Message and whatever object or resource is received-from or sent-to the other system (File, HTTP Request, JMS Message, etc). Depending on the transport, the Channel Adapter may also populate or extract Message header values. Spring Integration provides a number of Channel Adapters, and they will be described in upcoming chapters.

| Note |
|---|---|
|
Message sources can be Pollable (e.g. POP3) or Message-Driven (e.g. IMAP Idle); in this diagram, this is depicted by the "clock" symbol and the solid arrow (poll) and the dotted arrow (message-driven). |

| Note |
|---|---|
|
As discussed in Message Channel above, channels can be Pollable or Subscribable; in this diagram, this is depicted by the "clock" symbol and the solid arrow (poll) and the dotted arrow (subscribe). |
Throughout this document you will see references to XML namespace support for declaring elements in a Spring Integration flow.
This support is provided by a series of namespace parsers that generate appropriate bean definitions to implement a particular component.
For example, many endpoints consist of a MessageHandler bean and a ConsumerEndpointFactoryBean into which the handler and an input channel name are injected.
The first time a Spring Integration namespace element is encountered, the framework automatically declares a number of beans that are used to support the runtime environment (task scheduler, implicit channel creator, etc).
![[Important]](images/important.png) | Important |
|---|---|
|
Starting with version 4.0, the |
The @EnableIntegration annotation is also useful when you have a parent context with no Spring Integration components
and 2 or more child contexts that use Spring Integration.
It enables these common components to be declared once only, in the parent context.
The @EnableIntegration annotation registers many infrastructure components with the application context:
-
Registers some built-in beans, e.g.
errorChanneland itsLoggingHandler,taskSchedulerfor pollers,jsonPathSpEL-function etc.; -
Adds several
BeanFactoryPostProcessors to enhance theBeanFactoryfor global and default integration environment; -
Adds several
BeanPostProcessors to enhance and/or convert and wrap particular beans for integration purposes; - Adds annotations processors to parse Messaging Annotations and registers components for them with the application context.
The @IntegrationComponentScan annotation has also been introduced to permit classpath scanning.
This annotation plays a similar role as the standard Spring Framework @ComponentScan annotation, but it is restricted just to Spring Integration specific components and annotations, which aren’t reachable by the standard Spring Framework component scan mechanism.
For example Section 8.4.6, “@MessagingGateway Annotation”.
The @EnablePublisher annotation has been introduced to register a PublisherAnnotationBeanPostProcessor bean and configure the default-publisher-channel for those @Publisher annotations which are provided without a channel attribute.
If more than one @EnablePublisher annotation is found, they must all have the same value for the default channel.
See Section B.1.1, “Annotation-driven approach via @Publisher annotation” for more information.
The @GlobalChannelInterceptor annotation has been introduced to mark ChannelInterceptor beans for global channel interception.
This annotation is an analogue of the <int:channel-interceptor> xml element (see the section called “Global Channel Interceptor Configuration”).
@GlobalChannelInterceptor annotations can be placed at the class level (with a @Component stereotype annotation), or on @Bean methods within @Configuration classes.
In either case, the bean must be a ChannelInterceptor.
The @IntegrationConverter annotation has been introduced to mark Converter, GenericConverter or ConverterFactory beans as candidate converters for integrationConversionService.
This annotation is an analogue of the <int:converter> xml element (see Section 8.1.6, “Payload Type Conversion”).
@IntegrationConverter annotations can be placed at the class level (with a @Component stereotype annotation), or on @Bean methods within @Configuration classes.
Also see Section E.6, “Annotation Support” for more information about Messaging Annotations.
It is generally recommended that you use plain old java objects (POJOs) whenever possible and only expose the framework in your code when absolutely necessary. See Section 3.8, “POJO Method invocation” for more information.
If you do expose the framework to your classes, there are some considerations that need to be taken into account, especially during application startup; some of these are listed here.
-
If your component is
ApplicationContextAware, you should generally not "use" theApplicationContextin thesetApplicationContext()method; just store a reference and defer such uses until later in the context lifecycle. -
If your component is an
InitializingBeanor uses@PostConstructmethods, do not send any messages from these initialization methods - the application context is not yet initialized when these methods are called, and sending such messages will likely fail. If you need to send a messages during startup, implementApplicationListenerand wait for theContextRefreshedEvent. Alternatively, implementSmartLifecycle, put your bean in a late phase, and send the messages from thestart()method.
When using XML configuration, to avoid getting false schema validation errors, you should use a "Spring-aware" IDE, such as the Spring Tool Suite (STS) (or eclipse with the Spring IDE plugins) or IntelliJ IDEA, for example.
These IDEs know how to resolve the correct XML schema from the classpath (using the META-INF/spring.schemas file in the jar(s)).
When using STS, or eclipse with the plugin, be sure to enable Spring Project Nature on the project.
The schemas hosted on the internet for certain legacy modules (those that existed in version 1.0) are the 1.0 versions for compatibility reasons; if your IDE uses these schemas, you will likely see false errors.
Each of these online schemas has a warning similar to this:
| Important |
|---|---|
|
This schema is for the 1.0 version of Spring Integration Core. We cannot update it to the current schema because that will break any applications using 1.0.3 or lower. For subsequent versions, the unversioned schema is resolved from the classpath and obtained from the jar. Please refer to github: |
The affected modules are
-
core (
spring-integration.xsd) - file
- http
- jms
- rmi
- security
- stream
- ws
- xml
With XML configuration and Spring Integration Namespace support, the XML Parsers hide how target beans are declared and wired together. For Java & Annotation Configuration, it is important to understand the Framework API for target end-user applications.
The first class citizens for EIP implementation are Message, Channel and Endpoint (see Section 3.3, “Main Components”
above).
Their implementations (contracts) are:
-
org.springframework.messaging.Message- see Section 5.1, “Message”; -
org.springframework.messaging.MessageChannel- see Section 4.1, “Message Channels”; -
org.springframework.integration.endpoint.AbstractEndpoint- see Section 4.2, “Poller”.
The first two are simple enough to understand how to implement, configure and use, respectively; the last one deserves more review.
The AbstractEndpoint is widely used throughout the Framework for different component implementations;
its main implementations are:
-
EventDrivenConsumer, when we subscribe to aSubscribableChannelto listen for messages; -
PollingConsumer, when we poll for messages from aPollableChannel.
Using Messaging Annotations and/or Java DSL, you shouldn’t worry about these components, because the Framework produces
them automatically via appropriate annotations and BeanPostProcessor s.
When building components manually, the ConsumerEndpointFactoryBean should be used to help to determine the target
AbstractEndpoint consumer implementation to create, based on the provided inputChannel property.
On the other hand, the ConsumerEndpointFactoryBean delegates to an another first class citizen in the Framework -
org.springframework.messaging.MessageHandler.
The goal of the implementation of this interface is to handle the message consumed by the endpoint from the channel.
All EIP components in Spring Integration are MessageHandler implementations,
e.g. AggregatingMessageHandler, MessageTransformingHandler, AbstractMessageSplitter etc.; as well as the target
protocol outbound adapters are implementations too, e.g. FileWritingMessageHandler,
HttpRequestExecutingMessageHandler, AbstractMqttMessageHandler etc.
When you develop Spring Integration applications with Java & Annotation Configuration, you should take a look into the
Spring Integration module to find an appropriate MessageHandler implementation to be used for the @ServiceActivator
configuration.
For example to send an XMPP message (see Chapter 38, XMPP Support) we should configure something like this:
@Bean
@ServiceActivator(inputChannel = "input")
public MessageHandler sendChatMessageHandler(XMPPConnection xmppConnection) {
    ChatMessageSendingMessageHandler handler = new ChatMessageSendingMessageHandler(xmppConnection);

    DefaultXmppHeaderMapper xmppHeaderMapper = new DefaultXmppHeaderMapper();
    xmppHeaderMapper.setRequestHeaderNames("*");
    handler.setHeaderMapper(xmppHeaderMapper);

    return handler;
}
The MessageHandler implementations represent the outbound and processing part of the message flow.
The inbound message flow side has its own components, which are divided to polling and listening behaviors.
The listening (message-driven) components are simple and typically require only one target class implementation to be ready to
produce messages.
Listening components can be one-way MessageProducerSupport implementations,
e.g. AbstractMqttMessageDrivenChannelAdapter and ImapIdleChannelAdapter; and request-reply -
MessagingGatewaySupport implementations, e.g. AmqpInboundGateway and AbstractWebServiceInboundGateway.
Polling inbound endpoints are for those protocols which don’t provide a listener API or aren’t intended for such a behavior. For example any File based protocol, as an FTP, any data bases (RDBMS or NoSQL) etc.
These inbound endpoints consist with two components: the poller configuration, to initiate the polling task periodically,
and message source class to read data from the target protocol and produce a message for the downstream integration flow.
The first class, for the poller configuration, is a SourcePollingChannelAdapter.
It is one more AbstractEndpoint implementation, but especially for polling to initiate an integration
flow.
Typically, with the Messaging Annotations or Java DSL, you shouldn’t worry about this class, the Framework produces
a bean for it, based on the @InboundChannelAdapter configuration or a Java DSL Builder spec.
Message source components are more important for the target application development and they all implement
the MessageSource interface, e.g. MongoDbMessageSource and AbstractTwitterMessageSource.
With that in mind, our config for reading data from an RDBMS table with JDBC may look like:
@Bean
@InboundChannelAdapter(value = "fooChannel", poller = @Poller(fixedDelay="5000"))
public MessageSource<?> storedProc(DataSource dataSource) {
    return new JdbcPollingChannelAdapter(dataSource, "SELECT * FROM foo where status = 0");
}
All the required inbound and outbound classes for the target protocols you can find in the particular Spring
Integration module, in most cases in the respective package.
For example spring-integration-websocket adapters are:
-
o.s.i.websocket.inbound.WebSocketInboundChannelAdapter- implementsMessageProducerSupportimplementation to listen frames on the socket and produce message to the channel; -
o.s.i.websocket.outbound.WebSocketOutboundMessageHandler- the one-wayAbstractMessageHandlerimplementation to convert incoming messages to the appropriate frame and send over websocket.
If you are familiar with Spring Integration XML configuration, starting with version 4.3, we provide information in the XSD element definitions about which target classes are used to declare beans for the adapter or gateway, for example:
<xsd:element name="outbound-async-gateway">
    <xsd:annotation>
		<xsd:documentation>
Configures a Consumer Endpoint for the 'o.s.i.amqp.outbound.AsyncAmqpOutboundGateway'
that will publish an AMQP Message to the provided Exchange and expect a reply Message.
The sending thread returns immediately; the reply is sent asynchronously; uses 'AsyncRabbitTemplate.sendAndReceive()'.
       </xsd:documentation>
	</xsd:annotation>
As discussed in Section 3.6, “Programming Considerations”, it is generally recommended to use a POJO programming style. For example,
@ServiceActivator
public String myService(String payload) { ... }
In this case, the framework will extract a String payload, invoke your method, and wrap the result in a message to send to the next component in the flow (the original headers will be copied to the new message).
In fact, if you are using XML configuration, you don’t even need the @ServiceActivator annotation:
<int:service-activator ... ref="myPojo" method="myService" />
public String myService(String payload) { ... }
You can omit the method attribute as long as there is no ambiguity in the public methods on the class.
Some further observations:
You can obtain header information in your POJO methods:
@ServiceActivator
public String myService(@Payload String payload, @Header("foo") String fooHeader) { ... }
You can dereference properties on the message:
@ServiceActivator
public String myService(@Payload("payload.foo") String foo, @Header("bar.baz") String barbaz) { ... }
Because many any varied POJO method invocations are available, versions prior to 5.0 used SpEL to invoke the POJO methods.
SpEL (even interpreted) is usually "fast enough" for these operations, when compared to the actual work usually done in the methods.
However, starting with version 5.0, the org.springframework.messaging.handler.invocation.InvocableHandlerMethod is used by default, when possible.
This technique is usually faster to execute than interpreted SpEL and is consistent with other Spring messaging projects.
The InvocableHandlerMethod is similar to the technique used to invoke controller methods in Spring MVC.
There are certain methods that are still always invoked using SpEL; examples include annotated parameters with dereferenced properties as discussed above.
This is because SpEL has the capability to navigate a property path.
There may be some other corner cases that we haven’t considered that also won’t work with InvocableHandlerMethod s.
For this reason, we automatically fall-back to using SpEL in those cases.
If you wish, you can also set up your POJO method such that it always uses SpEL, with the UseSpelInvoker annotation:
@UseSpelInvoker(compilerMode = "IMMEDIATE")
public void bar(String bar) { ... }
If the compilerMode property is omitted, the spring.expression.compiler.mode system property will determine the compiler mode - see SpEL compilation for more information about compiled SpEL.
This section covers all aspects of the core messaging API in Spring Integration. Here you will learn about Messages, Message Channels, and Message Endpoints. Many of the Enterprise Integration Patterns are covered here as well, such as Filters, Routers, Transformers, Service-Activators, Splitters, and Aggregators. The section also contains material about System Management, including the Control Bus and Message History support.
While the Message plays the crucial role of encapsulating data, it is the MessageChannel that decouples message producers from message consumers.
Spring Integration’s top-level MessageChannel interface is defined as follows.
public interface MessageChannel {

    boolean send(Message message);

    boolean send(Message message, long timeout);
}
When sending a message, the return value will be true if the message is sent successfully. If the send call times out or is interrupted, then it will return false.
Since Message Channels may or may not buffer Messages (as discussed in the overview), there are two sub-interfaces defining the buffering (pollable) and non-buffering (subscribable) channel behavior.
Here is the definition of PollableChannel.
public interface PollableChannel extends MessageChannel {

    Message<?> receive();

    Message<?> receive(long timeout);

}
Similar to the send methods, when receiving a message, the return value will be null in the case of a timeout or interrupt.
The SubscribableChannel base interface is implemented by channels that send Messages directly to their subscribed MessageHandler s.
Therefore, they do not provide receive methods for polling, but instead define methods for managing those subscribers:
public interface SubscribableChannel extends MessageChannel {

    boolean subscribe(MessageHandler handler);

    boolean unsubscribe(MessageHandler handler);

}
Spring Integration provides several different Message Channel implementations. Each is briefly described in the sections below.
The PublishSubscribeChannel implementation broadcasts any Message sent to it to all of its subscribed handlers.
This is most often used for sending Event Messages whose primary role is notification as opposed to Document Messages which are generally intended to be processed by a single handler.
Note that the PublishSubscribeChannel is intended for sending only.
Since it broadcasts to its subscribers directly when its send(Message) method is invoked, consumers cannot poll for Messages (it does not implement PollableChannel and therefore has no receive() method).
Instead, any subscriber must be a MessageHandler itself, and the subscriber’s handleMessage(Message) method will be invoked in turn.
Prior to version 3.0, invoking the send method on a PublishSubscribeChannel that had no subscribers returned false.
When used in conjunction with a MessagingTemplate, a MessageDeliveryException was thrown.
Starting with version 3.0, the behavior has changed such that a send is always considered successful if at least the minimum subscribers are present (and successfully handle the message).
This behavior can be modified by setting the minSubscribers property, which defaults to 0.
| Note |
|---|---|
|
If a |
The QueueChannel implementation wraps a queue.
Unlike the PublishSubscribeChannel, the QueueChannel has point-to-point semantics.
In other words, even if the channel has multiple consumers, only one of them should receive any Message sent to that channel.
It provides a default no-argument constructor (providing an essentially unbounded capacity of Integer.MAX_VALUE) as well as a constructor that accepts the queue capacity:
public QueueChannel(int capacity)
A channel that has not reached its capacity limit will store messages in its internal queue, and the send() method will return immediately even if no receiver is ready to handle the message.
If the queue has reached capacity, then the sender will block until room is available.
Or, if using the send call that accepts a timeout, it will block until either room is available or the timeout period elapses, whichever occurs first.
Likewise, a receive call will return immediately if a message is available on the queue, but if the queue is empty, then a receive call may block until either a message is available or the timeout elapses.
In either case, it is possible to force an immediate return regardless of the queue’s state by passing a timeout value of 0.
Note however, that calls to the no-arg versions of send() and receive() will block indefinitely.
Whereas the QueueChannel enforces first-in/first-out (FIFO) ordering, the PriorityChannel is an alternative implementation that allows for messages to be ordered within the channel based upon a priority.
By default the priority is determined by the priority header within each message.
However, for custom priority determination logic, a comparator of type Comparator<Message<?>> can be provided to the PriorityChannel's constructor.
The RendezvousChannel enables a "direct-handoff" scenario where a sender will block until another party invokes the channel’s receive() method or vice-versa.
Internally, this implementation is quite similar to the QueueChannel except that it uses a SynchronousQueue (a zero-capacity implementation of BlockingQueue).
This works well in situations where the sender and receiver are operating in different threads but simply dropping the message in a queue asynchronously is not appropriate.
In other words, with a RendezvousChannel at least the sender knows that some receiver has accepted the message, whereas with a QueueChannel, the message would have been stored to the internal queue and potentially never received.
![[Tip]](images/tip.png) | Tip |
|---|---|
|
Keep in mind that all of these queue-based channels are storing messages in-memory only by default.
When persistence is required, you can either provide a message-store attribute within the queue element to reference a persistent MessageStore implementation, or you can replace the local channel with one that is backed by a persistent broker, such as a JMS-backed channel or Channel Adapter.
The latter option allows you to take advantage of any JMS provider’s implementation for message persistence, and it will be discussed in Chapter 21, JMS Support.
However, when buffering in a queue is not necessary, the simplest approach is to rely upon the |
The RendezvousChannel is also useful for implementing request-reply operations.
The sender can create a temporary, anonymous instance of RendezvousChannel which it then sets as the replyChannel header when building a Message.
After sending that Message, the sender can immediately call receive (optionally providing a timeout value) in order to block while waiting for a reply Message.
This is very similar to the implementation used internally by many of Spring Integration’s request-reply components.
The DirectChannel has point-to-point semantics but otherwise is more similar to the PublishSubscribeChannel than any of the queue-based channel implementations described above.
It implements the SubscribableChannel interface instead of the PollableChannel interface, so it dispatches Messages directly to a subscriber.
As a point-to-point channel, however, it differs from the PublishSubscribeChannel in that it will only send each Message to a single subscribed MessageHandler.
In addition to being the simplest point-to-point channel option, one of its most important features is that it enables a single thread to perform the operations on "both sides" of the channel.
For example, if a handler is subscribed to a DirectChannel, then sending a Message to that channel will trigger invocation of that handler’s handleMessage(Message) method directly in the
sender’s thread, before the send() method invocation can return.
The key motivation for providing a channel implementation with this behavior is to support transactions that must span across the channel while still benefiting from the abstraction and loose coupling that the channel provides. If the send call is invoked within the scope of a transaction, then the outcome of the handler’s invocation (e.g. updating a database record) will play a role in determining the ultimate result of that transaction (commit or rollback).
| Note |
|---|---|
|
Since the |
The DirectChannel internally delegates to a Message Dispatcher to invoke its subscribed Message Handlers, and that dispatcher can have a load-balancing strategy exposed via load-balancer or load-balancer-ref attributes (mutually exclusive).
The load balancing strategy is used by the Message Dispatcher to help determine how Messages are distributed amongst Message Handlers in the case that there are multiple Message Handlers subscribed to the same channel.
As a convenience the load-balancer attribute exposes enumeration of values pointing to pre-existing implementations of LoadBalancingStrategy.
The "round-robin" (load-balances across the handlers in rotation) and "none" (for the cases where one wants to explicitely disable load balancing) are the only available values.
Other strategy implementations may be added in future versions.
However, since version 3.0 you can provide your own implementation of the LoadBalancingStrategy and inject it using load-balancer-ref attribute which should point to a bean that implements LoadBalancingStrategy.
<int:channel id="lbRefChannel">
  <int:dispatcher load-balancer-ref="lb"/>
</int:channel>

<bean id="lb" class="foo.bar.SampleLoadBalancingStrategy"/>
Note that load-balancer or load-balancer-ref attributes are mutually exclusive.
The load-balancing also works in combination with a boolean failover property. If the "failover" value is true (the default), then the dispatcher will fall back to any subsequent handlers as necessary when preceding handlers throw Exceptions. The order is determined by an optional order value defined on the handlers themselves or, if no such value exists, the order in which the handlers are subscribed.
If a certain situation requires that the dispatcher always try to invoke the first handler, then fallback in the same fixed order sequence every time an error occurs, no load-balancing strategy should be provided. In other words, the dispatcher still supports the failover boolean property even when no load-balancing is enabled. Without load-balancing, however, the invocation of handlers will always begin with the first according to their order. For example, this approach works well when there is a clear definition of primary, secondary, tertiary, and so on. When using the namespace support, the "order" attribute on any endpoint will determine that order.
| Note |
|---|---|
|
Keep in mind that load-balancing and failover only apply when a channel has more than one subscribed Message Handler. When using the namespace support, this means that more than one endpoint shares the same channel reference in the "input-channel" attribute. |
The ExecutorChannel is a point-to-point channel that supports the same dispatcher configuration as DirectChannel (load-balancing strategy and the failover boolean property).
The key difference between these two dispatching channel types is that the ExecutorChannel delegates to an instance of TaskExecutor to perform the dispatch.
This means that the send method typically will not block, but it also means that the handler invocation may not occur in the sender’s thread.
It therefore does not support transactions spanning the sender and receiving handler.
| Tip |
|---|---|
|
Note that there are occasions where the sender may block.
For example, when using a TaskExecutor with a rejection-policy that throttles back on the client (such as the |
Spring Integration 1.0 provided a ThreadLocalChannel implementation, but that has been removed as of 2.0.
Now, there is a more general way for handling the same requirement by simply adding a "scope" attribute to a channel.
The value of the attribute can be any name of a Scope that is available within the context.
For example, in a web environment, certain Scopes are available, and any custom Scope implementations can be registered with the context.
Here’s an example of a ThreadLocal-based scope being applied to a channel, including the registration of the Scope itself.
<int:channel id="threadScopedChannel" scope="thread">
     <int:queue />
</int:channel>

<bean class="org.springframework.beans.factory.config.CustomScopeConfigurer">
    <property name="scopes">
        <map>
            <entry key="thread" value="org.springframework.context.support.SimpleThreadScope" />
        </map>
    </property>
</bean>
The channel above also delegates to a queue internally, but the channel is bound to the current thread, so the contents of the queue are as well.
That way the thread that sends to the channel will later be able to receive those same Messages, but no other thread would be able to access them.
While thread-scoped channels are rarely needed, they can be useful in situations where DirectChannels are being used to enforce a single thread of operation but any reply Messages should be sent to a "terminal" channel.
If that terminal channel is thread-scoped, the original sending thread can collect its replies from it.
Now, since any channel can be scoped, you can define your own scopes in addition to Thread Local.
One of the advantages of a messaging architecture is the ability to provide common behavior and capture meaningful information about the messages passing through the system in a non-invasive way.
Since the Message s are being sent to and received from MessageChannels, those channels provide an opportunity for intercepting the send and receive operations.
The ChannelInterceptor strategy interface provides methods for each of those operations:
public interface ChannelInterceptor {

    Message<?> preSend(Message<?> message, MessageChannel channel);

    void postSend(Message<?> message, MessageChannel channel, boolean sent);

    void afterSendCompletion(Message<?> message, MessageChannel channel, boolean sent, Exception ex);

    boolean preReceive(MessageChannel channel);

    Message<?> postReceive(Message<?> message, MessageChannel channel);

    void afterReceiveCompletion(Message<?> message, MessageChannel channel, Exception ex);
}
After implementing the interface, registering the interceptor with a channel is just a matter of calling:
channel.addInterceptor(someChannelInterceptor);
The methods that return a Message instance can be used for transforming the Message or can return null to prevent further processing (of course, any of the methods can throw a RuntimeException).
Also, the preReceive method can return false to prevent the receive operation from proceeding.
| Note |
|---|---|
|
Keep in mind that |
Spring Integration also provides an implementation of the Wire Tap pattern. It is a simple interceptor that sends the Message to another channel without otherwise altering the existing flow. It can be very useful for debugging and monitoring. An example is shown in the section called “Wire Tap”.
Because it is rarely necessary to implement all of the interceptor methods, a ChannelInterceptorAdapter class is also available for sub-classing.
It provides no-op methods (the void method is empty, the Message returning methods return the Message as-is, and the boolean method returns true).
Therefore, it is often easiest to extend that class and just implement the method(s) that you need as in the following example.
public class CountingChannelInterceptor extends ChannelInterceptorAdapter {

    private final AtomicInteger sendCount = new AtomicInteger();

    @Override
    public Message<?> preSend(Message<?> message, MessageChannel channel) {
        sendCount.incrementAndGet();
        return message;
    }
}
| Tip |
|---|---|
|
The order of invocation for the interceptor methods depends on the type of channel. As described above, the queue-based channels are the only ones where the receive method is intercepted in the first place. Additionally, the relationship between send and receive interception depends on the timing of separate sender and receiver threads. For example, if a receiver is already blocked while waiting for a message the order could be: preSend, preReceive, postReceive, postSend. However, if a receiver polls after the sender has placed a message on the channel and already returned, the order would be: preSend, postSend, (some-time-elapses) preReceive, postReceive. The time that elapses in such a case depends on a number of factors and is therefore generally unpredictable (in fact, the receive may never happen!). Obviously, the type of queue also plays a role (e.g. rendezvous vs. priority). The bottom line is that you cannot rely on the order beyond the fact that preSend will precede postSend and preReceive will precede postReceive. |
Starting with Spring Framework 4.1 and Spring Integration 4.1, the ChannelInterceptor provides new methods - afterSendCompletion() and afterReceiveCompletion().
They are invoked after send()/receive() calls, regardless of any exception that is raised, thus allowing for resource cleanup.
Note, the Channel invokes these methods on the ChannelInterceptor List in the reverse order of the initial preSend()/preReceive() calls.
As you will see when the endpoints and their various configuration options are introduced, Spring Integration provides a foundation for messaging components that enables non-invasive invocation of your application code from the messaging system.
However, sometimes it is necessary to invoke the messaging system from your application code.
For convenience when implementing such use-cases, Spring Integration provides a MessagingTemplate that supports a variety of operations across the Message Channels, including request/reply scenarios.
For example, it is possible to send a request and wait for a reply.
MessagingTemplate template = new MessagingTemplate();

Message reply = template.sendAndReceive(someChannel, new GenericMessage("test"));
In that example, a temporary anonymous channel would be created internally by the template. The sendTimeout and receiveTimeout properties may also be set on the template, and other exchange types are also supported.
public boolean send(final MessageChannel channel, final Message<?> message) { ...
}

public Message<?> sendAndReceive(final MessageChannel channel, final Message<?> request) { ..
}

public Message<?> receive(final PollableChannel<?> channel) { ...
}
| Note |
|---|---|
|
A less invasive approach that allows you to invoke simple interfaces with payload and/or header values instead of Message instances is described in Section 8.4.1, “Enter the GatewayProxyFactoryBean”. |
To create a Message Channel instance, you can use the <channel/> element:
<int:channel id="exampleChannel"/>
The default channel type is Point to Point.
To create a Publish Subscribe channel, use the <publish-subscribe-channel/> element:
<int:publish-subscribe-channel id="exampleChannel"/>
When using the <channel/> element without any sub-elements, it will create a DirectChannel instance (a SubscribableChannel).
However, you can alternatively provide a variety of <queue/> sub-elements to create any of the pollable channel types (as described in Section 4.1.2, “Message Channel Implementations”).
Examples of each are shown below.
As mentioned above, DirectChannel is the default type.
<int:channel id="directChannel"/>
A default channel will have a round-robin load-balancer and will also have failover enabled (See the discussion in the section called “DirectChannel” for more detail).
To disable one or both of these, add a <dispatcher/> sub-element and configure the attributes:
<int:channel id="failFastChannel">
    <int:dispatcher failover="false"/>
</channel>

<int:channel id="channelWithFixedOrderSequenceFailover">
    <int:dispatcher load-balancer="none"/>
</int:channel>
There are times when a consumer can only process a particular type of payload and you need to therefore ensure the payload type of input Messages. Of course the first thing that comes to mind is Message Filter. However all that Message Filter will do is filter out Messages that are not compliant with the requirements of the consumer. Another way would be to use a Content Based Router and route Messages with non-compliant data-types to specific Transformers to enforce transformation/conversion to the required data-type. This of course would work, but a simpler way of accomplishing the same thing is to apply the Datatype Channel pattern. You can use separate Datatype Channels for each specific payload data-type.
To create a Datatype Channel that only accepts messages containing a certain payload type, provide the fully-qualified class name in the channel element’s datatype attribute:
<int:channel id="numberChannel" datatype="java.lang.Number"/>
Note that the type check passes for any type that is assignable to the channel’s datatype.
In other words, the "numberChannel" above would accept messages whose payload is java.lang.Integer or java.lang.Double.
Multiple types can be provided as a comma-delimited list:
<int:channel id="stringOrNumberChannel" datatype="java.lang.String,java.lang.Number"/>
So the numberChannel above will only accept Messages with a data-type of java.lang.Number.
But what happens if the payload of the Message is not of the required type? It depends on whether you have defined a bean named integrationConversionService that is an instance of Spring’s Conversion Service.
If not, then an Exception would be thrown immediately, but if you do have an "integrationConversionService" bean defined, it will be used in an attempt to convert the Message’s payload to the acceptable type.
You can even register custom converters. For example, let’s say you are sending a Message with a String payload to the numberChannel we configured above.
MessageChannel inChannel = context.getBean("numberChannel", MessageChannel.class);
inChannel.send(new GenericMessage<String>("5"));
Typically this would be a perfectly legal operation, however since we are using Datatype Channel the result of such operation would generate an exception:
Exception in thread "main" org.springframework.integration.MessageDeliveryException:
Channel 'numberChannel'
expected one of the following datataypes [class java.lang.Number],
but received [class java.lang.String]
…
And rightfully so since we are requiring the payload type to be a Number while sending a String. So we need something to convert String to a Number. All we need to do is implement a Converter.
public static class StringToIntegerConverter implements Converter<String, Integer> {
    public Integer convert(String source) {
        return Integer.parseInt(source);
    }
}
Then, register it as a Converter with the Integration Conversion Service:
<int:converter ref="strToInt"/>

<bean id="strToInt" class="org.springframework.integration.util.Demo.StringToIntegerConverter"/>
When the converter element is parsed, it will create the "integrationConversionService" bean on-demand if one is not already defined. With that Converter in place, the send operation would now be successful since the Datatype Channel will use that Converter to convert the String payload to an Integer.
| Note |
|---|---|
|
For more information regarding Payload Type Conversion, please read Section 8.1.6, “Payload Type Conversion”. |
Beginning with version 4.0, the integrationConversionService is invoked by the DefaultDatatypeChannelMessageConverter, which looks up the conversion service in the application context.
To use a different conversion technique, you can specify the message-converter attribute on the channel.
This must be a reference to a MessageConverter implementation.
Only the fromMessage method is used, which provides the converter with access to the message headers (for example if the conversion might need information from the headers, such as content-type).
The method can return just the converted payload, or a full Message object.
If the latter, the converter must be careful to copy all the headers from the inbound message.
Alternatively, declare a <bean/> of type MessageConverter with an id "datatypeChannelMessageConverter" and that converter will be used by all channels with a datatype.
To create a QueueChannel, use the <queue/> sub-element.
You may specify the channel’s capacity:
<int:channel id="queueChannel">
    <queue capacity="25"/>
</int:channel>
| Note |
|---|---|
|
If you do not provide a value for the capacity attribute on this |
Persistent QueueChannel Configuration
Since a QueueChannel provides the capability to buffer Messages, but does so in-memory only by default, it also introduces a possibility that Messages could be lost in the event of a system failure.
To mitigate this risk, a QueueChannel may be backed by a persistent implementation of the MessageGroupStore strategy interface.
For more details on MessageGroupStore and MessageStore see Section 10.4, “Message Store”.
| Important |
|---|---|
|
The |
When a QueueChannel receives a Message, it will add it to the Message Store, and when a Message is polled from a QueueChannel, it is removed from the Message Store.
By default, a QueueChannel stores its Messages in an in-memory Queue and can therefore lead to the lost message scenario mentioned above.
However Spring Integration provides persistent stores, such as the JdbcChannelMessageStore.
You can configure a Message Store for any QueueChannel by adding the message-store attribute as shown in the next example.
<int:channel id="dbBackedChannel">
    <int:queue message-store="channelStore"/>
</int:channel>

<bean id="channelStore" class="o.s.i.jdbc.store.JdbcChannelMessageStore">
    <property name="dataSource" ref="dataSource"/>
    <property name="channelMessageStoreQueryProvider" ref="queryProvider"/>
</bean>
The Spring Integration JDBC module also provides schema DDL for a number of popular databases. These schemas are located in the org.springframework.integration.jdbc.store.channel package of that module (spring-integration-jdbc).
| Important |
|---|---|
|
One important feature is that with any transactional persistent store (e.g., |
Many other implementations of the Message Store will be available as the growing number of Spring projects related to "NoSQL" data stores provide the underlying support. Of course, you can always provide your own implementation of the MessageGroupStore interface if you cannot find one that meets your particular needs.
Since version 4.0, it is recommended that QueueChannel s are configured to use a ChannelMessageStore if possible.
These are generally optimized for this use, when compared with a general message store.
If the ChannelMessageStore is a ChannelPriorityMessageStore the messages will be received in FIFO within priority order.
The notion of priority is determined by the message store implementation.
For example the Java Configuration for the Section 23.3.1, “MongoDB Channel Message Store”:
@Bean
public BasicMessageGroupStore mongoDbChannelMessageStore(MongoDbFactory mongoDbFactory) {
    MongoDbChannelMessageStore store = new MongoDbChannelMessageStore(mongoDbFactory);
    store.setPriorityEnabled(true);
    return store;
}

@Bean
public PollableChannel priorityQueue(BasicMessageGroupStore mongoDbChannelMessageStore) {
    return new PriorityChannel(new MessageGroupQueue(mongoDbChannelMessageStore, "priorityQueue"));
}
| Note |
|---|---|
|
Pay attention to the |
The same with Java DSL may look like:
@Bean
public IntegrationFlow priorityFlow(PriorityCapableChannelMessageStore mongoDbChannelMessageStore) {
    return IntegrationFlows.from((Channels c) ->
            c.priority("priorityChannel", mongoDbChannelMessageStore, "priorityGroup"))
            ....
            .get();
}
Another option to customize the QueueChannel environment is provided by the ref attribute of the <int:queue> sub-element or particular constructor.
This attribute implies the reference to any java.util.Queue implementation.
For example Hazelcast distributed IQueue:
@Bean
public HazelcastInstance hazelcastInstance() {
    return Hazelcast.newHazelcastInstance(new Config()
                                           .setProperty("hazelcast.logging.type", "log4j"));
}

@Bean
public PollableChannel distributedQueue() {
    return new QueueChannel(hazelcastInstance()
                              .getQueue("springIntegrationQueue"));
}
To create a PublishSubscribeChannel, use the <publish-subscribe-channel/> element.
When using this element, you can also specify the task-executor used for publishing Messages (if none is specified it simply publishes in the sender’s thread):
<int:publish-subscribe-channel id="pubsubChannel" task-executor="someExecutor"/>
If you are providing a Resequencer or Aggregator downstream from a PublishSubscribeChannel, then you can set the apply-sequence property on the channel to true.
That will indicate that the channel should set the sequence-size and sequence-number Message headers as well as the correlation id prior to passing the Messages along.
For example, if there are 5 subscribers, the sequence-size would be set to 5, and the Messages would have sequence-number header values ranging from 1 to 5.
<int:publish-subscribe-channel id="pubsubChannel" apply-sequence="true"/>
| Note |
|---|---|
|
The |
To create an ExecutorChannel, add the <dispatcher> sub-element along with a task-executor attribute.
Its value can reference any TaskExecutor within the context.
For example, this enables configuration of a thread-pool for dispatching messages to subscribed handlers.
As mentioned above, this does break the "single-threaded" execution context between sender and receiver so that any active transaction context will not be shared by the invocation of the handler (i.e.
the handler may throw an Exception, but the send invocation has already returned successfully).
<int:channel id="executorChannel">
    <int:dispatcher task-executor="someExecutor"/>
</int:channel>
| Note |
|---|---|
|
The <int:channel id="executorChannelWithoutFailover"> <int:dispatcher task-executor="someExecutor" failover="false"/> </int:channel> |
To create a PriorityChannel, use the <priority-queue/> sub-element:
<int:channel id="priorityChannel">
    <int:priority-queue capacity="20"/>
</int:channel>
By default, the channel will consult the priority header of the message.
However, a custom Comparator reference may be provided instead.
Also, note that the PriorityChannel (like the other types) does support the datatype attribute.
As with the QueueChannel, it also supports a capacity attribute.
The following example demonstrates all of these:
<int:channel id="priorityChannel" datatype="example.Widget">
    <int:priority-queue comparator="widgetComparator"
                    capacity="10"/>
</int:channel>
Since version 4.0, the priority-channel child element supports the message-store option (comparator and capacity are not allowed in that case).
The message store must be a PriorityCapableChannelMessageStore and, in this case.
Implementations of the PriorityCapableChannelMessageStore are currently provided for Redis, JDBC and MongoDB.
See the section called “QueueChannel Configuration” and Section 10.4, “Message Store” for more information.
You can find sample configuration in Section 19.4.3, “Backing Message Channels”.
A RendezvousChannel is created when the queue sub-element is a <rendezvous-queue>.
It does not provide any additional configuration options to those described above, and its queue does not accept any capacity value since it is a 0-capacity direct handoff queue.
<int:channel id="rendezvousChannel"/>
    <int:rendezvous-queue/>
</int:channel>
Any channel can be configured with a "scope" attribute.
<int:channel id="threadLocalChannel" scope="thread"/>
Message channels may also have interceptors as described in Section 4.1.3, “Channel Interceptors”.
The <interceptors/> sub-element can be added within a <channel/> (or the more specific element types).
Provide the ref attribute to reference any Spring-managed object that implements the ChannelInterceptor interface:
<int:channel id="exampleChannel">
    <int:interceptors>
        <ref bean="trafficMonitoringInterceptor"/>
    </int:interceptors>
</int:channel>
In general, it is a good idea to define the interceptor implementations in a separate location since they usually provide common behavior that can be reused across multiple channels.
Channel Interceptors provide a clean and concise way of applying cross-cutting behavior per individual channel. If the same behavior should be applied on multiple channels, configuring the same set of interceptors for each channel would not be the most efficient way. To avoid repeated configuration while also enabling interceptors to apply to multiple channels, Spring Integration provides Global Interceptors. Look at the example below:
<int:channel-interceptor pattern="input*, bar*, foo, !baz*" order="3">
    <bean class="foo.barSampleInterceptor"/>
</int:channel-interceptor>
or
<int:channel-interceptor ref="myInterceptor" pattern="input*, bar*, foo, !baz*" order="3"/>

<bean id="myInterceptor" class="foo.barSampleInterceptor"/>
Each <channel-interceptor/> element allows you to define a global interceptor which will be applied on all channels that match any patterns defined via the pattern attribute.
In the above case the global interceptor will be applied on the foo channel and all other channels that begin with bar or input and not to channel starting with baz (starting with version 5.0).
![[Warning]](images/warning.png) | Warning |
|---|---|
|
The addition of this syntax to the pattern causes one possible (although perhaps unlikely) problem.
If you have a bean |
The order attribute allows you to manage where this interceptor will be injected if there are multiple interceptors on a given channel. For example, channel inputChannel could have individual interceptors configured locally (see below):
<int:channel id="inputChannel">
  <int:interceptors>
    <int:wire-tap channel="logger"/>
  </int:interceptors>
</int:channel>
A reasonable question is how will a global interceptor be injected in relation to other interceptors configured locally or through other global interceptor definitions?
The current implementation provides a very simple mechanism for defining the order of interceptor execution.
A positive number in the order attribute will ensure interceptor injection after any existing interceptors and a negative number will ensure that the interceptor is injected before existing interceptors.
This means that in the above example, the global interceptor will be injected AFTER (since its order is greater than 0) the wire-tap interceptor configured locally.
If there were another global interceptor with a matching pattern, its order would be determined by comparing the values of the order attribute.
To inject a global interceptor BEFORE the existing interceptors, use a negative value for the order attribute.
| Note |
|---|---|
|
Note that both the |
As mentioned above, Spring Integration provides a simple Wire Tap interceptor out of the box.
You can configure a Wire Tap on any channel within an <interceptors/> element.
This is especially useful for debugging, and can be used in conjunction with Spring Integration’s logging Channel Adapter as follows:
<int:channel id="in">
    <int:interceptors>
        <int:wire-tap channel="logger"/>
    </int:interceptors>
</int:channel>

<int:logging-channel-adapter id="logger" level="DEBUG"/>
| Tip |
|---|---|
|
The logging-channel-adapter also accepts an expression attribute so that you can evaluate a SpEL expression against payload and/or headers variables.
Alternatively, to simply log the full Message toString() result, provide a value of "true" for the log-full-message attribute.
That is |
A little more on Wire Tap
One of the common misconceptions about the wire tap and other similar components (Section B.1, “Message Publishing Configuration”) is that they are automatically asynchronous in nature. Wire-tap as a component is not invoked asynchronously be default. Instead, Spring Integration focuses on a single unified approach to configuring asynchronous behavior: the Message Channel. What makes certain parts of the message flow sync or async is the type of Message Channel that has been configured within that flow. That is one of the primary benefits of the Message Channel abstraction. From the inception of the framework, we have always emphasized the need and the value of the Message Channel as a first-class citizen of the framework. It is not just an internal, implicit realization of the EIP pattern, it is fully exposed as a configurable component to the end user. So, the Wire-tap component is ONLY responsible for performing the following 3 tasks:
- intercept a message flow by tapping into a channel (e.g., channelA)
- grab each message
- send the message to another channel (e.g., channelB)
It is essentially a variation of the Bridge, but it is encapsulated within a channel definition (and hence easier to enable and disable without disrupting a flow). Also, unlike the bridge, it basically forks another message flow. Is that flow synchronous or asynchronous? The answer simply depends on the type of Message Channel that channelB is. And, now you know that we have: Direct Channel, Pollable Channel, and Executor Channel as options. The last two do break the thread boundary making communication via such channels asynchronous simply because the dispatching of the message from that channel to its subscribed handlers happens on a different thread than the one used to send the message to that channel. That is what is going to make your wire-tap flow sync or async. It is consistent with other components within the framework (e.g., Message Publisher) and actually brings a level of consistency and simplicity by sparing you from worrying in advance (other than writing thread safe code) whether a particular piece of code should be implemented as sync or async. The actual wiring of two pieces of code (component A and component B) via Message Channel is what makes their collaboration sync or async. You may even want to change from sync to async in the future and Message Channel is what’s going to allow you to do it swiftly without ever touching the code.
One final point regarding the Wire Tap is that, despite the rationale provided above for not being async by default, one should keep in mind it is usually desirable to hand off the Message as soon as possible. Therefore, it would be quite common to use an asynchronous channel option as the wire-tap’s outbound channel. Nonetheless, another reason that we do not enforce asynchronous behavior by default is that you might not want to break a transactional boundary. Perhaps you are using the Wire Tap for auditing purposes, and you DO want the audit Messages to be sent within the original transaction. As an example, you might connect the wire-tap to a JMS outbound-channel-adapter. That way, you get the best of both worlds: 1) the sending of a JMS Message can occur within the transaction while 2) it is still a "fire-and-forget" action thereby preventing any noticeable delay in the main message flow.
| Important |
|---|---|
|
Starting with version 4.0, it is important to avoid circular references when an interceptor (such as |
Starting with version 4.3, the WireTap has additional constructors that take a channelName instead of a
MessageChannel instance.
This can be convenient for Java Configuration and when channel auto-creation logic is being used.
The target MessageChannel bean is resolved from the provided channelName later, on the first interaction with the
interceptor.
| Important |
|---|---|
|
Channel resolution requires a |
This late-binding approach also allows simplification of typical wire-tapping patterns with Java DSL configuration:
@Bean
public PollableChannel myChannel() {
    return MessageChannels.queue()
            .wireTap("loggingFlow.input")
            .get();
}

@Bean
public IntegrationFlow loggingFlow() {
    return f -> f.log();
}
Wire taps can be made conditional, using the selector or selector-expression attributes.
The selector references a MessageSelector bean, which can determine at runtime whether the message should go to the tap channel.
Similarly, the` selector-expression` is a boolean SpEL expression that performs the same purpose - if the expression evaluates to true, the message will be sent to the tap channel.
It is possible to configure a global wire tap as a special case of the the section called “Global Channel Interceptor Configuration”.
Simply configure a top level wire-tap element.
Now, in addition to the normal wire-tap namespace support, the pattern and order attributes are supported and work in exactly the same way as with the channel-interceptor
<int:wire-tap pattern="input*, bar*, foo" order="3" channel="wiretapChannel"/>
| Tip |
|---|---|
|
A global wire tap provides a convenient way to configure a single channel wire tap externally without modifying the existing channel configuration.
Simply set the |
If namespace support is enabled, there are two special channels defined within the application context by default: errorChannel and nullChannel.
The nullChannel acts like /dev/null, simply logging any Message sent to it at DEBUG level and returning immediately.
Any time you face channel resolution errors for a reply that you don’t care about, you can set the affected component’s output-channel attribute to nullChannel (the name nullChannel is reserved within the application context).
The errorChannel is used internally for sending error messages and may be overridden with a custom configuration.
This is discussed in greater detail in Section E.4, “Error Handling”.
See also Section 9.4, “Message Channels” in Java DSL chapter for more information about message channel and interceptors.
When Message Endpoints (Channel Adapters) are connected to channels and instantiated, they produce one of the following 2 instances:
The actual implementation depends on which type of channel these Endpoints are connected to.
A channel adapter connected to a channel that implements the org.springframework.messaging.SubscribableChannel interface will produce an instance of EventDrivenConsumer.
On the other hand, a channel adapter connected to a channel that implements the org.springframework.messaging.PollableChannel interface (e.g. a QueueChannel) will produce an instance of PollingConsumer.
Polling Consumers allow Spring Integration components to actively poll for Messages, rather than to process Messages in an event-driven manner.
They represent a critical cross cutting concern in many messaging scenarios. In Spring Integration, Polling Consumers are based on the pattern with the same name, which is described in the book "Enterprise Integration Patterns" by Gregor Hohpe and Bobby Woolf. You can find a description of the pattern on the book’s website at:
http://www.enterpriseintegrationpatterns.com/PollingConsumer.html
Furthermore, in Spring Integration a second variation of the Polling Consumer pattern exists.
When Inbound Channel Adapters are being used, these adapters are often wrapped by a SourcePollingChannelAdapter.
For example, when retrieving messages from a remote FTP Server location, the adapter described in Section 16.4, “FTP Inbound Channel Adapter” is configured with a poller to retrieve messages periodically.
So, when components are configured with Pollers, the resulting instances are of one of the following types:
This means, Pollers are used in both inbound and outbound messaging scenarios. Here are some use-cases that illustrate the scenarios in which Pollers are used:
- Polling certain external systems such as FTP Servers, Databases, Web Services
- Polling internal (pollable) Message Channels
- Polling internal services (E.g. repeatedly execute methods on a Java class)
| Note |
|---|---|
|
AOP Advice classes can be applied to pollers, in an |
This chapter is meant to only give a high-level overview regarding Polling Consumers and how they fit into the concept of message channels - Section 4.1, “Message Channels” and channel adapters - Section 4.3, “Channel Adapter”. For more in-depth information regarding Messaging Endpoints in general and Polling Consumers in particular, please see Section 8.1, “Message Endpoints”.
Advice objects, in an advice-chain on a poller, advise the whole polling task (message retrieval and processing).
These "around advice" methods do not have access to any context for the poll, just the poll itself.
This is fine for requirements such as making a task transactional, or skipping a poll due to some external condition as discussed above.
What if we wish to take some action depending on the result of the receive part of the poll, or if we want to adjust the poller depending on conditions?
Version 4.2 introduced the AbstractMessageSourceAdvice.
Any Advice objects in the advice-chain that subclass this class, are applied to just the receive operation.
Such classes implement the following methods:
beforeReceive(MessageSource<?> source)
This method is called before the MessageSource.receive() method.
It enables you to examine and or reconfigure the source at this time. Returning false cancels this poll (similar to the PollSkipAdvice mentioned above).
Message<?> afterReceive(Message<?> result, MessageSource<?> source)
This method is called after the receive() method; again, you can reconfigure the source, or take any action perhaps depending on the result (which can be null if there was no message created by the source).
You can even return a different message!
| Advice Chain Ordering |
|---|---|
|
It is important to understand how the advice chain is processed during initialization.
|
This advice is a simple implementation of AbstractMessageSourceAdvice, when used in conjunction with a DynamicPeriodicTrigger, it adjusts the polling frequency depending on whether or not the previous poll resulted in a message or not.
The poller must also have a reference to the same DynamicPeriodicTrigger.
| Important: Async Handoff |
|---|---|
|
This advice modifies the trigger based on the |
This advice allows the selection of one of two triggers based on whether a poll returns a message or not.
Consider a poller that uses a CronTrigger; CronTrigger s are immutable so cannot be altered once constructed.
Consider a use case where we want to use a cron expression to trigger a poll once each hour but, if no message is
received, poll once per minute and, when a message is retrieved, revert to using the cron expression.
The advice (and poller) use a CompoundTrigger for this purpose.
The trigger’s primary trigger can be a CronTrigger.
When the advice detects that no message is received, it adds the secondary trigger to the CompoundTrigger.
When the CompoundTrigger 's nextExecutionTime method is invoked, it will delegate to the secondary trigger, if
present; otherwise the primary trigger.
The poller must also have a reference to the same CompoundTrigger.
The following shows the configuration for the hourly cron expression with fall-back to every minute…
<int:inbound-channel-adapter channel="nullChannel" auto-startup="false">
    <bean class="org.springframework.integration.endpoint.PollerAdviceTests.Source" />
    <int:poller trigger="compoundTrigger">
        <int:advice-chain>
            <bean class="org.springframework.integration.aop.CompoundTriggerAdvice">
                <constructor-arg ref="compoundTrigger"/>
                <constructor-arg ref="secondary"/>
            </bean>
        </int:advice-chain>
    </int:poller>
</int:inbound-channel-adapter>

<bean id="compoundTrigger" class="org.springframework.integration.util.CompoundTrigger">
    <constructor-arg ref="primary" />
</bean>

<bean id="primary" class="org.springframework.scheduling.support.CronTrigger">
    <constructor-arg value="0 0 * * * *" /> <!-- top of every hour -->
</bean>

<bean id="secondary" class="org.springframework.scheduling.support.PeriodicTrigger">
    <constructor-arg value="60000" />
</bean>
| Important: Async Handoff |
|---|---|
|
This advice modifies the trigger based on the |
A Channel Adapter is a Message Endpoint that enables connecting a single sender or receiver to a Message Channel. Spring Integration provides a number of adapters out of the box to support various transports, such as JMS, File, HTTP, Web Services, Mail, and more. Those will be discussed in upcoming chapters of this reference guide. However, this chapter focuses on the simple but flexible Method-invoking Channel Adapter support. There are both inbound and outbound adapters, and each may be configured with XML elements provided in the core namespace. These provide an easy way to extend Spring Integration as long as you have a method that can be invoked as either a source or destination.
An "inbound-channel-adapter" element can invoke any method on a Spring-managed Object and send a non-null return value to a MessageChannel after converting it to a Message.
When the adapter’s subscription is activated, a poller will attempt to receive messages from the source.
The poller will be scheduled with the TaskScheduler according to the provided configuration.
To configure the polling interval or cron expression for an individual channel-adapter, provide a poller element with one of the scheduling attributes, such as fixed-rate or cron.
<int:inbound-channel-adapter ref="source1" method="method1" channel="channel1">
    <int:poller fixed-rate="5000"/>
</int:inbound-channel-adapter>

<int:inbound-channel-adapter ref="source2" method="method2" channel="channel2">
    <int:poller cron="30 * 9-17 * * MON-FRI"/>
</int:channel-adapter>
Also see Section 4.3.3, “Channel Adapter Expressions and Scripts”.
| Note |
|---|---|
|
If no poller is provided, then a single default poller must be registered within the context. See Section 8.1.4, “Endpoint Namespace Support” for more detail. |
| Important: Poller Configuration |
|---|---|
|
Some For example: <int:poller max-messages-per-poll="1" fixed-rate="1000"/> <int:poller max-messages-per-poll="10" fixed-rate="1000"/> In the the first configuration the polling task will be invoked once per poll and during such task (poll) the method (which results in the production of the Message) will be invoked once based on the <int:poller fixed-rate="1000"/> Note there is no However in the SourcePollingChannelAdapter it is a bit different.
The default value for However if you are sure that your method can return null and you need the behavior where you want to poll for as many sources as available per each poll, then you should explicitly set <int:poller max-messages-per-poll="-1" fixed-rate="1000"/> |
An "outbound-channel-adapter" element can also connect a MessageChannel to any POJO consumer method that should be invoked with the payload of Messages sent to that channel.
<int:outbound-channel-adapter channel="channel1" ref="target" method="handle"/>

<beans:bean id="target" class="org.Foo"/>
If the channel being adapted is a PollableChannel, provide a poller sub-element:
<int:outbound-channel-adapter channel="channel2" ref="target" method="handle">
    <int:poller fixed-rate="3000" />
</int:outbound-channel-adapter>

<beans:bean id="target" class="org.Foo"/>
Using a "ref" attribute is generally recommended if the POJO consumer implementation can be reused in other <outbound-channel-adapter> definitions.
However if the consumer implementation is only referenced by a single definition of the <outbound-channel-adapter>, you can define it as inner bean:
<int:outbound-channel-adapter channel="channel" method="handle">
    <beans:bean class="org.Foo"/>
</int:outbound-channel-adapter>
| Note |
|---|---|
|
Using both the "ref" attribute and an inner handler definition in the same |
Any Channel Adapter can be created without a "channel" reference in which case it will implicitly create an instance of DirectChannel.
The created channel’s name will match the "id" attribute of the <inbound-channel-adapter> or <outbound-channel-adapter> element.
Therefore, if the "channel" is not provided, the "id" is required.
Like many other Spring Integration components, the <inbound-channel-adapter> and <outbound-channel-adapter> also provide support for SpEL expression evaluation.
To use SpEL, provide the expression string via the expression attribute instead of providing the ref and method attributes that are used for method-invocation on a bean.
When an Expression is evaluated, it follows the same contract as method-invocation where: the expression for an <inbound-channel-adapter> will generate a message anytime the evaluation result is a non-null value, while the expression for an <outbound-channel-adapter> must be the equivalent of a void returning method invocation.
Starting with Spring Integration 3.0, an <int:inbound-channel-adapter/> can also be configured with a SpEL <expression/> (or even with <script/>) sub-element, for when more sophistication is required than can be achieved with the simple expression attribute.
If you provide a script as a Resource using the location attribute, you can also set the refresh-check-delay allowing the resource to be refreshed periodically.
If you want the script to be checked on each poll, you would need to coordinate this setting with the poller’s trigger:
<int:inbound-channel-adapter ref="source1" method="method1" channel="channel1">
    <int:poller max-messages-per-poll="1" fixed-delay="5000"/>
    <script:script lang="ruby" location="Foo.rb" refresh-check-delay="5000"/>
</int:inbound-channel-adapter>
Also see the cacheSeconds property on the ReloadableResourceBundleExpressionSource when using the <expression/> sub-element.
For more information regarding expressions see Appendix A, Spring Expression Language (SpEL), and for scripts - Section 8.8, “Groovy support” and Section 8.7, “Scripting support”.
| Important |
|---|---|
|
The |
A Messaging Bridge is a relatively trivial endpoint that simply connects two Message Channels or Channel Adapters.
For example, you may want to connect a PollableChannel to a SubscribableChannel so that the subscribing endpoints do not have to worry about any polling configuration.
Instead, the Messaging Bridge provides the polling configuration.
By providing an intermediary poller between two channels, a Messaging Bridge can be used to throttle inbound Messages. The poller’s trigger will determine the rate at which messages arrive on the second channel, and the poller’s "maxMessagesPerPoll" property will enforce a limit on the throughput.
Another valid use for a Messaging Bridge is to connect two different systems. In such a scenario, Spring Integration’s role would be limited to making the connection between these systems and managing a poller if necessary. It is probably more common to have at least a Transformer between the two systems to translate between their formats, and in that case, the channels would be provided as the input-channel and output-channel of a Transformer endpoint. If data format translation is not required, the Messaging Bridge may indeed be sufficient.
The <bridge> element is used to create a Messaging Bridge between two Message Channels or Channel Adapters. Simply provide the "input-channel" and "output-channel" attributes:
<int:bridge input-channel="input" output-channel="output"/>
As mentioned above, a common use case for the Messaging Bridge is to connect a PollableChannel to a SubscribableChannel, and when performing this role, the Messaging Bridge may also serve as a throttler:
<int:bridge input-channel="pollable" output-channel="subscribable">
     <int:poller max-messages-per-poll="10" fixed-rate="5000"/>
 </int:bridge>
Connecting Channel Adapters is just as easy. Here is a simple echo example between the "stdin" and "stdout" adapters from Spring Integration’s "stream" namespace.
<int-stream:stdin-channel-adapter id="stdin"/>

 <int-stream:stdout-channel-adapter id="stdout"/>

 <int:bridge id="echo" input-channel="stdin" output-channel="stdout"/>
Of course, the configuration would be similar for other (potentially more useful) Channel Adapter bridges, such as File to JMS, or Mail to File. The various Channel Adapters will be discussed in upcoming chapters.
| Note |
|---|---|
|
If no output-channel is defined on a bridge, the reply channel provided by the inbound Message will be used, if available. If neither output or reply channel is available, an Exception will be thrown. |
@Bean
public PollableChannel polled() {
    return new QueueChannel();
}

@Bean
@BridgeFrom(value = "polled", poller = @Poller(fixedDelay = "5000", maxMessagesPerPoll = "10"))
public SubscribableChannel direct() {
    return new DirectChannel();
}
or
@Bean
@BridgeTo(value = "direct", poller = @Poller(fixedDelay = "5000", maxMessagesPerPoll = "10"))
public PollableChannel polled() {
    return new QueueChannel();
}

@Bean
public SubscribableChannel direct() {
    return new DirectChannel();
}
Or, using a BridgeHandler:
@Bean
@ServiceActivator(inputChannel = "polled",
        poller = @Poller(fixedRate = "5000", maxMessagesPerPoll = "10"))
public BridgeHandler bridge() {
    BridgeHandler bridge = new BridgeHandler();
    bridge.setOutputChannelName("direct");
    return bridge;
}
The Spring Integration Message is a generic container for data.
Any object can be provided as the payload, and each Message also includes headers containing user-extensible properties as key-value pairs.
Here is the definition of the Message interface:
public interface Message<T> {

    T getPayload();

    MessageHeaders getHeaders();

}
The Message is obviously a very important part of the API.
By encapsulating the data in a generic wrapper, the messaging system can pass it around without any knowledge of the data’s type.
As an application evolves to support new types, or when the types themselves are modified and/or extended, the messaging system will not be affected by such changes.
On the other hand, when some component in the messaging system does require access to information about the Message, such metadata can typically be stored to and retrieved from the metadata in the Message Headers.
Just as Spring Integration allows any Object to be used as the payload of a Message, it also supports any Object types as header values.
In fact, the MessageHeaders class implements the java.util.Map interface:
public final class MessageHeaders implements Map<String, Object>, Serializable {
  ...
}
| Note |
|---|---|
|
Even though the MessageHeaders implements Map, it is effectively a read-only implementation.
Any attempt to put a value in the Map will result in an |
As an implementation of Map, the headers can obviously be retrieved by calling get(..) with the name of the header.
Alternatively, you can provide the expected Class as an additional parameter.
Even better, when retrieving one of the pre-defined values, convenient getters are available.
Here is an example of each of these three options:
 Object someValue = message.getHeaders().get("someKey");

 CustomerId customerId = message.getHeaders().get("customerId", CustomerId.class);

 Long timestamp = message.getHeaders().getTimestamp();
The following Message headers are pre-defined:
Table 5.1. Pre-defined Message Headers
| Header Name | Header Type | Usage |
|---|---|---|
MessageHeaders.ID | java.util.UUID | An identifier for this message instance. Changes each time a message is mutated. |
MessageHeaders.
TIMESTAMP | java.lang.Long | The time the message was created. Changes each time a message is mutated. |
MessageHeaders.
REPLY_CHANNEL | java.lang.Object (String or MessageChannel) | A channel to which a reply (if any) will be sent when no explicit output channel is configured and there is no |
MessageHeaders.
ERROR_CHANNEL | java.lang.Object (String or MessageChannel) | A channel to which errors will be sent.
If the value is a |
Many inbound and outbound adapter implementations will also provide and/or expect certain headers, and additional user-defined headers can also be configured.
Constants for these headers can be found in those modules where such headers exist, for example AmqpHeaders, JmsHeaders etc.
Starting with Spring Framework 4.0 and Spring Integration 4.0, the core Messaging abstraction has been moved to the spring-messaging module and the new MessageHeaderAccessor API has been introduced to provide additional abstraction over Messaging implementations.
All (core) Spring Integration specific Message Headers constants are now declared in the IntegrationMessageHeaderAccessor class:
Table 5.2. Pre-defined Message Headers
| Header Name | Header Type | Usage |
|---|---|---|
IntegrationMessageHeaderAccessor.
CORRELATION_ID | java.lang.Object | Used to correlate two or more messages. |
IntegrationMessageHeaderAccessor.
SEQUENCE_NUMBER | java.lang.Integer | Usually a sequence number with a group of messages with a |
IntegrationMessageHeaderAccessor.
SEQUENCE_SIZE | java.lang.Integer | The number of messages within a group of correlated messages. |
IntegrationMessageHeaderAccessor.
EXPIRATION_DATE | java.lang.Long | Indicates when a message is expired.
Not used by the framework directly but can be set with a header enricher and used in a |
IntegrationMessageHeaderAccessor.
PRIORITY | java.lang.Integer | Message priority; for example within a |
IntegrationMessageHeaderAccessor.
DUPLICATE_MESSAGE | java.lang.Boolean | True if a message was detected as a duplicate by an idempotent receiver interceptor. See Section 8.9.11, “Idempotent Receiver Enterprise Integration Pattern”. |
Convenient typed getters for some of these headers are provided on the IntegrationMessageHeaderAccessor class:
IntegrationMessageHeaderAccessor accessor = new IntegrationMessageHeaderAccessor(message);
int sequenceNumber = accessor.getSequenceNumber();
Object correlationId = accessor.getCorrelationId();
...
The following headers also appear in the IntegrationMessageHeaderAccessor but are generally not used by user code; their inclusion here is for completeness:
Table 5.3. Pre-defined Message Headers
| Header Name | Header Type | Usage |
|---|---|---|
IntegrationMessageHeaderAccessor.
SEQUENCE_DETAILS | java.util.List< List<Object>> | A stack of correlation data used when nested correlation is needed (e.g.
|
IntegrationMessageHeaderAccessor.
ROUTING_SLIP | java.util.Map< List<Object>, Integer> |
When a message transitions through an application, each time it is mutated (e.g.
by a transformer) a new message id is assigned.
The message id is a UUID.
Beginning with Spring Integration 3.0, the default strategy used for id generation is more efficient than the previous java.util.UUID.randomUUID() implementation.
It uses simple random numbers based on a secure random seed, instead of creating a secure random number each time.
A different UUID generation strategy can be selected by declaring a bean that implements org.springframework.util.IdGenerator in the application context.
| Important |
|---|---|
|
Only one UUID generation strategy can be used in a classloader.
This means that if two or more application contexts are running in the same classloader, they will share the same strategy.
If one of the contexts changes the strategy, it will be used by all contexts.
If two or more contexts in the same classloader declare a bean of type |
In addition to the default strategy, two additional IdGenerators are provided; org.springframework.util.JdkIdGenerator uses the previous UUID.randomUUID() mechanism; o.s.i.support.IdGenerators.SimpleIncrementingIdGenerator can be used in cases where a UUID is not really needed and a simple incrementing value is sufficient.
The MessageHeaders.ID and MessageHeaders.TIMESTAMP are read-only headers and they cannot be overridden.
Since version 4.3.2, the MessageBuilder provides the readOnlyHeaders(String... readOnlyHeaders) API to customize a list of headers which should not be copied from an upstream Message.
Just the MessageHeaders.ID and MessageHeaders.TIMESTAMP are read only by default.
The global spring.integration.readOnly.headers property (see Section E.5, “Global Properties”) is provided to customize DefaultMessageBuilderFactory for Framework components.
This can be useful when you would like do not populate some out-of-the-box headers, like contentType by the ObjectToJsonTransformer (see the section called “JSON Transformers”).
When you try to build a new message using MessageBuilder, this kind of headers are ignored and particular INFO message is emitted to logs.
Starting with version 5.0, Messaging Gateway, Header Enricher, Content Enricher and Header Filter don’t allow to configure MessageHeaders.ID and MessageHeaders.TIMESTAMP header names when DefaultMessageBuilderFactory is used and they throw BeanInitializationException.
When messages are processed (and modified) by message-producing endpoints (such as a service activator), in general, inbound headers are propagated to the outbound message. One exception to this is a transformer, when a complete message is returned to the framework; in that case, the user code is responsible for the entire outbound message. When a transformer just returns the payload; the inbound headers are propagated. Also, a header is only propagated if it does not already exist in the outbound message, allowing user code to change header values as needed.
Starting with version 4.3.10, you can configure message handlers (that modify messages and produce output) to suppress the propagation of specific headers.
Call the setNotPropagatedHeaders() or addNotPropagatedHeaders() methods on the MessageProducingMessageHandler abstract class, to configure the header(s) you don’t want to be copied.
You can also globally suppress propagation of specific message headers by setting the readOnlyHeaders property in META-INF/spring.integration.properties to a comma-delimited list of headers.
Starting with version 5.0, the setNotPropagatedHeaders() implementation on the AbstractMessageProducingHandler applies the simple patterns (xxx*, *xxx, *xxx* or xxx*yyy) to allow filtering headers with a common suffix or prefix.
See PatternMatchUtils JavaDocs for more information.
When one of the patterns is * (asterisk), no headers are propagated; all other patterns are ignored.
In this case the Service Activator behaves the same way as Transformer and any required headers must be supplied in the Message returned from the service method.
The option notPropagatedHeaders() is available in the ConsumerEndpointSpec for Java DSL, as well as for XML configuration of the <service-activator> component as a not-propagated-headers attribute.
The base implementation of the Message interface is GenericMessage<T>, and it provides two constructors:
new GenericMessage<T>(T payload);

new GenericMessage<T>(T payload, Map<String, Object> headers)
When a Message is created, a random unique id will be generated. The constructor that accepts a Map of headers will copy the provided headers to the newly created Message.
There is also a convenient implementation of Message designed to communicate error conditions.
This implementation takes Throwable object as its payload:
ErrorMessage message = new ErrorMessage(someThrowable);

Throwable t = message.getPayload();
Notice that this implementation takes advantage of the fact that the GenericMessage base class is parameterized.
Therefore, as shown in both examples, no casting is necessary when retrieving the Message payload Object.
You may notice that the Message interface defines retrieval methods for its payload and headers but no setters.
The reason for this is that a Message cannot be modified after its initial creation.
Therefore, when a Message instance is sent to multiple consumers (e.g.
through a Publish Subscribe Channel), if one of those consumers needs to send a reply with a different payload type, it will need to create a new Message.
As a result, the other consumers are not affected by those changes.
Keep in mind, that multiple consumers may access the same payload instance or header value, and whether such an instance is itself immutable is a decision left to the developer.
In other words, the contract for Messages is similar to that of an unmodifiable Collection, and the MessageHeaders' map further exemplifies that; even though the MessageHeaders class implements java.util.Map, any attempt to invoke a put operation (or remove or clear) on the MessageHeaders will result in an UnsupportedOperationException.
Rather than requiring the creation and population of a Map to pass into the GenericMessage constructor, Spring Integration does provide a far more convenient way to construct Messages: MessageBuilder.
The MessageBuilder provides two factory methods for creating Messages from either an existing Message or with a payload Object.
When building from an existing Message, the headers and payload of that Message will be copied to the new Message:
Message<String> message1 = MessageBuilder.withPayload("test")
        .setHeader("foo", "bar")
        .build();

Message<String> message2 = MessageBuilder.fromMessage(message1).build();

assertEquals("test", message2.getPayload());
assertEquals("bar", message2.getHeaders().get("foo"));
If you need to create a Message with a new payload but still want to copy the headers from an existing Message, you can use one of the copy methods.
Message<String> message3 = MessageBuilder.withPayload("test3")
        .copyHeaders(message1.getHeaders())
        .build();

Message<String> message4 = MessageBuilder.withPayload("test4")
        .setHeader("foo", 123)
        .copyHeadersIfAbsent(message1.getHeaders())
        .build();

assertEquals("bar", message3.getHeaders().get("foo"));
assertEquals(123, message4.getHeaders().get("foo"));
Notice that the copyHeadersIfAbsent does not overwrite existing values.
Also, in the second example above, you can see how to set any user-defined header with setHeader.
Finally, there are set methods available for the predefined headers as well as a non-destructive method for setting any header (MessageHeaders also defines constants for the pre-defined header names).
Message<Integer> importantMessage = MessageBuilder.withPayload(99)
        .setPriority(5)
        .build();

assertEquals(5, importantMessage.getHeaders().getPriority());

Message<Integer> lessImportantMessage = MessageBuilder.fromMessage(importantMessage)
        .setHeaderIfAbsent(IntegrationMessageHeaderAccessor.PRIORITY, 2)
        .build();

assertEquals(2, lessImportantMessage.getHeaders().getPriority());
The priority header is only considered when using a PriorityChannel (as described in the next chapter).
It is defined as java.lang.Integer.
Routers are a crucial element in many messaging architectures. They consume Messages from a Message Channel and forward each consumed message to one or more different Message Channel depending on a set of conditions.
Spring Integration provides the following routers out-of-the-box:
Router implementations share many configuration parameters. Yet, certain differences exist between routers. Furthermore, the availability of configuration parameters depends on whether Routers are used inside or outside of a chain. In order to provide a quick overview, all available attributes are listed in the 2 tables below.
Table 6.1. Routers Outside of a Chain
| Attribute | router | header value router | xpath router | payload type router | recipient list router | exception type router |
|---|---|---|---|---|---|---|
apply-sequence |  | | | | | |
default-output-channel | | | | | | |
resolution-required | | | | | | |
ignore-send-failures | | | | | | |
timeout | | | | | | |
id | | | | | | |
auto-startup | | | | | | |
input-channel | | | | | | |
order | | | | | | |
method | | |||||
ref | | |||||
expression | | |||||
header-name | | |||||
evaluate-as-string | | |||||
xpath-expression-ref | | |||||
converter | |
Table 6.2. Routers Inside of a Chain
| Attribute | router | header value router | xpath router | payload type router | recipient list router | exception type router |
|---|---|---|---|---|---|---|
apply-sequence | | | | | | |
default-output-channel | | | | | | |
resolution-required | | | | | | |
ignore-send-failures | | | | | | |
timeout | | | | | | |
id | ||||||
auto-startup | ||||||
input-channel | ||||||
order | ||||||
method | | |||||
ref | | |||||
expression | | |||||
header-name | | |||||
evaluate-as-string | | |||||
xpath-expression-ref | | |||||
converter | |
| Important |
|---|---|
|
Router parameters have been more standardized across all router implementations with Spring Integration 2.1. Consequently, there are a few minor changes that leave the possibility of breaking older Spring Integration based applications. Since Spring Integration 2.1 the Prior to these changes, the If you do desire to drop messages silently simply set |
The following parameters are valid for all routers inside and outside of chains.
- apply-sequence
- This attribute specifies whether sequence number and size headers should be added to each Message. This optional attribute defaults to false.
- default-output-channel
-
If set, this attribute provides a reference to the channel, where Messages should be sent, if channel resolution fails to return any channels.
If no default output channel is provided, the router will throw an Exception.
If you would like to silently drop those messages instead, add the
nullChannelas the default output channel attribute value.
| Note |
|---|---|
|
A Message will only be sent to the |
- resolution-required
-
If true this attribute specifies that channel names must always be successfully resolved to channel instances that exist.
If set to true, a
MessagingExceptionwill be raised, in case the channel cannot be resolved. Setting this attribute to false, will cause any unresovable channels to be ignored. This optional attribute will, if not explicitly set, default to true.
| Note |
|---|---|
|
A Message will only be sent to the |
- ignore-send-failures
-
If set to true, failures to send to a message channel will be ignored.
If set to false, a
MessageDeliveryExceptionwill be thrown instead, and if the router resolves more than one channel, any subsequent channels will not receive the message.
The exact behavior of this attribute depends on the type of the Channel messages are sent to.
For example, when using direct channels (single threaded), send-failures can be caused by exceptions thrown by components much further down-stream.
However, when sending messages to a simple queue channel (asynchronous) the likelihood of an exception to be thrown is rather remote.
| Note |
|---|---|
|
While most routers will route to a single channel, they are allowed to return more than one channel name.
The |
This attribute defaults to false.
- timeout
-
The
timeoutattribute specifies the maximum amount of time in milliseconds to wait, when sending Messages to the target Message Channels. By default the send operation will block indefinitely.
The following parameters are valid only across all top-level routers that are ourside of chains.
- id
- Identifies the underlying Spring bean definition which in case of Routers is an instance of EventDrivenConsumer or PollingConsumer depending on whether the Router’s input-channel is a SubscribableChannel or PollableChannel, respectively. This is an optional attribute.
- auto-startup
-
This
Lifecycleattribute signaled if this component should be started during startup of the Application Context. This optional attribute defaults to true. - input-channel
- The receiving Message channel of this endpoint.
- order
- This attribute defines the order for invocation when this endpoint is connected as a subscriber to a channel. This is particularly relevant when that channel is using a failover dispatching strategy. It has no effect when this endpoint itself is a Polling Consumer for a channel with a queue.
Since content-based routing often requires some domain-specific logic, most use-cases will require Spring Integration’s options for delegating to POJOs using the XML namespace support and/or Annotations. Both of these are discussed below, but first we present a couple implementations that are available out-of-the-box since they fulfill common requirements.
A PayloadTypeRouter will send Messages to the channel as defined by payload-type mappings.
<bean id="payloadTypeRouter"
      class="org.springframework.integration.router.PayloadTypeRouter">
    <property name="channelMapping">
        <map>
            <entry key="java.lang.String" value-ref="stringChannel"/>
            <entry key="java.lang.Integer" value-ref="integerChannel"/>
        </map>
    </property>
</bean>
Configuration of the PayloadTypeRouter is also supported via the namespace provided by Spring Integration (see Section E.2, “Namespace Support”), which essentially simplifies configuration by combining the <router/> configuration and its corresponding implementation defined using a <bean/> element into a single and more concise configuration element.
The example below demonstrates a PayloadTypeRouter configuration which is equivalent to the one above using the namespace support:
<int:payload-type-router input-channel="routingChannel">
    <int:mapping type="java.lang.String" channel="stringChannel" />
    <int:mapping type="java.lang.Integer" channel="integerChannel" />
</int:payload-type-router>
The equivalent router, using Java configuration:
@ServiceActivator(inputChannel = "routingChannel")
@Bean
public PayloadTypeRouter router() {
    PayloadTypeRouter router = new PayloadTypeRouter();
    router.setChannelMapping(String.class.getName(), "stringChannel");
    router.setChannelMapping(Integer.class.getName(), "integerChannel");
    return router;
}
When using the Java DSL, there are two options; 1) define the router object as above…
@Bean
public IntegrationFlow routerFlow1() {
    return IntegrationFlows.from("routingChannel")
            .route(router())
            .get();
}

public PayloadTypeRouter router() {
    PayloadTypeRouter router = new PayloadTypeRouter();
    router.setChannelMapping(String.class.getName(), "stringChannel");
    router.setChannelMapping(Integer.class.getName(), "integerChannel");
    return router;
}
Note that the router can be, but doesn’t have to be, a @Bean - the flow will register it if it is not.
2) define the routing function within the DSL flow itself…
@Bean
public IntegrationFlow routerFlow2() {
    return IntegrationFlows.from("routingChannel")
            .<Object, Class<?>>route(Object::getClass, m -> m
                    .channelMapping(String.class, "stringChannel")
                    .channelMapping(Integer.class, "integerChannel"))
            .get();
}
A HeaderValueRouter will send Messages to the channel based on the individual header value mappings.
When a HeaderValueRouter is created it is initialized with the name of the header to be evaluated.
The value of the header could be one of two things:
1. Arbitrary value
2. Channel name
If arbitrary then additional mappings for these header values to channel names is required, otherwise no additional configuration is needed.
Spring Integration provides a simple namespace-based XML configuration to configure a HeaderValueRouter.
The example below demonstrates two types of namespace-based configuration for the HeaderValueRouter.
1. Configuration where mapping of header values to channels is required
<int:header-value-router input-channel="routingChannel" header-name="testHeader">
    <int:mapping value="someHeaderValue" channel="channelA" />
    <int:mapping value="someOtherHeaderValue" channel="channelB" />
</int:header-value-router>
During the resolution process this router may encounter channel resolution failures, causing an exception.
If you want to suppress such exceptions and send unresolved messages to the default output channel (identified with the default-output-channel attribute) set resolution-required to false.
Normally, messages for which the header value is not explicitly mapped to a channel will be sent to the default-output-channel.
However, in cases where the header value is mapped to a channel name but the channel cannot be resolved, setting the resolution-required attribute to false will result in routing such messages to the default-output-channel.
| Important |
|---|---|
|
With Spring Integration 2.1 the attribute was changed from |
The equivalent router, using Java configuration:
@ServiceActivator(inputChannel = "routingChannel")
@Bean
public HeaderValueRouter router() {
    HeaderValueRouter router = new HeaderValueRouter("testHeader");
    router.setChannelMapping("someHeaderValue", "channelA");
    router.setChannelMapping("someOtherHeaderValue", "channelB");
    return router;
}
When using the Java DSL, there are two options; 1) define the router object as above…
@Bean
public IntegrationFlow routerFlow1() {
    return IntegrationFlows.from("routingChannel")
            .route(router())
            .get();
}

public HeaderValueRouter router() {
    HeaderValueRouter router = new HeaderValueRouter("testHeader");
    router.setChannelMapping("someHeaderValue", "channelA");
    router.setChannelMapping("someOtherHeaderValue", "channelB");
    return router;
}
Note that the router can be, but doesn’t have to be, a @Bean - the flow will register it if it is not.
2) define the routing function within the DSL flow itself…
@Bean
public IntegrationFlow routerFlow2() {
    return IntegrationFlows.from("routingChannel")
            .<Message<?>, String>route(m -> m.getHeaders().get("testHeader", String.class), m -> m
                    .channelMapping("someHeaderValue", "channelA")
                    .channelMapping("someOtherHeaderValue", "channelB"),
                e -> e.id("headerValueRouter"))
            .get();
}
2. Configuration where mapping of header values to channel names is not required since header values themselves represent channel names
<int:header-value-router input-channel="routingChannel" header-name="testHeader"/>
| Note |
|---|---|
|
Since Spring Integration 2.1 the behavior of resolving channels is more explicit.
For example, if you ommit the Basically, by default the Router must be able to route messages successfully to at least one channel.
If you really want to drop messages, you must also have |
A RecipientListRouter will send each received Message to a statically defined list of Message Channels:
<bean id="recipientListRouter"
      class="org.springframework.integration.router.RecipientListRouter">
    <property name="channels">
        <list>
            <ref bean="channel1"/>
            <ref bean="channel2"/>
            <ref bean="channel3"/>
        </list>
    </property>
</bean>
Spring Integration also provides namespace support for the RecipientListRouter configuration (see Section E.2, “Namespace Support”) as the example below demonstrates.
<int:recipient-list-router id="customRouter" input-channel="routingChannel"
        timeout="1234"
        ignore-send-failures="true"
        apply-sequence="true">
  <int:recipient channel="channel1"/>
  <int:recipient channel="channel2"/>
</int:recipient-list-router>
The equivalent router, using Java configuration:
@ServiceActivator(inputChannel = "routingChannel")
@Bean
public RecipientListRouter router() {
    RecipientListRouter router = new RecipientListRouter();
    router.setSendTimeout(1_234L);
    router.setIgnoreSendFailures(true);
    router.setApplySequence(true);
    router.addRecipient("channel1");
    router.addRecipient("channel2");
    router.addRecipient("channel3");
    return router;
}
The equivalent router, using the Java DSL:
@Bean
public IntegrationFlow routerFlow() {
    return IntegrationFlows.from("routingChannel")
            .routeToRecipients(r -> r
                    .applySequence(true)
                    .ignoreSendFailures(true)
                    .recipient("channel1")
                    .recipient("channel2")
                    .recipient("channel3")
                    .sendTimeout(1_234L))
            .get();
}
| Note |
|---|---|
|
The apply-sequence flag here has the same effect as it does for a publish-subscribe-channel, and like a publish-subscribe-channel, it is disabled by default on the recipient-list-router. Refer to the section called “PublishSubscribeChannel Configuration” for more information. |
Another convenient option when configuring a RecipientListRouter is to use Spring Expression Language (SpEL) support as selectors for individual recipient channels.
This is similar to using a Filter at the beginning of chain to act as a "Selective Consumer".
However, in this case, it’s all combined rather concisely into the router’s configuration.
<int:recipient-list-router id="customRouter" input-channel="routingChannel">
    <int:recipient channel="channel1" selector-expression="payload.equals('foo')"/>
    <int:recipient channel="channel2" selector-expression="headers.containsKey('bar')"/>
</int:recipient-list-router>
In the above configuration a SpEL expression identified by the selector-expression attribute will be evaluated to determine if this recipient should be included in the recipient list for a given input Message.
The evaluation result of the expression must be a boolean.
If this attribute is not defined, the channel will always be among the list of recipients.
Starting with version 4.1, the RecipientListRouter provides several operation to manipulate with recipients dynamically at runtime.
These management operations are presented by RecipientListRouterManagement @ManagedResource.
They are available using Section 10.6, “Control Bus” as well as via JMX:
<control-bus input-channel="controlBus"/>

<recipient-list-router id="simpleRouter" input-channel="routingChannelA">
   <recipient channel="channel1"/>
</recipient-list-router>

<channel id="channel2"/>
messagingTemplate.convertAndSend(controlBus, "@'simpleRouter.handler'.addRecipient('channel2')");
From the application start up the simpleRouter will have only one channel1 recipient.
But after the addRecipient command above the new channel2 recipient will be added.
It is a "registering an interest in something that is part of the Message" use case, when we may be interested in messages from the router at some time period, so we are subscribing to the the recipient-list-router and in some point decide to unsubscribe our interest.
Having the runtime management operation for the <recipient-list-router>, it can be configured without any <recipient> from the start.
In this case the behaviour of RecipientListRouter is the same, when there is no one matching recipient for the message: if defaultOutputChannel is configured, the message will be sent there, otherwise the MessageDeliveryException is thrown.
The XPath Router is part of the XML Module. See Section 37.6, “Routing XML Messages Using XPath”.
Spring Integration also provides a special type-based router called ErrorMessageExceptionTypeRouter for routing Error Messages (Messages whose payload is a Throwable instance).
ErrorMessageExceptionTypeRouter is very similar to the PayloadTypeRouter.
In fact they are almost identical.
The only difference is that while PayloadTypeRouter navigates the instance hierarchy of a payload instance (e.g., payload.getClass().getSuperclass()) to find the most specific type/channel mappings,
the ErrorMessageExceptionTypeRouter navigates the hierarchy of exception causes (e.g., payload.getCause())
to find the most specific Throwable type/channel mappings and uses mappingClass.isInstance(cause) to match the
cause to the class or any super class.
| Note |
|---|---|
|
Since version 4.3 the |
Below is a sample configuration for ErrorMessageExceptionTypeRouter.
<int:exception-type-router input-channel="inputChannel"
                           default-output-channel="defaultChannel">
    <int:mapping exception-type="java.lang.IllegalArgumentException"
                 channel="illegalChannel"/>
    <int:mapping exception-type="java.lang.NullPointerException"
                 channel="npeChannel"/>
</int:exception-type-router>

<int:channel id="illegalChannel" />
<int:channel id="npeChannel" />
The "router" element provides a simple way to connect a router to an input channel and also accepts the optional default-output-channel attribute.
The ref attribute references the bean name of a custom Router implementation (extending AbstractMessageRouter):
<int:router ref="payloadTypeRouter" input-channel="input1"
            default-output-channel="defaultOutput1"/>

<int:router ref="recipientListRouter" input-channel="input2"
            default-output-channel="defaultOutput2"/>

<int:router ref="customRouter" input-channel="input3"
            default-output-channel="defaultOutput3"/>

<beans:bean id="customRouterBean" class="org.foo.MyCustomRouter"/>
Alternatively, ref may point to a simple POJO that contains the @Router annotation (see below), or the ref may be combined with an explicit method name.
Specifying a method applies the same behavior described in the @Router annotation section below.
<int:router input-channel="input" ref="somePojo" method="someMethod"/>
Using a ref attribute is generally recommended if the custom router implementation is referenced in other <router> definitions.
However if the custom router implementation should be scoped to a single definition of the <router>, you may provide an inner bean definition:
<int:router method="someMethod" input-channel="input3"
            default-output-channel="defaultOutput3">
    <beans:bean class="org.foo.MyCustomRouter"/>
</int:router>
| Note |
|---|---|
|
Using both the |
| Important |
|---|---|
|
If the "ref" attribute references a bean that extends |
The equivalent router, using Java Configuration:
@Bean
@Router(inputChannel = "routingChannel")
public AbstractMessageRouter myCustomRouter() {
    return new AbstractMessageRouter() {

        @Override
        protected Collection<MessageChannel> determineTargetChannels(Message<?> message) {
            return // determine channel(s) for message
        }

    };
}
The equivalent router, using the Java DSL:
@Bean
public IntegrationFlow routerFlow() {
    return IntegrationFlows.from("routingChannel")
            .route(myCustomRouter())
            .get();
}

public AbstractMessageRouter myCustomRouter() {
    return new AbstractMessageRouter() {

        @Override
        protected Collection<MessageChannel> determineTargetChannels(Message<?> message) {
            return // determine channel(s) for message
        }

    };
}
or, if you can route on just some message payload data:
@Bean
public IntegrationFlow routerFlow() {
    return IntegrationFlows.from("routingChannel")
            .route(String.class, p -> p.contains("foo") ? "fooChannel" : "barChannel")
            .get();
}
Routers and the Spring Expression Language (SpEL)
Sometimes the routing logic may be simple and writing a separate class for it and configuring it as a bean may seem like overkill. As of Spring Integration 2.0 we offer an alternative where you can now use SpEL to implement simple computations that previously required a custom POJO router.
| Note |
|---|---|
|
For more information about the Spring Expression Language, please refer to the respective chapter in the Spring Framework Reference Documentation at: |
Generally a SpEL expression is evaluated and the result is mapped to a channel:
<int:router input-channel="inChannel" expression="payload.paymentType">
    <int:mapping value="CASH" channel="cashPaymentChannel"/>
    <int:mapping value="CREDIT" channel="authorizePaymentChannel"/>
    <int:mapping value="DEBIT" channel="authorizePaymentChannel"/>
</int:router>
The equivalent router, using Java Configuration:
@Router(inputChannel = "routingChannel")
@Bean
public ExpressionEvaluatingRouter router() {
    ExpressionEvaluatingRouter router = new ExpressionEvaluatingRouter("payload.paymentType");
    router.setChannelMapping("CASH", "cashPaymentChannel");
    router.setChannelMapping("CREDIT", "authorizePaymentChannel");
    router.setChannelMapping("DEBIT", "authorizePaymentChannel");
    return router;
}
The equivalent router, using the Java DSL:
@Bean
public IntegrationFlow routerFlow() {
    return IntegrationFlows.from("routingChannel")
        .route("payload.paymentType", r -> r
            .channelMapping("CASH", "cashPaymentChannel")
            .channelMapping("CREDIT", "authorizePaymentChannel")
            .channelMapping("DEBIT", "authorizePaymentChannel"))
        .get();
}
To simplify things even more, the SpEL expression may evaluate to a channel name:
<int:router input-channel="inChannel" expression="payload + 'Channel'"/>
In the above configuration the result channel will be computed by the SpEL expression which simply concatenates the value of the payload with the literal String Channel.
Another value of SpEL for configuring routers is that an expression can actually return a Collection, effectively making every <router> a Recipient List Router.
Whenever the expression returns multiple channel values the Message will be forwarded to each channel.
<int:router input-channel="inChannel" expression="headers.channels"/>
In the above configuration, if the Message includes a header with the name channels the value of which is a List of channel names then the Message will be sent to each channel in the list.
You may also find Collection Projection and Collection Selection expressions useful to select multiple channels.
For further information, please see:
When using @Router to annotate a method, the method may return either a MessageChannel or String type.
In the latter case, the endpoint will resolve the channel name as it does for the default output channel.
Additionally, the method may return either a single value or a collection.
If a collection is returned, the reply message will be sent to multiple channels.
To summarize, the following method signatures are all valid.
@Router
public MessageChannel route(Message message) {...}

@Router
public List<MessageChannel> route(Message message) {...}

@Router
public String route(Foo payload) {...}

@Router
public List<String> route(Foo payload) {...}
In addition to payload-based routing, a Message may be routed based on metadata available within the message header as either a property or attribute.
In this case, a method annotated with @Router may include a parameter annotated with @Header which is mapped to a header value as illustrated below and documented in Section E.6, “Annotation Support”.
@Router
public List<String> route(@Header("orderStatus") OrderStatus status)
| Note |
|---|---|
|
For routing of XML-based Messages, including XPath support, see Chapter 37, XML Support - Dealing with XML Payloads. |
Also see Section 9.9, “Message Routers” in Java DSL chapter for more information about routers configuration.
So as you can see, Spring Integration provides quite a few different router configurations for common content-based routing use cases as well as the option of implementing custom routers as POJOs.
For example PayloadTypeRouter provides a simple way to configure a router which computes channels based on the payload type of the incoming Message while HeaderValueRouter provides the same convenience in configuring a router which computes channels by evaluating the value of a particular Message Header.
There are also expression-based (SpEL) routers where the channel is determined based on evaluating an expression.
Thus, these type of routers exhibit some dynamic characteristics.
However these routers all require static configuration. Even in the case of expression-based routers, the expression itself is defined as part of the router configuration which means that_the same expression operating on the same value will always result in the computation of the same channel_. This is acceptable in most cases since such routes are well defined and therefore predictable. But there are times when we need to change router configurations dynamically so message flows may be routed to a different channel.
Example:
You might want to bring down some part of your system for maintenance and temporarily re-reroute messages to a different message flow.
Or you may want to introduce more granularity to your message flow by adding another route to handle a more concrete type of java.lang.Number (in the case of PayloadTypeRouter).
Unfortunately with static router configuration to accomplish this, you would have to bring down your entire application, change the configuration of the router (change routes) and bring it back up. This is obviously not the solution.
The Dynamic Router pattern describes the mechanisms by which one can change/configure routers dynamically without bringing down the system or individual routers.
Before we get into the specifics of how this is accomplished in Spring Integration, let’s quickly summarize the typical flow of the router, which consists of 3 simple steps:
-
Step 1 - Compute
channel identifierwhich is a value calculated by the router once it receives the Message. Typically it is aStringor and instance of the actualMessageChannel. -
Step 2 - Resolve
channel identifiertochannel name. We’ll describe specifics of this process in a moment. -
Step 3 - Resolve
channel nameto the actualMessageChannel
There is not much that can be done with regard to dynamic routing if Step 1 results in the actual instance of the MessageChannel, simply because the MessageChannel is the final product of any router’s job.
However, if Step 1 results in a channel identifier that is not an instance of MessageChannel, then there are quite a few possibilities to influence the process of deriving the Message Channel.
Lets look at couple of the examples in the context of the 3 steps mentioned above:
Payload Type Router
<int:payload-type-router input-channel="routingChannel">
    <int:mapping type="java.lang.String"  channel="channel1" />
    <int:mapping type="java.lang.Integer" channel="channel2" />
</int:payload-type-router>
Within the context of the Payload Type Router the 3 steps mentioned above would be realized as:
-
Step 1 - Compute
channel identifierwhich is the fully qualified name of the payload type (e.g., java.lang.String). -
Step 2 - Resolve
channel identifiertochannel namewhere the result of the previous step is used to select the appropriate value from the payload type mapping defined viamappingelement. -
Step 3 - Resolve
channel nameto the actual instance of theMessageChannelas a reference to a bean within the Application Context (which is hopefully aMessageChannel) identified by the result of the previous step.
In other words, each step feeds the next step until the process completes.
Header Value Router
<int:header-value-router input-channel="inputChannel" header-name="testHeader">
    <int:mapping value="foo" channel="fooChannel" />
    <int:mapping value="bar" channel="barChannel" />
</int:header-value-router>
Similar to the PayloadTypeRouter:
-
Step 1 - Compute
channel identifierwhich is the value of the header identified by theheader-nameattribute. -
Step 2 - Resolve
channel identifiertochannel namewhere the result of the previous step is used to select the appropriate value from the general mapping defined viamappingelement. -
Step 3 - Resolve
channel nameto the actual instance of theMessageChannelas a reference to a bean within the Application Context (which is hopefully aMessageChannel) identified by the result of the previous step.
The above two configurations of two different router types look almost identical.
However if we look at the alternate configuration of the HeaderValueRouter we clearly see that there is no mapping sub element:
<int:header-value-router input-channel="inputChannel" header-name="testHeader">
But the configuration is still perfectly valid. So the natural question is what about the mapping in the Step 2?
What this means is that Step 2 is now an optional step.
If mapping is not defined then the channel identifier value computed in Step 1 will automatically be treated as the channel name, which will now be resolved to the actual MessageChannel as in Step 3.
What it also means is that Step 2 is one of the key steps to provide dynamic characteristics to the routers, since it introduces a process which allows you to change the way channel identifier resolves to 'channel name', thus influencing the process of determining the final instance of the MessageChannel from the initial channel identifier.
For Example:
In the above configuration let’s assume that the testHeader value is kermit which is now a channel identifier (Step 1).
Since there is no mapping in this router, resolving this channel identifier to a channel name (Step 2) is impossible and this channel identifier is now treated as channel name.
However what if there was a mapping but for a different value?
The end result would still be the same and that is: if a new value cannot be determined through the process of resolving the channel identifier to a channel name, such channel identifier becomes channel name.
So all that is left is for Step 3 to resolve the channel name (kermit) to an actual instance of the MessageChannel identified by this name.
That basically involves a bean lookup for the name provided.
So now all messages which contain the header/value pair as testHeader=kermit are going to be routed to a MessageChannel whose bean name (id) is kermit.
But what if you want to route these messages to the simpson channel? Obviously changing a static configuration will work, but will also require bringing your system down.
However if you had access to the channel identifier map, then you could just introduce a new mapping where the header/value pair is now kermit=simpson, thus allowing Step 2 to treat kermit as a channel identifier while resolving it to simpson as the channel name .
The same obviously applies for PayloadTypeRouter, where you can now remap or remove a particular payload type
mapping.
In fact, it applies to every other router, including expression-based routers, since their computed values will now have a chance to go through Step 2 to be additionally resolved to the actual channel name.
Any router that is a subclass of the AbstractMappingMessageRouter (which includes most framework defined routers) is a Dynamic Router simply because the channelMapping is defined at the AbstractMappingMessageRouter level.
That map’s setter method is exposed as a public method along with setChannelMapping and removeChannelMapping methods.
These allow you to change/add/remove router mappings at runtime as long as you have a reference to the router itself.
It also means that you could expose these same configuration options via JMX (see Section 10.2, “JMX Support”) or the Spring Integration ControlBus (see Section 10.6, “Control Bus”) functionality.
One way to manage the router mappings is through the Control Bus pattern which exposes a Control Channel where you can send control messages to manage and monitor Spring Integration components, including routers.
| Note |
|---|---|
|
For more information about the Control Bus, please see chapter Section 10.6, “Control Bus”. |
Typically you would send a control message asking to invoke a particular operation on a particular managed component (e.g. router). Two managed operations (methods) that are specific to changing the router resolution process are:
-
public void setChannelMapping(String key, String channelName)- will allow you to add a new or modify an existing mapping betweenchannel identifierandchannel name -
public void removeChannelMapping(String key)- will allow you to remove a particular channel mapping, thus disconnecting the relationship betweenchannel identifierandchannel name
Note that these methods can be used for simple changes (updating a single route or adding/removing a route). However, if you want to remove one route and add another, the updates are not atomic. This means the routing table may be in an indeterminate state between the updates. Starting with version 4.0, you can now use the control bus to update the entire routing table atomically.
-
public Map<String, String>getChannelMappings()returns the current mappings. -
public void replaceChannelMappings(Properties channelMappings)updates the mappings. Notice that the parameter is a properties object; this allows the use of the inbuiltStringToPropertiesConverterby a control bus command, for example:
"@'router.handler'.replaceChannelMappings('foo=qux \n baz=bar')"
-
note that each mapping is separated by a newline character (
\n). For programmatic changes to the map, it is recommended that thesetChannelMappingsmethod is used instead, for type-safety. Any non-String keys or values passed intoreplaceChannelMappingsare ignored.
You can also expose a router instance with Spring’s JMX support, and then use your favorite JMX client (e.g., JConsole) to manage those operations (methods) for changing the router’s configuration.
| Note |
|---|---|
|
For more information about Spring Integration’s JMX support, please see chapter Section 10.2, “JMX Support”. |
Starting with version 4.1, Spring Integration provides an implementation of the Routing Slip Enterprise Integration Pattern.
It is implemented as a routingSlip message header which is used to determine the next channel in AbstractMessageProducingHandler s, when an outputChannel isn’t specified for the endpoint.
This pattern is useful in complex, dynamic, cases when it can become difficult to configure multiple routers to determine message flow.
When a message arrives at an endpoint that has no output-channel, the routingSlip is consulted to determine the next channel to which the message will be sent.
When the routing slip is exhausted, normal replyChannel processing resumes.
Configuration for the Routing Slip is presented as a HeaderEnricher option - a semicolon-separated Routing Slip path entries:
<util:properties id="properties">
    <beans:prop key="myRoutePath1">channel1</beans:prop>
    <beans:prop key="myRoutePath2">request.headers[myRoutingSlipChannel]</beans:prop>
</util:properties>

<context:property-placeholder properties-ref="properties"/>

<header-enricher input-channel="input" output-channel="process">
    <routing-slip
        value="${myRoutePath1}; @routingSlipRoutingPojo.get(request, reply);
               routingSlipRoutingStrategy; ${myRoutePath2}; finishChannel"/>
</header-enricher>
In this sample we have:
-
A
<context:property-placeholder>configuration to demonstrate that the entries in the Routing Slippathcan be specified as resolvable keys. -
The
<header-enricher><routing-slip>sub-element is used to populate theRoutingSlipHeaderValueMessageProcessorto theHeaderEnricherhandler. -
The
RoutingSlipHeaderValueMessageProcessoraccepts a String array of resolved Routing Slippathentries and returns (fromprocessMessage()) asingletonMapwith thepathaskeyand0as initialroutingSlipIndex.
Routing Slip path entries can contain MessageChannel bean names, RoutingSlipRouteStrategy bean names and also Spring expressions (SpEL).
The RoutingSlipHeaderValueMessageProcessor checks each Routing Slip path entry against the BeanFactory on the first processMessage invocation.
It converts entries, which aren’t bean names in the application context, to ExpressionEvaluatingRoutingSlipRouteStrategy instances.
RoutingSlipRouteStrategy entries are invoked multiple times, until they return null, or an empty String.
Since the Routing Slip is involved in the getOutputChannel process we have a request-reply context.
The RoutingSlipRouteStrategy has been introduced to determine the next outputChannel using the requestMessage, as well as the reply object.
An implementation of this strategy should be registered as a bean in the application context and its bean name is used in the Routing Slip path.
The ExpressionEvaluatingRoutingSlipRouteStrategy implementation is provided.
It accepts a SpEL expression, and an internal ExpressionEvaluatingRoutingSlipRouteStrategy.RequestAndReply object is used as the root object of the evaluation context.
This is to avoid the overhead of EvaluationContext creation for each ExpressionEvaluatingRoutingSlipRouteStrategy.getNextPath() invocation.
It is a simple Java Bean with two properties - Message<?> request and Object reply.
With this expression implementation, we can specify Routing Slip path entries using SpEL (@routingSlipRoutingPojo.get(request, reply), request.headers[myRoutingSlipChannel]) avoiding a bean definition for the RoutingSlipRouteStrategy.
| Note |
|---|---|
|
The |
| Important |
|---|---|
|
If a Routing Slip is involved in a distributed environment - cross-JVM application, |
For Java configuration, simply add a RoutingSlipHeaderValueMessageProcessor instance to the HeaderEnricher bean definition:
@Bean
@Transformer(inputChannel = "routingSlipHeaderChannel")
public HeaderEnricher headerEnricher() {
    return new HeaderEnricher(Collections.singletonMap(IntegrationMessageHeaderAccessor.ROUTING_SLIP,
            new RoutingSlipHeaderValueMessageProcessor("myRoutePath1",
                                                       "@routingSlipRoutingPojo.get(request, reply)",
                                                       "routingSlipRoutingStrategy",
                                                       "request.headers[myRoutingSlipChannel]",
                                                       "finishChannel")));
}
The Routing Slip algorithm works as follows when an endpoint produces a reply and there is no outputChannel defined:
-
The
routingSlipIndexis used to get a value from the Routing Slippathlist. -
If the value by
routingSlipIndexisString, it is used to get a bean fromBeanFactory. -
If a returned bean is an instance of
MessageChannel, it is used as the nextoutputChanneland theroutingSlipIndexis incremented in the reply message header (the Routing Slippathentries remain unchanged). -
If a returned bean is an instance of
RoutingSlipRouteStrategyand itsgetNextPathdoesn’t return an empty String, that result is used a bean name for the nextoutputChannel. TheroutingSlipIndexremains unchanged. -
If
RoutingSlipRouteStrategy.getNextPathreturns an empty String, theroutingSlipIndexis incremented and thegetOutputChannelFromRoutingSlipis invoked recursively for the next Routing Slippathitem; -
If the next Routing Slip
pathentry isn’t a String it must be an instance ofRoutingSlipRouteStrategy; -
When the
routingSlipIndexexceeds the size of the Routing Slippathlist, the algorithm moves to the default behavior for the standardreplyChannelheader.
The EIP also defines the Process Manager pattern.
This pattern can now easily be implemented using custom Process Manager logic encapsulated in a RoutingSlipRouteStrategy within the routing slip.
In addition to a bean name, the RoutingSlipRouteStrategy can return any MessageChannel object; and there is no requirement that this MessageChannel instance is a bean in the application context.
This way, we can provide powerful dynamic routing logic, when there is no prediction which channel should be used; a MessageChannel can be created within the RoutingSlipRouteStrategy and returned.
A FixedSubscriberChannel with an associated MessageHandler implementation is good combination for such cases.
For example we can route to a Reactor Stream:
@Bean
public PollableChannel resultsChannel() {
    return new QueueChannel();
}
@Bean
public RoutingSlipRouteStrategy routeStrategy() {
    return (requestMessage, reply) -> requestMessage.getPayload() instanceof String
            ? new FixedSubscriberChannel(m ->
            Mono.just((String) m.getPayload())
                    .map(String::toUpperCase)
                    .subscribe(v -> messagingTemplate().convertAndSend(resultsChannel(), v)))
            : new FixedSubscriberChannel(m ->
            Mono.just((Integer) m.getPayload())
                    .map(v -> v * 2)
                    .subscribe(v -> messagingTemplate().convertAndSend(resultsChannel(), v)));
}
Message Filters are used to decide whether a Message should be passed along or dropped based on some criteria such as a Message Header value or Message content itself. Therefore, a Message Filter is similar to a router, except that for each Message received from the filter’s input channel, that same Message may or may not be sent to the filter’s output channel. Unlike the router, it makes no decision regarding which Message Channel to send the Message to but only decides whether to send.
| Note |
|---|---|
|
As you will see momentarily, the Filter also supports a discard channel, so in certain cases it can play the role of a very simple router (or "switch") based on a boolean condition. |
In Spring Integration, a Message Filter may be configured as a Message Endpoint that delegates to an implementation of the MessageSelector interface.
That interface is itself quite simple:
public interface MessageSelector {

    boolean accept(Message<?> message);

}
The MessageFilter constructor accepts a selector instance:
MessageFilter filter = new MessageFilter(someSelector);
In combination with the namespace and SpEL, very powerful filters can be configured with very little java code.
The <filter> element is used to create a Message-selecting endpoint.
In addition to input-channel and output-channel attributes, it requires a ref.
The ref may point to a MessageSelector implementation:
<int:filter input-channel="input" ref="selector" output-channel="output"/>

<bean id="selector" class="example.MessageSelectorImpl"/>
Alternatively, the method attribute can be added at which point the ref may refer to any object.
The referenced method may expect either the Message type or the payload type of inbound Messages.
The method must return a boolean value.
If the method returns true, the Message will be sent to the output-channel.
<int:filter input-channel="input" output-channel="output"
    ref="exampleObject" method="someBooleanReturningMethod"/>

<bean id="exampleObject" class="example.SomeObject"/>
If the selector or adapted POJO method returns false, there are a few settings that control the handling of the rejected Message.
By default (if configured like the example above), rejected Messages will be silently dropped.
If rejection should instead result in an error condition, then set the throw-exception-on-rejection attribute to true:
<int:filter input-channel="input" ref="selector"
    output-channel="output" throw-exception-on-rejection="true"/>
If you want rejected messages to be routed to a specific channel, provide that reference as the discard-channel:
<int:filter input-channel="input" ref="selector"
    output-channel="output" discard-channel="rejectedMessages"/>
Also see Section 8.9.7, “Advising Filters”.
| Note |
|---|---|
|
Message Filters are commonly used in conjunction with a Publish Subscribe Channel. Many filter endpoints may be subscribed to the same channel, and they decide whether or not to pass the Message to the next endpoint which could be any of the supported types (e.g. Service Activator). This provides a reactive alternative to the more proactive approach of using a Message Router with a single Point-to-Point input channel and multiple output channels. |
Using a ref attribute is generally recommended if the custom filter implementation is referenced in other <filter> definitions.
However if the custom filter implementation is scoped to a single <filter> element, provide an inner bean definition:
<int:filter method="someMethod" input-channel="inChannel" output-channel="outChannel">
  <beans:bean class="org.foo.MyCustomFilter"/>
</filter>
| Note |
|---|---|
|
Using both the |
| Important |
|---|---|
|
If the "ref" attribute references a bean that extends |
With the introduction of SpEL support, Spring Integration added the expression attribute to the filter element.
It can be used to avoid Java entirely for simple filters.
<int:filter input-channel="input" expression="payload.equals('nonsense')"/>
The string passed as the expression attribute will be evaluated as a SpEL expression with the Message available in the evaluation context. If it is necessary to include the result of an expression in the scope of the application context you can use the #{} notation as defined in the SpEL reference documentation.
<int:filter input-channel="input"
            expression="payload.matches(#{filterPatterns.nonsensePattern})"/>
If the Expression itself needs to be dynamic, then an expression sub-element may be used. That provides a level of indirection for resolving the Expression by its key from an ExpressionSource. That is a strategy interface that you can implement directly, or you can rely upon a version available in Spring Integration that loads Expressions from a "resource bundle" and can check for modifications after a given number of seconds. All of this is demonstrated in the following configuration sample where the Expression could be reloaded within one minute if the underlying file had been modified. If the ExpressionSource bean is named "expressionSource", then it is not necessary to provide the` source` attribute on the <expression> element, but in this case it’s shown for completeness.
<int:filter input-channel="input" output-channel="output">
    <int:expression key="filterPatterns.example" source="myExpressions"/>
</int:filter>

<beans:bean id="myExpressions" id="myExpressions"
    class="o.s.i.expression.ReloadableResourceBundleExpressionSource">
    <beans:property name="basename" value="config/integration/expressions"/>
    <beans:property name="cacheSeconds" value="60"/>
</beans:bean>
Then, the config/integration/expressions.properties file (or any more specific version with a locale extension to be resolved in the typical way that resource-bundles are loaded) would contain a key/value pair:
filterPatterns.example=payload > 100
| Note |
|---|---|
|
All of these examples that use |
A filter configured using annotations would look like this.
public class PetFilter { ... @Filterpublic boolean dogsOnly(String input) { ... } }
|
An annotation indicating that this method shall be used as a filter. Must be specified if this class will be used as a filter. |
All of the configuration options provided by the xml element are also available for the @Filter annotation.
The filter can be either referenced explicitly from XML or, if the @MessageEndpoint annotation is defined on the class, detected automatically through classpath scanning.
Also see Section 8.9.8, “Advising Endpoints Using Annotations”.
The Splitter is a component whose role is to partition a message in several parts, and send the resulting messages to be processed independently. Very often, they are upstream producers in a pipeline that includes an Aggregator.
The API for performing splitting consists of one base class, AbstractMessageSplitter, which is a MessageHandler implementation, encapsulating features which are common to splitters, such as filling in the appropriate message headers CORRELATION_ID, SEQUENCE_SIZE, and SEQUENCE_NUMBER on the messages that are produced.
This enables tracking down the messages and the results of their processing (in a typical scenario, these headers would be copied over to the messages that are produced by the various transforming endpoints), and use them, for example, in a Composed Message Processor scenario.
An excerpt from AbstractMessageSplitter can be seen below:
public abstract class AbstractMessageSplitter
    extends AbstractReplyProducingMessageConsumer {
    ...
    protected abstract Object splitMessage(Message<?> message);

}
To implement a specific Splitter in an application, extend AbstractMessageSplitter and implement the splitMessage method, which contains logic for splitting the messages.
The return value may be one of the following:
-
A
Collectionor an array of Messages, or anIterable(orIterator) that iterates over Messages - in this case the messages will be sent as such (after theCORRELATION_ID,SEQUENCE_SIZEandSEQUENCE_NUMBERare populated). Using this approach gives more control to the developer, for example for populating custom message headers as part of the splitting process. -
A
Collectionor an array of non-Message objects, or anIterable(orIterator) that iterates over non-Message objects - works like the prior case, except that each collection element will be used as a Message payload. Using this approach allows developers to focus on the domain objects without having to consider the Messaging system and produces code that is easier to test. -
a
Messageor non-Message object (but not a Collection or an Array) - it works like the previous cases, except a single message will be sent out.
In Spring Integration, any POJO can implement the splitting algorithm, provided that it defines a method that accepts a single argument and has a return value.
In this case, the return value of the method will be interpreted as described above.
The input argument might either be a Message or a simple POJO.
In the latter case, the splitter will receive the payload of the incoming message.
Since this decouples the code from the Spring Integration API and will typically be easier to test, it is the recommended approach.
Iterators
Starting with version 4.1, the AbstractMessageSplitter supports the Iterator type for the value to split.
Note, in the case of an Iterator (or Iterable), we don’t have access to the number of underlying items and the SEQUENCE_SIZE header is set to 0.
This means that the default SequenceSizeReleaseStrategy of an <aggregator> won’t work and the group for the CORRELATION_ID from the splitter won’t be released; it will remain as incomplete.
In this case you should use an appropriate custom ReleaseStrategy or rely on send-partial-result-on-expiry together with group-timeout or a MessageGroupStoreReaper.
Starting with version 5.0, the AbstractMessageSplitter provides protected obtainSizeIfPossible() methods to allow the determination of the size of the Iterable and Iterator objects if that is possible.
For example XPathMessageSplitter can determine the size of the underlying NodeList object.
An Iterator object is useful to avoid the need for building an entire collection in the memory before splitting.
For example, when underlying items are populated from some external system (e.g.
DataBase or FTP MGET) using iterations or streams.
Stream and Flux
Starting with version 5.0, the AbstractMessageSplitter supports the Java Stream and Reactive Streams Publisher types for the value to split.
In this case the target Iterator is built on their iteration functionality.
In addition, if Splitter’s output channel is an instance of a ReactiveStreamsSubscribableChannel, the AbstractMessageSplitter produces a Flux result instead of an Iterator and the output channel is subscribed to this Flux for back-pressure based splitting on downstream flow demand.
A splitter can be configured through XML as follows:
<int:channel id="inputChannel"/> <int:splitter id="splitter"method="split"
input-channel="inputChannel"
output-channel="outputChannel" />
<int:channel id="outputChannel"/> <beans:bean id="splitterBean" class="sample.PojoSplitter"/>
|
The id of the splitter is optional. |
|
A reference to a bean defined in the application context.
The bean must implement the splitting logic as described in the section above .Optional.
If reference to a bean is not provided, then it is assumed that the payload of the Message that arrived on the |
|
The method (defined on the bean specified above) that implements the splitting logic.Optional. |
|
The input channel of the splitter. Required. |
|
The channel to which the splitter will send the results of splitting the incoming message. Optional (because incoming messages can specify a reply channel themselves). |
Using a ref attribute is generally recommended if the custom splitter implementation may be referenced in other <splitter> definitions.
However if the custom splitter handler implementation should be scoped to a single definition of the <splitter>, configure an inner bean definition:
<int:splitter id="testSplitter" input-channel="inChannel" method="split"
                output-channel="outChannel">
  <beans:bean class="org.foo.TestSplitter"/>
</int:splitter>
| Note |
|---|---|
|
Using both a |
| Important |
|---|---|
|
If the "ref" attribute references a bean that extends |
The @Splitter annotation is applicable to methods that expect either the Message type or the message payload type, and the return values of the method should be a Collection of any type.
If the returned values are not actual Message objects, then each item will be wrapped in a Message as its payload.
Each message will be sent to the designated output channel for the endpoint on which the @Splitter is defined.
@Splitter
List<LineItem> extractItems(Order order) {
    return order.getItems()
}
Also see Section 8.9.8, “Advising Endpoints Using Annotations”.
Also see Section 9.10, “Splitters” in Java DSL chapter.
Basically a mirror-image of the Splitter, the Aggregator is a type of Message Handler that receives multiple Messages and combines them into a single Message. In fact, an Aggregator is often a downstream consumer in a pipeline that includes a Splitter.
Technically, the Aggregator is more complex than a Splitter, because it is stateful as it must hold the Messages to be aggregated and determine when the complete group of Messages is ready to be aggregated.
In order to do this it requires a MessageStore.
The Aggregator combines a group of related messages, by correlating and storing them, until the group is deemed complete. At that point, the Aggregator will create a single message by processing the whole group, and will send the aggregated message as output.
Implementing an Aggregator requires providing the logic to perform the aggregation (i.e., the creation of a single message from many). Two related concepts are correlation and release.
Correlation determines how messages are grouped for aggregation.
In Spring Integration correlation is done by default based on the IntegrationMessageHeaderAccessor.CORRELATION_ID message header.
Messages with the same IntegrationMessageHeaderAccessor.CORRELATION_ID will be grouped together.
However, the correlation strategy may be customized to allow other ways of specifying how the messages should be grouped together by implementing a CorrelationStrategy (see below).
To determine the point at which a group of messages is ready to be processed, a ReleaseStrategy is consulted.
The default release strategy for the Aggregator will release a group when all messages included in a sequence are present, based on the IntegrationMessageHeaderAccessor.SEQUENCE_SIZE header.
This default strategy may be overridden by providing a reference to a custom ReleaseStrategy implementation.
The Aggregation API consists of a number of classes:
-
The interface
MessageGroupProcessor, and its subclasses:MethodInvokingAggregatingMessageGroupProcessorandExpressionEvaluatingMessageGroupProcessor -
The
ReleaseStrategyinterface and its default implementationSimpleSequenceSizeReleaseStrategy -
The
CorrelationStrategyinterface and its default implementationHeaderAttributeCorrelationStrategy
The AggregatingMessageHandler (subclass of AbstractCorrelatingMessageHandler) is a MessageHandler implementation, encapsulating the common functionalities of an Aggregator (and other correlating use cases), which are:
- correlating messages into a group to be aggregated
-
maintaining those messages in a
MessageStoreuntil the group can be released - deciding when the group can be released
- aggregating the released group into a single message
- recognizing and responding to an expired group
The responsibility of deciding how the messages should be grouped together is delegated to a CorrelationStrategy instance.
The responsibility of deciding whether the message group can be released is delegated to a ReleaseStrategy instance.
Here is a brief highlight of the base AbstractAggregatingMessageGroupProcessor (the responsibility of implementing the aggregatePayloads method is left to the developer):
public abstract class AbstractAggregatingMessageGroupProcessor
              implements MessageGroupProcessor {

    protected Map<String, Object> aggregateHeaders(MessageGroup group) {
        // default implementation exists
    }

    protected abstract Object aggregatePayloads(MessageGroup group, Map<String, Object> defaultHeaders);

}
The CorrelationStrategy is owned by the AbstractCorrelatingMessageHandler and it has a default value based on the IntegrationMessageHeaderAccessor.CORRELATION_ID message header:
public AbstractCorrelatingMessageHandler(MessageGroupProcessor processor, MessageGroupStore store,
        CorrelationStrategy correlationStrategy, ReleaseStrategy releaseStrategy) {
    ...
    this.correlationStrategy = correlationStrategy == null ?
        new HeaderAttributeCorrelationStrategy(IntegrationMessageHeaderAccessor.CORRELATION_ID) : correlationStrategy;
    this.releaseStrategy = releaseStrategy == null ? new SimpleSequenceSizeReleaseStrategy() : releaseStrategy;
    ...
}
As for actual processing of the message group, the default implementation is the DefaultAggregatingMessageGroupProcessor.
It creates a single Message whose payload is a List of the payloads received for a given group.
This works well for simple Scatter Gather implementations with either a Splitter, Publish Subscribe Channel, or Recipient List Router upstream.
| Note |
|---|---|
|
When using a Publish Subscribe Channel or Recipient List Router in this type of scenario, be sure to enable the flag to |
When implementing a specific aggregator strategy for an application, a developer can extend AbstractAggregatingMessageGroupProcessor and implement the aggregatePayloads method.
However, there are better solutions, less coupled to the API, for implementing the aggregation logic which can be configured easily either through XML or through annotations.
In general, any POJO can implement the aggregation algorithm if it provides a method that accepts a single java.util.List as an argument (parameterized lists are supported as well).
This method will be invoked for aggregating messages as follows:
-
if the argument is a
java.util.Collection<T>, and the parameter type T is assignable toMessage, then the whole list of messages accumulated for aggregation will be sent to the aggregator -
if the argument is a non-parameterized
java.util.Collectionor the parameter type is not assignable toMessage, then the method will receive the payloads of the accumulated messages -
if the return type is not assignable to
Message, then it will be treated as the payload for a Message that will be created automatically by the framework.
| Note |
|---|---|
|
In the interest of code simplicity, and promoting best practices such as low coupling, testability, etc., the preferred way of implementing the aggregation logic is through a POJO, and using the XML or annotation support for configuring it in the application. |
If the MessageGroupProcessor 's processMessageGroup method returns a collection, it must be a collection of
Message<?> s.
In this case, the messages are released individually.
Prior to version 4.2, it was not possible to provide a MessageGroupProcessor using XML configuration, only POJO
methods could be used for aggregation.
Now, if the framework detects that the referenced (or inner) bean implements MessageProcessor, it is used as the
aggregator’s output processor.
If you wish to release a collection of objects from a custom MessageGroupProcessor as the payload of a message, your
class should extend AbstractAggregatingMessageGroupProcessor and implement aggregatePayloads().
Also, since version 4.2, a SimpleMessageGroupProcessor is provided; which simply returns the collection of
messages from the group, which, as indicated above, causes the released messages to be sent individually.
This allows the aggregator to work as a message barrier where arriving messages are held until the release strategy fires, and the group is released, as a sequence of individual messages.
The ReleaseStrategy interface is defined as follows:
public interface ReleaseStrategy {

  boolean canRelease(MessageGroup group);

}
In general, any POJO can implement the completion decision logic if it provides a method that accepts a single java.util.List as an argument (parameterized lists are supported as well), and returns a boolean value.
This method will be invoked after the arrival of each new message, to decide whether the group is complete or not, as follows:
-
if the argument is a
java.util.List<T>, and the parameter type T is assignable toMessage, then the whole list of messages accumulated in the group will be sent to the method -
if the argument is a non-parametrized
java.util.Listor the parameter type is not assignable toMessage, then the method will receive the payloads of the accumulated messages - the method must return true if the message group is ready for aggregation, and false otherwise.
For example:
public class MyReleaseStrategy {

    @ReleaseStrategy
    public boolean canMessagesBeReleased(List<Message<?>>) {...}
}
public class MyReleaseStrategy {

    @ReleaseStrategy
    public boolean canMessagesBeReleased(List<String>) {...}
}
As you can see based on the above signatures, the POJO-based Release Strategy will be passed a Collection of not-yet-released Messages (if you need access to the whole Message) or a Collection of payload objects (if the type parameter is anything other than Message).
Typically this would satisfy the majority of use cases.
However if, for some reason, you need to access the full MessageGroup then you should simply provide an implementation of the ReleaseStrategy interface.
| Warning |
|---|---|
|
When handling potentially large groups, it is important to understand how these methods are invoked because the release strategy may be invoked multiple times before the group is released.
The most efficient is an implementation of For these reasons, for large groups, it is recommended that you implement |
When the group is released for aggregation, all its not-yet-released messages are processed and removed from the group.
If the group is also complete (i.e.
if all messages from a sequence have arrived or if there is no sequence defined), then the group is marked as complete.
Any new messages for this group will be sent to the discard channel (if defined).
Setting expire-groups-upon-completion to true (default is false) removes the entire group and any new messages, with the same correlation id as the removed group, will form a new group.
Partial sequences can be released by using a MessageGroupStoreReaper together with send-partial-result-on-expiry being set to true.
| Important |
|---|---|
|
To facilitate discarding of late-arriving messages, the aggregator must maintain state about the group after it has been released.
This can eventually cause out of memory conditions.
To avoid such situations, you should consider configuring a |
Spring Integration provides an out-of-the box implementation for ReleaseStrategy, the SimpleSequenceSizeReleaseStrategy.
This implementation consults the SEQUENCE_NUMBER and SEQUENCE_SIZE headers of each arriving message to decide when a message group is complete and ready to be aggregated.
As shown above, it is also the default strategy.
| Note |
|---|---|
|
Before version 5.0, the default release strategy was |
If you are aggregating large groups, you don’t need to release partial groups, and you don’t need to detect/reject duplicate sequences, consider using the SimpleSequenceSizeReleaseStrategy instead - it is much more efficient for these use cases, and is the default since version 5.0 when partial group release is not specified.
The 4.3 release changed the default Collection for messages in a SimpleMessageGroup to HashSet (it was previously a BlockingQueue).
This was expensive when removing individual messages from large groups (an O(n) linear scan was required).
Although the hash set is generally much faster for removing, it can be expensive for large messages because the hash has to be calculated (on both inserts and removes).
If you have messages that are expensive to hash, consider using some other collection type.
As discussed in Section 10.4.1, “MessageGroupFactory”, a SimpleMessageGroupFactory is provided so you can select the Collection that best suits your needs.
You can also provide your own factory implementation to create some other Collection<Message<?>>.
Here is an example of how to configure an aggregator with the previous implementation and a SimpleSequenceSizeReleaseStrategy.
<int:aggregator input-channel="aggregate"
    output-channel="out" message-store="store" release-strategy="releaser" />

<bean id="store" class="org.springframework.integration.store.SimpleMessageStore">
    <property name="messageGroupFactory">
        <bean class="org.springframework.integration.store.SimpleMessageGroupFactory">
            <constructor-arg value="BLOCKING_QUEUE"/>
        </bean>
    </property>
</bean>

<bean id="releaser" class="SimpleSequenceSizeReleaseStrategy" />
The CorrelationStrategy interface is defined as follows:
public interface CorrelationStrategy {

  Object getCorrelationKey(Message<?> message);

}
The method returns an Object which represents the correlation key used for associating the message with a message group.
The key must satisfy the criteria used for a key in a Map with respect to the implementation of equals() and hashCode().
In general, any POJO can implement the correlation logic, and the rules for mapping a message to a method’s argument (or arguments) are the same as for a ServiceActivator (including support for @Header annotations).
The method must return a value, and the value must not be null.
Spring Integration provides an out-of-the box implementation for CorrelationStrategy, the HeaderAttributeCorrelationStrategy.
This implementation returns the value of one of the message headers (whose name is specified by a constructor argument) as the correlation key.
By default, the correlation strategy is a HeaderAttributeCorrelationStrategy returning the value of the CORRELATION_ID header attribute.
If you have a custom header name you would like to use for correlation, then simply configure that on an instance of HeaderAttributeCorrelationStrategy and provide that as a reference for the Aggregator’s correlation-strategy.
Changes to groups are thread safe; a LockRegistry is used to obtain a lock for the resolved correlation id.
A DefaultLockRegistry is used by default (in-memory).
For synchronizing updates across servers, where a shared MessageGroupStore is being used, a shared lock registry
must be configured.
See Section 6.4.4, “Configuring an Aggregator” below for more information.
See Section 9.11, “Aggregators and Resequencers” for configuring an Aggregator in Java DSL.
Spring Integration supports the configuration of an aggregator via XML through the <aggregator/> element.
Below you can see an example of an aggregator.
<channel id="inputChannel"/> <int:aggregator id="myAggregator"order="1"
send-partial-result-on-expiry="false"
send-timeout="1000"
correlation-strategy="correlationStrategyBean"
correlation-strategy-method="correlate"
correlation-strategy-expression="headers['foo']"
ref="aggregatorBean"
method="aggregate"
release-strategy="releaseStrategyBean"
release-strategy-method="release" (16) release-strategy-expression="size() == 5" (17) expire-groups-upon-completion="false" (18) empty-group-min-timeout="60000" (19) lock-registry="lockRegistry" (20) group-timeout="60000" (21) group-timeout-expression="size() ge 2 ? 100 : -1" (22) expire-groups-upon-timeout="true" (23) scheduler="taskScheduler" > (24) <expire-transactional/> (25) <expire-advice-chain/> (26) </aggregator> <int:channel id="outputChannel"/> <int:channel id="throwAwayChannel"/> <bean id="persistentMessageStore" class="org.springframework.integration.jdbc.store.JdbcMessageStore"> <constructor-arg ref="dataSource"/> </bean> <bean id="aggregatorBean" class="sample.PojoAggregator"/> <bean id="releaseStrategyBean" class="sample.PojoReleaseStrategy"/> <bean id="correlationStrategyBean" class="sample.PojoCorrelationStrategy"/>
|
The id of the aggregator is Optional. |
|
Lifecycle attribute signaling if aggregator should be started during Application Context startup. Optional (default is true). |
|
The channel from which where aggregator will receive messages. Required. |
|
The channel to which the aggregator will send the aggregation results. Optional (because incoming messages can specify a reply channel themselves via replyChannel Message Header). |
|
The channel to which the aggregator will send the messages that timed out (if |
|
A reference to a |
|
Order of this aggregator when more than one handle is subscribed to the same DirectChannel (use for load balancing purposes). Optional. |
|
Indicates that expired messages should be aggregated and sent to the output-channel or replyChannel once their containing |
|
The timeout interval to wait when sending a reply |
|
A reference to a bean that implements the message correlation (grouping) algorithm.
The bean can be an implementation of the |
|
A method defined on the bean referenced by |
|
A SpEL expression representing the correlation strategy.
Example: |
|
A reference to a bean defined in the application context. The bean must implement the aggregation logic as described above. Optional (by default the list of aggregated Messages will become a payload of the output message). |
|
A method defined on the bean referenced by |
|
A reference to a bean that implements the release strategy.
The bean can be an implementation of the |
|
A method defined on the bean referenced by | |
|
A SpEL expression representing the release strategy; the root object for the expression is a | |
|
When set to true (default false), completed groups are removed from the message store, allowing subsequent messages with the same correlation to form a new group. The default behavior is to send messages with the same correlation as a completed group to the discard-channel. | |
|
Only applies if a | |
|
A reference to a | |
|
A timeout in milliseconds to force the | |
|
The SpEL expression that evaluates to a | |
|
When a group is completed due to a timeout (or by a | |
|
A | |
|
Since version 4.1.
Allows a transaction to be started for the | |
|
Since version 4.1.
Allows the configuration of any |
| Expiring Groups | ||
|---|---|---|---|
|
There are two attributes related to expiring (completely removing) groups.
When a group is expired, there is no record of it and if a new message arrives with the same correlation, a new group is started.
When a group is completed (without expiry), the empty group remains and late arriving messages are discarded.
Empty groups can be removed later using a
If a group is not completed normally, but is released or discarded because of a timeout, the group is normally expired.
Since version 4.1, you can now control this behavior using
Starting with version 5.0 empty groups are also scheduled for removal after |
Using a ref attribute is generally recommended if a custom aggregator handler implementation may be referenced in other <aggregator> definitions.
However if a custom aggregator implementation is only being used by a single definition of the <aggregator>, you can use an inner bean definition (starting with version 1.0.3) to configure the aggregation POJO within the <aggregator> element:
<aggregator input-channel="input" method="sum" output-channel="output">
    <beans:bean class="org.foo.PojoAggregator"/>
</aggregator>
| Note |
|---|---|
|
Using both a |
An example implementation of the aggregator bean looks as follows:
public class PojoAggregator {

  public Long add(List<Long> results) {
    long total = 0l;
    for (long partialResult: results) {
      total += partialResult;
    }
    return total;
  }
}
An implementation of the completion strategy bean for the example above may be as follows:
public class PojoReleaseStrategy {
...
  public boolean canRelease(List<Long> numbers) {
    int sum = 0;
    for (long number: numbers) {
      sum += number;
    }
    return sum >= maxValue;
  }
}
| Note |
|---|---|
|
Wherever it makes sense, the release strategy method and the aggregator method can be combined in a single bean. |
An implementation of the correlation strategy bean for the example above may be as follows:
public class PojoCorrelationStrategy {
...
  public Long groupNumbersByLastDigit(Long number) {
    return number % 10;
  }
}
For example, this aggregator would group numbers by some criterion (in our case the remainder after dividing by 10) and will hold the group until the sum of the numbers provided by the payloads exceeds a certain value.
| Note |
|---|---|
|
Wherever it makes sense, the release strategy method, correlation strategy method and the aggregator method can be combined in a single bean (all of them or any two). |
Since Spring Integration 2.0, the various strategies (correlation, release, and aggregation) may be handled with SpEL which is recommended if the logic behind such release strategy is relatively simple. Let’s say you have a legacy component that was designed to receive an array of objects. We know that the default release strategy will assemble all aggregated messages in the List. So now we have two problems. First we need to extract individual messages from the list, and then we need to extract the payload of each message and assemble the array of objects (see code below).
public String[] processRelease(List<Message<String>> messages){
    List<String> stringList = new ArrayList<String>();
    for (Message<String> message : messages) {
        stringList.add(message.getPayload());
    }
    return stringList.toArray(new String[]{});
}
However, with SpEL such a requirement could actually be handled relatively easily with a one-line expression, thus sparing you from writing a custom class and configuring it as a bean.
<int:aggregator input-channel="aggChannel"
    output-channel="replyChannel"
    expression="#this.![payload].toArray()"/>
In the above configuration we are using a Collection Projection expression to assemble a new collection from the payloads of all messages in the list and then transforming it to an Array, thus achieving the same result as the java code above.
The same expression-based approach can be applied when dealing with custom Release and Correlation strategies.
Instead of defining a bean for a custom CorrelationStrategy via the correlation-strategy attribute, you can implement your simple correlation logic via a SpEL expression and configure it via the correlation-strategy-expression attribute.
For example:
correlation-strategy-expression="payload.person.id"
In the above example it is assumed that the payload has an attribute person with an id which is going to be used to correlate messages.
Likewise, for the ReleaseStrategy you can implement your release logic as a SpEL expression and configure it via the release-strategy-expression attribute.
The root object for evaluation context is the MessageGroup itself.
The List of messages can be referenced using the message property of the group within the expression.
| Note |
|---|---|
|
In releases prior to version 5.0, the root object was the collection of |
For example:
release-strategy-expression="!messages.?[payload==5].empty"
In this example the root object of the SpEL Evaluation Context is the MessageGroup itself, and you are simply stating that as soon as there are a message with payload as 5 in this group, it should be released.
Starting with version 4.0, two new mutually exclusive attributes have been introduced: group-timeout and group-timeout-expression (see the description above).
There are some cases where it is needed to emit the aggregator result (or discard the group) after a timeout if the ReleaseStrategy doesn’t release when the current Message arrives.
For this purpose the groupTimeout option allows scheduling the MessageGroup to be forced complete:
<aggregator input-channel="input" output-channel="output"
        send-partial-result-on-expiry="true"
        group-timeout-expression="size() ge 2 ? 10000 : -1"
        release-strategy-expression="messages[0].headers.sequenceNumber == messages[0].headers.sequenceSize"/>
With this example, the normal release will be possible if the aggregator receives the last message in sequence as defined by the release-strategy-expression.
If that specific message does not arrive, the groupTimeout will force the group complete after 10 seconds as long as the group contains at least 2 Messages.
The results of forcing the group complete depends on the ReleaseStrategy and the send-partial-result-on-expiry.
First, the release strategy is again consulted to see if a normal release is to be made - while the group won’t have changed, the ReleaseStrategy can decide to release the group at this time.
If the release strategy still does not release the group, it will be expired.
If send-partial-result-on-expiry is true, existing messages in the (partial) MessageGroup will be released as a normal aggregator reply Message to the output-channel, otherwise it will be discarded.
There is a difference between groupTimeout behavior and MessageGroupStoreReaper (see Section 6.4.4, “Configuring an Aggregator”).
The reaper initiates forced completion for all MessageGroup s in the MessageGroupStore periodically.
The groupTimeout does it for each MessageGroup individually, if a new Message doesn’t arrive during the groupTimeout.
Also, the reaper can be used to remove empty groups (empty groups are retained in order to discard late messages, if expire-groups-upon-completion is false).
An aggregator configured using annotations would look like this.
public class Waiter { ... @Aggregator
|
An annotation indicating that this method shall be used as an aggregator. Must be specified if this class will be used as an aggregator. |
|
An annotation indicating that this method shall be used as the release strategy of an aggregator.
If not present on any method, the aggregator will use the |
|
An annotation indicating that this method shall be used as the correlation strategy of an aggregator.
If no correlation strategy is indicated, the aggregator will use the |
All of the configuration options provided by the xml element are also available for the @Aggregator annotation.
The aggregator can be either referenced explicitly from XML or, if the @MessageEndpoint is defined on the class, detected automatically through classpath scanning.
Annotation configuration (@Aggregator and others) for the Aggregator component covers only simple use cases,
where most default options are sufficient.
If you need more control over those options using Annotation configuration, consider using
a @Bean definition for the AggregatingMessageHandler and mark its
@Bean method with @ServiceActivator:
@ServiceActivator(inputChannel = "aggregatorChannel")
@Bean
public MessageHandler aggregator(MessageGroupStore jdbcMessageGroupStore) {
     AggregatingMessageHandler aggregator =
                       new AggregatingMessageHandler(new DefaultAggregatingMessageGroupProcessor(),
                                                 jdbcMessageGroupStore);
     aggregator.setOutputChannel(resultsChannel());
     aggregator.setGroupTimeoutExpression(new ValueExpression<>(500L));
     aggregator.setTaskScheduler(this.taskScheduler);
     return aggregator;
}
See Section 6.4.3, “Programming model” and Section E.6.2, “Annotations on @Beans” for more information.
| Note |
|---|---|
|
Starting with the version 4.2 the |
Aggregator (and some other patterns in Spring Integration) is a stateful pattern that requires decisions to be made based on a group of messages that have arrived over a period of time, all with the same correlation key.
The design of the interfaces in the stateful patterns (e.g.
ReleaseStrategy) is driven by the principle that the components (whether defined by the framework or a user) should be able to remain stateless.
All state is carried by the MessageGroup and its management is delegated to the MessageGroupStore.
public interface MessageGroupStore {

    int getMessageCountForAllMessageGroups();

    int getMarkedMessageCountForAllMessageGroups();

    int getMessageGroupCount();

    MessageGroup getMessageGroup(Object groupId);

    MessageGroup addMessageToGroup(Object groupId, Message<?> message);

    MessageGroup markMessageGroup(MessageGroup group);

    MessageGroup removeMessageFromGroup(Object key, Message<?> messageToRemove);

    MessageGroup markMessageFromGroup(Object key, Message<?> messageToMark);

    void removeMessageGroup(Object groupId);

    void registerMessageGroupExpiryCallback(MessageGroupCallback callback);

    int expireMessageGroups(long timeout);
}
For more information please refer to the JavaDoc.
The MessageGroupStore accumulates state information in MessageGroups while waiting for a release strategy to be triggered, and that event might not ever happen.
So to prevent stale messages from lingering, and for volatile stores to provide a hook for cleaning up when the application shuts down, the MessageGroupStore allows the user to register callbacks to apply to its MessageGroups when they expire.
The interface is very straightforward:
public interface MessageGroupCallback {

    void execute(MessageGroupStore messageGroupStore, MessageGroup group);

}
The callback has direct access to the store and the message group so it can manage the persistent state (e.g. by removing the group from the store entirely).
The MessageGroupStore maintains a list of these callbacks which it applies, on demand, to all messages whose timestamp is earlier than a time supplied as a parameter (see the registerMessageGroupExpiryCallback(..) and expireMessageGroups(..) methods above).
The expireMessageGroups method can be called with a timeout value.
Any message older than the current time minus this value will be expired, and have the callbacks applied.
Thus it is the user of the store that defines what is meant by message group "expiry".
As a convenience for users, Spring Integration provides a wrapper for the message expiry in the form of a MessageGroupStoreReaper:
<bean id="reaper" class="org...MessageGroupStoreReaper">
    <property name="messageGroupStore" ref="messageStore"/>
    <property name="timeout" value="30000"/>
</bean>

<task:scheduled-tasks scheduler="scheduler">
    <task:scheduled ref="reaper" method="run" fixed-rate="10000"/>
</task:scheduled-tasks>
The reaper is a Runnable, and all that is happening in the example above is that the message group store’s expire method is being called once every 10 seconds.
The timeout itself is 30 seconds.
| Note |
|---|---|
|
It is important to understand that the timeout property of the |
In addition to the reaper, the expiry callbacks are invoked when the application shuts down via a lifecycle callback in the AbstractCorrelatingMessageHandler.
The AbstractCorrelatingMessageHandler registers its own expiry callback, and this is the link with the boolean flag send-partial-result-on-expiry in the XML configuration of the aggregator.
If the flag is set to true, then when the expiry callback is invoked, any unmarked messages in groups that are not yet released can be sent on to the output channel.
| Important |
|---|---|
|
When a shared Some For more information about |
Related to the Aggregator, albeit different from a functional standpoint, is the Resequencer.
The Resequencer works in a similar way to the Aggregator, in the sense that it uses the CORRELATION_ID to store messages in groups, the difference being that the Resequencer does not process the messages in any way.
It simply releases them in the order of their SEQUENCE_NUMBER header values.
With respect to that, the user might opt to release all messages at once (after the whole sequence, according to the SEQUENCE_SIZE, has been released), or as soon as a valid sequence is available.
| Important |
|---|---|
|
The resequencer is intended to resequence relatively short sequences of messages with small gaps. If you have a large number of disjoint sequences with many gaps, you may experience performance issues. |
See Section 9.11, “Aggregators and Resequencers” for configuring a Resequencer in Java DSL.
Configuring a resequencer requires only including the appropriate element in XML.
A sample resequencer configuration is shown below.
<int:channel id="inputChannel"/> <int:channel id="outputChannel"/> <int:resequencer id="completelyDefinedResequencer"
|
The id of the resequencer is optional. |
|
The input channel of the resequencer. Required. |
|
The channel to which the resequencer will send the reordered messages. Optional. |
|
The channel to which the resequencer will send the messages that timed out (if |
|
Whether to send out ordered sequences as soon as they are available, or only after the whole message group arrives. Optional (false by default). |
|
A reference to a |
|
Whether, upon the expiration of the group, the ordered group should be sent out (even if some of the messages are missing). Optional (false by default). See Section 6.4.5, “Managing State in an Aggregator: MessageGroupStore”. |
|
The timeout interval to wait when sending a reply |
|
A reference to a bean that implements the message correlation (grouping) algorithm.
The bean can be an implementation of the |
|
A method defined on the bean referenced by |
|
A SpEL expression representing the correlation strategy.
Example: |
|
A reference to a bean that implements the release strategy.
The bean can be an implementation of the |
|
A method defined on the bean referenced by |
|
A SpEL expression representing the release strategy; the root object for the expression is a |
|
Only applies if a |
|
See the section called “Configuring an Aggregator with XML”. | |
|
See the section called “Configuring an Aggregator with XML”. | |
|
See the section called “Configuring an Aggregator with XML”. | |
|
See the section called “Configuring an Aggregator with XML”. | |
|
When a group is completed due to a timeout (or by a |
| Note |
|---|---|
|
Since there is no custom behavior to be implemented in Java classes for resequencers, there is no annotation support for it. |
The MessageHandlerChain is an implementation of MessageHandler that can be configured as a single Message Endpoint while actually delegating to a chain of other handlers, such as Filters, Transformers, Splitters, and so on.
This can lead to a much simpler configuration when several handlers need to be connected in a fixed, linear progression.
For example, it is fairly common to provide a Transformer before other components.
Similarly, when providing a Filter before some other component in a chain, you are essentially creating a Selective Consumer.
In either case, the chain only requires a single input-channel and a single output-channel eliminating the need to define channels for each individual component.
| Tip |
|---|---|
|
Spring Integration’s |
The handler chain simplifies configuration while internally maintaining the same degree of loose coupling between components, and it is trivial to modify the configuration if at some point a non-linear arrangement is required.
Internally, the chain will be expanded into a linear setup of the listed endpoints, separated by anonymous channels. The reply channel header will not be taken into account within the chain: only after the last handler is invoked will the resulting message be forwarded on to the reply channel or the chain’s output channel. Because of this setup all handlers except the last required to implement the MessageProducer interface (which provides a setOutputChannel() method). The last handler only needs an output channel if the outputChannel on the MessageHandlerChain is set.
| Note |
|---|---|
|
As with other endpoints, the |
In most cases there is no need to implement MessageHandlers yourself.
The next section will focus on namespace support for the chain element.
Most Spring Integration endpoints, like Service Activators and Transformers, are suitable for use within a MessageHandlerChain.
The <chain> element provides an input-channel attribute, and if the last element in the chain is capable of producing reply messages (optional), it also supports an output-channel attribute.
The sub-elements are then filters, transformers, splitters, and service-activators.
The last element may also be a router or an outbound-channel-adapter.
<int:chain input-channel="input" output-channel="output">
    <int:filter ref="someSelector" throw-exception-on-rejection="true"/>
    <int:header-enricher>
        <int:header name="foo" value="bar"/>
    </int:header-enricher>
    <int:service-activator ref="someService" method="someMethod"/>
</int:chain>
The <header-enricher> element used in the above example will set a message header named "foo" with a value of "bar" on the message.
A header enricher is a specialization of Transformer that touches only header values.
You could obtain the same result by implementing a MessageHandler that did the header modifications and wiring that as a bean, but the header-enricher is obviously a simpler option.
The <chain> can be configured as the last black-box consumer of the message flow. For this solution it is enough to put at the end of the <chain> some <outbound-channel-adapter>:
<int:chain input-channel="input">
    <int-xml:marshalling-transformer marshaller="marshaller" result-type="StringResult" />
    <int:service-activator ref="someService" method="someMethod"/>
    <int:header-enricher>
        <int:header name="foo" value="bar"/>
    </int:header-enricher>
    <int:logging-channel-adapter level="INFO" log-full-message="true"/>
</int:chain>
Disallowed Attributes and Elements
It is important to note that certain attributes, such as order and input-channel are not allowed to be specified on components used within a chain. The same is true for the poller sub-element.
| Important |
|---|---|
|
For the Spring Integration core components, the XML Schema itself will enforce some of these constraints. However, for non-core components or your own custom components, these constraints are enforced by the XML namespace parser, not by the XML Schema. These XML namespace parser constraints were added with Spring Integration 2.2.
The XML namespace parser will throw an |
'id' Attribute
Beginning with Spring Integration 3.0, if a chain element is given an id, the bean name for the element is a combination of the chain’s id and the id of the element itself.
Elements without an id are not registered as beans, but they are given componentName s that include the chain id.
For example:
<int:chain id="fooChain" input-channel="input">
    <int:service-activator id="fooService" ref="someService" method="someMethod"/>
    <int:object-to-json-transformer/>
</int:chain>
-
The
<chain>root element has an id fooChain. So, theAbstractEndpointimplementation (PollingConsumerorEventDrivenConsumer, depending on the input-channel type) bean takes this value as it’s bean name. -
The
MessageHandlerChainbean acquires a bean alias fooChain.handler, which allows direct access to this bean from theBeanFactory. -
The
<service-activator>is not a fully-fledged Messaging Endpoint (PollingConsumerorEventDrivenConsumer) - it is simply aMessageHandlerwithin the<chain>. In this case, the bean name registered with theBeanFactoryis fooChain$child.fooService.handler. -
The componentName of this
ServiceActivatingHandlertakes the same value, but without the .handler suffix - fooChain$child.fooService. -
The last
<chain>sub-component,<object-to-json-transformer>, doesn’t have an id attribute. Its componentName is based on its position in the<chain>. In this case, it is fooChain$child#1. (The final element of the name is the order within the chain, beginning with #0). Note, this transformer isn’t registered as a bean within the application context, so, it doesn’t get a beanName, however its componentName has a value which is useful for logging etc.
The id attribute for <chain> elements allows them to be eligible for JMX export and they are trackable via Message History.
They can also be accessed from the BeanFactory using the appropriate bean name as discussed above.
| Tip |
|---|---|
|
It is useful to provide an explicit id attribute on |
Calling a Chain from within a Chain
Sometimes you need to make a nested call to another chain from within a chain and then come back and continue execution within the original chain. To accomplish this you can utilize a Messaging Gateway by including a <gateway> element. For example:
<int:chain id="main-chain" input-channel="in" output-channel="out">
    <int:header-enricher>
      <int:header name="name" value="Many" />
    </int:header-enricher>
    <int:service-activator>
      <bean class="org.foo.SampleService" />
    </int:service-activator>
    <int:gateway request-channel="inputA"/>
</int:chain>

<int:chain id="nested-chain-a" input-channel="inputA">
    <int:header-enricher>
        <int:header name="name" value="Moe" />
    </int:header-enricher>
    <int:gateway request-channel="inputB"/>
    <int:service-activator>
        <bean class="org.foo.SampleService" />
    </int:service-activator>
</int:chain>

<int:chain id="nested-chain-b" input-channel="inputB">
    <int:header-enricher>
        <int:header name="name" value="Jack" />
    </int:header-enricher>
    <int:service-activator>
        <bean class="org.foo.SampleService" />
    </int:service-activator>
</int:chain>
In the above example the nested-chain-a will be called at the end of main-chain processing by the gateway element configured there.
While in nested-chain-a a call to a nested-chain-b will be made after header enrichment and then it will come back to finish execution in nested-chain-b.
Finally the flow returns to the main-chain.
When the nested version of a <gateway> element is defined in the chain, it does not require the service-interface attribute.
Instead, it simple takes the message in its current state and places it on the channel defined via the request-channel attribute.
When the downstream flow initiated by that gateway completes, a Message will be returned to the gateway and continue its journey within the current chain.
Starting with version 4.1, Spring Integration provides an implementation of the Scatter-Gather Enterprise Integration Pattern. It is a compound endpoint, where the goal is to send a message to the recipients and aggregate the results. Quoting the EIP Book, it is a component for scenarios like best quote, when we need to request information from several suppliers and decide which one provides us with the best term for the requested item.
Previously, the pattern could be configured using discrete components, this enhancement brings more convenient configuration.
The ScatterGatherHandler is a request-reply endpoint that combines a PublishSubscribeChannel (or RecipientListRouter) and an AggregatingMessageHandler.
The request message is sent to the scatter channel and the ScatterGatherHandler waits for the reply from the aggregator to sends to the outputChannel.
The Scatter-Gather pattern suggests two scenarios - Auction and Distribution.
In both cases, the aggregation function is the same and provides all options available for the AggregatingMessageHandler.
Actually the ScatterGatherHandler just requires an AggregatingMessageHandler as a constructor argument.
See Section 6.4, “Aggregator” for more information.
Auction
The Auction Scatter-Gather variant uses publish-subscribe logic for the request message, where the scatter channel is a PublishSubscribeChannel with apply-sequence="true".
However, this channel can be any MessageChannel implementation as is the case with the request-channel in the ContentEnricher (see Section 7.2, “Content Enricher”) but, in this case, the end-user should support his own custom correlationStrategy for the aggregation function.
Distribution
The Distribution Scatter-Gather variant is based on the RecipientListRouter (see the section called “RecipientListRouter”) with all available options for the RecipientListRouter.
This is the second ScatterGatherHandler constructor argument.
If you want to rely just on the default correlationStrategy for the recipient-list-router and the aggregator, you should specify apply-sequence="true".
Otherwise, a custom correlationStrategy should be supplied for the aggregator.
Unlike the PublishSubscribeChannel (Auction) variant, having a recipient-list-router selector option, we can filter target suppliers based on the message.
With apply-sequence="true" the default sequenceSize will be supplied and the aggregator will be able to release the group correctly.
The Distribution option is mutually exclusive with the Auction option.
In both cases, the request (scatter) message is enriched with the gatherResultChannel QueueChannel header, to wait for a reply message from the aggregator.
By default, all suppliers should send their result to the replyChannel header (usually by omitting the output-channel from the ultimate endpoint).
However, the gatherChannel option is also provided, allowing suppliers to send their reply to that channel for the aggregation.
For Java and Annotation configuration, the bean definition for the Scatter-Gather is:
@Bean
public MessageHandler distributor() {
    RecipientListRouter router = new RecipientListRouter();
    router.setApplySequence(true);
    router.setChannels(Arrays.asList(distributionChannel1(), distributionChannel2(),
            distributionChannel3()));
    return router;
}

@Bean
public MessageHandler gatherer() {
	return new AggregatingMessageHandler(
			new ExpressionEvaluatingMessageGroupProcessor("^[payload gt 5] ?: -1D"),
			new SimpleMessageStore(),
			new HeaderAttributeCorrelationStrategy(
			       IntegrationMessageHeaderAccessor.CORRELATION_ID),
			new ExpressionEvaluatingReleaseStrategy("size() == 2"));
}

@Bean
@ServiceActivator(inputChannel = "distributionChannel")
public MessageHandler scatterGatherDistribution() {
	ScatterGatherHandler handler = new ScatterGatherHandler(distributor(), gatherer());
	handler.setOutputChannel(output());
	return handler;
}
Here, we configure the RecipientListRouter distributor bean, with applySequence="true" and the list of recipient channels.
The next bean is for an AggregatingMessageHandler.
Finally, we inject both those beans into the ScatterGatherHandler bean definition and mark it as a @ServiceActivator to wire the Scatter-Gather component into the integration flow.
Configuring the <scatter-gather> endpoint using the XML namespace:
<scatter-gather id=""
|
The id of the Endpoint.
The |
|
Lifecycle attribute signaling if the Endpoint should be started during Application Context initialization.
In addition, the |
|
The channel to receive request messages to handle them in the |
|
The channel to which the Scatter-Gather will send the aggregation results.
Optional (because incoming messages can specify a reply channel themselves via |
|
The channel to send the scatter message for the Auction scenario.
Optional.
Mutually exclusive with |
|
The channel to receive replies from each supplier for the aggregation.
is used as the |
|
Order of this component when more than one handler is subscribed to the same DirectChannel (use for load balancing purposes). Optional. |
|
Specify the phase in which the endpoint should be started and stopped. The startup order proceeds from lowest to highest, and the shutdown order is the reverse of that. By default this value is Integer.MAX_VALUE meaning that this container starts as late as possible and stops as soon as possible. Optional. |
|
The timeout interval to wait when sending a reply |
|
Allows you to specify how long the Scatter-Gather will wait for the reply message before returning.
By default it will wait indefinitely.
null is returned if the reply times out.
Optional.
Defaults to |
|
Specify whether the Scatter-Gather must return a non-null value.
This value is |
|
The |
|
The |
Sometimes, we need to suspend a message flow thread until some other asynchronous event occurs. For example, consider an HTTP request that publishes a message to RabbitMQ. We might wish to not reply to the user until the RabbitMQ broker has issued an acknowledgment that the message was received.
Spring Integration version 4.2 introduced the <barrier/> component for this purpose.
The underlying MessageHandler is the BarrierMessageHandler; this class also implements
MessageTriggerAction where a message passed to the trigger() method releases a corresponding thread in the
handleRequestMessage() method (if present).
The suspended thread and trigger thread are correlated by invoking a CorrelationStrategy on the messages.
When a message is sent to the input-channel, the thread is suspended for up to timeout milliseconds, waiting for
a corresponding trigger message.
The default correlation strategy uses the IntegrationMessageHeaderAccessor.CORRELATION_ID header.
When a trigger message arrives with the same correlation, the thread is released.
The message sent to the output-channel after release is constructed using a MessageGroupProcessor.
By default, the message is a Collection<?> of the two payloads and the headers are merged, using a
DefaultAggregatingMessageGroupProcessor.
![[Caution]](images/caution.png) | Caution |
|---|---|
|
If the |
The requires-reply property determines the action if the suspended thread times out before the trigger message
arrives.
By default, it is false which means the endpoint simply returns null, the flow ends and the thread returns to the
caller.
When true, a ReplyRequiredException is thrown.
You can call the trigger() method programmatically (obtain the bean reference using the name barrier.handler
- where barrier is the bean name of the barrier endpoint) or you can configure
an <outbound-channel-adapter/> to trigger the release.
| Important |
|---|---|
|
Only one thread can be suspended with the same correlation; the same correlation can be used multiple times but only once concurrently. An exception is thrown if a second thread arrives with the same correlation. |
<int:barrier id="barrier1" input-channel="in" output-channel="out"
        correlation-strategy-expression="headers['myHeader']"
        output-processor="myOutputProcessor"
        discard-channel="lateTriggerChannel"
        timeout="10000">
</int:barrier>

<int:outbound-channel-adapter channel="release" ref="barrier1.handler" method="trigger" />
In this example, a custom header is used for correlation.
Either the thread sending a message to in or the one sending a message to release will wait for
up to 10 seconds until the other arrives.
When the message is released, the out channel will be sent a message combining the result of invoking the
custom MessageGroupProcessor bean myOutputProcessor.
If the main thread times out and a trigger arrives later, you can configure a discard channel to which the late trigger will be sent.
Java configuration is shown below.
@Configuration
@EnableIntegration
public class Config {

    @ServiceActivator(inputChannel="in")
    @Bean
    public BarrierMessageHandler barrier() {
        BarrierMessageHandler barrier = new BarrierMessageHandler(10000);
        barrier.setOutputChannel(out());
        barrier.setDiscardChannel(lateTriggers());
        return barrier;
    }

    @ServiceActivator (inputChannel="release")
    @Bean
    public MessageHandler releaser() {
        return new MessageHandler() {

            @Override
            public void handleMessage(Message<?> message) throws MessagingException {
                barrier().trigger(message);
            }

        };
    }

}
See the barrier sample application for an example of this component.
Message Transformers play a very important role in enabling the loose-coupling of Message Producers and Message Consumers. Rather than requiring every Message-producing component to know what type is expected by the next consumer, Transformers can be added between those components. Generic transformers, such as one that converts a String to an XML Document, are also highly reusable.
For some systems, it may be best to provide a Canonical Data Model, but Spring Integration’s general philosophy is not to require any particular format. Rather, for maximum flexibility, Spring Integration aims to provide the simplest possible model for extension. As with the other endpoint types, the use of declarative configuration in XML and/or Annotations enables simple POJOs to be adapted for the role of Message Transformers. These configuration options will be described below.
| Note |
|---|---|
|
For the same reason of maximizing flexibility, Spring does not require XML-based Message payloads. Nevertheless, the framework does provide some convenient Transformers for dealing with XML-based payloads if that is indeed the right choice for your application. For more information on those transformers, see Chapter 37, XML Support - Dealing with XML Payloads. |
The <transformer> element is used to create a Message-transforming endpoint. In addition to "input-channel" and "output-channel" attributes, it requires a "ref". The "ref" may either point to an Object that contains the @Transformer annotation on a single method (see below) or it may be combined with an explicit method name value provided via the "method" attribute.
<int:transformer id="testTransformer" ref="testTransformerBean" input-channel="inChannel"
             method="transform" output-channel="outChannel"/>
<beans:bean id="testTransformerBean" class="org.foo.TestTransformer" />
Using a ref attribute is generally recommended if the custom transformer handler implementation can be reused in other <transformer> definitions.
However if the custom transformer handler implementation should be scoped to a single definition of the <transformer>, you can define an inner bean definition:
<int:transformer id="testTransformer" input-channel="inChannel" method="transform"
                output-channel="outChannel">
  <beans:bean class="org.foo.TestTransformer"/>
</transformer>
| Note |
|---|---|
|
Using both the "ref" attribute and an inner handler definition in the same |
| Important |
|---|---|
|
If the "ref" attribute references a bean that extends |
When using a POJO, the method that is used for transformation may expect either the Message type or the payload type of inbound Messages.
It may also accept Message header values either individually or as a full map by using the @Header and @Headers parameter annotations respectively.
The return value of the method can be any type.
If the return value is itself a Message, that will be passed along to the transformer’s output channel.
As of Spring Integration 2.0, a Message Transformer’s transformation method can no longer return null.
Returning null will result in an exception since a Message Transformer should always be expected to transform each source Message into a valid target Message.
In other words, a Message Transformer should not be used as a Message Filter since there is a dedicated <filter> option for that.
However, if you do need this type of behavior (where a component might return NULL and that should not be considered an error), a service-activator could be used.
Its requires-reply value is FALSE by default, but that can be set to TRUE in order to have Exceptions thrown for NULL return values as with the transformer.
Transformers and Spring Expression Language (SpEL)
Just like Routers, Aggregators and other components, as of Spring Integration 2.0 Transformers can also benefit from SpEL support (http://docs.spring.io/spring/docs/current/spring-framework-reference/html/expressions.html) whenever transformation logic is relatively simple.
<int:transformer input-channel="inChannel"
	output-channel="outChannel"
	expression="payload.toUpperCase() + '- [' + T(java.lang.System).currentTimeMillis() + ']'"/>
In the above configuration we are achieving a simple transformation of the payload with a simple SpEL expression and without writing a custom transformer. Our payload (assuming String) will be upper-cased and concatenated with the current timestamp with some simple formatting.
There are also a few Transformer implementations available out of the box.
Because, it is fairly common to use the toString() representation of an Object, Spring Integration provides an ObjectToStringTransformer whose output is a Message with a String payload.
That String is the result of invoking the toString() operation on the inbound Message’s payload.
<int:object-to-string-transformer input-channel="in" output-channel="out"/>
A potential example for this would be sending some arbitrary object to the outbound-channel-adapter in the file namespace.
Whereas that Channel Adapter only supports String, byte-array, or java.io.File payloads by default, adding this transformer immediately before the adapter will handle the necessary conversion.
Of course, that works fine as long as the result of the toString() call is what you want to be written to the File.
Otherwise, you can just provide a custom POJO-based Transformer via the generic transformer element shown previously.
| Tip |
|---|---|
|
When debugging, this transformer is not typically necessary since the logging-channel-adapter is capable of logging the Message payload. Refer to the section called “Wire Tap” for more detail. |
| Note |
|---|---|
|
The object-to-string-transformer is very simple; it invokes For more sophistication (such as selection of the charset dynamically, at runtime), you can use a SpEL expression-based transformer instead; for example: <int:transformer input-channel="in" output-channel="out" expression="new java.lang.String(payload, headers['myCharset']" /> |
If you need to serialize an Object to a byte array or deserialize a byte array back into an Object, Spring Integration provides symmetrical serialization transformers. These will use standard Java serialization by default, but you can provide an implementation of Spring 3.0’s Serializer or Deserializer strategies via the serializer and deserializer attributes, respectively.
<int:payload-serializing-transformer input-channel="objectsIn" output-channel="bytesOut"/>

<int:payload-deserializing-transformer input-channel="bytesIn" output-channel="objectsOut"
    white-list="com.mycom.*,com.yourcom.*"/>
| Important |
|---|---|
|
When deserializing data from untrusted sources, you should consider adding a |
Spring Integration also provides Object-to-Map and Map-to-Object transformers which utilize the JSON to serialize and de-serialize the object graphs. The object hierarchy is introspected to the most primitive types (String, int, etc.). The path to this type is described via SpEL, which becomes the key in the transformed Map. The primitive type becomes the value.
For example:
public class Parent{
    private Child child;
    private String name;
    // setters and getters are omitted
}

public class Child{
    private String name;
    private List<String> nickNames;
    // setters and getters are omitted
}
...will be transformed to a Map which looks like this: {person.name=George, person.child.name=Jenna, person.child.nickNames[0]=Bimbo ... etc}
The JSON-based Map allows you to describe the object structure without sharing the actual types allowing you to restore/rebuild the object graph into a differently typed Object graph as long as you maintain the structure.
For example: The above structure could be easily restored back to the following Object graph via the Map-to-Object transformer:
public class Father {
    private Kid child;
    private String name;
    // setters and getters are omitted
}

public class Kid {
    private String name;
    private List<String> nickNames;
    // setters and getters are omitted
}
If you need to create a "structured" map, you can provide the flatten attribute. The default value for this attribute is true meaning the default behavior; if you provide a false value, then the structure will be a map of maps.
For example:
public class Parent {
	private Child child;
	private String name;
	// setters and getters are omitted
}

public class Child {
	private String name;
	private List<String> nickNames;
	// setters and getters are omitted
}
...will be transformed to a Map which looks like this: {name=George, child={name=Jenna, nickNames=[Bimbo, ...]}}
To configure these transformers, Spring Integration provides namespace support Object-to-Map:
<int:object-to-map-transformer input-channel="directInput" output-channel="output"/>
or
<int:object-to-map-transformer input-channel="directInput" output-channel="output" flatten="false"/>
Map-to-Object
<int:map-to-object-transformer input-channel="input"
                         output-channel="output"
                          type="org.foo.Person"/>
or
<int:map-to-object-transformer input-channel="inputA"
                                output-channel="outputA"
                                ref="person"/>
<bean id="person" class="org.foo.Person" scope="prototype"/>
| Note |
|---|---|
|
NOTE: ref and type attributes are mutually exclusive.
You can only use one.
Also, if using the ref attribute, you must point to a prototype scoped bean, otherwise a |
Starting with version 5.0, the ObjectToMapTransformer can be supplied with the customized JsonObjectMapper, for example in use-cases when we need special formats for dates or nulls for empty collections.
See the section called “JSON Transformers” for more information about JsonObjectMapper implementations.
The StreamTransformer transforms InputStream payloads to a byte[] or a String if a charset is provided.
<int:stream-transformer input-channel="directInput" output-channel="output"/> <!-- byte[] -->

<int:stream-transformer id="withCharset" charset="UTF-8"
    input-channel="charsetChannel" output-channel="output"/> <!-- String -->
@Bean
@Transformer(inputChannel = "stream", outputChannel = "data")
public StreamTransformer streamToBytes() {
    return new StreamTransformer(); // transforms to byte[]
}

@Bean
@Transformer(inputChannel = "stream", outputChannel = "data")
public StreamTransformer streamToString() {
    return new StreamTransformer("UTF-8"); // transforms to String
}
Object to JSON and JSON to Object transformers are provided.
<int:object-to-json-transformer input-channel="objectMapperInput"/>
<int:json-to-object-transformer input-channel="objectMapperInput"
    type="foo.MyDomainObject"/>
These use a vanilla JsonObjectMapper by default based on implementation from classpath.
You can provide your own custom JsonObjectMapper implementation with appropriate options or based on required library (e.g.
GSON).
<int:json-to-object-transformer input-channel="objectMapperInput"
    type="foo.MyDomainObject" object-mapper="customObjectMapper"/>
| Note |
|---|---|
|
Beginning with version 3.0, the Note, |
| Important |
|---|---|
|
If there are requirements to use both Jackson libraries and/or Boon in the same application, keep in mind that before version 3.0, the JSON transformers used only Jackson 1.x. From 4.1 on, the framework will select Jackson 2 by default ahead of the Boon implementation if both are on the classpath. Jackson 1.x is no longer supported by the framework internally but, of course, you can still use it within your code. To avoid unexpected issues with JSON mapping features, when using annotations, there may be a need to apply annotations from both Jacksons and/or Boon on domain classes: @org.codehaus.jackson.annotate.JsonIgnoreProperties(ignoreUnknown=true) @com.fasterxml.jackson.annotation.JsonIgnoreProperties(ignoreUnknown=true) @org.boon.json.annotations.JsonIgnoreProperties("foo") public class Foo { @org.codehaus.jackson.annotate.JsonProperty("fooBar") @com.fasterxml.jackson.annotation.JsonProperty("fooBar") @org.boon.json.annotations.JsonProperty("fooBar") public Object bar; } |
You may wish to consider using a FactoryBean or simple factory method to create the JsonObjectMapper with the required characteristics.
public class ObjectMapperFactory {

    public static Jackson2JsonObjectMapper getMapper() {
        ObjectMapper mapper = new ObjectMapper();
        mapper.configure(JsonParser.Feature.ALLOW_COMMENTS, true);
        return new Jackson2JsonObjectMapper(mapper);
    }
}
<bean id="customObjectMapper" class="foo.ObjectMapperFactory"
            factory-method="getMapper"/>
| Important |
|---|---|
|
Beginning with version 2.2, the It you wish to set the content type header to some other value, or explicitly overwrite any existing header with some value (including |
Beginning with version 3.0, the ObjectToJsonTransformer adds headers, reflecting the source type, to the message.
Similarly, the JsonToObjectTransformer can use those type headers when converting the JSON to an object.
These headers are mapped in the AMQP adapters so that they are entirely compatible with the Spring-AMQP JsonMessageConverter.
This enables the following flows to work without any special configuration…
...->amqp-outbound-adapter---->
---->amqp-inbound-adapter->json-to-object-transformer->...
Where the outbound adapter is configured with a JsonMessageConverter and the inbound adapter uses the default SimpleMessageConverter.
...->object-to-json-transformer->amqp-outbound-adapter---->
---->amqp-inbound-adapter->...
Where the outbound adapter is configured with a SimpleMessageConverter and the inbound adapter uses the default JsonMessageConverter.
...->object-to-json-transformer->amqp-outbound-adapter---->
---->amqp-inbound-adapter->json-to-object-transformer->
Where both adapters are configured with a SimpleMessageConverter.
| Note |
|---|---|
|
When using the headers to determine the type, you should not provide a |
In addition to JSON Transformers, Spring Integration provides a built-in #jsonPath SpEL function for use in expressions. For more information see Appendix A, Spring Expression Language (SpEL).
Since version 3.0, Spring Integration also provides a built-in #xpath SpEL function for use in expressions. For more information see Section 37.9, “#xpath SpEL Function”.
Beginning with version 4.0, the ObjectToJsonTransformer supports the resultType property, to specify the node JSON representation.
The result node tree representation depends on the implementation of the provided JsonObjectMapper.
By default, the ObjectToJsonTransformer uses a Jackson2JsonObjectMapper and delegates the conversion of the object to the node tree to the ObjectMapper#valueToTree method.
The node JSON representation provides efficiency for using the JsonPropertyAccessor, when the downstream message flow uses SpEL expressions with access to the properties of the JSON data.
See Section A.4, “PropertyAccessors”.
When using Boon, the NODE representation is a Map<String, Object>
The @Transformer annotation can also be added to methods that expect either the Message type or the message payload type.
The return value will be handled in the exact same way as described above in the section describing the <transformer> element.
@Transformer
Order generateOrder(String productId) {
    return new Order(productId);
}
Transformer methods may also accept the @Header and @Headers annotations that is documented in Section E.6, “Annotation Support”
@Transformer
Order generateOrder(String productId, @Header("customerName") String customer) {
    return new Order(productId, customer);
}
Also see Section 8.9.8, “Advising Endpoints Using Annotations”.
Some times your transformation use case might be as simple as removing a few headers. For such a use case, Spring Integration provides a Header Filter which allows you to specify certain header names that should be removed from the output Message (e.g. for security reasons or a value that was only needed temporarily). Basically, the Header Filter is the opposite of the Header Enricher. The latter is discussed in Section 7.2.2, “Header Enricher”.
<int:header-filter input-channel="inputChannel"
		output-channel="outputChannel" header-names="lastName, state"/>
As you can see, configuration of a Header Filter is quite simple.
It is a typical endpoint with input/output channels and a header-names attribute.
That attribute accepts the names of the header(s) (delimited by commas if there are multiple)
that need to be removed.
So, in the above example the headers named lastName and state will not be present on the outbound Message.
See Section 7.4, “Codec”.
At times you may have a requirement to enhance a request with more information than was provided by the target system. The Content Enricher pattern describes various scenarios as well as the component (Enricher), which allows you to address such requirements.
The Spring Integration Core module includes 2 enrichers:
Furthermore, several Adapter specific Header Enrichers are included as well:
Please go to the adapter specific sections of this reference manual to learn more about those adapters.
For more information regarding expressions support, please see Appendix A, Spring Expression Language (SpEL).
If you only need to add headers to a Message, and they are not dynamically determined by the Message content, then referencing a custom implementation of a Transformer may be overkill.
For that reason, Spring Integration provides support for the Header Enricher pattern.
It is exposed via the <header-enricher> element.
<int:header-enricher input-channel="in" output-channel="out">
    <int:header name="foo" value="123"/>
    <int:header name="bar" ref="someBean"/>
</int:header-enricher>
The Header Enricher also provides helpful sub-elements to set well-known header names.
<int:header-enricher input-channel="in" output-channel="out">
    <int:error-channel ref="applicationErrorChannel"/>
    <int:reply-channel ref="quoteReplyChannel"/>
    <int:correlation-id value="123"/>
    <int:priority value="HIGHEST"/>
    <routing-slip value="channel1; routingSlipRoutingStrategy; request.headers[myRoutingSlipChannel]"/>
    <int:header name="bar" ref="someBean"/>
</int:header-enricher>
In the above configuration you can clearly see that for well-known headers such as errorChannel, correlationId, priority, replyChannel, routing-slip etc., instead of using generic <header> sub-elements where you would have to provide both header name and value, you can use convenient sub-elements to set those values directly.
Starting with version 4.1 the Header Enricher provides routing-slip sub-element.
See the section called “Routing Slip” for more information.
POJO Support
Often a header value cannot be defined statically and has to be determined dynamically based on some content in the Message.
That is why Header Enricher allows you to also specify a bean reference using the ref and method attribute.
The specified method will calculate the header value.
Let’s look at the following configuration:
<int:header-enricher input-channel="in" output-channel="out">
    <int:header name="foo" method="computeValue" ref="myBean"/>
</int:header-enricher>

<bean id="myBean" class="foo.bar.MyBean"/>
public class MyBean {

    public String computeValue(String payload){
        return payload.toUpperCase() + "_US";
    }
}
You can also configure your POJO as inner bean:
<int:header-enricher  input-channel="inputChannel" output-channel="outputChannel">
    <int:header name="some_header">
        <bean class="org.MyEnricher"/>
    </int:header>
</int:header-enricher>
as well as point to a Groovy script:
<int:header-enricher  input-channel="inputChannel" output-channel="outputChannel">
    <int:header name="some_header">
        <int-groovy:script location="org/SampleGroovyHeaderEnricher.groovy"/>
    </int:header>
</int:header-enricher>
SpEL Support
In Spring Integration 2.0 we have introduced the convenience of the Spring Expression Language (SpEL) to help configure many different components. The Header Enricher is one of them. Looking again at the POJO example above, you can see that the computation logic to determine the header value is actually pretty simple. A natural question would be: "is there a simpler way to accomplish this?". That is where SpEL shows its true power.
<int:header-enricher input-channel="in" output-channel="out">
    <int:header name="foo" expression="payload.toUpperCase() + '_US'"/>
</int:header-enricher>
As you can see, by using SpEL for such simple cases, we no longer have to provide a separate class and configure it in the application context. All we need is the expression attribute configured with a valid SpEL expression. The payload and headers variables are bound to the SpEL Evaluation Context, giving you full access to the incoming Message.
The following are some examples of Java Configuration for header enrichers:
@Bean
@Transformer(inputChannel = "enrichHeadersChannel", outputChannel = "emailChannel")
public HeaderEnricher enrichHeaders() {
    Map<String, ? extends HeaderValueMessageProcessor<?>> headersToAdd =
            Collections.singletonMap("emailUrl",
                      new StaticHeaderValueMessageProcessor<>(this.imapUrl));
    HeaderEnricher enricher = new HeaderEnricher(headersToAdd);
    return enricher;
}

@Bean
@Transformer(inputChannel="enrichHeadersChannel", outputChannel="emailChannel")
public HeaderEnricher enrichHeaders() {
    Map<String, HeaderValueMessageProcessor<?>> headersToAdd = new HashMap<>();
    headersToAdd.put("emailUrl", new StaticHeaderValueMessageProcessor<String>(this.imapUrl));
    Expression expression = new SpelExpressionParser().parseExpression("payload.from[0].toString()");
    headersToAdd.put("from",
               new ExpressionEvaluatingHeaderValueMessageProcessor<>(expression, String.class));
    HeaderEnricher enricher = new HeaderEnricher(headersToAdd);
    return enricher;
}
The first adds a single literal header. The second adds two headers - a literal header and one based on a SpEL expression.
The following is an example of Java DSL Configuration for a header enricher:
@Bean
public IntegrationFlow enrichHeadersInFlow() {
    return f -> f
                ...
                .enrichHeaders(h -> h.header("emailUrl", this.emailUrl)
                                     .headerExpression("from", "payload.from[0].toString()"))
                .handle(...);
}
Starting with Spring Integration 3.0, a new sub-element <int:header-channels-to-string/> is available; it has no attributes.
This converts existing replyChannel and errorChannel headers (when they are a MessageChannel) to a String and stores the channel(s) in a registry for later resolution when it is time to send a reply, or handle an error.
This is useful for cases where the headers might be lost; for example when serializing a message into a message store or when transporting the message over JMS.
If the header does not already exist, or it is not a MessageChannel, no changes are made.
Use of this functionality requires the presence of a HeaderChannelRegistry bean.
By default, the framework creates a DefaultHeaderChannelRegistry with the default expiry (60 seconds).
Channels are removed from the registry after this time.
To change this, simply define a bean with id integrationHeaderChannelRegistry and configure the required default delay using a constructor argument (milliseconds).
Since version 4.1, you can set a property removeOnGet to true on the <bean/> definition, and the mapping entry will be removed immediately on first use.
This might be useful in a high-volume environment and when the channel is only used once, rather than waiting for the reaper to remove it.
The HeaderChannelRegistry has a size() method to determine the current size of the registry.
The runReaper() method cancels the current scheduled task and runs the reaper immediately; the task is then scheduled to run again based on the current delay.
These methods can be invoked directly by getting a reference to the registry, or you can send a message with, for example, the following content to a control bus:
"@integrationHeaderChannelRegistry.runReaper()"
This sub-element is a convenience only, and is the equivalent of specifying:
<int:reply-channel
    expression="@integrationHeaderChannelRegistry.channelToChannelName(headers.replyChannel)"
    overwrite="true" />
<int:error-channel
    expression="@integrationHeaderChannelRegistry.channelToChannelName(headers.errorChannel)"
    overwrite="true" />
Starting with version 4.1, you can now override the registry’s configured reaper delay, so the the channel mapping is retained for at least the specified time, regardless of the reaper delay:
<int:header-enricher input-channel="inputTtl" output-channel="next">
    <int:header-channels-to-string time-to-live-expression="120000" />
</int:header-enricher>

<int:header-enricher input-channel="inputCustomTtl" output-channel="next">
    <int:header-channels-to-string
        time-to-live-expression="headers['channelTTL'] ?: 120000" />
</int:header-enricher>
In the first case, the time to live for every header channel mapping will be 2 minutes; in the second case, the time to live is specified in the message header and uses an elvis operator to use 2 minutes if there is no header.
In certain situations the Header Enricher, as discussed above, may not be sufficient and payloads themselves may have to be enriched with additional information. For example, order messages that enter the Spring Integration messaging system have to look up the order’s customer based on the provided customer number and then enrich the original payload with that information.
Since Spring Integration 2.1, the Payload Enricher is provided.
A Payload Enricher defines an endpoint that passes a Message to the exposed request channel and then expects a reply message.
The reply message then becomes the root object for evaluation of expressions to enrich the target payload.
The Payload Enricher provides full XML namespace support via the enricher element.
In order to send request messages, the payload enricher has a request-channel attribute that allows you to dispatch messages to a request channel.
Basically by defining the request channel, the Payload Enricher acts as a Gateway, waiting for the message that were sent to the request channel to return, and the Enricher then augments the message’s payload with the data provided by the reply message.
When sending messages to the request channel you also have the option to only send a subset of the original payload using the request-payload-expression attribute.
The enriching of payloads is configured through SpEL expressions, providing users with a maximum degree of flexibility.
Therefore, users are not only able to enrich payloads with direct values from the reply channel’s Message, but they can use SpEL expressions to extract a subset from that Message, only, or to apply addtional inline transformations, allowing them to further manipulate the data.
If you only need to enrich payloads with static values, you don’t have to provide the request-channel attribute.
| Note |
|---|---|
|
Enrichers are a variant of Transformers and in many cases you could use a Payload Enricher or a generic Transformer implementation to add additional data to your messages payloads. Thus, familiarize yourself with all transformation-capable components that are provided by Spring Integration and carefully select the implementation that semantically fits your business case best. |
Below, please find an overview of all available configuration options that are available for the payload enricher:
<int:enricher request-channel=""
|
Channel to which a Message will be sent to get the data to use for enrichment. Optional. |
|
Lifecycle attribute signaling if this component should be started during Application Context startup. Defaults to true.Optional. |
|
Id of the underlying bean definition, which is either an |
|
Specifies the order for invocation when this endpoint is connected as a subscriber to a channel. This is particularly relevant when that channel is using a "failover" dispatching strategy. It has no effect when this endpoint itself is a Polling Consumer for a channel with a queue. Optional. |
|
Identifies the Message channel where a Message will be sent after it is being processed by this endpoint.Optional. |
|
By default the original message’s payload will be used as payload that will be send to the |
|
Channel where a reply Message is expected. This is optional; typically the auto-generated temporary reply channel is sufficient. Optional. |
|
Channel to which an |
|
Maximum amount of time in milliseconds to wait when sending a message to the channel, if such channel may block.
For example, a Queue Channel can block until space is available, if its maximum capacity has been reached.
Internally the send timeout is set on the |
|
Boolean value indicating whether any payload that implements |
|
Allows you to configure a Message Poller if this endpoint is a Polling Consumer. Optional. |
|
Each |
|
Each |
Below, please find several examples of using a Payload Enricher in various situations.
In the following example, a User object is passed as the payload of the Message.
The User has several properties but only the username is set initially.
The Enricher’s request-channel attribute below is configured to pass the User on to the findUserServiceChannel.
Through the implicitly set reply-channel a User object is returned and using the property sub-element, properties from the reply are extracted and used to enrich the original payload.
<int:enricher id="findUserEnricher"
              input-channel="findUserEnricherChannel"
              request-channel="findUserServiceChannel">
    <int:property name="email"    expression="payload.email"/>
    <int:property name="password" expression="payload.password"/>
</int:enricher>
| Note |
|---|---|
|
The code samples shown here, are part of the Spring Integration Samples project. Please feel free to check it out in the Appendix G, Spring Integration Samples. |
How do I pass only a subset of data to the request channel?
Using a request-payload-expression attribute a single property of the payload can be passed on to the request channel instead of the full message.
In the example below on the username property is passed on to the request channel.
Keep in mind, that although only the username is passed on, the resulting message send to the request channel will contain the full set of MessageHeaders.
<int:enricher id="findUserByUsernameEnricher"
              input-channel="findUserByUsernameEnricherChannel"
              request-channel="findUserByUsernameServiceChannel"
              request-payload-expression="payload.username">
    <int:property name="email"    expression="payload.email"/>
    <int:property name="password" expression="payload.password"/>
</int:enricher>
How can I enrich payloads that consist of Collection data?
In the following example, instead of a User object, a Map is passed in.
The Map contains the username under the map key username.
Only the username is passed on to the request channel.
The reply contains a full User object, which is ultimately added to the Map under the user key.
<int:enricher id="findUserWithMapEnricher"
              input-channel="findUserWithMapEnricherChannel"
              request-channel="findUserByUsernameServiceChannel"
              request-payload-expression="payload.username">
    <int:property name="user" expression="payload"/>
</int:enricher>
How can I enrich payloads with static information without using a request channel?
Here is an example that does not use a request channel at all, but solely enriches the message’s payload with static values. But please be aware that the word static is used loosely here. You can still use SpEL expressions for setting those values.
<int:enricher id="userEnricher"
              input-channel="input">
    <int:property name="user.updateDate" expression="new java.util.Date()"/>
    <int:property name="user.firstName" value="foo"/>
    <int:property name="user.lastName"  value="bar"/>
    <int:property name="user.age"       value="42"/>
</int:enricher>
In the earlier sections we’ve covered several Content Enricher type components that help you deal with situations where a message is missing a piece of data. We also discussed Content Filtering which lets you remove data items from a message. However there are times when we want to hide data temporarily. For example, in a distributed system we may receive a Message with a very large payload. Some intermittent message processing steps may not need access to this payload and some may only need to access certain headers, so carrying the large Message payload through each processing step may cause performance degradation, may produce a security risk, and may make debugging more difficult.
The Claim Check pattern describes a mechanism that allows you to store data in a well known place while only maintaining a pointer (Claim Check) to where that data is located. You can pass that pointer around as a payload of a new Message thereby allowing any component within the message flow to get the actual data as soon as it needs it. This approach is very similar to the Certified Mail process where you’ll get a Claim Check in your mailbox and would have to go to the Post Office to claim your actual package. Of course it’s also the same idea as baggage-claim on a flight or in a hotel.
Spring Integration provides two types of Claim Check transformers:
- Incoming Claim Check Transformer
- Outgoing Claim Check Transformer
Convenient namespace-based mechanisms are available to configure them.
An Incoming Claim Check Transformer will transform an incoming Message by storing it in the Message Store identified by its message-store attribute.
<int:claim-check-in id="checkin"
        input-channel="checkinChannel"
        message-store="testMessageStore"
        output-channel="output"/>
In the above configuration the Message that is received on the input-channel will be persisted to the Message Store identified with the message-store attribute and indexed with generated ID.
That ID is the Claim Check for that Message.
The Claim Check will also become the payload of the new (transformed) Message that will be sent to the output-channel.
Now, lets assume that at some point you do need access to the actual Message. You can of course access the Message Store manually and get the contents of the Message, or you can use the same approach as before except now you will be transforming the Claim Check to the actual Message by using an Outgoing Claim Check Transformer.
Here is an overview of all available parameters of an Incoming Claim Check Transformer:
<int:claim-check-in auto-startup="true"
|
Lifecycle attribute signaling if this component should be started during Application Context startup.
Defaults to true.
Attribute is not available inside a |
|
Id identifying the underlying bean definition ( |
|
The receiving Message channel of this endpoint.
Attribute is not available inside a |
|
Reference to the MessageStore to be used by this Claim Check transformer. If not specified, the default reference will be to a bean named messageStore. Optional. |
|
Specifies the order for invocation when this endpoint is connected as a subscriber to a channel.
This is particularly relevant when that channel is using a failover dispatching strategy.
It has no effect when this endpoint itself is a Polling Consumer for a channel with a queue.
Attribute is not available inside a |
|
Identifies the Message channel where Message will be sent after its being processed by this endpoint.
Attribute is not available inside a |
|
Specify the maximum amount of time in milliseconds to wait when sending a reply Message to the output channel.
Defaults to |
|
Defines a poller.
Element is not available inside a |
An Outgoing Claim Check Transformer allows you to transform a Message with a Claim Check payload into a Message with the original content as its payload.
<int:claim-check-out id="checkout"
        input-channel="checkoutChannel"
        message-store="testMessageStore"
        output-channel="output"/>
In the above configuration, the Message that is received on the input-channel should have a Claim Check as its payload and the Outgoing Claim Check Transformer will transform it into a Message with the original payload by simply querying the Message store for a Message identified by the provided Claim Check.
It then sends the newly checked-out Message to the output-channel.
Here is an overview of all available parameters of an Outgoing Claim Check Transformer:
<int:claim-check-out auto-startup="true"
|
Lifecycle attribute signaling if this component should be started during Application Context startup.
Defaults to true.
Attribute is not available inside a |
|
Id identifying the underlying bean definition ( |
|
The receiving Message channel of this endpoint.
Attribute is not available inside a |
|
Reference to the MessageStore to be used by this Claim Check transformer. If not specified, the default reference will be to a bean named messageStore. Optional. |
|
Specifies the order for invocation when this endpoint is connected as a subscriber to a channel.
This is particularly relevant when that channel is using a failover dispatching strategy.
It has no effect when this endpoint itself is a Polling Consumer for a channel with a queue.
Attribute is not available inside a |
|
Identifies the Message channel where Message will be sent after its being processed by this endpoint.
Attribute is not available inside a |
|
If set to |
|
Specify the maximum amount of time in milliseconds to wait when sending a reply Message to the output channel.
Defaults to |
|
Defines a poller.
Element is not available inside a |
Claim Once
There are scenarios when a particular message must be claimed only once.
As an analogy, consider the airplane luggage check-in/out process.
Checking-in your luggage on departure and and then claiming it on arrival is a classic example of such a scenario.
Once the luggage has been claimed, it can not be claimed again without first checking it back in.
To accommodate such cases, we introduced a remove-message boolean attribute on the claim-check-out transformer.
This attribute is set to false by default.
However, if set to true, the claimed Message will be removed from the MessageStore, so that it can no longer be claimed again.
This is also something to consider in terms of storage space, especially in the case of the in-memory Map-based SimpleMessageStore, where failing to remove the Messages could ultimately lead to an OutOfMemoryException.
Therefore, if you don’t expect multiple claims to be made, it’s recommended that you set the remove-message attribute’s value to true.
<int:claim-check-out id="checkout"
        input-channel="checkoutChannel"
        message-store="testMessageStore"
        output-channel="output"
        remove-message="true"/>
Although we rarely care about the details of the claim checks as long as they work, it is still worth knowing that the current implementation of the actual Claim Check (the pointer) in Spring Integration is a UUID to ensure uniqueness.
org.springframework.integration.store.MessageStore is a strategy interface for storing and retrieving messages.
Spring Integration provides two convenient implementations of it.
SimpleMessageStore: an in-memory, Map-based implementation (the default, good for testing) and JdbcMessageStore: an implementation that uses a relational database via JDBC.
Spring Integration version 4.2 introduces the Codec abstraction.
Codecs are used to encode/decode objects to/from byte[].
They are an alternative to Java Serialization.
One advantage is, typically, objects do not have to implement Serializable.
One implementation, using Kryo for serialization, is provided but you
can provide your own implementation for use in any of these components:
-
EncodingPayloadTransformer -
DecodingTransformer -
CodecMessageConverter
See their JavaDocs for more information.
This transformer encodes the payload to a byte[] using the codec.
It does not affect message headers.
This transformer decodes a byte[] using the codec; it needs to be configured with the Class to which the object
should be decoded (or an expression that resolves to a Class).
If the resulting object is a Message<?>, inbound headers will not be retained.
Certain endpoints (e.g. TCP, Redis) have no concept of message headers; they support the use of a
MessageConverter and the CodecMessageConverter can be used to convert a message to/from a byte[] for
transmission.
Currently, this is the only implementation of Codec.
There are two Codec s - PojoCodec which can be used in the transformers and MessageCodec which can be used
in the CodecMessageConverter.
Several custom serializers are provided by the framework:
-
FileSerializer -
MessageHeadersSerializer -
MutableMessageHeadersSerializer
The first can be used with the PojoCodec, by initializing it with the FileKryoRegistrar.
The second and third are used with the MessageCodec, which is initialized with the MessageKryoRegistrar.
By default, Kryo delegates unknown Java types to its FieldSerializer.
Kryo also registers default serializers for each primitive type along with String, Collection and Map serializers.
FieldSerializer uses reflection to navigate the object graph. A more efficient approach is to implement a custom
serializer that is aware of the object’s structure and can directly serialize selected primitive fields:
public class AddressSerializer extends Serializer<Address> {

    @Override
    public void write(Kryo kryo, Output output, Address address) {
        output.writeString(address.getStreet());
        output.writeString(address.getCity());
        output.writeString(address.getCountry());
    }

    @Override
    public Address read(Kryo kryo, Input input, Class<Address> type) {
        return new Address(input.readString(), input.readString(), input.readString());
    }
}
The Serializer interface exposes Kryo, Input, and Output which provide
complete control over which fields are included and other internal settings as
described in the documentation.
| Note |
|---|---|
|
When registering your custom serializer, you need a registration ID. The registration IDs are arbitrary but in our case must be explicitly defined because each Kryo instance across the distributed application must use the same IDs. Kryo recommends small positive integers, and reserves a few ids (value < 10). Spring Integration currently defaults to using 40, 41 and 42 (for the file and message header serializers mentioned above); we recommend you start at, say 60, to allow for expansion in the framework. These framework defaults can be overridden by configuring the registrars mentioned above. |
If custom serialization is indicated, please consult the Kryo documentation
since you will be using the native API.
For an example, see the MessageCodec.
If you have write access to the domain object source code it may implement KryoSerializable as described
here.
In this case
the class provides the serialization methods itself and no further configuration
is required. This has the advantage of being much simpler to use
with XD, however benchmarks have shown this is not quite as efficient as
registering a custom serializer explicitly:
public class Address implements KryoSerializable {
    ...

    @Override
    public void write(Kryo kryo, Output output) {
        output.writeString(this.street);
        output.writeString(this.city);
        output.writeString(this.country);
    }

    @Override
    public void read(Kryo kryo, Input input) {
        this.street = input.readString();
        this.city = input.readString();
        this.country = input.readString();
    }
}
Note that this technique can also be used to wrap a serialization library other than Kryo.
Kryo also provides an annotation as described here.
@DefaultSerializer(SomeClassSerializer.class)
public class SomeClass {
       // ...
}
If you have write access to the domain object this may be a simpler alternative to specify a custom serializer. Note this does not register the class with an ID, so your mileage may vary.
The first part of this chapter covers some background theory and reveals quite a bit about the underlying API that drives Spring Integration’s various messaging components. This information can be helpful if you want to really understand what’s going on behind the scenes. However, if you want to get up and running with the simplified namespace-based configuration of the various elements, feel free to skip ahead to Section 8.1.4, “Endpoint Namespace Support” for now.
As mentioned in the overview, Message Endpoints are responsible for connecting the various messaging components to channels. Over the next several chapters, you will see a number of different components that consume Messages. Some of these are also capable of sending reply Messages. Sending Messages is quite straightforward. As shown above in Section 4.1, “Message Channels”, it’s easy to send a Message to a Message Channel. However, receiving is a bit more complicated. The main reason is that there are two types of consumers: Polling Consumers and Event Driven Consumers.
Of the two, Event Driven Consumers are much simpler. Without any need to manage and schedule a separate poller thread, they are essentially just listeners with a callback method. When connecting to one of Spring Integration’s subscribable Message Channels, this simple option works great. However, when connecting to a buffering, pollable Message Channel, some component has to schedule and manage the polling thread(s). Spring Integration provides two different endpoint implementations to accommodate these two types of consumers. Therefore, the consumers themselves can simply implement the callback interface. When polling is required, the endpoint acts as a container for the consumer instance. The benefit is similar to that of using a container for hosting Message Driven Beans, but since these consumers are simply Spring-managed Objects running within an ApplicationContext, it more closely resembles Spring’s own MessageListener containers.
Spring Integration’s MessageHandler interface is implemented by many of the components within the framework.
In other words, this is not part of the public API, and a developer would not typically implement MessageHandler directly.
Nevertheless, it is used by a Message Consumer for actually handling the consumed Messages, and so being aware of this strategy interface does help in terms of understanding the overall role of a consumer.
The interface is defined as follows:
public interface MessageHandler {

    void handleMessage(Message<?> message);

}
Despite its simplicity, this provides the foundation for most of the components that will be covered in the following chapters (Routers, Transformers, Splitters, Aggregators, Service Activators, etc). Those components each perform very different functionality with the Messages they handle, but the requirements for actually receiving a Message are the same, and the choice between polling and event-driven behavior is also the same. Spring Integration provides two endpoint implementations that host these callback-based handlers and allow them to be connected to Message Channels.
Because it is the simpler of the two, we will cover the Event Driven Consumer endpoint first.
You may recall that the SubscribableChannel interface provides a subscribe() method and that the method accepts a MessageHandler parameter (as shown in the section called “SubscribableChannel”):
subscribableChannel.subscribe(messageHandler);
Since a handler that is subscribed to a channel does not have to actively poll that channel, this is an Event Driven Consumer, and the implementation provided by Spring Integration accepts a a SubscribableChannel and a MessageHandler:
SubscribableChannel channel = context.getBean("subscribableChannel", SubscribableChannel.class);

EventDrivenConsumer consumer = new EventDrivenConsumer(channel, exampleHandler);
Spring Integration also provides a PollingConsumer, and it can be instantiated in the same way except that the channel must implement PollableChannel:
PollableChannel channel = context.getBean("pollableChannel", PollableChannel.class);

PollingConsumer consumer = new PollingConsumer(channel, exampleHandler);
| Note |
|---|---|
|
For more information regarding Polling Consumers, please also read Section 4.2, “Poller” as well as Section 4.3, “Channel Adapter”. |
There are many other configuration options for the Polling Consumer. For example, the trigger is a required property:
PollingConsumer consumer = new PollingConsumer(channel, handler);

consumer.setTrigger(new IntervalTrigger(30, TimeUnit.SECONDS));
Spring Integration currently provides two implementations of the Trigger interface: IntervalTrigger and CronTrigger.
The IntervalTrigger is typically defined with a simple interval (in milliseconds), but also supports an initialDelay property and a boolean fixedRate property (the default is false, i.e.
fixed delay):
IntervalTrigger trigger = new IntervalTrigger(1000);
trigger.setInitialDelay(5000);
trigger.setFixedRate(true);
The CronTrigger simply requires a valid cron expression (see the Javadoc for details):
CronTrigger trigger = new CronTrigger("*/10 * * * * MON-FRI");
In addition to the trigger, several other polling-related configuration properties may be specified:
PollingConsumer consumer = new PollingConsumer(channel, handler);

consumer.setMaxMessagesPerPoll(10);
consumer.setReceiveTimeout(5000);
The maxMessagesPerPoll property specifies the maximum number of messages to receive within a given poll operation.
This means that the poller will continue calling receive() without waiting until either null is returned or that max is reached.
For example, if a poller has a 10 second interval trigger and a maxMessagesPerPoll setting of 25, and it is polling a channel that has 100 messages in its queue, all 100 messages can be retrieved within 40 seconds.
It grabs 25, waits 10 seconds, grabs the next 25, and so on.
The receiveTimeout property specifies the amount of time the poller should wait if no messages are available when it invokes the receive operation. For example, consider two options that seem similar on the surface but are actually quite different: the first has an interval trigger of 5 seconds and a receive timeout of 50 milliseconds while the second has an interval trigger of 50 milliseconds and a receive timeout of 5 seconds. The first one may receive a message up to 4950 milliseconds later than it arrived on the channel (if that message arrived immediately after one of its poll calls returned). On the other hand, the second configuration will never miss a message by more than 50 milliseconds. The difference is that the second option requires a thread to wait, but as a result it is able to respond much more quickly to arriving messages. This technique, known as long polling, can be used to emulate event-driven behavior on a polled source.
A Polling Consumer may also delegate to a Spring TaskExecutor, as illustrated in the following example:
PollingConsumer consumer = new PollingConsumer(channel, handler);

TaskExecutor taskExecutor = context.getBean("exampleExecutor", TaskExecutor.class);
consumer.setTaskExecutor(taskExecutor);
Furthermore, a PollingConsumer has a property called adviceChain.
This property allows you to specify a List of AOP Advices for handling additional cross cutting concerns including transactions.
These advices are applied around the doPoll() method.
For more in-depth information, please see the sections AOP Advice chains and Transaction Support under Section 8.1.4, “Endpoint Namespace Support”.
The examples above show dependency lookups, but keep in mind that these consumers will most often be configured as Spring bean definitions.
In fact, Spring Integration also provides a FactoryBean called ConsumerEndpointFactoryBean that creates the appropriate consumer type based on the type of channel, and there is full XML namespace support to even further hide those details.
The namespace-based configuration will be featured as each component type is introduced.
| Note |
|---|---|
|
Many of the |
Throughout the reference manual, you will see specific configuration examples for endpoint elements, such as router, transformer, service-activator, and so on.
Most of these will support an input-channel attribute and many will support an output-channel attribute.
After being parsed, these endpoint elements produce an instance of either the PollingConsumer or the EventDrivenConsumer depending on the type of the input-channel that is referenced: PollableChannel or SubscribableChannel respectively.
When the channel is pollable, then the polling behavior is determined based on the endpoint element’s poller sub-element and its attributes.
In the configuration below you find a poller with all available configuration options:
<int:poller cron=""
|
Provides the ability to configure Pollers using Cron expressions.
The underlying implementation uses an |
|
By setting this attribute to true, it is possible to define exactly one (1) global default poller.
An exception is raised if more than one default poller is defined in the application context.
Any endpoints connected to a PollableChannel (PollingConsumer) or any SourcePollingChannelAdapter that does not have any explicitly configured poller will then use the global default Poller.
Optional.
Defaults to |
|
Identifies the channel which error messages will be sent to if a failure occurs in this poller’s invocation.
To completely suppress Exceptions, provide a reference to the |
|
The fixed delay trigger uses a |
|
The fixed rate trigger uses a |
|
The Id referring to the Poller’s underlying bean-definition, which is of type |
|
Please see Section 4.3.1, “Configuring An Inbound Channel Adapter” for more information.
Optional.
If not specified the default values used depends on the context.
If a |
|
Value is set on the underlying class |
|
Bean reference to another top-level poller.
The |
|
Provides the ability to reference a custom task executor. Please see the section below titled TaskExecutor Support for further information. Optional. |
|
This attribute specifies the |
|
Reference to any spring configured bean which implements the |
|
Allows to specify extra AOP Advices to handle additional cross cutting concerns. Please see the section below titled Transaction Support for further information. Optional. |
|
Pollers can be made transactional. Please see the section below titled AOP Advice chains for further information. Optional. |
Examples
For example, a simple interval-based poller with a 1-second interval would be configured like this:
<int:transformer input-channel="pollable" ref="transformer" output-channel="output"> <int:poller fixed-rate="1000"/> </int:transformer>
As an alternative to fixed-rate you can also use the fixed-delay attribute.
For a poller based on a Cron expression, use the cron attribute instead:
<int:transformer input-channel="pollable" ref="transformer" output-channel="output"> <int:poller cron="*/10 * * * * MON-FRI"/> </int:transformer>
If the input channel is a PollableChannel, then the poller configuration is required.
Specifically, as mentioned above, the trigger is a required property of the PollingConsumer class.
Therefore, if you omit the poller sub-element for a Polling Consumer endpoint’s configuration, an Exception may be thrown.
The exception will also be thrown if you attempt to configure a poller on the element that is connected to a non-pollable channel.
It is also possible to create top-level pollers in which case only a ref is required:
<int:poller id="weekdayPoller" cron="*/10 * * * * MON-FRI"/> <int:transformer input-channel="pollable" ref="transformer" output-channel="output"> <int:poller ref="weekdayPoller"/> </int:transformer>
| Note |
|---|---|
|
The ref attribute is only allowed on the inner-poller definitions. Defining this attribute on a top-level poller will result in a configuration exception thrown during initialization of the Application Context. |
Global Default Pollers
In fact, to simplify the configuration even further, you can define a global default poller.
A single top-level poller within an ApplicationContext may have the default attribute with a value of true.
In that case, any endpoint with a PollableChannel for its input-channel that is defined within the same ApplicationContext and has no explicitly configured poller sub-element will use that default.
<int:poller id="defaultPoller" default="true" max-messages-per-poll="5" fixed-rate="3000"/> <!-- No <poller/> sub-element is necessary since there is a default --> <int:transformer input-channel="pollable" ref="transformer" output-channel="output"/>
Transaction Support
Spring Integration also provides transaction support for the pollers so that each receive-and-forward operation can be performed as an atomic unit-of-work. To configure transactions for a poller, simply add the_<transactional/>_ sub-element. The attributes for this element should be familiar to anyone who has experience with Spring’s Transaction management:
<int:poller fixed-delay="1000"> <int:transactional transaction-manager="txManager" propagation="REQUIRED" isolation="REPEATABLE_READ" timeout="10000" read-only="false"/> </int:poller>
For more information please refer to Section C.1.1, “Poller Transaction Support”.
AOP Advice chains
Since Spring transaction support depends on the Proxy mechanism with TransactionInterceptor (AOP Advice) handling transactional behavior of the message flow initiated by the poller, some times there is a need to provide extra Advice(s) to handle other cross cutting behavior associated with the poller.
For that poller defines an advice-chain element allowing you to add more advices - class that implements MethodInterceptor interface…
<int:service-activator id="advicedSa" input-channel="goodInputWithAdvice" ref="testBean" method="good" output-channel="output"> <int:poller max-messages-per-poll="1" fixed-rate="10000"> <int:advice-chain> <ref bean="adviceA" /> <beans:bean class="org.bar.SampleAdvice" /> <ref bean="txAdvice" /> </int:advice-chain> </int:poller> </int:service-activator>
For more information on how to implement MethodInterceptor please refer to AOP sections of Spring reference manual (section 8 and 9). Advice chain can also be applied on the poller that does not have any transaction configuration essentially allowing you to enhance the behavior of the message flow initiated by the poller.
| Important |
|---|---|
|
When using an advice chain, the |
TaskExecutor Support
The polling threads may be executed by any instance of Spring’s TaskExecutor abstraction.
This enables concurrency for an endpoint or group of endpoints.
As of Spring 3.0, there is a task namespace in the core Spring Framework, and its <executor/> element supports the creation of a simple thread pool executor.
That element accepts attributes for common concurrency settings such as pool-size and queue-capacity.
Configuring a thread-pooling executor can make a substantial difference in how the endpoint performs under load.
These settings are available per-endpoint since the performance of an endpoint is one of the major factors to consider (the other major factor being the expected volume on the channel to which the endpoint subscribes).
To enable concurrency for a polling endpoint that is configured with the XML namespace support, provide the task-executor reference on its <poller/> element and then provide one or more of the properties shown below:
<int:poller task-executor="pool" fixed-rate="1000"/> <task:executor id="pool" pool-size="5-25" queue-capacity="20" keep-alive="120"/>
If no task-executor is provided, the consumer’s handler will be invoked in the caller’s thread.
Note that the caller is usually the default TaskScheduler (see Section E.3, “Configuring the Task Scheduler”).
Also, keep in mind that the task-executor attribute can provide a reference to any implementation of Spring’s TaskExecutor interface by specifying the bean name.
The executor element above is simply provided for convenience.
As mentioned in the background section for Polling Consumers above, you can also configure a Polling Consumer in such a way as to emulate event-driven behavior. With a long receive-timeout and a short interval-trigger, you can ensure a very timely reaction to arriving messages even on a polled message source. Note that this will only apply to sources that have a blocking wait call with a timeout. For example, the File poller does not block, each receive() call returns immediately and either contains new files or not. Therefore, even if a poller contains a long receive-timeout, that value would never be usable in such a scenario. On the other hand when using Spring Integration’s own queue-based channels, the timeout value does have a chance to participate. The following example demonstrates how a Polling Consumer will receive Messages nearly instantaneously.
<int:service-activator input-channel="someQueueChannel" output-channel="output"> <int:poller receive-timeout="30000" fixed-rate="10"/> </int:service-activator>
Using this approach does not carry much overhead since internally it is nothing more then a timed-wait thread which does not require nearly as much CPU resource usage as a thrashing, infinite while loop for example.
When configuring Pollers with a fixed-delay or fixed-rate attribute, the default implementation will use a PeriodicTrigger instance.
The PeriodicTrigger is part of the Core Spring Framework and it accepts the interval as a constructor argument, only.
Therefore it cannot be changed at runtime.
However, you can define your own implementation of the org.springframework.scheduling.Trigger interface.
You could even use the PeriodicTrigger as a starting point.
Then, you can add a setter for the interval (period), or you could even embed your own throttling logic within the trigger itself if desired.
The period property will be used with each call to nextExecutionTime to schedule the next poll.
To use this custom trigger within pollers, declare the bean definition of the custom Trigger in your application context and inject the dependency into your Poller configuration using the trigger attribute, which references the custom Trigger bean instance.
You can now obtain a reference to the Trigger bean and the polling interval can be changed between polls.
For an example, please see the Spring Integration Samples project. It contains a sample called dynamic-poller, which uses a custom Trigger and demonstrates the ability to change the polling interval at runtime.
https://github.com/SpringSource/spring-integration-samples/tree/master/intermediate
The sample provides a custom Trigger which implements the org.springframework.scheduling.Trigger interface. The sample’s Trigger is based on Spring’s PeriodicTrigger implementation. However, the fields of the custom trigger are not final and the properties have explicit getters and setters, allowing to dynamically change the polling period at runtime.
| Note |
|---|---|
|
It is important to note, though, that because the Trigger method is nextExecutionTime(), any changes to a dynamic trigger will not take effect until the next poll, based on the existing configuration. It is not possible to force a trigger to fire before it’s currently configured next execution time. |
Throughout the reference manual, you will also see specific configuration and implementation examples of various endpoints which can accept a Message or any arbitrary Object as an input parameter.
In the case of an Object, such a parameter will be mapped to a Message payload or part of the payload or header (when using the Spring Expression Language).
However there are times when the type of input parameter of the endpoint method does not match the type of the payload or its part.
In this scenario we need to perform type conversion.
Spring Integration provides a convenient way for registering type converters (using the Spring ConversionService) within its own instance of a conversion service bean named integrationConversionService.
That bean is automatically created as soon as the first converter is defined using the Spring Integration infrastructure.
To register a Converter all you need is to implement org.springframework.core.convert.converter.Converter, org.springframework.core.convert.converter.GenericConverter or org.springframework.core.convert.converter.ConverterFactory.
The Converter implementation is the simplest and converts from a single type to another.
For more sophistication, such as converting to a class hierarchy, you would implement a GenericConverter and possibly a ConditionalConverter.
These give you complete access to the from and to type descriptors enabling complex conversions.
For example, if you have an abstract class Foo that is the target of your conversion (parameter type, channel data type etc) and you have two concrete implementations Bar and Baz and you wish to convert to one or the other based on the input type, the GenericConverter would be a good fit.
Refer to the JavaDocs for these interfaces for more information.
When you have implemented your converter, you can register it with convenient namespace support:
<int:converter ref="sampleConverter"/> <bean id="sampleConverter" class="foo.bar.TestConverter"/>
or as an inner bean:
<int:converter> <bean class="o.s.i.config.xml.ConverterParserTests$TestConverter3"/> </int:converter>
Starting with Spring Integration 4.0, the above configuration is available using annotations:
@Component @IntegrationConverter public class TestConverter implements Converter<Boolean, Number> { public Number convert(Boolean source) { return source ? 1 : 0; } }
or as a @Configuration part:
@Configuration @EnableIntegration public class ContextConfiguration { @Bean @IntegrationConverter public SerializingConverter serializingConverter() { return new SerializingConverter(); } }
| Important |
|---|---|
|
When configuring an Application Context, the Spring Framework allows you to add a conversionService bean (see Configuring a ConversionService chapter). This service is used, when needed, to perform appropriate conversions during bean creation and configuration. In contrast, the integrationConversionService is used for runtime conversions. These uses are quite different; converters that are intended for use when wiring bean constructor-args and properties may produce unintended results if used at runtime for Spring Integration expression evaluation against Messages within Datatype Channels, Payload Type transformers etc. However, if you do want to use the Spring conversionService as the Spring Integration integrationConversionService, you can configure an alias in the Application Context: <alias name="conversionService" alias="integrationConversionService"/> In this case the conversionService's Converters will be available for Spring Integration runtime conversion. |
Starting with version 5.0, by default, the method invocation mechanism is based on the org.springframework.messaging.handler.invocation.InvocableHandlerMethod infrastructure.
Its HandlerMethodArgumentResolver implementations (e.g. PayloadArgumentResolver and MessageMethodArgumentResolver) can use the MessageConverter abstraction to convert an incoming payload to the target method argument type.
The conversion can be based on the contentType message header.
For this purpose Spring Integration provides the ConfigurableCompositeMessageConverter that delegates to a list of registered converters to be invoked until one of them returns a non-null result.
By default this converter provides (in strict order):
-
MappingJackson2MessageConverterif Jackson processor is present in classpath; -
ByteArrayMessageConverter -
ObjectStringMessageConverter -
GenericMessageConverter
Please, consult their JavaDocs for more information about their purpose and appropriate contentType value for conversion.
The ConfigurableCompositeMessageConverter is used because it can be be supplied with any other MessageConverter s including or excluding above mentioned default converters and registered as an appropriate bean in the application context overriding the default one:
@Bean(name = IntegrationContextUtils.ARGUMENT_RESOLVER_MESSAGE_CONVERTER_BEAN_NAME) public ConfigurableCompositeMessageConverter compositeMessageConverter() { List<MessageConverter> converters = Arrays.asList(new MarshallingMessageConverter(jaxb2Marshaller()), new JavaSerializationMessageConverter()); return new ConfigurableCompositeMessageConverter(converters); }
And those two new converters will be registered in the composite before the defaults.
You can also not use a ConfigurableCompositeMessageConverter, but provide your own MessageConverter by registering a bean with the name integrationArgumentResolverMessageConverter (IntegrationContextUtils.ARGUMENT_RESOLVER_MESSAGE_CONVERTER_BEAN_NAME constant).
| Note |
|---|---|
|
The |
If you want the polling to be asynchronous, a Poller can optionally specify a task-executor attribute pointing to an existing instance of any TaskExecutor bean (Spring 3.0 provides a convenient namespace configuration via the task namespace).
However, there are certain things you must understand when configuring a Poller with a TaskExecutor.
The problem is that there are two configurations in place. The Poller and the TaskExecutor, and they both have to be in tune with each other otherwise you might end up creating an artificial memory leak.
Let’s look at the following configuration provided by one of the users on the Spring Integration Forum:
<int:channel id="publishChannel"> <int:queue /> </int:channel> <int:service-activator input-channel="publishChannel" ref="myService"> <int:poller receive-timeout="5000" task-executor="taskExecutor" fixed-rate="50" /> </int:service-activator> <task:executor id="taskExecutor" pool-size="20" />
The above configuration demonstrates one of those out of tune configurations.
By default, the task executor has an unbounded task queue. The poller keeps scheduling new tasks even though all the threads are blocked waiting for either a new message to arrive, or the timeout to expire. Given that there are 20 threads executing tasks with a 5 second timeout, they will be executed at a rate of 4 per second (5000/20 = 250ms). But, new tasks are being scheduled at a rate of 20 per second, so the internal queue in the task executor will grow at a rate of 16 per second (while the process is idle), so we essentially have a memory leak.
One of the ways to handle this is to set the queue-capacity attribute of the Task Executor; and even 0 is a reasonable
value.
You can also manage it by specifying what to do with messages that can not be queued by setting the rejection-policy attribute of the Task Executor (e.g., DISCARD).
In other words, there are certain details you must understand with regard to configuring the TaskExecutor.
Please refer to Task Execution and Scheduling of the Spring reference manual for more detail on the subject.
Many endpoints are composite beans; this includes all consumers and all polled inbound channel adapters.
Consumers (polled or event- driven) delegate to a MessageHandler; polled adapters obtain messages by delegating to a MessageSource.
Often, it is useful to obtain a reference to the delegate bean, perhaps to change configuration at runtime, or for testing.
These beans can be obtained from the ApplicationContext with well-known names.
MessageHandler s are registered with the application context with a bean id someConsumer.handler (where consumer is the endpoint’s id attribute).
MessageSource s are registered with a bean id somePolledAdapter.source, again where somePolledAdapter is the id of the adapter.
The above only applies to the framework component itself. If you use an inner bean definition such as this:
<int:service-activator id="exampleServiceActivator" input-channel="inChannel" output-channel = "outChannel" method="foo"> <beans:bean class="org.foo.ExampleServiceActivator"/> </int:service-activator>
the bean is treated like any inner bean declared that way and is not registered with the application context.
If you wish to access this bean in some other manner, declare it at the top level with an id and use the ref attribute instead.
See the Spring Documentation for more information.
Starting with version 4.2, endpoints can be assigned to roles. Roles allow endpoints to be started and stopped as a group; this is particularly useful when using leadership election where a set of endpoints can be started or stopped when leadership is granted or revoked respectively.
You can assign endpoints to roles using XML, Java configuration, or programmatically:
<int:inbound-channel-adapter id="ica" channel="someChannel" expression="'foo'" role="cluster" auto-startup="false"> <int:poller fixed-rate="60000" /> </int:inbound-channel-adapter>
@Bean @ServiceActivator(inputChannel = "sendAsyncChannel", autoStartup="false") @Role("cluster") public MessageHandler sendAsyncHandler() { return // some MessageHandler }
@Payload("#args[0].toLowerCase()") @Role("cluster") public String handle(String payload) { return payload.toUpperCase(); }
@Autowired private SmartLifecycleRoleController roleController; ... this.roleController.addSmartLifeCycleToRole("cluster", someEndpoint); ...
IntegrationFlow flow -> flow
.handle(..., e -> e.role("cluster"));
Each of these adds the endpoint to the role cluster.
Invoking roleController.startLifecyclesInRole("cluster") (and the corresponding stop... method) will start/stop
the endpoints.
| Note |
|---|---|
|
Any object implementing |
The SmartLifecycleRoleController implements ApplicationListener<AbstractLeaderEvent> and it will automatically
start/stop its configured SmartLifecycle objects when leadership is granted/revoked (when some bean publishes
OnGrantedEvent or OnRevokedEvent respectively).
| Important |
|---|---|
|
When using leadership election to start/stop components, it is important to set the |
Starting with _version 4.3.8, the SmartLifecycleRoleController provides several status methods:
public Collection<String> getRoles()
|
Returns a list of the roles being managed. |
|
Returns true if all endpoints in the role are running. |
|
Returns true if none of the endpoints in the role are running. |
|
Returns a map of |
Groups of endpoints can be started/stopped based on leadership being granted or revoked respectively. This is useful in clustered scenarios where shared resources must only be consumed by a single instance. An example of this is a file inbound channel adapter that is polling a shared directory. (See Section 15.2, “Reading Files”).
To participate in a leader election and be notified when elected leader, when leadership is revoked or, failure to acquire the resources to become leader, an application creates a component in the application context called a "leader initiator".
Normally a leader initiator is a SmartLifecycle so it starts up (optionally) automatically when the context starts, and then publishes notifications when leadership changes.
Users can also receive failure notifications by setting the publishFailedEvents to true (starting with version 5.0), in cases when they want take a specific action if a failure occurs.
By convention the user provides a Candidate that receives the callbacks and also can revoke the leadership through a Context object provided by the framework.
User code can also listen for org.springframework.integration.leader.event.AbstractLeaderEvent s, and respond accordingly, for instance using a SmartLifecycleRoleController.
There is a basic implementation of a leader initiator based on the LockRegistry abstraction.
To use it you just need to create an instance as a bean, for example:
@Bean public LockRegistryLeaderInitiator leaderInitiator(LockRegistry locks) { return new LockRegistryLeaderInitiator(locks); }
If the lock registry is implemented correctly, there will only ever be at most one leader.
If the lock registry also provides locks which throw exceptions (ideally InterruptedException) when they expire or are broken, then the duration of the leaderless periods can be as short as is allowed by the inherent latency in the lock implementation.
By default there is a busyWaitMillis property that adds some additional latency to prevent CPU starvation in the (more usual) case that the locks are imperfect and you only know they expired by trying to obtain one again.
See Section 39.4, “Zookeeper Leadership Event Handling” for more information about leadership election and events using Zookeeper.
The primary purpose of a Gateway is to hide the messaging API provided by Spring Integration. It allows your application’s business logic to be completely unaware of the Spring Integration API and using a generic Gateway, your code interacts instead with a simple interface, only.
As mentioned above, it would be great to have no dependency on the Spring Integration API at all - including the gateway class.
For that reason, Spring Integration provides the GatewayProxyFactoryBean that generates a proxy for any interface and internally invokes the gateway methods shown below.
Using dependency injection you can then expose the interface to your business methods.
Here is an example of an interface that can be used to interact with Spring Integration:
package org.cafeteria; public interface Cafe { void placeOrder(Order order); }
Namespace support is also provided which allows you to configure such an interface as a service as demonstrated by the following example.
<int:gateway id="cafeService" service-interface="org.cafeteria.Cafe" default-request-channel="requestChannel" default-reply-timeout="10000" default-reply-channel="replyChannel"/>
With this configuration defined, the "cafeService" can now be injected into other beans, and the code that invokes the methods on that proxied instance of the Cafe interface has no awareness of the Spring Integration API. The general approach is similar to that of Spring Remoting (RMI, HttpInvoker, etc.). See the "Samples" Appendix for an example that uses this "gateway" element (in the Cafe demo).
The defaults in the configuration above are applied to all methods on the gateway interface; if a reply timeout is not specified, the calling thread will wait indefinitely for a reply. See Section 8.4.11, “Gateway behavior when no response arrives”.
The defaults can be overridden for individual methods; see Section 8.4.4, “Gateway Configuration with Annotations and/or XML”.
Typically you don’t have to specify the default-reply-channel, since a Gateway will auto-create a temporary, anonymous reply channel, where it will listen for the reply.
However, there are some cases which may prompt you to define a default-reply-channel (or reply-channel with adapter gateways such as HTTP, JMS, etc.).
For some background, we’ll quickly discuss some of the inner-workings of the Gateway.
A Gateway will create a temporary point-to-point reply channel which is anonymous and is added to the Message Headers with the name replyChannel.
When providing an explicit default-reply-channel (reply-channel with remote adapter gateways), you have the option to point to a publish-subscribe channel, which is so named because you can add more than one subscriber to it.
Internally Spring Integration will create a Bridge between the temporary replyChannel and the explicitly defined default-reply-channel.
So let’s say you want your reply to go not only to the gateway, but also to some other consumer.
In this case you would want two things: a) a named channel you can subscribe to and b) that channel is a publish-subscribe-channel. The default strategy used by the gateway will not satisfy those needs, because the reply channel added to the header is anonymous and point-to-point.
This means that no other subscriber can get a handle to it and even if it could, the channel has point-to-point behavior such that only one subscriber would get the Message.
So by defining a default-reply-channel you can point to a channel of your choosing, which in this case would be a publish-subscribe-channel.
The Gateway would create a bridge from it to the temporary, anonymous reply channel that is stored in the header.
Another case where you might want to provide a reply channel explicitly is for monitoring or auditing via an interceptor (e.g., wiretap). You need a named channel in order to configure a Channel Interceptor.
public interface Cafe { @Gateway(requestChannel="orders") void placeOrder(Order order); }
You may alternatively provide such content in method sub-elements if you prefer XML configuration (see the next paragraph).
It is also possible to pass values to be interpreted as Message headers on the Message that is created and sent to the
request channel by using the @Header annotation:
public interface FileWriter { @Gateway(requestChannel="filesOut") void write(byte[] content, @Header(FileHeaders.FILENAME) String filename); }
If you prefer the XML approach of configuring Gateway methods, you can provide method sub-elements to the gateway configuration.
<int:gateway id="myGateway" service-interface="org.foo.bar.TestGateway" default-request-channel="inputC"> <int:default-header name="calledMethod" expression="#gatewayMethod.name"/> <int:method name="echo" request-channel="inputA" reply-timeout="2" request-timeout="200"/> <int:method name="echoUpperCase" request-channel="inputB"/> <int:method name="echoViaDefault"/> </int:gateway>
You can also provide individual headers per method invocation via XML.
This could be very useful if the headers you want to set are static in nature and you don’t want to embed them in the gateway’s method signature via @Header annotations.
For example, in the Loan Broker example we want to influence how aggregation of the Loan quotes will be done based on what type of request was initiated (single quote or all quotes).
Determining the type of the request by evaluating what gateway method was invoked, although possible, would violate the separation of concerns paradigm (the method is a java artifact), but expressing your intention (meta information) via Message headers is natural in a Messaging architecture.
<int:gateway id="loanBrokerGateway" service-interface="org.springframework.integration.loanbroker.LoanBrokerGateway"> <int:method name="getLoanQuote" request-channel="loanBrokerPreProcessingChannel"> <int:header name="RESPONSE_TYPE" value="BEST"/> </int:method> <int:method name="getAllLoanQuotes" request-channel="loanBrokerPreProcessingChannel"> <int:header name="RESPONSE_TYPE" value="ALL"/> </int:method> </int:gateway>
In the above case you can clearly see how a different value will be set for the RESPONSE_TYPE header based on the gateway’s method.
Expressions and "Global" Headers
The <header/> element supports expression as an alternative to value.
The SpEL expression is evaluated to determine the value of the header.
There is no #root object but the following variables are available:
#args - an Object[] containing the method arguments
#gatewayMethod - the java.reflect.Method object representing the method in the service-interface that was invoked.
A header containing this variable can be used later in the flow, for example, for routing.
For example, if you wish to route on the simple method name, you might add a header, with expression #gatewayMethod.name.
| Note |
|---|---|
|
The |
Since 3.0, <default-header/> s can be defined to add headers to all messages produced by the gateway, regardless of the method invoked.
Specific headers defined for a method take precedence over default headers.
Specific headers defined for a method here will override any @Header annotations in the service interface.
However, default headers will NOT override any @Header annotations in the service interface.
The gateway now also supports a default-payload-expression which will be applied for all methods (unless overridden).
Using the configuration techniques in the previous section allows control of how method arguments are mapped to message elements (payload and header(s)). When no explicit configuration is used, certain conventions are used to perform the mapping. In some cases, these conventions cannot determine which argument is the payload and which should be mapped to headers.
public String send1(Object foo, Map bar); public String send2(Map foo, Map bar);
In the first case, the convention will map the first argument to the payload (as long as it is not a Map) and the contents of the second become headers.
In the second case (or the first when the argument for parameter foo is a Map), the framework cannot determine which argument should be the payload; mapping will fail.
This can generally be resolved using a payload-expression, a @Payload annotation and/or a @Headers annotation.
Alternatively, and whenever the conventions break down, you can take the entire responsibility for mapping the method calls to messages.
To do this, implement an MethodArgsMessageMapper and provide it to the <gateway/> using the mapper attribute.
The mapper maps a MethodArgsHolder, which is a simple class wrapping the java.reflect.Method instance and an Object[] containing the arguments.
When providing a custom mapper, the default-payload-expression attribute and <default-header/> elements are not allowed on the gateway; similarly, the payload-expression attribute and <header/> elements are not allowed on any <method/> elements.
Mapping Method Arguments
Here are examples showing how method arguments can be mapped to the message (and some examples of invalid configuration):
public interface MyGateway { void payloadAndHeaderMapWithoutAnnotations(String s, Map<String, Object> map); void payloadAndHeaderMapWithAnnotations(@Payload String s, @Headers Map<String, Object> map); void headerValuesAndPayloadWithAnnotations(@Header("k1") String x, @Payload String s, @Header("k2") String y); void mapOnly(Map<String, Object> map); // the payload is the map and no custom headers are added void twoMapsAndOneAnnotatedWithPayload(@Payload Map<String, Object> payload, Map<String, Object> headers); @Payload("#args[0] + #args[1] + '!'") void payloadAnnotationAtMethodLevel(String a, String b); @Payload("@someBean.exclaim(#args[0])") void payloadAnnotationAtMethodLevelUsingBeanResolver(String s); void payloadAnnotationWithExpression(@Payload("toUpperCase()") String s); void payloadAnnotationWithExpressionUsingBeanResolver(@Payload("@someBean.sum(#this)") String s); //
|
Note that in this example, the SpEL variable |
The XML equivalent looks a little different, since there is no #this context for the method argument, but expressions can refer to method arguments using the #args variable:
<int:gateway id="myGateway" service-interface="org.foo.bar.MyGateway"> <int:method name="send1" payload-expression="#args[0] + 'bar'"/> <int:method name="send2" payload-expression="@someBean.sum(#args[0])"/> <int:method name="send3" payload-expression="#method"/> <int:method name="send4"> <int:header name="foo" expression="#args[2].toUpperCase()"/> </int:method> </int:gateway>
Starting with version 4.0, gateway service interfaces can be marked with a @MessagingGateway annotation instead of requiring the definition of a <gateway /> xml element for configuration.
The following compares the two approaches for configuring the same gateway:
<int:gateway id="myGateway" service-interface="org.foo.bar.TestGateway" default-request-channel="inputC"> <int:default-header name="calledMethod" expression="#gatewayMethod.name"/> <int:method name="echo" request-channel="inputA" reply-timeout="2" request-timeout="200"/> <int:method name="echoUpperCase" request-channel="inputB"> <int:header name="foo" value="bar"/> </int:method> <int:method name="echoViaDefault"/> </int:gateway>
@MessagingGateway(name = "myGateway", defaultRequestChannel = "inputC", defaultHeaders = @GatewayHeader(name = "calledMethod", expression="#gatewayMethod.name")) public interface TestGateway { @Gateway(requestChannel = "inputA", replyTimeout = 2, requestTimeout = 200) String echo(String payload); @Gateway(requestChannel = "inputB", headers = @GatewayHeader(name = "foo", value="bar")) String echoUpperCase(String payload); String echoViaDefault(String payload); }
| Important |
|---|---|
|
As with the XML version, Spring Integration creates the |
| Note |
|---|---|
|
If you have no XML configuration, the |
When invoking methods on a Gateway interface that do not have any arguments, the default behavior is to receive a Message from a PollableChannel.
At times however, you may want to trigger no-argument methods so that you can in fact interact with other components downstream that do not require user-provided parameters, e.g. triggering no-argument SQL calls or Stored Procedures.
In order to achieve send-and-receive semantics, you must provide a payload.
In order to generate a payload, method parameters on the interface are not necessary.
You can either use the @Payload annotation or the payload-expression attribute in XML on the method sub-element.
Below please find a few examples of what the payloads could be:
- a literal string
- #gatewayMethod.name
- new java.util.Date()
- @someBean.someMethod()'s return value
Here is an example using the @Payload annotation:
public interface Cafe {
@Payload("new java.util.Date()")
List<Order> retrieveOpenOrders();
}
If a method has no argument and no return value, but does contain a payload expression, it will be treated as a send-only operation.
Of course, the Gateway invocation might result in errors. By default, any error that occurs downstream will be re-thrown as is upon the Gateway’s method invocation. For example, consider the following simple flow:
gateway -> service-activator
If the service invoked by the service activator throws a FooException, the framework wraps it in a MessagingException, attaching the message passed to the service activator in the failedMessage property.
Any logging performed by the framework will therefore have full context of the failure.
When the exception is caught by the gateway, by default, the FooException will be unwrapped and thrown to the caller.
You can configure a throws clause on the gateway method declaration for matching the particular exception type in the cause chain.
For example if you would like to catch a whole MessagingException with all the messaging information of the reason of downstream error, you should have a gateway method like this:
public interface MyGateway { void performProcess() throws MessagingException; }
Since we encourage POJO programming, you may not want to expose the caller to messaging infrastructure.
If your gateway method does not have a throws clause, the gateway will traverse the cause tree looking for a RuntimeException (that is not a MessagingException).
If none is found, the framework will simply throw the MessagingException.
If the FooException in the discussion above has a cause BarException and your method throws BarException then the gateway will further unwrap that and throw it to the caller.
When a gateway is declared with no service-interface, an internal framework interface RequestReplyExchanger is used.
public interface RequestReplyExchanger { Message<?> exchange(Message<?> request) throws MessagingException; }
Before version 5.0 this exchange method did not have a throws clause and therefore the exception was unwrapped.
If you are using this interface, and wish to restore the previous unwrap behavior, use a custom service-interface instead, or simply access the cause of the MessagingException yourself.
However there are times when you may want to simply log the error rather than propagating it, or you may want to treat an Exception as a valid reply, by mapping it to a Message that will conform to some "error message" contract that the caller understands.
To accomplish this, the Gateway provides support for a Message Channel dedicated to the errors via the error-channel attribute.
In the example below, you can see that a transformer is used to create a reply Message from the Exception.
<int:gateway id="sampleGateway" default-request-channel="gatewayChannel" service-interface="foo.bar.SimpleGateway" error-channel="exceptionTransformationChannel"/> <int:transformer input-channel="exceptionTransformationChannel" ref="exceptionTransformer" method="createErrorResponse"/>
The exceptionTransformer could be a simple POJO that knows how to create the expected error response objects.
That would then be the payload that is sent back to the caller.
Obviously, you could do many more elaborate things in such an "error flow" if necessary.
It might involve routers (including Spring Integration’s ErrorMessageExceptionTypeRouter), filters, and so on.
Most of the time, a simple transformer should be sufficient, however.
Alternatively, you might want to only log the Exception (or send it somewhere asynchronously). If you provide a one-way flow, then nothing would be sent back to the caller. In the case that you want to completely suppress Exceptions, you can provide a reference to the global "nullChannel" (essentially a /dev/null approach). Finally, as mentioned above, if no "error-channel" is defined at all, then the Exceptions will propagate as usual.
When using the @MessagingGateway annotation (see Section 8.4.6, “@MessagingGateway Annotation”), use the errroChannel attribute.
Starting with version 5.0, when using a gateway method with a void return type (one-way flow), the error-channel reference (if provided) is populated in the standard errorChannel header of each message sent.
This allows a downstream async flow, based on the standard ExecutorChannel configuration (or a QueueChannel), to override a default global errorChannel exceptions sending behavior.
Previously you had to specify an errorChannel header manually via @GatewayHeader annotation or <header> sub-element.
The error-channel property was ignored for void methods with an asynchronous flow; error messages were sent to the default errorChannel instead.
| Important |
|---|---|
|
Exposing the messaging system via simple POJI Gateways obviously provides benefits, but "hiding" the reality of the underlying messaging system does come at a price so there are certain things you should consider. We want our Java method to return as quickly as possible and not hang for an indefinite amount of time while the caller is waiting on it to return (void, return value, or a thrown Exception). When regular methods are used as a proxies in front of the Messaging system, we have to take into account the potentially asynchronous nature of the underlying messaging. This means that there might be a chance that a Message that was initiated by a Gateway could be dropped by a Filter, thus never reaching a component that is responsible for producing a reply. Some Service Activator method might result in an Exception, thus providing no reply (as we don’t generate Null messages). So as you can see there are multiple scenarios where a reply message might not be coming. That is perfectly natural in messaging systems. However think about the implication on the gateway method. The Gateway’s method input arguments were incorporated into a Message and sent downstream. The reply Message would be converted to a return value of the Gateway’s method. So you might want to ensure that for each Gateway call there will always be a reply Message. Otherwise, your Gateway method might never return and will hang indefinitely. One of the ways of handling this situation is via an Asynchronous Gateway (explained later in this section). Another way of handling it is to explicitly set the reply-timeout attribute. That way, the gateway will not hang any longer than the time specified by the reply-timeout and will return null if that timeout does elapse. Finally, you might want to consider setting downstream flags such as requires-reply on a service-activator or throw-exceptions-on-rejection on a filter. These options will be discussed in more detail in the final section of this chapter. |
| Note |
|---|---|
|
If the downstream flow returns an |
There are two properties requestTimeout and replyTimeout.
The request timeout only applies if the channel can block (e.g. a bounded QueueChannel that is full).
The reply timeout is how long the gateway will wait for a reply, or return null; it defaults to infinity.
The timeouts can be set as defaults for all methods on the gateway (defaultRequestTimeout, defaultReplyTimeout) (or on the MessagingGateway interface annotation).
Individual methods can override these defaults (in <method/> child elements) or on the @Gateway annotation.
Starting with version 5.0, the timeouts can be defined as expressions:
@Gateway(payloadExpression = "#args[0]", requestChannel = "someChannel", requestTimeoutExpression = "#args[1]", replyTimeoutExpression = "#args[2]") String lateReply(String payload, long requestTimeout, long replyTimeout);
The evaluation context has a BeanResolver (use @someBean to reference other beans) and the #args array variable is available.
When configuring with XML, the timeout attributes can be a simple long value or a SpEL expression.
<method name="someMethod" request-channel="someRequestChannel" payload-expression="#args[0]" request-timeout="1000" reply-timeout="#args[1]"> </method>
As a pattern, the Messaging Gateway is a very nice way to hide messaging-specific code while still exposing the full capabilities of the messaging system.
As you’ve seen, the GatewayProxyFactoryBean provides a convenient way to expose a Proxy over a service-interface thus giving you POJO-based access to a messaging system (based on objects in your own domain, or primitives/Strings, etc).
But when a gateway is exposed via simple POJO methods which return values it does imply that for each Request message (generated when the method is invoked) there must be a Reply message (generated when the method has returned).
Since Messaging systems naturally are asynchronous you may not always be able to guarantee the contract where "for each request there will always be be a reply". With Spring Integration 2.0 we introduced support for an Asynchronous Gateway which is a convenient way to initiate flows where you may not know if a reply is expected or how long will it take for replies to arrive.
A natural way to handle these types of scenarios in Java would be relying upon java.util.concurrent.Future instances, and that is exactly what Spring Integration uses to support an Asynchronous Gateway.
From the XML configuration, there is nothing different and you still define Asynchronous Gateway the same way as a regular Gateway.
<int:gateway id="mathService" service-interface="org.springframework.integration.sample.gateway.futures.MathServiceGateway" default-request-channel="requestChannel"/>
However the Gateway Interface (service-interface) is a little different:
public interface MathServiceGateway { Future<Integer> multiplyByTwo(int i); }
As you can see from the example above, the return type for the gateway method is a Future.
When GatewayProxyFactoryBean sees that the return type of the gateway method is a Future, it immediately switches to the async mode by utilizing an AsyncTaskExecutor.
That is all.
The call to such a method always returns immediately with a Future instance.
Then, you can interact with the Future at your own pace to get the result, cancel, etc.
And, as with any other use of Future instances, calling get() may reveal a timeout, an execution exception, and so on.
MathServiceGateway mathService = ac.getBean("mathService", MathServiceGateway.class); Future<Integer> result = mathService.multiplyByTwo(number); // do something else here since the reply might take a moment int finalResult = result.get(1000, TimeUnit.SECONDS);
For a more detailed example, please refer to the async-gateway sample distributed within the Spring Integration samples.
Starting with version 4.1, async gateway methods can also return ListenableFuture (introduced in Spring Framework 4.0).
These return types allow you to provide a callback which is invoked when the result is available (or an exception occurs).
When the gateway detects this return type, and the task executor (see below) is an AsyncListenableTaskExecutor, the executor’s submitListenable() method is invoked.
ListenableFuture<String> result = this.asyncGateway.async("foo"); result.addCallback(new ListenableFutureCallback<String>() { @Override public void onSuccess(String result) { ... } @Override public void onFailure(Throwable t) { ... } });
By default, the GatewayProxyFactoryBean uses org.springframework.core.task.SimpleAsyncTaskExecutor when submitting internal AsyncInvocationTask instances for any gateway method whose return type is Future.
However the async-executor attribute in the <gateway/> element’s configuration allows you to provide a reference to any implementation of java.util.concurrent.Executor available within the Spring application context.
The (default) SimpleAsyncTaskExecutor supports both Future and ListenableFuture return types, returning FutureTask or ListenableFutureTask respectively. Also see the section called “CompletableFuture” below.
Even though there is a default executor, it is often useful to provide an external one so that you can identify its threads in logs (when using XML, the thread name is based on the executor’s bean name):
@Bean public AsyncTaskExecutor exec() { SimpleAsyncTaskExecutor simpleAsyncTaskExecutor = new SimpleAsyncTaskExecutor(); simpleAsyncTaskExecutor.setThreadNamePrefix("exec-"); return simpleAsyncTaskExecutor; } @MessagingGateway(asyncExecutor = "exec") public interface ExecGateway { @Gateway(requestChannel = "gatewayChannel") Future<?> doAsync(String foo); }
If you wish to return a different Future implementation, you can provide a custom executor, or disable the executor altogether and return the Future in the reply message payload from the downstream flow.
To disable the executor, simply set it to null in the GatewayProxyFactoryBean (setAsyncTaskExecutor(null)).
When configuring the gateway with XML, use async-executor=""; when configuring using the @MessagingGateway annotation, use:
@MessagingGateway(asyncExecutor = AnnotationConstants.NULL) public interface NoExecGateway { @Gateway(requestChannel = "gatewayChannel") Future<?> doAsync(String foo); }
| Important |
|---|---|
|
If the return type is a specific concrete |
Starting with version 4.2, gateway methods can now return CompletableFuture<?>.
There are several modes of operation when returning this type:
When an async executor is provided and the return type is exactly CompletableFuture (not a subclass), the framework
will run the task on the executor and immediately return a CompletableFuture to the caller.
CompletableFuture.supplyAsync(Supplier<U> supplier, Executor executor) is used to create the future.
When the async executor is explicitly set to null and the return type is CompletableFuture or the return type
is a subclass of CompletableFuture, the flow is invoked on the caller’s thread.
In this scenario, it is expected that the downstream flow will return a CompletableFuture of the appropriate type.
Usage Scenarios
CompletableFuture<Invoice> order(Order order);
<int:gateway service-interface="foo.Service" default-request-channel="orders" />
In this scenario, the caller thread returns immediately with a CompletableFuture<Invoice> which will be completed
when the downstream flow replies to the gateway (with an Invoice object).
CompletableFuture<Invoice> order(Order order);
<int:gateway service-interface="foo.Service" default-request-channel="orders" async-executor="" />
In this scenario, the caller thread will return with a CompletableFuture<Invoice> when the downstream flow provides it as the payload of the reply to the gateway. Some other process must complete the future when the invoice is ready.
MyCompletableFuture<Invoice> order(Order order);
<int:gateway service-interface="foo.Service" default-request-channel="orders" />
In this scenario, the caller thread will return with a CompletableFuture<Invoice> when the downstream flow provides
it as the payload of the reply to the gateway.
Some other process must complete the future when the invoice is ready.
If DEBUG logging is enabled, a log is emitted indicating that the async executor cannot be used for this scenario.
CompletableFuture s can be used to perform additional manipulation on the reply, such as:
CompletableFuture<String> process(String data); ... CompletableFuture result = process("foo") .thenApply(t -> t.toUpperCase()); ... String out = result.get(10, TimeUnit.SECONDS);
Starting with version 5.0, the GatewayProxyFactoryBean allows the use of the Project Reactor with gateway interface methods, utilizing a Mono<T> return type.
The internal AsyncInvocationTask is wrapped in a Mono.fromCallable().
A Mono can be used to retrieve the result later (similar to a Future<?>) or you can consume from it with the dispatcher invoking your Consumer when the result is returned to the gateway.
| Important |
|---|---|
|
The |
@MessagingGateway public static interface TestGateway { @Gateway(requestChannel = "promiseChannel") Mono<Integer> multiply(Integer value); } ... @ServiceActivator(inputChannel = "promiseChannel") public Integer multiply(Integer value) { return value * 2; } ... Flux.just("1", "2", "3", "4", "5") .map(Integer::parseInt) .flatMap(this.testGateway::multiply) .collectList() .subscribe(integers -> ...);
Another example is a simple callback scenario:
Mono<Invoice> mono = service.process(myOrder); mono.subscribe(invoice -> handleInvoice(invoice));
The calling thread continues, with handleInvoice() being called when the flow completes.
As it was explained earlier, the Gateway provides a convenient way of interacting with a Messaging system via POJO method invocations, but realizing that a typical method invocation, which is generally expected to always return (even with an Exception), might not always map one-to-one to message exchanges (e.g., a reply message might not arrive - which is equivalent to a method not returning). It is important to go over several scenarios especially in the Sync Gateway case and understand the default behavior of the Gateway and how to deal with these scenarios to make the Sync Gateway behavior more predictable regardless of the outcome of the message flow that was initialed from such Gateway.
There are certain attributes that could be configured to make Sync Gateway behavior more predictable, but some of them might not always work as you might have expected. One of them is reply-timeout (at the method level or default-reply-timeout at the gateway level). So, lets look at the reply-timeout attribute and see how it can/can’t influence the behavior of the Sync Gateway in various scenarios. We will look at single-threaded scenario (all components downstream are connected via Direct Channel) and multi-threaded scenarios (e.g., somewhere downstream you may have Pollable or Executor Channel which breaks single-thread boundary)
Long running process downstream
Sync Gateway - single-threaded.
If a component downstream is still running (e.g., infinite loop or a very slow service), then setting a reply-timeout has no effect and the Gateway method call will not return until such downstream service exits (via return or exception).
Sync Gateway - multi-threaded.
If a component downstream is still running (e.g., infinite loop or a very slow service), in a multi-threaded message flow setting the reply-timeout will have an effect by allowing gateway method invocation to return once the timeout has been reached, since the GatewayProxyFactoryBean will simply poll on the reply channel waiting for a message until the timeout expires.
However it could result in a null return from the Gateway method if the timeout has been reached before the actual reply was produced. It is also important to understand that the reply message (if produced) will be sent to a reply channel after the Gateway method invocation might have returned, so you must be aware of that and design your flow with this in mind.
Downstream component returns 'null'
Sync Gateway - single-threaded. If a component downstream returns null and no reply-timeout has been configured, the Gateway method call will hang indefinitely unless: a) a reply-timeout has been configured or b) the requires-reply attribute has been set on the downstream component (e.g., service-activator) that might return null. In this case, an Exception would be thrown and propagated to the Gateway.Sync Gateway - multi-threaded. Behavior is the same as above.
Downstream component return signature is void while Gateway method signature is non-void
Sync Gateway - single-threaded. If a component downstream returns void and no reply-timeout has been configured, the Gateway method call will hang indefinitely unless a reply-timeout has been configured Sync Gateway - multi-threaded Behavior is the same as above.
Downstream component results in Runtime Exception (regardless of the method signature)
Sync Gateway - single-threaded. If a component downstream throws a Runtime Exception, such exception will be propagated via an Error Message back to the gateway and re-thrown. Sync Gateway - multi-threaded Behavior is the same as above.
| Important |
|---|---|
|
It is also important to understand that by default reply-timeout is unbounded* which means that if not explicitly set there are several scenarios (described above) where your Gateway method invocation might hang indefinitely. So, make sure you analyze your flow and if there is even a remote possibility of one of these scenarios to occur, set the reply-timeout attribute to a safe value or, even better, set the requires-reply attribute of the downstream component to true to ensure a timely response as produced by the throwing of an Exception as soon as that downstream component does return null internally. But also, realize that there are some scenarios (see the very first one) where reply-timeout will not help. That means it is also important to analyze your message flow and decide when to use a Sync Gateway vs an Async Gateway. As you’ve seen the latter case is simply a matter of defining Gateway methods that return Future instances. Then, you are guaranteed to receive that return value, and you will have more granular control over the results of the invocation.Also, when dealing with a Router you should remember that setting the resolution-required attribute to true will result in an Exception thrown by the router if it can not resolve a particular channel. Likewise, when dealing with a Filter, you can set the throw-exception-on-rejection attribute. In both of these cases, the resulting flow will behave like that containing a service-activator with the requires-reply attribute. In other words, it will help to ensure a timely response from the Gateway method invocation. |
| Note |
|---|---|
|
* reply-timeout is unbounded for <gateway/> elements (created by the GatewayProxyFactoryBean). Inbound gateways for external integration (ws, http, etc.) share many characteristics and attributes with these gateways. However, for those inbound gateways, the default reply-timeout is 1000 milliseconds (1 second). If a downstream async hand-off is made to another thread, you may need to increase this attribute to allow enough time for the flow to complete before the gateway times out. |
| Important |
|---|---|
|
It is important to understand that the timer starts when the thread returns to the gateway, i.e. when the flow completes or a message is handed off to another thread. At that time, the calling thread starts waiting for the reply. If the flow was completely synchronous, the reply will be immediately available; for asynchronous flows, the thread will wait for up to this time. |
Also see Section 9.21, “IntegrationFlow as Gateway” in the Java DSL chapter for options to define gateways via IntegrationFlows.
The Service Activator is the endpoint type for connecting any Spring-managed Object to an input channel so that it may play the role of a service. If the service produces output, it may also be connected to an output channel. Alternatively, an output producing service may be located at the end of a processing pipeline or message flow in which case, the inbound Message’s "replyChannel" header can be used. This is the default behavior if no output channel is defined and, as with most of the configuration options you’ll see here, the same behavior actually applies for most of the other components we have seen.
To create a Service Activator, use the service-activator element with the input-channel and ref attributes:
<int:service-activator input-channel="exampleChannel" ref="exampleHandler"/>
The configuration above selects all methods from the exampleHandler which meet one of the Messaging requirements:
-
annotated with
@ServiceActivator; -
is
public; -
not
voidreturn ifrequiresReply == true.
The target method for invocation at runtime is selected for each request message by their payload type.
Or as a fallback to Message<?> type if such a method is present on target class.
Starting with version 5.0, one service method can be marked with the @org.springframework.integration.annotation.Default as a fallback for all non-matching cases.
This can be useful when using Section 8.1.7, “Content Type Conversion” with the target method being invoked after conversion.
To delegate to an explicitly defined method of any object, simply add the "method" attribute.
<int:service-activator input-channel="exampleChannel" ref="somePojo" method="someMethod"/>
In either case, when the service method returns a non-null value, the endpoint will attempt to send the reply message to an appropriate reply channel. To determine the reply channel, it will first check if an "output-channel" was provided in the endpoint configuration:
<int:service-activator input-channel="exampleChannel" output-channel="replyChannel" ref="somePojo" method="someMethod"/>
If the method returns a result and no "output-channel" is defined, the framework will then check the request Message’s replyChannel header value.
If that value is available, it will then check its type.
If it is a MessageChannel, the reply message will be sent to that channel.
If it is a String, then the endpoint will attempt to resolve the channel name to a channel instance.
If the channel cannot be resolved, then a DestinationResolutionException will be thrown.
It it can be resolved, the Message will be sent there.
If the request Message doesn’t have replyChannel header and and the reply object is a Message, its replyChannel header is consulted for a target destination.
This is the technique used for Request Reply messaging in Spring Integration, and it is also an example of the Return Address pattern.
If your method returns a result, and you want to discard it and end the flow, you should configure the output-channel to send to a NullChannel.
For convenience, the framework registers one with the name nullChannel.
See Section 4.1.6, “Special Channels” for more information.
The Service Activator is one of those components that is not required to produce a reply message.
If your method returns null or has a void return type, the Service Activator exits after the method invocation, without any signals.
This behavior can be controlled by the AbstractReplyProducingMessageHandler.requiresReply option, also exposed as requires-reply when configuring with the XML namespace.
If the flag is set to true and the method returns null, a ReplyRequiredException is thrown.
The argument in the service method could be either a Message or an arbitrary type. If the latter, then it will be assumed that it is a Message payload, which will be extracted from the message and injected into such service method. This is generally the recommended approach as it follows and promotes a POJO model when working with Spring Integration. Arguments may also have @Header or @Headers annotations as described in Section E.6, “Annotation Support”
| Note |
|---|---|
|
The service method is not required to have any arguments at all, which means you can implement event-style Service Activators, where all you care about is an invocation of the service method, not worrying about the contents of the message. Think of it as a NULL JMS message. An example use-case for such an implementation could be a simple counter/monitor of messages deposited on the input channel. |
Starting with version 4.1 the framework correct converts Message properties (payload and headers) to the Java 8 Optional POJO method parameters:
public class MyBean { public String computeValue(Optional<String> payload, @Header(value="foo", required=false) String foo1, @Header(value="foo") Optional<String> foo2) { if (payload.isPresent()) { String value = payload.get(); ... } else { ... } } }
Using a ref attribute is generally recommended if the custom Service Activator handler implementation can be reused in other <service-activator> definitions.
However if the custom Service Activator handler implementation is only used within a single definition of the <service-activator>, you can provide an inner bean definition:
<int:service-activator id="exampleServiceActivator" input-channel="inChannel" output-channel = "outChannel" method="foo"> <beans:bean class="org.foo.ExampleServiceActivator"/> </int:service-activator>
| Note |
|---|---|
|
Using both the "ref" attribute and an inner handler definition in the same |
| Important |
|---|---|
|
If the "ref" attribute references a bean that extends |
Service Activators and the Spring Expression Language (SpEL)
Since Spring Integration 2.0, Service Activators can also benefit from SpEL (http://static.springsource.org/spring/docs/3.0.x/spring-framework-reference/html/expressions.html).
For example, you may now invoke any bean method without pointing to the bean via a ref attribute or including it as an inner bean definition.
For example:
<int:service-activator input-channel="in" output-channel="out" expression="@accountService.processAccount(payload, headers.accountId)"/> <bean id="accountService" class="foo.bar.Account"/>
In the above configuration instead of injecting accountService using a ref or as an inner bean, we are simply using SpEL’s @beanId notation and invoking a method which takes a type compatible with Message payload.
We are also passing a header value.
As you can see, any valid SpEL expression can be evaluated against any content in the Message.
For simple scenarios your Service Activators do not even have to reference a bean if all logic can be encapsulated by such an expression.
<int:service-activator input-channel="in" output-channel="out" expression="payload * 2"/>
In the above configuration our service logic is to simply multiply the payload value by 2, and SpEL lets us handle it relatively easy.
See Section 9.12, “ServiceActivators (.handle())” in Java DSL chapter for more information about configuring Service Activator.
The service activator is invoked by the calling thread; this would be some upstream thread if the input channel is a
SubscribableChannel, or a poller thread for a PollableChannel.
If the service returns a ListenableFuture<?> the default action is to send that as the payload of the message sent
to the output (or reply) channel.
Starting with version 4.3, you can now set the async attribute to true (setAsync(true) when using
Java configuration).
If the service returns a ListenableFuture<?> when this is true, the calling thread is released immediately, and the
reply message is sent on the thread (from within your service) that completes the future.
This is particularly advantageous for long-running services using a PollableChannel because the poller thread is
freed up to perform other services within the framework.
If the service completes the future with an Exception, normal error processing will occur - an ErrorMessage is
sent to the errorChannel message header, if present or otherwise to the default errorChannel (if available).
A Delayer is a simple endpoint that allows a Message flow to be delayed by a certain interval.
When a Message is delayed, the original sender will not block.
Instead, the delayed Messages will be scheduled with an instance of org.springframework.scheduling.TaskScheduler to be sent to the output channel after the delay has passed.
This approach is scalable even for rather long delays, since it does not result in a large number of blocked sender Threads.
On the contrary, in the typical case a thread pool will be used for the actual execution of releasing the Messages.
Below you will find several examples of configuring a Delayer.
The <delayer> element is used to delay the Message flow between two Message Channels.
As with the other endpoints, you can provide the input-channel and output-channel attributes, but the delayer also has default-delay and expression attributes (and expression sub-element) that are used to determine the number of milliseconds that each Message should be delayed.
The following delays all messages by 3 seconds:
<int:delayer id="delayer" input-channel="input" default-delay="3000" output-channel="output"/>
If you need per-Message determination of the delay, then you can also provide the SpEL expression using the expression attribute:
<int:delayer id="delayer" input-channel="input" output-channel="output" default-delay="3000" expression="headers['delay']"/>
In the example above, the 3 second delay would only apply when the expression evaluates to null for a given inbound Message. If you only want to apply a delay to Messages that have a valid result of the expression evaluation, then you can use a default-delay of 0 (the default). For any Message that has a delay of 0 (or less), the Message will be sent immediately, on the calling Thread.
The java configuration equivalent of the second example is:
@ServiceActivator(inputChannel = "input") @Bean public DelayHandler delayer() { DelayHandler handler = new DelayHandler("delayer.messageGroupId"); handler.setDefaultDelay(3_000L); handler.setDelayExpressionString("headers['delay']"); handler.setOutputChannelName("output"); return handler; }
and with the Java DSL:
@Bean public IntegrationFlow flow() { return IntegrationFlows.from("input") .delay("delayer.messageGroupId", d -> d .defaultDelay(3_000L) .delayExpression("headers['delay']")) .channel("output") .get(); }
| Note |
|---|---|
|
The XML parser uses a message group id |
| Tip |
|---|---|
|
The delay handler supports expression evaluation results that represent an interval in milliseconds (any Object whose |
| Important |
|---|---|
|
The expression evaluation may throw an evaluation Exception for various reasons, including an invalid expression, or other conditions.
By default, such exceptions are ignored (logged at DEBUG level) and the delayer falls back to the default delay (if any).
You can modify this behavior by setting the |
| Tip |
|---|---|
|
Notice in the example above that the delay expression is specified as org.springframework.expression.spel.SpelEvaluationException: EL1008E:(pos 8): Field or property 'delay' cannot be found on object of type 'org.springframework.messaging.MessageHeaders' So, if there is a possibility of the header being omitted, and you want to fall back to the default delay, it is generally more efficient (and recommended) to use the Indexer syntax instead of dot property accessor syntax, because detecting the null is faster than catching an exception. |
The delayer delegates to an instance of Spring’s TaskScheduler abstraction.
The default scheduler used by the delayer is the ThreadPoolTaskScheduler instance provided by Spring Integration on startup: Section E.3, “Configuring the Task Scheduler”.
If you want to delegate to a different scheduler, you can provide a reference through the delayer element’s scheduler attribute:
<int:delayer id="delayer" input-channel="input" output-channel="output" expression="headers.delay" scheduler="exampleTaskScheduler"/> <task:scheduler id="exampleTaskScheduler" pool-size="3"/>
| Tip |
|---|---|
|
If you configure an external |
| Tip |
|---|---|
|
Also keep in mind |
The DelayHandler persists delayed Messages into the Message Group in the provided MessageStore.
(The groupId is based on required id attribute of <delayer> element.) A delayed message is removed from the MessageStore by the scheduled task just before the DelayHandler sends the Message to the output-channel.
If the provided MessageStore is persistent (e.g.
JdbcMessageStore) it provides the ability to not lose Messages on the application shutdown.
After application startup, the DelayHandler reads Messages from its Message Group in the MessageStore and reschedules them with a delay based on the original arrival time of the Message (if the delay is numeric).
For messages where the delay header was a Date, that is used when rescheduling.
If a delayed Message remained in the MessageStore more than its delay, it will be sent immediately after startup.
The <delayer> can be enriched with mutually exclusive sub-elements <transactional> or <advice-chain>.
The List of these AOP Advices is applied to the proxied internal DelayHandler.ReleaseMessageHandler, which has the responsibility to release the Message, after the delay, on a Thread of the scheduled task.
It might be used, for example, when the downstream message flow throws an Exception and the ReleaseMessageHandler's transaction will be rolled back.
In this case the delayed Message will remain in the persistent MessageStore.
You can use any custom org.aopalliance.aop.Advice implementation within the <advice-chain>.
A sample configuration of the <delayer> may look like this:
<int:delayer id="delayer" input-channel="input" output-channel="output" expression="headers.delay" message-store="jdbcMessageStore"> <int:advice-chain> <beans:ref bean="customAdviceBean"/> <tx:advice> <tx:attributes> <tx:method name="*" read-only="true"/> </tx:attributes> </tx:advice> </int:advice-chain> </int:delayer>
The DelayHandler can be exported as a JMX MBean with managed operations getDelayedMessageCount and reschedulePersistedMessages, which allows the rescheduling of delayed persisted Messages at runtime, for example, if the TaskScheduler has previously been stopped.
These operations can be invoked via a Control Bus command:
Message<String> delayerReschedulingMessage =
MessageBuilder.withPayload("@'delayer.handler'.reschedulePersistedMessages()").build();
controlBusChannel.send(delayerReschedulingMessage);
| Note |
|---|---|
|
For more information regarding the Message Store, JMX and the Control Bus, please read Chapter 10, System Management. |
With Spring Integration 2.1 we’ve added support for the JSR223 Scripting for Java specification, introduced in Java version 6. This allows you to use scripts written in any supported language including Ruby/JRuby, Javascript and Groovy to provide the logic for various integration components similar to the way the Spring Expression Language (SpEL) is used in Spring Integration. For more information about JSR223 please refer to the documentation
| Important |
|---|---|
|
Note that this feature requires Java 6 or higher. Sun developed a JSR223 reference implementation which works with Java 5 but it is not officially supported and we have not tested it with Spring Integration. |
In order to use a JVM scripting language, a JSR223 implementation for that language must be included in your class path. Java 6 natively supports Javascript. The Groovy and JRuby projects provide JSR233 support in their standard distribution. Other language implementations may be available or under development. Please refer to the appropriate project website for more information.
| Important |
|---|---|
|
Various JSR223 language implementations have been developed by third parties. A particular implementation’s compatibility with Spring Integration depends on how well it conforms to the specification and/or the implementer’s interpretation of the specification. |
| Tip |
|---|---|
|
If you plan to use Groovy as your scripting language, we recommended you use Spring-Integration’s Groovy Support as it offers additional features specific to Groovy. However you will find this section relevant as well. |
Depending on the complexity of your integration requirements scripts may be provided inline as CDATA in XML configuration or as a reference to a Spring resource containing the script.
To enable scripting support Spring Integration defines a ScriptExecutingMessageProcessor which will bind the Message Payload to a variable named payload and the Message Headers to a headers variable, both accessible within the script execution context.
All that is left for you to do is write a script that uses these variables.
Below are a couple of sample configurations:
Filter
<int:filter input-channel="referencedScriptInput"> <int-script:script lang="ruby" location="some/path/to/ruby/script/RubyFilterTests.rb"/> </int:filter> <int:filter input-channel="inlineScriptInput"> <int-script:script lang="groovy"> <![CDATA[ return payload == 'good' ]]> </int-script:script> </int:filter>
Here, you see that the script can be included inline or can reference a resource location via the location attribute.
Additionally the lang attribute corresponds to the language name (or JSR223 alias)
Other Spring Integration endpoint elements which support scripting include router, service-activator, transformer, and splitter. The scripting configuration in each case would be identical to the above (besides the endpoint element).
Another useful feature of Scripting support is the ability to update (reload) scripts without having to restart the Application Context.
To accomplish this, specify the refresh-check-delay attribute on the script element:
<int-script:script location="..." refresh-check-delay="5000"/>
In the above example, the script location will be checked for updates every 5 seconds. If the script is updated, any invocation that occurs later than 5 seconds since the update will result in execution of the new script.
<int-script:script location="..." refresh-check-delay="0"/>
In the above example the context will be updated with any script modifications as soon as such modification occurs, providing a simple mechanism for real-time configuration. Any negative number value means the script will not be reloaded after initialization of the application context. This is the default behavior.
| Important |
|---|---|
|
Inline scripts can not be reloaded. |
<int-script:script location="..." refresh-check-delay="-1"/>
Script variable bindings
Variable bindings are required to enable the script to reference variables externally provided to the script’s execution context.
As we have seen, payload and headers are used as binding variables by default.
You can bind additional variables to a script via <variable> sub-elements:
<script:script lang="js" location="foo/bar/MyScript.js"> <script:variable name="foo" value="foo"/> <script:variable name="bar" value="bar"/> <script:variable name="date" ref="date"/> </script:script>
As shown in the above example, you can bind a script variable either to a scalar value or a Spring bean reference.
Note that payload and headers will still be included as binding variables.
With Spring Integration 3.0, in addition to the variable sub-element, the variables attribute has been introduced.
This attribute and variable sub-elements aren’t mutually exclusive and you can combine them within one script component.
However variables must be unique, regardless of where they are defined.
Also, since Spring Integration 3.0, variable bindings are allowed for inline scripts too:
<service-activator input-channel="input"> <script:script lang="ruby" variables="foo=FOO, date-ref=dateBean"> <script:variable name="bar" ref="barBean"/> <script:variable name="baz" value="bar"/> <![CDATA[ payload.foo = foo payload.date = date payload.bar = bar payload.baz = baz payload ]]> </script:script> </service-activator>
The example above shows a combination of an inline script, a variable sub-element and a variables attribute.
The variables attribute is a comma-separated value, where each segment contains an = separated pair of the variable and its value.
The variable name can be suffixed with -ref, as in the date-ref variable above.
That means that the binding variable will have the name date, but the value will be a reference to the dateBean bean from the application context.
This may be useful when using Property Placeholder Configuration or command line arguments.
If you need more control over how variables are generated, you can implement your own Java class using the ScriptVariableGenerator strategy:
public interface ScriptVariableGenerator { Map<String, Object> generateScriptVariables(Message<?> message); }
This interface requires you to implement the method generateScriptVariables(Message).
The Message argument allows you to access any data available in the Message payload and headers and the return value is the Map of bound variables.
This method will be called every time the script is executed for a Message.
All you need to do is provide an implementation of ScriptVariableGenerator and reference it with the script-variable-generator attribute:
<int-script:script location="foo/bar/MyScript.groovy" script-variable-generator="variableGenerator"/> <bean id="variableGenerator" class="foo.bar.MyScriptVariableGenerator"/>
If a script-variable-generator is not provided, script components use DefaultScriptVariableGenerator, which merges any provided <variable> s with payload and headers variables from the Message in its generateScriptVariables(Message) method.
| Important |
|---|---|
|
You cannot provide both the |
In Spring Integration 2.0 we added Groovy support allowing you to use the Groovy scripting language to provide the logic for various integration components similar to the way the Spring Expression Language (SpEL) is supported for routing, transformation and other integration concerns. For more information about Groovy please refer to the Groovy documentation which you can find on the project website.
With Spring Integration 2.1, Groovy Support’s configuration namespace is an extension of Spring Integration’s Scripting Support and shares the core configuration and behavior described in detail in the Scripting Support section.
Even though Groovy scripts are well supported by generic Scripting Support, Groovy Support provides the Groovy configuration namespace which is backed by the Spring Framework’s org.springframework.scripting.groovy.GroovyScriptFactory and related components, offering extended capabilities for using Groovy.
Below are a couple of sample configurations:
Filter
<int:filter input-channel="referencedScriptInput"> <int-groovy:script location="some/path/to/groovy/file/GroovyFilterTests.groovy"/> </int:filter> <int:filter input-channel="inlineScriptInput"> <int-groovy:script><![CDATA[ return payload == 'good' ]]></int-groovy:script> </int:filter>
As the above examples show, the configuration looks identical to the general Scripting Support configuration.
The only difference is the use of the Groovy namespace as indicated in the examples by the int-groovy namespace prefix.
Also note that the lang attribute on the <script> tag is not valid in this namespace.
Groovy object customization
If you need to customize the Groovy object itself, beyond setting variables, you can reference a bean that implements GroovyObjectCustomizer via the customizer attribute.
For example, this might be useful if you want to implement a domain-specific language (DSL) by modifying the MetaClass and registering functions to be available within the script:
<int:service-activator input-channel="groovyChannel"> <int-groovy:script location="foo/SomeScript.groovy" customizer="groovyCustomizer"/> </int:service-activator> <beans:bean id="groovyCustomizer" class="org.foo.MyGroovyObjectCustomizer"/>
Setting a custom GroovyObjectCustomizer is not mutually exclusive with <variable> sub-elements or the script-variable-generator attribute.
It can also be provided when defining an inline script.
With Spring Integration 3.0, in addition to the variable sub-element, the variables attribute has been introduced.
Also, groovy scripts have the ability to resolve a variable to a bean in the BeanFactory, if a binding variable was not provided with the name:
<int-groovy:script> <![CDATA[ entityManager.persist(payload) payload ]]> </int-groovy:script>
where variable entityManager is an appropriate bean in the application context.
For more information regarding <variable>, variables, and script-variable-generator, see the paragraph Script variable bindings of Section 8.7.1, “Script configuration”.
Groovy Script Compiler Customization
The @CompileStatic hint is the most popular Groovy compiler customization option,
which can be used on the class or method level.
See more information in the Groovy
Reference Manual and,
specifically, @CompileStatic.
To utilize this feature for short scripts (in integration scenarios), we are forced to change a simple script like this
(a <filter> script):
headers.type == 'good'
to more Java-like code:
@groovy.transform.CompileStatic String filter(Map headers) { headers.type == 'good' } filter(headers)
With that, the filter() method will be transformed and compiled to static Java code, bypassing the Groovy
dynamic phases of invocation, like getProperty() factories and CallSite proxies.
Starting with version 4.3, Spring Integration Groovy components can be configured with the compile-static boolean
option, specifying that ASTTransformationCustomizer for @CompileStatic should be added to the internal
CompilerConfiguration.
With that in place, we can omit the method declaration with @CompileStatic in our script code and still get compiled
plain Java code.
In this case our script can still be short but still needs to be a little more verbose than interpreted script:
binding.variables.headers.type == 'good'
Where we can access the headers and payload (or any other) variables only through the groovy.lang.Script
binding property since, with @CompileStatic, we don’t have the dynamic GroovyObject.getProperty() capability.
In addition, the compiler-configuration bean reference has been introduced.
With this attribute, you can provide any other required Groovy compiler customizations, e.g. ImportCustomizer.
For more information about this feature, please, refer to the Groovy Documentation:
Advanced compiler configuration.
| Note |
|---|---|
|
Using |
| Note |
|---|---|
|
The Groovy compiler customization does not have any effect to the |
As described in (EIP), the idea behind the Control Bus is that the same messaging system can be used for monitoring and managing the components within the framework as is used for "application-level" messaging. In Spring Integration we build upon the adapters described above so that it’s possible to send Messages as a means of invoking exposed operations. One option for those operations is Groovy scripts.
<int-groovy:control-bus input-channel="operationChannel"/>
The Control Bus has an input channel that can be accessed for invoking operations on the beans in the application context.
The Groovy Control Bus executes messages on the input channel as Groovy scripts.
It takes a message, compiles the body to a Script, customizes it with a GroovyObjectCustomizer, and then executes it.
The Control Bus' MessageProcessor exposes all beans in the application context that are annotated with @ManagedResource, implement Spring’s Lifecycle interface or extend Spring’s CustomizableThreadCreator base class (e.g.
several of the TaskExecutor and TaskScheduler implementations).
| Important |
|---|---|
|
Be careful about using managed beans with custom scopes (e.g.
request) in the Control Bus' command scripts, especially inside an async message flow.
If The Control Bus' |
If you need to further customize the Groovy objects, you can also provide a reference to a bean that implements GroovyObjectCustomizer via the customizer attribute.
<int-groovy:control-bus input-channel="input" output-channel="output" customizer="groovyCustomizer"/> <beans:bean id="groovyCustomizer" class="org.foo.MyGroovyObjectCustomizer"/>
Prior to Spring Integration 2.2, you could add behavior to an entire Integration flow by adding an AOP Advice to a poller’s <advice-chain/> element.
However, let’s say you want to retry, say, just a REST Web Service call, and not any downstream endpoints.
For example, consider the following flow:
inbound-adapter→poller→http-gateway1→http-gateway2→jdbc-outbound-adapter
If you configure some retry-logic into an advice chain on the poller, and, the call to http-gateway2 failed because of a network glitch, the retry would cause both http-gateway1 and http-gateway2 to be called a second time. Similarly, after a transient failure in the jdbc-outbound-adapter, both http-gateways would be called a second time before again calling the jdbc-outbound-adapter.
Spring Integration 2.2 adds the ability to add behavior to individual endpoints.
This is achieved by the addition of the <request-handler-advice-chain/> element to many endpoints.
For example:
<int-http:outbound-gateway id="withAdvice" url-expression="'http://localhost/test1'" request-channel="requests" reply-channel="nextChannel"> <int:request-handler-advice-chain> <ref bean="myRetryAdvice" /> </request-handler-advice-chain> </int-http:outbound-gateway>
In this case, myRetryAdvice will only be applied locally to this gateway and will not apply to further actions taken downstream after the reply is sent to the nextChannel. The scope of the advice is limited to the endpoint itself.
| Important |
|---|---|
|
At this time, you cannot advise an entire However, a |
In addition to providing the general mechanism to apply AOP Advice classes in this way, three standard Advices are provided:
-
RequestHandlerRetryAdvice -
RequestHandlerCircuitBreakerAdvice -
ExpressionEvaluatingRequestHandlerAdvice
These are each described in detail in the following sections.
The retry advice (o.s.i.handler.advice.RequestHandlerRetryAdvice) leverages the rich retry mechanisms provided by the Spring Retry project.
The core component of spring-retry is the RetryTemplate, which allows configuration of sophisticated retry scenarios, including RetryPolicy and BackoffPolicy strategies, with a number of implementations, as well as a RecoveryCallback strategy to determine the action to take when retries are exhausted.
Stateless Retry
Stateless retry is the case where the retry activity is handled entirely within the advice, where the thread pauses (if so configured) and retries the action.
Stateful Retry
Stateful retry is the case where the retry state is managed within the advice, but where an exception is thrown and the caller resubmits the request. An example for stateful retry is when we want the message originator (e.g. JMS) to be responsible for resubmitting, rather than performing it on the current thread. Stateful retry needs some mechanism to detect a retried submission.
Further Information
For more information on spring-retry, refer to the project’s javadocs, as well as the reference documentation for Spring Batch, where spring-retry originated.
| Warning |
|---|---|
|
The default back off behavior is no back off - retries are attempted immediately. Using a back off policy that causes threads to pause between attempts may cause performance issues, including excessive memory use and thread starvation. In high volume environments, back off policies should be used with caution. |
The following examples use a simple <service-activator/> that always throws an exception:
public class FailingService { public void service(String message) { throw new RuntimeException("foo"); } }
Simple Stateless Retry
This example uses the default RetryTemplate which has a SimpleRetryPolicy which tries 3 times.
There is no BackOffPolicy so the 3 attempts are made back-to-back-to-back with no delay between attempts.
There is no RecoveryCallback so, the result is to throw the exception to the caller after the final failed retry occurs.
In a Spring Integration environment, this final exception might be handled using an error-channel on the inbound endpoint.
<int:service-activator input-channel="input" ref="failer" method="service"> <int:request-handler-advice-chain> <bean class="o.s.i.handler.advice.RequestHandlerRetryAdvice"/> </request-handler-advice-chain> </int:service-activator> DEBUG [task-scheduler-2]preSend on channel 'input', message: [Payload=...] DEBUG [task-scheduler-2]Retry: count=0 DEBUG [task-scheduler-2]Checking for rethrow: count=1 DEBUG [task-scheduler-2]Retry: count=1 DEBUG [task-scheduler-2]Checking for rethrow: count=2 DEBUG [task-scheduler-2]Retry: count=2 DEBUG [task-scheduler-2]Checking for rethrow: count=3 DEBUG [task-scheduler-2]Retry failed last attempt: count=3
Simple Stateless Retry with Recovery
This example adds a RecoveryCallback to the above example; it uses a ErrorMessageSendingRecoverer to send an ErrorMessage to a channel.
<int:service-activator input-channel="input" ref="failer" method="service"> <int:request-handler-advice-chain> <bean class="o.s.i.handler.advice.RequestHandlerRetryAdvice"> <property name="recoveryCallback"> <bean class="o.s.i.handler.advice.ErrorMessageSendingRecoverer"> <constructor-arg ref="myErrorChannel" /> </bean> </property> </bean> </request-handler-advice-chain> </int:int:service-activator> DEBUG [task-scheduler-2]preSend on channel 'input', message: [Payload=...] DEBUG [task-scheduler-2]Retry: count=0 DEBUG [task-scheduler-2]Checking for rethrow: count=1 DEBUG [task-scheduler-2]Retry: count=1 DEBUG [task-scheduler-2]Checking for rethrow: count=2 DEBUG [task-scheduler-2]Retry: count=2 DEBUG [task-scheduler-2]Checking for rethrow: count=3 DEBUG [task-scheduler-2]Retry failed last attempt: count=3 DEBUG [task-scheduler-2]Sending ErrorMessage :failedMessage:[Payload=...]
Stateless Retry with Customized Policies, and Recovery
For more sophistication, we can provide the advice with a customized RetryTemplate.
This example continues to use the SimpleRetryPolicy but it increases the attempts to 4.
It also adds an ExponentialBackoffPolicy where the first retry waits 1 second, the second waits 5 seconds and the third waits 25 (for 4 attempts in all).
<int:service-activator input-channel="input" ref="failer" method="service"> <int:request-handler-advice-chain> <bean class="o.s.i.handler.advice.RequestHandlerRetryAdvice"> <property name="recoveryCallback"> <bean class="o.s.i.handler.advice.ErrorMessageSendingRecoverer"> <constructor-arg ref="myErrorChannel" /> </bean> </property> <property name="retryTemplate" ref="retryTemplate" /> </bean> </request-handler-advice-chain> </int:service-activator> <bean id="retryTemplate" class="org.springframework.retry.support.RetryTemplate"> <property name="retryPolicy"> <bean class="org.springframework.retry.policy.SimpleRetryPolicy"> <property name="maxAttempts" value="4" /> </bean> </property> <property name="backOffPolicy"> <bean class="org.springframework.retry.backoff.ExponentialBackOffPolicy"> <property name="initialInterval" value="1000" /> <property name="multiplier" value="5.0" /> <property name="maxInterval" value="60000" /> </bean> </property> </bean> 27.058 DEBUG [task-scheduler-1]preSend on channel 'input', message: [Payload=...] 27.071 DEBUG [task-scheduler-1]Retry: count=0 27.080 DEBUG [task-scheduler-1]Sleeping for 1000 28.081 DEBUG [task-scheduler-1]Checking for rethrow: count=1 28.081 DEBUG [task-scheduler-1]Retry: count=1 28.081 DEBUG [task-scheduler-1]Sleeping for 5000 33.082 DEBUG [task-scheduler-1]Checking for rethrow: count=2 33.082 DEBUG [task-scheduler-1]Retry: count=2 33.083 DEBUG [task-scheduler-1]Sleeping for 25000 58.083 DEBUG [task-scheduler-1]Checking for rethrow: count=3 58.083 DEBUG [task-scheduler-1]Retry: count=3 58.084 DEBUG [task-scheduler-1]Checking for rethrow: count=4 58.084 DEBUG [task-scheduler-1]Retry failed last attempt: count=4 58.086 DEBUG [task-scheduler-1]Sending ErrorMessage :failedMessage:[Payload=...]
Namespace Support for Stateless Retry
Starting with version 4.0, the above configuration can be greatly simplified with the namespace support for the retry advice:
<int:service-activator input-channel="input" ref="failer" method="service"> <int:request-handler-advice-chain> <bean ref="retrier" /> </request-handler-advice-chain> </int:service-activator> <int:handler-retry-advice id="retrier" max-attempts="4" recovery-channel="myErrorChannel"> <int:exponential-back-off initial="1000" multiplier="5.0" maximum="60000" /> </int:handler-retry-advice>
In this example, the advice is defined as a top level bean so it can be used in multiple request-handler-advice-chain s.
You can also define the advice directly within the chain:
<int:service-activator input-channel="input" ref="failer" method="service"> <int:request-handler-advice-chain> <int:retry-advice id="retrier" max-attempts="4" recovery-channel="myErrorChannel"> <int:exponential-back-off initial="1000" multiplier="5.0" maximum="60000" /> </int:retry-advice> </request-handler-advice-chain> </int:service-activator>
A <handler-retry-advice/> with no child element uses no back off; it can have a fixed-back-off or exponential-back-off child element.
If there is no recovery-channel, the exception is thrown when retries are exhausted.
The namespace can only be used with stateless retry.
For more complex environments (custom policies etc), use normal <bean/> definitions.
Simple Stateful Retry with Recovery
To make retry stateful, we need to provide the Advice with a RetryStateGenerator implementation.
This class is used to identify a message as being a resubmission so that the RetryTemplate can determine the current state of retry for this message.
The framework provides a SpelExpressionRetryStateGenerator which determines the message identifier using a SpEL expression.
This is shown below; this example again uses the default policies (3 attempts with no back off); of course, as with stateless retry, these policies can be customized.
<int:service-activator input-channel="input" ref="failer" method="service"> <int:request-handler-advice-chain> <bean class="o.s.i.handler.advice.RequestHandlerRetryAdvice"> <property name="retryStateGenerator"> <bean class="o.s.i.handler.advice.SpelExpressionRetryStateGenerator"> <constructor-arg value="headers['jms_messageId']" /> </bean> </property> <property name="recoveryCallback"> <bean class="o.s.i.handler.advice.ErrorMessageSendingRecoverer"> <constructor-arg ref="myErrorChannel" /> </bean> </property> </bean> </int:request-handler-advice-chain> </int:service-activator> 24.351 DEBUG [Container#0-1]preSend on channel 'input', message: [Payload=...] 24.368 DEBUG [Container#0-1]Retry: count=0 24.387 DEBUG [Container#0-1]Checking for rethrow: count=1 24.387 DEBUG [Container#0-1]Rethrow in retry for policy: count=1 24.387 WARN [Container#0-1]failure occurred in gateway sendAndReceive org.springframework.integration.MessagingException: Failed to invoke handler ... Caused by: java.lang.RuntimeException: foo ... 24.391 DEBUG [Container#0-1]Initiating transaction rollback on application exception ... 25.412 DEBUG [Container#0-1]preSend on channel 'input', message: [Payload=...] 25.412 DEBUG [Container#0-1]Retry: count=1 25.413 DEBUG [Container#0-1]Checking for rethrow: count=2 25.413 DEBUG [Container#0-1]Rethrow in retry for policy: count=2 25.413 WARN [Container#0-1]failure occurred in gateway sendAndReceive org.springframework.integration.MessagingException: Failed to invoke handler ... Caused by: java.lang.RuntimeException: foo ... 25.414 DEBUG [Container#0-1]Initiating transaction rollback on application exception ... 26.418 DEBUG [Container#0-1]preSend on channel 'input', message: [Payload=...] 26.418 DEBUG [Container#0-1]Retry: count=2 26.419 DEBUG [Container#0-1]Checking for rethrow: count=3 26.419 DEBUG [Container#0-1]Rethrow in retry for policy: count=3 26.419 WARN [Container#0-1]failure occurred in gateway sendAndReceive org.springframework.integration.MessagingException: Failed to invoke handler ... Caused by: java.lang.RuntimeException: foo ... 26.420 DEBUG [Container#0-1]Initiating transaction rollback on application exception ... 27.425 DEBUG [Container#0-1]preSend on channel 'input', message: [Payload=...] 27.426 DEBUG [Container#0-1]Retry failed last attempt: count=3 27.426 DEBUG [Container#0-1]Sending ErrorMessage :failedMessage:[Payload=...]
Comparing with the stateless examples, you can see that with stateful retry, the exception is thrown to the caller on each failure.
Exception Classification for Retry
Spring Retry has a great deal of flexibility for determining which exceptions can invoke retry.
The default configuration will retry for all exceptions and the exception classifier just looks at the top level exception.
If you configure it to, say, only retry on BarException and your application throws a FooException where the cause is a BarException, retry will not occur.
Since Spring Retry 1.0.3, the BinaryExceptionClassifier has a property traverseCauses (default false).
When true it will traverse exception causes until it finds a match or there is no cause.
To use this classifier for retry, use a SimpleRetryPolicy created with the constructor that takes the max attempts, the Map of Exception s and the boolean (traverseCauses), and inject this policy into the RetryTemplate.
The general idea of the Circuit Breaker Pattern is that, if a service is not currently available, then don’t waste time (and resources) trying to use it.
The o.s.i.handler.advice.RequestHandlerCircuitBreakerAdvice implements this pattern.
When the circuit breaker is in the closed state, the endpoint will attempt to invoke the service.
The circuit breaker goes to the open state if a certain number of consecutive attempts fail; when it is in the open state, new requests will "fail fast" and no attempt will be made to invoke the service until some time has expired.
When that time has expired, the circuit breaker is set to the half-open state. When in this state, if even a single attempt fails, the breaker will immediately go to the open state; if the attempt succeeds, the breaker will go to the closed state, in which case, it won’t go to the open state again until the configured number of consecutive failures again occur. Any successful attempt resets the state to zero failures for the purpose of determining when the breaker might go to the open state again.
Typically, this Advice might be used for external services, where it might take some time to fail (such as a timeout attempting to make a network connection).
The RequestHandlerCircuitBreakerAdvice has two properties: threshold and halfOpenAfter.
The threshold property represents the number of consecutive failures that need to occur before the breaker goes open.
It defaults to 5.
The halfOpenAfter property represents the time after the last failure that the breaker will wait before attempting another request.
Default is 1000 milliseconds.
Example:
<int:service-activator input-channel="input" ref="failer" method="service"> <int:request-handler-advice-chain> <bean class="o.s.i.handler.advice.RequestHandlerCircuitBreakerAdvice"> <property name="threshold" value="2" /> <property name="halfOpenAfter" value="12000" /> </bean> </int:request-handler-advice-chain> </int:service-activator> 05.617 DEBUG [task-scheduler-1]preSend on channel 'input', message: [Payload=...] 05.638 ERROR [task-scheduler-1]org.springframework.messaging.MessageHandlingException: java.lang.RuntimeException: foo ... 10.598 DEBUG [task-scheduler-2]preSend on channel 'input', message: [Payload=...] 10.600 ERROR [task-scheduler-2]org.springframework.messaging.MessageHandlingException: java.lang.RuntimeException: foo ... 15.598 DEBUG [task-scheduler-3]preSend on channel 'input', message: [Payload=...] 15.599 ERROR [task-scheduler-3]org.springframework.messaging.MessagingException: Circuit Breaker is Open for ServiceActivator ... 20.598 DEBUG [task-scheduler-2]preSend on channel 'input', message: [Payload=...] 20.598 ERROR [task-scheduler-2]org.springframework.messaging.MessagingException: Circuit Breaker is Open for ServiceActivator ... 25.598 DEBUG [task-scheduler-5]preSend on channel 'input', message: [Payload=...] 25.601 ERROR [task-scheduler-5]org.springframework.messaging.MessageHandlingException: java.lang.RuntimeException: foo ... 30.598 DEBUG [task-scheduler-1]preSend on channel 'input', message: [Payload=foo...] 30.599 ERROR [task-scheduler-1]org.springframework.messaging.MessagingException: Circuit Breaker is Open for ServiceActivator
In the above example, the threshold is set to 2 and halfOpenAfter is set to 12 seconds; a new request arrives every 5 seconds. You can see that the first two attempts invoked the service; the third and fourth failed with an exception indicating the circuit breaker is open. The fifth request was attempted because the request was 15 seconds after the last failure; the sixth attempt fails immediately because the breaker immediately went to open.
The final supplied advice class is the o.s.i.handler.advice.ExpressionEvaluatingRequestHandlerAdvice.
This advice is more general than the other two advices.
It provides a mechanism to evaluate an expression on the original inbound message sent to the endpoint.
Separate expressions are available to be evaluated, either after success, or failure.
Optionally, a message containing the evaluation result, together with the input message, can be sent to a message channel.
A typical use case for this advice might be with an <ftp:outbound-channel-adapter/>, perhaps to move the file to one directory if the transfer was successful, or to another directory if it fails:
The Advice has properties to set an expression when successful, an expression for failures, and corresponding channels for each.
For the successful case, the message sent to the successChannel is an AdviceMessage, with the payload being the result of the expression evaluation, and an additional property inputMessage which contains the original message sent to the handler.
A message sent to the failureChannel (when the handler throws an exception) is an ErrorMessage with a payload of MessageHandlingExpressionEvaluatingAdviceException.
Like all MessagingException s, this payload has failedMessage and cause properties, as well as an additional property evaluationResult, containing the result of the expression evaluation.
When an exception is thrown in the scope of the advice, by default, that exception is thrown to caller after any
failureExpression is evaluated.
If you wish to suppress throwing the exception, set the trapException property to true.
Example - Configuring the Advice with Java DSL.
@SpringBootApplication public class EerhaApplication { public static void main(String[] args) { ConfigurableApplicationContext context = SpringApplication.run(EerhaApplication.class, args); MessageChannel in = context.getBean("advised.input", MessageChannel.class); in.send(new GenericMessage<>("good")); in.send(new GenericMessage<>("bad")); context.close(); } @Bean public IntegrationFlow advised() { return f -> f.handle((GenericHandler<String>) (payload, headers) -> { if (payload.equals("good")) { return null; } else { throw new RuntimeException("some failure"); } }, c -> c.advice(expressionAdvice())); } @Bean public Advice expressionAdvice() { ExpressionEvaluatingRequestHandlerAdvice advice = new ExpressionEvaluatingRequestHandlerAdvice(); advice.setSuccessChannelName("success.input"); advice.setOnSuccessExpressionString("payload + ' was successful'"); advice.setFailureChannelName("failure.input"); advice.setOnFailureExpressionString( "payload + ' was bad, with reason: ' + #exception.cause.message"); advice.setTrapException(true); return advice; } @Bean public IntegrationFlow success() { return f -> f.handle(System.out::println); } @Bean public IntegrationFlow failure() { return f -> f.handle(System.out::println); } }
In addition to the provided Advice classes above, you can implement your own Advice classes.
While you can provide any implementation of org.aopalliance.aop.Advice (usually org.aopalliance.intercept.MethodInterceptor), it is generally recommended that you subclass o.s.i.handler.advice.AbstractRequestHandlerAdvice.
This has the benefit of avoiding writing low-level Aspect Oriented Programming code as well as providing a starting point that is specifically tailored for use in this environment.
Subclasses need to implement the doInvoke()` method:
/**
* Subclasses implement this method to apply behavior to the {@link MessageHandler} callback.execute()
* invokes the handler method and returns its result, or null).
* @param callback Subclasses invoke the execute() method on this interface to invoke the handler method.
* @param target The target handler.
* @param message The message that will be sent to the handler.
* @return the result after invoking the {@link MessageHandler}.
* @throws Exception
*/
protected abstract Object doInvoke(ExecutionCallback callback, Object target, Message<?> message) throws Exception;
The callback parameter is simply a convenience to avoid subclasses dealing with AOP directly; invoking the callback.execute() method invokes the message handler.
The target parameter is provided for those subclasses that need to maintain state for a specific handler, perhaps by maintaining that state in a Map, keyed by the target.
This allows the same advice to be applied to multiple handlers.
The RequestHandlerCircuitBreakerAdvice uses this to keep circuit breaker state for each handler.
The message parameter is the message that will be sent to the handler. While the advice cannot modify the message before invoking the handler, it can modify the payload (if it has mutable properties). Typically, an advice would use the message for logging and/or to send a copy of the message somewhere before or after invoking the handler.
The return value would normally be the value returned by callback.execute(); but the advice does have the ability to modify the return value.
Note that only AbstractReplyProducingMessageHandler s return a value.
public class MyAdvice extends AbstractRequestHandlerAdvice { @Override protected Object doInvoke(ExecutionCallback callback, Object target, Message<?> message) throws Exception { // add code before the invocation Object result = callback.execute(); // add code after the invocation return result; } }
| Note |
|---|---|
|
In addition to the For more information, see the ReflectiveMethodInvocation JavaDocs. |
While the abstract class mentioned above is provided as a convenience, you can add any Advice to the chain, including a transaction advice.
As discussed in the introduction to this section, advice objects in a request handler advice chain are applied to just the current endpoint, not the downstream flow (if any).
For MessageHandler s that produce a reply (AbstractReplyProducingMessageHandler), the advice is applied to an internal method
handleRequestMessage() (called from MessageHandler.handleMessage()).
For other message handlers, the advice is applied to MessageHandler.handleMessage().
There are some circumstances where, even if a message handler is an AbstractReplyProducingMessageHandler, the advice must be applied to the handleMessage method - for example, the Idempotent Receiver might return null and this would cause an exception if the handler’s replyRequired property is true.
Starting with version 4.3.1, a new HandleMessageAdvice and the AbstractHandleMessageAdvice base implementation have been introduced.
Advice s that implement HandleMessageAdvice will always be applied to the handleMessage() method, regardless of the handler type.
It is important to understand that HandleMessageAdvice implementations (such as Idempotent Receiver), when applied to a handler that returns a response, are dissociated from the adviceChain and properly applied to the MessageHandler.handleMessage() method.
Bear in mind, however, that this means the advice chain order is not complied with; and, with configuration such as:
<some-reply-producing-endpoint ... > <int:request-handler-advice-chain> <tx:advice ... /> <bean ref="myHandleMessageAdvice" /> </int:request-handler-advice-chain> </some-reply-producing-endpoint>
The <tx:advice> is applied to the AbstractReplyProducingMessageHandler.handleRequestMessage(), but myHandleMessageAdvice is applied for to MessageHandler.handleMessage() and, therefore, invoked before the <tx:advice>.
To retain the order, you should follow with standard Spring AOP configuration approach and use endpoint id together with the .handler suffix to obtain the target MessageHandler bean.
Note, however, that in that case, the entire downstream flow would be within the transaction scope.
In the case of a MessageHandler that does not return a response, the advice chain order is retained.
Starting with version 5.0 a new TransactionHandleMessageAdvice has been introduced to make the whole downstream flow transactional, thanks to the HandleMessageAdvice implementation.
When regular TransactionInterceptor is used in the <request-handler-advice-chain>, for example via <tx:advice> configuration, a started transaction is only applied only for an internal AbstractReplyProducingMessageHandler.handleRequestMessage() and isn’t propagated to the downstream flow.
To simplify XML configuration, alongside with the <request-handler-advice-chain>, a <transactional> sub-element has been added to all <outbound-gateway> and <service-activator> & family components:
<int-rmi:outbound-gateway remote-channel="foo" host="localhost" request-channel="good" reply-channel="reply" port="#{@port}"> <int-rmi:transactional/> </int-rmi:outbound-gateway> <bean id="transactionManager" class="org.mockito.Mockito" factory-method="mock"> <constructor-arg value="org.springframework.transaction.PlatformTransactionManager"/> </bean>
For whom is familiar with JPA Integration components such a configuration isn’t new, but now we can start transaction from any point in our flow, not only from the <poller> or Message Driven Channel Adapter like in JMS.
Java & Annotation configuration can be simplified via newly introduced TransactionInterceptorBuilder and the result bean name can be used in the Messaging Annotations adviceChain attribute:
@Bean public ConcurrentMetadataStore store() { return new SimpleMetadataStore(hazelcastInstance() .getMap("idempotentReceiverMetadataStore")); } @Bean public IdempotentReceiverInterceptor idempotentReceiverInterceptor() { return new IdempotentReceiverInterceptor( new MetadataStoreSelector( message -> message.getPayload().toString(), message -> message.getPayload().toString().toUpperCase(), store())); } @Bean public TransactionInterceptor transactionInterceptor() { return new TransactionInterceptorBuilder(true) .transactionManager(this.transactionManager) .isolation(Isolation.READ_COMMITTED) .propagation(Propagation.REQUIRES_NEW) .build(); } @Bean @org.springframework.integration.annotation.Transformer(inputChannel = "input", outputChannel = "output", adviceChain = { "idempotentReceiverInterceptor", "transactionInterceptor" }) public Transformer transformer() { return message -> message; }
Note the true for the TransactionInterceptorBuilder constructor, which means produce TransactionHandleMessageAdvice, not regular TransactionInterceptor.
Java DSL supports such an Advice via .transactional() options on the endpoint configuration:
@Bean public IntegrationFlow updatingGatewayFlow() { return f -> f .handle(Jpa.updatingGateway(this.entityManagerFactory), e -> e.transactional(true)) .channel(c -> c.queue("persistResults")); }
There is an additional consideration when advising Filter s.
By default, any discard actions (when the filter returns false) are performed within the scope of the advice chain.
This could include all the flow downstream of the discard channel.
So, for example if an element downstream of the discard-channel throws an exception, and there is a retry advice, the process will be retried.
This is also the case if throwExceptionOnRejection is set to true (the exception is thrown within the scope of the advice).
Setting discard-within-advice to "false" modifies this behavior and the discard (or exception) occurs after the advice chain is called.
When configuring certain endpoints using annotations (@Filter, @ServiceActivator, @Splitter, and @Transformer), you can supply a bean name for the advice chain in the adviceChain attribute.
In addition, the @Filter annotation also has the discardWithinAdvice attribute, which can be used to configure the discard behavior as discussed in Section 8.9.7, “Advising Filters”.
An example with the discard being performed after the advice is shown below.
@MessageEndpoint public class MyAdvisedFilter { @Filter(inputChannel="input", outputChannel="output", adviceChain="adviceChain", discardWithinAdvice="false") public boolean filter(String s) { return s.contains("good"); } }
Advice classes are "around" advices and are applied in a nested fashion. The first advice is the outermost, the last advice the innermost (closest to the handler being advised). It is important to put the advice classes in the correct order to achieve the functionality you desire.
For example, let’s say you want to add a retry advice and a transaction advice.
You may want to place the retry advice advice first, followed by the transaction advice.
Then, each retry will be performed in a new transaction.
On the other hand, if you want all the attempts, and any recovery operations (in the retry RecoveryCallback), to be scoped within the transaction, you would put the transaction advice first.
Sometimes, it is useful to access handler properties from within the advice.
For example, most handlers implement NamedComponent and you can access the component name.
The target object can be accessed via the target argument when subclassing AbstractRequestHandlerAdvice or
invocation.getThis() when implementing org.aopalliance.intercept.MethodInterceptor.
When the entire handler is advised (such as when the handler does not produce replies, or the advice implements HandleMessageAdvice), you can simply cast the target object to the desired implemented interface, such as NamedComponent.
String componentName = ((NamedComponent) target).getComponentName();
or
String componentName = ((NamedComponent) invocation.getThis()).getComponentName();
when implementing MethodInterceptor directly.
When only the handleRequestMessage() method is advised (in a reply-producing handler), you need to access the
full handler, which is an AbstractReplyProducingMessageHandler…
AbstractReplyProducingMessageHandler handler =
((AbstractReplyProducingMessageHandler.RequestHandler) target).getAdvisedHandler();
String componentName = handler.getComponentName();
Starting with version 4.1, Spring Integration provides an implementation of the Idempotent Receiver Enterprise Integration Pattern.
It is a functional pattern and the whole idempotency logic should be implemented in the application, however to simplify the decision-making, the IdempotentReceiverInterceptor component is provided.
This is an AOP Advice, which is applied to the MessageHandler.handleMessage() method and can filter a request message or mark it as a duplicate, according to its configuration.
Previously, users could have implemented this pattern, by using a custom MessageSelector in a <filter/> (Section 6.2, “Filter”), for example.
However, since this pattern is really behavior of an endpoint rather than being an endpoint itself, the Idempotent Receiver implementation doesn’t provide an endpoint component; rather, it is applied to endpoints declared in the application.
The logic of the IdempotentReceiverInterceptor is based on the provided MessageSelector and, if the message isn’t accepted by that selector, it will be enriched with the duplicateMessage header set to true.
The target MessageHandler (or downstream flow) can consult this header to implement the correct idempotency logic.
If the IdempotentReceiverInterceptor is configured with a discardChannel and/or throwExceptionOnRejection = true, the duplicate Message won’t be sent to the target MessageHandler.handleMessage(), but discarded.
If you simply want to discard (do nothing with) the duplicate Message, the discardChannel should be configured with a NullChannel, such as the default nullChannel bean.
To maintain state between messages and provide the ability to compare messages for the idempotency, the MetadataStoreSelector is provided.
It accepts a MessageProcessor implementation (which creates a lookup key based on the Message) and an optional ConcurrentMetadataStore (Section 10.5, “Metadata Store”).
See the MetadataStoreSelector JavaDocs for more information.
The value for ConcurrentMetadataStore also can be customized using additional MessageProcessor.
By default MetadataStoreSelector uses timestamp message header.
For convenience, the MetadataStoreSelector options are configurable directly on the <idempotent-receiver> component:
<idempotent-receiver id=""
|
The id of the |
|
Consumer Endpoint name(s) or pattern(s) to which this interceptor will be applied.
Separate names (patterns) with commas ( |
|
A |
|
Identifies the channel to which to send a message when the |
|
A |
|
A |
|
A SpEL expression to populate an |
|
A |
|
A SpEL expression to populate an |
|
Throw an exception if the |
For Java configuration, the method level IdempotentReceiver annotation is provided.
It is used to mark a method that has a Messaging annotation (@ServiceActivator, @Router etc.) to specify which IdempotentReceiverInterceptor s will be applied to this endpoint:
@Bean public IdempotentReceiverInterceptor idempotentReceiverInterceptor() { return new IdempotentReceiverInterceptor(new MetadataStoreSelector(m -> m.getHeaders().get(INVOICE_NBR_HEADER))); } @Bean @ServiceActivator(inputChannel = "input", outputChannel = "output") @IdempotentReceiver("idempotentReceiverInterceptor") public MessageHandler myService() { .... }
| Note |
|---|---|
|
The |
The <logging-channel-adapter/> is often used in conjunction with a Wire Tap, as discussed in the section called “Wire Tap”.
However, it can also be used as the ultimate consumer of any flow.
For example, consider a flow that ends with a <service-activator/> that returns a result, but you wish to discard that result.
To do that, you could send the result to NullChannel.
Alternatively, you can route it to an INFO level <logging-channel-adapter/>; that way, you can see the discarded message when logging at INFO level, but not see it when logging at, say, WARN level.
With a NullChannel, you would only see the discarded message when logging at DEBUG level.
<int:logging-channel-adapter
channel=""
level="INFO"
expression=""
log-full-message="false"
logger-name="" />
|
The channel connecting the logging adapter to an upstream component. |
|
The logging level at which messages sent to this adapter will be logged.
Default: |
|
A SpEL expression representing exactly what part(s) of the message will be logged.
Default: |
|
When |
|
Specifies the name of the logger (known as |
The following Spring Boot application provides an example of configuring the LoggingHandler using Java configuration:
@SpringBootApplication public class LoggingJavaApplication { public static void main(String[] args) { ConfigurableApplicationContext context = new SpringApplicationBuilder(LoggingJavaApplication.class) .web(false) .run(args); MyGateway gateway = context.getBean(MyGateway.class); gateway.sendToLogger("foo"); } @Bean @ServiceActivator(inputChannel = "logChannel") public LoggingHandler logging() { LoggingHandler adapter = new LoggingHandler(LoggingHandler.Level.DEBUG); adapter.setLoggerName("TEST_LOGGER"); adapter.setLogExpressionString("headers.id + ': ' + payload"); return adapter; } @MessagingGateway(defaultRequestChannel = "logChannel") public interface MyGateway { void sendToLogger(String data); } }
The following Spring Boot application provides an example of configuring the logging channel adapter using the Java DSL:
@SpringBootApplication public class LoggingJavaApplication { public static void main(String[] args) { ConfigurableApplicationContext context = new SpringApplicationBuilder(LoggingJavaApplication.class) .web(false) .run(args); MyGateway gateway = context.getBean(MyGateway.class); gateway.sendToLogger("foo"); } @Bean public IntegrationFlow loggingFlow() { return IntegrationFlows.from(MyGateway.class) .log(LoggingHandler.Level.DEBUG, "TEST_LOGGER", m -> m.getHeaders().getId() + ": " + m.getPayload()); } @MessagingGateway public interface MyGateway { void sendToLogger(String data); } }
The Spring Integration JavaConfig and DSL extension provides a set of convenient Builders and a fluent API to configure Spring Integration message flows from Spring @Configuration classes.
@Configuration @EnableIntegration public class MyConfiguration { @Bean public AtomicInteger integerSource() { return new AtomicInteger(); } @Bean public IntegrationFlow myFlow() { return IntegrationFlows.from(integerSource::getAndIncrement, c -> c.poller(Pollers.fixedRate(100))) .channel("inputChannel") .filter((Integer p) -> p > 0) .transform(Object::toString) .channel(MessageChannels.queue()) .get(); } }
As the result after ApplicationContext start up Spring Integration endpoints and Message Channels will be created as is the case after XML parsing.
Such configuration can be used to replace XML configuration or along side with it.
The Java DSL for Spring Integration is essentially a facade for Spring Integration.
The DSL provides a simple way to embed Spring Integration Message Flows into your application using the fluent Builder pattern together with existing Java and Annotation configurations from Spring Framework and Spring Integration as well.
Another useful tool to simplify configuration is Java 8 Lambdas.
The cafe is a good example of using the DSL.
The DSL is presented by the IntegrationFlows Factory for the IntegrationFlowBuilder.
This produces the IntegrationFlow component, which should be registered as a Spring bean (@Bean).
The builder pattern is used to express arbitrarily complex structures as a hierarchy of methods that may accept Lambdas as arguments.
The IntegrationFlowBuilder just collects integration components (MessageChannel s, AbstractEndpoint s etc.) in the IntegrationFlow bean for further parsing and registration of concrete beans in the application context by the IntegrationFlowBeanPostProcessor.
The Java DSL uses Spring Integration classes directly and bypasses any XML generation and parsing. However, the DSL offers more than syntactic sugar on top of XML. One of its most compelling features is the ability to define inline Lambdas to implement endpoint logic, eliminating the need for external classes to implement custom logic. In some sense, Spring Integration’s support for the Spring Expression Language (SpEL) and inline scripting address this, but Java Lambdas are easier and much more powerful.
The org.springframework.integration.dsl package contains the IntegrationFlowBuilder API mentioned above and a bunch of IntegrationComponentSpec implementations which are builders too and provide the fluent API to configure concrete endpoints.
The IntegrationFlowBuilder infrastructure provides common EIP for message based applications, such as channels, endpoints, pollers and channel interceptors.
Endpoints are expressed as verbs in the DSL to improve readability. The following list includes the common DSL method names and the associated EIP endpoint:
-
transform →
Transformer -
filter →
Filter -
handle →
ServiceActivator -
split →
Splitter -
aggregate →
Aggregator -
route →
Router -
bridge →
Bridge
Conceptually, integration processes are constructed by composing these endpoints into one or more message flows.
Note that EIP does not formally define the term message flow, but it is useful to think of it as a unit of work that uses well known messaging patterns.
The DSL provides an IntegrationFlow component to define a composition of channels and endpoints between them, but now IntegrationFlow plays only the configuration role to populate real beans in the application context and isn’t used at runtime:
@Bean public IntegrationFlow integerFlow() { return IntegrationFlows.from("input") .<String, Integer>transform(Integer::parseInt) .get(); }
Here we use the IntegrationFlows factory to define an IntegrationFlow bean using EIP-methods from IntegrationFlowBuilder.
The transform method accepts a Lambda as an endpoint argument to operate on the message payload.
The real argument of this method is GenericTransformer<S, T>, hence any out-of-the-box transformers (ObjectToJsonTransformer, FileToStringTransformer etc.) can be used here.
Under the covers, IntegrationFlowBuilder recognizes the MessageHandler and endpoint for that: MessageTransformingHandler and ConsumerEndpointFactoryBean, respectively.
Let’s look at another example:
@Bean public IntegrationFlow myFlow() { return IntegrationFlows.from("input") .filter("World"::equals) .transform("Hello "::concat) .handle(System.out::println) .get(); }
The above example composes a sequence of Filter -> Transformer -> Service Activator.
The flow is one way, that is it does not provide a a reply message but simply prints the payload to STDOUT.
The endpoints are automatically wired together using direct channels.
In addition to the IntegrationFlowBuilder with EIP-methods the Java DSL provides a fluent API to configure MessageChannel s.
For this purpose the MessageChannels builder factory is provided:
@Bean public MessageChannel priorityChannel() { return MessageChannels.priority(this.mongoDbChannelMessageStore, "priorityGroup") .interceptor(wireTap()) .get(); }
The same MessageChannels builder factory can be used in the channel() EIP-method from IntegrationFlowBuilder to wire endpoints similar to an`input-channel`/output-channel pair in the XML configuration.
By default endpoints are wired via DirectChannel s where the bean name is based on the pattern: [IntegrationFlow.beanName].channel#[channelNameIndex].
This rule is applied for unnamed channels produced by inline MessageChannels builder factory usage, too.
However all MessageChannels methods have a channelId -aware variant to create the bean names for MessageChannel s.
The MessageChannel references can be used as well as beanName, as bean-method invocations.
Here is a sample with possible variants of channel() EIP-method usage:
@Bean public MessageChannel queueChannel() { return MessageChannels.queue().get(); } @Bean public MessageChannel publishSubscribe() { return MessageChannels.publishSubscribe().get(); } @Bean public IntegrationFlow channelFlow() { return IntegrationFlows.from("input") .fixedSubscriberChannel() .channel("queueChannel") .channel(publishSubscribe()) .channel(MessageChannels.executor("executorChannel", this.taskExecutor)) .channel("output") .get(); }
-
from("input")means: find and use theMessageChannelwith the "input" id, or create one; -
fixedSubscriberChannel()produces an instance ofFixedSubscriberChanneland registers it with namechannelFlow.channel#0; -
channel("queueChannel")works the same way but, of course, uses an existing "queueChannel" bean; -
channel(publishSubscribe())- the bean-method reference; -
channel(MessageChannels.executor("executorChannel", this.taskExecutor))theIntegrationFlowBuilderunwrapsIntegrationComponentSpecto theExecutorChanneland registers it as "executorChannel"; -
channel("output")- registers theDirectChannelbean with "output" name as long as there are no beans with this name.
Note: the IntegrationFlow definition shown above is valid and all of its channels are applied to endpoints with BridgeHandler s.
| Important |
|---|---|
|
Be careful to use the same inline channel definition via |
@Bean public IntegrationFlow startFlow() { return IntegrationFlows.from("input") .transform(...) .channel(MessageChannels.queue("queueChannel")) .get(); } @Bean public IntegrationFlow endFlow() { return IntegrationFlows.from(MessageChannels.queue("queueChannel")) .handle(...) .get(); }
You end up with:
Caused by: java.lang.IllegalStateException:
Could not register object [queueChannel] under bean name 'queueChannel':
there is already object [queueChannel] bound
at o.s.b.f.s.DefaultSingletonBeanRegistry.registerSingleton(DefaultSingletonBeanRegistry.java:129)
To make it working there is just need to declare @Bean for that channel and use its bean-method from different IntegrationFlow s.
A similar fluent API is provided to configure PollerMetadata for AbstractPollingEndpoint implementations.
The Pollers builder factory can be used to configure common bean definitions or those created from IntegrationFlowBuilder EIP-methods:
@Bean(name = PollerMetadata.DEFAULT_POLLER) public PollerMetadata poller() { return Pollers.fixedRate(500).get(); }
See Pollers and PollerSpec Java Docs for more information.
All IntegrationFlowBuilder EIP-methods have a variant to apply the Lambda parameter to provide options for AbstractEndpoint s: SmartLifecycle, PollerMetadata, request-handler-advice-chain etc.
Each of them has generic arguments, so it allows you to simply configure an endpoint and even its MessageHandler in the context:
@Bean public IntegrationFlow flow2() { return IntegrationFlows.from(this.inputChannel) .transform(new PayloadSerializingTransformer(), c -> c.autoStartup(false).id("payloadSerializingTransformer")) .transform((Integer p) -> p * 2, c -> c.advice(this.expressionAdvice())) .get(); }
In addition the EndpointSpec provides an id() method to allow you to register an endpoint bean with a given bean name, rather than a generated one.
The DSL API provides a convenient, fluent Transformers factory to be used as inline target object definition within .transform() EIP-method:
@Bean public IntegrationFlow transformFlow() { return IntegrationFlows.from("input") .transform(Transformers.fromJson(MyPojo.class)) .transform(Transformers.serializer()) .get(); }
It avoids inconvenient coding using setters and makes the flow definition more straightforward.
Note, that Transformers can be use to declare target Transformer s as @Bean s and, again, use them from IntegrationFlow definition as bean-methods.
Nevertheless, the DSL parser takes care about bean declarations for inline objects, if they aren’t defined as beans yet.
See Transformers Java Docs for more information and supported factory methods.
Typically message flows start from some Inbound Channel Adapter (e.g. <int-jdbc:inbound-channel-adapter>).
The adapter is configured with <poller> and it asks a MessageSource<?> for producing messages periodically.
Java DSL allows to start IntegrationFlow from a MessageSource<?>, too.
For this purpose IntegrationFlows builder factory provides overloaded IntegrationFlows.from(MessageSource<?> messageSource) method.
The MessageSource<?> may be configured as a bean and provided as argument for that method.
The second parameter of IntegrationFlows.from() is a Consumer<SourcePollingChannelAdapterSpec> Lambda and allows to provide options for the SourcePollingChannelAdapter, e.g. PollerMetadata or SmartLifecycle:
@Bean public MessageSource<Object> jdbcMessageSource() { return new JdbcPollingChannelAdapter(this.dataSource, "SELECT * FROM foo"); } @Bean public IntegrationFlow pollingFlow() { return IntegrationFlows.from(jdbcMessageSource(), c -> c.poller(Pollers.fixedRate(100).maxMessagesPerPoll(1))) .transform(Transformers.toJson()) .channel("furtherProcessChannel") .get(); }
There is also an IntegrationFlows.from() variant based on the java.util.function.Supplier if there is no requirements to build Message objects directly.
The result of the Supplier.get() is wrapped to the Message (if it isn’t message already) by Framework automatically.
The next sections discuss selected endpoints which require further explanation.
Spring Integration natively provides specialized router types including:
-
HeaderValueRouter -
PayloadTypeRouter -
ExceptionTypeRouter -
RecipientListRouter -
XPathRouter
As with many other DSL IntegrationFlowBuilder EIP-methods the route() method can apply any out-of-the-box AbstractMessageRouter implementation, or for convenience a String as a SpEL expression, or a ref/method pair.
In addition route() can be configured with a Lambda - the inline method invocation case, and with a Lambda for a Consumer<RouterSpec<MethodInvokingRouter>>.
The fluent API also provides AbstractMappingMessageRouter options like channelMapping(String key, String channelName) pairs:
@Bean public IntegrationFlow routeFlow() { return IntegrationFlows.from("routerInput") .<Integer, Boolean>route(p -> p % 2 == 0, m -> m.suffix("Channel") .channelMapping("true", "even") .channelMapping("false", "odd") ) .get(); }
A simple expression-based router:
@Bean public IntegrationFlow routeFlow() { return IntegrationFlows.from("routerInput") .route("headers['destChannel']") .get(); }
The routeToRecipients() method takes a Consumer<RecipientListRouterSpec>:
@Bean public IntegrationFlow recipientListFlow() { return IntegrationFlows.from("recipientListInput") .<String, String>transform(p -> p.replaceFirst("Payload", "")) .routeToRecipients(r -> r .recipient("foo-channel", "'foo' == payload") .recipient("bar-channel", m -> m.getHeaders().containsKey("recipient") && (boolean) m.getHeaders().get("recipient")) .recipientFlow("'foo' == payload or 'bar' == payload or 'baz' == payload", f -> f.<String, String>transform(String::toUpperCase) .channel(c -> c.queue("recipientListSubFlow1Result"))) .recipientFlow((String p) -> p.startsWith("baz"), f -> f.transform("Hello "::concat) .channel(c -> c.queue("recipientListSubFlow2Result"))) .recipientFlow(new FunctionExpression<Message<?>>(m -> "bax".equals(m.getPayload())), f -> f.channel(c -> c.queue("recipientListSubFlow3Result"))) .defaultOutputToParentFlow()) .get(); }
The .defaultOutputToParentFlow() of the .routeToRecipients() allows to make the router’s defaultOutput as a gateway to continue a process for the unmatched messages in the main flow.
A splitter is created using the split() EIP-method.
By default, if the payload is a Iterable, Iterator, Array, Stream or Reactive Publisher, this will output each item as an individual message.
This takes a Lambda, SpEL expression, any AbstractMessageSplitter implementation, or can be used without parameters to provide the DefaultMessageSplitter.
For example:
@Bean public IntegrationFlow splitFlow() { return IntegrationFlows.from("splitInput") .split(s -> s.applySequence(false).get().getT2().setDelimiters(",")) .channel(MessageChannels.executor(this.taskExecutor())) .get(); }
This creates a splitter that splits a message containing a comma delimited String.
Note: the getT2() method comes from Tuple Collection which is the result of EndpointSpec.get() and represents a pair of ConsumerEndpointFactoryBean and DefaultMessageSplitter for the example above.
An Aggregator is conceptually the converse of a Splitter.
It aggregates a sequence of individual messages into a single message and is necessarily more complex.
By default, an aggregator will return a message containing a collection of payloads from incoming messages.
The same rules are applied for the Resequencer:
@Bean public IntegrationFlow splitAggregateFlow() { return IntegrationFlows.from("splitAggregateInput") .split() .channel(MessageChannels.executor(this.taskExecutor())) .resequence() .aggregate() .get(); }
The above is a canonical example of splitter/aggregator pattern.
The split() method splits the list into individual messages and sends them to the ExecutorChannel.
The resequence() method reorders messages by sequence details from message headers.
The aggregate() method just collects those messages to the result list.
However, you may change the default behavior by specifying a release strategy and correlation strategy, among other things. Consider the following:
.aggregate(a ->
a.correlationStrategy(m -> m.getHeaders().get("myCorrelationKey"))
.releaseStrategy(g -> g.size() > 10)
.messageStore(messageStore()))
The similar Lambda configurations are provided for the resequence() EIP-method.
The .handle() EIP-method’s goal is to invoke any MessageHandler implementation or any method on some POJO.
Another option to define "activity" via Lambda expression.
Hence a generic GenericHandler<P> functional interface has been introduced.
Its handle method requires two arguments - P payload and Map<String, Object> headers.
Having that we can define a flow like this:
@Bean public IntegrationFlow myFlow() { return IntegrationFlows.from("flow3Input") .<Integer>handle((p, h) -> p * 2) .get(); }
However one main goal of Spring Integration an achieving of loose coupling via runtime type conversion from message payload to target arguments of message handler.
Since Java doesn’t support generic type resolution for Lambda classes, we introduced a workaround with additional payloadType argument for the most EIP-methods and LambdaMessageProcessor, which delegates the hard conversion work to the Spring’s ConversionService using provided type and requested message to target method arguments.
The IntegrationFlow might look like this:
@Bean public IntegrationFlow integerFlow() { return IntegrationFlows.from("input") .<byte[], String>transform(p - > new String(p, "UTF-8")) .handle(Integer.class, (p, h) -> p * 2) .get(); }
Of course we register some custom BytesToIntegerConverter within ConversionService and get rid of that additional .transform().
For convenience to log the message journey throw the Spring Integration flow (<logging-channel-adapter>), a log() operator is presented.
Underneath it is represented by the WireTap ChannelInterceptor and LoggingHandler as subscriber.
It is responsible to log message incoming into the next endpoint or for the current channel:
.filter(...)
.log(LoggingHandler.Level.ERROR, "test.category", m -> m.getHeaders().getId())
.route(...)
In this example an id header will be logged with ERROR level onto "test.category" only for messages passed the filter and before routing.
A .wireTap() fluent API exists for MessageChannelSpec builders.
A target configuration gains much more from Java DSL usage:
@Bean public QueueChannelSpec myChannel() { return MessageChannels.queue() .wireTap("loggingFlow.input"); } @Bean public IntegrationFlow loggingFlow() { return f -> f.log(); }
| Important |
|---|---|
|
If @Bean public IntegrationFlow sseFlow() { return IntegrationFlows .from(WebFlux.inboundGateway("/sse") .requestMapping(m -> m.produces(MediaType.TEXT_EVENT_STREAM_VALUE))) .handle((p, h) -> Flux.just("foo", "bar", "baz")) .log(LoggingHandler.Level.WARN) .bridge() .get(); } |
As we have seen, IntegrationFlowBuilder provides a top level API to produce Integration components wired to message flows.
This is convenient if your integration may be accomplished with a single flow (which is often the case).
Alternately IntegrationFlow s can be joined via MessageChannel s.
By default, the MessageFlow behaves as a Chain in Spring Integration parlance.
That is, the endpoints are automatically wired implicitly via DirectChannel s.
The message flow is not actually constructed as a chain, affording much more flexibility.
For example, you may send a message to any component within the flow, if you know its inputChannel name, i.e., explicitly define it.
You may also reference externally defined channels within a flow to allow the use of channel adapters to enable remote transport protocols, file I/O, and the like, instead of direct channels.
As such, the DSL does not support the Spring Integration chain element since it doesn’t add much value.
Since the Spring Integration Java DSL produces the same bean definition model as any other configuration options and is based on the existing Spring Framework @Configuration infrastructure, it can be used together with Integration XML definitions and wired with Spring Integration Messaging Annotations configuration.
Another alternative to define direct IntegrationFlow s is based on a fact that IntegrationFlow can be declared as Lambda too:
@Bean public IntegrationFlow lambdaFlow() { return f -> f.filter("World"::equals) .transform("Hello "::concat) .handle(System.out::println); }
The result of this definition is the same bunch of Integration components wired with implicit direct channel.
Only limitation is here, that this flow is started with named direct channel - lambdaFlow.input.
And Lambda flow can’t start from MessageSource or MessageProducer.
The FunctionExpression (an implementation of SpEL Expression) has been introduced to get a gain of Java and Lambda usage for the method and its generics context.
The Function<T, R> option is provided for the DSL components alongside with expression option, when there is the implicit Strategy variant from Core Spring Integration.
The usage may look like:
.enrich(e -> e.requestChannel("enrichChannel") .requestPayload(Message::getPayload) .propertyFunction("date", m -> new Date()))
The FunctionExpression also supports runtime type conversion as it is done in the standard SpelExpression.
Some of if...else and publish-subscribe components provide the support to specify their logic or mapping using Sub Flows.
The simplest sample is .publishSubscribeChannel():
@Bean public IntegrationFlow subscribersFlow() { return flow -> flow .publishSubscribeChannel(Executors.newCachedThreadPool(), s -> s .subscribe(f -> f .<Integer>handle((p, h) -> p / 2) .channel(c -> c.queue("subscriber1Results"))) .subscribe(f -> f .<Integer>handle((p, h) -> p * 2) .channel(c -> c.queue("subscriber2Results")))) .<Integer>handle((p, h) -> p * 3) .channel(c -> c.queue("subscriber3Results")); }
Of course the same result we can achieve with separate IntegrationFlow @Bean definitions, but we hope you’ll find the subflow style of logic composition useful.
Similar publish-subscribe subflow composition provides .routeToRecipients().
Another sample is .discardFlow() on the .filter() instead of .discardChannel().
The .route() deserves special attention.
As a sample:
@Bean public IntegrationFlow routeFlow() { return f -> f .<Integer, Boolean>route(p -> p % 2 == 0, m -> m.channelMapping("true", "evenChannel") .subFlowMapping("false", sf -> sf.<Integer>handle((p, h) -> p * 3))) .transform(Object::toString) .channel(c -> c.queue("oddChannel")); }
The .channelMapping() continues to work as in regular Router mapping, but the .subFlowMapping() tied that subflow with main flow.
In other words, any router’s subflow returns to the main flow after .route().
Of course, subflows can be nested with any depth, but we don’t recommend to do that because, in fact, even in the router case, adding complex subflows within a flow would quickly begin to look like a plate of spaghetti and difficult for a human to parse.
All of the examples so far illustrate how the DSL supports a messaging architecture using the Spring Integration programming model, but we haven’t done any real integration yet. This requires access to remote resources via http, jms, amqp, tcp, jdbc, ftp, smtp, and the like, or access to the local file system. Spring Integration supports all of these and more. Ideally, the DSL should offer first class support for all of them but it is a daunting task to implement all of these and keep up as new adapters are added to Spring Integration. So the expectation is that the DSL will continually be catching up with Spring Integration.
Anyway we are providing the hi-level API to define protocol-specific seamlessly.
This is achieved with Factory and Builder patterns and, of course, with Lambdas.
The factory classes can be considered "Namespace Factories", because they play the same role as XML namespace for components from the concrete protocol-specific Spring Integration modules.
Currently, Spring Integration Java DSL supports Amqp, Feed, Jms, Files, (S)Ftp, Http, JPA, MongoDb, TCP/UDP, Mail, WebFlux and Scripts namespace factories:
@Bean public IntegrationFlow amqpFlow() { return IntegrationFlows.from(Amqp.inboundGateway(this.rabbitConnectionFactory, queue())) .transform("hello "::concat) .transform(String.class, String::toUpperCase) .get(); } @Bean public IntegrationFlow jmsOutboundGatewayFlow() { return IntegrationFlows.from("jmsOutboundGatewayChannel") .handle(Jms.outboundGateway(this.jmsConnectionFactory) .replyContainer(c -> c.concurrentConsumers(3) .sessionTransacted(true)) .requestDestination("jmsPipelineTest")) .get(); } @Bean public IntegrationFlow sendMailFlow() { return IntegrationFlows.from("sendMailChannel") .handle(Mail.outboundAdapter("localhost") .port(smtpPort) .credentials("user", "pw") .protocol("smtp") .javaMailProperties(p -> p.put("mail.debug", "true")), e -> e.id("sendMailEndpoint")) .get(); }
We show here the usage of namespace factories as inline adapters declarations, however they can be used from @Bean definitions to make the IntegrationFlow method-chain more readable.
We are soliciting community feedback on these namespace factories before we spend effort on others; we’d also appreciate some prioritization for which adapters/gateways we should support next.
See more Java DSL samples in the protocol-specific chapter throughout this reference manual.
All other protocol channel adapters may be configured as generic beans and wired to the IntegrationFlow:
@Bean public QueueChannelSpec wrongMessagesChannel() { return MessageChannels .queue() .wireTap("wrongMessagesWireTapChannel"); } @Bean public IntegrationFlow xpathFlow(MessageChannel wrongMessagesChannel) { return IntegrationFlows.from("inputChannel") .filter(new StringValueTestXPathMessageSelector("namespace-uri(/*)", "my:namespace"), e -> e.discardChannel(wrongMessagesChannel)) .log(LoggingHandler.Level.ERROR, "test.category", m -> m.getHeaders().getId()) .route(xpathRouter(wrongMessagesChannel)) .get(); } @Bean public AbstractMappingMessageRouter xpathRouter(MessageChannel wrongMessagesChannel) { XPathRouter router = new XPathRouter("local-name(/*)"); router.setEvaluateAsString(true); router.setResolutionRequired(false); router.setDefaultOutputChannel(wrongMessagesChannel); router.setChannelMapping("Tags", "splittingChannel"); router.setChannelMapping("Tag", "receivedChannel"); return router; }
The IntegrationFlow as an interface can be implemented directly and specified as component for scanning:
@Component public class MyFlow implements IntegrationFlow { @Override public void configure(IntegrationFlowDefinition<?> f) { f.<String, String>transform(String::toUpperCase); } }
And yes, it is picked up by the IntegrationFlowBeanPostProcessor and correctly parsed and registered in the application context.
For convenience and loosely coupled architecture the IntegrationFlowAdapter base class implementation is provided.
It requires a buildFlow() method implementation to produce an IntegrationFlowDefinition using one of from() support methods:
@Component public class MyFlowAdapter extends IntegrationFlowAdapter { private final AtomicBoolean invoked = new tomicBoolean(); public Date nextExecutionTime(TriggerContext triggerContext) { return this.invoked.getAndSet(true) ? null : new Date(); } @Override protected IntegrationFlowDefinition<?> buildFlow() { return from(this, "messageSource", e -> e.poller(p -> p.trigger(this::nextExecutionTime))) .split(this) .transform(this) .aggregate(a -> a.processor(this, null), null) .enrichHeaders(Collections.singletonMap("foo", "FOO")) .filter(this) .handle(this) .channel(c -> c.queue("myFlowAdapterOutput")); } public String messageSource() { return "B,A,R"; } @Splitter public String[] split(String payload) { return StringUtils.commaDelimitedListToStringArray(payload); } @Transformer public String transform(String payload) { return payload.toLowerCase(); } @Aggregator public String aggregate(List<String> payloads) { return payloads.stream().collect(Collectors.joining()); } @Filter public boolean filter(@Header Optional<String> foo) { return foo.isPresent(); } @ServiceActivator public String handle(String payload, @Header String foo) { return payload + ":" + foo; } }
The IntegrationFlow s and therefore all its dependant components can be registered at runtime.
This was done previously by the BeanFactory.registerSingleton() hook and now via newly introduced in the Spring Framework 5.0 programmatic BeanDefinition registration with the instanceSupplier hook:
BeanDefinition beanDefinition =
BeanDefinitionBuilder.genericBeanDefinition((Class<Object>) bean.getClass(), () -> bean)
.getRawBeanDefinition();
((BeanDefinitionRegistry) this.beanFactory).registerBeanDefinition(beanName, beanDefinition);
and all the necessary bean initialization and lifecycle is done automatically as it is with the standard context configuration bean definitions.
To simplify the development experience Spring Integration introduced IntegrationFlowContext to register and manage IntegrationFlow instances at runtime:
@Autowired private AbstractServerConnectionFactory server1; @Autowired private IntegrationFlowContext flowContext; ... @Test public void testTcpGateways() { TestingUtilities.waitListening(this.server1, null); IntegrationFlow flow = f -> f .handle(Tcp.outboundGateway(Tcp.netClient("localhost", this.server1.getPort()) .serializer(TcpCodecs.crlf()) .deserializer(TcpCodecs.lengthHeader1()) .id("client1")) .remoteTimeout(m -> 5000)) .transform(Transformers.objectToString()); IntegrationFlowRegistration theFlow = this.flowContext.registration(flow).register(); assertThat(theFlow.getMessagingTemplate().convertSendAndReceive("foo", String.class), equalTo("FOO")); }
This is useful when we have multi configuration options and have to create several instances of similar flows.
So, we can iterate our options and create and register IntegrationFlow s within loop.
Another variant when our source of data isn’t Spring-based and we must create it on the fly.
Such a sample is Reactive Streams event source:
Flux<Message<?>> messageFlux =
Flux.just("1,2,3,4")
.map(v -> v.split(","))
.flatMapIterable(Arrays::asList)
.map(Integer::parseInt)
.map(GenericMessage<Integer>::new);
QueueChannel resultChannel = new QueueChannel();
IntegrationFlow integrationFlow =
IntegrationFlows.from(messageFlux)
.<Integer, Integer>transform(p -> p * 2)
.channel(resultChannel)
.get();
this.integrationFlowContext.registration(integrationFlow)
.register();
The IntegrationFlowRegistrationBuilder (as a result of the IntegrationFlowContext.registration()) can be used to specify a bean name for the IntegrationFlow to register, to control its autoStartup and also for additional, non Integration beans registration.
Usually those additional beans are connection factories (AMQP, JMS, (S)FTP, TCP/UDP etc.), serializers/deserializers or any other required support components.
Such a dynamically registered IntegrationFlow and all its dependant beans can be removed afterwards using IntegrationFlowRegistration.destroy() callback.
See IntegrationFlowContext JavaDocs for more information.
The IntegrationFlow can start from the service interface providing GatewayProxyFactoryBean component:
public interface ControlBusGateway { void send(String command); } ... @Bean public IntegrationFlow controlBusFlow() { return IntegrationFlows.from(ControlBusGateway.class) .controlBus() .get(); }
All the proxy for interface methods are supplied with the channel to send messages to the next integration component in the IntegrationFlow.
The service interface can be marked with the @MessagingGateway as well as methods with the @Gateway annotations.
Nevertheless the requestChannel is ignored and overridden with that internal channel for the next component in the IntegrationFlow.
Otherwise such a configuration via IntegrationFlow won’t make sense.
By default a GatewayProxyFactoryBean gets a conventional bean name like [FLOW_BEAN_NAME.gateway].
That id can be changed via @MessagingGateway.name() attribute or the overloaded from(Class<?> serviceInterface, String beanName) factory method.
With the Java 8 on board we even can create such an Integration Gateway with the java.util.function interfaces:
@Bean public IntegrationFlow errorRecovererFlow() { return IntegrationFlows.from(Function.class, "errorRecovererFunction") .handle((GenericHandler<?>) (p, h) -> { throw new RuntimeException("intentional"); }, e -> e.advice(retryAdvice())) .get(); }
That can be used lately as:
@Autowired @Qualifier("errorRecovererFunction") private Function<String, String> errorRecovererFlowGateway;
| Note |
|---|---|
|
Prior to version 4.2 metrics were only available when JMX was enabled. See Section 10.2, “JMX Support”. |
To enable MessageSource, MessageChannel and MessageHandler metrics, add an <int:management/> bean to the
application context, or annotate one of your @Configuration classes with @EnableIntegrationManagement.
MessageSource s only maintain counts, MessageChannel s and MessageHandler s maintain duration statistics in
addition to counts.
See Section 10.1.2, “MessageChannel Metric Features” and Section 10.1.3, “MessageHandler Metric Features” below.
This causes the automatic registration of the IntegrationManagementConfigurer bean in the application context.
Only one such bean can exist in the context and it must have the bean name integrationManagementConfigurer
if registered manually via a <bean/> definition.
This bean applies it’s configuration to beans after all beans in the context have been instantiated.
In addition to metrics, you can control debug logging in the main message flow.
It has been found that in very high volume applications, even calls to isDebugEnabled() can be quite expensive with
some logging subsystems.
You can disable all such logging to avoid this overhead; exception logging (debug or otherwise) are not affected
by this setting.
A number of options are available:
<int:management default-logging-enabled="true"
@Configuration @EnableIntegration @EnableIntegrationManagement( defaultLoggingEnabled = "true",
|
Set to |
|
Enable or disable count metrics for components not matching one of the patterns in <4>.
Only applied if you have not explicitly configured the setting in a bean definition.
Default |
|
Enable or disable statistical metrics for components not matching one of the patterns in <5>. Only applied if you have not explicitly configured the setting in a bean definition. Default false. |
|
A comma-delimited list of patterns for beans for which counts should be enabled; negate the pattern with |
|
A comma-delimited list of patterns for beans for which statistical metrics should be enabled; negate the pattern
with |
|
A reference to a |
At runtime, counts and statistics can be obtained by calling IntegrationManagementConfigurer getChannelMetrics,
getHandlerMetrics and getSourceMetrics, returning MessageChannelMetrics, MessageHandlerMetrics and
MessageSourceMetrics respectively.
See the javadocs for complete information about these classes.
When JMX is enabled (see Section 10.2, “JMX Support”), these metrics are also exposed by the IntegrationMBeanExporter.
| Important |
|---|---|
|
|
Message channels report metrics according to their concrete type.
If you are looking at a DirectChannel, you will see statistics for the send operation.
If it is a QueueChannel, you will also see statistics for the receive operation, as well as the count of messages that are currently buffered by this QueueChannel.
In both cases there are some metrics that are simple counters (message count and error count), and some that are estimates of averages of interesting quantities.
The algorithms used to calculate these estimates are described briefly in the section below.
Table 10.1. MessageChannel Metrics
| Metric Type | Example | Algorithm |
|---|---|---|
Count | Send Count | Simple incrementer. Increases by one when an event occurs. |
Error Count | Send Error Count | Simple incrementer. Increases by one when an send results in an error. |
Duration | Send Duration (method execution time in milliseconds) | Exponential Moving Average with decay factor (10 by default). Average of the method execution time over roughly the last 10 (default) measurements. |
Rate | Send Rate (number of operations per second) | Inverse of Exponential Moving Average of the interval between events with decay in time (lapsing over 60 seconds by default) and per measurement (last 10 events by default). |
Error Rate | Send Error Rate (number of errors per second) | Inverse of Exponential Moving Average of the interval between error events with decay in time (lapsing over 60 seconds by default) and per measurement (last 10 events by default). |
Ratio | Send Success Ratio (ratio of successful to total sends) | Estimate the success ratio as the Exponential Moving Average of the series composed of values 1 for success and 0 for failure (decaying as per the rate measurement over time and events by default). Error ratio is 1 - success ratio. |
The following table shows the statistics maintained for message handlers. Some metrics are simple counters (message count and error count), and one is an estimate of averages of send duration. The algorithms used to calculate these estimates are described briefly in the table below:
Table 10.2. MessageHandlerMetrics
| Metric Type | Example | Algorithm |
|---|---|---|
Count | Handle Count | Simple incrementer. Increases by one when an event occurs. |
Error Count | Handler Error Count | Simple incrementer. Increases by one when an invocation results in an error. |
Active Count | Handler Active Count | Indicates the number of currently active threads currently invoking the handler (or any downstream synchronous flow). |
Duration | Handle Duration (method execution time in milliseconds) | Exponential Moving Average with decay factor (10 by default). Average of the method execution time over roughly the last 10 (default) measurements. |
A feature of the time-based average estimates is that they decay with time if no new measurements arrive. To help interpret the behaviour over time, the time (in seconds) since the last measurement is also exposed as a metric.
There are two basic exponential models: decay per measurement (appropriate for duration and anything where the number of measurements is part of the metric), and decay per time unit (more suitable for rate measurements where the time in between measurements is part of the metric). Both models depend on the fact that
S(n) = sum(i=0,i=n) w(i) x(i) has a special form when w(i) = r^i, with r=constant:
S(n) = x(n) + r S(n-1) (so you only have to store S(n-1), not the whole series x(i), to generate a new metric estimate from the last measurement).
The algorithms used in the duration metrics use r=exp(-1/M) with M=10.
The net effect is that the estimate S(n) is more heavily weighted to recent measurements and is composed roughly of the last M measurements.
So M is the "window" or lapse rate of the estimate In the case of the vanilla moving average, i is a counter over the number of measurements.
In the case of the rate we interpret i as the elapsed time, or a combination of elapsed time and a counter (so the metric estimate contains contributions roughly from the last M measurements and the last T seconds).
A new strategy interface MetricsFactory has been introduced allowing you to provide custom channel metrics for your
MessageChannel s and MessageHandler s.
By default, a DefaultMetricsFactory provides default implementation of MessageChannelMetrics and
MessageHandlerMetrics which are described in the next bullet.
To override the default MetricsFactory configure it as described above, by providing a reference to your
MetricsFactory bean instance.
You can either customize the default implementations as described in the next bullet, or provide completely different
implementations by extending AbstractMessageChannelMetrics and/or AbstractMessageHandlerMetrics.
In addition to the default metrics factory described above, the framework provides the AggregatingMetricsFactory.
This factory creates AggregatingMessageChannelMetrics and AggregatingMessageHandlerMetrics.
In very high volume scenarios, the cost of capturing statistics can be prohibitive (2 calls to the system time and
storing the data for each message).
The aggregating metrics aggregate the response time over a sample of messages.
This can save significant CPU time.
| Caution |
|---|---|
|
The statistics will be skewed if messages arrive in bursts. These metrics are intended for use with high, constant-volume, message rates. |
<bean id="aggregatingMetricsFactory" class="org.springframework.integration.support.management.AggregatingMetricsFactory"> <constructor-arg value="1000" /> <!-- sample size --> </bean>
The above configuration aggregates the duration over 1000 messages. Counts (send, error) are maintained per-message but the statistics are per 1000 messages.
- Customizing the Default Channel/Handler Statistics
See Section 10.1.4, “Time-Based Average Estimates” and the Javadocs for the ExponentialMovingAverage* classes for more information about these
values.
By default, the DefaultMessageChannelMetrics and DefaultMessageHandlerMetrics use a window of 10 measurements,
a rate period of 1 second (rate per second) and a decay lapse period of 1 minute.
If you wish to override these defaults, you can provide a custom MetricsFactory that returns appropriately configured
metrics and provide a reference to it to the MBean exporter as described above.
Example:
public static class CustomMetrics implements MetricsFactory { @Override public AbstractMessageChannelMetrics createChannelMetrics(String name) { return new DefaultMessageChannelMetrics(name, new ExponentialMovingAverage(20, 1000000.), new ExponentialMovingAverageRate(2000, 120000, 30, true), new ExponentialMovingAverageRatio(130000, 40, true), new ExponentialMovingAverageRate(3000, 140000, 50, true)); } @Override public AbstractMessageHandlerMetrics createHandlerMetrics(String name) { return new DefaultMessageHandlerMetrics(name, new ExponentialMovingAverage(20, 1000000.)); } }
- Advanced Customization
The customizations described above are wholesale and will apply to all appropriate beans exported by the MBean exporter. This is the extent of customization available using XML configuration.
Individual beans can be provided with different implementations using java @Configuration or programmatically at
runtime, after the application context has been refreshed, by invoking the configureMetrics methods on
AbstractMessageChannel and AbstractMessageHandler.
- Performance Improvement
Previously, the time-based metrics (see Section 10.1.4, “Time-Based Average Estimates”) were calculated in real time.
The statistics are now calculated when retrieved instead.
This resulted in a significant performance improvement, at the expense of a small amount of additional memory for each statistic.
As discussed in the bullet above, the statistics can be disabled altogether, while retaining the MBean allowing the invocation of Lifecycle methods.
Spring Integration provides Channel Adapters for receiving and publishing JMX Notifications. There is also an_Inbound Channel Adapter_ for polling JMX MBean attribute values, and an Outbound Channel Adapter for invoking JMX MBean operations.
The Notification-listening Channel Adapter requires a JMX ObjectName for the MBean that publishes notifications to which this listener should be registered. A very simple configuration might look like this:
<int-jmx:notification-listening-channel-adapter id="adapter" channel="channel" object-name="example.domain:name=publisher"/>
| Tip |
|---|---|
|
The notification-listening-channel-adapter registers with an |
The adapter can also accept a reference to a NotificationFilter and a handback Object to provide some context that is passed back with each Notification.
Both of those attributes are optional.
Extending the above example to include those attributes as well as an explicit MBeanServer bean name would produce the following:
<int-jmx:notification-listening-channel-adapter id="adapter" channel="channel" mbean-server="someServer" object-name="example.domain:name=somePublisher" notification-filter="notificationFilter" handback="myHandback"/>
The Notification-listening Channel Adapter is event-driven and registered with the MBeanServer directly.
It does not require any poller configuration.
| Note |
|---|---|
|
For this component only, the object-name attribute can contain an ObjectName pattern (e.g. "org.foo:type=Bar,name=*") and the adapter will receive notifications from all MBeans with ObjectNames that match the pattern. In addition, the object-name attribute can contain a SpEL reference to a <util:list/> of ObjectName patterns: <jmx:notification-listening-channel-adapter id="manyNotificationsAdapter" channel="manyNotificationsChannel" object-name="#{patterns}"/> <util:list id="patterns"> <value>org.foo:type=Foo,name=*</value> <value>org.foo:type=Bar,name=*</value> </util:list> The names of the located MBean(s) will be logged when DEBUG level logging is enabled. |
The Notification-publishing Channel Adapter is relatively simple. It only requires a JMX ObjectName in its configuration as shown below.
<context:mbean-export/> <int-jmx:notification-publishing-channel-adapter id="adapter" channel="channel" object-name="example.domain:name=publisher"/>
It does also require that an MBeanExporter be present in the context.
That is why the <context:mbean-export/> element is shown above as well.
When Messages are sent to the channel for this adapter, the Notification is created from the Message content. If the payload is a String it will be passed as the message text for the Notification. Any other payload type will be passed as the userData of the Notification.
JMX Notifications also have a type, and it should be a dot-delimited String.
There are two ways to provide the type.
Precedence will always be given to a Message header value associated with the JmxHeaders.NOTIFICATION_TYPE key.
On the other hand, you can rely on a fallback default-notification-type attribute provided in the configuration.
<context:mbean-export/> <int-jmx:notification-publishing-channel-adapter id="adapter" channel="channel" object-name="example.domain:name=publisher" default-notification-type="some.default.type"/>
The Attribute Polling Channel Adapter is useful when you have a requirement, to periodically check on some value that is available through an MBean as a managed attribute. The poller can be configured in the same way as any other polling adapter in Spring Integration (or it’s possible to rely on the default poller). The object-name and attribute-name are required. An MBeanServer reference is also required, but it will automatically check for a bean named mbeanServer by default, just like the Notification-listening Channel Adapter described above.
<int-jmx:attribute-polling-channel-adapter id="adapter" channel="channel" object-name="example.domain:name=someService" attribute-name="InvocationCount"> <int:poller max-messages-per-poll="1" fixed-rate="5000"/> </int-jmx:attribute-polling-channel-adapter>
The Tree Polling Channel Adapter queries the JMX MBean tree and sends a message with a payload that is the graph of objects that matches the query. By default the MBeans are mapped to primitives and simple Objects like Map, List and arrays - permitting simple transformation, for example, to JSON. An MBeanServer reference is also required, but it will automatically check for a bean named mbeanServer by default, just like the Notification-listening Channel Adapter described above. A basic configuration would be:
<int-jmx:tree-polling-channel-adapter id="adapter" channel="channel" query-name="example.domain:type=*"> <int:poller max-messages-per-poll="1" fixed-rate="5000"/> </int-jmx:tree-polling-channel-adapter>
This will include all attributes on the MBeans selected.
You can filter the attributes by providing an MBeanObjectConverter that has an appropriate filter configured.
The converter can be provided as a reference to a bean definition using the converter attribute, or as an inner <bean/> definition.
A DefaultMBeanObjectConverter is provided which can take a MBeanAttributeFilter in its constructor argument.
Two standard filters are provided; the NamedFieldsMBeanAttributeFilter allows you to specify a list of attributes to include and the NotNamedFieldsMBeanAttributeFilter allows you to specify a list of attributes to exclude.
You can also implement your own filter
The operation-invoking-channel-adapter enables Message-driven invocation of any managed operation exposed by an MBean. Each invocation requires the operation name to be invoked and the ObjectName of the target MBean. Both of these must be explicitly provided via adapter configuration:
<int-jmx:operation-invoking-channel-adapter id="adapter" object-name="example.domain:name=TestBean" operation-name="ping"/>
Then the adapter only needs to be able to discover the mbeanServer bean. If a different bean name is required, then provide the mbean-server attribute with a reference.
The payload of the Message will be mapped to the parameters of the operation, if any. A Map-typed payload with String keys is treated as name/value pairs, whereas a List or array would be passed as a simple argument list (with no explicit parameter names). If the operation requires a single parameter value, then the payload can represent that single value, and if the operation requires no parameters, then the payload would be ignored.
If you want to expose a channel for a single common operation to be invoked by Messages that need not contain headers, then that option works well.
Similar to the operation-invoking-channel-adapter Spring Integration also provides a operation-invoking-outbound-gateway, which could be used when dealing with non-void operations and a return value is required. Such return value will be sent as message payload to the reply-channel specified by this Gateway.
<int-jmx:operation-invoking-outbound-gateway request-channel="requestChannel" reply-channel="replyChannel" object-name="o.s.i.jmx.config:type=TestBean,name=testBeanGateway" operation-name="testWithReturn"/>
If the reply-channel attribute is not provided, the reply message will be sent to the channel that is identified by the IntegrationMessageHeaderAccessor.REPLY_CHANNEL header.
That header is typically auto-created by the entry point into a message flow, such as any Gateway component.
However, if the message flow was started by manually creating a Spring Integration Message and sending it directly to a Channel, then you must specify the message header explicitly or use the provided reply-channel attribute.
Spring Integration components themselves may be exposed as MBeans when the IntegrationMBeanExporter is configured.
To create an instance of the IntegrationMBeanExporter, define a bean and provide a reference to an MBeanServer and a domain name (if desired).
The domain can be left out, in which case the default domain is org.springframework.integration.
<int-jmx:mbean-export id="integrationMBeanExporter" default-domain="my.company.domain" server="mbeanServer"/> <bean id="mbeanServer" class="org.springframework.jmx.support.MBeanServerFactoryBean"> <property name="locateExistingServerIfPossible" value="true"/> </bean>
| Important |
|---|---|
|
The MBean exporter is orthogonal to the one provided in Spring core - it registers message channels and message handlers, but not itself.
You can expose the exporter itself, and certain other components in Spring Integration, using the standard It also has a useful operation, as discussed in the section called “Orderly Shutdown Managed Operation”. |
Starting with Spring Integration 4.0 the @EnableIntegrationMBeanExport annotation has been introduced for convenient configuration of a default (integrationMbeanExporter) bean of type IntegrationMBeanExporter with several useful options at the @Configuration class level.
For example:
@Configuration @EnableIntegration @EnableIntegrationMBeanExport(server = "mbeanServer", managedComponents = "input") public class ContextConfiguration { @Bean public MBeanServerFactoryBean mbeanServer() { return new MBeanServerFactoryBean(); } }
If there is a need to provide more options, or have several IntegrationMBeanExporter beans e.g.
for different MBean Servers, or to avoid conflicts with the standard Spring MBeanExporter (e.g.
via @EnableMBeanExport), you can simply configure an IntegrationMBeanExporter as a generic bean.
All the MessageChannel, MessageHandler and MessageSource instances in the application are wrapped by the MBean exporter to provide management and monitoring features.
The generated JMX object names for each component type are listed in the table below:
Table 10.3. MBean ObjectNames
| Component Type | ObjectName |
|---|---|
MessageChannel | o.s.i:type=MessageChannel,name=<channelName> |
MessageSource | o.s.i:type=MessageSource,name=<channelName>,bean=<source> |
MessageHandler | o.s.i:type=MessageSource,name=<channelName>,bean=<source> |
The bean attribute in the object names for sources and handlers takes one of the values in the table below:
Table 10.4. bean ObjectName Part
| Bean Value | Description |
|---|---|
endpoint | The bean name of the enclosing endpoint (e.g. <service-activator>) if there is one |
anonymous | An indication that the enclosing endpoint didn’t have a user-specified bean name, so the JMX name is the input channel name |
internal | For well-known Spring Integration default components |
handler/source | None of the above: fallback to the |
Custom elements can be appended to the object name by providing a reference to a Properties object in the object-name-static-properties attribute.
Also, since Spring Integration 3.0, you can use a custom ObjectNamingStrategy using the object-naming-strategy attribute.
This permits greater control over the naming of the MBeans.
For example, to group all Integration MBeans under an Integration type.
A simple custom naming strategy implementation might be:
public class Namer implements ObjectNamingStrategy { private final ObjectNamingStrategy realNamer = new KeyNamingStrategy(); @Override public ObjectName getObjectName(Object managedBean, String beanKey) throws MalformedObjectNameException { String actualBeanKey = beanKey.replace("type=", "type=Integration,componentType="); return realNamer.getObjectName(managedBean, actualBeanKey); } }
The beanKey argument is a String containing the standard object name beginning with the default-domain and including any additional static properties.
This example simply moves the standard type part to componentType and sets the type to Integration, enabling selection of all Integration MBeans in one query:"my.domain:type=Integration,*.
This also groups the beans under one tree entry under the domain in tools like VisualVM.
| Note |
|---|---|
|
The default naming strategy is a MetadataNamingStrategy.
The exporter propagates the |
Version 4.2 introduced some important improvements, representing a fairly major overhaul to the JMX support in the framework. These resulted in a significant performance improvement of the JMX statistics collection and much more control thereof, but has some implications for user code in a few specific (uncommon) situations. These changes are detailed below, with a caution where necessary.
- Metrics Capture
Previously, MessageSource, MessageChannel and MessageHandler metrics were captured by wrapping the object in a JDK dynamic proxy to intercept appropriate method calls and capture the statistics.
The proxy was added when an integration MBean exporter was declared in the context.
Now, the statistics are captured by the beans themselves; see Section 10.1, “Metrics and Management” for more information.
| Warning |
|---|---|
|
This change means that you no longer automatically get an MBean or statistics for custom |
The removal of the proxy has two additional benefits; 1) stack traces in exceptions are reduced (when JMX is enabled) because the proxy is not on the stack; 2) cases where 2 MBeans were exported for the same bean now only export a single MBean with consolidated attributes/operations (see the MBean consolidation bullet below).
- Resolution
System.nanoTime() is now used to capture times instead of System.currentTimeMillis().
This may provide more accuracy on some JVMs, espcially when durations of less than 1 millisecond are expected
- Setting Initial Statistics Collection State
Previously, when JMX was enabled, all sources, channels, handlers captured statistics.
It is now possible to control whether the statisics are enabled on an individual component.
Further, it is possible to capture simple counts on MessageChannel s and MessageHandler s instead of the complete time-based statistics.
This can have significant performance implications because you can selectively configure where you need detailed statistics, as well as enable/disable at runtime.
See Section 10.1, “Metrics and Management”.
- @IntegrationManagedResource
Similar to the @ManagedResource annotation, the @IntegrationManagedResource marks a class as eligible to be exported as an MBean; however, it will only be exported if there is an IntegrationMBeanExporter in the application context.
Certain Spring Integration classes (in the org.springframework.integration) package) that were previously annotated with`@ManagedResource` are now annotated with both @ManagedResource and @IntegrationManagedResource.
This is for backwards compatibility (see the next bullet).
Such MBeans will be exported by any context MBeanServeror an IntegrationMBeanExporter (but not both - if both exporters are present, the bean is exported by the integration exporter if the bean matches a managed-components pattern).
- Consolidated MBeans
Certain classes within the framework (mapping routers for example) have additional attributes/operations over and above those provided by metrics and Lifecycle.
We will use a Router as an example here.
Previously, beans of these types were exported as two distinct MBeans:
1) the metrics MBean (with an objectName such as: intDomain:type=MessageHandler,name=myRouter,bean=endpoint).
This MBean had metrics attributes and metrics/Lifecycle operations.
2) a second MBean (with an objectName such as:
ctxDomain:name=org.springframework.integration.config.RouterFactoryBean#0
,type=MethodInvokingRouter)
was exported with the channel mappings attribute and operations.
Now, the attributes and operations are consolidated into a single MBean.
The objectName will depend on the exporter.
If exported by the integration MBean exporter, the objectName will be, for example: intDomain:type=MessageHandler,name=myRouter,bean=endpoint.
If exported by another exporter, the objectName will be, for example: ctxDomain:name=org.springframework.integration.config.RouterFactoryBean#0
,type=MethodInvokingRouter.
There is no difference between these MBeans (aside from the objectName), except that the statistics will not be enabled (the attributes will be 0) by exporters other than the integration exporter; statistics can be enabled at runtime using the JMX operations.
When exported by the integration MBean exporter, the initial state can be managed as described above.
| Warning |
|---|---|
|
If you are currently using the second MBean to change, for example, channel mappings, and you are using the integration MBean exporter, note that the objectName has changed because of the MBean consolidation. There is no change if you are not using the integration MBean exporter. |
- MBean Exporter Bean Name Patterns
Previously, the managed-components patterns were inclusive only.
If a bean name matched one of the patterns it would be included.
Now, the pattern can be negated by prefixing it with !.
i.e.
"!foo*, foox" will match all beans that don’t start with foo, except foox.
Patterns are evaluated left to right and the first match (positive or negative) wins and no further patterns are applied.
| Warning |
|---|---|
|
The addition of this syntax to the pattern causes one possible (although perhaps unlikely) problem.
If you have a bean |
- IntegrationMBeanExporter changes
The IntegrationMBeanExporter no longer implements SmartLifecycle; this means that start() and stop() operations
are no longer available to register/unregister MBeans.
The MBeans are now registered during context initialization and unregistered when the context is destroyed.
The MBean exporter provides a JMX operation to shut down the application in an orderly manner, intended for use before terminating the JVM.
public void stopActiveComponents(long howLong)
Its use and operation are described in Section 10.7, “Orderly Shutdown”.
The key benefit of a messaging architecture is loose coupling where participating components do not maintain any awareness about one another. This fact alone makes your application extremely flexible, allowing you to change components without affecting the rest of the flow, change messaging routes, message consuming styles (polling vs event driven), and so on. However, this unassuming style of architecture could prove to be difficult when things go wrong. When debugging, you would probably like to get as much information about the message as you can (its origin, channels it has traversed, etc.)
Message History is one of those patterns that helps by giving you an option to maintain some level of awareness of a message path either for debugging purposes or to maintain an audit trail. Spring integration provides a simple way to configure your message flows to maintain the Message History by adding a header to the Message and updating that header every time a message passes through a tracked component.
To enable Message History all you need is to define the message-history element in your configuration.
<int:message-history/>
Now every named component (component that has an id defined) will be tracked.
The framework will set the history header in your Message.
Its value is very simple - List<Properties>.
<int:gateway id="sampleGateway" service-interface="org.springframework.integration.history.sample.SampleGateway" default-request-channel="bridgeInChannel"/> <int:chain id="sampleChain" input-channel="chainChannel" output-channel="filterChannel"> <int:header-enricher> <int:header name="baz" value="baz"/> </int:header-enricher> </int:chain>
The above configuration will produce a very simple Message History structure:
[{name=sampleGateway, type=gateway, timestamp=1283281668091},
{name=sampleChain, type=chain, timestamp=1283281668094}]
To get access to Message History all you need is access the MessageHistory header. For example:
Iterator<Properties> historyIterator =
message.getHeaders().get(MessageHistory.HEADER_NAME, MessageHistory.class).iterator();
assertTrue(historyIterator.hasNext());
Properties gatewayHistory = historyIterator.next();
assertEquals("sampleGateway", gatewayHistory.get("name"));
assertTrue(historyIterator.hasNext());
Properties chainHistory = historyIterator.next();
assertEquals("sampleChain", chainHistory.get("name"));
You might not want to track all of the components.
To limit the history to certain components based on their names, all you need is provide the tracked-components attribute and specify a comma-delimited list of component names and/or patterns that match the components you want to track.
<int:message-history tracked-components="*Gateway, sample*, foo"/>
In the above example, Message History will only be maintained for all of the components that end with Gateway, start with sample, or match the name foo exactly.
Starting with version 4.0, you can also use the @EnableMessageHistory annotation in a @Configuration class.
In addition, the MessageHistoryConfigurer bean is now exposed as a JMX MBean by the IntegrationMBeanExporter (see Section 10.2.7, “MBean Exporter”), allowing the patterns to be changed at runtime.
Note, however, that the bean must be stopped (turning off message history) in order to change the patterns.
This feature might be useful to temporarily turn on history to analyze a system.
The MBean’s object name is "<domain>:name=messageHistoryConfigurer,type=MessageHistoryConfigurer".
| Important |
|---|---|
|
If multiple beans (declared by |
| Note |
|---|---|
|
Remember that by definition the Message History header is immutable (you can’t re-write history, although some try). Therefore, when writing Message History values, the components are either creating brand new Messages (when the component is an origin), or they are copying the history from a request Message, modifying it and setting the new list on a reply Message. In either case, the values can be appended even if the Message itself is crossing thread boundaries. That means that the history values can greatly simplify debugging in an asynchronous message flow. |
Enterprise Integration Patterns (EIP) identifies several patterns that have the capability to buffer messages. For example, an Aggregator buffers messages until they can be released and a QueueChannel buffers messages until consumers explicitly receive those messages from that channel. Because of the failures that can occur at any point within your message flow, EIP components that buffer messages also introduce a point where messages could be lost.
To mitigate the risk of losing Messages, EIP defines the Message Store pattern which allows EIP components to store Messages typically in some type of persistent store (e.g. RDBMS).
Spring Integration provides support for the Message Store pattern by a) defining a org.springframework.integration.store.MessageStore strategy interface, b) providing several implementations of this interface, and c) exposing a message-store attribute on all components that have the capability to buffer messages so that you can inject any instance that implements the MessageStore interface.
Details on how to configure a specific Message Store implementation and/or how to inject a MessageStore implementation into a specific buffering component are described throughout the manual (see the specific component, such as QueueChannel, Aggregator, Delayer etc.), but here are a couple of samples to give you an idea:
QueueChannel
<int:channel id="myQueueChannel"> <int:queue message-store="refToMessageStore"/> <int:channel>
Aggregator
<int:aggregator … message-store="refToMessageStore"/>
By default Messages are stored in-memory using org.springframework.integration.store.SimpleMessageStore, an implementation of MessageStore.
That might be fine for development or simple low-volume environments where the potential loss of non-persistent messages is not a concern.
However, the typical production application will need a more robust option, not only to mitigate the risk of message loss but also to avoid potential out-of-memory errors.
Therefore, we also provide MessageStore implementations for a variety of data-stores.
Below is a complete list of supported implementations:
- Section 19.4, “JDBC Message Store” - uses RDBMS to store Messages
- Section 25.4, “Redis Message Store” - uses Redis key/value datastore to store Messages
- Section 23.3, “MongoDB Message Store” - uses MongoDB document store to store Messages
- Section 17.5, “Gemfire Message Store” - uses Gemfire distributed cache to store Messages
| Important |
|---|---|
|
However be aware of some limitations while using persistent implementations of the The Message data (payload and headers) is serialized and deserialized using different serialization strategies depending on the implementation of the Special attention must be paid to the headers that represent certain types of data. For example, if one of the headers contains an instance of some Spring Bean, upon deserialization you may end up with a different instance of that bean, which directly affects some of the implicit headers created by the framework (e.g., REPLY_CHANNEL or ERROR_CHANNEL). Currently they are not serializable, but even if they were, the deserialized channel would not represent the expected instance. Beginning with Spring Integration version 3.0, this issue can be resolved with a header enricher, configured to replace these headers with a name after registering the channel with the Also when configuring a message-flow like this: gateway → queue-channel (backed by a persistent Message Store) → service-activator That gateway creates a Temporary Reply Channel, and it will be lost by the time the service-activator’s poller reads from the queue. Again, you can use the header enricher to replace the headers with a String representation. For more information, refer to the Section 7.2.2, “Header Enricher”. |
Spring Integration 4.0 introduced two new interfaces ChannelMessageStore - to implement operations specific for QueueChannel s, PriorityCapableChannelMessageStore - to mark MessageStore implementation to be used for PriorityChannel s and to provide priority order for persisted Messages.
The real behaviour depends on implementation.
The Framework provides these implementations, which can be used as a persistent MessageStore for QueueChannel and PriorityChannel:
Starting with version 4.3, some MessageGroupStore implementations can be injected with a custom
MessageGroupFactory strategy to create/customize the MessageGroup instances used by the MessageGroupStore.
This defaults to a SimpleMessageGroupFactory which produces SimpleMessageGroup s based on the GroupType.HASH_SET
(LinkedHashSet) internal collection.
Other possible options are SYNCHRONISED_SET and BLOCKING_QUEUE, where the last one can be used to reinstate the
previous SimpleMessageGroup behavior.
Also the PERSISTENT option is available. See the next section for more information.
Starting with version 4.3, all persistence MessageGroupStore s retrieve MessageGroup s and their messages
from the store with the Lazy-Load manner.
In most cases it is useful for the Correlation MessageHandler s (Section 6.4, “Aggregator” and Section 6.5, “Resequencer”),
when it would be an overhead to load entire MessageGroup from the store on each correlation operation.
To switch off the lazy-load behavior the AbstractMessageGroupStore.setLazyLoadMessageGroups(false) option
can be used from the configuration.
Our performance tests for lazy-load on MongoDB MessageStore (Section 23.3, “MongoDB Message Store”) and
<aggregator> (Section 6.4, “Aggregator”)
with custom release-strategy like:
<int:aggregator input-channel="inputChannel" output-channel="outputChannel" message-store="mongoStore" release-strategy-expression="size() == 1000"/>
demonstrate this results for 1000 simple messages:
StopWatch 'Lazy-Load Performance': running time (millis) = 38918 ----------------------------------------- ms % Task name ----------------------------------------- 02652 007% Lazy-Load 36266 093% Eager
Many external systems, services or resources aren’t transactional (Twitter, RSS, file system etc.) and there is no any ability to mark the data as read.
Or there is just need to implement the Enterprise Integration Pattern Idempotent Receiver in some integration solutions.
To achieve this goal and store some previous state of the Endpoint before the next interaction with external system, or deal with the next Message, Spring Integration provides the Metadata Store component being an implementation of the org.springframework.integration.metadata.MetadataStore interface with a general key-value contract.
The Metadata Store is designed to store various types of generic meta-data (e.g., published date of the last feed entry that has been processed) to help components such as the Feed adapter deal with duplicates.
If a component is not directly provided with a reference to a MetadataStore, the algorithm for locating a metadata store is as follows: First, look for a bean with id metadataStore in the ApplicationContext.
If one is found then it will be used, otherwise it will create a new instance of SimpleMetadataStore which is an in-memory implementation that will only persist metadata within the lifecycle of the currently running Application Context.
This means that upon restart you may end up with duplicate entries.
If you need to persist metadata between Application Context restarts, these persistent MetadataStores are provided by
the framework:
The PropertiesPersistingMetadataStore is backed by a properties file and a PropertiesPersister.
By default, it only persists the state when the application context is closed normally. It implements Flushable so you
can persist the state at will, be invoking flush().
<bean id="metadataStore" class="org.springframework.integration.metadata.PropertiesPersistingMetadataStore"/>
Alternatively, you can provide your own implementation of the MetadataStore interface (e.g.
JdbcMetadataStore) and configure it as a bean in the Application Context.
Starting with version 4.0, SimpleMetadataStore, PropertiesPersistingMetadataStore and RedisMetadataStore implement ConcurrentMetadataStore.
These provide for atomic updates and can be used across multiple component or application instances.
The Metadata Store is useful for implementing the EIP Idempotent Receiver pattern, when there is need to filter an incoming Message if it has already been processed, and just discard it or perform some other logic on discarding. The following configuration is an example of how to do this:
<int:filter input-channel="serviceChannel" output-channel="idempotentServiceChannel" discard-channel="discardChannel" expression="@metadataStore.get(headers.businessKey) == null"/> <int:publish-subscribe-channel id="idempotentServiceChannel"/> <int:outbound-channel-adapter channel="idempotentServiceChannel" expression="@metadataStore.put(headers.businessKey, '')"/> <int:service-activator input-channel="idempotentServiceChannel" ref="service"/>
The value of the idempotent entry may be some expiration date, after which that entry should be removed from Metadata Store by some scheduled reaper.
Also see Section 8.9.11, “Idempotent Receiver Enterprise Integration Pattern”.
Some metadata stores (currently only zookeeper) support registering a listener to receive events when items change.
public interface MetadataStoreListener { void onAdd(String key, String value); void onRemove(String key, String oldValue); void onUpdate(String key, String newValue); }
See the javadocs for more information.
The MetadataStoreListenerAdapter can be subclassed if you are only interested in a subset of events.
As described in (EIP), the idea behind the Control Bus is that the same messaging system can be used for monitoring and managing the components within the framework as is used for "application-level" messaging. In Spring Integration we build upon the adapters described above so that it’s possible to send Messages as a means of invoking exposed operations.
<int:control-bus input-channel="operationChannel"/>
The Control Bus has an input channel that can be accessed for invoking operations on the beans in the application context. It also has all the common properties of a service activating endpoint, e.g. you can specify an output channel if the result of the operation has a return value that you want to send on to a downstream channel.
The Control Bus executes messages on the input channel as Spring Expression Language expressions.
It takes a message, compiles the body to an expression, adds some context, and then executes it.
The default context supports any method that has been annotated with @ManagedAttribute or @ManagedOperation.
It also supports the methods on Spring’s Lifecycle interface, and it supports methods that are used to configure several of Spring’s TaskExecutor and TaskScheduler implementations.
The simplest way to ensure that your own methods are available to the Control Bus is to use the @ManagedAttribute and/or @ManagedOperation annotations.
Since those are also used for exposing methods to a JMX MBean registry, it’s a convenient by-product (often the same types of operations you want to expose to the Control Bus would be reasonable for exposing via JMX).
Resolution of any particular instance within the application context is achieved in the typical SpEL syntax.
Simply provide the bean name with the SpEL prefix for beans (@).
For example, to execute a method on a Spring Bean a client could send a message to the operation channel as follows:
Message operation = MessageBuilder.withPayload("@myServiceBean.shutdown()").build();
operationChannel.send(operation)
The root of the context for the expression is the Message itself, so you also have access to the payload and headers as variables within your expression.
This is consistent with all the other expression support in Spring Integration endpoints.
With Java and Annotations the Control Bus can be configured as follows:
@Bean @ServiceActivator(inputChannel = "operationChannel") public ExpressionControlBusFactoryBean controlBus() { return new ExpressionControlBusFactoryBean(); }
Or, when using Java DSL flow definitions:
@Bean public IntegrationFlow controlBusFlow() { return IntegrationFlows.from("controlBus") .controlBus() .get(); }
Or, if you prefer Lambda style with automatic DirectChannel creation:
@Bean public IntegrationFlow controlBus() { return IntegrationFlowDefinition::controlBus; }
In this case, the channel is named controlBus.input.
As described in Section 10.2.7, “MBean Exporter”, the MBean exporter provides a JMX operation stopActiveComponents, which is used to stop the application in an orderly manner. The operation has a single long parameter. The parameter indicates how long (in milliseconds) the operation will wait to allow in-flight messages to complete. The operation works as follows:
The first step calls beforeShutdown() on all beans that implement OrderlyShutdownCapable.
This allows such components to prepare for shutdown.
Examples of components that implement this interface, and what they do with this call include: JMS and AMQP message-driven adapters stop their listener containers; TCP server connection factories stop accepting new connections (while keeping existing connections open); TCP inbound endpoints drop (log) any new messages received; http inbound endpoints return 503 - Service Unavailable for any new requests.
The second step stops any active channels, such as JMS- or AMQP-backed channels.
The third step stops all MessageSource s.
The fourth step stops all inbound MessageProducer s (that are not OrderlyShutdownCapable).
The fifth step waits for any remaining time left, as defined by the value of the long parameter passed in to the operation. This is intended to allow any in-flight messages to complete their journeys. It is therefore important to select an appropriate timeout when invoking this operation.
The sixth step calls afterShutdown() on all OrderlyShutdownCapable components.
This allows such components to perform final shutdown tasks (closing all open sockets, for example).
As discussed in the section called “Orderly Shutdown Managed Operation” this operation can be invoked using JMX.
If you wish to programmatically invoke the method, you will need to inject, or otherwise get a reference to, the IntegrationMBeanExporter.
If no id attribute is provided on the <int-jmx:mbean-export/> definition, the bean will have a generated name.
This name contains a random component to avoid ObjectName collisions if multiple Spring Integration contexts exist in the same JVM (MBeanServer).
For this reason, if you wish to invoke the method programmatically, it is recommended that you provide the exporter with an id attribute so it can easily be accessed in the application context.
Finally, the operation can be invoked using the <control-bus>; see the monitoring Spring Integration sample application for details.
| Important |
|---|---|
|
The above algorithm was improved in version 4.1.
Previously, all task executors and schedulers were stopped.
This could cause mid-flow messages in |
Starting with version 4.3, Spring Integration provides access to an application’s runtime object model which can, optionally, include component metrics.
It is exposed as a graph, which may be used to visualize the current state of the integration application.
The o.s.i.support.management.graph package contains all the required classes to collect, build and render the runtime state of Spring Integration components as a single tree-like Graph object.
The IntegrationGraphServer should be declared as a bean to build, retrieve and refresh the Graph object.
The resulting Graph object can be serialized to any format, although JSON is flexible and convenient to parse and represent on the client side.
A simple Spring Integration application with only the default components would expose a graph as follows:
{ "contentDescriptor": { "providerVersion": "4.3.0.RELEASE", "providerFormatVersion": 1.0, "provider": "spring-integration", "name": "myApplication" }, "nodes": [ { "nodeId": 1, "name": "nullChannel", "stats": null, "componentType": "channel" }, { "nodeId": 2, "name": "errorChannel", "stats": null, "componentType": "publish-subscribe-channel" }, { "nodeId": 3, "name": "_org.springframework.integration.errorLogger", "stats": { "duration": { "count": 0, "min": 0.0, "max": 0.0, "mean": 0.0, "standardDeviation": 0.0, "countLong": 0 }, "errorCount": 0, "standardDeviationDuration": 0.0, "countsEnabled": true, "statsEnabled": true, "loggingEnabled": false, "handleCount": 0, "meanDuration": 0.0, "maxDuration": 0.0, "minDuration": 0.0, "activeCount": 0 }, "componentType": "logging-channel-adapter", "output": null, "input": "errorChannel" } ], "links": [ { "from": 2, "to": 3, "type": "input" } ] }
As you can see, the graph consists of three top-level elements.
The contentDescriptor graph element is pretty straightforward and contains general information about the application providing the data.
The name can be customized on the IntegrationGraphServer bean or via spring.application.name application context environment property.
Other properties are provided by the framework and allows you to distinguish a similar model from other sources.
The links graph element represents connections between nodes from the nodes graph element and, therefore, between integration components in the source Spring Integration application.
For example from a MessageChannel to an EventDrivenConsumer with some MessageHandler;
or from an AbstractReplyProducingMessageHandler to a MessageChannel.
For the convenience and to allow to determine a link purpose, the model is supplied with the type attribute.
The possible types are:
-
input - identify the direction from
MessageChannelto the endpoint;inputChannelorrequestChannelproperty; -
output - the direction from
MessageHandler,MessageProducerorSourcePollingChannelAdapterto theMessageChannelvia anoutputChannelorreplyChannelproperty; -
error - from
MessageHandleronPollingConsumerorMessageProducerorSourcePollingChannelAdapterto theMessageChannelvia anerrorChannelproperty; -
discard - from
DiscardingMessageHandler(e.g.MessageFilter) to theMessageChannelviaerrorChannelproperty. -
route - from
AbstractMappingMessageRouter(e.g.HeaderValueRouter) to theMessageChannel. Similar to output but determined at run-time. May be a configured channel mapping, or a dynamically resolved channel. Routers will typically only retain up to 100 dynamic routes for this purpose, but this can be modified using thedynamicChannelLimitproperty.
The information from this element can be used by a visualizing tool to render connections between nodes from the nodes graph element, where the from and to numbers represent the value from the nodeId property of the linked nodes.
For example the link type can be used to determine the proper port on the target node:
+---(discard)
|
+----o----+
| |
| |
| |
(input)--o o---(output)
| |
| |
| |
+----o----+
|
+---(error)
The nodes graph element is perhaps the most interesting because its elements contain not only the runtime components with their componentType s and name s, but can also optionally contain metrics exposed by the component.
Node elements contain various properties which are generally self-explanatory.
For example, expression-based components include the expression property containing the primary expression string for the component.
To enable the metrics, add an @EnableIntegrationManagement to some @Configuration class or add an <int:management/> element to your XML configuration.
You can control exactly which components in the framework collect statistics.
See Section 10.1, “Metrics and Management” for complete information.
See the stats attribute from the _org.springframework.integration.errorLogger component in the JSON example above.
The nullChannel and errorChannel don’t provide statistics information in this case, because the configuration for this example was:
@Configuration @EnableIntegration @EnableIntegrationManagement(statsEnabled = "_org.springframework.integration.errorLogger.handler", countsEnabled = "!*", defaultLoggingEnabled = "false") public class ManagementConfiguration { @Bean public IntegrationGraphServer integrationGraphServer() { return new IntegrationGraphServer(); } }
The nodeId represents a unique incremental identifier to distinguish one component from another.
It is also used in the links element to represent a relationship (connection) of this component to others, if any.
The input and output attributes are for the inputChannel and outputChannel properties of the AbstractEndpoint, MessageHandler, SourcePollingChannelAdapter or MessageProducerSupport.
See the next paragraph for more information.
Spring Integration components have various levels of complexity.
For example, any polled MessageSource also has a SourcePollingChannelAdapter and a MessageChannel to which to send messages from the source data periodically.
Other components might be middleware request-reply components, e.g. JmsOutboundGateway, with a consuming AbstractEndpoint to subscribe to (or poll) the requestChannel (input) for messages, and a replyChannel (output) to produce a reply message to send downstream.
Meanwhile, any MessageProducerSupport implementation (e.g. ApplicationEventListeningMessageProducer) simply wraps some source protocol listening logic and sends messages to the outputChannel.
Within the graph, Spring Integration components are represented using the IntegrationNode class hierarchy, which you can find in the o.s.i.support.management.graph package.
For example the ErrorCapableDiscardingMessageHandlerNode could be used for the AggregatingMessageHandler (because it has a discardChannel option) and can produce errors when consuming from a PollableChannel using a PollingConsumer.
Another sample is CompositeMessageHandlerNode - for a MessageHandlerChain when subscribed to a SubscribableChannel, using an EventDrivenConsumer.
| Note |
|---|---|
|
The |
@MessagingGateway(defaultRequestChannel = "four") public interface Gate { void foo(String foo); void foo(Integer foo); void bar(String bar); }
produces nodes like:
{ "nodeId" : 10, "name" : "gate.bar(class java.lang.String)", "stats" : null, "componentType" : "gateway", "output" : "four", "errors" : null }, { "nodeId" : 11, "name" : "gate.foo(class java.lang.String)", "stats" : null, "componentType" : "gateway", "output" : "four", "errors" : null }, { "nodeId" : 12, "name" : "gate.foo(class java.lang.Integer)", "stats" : null, "componentType" : "gateway", "output" : "four", "errors" : null }
This IntegrationNode hierarchy can be used for parsing the graph model on the client side, as well as for the understanding the general Spring Integration runtime behavior.
See also Section 3.7, “Programming Tips and Tricks” for more information.
If your application is WEB-based (or built on top of Spring Boot using an embedded web container) and the Spring Integration HTTP module (see Chapter 18, HTTP Support) is present on the classpath, you can use a IntegrationGraphController to expose the IntegrationGraphServer functionality as a REST service.
For this purpose, the @EnableIntegrationGraphController @Configuration class annotation and the <int-http:graph-controller/> XML element, are available in the HTTP module.
Together with the @EnableWebMvc annotation (or <mvc:annotation-driven/> for xml definitions), this configuration registers an IntegrationGraphController @RestController where its @RequestMapping.path can be configured on the @EnableIntegrationGraphController annotation or <int-http:graph-controller/> element.
The default path is /integration.
The IntegrationGraphController @RestController provides these services:
-
@GetMapping(name = "getGraph")- to retrieve the state of the Spring Integration components since the lastIntegrationGraphServerrefresh. Theo.s.i.support.management.graph.Graphis returned as a@ResponseBodyof the REST service; -
@GetMapping(path = "/refresh", name = "refreshGraph")- to refresh the currentGraphfor the actual runtime state and return it as a REST response. It is not necessary to refresh the graph for metrics, they are provided in real-time when the graph is retrieved. Refresh can be called if the application context has been modified since the graph was last retrieved and the graph is completely rebuilt.
Any Security and Cross Origin restrictions for the IntegrationGraphController can be achieved with the standard configuration options and components provided by Spring Security and Spring MVC projects.
A simple example of that follows:
<mvc:annotation-driven /> <mvc:cors> <mvc:mapping path="/myIntegration/**" allowed-origins="http://localhost:9090" allowed-methods="GET" /> </mvc:cors> <security:http> <security:intercept-url pattern="/myIntegration/**" access="ROLE_ADMIN" /> </security:http> <int-http:graph-controller path="/myIntegration" />
The Java & Annotation Configuration variant follows; note that, for convenience, the annotation provides an allowedOrigins attribute; this just provides GET access to the path.
For more sophistication, you can configure the CORS mappings using standard Spring MVC mechanisms.
@Configuration @EnableWebMvc @EnableWebSecurity @EnableIntegration @EnableIntegrationGraphController(path = "/testIntegration", allowedOrigins="http://localhost:9090") public class IntegrationConfiguration extends WebSecurityConfigurerAdapter { @Override protected void configure(HttpSecurity http) throws Exception { http .authorizeRequests() .antMatchers("/testIntegration/**").hasRole("ADMIN") // ... .formLogin(); } //... }
This section covers the various Channel Adapters and Messaging Gateways provided by Spring Integration to support Message-based communication with external systems.
As discussed in the sections above, Spring Integration provides a number of endpoints used to interface with external systems, file systems etc. The following is a summary of the various endpoints with quick links to the appropriate chapter.
To recap, Inbound Channel Adapters are used for one-way integration bringing data into the messaging application. Outbound Channel Adapters are used for one-way integration to send data out of the messaging application. Inbound Gateways are used for a bidirectional integration flow where some other system invokes the messaging application and receives a reply.Outbound Gateways are used for a bidirectional integration flow where the messaging application invokes some external service or entity, expecting a result.
Table 11.1. Endpoint Quick Reference
In addition, as discussed in Part IV, “Core Messaging”, endpoints are provided for interfacing with Plain Old Java Objects (POJOs).
As discussed in Section 4.3, “Channel Adapter”, the <int:inbound-channel-adapter> allows polling a java method for data; the <int:outbound-channel-adapter> allows sending data to a void method, and as discussed in Section 8.4, “Messaging Gateways”, the <int:gateway> allows any Java program to invoke a messaging flow.
Each of these without requiring any source level dependencies on Spring Integration.
The equivalent of an outbound gateway in this context would be to use a Section 8.5, “Service Activator” to invoke a method that returns an Object of some kind.
Spring Integration provides Channel Adapters for receiving and sending messages using the Advanced Message Queuing Protocol (AMQP). The following adapters are available:
Spring Integration also provides a point-to-point Message Channel as well as a publish/subscribe Message Channel backed by AMQP Exchanges and Queues.
In order to provide AMQP support, Spring Integration relies on (Spring AMQP) which "applies core Spring concepts to the development of AMQP-based messaging solutions". Spring AMQP provides similar semantics to (Spring JMS).
Whereas the provided AMQP Channel Adapters are intended for unidirectional Messaging (send or receive) only, Spring Integration also provides inbound and outbound AMQP Gateways for request/reply operations.
| Tip |
|---|---|
|
Please familiarize yourself with the reference documentation of the Spring AMQP project as well. It provides much more in-depth information regarding Spring’s integration with AMQP in general and RabbitMQ in particular. |
A configuration sample for an AMQP Inbound Channel Adapter is shown below.
<int-amqp:inbound-channel-adapter id="inboundAmqp"
|
Unique ID for this adapter. Optional. |
|
Message Channel to which converted Messages should be sent. Required. |
|
Names of the AMQP Queues from which Messages should be consumed (comma-separated list).Required. |
|
Acknowledge Mode for the |
|
Extra AOP Advice(s) to handle cross cutting behavior associated with this Inbound Channel Adapter. Optional. |
|
Flag to indicate that channels created by this component will be transactional. If true, tells the framework to use a transactional channel and to end all operations (send or receive) with a commit or rollback depending on the outcome, with an exception signalling a rollback. Optional (Defaults to false). |
|
Specify the number of concurrent consumers to create. Default is 1. Raising the number of concurrent consumers is recommended in order to scale the consumption of messages coming in from a queue. However, note that any ordering guarantees are lost once multiple consumers are registered. In general, use 1 consumer for low-volume queues. Not allowed when consumers-per-queue is set. Optional. |
|
Bean reference to the RabbitMQ ConnectionFactory. Optional (Defaults to connectionFactory). |
|
Message Channel to which error Messages should be sent. Optional. |
|
Shall the listener channel (com.rabbitmq.client.Channel) be exposed to a registered |
|
A reference to an |
|
Comma-separated list of names of AMQP Headers to be mapped from the AMQP request into the MessageHeaders. This can only be provided if the header-mapper reference is not provided. The values in this list can also be simple patterns to be matched against the header names (e.g. "*" or "foo*, bar" or "*foo"). |
|
Reference to the |
|
The MessageConverter to use when receiving AMQP Messages. Optional. |
|
The MessagePropertiesConverter to use when receiving AMQP Messages. Optional. |
|
Specify the phase in which the underlying | |
|
Tells the AMQP broker how many messages to send to each consumer in a single request. Often this can be set quite high to improve throughput. It should be greater than or equal to the transaction size (see attribute "tx-size"). Optional (Defaults to 1). | |
|
Receive timeout in milliseconds. Optional (Defaults to 1000). | |
|
Specifies the interval between recovery attempts of the underlying | |
|
If true, and none of the queues are available on the broker, the container will throw a fatal exception during startup and will stop if the queues are deleted when the container is running (after making 3 attempts to passively declare the queues).
If false, the container will not throw an exception and go into recovery mode, attempting to restart according to the | |
|
The time to wait for workers in milliseconds after the underlying | |
|
By default, the underlying | |
|
By default the underlying | |
|
Sets a Bean reference to an external | |
|
Tells the | |
|
Indicates that the underlying listener container should be a |
| container |
|---|---|
|
Note that when configuring an external container, you cannot use the Spring AMQP namespace to define the container.
This is because the namespace requires at least one <bean id="container" class="org.springframework.amqp.rabbit.listener.SimpleMessageListenerContainer"> <property name="connectionFactory" ref="connectionFactory" /> <property name="queueNames" value="foo.queue" /> <property name="defaultRequeueRejected" value="false"/> </bean> |
| Important |
|---|---|
|
Even though the Spring Integration JMS and AMQP support is very similar, important differences exist.
The JMS Inbound Channel Adapter is using a |
The following Spring Boot application provides an example of configuring the inbound adapter using Java configuration:
@SpringBootApplication public class AmqpJavaApplication { public static void main(String[] args) { new SpringApplicationBuilder(AmqpJavaApplication.class) .web(false) .run(args); } @Bean public MessageChannel amqpInputChannel() { return new DirectChannel(); } @Bean public AmqpInboundChannelAdapter inbound(SimpleMessageListenerContainer listenerContainer, @Qualifier("amqpInputChannel") MessageChannel channel) { AmqpInboundChannelAdapter adapter = new AmqpInboundChannelAdapter(listenerContainer); adapter.setOutputChannel(channel); return adapter; } @Bean public SimpleMessageListenerContainer container(ConnectionFactory connectionFactory) { SimpleMessageListenerContainer container = new SimpleMessageListenerContainer(connectionFactory); container.setQueueNames("foo"); container.setConcurrentConsumers(2); // ... return container; } @Bean @ServiceActivator(inputChannel = "amqpInputChannel") public MessageHandler handler() { return new MessageHandler() { @Override public void handleMessage(Message<?> message) throws MessagingException { System.out.println(message.getPayload()); } }; } }
The following Spring Boot application provides an example of configuring the inbound adapter using the Java DSL:
@SpringBootApplication public class AmqpJavaApplication { public static void main(String[] args) { new SpringApplicationBuilder(AmqpJavaApplication.class) .web(false) .run(args); } @Bean public IntegrationFlow amqpInbound(ConnectionFactory connectionFactory) { return IntegrationFlows.from(Amqp.inboundAdapter(connectionFactory, "foo")) .handle(m -> System.out.println(m.getPayload())) .get(); } }
The inbound gateway supports all the attributes on the inbound channel adapter (except channel is replaced by request-channel), plus some additional attributes:
<int-amqp:inbound-gateway id="inboundGateway"
|
Unique ID for this adapter. Optional. |
|
Message Channel to which converted Messages should be sent. Required. |
|
A reference to an |
|
Comma-separated list of names of AMQP Headers to be mapped from the AMQP request into the |
|
Comma-separated list of names of |
|
Message Channel where reply Messages will be expected. Optional. |
|
Used to set the |
|
The customized |
|
The |
See the note in Section 12.2, “Inbound Channel Adapter” about configuring the listener-container attribute.
The following Spring Boot application provides an example of configuring the inbound gateway using Java configuration:
@SpringBootApplication public class AmqpJavaApplication { public static void main(String[] args) { new SpringApplicationBuilder(AmqpJavaApplication.class) .web(false) .run(args); } @Bean public MessageChannel amqpInputChannel() { return new DirectChannel(); } @Bean public AmqpInboundGateway inbound(SimpleMessageListenerContainer listenerContainer, @Qualifier("amqpInputChannel") MessageChannel channel) { AmqpInboundGateway gateway = new AmqpInboundGateway(listenerContainer); gateway.setRequestChannel(channel); gateway.setDefaultReplyTo("bar"); return gateway; } @Bean public SimpleMessageListenerContainer container(ConnectionFactory connectionFactory) { SimpleMessageListenerContainer container = new SimpleMessageListenerContainer(connectionFactory); container.setQueueNames("foo"); container.setConcurrentConsumers(2); // ... return container; } @Bean @ServiceActivator(inputChannel = "amqpInputChannel") public MessageHandler handler() { return new AbstractReplyProducingMessageHandler() { @Override protected Object handleRequestMessage(Message<?> requestMessage) { return "reply to " + requestMessage.getPayload(); } }; } }
The following Spring Boot application provides an example of configuring the inbound gateway using the Java DSL:
@SpringBootApplication public class AmqpJavaApplication { public static void main(String[] args) { new SpringApplicationBuilder(AmqpJavaApplication.class) .web(false) .run(args); } @Bean // return the upper cased payload public IntegrationFlow amqpInboundGateway(ConnectionFactory connectionFactory) { return IntegrationFlows.from(Amqp.inboundGateway(connectionFactory, "foo")) .transform(String.class, String::toUpperCase) .get(); } }
By default the inbound endpoints use acknowledge mode AUTO, which means the container automatically acks the message when the downstream integration flow completes (or a message is handed off to another thread using a QueueChannel or ExecutorChannel).
Setting the mode to NONE configures the consumer such that acks are not used at all (the broker automatically acks the message as soon as it is sent).
Setting the mode to MANUAL allows user code to ack the message at some other point during processing.
To support this, with this mode, the endpoints provide the Channel and deliveryTag in the amqp_channel and amqp_deliveryTag headers respectively.
You can perform any valid rabbit command on the Channel but, generally, only basicAck and basicNack (or basicReject) would be used.
In order to not interfere with the operation of the container, you should not retain a reference to the channel and just use it in the context of the current message.
| Note |
|---|---|
|
Since the |
This is an example of how you might use MANUAL acknowledgement:
@ServiceActivator(inputChannel = "foo", outputChannel = "bar") public Object handle(@Payload String payload, @Header(AmqpHeaders.CHANNEL) Channel channel, @Header(AmqpHeaders.DELIVERY_TAG) Long deliveryTag) throws Exception { // Do some processing if (allOK) { channel.basicAck(deliveryTag, false); // perhaps do some more processing } else { channel.basicNack(deliveryTag, false, true); } return someResultForDownStreamProcessing; }
A configuration sample for an AMQP Outbound Channel Adapter is shown below.
<int-amqp:outbound-channel-adapter id="outboundAmqp"
|
Unique ID for this adapter. Optional. |
|
Message Channel to which Messages should be sent in order to have them converted and published to an AMQP Exchange. Required. |
|
Bean Reference to the configured AMQP Template Optional (Defaults to "amqpTemplate"). |
|
The name of the AMQP Exchange to which Messages should be sent. If not provided, Messages will be sent to the default, no-name Exchange. Mutually exclusive with exchange-name-expression. Optional. |
|
A SpEL expression that is evaluated to determine the name of the AMQP Exchange to which Messages should be sent, with the message as the root object. If not provided, Messages will be sent to the default, no-name Exchange. Mutually exclusive with exchange-name. Optional. |
|
The order for this consumer when multiple consumers are registered thereby enabling load-balancing and/or failover. Optional (Defaults to Ordered.LOWEST_PRECEDENCE [=Integer.MAX_VALUE]). |
|
The fixed routing-key to use when sending Messages. By default, this will be an empty String. Mutually exclusive with routing-key-expression.Optional. |
|
A SpEL expression that is evaluated to determine the routing-key to use when sending Messages, with the message as the root object (e.g. payload.key). By default, this will be an empty String. Mutually exclusive with routing-key. Optional. |
|
The default delivery mode for messages; |
|
An expression defining correlation data.
When provided, this configures the underlying amqp template to receive publisher confirms.
Requires a dedicated |
|
The channel to which positive (ack) publisher confirms are sent; payload is the correlation data defined by the confirm-correlation-expression.
If the expression is |
|
The channel to which negative (nack) publisher confirms are sent; payload is the correlation data defined by the confirm-correlation-expression (if there is no |
|
The channel to which returned messages are sent.
When provided, the underlying amqp template is configured to return undeliverable messages to the adapter.
When there is no |
|
A reference to an |
|
A reference to an |
|
Comma-separated list of names of AMQP Headers to be mapped from the | |
|
When set to |
| return-channel |
|---|---|
|
Using a |
The following Spring Boot application provides an example of configuring the outbound adapter using Java configuration:
@SpringBootApplication @IntegrationComponentScan public class AmqpJavaApplication { public static void main(String[] args) { ConfigurableApplicationContext context = new SpringApplicationBuilder(AmqpJavaApplication.class) .web(false) .run(args); MyGateway gateway = context.getBean(MyGateway.class); gateway.sendToRabbit("foo"); } @Bean @ServiceActivator(inputChannel = "amqpOutboundChannel") public AmqpOutboundEndpoint amqpOutbound(AmqpTemplate amqpTemplate) { AmqpOutboundEndpoint outbound = new AmqpOutboundEndpoint(amqpTemplate); outbound.setRoutingKey("foo"); // default exchange - route to queue 'foo' return outbound; } @Bean public MessageChannel amqpOutboundChannel() { return new DirectChannel(); } @MessagingGateway(defaultRequestChannel = "amqpOutboundChannel") public interface MyGateway { void sendToRabbit(String data); } }
The following Spring Boot application provides an example of configuring the outbound adapter using the Java DSL:
@SpringBootApplication @IntegrationComponentScan public class AmqpJavaApplication { public static void main(String[] args) { ConfigurableApplicationContext context = new SpringApplicationBuilder(AmqpJavaApplication.class) .web(false) .run(args); MyGateway gateway = context.getBean(MyGateway.class); gateway.sendToRabbit("foo"); } @Bean public IntegrationFlow amqpOutbound(AmqpTemplate amqpTemplate) { return IntegrationFlows.from(amqpOutboundChannel()) .handle(Amqp.outboundAdapter(amqpTemplate) .routingKey("foo")) // default exchange - route to queue 'foo' .get(); } @Bean public MessageChannel amqpOutboundChannel() { return new DirectChannel(); } @MessagingGateway(defaultRequestChannel = "amqpOutboundChannel") public interface MyGateway { void sendToRabbit(String data); } }
Configuration for an AMQP Outbound Gateway is shown below.
<int-amqp:outbound-gateway id="inboundGateway"
|
Unique ID for this adapter. Optional. |
|
Message Channel to which Messages should be sent in order to have them converted and published to an AMQP Exchange. Required. |
|
Bean Reference to the configured AMQP Template Optional (Defaults to "amqpTemplate"). |
|
The name of the AMQP Exchange to which Messages should be sent. If not provided, Messages will be sent to the default, no-name Exchange. Mutually exclusive with exchange-name-expression. Optional. |
|
A SpEL expression that is evaluated to determine the name of the AMQP Exchange to which Messages should be sent, with the message as the root object. If not provided, Messages will be sent to the default, no-name Exchange. Mutually exclusive with exchange-name. Optional. |
|
The order for this consumer when multiple consumers are registered thereby enabling load-balancing and/or failover. Optional (Defaults to Ordered.LOWEST_PRECEDENCE [=Integer.MAX_VALUE]). |
|
Message Channel to which replies should be sent after being received from an AMQP Queue and converted.Optional. |
|
The time the gateway will wait when sending the reply message to the |
|
When |
|
The routing-key to use when sending Messages. By default, this will be an empty String. Mutually exclusive with routing-key-expression. Optional. |
|
A SpEL expression that is evaluated to determine the routing-key to use when sending Messages, with the message as the root object (e.g. payload.key). By default, this will be an empty String. Mutually exclusive with routing-key. Optional. |
|
The default delivery mode for messages; |
|
Since version 4.2. An expression defining correlation data.
When provided, this configures the underlying amqp template to receive publisher confirms.
Requires a dedicated |
|
The channel to which positive (ack) publisher confirms are sent; payload is the correlation data defined by the confirm-correlation-expression.
If the expression is |
|
The channel to which negative (nack) publisher confirms are sent; payload is the correlation data defined by the confirm-correlation-expression (if there is no |
|
The channel to which returned messages are sent.
When provided, the underlying amqp template is configured to return undeliverable messages to the adapter.
When there is no | |
|
A reference to an | |
|
When set to |
| return-channel |
|---|---|
|
Using a |
| Important |
|---|---|
|
The underlying |
The following Spring Boot application provides an example of configuring the outbound gateway using Java configuration:
@SpringBootApplication @IntegrationComponentScan public class AmqpJavaApplication { public static void main(String[] args) { ConfigurableApplicationContext context = new SpringApplicationBuilder(AmqpJavaApplication.class) .web(false) .run(args); MyGateway gateway = context.getBean(MyGateway.class); String reply = gateway.sendToRabbit("foo"); System.out.println(reply); } @Bean @ServiceActivator(inputChannel = "amqpOutboundChannel") public AmqpOutboundEndpoint amqpOutbound(AmqpTemplate amqpTemplate) { AmqpOutboundEndpoint outbound = new AmqpOutboundEndpoint(amqpTemplate); outbound.setExpectReply(true); outbound.setRoutingKey("foo"); // default exchange - route to queue 'foo' return outbound; } @Bean public MessageChannel amqpOutboundChannel() { return new DirectChannel(); } @MessagingGateway(defaultRequestChannel = "amqpOutboundChannel") public interface MyGateway { String sendToRabbit(String data); } }
Notice that the only difference between the outbound adapter and outbound gateway configuration is the setting of the
expectReply property.
The following Spring Boot application provides an example of configuring the outbound adapter using the Java DSL:
@SpringBootApplication @IntegrationComponentScan public class AmqpJavaApplication { public static void main(String[] args) { ConfigurableApplicationContext context = new SpringApplicationBuilder(AmqpJavaApplication.class) .web(false) .run(args); RabbitTemplate template = context.getBean(RabbitTemplate.class); MyGateway gateway = context.getBean(MyGateway.class); String reply = gateway.sendToRabbit("foo"); System.out.println(reply); } @Bean public IntegrationFlow amqpOutbound(AmqpTemplate amqpTemplate) { return IntegrationFlows.from(amqpOutboundChannel()) .handle(Amqp.outboundGateway(amqpTemplate) .routingKey("foo")) // default exchange - route to queue 'foo' .get(); } @Bean public MessageChannel amqpOutboundChannel() { return new DirectChannel(); } @MessagingGateway(defaultRequestChannel = "amqpOutboundChannel") public interface MyGateway { String sendToRabbit(String data); } }
The gateway discussed in the previous section is synchronous, in that the sending thread is suspended until a
reply is received (or a timeout occurs).
Spring Integration version 4.3 added this asynchronous gateway, which uses the AsyncRabbitTemplate from Spring AMQP.
When a message is sent, the thread returns immediately after the send completes, and the reply is sent on the template’s
listener container thread when it is received.
This can be useful when the gateway is invoked on a poller thread; the thread is released and is available for other
tasks in the framework.
Configuration for an AMQP Async Outbound Gateway is shown below.
<int-amqp:outbound-gateway id="inboundGateway"
|
Unique ID for this adapter. Optional. |
|
Message Channel to which Messages should be sent in order to have them converted and published to an AMQP Exchange. Required. |
|
Bean Reference to the configured |
|
The name of the AMQP Exchange to which Messages should be sent. If not provided, Messages will be sent to the default, no-name Exchange. Mutually exclusive with exchange-name-expression. Optional. |
|
A SpEL expression that is evaluated to determine the name of the AMQP Exchange to which Messages should be sent, with the message as the root object. If not provided, Messages will be sent to the default, no-name Exchange. Mutually exclusive with exchange-name. Optional. |
|
The order for this consumer when multiple consumers are registered thereby enabling load-balancing and/or failover. Optional (Defaults to Ordered.LOWEST_PRECEDENCE [=Integer.MAX_VALUE]). |
|
Message Channel to which replies should be sent after being received from an AMQP Queue and converted. Optional. |
|
The time the gateway will wait when sending the reply message to the |
|
When |
|
The routing-key to use when sending Messages. By default, this will be an empty String. Mutually exclusive with routing-key-expression. Optional. |
|
A SpEL expression that is evaluated to determine the routing-key to use when sending Messages, with the message as the root object (e.g. payload.key). By default, this will be an empty String. Mutually exclusive with routing-key. Optional. |
|
The default delivery mode for messages; |
|
An expression defining correlation data.
When provided, this configures the underlying amqp template to receive publisher confirms.
Requires a dedicated |
|
The channel to which positive (ack) publisher confirms are sent; payload is the correlation
data defined by the confirm-correlation-expression.
Requires the underlying |
|
Since version 4.2. The channel to which negative (nack) publisher confirms are sent; payload is the correlation
data defined by the confirm-correlation-expression.
Requires the underlying |
|
The channel to which returned messages are sent.
When provided, the underlying amqp template is configured to return undeliverable messages to the gateway.
The message will be constructed from the data received from amqp, with the following additional headers:
amqp_returnReplyCode, amqp_returnReplyText, amqp_returnExchange, amqp_returnRoutingKey.
Requires the underlying | |
|
When set to |
Also see Section 8.5.3, “Asynchronous Service Activator” for more information.
| RabbitTemplate |
|---|---|
|
When using confirms and returns, it is recommended that the |
The following configuration provides an example of configuring the outbound gateway using Java configuration:
@Configuration public class AmqpAsyncConfig { @Bean @ServiceActivator(inputChannel = "amqpOutboundChannel") public AsyncAmqpOutboundGateway amqpOutbound(AmqpTemplate asyncTemplate) { AsyncAmqpOutboundGateway outbound = new AsyncAmqpOutboundGateway(asyncTemplate); outbound.setRoutingKey("foo"); // default exchange - route to queue 'foo' return outbound; } @Bean public AsyncRabbitTemplate asyncTemplate(RabbitTemplate rabbitTemplate, SimpleMessageListenerContainer replyContainer) { return new AsyncRabbitTemplate(rabbitTemplate, replyContainer); } @Bean public SimpleMessageListenerContainer replyContainer() { SimpleMessageListenerContainer container = new SimpleMessageListenerContainer(ccf); container.setQueueNames("asyncRQ1"); return container; } @Bean public MessageChannel amqpOutboundChannel() { return new DirectChannel(); } }
The following Spring Boot application provides an example of configuring the outbound adapter using the Java DSL:
@SpringBootApplication public class AmqpAsyncApplication { public static void main(String[] args) { ConfigurableApplicationContext context = new SpringApplicationBuilder(AmqpAsyncApplication.class) .web(false) .run(args); MyGateway gateway = context.getBean(MyGateway.class); String reply = gateway.sendToRabbit("foo"); System.out.println(reply); } @Bean public IntegrationFlow asyncAmqpOutbound(AsyncRabbitTemplate asyncRabbitTemplate) { return f -> f .handle(Amqp.asyncOutboundGateway(asyncRabbitTemplate) .routingKey("foo")); // default exchange - route to queue 'foo' } @MessagingGateway(defaultRequestChannel = "asyncAmqpOutbound.input") public interface MyGateway { String sendToRabbit(String data); } }
Spring AMQP 1.4 introduced the ContentTypeDelegatingMessageConverter where the actual converter is selected based
on the incoming content type message property.
This could be used by inbound endpoints.
Spring Integration version 4.3 now allows the ContentTypeDelegatingMessageConverter to be used on outbound
endpoints as well - with the contentType header specifiying which converter will be used.
The following configures a ContentTypeDelegatingMessageConverter with the default converter being the
SimpleMessageConverter (which handles java serialization and plain text), together with a JSON converter:
<amqp:outbound-channel-adapter id="withContentTypeConverter" channel="ctRequestChannel" exchange-name="someExchange" routing-key="someKey" amqp-template="amqpTemplateContentTypeConverter" /> <int:channel id="ctRequestChannel"/> <rabbit:template id="amqpTemplateContentTypeConverter" connection-factory="connectionFactory" message-converter="ctConverter" /> <bean id="ctConverter" class="o.s.amqp.support.converter.ContentTypeDelegatingMessageConverter"> <property name="delegates"> <map> <entry key="application/json"> <bean class="o.s.amqp.support.converter.Jackson2JsonMessageConverter" /> </entry> </map> </property> </bean>
Sending a message to ctRequestChannel with the contentType header set to application/json will cause the
JSON converter to be selected.
This applies to both the outbound channel adapter and gateway.
| Note |
|---|---|
|
Starting with version 5.0, headers that are added to the There are, however, cases where the previous behavior is desired.
For example, with a There is now a property on the outbound channel adapter and gateway (as well as AMQP-backed channels) |
Spring AMQP version 1.6 introduced a mechanism to allow the specification of a default user id for outbound messages.
It has always been possible to set the AmqpHeaders.USER_ID header which will now take precedence over the default.
This might be useful to message recipients; for inbound messages, if the message publisher sets the property, it is made available in the AmqpHeaders.RECEIVED_USER_ID header.
Note that RabbitMQ validates that the user id is the actual user id for the connection or one for which impersonation is allowed.
To configure a default user id for outbound messages, configure it on a RabbitTemplate and configure the outbound adapter or gateway to use that template.
Similarly, to set the user id property on replies, inject an appropriately configured template into the inbound gateway.
See the Spring AMQP documentation for more information.
Spring AMQP supports the RabbitMQ Delayed Message Exchange Plugin.
For inbound messages, the x-delay header is mapped to the AmqpHeaders.RECEIVED_DELAY header.
Setting the AMQPHeaders.DELAY header will cause the corresponding x-delay header to be set in outbound messages.
You can also specify the delay and delayExpression properties on outbound endpoints (delay-expression when using XML configuration).
This takes precedence over the AmqpHeaders.DELAY header.
There are two Message Channel implementations available. One is point-to-point, and the other is publish/subscribe. Both of these channels provide a wide range of configuration attributes for the underlying AmqpTemplate and SimpleMessageListenerContainer as you have seen on the Channel Adapters and Gateways. However, the examples we’ll show here are going to have minimal configuration. Explore the XML schema to view the available attributes.
A point-to-point channel would look like this:
<int-amqp:channel id="p2pChannel"/>
Under the covers a Queue named "si.p2pChannel" would be declared, and this channel will send to that Queue (technically by sending to the no-name Direct Exchange with a routing key that matches this Queue’s name).
This channel will also register a consumer on that Queue.
If you want the channel to be "pollable" instead of message-driven, then simply provide the "message-driven" flag with
a value of false:
<int-amqp:channel id="p2pPollableChannel" message-driven="false"/>
A publish/subscribe channel would look like this:
<int-amqp:publish-subscribe-channel id="pubSubChannel"/>
Under the covers a Fanout Exchange named "si.fanout.pubSubChannel" would be declared, and this channel will send to that Fanout Exchange. This channel will also declare a server-named exclusive, auto-delete, non-durable Queue and bind that to the Fanout Exchange while registering a consumer on that Queue to receive Messages. There is no "pollable" option for a publish-subscribe-channel; it must be message-driven.
Starting with version 4.1 AMQP Backed Message Channels, alongside with channel-transacted, support
template-channel-transacted to separate transactional configuration for the AbstractMessageListenerContainer and
for the RabbitTemplate.
Note, previously, the channel-transacted was true by default, now it changed to false as standard default value
for the AbstractMessageListenerContainer.
Prior to version 4.3, AMQP-backed channels only supported messages with Serializable payloads and headers.
The entire message was converted (serialized) and sent to RabbitMQ.
Now, you can set the extract-payload attribute (or setExtractPayload() when using Java configuration) to true.
When this flag is true, the message payload is converted and the headers mapped, in a similar manner to when using
channel adapters.
This allows AMQP-backed channels to be used with non-serializable payloads (perhaps with another message converter
such as the Jackson2JsonMessageConverter).
The default mapped headers are discussed in Section 12.12, “AMQP Message Headers”.
You can modify the mapping by providing custom mappers using the outbound-header-mapper and inbound-header-mapper
attributes.
You can now also specify a default-delivery-mode, used to set the delivery mode when there is no
amqp_deliveryMode header.
By default, Spring AMQP MessageProperties uses PERSISTENT delivery mode.
| Important |
|---|---|
|
Just as with other persistence-backed channels, AMQP-backed channels are intended to provide message persistence to avoid message loss. They are not intended to distribute work to other peer applications; for that purpose, use channel adapters instead. |
| Important |
|---|---|
|
Starting with version 5.0, the pollable channel now blocks the poller thread for the specified |
The following provides an example of configuring the channels using Java configuration:
@Bean public AmqpChannelFactoryBean pollable(ConnectionFactory connectionFactory) { AmqpChannelFactoryBean factoryBean = new AmqpChannelFactoryBean(); factoryBean.setConnectionFactory(connectionFactory); factoryBean.setQueueName("foo"); factoryBean.setPubSub(false); return factoryBean; } @Bean public AmqpChannelFactoryBean messageDriven(ConnectionFactory connectionFactory) { AmqpChannelFactoryBean factoryBean = new AmqpChannelFactoryBean(true); factoryBean.setConnectionFactory(connectionFactory); factoryBean.setQueueName("bar"); factoryBean.setPubSub(false); return factoryBean; } @Bean public AmqpChannelFactoryBean pubSub(ConnectionFactory connectionFactory) { AmqpChannelFactoryBean factoryBean = new AmqpChannelFactoryBean(true); factoryBean.setConnectionFactory(connectionFactory); factoryBean.setQueueName("baz"); factoryBean.setPubSub(false); return factoryBean; }
The following provides an example of configuring the channels using the Java DSL:
@Bean public IntegrationFlow pollableInFlow(ConnectionFactory connectionFactory) { return IntegrationFlows.from(...) ... .channel(Amqp.pollableChannel(connectionFactory) .queueName("foo")) ... .get(); } @Bean public IntegrationFlow messageDrivenInFow(ConnectionFactory connectionFactory) { return IntegrationFlows.from(...) ... .channel(Amqp.channel(connectionFactory) .queueName("bar")) ... .get(); } @Bean public IntegrationFlow pubSubInFlow(ConnectionFactory connectionFactory) { return IntegrationFlows.from(...) ... .channel(Amqp.publisSubscribeChannel(connectionFactory) .queueName("baz")) ... .get(); }
The Spring Integration AMQP Adapters will map all AMQP properties and headers automatically.
(This is a change in 4.3 - previously, only standard headers were mapped).
These properties will be copied by default to and from Spring Integration MessageHeaders using the
DefaultAmqpHeaderMapper.
Of course, you can pass in your own implementation of AMQP specific header mappers, as the adapters have respective properties to support that.
Any user-defined headers within the AMQP MessageProperties WILL
be copied to or from an AMQP Message, unless explicitly negated by the requestHeaderNames and/or
replyHeaderNames properties of the DefaultAmqpHeaderMapper.
For an outbound mapper, no x-* headers are mapped by default; see the caution below for the reason why.
To override the default, and revert to the pre-4.3 behavior, use STANDARD_REQUEST_HEADERS and
STANDARD_REPLY_HEADERS in the properties.
| Tip |
|---|---|
|
When mapping user-defined headers, the values can also contain simple wildcard patterns (e.g. "foo*" or "*foo")
to be matched.
|
Starting with version 4.1, the AbstractHeaderMapper (a DefaultAmqpHeaderMapper superclass) allows the
NON_STANDARD_HEADERS token to be configured for the requestHeaderNames and/or replyHeaderNames properties
(in addition to the existing STANDARD_REQUEST_HEADERS and STANDARD_REPLY_HEADERS) to map all user-defined headers.
Class org.springframework.amqp.support.AmqpHeaders identifies the default headers that will be used by the
DefaultAmqpHeaderMapper:
- amqp_appId
- amqp_clusterId
- amqp_contentEncoding
- amqp_contentLength
- content-type
- amqp_correlationId
- amqp_delay
- amqp_deliveryMode
- amqp_deliveryTag
- amqp_expiration
- amqp_messageCount
- amqp_messageId
- amqp_receivedDelay
- amqp_receivedDeliveryMode
- amqp_receivedExchange
- amqp_receivedRoutingKey
- amqp_redelivered
- amqp_replyTo
- amqp_timestamp
- amqp_type
- amqp_userId
- amqp_publishConfirm
- amqp_publishConfirmNackCause
- amqp_returnReplyCode
- amqp_returnReplyText
- amqp_returnExchange
- amqp_returnRoutingKey
- amqp_channel
- amqp_consumerTag
- amqp_consumerQueue
| Caution |
|---|---|
|
As mentioned above, using a header mapping pattern |
Starting with version 4.3, patterns in the header mappings can be negated by preceding the pattern with !.
Negated patterns get priority, so a list such as
STANDARD_REQUEST_HEADERS,foo,ba*,!bar,!baz,qux,!foo will NOT map foo
(nor bar nor baz); the standard headers plus bad, qux will be mapped.
| Important |
|---|---|
|
If you have a user defined header that begins with |
To experiment with the AMQP adapters, check out the samples available in the Spring Integration Samples Git repository at:
Currently there is one sample available that demonstrates the basic functionality of the Spring Integration AMQP Adapter using an Outbound Channel Adapter and an Inbound Channel Adapter. As AMQP Broker implementation the sample uses RabbitMQ (http://www.rabbitmq.com/).
| Note |
|---|---|
|
In order to run the example you will need a running instance of RabbitMQ. A local installation with just the basic defaults will be sufficient. For detailed RabbitMQ installation procedures please visit: http://www.rabbitmq.com/install.html |
Once the sample application is started, you enter some text on the command prompt and a message containing that entered text is dispatched to the AMQP queue. In return that message is retrieved via Spring Integration and then printed to the console.
The image belows illustrates the basic set of Spring Integration components used in this sample.
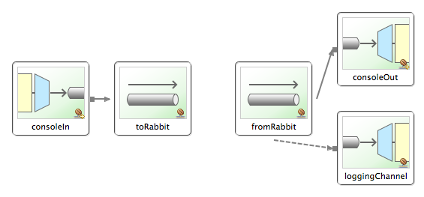
Spring Integration provides support for inbound and outbound ApplicationEvents as defined by the underlying Spring Framework.
For more information about Spring’s support for events and listeners, refer to the Spring Reference Manual.
To receive events and send them to a channel, simply define an instance of Spring Integration’s ApplicationEventListeningMessageProducer.
This class is an implementation of Spring’s ApplicationListener interface.
By default it will pass all received events as Spring Integration Messages.
To limit based on the type of event, configure the list of event types that you want to receive with the eventTypes property.
If a received event has a Message instance as its source, then that will be passed as-is.
Otherwise, if a SpEL-based "payloadExpression" has been provided, that will be evaluated against the ApplicationEvent instance.
If the event’s source is not a Message instance and no "payloadExpression" has been provided, then the ApplicationEvent itself will be passed as the payload.
Starting with version 4.2 the ApplicationEventListeningMessageProducer implements GenericApplicationListener
and can be configured to accept not only ApplicationEvent types, but any type for treating payload events
which are supported since Spring Framework 4.2, too.
When the accepted event is an instance of PayloadApplicationEvent, its payload is used for the message to send.
For convenience namespace support is provided to configure an ApplicationEventListeningMessageProducer via the inbound-channel-adapter element.
<int-event:inbound-channel-adapter channel="eventChannel" error-channel="eventErrorChannel" event-types="example.FooEvent, example.BarEvent, java.util.Date"/> <int:publish-subscribe-channel id="eventChannel"/>
In the above example, all Application Context events that match one of the types specified by the event-types (optional) attribute will be delivered as Spring Integration Messages to the Message Channel named eventChannel. If a downstream component throws an exception, a MessagingException containing the failed message and exception will be sent to the channel named eventErrorChannel. If no "error-channel" is specified and the downstream channels are synchronous, the Exception will be propagated to the caller.
To send Spring ApplicationEvents, create an instance of the ApplicationEventPublishingMessageHandler and register it within an endpoint.
This implementation of the MessageHandler interface also implements Spring’s ApplicationEventPublisherAware interface and thus acts as a bridge between Spring Integration Messages and ApplicationEvents.
For convenience namespace support is provided to configure an ApplicationEventPublishingMessageHandler via the outbound-channel-adapter element.
<int:channel id="eventChannel"/> <int-event:outbound-channel-adapter channel="eventChannel"/>
If you are using a PollableChannel (e.g., Queue), you can also provide poller as a sub-element of the outbound-channel-adapter element. You can also optionally provide a task-executor reference for that poller. The following example demonstrates both.
<int:channel id="eventChannel"> <int:queue/> </int:channel> <int-event:outbound-channel-adapter channel="eventChannel"> <int:poller max-messages-per-poll="1" task-executor="executor" fixed-rate="100"/> </int-event:outbound-channel-adapter> <task:executor id="executor" pool-size="5"/>
In the above example, all messages sent to the eventChannel channel will be published as ApplicationEvents to any relevant ApplicationListener instances that are registered within the same Spring ApplicationContext.
If the payload of the Message is an ApplicationEvent, it will be passed as-is.
Otherwise the Message itself will be wrapped in a MessagingEvent instance.
Starting with version 4.2 the ApplicationEventPublishingMessageHandler (<int-event:outbound-channel-adapter>)
can be configured with the publish-payload boolean attribute to publish to the application context payload as is,
instead of wrapping it to a MessagingEvent instance.
Spring Integration provides support for Syndication via Feed Adapters. The implementation is based on the ROME Framework.
Web syndication is a form of publishing material such as news stories, press releases, blog posts, and other items typically available on a website but also made available in a feed format such as RSS or ATOM.
Spring integration provides support for Web Syndication via its feed adapter and provides convenient namespace-based configuration for it. To configure the feed namespace, include the following elements within the headers of your XML configuration file:
xmlns:int-feed="http://www.springframework.org/schema/integration/feed" xsi:schemaLocation="http://www.springframework.org/schema/integration/feed http://www.springframework.org/schema/integration/feed/spring-integration-feed.xsd"
The only adapter that is really needed to provide support for retrieving feeds is an inbound channel adapter. This allows you to subscribe to a particular URL. Below is an example configuration:
<int-feed:inbound-channel-adapter id="feedAdapter" channel="feedChannel" url="http://feeds.bbci.co.uk/news/rss.xml"> <int:poller fixed-rate="10000" max-messages-per-poll="100" /> </int-feed:inbound-channel-adapter>
In the above configuration, we are subscribing to a URL identified by the url attribute.
As news items are retrieved they will be converted to Messages and sent to a channel identified by the channel attribute.
The payload of each message will be a com.sun.syndication.feed.synd.SyndEntry instance.
That encapsulates various data about a news item (content, dates, authors, etc.).
You can also see that the Inbound Feed Channel Adapter is a Polling Consumer.
That means you have to provide a poller configuration.
However, one important thing you must understand with regard to Feeds is that its inner-workings are slightly different then most other poling consumers.
When an Inbound Feed adapter is started, it does the first poll and receives a com.sun.syndication.feed.synd.SyndEntryFeed instance.
That is an object that contains multiple SyndEntry objects.
Each entry is stored in the local entry queue and is released based on the value in the max-messages-per-poll attribute such that each Message will contain a single entry.
If during retrieval of the entries from the entry queue the queue had become empty, the adapter will attempt to update the Feed thereby populating the queue with more entries (SyndEntry instances) if available.
Otherwise the next attempt to poll for a feed will be determined by the trigger of the poller (e.g., every 10 seconds in the above configuration).
Duplicate Entries
Polling for a Feed might result in entries that have already been processed ("I already read that news item, why are you showing it to me again?").
Spring Integration provides a convenient mechanism to eliminate the need to worry about duplicate entries.
Each feed entry will have a published date field.
Every time a new Message is generated and sent, Spring Integration will store the value of the latest published date in an instance of the MetadataStore strategy (Section 10.5, “Metadata Store”).
| Note |
|---|---|
|
The key used to persist the latest published date is the value of the (required) |
Other Options
Starting with version 5.0, the deprecated com.rometools.fetcher.FeedFetcher option has been removed and an overloaded FeedEntryMessageSource constructor for an org.springframework.core.io.Resource is provided.
This is useful when Feed source isn’t an HTTP endpoint, but any other resource, local or remote on FTP, for example.
In the FeedEntryMessageSource logic such a resource (or provided URL) is parsed by the SyndFeedInput to the SyndFeed object for processing mentioned above.
A customized SyndFeedInput (for example with the allowDoctypes option) instance also can be injected to the FeedEntryMessageSource.
The following Spring Boot application provides an example of configuring the Inbound Adapter using the Java DSL:
@SpringBootApplication public class FeedJavaApplication { public static void main(String[] args) { new SpringApplicationBuilder(FeedJavaApplication.class) .web(false) .run(args); } @Value("org/springframework/integration/feed/sample.rss") private Resource feedResource; @Bean public MetadataStore metadataStore() { PropertiesPersistingMetadataStore metadataStore = new PropertiesPersistingMetadataStore(); metadataStore.setBaseDirectory(tempFolder.getRoot().getAbsolutePath()); return metadataStore; } @Bean public IntegrationFlow feedFlow() { return IntegrationFlows .from(Feed.inboundAdapter(this.feedResource, "feedTest") .metadataStore(metadataStore()), e -> e.poller(p -> p.fixedDelay(100))) .channel(c -> c.queue("entries")) .get(); } }
Spring Integration’s File support extends the Spring Integration Core with a dedicated vocabulary to deal with reading, writing, and transforming files. It provides a namespace that enables elements defining Channel Adapters dedicated to files and support for Transformers that can read file contents into strings or byte arrays.
This section will explain the workings of FileReadingMessageSource and FileWritingMessageHandler and how to configure them as beans.
Also the support for dealing with files through file specific implementations of Transformer will be discussed.
Finally the file specific namespace will be explained.
A FileReadingMessageSource can be used to consume files from the filesystem.
This is an implementation of MessageSource that creates messages from a file system directory.
<bean id="pollableFileSource" class="org.springframework.integration.file.FileReadingMessageSource" p:directory="${input.directory}"/>
To prevent creating messages for certain files, you may supply a FileListFilter.
By default the following 2 filters are used:
-
IgnoreHiddenFileListFilter -
AcceptOnceFileListFilter
The IgnoreHiddenFileListFilter ensures that hidden files are not being processed.
Please keep in mind that the exact definition of hidden is system-dependent. For example,
on UNIX-based systems, a file beginning with a period character is considered to be hidden.
Microsoft Windows, on the other hand, has a dedicated file attribute to indicate
hidden files.
| Important |
|---|---|
|
The |
The AcceptOnceFileListFilter ensures files are picked up only once from the directory.
| Note |
|---|---|
|
The Since version 4.0, this filter requires a Since version 4.1.5, this filter has a new property |
<bean id="pollableFileSource" class="org.springframework.integration.file.FileReadingMessageSource" p:inputDirectory="${input.directory}" p:filter-ref="customFilterBean"/>
A common problem with reading files is that a file may be detected before it is ready.
The default AcceptOnceFileListFilter does not prevent this.
In most cases, this can be prevented if the file-writing process renames each file as soon as it is ready for reading.
A filename-pattern or filename-regex filter that accepts only files that are ready (e.g.
based on a known suffix), composed with the default AcceptOnceFileListFilter allows for this.
The CompositeFileListFilter enables the composition.
<bean id="pollableFileSource" class="org.springframework.integration.file.FileReadingMessageSource" p:inputDirectory="${input.directory}" p:filter-ref="compositeFilter"/> <bean id="compositeFilter" class="org.springframework.integration.file.filters.CompositeFileListFilter"> <constructor-arg> <list> <bean class="o.s.i.file.filters.AcceptOnceFileListFilter"/> <bean class="o.s.i.file.filters.RegexPatternFileListFilter"> <constructor-arg value="^test.*$"/> </bean> </list> </constructor-arg> </bean>
If it is not possible to create the file with a temporary name and rename to the final name, another alternative is
provided.
The LastModifiedFileListFilter was added in version 4.2.
This filter can be configured with an age property and only files older than this will be passed by the filter.
The age defaults to 60 seconds, but you should choose an age that is large enough to avoid picking up a file early, due
to, say, network glitches.
<bean id="filter" class="org.springframework.integration.file.filters.LastModifiedFileListFilter"> <property name="age" value="120" /> </bean>
Starting with version 4.3.7 a ChainFileListFilter (an extension of CompositeFileListFilter) has been introduced to allow scenarios when subsequent filters should only see the result of the previous filter.
(With the CompositeFileListFilter, all filters see all the files, but only files that pass all filters are passed by the CompositeFileListFilter).
An example of where the new behavior is required is a combination of LastModifiedFileListFilter and AcceptOnceFileListFilter, when we do not wish to accept the file until some amount of time has elapsed.
With the CompositeFileListFilter, since the AcceptOnceFileListFilter sees all the files on the first pass, it won’t pass it later when the other filter does.
The CompositeFileListFilter approach is useful when a pattern filter is combined with a custom filter that looks for a secondary indicating file transfer is complete.
The pattern filter might only pass the primary file (e.g. foo.txt) but the "done" filter needs to see if, say foo.done is present.
Say we have files a.txt, a.done, and b.txt.
The pattern filter only passes a.txt and b.txt, the "done" filter will see all three files and only pass a.txt.
The final result of the composite filter is only a.txt is released.
| Note |
|---|---|
|
With the |
Starting with version 5.0 an ExpressionFileListFilter has been introduced to allow to execute SpEL expression against file as a context evaluation root object.
For this purpose all the XML components for file handling (local and remote), alongside with an existing filter attribute, have been supplied with the filter-expression option:
<int-file:inbound-channel-adapter directory="${inputdir}" filter-expression="name matches '.text'" auto-startup="false"/>
Message Headers
Starting with version 5.0 the FileReadingMessageSource, in addition to the payload as a polled File, populates these headers to the outbound Message:
-
FileHeaders.FILENAME- theFile.getName()of the file to send. Can be used for subsequent rename or copy logic; -
FileHeaders.ORIGINAL_FILE- theFileobject itself. Typically this header is populated automatically by Framework components, like Section 15.5, “File Splitter” or Section 15.4, “File Transformers”, when we lose the originalFileobject. But for consistency and convenience with any other custom use-cases this header can be useful to get access to the original file; -
FileHeaders.RELATIVE_PATH- a new header introduced to represent the part of file path relative to the root directory for the scan. This header can be useful when the requirement is to restore a source directory hierarchy in the other places. For this purpose theDefaultFileNameGenerator(Section 15.3.1, “Generating File Names”) can be configured to use this header.
Directory scanning and polling
The FileReadingMessageSource doesn’t produce messages for files from the directory immediately.
It uses an internal queue for eligible files returned by the scanner.
The scanEachPoll option is used to ensure that the internal queue is refreshed with the latest input directory
content on each poll.
By default (scanEachPoll = false), the FileReadingMessageSource empties its queue before scanning the directory
again.
This default behavior is particularly useful to reduce scans of large numbers of files in a directory.
However, in cases where custom ordering is required, it is important to consider the effects of setting this flag to
true; the order in which files are processed may not be as expected.
By default, files in the queue are processed in their natural (path) order.
New files added by a scan, even when the queue already has files, are inserted in the appropriate position to maintain
that natural order.
To customize the order, the FileReadingMessageSource can accept a Comparator<File> as a constructor argument.
It is used by the internal (PriorityBlockingQueue) to reorder its content according to the business requirements.
Therefore, to process files in a specific order, you should provide a comparator to the FileReadingMessageSource,
rather than ordering the list produced by a custom DirectoryScanner.
Starting with version 5.0, a new RecursiveDirectoryScanner is presented to perform file tree visiting.
The implementation is based on the Files.walk(Path start, int maxDepth, FileVisitOption... options) functionality.
The root directory (DirectoryScanner.listFiles(File) argument) is excluded from the result.
All other sub-directories includes/excludes are based on the target FileListFilter implementation.
For example the SimplePatternFileListFilter filters directories by default.
See AbstractDirectoryAwareFileListFilter and its implementations for more information.
The configuration for file reading can be simplified using the file specific namespace. To do this use the following template.
<?xml version="1.0" encoding="UTF-8"?> <beans xmlns="http://www.springframework.org/schema/beans" xmlns:xsi="http://www.w3.org/2001/XMLSchema-instance" xmlns:int="http://www.springframework.org/schema/integration" xmlns:int-file="http://www.springframework.org/schema/integration/file" xsi:schemaLocation="http://www.springframework.org/schema/beans http://www.springframework.org/schema/beans/spring-beans.xsd http://www.springframework.org/schema/integration http://www.springframework.org/schema/integration/spring-integration.xsd http://www.springframework.org/schema/integration/file http://www.springframework.org/schema/integration/file/spring-integration-file.xsd"> </beans>
Within this namespace you can reduce the FileReadingMessageSource and wrap it in an inbound Channel Adapter like this:
<int-file:inbound-channel-adapter id="filesIn1" directory="file:${input.directory}" prevent-duplicates="true" ignore-hidden="true"/> <int-file:inbound-channel-adapter id="filesIn2" directory="file:${input.directory}" filter="customFilterBean" /> <int-file:inbound-channel-adapter id="filesIn3" directory="file:${input.directory}" filename-pattern="test*" /> <int-file:inbound-channel-adapter id="filesIn4" directory="file:${input.directory}" filename-regex="test[0-9]+\.txt" />
The first channel adapter example is relying on the default FileListFilter s:
-
IgnoreHiddenFileListFilter(Do not process hidden files) -
AcceptOnceFileListFilter(Prevents duplication)
Therefore, you can also leave off the 2 attributes prevent-duplicates and ignore-hidden as they are true by default.
| Important |
|---|---|
|
The |
The second channel adapter example is using a custom filter, the third is using the filename-pattern attribute to
add an AntPathMatcher based filter, and the fourth is using the filename-regex attribute to add a regular expression Pattern based filter to the FileReadingMessageSource.
The filename-pattern and filename-regex attributes are each mutually exclusive with the regular filter reference attribute.
However, you can use the filter attribute to reference an instance of CompositeFileListFilter that combines any number of filters, including one or more pattern based filters to fit your particular needs.
When multiple processes are reading from the same directory it can be desirable to lock files to prevent them from being picked up concurrently.
To do this you can use a FileLocker.
There is a java.nio based implementation available out of the box, but it is also possible to implement your own locking scheme.
The nio locker can be injected as follows
<int-file:inbound-channel-adapter id="filesIn" directory="file:${input.directory}" prevent-duplicates="true"> <int-file:nio-locker/> </int-file:inbound-channel-adapter>
A custom locker you can configure like this:
<int-file:inbound-channel-adapter id="filesIn" directory="file:${input.directory}" prevent-duplicates="true"> <int-file:locker ref="customLocker"/> </int-file:inbound-channel-adapter>
| Note |
|---|---|
|
When a file inbound adapter is configured with a locker, it will take the responsibility to acquire a lock before the file is allowed to be received.
It will not assume the responsibility to unlock the file. If you have processed the file and keeping the locks hanging around you have a memory leak.
If this is a problem in your case you should call |
When filtering and locking files is not enough it might be needed to control the way files are listed entirely.
To implement this type of requirement you can use an implementation of DirectoryScanner.
This scanner allows you to determine entirely what files are listed each poll.
This is also the interface that Spring Integration uses internally to wire FileListFilter s and FileLocker to the FileReadingMessageSource.
A custom DirectoryScanner can be injected into the <int-file:inbound-channel-adapter/> on the scanner attribute.
<int-file:inbound-channel-adapter id="filesIn" directory="file:${input.directory}" scanner="customDirectoryScanner"/>
This gives you full freedom to choose the ordering, listing and locking strategies.
It is also important to understand that filters (including patterns, regex, prevent-duplicates etc) and locker s,
are actually used by the scanner.
Any of these attributes set on the adapter are subsequently injected into the internal scanner.
For the case of an external scanner, all filter and locker attributes are prohibited on the
FileReadingMessageSource; they must be specified (if required) on that custom DirectoryScanner.
In other words, if you inject a scanner into the FileReadingMessageSource, you should supply filter and locker
on that scanner not on the FileReadingMessageSource.
| Note |
|---|---|
|
The |
The FileReadingMessageSource.WatchServiceDirectoryScanner relies on file system events when new files are added to the directory.
During initialization, the directory is registered to generate events; the initial file list is also built.
While walking the directory tree, any subdirectories encountered are also registered to generate events.
On the first poll, the initial file list from walking the directory is returned.
On subsequent polls, files from new creation events are returned.
If a new subdirectory is added, its creation event is used to walk the new subtree to find existing files, as well
as registering any new subdirectories found.
| Note |
|---|---|
|
There is a case with |
The WatchServiceDirectoryScanner can be enable via FileReadingMessageSource.use-watch-service option, which is mutually exclusive with the scanner option.
An internal FileReadingMessageSource.WatchServiceDirectoryScanner instance is populated for the provided directory.
In addition, now the WatchService polling logic can track the StandardWatchEventKinds.ENTRY_MODIFY and
StandardWatchEventKinds.ENTRY_DELETE, too.
The ENTRY_MODIFY events logic should be implemented properly in the FileListFilter to track not only new files but
also the modification, if that is requirement.
Otherwise the files from those events are treated the same way.
The ENTRY_DELETE events have effect for the ResettableFileListFilter implementations and, therefore, their files
are provided for the remove() operation.
This means that (when this event is enabled), filters such as the AcceptOnceFileListFilter will have the file removed,
meaning that, if a file with the same name appears, it will pass the filter and be sent as a message.
For this purpose the watch-events
(FileReadingMessageSource.setWatchEvents(WatchEventType... watchEvents)) has been introduced
(WatchEventType is a public inner enum in FileReadingMessageSource).
With such an option we can implement some scenarios, when we would like to do one downstream flow logic for new files,
and other for modified.
We can achieve that with different <int-file:inbound-channel-adapter> definitions, but for the same directory:
<int-file:inbound-channel-adapter id="newFiles" directory="${input.directory}" use-watch-service="true"/> <int-file:inbound-channel-adapter id="modifiedFiles" directory="${input.directory}" use-watch-service="true" filter="acceptAllFilter" watch-events="MODIFY"/> <!-- CREATE by default -->
A HeadDirectoryScanner can be used to limit the number of files retained in memory.
This can be useful when scanning large directories.
With XML configuration, this is enabled using the queue-size property on the inbound channel adapter.
Prior to version 4.2, this setting was incompatible with the use of any other filters.
Any other filters (including prevent-duplicates="true") overwrote the filter used to limit the size.
| Note |
|---|---|
|
The use of a Generally, instead of using an |
The following Spring Boot application provides an example of configuring the inbound adapter using Java configuration:
@SpringBootApplication public class FileReadingJavaApplication { public static void main(String[] args) { new SpringApplicationBuilder(FileReadingJavaApplication.class) .web(false) .run(args); } @Bean public MessageChannel fileInputChannel() { return new DirectChannel(); } @Bean @InboundChannelAdapter(value = "fileInputChannel", poller = @Poller(fixedDelay = "1000")) public MessageSource<File> fileReadingMessageSource() { FileReadingMessageSource source = new FileReadingMessageSource(); source.setDirectory(new File(INBOUND_PATH)); source.setFilter(new SimplePatternFileListFilter("*.txt")); return source; } @Bean @Transformer(inputChannel = "fileInputChannel", outputChannel = "processFileChannel") public FileToStringTransformer fileToStringTransformer() { return new FileToStringTransformer(); } }
The following Spring Boot application provides an example of configuring the inbound adapter using the Java DSL:
@SpringBootApplication public class FileReadingJavaApplication { public static void main(String[] args) { new SpringApplicationBuilder(FileReadingJavaApplication.class) .web(false) .run(args); } @Bean public IntegrationFlow fileReadingFlow() { return IntegrationFlows .from(s -> s.file(new File(INBOUND_PATH)) .patternFilter("*.txt"), e -> e.poller(Pollers.fixedDelay(1000))) .transform(Transformers.fileToString()) .channel("processFileChannel") .get(); } }
Another popular use case is to get lines from the end (or tail) of a file, capturing new lines when they are added.
Two implementations are provided; the first, OSDelegatingFileTailingMessageProducer, uses the native tail command (on operating systems that have one).
This is likely the most efficient implementation on those platforms.
For operating systems that do not have a tail command, the second implementation ApacheCommonsFileTailingMessageProducer
which uses the Apache commons-io Tailer class.
In both cases, file system events, such as files being unavailable etc, are published as ApplicationEvent s using the normal Spring event publishing mechanism.
Examples of such events are:
[message=tail: cannot open `/tmp/foo' for reading:
No such file or directory, file=/tmp/foo]
[message=tail: `/tmp/foo' has become accessible, file=/tmp/foo]
[message=tail: `/tmp/foo' has become inaccessible:
No such file or directory, file=/tmp/foo]
[message=tail: `/tmp/foo' has appeared;
following end of new file, file=/tmp/foo]
This sequence of events might occur, for example, when a file is rotated.
Starting with version 5.0, a FileTailingIdleEvent is emitted when there is no data in the file during idleEventInterval.
[message=Idle timeout, file=/tmp/foo] [idle time=5438]
| Note |
|---|---|
|
Not all platforms supporting a |
Messages emitted from these endpoints have the following headers:
-
FileHeaders.ORIGINAL_FILE- theFileobject -
FileHeaders.FILENAME- the file name (File.getName())
| Note |
|---|---|
|
In versions prior to version 5.0, the |
Example configurations:
<int-file:tail-inbound-channel-adapter id="native" channel="input" task-executor="exec" file="/tmp/foo"/>
This creates a native adapter with default -F -n 0 options (follow the file name from the current end).
<int-file:tail-inbound-channel-adapter id="native" channel="input" native-options="-F -n +0" task-executor="exec" file-delay=10000 file="/tmp/foo"/>
This creates a native adapter with -F -n +0 options (follow the file name, emitting all existing lines).
If the tail command fails (on some platforms, a missing file causes the tail to fail, even with -F specified), the command will be retried every 10 seconds.
<int-file:tail-inbound-channel-adapter id="native" channel="input" enable-status-reader="false" task-executor="exec" file="/tmp/foo"/>
By default native adapter capture from standard output and send them as messages and from standard error to raise events.
Starting with version 4.3.6, you can discard the standard error events by setting the enable-status-reader to false.
<int-file:tail-inbound-channel-adapter id="native" channel="input" idle-event-interval="5000" task-executor="exec" file="/tmp/foo"/>
IdleEventInterval is set to 5000 then, if no lines are written for 5 second, FileTailingIdleEvent will be triggered every 5 second.
This can be useful if we need to stop the adapter.
<int-file:tail-inbound-channel-adapter id="apache" channel="input" task-executor="exec" file="/tmp/bar" delay="2000" end="false" reopen="true" file-delay="10000"/>
This creates an Apache commons-io Tailer adapter that examines the file for new lines every 2 seconds, and checks for existence of a missing file every 10 seconds.
The file will be tailed from the beginning (end="false") instead of the end (which is the default).
The file will be reopened for each chunk (the default is to keep the file open).
| Important |
|---|---|
|
Specifying the |
A common problem in file transfer scenarios is how to determine that the transfer is complete, so you don’t start reading an incomplete file.
A common technique to solve this problem is to write the file with a temporary name and then atomically rename it to the final name.
This, together with a filter that masks the temporary file from being picked up by the consumer provides a robust solution.
This technique is used by Spring Integration components that write files (locally or remotely); by default, they append .writing to the file name and remove it when the transfer is complete.
Another common technique is to write a second "marker" file to indicate the file transfer is complete.
In this scenario, say, you should not consider foo.txt to be available for use until foo.txt.complete is also present.
Spring Integration version 5.0 introduces new filters to support this mechanism.
Implementations are provided for the file system (FileSystemMarkerFilePresentFileListFilter), FTP and SFTP.
They are configurable such that the marker file can have any name, although it will usually be related to the file being transferred.
See the javadocs for more information.
To write messages to the file system you can use a FileWritingMessageHandler. This class can deal with the following payload types:
- File,
- String
- byte array
- InputStream (since version 4.2)
You can configure the encoding and the charset that will be used in case of a String payload.
To make things easier, you can configure the FileWritingMessageHandler as part of an Outbound Channel Adapter or
Outbound Gateway using the provided XML namespace support.
Starting with version 4.3, you can specify the buffer size to use when writing files.
In its simplest form, the FileWritingMessageHandler only requires a destination directory for writing the files.
The name of the file to be written is determined by the handler’s FileNameGenerator.
The default implementation looks for a Message header whose key matches the constant defined as FileHeaders.FILENAME.
Alternatively, you can specify an expression to be evaluated against the Message in order to generate a file name, e.g. headers[myCustomHeader] + '.foo'.
The expression must evaluate to a String.
For convenience, the DefaultFileNameGenerator also provides the setHeaderName method, allowing you to explicitly specify the Message header whose value shall be used as the filename.
Once setup, the DefaultFileNameGenerator will employ the following resolution steps to determine the filename for a given Message payload:
-
Evaluate the expression against the Message and, if the result is a non-empty
String, use it as the filename. -
Otherwise, if the payload is a
java.io.File, use the file’s filename. -
Otherwise, use the Message ID appended with .
msgas the filename.
When using the XML namespace support, both, the File Outbound Channel Adapter and the File Outbound Gateway support the following two mutually exclusive configuration attributes:
-
filename-generator(a reference to aFileNameGeneratorimplementation) -
filename-generator-expression(an expression evaluating to aString)
While writing files, a temporary file suffix will be used (default: .writing).
It is appended to the filename while the file is being written.
To customize the suffix, you can set the temporary-file-suffix attribute on both the File Outbound Channel Adapter and the File Outbound Gateway.
| Note |
|---|---|
|
When using the APPEND file mode, the temporary-file-suffix attribute is ignored, since the data is appended to the file directly. |
Starting with version 4.2.5 the generated file name (as a result of filename-generator/filename-generator-expression
evaluation) can represent a sub-path together with the target file name.
It is used as a second constructor argument for File(File parent, String child) as before, but in the past we didn’t
created (mkdirs()) directories for sub-path assuming only the file name.
This approach is useful for cases when we need to restore the file system tree according the source directory.
For example we unzipping the archive and want to save all file in the target directory at the same order.
Both, the File Outbound Channel Adapter and the File Outbound Gateway provide two configuration attributes for specifying the output directory:
- directory
- directory-expression
| Note |
|---|---|
|
The directory-expression attribute is available since Spring Integration 2.2. |
Using the directory attribute
When using the directory attribute, the output directory will be set to a fixed value, that is set at initialization time of the FileWritingMessageHandler.
If you don’t specify this attribute, then you must use the directory-expression attribute.
Using the directory-expression attribute
If you want to have full SpEL support you would choose the directory-expression attribute. This attribute accepts a SpEL expression that is evaluated for each message being processed. Thus, you have full access to a Message’s payload and its headers to dynamically specify the output file directory.
The SpEL expression must resolve to either a String or to java.io.File.
Furthermore the resulting String or File must point to a directory.
If you don’t specify the directory-expression attribute, then you must set the directory attribute.
Using the auto-create-directory attribute
If the destination directory does not exists, yet, by default the respective destination directory and any non-existing parent directories are being created automatically. You can set the auto-create-directory attribute to false in order to prevent that. This attribute applies to both, the directory and the directory-expression attribute.
| Note |
|---|---|
|
When using the directory attribute and auto-create-directory is Instead of checking for the existence of the destination directory at initialization time of the adapter, this check is now performed for each message being processed. Furthermore, if auto-create-directory is |
When writing files and the destination file already exists, the default behavior is to overwrite that target file. This behavior, though, can be changed by setting the mode attribute on the respective File Outbound components. The following options exist:
- REPLACE (Default)
- REPLACE_IF_MODIFIED
- APPEND
- APPEND_NO_FLUSH
- FAIL
- IGNORE
| Note |
|---|---|
|
The mode attribute and the options APPEND, FAIL and IGNORE, are available since Spring Integration 2.2. |
REPLACE
If the target file already exists, it will be overwritten. If the mode attribute is not specified, then this is the default behavior when writing files.
REPLACE_IF_MODIFIED
If the target file already exists, it will be overwritten only if the last modified timestamp is different to the source file.
For File payloads, the payload lastModified time is compared to the existing file.
For other payloads, the FileHeaders.SET_MODIFIED (file_setModified) header is compared to the existing file.
If the header is missing, or has a value that is not a Number, the file is always replaced.
APPEND
This mode allows you to append Message content to the existing file instead of creating a new file each time. Note that this attribute is mutually exclusive with temporary-file-suffix attribute since when appending content to the existing file, the adapter no longer uses a temporary file. The file is closed after each message.
APPEND_NO_FLUSH
This has the same semantics as APPEND but the data is not flushed and the file is not closed after each message. This can provide a significant performance at the risk of data loss in the case of a failure. See Section 15.3.4, “Flushing Files When using APPEND_NO_FLUSH” for more information.
FAIL
If the target file exists, a MessageHandlingException is thrown.
IGNORE
If the target file exists, the message payload is silently ignored.
| Note |
|---|---|
|
When using a temporary file suffix (default: |
The APPEND_NO_FLUSH mode was added in version 4.3. This can improve performance because the file is not closed after each message. However, this can cause data loss in the event of a failure.
Several flushing strategies, to mitigate this data loss, are provided:
-
flushInterval- if a file is not written to for this period of time, it is automatically flushed. This is approximate and may be up to1.33xthis time (with an average of1.167x). -
Send a message to the message handler’s
triggermethod containing a regular expression. Files with absolute path names matching the pattern will be flushed. -
Provide the handler with a custom
MessageFlushPredicateimplementation to modify the action taken when a message is sent to thetriggermethod. -
Invoke one of the handler’s
flushIfNeededmethods passing in a customFileWritingMessageHandler.FlushPredicateorFileWritingMessageHandler.MessageFlushPredicateimplementation.
The predicates are called for each open file. See the java docs for these interfaces for more information. Note that, since version 5.0, the predicate methods provide another parameter - the time that the current file was first written to if new or previously closed.
When using flushInterval, the interval starts at the last write - the file is flushed only if it is idle for the interval.
Starting with version 4.3.7, and additional property flushWhenIdle can be set to false, meaning that the interval starts with the first write to a previously flushed (or new) file.
By default, the destination file lastModified timestamp will be the time the file was created (except a rename
in-place will retain the current timestamp).
Starting with version 4.3, you can now configure preserve-timestamp (or setPreserveTimestamp(true) when using
Java configuration).
For File payloads, this will transfer the timestamp from the inbound file to the outbound (regardless of whether a
copy was required).
For other payloads, if the FileHeaders.SET_MODIFIED header (file_setModified) is present, it will be used to set
the destination file’s lastModified timestamp, as long as the header is a Number.
Starting with version 5.0, when writing files to a file system that supports Posix permissions, you can specify those permissions on the outbound channel adapter or gateway.
The property is an integer and is usually supplied in the familiar octal format; e.g. 0640 meaning the owner has read/write permissions, the group has read only permission and others have no access.
<int-file:outbound-channel-adapter id="filesOut" directory="${input.directory.property}"/>
The namespace based configuration also supports a delete-source-files attribute.
If set to true, it will trigger the deletion of the original source files after writing to a destination.
The default value for that flag is false.
<int-file:outbound-channel-adapter id="filesOut" directory="${output.directory}" delete-source-files="true"/>
| Note |
|---|---|
|
The |
Starting with version 4.2 The FileWritingMessageHandler supports an append-new-line option.
If set to true, a new line is appended to the file after a message is written.
The default attribute value is false.
<int-file:outbound-channel-adapter id="newlineAdapter" append-new-line="true" directory="${output.directory}"/>
In cases where you want to continue processing messages based on the written file, you can use the outbound-gateway instead.
It plays a very similar role as the outbound-channel-adapter.
However, after writing the file, it will also send it to the reply channel as the payload of a Message.
<int-file:outbound-gateway id="mover" request-channel="moveInput" reply-channel="output" directory="${output.directory}" mode="REPLACE" delete-source-files="true"/>
As mentioned earlier, you can also specify the mode attribute, which defines the behavior of how to deal with situations where the destination file already exists. Please see Section 15.3.3, “Dealing with Existing Destination Files” for further details. Generally, when using the File Outbound Gateway, the result file is returned as the Message payload on the reply channel.
This also applies when specifying the IGNORE mode. In that case the pre-existing destination file is returned. If the payload of the request message was a file, you still have access to that original file through the Message Header FileHeaders.ORIGINAL_FILE.
| Note |
|---|---|
|
The outbound-gateway works well in cases where you want to first move a file and then send it through a processing pipeline.
In such cases, you may connect the file namespace’s |
If you have more elaborate requirements or need to support additional payload types as input to be converted to file content you could extend the FileWritingMessageHandler, but a much better option is to rely on a Transformer.
The following Spring Boot application provides an example of configuring the inbound adapter using Java configuration:
@SpringBootApplication @IntegrationComponentScan public class FileWritingJavaApplication { public static void main(String[] args) { ConfigurableApplicationContext context = new SpringApplicationBuilder(FileWritingJavaApplication.class) .web(false) .run(args); MyGateway gateway = context.getBean(MyGateway.class); gateway.writeToFile("foo.txt", new File(tmpDir.getRoot(), "fileWritingFlow"), "foo"); } @Bean @ServiceActivator(inputChannel = "writeToFileChannel") public MessageHandler fileWritingMessageHandler() { Expression directoryExpression = new SpelExpressionParser().parseExpression("headers.directory"); FileWritingMessageHandler handler = new FileWritingMessageHandler(directoryExpression); handler.setFileExistsMode(FileExistsMode.APPEND); return handler; } @MessagingGateway(defaultRequestChannel = "writeToFileChannel") public interface MyGateway { void writeToFile(@Header(FileHeaders.FILENAME) String fileName, @Header(FileHeaders.FILENAME) File directory, String data); } }
The following Spring Boot application provides an example of configuring the inbound adapter using the Java DSL:
@SpringBootApplication public class FileWritingJavaApplication { public static void main(String[] args) { ConfigurableApplicationContext context = new SpringApplicationBuilder(FileWritingJavaApplication.class) .web(false) .run(args); MessageChannel fileWritingInput = context.getBean("fileWritingInput", MessageChannel.class); fileWritingInput.send(new GenericMessage<>("foo")); } @Bean public IntegrationFlow fileWritingFlow() { return IntegrationFlows.from("fileWritingInput") .enrichHeaders(h -> h.header(FileHeaders.FILENAME, "foo.txt") .header("directory", new File(tmpDir.getRoot(), "fileWritingFlow"))) .handleWithAdapter(a -> a.fileGateway(m -> m.getHeaders().get("directory"))) .channel(MessageChannels.queue("fileWritingResultChannel")) .get(); } }
To transform data read from the file system to objects and the other way around you need to do some work.
Contrary to FileReadingMessageSource and to a lesser extent FileWritingMessageHandler, it is very likely that you will need your own mechanism to get the job done.
For this you can implement the Transformer interface.
Or extend the AbstractFilePayloadTransformer for inbound messages.
Some obvious implementations have been provided.
FileToByteArrayTransformer transforms Files into byte[] using Spring’s FileCopyUtils.
It is often better to use a sequence of transformers than to put all transformations in a single class.
In that case the File to byte[] conversion might be a logical first step.
FileToStringTransformer will convert Files to Strings as the name suggests.
If nothing else, this can be useful for debugging (consider using with a Wire Tap).
To configure File specific transformers you can use the appropriate elements from the file namespace.
<int-file:file-to-bytes-transformer input-channel="input" output-channel="output" delete-files="true"/> <int-file:file-to-string-transformer input-channel="input" output-channel="output" delete-files="true" charset="UTF-8"/>
The delete-files option signals to the transformer that it should delete the inbound File after the transformation is complete.
This is in no way a replacement for using the AcceptOnceFileListFilter when the FileReadingMessageSource is being used in a multi-threaded environment (e.g.
Spring Integration in general).
The FileSplitter was added in version 4.1.2 and namespace support was added in version 4.2.
The FileSplitter splits text files into individual lines, based on BufferedReader.readLine().
By default, the splitter uses an Iterator to emit lines one-at-a-time as they are read from the file.
Setting the iterator property to false causes it to read all the lines into memory before emitting them as messages.
One use case for this might be if you want to detect I/O errors on the file before sending any messages containing
lines.
However, it is only practical for relatively short files.
Inbound payloads can be File, String (a File path), InputStream, or Reader.
Other payload types will be emitted unchanged.
<int-file:splitter id="splitter"
|
The bean name of the splitter. |
|
Set to |
|
Set to |
|
When |
|
Set to |
|
Set to |
|
Set the charset name to be used when reading the text data into |
|
The header name for the first line to be carried as a header in the messages emitted for the remaining lines. Since version 5.0. |
|
Set the input channel used to send messages to the splitter. |
|
Set the output channel to which messages will be sent. |
|
Set the send timeout - only applies if the |
|
Set to |
|
Set the order of this endpoint if the |
|
Set the startup phase for the splitter (used when |
The FileSplitter will also split any text-based InputStream into lines.
When used in conjunction with an FTP or SFTP streaming inbound channel adapter, or an FTP or SFTP outbound gateway
using the stream option to retrieve a file, starting with version 4.3, the splitter will automatically close
the session supporting the stream, when the file is completely consumed.
See Section 16.5, “FTP Streaming Inbound Channel Adapter” and Section 28.8, “SFTP Streaming Inbound Channel Adapter” as well as Section 16.8, “FTP Outbound Gateway” and Section 28.11, “SFTP Outbound Gateway” for more
information about these facilities.
When using Java configuration, an additional constructor is available:
public FileSplitter(boolean iterator, boolean markers, boolean markersJson)
When markersJson is true, the markers will be represented as a JSON string, as long as a suitable JSON processor library, such as Jackson or Boon, is on the classpath.
Starting with version 5.0, the firstLineAsHeader option is introduced to specify that the first line of content is a header (such as column names in a CSV file).
The argument passed to this property is the header name under which the first line will be carried as a header in the messages emitted for the remaining lines.
This line is not included in the sequence header (if applySequence is true) nor in the FileMarker.END lineCount.
If file contains only the header line, the file is treated as empty and therefore only FileMarker s are emitted during splitting (if markers are enabled, otherwise no messages are emitted).
By default (if no header name is set), the first line is considered to be data and will be the payload of the first emitted message.
If you need more complex logic about headers extraction from the file content (not first line, not the whole content of the line, not one header etc.), consider to use Header Enricher upfront of the FileSplitter.
The lines which have been moved to the headers might be filtered downstream from the normal content process.
@Splitter(inputChannel="toSplitter") @Bean public MessageHandler fileSplitter() { FileSplitter splitter = new FileSplitter(true, true); splitter.setApplySequence(true); splitter.setOutputChannel(outputChannel); return splitter; }
The following Spring Boot application provides an example of configuring the inbound adapter using the Java DSL:
@SpringBootApplication public class FileSplitterApplication { public static void main(String[] args) { new SpringApplicationBuilder(FileSplitterApplication.class) .web(false) .run(args); } @Bean public IntegrationFlow fileSplitterFlow() { return IntegrationFlows .from(Files.inboundAdapter(tmpDir.getRoot()) .filter(new ChainFileListFilter<File>() .addFilter(new AcceptOnceFileListFilter<>()) .addFilter(new ExpressionFileListFilter<>( new FunctionExpression<File>(f -> "foo.tmp".equals(f.getName())))))) .split(Files.splitter() .markers() .charset(StandardCharsets.US_ASCII) .firstLineAsHeader("fileHeader") .applySequence(true)) .channel(c -> c.queue("fileSplittingResultChannel")) .get(); } }
Spring Integration provides support for file transfer operations via FTP and FTPS.
The File Transfer Protocol (FTP) is a simple network protocol which allows you to transfer files between two computers on the Internet.
There are two actors when it comes to FTP communication: client and server. To transfer files with FTP/FTPS, you use a client which initiates a connection to a remote computer that is running an FTP server. After the connection is established, the client can choose to send and/or receive copies of files.
Spring Integration supports sending and receiving files over FTP/FTPS by providing three client side endpoints: Inbound Channel Adapter, Outbound Channel Adapter, and Outbound Gateway. It also provides convenient namespace-based configuration options for defining these client components.
To use the FTP namespace, add the following to the header of your XML file:
xmlns:int-ftp="http://www.springframework.org/schema/integration/ftp"
xsi:schemaLocation="http://www.springframework.org/schema/integration/ftp
http://www.springframework.org/schema/integration/ftp/spring-integration-ftp.xsd"
| Important |
|---|---|
|
Starting with version 3.0, sessions are no longer cached by default. See Section 16.9, “FTP Session Caching”. |
Before configuring FTP adapters you must configure an FTP Session Factory.
You can configure the FTP Session Factory with a regular bean definition where the implementation class is org.springframework.integration.ftp.session.DefaultFtpSessionFactory: Below is a basic configuration:
<bean id="ftpClientFactory" class="org.springframework.integration.ftp.session.DefaultFtpSessionFactory"> <property name="host" value="localhost"/> <property name="port" value="22"/> <property name="username" value="kermit"/> <property name="password" value="frog"/> <property name="clientMode" value="0"/> <property name="fileType" value="2"/> <property name="bufferSize" value="100000"/> </bean>
For FTPS connections all you need to do is use org.springframework.integration.ftp.session.DefaultFtpsSessionFactory instead.
Below is the complete configuration sample:
<bean id="ftpClientFactory" class="org.springframework.integration.ftp.session.DefaultFtpsSessionFactory"> <property name="host" value="localhost"/> <property name="port" value="22"/> <property name="username" value="oleg"/> <property name="password" value="password"/> <property name="clientMode" value="1"/> <property name="fileType" value="2"/> <property name="useClientMode" value="true"/> <property name="cipherSuites" value="a,b.c"/> <property name="keyManager" ref="keyManager"/> <property name="protocol" value="SSL"/> <property name="trustManager" ref="trustManager"/> <property name="prot" value="P"/> <property name="needClientAuth" value="true"/> <property name="authValue" value="oleg"/> <property name="sessionCreation" value="true"/> <property name="protocols" value="SSL, TLS"/> <property name="implicit" value="true"/> </bean>
Every time an adapter requests a session object from its SessionFactory the session is returned from a session pool maintained by a caching wrapper around the factory.
A Session in the session pool might go stale (if it has been disconnected by the server due to inactivity) so the SessionFactory will perform validation to make sure that it never returns a stale session to the adapter.
If a stale session was encountered, it will be removed from the pool, and a new one will be created.
| Note |
|---|---|
|
If you experience connectivity problems and would like to trace Session creation as well as see which Sessions are polled you may enable it by setting the logger to TRACE level (e.g., log4j.category.org.springframework.integration.file=TRACE) |
Now all you need to do is inject these session factories into your adapters. Obviously the protocol (FTP or FTPS) that an adapter will use depends on the type of session factory that has been injected into the adapter.
| Note |
|---|---|
|
A more practical way to provide values for FTP/FTPS Session Factories is by using Spring’s property placeholder support (See: http://docs.spring.io/spring/docs/current/spring-framework-reference/html/beans.html#beans-factory-placeholderconfigurer). |
Advanced Configuration
DefaultFtpSessionFactory provides an abstraction over the underlying client API which, since Spring Integration 2.0, is Apache Commons Net.
This spares you from the low level configuration details of the org.apache.commons.net.ftp.FTPClient.
Several common properties are exposed on the session factory (since version 4.0, this now includes connectTimeout, defaultTimeout and dataTimeout).
However there are times when access to lower level FTPClient configuration is necessary to achieve more advanced configuration (e.g., setting the port range for active mode etc.).
For that purpose, AbstractFtpSessionFactory (the base class for all FTP Session Factories) exposes hooks, in the form of the two post-processing methods below.
/** * Will handle additional initialization after client.connect() method was invoked, * but before any action on the client has been taken */ protected void postProcessClientAfterConnect(T t) throws IOException { // NOOP } /** * Will handle additional initialization before client.connect() method was invoked. */ protected void postProcessClientBeforeConnect(T client) throws IOException { // NOOP }
As you can see, there is no default implementation for these two methods.
However, by extending DefaultFtpSessionFactory you can override these methods to provide more advanced configuration of the FTPClient.
For example:
public class AdvancedFtpSessionFactory extends DefaultFtpSessionFactory { protected void postProcessClientBeforeConnect(FTPClient ftpClient) throws IOException { ftpClient.setActivePortRange(4000, 5000); } }
When using FTP over SSL/TLS, some servers require the same SSLSession to be used on the control and data connections; this is to prevent "stealing" data connections; see here for more information.
Currently, the Apache FTPSClient does not support this feature - see NET-408.
The following solution, courtesy of Stack Overflow, uses reflection on the sun.security.ssl.SSLSessionContextImpl so may not work on other JVMs.
The stack overflow answer was submitted in 2015 and the solution has been tested by the Spring Integration team recently on JDK 1.8.0_112.
@Bean public DefaultFtpsSessionFactory sf() { DefaultFtpsSessionFactory sf = new DefaultFtpsSessionFactory() { @Override protected FTPSClient createClientInstance() { return new SharedSSLFTPSClient(); } }; sf.setHost("..."); sf.setPort(21); sf.setUsername("..."); sf.setPassword("..."); sf.setNeedClientAuth(true); return sf; } private static final class SharedSSLFTPSClient extends FTPSClient { @Override protected void _prepareDataSocket_(final Socket socket) throws IOException { if (socket instanceof SSLSocket) { // Control socket is SSL final SSLSession session = ((SSLSocket) _socket_).getSession(); final SSLSessionContext context = session.getSessionContext(); context.setSessionCacheSize(0); // you might want to limit the cache try { final Field sessionHostPortCache = context.getClass() .getDeclaredField("sessionHostPortCache"); sessionHostPortCache.setAccessible(true); final Object cache = sessionHostPortCache.get(context); final Method method = cache.getClass().getDeclaredMethod("put", Object.class, Object.class); method.setAccessible(true); String key = String.format("%s:%s", socket.getInetAddress().getHostName(), String.valueOf(socket.getPort())).toLowerCase(Locale.ROOT); method.invoke(cache, key, session); key = String.format("%s:%s", socket.getInetAddress().getHostAddress(), String.valueOf(socket.getPort())).toLowerCase(Locale.ROOT); method.invoke(cache, key, session); } catch (NoSuchFieldException e) { // Not running in expected JRE logger.warn("No field sessionHostPortCache in SSLSessionContext", e); } catch (Exception e) { // Not running in expected JRE logger.warn(e.getMessage()); } } } }
Version 4.2 introduced the DelegatingSessionFactory which allows the selection of the actual session factory at
runtime.
Prior to invoking the ftp endpoint, call setThreadKey() on the factory to associate a key with the current thread.
That key is then used to lookup the actual session factory to be used.
The key can be cleared by calling clearThreadKey() after use.
Convenience methods have been added so this can easily be done from a message flow:
<bean id="dsf" class="org.springframework.integration.file.remote.session.DelegatingSessionFactory"> <constructor-arg> <bean class="o.s.i.file.remote.session.DefaultSessionFactoryLocator"> <!-- delegate factories here --> </bean> </constructor-arg> </bean> <int:service-activator input-channel="in" output-channel="c1" expression="@dsf.setThreadKey(#root, headers['factoryToUse'])" /> <int-ftp:outbound-gateway request-channel="c1" reply-channel="c2" ... /> <int:service-activator input-channel="c2" output-channel="out" expression="@dsf.clearThreadKey(#root)" />
| Important |
|---|---|
|
When using session caching (see Section 16.9, “FTP Session Caching”), each of the delegates should be cached; you
cannot cache the |
The FTP Inbound Channel Adapter is a special listener that will connect to the FTP server and will listen for the remote directory events (e.g., new file created) at which point it will initiate a file transfer.
<int-ftp:inbound-channel-adapter id="ftpInbound" channel="ftpChannel" session-factory="ftpSessionFactory" auto-create-local-directory="true" delete-remote-files="true" filename-pattern="*.txt" remote-directory="some/remote/path" remote-file-separator="/" preserve-timestamp="true" local-filename-generator-expression="#this.toUpperCase() + '.a'" scanner="myDirScanner" local-filter="myFilter" temporary-file-suffix=".writing" max-fetch-size="-1" local-directory="."> <int:poller fixed-rate="1000"/> </int-ftp:inbound-channel-adapter>
As you can see from the configuration above you can configure an FTP Inbound Channel Adapter via the inbound-channel-adapter element while also providing values for various attributes such as local-directory, filename-pattern (which is based on simple pattern matching, not regular expressions), and of course the reference to a session-factory.
By default the transferred file will carry the same name as the original file.
If you want to override this behavior you can set the local-filename-generator-expression attribute which allows you to provide a SpEL Expression to generate the name of the local file.
Unlike outbound gateways and adapters where the root object of the SpEL Evaluation Context is a Message, this inbound adapter does not yet have the Message at the time of evaluation since that’s what it ultimately generates with the transferred file as its payload.
So, the root object of the SpEL Evaluation Context is the original name of the remote file (String).
The inbound channel adapter first retrieves the file to a local directory and then emits each file according to the poller configuration.
Starting with version 5.0, you can now limit the number of files fetched from the FTP server when new file retrievals are needed.
This can be beneficial when the target files are very large and/or when running in a clustered system with a persistent file list filter discussed below.
Use max-fetch-size for this purpose; a negative value (default) means no limit and all matching files will be retrieved; see Section 16.6, “Inbound Channel Adapters: Controlling Remote File Fetching” for more information.
Since version 5.0, you can also provide a custom DirectoryScanner implementation to the inbound-channel-adapter via the scanner attribute.
Starting with Spring Integration 3.0, you can specify the preserve-timestamp attribute (default false); when true, the local file’s modified timestamp will be set to the value retrieved from the server; otherwise it will be set to the current time.
Starting with version 4.2, you can specify remote-directory-expression instead of remote-directory, allowing
you to dynamically determine the directory on each poll.
e.g remote-directory-expression="@myBean.determineRemoteDir()".
Starting with version 4.3, the remote-directory/remote-directory-expression attributes can be omitted assuming null.
In this case, according to the FTP protocol, the Client working directory is used as a default remote directory.
Sometimes file filtering based on the simple pattern specified via filename-pattern attribute might not be sufficient.
If this is the case, you can use the filename-regex attribute to specify a Regular Expression (e.g. filename-regex=".*\.test$").
And of course if you need complete control you can use filter attribute and provide a reference to any custom implementation of the org.springframework.integration.file.filters.FileListFilter, a strategy interface for filtering a list of files.
This filter determines which remote files are retrieved.
You can also combine a pattern based filter with other filters, such as an AcceptOnceFileListFilter to avoid synchronizing files that have previously been fetched, by using a CompositeFileListFilter.
The AcceptOnceFileListFilter stores its state in memory.
If you wish the state to survive a system restart, consider using the FtpPersistentAcceptOnceFileListFilter instead.
This filter stores the accepted file names in an instance of the MetadataStore strategy (Section 10.5, “Metadata Store”).
This filter matches on the filename and the remote modified time.
Since version 4.0, this filter requires a ConcurrentMetadataStore.
When used with a shared data store (such as Redis with the RedisMetadataStore) this allows filter keys to be shared across multiple application or server instances.
Starting with version 5.0, the FtpPersistentAcceptOnceFileListFilter with in-memory SimpleMetadataStore is applied by default for the FtpInboundFileSynchronizer.
This filter is also applied together with the regex or pattern option in the XML configuration as well as via FtpInboundChannelAdapterSpec in Java DSL.
Any other use-cases can be reached via CompositeFileListFilter (or ChainFileListFilter).
The above discussion refers to filtering the files before retrieving them.
Once the files have been retrieved, an additional filter is applied to the files on the file system.
By default, this is an AcceptOnceFileListFilter which, as discussed, retains state in memory and does not consider the file’s modified time.
Unless your application removes files after processing, the adapter will re-process the files on disk by default after an application restart.
Also, if you configure the filter to use a FtpPersistentAcceptOnceFileListFilter, and the remote file timestamp changes (causing it to be re-fetched), the default local filter will not allow this new file to be processed.
Use the local-filter attribute to configure the behavior of the local file system filter.
Starting with version 4.3.8, a FileSystemPersistentAcceptOnceFileListFilter is configured by default.
This filter stores the accepted file names and modified timestamp in an instance of the MetadataStore strategy (Section 10.5, “Metadata Store”), and will detect changes to the local file modified time.
The default MetadataStore is a SimpleMetadataStore which stores state in memory.
Since version 4.1.5, these filters have a new property flushOnUpdate which will cause them to flush the
metadata store on every update (if the store implements Flushable).
| Important |
|---|---|
|
Further, if you use a distributed |
The actual local filter is a CompositeFileListFilter containing the supplied filter and a pattern filter that prevents processing files that are in the process of being downloaded (based on the temporary-file-suffix); files are downloaded with this suffix (default: .writing) and the file is renamed to its final name when the transfer is complete, making it visible to the filter.
The remote-file-separator attribute allows you to configure a file separator character to use if the default / is not applicable for your particular environment.
Please refer to the schema for more details on these attributes.
It is also important to understand that the FTP Inbound Channel Adapter is a Polling Consumer and therefore you must configure a poller (either via a global default or a local sub-element).
Once a file has been transferred, a Message with a java.io.File as its payload will be generated and sent to the channel identified by the channel attribute.
More on File Filtering and Large Files
Sometimes the file that just appeared in the monitored (remote) directory is not complete.
Typically such a file will be written with temporary extension (e.g., foo.txt.writing) and then renamed after the writing process finished.
As a user in most cases you are only interested in files that are complete and would like to filter only files that are complete.
To handle these scenarios you can use the filtering support provided by the filename-pattern, filename-regex and filter attributes.
Here is an example that uses a custom Filter implementation.
<int-ftp:inbound-channel-adapter channel="ftpChannel" session-factory="ftpSessionFactory" filter="customFilter" local-directory="file:/my_transfers"> remote-directory="some/remote/path" <int:poller fixed-rate="1000"/> </int-ftp:inbound-channel-adapter> <bean id="customFilter" class="org.example.CustomFilter"/>
Poller configuration notes for the inbound FTP adapter
The job of the inbound FTP adapter consists of two tasks: 1) Communicate with a remote server in order to transfer files from a remote directory to a local directory. 2) For each transferred file, generate a Message with that file as a payload and send it to the channel identified by the channel attribute. That is why they are called channel-adapters rather than just adapters. The main job of such an adapter is to generate a Message to be sent to a Message Channel. Essentially, the second task mentioned above takes precedence in such a way that IF your local directory already has one or more files it will first generate Messages from those, and ONLY when all local files have been processed, will it initiate the remote communication to retrieve more files.
Also, when configuring a trigger on the poller you should pay close attention to the max-messages-per-poll attribute.
Its default value is 1 for all SourcePollingChannelAdapter instances (including FTP).
This means that as soon as one file is processed, it will wait for the next execution time as determined by your trigger configuration.
If you happened to have one or more files sitting in the local-directory, it would process those files before it would initiate communication with the remote FTP server.
And, if the max-messages-per-poll were set to 1 (default), then it would be processing only one file at a time with intervals as defined by your trigger, essentially working as one-poll === one-file.
For typical file-transfer use cases, you most likely want the opposite behavior: to process all the files you can for each poll and only then wait for the next poll.
If that is the case, set max-messages-per-poll to -1.
Then, on each poll, the adapter will attempt to generate as many Messages as it possibly can.
In other words, it will process everything in the local directory, and then it will connect to the remote directory to transfer everything that is available there to be processed locally.
Only then is the poll operation considered complete, and the poller will wait for the next execution time.
You can alternatively set the max-messages-per-poll value to a positive value indicating the upward limit of Messages to be created from files with each poll. For example, a value of 10 means that on each poll it will attempt to process no more than 10 files.
It is important to understand the architecture of the adapter.
There is a file synchronizer which fetches the files, and a FileReadingMessageSource to emit a message for each
synchronized file.
As discussed above, there are two filters involved.
The filter attribute (and patterns) refers to the remote (FTP) file list - to avoid fetching files that have already
been fetched.
The local-filter is used by the FileReadingMessageSource to determine which files are to be sent as messages.
The synchronizer lists the remote files and consults its filter; the files are then transferred.
If an IO error occurs during file transfer, any files that have already been added to the filter are removed so they
are eligible to be re-fetched on the next poll.
This only applies if the filter implements ReversibleFileListFilter (such as the AcceptOnceFileListFilter).
If, after synchronizing the files, an error occurs on the downstream flow processing a file, there is no automatic rollback of the filter so the failed file will not be reprocessed by default.
If you wish to reprocess such files after a failure, you can use configuration similar to the following to facilitate
the removal of the failed file from the filter.
This will work for any ResettableFileListFilter.
<int-ftp:inbound-channel-adapter id="ftpAdapter" session-factory="ftpSessionFactory" channel="requestChannel" remote-directory-expression="'/sftpSource'" local-directory="file:myLocalDir" auto-create-local-directory="true" filename-pattern="*.txt"> <int:poller fixed-rate="1000"> <int:transactional synchronization-factory="syncFactory" /> </int:poller> </int-ftp:inbound-channel-adapter> <bean id="acceptOnceFilter" class="org.springframework.integration.file.filters.AcceptOnceFileListFilter" /> <int:transaction-synchronization-factory id="syncFactory"> <int:after-rollback expression="payload.delete()" /> </int:transaction-synchronization-factory> <bean id="transactionManager" class="org.springframework.integration.transaction.PseudoTransactionManager" />
Starting with version 5.0, the Inbound Channel Adapter can build sub-directories locally according the generated local file name.
That can be a remote sub-path as well.
To be able to read local directory recursively for modification according the hierarchy support, an internal FileReadingMessageSource now can be supplied with a new RecursiveDirectoryScanner based on the Files.walk() algorithm.
See AbstractInboundFileSynchronizingMessageSource.setScanner() for more information.
Also the AbstractInboundFileSynchronizingMessageSource can now be switched to the WatchService -based DirectoryScanner via setUseWatchService() option.
It is also configured for all the WatchEventType s to react for any modifications in local directory.
The reprocessing sample above is based on the build-in functionality of the FileReadingMessageSource.WatchServiceDirectoryScanner to perform ResettableFileListFilter.remove() when the file is deleted (StandardWatchEventKinds.ENTRY_DELETE) from the local directory.
See Section 15.2.2, “WatchServiceDirectoryScanner” for more information.
The following Spring Boot application provides an example of configuring the inbound adapter using Java configuration:
@SpringBootApplication public class FtpJavaApplication { public static void main(String[] args) { new SpringApplicationBuilder(FtpJavaApplication.class) .web(false) .run(args); } @Bean public SessionFactory<FTPFile> ftpSessionFactory() { DefaultFtpSessionFactory sf = new DefaultFtpSessionFactory(); sf.setHost("localhost"); sf.setPort(port); sf.setUsername("foo"); sf.setPassword("foo"); return new CachingSessionFactory<FTPFile>(sf); } @Bean public FtpInboundFileSynchronizer ftpInboundFileSynchronizer() { FtpInboundFileSynchronizer fileSynchronizer = new FtpInboundFileSynchronizer(ftpSessionFactory()); fileSynchronizer.setDeleteRemoteFiles(false); fileSynchronizer.setRemoteDirectory("foo"); fileSynchronizer.setFilter(new FtpSimplePatternFileListFilter("*.xml")); return fileSynchronizer; } @Bean @InboundChannelAdapter(channel = "ftpChannel", poller = @Poller(fixedDelay = "5000")) public MessageSource<File> ftpMessageSource() { FtpInboundFileSynchronizingMessageSource source = new FtpInboundFileSynchronizingMessageSource(ftpInboundFileSynchronizer()); source.setLocalDirectory(new File("ftp-inbound")); source.setAutoCreateLocalDirectory(true); source.setLocalFilter(new AcceptOnceFileListFilter<File>()); source.setMaxFetchSize(1); return source; } @Bean @ServiceActivator(inputChannel = "ftpChannel") public MessageHandler handler() { return new MessageHandler() { @Override public void handleMessage(Message<?> message) throws MessagingException { System.out.println(message.getPayload()); } }; } }
The following Spring Boot application provides an example of configuring the inbound adapter using the Java DSL:
@SpringBootApplication public class FtpJavaApplication { public static void main(String[] args) { new SpringApplicationBuilder(FtpJavaApplication.class) .web(false) .run(args); } @Bean public IntegrationFlow ftpInboundFlow() { return IntegrationFlows .from(s -> s.ftp(this.ftpSessionFactory) .preserveTimestamp(true) .remoteDirectory("foo") .regexFilter(".*\\.txt$") .localFilename(f -> f.toUpperCase() + ".a") .localDirectory(new File("d:\\ftp_files")), e -> e.id("ftpInboundAdapter") .autoStartup(true) .poller(Pollers.fixedDelay(5000))) .handle(m -> System.out.println(m.getPayload())) .get(); } }
See Section 15.2.7, “Dealing With Incomplete Data”.
The FtpSystemMarkerFilePresentFileListFilter is provided to filter remote files that don’t have a corresponding marker file on the remote system.
See the javadocs for configuration information.
The streaming inbound channel adapter was introduced in version 4.3.
This adapter produces message with payloads of type InputStream, allowing files to be fetched without writing to the
local file system.
Since the session remains open, the consuming application is responsible for closing the session when the file has been
consumed.
The session is provided in the closeableResource header (IntegrationMessageHeaderAccessor.CLOSEABLE_RESOURCE).
Standard framework components, such as the FileSplitter and StreamTransformer will automatically close the session.
See Section 15.5, “File Splitter” and the section called “Stream Transformer” for more information about these components.
<int-ftp:inbound-streaming-channel-adapter id="ftpInbound" channel="ftpChannel" session-factory="sessionFactory" filename-pattern="*.txt" filename-regex=".*\.txt" filter="filter" filter-expression="@myFilterBean.check(#root)" remote-file-separator="/" comparator="comparator" max-fetch-size="1" remote-directory-expression="'foo/bar'"> <int:poller fixed-rate="1000" /> </int-ftp:inbound-streaming-channel-adapter>
Only one of filename-pattern, filename-regex, filter or filter-expression is allowed.
| Important |
|---|---|
|
Starting with version 5.0, by default, the |
Use the max-fetch-size attribute to limit the number of files fetched on each poll when a fetch is necessary; set to 1 and use a persistent filter when running in a clustered environment; see Section 16.6, “Inbound Channel Adapters: Controlling Remote File Fetching” for more information.
The adapter puts the remote directory and file name in headers FileHeaders.REMOTE_DIRECTORY and FileHeaders.REMOTE_FILE respectively.
Starting with version 5.0, additional remote file information, represented in JSON by default, is provided in the FileHeaders.REMOTE_FILE_INFO header.
If you set the fileInfoJson property on the FtpStreamingMessageSource to false, the header will contain an FtpFileInfo object.
The FTPFile object provided by the underlying Apache Net library can be accessed using the FtpFileInfo.getFileInfo() method.
The fileInfoJson property is not available when using XML configuration but you can set it by injecting the FtpStreamingMessageSource into one of your configuration classes.
The following Spring Boot application provides an example of configuring the inbound adapter using Java configuration:
@SpringBootApplication public class FtpJavaApplication { public static void main(String[] args) { new SpringApplicationBuilder(FtpJavaApplication.class) .web(false) .run(args); } @Bean @InboundChannelAdapter(channel = "stream") public MessageSource<InputStream> ftpMessageSource() { FtpStreamingMessageSource messageSource = new FtpStreamingMessageSource(template()); messageSource.setRemoteDirectory("ftpSource/"); messageSource.setFilter(new AcceptAllFileListFilter<>()); messageSource.setMaxFetchSize(1); return messageSource; } @Bean @Transformer(inputChannel = "stream", outputChannel = "data") public org.springframework.integration.transformer.Transformer transformer() { return new StreamTransformer("UTF-8"); } @Bean public FtpRemoteFileTemplate template() { return new FtpRemoteFileTemplate(ftpSessionFactory()); } @ServiceActivator(inputChannel = "data", adviceChain = "after") @Bean public MessageHandler handle() { return System.out::println; } @Bean public ExpressionEvaluatingRequestHandlerAdvice after() { ExpressionEvaluatingRequestHandlerAdvice advice = new ExpressionEvaluatingRequestHandlerAdvice(); advice.setOnSuccessExpression( "@template.remove(headers['file_remoteDirectory'] + headers['file_remoteFile'])"); advice.setPropagateEvaluationFailures(true); return advice; } }
Notice that, in this example, the message handler downstream of the transformer has an advice that removes the remote file after processing.
There are two properties that should be considered when configuring inbound channel adapters.
max-messages-per-poll, as with all pollers, can be used to limit the number of messages emitted on each poll (if more than the configured value are ready).
max-fetch-size (since version 5.0) can limit the number of files retrieved from the remote server at a time.
The following scenarios assume the starting state is an empty local directory.
-
max-messages-per-poll=2andmax-fetch-size=1, the adapter will fetch one file, emit it, fetch the next file, emit it; then sleep until the next poll. -
max-messages-per-poll=2andmax-fetch-size=2), the adapter will fetch both files, then emit each one. -
max-messages-per-poll=2andmax-fetch-size=4, the adapter will fetch up to 4 files (if available) and emit the first two (if there are at least two); the next two files will be emitted on the next poll. -
max-messages-per-poll=2andmax-fetch-sizenot specified, the adapter will fetch all remote files and emit the first two (if there are at least two); the subsequent files will be emitted on subsequent polls (2-at-a-time); when all are consumed, the remote fetch will be attempted again, to pick up any new files.
| Important |
|---|---|
|
When deploying multiple instances of an application, a small |
Another use for max-fetch-size is if you want to stop fetching remote files, but continue to process files that have already been fetched.
Setting the maxFetchSize property on the MessageSource (programmatically, via JMX, or via a control bus) effectively stops the adapter from fetching more files, but allows the poller to continue to emit messages for files that have previously been fetched.
If the poller is active when the property is changed, the change will take effect on the next poll.
The FTP Outbound Channel Adapter relies upon a MessageHandler implementation that will connect to the FTP server and initiate an FTP transfer for every file it receives in the payload of incoming Messages.
It also supports several representations of the File so you are not limited only to java.io.File typed payloads.
The FTP Outbound Channel Adapter supports the following payloads: 1) java.io.File - the actual file object; 2) byte[] - a byte array that represents the file contents; and 3) java.lang.String - text that represents the file contents.
<int-ftp:outbound-channel-adapter id="ftpOutbound" channel="ftpChannel" session-factory="ftpSessionFactory" charset="UTF-8" remote-file-separator="/" auto-create-directory="true" remote-directory-expression="headers['remote_dir']" temporary-remote-directory-expression="headers['temp_remote_dir']" filename-generator="fileNameGenerator" use-temporary-filename="true" mode="REPLACE"/>
As you can see from the configuration above you can configure an FTP Outbound Channel Adapter via the outbound-channel-adapter element while also providing values for various attributes such as filename-generator (an implementation of the org.springframework.integration.file.FileNameGenerator strategy interface), a reference to a session-factory, as well as other attributes.
You can also see some examples of *expression attributes which allow you to use SpEL to configure things like remote-directory-expression, temporary-remote-directory-expression and remote-filename-generator-expression (a SpEL alternative to filename-generator shown above).
As with any component that allows the usage of SpEL, access to Payload and Message Headers is available via payload and headers variables.
Please refer to the schema for more details on the available attributes.
| Note |
|---|---|
|
By default Spring Integration will use |
| Important |
|---|---|
|
Defining certain values (e.g., remote-directory) might be platform/ftp server dependent. For example as it was reported on this forum http://forum.springsource.org/showthread.php?p=333478&posted=1#post333478 on some platforms you must add slash to the end of the directory definition (e.g., remote-directory="/foo/bar/" instead of remote-directory="/foo/bar") |
Starting with version 4.1, you can specify the mode when transferring the file.
By default, an existing file will be overwritten; the modes are defined on enum FileExistsMode, having values REPLACE (default), APPEND, IGNORE, and FAIL.
With IGNORE and FAIL, the file is not transferred; FAIL causes an exception to be thrown whereas IGNORE silently ignores the transfer (although a DEBUG log entry is produced).
Avoiding Partially Written Files
One of the common problems, when dealing with file transfers, is the possibility of processing a partial file - a file might appear in the file system before its transfer is actually complete.
To deal with this issue, Spring Integration FTP adapters use a very common algorithm where files are transferred under a temporary name and then renamed once they are fully transferred.
By default, every file that is in the process of being transferred will appear in the file system with an additional suffix which, by default, is .writing; this can be changed using the temporary-file-suffix attribute.
However, there may be situations where you don’t want to use this technique (for example, if the server does not permit renaming files).
For situations like this, you can disable this feature by setting use-temporary-file-name to false (default is true).
When this attribute is false, the file is written with its final name and the consuming application will need some other mechanism to detect that the file is completely uploaded before accessing it.
The following Spring Boot application provides an example of configuring the Outbound Adapter using Java configuration:
@SpringBootApplication @IntegrationComponentScan public class FtpJavaApplication { public static void main(String[] args) { ConfigurableApplicationContext context = new SpringApplicationBuilder(FtpJavaApplication.class) .web(false) .run(args); MyGateway gateway = context.getBean(MyGateway.class); gateway.sendToFtp(new File("/foo/bar.txt")); } @Bean public SessionFactory<FTPFile> ftpSessionFactory() { DefaultFtpSessionFactory sf = new DefaultFtpSessionFactory(); sf.setHost("localhost"); sf.setPort(port); sf.setUsername("foo"); sf.setPassword("foo"); return new CachingSessionFactory<FTPFile>(sf); } @Bean @ServiceActivator(inputChannel = "ftpChannel") public MessageHandler handler() { FtpMessageHandler handler = new FtpMessageHandler(ftpSessionFactory()); handler.setRemoteDirectoryExpressionString("headers['remote-target-dir']"); handler.setFileNameGenerator(new FileNameGenerator() { @Override public String generateFileName(Message<?> message) { return "handlerContent.test"; } }); return handler; } @MessagingGateway public interface MyGateway { @Gateway(requestChannel = "toFtpChannel") void sendToFtp(File file); } }
The following Spring Boot application provides an example of configuring the Outbound Adapter using the Java DSL:
@SpringBootApplication @IntegrationComponentScan public class FtpJavaApplication { public static void main(String[] args) { ConfigurableApplicationContext context = new SpringApplicationBuilder(FtpJavaApplication.class) .web(false) .run(args); MyGateway gateway = context.getBean(MyGateway.class); gateway.sendToFtp(new File("/foo/bar.txt")); } @Bean public SessionFactory<FTPFile> ftpSessionFactory() { DefaultFtpSessionFactory sf = new DefaultFtpSessionFactory(); sf.setHost("localhost"); sf.setPort(port); sf.setUsername("foo"); sf.setPassword("foo"); return new CachingSessionFactory<FTPFile>(sf); } @Bean public IntegrationFlow ftpOutboundFlow() { return IntegrationFlows.from("toFtpChannel") .handle(Ftp.outboundAdapter(ftpSessionFactory(), FileExistsMode.FAIL) .useTemporaryFileName(false) .fileNameExpression("headers['" + FileHeaders.FILENAME + "']") .remoteDirectory(this.ftpServer.getTargetFtpDirectory().getName()) ).get(); } @MessagingGateway public interface MyGateway { @Gateway(requestChannel = "toFtpChannel") void sendToFtp(File file); } }
The FTP Outbound Gateway provides a limited set of commands to interact with a remote FTP/FTPS server. Commands supported are:
- ls (list files)
- nlst (list file names)
- get (retrieve file)
- mget (retrieve file(s))
- rm (remove file(s))
- mv (move/rename file)
- put (send file)
- mput (send multiple files)
ls
ls lists remote file(s) and supports the following options:
-
-1 - just retrieve a list of file names, default is to retrieve a list of
FileInfoobjects. - -a - include all files (including those starting with .)
- -f - do not sort the list
- -dirs - include directories (excluded by default)
- -links - include symbolic links (excluded by default)
- -R - list the remote directory recursively
In addition, filename filtering is provided, in the same manner as the inbound-channel-adapter.
The message payload resulting from an ls operation is a list of file names, or a list of FileInfo objects.
These objects provide information such as modified time, permissions etc.
The remote directory that the ls command acted on is provided in the file_remoteDirectory header.
When using the recursive option (-R), the fileName includes any subdirectory elements, representing a relative path to the file (relative to the remote directory).
If the -dirs option is included, each recursive directory is also returned as an element in the list.
In this case, it is recommended that the -1 is not used because you would not be able to determine files Vs.
directories, which is achievable using the FileInfo objects.
Starting with version 4.3, the FtpSession supports null for the list() and listNames() methods,
therefore the expression attribute can be omitted.
For Java configuration, there are two constructors without an expression argument for convenience.
null for LS, NLST, PUT and MPUT commands is treated as the Client working directory according to the FTP protocol.
All other commands must be supplied with the expression to evaluate remote path against request message.
The working directory can be set via the FTPClient.changeWorkingDirectory() function when you extend the DefaultFtpSessionFactory and implement postProcessClientAfterConnect() callback.
nlst
(Since version 5.0)
Lists remote file names and supports the following options:
- -f - do not sort the list
The message payload resulting from an nlst operation is a list of file names.
The remote directory that the nlst command acted on is provided in the file_remoteDirectory header.
Unlike the -1 option for the ls command (see above), which uses the LIST command, the nlst command sends an NLST command to the target FTP server.
This command is useful when the server doesn’t support LIST, due to security restrictions, for example.
The result of the nlst is just the names, therefore the framework can’t determine if an entity is a directory, to perform filtering or recursive listing, for example.
get
get retrieves a remote file and supports the following option:
- -P - preserve the timestamp of the remote file.
- -stream - retrieve the remote file as a stream.
-
-D - delete the remote file after successful transfer.
The remote file is NOT deleted if the transfer is ignored because the
FileExistsModeisIGNOREand the local file already exists.
The remote directory is provided in the file_remoteDirectory header, and the filename is provided in the file_remoteFile header.
The message payload resulting from a get operation is a File object representing the retrieved file, or
an InputStream when the -stream option is provided.
This option allows retrieving the file as a stream.
For text files, a common use case is to combine this operation with a File Splitter or
Stream Transformer.
When consuming remote files as streams, the user is responsible for closing the Session after the stream is
consumed.
For convenience, the Session is provided in the closeableResource header, a convenience method is provided on the
IntegrationMessageHeaderAccessor:
Closeable closeable = new IntegrationMessageHeaderAccessor(message).getCloseableResource(); if (closeable != null) { closeable.close(); }
Framework components such as the File Splitter and Stream Transformer will automatically close the session after the data is transferred.
The following shows an example of consuming a file as a stream:
<int-ftp:outbound-gateway session-factory="ftpSessionFactory" request-channel="inboundGetStream" command="get" command-options="-stream" expression="payload" remote-directory="ftpTarget" reply-channel="stream" /> <int-file:splitter input-channel="stream" output-channel="lines" />
Note: if you consume the input stream in a custom component, you must close the Session.
You can either do that in your custom code, or route a copy of the message to a service-activator and use SpEL:
<int:service-activator input-channel="closeSession" expression="headers['closeableResource'].close()" />
mget
mget retrieves multiple remote files based on a pattern and supports the following options:
- -P - preserve the timestamps of the remote files.
- -R - retrieve the entire directory tree recursively.
- -x - Throw an exception if no files match the pattern (otherwise an empty list is returned).
-
-D - delete each remote file after successful transfer.
The remote file is NOT deleted if the transfer is ignored because the
FileExistsModeisIGNOREand the local file already exists.
The message payload resulting from an mget operation is a List<File> object - a List of File objects, each representing a retrieved file.
| Important |
|---|---|
|
Starting with version 5.0, if the |
The expression used to determine the remote path should produce a result that ends with * - e.g. foo/* will fetch the complete tree under foo.
Starting with version 5.0, a recursive MGET, combined with the new FileExistsMode.REPLACE_IF_MODIFIED mode, can be used to periodically synchronize an entire remote directory tree locally.
This mode will set the local file last modified timestamp with the remote timestamp, regardless of the -P (preserve timestamp) option.
| Notes for when using recursion (-R) |
|---|---|
|
The pattern is ignored, and If a subdirectory is filtered, no additional traversal of that subdirectory is performed. The Typically, you would use the |
Starting with version 5.0, the FtpSimplePatternFileListFilter and FtpRegexPatternFileListFilter can be configured to always pass directories by setting the alwaysAcceptDirectories to true.
This allows recursion for a simple pattern; examples follow:
<bean id="starDotTxtFilter" class="org.springframework.integration.ftp.filters.FtpSimplePatternFileListFilter"> <constructor-arg value="*.txt" /> <property name="alwaysAcceptDirectories" value="true" /> </bean> <bean id="dotStarDotTxtFilter" class="org.springframework.integration.ftp.filters.FtpRegexPatternFileListFilter"> <constructor-arg value="^.*\.txt$" /> <property name="alwaysAcceptDirectories" value="true" /> </bean>
and provide one of these filters using filter property on the gateway.
See also Section 16.8.3, “Outbound Gateway Partial Success (mget and mput)”.
put
put sends a file to the remote server; the payload of the message can be a java.io.File, a byte[] or a String.
A remote-filename-generator (or expression) is used to name the remote file.
Other available attributes include remote-directory, temporary-remote-directory (and their *-expression) equivalents, use-temporary-file-name, and auto-create-directory.
Refer to the schema documentation for more information.
The message payload resulting from a put operation is a String representing the full path of the file on the server after transfer.
mput
mput sends multiple files to the server and supports the following option:
- -R - Recursive - send all files (possibly filtered) in the directory and subdirectories
The message payload must be a java.io.File representing a local directory.
The same attributes as the put command are supported.
In addition, files in the local directory can be filtered with one of mput-pattern, mput-regex, mput-filter or mput-filter-expression.
The filter works with recursion, as long as the subdirectories themselves pass the filter.
Subdirectories that do not pass the filter are not recursed.
The message payload resulting from an mget operation is a List<String> object - a List of remote file paths resulting from the transfer.
See also Section 16.8.3, “Outbound Gateway Partial Success (mget and mput)”.
rm
The rm command has no options.
The message payload resulting from an rm operation is Boolean.TRUE if the remove was successful, Boolean.FALSE otherwise.
The remote directory is provided in the file_remoteDirectory header, and the filename is provided in the file_remoteFile header.
mv
The mv command has no options.
The expression attribute defines the "from" path and the rename-expression attribute defines the "to" path.
By default, the rename-expression is headers['file_renameTo'].
This expression must not evaluate to null, or an empty String.
If necessary, any remote directories needed will be created.
The payload of the result message is Boolean.TRUE.
The original remote directory is provided in the file_remoteDirectory header, and the filename is provided in the file_remoteFile header.
The new path is in the file_renameTo header.
Additional Information
The get and mget commands support the local-filename-generator-expression attribute.
It defines a SpEL expression to generate the name of local file(s) during the transfer.
The root object of the evaluation context is the request Message but, in addition, the remoteFileName variable is also available, which is particularly useful for mget, for example: local-filename-generator-expression="#remoteFileName.toUpperCase() + headers.foo".
The get and mget commands support the local-directory-expression attribute.
It defines a SpEL expression to generate the name of local directory(ies) during the transfer.
The root object of the evaluation context is the request Message but, in addition, the remoteDirectory variable is also available, which is particularly useful for mget, for example: local-directory-expression="'/tmp/local/' + #remoteDirectory.toUpperCase() + headers.foo".
This attribute is mutually exclusive with local-directory attribute.
For all commands, the PATH that the command acts on is provided by the expression property of the gateway. For the mget command, the expression might evaluate to , meaning retrieve all files, or somedirectory/ etc.
Here is an example of a gateway configured for an ls command…
<int-ftp:outbound-gateway id="gateway1" session-factory="ftpSessionFactory" request-channel="inbound1" command="ls" command-options="-1" expression="payload" reply-channel="toSplitter"/>
The payload of the message sent to the toSplitter channel is a list of String objects containing the filename of each file.
If the command-options was omitted, it would be a list of FileInfo objects.
Options are provided space-delimited, e.g. command-options="-1 -dirs -links".
Starting with version 4.2, the GET, MGET, PUT and MPUT commands support a FileExistsMode property (mode
when using the namespace support). This affects the behavior when the local file exists (GET and MGET) or the remote
file exists (PUT and MPUT). Supported modes are REPLACE, APPEND, FAIL and IGNORE.
For backwards compatibility, the default mode for PUT and MPUT operations is REPLACE and for GET and MGET
operations, the default is FAIL.
Starting with version 5.0, the setWorkingDirExpression() (working-dir-expression) option is provided on the FtpOutboundGateway (<int-ftp:outbound-gateway>) enabling the client working directory to be changed at runtime; the expression is evaluated against the request message.
The previous working directory is restored after each gateway operation.
The following Spring Boot application provides an example of configuring the Outbound Gateway using Java configuration:
@SpringBootApplication public class FtpJavaApplication { public static void main(String[] args) { new SpringApplicationBuilder(FtpJavaApplication.class) .web(false) .run(args); } @Bean public SessionFactory<FTPFile> ftpSessionFactory() { DefaultFtpSessionFactory sf = new DefaultFtpSessionFactory(); sf.setHost("localhost"); sf.setPort(port); sf.setUsername("foo"); sf.setPassword("foo"); return new CachingSessionFactory<FTPFile>(sf); } @Bean @ServiceActivator(inputChannel = "ftpChannel") public MessageHandler handler() { FtpOutboundGateway ftpOutboundGateway = new FtpOutboundGateway(ftpSessionFactory(), "ls", "'my_remote_dir/'"); ftpOutboundGateway.setOutputChannelName("lsReplyChannel"); return ftpOutboundGateway; } }
The following Spring Boot application provides an example of configuring the Outbound Gateway using the Java DSL:
@SpringBootApplication public class FtpJavaApplication { public static void main(String[] args) { new SpringApplicationBuilder(FtpJavaApplication.class) .web(false) .run(args); } @Bean public SessionFactory<FTPFile> ftpSessionFactory() { DefaultFtpSessionFactory sf = new DefaultFtpSessionFactory(); sf.setHost("localhost"); sf.setPort(port); sf.setUsername("foo"); sf.setPassword("foo"); return new CachingSessionFactory<FTPFile>(sf); } @Bean public FtpOutboundGatewaySpec ftpOutboundGateway() { return Ftp.outboundGateway(ftpSessionFactory(), AbstractRemoteFileOutboundGateway.Command.MGET, "payload") .options(AbstractRemoteFileOutboundGateway.Option.RECURSIVE) .regexFileNameFilter("(subFtpSource|.*1.txt)") .localDirectoryExpression("'localDirectory/' + #remoteDirectory") .localFilenameExpression("#remoteFileName.replaceFirst('ftpSource', 'localTarget')"); } @Bean public IntegrationFlow ftpMGetFlow(AbstractRemoteFileOutboundGateway<FTPFile> ftpOutboundGateway) { return f -> f .handle(ftpOutboundGateway) .channel(c -> c.queue("remoteFileOutputChannel")); } }
When performing operations on multiple files (mget and mput) it is possible that an exception occurs some time after
one or more files have been transferred.
In this case (starting with version 4.2), a PartialSuccessException is thrown.
As well as the usual MessagingException properties (failedMessage and cause), this exception has two additional
properties:
-
partialResults- the successful transfer results. -
derivedInput- the list of files generated from the request message (e.g. local files to transfer for anmput).
This will enable you to determine which files were successfully transferred, and which were not.
In the case of a recursive mput, the PartialSuccessException may have nested PartialSuccessException s.
Consider:
root/ |- file1.txt |- subdir/ | - file2.txt | - file3.txt |- zoo.txt
If the exception occurs on file3.txt, the PartialSuccessException thrown by the gateway will have derivedInput
of file1.txt, subdir, zoo.txt and partialResults of file1.txt.
It’s cause will be another PartialSuccessException with derivedInput of file2.txt, file3.txt and
partialResults of file2.txt.
| Important |
|---|---|
|
Starting with Spring Integration version 3.0, sessions are no longer cached by default; the |
In versions prior to 3.0, the sessions were cached automatically by default.
A cache-sessions attribute was available for disabling the auto caching, but that solution did not provide a way to configure other session caching attributes.
For example, you could not limit on the number of sessions created.
To support that requirement and other configuration options, a CachingSessionFactory was provided.
It provides sessionCacheSize and sessionWaitTimeout properties.
As its name suggests, the sessionCacheSize property controls how many active sessions the factory will maintain in its cache (the DEFAULT is unbounded).
If the sessionCacheSize threshold has been reached, any attempt to acquire another session will block until either one of the cached sessions becomes available or until the wait time for a Session expires (the DEFAULT wait time is Integer.MAX_VALUE).
The sessionWaitTimeout property enables configuration of that value.
If you want your Sessions to be cached, simply configure your default Session Factory as described above and then wrap it in an instance of CachingSessionFactory where you may provide those additional properties.
<bean id="ftpSessionFactory" class="o.s.i.ftp.session.DefaultFtpSessionFactory"> <property name="host" value="localhost"/> </bean> <bean id="cachingSessionFactory" class="o.s.i.file.remote.session.CachingSessionFactory"> <constructor-arg ref="ftpSessionFactory"/> <constructor-arg value="10"/> <property name="sessionWaitTimeout" value="1000"/> </bean>
In the above example you see a CachingSessionFactory created with the sessionCacheSize set to 10 and the
sessionWaitTimeout set to 1 second (its value is in milliseconds).
Starting with Spring Integration version 3.0, the CachingConnectionFactory provides a resetCache() method.
When invoked, all idle sessions are immediately closed and in-use sessions are closed when they are returned to the cache.
New requests for sessions will establish new sessions as necessary.
Starting with Spring Integration version 3.0 a new abstraction is provided over the FtpSession object.
The template provides methods to send, retrieve (as an InputStream), remove, and rename files.
In addition an execute method is provided allowing the caller to execute multiple operations on the session.
In all cases, the template takes care of reliably closing the session.
For more information, refer to the
JavaDocs for RemoteFileTemplate.
There is a subclass for FTP: FtpRemoteFileTemplate.
Additional methods were added in version 4.1 including getClientInstance() which provides access to the underlying FTPClient enabling access to low-level APIs.
Not all FTP servers properly implement STAT <path> command, in that it can return a positive result for a non-existent path.
The NLST command reliably returns the name, when the path is a file and it exists.
However, this does not support checking that an empty directory exists since NLST always returns an empty list in this case, when the path is a directory.
Since the template doesn’t know if the path represents a directory or not, it has to perform additional checks when the path does not appear to exist, when using NLST.
This adds overhead, requiring several requests to the server.
Starting with version 4.1.9 the FtpRemoteFileTemplate provides FtpRemoteFileTemplate.ExistsMode property with the following options:
-
STAT- Perform theSTATFTP command (FTPClient.getStatus(path)) to check the path existence; this is the default and requires that your FTP server properly supports theSTATcommand (with a path). -
NLST- Perform theNLSTFTP command -FTPClient.listName(path); use this if you are testing for a path that is a full path to a file; it won’t work for empty directories. -
NLST_AND_DIRS- Perform theNLSTcommand first and if it returns no files, fall back to a technique which temporarily switches the working directory usingFTPClient.changeWorkingDirectory(path). SeeFtpSession.exists()for more information.
Since we know that the FileExistsMode.FAIL case is always only looking for a file (and not a directory), we safely use NLST mode for the FtpMessageHandler and FtpOutboundGateway components.
For any other cases the FtpRemoteFileTemplate can be extended for implementing a custom logic in the overridden exist() method.
Starting with version 5.0, the new RemoteFileOperations.invoke(OperationsCallback<F, T> action) method is available.
This method allows several RemoteFileOperations calls to be called in the scope of the same, thread-bounded, Session.
This is useful when you need to perform several high-level operations of the RemoteFileTemplate as one unit of work.
For example AbstractRemoteFileOutboundGateway uses it with the mput command implementation, where we perform a put operation for each file in the provided directory and recursively for its sub-directories.
See the JavaDocs for more information.
Starting with Spring Integration version 4.2, a MessageSessionCallback<F, T> implementation can be used with the
<int-ftp:outbound-gateway/> (FtpOutboundGateway) to perform any operation(s) on the Session<FTPFile> with
the requestMessage context.
It can be used for any non-standard or low-level FTP operation (or several); for example, allowing access
from an integration flow definition, and functional interface (Lambda) implementation injection:
@Bean @ServiceActivator(inputChannel = "ftpChannel") public MessageHandler ftpOutboundGateway(SessionFactory<FTPFile> sessionFactory) { return new FtpOutboundGateway(sessionFactory, (session, requestMessage) -> session.list(requestMessage.getPayload())); }
Another example might be to pre- or post- process the file data being sent/retrieved.
When using XML configuration, the <int-ftp:outbound-gateway/> provides a session-callback attribute to allow you to
specify the MessageSessionCallback bean name.
| Note |
|---|---|
|
The |
Spring Integration provides support for VMWare vFabric GemFire
VMWare vFabric GemFire (GemFire) is a distributed data management platform providing a key-value data grid along with advanced distributed system features such as event processing, continuous querying, and remote function execution. This guide assumes some familiarity with GemFire and its API.
Spring integration provides support for GemFire by providing inbound adapters for entry and continuous query events, an outbound adapter to write entries to the cache, and MessageStore and MessageGroupStore implementations.
Spring integration leverages thehttp://www.springsource.org/spring-gemfire[Spring Gemfire] project, providing a thin wrapper over its components.
To configure the int-gfe namespace, include the following elements within the headers of your XML configuration file:
xmlns:int-gfe="http://www.springframework.org/schema/integration/gemfire" xsi:schemaLocation="http://www.springframework.org/schema/integration/gemfire http://www.springframework.org/schema/integration/gemfire/spring-integration-gemfire.xsd"
The inbound-channel-adapter produces messages on a channel triggered by a GemFire EntryEvent.
GemFire generates events whenever an entry is CREATED, UPDATED, DESTROYED, or INVALIDATED in the associated region.
The inbound channel adapter allows you to filter on a subset of these events.
For example, you may want to only produce messages in response to an entry being CREATED.
In addition, the inbound channel adapter can evaluate a SpEL expression if, for example, you want your message payload to contain an event property such as the new entry value.
<gfe:cache/> <gfe:replicated-region id="region"/> <int-gfe:inbound-channel-adapter id="inputChannel" region="region" cache-events="CREATED" expression="newValue"/>
In the above configuration, we are creating a GemFire Cache and Region using Spring GemFire’s gfe namespace.
The inbound-channel-adapter requires a reference to the GemFire region for which the adapter will be listening for events.
Optional attributes include cache-events which can contain a comma separated list of event types for which a message will be produced on the input channel.
By default CREATED and UPDATED are enabled.
Note that this adapter conforms to Spring integration conventions.
If no channel attribute is provided, the channel will be created from the id attribute.
This adapter also supports an error-channel.
The GemFire EntryEvent is the #root object of the expression evaluation.
Example:
expression="new foo.MyEvent(key, oldValue, newValue)"
If the expression attribute is not provided, the message payload will be the GemFire EntryEvent itself.
The cq-inbound-channel-adapter produces messages a channel triggered by a GemFire continuous query or CqEvent event.
Spring GemFire introduced continuous query support in release 1.1, including a ContinuousQueryListenerContainer which provides a nice abstraction over the GemFire native API.
This adapter requires a reference to a ContinuousQueryListenerContainer, and creates a listener for a given query and executes the query.
The continuous query acts as an event source that will fire whenever its result set changes state.
| Note |
|---|---|
|
GemFire queries are written in OQL and are scoped to the entire cache (not just one region). Additionally, continuous queries require a remote (i.e., running in a separate process or remote host) cache server. Please consult the GemFire documentation for more information on implementing continuous queries. |
<gfe:client-cache id="client-cache" pool-name="client-pool"/> <gfe:pool id="client-pool" subscription-enabled="true" > <!--configure server or locator here required to address the cache server --> </gfe:pool> <gfe:client-region id="test" cache-ref="client-cache" pool-name="client-pool"/> <gfe:cq-listener-container id="queryListenerContainer" cache="client-cache" pool-name="client-pool"/> <int-gfe:cq-inbound-channel-adapter id="inputChannel" cq-listener-container="queryListenerContainer" query="select * from /test"/>
In the above configuration, we are creating a GemFire client cache (recall a remote cache server is required for this implementation and its address is configured as a sub-element of the pool), a client region and a ContinuousQueryListenerContainer using Spring GemFire.
The continuous query inbound channel adapter requires a cq-listener-container attribute which contains a reference to the ContinuousQueryListenerContainer.
Optionally, it accepts an expression attribute which uses SpEL to transform the CqEvent or extract an individual property as needed.
The cq-inbound-channel-adapter provides a query-events attribute, containing a comma separated list of event types for which a message will be produced on the input channel.
Available event types are CREATED, UPDATED, DESTROYED, REGION_DESTROYED, REGION_INVALIDATED.
CREATED and UPDATED are enabled by default.
Additional optional attributes include, query-name which provides an optional query name, and expression which works as described in the above section, and durable - a boolean value indicating if the query is durable (false by default).
Note that this adapter conforms to Spring integration conventions.
If no channel attribute is provided, the channel will be created from the id attribute.
This adapter also supports an error-channel
The outbound-channel-adapter writes cache entries mapped from the message payload.
In its simplest form, it expects a payload of type java.util.Map and puts the map entries into its configured region.
<int-gfe:outbound-channel-adapter id="cacheChannel" region="region"/>
Given the above configuration, an exception will be thrown if the payload is not a Map. Additionally, the outbound channel adapter can be configured to create a map of cache entries using SpEL of course.
<int-gfe:outbound-channel-adapter id="cacheChannel" region="region"> <int-gfe:cache-entries> <entry key="payload.toUpperCase()" value="payload.toLowerCase()"/> <entry key="'foo'" value="'bar'"/> </int-gfe:cache-entries> </int-gfe:outbound-channel-adapter>
In the above configuration, the inner element cache-entries is semantically equivalent to Spring map element.
The adapter interprets the key and value attributes as SpEL expressions with the message as the evaluation context.
Note that this contain arbitrary cache entries (not only those derived from the message) and that literal values must be enclosed in single quotes.
In the above example, if the message sent to cacheChannel has a String payload with a value "Hello", two entries [HELLO:hello, foo:bar] will be written (created or updated) in the cache region.
This adapter also supports the order attribute which may be useful if it is bound to a PublishSubscribeChannel.
As described in EIP, a Message Store allows you to persist Messages. This can be very useful when dealing with components that have a capability to buffer messages (QueueChannel, Aggregator, Resequencer, etc.) if reliability is a concern. In Spring Integration, the MessageStore strategy also provides the foundation for thehttp://www.eaipatterns.com/StoreInLibrary.html[ClaimCheck] pattern, which is described in EIP as well.
Spring Integration’s Gemfire module provides the GemfireMessageStore which is an implementation of both the the MessageStore strategy (mainly used by the QueueChannel and ClaimCheck patterns) and the MessageGroupStore strategy (mainly used by the Aggregator and Resequencer patterns).
<bean id="gemfireMessageStore" class="o.s.i.gemfire.store.GemfireMessageStore"> <constructor-arg ref="myRegion"/> </bean> <gfe:cache/> <gfe:replicated-region id="myRegion"/> <int:channel id="somePersistentQueueChannel"> <int:queue message-store="gemfireMessageStore"/> <int:channel> <int:aggregator input-channel="inputChannel" output-channel="outputChannel" message-store="gemfireMessageStore"/>
In the above example, the cache and region are configured using the spring-gemfire namespace (not to be confused with the spring-integration-gemfire namespace). Often it is desirable for the message store to be maintained in one or more remote cache servers in a client-server configuration (See the GemFire product documentation for more details). In this case, you configure a client cache, client region, and client pool and inject the region into the MessageStore. Here is an example:
<bean id="gemfireMessageStore" class="org.springframework.integration.gemfire.store.GemfireMessageStore"> <constructor-arg ref="myRegion"/> </bean> <gfe:client-cache/> <gfe:client-region id="myRegion" shortcut="PROXY" pool-name="messageStorePool"/> <gfe:pool id="messageStorePool"> <gfe:server host="localhost" port="40404" /> </gfe:pool>
Note the pool element is configured with the address of a cache server (a locator may be substituted here). The region is configured as a PROXY so that no data will be stored locally. The region’s id corresponds to a region with the same name configured in the cache server.
Starting with version 4.3.12, the GemfireMessageStore supports the key prefix option to allow distinguishing between instances of the store on the same Gemfire region.
Starting with version 4.0, the GemfireLockRegistry is available.
Certain components (for example aggregator and resequencer) use a lock obtained from a LockRegistry instance to ensure that only one thread is manipulating a group at a time.
The DefaultLockRegistry performs this function within a single component; you can now configure an external lock registry on these components.
When used with a shared MessageGroupStore, the GemfireLockRegistry can be use to provide this functionality across multiple application instances, such that only one instance can manipulate the group at a time.
| Note |
|---|---|
|
One of the |
As of version 4.0, a new Gemfire-based MetadataStore (Section 10.5, “Metadata Store”) implementation is available.
The GemfireMetadataStore can be used to maintain metadata state across application restarts.
This new MetadataStore implementation can be used with adapters such as:
In order to instruct these adapters to use the new GemfireMetadataStore, simply declare a Spring bean using the bean name metadataStore.
The Twitter Inbound Channel Adapter and the Feed Inbound Channel Adapter will both automatically pick up and use the declared GemfireMetadataStore.
| Note |
|---|---|
|
The |
| Note |
|---|---|
|
Since version 5.0, the |
GemfireMetadataStore metadataStore = new GemfireMetadataStore(cache); metadataStore.addListener(new MetadataStoreListenerAdapter() { @Override public void onAdd(String key, String value) { ... } });
The HTTP support allows for the execution of HTTP requests and the processing of inbound HTTP requests.
The HTTP support consists of the following gateway implementations: HttpInboundEndpoint, HttpRequestExecutingMessageHandler.
Also see Chapter 34, WebFlux Support.
To receive messages over HTTP, you need to use an HTTP Inbound Channel Adapter or Gateway. To support the HTTP Inbound Adapters, they need to be deployed within a servlet container such as Apache Tomcat or Jetty. The easiest way to do this is to use Spring’s HttpRequestHandlerServlet, by providing the following servlet definition in the web.xml file:
<servlet> <servlet-name>inboundGateway</servlet-name> <servlet-class>o.s.web.context.support.HttpRequestHandlerServlet</servlet-class> </servlet>
Notice that the servlet name matches the bean name.
For more information on using the HttpRequestHandlerServlet, see chapter
Remoting and web services using Spring,
which is part of the Spring Framework Reference documentation.
If you are running within a Spring MVC application, then the aforementioned explicit servlet definition is not necessary. In that case, the bean name for your gateway can be matched against the URL path just like a Spring MVC Controller bean. For more information, please see the chapter Web MVC framework, which is part of the Spring Framework Reference documentation.
| Tip |
|---|---|
|
For a sample application and the corresponding configuration, please see the Spring Integration Samples repository. It contains the Http Sample application demonstrating Spring Integration’s HTTP support. |
Below is an example bean definition for a simple HTTP inbound endpoint.
<bean id="httpInbound" class="org.springframework.integration.http.inbound.HttpRequestHandlingMessagingGateway"> <property name="requestChannel" ref="httpRequestChannel" /> <property name="replyChannel" ref="httpReplyChannel" /> </bean>
The HttpRequestHandlingMessagingGateway accepts a list of HttpMessageConverter instances or else relies on a default list.
The converters allow customization of the mapping from HttpServletRequest to Message.
The default converters encapsulate simple strategies, which for example will create a String message for a POST request where the content type starts with "text", see the Javadoc for full details.
An additional flag (mergeWithDefaultConverters) can be set along with the list of custom HttpMessageConverter to add the default converters after the custom converters.
By default this flag is set to false, meaning that the custom converters replace the default list.
The message conversion process uses the (optional) requestPayloadType property and the incoming Content-Type header.
Starting with version 4.3, if a request has no content type header, application/octet-stream is assumed, as
recommended by RFC 2616.
Previously, the body of such messages was ignored.
Starting with Spring Integration 2.0, MultiPart File support is implemented.
If the request has been wrapped as a MultipartHttpServletRequest, when using the default converters, that request will be converted to a Message payload that is a MultiValueMap containing values that may be byte arrays, Strings, or instances of Spring’s MultipartFile depending on the content type of the individual parts.
| Note |
|---|---|
|
The HTTP inbound Endpoint will locate a |
| Note |
|---|---|
|
If you wish to proxy a <int-http:inbound-gateway channel="receiveChannel" path="/inboundAdapter.htm" request-payload-type="byte[]" message-converters="converters" merge-with-default-converters="false" supported-methods="POST" /> <util:list id="converters"> <beans:bean class="org.springframework.http.converter.ByteArrayHttpMessageConverter" /> <beans:bean class="org.springframework.http.converter.StringHttpMessageConverter" /> <beans:bean class="org.springframework.http.converter.json.MappingJackson2HttpMessageConverter" /> </util:list> |
In sending a response to the client there are a number of ways to customize the behavior of the gateway.
By default the gateway will simply acknowledge that the request was received by sending a 200 status code back.
It is possible to customize this response by providing a viewName to be resolved by the Spring MVC ViewResolver.
In the case that the gateway should expect a reply to the Message then setting the expectReply flag (constructor argument) will cause the gateway to wait for a reply Message before creating an HTTP response.
Below is an example of a gateway configured to serve as a Spring MVC Controller with a view name.
Because of the constructor arg value of TRUE, it wait for a reply.
This also shows how to customize the HTTP methods accepted by the gateway, which are POST and GET by default.
<bean id="httpInbound" class="org.springframework.integration.http.inbound.HttpRequestHandlingController"> <constructor-arg value="true" /> <!-- indicates that a reply is expected --> <property name="requestChannel" ref="httpRequestChannel" /> <property name="replyChannel" ref="httpReplyChannel" /> <property name="viewName" value="jsonView" /> <property name="supportedMethodNames" > <list> <value>GET</value> <value>DELETE</value> </list> </property> </bean>
The reply message will be available in the Model map. The key that is used for that map entry by default is reply, but this can be overridden by setting the replyKey property on the endpoint’s configuration.
To configure the HttpRequestExecutingMessageHandler write a bean definition like this:
<bean id="httpOutbound" class="org.springframework.integration.http.outbound.HttpRequestExecutingMessageHandler"> <constructor-arg value="http://localhost:8080/example" /> <property name="outputChannel" ref="responseChannel" /> </bean>
This bean definition will execute HTTP requests by delegating to a RestTemplate.
That template in turn delegates to a list of HttpMessageConverters to generate the HTTP request body from the Message payload.
You can configure those converters as well as the ClientHttpRequestFactory instance to use:
<bean id="httpOutbound" class="org.springframework.integration.http.outbound.HttpRequestExecutingMessageHandler"> <constructor-arg value="http://localhost:8080/example" /> <property name="outputChannel" ref="responseChannel" /> <property name="messageConverters" ref="messageConverterList" /> <property name="requestFactory" ref="customRequestFactory" /> </bean>
By default the HTTP request will be generated using an instance of SimpleClientHttpRequestFactory which uses the JDK HttpURLConnection.
Use of the Apache Commons HTTP Client is also supported through the provided CommonsClientHttpRequestFactory which can be injected as shown above.
| Note |
|---|---|
|
In the case of the Outbound Gateway, the reply message produced by the gateway will contain all Message Headers present in the request message. |
Cookies
Basic cookie support is provided by the transfer-cookies attribute on the outbound gateway. When set to true (default is false), a Set-Cookie header received from the server in a response will be converted to Cookie in the reply message. This header will then be used on subsequent sends. This enables simple stateful interactions, such as…
...->logonGateway->...->doWorkGateway->...->logoffGateway->...
If transfer-cookies is false, any Set-Cookie header received will remain as Set-Cookie in the reply message, and will be dropped on subsequent sends.
| Note: Empty Response Bodies |
|---|---|
|
HTTP is a request/response protocol.
However the response may not have a body, just headers.
In this case, the |
| Note: expected-response-type |
|---|---|
|
Further to the note above regarding empty response bodies, if a response does contain a body, you must provide an appropriate |
Spring Integration provides an http namespace and the corresponding schema definition. To include it in your configuration, simply provide the following namespace declaration in your application context configuration file:
<?xml version="1.0" encoding="UTF-8"?> <beans xmlns="http://www.springframework.org/schema/beans" xmlns:xsi="http://www.w3.org/2001/XMLSchema-instance" xmlns:int="http://www.springframework.org/schema/integration" xmlns:int-http="http://www.springframework.org/schema/integration/http" xsi:schemaLocation=" http://www.springframework.org/schema/beans http://www.springframework.org/schema/beans/spring-beans.xsd http://www.springframework.org/schema/integration http://www.springframework.org/schema/integration/spring-integration.xsd http://www.springframework.org/schema/integration/http http://www.springframework.org/schema/integration/http/spring-integration-http.xsd"> ... </beans>
The XML Namespace provides two components for handling HTTP Inbound requests. In order to process requests without returning a dedicated response, use the inbound-channel-adapter:
<int-http:inbound-channel-adapter id="httpChannelAdapter" channel="requests" supported-methods="PUT, DELETE"/>
To process requests that do expect a response, use an inbound-gateway:
<int-http:inbound-gateway id="inboundGateway" request-channel="requests" reply-channel="responses"/>
| Note |
|---|---|
|
Spring Integration 3.0 is improving the REST support by introducing the IntegrationRequestMappingHandlerMapping. The implementation relies on the enhanced REST support provided by Spring Framework 3.1 or higher. |
The parsing of the HTTP Inbound Gateway or the HTTP Inbound Channel Adapter registers an integrationRequestMappingHandlerMapping bean of type IntegrationRequestMappingHandlerMapping, in case there is none registered, yet.
This particular implementation of the HandlerMapping delegates its logic to the RequestMappingInfoHandlerMapping.
The implementation provides similar functionality as the one provided by the org.springframework.web.bind.annotation.RequestMapping annotation in Spring MVC.
| Note |
|---|---|
|
For more information, please see Mapping Requests With |
For this purpose, Spring Integration 3.0 introduces the <request-mapping> sub-element.
This optional sub-element can be added to the <http:inbound-channel-adapter> and the <http:inbound-gateway>.
It works in conjunction with the path and supported-methods attributes:
<inbound-gateway id="inboundController" request-channel="requests" reply-channel="responses" path="/foo/{fooId}" supported-methods="GET" view-name="foo" error-code="oops"> <request-mapping headers="User-Agent" params="myParam=myValue" consumes="application/json" produces="!text/plain"/> </inbound-gateway>
Based on this configuration, the namespace parser creates an instance of the IntegrationRequestMappingHandlerMapping (if none exists, yet), a HttpRequestHandlingController bean and associated with it an instance of RequestMapping, which in turn, is converted to the Spring MVC RequestMappingInfo.
The <request-mapping> sub-element provides the following attributes:
- headers
- params
- consumes
- produces
With the path and supported-methods attributes of the <http:inbound-channel-adapter> or the <http:inbound-gateway>, <request-mapping> attributes translate directly into the respective options provided by the org.springframework.web.bind.annotation.RequestMapping annotation in Spring MVC.
The <request-mapping> sub-element allows you to configure several Spring Integration HTTP Inbound Endpoints to the same path (or even the same supported-methods) and to provide different downstream message flows based on incoming HTTP requests.
Alternatively, you can also declare just one HTTP Inbound Endpoint and apply routing and filtering logic within the Spring Integration flow to achieve the same result.
This allows you to get the Message into the flow as early as possibly, e.g.:
<int-http:inbound-gateway request-channel="httpMethodRouter" supported-methods="GET,DELETE" path="/process/{entId}" payload-expression="#pathVariables.entId"/> <int:router input-channel="httpMethodRouter" expression="headers.http_requestMethod"> <int:mapping value="GET" channel="in1"/> <int:mapping value="DELETE" channel="in2"/> </int:router> <int:service-activator input-channel="in1" ref="service" method="getEntity"/> <int:service-activator input-channel="in2" ref="service" method="delete"/>
For more information regarding Handler Mappings, please see: Handler Mappings.
Starting with version 4.2 the <http:inbound-channel-adapter> and <http:inbound-gateway> can be configured with
a <cross-origin> sub-element.
It represents the same options as Spring MVC’s @CrossOrigin for @Controller methods
and allows the configuration of Cross-origin resource sharing (CORS) for Spring Integration HTTP endpoints:
-
origin- List of allowed origins.*means that all origins are allowed. These values are placed in theAccess-Control-Allow-Originheader of both the pre-flight and actual responses. Default value is*. -
allowed-headers- Indicates which request headers can be used during the actual request.*means that all headers asked by the client are allowed. This property controls the value of the pre-flight response’sAccess-Control-Allow-Headersheader. Default value is*. -
exposed-headers- List of response headers that the user-agent will allow the client to access. This property controls the value of the actual response’sAccess-Control-Expose-Headersheader. -
method- The HTTP request methods to allow: GET, POST, HEAD, OPTIONS, PUT, PATCH, DELETE, TRACE. Methods specified here overrides those insupported-methods. -
allow-credentials- Set totrueif the the browser should include any cookies associated to the domain of the request, orfalseif it should not. Empty string "" means undefined. Iftrue, the pre-flight response will include the headerAccess-Control-Allow-Credentials=true. Default value istrue. -
max-age- Controls the cache duration for pre-flight responses. Setting this to a reasonable value can reduce the number of pre-flight request/response interactions required by the browser. This property controls the value of theAccess-Control-Max-Ageheader in the pre-flight response. A value of-1means undefined. Default value is 1800 seconds, or 30 minutes.
The CORS Java Configuration is represented by the org.springframework.integration.http.inbound.CrossOrigin class,
instances of which can be injected to the HttpRequestHandlingEndpointSupport beans.
Starting with version 4.1 the <http:inbound-channel-adapter> can be configured with a status-code-expression to override the default 200 OK status.
The expression must return an object which can be converted to an org.springframework.http.HttpStatus enum value.
The evaluationContext has a BeanResolver but no variables, so the usage of this attribute is somewhat limited.
An example might be to resolve, at runtime, some scoped Bean that returns a status code value but, most likely, it will be set to a fixed value such as status-code=expression="204" (No Content), or status-code-expression="T(org.springframework.http.HttpStatus).NO_CONTENT".
By default, status-code-expression is null meaning that the normal 200 OK response status will be returned.
<http:inbound-channel-adapter id="inboundController" channel="requests" view-name="foo" error-code="oops" status-code-expression="T(org.springframework.http.HttpStatus).ACCEPTED"> <request-mapping headers="BAR"/> </http:inbound-channel-adapter>
The <http:inbound-gateway> resolves the status code from the http_statusCode header of the reply Message.
Starting with version 4.2, the default response status code when no reply is received within the reply-timeout
is 500 Internal Server Error.
There are two ways to modify this behavior:
-
add a
reply-timeout-status-code-expression- this has the same semantics as thestatus-code-expressionon the inbound adapter. -
Add an
error-channeland return an appropriate message with an http status code header, such as…
<int:chain input-channel="errors"> <int:header-enricher> <int:header name="http_statusCode" value="504" /> </int:header-enricher> <int:transformer expression="payload.failedMessage" /> </int:chain>
The payload of the ErrorMessage is a MessageTimeoutException; it must be transformed to something that can be
converted by the gateway, such as a String; a good candidate is the exception’s message property, which is the
value used when using the expression technique.
If the error flow times out after a main flow timeout, 500 Internal Server Error is returned, or the
reply-timeout-status-code-expression is evaluated, if present.
| Note |
|---|---|
|
previously, the default status code for a timeout was |
By Using the path attribute in conjunction with the payload-expression attribute as well as the header sub-element, you have a high degree of flexibility for mapping inbound request data.
In the following example configuration, an Inbound Channel Adapter is configured to accept requests using the following URI: /first-name/{firstName}/last-name/{lastName}
Using the payload-expression attribute, the URI template variable {firstName} is mapped to be the Message payload, while the {lastName} URI template variable will map to the lname Message header.
<int-http:inbound-channel-adapter id="inboundAdapterWithExpressions" path="/first-name/{firstName}/last-name/{lastName}" channel="requests" payload-expression="#pathVariables.firstName"> <int-http:header name="lname" expression="#pathVariables.lastName"/> </int-http:inbound-channel-adapter>
For more information about URI template variables, please see the Spring Reference Manual: uri template patterns.
Since Spring Integration 3.0, in addition to the existing #pathVariables and #requestParams variables being available in payload and header expressions, other useful variables have been added.
The entire list of available expression variables:
-
#requestParams - the
MultiValueMapfrom theServletRequestparameterMap. -
#pathVariables - the
Mapfrom URI Template placeholders and their values; -
#matrixVariables - the
MapofMultiValueMapaccording to Spring MVC Specification. Note, #matrixVariables require Spring MVC 3.2 or higher; -
#requestAttributes - the
org.springframework.web.context.request.RequestAttributesassociated with the current Request; -
#requestHeaders - the
org.springframework.http.HttpHeadersobject from the current Request; -
#cookies - the
Map<String, Cookie>ofjavax.servlet.http.Cookies from the current Request.
Note, all these values (and others) can be accessed within expressions in the downstream message flow via the ThreadLocal org.springframework.web.context.request.RequestAttributes variable, if that message flow is single-threaded and lives within the request thread:
<int-:transformer expression="T(org.springframework.web.context.request.RequestContextHolder). requestAttributes.request.queryString"/>
To configure the outbound gateway you can use the namespace support as well.
The following code snippet shows the different configuration options for an outbound Http gateway.
Most importantly, notice that the http-method and expected-response-type are provided.
Those are two of the most commonly configured values.
The default http-method is POST, and the default response type is null.
With a null response type, the payload of the reply Message would contain the ResponseEntity as long as it’s http status is a success (non-successful status codes will throw Exceptions).
If you are expecting a different type, such as a String, then provide that fully-qualified class name as shown below.
See also the note about empty response bodies in Section 18.3, “Http Outbound Components”.
| Important |
|---|---|
|
Beginning with Spring Integration 2.1 the request-timeout attribute of the HTTP Outbound Gateway was renamed to reply-timeout to better reflect the intent. |
<int-http:outbound-gateway id="example" request-channel="requests" url="http://localhost/test" http-method="POST" extract-request-payload="false" expected-response-type="java.lang.String" charset="UTF-8" request-factory="requestFactory" reply-timeout="1234" reply-channel="replies"/>
| Important |
|---|---|
|
Since Spring Integration 2.2, Java serialization over HTTP is no longer enabled by default.
Previously, when setting the However, because this could cause incompatibility with existing applications, it was decided to no longer automatically add this converter to the HTTP endpoints.
If you wish to use Java serialization, you will need to add the |
Beginning with Spring Integration 2.2 you can also determine the HTTP Method dynamically using SpEL and the http-method-expression attribute.
Note that this attribute is obviously mutually exclusive with http-method You can also use expected-response-type-expression attribute instead of expected-response-type and provide any valid SpEL expression that determines the type of the response.
<int-http:outbound-gateway id="example" request-channel="requests" url="http://localhost/test" http-method-expression="headers.httpMethod" extract-request-payload="false" expected-response-type-expression="payload" charset="UTF-8" request-factory="requestFactory" reply-timeout="1234" reply-channel="replies"/>
If your outbound adapter is to be used in a unidirectional way, then you can use an outbound-channel-adapter instead. This means that a successful response will simply execute without sending any Messages to a reply channel. In the case of any non-successful response status code, it will throw an exception. The configuration looks very similar to the gateway:
<int-http:outbound-channel-adapter id="example" url="http://localhost/example" http-method="GET" channel="requests" charset="UTF-8" extract-payload="false" expected-response-type="java.lang.String" request-factory="someRequestFactory" order="3" auto-startup="false"/>
| Note |
|---|---|
|
To specify the URL; you can use either the url attribute or the url-expression attribute. The url is a simple string (with placeholders for URI variables, as described below); the url-expression is a SpEL expression, with the Message as the root object, enabling dynamic urls. The url resulting from the expression evaluation can still have placeholders for URI variables. In previous releases, some users used the place holders to replace the entire URL with a URI variable. Changes in Spring 3.1 can cause some issues with escaped characters, such as ?. For this reason, it is recommended that if you wish to generate the URL entirely at runtime, you use the url-expression attribute. |
If your URL contains URI variables, you can map them using the uri-variable sub-element.
This sub-element is available for the Http Outbound Gateway and the Http Outbound Channel Adapter.
<int-http:outbound-gateway id="trafficGateway" url="http://local.yahooapis.com/trafficData?appid=YdnDemo&zip={zipCode}" request-channel="trafficChannel" http-method="GET" expected-response-type="java.lang.String"> <int-http:uri-variable name="zipCode" expression="payload.getZip()"/> </int-http:outbound-gateway>
The uri-variable sub-element defines two attributes: name and expression.
The name attribute identifies the name of the URI variable, while the expression attribute is used to set the actual value.
Using the expression attribute, you can leverage the full power of the Spring Expression Language (SpEL) which gives you full dynamic access to the message payload and the message headers.
For example, in the above configuration the getZip() method will be invoked on the payload object of the Message and the result of that method will be used as the value for the URI variable named zipCode.
Since Spring Integration 3.0, HTTP Outbound Endpoints support the uri-variables-expression attribute to specify an Expression which should be evaluated, resulting in a Map for all URI variable placeholders within the URL template.
It provides a mechanism whereby different variable expressions can be used, based on the outbound message.
This attribute is mutually exclusive with the <uri-variable/> sub-element:
<int-http:outbound-gateway url="http://foo.host/{foo}/bars/{bar}" request-channel="trafficChannel" http-method="GET" uri-variables-expression="@uriVariablesBean.populate(payload)" expected-response-type="java.lang.String"/>
where uriVariablesBean might be:
public class UriVariablesBean { private static final ExpressionParser EXPRESSION_PARSER = new SpelExpressionParser(); public Map<String, ?> populate(Object payload) { Map<String, Object> variables = new HashMap<String, Object>(); if (payload instanceOf String.class)) { variables.put("foo", "foo")); } else { variables.put("foo", EXPRESSION_PARSER.parseExpression("headers.bar")); } return variables; } }
| Note |
|---|---|
|
The |
Scenarios when we need to supply a dynamic set of URI variables on per message basis can be achieved with the custom url-expression and some utilities for building and encoding URL parameters:
url-expression="T(org.springframework.web.util.UriComponentsBuilder)
.fromHttpUrl('http://HOST:PORT/PATH')
.queryParams(payload)
.build()
.toUri()"
where queryParams() expects a MultiValueMap<String, String> as an argument, so a real set of URL query parameters can be build in advance, before performing request.
The whole queryString can also be presented as an uri variable:
<int-http:outbound-gateway id="proxyGateway" request-channel="testChannel" url="http://testServer/test?{queryString}"> <int-http:uri-variable name="queryString" expression="'a=A&b=B'"/> </int-http:outbound-gateway>
In this case the URL encoding must be provided manually.
For example the org.apache.http.client.utils.URLEncodedUtils#format() can be used for this purpose.
A mentioned, manually built, MultiValueMap<String, String> can be converted to the the List<NameValuePair> format() method argument using this Java Streams snippet:
List<NameValuePair> nameValuePairs =
params.entrySet()
.stream()
.flatMap(e -> e
.getValue()
.stream()
.map(v -> new BasicNameValuePair(e.getKey(), v)))
.collect(Collectors.toList());
By default, the URL string is encoded (see UriComponentsBuilder) to the URI object before sending the request.
In some scenarios with a non-standard URI (e.g.
the RabbitMQ Rest API) it is undesirable to perform the encoding.
The <http:outbound-gateway/> and <http:outbound-channel-adapter/> provide an encode-uri attribute.
To disable encoding the URL, this attribute should be set to false (by default it is true).
If you wish to partially encode some of the URL, this can be achieved using an expression within a <uri-variable/>:
<http:outbound-gateway url="http://somehost/%2f/fooApps?bar={param}" encode-uri="false"> <http:uri-variable name="param" expression="T(org.apache.commons.httpclient.util.URIUtil) .encodeWithinQuery('Hello World!')"/> </http:outbound-gateway>
Inbound Gateway Using Java Configuration.
@Bean public HttpRequestHandlingMessagingGateway inbound() { HttpRequestHandlingMessagingGateway gateway = new HttpRequestHandlingMessagingGateway(true); gateway.setRequestMapping(mapping()); gateway.setRequestPayloadType(String.class); gateway.setRequestChannelName("httpRequest"); return gateway; } @Bean public RequestMapping mapping() { RequestMapping requestMapping = new RequestMapping(); requestMapping.setPathPatterns("/foo"); requestMapping.setMethods(HttpMethod.POST); return requestMapping; }
Inbound Gateway Using the Java DSL.
@Bean public IntegrationFlow inbound() { return IntegrationFlows.from(Http.inboundGateway("/foo") .requestMapping(m -> m.methods(HttpMethod.POST)) .requestPayloadType(String.class)) .channel("httpRequest") .get(); }
Outbound Gateway Using Java Configuration.
@ServiceActivator(inputChannel = "httpOutRequest") @Bean public HttpRequestExecutingMessageHandler outbound() { HttpRequestExecutingMessageHandler handler = new HttpRequestExecutingMessageHandler("http://localhost:8080/foo"); handler.setHttpMethod(HttpMethod.POST); handler.setExpectedResponseType(String.class); return handler; }
Outbound Gateway Using the Java DSL.
@Bean public IntegrationFlow outbound() { return IntegrationFlows.from("httpOutRequest") .handle(Http.outboundGateway("http://localhost:8080/foo") .httpMethod(HttpMethod.POST) .expectedResponseType(String.class)) .get(); }
In the context of HTTP components, there are two timing areas that have to be considered.
Timeouts when interacting with Spring Integration Channels
Timeouts when interacting with a remote HTTP server
First, the components interact with Message Channels, for which timeouts can be specified. For example, an HTTP Inbound Gateway will forward messages received from connected HTTP Clients to a Message Channel (Request Timeout) and consequently the HTTP Inbound Gateway will receive a reply Message from the Reply Channel (Reply Timeout) that will be used to generate the HTTP Response. Please see the figure below for an illustration.
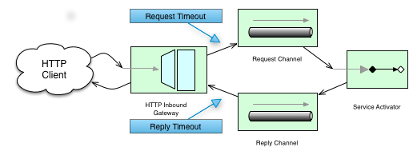
For outbound endpoints, the second thing to consider is timing while interacting with the remote server.
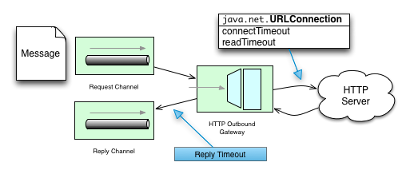
You may want to configure the HTTP related timeout behavior, when making active HTTP requests using the HTTP Outbound Gateway or the HTTP Outbound Channel Adapter. In those instances, these two components use Spring’s RestTemplate support to execute HTTP requests.
In order to configure timeouts for the HTTP Outbound Gateway and the HTTP Outbound Channel Adapter, you can either reference a RestTemplate bean directly, using the rest-template attribute, or you can provide a reference to a ClientHttpRequestFactory bean using the request-factory attribute.
Spring provides the following implementations of the ClientHttpRequestFactory interface:
SimpleClientHttpRequestFactory - Uses standard J2SE facilities for making HTTP Requests
HttpComponentsClientHttpRequestFactory - Uses Apache HttpComponents HttpClient (Since Spring 3.1)
If you don’t explicitly configure the request-factory or rest-template attribute respectively, then a default RestTemplate which uses a SimpleClientHttpRequestFactory will be instantiated.
| Note |
|---|---|
|
With some JVM implementations, the handling of timeouts using the URLConnection class may not be consistent. E.g. from the Java™ Platform, Standard Edition 6 API Specification on setConnectTimeout: [quote] Some non-standard implementation of this method may ignore the specified timeout. To see the connect timeout set, please call getConnectTimeout(). Please test your timeouts if you have specific needs.
Consider using the |
| Important |
|---|---|
|
When using the Apache HttpComponents HttpClient with a Pooling Connection Manager, be aware that, by default, the connection manager will create no more than 2 concurrent connections per given route and no more than 20 connections in total. For many real-world applications these limits may prove too constraining. Refer to the Apache documentation (link above) for information about configuring this important component. |
Here is an example of how to configure an HTTP Outbound Gateway using a SimpleClientHttpRequestFactory, configured with connect and read timeouts of 5 seconds respectively:
<int-http:outbound-gateway url="http://www.google.com/ig/api?weather={city}" http-method="GET" expected-response-type="java.lang.String" request-factory="requestFactory" request-channel="requestChannel" reply-channel="replyChannel"> <int-http:uri-variable name="city" expression="payload"/> </int-http:outbound-gateway> <bean id="requestFactory" class="org.springframework.http.client.SimpleClientHttpRequestFactory"> <property name="connectTimeout" value="5000"/> <property name="readTimeout" value="5000"/> </bean>
HTTP Outbound Gateway
For the HTTP Outbound Gateway, the XML Schema defines only the reply-timeout.
The reply-timeout maps to the sendTimeout property of the org.springframework.integration.http.outbound.HttpRequestExecutingMessageHandler class.
More precisely, the property is set on the extended AbstractReplyProducingMessageHandler class, which ultimately sets the property on the MessagingTemplate.
The value of the sendTimeout property defaults to "-1" and will be applied to the connected MessageChannel.
This means, that depending on the implementation, the Message Channel’s send method may block indefinitely.
Furthermore, the sendTimeout property is only used, when the actual MessageChannel implementation has a blocking send (such as full bounded QueueChannel).
HTTP Inbound Gateway
For the HTTP Inbound Gateway, the XML Schema defines the request-timeout attribute, which will be used to set the requestTimeout property on the HttpRequestHandlingMessagingGateway class (on the extended MessagingGatewaySupport class).
Secondly, the_reply-timeout_ attribute exists and it maps to the replyTimeout property on the same class.
The default for both timeout properties is "1000ms".
Ultimately, the request-timeout property will be used to set the sendTimeout on the used MessagingTemplate instance.
The replyTimeout property on the other hand, will be used to set the receiveTimeout property on the used MessagingTemplate instance.
| Tip |
|---|---|
|
In order to simulate connection timeouts, connect to a non-routable IP address, for example 10.255.255.10. |
If you are behind a proxy and need to configure proxy settings for HTTP outbound adapters and/or gateways, you can apply one of two approaches. In most cases, you can rely on the standard Java System Properties that control the proxy settings. Otherwise, you can explicitly configure a Spring bean for the HTTP client request factory instance.
Standard Java Proxy configuration
There are 3 System Properties you can set to configure the proxy settings that will be used by the HTTP protocol handler:
- http.proxyHost - the host name of the proxy server.
- http.proxyPort - the port number, the default value being 80.
- http.nonProxyHosts - a list of hosts that should be reached directly, bypassing the proxy. This is a list of patterns separated by |. The patterns may start or end with a * for wildcards. Any host matching one of these patterns will be reached through a direct connection instead of through a proxy.
And for HTTPS:
- https.proxyHost - the host name of the proxy server.
- https.proxyPort - the port number, the default value being 80.
For more information please refer to this document: http://download.oracle.com/javase/6/docs/technotes/guides/net/proxies.html
Spring’s SimpleClientHttpRequestFactory
If for any reason, you need more explicit control over the proxy configuration, you can use Spring’s SimpleClientHttpRequestFactory and configure its proxy property as such:
<bean id="requestFactory" class="org.springframework.http.client.SimpleClientHttpRequestFactory"> <property name="proxy"> <bean id="proxy" class="java.net.Proxy"> <constructor-arg> <util:constant static-field="java.net.Proxy.Type.HTTP"/> </constructor-arg> <constructor-arg> <bean class="java.net.InetSocketAddress"> <constructor-arg value="123.0.0.1"/> <constructor-arg value="8080"/> </bean> </constructor-arg> </bean> </property> </bean>
Spring Integration provides support for Http Header mapping for both HTTP Request and HTTP Responses.
By default all standard Http Headers as defined here http://en.wikipedia.org/wiki/List_of_HTTP_header_fields will be mapped from the message to HTTP request/response headers without further configuration.
However if you do need further customization you may provide additional configuration via convenient namespace support.
You can provide a comma-separated list of header names, and you can also include simple patterns with the * character acting as a wildcard.
If you do provide such values, it will override the default behavior.
Basically, it assumes you are in complete control at that point.
However, if you do want to include all of the standard HTTP headers, you can use the shortcut patterns: HTTP_REQUEST_HEADERS and HTTP_RESPONSE_HEADERS.
Here are some examples:
<int-http:outbound-gateway id="httpGateway" url="http://localhost/test2" mapped-request-headers="foo, bar" mapped-response-headers="X-*, HTTP_RESPONSE_HEADERS" channel="someChannel"/> <int-http:outbound-channel-adapter id="httpAdapter" url="http://localhost/test2" mapped-request-headers="foo, bar, HTTP_REQUEST_HEADERS" channel="someChannel"/>
The adapters and gateways will use the DefaultHttpHeaderMapper which now provides two static factory methods for "inbound" and "outbound" adapters so that the proper direction can be applied (mapping HTTP requests/responses IN/OUT as appropriate).
If further customization is required you can also configure a DefaultHttpHeaderMapper independently and inject it into the adapter via the header-mapper attribute.
Before version 5.0, the DefaultHttpHeaderMapper the default prefix for user-defined, non-standard HTTP headers was X-.
In _version 5.0_ this has been changed to an empty string.
According to RFC-6648, the use of such prefixes is now discouraged.
This option can still be customized by setting the DefaultHttpHeaderMapper.setUserDefinedHeaderPrefix() property.
<int-http:outbound-gateway id="httpGateway" url="http://localhost/test2" header-mapper="headerMapper" channel="someChannel"/> <bean id="headerMapper" class="o.s.i.http.support.DefaultHttpHeaderMapper"> <property name="inboundHeaderNames" value="foo*, *bar, baz"/> <property name="outboundHeaderNames" value="a*b, d"/> </bean>
Of course, you can even implement the HeaderMapper strategy interface directly and provide a reference to that if you need to do something other than what the DefaultHttpHeaderMapper supports.
Starting with version 4.3, the HTTP module provides an @EnableIntegrationGraphController @Configuration class annotation and <int-http:graph-controller/> XML element to expose the IntegrationGraphServer as a REST service.
See Section 10.8, “Integration Graph” for more information.
This example demonstrates how simple it is to send a Multipart HTTP request via Spring’s RestTemplate and receive it with a Spring Integration HTTP Inbound Adapter.
All we are doing is creating a MultiValueMap and populating it with multi-part data.
The RestTemplate will take care of the rest (no pun intended) by converting it to a MultipartHttpServletRequest . This particular client will send a multipart HTTP Request which contains the name of the company as well as an image file with the company logo.
RestTemplate template = new RestTemplate(); String uri = "http://localhost:8080/multipart-http/inboundAdapter.htm"; Resource s2logo = new ClassPathResource("org/springframework/samples/multipart/spring09_logo.png"); MultiValueMap map = new LinkedMultiValueMap(); map.add("company", "SpringSource"); map.add("company-logo", s2logo); HttpHeaders headers = new HttpHeaders(); headers.setContentType(new MediaType("multipart", "form-data")); HttpEntity request = new HttpEntity(map, headers); ResponseEntity<?> httpResponse = template.exchange(uri, HttpMethod.POST, request, null);
That is all for the client.
On the server side we have the following configuration:
<int-http:inbound-channel-adapter id="httpInboundAdapter" channel="receiveChannel" path="/inboundAdapter.htm" supported-methods="GET, POST"/> <int:channel id="receiveChannel"/> <int:service-activator input-channel="receiveChannel"> <bean class="org.springframework.integration.samples.multipart.MultipartReceiver"/> </int:service-activator> <bean id="multipartResolver" class="org.springframework.web.multipart.commons.CommonsMultipartResolver"/>
The httpInboundAdapter will receive the request, convert it to a Message with a payload that is a LinkedMultiValueMap.
We then are parsing that in the multipartReceiver service-activator;
public void receive(LinkedMultiValueMap<String, Object> multipartRequest){ System.out.println("### Successfully received multipart request ###"); for (String elementName : multipartRequest.keySet()) { if (elementName.equals("company")){ System.out.println("\t" + elementName + " - " + ((String[]) multipartRequest.getFirst("company"))[0]); } else if (elementName.equals("company-logo")){ System.out.println("\t" + elementName + " - as UploadedMultipartFile: " + ((UploadedMultipartFile) multipartRequest .getFirst("company-logo")).getOriginalFilename()); } } }
You should see the following output:
### Successfully received multipart request ### company - SpringSource company-logo - as UploadedMultipartFile: spring09_logo.png
Spring Integration provides Channel Adapters for receiving and sending messages via database queries. Through those adapters Spring Integration supports not only plain JDBC SQL Queries, but also Stored Procedure and Stored Function calls.
The following JDBC components are available by default:
Furthermore, the Spring Integration JDBC Module also provides a JDBC Message Store
The main function of an inbound Channel Adapter is to execute a SQL SELECT query and turn the result set as a message.
The message payload is the whole result set, expressed as a List, and the types of the items in the list depend on the row-mapping strategy that is used.
The default strategy is a generic mapper that just returns a Map for each row in the query result.
Optionally, this can be changed by adding a reference to a RowMapper instance (see the Spring JDBC documentation for more detailed information about row mapping).
| Note |
|---|---|
|
If you want to convert rows in the SELECT query result to individual messages you can use a downstream splitter. |
The inbound adapter also requires a reference to either a JdbcTemplate instance or a DataSource.
As well as the SELECT statement to generate the messages, the adapter above also has an UPDATE statement that is being used to mark the records as processed so that they don’t show up in the next poll.
The update can be parameterized by the list of ids from the original select.
This is done through a naming convention by default (a column in the input result set called "id" is translated into a list in the parameter map for the update called "id").
The following example defines an inbound Channel Adapter with an update query and a DataSource reference.
<int-jdbc:inbound-channel-adapter query="select * from item where status=2" channel="target" data-source="dataSource" update="update item set status=10 where id in (:id)" />
| Note |
|---|---|
|
The parameters in the update query are specified with a colon (:) prefix to the name of a parameter (which in this case is an expression to be applied to each of the rows in the polled result set). This is a standard feature of the named parameter JDBC support in Spring JDBC combined with a convention (projection onto the polled result list) adopted in Spring Integration. The underlying Spring JDBC features limit the available expressions (e.g. most special characters other than period are disallowed), but since the target is usually a list of or an individual object addressable by simple bean paths this isn’t unduly restrictive. |
To change the parameter generation strategy you can inject a SqlParameterSourceFactory into the adapter to override the default behavior (the adapter has a sql-parameter-source-factory attribute).
Spring Integration provides a ExpressionEvaluatingSqlParameterSourceFactory which will create a SpEL-based parameter source, with the results of the query as the #root object.
(If update-per-row is true, the root object is the row).
If the same parameter name appears multiple times in the update query, it is evaluated only one time, and its result is cached.
You can also use a parameter source for the select query. In this case, since there is no "result" object to evaluate against, a single parameter source is used each time (rather than using a parameter source factory). Starting with version 4.0, you can use Spring to create a SpEL based parameter source as follows:
<int-jdbc:inbound-channel-adapter query="select * from item where status=:status" channel="target" data-source="dataSource" select-sql-parameter-source="parameterSource" /> <bean id="parameterSource" factory-bean="parameterSourceFactory" factory-method="createParameterSourceNoCache"> <constructor-arg value="" /> </bean> <bean id="parameterSourceFactory" class="o.s.integration.jdbc.ExpressionEvaluatingSqlParameterSourceFactory"> <property name="parameterExpressions"> <map> <entry key="status" value="@statusBean.which()" /> </map> </property> </bean> <bean id="statusBean" class="foo.StatusDetermination" />
The value in each parameter expression can be any valid SpEL expression.
The #root object for the expression evaluation is the constructor argument defined on the parameterSource bean.
It is static for all evaluations (in this case, an empty String).
Starting with version 5.0, the ExpressionEvaluatingSqlParameterSourceFactory can be supplied with the sqlParameterTypes to specify the target SQL type for the particular parameter.
Below example provides sql type for the parameters being used in the query.
<int-jdbc:inbound-channel-adapter query="select * from item where status=:status" channel="target" data-source="dataSource" select-sql-parameter-source="parameterSource" /> <bean id="parameterSource" factory-bean="parameterSourceFactory" factory-method="createParameterSourceNoCache"> <constructor-arg value="" /> </bean> <bean id="parameterSourceFactory" class="o.s.integration.jdbc.ExpressionEvaluatingSqlParameterSourceFactory"> <property name="sqlParameterTypes"> <map> <entry key="status" value=""#{ T(java.sql.Types).BINARY}" /> </map> </property> </bean>
| Important |
|---|---|
|
Use the |
The inbound adapter accepts a regular Spring Integration poller as a sub element, so for instance the frequency of the polling can be controlled. A very important feature of the poller for JDBC usage is the option to wrap the poll operation in a transaction, for example:
<int-jdbc:inbound-channel-adapter query="..." channel="target" data-source="dataSource" update="..."> <int:poller fixed-rate="1000"> <int:transactional/> </int:poller> </int-jdbc:inbound-channel-adapter>
| Note |
|---|---|
|
If a poller is not explicitly specified, a default value will be used (and as per normal with Spring Integration can be defined as a top level bean). |
In this example the database is polled every 1000 milliseconds, and the update and select queries are both executed in the same transaction. The transaction manager configuration is not shown, but as long as it is aware of the data source then the poll is transactional. A common use case is for the downstream channels to be direct channels (the default), so that the endpoints are invoked in the same thread, and hence the same transaction. Then if any of them fail, the transaction rolls back and the input data is reverted to its original state.
The JDBC Inbound Channel Adapter defines an attribute max-rows-per-poll.
When you specify the adapter’s Poller, you can also define a property called max-messages-per-poll.
While these two attributes look similar, their meaning is quite different.
max-messages-per-poll specifies the number of times the query is executed per polling interval, whereas max-rows-per-poll specifies the number of rows returned for each execution.
Under normal circumstances, you would likely not want to set the Poller’s max-messages-per-poll property when using the JDBC Inbound Channel Adapter.
Its default value is 1, which means that the JDBC Inbound Channel Adapter's receive() method is executed exactly once for each poll interval.
Setting the max-messages-per-poll attribute to a larger value means that the query is executed that many times back to back.
For more information regarding the max-messages-per-poll attribute, please see Section 4.3.1, “Configuring An Inbound Channel Adapter”.
In contrast, the max-rows-per-poll attribute, if greater than 0, specifies the maximum number of rows that will be used from the query result set, per execution of the receive() method.
If the attribute is set to 0, then all rows will be included in the resulting message.
If not explicitly set, the attribute defaults to 0.
The outbound Channel Adapter is the inverse of the inbound: its role is to handle a message and use it to execute a SQL query. The message payload and headers are available by default as input parameters to the query, for instance:
<int-jdbc:outbound-channel-adapter query="insert into foos (id, status, name) values (:headers[id], 0, :payload[foo])" data-source="dataSource" channel="input"/>
In the example above, messages arriving on the channel labelled input have a payload of a map with key foo, so the [] operator dereferences that value from the map.
The headers are also accessed as a map.
| Note |
|---|---|
|
The parameters in the query above are bean property expressions on the incoming message (not Spring EL expressions).
This behavior is part of the |
The outbound adapter requires a reference to either a DataSource or a JdbcTemplate.
It can also have a SqlParameterSourceFactory injected to control the binding of each incoming message to a query.
If the input channel is a direct channel, then the outbound adapter runs its query in the same thread, and therefore the same transaction (if there is one) as the sender of the message.
Passing Parameters using SpEL Expressions
A common requirement for most JDBC Channel Adapters is to pass parameters as part of Sql queries or Stored Procedures/Functions.
As mentioned above, these parameters are by default bean property expressions, not SpEL expressions.
However, if you need to pass SpEL expression as parameters, you must inject a SqlParameterSourceFactory explicitly.
The following example uses a ExpressionEvaluatingSqlParameterSourceFactory to achieve that requirement.
<jdbc:outbound-channel-adapter data-source="dataSource" channel="input" query="insert into MESSAGES (MESSAGE_ID,PAYLOAD,CREATED_DATE) \ values (:id, :payload, :createdDate)" sql-parameter-source-factory="spelSource"/> <bean id="spelSource" class="o.s.integration.jdbc.ExpressionEvaluatingSqlParameterSourceFactory"> <property name="parameterExpressions"> <map> <entry key="id" value="headers['id'].toString()"/> <entry key="createdDate" value="new java.util.Date()"/> <entry key="payload" value="payload"/> </map> </property> </bean>
For further information, please also see Section 19.5.5, “Defining Parameter Sources”
PreparedStatement Callback
There are some cases when the flexibility and loose-coupling of SqlParameterSourceFactory isn’t enough for the target
PreparedStatement or we need to do some low-level JDBC work.
The Spring JDBC module provides APIs to configure the execution environment (e.g. ConnectionCallback
or PreparedStatementCreator) and manipulation of parameter values (e.g. SqlParameterSource).
Or even APIs for low level operations, for example StatementCallback.
Starting with Spring Integration 4.2, the MessagePreparedStatementSetter is available to allow
the specification of parameters on the PreparedStatement manually, in the requestMessage context.
This class plays exactly the same role as PreparedStatementSetter in the standard Spring JDBC API.
Actually it is invoked directly from an inline PreparedStatementSetter implementation, when the JdbcMessageHandler
invokes execute on the JdbcTemplate.
This functional interface option is mutually exclusive with sqlParameterSourceFactory and can be used as a more
powerful alternative to populate parameters of the PreparedStatement from the requestMessage.
For example it is useful when we need to store File data to the DataBase BLOB column in a stream manner:
@Bean @ServiceActivator(inputChannel = "storeFileChannel") public MessageHandler jdbcMessageHandler(DataSource dataSource) { JdbcMessageHandler jdbcMessageHandler = new JdbcMessageHandler(dataSource, "INSERT INTO imagedb (image_name, content, description) VALUES (?, ?, ?)"); jdbcMessageHandler.setPreparedStatementSetter((ps, m) -> { ps.setString(1, m.getHeaders().get(FileHeaders.FILENAME)); try (FileInputStream inputStream = new FileInputStream((File) m.getPayload())) { ps.setBlob(2, inputStream); } catch (Exception e) { throw new MessageHandlingException(m, e); } ps.setClob(3, new StringReader(m.getHeaders().get("description", String.class))); }); return jdbcMessageHandler; }
From the XML configuration perspective, the prepared-statement-setter attribute is available on the
<int-jdbc:outbound-channel-adapter> component, to specify a MessagePreparedStatementSetter
bean reference.
The outbound Gateway is like a combination of the outbound and inbound adapters: its role is to handle a message and use it to execute a SQL query and then respond with the result sending it to a reply channel. The message payload and headers are available by default as input parameters to the query, for instance:
<int-jdbc:outbound-gateway update="insert into foos (id, status, name) values (:headers[id], 0, :payload[foo])" request-channel="input" reply-channel="output" data-source="dataSource" />
The result of the above would be to insert a record into the "foos" table and return a message to the output channel indicating the number of rows affected (the payload is a map: {UPDATED=1}).
If the update query is an insert with auto-generated keys, the reply message can be populated with the generated keys by adding keys-generated="true" to the above example (this is not the default because it is not supported by some database platforms).
For example:
<int-jdbc:outbound-gateway update="insert into foos (status, name) values (0, :payload[foo])" request-channel="input" reply-channel="output" data-source="dataSource" keys-generated="true"/>
Instead of the update count or the generated keys, you can also provide a select query to execute and generate a reply message from the result (like the inbound adapter), e.g:
<int-jdbc:outbound-gateway update="insert into foos (id, status, name) values (:headers[id], 0, :payload[foo])" query="select * from foos where id=:headers[$id]" request-channel="input" reply-channel="output" data-source="dataSource"/>
Since Spring Integration 2.2 the update SQL query is no longer mandatory. You can now solely provide a select query, using either the query attribute or the query sub-element. This is extremely useful if you need to actively retrieve data using e.g. a generic Gateway or a Payload Enricher. The reply message is then generated from the result, like the inbound adapter, and passed to the reply channel.
<int-jdbc:outbound-gateway query="select * from foos where id=:headers[id]" request-channel="input" reply-channel="output" data-source="dataSource"/>
| Important |
|---|---|
|
By default the component for the SELECT query returns only one, first row from the cursor.
This can be adjusted with the |
As with the channel adapters, there is also the option to provide SqlParameterSourceFactory instances for request and reply.
The default is the same as for the outbound adapter, so the request message is available as the root of an expression.
If keys-generated="true" then the root of the expression is the generated keys (a map if there is only one or a list of maps if multi-valued).
The outbound gateway requires a reference to either a DataSource or a JdbcTemplate.
It can also have a SqlParameterSourceFactory injected to control the binding of the incoming message to the query.
Starting with the version 4.2 the request-prepared-statement-setter attribute is available on the
<int-jdbc:outbound-gateway> as an alternative to the request-sql-parameter-source-factory.
It allows you to specify a MessagePreparedStatementSetter bean reference, which implements more sophisticated
PreparedStatement preparation before its execution.
See Section 19.2, “Outbound Channel Adapter” for more information about MessagePreparedStatementSetter.
Spring Integration provides 2 JDBC specific Message Store implementations.
The first one, is the JdbcMessageStore which is suitable to be used in conjunction with Aggregators and the Claim-Check pattern.
While it can be used for backing Message Channels as well, you may want to consider using the JdbcChannelMessageStore implementation instead, as it provides a more targeted and scalable implementation.
Before starting to use JDBC Message Store components, it is important to provision target data base with the appropriate objects.
Spring Integration ships with some sample scripts that can be used to initialize a database.
In the spring-integration-jdbc JAR file you can find scripts in the org.springframework.integration.jdbc package: there is a create and a drop script example for a range of common database platforms.
A common way to use these scripts is to reference them in a Spring JDBC data source initializer.
Note that the scripts are provided as samples or specifications of the the required table and column names.
You may find that you need to enhance them for production use (e.g. with index declarations).
The JDBC module provides an implementation of the Spring Integration MessageStore (important in the Claim Check pattern) and MessageGroupStore (important in stateful patterns like Aggregator) backed by a database.
Both interfaces are implemented by the JdbcMessageStore, and there is also support for configuring store instances in XML.
For example:
<int-jdbc:message-store id="messageStore" data-source="dataSource"/>
A JdbcTemplate can be specified instead of a DataSource.
Other optional attributes are show in the next example:
<int-jdbc:message-store id="messageStore" data-source="dataSource" lob-handler="lobHandler" table-prefix="MY_INT_"/>
Here we have specified a LobHandler for dealing with messages as large objects (e.g.
often necessary if using Oracle) and a prefix for the table names in the queries generated by the store.
The table name prefix defaults to INT_.
If you intend backing Message Channels using JDBC, it is recommended to use the provided JdbcChannelMessageStore implementation instead.
It can only be used in conjunction with Message Channels.
Supported Databases
The JdbcChannelMessageStore uses database specific SQL queries to retrieve messages from the database.
Therefore, users must set the ChannelMessageStoreQueryProvider property on the JdbcChannelMessageStore.
This channelMessageStoreQueryProvider provides the SQL queries and Spring Integration provides support for the following relational databases:
- PostgreSQL
- HSQLDB
- MySQL
- Oracle
- Derby
- H2
- SqlServer
- Sybase
- DB2
If your database is not listed, you can easily extend the AbstractChannelMessageStoreQueryProvider class and provide your own custom queries.
Since version 4.0, the MESSAGE_SEQUENCE column has been added to the table to ensure first-in-first-out (FIFO) queueing even when messages are stored in the same millisecond.
Since version 5.0, by overloading ChannelMessageStorePreparedStatementSetter class you can provide custom implementation for message insertion in the JdbcChannelMessageStore.
It might be different columns or table structure or serialization strategy.
For example, instead of default serialization to byte[], we can store its structure in JSON string.
Below example uses the default implementation of setValues to store common columns and overrides the behavior just to store the message payload as varchar.
public class JsonPreparedStatementSetter extends ChannelMessageStorePreparedStatementSetter { public JsonPreparedStatementSetter() { super(); } @Override public void setValues(PreparedStatement preparedStatement, Message<?> requestMessage, Object groupId, String region, boolean priorityEnabled) throws SQLException { // Populate common columns super.setValues(preparedStatement, requestMessage, groupId, region, priorityEnabled); // Store message payload as varchar preparedStatement.setString(6, requestMessage.getPayload().toString()); } }
| Important |
|---|---|
|
Generally it is not recommended to use a relational database for the purpose of queuing. Instead, if possible, consider using either JMS or AMQP backed channels instead. For further reference please see the following resources: |
Concurrent Polling
When polling a Message Channel, you have the option to configure the associated Poller with a TaskExecutor reference.
| Important |
|---|---|
|
Keep in mind, though, that if you use a JDBC backed Message Channel and you are planning on polling the channel and consequently the message store transactionally with multiple threads, you should ensure that you use a relational database that supports Multiversion Concurrency Control (MVCC). Otherwise, locking may be an issue and the performance, when using multiple threads, may not materialize as expected. For example Apache Derby is problematic in that regard. To achieve better JDBC queue throughput, and avoid issues when different threads may poll the same |
<bean id="queryProvider" class="o.s.i.jdbc.store.channel.PostgresChannelMessageStoreQueryProvider"/> <int:transaction-synchronization-factory id="syncFactory"> <int:after-commit expression="@store.removeFromIdCache(headers.id.toString())" /> <int:after-rollback expression="@store.removeFromIdCache(headers.id.toString())"/> </int:transaction-synchronization-factory> <task:executor id="pool" pool-size="10" queue-capacity="10" rejection-policy="CALLER_RUNS" /> <bean id="store" class="o.s.i.jdbc.store.JdbcChannelMessageStore"> <property name="dataSource" ref="dataSource"/> <property name="channelMessageStoreQueryProvider" ref="queryProvider"/> <property name="region" value="TX_TIMEOUT"/> <property name="usingIdCache" value="true"/> </bean> <int:channel id="inputChannel"> <int:queue message-store="store"/> </int:channel> <int:bridge input-channel="inputChannel" output-channel="outputChannel"> <int:poller fixed-delay="500" receive-timeout="500" max-messages-per-poll="1" task-executor="pool"> <int:transactional propagation="REQUIRED" synchronization-factory="syncFactory" isolation="READ_COMMITTED" transaction-manager="transactionManager" /> </int:poller> </int:bridge> <int:channel id="outputChannel" />
Priority Channel
Starting with version 4.0, the JdbcChannelMessageStore implements PriorityCapableChannelMessageStore and provides the priorityEnabled option allowing it to be used as a message-store reference for priority-queue s.
For this purpose, the INT_CHANNEL_MESSAGE has a MESSAGE_PRIORITY column to store the value of PRIORITY Message header.
In addition, a new MESSAGE_SEQUENCE column is also provided to achieve a robust first-in-first-out (FIFO) polling mechanism, even when multiple messages are stored with the same priority in the same millisecond.
Messages are polled (selected) from the database with order by MESSAGE_PRIORITY DESC NULLS LAST, CREATED_DATE, MESSAGE_SEQUENCE.
| Note |
|---|---|
|
It’s not recommended to use the same |
<bean id="channelStore" class="o.s.i.jdbc.store.JdbcChannelMessageStore"> <property name="dataSource" ref="dataSource"/> <property name="channelMessageStoreQueryProvider" ref="queryProvider"/> </bean> <int:channel id="queueChannel"> <int:queue message-store="channelStore"/> </int:channel> <bean id="priorityStore" parent="channelStore"> <property name="priorityEnabled" value="true"/> </bean> <int:channel id="priorityChannel"> <int:priority-queue message-store="priorityStore"/> </int:channel>
It is common to use a JdbcMessageStore as a global store for a group of applications, or nodes in the same application.
To provide some protection against name clashes, and to give control over the database meta-data configuration, the message store allows the tables to be partitioned in two ways.
One is to use separate table names, by changing the prefix as described above, and the other is to specify a "region" name for partitioning data within a single table.
An important use case for this is when the MessageStore is managing persistent queues backing a Spring Integration Message Channel.
The message data for a persistent channel is keyed in the store on the channel name, so if the channel names are not globally unique then there is the danger of channels picking up data that was not intended for them.
To avoid this, the message store region can be used to keep data separate for different physical channels that happen to have the same logical name.
In certain situations plain JDBC support is not sufficient. Maybe you deal with legacy relational database schemas or you have complex data processing needs, but ultimately you have to use Stored Procedures or Stored Functions. Since Spring Integration 2.1, we provide three components in order to execute Stored Procedures or Stored Functions:
- Stored Procedures Inbound Channel Adapter
- Stored Procedures Outbound Channel Adapter
- Stored Procedures Outbound Gateway
In order to enable calls to Stored Procedures and Stored Functions, the Stored Procedure components use the org.springframework.jdbc.core.simple.SimpleJdbcCall class.
Consequently, the following databases are fully supported for executing Stored Procedures:
- Apache Derby
- DB2
- MySQL
- Microsoft SQL Server
- Oracle
- PostgreSQL
- Sybase
If you want to execute Stored Functions instead, the following databases are fully supported:
- MySQL
- Microsoft SQL Server
- Oracle
- PostgreSQL
| Note |
|---|---|
|
Even though your particular database may not be fully supported, chances are, that you can use the Stored Procedure Spring Integration components quite successfully anyway, provided your RDBMS supports Stored Procedures or Functions. As a matter of fact, some of the provided integration tests use the H2 database. Nevertheless, it is very important to thoroughly test those usage scenarios. |
The Stored Procedure components provide full XML Namespace support and configuring the components is similar as for the general purpose JDBC components discussed earlier.
Certain configuration parameters are shared among all Stored Procedure components and are described below:
auto-startup
Lifecycle attribute signaling if this component should be started during Application Context startup.
Defaults to true.
Optional.
data-source
Reference to a javax.sql.DataSource, which is used to access the database. Required.
id
Identifies the underlying Spring bean definition, which is an instance of either EventDrivenConsumer or PollingConsumer, depending on whether the Outbound Channel Adapter’s channel attribute references a SubscribableChannel or a PollableChannel.
Optional.
ignore-column-meta-data
For fully supported databases, the underlying SimpleJdbcCall class can automatically retrieve the parameter information for the to be invoked Stored Procedure or Function from the JDBC Meta-data.
However, if the used database does not support meta data lookups or if you like to provide customized parameter definitions, this flag can be set to true.
It defaults to false.
Optional.
is-function
If true, a SQL Function is called.
In that case the stored-procedure-name or stored-procedure-name-expression attributes define the name of the called function.
Defaults to false.
Optional.
stored-procedure-name
The attribute specifies the name of the stored procedure.
If the is-function attribute is set to true, this attribute specifies the function name instead.
Either this property or stored-procedure-name-expression must be specified.
stored-procedure-name-expression
This attribute specifies the name of the stored procedure using a SpEL expression. Using SpEL you have access to the full message (if available), including its headers and payload. You can use this attribute to invoke different Stored Procedures at runtime. For example, you can provide Stored Procedure names that you would like to execute as a Message Header. The expression must resolve to a String.
If the is-function attribute is set to true, this attribute specifies a Stored Function.
Either this property or stored-procedure-name must be specified.
jdbc-call-operations-cache-size
Defines the maximum number of cached SimpleJdbcCallOperations instances.
Basically, for each Stored Procedure Name a new SimpleJdbcCallOperations instance is created that in return is being cached.
| Note |
|---|---|
|
The |
The default cache size is 10. A value of 0 disables caching. Negative values are not permitted.
If you enable JMX, statistical information about the jdbc-call-operations-cache is exposed as MBean.
Please see Section 10.2.7, “MBean Exporter” for more information.
sql-parameter-source-factory (Not available for the Stored Procedure Inbound Channel Adapter.)
Reference to a SqlParameterSourceFactory.
By default bean properties of the passed in Message payload will be used as a source for the Stored Procedure’s input parameters using a BeanPropertySqlParameterSourceFactory.
This may be sufficient for basic use cases.
For more sophisticated options, consider passing in one or more ProcedureParameter.
Please also refer to Section 19.5.5, “Defining Parameter Sources”.
Optional.
use-payload-as-parameter-source (Not available for the Stored Procedure Inbound Channel Adapter.)
If set to true, the payload of the Message will be used as a source for providing parameters.
If false, however, the entire Message will be available as a source for parameters.
If no Procedure Parameters are passed in, this property will default to true.
This means that using a default BeanPropertySqlParameterSourceFactory the bean properties of the payload will be used as a source for parameter values for the to-be-executed Stored Procedure or Stored Function.
However, if Procedure Parameters are passed in, then this property will by default evaluate to false.
ProcedureParameter allow for SpEL Expressions to be provided and therefore it is highly beneficial to have access to the entire Message.
The property is set on the underlying StoredProcExecutor.
Optional.
The Stored Procedure components share a common set of sub-elements to define and pass parameters to Stored Procedures or Functions. The following elements are available:
-
parameter -
returning-resultset -
sql-parameter-definition -
poller
parameter
Provides a mechanism to provide Stored Procedure parameters. Parameters can be either static or provided using a SpEL Expressions. Optional.
<int-jdbc:parameter name=""
|
The name of the parameter to be passed into the Stored Procedure or Stored Function. Required. |
|
This attribute specifies the type of the value.
If nothing is provided this attribute will default to |
|
The value of the parameter.
You have to provider either this attribute or the |
|
Instead of the |
returning-resultset
Stored Procedures may return multiple result sets.
By setting one or more returning-resultset elements, you can specify RowMappers in order to convert each returned ResultSet to meaningful objects.
Optional.
<int-jdbc:returning-resultset name="" row-mapper="" />
sql-parameter-definition
If you are using a database that is fully supported, you typically don’t have to specify the Stored Procedure parameter definitions.
Instead, those parameters can be automatically derived from the JDBC Meta-data.
However, if you are using databases that are not fully supported, you must set those parameters explicitly using the sql-parameter-definition sub-element.
You can also choose to turn off any processing of parameter meta data information obtained via JDBC using the ignore-column-meta-data attribute.
<int-jdbc:sql-parameter-definition name=""
|
Specifies the name of the SQL parameter. Required. |
|
Specifies the direction of the SQL parameter definition.
Defaults to |
|
The SQL type used for this SQL parameter definition. Will translate into the integer value as defined by java.sql.Types. Alternatively you can provide the integer value as well. If this attribute is not explicitly set, then it will default to VARCHAR. Optional. |
|
The scale of the SQL parameter. Only used for numeric and decimal parameters. Optional. |
|
The typeName for types that are user-named like: |
|
The reference to a custom value handler for complex types. An implementation of SqlReturnType. This attribute is mutually exclusive with the scale attribute and is applicable for OUT(INOUT)-parameters only. Optional. |
poller
Allows you to configure a Message Poller if this endpoint is a PollingConsumer.
Optional.
Parameter Sources govern the techniques of retrieving and mapping the Spring Integration Message properties to the relevant Stored Procedure input parameters. The Stored Procedure components follow certain rules.
By default bean properties of the passed in Message payload will be used as a source for the Stored Procedure’s input parameters.
In that case a BeanPropertySqlParameterSourceFactory will be used.
This may be sufficient for basic use cases.
The following example illustrates that default behavior.
| Important |
|---|---|
|
Please be aware that for the "automatic" lookup of bean properties using the |
Let’s assume we have a payload that consists of a simple bean with the following three properties: id, name and description. Furthermore, we have a simplistic Stored Procedure called INSERT_COFFEE that accepts three input parameters: id, name and description. We also use a fully supported database. In that case the following configuration for a Stored Procedure Outbound Adapter will be sufficient:
<int-jdbc:stored-proc-outbound-channel-adapter data-source="dataSource" channel="insertCoffeeProcedureRequestChannel" stored-procedure-name="INSERT_COFFEE"/>
For more sophisticated options consider passing in one or more ProcedureParameter.
If you do provide ProcedureParameter explicitly, then as default an ExpressionEvaluatingSqlParameterSourceFactory will be used for parameter processing in order to enable the full power of SpEL expressions.
Furthermore, if you need even more control over how parameters are retrieved, consider passing in a custom implementation of a SqlParameterSourceFactory using the sql-parameter-source-factory attribute.
<int-jdbc:stored-proc-inbound-channel-adapter channel=""
|
Channel to which polled messages will be sent. If the stored procedure or function does not return any data, the payload of the Message will be Null. Required. |
|
Limits the number of rows extracted per query. Otherwise all rows are extracted into the outgoing message. Optional. |
|
If this attribute is set to |
|
Indicates whether this procedure’s return value should be included. Since Spring Integration 3.0. Optional. |
| Note |
|---|---|
|
When you declare a Poller, you may notice the Poller’s |
<int-jdbc:stored-proc-outbound-channel-adapter channel=""
|
The receiving Message Channel of this endpoint. Required. |
|
Specifies the order for invocation when this endpoint is connected as a subscriber to a channel. This is particularly relevant when that channel is using a failover dispatching strategy. It has no effect when this endpoint itself is a Polling Consumer for a channel with a queue. Optional. |
<int-jdbc:stored-proc-outbound-gateway request-channel=""
|
The receiving Message Channel of this endpoint. Required. |
|
Message Channel to which replies should be sent, after receiving the database response. Optional. |
|
Allows you to specify how long this gateway will wait for the reply message to be sent successfully before throwing an exception.
Keep in mind that when sending to a |
|
Indicates whether this procedure’s return value should be included. Optional. |
|
If the |
In the following two examples we call Apache Derby Stored Procedures.
The first procedure will call a Stored Procedure that returns a ResultSet, and using a RowMapper the data is converted into a domain object, which then becomes the Spring Integration message payload.
In the second sample we call a Stored Procedure that uses Output Parameters instead, in order to return data.
| Note |
|---|---|
|
Please have a look at the Spring Integration Samples project, located at null The project contains the Apache Derby example referenced here, as well as instruction on how to run it. The Spring Integration Samples project also provides an example using Oracle Stored Procedures. |
In the first example, we call a Stored Procedure named FIND_ALL_COFFEE_BEVERAGES that does not define any input parameters but which returns a ResultSet.
In Apache Derby, Stored Procedures are implemented using Java. Here is the method signature followed by the corresponding Sql:
public static void findAllCoffeeBeverages(ResultSet[] coffeeBeverages) throws SQLException { ... }
CREATE PROCEDURE FIND_ALL_COFFEE_BEVERAGES() \ PARAMETER STYLE JAVA LANGUAGE JAVA MODIFIES SQL DATA DYNAMIC RESULT SETS 1 \ EXTERNAL NAME 'org.springframework.integration.jdbc.storedproc.derby.DerbyStoredProcedures.findAllCoffeeBeverages';
In Spring Integration, you can now call this Stored Procedure using e.g.
a stored-proc-outbound-gateway
<int-jdbc:stored-proc-outbound-gateway id="outbound-gateway-storedproc-find-all" data-source="dataSource" request-channel="findAllProcedureRequestChannel" expect-single-result="true" stored-procedure-name="FIND_ALL_COFFEE_BEVERAGES"> <int-jdbc:returning-resultset name="coffeeBeverages" row-mapper="org.springframework.integration.support.CoffeBeverageMapper"/> </int-jdbc:stored-proc-outbound-gateway>
In the second example, we call a Stored Procedure named FIND_COFFEE that has one input parameter. Instead of returning a ResultSet, an output parameter is used:
public static void findCoffee(int coffeeId, String[] coffeeDescription) throws SQLException { ... }
CREATE PROCEDURE FIND_COFFEE(IN ID INTEGER, OUT COFFEE_DESCRIPTION VARCHAR(200)) \ PARAMETER STYLE JAVA LANGUAGE JAVA EXTERNAL NAME \ 'org.springframework.integration.jdbc.storedproc.derby.DerbyStoredProcedures.findCoffee';
In Spring Integration, you can now call this Stored Procedure using e.g.
a stored-proc-outbound-gateway
<int-jdbc:stored-proc-outbound-gateway id="outbound-gateway-storedproc-find-coffee" data-source="dataSource" request-channel="findCoffeeProcedureRequestChannel" skip-undeclared-results="true" stored-procedure-name="FIND_COFFEE" expect-single-result="true"> <int-jdbc:parameter name="ID" expression="payload" /> </int-jdbc:stored-proc-outbound-gateway>
Starting with version 4.3, the JdbcLockRegistry is available.
Certain components (for example aggregator and resequencer) use a lock obtained from a LockRegistry instance to ensure that only one thread is manipulating a group at a time.
The DefaultLockRegistry performs this function within a single component; you can now configure an external lock registry on these components.
When used with a shared MessageGroupStore, the JdbcLockRegistry can be use to provide this functionality across multiple application instances, such that only one instance can manipulate the group at a time.
When a lock is released by a local thread, another local thread will generally be able to acquire the lock immediately. If a lock is released by a thread using a different registry instance, it can take up to 100ms to acquire the lock.
The JdbcLockRegistry is based on the LockRepository abstraction, where a DefaultLockRepository implementation is present.
The data base schema scripts are located in the org.springframework.integration.jdbc package divided to the particular RDBMS vendors.
For example the H2 DDL for lock table looks like:
CREATE TABLE INT_LOCK ( LOCK_KEY CHAR(36), REGION VARCHAR(100), CLIENT_ID CHAR(36), CREATED_DATE TIMESTAMP NOT NULL, constraint LOCK_PK primary key (LOCK_KEY, REGION) );
The INT_ can be changed according to the target data base design requirements.
Therefore prefix property must be used on the DefaultLockRepository bean definition.
Sometimes it happens that one application has moved to the state when it can’t release distributed lock - remove the particular record in the data base.
For this purpose such dead locks can be expired by the other application on the next locking invocation.
The timeToLive (TTL) option on the DefaultLockRepository is provided for this purpose.
The user may also want to specify CLIENT_ID for the locks stored for a given DefaultLockRepository instance.
In this case you can specify the id to be associated with the DefaultLockRepository as a constructor parameter.
Starting with version 5.0, the JDBC MetadataStore (Section 10.5, “Metadata Store”) implementation is available.
The JdbcMetadataStore can be used to maintain metadata state across application restarts.
This MetadataStore implementation can be used with adapters such as:
In order to configure these adapters to use the JdbcMetadataStore, simply declare a Spring bean using the
bean name metadataStore. The Twitter Inbound Channel Adapter and the Feed Inbound Channel Adapter will both
automatically pick up and use the declared JdbcMetadataStore:
@Bean public MetadataStore metadataStore(DataSource dataSource) { return new JdbcMetadataStore(dataSource); }
Data base schema scripts for several RDMBS vendors are located in the org.springframework.integration.jdbc package.
For example the H2 DDL for metadata table looks like:
CREATE TABLE INT_METADATA_STORE ( METADATA_KEY VARCHAR(255) NOT NULL, METADATA_VALUE VARCHAR(4000), REGION VARCHAR(100) NOT NULL, constraint METADATA_STORE primary key (METADATA_KEY, REGION) );
The INT_ prefix can be changed according to the target data base design requirements and the JdbcMetadataStore can be configured to use the custom prefix.
The JdbcMetadataStore implements ConcurrentMetadataStore, allowing it to be reliably shared across multiple
application instances where only one instance will be allowed to store or modify a key’s value.
All of these operations are atomic via transaction guarantees.
Transaction management is required to use JdbcMetadataStore.
Inbound Channel Adapters can be supplied with a reference to the TransactionManager in the poller configuration.
Unlike non-transactional MetadataStore implementations, with JdbcMetadataStore, the entry appears in the target table only after the transaction commits.
When a rollback occurs, no entries is added to the INT_METADATA_STORE table.
Spring Integration’s JPA (Java Persistence API) module provides components for performing various database operations using JPA. The following components are provided:
These components can be used to perform select, create, update and delete operations on the target databases by sending/receiving messages to them.
The JPA Inbound Channel Adapter lets you poll and retrieve (select) data from the database using JPA whereas the JPA Outbound Channel Adapter lets you create, update and delete entities.
Outbound Gateways for JPA can be used to persist entities to the database, yet allowing you to continue with the flow and execute further components downstream. Similarly, you can use an Outbound Gateway to retrieve entities from the database.
For example, you may use the Outbound Gateway, which receives a Message with a userId as payload on its request channel, to query the database and retrieve the User entity and pass it downstream for further processing.
Recognizing these semantic differences, Spring Integration provides 2 separate JPA Outbound Gateways:
- Retrieving Outbound Gateway
- Updating Outbound Gateway
Functionality
All JPA components perform their respective JPA operations by using either one of the following:
- Entity classes
- Java Persistence Query Language (JPQL) for update, select and delete (inserts are not supported by JPQL)
- Native Query
- Named Query
In the following sections we will describe each of these components in more detail.
The Spring Integration JPA support has been tested using the following persistence providers:
- Hibernate
- EclipseLink
When using a persistence provider, please ensure that the provider is compatible with JPA 2.1.
Each of the provided components uses the o.s.i.jpa.core.JpaExecutor class which, in turn, uses an implementation of the o.s.i.jpa.core.JpaOperations interface.
JpaOperations operates like a typical Data Access Object (DAO) and provides methods such as find, persist, executeUpdate etc.
For most use cases the provided default implementation o.s.i.jpa.core.DefaultJpaOperations should be sufficient.
Nevertheless, you have the option to specify your own implementation in case you require custom behavior.
For initializing a JpaExecutor you have to use one of 3 available constructors that accept one of:
- EntityManagerFactory
- EntityManager or
- JpaOperations
@Bean public JpaExecutor jpaExecutor() { JpaExecutor executor = new JpaExecutor(this.entityManagerFactory); executor.setJpaParameters(Collections.singletonList(new JpaParameter("firstName", null, "#this"))); executor.setUsePayloadAsParameterSource(true); executor.setExpectSingleResult(true); return executor; } @ServiceActivator(inputChannel = "getEntityChannel") @Bean public MessageHandler retrievingJpaGateway() { JpaOutboundGateway gateway = new JpaOutboundGateway(jpaExecutor()); gateway.setGatewayType(OutboundGatewayType.RETRIEVING); gateway.setOutputChannelName("resultsChannel"); return gateway; }
When using XML namespace support, the underlying parser classes will instantiate the relevant Java classes for you. Thus, you typically don’t have to deal with the inner workings of the JPA adapter. This section will document the XML Namespace Support provided by the Spring Integration and will show you how to use the XML Namespace Support to configure the Jpa components.
Certain configuration parameters are shared amongst all JPA components and are described below:
auto-startup
Lifecycle attribute signaling if this component should be started during Application Context startup.
Defaults to true.
Optional.
id
Identifies the underlying Spring bean definition, which is an instance of either EventDrivenConsumer or PollingConsumer.
Optional.
entity-manager-factory
The reference to the JPA Entity Manager Factory that will be used by the adapter to create the EntityManager.
Either this attribute or the entity-manager attribute or the jpa-operations attribute must be provided.
entity-manager
The reference to the JPA Entity Manager that will be used by the component. Either this attribute or the entity-manager-factory attribute or the jpa-operations attribute must be provided.
| Note |
|---|---|
|
Usually your Spring Application Context only defines a JPA Entity Manager Factory and the |
<bean id="entityManager" class="org.springframework.orm.jpa.support.SharedEntityManagerBean"> <property name="entityManagerFactory" ref="entityManagerFactoryBean" /> </bean>
jpa-operations
Reference to a bean implementing the JpaOperations interface.
In rare cases it might be advisable to provide your own implementation of the JpaOperations interface, instead of relying on the default implementation org.springframework.integration.jpa.core.DefaultJpaOperations.
As JpaOperations wraps the necessary datasource; the JPA Entity Manager or JPA Entity Manager Factory must not be provided, if the jpa-operations attribute is used.
entity-class
The fully qualified name of the entity class. The exact semantics of this attribute vary, depending on whether we are performing a persist/update operation or whether we are retrieving objects from the database.
When retrieving data, you can specify the entity-class attribute to indicate that you would like to retrieve objects of this type from the database. In that case you must not define any of the query attributes ( jpa-query, native-query or named-query )
When persisting data, the entity-class attribute will indicate the type of object to persist. If not specified (for persist operations) the entity class will be automatically retrieved from the Message’s payload.
jpa-query
Defines the JPA query (Java Persistence Query Language) to be used.
native-query
Defines the native SQL query to be used.
named-query
This attribute refers to a named query. A named query can either be defined in Native SQL or JPAQL but the underlying JPA persistence provider handles that distinction internally.
For providing parameters, the parameter XML sub-element can be used. It provides a mechanism to provide parameters for the queries that are either based on the Java Persistence Query Language (JPQL) or native SQL queries. Parameters can also be provided for Named Queries.
Expression based Parameters
<int-jpa:parameter expression="payload.name" name="firstName"/>
Value based Parameters
<int-jpa:parameter name="name" type="java.lang.String" value="myName"/>
Positional Parameters
<int-jpa:parameter expression="payload.name"/> <int-jpa:parameter type="java.lang.Integer" value="21"/>
All JPA operations like INSERT, UPDATE and DELETE require a transaction to be active whenever they are performed.
For Inbound Channel Adapters there is nothing special to be done, it is similar to the way we configure transaction managers with pollers used with other inbound channel adapters.
The xml snippet below shows a sample where a transaction manager is configured with the poller used with an Inbound Channel Adapter.
<int-jpa:inbound-channel-adapter channel="inboundChannelAdapterOne" entity-manager="em" auto-startup="true" jpa-query="select s from Student s" expect-single-result="true" delete-after-poll="true"> <int:poller fixed-rate="2000" > <int:transactional propagation="REQUIRED" transaction-manager="transactionManager"/> </int:poller> </int-jpa:inbound-channel-adapter>
However, it may be necessary to specifically start a transaction when using an Outbound Channel Adapter/Gateway. If a DirectChannel is an input channel for the outbound adapter/gateway, and if transaction is active in the current thread of execution, the JPA operation will be performed in the same transaction context. We can also configure to execute this JPA operation in a new transaction as below.
<int-jpa:outbound-gateway request-channel="namedQueryRequestChannel" reply-channel="namedQueryResponseChannel" named-query="updateStudentByRollNumber" entity-manager="em" gateway-type="UPDATING"> <int-jpa:parameter name="lastName" expression="payload"/> <int-jpa:parameter name="rollNumber" expression="headers['rollNumber']"/> <int-jpa:transactional propagation="REQUIRES_NEW" transaction-manager="transactionManager"/> </int-jpa:outbound-gateway>
As we can see above, the transactional sub element of the outbound gateway/adapter will be used to specify the transaction attributes. It is optional to define this child element if you have DirectChannel as an input channel to the adapter and you want the adapter to execute the operations in the same transaction context as the caller. If, however, you are using an ExecutorChannel, it is required to have the transactional sub element as the invoking client’s transaction context is not propagated.
| Note |
|---|---|
|
Unlike the transactional sub element of the poller which is defined in the spring integration’s namespace, the transactional sub element for the outbound gateway/adapter is defined in the jpa namespace. |
An Inbound Channel Adapter is used to execute a select query over the database using JPA QL and return the result.
The message payload will be either a single entity or a List of entities.
Below is a sample xml snippet that shows a sample usage of inbound-channel-adapter.
<int-jpa:inbound-channel-adapter channel="inboundChannelAdapterOne"
|
The channel over which the inbound-channel-adapter will put the messages with the payload received after executing the provided JPA QL in the query attribute. |
|
The |
|
Attribute signalling if the component should be automatically started on startup of the Application Context.
The value defaults to |
|
The JPA QL that needs to be executed and whose result needs to be sent out as the payload of the message |
|
The attribute that tells if the executed JPQL query gives a single entity in the result or a |
|
This non zero, non negative integer value tells the adapter not to select more than given number of rows on execution of the select operation.
By default, if this attribute is not set, all the possible records are selected by given query.
This attribute is mutually exclusive with |
|
An expression, mutually exclusive with |
|
Set this value to |
|
Set this value to |
<int-jpa:inbound-channel-adapter auto-startup="true"
|
This Lifecycle attribute signaled if this component should be started during startup of the Application Context. This attribute defaults to true.Optional. |
|
The channel to which the adapter will send a message with the payload that was received after performing the desired JPA operation. |
|
A boolean flag that indicates whether the records selected are to be deleted after they are being polled by the adapter.
By default the value is |
|
A boolean flag that indicates whether the records can be deleted in bulk or are deleted one record at a time.
By default the value is |
|
The fully qualified name of the entity class that would be queried from the database. The adapter will automatically build a JPA Query to be executed based on the entity class name provided.Optional. |
|
An instance of |
|
An instance of |
|
A boolean flag indicating whether the select operation is expected to return a single result or a |
|
An implementation of |
|
The JPA QL that needs to be executed by this adapter.Optional. |
|
The named query that needs to be executed by this adapter.Optional. |
|
The native query that will be executed by this adapter. Either of the jpa-query, named-query,entity-class or native-query attributes are to be used. Optional. |
|
An implementation of |
|
Maximum amount of time in milliseconds to wait when sending a message to the channel.Optional. |
The following Spring Boot application provides an example of configuring the inbound adapter using Java configuration:
@SpringBootApplication @EntityScan(basePackageClasses = StudentDomain.class) public class JpaJavaApplication { public static void main(String[] args) { new SpringApplicationBuilder(JpaJavaApplication.class) .web(false) .run(args); } @Autowired private EntityManagerFactory entityManagerFactory; @Bean public JpaExecutor jpaExecutor() { JpaExecutor executor = new JpaExecutor(this.entityManagerFactory); jpaExecutor.setJpaQuery("from Student"); return executor; } @Bean @InboundChannelAdapter(channel = "jpaInputChannel", poller = @Poller(fixedDelay = "${poller.interval}")) public MessageSource<?> jpaInbound() { return new JpaPollingChannelAdapter(jpaExecutor()); } @Bean @ServiceActivator(inputChannel = "jpaInputChannel") public MessageHandler handler() { return message -> System.out.println(message.getPayload()); } }
The following Spring Boot application provides an example of configuring the Inbound Adapter using the Java DSL:
@SpringBootApplication @EntityScan(basePackageClasses = StudentDomain.class) public class JpaJavaApplication { public static void main(String[] args) { new SpringApplicationBuilder(JpaJavaApplication.class) .web(false) .run(args); } @Autowired private EntityManagerFactory entityManagerFactory; @Bean public IntegrationFlow pollingAdapterFlow() { return IntegrationFlows .from(Jpa.inboundAdapter(this.entityManagerFactory) .entityClass(StudentDomain.class) .maxResults(1) .expectSingleResult(true), e -> e.poller(p -> p.trigger(new OnlyOnceTrigger()))) .channel(c -> c.queue("pollingResults")) .get(); } }
The JPA Outbound channel adapter allows you to accept messages over a request channel. The payload can either be used as the entity to be persisted, or used along with the headers in parameter expressions for a defined JPQL query to be executed. In the following sub sections we shall see what those possible ways of performing these operations are.
The XML snippet below shows how we can use the Outbound Channel Adapter to persist an entity to the database.
<int-jpa:outbound-channel-adapter channel="entityTypeChannel"
|
The channel over which a valid JPA entity will be sent to the JPA Outbound Channel Adapter. |
|
The fully qualified name of the entity class that would be accepted by the adapter to be persisted in the database. You can actually leave off this attribute in most cases as the adapter can determine the entity class automatically from the Spring Integration Message payload. |
|
The operation that needs to be done by the adapter, valid values are PERSIST, MERGE and DELETE. The default value is MERGE. |
|
The JPA entity manager to be used. |
As we can see above these 4 attributes of the outbound-channel-adapter are all we need to configure it to accept entities over the input channel and process them to PERSIST,MERGE or DELETE it from the underlying data source.
| Note |
|---|---|
|
As of Spring Integration 3.0, payloads to PERSIST or MERGE can also be of type |
We have seen in the above sub section how to perform a PERSIST action using an entity We will now see how to use the outbound channel adapter which uses JPA QL (Java Persistence API Query Language)
<int-jpa:outbound-channel-adapter channel="jpaQlChannel"
|
The input channel over which the message is being sent to the outbound channel adapter |
|
The JPA QL that needs to be executed.This query may contain parameters that will be evaluated using the parameter child tag. |
|
The entity manager used by the adapter to perform the JPA operations |
|
This sub element, one for each parameter will be used to evaluate the value of the parameter names specified in the JPA QL specified in the query attribute |
The parameter sub element accepts an attribute name which corresponds to the named parameter specified in the provided JPA QL (point 2 in the above mentioned sample). The value of the parameter can either be static or can be derived using an expression. The static value and the expression to derive the value is specified using the value and the expression attributes respectively. These attributes are mutually exclusive.
If the value attribute is specified we can provide an optional type attribute.
The value of this attribute is the fully qualified name of the class whose value is represented by the value attribute.
By default the type is assumed to be a java.lang.String.
<int-jpa:outbound-channel-adapter ... > <int-jpa:parameter name="level" value="2" type="java.lang.Integer"/> <int-jpa:parameter name="name" expression="payload['name']"/> </int-jpa:outbound-channel-adapter>
As seen in the above snippet, it is perfectly valid to use multiple parameter sub elements within an outbound channel adapter tag and derive some parameters using expressions and some with static value.
However, care should be taken not to specify the same parameter name multiple times, and, provide one parameter sub element for each named parameter specified in the JPA query.
For example, we are specifying two parameters level and name where level attribute is a static value of type java.lang.Integer, where as the name attribute is derived from the payload of the message
| Note |
|---|---|
|
Though specifying select is valid for JPA QL, it makes no sense as outbound channel adapters will not be returning any result. If you want to select some values, consider using the outbound gateway instead. |
In this section we will see how to use native queries to perform the operations using JPA outbound channel adapter. Using native queries is similar to using JPA QL, except that the query specified here is a native database query. By choosing native queries we lose the database vendor independence which we get using JPA QL.
One of the things we can achieve using native queries is to perform database inserts, which is not possible using JPA QL (To perform inserts we send JPA entities to the channel adapter as we have seen earlier). Below is a small xml fragment that demonstrates the use of native query to insert values in a table. Please note that we have only mentioned the important attributes below. All other attributes like channel, entity-manager and the parameter sub element has the same semantics as when we use JPA QL.
| Important |
|---|---|
|
Please be aware that named parameters may not be supported by your JPA provider in conjunction with native SQL queries. While they work fine using Hibernate, OpenJPA and EclipseLink do NOT support them: https://issues.apache.org/jira/browse/OPENJPA-111 Section 3.8.12 of the JPA 2.0 spec states: "Only positional parameter binding and positional access to result items may be portably used for native queries." |
<int-jpa:outbound-channel-adapter channel="nativeQlChannel" native-query="insert into STUDENT_TABLE(FIRST_NAME,LAST_UPDATED) values (:lastName,:lastUpdated)"
|
The native query that will be executed by this outbound channel adapter |
We will now see how to use named queries after seeing using entity, JPA QL and native query in previous sub sections. Using named query is also very similar to using JPA QL or a native query, except that we specify a named query instead of a query. Before we go further and see the xml fragment for the declaration of the outbound-channel-adapter, we will see how named JPA named queries are defined.
In our case, if we have an entity called Student, then we have the following in the class to define two named queries selectStudent and updateStudent.
Below is a way to define named queries using annotations
@Entity @Table(name="Student") @NamedQueries({ @NamedQuery(name="selectStudent", query="select s from Student s where s.lastName = 'Last One'"), @NamedQuery(name="updateStudent", query="update Student s set s.lastName = :lastName, lastUpdated = :lastUpdated where s.id in (select max(a.id) from Student a)") }) public class Student { ...
You can alternatively use the orm.xml to define named queries as seen below
<entity-mappings ...> ... <named-query name="selectStudent"> <query>select s from Student s where s.lastName = 'Last One'</query> </named-query> </entity-mappings>
Now that we have seen how we can define named queries using annotations or using orm.xml, we will now see a small xml fragment for defining an outbound-channel-adapter using named query
<int-jpa:outbound-channel-adapter channel="namedQueryChannel" named-query="updateStudent"
|
The named query that we want the adapter to execute when it receives a message over the channel |
<int-jpa:outbound-channel-adapter auto-startup="true"
|
Lifecycle attribute signaling if this component should be started during Application Context startup.
Defaults to |
|
The channel from which the outbound adapter will receive messages for performing the desired operation. |
|
The fully qualified name of the entity class for the JPA Operation. The attributes entity-class, query and named-query are mutually exclusive. Optional. |
|
An instance of |
|
An instance of |
|
An implementation of |
|
The JPA QL that needs to be executed by this adapter.Optional. |
|
The named query that needs to be executed by this adapter.Optional. |
|
The native query that will be executed by this adapter. Either of the jpa-query, named-query or native-query attributes are to be used. Optional. |
|
The order for this consumer when multiple consumers are registered thereby managing load- balancing and/or failover. Optional (Defaults to Ordered.LOWEST_PRECEDENCE). |
|
An instance of |
|
Accepts one of the following: PERSIST, MERGE or DELETE.
Indicates the operation that the adapter needs to perform.
Relevant only if an entity is being used for JPA operations.
Ignored if JPA QL, named query or native query is provided.
Defaults to MERGE.
Optional.
As of Spring Integration 3.0, payloads to persist or merge can also be of type |
|
Set this value to |
|
Set this attribute to a value greater than 0 if you want to flush the persistence context immediately after persist, merge or delete operations and don’t want to rely on the |
|
Set this value to true if you want to clear persistence context immediately after each flush operation.
The attribute’s value is applied only if the |
|
If set to true, the payload of the Message will be used as a source for providing parameters. If false, however, the entire Message will be available as a source for parameters.Optional. | |
|
Defines the transaction management attributes and the reference to transaction manager to be used by the JPA adapter.Optional. | |
|
One or more parameter attributes, one for each parameter used in the query. The value or expression provided will be evaluated to compute the value of the parameter.Optional. |
The following Spring Boot application provides an example of configuring the inbound adapter using Java configuration:
@SpringBootApplication @EntityScan(basePackageClasses = StudentDomain.class) @IntegrationComponentScan public class JpaJavaApplication { public static void main(String[] args) { new SpringApplicationBuilder(JpaJavaApplication.class) .web(false) .run(args); } @Autowired private EntityManagerFactory entityManagerFactory; @MessagingGateway interface JpaGateway { @Gateway(requestChannel = "jpaPersistChannel") @Transactional void persistStudent(StudentDomain payload); } @Bean public JpaExecutor jpaExecutor() { JpaExecutor executor = new JpaExecutor(this.entityManagerFactory); jpaExecutor.setEntityClass(StudentDomain.class); jpaExecutor.setPersistMode(PersistMode.PERSIST); return executor; } @Bean @ServiceActivator(channel = "jpaPersistChannel") public MessageHandler jpaOutbound() { JpaOutboundGateway adapter = new JpaOutboundGateway(jpaExecutor()); adapter.setProducesReply(false); return adapter; } }
The following Spring Boot application provides an example of configuring the Inbound Adapter using the Java DSL:
@SpringBootApplication @EntityScan(basePackageClasses = StudentDomain.class) public class JpaJavaApplication { public static void main(String[] args) { new SpringApplicationBuilder(JpaJavaApplication.class) .web(false) .run(args); } @Autowired private EntityManagerFactory entityManagerFactory; @Bean public IntegrationFlow outboundAdapterFlow() { return f -> f .handle(Jpa.outboundAdapter(this.entityManagerFactory) .entityClass(StudentDomain.class) .persistMode(PersistMode.PERSIST), e -> e.transactional()); } }
The JPA Inbound Channel Adapter allows you to poll a database in order to retrieve one or more JPA entities and the retrieved data is consequently used to start a Spring Integration flow using the retrieved data as message payload.
Additionally, you may use JPA Outbound Channel Adapters at the end of your flow in order to persist data, essentially terminating the flow at the end of the persistence operation.
However, how can you execute JPA persistence operation in the middle of a flow? For example, you may have business data that you are processing in your Spring Integration message flow, that you would like to persist, yet you still need to execute other components further downstream. Or instead of polling the database using a poller, you rather have the need to execute JPQL queries and retrieve data actively which then is used to being processed in subsequent components within your flow.
This is where JPA Outbound Gateways come into play. They give you the ability to persist data as well as retrieving data. To facilitate these uses, Spring Integration provides two types of JPA Outbound Gateways:
- Updating Outbound Gateway
- Retrieving Outbound Gateway
Whenever the Outbound Gateway is used to perform an action that saves, updates or solely deletes some records in the database, you need to use an Updating Outbound Gateway gateway. If for example an entity is used to persist it, then a merged/persisted entity is returned as a result. In other cases the number of records affected (updated or deleted) is returned instead.
When retrieving (selecting) data from the database, we use a Retrieving Outbound Gateway. With a Retrieving Outbound Gateway gateway, we can use either JPQL, Named Queries (native or JPQL-based) or Native Queries (SQL) for selecting the data and retrieving the results.
An Updating Outbound Gateway is functionally very similar to an Outbound Channel Adapter, except that an Updating Outbound Gateway is used to send a result to the Gateway’s reply channel after performing the given JPA operation.
A Retrieving Outbound Gateway is quite similar to an Inbound Channel Adapter.
| Note |
|---|---|
|
We recommend you to first refer to the JPA Outbound Channel Adapter section and the JPA Inbound Channel Adapter sections above, as most of the common concepts are being explained there. |
This similarity was the main factor to use the central JpaExecutor class to unify common functionality as much as possible.
Common for all JPA Outbound Gateways and simlar to the outbound-channel-adapter, we can use
- Entity classes
- JPA Query Language (JPQL)
- Native query
- Named query
for performing various JPA operations. For configuration examples please see Section 20.6.8, “JPA Outbound Gateway Samples”.
JPA Outbound Gateways always have access to the Spring Integration Message as input. As such the following parameters are available:
parameter-source-factory
An instance of o.s.i.jpa.support.parametersource.ParameterSourceFactory that will be used to get an instance of o.s.i.jpa.support.parametersource.ParameterSource.
The ParameterSource is used to resolve the values of the parameters provided in the query.
The_parameter-source-factory_ attribute is ignored, if operations are performed using a JPA entity.
If a parameter sub-element is used, the factory must be of type ExpressionEvaluatingParameterSourceFactory, located in package o.s.i.jpa.support.parametersource.
Optional.
use-payload-as-parameter-source
If set to true, the payload of the Message will be used as a source for providing parameters.
If set to false, the entire Message will be available as a source for parameters.
If no JPA Parameters are passed in, this property will default to true.
This means that using a default BeanPropertyParameterSourceFactory, the bean properties of the payload will be used as a source for parameter values for the to-be-executed JPA query.
However, if JPA Parameters are passed in, then this property will by default evaluate to false.
The reason is that JPA Parameters allow for SpEL Expressions to be provided and therefore it is highly beneficial to have access to the entire Message, including the Headers.
<int-jpa:updating-outbound-gateway request-channel=""
|
The channel from which the outbound gateway will receive messages for performing the desired operation. This attribute is similar to channel attribute of the outbound-channel-adapter.Optional. |
|
The channel to which the gateway will send the response after performing the required JPA operation. If this attribute is not defined, the request message must have a replyChannel header. Optional. |
|
Specifies the time the gateway will wait to send the result to the reply channel. Only applies when the reply channel itself might block the send (for example a bounded QueueChannel that is currently full). By default the Gateway will wait indefinitely. The value is specified in milliseconds. Optional. |
The following Spring Boot application provides an example of configuring the inbound adapter using Java configuration:
@SpringBootApplication @EntityScan(basePackageClasses = StudentDomain.class) @IntegrationComponentScan public class JpaJavaApplication { public static void main(String[] args) { new SpringApplicationBuilder(JpaJavaApplication.class) .web(false) .run(args); } @Autowired private EntityManagerFactory entityManagerFactory; @MessagingGateway interface JpaGateway { @Gateway(requestChannel = "jpaUpdateChannel") @Transactional void updateStudent(StudentDomain payload); } @Bean @ServiceActivator(channel = "jpaUpdateChannel") public MessageHandler jpaOutbound() { JpaOutboundGateway adapter = new JpaOutboundGateway(new JpaExecutor(this.entityManagerFactory)); adapter.setOutputChannelName("updateResults"); return adapter; } }
The following Spring Boot application provides an example of configuring the Inbound Adapter using the Java DSL:
@SpringBootApplication @EntityScan(basePackageClasses = StudentDomain.class) public class JpaJavaApplication { public static void main(String[] args) { new SpringApplicationBuilder(JpaJavaApplication.class) .web(false) .run(args); } @Autowired private EntityManagerFactory entityManagerFactory; @Bean public IntegrationFlow updatingGatewayFlow() { return f -> f .handle(Jpa.updatingGateway(this.entityManagerFactory), e -> e.transactional(true)) .channel(c -> c.queue("updateResults")); } }
<int-jpa:retrieving-outbound-gateway request-channel="" auto-startup="true" delete-after-poll="false" delete-in-batch="false" entity-class="" id-expression=""
|
(Since Spring Integration 4.0) The SpEL expression to determine the |
|
A boolean flag indicating whether the select operation is expected to return a single result or a |
|
This non zero, non negative integer value tells the adapter not to select more than given number of rows on execution of the select operation.
By default, if this attribute is not set, all the possible records are selected by given query.
This attribute is mutually exclusive with |
|
An expression, mutually exclusive with |
|
This non zero, non negative integer value tells the adapter the first record from which the results are to be retrieved This attribute is mutually exclusive to |
|
This expression is evaluated against the message to find the position of first record in the result set to be retrieved This attribute is mutually exclusive to |
The following Spring Boot application provides an example of configuring the inbound adapter using Java configuration:
@SpringBootApplication @EntityScan(basePackageClasses = StudentDomain.class) public class JpaJavaApplication { public static void main(String[] args) { new SpringApplicationBuilder(JpaJavaApplication.class) .web(false) .run(args); } @Autowired private EntityManagerFactory entityManagerFactory; @Bean public JpaExecutor jpaExecutor() { JpaExecutor executor = new JpaExecutor(this.entityManagerFactory); jpaExecutor.setJpaQuery("from Student s where s.id = :id"); executor.setJpaParameters(Collections.singletonList(new JpaParameter("id", null, "payload"))); jpaExecutor.setExpectSingleResult(true); return executor; } @Bean @ServiceActivator(channel = "jpaRetrievingChannel") public MessageHandler jpaOutbound() { JpaOutboundGateway adapter = new JpaOutboundGateway(jpaExecutor()); adapter.setOutputChannelName("retrieveResults"); adapter.setGatewayType(OutboundGatewayType.RETRIEVING); return adapter; } }
The following Spring Boot application provides an example of configuring the Inbound Adapter using the Java DSL:
@SpringBootApplication @EntityScan(basePackageClasses = StudentDomain.class) public class JpaJavaApplication { public static void main(String[] args) { new SpringApplicationBuilder(JpaJavaApplication.class) .web(false) .run(args); } @Autowired private EntityManagerFactory entityManagerFactory; @Bean public IntegrationFlow retrievingGatewayFlow() { return f -> f .handle(Jpa.retrievingGateway(this.entityManagerFactory) .jpaQuery("from Student s where s.id = :id") .expectSingleResult(true) .parameterExpression("id", "payload")) .channel(c -> c.queue("retrieveResults")); } }
| Important |
|---|---|
|
When choosing to delete entities upon retrieval and you have retrieved a collection of entities, please be aware that by default entities are deleted on a per entity basis. This may cause performance issues. Alternatively, you can set attribute deleteInBatch to true, which will perform a batch delete. However, please be aware of the limitation that in that case cascading deletes are not supported. JSR 317: Java™ Persistence 2.0 states in chapter Chapter 4.10, Bulk Update and Delete Operations that: "A delete operation only applies to entities of the specified class and its subclasses. It does not cascade to related entities." For more information please see JSR 317: Java™ Persistence 2.0 |
This section contains various examples of the Updating Outbound Gateway and Retrieving Outbound Gateway
Update using an Entity Class
In this example an Updating Outbound Gateway is persisted using solely the entity class org.springframework.integration.jpa.test.entity.Student as JPA defining parameter.
<int-jpa:updating-outbound-gateway request-channel="entityRequestChannel"
|
This is the request channel for the outbound gateway, this is similar to the channel attribute of the outbound-channel-adapter |
|
This is where a gateway differs from an outbound adapter, this is the channel over which the reply of the performed JPA operation is received. If,however, you are not interested in the reply received and just want to perform the operation, then using a JPA outbound-channel-adapter is the appropriate choice. In above case, where we are using entity class, the reply will be the entity object that was created/merged as a result of the JPA operation. |
Update using JPQL
In this example, we will see how we can update an entity using the Java Persistence Query Language (JPQL). For this we use an_Updating Outbound Gateway_.
<int-jpa:updating-outbound-gateway request-channel="jpaqlRequestChannel" reply-channel="jpaqlResponseChannel" jpa-query="update Student s set s.lastName = :lastName where s.rollNumber = :rollNumber"
|
The JPQL query that will be executed by the gateway. Since an Updating Outbound Gateway is used, only update and delete JPQL queries would be sensible choices. |
When sending a message with a String payload and containing a header rollNumber with a long value, the last name of the student with the provided roll number is updated to the value provided in the message payload. When using an UPDATING gateway, the return value is always an integer value which denotes the number of records affected by execution of the JPA QL.
Retrieving an Entity using JPQL
The following examples uses a Retrieving Outbound Gateway together with JPQL to retrieve (select) one or more entities from the database.
<int-jpa:retrieving-outbound-gateway request-channel="retrievingGatewayReqChannel" reply-channel="retrievingGatewayReplyChannel" jpa-query="select s from Student s where s.firstName = :firstName and s.lastName = :lastName" entity-manager="em"> <int-jpa:parameter name="firstName" expression="payload"/> <int-jpa:parameter name="lastName" expression="headers['lastName']"/> </int-jpa:outbound-gateway>
Retrieving an Entity using id-expression
The following examples uses a Retrieving Outbound Gateway together with id-expression to retrieve (find) one and only one entity from the database.
The primaryKey is the result of id-expression evaluation.
The entityClass is a class of Message payload.
<int-jpa:retrieving-outbound-gateway request-channel="retrievingGatewayReqChannel" reply-channel="retrievingGatewayReplyChannel" id-expression="payload.id" entity-manager="em"/>
Update using a Named Query
Using a Named Query is basically the same as using a JPQL query directly. The difference is that the named-query attribute is used instead, as seen in the xml snippet below.
<int-jpa:updating-outbound-gateway request-channel="namedQueryRequestChannel" reply-channel="namedQueryResponseChannel" named-query="updateStudentByRollNumber" entity-manager="em"> <int-jpa:parameter name="lastName" expression="payload"/> <int-jpa:parameter name="rollNumber" expression="headers['rollNumber']"/> </int-jpa:outbound-gateway>
| Note |
|---|---|
|
You can find a complete Sample application for using Spring Integration’s JPA adapter at jpa sample. |
Spring Integration provides Channel Adapters for receiving and sending JMS messages.
There are actually two JMS-based inbound Channel Adapters.
The first uses Spring’s JmsTemplate to receive based on a polling period.
The second is "message-driven" and relies upon a Spring MessageListener container.
There is also an outbound Channel Adapter which uses the JmsTemplate to convert and send a JMS Message on demand.
As you can see from above by using JmsTemplate and MessageListener container Spring Integration relies on Spring’s JMS support.
This is important to understand since most of the attributes exposed on these adapters will configure the underlying Spring’s JmsTemplate and/or MessageListener container.
For more details about JmsTemplate and MessageListener container please refer to Spring JMS documentation.
Whereas the JMS Channel Adapters are intended for unidirectional Messaging (send-only or receive-only), Spring Integration also provides inbound and outbound JMS Gateways for request/reply operations.
The inbound gateway relies on one of Spring’s MessageListener container implementations for Message-driven reception that is also capable of sending a return value to the reply-to Destination as provided by the received Message.
The outbound Gateway sends a JMS Message to a request-destination (or request-destination-name or request-destination-expression) and then receives a reply Message.
The reply-destination reference (or reply-destination-name or reply-destination-expression) can be configured explicitly or else the outbound gateway will use a JMS TemporaryQueue.
Prior to Spring Integration 2.2, if necessary, a TemporaryQueue was created (and removed) for each request/reply.
Beginning with Spring Integration 2.2, the outbound gateway can be configured to use a MessageListener container to receive replies instead of directly using a new (or cached) Consumer to receive the reply for each request.
When so configured, and no explicit reply destination is provided, a single TemporaryQueue is used for each gateway instead of one for each request.
The inbound Channel Adapter requires a reference to either a single JmsTemplate instance or both ConnectionFactory and Destination (a destinationName can be provided in place of the destination reference).
The following example defines an inbound Channel Adapter with a Destination reference.
<int-jms:inbound-channel-adapter id="jmsIn" destination="inQueue" channel="exampleChannel"> <int:poller fixed-rate="30000"/> </int-jms:inbound-channel-adapter>
| Tip |
|---|---|
|
Notice from the configuration that the inbound-channel-adapter is a Polling Consumer.
That means that it invokes |
| Note |
|---|---|
|
All of the JMS adapters that require a reference to the |
If extract-payload is set to true (which is the default), the received JMS Message will be passed through the MessageConverter.
When relying on the default SimpleMessageConverter, this means that the resulting Spring Integration Message will have the JMS Message’s body as its payload.
A JMS TextMessage will produce a String-based payload, a JMS BytesMessage will produce a byte array payload, and a JMS ObjectMessage 's Serializable instance will become the Spring Integration Message’s payload.
If instead you prefer to have the raw JMS Message as the Spring Integration Message’s payload, then set extract-payload to false.
<int-jms:inbound-channel-adapter id="jmsIn" destination="inQueue" channel="exampleChannel" extract-payload="false"/> <int:poller fixed-rate="30000"/> </int-jms:inbound-channel-adapter>
Starting with version 4.0, the inbound channel adapter supports the session-transacted attribute.
In earlier versions, you had to inject a JmsTemplate with sessionTransacted set to true.
(The adapter did allow the acknowledge attribute to be set to transacted but this was incorrect and did not work).
Note, however, that setting session-transacted to true has little value because the transaction is committed
immediately after the receive() and before the message is sent to the channel.
If you want the entire flow to be transactional (for example if there is a downstream outbound channel adapter), you must use a transactional poller, with a JmsTransactionManager.
Or, consider using a jms-message-driven-channel-adapter with acknowledge set to transacted (the default).
The "message-driven-channel-adapter" requires a reference to either an instance of a Spring MessageListener container (any subclass of AbstractMessageListenerContainer) or both ConnectionFactory and Destination (a destinationName can be provided in place of the destination reference).
The following example defines a message-driven Channel Adapter with a Destination reference.
<int-jms:message-driven-channel-adapter id="jmsIn" destination="inQueue" channel="exampleChannel"/>
| Note |
|---|---|
|
The Message-Driven adapter also accepts several properties that pertain to the MessageListener container.
These values are only considered if you do not provide a If you have a custom listener container implementation (usually a subclass of |
| Important |
|---|---|
|
Starting with version 4.2, the default |
The extract-payload property has the same effect as described above, and once again its default value is true.
The poller sub-element is not applicable for a message-driven Channel Adapter, as it will be actively invoked.
For most usage scenarios, the message-driven approach is better since the Messages will be passed along to the MessageChannel as soon as they are received from the underlying JMS consumer.
Finally, the <message-driven-channel-adapter> also accepts the error-channel attribute.
This provides the same basic functionality as described in Section 8.4.1, “Enter the GatewayProxyFactoryBean”.
<int-jms:message-driven-channel-adapter id="jmsIn" destination="inQueue" channel="exampleChannel" error-channel="exampleErrorChannel"/>
When comparing this to the generic gateway configuration, or the JMS inbound-gateway that will be discussed below, the key difference here is that we are in a one-way flow since this is a channel-adapter, not a gateway.
Therefore, the flow downstream from the error-channel should also be one-way.
For example, it could simply send to a logging handler, or it could be connected to a different JMS <outbound-channel-adapter> element.
When consuming from topics, set the pub-sub-domain attribute to true; set subscription-durable to true
for a durable subscription, subscription-shared for a shared subscription (requires a JMS 2.0 broker and
has been available since version 4.2).
Use subscription-name to name the subscription.
| Note |
|---|---|
|
Starting with version 4.2 the error-channel is used for the conversion errors, too.
Previously, if a JMS |
The JmsSendingMessageHandler implements the MessageHandler interface and is capable of converting Spring Integration Messages to JMS messages and then sending to a JMS destination.
It requires either a jmsTemplate reference or both jmsConnectionFactory and destination references (again, the destinationName may be provided in place of the destination).
As with the inbound Channel Adapter, the easiest way to configure this adapter is with the namespace support.
The following configuration will produce an adapter that receives Spring Integration Messages from the "exampleChannel" and then converts those into JMS Messages and sends them to the JMS Destination reference whose bean name is "outQueue".
<int-jms:outbound-channel-adapter id="jmsOut" destination="outQueue" channel="exampleChannel"/>
As with the inbound Channel Adapters, there is an extract-payload property. However, the meaning is reversed for the outbound adapter. Rather than applying to the JMS Message, the boolean property applies to the Spring Integration Message payload. In other words, the decision is whether to pass the Spring Integration Message itself as the JMS Message body or whether to pass the Spring Integration Message’s payload as the JMS Message body. The default value is once again true. Therefore, if you pass a Spring Integration Message whose payload is a String, a JMS TextMessage will be created. If on the other hand you want to send the actual Spring Integration Message to another system via JMS, then simply set this to false.
| Note |
|---|---|
|
Regardless of the boolean value for payload extraction, the Spring Integration MessageHeaders will map to JMS properties as long as you are relying on the default converter or provide a reference to another instance of HeaderMappingMessageConverter (the same holds true for inbound adapters except that in those cases, it’s the JMS properties mapping to Spring Integration MessageHeaders). |
Starting with version 4.0, the outbound channel adapter supports the session-transacted attribute.
In earlier versions, you had to inject a JmsTemplate with sessionTransacted set to true.
The attribute now sets the property on the built-in default JmsTemplate.
If a transaction exists (perhaps from an upstream message-driven-channel-adapter) the send will be performed within the same transaction.
Otherwise a new transaction will be started.
Spring Integration’s message-driven JMS inbound-gateway delegates to a MessageListener container, supports dynamically adjusting concurrent consumers, and can also handle replies.
The inbound gateway requires references to a ConnectionFactory, and a request Destination (or requestDestinationName).
The following example defines a JMS "inbound-gateway" that receives from the JMS queue referenced by the bean id "inQueue" and sends to the Spring Integration channel named "exampleChannel".
<int-jms:inbound-gateway id="jmsInGateway" request-destination="inQueue" request-channel="exampleChannel"/>
Since the gateways provide request/reply behavior instead of unidirectional send or receive, they also have two distinct properties for the "payload extraction" (as discussed above for the Channel Adapters' extract-payload setting). For an inbound-gateway, the extract-request-payload property determines whether the received JMS Message body will be extracted. If false, the JMS Message itself will become the Spring Integration Message payload. The default is true.
Similarly, for an inbound-gateway the extract-reply-payload property applies to the Spring Integration Message that is going to be converted into a reply JMS Message. If you want to pass the whole Spring Integration Message (as the body of a JMS ObjectMessage) then set this to false. By default, it is also true such that the Spring Integration Message payload will be converted into a JMS Message (e.g. String payload becomes a JMS TextMessage).
As with anything else, Gateway invocation might result in error. By default Producer will not be notified of the errors that might have occurred on the consumer side and will time out waiting for the reply. However there might be times when you want to communicate an error condition back to the consumer, in other words treat the Exception as a valid reply by mapping it to a Message. To accomplish this JMS Inbound Gateway provides support for a Message Channel to which errors can be sent for processing, potentially resulting in a reply Message payload that conforms to some contract defining what a caller may expect as an "error" reply. Such a channel can be configured via the error-channel attribute.
<int-jms:inbound-gateway request-destination="requestQueue" request-channel="jmsinputchannel" error-channel="errorTransformationChannel"/> <int:transformer input-channel="exceptionTransformationChannel" ref="exceptionTransformer" method="createErrorResponse"/>
You might notice that this example looks very similar to that included within Section 8.4.1, “Enter the GatewayProxyFactoryBean”. The same idea applies here: The exceptionTransformer could be a simple POJO that creates error response objects, you could reference the "nullChannel" to suppress the errors, or you could leave error-channel out to let the Exception propagate.
When consuming from topics, set the pub-sub-domain attribute to true; set subscription-durable to true
for a durable subscription, subscription-shared for a shared subscription (requires a JMS 2.0 broker and
has been available since version 4.2).
Use subscription-name to name the subscription.
| Important |
|---|---|
|
Starting with version 4.2, the default |
The outbound Gateway creates JMS Messages from Spring Integration Messages and then sends to a request-destination.
It will then handle the JMS reply Message either by using a selector to receive from the reply-destination that you configure, or if no reply-destination is provided, it will create JMS TemporaryQueue s.
| Warning |
|---|---|
|
Using a reply-destination (or reply-destination-name), together with a If you specify a reply destination, you are advised to NOT use cached consumers.
Alternatively, consider using a |
<int-jms:outbound-gateway id="jmsOutGateway" request-destination="outQueue" request-channel="outboundJmsRequests" reply-channel="jmsReplies"/>
The outbound-gateway payload extraction properties are inversely related to those of the inbound-gateway (see the discussion above). That means that the extract-request-payload property value applies to the Spring Integration Message that is being converted into a JMS Message to be sent as a request, and the extract-reply-payload property value applies to the JMS Message that is received as a reply and then converted into a Spring Integration Message to be subsequently sent to the reply-channel as shown in the example configuration above.
<reply-listener/>
Spring Integration 2.2 introduced an alternative technique for handling replies.
If you add a <reply-listener/> child element to the gateway, instead of creating a consumer for each reply, a MessageListener container is used to receive the replies and hand them over to the requesting thread.
This provides a number of performance benefits as well as alleviating the cached consumer memory utilization problem described in the caution above.
When using a <reply-listener/> with an outbound gateway with no reply-destination, instead of creating a TemporaryQueue for each request, a single TemporaryQueue is used (the gateway will create an additional TemporaryQueue, as necessary, if the connection to the broker is lost and recovered).
When using a correlation-key, multiple gateways can share the same reply destination because the listener container uses a selector that is unique to each gateway.
| Warning |
|---|---|
|
If you specify a reply listener, and specify a reply destination (or reply destination name), but provide NO correlation key, the gateway will log a warning and fall back to pre-2.2 behavior. This is because there is no way to configure a selector in this case, thus there is no way to avoid a reply going to a different gateway that might be configured with the same reply destination. Note that, in this situation, a new consumer is used for each request, and consumers can build up in memory as described in the caution above; therefore cached consumers should not be used in this case. |
<int-jms:outbound-gateway id="jmsOutGateway" request-destination="outQueue" request-channel="outboundJmsRequests" reply-channel="jmsReplies"> <int-jms:reply-listener /> </int-jms-outbound-gateway>
In the above example, a reply listener with default attributes is used. The listener is very lightweight and it is anticipated that, in most cases, only a single consumer will be needed. However, attributes such as concurrent-consumers, max-concurrent-consumers etc., can be added. Refer to the schema for a complete list of supported attributes, together with the Spring JMS documentation for their meanings.
Idle Reply Listeners
Starting with version 4.2, the reply listener can be started as needed (and stopped after an idle time) instead of running for the duration of the gateway’s lifecycle. This might be useful if you have many gateways in the application context where they are mostly idle. One such situation is a context with many (inactive) partitioned Spring Batch jobs using Spring Integration and JMS for partition distribution. If all the reply listeners were active, the JMS broker would have an active consumer for each gateway. By enabling the idle timeout, each consumer would exist only while the corresponding batch job is running (and for a short time after it finishes).
See idle-reply-listener-timeout in Section 21.5.3, “Attribute Reference”.
The following describes the mechanisms used for reply correlation (ensuring the originating gateway receives replies to only its requests), depending on how the gateway is configured. See the next section for complete description of the attributes discussed here.
1. No reply-destination* properties; no <reply-listener>
A TemporaryQueue is created for each request, and deleted when the request is complete (successfully or otherwise).
correlation-key is irrelevant.
2. A reply-destination* property is provided; no <reply-listener/>; no correlation-key
The JMSCorrelationID equal to the outgoing message id is used as a message selector for the consumer:
messageSelector = "JMSCorrelationID = '" + messageId + "'"
The responding system is expected to return the inbound JMSMessageID in the reply JMSCorrelationID - this is a
common pattern and is implemented by the Spring Integration inbound gateway as well as Spring’s
MessageListenerAdapter for message-driven POJOs.
| Note |
|---|---|
|
When using this configuration, you should not use a topic for replies; the reply may be lost. |
3. A reply-destination* property is provided; no <reply-listener/>; correlation-key="JMSCorrelationID"
The gateway generates a unique correlation id and inserts it in the JMSCorrelationID header.
The message selector is:
messageSelector = "JMSCorrelationID = '" + uniqueId + "'"
The responding system is expected to return the inbound JMSCorrelationID in the reply JMSCorrelationID - this is a
common pattern and is implemented by the Spring Integration inbound gateway as well as Spring’s
MessageListenerAdapter for message-driven POJOs.
4. A reply-destination* property is provided; no <reply-listener/>; correlation-key="myCorrelationHeader"
The gateway generates a unique correlation id and inserts it in the myCorrelationHeader message property.
The correlation-key can be any user-defined value; the message selector is:
messageSelector = "myCorrelationHeader = '" + uniqueId + "'"
The responding system is expected to return the inbound myCorrelationHeader in the reply myCorrelationHeader.
5. A reply-destination* property is provided; no <reply-listener/>; correlation-key="JMSCorrelationID*"
(Note the * in the correlation key)
The gateway uses the value in the jms_correlationId header (if present) from the request message, and inserts it in
the JMSCorrelationID header.
The message selector is:
messageSelector = "JMSCorrelationID = '" + headers['jms_correlationId'] + "'"
The user must ensure this value is unique.
If the header does not exist, the gateway behaves as in 3. above.
The responding system is expected to return the inbound JMSCorrelationID in the reply JMSCorrelationID - this is a
common pattern and is implemented by the Spring Integration inbound gateway as well as Spring’s
MessageListenerAdapter for message-driven POJOs.
6. No reply-destination* properties; with <reply-listener>
A temporary queue is created and used for all replies from this gateway instance.
No correlation data is needed in the message but the outgoing JMSMessageID is used internally in the gateway to
direct the reply to the correct requesting thread.
7. A reply-destination* property is provided; with <reply-listener>, no correlation-key
NOT ALLOWED
The <reply-listener/> configuration is ignored and the gateway behaves as in 2. above.
A warning log message is written indicating this situation.
8. A reply-destination* property is provided; with <reply-listener>, correlation-key="JMSCorrelationID"
The gateway has a unique correlation id and inserts it, together with an incrementing value in the JMSCorrelationID
header (gatewayId + "_" + ++seq).
The message selector is:
messageSelector = "JMSCorrelationID LIKE '" + gatewayId%'"
The responding system is expected to return the inbound JMSCorrelationID in the reply JMSCorrelationID - this is a
common pattern and is implemented by the Spring Integration inbound gateway as well as Spring’s
MessageListenerAdapter for message-driven POJOs.
Since each gateway has a unique id, each instance only gets its own replies; the complete correlation data is used
to route the reply to the correct requesting thread.
9. A reply-destination* property is provided; with <reply-listener/>; correlation-key="myCorrelationHeader"
The gateway has a unique correlation id and inserts it, together with an incrementing value in the myCorrelationHeader
property (gatewayId + "_" + ++seq).
The correlation-key can be any user-defined value; and the message selector is:
messageSelector = "myCorrelationHeader LIKE '" + gatewayId%'"
The responding system is expected to return the inbound myCorrelationHeader in the reply myCorrelationHeader.
Since each gateway has a unique id, each instance only gets its own replies; the complete correlation data is used
to route the reply to the correct requesting thread.
10. A reply-destination* property is provided; with <reply-listener/>; correlation-key="JMSCorrelationID*"
(Note the * in the correlation key)
NOT ALLOWED
User-supplied correlation ids are not permitted with a reply listener; the gateway will not initialize with this configuration.
Starting with version 4.3, you can now specify async="true" (or setAsync(true)) when configuring the outbound
gateway.
By default, when a request is sent to the gateway, the requesting thread is suspended until the reply is received and
the flow then continues on that thread.
If async is true, the requesting thread is released immediately after the send completes, and the reply is returned
(and the flow continues) on the listener container thread.
This can be useful when the gateway is invoked on a poller thread; the thread is released and is available for other
tasks within the framework.
async requires a <reply-listener/> (or setUseReplyContainer(true) when using Java configuration); it also
requires a correlationKey (usually JMSCorrelationID) to be specified.
If either of these conditions are not met, async is ignored.
<int-jms:outbound-gateway connection-factory="connectionFactory"
|
Reference to a |
|
The name of a property that will contain correlation data to correlate responses with replies.
If omitted, the gateway will expect the responding system to return the value of the outbound JMSMessageID header in the JMSCorrelationID header.
If specified, the gateway will generate a correlation id and populate the specified property with it; the responding system must echo back that value in the same property.
Can be set to |
|
A boolean value indicating whether the delivery mode should be DeliveryMode.PERSISTENT (true) or DeliveryMode.NON_PERSISTENT (false).
This setting will only take effect if |
|
A |
|
When set to |
|
When set to |
|
When set to |
|
A |
|
A reference to a |
|
The default priority of request messages.
Overridden by the message priority header, if present; range 0-9.
This setting will only take effect if |
|
The time (in millseconds) to wait for a reply. Default 5 seconds. |
|
The channel to which the reply message will be sent. |
|
A reference to a |
|
A SpEL expression evaluating to a |
|
The name of the destination which will be set as the JMSReplyTo header; used by the |
|
When set to | |
|
The time the gateway will wait when sending the reply message to the | |
|
The channel on which this gateway receives request messages. | |
|
A reference to a | |
|
A SpEL expression evaluating to a | |
|
The name of the destination to which request messages will be sent; used by the | |
|
When set to | |
|
Specify the message time to live.
This setting will only take effect if | |
|
Specify whether this outbound gateway must return a non-null value.
This value is | |
|
When a | |
|
When this element is included, replies are received by an asynchronous |
JMS Message can contain meta-information such as JMS API headers as well as simple properties.
You can map those to/from Spring Integration Message Headers using JmsHeaderMapper.
The JMS API headers are passed to the appropriate setter methods (e.g.
setJMSReplyTo) whereas other headers will be copied to the general properties of the JMS Message.
JMS Outbound Gateway is bootstrapped with the default implementation of JmsHeaderMapper which will map standard JMS API Headers as well as primitive/String Message Headers.
Custom header mapper could also be provided via header-mapper attribute of inbound and outbound gateways.
| Important |
|---|---|
|
Since version 4.0, the |
| Important |
|---|---|
|
Since version 4.3, the |
If you need to convert the message, all JMS adapters and gateways, allow you to provide a MessageConverter via message-converter attribute.
Simply provide the bean name of an instance of MessageConverter that is available within the same ApplicationContext.
Also, to provide some consistency with Marshaller and Unmarshaller interfaces Spring provides MarshallingMessageConverter which you can configure with your own custom Marshallers and Unmarshallers
<int-jms:inbound-gateway request-destination="requestQueue" request-channel="inbound-gateway-channel" message-converter="marshallingMessageConverter"/> <bean id="marshallingMessageConverter" class="org.springframework.jms.support.converter.MarshallingMessageConverter"> <constructor-arg> <bean class="org.bar.SampleMarshaller"/> </constructor-arg> <constructor-arg> <bean class="org.bar.SampleUnmarshaller"/> </constructor-arg> </bean>
| Note |
|---|---|
|
Note, however, that when you provide your own MessageConverter instance, it will still be wrapped within the HeaderMappingMessageConverter. This means that the extract-request-payload and extract-reply-payload properties may affect what actual objects are passed to your converter. The HeaderMappingMessageConverter itself simply delegates to a target MessageConverter while also mapping the Spring Integration MessageHeaders to JMS Message properties and vice-versa. |
The Channel Adapters and Gateways featured above are all intended for applications that are integrating with other external systems. The inbound options assume that some other system is sending JMS Messages to the JMS Destination and the outbound options assume that some other system is receiving from the Destination. The other system may or may not be a Spring Integration application. Of course, when sending the Spring Integration Message instance as the body of the JMS Message itself (with the extract-payload value set to false), it is assumed that the other system is based on Spring Integration. However, that is by no means a requirement. That flexibility is one of the benefits of using a Message-based integration option with the abstraction of "channels" or Destinations in the case of JMS.
There are cases where both the producer and consumer for a given JMS Destination are intended to be part of the same application, running within the same process. This could be accomplished by using a pair of inbound and outbound Channel Adapters. The problem with that approach is that two adapters are required even though conceptually the goal is to have a single Message Channel. A better option is supported as of Spring Integration version 2.0. Now it is possible to define a single "channel" when using the JMS namespace.
<int-jms:channel id="jmsChannel" queue="exampleQueue"/>
The channel in the above example will behave much like a normal <channel/> element from the main Spring Integration namespace. It can be referenced by both "input-channel" and "output-channel" attributes of any endpoint. The difference is that this channel is backed by a JMS Queue instance named "exampleQueue". This means that asynchronous messaging is possible between the producing and consuming endpoints, but unlike the simpler asynchronous Message Channels created by adding a <queue/> sub-element within a non-JMS <channel/> element, the Messages are not just stored in an in-memory queue. Instead those Messages are passed within a JMS Message body, and the full power of the underlying JMS provider is then available for that channel. Probably the most common rationale for using this alternative would be to take advantage of the persistence made available by the store and forward approach of JMS messaging. If configured properly, the JMS-backed Message Channel also supports transactions. In other words, a producer would not actually write to a transactional JMS-backed channel if its send operation is part of a transaction that rolls back. Likewise, a consumer would not physically remove a JMS Message from the channel if the reception of that Message is part of a transaction that rolls back. Note that the producer and consumer transactions are separate in such a scenario. This is significantly different than the propagation of a transactional context across the simple, synchronous <channel/> element that has no <queue/> sub-element.
Since the example above is referencing a JMS Queue instance, it will act as a point-to-point channel. If on the other hand, publish/subscribe behavior is needed, then a separate element can be used, and a JMS Topic can be referenced instead.
<int-jms:publish-subscribe-channel id="jmsChannel" topic="exampleTopic"/>
For either type of JMS-backed channel, the name of the destination may be provided instead of a reference.
<int-jms:channel id="jmsQueueChannel" queue-name="exampleQueueName"/> <jms:publish-subscribe-channel id="jmsTopicChannel" topic-name="exampleTopicName"/>
In the examples above, the Destination names would be resolved by Spring’s default DynamicDestinationResolver implementation, but any implementation of the DestinationResolver interface could be provided.
Also, the JMS ConnectionFactory is a required property of the channel, but by default the expected bean name would be jmsConnectionFactory.
The example below provides both a custom instance for resolution of the JMS Destination names and a different name for the ConnectionFactory.
<int-jms:channel id="jmsChannel" queue-name="exampleQueueName" destination-resolver="customDestinationResolver" connection-factory="customConnectionFactory"/>
For the <publish-subscribe-channel />; set the durable attribute to true
for a durable subscription, subscription-shared for a shared subscription (requires a JMS 2.0 broker and
has been available since version 4.2).
Use subscription to name the subscription.
With JMS message selectors you can filter JMS Messages based on JMS headers as well as JMS properties. For example, if you want to listen to messages whose custom JMS header property fooHeaderProperty equals bar, you can specify the following expression:
fooHeaderProperty = 'bar'
Message selector expressions are a subset of the SQL-92 conditional expression syntax, and are defined as part of the Java Message Service specification (Version 1.1 April 12, 2002). Specifically, please see chapter "3.8 Message Selection". It contains a detailed explanation of the expressions syntax.
You can specify the JMS message selector attribute using XML Namespace configuration for the following Spring Integration JMS components:
- JMS Channel
- JMS Publish Subscribe Channel
- JMS Inbound Channel Adapter
- JMS Inbound Gateway
- JMS Message-driven Channel Adapter
| Important |
|---|---|
|
It is important to remember that you cannot reference message body values using JMS Message selectors. |
To experiment with these JMS adapters, check out the JMS samples available in the Spring Integration Samples Git repository:
There are two samples included. One provides Inbound and Outbound Channel Adapters, and the other provides Inbound and Outbound Gateways. They are configured to run with an embedded_http://activemq.apache.org/[ActiveMQ]_ process, but the samples' common.xml__Spring Application Context file can easily be modified to support either a different JMS provider or a standalone ActiveMQ process.
In other words, you can split the configuration, so that the Inbound and Outbound Adapters are running in separate JVMs. If you have ActiveMQ installed, simply modify the brokerURL property within the common.xml file to use tcp://localhost:61616 (instead of vm://localhost). Both of the samples accept input via stdin and then echo back to stdout. Look at the configuration to see how these messages are routed over JMS.
Spring Integration provides support for outbound email with the MailSendingMessageHandler.
It delegates to a configured instance of Spring’s JavaMailSender:
JavaMailSender mailSender = context.getBean("mailSender", JavaMailSender.class); MailSendingMessageHandler mailSendingHandler = new MailSendingMessageHandler(mailSender);
MailSendingMessageHandler has various mapping strategies that use Spring’s MailMessage abstraction.
If the received Message’s payload is already a MailMessage instance, it will be sent directly.
Therefore, it is generally recommended to precede this consumer with a Transformer for non-trivial MailMessage construction requirements.
However, a few simple Message mapping strategies are supported out-of-the-box.
For example, if the message payload is a byte array, then that will be mapped to an attachment.
For simple text-based emails, you can provide a String-based Message payload.
In that case, a MailMessage will be created with that String as the text content.
If you are working with a Message payload type whose toString() method returns appropriate mail text content, then consider adding Spring Integration’s ObjectToStringTransformer prior to the outbound Mail adapter (see the example within the section called “Configuring Transformer with XML” for more detail).
The outbound MailMessage may also be configured with certain values from the MessageHeaders.
If available, values will be mapped to the outbound mail’s properties, such as the recipients (TO, CC, and BCC), the from/reply-to, and the subject.
The header names are defined by the following constants:
MailHeaders.SUBJECT MailHeaders.TO MailHeaders.CC MailHeaders.BCC MailHeaders.FROM MailHeaders.REPLY_TO
| Note |
|---|---|
|
|
Spring Integration also provides support for inbound email with the MailReceivingMessageSource.
It delegates to a configured instance of Spring Integration’s own MailReceiver interface, and there are two implementations: Pop3MailReceiver and ImapMailReceiver.
The easiest way to instantiate either of these is by passing the uri for a Mail store to the receiver’s constructor.
For example:
MailReceiver receiver = new Pop3MailReceiver("pop3://usr:pwd@localhost/INBOX");
Another option for receiving mail is the IMAP "idle" command (if supported by the mail server you are using).
Spring Integration provides the ImapIdleChannelAdapter which is itself a Message-producing endpoint.
It delegates to an instance of the ImapMailReceiver but enables asynchronous reception of Mail Messages.
There are examples in the next section of configuring both types of inbound Channel Adapter with Spring Integration’s namespace support in the mail schema.
| Important |
|---|---|
|
Normally, when To: foo@bar From: bar@baz Subject: Test Email foo With a simple Starting with version 2.2, the framework eagerly fetches IMAP messages and exposes them as an internal subclass of |
By default, the payload of messages produced by the inbound adapters is the raw MimeMessage; you can interrogate
the headers and content using that object.
Starting with version 4.3, you can provide a HeaderMapper<MimeMessage> to map the headers to MessageHeaders; for
convenience, a DefaultMailHeaderMapper is provided for this purpose.
This maps the following headers:
-
mail_from- A String representation of thefromaddress. -
mail_bcc- A String array containing thebccaddresses. -
mail_cc- A String array containing theccaddresses. -
mail_to- A String array containing thetoaddresses. -
mail_replyTo- A String representation of thereplyToaddress. -
mail_subject- The mail subject. -
mail_lineCount- A line count (if available). -
mail_receivedDate- The received date (if available). -
mail_size- The mail size (if available). -
mail_expunged- A boolen indicating if the message is expunged. -
mail_raw- AMultiValueMapcontaining all the mail headers and their values. -
mail_contentType- The content type of the original mail message. -
contentType- The payload content type (see below).
When message mapping is enabled, the payload depends on the mail message and its implementation.
Email contents are usually rendered by a DataHandler within the MimeMessage.
-
For a simple
text/*email, the payload will be a String and thecontentTypeheader will be the same asmail_contentType. -
For a messages with embedded
javax.mail.Parts, theDataHandlerusually renders aPartobject - these objects are notSerializable, and are not suitable for serialization using alternative technologies such asKryo. For this reason, by default, when mapping is enabled, such payloads are rendered as a rawbyte[]containing thePartdata. Examples ofPartareMessageandMultipart. ThecontentTypeheader isapplication/octet-streamin this case. To change this behavior, and receive aMultipartobject payload, setembeddedPartsAsBytestofalseon theMailReceiver. For content types that are unknown to theDataHandler, the contents are rendered as abyte[]with acontentTypeheader ofapplication/octet-stream.
When you do not provide a header mapper, the message payload is the MimeMessage presented by javax.mail.
The framework provides a MailToStringTransformer which can be used to convert the message using a simple strategy
to convert the mail contents to a String.
This is also available using the XML namespace:
<int-mail:mail-to-string-transformer ... >
and with Java configuration:
@Bean @Transformer(inputChannel="...", outputChannel="...") public Transformer transformer() { return new MailToStringTransformer(); }
and with the Java DSL:
... .transform(Transformers.fromMail()) ...
Starting with version 4.3, the transformer will handle embedded Part as well as Multipart which was handled
previously.
The transformer is a subclass of AbstractMailTransformer which maps the address and subject headers from the list
above.
If you wish to perform some other transformation on the message, consider subclassing AbstractMailTransformer.
Spring Integration provides a namespace for mail-related configuration. To use it, configure the following schema locations.
<?xml version="1.0" encoding="UTF-8"?> <beans xmlns="http://www.springframework.org/schema/schema/beans" xmlns:xsi="http://www.w3.org/2001/XMLSchema-instance" xmlns:int-mail="http://www.springframework.org/schema/integration/mail" xsi:schemaLocation="http://www.springframework.org/schema/beans http://www.springframework.org/schema/beans/spring-beans.xsd http://www.springframework.org/schema/integration/mail http://www.springframework.org/schema/integration/mail/spring-integration-mail.xsd">
To configure an outbound Channel Adapter, provide the channel to receive from, and the MailSender:
<int-mail:outbound-channel-adapter channel="outboundMail" mail-sender="mailSender"/>
Alternatively, provide the host, username, and password:
<int-mail:outbound-channel-adapter channel="outboundMail" host="somehost" username="someuser" password="somepassword"/>
| Note |
|---|---|
|
Keep in mind, as with any outbound Channel Adapter, if the referenced channel is a |
When using the namespace support, a header-enricher Message Transformer is also available. This simplifies the application of the headers mentioned above to any Message prior to sending to the Mail Outbound Channel Adapter.
<int-mail:header-enricher input-channel="expressionsInput" default-overwrite="false"> <int-mail:to expression="payload.to"/> <int-mail:cc expression="payload.cc"/> <int-mail:bcc expression="payload.bcc"/> <int-mail:from expression="payload.from"/> <int-mail:reply-to expression="payload.replyTo"/> <int-mail:subject expression="payload.subject" overwrite="true"/> </int-mail:header-enricher>
This example assumes the payload is a JavaBean with appropriate getters for the specified properties, but any SpEL expression can be used.
Alternatively, use the value attribute to specify a literal.
Notice also that you can specify default-overwrite and individual overwrite attributes to control the behavior with existing headers.
To configure an Inbound Channel Adapter, you have the choice between polling or event-driven (assuming your mail server supports IMAP IDLE - if not, then polling is the only option). A polling Channel Adapter simply requires the store URI and the channel to send inbound Messages to. The URI may begin with "pop3" or "imap":
<int-mail:inbound-channel-adapter id="imapAdapter" store-uri="imaps://[username]:[password]@imap.gmail.com/INBOX" java-mail-properties="javaMailProperties" channel="receiveChannel" should-delete-messages="true" should-mark-messages-as-read="true" auto-startup="true"> <int:poller max-messages-per-poll="1" fixed-rate="5000"/> </int-mail:inbound-channel-adapter>
If you do have IMAP idle support, then you may want to configure the "imap-idle-channel-adapter" element instead. Since the "idle" command enables event-driven notifications, no poller is necessary for this adapter. It will send a Message to the specified channel as soon as it receives the notification that new mail is available:
<int-mail:imap-idle-channel-adapter id="customAdapter" store-uri="imaps://[username]:[password]@imap.gmail.com/INBOX" channel="receiveChannel" auto-startup="true" should-delete-messages="false" should-mark-messages-as-read="true" java-mail-properties="javaMailProperties"/>
...where javaMailProperties could be provided by creating and populating a regular java.utils.Properties object.
For example via util namespace provided by Spring.
| Important |
|---|---|
|
If your username contains the @ character use %40 instead of @ to avoid parsing errors from the underlying JavaMail API. |
<util:properties id="javaMailProperties"> <prop key="mail.imap.socketFactory.class">javax.net.ssl.SSLSocketFactory</prop> <prop key="mail.imap.socketFactory.fallback">false</prop> <prop key="mail.store.protocol">imaps</prop> <prop key="mail.debug">false</prop> </util:properties>
By default, the ImapMailReceiver will search for Messages based on the default SearchTerm which is All mails that
are RECENT (if supported), that are NOT ANSWERED, that are NOT DELETED, that are NOT SEEN and have not
been processed by this mail receiver (enabled by the use of the custom USER flag or simply NOT FLAGGED if not
supported).
The custom user flag is spring-integration-mail-adapter but can be configured.
Since version 2.2, the SearchTerm used by the ImapMailReceiver is fully configurable via the SearchTermStrategy
which you can inject via the search-term-strategy attribute.
SearchTermStrategy is a simple strategy interface with a single method that allows you to create an instance of the
SearchTerm that will be used by the ImapMailReceiver.
See Section 22.5, “Marking IMAP Messages When \Recent is Not Supported” regarding message flagging.
public interface SearchTermStrategy { SearchTerm generateSearchTerm(Flags supportedFlags, Folder folder); }
For example:
<mail:imap-idle-channel-adapter id="customAdapter" store-uri="imap:foo" … search-term-strategy="searchTermStrategy"/> <bean id="searchTermStrategy" class="o.s.i.mail.config.ImapIdleChannelAdapterParserTests.TestSearchTermStrategy"/>
In the above example instead of relying on the default SearchTermStrategy the TestSearchTermStrategy will be used instead
IMAP IDLE and lost connection
When using IMAP IDLE channel adapter there might be situations where connection to the server may be lost (e.g., network failure) and since Java Mail documentation explicitly states that the actual IMAP API is EXPERIMENTAL it is important to understand the differences in the API and how to deal with them when configuring IMAP IDLE adapters. Currently Spring Integration Mail adapters was tested with Java Mail 1.4.1 and Java Mail 1.4.3 and depending on which one is used special attention must be payed to some of the java mail properties that needs to be set with regard to auto-reconnect.
| Note |
|---|---|
|
The following behavior was observed with GMAIL but should provide you with some tips on how to solve re-connect issue with other providers, however feedback is always welcome. Again, below notes are based on GMAIL. |
With Java Mail 1.4.1 if mail.imaps.timeout property is set for a relatively short period of time (e.g., ~ 5 min) then IMAPFolder.idle() will throw FolderClosedException after this timeout.
However if this property is not set (should be indefinite) the behavior that was observed is that IMAPFolder.idle() method never returns nor it throws an exception.
It will however reconnect automatically if connection was lost for a short period of time (e.g., under 10 min), but if connection was lost for a long period of time (e.g., over 10 min), then IMAPFolder.idle() will not throw FolderClosedException nor it will re-establish connection and will remain in the blocked state indefinitely, thus leaving you no possibility to reconnect without restarting the adapter.
So the only way to make re-connect to work with Java Mail 1.4.1 is to set mail.imaps.timeout property explicitly to some value, but it also means that such value should be relatively short (under 10 min) and the connection should be re-established relatively quickly.
Again, it may be different with other providers.
With Java Mail 1.4.3 there was significant improvements to the API ensuring that there will always be a condition which will force IMAPFolder.idle() method to return via StoreClosedException or FolderClosedException or simply return, thus allowing us to proceed with auto-reconnect.
Currently auto-reconnect will run infinitely making attempts to reconnect every 10 sec.
| Important |
|---|---|
|
In both configurations |
| Note |
|---|---|
|
When configuring a polling email adapter’s should-mark-messages-as-read attribute, be aware of the protocol you are configuring to retrieve messages. For example POP3 does not support this flag which means setting it to either value will have no effect as messages will NOT be marked as read. |
| Important |
|---|---|
|
It is important to understand that that these actions (marking messages read, and deleting messages) are performed after the messages are received, but before they are processed. This can cause messages to be lost. You may wish to consider using transaction synchronization instead - see Section 22.7, “Transaction Synchronization” |
The <imap-idle-channel-adapter/> also accepts the error-channel attribute.
If a downstream exception is thrown and an error-channel is specified, a MessagingException message containing the failed message and original exception, will be sent to this channel.
Otherwise, if the downstream channels are synchronous, any such exception will simply be logged as a warning by the channel adapter.
| Note |
|---|---|
|
Beginning with the 3.0 release, the IMAP idle adapter emits application events (specifically |
If shouldMarkMessagesAsRead is true, the IMAP adapters set the \Seen flag.
In addition, when an email server does not support the \Recent flag, the IMAP adapters mark messages with a user
flag (spring-integration-mail-adapter by default) as long as the server supports user flags.
If not, Flag.FLAGGED is set to true.
These flags are applied regardless of the shouldMarkMessagesRead setting.
As discussed in Section 22.4, “Mail Namespace Support”, the default SearchTermStrategy will ignore messages so flagged.
Starting with version 4.2.2, the name of the user flag can be set using setUserFlag on the MailReceiver - this
allows multiple receivers to use a different flag (as long as the mail server supports user flags).
The attribute user-flag is available when configuring the adapter with the namespace.
Very often you may encounter a requirement to filter incoming messages (e.g., You want to only read emails that have Spring Integration in the Subject line).
This could be easily accomplished by connecting Inbound Mail adapter with an expression-based Filter.
Although it would work, there is a downside to this approach.
Since messages would be filtered after going through inbound mail adapter all such messages would be marked as read (SEEN) or Un-read (depending on the value of should-mark-messages-as-read attribute).
However in reality what would be more useful is to mark messages as SEEN only if they passed the filtering criteria.
This is very similar to looking at your email client while scrolling through all the messages in the preview pane, but only flagging messages as SEEN that were actually opened and read.
In Spring Integration 2.0.4 we’ve introduced mail-filter-expression attribute on inbound-channel-adapter and imap-idle-channel-adapter.
This attribute allows you to provide an expression which is a combination of SpEL and Regular Expression.
For example if you would like to read only emails that contain Spring Integration in the Subject line, you would configure mail-filter-expression attribute like this this: mail-filter-expression="subject matches '(?i).*Spring Integration.*"
Since javax.mail.internet.MimeMessage is the root context of SpEL Evaluation Context, you can filter on any value available through MimeMessage including the actual body of the message.
This one is particularly important since reading the body of the message would typically result in such message to be marked as SEEN by default, but since we now setting PEAK flag of every incomming message to true, only messages that were explicitly marked as SEEN will be seen as read.
So in the below example only messages that match the filter expression will be output by this adapter and only those messages will be marked as SEEN.
In this case based on the mail-filter-expression only messages that contain Spring Integration in the subject line will be produced by this adapter.
<int-mail:imap-idle-channel-adapter id="customAdapter" store-uri="imaps://some_google_address:${password}@imap.gmail.com/INBOX" channel="receiveChannel" should-mark-messages-as-read="true" java-mail-properties="javaMailProperties" mail-filter-expression="subject matches '(?i).*Spring Integration.*'"/>
Another reasonable question is what happens on the next poll, or idle event, or what happens when such adapter is restarted. Will there be a potential duplication of massages to be filtered? In other words if on the last retrieval where you had 5 new messages and only 1 passed the filter what would happen with the other 4. Would they go through the filtering logic again on the next poll or idle? After all they were not marked as SEEN. The actual answer is no. They would not be subject of duplicate processing due to another flag (RECENT) that is set by the Email server and is used by Spring Integration mail search filter. Folder implementations set this flag to indicate that this message is new to this folder, that is, it has arrived since the last time this folder was opened. In other while our adapter may peek at the email it also lets the email server know that such email was touched and therefore will be marked as RECENT by the email server.
Transaction synchronization for inbound adapters allows you to take different actions after a transaction commits, or rolls back.
Transaction synchronization is enabled by adding a <transactional/> element to the poller for the polled <inbound-adapter/>, or to the <imap-idle-inbound-adapter/>.
Even if there is no real transaction involved, you can still enable this feature by using a PseudoTransactionManager with the <transactional/> element.
For more information, see Section C.3, “Transaction Synchronization”.
Because of the many different mail servers, and specifically the limitations that some have, at this time we only provide a strategy for these transaction synchronizations. You can send the messages to some other Spring Integration components, or invoke a custom bean to perform some action. For example, to move an IMAP message to a different folder after the transaction commits, you might use something similar to the following:
<int-mail:imap-idle-channel-adapter id="customAdapter" store-uri="imaps://foo.com:[email protected]/INBOX" channel="receiveChannel" auto-startup="true" should-delete-messages="false" java-mail-properties="javaMailProperties"> <int:transactional synchronization-factory="syncFactory"/> </int-mail:imap-idle-channel-adapter> <int:transaction-synchronization-factory id="syncFactory"> <int:after-commit expression="@syncProcessor.process(payload)"/> </int:transaction-synchronization-factory> <bean id="syncProcessor" class="foo.bar.Mover"/>
public class Mover { public void process(MimeMessage message) throws Exception{ Folder folder = message.getFolder(); folder.open(Folder.READ_WRITE); String messageId = message.getMessageID(); Message[] messages = folder.getMessages(); FetchProfile contentsProfile = new FetchProfile(); contentsProfile.add(FetchProfile.Item.ENVELOPE); contentsProfile.add(FetchProfile.Item.CONTENT_INFO); contentsProfile.add(FetchProfile.Item.FLAGS); folder.fetch(messages, contentsProfile); // find this message and mark for deletion for (int i = 0; i < messages.length; i++) { if (((MimeMessage) messages[i]).getMessageID().equals(messageId)) { messages[i].setFlag(Flags.Flag.DELETED, true); break; } } Folder fooFolder = store.getFolder("FOO")); fooFolder.appendMessages(new MimeMessage[]{message}); folder.expunge(); folder.close(true); fooFolder.close(false); } }
| Important |
|---|---|
|
For the message to be still available for manipulation after the transaction, should-delete-messages must be set to false. |
As of version 2.1 Spring Integration introduces support for MongoDB: a "high-performance, open source, document-oriented database". This support comes in the form of a MongoDB-based MessageStore.
To download, install, and run MongoDB please refer to the MongoDB documentation.
To begin interacting with MongoDB you first need to connect to it.
Spring Integration builds on the support provided by another Spring project, Spring Data MongoDB, which provides a factory class called MongoDbFactory that simplifies integration with the MongoDB Client API.
MongoDbFactory
To connect to MongoDB you can use an implementation of the MongoDbFactory interface:
public interface MongoDbFactory { /** * Creates a default {@link DB} instance. * * @return the DB instance * @throws DataAccessException */ DB getDb() throws DataAccessException; /** * Creates a {@link DB} instance to access the database with the given name. * * @param dbName must not be {@literal null} or empty. * * @return the DB instance * @throws DataAccessException */ DB getDb(String dbName) throws DataAccessException; }
The example below shows SimpleMongoDbFactory, the out-of-the-box implementation:
In Java:
MongoDbFactory mongoDbFactory = new SimpleMongoDbFactory(new Mongo(), "test");
Or in Spring’s XML configuration:
<bean id="mongoDbFactory" class="o.s.data.mongodb.core.SimpleMongoDbFactory"> <constructor-arg> <bean class="com.mongodb.Mongo"/> </constructor-arg> <constructor-arg value="test"/> </bean>
As you can see SimpleMongoDbFactory takes two arguments: 1) a Mongo instance and 2) a String specifying the name of the database.
If you need to configure properties such as host, port, etc, you can pass those using one of the constructors provided by the underlying Mongo class.
For more information on how to configure MongoDB, please refer to the Spring-Data-MongoDB reference.
As described in EIP, a Message Store allows you to persist Messages.
This can be very useful when dealing with components that have a capability to buffer messages (QueueChannel, Aggregator, Resequencer, etc.) if reliability is a concern.
In Spring Integration, the MessageStore strategy also provides the foundation for the ClaimCheck pattern, which is described in EIP as well.
Spring Integration’s MongoDB module provides the MongoDbMessageStore which is an implementation of both the MessageStore strategy (mainly used by the ClaimCheck pattern) and the MessageGroupStore strategy (mainly used by the Aggregator and Resequencer patterns).
<bean id="mongoDbMessageStore" class="o.s.i.mongodb.store.MongoDbMessageStore"> <constructor-arg ref="mongoDbFactory"/> </bean> <int:channel id="somePersistentQueueChannel"> <int:queue message-store="mongoDbMessageStore"/> <int:channel> <int:aggregator input-channel="inputChannel" output-channel="outputChannel" message-store="mongoDbMessageStore"/>
Above is a sample MongoDbMessageStore configuration that shows its usage by a QueueChannel and an Aggregator.
As you can see it is a simple bean configuration, and it expects a MongoDbFactory as a constructor argument.
The MongoDbMessageStore expands the Message as a Mongo document with all nested properties using the Spring Data Mongo Mapping mechanism.
It is useful when you need to have access to the payload or headers for auditing or analytics, for example, against stored messages.
| Important |
|---|---|
|
The |
Spring Integration 3.0 introduced the ConfigurableMongoDbMessageStore - MessageStore and MessageGroupStore implementation.
This class can receive, as a constructor argument, a MongoTemplate, with which you can configure with a custom WriteConcern, for example.
Another constructor requires a MappingMongoConverter, and a MongoDbFactory, which allows you to provide some custom conversions for Message s and their properties.
Note, by default, the ConfigurableMongoDbMessageStore uses standard Java serialization to write/read Message s to/from MongoDB (see MongoDbMessageBytesConverter) and relies on default values for other properties from MongoTemplate, which is built from the provided MongoDbFactory and MappingMongoConverter.
The default name for the collection stored by the ConfigurableMongoDbMessageStore is configurableStoreMessages.
It is recommended to use this implementation for robust and flexible solutions when messages contain complex data types.
Starting with version 4.0, the new MongoDbChannelMessageStore has been introduced; it is an optimized MessageGroupStore for use in QueueChannel s.
With priorityEnabled = true, it can be used in <int:priority-queue> s to achieve priority order polling for persisted messages.
The priority MongoDB document field is populated from the IntegrationMessageHeaderAccessor.PRIORITY (priority) message header.
In addition, all MongoDB MessageStore s now have a sequence field for MessageGroup documents.
The sequence value is the result of an $inc operation for a simple sequence document from the same collection, which is created on demand.
The sequence field is used in poll operations to provide first-in-first-out (FIFO) message order (within priority if configured) when messages are stored within the same millisecond.
| Note |
|---|---|
|
It is not recommended to use the same |
<bean id="channelStore" class="o.s.i.mongodb.store.MongoDbChannelMessageStore"> <constructor-arg name="mongoDbFactory" ref="mongoDbFactory"/> </bean> <int:channel id="queueChannel"> <int:queue message-store="store"/> </int:channel> <bean id="priorityStore" parent="channelStore"> <property name="priorityEnabled" value="true"/> </bean> <int:channel id="priorityChannel"> <int:priority-queue message-store="priorityStore"/> </int:channel>
As of Spring Integration 4.2, a new MongoDB-based MetadataStore (Section 10.5, “Metadata Store”) implementation is available.
The MongoDbMetadataStore can be used to maintain metadata state across application restarts.
This new MetadataStore implementation can be used with adapters such as:
In order to instruct these adapters to use the new MongoDbMetadataStore, simply declare a Spring bean using the
bean name metadataStore. The Twitter Inbound Channel Adapter and the Feed Inbound Channel Adapter will both
automatically pick up and use the declared MongoDbMetadataStore:
@Bean public MetadataStore metadataStore(MongoDbFactory factory) { return new MongoDbMetadataStore(factory, "integrationMetadataStore"); }
The MongoDbMetadataStore also implements ConcurrentMetadataStore, allowing it to be reliably shared across multiple
application instances where only one instance will be allowed to store or modify a key’s value.
All these operations are atomic via MongoDB guarantees.
The MongoDb Inbound Channel Adapter is a polling consumer that reads data from MongoDb and sends it as a Message payload.
<int-mongodb:inbound-channel-adapter id="mongoInboundAdapter" channel="replyChannel" query="{'name' : 'Bob'}" entity-class="java.lang.Object" auto-startup="false"> <int:poller fixed-rate="100"/> </int-mongodb:inbound-channel-adapter>
As you can see from the configuration above, you configure a MongoDb Inbound Channel Adapter using the inbound-channel-adapter element, providing values for various attributes such as:
-
query- a JSON query (see MongoDb Querying) -
query-expression- A SpEL expression that is evaluated to a JSON query String (as thequeryattribute above), or to an instance ofo.s.data.mongodb.core.query.Query. Mutually exclusive withqueryattribute. -
entity-class- the type of the payload object; if not supplied, acom.mongodb.DBObjectwill be returned. -
collection-nameorcollection-name-expression- Identifies the name of the MongoDb collection to use. -
mongodb-factory- reference to an instance ofo.s.data.mongodb.MongoDbFactory -
mongo-template- reference to an instance ofo.s.data.mongodb.core.MongoTemplateand other attributes that are common across all other inbound adapters (e.g., 'channel').
| Note |
|---|---|
|
You cannot set both |
The example above is relatively simple and static since it has a literal value for the query and uses the default name for a collection.
Sometimes you may need to change those values at runtime, based on some condition.
To do that, simply use their -expression equivalents (query-expression and collection-name-expression) where the provided expression can be any valid SpEL expression.
Also, you may wish to do some post-processing to the successfully processed data that was read from the MongoDb. For example; you may want to move or remove a document after its been processed. You can do this using Transaction Synchronization feature that was added with Spring Integration 2.2.
<int-mongodb:inbound-channel-adapter id="mongoInboundAdapter" channel="replyChannel" query-expression="new BasicQuery('{''name'' : ''Bob''}').limit(100)" entity-class="java.lang.Object" auto-startup="false"> <int:poller fixed-rate="200" max-messages-per-poll="1"> <int:transactional synchronization-factory="syncFactory"/> </int:poller> </int-mongodb:inbound-channel-adapter> <int:transaction-synchronization-factory id="syncFactory"> <int:after-commit expression="@documentCleaner.remove(#mongoTemplate, payload, headers.mongo_collectionName)" channe="someChannel"/> </int:transaction-synchronization-factory> <bean id="documentCleaner" class="foo.bar.DocumentCleaner"/> <bean id="transactionManager" class="o.s.i.transaction.PseudoTransactionManager"/>
public class DocumentCleaner { public void remove(MongoOperations mongoOperations, Object target, String collectionName) { if (target instanceof List<?>){ List<?> documents = (List<?>) target; for (Object document : documents) { mongoOperations.remove(new BasicQuery(JSON.serialize(document)), collectionName); } } } }
As you can see from the above, all you need to do is declare your poller to be transactional with a transactional element.
This element can reference a real transaction manager (for example if some other part of your flow invokes JDBC).
If you don’t have a real transaction, you can use a org.springframework.integration.transaction.PseudoTransactionManager which is an implementation of Spring’s PlatformTransactionManager and enables the use of the transaction synchronization features of the mongo adapter when there is no actual transaction.
| Important |
|---|---|
|
This does NOT make MongoDB itself transactional, it simply allows the synchronization of actions to be taken before/after success (commit) or after failure (rollback). |
Once your poller is transactional all you need to do is set an instance of the o.s.i.transaction.TransactionSynchronizationFactory on the transactional element.
TransactionSynchronizationFactory will create an instance of the TransactionSynchronization.
For your convenience, we’ve exposed a default SpEL-based TransactionSynchronizationFactory which allows you to configure SpEL expressions, with their execution being coordinated (synchronized) with a transaction.
Expressions for before-commit, after-commit, and after-rollback are supported, together with a channel for each where the evaluation result (if any) will be sent.
For each sub-element you can specify expression and/or channel attributes.
If only the channel attribute is present the received Message will be sent there as part of the particular synchronization scenario.
If only the expression attribute is present and the result of an expression is a non-Null value, a Message with the result as the payload will be generated and sent to a default channel (NullChannel) and will appear in the logs (DEBUG).
If you want the evaluation result to go to a specific channel add a channel attribute.
If the result of an expression is null or void, no Message will be generated.
For more information about transaction synchronization, see Section C.3, “Transaction Synchronization”.
The MongoDb Outbound Channel Adapter allows you to write the Message payload to a MongoDb document store
<int-mongodb:outbound-channel-adapter id="fullConfigWithCollectionExpression" collection-name="myCollection" mongo-converter="mongoConverter" mongodb-factory="mongoDbFactory" />
As you can see from the configuration above, you configure a MongoDb Outbound Channel Adapter using the outbound-channel-adapter element, providing values for various attributes such as:
-
collection-nameorcollection-name-expression- Identifies the name of the MongoDb collection to use. -
mongo-converter- reference to an instance ofo.s.data.mongodb.core.convert.MongoConverterto assist with converting a raw java object to a JSON document representation -
mongodb-factory- reference to an instance ofo.s.data.mongodb.MongoDbFactory -
mongo-template- reference to an instance ofo.s.data.mongodb.core.MongoTemplate(NOTE: you can not have both mongo-template and mongodb-factory set)
and other attributes that are common across all other inbound adapters (e.g., channel).
The example above is relatively simple and static since it has a literal value for the collection-name.
Sometimes you may need to change this value at runtime based on some condition.
To do that, simply use collection-name-expression where the provided expression can be any valid SpEL expression.
Starting with version 5.0, the MongoDb Outbound Gateway is provided and it allows you to query a database by sending a Message to its request channel. The gateway will then send the response to the reply channel. The Message payload and headers can be used to specify the query, as well as collection name.
<int-mongodb:outbound-gateway id="gatewayQuery" mongodb-factory="mongoDbFactory" mongo-converter="mongoConverter" query="{firstName: 'Bob'}" collection-name="foo" request-channel="in" reply-channel="out" entity-class="org.springframework.integration.mongodb.test.entity$Person"/>
-
collection-nameorcollection-name-expression- identifies the name of the MongoDb collection to use; -
mongo-converter- reference to an instance ofo.s.data.mongodb.core.convert.MongoConverterto assist with converting a raw java object to a JSON document representation -
mongodb-factory- reference to an instance ofo.s.data.mongodb.MongoDbFactory -
mongo-template- reference to an instance ofo.s.data.mongodb.core.MongoTemplate(NOTE: you can not have both mongo-template and mongodb-factory set) -
entity-class- the fully qualified name of the entity class to be passed tofind(..)orfindOne(..)method in MongoTemplate. If this attribute is not provided the default value isorg.bson.Document; -
queryorquery-expression- specifies the MongoDb query. Please refer to MongoDB documentation for more query samples. -
collection-callback- reference to an instance oforg.springframework.data.mongodb.core.CollectionCallback(NOTE: you can not have both collection-callback and any of the query attributes).
The following Spring Boot application provides an example of configuring the outbound gateway using Java configuration:
@SpringBootApplication public class MongoDbJavaApplication { public static void main(String[] args) { new SpringApplicationBuilder(MongoDbJavaApplication.class) .web(false) .run(args); } @Autowired private MongoDbFactory mongoDbFactory; @Bean @ServiceActivator(inputChannel = "requestChannel") public MessageHandler mongoDbOutboundGateway() { MongoDbOutboundGateway gateway = new MongoDbOutboundGateway(this.mongoDbFactory); gateway.setCollectionNameExpressionString("'foo'"); gateway.setQueryExpressionString("'{''name'' : ''Bob''}'"); gateway.setExpectSingleResult(true); gateway.setEntityClass(Person.class); gateway.setOutputChannelName("replyChannel"); return gateway; } @Bean @ServiceActivator(inputChannel = "replyChannel") public MessageHandler handler() { return message -> System.out.println(message.getPayload()); } }
The following Spring Boot application provides an example of configuring the Outbound Gateway using the Java DSL:
@SpringBootApplication public class MongoDbJavaApplication { public static void main(String[] args) { new SpringApplicationBuilder(MongoDbJavaApplication.class) .web(false) .run(args); } @Autowired private MongoDbFactory; @Autowired private MongoConverter; @Bean public IntegrationFlow gatewaySingleQueryFlow() { return f -> f .handle(queryOutboundGateway()) .channel(c -> c.queue("retrieveResults")); } private MongoDbOutboundGatewaySpec queryOutboundGateway() { return MongoDb.outboundGateway(this.mongoDbFactory, this.mongoConverter) .query("{name : 'Bob'}") .collectionNameFunction(m -> m.getHeaders().get("collection")) .expectSingleResult(true) .entityClass(Person.class); } }
Alternatively to the query and query-expression properties, you can specify other database operations through
the collectionCallback property.
The following example specifies a count operation:
private MongoDbOutboundGatewaySpec collectionCallbackOutboundGateway() { return MongoDb.outboundGateway(this.mongoDbFactory, this.mongoConverter) .collectionCallback(MongoCollection::count) .collectionName("foo"); }
Spring Integration provides inbound and outbound channel adapters supporting the MQ Telemetry Transport (MQTT) protocol. The current implementation uses the Eclipse Paho MQTT Client library.
Configuration of both adapters is achieved using the DefaultMqttPahoClientFactory.
Refer to the Paho documentation for more information about configuration options.
The inbound channel adapter is implemented by the MqttPahoMessageDrivenChannelAdapter.
For convenience, it can be configured using the namespace.
A minimal configuration might be:
<bean id="clientFactory" class="org.springframework.integration.mqtt.core.DefaultMqttPahoClientFactory"> <property name="userName" value="${mqtt.username}"/> <property name="password" value="${mqtt.password}"/> </bean> <int-mqtt:message-driven-channel-adapter id="mqttInbound" client-id="${mqtt.default.client.id}.src" url="${mqtt.url}" topics="sometopic" client-factory="clientFactory" channel="output"/>
Attributes:
<int-mqtt:message-driven-channel-adapter id="oneTopicAdapter" client-id="foo"
|
The client id. |
|
The broker URL. |
|
A comma delimited list of topics from which this adapter will receive messages. |
|
A comma delimited list of QoS values. Can be a single value that is applied to all topics, or a value for each topic (in which case the lists must the same length). |
|
An |
|
The client factory. |
|
The send timeout - only applies if the channel might block (such as a bounded |
|
The error channel - downstream exceptions will be sent to this channel, if supplied, in an |
|
The recovery interval - controls the interval at which the adapter will attempt to reconnect after
a failure; it defaults to |
| Note |
|---|---|
|
Starting with version 4.1 the url can be omitted and, instead, the server URIs can be provided in the |
Starting with version 4.2.2, an MqttSubscribedEvent is published when the adapter successfully subscribes to the
topic(s).
MqttConnectionFailedEvent s are published when the connection/subscription fails.
These events can be received by a bean that implements ApplicationListener.
Also, a new property recoveryInterval controls the interval at which the adapter will attempt to reconnect after
a failure; it defaults to 10000ms (ten seconds).
| Note |
|---|---|
|
Prior to version 4.2.3, the client always unsubscribed when the adapter was stopped.
This was incorrect because if the client QOS is > 0, we need to keep the subscription active so that messages arriving
while the adapter is stopped will be delivered on the next start.
This also requires setting the Starting with version 4.2.3, the adapter will not unsubscribe (by default) if the This behavior can be overridden by setting the To revert to the pre-4.2.3 behavior, use |
| Important |
|---|---|
|
Starting with version 5.0, the |
Starting with version 4.1, it is possible to programmatically change the topics to which the adapter is subscribed.
Methods addTopic() and removeTopic() are provided.
When adding topics, you can optionally specify the QoS (default: 1).
You can also modify the topics by sending an appropriate message to a <control-bus/> with an appropriate payload: "myMqttAdapter.addTopic('foo', 1)".
Stopping/starting the adapter has no effect on the topic list (it does not revert to the original settings in the configuration). The changes are not retained beyond the life cycle of the application context; a new application context will revert to the configured settings.
Changing the topics while the adapter is stopped (or disconnected from the broker) will take effect the next time a connection is established.
The following Spring Boot application provides an example of configuring the inbound adapter using Java configuration:
@SpringBootApplication public class MqttJavaApplication { public static void main(String[] args) { new SpringApplicationBuilder(MqttJavaApplication.class) .web(false) .run(args); } @Bean public MessageChannel mqttInputChannel() { return new DirectChannel(); } @Bean public MessageProducer inbound() { MqttPahoMessageDrivenChannelAdapter adapter = new MqttPahoMessageDrivenChannelAdapter("tcp://localhost:1883", "testClient", "topic1", "topic2"); adapter.setCompletionTimeout(5000); adapter.setConverter(new DefaultPahoMessageConverter()); adapter.setQos(1); adapter.setOutputChannel(mqttInputChannel()); return adapter; } @Bean @ServiceActivator(inputChannel = "mqttInputChannel") public MessageHandler handler() { return new MessageHandler() { @Override public void handleMessage(Message<?> message) throws MessagingException { System.out.println(message.getPayload()); } }; } }
The outbound channel adapter is implemented by the MqttPahoMessageHandler which is wrapped in a ConsumerEndpoint.
For convenience, it can be configured using the namespace.
Starting with version 4.1, the adapter supports asynchronous sends, avoiding blocking until the delivery is confirmed; application events can be emitted to enable applications to confirm delivery if desired.
Attributes:
<int-mqtt:outbound-channel-adapter id="withConverter" client-id="foo"
|
The client id. |
|
The broker URL. |
|
An |
|
The client factory. |
|
The default quality of service (used if no |
|
An expression to evaluate to determine the qos; default |
|
The default value of the retained flag (used if no |
|
An expression to evaluate to determine the retained boolean; default |
|
The default topic to which the message will be sent (used if no |
|
An expression to evaluate to determine the destination topic; default |
|
When |
|
When |
| Note |
|---|---|
|
Starting with version 4.1 the url can be omitted and, instead, the server URIs can be provided in the |
The following Spring Boot application provides an example of configuring the outbound adapter using Java configuration:
@SpringBootApplication @IntegrationComponentScan public class MqttJavaApplication { public static void main(String[] args) { ConfigurableApplicationContext context = new SpringApplicationBuilder(MqttJavaApplication.class) .web(false) .run(args); MyGateway gateway = context.getBean(MyGateway.class); gateway.sendToMqtt("foo"); } @Bean public MqttPahoClientFactory mqttClientFactory() { DefaultMqttPahoClientFactory factory = new DefaultMqttPahoClientFactory(); factory.setServerURIs("tcp://host1:1883", "tcp://host2:1883"); factory.setUserName("username"); factory.setPassword("password"); return factory; } @Bean @ServiceActivator(inputChannel = "mqttOutboundChannel") public MessageHandler mqttOutbound() { MqttPahoMessageHandler messageHandler = new MqttPahoMessageHandler("testClient", mqttClientFactory()); messageHandler.setAsync(true); messageHandler.setDefaultTopic("testTopic"); return messageHandler; } @Bean public MessageChannel mqttOutboundChannel() { return new DirectChannel(); } @MessagingGateway(defaultRequestChannel = "mqttOutboundChannel") public interface MyGateway { void sendToMqtt(String data); } }
Since version 2.1 Spring Integration introduces support for Redis: _"an open source advanced key-value store". _ This support comes in the form of a Redis-based MessageStore as well as Publish-Subscribe Messaging adapters that are supported by Redis via its PUBLISH, SUBSCRIBE and UNSUBSCRIBE commands.
To download, install and run Redis please refer to the Redis documentation.
To begin interacting with Redis you first need to connect to it.
Spring Integration uses support provided by another Spring project, Spring Data Redis, which provides typical Spring constructs: ConnectionFactory and Template.
Those abstractions simplify integration with several Redis-client Java APIs.
Currently Spring-Data-Redis supportshttps://github.com/xetorthio/jedis[jedis], jredis and rjc
RedisConnectionFactory
To connect to Redis you would use one of the implementations of the RedisConnectionFactory interface:
public interface RedisConnectionFactory extends PersistenceExceptionTranslator { /** * Provides a suitable connection for interacting with Redis. * * @return connection for interacting with Redis. */ RedisConnection getConnection(); }
The example below shows how to create a JedisConnectionFactory.
In Java:
JedisConnectionFactory jcf = new JedisConnectionFactory();
jcf.afterPropertiesSet();
Or in Spring’s XML configuration:
<bean id="redisConnectionFactory" class="o.s.data.redis.connection.jedis.JedisConnectionFactory"> <property name="port" value="7379" /> </bean>
The implementations of RedisConnectionFactory provide a set of properties such as port and host that can be set if needed. Once an instance of RedisConnectionFactory is created, you can create an instance of RedisTemplate and inject it with the RedisConnectionFactory.
RedisTemplate
As with other template classes in Spring (e.g., JdbcTemplate, JmsTemplate) RedisTemplate is a helper class that simplifies Redis data access code.
For more information about RedisTemplate and its variations (e.g., StringRedisTemplate) please refer to the Spring-Data-Redis documentation
The code below shows how to create an instance of RedisTemplate:
In Java:
RedisTemplate rt = new RedisTemplate<String, Object>();
rt.setConnectionFactory(redisConnectionFactory);
- Or in Spring’s XML configuration
<bean id="redisTemplate" class="org.springframework.data.redis.core.RedisTemplate"> <property name="connectionFactory" ref="redisConnectionFactory"/> </bean>
As mentioned in the introduction Redis provides support for Publish-Subscribe messaging via its PUBLISH, SUBSCRIBE and UNSUBSCRIBE commands. As with JMS and AMQP, Spring Integration provides Message Channels and adapters for sending and receiving messages via Redis.
Similar to the JMS there are cases where both the producer and consumer are intended to be part of the same application, running within the same process. This could be accomplished by using a pair of inbound and outbound Channel Adapters, however just like with Spring Integration’s JMS support, there is a simpler approach to address this use case.
<int-redis:publish-subscribe-channel id="redisChannel" topic-name="si.test.topic"/>
The publish-subscribe-channel (above) will behave much like a normal <publish-subscribe-channel/> element from the main Spring Integration namespace.
It can be referenced by both input-channel and output-channel attributes of any endpoint.
The difference is that this channel is backed by a Redis topic name - a String value specified by the topic-name attribute.
However unlike JMS this topic doesn’t have to be created in advance or even auto-created by Redis.
In Redis topics are simple String values that play the role of an address, and all the producer and consumer need to do to communicate is use the same String value as their topic name.
A simple subscription to this channel means that asynchronous pub-sub messaging is possible between the producing and consuming endpoints, but unlike the asynchronous Message Channels created by adding a <queue/> sub-element within a simple Spring Integration <channel/> element, the Messages are not just stored in an in-memory queue.
Instead those Messages are passed through Redis allowing you to rely on its support for persistence and clustering as well as its interoperability with other non-java platforms.
The Redis-based Inbound Channel Adapter (RedisInboundChannelAdapter) adapts incoming Redis messages into Spring Messages in the same way as other inbound adapters.
It receives platform-specific messages (Redis in this case) and converts them to Spring Messages using a MessageConverter strategy.
<int-redis:inbound-channel-adapter id="redisAdapter" topics="foo, bar" channel="receiveChannel" error-channel="testErrorChannel" message-converter="testConverter" /> <bean id="redisConnectionFactory" class="o.s.data.redis.connection.jedis.JedisConnectionFactory"> <property name="port" value="7379" /> </bean> <bean id="testConverter" class="foo.bar.SampleMessageConverter" />
Above is a simple but complete configuration of a Redis Inbound Channel Adapter.
Note that the above configuration relies on the familiar Spring paradigm of auto-discovering certain beans.
In this case the redisConnectionFactory is implicitly injected into the adapter.
You can of course specify it explicitly using the connection-factory attribute instead.
Also, note that the above configuration injects the adapter with a custom MessageConverter.
The approach is similar to JMS where MessageConverters are used to convert between Redis Messages and the Spring Integration Message payloads.
The default is a SimpleMessageConverter.
Inbound adapters can subscribe to multiple topic names hence the comma-delimited set of values in the topics attribute.
Since version 3.0, the Inbound Adapter, in addition to the existing topics attribute, now has the topic-patterns attribute.
This attribute contains a comma-delimited set of Redis topic patterns.
For more information regarding Redis publish/subscribe, see Redis Pub/Sub.
Inbound adapters can use a RedisSerializer to deserialize the body of Redis Messages.
The serializer attribute of the <int-redis:inbound-channel-adapter> can be set to an empty string, which results in a null value for the RedisSerializer property.
In this case the raw byte[] bodies of Redis Messages are provided as the message payloads.
Since version 5.0, an Executor instance can be provided to the Inbound Adapter via the task-executor attribute of the <int-redis:inbound-channel-adapter>.
Also the received Spring Integration Messages have now RedisHeaders.MESSAGE_SOURCE header to indicate the source of the published message - topic or pattern.
This can be used downstream for routing logic.
The Redis-based Outbound Channel Adapter adapts outgoing Spring Integration messages into Redis messages in the same way as other outbound adapters.
It receives Spring Integration messages and converts them to platform-specific messages (Redis in this case) using a MessageConverter strategy.
<int-redis:outbound-channel-adapter id="outboundAdapter" channel="sendChannel" topic="foo" message-converter="testConverter"/> <bean id="redisConnectionFactory" class="o.s.data.redis.connection.jedis.JedisConnectionFactory"> <property name="port" value="7379"/> </bean> <bean id="testConverter" class="foo.bar.SampleMessageConverter" />
As you can see the configuration is similar to the Redis Inbound Channel Adapter.
The adapter is implicitly injected with a RedisConnectionFactory which was defined with redisConnectionFactory as its bean name.
This example also includes the optional, custom MessageConverter (the testConverter bean).
Since Spring Integration 3.0, the <int-redis:outbound-channel-adapter>, as an alternative to the topic attribute, has the topic-expression attribute to determine the Redis topic against the Message at runtime.
These attributes are mutually exclusive.
Since Spring Integration 3.0, a Queue Inbound Channel Adapter is available to pop messages from a Redis List. By default it uses right pop, but it can be configured to use left pop instead. The adapter is message-driven using an internal listener thread and does not use a poller.
<int-redis:queue-inbound-channel-adapter id=""
|
The component bean name.
If the |
|
The |
|
A |
|
A |
|
A reference to a |
|
The name of the Redis List on which the queue-based pop operation is performed to get Redis messages. |
|
The |
|
The |
|
The timeout in milliseconds for pop operation to wait for a Redis message from the queue. Default is 1 second. |
|
The time in milliseconds for which the listener task should sleep after exceptions on the pop operation, before restarting the listener task. |
|
Specify if this Endpoint expects data from the Redis queue to contain entire |
|
A reference to a Spring |
|
Specify whether this Endpoint should use right pop (when |
Since Spring Integration 3.0, a Queue Outbound Channel Adapter is available to push to a Redis List from Spring Integration messages. By default, it uses left push, but it can be configured to use right push instead.
<int-redis:queue-outbound-channel-adapter id=""
|
The component bean name.
If the |
|
The |
|
A reference to a |
|
The name of the Redis List on which the queue-based push operation is performed to send Redis messages.
This attribute is mutually exclusive with |
|
A SpEL |
|
A |
|
Specify if this Endpoint should send just the payload to the Redis queue, or the entire |
|
Specify whether this Endpoint should use left push (when |
Since Spring Integration 3.0, the Redis module provides an implementation of IntegrationEvent - which, in turn, is a org.springframework.context.ApplicationEvent.
The RedisExceptionEvent encapsulates an Exception s from Redis operations (with the Endpoint being the source of the event).
For example, the <int-redis:queue-inbound-channel-adapter/> emits those events after catching Exception s from the BoundListOperations.rightPop operation.
The exception may be any generic org.springframework.data.redis.RedisSystemException or a org.springframework.data.redis.RedisConnectionFailureException.
Handling these events using an <int-event:inbound-channel-adapter/> can be useful to determine problems with background Redis tasks and to take administrative actions.
As described in EIP, a Message Store allows you to persist Messages. This can be very useful when dealing with components that have a capability to buffer messages (Aggregator, Resequencer, etc.) if reliability is a concern. In Spring Integration, the MessageStore strategy also provides the foundation for the ClaimCheck pattern, which is described in EIP as well.
Spring Integration’s Redis module provides the RedisMessageStore.
<bean id="redisMessageStore" class="o.s.i.redis.store.RedisMessageStore"> <constructor-arg ref="redisConnectionFactory"/> </bean> <int:aggregator input-channel="inputChannel" output-channel="outputChannel" message-store="redisMessageStore"/>
Above is a sample RedisMessageStore configuration that shows its usage by an Aggregator.
As you can see it is a simple bean configuration, and it expects a RedisConnectionFactory as a constructor argument.
By default the RedisMessageStore will use Java serialization to serialize the Message.
However if you want to use a different serialization technique (e.g., JSON), you can provide your own serializer via the valueSerializer property of the RedisMessageStore.
Starting with version 4.3.10, the Framework provides Jackson Serializer and Deserializer implementations for Message s and MessageHeaders - MessageHeadersJacksonSerializer and MessageJacksonDeserializer, respectively.
They have to be configured via the SimpleModule options for the ObjectMapper.
In addition, enableDefaultTyping should be configured on the ObjectMapper to add type information for each serialized complex object.
That type information is then used during deserialization.
The Framework provides a utility method JacksonJsonUtils.messagingAwareMapper(), which is already supplied with all the above-mentioned properties and serializers.
To manage JSON serialization in the RedisMessageStore, it must be configured like so:
RedisMessageStore store = new RedisMessageStore(jedisConnectionFactory); ObjectMapper mapper = JacksonJsonUtils.messagingAwareMapper(); RedisSerializer<Object> serializer = new GenericJackson2JsonRedisSerializer(mapper); store.setValueSerializer(serializer);
Starting with version 4.3.12, the RedisMessageStore supports the key prefix option to allow distinguishing between instances of the store on the same Redis server.
The RedisMessageStore above maintains each group as a value under a single key (the group id).
While this can be used to back a QueueChannel for persistence, a specialized RedisChannelMessageStore is provided for that purpose (since version 4.0).
This store uses a LIST for each channel and LPUSH when sending and RPOP when receiving messages.
This store also uses JDK serialization by default, but the value serializer can be modified as described above.
It is recommended that this store is used for backing channels, instead of the general RedisMessageStore.
<bean id="redisMessageStore" class="o.s.i.redis.store.RedisChannelMessageStore"> <constructor-arg ref="redisConnectionFactory"/> </bean> <int:channel id="somePersistentQueueChannel"> <int:queue message-store="redisMessageStore"/> <int:channel>
The keys that are used to store the data have the form <storeBeanName>:<channelId> (in the above example, redisMessageStore:somePersistentQueueChannel).
In addition, a subclass RedisChannelPriorityMessageStore is also provided.
When this is used with a QueueChannel, the messages are received in (FIFO within) priority order.
It uses the standard IntegrationMessageHeaderAccessor.PRIORITY header and supports priority values 0 - 9; messages with other priorities (and messages with no priority) are retrieved in FIFO order after any messages with priority.
| Important |
|---|---|
|
These stores implement only |
As of Spring Integration 3.0 a new Redis-based MetadataStore (Section 10.5, “Metadata Store”) implementation is available.
The RedisMetadataStore can be used to maintain state of a MetadataStore across application restarts.
This new MetadataStore implementation can be used with adapters such as:
In order to instruct these adapters to use the new RedisMetadataStore simply declare a Spring bean using the bean name metadataStore.
The Twitter Inbound Channel Adapter and the Feed Inbound Channel Adapter will both automatically pick up and use the declared RedisMetadataStore.
<bean name="metadataStore" class="o.s.i.redis.store.metadata.RedisMetadataStore"> <constructor-arg name="connectionFactory" ref="redisConnectionFactory"/> </bean>
The RedisMetadataStore is backed by RedisProperties and interaction with it uses BoundHashOperations, which, in turn, requires a key for the entire Properties store.
In the case of the MetadataStore, this key plays the role of a region, which is useful in distributed environment, when several applications use the same Redis server.
By default this key has the value MetaData.
Starting with version 4.0, this store now implements ConcurrentMetadataStore, allowing it to be reliably shared across multiple application instances where only one instance will be allowed to store or modify a key’s value.
| Important |
|---|---|
|
The |
The RedisStore Inbound Channel Adapter is a polling consumer that reads data from a Redis collection and sends it as a Message payload.
<int-redis:store-inbound-channel-adapter id="listAdapter" connection-factory="redisConnectionFactory" key="myCollection" channel="redisChannel" collection-type="LIST" > <int:poller fixed-rate="2000" max-messages-per-poll="10"/> </int-redis:store-inbound-channel-adapter>
As you can see from the configuration above you configure a Redis Store Inbound Channel Adapter using the store-inbound-channel-adapter element, providing values for various attributes such as:
-
keyorkey-expression- The name of the key for the collection being used. -
collection-type- enumeration of the Collection types supported by this adapter. Supported Collections are: LIST, SET, ZSET, PROPERTIES, MAP -
connection-factory- reference to an instance ofo.s.data.redis.connection.RedisConnectionFactory -
redis-template- reference to an instance ofo.s.data.redis.core.RedisTemplate
and other attributes that are common across all other inbound adapters (e.g., channel).
| Note |
|---|---|
|
You cannot set both |
| Important |
|---|---|
|
By default, the adapter uses a <bean id="redisTemplate" class="org.springframework.data.redis.core.RedisTemplate"> <property name="connectionFactory" ref="redisConnectionFactory"/> <property name="keySerializer"> <bean class="org.springframework.data.redis.serializer.StringRedisSerializer"/> </property> <property name="hashKeySerializer"> <bean class="org.springframework.data.redis.serializer.StringRedisSerializer"/> </property> </bean> This uses String serializers for keys and hash keys and the default JDK Serialization serializers for values and hash values. |
The example above is relatively simple and static since it has a literal value for the key.
Sometimes, you may need to change the value of the key at runtime based on some condition.
To do that, simply use key-expression instead, where the provided expression can be any valid SpEL expression.
Also, you may wish to perform some post-processing to the successfully processed data that was read from the Redis collection. For example; you may want to move or remove the value after its been processed. You can do this using the Transaction Synchronization feature that was added with Spring Integration 2.2.
<int-redis:store-inbound-channel-adapter id="zsetAdapterWithSingleScoreAndSynchronization" connection-factory="redisConnectionFactory" key-expression="'presidents'" channel="otherRedisChannel" auto-startup="false" collection-type="ZSET"> <int:poller fixed-rate="1000" max-messages-per-poll="2"> <int:transactional synchronization-factory="syncFactory"/> </int:poller> </int-redis:store-inbound-channel-adapter> <int:transaction-synchronization-factory id="syncFactory"> <int:after-commit expression="payload.removeByScore(18, 18)"/> </int:transaction-synchronization-factory> <bean id="transactionManager" class="o.s.i.transaction.PseudoTransactionManager"/>
As you can see from the above all, you need to do is declare your poller to be transactional with a transactional element.
This element can reference a real transaction manager (for example if some other part of your flow invokes JDBC).
If you don’t have a real transaction, you can use a o.s.i.transaction.PseudoTransactionManager which is an implementation of Spring’s PlatformTransactionManager and enables the use of the transaction synchronization features of the redis adapter when there is no actual transaction.
| Important |
|---|---|
|
This does NOT make the Redis activities themselves transactional, it simply allows the synchronization of actions to be taken before/after success (commit) or after failure (rollback). |
Once your poller is transactional all you need to do is set an instance of the o.s.i.transaction.TransactionSynchronizationFactory on the transactional element.
TransactionSynchronizationFactory will create an instance of the TransactionSynchronization.
For your convenience we’ve exposed a default SpEL-based TransactionSynchronizationFactory which allows you to configure SpEL expressions, with their execution being coordinated (synchronized) with a transaction.
Expressions for before-commit, after-commit, and after-rollback are supported, together with a channel for each where the evaluation result (if any) will be sent.
For each sub-element you can specify expression and/or channel attributes.
If only the channel attribute is present the received Message will be sent there as part of the particular synchronization scenario.
If only the expression attribute is present and the result of an expression is a non-Null value, a Message with the result as the payload will be generated and sent to a default channel (NullChannel) and will appear in the logs (DEBUG).
If you want the evaluation result to go to a specific channel add a channel attribute.
If the result of an expression is null or void, no Message will be generated.
For more information about transaction synchronization, see Section C.3, “Transaction Synchronization”.
The RedisStore Outbound Channel Adapter allows you to write a Message payload to a Redis collection
<int-redis:store-outbound-channel-adapter id="redisListAdapter" collection-type="LIST" channel="requestChannel" key="myCollection" />
As you can see from the configuration above, you configure a Redis Store Outbound Channel Adapter using the store-inbound-channel-adapter element, providing values for various attributes such as:
-
keyorkey-expression- The name of the key for the collection being used. -
extract-payload-elements- If set totrue(Default) and the payload is an instance of a "multi- value" object (i.e., Collection or Map) it will be stored using addAll/ putAll semantics. Otherwise, if set tofalsethe payload will be stored as a single entry regardless of its type. If the payload is not an instance of a "multi-value" object, the value of this attribute is ignored and the payload will always be stored as a single entry. -
collection-type- enumeration of the Collection types supported by this adapter. Supported Collections are: LIST, SET, ZSET, PROPERTIES, MAP -
map-key-expression- SpEL expression that returns the name of the key for entry being stored. Only applies if thecollection-typeis MAP or PROPERTIES and extract-payload-elements is false. -
connection-factory- reference to an instance ofo.s.data.redis.connection.RedisConnectionFactory -
redis-template- reference to an instance ofo.s.data.redis.core.RedisTemplate
and other attributes that are common across all other inbound adapters (e.g., channel).
| Note |
|---|---|
|
You cannot set both |
| Important |
|---|---|
|
By default, the adapter uses a |
The example above is relatively simple and static since it has a literal values for the key and other attributes.
Sometimes you may need to change the values dynamically at runtime based on some condition.
To do that simply use their -expression equivalents (key-expression, map-key-expression etc.) where the provided expression can be any valid SpEL expression.
Since Spring Integration 4.0, the Redis Command Gateway is available to perform any standard Redis command using generic RedisConnection#execute method:
<int-redis:outbound-gateway request-channel=""
|
The |
|
The |
|
Specify whether this outbound gateway must return a non-null value.
This value is |
|
The timeout in milliseconds to wait until the reply message will be sent or not. Typically is applied for queue-based limited reply-channels. |
|
A reference to a |
|
A reference to a |
|
Reference to an instance of |
|
The SpEL expression that returns the command key.
Default is the |
|
Comma-separate SpEL expressions that will be evaluated as command arguments.
Mutually exclusive with the |
|
A |
|
Reference to an instance of |
The <int-redis:outbound-gateway> can be used as a common component to perform any desired Redis operation.
For example to get incremented value from Redis Atomic Number:
<int-redis:outbound-gateway request-channel="requestChannel" reply-channel="replyChannel" command-expression="'INCR'"/>
where the Message payload should be a name of redisCounter, which may be provided by org.springframework.data.redis.support.atomic.RedisAtomicInteger bean definition.
The RedisConnection#execute has a generic Object as return type and real result depends on command type, for example MGET returns a List<byte[]>.
For more information about commands, their arguments and result type seehttp://redis.io/commands[Redis Specification].
Since Spring Integration 4.1, the Redis Queue Outbound Gateway is available to perform request and reply scenarios.
It pushes a conversation`UUID` to the provided queue, then pushes the value to a Redis List with that UUID as its key and waits for the reply from a Redis List with a key of UUID + '.reply'.
A different UUID is used for each interaction.
<int-redis:queue-outbound-gateway request-channel=""
|
The |
|
The |
|
Specify whether this outbound gateway must return a non-null value.
This value is |
|
The timeout in milliseconds to wait until the reply message will be sent or not. Typically is applied for queue-based limited reply-channels. |
|
A reference to a |
|
The name of the Redis List to which outbound gateway will send a conversation`UUID`. |
|
The order for this outbound gateway when multiple gateway are registered thereby |
|
The |
|
Specify if this Endpoint expects data from the Redis queue to contain entire |
Since Spring Integration 4.1, the Redis Queue Inbound Gateway is available to perform request and reply scenarios.
It pops a conversation UUID from the provided queue, then pops the value from the Redis List with that UUID as its key and pushes the reply to the Redis List with a key of UUID + '.reply':
<int-redis:queue-inbound-gateway request-channel=""
|
The |
|
The |
|
A reference to a Spring |
|
The timeout in milliseconds to wait until the reply message will be sent or not. Typically is applied for queue-based limited reply-channels. |
|
A reference to a |
|
The name of the Redis List for the conversation |
|
The order for this inbound gateway when multiple gateway are registered thereby |
|
The |
|
The timeout in milliseconds to wait until the receive message will be get or not. Typically is applied for queue-based limited request-channels. |
|
Specify if this Endpoint expects data from the Redis queue to contain entire |
|
The time in milliseconds for which the listener task should sleep after exceptions on the right pop operation, before restarting the listener task. |
Starting with version 4.0, the RedisLockRegistry is available.
Certain components (for example aggregator and resequencer) use a lock obtained from a LockRegistry instance to ensure that only one thread is manipulating a group at a time.
The DefaultLockRegistry performs this function within a single component; you can now configure an external lock registry on these components.
When used with a shared MessageGroupStore, the RedisLockRegistry can be use to provide this functionality across multiple application instances, such that only one instance can manipulate the group at a time.
When a lock is released by a local thread, another local thread will generally be able to acquire the lock immediately. If a lock is released by a thread using a different registry instance, it can take up to 100ms to acquire the lock.
To avoid "hung" locks (when a server fails), the locks in this registry are expired after a default 60 seconds, but this can be configured on the registry. Locks are normally held for a much smaller time.
| Important |
|---|---|
|
Because the keys can expire, an attempt to unlock an expired lock will result in an exception being thrown. However, be aware that the resources protected by such a lock may have been compromised so such exceptions should be considered severe. The expiry should be set at a large enough value to prevent this condition, while small enough that the lock can be recovered after a server failure in a reasonable amount of time. |
Starting with version 5.0, the RedisLockRegistry implements ExpirableLockRegistry providing functionality to remove locks last acquired more than age ago that are not currently locked.
The Resource Inbound Channel Adapter builds upon Spring’s Resource abstraction to support greater flexibility across a variety of actual types of underlying resources, such as a file, a URL, or a class path resource.
Therefore, it’s similar to but more generic than the File Inbound Channel Adapter.
The Resource Inbound Channel Adapter is a polling adapter that creates a Message whose payload is a collection of Resource objects.
Resource objects are resolved based on the pattern specified using the pattern attribute.
The collection of resolved Resource objects is then sent as a payload within a Message to the adapter’s channel.
That is one major difference between Resource Inbound Channel Adapter and File Inbound Channel Adapter; the latter buffers File objects and sends a single File object per Message.
Below is an example of a very simple configuration which will find all files ending with the properties extension in the foo.bar package available on the classpath and will send them as the payload of a Message to the channel named resultChannel:
<int:resource-inbound-channel-adapter id="resourceAdapter" channel="resultChannel" pattern="classpath:foo/bar/*.properties"> <int:poller fixed-rate="1000"/> </int:resource-inbound-channel-adapter>
The Resource Inbound Channel Adapter relies on the org.springframework.core.io.support.ResourcePatternResolver strategy interface to resolve the provided pattern.
It defaults to an instance of the current ApplicationContext.
However you may provide a reference to an instance of your own implementation of ResourcePatternResolver using the pattern-resolver attribute:
<int:resource-inbound-channel-adapter id="resourceAdapter" channel="resultChannel" pattern="classpath:foo/bar/*.properties" pattern-resolver="myPatternResolver"> <int:poller fixed-rate="1000"/> </int:resource-inbound-channel-adapter> <bean id="myPatternResolver" class="org.example.MyPatternResolver"/>
You may have a use case where you need to further filter the collection of resources resolved by the ResourcePatternResolver.
For example, you may want to prevent resources that were resolved already from appearing in a collection of resolved resources ever again.
On the other hand your resources might be updated rather often and you do want them to be picked up again.
In other words there is a valid use case for defining an additional filter as well as disabling filtering altogether.
You can provide your own implementation of the org.springframework.integration.util.CollectionFilter strategy interface:
public interface CollectionFilter<T> { Collection<T> filter(Collection<T> unfilteredElements); }
As you can see the CollectionFilter receives a collection of un-filtered elements (which would be Resource objects in this case), and it returns a collection of filtered elements of that same type.
If you are defining the adapter via XML but you do not specify a filter reference, a default implementation of CollectionFilter will be used by the Resource Inbound Channel Adapter.
The implementation class of that default filter is org.springframework.integration.util.AcceptOnceCollectionFilter.
It remembers the elements passed in the previous invocation in order to avoid returning those elements more than once.
To inject your own implementation of CollectionFilter instead, use the filter attribute.
<int:resource-inbound-channel-adapter id="resourceAdapter" channel="resultChannel" pattern="classpath:foo/bar/*.properties" filter="myFilter"> <int:poller fixed-rate="1000"/> </int:resource-inbound-channel-adapter> <bean id="myFilter" class="org.example.MyFilter"/>
If you don’t need any filtering and want to disable even the default CollectionFilter strategy, simply provide an empty value for the filter attribute (e.g., filter="")
This Chapter explains how to use RMI specific channel adapters to distribute a system over multiple JVMs. The first section will deal with sending messages over RMI. The second section shows how to receive messages over RMI. The last section shows how to define rmi channel adapters through the namespace support.
To send messages from a channel over RMI, simply define an RmiOutboundGateway.
This gateway will use Spring’s RmiProxyFactoryBean internally to create a proxy for a remote gateway.
Note that to invoke a remote interface that doesn’t use Spring Integration you should use a service activator in combination with Spring’s RmiProxyFactoryBean.
To configure the outbound gateway write a bean definition like this:
<bean id="rmiOutGateway" class=org.spf.integration.rmi.RmiOutboundGateway> <constructor-arg value="rmi://host"/> <property name="replyChannel" value="replies"/> </bean>
To receive messages over RMI you need to use a RmiInboundGateway.
This gateway can be configured like this
<bean id="rmiInGateway" class=org.spf.integration.rmi.RmiInboundGateway> <property name="requestChannel" value="requests"/> </bean>
| Important |
|---|---|
|
If you use an |
To configure the inbound gateway you can choose to use the namespace support for it. The following code snippet shows the different configuration options that are supported.
<int-rmi:inbound-gateway id="gatewayWithDefaults" request-channel="testChannel"/> <int-rmi:inbound-gateway id="gatewayWithCustomProperties" request-channel="testChannel" expect-reply="false" request-timeout="123" reply-timeout="456"/> <int-rmi:inbound-gateway id="gatewayWithHost" request-channel="testChannel" registry-host="localhost"/> <int-rmi:inbound-gateway id="gatewayWithPort" request-channel="testChannel" registry-port="1234" error-channel="rmiErrorChannel"/> <int-rmi:inbound-gateway id="gatewayWithExecutorRef" request-channel="testChannel" remote-invocation-executor="invocationExecutor"/>
To configure the outbound gateway you can use the namespace support as well. The following code snippet shows the different configuration for an outbound rmi gateway.
<int-rmi:outbound-gateway id="gateway" request-channel="localChannel" remote-channel="testChannel" host="localhost"/>
@Bean public RmiInboundGateway inbound() { RmiInboundGateway gateway = new RmiInboundGateway(); gateway.setRequestChannel(requestChannel()); gateway.setRegistryHost("host"); gateway.setRegistryPort(port); return gateway; } @Bean @ServiceActivator(inputChannel="inChannel") public RmiOutboundGateway outbound() { RmiOutboundGateway gateway = new RmiOutboundGateway("rmi://host:port/" + RmiInboundGateway.SERVICE_NAME_PREFIX + "remoteChannelName"); return gateway; }
Starting with version 4.3, the outbound gateway has a second constructor that takes a RmiProxyFactoryBeanConfigurer instance along with the service url argument.
This allows further configuration before the proxy is created; for example, to inject a Spring Security ContextPropagatingRemoteInvocationFactory:
@Bean @ServiceActivator(inputChannel="inChannel") public RmiOutboundGateway outbound() { RmiOutboundGateway gateway = new RmiOutboundGateway("rmi://host:port/" + RmiInboundGateway.SERVICE_NAME_PREFIX + "remoteChannelName", pfb -> { pfb.setRemoteInvocationFactory(new ContextPropagatingRemoteInvocationFactory()); }); return gateway; }
Starting with version 5.0, this can be set using the XML namespace, using the configurer attribute.
Spring Integration provides support for file transfer operations via SFTP.
The Secure File Transfer Protocol (SFTP) is a network protocol which allows you to transfer files between two computers on the Internet over any reliable stream.
The SFTP protocol requires a secure channel, such as SSH, as well as visibility to a client’s identity throughout the SFTP session.
Spring Integration supports sending and receiving files over SFTP by providing three client side endpoints: Inbound Channel Adapter, Outbound Channel Adapter, and Outbound Gateway It also provides convenient namespace configuration to define these client components.
xmlns:int-sftp="http://www.springframework.org/schema/integration/sftp"
xsi:schemaLocation="http://www.springframework.org/schema/integration/sftp
http://www.springframework.org/schema/integration/sftp/spring-integration-sftp.xsd"
| Important |
|---|---|
|
Starting with version 3.0, sessions are no longer cached by default. See Section 28.5, “SFTP Session Caching”. |
Before configuring SFTP adapters, you must configure an SFTP Session Factory. You can configure the SFTP Session Factory via a regular bean definition:
<beans:bean id="sftpSessionFactory" class="org.springframework.integration.sftp.session.DefaultSftpSessionFactory"> <beans:property name="host" value="localhost"/> <beans:property name="privateKey" value="classpath:META-INF/keys/sftpTest"/> <beans:property name="privateKeyPassphrase" value="springIntegration"/> <beans:property name="port" value="22"/> <beans:property name="user" value="kermit"/> </beans:bean>
Every time an adapter requests a session object from its SessionFactory, a new SFTP session is being created.
Under the covers, the SFTP Session Factory relies on the JSch library to provide the SFTP capabilities.
However, Spring Integration also supports the caching of SFTP sessions, please see Section 28.5, “SFTP Session Caching” for more information.
| Important |
|---|---|
|
JSch supports multiple channels (operations) over a connection to the server.
By default, the Spring Integration session factory uses a separate physical connection for each channel.
Since Spring Integration 3.0, you can configure the session factory (using a boolean constructor arg - default When using this feature, you must wrap the session factory in a caching session factory, as described below, so that the connection is not physically closed when an operation completes. If the cache is reset, the session is disconnected only when the last channel is closed. The connection will be refreshed if it is found to be disconnected when a new operation obtains a session. |
| Note |
|---|---|
|
If you experience connectivity problems and would like to trace Session creation as well as see which Sessions are polled you may enable it by setting the logger to TRACE level (e.g., log4j.category.org.springframework.integration.sftp=TRACE). Please also see Section 28.12, “SFTP/JSCH Logging”. |
Now all you need to do is inject this SFTP Session Factory into your adapters.
| Note |
|---|---|
|
A more practical way to provide values for the SFTP Session Factory would be via Spring’s property placeholder support. |
Below you will find all properties that are exposed by the DefaultSftpSessionFactory.
isSharedSession (constructor argument)
When true, a single connection will be used and JSch Channels will be multiplexed.
Defaults to false.
clientVersion
Allows you to set the client version property. It’s default depends on the underlying JSch version but it will look like:_SSH-2.0-JSCH-0.1.45_
enableDaemonThread
If true, all threads will be daemon threads.
If set to false, normal non-daemon threads will be used instead.
This property will be set on the underlying Session.
There, this property will default to false, if not explicitly set.
host
The url of the host you want connect to. Mandatory.
hostKeyAlias
Sets the host key alias, used when comparing the host key to the known hosts list.
knownHosts
Specifies the filename that will be used for a host key repository.
The file has the same format as OpenSSH’s known_hosts file and is required and must be pre-populated if
allowUnknownKeys is false.
password
The password to authenticate against the remote host.
If a password is not provided, then the privateKey property is mandatory.
Not allowed if userInfo is set; the password is obtained from that object.
port
The port over which the SFTP connection shall be established.
If not specified, this value defaults to 22.
If specified, this properties must be a positive number.
privateKey
Allows you to set a Resource, which represents the location of the private key used for authenticating against the remote host. If the privateKey is not provided, then the password property is mandatory.
privateKeyPassphrase
The password for the private key.
Not allowed if userInfo is set; the passphrase is obtained from that object.
Optional.
proxy
Allows for specifying a JSch-based Proxy. If set, then the proxy object is used to create the connection to the remote host via the proxy. See Section 28.3, “Proxy Factory Bean” for a convenient way to configure the proxy.
serverAliveCountMax
Specifies the number of server-alive messages, which will be sent without any reply from the server before disconnecting.
If not set, this property defaults to 1.
serverAliveInterval
Sets the timeout interval (milliseconds) before a server alive message is sent, in case no message is received from the server.
sessionConfig
Using Properties, you can set additional configuration setting on the underlying JSch Session.
socketFactory
Allows you to pass in a SocketFactory. The socket factory is used to create a socket to the target host. When a proxy is used, the socket factory is passed to the proxy. By default plain TCP sockets are used.
timeout
The timeout property is used as the socket timeout parameter, as well as the default connection timeout.
Defaults to 0, which means, that no timeout will occur.
user
The remote user to use. Mandatory.
Set to true to allow connections to hosts with unknown (or changed) keys.
Default false (since 4.2 - defaults to true in 4.1.7 and was not configurable before that version).
Only applied if no userInfo is provided.
If false, a pre-populated knownHosts file is required.
userInfo
Set a custom UserInfo used during authentication.
In particular, be aware that promptYesNo() is invoked when an unknown (or changed) host key is received.
Also see allowUnknownHosts.
When a UserInfo is provided, the password and private key passphrase is obtained from it, and discrete
password and privateKeyPassprase properties cannot be set.
Jsch provides a mechanism to connect to the server via an HTTP or SOCKS proxy.
To use this feature, configure the Proxy and provide a reference to the DefaultSftpSessionFactory as discussed
above.
Three implementations are provided by Jsch, HTTP, SOCKS4 and SOCKS5.
Spring Integration 4.3 provides a FactoryBean making configuration of these proxies easier, allowing property
injection:
<bean id="proxySocks5" class="org.springframework.integration.sftp.session.JschProxyFactoryBean"> <constructor-arg value="SOCKS5" /> <constructor-arg value="${sftp.proxy.address}" /> <constructor-arg value="${sftp.proxy.port}" /> <constructor-arg value="${sftp.proxy.user}" /> <constructor-arg value="${sftp.proxy.pw}" /> </bean> <bean id="sessionFactory" class="org.springframework.integration.sftp.session.DefaultSftpSessionFactory" > ... <property name="proxy" ref="proxySocks5" /> ... </bean>
Version 4.2 introduced the DelegatingSessionFactory which allows the selection of the actual session factory at
runtime.
Prior to invoking the ftp endpoint, call setThreadKey() on the factory to associate a key with the current thread.
That key is then used to lookup the actual session factory to be used.
The key can be cleared by calling clearThreadKey() after use.
Convenience methods have been added so this can easily be done from a message flow:
<bean id="dsf" class="org.springframework.integration.file.remote.session.DelegatingSessionFactory"> <constructor-arg> <bean class="o.s.i.file.remote.session.DefaultSessionFactoryLocator"> <!-- delegate factories here --> </bean> </constructor-arg> </bean> <int:service-activator input-channel="in" output-channel="c1" expression="@dsf.setThreadKey(#root, headers['factoryToUse'])" /> <int-sftp:outbound-gateway request-channel="c1" reply-channel="c2" ... /> <int:service-activator input-channel="c2" output-channel="out" expression="@dsf.clearThreadKey(#root)" />
| Important |
|---|---|
|
When using session caching (see Section 28.5, “SFTP Session Caching”), each of the delegates should be cached; you
cannot cache the |
| Important |
|---|---|
|
Starting with Spring Integration version 3.0, sessions are no longer cached by default; the |
In versions prior to 3.0, the sessions were cached automatically by default.
A cache-sessions attribute was available for disabling the auto caching, but that solution did not provide a way to configure other session caching attributes.
For example, you could not limit on the number of sessions created.
To support that requirement and other configuration options, a CachingSessionFactory was provided.
It provides sessionCacheSize and sessionWaitTimeout properties.
As its name suggests, the sessionCacheSize property controls how many active sessions the factory will maintain in its cache (the DEFAULT is unbounded).
If the sessionCacheSize threshold has been reached, any attempt to acquire another session will block until either one of the cached sessions becomes available or until the wait time for a Session expires (the DEFAULT wait time is Integer.MAX_VALUE).
The sessionWaitTimeout property enables configuration of that value.
If you want your Sessions to be cached, simply configure your default Session Factory as described above and then wrap it in an instance of CachingSessionFactory where you may provide those additional properties.
<bean id="sftpSessionFactory" class="org.springframework.integration.sftp.session.DefaultSftpSessionFactory"> <property name="host" value="localhost"/> </bean> <bean id="cachingSessionFactory" class="org.springframework.integration.file.remote.session.CachingSessionFactory"> <constructor-arg ref="sftpSessionFactory"/> <constructor-arg value="10"/> <property name="sessionWaitTimeout" value="1000"/> </bean>
In the above example you see a CachingSessionFactory created with the sessionCacheSize set to 10 and the sessionWaitTimeout set to 1 second (its value is in milliseconds).
Starting with Spring Integration version 3.0, the CachingConnectionFactory provides a resetCache() method.
When invoked, all idle sessions are immediately closed and in-use sessions are closed when they are returned to the cache.
When using isSharedSession=true, the channel is closed, and the shared session is closed only when the last channel is closed.
New requests for sessions will establish new sessions as necessary.
Starting with Spring Integration version 3.0, a new abstraction is provided over the SftpSession object.
The template provides methods to send, retrieve (as an InputStream), remove, and rename files.
In addition an execute method is provided allowing the caller to execute multiple operations on the session.
In all cases, the template takes care of reliably closing the session.
For more information, refer to the javadocs for RemoteFileTemplate There is a subclass for SFTP: SftpRemoteFileTemplate.
Additional methods were added in version 4.1 including getClientInstance() which provides access to the underlying ChannelSftp enabling access to low-level APIs.
Starting with version 5.0, the new RemoteFileOperations.invoke(OperationsCallback<F, T> action) method is available.
This method allows several RemoteFileOperations calls to be called in the scope of the same, thread-bounded, Session.
This is useful when you need to perform several high-level operations of the RemoteFileTemplate as one unit of work.
For example AbstractRemoteFileOutboundGateway uses it with the mput command implementation, where we perform a put operation for each file in the provided directory and recursively for its sub-directories.
See the JavaDocs for more information.
The SFTP Inbound Channel Adapter is a special listener that will connect to the server and listen for the remote directory events (e.g., new file created) at which point it will initiate a file transfer.
<int-sftp:inbound-channel-adapter id="sftpAdapterAutoCreate" session-factory="sftpSessionFactory" channel="requestChannel" filename-pattern="*.txt" remote-directory="/foo/bar" preserve-timestamp="true" local-directory="file:target/foo" auto-create-local-directory="true" local-filename-generator-expression="#this.toUpperCase() + '.a'" scanner="myDirScanner" local-filter="myFilter" temporary-file-suffix=".writing" max-fetch-size="-1" delete-remote-files="false"> <int:poller fixed-rate="1000"/> </int-sftp:inbound-channel-adapter>
As you can see from the configuration above you can configure the SFTP Inbound Channel Adapter via the inbound-channel-adapter element while also providing values for various attributes such as local-directory - where files are going to be transferred TO and remote-directory - the remote source directory where files are going to be transferred FROM - as well as other attributes including a session-factory reference to the bean we configured earlier.
By default the transferred file will carry the same name as the original file.
If you want to override this behavior you can set the local-filename-generator-expression attribute which allows you to provide a SpEL Expression to generate the name of the local file.
Unlike outbound gateways and adapters where the root object of the SpEL Evaluation Context is a Message, this inbound adapter does not yet have the Message at the time of evaluation since that’s what it ultimately generates with the transferred file as its payload.
So, the root object of the SpEL Evaluation Context is the original name of the remote file (String).
The inbound channel adapter first retrieves the file to a local directory and then emits each file according to the poller configuration.
Starting with version 5.0 you can now limit the number of files fetched from the FTP server when new file retrievals are needed.
This can be beneficial when the target files are very large and/or when running in a clustered system with a persistent file list filter discussed below.
Use max-fetch-size for this purpose; a negative value (default) means no limit and all matching files will be retrieved; see Section 28.9, “Inbound Channel Adapters: Controlling Remote File Fetching” for more information.
Since version 5.0, you can also provide a custom DirectoryScanner implementation to the inbound-channel-adapter via the scanner attribute.
Starting with Spring Integration 3.0, you can specify the preserve-timestamp attribute (default false); when true, the local file’s modified timestamp will be set to the value retrieved from the server; otherwise it will be set to the current time.
Starting with version 4.2, you can specify remote-directory-expression instead of remote-directory, allowing
you to dynamically determine the directory on each poll.
e.g remote-directory-expression="@myBean.determineRemoteDir()".
Sometimes file filtering based on the simple pattern specified via filename-pattern attribute might not be sufficient.
If this is the case, you can use the filename-regex attribute to specify a Regular Expression (e.g.
filename-regex=".*\.test$").
And of course if you need complete control you can use the filter attribute to provide a reference to a custom implementation of the org.springframework.integration.file.filters.FileListFilter - a strategy interface for filtering a list of files.
This filter determines which remote files are retrieved.
You can also combine a pattern based filter with other filters, such as an AcceptOnceFileListFilter to avoid synchronizing files that have previously been fetched, by using a CompositeFileListFilter.
The AcceptOnceFileListFilter stores its state in memory.
If you wish the state to survive a system restart, consider using the SftpPersistentAcceptOnceFileListFilter instead.
This filter stores the accepted file names in an instance of the MetadataStore strategy (Section 10.5, “Metadata Store”).
This filter matches on the filename and the remote modified time.
Since version 4.0, this filter requires a ConcurrentMetadataStore.
When used with a shared data store (such as Redis with the RedisMetadataStore) this allows filter keys to be shared across multiple application or server instances.
Starting with version 5.0, the SftpPersistentAcceptOnceFileListFilter with in-memory SimpleMetadataStore is applied by default for the SftpInboundFileSynchronizer.
This filter is also applied together with the regex or pattern option in the XML configuration as well as via FtpInboundChannelAdapterSpec in Java DSL.
Any other use-cases can be reached via CompositeFileListFilter (or ChainFileListFilter).
The above discussion refers to filtering the files before retrieving them. Once the files have been retrieved, an additional filter is applied to the files on the file system. By default, this is an`AcceptOnceFileListFilter` which, as discussed, retains state in memory and does not consider the file’s modified time. Unless your application removes files after processing, the adapter will re-process the files on disk by default after an application restart.
Also, if you configure the filter to use a FtpPersistentAcceptOnceFileListFilter, and the remote file timestamp changes (causing it to be re-fetched), the default local filter will not allow this new file to be processed.
Use the local-filter attribute to configure the behavior of the local file system filter.
Starting with version 4.3.8, a FileSystemPersistentAcceptOnceFileListFilter is configured by default.
This filter stores the accepted file names and modified timestamp in an instance of the MetadataStore strategy (Section 10.5, “Metadata Store”), and will detect changes to the local file modified time.
The default MetadataStore is a SimpleMetadataStore which stores state in memory.
Since version 4.1.5, these filters have a new property flushOnUpdate which will cause them to flush the
metadata store on every update (if the store implements Flushable).
| Important |
|---|---|
|
Further, if you use a distributed |
The actual local filter is a CompositeFileListFilter containing the supplied filter and a pattern filter that prevents processing files that are in the process of being downloaded (based on the temporary-file-suffix); files are downloaded with this suffix (default: .writing) and the file is renamed to its final name when the transfer is complete, making it visible to the filter.
Please refer to the schema for more detail on these attributes.
It is also important to understand that SFTP Inbound Channel Adapter is a Polling Consumer and therefore you must configure a poller (either a global default or a local sub-element).
Once the file has been transferred to a local directory, a Message with java.io.File as its payload type will be generated and sent to the channel identified by the channel attribute.
More on File Filtering and Large Files
Sometimes a file that just appeared in the monitored (remote) directory is not complete.
Typically such a file will be written with some temporary extension (e.g., foo.txt.writing) and then renamed after the writing process completes.
As a user in most cases you are only interested in files that are complete and would like to filter only those files.
To handle these scenarios, use filtering support provided via the filename-pattern, filename-regex and filter attributes.
If you need a custom filter implementation simply include a reference in your adapter via the filter attribute.
<int-sftp:inbound-channel-adapter id="sftpInbondAdapter" channel="receiveChannel" session-factory="sftpSessionFactory" filter="customFilter" local-directory="file:/local-test-dir" remote-directory="/remote-test-dir"> <int:poller fixed-rate="1000" max-messages-per-poll="10" task-executor="executor"/> </int-sftp:inbound-channel-adapter> <bean id="customFilter" class="org.foo.CustomFilter"/>
It is important to understand the architecture of the adapter.
There is a file synchronizer which fetches the files, and a FileReadingMessageSource to emit a message for each
synchronized file.
As discussed above, there are two filters involved.
The filter attribute (and patterns) refers to the remote (SFTP) file list - to avoid fetching files that have already
been fetched.
The local-filter is used by the FileReadingMessageSource to determine which files are to be sent as messages.
The synchronizer lists the remote files and consults its filter; the files are then transferred.
If an IO error occurs during file transfer, any files that have already been added to the filter are removed so they
are eligible to be re-fetched on the next poll.
This only applies if the filter implements ReversibleFileListFilter (such as the AcceptOnceFileListFilter).
If, after synchronizing the files, an error occurs on the downstream flow processing a file, there is no automatic rollback of the filter so the failed file will not be reprocessed by default.
If you wish to reprocess such files after a failure, you can use configuration similar to the following to facilitate
the removal of the failed file from the filter.
This will work for any ResettableFileListFilter.
<int-sftp:inbound-channel-adapter id="sftpAdapter" session-factory="sftpSessionFactory" channel="requestChannel" remote-directory-expression="'/sftpSource'" local-directory="file:myLocalDir" auto-create-local-directory="true" filename-pattern="*.txt"> <int:poller fixed-rate="1000"> <int:transactional synchronization-factory="syncFactory" /> </int:poller> </int-sftp:inbound-channel-adapter> <bean id="acceptOnceFilter" class="org.springframework.integration.file.filters.AcceptOnceFileListFilter" /> <int:transaction-synchronization-factory id="syncFactory"> <int:after-rollback expression="payload.delete()" /> </int:transaction-synchronization-factory> <bean id="transactionManager" class="org.springframework.integration.transaction.PseudoTransactionManager" />
Starting with version 5.0, the Inbound Channel Adapter can build sub-directories locally according the generated local file name.
That can be a remote sub-path as well.
To be able to read local directory recursively for modification according the hierarchy support, an internal FileReadingMessageSource now can bve supplied with a new RecursiveDirectoryScanner based on the Files.walk() algorithm.
See AbstractInboundFileSynchronizingMessageSource.setScanner() for more information.
Also the AbstractInboundFileSynchronizingMessageSource can now be switched to the WatchService -based DirectoryScanner via setUseWatchService() option.
It is also configured for all the WatchEventType s to react for any modifications in local directory.
The reprocessing sample above is based on the build-in functionality of the FileReadingMessageSource.WatchServiceDirectoryScanner to perform ResettableFileListFilter.remove() when the file is deleted (StandardWatchEventKinds.ENTRY_DELETE) from the local directory.
See Section 15.2.2, “WatchServiceDirectoryScanner” for more information.
The following Spring Boot application provides an example of configuring the inbound adapter using Java configuration:
@SpringBootApplication public class SftpJavaApplication { public static void main(String[] args) { new SpringApplicationBuilder(SftpJavaApplication.class) .web(false) .run(args); } @Bean public SessionFactory<LsEntry> sftpSessionFactory() { DefaultSftpSessionFactory factory = new DefaultSftpSessionFactory(true); factory.setHost("localhost"); factory.setPort(port); factory.setUser("foo"); factory.setPassword("foo"); factory.setAllowUnknownKeys(true); return new CachingSessionFactory<LsEntry>(factory); } @Bean public SftpInboundFileSynchronizer sftpInboundFileSynchronizer() { SftpInboundFileSynchronizer fileSynchronizer = new SftpInboundFileSynchronizer(sftpSessionFactory()); fileSynchronizer.setDeleteRemoteFiles(false); fileSynchronizer.setRemoteDirectory("foo"); fileSynchronizer.setFilter(new SftpSimplePatternFileListFilter("*.xml")); return fileSynchronizer; } @Bean @InboundChannelAdapter(channel = "sftpChannel", poller = @Poller(fixedDelay = "5000")) public MessageSource<File> sftpMessageSource() { SftpInboundFileSynchronizingMessageSource source = new SftpInboundFileSynchronizingMessageSource(sftpInboundFileSynchronizer()); source.setLocalDirectory(new File("sftp-inbound")); source.setAutoCreateLocalDirectory(true); source.setLocalFilter(new AcceptOnceFileListFilter<File>()); source.setMaxFetchSize(1); return source; } @Bean @ServiceActivator(inputChannel = "sftpChannel") public MessageHandler handler() { return new MessageHandler() { @Override public void handleMessage(Message<?> message) throws MessagingException { System.out.println(message.getPayload()); } }; } }
The following Spring Boot application provides an example of configuring the inbound adapter using the Java DSL:
@SpringBootApplication public class SftpJavaApplication { public static void main(String[] args) { new SpringApplicationBuilder(SftpJavaApplication.class) .web(false) .run(args); } @Bean public IntegrationFlow sftpInboundFlow() { return IntegrationFlows .from(s -> s.sftp(this.sftpSessionFactory) .preserveTimestamp(true) .remoteDirectory("foo") .regexFilter(".*\\.txt$") .localFilenameExpression("#this.toUpperCase() + '.a'") .localDirectory(new File("sftp-inbound")), e -> e.id("sftpInboundAdapter") .autoStartup(true) .poller(Pollers.fixedDelay(5000))) .handle(m -> System.out.println(m.getPayload())) .get(); } }
See Section 15.2.7, “Dealing With Incomplete Data”.
The SftpSystemMarkerFilePresentFileListFilter is provided to filter remote files that don’t have the corresponding marker file on the remote system.
See the javadocs for configuration information.
The streaming inbound channel adapter was introduced in version 4.3.
This adapter produces message with payloads of type InputStream, allowing files to be fetched without writing to the
local file system.
Since the session remains open, the consuming application is responsible for closing the session when the file has been
consumed.
The session is provided in the closeableResource header (IntegrationMessageHeaderAccessor.CLOSEABLE_RESOURCE).
Standard framework components, such as the FileSplitter and StreamTransformer will automatically close the session.
See Section 15.5, “File Splitter” and the section called “Stream Transformer” for more information about these components.
<int-sftp:inbound-streaming-channel-adapter id="ftpInbound" channel="ftpChannel" session-factory="sessionFactory" filename-pattern="*.txt" filename-regex=".*\.txt" filter="filter" filter-expression="@myFilterBean.check(#root)" remote-file-separator="/" comparator="comparator" max-fetch-size="1" remote-directory-expression="'foo/bar'"> <int:poller fixed-rate="1000" /> </int-sftp:inbound-streaming-channel-adapter>
Only one of filename-pattern, filename-regex, filter or filter-expression is allowed.
| Important |
|---|---|
|
Starting with version 5.0, by default, the |
Use the max-fetch-size attribute to limit the number of files fetched on each poll when a fetch is necessary; set to 1 and use a persistent filter when running in a clustered environment; see Section 28.9, “Inbound Channel Adapters: Controlling Remote File Fetching” for more information.
The adapter puts the remote directory and file name in headers FileHeaders.REMOTE_DIRECTORY and FileHeaders.REMOTE_FILE respectively.
Starting with version 5.0, additional remote file information, in JSON, is provided in the FileHeaders.REMOTE_FILE_INFO header.
If you set the fileInfoJson property on the SftpStreamingMessageSource to false, the header will contain an SftpFileInfo object.
The LsEntry object provided by the underlying Jsch library can be accessed using the SftpFileInfo.getFileInfo() method.
The fileInfoJson property is not available when using XML configuration but you can set it by injecting the SftpStreamingMessageSource into one of your configuration classes.
The following Spring Boot application provides an example of configuring the inbound adapter using Java configuration:
@SpringBootApplication public class SftpJavaApplication { public static void main(String[] args) { new SpringApplicationBuilder(SftpJavaApplication.class) .web(false) .run(args); } @Bean @InboundChannelAdapter(channel = "stream") public MessageSource<InputStream> ftpMessageSource() { SftpStreamingMessageSource messageSource = new SftpStreamingMessageSource(template()); messageSource.setRemoteDirectory("sftpSource/"); messageSource.setFilter(new AcceptAllFileListFilter<>()); messageSource.setMaxFetchSize(1); return messageSource; } @Bean @Transformer(inputChannel = "stream", outputChannel = "data") public org.springframework.integration.transformer.Transformer transformer() { return new StreamTransformer("UTF-8"); } @Bean public SftpRemoteFileTemplate template() { return new SftpRemoteFileTemplate(sftpSessionFactory()); } @ServiceActivator(inputChannel = "data", adviceChain = "after") @Bean public MessageHandler handle() { return System.out::println; } @Bean public ExpressionEvaluatingRequestHandlerAdvice after() { ExpressionEvaluatingRequestHandlerAdvice advice = new ExpressionEvaluatingRequestHandlerAdvice(); advice.setOnSuccessExpression( "@template.remove(headers['file_remoteDirectory'] + headers['file_remoteFile'])"); advice.setPropagateEvaluationFailures(true); return advice; } }
Notice that, in this example, the message handler downstream of the transformer has an advice that removes the remote file after processing.
There are two properties that should be considered when configuring inbound channel adapters.
max-messages-per-poll, as with all pollers, can be used to limit the number of messages emitted on each poll (if more than the configured value are ready).
max-fetch-size (since version 5.0) can limit the number of files retrieved from the remote server at a time.
The following scenarios assume the starting state is an empty local directory.
-
max-messages-per-poll=2andmax-fetch-size=1, the adapter will fetch one file, emit it, fetch the next file, emit it; then sleep until the next poll. -
max-messages-per-poll=2andmax-fetch-size=2), the adapter will fetch both files, then emit each one. -
max-messages-per-poll=2andmax-fetch-size=4, the adapter will fetch up to 4 files (if available) and emit the first two (if there are at least two); the next two files will be emitted on the next poll. -
max-messages-per-poll=2andmax-fetch-sizenot specified, the adapter will fetch all remote files and emit the first two (if there are at least two); the subsequent files will be emitted on subsequent polls (2-at-a-time); when all are consumed, the remote fetch will be attempted again, to pick up any new files.
| Important |
|---|---|
|
When deploying multiple instances of an application, a small |
Another use for max-fetch-size is if you want to stop fetching remote files, but continue to process files that have already been fetched.
Setting the maxFetchSize property on the MessageSource (programmatically, via JMX, or via a control bus) effectively stops the adapter from fetching more files, but allows the poller to continue to emit messages for files that have previously been fetched.
If the poller is active when the property is changed, the change will take effect on the next poll.
The SFTP Outbound Channel Adapter is a special MessageHandler that will connect to the remote directory and will
initiate a file transfer for every file it will receive as the payload of an incoming Message.
It also supports several representations of the File so you are not limited to the File object.
Similar to the FTP outbound adapter, the SFTP Outbound Channel Adapter supports the following payloads:
1) java.io.File - the actual file object;
2) byte[] - byte array that represents the file contents;
3) java.lang.String - text that represents the file contents.
<int-sftp:outbound-channel-adapter id="sftpOutboundAdapter" session-factory="sftpSessionFactory" channel="inputChannel" charset="UTF-8" remote-file-separator="/" remote-directory="foo/bar" remote-filename-generator-expression="payload.getName() + '-foo'" filename-generator="fileNameGenerator" use-temporary-filename="true" chmod="600" mode="REPLACE"/>
As you can see from the configuration above you can configure the SFTP Outbound Channel Adapter via the outbound-channel-adapter element.
Please refer to the schema for more detail on these attributes.
SpEL and the SFTP Outbound Adapter
As with many other components in Spring Integration, you can benefit from the Spring Expression Language (SpEL) support when configuring an SFTP Outbound Channel Adapter, by specifying two attributes remote-directory-expression and remote-filename-generator-expression (see above).
The expression evaluation context will have the Message as its root object, thus allowing you to provide expressions which can dynamically compute the file name or the existing directory path based on the data in the Message (either from payload or headers).
In the example above we are defining the remote-filename-generator-expression attribute with an expression value that computes the file name based on its original name while also appending a suffix: -foo.
Starting with version 4.1, you can specify the mode when transferring the file.
By default, an existing file will be overwritten; the modes are defined on enum FileExistsMode, having values REPLACE (default), APPEND, IGNORE, and FAIL.
With IGNORE and FAIL, the file is not transferred; FAIL causes an exception to be thrown whereas IGNORE silently ignores the transfer (although a DEBUG log entry is produced).
Avoiding Partially Written Files
One of the common problems, when dealing with file transfers, is the possibility of processing a partial file - a file might appear in the file system before its transfer is actually complete.
To deal with this issue, Spring Integration SFTP adapters use a very common algorithm where files are transferred under a temporary name and than renamed once they are fully transferred.
By default, every file that is in the process of being transferred will appear in the file system with an additional suffix which, by default, is .writing; this can be changed using the temporary-file-suffix attribute.
However, there may be situations where you don’t want to use this technique (for example, if the server does not permit renaming files).
For situations like this, you can disable this feature by setting use-temporary-file-name to false (default is true).
When this attribute is false, the file is written with its final name and the consuming application will need some other mechanism to detect that the file is completely uploaded before accessing it.
Version 4.3 introduced the chmod attribute which changes the remote file permissions after upload.
Use the conventional Unix octal format, e.g. 600 allows read-write for the file owner only.
When configuring the adapter using java, you can use setChmodOctal("600") or setChmodDecimal(384).
The following Spring Boot application provides an example of configuring the Outbound Adapter using Java configuration:
@SpringBootApplication @IntegrationComponentScan public class SftpJavaApplication { public static void main(String[] args) { ConfigurableApplicationContext context = new SpringApplicationBuilder(SftpJavaApplication.class) .web(false) .run(args); MyGateway gateway = context.getBean(MyGateway.class); gateway.sendToSftp(new File("/foo/bar.txt")); } @Bean public SessionFactory<LsEntry> sftpSessionFactory() { DefaultSftpSessionFactory factory = new DefaultSftpSessionFactory(true); factory.setHost("localhost"); factory.setPort(port); factory.setUser("foo"); factory.setPassword("foo"); factory.setAllowUnknownKeys(true); return new CachingSessionFactory<LsEntry>(factory); } @Bean @ServiceActivator(inputChannel = "toSftpChannel") public MessageHandler handler() { SftpMessageHandler handler = new SftpMessageHandler(sftpSessionFactory()); handler.setRemoteDirectoryExpressionString("headers['remote-target-dir']"); handler.setFileNameGenerator(new FileNameGenerator() { @Override public String generateFileName(Message<?> message) { return "handlerContent.test"; } }); return handler; } @MessagingGateway public interface MyGateway { @Gateway(requestChannel = "toSftpChannel") void sendToSftp(File file); } }
The following Spring Boot application provides an example of configuring the Outbound Adapter using the Java DSL:
@SpringBootApplication public class SftpJavaApplication { public static void main(String[] args) { new SpringApplicationBuilder(SftpJavaApplication.class) .web(false) .run(args); } @Bean public IntegrationFlow sftpOutboundFlow() { return IntegrationFlows.from("toSftpChannel") .handle(Sftp.outboundAdapter(this.sftpSessionFactory, FileExistsMode.FAIL) .useTemporaryFileName(false) .remoteDirectory("/foo") ).get(); } }
The SFTP Outbound Gateway provides a limited set of commands to interact with a remote SFTP server. Commands supported are:
- ls (list files)
- nlst (list file names)
- get (retrieve file)
- mget (retrieve file(s))
- rm (remove file(s))
- mv (move/rename file)
- put (send file)
- mput (send multiple files)
ls
ls lists remote file(s) and supports the following options:
-
-1 - just retrieve a list of filenames, default is to retrieve a list of
FileInfoobjects. - -a - include all files (including those starting with .)
- -f - do not sort the list
- -dirs - include directories (excluded by default)
- -links - include symbolic links (excluded by default)
- -R - list the remote directory recursively
In addition, filename filtering is provided, in the same manner as the inbound-channel-adapter.
The message payload resulting from an ls operation is a list of file names, or a list of FileInfo objects.
These objects provide information such as modified time, permissions etc.
The remote directory that the ls command acted on is provided in the file_remoteDirectory header.
When using the recursive option (-R), the fileName includes any subdirectory elements, representing a relative path to the file (relative to the remote directory).
If the -dirs option is included, each recursive directory is also returned as an element in the list.
In this case, it is recommended that the -1 is not used because you would not be able to determine files Vs.
directories, which is achievable using the FileInfo objects.
nlst
(Since version 5.0)
Lists remote file names and supports the following options:
- -f - do not sort the list
The message payload resulting from an nlst operation is a list of file names.
The remote directory that the nlst command acted on is provided in the file_remoteDirectory header.
The SFTP protocol doesn’t provide list names functionality, s this command is fully equivalent of the ls command with -1 option and added here for convenience.
get
get retrieves a remote file and supports the following option:
- -P - preserve the timestamp of the remote file.
- -stream - retrieve the remote file as a stream.
-
-D - delete the remote file after successful transfer.
The remote file is NOT deleted if the transfer is ignored because the
FileExistsModeisIGNOREand the local file already exists.
The remote directory is provided in the file_remoteDirectory header, and the filename is provided in the file_remoteFile header.
The message payload resulting from a get operation is a File object representing the retrieved file, or
an InputStream when the -stream option is provided.
This option allows retrieving the file as a stream.
For text files, a common use case is to combine this operation with a File Splitter or
Stream Transformer.
When consuming remote files as streams, the user is responsible for closing the Session after the stream is
consumed.
For convenience, the Session is provided in the closeableResource header, a convenience method is provided on the
IntegrationMessageHeaderAccessor:
Closeable closeable = new IntegrationMessageHeaderAccessor(message).getCloseableResource(); if (closeable != null) { closeable.close(); }
Framework components such as the File Splitter and Stream Transformer will automatically close the session after the data is transferred.
The following shows an example of consuming a file as a stream:
<int-sftp:outbound-gateway session-factory="ftpSessionFactory" request-channel="inboundGetStream" command="get" command-options="-stream" expression="payload" remote-directory="ftpTarget" reply-channel="stream" /> <int-file:splitter input-channel="stream" output-channel="lines" />
Note: if you consume the input stream in a custom component, you must close the Session.
You can either do that in your custom code, or route a copy of the message to a service-activator and use SpEL:
<int:service-activator input-channel="closeSession" expression="headers['closeableResource'].close()" />
mget
mget retrieves multiple remote files based on a pattern and supports the following options:
- -P - preserve the timestamps of the remote files.
- -R - retrieve the entire directory tree recursively.
- -x - Throw an exception if no files match the pattern (otherwise an empty list is returned).
-
-D - delete each remote file after successful transfer.
The remote file is NOT deleted if the transfer is ignored because the
FileExistsModeisIGNOREand the local file already exists.
The message payload resulting from an mget operation is a List<File> object - a List of File objects, each representing a retrieved file.
| Important |
|---|---|
|
Starting with version 5.0, if the |
The expression used to determine the remote path should produce a result that ends with * - e.g. foo/* will fetch the complete tree under foo.
Starting with version 5.0, a recursive MGET, combined with the new FileExistsMode.REPLACE_IF_MODIFIED mode, can be used to periodically synchronize an entire remote directory tree locally.
This mode will set the local file last modified timestamp to the remote file timestamp, regardless of the -P (preserve timestamp) option.
| Notes for when using recursion (-R) |
|---|---|
|
The pattern is ignored, and If a subdirectory is filtered, no additional traversal of that subdirectory is performed. The Typically, you would use the |
Starting with version 5.0, the SftpSimplePatternFileListFilter and SftpRegexPatternFileListFilter can be configured to always pass directories by setting the alwaysAcceptDirectorties to true.
This allows recursion for a simple pattern; examples follow:
<bean id="starDotTxtFilter" class="org.springframework.integration.sftp.filters.SftpSimplePatternFileListFilter"> <constructor-arg value="*.txt" /> <property name="alwaysAcceptDirectories" value="true" /> </bean> <bean id="dotStarDotTxtFilter" class="org.springframework.integration.sftp.filters.SftpRegexPatternFileListFilter"> <constructor-arg value="^.*\.txt$" /> <property name="alwaysAcceptDirectories" value="true" /> </bean>
and provide one of these filters using filter property on the gateway.
See also Section 28.11.3, “Outbound Gateway Partial Success (mget and mput)”
put
put sends a file to the remote server; the payload of the message can be a java.io.File, a byte[] or a String.
A remote-filename-generator (or expression) is used to name the remote file.
Other available attributes include remote-directory, temporary-remote-directory (and their *-expression) equivalents, use-temporary-file-name, and auto-create-directory.
Refer to the schema documentation for more information.
The message payload resulting from a put operation is a String representing the full path of the file on the server after transfer.
Version 4.3 introduced the chmod attribute which changes the remote file permissions after upload.
Use the conventional Unix octal format, e.g. 600 allows read-write for the file owner only.
When configuring the adapter using java, you can use setChmod(0600).
mput
mput sends multiple files to the server and supports the following option:
- -R - Recursive - send all files (possibly filtered) in the directory and subdirectories
The message payload must be a java.io.File representing a local directory.
The same attributes as the put command are supported.
In addition, files in the local directory can be filtered with one of mput-pattern, mput-regex, mput-filter or mput-filter-expression.
The filter works with recursion, as long as the subdirectories themselves pass the filter.
Subdirectories that do not pass the filter are not recursed.
The message payload resulting from an mget operation is a List<String> object - a List of remote file paths resulting from the transfer.
See also Section 28.11.3, “Outbound Gateway Partial Success (mget and mput)”
Version 4.3 introduced the chmod attribute which changes the remote file permissions after upload.
Use the conventional Unix octal format, e.g. 600 allows read-write for the file owner only.
When configuring the adapter using java, you can use setChmodOctal("600") or setChmodDecimal(384).
rm
The rm command has no options.
The message payload resulting from an rm operation is Boolean.TRUE if the remove was successful, Boolean.FALSE otherwise.
The remote directory is provided in the file_remoteDirectory header, and the filename is provided in the file_remoteFile header.
mv
The mv command has no options.
The expression attribute defines the "from" path and the rename-expression attribute defines the "to" path.
By default, the rename-expression is headers['file_renameTo'].
This expression must not evaluate to null, or an empty String.
If necessary, any remote directories needed will be created.
The payload of the result message is Boolean.TRUE.
The original remote directory is provided in the file_remoteDirectory header, and the filename is provided in the file_remoteFile header.
The new path is in the file_renameTo header.
Additional Information
The get and mget commands support the local-filename-generator-expression attribute.
It defines a SpEL expression to generate the name of local file(s) during the transfer.
The root object of the evaluation context is the request Message but, in addition, the remoteFileName variable is also available, which is particularly useful for mget, for example: local-filename-generator-expression="#remoteFileName.toUpperCase() + headers.foo"
The get and mget commands support the local-directory-expression attribute.
It defines a SpEL expression to generate the name of local directory(ies) during the transfer.
The root object of the evaluation context is the request Message but, in addition, the remoteDirectory variable is also available, which is particularly useful for mget, for example: local-directory-expression="'/tmp/local/' + #remoteDirectory.toUpperCase() + headers.foo".
This attribute is mutually exclusive with local-directory attribute.
For all commands, the PATH that the command acts on is provided by the expression property of the gateway. For the mget command, the expression might evaluate to , meaning retrieve all files, or somedirectory/ etc.
Here is an example of a gateway configured for an ls command…
<int-ftp:outbound-gateway id="gateway1" session-factory="ftpSessionFactory" request-channel="inbound1" command="ls" command-options="-1" expression="payload" reply-channel="toSplitter"/>
The payload of the message sent to the toSplitter channel is a list of String objects containing the filename of each file.
If the command-options was omitted, it would be a list of FileInfo objects.
Options are provided space-delimited, e.g.
command-options="-1 -dirs -links".
Starting with version 4.2, the GET, MGET, PUT and MPUT commands support a FileExistsMode property (mode
when using the namespace support). This affects the behavior when the local file exists (GET and MGET) or the remote
file exists (PUT and MPUT). Supported modes are REPLACE, APPEND, FAIL and IGNORE.
For backwards compatibility, the default mode for PUT and MPUT operations is REPLACE and for GET and MGET
operations, the default is FAIL.
The following Spring Boot application provides an example of configuring the Outbound Gateway using Java configuration:
@SpringBootApplication public class SftpJavaApplication { public static void main(String[] args) { new SpringApplicationBuilder(SftpJavaApplication.class) .web(false) .run(args); } @Bean @ServiceActivator(inputChannel = "sftpChannel") public MessageHandler handler() { return new SftpOutboundGateway(ftpSessionFactory(), "ls", "'my_remote_dir/'"); } }
The following Spring Boot application provides an example of configuring the Outbound Gateway using the Java DSL:
@SpringBootApplication public class SftpJavaApplication { public static void main(String[] args) { new SpringApplicationBuilder(SftpJavaApplication.class) .web(false) .run(args); } @Bean public SessionFactory<LsEntry> sftpSessionFactory() { DefaultFtpSessionFactory sf = new DefaultFtpSessionFactory(); sf.setHost("localhost"); sf.setPort(port); sf.setUsername("foo"); sf.setPassword("foo"); return new CachingSessionFactory<LsEntry>(sf); } @Bean public QueueChannelSpec remoteFileOutputChannel() { return MessageChannels.queue(); } @Bean public IntegrationFlow sftpMGetFlow() { return IntegrationFlows.from("sftpMgetInputChannel") .handleWithAdapter(h -> h.sftpGateway(sftpSessionFactory(), AbstractRemoteFileOutboundGateway.Command.MGET, "payload") .options(AbstractRemoteFileOutboundGateway.Option.RECURSIVE) .regexFileNameFilter("(subSftpSource|.*1.txt)") .localDirectoryExpression("'myDir/' + #remoteDirectory") .localFilenameExpression("#remoteFileName.replaceFirst('sftpSource', 'localTarget')")) .channel("remoteFileOutputChannel") .get(); } }
When performing operations on multiple files (mget and mput) it is possible that an exception occurs some time after
one or more files have been transferred.
In this case (starting with version 4.2), a PartialSuccessException is thrown.
As well as the usual MessagingException properties (failedMessage and cause), this exception has two additional
properties:
-
partialResults- the successful transfer results. -
derivedInput- the list of files generated from the request message (e.g. local files to transfer for anmput).
This will enable you to determine which files were successfully transferred, and which were not.
In the case of a recursive mput, the PartialSuccessException may have nested PartialSuccessException s.
Consider:
root/ |- file1.txt |- subdir/ | - file2.txt | - file3.txt |- zoo.txt
If the exception occurs on file3.txt, the PartialSuccessException thrown by the gateway will have derivedInput
of file1.txt, subdir, zoo.txt and partialResults of file1.txt.
It’s cause will be another PartialSuccessException with derivedInput of file2.txt, file3.txt and
partialResults of file2.txt.
Since we use JSch libraries (http://www.jcraft.com/jsch/) to provide SFTP support, at times you may require more information from the JSch API itself, especially if something is not working properly (e.g., Authentication exceptions).
Unfortunately JSch does not use commons-logging but instead relies on custom implementations of their com.jcraft.jsch.Logger interface.
As of Spring Integration 2.0.1, we have implemented this interface.
So, now all you need to do to enable JSch logging is to configure your logger the way you usually do.
For example, here is valid configuration of a logger using Log4J.
log4j.category.com.jcraft.jsch=DEBUG
Starting with Spring Integration version 4.2, a MessageSessionCallback<F, T> implementation can be used with the
<int-sftp:outbound-gateway/> (SftpOutboundGateway) to perform any operation(s) on the Session<LsEntry> with
the requestMessage context.
It can be used for any non-standard or low-level FTP operation (or several); for example, allowing access
from an integration flow definition, and functional interface (Lambda) implementation injection:
@Bean @ServiceActivator(inputChannel = "sftpChannel") public MessageHandler sftpOutboundGateway(SessionFactory<ChannelSftp.LsEntry> sessionFactory) { return new SftpOutboundGateway(sessionFactory, (session, requestMessage) -> session.list(requestMessage.getPayload())); }
Another example might be to pre- or post- process the file data being sent/retrieved.
When using XML configuration, the <int-sftp:outbound-gateway/> provides a session-callback attribute to allow you
to specify the MessageSessionCallback bean name.
| Note |
|---|---|
|
The |
Spring Integration version 4.2 introduced STOMP Client support.
It is based on the architecture, infrastructure and API from the Spring Framework’s messaging module, stomp package.
Many of Spring STOMP components (e.g. StompSession or StompClientSupport)
are used within Spring Integration.
For more information, please, refer to the Spring Framework STOMP Support
chapter in the Spring Framework reference manual.
To configure STOMP (Simple [or Streaming] Text Orientated Messaging Protocol) let’s start with the STOMP Client object. The Spring Framework provides these implementations:
-
WebSocketStompClient- built on the Spring WebSocket API with support for standard JSR-356 WebSocket, Jetty 9, as well as SockJS for HTTP-based WebSocket emulation with SockJS Client. -
ReactorNettyTcpStompClient- built onReactorNettyTcpClientfrom thereactor-nettyproject.
Any other StompClientSupport implementation can be provided.
See the JavaDocs of those classes for more information.
The StompClientSupport class is designed as a factory to produce a StompSession for the provided
StompSessionHandler and all the remaining work is done through the callbacks to that StompSessionHandler
and StompSession abstraction.
With the Spring Integration adapter abstraction, we
need to provide some managed shared object to represent our application as a STOMP client with its unique session.
For this purpose, Spring Integration provides the StompSessionManager abstraction to manage the single
StompSession between any provided StompSessionHandler.
This allows the use of inbound or outbound channel adapters (or both) for the particular STOMP Broker.
See StompSessionManager (and its implementations) JavaDocs for more information.
The StompInboundChannelAdapter is a one-stop MessageProducer component to subscribe our Spring Integration
application to the provided STOMP destinations and receive messages from them, converted from the STOMP
frames using the provided MessageConverter on the connected StompSession.
The destinations (and therefore STOMP subscriptions) can be changed at runtime using appropriate @ManagedOperation s
on the StompInboundChannelAdapter.
For more configuration options see Section 29.8, “STOMP Namespace Support” and the StompInboundChannelAdapter JavaDocs.
The StompMessageHandler is the MessageHandler for the <int-stomp:outbound-channel-adapter>
to send the outgoing Message<?> s to the STOMP destination (pre-configured or determined at runtime via a SpEL expression) STOMP through the StompSession, provided by the shared StompSessionManager.
For more configuration option see Section 29.8, “STOMP Namespace Support” and the StompMessageHandler JavaDocs.
The STOMP protocol provides headers as part of frame; the entire structure of the STOMP frame has this format:
COMMAND header1:value1 header2:value2 Body^@
Spring Framework provides StompHeaders, to represent these headers.
See the JavaDocs for more details.
STOMP frames are converted to/from Message<?> and these headers are mapped to/from MessageHeaders.
Spring Integration provides a default HeaderMapper implementation for the STOMP adapters.
The implementation is StompHeaderMapper which provides fromHeaders() and toHeaders() operations for the
inbound and outbound adapters respectively.
As with many other Spring Integration modules, the IntegrationStompHeaders class has been
introduced to map standard STOMP headers to MessageHeaders with stomp_ as the header name prefix.
In addition, all MessageHeaders with that prefix are mapped to the StompHeaders when sending to a destination.
For more information, see the JavaDocs of those classes and the mapped-headers attribute description in the
Section 29.8, “STOMP Namespace Support”.
Many STOMP operations are asynchronous, including error handling.
For example, STOMP has a RECEIPT server frame that is returned when a client frame has requested one by adding
the RECEIPT header.
To provide access to these asynchronous events, Spring Integration emits StompIntegrationEvent s which can be
obtained by implementing an ApplicationListener or using an <int-event:inbound-channel-adapter> (see Section 13.1, “Receiving Spring Application Events”).
Specifically, a StompExceptionEvent is emitted from the AbstractStompSessionManager, when a
stompSessionListenableFuture receives onFailure() in case of failure to connect to STOMP Broker.
Another example is the StompMessageHandler which processes
ERROR STOMP frames, which are server responses to improper, unaccepted, messages sent by this StompMessageHandler.
The StompReceiptEvent s are emitted from the StompMessageHandler as a part of StompSession.Receiptable
callbacks in the asynchronous answers for the sent messages to the StompSession.
The StompReceiptEvent can be positive and negative depending on whether or not the RECEIPT frame was received
from the server within the receiptTimeLimit period, which can be configured on the StompClientSupport instance.
Defaults to 15 * 1000.
| Note |
|---|---|
|
The |
See the next paragraph for more information how to configure Spring Integration to accept those ApplicationEvent s.
A comprehensive Java & Annotation Configuration for STOMP Adapters may look like this:
@Configuration @EnableIntegration public class StompConfiguration { @Bean public ReactorNettyTcpStompClient stompClient() { ReactorNettyTcpStompClient stompClient = new ReactorNettyTcpStompClient("127.0.0.1", 61613); stompClient.setMessageConverter(new PassThruMessageConverter()); ThreadPoolTaskScheduler taskScheduler = new ThreadPoolTaskScheduler(); taskScheduler.afterPropertiesSet(); stompClient.setTaskScheduler(taskScheduler); stompClient.setReceiptTimeLimit(5000); return stompClient; } @Bean public StompSessionManager stompSessionManager() { ReactorNettyTcpStompSessionManager stompSessionManager = new ReactorNettyTcpStompSessionManager(stompClient()); stompSessionManager.setAutoReceipt(true); return stompSessionManager; } @Bean public PollableChannel stompInputChannel() { return new QueueChannel(); } @Bean public StompInboundChannelAdapter stompInboundChannelAdapter() { StompInboundChannelAdapter adapter = new StompInboundChannelAdapter(stompSessionManager(), "/topic/myTopic"); adapter.setOutputChannel(stompInputChannel()); return adapter; } @Bean @ServiceActivator(inputChannel = "stompOutputChannel") public MessageHandler stompMessageHandler() { StompMessageHandler handler = new StompMessageHandler(stompSessionManager()); handler.setDestination("/topic/myTopic"); return handler; } @Bean public PollableChannel stompEvents() { return new QueueChannel(); } @Bean public ApplicationListener<ApplicationEvent> stompEventListener() { ApplicationEventListeningMessageProducer producer = new ApplicationEventListeningMessageProducer(); producer.setEventTypes(StompIntegrationEvent.class); producer.setOutputChannel(stompEvents()); return producer; } }
Spring Integration STOMP namespace implements the inbound and outbound channel adapter components described below. To include it in your configuration, simply provide the following namespace declaration in your application context configuration file:
<?xml version="1.0" encoding="UTF-8"?> <beans xmlns="http://www.springframework.org/schema/beans" xmlns:xsi="http://www.w3.org/2001/XMLSchema-instance" xmlns:int="http://www.springframework.org/schema/integration" xmlns:int-stomp="http://www.springframework.org/schema/integration/stomp" xsi:schemaLocation=" http://www.springframework.org/schema/beans http://www.springframework.org/schema/beans/spring-beans.xsd http://www.springframework.org/schema/integration http://www.springframework.org/schema/integration/spring-integration.xsd http://www.springframework.org/schema/integration/stomp http://www.springframework.org/schema/integration/stomp/spring-integration-stomp.xsd"> ... </beans>
<int-stomp:outbound-channel-adapter>
<int-stomp:outbound-channel-adapter id=""
|
The component bean name.
The |
|
Identifies the channel attached to this adapter.
Optional - if |
|
Reference to a |
|
Reference to a bean implementing |
|
Comma-separated list of names of STOMP Headers to be mapped to the STOMP frame headers.
This can only be provided if the |
|
Name of the destination to which STOMP Messages will be sent.
Mutually exclusive with the |
|
A SpEL expression to be evaluated at runtime against each Spring Integration |
|
Boolean value indicating whether this endpoint should start automatically.
Default to |
|
The lifecycle phase within which this endpoint should start and stop.
The lower the value the earlier this endpoint will start and the later it will stop.
The default is |
<int-stomp:inbound-channel-adapter>
<int-stomp:inbound-channel-adapter id=""
|
The component bean name.
If the |
|
Identifies the channel attached to this adapter. |
|
The |
|
See the same option on the |
|
Comma-separated list of names of STOMP Headers to be mapped from the STOMP frame headers.
This can only be provided if the |
|
See the same option on the |
|
Comma-separated list of STOMP destination names to subscribe.
The list of destinations (and therefore subscriptions) can be modified at runtime
through the |
|
Maximum amount of time in milliseconds to wait when sending a message to the channel if the channel may block.
For example, a |
|
Fully qualified name of the java type for the target |
|
See the same option on the |
|
See the same option on the |
In many cases application data is obtained from a stream. It is not recommended to send a reference to a Stream as a message payload to a consumer. Instead messages are created from data that is read from an input stream and message payloads are written to an output stream one by one.
Spring Integration provides two adapters for streams.
Both ByteStreamReadingMessageSource and CharacterStreamReadingMessageSource implement MessageSource.
By configuring one of these within a channel-adapter element, the polling period can be configured, and the Message Bus can automatically detect and schedule them.
The byte stream version requires an InputStream, and the character stream version requires a Reader as the single constructor argument.
The ByteStreamReadingMessageSource also accepts the bytesPerMessage property to determine how many bytes it will attempt to read into each Message.
The default value is 1024.
<bean class="org.springframework.integration.stream.ByteStreamReadingMessageSource"> <constructor-arg ref="someInputStream"/> <property name="bytesPerMessage" value="2048"/> </bean> <bean class="org.springframework.integration.stream.CharacterStreamReadingMessageSource"> <constructor-arg ref="someReader"/> </bean>
The CharacterStreamReadingMessageSource wraps the reader in a BufferedReader (if it’s not one already).
You can set the buffer size used by the buffered reader in the second constructor argument.
Starting with version 5.0, a third constructor argument (blockToDetectEOF) controls the behavior of the CharacterStreamReadingMessageSource.
When false (default), the receive() method checks if the reader is ready() and returns null if not.
EOF is not detected in this case.
When true, the receive() method blocks until data is available, or EOF is detected on the underlying stream.
When EOF is detected, a StreamClosedEvent (application event) is published; you can consume this event with a bean implementing ApplicationListener<StreamClosedEvent>.
| Note |
|---|---|
|
To facilitate EOF detection, the poller thread will block in the |
| Important |
|---|---|
|
The poller will continue to publish an event on each poll once EOF has been detected; the application listener can stop the adapter to prevent this.
The event is published on the poller thread and stopping the adapter will cause the thread to be interrupted.
If you intend to perform some interruptible task after stopping the adapter, you must either perform the |
This facilitates "piping" or redirecting data to stdin, such as…
cat foo.txt | java -jar my.jar
or
java -jar my.jar < foo.txt
allowing the application to terminate when the pipe is closed.
Four convenient factory methods are available:
public static final CharacterStreamReadingMessageSource stdin() { ... } public static final CharacterStreamReadingMessageSource stdin(String charsetName) { ... } public static final CharacterStreamReadingMessageSource stdinPipe() { ... } public static final CharacterStreamReadingMessageSource stdinPipe(String charsetName) { ... }
For target streams, there are also two implementations: ByteStreamWritingMessageHandler and CharacterStreamWritingMessageHandler.
Each requires a single constructor argument - OutputStream for byte streams or Writer for character streams, and each provides a second constructor that adds the optional bufferSize.
Since both of these ultimately implement the MessageHandler interface, they can be referenced from a channel-adapter configuration as described in more detail in Section 4.3, “Channel Adapter”.
<bean class="org.springframework.integration.stream.ByteStreamWritingMessageHandler"> <constructor-arg ref="someOutputStream"/> <constructor-arg value="1024"/> </bean> <bean class="org.springframework.integration.stream.CharacterStreamWritingMessageHandler"> <constructor-arg ref="someWriter"/> </bean>
To reduce the configuration needed for stream related channel adapters there is a namespace defined. The following schema locations are needed to use it.
<?xml version="1.0" encoding="UTF-8"?> <beans:beans xmlns:int-stream="http://www.springframework.org/schema/integration/stream" xmlns:xsi="http://www.w3.org/2001/XMLSchema-instance" xmlns:beans="http://www.springframework.org/schema/beans" xsi:schemaLocation="http://www.springframework.org/schema/beans http://www.springframework.org/schema/beans/spring-beans.xsd http://www.springframework.org/schema/integration/stream http://www.springframework.org/schema/integration/stream/spring-integration-stream.xsd">
To configure the inbound channel adapter the following code snippet shows the different configuration options that are supported.
<int-stream:stdin-channel-adapter id="adapterWithDefaultCharset"/> <int-stream:stdin-channel-adapter id="adapterWithProvidedCharset" charset="UTF-8"/>
Starting with version 5.0 you can set the detect-eof attribute which sets the blockToDetectEOF property - see Section 30.2, “Reading from streams” for more information.
To configure the outbound channel adapter you can use the namespace support as well. The following code snippet shows the different configuration for an outbound channel adapters.
<int-stream:stdout-channel-adapter id="stdoutAdapterWithDefaultCharset" channel="testChannel"/> <int-stream:stdout-channel-adapter id="stdoutAdapterWithProvidedCharset" charset="UTF-8" channel="testChannel"/> <int-stream:stderr-channel-adapter id="stderrAdapter" channel="testChannel"/> <int-stream:stdout-channel-adapter id="newlineAdapter" append-newline="true" channel="testChannel"/>
Spring Integration 2.2 introduced the Syslog transformer SyslogToMapTransformer.
This transformer, together with a UDP or TCP inbound adapter could be used to receive and analyze syslog records from other hosts.
The transformer creates a message payload containing a map of the elements from the syslog message.
Spring Integration 3.0 introduced convenient namespace support for configuring a Syslog inbound adapter in a single element.
Starting with version 4.1.1, the framework now supports the extended Syslog format, as specified in RFC 5424>.
In addition, when using TCP and RFC5424, both octet counting and non-transparent framing described in RFC 6587 are supported.
This element encompasses a UDP or TCP inbound channel adapter and a MessageConverter to convert the Syslog message to a Spring Integration message.
The DefaultMessageConverter delegates to the SyslogToMapTransformer, creating a message with its payload being the Map of Syslog fields.
In addition, all fields except the message are also made available as headers in the message, prefixed with syslog_.
In this mode, only RFC 3164 (BSD) syslogs are supported.
Since version 4.1, the DefaultMessageConverter has a property asMap (default true); when it is false, the converter will leave the message payload as the original complete syslog message, in a byte[], while still setting the headers.
Since version 4.1.1, RFC 5424 is also supported, using the RFC5424MessageConverter; in this case the fields are not copied as headers, unless asMap is set to false, in which case the original message is the payload and the decoded fields are headers.
| Important |
|---|---|
|
To use RFC 5424 with a TCP transport, additional configuration is required, to enable the different framing techniques described in RFC 6587.
The adapter needs a TCP connection factory configured with a |
<int-syslog:inbound-channel-adapter id="syslogIn" port="1514" />
A UDP adapter that sends messages to channel syslogIn (the adapter bean name is syslogIn.adapter).
The adapter listens on port 1514.
<int-syslog:inbound-channel-adapter id="syslogIn" channel="fromSyslog" port="1514" />
A UDP adapter that sends message to channel fromSyslog (the adapter bean name is syslogIn).
The adapter listens on port 1514.
<int-syslog:inbound-channel-adapter id="bar" protocol="tcp" port="1514" />
A TCP adapter that sends messages to channel syslogIn (the adapter bean name is syslogIn.adapter).
The adapter listens on port 1514.
Note the addition of the protocol attribute.
This attribute can contain udp or tcp; it defaults to udp.
<int-syslog:inbound-channel-adapter id="udpSyslog" channel="fromSyslog" auto-startup="false" phase="10000" converter="converter" send-timeout="1000" error-channel="errors"> <int-syslog:udp-attributes port="1514" lookup-host="false" /> </int-syslog:inbound-channel-adapter>
A UDP adapter that sends messages to channel fromSyslog.
It also shows the SmartLifecycle attributes auto-startup and phase.
It has a reference to a custom org.springframework.integration.syslog.MessageConverter with id converter and an error-channel.
Also notice the udp-attributes child element.
You can set various UDP attributes here, as defined in Table 32.2, “UDP Inbound Channel Adapter Attributes”.
| Note |
|---|---|
|
When using the |
<int-syslog:inbound-channel-adapter id="TcpSyslog" protocol="tcp" channel="fromSyslog" connection-factory="cf" /> <int-ip:tcp-connection-factory id="cf" type="server" port="1514" />
A TCP adapter that sends messages to channel fromSyslog.
It also shows how to reference an externally defined connection factory, which can be used for advanced configuration (socket keep alive etc).
For more information, see Section 32.3, “TCP Connection Factories”.
| Note |
|---|---|
|
The externally configured |
<int-syslog:inbound-channel-adapter id="rfc5424Tcp" protocol="tcp" channel="fromSyslog" connection-factory="cf" converter="rfc5424" /> <int-ip:tcp-connection-factory id="cf" using-nio="true" type="server" port="1514" deserializer="rfc6587" /> <bean id="rfc5424" class="org.springframework.integration.syslog.RFC5424MessageConverter" /> <bean id="rfc6587" class="org.springframework.integration.syslog.inbound.RFC6587SyslogDeserializer" />
A TCP adapter that sends messages to channel fromSyslog.
It is configured to use the RFC 5424 converter and is configured with a reference to an externally defined connection factory with the RFC 6587 deserializer (required for RFC 5424).
Spring Integration provides Channel Adapters for receiving and sending messages over internet protocols. Both UDP (User Datagram Protocol) and TCP (Transmission Control Protocol) adapters are provided. Each adapter provides for one-way communication over the underlying protocol. In addition, simple inbound and outbound tcp gateways are provided. These are used when two-way communication is needed.
Two flavors each of UDP inbound and outbound channel adapters are provided UnicastSendingMessageHandler sends a datagram packet to a single destination.
UnicastReceivingChannelAdapter receives incoming datagram packets.
MulticastSendingMessageHandler sends (broadcasts) datagram packets to a multicast address.
MulticastReceivingChannelAdapter receives incoming datagram packets by joining to a multicast address.
TCP inbound and outbound channel adapters are provided TcpSendingMessageHandler sends messages over TCP.
TcpReceivingChannelAdapter receives messages over TCP.
An inbound TCP gateway is provided; this allows for simple request/response processing. While the gateway can support any number of connections, each connection can only process serially. The thread that reads from the socket waits for, and sends, the response before reading again. If the connection factory is configured for single use connections, the connection is closed after the socket times out.
An outbound TCP gateway is provided; this allows for simple request/response processing. If the associated connection factory is configured for single use connections, a new connection is immediately created for each new request. Otherwise, if the connection is in use, the calling thread blocks on the connection until either a response is received or a timeout or I/O error occurs.
The TCP and UDP inbound channel adapters, and the TCP inbound gateway, support the "error-channel" attribute. This provides the same basic functionality as described in Section 8.4.1, “Enter the GatewayProxyFactoryBean”.
<int-ip:udp-outbound-channel-adapter id="udpOut" host="somehost" port="11111" multicast="false" channel="exampleChannel"/>
A simple UDP outbound channel adapter.
| Tip |
|---|---|
|
When setting multicast to true, provide the multicast address in the host attribute. |
UDP is an efficient, but unreliable protocol. Two attributes are added to improve reliability. When check-length is set to true, the adapter precedes the message data with a length field (4 bytes in network byte order). This enables the receiving side to verify the length of the packet received. If a receiving system uses a buffer that is too short the contain the packet, the packet can be truncated. The length header provides a mechanism to detect this.
Starting with version 4.3, the port can be set to 0, in which case the Operating System chooses the port; the
chosen port can be discovered by invoking getPort() after the adapter is started and isListening() returns true.
<int-ip:udp-outbound-channel-adapter id="udpOut" host="somehost" port="11111" multicast="false" check-length="true" channel="exampleChannel"/>
An outbound channel adapter that adds length checking to the datagram packets.
| Tip |
|---|---|
|
The recipient of the packet must also be configured to expect a length to precede the actual data.
For a Spring Integration UDP inbound channel adapter, set its |
The second reliability improvement allows an application-level acknowledgment protocol to be used. The receiver must send an acknowledgment to the sender within a specified time.
<int-ip:udp-outbound-channel-adapter id="udpOut" host="somehost" port="11111" multicast="false" check-length="true" acknowledge="true" ack-host="thishost" ack-port="22222" ack-timeout="10000" channel="exampleChannel"/>
An outbound channel adapter that adds length checking to the datagram packets and waits for an acknowledgment.
| Tip |
|---|---|
|
Setting acknowledge to true implies the recipient of the packet can interpret the header added to the packet containing acknowledgment data (host and port). Most likely, the recipient will be a Spring Integration inbound channel adapter. |
| Tip |
|---|---|
|
When multicast is true, an additional attribute min-acks-for-success specifies how many acknowledgments must be received within the ack-timeout. |
For even more reliable networking, TCP can be used.
Starting with version 4.3, the ackPort can be set to 0, in which case the Operating System chooses the port.
@Bean @ServiceActivator(inputChannel = "udpOut") public UnicastSendingMessageHandler handler() { return new UnicastSendingMessageHandler("localhost", 11111); }
(or MulticastSendingChannelAdapter for multicast).
@Bean public IntegrationFlow udpOutFlow() { return IntegrationFlows.from("udpOut") .handle(Udp.outboundAdapter("localhost", 1234)) .get(); }
<int-ip:udp-inbound-channel-adapter id="udpReceiver" channel="udpOutChannel" port="11111" receive-buffer-size="500" multicast="false" check-length="true"/>
A basic unicast inbound udp channel adapter.
<int-ip:udp-inbound-channel-adapter id="udpReceiver" channel="udpOutChannel" port="11111" receive-buffer-size="500" multicast="true" multicast-address="225.6.7.8" check-length="true"/>
A basic multicast inbound udp channel adapter.
By default, reverse DNS lookups are done on inbound packets to convert IP addresses to hostnames for use in message headers.
In environments where DNS is not configured, this can cause delays.
This default behavior can be overridden by setting the lookup-host attribute to "false".
@Bean public UnicastReceivingChannelAdapter udpIn() { UnicastReceivingChannelAdapter adapter = new UnicastReceivingChannelAdapter(11111); adapter.setOutputChannelName("udpChannel"); return adapter; }
@Bean public IntegrationFlow udpIn() { return IntegrationFlows.from(Udp.inboundAdapter(11111)) .channel("udpChannel") .get(); }
The destination-expression and socket-expression options are available
for the <int-ip:udp-outbound-channel-adapter> (UnicastSendingMessageHandler).
The destination-expression can be used as a runtime alternative to the hardcoded host/port pair to determine
the destination address for the outgoing datagram packet against a requestMessage as the root object for the evaluation context.
The expression must evaluate to an URI, or String in the URI style (see RFC-2396)
or SocketAddress.
The inbound IpHeaders.PACKET_ADDRESS header can be used for this expression as well.
In the Framework, this header is populated by the DatagramPacketMessageMapper, when we receive datagrams in the
UnicastReceivingChannelAdapter and convert them to messages.
The header value is exactly the result of DatagramPacket.getSocketAddress() of the incoming datagram.
With the socket-expression, the Outbound Channel Adapter can use e.g. an Inbound Channel Adapter socket
to send datagrams through same port which they were received.
It’s useful in a scenario when our application works as a UDP server and clients operate behind NAT.
This expression must evaluate to a DatagramSocket.
The requestMessage is used as the root object for the evaluation context.
The socket-expression parameter cannot be used with parameters multicast and acknowledge.
<int-ip:udp-inbound-channel-adapter id="inbound" port="0" channel="in" /> <int:channel id="in" /> <int:transformer expression="new String(payload).toUpperCase()" input-channel="in" output-channel="out"/> <int:channel id="out" /> <int-ip:udp-outbound-channel-adapter id="outbound" socket-expression="@inbound.socket" destination-expression="headers['ip_packetAddress']" channel="out" />
The equivalent configuration using Java DSL Configuration:
@Bean public IntegrationFlow udpEchoUpcaseServer() { return IntegrationFlows.from(Udp.inboundAdapter(11111).id("udpIn")) .<byte[], String>transform(p -> new String(p).toUpperCase()) .handle(Udp.outboundAdapter("headers['ip_packetAddress']") .socketExpression("@udpIn.socket")) .get(); }
For TCP, the configuration of the underlying connection is provided using a Connection Factory. Two types of connection factory are provided; a client connection factory and a server connection factory. Client connection factories are used to establish outgoing connections; Server connection factories listen for incoming connections.
A client connection factory is used by an outbound channel adapter but a reference to a client connection factory can also be provided to an inbound channel adapter and that adapter will receive any incoming messages received on connections created by the outbound adapter.
A server connection factory is used by an inbound channel adapter or gateway (in fact the connection factory will not function without one). A reference to a server connection factory can also be provided to an outbound adapter; that adapter can then be used to send replies to incoming messages to the same connection.
| Tip |
|---|---|
|
Reply messages will only be routed to the connection if the reply contains the header |
| Tip |
|---|---|
|
This is the extent of message correlation performed when sharing connection factories between inbound and outbound adapters. Such sharing allows for asynchronous two-way communication over TCP. By default, only payload information is transferred using TCP; therefore any message correlation must be performed by downstream components such as aggregators or other endpoints. Support for transferring selected headers was introduced in version 3.0. For more information refer to Section 32.8, “TCP Message Correlation”. |
A maximum of one adapter of each type may be given a reference to a connection factory.
Connection factories using java.net.Socket and java.nio.channel.SocketChannel are provided.
<int-ip:tcp-connection-factory id="server" type="server" port="1234"/>
A simple server connection factory that uses java.net.Socket connections.
<int-ip:tcp-connection-factory id="server" type="server" port="1234" using-nio="true"/>
A simple server connection factory that uses java.nio.channel.SocketChannel connections.
| Note |
|---|---|
|
Starting with Spring Integration version 4.2, if the server is configured to listen on a random port (0),
the actual port chosen by the OS can be obtained using |
<int-ip:tcp-connection-factory id="client" type="client" host="localhost" port="1234" single-use="true" so-timeout="10000"/>
A client connection factory that uses java.net.Socket connections and creates a new connection for each message.
<int-ip:tcp-connection-factory id="client" type="client" host="localhost" port="1234" single-use="true" so-timeout="10000" using-nio=true/>
A client connection factory that uses java.nio.channel.Socket connections and creates a new connection for each message.
TCP is a streaming protocol; this means that some structure has to be provided to data transported over TCP, so the receiver can demarcate the data into discrete messages. Connection factories are configured to use (de)serializers to convert between the message payload and the bits that are sent over TCP. This is accomplished by providing a deserializer and serializer for inbound and outbound messages respectively. A number of standard (de)serializers are provided.
The ByteArrayCrlfSerializer*, converts a byte array to a stream of bytes followed by carriage return and linefeed characters (\r\n).
This is the default (de)serializer and can be used with telnet as a client, for example.
The ByteArraySingleTerminatorSerializer*, converts a byte array to a stream of bytes followed by a single termination character (default 0x00).
The ByteArrayLfSerializer*, converts a byte array to a stream of bytes followed by a single linefeed character (0x0a).
The ByteArrayStxEtxSerializer*, converts a byte array to a stream of bytes preceded by an STX (0x02) and followed by an ETX (0x03).
The ByteArrayLengthHeaderSerializer, converts a byte array to a stream of bytes preceded by a binary length in network byte order (big endian).
This a very efficient deserializer because it does not have to parse every byte looking for a termination character sequence.
It can also be used for payloads containing binary data; the above serializers only support text in the payload.
The default size of the length header is 4 bytes (Integer), allowing for messages up to (2^31 - 1) bytes.
However, the length header can be a single byte (unsigned) for messages up to 255 bytes, or an unsigned short (2 bytes) for messages up to (2^16 - 1) bytes.
If you need any other format for the header, you can subclass this class and provide implementations for the readHeader and writeHeader methods.
The absolute maximum data size supported is (2^31 - 1) bytes.
The ByteArrayRawSerializer*, converts a byte array to a stream of bytes and adds no additional message demarcation data; with this (de)serializer, the end of a message is indicated by the client closing the socket in an orderly fashion.
When using this serializer, message reception will hang until the client closes the socket, or a timeout occurs; a timeout will NOT result in a message.
When this serializer is being used, and the client is a Spring Integration application, the client must use a connection factory that is configured with single-use=true - this causes the adapter to close the socket after sending the message; the serializer will not, itself, close the connection.
This serializer should only be used with connection factories used by channel adapters (not gateways), and the connection factories should be used by either an inbound or outbound adapter, and not both.
Also see ByteArrayElasticRawDeserializer below.
| Note |
|---|---|
|
Before version 4.2.2, when using NIO, this serializer treated a timeout (during read) as an end of file and the
data read so far was emitted as a message.
This is unreliable and should not be used to delimit messages; it now treats such conditions as an exception.
In the unlikely event you are using it this way, the previous behavior can be restored by setting the
|
Each of these is a subclass of AbstractByteArraySerializer which implements both org.springframework.core.serializer.Serializer and org.springframework.core.serializer.Deserializer.
For backwards compatibility, connections using any subclass of AbstractByteArraySerializer for serialization will also accept a String which will be converted to a byte array first.
Each of these (de)serializers converts an input stream containing the corresponding format to a byte array payload.
To avoid memory exhaustion due to a badly behaved client (one that does not adhere to the protocol of the configured serializer), these serializers impose a maximum message size.
If the size is exceeded by an incoming message, an exception will be thrown.
The default maximum message size is 2048 bytes, and can be increased by setting the maxMessageSize property.
If you are using the default (de)serializer and wish to increase the maximum message size, you must declare it as an explicit bean with the property set and configure the connection factory to use that bean.
The classes marked with * above use an intermediate buffer and copy the decoded data to a final buffer of the correct
size.
Starting with version 4.3, these can be configured with a poolSize property to allow these raw buffers to be reused
instead of being allocated and discarded for each message, which is the default behavior.
Setting the property to a negative value will create a pool that has no bounds.
If the pool is bounded, you can also set the poolWaitTimeout property (milliseconds) after which an exception is
thrown if no buffer becomes available; it defaults to infinity.
Such an exception will cause the socket to be closed.
If you wish to use the same mechanism in custom deserializers, subclass AbstractPooledBufferByteArraySerializer
instead of its super class AbstractByteArraySerializer, and implement doDeserialize() instead of deserialize().
The buffer will be returned to the pool automatically.
AbstractPooledBufferByteArraySerializer also provides a convenient utility method copyToSizedArray().
Version 5.0 added the ByteArrayElasticRawDeserializer.
This is similar to the deserializer side of ByteArrayRawSerializer above, except it is not necessary to set a maxMessageSize.
Internally, it uses a ByteArrayOutputStream which allows the buffer to grow as needed.
The client must close the socket in an orderly manner to signal end of message.
The MapJsonSerializer uses a Jackson ObjectMapper to convert between a Map and JSON.
This can be used in conjunction with a MessageConvertingTcpMessageMapper and a MapMessageConverter to transfer selected headers and the payload in a JSON format.
| Note |
|---|---|
|
The Jackson |
The final standard serializer is org.springframework.core.serializer.DefaultSerializer which can be used to convert Serializable objects using java serialization.org.springframework.core.serializer.DefaultDeserializer is provided for inbound deserialization of streams containing Serializable objects.
To implement a custom (de)serializer pair, implement the org.springframework.core.serializer.Deserializer and org.springframework.core.serializer.Serializer interfaces.
If you do not wish to use the default (de)serializer (ByteArrayCrLfSerializer), you must supply serializer and deserializer attributes on the connection factory (example below).
<bean id="javaSerializer" class="org.springframework.core.serializer.DefaultSerializer" /> <bean id="javaDeserializer" class="org.springframework.core.serializer.DefaultDeserializer" /> <int-ip:tcp-connection-factory id="server" type="server" port="1234" deserializer="javaDeserializer" serializer="javaSerializer"/>
A server connection factory that uses java.net.Socket connections and uses Java serialization on the wire.
For full details of the attributes available on connection factories, see the reference at the end of this section.
By default, reverse DNS lookups are done on inbound packets to convert IP addresses to hostnames for use in message headers.
In environments where DNS is not configured, this can cause connection delays.
This default behavior can be overridden by setting the lookup-host attribute to "false".
| Note |
|---|---|
|
It is possible to modify the creation of and/or attributes of sockets - see Section 32.10, “SSL/TLS Support”. As is noted there, such modifications are possible whether or not SSL is being used. |
As noted above, TCP sockets can be single-use (one request/response) or shared. Shared sockets do not perform well with outbound gateways, in high-volume environments, because the socket can only process one request/response at a time.
To improve performance, users could use collaborating channel adapters instead of gateways, but that requires application-level message correlation. See Section 32.8, “TCP Message Correlation” for more information.
Spring Integration 2.2 introduced a caching client connection factory, where a pool of shared sockets is used, allowing a gateway to process multiple concurrent requests with a pool of shared connections.
It is now possible to configure a TCP connection factory that supports failover to one or more other servers. When sending a message, the factory will iterate over all its configured factories until either the message can be sent, or no connection can be found. Initially, the first factory in the configured list is used; if a connection subsequently fails the next factory will become the current factory.
<bean id="failCF" class="o.s.i.ip.tcp.connection.FailoverClientConnectionFactory"> <constructor-arg> <list> <ref bean="clientFactory1"/> <ref bean="clientFactory2"/> </list> </constructor-arg> </bean>
| Note |
|---|---|
|
When using the failover connection factory, the singleUse property must be consistent between the factory itself and the list of factories it is configured to use. |
Spring Integration version 5.0 introduced this connection factory.
It binds a connection to the calling thread and the same connection is reused each time that thread sends a message.
This continues until the connection is closed (by the server or network) or until the thread calls the releaseConnection() method.
The connections themselves are provided by another client factory implementation; which must be configured to provide non-shared (single-use) connections so that each thread gets a connection.
Example configuration:
@Bean public TcpNetClientConnectionFactory cf() { TcpNetClientConnectionFactory cf = new TcpNetClientConnectionFactory("localhost", Integer.parseInt(System.getProperty(PORT))); cf.setSingleUse(true); return cf; } @Bean public ThreadAffinityClientConnectionFactory tacf() { return new ThreadAffinityClientConnectionFactory(cf()); } @Bean @ServiceActivator(inputChannel = "out") public TcpOutboundGateway outGate() { TcpOutboundGateway outGate = new TcpOutboundGateway(); outGate.setConnectionFactory(tacf()); outGate.setReplyChannelName("toString"); return outGate; }
Connection factories can be configured with a reference to a TcpConnectionInterceptorFactoryChain.
Interceptors can be used to add behavior to connections, such as negotiation, security, and other setup.
No interceptors are currently provided by the framework but, for an example, see the InterceptedSharedConnectionTests in the source repository.
The HelloWorldInterceptor used in the test case works as follows:
When configured with a client connection factory, when the first message is sent over a connection that is intercepted, the interceptor sends Hello over the connection, and expects to receive world!. When that occurs, the negotiation is complete and the original message is sent; further messages that use the same connection are sent without any additional negotiation.
When configured with a server connection factory, the interceptor requires the first message to be Hello and, if it is, returns world!. Otherwise it throws an exception causing the connection to be closed.
All TcpConnection methods are intercepted.
Interceptor instances are created for each connection by an interceptor factory.
If an interceptor is stateful, the factory should create a new instance for each connection; if there is no state, the same interceptor can wrap each connection.
Interceptor factories are added to the configuration of an interceptor factory chain, which is provided to a connection factory using the interceptor-factory attribute.
Interceptors must extend TcpConnectionInterceptorSupport; factories must implement the TcpConnectionInterceptorFactory interface.
TcpConnectionInterceptorSupport is provided with passthrough methods; by extending this class, you only need to implement those methods you wish to intercept.
<bean id="helloWorldInterceptorFactory" class="o.s.i.ip.tcp.connection.TcpConnectionInterceptorFactoryChain"> <property name="interceptors"> <array> <bean class="o.s.i.ip.tcp.connection.HelloWorldInterceptorFactory"/> </array> </property> </bean> <int-ip:tcp-connection-factory id="server" type="server" port="12345" using-nio="true" single-use="true" interceptor-factory-chain="helloWorldInterceptorFactory"/> <int-ip:tcp-connection-factory id="client" type="client" host="localhost" port="12345" single-use="true" so-timeout="100000" using-nio="true" interceptor-factory-chain="helloWorldInterceptorFactory"/>
Configuring a connection interceptor factory chain.
Beginning with version 3.0, changes to TcpConnection s are reported by TcpConnectionEvent s.
TcpConnectionEvent is a subclass of ApplicationEvent and thus can be received by any ApplicationListener defined in the ApplicationContext, for example Event Inbound Channel Adapter.
TcpConnectionEvents have the following properties:
-
connectionId- the connection identifier which can be used in a message header to send data to the connection -
connectionFactoryName- the bean name of the connection factory the connection belongs to -
throwable- theThrowable(forTcpConnectionExceptionEventevents only) -
source- theTcpConnection; this can be used, for example, to determine the remote IP Address withgetHostAddress()(cast required)
In addition, since version 4.0 the standard deserializers discussed in Section 32.3, “TCP Connection Factories” now emit TcpDeserializationExceptionEvent s when problems are encountered decoding the data stream.
These events contain the exception, the buffer that was in the process of being built, and an offset into the buffer (if available) at the point the exception occurred.
Applications can use a normal ApplicationListener, or see Section 13.1, “Receiving Spring Application Events”, to capture these events, allowing analysis of the problem.
Starting with versions 4.0.7, 4.1.3, TcpConnectionServerExceptionEvent s are published whenever an unexpected exception occurs on a server socket (such as a BindException when the server socket is in use).
These events have a reference to the connection factory and the cause.
Starting with version 4.2, TcpConnectionFailedCorrelationEvent s are published whenever an endpoint (inbound gateway or
collaborating outbound channel adapter) receives a message that cannot be routed to a connection because the
ip_connectionId header is invalid.
Outbound gateways also publish this event when a late reply is received (the sender thread has timed out).
The event contains the connection id as well as an exception in the cause property that contains the failed message.
Starting with version 4.3, a TcpConnectionServerListeningEvent is emitted when a server connection factory is started.
This is useful when the factory is configured to listen on port 0, meaning that the operating system chooses the port.
It can also be used instead of polling isListening(), if you need to wait before starting some other process that will
connect to the socket.
| Important |
|---|---|
|
To avoid delaying the listening thread from accepting connections, the event is published on a separate thread. |
Starting with version 4.3.2, a TcpConnectionFailedEvent is emitted whenever a client connection can’t be created.
The source of the event is the connection factory which can be used to determine the host and port to which the connection could not be established.
TCP inbound and outbound channel adapters that utilize the above connection factories are provided.
These adapters have attributes connection-factory and channel.
The channel attribute specifies the channel on which messages arrive at an outbound adapter and on which messages are placed by an inbound adapter.
The connection-factory attribute indicates which connection factory is to be used to manage connections for the adapter.
While both inbound and outbound adapters can share a connection factory, server connection factories are always owned by an inbound adapter; client connection factories are always owned by an outbound adapter.
One, and only one, adapter of each type may get a reference to a connection factory.
<bean id="javaSerializer" class="org.springframework.core.serializer.DefaultSerializer"/> <bean id="javaDeserializer" class="org.springframework.core.serializer.DefaultDeserializer"/> <int-ip:tcp-connection-factory id="server" type="server" port="1234" deserializer="javaDeserializer" serializer="javaSerializer" using-nio="true" single-use="true"/> <int-ip:tcp-connection-factory id="client" type="client" host="localhost" port="#{server.port}" single-use="true" so-timeout="10000" deserializer="javaDeserializer" serializer="javaSerializer"/> <int:channel id="input" /> <int:channel id="replies"> <int:queue/> </int:channel> <int-ip:tcp-outbound-channel-adapter id="outboundClient" channel="input" connection-factory="client"/> <int-ip:tcp-inbound-channel-adapter id="inboundClient" channel="replies" connection-factory="client"/> <int-ip:tcp-inbound-channel-adapter id="inboundServer" channel="loop" connection-factory="server"/> <int-ip:tcp-outbound-channel-adapter id="outboundServer" channel="loop" connection-factory="server"/> <int:channel id="loop"/>
In this configuration, messages arriving in channel input are serialized over connections created by client received at the server and placed on channel loop. Since loop is the input channel for outboundServer the message is simply looped back over the same connection and received by inboundClient and deposited in channel replies. Java serialization is used on the wire.
Normally, inbound adapters use a type="server" connection factory, which listens for incoming connection requests. In some cases, it is desirable to establish the connection in reverse, whereby the inbound adapter connects to an external server and then waits for inbound messages on that connection.
This topology is supported by using client-mode="true" on the inbound adapter. In this case, the connection factory must be of type client and must have single-use set to false.
Two additional attributes are used to support this mechanism: retry-interval specifies (in milliseconds) how often the framework will attempt to reconnect after a connection failure.
scheduler is used to supply a TaskScheduler used to schedule the connection attempts, and to test that the connection is still active.
For an outbound adapter, the connection is normally established when the first message is sent. client-mode="true" on an outbound adapter will cause the connection to be established when the adapter is started. Adapters are automatically started by default. Again, the connection factory must be of type client and have single-use set to false and retry-interval and scheduler are also supported. If a connection fails, it will be re-established either by the scheduler or when the next message is sent.
For both inbound and outbound, if the adapter is started, you may force the adapter to establish a connection by sending a <control-bus /> command: @adapter_id.retryConnection() and examine the current state with @adapter_id.isConnected().
The inbound TCP gateway TcpInboundGateway and outbound TCP gateway TcpOutboundGateway use a server and client connection factory respectively.
Each connection can process a single request/response at a time.
The inbound gateway, after constructing a message with the incoming payload and sending it to the requestChannel, waits for a response and sends the payload from the response message by writing it to the connection.
| Note |
|---|---|
|
For the inbound gateway, care must be taken to retain, or populate, the ip_connectionId header because it is used to correlate the message to a connection. Messages that originate at the gateway will automatically have the header set. If the reply is constructed as a new message, you will need to set the header. The header value can be captured from the incoming message. |
As with inbound adapters, inbound gateways normally use a type="server" connection factory, which listens for incoming connection requests. In some cases, it is desirable to establish the connection in reverse, whereby the inbound gateway connects to an external server and then waits for, and replies to, inbound messages on that connection.
This topology is supported by using client-mode="true" on the inbound gateway. In this case, the connection factory must be of type client and must have single-use set to false.
Two additional attributes are used to support this mechanism: retry-interval specifies (in milliseconds) how often the framework will attempt to reconnect after a connection failure.
scheduler is used to supply a TaskScheduler used to schedule the connection attempts, and to test that the connection is still active.
If the gateway is started, you may force the gateway to establish a connection by sending a <control-bus /> command: @adapter_id.retryConnection() and examine the current state with @adapter_id.isConnected().
The outbound gateway, after sending a message over the connection, waits for a response and constructs a response message and puts in on the reply channel. Communications over the connections are single-threaded. Users should be aware that only one message can be handled at a time and, if another thread attempts to send a message before the current response has been received, it will block until any previous requests are complete (or time out). If, however, the client connection factory is configured for single-use connections each new request gets its own connection and is processed immediately.
<int-ip:tcp-inbound-gateway id="inGateway" request-channel="tcpChannel" reply-channel="replyChannel" connection-factory="cfServer" reply-timeout="10000"/>
A simple inbound TCP gateway; if a connection factory configured with the default (de)serializer is used, messages will be \r\n delimited data and the gateway can be used by a simple client such as telnet.
<int-ip:tcp-outbound-gateway id="outGateway" request-channel="tcpChannel" reply-channel="replyChannel" connection-factory="cfClient" request-timeout="10000" remote-timeout="10000"/> <!-- or e.g. remote-timeout-expression="headers['timeout']" -->
A simple outbound TCP gateway.
One goal of the IP Endpoints is to provide communication with systems other than another Spring Integration application.
For this reason, only message payloads are sent and received, by default.
Since 3.0, headers can be transferred, using JSON, Java serialization, or with custom Serializer s and Deserializer s; see Section 32.8.4, “Transferring Headers” for more information.
No message correlation is provided by the framework, except when using the gateways, or collaborating channel adapters on the server side.
In the paragraphs below we discuss the various correlation techniques available to applications.
In most cases, this requires specific application-level correlation of messages, even when message payloads contain some natural correlation data (such as an order number).
The gateways will automatically correlate messages. However, an outbound gateway should only be used for relatively low-volume use. When the connection factory is configured for a single shared connection to be used for all message pairs (single-use="false"), only one message can be processed at a time. A new message will have to wait until the reply to the previous message has been received. When a connection factory is configured for each new message to use a new connection (single-use="true"), the above restriction does not apply. While this may give higher throughput than a shared connection environment, it comes with the overhead of opening and closing a new connection for each message pair.
Therefore, for high-volume messages, consider using a collaborating pair of channel adapters. However, you will need to provide collaboration logic.
Another solution, introduced in Spring Integration 2.2, is to use a CachingClientConnectionFactory, which allows the use of a pool of shared connections.
To achieve high-volume throughput (avoiding the pitfalls of using gateways as mentioned above) you may consider configuring a pair of collaborating outbound and inbound channel adapters. Collaborating adapters can also be used (server-side or client-side) for totally asynchronous communication (rather than with request/reply semantics). On the server side, message correlation is automatically handled by the adapters because the inbound adapter adds a header allowing the outbound adapter to determine which connection to use to send the reply message.
| Note |
|---|---|
|
On the server side, care must be taken to populate the ip_connectionId header because it is used to correlate the message to a connection. Messages that originate at the inbound adapter will automatically have the header set. If you wish to construct other messages to send, you will need to set the header. The header value can be captured from an incoming message. |
On the client side, the application will have to provide its own correlation logic, if needed. This can be done in a number of ways.
If the message payload has some natural correlation data, such as a transaction id or an order number, AND there is no need to retain any information (such as a reply channel header) from the original outbound message, the correlation is simple and would done at the application level in any case.
If the message payload has some natural correlation data, such as a transaction id or an order number, but there is a need to retain some information (such as a reply channel header) from the original outbound message, you may need to retain a copy of the original outbound message (perhaps by using a publish-subscribe channel) and use an aggregator to recombine the necessary data.
For either of the previous two paragraphs, if the payload has no natural correlation data, you may need to provide a transformer upstream of the outbound channel adapter to enhance the payload with such data. Such a transformer may transform the original payload to a new object containing both the original payload and some subset of the message headers. Of course, live objects (such as reply channels) from the headers can not be included in the transformed payload.
If such a strategy is chosen you will need to ensure the connection factory has an appropriate serializer/deserializer pair to handle such a payload, such as the DefaultSerializer/Deserializer which use java serialization, or a custom serializer and deserializer.
The ByteArray*Serializer options mentioned in Section 32.3, “TCP Connection Factories”, including the default ByteArrayCrLfSerializer, do not support such payloads, unless the transformed payload is a String or byte[],
| Note |
|---|---|
|
Before the 2.2 release, when a client connection factory was used by collaborating channel adapters, the so-timeout attribute defaulted to the default reply timeout (10 seconds). This meant that if no data were received by the inbound adapter for this period of time, the socket was closed. This default behavior was not appropriate in a truly asynchronous environment, so it now defaults to an infinite timeout. You can reinstate the previous default behavior by setting the so-timeout attribute on the client connection factory to 10000 milliseconds. |
TCP is a streaming protocol; Serializers and Deserializers are used to demarcate messages within the stream.
Prior to 3.0, only message payloads (String or byte[]) could be transferred over TCP.
Beginning with 3.0, you can now transfer selected headers as well as the payload.
It is important to understand, though, that "live" objects, such as the replyChannel header cannot be serialized.
Sending header information over TCP requires some additional configuration.
The first step is to provide the ConnectionFactory with a MessageConvertingTcpMessageMapper using the mapper attribute.
This mapper delegates to any MessageConverter implementation to convert the message to/from some object that can be (de)serialized by the configured serializer and deserializer.
A MapMessageConverter is provided, which allows the specification of a list of headers that will be added to a Map object, along with the payload.
The generated Map has two entries: payload and headers.
The headers entry is itself a Map containing the selected headers.
The second step is to provide a (de)serializer that can convert between a Map and some wire format.
This can be a custom (de)Serializer, which would typically be needed if the peer system is not a Spring Integration application.
A MapJsonSerializer is provided that will convert a Map to/from JSON.
This uses a Spring Integration JsonObjectMapper to perform this function.
You can provide a custom JsonObjectMapper if needed.
By default, the serializer inserts a linefeed 0x0a character between objects.
See the JavaDocs for more information.
| Note |
|---|---|
|
At the time of writing, the |
You can also use standard Java serialization of the Map, using the DefaultSerializer and DefaultDeserializer.
The following example shows the configuration of a connection factory that transfers the correlationId, sequenceNumber, and sequenceSize headers using JSON.
<int-ip:tcp-connection-factory id="client" type="client" host="localhost" port="12345" mapper="mapper" serializer="jsonSerializer" deserializer="jsonSerializer"/> <bean id="mapper" class="o.sf.integration.ip.tcp.connection.MessageConvertingTcpMessageMapper"> <constructor-arg name="messageConverter"> <bean class="o.sf.integration.support.converter.MapMessageConverter"> <property name="headerNames"> <list> <value>correlationId</value> <value>sequenceNumber</value> <value>sequenceSize</value> </list> </property> </bean> </constructor-arg> </bean> <bean id="jsonSerializer" class="o.sf.integration.ip.tcp.serializer.MapJsonSerializer" />
A message sent with the above configuration, with payload foo would appear on the wire like so:
{"headers":{"correlationId":"bar","sequenceSize":5,"sequenceNumber":1},"payload":"foo"}
Using NIO (see using-nio in Section 32.12, “IP Configuration Attributes”) avoids dedicating a thread to read from each socket.
For a small number of sockets, you will likely find that not using NIO, together with an async handoff (e.g.
to a QueueChannel), will perform as well as, or better than, using NIO.
Consider using NIO when handling a large number of connections. However, the use of NIO has some other ramifications. A pool of threads (in the task executor) is shared across all the sockets; each incoming message is assembled and sent to the configured channel as a separate unit of work on a thread selected from that pool. Two sequential messages arriving on the same socket might be processed by different threads. This means that the order in which the messages are sent to the channel is indeterminate; the strict ordering of the messages arriving on the socket is not maintained.
For some applications, this is not an issue; for others it is.
If strict ordering is required, consider setting using-nio to false and using async handoff.
Alternatively, you may choose to insert a resequencer downstream of the inbound endpoint to return the messages to their proper sequence. Set apply-sequence to true on the connection factory, and messages arriving on a TCP connection will have sequenceNumber and correlationId headers set. The resequencer uses these headers to return the messages to their proper sequence.
Pool Size
The pool size attribute is no longer used; previously, it specified the size of the default thread pool when a task-executor was not specified. It was also used to set the connection backlog on server sockets. The first function is no longer needed (see below); the second function is replaced by the backlog attribute.
Previously, when using a fixed thread pool task executor (which was the default), with NIO, it was possible to get a deadlock and processing would stop. The problem occurred when a buffer was full, a thread reading from the socket was trying to add more data to the buffer, and there were no threads available to make space in the buffer. This only occurred with a very small pool size, but it could be possible under extreme conditions. Since 2.2, two changes have eliminated this problem. First, the default task executor is a cached thread pool executor. Second, deadlock detection logic has been added such that if thread starvation occurs, instead of deadlocking, an exception is thrown, thus releasing the deadlocked resources.
| Important |
|---|---|
|
Now that the default task executor is unbounded, it is possible that an out of memory condition might occur with high rates of incoming messages, if message processing takes extended time. If your application exhibits this type of behavior, you are advised to use a pooled task executor with an appropriate pool size, but see the next section. |
There are some important considerations when using a fixed thread pool with the CallerRunsPolicy (CALLER_RUNS when using the <task/> namespace) and the queue capacity is small.
The following does not apply if you are not using a fixed thread pool.
With NIO connections there are 3 distinct task types; the IO Selector processing is performed on one dedicated thread - detecting events, accepting new connections, and dispatching the IO read operations to other threads, using the task executor. When an IO reader thread (to which the read operation is dispatched) reads data, it hands off to another thread to assemble the incoming message; large messages may take several reads to complete. These "assembler" threads can block waiting for data. When a new read event occurs, the reader determines if this socket already has an assembler and runs a new one if not. When the assembly process is complete, the assembler thread is returned to the pool.
This can cause a deadlock when the pool is exhausted and the CALLER_RUNS rejection policy is in use, and the task queue is full.
When the pool is empty and there is no room in the queue, the IO selector thread receives an OP_READ event and dispatches the read using the executor; the queue is full, so the selector thread itself starts the read process; now, it detects that there is not an assembler for this socket and, before it does the read, fires off an assembler; again, the queue is full, and the selector thread becomes the assembler.
The assembler is now blocked awaiting the data to be read, which will never happen.
The connection factory is now deadlocked because the selector thread can’t handle new events.
We must avoid the selector (or reader) threads performing the assembly task to avoid this deadlock. It is desirable to use seperate pools for the IO and assembly operations.
The framework provides a CompositeExecutor, which allows the configuration of two distinct executors; one for performing IO operations, and one for message assembly.
In this environment, an IO thread can never become an assembler thread, and the deadlock cannot occur.
In addition, the task executors should be configured to use a AbortPolicy (ABORT when using <task>).
When an IO cannot be completed, it is deferred for a short time and retried continually until it can be completed and an assembler allocated.
By default, the delay is 100ms but it can be changed using the readDelay property on the connection factory (read-delay when configuring with the XML namespace).
Example configuration of the composite executor is shown below.
@Bean private CompositeExecutor compositeExecutor() { ThreadPoolTaskExecutor ioExec = new ThreadPoolTaskExecutor(); ioExec.setCorePoolSize(4); ioExec.setMaxPoolSize(10); ioExec.setQueueCapacity(0); ioExec.setThreadNamePrefix("io-"); ioExec.setRejectedExecutionHandler(new AbortPolicy()); ioExec.initialize(); ThreadPoolTaskExecutor assemblerExec = new ThreadPoolTaskExecutor(); assemblerExec.setCorePoolSize(4); assemblerExec.setMaxPoolSize(10); assemblerExec.setQueueCapacity(0); assemblerExec.setThreadNamePrefix("assembler-"); assemblerExec.setRejectedExecutionHandler(new AbortPolicy()); assemblerExec.initialize(); return new CompositeExecutor(ioExec, assemblerExec); }
<bean id="myTaskExecutor" class="org.springframework.integration.util.CompositeExecutor"> <constructor-arg ref="io"/> <constructor-arg ref="assembler"/> </bean> <task:executor id="io" pool-size="4-10" queue-capacity="0" rejection-policy="ABORT" /> <task:executor id="assembler" pool-size="4-10" queue-capacity="0" rejection-policy="ABORT" />
<bean id="myTaskExecutor" class="org.springframework.integration.util.CompositeExecutor"> <constructor-arg> <bean class="org.springframework.scheduling.concurrent.ThreadPoolTaskExecutor"> <property name="threadNamePrefix" value="io-" /> <property name="corePoolSize" value="4" /> <property name="maxPoolSize" value="8" /> <property name="queueCapacity" value="0" /> <property name="rejectedExecutionHandler"> <bean class="java.util.concurrent.ThreadPoolExecutor.AbortPolicy" /> </property> </bean> </constructor-arg> <constructor-arg> <bean class="org.springframework.scheduling.concurrent.ThreadPoolTaskExecutor"> <property name="threadNamePrefix" value="assembler-" /> <property name="corePoolSize" value="4" /> <property name="maxPoolSize" value="10" /> <property name="queueCapacity" value="0" /> <property name="rejectedExecutionHandler"> <bean class="java.util.concurrent.ThreadPoolExecutor.AbortPolicy" /> </property> </bean> </constructor-arg> </bean>
Secure Sockets Layer/Transport Layer Security is supported.
When using NIO, the JDK 5+ SSLEngine feature is used to handle handshaking after the connection is established.
When not using NIO, standard SSLSocketFactory and SSLServerSocketFactory objects are used to create connections.
A number of strategy interfaces are provided to allow significant customization; default implementations of these interfaces provide for the simplest way to get started with secure communications.
Regardless of whether NIO is being used, you need to configure the ssl-context-support attribute on the connection factory.
This attribute references a <bean/> definition that describes the location and passwords for the required key stores.
SSL/TLS peers require two keystores each; a keystore containing private/public key pairs identifying the peer; a truststore, containing the public keys for peers that are trusted.
See the documentation for the keytool utility provided with the JDK.
The essential steps are
- Create a new key pair and store in a keystore.
- Export the public key.
- Import the public key into the peer’s truststore.
Repeat for the other peer.
| Note |
|---|---|
|
It is common in test cases to use the same key stores on both peers, but this should be avoided for production. |
After establishing the key stores, the next step is to indicate their locations to the TcpSSLContextSupport bean, and provide a reference to that bean to the connection factory.
<bean id="sslContextSupport" class="o.sf.integration.ip.tcp.connection.support.DefaultTcpSSLContextSupport"> <constructor-arg value="client.ks"/> <constructor-arg value="client.truststore.ks"/> <constructor-arg value="secret"/> <constructor-arg value="secret"/> </bean> <ip:tcp-connection-factory id="clientFactory" type="client" host="localhost" port="1234" ssl-context-support="sslContextSupport" />
The DefaulTcpSSLContextSupport class also has an optional protocol property, which can be SSL or TLS (default).
The keystore file names (first two constructor arguments) use the Spring Resource abstraction; by default the files will be located on the classpath, but this can be overridden by using the file: prefix, to find the files on the filesystem instead.
Starting with version 4.3.6, when using NIO, you can specify an ssl-handshake-timeout (seconds) on the connection factory.
This timeout (default 30) is used during SSL handshake when waiting for data; if the timeout is exceeded, the process is aborted and the socket closed.
In many cases, the configuration described above is all that is needed to enable secure communication over TCP/IP. However, a number of strategy interfaces are provided to allow customization and modification of socket factories and sockets.
-
TcpSSLContextSupport -
TcpSocketFactorySupport -
TcpSocketSupport -
TcpNetConnectionSupport -
TcpNioConnectionSupport
TcpSSLContextSupport.
public interface TcpSSLContextSupport { SSLContext getSSLContext() throws Exception; }
Implementations of this interface are responsible for creating an SSLContext.
The implementation provided by the framework is the DefaultTcpSSLContextSupport described above.
If you require different behavior, implement this interface and provide the connection factory with a reference to a bean of your class' implementation.
TcpSocketFactorySupport.
public interface TcpSocketFactorySupport { ServerSocketFactory getServerSocketFactory(); SocketFactory getSocketFactory(); }
Implementations of this interface are responsible for obtaining references to ServerSocketFactory and SocketFactory.
Two implementations are provided; the first is DefaultTcpNetSocketFactorySupport for non-SSL sockets (when no ssl-context-support attribute is defined); this simply uses the JDK’s default factories.
The second implementation is DefaultTcpNetSSLSocketFactorySupport; this is used, by default, when an ssl-context-support attribute is defined; it uses the SSLContext created by that bean to create the socket factories.
| Note |
|---|---|
|
This interface only applies if |
TcpSocketSupport.
public interface TcpSocketSupport { void postProcessServerSocket(ServerSocket serverSocket); void postProcessSocket(Socket socket); }
Implementations of this interface can modify sockets after they are created, and after all configured attributes have been applied, but before the sockets are used.
This applies whether or not NIO is being used.
For example, you could use an implementation of this interface to modify the supported cipher suites on an SSL socket, or you could add a listener that gets notified after SSL handshaking is complete.
The sole implementation provided by the framework is the DefaultTcpSocketSupport which does not modify the sockets in any way
To supply your own implementation of TcpSocketFactorySupport or TcpSocketSupport, provide the connection factory with references to beans of your custom type using the socket-factory-support and socket-support attributes, respectively.
TcpNetConnectionSupport.
public interface TcpNetConnectionSupport { TcpNetConnection createNewConnection(Socket socket, boolean server, boolean lookupHost, ApplicationEventPublisher applicationEventPublisher, String connectionFactoryName) throws Exception; }
This interface is invoked to create TcpNetConnection objects (or objects from subclasses).
The framework provides a single implementation DefatulTcpNetConnectionSupport which creates simple TcpNetConnection objects by default.
It has two properties pushbackCapable and pushbackBufferSize; when push back is enabled, the implementation returns a subclass that wraps the connection’s InputStream in a PushbackInputStream.
Aligned with the PushbackInputStream default, the buffer size defaults to 1.
This enables deserializers to "unread" (push back) bytes into the stream.
The following is a trivial example of how it might be used in a delegating deserializer which "peeks" at the first byte to determine which deserializer to invoke:
public class CompositeDeserializer implements Deserializer<byte[]> { private final ByteArrayStxEtxSerializer stxEtx = new ByteArrayStxEtxSerializer(); private final ByteArrayCrLfSerializer crlf = new ByteArrayCrLfSerializer(); @Override public byte[] deserialize(InputStream inputStream) throws IOException { PushbackInputStream pbis = (PushbackInputStream) inputStream; int first = pbis.read(); if (first < 0) { throw new SoftEndOfStreamException(); } pbis.unread(first); if (first == ByteArrayStxEtxSerializer.STX) { this.receivedStxEtx = true; return this.stxEtx.deserialize(pbis); } else { this.receivedCrLf = true; return this.crlf.deserialize(pbis); } } }
TcpNioConnectionSupport.
public interface TcpNioConnectionSupport { TcpNioConnection createNewConnection(SocketChannel socketChannel, boolean server, boolean lookupHost, ApplicationEventPublisher applicationEventPublisher, String connectionFactoryName) throws Exception; }
This interface is invoked to create TcpNioConnection objects (or objects from subclasses).
Two implementations are provided DefaultTcpNioSSLConnectionSupport and DefaultTcpNioConnectionSupport which are used depending on whether SSL is in use or not.
A common use case would be to subclass DefaultTcpNioSSLConnectionSupport and override postProcessSSLEngine; see the example below.
As with the DefatulTcpNetConnectionSupport, these implementations also support push back.
To enable client certificate authentication when using SSL, the technique depends on whether NIO is in use or not.
When NIO is not being used, provide a custom TcpSocketSupport implementation to post-process the server socket:
serverFactory.setTcpSocketSupport(new DefaultTcpSocketSupport() { @Override public void postProcessServerSocket(ServerSocket serverSocket) { ((SSLServerSocket) serverSocket).setNeedClientAuth(true); } });
(When using XML configuration, provide a reference to your bean using the socket-support attribute).
When using NIO, provide a custom TcpNioSslConnectionSupport implementation to post-process the SSLEngine.
@Bean public DefaultTcpNioSSLConnectionSupport tcpNioConnectionSupport() { return new DefaultTcpNioSSLConnectionSupport(serverSslContextSupport) { @Override protected void postProcessSSLEngine(SSLEngine sslEngine) { sslEngine.setNeedClientAuth(true); } } } @Bean public TcpNioServerConnectionFactory server() { ... serverFactory.setTcpNioConnectionSupport(tcpNioConnectionSupport()); ... }
(When using XML configuration, since version 4.3.7, provide a reference to your bean using the nio-connection-support attribute).
Table 32.1. Connection Factory Attributes
| Attribute Name | Client? | Server? | Allowed Values | Attribute Description |
|---|---|---|---|---|
type | Y | Y | client, server | Determines whether the connection factory is a client or server. |
host | Y | N | The host name or ip address of the destination. | |
port | Y | Y | The port. | |
serializer | Y | Y | An implementation of | |
deserializer | Y | Y | An implementation of | |
using-nio | Y | Y | true, false | Whether or not connection uses NIO. Refer to the java.nio package for more information. See Section 32.9, “A Note About NIO”. Default false. |
using-direct-buffers | Y | N | true, false | When using NIO, whether or not the connection uses direct buffers.
Refer to |
apply-sequence | Y | Y | true, false | When using NIO, it may be necessary to resequence messages. When this attribute is set to true, correlationId and sequenceNumber headers will be added to received messages. See Section 32.9, “A Note About NIO”. Default false. |
so-timeout | Y | Y | Defaults to 0 (infinity), except for server connection factories with single-use="true". In that case, it defaults to the default reply timeout (10 seconds). | |
so-send-buffer-size | Y | Y | See | |
so-receive-buffer- size | Y | Y | See | |
so-keep-alive | Y | Y | true, false | See |
so-linger | Y | Y | Sets linger to true with supplied value.
See | |
so-tcp-no-delay | Y | Y | true, false | See |
so-traffic-class | Y | Y | See | |
local-address | N | Y | On a multi-homed system, specifies an IP address for the interface to which the socket will be bound. | |
task-executor | Y | Y | Specifies a specific Executor to be used for socket handling. If not supplied, an internal cached thread executor will be used. Needed on some platforms that require the use of specific task executors such as a WorkManagerTaskExecutor. | |
single-use | Y | Y | true, false | Specifies whether a connection can be used for multiple messages. If true, a new connection will be used for each message. |
pool-size | N | N | This attribute is no longer used. For backward compatibility, it sets the backlog but users should use backlog to specify the connection backlog in server factories | |
backlog | N | Y | Sets the connection backlog for server factories. | |
lookup-host | Y | Y | true, false | Specifies whether reverse lookups are done on IP addresses to convert to host names for use in message headers. If false, the IP address is used instead. Defaults to true. |
interceptor-factory-chain | Y | Y | ||
ssl-context-support | Y | Y | ||
socket-factory-support | Y | Y | ||
socket-support | Y | Y | ||
nio-connection-support | Y | Y | ||
read-delay | Y | Y | long > 0 | The delay (in milliseconds) before retrying a read after the previous attempt failed due to insufficient threads.
Default 100.
Only applies if |
Table 32.2. UDP Inbound Channel Adapter Attributes
| Attribute Name | Allowed Values | Attribute Description |
|---|---|---|
port | The port on which the adapter listens. | |
multicast | true, false | Whether or not the udp adapter uses multicast. |
multicast-address | When multicast is true, the multicast address to which the adapter joins. | |
pool-size | Specifies the concurrency. Specifies how many packets can be handled concurrently. It only applies if task-executor is not configured. Defaults to 5. | |
task-executor | Specifies a specific Executor to be used for socket handling. If not supplied, an internal pooled executor will be used. Needed on some platforms that require the use of specific task executors such as a WorkManagerTaskExecutor. See pool-size for thread requirements. | |
receive-buffer-size | The size of the buffer used to receive DatagramPackets. Usually set to the MTU size. If a smaller buffer is used than the size of the sent packet, truncation can occur. This can be detected by means of the check-length attribute.. | |
check-length | true, false | Whether or not a udp adapter expects a data length field in the packet received. Used to detect packet truncation. |
so-timeout | See | |
so-send-buffer-size | Used for udp acknowledgment packets.
See | |
so-receive-buffer- size | See | |
local-address | On a multi-homed system, specifies an IP address for the interface to which the socket will be bound. | |
error-channel | If an Exception is thrown by a downstream component, the MessagingException message containing the exception and failed message is sent to this channel. | |
lookup-host | true, false | Specifies whether reverse lookups are done on IP addresses to convert to host names for use in message headers. If false, the IP address is used instead. Defaults to true. |
Table 32.3. UDP Outbound Channel Adapter Attributes
| Attribute Name | Allowed Values | Attribute Description |
|---|---|---|
host | The host name or ip address of the destination. For multicast udp adapters, the multicast address. | |
port | The port on the destination. | |
multicast | true, false | Whether or not the udp adapter uses multicast. |
acknowledge | true, false | Whether or not a udp adapter requires an acknowledgment from the destination. when enabled, requires setting the following 4 attributes. |
ack-host | When acknowledge is true, indicates the host or ip address to which the acknowledgment should be sent. Usually the current host, but may be different, for example when Network Address Transaction (NAT) is being used. | |
ack-port | When acknowledge is true, indicates the port to which the acknowledgment should be sent. The adapter listens on this port for acknowledgments. | |
ack-timeout | When acknowledge is true, indicates the time in milliseconds that the adapter will wait for an acknowledgment. If an acknowledgment is not received in time, the adapter will throw an exception. | |
min-acks-for- success | Defaults to 1. For multicast adapters, you can set this to a larger value, requiring acknowledgments from multiple destinations. | |
check-length | true, false | Whether or not a udp adapter includes a data length field in the packet sent to the destination. |
time-to-live | For multicast adapters, specifies the time to live attribute for the | |
so-timeout | See | |
so-send-buffer-size | See | |
so-receive-buffer- size | Used for udp acknowledgment packets.
See | |
local-address | On a multi-homed system, for the UDP adapter, specifies an IP address for the interface to which the socket will be bound for reply messages. For a multicast adapter it is also used to determine which interface the multicast packets will be sent over. | |
task-executor | Specifies a specific Executor to be used for acknowledgment handling. If not supplied, an internal single threaded executor will be used. Needed on some platforms that require the use of specific task executors such as a WorkManagerTaskExecutor. One thread will be dedicated to handling acknowledgments (if the acknowledge option is true). | |
destination-expression | SpEL expression | A SpEL expression to be evaluated to determine which |
socket-expression | SpEL expression | A SpEL expression to be evaluated to determine which datagram socket use for sending outgoing UDP packets. |
Table 32.4. TCP Inbound Channel Adapter Attributes
| Attribute Name | Allowed Values | Attribute Description |
|---|---|---|
channel | The channel to which inbound messages will be sent. | |
connection-factory | If the connection factory has a type server, the factory is owned by this adapter. If it has a type client, it is owned by an outbound channel adapter and this adapter will receive any incoming messages on the connection created by the outbound adapter. | |
error-channel | If an Exception is thrown by a downstream component, the MessagingException message containing the exception and failed message is sent to this channel. | |
client-mode | true, false | When true, the inbound adapter will act as a client, with respect to establishing the connection and then receive incoming messages on that connection. Default = false. Also see retry-interval and scheduler. The connection factory must be of type client and have single-use set to false. |
retry-interval | When in client-mode, specifies the number of milliseconds to wait between connection attempts, or after a connection failure. Default 60,000 (60 seconds). | |
scheduler | true, false | Specifies a |
Table 32.5. TCP Outbound Channel Adapter Attributes
| Attribute Name | Allowed Values | Attribute Description |
|---|---|---|
channel | The channel on which outbound messages arrive. | |
connection-factory | If the connection factory has a type client, the factory is owned by this adapter. If it has a type server, it is owned by an inbound channel adapter and this adapter will attempt to correlate messages to the connection on which an original inbound message was received. | |
client-mode | true, false | When true, the outbound adapter will attempt to establish the connection as soon as it is started. When false, the connection is established when the first message is sent. Default = false. Also see retry-interval and scheduler. The connection factory must be of type client and have single-use set to false. |
retry-interval | When in client-mode, specifies the number of milliseconds to wait between connection attempts, or after a connection failure. Default 60,000 (60 seconds). | |
scheduler | true, false | Specifies a |
Table 32.6. TCP Inbound Gateway Attributes
| Attribute Name | Allowed Values | Attribute Description |
|---|---|---|
connection-factory | The connection factory must be of type server. | |
request-channel | The channel to which incoming messages will be sent. | |
reply-channel | The channel on which reply messages may arrive. Usually replies will arrive on a temporary reply channel added to the inbound message header | |
reply-timeout | The time in milliseconds for which the gateway will wait for a reply. Default 1000 (1 second). | |
error-channel | If an Exception is thrown by a downstream component, the MessagingException message containing the exception and failed message is sent to this channel; any reply from that flow will then be returned as a response by the gateway. | |
client-mode | true, false | When true, the inbound gateway will act as a client, with respect to establishing the connection and then receive (and reply to) incoming messages on that connection. Default = false. Also see retry-interval and scheduler. The connection factory must be of type client and have single-use set to false. |
retry-interval | When in client-mode, specifies the number of milliseconds to wait between connection attempts, or after a connection failure. Default 60,000 (60 seconds). | |
scheduler | true, false | Specifies a |
Table 32.7. TCP Outbound Gateway Attributes
| Attribute Name | Allowed Values | Attribute Description |
|---|---|---|
connection-factory | The connection factory must be of type client. | |
request-channel | The channel on which outgoing messages will arrive. | |
reply-channel | Optional. The channel to which reply messages may be sent. | |
remote-timeout | The time in milliseconds for which the gateway will wait for a reply from the remote system.
Mutually exclusive with | |
remote-timeout-expression | A SpEL expression, evaluated against the message to determine the time in milliseconds for which the gateway will wait for a reply from the remote system.
Mutually exclusive with | |
request-timeout | If a single-use connection factory is not being used, The time in milliseconds for which the gateway will wait to get access to the shared connection. | |
reply-timeout | The time in milliseconds for which the gateway will wait when sending the reply to the reply-channel. Only applies if the reply-channel might block, such as a bounded QueueChannel that is currently full. |
IP Message Headers.
The following MessageHeader s are used by this module:
| Header Name | IpHeaders Constant | Description |
|---|---|---|
ip_hostname | HOSTNAME | The host name from which a TCP message or UDP packet was received.
If |
ip_address | IP_ADDRESS | The ip address from which a TCP message or UDP packet was received. |
ip_port | PORT | The remote port for a UDP packet. |
ip_localInetAddress | IP_LOCAL_ADDRESS | The local |
ip_ackTo | ACKADDRESS | The remote ip address to which UDP application-level acks will be sent. The framework includes acknowledgment information in the data packet. |
ip_ackId | ACK_ID | A correlation id for UDP application-level acks. The framework includes acknowledgment information in the data packet. |
ip_tcp_remotePort | REMOTE_PORT | The remote port for a TCP connection. |
ip_connectionId | CONNECTION_ID | A unique identifier for a TCP connection; set by the framework for inbound messages; when sending to a server-side inbound channel adapter, or replying to an inbound gateway, this header is required so the endpoint can determine which connection to send the message to. |
ip_actualConnectionId | ACTUAL_ CONNECTION_ID | For information only - when using a cached or failover client connection factory, contains the actual underlying connection id. |
contentType | MessageHeaders. CONTENT_TYPE | An optional content type for inbound messages; see below.
Note that, unlike the other header constants, this constant is in the class |
For inbound messages, ip_hostname, ip_address, ip_tcp_remotePort and ip_connectionId are mapped by the default
TcpHeaderMapper.
Set the mapper’s addContentTypeHeader property to true and the mapper will set the contentType header (application/octet-stream;charset="UTF-8") by default.
You can change the default by setting the contentType property.
Users can add additional headers by subclassing TcpHeaderMapper and overriding the method supplyCustomHeaders.
For example, when using SSL, properties of the SSLSession can be added by obtaining the session object from the
TcpConnection object which is provided as an argument to the supplyCustomHeaders method.
For outbound messages, String payloads are converted to byte[] using the default (UTF-8) charset.
Set the charset property to change the default.
When customizing the mapper properties, or subclassing, declare the mapper as a bean and provide an instance to the connection factory using the mapper property
The following example from the samples repository is used to illustrate some of the configuration options when using annotations instead of XML.
@EnableIntegration
|
Standard Spring Integration annotation enabling the infrastructure for an integration application. |
|
Searches for |
|
The entry point to the client-side of the flow. The calling application can |
|
Outbound endpoints consist of a |
|
Inbound endpoints (in the TCP/UDP module) are all message-driven so just need to be declared as simple |
|
This class provides a number of POJO methods for use in this sample flow (a |
|
The client-side connection factory. |
|
The server-side connection factory. |
Spring Integration provides support for interacting with Twitter. With the Twitter adapters you can both receive and send Twitter messages. You can also perform a Twitter search based on a schedule and publish the search results within Messages. Since version 4.0, a search outbound gateway is provided to perform dynamic searches.
Twitter is a social networking and micro-blogging service that enables its users to send and read messages known as tweets. Tweets are text-based posts of up to 140 characters displayed on the author’s profile page and delivered to the author’s subscribers who are known as followers.
| Important |
|---|---|
|
Versions of Spring Integration prior to 2.1 were dependent upon the Twitter4J API, but with the release of Spring Social 1.0 GA, Spring Integration, as of version 2.1, now builds directly upon Spring Social’s Twitter support, instead of Twitter4J.
All Twitter endpoints require the configuration of a |
Spring Integration provides a convenient namespace configuration to define Twitter artifacts. You can enable it by adding the following within your XML header.
xmlns:int-twitter="http://www.springframework.org/schema/integration/twitter" xsi:schemaLocation="http://www.springframework.org/schema/integration/twitter http://www.springframework.org/schema/integration/twitter/spring-integration-twitter.xsd"
For authenticated operations, Twitter uses OAuth - an authentication protocol that allows users to approve an application to act on their behalf without sharing their password. More information can be found at http://oauth.net or in this article http://hueniverse.com/oauth from Hueniverse. Please also see OAuth FAQ for more information about OAuth and Twitter.
In order to use OAuth authentication/authorization with Twitter you must create a new Application on the Twitter Developers site. Follow the directions below to create a new application and obtain consumer keys and an access token:
- Go to http://dev.twitter.com
-
Click on the
Register an applink and fill out all required fields on the form provided; setApplication TypetoClientand depending on the nature of your application selectDefault Access Typeas Read & Write or Read-only and Submit the form. If everything is successful you’ll be presented with theConsumer KeyandConsumer Secret. Copy both values in a safe place. -
On the same page you should see a
My Access Tokenbutton on the side bar (right). Click on it and you’ll be presented with two more values:Access TokenandAccess Token Secret. Copy these values in a safe place as well.
As mentioned above, Spring Integration relies upon Spring Social, and that library provides an implementation of the template pattern, o.s.social.twitter.api.impl.TwitterTemplate to interact with Twitter.
For anonymous operations (e.g., search), you don’t have to define an instance of TwitterTemplate explicitly, since a default instance will be created and injected into the endpoint.
However, for authenticated operations (update status, send direct message, etc.), you must configure a TwitterTemplate as a bean and inject it explicitly into the endpoint, because the authentication configuration is required.
Below is a sample configuration of TwitterTemplate:
<bean id="twitterTemplate" class="o.s.social.twitter.api.impl.TwitterTemplate"> <constructor-arg value="4XzBPacJQxyBzzzH"/> <constructor-arg value="AbRxUAvyCtqQtvxFK8w5ZMtMj20KFhB6o"/> <constructor-arg value="21691649-4YZY5iJEOfz2A9qCFd9SjBRGb3HLmIm4HNE"/> <constructor-arg value="AbRxUAvyNCtqQtxFK8w5ZMtMj20KFhB6o"/> </bean>
| Note |
|---|---|
|
The values above are not real. |
As you can see from the configuration above, all we need to do is to provide OAuth `attributes` as constructor arguments. The values would be those you obtained in the previous step. The order of constructor arguments is: 1) `consumerKey`, 2) `consumerSecret`, 3) `accessToken`, and 4) `accessTokenSecret`.
A more practical way to manage OAuth connection attributes would be via Spring’s property placeholder support by simply creating a property file (e.g., oauth.properties):
twitter.oauth.consumerKey=4XzBPacJQxyBzzzH
twitter.oauth.consumerSecret=AbRxUAvyCtqQtvxFK8w5ZMtMj20KFhB6o
twitter.oauth.accessToken=21691649-4YZY5iJEOfz2A9qCFd9SjBRGb3HLmIm4HNE
twitter.oauth.accessTokenSecret=AbRxUAvyNCtqQtxFK8w5ZMtMj20KFhB6o
Then, you can configure a property-placeholder to point to the above property file:
<context:property-placeholder location="classpath:oauth.properties"/> <bean id="twitterTemplate" class="o.s.social.twitter.api.impl.TwitterTemplate"> <constructor-arg value="${twitter.oauth.consumerKey}"/> <constructor-arg value="${twitter.oauth.consumerSecret}"/> <constructor-arg value="${twitter.oauth.accessToken}"/> <constructor-arg value="${twitter.oauth.accessTokenSecret}"/> </bean>
Twitter inbound adapters allow you to receive Twitter Messages. There are several types of twitter messages, or tweets
Spring Integration version 2.0 and above provides support for receiving tweets as Timeline Updates, Direct Messages, Mention Messages as well as Search Results.
| Important |
|---|---|
|
Every Inbound Twitter Channel Adapter is a Polling Consumer which means you have to provide a poller configuration. Twitter defines a concept of Rate Limiting. You can read more about it here: Rate Limiting. In a nutshell, Rate Limiting is a mechanism that Twitter uses to manage how often an application can poll for updates. You should consider this when setting your poller intervals so that the adapter polls in compliance with the Twitter policies. With Spring Integration prior to version 3.0, a hard-coded limit within the adapters was used to ensure the polling interval could not be less than 15 seconds. This is no longer the case and the poller configuration is applied directly. |
Another issue that we need to worry about is handling duplicate Tweets.
The same adapter (e.g., Search or Timeline Update) while polling on Twitter may receive the same values more than once.
For example if you keep searching on Twitter with the same search criteria you’ll end up with the same set of tweets unless some other new tweet that matches your search criteria was posted in between your searches.
In that situation you’ll get all the tweets you had before plus the new one.
But what you really want is only the new tweet(s).
Spring Integration provides an elegant mechanism for handling these situations.
The latest Tweet id will be stored in an instance of the org.springframework.integration.metadata.MetadataStore strategy (e.g.
last retrieved tweet in this case).
For more information see Section 10.5, “Metadata Store”.
| Note |
|---|---|
|
The key used to persist the latest twitter id is the value of the (required) |
Prior to version 4.0, the page size was hard-coded to 20.
This is now configurable using the page-size attribute (defaults to 20).
This adapter allows you to receive updates from everyone you follow. It’s essentially the "Timeline Update" adapter.
<int-twitter:inbound-channel-adapter twitter-template="twitterTemplate" channel="inChannel"> <int:poller fixed-rate="5000" max-messages-per-poll="3"/> </int-twitter:inbound-channel-adapter>
This adapter allows you to receive Direct Messages that were sent to you from other Twitter users.
<int-twitter:dm-inbound-channel-adapter twitter-template="twiterTemplate" channel="inboundDmChannel"> <int-poller fixed-rate="5000" max-messages-per-poll="3"/> </int-twitter:dm-inbound-channel-adapter>
This adapter allows you to receive Twitter Messages that Mention you via @user syntax.
<int-twitter:mentions-inbound-channel-adapter twitter-template="twiterTemplate" channel="inboundMentionsChannel"> <int:poller fixed-rate="5000" max-messages-per-poll="3"/> </int-twitter:mentions-inbound-channel-adapter>
This adapter allows you to perform searches. As you can see it is not necessary to define twitter-template since a search can be performed anonymously, however you must define a search query.
<int-twitter:search-inbound-channel-adapter query="#springintegration" channel="inboundMentionsChannel"> <int:poller fixed-rate="5000" max-messages-per-poll="3"/> </int-twitter:search-inbound-channel-adapter>
Refer to https://dev.twitter.com/docs/using-search to learn more about Twitter queries.
As you can see the configuration of all of these adapters is very similar to other inbound adapters with one exception.
Some may need to be injected with the twitter-template.
Once received each Twitter Message would be encapsulated in a Spring Integration Message and sent to the channel specified by the channel attribute.
Currently the Payload type of any Message is org.springframework.integration.twitter.core.Tweet which is very similar to the object with the same name in Spring Social.
As we migrate to Spring Social we’ll be depending on their API and some of the artifacts that are currently in use will be obsolete, however we’ve already made sure that the impact of such migration is minimal by aligning our API with the current state (at the time of writing) of Spring Social.
To get the text from the org.springframework.social.twitter.api.Tweet simply invoke the getText() method.
Twitter outbound channel adapters allow you to send Twitter Messages, or tweets.
Spring Integration version 2.0 and above supports sending Status Update Messages and Direct Messages. Twitter outbound channel adapters will take the Message payload and send it as a Twitter message. Currently the only supported payload type is`String`, so consider adding a transformer if the payload of the incoming message is not a String.
This adapter allows you to send regular status updates by simply sending a Message to the channel identified by the channel attribute.
<int-twitter:outbound-channel-adapter twitter-template="twitterTemplate" channel="twitterChannel"/>
The only extra configuration that is required for this adapter is the `twitter-template` reference.
Starting with version 4.0 the <int-twitter:outbound-channel-adapter> supports a tweet-data-expression to populate the TweetData argument (Spring Social Twitter) using the message as the root object of the expression evaluation context.
The result can be a String, which will be used for the TweetData message; a Tweet object, the text of which will be used for the TweetData message; or an entire TweetData object.
For convenience, the TweetData can be built from the expression directly without needing a fully qualified class name:
<int-twitter:outbound-channel-adapter twitter-template="twitterTemplate" channel="twitterChannel" tweet-data-expression="new TweetData(payload).withMedia(headers.media).displayCoordinates(true)/>
This allows, for example, attaching an image to the tweet.
This adapter allows you to send Direct Twitter Messages (i.e., @user) by simply sending a Message to the channel identified by the channel attribute.
<int-twitter:dm-outbound-channel-adapter twitter-template="twitterTemplate" channel="twitterChannel"/>
The only extra configuration that is required for this adapter is the `twitter-template` reference.
When it comes to Twitter Direct Messages, you must specify who you are sending the message to - the target userid.
The Twitter Outbound Direct Message Channel Adapter will look for a target userid in the Message headers under the name twitter_dmTargetUserId which is also identified by the following constant: TwitterHeaders.DM_TARGET_USER_ID.
So when creating a Message all you need to do is add a value for that header.
Message message = MessageBuilder.withPayload("hello") .setHeader(TwitterHeaders.DM_TARGET_USER_ID, "z_oleg").build();
The above approach works well if you are creating the Message programmatically. However it’s more common to provide the header value within a messaging flow. The value can be provided by an upstream <header-enricher>.
<int:header-enricher input-channel="in" output-channel="out"> <int:header name="twitter_dmTargetUserId" value="z_oleg"/> </int:header-enricher>
It’s quite common that the value must be determined dynamically. For those cases you can take advantage of SpEL support within the <header-enricher>.
<int:header-enricher input-channel="in" output-channel="out"> <int:header name="twitter_dmTargetUserId" expression="@twitterIdService.lookup(headers.username)"/> </int:header-enricher>
| Important |
|---|---|
|
Twitter does not allow you to post duplicate Messages. This is a common problem during testing when the same code works the first time but does not work the second time. So, make sure to change the content of the Message each time. Another thing that works well for testing is to append a timestamp to the end of each message. |
In Spring Integration, an outbound gateway is used for two-way request/response communication with an external service.
The Twitter Search Outbound Gateway allows you to issue dynamic twitter searches.
The reply message payload is a collection of Tweet objects.
If the search returns no results, the payload is an empty collection.
You can limit the number of tweets and you can page through a larger set of tweets by making multiple calls.
To facilitate this, search reply messages contain a header twitter_searchMetadata with its value being a SearchMetadata object.
For more information on the Tweet, SearchParameters and SearchMetadata classes, refer to the Spring Social Twitter documentation.
Configuring the Outbound Gateway
<int-twitter:search-outbound-gateway id="twitter" request-channel="in"
|
The channel used to send search requests to this gateway. |
|
A reference to a |
|
A SpEL expression that evaluates to argument(s) for the search.
Default: "payload" - in which case the payload can be a |
|
The channel to which to send the reply; if omitted, the |
|
The timeout when sending the reply message to the reply channel; only applies if the reply channel can block, for example a bounded queue channel that is full. |
|
When subscribed to a publish/subscribe channel, the order in which this endpoint will be invoked. |
|
|
|
|
The WebFlux Spring Integration module (spring-integration-webflux) allows for the execution of HTTP requests and the processing of inbound HTTP requests in Reactive manner.
The WebFlux support consists of the following gateway implementations: WebFluxInboundEndpoint, WebFluxRequestExecutingMessageHandler.
The implementation is fully based on the Spring WebFlux and Project Reactor foundations.
Also see Chapter 18, HTTP Support for more information since many options are shared between reactive and regular HTTP components.
Starting with version 5.0, the WebFluxInboundEndpoint, WebHandler, implementation is provided.
This component is similar to the MVC-based HttpRequestHandlingEndpointSupport with which it shares some common options via the newly extracted BaseHttpInboundEndpoint.
Instead of MVC, it is used in the Spring WebFlux Reactive environment.
A simple sample for explanation:
@Configuration @EnableWebFlux @EnableIntegration public class ReactiveHttpConfiguration { @Bean public WebFluxInboundEndpoint simpleInboundEndpoint() { WebFluxInboundEndpoint endpoint = new WebFluxInboundEndpoint(); RequestMapping requestMapping = new RequestMapping(); requestMapping.setPathPatterns("/test"); endpoint.setRequestMapping(requestMapping); endpoint.setRequestChannelName("serviceChannel"); return endpoint; } @ServiceActivator(inputChannel = "serviceChannel") String service() { return "It works!"; } }
As can be seen, the configuration is similar to the HttpRequestHandlingEndpointSupport mentioned above, except that we use @EnableWebFlux to add the WebFlux infrastructure to our integration application.
Also, the WebFluxInboundEndpoint performs sendAndReceive operation to the downstream flow using back-pressure, on demand based capabilities, provided by the reactive HTTP server implementation.
| Note |
|---|---|
|
The reply part is non-blocking as well and based on the internal |
The WebFluxInboundEndpoint can be configured with a custom ServerCodecConfigurer, RequestedContentTypeResolver and even a ReactiveAdapterRegistry.
The latter provides a mechanism where we can return a reply as any reactive type - Reactor Flux, RxJava Observable, Flowable etc.
This way, we can simply implement Server Sent Events scenarios with Spring Integration components:
@Bean public IntegrationFlow sseFlow() { return IntegrationFlows .from(WebFlux.inboundGateway("/sse") .requestMapping(m -> m.produces(MediaType.TEXT_EVENT_STREAM_VALUE))) .handle((p, h) -> Flux.just("foo", "bar", "baz")) .get(); }
Also see Section 18.4.3, “Request Mapping Support” and Section 18.4.4, “Cross-Origin Resource Sharing (CORS) Support” for more possible configuration options.
The WebFluxRequestExecutingMessageHandler (starting with version 5.0) implementation is very similar to HttpRequestExecutingMessageHandler, using a WebClient from the Spring Framework WebFlux module.
To configure it, define a bean like this:
<bean id="httpReactiveOutbound" class="org.springframework.integration.webflux.outbound.WebFluxRequestExecutingMessageHandler"> <constructor-arg value="http://localhost:8080/example" /> <property name="outputChannel" ref="responseChannel" /> </bean>
You can configure a WebClient instance to use:
<beans:bean id="webClient" class="org.springframework.web.reactive.function.client.WebClient" factory-method="create"/> <bean id="httpReactiveOutbound" class="org.springframework.integration.webflux.outbound.WebFluxRequestExecutingMessageHandler"> <constructor-arg value="http://localhost:8080/example" /> <constructor-arg re="webClient" /> <property name="outputChannel" ref="responseChannel" /> </bean>
The WebClient exchange() operation returns a Mono<ClientResponse> which is mapped to the AbstractIntegrationMessageBuilder reactive support (using Mono.map()) as the output from the WebFluxRequestExecutingMessageHandler.
Together with the ReactiveChannel as an outputChannel, the Mono<ClientResponse> evaluation is deferred until a downstream subscription is made.
Otherwise, it is treated as an async mode and the Mono response is adapted to an SettableListenableFuture for an asynchronous reply from the WebFluxRequestExecutingMessageHandler.
Also see Section 18.3, “Http Outbound Components” for more possible configuration options.
Spring Integration provides a webflux namespace and the corresponding schema definition. To include it in your configuration, simply provide the following namespace declaration in your application context configuration file:
<?xml version="1.0" encoding="UTF-8"?> <beans xmlns="http://www.springframework.org/schema/beans" xmlns:xsi="http://www.w3.org/2001/XMLSchema-instance" xmlns:int="http://www.springframework.org/schema/integration" xmlns:int-webflux="http://www.springframework.org/schema/integration/webflux" xsi:schemaLocation=" http://www.springframework.org/schema/beans http://www.springframework.org/schema/beans/spring-beans.xsd http://www.springframework.org/schema/integration http://www.springframework.org/schema/integration/spring-integration.xsd http://www.springframework.org/schema/integration/webflux http://www.springframework.org/schema/integration/webflux/spring-integration-webflux.xsd"> ... </beans>
If you want to execute the http request in a reactive, non-blocking way, you can use the outbound-gateway or outbound-channel-adapter.
<int-webflux:outbound-gateway id="reactiveExample1" request-channel="requests" url="http://localhost/test" http-method-expression="headers.httpMethod" extract-request-payload="false" expected-response-type-expression="payload" charset="UTF-8" reply-timeout="1234" reply-channel="replies"/> <int-webflux:outbound-channel-adapter id="reactiveExample2" url="http://localhost/example" http-method="GET" channel="requests" charset="UTF-8" extract-payload="false" expected-response-type="java.lang.String" order="3" auto-startup="false"/>
Inbound Gateway Using Java Configuration.
@Bean public WebFluxInboundEndpoint jsonInboundEndpoint() { WebFluxInboundEndpoint endpoint = new WebFluxInboundEndpoint(); RequestMapping requestMapping = new RequestMapping(); requestMapping.setPathPatterns("/persons"); endpoint.setRequestMapping(requestMapping); endpoint.setRequestChannel(fluxResultChannel()); return endpoint; } @Bean public MessageChannel fluxResultChannel() { return new FluxMessageChannel(); } @ServiceActivator(inputChannel = "fluxResultChannel") Flux<Person> getPersons() { return Flux.just(new Person("Jane"), new Person("Jason"), new Person("John")); }
Inbound Gateway Using the Java DSL.
@Bean public IntegrationFlow inboundChannelAdapterFlow() { return IntegrationFlows .from(WebFlux.inboundChannelAdapter("/reactivePost") .requestMapping(m -> m.methods(HttpMethod.POST)) .requestPayloadType(ResolvableType.forClassWithGenerics(Flux.class, String.class)) .statusCodeFunction(m -> HttpStatus.ACCEPTED)) .channel(c -> c.queue("storeChannel")) .get(); }
Outbound Gateway Using Java Configuration.
@ServiceActivator(inputChannel = "reactiveHttpOutRequest") @Bean public WebFluxRequestExecutingMessageHandler reactiveOutbound(WebClient client) { WebFluxRequestExecutingMessageHandler handler = new WebFluxRequestExecutingMessageHandler("http://localhost:8080/foo", client); handler.setHttpMethod(HttpMethod.POST); handler.setExpectedResponseType(String.class); return handler; }
Outbound Gateway Using the Java DSL.
@Bean public IntegrationFlow outboundReactive() { return f -> f .handle(WebFlux.<MultiValueMap<String, String>>outboundGateway(m -> UriComponentsBuilder.fromUriString("http://localhost:8080/foo") .queryParams(m.getPayload()) .build() .toUri()) .httpMethod(HttpMethod.GET) .expectedResponseType(String.class)); }
Since WebFlux components are fully based on the HTTP protocol there is no difference in the HTTP headers mapping. See Section 18.8, “HTTP Header Mappings” for more possible options and components to use for mapping headers.
Starting with version 4.1 Spring Integration has introduced WebSocket support.
It is based on architecture, infrastructure and API from the Spring Framework’s web-socket module.
Therefore, many of Spring WebSocket’s components (e.g.
SubProtocolHandler or WebSocketClient) and configuration options (e.g.
@EnableWebSocketMessageBroker) can be reused within Spring Integration.
For more information, please, refer to the Spring Framework WebSocket Support chapter in the Spring Framework reference manual.
| Note |
|---|---|
|
Since the Spring Framework WebSocket infrastructure is based on the Spring Messaging foundation and provides a basic Messaging framework based on the same |
@MessagingGateway @Controller public interface WebSocketGateway { @MessageMapping("/greeting") @SendToUser("/queue/answer") @Gateway(requestChannel = "greetingChannel") String greeting(String payload); }
Since the WebSocket protocol is streaming by definition and we can send and receive messages to/from a WebSocket at the same time, we can simply deal with an appropriate WebSocketSession, regardless of being on the client or server side.
To encapsulate the connection management and WebSocketSession registry, the IntegrationWebSocketContainer is provided with ClientWebSocketContainer and ServerWebSocketContainer implementations.
Thanks to the WebSocket API and its implementation in the Spring Framework, with many extensions, the same classes are used on the server side as well as the client side (from a Java perspective, of course).
Hence most connection and WebSocketSession registry options are the same on both sides.
That allows us to reuse many configuration items and infrastructure hooks to build WebSocket applications on the server side as well as on the client side:
//Client side @Bean public WebSocketClient webSocketClient() { return new SockJsClient(Collections.singletonList(new WebSocketTransport(new JettyWebSocketClient()))); } @Bean public IntegrationWebSocketContainer clientWebSocketContainer() { return new ClientWebSocketContainer(webSocketClient(), "ws://my.server.com/endpoint"); } //Server side @Bean public IntegrationWebSocketContainer serverWebSocketContainer() { return new ServerWebSocketContainer("/endpoint").withSockJs(); }
The IntegrationWebSocketContainer is designed to achieve bidirectional messaging and can be shared between Inbound and Outbound Channel Adapters (see below), can be referenced only from one of them (when using one-way - sending or receiving - WebSocket messaging).
It can be used without any Channel Adapter, but in this case, IntegrationWebSocketContainer only plays a role as the WebSocketSession registry.
| Note |
|---|---|
|
The |
The WebSocketInboundChannelAdapter implements the receiving part of WebSocketSession interaction.
It must be supplied with a IntegrationWebSocketContainer, and the adapter registers itself as a WebSocketListener to handle incoming messages and WebSocketSession events.
| Note |
|---|---|
|
Only one |
For WebSocket _sub-protocol_s, the WebSocketInboundChannelAdapter can be configured with SubProtocolHandlerRegistry as the second constructor argument.
The adapter delegates to the SubProtocolHandlerRegistry to determine the appropriate SubProtocolHandler for the accepted WebSocketSession and to convert WebSocketMessage to a Message according to the sub-protocol implementation.
| Note |
|---|---|
|
By default, the |
The WebSocketInboundChannelAdapter accepts and sends to the underlying integration flow only Message s with SimpMessageType.MESSAGE or an empty simpMessageType header.
All other Message types are handled through the ApplicationEvent s emitted from a SubProtocolHandler implementation (e.g.
StompSubProtocolHandler).
On the server side WebSocketInboundChannelAdapter can be configured with the useBroker = true option, if the @EnableWebSocketMessageBroker configuration is present.
In this case all non-MESSAGE Message types are delegated to the provided AbstractBrokerMessageHandler.
In addition, if the Broker Relay is configured with destination prefixes, those Messages, which match to the Broker destinations, are routed to the AbstractBrokerMessageHandler, instead of to the outputChannel of the WebSocketInboundChannelAdapter.
If useBroker = false and received message is of SimpMessageType.CONNECT type, the WebSocketInboundChannelAdapter sends SimpMessageType.CONNECT_ACK message to the WebSocketSession immediately without sending it to the channel.
| Note |
|---|---|
|
Spring’s WebSocket Support allows the configuration of only one Broker Relay, hence we don’t require an |
For more configuration options see Section 35.5, “WebSockets Namespace Support”.
The WebSocketOutboundChannelAdapter accepts Spring Integration messages from its MessageChannel, determines the WebSocketSession id from the MessageHeaders, retrieves the WebSocketSession from the provided IntegrationWebSocketContainer and delegates the conversion and sending WebSocketMessage work to the appropriate SubProtocolHandler from the provided SubProtocolHandlerRegistry.
On the client side, the WebSocketSession id message header isn’t required, because ClientWebSocketContainer deals only with a single connection and its WebSocketSession respectively.
To use the STOMP sub-protocol, this adapter should be configured with a StompSubProtocolHandler.
Then you can send any STOMP message type to this adapter, using StompHeaderAccessor.create(StompCommand...) and a MessageBuilder, or just using a HeaderEnricher (see Section 7.2.2, “Header Enricher”).
For more configuration options see below.
Spring Integration WebSocket namespace includes several components described below. To include it in your configuration, simply provide the following namespace declaration in your application context configuration file:
<?xml version="1.0" encoding="UTF-8"?> <beans xmlns="http://www.springframework.org/schema/beans" xmlns:xsi="http://www.w3.org/2001/XMLSchema-instance" xmlns:int="http://www.springframework.org/schema/integration" xmlns:int-websocket="http://www.springframework.org/schema/integration/websocket" xsi:schemaLocation=" http://www.springframework.org/schema/beans http://www.springframework.org/schema/beans/spring-beans.xsd http://www.springframework.org/schema/integration http://www.springframework.org/schema/integration/spring-integration.xsd http://www.springframework.org/schema/integration/websocket http://www.springframework.org/schema/integration/websocket/spring-integration-websocket.xsd"> ... </beans>
<int-websocket:client-container>
<int-websocket:client-container id=""
|
The component bean name. |
|
The |
|
The |
|
Comma-separated values for the URI variable placeholders within the |
|
The |
|
The WebSocket session send timeout limit.
Defaults to |
|
The WebSocket session send message size limit.
Defaults to |
|
Boolean value indicating whether this endpoint should start automatically.
Defaults to |
|
The lifecycle phase within which this endpoint should start and stop.
The lower the value the earlier this endpoint will start and the later it will stop.
The default is |
|
A |
<int-websocket:server-container>
<int-websocket:server-container id=""
|
The component bean name. |
|
A path (or comma-separated paths) that maps a particular request to a |
|
The |
|
List of |
|
Configure one or more factories ( |
|
See the same option on the |
|
See the same option on the |
|
Configure allowed Origin header values. Multiple origins may be specified as a comma-separated list. This check is mostly designed for browser clients. There is noting preventing other types of client to modify the Origin header value. When SockJS is enabled and allowed origins are restricted, transport types that do not use Origin headers for cross origin requests (jsonp-polling, iframe-xhr-polling, iframe-eventsource and iframe-htmlfile) are disabled. As a consequence, IE6/IE7 are not supported and IE8/IE9 will only be supported without cookies. By default, all origins are allowed. |
|
Transports with no native cross-domain communication (e.g.
"eventsource", "htmlfile") must get a simple page from the "foreign" domain in an invisible iframe so that code in the iframe can run from a domain local to the SockJS server.
Since the iframe needs to load the SockJS javascript client library, this property allows specifying where to load it from.
By default this is set to point to |
|
Minimum number of bytes that can be send over a single HTTP streaming request before it will be closed.
Defaults to |
|
The "cookie_needed" value in the response from the SockJs |
|
The amount of time in milliseconds when the server has not sent any messages and after which the server should
send a heartbeat frame to the client in order to keep the connection from breaking.
The default value is |
|
The amount of time in milliseconds before a client is considered disconnected after not having a receiving
connection, i.e.
an active connection over which the server can send data to the client.
The default value is |
|
The number of server-to-client messages that a session can cache while waiting for the next HTTP polling request
from the client.
The default size is |
|
Some load balancers don’t support websockets.
Set this option to |
|
The | |
|
The | |
|
List of | |
|
The option to disable automatic addition of CORS headers for SockJS requests.
The default value is |
<int-websocket:outbound-channel-adapter>
<int-websocket:outbound-channel-adapter id=""
|
The component bean name.
If the |
|
Identifies the channel attached to this adapter. |
|
The reference to the |
|
Optional reference to a |
|
List of |
|
List of |
|
Flag to indicate if the default converters should be registered after any custom converters.
This flag is used only if |
|
Boolean value indicating whether this endpoint should start automatically.
Default to |
|
The lifecycle phase within which this endpoint should start and stop.
The lower the value the earlier this endpoint will start and the later it will stop.
The default is |
<int-websocket:inbound-channel-adapter>
<int-websocket:inbound-channel-adapter id=""
|
The component bean name.
If the |
|
Identifies the channel attached to this adapter. |
|
The |
|
See the same option on the |
|
See the same option on the |
|
See the same option on the |
|
See the same option on the |
|
See the same option on the |
|
Maximum amount of time in milliseconds to wait when sending a message to the channel if the channel may block.
For example, a |
|
Fully qualified name of the java type for the target |
|
Flag to indicate if this adapter will send |
|
See the same option on the |
|
See the same option on the |
Starting with version 4.3.13, the ClientStompEncoder is provided as an extension of standard StompEncoder for using on client side of the WebSocket Channel Adapters.
An instance of the ClientStompEncoder must be injected into the StompSubProtocolHandler for proper client side message preparation.
One of the problem of the default StompSubProtocolHandler that it was designed for the server side, so it updates the SEND stompCommand header into MESSAGE as it must be by the STOMP protocol from server side.
If client doesn’t send its messages in the proper SEND web socket frame, some STOMP brokers won’t accept them.
The purpose of the ClientStompEncoder, in this case, is to override stompCommand header to the SEND value before encoding the message to the byte[].
To invoke a Web Service upon sending a message to a channel, there are two options - both of which build upon the Spring Web Services project: SimpleWebServiceOutboundGateway and MarshallingWebServiceOutboundGateway.
The former will accept either a String or javax.xml.transform.Source as the message payload.
The latter provides support for any implementation of the Marshaller and Unmarshaller interfaces.
Both require a Spring Web Services DestinationProvider for determining the URI of the Web Service to be called.
simpleGateway = new SimpleWebServiceOutboundGateway(destinationProvider); marshallingGateway = new MarshallingWebServiceOutboundGateway(destinationProvider, marshaller);
| Note |
|---|---|
|
When using the namespace support described below, you will only need to set a URI.
Internally, the parser will configure a fixed URI |
Starting with version 5.0 the SimpleWebServiceOutboundGateway and MarshallingWebServiceOutboundGateway can be supplied with an external WebServiceTemplate instance, which may be configured for any custom properties, including checkConnectionForFault allowing your application to deal with non-conforming services.
For more detail on the inner workings, see the Spring Web Services reference guide’s chapter covering client access as well as the chapter covering Object/XML mapping.
To send a message to a channel upon receiving a Web Service invocation, there are two options again: SimpleWebServiceInboundGateway and MarshallingWebServiceInboundGateway.
The former will extract a javax.xml.transform.Source from the WebServiceMessage and set it as the message payload.
The latter provides support for implementation of the Marshaller and Unmarshaller interfaces.
If the incoming web service message is a SOAP message the SOAP Action header will be added to the headers of the`Message` that is forwarded onto the request channel.
simpleGateway = new SimpleWebServiceInboundGateway(); simpleGateway.setRequestChannel(forwardOntoThisChannel); simpleGateway.setReplyChannel(listenForResponseHere); //Optional marshallingGateway = new MarshallingWebServiceInboundGateway(marshaller); //set request and optionally reply channel
Both gateways implement the Spring Web Services MessageEndpoint interface, so they can be configured with a MessageDispatcherServlet as per standard Spring Web Services configuration.
For more detail on how to use these components, see the Spring Web Services reference guide’s chapter covering creating a Web Service. The chapter covering Object/XML mapping is also applicable again.
To include the SimpleWebServiceInboundGateway and MarshallingWebServiceInboundGateway configurations to the Spring WS
infrastructure you should add the EndpointMapping definition between MessageDispatcherServlet and the target
MessageEndpoint implementations like you do that with normal Spring WS application.
For this purpose (from Spring Integration perspective), the Spring WS provides these convenient EndpointMapping
implementations:
-
o.s.ws.server.endpoint.mapping.UriEndpointMapping -
o.s.ws.server.endpoint.mapping.PayloadRootQNameEndpointMapping -
o.s.ws.soap.server.endpoint.mapping.SoapActionEndpointMapping -
o.s.ws.server.endpoint.mapping.XPathPayloadEndpointMapping
The beans for these classes must be specified in the application context referencing to the
SimpleWebServiceInboundGateway and/or MarshallingWebServiceInboundGateway bean definitions according to the WS
mapping algorithm.
Please, refer to the Endpoint mappings for the more information.
To configure an outbound Web Service Gateway, use the "outbound-gateway" element from the "ws" namespace:
<int-ws:outbound-gateway id="simpleGateway" request-channel="inputChannel" uri="http://example.org"/>
| Note |
|---|---|
|
Notice that this example does not provide a reply-channel.
If the Web Service were to return a non-empty response, the Message containing that response would be sent to the reply
channel provided in the request Message’s |
| Tip |
|---|---|
|
When invoking a Web Service that returns an empty response after using a String payload for the request Message, no reply Message will be sent by default. Therefore you don’t need to set a reply-channel or have a REPLY_CHANNEL header in the request Message. If for any reason you actually do want to receive the empty response as a Message, then provide the ignore-empty-responses attribute with a value of false (this only applies for Strings, because using a Source or Document object simply leads to a NULL response and will therefore never generate a reply Message). |
To set up an inbound Web Service Gateway, use the "inbound-gateway":
<int-ws:inbound-gateway id="simpleGateway" request-channel="inputChannel"/>
To use Spring OXM Marshallers and/or Unmarshallers, provide bean references. For outbound:
<int-ws:outbound-gateway id="marshallingGateway" request-channel="requestChannel" uri="http://example.org" marshaller="someMarshaller" unmarshaller="someUnmarshaller"/>
And for inbound:
<int-ws:inbound-gateway id="marshallingGateway" request-channel="requestChannel" marshaller="someMarshaller" unmarshaller="someUnmarshaller"/>
| Note |
|---|---|
|
Most |
For either outbound gateway type, a "destination-provider" attribute can be specified instead of the "uri" (exactly one of them is required). You can then reference any Spring Web Services DestinationProvider implementation (e.g. to lookup the URI at runtime from a registry).
For either outbound gateway type, the "message-factory" attribute can also be configured with a reference to any Spring Web Services WebServiceMessageFactory implementation.
For the simple inbound gateway type, the "extract-payload" attribute can be set to false to forward the entire WebServiceMessage instead of just its payload as a Message to the request channel.
This might be useful, for example, when a custom Transformer works against the WebServiceMessage directly.
Starting with version 5.0 the web-service-template reference attribute is presented for the injection of a WebServiceTemplate with any possible custom properties.
For all URI-schemes supported by Spring Web Services (URIs and Transports) <uri-variable/> substitution is provided:
<ws:outbound-gateway id="gateway" request-channel="input" uri="http://springsource.org/{foo}-{bar}"> <ws:uri-variable name="foo" expression="payload.substring(1,7)"/> <ws:uri-variable name="bar" expression="headers.x"/> </ws:outbound-gateway> <ws:outbound-gateway request-channel="inputJms" uri="jms:{destination}?deliveryMode={deliveryMode}&priority={priority}" message-sender="jmsMessageSender"> <ws:uri-variable name="destination" expression="headers.jmsQueue"/> <ws:uri-variable name="deliveryMode" expression="headers.deliveryMode"/> <ws:uri-variable name="priority" expression="headers.jms_priority"/> </ws:outbound-gateway>
If a DestinationProvider is supplied, variable substitution is not supported and a configuration error will result if variables are provided.
Controlling URI Encoding
By default, the URL string is encoded (see UriComponentsBuilder) to the URI object before sending the request.
In some scenarios with a non-standard URI it is undesirable to perform the encoding.
Since version 4.1 the <ws:outbound-gateway/> provides an encode-uri attribute.
To disable encoding the URL, this attribute should be set to false (by default it is true).
If you wish to partially encode some of the URL, this can be achieved using an expression within a <uri-variable/>:
<ws:outbound-gateway url="http://somehost/%2f/fooApps?bar={param}" encode-uri="false"> <http:uri-variable name="param" expression="T(org.apache.commons.httpclient.util.URIUtil) .encodeWithinQuery('Hello World!')"/> </ws:outbound-gateway>
Note, encode-uri is ignored, if DestinationProvider is supplied.
The Spring Integration WebService Gateways will map the SOAP Action header automatically.
It will be copied by default to and from Spring Integration MessageHeaders using the
DefaultSoapHeaderMapper.
Of course, you can pass in your own implementation of SOAP specific header mappers, as the gateways have respective properties to support that.
Any user-defined SOAP headers will NOT
be copied to or from a SOAP Message, unless explicitly specified by the requestHeaderNames and/or
replyHeaderNames properties of the DefaultSoapHeaderMapper.
When using the XML namespace for configuration, these properties can be set using the mapped-request-headers and
mapped-reply-headers, or a custom mapper can be provided using the header-mapper attribute.
| Tip |
|---|---|
|
When mapping user-defined headers, the values can also contain simple wildcard patterns (e.g. "foo*" or "*foo") to be matched.
For example, if you need to copy all user-defined headers simply use the wildcard character |
Starting with version 4.1, the AbstractHeaderMapper (a DefaultSoapHeaderMapper superclass) allows the
NON_STANDARD_HEADERS token to be configured for the requestHeaderNames and/or replyHeaderNames
properties (in addition to existing STANDARD_REQUEST_HEADERS and STANDARD_REPLY_HEADERS) to map all
user-defined headers.
Note, it is recommended to use the combination like this STANDARD_REPLY_HEADERS, NON_STANDARD_HEADERS instead of a
*, to avoid mapping of request headers to the reply.
Starting with version 4.3, patterns in the header mappings can be negated by preceding the pattern with !.
Negated patterns get priority, so a list such as
STANDARD_REQUEST_HEADERS,foo,ba*,!bar,!baz,qux,!foo will NOT map foo
(nor bar nor baz); the standard headers plus bad, qux will be mapped.
| Important |
|---|---|
|
If you have a user defined header that begins with |
Inbound SOAP headers (request headers for the inbound gateway, reply-headers for the outbound gateway) are mapped as
SoapHeaderElement objects.
The contents can be explored by accessing the Source:
<soapenv:Envelope xmlns:soapenv="http://schemas.xmlsoap.org/soap/envelope/"> <soapenv:Header> <auth> <username>user</username> <password>pass</password> </auth> <bar>BAR</bar> <baz>BAZ</baz> <qux>qux</qux> </soapenv:Header> <soapenv:Body> ... </soapenv:Body> </soapenv:Envelope>
If mapped-request-headers is "auth, ba*", the auth, bar and baz headers are mapped but qux is not.
... SoapHeaderElement header = (SoapHeaderElement) headers.get("auth"); DOMSource source = (DOMSource) header.getSource(); NodeList nodeList = source.getNode().getChildNodes(); assertEquals("username", nodeList.item(0).getNodeName()); assertEquals("user", nodeList.item(0).getFirstChild().getNodeValue()); ...
Starting with version 5.0, the DefaultSoapHeaderMapper supports user-defined headers of type javax.xml.transform.Source and populates them as child nodes of the <soapenv:Header>:
Map<String, Object> headers = new HashMap<>(); String authXml = "<auth xmlns='http://test.auth.org'>" + "<username>user</username>" + "<password>pass</password>" + "</auth>"; headers.put("auth", new StringSource(authXml)); ... DefaultSoapHeaderMapper mapper = new DefaultSoapHeaderMapper(); mapper.setRequestHeaderNames("auth");
And in the end we have SOAP envelope as:
<soapenv:Envelope xmlns:soapenv="http://schemas.xmlsoap.org/soap/envelope/"> <soapenv:Header> <auth xmlns="http://test.auth.org"> <username>user</username> <password>pass</password> </auth> </soapenv:Header> <soapenv:Body> ... </soapenv:Body> </soapenv:Envelope>
The Marshalling Inbound and Outbound WebService Gateways support attachments directly via built-in functionality of the marshaller, e.g. Jaxb2Marshaller provides the mtomEnabled option.
Starting with version 5.0, the Simple WebService Gateways can operate with inbound and outbound MimeMessage s directly, which have an API to manipulate attachments.
When you need to send WebService message with attachments (either a reply from a server, or a client request) you should use the WebServiceMessageFactory directly and send a WebServiceMessage with attachments as a payload to the request or reply channel of the gateway:
WebServiceMessageFactory messageFactory = new SaajSoapMessageFactory(MessageFactory.newInstance()); MimeMessage webServiceMessage = (MimeMessage) messageFactory.createWebServiceMessage(); String request = "<test>foo</test>"; TransformerFactory transformerFactory = TransformerFactory.newInstance(); Transformer transformer = transformerFactory.newTransformer(); transformer.transform(new StringSource(request), webServiceMessage.getPayloadResult()); webServiceMessage.addAttachment("myAttachment", new ByteArrayResource("my_data".getBytes()), "plain/text"); this.webServiceChannel.send(new GenericMessage<>(webServiceMessage));
Spring Integration’s XML support extends the core of Spring Integration with the following components:
These components are designed to make working with XML messages in Spring Integration simple.
The provided messaging components are designed to work with XML represented in a range of formats including instances of java.lang.String, org.w3c.dom.Document and javax.xml.transform.Source.
It should be noted however that where a DOM representation is required, for example in order to evaluate an XPath expression, the String payload will be converted into the required type and then converted back again to String.
Components that require an instance of DocumentBuilder will create a namespace-aware instance if one is not provided.
In cases where you require greater control over document creation, you can provide an appropriately configured instance of DocumentBuilder.
All components within the Spring Integration XML module provide namespace support. In order to enable namespace support, you need to import the respective schema for the Spring Integration XML Module. A typical setup is shown below:
<?xml version="1.0" encoding="UTF-8"?> <beans xmlns="http://www.springframework.org/schema/beans" xmlns:xsi="http://www.w3.org/2001/XMLSchema-instance" xmlns:int="http://www.springframework.org/schema/integration" xmlns:int-xml="http://www.springframework.org/schema/integration/xml" xsi:schemaLocation="http://www.springframework.org/schema/beans http://www.springframework.org/schema/beans/spring-beans.xsd http://www.springframework.org/schema/integration http://www.springframework.org/schema/integration/spring-integration.xsd http://www.springframework.org/schema/integration/xml http://www.springframework.org/schema/integration/xml/spring-integration-xml.xsd"> </beans>
Many of the components within the Spring Integration XML module work with XPath Expressions.
Each of those components will either reference an XPath Expression that has been defined as top-level element or via a nested <xpath-expression/> element.
All forms of XPath expressions result in the creation of an XPathExpression using the Spring org.springframework.xml.xpath.XPathExpressionFactory.
When creating XPath expressions, the best XPath implementation that is available on the classpath is being used, either JAXP 1.3+ or Jaxen, whereby JAXP is preferred.
| Note |
|---|---|
|
Spring Integration under the covers uses the XPath functionality as provided by the Spring Web Services project (http://www.spring.io/spring-ws). Specifically, Spring Web Services' XML module (spring-xml-x.x.x.jar) is being used. Therefore, for a deeper understanding, please refer to the respective documentation as well at: http://docs.spring.io/spring-ws/docs/current/reference/html/common.html#xpath |
Here is an overview of all available configuration parameters of the xpath-expression element:
<int-xml:xpath-expression expression=""
|
Defines an XPath expression. Required. |
|
The Identifier of the underlying bean definition. Will be an instance of `org.springframework.xml.xpath.XPathExpression`Optional. |
|
Reference to a map containing namespaces.
The key of the map defines the namespace prefix and the value of the map sets the namespace URI.
It is not valid to specify both this attribute and the |
|
Allows you to set the namespace prefix directly as and attribute on the XPath expression element.
If you set |
|
Allows you to set the namespace URI directly as an attribute on the XPath expression element.
If you set |
|
Defines a map containing namespaces. Only one map child element is allowed. The key of the map defines the namespace prefix and the value of the map sets the namespace URI. |
It is not valid to specify both this sub-element and the map attribute, or setting the ns-prefix and ns-uri attributes.
Optional.
For the XPath Expression Element, namespace information can be optionally provided as configuration parameters. As such, namespaces can be defined using one of the following 3 choices:
-
Reference a map using the
namespace-mapattribute -
Provide a map of namespaces using the
mapsub-element -
Specifying the
ns-prefixand thens-uriattribute
All three options are mutually exclusive. Only one option can be set.
Below, please find several different usage examples on how to use XPath expressions using the XML namespace support including the various option for setting the XML namespaces as discussed above.
<int-xml:xpath-filter id="filterReferencingXPathExpression" xpath-expression-ref="refToXpathExpression"/> <int-xml:xpath-expression id="refToXpathExpression" expression="/name"/> <int-xml:xpath-filter id="filterWithoutNamespace"> <int-xml:xpath-expression expression="/name"/> </int-xml:xpath-filter> <int-xml:xpath-filter id="filterWithOneNamespace"> <int-xml:xpath-expression expression="/ns1:name" ns-prefix="ns1" ns-uri="www.example.org"/> </int-xml:xpath-filter> <int-xml:xpath-filter id="filterWithTwoNamespaces"> <int-xml:xpath-expression expression="/ns1:name/ns2:type"> <map> <entry key="ns1" value="www.example.org/one"/> <entry key="ns2" value="www.example.org/two"/> </map> </int-xml:xpath-expression> </int-xml:xpath-filter> <int-xml:xpath-filter id="filterWithNamespaceMapReference"> <int-xml:xpath-expression expression="/ns1:name/ns2:type" namespace-map="defaultNamespaces"/> </int-xml:xpath-filter> <util:map id="defaultNamespaces"> <util:entry key="ns1" value="www.example.org/one"/> <util:entry key="ns2" value="www.example.org/two"/> </util:map>
When working with default namespaces, you may run into situations that behave differently than originally expected. Let’s assume we have the following XML document:
<?xml version="1.0" encoding="UTF-8"?> <order> <orderItem> <isbn>0321200683</isbn> <quantity>2</quantity> </orderItem> <orderItem> <isbn>1590596439</isbn> <quantity>1</quantity> </orderItem> </order>
This document is not declaring any namespace. Therefore, applying the following XPath Expression will work as expected:
<int-xml:xpath-expression expression="/order/orderItem" />
You might expect that the same expression will also work for the following XML file. It looks exactly the same as the previous example but in addition it also declares a default namespace:
<?xml version="1.0" encoding="UTF-8"?> <order xmlns="http://www.example.org/orders"> <orderItem> <isbn>0321200683</isbn> <quantity>2</quantity> </orderItem> <orderItem> <isbn>1590596439</isbn> <quantity>1</quantity> </orderItem> </order>
However, the XPath Expression used previously will fail in this case.
In order to solve this issue, you must provide a namespace prefix and a namespace URI using either the ns-prefix and ns-uri attribute or by providing a namespace-map attribute instead. The namespace URI must match the namespace declared in your XML document, which in this example is http://www.example.org/orders.
The namespace prefix, however, can be arbitrarily chosen. In fact, just providing an empty String will actually work (Null is not allowed). In the case of a namespace prefix consisting of an empty String, your Xpath Expression will use a colon (":") to indicate the default namespace. If you leave the colon off, the XPath expression will not match. The following XPath Expression will match against the XML document above:
<int-xml:xpath-expression expression="/:order/:orderItem" ns-prefix="" ns-uri="http://www.example.org/prodcuts"/>
Of course you can also provide any other arbitrarily chosen namespace prefix. The following XPath expression using the myorder namespace prefix will match also:
<int-xml:xpath-expression expression="/myorder:order/myorder:orderItem" ns-prefix="myorder" ns-uri="http://www.example.org/prodcuts"/>
It is important to remember that the namespace URI is the really important piece of information to declare, not the prefix itself. The Jaxen FAQ summarizes the point very well:
In XPath 1.0, all unprefixed names are unqualified. There is no requirement that the prefixes used in the XPath expression are the same as the prefixes used in the document being queried. Only the namespace URIs need to match, not the prefixes.
This section will explain the workings of the following transformers and how to configure them as beans:
All of the provided XML transformers extend AbstractTransformer or AbstractPayloadTransformer and therefore implement Transformer. When configuring XML transformers as beans in Spring Integration, you would normally configure the Transformer in conjunction with a MessageTransformingHandler. This allows the transformer to be used as an Endpoint. Finally, the namespace support will be discussed, which allows for the simple configuration of the transformers as elements in XML.
An UnmarshallingTransformer allows an XML Source to be unmarshalled using implementations of the Spring OXM Unmarshaller.
Spring’s Object/XML Mapping support provides several implementations supporting marshalling and unmarshalling using JAXB, Castor and JiBX amongst others.
The unmarshaller requires an instance of Source.
If the message payload is not an instance of Source, conversion will be attempted.
Currently String, File and org.w3c.dom.Document payloads are supported.
Custom conversion to a Source is also supported by injecting an implementation of a SourceFactory.
| Note |
|---|---|
|
If a |
Starting with version 5.0, the UnmarshallingTransformer also supports an org.springframework.ws.mime.MimeMessage as the incoming payload.
This can be useful in scenarios when we receive a raw WebServiceMessage via SOAP with MTOM attachments.
See Section 36.6, “MTOM Support” for more information.
<bean id="unmarshallingTransformer" class="o.s.i.xml.transformer.UnmarshallingTransformer"> <constructor-arg> <bean class="org.springframework.oxm.jaxb.Jaxb2Marshaller"> <property name="contextPath" value="org.example" /> </bean> </constructor-arg> </bean>
The MarshallingTransformer allows an object graph to be converted into XML using a Spring OXM Marshaller.
By default the MarshallingTransformer will return a DomResult.
However, the type of result can be controlled by configuring an alternative ResultFactory such as StringResultFactory.
In many cases it will be more convenient to transform the payload into an alternative XML format.
To achieve this, configure a ResultTransformer.
Two implementations are provided, one which converts to String and another which converts to Document.
<bean id="marshallingTransformer" class="o.s.i.xml.transformer.MarshallingTransformer"> <constructor-arg> <bean class="org.springframework.oxm.jaxb.Jaxb2Marshaller"> <property name="contextPath" value="org.example"/> </bean> </constructor-arg> <constructor-arg> <bean class="o.s.i.xml.transformer.ResultToDocumentTransformer"/> </constructor-arg> </bean>
By default, the MarshallingTransformer will pass the payload Object to the Marshaller, but if its boolean extractPayload property is set to false, the entire Message instance will be passed to the Marshaller instead.
That may be useful for certain custom implementations of the Marshaller interface, but typically the payload is the appropriate source Object for marshalling when delegating to any of the various out-of-the-box Marshaller implementations.
XsltPayloadTransformer transforms XML payloads using Extensible Stylesheet Language Transformations (XSLT).
The transformer’s constructor requires an instance of either Resource or Templates to be passed in.
Passing in a Templates instance allows for greater configuration of the TransformerFactory used to create the template instance.
As with the UnmarshallingTransformer, the XsltPayloadTransformer will do the actual XSLT transformation using instances of Source.
Therefore, if the message payload is not an instance of Source, conversion will be attempted.
String and Document payloads are supported directly.
Custom conversion to a Source is also supported by injecting an implementation of a SourceFactory.
| Note |
|---|---|
|
If a |
By default, the XsltPayloadTransformer will create a message with a Result payload, similar to the XmlPayloadMarshallingTransformer.
This can be customised by providing a ResultFactory and/or a ResultTransformer.
<bean id="xsltPayloadTransformer" class="o.s.i.xml.transformer.XsltPayloadTransformer"> <constructor-arg value="classpath:org/example/xsl/transform.xsl"/> <constructor-arg> <bean class="o.s.i.xml.transformer.ResultToDocumentTransformer"/> </constructor-arg> </bean>
Starting with Spring Integration 3.0, you can now specify the transformer factory class name using a constructor argument.
This is configured using the transformer-factory-class attribute when using the namespace.
Both the MarshallingTransformer and the XsltPayloadTransformer allow you to specify a ResultTransformer.
Thus, if the Marshalling or XSLT transformation returns a Result, than you have the option to also use a ResultTransformer to transform the Result into another format.
Spring Integration provides 2 concrete`ResultTransformer` implementations:
Using ResultTransformers with the MarshallingTransformer
By default, the MarshallingTransformer will always return a Result.
By specifying a ResultTransformer, you can customize the type of payload returned.
Using ResultTransformers with the XsltPayloadTransformer
The behavior is slighly more complex for the XsltPayloadTransformer.
By default, if the input payload is an instance of String or Document the resultTransformer property is ignored.
However, if the input payload is a Source or any other type, then the resultTransformer property is applied.
Additionally, you can set the property alwaysUseResultFactory to true, which will also cause the specified resultTransformer to being used.
For more information and examples, please see Section 37.3.3, “Namespace Configuration and ResultTransformers”
Namespace support for all XML transformers is provided in the Spring Integration XML namespace, a template for which can be seen below.
The namespace support for transformers creates an instance of either`EventDrivenConsumer` or PollingConsumer according to the type of the provided input channel.
The namespace support is designed to reduce the amount of XML configuration by allowing the creation of an endpoint and transformer using one element.
UnmarshallingTransformer
The namespace support for the UnmarshallingTransformer is shown below.
Since the namespace is now creating an endpoint instance rather than a transformer, a poller can also be nested within the element to control the polling of the input channel.
<int-xml:unmarshalling-transformer id="defaultUnmarshaller" input-channel="input" output-channel="output" unmarshaller="unmarshaller"/> <int-xml:unmarshalling-transformer id="unmarshallerWithPoller" input-channel="input" output-channel="output" unmarshaller="unmarshaller"> <int:poller fixed-rate="2000"/> <int-xml:unmarshalling-transformer/>
MarshallingTransformer
The namespace support for the marshalling transformer requires an input-channel, output-channel and a reference to a marshaller.
The optional result-type attribute can be used to control the type of result created.
Valid values are StringResult or DomResult (the default).
<int-xml:marshalling-transformer input-channel="marshallingTransformerStringResultFactory" output-channel="output" marshaller="marshaller" result-type="StringResult" /> <int-xml:marshalling-transformer input-channel="marshallingTransformerWithResultTransformer" output-channel="output" marshaller="marshaller" result-transformer="resultTransformer" /> <bean id="resultTransformer" class="o.s.i.xml.transformer.ResultToStringTransformer"/>
Where the provided result types are not sufficient, a reference to a custom implementation of ResultFactory can be provided as an alternative to setting the result-type attribute, using the result-factory attribute.
The attributes result-type and result-factory are mutually exclusive.
| Note |
|---|---|
|
Internally, the result types |
XsltPayloadTransformer
Namespace support for the XsltPayloadTransformer allows you to either pass in a Resource, in order to create the Templates instance, or alternatively, you can pass in a precreated Templates instance as a reference.
In common with the marshalling transformer, the type of the result output can be controlled by specifying either the result-factory or result-type attribute.
A result-transformer attribute can also be used to reference an implementation of ResultTransformer where conversion of the result is required before sending.
| Important |
|---|---|
|
If you specify the |
<int-xml:xslt-transformer id="xsltTransformerWithResource" input-channel="withResourceIn" output-channel="output" xsl-resource="org/springframework/integration/xml/config/test.xsl"/> <int-xml:xslt-transformer id="xsltTransformerWithTemplatesAndResultTransformer" input-channel="withTemplatesAndResultTransformerIn" output-channel="output" xsl-templates="templates" result-transformer="resultTransformer"/>
Often you may need to have access to Message data, such as the Message Headers, in order to assist with transformation.
For example, you may need to get access to certain Message Headers and pass them on as parameters to a transformer (e.g., transformer.setParameter(..)).
Spring Integration provides two convenient ways to accomplish this, as illustrated in following example:
<int-xml:xslt-transformer id="paramHeadersCombo" input-channel="paramHeadersComboChannel" output-channel="output" xsl-resource="classpath:transformer.xslt" xslt-param-headers="testP*, *foo, bar, baz"> <int-xml:xslt-param name="helloParameter" value="hello"/> <int-xml:xslt-param name="firstName" expression="headers.fname"/> </int-xml:xslt-transformer>
If message header names match 1:1 to parameter names, you can simply use xslt-param-headers attribute.
There you can also use wildcards for simple pattern matching, which supports the following simple pattern styles: "xxx*", "xxx", "*xxx" and "xxx*yyy".
You can also configure individual Xslt parameters via the <xslt-param/> sub element.
There you can use either the expression or value attribute.
The expression attribute should be any valid SpEL expression with Message being the root object of the expression evaluation context.
The value attribute, just like any value in Spring beans, allows you to specify simple scalar values.
You can also use property placeholders (e.g., ${some.value}).
So as you can see, with the expression and value attribute, Xslt parameters could now be mapped to any accessible part of the Message as well as any literal value.
Starting with Spring Integration 3.0, you can now specify the transformer factory class name using the transformer-factory-class attribute.
The usage of ResultTransformers was previously introduced in the section called “ResultTransformers”.
The following example illustrates several special use-cases using XML namespace configuration.
First, we define the ResultTransformer:
<beans:bean id="resultToDoc" class="o.s.i.xml.transformer.ResultToDocumentTransformer"/>
This ResultTransformer will accept either a StringResult or a DOMResult as input and converts the input into a Document.
Now, let’s declare the transformer:
<int-xml:xslt-transformer input-channel="in" output-channel="fahrenheitChannel" xsl-resource="classpath:noop.xslt" result-transformer="resultToDoc"/>
If the incoming message’s payload is of type Source, then as first step the Result is determined using the ResultFactory.
As we did not specify a ResultFactory, the default DomResultFactory is used, meaning that the transformation will yield a DomResult.
However, as we specified a ResultTransformer, it will be used and the resulting Message payload will be of type`Document`.
| Important |
|---|---|
|
If the incoming message’s payload is of type |
If the message payload is neither a Source, String or Document, as a fallback option, it is attempted to create a`Source` using the default SourceFactory.
As we did not specify a SourceFactory explicitly using the source-factory attribute, the default DomSourceFactory is used.
If successful, the XSLT transformation is executed as if the payload was of type Source, which we described in the previous paragraphs.
| Note |
|---|---|
|
The |
The next transformer declaration adds a result-type attribute using StringResult as its value.
First, the result-type is internally represented by the StringResultFactory.
Thus, you could have also added a reference to a StringResultFactory, using the result-factory attribute, which would haven been the same.
<int-xml:xslt-transformer input-channel="in" output-channel="fahrenheitChannel" xsl-resource="classpath:noop.xslt" result-transformer="resultToDoc" result-type="StringResult"/>
Because we are using a ResultFactory, the alwaysUseResultFactory property of the XsltPayloadTransformer class will be implicitly set to true.
Consequently, the referenced ResultToDocumentTransformer will be used.
Therefore, if you transform a payload of type String, the resulting payload will be of type Document.
XsltPayloadTransformer and <xsl:output method="text"/>
<xsl:output method="text"/> tells the XSLT template to only produce text content from the input source.
In this particular case there is no reason to have a DomResult.
Therefore, the XsltPayloadTransformer defaults to StringResult if the output property called method of the underlying javax.xml.transform.Transformer returns "text".
This coercion is performed independent from the inbound payload type.
Keep in mind that this [quote]
smart behavior is only available, if the result-type or result-factory attributes aren’t provided for the respective <int-xml:xslt-transformer> component.
When it comes to message transformation XPath is a great way to transform Messages that have XML payloads by defining XPath transformers via <xpath-transformer/> element.
Simple XPath transformation
Let’s look at the following transformer configuration:
<int-xml:xpath-transformer input-channel="inputChannel" output-channel="outputChannel" xpath-expression="/person/@name" />
...and Message
Message<?> message =
MessageBuilder.withPayload("<person name='John Doe' age='42' married='true'/>").build();
After sending this message to the inputChannel the XPath transformer configured above will transform this XML Message to a simple Message with payload of John Doe all based on the simple XPath Expression specified in the xpath-expression attribute.
XPath also has the capability to perform simple conversion of extracted elements to a desired type.
Valid return types are defined in javax.xml.xpath.XPathConstants and follows the conversion rules specified by the javax.xml.xpath.XPath interface.
The following constants are defined by the XPathConstants class: BOOLEAN, DOM_OBJECT_MODEL, NODE, NODESET, NUMBER, STRING
You can configure the desired type by simply using the evaluation-type attribute of the <xpath-transformer/> element.
<int-xml:xpath-transformer input-channel="numberInput" xpath-expression="/person/@age" evaluation-type="NUMBER_RESULT" output-channel="output"/> <int-xml:xpath-transformer input-channel="booleanInput" xpath-expression="/person/@married = 'true'" evaluation-type="BOOLEAN_RESULT" output-channel="output"/>
Node Mappers
If you need to provide custom mapping for the node extracted by the XPath expression simply provide a reference to the implementation of the org.springframework.xml.xpath.NodeMapper - an interface used by XPathOperations implementations for mapping Node objects on a per-node basis.
To provide a reference to a NodeMapper simply use node-mapper attribute:
<int-xml:xpath-transformer input-channel="nodeMapperInput" xpath-expression="/person/@age" node-mapper="testNodeMapper" output-channel="output"/>
...and Sample NodeMapper implementation:
class TestNodeMapper implements NodeMapper { public Object mapNode(Node node, int nodeNum) throws DOMException { return node.getTextContent() + "-mapped"; } }
XML Payload Converter
You can also use an implementation of the org.springframework.integration.xml.XmlPayloadConverter to provide more granular transformation:
<int-xml:xpath-transformer input-channel="customConverterInput" output-channel="output" xpath-expression="/test/@type" converter="testXmlPayloadConverter" />
...and Sample XmlPayloadConverter implementation:
class TestXmlPayloadConverter implements XmlPayloadConverter { public Source convertToSource(Object object) { throw new UnsupportedOperationException(); } // public Node convertToNode(Object object) { try { return DocumentBuilderFactory.newInstance().newDocumentBuilder().parse( new InputSource(new StringReader("<test type='custom'/>"))); } catch (Exception e) { throw new IllegalStateException(e); } } // public Document convertToDocument(Object object) { throw new UnsupportedOperationException(); } }
The DefaultXmlPayloadConverter is used if this reference is not provided, and it should be sufficient in most cases since it can convert from Node, Document, Source, File, String, InputStream and byte[] typed payloads.
If you need to extend beyond the capabilities of that default implementation, then an upstream Transformer is probably a better option than providing a reference to a custom implementation of this strategy here.
XPathMessageSplitter supports messages with either String or Document payloads.
The splitter uses the provided XPath expression to split the payload into a number of nodes.
By default this will result in each Node instance becoming the payload of a new message.
Where it is preferred that each message be a Document the createDocuments flag can be set.
Where a String payload is passed in the payload will be converted then split before being converted back to a number of String messages.
The XPath splitter implements MessageHandler and should therefore be configured in conjunction with an appropriate endpoint (see the namespace support below for a simpler configuration alternative).
<bean id="splittingEndpoint" class="org.springframework.integration.endpoint.EventDrivenConsumer"> <constructor-arg ref="orderChannel" /> <constructor-arg> <bean class="org.springframework.integration.xml.splitter.XPathMessageSplitter"> <constructor-arg value="/order/items" /> <property name="documentBuilder" ref="customisedDocumentBuilder" /> <property name="outputChannel" ref="orderItemsChannel" /> </bean> </constructor-arg> </bean>
XPath splitter namespace support allows the creation of a Message Endpoint with an input channel and output channel.
<!-- Split the order into items creating a new message for each item node --> <int-xml:xpath-splitter id="orderItemSplitter" input-channel="orderChannel" output-channel="orderItemsChannel"> <int-xml:xpath-expression expression="/order/items"/> </int-xml:xpath-splitter> <!-- Split the order into items creating a new document for each item--> <int-xml:xpath-splitter id="orderItemDocumentSplitter" input-channel="orderChannel" output-channel="orderItemsChannel" create-documents="true"> <int-xml:xpath-expression expression="/order/items"/> <int:poller fixed-rate="2000"/> </int-xml:xpath-splitter>
Starting with version 4.2, the XPathMessageSplitter exposes outputProperties
(such as OutputKeys.OMIT_XML_DECLARATION) property for the javax.xml.transform.Transformer instances when a
request payload isn’t of org.w3c.dom.Node type:
<util:properties id="outputProperties"> <beans:prop key="#{T (javax.xml.transform.OutputKeys).OMIT_XML_DECLARATION}">yes</beans:prop> </util:properties> <xpath-splitter input-channel="input" output-properties="outputProperties"> <xpath-expression expression="/orders/order"/> </xpath-splitter>
Starting with version 4.2, the XPathMessageSplitter exposes an iterator option as a boolean flag (defaults to true).
This allows the "streaming" of split nodes in the downstream flow.
With the iterator mode, each node is transformed while iterating. When false, all entries are transformed first,
before the split nodes start being sent to the output channel (transform, send, transform, send Vs. transform,
transform, send, send).
See Section 6.3, “Splitter” for more information.
Similar to SpEL-based routers, Spring Integration provides support for routing messages based on XPath expressions, allowing you to create a Message Endpoint with an input channel but no output channel. Instead, one or more output channels are determined dynamically.
<int-xml:xpath-router id="orderTypeRouter" input-channel="orderChannel"> <int-xml:xpath-expression expression="/order/type"/> </int-xml:xpath-router>
| Note |
|---|---|
|
For an overview of attributes that are common among Routers, please see chapter: Section 6.1.2, “Common Router Parameters” |
Internally XPath expressions will be evaluated as NODESET type and converted to a List<String> representing channel names.
Typically such a list will contain a single channel name.
However, based on the results of an XPath Expression, the XPath router can also take on the characteristics of a Recipient List Router if the XPath Expression returns more then one value.
In that case, the List<String> will contain more then one channel name and consequently Messages will be sent to all channels in the list.
Thus, assuming that the XML file passed to the router configured below contains many responder sub-elements representing channel names, the message will be sent to all of those channels.
<!-- route the order to all responders--> <int-xml:xpath-router id="responderRouter" input-channel="orderChannel"> <int-xml:xpath-expression expression="/request/responders"/> </int-xml:xpath-router>
If the returned values do not represent the channel names directly, additional mapping parameters can be specified, in order to map those returned values to actual channel names.
For example if the /request/responders expression results in two values responderA and responderB but you don’t want to couple the responder names to channel names, you may provide additional mapping configuration such as the following:
<!-- route the order to all responders--> <int-xml:xpath-router id="responderRouter" input-channel="orderChannel"> <int-xml:xpath-expression expression="/request/responders"/> <int-xml:mapping value="responderA" channel="channelA"/> <int-xml:mapping value="responderB" channel="channelB"/> </int-xml:xpath-router>
As already mentioned, the default evaluation type for XPath expressions is NODESET, which is converted to a List<String> of channel names, therefore handling single channel scenarios as well as multiple ones.
Nonetheless, certain XPath expressions may evaluate as String type from the very beginning. Take for example the following XPath Expression:
name(./node())
This expression will return the name of the root node. It will resulting in an exception, if the default evaluation type NODESET is being used.
For these scenarious, you may use the evaluate-as-string attribute, which will allow you to manage the evaluation type.
It is FALSE by default, however if set to TRUE, the String evaluation type will be used.
| Note |
|---|---|
|
To provide some background information: XPath 1.0 specifies 4 data types:
When the XPath Router evaluates expressions using the optional For further information, please see: |
For example if we want to route based on the name of the root node, we can use the following configuration:
<int-xml:xpath-router id="xpathRouterAsString" input-channel="xpathStringChannel" evaluate-as-string="true"> <int-xml:xpath-expression expression="name(./node())"/> </int-xml:xpath-router>
For XPath Routers, you can also specify the Converter to use when converting payloads prior to XPath evaluation.
As such, the XPath Router supports custom implementations of the XmlPayloadConverter strategy, and when configuring an xpath-router element in XML, a reference to such an implementation may be provided via the converter attribute.
If this reference is not explicitly provided, the DefaultXmlPayloadConverter is used.
It should be sufficient in most cases, since it can convert from Node, Document, Source, File, and String typed payloads.
If you need to extend beyond the capabilities of that default implementation, then an upstream Transformer is generally a better option in most cases, rather than providing a reference to a custom implementation of this strategy here.
The XPath Header Enricher defines a Header Enricher Message Transformer that evaluates XPath expressions against the message payload and inserts the result of the evaluation into a message header.
Please see below for an overview of all available configuration parameters:
<int-xml:xpath-header-enricher default-overwrite="true"
|
Specify the default boolean value for whether to overwrite existing header values. This will only take effect for sub-elements that do not provide their own overwrite attribute. If the default- overwrite attribute is not provided, then the specified header values will NOT overwrite any existing ones with the same header names. Optional. |
|
Id for the underlying bean definition. Optional. |
|
The receiving Message channel of this endpoint. Optional. |
|
Channel to which enriched messages shall be send to. Optional. |
|
Specify whether null values, such as might be returned from an expression evaluation, should be skipped. The default value is true. Set this to false if a null value should trigger removal of the corresponding header instead.Optional. |
|
Optional. |
|
The name of the header to be enriched. Mandatory. |
|
The result type expected from the XPath evaluation.
This will be the type of the header value, if there is no |
|
The fully qualified class name for the header value type.
The result of XPath evaluation will be converted to this type using the |
|
Boolean value to indicate whether this header value should overwrite an existing header value for the same name if already present on the input Message. |
|
The XPath Expression as a String.
Either this attribute or |
|
The XPath Expression reference.
Either this attribute or |
This component defines an XPath-based Message Filter.
Under the covers this components uses a MessageFilter that wraps an instance of AbstractXPathMessageSelector.
| Note |
|---|---|
|
Please also refer to the chapter on Message Filters for further details. |
In order to use the XPath Filter you must as a minimum provide an XPath Expression either by declaring the xpath-expression sub-element or by referencing an XPath Expression using the xpath-expression-ref attribute.
If the provided XPath expression will evaluate to a boolean value, no further configuration parameters are necessary.
However, if the XPath expression will evaluate to a String, the match-value attribute should be specified against which the evaluation result will be matched.
There are three options for the match-type:
-
exact - correspond to
equalsonjava.lang.String. The underlying implementation uses aStringValueTestXPathMessageSelector -
case-insensitive - correspond to
equals-ignore-caseonjava.lang.String. The underlying implementation uses aStringValueTestXPathMessageSelector -
regex - matches operations one
java.lang.String. The underlying implementation uses aRegexTestXPathMessageSelector
When providing a match-type value of regex, the value provided with the match-value attribute must be a valid Regular Expression.
<int-xml:xpath-filter discard-channel=""
|
Message Channel where you want rejected messages to be sent. Optional. |
|
Id for the underlying bean definition. Optional. |
|
The receiving Message channel of this endpoint. Optional. |
|
Type of match to apply between the XPath evaluation result and the match-value. Default is exact. Optional. |
|
String value to be matched against the XPath evaluation result. If this attribute is not provided, then the XPath evaluation MUST produce a boolean result directly. Optional. |
|
The channel to which Messages that matched the filter criterias shall be dispatched to. Optional. |
|
By default, this property is set to false and rejected Messages (Messages that did not match the filter criteria) will be silently dropped. However, if set to true message rejection will result in an error condition and the exception will be propagated upstream to the caller. Optional. |
|
Reference to an XPath expression instance to evaluate. |
|
This sub-element sets the XPath expression to be evaluated.
If this is not defined you MUST define the |
|
Optional. |
Spring Integration, since version 3.0, provides the #xpath built-in SpEL function, which invokes the static method XPathUtils.evaluate(...).
This method delegates to an org.springframework.xml.xpath.XPathExpression.
The following shows some usage examples:
<transformer expression="#xpath(payload, '/name')"/> <filter expression="#xpath(payload, headers.xpath, 'boolean')"/> <splitter expression="#xpath(payload, '//book', 'document_list')"/> <router expression="#xpath(payload, '/person/@age', 'number')"> <mapping channel="output1" value="16"/> <mapping channel="output2" value="45"/> </router>
#xpath also supports a third optional parameter for converting the result of the xpath evaluation.
It can be one of the String constants 'string', 'boolean', 'number', 'node', 'node_list' and 'document_list' or an org.springframework.xml.xpath.NodeMapper instance.
By default the #xpath SpEL function returns a String representation of the xpath evaluation.
| Note |
|---|---|
|
To enable the |
For more information see Appendix A, Spring Expression Language (SpEL).
The XML Validating Filter allows you to validate incoming messages against provided schema instances. The following schema types are supported:
- xml-schema (http://www.w3.org/2001/XMLSchema)
- relax-ng (http://relaxng.org/ns/structure/1.0)
Messages that fail validation can either be silently dropped or they can be forwarded to a definable discard-channel.
Furthermore you can configure this filter to throw an Exception in case validation fails.
Please see below for an overview of all available configuration parameters:
<int-xml:validating-filter discard-channel=""
|
Message Channel where you want rejected messages to be sent. Optional. |
|
Id for the underlying bean definition. Optional. |
|
The receiving Message channel of this endpoint. Optional. |
|
Message Channel where you want accepted messages to be sent. Optional. |
|
Sets the location of the schema to validate the Message’s payload against.
Internally uses the |
|
Sets the schema type.
Can be either |
|
If |
|
Reference to a custom |
|
Reference to a custom |
|
Optional. |
Spring Integration provides Channel Adapters for XMPP.
XMPP describes a way for multiple agents to communicate with each other in a distributed system. The canonical use case is to send and receive chat messages, though XMPP can be, and is, used for far more applications. XMPP is used to describe a network of actors. Within that network, actors may address each other directly, as well as broadcast status changes (e.g. "presence").
XMPP provides the messaging fabric that underlies some of the biggest Instant Messaging networks in the world, including Google Talk (GTalk) - which is also available from within GMail - and Facebook Chat. There are many good open-source XMPP servers available. Two popular implementations are Openfire and ejabberd
Spring integration provides support for XMPP via XMPP adapters which support sending and receiving both XMPP chat messages and presence changes from other entries in your roster. As with other adapters, the XMPP adapters come with support for a convenient namespace-based configuration. To configure the XMPP namespace, include the following elements in the headers of your XML configuration file:
xmlns:int-xmpp="http://www.springframework.org/schema/integration/xmpp" xsi:schemaLocation="http://www.springframework.org/schema/integration/xmpp http://www.springframework.org/schema/integration/xmpp/spring-integration-xmpp.xsd"
Before using inbound or outbound XMPP adapters to participate in the XMPP network, an actor must establish its XMPP connection.
This connection object could be shared by all XMPP adapters connected to a particular account.
Typically this requires - at a minimum -user, password, and host.
To create a basic XMPP connection, you can utilize the convenience of the namespace.
<int-xmpp:xmpp-connection id="myConnection" user="user" password="password" host="host" port="port" resource="theNameOfTheResource" subscription-mode="accept_all"/>
| Note |
|---|---|
|
For added convenience you can rely on the default naming convention and omit the |
If the XMPP Connection goes stale, reconnection attempts will be made with an automatic login as long as the previous connection state was logged (authenticated).
We also register a ConnectionListener which will log connection events if the DEBUG logging level is enabled.
The subscription-mode initiates the Roster listener to deal with incoming subscriptions from other users.
This functionality isn’t always available for the target XMPP servers.
For example GCM/FCM fully disables it.
To switch off the Roster listener for subscriptions you should configure it with an empty string when using XML configuration: subscription-mode="", or with XmppConnectionFactoryBean.setSubscriptionMode(null) when using Java Configuration. Doing so will disable Roster at the login phase as well.
See Roster.setRosterLoadedAtLogin(Boolean) for more information.
The Spring Integration adapters support receiving chat messages from other users in the system.
To do this, the Inbound Message Channel Adapter "logs in" as a user on your behalf and receives the messages sent to that user.
Those messages are then forwarded to your Spring Integration client.
Configuration support for the XMPP Inbound Message Channel Adapter is provided via the inbound-channel-adapter element.
<int-xmpp:inbound-channel-adapter id="xmppInboundAdapter" channel="xmppInbound" xmpp-connection="testConnection" payload-expression="getExtension('google:mobile:data').json" stanza-filter="stanzaFilter" auto-startup="true"/>
As you can see amongst the usual attributes this adapter also requires a reference to an XMPP Connection.
It is also important to mention that the XMPP inbound adapter is an event driven adapter and a Lifecycle implementation.
When started it will register a PacketListener that will listen for incoming XMPP Chat Messages.
It forwards any received messages to the underlying adapter which will convert them to Spring Integration Messages and send them to the specified channel.
It will unregister the PacketListener when it is stopped.
Starting with version 4.3 the ChatMessageListeningEndpoint (and its <int-xmpp:inbound-channel-adapter>)
supports a org.jivesoftware.smack.filter.StanzaFilter injection to be registered on the provided XMPPConnection
together with an internal StanzaListener implementation.
See their JavaDocs for more information.
Also with the version 4.3 the payload-expression has been introduced for the ChatMessageListeningEndpoint.
The incoming org.jivesoftware.smack.packet.Message represents a root object of evaluation context.
This option is useful in case of Section 38.7, “XMPP Extensions”.
For example, for the GCM protocol we can extract the body using expression:
payload-expression="getExtension('google:mobile:data').json"
for the XHTML protocol:
payload-expression="getExtension(T(org.jivesoftware.smackx.xhtmlim.packet.XHTMLExtension).NAMESPACE).bodies[0]"
To simplify the access to the Extension in the XMPP Message, the extension variable is added into the
EvaluationContext.
Note, it is done only when one and only one Extension is present in the Message.
The samples above with the namespace manipulations can be simplified to something like:
---- payload-expression="#extension.json" payload-expression="#extension.bodies[0]" ----
You may also send chat messages to other users on XMPP using the Outbound Message Channel Adapter.
Configuration support for the XMPP Outbound Message Channel Adapter is provided via the outbound-channel-adapter element.
<int-xmpp:outbound-channel-adapter id="outboundEventAdapter" channel="outboundEventChannel" xmpp-connection="testConnection"/>
The adapter expects as its input - at a minimum - a payload of type java.lang.String, and a header value for
XmppHeaders.CHAT_TO that specifies to which user the Message should be sent.
To create a message you might use the following Java code:
Message<String> xmppOutboundMsg = MessageBuilder.withPayload("Hello, XMPP!" ) .setHeader(XmppHeaders.CHAT_TO, "userhandle") .build();
Another mechanism of setting the header is by using the XMPP header-enricher support. Here is an example.
<int-xmpp:header-enricher input-channel="input" output-channel="output"> <int-xmpp:chat-to value="[email protected]"/> </int-xmpp:header-enricher>
Starting with version 4.3 the packet extension support has been added to the ChatMessageSendingMessageHandler
(<int-xmpp:outbound-channel-adapter>).
Alongside with the regular String and org.jivesoftware.smack.packet.Message payload, now you can send a message
with a payload as a org.jivesoftware.smack.packet.ExtensionElement which is populated to the
org.jivesoftware.smack.packet.Message.addExtension() instead of setBody().
For the convenience an extension-provider option has been added for the ChatMessageSendingMessageHandler
to allow to inject org.jivesoftware.smack.provider.ExtensionElementProvider, which builds an ExtensionElement
against the payload at runtime.
For this case the payload must be String in JSON or XML format depending of the XEP protocol.
XMPP also supports broadcasting state. You can use this capability to let people who have you on their roster see your state changes. This happens all the time with your IM clients; you change your away status, and then set an away message, and everybody who has you on their roster sees your icon or username change to reflect this new state, and additionally might see your new "away" message. If you would like to receive notification, or notify others, of state changes, you can use Spring Integration’s "presence" adapters.
Spring Integration provides an Inbound Presence Message Channel Adapter which supports receiving Presence events from other users in the system who happen to be on your Roster.
To do this, the adapter "logs in" as a user on your behalf, registers a RosterListener and forwards received Presence update events as Messages to the channel identified by the channel attribute.
The payload of the Message will be a org.jivesoftware.smack.packet.Presence object (see https://www.igniterealtime.org/builds/smack/docs/latest/javadoc/org/jivesoftware/smack/packet/Presence.html).
Configuration support for the XMPP Inbound Presence Message Channel Adapter is provided via the presence-inbound-channel-adapter element.
<int-xmpp:presence-inbound-channel-adapter channel="outChannel" xmpp-connection="testConnection" auto-startup="false"/>
As you can see amongst the usual attributes this adapter also requires a reference to an XMPP Connection.
It is also important to mention that this adapter is an event driven adapter and a Lifecycle implementation.
It will register a RosterListener when started and will unregister that RosterListener when stopped.
Spring Integration also supports sending Presence events to be seen by other users in the network who happen to have you on their Roster.
When you send a Message to the Outbound Presence Message Channel Adapter it extracts the payload, which is expected to be of type org.jivesoftware.smack.packet.Presence and sends it to the XMPP Connection, thus advertising your presence events to the rest of the network.
Configuration support for the XMPP Outbound Presence Message Channel Adapter is provided via the presence-outbound-channel-adapter element.
<int-xmpp:presence-outbound-channel-adapter id="eventOutboundPresenceChannel" xmpp-connection="testConnection"/>
It can also be a Polling Consumer (if it receives Messages from a Pollable Channel) in which case you would need to register a Poller.
<int-xmpp:presence-outbound-channel-adapter id="pollingOutboundPresenceAdapter" xmpp-connection="testConnection" channel="pollingChannel"> <int:poller fixed-rate="1000" max-messages-per-poll="1"/> </int-xmpp:presence-outbound-channel-adapter>
Like its inbound counterpart, it requires a reference to an XMPP Connection.
| Note |
|---|---|
|
If you are relying on the default naming convention for an XMPP Connection bean (described earlier), and you have only one XMPP Connection bean configured in your Application Context, you may omit the |
Since Spring Integration XMPP support is based on the Smack 4.0 API (http://www.igniterealtime.org/projects/smack/), it is important to know a few details related to more complex configuration of the XMPP Connection object.
As stated earlier the xmpp-connection namespace support is designed to simplify basic connection configuration and only supports a few common configuration attributes.
However, the org.jivesoftware.smack.ConnectionConfiguration object defines about 20 attributes, and there is no real value of adding namespace support for all of them.
So, for more complex connection configurations, simply configure an instance of our XmppConnectionFactoryBean as a regular bean, and inject a org.jivesoftware.smack.ConnectionConfiguration as a constructor argument to that FactoryBean.
Every property you need, can be specified directly on that ConnectionConfiguration instance (a bean definition with the p namespace would work well).
This way SSL, or any other attributes, could be set directly.
Here’s an example:
<bean id="xmppConnection" class="o.s.i.xmpp.XmppConnectionFactoryBean"> <constructor-arg> <bean class="org.jivesoftware.smack.ConnectionConfiguration"> <constructor-arg value="myServiceName"/> <property name="socketFactory" ref="..."/> </bean> </constructor-arg> </bean> <int:channel id="outboundEventChannel"/> <int-xmpp:outbound-channel-adapter id="outboundEventAdapter" channel="outboundEventChannel" xmpp-connection="xmppConnection"/>
Another important aspect of the Smack API is static initializers.
For more complex cases (e.g., registering a SASL Mechanism), you may need to execute certain static initializers.
One of those static initializers is SASLAuthentication, which allows you to register supported SASL mechanisms.
For that level of complexity, we would recommend Spring JavaConfig-style of the XMPP Connection configuration.
Then, you can configure the entire component through Java code and execute all other necessary Java code including static initializers at the appropriate time.
@Configuration public class CustomConnectionConfiguration { @Bean public XMPPConnection xmppConnection() { SASLAuthentication.supportSASLMechanism("EXTERNAL", 0); // static initializer ConnectionConfiguration config = new ConnectionConfiguration("localhost", 5223); config.setTrustorePath("path_to_truststore.jks"); config.setSecurityEnabled(true); config.setSocketFactory(SSLSocketFactory.getDefault()); return new XMPPConnection(config); } }
For more information on the JavaConfig style of Application Context configuration, refer to the following section in the Spring Reference Manual.
The Spring Integration XMPP Adapters will map standard XMPP properties automatically.
These properties will be copied by default to and from Spring Integration MessageHeaders using the
DefaultXmppHeaderMapper.
Any user-defined headers will NOT be copied to or from an XMPP Message, unless explicitly specified by the
requestHeaderNames and/or replyHeaderNames properties of the DefaultXmppHeaderMapper.
| Tip |
|---|---|
|
When mapping user-defined headers, the values can also contain simple wildcard patterns (e.g. "foo*" or "*foo") to be matched. |
Starting with version 4.1, the AbstractHeaderMapper (a DefaultXmppHeaderMapper superclass) allows the
NON_STANDARD_HEADERS token to be configured for the requestHeaderNames property (in addition to existing
STANDARD_REQUEST_HEADERS) to map all user-defined headers.
Class org.springframework.xmpp.XmppHeaders identifies the default headers that will be used by the DefaultXmppHeaderMapper:
- xmpp_from
- xmpp_subject
- xmpp_thread
- xmpp_to
- xmpp_type
Starting with version 4.3, patterns in the header mappings can be negated by preceding the pattern with !.
Negated patterns get priority, so a list such as
STANDARD_REQUEST_HEADERS,foo,ba*,!bar,!baz,qux,!foo will NOT map foo
(nor bar nor baz); the standard headers plus bad, qux will be mapped.
| Important |
|---|---|
|
If you have a user defined header that begins with |
The XMPP protocol stands for eXstensible Messaging and Presence Protocol. The "extensible" part is important. XMPP is based around XML, a data format that supports a concept known as namespacing.
Through namespacing, you can add bits to XMPP that are not defined in the original specifications. This is important because the XMPP specification deliberately describes only a set of core things like:
- How a client connects to a server
- Encryption (SSL/TLS)
- Authentication
- How servers can communicate with each other to relay messages
- and a few other basic building blocks.
Once you have implemented this, you have an XMPP client and can send any kind of data you like. But that’s not the end.
For example, perhaps you decide that you want to include formatting in a message (bold, italic, etc.) which is not defined in the core XMPP specification. Well, you can make up a way to do that, but unless everyone else does it the same way as you, no other software will be able interpret it (they will just ignore namespaces they don’t understand).
So the XMPP Standards Foundation (XSF) publishes a series of extra documents, known as XMPP Enhancement Proposals (XEPs). In general each XEP describes a particular activity (from message formatting, to file transfers, multi-user chats and many more), and they provide a standard format for everyone to use for that activity.
The Smack API provides many XEP implementations with its extensions and experimental
projects.
And starting with Spring Integration version 4.3 any XEP can be use with the existing XMPP channel adapters.
To be able to process XEPs or any other custom XMPP extensions, the Smack’s ProviderManager pre-configuration
must be provided.
It can be done via direct usage from the static Java code:
ProviderManager.addIQProvider("element", "namespace", new MyIQProvider()); ProviderManager.addExtensionProvider("element", "namespace", new MyExtProvider());
or via .providers configuration file in the specific instance and JVM argument:
-Dsmack.provider.file=file:///c:/my/provider/mycustom.providers
where mycustom.providers might be like this:
<?xml version="1.0"?> <smackProviders> <iqProvider> <elementName>query</elementName> <namespace>jabber:iq:time</namespace> <className>org.jivesoftware.smack.packet.Time</className> </iqProvider> <iqProvider> <elementName>query</elementName> <namespace>http://jabber.org/protocol/disco#items</namespace> <className>org.jivesoftware.smackx.provider.DiscoverItemsProvider</className> </iqProvider> <extensionProvider> <elementName>subscription</elementName> <namespace>http://jabber.org/protocol/pubsub</namespace> <className>org.jivesoftware.smackx.pubsub.provider.SubscriptionProvider</className> </extensionProvider> </smackProviders>
For example the most popular XMPP messaging extension is
Google Cloud Messaging (GCM).
The Smack provides the particular org.jivesoftware.smackx.gcm.provider.GcmExtensionProvider for that and
registers that by default with the smack-experimental jar in the classpath using experimental.providers resource:
<!-- GCM JSON payload --> <extensionProvider> <elementName>gcm</elementName> <namespace>google:mobile:data</namespace> <className>org.jivesoftware.smackx.gcm.provider.GcmExtensionProvider</className> </extensionProvider>
Also the GcmPacketExtension is present for the target messaging protocol to parse incoming packets and build outgoing:
GcmPacketExtension gcmExtension = (GcmPacketExtension) xmppMessage.getExtension(GcmPacketExtension.NAMESPACE); String message = gcmExtension.getJson());
GcmPacketExtension packetExtension = new GcmPacketExtension(gcmJson); Message smackMessage = new Message(); smackMessage.addExtension(packetExtension);
See Section 38.3.1, “Inbound Message Channel Adapter” and Section 38.3.2, “Outbound Message Channel Adapter” above for more information.
Zookeeper support was added to the framework in version 4.2, comprised of:
- MetadataStore
- LockRegistry
- Leadership Event Handling
The ZookeeperMetadataStore can be used where any MetadataStore is needed, such as peristent file list filters,
etc.
See Section 10.5, “Metadata Store” for more information.
<bean id="client" class="org.springframework.integration.zookeeper.config.CuratorFrameworkFactoryBean"> <constructor-arg value="${connect.string}" /> </bean> <bean id="meta" class="org.springframework.integration.zookeeper.metadata.ZookeeperMetadataStore"> <constructor-arg ref="client" /> </bean>
@Bean public MetadataStore zkStore(CuratorFramework client) { return new ZookeeperMetadataStore(client); }
The ZookeeperLockRegistry can be used where any LockRegistry is needed, such as when using an Aggregator in a
clustered environment, with a shared MessageStore.
A LocRegistry is used to "look up" a lock based on a key (the aggregator uses the correlationId).
By default, locks in the ZookeeperLockRegistry are maintained in zookeeper under the path
/SpringIntegration-LockRegistry/.
You can customize the path by providing an implementation of ZookeeperLockRegistry.KeyToPathStrategy.
public interface KeyToPathStrategy { String pathFor(String key); boolean bounded(); }
If the strategy returns true from isBounded, unused locks do not need to be harvested.
For unbounded strategies (such as the default) you will need to invoke expireUnusedOlderThan(long age) from time
to time, to remove old unused locks from memory.
To configure an application for leader election using Zookeeper in XML:
<int-zk:leader-listener client="client" path="/siNamespace" role="cluster" />
client is a reference to a CuratorFramework bean; a CuratorFrameworkFactoryBean is available.
When a leader is elected, an OnGrantedEvent will be published for the role cluster; any endpoints in that role
will be started.
When leadership is revoked, an OnRevokedEvent will be published for the role cluster; any endpoints in that role
will be stopped.
See Section 8.2, “Endpoint Roles” for more information.
In Java configuration you can create an instance of the leader initiator like this:
@Bean public LeaderInitiatorFactoryBean leaderInitiator(CuratorFramework client) { return new LeaderInitiatorFactoryBean(client, "/siTest/", "cluster"); }
Advanced Topics and Additional Resources
Many Spring Integration components can be configured using expressions. These expressions are written in the Spring Expression Language.
In most cases, the #root object is the Message which, of course, has two properties - headers and payload - allowing such expressions as payload, payload.foo, headers['my.header'] etc.
In some cases, additional variables are provided, for example the <int-http:inbound-gateway/> provides #requestParams (parameters from the HTTP request) and #pathVariables (values from path placeholders in the URI).
For all SpEL expressions, a BeanResolver is available, enabling references to any bean in the application context.
For example @myBean.foo(payload).
In addition, two PropertyAccessors are available; a MapAccessor enables accessing values in a Map using a key, and a ReflectivePropertyAccessor which allows access to fields and or JavaBean compliant properties (using getters and setters).
This is how the Message headers and payload properties are accessible.
Starting with Spring Integration 3.0, it is possible to add additional PropertyAccessor s to the SpEL evaluation contexts used by the framework.
The framework provides the JsonPropertyAccessor which can be used (read-only) to access fields from a JsonNode, or JSON in a String.
Or you can create your own PropertyAccessor if you have specific needs.
In addition, custom functions can be added.
Custom functions are static methods declared on a class.
Functions and property accessors are available in any SpEL expression used throughout the framework.
The following configuration shows how to directly configure the IntegrationEvaluationContextFactoryBean with custom property accessors and functions.
However, for convenience, namespace support is provided for both, as described in the following sections, and the framework will automatically configure the factory bean on your behalf.
<bean id="integrationEvaluationContext" class="org.springframework.integration.config.IntegrationEvaluationContextFactoryBean"> <property name="propertyAccessors"> <util:map> <entry key="foo"> <bean class="foo.MyCustomPropertyAccessor"/> </entry> </util:map> </property> <property name="functions"> <map> <entry key="barcalc" value="#{T(foo.MyFunctions).getMethod('calc', T(foo.MyBar))}"/> </map> </property> </bean>
This factory bean definition will override the default integrationEvaluationContext bean definition, adding the custom accessor to the list (which also includes the standard accessors mentioned above), and one custom function.
Note that custom functions are static methods.
In the above example, the custom function is a static method calc on class MyFunctions and takes a single parameter of type MyBar.
Say you have a Message with a payload that has a type MyFoo on which you need to perform some action to create a MyBar object from it, and you then want to invoke a custom function calc on that object.
The standard property accessors wouldn’t know how to get a MyBar from a MyFoo so you could write and configure a custom property accessor to do so.
So, your final expression might be "#barcalc(payload.myBar)".
The factory bean has another property typeLocator which allows you to customize the TypeLocator used during SpEL evaluation.
This might be necessary when running in some environments that use a non-standard ClassLoader.
In the following example, SpEL expressions will always use the bean factory’s class loader:
<bean id="integrationEvaluationContext" class="org.springframework.integration.config.IntegrationEvaluationContextFactoryBean"> <property name="typeLocator"> <bean class="org.springframework.expression.spel.support.StandardTypeLocator"> <constructor-arg value="#{beanFactory.beanClassLoader}"/> </bean> </property> </bean>
Namespace support is provided for easy addition of SpEL custom functions.
You can specify <spel-function/> components to provide custom SpEL functions to the EvaluationContext used throughout the framework.
Instead of configuring the factory bean above, simply add one or more of these components and the framework will automatically add them to the default integrationEvaluationContext factory bean.
For example, assuming we have a useful static method to evaluate XPath:
<int:spel-function id="xpath" class="com.foo.test.XPathUtils" method="evaluate(java.lang.String, java.lang.Object)"/> <int:transformer input-channel="in" output-channel="out" expression="#xpath('//foo/@bar', payload)" />
With this sample:
-
The default
IntegrationEvaluationContextFactoryBeanbean with id integrationEvaluationContext is registered with the application context. -
The
<spel-function/>is parsed and added to thefunctionsMap of integrationEvaluationContext as map entry withidas the key and the staticMethodas the value. -
The integrationEvaluationContext factory bean creates a new
StandardEvaluationContextinstance, and it is configured with the defaultPropertyAccessors,BeanResolverand the custom functions. -
That
EvaluationContextinstance is injected into theExpressionEvaluatingTransformerbean.
To provide a SpEL Function via Java Configuration, you should declare a SpelFunctionFactoryBean bean for each function.
The sample above can be configured as follows:
@Bean public SpelFunctionFactoryBean xpath() { return new SpelFunctionFactoryBean(XPathUtils.class, "evaluate"); }
| Note |
|---|---|
|
SpEL functions declared in a parent context are also made available in any child context(s).
Each context has its own instance of the integrationEvaluationContext factory bean because each needs a different |
Built-in SpEL Functions
Spring Integration provides some standard functions, which are registered with the application context automatically on start up:
#jsonPath - to evaluate a jsonPath on some provided object.
This function invokes JsonPathUtils.evaluate(...).
This static method delegates to the Jayway JsonPath library.
The following shows some usage examples:
<transformer expression="#jsonPath(payload, '$.store.book[0].author')"/> <filter expression="#jsonPath(payload,'$..book[2].isbn') matches '\d-\d{3}-\d{5}-\d'"/> <splitter expression="#jsonPath(payload, '$.store.book')"/> <router expression="#jsonPath(payload, headers.jsonPath)"> <mapping channel="output1" value="reference"/> <mapping channel="output2" value="fiction"/> </router>
#jsonPath also supports the third optional parameter - an array of com.jayway.jsonpath.Filter, which could be provided by a reference to a bean or bean method, for example.
| Note |
|---|---|
|
Using this function requires the Jayway JsonPath library (json-path.jar) to be on the classpath; otherwise the #jsonPath SpEL function won’t be registered. |
For more information regarding JSON see JSON Transformers in Section 7.1, “Transformer”.
#xpath - to evaluate an xpath on some provided object. For more information regarding xml and xpath see Chapter 37, XML Support - Dealing with XML Payloads.
Namespace support is provided for the easy addition of SpEL custom PropertyAccessor implementations.
You can specify the <spel-property-accessors/> component to provide a list of custom PropertyAccessor s to the EvaluationContext used throughout the framework.
Instead of configuring the factory bean above, simply add one or more of these components, and the framework will automatically add the accessors to the default integrationEvaluationContext factory bean:
<int:spel-property-accessors> <bean id="jsonPA" class="org.springframework.integration.json.JsonPropertyAccessor"/> <ref bean="fooPropertyAccessor"/> </int:spel-property-accessors>
With this sample, two custom PropertyAccessor s will be injected to the EvaluationContext in the order that they are declared.
To provide PropertyAccessor s via Java Configuration, you should declare a SpelPropertyAccessorRegistrar bean with the name spelPropertyAccessorRegistrar (IntegrationContextUtils.SPEL_PROPERTY_ACCESSOR_REGISTRAR_BEAN_NAME constant).
The sample above can be configured as follows:
@Bean public SpelPropertyAccessorRegistrar spelPropertyAccessorRegistrar() { return new SpelPropertyAccessorRegistrar(new JsonPropertyAccessor()) .add(fooPropertyAccessor()); }
| Note |
|---|---|
|
Custom |
The AOP Message Publishing feature allows you to construct and send a message as a by-product of a method invocation. For example, imagine you have a component and every time the state of this component changes you would like to be notified via a Message. The easiest way to send such notifications would be to send a message to a dedicated channel, but how would you connect the method invocation that changes the state of the object to a message sending process, and how should the notification Message be structured? The AOP Message Publishing feature handles these responsibilities with a configuration-driven approach.
Spring Integration provides two approaches: XML and Annotation-driven.
The annotation-driven approach allows you to annotate any method with the @Publisher annotation, specifying a channel attribute.
The Message will be constructed from the return value of the method invocation and sent to a channel specified by the channel attribute.
To further manage message structure, you can also use a combination of both @Payload and @Header annotations.
Internally this message publishing feature of Spring Integration uses both Spring AOP by defining PublisherAnnotationAdvisor and Spring 3.0’s Expression Language (SpEL) support, giving you considerable flexibility and control over the structure of the Message it will publish.
The PublisherAnnotationAdvisor defines and binds the following variables:
- #return - will bind to a return value allowing you to reference it or its attributes (e.g., #return.foo where foo is an attribute of the object bound to #return)
- #exception - will bind to an exception if one is thrown by the method invocation.
- #args - will bind to method arguments, so individual arguments could be extracted by name (e.g., #args.fname as in the above method)
Let’s look at a couple of examples:
@Publisher public String defaultPayload(String fname, String lname) { return fname + " " + lname; }
In the above example the Message will be constructed with the following structure:
- Message payload - will be the return type and value of the method. This is the default.
- A newly constructed message will be sent to a default publisher channel configured with an annotation post processor (see the end of this section).
@Publisher(channel="testChannel") public String defaultPayload(String fname, @Header("last") String lname) { return fname + " " + lname; }
In this example everything is the same as above, except that we are not using a default publishing channel.
Instead we are specifying the publishing channel via the channel attribute of the @Publisher annotation.
We are also adding a @Header annotation which results in the Message header named last having the same value as the lname method parameter.
That header will be added to the newly constructed Message.
@Publisher(channel="testChannel") @Payload public String defaultPayloadButExplicitAnnotation(String fname, @Header String lname) { return fname + " " + lname; }
The above example is almost identical to the previous one.
The only difference here is that we are using a @Payload annotation on the method, thus explicitly specifying that the return value of the method should be used as the payload of the Message.
@Publisher(channel="testChannel") @Payload("#return + #args.lname") public String setName(String fname, String lname, @Header("x") int num) { return fname + " " + lname; }
Here we are expanding on the previous configuration by using the Spring Expression Language in the @Payload annotation to further instruct the framework how the message should be constructed.
In this particular case the message will be a concatenation of the return value of the method invocation and the lname input argument.
The Message header named x will have its value determined by the num input argument.
That header will be added to the newly constructed Message.
@Publisher(channel="testChannel") public String argumentAsPayload(@Payload String fname, @Header String lname) { return fname + " " + lname; }
In the above example you see another usage of the @Payload annotation.
Here we are annotating a method argument which will become the payload of the newly constructed message.
As with most other annotation-driven features in Spring, you will need to register a post-processor (PublisherAnnotationBeanPostProcessor).
<bean class="org.springframework.integration.aop.PublisherAnnotationBeanPostProcessor"/>
You can instead use namespace support for a more concise configuration:
<int:annotation-config default-publisher-channel="defaultChannel"/>
Similar to other Spring annotations (@Component, @Scheduled, etc.), @Publisher can also be used as a meta-annotation.
That means you can define your own annotations that will be treated in the same way as the @Publisher itself.
@Target({ElementType.METHOD, ElementType.TYPE}) @Retention(RetentionPolicy.RUNTIME) @Publisher(channel="auditChannel") public @interface Audit { }
Here we defined the @Audit annotation which itself is annotated with @Publisher.
Also note that you can define a channel attribute on the meta-annotation thus encapsulating the behavior of where messages will be sent inside of this annotation.
Now you can annotate any method:
@Audit public String test() { return "foo"; }
In the above example every invocation of the test() method will result in a Message with a payload created from its return value.
Each Message will be sent to the channel named auditChannel.
One of the benefits of this technique is that you can avoid the duplication of the same channel name across multiple annotations.
You also can provide a level of indirection between your own, potentially domain-specific annotations and those provided by the framework.
You can also annotate the class which would mean that the properties of this annotation will be applied on every public method of that class.
@Audit static class BankingOperationsImpl implements BankingOperations { public String debit(String amount) { . . . } public String credit(String amount) { . . . } }
The XML-based approach allows you to configure the same AOP-based Message Publishing functionality with simple namespace-based configuration of a MessagePublishingInterceptor.
It certainly has some benefits over the annotation-driven approach since it allows you to use AOP pointcut expressions, thus possibly intercepting multiple methods at once or intercepting and publishing methods to which you don’t have the source code.
To configure Message Publishing via XML, you only need to do the following two things:
-
Provide configuration for
MessagePublishingInterceptorvia the<publishing-interceptor>XML element. -
Provide AOP configuration to apply the
MessagePublishingInterceptorto managed objects.
<aop:config> <aop:advisor advice-ref="interceptor" pointcut="bean(testBean)" /> </aop:config> <publishing-interceptor id="interceptor" default-channel="defaultChannel"> <method pattern="echo" payload="'Echoing: ' + #return" channel="echoChannel"> <header name="foo" value="bar"/> </method> <method pattern="repl*" payload="'Echoing: ' + #return" channel="echoChannel"> <header name="foo" expression="'bar'.toUpperCase()"/> </method> <method pattern="echoDef*" payload="#return"/> </publishing-interceptor>
As you can see the <publishing-interceptor> configuration looks rather similar to the Annotation-based approach, and it also utilizes the power of the Spring 3.0 Expression Language.
In the above example the execution of the echo method of a testBean will render a Message with the following structure:
-
The Message payload will be of type String with the content "Echoing: [value]" where
valueis the value returned by an executed method. - The Message will have a header with the name "foo" and value "bar".
-
The Message will be sent to
echoChannel.
The second method is very similar to the first. Here every method that begins with repl will render a Message with the following structure:
- The Message payload will be the same as in the above sample
-
The Message will have a header named "foo" whose value is the result of the SpEL expression
'bar'.toUpperCase(). -
The Message will be sent to
echoChannel.
The second method, mapping the execution of any method that begins with echoDef of testBean, will produce a Message with the following structure.
- The Message payload will be the value returned by an executed method.
-
Since the
channelattribute is not provided explicitly, the Message will be sent to thedefaultChanneldefined by the publisher.
For simple mapping rules you can rely on the publisher defaults. For example:
<publishing-interceptor id="anotherInterceptor"/>
This will map the return value of every method that matches the pointcut expression to a payload and will be sent to a default-channel. If the defaultChannel_is not specified (as above) the messages will be sent to the global _nullChannel.
Async Publishing
One important thing to understand is that publishing occurs in the same thread as your component’s execution. So by default in is synchronous. This means that the entire message flow would have to wait until the publisher’s flow completes. However, quite often you want the complete opposite and that is to use this Message publishing feature to initiate asynchronous sub-flows. For example, you might host a service (HTTP, WS etc.) which receives a remote request.You may want to send this request internally into a process that might take a while. However you may also want to reply to the user right away. So, instead of sending inbound requests for processing via the output channel (the conventional way), you can simply use output-channel or a replyChannel header to send a simple acknowledgment-like reply back to the caller while using the Message publisher feature to initiate a complex flow.
EXAMPLE: Here is the simple service that receives a complex payload, which needs to be sent further for processing, but it also needs to reply to the caller with a simple acknowledgment.
public String echo(Object complexPayload) { return "ACK"; }
So instead of hooking up the complex flow to the output channel we use the Message publishing feature instead. We configure it to create a new Message using the input argument of the service method (above) and send that to the localProcessChannel. And to make sure this sub-flow is asynchronous all we need to do is send it to any type of asynchronous channel (ExecutorChannel in this example).
<int:service-activator input-channel="inputChannel" output-channel="outputChannel" ref="sampleservice"/> <bean id="sampleservice" class="test.SampleService"/> <aop:config> <aop:advisor advice-ref="interceptor" pointcut="bean(sampleservice)" /> </aop:config> <int:publishing-interceptor id="interceptor" > <int:method pattern="echo" payload="#args[0]" channel="localProcessChannel"> <int:header name="sample_header" expression="'some sample value'"/> </int:method> </int:publishing-interceptor> <int:channel id="localProcessChannel"> <int:dispatcher task-executor="executor"/> </int:channel> <task:executor id="executor" pool-size="5"/>
Another way of handling this type of scenario is with a wire-tap.
In the above sections we looked at the Message publishing feature of Spring Integration which constructs and publishes messages as by-products of Method invocations.
However in those cases, you are still responsible for invoking the method.
In Spring Integration 2.0 we’ve added another related useful feature: support for scheduled Message producers/publishers via the new "expression" attribute on the inbound-channel-adapter element.
Scheduling could be based on several triggers, any one of which may be configured on the poller sub-element.
Currently we support cron, fixed-rate, fixed-delay as well as any custom trigger implemented by you and referenced by the trigger attribute value.
As mentioned above, support for scheduled producers/publishers is provided via the <inbound-channel-adapter> xml element. Let’s look at couple of examples:
<int:inbound-channel-adapter id="fixedDelayProducer" expression="'fixedDelayTest'" channel="fixedDelayChannel"> <int:poller fixed-delay="1000"/> </int:inbound-channel-adapter>
In the above example an inbound Channel Adapter will be created which will construct a Message with its payload being the result of the expression defined in the expression attribute.
Such messages will be created and sent every time the delay specified by the fixed-delay attribute occurs.
<int:inbound-channel-adapter id="fixedRateProducer" expression="'fixedRateTest'" channel="fixedRateChannel"> <int:poller fixed-rate="1000"/> </int:inbound-channel-adapter>
This example is very similar to the previous one, except that we are using the fixed-rate attribute which will allow us to send messages at a fixed rate (measuring from the start time of each task).
<int:inbound-channel-adapter id="cronProducer" expression="'cronTest'" channel="cronChannel"> <int:poller cron="7 6 5 4 3 ?"/> </int:inbound-channel-adapter>
This example demonstrates how you can apply a Cron trigger with a value specified in the cron attribute.
<int:inbound-channel-adapter id="headerExpressionsProducer" expression="'headerExpressionsTest'" channel="headerExpressionsChannel" auto-startup="false"> <int:poller fixed-delay="5000"/> <int:header name="foo" expression="6 * 7"/> <int:header name="bar" value="x"/> </int:inbound-channel-adapter>
Here you can see that in a way very similar to the Message publishing feature we are enriching a newly constructed Message with extra Message headers which can take scalar values or the results of evaluating Spring expressions.
If you need to implement your own custom trigger you can use the trigger attribute to provide a reference to any spring configured bean which implements the org.springframework.scheduling.Trigger interface.
<int:inbound-channel-adapter id="triggerRefProducer" expression="'triggerRefTest'" channel="triggerRefChannel"> <int:poller trigger="customTrigger"/> </int:inbound-channel-adapter> <beans:bean id="customTrigger" class="o.s.scheduling.support.PeriodicTrigger"> <beans:constructor-arg value="9999"/> </beans:bean>
Spring Integration exposes several hooks to address transactional needs of you message flows. But to better understand these hooks and how you can benefit from them we must first revisit the 6 mechanisms that could be used to initiate Message flows and see how transactional needs of these flows could be addressed within each of these mechanisms.
Here are the 6 mechanisms to initiate a Message flow and their short summary (details for each are provided throughout this manual):
- Gateway Proxy - Your basic Messaging Gateway
- MessageChannel - Direct interactions with MessageChannel methods (e.g., channel.send(message))
- Message Publisher - the way to initiate message flow as the by-product of method invocations on Spring beans
- Inbound Channel Adapters/Gateways - the way to initiate message flow based on connecting third-party system with Spring Integration messaging system(e.g., [JmsMessage] → Jms Inbound Adapter[SI Message] → SI Channel)
- Scheduler - the way to initiate message flow based on scheduling events distributed by a pre-configured Scheduler
- Poller - similar to the Scheduler and is the way to initiate message flow based on scheduling or interval-based events distributed by a pre-configured Poller
These 6 could be split in 2 general categories:
- Message flows initiated by a USER process - Example scenarios in this category would be invoking a Gateway method or explicitly sending a Message to a MessageChannel. In other words, these message flows depend on a third party process (e.g., some code that we wrote) to be initiated.
- Message flows initiated by a DAEMON process - Example scenarios in this category would be a Poller polling a Message queue to initiate a new Message flow with the polled Message or a Scheduler scheduling the process by creating a new Message and initiating a message flow at a predefined time.
Clearly the Gateway Proxy, MessageChannel.send(..) and MessagePublisher all belong to the 1st category and Inbound Adapters/Gateways, Scheduler and Poller belong to the 2nd.
So, how do we address transactional needs in various scenarios within each category and is there a need for Spring Integration to provide something explicitly with regard to transactions for a particular scenario? Or, can Spring’s Transaction Support be leveraged instead?.
The first and most obvious goal is NOT to re-invent something that has already been invented unless you can provide a better solution. In our case Spring itself provides first class support for transaction management. So our goal here is not to provide something new but rather delegate/use Spring to benefit from the existing support for transactions. In other words as a framework we must expose hooks to the Transaction management functionality provided by Spring. But since Spring Integration configuration is based on Spring Configuration it is not always necessary to expose these hooks as they are already exposed via Spring natively. Remember every Spring Integration component is a Spring Bean after all.
With this goal in mind let’s look at the two scenarios.
If you think about it, Message flows that are initiated by the USER process (Category 1) and obviously configured in a Spring Application Context, are subject to transactional configuration of such processes and therefore don’t need to be explicitly configured by Spring Integration to support transactions.
The transaction could and should be initiated through standard Transaction support provided by Spring.
The Spring Integration message flow will honor the transactional semantics of the components naturally because it is Spring configured.
For example, a Gateway or ServiceActivator method could be annotated with @Transactional or TransactionInterceptor could be defined in an XML configuration with a point-cut expression pointing to specific methods that should be transactional.
The bottom line is that you have full control over transaction configuration and boundaries in these scenarios.
However, things are a bit different when it comes to Message flows initiated by the DAEMON process (Category 2). Although configured by the developer these flows do not directly involve a human or some other process to be initiated. These are trigger-based flows that are initiated by a trigger process (DAEMON process) based on the configuration of such process. For example, we could have a Scheduler initiating a message flow every Friday night of every week. We can also configure a trigger that initiates a Message flow every second, etc. So, we obviously need a way to let these trigger-based processes know of our intention to make the resulting Message flows transactional so that a Transaction context could be created whenever a new Message flow is initiated. In other words we need to expose some Transaction configuration, but ONLY enough to delegate to Transaction support already provided by Spring (as we do in other scenarios).
Spring Integration provides transactional support for Pollers. Pollers are a special type of component because we can call receive() within that poller task against a resource that is itself transactional thus including receive() call in the the boundaries of the Transaction allowing it to be rolled back in case of a task failure. If we were to add the same support for channels, the added transactions would affect all downstream components starting with that send() call. That is providing a rather wide scope for transaction demarcation without any strong reason especially when Spring already provides several ways to address the transactional needs of any component downstream. However the receive() method being included in a transaction boundary is the "strong reason" for pollers.
Any time you configure a Poller you can provide transactional configuration via the transactional sub-element and its attributes:
<int:poller max-messages-per-poll="1" fixed-rate="1000"> <transactional transaction-manager="txManager" isolation="DEFAULT" propagation="REQUIRED" read-only="true" timeout="1000"/> </poller>
As you can see this configuration looks very similar to native Spring transaction configuration.
You must still provide a reference to a Transaction manager and specify transaction attributes or rely on defaults (e.g., if the transaction-manager attribute is not specified, it will default to the bean with the name transactionManager).
Internally the process would be wrapped in Spring’s native Transaction where TransactionInterceptor is responsible for handling transactions.
For more information on how to configure a Transaction Manager, the types of Transaction Managers (e.g., JTA, Datasource etc.) and other details related to transaction configuration please refer to Spring’s Reference manual (Chapter 10 - Transaction Management).
With the above configuration all Message flows initiated by this poller will be transactional. For more information and details on a Poller’s transactional configuration please refer to section - 21.1.1. Polling and Transactions.
Along with transactions, several more cross cutting concerns might need to be addressed when running a Poller. To help with that, the Poller element accepts an <advice-chain> _ sub-element which allows you to define a custom chain of Advice instances to be applied on the Poller. (see section 4.4 for more details) In Spring Integration 2.0, the Poller went through the a refactoring effort and is now using a proxy mechanism to address transactional concerns as well as other cross cutting concerns. One of the significant changes evolving from this effort is that we made _<transactional> and <advice-chain> elements mutually exclusive. The rationale behind this is that if you need more than one advice, and one of them is Transaction advice, then you can simply include it in the <advice-chain> with the same convenience as before but with much more control since you now have an option to position any advice in the desired order.
<int:poller max-messages-per-poll="1" fixed-rate="10000"> <advice-chain> <ref bean="txAdvice"/> <ref bean="someAotherAdviceBean" /> <beans:bean class="foo.bar.SampleAdvice"/> </advice-chain> </poller> <tx:advice id="txAdvice" transaction-manager="txManager"> <tx:attributes> <tx:method name="get*" read-only="true"/> <tx:method name="*"/> </tx:attributes> </tx:advice>
As you can see from the example above, we have provided a very basic XML-based configuration of Spring Transaction advice - "txAdvice" and included it within the <advice-chain> defined by the Poller. If you only need to address transactional concerns of the Poller, then you can still use the <transactional> element as a convenience.
Another important factor is the boundaries of Transactions within a Message flow. When a transaction is started, the transaction context is bound to the current thread. So regardless of how many endpoints and channels you have in your Message flow your transaction context will be preserved as long as you are ensuring that the flow continues on the same thread. As soon as you break it by introducing a Pollable Channel or Executor Channel or initiate a new thread manually in some service, the Transactional boundary will be broken as well. Essentially the Transaction will END right there, and if a successful handoff has transpired between the threads, the flow would be considered a success and a COMMIT signal would be sent even though the flow will continue and might still result in an Exception somewhere downstream. If such a flow were synchronous, that Exception could be thrown back to the initiator of the Message flow who is also the initiator of the transactional context and the transaction would result in a ROLLBACK. The middle ground is to use transactional channels at any point where a thread boundary is being broken. For example, you can use a Queue-backed Channel that delegates to a transactional MessageStore strategy, or you could use a JMS-backed channel.
In some environments, it is advantageous to synchronize operations with a transaction that encompasses the entire flow. For example, consider a <file:inbound-channel-adapter/> at the start of a flow, that performs a number of database updates. If the transaction commits, we might want to move the file to a success directory, while we might want to move it to a failures directory if the transaction rolls back.
Spring Integration 2.2 introduces the capability of synchronizing these operations with a transaction.
In addition, you can configure a PseudoTransactionManager if you don’t have a real transaction, but still want to perform different actions on success, or failure.
For more information, see Section C.4, “Pseudo Transactions”.
Key strategy interfaces for this feature are
public interface TransactionSynchronizationFactory { TransactionSynchronization create(Object key); } public interface TransactionSynchronizationProcessor { void processBeforeCommit(IntegrationResourceHolder holder); void processAfterCommit(IntegrationResourceHolder holder); void processAfterRollback(IntegrationResourceHolder holder); }
The factory is responsible for creating a TransactionSynchronization object.
You can implement your own, or use the one provided by the framework: DefaultTransactionSynchronizationFactory.
This implementation returns a TransactionSynchronization that delegates to a default implementation of TransactionSynchronizationProcessor, the ExpressionEvaluatingTransactionSynchronizationProcessor.
This processor supports three SpEL expressions, beforeCommitExpression, afterCommitExpression, and afterRollbackExpression.
These actions should be self-explanatory to those familiar with transactions.
In each case, the #root variable is the original Message; in some cases, other SpEL variables are made available, depending on the MessageSource being polled by the poller.
For example, the MongoDbMessageSource provides the #mongoTemplate variable which references the message source’s MongoTemplate; the RedisStoreMessageSource provides the #store variable which references the RedisStore created by the poll.
To enable the feature for a particular poller, you provide a reference to the TransactionSynchronizationFactory on the poller’s <transactional/> element using the synchronization-factory attribute.
Starting with version 5.0, a new PassThroughTransactionSynchronizationFactory is provided which is applied by default to polling endpoints when no TransactionSynchronizationFactory is configured but an advice of type TransactionInterceptor exists in the advice chain.
When using any out-of-the-box TransactionSynchronizationFactory implementation, polling endpoints bind a polled message to the current transactional context and provide it as a failedMessage in a MessagingException if an exception is thrown after the TX advice.
When using a custom TX advice that does not implement TransactionInterceptor, a PassThroughTransactionSynchronizationFactory can be configured explicitly to achieve this behavior.
In either case, the MessagingException becomes the payload of the ErrorMessage that is sent to the errorChannel and the cause is the raw exception thrown by the advice.
Previously, the ErrorMessage had a payload that was the raw exception thrown by the advice and did not provide a reference to the failedMessage information, making it difficult to determine the reasons for the transaction commit problem.
To simplify configuration of these components, namespace support for the default factory has been provided. Configuration is best described using an example:
<int-file:inbound-channel-adapter id="inputDirPoller" channel="someChannel" directory="/foo/bar" filter="filter" comparator="testComparator"> <int:poller fixed-rate="5000"> <int:transactional transaction-manager="transactionManager" synchronization-factory="syncFactory" /> </int:poller> </int-file:inbound-channel-adapter> <int:transaction-synchronization-factory id="syncFactory"> <int:after-commit expression="payload.renameTo('/success/' + payload.name)" channel="committedChannel" /> <int:after-rollback expression="payload.renameTo('/failed/' + payload.name)" channel="rolledBackChannel" /> </int:transaction-synchronization-factory>
The result of the SpEL evaluation is sent as the payload to either the committedChannel or rolledBackChannel (in this case, this would be Boolean.TRUE or Boolean.FALSE - the result of the java.io.File.renameTo() method call).
If you wish to send the entire payload for further Spring Integration processing, simply use the expression payload.
| Important |
|---|---|
|
It is important to understand that this is simply synchronizing the actions with a transaction, it does not make a resource that is not inherently transactional actually transactional. Instead, the transaction (be it JDBC or otherwise) is started before the poll, and committed/rolled back when the flow completes, followed by the synchronized action. It is also important to understand that if you provide a custom |
In addition to the after-commit and after-rollback expressions, before-commit is also supported. In that case, if the evaluation (or downstream processing) throws an exception, the transaction will be rolled back instead of being committed.
Referring to the above section, you may be thinking it would be useful to take these success or failure actions when a flow completes, even if there is no real transactional resources (such as JDBC) downstream of the poller. For example, consider a <file:inbound-channel-adapter/> followed by an <ftp:outbout-channel-adapter/>. Neither of these components is transactional but we might want to move the input file to different directories, based on the success or failure of the ftp transfer.
To provide this functionality, the framework provides a PseudoTransactionManager, enabling the above configuration even when there is no real transactional resource involved.
If the flow completes normally, the beforeCommit and afterCommit synchronizations will be called, on failure the afterRollback will be called.
Of course, because it is not a real transaction there will be no actual commit or rollback.
The pseudo transaction is simply a vehicle used to enable the synchronization features.
To use a PseudoTransactionManager, simply define it as a <bean/>, in the same way you would configure a real transaction manager:
<bean id="transactionManager" class="o.s.i.transaction.PseudoTransactionManager" />
Security is one of the important functions in any modern enterprise (or cloud) application,
moreover it is critical for distributed systems, such as those built using Enterprise
Integration Patterns.
Messaging independence and loosely-coupling allow target systems to communicate with each other
with any type of data in the message’s payload.
We can either trust all those messages or secure our service against "infecting" messages.
Spring Integration together with Spring Security provide a simple and comprehensive way to secure message channels, as well as other part of the integration solution.
Spring Integration provides the interceptor ChannelSecurityInterceptor, which extends AbstractSecurityInterceptor and intercepts send and receive calls on the channel.
Access decisions are then made with reference to a ChannelSecurityMetadataSource which provides the metadata describing the send and receive access policies for certain channels.
The interceptor requires that a valid SecurityContext has been established by authenticating with Spring Security.
See the Spring Security reference documentation for details.
Namespace support is provided to allow easy configuration of security constraints.
This consists of the secured channels tag which allows definition of one or more channel name patterns in conjunction with a definition of the security configuration for send and receive.
The pattern is a java.util.regexp.Pattern.
<?xml version="1.0" encoding="UTF-8"?> <beans:beans xmlns:int="http://www.springframework.org/schema/integration" xmlns:int-security="http://www.springframework.org/schema/integration/security" xmlns:beans="http://www.springframework.org/schema/beans" xmlns:xsi="http://www.w3.org/2001/XMLSchema-instance" xmlns:security="http://www.springframework.org/schema/security" xsi:schemaLocation="http://www.springframework.org/schema/beans http://www.springframework.org/schema/beans/spring-beans.xsd http://www.springframework.org/schema/security http://www.springframework.org/schema/security/spring-security.xsd http://www.springframework.org/schema/integration http://www.springframework.org/schema/integration/spring-integration.xsd http://www.springframework.org/schema/integration/security http://www.springframework.org/schema/integration/security/spring-integration-security.xsd"> <int-security:secured-channels> <int-security:access-policy pattern="admin.*" send-access="ROLE_ADMIN"/> <int-security:access-policy pattern="user.*" receive-access="ROLE_USER"/> </int-security:secured-channels>
By default the secured-channels namespace element expects a bean named authenticationManager which implements AuthenticationManager and a bean named accessDecisionManager which implements AccessDecisionManager.
Where this is not the case references to the appropriate beans can be configured as attributes of the secured-channels element as below.
<int-security:secured-channels access-decision-manager="customAccessDecisionManager" authentication-manager="customAuthenticationManager"> <int-security:access-policy pattern="admin.*" send-access="ROLE_ADMIN"/> <int-security:access-policy pattern="user.*" receive-access="ROLE_USER"/> </int-security:secured-channels>
Starting with version 4.2, the @SecuredChannel annotation is available for Java & Annotation
configuration in @Configuration classes.
With the @SecuredChannel annotation, the Java configuration variant of the XML configuration above is:
@Configuration @EnableIntegration public class ContextConfiguration { @Bean @SecuredChannel(interceptor = "channelSecurityInterceptor", sendAccess = "ROLE_ADMIN") public SubscribableChannel adminChannel() { return new DirectChannel(); } @Bean @SecuredChannel(interceptor = "channelSecurityInterceptor", receiveAccess = "ROLE_USER") public SubscribableChannel userChannel() { return new DirectChannel(); } @Bean public ChannelSecurityInterceptor channelSecurityInterceptor( AuthenticationManager authenticationManager, AccessDecisionManager accessDecisionManager) { ChannelSecurityInterceptor channelSecurityInterceptor = new ChannelSecurityInterceptor(); channelSecurityInterceptor.setAuthenticationManager(authenticationManager); channelSecurityInterceptor.setAccessDecisionManager(accessDecisionManager); return channelSecurityInterceptor; } }
To be sure that our interaction with the application is secure, according to its security system rules, we should supply
some security context with an authentication (principal) object.
The Spring Security project provides a flexible, canonical mechanism to authenticate our application clients
over HTTP, WebSocket or SOAP protocols (as can be done for any other integration protocol
with a simple Spring Security extension) and it provides a SecurityContext for further authorization checks on the
application objects, such as message channels.
By default, the SecurityContext is tied with the current Thread 's execution state using the
(ThreadLocalSecurityContextHolderStrategy).
It is accessed by an AOP interceptor on secured methods to check if that principal of the invocation has
sufficient permissions to call that method, for example.
This works well with the current thread, but often, processing logic can be performed on another thread or even
on several threads, or on to some external system(s).
Standard thread-bound behavior is easy to configure if our application is built on the Spring Integration components
and its message channels.
In this case, the secured objects may be any service activator or transformer, secured with a
MethodSecurityInterceptor in their <request-handler-advice-chain> (see Section 8.9, “Adding Behavior to Endpoints”)
or even MessageChannel (see Section D.2, “Securing channels” above).
When using DirectChannel communication, the SecurityContext is available
automatically, because the downstream flow runs on the current thread.
But in case of the QueueChannel, ExecutorChannel and PublishSubscribeChannel with an Executor, messages are
transferred from one thread to another (or several) by the nature of those channels.
In order to support such scenarios,
we can either transfer an Authentication object within the message headers and extract and authenticate it on the
other side before secured object access.
Or, we can propagate the SecurityContext to the thread receiving the transferred message.
Starting with version 4.2 SecurityContext propagation has been introduced.
It is implemented as a SecurityContextPropagationChannelInterceptor, which can simply be added to any MessageChannel
or configured as a @GlobalChannelInterceptor.
The logic of this interceptor is based on the SecurityContext extraction from the current thread from the preSend()
method, and its populating to another thread from the postReceive() (beforeHandle()) method.
Actually, this interceptor is an extension of the more generic ThreadStatePropagationChannelInterceptor, which wraps
the message-to-send together with the state-to-propagate in an internal Message<?> extension -
MessageWithThreadState<S>, - on one side and extracts the original message back and state-to-propagate on another.
The ThreadStatePropagationChannelInterceptor can be extended for any context propagation use-case and
SecurityContextPropagationChannelInterceptor is a good sample on the matter.
| Important |
|---|---|
|
Since the logic of the |
Propagation and population of SecurityContext is just one half of the work.
Since the message isn’t an owner of the threads in the message flow and we should be sure that we are secure against
any incoming messages, we have to clean up the SecurityContext from ThreadLocal.
The SecurityContextPropagationChannelInterceptor provides afterMessageHandled() interceptor’s method
implementation to do the clean up operation to free the Thread in the end of invocation from that propagated principal.
This means that, when the thread that processes the handed-off message, completes the processing of the message
(successfully or otherwise), the context is cleared so that it can’t be inadvertently be used when processing another
message.
| Note |
|---|---|
|
When working with Asynchronous Gateway, you should use an appropriate |
@Configuration @EnableIntegration @IntegrationComponentScan public class ContextConfiguration { @Bean public AsyncTaskExecutor securityContextExecutor() { return new DelegatingSecurityContextAsyncTaskExecutor( new SimpleAsyncTaskExecutor()); } } ... @MessagingGateway(asyncExecutor = "securityContextExecutor") public interface SecuredGateway { @Gateway(requestChannel = "queueChannel") Future<String> send(String payload); }
Spring Integration offers a number of configuration options. Which option you choose depends upon your particular needs and at what level you prefer to work. As with the Spring framework in general, it is also possible to mix and match the various techniques according to the particular problem at hand. For example, you may choose the XSD-based namespace for the majority of configuration combined with a handful of objects that are configured with annotations. As much as possible, the two provide consistent naming. XML elements defined by the XSD schema will match the names of annotations, and the attributes of those XML elements will match the names of annotation properties. Direct usage of the API is of course always an option, but we expect that most users will choose one of the higher-level options, or a combination of the namespace-based and annotation-driven configuration.
Spring Integration components can be configured with XML elements that map directly to the terminology and concepts of enterprise integration. In many cases, the element names match those of the Enterprise Integration Patterns.
To enable Spring Integration’s core namespace support within your Spring configuration files, add the following namespace reference and schema mapping in your top-level beans element:
<beans xmlns="http://www.springframework.org/schema/beans"
xmlns:xsi="http://www.w3.org/2001/XMLSchema-instance"
xmlns:int="http://www.springframework.org/schema/integration"
xsi:schemaLocation="http://www.springframework.org/schema/beans
http://www.springframework.org/schema/beans/spring-beans.xsd
http://www.springframework.org/schema/integration
http://www.springframework.org/schema/integration/spring-integration.xsd">
You can choose any name after "xmlns:"; int is used here for clarity, but you might prefer a shorter abbreviation. Of course if you are using an XML-editor or IDE support, then the availability of auto-completion may convince you to keep the longer name for clarity. Alternatively, you can create configuration files that use the Spring Integration schema as the primary namespace:
<beans:beans xmlns="http://www.springframework.org/schema/integration" xmlns:xsi="http://www.w3.org/2001/XMLSchema-instance" xmlns:beans="http://www.springframework.org/schema/beans" xsi:schemaLocation="http://www.springframework.org/schema/beans http://www.springframework.org/schema/beans/spring-beans.xsd http://www.springframework.org/schema/integration http://www.springframework.org/schema/integration/spring-integration.xsd">
When using this alternative, no prefix is necessary for the Spring Integration elements.
On the other hand, if you want to define a generic Spring "bean" within the same configuration file, then a prefix would be required for the bean element (<beans:bean .../>).
Since it is generally a good idea to modularize the configuration files themselves based on responsibility and/or architectural layer, you may find it appropriate to use the latter approach in the integration-focused configuration files, since generic beans are seldom necessary within those same files.
For purposes of this documentation, we will assume the "integration" namespace is primary.
Many other namespaces are provided within the Spring Integration distribution. In fact, each adapter type (JMS, File, etc.) that provides namespace support defines its elements within a separate schema. In order to use these elements, simply add the necessary namespaces with an "xmlns" entry and the corresponding "schemaLocation" mapping. For example, the following root element shows several of these namespace declarations:
<?xml version="1.0" encoding="UTF-8"?> <beans xmlns="http://www.springframework.org/schema/beans" xmlns:xsi="http://www.w3.org/2001/XMLSchema-instance" xmlns:int="http://www.springframework.org/schema/integration" xmlns:int-file="http://www.springframework.org/schema/integration/file" xmlns:int-jms="http://www.springframework.org/schema/integration/jms" xmlns:int-mail="http://www.springframework.org/schema/integration/mail" xmlns:int-rmi="http://www.springframework.org/schema/integration/rmi" xmlns:int-ws="http://www.springframework.org/schema/integration/ws" xsi:schemaLocation="http://www.springframework.org/schema/beans http://www.springframework.org/schema/beans/spring-beans.xsd http://www.springframework.org/schema/integration http://www.springframework.org/schema/integration/spring-integration.xsd http://www.springframework.org/schema/integration/file http://www.springframework.org/schema/integration/file/spring-integration-file.xsd http://www.springframework.org/schema/integration/jms http://www.springframework.org/schema/integration/jms/spring-integration-jms.xsd http://www.springframework.org/schema/integration/mail http://www.springframework.org/schema/integration/mail/spring-integration-mail.xsd http://www.springframework.org/schema/integration/rmi http://www.springframework.org/schema/integration/rmi/spring-integration-rmi.xsd http://www.springframework.org/schema/integration/ws http://www.springframework.org/schema/integration/ws/spring-integration-ws.xsd"> ... </beans>
The reference manual provides specific examples of the various elements in their corresponding chapters. Here, the main thing to recognize is the consistency of the naming for each namespace URI and schema location.
In Spring Integration, the ApplicationContext plays the central role of a Message Bus, and there are only a couple configuration options to consider. First, you may want to control the central TaskScheduler instance. You can do so by providing a single bean with the name "taskScheduler". This is also defined as a constant:
IntegrationContextUtils.TASK_SCHEDULER_BEAN_NAME
By default Spring Integration relies on an instance of ThreadPoolTaskScheduler as described in the Task Execution and Scheduling section of the Spring Framework reference manual.
That default TaskScheduler will startup automatically with a pool of 10 threads, but see Section E.5, “Global Properties”.
If you provide your own TaskScheduler instance instead, you can set the autoStartup property to false, and/or you can provide your own pool size value.
When Polling Consumers provide an explicit task-executor reference in their configuration, the invocation of the handler methods will happen within that executor’s thread pool and not the main scheduler pool. However, when no task-executor is provided for an endpoint’s poller, it will be invoked by one of the main scheduler’s threads.
| Caution |
|---|---|
|
Do not run long-running tasks on poller threads; use a task executor instead.
If you have a lot of polling endpoints, you can cause thread starvation, unless you increase the pool size.
Also, polling consumers have a default |
| Note |
|---|---|
|
An endpoint is a Polling Consumer if its input channel is one of the queue-based (i.e. pollable) channels. Event Driven Consumers are those having input channels that have dispatchers instead of queues (i.e. they are subscribable). Such endpoints have no poller configuration since their handlers will be invoked directly. |
| Important |
|---|---|
|
When running in a JEE container, you may need to use Spring’s <bean id="taskScheduler" class="o.s.scheduling.commonj.TimerManagerTaskScheduler"> <property name="timerManagerName" value="tm/MyTimerManager" /> <property name="resourceRef" value="true" /> </bean> |
The next section will describe what happens if Exceptions occur within the asynchronous invocations.
As described in the overview at the very beginning of this manual, one of the main motivations behind a Message-oriented framework like Spring Integration is to promote loose-coupling between components. The Message Channel plays an important role in that producers and consumers do not have to know about each other. However, the advantages also have some drawbacks. Some things become more complicated in a very loosely coupled environment, and one example is error handling.
When sending a Message to a channel, the component that ultimately handles that Message may or may not be operating within the same thread as the sender.
If using a simple default DirectChannel (with the <channel> element that has no <queue> sub-element and no task-executor attribute),
the Message-handling will occur in the same thread that sends the initial message.
In that case, if an Exception is thrown, it can be caught by the sender (or it may propagate past the sender if it is an uncaught RuntimeException).
So far, everything is fine.
This is the same behavior as an Exception-throwing operation in a normal call stack.
A message flow that runs on a caller thread might be invoked via a Messaging Gateway (see Section 8.4, “Messaging Gateways”) or a MessagingTemplate (see Section 4.1.4, “MessagingTemplate”).
In either case, the default behavior is to throw any exceptions to the caller.
For the Messaging Gateway, see Section 8.4.8, “Error Handling” for details about how the exception is thrown and how to configure the gateway to route the errors to an error channel instead.
When using a MessagingTemplate, or sending to a MessageChannel directly, exceptions are always thrown to the caller.
When adding asynchronous processing, things become rather more complicated.
For instance, if the channel element does provide a queue sub-element, then the component that handles the Message will be operating in a different thread than the sender.
The same is true when an ExecutorChannel is used.
The sender may have dropped the Message into the channel and moved on to other things.
There is no way for the Exception to be thrown directly back to that sender using standard Exception throwing techniques.
Instead, handling errors for asynchronous processes requires an asynchronous error-handling mechanism as well.
Spring Integration supports error handling for its components by publishing errors to a Message Channel.
Specifically, the Exception will become the payload of a Spring Integration ErrorMessage.
That Message will then be sent to a Message Channel that is resolved in a way that is similar to the replyChannel resolution.
First, if the request Message being handled at the time the Exception occurred contains an errorChannel header (the
header name is defined in the constant: MessageHeaders.ERROR_CHANNEL), the ErrorMessage will be sent to that channel.
Otherwise, the error handler will send to a "global" channel whose bean name is "errorChannel"
(this is also defined as a constant: IntegrationContextUtils.ERROR_CHANNEL_BEAN_NAME).
A default "errorChannel" bean is created behind the scenes by the Framework. However, you can just as easily define your own if you want to control the settings.
<int:channel id="errorChannel"> <int:queue capacity="500"/> </int:channel>
| Note |
|---|---|
|
The default "errorChannel" is a |
The most important thing to understand here is that the messaging-based error handling will only apply to Exceptions
that are thrown by a Spring Integration task that is executing within a TaskExecutor.
This does not apply to Exceptions thrown by a handler that is operating within the same thread as the sender (e.g.
through a DirectChannel as described above).
| Note |
|---|---|
|
When Exceptions occur in a scheduled poller task’s execution, those exceptions will be wrapped in |
To enable global error handling, simply register a handler on that channel.
For example, you can configure Spring Integration’s ErrorMessageExceptionTypeRouter as the handler of an endpoint that is subscribed to the errorChannel.
That router can then spread the error messages across multiple channels based on Exception type.
Starting with version 4.3.10, the ErrorMessagePublisher and the ErrorMessageStrategy are provided.
They can be used as general mechanism for publishing ErrorMessage s and can be called or extended in any error handling scenarios.
The ErrorMessageSendingRecoverer extends this class as a RecoveryCallback implementation that can be used with retry, such as the
RequestHandlerRetryAdvice.
The ErrorMessageStrategy is used to build an ErrorMessage based on the provided exception and an AttributeAccessor context.
It can be injected to any MessageProducerSupport and MessagingGatewaySupport - and the requestMessage is stored under ErrorMessageUtils.INPUT_MESSAGE_CONTEXT_KEY in the AttributeAccessor context.
The ErrorMessageStrategy can use that requestMessage as the originalMessage property of the ErrorMessage it creates.
The DefaultErrorMessageStrategy does exactly that.
Certain global framework properties can be overridden by providing a properties file on the classpath.
The default properties can be found in /META-INF/spring.integration.default.properties in the spring-integration-core
jar.
You can see them on GitHub here,
but here are the current default values:
spring.integration.channels.autoCreate=true
|
When true, |
|
This property provides the default number of subscribers allowed on, say, a |
|
This property provides the default number of subscribers allowed on, say, a |
|
The number of threads available in the default |
|
When |
|
A comma-separated list of message header names which should not be populated into |
|
A comma-separated list of |
These properties can be overridden by adding a file /META-INF/spring.integration.properties to the classpath.
It is not necessary to provide all the properties, just those that you want to override.
In addition to the XML namespace support for configuring Message Endpoints, it is also possible to use annotations.
First, Spring Integration provides the class-level @MessageEndpoint as a stereotype annotation, meaning that it is itself annotated with Spring’s @Component annotation and is therefore recognized automatically as a bean definition when using Spring component-scanning.
Even more important are the various method-level annotations that indicate the annotated method is capable of handling a message. The following example demonstrates both:
@MessageEndpoint public class FooService { @ServiceActivator public void processMessage(Message message) { ... } }
Exactly what it means for the method to "handle" the Message depends on the particular annotation. Annotations available in Spring Integration include:
- @Aggregator
- @Filter
- @Router
- @ServiceActivator
- @Splitter
- @Transformer
- @InboundChannelAdapter
- @BridgeFrom
- @BridgeTo
- @MessagingGateway
- @IntegrationComponentScan
The behavior of each is described in its own chapter or section within this reference.
| Note |
|---|---|
|
If you are using XML configuration in combination with annotations, the |
In most cases, the annotated handler method should not require the Message type as its parameter.
Instead, the method parameter type can match the message’s payload type.
public class FooService { @ServiceActivator public void bar(Foo foo) { ... } }
When the method parameter should be mapped from a value in the MessageHeaders, another option is to use the parameter-level @Header annotation.
In general, methods annotated with the Spring Integration annotations can either accept the Message itself, the message payload, or a header value (with @Header) as the parameter.
In fact, the method can accept a combination, such as:
public class FooService { @ServiceActivator public void bar(String payload, @Header("x") int valueX, @Header("y") int valueY) { ... } }
There is also a @Headers annotation that provides all of the Message headers as a Map:
public class FooService { @ServiceActivator public void bar(String payload, @Headers Map<String, Object> headerMap) { ... } }
| Note |
|---|---|
|
The value of the annotation can also be a SpEL expression (e.g., |
For several of these annotations, when a Message-handling method returns a non-null value, the endpoint will attempt to send a reply. This is consistent across both configuration options (namespace and annotations) in that such an endpoint’s output channel will be used if available, and the REPLY_CHANNEL message header value will be used as a fallback.
| Tip |
|---|---|
|
The combination of output channels on endpoints and the reply channel message header enables a pipeline approach where multiple components have an output channel, and the final component simply allows the reply message to be forwarded to the reply channel as specified in the original request message. In other words, the final component depends on the information provided by the original sender and can dynamically support any number of clients as a result. This is an example of Return Address. |
In addition to the examples shown here, these annotations also support inputChannel and outputChannel properties.
@Service public class FooService { @ServiceActivator(inputChannel="input", outputChannel="output") public void bar(String payload, @Headers Map<String, Object> headerMap) { ... } }
The processing of these annotations creates the same beans (AbstractEndpoint s and MessageHandler s (or MessageSource s for the inbound channel adapter - see below) as with similar xml components.
The bean names are generated with this pattern: [componentName].[methodName].[decapitalizedAnnotationClassShortName]
(e.g for the sample above - fooService.bar.serviceActivator)
for the AbstractEndpoint and the same name with an additional .handler (.source) suffix for the MessageHandler (MessageSource) bean.
The MessageHandler s (MessageSource s) are also eligible to be tracked by Section 10.3, “Message History”.
Starting with version 4.0, all Messaging Annotations provide SmartLifecycle options - autoStartup and phase to allow endpoint lifecycle control on application context initialization.
They default to true and 0 respectively.
To change the state of an endpoint (e.g` start()/stop()) obtain a reference to the endpoint bean using the `BeanFactory (or autowiring) and invoke the method(s), or send a command message to the Control Bus (Section 10.6, “Control Bus”).
For these purposes you should use the beanName mentioned above.
@Poller
Before Spring Integration 4.0, the above Messaging Annotations required that the inputChannel was a reference to a SubscribableChannel.
For PollableChannel s there was need to use a <int:bridge/>, to configure a <int:poller/> to make the composite endpoint - a PollingConsumer.
Starting with version 4.0, the @Poller annotation has been introduced to allow the configuration of poller attributes directly on the above Messaging Annotations:
public class AnnotationService { @Transformer(inputChannel = "input", outputChannel = "output", poller = @Poller(maxMessagesPerPoll = "${poller.maxMessagesPerPoll}", fixedDelay = "${poller.fixedDelay}")) public String handle(String payload) { ... } }
This annotation provides only simple PollerMetadata options.
The @Poller's attributes maxMessagesPerPoll, fixedDelay, fixedRate and cron can be configured with property-placeholders.
If it is necessary to provide more polling options (e.g. transaction, advice-chain, error-handler etc.), the PollerMetadata should be configured as a generic bean with its bean name used for @Poller's value attribute.
In this case, no other attributes are allowed (they would be specified on the PollerMetadata bean).
Note, if inputChannel is PollableChannel and no @Poller is configured, the default PollerMetadata will be used, if it is present in the application context.
To declare the default poller using @Configuration, use:
@Bean(name = PollerMetadata.DEFAULT_POLLER) public PollerMetadata defaultPoller() { PollerMetadata pollerMetadata = new PollerMetadata(); pollerMetadata.setTrigger(new PeriodicTrigger(10)); return pollerMetadata; }
With this endpoint using the default poller:
public class AnnotationService { @Transformer(inputChannel = "aPollableChannel", outputChannel = "output") public String handle(String payload) { ... } }
To use a named poller, use:
@Bean public PollerMetadata myPoller() { PollerMetadata pollerMetadata = new PollerMetadata(); pollerMetadata.setTrigger(new PeriodicTrigger(1000)); return pollerMetadata; }
With this endpoint using the default poller:
public class AnnotationService { @Transformer(inputChannel = "aPollableChannel", outputChannel = "output" poller = @Poller("myPoller") public String handle(String payload) { ... } }
Starting with version 4.3.3, the @Poller annotation now has the errorChannel attribute for easier configuration of the underlying MessagePublishingErrorHandler.
This attribute play the same role as error-channel in the <poller> xml component.
See Section 8.1.4, “Endpoint Namespace Support” for more information.
@InboundChannelAdapter
Starting with version 4.0, the @InboundChannelAdapter method annotation is available.
This produces a SourcePollingChannelAdapter integration component based on a MethodInvokingMessageSource for the annotated method.
This annotation is an analogue of <int:inbound-channel-adapter> XML component and has the same restrictions: the method cannot have parameters, and the return type must not be void.
It has two attributes: value - the required MessageChannel bean name and poller - an optional @Poller annotation, as described above.
If there is need to provide some MessageHeaders, use a Message<?> return type and build the Message<?> within the method using a MessageBuilder to configure its MessageHeaders.
@InboundChannelAdapter("counterChannel") public Integer count() { return this.counter.incrementAndGet(); } @InboundChannelAdapter(value = "fooChannel", poller = @Poller(fixed-rate = "5000")) public String foo() { return "foo"; }
Starting with version 4.3 the channel alias for the value annotation attribute has been introduced for better
source code readability.
Also the target MessageChannel bean is resolved in the SourcePollingChannelAdapter by the provided name
(outputChannelName options) on the first receive() call, not during
initialization phase.
It allows the late binding logic, when the target MessageChannel bean from the consumer perspective
is created and registered a bit later than the @InboundChannelAdapter parsing phase.
The first example requires that the default poller has been declared elsewhere in the application context.
@MessagingGateway
See Section 8.4.6, “@MessagingGateway Annotation”.
@IntegrationComponentScan
The standard Spring Framework @ComponentScan annotation doesn’t scan interfaces for stereotype @Component
annotations.
To overcome this limitation and allow the configuration of @MessagingGateway (see Section 8.4.6, “@MessagingGateway Annotation”),
the @IntegrationComponentScan mechanism has been introduced.
This annotation must be placed along with a @Configuration annotation, and customized for the scanning options,
such as basePackages and basePackageClasses.
In this case all discovered interfaces annotated with @MessagingGateway will be parsed and registered
as a GatewayProxyFactoryBean s.
All other class-based components are parsed by the standard @ComponentScan.
In future, more scanning logic may be added to the @IntegrationComponentScan.
Starting with version 4.0, all Messaging Annotations can be configured as meta-annotations and all user-defined Messaging Annotations can define the same attributes to override their default values. In addition, meta-annotations can be configured hierarchically:
@Target({ElementType.METHOD, ElementType.ANNOTATION_TYPE}) @Retention(RetentionPolicy.RUNTIME) @ServiceActivator(inputChannel = "annInput", outputChannel = "annOutput") public @interface MyServiceActivator { String[] adviceChain = { "annAdvice" }; } @Target({ElementType.METHOD, ElementType.ANNOTATION_TYPE}) @Retention(RetentionPolicy.RUNTIME) @MyServiceActivator public @interface MyServiceActivator1 { String inputChannel(); String outputChannel(); } ... @MyServiceActivator1(inputChannel = "inputChannel", outputChannel = "outputChannel") public Object service(Object payload) { ... }
This allows users to set defaults for various attributes and enables isolation of framework Java dependencies to user annotations, avoiding their use in user classes. If the framework finds a method with a user annotation that has a framework meta-annotation, it is treated as if the method was annotated directly with the framework annotation.
Starting with version 4.0, Messaging Annotations can be configured on @Bean method definitions in @Configuration classes, to produce Message Endpoints based on the beans, not methods.
It is useful when @Bean definitions are "out of the box" MessageHandler s (AggregatingMessageHandler, DefaultMessageSplitter etc.), Transformer s (JsonToObjectTransformer, ClaimCheckOutTransformer etc.), MessageSource s (FileReadingMessageSource, RedisStoreMessageSource etc.):
@Configuration @EnableIntegration public class MyFlowConfiguration { @Bean @InboundChannelAdapter(value = "inputChannel", poller = @Poller(fixedDelay = "1000")) public MessageSource<String> consoleSource() { return CharacterStreamReadingMessageSource.stdin(); } @Bean @Transformer(inputChannel = "inputChannel", outputChannel = "httpChannel") public ObjectToMapTransformer toMapTransformer() { return new ObjectToMapTransformer(); } @Bean @ServiceActivator(inputChannel = "httpChannel") public MessageHandler httpHandler() { HttpRequestExecutingMessageHandler handler = new HttpRequestExecutingMessageHandler("http://foo/service"); handler.setExpectedResponseType(String.class); handler.setOutputChannelName("outputChannel"); return handler; } @Bean @ServiceActivator(inputChannel = "outputChannel") public LoggingHandler loggingHandler() { return new LoggingHandler("info"); } }
Starting with version 5.0, support is also provided for @Bean annotated InboundChannelAdapter`s that return `java.util.function.Supplier which can produce either a POJO or a Message:
@Configuration @EnableIntegration public class MyFlowConfiguration { @Bean @InboundChannelAdapter(value = "inputChannel", poller = @Poller(fixedDelay = "1000")) public Supplier<String> pojoSupplier() { return () -> "foo"; } @Bean @InboundChannelAdapter(value = "inputChannel", poller = @Poller(fixedDelay = "1000")) public Supplier<Message<String>> messageSupplier() { return () -> new GenericMessage<>("foo"); }
The meta-annotation rules work on @Bean methods as well (@MyServiceActivator above can be applied to a @Bean definition).
| Note |
|---|---|
|
When using these annotations on consumer |
| Note |
|---|---|
|
The bean names are generated with this algorithm:
* The |
| Important |
|---|---|
|
When using these annotations on |
| Note |
|---|---|
|
With Java & Annotation configuration we can use any |
@Bean @ServiceActivator(inputChannel = "skippedChannel") @Profile("foo") public MessageHandler skipped() { return System.out::println; }
Together with the existing Spring Container logic, the Messaging Endpoint bean, based on the @ServiceActivator
annotation, won’t be registered as well.
Starting with version 4.0, the Messaging Annotation and Java configuration provides @BridgeFrom and @BridgeTo @Bean method annotations to mark MessageChannel beans in @Configuration classes.
This is just for completeness, providing a convenient mechanism to declare a BridgeHandler and its Message Endpoint configuration:
@Bean public PollableChannel bridgeFromInput() { return new QueueChannel(); } @Bean @BridgeFrom(value = "bridgeFromInput", poller = @Poller(fixedDelay = "1000")) public MessageChannel bridgeFromOutput() { return new DirectChannel(); } @Bean public QueueChannel bridgeToOutput() { return new QueueChannel(); } @Bean @BridgeTo("bridgeToOutput") public MessageChannel bridgeToInput() { return new DirectChannel(); }
These annotations can be used as meta-annotations as well.
Spring Integration implements a flexible facility to map Messages to Methods and their arguments without providing extra configuration by relying on some default rules as well as defining certain conventions.
Single un-annotated parameter (object or primitive) which is not a Map/Properties with non-void return type;
public String foo(Object o);
Details:
Input parameter is Message Payload. If parameter type is not compatible with Message Payload an attempt will be made to convert it using Conversion Service provided by Spring 3.0. The return value will be incorporated as a Payload of the returned Message
Single un-annotated parameter (object or primitive) which is not a Map/Properties with Message return type;
public Message foo(Object o);
Details:
Input parameter is Message Payload. If parameter type is not compatible with Message Payload an attempt will be made to convert it using Conversion Service provided by Spring 3.0. The return value is a newly constructed Message that will be sent to the next destination.
_Single parameter which is a Message or its subclass with arbitrary object/primitive return type; _
public int foo(Message msg);
Details:
Input parameter is Message itself. The return value will become a payload of the Message that will be sent to the next destination.
Single parameter which is a Message or its subclass with Message or its subclass as a return type;
public Message foo(Message msg);
Details:
Input parameter is Message itself. The return value is a newly constructed Message that will be sent to the next destination.
Single parameter which is of type Map or Properties with Message as a return type;
public Message foo(Map m);
Details:
This one is a bit interesting. Although at first it might seem like an easy mapping straight to Message Headers, the preference is always given to a Message Payload. This means that if Message Payload is of type Map, this input argument will represent Message Payload. However if Message Payload is not of type Map, then no conversion via Conversion Service will be attempted and the input argument will be mapped to Message Headers.
Two parameters where one of them is arbitrary non-Map/Properties type object/primitive and another is Map/Properties type object (regardless of the return)
public Message foo(Map h, <T> t);
Details:
This combination contains two input parameters where one of them is of type Map. Naturally the non-Map parameters (regardless of the order) will be mapped to a Message Payload and the Map/Properties (regardless of the order) will be mapped to Message Headers giving you a nice POJO way of interacting with Message structure.
No parameters (regardless of the return)
public String foo();
Details:
This Message Handler method will be invoked based on the Message sent to the input channel this handler is hooked up to, however no Message data will be mapped, thus making Message act as event/trigger to invoke such handlerThe output will be mapped according to the rules above
No parameters, void return
public void foo();
Details:
Same as above, but no output
Annotation based mappings
Annotation based mapping is the safest and least ambiguous approach to map Messages to Methods. There wil be many pointers to annotation based mapping throughout this manual, however here are couple of examples:
public String foo(@Payload String s, @Header("foo") String b)
Very simple and explicit way of mapping Messages to method. As you’ll see later on, without an annotation this signature would result in an ambiguous condition. However by explicitly mapping the first argument to a Message Payload and the second argument to a value of the foo Message Header, we have avoided any ambiguity.
public String foo(@Payload String s, @RequestParam("foo") String b)
Looks almost identical to the previous example, however @RequestMapping or any other non-Spring Integration mapping annotation is irrelevant and therefore will be ignored leaving the second parameter unmapped. Although the second parameter could easily be mapped to a Payload, there can only be one Payload. Therefore this method mapping is ambiguous.
public String foo(String s, @Header("foo") String b)
The same as above. The only difference is that the first argument will be mapped to the Message Payload implicitly.
public String foo(@Headers Map m, @Header("foo") Map f, @Header("bar") String bar)
Yet another signature that would definitely be treated as ambiguous without annotations because it has more than 2 arguments. Furthermore, two of them are Maps. However, with annotation-based mapping, the ambiguity is easily avoided. In this example the first argument is mapped to all the Message Headers, while the second and third argument map to the values of Message Headers foo and bar. The payload is not being mapped to any argument.
Multiple parameters:
Multiple parameters could create a lot of ambiguity with regards to determining the appropriate mappings.
The general advice is to annotate your method parameters with @Payload and/or @Header/@Headers.
Below are some of the examples of ambiguous conditions which result in an Exception being raised.
public String foo(String s, int i)
- the two parameters are equal in weight, therefore there is no way to determine which one is a payload.
public String foo(String s, Map m, String b)
- almost the same as above. Although the Map could be easily mapped to Message Headers, there is no way to determine what to do with the two Strings.
public String foo(Map m, Map f)
- although one might argue that one Map could be mapped to Message Payload and another one to Message Headers, it would be unreasonable to rely on the order (e.g., first is Payload, second Headers)
| Tip |
|---|---|
|
Basically any method signature with more than one method argument which is not (Map, <T>), and those parameters are not annotated, will result in an ambiguous condition thus triggering an Exception. |
Multiple methods:
Message Handlers with multiple methods are mapped based on the same rules that are described above, however some scenarios might still look confusing.
Multiple methods (same or different name) with legal (mappable) signatures:
public class Foo { public String foo(String str, Map m); public String foo(Map m); }
As you can see, the Message could be mapped to either method. The first method would be invoked where Message Payload could be mapped to str and Message Headers could be mapped to m. The second method could easily also be a candidate where only Message Headers are mapped to m. To make meters worse both methods have the same name which at first might look very ambiguous considering the following configuration:
<int:service-activator input-channel="input" output-channel="output" method="foo"> <bean class="org.bar.Foo"/> </int:service-activator>
At this point it would be important to understand Spring Integration mapping Conventions where at the very core, mappings are based on Payload first and everything else next. In other words the method whose argument could be mapped to a Payload will take precedence over all other methods.
On the other hand let’s look at slightly different example:
public class Foo { public String foo(String str, Map m); public String foo(String str); }
If you look at it you can probably see a truly ambiguous condition. In this example since both methods have signatures that could be mapped to a Message Payload. They also have the same name. Such handler methods will trigger an Exception. However if the method names were different you could influence the mapping with a method attribute (see below):
public class Foo { public String foo(String str, Map m); public String bar(String str); }
<int:service-activator input-channel="input" output-channel="output" method="bar"> <bean class="org.bar.Foo"/> </int:service-activator>
Now there is no ambiguity since the configuration explicitly maps to the bar method which has no name conflicts.
Spring Integration provides a number of utilities and annotations to help when testing your application.
Test support is presented by two modules: spring-integration-test-support which contains core items and shared utilities, and spring-integration-test which provides mocking and application context configuration components for integration tests.
spring-integration-test-support (spring-integration-test in versions before 5.0) provides basic, standalone utilities, rules and matchers for unit testing (it also has no dependencies on Spring Integration itself, and is used internally in Framework tests). spring-integration-test is aimed to help with integration testing and provides a comprehensive high level API to mock integration components and verify behavior of individual components, including whole integration flows or just parts thereof.
A thorough treatment of testing in the enterprise is beyond the scope of this reference manual.
See the Test-Driven Development in Enterprise Integration Projects paper, by Gregor Hohpe and Wendy Istvanick, for a source of ideas and principles for testing your target integration solution.
The Spring Integration Test Framework and test utilities are fully based on existing JUnit, Hamcrest and Mockito libraries. The Application Context interaction is based on the Spring Test Framework. Please, refer to the documentation for those projects for further information.
Thanks to the canonical implementation of the EIP in Spring Integration Framework and its first class citizens like MessageChannel, Endpoint and MessageHandler abstractions and supported out-of-the-box loose coupling principles, we can implement integration solutions of any complexity.
With the Spring Integration API for the flow definitions, we can improve, modify or even replace some part of the flow without impacting (mostly) other components in the integration solution.
Testing such an integration solution is still a challenge, from an end-to-end perspective, as well as with an in-isolation approach.
There are several existing tools which help to test or mock some integration protocols and they work very well with Spring Integration Channel Adapters; examples include:
-
Spring
MockMVCand itsMockRestServiceServerfor HTTP; - Some RDBMS vendors provide embedded data bases for JDBC or JPA support;
- ActiveMQ can be embedded for testing JMS or STOMP protocols;
- There are tools for embedded MongoDB and Redis;
- Tomcat and Jetty have embedded libraries to test real HTTP, Web Services or WebSockets;
-
The
FtpServerandSshServerfrom the Apache Mina project can be used for testing (S)FTP protocols; - Gemfire and Hazelcast can be run as real data grid nodes in the tests;
-
The Curator Framework provides a
TestingServerfor Zookeeper interaction; - Apache Kafka provides admin tools to embed a Kafka Broker in the tests.
Most of these tools and libraries are used in Spring Integration tests and from the GitHub repository, in the test directory of each module, you can discover ideas how to build your own tests for integration solutions.
The rest of this chapter describes the testing tools and utilities provided by the Spring Integration Framework.
The spring-integration-test-support module provides utilities and helpers for unit testing.
The TestUtils class is mostly used for properties assertions in JUnit tests:
@Test public void loadBalancerRef() { MessageChannel channel = channels.get("lbRefChannel"); LoadBalancingStrategy lbStrategy = TestUtils.getPropertyValue(channel, "dispatcher.loadBalancingStrategy", LoadBalancingStrategy.class); assertTrue(lbStrategy instanceof SampleLoadBalancingStrategy); }
TestUtils.getPropertyValue() is based on Spring’s DirectFieldAccessor and provides the ability to get a value from the target private property.
As you see by the example above it also supports nested properties access, using dotted notation.
The createTestApplicationContext() factory method produce a TestApplicationContext instance with the supplied Spring Integration environment.
See the JavaDocs of other TestUtils methods for more information about this class.
The SocketUtils provides several methods to select a random port(s) for exposing server-side components without conflicts:
<bean id="socketUtils" class="org.springframework.integration.test.util.SocketUtils" /> <int-syslog:inbound-channel-adapter id="syslog" channel="sysLogs" port="#{socketUtils.findAvailableUdpSocket(1514)}" /> <int:channel id="sysLogs"> <int:queue/> </int:channel>
Which is used from the unit test as:
@Autowired @Qualifier("syslog.adapter") private UdpSyslogReceivingChannelAdapter adapter; @Autowired private PollableChannel sysLogs; ... @Test public void testSimplestUdp() throws Exception { int port = TestUtils.getPropertyValue(adapter1, "udpAdapter.port", Integer.class); byte[] buf = "<157>JUL 26 22:08:35 WEBERN TESTING[70729]: TEST SYSLOG MESSAGE".getBytes("UTF-8"); DatagramPacket packet = new DatagramPacket(buf, buf.length, new InetSocketAddress("localhost", port)); DatagramSocket socket = new DatagramSocket(); socket.send(packet); socket.close(); Message<?> message = foo.receive(10000); assertNotNull(message); }
| Note |
|---|---|
|
This tecnique is not foolproof; some other process could be allocated the "free" port before your test opens it.
It is generally more preferable to use a server port |
The OnlyOnceTrigger is useful for polling endpoints when it is good to produce only one test message and verify the behavior without impacting of unexpected other period messages:
<bean id="testTrigger" class="org.springframework.integration.test.util.OnlyOnceTrigger" /> <int:poller id="jpaPoller" trigger="testTrigger"> <int:transactional transaction-manager="transactionManager" /> </int:poller>
@Autowired @Qualifier("jpaPoller") PollerMetadata poller; @Autowired OnlyOnceTrigger testTrigger; ... @Test @DirtiesContext public void testWithEntityClass() throws Exception { this.testTrigger.reset(); ... JpaPollingChannelAdapter jpaPollingChannelAdapter = new JpaPollingChannelAdapter(jpaExecutor); SourcePollingChannelAdapter adapter = JpaTestUtils.getSourcePollingChannelAdapter( jpaPollingChannelAdapter, this.outputChannel, this.poller, this.context, this.getClass().getClassLoader()); adapter.start(); ... }
The org.springframework.integration.test.support package contains various abstract classes which should be implemented in target tests.
See their JavaDocs for more information.
The org.springframework.integration.test.matcher package contains several Matcher implementations to assert Message and its properties in unit tests:
import static org.springframework.integration.test.matcher.PayloadMatcher.hasPayload; ... @Test public void transform_withFilePayload_convertedToByteArray() throws Exception { Message<?> result = this.transformer.transform(message); assertThat(result, is(notNullValue())); assertThat(result, hasPayload(is(instanceOf(byte[].class)))); assertThat(result, hasPayload(SAMPLE_CONTENT.getBytes(DEFAULT_ENCODING))); }
The MockitoMessageMatchers factory can be used for mocks stubbing and verifications:
static final Date SOME_PAYLOAD = new Date(); static final String SOME_HEADER_VALUE = "bar"; static final String SOME_HEADER_KEY = "test.foo"; ... Message<?> message = MessageBuilder.withPayload(SOME_PAYLOAD) .setHeader(SOME_HEADER_KEY, SOME_HEADER_VALUE) .build(); MessageHandler handler = mock(MessageHandler.class); handler.handleMessage(message); verify(handler).handleMessage(messageWithPayload(SOME_PAYLOAD)); verify(handler).handleMessage(messageWithPayload(is(instanceOf(Date.class)))); ... MessageChannel channel = mock(MessageChannel.class); when(channel.send(messageWithHeaderEntry(SOME_HEADER_KEY, is(instanceOf(Short.class))))) .thenReturn(true); assertThat(channel.send(message), is(false));
Additional utilities will eventually be added or migrated.
For example RemoteFileTestSupport implementations for the (S)FTP tests can be moved from the test directory of those particular modules to this spring-integration-test-support artifact.
Typically, tests for Spring applications use the Spring Test Framework and since Spring Integration is based on the Spring Framework foundation, everything we can do with the Spring Test Framework is applied as well when testing integration flows.
The org.springframework.integration.test.context package provides some components for enhancing the test context for integration needs.
First of all we configure our test class with a @SpringIntegrationTest annotation to enable the Spring Integration Test Framework:
@RunWith(SpringRunner.class) @SpringIntegrationTest(noAutoStartup = {"inboundChannelAdapter", "*Source*"}) public class MyIntegrationTests { @Autowired private MockIntegrationContext mockIntegrationContext; }
The @SpringIntegrationTest annotation populates a MockIntegrationContext bean which can be autowired to the test class to access its methods.
With the provided noAutoStartup option, the Spring Integration Test Framework prevents endpoints that are normally autoStartup=true from starting. The endpoints are matched to the provided patterns, which support the following simple pattern styles: xxx*, *xxx, *xxx* and xxx*yyy.
This is useful, when we would like to not have real connections to the target systems from Inbound Channel Adapters, for example an AMQP Inbound Gateway, JDBC Polling Channel Adapter, WebSocket Message Producer in client mode etc.
The MockIntegrationContext is aimed to be used in the target test-cases for modifications to beans in the real application context, for example those endpoints that have autoStartup overridden to false can be replaced with mocks:
@Test public void testMockMessageSource() { MessageSource<String> messageSource = () -> new GenericMessage<>("foo"); this.mockIntegrationContext.substituteMessageSourceFor("mySourceEndpoint", messageSource); Message<?> receive = this.results.receive(10_000); assertNotNull(receive); }
See their JavaDocs for more information.
The org.springframework.integration.test.mock package offers tools and utilities for mocking, stubbing and verification of activity on Spring Integration components.
The mocking functionality is fully based and compatible with the well known Mockito Framework.
(The current Mockito transitive dependency is of version 2.5.x.)
The MockIntegration factory provides an API to build mocks for Spring Integration beans which are parts of the integration flow - MessageSource, MessageProducer, MessageHandler, MessageChannel.
The target mocks can be used during configuration phase:
<int:inbound-channel-adapter id="inboundChannelAdapter" channel="results"> <bean class="org.springframework.integration.test.mock.MockIntegration" factory-method="mockMessageSource"> <constructor-arg value="a"/> <constructor-arg> <array> <value>b</value> <value>c</value> </array> </constructor-arg> </bean> </int:inbound-channel-adapter>
@InboundChannelAdapter(channel = "results") @Bean public MessageSource<Integer> testingMessageSource() { return MockIntegration.mockMessageSource(1, 2, 3); } ... StandardIntegrationFlow flow = IntegrationFlows .from(MockIntegration.mockMessageSource("foo", "bar", "baz")) .<String, String>transform(String::toUpperCase) .channel(out) .get(); IntegrationFlowRegistration registration = this.integrationFlowContext.registration(flow) .register();
as well as in the target test method to replace the real endpoints before performing verifications and assertions.
For this purpose, the aforementioned MockIntegrationContext should be used from the test:
this.mockIntegrationContext.substituteMessageSourceFor("mySourceEndpoint", MockIntegration.mockMessageSource("foo", "bar", "baz")); Message<?> receive = this.results.receive(10_000); assertNotNull(receive); assertEquals("FOO", receive.getPayload());
Unlike the Mockito MessageSource mock object, the MockMessageHandler is just a regular AbstractMessageProducingHandler extension with a chain API to stub handling for incoming messages.
The MockMessageHandler provides handleNext(Consumer<Message<?>>) to specify a one-way stub for the next request message; used to mock message handlers that don’t produce replies.
The handleNextAndReply(Function<Message<?>, ?>) is provided for performing the same stub logic for the next request message and producing a reply for it.
They can be chained to simulate any arbitrary request-reply scenarios for all expected request messages variants.
These consumers and functions are applied to the incoming messages, one at a time from the stack, until the last, which is then used for all remaining messages.
The behavior is similar to the Mockito Answer or doReturn() API.
In addition, a Mockito ArgumentCaptor<Message<?>> can be supplied to the MockMessageHandler in a constructor argument.
Each request message for the MockMessageHandler is captured by that ArgumentCaptor.
During the test, its getValue()/getAllValues() can be used to verify and assert those request messages.
The MockIntegrationContext provides an substituteMessageHandlerFor() API for replacing the actual configured MessageHandler with a MockMessageHandler, in the particular endpoint in the application context under test.
A typical usage might be:
ArgumentCaptor<Message<?>> messageArgumentCaptor = ArgumentCaptor.forClass(Message.class); MessageHandler mockMessageHandler = mockMessageHandler(messageArgumentCaptor) .handleNextAndReply(m -> m.getPayload().toString().toUpperCase()); this.mockIntegrationContext.substituteMessageHandlerFor("myService.serviceActivator", mockMessageHandler); GenericMessage<String> message = new GenericMessage<>("foo"); this.myChannel.send(message); Message<?> received = this.results.receive(10000); assertNotNull(received); assertEquals("FOO", received.getPayload()); assertSame(message, messageArgumentCaptor.getValue());
See MockIntegration and MockMessageHandler JavaDocs for more information.
As well as exploring the test cases in the framework itself, the spring-integration-samples repository has some sample apps specifically around testing, such as testing-examples and advanced-testing-examples.
In some cases, the samples themselves have comprehensive end-to-end tests, such as the file-split-ftp sample.
As of Spring Integration 2.0, the samples are no longer included with the Spring Integration distribution. Instead we have switched to a much simpler collaborative model that should promote better community participation and, ideally, more contributions. Samples now have a dedicated Git repository and a dedicated JIRA Issue Tracking system. Sample development will also have its own lifecycle which is not dependent on the lifecycle of the framework releases, although the repository will still be tagged with each major release for compatibility reasons.
The great benefit to the community is that we can now add more samples and make them available to you right away without waiting for the next release. Having its own JIRA that is not tied to the the actual framework is also a great benefit. You now have a dedicated place to suggest samples as well as report issues with existing samples. Or, _ you may want to submit a sample to us_ as an attachment through the JIRA or, better, through the collaborative model that Git promotes. If we believe your sample adds value, we would be more then glad to add it to the samples repository, properly crediting you as the author.
The Spring Integration Samples project is hosted on GitHub. You can find the repository at:
https://github.com/SpringSource/spring-integration-samples
In order to check out or clone (Git parlance) the samples, please make sure you have a Git client installed on your system. There are several GUI-based products available for many platforms, e.g. EGit for the Eclipse IDE. A simple Google search will help you find them. Of course you can also just use the command line interface for <http://git-scm.com/,Git>.
| Note |
|---|---|
|
If you need more information on how to install and/or use Git, please visit: http://git-scm.com/. |
In order to checkout (clone in Git terms) the Spring Integration samples repository using the Git command line tool, issue the following commands:
$ git clone https://github.com/SpringSource/spring-integration-samples.git
That is all you need to do in order to clone the entire samples repository into a directory named spring-integration-samples within the working directory where you issued that git command. Since the samples repository is a live repository, you might want to perform periodic pulls (updates) to get new samples, as well as updates to the existing samples. In order to do so issue the following git pull command:
$ git pull
How can I contribute my own Samples?
Github is for social coding: if you want to submit your own code examples to the Spring Integration Samples project, we encourage contributions through pull requests from forks of this repository. If you want to contribute code this way, please reference, if possible, ahttps://jira.springframework.org/browse/INTSAMPLES[JIRA Ticket] that provides some details regarding the provided sample.
| Sign the contributor license agreement |
|---|---|
|
Very important: before we can accept your Spring Integration sample, we will need you to sign the SpringSource contributor license agreement (CLA). Signing the contributor’s agreement does not grant anyone commit rights to the main repository, but it does mean that we can accept your contributions, and you will get an author credit if we do. In order to read and sign the CLA, please go to: https://support.springsource.com/spring_committer_signup From the Project drop down, please select Spring Integration. The Project Lead is Gary Russell. |
Code Contribution Process
For the actual code contribution process, please read the the Contributor Guidelines for Spring Integration, they apply for this project as well:
https://github.com/spring-projects/spring-integration/blob/master/CONTRIBUTING.md
This process ensures that every commit gets peer-reviewed. As a matter of fact, the core committers follow the exact same rules. We are gratefully looking forward to your Spring Integration Samples!
Sample Requests
As mentioned earlier, the Spring Integration Samples project has a dedicated JIRA Issue tracking system. To submit new sample requests, please visit our JIRA Issue Tracking system:
Starting with Spring Integration 2.0, the structure of the samples changed as well. With plans for more samples we realized that some samples have different goals than others. While they all share the common goal of showing you how to apply and work with the Spring Integration framework, they also differ in areas where some samples are meant to concentrate on a technical use case while others focus on a business use case, and some samples are all about showcasing various techniques that could be applied to address certain scenarios (both technical and business). The new categorization of samples will allow us to better organize them based on the problem each sample addresses while giving you a simpler way of finding the right sample for your needs.
Currently there are 4 categories. Within the samples repository each category has its own directory which is named after the category name:
BASIC (samples/basic)
This is a good place to get started. The samples here are technically motivated and demonstrate the bare minimum with regard to configuration and code. These should help you to get started quickly by introducing you to the basic concepts, API and configuration of Spring Integration as well as Enterprise Integration Patterns (EIP). For example, if you are looking for an answer on how to implement and wire a Service Activator to a Message Channel or how to use a Messaging Gateway as a facade to your message exchange, or how to get started with using MAIL or TCP/UDP modules etc., this would be the right place to find a good sample. The bottom line is this is a good place to get started.
INTERMEDIATE (samples/intermediate)
This category targets developers who are already familiar with the Spring Integration framework (past getting started), but need some more guidance while resolving the more advanced technical problems one might deal with after switching to a Messaging architecture. For example, if you are looking for an answer on how to handle errors in various message exchange scenarios or how to properly configure the Aggregator for the situations where some messages might not ever arrive for aggregation, or any other issue that goes beyond a basic implementation and configuration of a particular component and addresses what else types of problems, this would be the right place to find these type of samples.
ADVANCED (samples/advanced)
This category targets developers who are very familiar with the Spring Integration framework but are looking to extend it to address a specific custom need by using Spring Integration’s public API. For example, if you are looking for samples showing you how to implement a custom Channel or Consumer (event-based or polling-based), or you are trying to figure out what is the most appropriate way to implement a custom Bean parser on top of the Spring Integration Bean parser hierarchy when implementing your own namespace and schema for a custom component, this would be the right place to look. Here you can also find samples that will help you with Adapter development. Spring Integration comes with an extensive library of adapters to allow you to connect remote systems with the Spring Integration messaging framework. However you might have a need to integrate with a system for which the core framework does not provide an adapter. So, you may decide to implement your own (and potentially contribute it). This category would include samples showing you how.
APPLICATIONS (samples/applications)
This category targets developers and architects who have a good understanding of Message-driven architecture and EIP, and an above average understanding of Spring and Spring Integration who are looking for samples that address a particular business problem. In other words the emphasis of samples in this category is business use cases and how they can be solved with a Message-Driven Architecture and Spring Integration in particular. For example, if you are interested to see how a Loan Broker or Travel Agent process could be implemented and automated via Spring Integration, this would be the right place to find these types of samples.
| Important |
|---|---|
|
Remember: Spring Integration is a community driven framework, therefore community participation is IMPORTANT. That includes Samples; so, if you can’t find what you are looking for, let us know! |
Currently Spring Integration comes with quite a few samples and you can only expect more.
To help you better navigate through them, each sample comes with its own readme.txt file which covers several details about the sample (e.g., what EIP patterns it addresses, what problem it is trying to solve, how to run sample etc.).
However, certain samples require a more detailed and sometimes graphical explanation.
In this section you’ll find details on samples that we believe require special attention.
In this section, we will review the Loan Broker sample application that is included in the Spring Integration samples. This sample is inspired by one of the samples featured in Gregor Hohpe and Bobby Woolf’s book, Enterprise Integration Patterns.
The diagram below represents the entire process
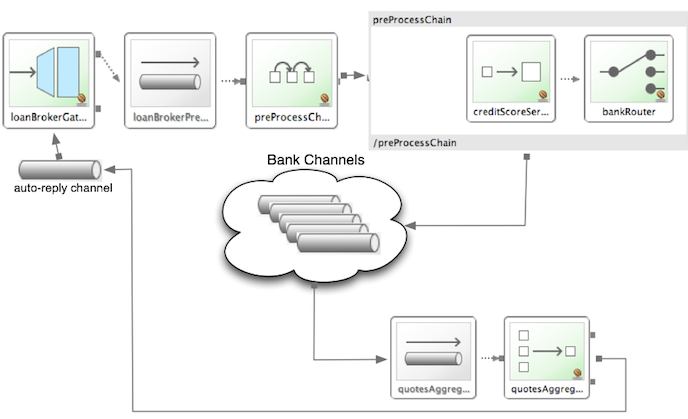
Now lets look at this process in more detail
At the core of an EIP architecture are the very simple yet powerful concepts of Pipes and Filters, and of course: Messages. Endpoints (Filters) are connected with one another via Channels (Pipes). The producing endpoint sends Message to the Channel, and the Message is retrieved by the Consuming endpoint. This architecture is meant to define various mechanisms that describe HOW information is exchanged between the endpoints, without any awareness of WHAT those endpoints are or what information they are exchanging. Thus, it provides for a very loosely coupled and flexible collaboration model while also decoupling Integration concerns from Business concerns. EIP extends this architecture by further defining:
- The types of pipes (Point-to-Point Channel, Publish-Subscribe Channel, Channel Adapter, etc.)
- The core filters and patterns around how filters collaborate with pipes (Message Router, Splitters and Aggregators, various Message Transformation patterns, etc.)
The details and variations of this use case are very nicely described in Chapter 9 of the EIP Book, but here is the brief summary; A Consumer while shopping for the best Loan Quote(s) subscribes to the services of a Loan Broker, which handles details such as:
- Consumer pre-screening (e.g., obtain and review the consumer’s Credit history)
- Determine the most appropriate Banks (e.g., based on consumer’s credit history/score)
- Send a Loan quote request to each selected Bank
- Collect responses from each Bank
- Filter responses and determine the best quote(s), based on consumer’s requirements.
- Pass the Loan quote(s) back to the consumer.
Obviously the real process of obtaining a loan quote is a bit more complex, but since our goal here is to demonstrate how Enterprise Integration Patterns are realized and implemented within SI, the use case has been simplified to concentrate only on the Integration aspects of the process. It is not an attempt to give you an advice in consumer finances.
As you can see, by hiring a Loan Broker, the consumer is isolated from the details of the Loan Broker’s operations, and each Loan Broker’s operations may defer from one another to maintain competitive advantage, so whatever we assemble/implement must be flexible so any changes could be introduced quickly and painlessly. Speaking of change, the Loan Broker sample does not actually talk to any imaginary Banks or Credit bureaus. Those services are stubbed out. Our goal here is to assemble, orchestrate and test the integration aspect of the process as a whole. Only then can we start thinking about wiring such process to the real services. At that time the assembled process and its configuration will not change regardless of the number of Banks a particular Loan Broker is dealing with, or the type of communication media (or protocols) used (JMS, WS, TCP, etc.) to communicate with these Banks.
DESIGN
As you analyze the 6 requirements above you’ll quickly see that they all fall into the category of Integration concerns. For example, in the consumer pre-screening step we need to gather additional information about the consumer and the consumer’s desires and enrich the loan request with additional meta information. We then have to filter such information to select the most appropriate list of Banks, and so on. Enrich, filter, select – these are all integration concerns for which EIP defines a solution in the form of patterns. SI provides an implementation of these patterns.
The Messaging Gateway pattern provides a simple mechanism to access messaging systems, including our Loan Broker. In SI you define the Gateway as a Plain Old Java Interface (no need to provide an implementation), configure it via the XML <gateway> element or via annotation and use it as any other Spring bean. SI will take care of delegating and mapping method invocations to the Messaging infrastructure by generating a Message (payload is mapped to an input parameter of the method) and sending it to the designated channel.
<int:gateway id="loanBrokerGateway" default-request-channel="loanBrokerPreProcessingChannel" service-interface="org.springframework.integration.samples.loanbroker.LoanBrokerGateway"> <int:method name="getBestLoanQuote"> <int:header name="RESPONSE_TYPE" value="BEST"/> </int:method> </int:gateway>
Our current Gateway provides two methods that could be invoked. One that will return the best single quote and another one that will return all quotes. Somehow downstream we need to know what type of reply the caller is looking for. The best way to achieve this in Messaging architecture is to enrich the content of the message with some meta-data describing your intentions. Content Enricher is one of the patterns that addresses this and although Spring Integration does provide a separate configuration element to enrich Message Headers with arbitrary data (we’ll see it later), as a convenience, since_Gateway_ element is responsible to construct the initial Message it provides embedded capability to enrich the newly created Message with arbitrary Message Headers. In our example we are adding header RESPONSE_TYPE with value BEST' whenever the getBestQuote() method is invoked. For other method we are not adding any header. Now we can check downstream for an existence of this header and based on its presence and its value we can determine what type of reply the caller is looking for.
Based on the use case we also know there are some pre-screening steps that needs to be performed such as getting and evaluating the consumer’s credit score, simply because some premiere Banks will only typically accept quote requests from consumers that meet a minimum credit score requirement. So it would be nice if the Message would be enriched with such information before it is forwarded to the Banks. It would also be nice if when several processes needs to be completed to provide such meta-information, those processes could be grouped in a single unit. In our use case we need to determine credit score and based on the credit score and some rule select a list of Message Channels (Bank Channels) we will sent quote request to.
Composed Message Processor
The Composed Message Processor pattern describes rules around building endpoints that maintain control over message flow which consists of multiple message processors. In Spring Integration Composed Message Processor pattern is implemented via <chain> element.
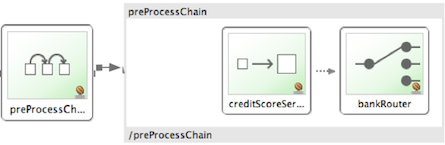
As you can see from the above configuration we have a chain with inner header-enricher element which will further enrich the content of the Message with the header CREDIT_SCORE and value that will be determined by the call to a credit service (simple POJO spring bean identified by creditBureau name) and then it will delegate to the Message Router
There are several implementations of the Message Routing pattern available in Spring Integration. Here we are using a router that will determine a list of channels based on evaluating an expression (Spring Expression Language) which will look at the credit score that was determined is the previous step and will select the list of channels from the Map bean with id banks whose values are premier or secondary based o the value of credit score. Once the list of Channels is selected, the Message will be routed to those Channels.
Now, one last thing the Loan Broker needs to to is to receive the loan quotes form the banks, aggregate them by consumer (we don’t want to show quotes from one consumer to another), assemble the response based on the consumer’s selection criteria (single best quote or all quotes) and reply back to the consumer.

An Aggregator pattern describes an endpoint which groups related Messages into a single Message. Criteria and rules can be provided to determine an aggregation and correlation strategy. SI provides several implementations of the Aggregator pattern as well as a convenient name-space based configuration.
<int:aggregator id="quotesAggregator" input-channel="quotesAggregationChannel" method="aggregateQuotes"> <beans:bean class="org.springframework.integration.samples.loanbroker.LoanQuoteAggregator"/> </int:aggregator>
Our Loan Broker defines a quotesAggregator bean via the <aggregator> element which provides a default aggregation and correlation strategy.
The default correlation strategy correlates messages based on the correlationId header (see Correlation Identifier pattern).
What’s interesting is that we never provided the value for this header.
It was set earlier by the router automatically, when it generated a separate Message for each Bank channel.
Once the Messages are correlated they are released to the actual Aggregator implementation. Although default Aggregator is provided by SI, its strategy (gather the list of payloads from all Messages and construct a new Message with this List as payload) does not satisfy our requirement. The reason is that our consumer might require a single best quote or all quotes. To communicate the consumer’s intention, earlier in the process we set the RESPONSE_TYPE header. Now we have to evaluate this header and return either all the quotes (the default aggregation strategy would work) or the best quote (the default aggregation strategy will not work because we have to determine which loan quote is the best).
Obviously selecting the best quote could be based on complex criteria and would influence the complexity of the aggregator implementation and configuration, but for now we are making it simple.
If consumer wants the best quote we will select a quote with the lowest interest rate.
To accomplish that the LoanQuoteAggregator.java will sort all the quotes and return the first one.
The LoanQuote.java implements Comparable which compares quotes based on the rate attribute.
Once the response Message is created it is sent to the default-reply-channel of the Messaging Gateway (thus the consumer) which started the process.
Our consumer got the Loan Quote!
Conclusion
As you can see a rather complex process was assembled based on POJO (read existing, legacy), light weight, embeddable messaging framework (Spring Integration) with a loosely coupled programming model intended to simplify integration of heterogeneous systems without requiring a heavy-weight ESB-like engine or proprietary development and deployment environment, because as a developer you should not be porting your Swing or console-based application to an ESB-like server or implementing proprietary interfaces just because you have an integration concern.
This and other samples in this section are built on top of Enterprise Integration Patterns and can be considered "building blocks" for YOUR solution; they are not intended to be complete solutions. Integration concerns exist in all types of application (whether server based or not). It should not require change in design, testing and deployment strategy if such applications need to be integrated.
In this section, we will review a Cafe sample application that is included in the Spring Integration samples. This sample is inspired by another sample featured in Gregor Hohpe’s http://www.eaipatterns.com/ramblings.html[Ramblings].
The domain is that of a Cafe, and the basic flow is depicted in the following diagram:
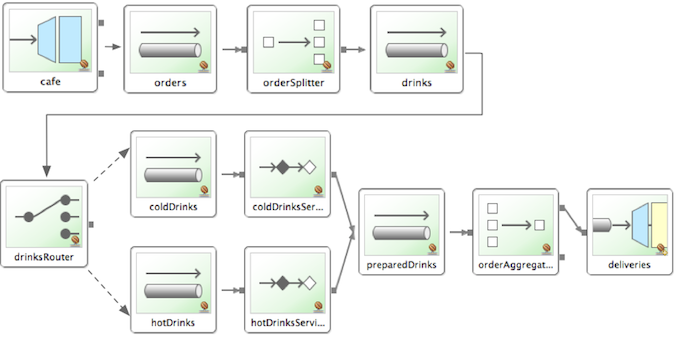
The Order object may contain multiple OrderItems.
Once the order is placed, a Splitter will break the composite order message into a single message per drink.
Each of these is then processed by a Router that determines whether the drink is hot or cold (checking the OrderItem object’s isIced property).
The Barista prepares each drink, but hot and cold drink preparation are handled by two distinct methods: prepareHotDrink and prepareColdDrink.
The prepared drinks are then sent to the Waiter where they are aggregated into a Delivery object.
Here is the XML configuration:
<?xml version="1.0" encoding="UTF-8"?> <beans:beans xmlns:int="http://www.springframework.org/schema/integration" xmlns:xsi="http://www.w3.org/2001/XMLSchema-instance" xmlns:beans="http://www.springframework.org/schema/beans" xmlns:int-stream="http://www.springframework.org/schema/integration/stream" xsi:schemaLocation="http://www.springframework.org/schema/beans http://www.springframework.org/schema/beans/spring-beans.xsd http://www.springframework.org/schema/integration http://www.springframework.org/schema/integration/spring-integration.xsd http://www.springframework.org/schema/integration/stream http://www.springframework.org/schema/integration/stream/spring-integration-stream.xsd"> <int:gateway id="cafe" service-interface="o.s.i.samples.cafe.Cafe"/> <int:channel id="orders"/> <int:splitter input-channel="orders" ref="orderSplitter" method="split" output-channel="drinks"/> <int:channel id="drinks"/> <int:router input-channel="drinks" ref="drinkRouter" method="resolveOrderItemChannel"/> <int:channel id="coldDrinks"><int:queue capacity="10"/></int:channel> <int:service-activator input-channel="coldDrinks" ref="barista" method="prepareColdDrink" output-channel="preparedDrinks"/> <int:channel id="hotDrinks"><int:queue capacity="10"/></int:channel> <int:service-activator input-channel="hotDrinks" ref="barista" method="prepareHotDrink" output-channel="preparedDrinks"/> <int:channel id="preparedDrinks"/> <int:aggregator input-channel="preparedDrinks" ref="waiter" method="prepareDelivery" output-channel="deliveries"/> <int-stream:stdout-channel-adapter id="deliveries"/> <beans:bean id="orderSplitter" class="org.springframework.integration.samples.cafe.xml.OrderSplitter"/> <beans:bean id="drinkRouter" class="org.springframework.integration.samples.cafe.xml.DrinkRouter"/> <beans:bean id="barista" class="o.s.i.samples.cafe.xml.Barista"/> <beans:bean id="waiter" class="o.s.i.samples.cafe.xml.Waiter"/> <int:poller id="poller" default="true" fixed-rate="1000"/> </beans:beans>
As you can see, each Message Endpoint is connected to input and/or output channels. Each endpoint will manage its own Lifecycle (by default endpoints start automatically upon initialization - to prevent that add the "auto-startup" attribute with a value of "false"). Most importantly, notice that the objects are simple POJOs with strongly typed method arguments. For example, here is the Splitter:
public class OrderSplitter { public List<OrderItem> split(Order order) { return order.getItems(); } }
In the case of the Router, the return value does not have to be a MessageChannel instance (although it can be).
As you see in this example, a String-value representing the channel name is returned instead.
public class DrinkRouter { public String resolveOrderItemChannel(OrderItem orderItem) { return (orderItem.isIced()) ? "coldDrinks" : "hotDrinks"; } }
Now turning back to the XML, you see that there are two <service-activator> elements.
Each of these is delegating to the same Barista instance but different methods: prepareHotDrink or prepareColdDrink corresponding to the two channels where order items have been routed.
public class Barista { private long hotDrinkDelay = 5000; private long coldDrinkDelay = 1000; private AtomicInteger hotDrinkCounter = new AtomicInteger(); private AtomicInteger coldDrinkCounter = new AtomicInteger(); public void setHotDrinkDelay(long hotDrinkDelay) { this.hotDrinkDelay = hotDrinkDelay; } public void setColdDrinkDelay(long coldDrinkDelay) { this.coldDrinkDelay = coldDrinkDelay; } public Drink prepareHotDrink(OrderItem orderItem) { try { Thread.sleep(this.hotDrinkDelay); System.out.println(Thread.currentThread().getName() + " prepared hot drink #" + hotDrinkCounter.incrementAndGet() + " for order #" + orderItem.getOrder().getNumber() + ": " + orderItem); return new Drink(orderItem.getOrder().getNumber(), orderItem.getDrinkType(), orderItem.isIced(), orderItem.getShots()); } catch (InterruptedException e) { Thread.currentThread().interrupt(); return null; } } public Drink prepareColdDrink(OrderItem orderItem) { try { Thread.sleep(this.coldDrinkDelay); System.out.println(Thread.currentThread().getName() + " prepared cold drink #" + coldDrinkCounter.incrementAndGet() + " for order #" + orderItem.getOrder().getNumber() + ": " + orderItem); return new Drink(orderItem.getOrder().getNumber(), orderItem.getDrinkType(), orderItem.isIced(), orderItem.getShots()); } catch (InterruptedException e) { Thread.currentThread().interrupt(); return null; } } }
As you can see from the code excerpt above, the barista methods have different delays (the hot drinks take 5 times as long to prepare).
This simulates work being completed at different rates.
When the CafeDemo main method runs, it will loop 100 times sending a single hot drink and a single cold drink each time.
It actually sends the messages by invoking the placeOrder method on the Cafe interface.
Above, you will see that the <gateway> element is specified in the configuration file.
This triggers the creation of a proxy that implements the given service-interface and connects it to a channel.
The channel name is provided on the @Gateway annotation of the Cafe interface.
public interface Cafe { @Gateway(requestChannel="orders") void placeOrder(Order order); }
Finally, have a look at the main() method of the CafeDemo itself.
public static void main(String[] args) { AbstractApplicationContext context = null; if (args.length > 0) { context = new FileSystemXmlApplicationContext(args); } else { context = new ClassPathXmlApplicationContext("cafeDemo.xml", CafeDemo.class); } Cafe cafe = context.getBean("cafe", Cafe.class); for (int i = 1; i <= 100; i++) { Order order = new Order(i); order.addItem(DrinkType.LATTE, 2, false); order.addItem(DrinkType.MOCHA, 3, true); cafe.placeOrder(order); } }
| Tip |
|---|---|
|
To run this sample as well as 8 others, refer to the |
When you run cafeDemo, you will see that the cold drinks are initially prepared more quickly than the hot drinks. Because there is an aggregator, the cold drinks are effectively limited by the rate of the hot drink preparation. This is to be expected based on their respective delays of 1000 and 5000 milliseconds. However, by configuring a poller with a concurrent task executor, you can dramatically change the results. For example, you could use a thread pool executor with 5 workers for the hot drink barista while keeping the cold drink barista as it is:
<int:service-activator input-channel="hotDrinks" ref="barista" method="prepareHotDrink" output-channel="preparedDrinks"/> <int:service-activator input-channel="hotDrinks" ref="barista" method="prepareHotDrink" output-channel="preparedDrinks"> <int:poller task-executor="pool" fixed-rate="1000"/> </int:service-activator> <task:executor id="pool" pool-size="5"/>
Also, notice that the worker thread name is displayed with each invocation. You will see that the hot drinks are prepared by the task-executor threads. If you provide a much shorter poller interval (such as 100 milliseconds), then you will notice that occasionally it throttles the input by forcing the task-scheduler (the caller) to invoke the operation.
| Note |
|---|---|
|
In addition to experimenting with the poller’s concurrency settings, you can also add the transactional sub-element and then refer to any PlatformTransactionManager instance within the context. |
The xml messaging sample in basic/xml illustrates how to use some of the provided components which deal with xml payloads.
The sample uses the idea of processing an order for books represented as xml.
NOTE:This sample shows that the namespace prefix can be whatever you want; while we usually use, int-xml for
integration XML components, the sample uses si-xml.
First the order is split into a number of messages, each one representing a single order item using the XPath splitter component.
<si-xml:xpath-splitter id="orderItemSplitter" input-channel="ordersChannel" output-channel="stockCheckerChannel" create-documents="true"> <si-xml:xpath-expression expression="/orderNs:order/orderNs:orderItem" namespace-map="orderNamespaceMap" /> </si-xml:xpath-splitter>
A service activator is then used to pass the message into a stock checker POJO. The order item document is enriched with information from the stock checker about order item stock level. This enriched order item message is then used to route the message. In the case where the order item is in stock the message is routed to the warehouse.
<si-xml:xpath-router id="instockRouter" input-channel="orderRoutingChannel" resolution-required="true"> <si-xml:xpath-expression expression="/orderNs:orderItem/@in-stock" namespace-map="orderNamespaceMap" /> <si-xml:mapping value="true" channel="warehouseDispatchChannel"/> <si-xml:mapping value="false" channel="outOfStockChannel"/> </si-xml:xpath-router>
Where the order item is not in stock the message is transformed using xslt into a format suitable for sending to the supplier.
<si-xml:xslt-transformer input-channel="outOfStockChannel" output-channel="resupplyOrderChannel" xsl-resource="classpath:org/springframework/integration/samples/xml/bigBooksSupplierTransformer.xsl"/>
The definitive source of information about Spring Integration is the Spring Integration Home at http://spring.io. That site serves as a hub of information and is the best place to find up-to-date announcements about the project as well as links to articles, blogs, and new sample applications.
Please be sure to also see the Migration Guide for important changes that might affect your applications. Migration guides for all versions back to 2.1 can be found on the Wiki.
The new MessageGroupFactory strategy has been introduced to allow a control over MessageGroup instances
in MessageGroupStore logic.
The SimpleMessageGroupFactory is provided for the SimpleMessageGroup with the GroupType.HASH_SET as the default
factory for the standard MessageGroupStore implementations.
See Section 10.4, “Message Store” for more information.
The PersistentMessageGroup, - lazy-load proxy, - implementation is provided for persistent MessageGroupStore s,
which return this instance for the getMessageGroup() when their lazyLoadMessageGroups is true (defaults).
See Section 10.4, “Message Store” for more information.
New inbound channel adapters are provided that return an InputStream for each file allowing you to retrieve remote
files without writing them to the local file system
See Section 16.5, “FTP Streaming Inbound Channel Adapter” and Section 28.8, “SFTP Streaming Inbound Channel Adapter” for more information.
A new StreamTransformer is provided to transform an InputStream payload to either a byte[] or String.
See the section called “Stream Transformer” for more information.
A new IntegrationGraphServer together with the IntegrationGraphController REST service are provided to expose the runtime model of a Spring Integration application as a graph.
See Section 10.8, “Integration Graph” for more information.
A new JdbcLockRegistry is provided for distributed locks shared through the data base table.
See Section 19.6, “JDBC Lock Registry” for more information.
A new LeaderInitiator implementation is provided based on the LockRegistry strategy.
See Section 8.3, “Leadership Event Handling” for more information.
Previously, it was possible to specify a reply-channel on an outbound gateway within a chain.
It was completely ignored; the gateway’s reply goes to the next chain element, or to the chain’s output channel
if the gateway is the last element.
This condition is now detected and disallowed.
If you have such configuration, simply remove the reply-channel.
An option to make the Service Asynchronous has been added. See Section 8.5.3, “Asynchronous Service Activator” for more information.
The Messaging Annotation Support doesn’t require any more @MessageEndpoint (or any other @Component) annotation
declaration on the class level.
To restore the previous behaviour specify the spring.integration.messagingAnnotations.require.componentAnnotation of
spring.integration.properties as true.
See Section E.5, “Global Properties” and Section E.6, “Annotation Support” for more information.
The customizable userFlag added in 4.2.2 to provide customization of the flag used to denote that the mail has been
seen is now available using the XML namespace.
See Section 22.5, “Marking IMAP Messages When \Recent is Not Supported” for more information.
There is now an option to map inbound mail messages with the MessageHeaders containing the mail headers and the
payload containing the email content.
Previously, the payload was always the raw MimeMessage.
See Section 22.3, “Inbound Mail Message Mapping” for more information.
The DefaultJmsHeaderMapper now maps the standard correlationId header as a message property by invoking its
toString() method.
See Section 21.6, “Mapping Message Headers to/from JMS Message” for more information.
The JMS Outbound gateway now has an async property.
See Section 21.5.2, “Async Gateway” for more information.
There is a change in behavior when a POJO aggregator releases a collection of Message<?> objects; this is rare but if
your application does that, you will need to make a small change to your POJO. See this Important note
for more information.
A new TcpConnectionServerListeningEvent is emitted when a server connection factory is started.
See Section 32.5, “TCP Connection Events” for more information.
The destination-expression and socket-expression are now available for the <int-ip:udp-outbound-channel-adapter>.
See Section 32.2, “UDP Adapters” for more information.
The various deserializers that can’t allocate the final buffer until the whole message has been assembled now support pooling of the raw buffer into which the data is received, rather than creating and discarding a buffer for each message. See Section 32.3, “TCP Connection Factories” for more information.
The message mapper now, optionally, sets a configured content type header. See Section 32.13, “IP Message Headers” for more information.
The generated file name for the FileWritingMessageHandler can represent sub-path to save the desired directory
structure for file in the target directory.
See Section 15.3.1, “Generating File Names” for more information.
The FileReadingMessageSource now hides the WatchService directory scanning logic in the inner class.
The use-watch-service and watch-events options are provided to enable such a behaviour.
The top level WatchServiceDirectoryScanner has been deprecated because of inconsistency around API.
See Section 15.2.2, “WatchServiceDirectoryScanner” for more information.
You can now avoid flushing files when appending and use a number of strategies to flush the data during idle periods. See Section 15.3.4, “Flushing Files When using APPEND_NO_FLUSH” for more information.
The outbound channel adapter can now be configured to set the destination file’s lastmodified timestamp.
See Section 15.3.5, “File Timestamps” for more information.
The FileSplitter will now automatically close an (S)FTP session when the file is completely read.
This applies when the outbound gateway returns an InputStream or the new (S)FTP streaming channel adapters are being used.
Also a new markers-json options has been introduced to convert FileSplitter.FileMarker to JSON String for relaxed downstream network interaction.
See Section 15.5, “File Splitter” for more information.
A new ChainFileListFilter is provided as an alternative to CompositeFileListFilter.
See Section 15.2, “Reading Files” for more information.
The outbound endpoints now support a RabbitTemplate configured with a ContentTypeDelegatingMessageConverter such
that the converter can be chosen based on the message content type.
See Section 12.8, “Outbound Message Conversion” for more information.
Spring AMQP 1.6 adds support for
Delayed Message Exchanges.
Header mapping now supports the headers (amqp_delay and amqp_receivedDelay) used by this feature.
AMQP-backed channels now support message mapping. See Section 12.11, “AMQP Backed Message Channels” for more information.
Previously, the queue channel adapters always used the Redis List in a fixed direction,
pushing to the left end and reading from the right end.
It is now possible to configure the reading and writing direction using rightPop and leftPush options for the
RedisQueueMessageDrivenEndpoint and RedisQueueOutboundChannelAdapter respectively.
See Section 25.3.4, “Redis Queue Inbound Channel Adapter” and Section 25.3.5, “Redis Queue Outbound Channel Adapter” for more information.
The default serializer in the inbound gateway has been changed to a JdkSerializationRedisSerializer for compatibility
with the outbound gateway.
See Section 25.10, “Redis Queue Inbound Gateway” for more information.
Previously, with requests that had a body (such as POST) that had no content-type header, the body was ignored.
With this release, the content type of such requests is considered to be application/octet-stream as recommended
by RFC 2616.
See Section 18.2, “Http Inbound Components” for more information.
A new factory bean is provided to simplify the configuration of Jsch proxies for SFTP. See Section 28.3, “Proxy Factory Bean” for more information.
The SFTP outbound gateway (for put and mput commands) and the SFTP outbound channel adapter now support the
chmod attribute to change the remote file permissions after uploading.
See Section 28.10, “SFTP Outbound Channel Adapter” and Section 28.11, “SFTP Outbound Gateway” for more information.
The FtpSession now supports null for the list() and listNames() method, since it is possible by the
underlying FTP Client.
With that the FtpOutboundGateway can now be configured without remoteDirectory expression.
And the <int-ftp:inbound-channel-adapter> can be configured without remote-directory/remote-directory-expression.
See Chapter 16, FTP/FTPS Adapters for more information.
The ErrorMessageExceptionTypeRouter supports now the Exception superclass mappings to avoid duplication
for the same channel in case of several inheritors.
For this purpose the ErrorMessageExceptionTypeRouter loads mapping classes during initialization to fail-fast
for a ClassNotFoundException.
See Section 6.1, “Routers” for more information.
AMQP, WS and XMPP header mappings (e.g. request-header-mapping, reply-header-mapping) now support negated
patterns.
See Section 12.12, “AMQP Message Headers”, Section 36.5, “WS Message Headers”, and Section 38.6, “XMPP Message Headers” for more information.
Previously, only standard AMQP headers were mapped by default; users had to explicitly enable mapping of user-defined
headers.
With this release all headers are mapped by default.
In addition, the inbound amqp_deliveryMode header is no longer mapped by default.
See Section 12.12, “AMQP Message Headers” for more information.
Groovy scripts can now be configured with the compile-static hint or any other CompilerConfiguration options.
See Section 8.8.1, “Groovy configuration” for more information.
The @InboundChannelAdapter has now an alias channel attribute for regular value.
In addition the target SourcePollingChannelAdapter components can now resolve the target outputChannel bean
from its provided name (outputChannelName options) in late-binding manner.
See Section E.6, “Annotation Support” for more information.
The XMPP Extensions (XEP) are now supported by the XMPP channel adapters. See Section 38.7, “XMPP Extensions” for more information.
The WireTap ChannelInterceptor now can accept a channelName which is resolved to the target MessageChannel
later, during the first active interceptor operation.
See the section called “Wire Tap” for more information.
The ChannelMessageStoreQueryProvider now supports H2 database.
See Section 19.4.3, “Backing Message Channels” for more information.
The ServerWebSocketContainer now exposes allowedOrigins option and SockJsServiceOptions a suppressCors option.
See Chapter 35, WebSockets Support for more information.
Please be sure to also see the Migration Guide for important changes that might affect your applications. Migration guides for all versions back to 2.1 can be found on the Wiki.
A new MetricsFactory strategy interface has been introduced.
This, together with other changes in the JMX and management infrastructure provides much more control over management
configuration and runtime performance.
However, this has some important implications for (some) user environments.
For complete details, see Section 10.1, “Metrics and Management” and the section called “JMX Improvements”.
The MongoDbMetadataStore is now available. For more information, see Section 23.3.2, “MongoDB Metadata Store”.
The @SecuredChannel annotation has been introduced, replacing the deprecated ChannelSecurityInterceptorFactoryBean.
For more information, see Appendix D, Security in Spring Integration.
The SecurityContextPropagationChannelInterceptor has been
introduced for the SecurityContext propagation from one message flow’s Thread to another.
For more information, see Appendix D, Security in Spring Integration.
The FileSplitter, which splits text files into lines, was added in 4.1.2.
It now has full support in the int-file: namespace; see Section 15.5, “File Splitter” for more information.
Zookeeper support has been added to the framework to assist when running on a clustered/multi-host environment.
- ZookeeperMetadataStore
- ZookeeperLockRegistry
- Zookeeper Leadership
See Chapter 39, Zookeeper Support for more information.
A new thread <int:barrier/> component is available allowing a thread to be suspended until some asynchronous event
occurs.
See Section 6.8, “Thread Barrier” for more information.
STOMP support has been added to the framework as inbound and outbound channel adapters pair. See Chapter 29, STOMP Support for more information.
A new Codec abstraction has been introduced, to encode/decode objects to/from byte[].
An implementation that uses Kryo is provided.
Codec-based transformers and message converters are also provided.
See Section 7.4, “Codec” for more information.
A new MessagePreparedStatementSetter functional interface callback is available for the JdbcMessageHandler
(<int-jdbc:outbound-gateway> and <int-jdbc:outbound-channel-adapter>) as an alternative to the
SqlParameterSourceFactory to populate parameters on the PreparedStatement with the requestMessage context.
See Section 19.2, “Outbound Channel Adapter” for more information.
As an alternative to the existing selector attribute, the <wire-tap/> now supports the selector-expression attribute.
See Chapter 15, File Support for more information about these changes.
The <int-file:outbound-channel-adapter> and <int-file:outbound-gateway> now support an append-new-line attribute.
If set to true, a new line is appended to the file after a message is written.
The default attribute value is false.
The ignore-hidden attribute has been introduced for the <int-file:inbound-channel-adapter> to pick up or not
the hidden files from the source directory.
It is true by default.
The FileWritingMessageHandler now also accepts InputStream as a valid message payload type.
The ScatterGatherHandler class has been moved from the org.springframework.integration.handler to the org.springframework.integration.scattergather.
The TCP Serializers no longer flush() the OutputStream; this is now done by the TcpNxxConnection classes.
If you are using the serializers directly within user code, you may have to flush() the OutputStream.
TcpConnectionServerExceptionEvent s are now published whenever an unexpected exception occurs on a TCP server socket (also added to 4.1.3, 4.0.7).
See Section 32.5, “TCP Connection Events” for more information.
If a TCP server socket factory is configured to listen on a random port, the actual port chosen by the OS can now
be obtained using getPort().
getServerSocketAddress() is also available.
See Section 32.3, “TCP Connection Factories” for more information.
The TcpOutboundGateway now supports remote-timeout-expression as an alternative to the existing remote-timeout attribute.
This allows setting the timeout based on each message.
Also, the remote-timeout no longer defaults to the same value as reply-timeout which has a completely different meaning.
See Table 32.7, “TCP Outbound Gateway Attributes” for more information.
TcpConnection s now support getSslSession() to enable users to extract information from the session to add to
message headers.
See Section 32.13, “IP Message Headers” for more information.
New events are now published whenever a correlation exception occurs - for example sending a message to a non-existent socket.
The TcpConnectionEventListeningMessageProducer is deprecated; use the generic event adapter instead.
See Section 32.5, “TCP Connection Events” for more information.
Previously, the @Poller on an inbound channel adapter defaulted the maxMessagesPerPoll attribute to -1 (infinity).
This was inconsistent with the XML configuration of <inbound-channel-adapter/> s, which defaults to 1.
The annotation now defaults this attribute to 1.
o.s.integration.util.FunctionIterator now requires a o.s.integration.util.Function instead of a
reactor.function.Function.
This was done to remove an unnecessary hard dependency on Reactor.
Any uses of this iterator will need to change the import.
Of course, Reactor is still supported for functionality such as the Promise gateway; the dependency was removed for those users who don’t need it.
It is now possible to configure the reply listener in JMS outbound gateways to be initialized on-demand and stopped after an idle period, instead of being controlled by the gateway’s lifecycle.
See Section 21.5, “Outbound Gateway” for more information.
The error-channel now is used for the conversion errors, which have caused a transaction rollback and message redelivery previously.
See Section 21.2, “Message-Driven Channel Adapter” and Section 21.4, “Inbound Gateway” for more information.
When using an implicitly defined DefaultMessageListenerContainer, the default acknowledge is now transacted.
transacted is recommended when using this container, to avoid message loss.
This default now applies to the message-driven inbound adapter and the inbound gateway, it was already the
default for jms-backed channels.
See Section 21.2, “Message-Driven Channel Adapter” and Section 21.4, “Inbound Gateway” for more information.
Namespace support for shared subscriptions (JMS 2.0) has been added to message-driven endpoints and the
<int-jms:publish-subscribe-channel>.
Previously, you had to wire up listener containers as <bean/> s to use shared connections.
See Chapter 21, JMS Support for more information.
Much more flexibility is now provided for dynamic polling.
See Section 4.2.3, “Conditional Pollers for Message Sources” for more information.
The <int-amqp:outbound-gateway> now supports confirm-correlation-expression and confirm-(n)ack-channel
attributes with similar purpose as for <int-amqp:outbound-channel-adapter>.
For both the outbound channel adapter and gateway, if the correlation data is a Message<?>, it will be the basis
of the message on the ack/nack channel, with the additional header(s) added.
Previously, any correlation data (including Message<?>) was returned as the payload of the ack/nack message.
The <int-amqp:inbound-gateway> now exposes the amqp-template attribute to allow more control over an external bean
for the reply RabbitTemplate or even provide your own AmqpTemplate implementation.
In addition the default-reply-to is exposed to be used if request message doesn’t have replyTo property.
See Chapter 12, AMQP Support for more information.
The XPathMessageSplitter (<int-xml:xpath-splitter>) now allows the configuration of output-properties
for the internal javax.xml.transform.Transformer and supports an Iterator mode (defaults to true) for the xpath
evaluation org.w3c.dom.NodeList result.
See Section 37.5, “Splitting XML Messages” for more information.
The HTTP Inbound Endpoints (<int-http:inbound-channel-adapter> and <int-http:inbound-gateway>) now allow the
configuration of Cross-Origin Resource Sharing (CORS).
See Section 18.4.4, “Cross-Origin Resource Sharing (CORS) Support” for more information.
The HTTP inbound gateway can be configured as to what status code to return when a request times out.
The default is now 500 Internal Server Error instead of 200 OK.
See Section 18.4.5, “Response StatusCode” for more information.
Documentation is provided for when proxying multipart/form-data requests.
See Chapter 18, HTTP Support for more information.
When using Java 8, gateway methods can now return CompletableFuture<?>.
See the section called “CompletableFuture” for more information.
The request and reply timeout properties are now String instead of Long to allow configuration with property
placeholders or SpEL. See Section 8.4.6, “@MessagingGateway Annotation”.
This release includes some performance improvements for aggregating components (aggregator, resequencer, etc),
by more efficiently removing messages from groups when they are released.
New methods (removeMessagesFromGroup) have been added to the message store.
Set the removeBatchSize property (default 100) to adjust the number of messages deleted in each operation.
Currently, JDBC, Redis and MongoDB message stores support this property.
When using a ref or inner bean for the aggregator, it is now possible to bind a MessageGroupProcessor directly.
In addition, a SimpleMessageGroupProcessor is provided that simply returns the collection of messages in the group.
When an output processor produces a collection of Message<?>, the aggregator releases those messages individually.
Configuring the SimpleMessageGroupProcessor makes the aggregator a message barrier, were messages are held up
until they all arrive, and are then released individually. See Section 6.4, “Aggregator” for more information.
You can now specify a remote-directory-expression on the inbound channel adapters, to determine the directory
at runtime.
See Chapter 16, FTP/FTPS Adapters and Chapter 28, SFTP Adapters for more information.
When use FTP/SFTP outbound gateways to operate on multiple files (mget, mput), it is possible for an exception to
occur after part of the request is completed.
If such a condition occurs, a PartialSuccessException is thrown containing the partial results.
See Section 16.8, “FTP Outbound Gateway” and Section 28.11, “SFTP Outbound Gateway” for more information.
A delegating session factory is now available, enabling the selection of a particular session factory based on some thread context value.
See Section 16.3, “Delegating Session Factory” and Section 28.4, “Delegating Session Factory” for more information.
Previously, the DefaultSftpSessionFactory unconditionally allowed connections to unknown hosts.
This is now configurable (default false).
The factory now requires a configured knownHosts file unless the allowUnknownKeys property is true (default
false).
See Section 28.2.1, “Configuration Properties” for more information.
The MessageSessionCallback<F, T> has been introduced to perform any custom Session operation(s) with the
requestMessage context in the <int-(s)ftp:outbound-gateway/>.
See Section 16.11, “MessageSessionCallback” and Section 28.13, “MessageSessionCallback” for more information.
WebSocketHandlerDecoratorFactory support has been added to the ServerWebSocketContainer
to allow chained customization for the internal WebSocketHandler.
See Section 35.5, “WebSockets Namespace Support” for more information.
The ApplicationEvent adapters can now operate with payload as event directly allow omitting custom
ApplicationEvent extensions.
The publish-payload boolean attribute has been introduced on the <int-event:outbound-channel-adapter> for this
purpose.
See Chapter 13, Spring ApplicationEvent Support for more information.
Please be sure to also see the Migration Guide for important changes that might affect your applications. Migration guides for all versions back to 2.1 can be found on the Wiki.
A Reactor Promise return type is now supported for Messaging Gateway methods.
See Section 8.4.10, “Asynchronous Gateway”.
The WebSocket module is now available.
It is fully based on the Spring WebSocket and Spring Messaging modules and provides an <inbound-channel-adapter> and an <outbound-channel-adapter>.
See Chapter 35, WebSockets Support for more information.
The Scatter-Gather EIP pattern is now implemented. See Section 6.7, “Scatter-Gather” for more information.
The Routing Slip EIP pattern implementation is now provided. See the section called “Routing Slip” for more information.
The Idempotent Receiver EIP implementation is now provided via the <idempotent-receiver> component in XML, or the IdempotentReceiverInterceptor and IdempotentReceiver annotation when using Java Configuration.
See Section 8.9.11, “Idempotent Receiver Enterprise Integration Pattern” and their JavaDocs for more information.
The Boon JsonObjectMapper is now provided for the JSON transformers.
See Section 7.1, “Transformer” for more information.
The <redis-queue-inbound-gateway> and <redis-queue-outbound-gateway> components are now provided.
See Section 25.10, “Redis Queue Inbound Gateway” and Section 25.9, “Redis Queue Outbound Gateway”.
The PollSkipAdvice is now provided to be used within <advice-chain> of the <poller> to determine if the current poll should be suppressed (skipped) by some condition implemented with PollSkipStrategy.
See Section 4.2, “Poller” for more information.
Elements that utilize a message listener container (inbound endpoints, channel) now support the missing-queues-fatal attribute.
See Chapter 12, AMQP Support for more information.
The AMQP outbound endpoints support a new property lazy-connect (default true).
When true, the connection to the broker is not established until the first message arrives (assuming there are no inbound endpoints, which always attempt to establish the connection during startup).
When set the false an attempt to establish the connection is made during application startup.
See Chapter 12, AMQP Support for more information.
The SimpleMessageStore no longer makes a copy of the group when calling getMessageGroup().
See Caution with SimpleMessageStore for more information.
The <ws:outbound-gateway/> now provides an encode-uri attribute to allow disabling the encoding of the URI object before sending the request.
The <http:inbound-channel-adapter> can now be configured with a status-code-expression to override the default 200 OK status.
See Section 18.4, “HTTP Namespace Support” for more information.
The MQTT channel adapters can now be configured to connect to multiple servers, for example, to support High Availability (HA). See Chapter 24, MQTT Support for more information.
The MQTT message-driven channel adapter now supports specifying the QoS setting for each subscription. See Section 24.2, “Inbound (message-driven) Channel Adapter” for more information.
The MQTT outbound channel adapter now supports asynchronous sends, avoiding blocking until delivery is confirmed. See Section 24.3, “Outbound Channel Adapter” for more information.
It is now possible to programmatically subscribe to and unsubscribe from topics at runtime. See Section 24.2, “Inbound (message-driven) Channel Adapter” for more information.
The FTP and SFTP outbound channel adapters now support appending to remote files, as well as taking specific actions when a remote file already exists.
The remote file templates now also support this as well as rmdir() and exists().
In addition, the remote file templates provide access to the underlying client object enabling access to low-level APIs.
See Chapter 16, FTP/FTPS Adapters and Chapter 28, SFTP Adapters for more information.
Splitter components now support an Iterator as the result object for producing output messages.
See Section 6.3, “Splitter” for more information.
Aggregator s now support a new attribute expire-groups-upon-timeout.
See Section 6.4.4, “Configuring an Aggregator” for more information.
An null-result-expression attribute has been added, which is evaluated and returned if <enricher> returns null.
It can be added in <header> and <property>.
See Section 7.2, “Content Enricher” for more information.
An error-channel attribute has been added, which is used to handle an error flow if Exception occurs downstream of the request-channel.
This enable you to return an alternative object to use for enrichment.
See Section 7.2, “Content Enricher” for more information.
The <header-enricher/>'s <header-channels-to-string/> element can now override the header channel registry’s default time for retaining channel mappings.
See the section called “Header Channel Registry” for more information.
Improvements have been made to the orderly shutdown algorithm. See Section 10.7, “Orderly Shutdown” for more information.
The RecipientListRouter provides now several management operations to configure recipients at runtime.
With that the <recipient-list-router> can now be configured without any <recipient> from the start.
See the section called “RecipientListRouterManagement” for more information.
The AbstractHeaderMapper implementations now provides the additional NON_STANDARD_HEADERS token to map any user-defined headers, which aren’t mapped by default.
See Section 12.12, “AMQP Message Headers” for more information.
The new template-channel-transacted attribute has been introduced for AMQP MessageChannel s.
See Section 12.11, “AMQP Backed Message Channels” for more information.
The default syslog message converter now has an option to retain the original message in the payload, while still setting the headers. See Section 31.2, “Syslog <inbound-channel-adapter>” for more information.
In addition to the Promise return type mentioned above, gateway methods may now return a ListenableFuture, introduced in Spring Framework 4.0.
You can also disable the async processing in the gateway, allowing a downstream flow to directly return a Future.
See Section 8.4.10, “Asynchronous Gateway”.
Aggregator s and Resequencer s now support an <expire-advice-chain/> and <expire-transactional/> sub-elements to advise the forceComplete operation.
See Section 6.4.4, “Configuring an Aggregator” for more information.
The <int:outbound-channel-adapter/> now supports the <script/> sub-element.
The underlying script must have a void return type or return null.
See Section 8.8, “Groovy support” and Section 8.7, “Scripting support”.
When a message group in a resequencer is timed out (using group-timeout or a MessageGroupStoreReaper), late arriving messages will now be discarded immediately by default.
See Section 6.5, “Resequencer”.
Now Spring Integration consistently handles the Java 8’s Optional type.
See Section 8.5.2, “Configuring Service Activator”.
The QueueChannel backed Queue type has been changed from BlockingQueue to the more generic Queue.
It allows the use of any external Queue implementation, for example Reactor’s PersistentQueue.
See the section called “QueueChannel Configuration”.
The ChannelInterceptor now supports additional afterSendCompletion() and afterReceiveCompletion() methods.
See Section 4.1.3, “Channel Interceptors”.
Since version 4.1.1 there is a change of behavior if you explicitly set the javamail property mail.[protocol].peek to false (where [protocol] is imap or imaps).
See Important: IMAP PEEK.
Please be sure to also see the Migration Guide for important changes that might affect your applications. Migration guides for all versions back to 2.1 can be found on the Wiki.
The MQTT channel adapters (previously available in the Spring Integration Extensions repository) are now available as part of the normal Spring Integration distribution. See Chapter 24, MQTT Support
The @EnableIntegration annotation has been added, to permit declaration of standard Spring Integration beans when using @Configuration classes.
See Section E.6, “Annotation Support” for more information.
The @IntegrationComponentScan annotation has been added, to permit classpath scanning for Spring Integration specific components.
See Section E.6, “Annotation Support” for more information.
Message history can now be enabled with the @EnableMessageHistory annotation in a @Configuration class; in addition the message history settings can be modified by a JMX MBean.
In addition auto-created MessageHandler s for annotated endpoints (e.g.
@ServiceActivator, @Splitter etc.) now are also trackable by MessageHistory.
For more information, see Section 10.3, “Message History”.
Messaging gateway interfaces can now be configured with the @MessagingGateway annotation.
It is an analogue of the <int:gateway/> xml element.
For more information, see Section 8.4.6, “@MessagingGateway Annotation”.
As well as the @EnableIntegration annotation mentioned above, a a hook has been introduced to allow the Spring Integration infrastructure beans to be configured using Spring Boot’s @EnableAutoConfiguration.
For more information seehttp://docs.spring.io/spring-boot/docs/current/reference/html/using-boot-auto-configuration.html[Spring Boot - AutoConfigure].
As well as the @EnableIntegration annotation mentioned above, the @GlobalChannelInterceptor annotation has bean introduced.
For more information, see Section E.6, “Annotation Support”.
The @IntegrationConverter annotation has bean introduced, as an analogue of <int:converter/> component.
For more information, see Section E.6, “Annotation Support”.
The @EnablePublisher annotation has been added, to allow the specification of a default-publisher-channel for @Publisher annotations.
See Section E.6, “Annotation Support” for more information.
A new Redis MessageGroupStore, that is optimized for use when backing a QueueChannel for persistence, is now provided.
For more information, see Section 25.4.1, “Redis Channel Message Stores”.
A new Redis ChannelPriorityMessageStore is now provided.
This can be used to retrieve messages by priority.
For more information, see Section 25.4.1, “Redis Channel Message Stores”.
MongoDB support now provides the MongoDbChannelMessageStore - a channel specific MessageStore implementation.
With priorityEnabled = true, it can be used in <int:priority-queue> s to achieve priority order polling of persisted messages.
For more information see Section 23.3.1, “MongoDB Channel Message Store”.
The IntegrationMBeanExporter can now be enabled with the @EnableIntegrationMBeanExport annotation in a @Configuration class.
For more information, see Section 10.2.7, “MBean Exporter”.
Configuration of Spring Security for message channels using @Configuration classes is now supported by using a ChannelSecurityInterceptorFactoryBean.
For more information, see Appendix D, Security in Spring Integration.
The Redis support now provides the <outbound-gateway> component to perform generic Redis commands using the RedisConnection#execute method.
For more information, see Section 25.8, “Redis Outbound Command Gateway”.
The RedisLockRegistry and GemfireLockRegistry are now available supporting global locks visible to multiple application instances/servers.
These can be used with aggregating message handlers across multiple application instances such that group release will occur on only one instance.
For more information, see Section 25.11, “Redis Lock Registry”, Section 17.6, “Gemfire Lock Registry” and Section 6.4, “Aggregator”.
Annotation-based messaging configuration can now have a poller attribute.
This means that methods annotated with (@ServiceActivator, @Aggregator etc.) can now use an inputChannel that is a reference to a PollableChannel.
For more information, see Section E.6, “Annotation Support”.
The @InboundChannelAdapter method annotation is now available.
It is an analogue of the <int:inbound-channel-adapter> XML component.
In addition, all Messaging Annotations now provide SmartLifecycle options.
For more information, see Section E.6, “Annotation Support”.
A new twitter endpoint <int-twitter-search-outbound-gateway/> has been added.
Unlike the search inbound adapter which polls using the same search query each time, the outbound gateway allows on-demand customized queries.
For more information, see Section 33.6, “Twitter Search Outbound Gateway”.
The GemfireMetadataStore is provided, allowing it to be used, for example, in a AbstractPersistentAcceptOnceFileListFilter implementation in a multiple application instance/server environment.
For more information, see Section 10.5, “Metadata Store”, Section 15.2, “Reading Files”, Section 16.4, “FTP Inbound Channel Adapter” and Section 28.7, “SFTP Inbound Channel Adapter”.
Annotation and Java configuration has introduced @BridgeFrom and @BridgeTo @Bean method annotations to mark MessageChannel beans in @Configuration classes.
For more information, see Section E.6, “Annotation Support”.
Messaging Annotations (@ServiceActivator, @Router, @MessagingGateway etc.) can now be configured as meta-annotations for user-defined Messaging Annotations.
In addition the user-defined annotations can have the same attributes (inputChannel, @Poller, autoStartup etc.).
For more information, see Section E.6, “Annotation Support”.
Core messaging abstractions (Message, MessageChannel etc) have moved to the Spring Framework spring-messaging module.
Users who reference these classes directly in their code will need to make changes as described in the first section of the Migration Guide.
The header-type attribute has been introduced for the header sub-element of the <int-xml:xpath-header-enricher>.
This attribute provides the target type for the header value to which the result of the XPath expression evaluation will be converted.
For more information see Section 37.7, “XPath Header Enricher”.
The result-type attribute has been introduced for the <int:object-to-json-transformer>.
This attribute provides the target type for the result of object mapping to JSON.
It supports STRING (default) and NODE.
For more information see the section called “JSON Transformers”.
The DefaultJmsHeaderMapper now maps an incoming JMSPriority header to the Spring Integration priority header.
Previously priority was only considered for outbound messages.
For more information see Section 21.6, “Mapping Message Headers to/from JMS Message”.
The JMS outbound channel adapter now supports the session-transacted attribute (default false).
Previously, you had to inject a customized JmsTemplate to use transactions.
See Section 21.3, “Outbound Channel Adapter”.
The JMS inbound channel adapter now supports the session-transacted attribute (default false).
Previously, you had to inject a customized JmsTemplate to use transactions (the adapter allowed transacted in the acknowledgeMode which was incorrect, and didn’t work; this value is no longer allowed).
See Section 21.1, “Inbound Channel Adapter”.
You can now specify a MessageConverter to be used when converting (if necessary) payloads to one of the accepted datatype s in a Datatype channel.
For more information see the section called “Datatype Channel Configuration”.
Simplified namespace support has been added to configure a RequestHandlerRetryAdvice.
For more information see the section called “Configuring the Retry Advice”.
The mutually exclusive group-timeout and group-timeout-expression attributes have been added to the <int:aggregator> and <int:resequencer>.
These attributes allow forced completion of a partial MessageGroup, if the ReleaseStrategy does not release a group and no further messages arrive within the time specified.
For more information see Section 6.4.4, “Configuring an Aggregator”.
The RedisMetadataStore now implements ConcurrentMetadataStore, allowing it to be used, for example, in a AbstractPersistentAcceptOnceFileListFilter implementation in a multiple application instance/server environment.
For more information, see Section 25.5, “Redis Metadata Store”, Section 15.2, “Reading Files”, Section 16.4, “FTP Inbound Channel Adapter” and Section 28.7, “SFTP Inbound Channel Adapter”.
The JdbcChannelMessageStore now implements PriorityCapableChannelMessageStore, allowing it to be used as a message-store reference for priority-queue s.
For more information, see Section 19.4.3, “Backing Message Channels”.
Spring AMQP, by default, creates persistent messages on the broker.
This behavior can be overridden by setting the amqp_deliveryMode header and/or customizing the mappers.
A convenient default-delivery-mode attribute has now been added to the adapters to provide easier configuration of this important setting.
For more information, see Section 12.5, “Outbound Channel Adapter” and Section 12.6, “Outbound Gateway”.
The DefaultFtpSessionFactory now exposes the connectTimeout, defaultTimeout and dataTimeout properties, avoiding the need to subclass the factory just to set these common properties.
The postProcess* methods are still available for more advanced configuration.
See Section 16.2, “FTP Session Factory” for more information.
The StatusUpdatingMessageHandler (<int-twitter:outbound-channel-adapter>) now supports the tweet-data-expression attribute to build a org.springframework.social.twitter.api.TweetData object for updating the timeline status allowing, for example, attaching an image.
See Section 33.5.1, “Twitter Outbound Update Channel Adapter” for more information.
The id-expression attribute has been introduced for <int-jpa:retrieving-outbound-gateway> to perform EntityManager.find(Class entityClass, Object primaryKey).
See Section 20.6.5, “Retrieving Outbound Gateway” for more information.
When one of the standard deserializers encounters a problem decoding the input stream to a message, it will now emit a TcpDeserializationExceptionEvent, allowing applications to examine the data at the point the exception occurred.
See Section 32.5, “TCP Connection Events” for more information.
Messaging Annotations (@ServiceActivator, @Router, @InboundChannelAdapter etc.) can now be configured on @Bean definitions in @Configuration classes.
For more information, see Section E.6, “Annotation Support”.
The HTTP module now provides powerful Request Mapping support for Inbound Endpoints.
Class UriPathHandlerMapping was replaced by IntegrationRequestMappingHandlerMapping, which is registered under the bean name integrationRequestMappingHandlerMapping in the application context.
Upon parsing of the HTTP Inbound Endpoint, a new IntegrationRequestMappingHandlerMapping bean is either registered or an existing bean is being reused.
To achieve flexible Request Mapping configuration, Spring Integration provides the <request-mapping/> sub-element for the <http:inbound-channel-adapter/> and the <http:inbound-gateway/>.
Both HTTP Inbound Endpoints are now fully based on the Request Mapping infrastructure that was introduced with Spring MVC 3.1.
For example, multiple paths are supported on a single inbound endpoint.
For more information see Section 18.4, “HTTP Namespace Support”.
A new IntegrationEvaluationContextFactoryBean is provided to allow configuration of custom PropertyAccessor s and functions for use in SpEL expressions throughout the framework.
For more information see Appendix A, Spring Expression Language (SpEL).
To customize the SpEL EvaluationContext with static Method functions, the new <spel-function/> component is introduced.
Two built-in functions are also provided (#jsonPath and #xpath).
For more information see Section A.3, “SpEL Functions”.
To customize the SpEL EvaluationContext with PropertyAccessor implementations the new <spel-property-accessors/> component is introduced.
For more information see Section A.4, “PropertyAccessors”.
A new Redis-based MetadataStore implementation has been added.
The RedisMetadataStore can be used to maintain state of a MetadataStore across application restarts.
This new MetadataStore implementation can be used with adapters such as:
- Twitter Inbound Adapters
- Feed Inbound Channel Adapter
New queue-based components have been added.
The <int-redis:queue-inbound-channel-adapter/> and the <int-redis:queue-outbound-channel-adapter/> components are provided to perform right pop and left push operations on a Redis List, respectively.
For more information see Chapter 25, Redis Support.
It is now possible to instruct the framework to store reply and error channels in a registry for later resolution.
This is useful for cases where the replyChannel or errorChannel might be lost; for example when serializing a message.
See Section 7.2.2, “Header Enricher” for more information.
In addition to the existing eMongoDbMessageStore, a new ConfigurableMongoDbMessageStore has been introduced.
This provides a more robust and flexible implementation of MessageStore for MongoDB.
It does not have backward compatibility, with the existing store, but it is recommended to use it for new applications.
Existing applications can use it, but messages in the old store will not be available.
See Chapter 23, MongoDb Support for more information.
Building on the 2.2 SyslogToMapTransformer Spring Integration 3.0 now introduces UDP and TCP inbound channel adapters especially tailored for receiving SYSLOG messages.
For more information, see Chapter 31, Syslog Support.
File 'tail’ing inbound channel adapters are now provided to generate messages when lines are added to the end of text files; see Section 15.2.6, “'Tail’ing Files”.
-
A new
<int-jmx:tree-polling-channel-adapter/>is provided; this adapter queries the JMX MBean tree and sends a message with a payload that is the graph of objects that matches the query. By default the MBeans are mapped to primitives and simple Objects like Map, List and arrays - permitting simple transformation, for example, to JSON. -
The
IntegrationMBeanExporternow allows the configuration of a customObjectNamingStrategyusing thenaming-strategyattribute.
For more information, see Section 10.2, “JMX Support”.
TcpConnection s now emit ApplicationEvent s (specifically TcpConnectionEvent s) when connections are opened, closed, or an exception occurs.
This allows applications to be informed of changes to TCP connections using the normal Spring ApplicationListener mechanism.
AbstractTcpConnection has been renamed TcpConnectionSupport; custom connections that are subclasses of this class, can use its methods to publish events.
Similarly, AbstractTcpConnectionInterceptor has been renamed to TcpConnectionInterceptorSupport.
In addition, a new <int-ip:tcp-connection-event-inbound-channel-adapter/> is provided; by default, this adapter sends all TcpConnectionEvent s to a Channel.
Further, the TCP Connection Factories, now provide a new method getOpenConnectionIds(), which returns a list of identifiers for all open connections; this allows applications, for example, to broadcast to all open connections.
Finally, the connection factories also provide a new method closeConnection(String connectionId) which allows applications to explicitly close a connection using its ID.
For more information see Section 32.5, “TCP Connection Events”.
The <int:inbound-channel-adapter/> now supports <expression/> and <script/> sub-elements to create a MessageSource; see Section 4.3.3, “Channel Adapter Expressions and Scripts”.
The Content Enricher now provides configuration for <header/> sub-elements, to enrich the outbound Message with headers based on the reply Message from the underlying message flow.
For more information see Section 7.2.3, “Payload Enricher”.
Previously, message ids were generated using the JDK UUID.randomUUID() method.
With this release, the default mechanism has been changed to use a more efficient algorithm which is significantly faster.
In addition, the ability to change the strategy used to generate message ids has been added.
For more information see the section called “Message ID Generation”.
- It is now possible to set common headers across all gateway methods, and more options are provided for adding, to the message, information about which method was invoked.
- It is now possible to entirely customize the way that gateway method calls are mapped to messages.
-
The
GatewayMethodMetadatais now public class and it makes possible flexibly to configure theGatewayProxyFactoryBeanprogrammatically from Java code.
For more information see Section 8.4, “Messaging Gateways”.
-
Outbound Endpoint encode-uri -
<http:outbound-gateway/>and<http:outbound-channel-adapter/>now provide anencode-uriattribute to allow disabling the encoding of the URI object before sending the request. -
Inbound Endpoint merge-with-default-converters -
<http:inbound-gateway/>and<http:inbound-channel-adapter/>now have amerge-with-default-convertersattribute to include the list of defaultHttpMessageConverters after the custom message converters. -
If-(Un)Modified-Since HTTP Headers - previously, If-Modified-Since and If-Unmodified-Since HTTP headers were incorrectly processed within from/to HTTP headers mapping in the
DefaultHttpHeaderMapper. Now, in addition correcting that issue,DefaultHttpHeaderMapperprovides date parsing from formatted strings for any HTTP headers that accept date-time values. -
Inbound Endpoint Expression Variables - In addition to the existing #requestParams and #pathVariables, the
<http:inbound-gateway/>and<http:inbound-channel-adapter/>now support additional useful variables: #matrixVariables, #requestAttributes, #requestHeaders and #cookies. These variables are available in both payload and header expressions. -
Outbound Endpoint uri-variables-expression - HTTP Outbound Endpoints now support the
uri-variables-expressionattribute to specify anExpressionto evaluate aMapfor all URI variable placeholders within URL template. This allows selection of a different map of expressions based on the outgoing message.
For more information see Chapter 18, HTTP Support.
- A new abstraction for JSON conversion has been introduced. Implementations for Jackson 1.x and Jackson 2 are currently provided, with the version being determined by presence on the classpath. Previously, only Jackson 1.x was supported.
-
The
ObjectToJsonTransformerandJsonToObjectTransformernow emit/consume headers containing type information.
For more information, see JSON Transformers in Section 7.1, “Transformer”.
Previously, the id attribute for elements within a <chain> was ignored and, in some cases, disallowed.
Now, the id attribute is allowed for all elements within a <chain>.
The bean names of chain elements is a combination of the surrounding chain’s id and the id of the element itself.
For example: fooChain$child.fooTransformer.handler.
For more information see Section 6.6, “Message Handler Chain”.
The AbstractCorrelatingMessageHandler provides a new property empty-group-min-timeout to allow empty group expiry to run on a longer schedule than expiring partial groups.
Empty groups will not be removed from the MessageStore until they have not been modified for at least this number of milliseconds.
For more information see Section 6.4.4, “Configuring an Aggregator”.
New FileListFilter s that use a persistent MetadataStore are now available.
These can be used to prevent duplicate files after a system restart.
See Section 15.2, “Reading Files”, Section 16.4, “FTP Inbound Channel Adapter”, and Section 28.7, “SFTP Inbound Channel Adapter” for more information.
A new variables attribute has been introduced for scripting components.
In addition, variable bindings are now allowed for inline scripts.
See Section 8.8, “Groovy support” and Section 8.7, “Scripting support” for more information.
Previously, when configuring LoadBalancingStrategy on the channel’s dispatcher sub-element, the only available option was to use a pre-defined enumeration of values which did not allow one to set a custom implementation of the LoadBalancingStrategy.
You can now use load-balancer-ref to provide a reference to a custom implementation of the LoadBalancingStrategy.
For more information see the section called “DirectChannel”.
Previously, sending to a <publish-subscribe-channel/> that had no subscribers would return a false result.
If used in conjunction with a MessagingTemplate, this would result in an exception being thrown.
Now, the PublishSubscribeChannel has a property minSubscribers (default 0).
If the message is sent to at least the minimum number of subscribers, the send is deemed to be successful (even if zero).
If an application is expecting to get an exception under these conditions, set the minimum subscribers to at least 1.
The FTP, SFTP and FTPS endpoints no longer cache sessions by default
The deprecated cached-sessions attribute has been removed from all endpoints.
Previously, the embedded caching mechanism controlled by this attribute’s value didn’t provide a way to limit the size of the cache, which could grow indefinitely.
The CachingConnectionFactory was introduced in release 2.1 and it became the preferred (and is now the only) way to cache sessions.
The CachingConnectionFactory now provides a new method resetCache().
This immediately closes idle sessions and causes in-use sessions to be closed as and when they are returned to the cache.
The DefaultSftpSessionFactory (in conjunction with a CachingSessionFactory) now supports multiplexing channels over a single SSH connection (SFTP Only).
FTP, SFTP and FTPS Inbound Adapters
Previously, there was no way to override the default filter used to process files retrieved from a remote server.
The filter attribute determines which files are retrieved but the FileReadingMessageSource uses an AcceptOnceFileListFilter.
This means that if a new copy of a file is retrieved, with the same name as a previously copied file, no message was sent from the adapter.
With this release, a new attribute local-filter allows you to override the default filter, for example with an AcceptAllFileListFilter, or some other custom filter.
For users that wish the behavior of the AcceptOnceFileListFilter to be maintained across JVM executions, a custom filter that retains state, perhaps on the file system, can now be configured.
Inbound Channel Adapters now support the preserve-timestamp attribute, which sets the local file modified timestamp to the timestamp from the server (default false).
FTP, SFTP and FTPS Gateways
- The gateways now support the mv command, enabling the renaming of remote files.
- The gateways now support recursive ls and mget commands, enabling the retrieval of a remote file tree.
- The gateways now support put and mput commands, enabling sending file(s) to the remote server.
-
The
local-filename-generator-expressionattribute is now supported, enabling the naming of local files during retrieval. By default, the same name as the remote file is used. -
The
local-directory-expressionattribute is now supported, enabling the naming of local directories during retrieval based on the remote directory.
Remote File Template
A new higher-level abstraction (RemoteFileTemplate) is provided over the Session implementations used by the FTP and SFTP modules.
While it is used internally by endpoints, this abstraction can also be used programmatically and, like all Spring *Template implementations, reliably closes the underlying session while allowing low level access to the session when needed.
For more information, see Chapter 16, FTP/FTPS Adapters and Chapter 28, SFTP Adapters.
All Outbound Gateways (e.g.
<jdbc:outbound-gateway/> or <jms:outbound-gateway/>) are designed for request-reply scenarios.
A response is expected from the external service and will be published to the reply-channel, or the replyChannel message header.
However, there are some cases where the external system might not always return a result, e.g.
a <jdbc:outbound-gateway/>, when a SELECT ends with an empty ResultSet or, say, a Web Service is One-Way.
An option is therefore needed to configure whether or not a reply is required.
For this purpose, the requires-reply attribute has been introduced for Outbound Gateway components.
In most cases, the default value for requires-reply is true and, if there is not any result, a ReplyRequiredException will be thrown.
Changing the value to false means that, if an external service doesn’t return anything, the message-flow will end at that point, similar to an Outbound Channel Adapter.
| Note |
|---|---|
|
The WebService outbound gateway has an additional attribute |
Note, the requiresReply property was previously present in the AbstractReplyProducingMessageHandler but set to false, and there wasn’t any way to configure it on Outbound Gateways using the XML namespace.
| Important |
|---|---|
|
Previously, a gateway receiving no reply would silently end the flow (with a DEBUG log message); with this change an exception will now be thrown by default by most gateways.
To revert to the previous behavior, set |
Previously, the <int-amqp:outbound-gateway/> mapped headers before invoking the message converter, and the converter could overwrite headers such as content-type.
The outbound adapter maps the headers after the conversion, which means headers like content-type from the outbound Message (if present) are used.
Starting with this release, the gateway now maps the headers after the message conversion, consistent with the adapter.
If your application relies on the previous behavior (where the converter’s headers overrode the mapped headers), you either need to filter those headers (before the message reaches the gateway) or set them appropriately.
The headers affected by the SimpleMessageConverter are content-type and content-encoding.
Custom message converters may set other headers.
For more complex database-specific types, not supported by the standard CallableStatement.getObject method, 2 new additional attributes were introduced to the <sql-parameter-definition/> element with OUT-direction:
type-name
return-type
The row-mapper attribute of the Stored Procedure Inbound Channel Adapter <returning-resultset/> sub-element now supports a reference to a RowMapper bean definition.
Previously, it contained just a class name (which is still supported).
For more information see Section 19.5, “Stored Procedures”.
Web Service Outbound Gateway uri attribute now supports <uri-variable/> substitution for all URI-schemes supported by Spring Web Services.
For more information see Section 36.4, “Outbound URI Configuration”.
The Redis Inbound Channel Adapter can now use a null value for serializer property, with the raw data being the message payload.
The Redis Outbound Channel Adapter now has the topic-expression property to determine the Redis topic against the Message at runtime.
The Redis Inbound Channel Adapter, in addition to the existing topics attribute, now has the topic-patterns attribute.
For more information, see Chapter 25, Redis Support.
Previously, when a <filter/> had a <request-handler-advice-chain/>, the discard action was all performed within the scope of the advice chain (including any downstream flow on the discard-channel).
The filter element now has an attribute discard-within-advice (default true), to allow the discard action to be performed after the advice chain completes.
See Section 8.9.7, “Advising Filters”.
Request Handler Advice Chains can now be configured using annotations. See Section 8.9.8, “Advising Endpoints Using Annotations”.
This transformer now correctly transforms byte[] and char[] payloads to String.
For more information see Section 7.1, “Transformer”.
Payloads to persist or merge can now be of type http://docs.oracle.com/javase/7/docs/api/java/lang/Iterable.html[java.lang.Iterable].
In that case, each object returned by the Iterable is treated as an entity and persisted or merged using the underlying EntityManager.
NULL values returned by the iterator are ignored.
The JPA adapters now have additional attributes to optionally flush and clear entities from the associated persistence context after performing persistence operations.
Retrieving gateways had no mechanism to specify the first record to be retrieved which is a common use case.
The retrieving gateways now support specifying this parameter using a first-result and first-result-expression attributes to the gateway definition.
Section 20.6.5, “Retrieving Outbound Gateway”.
The JPA retrieving gateway and inbound adapter now have an attribute to specify the maximum number of results in a result set as an expression.
In addition, the max-results attribute has been introduced to replace max-number-of-results, which has been deprecated.
max-results and max-results-expression are used to provide the maximum number of results, or an expression to compute the maximum number of results, respectively, in the result set.
For more information see Chapter 20, JPA Support.
Previously, the <delayer> provided a delay-header-name attribute to determine the delay value at runtime.
In complex cases it was necessary to precede the <delayer> with a <header-enricher>.
Spring Integration 3.0 introduced the expression attribute and expression sub-element for dynamic delay determination.
The delay-header-name attribute is now deprecated because the header evaluation can be specified in the expression.
In addition, the ignore-expression-failures was introduced to control the behavior when an expression evaluation fails.
For more information see Section 8.6, “Delayer”.
Spring Integration 3.0 adds a new set of DDL scripts for MySQL version 5.6.4 and higher. Now MySQL supports fractional seconds and is thus improving the FIFO ordering when polling from a MySQL-based Message Store. For more information, please see Section 19.4.2, “The Generic JDBC Message Store”.
Previously, if an IMAP idle connection failed, it was logged but there was no mechanism to inform an application.
Such exceptions now generate ApplicationEvent s.
Applications can obtain these events using an <int-event:inbound-channel-adapter> or any ApplicationListener configured to receive an ImapIdleExceptionEvent or one of its super classes.
The TCP connection factories now enable the configuration of a flexible mechanism to transfer selected headers (as well as the payload) over TCP.
A new TcpMessageMapper enables the selection of the headers, and an appropriate (de)serializer needs to be configured to write the resulting Map to the TCP stream.
A MapJsonSerializer is provided as a convenient mechanism to transfer headers and payload over TCP.
For more information see Section 32.8.4, “Transferring Headers”.
Previously, when configuring a <message-driven-channel-adapter/>, if you wished to use a specific TaskExecutor, it was necessary to declare a container bean and provide it to the adapter using the container attribute.
The task-executor is now provided, allowing it to be set directly on the adapter.
This is in addition to several other container attributes that were already available.
The RMI Inbound Gateway now supports an error-channel attribute.
See Section 27.3, “Inbound RMI”.
You can now specify the transformer factory class name using the transformer-factory-class attribute.
See the section called “XsltPayloadTransformer”
Spring Integration now has RedisStore Inbound and Outbound Channel Adapters allowing you to write and read Message payloads to/from Redis collection(s). For more information please see Section 25.7, “RedisStore Outbound Channel Adapter” and Section 25.6, “RedisStore Inbound Channel Adapter”.
Spring Integration now has MongoDB Inbound and Outbound Channel Adapters allowing you to write and read Message payloads to/from a MongoDB document store. For more information please see Section 23.5, “MongoDB Outbound Channel Adapter” and Section 23.4, “MongoDB Inbound Channel Adapter”.
Spring Integration now includes components for the Java Persistence API (JPA) for retrieving and persisting JPA entity objects. The JPA Adapter includes the following components:
For more information please see Chapter 20, JPA Support
The ability to add an <advice-chain/> to a poller has been available for some time. However, the behavior added by this affects the entire integration flow. It did not address the ability to add, say, retry, to an individual endpoint. The 2.2. release introduces the <request-handler-advice-chain/> to many endpoints.
In addition, 3 standard Advice classes have been provided for this purpose:
- MessageHandlerRetryAdvice
- MessageHandlerCircuitBreakerAdvice
- ExpressionEvaluatingMessageHandlerAdvice
For more information, see Section 8.9, “Adding Behavior to Endpoints”.
Pollers can now participate in Spring’s Transaction Synchronization feature. This allows for synchronizing such operations as renaming files by an inbound channel adapter depending on whether the transaction commits, or rolls back.
In addition, these features can be enabled when there is not a real transaction present, by means of a PseudoTransactionManager.
For more information see Section C.3, “Transaction Synchronization”.
When using the File Oubound Channel Adapter or the File Outbound Gateway, a new mode property was added. Prior to Spring Integration 2.2, target files were replaced when they existed. Now you can specify the following options:
- REPLACE (Default)
- APPEND
- FAIL
- IGNORE
For more information please see Section 15.3.3, “Dealing with Existing Destination Files”.
The XML Namespace support adds the reply-timeout attribute to the following Outbound Gateways:
- Amqp Outbound Gateway
- File Outbound Gateway
- Ftp Outbound Gateway
- Sftp Outbound Gateway
- Ws Outbound Gateway
Spring Integration now uses Spring AMQP 1.1. This enables several features to be used within a Spring Integration application, including…
- A fixed reply queue for the outbound gateway
- HA (mirrored) queues
- Publisher Confirms
- Returned Messages
- Support for Dead Letter Exchanges/Dead Letter Queues
SpEL Support
When using the Stored Procedure components of the Spring Integration JDBC Adapter, you can now provide Stored Procedure Names or Stored Function Names using Spring Expression Language (SpEL).
This allows you to specify the Stored Procedures to be invoked at runtime. For example, you can provide Stored Procedure names that you would like to execute via Message Headers. For more information please see Section 19.5, “Stored Procedures”.
JMX Support
The Stored Procedure components now provide basic JMX support, exposing some of their properties as MBeans:
- Stored Procedure Name
- Stored Procedure Name Expression
- JdbcCallOperations Cache Statistics
When using the JDBC Outbound Gateway, the update query is no longer mandatory. You can now provide solely a select query using the request message as a source of parameters.
A new Message Channel-specific Message Store Implementation has been added, providing a more scalable solution using database-specific SQL queries. For more information please see: Section 19.4.3, “Backing Message Channels”.
A method stopActiveComponents() has been added to the IntegrationMBeanExporter.
This allows a Spring Integration application to be shut down in an orderly manner, disallowing new inbound messages to certain adapters and waiting for some time to allow in-flight messages to complete.
The JMS Outbound Gateway can now be configured to use a MessageListener container to receive replies.
This can improve performance of the gateway.
The ObjectToJsonTransformer now sets the content-type header to application/json by default.
For more information see Section 7.1, “Transformer”.
Java serialization over HTTP is no longer enabled by default.
Previously, when setting a expected-response-type to a Serializable object, the Accept header was not properly set up.
The SerializingHttpMessageConverter has now been updated to set the Accept header to application/x-java-serialized-object.
However, because this could cause incompatibility with existing applications, it was decided to no longer automatically add this converter to the HTTP endpoints.
If you wish to use Java serialization, you will need to add the SerializingHttpMessageConverter to the appropriate endpoints, using the message-converters attribute, when using XML configuration, or using the setMessageConverters() method.
Alternatively, you may wish to consider using JSON instead which is enabled by simply having Jackson on the classpath.
In Spring Integration 2.0, support for Groovy was added. With Spring Integration 2.1 we expanded support for additional languages substantially by implementing support for JSR-223 (Scripting for the Java™ Platform). Now you have the ability to use any scripting language that supports JSR-223 including:
- Javascript
- Ruby/JRuby
- Python/Jython
- Groovy
For further details please see Section 8.7, “Scripting support”.
Spring Integration provides support for GemFire by providing inbound adapters for entry and continuous query events, an outbound adapter to write entries to the cache, and MessageStore and MessageGroupStore implementations.
Spring integration leverages the Spring Gemfire project, providing a thin wrapper over its components.
For further details please see Chapter 17, GemFire Support.
Spring Integration 2.1 adds several Channel Adapters for receiving and sending messages using thehttp://www.amqp.org/[Advanced Message Queuing Protocol] (AMQP). Furthermore, Spring Integration also provides a point-to-point Message Channel, as well as a publish/subscribe Message Channel that are backed by AMQP Exchanges and Queues.
For further details please see Chapter 12, AMQP Support.
As of version 2.1 Spring Integration provides support for MongoDB by providing a MongoDB-based MessageStore.
For further details please see Chapter 23, MongoDb Support.
As of version 2.1 Spring Integration supports Redis, an advanced key-value store, by providing a Redis-based MessageStore as well as Publish-Subscribe Messaging adapters.
For further details please see Chapter 25, Redis Support.
As of version 2.1, we’ve introduced a new Resource Inbound Channel Adapter that builds upon Spring’s Resource abstraction to support greater flexibility across a variety of actual types of underlying resources, such as a file, a URL, or a class path resource. Therefore, it’s similar to but more generic than the File Inbound Channel Adapter.
For further details please see Section 26.2, “Resource Inbound Channel Adapter”.
With Spring Integration 2.1, the JDBC Module also provides Stored Procedure support by adding several new components, including inbound/outbound channel adapters and an Outbound Gateway.
The Stored Procedure support leverages Spring’shttp://static.springsource.org/spring/docs/3.0.x/javadoc-api/org/springframework/jdbc/core/simple/SimpleJdbcCall.html[SimpleJdbcCall] class and consequently supports stored procedures for:
- Apache Derby
- DB2
- MySQL
- Microsoft SQL Server
- Oracle
- PostgreSQL
- Sybase
The Stored Procedure components also support Sql Functions for the following databases:
- MySQL
- Microsoft SQL Server
- Oracle
- PostgreSQL
For further details please see Section 19.5, “Stored Procedures”.
Spring Integration 2.1 provides a new XPath-based Message Filter, that is part of the XML module.
The XPath Filter allows you to filter messages using provided XPath Expressions.
Furthermore, documentation was added for the XML Validating Filter.
For more details please see Section 37.8, “Using the XPath Filter” and Section 37.10, “XML Validating Filter”.
Since Spring Integration 2.1, the Payload Enricher is provided.
A Payload Enricher defines an endpoint that typically passes ahttp://static.springsource.org/spring-integration/api/org/springframework/integration/Message.html[Message] to the exposed request channel and then expects a reply message.
The reply message then becomes the root object for evaluation of expressions to enrich the target payload.
For further details please see Section 7.2.3, “Payload Enricher”.
Spring Integration 2.1 provides two new Outbound Gateways in order to interact with remote File Transfer Protocol (FTP) or Secure File Transfer Protocol (SFT) servers. These two gateways allow you to directly execute a limited set of remote commands.
For instance, you can use these Outbound Gateways to list, retrieve and delete remote files and have the Spring Integration message flow continue with the remote server’s response.
For further details please see Section 16.8, “FTP Outbound Gateway” and Section 28.11, “SFTP Outbound Gateway”.
As of version 2.1, we have exposed more flexibility with regards to session management for remote file adapters (e.g., FTP, SFTP etc).
Specifically, the cache-sessions attribute, which is available via the XML namespace support, is now deprecated.
Alternatively, we added the sessionCacheSize and sessionWaitTimeout attributes on the CachingSessionFactory.
For further details please see Section 16.9, “FTP Session Caching” and Section 28.5, “SFTP Session Caching”.
Router parameters have been standardized across all router implementations with Spring Integration 2.1 providing a more consistent user experience.
With Spring Integration 2.1 the ignore-channel-name-resolution-failures attribute has been removed in favor of consolidating its behavior with the resolution-required attribute.
Also, the resolution-required attribute now defaults to true.
Starting with Spring Integration 2.1, routers will no longer silently drop any messages, if no default output channel was defined.
This means, that by default routers now require at least one resolved channel (if no default-output-channel was set) and by default will throw a MessageDeliveryException if no channel was determined (or an attempt to send was not successful).
If, however, you do desire to drop messages silently, simply set default-output-channel="nullChannel".
| Important |
|---|---|
|
With the standardization of Router parameters and the consolidation of the parameters described above, there is the possibility of breaking older Spring Integration based applications. |
For further details please see Section 6.1, “Routers”
Spring Integration 2.1 ships with an updated XML Schema (version 2.1), providing many improvements, e.g. the Router standardizations discussed above.
From now on, users must always declare the latest XML schema (currently version 2.1). Alternatively, they can use the version-less schema. Generally, the best option is to use version-less namespaces, as these will automatically use the latest available version of Spring Integration.
Declaring a version-less Spring Integration namespace:
<?xml version="1.0" encoding="UTF-8"?> <beans xmlns="http://www.springframework.org/schema/beans" xmlns:xsi="http://www.w3.org/2001/XMLSchema-instance" xmlns:int="http://www.springframework.org/schema/integration" xsi:schemaLocation="http://www.springframework.org/schema/integration http://www.springframework.org/schema/integration/spring-integration.xsd http://www.springframework.org/schema/beans http://www.springframework.org/schema/beans/spring-beans.xsd"> ... </beans>
Declaring a Spring Integration namespace using an explicit version:
<?xml version="1.0" encoding="UTF-8"?> <beans xmlns="http://www.springframework.org/schema/beans" xmlns:xsi="http://www.w3.org/2001/XMLSchema-instance" xmlns:int="http://www.springframework.org/schema/integration" xsi:schemaLocation="http://www.springframework.org/schema/integration http://www.springframework.org/schema/integration/spring-integration-2.2.xsd http://www.springframework.org/schema/beans http://www.springframework.org/schema/beans/spring-beans.xsd"> ... </beans>
The old 1.0 and 2.0 schemas are still there, but if an Application Context still references one of those deprecated schemas, the validator will fail on initialization.
Since version 2.0, the Spring Integration project uses Git for version control. In order to increase community visibility even further, the project was moved from SpringSource hosted Git repositories to Github. The Spring Integration Git repository is located at:null
For the project we also improved the process of providing code contributions and we ensure that every commit is peer-reviewed. In fact, core committers now follow the same process as contributors. For more details please see:
null
In an effort to provide better source code visibility and consequently to monitor the quality of Spring Integration’s source code, an instance of Sonar was setup and metrics are gathered nightly and made avaiblable at:
null
For the 2.1 release of Spring Integration we also expanded the Spring Integration Samples project and added many new samples, e.g. samples covering AMQP support, the new payload enricher, a sample illustrating techniques for testing Spring Integration flow fragments, as well as an example for executing Stored Procedures against Oracle. For details please visit:
null
For a detailed migration guide in regards to upgrading an existing application that uses Spring Integration older than version 2.0, please see:
null
Spring Integration 2.0 is built on top of Spring 3.0.5 and makes many of its features available to our users.
You can now use SpEL expressions within the transformer, router, filter, splitter, aggregator, service-activator, header-enricher, and many more elements of the Spring Integration core namespace as well as various adapters. There are many samples provided throughout this manual.
You can now benefit from Conversion Service support provided with Spring while configuring many Spring Integration components such as Datatype Channel. See Section 4.1.2, “Message Channel Implementations” as well Section 8.5.1, “Introduction”. Also, the SpEL support mentioned in the previous point also relies upon the ConversionService. Therefore, you can register Converters once, and take advantage of them anywhere you are using SpEL expressions.
Spring 3.0 defines two new strategies related to scheduling: TaskScheduler and Trigger Spring Integration (which uses a lot of scheduling) now builds upon these. In fact, Spring Integration 1.0 had originally defined some of the components (e.g. CronTrigger) that have now been migrated into Spring 3.0’s core API. Now, you can benefit from reusing the same components within the entire Application Context (not just Spring Integration configuration). Configuration of Spring Integration Pollers has been greatly simplified as well by providing attributes for directly configuring rates, delays, cron expressions, and trigger references. See Section 4.3, “Channel Adapter” for sample configurations.
Our outbound HTTP adapters now delegate to Spring’s RestTemplate for executing the HTTP request and handling its response. This also means that you can reuse any custom HttpMessageConverter implementations. See Section 18.3, “Http Outbound Components” for more details.
Also in 2.0 we have added support for even more of the patterns described in Hohpe and Woolf’s Enterprise Integration Patterns book.
We now provide support for the Message History pattern allowing you to keep track of all traversed components, including the name of each channel and endpoint as well as the timestamp of that traversal. See Section 10.3, “Message History” for more details.
We now provide support for the Message Store pattern. The Message Store provides a strategy for persisting messages on behalf of any process whose scope extends beyond a single transaction, such as the Aggregator and Resequencer. Many sections of this document provide samples on how to use a Message Store as it affects several areas of Spring Integration. See Section 10.4, “Message Store”, Section 7.3, “Claim Check”, Section 4.1, “Message Channels”, Section 6.4, “Aggregator”, Chapter 19, JDBC Support, and Section 6.5, “Resequencer” for more details
We have added an implementation of the Claim Check pattern. The idea behind the Claim Check pattern is that you can exchange a Message payload for a "claim ticket" and vice-versa. This allows you to reduce bandwidth and/or avoid potential security issues when sending Messages across channels. See Section 7.3, “Claim Check” for more details.
We have provided implementations of the Control Bus pattern which allows you to use messaging to manage and monitor endpoints and channels. The implementations include both a SpEL-based approach and one that executes Groovy scripts. See Section 10.6, “Control Bus” and Section 8.8.2, “Control Bus” for more details.
We have added several new Channel Adapters and Messaging Gateways in Spring Integration 2.0.
We have added Channel Adapters for receiving and sending messages over the TCP and UDP internet protocols. See Chapter 32, TCP and UDP Support for more details. Also, you can checkout the following blog: TCP/UDP support
Twitter adapters provides support for sending and receiving Twitter Status updates as well as Direct Messages. You can also perform Twitter Searches with an inbound Channel Adapter. See Chapter 33, Twitter Support for more details.
The new XMPP adapters support both Chat Messages and Presence events. See Chapter 38, XMPP Support for more details.
Inbound and outbound File transfer support over FTP/FTPS is now available. See Chapter 16, FTP/FTPS Adapters for more details.
Inbound and outbound File transfer support over SFTP is now available. See Chapter 28, SFTP Adapters for more details.
We have also added Channel Adapters for receiving news feeds (ATOM/RSS). See Chapter 14, Feed Adapter for more details.
With Spring Integration 2.0 we’ve added Groovy support allowing you to use Groovy scripting language to provide integration and/or business logic. See Section 8.8, “Groovy support” for more details.
These symmetrical transformers convert payload objects to and from a Map. See Section 7.1, “Transformer” for more details.
These symmetrical transformers convert payload objects to and from JSON. See Section 7.1, “Transformer” for more details.
These symmetrical transformers convert payload objects to and from byte arrays. They also support the Serializer and Deserializer strategy interfaces that have been added as of Spring 3.0.5. See Section 7.1, “Transformer” for more details.
The core API went through some significant refactoring to make it simpler and more usable. Although we anticipate that the impact to the end user should be minimal, please read through this document to find what was changed. Especially, visit Section 6.1.5, “Dynamic Routers” , Section 8.4, “Messaging Gateways”, Section 18.3, “Http Outbound Components”, Section 5.1, “Message”, and Section 6.4, “Aggregator” for more details. If you are depending directly on some of the core components (Message, MessageHeaders, MessageChannel, MessageBuilder, etc.), you will notice that you need to update any import statements. We restructured some packaging to provide the flexibility we needed for extending the domain model while avoiding any cyclical dependencies (it is a policy of the framework to avoid such "tangles").
With Spring Integration 2.0 we have switched our build environment to use Git for source control. To access our repository simply follow this URL: http://git.springsource.org/spring-integration. We have also switched our build system to Gradle.
With Spring Integration 2.0 we have decoupled the samples from our main release distribution. Please read this blog to get more info New Spring Integration Samples We have also created many new samples, including samples for every new Adapter.
There is an amazing new visual editor for Spring Integration included within the latest version of SpringSource Tool Suite. If you are not already using STS, please download it here: