HTTP Support
Spring Integration’s HTTP support allows for the running of HTTP requests and the processing of inbound HTTP requests.
The HTTP support consists of the following gateway implementations: HttpInboundEndpoint and HttpRequestExecutingMessageHandler.
See also WebFlux Support.
You need to include this dependency into your project:
<dependency>
    <groupId>org.springframework.integration</groupId>
    <artifactId>spring-integration-http</artifactId>
    <version>5.2.0.RC1</version>
</dependency>compile "org.springframework.integration:spring-integration-http:5.2.0.RC1"The javax.servlet:javax.servlet-api dependency must be provided on the target Servlet container.
Http Inbound Components
To receive messages over HTTP, you need to use an HTTP inbound channel adapter or an HTTP inbound gateway.
To support the HTTP inbound adapters, they need to be deployed within a servlet container such as Apache Tomcat or Jetty.
The easiest way to do this is to use Spring’s HttpRequestHandlerServlet, by providing the following servlet definition in the web.xml file:
<servlet>
    <servlet-name>inboundGateway</servlet-name>
    <servlet-class>o.s.web.context.support.HttpRequestHandlerServlet</servlet-class>
</servlet>
Notice that the servlet name matches the bean name.
For more information on using the HttpRequestHandlerServlet, see Remoting and web services using Spring, which is part of the Spring Framework Reference documentation.
If you are running within a Spring MVC application, then the aforementioned explicit servlet definition is not necessary. In that case, the bean name for your gateway can be matched against the URL path as you would for a Spring MVC Controller bean. For more information, see Web MVC framework, which is part of the Spring Framework Reference documentation.
| For a sample application and the corresponding configuration, see the Spring Integration Samples repository. It contains the HTTP sample application, which demonstrates Spring Integration’s HTTP support. |
The following example bean defines an HTTP inbound endpoint:
<bean id="httpInbound"
  class="org.springframework.integration.http.inbound.HttpRequestHandlingMessagingGateway">
  <property name="requestChannel" ref="httpRequestChannel" />
  <property name="replyChannel" ref="httpReplyChannel" />
</bean>
The HttpRequestHandlingMessagingGateway accepts a list of HttpMessageConverter instances or else relies on a default list.
The converters allow customization of the mapping from HttpServletRequest to Message.
The default converters encapsulate simple strategies, which (for example) create a String message for a POST request where the content type starts with text.
See the Javadoc for full details.
An additional flag (mergeWithDefaultConverters) can be set along with the list of custom HttpMessageConverter to add the default converters after the custom converters.
By default, this flag is set to false, meaning that the custom converters replace the default list.
The message conversion process uses the (optional) requestPayloadType property and the incoming Content-Type header.
Starting with version 4.3, if a request has no content type header, application/octet-stream is assumed, as recommended by RFC 2616.
Previously, the body of such messages was ignored.
Spring Integration 2.0 implemented multipart file support.
If the request has been wrapped as a MultipartHttpServletRequest, when you use the default converters, that request is converted to a Message payload that is a MultiValueMap containing values that may be byte arrays, strings, or instances of Spring’s MultipartFile, depending on the content type of the individual parts.
The HTTP inbound endpoint locates a MultipartResolver in the context if one has a bean name of multipartResolver (the same name expected by Spring’s DispatcherServlet).
If it does locate that bean, the support for multipart files is enabled on the inbound request mapper.
Otherwise, it fails when it tries to map a multipart file request to a Spring Integration Message.
For more on Spring’s support for MultipartResolver, see the Spring Reference Manual.
|
|
If you wish to proxy a |
When you send a response to the client, you have a number of ways to customize the behavior of the gateway.
By default, the gateway acknowledges that the request was received by sending a 200 status code back.
It is possible to customize this response by providing a 'viewName' to be resolved by the Spring MVC ViewResolver.
If the gateway should expect a reply to the Message, you can set the expectReply flag (constructor argument) to cause the gateway to wait for a reply Message before creating an HTTP response.
The following example configures a gateway to serve as a Spring MVC Controller with a view name:
<bean id="httpInbound"
  class="org.springframework.integration.http.inbound.HttpRequestHandlingController">
  <constructor-arg value="true" /> <!-- indicates that a reply is expected -->
  <property name="requestChannel" ref="httpRequestChannel" />
  <property name="replyChannel" ref="httpReplyChannel" />
  <property name="viewName" value="jsonView" />
  <property name="supportedMethodNames" >
    <list>
      <value>GET</value>
      <value>DELETE</value>
    </list>
  </property>
</bean>
Because of the constructor-arg value of true, it waits for a reply.
The preceding example also shows how to customize the HTTP methods accepted by the gateway, which are POST and GET by default.
The reply message is available in the model map. By default, the key for that map entry is 'reply', but you can override this default by setting the 'replyKey' property on the endpoint’s configuration.
Payload Validation
Starting with version 5.2, the HTTP inbound endpoints can be supplied with a Validator to check a payload before sending into the channel.
This payload is already a result of conversion and extraction after payloadExpression to narrow a validation scope in regards to the valuable data.
The validation failure handling is fully the same what we have in Spring MVC Error Handling.
HTTP Outbound Components
This section describes Spring Integration’s HTTP outbound components.
Using HttpRequestExecutingMessageHandler
To configure the HttpRequestExecutingMessageHandler, write a bean definition similar to the following:
<bean id="httpOutbound"
  class="org.springframework.integration.http.outbound.HttpRequestExecutingMessageHandler">
  <constructor-arg value="http://localhost:8080/example" />
  <property name="outputChannel" ref="responseChannel" />
</bean>
This bean definition runs HTTP requests by delegating to a RestTemplate.
That template, in turn, delegates to a list of HttpMessageConverter instances to generate the HTTP request body from the Message payload.
You can configure those converters as well as the ClientHttpRequestFactory instance to use, as the following example shows:
<bean id="httpOutbound"
  class="org.springframework.integration.http.outbound.HttpRequestExecutingMessageHandler">
  <constructor-arg value="http://localhost:8080/example" />
  <property name="outputChannel" ref="responseChannel" />
  <property name="messageConverters" ref="messageConverterList" />
  <property name="requestFactory" ref="customRequestFactory" />
</bean>
By default, the HTTP request is generated by using an instance of SimpleClientHttpRequestFactory, which uses the JDK HttpURLConnection.
Use of the Apache Commons HTTP Client is also supported through CommonsClientHttpRequestFactory, which you can inject (as shown earlier).
| For the outbound gateway, the reply message produced by the gateway contains all the message headers that are present in the request message. |
Using Cookies
Basic cookie support is provided by the transfer-cookies attribute on the outbound gateway.
When set to true (the default is false), a Set-Cookie header received from the server in a response is converted to Cookie in the reply message.
This header is then used on subsequent sends.
This enables simple stateful interactions, such as the following:
…→logonGateway→…→doWorkGateway→…→logoffGateway→…
If transfer-cookies is false, any Set-Cookie header received remains as Set-Cookie in the reply message and is dropped on subsequent sends.
|
Empty Response Bodies
HTTP is a request-response protocol.
However, the response may not have a body, only headers.
In this case, the |
|
expected-response-type
Further to the preceding note about empty response bodies, if a response does contain a body, you must provide an appropriate |
HTTP Namespace Support
Spring Integration provides an http namespace and the corresponding schema definition.
To include it in your configuration, provide the following namespace declaration in your application context configuration file:
<?xml version="1.0" encoding="UTF-8"?>
<beans xmlns="http://www.springframework.org/schema/beans"
  xmlns:xsi="http://www.w3.org/2001/XMLSchema-instance"
  xmlns:int="http://www.springframework.org/schema/integration"
  xmlns:int-http="http://www.springframework.org/schema/integration/http"
  xsi:schemaLocation="
    http://www.springframework.org/schema/beans
    https://www.springframework.org/schema/beans/spring-beans.xsd
    http://www.springframework.org/schema/integration
    https://www.springframework.org/schema/integration/spring-integration.xsd
    http://www.springframework.org/schema/integration/http
    https://www.springframework.org/schema/integration/http/spring-integration-http.xsd">
    ...
</beans>
Inbound
The XML namespace provides two components for handling HTTP inbound requests: inbound-channel-adapter and inbound-gateway.
In order to process requests without returning a dedicated response, use the inbound-channel-adapter.
The following example shows how to configure one:
<int-http:inbound-channel-adapter id="httpChannelAdapter" channel="requests"
    supported-methods="PUT, DELETE"/>
To process requests that do expect a response, use an inbound-gateway.
The following example shows how to configure one:
<int-http:inbound-gateway id="inboundGateway"
    request-channel="requests"
    reply-channel="responses"/>
Request Mapping Support
Spring Integration 3.0 improved the REST support by introducing the IntegrationRequestMappingHandlerMapping.
The implementation relies on the enhanced REST support provided by Spring Framework 3.1 or higher.
|
The parsing of the HTTP inbound gateway or the HTTP inbound channel adapter registers an integrationRequestMappingHandlerMapping bean of type IntegrationRequestMappingHandlerMapping, in case one is not yet registered.
This particular implementation of the HandlerMapping delegates its logic to RequestMappingInfoHandlerMapping.
The implementation provides functionality similar to the org.springframework.web.bind.annotation.RequestMapping annotation in Spring MVC.
For more information, see Mapping Requests With @RequestMapping.
|
For this purpose, Spring Integration 3.0 introduces the <request-mapping> element.
You can add this optional element to <http:inbound-channel-adapter> and <http:inbound-gateway>.
It works in conjunction with the path and supported-methods attributes.
The following example shows how to configure it on an inbound gateway:
<inbound-gateway id="inboundController"
    request-channel="requests"
    reply-channel="responses"
    path="/foo/{fooId}"
    supported-methods="GET"
    view-name="foo"
    error-code="oops">
   <request-mapping headers="User-Agent"
     params="myParam=myValue"
     consumes="application/json"
     produces="!text/plain"/>
</inbound-gateway>
Based on the preceding configuration, the namespace parser creates an instance of the IntegrationRequestMappingHandlerMapping (if none exists) and an HttpRequestHandlingController bean and associates with it an instance of RequestMapping.
This RequestMapping instance is, in turn, converted to the Spring MVC RequestMappingInfo.
The <request-mapping> element provides the following attributes:
-
headers -
params -
consumes -
produces
With the path and supported-methods attributes of the <http:inbound-channel-adapter> or the <http:inbound-gateway>, <request-mapping> attributes translate directly into the respective options provided by the org.springframework.web.bind.annotation.RequestMapping annotation in Spring MVC.
The <request-mapping> element lets you configure several Spring Integration HTTP inbound endpoints to the same path (or even the same supported-methods) and lets you provide different downstream message flows based on incoming HTTP requests.
Alternatively, you can also declare only one HTTP inbound endpoint and apply routing and filtering logic within the Spring Integration flow to achieve the same result.
This lets you get the Message into the flow as early as possibly.
The following example shows how to do so:
<int-http:inbound-gateway request-channel="httpMethodRouter"
    supported-methods="GET,DELETE"
    path="/process/{entId}"
    payload-expression="#pathVariables.entId"/>

<int:router input-channel="httpMethodRouter" expression="headers.http_requestMethod">
    <int:mapping value="GET" channel="in1"/>
    <int:mapping value="DELETE" channel="in2"/>
</int:router>

<int:service-activator input-channel="in1" ref="service" method="getEntity"/>

<int:service-activator input-channel="in2" ref="service" method="delete"/>
For more information regarding handler mappings, see the Spring Framework Web Servlet documentation or the Spring Framework Web Reactive documentation.
Cross-origin Resource Sharing (CORS) Support
Starting with version 4.2, you can configure the <http:inbound-channel-adapter> and <http:inbound-gateway> with a <cross-origin> element.
It represents the same options as Spring MVC’s @CrossOrigin for @Controller annotations and allows the configuration of cross-origin resource sharing (CORS) for Spring Integration HTTP endpoints:
-
origin: List of allowed origins. The*means that all origins are allowed. These values are placed in theAccess-Control-Allow-Originheader of both the pre-flight and actual responses. The default value is*. -
allowed-headers: Indicates which request headers can be used during the actual request. The*means that all headers requested by the client are allowed. This property controls the value of the pre-flight response’sAccess-Control-Allow-Headersheader. The default value is*. -
exposed-headers: List of response headers that the user-agent lets the client access. This property controls the value of the actual response’sAccess-Control-Expose-Headersheader. -
method: The HTTP request methods to allow:GET,POST,HEAD,OPTIONS,PUT,PATCH,DELETE,TRACE. Methods specified here overrides those insupported-methods. -
allow-credentials: Set totrueif the the browser should include any cookies associated to the domain of the request orfalseif it should not. An empty string ("") means undefined. Iftrue, the pre-flight response includes theAccess-Control-Allow-Credentials=trueheader. The default value istrue. -
max-age: Controls the cache duration for pre-flight responses. Setting this to a reasonable value can reduce the number of pre-flight request-response interactions required by the browser. This property controls the value of theAccess-Control-Max-Ageheader in the pre-flight response. A value of-1means undefined. The default value is 1800 seconds (30 minutes).
The CORS Java Configuration is represented by the org.springframework.integration.http.inbound.CrossOrigin class, instances of which can be injected into the HttpRequestHandlingEndpointSupport beans.
Response Status Code
Starting with version 4.1, you can configure the <http:inbound-channel-adapter> with a status-code-expression to override the default 200 OK status.
The expression must return an object that can be converted to an org.springframework.http.HttpStatus enum value.
The evaluationContext has a BeanResolver and, starting with version 5.1, is supplied with the RequestEntity<?> as root object.
An example might be to resolve, at runtime, some scoped bean that returns a status code value.
However, most likely, it is set to a fixed value such as status-code=expression="204" (No Content), or status-code-expression="T(org.springframework.http.HttpStatus).NO_CONTENT".
By default, status-code-expression is null, meaning that the normal '200 OK' response status is returned.
Using the RequestEntity<?> as root object, the status code can be conditional e.g. on the request method, some header, URI content or even request body.
The following example shows how to set the status code to ACCEPTED:
<http:inbound-channel-adapter id="inboundController"
       channel="requests" view-name="foo" error-code="oops"
       status-code-expression="T(org.springframework.http.HttpStatus).ACCEPTED">
   <request-mapping headers="BAR"/>
</http:inbound-channel-adapter>
The <http:inbound-gateway> resolves the 'status code' from the http_statusCode header of the reply Message.
Starting with version 4.2, the default response status code when no reply is received within the reply-timeout is 500 Internal Server Error.
There are two ways to modify this behavior:
-
Add a
reply-timeout-status-code-expression. This has the same semantics as thestatus-code-expressionon the inbound adapter. -
Add an
error-channeland return an appropriate message with an HTTP status code header, as the following example shows:<int:chain input-channel="errors"> <int:header-enricher> <int:header name="http_statusCode" value="504" /> </int:header-enricher> <int:transformer expression="payload.failedMessage" /> </int:chain>
The payload of the ErrorMessage is a MessageTimeoutException.
It must be transformed to something that can be converted by the gateway, such as a String.
A good candidate is the exception’s message property, which is the value used when you use the expression technique.
If the error flow times out after a main flow timeout, 500 Internal Server Error is returned, or, if the reply-timeout-status-code-expression is present, it is evaluated.
Previously, the default status code for a timeout was 200 OK.
To restore that behavior, set reply-timeout-status-code-expression="200".
|
URI Template Variables and Expressions
By using the path attribute in conjunction with the payload-expression attribute and the header element, you have a high degree of flexibility for mapping inbound request data.
In the following example configuration, an inbound channel adapter is configured to accept requests using the following URI:
/first-name/{firstName}/last-name/{lastName}When you use the payload-expression attribute, the {firstName} URI template variable maps to be the Message payload, while the {lastName} URI template variable maps to the lname message header, as defined in the following example:
<int-http:inbound-channel-adapter id="inboundAdapterWithExpressions"
    path="/first-name/{firstName}/last-name/{lastName}"
    channel="requests"
    payload-expression="#pathVariables.firstName">
    <int-http:header name="lname" expression="#pathVariables.lastName"/>
</int-http:inbound-channel-adapter>
For more information about URI template variables, see uri template patterns in the Spring Reference Manual.
Since Spring Integration 3.0, in addition to the existing #pathVariables and #requestParams variables being available in payload and header expressions, we added other useful expression variables:
-
#requestParams: TheMultiValueMapfrom theServletRequestparameterMap. -
#pathVariables: TheMapfrom URI Template placeholders and their values. -
#matrixVariables: TheMapofMultiValueMapaccording to the Spring MVC Specification. Note that#matrixVariablesrequires Spring MVC 3.2 or higher. -
#requestAttributes: Theorg.springframework.web.context.request.RequestAttributesassociated with the current request. -
#requestHeaders: Theorg.springframework.http.HttpHeadersobject from the current request. -
#cookies: TheMap<String, Cookie>ofjavax.servlet.http.Cookieinstances from the current request.
Note that all these values (and others) can be accessed within expressions in the downstream message flow through the ThreadLocal org.springframework.web.context.request.RequestAttributes variable, if that message flow is single-threaded and lives within the request thread.
The following example configures a transformer that uses an expression attribute:
<int-:transformer
    expression="T(org.springframework.web.context.request.RequestContextHolder).
                  requestAttributes.request.queryString"/>
Outbound
To configure the outbound gateway, you can use the namespace support. The following code snippet shows the available configuration options for an outbound HTTP gateway:
<int-http:outbound-gateway id="example"
    request-channel="requests"
    url="http://localhost/test"
    http-method="POST"
    extract-request-payload="false"
    expected-response-type="java.lang.String"
    charset="UTF-8"
    request-factory="requestFactory"
    reply-timeout="1234"
    reply-channel="replies"/>
Most importantly, notice that the 'http-method' and 'expected-response-type' attributes are provided.
Those are two of the most commonly configured values.
The default http-method is POST, and the default response type is null.
With a null response type, the payload of the reply Message contains the ResponseEntity, as long as its HTTP status is a success (non-successful status codes throw exceptions).
If you expect a different type, such as a String, provide that as a fully-qualified class name (java.lang.String in the preceding example).
See also the note about empty response bodies in HTTP Outbound Components.
Beginning with Spring Integration 2.1, the request-timeout attribute of the HTTP outbound gateway was renamed to reply-timeout to better reflect its intent.
|
|
Since Spring Integration 2.2, Java serialization over HTTP is no longer enabled by default.
Previously, when setting the However, because this could cause incompatibility with existing applications, it was decided to no longer automatically add this converter to the HTTP endpoints.
If you wish to use Java serialization, you can add the |
Beginning with Spring Integration 2.2, you can also determine the HTTP method dynamically by using SpEL and the http-method-expression attribute.
Note that this attribute is mutually exclusive with http-method.
You can also use the expected-response-type-expression attribute instead of expected-response-type and provide any valid SpEL expression that determines the type of the response.
The following configuration example uses expected-response-type-expression:
<int-http:outbound-gateway id="example"
    request-channel="requests"
    url="http://localhost/test"
    http-method-expression="headers.httpMethod"
    extract-request-payload="false"
    expected-response-type-expression="payload"
    charset="UTF-8"
    request-factory="requestFactory"
    reply-timeout="1234"
    reply-channel="replies"/>
If your outbound adapter is to be used in a unidirectional way, you can use an outbound-channel-adapter instead.
This means that a successful response executes without sending any messages to a reply channel.
In the case of any non-successful response status code, it throws an exception.
The configuration looks very similar to the gateway, as the following example shows:
<int-http:outbound-channel-adapter id="example"
    url="http://localhost/example"
    http-method="GET"
    channel="requests"
    charset="UTF-8"
    extract-payload="false"
    expected-response-type="java.lang.String"
    request-factory="someRequestFactory"
    order="3"
auto-startup="false"/>|
To specify the URL, you can use either the 'url' attribute or the 'url-expression' attribute.
The 'url' attribute takes a simple string (with placeholders for URI variables, as described below).
The 'url-expression' is a SpEL expression, with the In previous releases, some users used the place holders to replace the entire URL with a URI variable. Changes in Spring 3.1 can cause some issues with escaped characters, such as '?'. For this reason, we recommend that, if you wish to generate the URL entirely at runtime, you use the 'url-expression' attribute. |
Mapping URI Variables
If your URL contains URI variables, you can map them by using the uri-variable element.
This element is available for the HTTP outbound gateway and the HTTP outbound channel adapter.
The following example maps the zipCode URI variable to an expression:
<int-http:outbound-gateway id="trafficGateway"
url="https://local.yahooapis.com/trafficData?appid=YdnDemo&zip={zipCode}"
request-channel="trafficChannel"
http-method="GET"
expected-response-type="java.lang.String">
<int-http:uri-variable name="zipCode" expression="payload.getZip()"/>
</int-http:outbound-gateway>The uri-variable element defines two attributes: name and expression.
The name attribute identifies the name of the URI variable, while the expression attribute is used to set the actual value.
By using the expression attribute, you can leverage the full power of the Spring Expression Language (SpEL), which gives you full dynamic access to the message payload and the message headers.
For example, in the preceding configuration, the getZip() method is invoked on the payload object of the Message and the result of that method is used as the value of the URI variable named 'zipCode'.
Since Spring Integration 3.0, HTTP outbound endpoints support the uri-variables-expression attribute to specify an expression that should be evaluated, resulting in a Map of all URI variable placeholders within the URL template.
It provides a mechanism whereby you can use different variable expressions, based on the outbound message.
This attribute is mutually exclusive with the <uri-variable/> element.
The following example shows how to use the uri-variables-expression attribute:
<int-http:outbound-gateway
     url="https://foo.host/{foo}/bars/{bar}"
     request-channel="trafficChannel"
     http-method="GET"
     uri-variables-expression="@uriVariablesBean.populate(payload)"
     expected-response-type="java.lang.String"/>
uriVariablesBean might be defined as follows:
public class UriVariablesBean {
    private static final ExpressionParser EXPRESSION_PARSER = new SpelExpressionParser();

    public Map<String, ?> populate(Object payload) {
        Map<String, Object> variables = new HashMap<String, Object>();
        if (payload instanceOf String.class)) {
            variables.put("foo", "foo"));
        }
        else {
            variables.put("foo", EXPRESSION_PARSER.parseExpression("headers.bar"));
        }
        return variables;
    }

}
The uri-variables-expression must evaluate to a Map.
The values of the Map must be instances of String or Expression.
This Map is provided to an ExpressionEvalMap for further resolution of URI variable placeholders by using those expressions in the context of the outbound Message.
|
IMPORTANT
The uriVariablesExpression property provides a very powerful mechanism for evaluating URI variables.
We anticipate that people mostly use simple expressions, such as the preceding example.
However, you can also configure something such as "@uriVariablesBean.populate(#root)" with an expression in the returned map being variables.put("thing1", EXPRESSION_PARSER.parseExpression(message.getHeaders().get("thing2", String.class)));, where the expression is dynamically provided in the message header named thing2.
Since the header may come from an untrusted source, the HTTP outbound endpoints use SimpleEvaluationContext when evaluating these expressions.
The SimpleEvaluationContext uses only a subset of SpEL features.
If you trust your message sources and wish to use the restricted SpEL constructs, set the trustedSpel property of the outbound endpoint to true.
You can achieve scenarios that need to supply a dynamic set of URI variables on a per-message basis by using a custom url-expression and some utilities for building and encoding URL parameters.
The following example shows how to do so:
url-expression="T(org.springframework.web.util.UriComponentsBuilder)
                           .fromHttpUrl('https://HOST:PORT/PATH')
                           .queryParams(payload)
                           .build()
                           .toUri()"
The queryParams() method expects a MultiValueMap<String, String> as an argument, so you can build a real set of URL query parameters in advance, before performing the request.
The whole queryString can also be presented as a uri-variable, as the following example shows:
<int-http:outbound-gateway id="proxyGateway" request-channel="testChannel"
url="http://testServer/test?{queryString}">
<int-http:uri-variable name="queryString" expression="'a=A&b=B'"/>
</int-http:outbound-gateway>In this case, you must manually provide the URL encoding.
For example, you can use the org.apache.http.client.utils.URLEncodedUtils#format() for this purpose.
As mentioned earlier, a manually built MultiValueMap<String, String> can be converted to the the List<NameValuePair> format() method argument by using the following Java Streams snippet:
List<NameValuePair> nameValuePairs =
    params.entrySet()
            .stream()
            .flatMap(e -> e
                    .getValue()
                    .stream()
                    .map(v -> new BasicNameValuePair(e.getKey(), v)))
            .collect(Collectors.toList());
Controlling URI Encoding
By default, the URL string is encoded (see UriComponentsBuilder) to the URI object before sending the request.
In some scenarios with a non-standard URI (such as the RabbitMQ REST API), it is undesirable to perform the encoding.
The <http:outbound-gateway/> and <http:outbound-channel-adapter/> provide an encode-uri attribute.
To disable encoding the URL, set this attribute to false (by default, it is true).
If you wish to partially encode some of the URL, use an expression within a <uri-variable/>, as the following example shows:
<http:outbound-gateway url="https://somehost/%2f/fooApps?bar={param}" encode-uri="false">
          <http:uri-variable name="param"
            expression="T(org.apache.commons.httpclient.util.URIUtil)
                                             .encodeWithinQuery('Hello World!')"/>
</http:outbound-gateway>
Configuring HTTP Endpoints with Java
The following example shows how to configure an inbound gateway with Java:
@Bean
public HttpRequestHandlingMessagingGateway inbound() {
    HttpRequestHandlingMessagingGateway gateway =
        new HttpRequestHandlingMessagingGateway(true);
    gateway.setRequestMapping(mapping());
    gateway.setRequestPayloadType(String.class);
    gateway.setRequestChannelName("httpRequest");
    return gateway;
}

@Bean
public RequestMapping mapping() {
    RequestMapping requestMapping = new RequestMapping();
    requestMapping.setPathPatterns("/foo");
    requestMapping.setMethods(HttpMethod.POST);
    return requestMapping;
}
The following example shows how to configure an inbound gateway with the Java DSL:
@Bean
public IntegrationFlow inbound() {
    return IntegrationFlows.from(Http.inboundGateway("/foo")
            .requestMapping(m -> m.methods(HttpMethod.POST))
            .requestPayloadType(String.class))
        .channel("httpRequest")
        .get();
}
The following example shows how to configure an outbound gateway with Java:
@ServiceActivator(inputChannel = "httpOutRequest")
@Bean
public HttpRequestExecutingMessageHandler outbound() {
    HttpRequestExecutingMessageHandler handler =
        new HttpRequestExecutingMessageHandler("http://localhost:8080/foo");
    handler.setHttpMethod(HttpMethod.POST);
    handler.setExpectedResponseType(String.class);
    return handler;
}
The following example shows how to configure an outbound gateway with the Java DSL:
@Bean
public IntegrationFlow outbound() {
    return IntegrationFlows.from("httpOutRequest")
        .handle(Http.outboundGateway("http://localhost:8080/foo")
            .httpMethod(HttpMethod.POST)
            .expectedResponseType(String.class))
        .get();
}
Timeout Handling
In the context of HTTP components, there are two timing areas that have to be considered:
-
Timeouts when interacting with Spring Integration Channels
-
Timeouts when interacting with a remote HTTP server
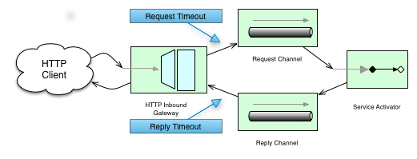
The components interact with message channels, for which timeouts can be specified. For example, an HTTP Inbound Gateway forwards messages received from connected HTTP Clients to a message channel (which uses a request timeout) and consequently the HTTP Inbound Gateway receives a reply message from the reply channel (which uses a reply timeout) that is used to generate the HTTP Response. The following illustration offers a visual explanation:
For outbound endpoints, we need to consider how timing works while interacting with the remote server. The following image shows this scenario:
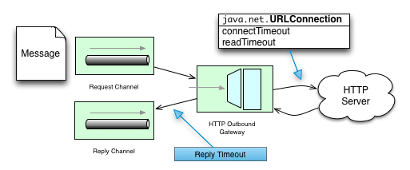
You may want to configure the HTTP related timeout behavior, when making active HTTP requests by using the HTTP outbound gateway or the HTTP outbound channel adapter.
In those instances, these two components use Spring’s RestTemplate support to execute HTTP requests.
To configure timeouts for the HTTP outbound gateway and the HTTP outbound channel adapter, you can either reference a RestTemplate bean directly (by using the rest-template attribute) or you can provide a reference to a ClientHttpRequestFactory bean (by using the request-factory attribute).
Spring provides the following implementations of the ClientHttpRequestFactory interface:
-
SimpleClientHttpRequestFactory: Uses standard J2SE facilities for making HTTP Requests -
HttpComponentsClientHttpRequestFactory: Uses Apache HttpComponents HttpClient (since Spring 3.1)
If you do not explicitly configure the request-factory or rest-template attribute, a default RestTemplate (which uses a SimpleClientHttpRequestFactory) is instantiated.
|
With some JVM implementations, the handling of timeouts by the For example, from the Java™ Platform, Standard Edition 6 API Specification on Some non-standard implementation of this method may ignore the specified timeout. To see the connect timeout set, please call getConnectTimeout(). If you have specific needs, you should test your timeouts.
Consider using the |
| When you use the Apache HttpComponents HttpClient with a pooling connection manager, you should be aware that, by default, the connection manager creates no more than two concurrent connections per given route and no more than 20 connections in total. For many real-world applications, these limits may prove to be too constraining. See the Apache documentation for information about configuring this important component. |
The following example configures an HTTP outbound gateway by using a SimpleClientHttpRequestFactory that is configured with connect and read timeouts of 5 seconds, respectively:
<int-http:outbound-gateway url="https://samples.openweathermap.org/data/2.5/weather?q={city}"
                           http-method="GET"
                           expected-response-type="java.lang.String"
                           request-factory="requestFactory"
                           request-channel="requestChannel"
                           reply-channel="replyChannel">
    <int-http:uri-variable name="city" expression="payload"/>
</int-http:outbound-gateway>

<bean id="requestFactory"
      class="org.springframework.http.client.SimpleClientHttpRequestFactory">
    <property name="connectTimeout" value="5000"/>
    <property name="readTimeout"    value="5000"/>
</bean>
HTTP Outbound Gateway
For the HTTP Outbound Gateway, the XML Schema defines only the reply-timeout.
The reply-timeout maps to the sendTimeout property of the org.springframework.integration.http.outbound.HttpRequestExecutingMessageHandler class.
More precisely, the property is set on the extended AbstractReplyProducingMessageHandler class, which ultimately sets the property on the MessagingTemplate.
The value of the sendTimeout property defaults to "-1" and will be applied to the connected MessageChannel.
This means, that depending on the implementation, the Message Channel’s send method may block indefinitely.
Furthermore, the sendTimeout property is only used, when the actual MessageChannel implementation has a blocking send (such as 'full' bounded QueueChannel).
HTTP Inbound Gateway
For the HTTP inbound gateway, the XML Schema defines the request-timeout attribute, which is used to set the requestTimeout property on the HttpRequestHandlingMessagingGateway class (on the extended MessagingGatewaySupport class).
You can also use the reply-timeout attribute to map to the replyTimeout property on the same class.
The default for both timeout properties is 1000ms (one thousand milliseconds or one second).
Ultimately, the request-timeout property is used to set the sendTimeout on the MessagingTemplate instance.
The replyTimeout property, on the other hand, is used to set the receiveTimeout property on the MessagingTemplate instance.
| To simulate connection timeouts, you can connect to a non-routable IP address, such as 10.255.255.10. |
HTTP Proxy configuration
If you are behind a proxy and need to configure proxy settings for HTTP outbound adapters or gateways, you can apply one of two approaches. In most cases, you can rely on the standard Java system properties that control the proxy settings. Otherwise, you can explicitly configure a Spring bean for the HTTP client request factory instance.
Standard Java Proxy configuration
You can set three system properties to configure the proxy settings that are used by the HTTP protocol handler:
-
http.proxyHost: The host name of the proxy server. -
http.proxyPort: The port number (the default is80). -
http.nonProxyHosts: A list of hosts that should be reached directly, bypassing the proxy. This is a list of patterns separated by|. The patterns may start or end with a*for wildcards. Any host that matches one of these patterns is reached through a direct connection instead of through a proxy.
For HTTPS, the following properties are available:
-
https.proxyHost: The host name of the proxy server. -
https.proxyPort: The port number, the default value being 80.
For more information, see https://docs.oracle.com/javase/8/docs/technotes/guides/net/proxies.html
Spring’s SimpleClientHttpRequestFactory
If you need more explicit control over the proxy configuration, you can use Spring’s SimpleClientHttpRequestFactory and configure its 'proxy' property, as the following example shows:
<bean id="requestFactory"
    class="org.springframework.http.client.SimpleClientHttpRequestFactory">
    <property name="proxy">
        <bean id="proxy" class="java.net.Proxy">
            <constructor-arg>
                <util:constant static-field="java.net.Proxy.Type.HTTP"/>
            </constructor-arg>
            <constructor-arg>
                <bean class="java.net.InetSocketAddress">
                    <constructor-arg value="123.0.0.1"/>
                    <constructor-arg value="8080"/>
                </bean>
            </constructor-arg>
        </bean>
    </property>
</bean>
HTTP Header Mappings
Spring Integration provides support for HTTP header mapping for both HTTP Request and HTTP Responses.
By default, all standard HTTP headers are mapped from the message to HTTP request or response headers without further configuration.
However, if you do need further customization, you can provide additional configuration by taking advantage of the namespace support.
You can provide a comma-separated list of header names, and you can include simple patterns with the '*' character acting as a wildcard.
Provide such values overrides the default behavior.
Basically, it assumes you are in complete control at that point.
However, if you do want to include all of the standard HTTP headers, you can use the shortcut patterns: HTTP_REQUEST_HEADERS and HTTP_RESPONSE_HEADERS.
The following listing shows two examples (the first of which uses a wildcard):
<int-http:outbound-gateway id="httpGateway"
    url="http://localhost/test2"
    mapped-request-headers="thing1, thing2"
    mapped-response-headers="X-*, HTTP_RESPONSE_HEADERS"
    channel="someChannel"/>

<int-http:outbound-channel-adapter id="httpAdapter"
    url="http://localhost/test2"
    mapped-request-headers="thing1, thing2, HTTP_REQUEST_HEADERS"
    channel="someChannel"/>
The adapters and gateways use the DefaultHttpHeaderMapper, which now provides two static factory methods for inbound and outbound adapters so that the proper direction can be applied (mapping HTTP requests and responses either in or out, as appropriate).
If you need further customization, you can also configure a DefaultHttpHeaderMapper independently and inject it into the adapter through the header-mapper attribute.
Before version 5.0, the DefaultHttpHeaderMapper the default prefix for user-defined, non-standard HTTP headers was X-.
Version 5.0 changed the default prefix to an empty string.
According to RFC-6648, the use of such prefixes is now discouraged.
You can still customize this option by setting the DefaultHttpHeaderMapper.setUserDefinedHeaderPrefix() property.
The following example configures a header mapper for an HTTP gateway:
<int-http:outbound-gateway id="httpGateway"
    url="http://localhost/test2"
    header-mapper="headerMapper"
    channel="someChannel"/>

<bean id="headerMapper" class="o.s.i.http.support.DefaultHttpHeaderMapper">
    <property name="inboundHeaderNames" value="thing1*, *thing2, thing3"/>
    <property name="outboundHeaderNames" value="a*b, d"/>
</bean>
If you need to do something other than what the DefaultHttpHeaderMapper supports, you can implement the HeaderMapper strategy interface directly and provide a reference to your implementation.
Integration Graph Controller
Starting with version 4.3, the HTTP module provides an @EnableIntegrationGraphController configuration class annotation and an <int-http:graph-controller/> XML element to expose the IntegrationGraphServer as a REST service.
See Integration Graph for more information.
HTTP Samples
This section wraps up our coverage of Spring Integration’s HTTP support with a few examples.
Multipart HTTP Request — RestTemplate (Client) and Http Inbound Gateway (Server)
This example shows how simple it is to send a multipart HTTP request with Spring’s RestTemplate and receive it with a Spring Integration HTTP inbound adapter.
We create a MultiValueMap and populate it with multipart data.
The RestTemplate takes care of the rest (no pun intended) by converting it to a MultipartHttpServletRequest.
This particular client sends a multipart HTTP Request that contains the name of the company and an image file (the company logo).
The following listing shows the example:
RestTemplate template = new RestTemplate();
String uri = "http://localhost:8080/multipart-http/inboundAdapter.htm";
Resource s2logo =
   new ClassPathResource("org/springframework/samples/multipart/spring09_logo.png");
MultiValueMap map = new LinkedMultiValueMap();
map.add("company", "SpringSource");
map.add("company-logo", s2logo);
HttpHeaders headers = new HttpHeaders();
headers.setContentType(new MediaType("multipart", "form-data"));
HttpEntity request = new HttpEntity(map, headers);
ResponseEntity<?> httpResponse = template.exchange(uri, HttpMethod.POST, request, null);
That is all we need for the client.
On the server side, we have the following configuration:
<int-http:inbound-channel-adapter id="httpInboundAdapter"
    channel="receiveChannel"
    path="/inboundAdapter.htm"
    supported-methods="GET, POST"/>

<int:channel id="receiveChannel"/>

<int:service-activator input-channel="receiveChannel">
    <bean class="org.springframework.integration.samples.multipart.MultipartReceiver"/>
</int:service-activator>

<bean id="multipartResolver"
    class="org.springframework.web.multipart.commons.CommonsMultipartResolver"/>
The 'httpInboundAdapter' receives the request and converts it to a Message with a payload that is a LinkedMultiValueMap.
We then parse that in the 'multipartReceiver' service-activator, as the following example shows:
public void receive(LinkedMultiValueMap<String, Object> multipartRequest){
    System.out.println("### Successfully received multipart request ###");
    for (String elementName : multipartRequest.keySet()) {
        if (elementName.equals("company")){
            System.out.println("\t" + elementName + " - " +
                ((String[]) multipartRequest.getFirst("company"))[0]);
        }
        else if (elementName.equals("company-logo")){
            System.out.println("\t" + elementName + " - as UploadedMultipartFile: " +
                ((UploadedMultipartFile) multipartRequest
                    .getFirst("company-logo")).getOriginalFilename());
        }
    }
}
You should see the following output:
### Successfully received multipart request ###
   company - SpringSource
   company-logo - as UploadedMultipartFile: spring09_logo.png