Google Web Toolkit (GWT) is a technolgy developed by Google to allow the use of existing Java knowledge and tools to build high performance, desktop-esk web applications. Whilst GWT abstracts away many complexities of web application development by not requiring you to learn Javascript and HTML nor worry about browser quirks and memory leaks there is still a start-up cost associated with GWT and the combination of Roo and GWT doesn’t absolve you completely from getting your hands a little dirty. This chapter aims to explain how Roo can reduce the time cost involved with getting started with GWT and does not attempt to provide a complete guide on GWT or its use. The GWT team has written excellent documentation to help you in understanding and using GWT in your project, the GWT documentation is especially useful when it comes to customising your application.
The GWT add-on enables you to create a complete web application for your domain model with a single command. Once enabled, the GWT add-on will maintain your application to ensure it reflects changes to the domain model. Currently the add-on only has a single command, which can be used to setup GWT in any Roo project. As such, Beginning With Roo: The Tutorial can be leveraged when starting out with Roo and GWT.
The first iteration of the add-on allowed you to generate a fully fledged GWT web application in under a minute via the expenses script (to run the expenses script just execute the command script expenses.roo from the Roo shell). The resulting application incorporated several hot new features found in GWT 2.1, these include:
the new lightweight RequestFactory infrastructure for client-server communication;
the built-in best practice MVP (Model View Presenter) framework;
ultra efficient new data presentation widgets; and,
data-binding support.
In Roo 1.1.1 we have built upon this by:
making the add-on more Roo-like, via a faux-ITD model;
incorporating all the improvements and fixes found in GWT 2.1.1, such as support for inheritance in proxied entities; and,
ensuring that user customisation remains intact upon each launch of Roo.
This chapter will outline each of these improvements in more detail.
The main GWT add-on commands are as follows:
web gwt setup - turn an existing Roo project it a GWT web application.
web gwt all - create GWT request and proxy classes for all domain types in your project
If your project has a domain model, which is currently represented by Roo’s JPA support via the entity and related field commands, additional views will be created to mirror entities in the domain. (A full run down of how to implement your domain model via the Roo shell can be found in section 2.5 of Beginning With Roo: The Tutorial)
web gwt gae update - to be run when the database is changed to Google App Engine from an SQL database or back again
To demostrate the basic structure of the conjured GWT application a new Roo project, with a very basic domain model, will be created using the following commands:
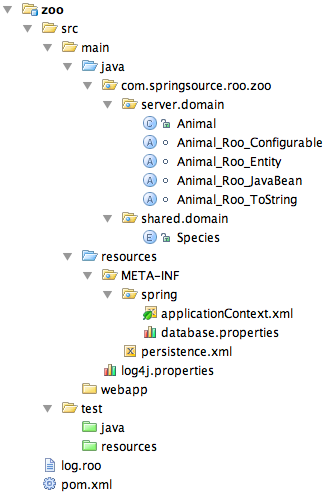
project --topLevelPackage com.springsource.roo.zoo

jpa setup --provider HIBERNATE --database HYPERSONIC_IN_MEMORY

enum type --class ~.shared.domain.Species
enum constant --name Fish
enum constant --name Bird
enum constant --name Mammal
enum constant --name Reptile
enum constant --name Amphibian

entity jpa --class ~.server.domain.Animal
field string --fieldName name --notNull
field enum --fieldName species --type ~.shared.domain.Species
This will create project with a layout as presented in Figure GWT.1.
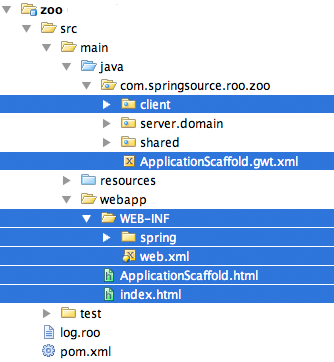
Upon running the gwt setup command, regardless of the presence of a domain model, a number of static scaffold files will be copied into your project. Figure GWT.2 displays the new files and directories (highlighted).
Most of the interesting stuff happens in the client package so we will concentrate on its sub-packages and files. The two sub-packages of interest are:
managed
this package contains all the files that are maintained by Roo. These are files that are created and updated to reflect changes in the domain model. The GWT add-on enforces a number of rules that mean that the add-on will not touch source. As GWT doesn’t currently support AspectJ the standard definition of what constitutes source is different than in other add-ons, such as the entity add-on. This will be expanded upon in the section ITDs: GWT Style below.
scaffold
this package contains static files that provide a framework for the other parts of the application. The files in this package are never updated or changed, they are copied to the Roo project upon running the gwt setup command.
After initial setup all the action occurs in the managed package. The managed package is comprised of:
activity
contains all classes that leverage the Activity infrastructure which is part of the new MVP framework in GWT. These files are changed as new entities are added or removed from the domain model.
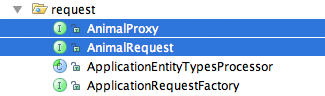
request
contains all classes that revolve around the use of RequestFactory. For each entity in the domain model a *Proxy and *Request class is created as highlighted in Figure GWT.3. More information can be found on RequestFactory via the GWT documentation, a basic synopsis is: a *Proxy class represents a server-side entity and a *Request class represents a server-side service.
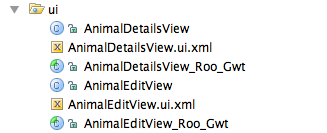
ui
contains all the managed view and ui related classes and files. When an entity is added to the domain model 8 view sets are created (a set generally includes a concrete-abstract type pair and a ui.xml file, an example of two file sets appear in Figure GWT.4) and a ProxyRenderer class. The file sets are as follows:
A GWT application can be run in two ways it can be run via Development Mode or once compiled to JavaScript from a standard application server such as Jetty.
Development Mode
Development mode allows you to make changes to your application without having to recompile to JavaScript, a time consuming operation, it also lets you to debug your application as if it were a standard Java application. More can be found on Development Mode via the GWT team’s documentation here. To run the application in Development Mode from the command line execute the Maven goal mvn gwt:run, this will open the Development Mode console where you can launch the application by clicking “Launch Default Browser”.

Development Mode requires that you are using a browser that supports the Development Mode plug-in, you should be prompted to install the plug-in upon first launch of the application if the browser that doesn’t currently have the plug-in installed. Alternatively you can check to see whether your browser is supported and download the plug-in from here.
Jetty
To compile the application to JavaScript and run it in Jetty execute the Maven goal mvn jetty:run-exploded from the command line. For larger applications compilation can take some time, so running the application outside of Development Mode is often not practical but can be beneficial when wanting to test the speed and size of the compiled application or to run the application in browsers that are not currently supported by the Development Mode plug-in.
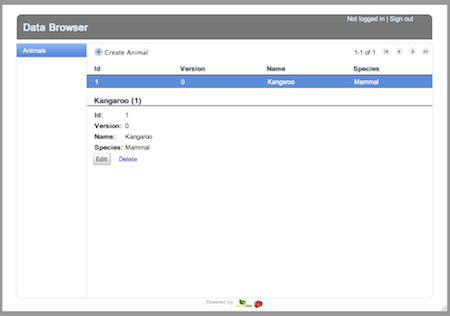
The application created via GWT add-on comes in two flavours: Desktop and Mobile. The default view depends on the device accessing the application. If you are viewing the application from a desktop browser then the following Desktop view would be displayed:
If you are viewing the application from a smartphone such as an Android device or an iPhone the following Mobile views would be displayed:

To force the desktop browser to display the Mobile view instead of the Desktop the “m=true” query string needs to be added to the URL used to access the application. For example to access the Mobile view from a desktop browser whilst using Development Mode the URL would be:
http://127.0.0.1:8888/ApplicationScaffold.html?gwt.codesvr=127.0.0.1:9997&m=true
One of the critical technologies that underpin Roo is AspectJ with Roo relying heavily on its inter-type declaration (ITD) features. GWT doesn’t currently support ITDs, but will in the future (please vote here to register your support), due to this a different approach had to be created which mimics how ITDs works albeit with an impact on class hierarchy. To achieve the same end as ITDs an abstract-concrete model has been introduced in Roo 1.1.1, this replicates how ITDs are used within Roo and provides clear separation between Roo and end-user modifications.
To demonstrate the changes a view class that is created, as part of running the expenses script, will be examined, EmployeedMobileEditView.java. Prior to 1.1.1, only Roo managed source files were created, so upon running expenses.roo a singular EmployeedMobileEditView.java was created. Any changes that Roo needed to make to this file as result of modifying the server-side Employee entity would cause user made changes to be overwritten.
As of Roo 1.1.1 two class files are created for each class that Roo may need to manage as a result of changes to entities. In addition to the singular EmployeedMobileEditView.java a EmployeedMobileEditView_Roo_Gwt.java file is also created from which EmployeedMobileEditView extends. All changes that Roo needs to make to will occur ONLY in EmployeedMobileEditView_Roo_Gwt and the end-user has the ability to leverage the Roo managed code or override it.
Following Roo convention a managed abstract class from which a concrete class extends is suffixed with “_Roo_Gwt”, a warning is also placed at the top of the source file. If a class is not referenced by another type only a warning is placed at the top of the source file. These naming conventions and warnings serve to highlight that this file is “owned” by Roo and a user shouldn’t make changes to the file.
In addition to Roo respecting user modifications to GWT client-side types changes made to UiBinder xml files are also preserved. The current implementation is fairly basic and round-tripping support will be added in a future release.
The management of ui.xml file works in the following way:
Roo looks for an element that has an “id=boundElementHolder” attribute, if a “boundElementHolder” element is not found Roo leaves the file.
If a “boundElementHolder” element is found each element contained within the “boundElementHolder” element is examined to see if there is an element which has an id attribute which corresponds to each bound field declared in the bound type. If an element is not found it is added based upon what has been specified as part of the original scaffolded application.
To stop the add-on recreating a field just create an invisible element with an id attribute equal to the field not be displayed. For example if the field “supervisor” wasn’t to be displayed the declared element in “boundElementHolder” would need to be replaced by <div id=”supervisor” style=”display:none”/>. Alternatively a adding “display:none” to the standard declared element’s style attribute can just be added.
Roo will re-order elements based on the order found in the underlying entity.
Prior to Roo 1.1.1 the behaviour of the GWT add-on was largely undefined, the following clarifies what can be expected of the add-on in Roo 1.1.1.
The add-on will only make changes to the abstract class, never the concrete type. NEVER.
Roo managed files are suffixed with _Roo_Gwt and have a warning comment in the first line notifying the user should not edit the file.
When a user adds/deletes/edits a field in a monitored Entity the addon will make appropriate changes in the mirrored types abstract classes.
When an entity is deleted, or the @RooJpaActiveRecord annotation is removed, the mirrored types will remain in play as to remain consistent with not touch user source.
Roo non-destructively manages a UiBinder xml file, thought formatting is lost in the process.
Unfortunately a number of breaking API changes in GWT happened with the release of GWT 2.1.1. Like any application built against an external library, you will need to refactor your application to deal with these changes.
The transition to the new abstract-concrete model and its associated benefits is not automatic. To take advantage of the new abstract-concrete model used by the GWT add-on, you will need to inherit from the respective *_Roo_Gwt files and optionally remove the methods in the concrete type that have been declared in the *_Roo_Gwt file.
Known GWT Issues
Whilst a number of issues have been resolved in GWT 2.1.1, there are still a few problems you will most likely come across:
RequestFactory doesn't support is*()/had*() methods for primitive booleans and EditorModel doesn't realise that primitive types are now supported in Proxies, which means that primitives are still not supported in the GWT add-on.
“mvn clean gwt:compile” doesn’t work and a “mvn clean compile gwt:compile” needs to be used.
The “Deprecated use of id="boundElementHolder"” warning will be removed when round-tripping support is added.