|
For the latest stable version, please use Spring Security 6.2.4! |
OAuth 2.0 Resource Server JWT
Minimal Dependencies for JWT
Most Resource Server support is collected into spring-security-oauth2-resource-server.
However, the support for decoding and verifying JWTs is in spring-security-oauth2-jose, meaning that both are necessary in order to have a working resource server that supports JWT-encoded Bearer Tokens.
Minimal Configuration for JWTs
When using Spring Boot, configuring an application as a resource server consists of two basic steps. First, include the needed dependencies and second, indicate the location of the authorization server.
Specifying the Authorization Server
In a Spring Boot application, to specify which authorization server to use, simply do:
spring:
  security:
    oauth2:
      resourceserver:
        jwt:
          issuer-uri: https://idp.example.com/issuer
Where idp.example.com/issuer is the value contained in the iss claim for JWT tokens that the authorization server will issue.
Resource Server will use this property to further self-configure, discover the authorization server’s public keys, and subsequently validate incoming JWTs.
To use the issuer-uri property, it must also be true that one of idp.example.com/issuer/.well-known/openid-configuration, idp.example.com/.well-known/openid-configuration/issuer, or idp.example.com/.well-known/oauth-authorization-server/issuer is a supported endpoint for the authorization server.
This endpoint is referred to as a Provider Configuration endpoint or a Authorization Server Metadata endpoint.
|
And that’s it!
Startup Expectations
When this property and these dependencies are used, Resource Server will automatically configure itself to validate JWT-encoded Bearer Tokens.
It achieves this through a deterministic startup process:
-
Query the Provider Configuration or Authorization Server Metadata endpoint for the
jwks_urlproperty -
Query the
jwks_urlendpoint for supported algorithms -
Configure the validation strategy to query
jwks_urlfor valid public keys of the algorithms found -
Configure the validation strategy to validate each JWTs
issclaim againstidp.example.com.
A consequence of this process is that the authorization server must be up and receiving requests in order for Resource Server to successfully start up.
| If the authorization server is down when Resource Server queries it (given appropriate timeouts), then startup will fail. |
Runtime Expectations
Once the application is started up, Resource Server will attempt to process any request containing an Authorization: Bearer header:
GET / HTTP/1.1
Authorization: Bearer some-token-value # Resource Server will process this
So long as this scheme is indicated, Resource Server will attempt to process the request according to the Bearer Token specification.
Given a well-formed JWT, Resource Server will:
-
Validate its signature against a public key obtained from the
jwks_urlendpoint during startup and matched against the JWT -
Validate the JWT’s
expandnbftimestamps and the JWT’sissclaim, and -
Map each scope to an authority with the prefix
SCOPE_.
| As the authorization server makes available new keys, Spring Security will automatically rotate the keys used to validate JWTs. |
The resulting Authentication#getPrincipal, by default, is a Spring Security Jwt object, and Authentication#getName maps to the JWT’s sub property, if one is present.
From here, consider jumping to:
How JWT Authentication Works
Next, let’s see the architectural components that Spring Security uses to support JWT Authentication in servlet-based applications, like the one we just saw.
JwtAuthenticationProvider is an AuthenticationProvider implementation that leverages a JwtDecoder and JwtAuthenticationConverter to authenticate a JWT.
Let’s take a look at how JwtAuthenticationProvider works within Spring Security.
The figure explains details of how the AuthenticationManager in figures from Reading the Bearer Token works.
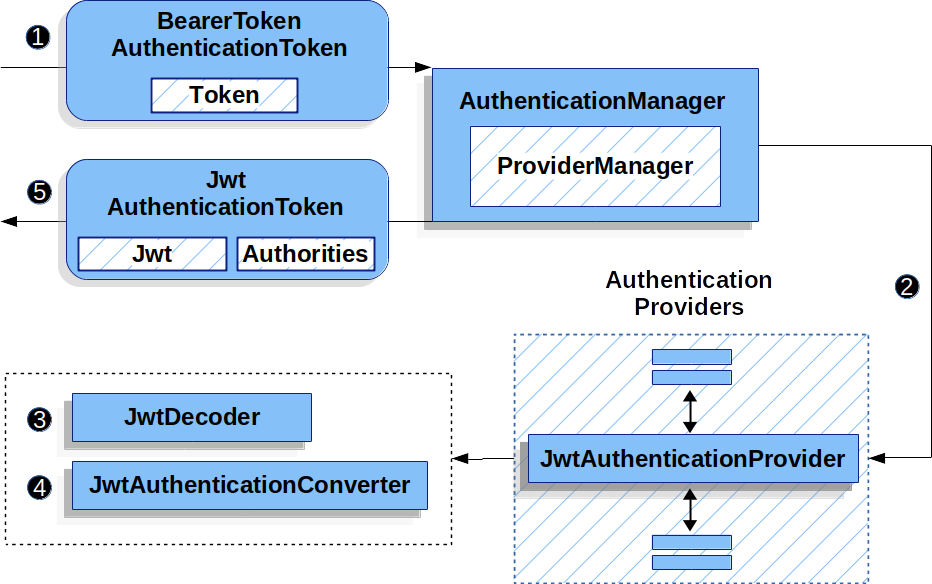
JwtAuthenticationProvider Usage![]() The authentication
The authentication Filter from Reading the Bearer Token passes a BearerTokenAuthenticationToken to the AuthenticationManager which is implemented by ProviderManager.
![]() The
The ProviderManager is configured to use an AuthenticationProvider of type JwtAuthenticationProvider.
![]()
JwtAuthenticationProvider decodes, verifies, and validates the Jwt using a JwtDecoder.
![]()
JwtAuthenticationProvider then uses the JwtAuthenticationConverter to convert the Jwt into a Collection of granted authorities.
![]() When authentication is successful, the
When authentication is successful, the Authentication that is returned is of type JwtAuthenticationToken and has a principal that is the Jwt returned by the configured JwtDecoder.
Ultimately, the returned JwtAuthenticationToken will be set on the SecurityContextHolder by the authentication Filter.
Specifying the Authorization Server JWK Set Uri Directly
If the authorization server doesn’t support any configuration endpoints, or if Resource Server must be able to start up independently from the authorization server, then the jwk-set-uri can be supplied as well:
spring:
  security:
    oauth2:
      resourceserver:
        jwt:
          issuer-uri: https://idp.example.com
jwk-set-uri: https://idp.example.com/.well-known/jwks.json| The JWK Set uri is not standardized, but can typically be found in the authorization server’s documentation |
Consequently, Resource Server will not ping the authorization server at startup.
We still specify the issuer-uri so that Resource Server still validates the iss claim on incoming JWTs.
| This property can also be supplied directly on the DSL. |
Supplying Audiences
As already seen, the issuer-uri property validates the iss claim; this is who sent the JWT.
Boot also has the audiences property for validating the aud claim; this is who the JWT was sent to.
A resource server’s audience can be indicated like so:
spring:
  security:
    oauth2:
      resourceserver:
        jwt:
          issuer-uri: https://idp.example.com
          audiences: https://my-resource-server.example.com
You can also add the aud validation programmatically, if needed.
|
The result will be that if the JWT’s iss claim is not idp.example.com, and its aud claim does not contain my-resource-server.example.com in its list, then validation will fail.
Overriding or Replacing Boot Auto Configuration
There are two @Beans that Spring Boot generates on Resource Server’s behalf.
The first is a SecurityFilterChain that configures the app as a resource server. When including spring-security-oauth2-jose, this SecurityFilterChain looks like:
-
Java
-
Kotlin
@Bean
public SecurityFilterChain filterChain(HttpSecurity http) throws Exception {
    http
        .authorizeHttpRequests(authorize -> authorize
            .anyRequest().authenticated()
        )
        .oauth2ResourceServer(OAuth2ResourceServerConfigurer::jwt);
    return http.build();
}
@Bean
open fun filterChain(http: HttpSecurity): SecurityFilterChain {
http {
authorizeRequests {
authorize(anyRequest, authenticated)
}
oauth2ResourceServer {
jwt { }
}
}
return http.build()
}If the application doesn’t expose a SecurityFilterChain bean, then Spring Boot will expose the above default one.
Replacing this is as simple as exposing the bean within the application:
-
Java
-
Kotlin
@EnableWebSecurity
public class MyCustomSecurityConfiguration {
    @Bean
    public SecurityFilterChain filterChain(HttpSecurity http) throws Exception {
        http
            .authorizeHttpRequests(authorize -> authorize
                .requestMatchers("/messages/**").hasAuthority("SCOPE_message:read")
                .anyRequest().authenticated()
            )
            .oauth2ResourceServer(oauth2 -> oauth2
                .jwt(jwt -> jwt
                    .jwtAuthenticationConverter(myConverter())
                )
            );
        return http.build();
    }
}
@EnableWebSecurity
class MyCustomSecurityConfiguration {
@Bean
open fun filterChain(http: HttpSecurity): SecurityFilterChain {
http {
authorizeRequests {
authorize("/messages/**", hasAuthority("SCOPE_message:read"))
authorize(anyRequest, authenticated)
}
oauth2ResourceServer {
jwt {
jwtAuthenticationConverter = myConverter()
}
}
}
return http.build()
}
}The above requires the scope of message:read for any URL that starts with /messages/.
Methods on the oauth2ResourceServer DSL will also override or replace auto configuration.
For example, the second @Bean Spring Boot creates is a JwtDecoder, which decodes String tokens into validated instances of Jwt:
-
Java
-
Kotlin
@Bean
public JwtDecoder jwtDecoder() {
    return JwtDecoders.fromIssuerLocation(issuerUri);
}
@Bean
fun jwtDecoder(): JwtDecoder {
return JwtDecoders.fromIssuerLocation(issuerUri)
}
Calling JwtDecoders#fromIssuerLocation is what invokes the Provider Configuration or Authorization Server Metadata endpoint in order to derive the JWK Set Uri.
|
If the application doesn’t expose a JwtDecoder bean, then Spring Boot will expose the above default one.
And its configuration can be overridden using jwkSetUri() or replaced using decoder().
Or, if you’re not using Spring Boot at all, then both of these components - the filter chain and a JwtDecoder can be specified in XML.
The filter chain is specified like so:
-
Xml
<http>
    <intercept-uri pattern="/**" access="authenticated"/>
    <oauth2-resource-server>
        <jwt decoder-ref="jwtDecoder"/>
    </oauth2-resource-server>
</http>
And the JwtDecoder like so:
-
Xml
<bean id="jwtDecoder"
        class="org.springframework.security.oauth2.jwt.JwtDecoders"
        factory-method="fromIssuerLocation">
    <constructor-arg value="${spring.security.oauth2.resourceserver.jwt.jwk-set-uri}"/>
</bean>
Using jwkSetUri()
An authorization server’s JWK Set Uri can be configured as a configuration property or it can be supplied in the DSL:
-
Java
-
Kotlin
-
Xml
@EnableWebSecurity
public class DirectlyConfiguredJwkSetUri {
    @Bean
    public SecurityFilterChain filterChain(HttpSecurity http) throws Exception {
        http
            .authorizeHttpRequests(authorize -> authorize
                .anyRequest().authenticated()
            )
            .oauth2ResourceServer(oauth2 -> oauth2
                .jwt(jwt -> jwt
                    .jwkSetUri("https://idp.example.com/.well-known/jwks.json")
                )
            );
        return http.build();
    }
}
@EnableWebSecurity
class DirectlyConfiguredJwkSetUri {
@Bean
open fun filterChain(http: HttpSecurity): SecurityFilterChain {
http {
authorizeRequests {
authorize(anyRequest, authenticated)
}
oauth2ResourceServer {
jwt {
jwkSetUri = "https://idp.example.com/.well-known/jwks.json"
}
}
}
return http.build()
}
}<http>
<intercept-uri pattern="/**" access="authenticated"/>
<oauth2-resource-server>
<jwt jwk-set-uri="https://idp.example.com/.well-known/jwks.json"/>
</oauth2-resource-server>
</http>Using jwkSetUri() takes precedence over any configuration property.
Using decoder()
More powerful than jwkSetUri() is decoder(), which will completely replace any Boot auto configuration of JwtDecoder:
-
Java
-
Kotlin
-
Xml
@EnableWebSecurity
public class DirectlyConfiguredJwtDecoder {
    @Bean
    public SecurityFilterChain filterChain(HttpSecurity http) throws Exception {
        http
            .authorizeHttpRequests(authorize -> authorize
                .anyRequest().authenticated()
            )
            .oauth2ResourceServer(oauth2 -> oauth2
                .jwt(jwt -> jwt
                    .decoder(myCustomDecoder())
                )
            );
        return http.build();
    }
}
@EnableWebSecurity
class DirectlyConfiguredJwtDecoder {
@Bean
open fun filterChain(http: HttpSecurity): SecurityFilterChain {
http {
authorizeRequests {
authorize(anyRequest, authenticated)
}
oauth2ResourceServer {
jwt {
jwtDecoder = myCustomDecoder()
}
}
}
return http.build()
}
}<http>
<intercept-uri pattern="/**" access="authenticated"/>
<oauth2-resource-server>
<jwt decoder-ref="myCustomDecoder"/>
</oauth2-resource-server>
</http>This is handy when deeper configuration, like validation, mapping, or request timeouts, is necessary.
Exposing a JwtDecoder @Bean
Or, exposing a JwtDecoder @Bean has the same effect as decoder():
-
Java
-
Kotlin
@Bean
public JwtDecoder jwtDecoder() {
    return NimbusJwtDecoder.withJwkSetUri(jwkSetUri).build();
}
@Bean
fun jwtDecoder(): JwtDecoder {
return NimbusJwtDecoder.withJwkSetUri(jwkSetUri).build()
}Configuring Trusted Algorithms
By default, NimbusJwtDecoder, and hence Resource Server, will only trust and verify tokens using RS256.
You can customize this via Spring Boot, the NimbusJwtDecoder builder, or from the JWK Set response.
Via Spring Boot
The simplest way to set the algorithm is as a property:
spring:
  security:
    oauth2:
      resourceserver:
        jwt:
          jws-algorithms: RS512
          jwk-set-uri: https://idp.example.org/.well-known/jwks.json
Using a Builder
For greater power, though, we can use a builder that ships with NimbusJwtDecoder:
-
Java
-
Kotlin
@Bean
JwtDecoder jwtDecoder() {
    return NimbusJwtDecoder.withJwkSetUri(this.jwkSetUri)
            .jwsAlgorithm(RS512).build();
}
@Bean
fun jwtDecoder(): JwtDecoder {
return NimbusJwtDecoder.withJwkSetUri(this.jwkSetUri)
.jwsAlgorithm(RS512).build()
}Calling jwsAlgorithm more than once will configure NimbusJwtDecoder to trust more than one algorithm, like so:
-
Java
-
Kotlin
@Bean
JwtDecoder jwtDecoder() {
    return NimbusJwtDecoder.withJwkSetUri(this.jwkSetUri)
            .jwsAlgorithm(RS512).jwsAlgorithm(ES512).build();
}
@Bean
fun jwtDecoder(): JwtDecoder {
return NimbusJwtDecoder.withJwkSetUri(this.jwkSetUri)
.jwsAlgorithm(RS512).jwsAlgorithm(ES512).build()
}Or, you can call jwsAlgorithms:
-
Java
-
Kotlin
@Bean
JwtDecoder jwtDecoder() {
    return NimbusJwtDecoder.withJwkSetUri(this.jwkSetUri)
            .jwsAlgorithms(algorithms -> {
                    algorithms.add(RS512);
                    algorithms.add(ES512);
            }).build();
}
@Bean
fun jwtDecoder(): JwtDecoder {
return NimbusJwtDecoder.withJwkSetUri(this.jwkSetUri)
.jwsAlgorithms {
it.add(RS512)
it.add(ES512)
}.build()
}From JWK Set response
Since Spring Security’s JWT support is based off of Nimbus, you can use all it’s great features as well.
For example, Nimbus has a JWSKeySelector implementation that will select the set of algorithms based on the JWK Set URI response.
You can use it to generate a NimbusJwtDecoder like so:
-
Java
-
Kotlin
@Bean
public JwtDecoder jwtDecoder() {
    // makes a request to the JWK Set endpoint
    JWSKeySelector<SecurityContext> jwsKeySelector =
            JWSAlgorithmFamilyJWSKeySelector.fromJWKSetURL(this.jwkSetUrl);

    DefaultJWTProcessor<SecurityContext> jwtProcessor =
            new DefaultJWTProcessor<>();
    jwtProcessor.setJWSKeySelector(jwsKeySelector);

    return new NimbusJwtDecoder(jwtProcessor);
}
@Bean
fun jwtDecoder(): JwtDecoder {
// makes a request to the JWK Set endpoint
val jwsKeySelector: JWSKeySelector<SecurityContext> = JWSAlgorithmFamilyJWSKeySelector.fromJWKSetURL<SecurityContext>(this.jwkSetUrl)
val jwtProcessor: DefaultJWTProcessor<SecurityContext> = DefaultJWTProcessor()
jwtProcessor.jwsKeySelector = jwsKeySelector
return NimbusJwtDecoder(jwtProcessor)
}Trusting a Single Asymmetric Key
Simpler than backing a Resource Server with a JWK Set endpoint is to hard-code an RSA public key. The public key can be provided via Spring Boot or by Using a Builder.
Via Spring Boot
Specifying a key via Spring Boot is quite simple. The key’s location can be specified like so:
spring:
  security:
    oauth2:
      resourceserver:
        jwt:
          public-key-location: classpath:my-key.pub
Or, to allow for a more sophisticated lookup, you can post-process the RsaKeyConversionServicePostProcessor:
-
Java
-
Kotlin
@Bean
BeanFactoryPostProcessor conversionServiceCustomizer() {
    return beanFactory ->
        beanFactory.getBean(RsaKeyConversionServicePostProcessor.class)
                .setResourceLoader(new CustomResourceLoader());
}
@Bean
fun conversionServiceCustomizer(): BeanFactoryPostProcessor {
return BeanFactoryPostProcessor { beanFactory ->
beanFactory.getBean<RsaKeyConversionServicePostProcessor>()
.setResourceLoader(CustomResourceLoader())
}
}Specify your key’s location:
key.location: hfds://my-key.pubAnd then autowire the value:
-
Java
-
Kotlin
@Value("${key.location}")
RSAPublicKey key;
@Value("\${key.location}")
val key: RSAPublicKey? = nullUsing a Builder
To wire an RSAPublicKey directly, you can simply use the appropriate NimbusJwtDecoder builder, like so:
-
Java
-
Kotlin
@Bean
public JwtDecoder jwtDecoder() {
    return NimbusJwtDecoder.withPublicKey(this.key).build();
}
@Bean
fun jwtDecoder(): JwtDecoder {
return NimbusJwtDecoder.withPublicKey(this.key).build()
}Trusting a Single Symmetric Key
Using a single symmetric key is also simple.
You can simply load in your SecretKey and use the appropriate NimbusJwtDecoder builder, like so:
-
Java
-
Kotlin
@Bean
public JwtDecoder jwtDecoder() {
    return NimbusJwtDecoder.withSecretKey(this.key).build();
}
@Bean
fun jwtDecoder(): JwtDecoder {
return NimbusJwtDecoder.withSecretKey(key).build()
}Configuring Authorization
A JWT that is issued from an OAuth 2.0 Authorization Server will typically either have a scope or scp attribute, indicating the scopes (or authorities) it’s been granted, for example:
{ …, "scope" : "messages contacts"}
When this is the case, Resource Server will attempt to coerce these scopes into a list of granted authorities, prefixing each scope with the string "SCOPE_".
This means that to protect an endpoint or method with a scope derived from a JWT, the corresponding expressions should include this prefix:
-
Java
-
Kotlin
-
Xml
@EnableWebSecurity
public class DirectlyConfiguredJwkSetUri {
    @Bean
    public SecurityFilterChain filterChain(HttpSecurity http) throws Exception {
        http
            .authorizeHttpRequests(authorize -> authorize
                .requestMatchers("/contacts/**").hasAuthority("SCOPE_contacts")
                .requestMatchers("/messages/**").hasAuthority("SCOPE_messages")
                .anyRequest().authenticated()
            )
            .oauth2ResourceServer(OAuth2ResourceServerConfigurer::jwt);
        return http.build();
    }
}
@EnableWebSecurity
class DirectlyConfiguredJwkSetUri {
@Bean
open fun filterChain(http: HttpSecurity): SecurityFilterChain {
http {
authorizeRequests {
authorize("/contacts/**", hasAuthority("SCOPE_contacts"))
authorize("/messages/**", hasAuthority("SCOPE_messages"))
authorize(anyRequest, authenticated)
}
oauth2ResourceServer {
jwt { }
}
}
return http.build()
}
}<http>
<intercept-uri pattern="/contacts/**" access="hasAuthority('SCOPE_contacts')"/>
<intercept-uri pattern="/messages/**" access="hasAuthority('SCOPE_messages')"/>
<oauth2-resource-server>
<jwt jwk-set-uri="https://idp.example.org/.well-known/jwks.json"/>
</oauth2-resource-server>
</http>Or similarly with method security:
-
Java
-
Kotlin
@PreAuthorize("hasAuthority('SCOPE_messages')")
public List<Message> getMessages(...) {}
@PreAuthorize("hasAuthority('SCOPE_messages')")
fun getMessages(): List<Message> { }Extracting Authorities Manually
However, there are a number of circumstances where this default is insufficient.
For example, some authorization servers don’t use the scope attribute, but instead have their own custom attribute.
Or, at other times, the resource server may need to adapt the attribute or a composition of attributes into internalized authorities.
To this end, Spring Security ships with JwtAuthenticationConverter, which is responsible for converting a Jwt into an Authentication.
By default, Spring Security will wire the JwtAuthenticationProvider with a default instance of JwtAuthenticationConverter.
As part of configuring a JwtAuthenticationConverter, you can supply a subsidiary converter to go from Jwt to a Collection of granted authorities.
Let’s say that that your authorization server communicates authorities in a custom claim called authorities.
In that case, you can configure the claim that JwtAuthenticationConverter should inspect, like so:
-
Java
-
Kotlin
-
Xml
@Bean
public JwtAuthenticationConverter jwtAuthenticationConverter() {
    JwtGrantedAuthoritiesConverter grantedAuthoritiesConverter = new JwtGrantedAuthoritiesConverter();
    grantedAuthoritiesConverter.setAuthoritiesClaimName("authorities");

    JwtAuthenticationConverter jwtAuthenticationConverter = new JwtAuthenticationConverter();
    jwtAuthenticationConverter.setJwtGrantedAuthoritiesConverter(grantedAuthoritiesConverter);
    return jwtAuthenticationConverter;
}
@Bean
fun jwtAuthenticationConverter(): JwtAuthenticationConverter {
val grantedAuthoritiesConverter = JwtGrantedAuthoritiesConverter()
grantedAuthoritiesConverter.setAuthoritiesClaimName("authorities")
val jwtAuthenticationConverter = JwtAuthenticationConverter()
jwtAuthenticationConverter.setJwtGrantedAuthoritiesConverter(grantedAuthoritiesConverter)
return jwtAuthenticationConverter
}<http>
<intercept-uri pattern="/contacts/**" access="hasAuthority('SCOPE_contacts')"/>
<intercept-uri pattern="/messages/**" access="hasAuthority('SCOPE_messages')"/>
<oauth2-resource-server>
<jwt jwk-set-uri="https://idp.example.org/.well-known/jwks.json"
jwt-authentication-converter-ref="jwtAuthenticationConverter"/>
</oauth2-resource-server>
</http>
<bean id="jwtAuthenticationConverter"
class="org.springframework.security.oauth2.server.resource.authentication.JwtAuthenticationConverter">
<property name="jwtGrantedAuthoritiesConverter" ref="jwtGrantedAuthoritiesConverter"/>
</bean>
<bean id="jwtGrantedAuthoritiesConverter"
class="org.springframework.security.oauth2.server.resource.authentication.JwtGrantedAuthoritiesConverter">
<property name="authoritiesClaimName" value="authorities"/>
</bean>You can also configure the authority prefix to be different as well.
Instead of prefixing each authority with SCOPE_, you can change it to ROLE_ like so:
-
Java
-
Kotlin
-
Xml
@Bean
public JwtAuthenticationConverter jwtAuthenticationConverter() {
    JwtGrantedAuthoritiesConverter grantedAuthoritiesConverter = new JwtGrantedAuthoritiesConverter();
    grantedAuthoritiesConverter.setAuthorityPrefix("ROLE_");

    JwtAuthenticationConverter jwtAuthenticationConverter = new JwtAuthenticationConverter();
    jwtAuthenticationConverter.setJwtGrantedAuthoritiesConverter(grantedAuthoritiesConverter);
    return jwtAuthenticationConverter;
}
@Bean
fun jwtAuthenticationConverter(): JwtAuthenticationConverter {
val grantedAuthoritiesConverter = JwtGrantedAuthoritiesConverter()
grantedAuthoritiesConverter.setAuthorityPrefix("ROLE_")
val jwtAuthenticationConverter = JwtAuthenticationConverter()
jwtAuthenticationConverter.setJwtGrantedAuthoritiesConverter(grantedAuthoritiesConverter)
return jwtAuthenticationConverter
}<http>
<intercept-uri pattern="/contacts/**" access="hasAuthority('SCOPE_contacts')"/>
<intercept-uri pattern="/messages/**" access="hasAuthority('SCOPE_messages')"/>
<oauth2-resource-server>
<jwt jwk-set-uri="https://idp.example.org/.well-known/jwks.json"
jwt-authentication-converter-ref="jwtAuthenticationConverter"/>
</oauth2-resource-server>
</http>
<bean id="jwtAuthenticationConverter"
class="org.springframework.security.oauth2.server.resource.authentication.JwtAuthenticationConverter">
<property name="jwtGrantedAuthoritiesConverter" ref="jwtGrantedAuthoritiesConverter"/>
</bean>
<bean id="jwtGrantedAuthoritiesConverter"
class="org.springframework.security.oauth2.server.resource.authentication.JwtGrantedAuthoritiesConverter">
<property name="authorityPrefix" value="ROLE_"/>
</bean>Or, you can remove the prefix altogether by calling JwtGrantedAuthoritiesConverter#setAuthorityPrefix("").
For more flexibility, the DSL supports entirely replacing the converter with any class that implements Converter<Jwt, AbstractAuthenticationToken>:
-
Java
-
Kotlin
static class CustomAuthenticationConverter implements Converter<Jwt, AbstractAuthenticationToken> {
    public AbstractAuthenticationToken convert(Jwt jwt) {
        return new CustomAuthenticationToken(jwt);
    }
}

// ...

@EnableWebSecurity
public class CustomAuthenticationConverterConfig {
    @Bean
    public SecurityFilterChain filterChain(HttpSecurity http) throws Exception {
        http
            .authorizeHttpRequests(authorize -> authorize
                .anyRequest().authenticated()
            )
            .oauth2ResourceServer(oauth2 -> oauth2
                .jwt(jwt -> jwt
                    .jwtAuthenticationConverter(new CustomAuthenticationConverter())
                )
            );
        return http.build();
    }
}
internal class CustomAuthenticationConverter : Converter<Jwt, AbstractAuthenticationToken> {
override fun convert(jwt: Jwt): AbstractAuthenticationToken {
return CustomAuthenticationToken(jwt)
}
}
// ...
@EnableWebSecurity
class CustomAuthenticationConverterConfig {
@Bean
open fun filterChain(http: HttpSecurity): SecurityFilterChain {
http {
authorizeRequests {
authorize(anyRequest, authenticated)
}
oauth2ResourceServer {
jwt {
jwtAuthenticationConverter = CustomAuthenticationConverter()
}
}
}
return http.build()
}
}Configuring Validation
Using minimal Spring Boot configuration, indicating the authorization server’s issuer uri, Resource Server will default to verifying the iss claim as well as the exp and nbf timestamp claims.
In circumstances where validation needs to be customized, Resource Server ships with two standard validators and also accepts custom OAuth2TokenValidator instances.
Customizing Timestamp Validation
JWT’s typically have a window of validity, with the start of the window indicated in the nbf claim and the end indicated in the exp claim.
However, every server can experience clock drift, which can cause tokens to appear expired to one server, but not to another. This can cause some implementation heartburn as the number of collaborating servers increases in a distributed system.
Resource Server uses JwtTimestampValidator to verify a token’s validity window, and it can be configured with a clockSkew to alleviate the above problem:
-
Java
-
Kotlin
@Bean
JwtDecoder jwtDecoder() {
     NimbusJwtDecoder jwtDecoder = (NimbusJwtDecoder)
             JwtDecoders.fromIssuerLocation(issuerUri);

     OAuth2TokenValidator<Jwt> withClockSkew = new DelegatingOAuth2TokenValidator<>(
            new JwtTimestampValidator(Duration.ofSeconds(60)),
            new JwtIssuerValidator(issuerUri));

     jwtDecoder.setJwtValidator(withClockSkew);

     return jwtDecoder;
}
@Bean
fun jwtDecoder(): JwtDecoder {
val jwtDecoder: NimbusJwtDecoder = JwtDecoders.fromIssuerLocation(issuerUri) as NimbusJwtDecoder
val withClockSkew: OAuth2TokenValidator<Jwt> = DelegatingOAuth2TokenValidator(
JwtTimestampValidator(Duration.ofSeconds(60)),
JwtIssuerValidator(issuerUri))
jwtDecoder.setJwtValidator(withClockSkew)
return jwtDecoder
}| By default, Resource Server configures a clock skew of 60 seconds. |
Configuring a Custom Validator
Adding a check for the aud claim is simple with the OAuth2TokenValidator API:
-
Java
-
Kotlin
OAuth2TokenValidator<Jwt> audienceValidator() {
    return new JwtClaimValidator<List<String>>(AUD, aud -> aud.contains("messaging"));
}
fun audienceValidator(): OAuth2TokenValidator<Jwt?> {
return JwtClaimValidator<List<String>>(AUD) { aud -> aud.contains("messaging") }
}Or, for more control you can implement your own OAuth2TokenValidator:
-
Java
-
Kotlin
static class AudienceValidator implements OAuth2TokenValidator<Jwt> {
    OAuth2Error error = new OAuth2Error("custom_code", "Custom error message", null);

    @Override
    public OAuth2TokenValidatorResult validate(Jwt jwt) {
        if (jwt.getAudience().contains("messaging")) {
            return OAuth2TokenValidatorResult.success();
        } else {
            return OAuth2TokenValidatorResult.failure(error);
        }
    }
}

// ...

OAuth2TokenValidator<Jwt> audienceValidator() {
    return new AudienceValidator();
}
internal class AudienceValidator : OAuth2TokenValidator<Jwt> {
var error: OAuth2Error = OAuth2Error("custom_code", "Custom error message", null)
override fun validate(jwt: Jwt): OAuth2TokenValidatorResult {
return if (jwt.audience.contains("messaging")) {
OAuth2TokenValidatorResult.success()
} else {
OAuth2TokenValidatorResult.failure(error)
}
}
}
// ...
fun audienceValidator(): OAuth2TokenValidator<Jwt> {
return AudienceValidator()
}Then, to add into a resource server, it’s a matter of specifying the JwtDecoder instance:
-
Java
-
Kotlin
@Bean
JwtDecoder jwtDecoder() {
    NimbusJwtDecoder jwtDecoder = (NimbusJwtDecoder)
        JwtDecoders.fromIssuerLocation(issuerUri);

    OAuth2TokenValidator<Jwt> audienceValidator = audienceValidator();
    OAuth2TokenValidator<Jwt> withIssuer = JwtValidators.createDefaultWithIssuer(issuerUri);
    OAuth2TokenValidator<Jwt> withAudience = new DelegatingOAuth2TokenValidator<>(withIssuer, audienceValidator);

    jwtDecoder.setJwtValidator(withAudience);

    return jwtDecoder;
}
@Bean
fun jwtDecoder(): JwtDecoder {
val jwtDecoder: NimbusJwtDecoder = JwtDecoders.fromIssuerLocation(issuerUri) as NimbusJwtDecoder
val audienceValidator = audienceValidator()
val withIssuer: OAuth2TokenValidator<Jwt> = JwtValidators.createDefaultWithIssuer(issuerUri)
val withAudience: OAuth2TokenValidator<Jwt> = DelegatingOAuth2TokenValidator(withIssuer, audienceValidator)
jwtDecoder.setJwtValidator(withAudience)
return jwtDecoder
}
As stated earlier, you can instead configure aud validation in Boot.
|
Configuring Claim Set Mapping
Spring Security uses the Nimbus library for parsing JWTs and validating their signatures. Consequently, Spring Security is subject to Nimbus’s interpretation of each field value and how to coerce each into a Java type.
For example, because Nimbus remains Java 7 compatible, it doesn’t use Instant to represent timestamp fields.
And it’s entirely possible to use a different library or for JWT processing, which may make its own coercion decisions that need adjustment.
Or, quite simply, a resource server may want to add or remove claims from a JWT for domain-specific reasons.
For these purposes, Resource Server supports mapping the JWT claim set with MappedJwtClaimSetConverter.
Customizing the Conversion of a Single Claim
By default, MappedJwtClaimSetConverter will attempt to coerce claims into the following types:
Claim |
Java Type |
|
|
|
|
|
|
|
|
|
|
|
|
|
|
An individual claim’s conversion strategy can be configured using MappedJwtClaimSetConverter.withDefaults:
-
Java
-
Kotlin
@Bean
JwtDecoder jwtDecoder() {
    NimbusJwtDecoder jwtDecoder = NimbusJwtDecoder.withJwkSetUri(jwkSetUri).build();

    MappedJwtClaimSetConverter converter = MappedJwtClaimSetConverter
            .withDefaults(Collections.singletonMap("sub", this::lookupUserIdBySub));
    jwtDecoder.setClaimSetConverter(converter);

    return jwtDecoder;
}
@Bean
fun jwtDecoder(): JwtDecoder {
val jwtDecoder = NimbusJwtDecoder.withJwkSetUri(jwkSetUri).build()
val converter = MappedJwtClaimSetConverter
.withDefaults(mapOf("sub" to this::lookupUserIdBySub))
jwtDecoder.setClaimSetConverter(converter)
return jwtDecoder
}This will keep all the defaults, except it will override the default claim converter for sub.
Adding a Claim
MappedJwtClaimSetConverter can also be used to add a custom claim, for example, to adapt to an existing system:
-
Java
-
Kotlin
MappedJwtClaimSetConverter.withDefaults(Collections.singletonMap("custom", custom -> "value"));MappedJwtClaimSetConverter.withDefaults(mapOf("custom" to Converter<Any, String> { "value" }))Removing a Claim
And removing a claim is also simple, using the same API:
-
Java
-
Kotlin
MappedJwtClaimSetConverter.withDefaults(Collections.singletonMap("legacyclaim", legacy -> null));MappedJwtClaimSetConverter.withDefaults(mapOf("legacyclaim" to Converter<Any, Any> { null }))Renaming a Claim
In more sophisticated scenarios, like consulting multiple claims at once or renaming a claim, Resource Server accepts any class that implements Converter<Map<String, Object>, Map<String,Object>>:
-
Java
-
Kotlin
public class UsernameSubClaimAdapter implements Converter<Map<String, Object>, Map<String, Object>> {
    private final MappedJwtClaimSetConverter delegate =
            MappedJwtClaimSetConverter.withDefaults(Collections.emptyMap());

    public Map<String, Object> convert(Map<String, Object> claims) {
        Map<String, Object> convertedClaims = this.delegate.convert(claims);

        String username = (String) convertedClaims.get("user_name");
        convertedClaims.put("sub", username);

        return convertedClaims;
    }
}
class UsernameSubClaimAdapter : Converter<Map<String, Any?>, Map<String, Any?>> {
private val delegate = MappedJwtClaimSetConverter.withDefaults(Collections.emptyMap())
override fun convert(claims: Map<String, Any?>): Map<String, Any?> {
val convertedClaims = delegate.convert(claims)
val username = convertedClaims["user_name"] as String
convertedClaims["sub"] = username
return convertedClaims
}
}And then, the instance can be supplied like normal:
-
Java
-
Kotlin
@Bean
JwtDecoder jwtDecoder() {
    NimbusJwtDecoder jwtDecoder = NimbusJwtDecoder.withJwkSetUri(jwkSetUri).build();
    jwtDecoder.setClaimSetConverter(new UsernameSubClaimAdapter());
    return jwtDecoder;
}
@Bean
fun jwtDecoder(): JwtDecoder {
val jwtDecoder: NimbusJwtDecoder = NimbusJwtDecoder.withJwkSetUri(jwkSetUri).build()
jwtDecoder.setClaimSetConverter(UsernameSubClaimAdapter())
return jwtDecoder
}Configuring Timeouts
By default, Resource Server uses connection and socket timeouts of 30 seconds each for coordinating with the authorization server.
This may be too short in some scenarios. Further, it doesn’t take into account more sophisticated patterns like back-off and discovery.
To adjust the way in which Resource Server connects to the authorization server, NimbusJwtDecoder accepts an instance of RestOperations:
-
Java
-
Kotlin
@Bean
public JwtDecoder jwtDecoder(RestTemplateBuilder builder) {
    RestOperations rest = builder
            .setConnectTimeout(Duration.ofSeconds(60))
            .setReadTimeout(Duration.ofSeconds(60))
            .build();

    NimbusJwtDecoder jwtDecoder = NimbusJwtDecoder.withJwkSetUri(jwkSetUri).restOperations(rest).build();
    return jwtDecoder;
}
@Bean
fun jwtDecoder(builder: RestTemplateBuilder): JwtDecoder {
val rest: RestOperations = builder
.setConnectTimeout(Duration.ofSeconds(60))
.setReadTimeout(Duration.ofSeconds(60))
.build()
return NimbusJwtDecoder.withJwkSetUri(jwkSetUri).restOperations(rest).build()
}Also by default, Resource Server caches in-memory the authorization server’s JWK set for 5 minutes, which you may want to adjust. Further, it doesn’t take into account more sophisticated caching patterns like eviction or using a shared cache.
To adjust the way in which Resource Server caches the JWK set, NimbusJwtDecoder accepts an instance of Cache:
-
Java
-
Kotlin
@Bean
public JwtDecoder jwtDecoder(CacheManager cacheManager) {
    return NimbusJwtDecoder.withJwkSetUri(jwkSetUri)
            .cache(cacheManager.getCache("jwks"))
            .build();
}
@Bean
fun jwtDecoder(cacheManager: CacheManager): JwtDecoder {
return NimbusJwtDecoder.withJwkSetUri(jwkSetUri)
.cache(cacheManager.getCache("jwks"))
.build()
}When given a Cache, Resource Server will use the JWK Set Uri as the key and the JWK Set JSON as the value.
Spring isn’t a cache provider, so you’ll need to make sure to include the appropriate dependencies, like spring-boot-starter-cache and your favorite caching provider.
|
Whether it’s socket or cache timeouts, you may instead want to work with Nimbus directly.
To do so, remember that NimbusJwtDecoder ships with a constructor that takes Nimbus’s JWTProcessor.
|

