|
For the latest stable version, please use Spring Security 6.2.4! |
Architecture
This section discusses Spring Security’s high-level architecture within Servlet based applications. We build on this high-level understanding within the Authentication, Authorization, and Protection Against Exploits sections of the reference.
A Review of Filters
Spring Security’s Servlet support is based on Servlet Filters, so it is helpful to look at the role of Filters generally first. The following image shows the typical layering of the handlers for a single HTTP request.
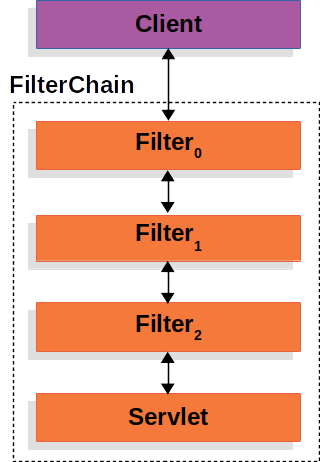
The client sends a request to the application, and the container creates a FilterChain, which contains the Filter instances and Servlet that should process the HttpServletRequest, based on the path of the request URI.
In a Spring MVC application, the Servlet is an instance of DispatcherServlet.
At most, one Servlet can handle a single HttpServletRequest and HttpServletResponse.
However, more than one Filter can be used to:
-
Prevent downstream
Filterinstances or theServletfrom being invoked. In this case, theFiltertypically writes theHttpServletResponse. -
Modify the
HttpServletRequestorHttpServletResponseused by the downstreamFilterinstances and theServlet.
The power of the Filter comes from the FilterChain that is passed into it.
FilterChain Usage Example-
Java
-
Kotlin
public void doFilter(ServletRequest request, ServletResponse response, FilterChain chain) {
	// do something before the rest of the application
    chain.doFilter(request, response); // invoke the rest of the application
    // do something after the rest of the application
}
fun doFilter(request: ServletRequest, response: ServletResponse, chain: FilterChain) {
// do something before the rest of the application
chain.doFilter(request, response) // invoke the rest of the application
// do something after the rest of the application
}Since a Filter impacts only downstream Filter instances and the Servlet, the order in which each Filter is invoked is extremely important.
DelegatingFilterProxy
Spring provides a Filter implementation named DelegatingFilterProxy that allows bridging between the Servlet container’s lifecycle and Spring’s ApplicationContext.
The Servlet container allows registering Filter instances by using its own standards, but it is not aware of Spring-defined Beans.
You can register DelegatingFilterProxy through the standard Servlet container mechanisms but delegate all the work to a Spring Bean that implements Filter.
Here is a picture of how DelegatingFilterProxy fits into the Filter instances and the FilterChain.
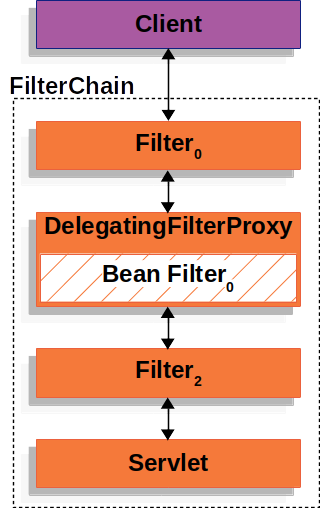
DelegatingFilterProxy looks up Bean Filter0 from the ApplicationContext and then invokes Bean Filter0.
The following listing shows pseudo code of DelegatingFilterProxy:
DelegatingFilterProxy Pseudo Code-
Java
-
Kotlin
public void doFilter(ServletRequest request, ServletResponse response, FilterChain chain) {
	// Lazily get Filter that was registered as a Spring Bean
	// For the example in DelegatingFilterProxy delegate is an instance of Bean Filter0
	Filter delegate = getFilterBean(someBeanName);
	// delegate work to the Spring Bean
	delegate.doFilter(request, response);
}
fun doFilter(request: ServletRequest, response: ServletResponse, chain: FilterChain) {
// Lazily get Filter that was registered as a Spring Bean
// For the example in DelegatingFilterProxy delegate is an instance of Bean Filter0
val delegate: Filter = getFilterBean(someBeanName)
// delegate work to the Spring Bean
delegate.doFilter(request, response)
}Another benefit of DelegatingFilterProxy is that it allows delaying looking up Filter bean instances.
This is important because the container needs to register the Filter instances before the container can start up.
However, Spring typically uses a ContextLoaderListener to load the Spring Beans, which is not done until after the Filter instances need to be registered.
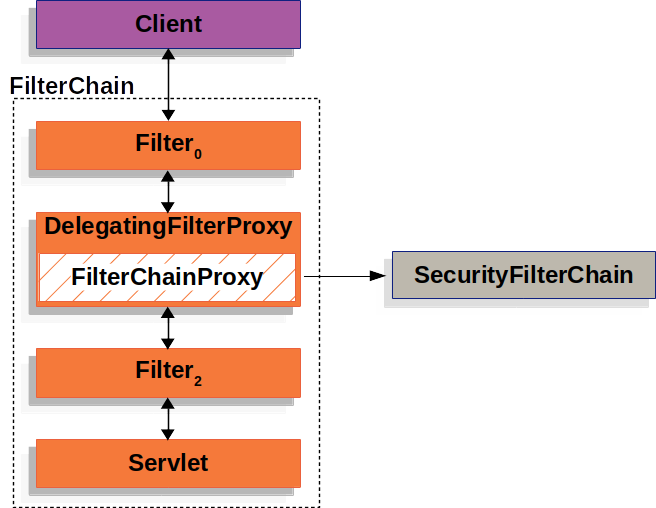
FilterChainProxy
Spring Security’s Servlet support is contained within FilterChainProxy.
FilterChainProxy is a special Filter provided by Spring Security that allows delegating to many Filter instances through SecurityFilterChain.
Since FilterChainProxy is a Bean, it is typically wrapped in a DelegatingFilterProxy.
The following image shows the role of FilterChainProxy.
SecurityFilterChain
SecurityFilterChain is used by FilterChainProxy to determine which Spring Security Filter instances should be invoked for the current request.
The following image shows the role of SecurityFilterChain.
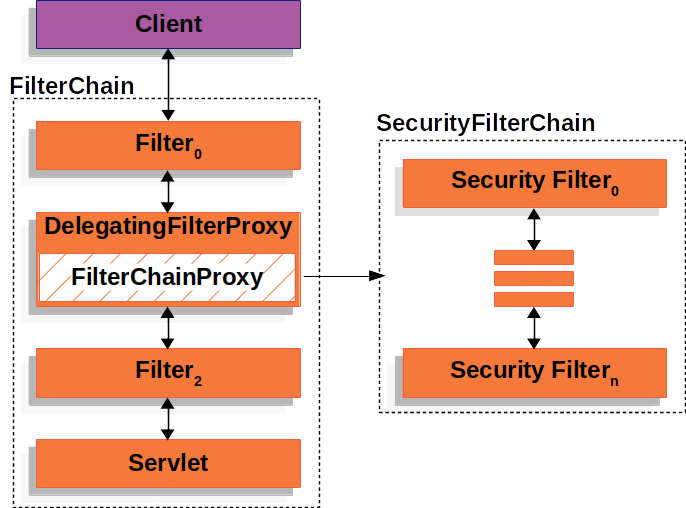
The Security Filters in SecurityFilterChain are typically Beans, but they are registered with FilterChainProxy instead of DelegatingFilterProxy.
FilterChainProxy provides a number of advantages to registering directly with the Servlet container or DelegatingFilterProxy.
First, it provides a starting point for all of Spring Security’s Servlet support.
For that reason, if you try to troubleshoot Spring Security’s Servlet support, adding a debug point in FilterChainProxy is a great place to start.
Second, since FilterChainProxy is central to Spring Security usage, it can perform tasks that are not viewed as optional.
For example, it clears out the SecurityContext to avoid memory leaks.
It also applies Spring Security’s HttpFirewall to protect applications against certain types of attacks.
In addition, it provides more flexibility in determining when a SecurityFilterChain should be invoked.
In a Servlet container, Filter instances are invoked based upon the URL alone.
However, FilterChainProxy can determine invocation based upon anything in the HttpServletRequest by using the RequestMatcher interface.
The following image shows multiple SecurityFilterChain instances:
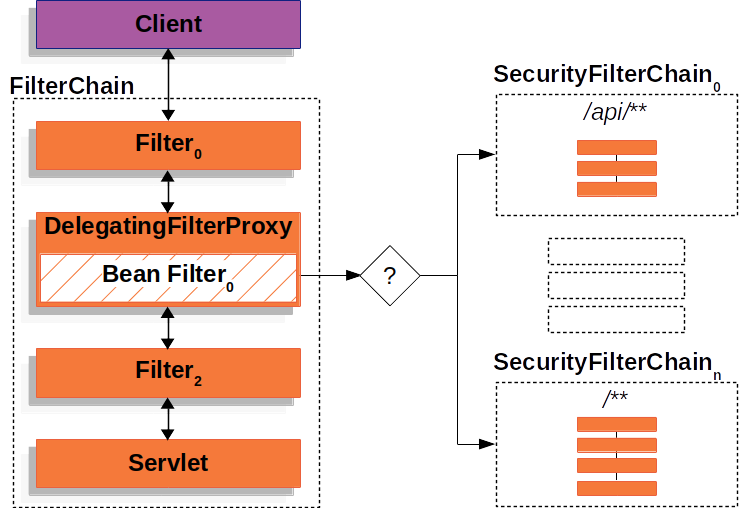
In the Multiple SecurityFilterChain figure, FilterChainProxy decides which SecurityFilterChain should be used.
Only the first SecurityFilterChain that matches is invoked.
If a URL of /api/messages/ is requested, it first matches on the SecurityFilterChain0 pattern of /api/**, so only SecurityFilterChain0 is invoked, even though it also matches on SecurityFilterChainn.
If a URL of /messages/ is requested, it does not match on the SecurityFilterChain0 pattern of /api/**, so FilterChainProxy continues trying each SecurityFilterChain.
Assuming that no other SecurityFilterChain instances match, SecurityFilterChainn is invoked.
Notice that SecurityFilterChain0 has only three security Filter instances configured.
However, SecurityFilterChainn has four security Filter instances configured.
It is important to note that each SecurityFilterChain can be unique and can be configured in isolation.
In fact, a SecurityFilterChain might have zero security Filter instances if the application wants Spring Security to ignore certain requests.
Security Filters
The Security Filters are inserted into the FilterChainProxy with the SecurityFilterChain API.
Those filters can be used for a number of different purposes, like authentication, authorization, exploit protection, and more.
The filters are executed in a specific order to guarantee that they are invoked at the right time, for example, the Filter that performs authentication should be invoked before the Filter that performs authorization.
It is typically not necessary to know the ordering of Spring Security’s Filters.
However, there are times that it is beneficial to know the ordering, if you want to know them, you can check the FilterOrderRegistration code.
To exemplify the above paragraph, let’s consider the following security configuration:
@Configuration
@EnableWebSecurity
public class SecurityConfig {

    @Bean
    public SecurityFilterChain filterChain(HttpSecurity http) throws Exception {
        http
            .csrf(Customizer.withDefaults())
            .authorizeHttpRequests(authorize -> authorize
                .anyRequest().authenticated()
            )
            .httpBasic(Customizer.withDefaults())
            .formLogin(Customizer.withDefaults());
        return http.build();
    }

}import org.springframework.security.config.web.servlet.invoke
@Configuration
@EnableWebSecurity
class SecurityConfig {
@Bean
fun filterChain(http: HttpSecurity): SecurityFilterChain {
http {
csrf { }
authorizeHttpRequests {
authorize(anyRequest, authenticated)
}
httpBasic { }
formLogin { }
}
return http.build()
}
}The above configuration will result in the following Filter ordering:
| Filter | Added by |
|---|---|
|
|
|
|
|
|
|
-
First, the
CsrfFilteris invoked to protect against CSRF attacks. -
Second, the authentication filters are invoked to authenticate the request.
-
Third, the
AuthorizationFilteris invoked to authorize the request.
|
There might be other |
Printing the Security Filters
Often times, it is useful to see the list of security Filters that are invoked for a particular request.
For example, you want to make sure that the filter you have added is in the list of the security filters.
The list of filters is printed at INFO level on the application startup, so you can see something like the following on the console output for example:
2023-06-14T08:55:22.321-03:00  INFO 76975 --- [           main] o.s.s.web.DefaultSecurityFilterChain     : Will secure any request with [
org.springframework.security.web.session.DisableEncodeUrlFilter@404db674,
org.springframework.security.web.context.request.async.WebAsyncManagerIntegrationFilter@50f097b5,
org.springframework.security.web.context.SecurityContextHolderFilter@6fc6deb7,
org.springframework.security.web.header.HeaderWriterFilter@6f76c2cc,
org.springframework.security.web.csrf.CsrfFilter@c29fe36,
org.springframework.security.web.authentication.logout.LogoutFilter@ef60710,
org.springframework.security.web.authentication.UsernamePasswordAuthenticationFilter@7c2dfa2,
org.springframework.security.web.authentication.ui.DefaultLoginPageGeneratingFilter@4397a639,
org.springframework.security.web.authentication.ui.DefaultLogoutPageGeneratingFilter@7add838c,
org.springframework.security.web.authentication.www.BasicAuthenticationFilter@5cc9d3d0,
org.springframework.security.web.savedrequest.RequestCacheAwareFilter@7da39774,
org.springframework.security.web.servletapi.SecurityContextHolderAwareRequestFilter@32b0876c,
org.springframework.security.web.authentication.AnonymousAuthenticationFilter@3662bdff,
org.springframework.security.web.access.ExceptionTranslationFilter@77681ce4,
org.springframework.security.web.access.intercept.AuthorizationFilter@169268a7]
And that will give a pretty good idea of the security filters that are configured for each filter chain.
But that is not all, you can also configure your application to print the invocation of each individual filter for each request. That is helpful to see if the filter you have added is invoked for a particular request or to check where an exception is coming from. To do that, you can configure your application to log the security events.
Adding a Custom Filter to the Filter Chain
Mostly of the times, the default security filters are enough to provide security to your application.
However, there might be times that you want to add a custom Filter to the security filter chain.
For example, let’s say that you want to add a Filter that gets a tenant id header and check if the current user has access to that tenant.
The previous description already gives us a clue on where to add the filter, since we need to know the current user, we need to add it after the authentication filters.
First, let’s create the Filter:
import java.io.IOException;

import jakarta.servlet.Filter;
import jakarta.servlet.FilterChain;
import jakarta.servlet.ServletException;
import jakarta.servlet.ServletRequest;
import jakarta.servlet.ServletResponse;
import jakarta.servlet.http.HttpServletRequest;
import jakarta.servlet.http.HttpServletResponse;

import org.springframework.security.access.AccessDeniedException;

public class TenantFilter implements Filter {

    @Override
    public void doFilter(ServletRequest servletRequest, ServletResponse servletResponse, FilterChain filterChain) throws IOException, ServletException {
        HttpServletRequest request = (HttpServletRequest) servletRequest;
        HttpServletResponse response = (HttpServletResponse) servletResponse;

        String tenantId = request.getHeader("X-Tenant-Id"); (1)
        boolean hasAccess = isUserAllowed(tenantId); (2)
        if (hasAccess) {
            filterChain.doFilter(request, response); (3)
            return;
        }
        throw new AccessDeniedException("Access denied"); (4)
    }

}
The sample code above does the following:
| 1 | Get the tenant id from the request header. |
| 2 | Check if the current user has access to the tenant id. |
| 3 | If the user has access, then invoke the rest of the filters in the chain. |
| 4 | If the user does not have access, then throw an AccessDeniedException. |
|
Instead of implementing |
Now, we need to add the filter to the security filter chain.
@Bean
SecurityFilterChain filterChain(HttpSecurity http) throws Exception {
    http
        // ...
        .addFilterBefore(new TenantFilter(), AuthorizationFilter.class); (1)
    return http.build();
}@Bean
fun filterChain(http: HttpSecurity): SecurityFilterChain {
http
// ...
.addFilterBefore(TenantFilter(), AuthorizationFilter::class.java) (1)
return http.build()
}| 1 | Use HttpSecurity#addFilterBefore to add the TenantFilter before the AuthorizationFilter. |
By adding the filter before the AuthorizationFilter we are making sure that the TenantFilter is invoked after the authentication filters.
You can also use HttpSecurity#addFilterAfter to add the filter after a particular filter or HttpSecurity#addFilterAt to add the filter at a particular filter position in the filter chain.
And that’s it, now the TenantFilter will be invoked in the filter chain and will check if the current user has access to the tenant id.
Be careful when you declare your filter as a Spring bean, either by annotating it with @Component or by declaring it as a bean in your configuration, because Spring Boot will automatically register it with the embedded container.
That may cause the filter to be invoked twice, once by the container and once by Spring Security and in a different order.
If you still want to declare your filter as a Spring bean to take advantage of dependency injection for example, and avoid the duplicate invocation, you can tell Spring Boot to not register it with the container by declaring a FilterRegistrationBean bean and setting its enabled property to false:
@Bean
public FilterRegistrationBean<TenantFilter> tenantFilterRegistration(TenantFilter filter) {
    FilterRegistrationBean<TenantFilter> registration = new FilterRegistrationBean<>(filter);
    registration.setEnabled(false);
    return registration;
}
Handling Security Exceptions
The ExceptionTranslationFilter allows translation of AccessDeniedException and AuthenticationException into HTTP responses.
ExceptionTranslationFilter is inserted into the FilterChainProxy as one of the Security Filters.
The following image shows the relationship of ExceptionTranslationFilter to other components:
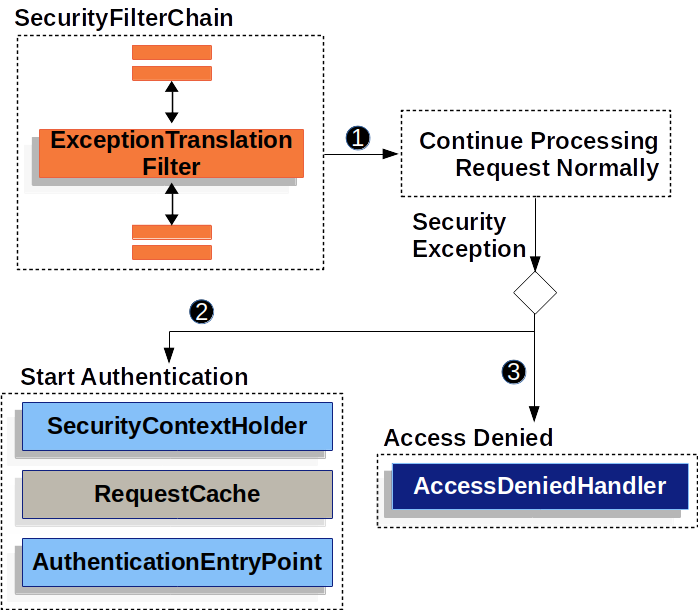
-
 First, the
 ExceptionTranslationFilterinvokesFilterChain.doFilter(request, response)to invoke the rest of the application. -
 If the user is not authenticated or it is an
 AuthenticationException, then Start Authentication.-
The SecurityContextHolder is cleared out.
-
The
HttpServletRequestis saved so that it can be used to replay the original request once authentication is successful. -
The
AuthenticationEntryPointis used to request credentials from the client. For example, it might redirect to a log in page or send aWWW-Authenticateheader.
-
-
 Otherwise, if it is an
 AccessDeniedException, then Access Denied. TheAccessDeniedHandleris invoked to handle access denied.
|
If the application does not throw an |
The pseudocode for ExceptionTranslationFilter looks something like this:
try {
	filterChain.doFilter(request, response); (1)
} catch (AccessDeniedException | AuthenticationException ex) {
	if (!authenticated || ex instanceof AuthenticationException) {
		startAuthentication(); (2)
	} else {
		accessDenied(); (3)
	}
}| 1 | As described in A Review of Filters, invoking FilterChain.doFilter(request, response) is the equivalent of invoking the rest of the application.
This means that if another part of the application, (FilterSecurityInterceptor or method security) throws an AuthenticationException or AccessDeniedException it is caught and handled here. |
| 2 | If the user is not authenticated or it is an AuthenticationException, Start Authentication. |
| 3 | Otherwise, Access Denied |
Saving Requests Between Authentication
As illustrated in Handling Security Exceptions, when a request has no authentication and is for a resource that requires authentication, there is a need to save the request for the authenticated resource to re-request after authentication is successful.
In Spring Security this is done by saving the HttpServletRequest using a RequestCache implementation.
RequestCache
The HttpServletRequest is saved in the RequestCache.
When the user successfully authenticates, the RequestCache is used to replay the original request.
The RequestCacheAwareFilter is what uses the RequestCache to save the HttpServletRequest.
By default, an HttpSessionRequestCache is used.
The code below demonstrates how to customize the RequestCache implementation that is used to check the HttpSession for a saved request if the parameter named continue is present.
RequestCache Only Checks for Saved Requests if continue Parameter Present-
Java
-
Kotlin
-
XML
@Bean
DefaultSecurityFilterChain springSecurity(HttpSecurity http) throws Exception {
	HttpSessionRequestCache requestCache = new HttpSessionRequestCache();
	requestCache.setMatchingRequestParameterName("continue");
	http
		// ...
		.requestCache((cache) -> cache
			.requestCache(requestCache)
		);
	return http.build();
}
@Bean
open fun springSecurity(http: HttpSecurity): SecurityFilterChain {
val httpRequestCache = HttpSessionRequestCache()
httpRequestCache.setMatchingRequestParameterName("continue")
http {
requestCache {
requestCache = httpRequestCache
}
}
return http.build()
}<http auto-config="true">
<!-- ... -->
<request-cache ref="requestCache"/>
</http>
<b:bean id="requestCache" class="org.springframework.security.web.savedrequest.HttpSessionRequestCache"
p:matchingRequestParameterName="continue"/>Prevent the Request From Being Saved
There are a number of reasons you may want to not store the user’s unauthenticated request in the session. You may want to offload that storage onto the user’s browser or store it in a database. Or you may want to shut off this feature since you always want to redirect the user to the home page instead of the page they tried to visit before login.
To do that, you can use the NullRequestCache implementation.
-
Java
-
Kotlin
-
XML
@Bean
SecurityFilterChain springSecurity(HttpSecurity http) throws Exception {
    RequestCache nullRequestCache = new NullRequestCache();
    http
        // ...
        .requestCache((cache) -> cache
            .requestCache(nullRequestCache)
        );
    return http.build();
}
@Bean
open fun springSecurity(http: HttpSecurity): SecurityFilterChain {
val nullRequestCache = NullRequestCache()
http {
requestCache {
requestCache = nullRequestCache
}
}
return http.build()
}<http auto-config="true">
<!-- ... -->
<request-cache ref="nullRequestCache"/>
</http>
<b:bean id="nullRequestCache" class="org.springframework.security.web.savedrequest.NullRequestCache"/>RequestCacheAwareFilter
The RequestCacheAwareFilter uses the RequestCache to save the HttpServletRequest.
Logging
Spring Security provides comprehensive logging of all security related events at the DEBUG and TRACE level. This can be very useful when debugging your application because for security measures Spring Security does not add any detail of why a request has been rejected to the response body. If you come across a 401 or 403 error, it is very likely that you will find a log message that will help you understand what is going on.
Let’s consider an example where a user tries to make a POST request to a resource that has CSRF protection enabled without the CSRF token.
With no logs, the user will see a 403 error with no explanation of why the request was rejected.
However, if you enable logging for Spring Security, you will see a log message like this:
2023-06-14T09:44:25.797-03:00 DEBUG 76975 --- [nio-8080-exec-1] o.s.security.web.FilterChainProxy        : Securing POST /hello
2023-06-14T09:44:25.797-03:00 TRACE 76975 --- [nio-8080-exec-1] o.s.security.web.FilterChainProxy        : Invoking DisableEncodeUrlFilter (1/15)
2023-06-14T09:44:25.798-03:00 TRACE 76975 --- [nio-8080-exec-1] o.s.security.web.FilterChainProxy        : Invoking WebAsyncManagerIntegrationFilter (2/15)
2023-06-14T09:44:25.800-03:00 TRACE 76975 --- [nio-8080-exec-1] o.s.security.web.FilterChainProxy        : Invoking SecurityContextHolderFilter (3/15)
2023-06-14T09:44:25.801-03:00 TRACE 76975 --- [nio-8080-exec-1] o.s.security.web.FilterChainProxy        : Invoking HeaderWriterFilter (4/15)
2023-06-14T09:44:25.802-03:00 TRACE 76975 --- [nio-8080-exec-1] o.s.security.web.FilterChainProxy        : Invoking CsrfFilter (5/15)
2023-06-14T09:44:25.814-03:00 DEBUG 76975 --- [nio-8080-exec-1] o.s.security.web.csrf.CsrfFilter         : Invalid CSRF token found for http://localhost:8080/hello
2023-06-14T09:44:25.814-03:00 DEBUG 76975 --- [nio-8080-exec-1] o.s.s.w.access.AccessDeniedHandlerImpl   : Responding with 403 status code
2023-06-14T09:44:25.814-03:00 TRACE 76975 --- [nio-8080-exec-1] o.s.s.w.header.writers.HstsHeaderWriter  : Not injecting HSTS header since it did not match request to [Is Secure]
It becomes clear that the CSRF token is missing and that is why the request is being denied.
To configure your application to log all the security events, you can add the following to your application:
logging.level.org.springframework.security=TRACE<configuration>
<appender name="STDOUT" class="ch.qos.logback.core.ConsoleAppender">
<!-- ... -->
</appender>
<!-- ... -->
<logger name="org.springframework.security" level="trace" additivity="false">
<appender-ref ref="Console" />
</logger>
</configuration>
