Event Service is an example how state machine concepts can be used as a processing engine for events. Sample was born out from a question:
![[Note]](images/note.png) | Note |
|---|---|
|
Can Spring Statemachine be used as a microservice to feed events to it with millions different state machine instances. |
In this example we will use a Redis to persist a state machine
instances.
Obviously a million state machine instances in a jvm would be
a relatively bad idea due to memory constraints. This simply leads to
other available features from a Spring Statemachine to persist a
StateMachineContext and re-use existing instances.
We assume few things like there is a shopping application which is
sending different types of PageView events into a separate
microservice which is then tracking user behaviour using a state
machine. State model is shown below which simply have few states
representing user navigating on product items list, add and remove
items from a cart and going to a payment page and initiating a pay
operation. Actual shopping application would send these events into
this service for example using a simple rest calls. More about this
later.
| Note |
|---|---|
|
Remember that focus here is to have an application which is exposing a
|
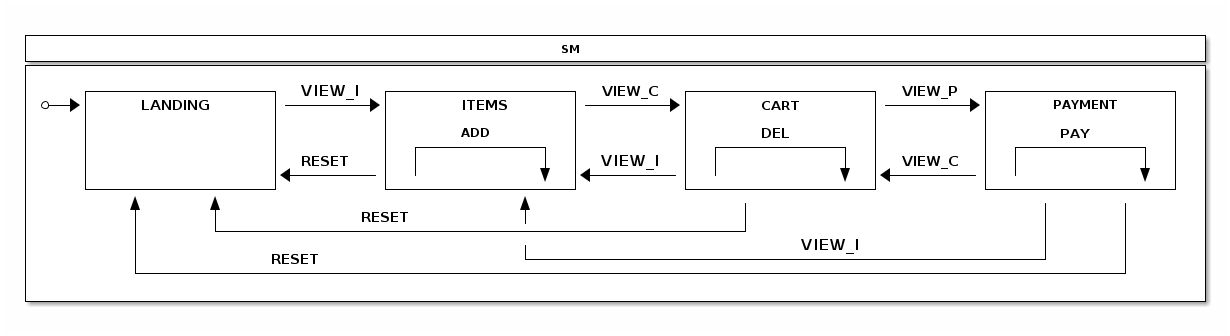
In below state machine configuration we simply model what we have in a
state chart. Various actions are updating state machine Extended
State to track number of entries into various states and also how
many times internal transition for ADD and DEL are called and if
PAY has been executed. Don’t focus on stateMachineTarget or
@Scope for now, as we’ll explain those in a bit.
@Bean(name = "stateMachineTarget")
@Scope(scopeName="prototype")
public StateMachine<States, Events> stateMachineTarget() throws Exception {
    Builder<States, Events> builder = StateMachineBuilder.<States, Events>builder();

    builder.configureConfiguration()
        .withConfiguration()
            .autoStartup(true);

    builder.configureStates()
        .withStates()
            .initial(States.HOME)
            .states(EnumSet.allOf(States.class));

    builder.configureTransitions()
        .withInternal()
            .source(States.ITEMS).event(Events.ADD)
            .action(addAction())
            .and()
        .withInternal()
            .source(States.CART).event(Events.DEL)
            .action(delAction())
            .and()
        .withInternal()
            .source(States.PAYMENT).event(Events.PAY)
            .action(payAction())
            .and()
        .withExternal()
            .source(States.HOME).target(States.ITEMS)
            .action(pageviewAction())
            .event(Events.VIEW_I)
            .and()
        .withExternal()
            .source(States.CART).target(States.ITEMS)
            .action(pageviewAction())
            .event(Events.VIEW_I)
            .and()
        .withExternal()
            .source(States.ITEMS).target(States.CART)
            .action(pageviewAction())
            .event(Events.VIEW_C)
            .and()
        .withExternal()
            .source(States.PAYMENT).target(States.CART)
            .action(pageviewAction())
            .event(Events.VIEW_C)
            .and()
        .withExternal()
            .source(States.CART).target(States.PAYMENT)
            .action(pageviewAction())
            .event(Events.VIEW_P)
            .and()
        .withExternal()
            .source(States.ITEMS).target(States.HOME)
            .action(resetAction())
            .event(Events.RESET)
            .and()
        .withExternal()
            .source(States.CART).target(States.HOME)
            .action(resetAction())
            .event(Events.RESET)
            .and()
        .withExternal()
            .source(States.PAYMENT).target(States.HOME)
            .action(resetAction())
            .event(Events.RESET);

    return builder.build();
}
In below config we set up a RedisConnectionFactory which defaults to
localhost and default port. We use StateMachinePersist with a
RepositoryStateMachinePersist implementation. Finally we create a
RedisStateMachinePersister which underneath uses a previously
created StateMachinePersist bean.
These are then used in a Controller handling REST calls.
@Bean
public RedisConnectionFactory redisConnectionFactory() {
    return new JedisConnectionFactory();
}

@Bean
public StateMachinePersist<States, Events, String> stateMachinePersist(RedisConnectionFactory connectionFactory) {
    RedisStateMachineContextRepository<States, Events> repository =
            new RedisStateMachineContextRepository<States, Events>(connectionFactory);
    return new RepositoryStateMachinePersist<States, Events>(repository);
}

@Bean
public RedisStateMachinePersister<States, Events> redisStateMachinePersister(
        StateMachinePersist<States, Events, String> stateMachinePersist) {
    return new RedisStateMachinePersister<States, Events>(stateMachinePersist);
}
We now get into why StateMachine was created as stateMachineTarget
and a prototype bean. State machine instantiation is a relatively
expensive operation so it is better to try to pool instances instead
of instantiating a new instance with every request. For this we first
create a poolTargetSource which wraps stateMachineTarget and pools
it with max size of 3. This poolTargetSource is then proxied with
ProxyFactoryBean using a request scope. Effectively this means
that every REST request will get pooled state machine instance from
a bean factory. It’s shown later how these are used.
@Bean
@Scope(value = "request", proxyMode = ScopedProxyMode.TARGET_CLASS)
public ProxyFactoryBean stateMachine() {
    ProxyFactoryBean pfb = new ProxyFactoryBean();
    pfb.setTargetSource(poolTargetSource());
    return pfb;
}
@Bean
public CommonsPool2TargetSource poolTargetSource() {
    CommonsPool2TargetSource pool = new CommonsPool2TargetSource();
    pool.setMaxSize(3);
    pool.setTargetBeanName("stateMachineTarget");
    return pool;
}
Let’s get into actual demo. You need to have a redis running on a localhost with a default settings. Then run the boot based sample application:
@n1:~# java -jar spring-statemachine-samples-eventservice-2.0.2.RELEASE.jar
In a browser you see something like:
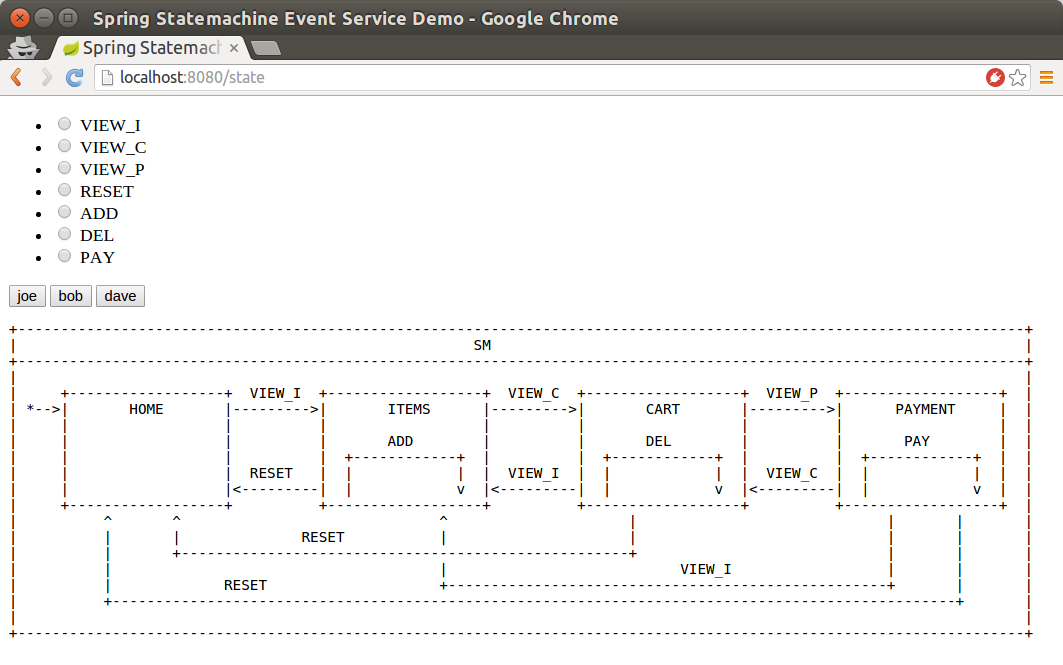
In this UI you have three users you can use, joe, bob and dave.
Clicking button will show current state and extended state. Enabling a
radio button before clicking users will send particular event for that
user. This is a way you can play with this using an UI.
In our StateMachineController we autowire StateMachine and
StateMachinePersist. StateMachine is a request scoped so you’ll
get new instance per request while StateMachinePersist is normal
singleton bean.
@Autowired
private StateMachine<States, Events> stateMachine;

@Autowired
private StateMachinePersister<States, Events, String> stateMachinePersister;
Below feedAndGetState is just used with an UI to do same things what
actual REST api will do.
@RequestMapping("/state")
public String feedAndGetState(@RequestParam(value = "user", required = false) String user,
        @RequestParam(value = "id", required = false) Events id, Model model) throws Exception {
    model.addAttribute("user", user);
    model.addAttribute("allTypes", Events.values());
    model.addAttribute("stateChartModel", stateChartModel);
    // we may get into this page without a user so
    // do nothing with a state machine
    if (StringUtils.hasText(user)) {
        resetStateMachineFromStore(user);
        if (id != null) {
            feedMachine(user, id);
        }
        model.addAttribute("states", stateMachine.getState().getIds());
        model.addAttribute("extendedState", stateMachine.getExtendedState().getVariables());
    }
    return "states";
}
Below feedPageview is a REST method which accepts a post with a
json content.
@RequestMapping(value = "/feed",method= RequestMethod.POST)
@ResponseStatus(HttpStatus.OK)
public void feedPageview(@RequestBody(required = true) Pageview event) throws Exception {
    Assert.notNull(event.getUser(), "User must be set");
    Assert.notNull(event.getId(), "Id must be set");
    resetStateMachineFromStore(event.getUser());
    feedMachine(event.getUser(), event.getId());
}
Below feedMachine will send event into a StateMachine and persists
its state using a StateMachinePersister.
private void feedMachine(String user, Events id) throws Exception {
    stateMachine.sendEvent(id);
    stateMachinePersister.persist(stateMachine, "testprefix:" + user);
}
Below resetStateMachineFromStore is used to restore a state machine
for a particular user.
private StateMachine<States, Events> resetStateMachineFromStore(String user) throws Exception {
    return stateMachinePersister.restore(stateMachine, "testprefix:" + user);
}
As you’d send event using UI, same can be done using a REST calls:
# curl http://localhost:8080/feed -H "Content-Type: application/json" --data '{"user":"joe","id":"VIEW_I"}'
At this point you should have a content in Redis with a
testprefix:joe key.
$ ./redis-cli
127.0.0.1:6379> KEYS *
1) "testprefix:joe"
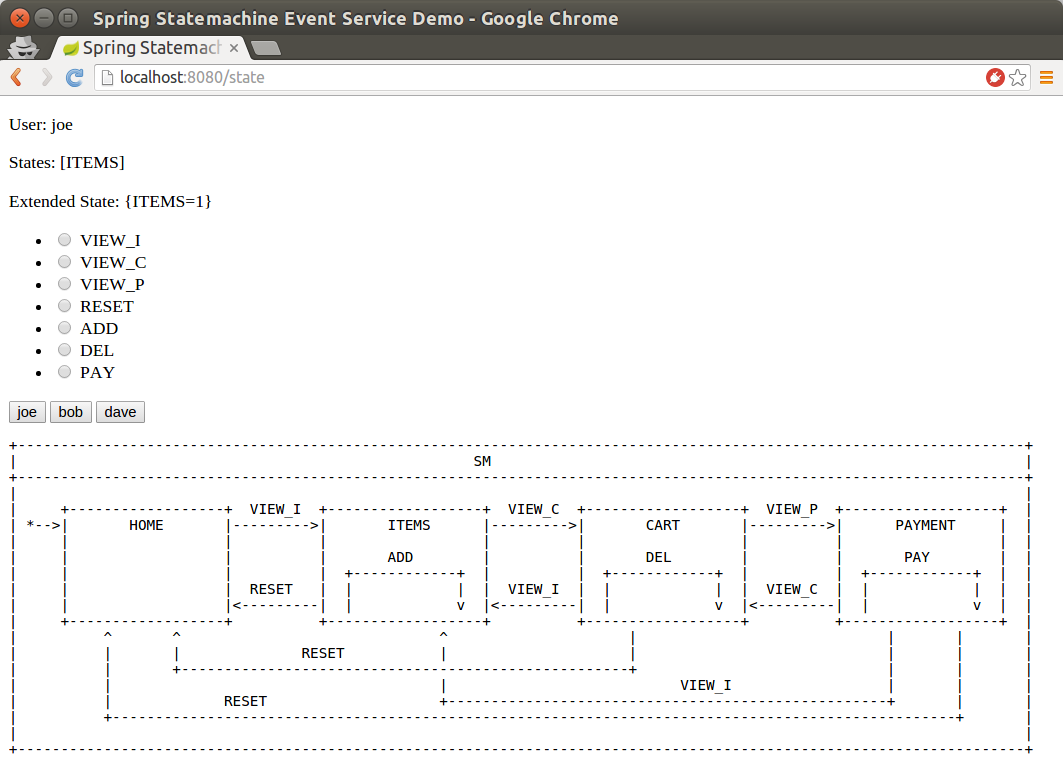
Below is a three images when state for joe has been changed from
HOME to ITEMS and when ADD action has been executed.
Send event ADD:
Now your are still on state ITEMS and internal transition caused
extended state variable COUNT to increase to 1.
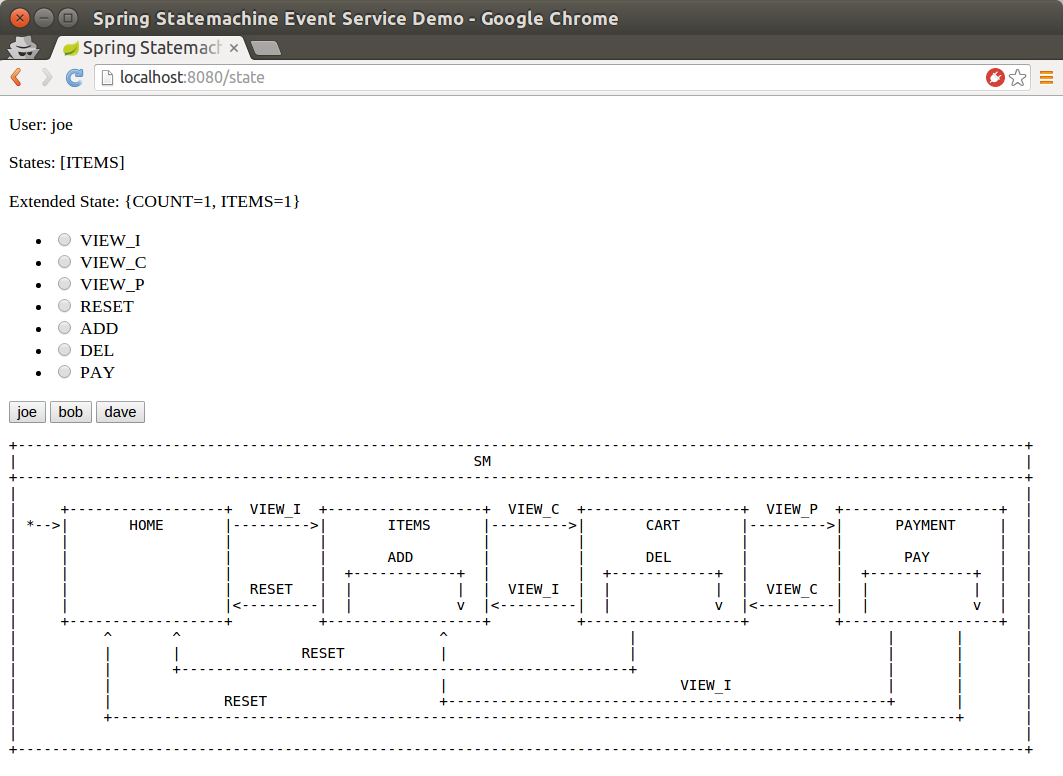
Execute below curl rest call few times or do it via UI and you
should see COUNT variable to increase with every call.
# curl http://localhost:8080/feed -H "Content-Type: application/json" # --data '{"user":"joe","id":"ADD"}'
