Preface
The concept of a state machine is most likely older than any reader of this reference documentation and definitely older than the Java language itself. Description of finite automata dates back to 1943 when gentlemen Warren McCulloch and Walter Pitts wrote a paper about it. Later George H. Mealy presented a state machine concept (known as a “Mealy Machine”) in 1955. A year later, in 1956, Edward F. Moore presented another paper, in which he described what is known as a “Moore Machine”. If you have ever read anything about state machines, the names, Mealy and Moore, should have popped up at some point.
This reference documentation contains the following parts:
Introduction contains introduction to this reference documentation.
Using Spring Statemachine describes the usage of Spring Statemachine(SSM).
State Machine Examples contains more detailed state machine examples.
FAQ contains frequently asked questions.
Appendices contains generic information about used material and state machines.
Introduction
Spring Statemachine (SSM) is a framework that lets application developers use traditional state machine concepts with Spring applications. SSM provides the following features:
-
Easy-to-use flat (one-level) state machine for simple use cases.
-
Hierarchical state machine structure to ease complex state configuration.
-
State machine regions to provide even more complex state configurations.
-
Usage of triggers, transitions, guards, and actions.
-
Type-safe configuration adapter.
-
State machine event listeners.
-
Spring IoC integration to associate beans with a state machine.
Before you continue, we recommend going through the appendices Glossary and A State Machine Crash Course to get a generic idea of what state machines are. The rest of the documentation expects you to be familiar with state machine concepts.
Background
State machines are powerful because their behavior is always guaranteed to be consistent and relatively easily debugged due to how operational rules are written in stone when a machine is started. The idea is that your application is now in and may exist in a finite number of states. Then something happens that takes your application from one state to the next. A state machine is driven by triggers, which are based on either events or timers.
It is much easier to design high-level logic outside of your application and then interact with a state machine in various different ways. You can interact with a state machine by sending events, listening to what a state machine does, or requesting the current state.
Traditionally, state machines are added to an existing project when developers realize that the code base is starting to look like a plate full of spaghetti. Spaghetti code looks like a never ending, hierarchical structure of IF, ELSE, and BREAK clauses, and compilers should probably ask developers to go home when things are starting to look too complex.
Usage Scenarios
A project is a good candidate to use a state machine when:
-
You can represent the application or part of its structure as states.
-
You want to split complex logic into smaller manageable tasks.
-
The application is already suffering concurrency issues with (for example) something happening asynchronously.
You are already trying to implement a state machine when you:
-
Use boolean flags or enums to model situations.
-
Have variables that have meaning only for some part of your application lifecycle.
-
Loop through an if-else structure (or, worse, multiple such structures), check whether a particular flag or enum is set, and then make further exceptions about what to do when certain combinations of your flags and enums exist or do not exist.
Getting started
what?”, “how?” and “why?” questions. We start with a gentle
introduction to Spring Statemachine. We then build our
first Spring Statemachine application and discuss some
core principles as we go.
System Requirement
Spring Statemachine 3.0.1 is built and tested with JDK 8 (all artifacts have JDK 7 compatibility) and Spring Framework 5.3.8. It does not require any other dependencies outside of Spring Framework within its core system.
Other optional parts (such as Using Distributed States) have dependencies on
Zookeeper, while State Machine Examples has dependencies
on spring-shell and spring-boot, which pull other dependencies
beyond the framework itself. Also, the optional security and data access features have
dependencies to on Spring Security and Spring Data modules.
Modules
The following table describes the modules that are available for Spring Statemachine.
| Module | Description |
|---|---|
|
The core system of Spring Statemachine. |
|
Common recipes that do not require dependencies outside of the core framework. |
|
|
|
Common support module for |
|
Support module for |
|
Support module for |
|
Support module for |
|
Zookeeper integration for a distributed state machine. |
|
Support module for state machine testing. |
|
Support module for Spring Cloud Cluster. Note that Spring Cloud Cluster has been superseded by Spring Integration. |
|
Support module for UI UML modeling with Eclipse Papyrus. |
|
Support module for Spring Boot. |
|
Bill of Materials pom. |
|
Spring Boot starter. |
Using Gradle
The following listing shows a typical build.gradle file created by choosing various settings at https://start.spring.io:
buildscript {
	ext {
		springBootVersion = '2.4.8'
	}
	repositories {
		mavenCentral()
		maven { url "https://repo.spring.io/snapshot" }
		maven { url "https://repo.spring.io/milestone" }
	}
	dependencies {
		classpath("org.springframework.boot:spring-boot-gradle-plugin:${springBootVersion}")
	}
}

apply plugin: 'java'
apply plugin: 'eclipse'
apply plugin: 'org.springframework.boot'
apply plugin: 'io.spring.dependency-management'

group = 'com.example'
version = '0.0.1-SNAPSHOT'
sourceCompatibility = 1.8

repositories {
	mavenCentral()
	maven { url "https://repo.spring.io/snapshot" }
	maven { url "https://repo.spring.io/milestone" }
}


ext {
	springStatemachineVersion = '3.0.1'
}

dependencies {
	compile('org.springframework.statemachine:spring-statemachine-starter')
	testCompile('org.springframework.boot:spring-boot-starter-test')
}

dependencyManagement {
	imports {
		mavenBom "org.springframework.statemachine:spring-statemachine-bom:${springStatemachineVersion}"
	}
}
Replace 0.0.1-SNAPSHOT with a version you want to use.
|
With a normal project structure, you can build this project with the following command:
# ./gradlew clean buildThe expected Spring Boot-packaged fat jar would be build/libs/demo-0.0.1-SNAPSHOT.jar.
You do not need the`libs-milestone` and libs-snapshot repositories for
production development.
|
Using Maven
The following example shows a typical pom.xml file, which was created by choosing various options at https://start.spring.io:
<?xml version="1.0" encoding="UTF-8"?>
<project xmlns="http://maven.apache.org/POM/4.0.0" xmlns:xsi="http://www.w3.org/2001/XMLSchema-instance"
	xsi:schemaLocation="http://maven.apache.org/POM/4.0.0 https://maven.apache.org/xsd/maven-4.0.0.xsd">
	<modelVersion>4.0.0</modelVersion>

	<groupId>com.example</groupId>
	<artifactId>demo</artifactId>
	<version>0.0.1-SNAPSHOT</version>
	<packaging>jar</packaging>

	<name>gs-statemachine</name>
	<description>Demo project for Spring Statemachine</description>

	<parent>
		<groupId>org.springframework.boot</groupId>
		<artifactId>spring-boot-starter-parent</artifactId>
		<version>2.4.8</version>
		<relativePath/> <!-- lookup parent from repository -->
	</parent>

	<properties>
		<project.build.sourceEncoding>UTF-8</project.build.sourceEncoding>
		<project.reporting.outputEncoding>UTF-8</project.reporting.outputEncoding>
		<java.version>1.8</java.version>
		<spring-statemachine.version>3.0.1</spring-statemachine.version>
	</properties>

	<dependencies>
		<dependency>
			<groupId>org.springframework.statemachine</groupId>
			<artifactId>spring-statemachine-starter</artifactId>
		</dependency>

		<dependency>
			<groupId>org.springframework.boot</groupId>
			<artifactId>spring-boot-starter-test</artifactId>
			<scope>test</scope>
		</dependency>
	</dependencies>

	<dependencyManagement>
		<dependencies>
			<dependency>
				<groupId>org.springframework.statemachine</groupId>
				<artifactId>spring-statemachine-bom</artifactId>
				<version>${spring-statemachine.version}</version>
				<type>pom</type>
				<scope>import</scope>
			</dependency>
		</dependencies>
	</dependencyManagement>

	<build>
		<plugins>
			<plugin>
				<groupId>org.springframework.boot</groupId>
				<artifactId>spring-boot-maven-plugin</artifactId>
			</plugin>
		</plugins>
	</build>

	<repositories>
		<repository>
			<id>spring-snapshots</id>
			<name>Spring Snapshots</name>
			<url>https://repo.spring.io/snapshot</url>
			<snapshots>
				<enabled>true</enabled>
			</snapshots>
		</repository>
		<repository>
			<id>spring-milestones</id>
			<name>Spring Milestones</name>
			<url>https://repo.spring.io/milestone</url>
			<snapshots>
				<enabled>false</enabled>
			</snapshots>
		</repository>
	</repositories>

	<pluginRepositories>
		<pluginRepository>
			<id>spring-snapshots</id>
			<name>Spring Snapshots</name>
			<url>https://repo.spring.io/snapshot</url>
			<snapshots>
				<enabled>true</enabled>
			</snapshots>
		</pluginRepository>
		<pluginRepository>
			<id>spring-milestones</id>
			<name>Spring Milestones</name>
			<url>https://repo.spring.io/milestone</url>
			<snapshots>
				<enabled>false</enabled>
			</snapshots>
		</pluginRepository>
	</pluginRepositories>


</project>
Replace 0.0.1-SNAPSHOT with a version you want to use.
|
With a normal project structure, you can build this project with the following command:
# mvn clean packageThe expected Spring Boot-packaged fat-jar would be target/demo-0.0.1-SNAPSHOT.jar.
You do not need the libs-milestone and libs-snapshot repositories for
production development.
|
Developing Your First Spring Statemachine Application
You can start by creating a simple Spring Boot Application class
that implements CommandLineRunner. The following example shows how to do so:
@SpringBootApplication
public class Application implements CommandLineRunner {

    public static void main(String[] args) {
        SpringApplication.run(Application.class, args);
    }

}
Then you need to add states and events, as the following example shows:
public enum States {
    SI, S1, S2
}

public enum Events {
    E1, E2
}
Then you need to add state machine configuration, as the following example shows:
@Configuration
@EnableStateMachine
public class StateMachineConfig
        extends EnumStateMachineConfigurerAdapter<States, Events> {

    @Override
    public void configure(StateMachineConfigurationConfigurer<States, Events> config)
            throws Exception {
        config
            .withConfiguration()
                .autoStartup(true)
                .listener(listener());
    }

    @Override
    public void configure(StateMachineStateConfigurer<States, Events> states)
            throws Exception {
        states
            .withStates()
                .initial(States.SI)
                    .states(EnumSet.allOf(States.class));
    }

    @Override
    public void configure(StateMachineTransitionConfigurer<States, Events> transitions)
            throws Exception {
        transitions
            .withExternal()
                .source(States.SI).target(States.S1).event(Events.E1)
                .and()
            .withExternal()
                .source(States.S1).target(States.S2).event(Events.E2);
    }

    @Bean
    public StateMachineListener<States, Events> listener() {
        return new StateMachineListenerAdapter<States, Events>() {
            @Override
            public void stateChanged(State<States, Events> from, State<States, Events> to) {
                System.out.println("State change to " + to.getId());
            }
        };
    }
}
Then you need to implement CommandLineRunner and autowire StateMachine.
The following example shows how to do so:
@Autowired
private StateMachine<States, Events> stateMachine;

@Override
public void run(String... args) throws Exception {
    stateMachine.sendEvent(Events.E1);
    stateMachine.sendEvent(Events.E2);
}
Depending on whether you build your application with Gradle or Maven,
you can run it by using java -jar build/libs/gs-statemachine-0.1.0.jar or
java -jar target/gs-statemachine-0.1.0.jar, respectively.
The result of this command should be normal Spring Boot output. However, you should also find the following lines:
State change to SI
State change to S1
State change to S2
These lines indicate that the machine you constructed is moving from one state to another, as it should.
What’s New
In 1.1
Spring Statemachine 1.1 focuses on security and better interoperability with web applications. It includes the following:
-
Comprehensive support for Spring Security has been added. See State Machine Security.
-
Context integration with `@WithStateMachine' has been greatly enhanced. See Context Integration.
-
StateContextis now a first class citizen, letting you interact with a State Machine. See UsingStateContext. -
Features around persistence have been enhanced with built-in support for redis. See Using Redis.
-
A new feature helps with persist operations. See Using
StateMachinePersister. -
Configuration model classes are now in a public API.
-
New features in timer-based events.
-
New
Junctionpseudostate. See Junction State. -
New Exit Point and Entry Point pseudostates. See Exit and Entry Point States.
-
Configuration model verifier.
-
New samples. See Security and Event Service.
-
UI modeling support using Eclipse Papyrus. See Eclipse Modeling Support.
In 1.2
Spring Statemachine 1.2 focuses on generic enhancements, better UML support, and integrations with external config repositories. It includes the following:
-
Support for UML sub-machines. See Using a Sub-Machine Reference.
-
A new repository abstraction that keeps machine configuration in an external repository. See Repository Support.
-
New support for state actions. See State Actions.
-
New transition error action concepts. See Transition Action Error Handling.
-
New action error concepts. See State Action Error Handling.
-
Initial work for Spring Boot support. See Spring Boot Support.
-
Support for tracing and monitoring. See Monitoring a State Machine.
In 1.2.8
Spring Statemachine 1.2.8 contains a bit more functionality than normally not seen in a point release, but these changes did not merit a fork of Spring Statemachine 1.3. It includes the following:
-
JPA entity classes have changed table names. See JPA.
-
A new sample. See Data Persist.
-
New entity classes for persistence. See Repository Persistence.
-
Transition conflict policy. See Configuring Common Settings
In 2.0
Spring Statemachine 2.0 focuses on Spring Boot 2.x support.
In 2.0.0
Spring Statemachine 2.0.0 includes the following:
-
The format of monitoring and tracing has been changed. See Monitoring and Tracing.
-
The
spring-statemachine-bootmodule has been renamed tospring-statemachine-autoconfigure.
In 3.0
Spring Statemachine 3.0.0 focuses on adding a Reactive support. Moving from 2.x to 3.x is
introducing some breaking changes which are detailed in Reactor Migration Guide.
With 3.0.x we have deprecated all blocking methods which will get removed at some point
in a future releases.
|
Please read an appendix Reactor Migration Guide carefully as it will steer you
through a process of migrating into |
At this point most of a documentation has been changed to showcase reactive interfaces while we still keep some notes around to users still using old blocking methods.
Using Spring Statemachine
This part of the reference documentation explains the core functionality that Spring Statemachine provides to any Spring based application.
It includes the following topics:
-
Statemachine Configuration describes the generic configuration support.
-
State Machine ID describes the use of machine id.
-
State Machine Factories describes the generic state machine factory support.
-
Using Deferred Events describes the deferred event support.
-
Using Scopes describes the scope support.
-
Using Actions describes the actions support.
-
Using Guards describes the guard support.
-
Using Extended State describes the extended state support.
-
Using
StateContextdescribes the state context support. -
Triggering Transitions describes the use of triggers.
-
Listening to State Machine Events describes the use of state machine listeners.
-
Context Integration describes the generic Spring application context support.
-
Using
StateMachineAccessordescribes the state machine internal accessor support. -
Using
StateMachineInterceptordescribes the state machine error handling support. -
State Machine Security describes the state machine security support.
-
State Machine Error Handling describes the state machine interceptor support.
-
State Machine Services describes the state machine service support.
-
Persisting a State Machine describes the state machine persisting support.
-
Spring Boot Support describes the Spring Boot support.
-
Monitoring a State Machine describes the monitoring and trancing support.
-
Using Distributed States describes the distributed state machine support.
-
Testing Support describes the state machine testing support.
-
Eclipse Modeling Support describes the state machine UML modeling support.
-
Repository Support describes the state machine repository config support.
Statemachine Configuration
One of the common tasks when using a state machine is to design its runtime configuration. This chapter focuses on how Spring Statemachine is configured and how it leverages Spring’s lightweight IoC containers to simplify the application internals to make it more manageable.
| Configuration examples in this section are not feature complete. That is, you always need to have definitions of both states and transitions. Otherwise, state machine configuration would be ill-formed. We have simply made code snippets less verbose by leaving other needed parts out. |
Using enable Annotations
We use two familiar Spring enabler annotations to ease configuration:
@EnableStateMachine and @EnableStateMachineFactory.
These annotations, when placed in a @Configuration class, enable
some basic functionality needed by a state machine.
You can use @EnableStateMachine when you need a configuration to create an
instance of StateMachine. Usually, a @Configuration class extends adapters
(EnumStateMachineConfigurerAdapter or StateMachineConfigurerAdapter), which
lets you override configuration callback methods. We automatically
detect whether you use these adapter classes and modify the runtime configuration
logic accordingly.
You can use @EnableStateMachineFactory when you need a configuration to create an
instance of a StateMachineFactory.
| Usage examples of these are shown in below sections. |
Configuring States
We get into more complex configuration examples a bit later in this guide, but
we first start with something simple. For most simple state
machine, you can use EnumStateMachineConfigurerAdapter and define
possible states and choose the initial and optional end states.
@Configuration
@EnableStateMachine
public class Config1Enums
		extends EnumStateMachineConfigurerAdapter<States, Events> {

	@Override
	public void configure(StateMachineStateConfigurer<States, Events> states)
			throws Exception {
		states
			.withStates()
				.initial(States.S1)
				.end(States.SF)
				.states(EnumSet.allOf(States.class));
	}

}
You can also use strings instead of enumerations as states and
events by using StateMachineConfigurerAdapter, as shown in the next example. Most
of the configuration examples ues enumerations, but, generally speaking,
you can interchange strings and enumerations.
@Configuration
@EnableStateMachine
public class Config1Strings
		extends StateMachineConfigurerAdapter<String, String> {

	@Override
	public void configure(StateMachineStateConfigurer<String, String> states)
			throws Exception {
		states
			.withStates()
				.initial("S1")
				.end("SF")
				.states(new HashSet<String>(Arrays.asList("S1","S2","S3","S4")));
	}

}| Using enumerations brings a safer set of states and event types but limits possible combinations to compile time. Strings do not have this limitation and let you use more dynamic ways to build state machine configurations but do not allow same level of safety. |
Configuring Hierarchical States
You can define hierarchical states can by using multiple withStates()
calls, where you can use parent() to indicate that these
particular states are sub-states of some other state.
The following example shows how to do so:
@Configuration
@EnableStateMachine
public class Config2
		extends EnumStateMachineConfigurerAdapter<States, Events> {

	@Override
	public void configure(StateMachineStateConfigurer<States, Events> states)
			throws Exception {
		states
			.withStates()
				.initial(States.S1)
				.state(States.S1)
				.and()
				.withStates()
					.parent(States.S1)
					.initial(States.S2)
					.state(States.S2);
	}

}
Configuring Regions
There are no special configuration methods to mark a collection of states to be part of an orthogonal state. To put it simply, orthogonal state is created when the same hierarchical state machine has multiple sets of states, each of which has an initial state. Because an individual state machine can only have one initial state, multiple initial states must mean that a specific state must have multiple independent regions. The following example shows how to define regions:
@Configuration
@EnableStateMachine
public class Config10
		extends EnumStateMachineConfigurerAdapter<States2, Events> {

	@Override
	public void configure(StateMachineStateConfigurer<States2, Events> states)
			throws Exception {
		states
			.withStates()
				.initial(States2.S1)
				.state(States2.S2)
				.and()
				.withStates()
					.parent(States2.S2)
					.initial(States2.S2I)
					.state(States2.S21)
					.end(States2.S2F)
					.and()
				.withStates()
					.parent(States2.S2)
					.initial(States2.S3I)
					.state(States2.S31)
					.end(States2.S3F);
	}

}
When persisting machines with regions or generally
relying on any functionalities to reset a machine, you may need
to have a dedicated ID for a region. By default, this ID
is a generated UUID. As the following example shows, StateConfigurer has
a method called region(String id) that lets you set the ID for a region:
@Configuration
@EnableStateMachine
public class Config10RegionId
		extends EnumStateMachineConfigurerAdapter<States2, Events> {

	@Override
	public void configure(StateMachineStateConfigurer<States2, Events> states)
			throws Exception {
		states
			.withStates()
				.initial(States2.S1)
				.state(States2.S2)
				.and()
				.withStates()
					.parent(States2.S2)
					.region("R1")
					.initial(States2.S2I)
					.state(States2.S21)
					.end(States2.S2F)
					.and()
				.withStates()
					.parent(States2.S2)
					.region("R2")
					.initial(States2.S3I)
					.state(States2.S31)
					.end(States2.S3F);
	}

}
Configuring Transitions
We support three different types of transitions: external,
internal, and local. Transitions are triggered either by a signal
(which is an event sent into a state machine) or by a timer.
The following example shows how to define all three kinds of transitions:
@Configuration
@EnableStateMachine
public class Config3
		extends EnumStateMachineConfigurerAdapter<States, Events> {

	@Override
	public void configure(StateMachineStateConfigurer<States, Events> states)
			throws Exception {
		states
			.withStates()
				.initial(States.S1)
				.states(EnumSet.allOf(States.class));
	}

	@Override
	public void configure(StateMachineTransitionConfigurer<States, Events> transitions)
			throws Exception {
		transitions
			.withExternal()
				.source(States.S1).target(States.S2)
				.event(Events.E1)
				.and()
			.withInternal()
				.source(States.S2)
				.event(Events.E2)
				.and()
			.withLocal()
				.source(States.S2).target(States.S3)
				.event(Events.E3);
	}

}
Configuring Guards
You can use guards to protect state transitions. You can use the Guard interface
to do an evaluation where a method has access to a StateContext.
The following example shows how to do so:
@Configuration
@EnableStateMachine
public class Config4
		extends EnumStateMachineConfigurerAdapter<States, Events> {

	@Override
	public void configure(StateMachineTransitionConfigurer<States, Events> transitions)
			throws Exception {
		transitions
			.withExternal()
				.source(States.S1).target(States.S2)
				.event(Events.E1)
				.guard(guard())
				.and()
			.withExternal()
				.source(States.S2).target(States.S3)
				.event(Events.E2)
				.guardExpression("true");

	}

	@Bean
	public Guard<States, Events> guard() {
		return new Guard<States, Events>() {

			@Override
			public boolean evaluate(StateContext<States, Events> context) {
				return true;
			}
		};
	}

}
In the preceding example, we used two different types of guard configurations. First, we
created a simple Guard as a bean and attached it to the transition between
states S1 and S2.
Second, we used a SPeL expression as a guard to dicate that the
expression must return a BOOLEAN value. Behind the scenes, this
expression-based guard is a SpelExpressionGuard. We attached it to
the transition between states S2 and S3. Both guards
always evaluate to true.
Configuring Actions
You can define actions to be executed with transitions and states. An action is always run as a result of a transition that originates from a trigger. The following example shows how to define an action:
@Configuration
@EnableStateMachine
public class Config51
		extends EnumStateMachineConfigurerAdapter<States, Events> {

	@Override
	public void configure(StateMachineTransitionConfigurer<States, Events> transitions)
			throws Exception {
		transitions
			.withExternal()
				.source(States.S1)
				.target(States.S2)
				.event(Events.E1)
				.action(action());
	}

	@Bean
	public Action<States, Events> action() {
		return new Action<States, Events>() {

			@Override
			public void execute(StateContext<States, Events> context) {
				// do something
			}
		};
	}

}
In the preceding example, a single Action is defined as a bean named action and associated
with a transition from S1 to S2.
The following example shows how to use an action multiple times:
@Configuration
@EnableStateMachine
public class Config52
		extends EnumStateMachineConfigurerAdapter<States, Events> {

	@Override
	public void configure(StateMachineStateConfigurer<States, Events> states)
			throws Exception {
		states
			.withStates()
				.initial(States.S1, action())
				.state(States.S1, action(), null)
				.state(States.S2, null, action())
				.state(States.S2, action())
				.state(States.S3, action(), action());
	}

	@Bean
	public Action<States, Events> action() {
		return new Action<States, Events>() {

			@Override
			public void execute(StateContext<States, Events> context) {
				// do something
			}
		};
	}

}
Usually, you would not define the same Action instance for different
stages, but we did it here to not make too much noise in a code
snippet.
|
In the preceding example, a single Action is defined by the bean named action and associated
with states S1, S2, and S3. We need to clarify what is going on here:
-
We defined an action for the initial state,
S1. -
We defined an entry action for state
S1and left the exit action empty. -
We defined an exit action for state
S2and left the entry action empty. -
We defined a single state action for state
S2. -
We defined both entry and exit actions for state
S3. -
Note that state
S1is used twice withinitial()andstate()functions. You need to do this only if you want to define entry or exit actions with initial state.
Defining action with initial() function only runs a particular
action when a state machine or sub state is started. This action
is an initializing action that is run only once. An action defined
with state() is then run if the state machine transitions back
and forward between initial and non-initial states.
|
State Actions
State actions are run differently compared to entry and exit actions, because execution happens after state has been entered and can be cancelled if state exit happens before a particular action has been completed.
State actions are executed using normal reactive flow by subscribing with
a Reactor’s default parallel scheduler. This means that, whatever you do in your
action, you need to be able to catch InterruptedException or, more generally,
periodically check whether Thread is interrupted.
The following example shows typical configuration that uses default the IMMEDIATE_CANCEL, which
would immediately cancel a running task when its state is complete:
@Configuration
@EnableStateMachine
static class Config1 extends StateMachineConfigurerAdapter<String, String> {

	@Override
	public void configure(StateMachineConfigurationConfigurer<String, String> config) throws Exception {
		config
			.withConfiguration()
				.stateDoActionPolicy(StateDoActionPolicy.IMMEDIATE_CANCEL);
	}

	@Override
	public void configure(StateMachineStateConfigurer<String, String> states) throws Exception {
		states
			.withStates()
				.initial("S1")
				.state("S2", context -> {})
				.state("S3");
	}

	@Override
	public void configure(StateMachineTransitionConfigurer<String, String> transitions) throws Exception {
		transitions
			.withExternal()
				.source("S1")
				.target("S2")
				.event("E1")
				.and()
			.withExternal()
				.source("S2")
				.target("S3")
				.event("E2");
	}
}
You can set a policy to TIMEOUT_CANCEL together with a global timeout
for each machine. This changes state behavior to await action completion
before cancelation is requested. The following example shows how to do so:
@Override
public void configure(StateMachineConfigurationConfigurer<String, String> config) throws Exception {
	config
		.withConfiguration()
			.stateDoActionPolicy(StateDoActionPolicy.TIMEOUT_CANCEL)
			.stateDoActionPolicyTimeout(10, TimeUnit.SECONDS);
}
If Event directly takes a machine into a state so that event headers
are available to a particular action, you can also use a dedicated
event header to set a specific timeout (defined in millis).
You can use the reserved header value StateMachineMessageHeaders.HEADER_DO_ACTION_TIMEOUT
for this purpose. The following example shows how to do so:
@Autowired
StateMachine<String, String> stateMachine;

void sendEventUsingTimeout() {
	stateMachine
		.sendEvent(Mono.just(MessageBuilder
			.withPayload("E1")
			.setHeader(StateMachineMessageHeaders.HEADER_DO_ACTION_TIMEOUT, 5000)
			.build()))
		.subscribe();

}
Transition Action Error Handling
You can always catch exceptions manually. However, with actions defined for
transitions, you can define an error action that is called if an
exception is raised. The exception is then available from a StateContext
passed to that action. The following example shows how to create a state
that handles an exception:
@Configuration
@EnableStateMachine
public class Config53
		extends EnumStateMachineConfigurerAdapter<States, Events> {

	@Override
	public void configure(StateMachineTransitionConfigurer<States, Events> transitions)
			throws Exception {
		transitions
			.withExternal()
				.source(States.S1)
				.target(States.S2)
				.event(Events.E1)
				.action(action(), errorAction());
	}

	@Bean
	public Action<States, Events> action() {
		return new Action<States, Events>() {

			@Override
			public void execute(StateContext<States, Events> context) {
				throw new RuntimeException("MyError");
			}
		};
	}

	@Bean
	public Action<States, Events> errorAction() {
		return new Action<States, Events>() {

			@Override
			public void execute(StateContext<States, Events> context) {
				// RuntimeException("MyError") added to context
				Exception exception = context.getException();
				exception.getMessage();
			}
		};
	}

}
If need be, you can manually create similar logic for every action. The following example shows how to do so:
@Override
public void configure(StateMachineTransitionConfigurer<States, Events> transitions)
		throws Exception {
	transitions
		.withExternal()
			.source(States.S1)
			.target(States.S2)
			.event(Events.E1)
			.action(Actions.errorCallingAction(action(), errorAction()));
}
State Action Error Handling
Logic similar to the logic that handles errors in state transitions is also available for entry to a state and exit from a state.
For these situations, StateConfigurer has methods called stateEntry, stateDo, and
stateExit. These methods define an error action together with a normal (non-error) action.
The following example shows how to use all three methods:
@Configuration
@EnableStateMachine
public class Config55
		extends EnumStateMachineConfigurerAdapter<States, Events> {

	@Override
	public void configure(StateMachineStateConfigurer<States, Events> states)
			throws Exception {
		states
			.withStates()
				.initial(States.S1)
				.stateEntry(States.S2, action(), errorAction())
				.stateDo(States.S2, action(), errorAction())
				.stateExit(States.S2, action(), errorAction())
				.state(States.S3);
	}

	@Bean
	public Action<States, Events> action() {
		return new Action<States, Events>() {

			@Override
			public void execute(StateContext<States, Events> context) {
				throw new RuntimeException("MyError");
			}
		};
	}

	@Bean
	public Action<States, Events> errorAction() {
		return new Action<States, Events>() {

			@Override
			public void execute(StateContext<States, Events> context) {
				// RuntimeException("MyError") added to context
				Exception exception = context.getException();
				exception.getMessage();
			}
		};
	}
}
Configuring Pseudo States
Pseudo state configuration is usually done by configuring states and transitions. Pseudo states are automatically added to state machine as states.
Initial State
You can mark a particular state as initial state by using the initial()
method. This initial action is good, for example, to initialize
extended state variables. The following example shows how to use the initial() method:
@Configuration
@EnableStateMachine
public class Config11
		extends EnumStateMachineConfigurerAdapter<States, Events> {

	@Override
	public void configure(StateMachineStateConfigurer<States, Events> states)
			throws Exception {
		states
			.withStates()
				.initial(States.S1, initialAction())
				.end(States.SF)
				.states(EnumSet.allOf(States.class));
	}

	@Bean
	public Action<States, Events> initialAction() {
		return new Action<States, Events>() {

			@Override
			public void execute(StateContext<States, Events> context) {
				// do something initially
			}
		};
	}

}
Terminate State
You can mark a particular state as being an end state by using the end() method.
You can do so at most once for each individual sub-machine or region.
The following example shows how to use the end() method:
@Configuration
@EnableStateMachine
public class Config1Enums
		extends EnumStateMachineConfigurerAdapter<States, Events> {

	@Override
	public void configure(StateMachineStateConfigurer<States, Events> states)
			throws Exception {
		states
			.withStates()
				.initial(States.S1)
				.end(States.SF)
				.states(EnumSet.allOf(States.class));
	}

}
State History
You can define state history once for each individual state machine.
You need to choose its state identifier and set either History.SHALLOW or
History.DEEP. The following example uses History.SHALLOW:
@Configuration
@EnableStateMachine
public class Config12
		extends EnumStateMachineConfigurerAdapter<States3, Events> {

	@Override
	public void configure(StateMachineStateConfigurer<States3, Events> states)
			throws Exception {
		states
			.withStates()
				.initial(States3.S1)
				.state(States3.S2)
				.and()
				.withStates()
					.parent(States3.S2)
					.initial(States3.S2I)
					.state(States3.S21)
					.state(States3.S22)
					.history(States3.SH, History.SHALLOW);
	}

	@Override
	public void configure(StateMachineTransitionConfigurer<States3, Events> transitions)
			throws Exception {
		transitions
			.withHistory()
				.source(States3.SH)
				.target(States3.S22);
	}

}
Also, as the preceding example shows, you can optionally define a default transition from a history state into a state vertex in a same machine. This transition takes place as a default if, for example, the machine has never been entered — thus, no history would be available. If a default state transition is not defined, then normal entry into a region is done. This default transition is also used if a machine’s history is a final state.
Choice State
Choice needs to be defined in both states and transitions to work
properly. You can mark a particular state as being a choice state by using the choice()
method. This state needs to match source state when a transition is
configured for this choice.
You can configure a transition by using withChoice(), where you define source
state and a first/then/last structure, which is equivalent to a normal
if/elseif/else. With first and then, you can specify a guard just
as you would use a condition with if/elseif clauses.
A transition needs to be able to exist, so you must make sure to use last.
Otherwise, the configuration is ill-formed. The following example shows how to define
a choice state:
@Configuration
@EnableStateMachine
public class Config13
		extends EnumStateMachineConfigurerAdapter<States, Events> {

	@Override
	public void configure(StateMachineStateConfigurer<States, Events> states)
			throws Exception {
		states
			.withStates()
				.initial(States.SI)
				.choice(States.S1)
				.end(States.SF)
				.states(EnumSet.allOf(States.class));
	}

	@Override
	public void configure(StateMachineTransitionConfigurer<States, Events> transitions)
			throws Exception {
		transitions
			.withChoice()
				.source(States.S1)
				.first(States.S2, s2Guard())
				.then(States.S3, s3Guard())
				.last(States.S4);
	}

	@Bean
	public Guard<States, Events> s2Guard() {
		return new Guard<States, Events>() {

			@Override
			public boolean evaluate(StateContext<States, Events> context) {
				return false;
			}
		};
	}

	@Bean
	public Guard<States, Events> s3Guard() {
		return new Guard<States, Events>() {

			@Override
			public boolean evaluate(StateContext<States, Events> context) {
				return true;
			}
		};
	}

}
Actions can be run with both incoming and outgoing transitions of a choice pseudostate. As the following example shows, one dummy lambda action is defined that leads into a choice state and one similar dummy lambda action is defined for one outgoing transition (where it also defines an error action):
@Configuration
@EnableStateMachine
public class Config23
		extends EnumStateMachineConfigurerAdapter<States, Events> {

	@Override
	public void configure(StateMachineStateConfigurer<States, Events> states)
			throws Exception {
		states
			.withStates()
				.initial(States.SI)
				.choice(States.S1)
				.end(States.SF)
				.states(EnumSet.allOf(States.class));
	}

	@Override
	public void configure(StateMachineTransitionConfigurer<States, Events> transitions)
			throws Exception {
		transitions
			.withExternal()
				.source(States.SI)
				.action(c -> {
						// action with SI-S1
					})
				.target(States.S1)
				.and()
			.withChoice()
				.source(States.S1)
				.first(States.S2, c -> {
						return true;
					})
				.last(States.S3, c -> {
						// action with S1-S3
					}, c -> {
						// error callback for action S1-S3
					});
	}
}| Junction have same api format meaning actions can be defined similarly. |
Junction State
You need to define a junction in both states and transitions for it to work
properly. You can mark a particular state as being a choice state by using the junction()
method. This state needs to match the source state when a transition is
configured for this choice.
You can configure the transition by using withJunction() where you define source
state and a first/then/last structure (which is equivalent to a normal
if/elseif/else). With first and then, you can specify a guard as
you would use a condition with if/elseif clauses.
A transition needs to be able to exist, so you must make sure to use last.
Otherwise, the configuration is ill-formed.
The following example uses a junction:
@Configuration
@EnableStateMachine
public class Config20
		extends EnumStateMachineConfigurerAdapter<States, Events> {

	@Override
	public void configure(StateMachineStateConfigurer<States, Events> states)
			throws Exception {
		states
			.withStates()
				.initial(States.SI)
				.junction(States.S1)
				.end(States.SF)
				.states(EnumSet.allOf(States.class));
	}

	@Override
	public void configure(StateMachineTransitionConfigurer<States, Events> transitions)
			throws Exception {
		transitions
			.withJunction()
				.source(States.S1)
				.first(States.S2, s2Guard())
				.then(States.S3, s3Guard())
				.last(States.S4);
	}

	@Bean
	public Guard<States, Events> s2Guard() {
		return new Guard<States, Events>() {

			@Override
			public boolean evaluate(StateContext<States, Events> context) {
				return false;
			}
		};
	}

	@Bean
	public Guard<States, Events> s3Guard() {
		return new Guard<States, Events>() {

			@Override
			public boolean evaluate(StateContext<States, Events> context) {
				return true;
			}
		};
	}

}
The difference between choice and junction is purely academic, as both are
implemented with first/then/last structures . However, in theory, based
on UML modeling, choice allows only one incoming transition while
junction allows multiple incoming transitions. At a code level, the
functionality is pretty much identical.
|
Fork State
You must define a fork in both states and transitions for it to work
properly. You can mark a particular state as being a choice state by using the fork()
method. This state needs to match source state when a transition is
configured for this fork.
The target state needs to be a super state or an immediate state in a regions. Using a super state as a target takes all regions into initial states. Targeting individual state gives more controlled entry into regions. The following example uses a fork:
@Configuration
@EnableStateMachine
public class Config14
		extends EnumStateMachineConfigurerAdapter<States2, Events> {

	@Override
	public void configure(StateMachineStateConfigurer<States2, Events> states)
			throws Exception {
		states
			.withStates()
				.initial(States2.S1)
				.fork(States2.S2)
				.state(States2.S3)
				.and()
				.withStates()
					.parent(States2.S3)
					.initial(States2.S2I)
					.state(States2.S21)
					.state(States2.S22)
					.end(States2.S2F)
					.and()
				.withStates()
					.parent(States2.S3)
					.initial(States2.S3I)
					.state(States2.S31)
					.state(States2.S32)
					.end(States2.S3F);
	}

	@Override
	public void configure(StateMachineTransitionConfigurer<States2, Events> transitions)
			throws Exception {
		transitions
			.withFork()
				.source(States2.S2)
				.target(States2.S22)
				.target(States2.S32);
	}

}
Join State
You must define a join in both states and transitions for it to work
properly. You can mark aparticular state as being a choice state by using the join()
method. This state does not need to match either source states or a
target state in a transition configuration.
You can select a target state where a transition goes when all source states have been joined. If you use state hosting regions as the source, the end states of a region are used as joins. Otherwise, you can pick any states from a region. The following exmaple uses a join:
@Configuration
@EnableStateMachine
public class Config15
		extends EnumStateMachineConfigurerAdapter<States2, Events> {

	@Override
	public void configure(StateMachineStateConfigurer<States2, Events> states)
			throws Exception {
		states
			.withStates()
				.initial(States2.S1)
				.state(States2.S3)
				.join(States2.S4)
				.state(States2.S5)
				.and()
				.withStates()
					.parent(States2.S3)
					.initial(States2.S2I)
					.state(States2.S21)
					.state(States2.S22)
					.end(States2.S2F)
					.and()
				.withStates()
					.parent(States2.S3)
					.initial(States2.S3I)
					.state(States2.S31)
					.state(States2.S32)
					.end(States2.S3F);
	}

	@Override
	public void configure(StateMachineTransitionConfigurer<States2, Events> transitions)
			throws Exception {
		transitions
			.withJoin()
				.source(States2.S2F)
				.source(States2.S3F)
				.target(States2.S4)
				.and()
			.withExternal()
				.source(States2.S4)
				.target(States2.S5);
	}
}
You can also have multiple transitions originate from a
join state. It this case, we advise you to use guards and define your guards
such that only one guard evaluates to TRUE at any given time. Otherwise,
transition behavior is not predictable. This is shown in the following example, where the guard
checks whether the extended state has variables:
@Configuration
@EnableStateMachine
public class Config22
		extends EnumStateMachineConfigurerAdapter<States2, Events> {

	@Override
	public void configure(StateMachineStateConfigurer<States2, Events> states)
			throws Exception {
		states
			.withStates()
				.initial(States2.S1)
				.state(States2.S3)
				.join(States2.S4)
				.state(States2.S5)
				.end(States2.SF)
				.and()
				.withStates()
					.parent(States2.S3)
					.initial(States2.S2I)
					.state(States2.S21)
					.state(States2.S22)
					.end(States2.S2F)
					.and()
				.withStates()
					.parent(States2.S3)
					.initial(States2.S3I)
					.state(States2.S31)
					.state(States2.S32)
					.end(States2.S3F);
	}

	@Override
	public void configure(StateMachineTransitionConfigurer<States2, Events> transitions)
			throws Exception {
		transitions
			.withJoin()
				.source(States2.S2F)
				.source(States2.S3F)
				.target(States2.S4)
				.and()
			.withExternal()
				.source(States2.S4)
				.target(States2.S5)
				.guardExpression("!extendedState.variables.isEmpty()")
				.and()
			.withExternal()
				.source(States2.S4)
				.target(States2.SF)
				.guardExpression("extendedState.variables.isEmpty()");
	}
}
Exit and Entry Point States
You can use exit and entry points to do more controlled exit and entry
from and into a submachine.
The following example uses the withEntry and withExit methods to define entry points:
@Configuration
@EnableStateMachine
static class Config21 extends StateMachineConfigurerAdapter<String, String> {

	@Override
	public void configure(StateMachineStateConfigurer<String, String> states)
			throws Exception {
		states
		.withStates()
			.initial("S1")
			.state("S2")
			.state("S3")
			.and()
			.withStates()
				.parent("S2")
				.initial("S21")
				.entry("S2ENTRY")
				.exit("S2EXIT")
				.state("S22");
	}

	@Override
	public void configure(StateMachineTransitionConfigurer<String, String> transitions)
			throws Exception {
		transitions
		.withExternal()
			.source("S1").target("S2")
			.event("E1")
			.and()
		.withExternal()
			.source("S1").target("S2ENTRY")
			.event("ENTRY")
			.and()
		.withExternal()
			.source("S22").target("S2EXIT")
			.event("EXIT")
			.and()
		.withEntry()
			.source("S2ENTRY").target("S22")
			.and()
		.withExit()
			.source("S2EXIT").target("S3");
	}
}
As shown in the preceding, you need to mark particular states as being exit and
entry states. Then you create a normal transitions into those states
and also specify withExit() and withEntry(), where those states
exit and entry respectively.
Configuring Common Settings
You can set part of a common state machine configuration by using
ConfigurationConfigurer. With it you can set BeanFactory and an autostart flag
for a state machine. It also lets you register StateMachineListener instances,
configure transition conflict policy and region execution policy.
The following example shows how to use ConfigurationConfigurer:
@Configuration
@EnableStateMachine
public class Config17
		extends EnumStateMachineConfigurerAdapter<States, Events> {

	@Override
	public void configure(StateMachineConfigurationConfigurer<States, Events> config)
			throws Exception {
		config
			.withConfiguration()
				.autoStartup(true)
				.machineId("myMachineId")
				.beanFactory(new StaticListableBeanFactory())
				.listener(new StateMachineListenerAdapter<States, Events>())
				.transitionConflictPolicy(TransitionConflictPolicy.CHILD)
				.regionExecutionPolicy(RegionExecutionPolicy.PARALLEL);
	}
}
By default, the state machine autoStartup flag is disabled, because all
instances that handle sub-states are controlled by the state machine itself
and cannot be automatically started. Also, it is much safer to leave
whether a machine should be started
automatically or not to the user. This flag controls only the autostart of a
top-level state machine.
Setting machineId within a configuration class is simply a convenience for those times when
you want or need to do it there.
Registering StateMachineListener instances is also partly for
convenience but is required if you want to catch a callback during a
state machine lifecycle, such as getting notified of a state machine’s
start and stop events. Note that you cannot listen a state
machine’s start events if autoStartup is enabled, unless you register a listener
during a configuration phase.
You can use transitionConflictPolicy when multiple
transition paths could be selected. One usual use case for this is when a
machine contains anonymous transitions that lead out from a sub-state
and a parent state and you want to define a policy in which one is
selected. This is a global setting within a machine instance and
defaults to CHILD.
You can use withDistributed() to configure DistributedStateMachine. It
lets you set a StateMachineEnsemble, which (if it exists) automatically
wraps any created StateMachine with DistributedStateMachine and
enables distributed mode. The following example shows how to use it:
@Configuration
@EnableStateMachine
public class Config18
		extends EnumStateMachineConfigurerAdapter<States, Events> {

	@Override
	public void configure(StateMachineConfigurationConfigurer<States, Events> config)
			throws Exception {
		config
			.withDistributed()
				.ensemble(stateMachineEnsemble());
	}

	@Bean
	public StateMachineEnsemble<States, Events> stateMachineEnsemble()
			throws Exception {
		// naturally not null but should return ensemble instance
		return null;
	}
}
For more about distributed states, see Using Distributed States.
The StateMachineModelVerifier interface is used internally to
do some sanity checks for a state machine’s structure. Its purpose is to
fail fast early instead of letting common configuration errors into a
state machine. By default, a verifier is automatically enabled and the
DefaultStateMachineModelVerifier implementation is used.
With withVerifier(), you can disable verifier or set a custom one if
needed. The following example shows how to do so:
@Configuration
@EnableStateMachine
public class Config19
		extends EnumStateMachineConfigurerAdapter<States, Events> {

	@Override
	public void configure(StateMachineConfigurationConfigurer<States, Events> config)
			throws Exception {
		config
			.withVerifier()
				.enabled(true)
				.verifier(verifier());
	}

	@Bean
	public StateMachineModelVerifier<States, Events> verifier() {
		return new StateMachineModelVerifier<States, Events>() {

			@Override
			public void verify(StateMachineModel<States, Events> model) {
				// throw exception indicating malformed model
			}
		};
	}
}
For more about config model, see StateMachine Config Model.
The withSecurity, withMonitoring and withPersistence configuration methods
are documented in State Machine Security, Monitoring a State Machine, and
Using StateMachineRuntimePersister, respectively.
|
Configuring Model
StateMachineModelFactory is a hook that lets you configure a statemachine model
without using a manual configuration. Essentially, it is a third-party
integration to integrate into a configuration model.
You can hook StateMachineModelFactory into a configuration model by
using a StateMachineModelConfigurer. The following example shows how to do so:
@Configuration
@EnableStateMachine
public static class Config1 extends StateMachineConfigurerAdapter<String, String> {

	@Override
	public void configure(StateMachineModelConfigurer<String, String> model) throws Exception {
		model
			.withModel()
				.factory(modelFactory());
	}

	@Bean
	public StateMachineModelFactory<String, String> modelFactory() {
		return new CustomStateMachineModelFactory();
	}
}
The follwoing example uses CustomStateMachineModelFactory to
define two states (S1 and S2) and an event (E1) between those
states:
public static class CustomStateMachineModelFactory implements StateMachineModelFactory<String, String> {

	@Override
	public StateMachineModel<String, String> build() {
		ConfigurationData<String, String> configurationData = new ConfigurationData<>();
		Collection<StateData<String, String>> stateData = new ArrayList<>();
		stateData.add(new StateData<String, String>("S1", true));
		stateData.add(new StateData<String, String>("S2"));
		StatesData<String, String> statesData = new StatesData<>(stateData);
		Collection<TransitionData<String, String>> transitionData = new ArrayList<>();
		transitionData.add(new TransitionData<String, String>("S1", "S2", "E1"));
		TransitionsData<String, String> transitionsData = new TransitionsData<>(transitionData);
		StateMachineModel<String, String> stateMachineModel = new DefaultStateMachineModel<String, String>(configurationData,
				statesData, transitionsData);
		return stateMachineModel;
	}

	@Override
	public StateMachineModel<String, String> build(String machineId) {
		return build();
	}
}| Defining a custom model is usually not what people are looking for, although it is possible. However, it is a central concept of allowing external access to this configuration model. |
You can find an example of using this model factory integration in Eclipse Modeling Support. You can find more generic info about custom model integration in Developer Documentation.
Things to Remember
When defining actions, guards, or any other references from a
configuration, it pays to remember how Spring Framework works
with beans. In the next example, we have defined a normal configuration with
states S1 and S2 and four transitions between those. All transitions
are guarded by either guard1 or guard2. You must ensure that
guard1 is created as a real bean because it is annotated with
@Bean, while guard2 is not.
This means that event E3 would get the guard2 condition as
TRUE, and E4 would get the guard2 condition as FALSE, because those are
coming from plain method calls to those functions.
However, because guard1 is defined as a @Bean, it is proxied by the
Spring Framework. Thus, additional calls to its method result in
only one instantiation of that instance. Event E1 would first get the
proxied instance with condition TRUE, while event E2 would get the same
instance with TRUE condition when the method call was defined with
FALSE. This is not a Spring State Machine-specific behavior. Rather, it is
how Spring Framework works with beans.
The following example shows how this arrangement works:
@Configuration
@EnableStateMachine
public class Config1
		extends StateMachineConfigurerAdapter<String, String> {

	@Override
	public void configure(StateMachineStateConfigurer<String, String> states)
			throws Exception {
		states
			.withStates()
				.initial("S1")
				.state("S2");
	}

	@Override
	public void configure(StateMachineTransitionConfigurer<String, String> transitions)
			throws Exception {
		transitions
			.withExternal()
				.source("S1").target("S2").event("E1").guard(guard1(true))
				.and()
			.withExternal()
				.source("S1").target("S2").event("E2").guard(guard1(false))
				.and()
			.withExternal()
				.source("S1").target("S2").event("E3").guard(guard2(true))
				.and()
			.withExternal()
				.source("S1").target("S2").event("E4").guard(guard2(false));
	}

	@Bean
	public Guard<String, String> guard1(final boolean value) {
		return new Guard<String, String>() {
			@Override
			public boolean evaluate(StateContext<String, String> context) {
				return value;
			}
		};
	}

	public Guard<String, String> guard2(final boolean value) {
		return new Guard<String, String>() {
			@Override
			public boolean evaluate(StateContext<String, String> context) {
				return value;
			}
		};
	}
}
State Machine ID
Various classes and interfaces use machineId either as a variable or as a
parameter in methods. This section takes a closer look at how
machineId relates to normal machine operation and instantiation.
During runtime, a machineId really does not have any big operational
role except to distinguish machines from each other — for example, when
following logs or doing deeper debugging. Having a lot of different
machine instances quickly gets developers lost in translation if there is
no easy way to identify these instances. As a result, we added the option to set the
machineId.
Using @EnableStateMachine
Setting machineId in Java configuration as mymachine then exposes that value
for logs. This same machineId is also available from the
StateMachine.getId() method. The following example uses the machineId method:
@Override
public void configure(StateMachineConfigurationConfigurer<String, String> config)
		throws Exception {
	config
		.withConfiguration()
			.machineId("mymachine");
}
The following example of log output shows the mymachine ID:
11:23:54,509  INFO main support.LifecycleObjectSupport [main] -
started S2 S1 / S1 / uuid=8fe53d34-8c85-49fd-a6ba-773da15fcaf1 / id=mymachine| The manual builder (see State Machine through a Builder) uses the same configuration interface, meaning that the behavior is equivalent. |
Using @EnableStateMachineFactory
You can see the same machineId getting configured if you use a
StateMachineFactory and request a new machine by using that ID,
as the following example shows:
StateMachineFactory<String, String> factory = context.getBean(StateMachineFactory.class);
StateMachine<String, String> machine = factory.getStateMachine("mymachine");
Using StateMachineModelFactory
Behind the scenes, all machine configurations are first translated into a
StateMachineModel so that StateMachineFactory need not know
from where the configuration originated, as a machine can be built from
Java configuration, UML, or a repository. If you want to go crazy, you can also use a custom
StateMachineModel, which is the lowest possible
level at which to define configuration.
What do all of these have to do with a machineId?
StateMachineModelFactory also has a method with the following signature:
StateMachineModel<S, E> build(String machineId) which a StateMachineModelFactory
implementation may choose to use.
RepositoryStateMachineModelFactory (see Repository Support) uses
machineId to support different configurations in a persistent
store through Spring Data Repository interfaces. For example, both
StateRepository and TransitionRepository have a method (List<T>
findByMachineId(String machineId)), to build different states and
transitions by a machineId. With
RepositoryStateMachineModelFactory, if machineId is used as empty
or NULL, it defaults to repository configuration (in a backing-persistent model)
without a known machine id.
Currently, UmlStateMachineModelFactory does not distinguish between
different machine IDs, as UML source is always coming from the same
file. This may change in future releases.
|
State Machine Factories
There are use cases when a state machine needs to be created dynamically instead of by defining static configuration at compile time. For example, if there are custom components that use their own state machines and these components are created dynamically, it is impossible to have a static state machine that is built during the application start. Internally, state machines are always built through factory interfaces. This then gives you an option to use this feature programmatically. Configuration for a state machine factory is exactly the same as shown in various examples in this document where state machine configuration is hard coded.
Factory through an Adapter
Actually creating a state machine by using @EnableStateMachine
works through a factory, so @EnableStateMachineFactory merely exposes
that factory through its interface. The following example uses
@EnableStateMachineFactory:
@Configuration
@EnableStateMachineFactory
public class Config6
		extends EnumStateMachineConfigurerAdapter<States, Events> {

	@Override
	public void configure(StateMachineStateConfigurer<States, Events> states)
			throws Exception {
		states
			.withStates()
				.initial(States.S1)
				.end(States.SF)
				.states(EnumSet.allOf(States.class));
	}

}
Now that you have used @EnableStateMachineFactory to create a factory
instead of a state machine bean, you can inject it and use it (as is) to
request new state machines. The following example shows how to do so:
public class Bean3 {

	@Autowired
	StateMachineFactory<States, Events> factory;

	void method() {
		StateMachine<States,Events> stateMachine = factory.getStateMachine();
		stateMachine.startReactively().subscribe();
	}
}
Adapter Factory Limitations
The current limitation of factory is that all the actions and guard with which it associates a state machine share the same instance. This means that, from your actions and guard, you need to specifically handle the case in which the same bean is called by different state machines. This limitation is something that will be resolved in future releases.
State Machine through a Builder
Using adapters (as shown above) has a limitation imposed by its
requirement to work through Spring @Configuration classes and the
application context. While this is a very clear model to configure a
state machine, it limits configuration at compile time,
which is not always what a user wants to do. If there is a requirement
to build more dynamic state machines, you can use a simple builder pattern
to construct similar instances. By using strings as states and
events, you can use this builder pattern to build fully dynamic state
machines outside of a Spring application context. The following example
shows how to do so:
StateMachine<String, String> buildMachine1() throws Exception {
	Builder<String, String> builder = StateMachineBuilder.builder();
	builder.configureStates()
		.withStates()
			.initial("S1")
			.end("SF")
			.states(new HashSet<String>(Arrays.asList("S1","S2","S3","S4")));
	return builder.build();
}
The builder uses the same configuration interfaces behind the scenes that
the @Configuration model uses for adapter classes. The same model goes to
configuring transitions, states, and common configuration through a builder’s
methods. This means that whatever you can use with a normal
EnumStateMachineConfigurerAdapter or StateMachineConfigurerAdapter
you can use dynamically through a builder.
Currently, the builder.configureStates(), builder.configureTransitions(),
and builder.configureConfiguration() interface methods cannot be
chained together, meaning that builder methods need to be called individually.
|
The following example sets a number of options with a builder:
StateMachine<String, String> buildMachine2() throws Exception {
	Builder<String, String> builder = StateMachineBuilder.builder();
	builder.configureConfiguration()
		.withConfiguration()
			.autoStartup(false)
			.beanFactory(null)
			.listener(null);
	return builder.build();
}
You need to understand when common configuration needs
to be used with machines instantiated from a builder. You can use a configurer
returned from a withConfiguration() to setup autoStart and BeanFactory.
You can also use one to register a StateMachineListener. If a StateMachine
instance returned from a builder is registered as a bean by using @Bean, BeanFactory
is attached automatically. If you use instances outside of a spring application context,
you must use these methods to set up the needed facilities.
Using Deferred Events
When an event is sent, it may fire an EventTrigger, which may then cause
a transition to happen, if a state machine is in a state where a trigger is
evaluated successfully. Normally, this may lead to a situation where
an event is not accepted and is dropped. However, you may wish
postpone this event until a state machine enters another state. In that case,
you can accept that event. In other words, an event
arrives at an inconvenient time.
Spring Statemachine provides a mechanism for deferring events for later processing. Every state can have a list of deferred events. If an event in the current state’s deferred event list occurs, the event is saved (deferred) for future processing until a state is entered that does not list the event in its deferred event list. When such a state is entered, the state machine automatically recalls any saved events that are no longer deferred and then either consumes or discards these events. It is possible for a superstate to have a transition defined on an event that is deferred by a substate. Following same hierarchical state machines concepts, the substate takes precedence over the superstate, the event is deferred, and the transition for the superstate is not run. With orthogonal regions, where one orthogonal region defers an event and another accepts the event, the accept takes precedence and the event is consumed and not deferred.
The most obvious use case for event deferring is when an event causes a transition into a particular state and the state machine is then returned back to its original state where a second event should cause the same transition. The following example shows this situation:
@Configuration
@EnableStateMachine
static class Config5 extends StateMachineConfigurerAdapter<String, String> {

	@Override
	public void configure(StateMachineStateConfigurer<String, String> states)
			throws Exception {
		states
			.withStates()
				.initial("READY")
				.state("DEPLOYPREPARE", "DEPLOY")
				.state("DEPLOYEXECUTE", "DEPLOY");
	}

	@Override
	public void configure(StateMachineTransitionConfigurer<String, String> transitions)
			throws Exception {
		transitions
			.withExternal()
				.source("READY").target("DEPLOYPREPARE")
				.event("DEPLOY")
				.and()
			.withExternal()
				.source("DEPLOYPREPARE").target("DEPLOYEXECUTE")
				.and()
			.withExternal()
				.source("DEPLOYEXECUTE").target("READY");
	}
}
In the preceding example, the state machine has a state of READY, which indicates that the machine is
ready to process events that would take it into a DEPLOY state, where the
actual deployment would happen. After a deploy action has been run, the machine
is returned back to the READY state. Sending multiple events in a
READY state does not cause any trouble if the machine is using synchronous executors,
because event sending would block between event calls. However, if the executor uses
threads, other events may get lost, because the machine is no longer in a state where
events can be processed. Thus, deferring some of these events lets the machine
preserve them. The following example shows how to configure such an arrangement:
@Configuration
@EnableStateMachine
static class Config6 extends StateMachineConfigurerAdapter<String, String> {

	@Override
	public void configure(StateMachineStateConfigurer<String, String> states)
			throws Exception {
		states
			.withStates()
				.initial("READY")
				.state("DEPLOY", "DEPLOY")
				.state("DONE")
				.and()
				.withStates()
					.parent("DEPLOY")
					.initial("DEPLOYPREPARE")
					.state("DEPLOYPREPARE", "DONE")
					.state("DEPLOYEXECUTE");
	}

	@Override
	public void configure(StateMachineTransitionConfigurer<String, String> transitions)
			throws Exception {
		transitions
			.withExternal()
				.source("READY").target("DEPLOY")
				.event("DEPLOY")
				.and()
			.withExternal()
				.source("DEPLOYPREPARE").target("DEPLOYEXECUTE")
				.and()
			.withExternal()
				.source("DEPLOYEXECUTE").target("READY")
				.and()
			.withExternal()
				.source("READY").target("DONE")
				.event("DONE")
				.and()
			.withExternal()
				.source("DEPLOY").target("DONE")
				.event("DONE");
	}
}
In the preceding example, the state machine uses nested states instead of a flat
state model, so the DEPLOY event can be deferred directly in a substate.
It also shows the concept of deferring the DONE event in a
sub-state that would then override the anonymous transition between
the DEPLOY and DONE states if the state machine happens to be in a
DEPLOYPREPARE state when the DONE event is dispatched. In the
DEPLOYEXECUTE state when the DONE event is not deferred, this event would
be handled in a super state.
Using Scopes
Support for scopes in a state machine is very limited, but you can
enable session scope by using a normal Spring @Scope annotation in one of two ways:
-
If the state machine is built manually by using a builder and returned into the context as a
@Bean. -
Through a configuration adapter.
Both of
these need @Scope to be present, with scopeName set to
session and proxyMode set to ScopedProxyMode.TARGET_CLASS. The following examples
show both use cases:
@Configuration
public class Config3 {

	@Bean
	@Scope(scopeName="session", proxyMode=ScopedProxyMode.TARGET_CLASS)
	StateMachine<String, String> stateMachine() throws Exception {
		Builder<String, String> builder = StateMachineBuilder.builder();
		builder.configureConfiguration()
			.withConfiguration()
				.autoStartup(true);
		builder.configureStates()
			.withStates()
				.initial("S1")
				.state("S2");
		builder.configureTransitions()
			.withExternal()
				.source("S1")
				.target("S2")
				.event("E1");
		StateMachine<String, String> stateMachine = builder.build();
		return stateMachine;
	}

}
@Configuration
@EnableStateMachine
@Scope(scopeName="session", proxyMode=ScopedProxyMode.TARGET_CLASS)
public static class Config4 extends StateMachineConfigurerAdapter<String, String> {
@Override
public void configure(StateMachineConfigurationConfigurer<String, String> config) throws Exception {
config
.withConfiguration()
.autoStartup(true);
}
@Override
public void configure(StateMachineStateConfigurer<String, String> states) throws Exception {
states
.withStates()
.initial("S1")
.state("S2");
}
@Override
public void configure(StateMachineTransitionConfigurer<String, String> transitions) throws Exception {
transitions
.withExternal()
.source("S1")
.target("S2")
.event("E1");
}
}TIP:See Scope for how to use session scoping.
Once you have scoped a state machine into session, autowiring it into
a @Controller gives a new state machine instance per session.
Each state machine is then destroyed when HttpSession is invalidated.
The following example shows how to use a state machine in a controller:
@Controller
public class StateMachineController {

	@Autowired
	StateMachine<String, String> stateMachine;

	@RequestMapping(path="/state", method=RequestMethod.POST)
	public HttpEntity<Void> setState(@RequestParam("event") String event) {
		stateMachine
			.sendEvent(Mono.just(MessageBuilder
				.withPayload(event).build()))
			.subscribe();
		return new ResponseEntity<Void>(HttpStatus.ACCEPTED);
	}

	@RequestMapping(path="/state", method=RequestMethod.GET)
	@ResponseBody
	public String getState() {
		return stateMachine.getState().getId();
	}
}
Using state machines in a session scopes needs careful planning,
mostly because it is a relatively heavy component.
|
| Spring Statemachine poms have no dependencies to Spring MVC classes, which you will need to work with session scope. However, if you are working with a web application, you have already pulled those dependencies directly from Spring MVC or Spring Boot. |
Using Actions
Actions are one of the most useful components that you can use to interact and collaborate with a state machine. You can run actions in various places in a state machine and its states lifecycle — for example, entering or exiting states or during transitions. The following example shows how to use actions in a state machine:
@Override
public void configure(StateMachineStateConfigurer<States, Events> states)
		throws Exception {
	states
		.withStates()
			.initial(States.SI)
			.state(States.S1, action1(), action2())
			.state(States.S2, action1(), action2())
			.state(States.S3, action1(), action3());
}
In the preceding example, the action1 and action2 beans are attached to the entry and
exit states, respectively. The following example defines those actions (and action3):
@Bean
public Action<States, Events> action1() {
	return new Action<States, Events>() {

		@Override
		public void execute(StateContext<States, Events> context) {
		}
	};
}

@Bean
public BaseAction action2() {
	return new BaseAction();
}

@Bean
public SpelAction action3() {
	ExpressionParser parser = new SpelExpressionParser();
	return new SpelAction(
			parser.parseExpression(
					"stateMachine.sendEvent(T(org.springframework.statemachine.docs.Events).E1)"));
}

public class BaseAction implements Action<States, Events> {

	@Override
	public void execute(StateContext<States, Events> context) {
	}
}

public class SpelAction extends SpelExpressionAction<States, Events> {

	public SpelAction(Expression expression) {
		super(expression);
	}
}
You can directly implement Action as an anonymous function or create
your own implementation and define the appropriate implementation as a
bean.
In the preceding example, action3 uses a SpEL expression to send the Events.E1 event into
a state machine.
StateContext is described in Using StateContext.
|
SpEL Expressions with Actions
You can also use a SpEL expression as a replacement for a
full Action implementation.
Reactive Actions
Normal Action interface is a simple functional method taking StateContext
and returning void. There’s nothing blocking here until you block
in a method itself and this is a bit of a problem as framework cannot
know what’s exactly happening inside of it.
public interface Action<S, E> {
	void execute(StateContext<S, E> context);
}
To overcome this issue we’ve internally changed Action handling to
process a plain java’s Function taking StateContext and returning
Mono. This way we can call action and fully in a reactive way to
execute action only when it’s subscribed and in a non-blocking way
to wait completion.
public interface ReactiveAction<S, E> extends Function<StateContext<S, E>, Mono<Void>> {
}|
Internally old |
Using Guards
As shown in Things to Remember, the guard1 and guard2 beans are attached to the entry and
exit states, respectively.
The following example also uses guards on events:
@Override
public void configure(StateMachineTransitionConfigurer<States, Events> transitions)
		throws Exception {
	transitions
		.withExternal()
			.source(States.SI).target(States.S1)
			.event(Events.E1)
			.guard(guard1())
			.and()
		.withExternal()
			.source(States.S1).target(States.S2)
			.event(Events.E1)
			.guard(guard2())
			.and()
		.withExternal()
			.source(States.S2).target(States.S3)
			.event(Events.E2)
			.guardExpression("extendedState.variables.get('myvar')");
}
You can directly implement Guard as an anonymous function or create
your own implementation and define the appropriate implementation as a
bean. In the preceding example, guardExpression checkS whether the extended
state variable named myvar evaluates to TRUE.
The following example implements some sample guards:
@Bean
public Guard<States, Events> guard1() {
	return new Guard<States, Events>() {

		@Override
		public boolean evaluate(StateContext<States, Events> context) {
			return true;
		}
	};
}

@Bean
public BaseGuard guard2() {
	return new BaseGuard();
}

public class BaseGuard implements Guard<States, Events> {

	@Override
	public boolean evaluate(StateContext<States, Events> context) {
		return false;
	}
}
StateContext is described in section Using StateContext.
|
SpEL Expressions with Guards
You can also use a SpEL expression as a replacement for a
full Guard implementation. The only requirement is that the expression needs
to return a Boolean value to satisfy the Guard implementation. This can be
demonstrated with a guardExpression() function that takes an
expression as an argument.
Reactive Guards
Normal Guard interface is a simple functional method taking StateContext
and returning boolean. There’s nothing blocking here until you block
in a method itself and this is a bit of a problem as framework cannot
know what’s exactly happening inside of it.
public interface Guard<S, E> {
	boolean evaluate(StateContext<S, E> context);
}
To overcome this issue we’ve internally changed Guard handling to
process a plain java’s Function taking StateContext and returning
Mono<Boolean>. This way we can call guard and fully in a reactive way
to evaluate it only when it’s subscribed and in a non-blocking way
to wait completion with a return value.
public interface ReactiveGuard<S, E> extends Function<StateContext<S, E>, Mono<Boolean>> {
}|
Internally old |
Using Extended State
Assume that you need to create a state machine that tracks how many times a user is pressing a key on a keyboard and then terminates when keys are pressed 1000 times. A possible but really naive solution would be to create a new state for each 1000 key presses. You might suddenly have an astronomical number of states, which, naturally, is not very practical.
This is where extended state variables come to the rescue by not needing to add more states to drive state machine changes. Instead, you can do a simple variable change during a transition.
StateMachine has a method called getExtendedState(). It returns an
interface called ExtendedState, which gives access to extended state
variables. You can access these variables directly through a state machine or through
StateContext during a callback from actions or transitions.
The following example shows how to do so:
public Action<String, String> myVariableAction() {
	return new Action<String, String>() {

		@Override
		public void execute(StateContext<String, String> context) {
			context.getExtendedState()
				.getVariables().put("mykey", "myvalue");
		}
	};
}
If you need to get notified for extended state variable
changes, you have two options: either use StateMachineListener or
listen for extendedStateChanged(key, value) callbacks. The following example
uses the extendedStateChanged method:
public class ExtendedStateVariableListener
		extends StateMachineListenerAdapter<String, String> {

	@Override
	public void extendedStateChanged(Object key, Object value) {
		// do something with changed variable
	}
}
Alternatively, you can implement a Spring Application context listener for
OnExtendedStateChanged. As mentioned in Listening to State Machine Events,
you can also listen all StateMachineEvent events.
The following example uses onApplicationEvent to listen for state changes:
public class ExtendedStateVariableEventListener
		implements ApplicationListener<OnExtendedStateChanged> {

	@Override
	public void onApplicationEvent(OnExtendedStateChanged event) {
		// do something with changed variable
	}
}
Using StateContext
StateContext is one of the most important objects
when working with a state machine, as it is passed into various methods
and callbacks to give the current state of a state machine and
where it is possibly going. You can think of it as a
snapshot of the current state machine stage when
is when StateContext is retreived.
In Spring Statemachine 1.0.x, StateContext usage was relatively naive
in terms of how it was used to pass stuff around as a simple “POJO”.
Starting from Spring Statemachine 1.1.x, its role has been greatly
improved by making it a first class citizen in a state machine.
|
You can use StateContext to get access to the following:
-
The current
MessageorEvent(or theirMessageHeaders, if known). -
The state machine’s
Extended State. -
The
StateMachineitself. -
To possible state machine errors.
-
To the current
Transition, if applicable. -
The source state of the state machine.
-
The target state of the state machine.
-
The current
Stage, as described in Stages.
StateContext is passed into various components, such as
Action and Guard.
Stages
Stage is arepresentation of a stage on
which a state machine is currently interacting with a user. The currently available
stages are EVENT_NOT_ACCEPTED, EXTENDED_STATE_CHANGED,
STATE_CHANGED, STATE_ENTRY, STATE_EXIT, STATEMACHINE_ERROR,
STATEMACHINE_START, STATEMACHINE_STOP, TRANSITION,
TRANSITION_START, and TRANSITION_END. These states may look familiar, as
they match how you can interact with listeners (as described in
Listening to State Machine Events).
Triggering Transitions
Driving a state machine is done by using transitions, which are triggered
by triggers. The currently supported triggers are EventTrigger and
TimerTrigger.
Using EventTrigger
EventTrigger is the most useful trigger, because it lets you
directly interact with a state machine by sending events to it. These
events are also called signals. You can add a trigger to a transition
by associating a state with it during configuration.
The following example shows how to do so:
@Autowired
StateMachine<String, String> stateMachine;

void signalMachine() {
	stateMachine
		.sendEvent(Mono.just(MessageBuilder
			.withPayload("E1").build()))
		.subscribe();

	Message<String> message = MessageBuilder
			.withPayload("E2")
			.setHeader("foo", "bar")
			.build();
	stateMachine.sendEvent(Mono.just(message)).subscribe();
}
Whether you send one event or multiple events, result is always a sequence
of results. This is so because in a presence multiple reqions, results will
come back from multiple machines in those regions. This is shown
with method sendEventCollect which gives a list of results. Method
itself is a just a syntactic sugar collecting Flux as list. If there is
just one region, this list contains one result.
Message<String> message1 = MessageBuilder
	.withPayload("E1")
	.build();

Mono<List<StateMachineEventResult<String, String>>> results =
	stateMachine.sendEventCollect(Mono.just(message1));

results.subscribe();| Nothing happens until returned flux is subscribed. See more about it from StateMachineEventResult. |
The preceding example sends an events by constructing a Mono wrapping
a Message and subscribing into returned Flux of results. Message lets
us add arbitrary extra information to an event, which is then visible
to StateContext when (for example) you implement actions.
Message headers are generally passed on until machine runs to
completion for a specific event. For example if an event is causing
transition into a state A which have an anonymous transition into a
state B, original event is available for actions or guards in state
B.
|
It is also possible to send a Flux of messages instead of sending just
one with a Mono.
Message<String> message1 = MessageBuilder
	.withPayload("E1")
	.build();
Message<String> message2 = MessageBuilder
	.withPayload("E2")
	.build();

Flux<StateMachineEventResult<String, String>> results =
	stateMachine.sendEvents(Flux.just(message1, message2));

results.subscribe();
StateMachineEventResult
StateMachineEventResult contains more detailed information about a result
of a event sending. From this you can get a Region which handled an event,
Message itself and what was an actual ResultType. From ResultType you
can see if message was accepted, denied or deferred. Generally speaking when
subscribtion completes, events are passed into a machine.
Using TimerTrigger
TimerTrigger is useful when something needs to be triggered
automatically without any user interaction. Trigger is added to a
transition by associating a timer with it during a configuration.
Currently, there are two types of supported timers, one that fires continuously and one that fires once a source state is entered. The following example shows how to use the triggers:
@Configuration
@EnableStateMachine
public class Config2 extends StateMachineConfigurerAdapter<String, String> {

	@Override
	public void configure(StateMachineStateConfigurer<String, String> states)
			throws Exception {
		states
			.withStates()
				.initial("S1")
				.state("S2")
				.state("S3");
	}

	@Override
	public void configure(StateMachineTransitionConfigurer<String, String> transitions)
			throws Exception {
		transitions
			.withExternal()
				.source("S1").target("S2").event("E1")
				.and()
			.withExternal()
				.source("S1").target("S3").event("E2")
				.and()
			.withInternal()
				.source("S2")
				.action(timerAction())
				.timer(1000)
				.and()
			.withInternal()
				.source("S3")
				.action(timerAction())
				.timerOnce(1000);
	}

	@Bean
	public TimerAction timerAction() {
		return new TimerAction();
	}
}

public class TimerAction implements Action<String, String> {

	@Override
	public void execute(StateContext<String, String> context) {
		// do something in every 1 sec
	}
}
The preceding example has three states: S1, S2, and S3. We have a normal
external transition from S1 to S2 and from S1 to S3 with
events E1 and E2, respectively. The interesting parts
for working with TimerTrigger are when we define
internal transitions for source states S2 and S3.
For both transitions, we invoke the Action bean (timerAction), where
source state S2 uses timer and S3 uses timerOnce.
Values given are in milliseconds (1000 milliseconds, or one second, in both cases).
Once a state machine receives event E1, it does a transition
from S1 to S2 and the timer kicks in. When the state is S2,
TimerTrigger runs and causes a transition associated with that
state — in this case, the internal transition that has the
timerAction defined.
Once a state machine receives the E2, event it does a transition
from S1 to S3 and the timer kicks in. This timer is executed only once
after the state is entered (after a delay defined in a timer).
Behind the scenes, timers are simple triggers that may cause a
transition to happen. Defining a transition with a timer() keeps
firing triggers and causes transition only if the source state is active.
Transition with timerOnce() is a little different, as it
triggers only after a delay when a source state is actually entered.
|
Use timerOnce() if you want something to happen after a delay
exactly once when state is entered.
|
Listening to State Machine Events
There are use cases where you want to know what is happening with a state machine, react to something, or get logging details for debugging purposes. Spring Statemachine provides interfaces for adding listeners. These listeners then give an option to get callbacks when various state changes, actions, and so on happen.
You basically have two options: listen to Spring application context events or directly attach a listener to a state machine. Both of these basically provide the same information. One produces events as event classes, and the other produces callbacks via a listener interface. Both of these have pros and cons, which we discuss later.
Application Context Events
Application context events classes are OnTransitionStartEvent,
OnTransitionEvent, OnTransitionEndEvent, OnStateExitEvent,
OnStateEntryEvent, OnStateChangedEvent, OnStateMachineStart,
OnStateMachineStop, and others that extend the base event class,
StateMachineEvent. These can be used as is with a Spring
ApplicationListener.
StateMachine sends context events through StateMachineEventPublisher.
The default implementation is automatically created if a @Configuration
class is annotated with @EnableStateMachine.
The following example gets a StateMachineApplicationEventListener
from a bean defined in a @Configuration class:
public class StateMachineApplicationEventListener
		implements ApplicationListener<StateMachineEvent> {

	@Override
	public void onApplicationEvent(StateMachineEvent event) {
	}
}

@Configuration
public class ListenerConfig {

	@Bean
	public StateMachineApplicationEventListener contextListener() {
		return new StateMachineApplicationEventListener();
	}
}
Context events are also automatically enabled by using @EnableStateMachine,
with StateMachine used to build a machine and registered as a bean,
as the following example shows:
@Configuration
@EnableStateMachine
public class ManualBuilderConfig {

	@Bean
	public StateMachine<String, String> stateMachine() throws Exception {

		Builder<String, String> builder = StateMachineBuilder.builder();
		builder.configureStates()
			.withStates()
				.initial("S1")
				.state("S2");
		builder.configureTransitions()
			.withExternal()
				.source("S1")
				.target("S2")
				.event("E1");
		return builder.build();
	}
}
Using StateMachineListener
By using StateMachineListener, you can either extend it and
implement all callback methods or use the StateMachineListenerAdapter
class, which contains stub method implementations and choose which ones
to override.
The following example uses the latter approach:
public class StateMachineEventListener
		extends StateMachineListenerAdapter<States, Events> {

	@Override
	public void stateChanged(State<States, Events> from, State<States, Events> to) {
	}

	@Override
	public void stateEntered(State<States, Events> state) {
	}

	@Override
	public void stateExited(State<States, Events> state) {
	}

	@Override
	public void transition(Transition<States, Events> transition) {
	}

	@Override
	public void transitionStarted(Transition<States, Events> transition) {
	}

	@Override
	public void transitionEnded(Transition<States, Events> transition) {
	}

	@Override
	public void stateMachineStarted(StateMachine<States, Events> stateMachine) {
	}

	@Override
	public void stateMachineStopped(StateMachine<States, Events> stateMachine) {
	}

	@Override
	public void eventNotAccepted(Message<Events> event) {
	}

	@Override
	public void extendedStateChanged(Object key, Object value) {
	}

	@Override
	public void stateMachineError(StateMachine<States, Events> stateMachine, Exception exception) {
	}

	@Override
	public void stateContext(StateContext<States, Events> stateContext) {
	}
}
In the preceding example, we created our own listener class
(StateMachineEventListener) that extends
StateMachineListenerAdapter.
The stateContext listener method gives access to various
StateContext changes on a different stages. You can find more about about it in
Using StateContext.
Once you have defined your own listener, you can registered it in a
state machine by using the addStateListener method. It is a matter of
flavor whether to hook it up within a spring configuration or do it
manually at any time during the application life-cycle.
The following example shows how to attach a listener:
public class Config7 {

	@Autowired
	StateMachine<States, Events> stateMachine;

	@Bean
	public StateMachineEventListener stateMachineEventListener() {
		StateMachineEventListener listener = new StateMachineEventListener();
		stateMachine.addStateListener(listener);
		return listener;
	}

}
Limitations and Problems
Spring application context is not the fastest event bus out there, so we
advise giving some thought to the rate of events the state machine
sends. For better performance, it may be better to use the
StateMachineListener interface. For this specific reason,
you can use the contextEvents flag with @EnableStateMachine and
@EnableStateMachineFactory to disable Spring application context
events, as shown in the preceding section.
The following example shows how to disable Spring application context events:
@Configuration
@EnableStateMachine(contextEvents = false)
public class Config8
		extends EnumStateMachineConfigurerAdapter<States, Events> {
}

@Configuration
@EnableStateMachineFactory(contextEvents = false)
public class Config9
		extends EnumStateMachineConfigurerAdapter<States, Events> {
}
Context Integration
It is a little limited to do interaction with a state machine by either listening to its events or using actions with states and transitions. From time to time, this approach is going be too limited and verbose to create interaction with the application with which a state machine works. For this specific use case, we have made a Spring-style context integration that easily inserts state machine functionality into your beans.
The available annotations has been harmonized to enable access to the same state machine execution points that are available from Listening to State Machine Events.
You can use the @WithStateMachine annotation to associate a state
machine with an existing bean. Then you can start adding
supported annotations to the methods of that bean.
The following example shows how to do so:
@WithStateMachine
public class Bean1 {

	@OnTransition
	public void anyTransition() {
	}
}
You can also attach any other state machine from an
application context by using the annotation name field.
The following example shows how to do so:
@WithStateMachine(name = "myMachineBeanName")
public class Bean2 {

	@OnTransition
	public void anyTransition() {
	}
}
Sometimes, it is more convenient to use machine id, which is something
you can set to better identify multiple instances. This ID maps to
the getId() method in the StateMachine interface.
The following example shows how to use it:
@WithStateMachine(id = "myMachineId")
public class Bean16 {

	@OnTransition
	public void anyTransition() {
	}
}
You can also use @WithStateMachine as a meta-annotation, as shown
in the preceding example. In this case, you could annotate your bean with WithMyBean.
The following example shows how to do so:
@Target(ElementType.TYPE)
@Retention(RetentionPolicy.RUNTIME)
@WithStateMachine(name = "myMachineBeanName")
public @interface WithMyBean {
}| The return type of these methods does not matter and is effectively discarded. |
Enabling Integration
You can enable all the features of @WithStateMachine by using
the @EnableWithStateMachine annotation, which imports the needed
configuration into the Spring Application Context. Both
@EnableStateMachine and @EnableStateMachineFactory are already
annotated with this annotation, so there is no need to add it again.
However, if a machine is built and configured without
configuration adapters, you must use @EnableWithStateMachine
to use these features with @WithStateMachine.
The following example shows how to do so:
public static StateMachine<String, String> buildMachine(BeanFactory beanFactory) throws Exception {
	Builder<String, String> builder = StateMachineBuilder.builder();

	builder.configureConfiguration()
		.withConfiguration()
			.machineId("myMachineId")
			.beanFactory(beanFactory);

	builder.configureStates()
		.withStates()
			.initial("S1")
			.state("S2");

	builder.configureTransitions()
		.withExternal()
			.source("S1")
			.target("S2")
			.event("E1");

	return builder.build();
}

@WithStateMachine(id = "myMachineId")
static class Bean17 {

	@OnStateChanged
	public void onStateChanged() {
	}
}
If a machine is not created as a bean, you need to set
BeanFactory for a machine, as shown in the prededing example. Otherwise, tge machine is
unaware of handlers that call your @WithStateMachine methods.
|
Method Parameters
Every annotation support exactly the same set of possible method
parameters, but runtime behavior differs, depending on the
annotation itself and the stage in which the annotated method is called. To
better understand how context works, see
Using StateContext.
| For differences between method parameters, see the sections that desdribe the individual annotation, later in this document. |
Effectively, all annotated methods are called by using Spring SPel
expressions, which are built dynamically during the process. To make
this work, these expressions needs to have a root object (against which they evaluate).
This root object is a StateContext. We have also made some
tweaks internally so that it is possible to access StateContext methods
directly without going through the context handle.
The simplest method parameter is a StateContext itself.
The following example shows how to use it:
@WithStateMachine
public class Bean3 {

	@OnTransition
	public void anyTransition(StateContext<String, String> stateContext) {
	}
}
You can access the rest of the StateContext content.
The number and order of the parameters does not matter.
The following example shows how to access the various parts of the StateContext content:
@WithStateMachine
public class Bean4 {

	@OnTransition
	public void anyTransition(
			@EventHeaders Map<String, Object> headers,
			@EventHeader("myheader1") Object myheader1,
			@EventHeader(name = "myheader2", required = false) String myheader2,
			ExtendedState extendedState,
			StateMachine<String, String> stateMachine,
			Message<String> message,
			Exception e) {
	}
}
Instead of getting all event headers with @EventHeaders, you can use
@EventHeader, which can bound to a single header.
|
Transition Annotations
The annotations for transitions are @OnTransition, @OnTransitionStart,
and @OnTransitionEnd.
These annotations behave exactly the same. To show how they work, we show
how @OnTransition is used. Within this annotation, a property’s
you can use source and target to qualify a transition. If
source and target are left empty, any transition is matched.
The following example shows how to use the @OnTransition annotation
(remember that @OnTransitionStart and @OnTransitionEnd work the same way):
@WithStateMachine
public class Bean5 {

	@OnTransition(source = "S1", target = "S2")
	public void fromS1ToS2() {
	}

	@OnTransition
	public void anyTransition() {
	}
}
By default, you cannot use the @OnTransition annotation with a state and
event enumerations that you have created, due to Java language limitations.
For this reason, you need to use string representations.
Additionally, you can access Event Headers and
ExtendedState by adding the needed arguments to a method. The method
is then called automatically with these arguments.
The following example shows how to do so:
@WithStateMachine
public class Bean6 {

	@StatesOnTransition(source = States.S1, target = States.S2)
	public void fromS1ToS2(@EventHeaders Map<String, Object> headers, ExtendedState extendedState) {
	}
}
However, if you want to have a type-safe annotation, you can
create a new annotation and use @OnTransition as a meta-annotation.
This user-level annotation can make references to actual states and
events enumerations, and the framework tries to match these in the same way.
The following example shows how to do so:
@Target(ElementType.METHOD)
@Retention(RetentionPolicy.RUNTIME)
@OnTransition
public @interface StatesOnTransition {

	States[] source() default {};

	States[] target() default {};
}
In the preceding example, we created a @StatesOnTransition annotation that defines
source and target in a type-safe manner.
The following example uses that annotation in a bean:
@WithStateMachine
public class Bean7 {

	@StatesOnTransition(source = States.S1, target = States.S2)
	public void fromS1ToS2() {
	}
}
State Annotations
The following annotations for states are available: @OnStateChanged, @OnStateEntry, and
@OnStateExit. The following example shows how to use OnStateChanged annotation (the
other two work the same way):
@WithStateMachine
public class Bean8 {

	@OnStateChanged
	public void anyStateChange() {
	}
}
As you can with Transition Annotations, you can define target and source states. The following example shows how to do so:
@WithStateMachine
public class Bean9 {

	@OnStateChanged(source = "S1", target = "S2")
	public void stateChangeFromS1toS2() {
	}
}
For type safety, new annotations need to be created for enumerations by using
@OnStateChanged as a meta-annotation. The following examples show how to do so:
@Target(ElementType.METHOD)
@Retention(RetentionPolicy.RUNTIME)
@OnStateChanged
public @interface StatesOnStates {

	States[] source() default {};

	States[] target() default {};
}
@WithStateMachine
public class Bean10 {
@StatesOnStates(source = States.S1, target = States.S2)
public void fromS1ToS2() {
}
}The methods for state entry and exit behave in the same way, as the following example shows:
@WithStateMachine
public class Bean11 {

	@OnStateEntry
	public void anyStateEntry() {
	}

	@OnStateExit
	public void anyStateExit() {
	}
}
Event Annotation
There is one event-related annotation. It is named @OnEventNotAccepted.
If you specify the event property, you can listen for a specific event not being
accepted. If you do not specify an event, you can list for any event not being
accepted. The following example shows both ways to use the @OnEventNotAccepted
annotation:
@WithStateMachine
public class Bean12 {

	@OnEventNotAccepted
	public void anyEventNotAccepted() {
	}

	@OnEventNotAccepted(event = "E1")
	public void e1EventNotAccepted() {
	}
}
State Machine Annotations
The following annotations are available for a state machine: @OnStateMachineStart,
@OnStateMachineStop, and @OnStateMachineError.
During a state machine’s start and stop, lifecycle methods are called.
The following example shows how to use @OnStateMachineStart and
@OnStateMachineStop to listen to these events:
@WithStateMachine
public class Bean13 {

	@OnStateMachineStart
	public void onStateMachineStart() {
	}

	@OnStateMachineStop
	public void onStateMachineStop() {
	}
}
If a state machine goes into an error with exception, @OnStateMachineStop
annotation is called. The following example shows how to use it:
@WithStateMachine
public class Bean14 {

	@OnStateMachineError
	public void onStateMachineError() {
	}
}
Extended State Annotation
There is one extended state-related annotation. It is named
@OnExtendedStateChanged. You can also listen to changes only
for specific key changes. The following example shows how to use the
@OnExtendedStateChanged, both with and without a key property:
@WithStateMachine
public class Bean15 {

	@OnExtendedStateChanged
	public void anyStateChange() {
	}

	@OnExtendedStateChanged(key = "key1")
	public void key1Changed() {
	}
}
Using StateMachineAccessor
StateMachine is the main interface for communicating with a state machine.
From time to time, you may need to get more dynamic and
programmatic access to internal structures of a state machine and its
nested machines and regions. For these use cases, StateMachine
exposes a functional interface called StateMachineAccessor, which provides
an interface to get access to individual StateMachine and
Region instances.
StateMachineFunction is a simple functional interface that lets
you apply the StateMachineAccess interface to a state machine. With
JDK 7, these create code that is a little verbose code. However, with JDK 8 lambdas,
the doce is relatively non-verbose.
The doWithAllRegions method gives access to all Region instances in
a state machine. The following example shows how to use it:
stateMachine.getStateMachineAccessor().doWithAllRegions(function -> function.setRelay(stateMachine));

stateMachine.getStateMachineAccessor()
	.doWithAllRegions(access -> access.setRelay(stateMachine));
The doWithRegion method gives access to single Region instance in a
state machine. The following example shows how to use it:
stateMachine.getStateMachineAccessor().doWithRegion(function -> function.setRelay(stateMachine));

stateMachine.getStateMachineAccessor()
	.doWithRegion(access -> access.setRelay(stateMachine));
The withAllRegions method gives access to all of the Region instances in
a state machine. The following example shows how to use it:
for (StateMachineAccess<String, String> access : stateMachine.getStateMachineAccessor().withAllRegions()) {
	access.setRelay(stateMachine);
}

stateMachine.getStateMachineAccessor().withAllRegions()
	.stream().forEach(access -> access.setRelay(stateMachine));
The withRegion method gives access to single Region instance in a
state machine. The following example shows how to use it:
stateMachine.getStateMachineAccessor()
	.withRegion().setRelay(stateMachine);
Using StateMachineInterceptor
Instead of using a StateMachineListener interface, you can
use a StateMachineInterceptor. One conceptual difference is that you can use an
interceptor to intercept and stop a current state
change or change its transition logic. Instead of implementing a full interface,
you can use an adapter class called StateMachineInterceptorAdapter to override
the default no-op methods.
You can register an interceptor through StateMachineAccessor. The concept of
an interceptor is a relatively deep internal feature and, thus, is not
exposed directly through the StateMachine interface.
The following example shows how to add a StateMachineInterceptor and override selected
methods:
stateMachine.getStateMachineAccessor()
	.withRegion().addStateMachineInterceptor(new StateMachineInterceptor<String, String>() {

		@Override
		public Message<String> preEvent(Message<String> message, StateMachine<String, String> stateMachine) {
			return message;
		}

		@Override
		public StateContext<String, String> preTransition(StateContext<String, String> stateContext) {
			return stateContext;
		}

		@Override
		public void preStateChange(State<String, String> state, Message<String> message,
				Transition<String, String> transition, StateMachine<String, String> stateMachine,
				StateMachine<String, String> rootStateMachine) {
		}

		@Override
		public StateContext<String, String> postTransition(StateContext<String, String> stateContext) {
			return stateContext;
		}

		@Override
		public void postStateChange(State<String, String> state, Message<String> message,
				Transition<String, String> transition, StateMachine<String, String> stateMachine,
				StateMachine<String, String> rootStateMachine) {
		}

		@Override
		public Exception stateMachineError(StateMachine<String, String> stateMachine,
				Exception exception) {
			return exception;
		}
});| For more about the error handling shown in preceding example, see State Machine Error Handling. |
State Machine Security
Security features are built atop of functionality from Spring Security. Security features are handy when it is required to protect part of a state machine execution and interaction with it.
| We expect you to be fairly familiar with Spring Security, meaning that we do not go into details of how the overall security framework works. For this information, you should read the Spring Security reference documentation (available here). |
The first level of defense with security is naturally protecting events, which really drive what is going to happen in a state machine. You can then define more fine-grained security settings for transitions and actions. This parallel to giving an employee access to a building and then giving access to specific rooms within the building and even the ability to turn on and off the lights in specific rooms. If you trust your users, event security may be all you need. If not, you need to apply more detailed security.
You can find more detailed information in Understanding Security.
| For a complete example, see the Security sample. |
Configuring Security
All generic configurations for security are done in
SecurityConfigurer, which is obtained from
StateMachineConfigurationConfigurer. By default, security is disabled,
even if Spring Security classes are
present. The following example shows how to enable security:
@Configuration
@EnableStateMachine
static class Config4 extends StateMachineConfigurerAdapter<String, String> {

	@Override
	public void configure(StateMachineConfigurationConfigurer<String, String> config)
			throws Exception {
		config
			.withSecurity()
				.enabled(true)
				.transitionAccessDecisionManager(null)
				.eventAccessDecisionManager(null);
	}
}
If you absolutely need to, you can customize AccessDecisionManager for both events and
transitions. If you do not define decision managers or
set them to null, default managers are created internally.
Securing Events
Event security is defined on a global level by a SecurityConfigurer.
The following example shows how to enable event security:
@Configuration
@EnableStateMachine
static class Config1 extends StateMachineConfigurerAdapter<String, String> {

	@Override
	public void configure(StateMachineConfigurationConfigurer<String, String> config)
			throws Exception {
		config
			.withSecurity()
				.enabled(true)
				.event("true")
				.event("ROLE_ANONYMOUS", ComparisonType.ANY);
	}
}
In the preceding configuration example, we use an expression of true, which always evaluates
to TRUE. Using an expression that always evaluates to TRUE
would not make sense in a real application but shows the point that
expression needs to return either TRUE or FALSE. We also defined an
attribute of ROLE_ANONYMOUS and a ComparisonType of ANY. For more about using attributes
and expressions, see Using Security Attributes and Expressions.
Securing Transitions
You can define transition security globally, as the following example shows.
@Configuration
@EnableStateMachine
static class Config6 extends StateMachineConfigurerAdapter<String, String> {

	@Override
	public void configure(StateMachineConfigurationConfigurer<String, String> config)
			throws Exception {
		config
			.withSecurity()
				.enabled(true)
				.transition("true")
				.transition("ROLE_ANONYMOUS", ComparisonType.ANY);
	}
}
If security is defined in a transition itself, it override any globally set security. The following example shows how to do so:
@Configuration
@EnableStateMachine
static class Config2 extends StateMachineConfigurerAdapter<String, String> {

	@Override
	public void configure(StateMachineTransitionConfigurer<String, String> transitions)
			throws Exception {
		transitions
			.withExternal()
				.source("S0")
				.target("S1")
				.event("A")
				.secured("ROLE_ANONYMOUS", ComparisonType.ANY)
				.secured("hasTarget('S1')");
	}
}
For more about using attributes and expressions, see Using Security Attributes and Expressions.
Securing Actions
There are no dedicated security definitions for actions in a state
machine, but you can secure actions by using a global method security
from Spring Security. This requires that an Action be
defined as a proxied @Bean and its execute method be annotated with
@Secured. The following example shows how to do so:
@Configuration
@EnableStateMachine
static class Config3 extends StateMachineConfigurerAdapter<String, String> {

	@Override
	public void configure(StateMachineConfigurationConfigurer<String, String> config)
			throws Exception {
		config
			.withSecurity()
				.enabled(true);
	}

	@Override
	public void configure(StateMachineStateConfigurer<String, String> states)
			throws Exception {
		states
			.withStates()
				.initial("S0")
				.state("S1");
	}

	@Override
	public void configure(StateMachineTransitionConfigurer<String, String> transitions)
			throws Exception {
		transitions
			.withExternal()
				.source("S0")
				.target("S1")
				.action(securedAction())
				.event("A");
	}

	@Scope(proxyMode = ScopedProxyMode.TARGET_CLASS)
	@Bean
	public Action<String, String> securedAction() {
		return new Action<String, String>() {

			@Secured("ROLE_ANONYMOUS")
			@Override
			public void execute(StateContext<String, String> context) {
			}
		};
	}

}
Global method security needs to be enabled with Spring Security. The following example shows how to do so:
@Configuration
@EnableGlobalMethodSecurity(securedEnabled = true)
public static class Config5 extends WebSecurityConfigurerAdapter {

	@Autowired
	public void configureGlobal(AuthenticationManagerBuilder auth) throws Exception {
		auth
			.inMemoryAuthentication()
				.withUser("user").password("password").roles("USER");
	}
}
See the Spring Security reference guide (available here) for more detail.
Using Security Attributes and Expressions
Generally, you can define security properties in either of two ways: by using security attributes and by using security expressions. Attributes are easier to use but are relatively limited in terms of functionality. Expressions provide more features but are a little bit harder to use.
Generic Attribute Usage
By default, AccessDecisionManager instances for events and
transitions both use a RoleVoter, meaning you can use role attributes
from Spring Security.
For attributes, we have three different comparison types: ANY, ALL, and
MAJORITY. These comparison types map onto default access decision managers
(AffirmativeBased, UnanimousBased, and ConsensusBased, respectively).
If you have defined a custom AccessDecisionManager, the comparison type is
effectively discarded, as it is used only to create a default manager.
Generic Expression Usage
Security expressions must return either TRUE or FALSE.
The base class for the expression root objects is
SecurityExpressionRoot. It provides some common expressions, which
are available in both transition and event security. The following table
describes the most often used built-in expressions:
| Expression | Description |
|---|---|
|
Returns |
|
Returns |
|
Returns |
|
Returns |
|
Allows direct access to the principal object that represents the current user. |
|
Allows direct access to the current |
|
Always evaluates to |
|
Always evaluates to |
|
Returns |
|
Returns |
|
Returns |
|
Returns |
|
Returns |
|
Returns |
Event Attributes
You can match an event ID by using a prefix of EVENT_. For example, matching
event A would match an attribute of EVENT_A.
Event Expressions
The base class for the expression root object for events is
EventSecurityExpressionRoot. It provides access to a Message
object, which is passed around with eventing. EventSecurityExpressionRoot
has only one method, which the following table describes:
| Expression | Description |
|---|---|
|
Returns |
Transition Attributes
When matching transition sources and targets, you can use the
TRANSITION_SOURCE_ and TRANSITION_TARGET_ prefixes respectively.
Transition Expressions
The base class for the expression root object for transitions is
TransitionSecurityExpressionRoot. It provides access to a
Transition
object, which is passed around for transition changes.
TransitionSecurityExpressionRoot has two methods, which the following
table describes:
| Expression | Description |
|---|---|
|
Returns |
|
Returns |
Understanding Security
This section provides more detailed information about how security works within a state machine. You may not really need to know, but it is always better to be transparent instead of hiding all the magic what happens behind the scenes.
Security makes sense only if Spring Statemachine runs in a walled
garden where user have no direct access to the application and could consequently
modify Spring Security’s SecurityContext hold in a local thread.
If the user controls the JVM, then effectively there is no security
at all.
|
The integration point for security is created with a
StateMachineInterceptor, which is then automatically added into a
state machine if security is enabled. The specific class is
StateMachineSecurityInterceptor, which intercepts events and
transitions. This interceptor then consults Spring Security’s
AccessDecisionManager to determine whether an event can be sent or whether a transition can be
executed. Effectively, if a decision or a vote with a AccessDecisionManager
results in an exception, the event or transition is denied.
Due to how AccessDecisionManager from Spring Security works, we
need one instance of it per secured object. This is one reason why there
are different managers for events and transitions. In this case, events
and transitions are different class objects that we secure.
By default, for events, voters (EventExpressionVoter, EventVoter, and
RoleVoter) are added into an AccessDecisionManager.
By default, for transitions, voters (TransitionExpressionVoter,
TransitionVoter, and RoleVoter) are added into an AccessDecisionManager.
State Machine Error Handling
If a state machine detects an internal error during a state transition logic, it may throw an exception. Before this exception is processed internally, you are given a chance to intercept.
Normally, you can use StateMachineInterceptor to intercept errors and the
following listing shows an example of it:
StateMachine<String, String> stateMachine;

void addInterceptor() {
	stateMachine.getStateMachineAccessor()
			.doWithRegion(function ->
				function.addStateMachineInterceptor(new StateMachineInterceptorAdapter<String, String>() {
					@Override
					public Exception stateMachineError(StateMachine<String, String> stateMachine,
													   Exception exception) {
						return exception;
					}
				})
			);

}
When errors are detected, the normal event notify mechanism is executed.
This lets you use either a StateMachineListener or a Spring Application
context event listener. For more about these, see
Listening to State Machine Events.
Having said that, the following example shows a simple listener:
public class ErrorStateMachineListener
		extends StateMachineListenerAdapter<String, String> {

	@Override
	public void stateMachineError(StateMachine<String, String> stateMachine, Exception exception) {
		// do something with error
	}
}
The following example shows a generic ApplicationListener checking StateMachineEvent:
public class GenericApplicationEventListener
		implements ApplicationListener<StateMachineEvent> {

	@Override
	public void onApplicationEvent(StateMachineEvent event) {
		if (event instanceof OnStateMachineError) {
			// do something with error
		}
	}
}
You can also directly define ApplicationListener to
recognize only StateMachineEvent instances, as the following example shows:
public class ErrorApplicationEventListener
		implements ApplicationListener<OnStateMachineError> {

	@Override
	public void onApplicationEvent(OnStateMachineError event) {
		// do something with error
	}
}| Actions defined for transitions also have their own error handling logic. See Transition Action Error Handling. |
With a reactive api’s it is possible to get Action execution error
back from a StateMachineEventResult. Having simple machine which
errors within action transitioning into state S1.
@Configuration
@EnableStateMachine
static class Config1 extends StateMachineConfigurerAdapter<String, String> {

	@Override
	public void configure(StateMachineStateConfigurer<String, String> states) throws Exception {
		states
			.withStates()
				.initial("SI")
				.stateEntry("S1", (context) -> {
					throw new RuntimeException("example error");
				});
	}

	@Override
	public void configure(StateMachineTransitionConfigurer<String, String> transitions) throws Exception {
		transitions
			.withExternal()
				.source("SI")
				.target("S1")
				.event("E1");
	}
}
Below test concept shows how possible error can be consumed from a StateMachineEventResult.
@Autowired
private StateMachine<String, String> machine;

@Test
public void testActionEntryErrorWithEvent() throws Exception {
	StepVerifier.create(machine.startReactively()).verifyComplete();
	assertThat(machine.getState().getIds()).containsExactlyInAnyOrder("SI");

	StepVerifier.create(machine.sendEvent(Mono.just(MessageBuilder.withPayload("E1").build())))
		.consumeNextWith(result -> {
			StepVerifier.create(result.complete()).consumeErrorWith(e -> {
				assertThat(e).isInstanceOf(StateMachineException.class).hasMessageContaining("example error");
			}).verify();
		})
		.verifyComplete();

	assertThat(machine.getState().getIds()).containsExactlyInAnyOrder("S1");
}| Error in entry/exit actions will not prevent transition to happen. |
State Machine Services
StateMachine services are higher-level implementations meant to
provide more user-level functionalities to ease normal runtime
operations. Currently, only one service interface
(StateMachineService) exists.
Persisting a State Machine
Traditionally, an instance of a state machine is used as is within a running program. You can achieve more dynamic behavior by using dynamic builders and factories, which allows state machine instantiation on-demand. Building an instance of a state machine is a relatively heavy operation. Consequently, if you need to (for example) handle an arbitrary state change in a database by using a state machine, you need to find a better and faster way to do it.
The persist feature lets you save a state of a state machine into an external repository and later reset a state machine based off the serialized state. For example, if you have a database table keeping orders, it would be way too expensive to update an order state with a state machine if a new instance would need to be built for every change. The persist feature lets you reset a state machine state without instantiating a new state machine instance.
| There is one recipe (see Persist) and one sample (see Persist) that provide more info about persisting states. |
While you can build a custom persistence feature by using a
StateMachineListener, it has one conceptual problem. When a listener
notifies about a change of state, the state change has already happened. If a
custom persistent method within a listener fails to update the serialized
state in an external repository, the state in a state machine and the state in
an external repository are then in an inconsistent state.
You can instead use a state machine interceptor to try to save the
serialized state into external storage during the state
change within a state machine. If this interceptor callback fails,
you can halt the state change attempt and, instead of ending in an
inconsistent state, you can then handle this error manually. See
Using StateMachineInterceptor for how to use interceptors.
Using StateMachineContext
You cannot persist a StateMachine by using normal java
serialization, as the object graph is too rich and contains too many
dependencies on other Spring context classes. StateMachineContext
is a runtime representation of a state machine that you can use to
restore an existing machine into a state represented by a particular
StateMachineContext object.
StateMachineContext contains two different ways to include information
for a child context. These are generally used when a machine contains
orthogonal regions. First, a context can have a list of child contexts
that can be used as is if they exist. Second, you can
include a list of references that are used if raw context children
are not in place. These child references are really the only way to
persist a machine where multiple parallel regions are running
independently.
| The Data Multi Persist sample shows how you can persist parallel regions. |
Using StateMachinePersister
Building a StateMachineContext and then restoring a state machine
from it has always been a little bit of “black magic” if done
manually. The StateMachinePersister interface aims to ease these
operations by providing persist and restore methods. The default
implementation of this interface is DefaultStateMachinePersister.
We can show how to use a StateMachinePersister by following
a snippets from tests. We start by creating two similar configurations
(machine1 and machine2) for a state machine. Note that we could build different
machines for this demonstration in other ways but this way
works for this case. The following example configures the two state machines:
@Configuration
@EnableStateMachine(name = "machine1")
static class Config1 extends Config {
}

@Configuration
@EnableStateMachine(name = "machine2")
static class Config2 extends Config {
}

static class Config extends StateMachineConfigurerAdapter<String, String> {

	@Override
	public void configure(StateMachineStateConfigurer<String, String> states) throws Exception {
		states
			.withStates()
				.initial("S1")
				.state("S1")
				.state("S2");
	}

	@Override
	public void configure(StateMachineTransitionConfigurer<String, String> transitions) throws Exception {
		transitions
			.withExternal()
				.source("S1")
				.target("S2")
				.event("E1");
	}
}
As we are using a StateMachinePersist object, we can create an in-memory
implementation.
| This in-memory sample is only for demonstration purposes. For real applications, you should use a real persistent storage implementation. |
The following listing shows how to use the in-memory sample:
static class InMemoryStateMachinePersist implements StateMachinePersist<String, String, String> {

	private final HashMap<String, StateMachineContext<String, String>> contexts = new HashMap<>();

	@Override
	public void write(StateMachineContext<String, String> context, String contextObj) throws Exception {
		contexts.put(contextObj, context);
	}

	@Override
	public StateMachineContext<String, String> read(String contextObj) throws Exception {
		return contexts.get(contextObj);
	}
}
After we have instantiated the two different machines, we can transfer
machine1 into state S2 through event E1. Then we can persist it and restore
machine2. The following example shows how to do so:
InMemoryStateMachinePersist stateMachinePersist = new InMemoryStateMachinePersist();
StateMachinePersister<String, String, String> persister = new DefaultStateMachinePersister<>(stateMachinePersist);

StateMachine<String, String> stateMachine1 = context.getBean("machine1", StateMachine.class);
StateMachine<String, String> stateMachine2 = context.getBean("machine2", StateMachine.class);
stateMachine1.startReactively().block();

stateMachine1
	.sendEvent(Mono.just(MessageBuilder
		.withPayload("E1").build()))
	.blockLast();
assertThat(stateMachine1.getState().getIds()).containsExactly("S2");

persister.persist(stateMachine1, "myid");
persister.restore(stateMachine2, "myid");
assertThat(stateMachine2.getState().getIds()).containsExactly("S2");
Using Redis
RepositoryStateMachinePersist (which implements
StateMachinePersist) offers support for persisting a state machine into Redis.
The specific implementation is a
RedisStateMachineContextRepository, which uses kryo serialization to
persist a StateMachineContext into Redis.
For StateMachinePersister, we have a Redis-related
RedisStateMachinePersister implementation, which takes an instance of
a StateMachinePersist and uses String as its context object.
| See the Event Service sample for detailed usage. |
RedisStateMachineContextRepository needs a
RedisConnectionFactory for it to work. We recommend using a
JedisConnectionFactory for it, as the preceding example shows.
Using StateMachineRuntimePersister
StateMachineRuntimePersister is a simple extension to
StateMachinePersist that adds an interface-level method to get
StateMachineInterceptor associated with it. This interceptor is then
required to persist a machine during state changes without needing to
stop and start a machine.
Currently, there are implementations for this interface for the
supported Spring Data Repositories. These implementations are
JpaPersistingStateMachineInterceptor, MongoDbPersistingStateMachineInterceptor,
and RedisPersistingStateMachineInterceptor.
| See the Data Persist sample for detailed usage. |
Spring Boot Support
The auto-configuration module (spring-statemachine-autoconfigure) contains all
the logic for integrating with Spring Boot, which provides functionality for
auto-configuration and actuators. All you need is to have this Spring Statemachine
library as part of a boot application.
Monitoring and Tracing
BootStateMachineMonitor is created automatically and associated with
a state machine. BootStateMachineMonitor is a custom StateMachineMonitor
implementation that integrates with Spring Boot’s MeterRegistry and endpoints
through a custom StateMachineTraceRepository. Optionally, you can disable this auto-configuration
by setting the spring.statemachine.monitor.enabled key to
false. The
Monitoring sample shows how to use this auto-configuration.
Repository Config
If the required classes are found from the classpath, Spring Data Repositories and entity class scanning is automatically auto-configured for Repository Support.
The currently supported configurations are JPA, Redis, and
MongoDB. You can disable repository auto-configuration by using the
spring.statemachine.data.jpa.repositories.enabled,
spring.statemachine.data.redis.repositories.enabled and
spring.statemachine.data.mongo.repositories.enabled properties, respectively.
Monitoring a State Machine
You can use StateMachineMonitor to get more information about the
durations of how long transitions and actions take to execute. The following listing
shows how this interface is implemented.
public class TestStateMachineMonitor extends AbstractStateMachineMonitor<String, String> {

	@Override
	public void transition(StateMachine<String, String> stateMachine, Transition<String, String> transition,
			long duration) {
	}

	@Override
	public void action(StateMachine<String, String> stateMachine,
			Function<StateContext<String, String>, Mono<Void>> action, long duration) {
	}
}
Once you have a StateMachineMonitor implementation, you can add it to
a state machine through configuration, as the following example shows:
@Configuration
@EnableStateMachine
public class Config1 extends StateMachineConfigurerAdapter<String, String> {

	@Override
	public void configure(StateMachineConfigurationConfigurer<String, String> config)
			throws Exception {
		config
			.withMonitoring()
				.monitor(stateMachineMonitor());
	}

	@Override
	public void configure(StateMachineStateConfigurer<String, String> states) throws Exception {
		states
			.withStates()
				.initial("S1")
				.state("S2");
	}

	@Override
	public void configure(StateMachineTransitionConfigurer<String, String> transitions) throws Exception {
		transitions
			.withExternal()
				.source("S1")
				.target("S2")
				.event("E1");
	}

	@Bean
	public StateMachineMonitor<String, String> stateMachineMonitor() {
		return new TestStateMachineMonitor();
	}
}| See the Monitoring sample for detailed usage. |
Using Distributed States
Distributed state is probably one of a most complicated concepts of a Spring state machine. What exactly is a distributed state? A state within a single state machine is naturally really simple to understand, but, when there is a need to introduce a shared distributed state through a state machine, things get a little complicated.
| Distributed state functionality is still a preview feature and is not yet considered to be stable in this particular release. We expect this feature to mature towards its first official release. |
For information about generic configuration support, see Configuring Common Settings. For an actual usage example, see the Zookeeper sample.
A distributed state machine is implemented through a
DistributedStateMachine class that wraps an actual instance
of a StateMachine. DistributedStateMachine intercepts
communication with a StateMachine instance and works with
distributed state abstractions handled through the
StateMachineEnsemble interface. Depending on the actual implementation,
you can also use the StateMachinePersist interface to serialize a
StateMachineContext, which contains enough information to reset a
StateMachine.
While a distributed state machine is implemented through an abstraction, only one implementation currently exists. It is based on Zookeeper.
The following example shows how to configure a Zookeeper-based distributed state machine`:
@Configuration
@EnableStateMachine
public class Config
		extends StateMachineConfigurerAdapter<String, String> {

	@Override
	public void configure(StateMachineConfigurationConfigurer<String, String> config)
			throws Exception {
		config
			.withDistributed()
				.ensemble(stateMachineEnsemble())
				.and()
			.withConfiguration()
				.autoStartup(true);
	}

	@Override
	public void configure(StateMachineStateConfigurer<String, String> states)
			throws Exception {
		// config states
	}

	@Override
	public void configure(StateMachineTransitionConfigurer<String, String> transitions)
			throws Exception {
		// config transitions
	}

	@Bean
	public StateMachineEnsemble<String, String> stateMachineEnsemble()
			throws Exception {
		return new ZookeeperStateMachineEnsemble<String, String>(curatorClient(), "/zkpath");
	}

	@Bean
	public CuratorFramework curatorClient()
			throws Exception {
		CuratorFramework client = CuratorFrameworkFactory
				.builder()
				.defaultData(new byte[0])
				.connectString("localhost:2181").build();
		client.start();
		return client;
	}

}
You can find the current technical documentation for a Zookeeker-based distributed state machine in the appendix.
Using ZookeeperStateMachineEnsemble
ZookeeperStateMachineEnsemble itself needs two mandatory settings,
an instance of curatorClient and a basePath. The client is a
CuratorFramework, and the path is the root of a tree in a Zookeeper instance.
Optionally, you can set cleanState, which defaults to TRUE
and clears existing data if no members exists in an ensemble. You can set
it to FALSE if you want to preserve distributed state within
application restarts.
Optionally, you can set the size of a logSize (defaults
to 32) to a keep history of state changes. The value of this
setting must be a power of two. 32 is generally a good default
value. If a particular state machine is left behind by more than the
size of the log, it is put into an error state and disconnected from the
ensemble, indicating it has lost its history and its ability to fully reconstruct the
synchronized status.
Testing Support
We have also added a set of utility classes to ease testing of state machine instances. These are used in the framework itself but are also very useful for end users.
StateMachineTestPlanBuilder builds a StateMachineTestPlan,
which has one method (called test()). That method runs a plan.
StateMachineTestPlanBuilder contains a fluent builder API to let you add
steps to a plan. During these steps, you can send events and check
various conditions, such as state changes, transitions, and extended state
variables.
The following example uses StateMachineBuilder to build a state machine:
private StateMachine<String, String> buildMachine() throws Exception {
	StateMachineBuilder.Builder<String, String> builder = StateMachineBuilder.builder();

	builder.configureConfiguration()
		.withConfiguration()
			.autoStartup(true);

	builder.configureStates()
			.withStates()
				.initial("SI")
				.state("S1");

	builder.configureTransitions()
			.withExternal()
				.source("SI").target("S1")
				.event("E1")
				.action(c -> {
					c.getExtendedState().getVariables().put("key1", "value1");
				});

	return builder.build();
}
In the following test plan, we have two steps. First, we check that the initial
state (SI) is indeed set. Second, we send an event (E1) and expect
one state change to happen and expect the machine to end up in a state of S1.
The following listing shows the test plan:
StateMachine<String, String> machine = buildMachine();
StateMachineTestPlan<String, String> plan =
		StateMachineTestPlanBuilder.<String, String>builder()
			.defaultAwaitTime(2)
			.stateMachine(machine)
			.step()
				.expectStates("SI")
				.and()
			.step()
				.sendEvent("E1")
				.expectStateChanged(1)
				.expectStates("S1")
				.expectVariable("key1")
				.expectVariable("key1", "value1")
				.expectVariableWith(hasKey("key1"))
				.expectVariableWith(hasValue("value1"))
				.expectVariableWith(hasEntry("key1", "value1"))
				.expectVariableWith(not(hasKey("key2")))
				.and()
			.build();
plan.test();
These utilities are also used within a framework to test distributed state machine features. Note that you can add multiple machines to a plan. If you add multiple machines, yuo can also choose to send an event a particular machine, a random machine, or all machines.
The preceding testing example uses the following Hamcrest imports:
import static org.hamcrest.CoreMatchers.not;
import static org.hamcrest.collection.IsMapContaining.hasKey;
import static org.hamcrest.collection.IsMapContaining.hasValue;

import org.junit.jupiter.api.Test;

import static org.hamcrest.collection.IsMapContaining.hasEntry;
All possible options for expected results are documented in the Javadoc for
StateMachineTestPlanStepBuilder.
|
Eclipse Modeling Support
Defining a state machine configuration with UI modeling is supported through the Eclipse Papyrus framework.
From the Eclipse wizard, you can create a new Papyrus Model with the UML Diagram
Language. In this example, it is named simple-machine. Then you
have an option to choose from various diagram kinds, and you must choose a StateMachine
Diagram.
We want to create a machine that has two states (S1 and S2), where
S1 is the initial state. Then, we need to create event E1 to do a transition
from S1 to S2. In Papyrus, a machine would then look like something
the following example:
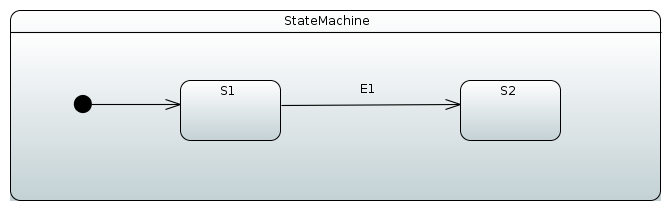
Behind the scenes, a raw UML file would look like the following example:
<?xml version="1.0" encoding="UTF-8"?>
<uml:Model xmi:version="20131001" xmlns:xmi="http://www.omg.org/spec/XMI/20131001" xmlns:uml="http://www.eclipse.org/uml2/5.0.0/UML" xmi:id="_AMP3IP8fEeW45bORGB4c_A" name="RootElement">
  <packagedElement xmi:type="uml:StateMachine" xmi:id="_AMRFQP8fEeW45bORGB4c_A" name="StateMachine">
    <region xmi:type="uml:Region" xmi:id="_AMRsUP8fEeW45bORGB4c_A" name="Region1">
      <transition xmi:type="uml:Transition" xmi:id="_chgcgP8fEeW45bORGB4c_A" source="_EZrg4P8fEeW45bORGB4c_A" target="_FAvg4P8fEeW45bORGB4c_A">
        <trigger xmi:type="uml:Trigger" xmi:id="_hs5jUP8fEeW45bORGB4c_A" event="_NeH84P8fEeW45bORGB4c_A"/>
      </transition>
      <transition xmi:type="uml:Transition" xmi:id="_egLIoP8fEeW45bORGB4c_A" source="_Fg0IEP8fEeW45bORGB4c_A" target="_EZrg4P8fEeW45bORGB4c_A"/>
      <subvertex xmi:type="uml:State" xmi:id="_EZrg4P8fEeW45bORGB4c_A" name="S1"/>
      <subvertex xmi:type="uml:State" xmi:id="_FAvg4P8fEeW45bORGB4c_A" name="S2"/>
      <subvertex xmi:type="uml:Pseudostate" xmi:id="_Fg0IEP8fEeW45bORGB4c_A"/>
    </region>
  </packagedElement>
  <packagedElement xmi:type="uml:Signal" xmi:id="_L01D0P8fEeW45bORGB4c_A" name="E1"/>
  <packagedElement xmi:type="uml:SignalEvent" xmi:id="_NeH84P8fEeW45bORGB4c_A" name="SignalEventE1" signal="_L01D0P8fEeW45bORGB4c_A"/>
</uml:Model>
When opening an existing model that has been defined as UML, you have three
files: .di, .notation, and .uml. If a model was not created in your
eclipse’s session, it does not understand how to open an actual state
chart. This is a known issue in the Papyrus plugin, and there is an easy
workaround. In a Papyrus perspective, you can see a model explorer for
your model. Double click Diagram StateMachine Diagram, which
instructs Eclipse to open this specific model in its proper Papyrus
modeling plugin.
|
Using UmlStateMachineModelFactory
After a UML file is in place in your project, you can import it into your
configuration by using StateMachineModelConfigurer, where
StateMachineModelFactory is associated with a model.
UmlStateMachineModelFactory is a special factory that knows how to
process a Eclipse Papyrus_generated UML structure. The source UML file can
either be given as a Spring Resource or as a normal location string.
The following example shows how to create an instance of
UmlStateMachineModelFactory:
@Configuration
@EnableStateMachine
public static class Config1 extends StateMachineConfigurerAdapter<String, String> {

	@Override
	public void configure(StateMachineModelConfigurer<String, String> model) throws Exception {
		model
			.withModel()
				.factory(modelFactory());
	}

	@Bean
	public StateMachineModelFactory<String, String> modelFactory() {
		return new UmlStateMachineModelFactory("classpath:org/springframework/statemachine/uml/docs/simple-machine.uml");
	}
}
As usual, Spring Statemachine works with guards and actions, which are defined as beans. Those need to be hooked into UML by its internal modeling structure. The following sections show how customized bean references are defined within UML definitions. Note that it is also possible to register particular methods manually without defining those as beans.
If UmlStateMachineModelFactory is created as a bean, its
ResourceLoader is automatically wired to find registered actions and
guards. You can also manually define a
StateMachineComponentResolver, which is then used to find these
components. The factory also has registerAction and
registerGuard methods, which you can use to register these components. For more
about this, see Using StateMachineComponentResolver.
A UML model is relatively loose when it comes to an implementation such as Spring Statemachine itself. Spring Statemachine leaves how to implement a lot of features and functionalities up to the actual implementation. The following sections go through how Spring Statemachine implements UML models based on the Eclipse Papyrus plugin.
Using StateMachineComponentResolver
The next example shows how UmlStateMachineModelFactory is defined with
a StateMachineComponentResolver, which registers the
myAction and myGuard functions, respectively. Note that these components
are not created as beans. The following listing shows the example:
@Configuration
@EnableStateMachine
public static class Config2 extends StateMachineConfigurerAdapter<String, String> {

	@Override
	public void configure(StateMachineModelConfigurer<String, String> model) throws Exception {
		model
			.withModel()
				.factory(modelFactory());
	}

	@Bean
	public StateMachineModelFactory<String, String> modelFactory() {
		UmlStateMachineModelFactory factory = new UmlStateMachineModelFactory(
				"classpath:org/springframework/statemachine/uml/docs/simple-machine.uml");
		factory.setStateMachineComponentResolver(stateMachineComponentResolver());
		return factory;
	}

	@Bean
	public StateMachineComponentResolver<String, String> stateMachineComponentResolver() {
		DefaultStateMachineComponentResolver<String, String> resolver = new DefaultStateMachineComponentResolver<>();
		resolver.registerAction("myAction", myAction());
		resolver.registerGuard("myGuard", myGuard());
		return resolver;
	}

	public Action<String, String> myAction() {
		return new Action<String, String>() {

			@Override
			public void execute(StateContext<String, String> context) {
			}
		};
	}

	public Guard<String, String> myGuard() {
		return new Guard<String, String>() {

			@Override
			public boolean evaluate(StateContext<String, String> context) {
				return false;
			}
		};
	}
}
Creating a Model
We start by creating an empty state machine model, shown in the following image:
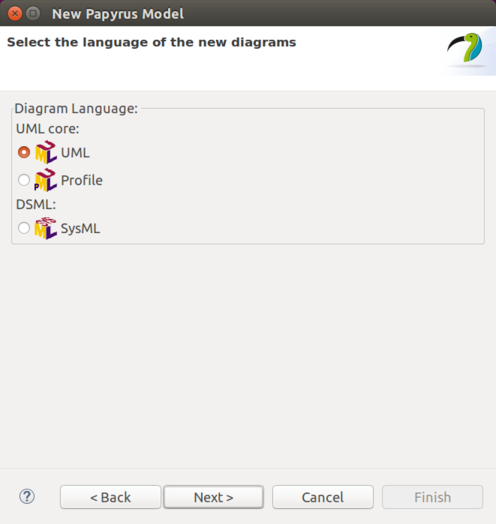
You can start by creating a new model and giving it a name, as the following image shows:

Then you need to choose StateMachine Diagram, as follows:
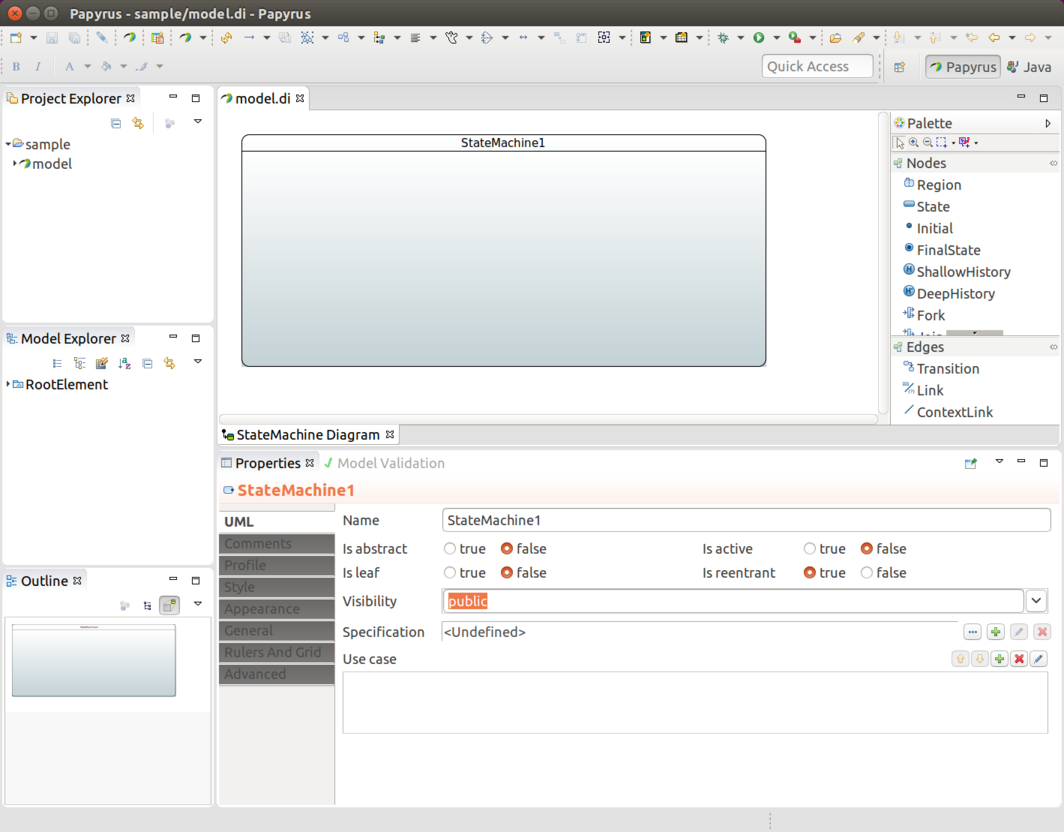
You end up with an empty state machine.
In the preceding images, you should have created a sample named model.
You should have wound up with three files: model.di,
model.notation, and model.uml. You can then used these files in any other
Eclipse instance. Further, you can import model.uml into a
Spring Statemachine.
Defining States
The state identifier comes from a component name in a diagram. You must have an initial state in your machine, which you can do by adding a root element and then drawing a transition to your own initial state, as the following image shows:
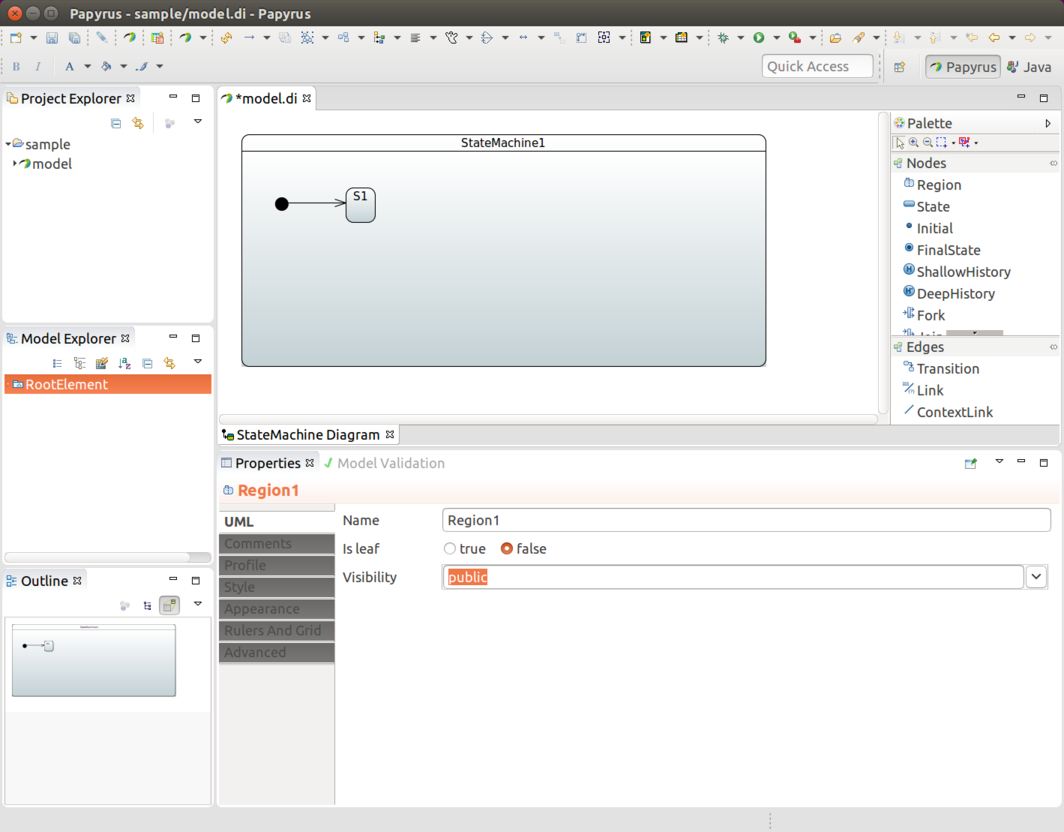
In the preceding image, we added a root element and an initial state (S1). Then we drew a transition
between those two to indicate that S1 is an initial state.
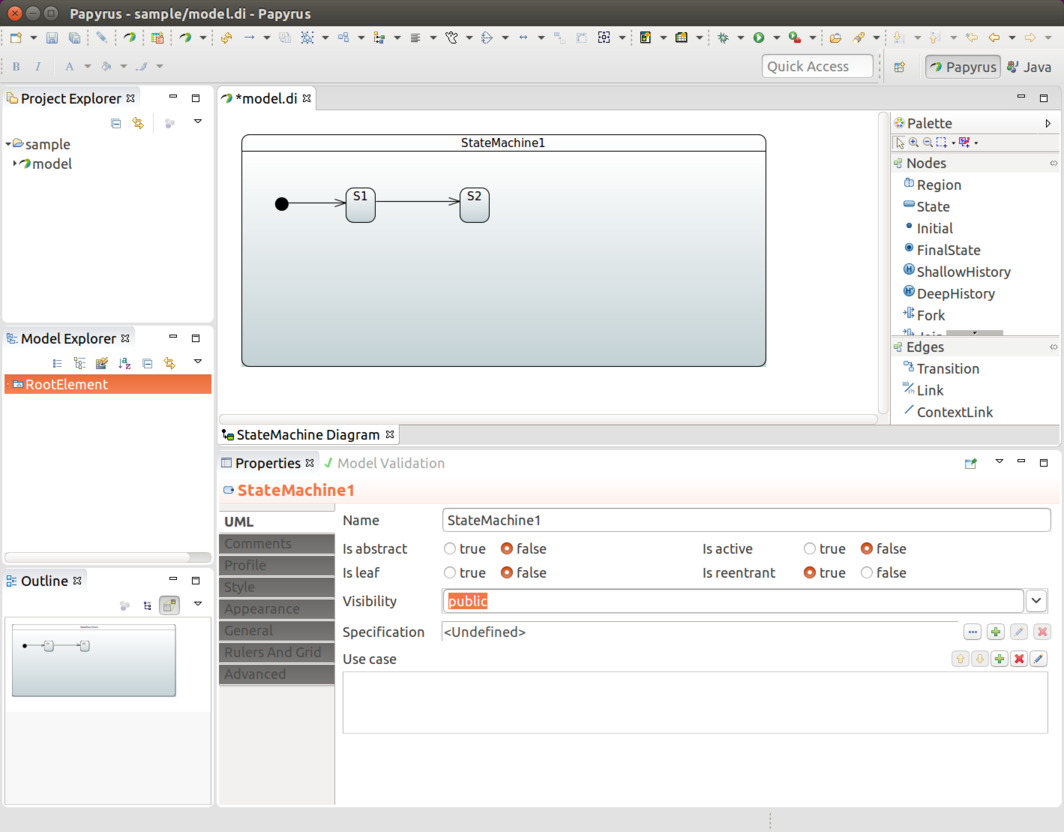
In the preceding image, we added a second state (S2) and added a transition between
S1 and S2 (indicating that we have two states).
Defining Events
To associate an event with a transition, you need to create a Signal
(E1, in this case). To do so, choose RootElement → New Child → Signal.
The following image shows the result:
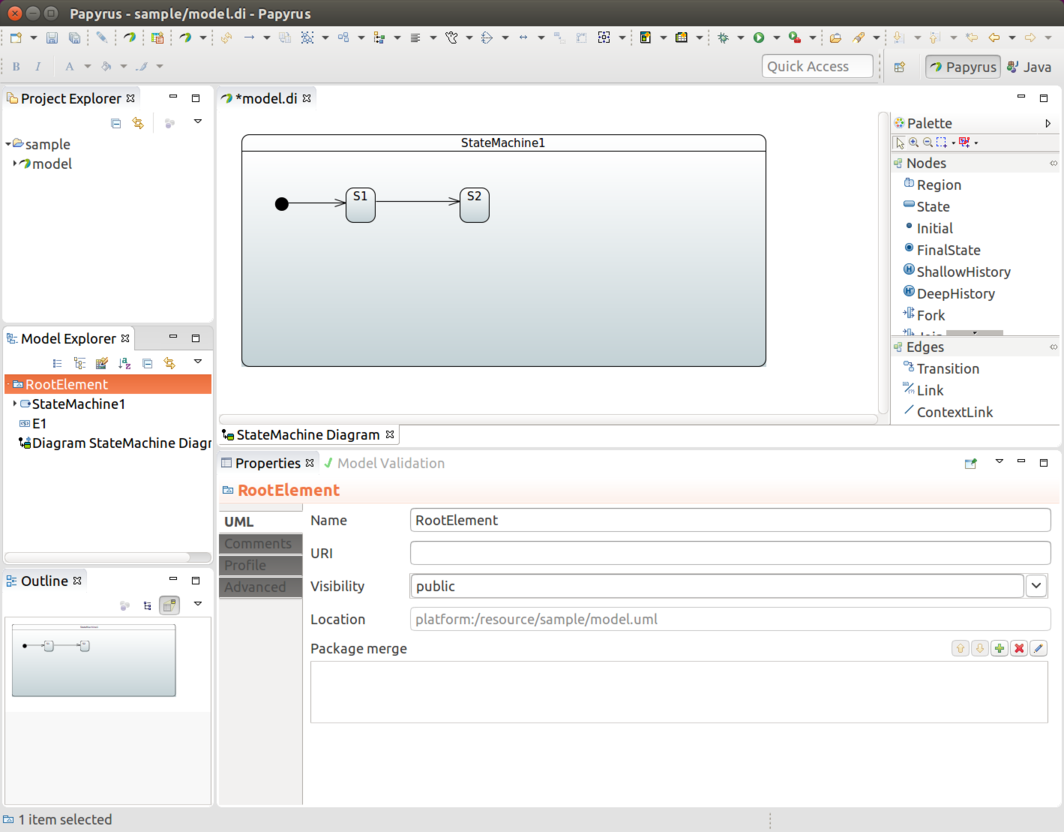
Then you need to crate a SignalEvent with the new Signal, E1.
To do so, choose RootElement → New Child → SignalEvent.
The following image shows the result:
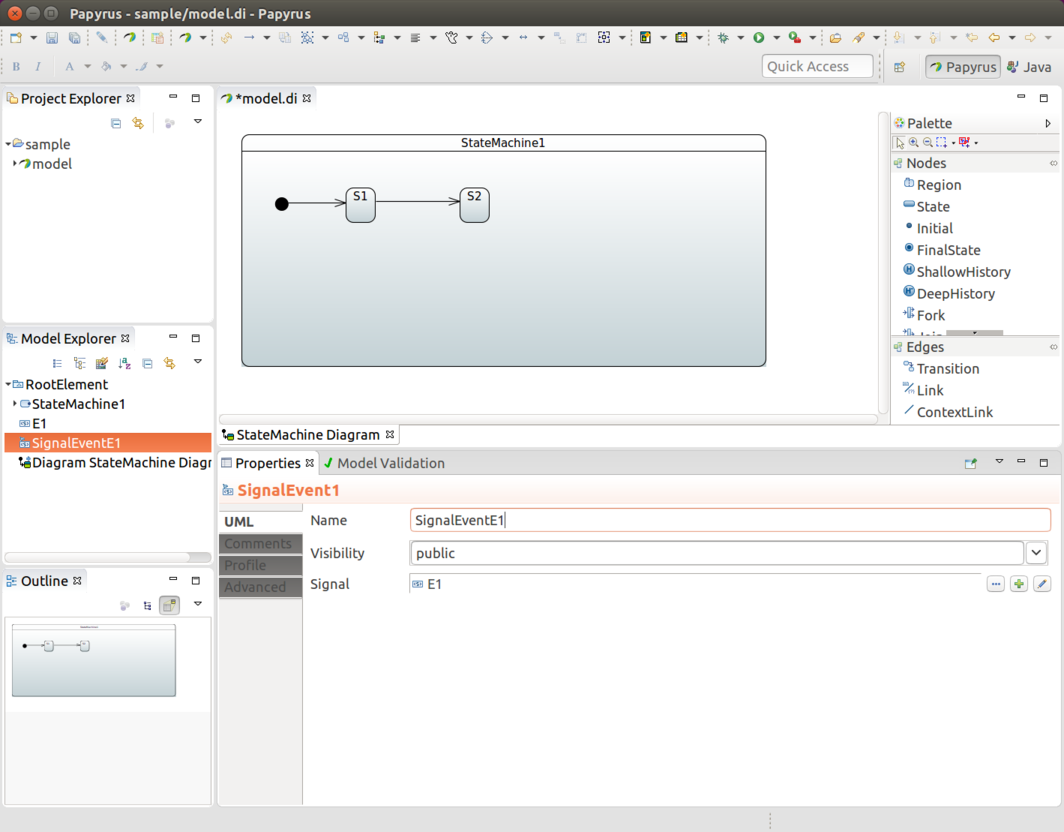
Now that you have defined a SignalEvent, you can use it to associate
a trigger with a transition. For more about that, see
Defining Transitions.
Defining Transitions
You can create a transition by drawing a transition line between the
source and target states. In the preceding images, we have states S1 and S2 and an
anonymous transition between the two. We want to associate event
E1 with that transition. We choose a transition, create a new
trigger, and define SignalEventE1 for that, as the following image shows:

This gives you something like the arrangement shown in the following image:
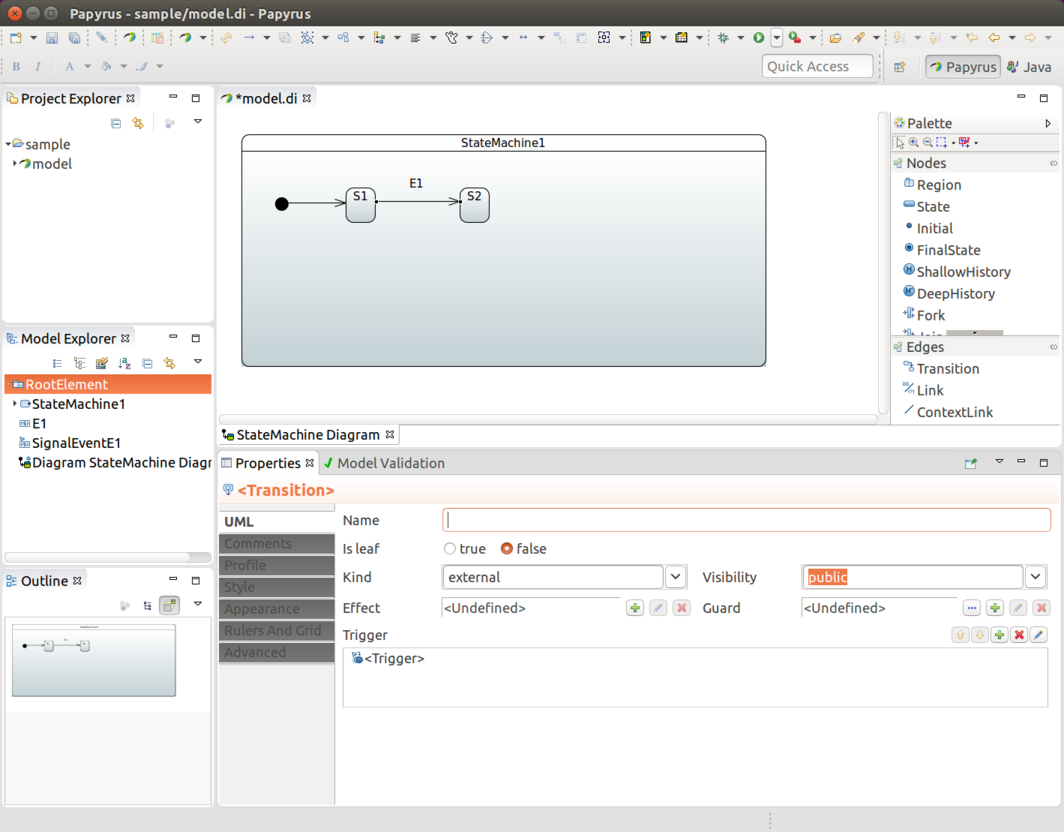
| If you omit SignalEvent for a transition, it becomes an anonymous transition. |
Defining Timers
Transitions can also happen based on timed events. Spring Statemachine support two types of timers, ones which fires continuously on a background and ones which fires once with a delay when state is entered.
To add a new TimeEvent child to Model Explorer, modify When as an expression defined as LiteralInteger. The value of it (in milliseconds) becomes the timer. Leave Is Relative false to make the timer fire continuously.
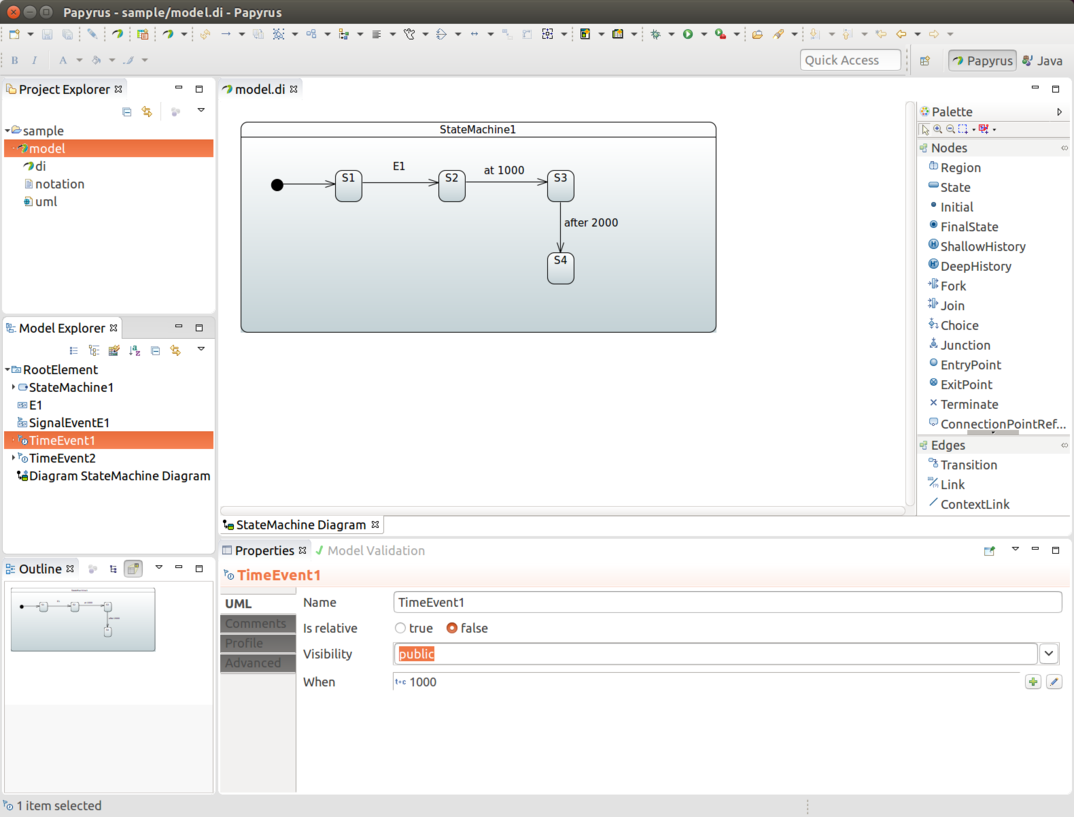
To define one timed based event that triggers when a state is entered, the process is exactly same as described earlier, but leave Is Relative set to true. The following image shows the result:

Then the user can pick one of these timed events instead of a signal event for a particular transition.
Defining a Choice
A choice is defined by drawing one incoming transition into a
CHOICE state and drawing multiple outgoing transitions from it to target
states. The configuration model in our StateConfigurer lets you define
an if/elseif/else structure. However, with UML, we need to work with
individual Guards for outgoing transitions.
You must ensure that the guards defined for transitions do not overlap so that, whatever happens, only one guard evaluates to TRUE at any given time. This gives precise and predictable results for choice branch evaluation. Also we recommend leaving one transition without a guard so that at least one transition path is guaranteed. The following image shows the result of making a choice with three branches:
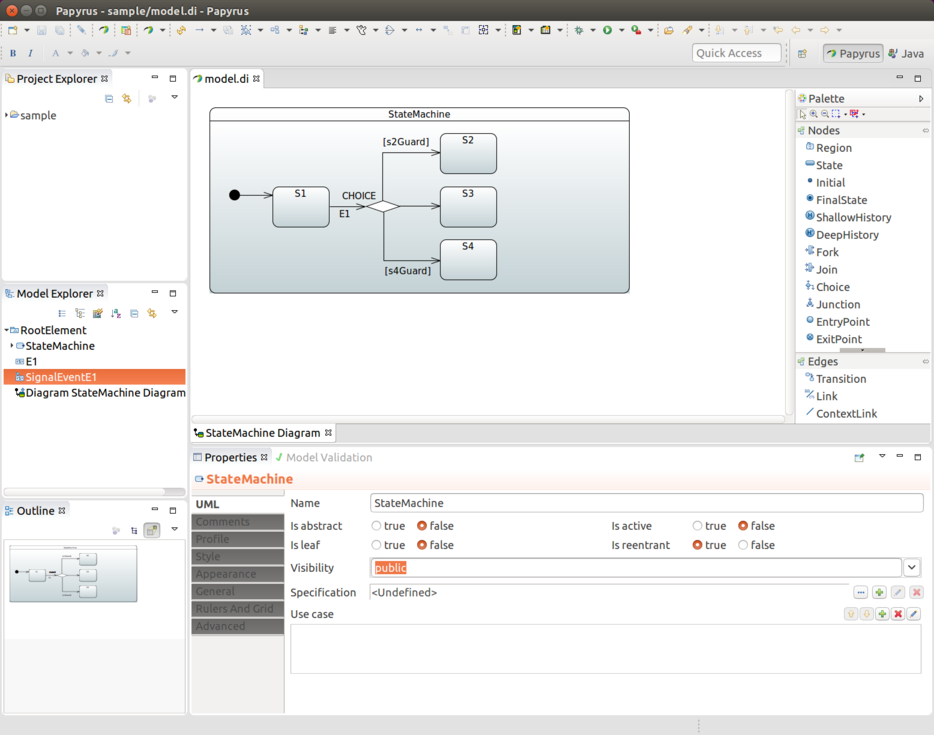
| Junction works similarly same, except that it allows multiple incoming transitions. Thus, its behavior compared to Choice is purely academic. The actual logic to select the outgoing transition is exactly the same. |
Defining a Junction
See Defining a Choice.
Defining Entry and Exit Points
You can use EntryPoint and ExitPoint to create controlled entry and exit
with states that have sub-states. In the following state chart, events E1 and
E2 have normal state behavior by entering and exiting state
S2, where normal state behavior happens by entering initial state
S21.
Using event E3 takes the machine into the ENTRY EntryPoint, which then
leads to S22 without activating initial state S21 at any time.
Similarly the EXIT ExitPoint with event E4 controls the specific exit
into state S4, while normal exit behavior from S2 would take the
machine into state S3. While on state S22, you can choose from
events E4 and E2 to take the machine into states S3 or S4,
respectively. The following image shows the result:
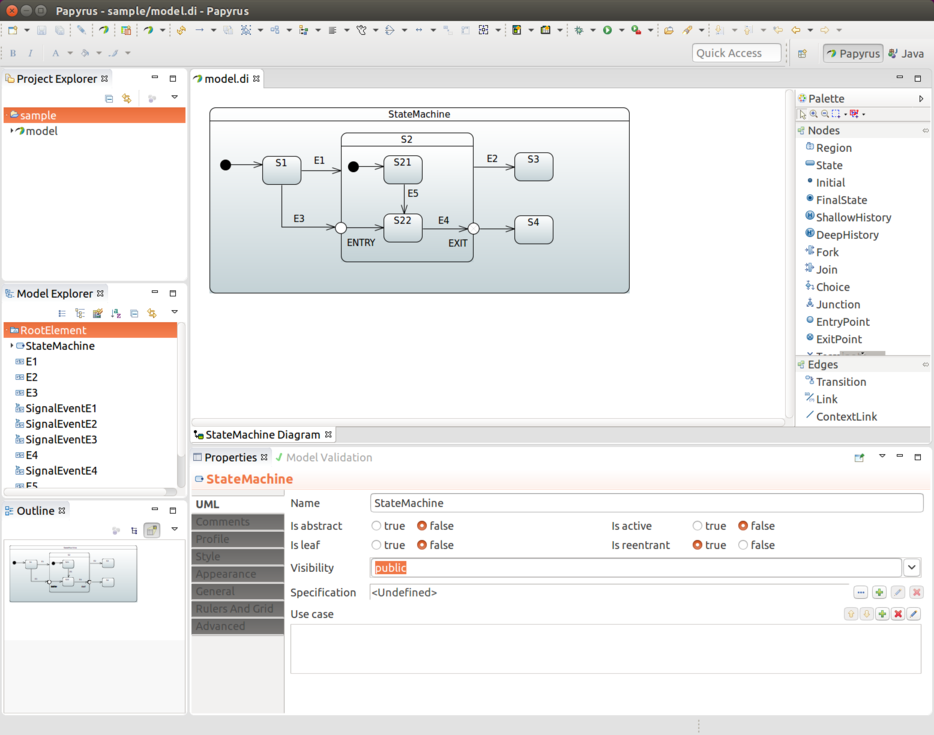
| If state is defined as a sub-machine reference and you need to use entry and exit points, you must externally define a ConnectionPointReference, with its entry and exit reference set to point to a correct entry or exit point within a submachine reference. Only after that, is it possible to target a transition that correctly links from the outside to the inside of a sub-machine reference. With ConnectionPointReference, you may need to find these settings from Properties → Advanced → UML → Entry/Exit. The UML specification lets you define multiple entries and exits. However, with a state machine, only one is allowed. |
Defining History States
When working with history states, three different concepts are in play. UML defines a Deep History and a Shallow History. The Default History State comes into play when history state is not yet known. These are represented in following sections.
Shallow History
In the following image, Shallow History is selected and a transition is defined into it:
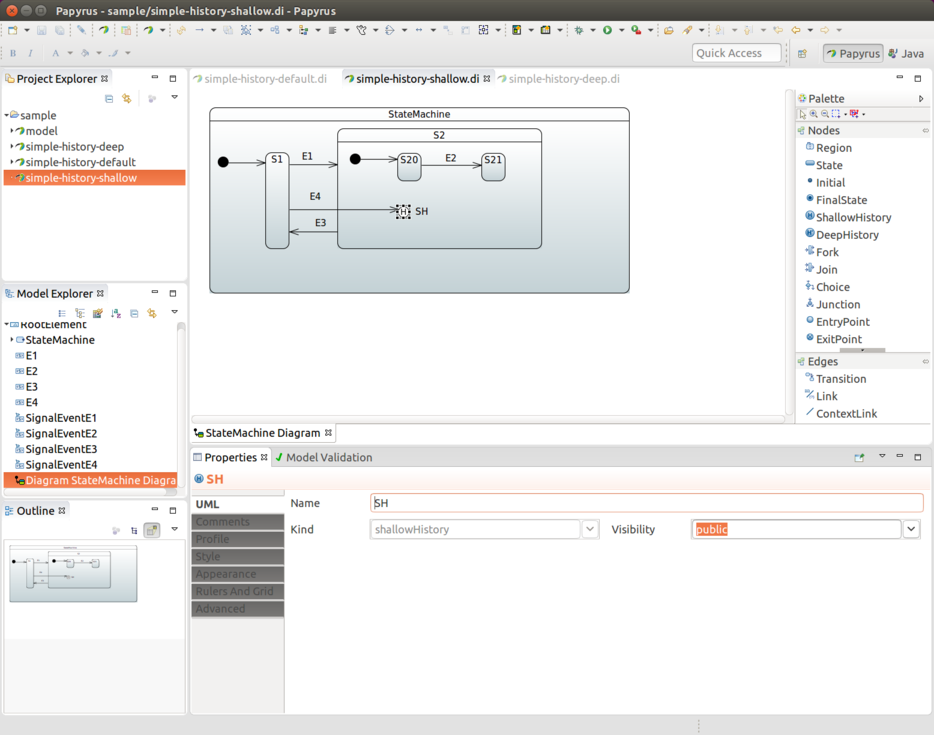
Deep History
Deep History is used for state that has other deep nested states, thus giving a chance to save whole nested state structure. The following image shows a definition that uses Deep History:
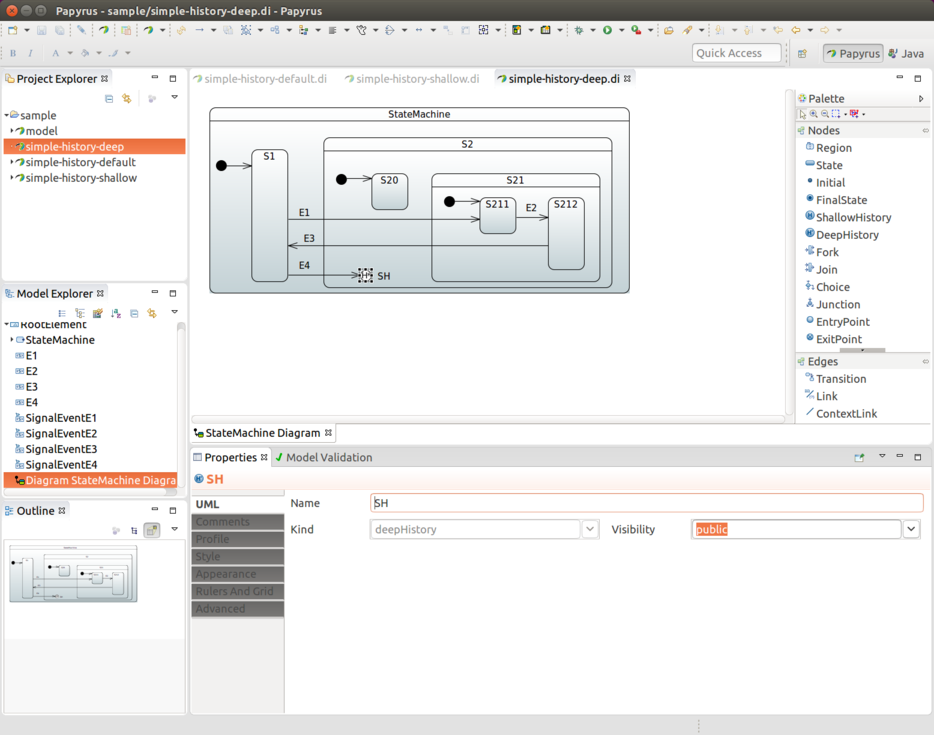
Default History
In cases where a Transition terminates on a history when
the state has not been entered before it had reached its
final state, there is an option to force
a transition to a specific substate, using the default
history mechanism. For this to happen, you must define a transition
into this default state. This is the transition from SH to
S22.
In the following image, state S22 is entered if state S2 has
never been active, as its history has never been recorded. If state
S2 has been active, then either S20 or S21 gets chosen.

Defining Forks and Joins
Both Fork and Join are represented as bars in Papyrus. As shown
in the next image, you need to draw one outgoing transition from FORK into state
S2 to have orthogonal regions. JOIN is then the reverse, where
joined states are collected together from incoming transitions.
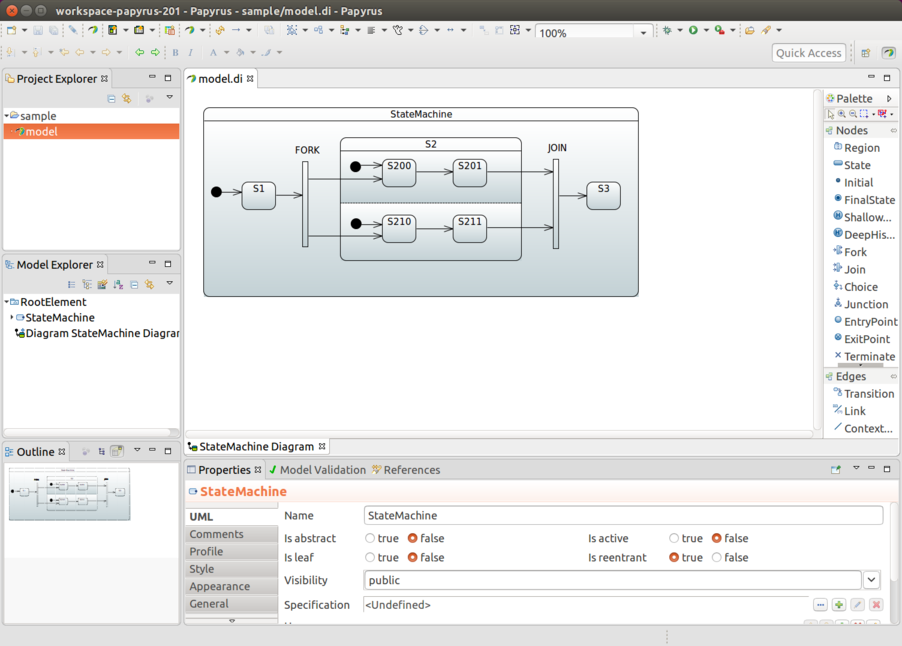
Defining Actions
You can assoiate swtate entry and exit actions by using a behavior. For more about this, see Defining a Bean Reference.
Using an Initial Action
An initial action (as shown in Configuring Actions) is defined in UML by adding an action in the transition that leads from the Initial State marker into the actual state. This Action is then run when the state machine is started.
Defining Guards
You can define a guard by first adding a Constraint and then defining its Specification as OpaqueExpression, which works in the same way as Defining a Bean Reference.
Defining a Bean Reference
When you need to make a bean reference in any UML effect,
action, or guard, you can do so with
FunctionBehavior or OpaqueBehavior, where the defined language needs to
be bean and the language body msut have a bean reference id.
Defining a SpEL Reference
When you need to use a SpEL expression instead of a bean reference in
any UML effect, action, or guard, you can do so by using
FunctionBehavior or OpaqueBehavior, where the defined language needs to
be spel and the language body must be a SpEL expression.
Using a Sub-Machine Reference
Normally, when you use sub-states, you draw those into the state chart itself. The chart may become too complex and big to follow, so we also support defining a sub-state as a state machine reference.
To create a sub-machine reference, you must first create a new diagram and give it a name (for example, SubStateMachine Diagram). The following image shows the menu choices to use:
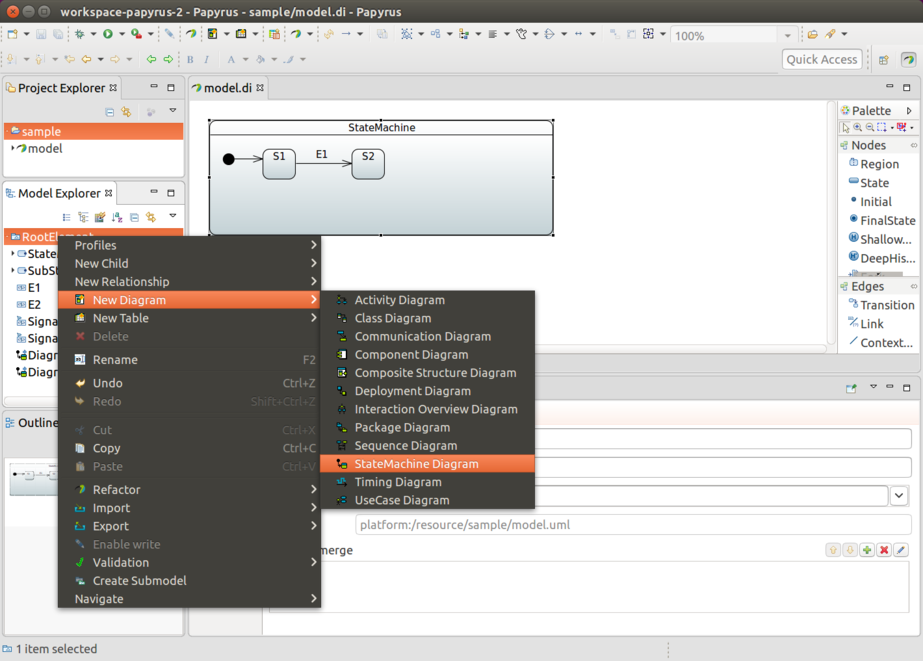
Give the new diagram the design you need. The following image shows a simple design as an example:
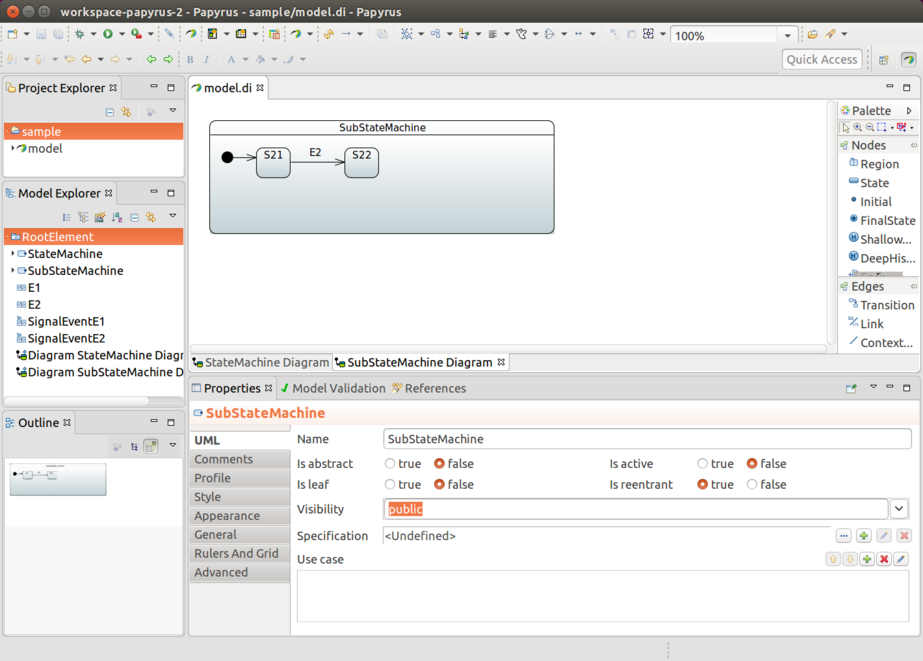
From the state you want to link (in this case,m state S2), click the
Submachine field and choose your linked machine (in our example,
SubStateMachine).
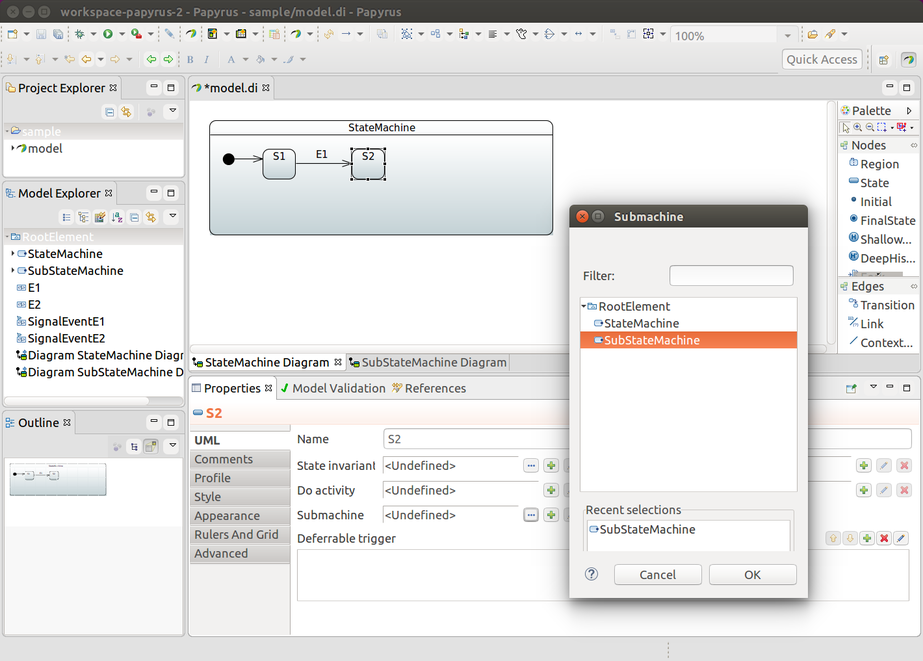
Finally, in the following image, you can see that state S2 is linked to SubStateMachine as a
sub-state.
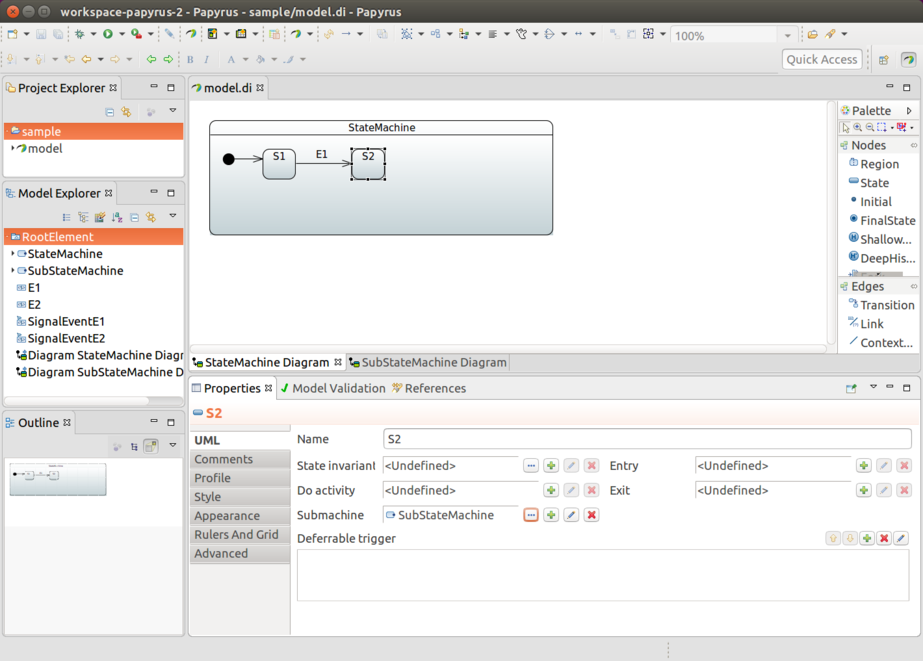
Using a Machine Import
It’s also possible to use import functionality where uml files can reference to other models.
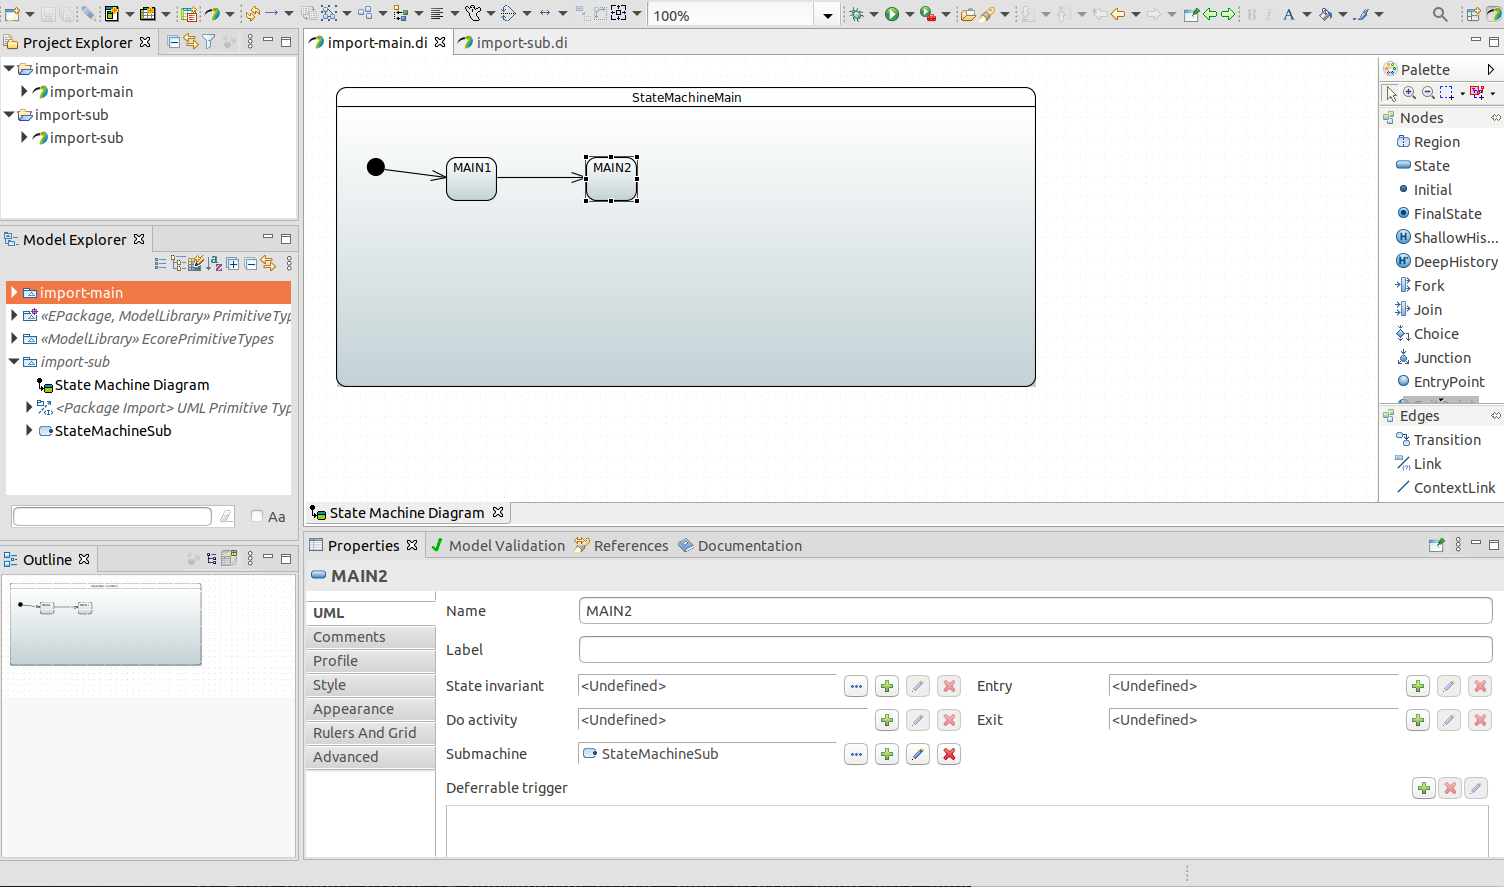
Within UmlStateMachineModelFactory it’s possible to use additional resources or locations
to define referenced model files.
@Configuration
@EnableStateMachine
public static class Config3 extends StateMachineConfigurerAdapter<String, String> {

	@Override
	public void configure(StateMachineModelConfigurer<String, String> model) throws Exception {
		model
			.withModel()
				.factory(modelFactory());
	}

	@Bean
	public StateMachineModelFactory<String, String> modelFactory() {
		return new UmlStateMachineModelFactory(
			"classpath:org/springframework/statemachine/uml/import-main/import-main.uml",
			new String[] { "classpath:org/springframework/statemachine/uml/import-sub/import-sub.uml" });
	}
}| Links between files in uml models needs to be relative as otherwise things break when model files are copied out from a classpath to a temporary directory so that eclipse parsing classes can read those. |
Repository Support
This section contains documentation related to using 'Spring Data Repositories' in Spring Statemachine.
Repository Configuration
You can keep machine configuration in external storage, from which it can be loaded on demand, instead of creating a static configuration by using either Java configuration or UML-based configuration. This integration works through a Spring Data Repository abstraction.
We have created a special StateMachineModelFactory implementation
called RepositoryStateMachineModelFactory. It can use the base
repository interfaces (StateRepository, TransitionRepository,
ActionRepository and GuardRepository) and base entity
interfaces (RepositoryState, RepositoryTransition,
RepositoryAction, and RepositoryGuard).
Due to way how entities and repositories work in Spring Data,
from a user perspective, read access can be fully abstracted as it is
done in RepositoryStateMachineModelFactory. There is no need to
know the actual mapped entity class with which a repository works.
Writing into a repository is always dependent on using a real
repository-specific entity class. From a machine-configuration point
of view, we do not need to know these, meaning that we do not need to know
whether the actual implementation is JPA, Redis, or anything else
that Spring Data supports. Using an actual repository-related
entity class comes into play when you manually try to write new
states or transitions into a backed repository.
Entity classes for RepositoryState and RepositoryTransition have a
machineId field, which is at your disposal and can be used to
differentiate between configurations — for example, if machines are built
via StateMachineFactory.
|
Actual implementations are documented in later sections. The following images are UML-equivalent state charts of repository configurations.
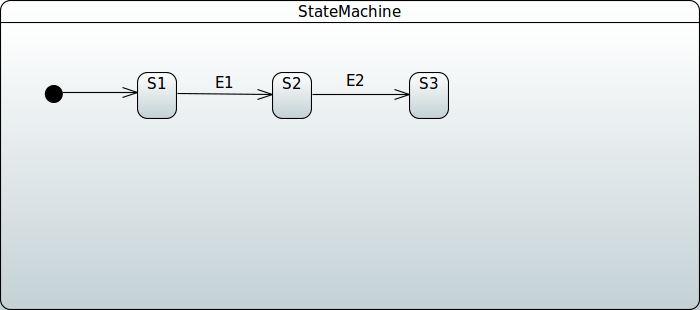
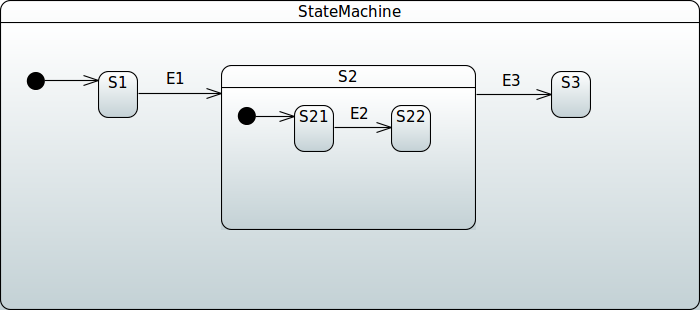
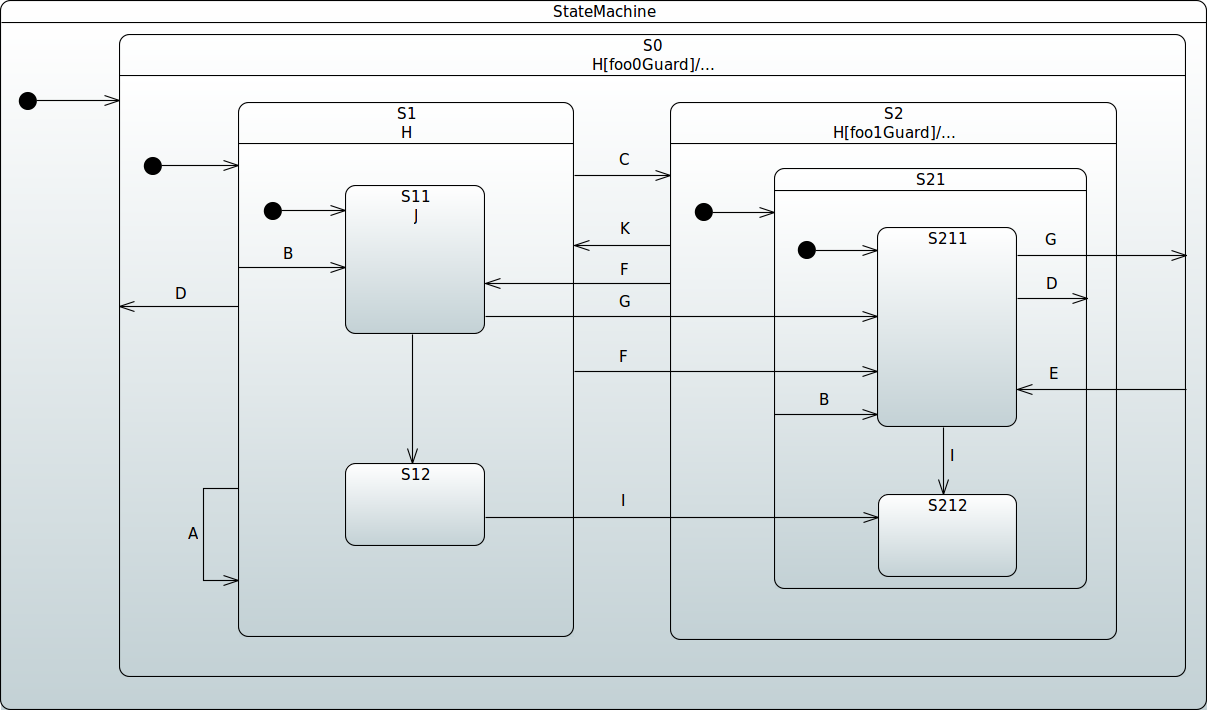
JPA
The actual repository implementations for JPA are
JpaStateRepository, JpaTransitionRepository, JpaActionRepository,
and JpaGuardRepository, which are backed by the
entity classes JpaRepositoryState, JpaRepositoryTransition,
JpaRepositoryAction, and JpaRepositoryGuard, respectively.
Unfortunately, version '1.2.8' had to make a change in JPA’s entity
model regarding used table names. Previously, generated table names
always had a prefix of JPA_REPOSITORY_, derived from entity class
names. As this caused breaking issues with databases imposing
restrictions on database object lengths, all entity classes have
spesific definitions to force table names. For example,
JPA_REPOSITORY_STATE is now 'STATE' — and so on with other
ntity classes.
|
The generic way to update states and transitions manually for JPA is shown in the following example (equivalent to the machine shown in SimpleMachine):
@Autowired
StateRepository<JpaRepositoryState> stateRepository;

@Autowired
TransitionRepository<JpaRepositoryTransition> transitionRepository;

void addConfig() {
	JpaRepositoryState stateS1 = new JpaRepositoryState("S1", true);
	JpaRepositoryState stateS2 = new JpaRepositoryState("S2");
	JpaRepositoryState stateS3 = new JpaRepositoryState("S3");

	stateRepository.save(stateS1);
	stateRepository.save(stateS2);
	stateRepository.save(stateS3);

	JpaRepositoryTransition transitionS1ToS2 = new JpaRepositoryTransition(stateS1, stateS2, "E1");
	JpaRepositoryTransition transitionS2ToS3 = new JpaRepositoryTransition(stateS2, stateS3, "E2");

	transitionRepository.save(transitionS1ToS2);
	transitionRepository.save(transitionS2ToS3);
}
The following example is also equivalent to the machine shown in SimpleSubMachine.
@Autowired
StateRepository<JpaRepositoryState> stateRepository;

@Autowired
TransitionRepository<JpaRepositoryTransition> transitionRepository;

void addConfig() {
	JpaRepositoryState stateS1 = new JpaRepositoryState("S1", true);
	JpaRepositoryState stateS2 = new JpaRepositoryState("S2");
	JpaRepositoryState stateS3 = new JpaRepositoryState("S3");

	JpaRepositoryState stateS21 = new JpaRepositoryState("S21", true);
	stateS21.setParentState(stateS2);
	JpaRepositoryState stateS22 = new JpaRepositoryState("S22");
	stateS22.setParentState(stateS2);

	stateRepository.save(stateS1);
	stateRepository.save(stateS2);
	stateRepository.save(stateS3);
	stateRepository.save(stateS21);
	stateRepository.save(stateS22);

	JpaRepositoryTransition transitionS1ToS2 = new JpaRepositoryTransition(stateS1, stateS2, "E1");
	JpaRepositoryTransition transitionS2ToS3 = new JpaRepositoryTransition(stateS21, stateS22, "E2");
	JpaRepositoryTransition transitionS21ToS22 = new JpaRepositoryTransition(stateS2, stateS3, "E3");

	transitionRepository.save(transitionS1ToS2);
	transitionRepository.save(transitionS2ToS3);
	transitionRepository.save(transitionS21ToS22);
}
First, you must access all repositories. The following example shows how to do so:
@Autowired
StateRepository<JpaRepositoryState> stateRepository;

@Autowired
TransitionRepository<JpaRepositoryTransition> transitionRepository;

@Autowired
ActionRepository<JpaRepositoryAction> actionRepository;

@Autowired
GuardRepository<JpaRepositoryGuard> guardRepository;
Second, you mus create actions and guards. The following example shows how to do so:
JpaRepositoryGuard foo0Guard = new JpaRepositoryGuard();
foo0Guard.setName("foo0Guard");

JpaRepositoryGuard foo1Guard = new JpaRepositoryGuard();
foo1Guard.setName("foo1Guard");

JpaRepositoryAction fooAction = new JpaRepositoryAction();
fooAction.setName("fooAction");

guardRepository.save(foo0Guard);
guardRepository.save(foo1Guard);
actionRepository.save(fooAction);
Third, you must create states. The following example shows how to do so:
JpaRepositoryState stateS0 = new JpaRepositoryState("S0", true);
stateS0.setInitialAction(fooAction);
JpaRepositoryState stateS1 = new JpaRepositoryState("S1", true);
stateS1.setParentState(stateS0);
JpaRepositoryState stateS11 = new JpaRepositoryState("S11", true);
stateS11.setParentState(stateS1);
JpaRepositoryState stateS12 = new JpaRepositoryState("S12");
stateS12.setParentState(stateS1);
JpaRepositoryState stateS2 = new JpaRepositoryState("S2");
stateS2.setParentState(stateS0);
JpaRepositoryState stateS21 = new JpaRepositoryState("S21", true);
stateS21.setParentState(stateS2);
JpaRepositoryState stateS211 = new JpaRepositoryState("S211", true);
stateS211.setParentState(stateS21);
JpaRepositoryState stateS212 = new JpaRepositoryState("S212");
stateS212.setParentState(stateS21);

stateRepository.save(stateS0);
stateRepository.save(stateS1);
stateRepository.save(stateS11);
stateRepository.save(stateS12);
stateRepository.save(stateS2);
stateRepository.save(stateS21);
stateRepository.save(stateS211);
stateRepository.save(stateS212);
Fourth and finally, you must create transitions. The following example shows how to do so:
JpaRepositoryTransition transitionS1ToS1 = new JpaRepositoryTransition(stateS1, stateS1, "A");
transitionS1ToS1.setGuard(foo1Guard);

JpaRepositoryTransition transitionS1ToS11 = new JpaRepositoryTransition(stateS1, stateS11, "B");
JpaRepositoryTransition transitionS21ToS211 = new JpaRepositoryTransition(stateS21, stateS211, "B");
JpaRepositoryTransition transitionS1ToS2 = new JpaRepositoryTransition(stateS1, stateS2, "C");
JpaRepositoryTransition transitionS1ToS0 = new JpaRepositoryTransition(stateS1, stateS0, "D");
JpaRepositoryTransition transitionS211ToS21 = new JpaRepositoryTransition(stateS211, stateS21, "D");
JpaRepositoryTransition transitionS0ToS211 = new JpaRepositoryTransition(stateS0, stateS211, "E");
JpaRepositoryTransition transitionS1ToS211 = new JpaRepositoryTransition(stateS1, stateS211, "F");
JpaRepositoryTransition transitionS2ToS21 = new JpaRepositoryTransition(stateS2, stateS21, "F");
JpaRepositoryTransition transitionS11ToS211 = new JpaRepositoryTransition(stateS11, stateS211, "G");

JpaRepositoryTransition transitionS0 = new JpaRepositoryTransition(stateS0, stateS0, "H");
transitionS0.setKind(TransitionKind.INTERNAL);
transitionS0.setGuard(foo0Guard);
transitionS0.setActions(new HashSet<>(Arrays.asList(fooAction)));

JpaRepositoryTransition transitionS1 = new JpaRepositoryTransition(stateS1, stateS1, "H");
transitionS1.setKind(TransitionKind.INTERNAL);

JpaRepositoryTransition transitionS2 = new JpaRepositoryTransition(stateS2, stateS2, "H");
transitionS2.setKind(TransitionKind.INTERNAL);
transitionS2.setGuard(foo1Guard);
transitionS2.setActions(new HashSet<>(Arrays.asList(fooAction)));

JpaRepositoryTransition transitionS11ToS12 = new JpaRepositoryTransition(stateS11, stateS12, "I");
JpaRepositoryTransition transitionS12ToS212 = new JpaRepositoryTransition(stateS12, stateS212, "I");
JpaRepositoryTransition transitionS211ToS12 = new JpaRepositoryTransition(stateS211, stateS12, "I");

JpaRepositoryTransition transitionS11 = new JpaRepositoryTransition(stateS11, stateS11, "J");
JpaRepositoryTransition transitionS2ToS1 = new JpaRepositoryTransition(stateS2, stateS1, "K");

transitionRepository.save(transitionS1ToS1);
transitionRepository.save(transitionS1ToS11);
transitionRepository.save(transitionS21ToS211);
transitionRepository.save(transitionS1ToS2);
transitionRepository.save(transitionS1ToS0);
transitionRepository.save(transitionS211ToS21);
transitionRepository.save(transitionS0ToS211);
transitionRepository.save(transitionS1ToS211);
transitionRepository.save(transitionS2ToS21);
transitionRepository.save(transitionS11ToS211);
transitionRepository.save(transitionS0);
transitionRepository.save(transitionS1);
transitionRepository.save(transitionS2);
transitionRepository.save(transitionS11ToS12);
transitionRepository.save(transitionS12ToS212);
transitionRepository.save(transitionS211ToS12);
transitionRepository.save(transitionS11);
transitionRepository.save(transitionS2ToS1);
You can find a complete example here. This example also shows how you can pre-populate a repository from an existing JSON file that has definitions for entity classes.
Redis
The actual repository implementations for a Redis instance are
RedisStateRepository, RedisTransitionRepository, RedisActionRepository,
and RedisGuardRepository, which are backed by the
entity classes RedisRepositoryState, RedisRepositoryTransition,
RedisRepositoryAction, and RedisRepositoryGuard, respectively.
The next example shows the generic way to manually update states and transitions for Redis. This is equivalent to machine shown in SimpleMachine.
@Autowired
StateRepository<RedisRepositoryState> stateRepository;

@Autowired
TransitionRepository<RedisRepositoryTransition> transitionRepository;

void addConfig() {
	RedisRepositoryState stateS1 = new RedisRepositoryState("S1", true);
	RedisRepositoryState stateS2 = new RedisRepositoryState("S2");
	RedisRepositoryState stateS3 = new RedisRepositoryState("S3");

	stateRepository.save(stateS1);
	stateRepository.save(stateS2);
	stateRepository.save(stateS3);


	RedisRepositoryTransition transitionS1ToS2 = new RedisRepositoryTransition(stateS1, stateS2, "E1");
	RedisRepositoryTransition transitionS2ToS3 = new RedisRepositoryTransition(stateS2, stateS3, "E2");

	transitionRepository.save(transitionS1ToS2);
	transitionRepository.save(transitionS2ToS3);
}
The following example is equivalent to machine shown in SimpleSubMachine:
@Autowired
StateRepository<RedisRepositoryState> stateRepository;

@Autowired
TransitionRepository<RedisRepositoryTransition> transitionRepository;

void addConfig() {
	RedisRepositoryState stateS1 = new RedisRepositoryState("S1", true);
	RedisRepositoryState stateS2 = new RedisRepositoryState("S2");
	RedisRepositoryState stateS3 = new RedisRepositoryState("S3");

	stateRepository.save(stateS1);
	stateRepository.save(stateS2);
	stateRepository.save(stateS3);


	RedisRepositoryTransition transitionS1ToS2 = new RedisRepositoryTransition(stateS1, stateS2, "E1");
	RedisRepositoryTransition transitionS2ToS3 = new RedisRepositoryTransition(stateS2, stateS3, "E2");

	transitionRepository.save(transitionS1ToS2);
	transitionRepository.save(transitionS2ToS3);
}
MongoDB
The actual repository implementations for a MongoDB instance are
MongoDbStateRepository, MongoDbTransitionRepository, MongoDbActionRepository,
and MongoDbGuardRepository, which are backed by the
entity classes MongoDbRepositoryState, MongoDbRepositoryTransition,
MongoDbRepositoryAction, and MongoDbRepositoryGuard, respectively.
The next example shows the generic way to manually update states and transitions for MongoDB. This is equivalent to the machine shown in SimpleMachine.
@Autowired
StateRepository<MongoDbRepositoryState> stateRepository;

@Autowired
TransitionRepository<MongoDbRepositoryTransition> transitionRepository;

void addConfig() {
	MongoDbRepositoryState stateS1 = new MongoDbRepositoryState("S1", true);
	MongoDbRepositoryState stateS2 = new MongoDbRepositoryState("S2");
	MongoDbRepositoryState stateS3 = new MongoDbRepositoryState("S3");

	stateRepository.save(stateS1);
	stateRepository.save(stateS2);
	stateRepository.save(stateS3);

	MongoDbRepositoryTransition transitionS1ToS2 = new MongoDbRepositoryTransition(stateS1, stateS2, "E1");
	MongoDbRepositoryTransition transitionS2ToS3 = new MongoDbRepositoryTransition(stateS2, stateS3, "E2");

	transitionRepository.save(transitionS1ToS2);
	transitionRepository.save(transitionS2ToS3);
}
The following example is equivalent to the machine shown in SimpleSubMachine.
@Autowired
StateRepository<MongoDbRepositoryState> stateRepository;

@Autowired
TransitionRepository<MongoDbRepositoryTransition> transitionRepository;

void addConfig() {
	MongoDbRepositoryState stateS1 = new MongoDbRepositoryState("S1", true);
	MongoDbRepositoryState stateS2 = new MongoDbRepositoryState("S2");
	MongoDbRepositoryState stateS3 = new MongoDbRepositoryState("S3");

	MongoDbRepositoryState stateS21 = new MongoDbRepositoryState("S21", true);
	stateS21.setParentState(stateS2);
	MongoDbRepositoryState stateS22 = new MongoDbRepositoryState("S22");
	stateS22.setParentState(stateS2);

	stateRepository.save(stateS1);
	stateRepository.save(stateS2);
	stateRepository.save(stateS3);
	stateRepository.save(stateS21);
	stateRepository.save(stateS22);

	MongoDbRepositoryTransition transitionS1ToS2 = new MongoDbRepositoryTransition(stateS1, stateS2, "E1");
	MongoDbRepositoryTransition transitionS2ToS3 = new MongoDbRepositoryTransition(stateS21, stateS22, "E2");
	MongoDbRepositoryTransition transitionS21ToS22 = new MongoDbRepositoryTransition(stateS2, stateS3, "E3");

	transitionRepository.save(transitionS1ToS2);
	transitionRepository.save(transitionS2ToS3);
	transitionRepository.save(transitionS21ToS22);
}
Repository Persistence
Apart from storing machine configuration (as shown in Repository Configuration), in an external repository, you canx also persist machines into repositories.
The StateMachineRepository interface is a central access point that
interacts with machine persistence and is backed by the entity class
RepositoryStateMachine.
JPA
The actual repository implementation for JPA is
JpaStateMachineRepository, which is backed by the entity class
JpaRepositoryStateMachine.
The following example shows the generic way to persist a machine for JPA:
@Autowired
StateMachineRepository<JpaRepositoryStateMachine> stateMachineRepository;

void persist() {

	JpaRepositoryStateMachine machine = new JpaRepositoryStateMachine();
	machine.setMachineId("machine");
	machine.setState("S1");
	// raw byte[] representation of a context
	machine.setStateMachineContext(new byte[] { 0 });

	stateMachineRepository.save(machine);
}
Redis
The actual repository implementation for a Redis is
RedisStateMachineRepository, which is backed by the entity class
RedisRepositoryStateMachine.
The following example shows the generic way to persist a machine for Redis:
@Autowired
StateMachineRepository<RedisRepositoryStateMachine> stateMachineRepository;

void persist() {

	RedisRepositoryStateMachine machine = new RedisRepositoryStateMachine();
	machine.setMachineId("machine");
	machine.setState("S1");
	// raw byte[] representation of a context
	machine.setStateMachineContext(new byte[] { 0 });

	stateMachineRepository.save(machine);
}
MongoDB
The actual repository implementation for MongoDB is
MongoDbStateMachineRepository, which is backed by the entity class
MongoDbRepositoryStateMachine.
The following example shows the generic way to persist a machine for MongoDB:
@Autowired
StateMachineRepository<MongoDbRepositoryStateMachine> stateMachineRepository;

void persist() {

	MongoDbRepositoryStateMachine machine = new MongoDbRepositoryStateMachine();
	machine.setMachineId("machine");
	machine.setState("S1");
	// raw byte[] representation of a context
	machine.setStateMachineContext(new byte[] { 0 });

	stateMachineRepository.save(machine);
}
Recipes
This chapter contains documentation for existing built-in state machine recipes.
Spring Statemachine is a foundational framework. That is, it does not have much higher-level functionality or many dependencies beyond Spring Framework. Consequently, correctly using a state machine may be difficult. To help, we have created a set of recipe modules that address common use cases.
What exactly is a recipe? A state machine recipe is a module that addresses a common use case. In essence, a state machine recipe is both an example that we have tried to make it easy for you to reuse and extend.
| Recipes are a great way to make external contributions to the Spring Statemachine project. If you are not ready to contribute to the framework core itself, a custom and common recipe is a great way to share functionality with other users. |
Persist
The persist recipe is a simple utility that lets you use a single state machine instance to persist and update the state of an arbitrary item in a repository.
The recipe’s main class is PersistStateMachineHandler, which makes three assumptions:
-
An instance of a
StateMachine<String, String>needs to be used with aPersistStateMachineHandler. Note that states and Events are required to be type ofString. -
PersistStateChangeListenerneeds to be registered with handler to react to persist request. -
The
handleEventWithStatemethod is used to orchestrate state changes.
You can find a sample that shows how to use this recipe at Persist.
Tasks
The tasks recipe is a concept to run DAG (Directed Acrylic Graph) of Runnable instances that use
a state machine. This recipe has been developed from ideas introduced
in Tasks sample.
The next image shows the generic concept of a state machine. In this state chart,
everything under TASKS shows a generic concept of how a single
task is executed. Because this recipe lets you register a deep
hierarchical DAG of tasks (meaning a real state chart would be a deeply
nested collection of sub-states and regions), we have no need to be
more precise.
For example, if you have only two registered tasks, the following state chart
would be correct when TASK_id is replaced with TASK_1 and TASK_2 (assuming
the registered tasks IDs are 1 and 2).
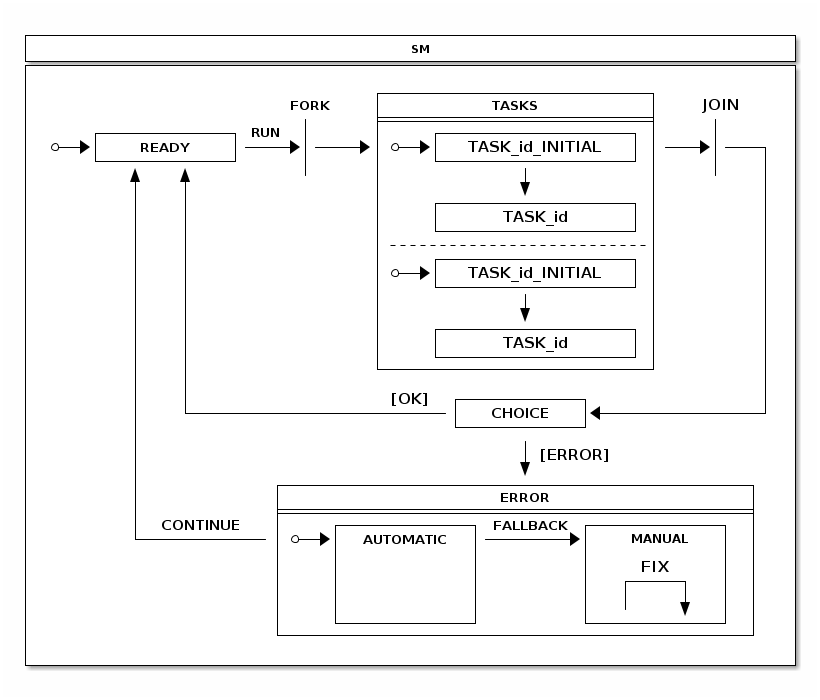
Executing a Runnable may result an error. Especially if a complex
DAG of tasks is involved, you want to have a way to handle
task execution errors and then have a way to continue execution
without executing already successfully executed tasks. Also,
it would be nice if some execution errors can be handled
automatically. As a last fallback, if an error cannot be handled
automatically, the state machine is put into a state where the user can handle
errors manually.
TasksHandler contains a builder method to configure a handler instance
and follows a simple builder pattern. You can use this builder to
register Runnable tasks and TasksListener instances and define
StateMachinePersist hook.
Now we can take a simple Runnable that runs a simple sleep as the following
example shows:
private Runnable sleepRunnable() {
	return new Runnable() {

		@Override
		public void run() {
			try {
				Thread.sleep(2000);
			} catch (InterruptedException e) {
			}
		}
	};
}| The preceding example is the base for all of the examples in this chapter. |
To execute multiple sleepRunnable tasks, you can register tasks and
execute runTasks() method from TasksHandler, as the following example shows:
TasksHandler handler = TasksHandler.builder()
		.task("1", sleepRunnable())
		.task("2", sleepRunnable())
		.task("3", sleepRunnable())
		.build();

handler.runTasks();
To listen to what is happening with a task execution, you can register an instance of
a TasksListener with a TasksHandler. This recipe
provides an adapter TasksListenerAdapter if you do not want to
implement a full interface. The listener provides a various hooks to
listen tasks execution events. The following example shows the definition of the
MyTasksListener class:
private class MyTasksListener extends TasksListenerAdapter {

	@Override
	public void onTasksStarted() {
	}

	@Override
	public void onTasksContinue() {
	}

	@Override
	public void onTaskPreExecute(Object id) {
	}

	@Override
	public void onTaskPostExecute(Object id) {
	}

	@Override
	public void onTaskFailed(Object id, Exception exception) {
	}

	@Override
	public void onTaskSuccess(Object id) {
	}

	@Override
	public void onTasksSuccess() {
	}

	@Override
	public void onTasksError() {
	}

	@Override
	public void onTasksAutomaticFix(TasksHandler handler, StateContext<String, String> context) {
	}
}
You can either register listeners by using a builder or register them directly with a
TasksHandler as the following example shows:
MyTasksListener listener1 = new MyTasksListener();
MyTasksListener listener2 = new MyTasksListener();

TasksHandler handler = TasksHandler.builder()
		.task("1", sleepRunnable())
		.task("2", sleepRunnable())
		.task("3", sleepRunnable())
		.listener(listener1)
		.build();

handler.addTasksListener(listener2);
handler.removeTasksListener(listener2);

handler.runTasks();
Every task needs to have a unique identifier, and (optionally) a task can be defined to be a sub-task. Effectively, this creates a DAG of tasks. The following example shows how to create a deep nested DAG of tasks:
TasksHandler handler = TasksHandler.builder()
		.task("1", sleepRunnable())
		.task("1", "12", sleepRunnable())
		.task("1", "13", sleepRunnable())
		.task("2", sleepRunnable())
		.task("2", "22", sleepRunnable())
		.task("2", "23", sleepRunnable())
		.task("3", sleepRunnable())
		.task("3", "32", sleepRunnable())
		.task("3", "33", sleepRunnable())
		.build();

handler.runTasks();
When an error happens and the state machine running these tasks goes into an
ERROR state, you can call fixCurrentProblems handler method to
reset the current state of the tasks kept in the state machine’s extended state
variables. You can then use the continueFromError handler method to
instruct the state machine to transition from the ERROR state back to the
READY state, where you can again run tasks.
The following example shows how to do so:
TasksHandler handler = TasksHandler.builder()
		.task("1", sleepRunnable())
		.task("2", sleepRunnable())
		.task("3", sleepRunnable())
		.build();

		handler.runTasks();
		handler.fixCurrentProblems();
		handler.continueFromError();
State Machine Examples
This part of the reference documentation explains the use of state machines together with sample code and UML state charts. We use a few shortcuts when representing the relationship between a state chart, Spring Statemachine configuration, and what an application does with a state machine. For complete examples, you should study the samples repository.
Samples are built directly from a main source distribution during a normal build cycle. This chapter includes the following samples:
The following listing shows how to build the samples:
./gradlew clean build -x testEvery sample is located in its own directory under
spring-statemachine-samples. The samples are based on Spring Boot and
Spring Shell, and you can find the usual Boot fat jars under every sample
project’s build/libs directory.
The filenames for the jars to which we refer in this section are populated during a
build of this document, meaning that, if you build samples from
master, you have files with a BUILD-SNAPSHOT postfix.
|
Turnstile
Turnstile is a simple device that gives you access if payment is
made. It is a concept that is simple to model using a state machine. In its
simplest, form there are only two states: LOCKED and UNLOCKED. Two
events, COIN and PUSH can happen, depending on whether someone
makes a payment or tries to go through the turnstile.
The following image shows the state machine:
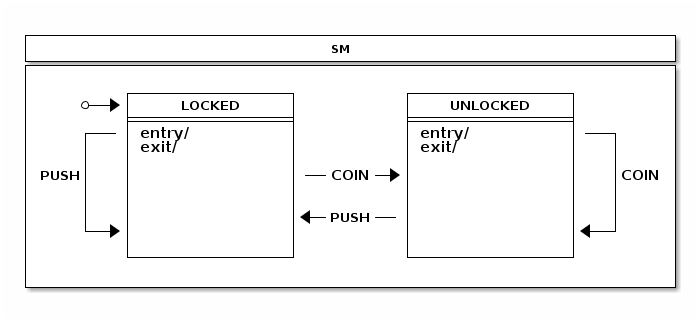
The following listing shows the enumeration that defines the possible states:
public enum States {
    LOCKED, UNLOCKED
}
The following listing shows the enumeration that defines the events:
public enum Events {
    COIN, PUSH
}
The following listing shows the code that configures the state machine:
@Configuration
@EnableStateMachine
static class StateMachineConfig
		extends EnumStateMachineConfigurerAdapter<States, Events> {

	@Override
	public void configure(StateMachineStateConfigurer<States, Events> states)
			throws Exception {
		states
			.withStates()
				.initial(States.LOCKED)
				.states(EnumSet.allOf(States.class));
	}

	@Override
	public void configure(StateMachineTransitionConfigurer<States, Events> transitions)
			throws Exception {
		transitions
			.withExternal()
				.source(States.LOCKED)
				.target(States.UNLOCKED)
				.event(Events.COIN)
				.and()
			.withExternal()
				.source(States.UNLOCKED)
				.target(States.LOCKED)
				.event(Events.PUSH);
	}

}
You can see how this sample state machine interacts with events by
running the turnstile sample. The following listing shows how to do so
and shows the command’s output:
$ java -jar spring-statemachine-samples-turnstile-3.0.1.jar

sm>sm print
+----------------------------------------------------------------+
|                              SM                                |
+----------------------------------------------------------------+
|                                                                |
|         +----------------+          +----------------+         |
|     *-->|     LOCKED     |          |    UNLOCKED    |         |
|         +----------------+          +----------------+         |
|     +---| entry/         |          | entry/         |---+     |
|     |   | exit/          |          | exit/          |   |     |
|     |   |                |          |                |   |     |
| PUSH|   |                |---COIN-->|                |   |COIN |
|     |   |                |          |                |   |     |
|     |   |                |          |                |   |     |
|     |   |                |<--PUSH---|                |   |     |
|     +-->|                |          |                |<--+     |
|         |                |          |                |         |
|         +----------------+          +----------------+         |
|                                                                |
+----------------------------------------------------------------+

sm>sm start
State changed to LOCKED
State machine started

sm>sm event COIN
State changed to UNLOCKED
Event COIN send

sm>sm event PUSH
State changed to LOCKED
Event PUSH send
Turnstile Reactive
Turnstile reactive is an enhacement to Turnstile sample using same StateMachine concept and adding a reactive web layer communicating reactively with a StateMachine reactive interfaces.
StateMachineController is a simple @RestController where we autowire our StateMachine.
@Autowired
private StateMachine<States, Events> stateMachine;
We create first mapping to return a machine state. As state doesn’t come out from
a machine reactively, we can defer it so that when a returned Mono is subscribed,
actual state is requested.
@GetMapping("/state")
public Mono<States> state() {
	return Mono.defer(() -> Mono.justOrEmpty(stateMachine.getState().getId()));
}
To send a single event or multiple events to a machine we can use a Flux in both
incoming and outgoing layers. EventResult here is just for this sample and simply
wraps ResultType and event.
@PostMapping("/events")
public Flux<EventResult> events(@RequestBody Flux<EventData> eventData) {
	return eventData
		.filter(ed -> ed.getEvent() != null)
		.map(ed -> MessageBuilder.withPayload(ed.getEvent()).build())
		.flatMap(m -> stateMachine.sendEvent(Mono.just(m)))
		.map(EventResult::new);
}
You can use the following command to run the sample:
$ java -jar spring-statemachine-samples-turnstilereactive-3.0.1.jarExample of getting a state:
GET http://localhost:8080/stateWould then response:
"LOCKED"Example of sending an event:
POST http://localhost:8080/events
content-type: application/json

{
    "event": "COIN"
}
Would then response:
[
  {
    "event": "COIN",
    "resultType": "ACCEPTED"
  }
]
You can post multiple events:
POST http://localhost:8080/events
content-type: application/json

[
    {
        "event": "COIN"
    },
    {
        "event": "PUSH"
    }
]
Response then contains results for both events:
[
  {
    "event": "COIN",
    "resultType": "ACCEPTED"
  },
  {
    "event": "PUSH",
    "resultType": "ACCEPTED"
  }
]
Showcase
Showcase is a complex state machine that shows all possible transition topologies up to four levels of state nesting. The following image shows the state machine:

The following listing shows the enumeration that defines the possible states:
public enum States {
    S0, S1, S11, S12, S2, S21, S211, S212
}
The following listing shows the enumeration that defines the events:
public enum Events {
    A, B, C, D, E, F, G, H, I
}
The following listing shows the code that configures the state machine:
@Override
public void configure(StateMachineStateConfigurer<States, Events> states)
		throws Exception {
	states
		.withStates()
			.initial(States.S0, fooAction())
			.state(States.S0)
			.and()
			.withStates()
				.parent(States.S0)
				.initial(States.S1)
				.state(States.S1)
				.and()
				.withStates()
					.parent(States.S1)
					.initial(States.S11)
					.state(States.S11)
					.state(States.S12)
					.and()
			.withStates()
				.parent(States.S0)
				.state(States.S2)
				.and()
				.withStates()
					.parent(States.S2)
					.initial(States.S21)
					.state(States.S21)
					.and()
					.withStates()
						.parent(States.S21)
						.initial(States.S211)
						.state(States.S211)
						.state(States.S212);
}
The following listing shows the code that configures the state machine’s transitions:
@Override
public void configure(StateMachineTransitionConfigurer<States, Events> transitions)
		throws Exception {
	transitions
		.withExternal()
			.source(States.S1).target(States.S1).event(Events.A)
			.guard(foo1Guard())
			.and()
		.withExternal()
			.source(States.S1).target(States.S11).event(Events.B)
			.and()
		.withExternal()
			.source(States.S21).target(States.S211).event(Events.B)
			.and()
		.withExternal()
			.source(States.S1).target(States.S2).event(Events.C)
			.and()
		.withExternal()
			.source(States.S2).target(States.S1).event(Events.C)
			.and()
		.withExternal()
			.source(States.S1).target(States.S0).event(Events.D)
			.and()
		.withExternal()
			.source(States.S211).target(States.S21).event(Events.D)
			.and()
		.withExternal()
			.source(States.S0).target(States.S211).event(Events.E)
			.and()
		.withExternal()
			.source(States.S1).target(States.S211).event(Events.F)
			.and()
		.withExternal()
			.source(States.S2).target(States.S11).event(Events.F)
			.and()
		.withExternal()
			.source(States.S11).target(States.S211).event(Events.G)
			.and()
		.withExternal()
			.source(States.S211).target(States.S0).event(Events.G)
			.and()
		.withInternal()
			.source(States.S0).event(Events.H)
			.guard(foo0Guard())
			.action(fooAction())
			.and()
		.withInternal()
			.source(States.S2).event(Events.H)
			.guard(foo1Guard())
			.action(fooAction())
			.and()
		.withInternal()
			.source(States.S1).event(Events.H)
			.and()
		.withExternal()
			.source(States.S11).target(States.S12).event(Events.I)
			.and()
		.withExternal()
			.source(States.S211).target(States.S212).event(Events.I)
			.and()
		.withExternal()
			.source(States.S12).target(States.S212).event(Events.I);

}
The following listing shows the code that configures the state machine’s actions and guards:
@Bean
public FooGuard foo0Guard() {
	return new FooGuard(0);
}

@Bean
public FooGuard foo1Guard() {
	return new FooGuard(1);
}

@Bean
public FooAction fooAction() {
	return new FooAction();
}
The following listing shows how the single action is defined:
private static class FooAction implements Action<States, Events> {

	@Override
	public void execute(StateContext<States, Events> context) {
		Map<Object, Object> variables = context.getExtendedState().getVariables();
		Integer foo = context.getExtendedState().get("foo", Integer.class);
		if (foo == null) {
			log.info("Init foo to 0");
			variables.put("foo", 0);
		} else if (foo == 0) {
			log.info("Switch foo to 1");
			variables.put("foo", 1);
		} else if (foo == 1) {
			log.info("Switch foo to 0");
			variables.put("foo", 0);
		}
	}
}
The following listing shows how the single guard is defined:
private static class FooGuard implements Guard<States, Events> {

	private final int match;

	public FooGuard(int match) {
		this.match = match;
	}

	@Override
	public boolean evaluate(StateContext<States, Events> context) {
		Object foo = context.getExtendedState().getVariables().get("foo");
		return !(foo == null || !foo.equals(match));
	}
}
The following listing shows the output that this state machine produces when it runs and various events are sent to it:
sm>sm start
Init foo to 0
Entry state S0
Entry state S1
Entry state S11
State machine started

sm>sm event A
Event A send

sm>sm event C
Exit state S11
Exit state S1
Entry state S2
Entry state S21
Entry state S211
Event C send

sm>sm event H
Switch foo to 1
Internal transition source=S0
Event H send

sm>sm event C
Exit state S211
Exit state S21
Exit state S2
Entry state S1
Entry state S11
Event C send

sm>sm event A
Exit state S11
Exit state S1
Entry state S1
Entry state S11
Event A send
In the preceding output, we can see that:
-
The state machine is started, which takes it to its initial state (
S11) through superstates (S1) and (S0). Also, the extended state variable,foo, is initialized to0. -
We try to execute a self transition in state
S1with eventA, but nothing happens because the transition is guarded by variablefooto be1. -
We send event
C, which takes us to the other state machine, where the initial state (S211) and its superstates are entered. In there, we can use eventH, which does a simple internal transition to flip thefoovariable. Then we go back by using eventC. -
Event
Ais sent again, and nowS1does a self transition because the guard evaluates totrue.
The following example offers a closer look at how hierarchical states and their event handling works:
sm>sm variables
No variables

sm>sm start
Init foo to 0
Entry state S0
Entry state S1
Entry state S11
State machine started

sm>sm variables
foo=0

sm>sm event H
Internal transition source=S1
Event H send

sm>sm variables
foo=0

sm>sm event C
Exit state S11
Exit state S1
Entry state S2
Entry state S21
Entry state S211
Event C send

sm>sm variables
foo=0

sm>sm event H
Switch foo to 1
Internal transition source=S0
Event H send

sm>sm variables
foo=1

sm>sm event H
Switch foo to 0
Internal transition source=S2
Event H send

sm>sm variables
foo=0
In the preceding sample:
-
We print extended state variables in various stages.
-
With event
H, we end up running an internal transition, which is logged with its source state. -
Note how event
His handled in different states (S0,S1, andS2). This is a good example of how hierarchical states and their event handling works. If stateS2is unable to handle eventHdue to a guard condition, its parent is checked next. This guarantees that, while the machine is on stateS2, thefooflag is always flipped around. However, in stateS1, eventHalways matches to its dummy transition without guard or action, so it never happens.
CD Player
CD Player is a sample which resembles a use case that many people have
used in the real world. CD Player itself is a really simple entity that allows a
user to open a deck, insert or change a disk, and then drive the player’s
functionality by pressing various buttons (eject, play,
stop, pause, rewind, and backward).
How many of us have really given thought to what it will take to make code that interacts with hardware to drive a CD Player. Yes, the concept of a player is simple, but, if you look behind the scenes, things actually get a bit convoluted.
You have probably noticed that, if your deck is open and you press play, the deck closes and a song starts to play (if a CD was inserted). In a sense, when the deck is open, you first need to close it and then try to start playing (again, if a CD is actually inserted). Hopefully, you have now realized that a simple CD Player is so simple. Sure, you can wrap all this with a simple class that has a few boolean variables and probably a few nested if-else clauses. That will do the job, but what about if you need to make all this behavior much more complex? Do you really want to keep adding more flags and if-else clauses?
The following image shows the state machine for our simple CD player:
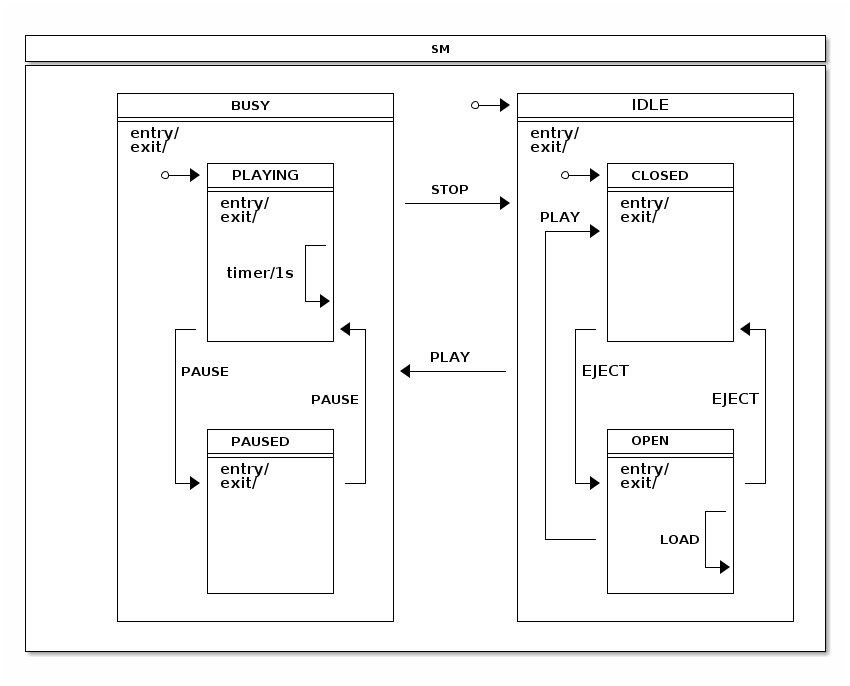
The rest of this section goes through how this sample and its state machine is designed and
how those two interacts with each other. The following three configuration sections
are used within an EnumStateMachineConfigurerAdapter.
@Override
public void configure(StateMachineStateConfigurer<States, Events> states)
		throws Exception {
	states
		.withStates()
			.initial(States.IDLE)
			.state(States.IDLE)
			.and()
			.withStates()
				.parent(States.IDLE)
				.initial(States.CLOSED)
				.state(States.CLOSED, closedEntryAction(), null)
				.state(States.OPEN)
				.and()
		.withStates()
			.state(States.BUSY)
			.and()
			.withStates()
				.parent(States.BUSY)
				.initial(States.PLAYING)
				.state(States.PLAYING)
				.state(States.PAUSED);

}
@Override
public void configure(StateMachineTransitionConfigurer<States, Events> transitions)
throws Exception {
transitions
.withExternal()
.source(States.CLOSED).target(States.OPEN).event(Events.EJECT)
.and()
.withExternal()
.source(States.OPEN).target(States.CLOSED).event(Events.EJECT)
.and()
.withExternal()
.source(States.OPEN).target(States.CLOSED).event(Events.PLAY)
.and()
.withExternal()
.source(States.PLAYING).target(States.PAUSED).event(Events.PAUSE)
.and()
.withInternal()
.source(States.PLAYING)
.action(playingAction())
.timer(1000)
.and()
.withInternal()
.source(States.PLAYING).event(Events.BACK)
.action(trackAction())
.and()
.withInternal()
.source(States.PLAYING).event(Events.FORWARD)
.action(trackAction())
.and()
.withExternal()
.source(States.PAUSED).target(States.PLAYING).event(Events.PAUSE)
.and()
.withExternal()
.source(States.BUSY).target(States.IDLE).event(Events.STOP)
.and()
.withExternal()
.source(States.IDLE).target(States.BUSY).event(Events.PLAY)
.action(playAction())
.guard(playGuard())
.and()
.withInternal()
.source(States.OPEN).event(Events.LOAD).action(loadAction());
}@Bean
public ClosedEntryAction closedEntryAction() {
return new ClosedEntryAction();
}
@Bean
public LoadAction loadAction() {
return new LoadAction();
}
@Bean
public TrackAction trackAction() {
return new TrackAction();
}
@Bean
public PlayAction playAction() {
return new PlayAction();
}
@Bean
public PlayingAction playingAction() {
return new PlayingAction();
}
@Bean
public PlayGuard playGuard() {
return new PlayGuard();
}In the preceding configuration:
-
We used
EnumStateMachineConfigurerAdapterto configure states and transitions. -
The
CLOSEDandOPENstates are defined as substates ofIDLE, and thePLAYINGandPAUSEDstates are defined as substates ofBUSY. -
With the
CLOSEDstate, we added an entry action as a bean calledclosedEntryAction. -
In the transitions we mostly map events to expected state transitions, such as
EJECTclosing and opening a deck andPLAY,STOP, andPAUSEdoing their natural transitions. For other transitions, we did the following:-
For source state
PLAYING, we added a timer trigger, which is needed to automatically track elapsed time within a playing track and to have a facility for making the decision about when to switch the to next track. -
For the
PLAYevent, if the source state isIDLEand the target state isBUSY, we defined an action calledplayActionand a guard calledplayGuard. -
For the
LOADevent and theOPENstate, we defined an internal transition with an action calledloadAction, which tracks inserting a disc with extended-state variables. -
The
PLAYINGstate defines three internal transitions. One is triggered by a timer that runs an action calledplayingAction, which updates the extended state variables. The other two transitions usetrackActionwith different events (BACKandFORWARD, respectively) to handle when the user wants to go back or forward in tracks.
-
This machine has only have six states, which are defined by the following enumeration:
public enum States {
	// super state of PLAYING and PAUSED
    BUSY,
    PLAYING,
    PAUSED,
	// super state of CLOSED and OPEN
    IDLE,
    CLOSED,
    OPEN
}
Events represent the buttons the user can press and whether the user loads a disc into the player. The following enumeration defines the events:
public enum Events {
    PLAY, STOP, PAUSE, EJECT, LOAD, FORWARD, BACK
}
The cdPlayer and library beans are used to drive the application.
The following listing shows the definition of these two beans:
@Bean
public CdPlayer cdPlayer() {
	return new CdPlayer();
}

@Bean
public Library library() {
	return Library.buildSampleLibrary();
}
We define extended state variable keys as simple enumerations, as the following listing shows:
public enum Variables {
	CD, TRACK, ELAPSEDTIME
}

public enum Headers {
	TRACKSHIFT
}
We wanted to make this sample type safe, so we define our own
annotation (@StatesOnTransition), which has a mandatory meta
annotation (@OnTransition).
The following listing defines the @StatesOnTransition annotation:
@Target(ElementType.METHOD)
@Retention(RetentionPolicy.RUNTIME)
@OnTransition
public @interface StatesOnTransition {

	States[] source() default {};

	States[] target() default {};

}
ClosedEntryAction is an entry action for the CLOSED state, to
send a PLAY event to the state machine if a disc is present.
The following listing defines ClosedEntryAction:
public static class ClosedEntryAction implements Action<States, Events> {

	@Override
	public void execute(StateContext<States, Events> context) {
		if (context.getTransition() != null
				&& context.getEvent() == Events.PLAY
				&& context.getTransition().getTarget().getId() == States.CLOSED
				&& context.getExtendedState().getVariables().get(Variables.CD) != null) {
			context.getStateMachine()
				.sendEvent(Mono.just(MessageBuilder
					.withPayload(Events.PLAY).build()))
				.subscribe();
		}
	}
}
LoadAction update an extended state variable if event
headers contain information about a disc to load.
The following listing defines LoadAction:
public static class LoadAction implements Action<States, Events> {

	@Override
	public void execute(StateContext<States, Events> context) {
		Object cd = context.getMessageHeader(Variables.CD);
		context.getExtendedState().getVariables().put(Variables.CD, cd);
	}
}
PlayAction resets the player’s elapsed time, which is kept as
an extended state variable.
The following listing defines PlayAction:
public static class PlayAction implements Action<States, Events> {

	@Override
	public void execute(StateContext<States, Events> context) {
		context.getExtendedState().getVariables().put(Variables.ELAPSEDTIME, 0l);
		context.getExtendedState().getVariables().put(Variables.TRACK, 0);
	}
}
PlayGuard guards the transition from IDLE to BUSY with the
PLAY event if the CD extended state variable does not indicate that a
disc has been loaded.
The following listing defines PlayGuard:
public static class PlayGuard implements Guard<States, Events> {

	@Override
	public boolean evaluate(StateContext<States, Events> context) {
		ExtendedState extendedState = context.getExtendedState();
		return extendedState.getVariables().get(Variables.CD) != null;
	}
}
PlayingAction updates an extended state variable called ELAPSEDTIME, which
the player can use to read and update its LCD status display. PlayingAction also handles
track shifting when the user goe back or forward in tracks.
The following example defines PlayingAction:
public static class PlayingAction implements Action<States, Events> {

	@Override
	public void execute(StateContext<States, Events> context) {
		Map<Object, Object> variables = context.getExtendedState().getVariables();
		Object elapsed = variables.get(Variables.ELAPSEDTIME);
		Object cd = variables.get(Variables.CD);
		Object track = variables.get(Variables.TRACK);
		if (elapsed instanceof Long) {
			long e = ((Long)elapsed) + 1000l;
			if (e > ((Cd) cd).getTracks()[((Integer) track)].getLength()*1000) {
				context.getStateMachine()
					.sendEvent(Mono.just(MessageBuilder
						.withPayload(Events.FORWARD)
						.setHeader(Headers.TRACKSHIFT.toString(), 1).build()))
					.subscribe();
			} else {
				variables.put(Variables.ELAPSEDTIME, e);
			}
		}
	}
}
TrackAction handles track shift actions when the user goes back or forward
in tracks. If a track is the last on a disc, playing is stopped and the STOP
event is sent to a state machine.
The following example defines TrackAction:
public static class TrackAction implements Action<States, Events> {

	@Override
	public void execute(StateContext<States, Events> context) {
		Map<Object, Object> variables = context.getExtendedState().getVariables();
		Object trackshift = context.getMessageHeader(Headers.TRACKSHIFT.toString());
		Object track = variables.get(Variables.TRACK);
		Object cd = variables.get(Variables.CD);
		if (trackshift instanceof Integer && track instanceof Integer && cd instanceof Cd) {
			int next = ((Integer)track) + ((Integer)trackshift);
			if (next >= 0 &&  ((Cd)cd).getTracks().length > next) {
				variables.put(Variables.ELAPSEDTIME, 0l);
				variables.put(Variables.TRACK, next);
			} else if (((Cd)cd).getTracks().length <= next) {
				context.getStateMachine()
					.sendEvent(Mono.just(MessageBuilder
						.withPayload(Events.STOP).build()))
					.subscribe();
			}
		}
	}
}
One other important aspect of state machines is that they have their
own responsibilities (mostly around handling states) and that all application
level logic should be kept outside. This means that applications need
to have a ways to interact with a state machine. Also, note
that we annotated CdPlayer with @WithStateMachine, which instructs a
state machine to find methods from your POJO, which are then called
with various transitions.
The following example shows how it updates its LCD status display:
@OnTransition(target = "BUSY")
public void busy(ExtendedState extendedState) {
	Object cd = extendedState.getVariables().get(Variables.CD);
	if (cd != null) {
		cdStatus = ((Cd)cd).getName();
	}
}
In the preceding example, we use the @OnTransition annotation to hook a callback
when a transition happens with a target state of BUSY.
The following listing shows how our state machine handles whether the player is closed:
@StatesOnTransition(target = {States.CLOSED, States.IDLE})
public void closed(ExtendedState extendedState) {
	Object cd = extendedState.getVariables().get(Variables.CD);
	if (cd != null) {
		cdStatus = ((Cd)cd).getName();
	} else {
		cdStatus = "No CD";
	}
	trackStatus = "";
}
@OnTransition (which we used in the preceding examples) can only be
used with strings that are matched from enumerations. @StatesOnTransition
lets you create your own type-safe annotations that use real enumerations.
The following example shows how this state machine actually works.
sm>sm start
Entry state IDLE
Entry state CLOSED
State machine started

sm>cd lcd
No CD

sm>cd library
0: Greatest Hits
  0: Bohemian Rhapsody  05:56
  1: Another One Bites the Dust  03:36
1: Greatest Hits II
  0: A Kind of Magic  04:22
  1: Under Pressure  04:08

sm>cd eject
Exit state CLOSED
Entry state OPEN

sm>cd load 0
Loading cd Greatest Hits

sm>cd play
Exit state OPEN
Entry state CLOSED
Exit state CLOSED
Exit state IDLE
Entry state BUSY
Entry state PLAYING

sm>cd lcd
Greatest Hits Bohemian Rhapsody 00:03

sm>cd forward

sm>cd lcd
Greatest Hits Another One Bites the Dust 00:04

sm>cd stop
Exit state PLAYING
Exit state BUSY
Entry state IDLE
Entry state CLOSED

sm>cd lcd
Greatest Hits
In the preceding run:
-
The state machine is started, which causes the machine to be initialized.
-
The CD player’s LCD screen status is printed.
-
The CD library is printed.
-
The CD player’s deck is opened.
-
The CD with index 0 is loaded into a deck.
-
Play causes the deck to get closed and immediate play, because a disc was inserted.
-
We print the LCD status and request the next track.
-
We stop playing.
Tasks
The Tasks sample demonstrates parallel task handling within regions and adds error handling to either automatically or manually fix task problems before continuing back to a state where the tasks can be run again. The following image shows the Tasks state machine:
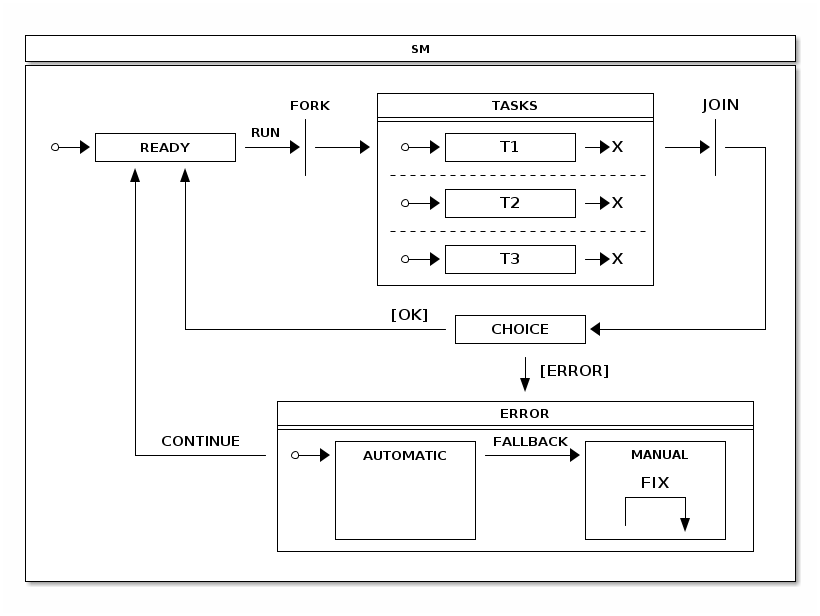
On a high level, in this state machine:
-
We always try to get into the
READYstate so that we can use the RUN event to execute tasks. -
Tkhe
TASKSstate, which is composed of three independent regions, has been put in the middle ofFORKandJOINstates, which will cause the regions to go into their initial states and to be joined by their end states. -
From the
JOINstate, we automatically go into aCHOICEstate, which checks for the existence of error flags in extended state variables. Tasks can set these flags, and doing so gives theCHOICEstate the ability to go into theERRORstate, where errors can be handled either automatically or manually. -
The
AUTOMATICstate inERRORcan try to automatically fix an error and goes back toREADYif it succeeds. If the error is something what cannot be handled automatically, user intervention is needed and the machine is put into theMANUALstate by theFALLBACKevent.
The following listing shows the enumeration that defines the possible states:
public enum States {
    READY,
    FORK, JOIN, CHOICE,
    TASKS, T1, T1E, T2, T2E, T3, T3E,
    ERROR, AUTOMATIC, MANUAL
}
The following listing shows the enumeration that defines the events:
public enum Events {
    RUN, FALLBACK, CONTINUE, FIX;
}
The following listing configures the possible states:
@Override
public void configure(StateMachineStateConfigurer<States, Events> states)
		throws Exception {
	states
		.withStates()
			.initial(States.READY)
			.fork(States.FORK)
			.state(States.TASKS)
			.join(States.JOIN)
			.choice(States.CHOICE)
			.state(States.ERROR)
			.and()
			.withStates()
				.parent(States.TASKS)
				.initial(States.T1)
				.end(States.T1E)
				.and()
			.withStates()
				.parent(States.TASKS)
				.initial(States.T2)
				.end(States.T2E)
				.and()
			.withStates()
				.parent(States.TASKS)
				.initial(States.T3)
				.end(States.T3E)
				.and()
			.withStates()
				.parent(States.ERROR)
				.initial(States.AUTOMATIC)
				.state(States.AUTOMATIC, automaticAction(), null)
				.state(States.MANUAL);
}
The following listing configures the possible transitions:
@Override
public void configure(StateMachineTransitionConfigurer<States, Events> transitions)
		throws Exception {
	transitions
		.withExternal()
			.source(States.READY).target(States.FORK)
			.event(Events.RUN)
			.and()
		.withFork()
			.source(States.FORK).target(States.TASKS)
			.and()
		.withExternal()
			.source(States.T1).target(States.T1E)
			.and()
		.withExternal()
			.source(States.T2).target(States.T2E)
			.and()
		.withExternal()
			.source(States.T3).target(States.T3E)
			.and()
		.withJoin()
			.source(States.TASKS).target(States.JOIN)
			.and()
		.withExternal()
			.source(States.JOIN).target(States.CHOICE)
			.and()
		.withChoice()
			.source(States.CHOICE)
			.first(States.ERROR, tasksChoiceGuard())
			.last(States.READY)
			.and()
		.withExternal()
			.source(States.ERROR).target(States.READY)
			.event(Events.CONTINUE)
			.and()
		.withExternal()
			.source(States.AUTOMATIC).target(States.MANUAL)
			.event(Events.FALLBACK)
			.and()
		.withInternal()
			.source(States.MANUAL)
			.action(fixAction())
			.event(Events.FIX);
}
The following guard sends a choice entry into the ERROR state and needs to
return TRUE if an error has happened. This guard checks that
all extended state variables(T1, T2, and T3) are TRUE.
@Bean
public Guard<States, Events> tasksChoiceGuard() {
	return new Guard<States, Events>() {

		@Override
		public boolean evaluate(StateContext<States, Events> context) {
			Map<Object, Object> variables = context.getExtendedState().getVariables();
			return !(ObjectUtils.nullSafeEquals(variables.get("T1"), true)
					&& ObjectUtils.nullSafeEquals(variables.get("T2"), true)
					&& ObjectUtils.nullSafeEquals(variables.get("T3"), true));
		}
	};
}
The following actions below send events to the state machine to request the next step, which is either to fall back or to continue back to ready.
@Bean
public Action<States, Events> automaticAction() {
	return new Action<States, Events>() {

		@Override
		public void execute(StateContext<States, Events> context) {
			Map<Object, Object> variables = context.getExtendedState().getVariables();
			if (ObjectUtils.nullSafeEquals(variables.get("T1"), true)
					&& ObjectUtils.nullSafeEquals(variables.get("T2"), true)
					&& ObjectUtils.nullSafeEquals(variables.get("T3"), true)) {
				context.getStateMachine()
					.sendEvent(Mono.just(MessageBuilder
						.withPayload(Events.CONTINUE).build()))
					.subscribe();
			} else {
				context.getStateMachine()
					.sendEvent(Mono.just(MessageBuilder
						.withPayload(Events.FALLBACK).build()))
					.subscribe();
			}
		}
	};
}

@Bean
public Action<States, Events> fixAction() {
	return new Action<States, Events>() {

		@Override
		public void execute(StateContext<States, Events> context) {
			Map<Object, Object> variables = context.getExtendedState().getVariables();
			variables.put("T1", true);
			variables.put("T2", true);
			variables.put("T3", true);
			context.getStateMachine()
				.sendEvent(Mono.just(MessageBuilder
					.withPayload(Events.CONTINUE).build()))
				.subscribe();
		}
	};
}
Default region execution is synchronous meaning a regions would be processed
sequentially. In this sample we simply want all task regions to get processed
parallel. This can be accomplished by defining RegionExecutionPolicy:
@Override
public void configure(StateMachineConfigurationConfigurer<States, Events> config)
		throws Exception {
	config
		.withConfiguration()
			.regionExecutionPolicy(RegionExecutionPolicy.PARALLEL);
}
The following example shows how this state machine actually works:
sm>sm start
State machine started
Entry state READY

sm>tasks run
Exit state READY
Entry state TASKS
run task on T2
run task on T1
run task on T3
run task on T2 done
run task on T1 done
run task on T3 done
Entry state T2
Entry state T1
Entry state T3
Exit state T2
Exit state T1
Exit state T3
Entry state T3E
Entry state T1E
Entry state T2E
Exit state TASKS
Entry state READY
In the preceding listing, we can see that tasks run multiple times. In the next listing, we introduce errors:
sm>tasks list
Tasks {T1=true, T3=true, T2=true}

sm>tasks fail T1

sm>tasks list
Tasks {T1=false, T3=true, T2=true}

sm>tasks run
Entry state TASKS
run task on T1
run task on T3
run task on T2
run task on T1 done
run task on T3 done
run task on T2 done
Entry state T1
Entry state T3
Entry state T2
Entry state T1E
Entry state T2E
Entry state T3E
Exit state TASKS
Entry state JOIN
Exit state JOIN
Entry state ERROR
Entry state AUTOMATIC
Exit state AUTOMATIC
Exit state ERROR
Entry state READY
In the preceding listing, if we simulate a failure for task T1, it is fixed automatically. In the next listing, we introduce more errors:
sm>tasks list
Tasks {T1=true, T3=true, T2=true}

sm>tasks fail T2

sm>tasks run
Entry state TASKS
run task on T2
run task on T1
run task on T3
run task on T2 done
run task on T1 done
run task on T3 done
Entry state T2
Entry state T1
Entry state T3
Entry state T1E
Entry state T2E
Entry state T3E
Exit state TASKS
Entry state JOIN
Exit state JOIN
Entry state ERROR
Entry state AUTOMATIC
Exit state AUTOMATIC
Entry state MANUAL

sm>tasks fix
Exit state MANUAL
Exit state ERROR
Entry state READY
In the precding example, if we simulate failure for either task T2 or T3, the state
machine goes to the MANUAL state, where problem needs to be fixed manually
before it can go back to the READY state.
Washer
The washer sample demonstrates how to use a history state to recover a running state configuration with a simulated power-off situation.
Anyone who has ever used a washing machine knows that if you somehow pause the program, it continue from the same state when unpaused. You can implement this kind of behavior in a state machine by using a history pseudo state. The following image shows our state machine for a washer:
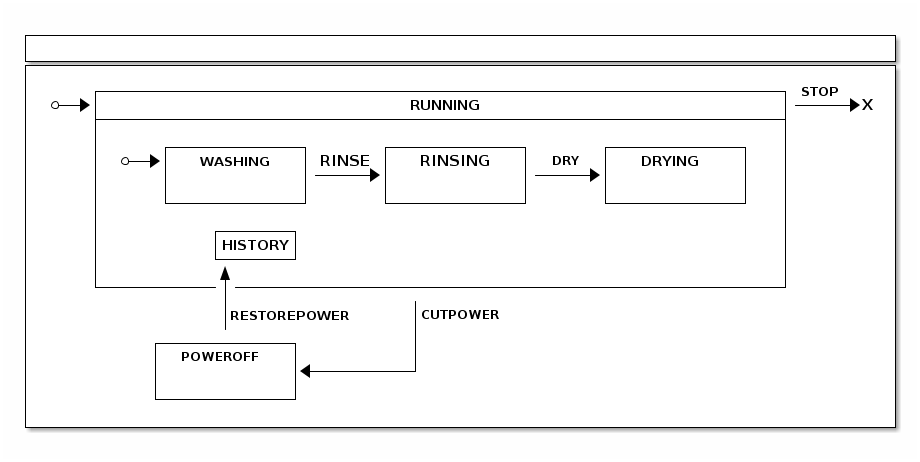
The following listing shows the enumeration that defines the possible states:
public enum States {
    RUNNING, HISTORY, END,
    WASHING, RINSING, DRYING,
    POWEROFF
}
The following listing shows the enumeration that defines the events:
public enum Events {
    RINSE, DRY, STOP,
    RESTOREPOWER, CUTPOWER
}
The following listing configures the possible states:
@Override
public void configure(StateMachineStateConfigurer<States, Events> states)
		throws Exception {
	states
		.withStates()
			.initial(States.RUNNING)
			.state(States.POWEROFF)
			.end(States.END)
			.and()
			.withStates()
				.parent(States.RUNNING)
				.initial(States.WASHING)
				.state(States.RINSING)
				.state(States.DRYING)
				.history(States.HISTORY, History.SHALLOW);
}
The following listing configures the possible transitions:
@Override
public void configure(StateMachineTransitionConfigurer<States, Events> transitions)
		throws Exception {
	transitions
		.withExternal()
			.source(States.WASHING).target(States.RINSING)
			.event(Events.RINSE)
			.and()
		.withExternal()
			.source(States.RINSING).target(States.DRYING)
			.event(Events.DRY)
			.and()
		.withExternal()
			.source(States.RUNNING).target(States.POWEROFF)
			.event(Events.CUTPOWER)
			.and()
		.withExternal()
			.source(States.POWEROFF).target(States.HISTORY)
			.event(Events.RESTOREPOWER)
			.and()
		.withExternal()
			.source(States.RUNNING).target(States.END)
			.event(Events.STOP);
}
The following example shows how this state machine actually works:
sm>sm start
Entry state RUNNING
Entry state WASHING
State machine started

sm>sm event RINSE
Exit state WASHING
Entry state RINSING
Event RINSE send

sm>sm event DRY
Exit state RINSING
Entry state DRYING
Event DRY send

sm>sm event CUTPOWER
Exit state DRYING
Exit state RUNNING
Entry state POWEROFF
Event CUTPOWER send

sm>sm event RESTOREPOWER
Exit state POWEROFF
Entry state RUNNING
Entry state WASHING
Entry state DRYING
Event RESTOREPOWER send
In the preceding run:
-
The state machine is started, which causes machine to get initialized.
-
The state machine goes to RINSING state.
-
The state machine goes to DRYING state.
-
The state machine cuts power and goes to POWEROFF state.
-
The state is restored from the HISTORY state, which takes state machine back to its previous known state.
Persist
Persist is a sample that uses the Persist recipe to demonstrate how database entry update logic can be controlled by a state machine.
The following image shows the state machine logic and configuration:
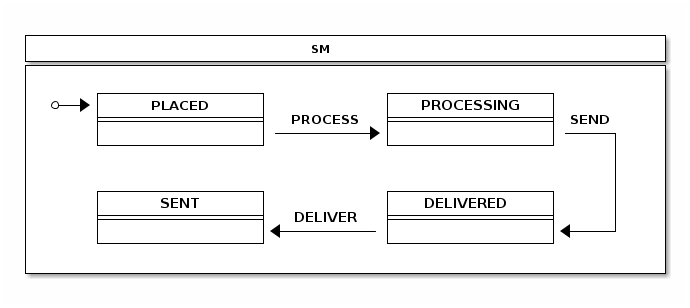
The following listing shows the state machine configuration:
@Configuration
@EnableStateMachine
static class StateMachineConfig
		extends StateMachineConfigurerAdapter<String, String> {

	@Override
	public void configure(StateMachineStateConfigurer<String, String> states)
			throws Exception {
		states
			.withStates()
				.initial("PLACED")
				.state("PROCESSING")
				.state("SENT")
				.state("DELIVERED");
	}

	@Override
	public void configure(StateMachineTransitionConfigurer<String, String> transitions)
			throws Exception {
		transitions
			.withExternal()
				.source("PLACED").target("PROCESSING")
				.event("PROCESS")
				.and()
			.withExternal()
				.source("PROCESSING").target("SENT")
				.event("SEND")
				.and()
			.withExternal()
				.source("SENT").target("DELIVERED")
				.event("DELIVER");
	}

}
The following configuration creates PersistStateMachineHandler:
@Configuration
static class PersistHandlerConfig {

	@Autowired
	private StateMachine<String, String> stateMachine;

	@Bean
	public Persist persist() {
		return new Persist(persistStateMachineHandler());
	}

	@Bean
	public PersistStateMachineHandler persistStateMachineHandler() {
		return new PersistStateMachineHandler(stateMachine);
	}

}
The following listing shows the Order class used with this sample:
public static class Order {
	int id;
	String state;

	public Order(int id, String state) {
		this.id = id;
		this.state = state;
	}

	@Override
	public String toString() {
		return "Order [id=" + id + ", state=" + state + "]";
	}

}
The following example shows the state machine’s output:
sm>persist db
Order [id=1, state=PLACED]
Order [id=2, state=PROCESSING]
Order [id=3, state=SENT]
Order [id=4, state=DELIVERED]

sm>persist process 1
Exit state PLACED
Entry state PROCESSING

sm>persist db
Order [id=2, state=PROCESSING]
Order [id=3, state=SENT]
Order [id=4, state=DELIVERED]
Order [id=1, state=PROCESSING]

sm>persist deliver 3
Exit state SENT
Entry state DELIVERED

sm>persist db
Order [id=2, state=PROCESSING]
Order [id=4, state=DELIVERED]
Order [id=1, state=PROCESSING]
Order [id=3, state=DELIVERED]
In the preceding run, the state machine:
-
Listed rows from an existing embedded database, which is already populated with sample data.
-
Requested to update order
1into thePROCESSINGstate. -
List database entries again and see that the state has been changed from
PLACEDtoPROCESSING. -
Update order
3to update its state fromSENTtoDELIVERED.
|
You may wonder where the database is, because there are literally no
signs of it in the sample code. The sample is based on Spring Boot and,
because the necessary classes are in a classpath, an embedded Spring Boot even creates an instance of |
Next, we need to handle state changes. The following listing shows how we do so:
public void change(int order, String event) {
Order o = jdbcTemplate.queryForObject("select id, state from orders where id = ?",
new RowMapper<Order>() {
public Order mapRow(ResultSet rs, int rowNum) throws SQLException {
return new Order(rs.getInt("id"), rs.getString("state"));
}
}, new Object[] { order });
handler.handleEventWithStateReactively(MessageBuilder
.withPayload(event).setHeader("order", order).build(), o.state)
.subscribe();
}Finally, we use a PersistStateChangeListener to update the database, as the
following listing shows:
private class LocalPersistStateChangeListener implements PersistStateChangeListener {
@Override
public void onPersist(State<String, String> state, Message<String> message,
Transition<String, String> transition, StateMachine<String, String> stateMachine) {
if (message != null && message.getHeaders().containsKey("order")) {
Integer order = message.getHeaders().get("order", Integer.class);
jdbcTemplate.update("update orders set state = ? where id = ?", state.getId(), order);
}
}
}Zookeeper
Zookeeper is a distributed version from the Turnstile sample.
This sample needs an external Zookeeper instance that is accessible from
localhost and has the default port and settings.
|
Configuration of this sample is almost the same as the turnstile sample. We
add only the configuration for the distributed state machine where we
configure StateMachineEnsemble, as the following listing shows:
@Override
public void configure(StateMachineConfigurationConfigurer<String, String> config) throws Exception {
config
.withDistributed()
.ensemble(stateMachineEnsemble());
}The actual StateMachineEnsemble needs to be created as a bean, together
with the CuratorFramework client, as the following example shows:
@Bean
public StateMachineEnsemble<String, String> stateMachineEnsemble() throws Exception {
return new ZookeeperStateMachineEnsemble<String, String>(curatorClient(), "/foo");
}
@Bean
public CuratorFramework curatorClient() throws Exception {
CuratorFramework client = CuratorFrameworkFactory.builder().defaultData(new byte[0])
.retryPolicy(new ExponentialBackoffRetry(1000, 3))
.connectString("localhost:2181").build();
client.start();
return client;
}For the next example, we need to create two different shell instances. We need to create one instance, see what happens, and then create the second instance. The following command starts the shell instances (remember to start only one instance for now):
@n1:~# java -jar spring-statemachine-samples-zookeeper-3.0.1.jarWhen state machine is started, its initial state is
LOCKED. Then it sends a COIN event to transition into UNLOCKED state.
The following example shows what happens:
sm>sm start
Entry state LOCKED
State machine started
sm>sm event COIN
Exit state LOCKED
Entry state UNLOCKED
Event COIN send
sm>sm state
UNLOCKEDNow you can open a second shell instance and start a state machine,
by using the same command that you used to start the first state machine. You should see
that the distributed state (UNLOCKED) is entered instead of the default
initial state (LOCKED).
The following example shows the state machine and its output:
sm>sm start
State machine started
sm>sm state
UNLOCKEDThen from either shell (we use second instance in the next example), send a
PUSH event to transit from the UNLOCKED into the LOCKED state.
The following example shows the state machine command and its output:
sm>sm event PUSH
Exit state UNLOCKED
Entry state LOCKED
Event PUSH sendIn the other shell (the first shell if you ran the preceding command in the second shell), you should see the state be changed automatically, based on distributed state kept in Zookeeper. The following example shows the state machine command and its output:
sm>Exit state UNLOCKED
Entry state LOCKEDWeb
Web is a distributed state machine example that uses a zookeeper state machine to handle distributed state. See Zookeeper.
| This example is meant to be run on multiple browser sessions against multiple different hosts. |
This sample uses a modified state machine structure from Showcase to work with a distributed state machine. The following image shows the state machine logic:
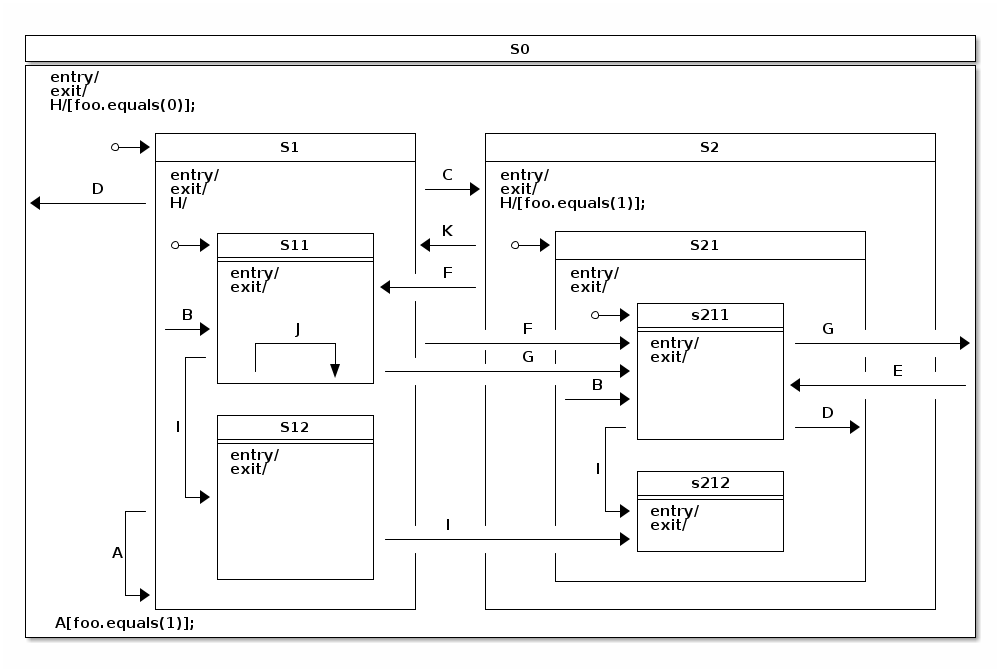
Due to the nature of this sample, an instance of a Zookeeper state machine is expected to
be available from a localhost for every individual sample instance.
|
This demonstration uses an example that starts three different sample instances.
If you run different instances on the same host, you need to
distinguish the port each one uses by adding --server.port=<myport> to the command.
Otherwise the default port for each host is 8080.
In this sample run, we have three hosts: n1, n2, and n3. Each one
has a local zookeeper instance running and a state machine sample running
on a port 8080.
In there different terminals, start the three different state machines by running the following command:
# java -jar spring-statemachine-samples-web-3.0.1.jarWhen all instances are running, you should see that all show similar
information when you access them with a browser. The states should be S0, S1, and S11.
The extended state variable named foo should have a value of 0. The main state is S11.

When you press the Event C button in any of the browser windows, the
distributed state is changed to S211, which is the target state
denoted by the transition associated with an event of type C.
The following image shows the change:
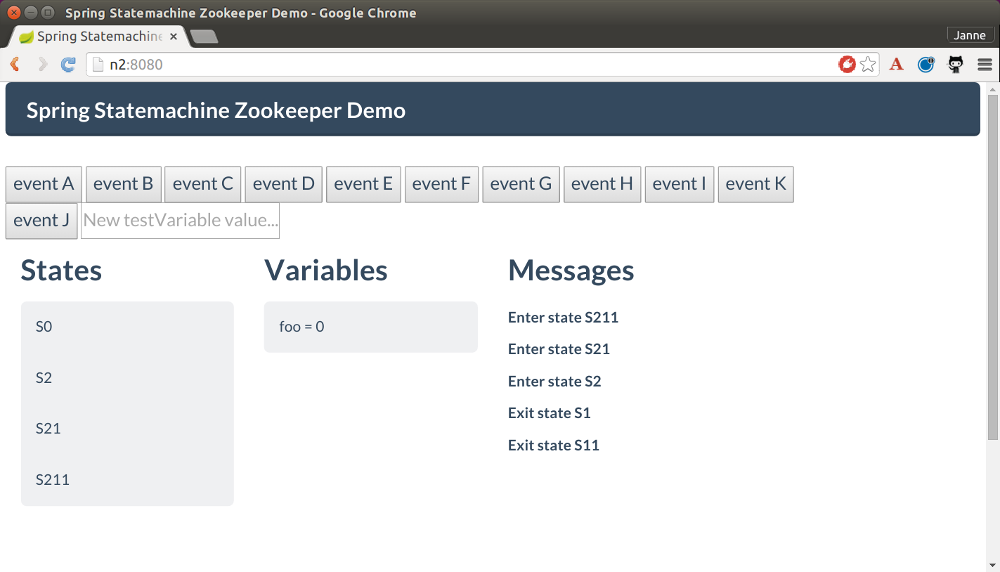
Now we can press the Event H button and see that the
internal transition runs on all state machines to change the
the value of the extended state variable named foo from 0 to 1. This change is
first done on the state machine that receives the event and is then propagated
to the other state machines. You should see only the variable named foo change
from 0 to 1.
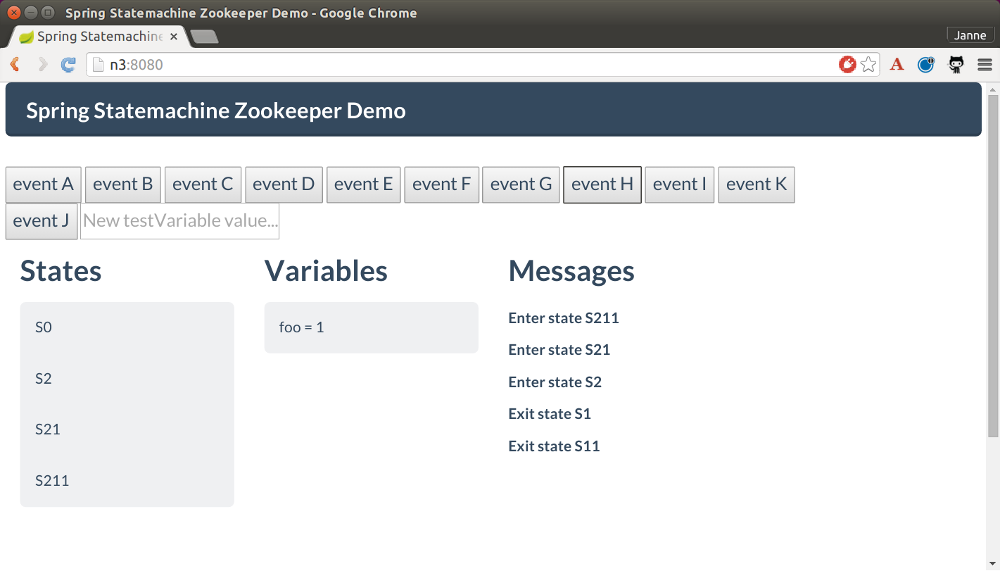
Finally, we can send Event K, which takes the state
machine state back to state S11. You should see this happen in
all of the browsers. The following image shows the result in one browser:
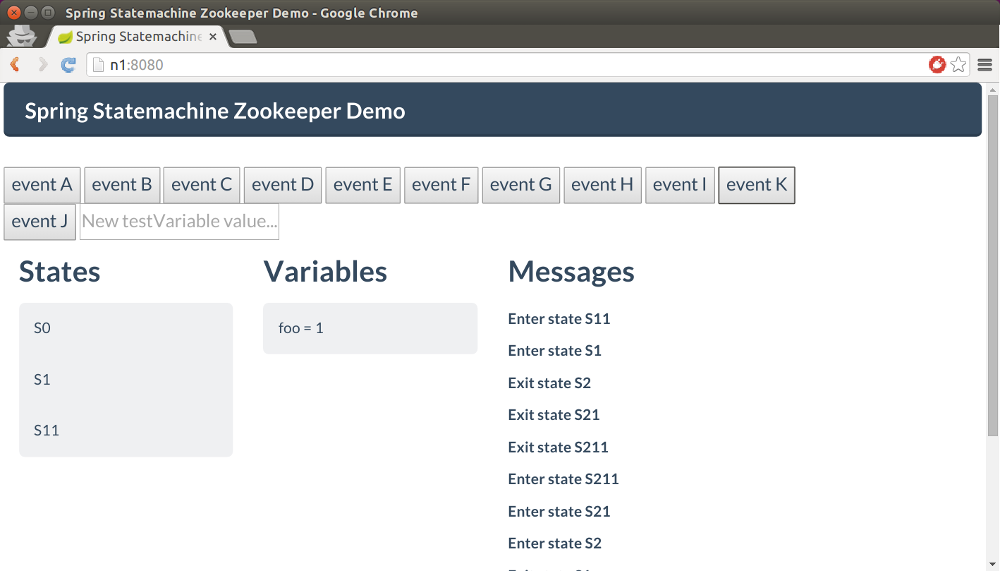
Scope
Scope is a state machine example that uses session scope to provide an individual instance for every user. The following image shows the states and events within the Scope state machine:
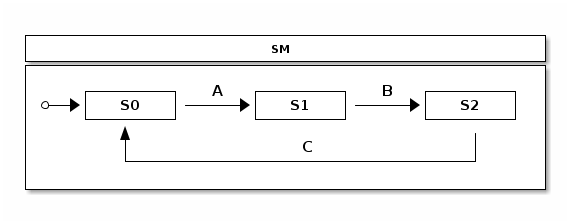
This simple state machine has three states: S0, S1, and S2.
Transitions between those are controlled by three events: A, B, and C.
To start the state machine, run the following command in a terminal:
# java -jar spring-statemachine-samples-scope-3.0.1.jarWhen the instance is running, you can open a browser and play with the state machine. If you open the same page in a different browser, (for example, one in Chrome and one in Firefox), you should get a new state machine instance for each user session. The following image shows the state machine in a browser:
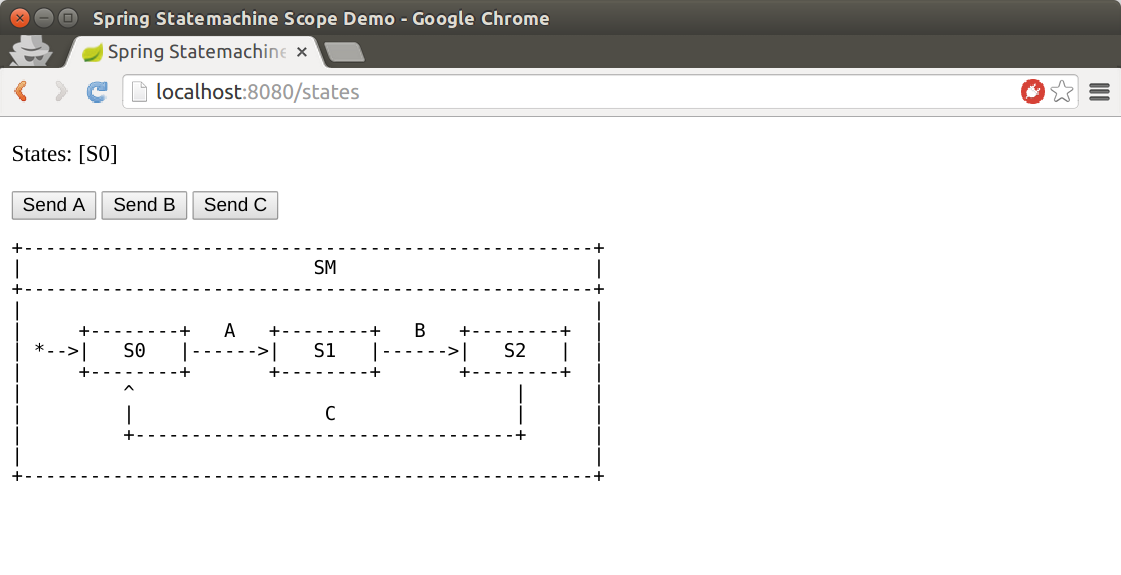
Security
Security is a state machine example that uses most of the possible combinations of securing a state machine. It secures sending events, transitions, and actions. The following image shows the state machine’s states and events:
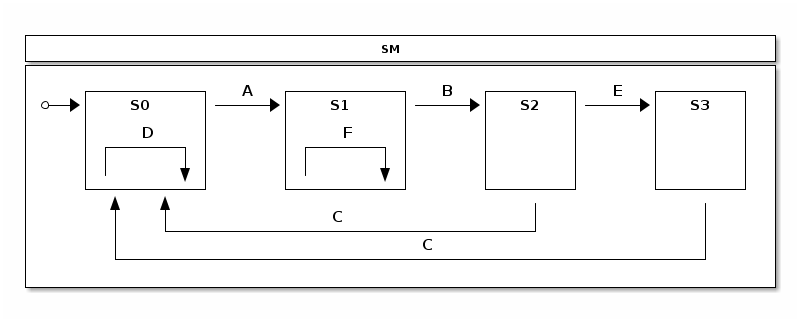
To start the state machine, run the following command:
# java -jar spring-statemachine-samples-secure-3.0.1.jarWe secure event sending by requiring that users have a role of USER.
Spring Security ensures that no other users can send events to this
state machine.
The following listing secures event sending:
@Override
public void configure(StateMachineConfigurationConfigurer<States, Events> config)
throws Exception {
config
.withConfiguration()
.autoStartup(true)
.and()
.withSecurity()
.enabled(true)
.event("hasRole('USER')");
}In this sample we define two users:
-
A user named
userwho has a role ofUSER -
A user named
adminwho has two roles:USERandADMIN
The password for both users is password.
The following listing configures the two users:
@EnableWebSecurity
@EnableGlobalMethodSecurity(securedEnabled = true)
static class SecurityConfig extends WebSecurityConfigurerAdapter {
@Autowired
public void configureGlobal(AuthenticationManagerBuilder auth) throws Exception {
auth
.inMemoryAuthentication()
.withUser("user")
.password("password")
.roles("USER")
.and()
.withUser("admin")
.password("password")
.roles("USER", "ADMIN");
}
}We define various transitions between states according to the state chart
shown at the beginning of the example. Only a user with an active ADMIN role can run
the external transitions between S2 and S3. Similarly only an ADMIN can
run the internal transition the S1 state.
The following listing defines the transitions, including their security:
@Override
public void configure(StateMachineTransitionConfigurer<States, Events> transitions)
throws Exception {
transitions
.withExternal()
.source(States.S0).target(States.S1).event(Events.A)
.and()
.withExternal()
.source(States.S1).target(States.S2).event(Events.B)
.and()
.withExternal()
.source(States.S2).target(States.S0).event(Events.C)
.and()
.withExternal()
.source(States.S2).target(States.S3).event(Events.E)
.secured("ROLE_ADMIN", ComparisonType.ANY)
.and()
.withExternal()
.source(States.S3).target(States.S0).event(Events.C)
.and()
.withInternal()
.source(States.S0).event(Events.D)
.action(adminAction())
.and()
.withInternal()
.source(States.S1).event(Events.F)
.action(transitionAction())
.secured("ROLE_ADMIN", ComparisonType.ANY);
}The following listing uses a method called adminAction whose return type is Action to
specify that the action is secured with a role of ADMIN:
@Scope(proxyMode = ScopedProxyMode.TARGET_CLASS)
@Bean
public Action<States, Events> adminAction() {
return new Action<States, Events>() {
@Secured("ROLE_ADMIN")
@Override
public void execute(StateContext<States, Events> context) {
log.info("Executed only for admin role");
}
};
}The following Action runs an internal transition in state S when event F is sent.
@Bean
public Action<States, Events> transitionAction() {
return new Action<States, Events>() {
@Override
public void execute(StateContext<States, Events> context) {
log.info("Executed only for admin role");
}
};
}The transition itself is secured with a
role of ADMIN, so this transition does not run if the current user
does not hate that role.
Event Service
The event service example shows how you can use state machine concepts as a processing engine for events. This sample evolved from a question:
Can I use Spring Statemachine as a microservice to feed events to different state machine instances? In fact, Spring Statemachine can feed events to potentially millions of different state machine instances.
This example uses a Redis instance to persist state machine
instances.
Obviously, a million state machine instances in a JVM would be
a bad idea, due to memory constraints. This leads to
other features of Spring Statemachine that let you persist a
StateMachineContext and re-use existing instances.
For this example, we assume that a shopping application
sends different types of PageView events to a separate
microservice which then tracks user behavior by using a state
machine. The following image shows the state model, which has a few states
that represent a user navigating a product items list, adding and removing
items from a cart, going to a payment page, and initiating a payment
operation:
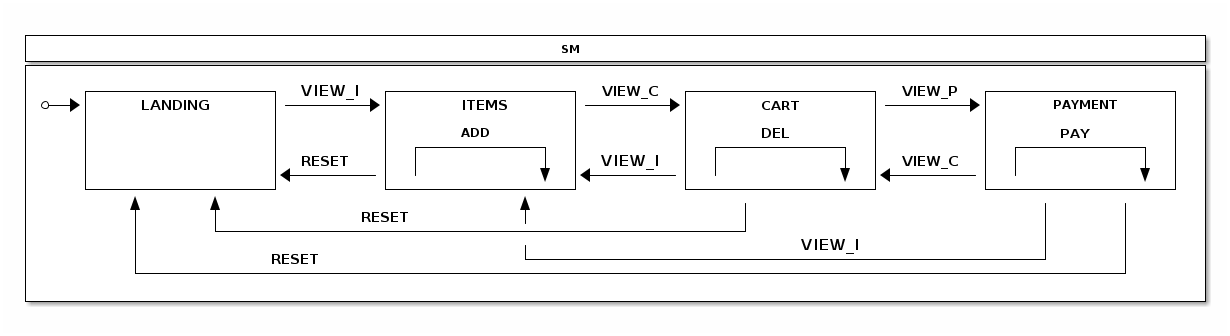
An actual shopping application would send these events into this service by (for example) using a rest call. More about this later.
Remember that the focus here is to have an application that exposes a
REST API that the user can use to send events that can be processed by a
state machine for each request.
|
The following state machine configuration models what we have in a
state chart. Various actions update the state machine’s Extended
State to track the number of entries into various states and also how
many times the internal transitions for ADD and DEL are called and whether
PAY has been executed:
@Bean(name = "stateMachineTarget")
@Scope(scopeName="prototype")
public StateMachine<States, Events> stateMachineTarget() throws Exception {
Builder<States, Events> builder = StateMachineBuilder.<States, Events>builder();
builder.configureConfiguration()
.withConfiguration()
.autoStartup(true);
builder.configureStates()
.withStates()
.initial(States.HOME)
.states(EnumSet.allOf(States.class));
builder.configureTransitions()
.withInternal()
.source(States.ITEMS).event(Events.ADD)
.action(addAction())
.and()
.withInternal()
.source(States.CART).event(Events.DEL)
.action(delAction())
.and()
.withInternal()
.source(States.PAYMENT).event(Events.PAY)
.action(payAction())
.and()
.withExternal()
.source(States.HOME).target(States.ITEMS)
.action(pageviewAction())
.event(Events.VIEW_I)
.and()
.withExternal()
.source(States.CART).target(States.ITEMS)
.action(pageviewAction())
.event(Events.VIEW_I)
.and()
.withExternal()
.source(States.ITEMS).target(States.CART)
.action(pageviewAction())
.event(Events.VIEW_C)
.and()
.withExternal()
.source(States.PAYMENT).target(States.CART)
.action(pageviewAction())
.event(Events.VIEW_C)
.and()
.withExternal()
.source(States.CART).target(States.PAYMENT)
.action(pageviewAction())
.event(Events.VIEW_P)
.and()
.withExternal()
.source(States.ITEMS).target(States.HOME)
.action(resetAction())
.event(Events.RESET)
.and()
.withExternal()
.source(States.CART).target(States.HOME)
.action(resetAction())
.event(Events.RESET)
.and()
.withExternal()
.source(States.PAYMENT).target(States.HOME)
.action(resetAction())
.event(Events.RESET);
return builder.build();
}Do not focus on stateMachineTarget or
@Scope for now, as we explain those later in this section.
We set up a RedisConnectionFactory that defaults to
localhost and default port. We use StateMachinePersist with a
RepositoryStateMachinePersist implementation. Finally, we create a
RedisStateMachinePersister that uses a previously
created StateMachinePersist bean.
These are then used in a Controller that handles REST calls,
as the following listing shows:
@Bean
public RedisConnectionFactory redisConnectionFactory() {
return new JedisConnectionFactory();
}
@Bean
public StateMachinePersist<States, Events, String> stateMachinePersist(RedisConnectionFactory connectionFactory) {
RedisStateMachineContextRepository<States, Events> repository =
new RedisStateMachineContextRepository<States, Events>(connectionFactory);
return new RepositoryStateMachinePersist<States, Events>(repository);
}
@Bean
public RedisStateMachinePersister<States, Events> redisStateMachinePersister(
StateMachinePersist<States, Events, String> stateMachinePersist) {
return new RedisStateMachinePersister<States, Events>(stateMachinePersist);
}We create a bean named stateMachineTarget.
State machine instantiation is a relatively
expensive operation, so it is better to try to pool instances instead
of instantiating a new instance for every request. To do so, we first
create a poolTargetSource that wraps stateMachineTarget and pools
it with a max size of three. When then proxy this poolTargetSource with
ProxyFactoryBean by using a request scope. Effectively, this means
that every REST request gets a pooled state machine instance from
a bean factory. Later, we show how these instances are used.
The following listing shows how we create the ProxyFactoryBean
and set the target source:
@Bean
@Scope(value = "request", proxyMode = ScopedProxyMode.TARGET_CLASS)
public ProxyFactoryBean stateMachine() {
ProxyFactoryBean pfb = new ProxyFactoryBean();
pfb.setTargetSource(poolTargetSource());
return pfb;
}The following listing shows we set the maximum size and set the target bean name:
@Bean
public CommonsPool2TargetSource poolTargetSource() {
CommonsPool2TargetSource pool = new CommonsPool2TargetSource();
pool.setMaxSize(3);
pool.setTargetBeanName("stateMachineTarget");
return pool;
}Now we can get into actual demo. You need to have a Redis server running on localhost with default settings. Then you need to run the Boot-based sample application by running the following command:
# java -jar spring-statemachine-samples-eventservice-3.0.1.jarIn a browser, you see something like the following:
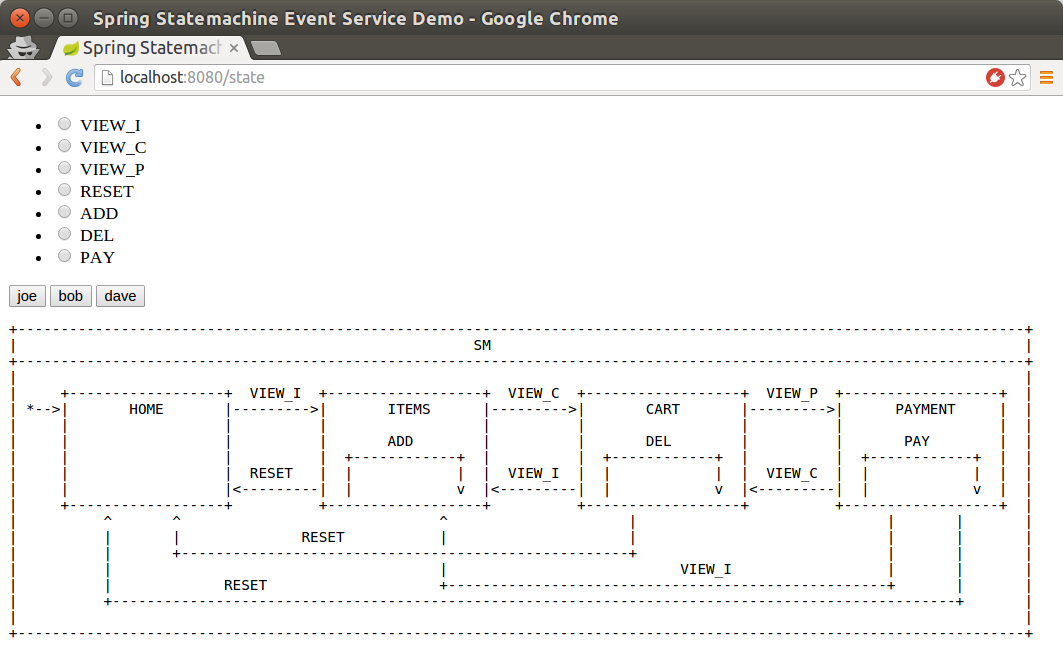
In this UI, you can use three users: joe, bob, and dave.
Clicking a button shows the current state and the extended state. Enabling a
radio button before clicking a button sends a particular event for that
user. This arrangement lets you play with the UI.
In our StateMachineController, we autowire StateMachine and
StateMachinePersister. StateMachine is request scoped, so you
get a new instance for each request, while StateMachinePersist is a normal
singleton bean.
The following listing autowires StateMachine and
StateMachinePersist:
@Autowired
private StateMachine<States, Events> stateMachine;
@Autowired
private StateMachinePersister<States, Events, String> stateMachinePersister;In the following listing, feedAndGetState is used with a UI to do same things that an
actual REST api might do:
@RequestMapping("/state")
public String feedAndGetState(@RequestParam(value = "user", required = false) String user,
@RequestParam(value = "id", required = false) Events id, Model model) throws Exception {
model.addAttribute("user", user);
model.addAttribute("allTypes", Events.values());
model.addAttribute("stateChartModel", stateChartModel);
// we may get into this page without a user so
// do nothing with a state machine
if (StringUtils.hasText(user)) {
resetStateMachineFromStore(user);
if (id != null) {
feedMachine(user, id);
}
model.addAttribute("states", stateMachine.getState().getIds());
model.addAttribute("extendedState", stateMachine.getExtendedState().getVariables());
}
return "states";
}In the following listing, feedPageview is a REST method that accepts a post with
JSON content.
@RequestMapping(value = "/feed",method= RequestMethod.POST)
@ResponseStatus(HttpStatus.OK)
public void feedPageview(@RequestBody(required = true) Pageview event) throws Exception {
Assert.notNull(event.getUser(), "User must be set");
Assert.notNull(event.getId(), "Id must be set");
resetStateMachineFromStore(event.getUser());
feedMachine(event.getUser(), event.getId());
}In the following listing, feedMachine sends an event into a StateMachine and persists
its state by using a StateMachinePersister:
private void feedMachine(String user, Events id) throws Exception {
stateMachine
.sendEvent(Mono.just(MessageBuilder
.withPayload(id).build()))
.blockLast();
stateMachinePersister.persist(stateMachine, "testprefix:" + user);
}The following listing shows a resetStateMachineFromStore that is used to restore a state machine
for a particular user:
private StateMachine<States, Events> resetStateMachineFromStore(String user) throws Exception {
return stateMachinePersister.restore(stateMachine, "testprefix:" + user);
}As you would usually send an event by using a UI, you can do the same by using REST calls,
as the following curl command shows:
# curl http://localhost:8080/feed -H "Content-Type: application/json" --data '{"user":"joe","id":"VIEW_I"}'At this point, you should have content in Redis with a key of
testprefix:joe, as the following example shows:
$ ./redis-cli
127.0.0.1:6379> KEYS *
1) "testprefix:joe"The next three images show when state for joe has been changed from
HOME to ITEMS and when the ADD action has been executed.
The following image the ADD event being sent:
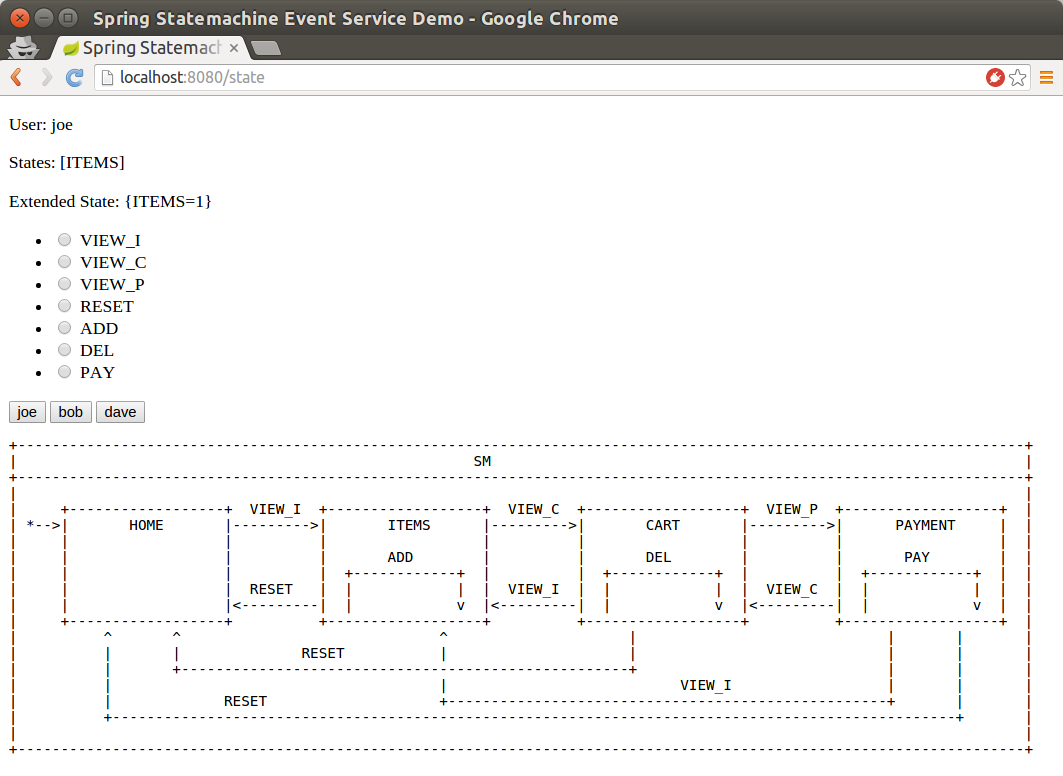
Now your are still on the ITEMS state, and the internal transition caused
the COUNT extended state variable to increase to 1, as the following image shows:

Now you can run the following curl rest call a few times (or do it through the UI) and
see the COUNT variable increase with every call:
# curl http://localhost:8080/feed -H "Content-Type: application/json" # --data '{"user":"joe","id":"ADD"}'The following image shows the result of these operations:
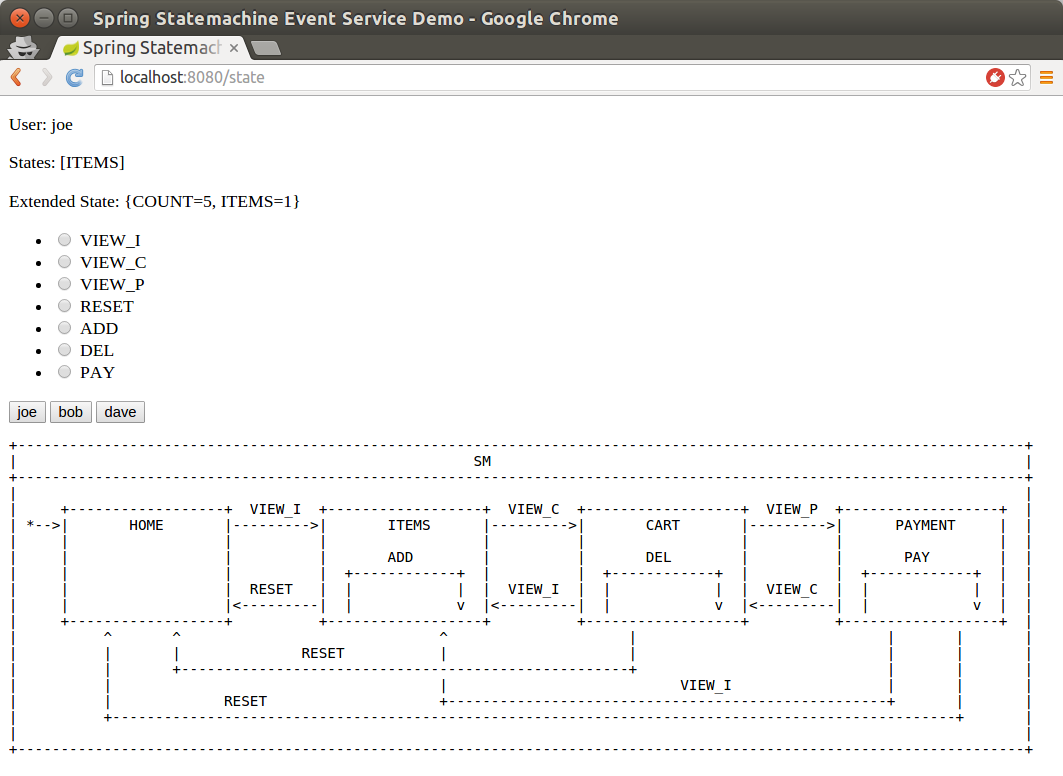
Deploy
The deploy example shows how you can use state machine concepts with UML modeling to provide a generic error handling state. This state machine is a relatively complex example of how you can use various features to provide a centralized error handling concept. The following image shows the deploy state machine:
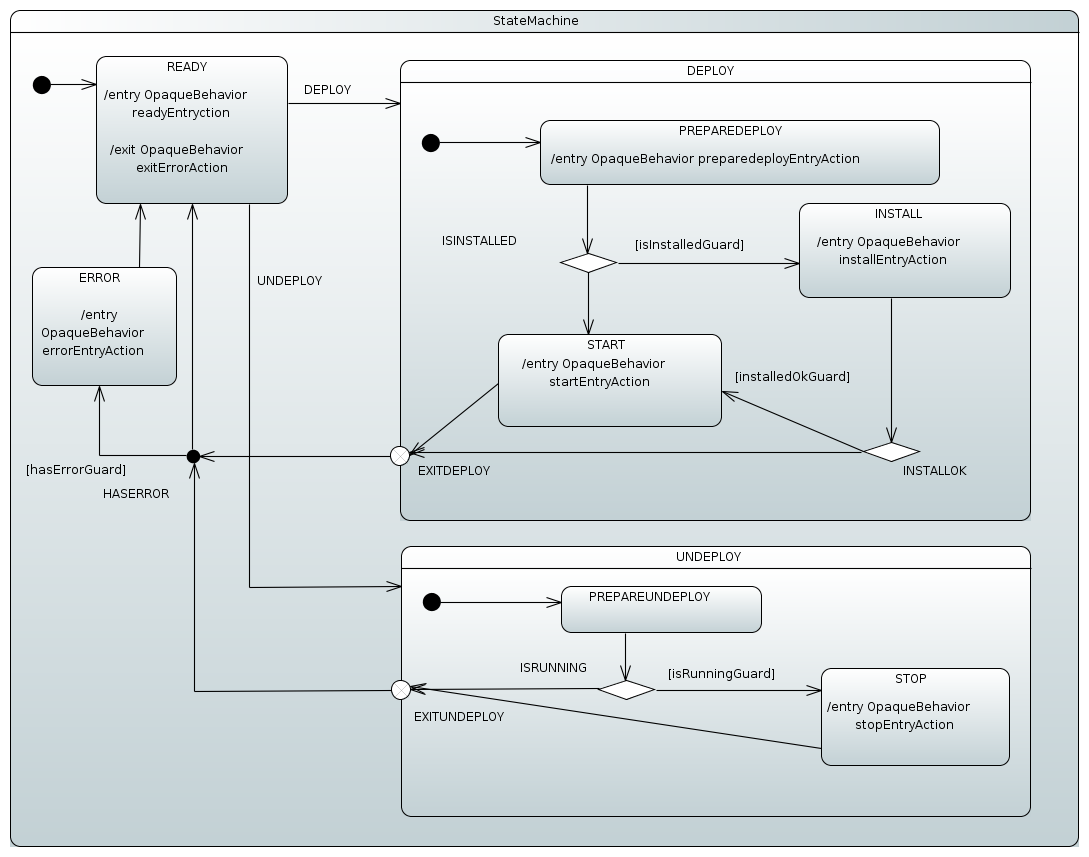
| The preceding state chart was designed by using the Eclipse Papyrus Plugin (seeEclipse Modeling Support) and imported into Spring StateMachine through the resulting UML model file. Actions and guards defined in a model are resolved from a Spring Application Context. |
In this state machine scenario, we have two different behaviors
(DEPLOY and UNDEPLOY) that user tries to execute.
In the preceding state chart:
-
In the
DEPLOYstate, theINSTALLandSTARTstates are entered conditionally. We enterSTARTdirectly if a product is already installed and have no need to try toSTARTif install fails. -
In the
UNDEPLOYstate, we enterSTOPconditionally if the application is already running. -
Conditional choices for
DEPLOYandUNDEPLOYare done through a choice pseudostate within those states, and the choices are selected by guards. -
We use exit point pseudostates to have a more controlled exit from the
DEPLOYandUNDEPLOYstates. -
After exiting from
DEPLOYandUNDEPLOY, we go through a junction pseudostate to choose whether to go through anERRORstate (if an error was added into an extended state). -
Finally, we go back to the
READYstate to process new requests.
Now we can get to the actual demo. Run the boot based sample application by running the following command:
# java -jar spring-statemachine-samples-deploy-3.0.1.jarIn a browser, you can see something like the following image:
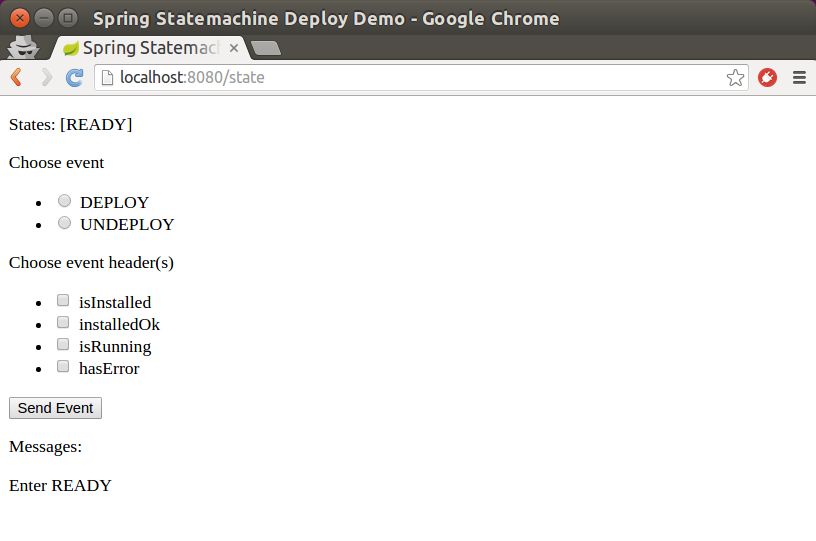
| As we do not have real install, start, or stop functionality, we simulate failures by checking the existence of particular message headers. |
Now you can start to send events to a machine and choose various message headers to drive functionality.
Order Shipping
The order shipping example shows how you can use state machine concepts to build a simple order processing system.
The following image shows a state chart that drives this order shipping sample.
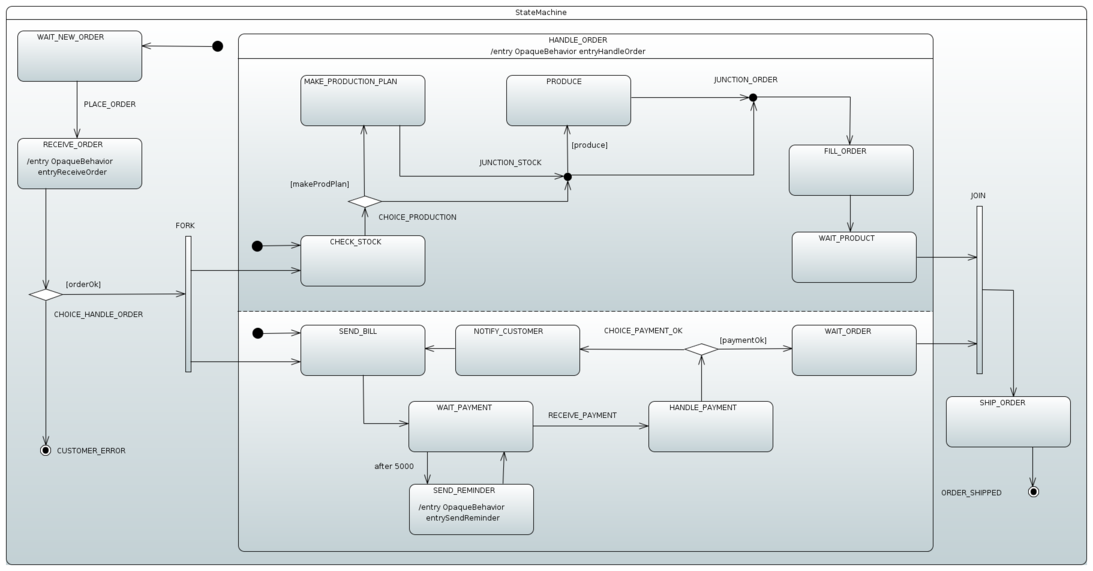
In the preceding state chart:
-
The state machine enters the
WAIT_NEW_ORDER(default) state. -
The event
PLACE_ORDERtransitions into theRECEIVE_ORDERstate and the entry action (entryReceiveOrder) is executed. -
If the order is
OK, the state machine goes into two regions, one handling order production and one handling user-level payment. Otherwise, the state machine goes intoCUSTOMER_ERROR, which is a final state. -
The state machine loops in a lower region to remind the user to pay until
RECEIVE_PAYMENTis sent successfully to indicate correct payment. -
Both regions go into waiting states (
WAIT_PRODUCTandWAIT_ORDER), where they are joined before the parent orthogonal state (HANDLE_ORDER) is exited. -
Finally, the state machine goes through
SHIP_ORDERto its final state (ORDER_SHIPPED).
The following command runs the sample:
# java -jar spring-statemachine-samples-ordershipping-3.0.1.jarIn a browser, you can see something similar to the following image. You can start by choosing a customer and an order to create a state machine.
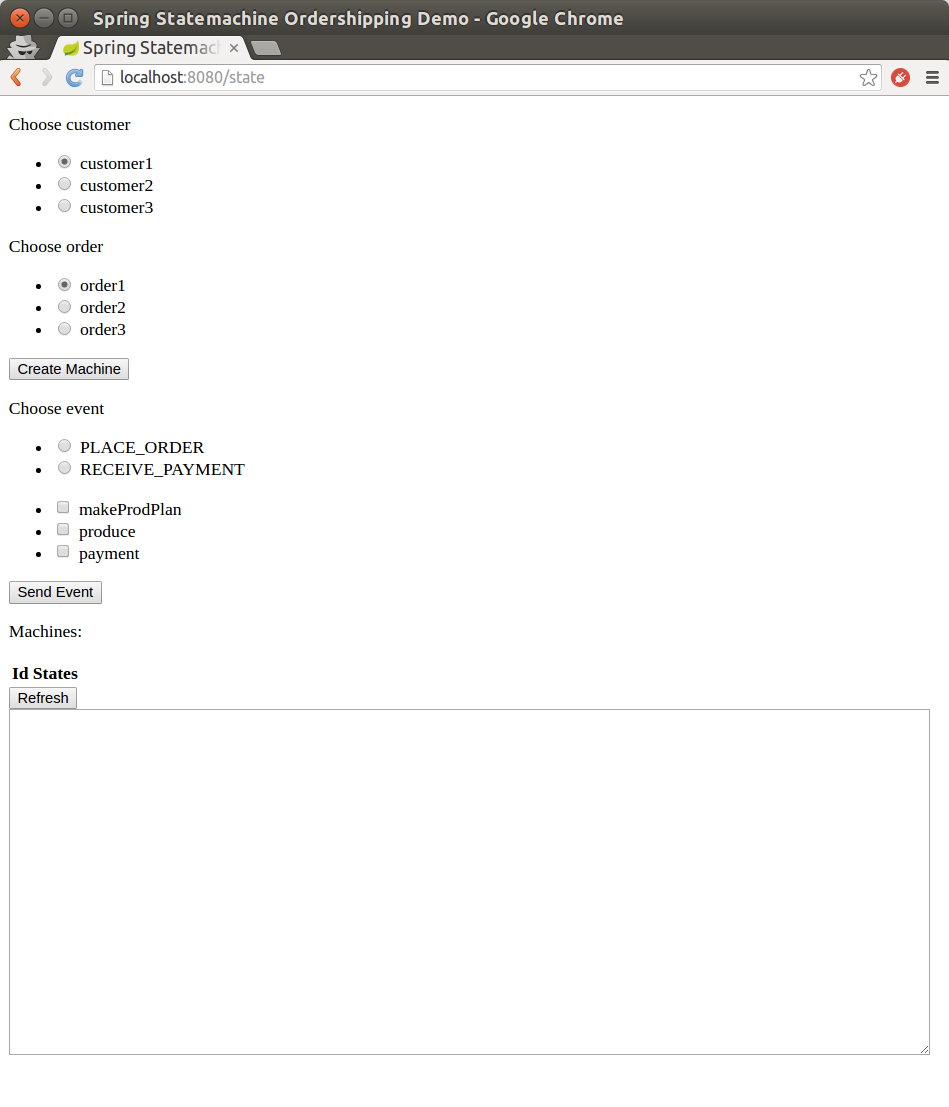
The state machine for a particular order is now created and you can start to play
with placing an order and sending a payment. Other settings (such as
makeProdPlan, produce, and payment) let you control how the state
machine works.
The following image shows the state machine waiting for an order:
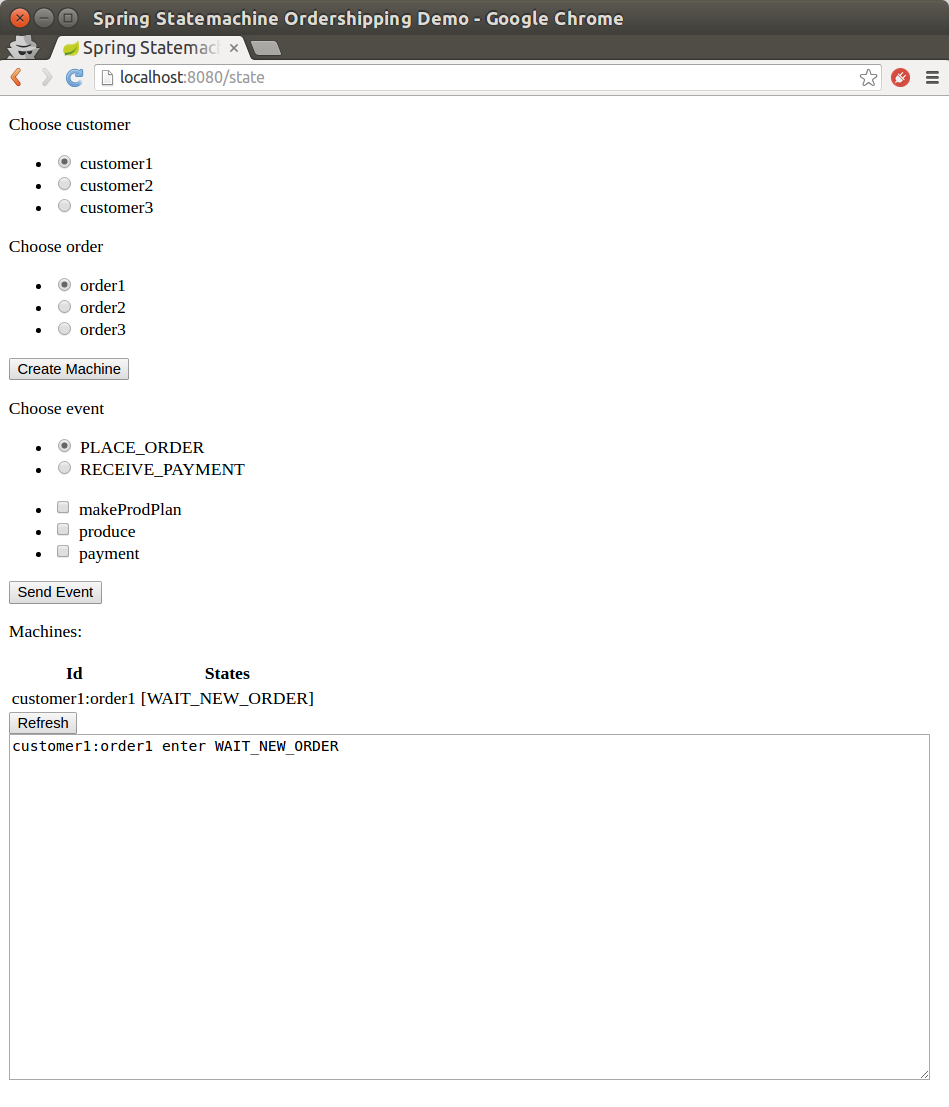
Finally, you can see what machine does by refreshing a page, as the following image shows:
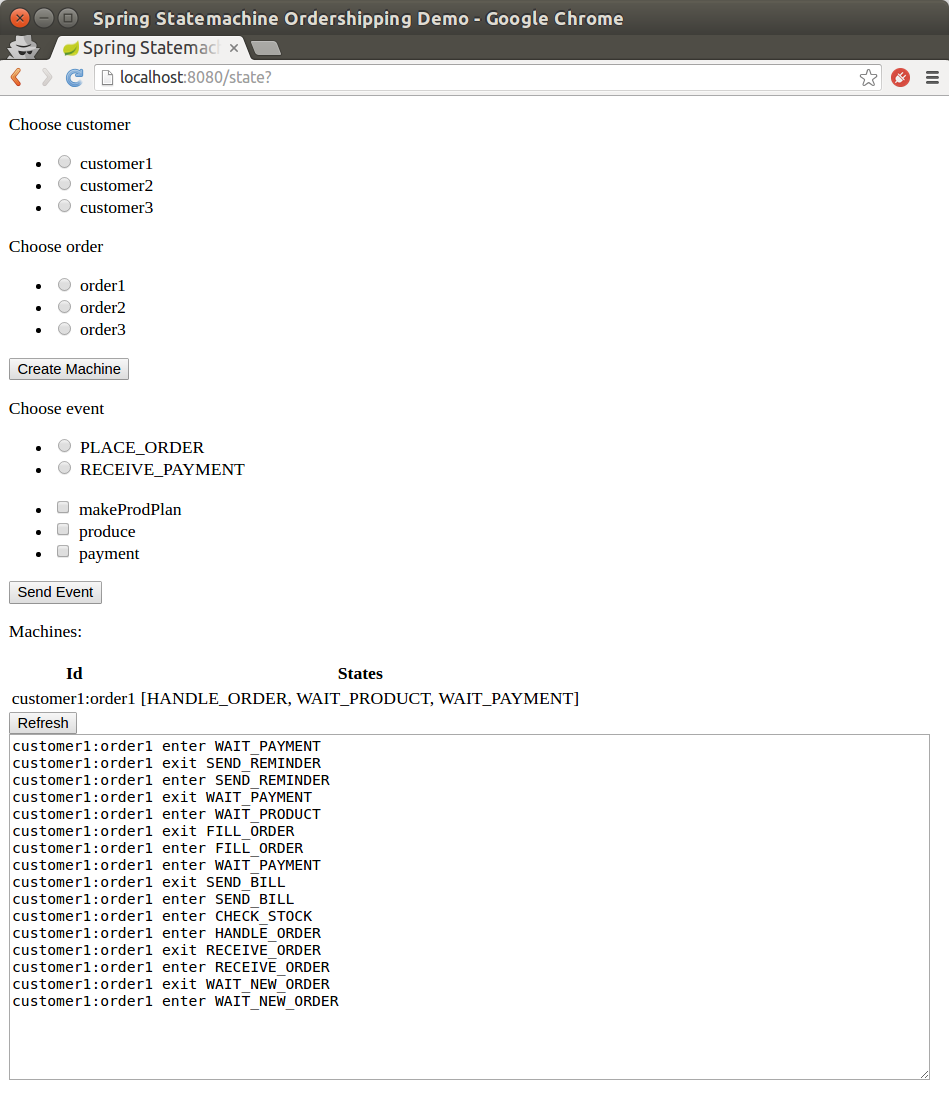
JPA Configuration
The JPA configuration example shows how you can use state machine concepts with a machine configuration kept in a database. This sample uses an embedded H2 database with an H2 Console (to ease playing with the database).
This sample uses spring-statemachine-autoconfigure (which, by default,
auto-configures the repositories and entity classes needed for JPA).
Thus, you need only @SpringBootApplication.
The following example shows the Application class with the @SpringBootApplication annotation:
@SpringBootApplication
public class Application {
public static void main(String[] args) {
SpringApplication.run(Application.class, args);
}
}The following example shows how to create a RepositoryStateMachineModelFactory:
@Configuration
@EnableStateMachineFactory
public static class Config extends StateMachineConfigurerAdapter<String, String> {
@Autowired
private StateRepository<? extends RepositoryState> stateRepository;
@Autowired
private TransitionRepository<? extends RepositoryTransition> transitionRepository;
@Override
public void configure(StateMachineModelConfigurer<String, String> model) throws Exception {
model
.withModel()
.factory(modelFactory());
}
@Bean
public StateMachineModelFactory<String, String> modelFactory() {
return new RepositoryStateMachineModelFactory(stateRepository, transitionRepository);
}
}You can use the following command to run the sample:
# java -jar spring-statemachine-samples-datajpa-3.0.1.jarAccessing the application at http://localhost:8080 brings up a newly
constructed machine for each request. You can then choose to send
events to a machine. The possible events and machine configuration are
updated from a database with every request.
The following image shows the UI and the initial events that are created when
this state machine starts:
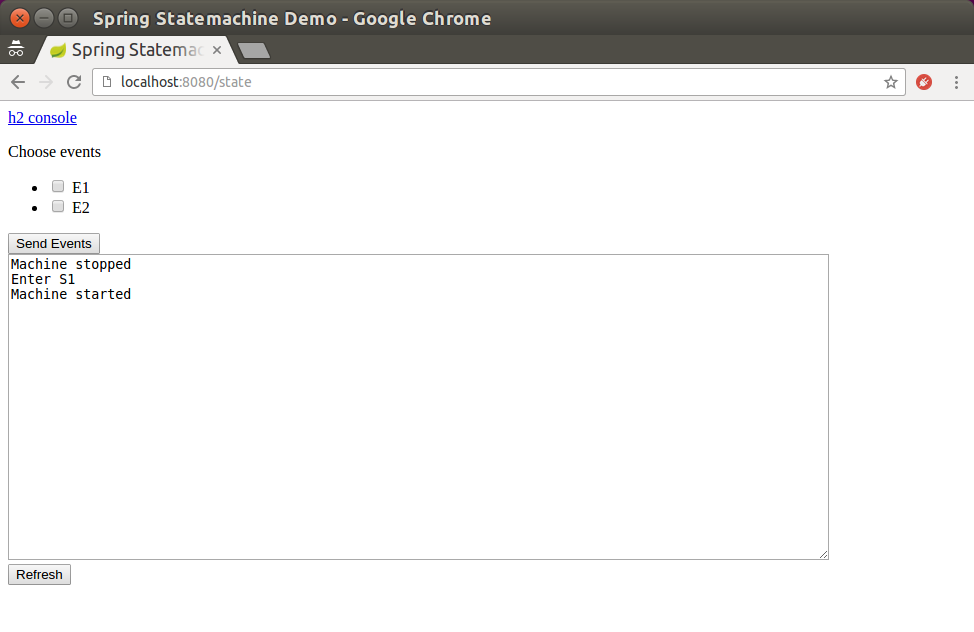
To access the embedded console, you can use the JDBC URL (which is jdbc:h2:mem:testdb, if it is
not already set).
The following image shows the H2 console:

From the console, you can see the database tables and modify them as you wish. The following image shows the result of a simple query in the UI:
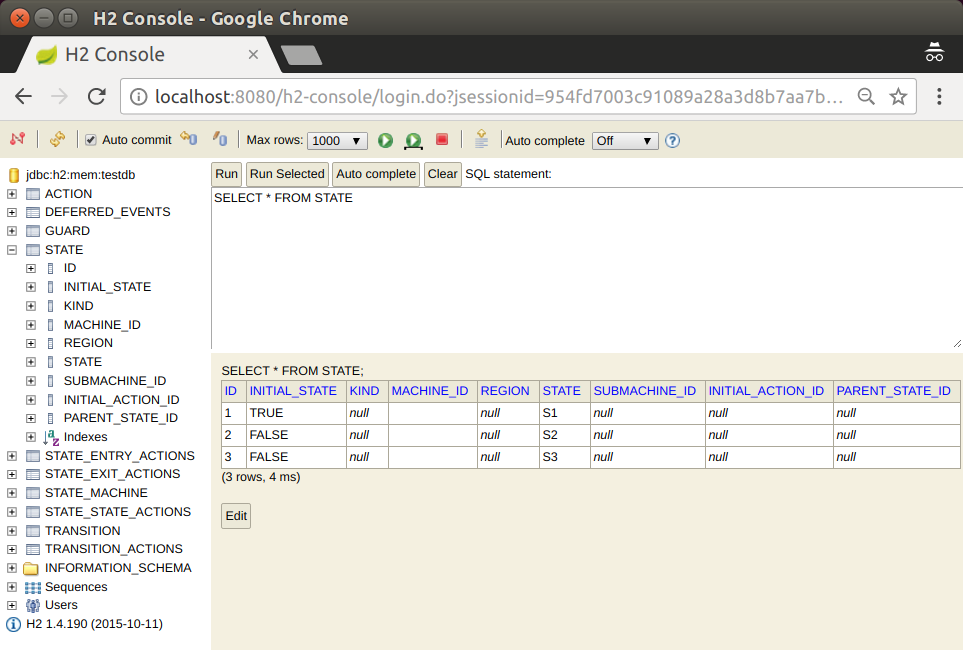
Now that you have gotten this far, you have probably wondered how those default
states and transitions got populated into the database. Spring Data
has a nice trick to auto-populate repositories, and we
used this feature through Jackson2RepositoryPopulatorFactoryBean.
The following example shows how we create such a bean:
@Bean
public StateMachineJackson2RepositoryPopulatorFactoryBean jackson2RepositoryPopulatorFactoryBean() {
StateMachineJackson2RepositoryPopulatorFactoryBean factoryBean = new StateMachineJackson2RepositoryPopulatorFactoryBean();
factoryBean.setResources(new Resource[]{new ClassPathResource("data.json")});
return factoryBean;
}The following listing shows the source of the data with which we populate the database:
[
{
"@id": "10",
"_class": "org.springframework.statemachine.data.jpa.JpaRepositoryAction",
"spel": "T(System).out.println('hello exit S1')"
},
{
"@id": "11",
"_class": "org.springframework.statemachine.data.jpa.JpaRepositoryAction",
"spel": "T(System).out.println('hello entry S2')"
},
{
"@id": "12",
"_class": "org.springframework.statemachine.data.jpa.JpaRepositoryAction",
"spel": "T(System).out.println('hello state S3')"
},
{
"@id": "13",
"_class": "org.springframework.statemachine.data.jpa.JpaRepositoryAction",
"spel": "T(System).out.println('hello')"
},
{
"@id": "1",
"_class": "org.springframework.statemachine.data.jpa.JpaRepositoryState",
"initial": true,
"state": "S1",
"exitActions": ["10"]
},
{
"@id": "2",
"_class": "org.springframework.statemachine.data.jpa.JpaRepositoryState",
"initial": false,
"state": "S2",
"entryActions": ["11"]
},
{
"@id": "3",
"_class": "org.springframework.statemachine.data.jpa.JpaRepositoryState",
"initial": false,
"state": "S3",
"stateActions": ["12"]
},
{
"_class": "org.springframework.statemachine.data.jpa.JpaRepositoryTransition",
"source": "1",
"target": "2",
"event": "E1",
"kind": "EXTERNAL"
},
{
"_class": "org.springframework.statemachine.data.jpa.JpaRepositoryTransition",
"source": "2",
"target": "3",
"event": "E2",
"actions": ["13"]
}
]Data Persist
The data persist sample shows how you can state machine concepts with a persisting machine in an external repository. This sample uses an embedded H2 database with an H2 Console (to ease playing with the database). Optionally, you can also enable Redis or MongoDB.
This sample uses spring-statemachine-autoconfigure (which, by default,
auto-configures the repositories and entity classes needed for JPA).
Thus, you need only @SpringBootApplication.
The following example shows the Application class with the @SpringBootApplication annotation:
@SpringBootApplication
public class Application {
public static void main(String[] args) {
SpringApplication.run(Application.class, args);
}
}The StateMachineRuntimePersister interface works on the runtime
level of a StateMachine. Its implementation,
JpaPersistingStateMachineInterceptor, is meant to be used with a
JPA.
The following listing creates a StateMachineRuntimePersister bean:
@Configuration
@Profile("jpa")
public static class JpaPersisterConfig {
@Bean
public StateMachineRuntimePersister<States, Events, String> stateMachineRuntimePersister(
JpaStateMachineRepository jpaStateMachineRepository) {
return new JpaPersistingStateMachineInterceptor<>(jpaStateMachineRepository);
}
}The following example shows how you can use a very similar configuration to create a bean for MongoDB:
@Configuration
@Profile("mongo")
public static class MongoPersisterConfig {
@Bean
public StateMachineRuntimePersister<States, Events, String> stateMachineRuntimePersister(
MongoDbStateMachineRepository jpaStateMachineRepository) {
return new MongoDbPersistingStateMachineInterceptor<>(jpaStateMachineRepository);
}
}The following example shows how you can use a very similar configuration to create a bean for Redis:
@Configuration
@Profile("redis")
public static class RedisPersisterConfig {
@Bean
public StateMachineRuntimePersister<States, Events, String> stateMachineRuntimePersister(
RedisStateMachineRepository jpaStateMachineRepository) {
return new RedisPersistingStateMachineInterceptor<>(jpaStateMachineRepository);
}
}You can configure StateMachine to use runtime persistence by using the
withPersistence configuration method.
The following listing shows how to do so:
@Autowired
private StateMachineRuntimePersister<States, Events, String> stateMachineRuntimePersister;
@Override
public void configure(StateMachineConfigurationConfigurer<States, Events> config)
throws Exception {
config
.withPersistence()
.runtimePersister(stateMachineRuntimePersister);
}This sample also uses DefaultStateMachineService, which makes it
easier to work with multiple machines.
The following listing shows how to create an instance of DefaultStateMachineService:
@Bean
public StateMachineService<States, Events> stateMachineService(
StateMachineFactory<States, Events> stateMachineFactory,
StateMachineRuntimePersister<States, Events, String> stateMachineRuntimePersister) {
return new DefaultStateMachineService<States, Events>(stateMachineFactory, stateMachineRuntimePersister);
}The following listing shows the logic that drives the StateMachineService in this sample:
private synchronized StateMachine<States, Events> getStateMachine(String machineId) throws Exception {
listener.resetMessages();
if (currentStateMachine == null) {
currentStateMachine = stateMachineService.acquireStateMachine(machineId);
currentStateMachine.addStateListener(listener);
currentStateMachine.startReactively().block();
} else if (!ObjectUtils.nullSafeEquals(currentStateMachine.getId(), machineId)) {
stateMachineService.releaseStateMachine(currentStateMachine.getId());
currentStateMachine.stopReactively().block();
currentStateMachine = stateMachineService.acquireStateMachine(machineId);
currentStateMachine.addStateListener(listener);
currentStateMachine.startReactively().block();
}
return currentStateMachine;
}You can use the following command to run the sample:
# java -jar spring-statemachine-samples-datapersist-3.0.1.jar|
By default, the |
Accessing the application at http://localhost:8080 brings up a newly constructed state machine for each request, and you can choose to send events to a machine. The possible events and machine configuration are updated from a database with every request.
The state machines in this sample have a simple configuration with states 'S1'
to 'S6' and events 'E1' to 'E6' to transition the state machine between those
states. You can use two state machine identifiers (datajpapersist1 and
datajpapersist2) to request a particular state machine.
The following image shows the UI that lets you pick a machine and an event and that shows
what happens when you do:
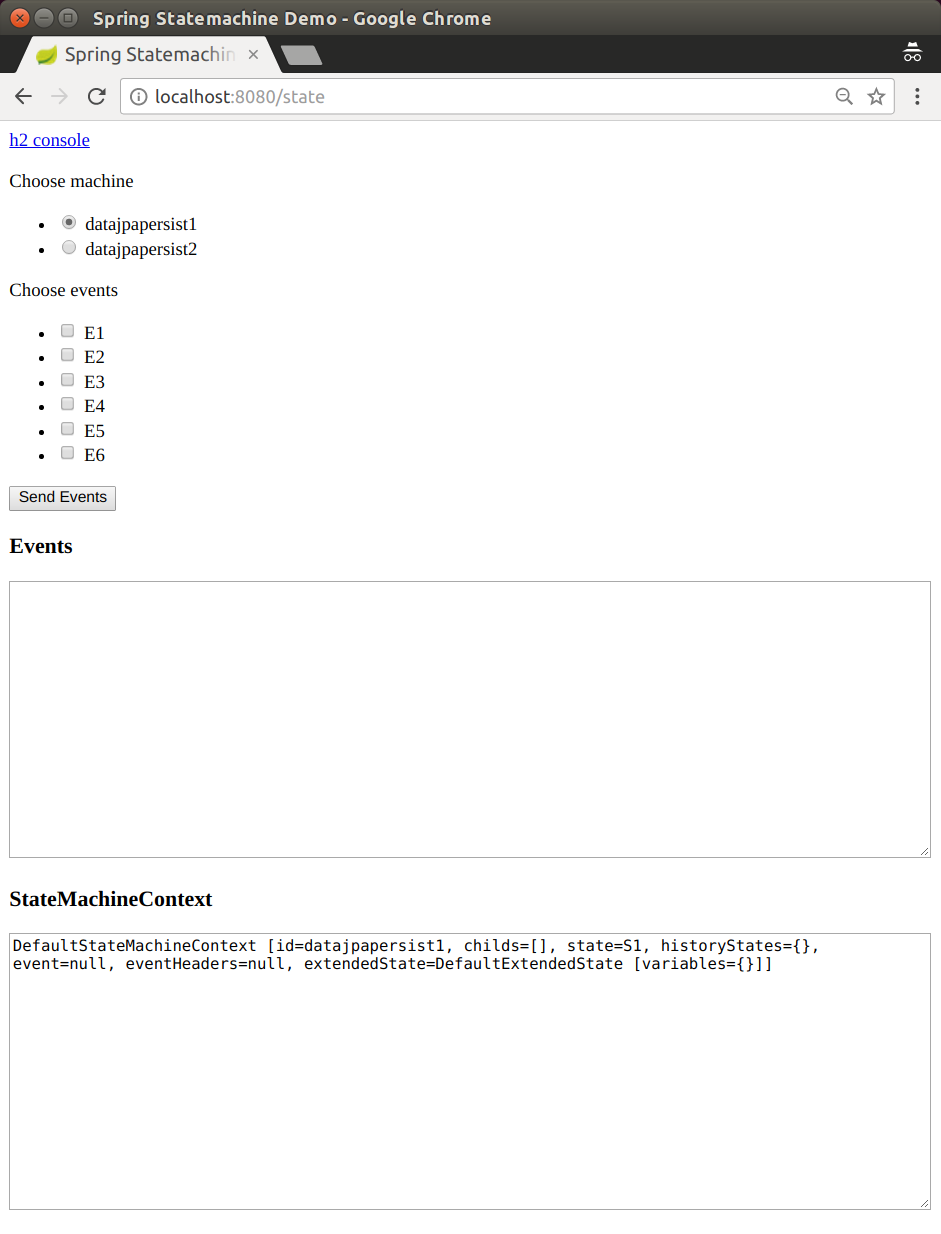
The sample defaults to using machine 'datajpapersist1' and goes to its initial state 'S1'. The following image shows the result of using those defaults:
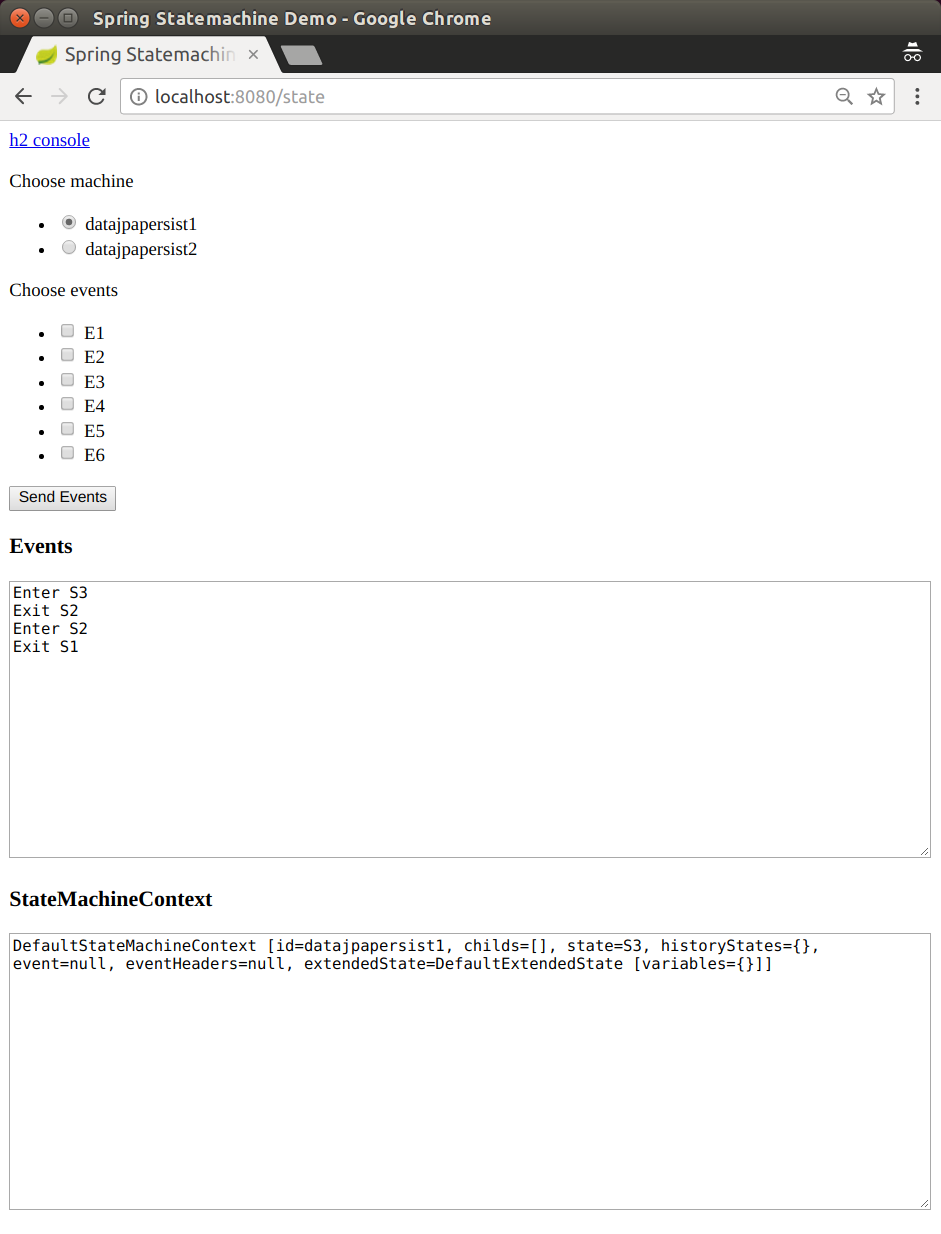
If you send events E1 and E2 to the datajpapersist1 state machine, its
state is persisted as 'S3'.
The following image shows the result of doing so:

If you then request state machine datajpapersist1 but send no events,
the state machine is restored back to its persisted state, S3.
Data Multi Persist
The data multi ersist sample is an extension of two other samples: JPA Configuration and Data Persist. We still keep machine configuration in a database and persist into a database. However, this time, we also have a machine that contains two orthogonal regions, to show how those are persisted independently. This sample also uses an embedded H2 database with an H2 Console (to ease playing with the database).
This sample uses spring-statemachine-autoconfigure (which, by default,
auto-configures the repositories and entity classes needed for JPA).
Thus, you need only @SpringBootApplication.
The following example shows the Application class with the @SpringBootApplication annotation:
@SpringBootApplication
public class Application {
public static void main(String[] args) {
SpringApplication.run(Application.class, args);
}
}As in the other data-driven samples, we again create a StateMachineRuntimePersister,
as the following listing shows:
@Bean
public StateMachineRuntimePersister<String, String, String> stateMachineRuntimePersister(
JpaStateMachineRepository jpaStateMachineRepository) {
return new JpaPersistingStateMachineInterceptor<>(jpaStateMachineRepository);
}A StateMachineService bean makes it easier to work with a machines.
The following listing shows how to create such a bean:
@Bean
public StateMachineService<String, String> stateMachineService(
StateMachineFactory<String, String> stateMachineFactory,
StateMachineRuntimePersister<String, String, String> stateMachineRuntimePersister) {
return new DefaultStateMachineService<String, String>(stateMachineFactory, stateMachineRuntimePersister);
}We use JSON data to import the configuration. The following example creates a bean to do so:
@Bean
public StateMachineJackson2RepositoryPopulatorFactoryBean jackson2RepositoryPopulatorFactoryBean() {
StateMachineJackson2RepositoryPopulatorFactoryBean factoryBean = new StateMachineJackson2RepositoryPopulatorFactoryBean();
factoryBean.setResources(new Resource[] { new ClassPathResource("datajpamultipersist.json") });
return factoryBean;
}The following listing shows how we get a RepositoryStateMachineModelFactory:
@Configuration
@EnableStateMachineFactory
public static class Config extends StateMachineConfigurerAdapter<String, String> {
@Autowired
private StateRepository<? extends RepositoryState> stateRepository;
@Autowired
private TransitionRepository<? extends RepositoryTransition> transitionRepository;
@Autowired
private StateMachineRuntimePersister<String, String, String> stateMachineRuntimePersister;
@Override
public void configure(StateMachineConfigurationConfigurer<String, String> config)
throws Exception {
config
.withPersistence()
.runtimePersister(stateMachineRuntimePersister);
}
@Override
public void configure(StateMachineModelConfigurer<String, String> model)
throws Exception {
model
.withModel()
.factory(modelFactory());
}
@Bean
public StateMachineModelFactory<String, String> modelFactory() {
return new RepositoryStateMachineModelFactory(stateRepository, transitionRepository);
}
}You can run the sample by using the following command:
# java -jar spring-statemachine-samples-datajpamultipersist-3.0.1.jarAccessing the application at http://localhost:8080 brings up a newly
constructed machine for each request and lets you send
events to a machine. The possible events and the state machine configuration are
updated from a database for each request. We also print out
all state machine contexts and the current root machine,
as the following image shows:

The state machine named datajpamultipersist1 is a simple “flat” machine where states S1,
S2 and S3 are transitioned by events E1, E2, and E3 (respectively).
However, the state machine named datajpamultipersist2 contains two
regions (R1 and R2) directly under the root level. That is why this
root level machine really does not have a state. We need
that root level machine to host those regions.
Regions R1 and R2 in the datajpamultipersist2 state machine contains states
S10, S11, and S12 and S20, S21, and S22 (respectively). Events
E10, E11, and E12 are used for region R1 and events E20, E21,
and event E22 is used for region R2. The following images shows what happens when we
send events E10 and E20 to the
datajpamultipersist2 state machine:

Regions have their own contexts with their own IDs, and the actual
ID is postfixed with # and the region ID. As the following image shows,
different regions in a database have different contexts:
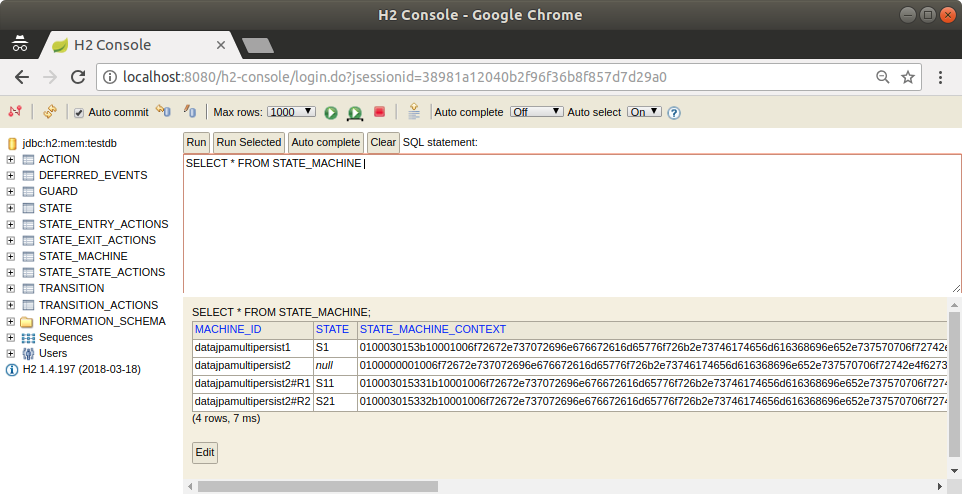
Data JPA Persist
The data persist sample shows how you can state machine concepts with a persisting machine in an external repository. This sample uses an embedded H2 database with an H2 Console (to ease playing with the database). Optionally, you can also enable Redis or MongoDB.
This sample uses spring-statemachine-autoconfigure (which, by default,
auto-configures the repositories and entity classes needed for JPA).
Thus, you need only @SpringBootApplication.
The following example shows the Application class with the @SpringBootApplication annotation:
@SpringBootApplication
public class Application {
public static void main(String[] args) {
SpringApplication.run(Application.class, args);
}
}The StateMachineRuntimePersister interface works on the runtime
level of a StateMachine. Its implementation,
JpaPersistingStateMachineInterceptor, is meant to be used with a
JPA.
The following listing creates a StateMachineRuntimePersister bean:
@Configuration
@Profile("jpa")
public static class JpaPersisterConfig {
@Bean
public StateMachineRuntimePersister<States, Events, String> stateMachineRuntimePersister(
JpaStateMachineRepository jpaStateMachineRepository) {
return new JpaPersistingStateMachineInterceptor<>(jpaStateMachineRepository);
}
}The following example shows how you can use a very similar configuration to create a bean for MongoDB:
@Configuration
@Profile("mongo")
public static class MongoPersisterConfig {
@Bean
public StateMachineRuntimePersister<States, Events, String> stateMachineRuntimePersister(
MongoDbStateMachineRepository jpaStateMachineRepository) {
return new MongoDbPersistingStateMachineInterceptor<>(jpaStateMachineRepository);
}
}The following example shows how you can use a very similar configuration to create a bean for Redis:
@Configuration
@Profile("redis")
public static class RedisPersisterConfig {
@Bean
public StateMachineRuntimePersister<States, Events, String> stateMachineRuntimePersister(
RedisStateMachineRepository jpaStateMachineRepository) {
return new RedisPersistingStateMachineInterceptor<>(jpaStateMachineRepository);
}
}You can configure StateMachine to use runtime persistence by using the
withPersistence configuration method.
The following listing shows how to do so:
@Autowired
private StateMachineRuntimePersister<States, Events, String> stateMachineRuntimePersister;
@Override
public void configure(StateMachineConfigurationConfigurer<States, Events> config)
throws Exception {
config
.withPersistence()
.runtimePersister(stateMachineRuntimePersister);
}This sample also uses DefaultStateMachineService, which makes it
easier to work with multiple machines.
The following listing shows how to create an instance of DefaultStateMachineService:
@Bean
public StateMachineService<States, Events> stateMachineService(
StateMachineFactory<States, Events> stateMachineFactory,
StateMachineRuntimePersister<States, Events, String> stateMachineRuntimePersister) {
return new DefaultStateMachineService<States, Events>(stateMachineFactory, stateMachineRuntimePersister);
}The following listing shows the logic that drives the StateMachineService in this sample:
private synchronized StateMachine<States, Events> getStateMachine(String machineId) throws Exception {
listener.resetMessages();
if (currentStateMachine == null) {
currentStateMachine = stateMachineService.acquireStateMachine(machineId);
currentStateMachine.addStateListener(listener);
currentStateMachine.startReactively().block();
} else if (!ObjectUtils.nullSafeEquals(currentStateMachine.getId(), machineId)) {
stateMachineService.releaseStateMachine(currentStateMachine.getId());
currentStateMachine.stopReactively().block();
currentStateMachine = stateMachineService.acquireStateMachine(machineId);
currentStateMachine.addStateListener(listener);
currentStateMachine.startReactively().block();
}
return currentStateMachine;
}You can use the following command to run the sample:
# java -jar spring-statemachine-samples-datapersist-3.0.1.jar|
By default, the |
Accessing the application at http://localhost:8080 brings up a newly constructed state machine for each request, and you can choose to send events to a machine. The possible events and machine configuration are updated from a database with every request.
The state machines in this sample have a simple configuration with states 'S1'
to 'S6' and events 'E1' to 'E6' to transition the state machine between those
states. You can use two state machine identifiers (datajpapersist1 and
datajpapersist2) to request a particular state machine.
The following image shows the UI that lets you pick a machine and an event and that shows
what happens when you do:
The sample defaults to using machine 'datajpapersist1' and goes to its initial state 'S1'. The following image shows the result of using those defaults:
If you send events E1 and E2 to the datajpapersist1 state machine, its
state is persisted as 'S3'.
The following image shows the result of doing so:
If you then request state machine datajpapersist1 but send no events,
the state machine is restored back to its persisted state, S3.
Monitoring
The monitoring sample shows how you can use state machine concepts to monitor state machine transitions and actions. The following listing configures the state machine that we use for this sample:
@Configuration
@EnableStateMachine
public static class Config extends StateMachineConfigurerAdapter<String, String> {
@Override
public void configure(StateMachineStateConfigurer<String, String> states)
throws Exception {
states
.withStates()
.initial("S1")
.state("S2", null, (c) -> {System.out.println("hello");})
.state("S3", (c) -> {System.out.println("hello");}, null);
}
@Override
public void configure(StateMachineTransitionConfigurer<String, String> transitions)
throws Exception {
transitions
.withExternal()
.source("S1").target("S2").event("E1")
.action((c) -> {System.out.println("hello");})
.and()
.withExternal()
.source("S2").target("S3").event("E2");
}
}You can use the following command to run the sample:
# java -jar spring-statemachine-samples-monitoring-3.0.1.jarThe following image shows the state machine’s initial state:
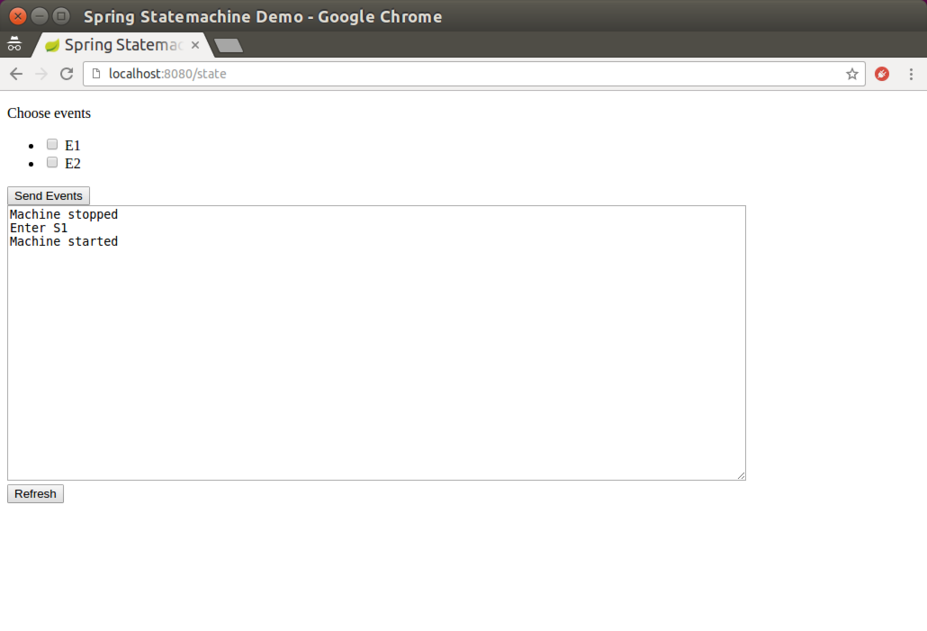
The following image shows the state of the state machine after we have performed some actions:
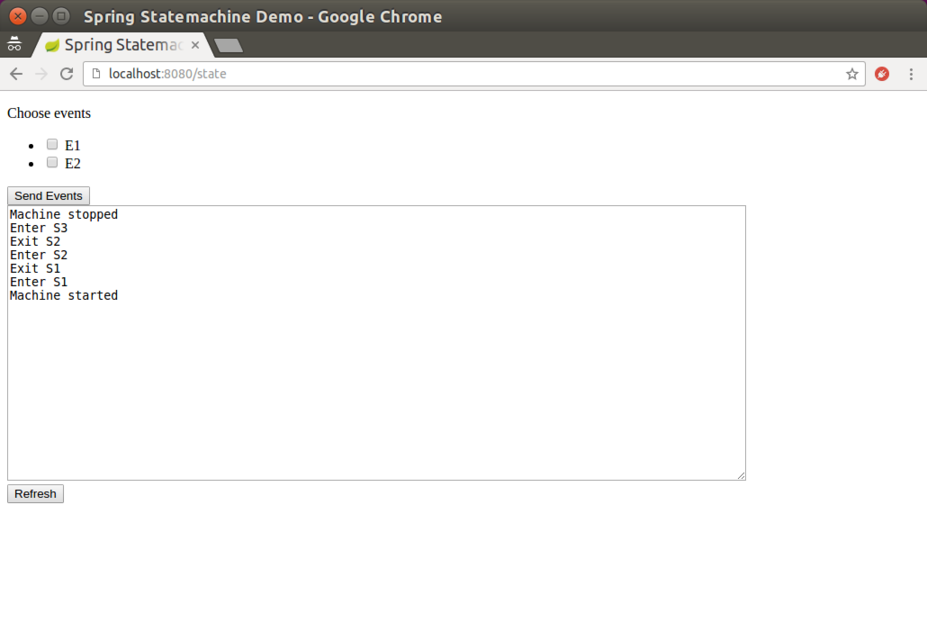
You can view metrics from Spring Boot by running the following two curl
commands (shown with their output):
# curl http://localhost:8080/actuator/metrics/ssm.transition.duration
{
"name":"ssm.transition.duration",
"measurements":[
{
"statistic":"COUNT",
"value":3.0
},
{
"statistic":"TOTAL_TIME",
"value":0.007
},
{
"statistic":"MAX",
"value":0.004
}
],
"availableTags":[
{
"tag":"transitionName",
"values":[
"INITIAL_S1",
"EXTERNAL_S1_S2"
]
}
]
}# curl http://localhost:8080/actuator/metrics/ssm.transition.transit
{
"name":"ssm.transition.transit",
"measurements":[
{
"statistic":"COUNT",
"value":3.0
}
],
"availableTags":[
{
"tag":"transitionName",
"values":[
"EXTERNAL_S1_S2",
"INITIAL_S1"
]
}
]
}You can also view tracing from Spring Boot by running the following curl
command (shown with its output):
# curl http://localhost:8080/actuator/statemachinetrace
[
{
"timestamp":"2018-02-11T06:44:12.723+0000",
"info":{
"duration":2,
"machine":null,
"transition":"EXTERNAL_S1_S2"
}
},
{
"timestamp":"2018-02-11T06:44:12.720+0000",
"info":{
"duration":0,
"machine":null,
"action":"demo.monitoring.StateMachineConfig$Config$$Lambda$576/1499688007@22b47b2f"
}
},
{
"timestamp":"2018-02-11T06:44:12.714+0000",
"info":{
"duration":1,
"machine":null,
"transition":"INITIAL_S1"
}
},
{
"timestamp":"2018-02-11T06:44:09.689+0000",
"info":{
"duration":4,
"machine":null,
"transition":"INITIAL_S1"
}
}
]FAQ
State Changes
You can choose from three approaches:
-
Implement an action and send an appropriate event to a state machine to trigger a transition into the proper target state.
-
Define a deferred event within a state and, before sending an event, send another event that is deferred. Doing so causes the next appropriate state transition when it is more convenient to handle that event.
-
Implement a triggerless transition, which automatically causes a state transition into the next state when state is entered and its actions has been completed.
Extended State
An important concept in a state machine is that nothing really happens
unless a trigger causes a state transition that
then can fire actions. However, having said that, Spring Statemachine
always has an initial transition when a state machine is started. With
this initial transition, you can run a simple action that, within
a StateContext, can do whatever it likes with extended state
variables.
Appendices
Appendix A: Support Content
This appendix provides generic information about the classes and material that are used in this reference documentation.
Classes Used in This Document
The following listings show the classes used throughout this reference guide:
public enum States {
SI,S1,S2,S3,S4,SF
}public enum States2 {
S1,S2,S3,S4,S5,SF,
S2I,S21,S22,S2F,
S3I,S31,S32,S3F
}public enum States3 {
S1,S2,SH,
S2I,S21,S22,S2F
}public enum Events {
E1,E2,E3,E4,EF
}Appendix B: State Machine Concepts
This appendix provides generial information about state machines.
Quick Example
Assuming we have states named STATE1 and STATE2 and events named EVENT1 and
EVENT2, you can define the logic of the state machine as the following image shows:
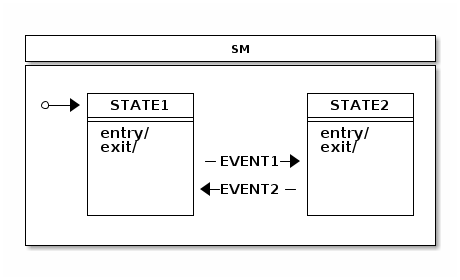
The following listings define the state machine in the preceding image:
public enum States {
STATE1, STATE2
}
public enum Events {
EVENT1, EVENT2
}@Configuration
@EnableStateMachine
public class Config1 extends EnumStateMachineConfigurerAdapter<States, Events> {
@Override
public void configure(StateMachineStateConfigurer<States, Events> states)
throws Exception {
states
.withStates()
.initial(States.STATE1)
.states(EnumSet.allOf(States.class));
}
@Override
public void configure(StateMachineTransitionConfigurer<States, Events> transitions)
throws Exception {
transitions
.withExternal()
.source(States.STATE1).target(States.STATE2)
.event(Events.EVENT1)
.and()
.withExternal()
.source(States.STATE2).target(States.STATE1)
.event(Events.EVENT2);
}
}@WithStateMachine
public class MyBean {
@OnTransition(target = "STATE1")
void toState1() {
}
@OnTransition(target = "STATE2")
void toState2() {
}
}public class MyApp {
@Autowired
StateMachine<States, Events> stateMachine;
void doSignals() {
stateMachine
.sendEvent(Mono.just(MessageBuilder
.withPayload(Events.EVENT1).build()))
.subscribe();
stateMachine
.sendEvent(Mono.just(MessageBuilder
.withPayload(Events.EVENT2).build()))
.subscribe();
}
}Glossary
- State Machine
-
The main entity that drives a collection of states, together with regions, transitions, and events.
- State
-
A state models a situation during which some invariant condition holds. The state is the main entity of a state machine where state changes are driven by events.
- Extended State
-
An extended state is a special set of variables kept in a state machine to reduce the number of needed states.
- Transition
-
A transition is a relationship between a source state and a target state. It may be part of a compound transition, which takes the state machine from one state configuration to another, representing the complete response of the state machine to an occurrence of an event of a particular type.
- Event
-
An entity that is sent to a state machine and then drives a various state changes.
- Initial State
-
A special state in which the state machine starts. The initial state is always bound to a particular state machine or a region. A state machine with multiple regions may have a multiple initial states.
- End State
-
(Also called as a final state.) A special kind of state signifying that the enclosing region is completed. If the enclosing region is directly contained in a state machine and all other regions in the state machine are also completed, the entire state machine is completed.
- History State
-
A pseudo state that lets a state machine remember its last active state. Two types of history state exists: shallow (which remembers only top level state) and deep (which remembers active states in sub-machines).
- Choice State
-
A pseudo state that allows for making a transition choice based on (for example) event headers or extended state variables.
- Junction State
-
A pseudo state that is relatively similar to choice state but allows multiple incoming transitions, while choice allows only one incoming transition.
- Fork State
-
A pseudo state that gives controlled entry into a region.
- Join State
-
A pseudo state that gives controlled exit from a region.
- Entry Point
-
A pseudo state that allows controlled entry into a submachine.
- Exit Point
-
A pseudo state that allows controlled exit from a submachine.
- Region
-
A region is an orthogonal part of either a composite state or a state machine. It contains states and transitions.
- Guard
-
A boolean expression evaluated dynamically based on the value of extended state variables and event parameters. Guard conditions affect the behavior of a state machine by enabling actions or transitions only when they evaluate to
TRUEand disabling them when they evaluate toFALSE. - Action
-
A action is a behavior run during the triggering of the transition.
A State Machine Crash Course
This appendix provides a generic crash course to state machine concepts.
States
A state is a model in which a state machine can be. It is always easier to describe state as a real world example rather than trying to use abstract concepts ingeneric documentation. To that end, consider a simple example of a keyboard — most of us use one every single day. If you have a full keyboard that has normal keys on the left side and the numeric keypad on the right side, you may have noticed that the numeric keypad may be in a two different states, depending on whether numlock is activated. If it is not active, pressing the number pad keys result in navigation by using arrows and so on. If the number pad is active, pressing those keys results in numbers being typed. Essentially, the number pad part of a keyboard can be in two different states.
To relate state concept to programming, it means that instead of using flags, nested if/else/break clauses, or other impractical (and sometimes tortuous) logic, you can rely on state, state variables, or another interaction with a state machine.
Pseudo States
Pseudostate is a special type of state that usually introduces more higher-level logic into a state machine by either giving a state a special meaning (such as initial state). A state machine can then internally react to these states by doing various actions that are available in UML state machine concepts.
Initial
The Initial pseudostate state is always needed for every single state machine, whether you have a simple one-level state machine or a more complex state machine composed of submachines or regions. The initial state defines where a state machine should go when it starts. Without it, a state machine is ill-formed.
End
The Terminate pseudostate (which is also called “end state”) indicates that a particular state machine has reached its final state. Effectively, this mean that a state machine no longer processes any events and does not transit to any other state. However, in the case where submachines are regions, a state machine can restart from its terminal state.
Choice
You can use the Choice pseudostate choose a dynamic conditional branch of a transition from this state. The dynamic condition is evaluated by guards so that one branch is selected. Usually a simple if/elseif/else structure is used to make sure that one branch is selected. Otherwise, the state machine might end up in a deadlock, and the configuration is ill-formed.
Junction
The Junction pseudostate is functionally similar to choice, as both are implemented with if/elseif/else structures. The only real difference is that junction allows multiple incoming transitions, while choice allows only one. Thus difference is largely academic but does have some differences, such as when a state machine is designed is used with a real UI modeling framework.
History
You can use the History pseudostate to remember the last active state
configuration. After a state machine has exited, you can use a history state
to restore a previously known configuration. There are two types
of history states available: SHALLOW (which remembers only the active state of a
state machine itself) and DEEP (which also remembers nested states).
A history state could be implemented externally by listening state machine events, but this would soon make for very difficult logic, especially if a state machine contains complex nested structures. Letting the state machine itself handle the recording of history states makes things much simpler. The user need only create a transition into a history state, and the state machine handles the needed logic to go back to its last known recorded state.
In cases where a Transition terminates on a history state when the state has not been previously entered (in other words, no prior history exists) or it had reached its end state, a transition can force the state machine to a specific substate, by using the default history mechanism. This transition originates in the history state and terminates on a specific vertex (the default history state) of the region that contains the history state. This transition is taken only if its execution leads to the history state and the state had never before been active. Otherwise, the normal history entry into the region is executed. If no default history transition is defined, the standard default entry of the region is performed.
Fork
You can use the Fork pseudostate to do an explicit entry into one or more regions. The following image shows how a fork works:
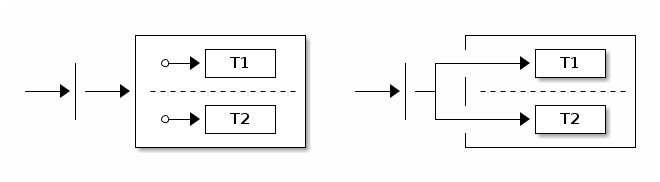
The target state can be a parent state that hosts regions, which simply means that regions are activated by entering their initial states. You can also add targets directly to any state in a region, which allows more controlled entry into a state.
Join
The Join pseudostate merges together several transitions that originate from different regions. It is generally used to wait and block for participating regions to get into its join target states. The following image shows how a join works:
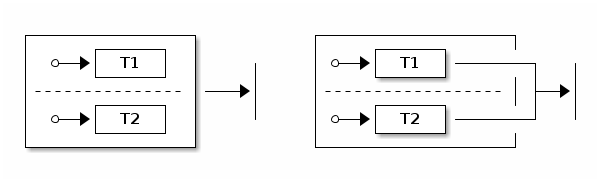
The source state can be a parent state that hosts regions, which means that join states are the terminal states of the participating regions. You can also define source states to be any state in a region, which allows controlled exit from regions.
Entry Point
An Entry Point pseudostate represents an entry point for a state machine or a composite state that provides encapsulation of the insides of the state or state machine. In each region of the state machine or composite state that owns the entry point, there is at most a single transition from the entry point to a vertex within that region.
Exit Point
An Exit Point pseudostate is an exit point of a state machine or composite state that provides encapsulation of the insides of the state or state machine. Transitions that terminate on an exit point within any region of the composite state (or a state machine referenced by a submachine state) imply exiting of this composite state or submachine state (with execution of its associated exit behavior).
Guard Conditions
Guard conditions are expressions which evaluates to either TRUE or
FALSE, based on extended state variables and event parameters. Guards
are used with actions and transitions to dynamically choose whether a
particular action or transition should be run. The various spects of guards,
event parameters, and extended state variables exist to make state
machine design much more simple.
Events
Event is the most-used trigger behavior to drive a state machine. There are other ways to trigger behavior in a state machine (such as a timer), but events are the ones that really let users interact with a state machine. Events are also called “signals”. They basically indicate something that can possibly alter a state machine state.
Transitions
A transition is a relationship between a source state and a target state. A switch from one state to another is a state transition caused by a trigger.
Internal Transition
Internal transition is used when an action needs to be run without causing a state transition. In an internal transition, the source state and the target state is always the same, and it is identical with a self-transition in the absence of state entry and exit actions.
External versus Local Transitions
In most cases, external and local transitions are functionally equivalent, except in cases where the transition happens between super and sub states. Local transitions do not cause exit and entry to a source state if the target state is a substate of a source state. Conversely, local transitions do not cause exit and entry to a target state if the target is a superstate of a source state. The following image shows the difference between local and external transitions with very simplistic super and sub states:
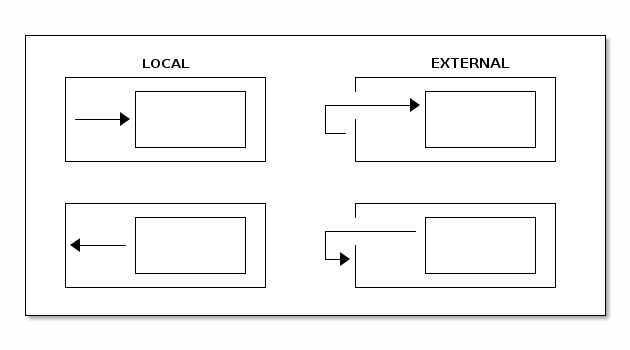
Actions
Actions really glue state machine state changes to a user’s own code. A state machine can run an action on various changes and on the steps in a state machine (such as entering or exiting a state) or doing a state transition.
Actions usually have access to a state context, which gives running code a choice to interact with a state machine in various ways. State context exposes a whole state machine so that a user can access extended state variables, event headers (if a transition is based on an event), or an actual transition (where it is possible to see more detailed about where this state change is coming from and where it is going).
Hierarchical State Machines
The concept of a hierarchical state machine is used to simplify state design when particular states must exist together.
Hierarchical states are really an innovation in UML state machines over
traditional state machines, such as Mealy or Moore machines.
Hierarchical states lets you define some level of abstraction (parallel
to how a Java developer might define a class structure with abstract
classes). For example, with a nested state machine, you can
define transition on a multiple level of states (possibly with
different conditions). A state machine always tries to see if the current
state is able to handle an event, together with transition guard
conditions. If these conditions do not evaluate to TRUE, the state
machine merely see what the super state can handle.
Regions
Regions (which are also called as orthogonal regions) are usually viewed as exclusive OR (XOR) operations applied to states. The concept of a region in terms of a state machine is usually a little difficult to understand, but things gets a little simpler with a simple example.
Some of us have a full size keyboard with the main keys on the left side and numeric keys on the right side. You have probably noticed that both sides really have their own state, which you see if you press a “numlock” key (which alters only the behaviour of the number pad itself). If you do not have a full-size keyboard, you can buy an external USB number pad. Given that the left and right side of a keyboard can each exist without the other, they must have totally different states, which means they are operating on different state machines. In state machine terms, the main part of a keyboard is one region and the number pad is another region.
It would be a little inconvenient to handle two different state machines as totally separate entities, because they still work together in some fashion. This independence lets orthogonal regions combine together in multiple simultaneous states within a single state in a state machine.
Appendix C: Distributed State Machine Technical Paper
This appendix provides more detailed technical documentation about using a Zookeeper instance with Spring Statemachine.
Abstract
Introducing a “distributed state” on top of a single state machine
instance running on a single JVM is a difficult and a complex topic.
The concept of a “Distributed State Machine” introduces a few relatively complex
problems on top of a simple state machine, due to its run-to-completion
model and, more generally, because of its single-thread execution model,
though orthogonal regions can be run in parallel. One other natural
problem is that state machine transition execution is driven by triggers,
which are either event or timer based.
Spring State Machine tries to solve the problem of spanning a generic “State Machine” through a JVM boundary by supporting distributed state machines. Here we show that you can use generic “State Machine” concepts across multiple JVMs and Spring Application Contexts.
We found that, if Distributed State Machine abstraction is carefully chosen
and backing distributed state repository guarantees CP readiness, it is
possible to create a consistent state machine that can share
distributed state among other state machines in an ensemble.
Our results demonstrate that distributed state changes are consistent if the backing repository is “CP” (discussed later). We anticipate our distributed state machine can provide a foundation to applications that need to work with shared distributed states. This model aims to provide good methods for cloud applications to have much easier ways to communicate with each other without having to explicitly build these distributed state concepts.
Introduction
Spring State Machine is not forced to use a single threaded execution model, because, once multiple regions are used, regions can be executed in parallel if the necessary configuration is applied. This is an important topic, because, once a user wants to have parallel state machine execution, it makes state changes faster for independent regions.
When state changes are no longer driven by a trigger in a local JVM or a local state machine instance, transition logic needs to be controlled externally in an arbitrary persistent storage. This storage needs to have a way to notify participating state machines when distributed state is changed.
CAP Theorem states that it is impossible for a distributed computer system to simultaneously provide all three of the following guarantees: consistency, availability, and partition tolerance.
This means that, whatever is chosen for a backing persistence storage, it is advisable to be “CP”. In this context, “CP” means “consistency” and “partition tolerance”. Naturally, a distributed Spring Statemachine does not care about its “CAP” level but, in reality, “consistency” and “partition tolerance” are more important than “availability”. This is an exact reason why (for example) Zookeeper uses “CP” storage.
All tests presented in this article are accomplished by running custom Jepsen tests in the following environment:
-
A cluster having nodes n1, n2, n3, n4 and n5.
-
Each node has a
Zookeeperinstance that constructs an ensemble with all other nodes. -
Each node has a Web sample installed, to connect to a local
Zookeepernode. -
Every state machine instance communicates only with a local
Zookeeperinstance. While connecting a machine to multiple instances is possible, it is not used here. -
All state machine instances, when started, create a
StateMachineEnsembleby using a Zookeeper ensemble. -
Each sample contains a custom rest API, which Jepsen uses to send events and check particular state machine statuses.
All Jepsen tests for Spring Distributed Statemachine are available from
Jepsen
Tests.
Generic Concepts
One design decision of a Distributed State Machine was not to make each
individual state machine instance be aware that it is part of a
“distributed ensemble”. Because the main functions and features of a
StateMachine can be accessed through its interface, it makes sense to
wrap this instance in a DistributedStateMachine, which
intercepts all state machine communication and collaborates with an
ensemble to orchestrate distributed state changes.
One other important concept is to be able to persist enough
information from a state machine to reset a state machine state
from an arbitrary state into a new deserialized state. This is naturally
needed when a new state machine instance joins with an ensemble
and needs to synchronize its own internal state with a distributed
state. Together with using concepts of distributed states and state
persisting, it is possible to create a distributed state machine.
Currently, the only backing repository of a Distributed State Machine is
implemented by using Zookeeper.
As mentioned in Using Distributed States, distributed states are enabled by
wrapping an instance of a StateMachine in a
DistributedStateMachine. The specific StateMachineEnsemble
implementation is ZookeeperStateMachineEnsemble provides
integration with Zookeeper.
The Role of ZookeeperStateMachinePersist
We wanted to have a generic interface (StateMachinePersist) that
Can persist StateMachineContext into arbitrary storage and
ZookeeperStateMachinePersist implements this interface for
Zookeeper.
The Role of ZookeeperStateMachineEnsemble
While a distributed state machine uses one set of serialized
contexts to update its own state, with zookeeper, we have a
conceptual problem around how to listen to these context changes. We
can serialize context into a zookeeper znode and eventually
listen when the znode data is modified. However, Zookeeper does not
guarantee that you get a notification for every data change,
because a registered watcher for a znode is disabled once it fires
and the user need to re-register that watcher. During this short time,
a znode data can be changed, thus resulting in missing events. It is
actually very easy to miss these events by changing data from
multiple threads in a concurrent manner.
To overcome this issue, we keep individual context changes
in multiple znodes and we use a simple integer counter to mark
which znode is the current active one. Doing so lets us replay missed
events. We do not want to create more and more znodes and then later
delete old ones. Instead, we use the simple concept of a circular
set of znodes. This lets us use a predefined set of znodes where
the current node can be determined with a simple integer counter. We already have
this counter by tracking the main znode data version (which, in
Zookeeper, is an integer).
The size of a circular buffer is mandated to be a power of two, to avoid trouble when the integer goes to overflow. For this reason, we need not handle any specific cases.
Distributed Tolerance
To show how a various distributed actions against a state machine work in real life, we use a set of Jepsen tests to simulate various conditions that might happen in a real distributed cluster. These include a “brain split” on a network level, parallel events with multiple “distributed state machines”, and changes in “extended state variables”. Jepsen tests are based on a sample Web, where this sample instance runs on multiple hosts together with a Zookeeper instance on every node where the state machine is run. Essentially, every state machine sample connects to a local Zookeeper instance, which lets us, by using Jepsen, to simulate network conditions.
The plotted graphs shown later in this chapter contain states and events that directly map to a state chart, which you can be find in Web.
Isolated Events
Sending an isolated single event into exactly one state machine in an ensemble is the simplest testing scenario and demonstrates that a state change in one state machine is properly propagated into other state machines in an ensemble.
In this test, we demonstrate that a state change in one machine eventually causes a consistent state change in other machines. The following image shows the events and state changes for a test state machine:
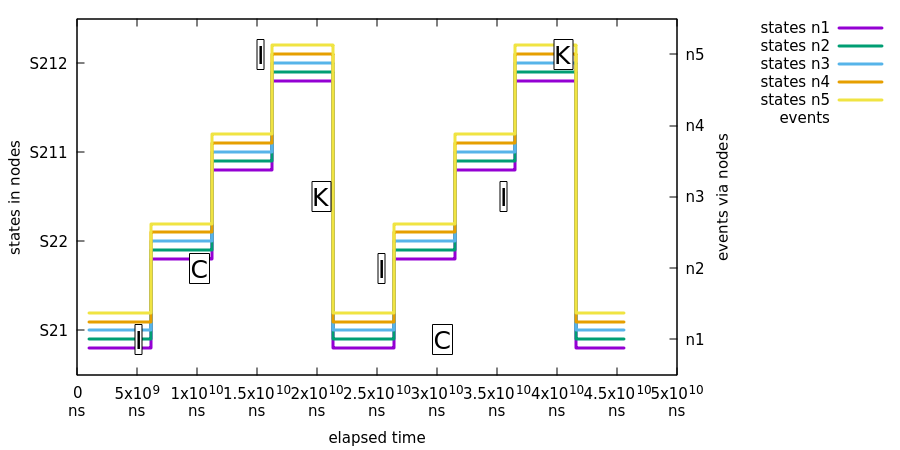
In the preceding image:
-
All machines report state
S21. -
Event
Iis sent to noden1and all nodes report state change fromS21toS22. -
Event
Cis sent to noden2and all nodes report state change fromS22toS211. -
Event
Iis sent to noden5and all nodes report state change fromS211toS212. -
Event
Kis sent to noden3and all nodes report state change fromS212toS21. -
We cycle events
I,C,I, andKone more time, through random nodes.
Parallel Events
One logical problem with multiple distributed state machines is that, if the same event is sent into multiple state machines at exactly the same time, only one of those events causes a distributed state transitions. This is a somewhat expected scenario, because the first state machine (for this event) that is able to change a distributed state controls the distributed transition logic. Effectively, all other machines that receive this same event silently discard the event, because the distributed state is no longer in a state where a particular event can be processed.
In the test shown in the following image, we demonstrate that a state change caused by a parallel event throughout an ensemble eventually causes a consistent state change in all machines:
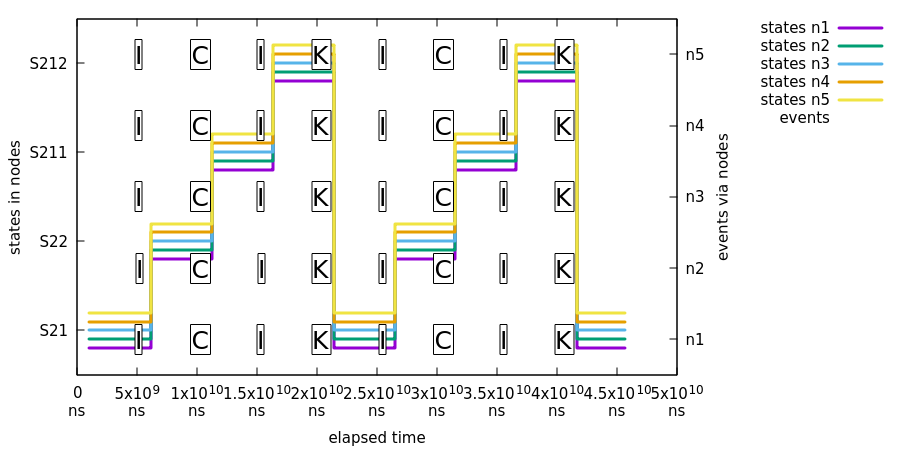
In the preceding image, we use the same event flow that we used in the previous sample (Isolated Events), with the difference that events are always sent to all nodes.
Concurrent Extended State Variable Changes
Extended state machine variables are not guaranteed to be atomic at any given time, but, after a distributed state change, all state machines in an ensemble should have a synchronized extended state.
In this test, we demonstrate that a change in extended state variables in one distributed state machine eventually becomes consistent in all the distributed state machines. The following image shows this test:
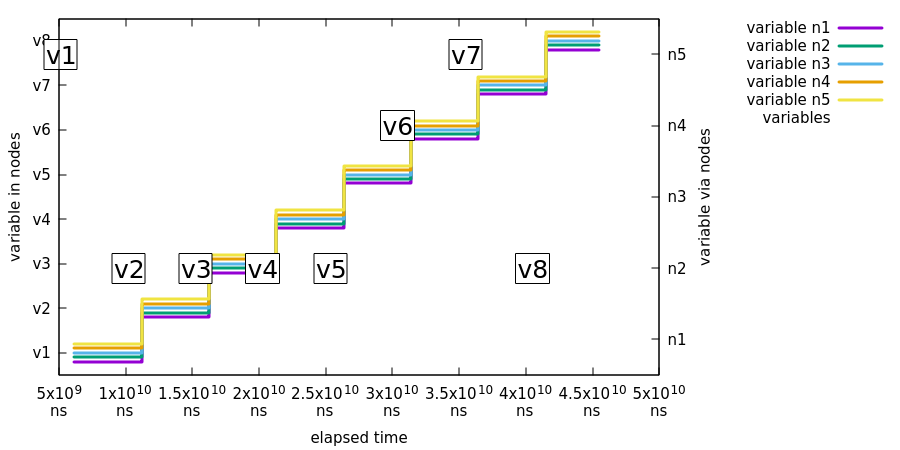
In the preceding image:
-
Event
Jis send to noden5with event variabletestVariablehaving valuev1. All nodes then report having a variable namedtestVariablewith a value ofv1. -
Event
Jis repeated from variablev2tov8, doing the same checks.
Partition Tolerance
We need to always assume that, sooner or later, things in a cluster go bad, whether it is a crash of a Zookeeper instance, a state machine crash, or a network problem such as a “brain split”. (A brain split is a situation where existing cluster members are isolated so that only parts of hosts are able to see each other). The usual scenario is that a brain split creates minority and majority partitions of an ensemble such that hosts in the minority cannot participate in an ensemble until the network status has been healed.
In the following tests, we demonstrate that various types of brain split in an ensemble eventually cause a fully synchronized state of all the distributed state machines.
There are two scenarios that have a straight brain split in a
network where where Zookeeper and Statemachine instances are
split in half (assuming each Statemachine connects to a
local Zookeeper instance):
-
If the current zookeeper leader is kept in a majority, all clients connected to the majority keep functioning properly.
-
If the current zookeeper leader is left in the minority, all clients disconnect from it and try to connect back till previous minority members have successfully joined back to existing majority ensemble.
| In our current Jepsen tests, we cannot separate Zookeeper split-brain scenarios between the leader being left in the majority or in the minority, so we need to run the tests multiple times to accomplish this situation. |
In the following plots, we have mapped a state machine error state into an
error to indicate that the state machine is in an error state instead of
a normal state. Please remember this when interpreting chart states.
|
In this first test, we show that, when an existing Zookeeper leader was kept in the majority, three out of five machines continue as is. The following image shows this test:

In the preceding image:
-
The first event,
C, is sent to all machines, leading a state change toS211. -
Jepsen nemesis causes a brain split, which causes partitions of
n1/n2/n5andn3/n4. Nodesn3/n4are left in the minority, and nodesn1/n2/n5construct a new healthy majority. Nodes in the majority keep functioning without problems, but nodes in the minority go into error states. -
Jepsen heals the network and, after some time, nodes
n3/n4join back into the ensemble and synchronize its distributed status. -
Finally, event
K1is sent to all state machines to ensure that the ensemble is working properly. This state change leads back to stateS21.
In the second test, we show that, when the existing zookeeper leader was kept in the minority, all machines error out. The following image shows the second test:
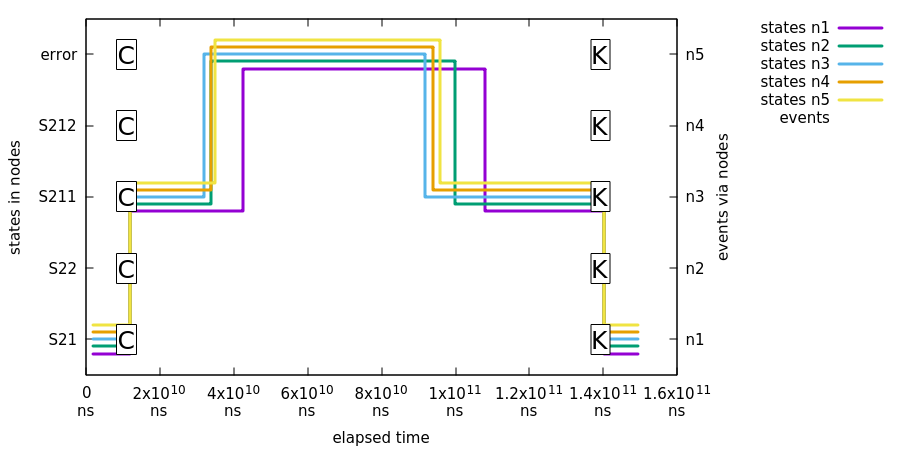
In the preceding image:
-
The first event,
C, is sent to all machines leading to a state change toS211. -
Jepsen nemesis causes a brain split, which causes partitions such that the existing
Zookeeperleader is kept in the minority and all instances are disconnected from the ensemble. -
Jepsen heals the network and, after some time, all nodes join back into the ensemble and synchronize its distributed status.
-
Finally, event
K1is sent to all state machines to ensure that ensemble workS properly. This state change leads back to stateS21.
Crash and Join Tolerance
In this test, we demonstrate that killing an existing state machine and then joining a new instance back into an ensemble keeps the distributed state healthy and the newly joined state machines synchronize their states properly. The following image shows the crash and join tolerance test:
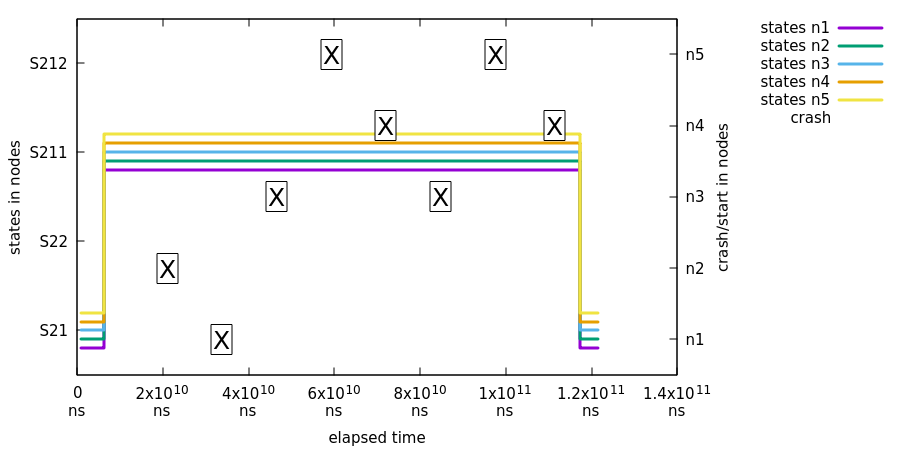
In this test, states are not checked between first the X and last the X.
Thus, the graph shows a flat line in between. The states are checked
exactly where the state change happens between S21 and S211.
|
In the preceding image:
-
All state machines are transitioned from the initial state (
S21) into stateS211so that we can test proper state synchronize during the join. -
Xmarks when a specific node has been crashed and started. -
At the same time, we request states from all machines and plot the result.
-
Finally, we do a simple transition back to
S21fromS211to make sure that all state machines still function properly.
Developer Documentation
This appendix provides generic information for adevelopers who may want to contribute or other people who want to understand how state machine works or understand its internal concepts.
StateMachine Config Model
StateMachineModel and other related SPI classes are an abstraction
between various configuration and factory classes. This also allows
easier integration for others to build state machines.
As the following listing shows, you can instantiate a state machine by building a model with configuration data classes and then asking a factory to build a state machine:
// setup configuration data
ConfigurationData<String, String> configurationData = new ConfigurationData<>();
// setup states data
Collection<StateData<String, String>> stateData = new ArrayList<>();
stateData.add(new StateData<String, String>("S1", true));
stateData.add(new StateData<String, String>("S2"));
StatesData<String, String> statesData = new StatesData<>(stateData);
// setup transitions data
Collection<TransitionData<String, String>> transitionData = new ArrayList<>();
transitionData.add(new TransitionData<String, String>("S1", "S2", "E1"));
TransitionsData<String, String> transitionsData = new TransitionsData<>(transitionData);
// setup model
StateMachineModel<String, String> stateMachineModel = new DefaultStateMachineModel<>(configurationData, statesData,
transitionsData);
// instantiate machine via factory
ObjectStateMachineFactory<String, String> factory = new ObjectStateMachineFactory<>(stateMachineModel);
StateMachine<String, String> stateMachine = factory.getStateMachine();Appendix D: Reactor Migration Guide
Main task for a work for 3.x has been to both internally and externally to move and change
as much as we can from imperative code into a reactive world. This means that some
of a main interfaces has added a new reative methods and most of a internal execution locig
(where applicable) has been moved over to handled by a reactor. Essentially what this means is that thread handling model is considerably different compared to 2.x. Following chapters
go throught all these changes.
Communicating with a Machine
We’ve added new reactive methods to StateMachine while still keeping old blocking event
methods in place.
Flux<StateMachineEventResult<S, E>> sendEvent(Mono<Message<E>> event);
Flux<StateMachineEventResult<S, E>> sendEvents(Flux<Message<E>> events);
Mono<List<StateMachineEventResult<S, E>>> sendEventCollect(Mono<Message<E>> event);We’re now solely working on a spring Message and reactor Mono and Flux classes.
You can send a Mono of a Message and receive back a Flux of StateMachineEventResult.
Remember that nothing happens until you subscribe to this Flux. More about
this returned value, see StateMachineEventResult. Method sendEventCollect
is just a syntactic sugar to pass in a Mono and get a Mono which wraps
results as a list.
Message<String> message = MessageBuilder.withPayload("EVENT").build();
machine.sendEvent(Mono.just(message)).subscribe();You can also send a Flux of messages instead of a single Mono message.
machine.sendEvents(Flux.just(message)).subscribe();All of the reactor methods are on your disposal and for example not to block and do something when event handling is completed, you could do something like.
Mono<Message<String>> mono = Mono.just(MessageBuilder.withPayload("EVENT").build());
machine.sendEvent(mono)
.doOnComplete(() -> {
System.out.println("Event handling complete");
})
.subscribe();Old API methods returning a boolean for accepted status are still in place
but are deprecated to get removed in future releases.
boolean accepted = machine.sendEvent("EVENT");TaskExecutor and TaskScheduler
StateMachine execution with TaskExecutor and state action scheduling with TaskScheduler
has been fully replaced in favour or Reactor execution and scheduling.
Essentially execution outside of a main thread is needed in two places, firstly with
State Actions which needs to be cancellable and secondly with Regions which should
be always be executed independently. Currently we’ve chosen to just use Reactor
Schedulers.parallel() for these which should give relatively good results as it
tries to automatically use available number of cpu cores from a system.
Reactive Examples
While most of an examples are still same, we’ve overhauled some of them and created some new:
-
Tunrstile Reactive Turnstile Reactive