This part of the documentation covers support for reactive stack, web applications built on a Reactive Streams API to run on non-blocking servers such as Netty, Undertow, and Servlet 3.1+ containers. Individual chapters cover the Spring WebFlux framework, the reactive WebClient, support for Testing, and Reactive Libraries. For Servlet stack, web applications, please see Web on Servlet Stack.
1. Spring WebFlux
1.1. Introduction
The original web framework included in the Spring Framework, Spring Web MVC, was purpose built for the Servlet API and Servlet containers. The reactive stack, web framework, Spring WebFlux, was added later in version 5.0. It is fully non-blocking, supports Reactive Streams back pressure, and runs on servers such as Netty, Undertow, and Servlet 3.1+ containers.
Both web frameworks mirror the names of their source modules
spring-webmvc and
spring-webflux
and co-exist side by side in the Spring Framework. Each module is optional.
Applications may use one or the other module, or in some cases both — e.g. Spring MVC controllers with the reactive WebClient.
1.1.1. Motivation
Why was Spring WebFlux created?
Part of the answer is the need for a non-blocking web stack to handle concurrency with a
small number of threads and scale with less hardware resources. Servlet 3.1 did provide
an API for non-blocking I/O. However, using it leads away from the rest of the Servlet API
where contracts are synchronous (Filter, Servlet) or blocking (getParameter,
getPart). This was the motivation for a new common API to serve as a foundation across
any non-blocking runtime. That is important because of servers such as Netty that are well
established in the async, non-blocking space.
The other part of the answer is functional programming. Much like the addition of annotations
in Java 5 created opportunities — e.g. annotated REST controllers or unit tests, the addition
of lambda expressions in Java 8 created opportunities for functional APIs in Java.
This is a boon for non-blocking applications and continuation style APIs — as popularized
by CompletableFuture and ReactiveX, that allow declarative
composition of asynchronous logic. At the programming model level Java 8 enabled Spring
WebFlux to offer functional web endpoints alongside with annotated controllers.
1.1.2. Define "reactive"
We touched on non-blocking and functional but what does reactive mean?
The term "reactive" refers to programming models that are built around reacting to change — network component reacting to I/O events, UI controller reacting to mouse events, etc. In that sense non-blocking is reactive because instead of being blocked we are now in the mode of reacting to notifications as operations complete or data becomes available.
There is also another important mechanism that we on the Spring team associate with "reactive" and that is non-blocking back pressure. In synchronous, imperative code, blocking calls serve as a natural form of back pressure that forces the caller to wait. In non-blocking code it becomes important to control the rate of events so that a fast producer does not overwhelm its destination.
Reactive Streams is a small spec, also adopted in Java 9, that defines the interaction between asynchronous components with back pressure. For example a data repository — acting as Publisher, can produce data that an HTTP server — acting as Subscriber, can then write to the response. The main purpose of Reactive Streams is to allow the subscriber to control how fast or how slow the publisher will produce data.
|
Common question: what if a publisher can’t slow down? |
1.1.3. Reactive API
Reactive Streams plays an important role for interoperability. It is of interest to libraries
and infrastructure components but less useful as an application API because it is too
low level. What applications need is a higher level and richer, functional API to
compose async logic — similar to the Java 8 Stream API but not only for collections.
This is the role that reactive libraries play.
Reactor is the reactive library of choice for Spring WebFlux. It provides the Mono and Flux API types to work on data sequences of 0..1 and 0..N through a rich set of operators aligned with the ReactiveX vocabulary of operators. Reactor is a Reactive Streams library and therefore all of its operators support non-blocking back pressure. Reactor has a strong focus on server-side Java. It is developed in close collaboration with Spring.
WebFlux requires Reactor as a core dependency but it is interoperable with other reactive
libraries via Reactive Streams. As a general rule WebFlux APIs accept a plain Publisher
as input, adapt it to Reactor types internally, use those, and then return either
Flux or Mono as output. So you can pass any Publisher as input and you can apply
operations on the output, but you’ll need to adapt the output for use with another reactive library.
Whenever feasible — e.g. annotated controllers, WebFlux adapts transparently to the use
of RxJava or other reactive library. See Reactive Libraries for more details.
1.1.4. Programming models
The spring-web module contains the reactive foundation that underlies Spring WebFlux
including HTTP abstractions, Reactive Streams adapters for supported
servers, codecs, and a core WebHandler API comparable to
the Servlet API but with non-blocking contracts.
On that foundation Spring WebFlux provides a choice of two programming models:
-
Annotated Controllers — consistent with Spring MVC, and based on the same annotations from the
spring-webmodule. Both Spring MVC and WebFlux controllers support reactive (Reactor, RxJava) return types and as a result it is not easy to tell them apart. One notable difference is that WebFlux also supports reactive@RequestBodyarguments. -
Functional Endpoints — lambda-based, lightweight, functional programming model. Think of this as a small library or a set of utilities that an application can use to route and handle requests. The big difference with annotated controllers is that the application is in charge of request handling from start to finish vs declaring intent through annotations and being called back.
1.1.5. Applicability
Spring MVC or WebFlux?
A natural question to ask but one that sets up an unsound dichotomy. It’s actually both working together to expand the range of available options. The two are designed for continuity and consistency with each other, they are available side by side, and feedback from each side benefits both sides. The diagram below shows how the two relate, what they have in common, and what each supports uniquely:
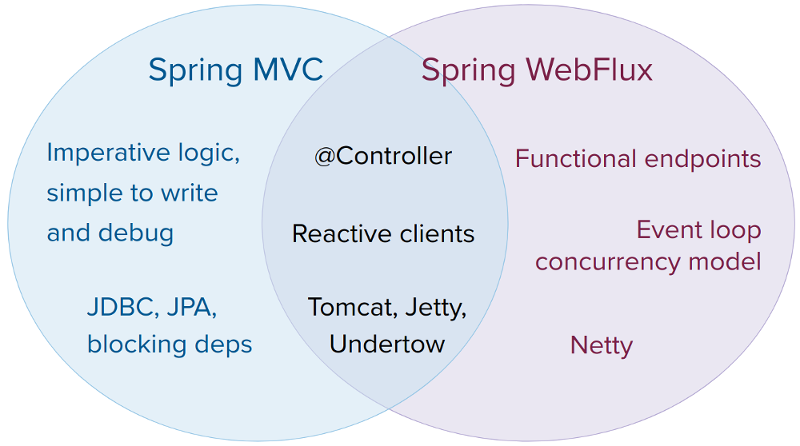
Below are some specific points to consider:
-
If you have a Spring MVC application that works fine, there is no need to change. Imperative programming is the easiest way to write, understand, and debug code. You have maximum choice of libraries since historically most are blocking.
-
If you are already shopping for a non-blocking web stack, Spring WebFlux offers the same execution model benefits as others in this space and also provides a choice of servers — Netty, Tomcat, Jetty, Undertow, Servlet 3.1+ containers, a choice of programming models — annotated controllers and functional web endpoints, and a choice of reactive libraries — Reactor, RxJava, or other.
-
If you are interested in a lightweight, functional web framework for use with Java 8 lambdas or Kotlin then use the Spring WebFlux functional web endpoints. That can also be a good choice for smaller applications or microservices with less complex requirements that can benefit from greater transparency and control.
-
In a microservice architecture you can have a mix of applications with either Spring MVC or Spring WebFlux controllers, or with Spring WebFlux functional endpoints. Having support for the same annotation-based programming model in both frameworks makes it easier to re-use knowledge while also selecting the right tool for the right job.
-
A simple way to evaluate an application is to check its dependencies. If you have blocking persistence APIs (JPA, JDBC), or networking APIs to use, then Spring MVC is the best choice for common architectures at least. It is technically feasible with both Reactor and RxJava to perform blocking calls on a separate thread but you wouldn’t be making the most of a non-blocking web stack.
-
If you have a Spring MVC application with calls to remote services, try the reactive
WebClient. You can return reactive types (Reactor, RxJava, or other) directly from Spring MVC controller methods. The greater the latency per call, or the interdependency among calls, the more dramatic the benefits. Spring MVC controllers can call other reactive components too. -
If you have a large team, keep in mind the steep learning curve in the shift to non-blocking, functional, and declarative programming. A practical way to start without a full switch is to use the reactive
WebClient. Beyond that start small and measure the benefits. We expect that for a wide range of applications the shift is unnecessary. If you are unsure what benefits to look for, start by learning about how non-blocking I/O works (e.g. concurrency on single-threaded Node.js) and its effects.
1.1.6. Servers
Spring WebFlux is supported on Tomcat, Jetty, Servlet 3.1+ containers, as well as on non-Servlet runtimes such as Netty and Undertow. All servers are adapted to a low-level, common API so that higher level programming models can be supported across servers.
Spring WebFlux does not have built-in support to start or stop a server. However it is easy to assemble an application from Spring configuration, and WebFlux infrastructure, and run it with a few lines of code.
Spring Boot has a WebFlux starter that automates these steps. By default the starter uses Netty but it is easy to switch to Tomcat, Jetty, or Undertow simply by changing your Maven or Gradle dependencies. Spring Boot defaults to Netty because it is more widely used in the async, non-blocking space, and provides a client and a server share resources.
Tomcat and Jetty can be used with both Spring MVC and WebFlux. Keep in mind however that the way they’re used is very different. Spring MVC relies on Servlet blocking I/O and allows applications to use the Servlet API directly if they need to. Spring WebFlux relies on Servlet 3.1 non-blocking I/O and uses the Servlet API behind a low-level adapter and not exposed for direct use.
For Undertow, Spring WebFlux uses Undertow APIs directly without the Servlet API.
1.1.7. Performance vs scale
Performance has many characteristics and meanings. Reactive and non-blocking generally
do not make applications run faster. They can, in some cases, for example if using the
WebClient to execute remote calls in parallel. On the whole it requires more work to do
things the non-blocking way and that can increase slightly the required processing time.
The key expected benefit of reactive and non-blocking is the ability to scale with a small, fixed number of threads and less memory. That makes applications more resilient under load because they scale in a more predictable way. In order to observe those benefits however you need to have some latency including a mix of slow and unpredictable network I/O. That’s where the reactive stack begins to show its strengths and the differences can be dramatic.
1.1.8. Concurrency Model
Both Spring MVC and Spring WebFlux support annotated controllers, but there is a key difference in the concurrency model and default assumptions for blocking and threads.
In Spring MVC, and servlet applications in general, it is assumed that applications may block the current thread, e.g. for remote calls, and for this reason servlet containers use a large thread pool, to absorb potential blocking during request handling.
In Spring WebFlux, and non-blocking servers in general, it is assumed that applications will not block, and therefore non-blocking servers use a small, fixed-size thread pool (event loop workers) to handle requests.
|
To "scale" and "small number of threads" may sound contradictory but to never block the current thread, and rely on callbacks instead, means you don’t need extra threads as there are no blocking calls to absorb. |
Invoking a Blocking API
What if you do need to use a blocking library? Both Reactor and RxJava provide the
publishOn operator to continue processing on a different thread. That means there is an
easy escape latch. Keep in mind however that blocking APIs are not a good fit for
this concurrency model.
Mutable State
In Reactor and RxJava, logic is declared through operators, and at runtime, a reactive pipeline is formed where data is processed sequentially, in distinct stages. A key benefit of that is that it frees applications from having to protect mutable state because application code within that pipeline is never invoked concurrently.
Threading Model
What threads should you expect to see on a server running with Spring WebFlux?
-
On a "vanilla" Spring WebFlux server (e.g. no data access, nor other optional dependencies), you can expect one thread for the server, and several others for request processing (typically as many as the number of CPU cores). Servlet containers, however, may start with more threads (e.g. 10 on Tomcat), in support of both servlet, blocking I/O and servlet 3.1, non-blocking I/O usage.
-
The reactive
WebClientoperates in event loop style. So you’ll see a small, fixed number of processing threads related to that, e.g. "reactor-http-nio-" with the Reactor Netty connector. However if Reactor Netty is used for both client and server, the two will share event loop resources by default. -
Reactor and RxJava provide thread pool abstractions, called Schedulers, to use with the
publishOnoperator that is used to switch processing to a different thread pool. The schedulers have names that suggest a specific concurrency strategy, e.g. "parallel" for CPU-bound work with a limited number of threads, or "elastic" for I/O-bound work with a large number of threads. If you see such threads it means some code is using a specific thread poolSchedulerstrategy. -
Data access libraries and other 3rd party dependencies may also create and use threads of their own.
Configuring
The Spring Framework does not provide support for starting and stopping servers. To configure the threading model for a server, you’ll need to use server-specific config APIs, or if using Spring Boot, check the Spring Boot configuration options for each server. The WebClient can be configured directly. For all other libraries, refer to their respective documentation.
1.2. Reactive Core
The spring-web module contains abstractions and infrastructure to build reactive web
applications. For server side processing this is organized in two distinct levels:
-
HttpHandler — basic, common API for HTTP request handling with non-blocking I/O and (Reactive Streams) back pressure, along with adapters for each supported server.
-
WebHandler API — slightly higher level, but still general purpose API for server request handling, which underlies higher level programming models such as annotated controllers and functional endpoints.
The reactive core also includes Codecs for client and server side use.
1.2.1. HttpHandler
HttpHandler is a simple contract with a single method to handle a request and response. It is intentionally minimal as its main purpose is to provide an abstraction over different server APIs for HTTP request handling.
Supported server APIs:
| Server name | Server API used | Reactive Streams support |
|---|---|---|
Netty |
Netty API |
|
Undertow |
Undertow API |
spring-web: Undertow to Reactive Streams bridge |
Tomcat |
Servlet 3.1 non-blocking I/O; Tomcat API to read and write ByteBuffers vs byte[] |
spring-web: Servlet 3.1 non-blocking I/O to Reactive Streams bridge |
Jetty |
Servlet 3.1 non-blocking I/O; Jetty API to write ByteBuffers vs byte[] |
spring-web: Servlet 3.1 non-blocking I/O to Reactive Streams bridge |
Servlet 3.1 container |
Servlet 3.1 non-blocking I/O |
spring-web: Servlet 3.1 non-blocking I/O to Reactive Streams bridge |
Server dependencies (and supported versions):
| Server name | Group id | Artifact name |
|---|---|---|
Reactor Netty |
io.projectreactor.ipc |
reactor-netty |
Undertow |
io.undertow |
undertow-core |
Tomcat |
org.apache.tomcat.embed |
tomcat-embed-core |
Jetty |
org.eclipse.jetty |
jetty-server, jetty-servlet |
Code snippets to adapt HttpHandler to each server API:
Reactor Netty
HttpHandler handler = ...
ReactorHttpHandlerAdapter adapter = new ReactorHttpHandlerAdapter(handler);
HttpServer.create(host, port).newHandler(adapter).block();
Undertow
HttpHandler handler = ...
UndertowHttpHandlerAdapter adapter = new UndertowHttpHandlerAdapter(handler);
Undertow server = Undertow.builder().addHttpListener(port, host).setHandler(adapter).build();
server.start();
Tomcat
HttpHandler handler = ...
Servlet servlet = new TomcatHttpHandlerAdapter(handler);

Tomcat server = new Tomcat();
File base = new File(System.getProperty("java.io.tmpdir"));
Context rootContext = server.addContext("", base.getAbsolutePath());
Tomcat.addServlet(rootContext, "main", servlet);
rootContext.addServletMappingDecoded("/", "main");
server.setHost(host);
server.setPort(port);
server.start();
Jetty
HttpHandler handler = ...
Servlet servlet = new JettyHttpHandlerAdapter(handler);

Server server = new Server();
ServletContextHandler contextHandler = new ServletContextHandler(server, "");
contextHandler.addServlet(new ServletHolder(servlet), "/");
contextHandler.start();

ServerConnector connector = new ServerConnector(server);
connector.setHost(host);
connector.setPort(port);
server.addConnector(connector);
server.start();
Servlet 3.1+ Container
To deploy as a WAR to any Servlet 3.1+ container, simply extend and include
AbstractReactiveWebInitializer
in the WAR, which wraps an HttpHandler with ServletHttpHandlerAdapter and registers
that as a Servlet.
1.2.2. WebHandler API
The WebHandler API is a general purpose, server, web API for processing requests through a
chain of WebExceptionHandler,
WebFilter, and a target
WebHandler components. The chain can be assembled
with WebHttpHandlerBuilder either by adding components to the builder or by having them
detected from a Spring ApplicationContext. The builder returns an
HttpHandler that can then be used to run on any of the supported servers.
While HttpHandler aims to be the most minimal contract across HTTP servers, the
WebHandler API provides essential features commonly used to build web applications.
For example, the ServerWebExchange available to WebHandler API components provides
access not only to the request and response, but also to request and session attributes,
access to parsed form data, multipart data, and more.
Special bean types
The table below lists the components that WebHttpHandlerBuilder detects:
| Bean name | Bean type | Count | Description |
|---|---|---|---|
<any> |
|
0..N |
Provide handling for exceptions from the chain of |
<any> |
|
0..N |
Apply interception style logic to before and after the rest of the filter chain and
the target |
"webHandler" |
|
1 |
The handler for the request. |
"webSessionManager" |
|
0..1 |
The manager for |
"serverCodecConfigurer" |
|
0..1 |
For access to |
"localeContextResolver" |
|
0..1 |
The resolver for |
Form data
ServerWebExchange exposes the following method for access to form data:
Mono<MultiValueMap<String, String>> getFormData();The DefaultServerWebExchange uses the configured HttpMessageReader to parse form data
("application/x-www-form-urlencoded") into a MultiValueMap. By default
FormHttpMessageReader is configured for use via the ServerCodecConfigurer bean
(see Web Handler API).
Multipart data
ServerWebExchange exposes the following method for access to multipart data:
Mono<MultiValueMap<String, Part>> getMultipartData();The DefaultServerWebExchange uses the configured
HttpMessageReader<MultiValueMap<String, Part>> to parse "multipart/form-data" content
into a MultiValueMap. At present
Synchronoss NIO Multipart is the only 3rd
party library supported, and the only library we know for non-blocking parsing of
multipart requests. It is enabled through the ServerCodecConfigurer bean
(see Web Handler API).
To parse multipart data in streaming fashion, use the Flux<Part> returned from an
HttpMessageReader<Part> instead. For example in an annotated controller use of
@RequestPart implies Map-like access to individual parts by name, and hence requires
parsing multipart data in full. By contrast @RequestBody can be used to decode the
content to Flux<Part> without collecting to a MultiValueMap.
1.2.3. Filters
In the WebHandler API, a WebFilter can be used to apply interception-style
logic before and after the rest of the processing chain of filters and the target
WebHandler. When using the WebFlux Config, registering a WebFilter is as simple
as declaring it as a Spring bean, and optionally expressing precedence via @Order on
the bean declaration or by implementing Ordered.
The following describe the available WebFilter implementations:
Forwarded Headers
As a request goes through proxies such as load balancers the host, port, and scheme may change presenting a challenge for applications that need to create links to resources since the links should reflect the host, port, and scheme of the original request as seen from a client perspective.
RFC 7239 defines the "Forwarded" HTTP header for proxies to use to provide information about the original request. There are also other non-standard headers in use such as "X-Forwarded-Host", "X-Forwarded-Port", and "X-Forwarded-Proto".
ForwardedHeaderFilter detects, extracts, and uses information from the "Forwarded"
header, or from "X-Forwarded-Host", "X-Forwarded-Port", and "X-Forwarded-Proto".
It wraps the request in order to overlay its host, port, and scheme and also "hides"
the forwarded headers for subsequent processing.
Note that there are security considerations when using forwarded headers as explained in Section 8 of RFC 7239. At the application level it is difficult to determine whether forwarded headers can be trusted or not. This is why the network upstream should be configured correctly to filter out untrusted forwarded headers from the outside.
Applications that don’t have a proxy and don’t need to use forwarded headers can
configure the ForwardedHeaderFilter to remove and ignore such headers.
CORS
Spring WebFlux provides fine-grained support for CORS configuration through annotations on
controllers. However when used with Spring Security it is advisable to rely on the built-in
CorsFilter that must be ordered ahead of Spring Security’s chain of filters.
See the section on CORS and the CORS WebFilter for more details.
1.2.4. Exceptions
In the WebHandler API, a WebExceptionHandler can be used to to handle
exceptions from the chain of WebFilter's and the target WebHandler. When using the
WebFlux Config, registering a WebExceptionHandler is as simple as declaring it as a
Spring bean, and optionally expressing precedence via @Order on the bean declaration or
by implementing Ordered.
Below are the available WebExceptionHandler implementations:
| Exception Handler | Description |
|---|---|
|
Provides handling for exceptions of type ResponseStatusException by setting the response to the HTTP status code of the exception. |
|
Extension of This handler is declared in the WebFlux Config. |
1.2.5. Codecs
HttpMessageReader and HttpMessageWriter are contracts for encoding and decoding HTTP request and response content via non-blocking I/O with (Rective Streams) back pressure.
Encoder and
Decoder are contracts for encoding and
decoding content, independent of HTTP. They can be wrapped with EncoderHttpMessageWriter
or DecoderHttpMessageReader and used for web processing.
All codecs are for client or server side use. All build on
DataBuffer which abstracts byte
buffer representations such as the Netty ByteBuf or java.nio.ByteBuffer (see
Data Buffers and Codecs for more details). ClientCodecConfigurer
and ServerCodecConfigurer are typically used to configure and customize the codecs to
use in an application.
The spring-core module has encoders and decoders for byte[], ByteBuffer, DataBuffer,
Resource, and String. The spring-web module adds encoders and decoders for Jackson
JSON, Jackson Smile, JAXB2, along with other web-specific HTTP message readers and writers
for form data, multipart requests, and server-sent events.
Jackson
The decoder relies on Jackson’s non-blocking, byte array parser to parse a stream of byte
chunks into a TokenBuffer stream, which can then be turned into Objects with Jackson’s
ObjectMapper. JSON and Smile
(binary JSON) data formats are currently supported.
The encoder processes a Publisher<?> as follows:
-
if the
Publisheris aMono(i.e. single value), the value is encoded when available. -
if media type is
application/stream+jsonfor JSON orapplication/stream+x-jackson-smilefor Smile, each value produced by thePublisheris encoded individually (and followed by a new line in JSON). -
otherwise all items from the
Publisherare gathered in withFlux#collectToList()and the resulting collection is encoded as an array.
As a special case to the above rules the ServerSentEventHttpMessageWriter feeds items
emitted from its input Publisher individually into the Jackson2JsonEncoder as a
Mono<?>.
Note that both the Jackson JSON encoder and decoder explicitly back out of rendering
elements of type String. Instead String's are treated as low level content, (i.e.
serialized JSON) and are rendered as-is by the CharSequenceEncoder. If you want a
Flux<String> rendered as a JSON array, you’ll have to use Flux#collectToList() and
provide a Mono<List<String>> instead.
HTTP Streaming
When a multi-value, reactive type such as Flux is used for response rendering, it may
be collected to a List and rendered as a whole (e.g. JSON array), or it may be treated
as an infinite stream with each item flushed immediately. The determination for which is
which is made based on content negotiation and the selected media type which may imply a
streaming format (e.g. "text/event-stream", "application/stream+json"), or not
(e.g. "application/json").
When streaming to the HTTP response, regardless of the media type (e.g. text/event-stream, application/stream+json), it is important to send data periodically, since the write would fail if the client has disconnected. The send could take the form of an empty (comment-only) SSE event, or any other data that the other side would have to interpret as a heartbeat and ignore.
1.3. DispatcherHandler
Spring WebFlux, like Spring MVC, is designed around the front controller pattern where a
central WebHandler, the DispatcherHandler, provides a shared algorithm for request
processing while actual work is performed by configurable, delegate components.
This model is flexible and supports diverse workflows.
DispatcherHandler discovers the delegate components it needs from Spring configuration.
It is also designed to be a Spring bean itself and implements ApplicationContextAware
for access to the context it runs in. If DispatcherHandler is declared with the bean
name "webHandler" it is in turn discovered by
WebHttpHandlerBuilder
which puts together a request processing chain as described in
WebHandler API.
Spring configuration in a WebFlux application typically contains:
-
DispatcherHandlerwith the bean name "webHandler" -
WebFilterandWebExceptionHandlerbeans -
Others
The configuration is given to WebHttpHandlerBuilder to build the processing chain:
ApplicationContext context = ...
HttpHandler handler = WebHttpHandlerBuilder.applicationContext(context);
The resulting HttpHandler is ready for use with a
server adapter.
1.3.1. Special bean types
The DispatcherHandler delegates to special beans to process requests and render the
appropriate responses. By "special beans" we mean Spring-managed, Object instances that
implement WebFlux framework contracts. Those usually come with built-in contracts but
you can customize their properties, extend then, or replaced.
The table below lists the special beans detected by the DispatcherHandler. Note that
there are also some other beans detected at a lower level, see
Special bean types in the Web Handler API.
| Bean type | Explanation |
|---|---|
HandlerMapping |
Map a request to a handler. The mapping is based on some criteria the details of
which vary by The main |
HandlerAdapter |
Help the |
HandlerResultHandler |
Process the result from the handler invocation and finalize the response. See Result Handling. |
1.3.2. WebFlux Config
Applications can declare the infrastructure beans listed under Web Handler API and DispatcherHandler that are required to process requests. However in most cases the WebFlux Config is the best starting point. It declares the required beans and provides a higher level configuration callback API to customize it.
|
Spring Boot relies on the WebFlux config to configure Spring WebFlux and also provides many extra convenient options. |
1.3.3. Processing
The DispatcherHandler processes requests as follows:
-
Each
HandlerMappingis asked to find a matching handler and the first match is used. -
If a handler is found, it is executed through an appropriate
HandlerAdapterwhich exposes the return value from the execution asHandlerResult. -
The
HandlerResultis given to an appropriateHandlerResultHandlerto complete processing by writing to the response directly or using a view to render.
1.3.4. Result Handling
The return value from the invocation of a handler, through a HandlerAdapter, is wrapped
as HandlerResult, along with some additional context, and passed to the first
HandlerResultHandler that claims support for it. The table below shows the available
HandlerResultHandler implementations all of which are declared in the WebFlux Config:
| Result Handler Type | Return Values | Default Order |
|---|---|---|
|
|
0 |
|
|
0 |
|
Handle return values from |
100 |
|
Also see View Resolution. |
|
1.3.5. Exceptions
The HandlerResult returned from a HandlerAdapter may expose a function for error
handling based on some handler-specific mechanism. This error function is called if:
-
the handler (e.g.
@Controller) invocation fails. -
handling of the handler return value through a
HandlerResultHandlerfails.
The error function can change the response, e.g. to an error status, as long as an error signal occurs before the reactive type returned from the handler produces any data items.
This is how @ExceptionHandler methods in @Controller classes are supported.
By contrast, support for the same in Spring MVC is built on a HandlerExceptionResolver.
This generally shouldn’t matter, however, keep in mind that in WebFlux you cannot use a
@ControllerAdvice to handle exceptions that occur before a handler is chosen.
See also Exceptions in the Annotated Controller section, or Exceptions in the WebHandler API section.
1.3.6. View Resolution
View resolution enables rendering to a browser with an HTML template and a model without
tying you to a specific view technology. In Spring WebFlux, view resolution is
supported through a dedicated HandlerResultHandler that uses
ViewResolver's to map a String, representing a logical view name, to a View
instance. The View is then used to render the response.
Handling
The HandlerResult passed into ViewResolutionResultHandler contains the return value
from the handler, and also the model that contains attributes added during request
handling. The return value is processed as one of the following:
-
String,CharSequence— a logical view name to be resolved to aViewthrough the list of configuredViewResolver's. -
void— select a default view name based on the request path minus the leading and trailing slash, and resolve it to aView. The same also happens when a view name was not provided, e.g. model attribute was returned, or an async return value, e.g.Monocompleted empty. -
Rendering — API for view resolution scenarios; explore the options in your IDE with code completion.
-
Model,Map— extra model attributes to be added to the model for the request. -
Any other — any other return value (except for simple types, as determined by BeanUtils#isSimpleProperty) is treated as a model attribute to be added to the model. The attribute name is derived from the Class name, using Conventions, unless a handler method
@ModelAttributeannotation is present.
The model can contain asynchronous, reactive types (e.g. from Reactor, RxJava). Prior
to rendering, AbstractView resolves such model attributes into concrete values
and updates the model. Single-value reactive types are resolved to a single
value, or no value (if empty) while multi-value reactive types, e.g. Flux<T> are
collected and resolved to List<T>.
To configure view resolution is as simple as adding a ViewResolutionResultHandler bean
to your Spring configuration. WebFlux Config provides a
dedicated configuration API for view resolution.
See View Technologies for more on the view technologies integrated with Spring WebFlux.
Redirecting
The special redirect: prefix in a view name allows you to perform a redirect. The
UrlBasedViewResolver (and sub-classes) recognize this as an instruction that a
redirect is needed. The rest of the view name is the redirect URL.
The net effect is the same as if the controller had returned a RedirectView or
Rendering.redirectTo("abc").build(), but now the controller itself can simply
operate in terms of logical view names. A view name such as
redirect:/some/resource is relative to the current application, while the view name
redirect:http://example.com/arbitrary/path redirects to an absolute URL.
Content negotiation
ViewResolutionResultHandler supports content negotiation. It compares the request
media type(s) with the media type(s) supported by each selected View. The first View
that supports the requested media type(s) is used.
In order to support media types such as JSON and XML, Spring WebFlux provides
HttpMessageWriterView which is a special View that renders through an
HttpMessageWriter. Typically you would configure these as default
views through the WebFlux Config. Default views are
always selected and used if they match the requested media type.
1.4. Annotated Controllers
Spring WebFlux provides an annotation-based programming model where @Controller and
@RestController components use annotations to express request mappings, request input,
exception handling, and more. Annotated controllers have flexible method signatures and
do not have to extend base classes nor implement specific interfaces.
Here is a basic example:
@RestController
public class HelloController {

    @GetMapping("/hello")
    public String handle() {
        return "Hello WebFlux";
    }
}
In this example the methods returns a String to be written to the response body.
1.4.1. @Controller
You can define controller beans using a standard Spring bean definition.
The @Controller stereotype allows for auto-detection, aligned with Spring general support
for detecting @Component classes in the classpath and auto-registering bean definitions
for them. It also acts as a stereotype for the annotated class, indicating its role as
a web component.
To enable auto-detection of such @Controller beans, you can add component scanning to
your Java configuration:
@Configuration
@ComponentScan("org.example.web")
public class WebConfig {

    // ...
}
@RestController is a composed annotation that is
itself meta-annotated with @Controller and @ResponseBody indicating a controller whose
every method inherits the type-level @ResponseBody annotation and therefore writes
directly to the response body vs view resolution and rendering with an HTML template.
1.4.2. Request Mapping
The @RequestMapping annotation is used to map requests to controllers methods. It has
various attributes to match by URL, HTTP method, request parameters, headers, and media
types. It can be used at the class-level to express shared mappings or at the method level
to narrow down to a specific endpoint mapping.
There are also HTTP method specific shortcut variants of @RequestMapping:
-
@GetMapping -
@PostMapping -
@PutMapping -
@DeleteMapping -
@PatchMapping
The above are Custom Annotations that are provided out of the box
because arguably most controller methods should be mapped to a specific HTTP method vs
using @RequestMapping which by default matches to all HTTP methods. At the same an
@RequestMapping is still needed at the class level to express shared mappings.
Below is an example with type and method level mappings:
@RestController
@RequestMapping("/persons")
class PersonController {

    @GetMapping("/{id}")
    public Person getPerson(@PathVariable Long id) {
        // ...
    }

    @PostMapping
    @ResponseStatus(HttpStatus.CREATED)
    public void add(@RequestBody Person person) {
        // ...
    }
}
URI Patterns
You can map requests using glob patterns and wildcards:
-
?matches one character -
*matches zero or more characters within a path segment -
**match zero or more path segments
You can also declare URI variables and access their values with @PathVariable:
@GetMapping("/owners/{ownerId}/pets/{petId}")
public Pet findPet(@PathVariable Long ownerId, @PathVariable Long petId) {
    // ...
}
URI variables can be declared at the class and method level:
@Controller
@RequestMapping("/owners/{ownerId}")
public class OwnerController {

    @GetMapping("/pets/{petId}")
    public Pet findPet(@PathVariable Long ownerId, @PathVariable Long petId) {
        // ...
    }
}
URI variables are automatically converted to the appropriate type or`TypeMismatchException`
is raised. Simple types — int, long, Date, are supported by default and you can
register support for any other data type.
See Type Conversion and DataBinder.
URI variables can be named explicitly — e.g. @PathVariable("customId"), but you can
leave that detail out if the names are the same and your code is compiled with debugging
information or with the -parameters compiler flag on Java 8.
The syntax {*varName} declares a URI variable that matches zero or more remaining
path segments. For example /resources/{*path} matches all files /resources/ and the
"path" variable captures the complete relative path.
The syntax {varName:regex} declares a URI variable with a regular expressions with the
syntax {varName:regex} — e.g. given URL "/spring-web-3.0.5 .jar", the below method
extracts the name, version, and file extension:
@GetMapping("/{name:[a-z-]+}-{version:\\d\\.\\d\\.\\d}{ext:\\.[a-z]+}")
public void handle(@PathVariable String version, @PathVariable String ext) {
    // ...
}
URI path patterns can also have embedded ${…} placeholders that are resolved on startup
via PropertyPlaceHolderConfigurer against local, system, environment, and other property
sources. This can be used for example to parameterize a base URL based on some external
configuration.
|
Spring WebFlux uses |
Spring WebFlux does not support suffix pattern matching — unlike Spring MVC, where a
mapping such as /person also matches to /person.*. For URL based content
negotiation, if needed, we recommend using a query parameter, which is simpler, more
explicit, and less vulnerable to URL path based exploits.
Pattern Comparison
When multiple patterns match a URL, they must be compared to find the best match. This is done
with PathPattern.SPECIFICITY_COMPARATOR which looks for patterns that more specific.
For every pattern, a score is computed based the number of URI variables and wildcards where a URI variable scores lower than a wildcard. A pattern with a lower total score wins. If two patterns have the same score, then the longer is chosen.
Catch-all patterns, e.g. **, {*varName}, are excluded from the scoring and are always
sorted last instead. If two patterns are both catch-all, the longer is chosen.
Consumable Media Types
You can narrow the request mapping based on the Content-Type of the request:
@PostMapping(path = "/pets", consumes = "application/json")
public void addPet(@RequestBody Pet pet) {
    // ...
}
The consumes attribute also supports negation expressions — e.g. !text/plain means any
content type other than "text/plain".
You can declare a shared consumes attribute at the class level. Unlike most other request mapping attributes however when used at the class level, a method-level consumes attribute overrides rather than extend the class level declaration.
|
|
Producible Media Types
You can narrow the request mapping based on the Accept request header and the list of
content types that a controller method produces:
@GetMapping(path = "/pets/{petId}", produces = "application/json;charset=UTF-8")
@ResponseBody
public Pet getPet(@PathVariable String petId) {
    // ...
}
The media type can specify a character set. Negated expressions are supported — e.g.
!text/plain means any content type other than "text/plain".
|
For JSON content type, the UTF-8 charset should be specified even if RFC7159 clearly states that "no charset parameter is defined for this registration" because some browsers require it for interpreting correctly UTF-8 special characters. |
You can declare a shared produces attribute at the class level. Unlike most other request mapping attributes however when used at the class level, a method-level produces attribute overrides rather than extend the class level declaration.
|
|
Parameters and Headers
You can narrow request mappings based on query parameter conditions. You can test for the
presence of a query parameter ("myParam"), for the absence ("!myParam"), or for a
specific value ("myParam=myValue"):
@GetMapping(path = "/pets/{petId}", params = "myParam=myValue")
public void findPet(@PathVariable String petId) {
    // ...
}
You can also use the same with request header conditions:
@GetMapping(path = "/pets", headers = "myHeader=myValue")
public void findPet(@PathVariable String petId) {
    // ...
}
HTTP HEAD, OPTIONS
@GetMapping — and also @RequestMapping(method=HttpMethod.GET), support HTTP HEAD
transparently for request mapping purposes. Controller methods don’t need to change.
A response wrapper, applied in the HttpHandler server adapter, ensures a "Content-Length"
header is set to the number of bytes written and without actually writing to the response.
By default HTTP OPTIONS is handled by setting the "Allow" response header to the list of HTTP
methods listed in all @RequestMapping methods with matching URL patterns.
For a @RequestMapping without HTTP method declarations, the "Allow" header is set to
"GET,HEAD,POST,PUT,PATCH,DELETE,OPTIONS". Controller methods should always declare the
supported HTTP methods for example by using the HTTP method specific variants — @GetMapping, @PostMapping, etc.
@RequestMapping method can be explicitly mapped to HTTP HEAD and HTTP OPTIONS, but that
is not necessary in the common case.
Custom Annotations
Spring WebFlux supports the use of composed annotations
for request mapping. Those are annotations that are themselves meta-annotated with
@RequestMapping and composed to redeclare a subset (or all) of the @RequestMapping
attributes with a narrower, more specific purpose.
@GetMapping, @PostMapping, @PutMapping, @DeleteMapping, and @PatchMapping are
examples of composed annotations. They’re provided out of the box because arguably most
controller methods should be mapped to a specific HTTP method vs using @RequestMapping
which by default matches to all HTTP methods. If you need an example of composed
annotations, look at how those are declared.
Spring WebFlux also supports custom request mapping attributes with custom request matching
logic. This is a more advanced option that requires sub-classing
RequestMappingHandlerMapping and overriding the getCustomMethodCondition method where
you can check the custom attribute and return your own RequestCondition.
1.4.3. Handler methods
@RequestMapping handler methods have a flexible signature and can choose from a range of
supported controller method arguments and return values.
Method arguments
The table below shows supported controller method arguments.
Reactive types (Reactor, RxJava, or other) are supported on arguments that require blocking I/O, e.g. reading the request body, to be resolved. This is marked in the description column. Reactive types are not expected on arguments that don’t require blocking.
JDK 1.8’s java.util.Optional is supported as a method argument in combination with
annotations that have a required attribute — e.g. @RequestParam, @RequestHeader,
etc, and is equivalent to required=false.
| Controller method argument | Description |
|---|---|
|
Access to the full |
|
Access to the HTTP request or response. |
|
Access to the session; this does not force the start of a new session unless attributes are added. Supports reactive types. |
|
Currently authenticated user; possibly a specific |
|
The HTTP method of the request. |
|
The current request locale, determined by the most specific |
|
The time zone associated with the current request, as determined by a |
|
For access to URI template variables. See URI Patterns. |
|
For access to name-value pairs in URI path segments. See Matrix variables. |
|
For access to Servlet request parameters. Parameter values are converted to the declared method argument type. See @RequestParam. Note that use of |
|
For access to request headers. Header values are converted to the declared method argument type. See @RequestHeader. |
|
For access to cookies. Cookies values are converted to the declared method argument type. See @CookieValue. |
|
For access to the HTTP request body. Body content is converted to the declared method
argument type using |
|
For access to request headers and body. The body is converted with |
|
For access to a part in a "multipart/form-data" request. Supports reactive types. See Multipart and Multipart data. |
|
For access to the model that is used in HTML controllers and exposed to templates as part of view rendering. |
|
For access to an existing attribute in the model (instantiated if not present) with data binding and validation applied. See @ModelAttribute as well as Model and DataBinder. Note that use of |
|
For access to errors from validation and data binding for a command object
(i.e. |
|
For marking form processing complete which triggers cleanup of session attributes
declared through a class-level |
|
For preparing a URL relative to the current request’s host, port, scheme, context path, and
the literal part of the servlet mapping also taking into account |
|
For access to any session attribute; in contrast to model attributes stored in the session
as a result of a class-level |
|
For access to request attributes. See @RequestAttribute for more details. |
Any other argument |
If a method argument is not matched to any of the above, by default it is resolved as
an |
Return values
The table below shows supported controller method return values. Note that reactive types from libraries such as Reactor, RxJava, or other are generally supported for all return values.
| Controller method return value | Description |
|---|---|
|
The return value is encoded through |
|
The return value specifies the full response including HTTP headers and body be encoded
through |
|
For returning a response with headers and no body. |
|
A view name to be resolved with |
|
A |
|
Attributes to be added to the implicit model with the view name implicitly determined based on the request path. |
|
An attribute to be added to the model with the view name implicitly determined based on the request path. Note that |
|
An API for model and view rendering scenarios. |
|
A method with a If none of the above is true, a |
|
Emit server-sent events; the |
Any other return value |
If a return value is not matched to any of the above, by default it is treated as a view
name, if it is |
Type Conversion
Some annotated controller method arguments that represent String-based request input — e.g.
@RequestParam, @RequestHeader, @PathVariable, @MatrixVariable, and @CookieValue,
may require type conversion if the argument is declared as something other than String.
For such cases type conversion is automatically applied based on the configured converters.
By default simple types such as int, long, Date, etc. are supported. Type conversion
can be customized through a WebDataBinder, see [mvc-ann-initbinder], or by registering
Formatters with the FormattingConversionService, see
Spring Field Formatting.
Matrix variables
RFC 3986 discusses name-value pairs in path segments. In Spring WebFlux we refer to those as "matrix variables" based on an "old post" by Tim Berners-Lee but they can be also be referred to as URI path parameters.
Matrix variables can appear in any path segment, each variable separated by semicolon and
multiple values separated by comma, e.g. "/cars;color=red,green;year=2012". Multiple
values can also be specified through repeated variable names, e.g.
"color=red;color=green;color=blue".
Unlike Spring MVC, in WebFlux the presence or absence of matrix variables in a URL does not affect request mappings. In other words you’re not required to use a URI variable to mask variable content. That said if you want to access matrix variables from a controller method you need to add a URI variable to the path segment where matrix variables are expected. Below is an example:
// GET /pets/42;q=11;r=22

@GetMapping("/pets/{petId}")
public void findPet(@PathVariable String petId, @MatrixVariable int q) {

    // petId == 42
    // q == 11
}
Given that all path segments may contain matrix variables, sometimes you may need to disambiguate which path variable the matrix variable is expected to be in. For example:
// GET /owners/42;q=11/pets/21;q=22

@GetMapping("/owners/{ownerId}/pets/{petId}")
public void findPet(
        @MatrixVariable(name="q", pathVar="ownerId") int q1,
        @MatrixVariable(name="q", pathVar="petId") int q2) {

    // q1 == 11
    // q2 == 22
}
A matrix variable may be defined as optional and a default value specified:
// GET /pets/42

@GetMapping("/pets/{petId}")
public void findPet(@MatrixVariable(required=false, defaultValue="1") int q) {

    // q == 1
}
To get all matrix variables, use a MultiValueMap:
// GET /owners/42;q=11;r=12/pets/21;q=22;s=23

@GetMapping("/owners/{ownerId}/pets/{petId}")
public void findPet(
        @MatrixVariable MultiValueMap<String, String> matrixVars,
        @MatrixVariable(pathVar="petId"") MultiValueMap<String, String> petMatrixVars) {

    // matrixVars: ["q" : [11,22], "r" : 12, "s" : 23]
    // petMatrixVars: ["q" : 22, "s" : 23]
}
@RequestParam
Use the @RequestParam annotation to bind query parameters to a method argument in a
controller. The following code snippet shows the usage:
@Controller
@RequestMapping("/pets")
public class EditPetForm {

    // ...

    @GetMapping
    public String setupForm(@RequestParam("petId") int petId, Model model) {
        Pet pet = this.clinic.loadPet(petId);
        model.addAttribute("pet", pet);
        return "petForm";
    }

    // ...

}|
Unlike the Servlet API "request paramater" concept that conflate query parameters, form
data, and multiparts into one, in WebFlux each is accessed individually through the
|
Method parameters using using the @RequestParam annotation are required by default, but
you can specify that a method parameter is optional by setting @RequestParam's
required flag to false or by declaring the argument with an java.util.Optional
wrapper.
Type conversion is applied automatically if the target method parameter type is not
String. See [mvc-ann-typeconversion].
When an @RequestParam annotation is declared as Map<String, String> or
MultiValueMap<String, String> argument, the map is populated with all query parameters.
Note that use of @RequestParam is optional, e.g. to set its attributes.
By default any argument that is a simple value type, as determined by
BeanUtils#isSimpleProperty,
and is not resolved by any other argument resolver, is treated as if it was annotated
with @RequestParam.
@RequestHeader
Use the @RequestHeader annotation to bind a request header to a method argument in a
controller.
Given request with headers:
Host                    localhost:8080
Accept                  text/html,application/xhtml+xml,application/xml;q=0.9
Accept-Language         fr,en-gb;q=0.7,en;q=0.3
Accept-Encoding         gzip,deflate
Accept-Charset          ISO-8859-1,utf-8;q=0.7,*;q=0.7
Keep-Alive              300
The following gets the value of the Accept-Encoding and Keep-Alive headers:
@GetMapping("/demo")
public void handle(
        @RequestHeader("Accept-Encoding") String encoding,
        @RequestHeader("Keep-Alive") long keepAlive) {
    //...
}
Type conversion is applied automatically if the target method parameter type is not
String. See [mvc-ann-typeconversion].
When an @RequestHeader annotation is used on a Map<String, String>,
MultiValueMap<String, String>, or HttpHeaders argument, the map is populated
with all header values.
|
Built-in support is available for converting a comma-separated string into an
array/collection of strings or other types known to the type conversion system. For
example a method parameter annotated with |
@CookieValue
Use the @CookieValue annotation to bind the value of an HTTP cookie to a method argument
in a controller.
Given request with the following cookie:
JSESSIONID=415A4AC178C59DACE0B2C9CA727CDD84
The following code sample demonstrates how to get the cookie value:
@GetMapping("/demo")
public void handle(@CookieValue("JSESSIONID") String cookie) {
    //...
}
Type conversion is applied automatically if the target method parameter type is not
String. See [mvc-ann-typeconversion].
@ModelAttribute
Use the @ModelAttribute annotation on a method argument to access an attribute from the
model, or have it instantiated if not present. The model attribute is also overlaid with
values of query parameters and form fields whose names match to field names. This is
referred to as data binding and it saves you from having to deal with parsing and
converting individual query parameters and form fields. For example:
@PostMapping("/owners/{ownerId}/pets/{petId}/edit")
public String processSubmit(@ModelAttribute Pet pet) { }
The Pet instance above is resolved as follows:
-
From the model if already added via Model.
-
From the HTTP session via @SessionAttributes.
-
From the invocation of a default constructor.
-
From the invocation of a "primary constructor" with arguments matching to query parameters or form fields; argument names are determined via JavaBeans
@ConstructorPropertiesor via runtime-retained parameter names in the bytecode.
After the model attribute instance is obtained, data binding is applied. The
WebExchangeDataBinder class matches names of query parameters and form fields to field
names on the target Object. Matching fields are populated after type conversion is applied
where necessary. For more on data binding (and validation) see
Validation. For more on customizing data binding see
DataBinder.
Data binding may result in errors. By default a WebExchangeBindException is raised but
to check for such errors in the controller method, add a BindingResult argument
immediately next to the @ModelAttribute as shown below:
@PostMapping("/owners/{ownerId}/pets/{petId}/edit")
public String processSubmit(@ModelAttribute("pet") Pet pet, BindingResult result) {
    if (result.hasErrors()) {
        return "petForm";
    }
    // ...
}
Validation can be applied automatically after data binding by adding the
javax.validation.Valid annotation or Spring’s @Validated annotation (also see
Bean validation and
Spring validation). For example:
@PostMapping("/owners/{ownerId}/pets/{petId}/edit")
public String processSubmit(@Valid @ModelAttribute("pet") Pet pet, BindingResult result) {
    if (result.hasErrors()) {
        return "petForm";
    }
    // ...
}
Spring WebFlux, unlike Spring MVC, supports reactive types in the model, e.g.
Mono<Account> or io.reactivex.Single<Account>. An @ModelAttribute argument can be
declared with or without a reactive type wrapper, and it will be resolved accordingly,
to the actual value if necessary. Note however that in order to use a BindingResult
argument, you must declare the @ModelAttribute argument before it without a reactive
type wrapper, as shown earlier. Alternatively, you can handle any errors through the
reactive type:
@PostMapping("/owners/{ownerId}/pets/{petId}/edit")
public Mono<String> processSubmit(@Valid @ModelAttribute("pet") Mono<Pet> petMono) {
    return petMono
        .flatMap(pet -> {
            // ...
        })
        .onErrorResume(ex -> {
            // ...
        });
}
Note that use of @ModelAttribute is optional, e.g. to set its attributes.
By default any argument that is not a simple value type, as determined by
BeanUtils#isSimpleProperty,
and is not resolved by any other argument resolver, is treated as if it was annotated
with @ModelAttribute.
@SessionAttributes
@SessionAttributes is used to store model attributes in the WebSession between
requests. It is a type-level annotation that declares session attributes used by a
specific controller. This will typically list the names of model attributes or types of
model attributes which should be transparently stored in the session for subsequent
requests to access.
For example:
@Controller
@SessionAttributes("pet")
public class EditPetForm {
    // ...
}
On the first request when a model attribute with the name "pet" is added to the model,
it is automatically promoted to and saved in the WebSession. It remains there until
another controller method uses a SessionStatus method argument to clear the storage:
@Controller
@SessionAttributes("pet")
public class EditPetForm {

    // ...

    @PostMapping("/pets/{id}")
    public String handle(Pet pet, BindingResult errors, SessionStatus status) {
        if (errors.hasErrors) {
            // ...
        }
            status.setComplete();
            // ...
        }
    }
}
@SessionAttribute
If you need access to pre-existing session attributes that are managed globally,
i.e. outside the controller (e.g. by a filter), and may or may not be present
use the @SessionAttribute annotation on a method parameter:
@GetMapping("/")
public String handle(@SessionAttribute User user) {
    // ...
}
For use cases that require adding or removing session attributes consider injecting
WebSession into the controller method.
For temporary storage of model attributes in the session as part of a controller
workflow consider using SessionAttributes as described in
@SessionAttributes.
@RequestAttribute
Similar to @SessionAttribute the @RequestAttribute annotation can be used to
access pre-existing request attributes created earlier, e.g. by a WebFilter:
@GetMapping("/")
public String handle(@RequestAttribute Client client) {
    // ...
}
Multipart
As explained in Multipart data, ServerWebExchange provides access to multipart
content. The best way to handle a file upload form (e.g. from a browser) in a controller
is through data binding to a command object:
class MyForm {

    private String name;

    private MultipartFile file;

    // ...

}

@Controller
public class FileUploadController {

    @PostMapping("/form")
    public String handleFormUpload(MyForm form, BindingResult errors) {
        // ...
    }

}
Multipart requests can also be submitted from non-browser clients in a RESTful service scenario. For example a file along with JSON:
POST /someUrl
Content-Type: multipart/mixed

--edt7Tfrdusa7r3lNQc79vXuhIIMlatb7PQg7Vp
Content-Disposition: form-data; name="meta-data"
Content-Type: application/json; charset=UTF-8
Content-Transfer-Encoding: 8bit

{
    "name": "value"
}
--edt7Tfrdusa7r3lNQc79vXuhIIMlatb7PQg7Vp
Content-Disposition: form-data; name="file-data"; filename="file.properties"
Content-Type: text/xml
Content-Transfer-Encoding: 8bit
... File Data ...
You can access individual parts with @RequestPart:
@PostMapping("/")
public String handle(@RequestPart("meta-data") Part metadata,
        @RequestPart("file-data") FilePart file) {
    // ...
}
To deserialize the raw part content, for example to JSON (similar to @RequestBody),
simply declare a concrete target Object, instead of Part:
@PostMapping("/")
public String handle(@RequestPart("meta-data") MetaData metadata) {
    // ...
}
@RequestPart can be used in combination with javax.validation.Valid, or Spring’s
@Validated annotation, which causes Standard Bean Validation to be applied.
By default validation errors cause a WebExchangeBindException which is turned
into a 400 (BAD_REQUEST) response. Alternatively validation errors can be handled locally
within the controller through an Errors or BindingResult argument:
@PostMapping("/")
public String handle(@Valid @RequestPart("meta-data") MetaData metadata,
        BindingResult result) {
    // ...
}
To access all multipart data in as a MultiValueMap use @RequestBody:
@PostMapping("/")
public String handle(@RequestBody Mono<MultiValueMap<String, Part>> parts) {
    // ...
}
To access multipart data sequentially, in streaming fashion, use @RequestBody with
Flux<Part> instead. For example:
@PostMapping("/")
public String handle(@RequestBody Flux<Part> parts) {
    // ...
}
@RequestBody
Use the @RequestBody annotation to have the request body read and deserialized into an
Object through an HttpMessageReader.
Below is an example with an @RequestBody argument:
@PostMapping("/accounts")
public void handle(@RequestBody Account account) {
    // ...
}
Unlike Spring MVC, in WebFlux the @RequestBody method argument supports reactive types
and fully non-blocking reading and (client-to-server) streaming:
@PostMapping("/accounts")
public void handle(@RequestBody Mono<Account> account) {
    // ...
}
You can use the HTTP message codecs option of the WebFlux Config to configure or customize message readers.
@RequestBody can be used in combination with javax.validation.Valid, or Spring’s
@Validated annotation, which causes Standard Bean Validation to be applied.
By default validation errors cause a WebExchangeBindException which is turned
into a 400 (BAD_REQUEST) response. Alternatively validation errors can be handled locally
within the controller through an Errors or BindingResult argument:
@PostMapping("/accounts")
public void handle(@Valid @RequestBody Account account, BindingResult result) {
    // ...
}
HttpEntity
HttpEntity is more or less identical to using @RequestBody but based on a
container object that exposes request headers and body. Below is an example:
@PostMapping("/accounts")
public void handle(HttpEntity<Account> entity) {
    // ...
}
@ResponseBody
Use the @ResponseBody annotation on a method to have the return serialized to the
response body through an HttpMessageWriter. For example:
@GetMapping("/accounts/{id}")
@ResponseBody
public Account handle() {
    // ...
}
@ResponseBody is also supported at the class level in which case it is inherited by
all controller methods. This is the effect of @RestController which is nothing more
than a meta-annotation marked with @Controller and @ResponseBody.
@ResponseBody supports reactive types which means you can return Reactor or RxJava
types and have the asynchronous values they produce rendered to the response.
For additional details, see HTTP Streaming and
JSON rendering.
@ResponseBody methods can be combined with JSON serialization views.
See Jackson JSON for details.
You can use the HTTP message codecs option of the WebFlux Config to configure or customize message writing.
ResponseEntity
ResponseEntity is more or less identical to using @ResponseBody but based
on a container object that specifies request headers and body. Below is an example:
@PostMapping("/something")
public ResponseEntity<String> handle() {
    // ...
    URI location = ...
    return new ResponseEntity.created(location).build();
}
Jackson JSON
Jackson serialization views
Spring WebFlux provides built-in support for
Jackson’s Serialization Views
which allows rendering only a subset of all fields in an Object. To use it with
@ResponseBody or ResponseEntity controller methods, use Jackson’s
@JsonView annotation to activate a serialization view class:
@RestController
public class UserController {

    @GetMapping("/user")
    @JsonView(User.WithoutPasswordView.class)
    public User getUser() {
        return new User("eric", "7!jd#h23");
    }
}

public class User {

    public interface WithoutPasswordView {};
    public interface WithPasswordView extends WithoutPasswordView {};

    private String username;
    private String password;

    public User() {
    }

    public User(String username, String password) {
        this.username = username;
        this.password = password;
    }

    @JsonView(WithoutPasswordView.class)
    public String getUsername() {
        return this.username;
    }

    @JsonView(WithPasswordView.class)
    public String getPassword() {
        return this.password;
    }
}|
|
1.4.4. Model
The @ModelAttribute annotation can be used:
-
On a method argument in
@RequestMappingmethods to create or access an Object from the model, and to bind it to the request through aWebDataBinder. -
As a method-level annotation in
@Controlleror@ControllerAdviceclasses helping to initialize the model prior to any@RequestMappingmethod invocation. -
On a
@RequestMappingmethod to mark its return value is a model attribute.
This section discusses @ModelAttribute methods, or the 2nd from the list above.
A controller can have any number of @ModelAttribute methods. All such methods are
invoked before @RequestMapping methods in the same controller. A @ModelAttribute
method can also be shared across controllers via @ControllerAdvice. See the section on
Controller Advice for more details.
@ModelAttribute methods have flexible method signatures. They support many of the same
arguments as @RequestMapping methods except for @ModelAttribute itself nor anything
related to the request body.
An example @ModelAttribute method:
@ModelAttribute
public void populateModel(@RequestParam String number, Model model) {
    model.addAttribute(accountRepository.findAccount(number));
    // add more ...
}
To add one attribute only:
@ModelAttribute
public Account addAccount(@RequestParam String number) {
    return accountRepository.findAccount(number);
}|
When a name is not explicitly specified, a default name is chosen based on the Object
type as explained in the Javadoc for
Conventions.
You can always assign an explicit name by using the overloaded |
Spring WebFlux, unlike Spring MVC, explicitly supports reactive types in the model,
e.g. Mono<Account> or io.reactivex.Single<Account>. Such asynchronous model
attributes may be transparently resolved (and the model updated) to their actual values
at the time of @RequestMapping invocation, providing a @ModelAttribute argument is
declared without a wrapper, for example:
@ModelAttribute
public void addAccount(@RequestParam String number) {
    Mono<Account> accountMono = accountRepository.findAccount(number);
    model.addAttribute("account", accountMono);
}

@PostMapping("/accounts")
public String handle(@ModelAttribute Account account, BindingResult errors) {
    // ...
}
In addition any model attributes that have a reactive type wrapper are resolved to their actual values (and the model updated) just prior to view rendering.
@ModelAttribute can also be used as a method-level annotation on @RequestMapping
methods in which case the return value of the @RequestMapping method is interpreted as a
model attribute. This is typically not required, as it is the default behavior in HTML
controllers, unless the return value is a String which would otherwise be interpreted
as a view name. @ModelAttribute can also help to customize the model attribute name:
@GetMapping("/accounts/{id}")
@ModelAttribute("myAccount")
public Account handle() {
    // ...
    return account;
}
1.4.5. DataBinder
@Controller or @ControllerAdvice classes can have @InitBinder methods in order to
initialize instances of WebDataBinder, and those in turn are used to:
-
Bind request parameters (i.e. form data or query) to a model object.
-
Convert String-based request values such as request parameters, path variables, headers, cookies, and others, to the target type of controller method arguments.
-
Format model object values as String values when rendering HTML forms.
@InitBinder methods can register controller-specific java.bean.PropertyEditor, or
Spring Converter and Formatter components. In addition, the
WebFlux Java config can be used to register Converter and
Formatter types in a globally shared FormattingConversionService.
@InitBinder methods support many of the same arguments that a @RequestMapping methods
do, except for @ModelAttribute (command object) arguments. Typically they’re are declared
with a WebDataBinder argument, for registrations, and a void return value.
Below is an example:
@Controller
public class FormController {

    @InitBinder
    public void initBinder(WebDataBinder binder) {
        SimpleDateFormat dateFormat = new SimpleDateFormat("yyyy-MM-dd");
        dateFormat.setLenient(false);
        binder.registerCustomEditor(Date.class, new CustomDateEditor(dateFormat, false));
    }

    // ...
}
Alternatively when using a Formatter-based setup through a shared
FormattingConversionService, you could re-use the same approach and register
controller-specific Formatter's:
@Controller
public class FormController {

    @InitBinder
    protected void initBinder(WebDataBinder binder) {
        binder.addCustomFormatter(new DateFormatter("yyyy-MM-dd"));
    }

    // ...
}
1.4.6. Exceptions
@Controller and @ControllerAdvice classes can have
@ExceptionHandler methods to handle exceptions from controller methods. For example:
@Controller
public class SimpleController {

    // ...

    @ExceptionHandler
    public ResponseEntity<String> handle(IOException ex) {
        // ...
    }
}
The exception may match against a top-level exception being propagated (i.e. a direct
IOException thrown), or against the immediate cause within a top-level wrapper exception
(e.g. an IOException wrapped inside an IllegalStateException).
For matching exception types, preferably declare the target exception as a method argument
as shown above. Alternatively, the annotation declaration may narrow the exception types to
match. We generally recommend to be as specific as possible in the argument signature and to
declare your primary root exception mappings on a @ControllerAdvice prioritized with a
corresponding order. See the MVC section for details.
|
An |
Support for @ExceptionHandler methods in Spring WebFlux is provided by the
HandlerAdapter for @RequestMapping methods. See Exceptions
under the DispatcherHandler section for more details.
REST API exceptions
A common requirement for REST services is to include error details in the body of the
response. The Spring Framework does not automatically do this because the representation
of error details in the response body is application specific. However a
@RestController may use @ExceptionHandler methods with a ResponseEntity return
value to set the status and the body of the response. Such methods may also be declared
in @ControllerAdvice classes to apply them globally.
|
Note that Spring WebFlux does not have an equivalent for the Spring MVC
|
1.4.7. Controller Advice
Typically @ExceptionHandler, @InitBinder, and @ModelAttribute methods apply within
the @Controller class (or class hierarchy) they are declared in. If you want such
methods to apply more globally, across controllers, you can declare them in a class
marked with @ControllerAdvice or @RestControllerAdvice.
@ControllerAdvice is marked with @Component which means such classes can be registered
as Spring beans via component scanning.
@RestControllerAdvice is also a meta-annotation marked with both @ControllerAdvice and
@ResponseBody which essentially means @ExceptionHandler methods are rendered to the
response body via message conversion (vs view resolution/template rendering).
On startup, the infrastructure classes for @RequestMapping and @ExceptionHandler methods
detect Spring beans of type @ControllerAdvice, and then apply their methods at runtime.
Global @ExceptionHandler methods (from an @ControllerAdvice) are applied after local
ones (from the @Controller). By contrast global @ModelAttribute and @InitBinder
methods are applied before local ones.
By default @ControllerAdvice methods apply to every request, i.e. all controllers, but
you can narrow that down to a subset of controllers via attributes on the annotation:
// Target all Controllers annotated with @RestController
@ControllerAdvice(annotations = RestController.class)
public class ExampleAdvice1 {}

// Target all Controllers within specific packages
@ControllerAdvice("org.example.controllers")
public class ExampleAdvice2 {}

// Target all Controllers assignable to specific classes
@ControllerAdvice(assignableTypes = {ControllerInterface.class, AbstractController.class})
public class ExampleAdvice3 {}
Keep in mind the above selectors are evaluated at runtime and may negatively impact performance if used extensively. See the @ControllerAdvice Javadoc for more details.
1.5. Functional Endpoints
Spring WebFlux includes a lightweight, functional programming model in which functions are used to route and handle requests and contracts are designed for immutability. It is an alternative to the annotated-based programming model but otherwise running on the same Reactive Core foundation
1.5.1. Overview
An HTTP request is handled with a HandlerFunction that takes ServerRequest and
returns Mono<ServerResponse>, both of which are immutable contracts that offer JDK-8
friendly access to the HTTP request and response. HandlerFunction is the equivalent of
an @RequestMapping method in the annotation-based programming model.
Requests are routed to a HandlerFunction with a RouterFunction that takes
ServerRequest and returns Mono<HandlerFunction>. When a request is matched to a
particular route, the HandlerFunction mapped to the route is used. RouterFunction is
the equivalent of an @RequestMapping annotation.
RouterFunctions.route(RequestPredicate, HandlerFunction) provides a router function
default implementation that can be used with a number of built-in request predicates.
For example:
import static org.springframework.http.MediaType.APPLICATION_JSON;
import static org.springframework.web.reactive.function.server.RequestPredicates.*;
import static org.springframework.web.reactive.function.server.RouterFunctions.route;

PersonRepository repository = ...
PersonHandler handler = new PersonHandler(repository);

RouterFunction<ServerResponse> route =
    route(GET("/person/{id}").and(accept(APPLICATION_JSON)), handler::getPerson)
        .andRoute(GET("/person").and(accept(APPLICATION_JSON)), handler::listPeople)
        .andRoute(POST("/person"), handler::createPerson);


public class PersonHandler {

    // ...

    public Mono<ServerResponse> listPeople(ServerRequest request) {
        // ...
    }

    public Mono<ServerResponse> createPerson(ServerRequest request) {
        // ...
    }

    public Mono<ServerResponse> getPerson(ServerRequest request) {
        // ...
    }
}
One way to run a RouterFunction is to turn it into an HttpHandler and install it
through one of the built-in server adapters:
-
RouterFunctions.toHttpHandler(RouterFunction) -
RouterFunctions.toHttpHandler(RouterFunction, HandlerStrategies)
Most applications will run through the WebFlux Java config, see Running a server.
1.5.2. HandlerFunction
ServerRequest and ServerResponse are immutable interfaces that offer JDK-8 friendly
access to the HTTP request and response with
Reactive Streams back pressure against the request
and response body stream. The request body is represented with a Reactor Flux or Mono.
The response body is represented with any Reactive Streams Publisher, including Flux
and Mono. For more on that see
Reactive Libraries.
ServerRequest
ServerRequest provides access to the HTTP method, URI, headers, and query parameters
while access to the body is provided through the body methods.
To extract the request body to a Mono<String>:
Mono<String> string = request.bodyToMono(String.class);
To extract the body to a Flux<Person>, where Person objects are decoded from some
serialized form, such as JSON or XML:
Flux<Person> people = request.bodyToFlux(Person.class);
The above are shortcuts that use the more general ServerRequest.body(BodyExtractor)
which accepts the BodyExtractor functional, strategy interface. The utility class
BodyExtractors provides access to a number of instances. For example, the above can
also be written as follows:
Mono<String> string = request.body(BodyExtractors.toMono(String.class));
Flux<Person> people = request.body(BodyExtractors.toFlux(Person.class));
To access form data:
Mono<MultiValueMap<String, String> map = request.body(BodyExtractors.toFormData());
To access multipart data as a map:
Mono<MultiValueMap<String, Part> map = request.body(BodyExtractors.toMultipartData());
To access multiparts, one at a time, in streaming fashion:
Flux<Part> parts = request.body(BodyExtractos.toParts());
ServerResponse
ServerResponse provides access to the HTTP response and since it is immutable, you use
a build to create it. The builder can be used to set the response status, to add response
headers, or to provide a body. Below is an example with a 200 (OK) response with JSON
content:
Mono<Person> person = ...
ServerResponse.ok().contentType(MediaType.APPLICATION_JSON).body(person, Person.class);
This is how to build a 201 (CREATED) response with "Location" header, and no body:
URI location = ...
ServerResponse.created(location).build();
Handler Classes
We can write a handler function as a lambda. For example:
HandlerFunction<ServerResponse> helloWorld =
  request -> ServerResponse.ok().body(fromObject("Hello World"));
That is convenient but in an application we need multiple functions and useful to group
related handler functions together into a handler (like an @Controller). For example,
here is a class that exposes a reactive Person repository:
import static org.springframework.http.MediaType.APPLICATION_JSON;
import static org.springframework.web.reactive.function.ServerResponse.ok;
import static org.springframework.web.reactive.function.BodyInserters.fromObject;

public class PersonHandler {

    private final PersonRepository repository;

    public PersonHandler(PersonRepository repository) {
        this.repository = repository;
    }

    public Mono<ServerResponse> listPeople(ServerRequest request) { (1)
        Flux<Person> people = repository.allPeople();
        return ok().contentType(APPLICATION_JSON).body(people, Person.class);
    }

    public Mono<ServerResponse> createPerson(ServerRequest request) { (2)
        Mono<Person> person = request.bodyToMono(Person.class);
        return ok().build(repository.savePerson(person));
    }

    public Mono<ServerResponse> getPerson(ServerRequest request) { (3)
        int personId = Integer.valueOf(request.pathVariable("id"));
        return repository.getPerson(personId)
            .flatMap(person -> ok().contentType(APPLICATION_JSON).body(fromObject(person)))
            .switchIfEmpty(ServerResponse.notFound().build());
    }
}| 1 | listPeople is a handler function that returns all Person objects found in the repository as
JSON. |
| 2 | createPerson is a handler function that stores a new Person contained in the request body.
Note that PersonRepository.savePerson(Person) returns Mono<Void>: an empty Mono that emits
a completion signal when the person has been read from the request and stored. So we use the
build(Publisher<Void>) method to send a response when that completion signal is received, i.e.
when the Person has been saved. |
| 3 | getPerson is a handler function that returns a single person, identified via the path
variable id. We retrieve that Person via the repository, and create a JSON response if it is
found. If it is not found, we use switchIfEmpty(Mono<T>) to return a 404 Not Found response. |
1.5.3. RouterFunction
RouterFunction is used to route requests to a HandlerFunction. Typically, you do not
write router functions yourself, but rather use
RouterFunctions.route(RequestPredicate, HandlerFunction). If the predicate applies, the
request is routed to the given HandlerFunction, or otherwise no routing is performed,
and that would translate to a 404 (Not Found) response.
Predicates
You can write your own RequestPredicate, but the RequestPredicates utility class
offers commonly implementations, based on the request path, HTTP method, content-type,
and so on. For example:
RouterFunction<ServerResponse> route =
    RouterFunctions.route(RequestPredicates.path("/hello-world"),
    request -> Response.ok().body(fromObject("Hello World")));
You can compose multiple request predicates together via:
-
RequestPredicate.and(RequestPredicate)— both must match. -
RequestPredicate.or(RequestPredicate)— either may match.
Many of the predicates from RequestPredicates are composed. For example
RequestPredicates.GET(String) is composed from RequestPredicates.method(HttpMethod)
and RequestPredicates.path(String).
You can compose multiple router functions into one, such that they’re evaluated in order, and if the first route doesn’t match, the second is evaluated. You can declare more specific routes before more general ones.
Routes
You can compose multiple router functions together via:
-
RouterFunction.and(RouterFunction) -
RouterFunction.andRoute(RequestPredicate, HandlerFunction)— shortcut forRouterFunction.and()with nestedRouterFunctions.route().
Using composed routes and predicates, we can then declare the following routes, referring
to methods in the PersonHandler, shown in [webflux-fn-handler-class], through
method-references:
import static org.springframework.http.MediaType.APPLICATION_JSON;
import static org.springframework.web.reactive.function.server.RequestPredicates.*;

PersonRepository repository = ...
PersonHandler handler = new PersonHandler(repository);

RouterFunction<ServerResponse> personRoute =
    route(GET("/person/{id}").and(accept(APPLICATION_JSON)), handler::getPerson)
        .andRoute(GET("/person").and(accept(APPLICATION_JSON)), handler::listPeople)
        .andRoute(POST("/person"), handler::createPerson);
1.5.4. Running a server
How do you run a router function in an HTTP server? A simple option is to convert a router
function to an HttpHandler using one of the following:
-
RouterFunctions.toHttpHandler(RouterFunction) -
RouterFunctions.toHttpHandler(RouterFunction, HandlerStrategies)
The returned HttpHandler can then be used with a number of servers adapters by following
HttpHandler for server-specific instructions.
A more advanced option is to run with a DispatcherHandler-based setup through the WebFlux Config which uses Spring configuration to declare the components quired to process requests. The WebFlux Java config declares the following infrastructure components to support functional endpoints:
-
RouterFunctionMapping— detects one or moreRouterFunction<?>beans in the Spring configuration, combines them viaRouterFunction.andOther, and routes requests to the resulting composedRouterFunction. -
HandlerFunctionAdapter— simple adapter that allows theDispatcherHandlerto invoke aHandlerFunctionthat was mapped to a request. -
ServerResponseResultHandler— handles the result from the invocation of aHandlerFunctionby invoking thewriteTomethod of theServerResponse.
The above components allow functional endpoints to fit within the DispatcherHandler request
processing lifecycle, and also potentially run side by side with annotated controllers, if
any are declared. It is also how functional endpoints are enabled the Spring Boot WebFlux
starter.
Below is example WebFlux Java config (see DispatcherHandler for how to run):
@Configuration
@EnableWebFlux
public class WebConfig implements WebFluxConfigurer {

    @Bean
    public RouterFunction<?> routerFunctionA() {
        // ...
    }

    @Bean
    public RouterFunction<?> routerFunctionB() {
        // ...
    }

    // ...

    @Override
    public void configureHttpMessageCodecs(ServerCodecConfigurer configurer) {
        // configure message conversion...
    }

    @Override
    public void addCorsMappings(CorsRegistry registry) {
        // configure CORS...
    }

    @Override
    public void configureViewResolvers(ViewResolverRegistry registry) {
        // configure view resolution for HTML rendering...
    }
}
1.5.5. HandlerFilterFunction
Routes mapped by a router function can be filtered by calling
RouterFunction.filter(HandlerFilterFunction), where HandlerFilterFunction is essentially a
function that takes a ServerRequest and HandlerFunction, and returns a ServerResponse.
The handler function parameter represents the next element in the chain: this is typically the
HandlerFunction that is routed to, but can also be another FilterFunction if multiple filters
are applied.
With annotations, similar functionality can be achieved using @ControllerAdvice and/or a ServletFilter.
Let’s add a simple security filter to our route, assuming that we have a SecurityManager that
can determine whether a particular path is allowed:
import static org.springframework.http.HttpStatus.UNAUTHORIZED;

SecurityManager securityManager = ...
RouterFunction<ServerResponse> route = ...

RouterFunction<ServerResponse> filteredRoute =
    route.filter((request, next) -> {
        if (securityManager.allowAccessTo(request.path())) {
            return next.handle(request);
        }
        else {
            return ServerResponse.status(UNAUTHORIZED).build();
        }
  });
You can see in this example that invoking the next.handle(ServerRequest) is optional: we only
allow the handler function to be executed when access is allowed.
|
CORS support for functional endpoints is provided via a dedicated |
1.6. URI Links
This section describes various options available in the Spring Framework to prepare URIs.
1.6.1. UriComponents
Spring MVC and Spring WebFlux
UriComponentsBuilder helps to build URI’s from URI templates with variables:
UriComponents uriComponents = UriComponentsBuilder
        .fromUriString("http://example.com/hotels/{hotel}")  (1)
        .queryParam("q", "{q}")  (2)
        .encode() (3)
        .build(); (4)

URI uri = uriComponents.expand("Westin", "123").toUri(); (5)| 1 | Static factory method with a URI template. |
| 2 | Add and/or replace URI components. |
| 3 | Request to have the URI template and URI variables encoded. |
| 4 | Build a UriComponents. |
| 5 | Expand variables, and obtain the URI. |
The above can be consolidated into one chain and shortened with buildAndExpand:
URI uri = UriComponentsBuilder
        .fromUriString("http://example.com/hotels/{hotel}")
        .queryParam("q", "{q}")
        .encode()
        .buildAndExpand("Westin", "123")
        .toUri();
It can be shortened further by going directly to URI (which implies encoding):
URI uri = UriComponentsBuilder
        .fromUriString("http://example.com/hotels/{hotel}")
        .queryParam("q", "{q}")
        .build("Westin", "123");
Or shorter further yet, with a full URI template:
URI uri = UriComponentsBuilder
        .fromUriString("http://example.com/hotels/{hotel}?q={q}")
        .build("Westin", "123");
1.6.2. UriBuilder
Spring MVC and Spring WebFlux
UriComponentsBuilder implements UriBuilder. A UriBuilder in turn
can be created with a UriBuilderFactory. Together UriBuilderFactory and UriBuilder
provide a pluggable mechanism to build URIs from URI templates, based on shared
configuration such as a base url, encoding preferences, and others.
The RestTemplate and the WebClient can be configured with a UriBuilderFactory
to customize the preparation of URIs. DefaultUriBuilderFactory is a default
implementation of UriBuilderFactory that uses UriComponentsBuilder internally and
exposes shared configuration options.
RestTemplate example:
// import org.springframework.web.util.DefaultUriBuilderFactory.EncodingMode;

String baseUrl = "http://example.org";
DefaultUriBuilderFactory factory = new DefaultUriBuilderFactory(baseUrl);
factory.setEncodingMode(EncodingMode.TEMPLATE_AND_VARIABLES);

RestTemplate restTemplate = new RestTemplate();
restTemplate.setUriTemplateHandler(factory);
WebClient example:
// import org.springframework.web.util.DefaultUriBuilderFactory.EncodingMode;

String baseUrl = "http://example.org";
DefaultUriBuilderFactory factory = new DefaultUriBuilderFactory(baseUrl);
factory.setEncodingMode(EncodingMode.TEMPLATE_AND_VARIABLES);

WebClient client = WebClient.builder().uriBuilderFactory(factory).build();
In addition DefaultUriBuilderFactory can also be used directly. It is similar to using
UriComponentsBuilder but instead of static factory methods, it is an actual instance
that holds configuration and preferences:
String baseUrl = "http://example.com";
DefaultUriBuilderFactory uriBuilderFactory = new DefaultUriBuilderFactory(baseUrl);

URI uri = uriBuilderFactory.uriString("/hotels/{hotel}")
        .queryParam("q", "{q}")
        .build("Westin", "123");
1.6.3. URI Encoding
Spring MVC and Spring WebFlux
UriComponentsBuilder exposes encoding options at 2 levels:
-
UriComponentsBuilder#encode() - pre-encodes the URI template first, then strictly encodes URI variables when expanded.
-
UriComponents#encode() - encodes URI components after URI variables are expanded.
Both options replace non-ASCII and illegal characters with escaped octets, however option 1 also replaces characters with reserved meaning that appear in URI variables.
|
Consider ";" which is legal in a path but has reserved meaning. Option 1 replaces ";" with "%3B" in URI variables but not in the URI template. By contrast, option 2 never replaces ";" since it is a legal character in a path. |
For most cases option 1 is likely to give the expected result because it treats URI variables as opaque data to be fully encoded, while option 2 is useful only if URI variables intentionally contain reserved characters.
Example usage using option 1:
URI uri = UriComponentsBuilder.fromPath("/hotel list/{city}")
            .queryParam("q", "{q}")
            .encode()
            .buildAndExpand("New York", "foo+bar")
            .toUri();

    // Result is "/hotel%20list/New%20York?foo%2Bbar"
The above can be shortened by going directly to URI (which implies encoding):
URI uri = UriComponentsBuilder.fromPath("/hotel list/{city}")
            .queryParam("q", "{q}")
            .build("New York", "foo+bar")
Or shorter further yet, with a full URI template:
URI uri = UriComponentsBuilder.fromPath("/hotel list/{city}?q={q}")
            .build("New York", "foo+bar")
The WebClient and the RestTemplate expand and encode URI templates internally through
the UriBuilderFactory strategy. Both can be configured with a custom strategy:
String baseUrl = "http://example.com";
DefaultUriBuilderFactory factory = new DefaultUriBuilderFactory(baseUrl)
factory.setEncodingMode(EncodingMode.TEMPLATE_AND_VALUES);

// Customize the RestTemplate..
RestTemplate restTemplate = new RestTemplate();
restTemplate.setUriTemplateHandler(factory);

// Customize the WebClient..
WebClient client = WebClient.builder().uriBuilderFactory(factory).build();
The DefaultUriBuilderFactory implementation uses UriComponentsBuilder internally to
expand and encode URI templates. As a factory it provides a single place to configure
the approach to encoding based on one of the below encoding modes:
-
TEMPLATE_AND_VALUES— usesUriComponentsBuilder#encode(), corresponding to option 1 above, to pre-encode the URI template and strictly encode URI variables when expanded. -
VALUES_ONLY— does not encode the URI template and instead applies strict encoding to URI variables viaUriUtils#encodeUriUriVariablesprior to expanding them into the template. -
URI_COMPONENTS— usesUriComponents#encode(), corresponding to option 2 above, to encode URI component value after URI variables are expanded. -
NONE— no encoding is applied.
Out of the box the RestTemplate is set to EncodingMode.URI_COMPONENTS for historic
reasons and for backwards compatibility. The WebClient relies on the default value
in DefaultUriBuilderFactory which was changed from EncodingMode.URI_COMPONENTS in
5.0.x to EncodingMode.TEMPLATE_AND_VALUES in 5.1.
1.7. CORS
1.7.1. Introduction
For security reasons browsers prohibit AJAX calls to resources outside the current origin. For example you could have your bank account in one tab and evil.com in another. Scripts from evil.com should not be able to make AJAX requests to your bank API with your credentials, e.g. withdrawing money from your account!
Cross-Origin Resource Sharing (CORS) is a W3C specification implemented by most browsers that allows you to specify what kind of cross domain requests are authorized rather than using less secure and less powerful workarounds based on IFRAME or JSONP.
1.7.2. Processing
The CORS specification distinguishes between preflight, simple, and actual requests. To learn how CORS works, you can read this article, among many others, or refer to the specification for more details.
Spring WebFlux HandlerMapping's provide built-in support for CORS. After successfully
mapping a request to a handler, HandlerMapping's check the CORS configuration for the
given request and handler and take further actions. Preflight requests are handled
directly while simple and actual CORS requests are intercepted, validated, and have
required CORS response headers set.
In order to enable cross-origin requests (i.e. the Origin header is present and
differs from the host of the request) you need to have some explicitly declared CORS
configuration. If no matching CORS configuration is found, preflight requests are
rejected. No CORS headers are added to the responses of simple and actual CORS requests
and consequently browsers reject them.
Each HandlerMapping can be
configured
individually with URL pattern based CorsConfiguration mappings. In most cases applications
will use the WebFlux Java config to declare such mappings, which results in a single,
global map passed to all HadlerMappping's.
Global CORS configuration at the HandlerMapping level can be combined with more
fine-grained, handler-level CORS configuration. For example annotated controllers can use
class or method-level @CrossOrigin annotations (other handlers can implement
CorsConfigurationSource).
The rules for combining global and local configuration are generally additive — e.g.
all global and all local origins. For those attributes where only a single value can be
accepted such as allowCredentials and maxAge, the local overrides the global value. See
CorsConfiguration#combine(CorsConfiguration)
for more details.
|
To learn more from the source or make advanced customizations, check:
|
1.7.3. @CrossOrigin
The @CrossOrigin
annotation enables cross-origin requests on annotated controller methods:
@RestController
@RequestMapping("/account")
public class AccountController {

    @CrossOrigin
    @GetMapping("/{id}")
    public Mono<Account> retrieve(@PathVariable Long id) {
        // ...
    }

    @DeleteMapping("/{id}")
    public Mono<Void> remove(@PathVariable Long id) {
        // ...
    }
}
By default @CrossOrigin allows:
-
All origins.
-
All headers.
-
All HTTP methods to which the controller method is mapped.
-
allowedCredentialsis not enabled by default since that establishes a trust level that exposes sensitive user-specific information such as cookies and CSRF tokens, and should only be used where appropriate. -
maxAgeis set to 30 minutes.
@CrossOrigin is supported at the class level too and inherited by all methods:
@CrossOrigin(origins = "http://domain2.com", maxAge = 3600)
@RestController
@RequestMapping("/account")
public class AccountController {

    @GetMapping("/{id}")
    public Mono<Account> retrieve(@PathVariable Long id) {
        // ...
    }

    @DeleteMapping("/{id}")
    public Mono<Void> remove(@PathVariable Long id) {
        // ...
    }
}
CrossOrigin can be used at both class and method-level:
@CrossOrigin(maxAge = 3600)
@RestController
@RequestMapping("/account")
public class AccountController {

    @CrossOrigin("http://domain2.com")
    @GetMapping("/{id}")
    public Mono<Account> retrieve(@PathVariable Long id) {
        // ...
    }

    @DeleteMapping("/{id}")
    public Mono<Void> remove(@PathVariable Long id) {
        // ...
    }
}
1.7.4. Global Config
In addition to fine-grained, controller method level configuration you’ll probably want to
define some global CORS configuration too. You can set URL-based CorsConfiguration
mappings individually on any HandlerMapping. Most applications however will use the
WebFlux Java config to do that.
By default global configuration enables the following:
-
All origins.
-
All headers.
-
GET,HEAD, andPOSTmethods. -
allowedCredentialsis not enabled by default since that establishes a trust level that exposes sensitive user-specific information such as cookies and CSRF tokens, and should only be used where appropriate. -
maxAgeis set to 30 minutes.
To enable CORS in the WebFlux Java config, use the CorsRegistry callback:
@Configuration
@EnableWebFlux
public class WebConfig implements WebFluxConfigurer {

    @Override
    public void addCorsMappings(CorsRegistry registry) {

        registry.addMapping("/api/**")
            .allowedOrigins("http://domain2.com")
            .allowedMethods("PUT", "DELETE")
            .allowedHeaders("header1", "header2", "header3")
            .exposedHeaders("header1", "header2")
            .allowCredentials(true).maxAge(3600);

        // Add more mappings...
    }
}
1.7.5. CORS WebFilter
You can apply CORS support through the built-in
CorsWebFilter, which is a
good fit with functional endpoints.
To configure the filter, you can declare a CorsWebFilter bean and pass a
CorsConfigurationSource to its constructor:
@Bean
CorsWebFilter corsFilter() {

    CorsConfiguration config = new CorsConfiguration();

    // Possibly...
    // config.applyPermitDefaultValues()

    config.setAllowCredentials(true);
    config.addAllowedOrigin("http://domain1.com");
    config.addAllowedHeader("");
    config.addAllowedMethod("");

    UrlBasedCorsConfigurationSource source = new UrlBasedCorsConfigurationSource();
    source.registerCorsConfiguration("/**", config);

    return new CorsWebFilter(source);
}
1.8. Web Security
The Spring Security project provides support for protecting web applications from malicious exploits. Check out the Spring Security reference documentation including:
1.9. View Technologies
The use of view technologies in Spring WebFlux is pluggable, whether you decide to use Thymeleaf, FreeMarker, or other, is primarily a matter of a configuration change. This chapter covers view technologies integrated with Spring WebFlux. We assume you are already familiar with View Resolution.
1.9.1. Thymeleaf
Thymeleaf is modern server-side Java template engine that emphasizes natural HTML templates that can be previewed in a browser by double-clicking, which is very helpful for independent work on UI templates, e.g. by designer, without the need for a running server. Thymeleaf offers an extensive set of features and it is actively developed and maintained. For a more complete introduction see the Thymeleaf project home page.
The Thymeleaf integration with Spring WebFlux is managed by the Thymeleaf project. The
configuration involves a few bean declarations such as
SpringResourceTemplateResolver, SpringWebFluxTemplateEngine, and
ThymeleafReactiveViewResolver. For more details see
Thymeleaf+Spring and the WebFlux integration
announcement.
1.9.2. FreeMarker
Apache FreeMarker is a template engine for generating any kind of text output from HTML to email, and others. The Spring Framework has a built-in integration for using Spring WebFlux with FreeMarker templates.
View config
To configure FreeMarker as a view technology:
@Configuration
@EnableWebFlux
public class WebConfig implements WebFluxConfigurer {

    @Override
    public void configureViewResolvers(ViewResolverRegistry registry) {
        registry.freemarker();
    }

    // Configure FreeMarker...

    @Bean
    public FreeMarkerConfigurer freeMarkerConfigurer() {
        FreeMarkerConfigurer configurer = new FreeMarkerConfigurer();
        configurer.setTemplateLoaderPath("classpath:/templates");
        return configurer;
    }
}
Your templates need to be stored in the directory specified by the FreeMarkerConfigurer
shown above. Given the above configuration if your controller returns the view name
"welcome" then the resolver will look for the
classpath:/templates/freemarker/welcome.ftl template.
FreeMarker config
FreeMarker 'Settings' and 'SharedVariables' can be passed directly to the FreeMarker
Configuration object managed by Spring by setting the appropriate bean properties on
the FreeMarkerConfigurer bean. The freemarkerSettings property requires a
java.util.Properties object and the freemarkerVariables property requires a
java.util.Map.
@Configuration
@EnableWebFlux
public class WebConfig implements WebFluxConfigurer {

    // ...

    @Bean
    public FreeMarkerConfigurer freeMarkerConfigurer() {
        Map<String, Object> variables = new HashMap<>();
        variables.put("xml_escape", new XmlEscape());

        FreeMarkerConfigurer configurer = new FreeMarkerConfigurer();
        configurer.setTemplateLoaderPath("classpath:/templates");
        configurer.setFreemarkerVariables(variables);
        return configurer;
    }
}
See the FreeMarker documentation for details of settings and variables as they apply to
the Configuration object.
1.9.3. Script Views
The Spring Framework has a built-in integration for using Spring WebFlux with any templating library that can run on top of the JSR-223 Java scripting engine. Below is a list of templating libraries we’ve tested on different script engines:
|
The basic rule for integrating any other script engine is that it must implement the
|
Requirements
You need to have the script engine on your classpath:
-
Nashorn JavaScript engine is provided with Java 8+. Using the latest update release available is highly recommended.
-
JRuby should be added as a dependency for Ruby support.
-
Jython should be added as a dependency for Python support.
-
org.jetbrains.kotlin:kotlin-script-utildependency and aMETA-INF/services/javax.script.ScriptEngineFactoryfile containing aorg.jetbrains.kotlin.script.jsr223.KotlinJsr223JvmLocalScriptEngineFactoryline should be added for Kotlin script support, see this example for more details.
You need to have the script templating library. One way to do that for Javascript is through WebJars.
Script templates
Declare a ScriptTemplateConfigurer bean in order to specify the script engine to use,
the script files to load, what function to call to render templates, and so on.
Below is an example with Mustache templates and the Nashorn JavaScript engine:
@Configuration
@EnableWebFlux
public class WebConfig implements WebFluxConfigurer {

    @Override
    public void configureViewResolvers(ViewResolverRegistry registry) {
        registry.scriptTemplate();
    }

    @Bean
    public ScriptTemplateConfigurer configurer() {
        ScriptTemplateConfigurer configurer = new ScriptTemplateConfigurer();
        configurer.setEngineName("nashorn");
        configurer.setScripts("mustache.js");
        configurer.setRenderObject("Mustache");
        configurer.setRenderFunction("render");
        return configurer;
    }
}
The render function is called with the following parameters:
-
String template: the template content -
Map model: the view model -
RenderingContext renderingContext: the RenderingContext that gives access to the application context, the locale, the template loader and the url (since 5.0)
Mustache.render() is natively compatible with this signature, so you can call it directly.
If your templating technology requires some customization, you may provide a script that implements a custom render function. For example, Handlerbars needs to compile templates before using them, and requires a polyfill in order to emulate some browser facilities not available in the server-side script engine.
@Configuration
@EnableWebMvc
public class WebConfig implements WebFluxConfigurer {

    @Override
    public void configureViewResolvers(ViewResolverRegistry registry) {
        registry.scriptTemplate();
    }

    @Bean
    public ScriptTemplateConfigurer configurer() {
        ScriptTemplateConfigurer configurer = new ScriptTemplateConfigurer();
        configurer.setEngineName("nashorn");
        configurer.setScripts("polyfill.js", "handlebars.js", "render.js");
        configurer.setRenderFunction("render");
        configurer.setSharedEngine(false);
        return configurer;
    }
}|
Setting the |
polyfill.js only defines the window object needed by Handlebars to run properly:
var window = {};This basic render.js implementation compiles the template before using it. A production
ready implementation should also store and reused cached templates / pre-compiled templates.
This can be done on the script side, as well as any customization you need (managing
template engine configuration for example).
function render(template, model) {
    var compiledTemplate = Handlebars.compile(template);
    return compiledTemplate(model);
}1.9.4. JSON, XML
For Content negotiation purposes it is useful to be able to alternate
between rendering a model with an HTML template or as other formats such as JSON or XML,
depending on the content type requested by the client. To support this Spring WebFlux
provides the HttpMessageWriterView that can be used to plug in any of the available
Codecs from spring-web such as Jackson2JsonEncoder,
Jackson2SmileEncoder, or Jaxb2XmlEncoder.
Unlike other view technologies, HttpMessageWriterView does not require a ViewResolver,
but instead is configured as a default view. You can
configure one more such default views, wrapping different HttpMessageWriter's or
Encoder's. The one that matches the requested content type is used at runtime.
In most cases a model will contain multiple attributes. In order to determine which one
to serialize, HttpMessageWriterView can be configured with the name of the model
attribute to use render, of if the model contains only one attribute, it will be used.
1.10. HTTP Caching
HTTP caching can significantly improve the performance of a web application. HTTP caching
revolves around the "Cache-Control" response header and subsequently conditional request
headers such as "Last-Modified" and "ETag". "Cache-Control" advises private (e.g. browser)
and public (e.g. proxy) caches how to cache and re-use responses. An "ETag" header is used
to make a conditional request that may result in a 304 (NOT_MODIFIED) without a body,
if the content has not changed. "ETag" can be seen as a more sophisticated successor to
the Last-Modified header.
This section describes HTTP caching related options available in Spring Web MVC.
1.10.1. CacheControl
CacheControl provides support for
configuring settings related to the "Cache-Control" header and is accepted as an argument
in a number of places:
While RFC 7234 describes all possible
directives for the "Cache-Control" response header, the CacheControl type takes a
use case oriented approach focusing on the common scenarios:
// Cache for an hour - "Cache-Control: max-age=3600"
CacheControl ccCacheOneHour = CacheControl.maxAge(1, TimeUnit.HOURS);

// Prevent caching - "Cache-Control: no-store"
CacheControl ccNoStore = CacheControl.noStore();

// Cache for ten days in public and private caches,
// public caches should not transform the response
// "Cache-Control: max-age=864000, public, no-transform"
CacheControl ccCustom = CacheControl.maxAge(10, TimeUnit.DAYS).noTransform().cachePublic();
1.10.2. Controllers
Controllers can add explicit support for HTTP caching. This is recommended since the
lastModified or ETag value for a resource needs to be calculated before it can be compared
against conditional request headers. A controller can add an ETag and "Cache-Control"
settings to a ResponseEntity:
@GetMapping("/book/{id}")
public ResponseEntity<Book> showBook(@PathVariable Long id) {

    Book book = findBook(id);
    String version = book.getVersion();

    return ResponseEntity
            .ok()
            .cacheControl(CacheControl.maxAge(30, TimeUnit.DAYS))
            .eTag(version) // lastModified is also available
            .body(book);
}
This will send an 304 (NOT_MODIFIED) response with an empty body, if the comparison to the conditional request headers indicates the content has not changed. Otherwise the "ETag" and "Cache-Control" headers will be added to the response.
The check against conditional request headers can also be made in the controller:
@RequestMapping
public String myHandleMethod(ServerWebExchange exchange, Model model) {

    long eTag = ... (1)

    if (exchange.checkNotModified(eTag)) {
        return null; (2)
    }

    model.addAttribute(...); (3)
    return "myViewName";
}| 1 | Application-specific calculation. |
| 2 | Response has been set to 304 (NOT_MODIFIED), no further processing. |
| 3 | Continue with request processing. |
There are 3 variants for checking conditional requests against eTag values, lastModified values, or both. For conditional "GET" and "HEAD" requests, the response may be set to 304 (NOT_MODIFIED). For conditional "POST", "PUT", and "DELETE", the response would be set to 409 (PRECONDITION_FAILED) instead to prevent concurrent modification.
1.10.3. Static resources
Static resources should be served with a "Cache-Control" and conditional response headers for optimal performance. See section on configuring Static resources.
1.11. WebFlux Config
The WebFlux Java config declares components required to process requests with annotated
controllers or functional endpoints, and it offers an API to customize the configuration.
That means you do not need to understand the underlying beans created by the Java config
but, if you want to, it’s very easy to see them in WebFluxConfigurationSupport or read more
what they are in Special bean types.
For more advanced customizations, not available in the configuration API, it is also possible to gain full control over the configuration through the Advanced config mode.
1.11.1. Enable WebFlux config
Use the @EnableWebFlux annotation in your Java config:
@Configuration
@EnableWebFlux
public class WebConfig {
}
The above registers a number of Spring WebFlux infrastructure beans also adapting to dependencies available on the classpath — for JSON, XML, etc.
1.11.2. WebFlux config API
In your Java config implement the WebFluxConfigurer interface:
@Configuration
@EnableWebFlux
public class WebConfig implements WebFluxConfigurer {

    // Implement configuration methods...

}
1.11.3. Conversion, formatting
By default formatters for Number and Date types are installed, including support for
the @NumberFormat and @DateTimeFormat annotations. Full support for the Joda-Time
formatting library is also installed if Joda-Time is present on the classpath.
To register custom formatters and converters:
@Configuration
@EnableWebFlux
public class WebConfig implements WebFluxConfigurer {

    @Override
    public void addFormatters(FormatterRegistry registry) {
        // ...
    }

}|
See FormatterRegistrar SPI
and the |
1.11.4. Validation
By default if Bean Validation is present
on the classpath — e.g. Hibernate Validator, the LocalValidatorFactoryBean is registered
as a global Validator for use with @Valid and Validated on
@Controller method arguments.
In your Java config, you can customize the global Validator instance:
@Configuration
@EnableWebFlux
public class WebConfig implements WebFluxConfigurer {

    @Override
    public Validator getValidator(); {
        // ...
    }

}
Note that you can also register Validator's locally:
@Controller
public class MyController {

    @InitBinder
    protected void initBinder(WebDataBinder binder) {
        binder.addValidators(new FooValidator());
    }

}|
If you need to have a |
1.11.5. Content type resolvers
You can configure how Spring WebFlux determines the requested media types for
@Controller's from the request. By default only the "Accept" header is checked but you
can also enable a query parameter based strategy.
To customize the requested content type resolution:
@Configuration
@EnableWebFlux
public class WebConfig implements WebFluxConfigurer {

    @Override
    public void configureContentTypeResolver(RequestedContentTypeResolverBuilder builder) {
        // ...
    }
}
1.11.6. HTTP message codecs
To customize how the request and response body are read and written:
@Configuration
@EnableWebFlux
public class WebConfig implements WebFluxConfigurer {

    @Override
    public void configureHttpMessageCodecs(ServerCodecConfigurer configurer) {
        // ...
    }
}
ServerCodecConfigurer provides a set of default readers and writers. You can use it to add
more readers and writers, customize the default ones, or replace the default ones completely.
For Jackson JSON and XML, consider using the Jackson2ObjectMapperBuilder which customizes Jackson’s default properties with the following ones:
-
DeserializationFeature.FAIL_ON_UNKNOWN_PROPERTIESis disabled. -
MapperFeature.DEFAULT_VIEW_INCLUSIONis disabled.
It also automatically registers the following well-known modules if they are detected on the classpath:
-
jackson-datatype-jdk7: support for Java 7 types like
java.nio.file.Path. -
jackson-datatype-joda: support for Joda-Time types.
-
jackson-datatype-jsr310: support for Java 8 Date & Time API types.
-
jackson-datatype-jdk8: support for other Java 8 types like
Optional.
1.11.7. View resolvers
To configure view resolution:
@Configuration
@EnableWebFlux
public class WebConfig implements WebFluxConfigurer {

    @Override
    public void configureViewResolvers(ViewResolverRegistry registry) {
        // ...
    }
}
The ViewResolverRegistry has shortcuts for view technologies that the Spring Framework
integrates with. Here is an example with FreeMarker which also requires configuring the
underlying FreeMarker view technology:
@Configuration
@EnableWebFlux
public class WebConfig implements WebFluxConfigurer {


    @Override
    public void configureViewResolvers(ViewResolverRegistry registry) {
        registry.freeMarker();
    }

    // Configure Freemarker...

    @Bean
    public FreeMarkerConfigurer freeMarkerConfigurer() {
        FreeMarkerConfigurer configurer = new FreeMarkerConfigurer();
        configurer.setTemplateLoaderPath("classpath:/templates");
        return configurer;
    }
}
You can also plug in any ViewResolver implementation:
@Configuration
@EnableWebFlux
public class WebConfig implements WebFluxConfigurer {


    @Override
    public void configureViewResolvers(ViewResolverRegistry registry) {
        ViewResolver resolver = ... ;
        registry.viewResolver(resolver);
    }
}
To support Content negotiation and rendering other formats
through view resolution, besides HTML, you can configure one or more default views based
on the HttpMessageWriterView implementation which accepts any of the available
Codecs from spring-web:
@Configuration
@EnableWebFlux
public class WebConfig implements WebFluxConfigurer {


    @Override
    public void configureViewResolvers(ViewResolverRegistry registry) {
        registry.freeMarker();

        Jackson2JsonEncoder encoder = new Jackson2JsonEncoder();
        registry.defaultViews(new HttpMessageWriterView(encoder));
    }

    // ...
}
See View Technologies for more on the view technologies integrated with Spring WebFlux.
1.11.8. Static resources
This option provides a convenient way to serve static resources from a list of Resource-based locations.
In the example below, given a request that starts with "/resources", the relative path is
used to find and serve static resources relative to "/static" on the classpath. Resources
will be served with a 1-year future expiration to ensure maximum use of the browser cache
and a reduction in HTTP requests made by the browser. The Last-Modified header is also
evaluated and if present a 304 status code is returned.
@Configuration
@EnableWebFlux
public class WebConfig implements WebFluxConfigurer {

    @Override
    public void addResourceHandlers(ResourceHandlerRegistry registry) {
        registry.addResourceHandler("/resources/**")
            .addResourceLocations("/public", "classpath:/static/")
            .setCacheControl(CacheControl.maxAge(365, TimeUnit.DAYS));
    }

}
The resource handler also supports a chain of ResourceResolver's and ResourceTransformer's. which can be used to create a toolchain for working with optimized resources.
The VersionResourceResolver can be used for versioned resource URLs based on an MD5 hash
computed from the content, a fixed application version, or other. A
ContentVersionStrategy (MD5 hash) is a good choice with some notable exceptions such as
JavaScript resources used with a module loader.
For example in your Java config;
@Configuration
@EnableWebFlux
public class WebConfig implements WebFluxConfigurer {

    @Override
    public void addResourceHandlers(ResourceHandlerRegistry registry) {
        registry.addResourceHandler("/resources/**")
                .addResourceLocations("/public/")
                .resourceChain(true)
                .addResolver(new VersionResourceResolver().addContentVersionStrategy("/**"));
    }

}
You can use ResourceUrlProvider to rewrite URLs and apply the full chain of resolvers and
transformers — e.g. to insert versions. The WebFlux config provides a ResourceUrlProvider
so it can be injected into others.
Unlike Spring MVC at present in WebFlux there is no way to transparently rewrite static
resource URLs since there are no view technologies that can make use of a non-blocking chain
of resolvers and transformers. When serving only local resources the workaround is to use
ResourceUrlProvider directly (e.g. through a custom tag) and block.
Note that when using both GzipResourceResolver and VersionedResourceResolver, they must
be registered in that order to ensure content based versions are always computed reliably
based on the unencoded file.
WebJars is also supported via WebJarsResourceResolver
and automatically registered when "org.webjars:webjars-locator" is present on the
classpath. The resolver can re-write URLs to include the version of the jar and can also
match to incoming URLs without versions — e.g. "/jquery/jquery.min.js" to
"/jquery/1.2.0/jquery.min.js".
1.11.9. Path Matching
Spring WebFlux uses parsed representation of path patterns — i.e. PathPattern, and also
the incoming request path — i.e. RequestPath, which eliminates the need to indicate
whether to decode the request path, or remove semicolon content, since PathPattern
can now access decoded path segment values and match safely.
Spring WebFlux also does not support suffix pattern matching so effectively there are only two
minor options to customize related to path matching — whether to match trailing slashes
(true by default) and whether the match is case-sensitive (false).
To customize those options:
@Configuration
@EnableWebFlux
public class WebConfig implements WebFluxConfigurer {

    @Override
    public void configurePathMatch(PathMatchConfigurer configurer) {
        // ...
    }

}
1.11.10. Advanced config mode
@EnableWebFlux imports DelegatingWebFluxConfiguration that (1) provides default
Spring configuration for WebFlux applications and (2) detects and delegates to
WebFluxConfigurer's to customize that configuration.
For advanced mode, remove @EnableWebFlux and extend directly from
DelegatingWebFluxConfiguration instead of implementing WebFluxConfigurer:
@Configuration
public class WebConfig extends DelegatingWebFluxConfiguration {

    // ...

}
You can keep existing methods in WebConfig but you can now also override bean declarations
from the base class and you can still have any number of other WebMvcConfigurer's on
the classpath.
1.12. HTTP/2
Servlet 4 containers are required to support HTTP/2 and Spring Framework 5 is compatible with Servlet API 4. From a programming model perspective there is nothing specific that applications need to do. However there are considerations related to server configuration. For more details please check out the HTTP/2 wiki page.
Currently Spring WebFlux does not support HTTP/2 with Netty. There is also no support for pushing resources programmatically to the client.
2. WebClient
The spring-webflux module includes a reactive, non-blocking client for HTTP requests
with a functional-style API client and Reactive Streams support. WebClient depends on a
lower level HTTP client library to execute requests and that support is pluggable.
WebClient
uses the same codecs as WebFlux server applications do, and
shares a common base package, some common APIs, and infrastructure with the
server functional web framework.
The API exposes Reactor Flux and Mono types, also see
Reactive Libraries. By default it uses
it uses Reactor Netty as the HTTP client
library but others can be plugged in through a custom ClientHttpConnector.
By comparison to the RestTemplate, the
WebClient is:
-
non-blocking, reactive, and supports higher concurrency with less hardware resources.
-
provides a functional API that takes advantage of Java 8 lambdas.
-
supports both synchronous and asynchronous scenarios.
-
supports streaming up or down from a server.
The RestTemplate is not a good fit for use in non-blocking applications, and therefore
Spring WebFlux application should always use the WebClient. The WebClient should also
be preferred in Spring MVC, in most high concurrency scenarios, and for composing a
sequence of remote, inter-dependent calls.
2.1. Retrieve
The retrieve() method is the easiest way to get a response body and decode it:
    WebClient client = WebClient.create("http://example.org");

    Mono<Person> result = client.get()
            .uri("/persons/{id}", id).accept(MediaType.APPLICATION_JSON)
            .retrieve()
            .bodyToMono(Person.class);
You can also get a stream of objects decoded from the response:
    Flux<Quote> result = client.get()
            .uri("/quotes").accept(MediaType.TEXT_EVENT_STREAM)
            .retrieve()
            .bodyToFlux(Quote.class);
By default, responses with 4xx or 5xx status codes result in an error of type
WebClientResponseException but you can customize that:
    Mono<Person> result = client.get()
            .uri("/persons/{id}", id).accept(MediaType.APPLICATION_JSON)
            .retrieve()
            .onStatus(HttpStatus::is4xxServerError, response -> ...)
            .onStatus(HttpStatus::is5xxServerError, response -> ...)
            .bodyToMono(Person.class);
2.2. Exchange
The exchange() method provides more control. The below example is equivalent
to retrieve() but also provides access to the ClientResponse:
    Mono<Person> result = client.get()
            .uri("/persons/{id}", id).accept(MediaType.APPLICATION_JSON)
            .exchange()
            .flatMap(response -> response.bodyToMono(Person.class));
At this level you can also create a full ResponseEntity:
    Mono<ResponseEntity<Person>> result = client.get()
            .uri("/persons/{id}", id).accept(MediaType.APPLICATION_JSON)
            .exchange()
            .flatMap(response -> response.toEntity(Person.class));
Note that unlike retrieve(), with exchange() there are no automatic error signals for
4xx and 5xx responses. You have to check the status code and decide how to proceed.
|
When using |
2.3. Request body
The request body can be encoded from an Object:
    Mono<Person> personMono = ... ;

    Mono<Void> result = client.post()
            .uri("/persons/{id}", id)
            .contentType(MediaType.APPLICATION_JSON)
            .body(personMono, Person.class)
            .retrieve()
            .bodyToMono(Void.class);
You can also have a stream of objects encoded:
    Flux<Person> personFlux = ... ;

    Mono<Void> result = client.post()
            .uri("/persons/{id}", id)
            .contentType(MediaType.APPLICATION_STREAM_JSON)
            .body(personFlux, Person.class)
            .retrieve()
            .bodyToMono(Void.class);
Or if you have the actual value, use the syncBody shortcut method:
    Person person = ... ;

    Mono<Void> result = client.post()
            .uri("/persons/{id}", id)
            .contentType(MediaType.APPLICATION_JSON)
            .syncBody(person)
            .retrieve()
            .bodyToMono(Void.class);
2.3.1. Form data
To send form data, provide a MultiValueMap<String, String> as the body. Note that the
content is automatically set to "application/x-www-form-urlencoded" by the
FormHttpMessageWriter:
    MultiValueMap<String, String> formData = ... ;

    Mono<Void> result = client.post()
            .uri("/path", id)
            .syncBody(formData)
            .retrieve()
            .bodyToMono(Void.class);
You can also supply form data in-line via BodyInserters:
    import static org.springframework.web.reactive.function.BodyInserters.*;

    Mono<Void> result = client.post()
            .uri("/path", id)
            .body(fromFormData("k1", "v1").with("k2", "v2"))
            .retrieve()
            .bodyToMono(Void.class);
2.3.2. Multipart data
To send multipart data, you need to provide a MultiValueMap<String, ?> whose values are
either Objects representing part content, or HttpEntity representing the content and
headers for a part. MultipartBodyBuilder provides a convenient API to prepare a
multipart request:
    MultipartBodyBuilder builder = new MultipartBodyBuilder();
    builder.part("fieldPart", "fieldValue");
    builder.part("filePart", new FileSystemResource("...logo.png"));
    builder.part("jsonPart", new Person("Jason"));

    MultiValueMap<String, HttpEntity<?>> parts = builder.build();
In most cases you do not have to specify the Content-Type for each part. The content
type is determined automatically based on the HttpMessageWriter chosen to serialize it,
or in the case of a Resource based on the file extension. If necessary you can
explicitly provide the MediaType to use for each part through one fo the overloaded
builder part methods.
Once a MultiValueMap is prepared, the easiest way to pass it to the the WebClient is
through the syncBody method:
    MultipartBodyBuilder builder = ...;

    Mono<Void> result = client.post()
            .uri("/path", id)
            .syncBody(builder.build())
            .retrieve()
            .bodyToMono(Void.class);
If the MultiValueMap contains at least one non-String value, which could also be
represent regular form data (i.e. "application/x-www-form-urlencoded"), you don’t have to
set the Content-Type to "multipart/form-data". This is always the case when using
MultipartBodyBuilder which ensures an HttpEntity wrapper.
As an alternative to MultipartBodyBuilder, you can also provide multipart content,
inline-style, through the built-in BodyInserters. For example:
    import static org.springframework.web.reactive.function.BodyInserters.*;

    Mono<Void> result = client.post()
            .uri("/path", id)
            .body(fromMultipartData("fieldPart", "value").with("filePart", resource))
            .retrieve()
            .bodyToMono(Void.class);
2.4. Builder options
A simple way to create WebClient is through the static factory methods create() and
create(String) with a base URL for all requests. You can also use WebClient.builder()
for access to more options.
To customize the underlying HTTP client:
    SslContext sslContext = ...

    ClientHttpConnector connector = new ReactorClientHttpConnector(
            builder -> builder.sslContext(sslContext));

    WebClient webClient = WebClient.builder()
            .clientConnector(connector)
            .build();
To customize the HTTP codecs used for encoding and decoding HTTP messages:
    ExchangeStrategies strategies = ExchangeStrategies.builder()
            .codecs(configurer -> {
                // ...
            })
            .build();

    WebClient webClient = WebClient.builder()
            .exchangeStrategies(strategies)
            .build();
The builder can be used to insert Client Filters.
Explore the WebClient.Builder in your IDE for other options related to URI building,
default headers (and cookies), and more.
After the WebClient is built, you can always obtain a new builder from it, in order to
build a new WebClient, based on, but without affecting the current instance:
    WebClient modifiedClient = client.mutate()
            // user builder methods...
            .build();
2.5. Client Filters
You can register an ExchangeFilterFunction in the WebClient.Builder to intercept and
possibly modify requests performed through the client:
WebClient client = WebClient.builder()
        .filter((request, next) -> {

            ClientRequest filtered = ClientRequest.from(request)
                    .header("foo", "bar")
                    .build();

            return next.exchange(filtered);
        })
        .build();
This can be used for cross-cutting concerns such as authentication. The example below uses a filter for basic authentication through a static factory method:
// static import of ExchangeFilterFunctions.basicAuthentication

WebClient client = WebClient.builder()
        .filter(basicAuthentication("user", "password"))
        .build();
Filters apply globally to every request. To change how a filter’s behavior for a specific
request, you can add request attributes to the ClientRequest that can then be accessed
by all filters in the chain:
WebClient client = WebClient.builder()
        .filter((request, next) -> {
            Optional<Object> usr = request.attribute("myAttribute");
            // ...
        })
        .build();

client.get().uri("http://example.org/")
        .attribute("myAttribute", "...")
        .retrieve()
        .bodyToMono(Void.class);

    }
You can also replicate an existing WebClient, and insert new filters or remove already
registered filters. In the example below, a basic authentication filter is inserted at
index 0:
// static import of ExchangeFilterFunctions.basicAuthentication

WebClient client = webClient.mutate()
        .filters(filterList -> {
            filterList.add(0, basicAuthentication("user", "password"));
        })
        .build();
2.6. Testing
To test code that uses the WebClient, you can use a mock web server such as the
OkHttp MockWebServer. To see example
use, check
WebClientIntegrationTests
in the Spring Framework tests, or the
static-server
sample in the OkHttp repository.
3. WebSockets
This part of the reference documentation covers support for Reactive stack, WebSocket messaging.
3.1. Introduction
The WebSocket protocol RFC 6455 provides a standardized way to establish a full-duplex, two-way communication channel between client and server over a single TCP connection. It is a different TCP protocol from HTTP but is designed to work over HTTP, using ports 80 and 443 and allowing re-use of existing firewall rules.
A WebSocket interaction begins with an HTTP request that uses the HTTP "Upgrade" header
to upgrade, or in this case to switch, to the WebSocket protocol:
GET /spring-websocket-portfolio/portfolio HTTP/1.1
Host: localhost:8080
Upgrade: websocket
Connection: Upgrade
Sec-WebSocket-Key: Uc9l9TMkWGbHFD2qnFHltg==
Sec-WebSocket-Protocol: v10.stomp, v11.stomp
Sec-WebSocket-Version: 13
Origin: http://localhost:8080
Instead of the usual 200 status code, a server with WebSocket support returns:
HTTP/1.1 101 Switching Protocols
Upgrade: websocket
Connection: Upgrade
Sec-WebSocket-Accept: 1qVdfYHU9hPOl4JYYNXF623Gzn0=
Sec-WebSocket-Protocol: v10.stomp
After a successful handshake the TCP socket underlying the HTTP upgrade request remains open for both client and server to continue to send and receive messages.
A complete introduction of how WebSockets work is beyond the scope of this document. Please read RFC 6455, the WebSocket chapter of HTML5, or one of many introductions and tutorials on the Web.
Note that if a WebSocket server is running behind a web server (e.g. nginx) you will likely need to configure it to pass WebSocket upgrade requests on to the WebSocket server. Likewise if the application runs in a cloud environment, check the instructions of the cloud provider related to WebSocket support.
3.1.1. HTTP vs WebSocket
Even though WebSocket is designed to be HTTP compatible and starts with an HTTP request, it is important to understand that the two protocols lead to very different architectures and application programming models.
In HTTP and REST, an application is modeled as many URLs. To interact with the application clients access those URLs, request-response style. Servers route requests to the appropriate handler based on the HTTP URL, method, and headers.
By contrast in WebSockets there is usually just one URL for the initial connect and subsequently all application messages flow on that same TCP connection. This points to an entirely different asynchronous, event-driven, messaging architecture.
WebSocket is also a low-level transport protocol which unlike HTTP does not prescribe any semantics to the content of messages. That means there is no way to route or process a message unless client and server agree on message semantics.
WebSocket clients and servers can negotiate the use of a higher-level, messaging protocol
(e.g. STOMP), via the "Sec-WebSocket-Protocol" header on the HTTP handshake request,
or in the absence of that they need to come up with their own conventions.
3.1.2. When to use it?
WebSockets can make a web page dynamic and interactive. However in many cases a combination of Ajax and HTTP streaming and/or long polling could provide a simple and effective solution.
For example news, mail, and social feeds need to update dynamically but it may be perfectly okay to do so every few minutes. Collaboration, games, and financial apps on the other hand need to be much closer to real time.
Latency alone is not a deciding factor. If the volume of messages is relatively low (e.g. monitoring network failures) HTTP streaming or polling may provide an effective solution. It is the combination of low latency, high frequency and high volume that make the best case for the use WebSocket.
Keep in mind also that over the Internet, restrictive proxies outside your control,
may preclude WebSocket interactions either because they are not configured to pass on the
Upgrade header or because they close long lived connections that appear idle? This
means that the use of WebSocket for internal applications within the firewall is a more
straight-forward decision than it is for public facing applications.
3.2. WebSocket API
The Spring Framework provides a WebSocket API that can be used to write client and server side applications that handle WebSocket messages.
3.2.1. Server
To create a WebSocket server, first create a WebSocketHandler:
import org.springframework.web.reactive.socket.WebSocketHandler;
import org.springframework.web.reactive.socket.WebSocketSession;

public class MyWebSocketHandler implements WebSocketHandler {

    @Override
    public Mono<Void> handle(WebSocketSession session) {
        // ...
    }
}
Then map it to a URL and add a WebSocketHandlerAdapter:
@Configuration
static class WebConfig {

    @Bean
    public HandlerMapping handlerMapping() {
        Map<String, WebSocketHandler> map = new HashMap<>();
        map.put("/path", new MyWebSocketHandler());

        SimpleUrlHandlerMapping mapping = new SimpleUrlHandlerMapping();
        mapping.setUrlMap(map);
        mapping.setOrder(-1); // before annotated controllers
        return mapping;
    }

    @Bean
    public WebSocketHandlerAdapter handlerAdapter() {
        return new WebSocketHandlerAdapter();
    }
}
3.2.2. WebSocketHandler
The handle method of WebSocketHandler takes WebSocketSession and returns Mono<Void>
to indicate when application handling of the session is complete. The session is handled
through two streams, one for inbound and one for outbound messages:
| WebSocketSession method | Description |
|---|---|
|
Provides access to the inbound message stream, and completes when the connection is closed. |
|
Takes a source for outgoing messages, writes the messages, and returns a |
A WebSocketHandler must compose the inbound and outbound streams into a unified flow, and
return a Mono<Void> that reflects the completion of that flow. Depending on application
requirements, the unified flow completes when:
-
Either inbound or outbound message streams complete.
-
Inbound stream completes (i.e. connection closed), while outbound is infinite.
-
At a chosen point through the
closemethod ofWebSocketSession.
When inbound and outbound message streams are composed together, there is no need to check if the connection is open, since Reactive Streams signals will terminate activity. The inbound stream receives a completion/error signal, and the outbound stream receives receives a cancellation signal.
The most basic implementation of a handler is one that handles the inbound stream:
class ExampleHandler implements WebSocketHandler {

    @Override
    public Mono<Void> handle(WebSocketSession session) {
        return session.receive()            (1)
                .doOnNext(message -> {
                    // ...                  (2)
                })
                .concatMap(message -> {
                    // ...                  (3)
                })
                .then();                    (4)
    }
}| 1 | Access stream of inbound messages. |
| 2 | Do something with each message. |
| 3 | Perform nested async operation using message content. |
| 4 | Return Mono<Void> that completes when receiving completes. |
|
For nested, asynchronous operations, you may need to call |
The below implementation combines the inbound with the outbound streams:
class ExampleHandler implements WebSocketHandler {

    @Override
    public Mono<Void> handle(WebSocketSession session) {

        Flux<WebSocketMessage> output = session.receive()               (1)
                .doOnNext(message -> {
                    // ...
                })
                .concatMap(message -> {
                    // ...
                })
                .map(value -> session.textMessage("Echo " + value));    (2)

        return session.send(output);                                    (3)
    }
}| 1 | Handle inbound message stream. |
| 2 | Create outbound message, producing a combined flow. |
| 3 | Return Mono<Void> that doesn’t complete while we continue to receive. |
Inbound and outbound streams can be independent, and joined only for completion:
class ExampleHandler implements WebSocketHandler {

    @Override
    public Mono<Void> handle(WebSocketSession session) {

        Mono<Void> input = session.receive()                                (1)
                .doOnNext(message -> {
                    // ...
                })
                .concatMap(message -> {
                    // ...
                })
                .then();

        Flux<String> source = ... ;
        Mono<Void> output = session.send(source.map(session::textMessage)); (2)

        return Mono.zip(input, output).then();                              (3)
    }
}| 1 | Handle inbound message stream. |
| 2 | Send outgoing messages. |
| 3 | Join the streams and return Mono<Void> that completes when either stream ends. |
3.2.3. Handshake
WebSocketHandlerAdapter delegates to a WebSocketService. By default that’s an instance
of HandshakeWebSocketService, which performs basic checks on the WebSocket request and
then uses RequestUpgradeStrategy for the server in use. Currently there is built-in
support for Reactor Netty, Tomcat, Jetty, and Undertow.
The above are just 3 examples to serve as a starting point.
3.2.4. Server config
The RequestUpgradeStrategy for each server exposes the WebSocket-related configuration
options available for the underlying WebSocket engine. Below is an example of setting
WebSocket options when running on Tomcat:
@Configuration
static class WebConfig {

    @Bean
    public WebSocketHandlerAdapter handlerAdapter() {
        return new WebSocketHandlerAdapter(webSocketService());
    }

    @Bean
    public WebSocketService webSocketService() {
        TomcatRequestUpgradeStrategy strategy = new TomcatRequestUpgradeStrategy();
        strategy.setMaxSessionIdleTimeout(0L);
        return new HandshakeWebSocketService(strategy);
    }
}
Check the upgrade strategy for your server to see what options are available. Currently only Tomcat and Jetty expose such options.
3.2.5. CORS
The easiest way to configure CORS and restrict access to a WebSocket endpoint is to
have your WebSocketHandler implement CorsConfigurationSource and return a
CorsConfiguraiton with allowed origins, headers, etc. If for any reason you can’t do
that, you can also set the corsConfigurations property on the SimpleUrlHandler to
specify CORS settings by URL pattern. If both are specified they’re combined via the
combine method on CorsConfiguration.
3.2.6. Client
Spring WebFlux provides a WebSocketClient abstraction with implementations for
Reactor Netty, Tomcat, Jetty, Undertow, and standard Java (i.e. JSR-356).
|
The Tomcat client is effectively an extension of the standard Java one with some extra
functionality in the |
To start a WebSocket session, create an instance of the client and use its execute
methods:
WebSocketClient client = new ReactorNettyWebSocketClient();

URI url = new URI("ws://localhost:8080/path");
client.execute(url, session ->
        session.receive()
                .doOnNext(System.out::println)
                .then());
Some clients, e.g. Jetty, implement Lifecycle and need to be started in stopped
before you can use them. All clients have constructor options related to configuration
of the underlying WebSocket client.
4. Testing
The spring-test module provides mock implementations of ServerHttpRequest,
ServerHttpResponse, and ServerWebExchange.
See Spring Web Reactive mock objects.
The WebTestClient builds on these mock request and
response objects to provide support for testing WebFlux applications without and HTTP
server. The WebTestClient can be used for end-to-end integration tests too.
5. Reactive Libraries
spring-webflux depends on reactor-core and uses it internally to compose asynchronous
logic and to provide Reactive Streams support. Generally WebFlux APIs return Flux or
Mono — since that’s what’s used internally, and leniently accept any Reactive Streams
Publisher implementation as input. The use of Flux vs Mono is important because it
helps to express cardinality — e.g. whether a single or multiple async values are
expected, and that can be essential for making decisions, for example when encoding or
decoding HTTP messages.
For annotated controllers, WebFlux transparently adapts to the reactive library chosen by
the application. This is done with the help of the
ReactiveAdapterRegistry which
provides pluggable support for reactive library and other asynchronous types. The registry
has built-in support for RxJava and CompletableFuture, but others can be registered too.
For functional APIs such as Functional Endpoints, the WebClient, and others, the general rules
for WebFlux APIs apply — Flux and Mono as return values, and Reactive Streams
Publisher as input. When a Publisher, whether custom or from another reactive library,
is provided, it can only be treated as a stream with unknown semantics (0..N). If however
the semantics are known, you can wrap it with Flux or Mono.from(Publisher) instead
of passing the raw Publisher.
|
For example, given a |