1.0.0.M3
Copyright © 2013-2016 Pivotal Software, Inc.
Table of Contents
- I. Spring Cloud Data Flow for Cloud Foundry
- 1. Spring Cloud Data Flow
- 2. Spring Cloud Stream
- 3. Spring Cloud Task
- 4. Deploying on Cloud Foundry
- 4.1. Provision a Redis service instance on Cloud Foundry.
- 4.2. Provision a Rabbit service instance on Cloud Foundry.
- 4.3. Download the Spring Cloud Data Flow Server and Shell apps:
- 4.4. Deploying the Server app on Cloud Foundry
- 4.5. Running the Server app locally
- 4.6. Running Spring Cloud Data Flow Shell locally
- 5. Security
- 6. Configuration Reference
- II. Streams
- 7. Introduction
- 8. Stream DSL
- 9. Register a Stream App
- 10. Creating a Stream
- 11. Destroying a Stream
- 12. Deploying and Undeploying Streams
- 13. Other Source and Sink Application Types
- 14. Simple Stream Processing
- 15. Stateful Stream Processing
- 16. Tap a Stream
- 17. Using Labels in a Stream
- 18. Explicit Broker Destinations in a Stream
- 19. Directed Graphs in a Stream
- III. Dashboard
- IV. Appendices
This project provides support for deploying Spring Cloud Stream and Spring Cloud Task applications to Cloud Foundry.
Spring Cloud Data Flow is a cloud-native programming and operating model for composable data microservices on a structured platform. With Spring Cloud Data Flow, developers can create and orchestrate data pipelines for common use cases such as data ingest, real-time analytics, and data import/export.
The Spring Cloud Data Flow architecture consists of a server that deploys Streams and Tasks. Streams are defined using a DSL or visually through the browser based designer UI. Streams are based on the Spring Cloud Stream programming model while Tasks are based on the Spring Cloud Task programming model. The sections below describe more information about creating your own custom Streams and Tasks
For more details about the core architecture components and the supported features, please review Spring Cloud Data Flow’s core reference guide. There’re several samples available for reference.
Spring Cloud Stream is a framework for building message-driven microservice applications. Spring Cloud Stream builds upon Spring Boot to create standalone, production-grade Spring applications, and uses Spring Integration to provide connectivity to message brokers. It provides opinionated configuration of middleware from several vendors, introducing the concepts of persistent publish-subscribe semantics, consumer groups, and partitions.
For more details about the core framework components and the supported features, please review Spring Cloud Stream’s reference guide.
There’s a rich ecosystem of Spring Cloud Stream Application-Starters that can be used either as standalone data microservice applications or in Spring Cloud Data Flow. For convenience, we have generated RabbitMQ and Apache Kafka variants of these application-starters that are available for use from Maven Repo and Docker Hub as maven artifacts and docker images, respectively.
Do you have a requirement to develop custom applications? No problem. Refer to this guide to create custom stream applications. There’re several samples available for reference.
![[Note]](images/note.png) | Note |
|---|---|
This feature is actively being developed and it is yet to be supported in Spring Cloud Data Flow’s Cloud Foundry server. |
Spring Cloud Task makes it easy to create short-lived microservices. We provide capabilities that allow short-lived JVM processes to be executed on demand in a production environment.
For more details about the core framework components and the supported features, please review Spring Cloud Task’s reference guide.
There’s a rich ecosystem of Spring Cloud Task Application-Starters that can be used either as standalone data microservice applications or in Spring Cloud Data Flow. For convenience, the generated application-starters are available for use from Maven Repo. There are several samples available for reference.
Spring Cloud Data Flow can be used to deploy modules in a Cloud Foundry environment. When doing so, the server application can either run itself on Cloud Foundry, or on another installation (e.g. a simple laptop).
The required configuration amounts to the same in either case, and is merely related to providing credentials to the Cloud Foundry instance so that the server can spawn applications itself. Any Spring Boot compatible configuration mechanism can be used (passing program arguments, editing configuration files before building the application, using Spring Cloud Config, using environment variables, etc.), although some may prove more practicable than others when running on Cloud Foundry.
| Note |
|---|---|
By default, the application registry in Spring Cloud Data Flow’s Cloud Foundry server is empty. It is intentionally designed to allow users to have the flexibility of choosing and registering applications, as they find appropriate for the given use-case requirement. Depending on the message-binder of choice, users can register between RabbitMQ or Apache Kafka based maven artifacts. |
Use cf marketplace to discover which plans are available to you, depending on the details of your Cloud Foundry setup.
For example when using Pivotal Web Services:
cf create-service rediscloud 30mb redis
Use cf marketplace to discover which plans are available to you, depending on the details of your Cloud Foundry setup.
For example when using Pivotal Web Services:
cf create-service cloudamqp lemur rabbit
wget http://repo.spring.io/milestone/org/springframework/cloud/spring-cloud-dataflow-server-cloudfoundry/1.0.0.M3/spring-cloud-dataflow-server-cloudfoundry-1.0.0.M3.jar
wget http://repo.spring.io/milestone/org/springframework/cloud/spring-cloud-dataflow-shell/1.0.0.RC1/spring-cloud-dataflow-shell-1.0.0.RC1.jar
You can either deploy the server application on Cloud Foundry itself or on your local machine. The following two sections explain each way of running the server.
Push the server application on Cloud Foundry, configure it (see below) and start it.
| Note |
|---|---|
You must use a unique name for your app; an app with the same name in the same organization will cause your deployment to fail |
cf push dataflow-server --no-start -p spring-cloud-dataflow-server-cloudfoundry-1.0.0.M3.jar
cf bind-service dataflow-server redis
cf bind-service dataflow-server rabbit
| Note |
|---|---|
If you are pushing to a space with multiple users, for example on PWS, there may already be a route taken for the
applicaiton name you have chosen. You can use the options |
Now we can configure the app. The following configuration is for Pivotal Web Services. You need to fill in {org}, {space}, {email} and {password} before running these commands.
| Note |
|---|---|
Only set 'Skip SSL Validation' to true if you’re running on a Cloud Foundry instance using self-signed certs (e.g. in development). Do not use for production. |
cf set-env dataflow-server SPRING_CLOUD_DEPLOYER_CLOUDFOUNDRY_URL https://api.run.pivotal.io
cf set-env dataflow-server SPRING_CLOUD_DEPLOYER_CLOUDFOUNDRY_ORG {org}
cf set-env dataflow-server SPRING_CLOUD_DEPLOYER_CLOUDFOUNDRY_SPACE {space}
cf set-env dataflow-server SPRING_CLOUD_DEPLOYER_CLOUDFOUNDRY_DOMAIN cfapps.io
cf set-env dataflow-server SPRING_CLOUD_DEPLOYER_CLOUDFOUNDRY_SERVICES redis,rabbit
cf set-env dataflow-server SPRING_CLOUD_DEPLOYER_CLOUDFOUNDRY_USERNAME {email}
cf set-env dataflow-server SPRING_CLOUD_DEPLOYER_CLOUDFOUNDRY_PASSWORD {password}
cf set-env dataflow-server SPRING_CLOUD_DEPLOYER_CLOUDFOUNDRY_SKIP_SSL_VALIDATION false
You can also set other optional properties for deployment to Cloud Foundry.
You can set the buildpack that will be used to deploy the application. For example, to use the Java offline buildback, set the following environment variable
cf set-env dataflow-server SPRING_CLOUD_DEPLOYER_CLOUDFOUNDRY_BUILDPACK java_buildpack_offline
The default memory and disk sizes for a deployed application can also be configured. By default they are 1024 MB memory and 1024 MB disk. Thse are controlled by setting an integer value, representing the number of MB, to the following properties, SPRING_CLOUD_DEPLOYER_CLOUDFOUNDRY_MEMORY and SPRING_CLOUD_DEPLOYER_CLOUDFOUNDRY_DISK. The default number of instances to deploy is set to 1, but can be overridden using with the SPRING_CLOUD_DEPLOYER_CLOUDFOUNDRY_INSTANCES property. All these properties are @ConfigurationProperties of the Cloud Foundry deployer. See CloudFoundryDeployerProperties.java for more information.
We are now ready to start the app.
cf start dataflow-server
Alternatively, you can run the Admin application locally on your machine which is described in the next section.
To run the server application locally, targeting your Cloud Foundry installation, you you need to configure the application either by passing in command line arguments (see below) or setting a number of environment variables.
To use environment variables set the following:
export SPRING_CLOUD_DEPLOYER_CLOUDFOUNDRY_URL=https://api.run.pivotal.io
export SPRING_CLOUD_DEPLOYER_CLOUDFOUNDRY_ORG={org}
export SPRING_CLOUD_DEPLOYER_CLOUDFOUNDRY_SPACE={space}
export SPRING_CLOUD_DEPLOYER_CLOUDFOUNDRY_DOMAIN=cfapps.io
export SPRING_CLOUD_DEPLOYER_CLOUDFOUNDRY_SERVICES=redis,rabbit
export SPRING_CLOUD_DEPLOYER_CLOUDFOUNDRY_USERNAME={email}
export SPRING_CLOUD_DEPLOYER_CLOUDFOUNDRY_PASSWORD={password}
export SPRING_CLOUD_DEPLOYER_CLOUDFOUNDRY_SKIP_SSL_VALIDATION=false
You need to fill in {org}, {space}, {email} and {password} before running these commands.
| Note |
|---|---|
Only set 'Skip SSL Validation' to true if you’re running on a Cloud Foundry instance using self-signed certs (e.g. in development). Do not use for production. |
Now we are ready to start the server application:
java -jar spring-cloud-dataflow-server-cloudfoundry-1.0.0.M3.jar [--option1=value1] [--option2=value2] [etc.]
Run the shell and optionally target the Admin application if not running on the same host (will typically be the case if deployed on Cloud Foundry as explained here)
$ java -jar spring-cloud-dataflow-shell-1.0.0.RC1.jar
server-unknown:>dataflow config server http://dataflow-server.cfapps.io
Successfully targeted http://dataflow-server.cfapps.io
dataflow:>
By default, the application registry will be empty. If you would like to register all out-of-the-box stream applications built with the RabbitMQ binder in bulk, you can with the following command. For more details, review how to register applications.
dataflow:>app import --uri http://bit.ly/stream-applications-rabbit-maven
By default, the Data Flow server is unsecured and runs on an unencrypted HTTP connection. You can secure your REST endpoints,
as well as the Data Flow Dashboard by enabling HTTPS and requiring clients to authenticate. More details about securing the
REST endpoints and configuring to authenticate against an OAUTH backend (i.e: UAA/SSO running on Cloud Foundry), please
review the security section from the core reference guide. The security configurations can be configured in dataflow-server.yml or passed as environment variables through cf set-env commands.
The following pieces of configuration must be provided. These are Spring Boot @ConfigurationProperties so you can set them as environment variables or by any other means that Spring Boot supports. Here is a listing in environment variable format as that is an easy way to get started configuring Boot applications in Cloud Foundry.
# Default values cited after the equal sign.
# Example values, typical for Pivotal Web Services, cited as a comment

# url of the CF API (used when using cf login -a for example), e.g. https://api.run.pivotal.io
# (for setting env var use SPRING_CLOUD_DEPLOYER_CLOUDFOUNDRY_URL)
spring.cloud.deployer.cloudfoundry.url=

# name of the organization that owns the space above, e.g. youruser-org
# (For Setting Env var use SPRING_CLOUD_DEPLOYER_CLOUDFOUNDRY_ORG)
spring.cloud.deployer.cloudfoundry.org=

# name of the space into which modules will be deployed
# (for setting env var use SPRING_CLOUD_DEPLOYER_CLOUDFOUNDRY_SPACE)
spring.cloud.deployer.cloudfoundry.space=<same space as server when running on CF, or 'development'>

# the root domain to use when mapping routes, e.g. cfapps.io
# (for setting env var use SPRING_CLOUD_DEPLOYER_CLOUDFOUNDRY_DOMAIN)
spring.cloud.deployer.cloudfoundry.domain=

# Comma separated set of service instance names to bind to the module.
# Amongst other things, this should include a service that will be used
# for Spring Cloud Stream binding
# (for setting env var use SPRING_CLOUD_DEPLOYER_CLOUDFOUNDRY_SERVICES)
spring.cloud.deployer.cloudfoundry.services=redis,rabbit

# username and password of the user to use to create apps (modules)
# (for setting env var use SPRING_CLOUD_DEPLOYER_CLOUDFOUNDRY_USERNAME and SPRING_CLOUD_DEPLOYER_CLOUDFOUNDRY_PASSWORD)
spring.cloud.deployer.cloudfoundry.username=
spring.cloud.deployer.cloudfoundry.password=

# Whether to allow self-signed certificates during SSL validation
# (for setting env var use SPRING_CLOUD_DEPLOYER_CLOUDFOUNDRY_SKIP_SSL_VALIDATION)
spring.cloud.deployer.cloudfoundry.skipSslValidation=false
Note that you can set the following properties spring.cloud.deployer.cloudfoundry.services,
spring.cloud.deployer.cloudfoundry.memory, and spring.cloud.deployer.cloudfoundry.disk as part of an individual
deployment request.
In this section you will learn all about Streams and how to use them with Spring Cloud Data Flow.
In Spring Cloud Data Flow, a basic stream defines the ingestion of event driven data from a source to a sink that passes through any number of processors. Streams are composed of spring-cloud-stream applications and the deployment of stream definitions is done via the Data Flow Server (REST API). The Getting Started section shows you how to start these servers and how to start and use the Spring Cloud Data Flow shell.
A high level DSL is used to create stream definitions. The DSL to define a stream that has an http source and a file sink (with no processors) is shown below
http | file
The DSL mimics a UNIX pipes and filters syntax. Default values for ports and filenames are used in this example but can be overridden using -- options, such as
http --server.port=8091 | file --directory=/tmp/httpdata/
To create these stream definitions you use the shell or make an HTTP POST request to the Spring Cloud Data Flow Server. More details can be found in the sections below.
In the examples above, we connected a source to a sink using the pipe symbol |. You can also pass properties to the source and sink configurations. The property names will depend on the individual app implementations, but as an example, the http source app exposes a server.port setting which allows you to change the data ingestion port from the default value. To create the stream using port 8000, we would use
dataflow:> stream create --definition "http --server.port=8000 | log" --name myhttpstream
The shell provides tab completion for application properties and also the shell command app info provides some additional documentation.
Register a Stream App with the App Registry using the Spring Cloud Data Flow Shell
app register command. You must provide a unique name, application type, and a URI that can be
resolved to the app artifact. For the type, specify "source", "processor", or "sink".
Here are a few examples:
dataflow:>app register --name mysource --type source --uri maven://com.example:mysource:0.0.1-SNAPSHOT

dataflow:>app register --name myprocessor --type processor --uri file:///Users/example/myprocessor-1.2.3.jar

dataflow:>app register --name mysink --type sink --uri http://example.com/mysink-2.0.1.jar
When providing a URI with the maven scheme, the format should conform to the following:
maven://<groupId>:<artifactId>[:<extension>[:<classifier>]]:<version>
For example, if you would like to register the snapshot versions of the http and log
applications built with the RabbitMQ binder, you could do the following:
dataflow:>app register --name http --type source --uri maven://org.springframework.cloud.stream.app:http-source-rabbit:1.0.0.BUILD-SNAPSHOT
dataflow:>app register --name log --type sink --uri maven://org.springframework.cloud.stream.app:http-log-rabbit:1.0.0.BUILD-SNAPSHOT
If you would like to register multiple apps at one time, you can store them in a properties file
where the keys are formatted as <type>.<name> and the values are the URIs.
For example, if you would like to register the snapshot versions of the http and log
applications built with the RabbitMQ binder, you could have the following in a properties file [eg: stream-apps.properties]:
source.http=maven://org.springframework.cloud.stream.app:http-source-rabbit:1.0.0.BUILD-SNAPSHOT
sink.log=maven://org.springframework.cloud.stream.app:log-sink-rabbit:1.0.0.BUILD-SNAPSHOT
Then to import the apps in bulk, use the app import command and provide the location of the properties file via --uri:
dataflow:>app import --uri file:///<YOUR_FILE_LOCATION>/stream-apps.properties
For convenience, we have the static files with application-URIs (for both maven and docker) available for all the out-of-the-box Stream and Task app-starters. You can point to this file and import all the application-URIs in bulk. Otherwise, as explained in previous paragraphs, you can register them individually or have your own custom property file with only the required application-URIs in it. It is recommended, however, to have a "focused" list of desired application-URIs in a custom property file.
List of available static property files:
- Maven based Stream Applications with RabbitMQ Binder: bit.ly/stream-applications-rabbit-maven
- Maven based Stream Applications with Kafka Binder: bit.ly/stream-applications-kafka-maven
- Maven based Task Applications: bit.ly/task-applications-maven
- Docker based Stream Applications with RabbitMQ Binder: bit.ly/stream-applications-rabbit-docker
- Docker based Stream Applications with Kafka Binder: bit.ly/stream-applications-kafka-docker
- Docker based Task Applications: bit.ly/task-applications-docker
For example, if you would like to register all out-of-the-box stream applications built with the RabbitMQ binder in bulk, you can with the following command.
dataflow:>app import --uri http://bit.ly/stream-applications-rabbit-maven
You can also pass the --local option (which is TRUE by default) to indicate whether the
properties file location should be resolved within the shell process itself. If the location should
be resolved from the Data Flow Server process, specify --local false.
When using either app register or app import, if a stream app is already registered with
the provided name and type, it will not be overridden by default. If you would like to override the
pre-existing stream app, then include the --force option.
| Note |
|---|---|
In some cases the Resource is resolved on the server side, whereas in others the URI will be passed to a runtime container instance where it is resolved. Consult the specific documentation of each Data Flow Server for more detail. |
Stream applications are Spring Boot applications which are aware of many common application properties, e.g. server.port but also families of properties such as those with the prefix spring.jmx and logging. When creating your own application it is desirable to whitelist properties so that the shell and the UI can display them first as primary properties when presenting options via TAB completion or in drop-down boxes.
To whitelist application properties create a file named spring-configuration-metadata-whitelist.properties in the META-INF resource directory. There are two property keys that can be used inside this file. The first key is named configuration-properties.classes. The value is a comma separated list of fully qualified @ConfigurationProperty class names. The second key is configuration-properties.names whose value is a comma separated list of property names. This can contain the full name of property, such as server.port or a partial name to whitelist a category of property names, e.g. spring.jmx.
The Spring Cloud Stream application starters are a good place to look for examples of usage. Here is a simple example of the file source’s spring-configuration-metadata-whitelist.properties file
configuration.classes=org.springframework.cloud.stream.app.file.sink.FileSinkProperties
If for some reason we also wanted to add file.prefix to this file, it would look like
configuration.classes=org.springframework.cloud.stream.app.file.sink.FileSinkProperties
configuration-properties.names=server.port
The Spring Cloud Data Flow Server exposes a full RESTful API for managing the lifecycle of stream definitions, but the easiest way to use is it is via the Spring Cloud Data Flow shell. Start the shell as described in the Getting Started section.
New streams are created by posting stream definitions. The definitions are built from a simple DSL. For example, let’s walk through what happens if we execute the following shell command:
dataflow:> stream create --definition "time | log" --name ticktock
This defines a stream named ticktock based off the DSL expression time | log. The DSL uses the "pipe" symbol |, to connect a source to a sink.
Then to deploy the stream execute the following shell command (or alternatively add the --deploy flag when creating the stream so that this step is not needed):
dataflow:> stream deploy --name ticktock
The Data Flow Server resolves time and log to maven coordinates and uses those to launch the time and log applications of the stream.
2016-06-01 09:41:21.728  INFO 79016 --- [nio-9393-exec-6] o.s.c.d.spi.local.LocalAppDeployer       : deploying app ticktock.log instance 0
   Logs will be in /var/folders/wn/8jxm_tbd1vj28c8vj37n900m0000gn/T/spring-cloud-dataflow-912434582726479179/ticktock-1464788481708/ticktock.log
2016-06-01 09:41:21.914  INFO 79016 --- [nio-9393-exec-6] o.s.c.d.spi.local.LocalAppDeployer       : deploying app ticktock.time instance 0
   Logs will be in /var/folders/wn/8jxm_tbd1vj28c8vj37n900m0000gn/T/spring-cloud-dataflow-912434582726479179/ticktock-1464788481910/ticktock.time
In this example, the time source simply sends the current time as a message each second, and the log sink outputs it using the logging framework.
You can tail the stdout log (which has an "_<instance>" suffix). The log files are located within the directory displayed in the Data Flow Server’s log output, as shown above.
$ tail -f /var/folders/wn/8jxm_tbd1vj28c8vj37n900m0000gn/T/spring-cloud-dataflow-912434582726479179/ticktock-1464788481708/ticktock.log/stdout_0.log
2016-06-01 09:45:11.250  INFO 79194 --- [  kafka-binder-] log.sink    : 06/01/16 09:45:11
2016-06-01 09:45:12.250  INFO 79194 --- [  kafka-binder-] log.sink    : 06/01/16 09:45:12
2016-06-01 09:45:13.251  INFO 79194 --- [  kafka-binder-] log.sink    : 06/01/16 09:45:13
If you would like to have multiple instances of an application in the stream, you can include a property with the deploy command:
dataflow:> stream deploy --name ticktock --properties "app.time.count=3"
![[Important]](images/important.png) | Important |
|---|---|
You can delete a stream by issuing the stream destroy command from the shell:
dataflow:> stream destroy --name ticktock
If the stream was deployed, it will be undeployed before the stream definition is deleted.
Often you will want to stop a stream, but retain the name and definition for future use. In that case you can undeploy the stream by name and issue the deploy command at a later time to restart it.
dataflow:> stream undeploy --name ticktock
dataflow:> stream deploy --name ticktock
Let’s try something a bit more complicated and swap out the time source for something else. Another supported source type is http, which accepts data for ingestion over HTTP POSTs. Note that the http source accepts data on a different port from the Data Flow Server (default 8080). By default the port is randomly assigned.
To create a stream using an http source, but still using the same log sink, we would change the original command above to
dataflow:> stream create --definition "http | log" --name myhttpstream --deploy
which will produce the following output from the server
2016-06-01 09:47:58.920  INFO 79016 --- [io-9393-exec-10] o.s.c.d.spi.local.LocalAppDeployer       : deploying app myhttpstream.log instance 0
   Logs will be in /var/folders/wn/8jxm_tbd1vj28c8vj37n900m0000gn/T/spring-cloud-dataflow-912434582726479179/myhttpstream-1464788878747/myhttpstream.log
2016-06-01 09:48:06.396  INFO 79016 --- [io-9393-exec-10] o.s.c.d.spi.local.LocalAppDeployer       : deploying app myhttpstream.http instance 0
   Logs will be in /var/folders/wn/8jxm_tbd1vj28c8vj37n900m0000gn/T/spring-cloud-dataflow-912434582726479179/myhttpstream-1464788886383/myhttpstream.http
Note that we don’t see any other output this time until we actually post some data (using a shell command). In order to see the randomly assigned port on which the http source is listening, execute:
dataflow:> runtime apps
You should see that the corresponding http source has a url property containing the host and port information on which it is listening. You are now ready to post to that url, e.g.:
dataflow:> http post --target http://localhost:1234 --data "hello"
dataflow:> http post --target http://localhost:1234 --data "goodbye"
and the stream will then funnel the data from the http source to the output log implemented by the log sink
2016-06-01 09:50:22.121  INFO 79654 --- [  kafka-binder-] log.sink    : hello
2016-06-01 09:50:26.810  INFO 79654 --- [  kafka-binder-] log.sink    : goodbye
Of course, we could also change the sink implementation. You could pipe the output to a file (file), to hadoop (hdfs) or to any of the other sink apps which are available. You can also define your own apps.
As an example of a simple processing step, we can transform the payload of the HTTP posted data to upper case using the stream definitions
http | transform --expression=payload.toUpperCase() | log
To create this stream enter the following command in the shell
dataflow:> stream create --definition "http | transform --expression=payload.toUpperCase() | log" --name mystream --deploy
Posting some data (using a shell command)
dataflow:> http post --target http://localhost:1234 --data "hello"
Will result in an uppercased 'HELLO' in the log
2016-06-01 09:54:37.749 INFO 80083 --- [ kafka-binder-] log.sink : HELLO
To demonstrate the data partitioning functionality, let’s deploy the following stream with Kafka as the binder.
dataflow:>stream create --name words --definition "http --server.port=9900 | splitter --expression=payload.split(' ') | log"
Created new stream 'words'

dataflow:>stream deploy words --properties "app.splitter.producer.partitionKeyExpression=payload,app.log.count=2"
Deployed stream 'words'

dataflow:>http post --target http://localhost:9900 --data "How much wood would a woodchuck chuck if a woodchuck could chuck wood"
> POST (text/plain;Charset=UTF-8) http://localhost:9900 How much wood would a woodchuck chuck if a woodchuck could chuck wood
> 202 ACCEPTED
You’ll see the following in the server logs.
2016-06-05 18:33:24.982  INFO 58039 --- [nio-9393-exec-9] o.s.c.d.spi.local.LocalAppDeployer       : deploying app words.log instance 0
   Logs will be in /var/folders/c3/ctx7_rns6x30tq7rb76wzqwr0000gp/T/spring-cloud-dataflow-694182453710731989/words-1465176804970/words.log
2016-06-05 18:33:24.988  INFO 58039 --- [nio-9393-exec-9] o.s.c.d.spi.local.LocalAppDeployer       : deploying app words.log instance 1
   Logs will be in /var/folders/c3/ctx7_rns6x30tq7rb76wzqwr0000gp/T/spring-cloud-dataflow-694182453710731989/words-1465176804970/words.log
Review the words.log instance 0 logs:
2016-06-05 18:35:47.047  INFO 58638 --- [  kafka-binder-] log.sink                                 : How
2016-06-05 18:35:47.066  INFO 58638 --- [  kafka-binder-] log.sink                                 : chuck
2016-06-05 18:35:47.066  INFO 58638 --- [  kafka-binder-] log.sink                                 : chuck
Review the words.log instance 1 logs:
2016-06-05 18:35:47.047  INFO 58639 --- [  kafka-binder-] log.sink                                 : much
2016-06-05 18:35:47.066  INFO 58639 --- [  kafka-binder-] log.sink                                 : wood
2016-06-05 18:35:47.066  INFO 58639 --- [  kafka-binder-] log.sink                                 : would
2016-06-05 18:35:47.066  INFO 58639 --- [  kafka-binder-] log.sink                                 : a
2016-06-05 18:35:47.066  INFO 58639 --- [  kafka-binder-] log.sink                                 : woodchuck
2016-06-05 18:35:47.067  INFO 58639 --- [  kafka-binder-] log.sink                                 : if
2016-06-05 18:35:47.067  INFO 58639 --- [  kafka-binder-] log.sink                                 : a
2016-06-05 18:35:47.067  INFO 58639 --- [  kafka-binder-] log.sink                                 : woodchuck
2016-06-05 18:35:47.067  INFO 58639 --- [  kafka-binder-] log.sink                                 : could
2016-06-05 18:35:47.067  INFO 58639 --- [  kafka-binder-] log.sink                                 : wood
This shows that payload splits that contain the same word are routed to the same application instance.
Taps can be created at various producer endpoints in a stream. For a stream like this:
stream create --definition "http | step1: transform --expression=payload.toUpperCase() | step2: transform --expression=payload+'!' | log" --name mainstream --deploy
taps can be created at the output of http, step1 and step2.
To create a stream that acts as a 'tap' on another stream requires to specify the source destination name for the tap stream. The syntax for source destination name is:
`:<stream-name>.<label/app-name>`
To create a tap at the output of http in the stream above, the source destination name is mainstream.http
To create a tap at the output of the first transform app in the stream above, the source destination name is mainstream.step1
The tap stream DSL looks like this:
stream create --definition ":mainstream.http > counter" --name tap_at_http --deploy

stream create --definition ":mainstream.step1 > jdbc" --name tap_at_step1_transformer --deploy
Note the colon (:) prefix before the destination names. The colon allows the parser to recognize this as a destination name instead of an app name.
When a stream is comprised of multiple apps with the same name, they must be qualified with labels:
stream create --definition "http | firstLabel: transform --expression=payload.toUpperCase() | secondLabel: transform --expression=payload+'!' | log" --name myStreamWithLabels --deploy
One can connect to a specific destination name located in the broker (Rabbit, Kafka etc.,) either at the source or at the sink position.
The following stream has the destination name at the source position:
stream create --definition ":myDestination > log" --name ingest_from_broker --deploy
This stream receives messages from the destination myDestination located at the broker and connects it to the log app.
The following stream has the destination name at the sink position:
stream create --definition "http > :myDestination" --name ingest_to_broker --deploy
This stream sends the messages from the http app to the destination myDestination located at the broker.
From the above streams, notice that the http and log apps are interacting with each other via the broker (through the destination myDestination) rather than having a pipe directly between http and log within a single stream.
It is also possible to connect two different destinations (source and sink positions) at the broker in a stream.
stream create --definition ":destination1 > :destination2" --name bridge_destinations --deploy
In the above stream, both the destinations (destination1 and destination2) are located in the broker. The messages flow from the source destination to the sink destination via a bridge app that connects them.
If directed graphs are needed instead of the simple linear streams described above, two features are relevant.
First, named destinations may be used as a way to combine the output from multiple streams or for multiple consumers to share the output from a single stream.
This can be done using the DSL syntax http > :mydestination or :mydestination > log.
Second, you may need to determine the output channel of a stream based on some information that is only known at runtime. In that case, a router may be used in the sink position of a stream definition. For more information, refer to the Router Sink starter’s README.
In addition to configuration via DSL, Spring Cloud Data Flow provides a mechanism for setting common properties to all the streaming applications that are launched by it.
This can be done by adding properties prefixed with spring.cloud.dataflow.applicationProperties.stream when starting the server.
When doing so, the server will pass all the properties, without the prefix, to the instances it launches.
For example, all the launched applications can be configured to use a specific Kafka broker by launching the configuration server with the following options:
--spring.cloud.dataflow.applicationProperties.stream.spring.cloud.stream.kafka.binder.brokers=192.168.1.100:9092
--spring.cloud.dataflow.applicationProperties.stream.spring.cloud.stream.kafka.binder.zkNodes=192.168.1.100:2181
This will cause the properties stream.spring.cloud.stream.kafka.binder.brokers and spring.cloud.stream.kafka.binder.zkNodes to be passed to all the launched applications.
| Note |
|---|---|
Properties configured using this mechanism have lower precedence than stream deployment properties.
They will be overridden if a property with the same key is specified at stream deployment time (e.g. |
This section describe how to use the Dashboard of Spring Cloud Data Flow.
Spring Cloud Data Flow provides a browser-based GUI which currently has 6 sections:
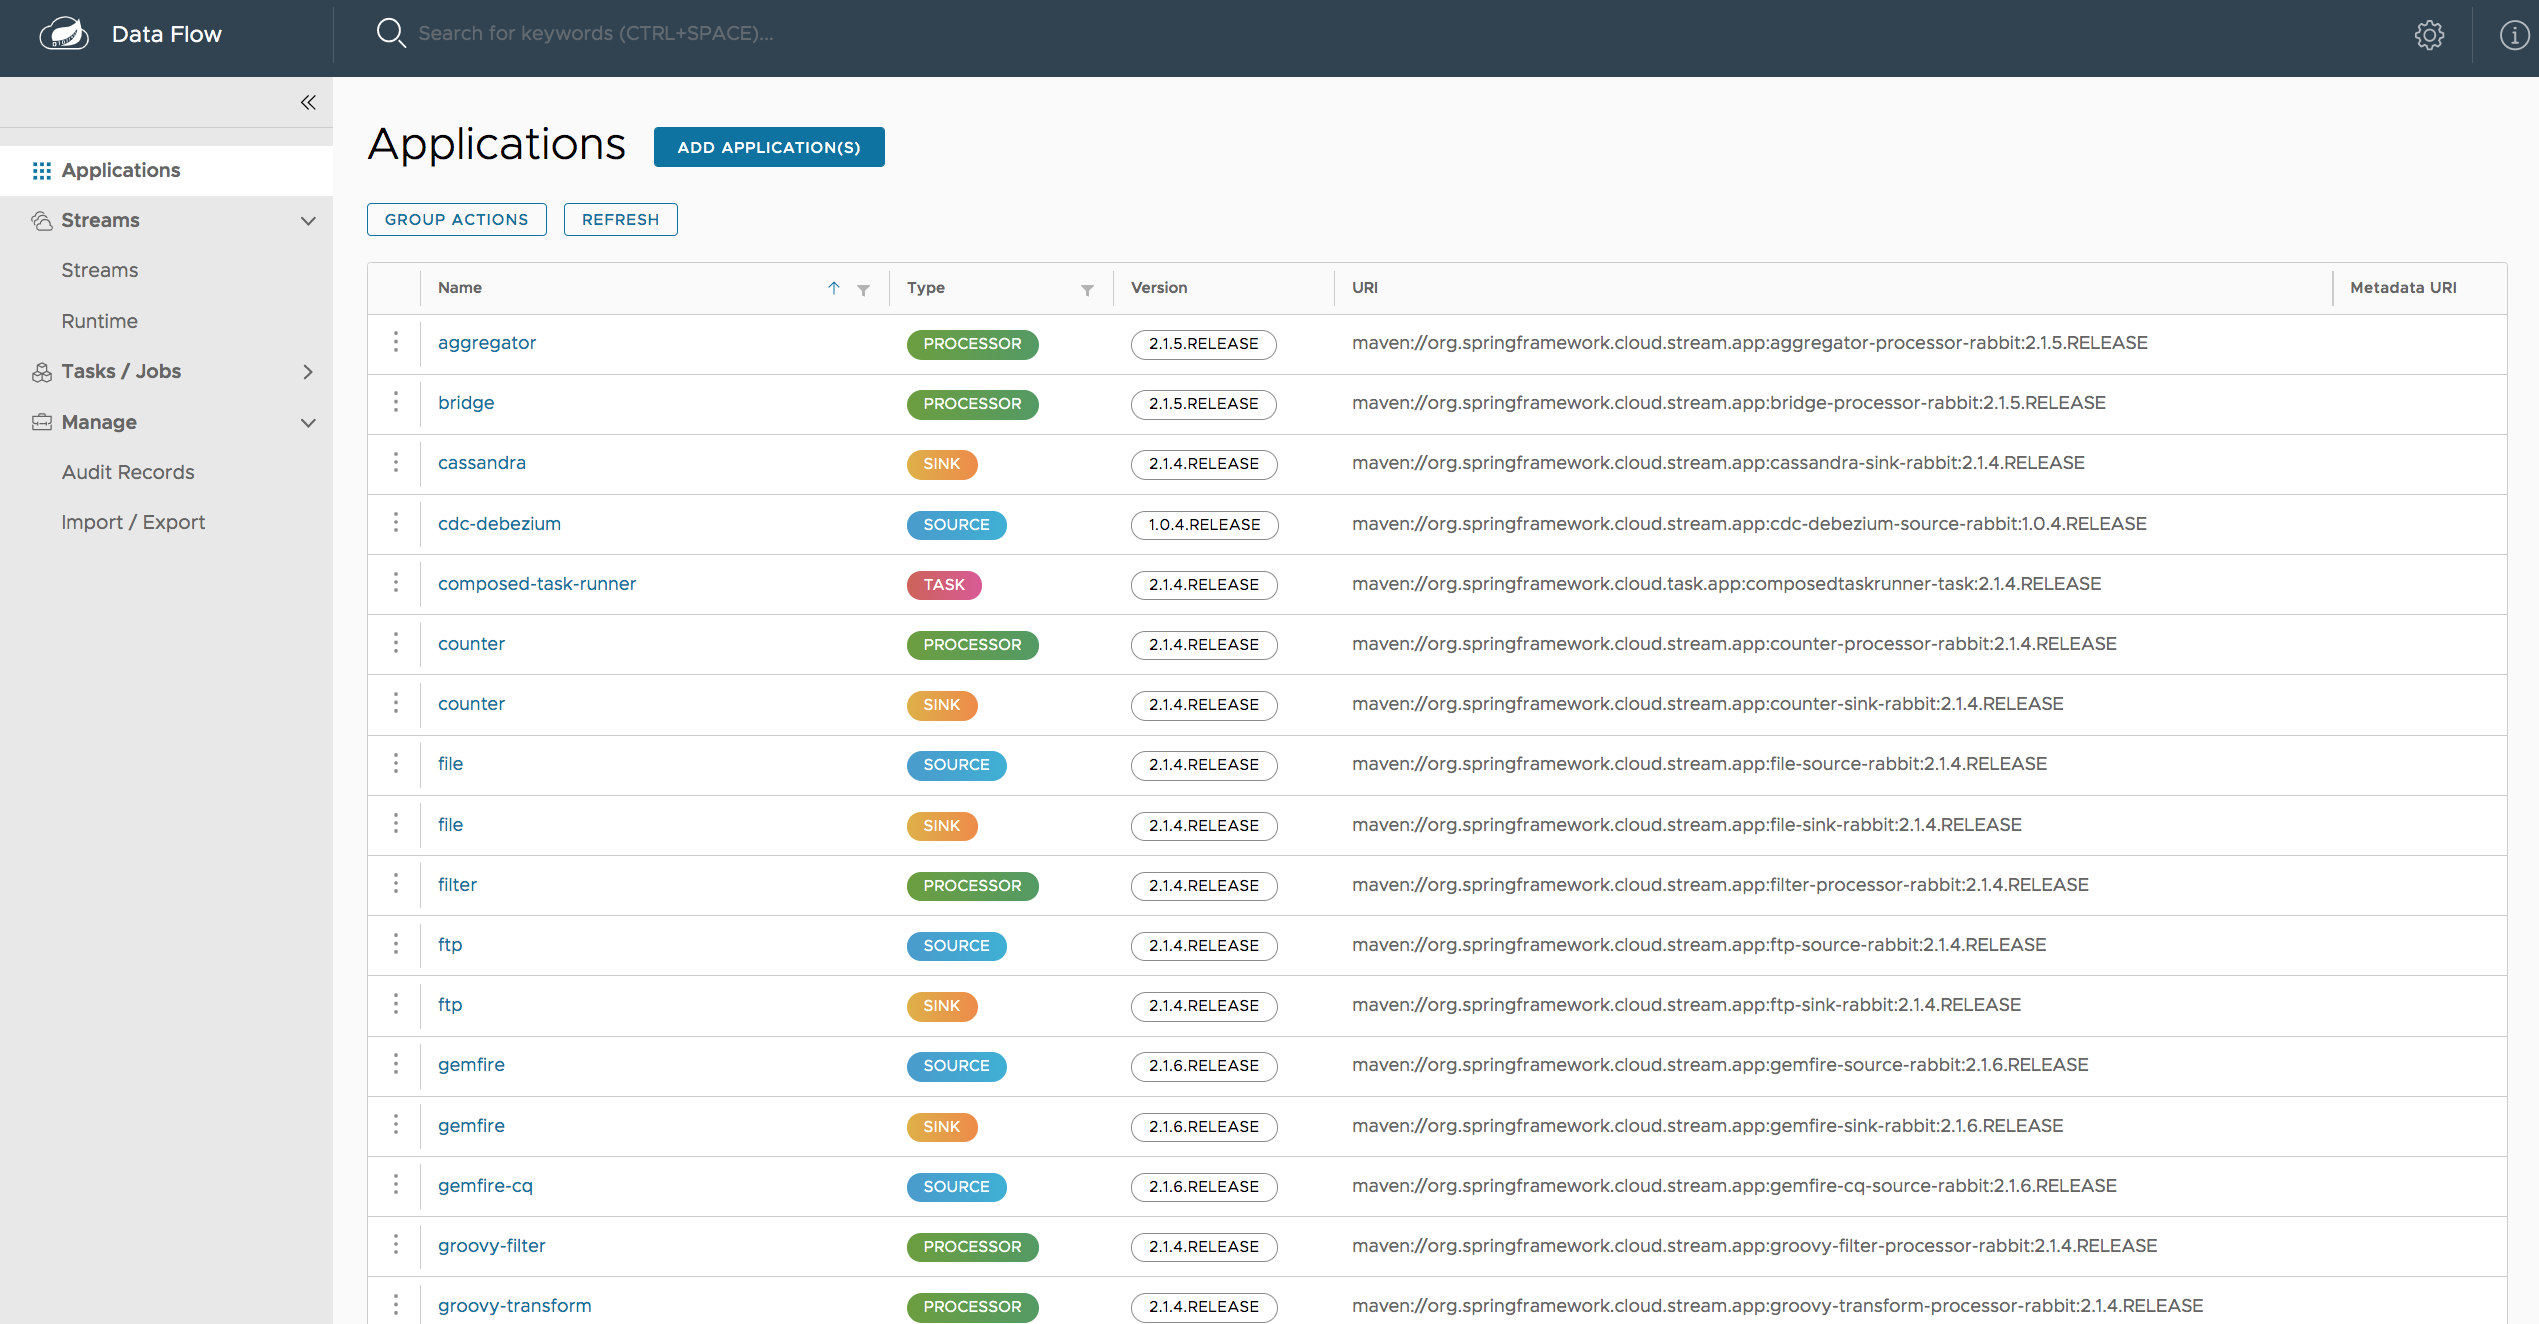
- Apps Lists all available applications and provides the control to register/unregister them
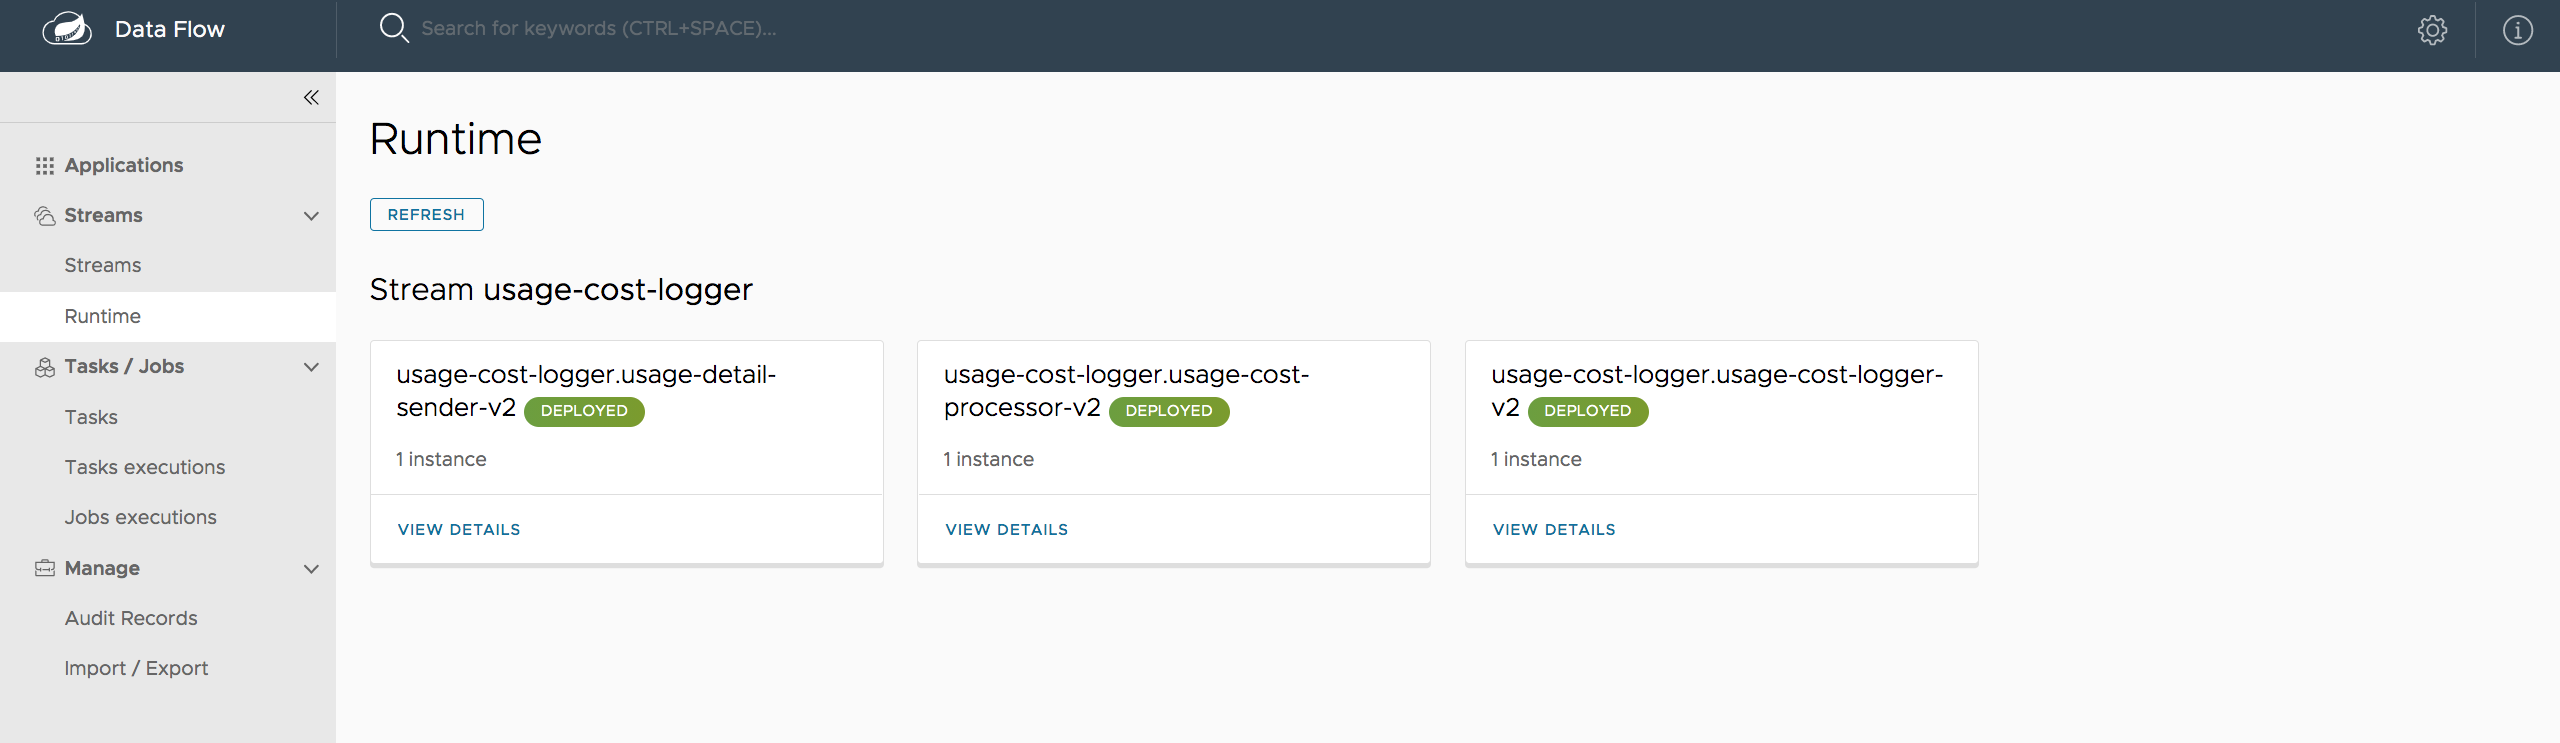
- Runtime Provides the Data Flow cluster view with the list of all running applications
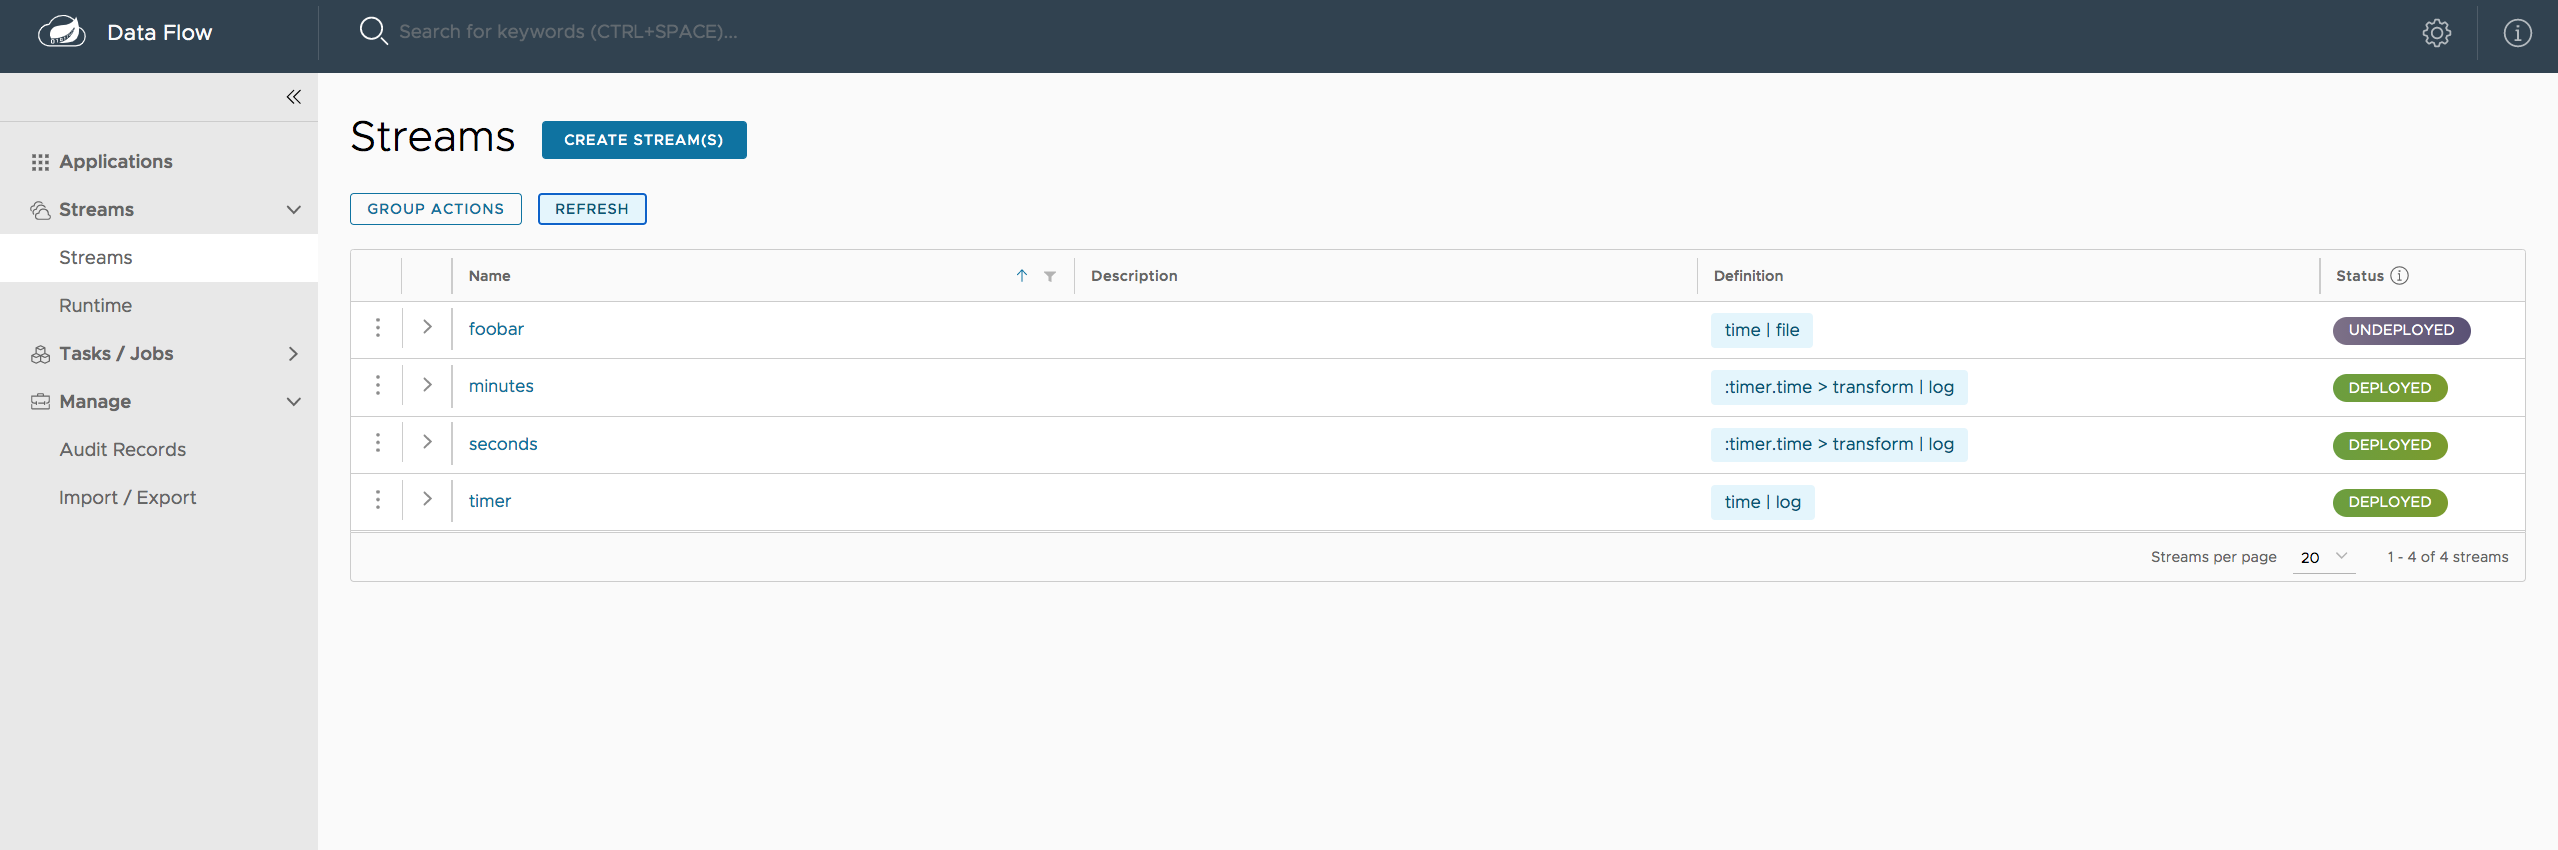
- Streams Deploy/undeploy Stream Definitions
- Tasks List, create, launch and destroy Task Definitions
- Jobs Perform Batch Job related functions
- Analytics Create data visualizations for the various analytics applications
Upon starting Spring Cloud Data Flow, the Dashboard is available at:
http://<host>:<port>/dashboard
For example: http://localhost:9393/dashboard
If you have enabled https, then it will be located at https://localhost:9393/dashboard.
If you have enabled security, a login form is available at http://localhost:9393/dashboard/#/login.
Note: The default Dashboard server port is 9393
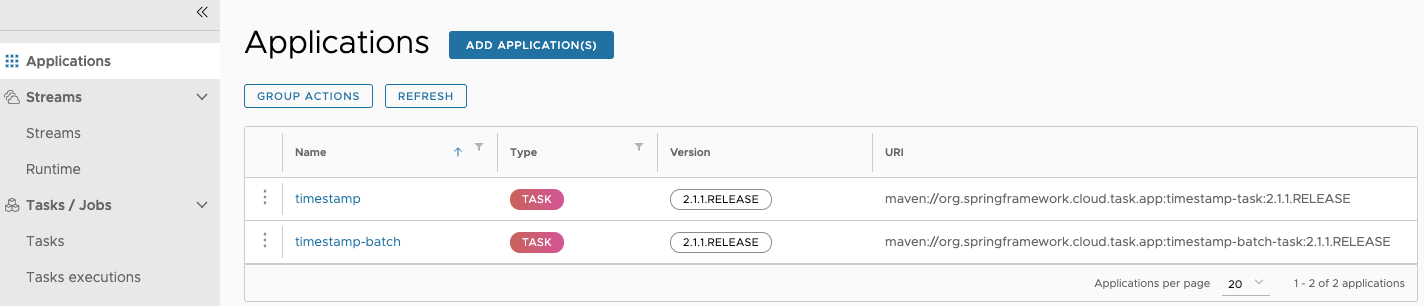
The Apps section of the Dashboard lists all the available applications and provides the control to register/unregister them (if applicable). By clicking on the magnifying glass, you will get a listing of available definition properties.
The Runtime section of the Dashboard application shows the Spring Cloud Data Flow cluster view with the list of all running applications. For each runtime app the state of the deployment and the number of deployed instances is shown. A list of the used deployment properties is available by clicking on the app id.
The Streams section of the Dashboard provides the Definitions tab that provides a listing of Stream definitions. There you have the option to deploy or undeploy those stream definitions. Additionally you can remove the definition by clicking on destroy.
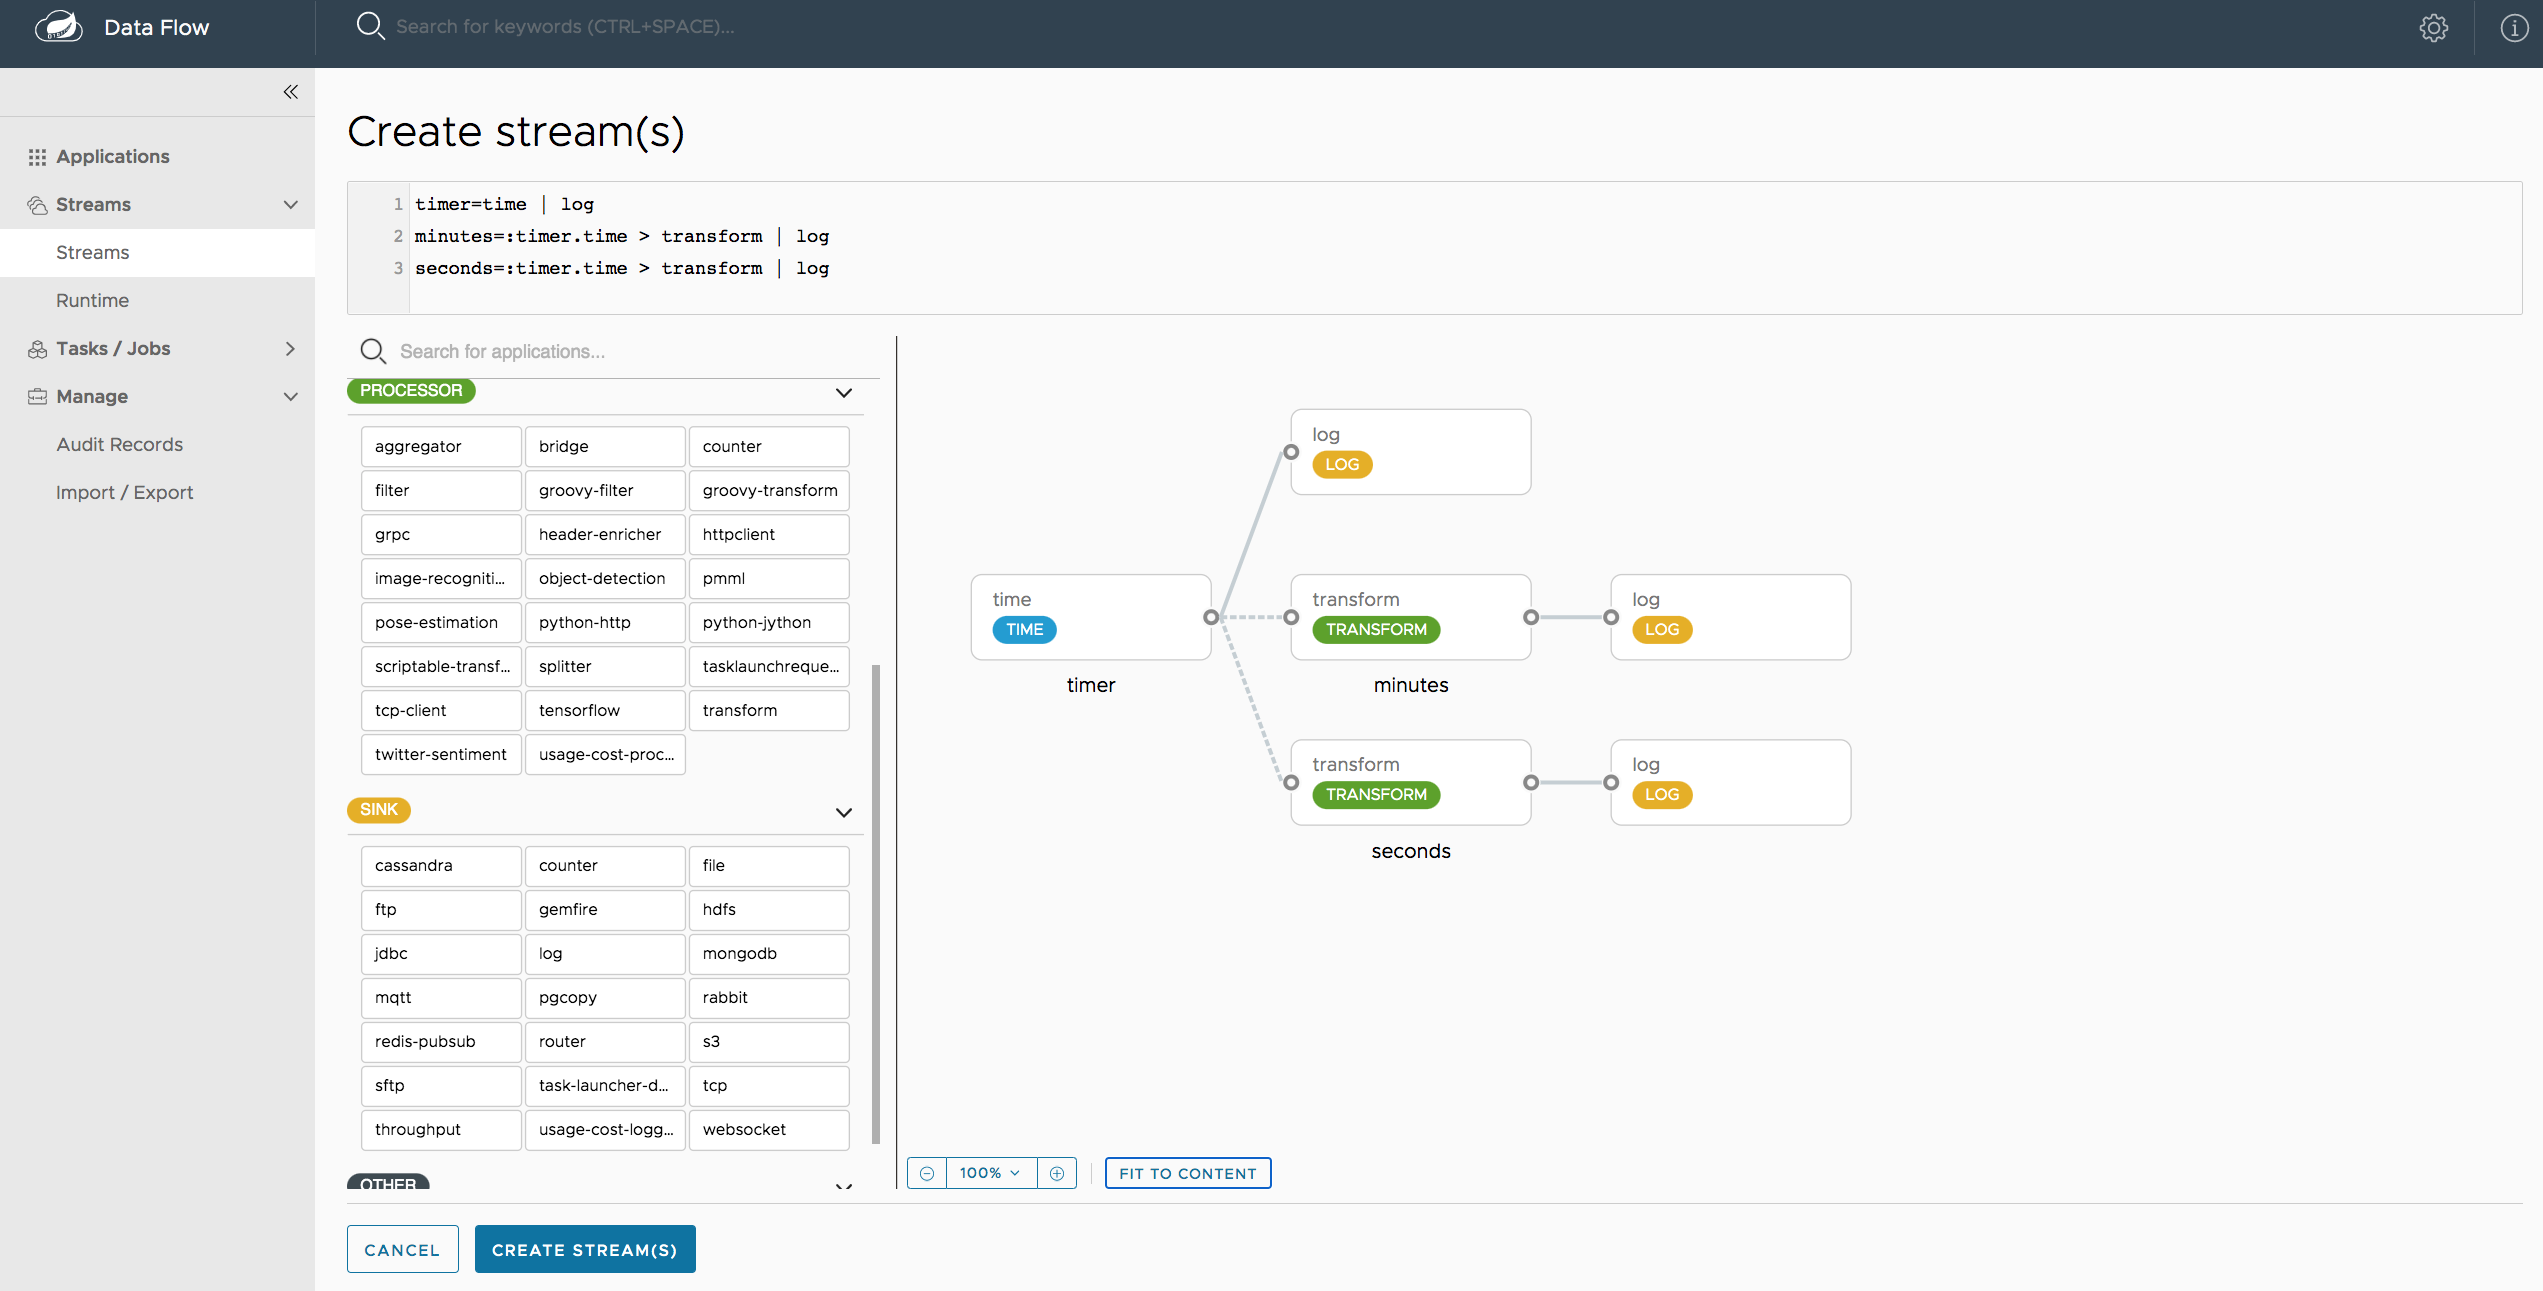
The Create Stream section of the Dashboard includes the Spring Flo designer tab that provides the canvas application, offering a interactive graphical interface for creating data pipelines.
In this tab, you can:
- Create, manage, and visualize stream pipelines using DSL, a graphical canvas, or both
- Write pipelines via DSL with content-assist and auto-complete
- Use auto-adjustment and grid-layout capabilities in the GUI for simpler and interactive organization of pipelines
Watch this screencast that highlights some of the "Flo for Spring Cloud Data Flow" capabilities. Spring Flo wiki includes more detailed content on core Flo capabilities.
The Tasks section of the Dashboard currently has three tabs:
- Apps
- Definitions
- Executions
Apps encapsulate a unit of work into a reusable component. Within the Data Flow runtime environment Apps allow users to create definitions for Streams as well as Tasks. Consequently, the Apps tab within the Tasks section allows users to create Task definitions.
Note: You will also use this tab to create Batch Jobs.
On this screen you can perform the following actions:
- View details such as the task app options.
- Create a Task Definition from the respective App.
On this screen you can create a new Task Definition. As a minimum you must provide a name for the new definition. You will also have the option to specify various properties that are used during the deployment of the app.
Note: Each parameter is only included if the Include checkbox is selected.
This page lists the Data Flow Task definitions and provides actions to launch or destroy those tasks.
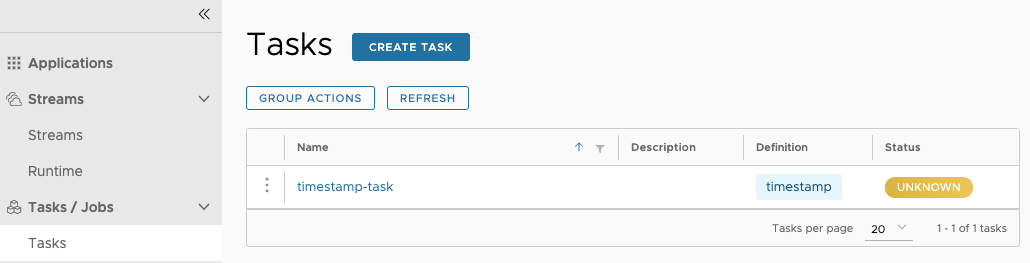
Once the task definition is created, they can be launched through the Dashboard
as well. Navigate to the Definitions tab. Select the Task you want to launch by
pressing Launch.
On the following screen, you can define one or more Task parameters by entering:
- Parameter Key
- Parameter Value
Task parameters are not typed.

The Jobs section of the Dashboard allows you to inspect Batch Jobs. The main section of the screen provides a list of Job Executions. Batch Jobs are Tasks that were executing one or more Batch Job. As such each Job Execution has a back reference to the Task Execution Id (Task Id).
In case of a failed job, you can also restart the task. When dealing with long-running Batch Jobs, you can also request to stop it.

This page lists the Batch Job Executions and provides the option to restart or stop a specific job execution, provided the operation is available. Furthermore, you have the option to view the Job execution details.
The list of Job Executions also shows the state of the underlying Job Definition. Thus, if the underlying definition has been deleted, deleted will be shown.
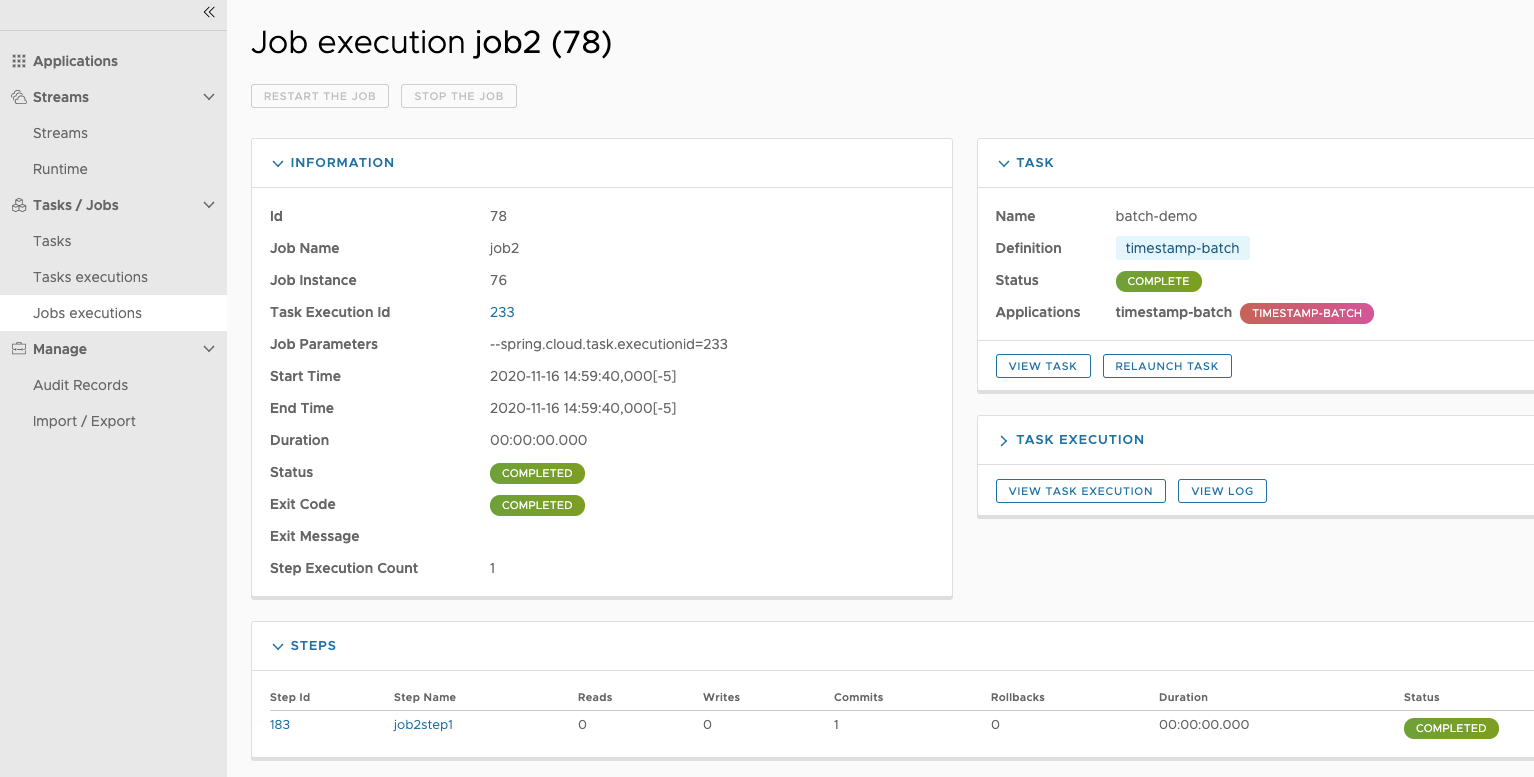
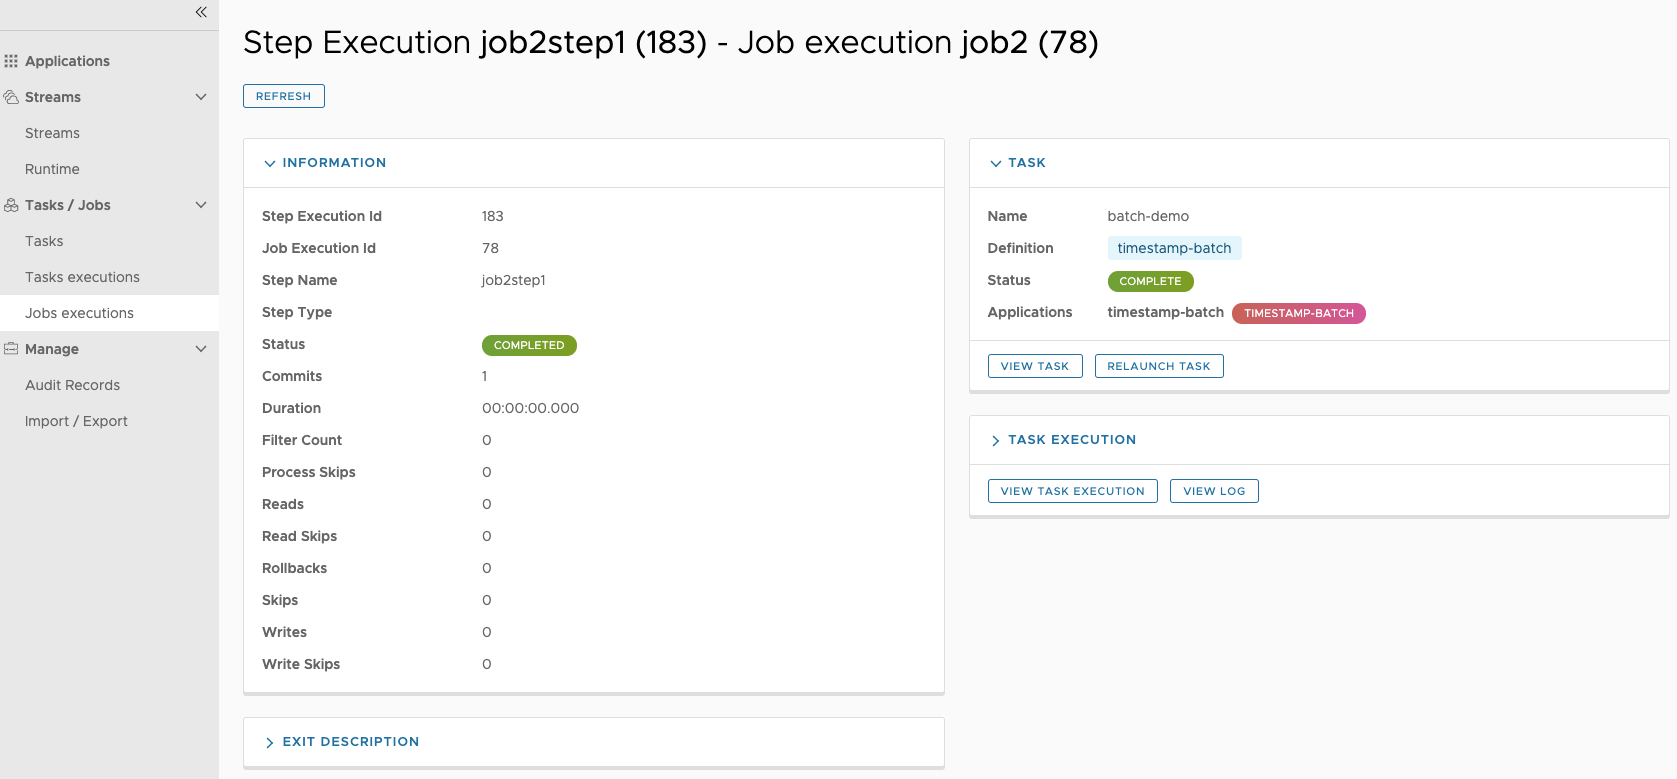
The Job Execution Details screen also contains a list of the executed steps. You can further drill into the Step Execution Details by clicking onto the magnifying glass.
On the top of the page, you will see progress indicator the respective step, with the option to refresh the indicator. Furthermore, a link is provided to view the step execution history.
The Step Execution details screen provides a complete list of all Step Execution Context key/value pairs.
| Important |
|---|---|
In case of exceptions, the Exit Description field will contain additional error information. Please be aware, though, that this field can only have a maximum of 2500 characters. Therefore, in case of long exception stacktraces, trimming of error messages may occur. In that case, please refer to the server log files for further details. |
On this screen, you can see a progress bar indicator in regards to the execution of the current step. Under the Step Execution History, you can also view various metrics associated with the selected step such as duration, read counts, write counts etc.
The Analytics section of the Dashboard provided data visualization capabilities for the various analytics applications available in Spring Cloud Data Flow:
- Counters
- Field-Value Counters
For example, if you have created the springtweets stream and the corresponding
counter in the Counter chapter, you can now easily create the corresponding
graph from within the Dashboard tab:
- Under
Metric Type, selectCountersfrom the select box - Under
Stream, selecttweetcount - Under
Visualization, select the desired chart option,Bar Chart
Using the icons to the right, you can add additional charts to the Dashboard, re-arange the order of created dashboards or remove data visualizations.
To build the source you will need to install JDK 1.8.
The build uses the Maven wrapper so you don’t have to install a specific version of Maven. To enable the tests for Redis you should run the server before bulding. See below for more information on how run Redis.
The main build command is
$ ./mvnw clean install
You can also add '-DskipTests' if you like, to avoid running the tests.
| Note |
|---|---|
You can also install Maven (>=3.3.3) yourself and run the |
| Note |
|---|---|
Be aware that you might need to increase the amount of memory
available to Maven by setting a |
The projects that require middleware generally include a
docker-compose.yml, so consider using
Docker Compose to run the middeware servers
in Docker containers. See the README in the
scripts demo
repository for specific instructions about the common cases of mongo,
rabbit and redis.
There is a "full" profile that will generate documentation. You can build just the documentation by executing
$ ./mvnw package -DskipTests=true -P full -pl spring-cloud-dataflow-server-cloudfoundry-docs -am
If you don’t have an IDE preference we would recommend that you use Spring Tools Suite or Eclipse when working with the code. We use the m2eclipe eclipse plugin for maven support. Other IDEs and tools should also work without issue.
We recommend the m2eclipe eclipse plugin when working with eclipse. If you don’t already have m2eclipse installed it is available from the "eclipse marketplace".
Unfortunately m2e does not yet support Maven 3.3, so once the projects
are imported into Eclipse you will also need to tell m2eclipse to use
the .settings.xml file for the projects. If you do not do this you
may see many different errors related to the POMs in the
projects. Open your Eclipse preferences, expand the Maven
preferences, and select User Settings. In the User Settings field
click Browse and navigate to the Spring Cloud project you imported
selecting the .settings.xml file in that project. Click Apply and
then OK to save the preference changes.
| Note |
|---|---|
Alternatively you can copy the repository settings from |