By default, the Data Flow server is unsecured and runs on an unencrypted HTTP connection. You can secure your REST endpoints, as well as the Data Flow Dashboard by enabling HTTPS and requiring clients to authenticate using either:
- OAuth 2.0
- Traditional Authentication (Incl. Basic Authentication)
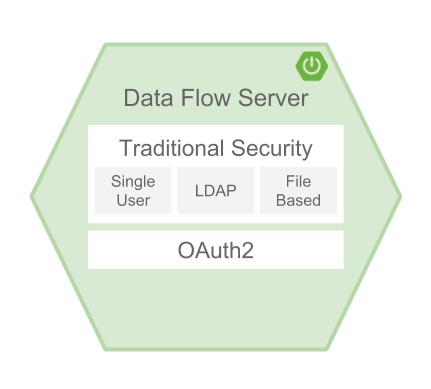
When choosing traditional authentication, the Spring Cloud Data Flow server will be the main authentication point, using Spring Security under the covers. When selecting this option, users then need to further define their preferred authentication mechanism aka select the desired authentication backing store:
When choosing between traditional authentication or OAuth2, keep in mind that both options are mutually exclusive. Please refer to the sub-chapters below for a more detailed discussion.
![[Note]](images/note.png) | Note |
|---|---|
By default, the REST endpoints (administration, management and health), as well as the Dashboard UI do not require authenticated access. |
By default, the dashboard, management, and health endpoints use HTTP as a transport.
You can switch to HTTPS easily, by adding a certificate to your configuration in
application.yml.
server: port: 8443ssl: key-alias: yourKeyAlias
key-store: path/to/keystore
key-store-password: yourKeyStorePassword
key-password: yourKeyPassword
trust-store: path/to/trust-store
trust-store-password: yourTrustStorePassword

| As the default port is |
| The alias (or name) under which the key is stored in the keystore. |
| The path to the keystore file. Classpath resources may also be specified, by using the classpath prefix: |
| The password of the keystore. |
| The password of the key. |
| The path to the truststore file. Classpath resources may also be specified, by using the classpath prefix: |
| The password of the trust store. |
| Note |
|---|---|
If HTTPS is enabled, it will completely replace HTTP as the protocol over which the REST endpoints and the Data Flow Dashboard interact. Plain HTTP requests will fail - therefore, make sure that you configure your Shell accordingly. |
For testing purposes or during development it might be convenient to create self-signed certificates. To get started, execute the following command to create a certificate:
$ keytool -genkey -alias dataflow -keyalg RSA -keystore dataflow.keystore \
          -validity 3650 -storetype JKS \
          -dname "CN=localhost, OU=Spring, O=Pivotal, L=Kailua-Kona, ST=HI, C=US"
          -keypass dataflow -storepass dataflow
| CN is the only important parameter here. It should match the domain you are trying to access, e.g. |
Then add the following to your application.yml file:
server:
  port: 8443
  ssl:
    enabled: true
    key-alias: dataflow
    key-store: "/your/path/to/dataflow.keystore"
    key-store-type: jks
    key-store-password: dataflow
    key-password: dataflow
This is all that’s needed for the Data Flow Server. Once you start the server, you should be able to access it via https://localhost:8443/. As this is a self-signed certificate, you will hit a warning in your browser, that you need to ignore.
By default self-signed certificates are an issue for the Shell and additional steps are necessary to make the Shell work with self-signed certificates. Two options are available:
- Add the self-signed certificate to the JVM truststore
- Skip certificate validation
Add the self-signed certificate to the JVM truststore
In order to use the JVM truststore option, we need to export the previously created certificate from the keystore:
$ keytool -export -alias dataflow -keystore dataflow.keystore -file dataflow_cert -storepass dataflowNext, we need to create a truststore which the Shell will use:
$ keytool -importcert -keystore dataflow.truststore -alias dataflow -storepass dataflow -file dataflow_cert -noprompt
Now, you are ready to launch the Data Flow Shell using the following JVM arguments:
$ java -Djavax.net.ssl.trustStorePassword=dataflow \
       -Djavax.net.ssl.trustStore=/path/to/dataflow.truststore \
       -Djavax.net.ssl.trustStoreType=jks \
-jar spring-cloud-dataflow-shell-1.2.2.RELEASE.jar![[Tip]](images/tip.png) | Tip |
|---|---|
In case you run into trouble establishing a connection via SSL, you can enable additional
logging by using and setting the |
Don’t forget to target the Data Flow Server with:
dataflow:> dataflow config server https://localhost:8443/Skip Certificate Validation
Alternatively, you can also bypass the certification validation by providing the
optional command-line parameter --dataflow.skip-ssl-validation=true.
Using this command-line parameter, the shell will accept any (self-signed) SSL certificate.
![[Warning]](images/warning.png) | Warning |
|---|---|
If possible you should avoid using this option. Disabling the trust manager defeats the purpose of SSL and makes you vulnerable to man-in-the-middle attacks. |
When using traditional authentication Spring Cloud Data Flow will be the sole authentication provider. In that case Dataflow REST API users would use Basic Authentication to access the endpoints.
When using that option, users have a choice of 3 backing stores for authentication details:
- Single User Authentication using Spring Boot properties
- File-based authentication for multiple users using a Yaml file
- Ldap Authentication
This is the simplest option and mimics the behavior of the default Spring Boot user
user-experience. It can be enabled by adding the following to application.yml or via
environment variables:
security: basic: enabled: true
| Enables basic authentication. Must be set to true for security to be enabled. |
| (Optional) The realm for Basic authentication. Will default to Spring if not explicitly set. |
| Note |
|---|---|
Current versions of Chrome do not display the realm. Please see the following Chromium issue ticket for more information. |
In this use-case, the underlying Spring Boot will auto-create a user called user with an auto-generated password which will be printed out to the console upon startup.
With this setup, the generated user will have all main roles assigned:
- VIEW
- CREATE
- MANAGE

You can customize the user yourself using the following properties:
security.user.name=user # Default user name. security.user.password= # Password for the default user name. A random password is logged on startup by default. security.user.role=VIEW, CREATE, MANAGE # Granted roles for the default user name.
| Note |
|---|---|
Please be aware of inherent issues of Basic Authentication and logging out, since the credentials are cached by the browser and simply browsing back to application pages will log you back in. |
Of course, you can also pass in credentials using system properties, environment variables or command-line arguments as this is standard Spring Boot behavior. For instance in the following example, command-line arguments are used to specify the user credentials:
$ java -jar spring-cloud-dataflow-server-local-1.2.2.RELEASE.jar\ --security.basic.enabled=true \ --security.user.name=test \ --security.user.password=pass \ --security.user.role=VIEW
If you need to define more than one file-based user account, please take a look at File based authentication.
By default Spring Boot allows you to only specify one single user. Spring Cloud Data Flow also supports the listing of more than one user in a configuration file, as described below. Each user must be assigned a password and one or more roles:
security: basic: enabled: true realm: Spring Cloud Data Flow spring: cloud: dataflow: security: authentication: file: enabled: true
| Enables file based authentication |
| This is a yaml map of username to password |
| Each map |
Spring Cloud Data Flow also supports authentication against an LDAP server (Lightweight Directory Access Protocol), providing support for the following 2 modes:
- Direct bind
- Search and bind
When the LDAP authentication option is activated, the default single user mode is turned off.
In direct bind mode, a pattern is defined for the user’s distinguished name (DN), using a placeholder for the username. The authentication process derives the distinguished name of the user by replacing the placeholder and use it to authenticate a user against the LDAP server, along with the supplied password. You can set up LDAP direct bind as follows:
security: basic: enabled: true realm: Spring Cloud Data Flow spring: cloud: dataflow: security: authentication: ldap: enabled: true
| Enables LDAP authentication |
| The URL for the LDAP server |
| The distinguished name (DN) pattern for authenticating against the server |
The search and bind mode involves connecting to an LDAP server, either anonymously or with a fixed account, and searching for the distinguished name of the authenticating user based on its username, and then using the resulting value and the supplied password for binding to the LDAP server. This option is configured as follows:
security: basic: enabled: true realm: Spring Cloud Data Flow spring: cloud: dataflow: security: authentication: ldap: enabled: true
| Enables LDAP integration |
| The URL of the LDAP server |
| A DN for to authenticate to the LDAP server, if anonymous searches are not supported (optional, required together with next option) |
| A password to authenticate to the LDAP server, if anonymous searches are not supported (optional, required together with previous option) |
| The base for searching the DN of the authenticating user (serves to restrict the scope of the search) |
| The search filter for the DN of the authenticating user |
| Tip |
|---|---|
For more information, please also see the chapter LDAP Authentication of the Spring Security reference guide. |
When connecting to an LDAP server, you typically (In the LDAP world) have 2 options in order to establish a connection to an LDAP server securely:
- LDAP over SSL (LDAPs)
- Start Transport Layer Security (Start TLS is defined in RFC2830)
As of Spring Cloud Data Flow 1.1.0 only LDAPs is supported out-of-the-box. When using
official certificates no special configuration is necessary, in order to connect
to an LDAP Server via LDAPs. Just change the url format to ldaps, e.g. ldaps://localhost:636.
In case of using self-signed certificates, the setup for your Spring Cloud Data Flow server becomes slightly more complex. The setup is very similar to Section 18.1.1, “Using Self-Signed Certificates” (Please read first) and Spring Cloud Data Flow needs to reference a trustStore in order to work with your self-signed certificates.
![[Important]](images/important.png) | Important |
|---|---|
While useful during development and testing, please never use self-signed certificates in production! |
Ultimately you have to provide a set of system properties to reference the trustStore and its credentials when starting the server:
$ java -Djavax.net.ssl.trustStorePassword=dataflow \
       -Djavax.net.ssl.trustStore=/path/to/dataflow.truststore \
       -Djavax.net.ssl.trustStoreType=jks \
       -jar spring-cloud-starter-dataflow-server-local-1.2.2.RELEASE.jar
As mentioned above, another option to connect to an LDAP server securely is via Start TLS. In the LDAP world, LDAPs is technically even considered deprecated in favor of Start TLS. However, this option is currently not supported out-of-the-box by Spring Cloud Data Flow.
Please follow the following issue tracker ticket to track its implementation. You may also want to look at the Spring LDAP reference documentation chapter on Custom DirContext Authentication Processing for further details.
When using traditional authentication with the Data Flow Shell, you typically provide a username and password using command-line arguments, e.g.:
$ java -jar target/spring-cloud-dataflow-shell-1.2.2.RELEASE.jar \ --dataflow.username=myuser \
| If authentication is enabled the username must be provided |
| If the password is not provided, the shell will prompt for it |
Alternatively, you can target a Data Flow server also from within the Shell:
server-unknown:>dataflow config server --uri http://localhost:9393 \
| Optional, defaults to localhost:9393 |
| Mandatory if security is enabled |
| If security is enabled, and the password is not provided, the user will be promted for it |
| Optional, ignores certificate errors (When using self-signed certificates). Use cautiously! |

All of the above deals with authentication, i.e. how to assess the identity of the user. Irrespective of the option chosen, you can also customize authorization i.e. who can do what.
The default scheme uses three roles to protect the REST endpoints that Spring Cloud Data Flow exposes:
- ROLE_VIEW for anything that relates to retrieving state
- ROLE_CREATE for anything that involves creating, deleting or mutating the state of the system
- ROLE_MANAGE for boot management endpoints.
All of those defaults are specified in dataflow-server-defaults.yml which is
part of the Spring Cloud Data Flow Core Module. Nonetheless, you can
override those, if desired, e.g. in application.yml. The configuration takes
the form of a YAML list (as some rules may have precedence over others) and so
you’ll need to copy/paste the whole list and tailor it to your needs (as there is no way to merge lists). Always refer to your version of application.yml, as the snippet reproduced below may be out-dated. The default rules are as such:
spring:
  cloud:
    dataflow:
      security:
        authorization:
          enabled: true
          rules:
            # Metrics

            - GET    /metrics/streams                => hasRole('ROLE_VIEW')

            # About

            - GET    /about                          => hasRole('ROLE_VIEW')

            # Metrics

            - GET    /metrics/**                     => hasRole('ROLE_VIEW')
            - DELETE /metrics/**                     => hasRole('ROLE_CREATE')

            # Boot Endpoints

            - GET    /management/**                  => hasRole('ROLE_MANAGE')

            # Apps

            - GET    /apps                           => hasRole('ROLE_VIEW')
            - GET    /apps/**                        => hasRole('ROLE_VIEW')
            - DELETE /apps/**                        => hasRole('ROLE_CREATE')
            - POST   /apps                           => hasRole('ROLE_CREATE')
            - POST   /apps/**                        => hasRole('ROLE_CREATE')

            # Completions

            - GET /completions/**                    => hasRole('ROLE_CREATE')

            # Job Executions & Batch Job Execution Steps && Job Step Execution Progress

            - GET    /jobs/executions                => hasRole('ROLE_VIEW')
            - PUT    /jobs/executions/**             => hasRole('ROLE_CREATE')
            - GET    /jobs/executions/**             => hasRole('ROLE_VIEW')

            # Batch Job Instances

            - GET    /jobs/instances                 => hasRole('ROLE_VIEW')
            - GET    /jobs/instances/*               => hasRole('ROLE_VIEW')

            # Running Applications

            - GET    /runtime/apps                   => hasRole('ROLE_VIEW')
            - GET    /runtime/apps/**                => hasRole('ROLE_VIEW')

            # Stream Definitions

            - GET    /streams/definitions            => hasRole('ROLE_VIEW')
            - GET    /streams/definitions/*          => hasRole('ROLE_VIEW')
            - GET    /streams/definitions/*/related  => hasRole('ROLE_VIEW')
            - POST   /streams/definitions            => hasRole('ROLE_CREATE')
            - DELETE /streams/definitions/*          => hasRole('ROLE_CREATE')
            - DELETE /streams/definitions            => hasRole('ROLE_CREATE')

            # Stream Deployments

            - DELETE /streams/deployments/*          => hasRole('ROLE_CREATE')
            - DELETE /streams/deployments            => hasRole('ROLE_CREATE')
            - POST   /streams/deployments/*          => hasRole('ROLE_CREATE')

            # Task Definitions

            - POST   /tasks/definitions              => hasRole('ROLE_CREATE')
            - DELETE /tasks/definitions/*            => hasRole('ROLE_CREATE')
            - GET    /tasks/definitions              => hasRole('ROLE_VIEW')
            - GET    /tasks/definitions/*            => hasRole('ROLE_VIEW')

            # Task Executions

            - GET    /tasks/executions               => hasRole('ROLE_VIEW')
            - GET    /tasks/executions/*             => hasRole('ROLE_VIEW')
            - POST   /tasks/executions               => hasRole('ROLE_CREATE')
            - DELETE /tasks/executions/*             => hasRole('ROLE_CREATE')
The format of each line is the following:
HTTP_METHOD URL_PATTERN '=>' SECURITY_ATTRIBUTE
where
- HTTP_METHOD is one http method, capital case
- URL_PATTERN is an Ant style URL pattern
- SECURITY_ATTRIBUTE is a SpEL expression (see docs.spring.io/spring-security/site/docs/current/reference/htmlsingle/#el-access)
- each of those separated by one or several blank characters (spaces, tabs, etc.)
Be mindful that the above is indeed a YAML list, not a map (thus the use of '-' dashes at the start of each line) that lives under the spring.cloud.dataflow.security.authorization.rules key.
| Tip |
|---|---|
In case you are solely interested in authentication but not authorization,
for instance every user shall have have access to all endpoints, then you can also
set |
If you are using basic security configuration by using security properties then it is important to set the roles for the users.
For instance,
java -jar spring-cloud-dataflow-server-local/target/spring-cloud-dataflow-server-local-1.2.2.RELEASE.jar \
    --security.basic.enabled=true \
    --security.user.name=test \
    --security.user.password=pass \
    --security.user.role=VIEW
When authorization is enabled, the Dashboard and the Shell will be role-aware, meaning that depending on the assigned role(s), not all functionality may be visible.
For instance, Shell commands, for which the user does not have the necessary roles for, will be marked as unavailable.
| Important |
|---|---|
Currently, the Shell’s |
Similarly for the Dashboard, the UI will not show pages, or page elements, for which the user is not authorized for.
When configuring Ldap for authentication, you can also specify the group-role-attribute
in conjunction with group-search-base and group-search-filter.
The group role attribure contains the name of the role. If not specified, the
ROLE_MANAGE role is populated by default.
For further information, please refer to Configuring an LDAP Server of the Spring Security reference guide.
OAuth 2.0 allows you to integrate Spring Cloud Data Flow into Single Sign On (SSO) environments. The following 3 OAuth2 Grant Types will be used:
- Authorization Code - Used for the GUI (Browser) integration. You will be redirected to your OAuth Service for authentication
- Password - Used by the shell (And the REST integration), so you can login using username and password
- Client Credentials - Retrieve an Access Token directly from your OAuth provider and pass it to the Dataflow server using the Authorization Http header.
The REST endpoints can be accessed using 2 ways:
- Basic Authentication which will use the Password Grant Type under the covers to authenticate with your OAuth2 service
- Access Token which will use the Client Credentials Grant Type under the covers
| Note |
|---|---|
When authentication is set up, it is strongly recommended to enable HTTPS as well, especially in production environments. |
You can turn on OAuth2 authentication by adding the following to application.yml or via
environment variables:
security: oauth2: client: client-id: myclient
| Providing the Client Id in the OAuth Configuration Section will activate OAuth2 security |
You can verify that basic authentication is working properly using curl:
$ curl -u myusername:mypassword http://localhost:9393/As a result you should see a list of available REST endpoints.
Besides Basic Authentication, you can also provide an Access Token in order to access the REST Api. In order to make that happen, you would retrieve an OAuth2 Access Token from your OAuth2 provider first, and then pass that Access Token to the REST Api using the Authorization Http header:
$ curl -H "Authorization: Bearer <ACCESS_TOKEN>" http://localhost:9393/
The OAuth2 authentication option uses the same authorization rules as used by the Traditional Authentication option.
| Tip |
|---|---|
The authorization rules are defined in |
Due to fact that the determination of security roles is very environment-specific,
Spring Cloud Data Flow will by default assign all roles to authenticated OAuth2
users using the DefaultDataflowAuthoritiesExtractor class.
You can customize that behavior by providing your own Spring bean definition that
extends Spring Security OAuth’s AuthoritiesExtractor interface. In that case,
the custom bean definition will take precedence over the default one provided by
Spring Cloud Data Flow
If your OAuth2 provider supports the Password Grant Type you can start the Data Flow Shell with:
$ java -jar spring-cloud-dataflow-shell-1.2.2.RELEASE.jar \
  --dataflow.uri=http://localhost:9393 \
  --dataflow.username=my_username --dataflow.password=my_password
| Note |
|---|---|
Keep in mind that when authentication for Spring Cloud Data Flow is enabled, the underlying OAuth2 provider must support the Password OAuth2 Grant Type, if you want to use the Shell. |
From within the Data Flow Shell you can also provide credentials using:
dataflow config server --uri http://localhost:9393 --username my_username --password my_passwordOnce successfully targeted, you should see the following output:
dataflow:>dataflow config info
dataflow config info

╔═══════════╤═══════════════════════════════════════╗
║Credentials│[username='my_username, password=****']║
╠═══════════╪═══════════════════════════════════════╣
║Result     │                                       ║
║Target     │http://localhost:9393                  ║
╚═══════════╧═══════════════════════════════════════╝
With Spring Security OAuth you can easily create your own OAuth2 Server with the following 2 simple annotations:
- @EnableResourceServer
- @EnableAuthorizationServer
A working example application can be found at:
https://github.com/ghillert/oauth-test-server/
Simply clone the project, built and start it. Furthermore configure Spring Cloud Data Flow with the respective Client Id and Client Secret.
If you rather like to use an existing OAuth2 provider, here is an example for GitHub. First you need to Register a new application under your GitHub account at:
https://github.com/settings/developers
When running a default version of Spring Cloud Data Flow locally, your GitHub configuration should look like the following:
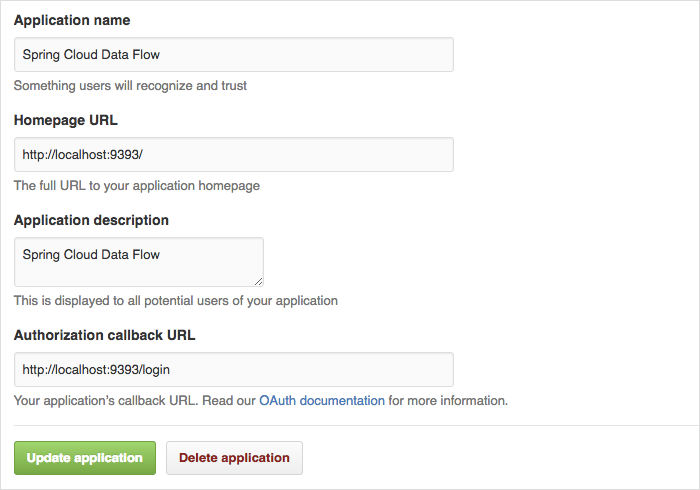
| Note |
|---|---|
For the Authorization callback URL you will enter Spring Cloud Data Flow’s Login URL, e.g. |
Configure Spring Cloud Data Flow with the GitHub relevant Client Id and Secret:
security:
  oauth2:
    client:
      client-id: your-github-client-id
      client-secret: your-github-client-secret
      access-token-uri: https://github.com/login/oauth/access_token
      user-authorization-uri: https://github.com/login/oauth/authorize
    resource:
      user-info-uri: https://api.github.com/user
| Important |
|---|---|
GitHub does not support the OAuth2 password grant type. As such you cannot use the Spring Cloud Data Flow Shell in conjunction with GitHub. |
When enabling security, please also make sure that the Spring Boot HTTP Management Endpoints
are secured as well. You can enable security for the management endpoints by adding the following to application.yml:
management:
  contextPath: /management
  security:
    enabled: true
| Important |
|---|---|
If you don’t explicitly enable security for the management endpoints,
you may end up having unsecured REST endpoints, despite |