If you are getting started with Spring Cloud Sleuth or Spring in general, start by reading this section. It answers the basic “what?”, “how?” and “why?” questions. It includes an introduction to Spring Cloud Sleuth, along with installation instructions. We then walk you through building your first Spring Cloud Sleuth application, discussing some core principles as we go.
1. Introducing Spring Cloud Sleuth
Spring Cloud Sleuth provides API for distributed tracing solution for Spring Cloud. It integrates with OpenZipkin Brave
Spring Cloud Sleuth is able to trace your requests and messages so that you can correlate that communication to corresponding log entries. You can also export the tracing information to an external system to visualize latency. Spring Cloud Sleuth supports OpenZipkin compatible systems directly.
1.1. Terminology
Spring Cloud Sleuth borrows Dapper’s terminology.
Span: The basic unit of work. For example, sending an RPC is a new span, as is sending a response to an RPC. Spans also have other data, such as descriptions, timestamped events, key-value annotations (tags), the ID of the span that caused them, and process IDs (normally IP addresses).
Spans can be started and stopped, and they keep track of their timing information. Once you create a span, you must stop it at some point in the future.
Trace: A set of spans forming a tree-like structure.
For example, if you run a distributed big-data store, a trace might be formed by a PUT request.
Annotation/Event: Used to record the existence of an event in time.
Conceptually in a typical RPC scenario we mark these events to highlight what kind of an action took place (it doesn’t mean that physically such an event will be set on a span).
-
cs: Client Sent. The client has made a request. This annotation indicates the start of the span.
-
sr: Server Received: The server side got the request and started processing it. Subtracting the
cstimestamp from this timestamp reveals the network latency. -
ss: Server Sent. Annotated upon completion of request processing (when the response got sent back to the client). Subtracting the
srtimestamp from this timestamp reveals the time needed by the server side to process the request. -
cr: Client Received. Signifies the end of the span. The client has successfully received the response from the server side. Subtracting the
cstimestamp from this timestamp reveals the whole time needed by the client to receive the response from the server.
The following image shows how Span and Trace look in a system.
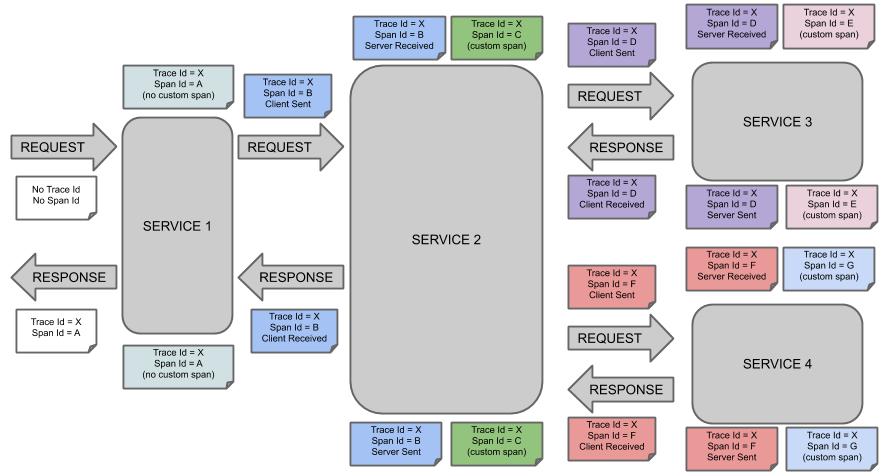
Each color of a note signifies a span (there are seven spans - from A to G). Consider the following note:
Trace Id = X
Span Id = D
Client Sent
This note indicates that the current span has Trace Id set to X and Span Id set to D.
Also, from the RPC perspective, the Client Sent event took place.
Let’s consider more notes:
Trace Id = X
Span Id = A
(no custom span)

Trace Id = X
Span Id = C
(custom span)
You can continue with a created span (example with no custom span indication) or you can create child spans manually (example with custom span indication).
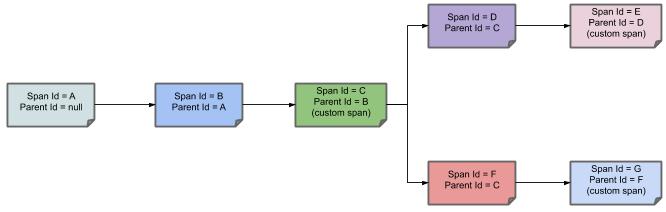
The following image shows how parent-child relationships of spans look:
2. Developing Your First Spring Cloud sleuth-based Application
This section describes how to develop a small “Hello World!” web application that highlights some of Spring Cloud Sleuth’s key features. We use Maven to build this project, since most IDEs support it. As the tracer implementation we’ll use OpenZipkin Brave.
|
You can shortcut the steps below by going to start.spring.io and choosing the "Web" and "Spring Cloud Sleuth" starters from the dependencies searcher. Doing so generates a new project structure so that you can start coding right away. |
2.1. Creating the POM
We need to start by creating a Maven pom.xml file.
The pom.xml is the recipe that is used to build your project.
Open your favorite text editor and add the following:
<?xml version="1.0" encoding="UTF-8"?>
<project xmlns="http://maven.apache.org/POM/4.0.0" xmlns:xsi="http://www.w3.org/2001/XMLSchema-instance"
    xsi:schemaLocation="http://maven.apache.org/POM/4.0.0 https://maven.apache.org/xsd/maven-4.0.0.xsd">
    <modelVersion>4.0.0</modelVersion>

    <groupId>com.example</groupId>
    <artifactId>myproject</artifactId>
    <version>0.0.1-SNAPSHOT</version>

    <parent>
        <groupId>org.springframework.boot</groupId>
        <artifactId>spring-boot-starter-parent</artifactId>
        <!-- Use the latest compatible Spring Boot version. You can check https://spring.io/projects/spring-cloud for more information -->
        <version>$2.4.10</version>
    </parent>

    <!-- Spring Cloud Sleuth requires a Spring Cloud BOM -->
    <dependencyManagement>
        <dependencies>
            <dependency>
                <groupId>org.springframework.cloud</groupId>
                <artifactId>spring-cloud-dependencies</artifactId>
                <!-- Provide the latest stable Spring Cloud release train version (e.g. 2020.0.0) -->
                <version>${release.train.version}</version>
                <type>pom</type>
                <scope>import</scope>
            </dependency>
        </dependencies>
    </dependencyManagement>

    <!-- (you don't need this if you are using a GA version) -->
    <repositories>
        <repository>
            <id>spring-snapshots</id>
            <url>https://repo.spring.io/snapshot</url>
            <snapshots><enabled>true</enabled></snapshots>
        </repository>
        <repository>
            <id>spring-milestones</id>
            <url>https://repo.spring.io/milestone</url>
        </repository>
    </repositories>
    <pluginRepositories>
        <pluginRepository>
            <id>spring-snapshots</id>
            <url>https://repo.spring.io/snapshot</url>
        </pluginRepository>
        <pluginRepository>
            <id>spring-milestones</id>
            <url>https://repo.spring.io/milestone</url>
        </pluginRepository>
    </pluginRepositories>
</project>
The preceding listing should give you a working build.
You can test it by running mvn package (for now, you can ignore the “jar will be empty - no content was marked for inclusion!” warning).
| At this point, you could import the project into an IDE (most modern Java IDEs include built-in support for Maven). For simplicity, we continue to use a plain text editor for this example. |
2.2. Adding Classpath Dependencies
To add the necessary dependencies, edit your pom.xml and add the spring-boot-starter-web dependency immediately below the parent section:
<dependencies>
    <!-- Boot's Web support -->
    <dependency>
        <groupId>org.springframework.boot</groupId>
        <artifactId>spring-boot-starter-web</artifactId>
    </dependency>
    <!-- Sleuth with Brave tracer implementation -->
    <dependency>
        <groupId>org.springframework.cloud</groupId>
        <artifactId>spring-cloud-starter-sleuth</artifactId>
    </dependency>
</dependencies>
2.3. Writing the Code
To finish our application, we need to create a single Java file.
By default, Maven compiles sources from src/main/java, so you need to create that directory structure and then add a file named src/main/java/Example.java to contain the following code:
import org.slf4j.Logger;
import org.slf4j.LoggerFactory;
import org.springframework.boot.*;
import org.springframework.boot.autoconfigure.*;
import org.springframework.web.bind.annotation.*;

@RestController
@EnableAutoConfiguration
public class Example {

    private static final Logger log = LoggerFactory.getLogger(Backend.class);

    @RequestMapping("/")
    String home() {
        log.info("Hello world!");
        return "Hello World!";
    }

    public static void main(String[] args) {
        SpringApplication.run(Example.class, args);
    }

}
Although there is not much code here, quite a lot is going on. We step through the important parts in the next few sections.
The @RestController and @RequestMapping Annotations
Spring Boot sets up the Rest Controller and makes our application bind to a Tomcat port. Spring Cloud Sleuth with Brave tracer will provide instrumentation of the incoming request.
2.4. Running the Example
At this point, your application should work.
Since you used the spring-boot-starter-parent POM, you have a useful run goal that you can use to start the application.
Type SPRING_APPLICATION_NAME=backend mvn spring-boot:run from the root project directory to start the application.
You should see output similar to the following:
$ mvn spring-boot:run

  .   ____          _            __ _ _
 /\\ / ___'_ __ _ _(_)_ __  __ _ \ \ \ \
( ( )\___ | '_ | '_| | '_ \/ _` | \ \ \ \
 \\/  ___)| |_)| | | | | || (_| |  ) ) ) )
  '  |____| .__|_| |_|_| |_\__, | / / / /
 =========|_|==============|___/=/_/_/_/
 ...
....... . . .
....... . . . (log output here)
....... . . .
........ Started Example in 2.222 seconds (JVM running for 6.514)
If you open a web browser to localhost:8080, you should see the following output:
Hello World!
If you check the logs you should see a similar output
2020-10-21 12:01:16.285 INFO [backend,0b6aaf642574edd3,0b6aaf642574edd3] 289589 --- [nio-9000-exec-1] Example : Hello world!
You can notice that the logging format has been updated with the following information [backend,0b6aaf642574edd3,0b6aaf642574edd3.
This entry corresponds to [application name,trace id, span id].
The application name got read from the SPRING_APPLICATION_NAME environment variable.
Instead of logging the request in the handler explicitly, you could set logging.level.org.springframework.web.servlet.DispatcherServlet=DEBUG.
|
To gracefully exit the application, press ctrl-c.
3. Next Steps
Hopefully, this section provided some of the Spring Cloud Sleuth basics and got you on your way to writing your own applications. If you are a task-oriented type of developer, you might want to jump over to spring.io and check out some of the getting started guides that solve specific “How do I do that with Spring?” problems. We also have Spring Cloud Sleuth-specific “how-to” reference documentation.
Otherwise, the next logical step is to read Using Spring Cloud Sleuth. If you are really impatient, you could also jump ahead and read about Spring Cloud Sleuth features.
You can find the default project samples at samples.