This part of the documentation covers support for Servlet-stack web applications built on the Servlet API and deployed to Servlet containers. Individual chapters include Spring MVC, View Technologies, CORS Support, and WebSocket Support. For reactive-stack web applications, see Web on Reactive Stack.
1. Spring Web MVC
Spring Web MVC is the original web framework built on the Servlet API and has been included
in the Spring Framework from the very beginning. The formal name, “Spring Web MVC,”
comes from the name of its source module
(spring-webmvc),
but it is more commonly known as “Spring MVC”.
Parallel to Spring Web MVC, Spring Framework 5.0 introduced a reactive-stack web framework
whose name, “Spring WebFlux,” is also based on its source module
(spring-webflux).
This section covers Spring Web MVC. The next section
covers Spring WebFlux.
For baseline information and compatibility with Servlet container and Java EE version ranges, see the Spring Framework Wiki.
1.1. DispatcherServlet
Spring MVC, as many other web frameworks, is designed around the front controller
pattern where a central Servlet, the DispatcherServlet, provides a shared algorithm
for request processing, while actual work is performed by configurable delegate components.
This model is flexible and supports diverse workflows.
The DispatcherServlet, as any Servlet, needs to be declared and mapped according
to the Servlet specification by using Java configuration or in web.xml.
In turn, the DispatcherServlet uses Spring configuration to discover
the delegate components it needs for request mapping, view resolution, exception
handling, and more.
The following example of the Java configuration registers and initializes
the DispatcherServlet, which is auto-detected by the Servlet container
(see Servlet Config):
public class MyWebApplicationInitializer implements WebApplicationInitializer {

    @Override
    public void onStartup(ServletContext servletCxt) {

        // Load Spring web application configuration
        AnnotationConfigWebApplicationContext ac = new AnnotationConfigWebApplicationContext();
        ac.register(AppConfig.class);
        ac.refresh();

        // Create and register the DispatcherServlet
        DispatcherServlet servlet = new DispatcherServlet(ac);
        ServletRegistration.Dynamic registration = servletCxt.addServlet("app", servlet);
        registration.setLoadOnStartup(1);
        registration.addMapping("/app/*");
    }
}class MyWebApplicationInitializer : WebApplicationInitializer {
override fun onStartup(servletCxt: ServletContext) {
// Load Spring web application configuration
val ac = AnnotationConfigWebApplicationContext()
ac.register(AppConfig::class.java)
ac.refresh()
// Create and register the DispatcherServlet
val servlet = DispatcherServlet(ac)
val registration = servletCxt.addServlet("app", servlet)
registration.setLoadOnStartup(1)
registration.addMapping("/app/*")
}
}
In addition to using the ServletContext API directly, you can also extend
AbstractAnnotationConfigDispatcherServletInitializer and override specific methods
(see the example under Context Hierarchy).
|
The following example of web.xml configuration registers and initializes the DispatcherServlet:
<web-app>

    <listener>
        <listener-class>org.springframework.web.context.ContextLoaderListener</listener-class>
    </listener>

    <context-param>
        <param-name>contextConfigLocation</param-name>
        <param-value>/WEB-INF/app-context.xml</param-value>
    </context-param>

    <servlet>
        <servlet-name>app</servlet-name>
        <servlet-class>org.springframework.web.servlet.DispatcherServlet</servlet-class>
        <init-param>
            <param-name>contextConfigLocation</param-name>
            <param-value></param-value>
        </init-param>
        <load-on-startup>1</load-on-startup>
    </servlet>

    <servlet-mapping>
        <servlet-name>app</servlet-name>
        <url-pattern>/app/*</url-pattern>
    </servlet-mapping>

</web-app>
Spring Boot follows a different initialization sequence. Rather than hooking into
the lifecycle of the Servlet container, Spring Boot uses Spring configuration to
bootstrap itself and the embedded Servlet container. Filter and Servlet declarations
are detected in Spring configuration and registered with the Servlet container.
For more details, see the
Spring Boot documentation.
|
1.1.1. Context Hierarchy
DispatcherServlet expects a WebApplicationContext (an extension of a plain
ApplicationContext) for its own configuration. WebApplicationContext has a link to the
ServletContext and the Servlet with which it is associated. It is also bound to the ServletContext
such that applications can use static methods on RequestContextUtils to look up the
WebApplicationContext if they need access to it.
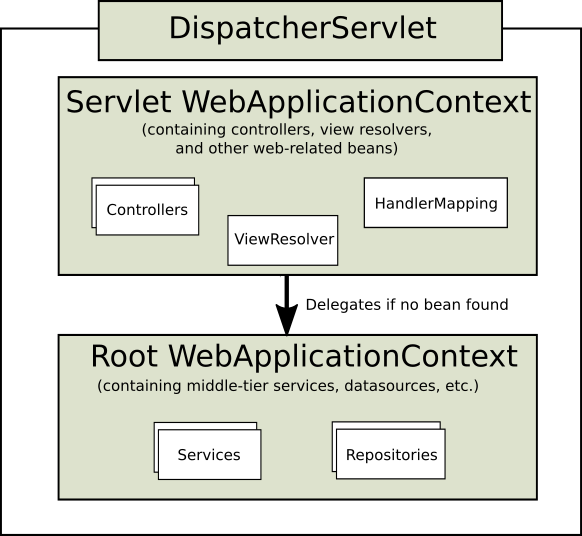
For many applications, having a single WebApplicationContext is simple and suffices.
It is also possible to have a context hierarchy where one root WebApplicationContext
is shared across multiple DispatcherServlet (or other Servlet) instances, each with
its own child WebApplicationContext configuration.
See Additional Capabilities of the ApplicationContext
for more on the context hierarchy feature.
The root WebApplicationContext typically contains infrastructure beans, such as data repositories and
business services that need to be shared across multiple Servlet instances. Those beans
are effectively inherited and can be overridden (that is, re-declared) in the Servlet-specific
child WebApplicationContext, which typically contains beans local to the given Servlet.
The following image shows this relationship:
The following example configures a WebApplicationContext hierarchy:
public class MyWebAppInitializer extends AbstractAnnotationConfigDispatcherServletInitializer {

    @Override
    protected Class<?>[] getRootConfigClasses() {
        return new Class<?>[] { RootConfig.class };
    }

    @Override
    protected Class<?>[] getServletConfigClasses() {
        return new Class<?>[] { App1Config.class };
    }

    @Override
    protected String[] getServletMappings() {
        return new String[] { "/app1/*" };
    }
}class MyWebAppInitializer : AbstractAnnotationConfigDispatcherServletInitializer() {
override fun getRootConfigClasses(): Array<Class<*>> {
return arrayOf(RootConfig::class.java)
}
override fun getServletConfigClasses(): Array<Class<*>> {
return arrayOf(App1Config::class.java)
}
override fun getServletMappings(): Array<String> {
return arrayOf("/app1/*")
}
}
If an application context hierarchy is not required, applications can return all
configuration through getRootConfigClasses() and null from getServletConfigClasses().
|
The following example shows the web.xml equivalent:
<web-app>

    <listener>
        <listener-class>org.springframework.web.context.ContextLoaderListener</listener-class>
    </listener>

    <context-param>
        <param-name>contextConfigLocation</param-name>
        <param-value>/WEB-INF/root-context.xml</param-value>
    </context-param>

    <servlet>
        <servlet-name>app1</servlet-name>
        <servlet-class>org.springframework.web.servlet.DispatcherServlet</servlet-class>
        <init-param>
            <param-name>contextConfigLocation</param-name>
            <param-value>/WEB-INF/app1-context.xml</param-value>
        </init-param>
        <load-on-startup>1</load-on-startup>
    </servlet>

    <servlet-mapping>
        <servlet-name>app1</servlet-name>
        <url-pattern>/app1/*</url-pattern>
    </servlet-mapping>

</web-app>
If an application context hierarchy is not required, applications may configure a
“root” context only and leave the contextConfigLocation Servlet parameter empty.
|
1.1.2. Special Bean Types
The DispatcherServlet delegates to special beans to process requests and render the
appropriate responses. By “special beans” we mean Spring-managed Object instances that
implement framework contracts. Those usually come with built-in contracts, but
you can customize their properties and extend or replace them.
The following table lists the special beans detected by the DispatcherServlet:
| Bean type | Explanation |
|---|---|
|
Map a request to a handler along with a list of
interceptors for pre- and post-processing.
The mapping is based on some criteria, the details of which vary by The two main |
|
Help the |
Strategy to resolve exceptions, possibly mapping them to handlers, to HTML error views, or other targets. See Exceptions. |
|
Resolve logical |
|
Resolve the |
|
Resolve themes your web application can use — for example, to offer personalized layouts. See Themes. |
|
Abstraction for parsing a multi-part request (for example, browser form file upload) with the help of some multipart parsing library. See Multipart Resolver. |
|
Store and retrieve the “input” and the “output” |
1.1.3. Web MVC Config
Applications can declare the infrastructure beans listed in Special Bean Types
that are required to process requests. The DispatcherServlet checks the
WebApplicationContext for each special bean. If there are no matching bean types,
it falls back on the default types listed in
DispatcherServlet.properties.
In most cases, the MVC Config is the best starting point. It declares the required beans in either Java or XML and provides a higher-level configuration callback API to customize it.
| Spring Boot relies on the MVC Java configuration to configure Spring MVC and provides many extra convenient options. |
1.1.4. Servlet Config
In a Servlet 3.0+ environment, you have the option of configuring the Servlet container
programmatically as an alternative or in combination with a web.xml file. The following
example registers a DispatcherServlet:
import org.springframework.web.WebApplicationInitializer;

public class MyWebApplicationInitializer implements WebApplicationInitializer {

    @Override
    public void onStartup(ServletContext container) {
        XmlWebApplicationContext appContext = new XmlWebApplicationContext();
        appContext.setConfigLocation("/WEB-INF/spring/dispatcher-config.xml");

        ServletRegistration.Dynamic registration = container.addServlet("dispatcher", new DispatcherServlet(appContext));
        registration.setLoadOnStartup(1);
        registration.addMapping("/");
    }
}import org.springframework.web.WebApplicationInitializer
class MyWebApplicationInitializer : WebApplicationInitializer {
override fun onStartup(container: ServletContext) {
val appContext = XmlWebApplicationContext()
appContext.setConfigLocation("/WEB-INF/spring/dispatcher-config.xml")
val registration = container.addServlet("dispatcher", DispatcherServlet(appContext))
registration.setLoadOnStartup(1)
registration.addMapping("/")
}
}WebApplicationInitializer is an interface provided by Spring MVC that ensures your
implementation is detected and automatically used to initialize any Servlet 3 container.
An abstract base class implementation of WebApplicationInitializer named
AbstractDispatcherServletInitializer makes it even easier to register the
DispatcherServlet by overriding methods to specify the servlet mapping and the
location of the DispatcherServlet configuration.
This is recommended for applications that use Java-based Spring configuration, as the following example shows:
public class MyWebAppInitializer extends AbstractAnnotationConfigDispatcherServletInitializer {

    @Override
    protected Class<?>[] getRootConfigClasses() {
        return null;
    }

    @Override
    protected Class<?>[] getServletConfigClasses() {
        return new Class<?>[] { MyWebConfig.class };
    }

    @Override
    protected String[] getServletMappings() {
        return new String[] { "/" };
    }
}class MyWebAppInitializer : AbstractAnnotationConfigDispatcherServletInitializer() {
override fun getRootConfigClasses(): Array<Class<*>>? {
return null
}
override fun getServletConfigClasses(): Array<Class<*>>? {
return arrayOf(MyWebConfig::class.java)
}
override fun getServletMappings(): Array<String> {
return arrayOf("/")
}
}If you use XML-based Spring configuration, you should extend directly from
AbstractDispatcherServletInitializer, as the following example shows:
public class MyWebAppInitializer extends AbstractDispatcherServletInitializer {

    @Override
    protected WebApplicationContext createRootApplicationContext() {
        return null;
    }

    @Override
    protected WebApplicationContext createServletApplicationContext() {
        XmlWebApplicationContext cxt = new XmlWebApplicationContext();
        cxt.setConfigLocation("/WEB-INF/spring/dispatcher-config.xml");
        return cxt;
    }

    @Override
    protected String[] getServletMappings() {
        return new String[] { "/" };
    }
}class MyWebAppInitializer : AbstractDispatcherServletInitializer() {
override fun createRootApplicationContext(): WebApplicationContext? {
return null
}
override fun createServletApplicationContext(): WebApplicationContext {
return XmlWebApplicationContext().apply {
setConfigLocation("/WEB-INF/spring/dispatcher-config.xml")
}
}
override fun getServletMappings(): Array<String> {
return arrayOf("/")
}
}AbstractDispatcherServletInitializer also provides a convenient way to add Filter
instances and have them be automatically mapped to the DispatcherServlet, as the
following example shows:
public class MyWebAppInitializer extends AbstractDispatcherServletInitializer {

    // ...

    @Override
    protected Filter[] getServletFilters() {
        return new Filter[] {
            new HiddenHttpMethodFilter(), new CharacterEncodingFilter() };
    }
}class MyWebAppInitializer : AbstractDispatcherServletInitializer() {
// ...
override fun getServletFilters(): Array<Filter> {
return arrayOf(HiddenHttpMethodFilter(), CharacterEncodingFilter())
}
}Each filter is added with a default name based on its concrete type and automatically
mapped to the DispatcherServlet.
The isAsyncSupported protected method of AbstractDispatcherServletInitializer
provides a single place to enable async support on the DispatcherServlet and all
filters mapped to it. By default, this flag is set to true.
Finally, if you need to further customize the DispatcherServlet itself, you can
override the createDispatcherServlet method.
1.1.5. Processing
The DispatcherServlet processes requests as follows:
-
The
WebApplicationContextis searched for and bound in the request as an attribute that the controller and other elements in the process can use. It is bound by default under theDispatcherServlet.WEB_APPLICATION_CONTEXT_ATTRIBUTEkey. -
The locale resolver is bound to the request to let elements in the process resolve the locale to use when processing the request (rendering the view, preparing data, and so on). If you do not need locale resolving, you do not need the locale resolver.
-
The theme resolver is bound to the request to let elements such as views determine which theme to use. If you do not use themes, you can ignore it.
-
If you specify a multipart file resolver, the request is inspected for multiparts. If multiparts are found, the request is wrapped in a
MultipartHttpServletRequestfor further processing by other elements in the process. See Multipart Resolver for further information about multipart handling. -
An appropriate handler is searched for. If a handler is found, the execution chain associated with the handler (preprocessors, postprocessors, and controllers) is executed in order to prepare a model or rendering. Alternatively, for annotated controllers, the response can be rendered (within the
HandlerAdapter) instead of returning a view. -
If a model is returned, the view is rendered. If no model is returned (maybe due to a preprocessor or postprocessor intercepting the request, perhaps for security reasons), no view is rendered, because the request could already have been fulfilled.
The HandlerExceptionResolver beans declared in the WebApplicationContext are used to
resolve exceptions thrown during request processing. Those exception resolvers allow
customizing the logic to address exceptions. See Exceptions for more details.
The Spring DispatcherServlet also supports the return of the
last-modification-date, as specified by the Servlet API. The process of determining
the last modification date for a specific request is straightforward: The
DispatcherServlet looks up an appropriate handler mapping and tests whether the
handler that is found implements the LastModified interface. If so, the value of the
long getLastModified(request) method of the LastModified interface is returned to
the client.
You can customize individual DispatcherServlet instances by adding Servlet
initialization parameters (init-param elements) to the Servlet declaration in the
web.xml file. The following table lists the supported parameters:
| Parameter | Explanation |
|---|---|
|
Class that implements |
|
String that is passed to the context instance (specified by |
|
Namespace of the |
|
Whether to throw a By default, this is set to Note that, if default servlet handling is also configured, unresolved requests are always forwarded to the default servlet and a 404 is never raised. |
1.1.6. Interception
All HandlerMapping implementations support handler interceptors that are useful when
you want to apply specific functionality to certain requests — for example, checking for
a principal. Interceptors must implement HandlerInterceptor from the
org.springframework.web.servlet package with three methods that should provide enough
flexibility to do all kinds of pre-processing and post-processing:
-
preHandle(..): Before the actual handler is executed -
postHandle(..): After the handler is executed -
afterCompletion(..): After the complete request has finished
The preHandle(..) method returns a boolean value. You can use this method to break or
continue the processing of the execution chain. When this method returns true, the
handler execution chain continues. When it returns false, the DispatcherServlet
assumes the interceptor itself has taken care of requests (and, for example, rendered an
appropriate view) and does not continue executing the other interceptors and the actual
handler in the execution chain.
See Interceptors in the section on MVC configuration for examples of how to
configure interceptors. You can also register them directly by using setters on individual
HandlerMapping implementations.
Note that postHandle is less useful with @ResponseBody and ResponseEntity methods for
which the response is written and committed within the HandlerAdapter and before
postHandle. That means it is too late to make any changes to the response, such as adding
an extra header. For such scenarios, you can implement ResponseBodyAdvice and either
declare it as an Controller Advice bean or configure it directly on
RequestMappingHandlerAdapter.
1.1.7. Exceptions
If an exception occurs during request mapping or is thrown from a request handler (such as
a @Controller), the DispatcherServlet delegates to a chain of HandlerExceptionResolver
beans to resolve the exception and provide alternative handling, which is typically an
error response.
The following table lists the available HandlerExceptionResolver implementations:
HandlerExceptionResolver |
Description |
|---|---|
|
A mapping between exception class names and error view names. Useful for rendering error pages in a browser application. |
Resolves exceptions raised by Spring MVC and maps them to HTTP status codes.
See also alternative |
|
|
Resolves exceptions with the |
|
Resolves exceptions by invoking an |
Chain of Resolvers
You can form an exception resolver chain by declaring multiple HandlerExceptionResolver
beans in your Spring configuration and setting their order properties as needed.
The higher the order property, the later the exception resolver is positioned.
The contract of HandlerExceptionResolver specifies that it can return:
-
a
ModelAndViewthat points to an error view. -
An empty
ModelAndViewif the exception was handled within the resolver. -
nullif the exception remains unresolved, for subsequent resolvers to try, and, if the exception remains at the end, it is allowed to bubble up to the Servlet container.
The MVC Config automatically declares built-in resolvers for default Spring MVC
exceptions, for @ResponseStatus annotated exceptions, and for support of
@ExceptionHandler methods. You can customize that list or replace it.
Container Error Page
If an exception remains unresolved by any HandlerExceptionResolver and is, therefore,
left to propagate or if the response status is set to an error status (that is, 4xx, 5xx),
Servlet containers can render a default error page in HTML. To customize the default
error page of the container, you can declare an error page mapping in web.xml.
The following example shows how to do so:
<error-page>
    <location>/error</location>
</error-page>
Given the preceding example, when an exception bubbles up or the response has an error status, the
Servlet container makes an ERROR dispatch within the container to the configured URL
(for example, /error). This is then processed by the DispatcherServlet, possibly mapping it
to a @Controller, which could be implemented to return an error view name with a model
or to render a JSON response, as the following example shows:
@RestController
public class ErrorController {

    @RequestMapping(path = "/error")
    public Map<String, Object> handle(HttpServletRequest request) {
        Map<String, Object> map = new HashMap<String, Object>();
        map.put("status", request.getAttribute("javax.servlet.error.status_code"));
        map.put("reason", request.getAttribute("javax.servlet.error.message"));
        return map;
    }
}@RestController
class ErrorController {
@RequestMapping(path = ["/error"])
fun handle(request: HttpServletRequest): Map<String, Any> {
val map = HashMap<String, Any>()
map["status"] = request.getAttribute("javax.servlet.error.status_code")
map["reason"] = request.getAttribute("javax.servlet.error.message")
return map
}
}
The Servlet API does not provide a way to create error page mappings in Java. You can,
however, use both a WebApplicationInitializer and a minimal web.xml.
|
1.1.8. View Resolution
Spring MVC defines the ViewResolver and View interfaces that let you render
models in a browser without tying you to a specific view technology. ViewResolver
provides a mapping between view names and actual views. View addresses the preparation
of data before handing over to a specific view technology.
The following table provides more details on the ViewResolver hierarchy:
| ViewResolver | Description |
|---|---|
|
Sub-classes of |
|
Implementation of |
|
Implementation of |
|
Simple implementation of the |
|
Convenient subclass of |
|
Convenient subclass of |
|
Implementation of the |
Handling
You can chain view resolvers by declaring more than one resolver bean and, if necessary, by
setting the order property to specify ordering. Remember, the higher the order property,
the later the view resolver is positioned in the chain.
The contract of a ViewResolver specifies that it can return null to indicate that the
view could not be found. However, in the case of JSPs and InternalResourceViewResolver,
the only way to figure out if a JSP exists is to perform a dispatch through
RequestDispatcher. Therefore, you must always configure an InternalResourceViewResolver
to be last in the overall order of view resolvers.
Configuring view resolution is as simple as adding ViewResolver beans to your Spring
configuration. The MVC Config provides a dedicated configuration API for
View Resolvers and for adding logic-less
View Controllers which are useful for HTML template
rendering without controller logic.
Redirecting
The special redirect: prefix in a view name lets you perform a redirect. The
UrlBasedViewResolver (and its subclasses) recognize this as an instruction that a
redirect is needed. The rest of the view name is the redirect URL.
The net effect is the same as if the controller had returned a RedirectView, but now
the controller itself can operate in terms of logical view names. A logical view
name (such as redirect:/myapp/some/resource) redirects relative to the current
Servlet context, while a name such as redirect:https://myhost.com/some/arbitrary/path
redirects to an absolute URL.
Note that, if a controller method is annotated with the @ResponseStatus, the annotation
value takes precedence over the response status set by RedirectView.
Forwarding
You can also use a special forward: prefix for view names that are
ultimately resolved by UrlBasedViewResolver and subclasses. This creates an
InternalResourceView, which does a RequestDispatcher.forward().
Therefore, this prefix is not useful with InternalResourceViewResolver and
InternalResourceView (for JSPs), but it can be helpful if you use another view
technology but still want to force a forward of a resource to be handled by the
Servlet/JSP engine. Note that you may also chain multiple view resolvers, instead.
Content Negotiation
ContentNegotiatingViewResolver
does not resolve views itself but rather delegates
to other view resolvers and selects the view that resembles the representation requested
by the client. The representation can be determined from the Accept header or from a
query parameter (for example, "/path?format=pdf").
The ContentNegotiatingViewResolver selects an appropriate View to handle the request
by comparing the request media types with the media type (also known as
Content-Type) supported by the View associated with each of its ViewResolvers. The
first View in the list that has a compatible Content-Type returns the representation
to the client. If a compatible view cannot be supplied by the ViewResolver chain,
the list of views specified through the DefaultViews property is consulted. This
latter option is appropriate for singleton Views that can render an appropriate
representation of the current resource regardless of the logical view name. The Accept
header can include wildcards (for example text/*), in which case a View whose
Content-Type is text/xml is a compatible match.
See View Resolvers under MVC Config for configuration details.
1.1.9. Locale
Most parts of Spring’s architecture support internationalization, as the Spring web
MVC framework does. DispatcherServlet lets you automatically resolve messages
by using the client’s locale. This is done with LocaleResolver objects.
When a request comes in, the DispatcherServlet looks for a locale resolver and, if it
finds one, it tries to use it to set the locale. By using the RequestContext.getLocale()
method, you can always retrieve the locale that was resolved by the locale resolver.
In addition to automatic locale resolution, you can also attach an interceptor to the handler mapping (see Interception for more information on handler mapping interceptors) to change the locale under specific circumstances (for example, based on a parameter in the request).
Locale resolvers and interceptors are defined in the
org.springframework.web.servlet.i18n package and are configured in your application
context in the normal way. The following selection of locale resolvers is included in
Spring.
Time Zone
In addition to obtaining the client’s locale, it is often useful to know its time zone.
The LocaleContextResolver interface offers an extension to LocaleResolver that lets
resolvers provide a richer LocaleContext, which may include time zone information.
When available, the user’s TimeZone can be obtained by using the
RequestContext.getTimeZone() method. Time zone information is automatically used
by any Date/Time Converter and Formatter objects that are registered with Spring’s
ConversionService.
Header Resolver
This locale resolver inspects the accept-language header in the request that was sent
by the client (for example, a web browser). Usually, this header field contains the locale of
the client’s operating system. Note that this resolver does not support time zone
information.
Cookie Resolver
This locale resolver inspects a Cookie that might exist on the client to see if a
Locale or TimeZone is specified. If so, it uses the specified details. By using the
properties of this locale resolver, you can specify the name of the cookie as well as the
maximum age. The following example defines a CookieLocaleResolver:
<bean id="localeResolver" class="org.springframework.web.servlet.i18n.CookieLocaleResolver">

    <property name="cookieName" value="clientlanguage"/>

    <!-- in seconds. If set to -1, the cookie is not persisted (deleted when browser shuts down) -->
    <property name="cookieMaxAge" value="100000"/>

</bean>
The following table describes the properties CookieLocaleResolver:
| Property | Default | Description |
|---|---|---|
|
classname + LOCALE |
The name of the cookie |
|
Servlet container default |
The maximum time a cookie persists on the client. If |
|
/ |
Limits the visibility of the cookie to a certain part of your site. When |
Session Resolver
The SessionLocaleResolver lets you retrieve Locale and TimeZone from the
session that might be associated with the user’s request. In contrast to
CookieLocaleResolver, this strategy stores locally chosen locale settings in the
Servlet container’s HttpSession. As a consequence, those settings are temporary
for each session and are, therefore, lost when each session terminates.
Note that there is no direct relationship with external session management mechanisms,
such as the Spring Session project. This SessionLocaleResolver evaluates and
modifies the corresponding HttpSession attributes against the current HttpServletRequest.
Locale Interceptor
You can enable changing of locales by adding the LocaleChangeInterceptor to one of the
HandlerMapping definitions. It detects a parameter in the request and changes the locale
accordingly, calling the setLocale method on the LocaleResolver in the dispatcher’s
application context. The next example shows that calls to all *.view resources
that contain a parameter named siteLanguage now changes the locale. So, for example,
a request for the URL, https://www.sf.net/home.view?siteLanguage=nl, changes the site
language to Dutch. The following example shows how to intercept the locale:
<bean id="localeChangeInterceptor"
        class="org.springframework.web.servlet.i18n.LocaleChangeInterceptor">
    <property name="paramName" value="siteLanguage"/>
</bean>

<bean id="localeResolver"
        class="org.springframework.web.servlet.i18n.CookieLocaleResolver"/>

<bean id="urlMapping"
        class="org.springframework.web.servlet.handler.SimpleUrlHandlerMapping">
    <property name="interceptors">
        <list>
            <ref bean="localeChangeInterceptor"/>
        </list>
    </property>
    <property name="mappings">
        <value>/**/*.view=someController</value>
    </property>
</bean>
1.1.10. Themes
You can apply Spring Web MVC framework themes to set the overall look-and-feel of your application, thereby enhancing user experience. A theme is a collection of static resources, typically style sheets and images, that affect the visual style of the application.
Defining a theme
To use themes in your web application, you must set up an implementation of the
org.springframework.ui.context.ThemeSource interface. The WebApplicationContext
interface extends ThemeSource but delegates its responsibilities to a dedicated
implementation. By default, the delegate is an
org.springframework.ui.context.support.ResourceBundleThemeSource implementation that
loads properties files from the root of the classpath. To use a custom ThemeSource
implementation or to configure the base name prefix of the ResourceBundleThemeSource,
you can register a bean in the application context with the reserved name, themeSource.
The web application context automatically detects a bean with that name and uses it.
When you use the ResourceBundleThemeSource, a theme is defined in a simple properties
file. The properties file lists the resources that make up the theme, as the following example shows:
styleSheet=/themes/cool/style.css
background=/themes/cool/img/coolBg.jpg
The keys of the properties are the names that refer to the themed elements from view
code. For a JSP, you typically do this using the spring:theme custom tag, which is
very similar to the spring:message tag. The following JSP fragment uses the theme
defined in the previous example to customize the look and feel:
<%@ taglib prefix="spring" uri="http://www.springframework.org/tags"%>
<html>
    <head>
        <link rel="stylesheet" href="<spring:theme code='styleSheet'/>" type="text/css"/>
    </head>
    <body style="background=<spring:theme code='background'/>">
        ...
    </body>
</html>
By default, the ResourceBundleThemeSource uses an empty base name prefix. As a result,
the properties files are loaded from the root of the classpath. Thus, you would put the
cool.properties theme definition in a directory at the root of the classpath (for
example, in /WEB-INF/classes). The ResourceBundleThemeSource uses the standard Java
resource bundle loading mechanism, allowing for full internationalization of themes. For
example, we could have a /WEB-INF/classes/cool_nl.properties that references a special
background image with Dutch text on it.
Resolving Themes
After you define themes, as described in the preceding section,
you decide which theme to use. The DispatcherServlet looks for a bean named themeResolver
to find out which ThemeResolver implementation to use. A theme resolver works in much the same
way as a LocaleResolver. It detects the theme to use for a particular request and can also
alter the request’s theme. The following table describes the theme resolvers provided by Spring:
| Class | Description |
|---|---|
|
Selects a fixed theme, set by using the |
|
The theme is maintained in the user’s HTTP session. It needs to be set only once for each session but is not persisted between sessions. |
|
The selected theme is stored in a cookie on the client. |
Spring also provides a ThemeChangeInterceptor that lets theme changes on every
request with a simple request parameter.
1.1.11. Multipart Resolver
MultipartResolver from the org.springframework.web.multipart package is a strategy
for parsing multipart requests including file uploads. There is one implementation
based on Commons FileUpload and another
based on Servlet 3.0 multipart request parsing.
To enable multipart handling, you need to declare a MultipartResolver bean in your
DispatcherServlet Spring configuration with a name of multipartResolver.
The DispatcherServlet detects it and applies it to the incoming request. When a POST with
content-type of multipart/form-data is received, the resolver parses the content and
wraps the current HttpServletRequest as MultipartHttpServletRequest to
provide access to resolved parts in addition to exposing them as request parameters.
Apache Commons FileUpload
To use Apache Commons FileUpload, you can configure a bean of type
CommonsMultipartResolver with a name of multipartResolver. You also need to
have commons-fileupload as a dependency on your classpath.
Servlet 3.0
Servlet 3.0 multipart parsing needs to be enabled through Servlet container configuration. To do so:
-
In Java, set a
MultipartConfigElementon the Servlet registration. -
In
web.xml, add a"<multipart-config>"section to the servlet declaration.
The following example shows how to set a MultipartConfigElement on the Servlet registration:
public class AppInitializer extends AbstractAnnotationConfigDispatcherServletInitializer {

    // ...

    @Override
    protected void customizeRegistration(ServletRegistration.Dynamic registration) {

        // Optionally also set maxFileSize, maxRequestSize, fileSizeThreshold
        registration.setMultipartConfig(new MultipartConfigElement("/tmp"));
    }

}class AppInitializer : AbstractAnnotationConfigDispatcherServletInitializer() {
// ...
override fun customizeRegistration(registration: ServletRegistration.Dynamic) {
// Optionally also set maxFileSize, maxRequestSize, fileSizeThreshold
registration.setMultipartConfig(MultipartConfigElement("/tmp"))
}
}Once the Servlet 3.0 configuration is in place, you can add a bean of type
StandardServletMultipartResolver with a name of multipartResolver.
1.1.12. Logging
DEBUG-level logging in Spring MVC is designed to be compact, minimal, and human-friendly. It focuses on high-value bits of information that are useful over and over again versus others that are useful only when debugging a specific issue.
TRACE-level logging generally follows the same principles as DEBUG (and, for example, also should not be a fire hose) but can be used for debugging any issue. In addition, some log messages may show a different level of detail at TRACE versus DEBUG.
Good logging comes from the experience of using the logs. If you spot anything that does not meet the stated goals, please let us know.
Sensitive Data
DEBUG and TRACE logging may log sensitive information. This is why request parameters and
headers are masked by default and their logging in full must be enabled explicitly
through the enableLoggingRequestDetails property on DispatcherServlet.
The following example shows how to do so by using Java configuration:
public class MyInitializer
        extends AbstractAnnotationConfigDispatcherServletInitializer {

    @Override
    protected Class<?>[] getRootConfigClasses() {
        return ... ;
    }

    @Override
    protected Class<?>[] getServletConfigClasses() {
        return ... ;
    }

    @Override
    protected String[] getServletMappings() {
        return ... ;
    }

    @Override
    protected void customizeRegistration(ServletRegistration.Dynamic registration) {
        registration.setInitParameter("enableLoggingRequestDetails", "true");
    }

}class MyInitializer : AbstractAnnotationConfigDispatcherServletInitializer() {
override fun getRootConfigClasses(): Array<Class<*>>? {
return ...
}
override fun getServletConfigClasses(): Array<Class<*>>? {
return ...
}
override fun getServletMappings(): Array<String> {
return ...
}
override fun customizeRegistration(registration: ServletRegistration.Dynamic) {
registration.setInitParameter("enableLoggingRequestDetails", "true")
}
}1.2. Filters
The spring-web module provides some useful filters:
1.2.1. Form Data
Browsers can submit form data only through HTTP GET or HTTP POST but non-browser clients can also
use HTTP PUT, PATCH, and DELETE. The Servlet API requires ServletRequest.getParameter*()
methods to support form field access only for HTTP POST.
The spring-web module provides FormContentFilter to intercept HTTP PUT, PATCH, and DELETE
requests with a content type of application/x-www-form-urlencoded, read the form data from
the body of the request, and wrap the ServletRequest to make the form data
available through the ServletRequest.getParameter*() family of methods.
1.2.2. Forwarded Headers
As a request goes through proxies (such as load balancers) the host, port, and scheme may change, and that makes it a challenge to create links that point to the correct host, port, and scheme from a client perspective.
RFC 7239 defines the Forwarded HTTP header
that proxies can use to provide information about the original request. There are other
non-standard headers, too, including X-Forwarded-Host, X-Forwarded-Port,
X-Forwarded-Proto, X-Forwarded-Ssl, and X-Forwarded-Prefix.
ForwardedHeaderFilter is a Servlet filter that modifies the request in order to
a) change the host, port, and scheme based on Forwarded headers, and b) to remove those
headers to eliminate further impact. The filter relies on wrapping the request, and
therefore it must be ordered ahead of other filters, such as RequestContextFilter, that
should work with the modified and not the original request.
There are security considerations for forwarded headers since an application cannot know
if the headers were added by a proxy, as intended, or by a malicious client. This is why
a proxy at the boundary of trust should be configured to remove untrusted Forwarded
headers that come from the outside. You can also configure the ForwardedHeaderFilter
with removeOnly=true, in which case it removes but does not use the headers.
In order to support asynchronous requests and error dispatches this
filter should be mapped with DispatcherType.ASYNC and also DispatcherType.ERROR.
If using Spring Framework’s AbstractAnnotationConfigDispatcherServletInitializer
(see Servlet Config) all filters are automatically registered for all dispatch
types. However if registering the filter via web.xml or in Spring Boot via a
FilterRegistrationBean be sure to include DispatcherType.ASYNC and
DispatcherType.ERROR in addition to DispatcherType.REQUEST.
1.2.3. Shallow ETag
The ShallowEtagHeaderFilter filter creates a “shallow” ETag by caching the content
written to the response and computing an MD5 hash from it. The next time a client sends,
it does the same, but it also compares the computed value against the If-None-Match
request header and, if the two are equal, returns a 304 (NOT_MODIFIED).
This strategy saves network bandwidth but not CPU, as the full response must be computed for each request. Other strategies at the controller level, described earlier, can avoid the computation. See HTTP Caching.
This filter has a writeWeakETag parameter that configures the filter to write weak ETags
similar to the following: W/"02a2d595e6ed9a0b24f027f2b63b134d6" (as defined in
RFC 7232 Section 2.3).
In order to support asynchronous requests this filter must be mapped
with DispatcherType.ASYNC so that the filter can delay and successfully generate an
ETag to the end of the last async dispatch. If using Spring Framework’s
AbstractAnnotationConfigDispatcherServletInitializer (see Servlet Config)
all filters are automatically registered for all dispatch types. However if registering
the filter via web.xml or in Spring Boot via a FilterRegistrationBean be sure to include
DispatcherType.ASYNC.
1.2.4. CORS
Spring MVC provides fine-grained support for CORS configuration through annotations on
controllers. However, when used with Spring Security, we advise relying on the built-in
CorsFilter that must be ordered ahead of Spring Security’s chain of filters.
See the sections on CORS and the CORS Filter for more details.
1.3. Annotated Controllers
Spring MVC provides an annotation-based programming model where @Controller and
@RestController components use annotations to express request mappings, request input,
exception handling, and more. Annotated controllers have flexible method signatures and
do not have to extend base classes nor implement specific interfaces.
The following example shows a controller defined by annotations:
@Controller
public class HelloController {

    @GetMapping("/hello")
    public String handle(Model model) {
        model.addAttribute("message", "Hello World!");
        return "index";
    }
}import org.springframework.ui.set
@Controller
class HelloController {
@GetMapping("/hello")
fun handle(model: Model): String {
model["message"] = "Hello World!"
return "index"
}
}In the preceding example, the method accepts a Model and returns a view name as a String,
but many other options exist and are explained later in this chapter.
| Guides and tutorials on spring.io use the annotation-based programming model described in this section. |
1.3.1. Declaration
You can define controller beans by using a standard Spring bean definition in the
Servlet’s WebApplicationContext. The @Controller stereotype allows for auto-detection,
aligned with Spring general support for detecting @Component classes in the classpath
and auto-registering bean definitions for them. It also acts as a stereotype for the
annotated class, indicating its role as a web component.
To enable auto-detection of such @Controller beans, you can add component scanning to
your Java configuration, as the following example shows:
@Configuration
@ComponentScan("org.example.web")
public class WebConfig {

    // ...
}@Configuration
@ComponentScan("org.example.web")
class WebConfig {
// ...
}The following example shows the XML configuration equivalent of the preceding example:
<?xml version="1.0" encoding="UTF-8"?>
<beans xmlns="http://www.springframework.org/schema/beans"
    xmlns:xsi="http://www.w3.org/2001/XMLSchema-instance"
    xmlns:p="http://www.springframework.org/schema/p"
    xmlns:context="http://www.springframework.org/schema/context"
    xsi:schemaLocation="
        http://www.springframework.org/schema/beans
        https://www.springframework.org/schema/beans/spring-beans.xsd
        http://www.springframework.org/schema/context
        https://www.springframework.org/schema/context/spring-context.xsd">

    <context:component-scan base-package="org.example.web"/>

    <!-- ... -->

</beans>
@RestController is a composed annotation that is
itself meta-annotated with @Controller and @ResponseBody to indicate a controller whose
every method inherits the type-level @ResponseBody annotation and, therefore, writes
directly to the response body versus view resolution and rendering with an HTML template.
AOP Proxies
In some cases, you may need to decorate a controller with an AOP proxy at runtime.
One example is if you choose to have @Transactional annotations directly on the
controller. When this is the case, for controllers specifically, we recommend
using class-based proxying. This is typically the default choice with controllers.
However, if a controller must implement an interface that is not a Spring Context
callback (such as InitializingBean, *Aware, and others), you may need to explicitly
configure class-based proxying. For example, with <tx:annotation-driven/> you can
change to <tx:annotation-driven proxy-target-class="true"/>, and with
@EnableTransactionManagement you can change to
@EnableTransactionManagement(proxyTargetClass = true).
1.3.2. Request Mapping
You can use the @RequestMapping annotation to map requests to controllers methods. It has
various attributes to match by URL, HTTP method, request parameters, headers, and media
types. You can use it at the class level to express shared mappings or at the method level
to narrow down to a specific endpoint mapping.
There are also HTTP method specific shortcut variants of @RequestMapping:
-
@GetMapping -
@PostMapping -
@PutMapping -
@DeleteMapping -
@PatchMapping
The shortcuts are Custom Annotations that are provided because,
arguably, most controller methods should be mapped to a specific HTTP method versus
using @RequestMapping, which, by default, matches to all HTTP methods. At the same,
a @RequestMapping is still needed at the class level to express shared mappings.
The following example has type and method level mappings:
@RestController
@RequestMapping("/persons")
class PersonController {

    @GetMapping("/{id}")
    public Person getPerson(@PathVariable Long id) {
        // ...
    }

    @PostMapping
    @ResponseStatus(HttpStatus.CREATED)
    public void add(@RequestBody Person person) {
        // ...
    }
}@RestController
@RequestMapping("/persons")
class PersonController {
@GetMapping("/{id}")
fun getPerson(@PathVariable id: Long): Person {
// ...
}
@PostMapping
@ResponseStatus(HttpStatus.CREATED)
fun add(@RequestBody person: Person) {
// ...
}
}URI patterns
You can map requests by using glob patterns and wildcards:
| Pattern | Description | Example |
|---|---|---|
|
Matches one character |
matches |
|
Matches zero or more characters within a path segment |
|
|
Matches zero or more path segments until the end of the path |
|
|
Matches a path segment and captures it as a variable named "name" |
|
|
Matches the regexp |
|
Captured URI variables can be accessed with @PathVariable, as the following example shows:
@GetMapping("/owners/{ownerId}/pets/{petId}")
public Pet findPet(@PathVariable Long ownerId, @PathVariable Long petId) {
    // ...
}@GetMapping("/owners/{ownerId}/pets/{petId}")
fun findPet(@PathVariable ownerId: Long, @PathVariable petId: Long): Pet {
// ...
}You can declare URI variables at the class and method levels, as the following example shows:
@Controller
@RequestMapping("/owners/{ownerId}")
public class OwnerController {

    @GetMapping("/pets/{petId}")
    public Pet findPet(@PathVariable Long ownerId, @PathVariable Long petId) {
        // ...
    }
}@Controller
@RequestMapping("/owners/{ownerId}")
class OwnerController {
@GetMapping("/pets/{petId}")
fun findPet(@PathVariable ownerId: Long, @PathVariable petId: Long): Pet {
// ...
}
}URI variables are automatically converted to the appropriate type, or TypeMismatchException
is raised. Simple types (int, long, Date, and so on) are supported by default and you can
register support for any other data type.
See Type Conversion and DataBinder.
You can explicitly name URI variables (for example, @PathVariable("customId")), but you can
leave that detail out if the names are the same and your code is compiled with debugging
information or with the -parameters compiler flag on Java 8.
The syntax {varName:regex} declares a URI variable with a regular expression that has
syntax of {varName:regex}. For example, given URL "/spring-web-3.0.5 .jar", the following method
extracts the name, version, and file extension:
@GetMapping("/{name:[a-z-]+}-{version:\\d\\.\\d\\.\\d}{ext:\\.[a-z]+}")
public void handle(@PathVariable String name, @PathVariable String version, @PathVariable String ext) {
    // ...
}@GetMapping("/{name:[a-z-]+}-{version:\\d\\.\\d\\.\\d}{ext:\\.[a-z]+}")
fun handle(@PathVariable name: String, @PathVariable version: String, @PathVariable ext: String) {
// ...
}URI path patterns can also have embedded ${…} placeholders that are resolved on startup
by using PropertyPlaceHolderConfigurer against local, system, environment, and other property
sources. You can use this, for example, to parameterize a base URL based on some external
configuration.
Spring MVC uses the PathMatcher contract and the AntPathMatcher implementation from
spring-core for URI path matching.
|
Pattern Comparison
When multiple patterns match a URL, they must be compared to find the best match. This is done
by using AntPathMatcher.getPatternComparator(String path), which looks for patterns that are more
specific.
A pattern is less specific if it has a lower count of URI variables (counted as 1), single wildcards (counted as 1), and double wildcards (counted as 2). Given an equal score, the longer pattern is chosen. Given the same score and length, the pattern with more URI variables than wildcards is chosen.
The default mapping pattern (/**) is excluded from scoring and always
sorted last. Also, prefix patterns (such as /public/**) are considered less
specific than other pattern that do not have double wildcards.
For the full details, see AntPatternComparator
in AntPathMatcher and also keep in mind that
you can customize the PathMatcher implementation.
See Path Matching in the configuration section.
Suffix Match
By default, Spring MVC performs .* suffix pattern matching so that a
controller mapped to /person is also implicitly mapped to /person.*.
The file extension is then used to interpret the requested content type to use for
the response (that is, instead of the Accept header) — for example, /person.pdf,
/person.xml, and others.
Using file extensions in this way was necessary when browsers used to send Accept headers
that were hard to interpret consistently. At present, that is no longer a necessity and
using the Accept header should be the preferred choice.
Over time, the use of file name extensions has proven problematic in a variety of ways. It can cause ambiguity when overlain with the use of URI variables, path parameters, and URI encoding. Reasoning about URL-based authorization and security (see next section for more details) also become more difficult.
To completely disable the use of file extensions, you must set both of the following:
-
useSuffixPatternMatching(false), see PathMatchConfigurer -
favorPathExtension(false), see ContentNegotiationConfigurer
URL-based content negotiation can still be useful (for example, when typing a URL in a
browser). To enable that, we recommend a query parameter-based strategy to avoid most of
the issues that come with file extensions. Alternatively, if you must use file extensions, consider
restricting them to a list of explicitly registered extensions through the
mediaTypes property of ContentNegotiationConfigurer.
|
Starting in 5.2.4, path extension related options for request mapping in RequestMappingHandlerMapping and for content negotiation in ContentNegotiationManagerFactoryBean are deprecated. See Spring Framework issue #24179 and related issues for further plans. |
Suffix Match and RFD
A reflected file download (RFD) attack is similar to XSS in that it relies on request input (for example, a query parameter and a URI variable) being reflected in the response. However, instead of inserting JavaScript into HTML, an RFD attack relies on the browser switching to perform a download and treating the response as an executable script when double-clicked later.
In Spring MVC, @ResponseBody and ResponseEntity methods are at risk, because
they can render different content types, which clients can request through URL path extensions.
Disabling suffix pattern matching and using path extensions for content negotiation
lower the risk but are not sufficient to prevent RFD attacks.
To prevent RFD attacks, prior to rendering the response body, Spring MVC adds a
Content-Disposition:inline;filename=f.txt header to suggest a fixed and safe download
file. This is done only if the URL path contains a file extension that is neither
allowed as safe nor explicitly registered for content negotiation. However, it can
potentially have side effects when URLs are typed directly into a browser.
Many common path extensions are allowed as safe by default. Applications with custom
HttpMessageConverter implementations can explicitly register file extensions for content
negotiation to avoid having a Content-Disposition header added for those extensions.
See Content Types.
See CVE-2015-5211 for additional recommendations related to RFD.
Consumable Media Types
You can narrow the request mapping based on the Content-Type of the request,
as the following example shows:
@PostMapping(path = "/pets", consumes = "application/json") (1)
public void addPet(@RequestBody Pet pet) {
    // ...
}| 1 | Using a consumes attribute to narrow the mapping by the content type. |
@PostMapping("/pets", consumes = ["application/json"]) (1)
fun addPet(@RequestBody pet: Pet) {
    // ...
}| 1 | Using a consumes attribute to narrow the mapping by the content type. |
The consumes attribute also supports negation expressions — for example, !text/plain means any
content type other than text/plain.
You can declare a shared consumes attribute at the class level. Unlike most other
request-mapping attributes, however, when used at the class level, a method-level consumes attribute
overrides rather than extends the class-level declaration.
MediaType provides constants for commonly used media types, such as
APPLICATION_JSON_VALUE and APPLICATION_XML_VALUE.
|
Producible Media Types
You can narrow the request mapping based on the Accept request header and the list of
content types that a controller method produces, as the following example shows:
@GetMapping(path = "/pets/{petId}", produces = "application/json") (1)
@ResponseBody
public Pet getPet(@PathVariable String petId) {
    // ...
}| 1 | Using a produces attribute to narrow the mapping by the content type. |
@GetMapping("/pets/{petId}", produces = ["application/json"]) (1)
@ResponseBody
fun getPet(@PathVariable petId: String): Pet {
    // ...
}| 1 | Using a produces attribute to narrow the mapping by the content type. |
The media type can specify a character set. Negated expressions are supported — for example,
!text/plain means any content type other than "text/plain".
You can declare a shared produces attribute at the class level. Unlike most other
request-mapping attributes, however, when used at the class level, a method-level produces attribute
overrides rather than extends the class-level declaration.
MediaType provides constants for commonly used media types, such as
APPLICATION_JSON_VALUE and APPLICATION_XML_VALUE.
|
Parameters, headers
You can narrow request mappings based on request parameter conditions. You can test for the
presence of a request parameter (myParam), for the absence of one (!myParam), or for a
specific value (myParam=myValue). The following example shows how to test for a specific value:
@GetMapping(path = "/pets/{petId}", params = "myParam=myValue") (1)
public void findPet(@PathVariable String petId) {
    // ...
}| 1 | Testing whether myParam equals myValue. |
@GetMapping("/pets/{petId}", params = ["myParam=myValue"]) (1)
fun findPet(@PathVariable petId: String) {
    // ...
}| 1 | Testing whether myParam equals myValue. |
You can also use the same with request header conditions, as the following example shows:
@GetMapping(path = "/pets", headers = "myHeader=myValue") (1)
public void findPet(@PathVariable String petId) {
    // ...
}| 1 | Testing whether myHeader equals myValue. |
@GetMapping("/pets", headers = ["myHeader=myValue"]) (1)
fun findPet(@PathVariable petId: String) {
    // ...
}HTTP HEAD, OPTIONS
@GetMapping (and @RequestMapping(method=HttpMethod.GET)) support HTTP HEAD
transparently for request mapping. Controller methods do not need to change.
A response wrapper, applied in javax.servlet.http.HttpServlet, ensures a Content-Length
header is set to the number of bytes written (without actually writing to the response).
@GetMapping (and @RequestMapping(method=HttpMethod.GET)) are implicitly mapped to
and support HTTP HEAD. An HTTP HEAD request is processed as if it were HTTP GET except
that, instead of writing the body, the number of bytes are counted and the Content-Length
header is set.
By default, HTTP OPTIONS is handled by setting the Allow response header to the list of HTTP
methods listed in all @RequestMapping methods that have matching URL patterns.
For a @RequestMapping without HTTP method declarations, the Allow header is set to
GET,HEAD,POST,PUT,PATCH,DELETE,OPTIONS. Controller methods should always declare the
supported HTTP methods (for example, by using the HTTP method specific variants:
@GetMapping, @PostMapping, and others).
You can explicitly map the @RequestMapping method to HTTP HEAD and HTTP OPTIONS, but that
is not necessary in the common case.
Custom Annotations
Spring MVC supports the use of composed annotations
for request mapping. Those are annotations that are themselves meta-annotated with
@RequestMapping and composed to redeclare a subset (or all) of the @RequestMapping
attributes with a narrower, more specific purpose.
@GetMapping, @PostMapping, @PutMapping, @DeleteMapping, and @PatchMapping are
examples of composed annotations. They are provided because, arguably, most
controller methods should be mapped to a specific HTTP method versus using @RequestMapping,
which, by default, matches to all HTTP methods. If you need an example of composed
annotations, look at how those are declared.
Spring MVC also supports custom request-mapping attributes with custom request-matching
logic. This is a more advanced option that requires subclassing
RequestMappingHandlerMapping and overriding the getCustomMethodCondition method, where
you can check the custom attribute and return your own RequestCondition.
Explicit Registrations
You can programmatically register handler methods, which you can use for dynamic registrations or for advanced cases, such as different instances of the same handler under different URLs. The following example registers a handler method:
@Configuration
public class MyConfig {

    @Autowired
    public void setHandlerMapping(RequestMappingHandlerMapping mapping, UserHandler handler) (1)
            throws NoSuchMethodException {

        RequestMappingInfo info = RequestMappingInfo
                .paths("/user/{id}").methods(RequestMethod.GET).build(); (2)

        Method method = UserHandler.class.getMethod("getUser", Long.class); (3)

        mapping.registerMapping(info, handler, method); (4)
    }
}| 1 | Inject the target handler and the handler mapping for controllers. |
| 2 | Prepare the request mapping meta data. |
| 3 | Get the handler method. |
| 4 | Add the registration. |
@Configuration
class MyConfig {

    @Autowired
    fun setHandlerMapping(mapping: RequestMappingHandlerMapping, handler: UserHandler) { (1)
        val info = RequestMappingInfo.paths("/user/{id}").methods(RequestMethod.GET).build() (2)
        val method = UserHandler::class.java.getMethod("getUser", Long::class.java) (3)
        mapping.registerMapping(info, handler, method) (4)
    }
}| 1 | Inject the target handler and the handler mapping for controllers. |
| 2 | Prepare the request mapping meta data. |
| 3 | Get the handler method. |
| 4 | Add the registration. |
1.3.3. Handler Methods
@RequestMapping handler methods have a flexible signature and can choose from a range of
supported controller method arguments and return values.
Method Arguments
The next table describes the supported controller method arguments. Reactive types are not supported for any arguments.
JDK 8’s java.util.Optional is supported as a method argument in combination with
annotations that have a required attribute (for example, @RequestParam, @RequestHeader,
and others) and is equivalent to required=false.
| Controller method argument | Description |
|---|---|
|
Generic access to request parameters and request and session attributes, without direct use of the Servlet API. |
|
Choose any specific request or response type — for example, |
|
Enforces the presence of a session. As a consequence, such an argument is never |
|
Servlet 4.0 push builder API for programmatic HTTP/2 resource pushes.
Note that, per the Servlet specification, the injected |
|
Currently authenticated user — possibly a specific |
|
The HTTP method of the request. |
|
The current request locale, determined by the most specific |
|
The time zone associated with the current request, as determined by a |
|
For access to the raw request body as exposed by the Servlet API. |
|
For access to the raw response body as exposed by the Servlet API. |
|
For access to URI template variables. See URI patterns. |
|
For access to name-value pairs in URI path segments. See Matrix Variables. |
|
For access to the Servlet request parameters, including multipart files. Parameter values
are converted to the declared method argument type. See Note that use of |
|
For access to request headers. Header values are converted to the declared method argument
type. See |
|
For access to cookies. Cookies values are converted to the declared method argument
type. See |
|
For access to the HTTP request body. Body content is converted to the declared method
argument type by using |
|
For access to request headers and body. The body is converted with an |
|
For access to a part in a |
|
For access to the model that is used in HTML controllers and exposed to templates as part of view rendering. |
|
Specify attributes to use in case of a redirect (that is, to be appended to the query string) and flash attributes to be stored temporarily until the request after redirect. See Redirect Attributes and Flash Attributes. |
|
For access to an existing attribute in the model (instantiated if not present) with
data binding and validation applied. See Note that use of |
|
For access to errors from validation and data binding for a command object
(that is, a |
|
For marking form processing complete, which triggers cleanup of session attributes
declared through a class-level |
|
For preparing a URL relative to the current request’s host, port, scheme, context path, and the literal part of the servlet mapping. See URI Links. |
|
For access to any session attribute, in contrast to model attributes stored in the session
as a result of a class-level |
|
For access to request attributes. See |
Any other argument |
If a method argument is not matched to any of the earlier values in this table and it is
a simple type (as determined by
BeanUtils#isSimpleProperty,
it is a resolved as a |
Return Values
The next table describes the supported controller method return values. Reactive types are supported for all return values.
| Controller method return value | Description |
|---|---|
|
The return value is converted through |
|
The return value that specifies the full response (including HTTP headers and body) is to be converted
through |
|
For returning a response with headers and no body. |
|
A view name to be resolved with |
|
A |
|
Attributes to be added to the implicit model, with the view name implicitly determined
through a |
|
An attribute to be added to the model, with the view name implicitly determined through
a Note that |
|
The view and model attributes to use and, optionally, a response status. |
|
A method with a If none of the above is true, a |
|
Produce any of the preceding return values asynchronously from any thread — for example, as a
result of some event or callback. See Asynchronous Requests and |
|
Produce any of the above return values asynchronously in a Spring MVC-managed thread.
See Asynchronous Requests and |
|
Alternative to |
|
Emit a stream of objects asynchronously to be written to the response with
|
|
Write to the response |
Reactive types — Reactor, RxJava, or others through |
Alternative to For streaming scenarios (for example, See Asynchronous Requests and Reactive Types. |
Any other return value |
Any return value that does not match any of the earlier values in this table and that
is a |
Type Conversion
Some annotated controller method arguments that represent String-based request input (such as
@RequestParam, @RequestHeader, @PathVariable, @MatrixVariable, and @CookieValue)
can require type conversion if the argument is declared as something other than String.
For such cases, type conversion is automatically applied based on the configured converters.
By default, simple types (int, long, Date, and others) are supported. You can customize
type conversion through a WebDataBinder (see DataBinder) or by registering
Formatters with the FormattingConversionService.
See Spring Field Formatting.
Matrix Variables
RFC 3986 discusses name-value pairs in path segments. In Spring MVC, we refer to those as “matrix variables” based on an “old post” by Tim Berners-Lee, but they can be also be referred to as URI path parameters.
Matrix variables can appear in any path segment, with each variable separated by a semicolon and
multiple values separated by comma (for example, /cars;color=red,green;year=2012). Multiple
values can also be specified through repeated variable names (for example,
color=red;color=green;color=blue).
If a URL is expected to contain matrix variables, the request mapping for a controller method must use a URI variable to mask that variable content and ensure the request can be matched successfully independent of matrix variable order and presence. The following example uses a matrix variable:
// GET /pets/42;q=11;r=22

@GetMapping("/pets/{petId}")
public void findPet(@PathVariable String petId, @MatrixVariable int q) {

    // petId == 42
    // q == 11
}// GET /pets/42;q=11;r=22
@GetMapping("/pets/{petId}")
fun findPet(@PathVariable petId: String, @MatrixVariable q: Int) {
// petId == 42
// q == 11
}Given that all path segments may contain matrix variables, you may sometimes need to disambiguate which path variable the matrix variable is expected to be in. The following example shows how to do so:
// GET /owners/42;q=11/pets/21;q=22

@GetMapping("/owners/{ownerId}/pets/{petId}")
public void findPet(
        @MatrixVariable(name="q", pathVar="ownerId") int q1,
        @MatrixVariable(name="q", pathVar="petId") int q2) {

    // q1 == 11
    // q2 == 22
}// GET /owners/42;q=11/pets/21;q=22
@GetMapping("/owners/{ownerId}/pets/{petId}")
fun findPet(
@MatrixVariable(name = "q", pathVar = "ownerId") q1: Int,
@MatrixVariable(name = "q", pathVar = "petId") q2: Int) {
// q1 == 11
// q2 == 22
}A matrix variable may be defined as optional and a default value specified, as the following example shows:
// GET /pets/42

@GetMapping("/pets/{petId}")
public void findPet(@MatrixVariable(required=false, defaultValue="1") int q) {

    // q == 1
}// GET /pets/42
@GetMapping("/pets/{petId}")
fun findPet(@MatrixVariable(required = false, defaultValue = "1") q: Int) {
// q == 1
}To get all matrix variables, you can use a MultiValueMap, as the following example shows:
// GET /owners/42;q=11;r=12/pets/21;q=22;s=23

@GetMapping("/owners/{ownerId}/pets/{petId}")
public void findPet(
        @MatrixVariable MultiValueMap<String, String> matrixVars,
        @MatrixVariable(pathVar="petId") MultiValueMap<String, String> petMatrixVars) {

    // matrixVars: ["q" : [11,22], "r" : 12, "s" : 23]
    // petMatrixVars: ["q" : 22, "s" : 23]
}// GET /owners/42;q=11;r=12/pets/21;q=22;s=23
@GetMapping("/owners/{ownerId}/pets/{petId}")
fun findPet(
@MatrixVariable matrixVars: MultiValueMap<String, String>,
@MatrixVariable(pathVar="petId") petMatrixVars: MultiValueMap<String, String>) {
// matrixVars: ["q" : [11,22], "r" : 12, "s" : 23]
// petMatrixVars: ["q" : 22, "s" : 23]
}Note that you need to enable the use of matrix variables. In the MVC Java configuration,
you need to set a UrlPathHelper with removeSemicolonContent=false through
Path Matching. In the MVC XML namespace, you can set
<mvc:annotation-driven enable-matrix-variables="true"/>.
@RequestParam
You can use the @RequestParam annotation to bind Servlet request parameters (that is,
query parameters or form data) to a method argument in a controller.
The following example shows how to do so:
@Controller
@RequestMapping("/pets")
public class EditPetForm {

    // ...

    @GetMapping
    public String setupForm(@RequestParam("petId") int petId, Model model) { (1)
        Pet pet = this.clinic.loadPet(petId);
        model.addAttribute("pet", pet);
        return "petForm";
    }

    // ...

}| 1 | Using @RequestParam to bind petId. |
import org.springframework.ui.set

@Controller
@RequestMapping("/pets")
class EditPetForm {

    // ...

    @GetMapping
    fun setupForm(@RequestParam("petId") petId: Int, model: Model): String { (1)
        val pet = this.clinic.loadPet(petId);
        model["pet"] = pet
        return "petForm"
    }

    // ...

}| 1 | Using @RequestParam to bind petId. |
By default, method parameters that use this annotation are required, but you can specify that
a method parameter is optional by setting the @RequestParam annotation’s required flag to
false or by declaring the argument with an java.util.Optional wrapper.
Type conversion is automatically applied if the target method parameter type is not
String. See Type Conversion.
Declaring the argument type as an array or list allows for resolving multiple parameter values for the same parameter name.
When an @RequestParam annotation is declared as a Map<String, String> or
MultiValueMap<String, String>, without a parameter name specified in the annotation,
then the map is populated with the request parameter values for each given parameter name.
Note that use of @RequestParam is optional (for example, to set its attributes).
By default, any argument that is a simple value type (as determined by
BeanUtils#isSimpleProperty)
and is not resolved by any other argument resolver, is treated as if it were annotated
with @RequestParam.
@RequestHeader
You can use the @RequestHeader annotation to bind a request header to a method argument in a
controller.
Consider the following request, with headers:
Host                    localhost:8080
Accept                  text/html,application/xhtml+xml,application/xml;q=0.9
Accept-Language         fr,en-gb;q=0.7,en;q=0.3
Accept-Encoding         gzip,deflate
Accept-Charset          ISO-8859-1,utf-8;q=0.7,*;q=0.7
Keep-Alive              300
The following example gets the value of the Accept-Encoding and Keep-Alive headers:
@GetMapping("/demo")
public void handle(
        @RequestHeader("Accept-Encoding") String encoding, (1)
        @RequestHeader("Keep-Alive") long keepAlive) { (2)
    //...
}| 1 | Get the value of the Accept-Encoding header. |
| 2 | Get the value of the Keep-Alive header. |
@GetMapping("/demo")
fun handle(
        @RequestHeader("Accept-Encoding") encoding: String, (1)
        @RequestHeader("Keep-Alive") keepAlive: Long) { (2)
    //...
}| 1 | Get the value of the Accept-Encoding header. |
| 2 | Get the value of the Keep-Alive header. |
If the target method parameter type is not
String, type conversion is automatically applied. See Type Conversion.
When an @RequestHeader annotation is used on a Map<String, String>,
MultiValueMap<String, String>, or HttpHeaders argument, the map is populated
with all header values.
Built-in support is available for converting a comma-separated string into an
array or collection of strings or other types known to the type conversion system. For
example, a method parameter annotated with @RequestHeader("Accept") can be of type
String but also String[] or List<String>.
|
@CookieValue
You can use the @CookieValue annotation to bind the value of an HTTP cookie to a method argument
in a controller.
Consider a request with the following cookie:
JSESSIONID=415A4AC178C59DACE0B2C9CA727CDD84
The following example shows how to get the cookie value:
@GetMapping("/demo")
public void handle(@CookieValue("JSESSIONID") String cookie) { (1)
    //...
}| 1 | Get the value of the JSESSIONID cookie. |
@GetMapping("/demo")
fun handle(@CookieValue("JSESSIONID") cookie: String) { (1)
    //...
}| 1 | Get the value of the JSESSIONID cookie. |
If the target method parameter type is not String, type conversion is applied automatically.
See Type Conversion.
@ModelAttribute
You can use the @ModelAttribute annotation on a method argument to access an attribute from
the model or have it be instantiated if not present. The model attribute is also overlain with
values from HTTP Servlet request parameters whose names match to field names. This is referred
to as data binding, and it saves you from having to deal with parsing and converting individual
query parameters and form fields. The following example shows how to do so:
@PostMapping("/owners/{ownerId}/pets/{petId}/edit")
public String processSubmit(@ModelAttribute Pet pet) { } (1)| 1 | Bind an instance of Pet. |
@PostMapping("/owners/{ownerId}/pets/{petId}/edit")
fun processSubmit(@ModelAttribute pet: Pet): String { } (1)| 1 | Bind an instance of Pet. |
The Pet instance above is resolved as follows:
-
From the model if already added by using Model.
-
From the HTTP session by using
@SessionAttributes. -
From a URI path variable passed through a
Converter(see the next example). -
From the invocation of a default constructor.
-
From the invocation of a “primary constructor” with arguments that match to Servlet request parameters. Argument names are determined through JavaBeans
@ConstructorPropertiesor through runtime-retained parameter names in the bytecode.
While it is common to use a Model to populate the model with
attributes, one other alternative is to rely on a Converter<String, T> in combination
with a URI path variable convention. In the following example, the model attribute name,
account, matches the URI path variable, account, and the Account is loaded by passing
the String account number through a registered Converter<String, Account>:
@PutMapping("/accounts/{account}")
public String save(@ModelAttribute("account") Account account) {
    // ...
}@PutMapping("/accounts/{account}")
fun save(@ModelAttribute("account") account: Account): String {
// ...
}After the model attribute instance is obtained, data binding is applied. The
WebDataBinder class matches Servlet request parameter names (query parameters and form
fields) to field names on the target Object. Matching fields are populated after type
conversion is applied, where necessary. For more on data binding (and validation), see
Validation. For more on customizing data binding, see
DataBinder.
Data binding can result in errors. By default, a BindException is raised. However, to check
for such errors in the controller method, you can add a BindingResult argument immediately next
to the @ModelAttribute, as the following example shows:
@PostMapping("/owners/{ownerId}/pets/{petId}/edit")
public String processSubmit(@ModelAttribute("pet") Pet pet, BindingResult result) { (1)
    if (result.hasErrors()) {
        return "petForm";
    }
    // ...
}| 1 | Adding a BindingResult next to the @ModelAttribute. |
@PostMapping("/owners/{ownerId}/pets/{petId}/edit")
fun processSubmit(@ModelAttribute("pet") pet: Pet, result: BindingResult): String { (1)
    if (result.hasErrors()) {
        return "petForm"
    }
    // ...
}| 1 | Adding a BindingResult next to the @ModelAttribute. |
In some cases, you may want access to a model attribute without data binding. For such
cases, you can inject the Model into the controller and access it directly or,
alternatively, set @ModelAttribute(binding=false), as the following example shows:
@ModelAttribute
public AccountForm setUpForm() {
    return new AccountForm();
}

@ModelAttribute
public Account findAccount(@PathVariable String accountId) {
    return accountRepository.findOne(accountId);
}

@PostMapping("update")
public String update(@Valid AccountForm form, BindingResult result,
        @ModelAttribute(binding=false) Account account) { (1)
    // ...
}| 1 | Setting @ModelAttribute(binding=false). |
@ModelAttribute
fun setUpForm(): AccountForm {
    return AccountForm()
}

@ModelAttribute
fun findAccount(@PathVariable accountId: String): Account {
    return accountRepository.findOne(accountId)
}

@PostMapping("update")
fun update(@Valid form: AccountForm, result: BindingResult,
           @ModelAttribute(binding = false) account: Account): String { (1)
    // ...
}| 1 | Setting @ModelAttribute(binding=false). |
You can automatically apply validation after data binding by adding the
javax.validation.Valid annotation or Spring’s @Validated annotation (
Bean Validation and
Spring validation). The following example shows how to do so:
@PostMapping("/owners/{ownerId}/pets/{petId}/edit")
public String processSubmit(@Valid @ModelAttribute("pet") Pet pet, BindingResult result) { (1)
    if (result.hasErrors()) {
        return "petForm";
    }
    // ...
}| 1 | Validate the Pet instance. |
@PostMapping("/owners/{ownerId}/pets/{petId}/edit")
fun processSubmit(@Valid @ModelAttribute("pet") pet: Pet, result: BindingResult): String { (1)
    if (result.hasErrors()) {
        return "petForm"
    }
    // ...
}
Note that using @ModelAttribute is optional (for example, to set its attributes).
By default, any argument that is not a simple value type (as determined by
BeanUtils#isSimpleProperty)
and is not resolved by any other argument resolver is treated as if it were annotated
with @ModelAttribute.
@SessionAttributes
@SessionAttributes is used to store model attributes in the HTTP Servlet session between
requests. It is a type-level annotation that declares the session attributes used by a
specific controller. This typically lists the names of model attributes or types of
model attributes that should be transparently stored in the session for subsequent
requests to access.
The following example uses the @SessionAttributes annotation:
@Controller
@SessionAttributes("pet") (1)
public class EditPetForm {
    // ...
}| 1 | Using the @SessionAttributes annotation. |
@Controller
@SessionAttributes("pet") (1)
public class EditPetForm {
    // ...
}| 1 | Using the @SessionAttributes annotation. |
On the first request, when a model attribute with the name, pet, is added to the model,
it is automatically promoted to and saved in the HTTP Servlet session. It remains there
until another controller method uses a SessionStatus method argument to clear the
storage, as the following example shows:
@Controller
@SessionAttributes("pet") (1)
public class EditPetForm {

    // ...

    @PostMapping("/pets/{id}")
    public String handle(Pet pet, BindingResult errors, SessionStatus status) {
        if (errors.hasErrors) {
            // ...
        }
            status.setComplete(); (2)
            // ...
        }
    }
}| 1 | Storing the Pet value in the Servlet session. |
| 2 | Clearing the Pet value from the Servlet session. |
@Controller
@SessionAttributes("pet") (1)
class EditPetForm {

    // ...

    @PostMapping("/pets/{id}")
    fun handle(pet: Pet, errors: BindingResult, status: SessionStatus): String {
        if (errors.hasErrors()) {
            // ...
        }
        status.setComplete() (2)
        // ...
    }
}| 1 | Storing the Pet value in the Servlet session. |
| 2 | Clearing the Pet value from the Servlet session. |
@SessionAttribute
If you need access to pre-existing session attributes that are managed globally
(that is, outside the controller — for example, by a filter) and may or may not be present,
you can use the @SessionAttribute annotation on a method parameter,
as the following example shows:
@RequestMapping("/")
public String handle(@SessionAttribute User user) { (1)
    // ...
}| 1 | Using a @SessionAttribute annotation. |
@RequestMapping("/")
fun handle(@SessionAttribute user: User): String { (1)
    // ...
}
For use cases that require adding or removing session attributes, consider injecting
org.springframework.web.context.request.WebRequest or
javax.servlet.http.HttpSession into the controller method.
For temporary storage of model attributes in the session as part of a controller
workflow, consider using @SessionAttributes as described in
@SessionAttributes.
@RequestAttribute
Similar to @SessionAttribute, you can use the @RequestAttribute annotations to
access pre-existing request attributes created earlier (for example, by a Servlet Filter
or HandlerInterceptor):
@GetMapping("/")
public String handle(@RequestAttribute Client client) { (1)
    // ...
}| 1 | Using the @RequestAttribute annotation. |
@GetMapping("/")
fun handle(@RequestAttribute client: Client): String { (1)
    // ...
}| 1 | Using the @RequestAttribute annotation. |
Redirect Attributes
By default, all model attributes are considered to be exposed as URI template variables in the redirect URL. Of the remaining attributes, those that are primitive types or collections or arrays of primitive types are automatically appended as query parameters.
Appending primitive type attributes as query parameters can be the desired result if a
model instance was prepared specifically for the redirect. However, in annotated
controllers, the model can contain additional attributes added for rendering purposes (for example,
drop-down field values). To avoid the possibility of having such attributes appear in the
URL, a @RequestMapping method can declare an argument of type RedirectAttributes and
use it to specify the exact attributes to make available to RedirectView. If the method
does redirect, the content of RedirectAttributes is used. Otherwise, the content of the
model is used.
The RequestMappingHandlerAdapter provides a flag called
ignoreDefaultModelOnRedirect, which you can use to indicate that the content of the default
Model should never be used if a controller method redirects. Instead, the controller
method should declare an attribute of type RedirectAttributes or, if it does not do so,
no attributes should be passed on to RedirectView. Both the MVC namespace and the MVC
Java configuration keep this flag set to false, to maintain backwards compatibility.
However, for new applications, we recommend setting it to true.
Note that URI template variables from the present request are automatically made
available when expanding a redirect URL, and you don’t need to explicitly add them
through Model or RedirectAttributes. The following example shows how to define a redirect:
@PostMapping("/files/{path}")
public String upload(...) {
    // ...
    return "redirect:files/{path}";
}@PostMapping("/files/{path}")
fun upload(...): String {
// ...
return "redirect:files/{path}"
}Another way of passing data to the redirect target is by using flash attributes. Unlike other redirect attributes, flash attributes are saved in the HTTP session (and, hence, do not appear in the URL). See Flash Attributes for more information.
Flash Attributes
Flash attributes provide a way for one request to store attributes that are intended for use in another. This is most commonly needed when redirecting — for example, the Post-Redirect-Get pattern. Flash attributes are saved temporarily before the redirect (typically in the session) to be made available to the request after the redirect and are removed immediately.
Spring MVC has two main abstractions in support of flash attributes. FlashMap is used
to hold flash attributes, while FlashMapManager is used to store, retrieve, and manage
FlashMap instances.
Flash attribute support is always “on” and does not need to be enabled explicitly.
However, if not used, it never causes HTTP session creation. On each request, there is an
“input” FlashMap with attributes passed from a previous request (if any) and an
“output” FlashMap with attributes to save for a subsequent request. Both FlashMap
instances are accessible from anywhere in Spring MVC through static methods in
RequestContextUtils.
Annotated controllers typically do not need to work with FlashMap directly. Instead, a
@RequestMapping method can accept an argument of type RedirectAttributes and use it
to add flash attributes for a redirect scenario. Flash attributes added through
RedirectAttributes are automatically propagated to the “output” FlashMap. Similarly,
after the redirect, attributes from the “input” FlashMap are automatically added to the
Model of the controller that serves the target URL.
Multipart
After a MultipartResolver has been enabled, the content of POST
requests with multipart/form-data is parsed and accessible as regular request
parameters. The following example accesses one regular form field and one uploaded
file:
@Controller
public class FileUploadController {

    @PostMapping("/form")
    public String handleFormUpload(@RequestParam("name") String name,
            @RequestParam("file") MultipartFile file) {

        if (!file.isEmpty()) {
            byte[] bytes = file.getBytes();
            // store the bytes somewhere
            return "redirect:uploadSuccess";
        }
        return "redirect:uploadFailure";
    }
}@Controller
class FileUploadController {
@PostMapping("/form")
fun handleFormUpload(@RequestParam("name") name: String,
@RequestParam("file") file: MultipartFile): String {
if (!file.isEmpty) {
val bytes = file.bytes
// store the bytes somewhere
return "redirect:uploadSuccess"
}
return "redirect:uploadFailure"
}
}Declaring the argument type as a List<MultipartFile> allows for resolving multiple
files for the same parameter name.
When the @RequestParam annotation is declared as a Map<String, MultipartFile> or
MultiValueMap<String, MultipartFile>, without a parameter name specified in the annotation,
then the map is populated with the multipart files for each given parameter name.
With Servlet 3.0 multipart parsing, you may also declare javax.servlet.http.Part
instead of Spring’s MultipartFile, as a method argument or collection value type.
|
You can also use multipart content as part of data binding to a command object. For example, the form field and file from the preceding example could be fields on a form object, as the following example shows:
class MyForm {

    private String name;

    private MultipartFile file;

    // ...
}

@Controller
public class FileUploadController {

    @PostMapping("/form")
    public String handleFormUpload(MyForm form, BindingResult errors) {
        if (!form.getFile().isEmpty()) {
            byte[] bytes = form.getFile().getBytes();
            // store the bytes somewhere
            return "redirect:uploadSuccess";
        }
        return "redirect:uploadFailure";
    }
}class MyForm(val name: String, val file: MultipartFile, ...)
@Controller
class FileUploadController {
@PostMapping("/form")
fun handleFormUpload(form: MyForm, errors: BindingResult): String {
if (!form.file.isEmpty) {
val bytes = form.file.bytes
// store the bytes somewhere
return "redirect:uploadSuccess"
}
return "redirect:uploadFailure"
}
}Multipart requests can also be submitted from non-browser clients in a RESTful service scenario. The following example shows a file with JSON:
POST /someUrl
Content-Type: multipart/mixed

--edt7Tfrdusa7r3lNQc79vXuhIIMlatb7PQg7Vp
Content-Disposition: form-data; name="meta-data"
Content-Type: application/json; charset=UTF-8
Content-Transfer-Encoding: 8bit

{
    "name": "value"
}
--edt7Tfrdusa7r3lNQc79vXuhIIMlatb7PQg7Vp
Content-Disposition: form-data; name="file-data"; filename="file.properties"
Content-Type: text/xml
Content-Transfer-Encoding: 8bit
... File Data ...
You can access the "meta-data" part with @RequestParam as a String but you’ll
probably want it deserialized from JSON (similar to @RequestBody). Use the
@RequestPart annotation to access a multipart after converting it with an
HttpMessageConverter:
@PostMapping("/")
public String handle(@RequestPart("meta-data") MetaData metadata,
        @RequestPart("file-data") MultipartFile file) {
    // ...
}@PostMapping("/")
fun handle(@RequestPart("meta-data") metadata: MetaData,
@RequestPart("file-data") file: MultipartFile): String {
// ...
}You can use @RequestPart in combination with javax.validation.Valid or use Spring’s
@Validated annotation, both of which cause Standard Bean Validation to be applied.
By default, validation errors cause a MethodArgumentNotValidException, which is turned
into a 400 (BAD_REQUEST) response. Alternatively, you can handle validation errors locally
within the controller through an Errors or BindingResult argument,
as the following example shows:
@PostMapping("/")
public String handle(@Valid @RequestPart("meta-data") MetaData metadata,
        BindingResult result) {
    // ...
}@PostMapping("/")
fun handle(@Valid @RequestPart("meta-data") metadata: MetaData,
result: BindingResult): String {
// ...
}@RequestBody
You can use the @RequestBody annotation to have the request body read and deserialized into an
Object through an HttpMessageConverter.
The following example uses a @RequestBody argument:
@PostMapping("/accounts")
public void handle(@RequestBody Account account) {
    // ...
}@PostMapping("/accounts")
fun handle(@RequestBody account: Account) {
// ...
}You can use the Message Converters option of the MVC Config to configure or customize message conversion.
You can use @RequestBody in combination with javax.validation.Valid or Spring’s
@Validated annotation, both of which cause Standard Bean Validation to be applied.
By default, validation errors cause a MethodArgumentNotValidException, which is turned
into a 400 (BAD_REQUEST) response. Alternatively, you can handle validation errors locally
within the controller through an Errors or BindingResult argument,
as the following example shows:
@PostMapping("/accounts")
public void handle(@Valid @RequestBody Account account, BindingResult result) {
    // ...
}@PostMapping("/accounts")
fun handle(@Valid @RequestBody account: Account, result: BindingResult) {
// ...
}HttpEntity
HttpEntity is more or less identical to using @RequestBody but is based on a
container object that exposes request headers and body. The following listing shows an example:
@PostMapping("/accounts")
public void handle(HttpEntity<Account> entity) {
    // ...
}@PostMapping("/accounts")
fun handle(entity: HttpEntity<Account>) {
// ...
}@ResponseBody
You can use the @ResponseBody annotation on a method to have the return serialized
to the response body through an
HttpMessageConverter.
The following listing shows an example:
@GetMapping("/accounts/{id}")
@ResponseBody
public Account handle() {
    // ...
}@GetMapping("/accounts/{id}")
@ResponseBody
fun handle(): Account {
// ...
}@ResponseBody is also supported at the class level, in which case it is inherited by
all controller methods. This is the effect of @RestController, which is nothing more
than a meta-annotation marked with @Controller and @ResponseBody.
You can use @ResponseBody with reactive types.
See Asynchronous Requests and Reactive Types for more details.
You can use the Message Converters option of the MVC Config to configure or customize message conversion.
You can combine @ResponseBody methods with JSON serialization views.
See Jackson JSON for details.
ResponseEntity
ResponseEntity is like @ResponseBody but with status and headers. For example:
@GetMapping("/something")
public ResponseEntity<String> handle() {
    String body = ... ;
    String etag = ... ;
    return ResponseEntity.ok().eTag(etag).build(body);
}@GetMapping("/something")
fun handle(): ResponseEntity<String> {
val body = ...
val etag = ...
return ResponseEntity.ok().eTag(etag).build(body)
}Spring MVC supports using a single value reactive type
to produce the ResponseEntity asynchronously, and/or single and multi-value reactive
types for the body.
Jackson JSON
Spring offers support for the Jackson JSON library.
JSON Views
Spring MVC provides built-in support for
Jackson’s Serialization Views,
which allow rendering only a subset of all fields in an Object. To use it with
@ResponseBody or ResponseEntity controller methods, you can use Jackson’s
@JsonView annotation to activate a serialization view class, as the following example shows:
@RestController
public class UserController {

    @GetMapping("/user")
    @JsonView(User.WithoutPasswordView.class)
    public User getUser() {
        return new User("eric", "7!jd#h23");
    }
}

public class User {

    public interface WithoutPasswordView {};
    public interface WithPasswordView extends WithoutPasswordView {};

    private String username;
    private String password;

    public User() {
    }

    public User(String username, String password) {
        this.username = username;
        this.password = password;
    }

    @JsonView(WithoutPasswordView.class)
    public String getUsername() {
        return this.username;
    }

    @JsonView(WithPasswordView.class)
    public String getPassword() {
        return this.password;
    }
}@RestController
class UserController {
@GetMapping("/user")
@JsonView(User.WithoutPasswordView::class)
fun getUser() = User("eric", "7!jd#h23")
}
class User(
@JsonView(WithoutPasswordView::class) val username: String,
@JsonView(WithPasswordView::class) val password: String) {
interface WithoutPasswordView
interface WithPasswordView : WithoutPasswordView
}
@JsonView allows an array of view classes, but you can specify only one per
controller method. If you need to activate multiple views, you can use a composite interface.
|
For controllers that rely on view resolution, you can add the serialization view class to the model, as the following example shows:
@Controller
public class UserController extends AbstractController {

    @GetMapping("/user")
    public String getUser(Model model) {
        model.addAttribute("user", new User("eric", "7!jd#h23"));
        model.addAttribute(JsonView.class.getName(), User.WithoutPasswordView.class);
        return "userView";
    }
}import org.springframework.ui.set
@Controller
class UserController : AbstractController() {
@GetMapping("/user")
fun getUser(model: Model): String {
model["user"] = User("eric", "7!jd#h23")
model[JsonView::class.qualifiedName] = User.WithoutPasswordView::class.java
return "userView"
}
}1.3.4. Model
You can use the @ModelAttribute annotation:
-
On a method argument in
@RequestMappingmethods to create or access anObjectfrom the model and to bind it to the request through aWebDataBinder. -
As a method-level annotation in
@Controlleror@ControllerAdviceclasses that help to initialize the model prior to any@RequestMappingmethod invocation. -
On a
@RequestMappingmethod to mark its return value is a model attribute.
This section discusses @ModelAttribute methods — the second item in the preceding list.
A controller can have any number of @ModelAttribute methods. All such methods are
invoked before @RequestMapping methods in the same controller. A @ModelAttribute
method can also be shared across controllers through @ControllerAdvice. See the section on
Controller Advice for more details.
@ModelAttribute methods have flexible method signatures. They support many of the same
arguments as @RequestMapping methods, except for @ModelAttribute itself or anything
related to the request body.
The following example shows a @ModelAttribute method:
@ModelAttribute
public void populateModel(@RequestParam String number, Model model) {
    model.addAttribute(accountRepository.findAccount(number));
    // add more ...
}@ModelAttribute
fun populateModel(@RequestParam number: String, model: Model) {
model.addAttribute(accountRepository.findAccount(number))
// add more ...
}The following example adds only one attribute:
@ModelAttribute
public Account addAccount(@RequestParam String number) {
    return accountRepository.findAccount(number);
}@ModelAttribute
fun addAccount(@RequestParam number: String): Account {
return accountRepository.findAccount(number)
}
When a name is not explicitly specified, a default name is chosen based on the Object
type, as explained in the javadoc for Conventions.
You can always assign an explicit name by using the overloaded addAttribute method or
through the name attribute on @ModelAttribute (for a return value).
|
You can also use @ModelAttribute as a method-level annotation on @RequestMapping methods,
in which case the return value of the @RequestMapping method is interpreted as a model
attribute. This is typically not required, as it is the default behavior in HTML controllers,
unless the return value is a String that would otherwise be interpreted as a view name.
@ModelAttribute can also customize the model attribute name, as the following example shows:
@GetMapping("/accounts/{id}")
@ModelAttribute("myAccount")
public Account handle() {
    // ...
    return account;
}@GetMapping("/accounts/{id}")
@ModelAttribute("myAccount")
fun handle(): Account {
// ...
return account
}1.3.5. DataBinder
@Controller or @ControllerAdvice classes can have @InitBinder methods that
initialize instances of WebDataBinder, and those, in turn, can:
-
Bind request parameters (that is, form or query data) to a model object.
-
Convert String-based request values (such as request parameters, path variables, headers, cookies, and others) to the target type of controller method arguments.
-
Format model object values as
Stringvalues when rendering HTML forms.
@InitBinder methods can register controller-specific java.bean.PropertyEditor or
Spring Converter and Formatter components. In addition, you can use the
MVC config to register Converter and Formatter
types in a globally shared FormattingConversionService.
@InitBinder methods support many of the same arguments that @RequestMapping methods
do, except for @ModelAttribute (command object) arguments. Typically, they are declared
with a WebDataBinder argument (for registrations) and a void return value.
The following listing shows an example:
@Controller
public class FormController {

    @InitBinder (1)
    public void initBinder(WebDataBinder binder) {
        SimpleDateFormat dateFormat = new SimpleDateFormat("yyyy-MM-dd");
        dateFormat.setLenient(false);
        binder.registerCustomEditor(Date.class, new CustomDateEditor(dateFormat, false));
    }

    // ...
}| 1 | Defining an @InitBinder method. |
@Controller
class FormController {

    @InitBinder (1)
    fun initBinder(binder: WebDataBinder) {
        val dateFormat = SimpleDateFormat("yyyy-MM-dd")
        dateFormat.isLenient = false
        binder.registerCustomEditor(Date::class.java, CustomDateEditor(dateFormat, false))
    }

    // ...
}| 1 | Defining an @InitBinder method. |
Alternatively, when you use a Formatter-based setup through a shared
FormattingConversionService, you can re-use the same approach and register
controller-specific Formatter implementations, as the following example shows:
@Controller
public class FormController {

    @InitBinder (1)
    protected void initBinder(WebDataBinder binder) {
        binder.addCustomFormatter(new DateFormatter("yyyy-MM-dd"));
    }

    // ...
}| 1 | Defining an @InitBinder method on a custom formatter. |
@Controller
class FormController {

    @InitBinder (1)
    protected fun initBinder(binder: WebDataBinder) {
        binder.addCustomFormatter(DateFormatter("yyyy-MM-dd"))
    }

    // ...
}| 1 | Defining an @InitBinder method on a custom formatter. |
1.3.6. Exceptions
@Controller and @ControllerAdvice classes can have
@ExceptionHandler methods to handle exceptions from controller methods, as the following example shows:
@Controller
public class SimpleController {

    // ...

    @ExceptionHandler
    public ResponseEntity<String> handle(IOException ex) {
        // ...
    }
}@Controller
class SimpleController {
// ...
@ExceptionHandler
fun handle(ex: IOException): ResponseEntity<String> {
// ...
}
}The exception may match against a top-level exception being propagated (that is, a direct
IOException being thrown) or against the immediate cause within a top-level wrapper exception
(for example, an IOException wrapped inside an IllegalStateException).
For matching exception types, preferably declare the target exception as a method argument,
as the preceding example shows. When multiple exception methods match, a root exception match is generally
preferred to a cause exception match. More specifically, the ExceptionDepthComparator is
used to sort exceptions based on their depth from the thrown exception type.
Alternatively, the annotation declaration may narrow the exception types to match, as the following example shows:
@ExceptionHandler({FileSystemException.class, RemoteException.class})
public ResponseEntity<String> handle(IOException ex) {
    // ...
}@ExceptionHandler(FileSystemException::class, RemoteException::class)
fun handle(ex: IOException): ResponseEntity<String> {
// ...
}You can even use a list of specific exception types with a very generic argument signature, as the following example shows:
@ExceptionHandler({FileSystemException.class, RemoteException.class})
public ResponseEntity<String> handle(Exception ex) {
    // ...
}@ExceptionHandler(FileSystemException::class, RemoteException::class)
fun handle(ex: Exception): ResponseEntity<String> {
// ...
}|
The distinction between root and cause exception matching can be surprising. In the The behavior is even simpler in the |
We generally recommend that you be as specific as possible in the argument signature,
reducing the potential for mismatches between root and cause exception types.
Consider breaking a multi-matching method into individual @ExceptionHandler
methods, each matching a single specific exception type through its signature.
In a multi-@ControllerAdvice arrangement, we recommend declaring your primary root exception
mappings on a @ControllerAdvice prioritized with a corresponding order. While a root
exception match is preferred to a cause, this is defined among the methods of a given
controller or @ControllerAdvice class. This means a cause match on a higher-priority
@ControllerAdvice bean is preferred to any match (for example, root) on a lower-priority
@ControllerAdvice bean.
Last but not least, an @ExceptionHandler method implementation can choose to back
out of dealing with a given exception instance by rethrowing it in its original form.
This is useful in scenarios where you are interested only in root-level matches or in
matches within a specific context that cannot be statically determined. A rethrown
exception is propagated through the remaining resolution chain, as though
the given @ExceptionHandler method would not have matched in the first place.
Support for @ExceptionHandler methods in Spring MVC is built on the DispatcherServlet
level, HandlerExceptionResolver mechanism.
Method Arguments
@ExceptionHandler methods support the following arguments:
| Method argument | Description |
|---|---|
Exception type |
For access to the raised exception. |
|
For access to the controller method that raised the exception. |
|
Generic access to request parameters and request and session attributes without direct use of the Servlet API. |
|
Choose any specific request or response type (for example, |
|
Enforces the presence of a session. As a consequence, such an argument is never |
|
Currently authenticated user — possibly a specific |
|
The HTTP method of the request. |
|
The current request locale, determined by the most specific |
|
The time zone associated with the current request, as determined by a |
|
For access to the raw response body, as exposed by the Servlet API. |
|
For access to the model for an error response. Always empty. |
|
Specify attributes to use in case of a redirect — (that is to be appended to the query string) and flash attributes to be stored temporarily until the request after the redirect. See Redirect Attributes and Flash Attributes. |
|
For access to any session attribute, in contrast to model attributes stored in the
session as a result of a class-level |
|
For access to request attributes. See |
Return Values
@ExceptionHandler methods support the following return values:
| Return value | Description |
|---|---|
|
The return value is converted through |
|
The return value specifies that the full response (including the HTTP headers and the body)
be converted through |
|
A view name to be resolved with |
|
A |
|
Attributes to be added to the implicit model with the view name implicitly determined
through a |
|
An attribute to be added to the model with the view name implicitly determined through
a Note that |
|
The view and model attributes to use and, optionally, a response status. |
|
A method with a If none of the above is true, a |
Any other return value |
If a return value is not matched to any of the above and is not a simple type (as determined by BeanUtils#isSimpleProperty), by default, it is treated as a model attribute to be added to the model. If it is a simple type, it remains unresolved. |
REST API exceptions
A common requirement for REST services is to include error details in the body of the
response. The Spring Framework does not automatically do this because the representation
of error details in the response body is application-specific. However, a
@RestController may use @ExceptionHandler methods with a ResponseEntity return
value to set the status and the body of the response. Such methods can also be declared
in @ControllerAdvice classes to apply them globally.
Applications that implement global exception handling with error details in the response
body should consider extending
ResponseEntityExceptionHandler,
which provides handling for exceptions that Spring MVC raises and provides hooks to
customize the response body. To make use of this, create a subclass of
ResponseEntityExceptionHandler, annotate it with @ControllerAdvice, override the
necessary methods, and declare it as a Spring bean.
1.3.7. Controller Advice
Typically @ExceptionHandler, @InitBinder, and @ModelAttribute methods apply within
the @Controller class (or class hierarchy) in which they are declared. If you want such
methods to apply more globally (across controllers), you can declare them in a class
annotated with @ControllerAdvice or @RestControllerAdvice.
@ControllerAdvice is annotated with @Component, which means such classes can be
registered as Spring beans through component scanning. @RestControllerAdvice is a composed annotation that is annotated
with both @ControllerAdvice and @ResponseBody, which essentially means
@ExceptionHandler methods are rendered to the response body through message conversion
(versus view resolution or template rendering).
On startup, the infrastructure classes for @RequestMapping and @ExceptionHandler
methods detect Spring beans annotated with @ControllerAdvice and then apply their
methods at runtime. Global @ExceptionHandler methods (from a @ControllerAdvice) are
applied after local ones (from the @Controller). By contrast, global @ModelAttribute
and @InitBinder methods are applied before local ones.
By default, @ControllerAdvice methods apply to every request (that is, all controllers),
but you can narrow that down to a subset of controllers by using attributes on the
annotation, as the following example shows:
// Target all Controllers annotated with @RestController
@ControllerAdvice(annotations = RestController.class)
public class ExampleAdvice1 {}

// Target all Controllers within specific packages
@ControllerAdvice("org.example.controllers")
public class ExampleAdvice2 {}

// Target all Controllers assignable to specific classes
@ControllerAdvice(assignableTypes = {ControllerInterface.class, AbstractController.class})
public class ExampleAdvice3 {}// Target all Controllers annotated with @RestController
@ControllerAdvice(annotations = [RestController::class])
class ExampleAdvice1
// Target all Controllers within specific packages
@ControllerAdvice("org.example.controllers")
class ExampleAdvice2
// Target all Controllers assignable to specific classes
@ControllerAdvice(assignableTypes = [ControllerInterface::class, AbstractController::class])
class ExampleAdvice3The selectors in the preceding example are evaluated at runtime and may negatively impact
performance if used extensively. See the
@ControllerAdvice
javadoc for more details.
1.4. Functional Endpoints
Spring Web MVC includes WebMvc.fn, a lightweight functional programming model in which functions are used to route and handle requests and contracts are designed for immutability. It is an alternative to the annotation-based programming model but otherwise runs on the same DispatcherServlet.
1.4.1. Overview
In WebMvc.fn, an HTTP request is handled with a HandlerFunction: a function that takes
ServerRequest and returns a ServerResponse.
Both the request and the response object have immutable contracts that offer JDK 8-friendly
access to the HTTP request and response.
HandlerFunction is the equivalent of the body of a @RequestMapping method in the
annotation-based programming model.
Incoming requests are routed to a handler function with a RouterFunction: a function that
takes ServerRequest and returns an optional HandlerFunction (i.e. Optional<HandlerFunction>).
When the router function matches, a handler function is returned; otherwise an empty Optional.
RouterFunction is the equivalent of a @RequestMapping annotation, but with the major
difference that router functions provide not just data, but also behavior.
RouterFunctions.route() provides a router builder that facilitates the creation of routers,
as the following example shows:
import static org.springframework.http.MediaType.APPLICATION_JSON;
import static org.springframework.web.servlet.function.RequestPredicates.*;
import static org.springframework.web.servlet.function.RouterFunctions.route;

PersonRepository repository = ...
PersonHandler handler = new PersonHandler(repository);

RouterFunction<ServerResponse> route = route()
    .GET("/person/{id}", accept(APPLICATION_JSON), handler::getPerson)
    .GET("/person", accept(APPLICATION_JSON), handler::listPeople)
    .POST("/person", handler::createPerson)
    .build();


public class PersonHandler {

    // ...

    public ServerResponse listPeople(ServerRequest request) {
        // ...
    }

    public ServerResponse createPerson(ServerRequest request) {
        // ...
    }

    public ServerResponse getPerson(ServerRequest request) {
        // ...
    }
}import org.springframework.web.servlet.function.router
val repository: PersonRepository = ...
val handler = PersonHandler(repository)
val route = router { (1)
accept(APPLICATION_JSON).nest {
GET("/person/{id}", handler::getPerson)
GET("/person", handler::listPeople)
}
POST("/person", handler::createPerson)
}
class PersonHandler(private val repository: PersonRepository) {
// ...
fun listPeople(request: ServerRequest): ServerResponse {
// ...
}
fun createPerson(request: ServerRequest): ServerResponse {
// ...
}
fun getPerson(request: ServerRequest): ServerResponse {
// ...
}
}| 1 | Create router using the router DSL. |
If you register the RouterFunction as a bean, for instance by exposing it in a
@Configuration class, it will auto-detected by the servlet, as explained in Running a Server.
1.4.2. HandlerFunction
ServerRequest and ServerResponse are immutable interfaces that offer JDK 8-friendly
access to the HTTP request and response, including headers, body, method, and status code.
ServerRequest
ServerRequest provides access to the HTTP method, URI, headers, and query parameters,
while access to the body is provided through the body methods.
The following example extracts the request body to a String:
String string = request.body(String.class);val string = request.body<String>()The following example extracts the body to a List<Person>,
where Person objects are decoded from a serialized form, such as JSON or XML:
List<Person> people = request.body(new ParameterizedTypeReference<List<Person>>() {});val people = request.body<Person>()The following example shows how to access parameters:
MultiValueMap<String, String> params = request.params();val map = request.params()ServerResponse
ServerResponse provides access to the HTTP response and, since it is immutable, you can use
a build method to create it. You can use the builder to set the response status, to add response
headers, or to provide a body. The following example creates a 200 (OK) response with JSON
content:
Person person = ...
ServerResponse.ok().contentType(MediaType.APPLICATION_JSON).body(person);val person: Person = ...
ServerResponse.ok().contentType(MediaType.APPLICATION_JSON).body(person)The following example shows how to build a 201 (CREATED) response with a Location header and no body:
URI location = ...
ServerResponse.created(location).build();val location: URI = ...
ServerResponse.created(location).build()Handler Classes
We can write a handler function as a lambda, as the following example shows:
HandlerFunction<ServerResponse> helloWorld =
request -> ServerResponse.ok().body("Hello World");val helloWorld: (ServerRequest) -> ServerResponse =
{ ServerResponse.ok().body("Hello World") }That is convenient, but in an application we need multiple functions, and multiple inline
lambda’s can get messy.
Therefore, it is useful to group related handler functions together into a handler class, which
has a similar role as @Controller in an annotation-based application.
For example, the following class exposes a reactive Person repository:
import static org.springframework.http.MediaType.APPLICATION_JSON;
import static org.springframework.web.reactive.function.server.ServerResponse.ok;

public class PersonHandler {

    private final PersonRepository repository;

    public PersonHandler(PersonRepository repository) {
        this.repository = repository;
    }

    public ServerResponse listPeople(ServerRequest request) { (1)
        List<Person> people = repository.allPeople();
        return ok().contentType(APPLICATION_JSON).body(people);
    }

    public ServerResponse createPerson(ServerRequest request) throws Exception { (2)
        Person person = request.body(Person.class);
        repository.savePerson(person);
        return ok().build();
    }

    public ServerResponse getPerson(ServerRequest request) { (3)
        int personId = Integer.parseInt(request.pathVariable("id"));
        Person person = repository.getPerson(personId);
        if (person != null) {
            return ok().contentType(APPLICATION_JSON).body(person))
        }
        else {
            return ServerResponse.notFound().build();
        }
    }

}| 1 | listPeople is a handler function that returns all Person objects found in the repository as
JSON. |
| 2 | createPerson is a handler function that stores a new Person contained in the request body. |
| 3 | getPerson is a handler function that returns a single person, identified by the id path
variable. We retrieve that Person from the repository and create a JSON response, if it is
found. If it is not found, we return a 404 Not Found response. |
class PersonHandler(private val repository: PersonRepository) {

    fun listPeople(request: ServerRequest): ServerResponse { (1)
        val people: List<Person> = repository.allPeople()
        return ok().contentType(APPLICATION_JSON).body(people);
    }

    fun createPerson(request: ServerRequest): ServerResponse { (2)
        val person = request.body<Person>()
        repository.savePerson(person)
        return ok().build()
    }

    fun getPerson(request: ServerRequest): ServerResponse { (3)
        val personId = request.pathVariable("id").toInt()
        return repository.getPerson(personId)?.let { ok().contentType(APPLICATION_JSON).body(it) }
                ?: ServerResponse.notFound().build()

    }
}| 1 | listPeople is a handler function that returns all Person objects found in the repository as
JSON. |
| 2 | createPerson is a handler function that stores a new Person contained in the request body. |
| 3 | getPerson is a handler function that returns a single person, identified by the id path
variable. We retrieve that Person from the repository and create a JSON response, if it is
found. If it is not found, we return a 404 Not Found response. |
Validation
A functional endpoint can use Spring’s validation facilities to
apply validation to the request body. For example, given a custom Spring
Validator implementation for a Person:
public class PersonHandler {

    private final Validator validator = new PersonValidator(); (1)

    // ...

    public ServerResponse createPerson(ServerRequest request) {
        Person person = request.body(Person.class);
        validate(person); (2)
        repository.savePerson(person);
        return ok().build();
    }

    private void validate(Person person) {
        Errors errors = new BeanPropertyBindingResult(person, "person");
        validator.validate(person, errors);
        if (errors.hasErrors()) {
            throw new ServerWebInputException(errors.toString()); (3)
        }
    }
}| 1 | Create Validator instance. |
| 2 | Apply validation. |
| 3 | Raise exception for a 400 response. |
class PersonHandler(private val repository: PersonRepository) {

    private val validator = PersonValidator() (1)

    // ...

    fun createPerson(request: ServerRequest): ServerResponse {
        val person = request.body<Person>()
        validate(person) (2)
        repository.savePerson(person)
        return ok().build()
    }

    private fun validate(person: Person) {
        val errors: Errors = BeanPropertyBindingResult(person, "person")
        validator.validate(person, errors)
        if (errors.hasErrors()) {
            throw ServerWebInputException(errors.toString()) (3)
        }
    }
}| 1 | Create Validator instance. |
| 2 | Apply validation. |
| 3 | Raise exception for a 400 response. |
Handlers can also use the standard bean validation API (JSR-303) by creating and injecting
a global Validator instance based on LocalValidatorFactoryBean.
See Spring Validation.
1.4.3. RouterFunction
Router functions are used to route the requests to the corresponding HandlerFunction.
Typically, you do not write router functions yourself, but rather use a method on the
RouterFunctions utility class to create one.
RouterFunctions.route() (no parameters) provides you with a fluent builder for creating a router
function, whereas RouterFunctions.route(RequestPredicate, HandlerFunction) offers a direct way
to create a router.
Generally, it is recommended to use the route() builder, as it provides
convenient short-cuts for typical mapping scenarios without requiring hard-to-discover
static imports.
For instance, the router function builder offers the method GET(String, HandlerFunction) to create a mapping for GET requests; and POST(String, HandlerFunction) for POSTs.
Besides HTTP method-based mapping, the route builder offers a way to introduce additional
predicates when mapping to requests.
For each HTTP method there is an overloaded variant that takes a RequestPredicate as a
parameter, though which additional constraints can be expressed.
Predicates
You can write your own RequestPredicate, but the RequestPredicates utility class
offers commonly used implementations, based on the request path, HTTP method, content-type,
and so on.
The following example uses a request predicate to create a constraint based on the Accept
header:
RouterFunction<ServerResponse> route = RouterFunctions.route()
    .GET("/hello-world", accept(MediaType.TEXT_PLAIN),
request -> ServerResponse.ok().body("Hello World")).build();import org.springframework.web.servlet.function.router
val route = router {
GET("/hello-world", accept(TEXT_PLAIN)) {
ServerResponse.ok().body("Hello World")
}
}You can compose multiple request predicates together by using:
-
RequestPredicate.and(RequestPredicate)— both must match. -
RequestPredicate.or(RequestPredicate)— either can match.
Many of the predicates from RequestPredicates are composed.
For example, RequestPredicates.GET(String) is composed from RequestPredicates.method(HttpMethod)
and RequestPredicates.path(String).
The example shown above also uses two request predicates, as the builder uses
RequestPredicates.GET internally, and composes that with the accept predicate.
Routes
Router functions are evaluated in order: if the first route does not match, the second is evaluated, and so on. Therefore, it makes sense to declare more specific routes before general ones. Note that this behavior is different from the annotation-based programming model, where the "most specific" controller method is picked automatically.
When using the router function builder, all defined routes are composed into one
RouterFunction that is returned from build().
There are also other ways to compose multiple router functions together:
-
add(RouterFunction)on theRouterFunctions.route()builder -
RouterFunction.and(RouterFunction) -
RouterFunction.andRoute(RequestPredicate, HandlerFunction)— shortcut forRouterFunction.and()with nestedRouterFunctions.route().
The following example shows the composition of four routes:
import static org.springframework.http.MediaType.APPLICATION_JSON;
import static org.springframework.web.servlet.function.RequestPredicates.*;

PersonRepository repository = ...
PersonHandler handler = new PersonHandler(repository);

RouterFunction<ServerResponse> otherRoute = ...

RouterFunction<ServerResponse> route = route()
    .GET("/person/{id}", accept(APPLICATION_JSON), handler::getPerson) (1)
    .GET("/person", accept(APPLICATION_JSON), handler::listPeople) (2)
    .POST("/person", handler::createPerson) (3)
    .add(otherRoute) (4)
.build();| 1 | GET /person/{id} with an Accept header that matches JSON is routed to
PersonHandler.getPerson |
| 2 | GET /person with an Accept header that matches JSON is routed to
PersonHandler.listPeople |
| 3 | POST /person with no additional predicates is mapped to
PersonHandler.createPerson, and |
| 4 | otherRoute is a router function that is created elsewhere, and added to the route built. |
import org.springframework.http.MediaType.APPLICATION_JSON
import org.springframework.web.servlet.function.router

val repository: PersonRepository = ...
val handler = PersonHandler(repository);

val otherRoute = router {  }

val route = router {
    GET("/person/{id}", accept(APPLICATION_JSON), handler::getPerson) (1)
    GET("/person", accept(APPLICATION_JSON), handler::listPeople) (2)
    POST("/person", handler::createPerson) (3)
}.and(otherRoute) (4)| 1 | GET /person/{id} with an Accept header that matches JSON is routed to
PersonHandler.getPerson |
| 2 | GET /person with an Accept header that matches JSON is routed to
PersonHandler.listPeople |
| 3 | POST /person with no additional predicates is mapped to
PersonHandler.createPerson, and |
| 4 | otherRoute is a router function that is created elsewhere, and added to the route built. |
Nested Routes
It is common for a group of router functions to have a shared predicate, for instance a shared
path.
In the example above, the shared predicate would be a path predicate that matches /person,
used by three of the routes.
When using annotations, you would remove this duplication by using a type-level @RequestMapping
annotation that maps to /person.
In WebMvc.fn, path predicates can be shared through the path method on the router function builder.
For instance, the last few lines of the example above can be improved in the following way by using nested routes:
RouterFunction<ServerResponse> route = route()
    .path("/person", builder -> builder (1)
        .GET("/{id}", accept(APPLICATION_JSON), handler::getPerson)
        .GET("", accept(APPLICATION_JSON), handler::listPeople)
        .POST("/person", handler::createPerson))
.build();| 1 | Note that second parameter of path is a consumer that takes the router builder. |
import org.springframework.web.servlet.function.router

val route = router {
    "/person".nest {
        GET("/{id}", accept(APPLICATION_JSON), handler::getPerson)
        GET("", accept(APPLICATION_JSON), handler::listPeople)
        POST("/person", handler::createPerson)
    }
}
Though path-based nesting is the most common, you can nest on any kind of predicate by using
the nest method on the builder.
The above still contains some duplication in the form of the shared Accept-header predicate.
We can further improve by using the nest method together with accept:
RouterFunction<ServerResponse> route = route()
    .path("/person", b1 -> b1
        .nest(accept(APPLICATION_JSON), b2 -> b2
            .GET("/{id}", handler::getPerson)
            .GET("", handler::listPeople))
        .POST("/person", handler::createPerson))
.build();import org.springframework.web.servlet.function.router
val route = router {
"/person".nest {
accept(APPLICATION_JSON).nest {
GET("/{id}", handler::getPerson)
GET("", handler::listPeople)
POST("/person", handler::createPerson)
}
}
}1.4.4. Running a Server
You typically run router functions in a DispatcherHandler-based setup through the
MVC Config, which uses Spring configuration to declare the
components required to process requests. The MVC Java configuration declares the following
infrastructure components to support functional endpoints:
-
RouterFunctionMapping: Detects one or moreRouterFunction<?>beans in the Spring configuration, combines them throughRouterFunction.andOther, and routes requests to the resulting composedRouterFunction. -
HandlerFunctionAdapter: Simple adapter that letsDispatcherHandlerinvoke aHandlerFunctionthat was mapped to a request.
The preceding components let functional endpoints fit within the DispatcherServlet request
processing lifecycle and also (potentially) run side by side with annotated controllers, if
any are declared. It is also how functional endpoints are enabled by the Spring Boot Web
starter.
The following example shows a WebFlux Java configuration:
@Configuration
@EnableMvc
public class WebConfig implements WebMvcConfigurer {

    @Bean
    public RouterFunction<?> routerFunctionA() {
        // ...
    }

    @Bean
    public RouterFunction<?> routerFunctionB() {
        // ...
    }

    // ...

    @Override
    public void configureMessageConverters(List<HttpMessageConverter<?>> converters) {
        // configure message conversion...
    }

    @Override
    public void addCorsMappings(CorsRegistry registry) {
        // configure CORS...
    }

    @Override
    public void configureViewResolvers(ViewResolverRegistry registry) {
        // configure view resolution for HTML rendering...
    }
}@Configuration
@EnableMvc
class WebConfig : WebMvcConfigurer {
@Bean
fun routerFunctionA(): RouterFunction<*> {
// ...
}
@Bean
fun routerFunctionB(): RouterFunction<*> {
// ...
}
// ...
override fun configureMessageConverters(converters: List<HttpMessageConverter<*>>) {
// configure message conversion...
}
override fun addCorsMappings(registry: CorsRegistry) {
// configure CORS...
}
override fun configureViewResolvers(registry: ViewResolverRegistry) {
// configure view resolution for HTML rendering...
}
}1.4.5. Filtering Handler Functions
You can filter handler functions by using the before, after, or filter methods on the routing
function builder.
With annotations, you can achieve similar functionality by using @ControllerAdvice, a ServletFilter, or both.
The filter will apply to all routes that are built by the builder.
This means that filters defined in nested routes do not apply to "top-level" routes.
For instance, consider the following example:
RouterFunction<ServerResponse> route = route()
    .path("/person", b1 -> b1
        .nest(accept(APPLICATION_JSON), b2 -> b2
            .GET("/{id}", handler::getPerson)
            .GET("", handler::listPeople)
            .before(request -> ServerRequest.from(request) (1)
                .header("X-RequestHeader", "Value")
                .build()))
        .POST("/person", handler::createPerson))
    .after((request, response) -> logResponse(response)) (2)
.build();| 1 | The before filter that adds a custom request header is only applied to the two GET routes. |
| 2 | The after filter that logs the response is applied to all routes, including the nested ones. |
import org.springframework.web.servlet.function.router

val route = router {
    "/person".nest {
        GET("/{id}", handler::getPerson)
        GET("", handler::listPeople)
        before { (1)
            ServerRequest.from(it)
                    .header("X-RequestHeader", "Value").build()
        }
        POST("/person", handler::createPerson)
        after { _, response -> (2)
            logResponse(response)
        }
    }
}| 1 | The before filter that adds a custom request header is only applied to the two GET routes. |
| 2 | The after filter that logs the response is applied to all routes, including the nested ones. |
The filter method on the router builder takes a HandlerFilterFunction: a
function that takes a ServerRequest and HandlerFunction and returns a ServerResponse.
The handler function parameter represents the next element in the chain.
This is typically the handler that is routed to, but it can also be another
filter if multiple are applied.
Now we can add a simple security filter to our route, assuming that we have a SecurityManager that
can determine whether a particular path is allowed.
The following example shows how to do so:
SecurityManager securityManager = ...

RouterFunction<ServerResponse> route = route()
    .path("/person", b1 -> b1
        .nest(accept(APPLICATION_JSON), b2 -> b2
            .GET("/{id}", handler::getPerson)
            .GET("", handler::listPeople))
        .POST("/person", handler::createPerson))
    .filter((request, next) -> {
        if (securityManager.allowAccessTo(request.path())) {
            return next.handle(request);
        }
        else {
            return ServerResponse.status(UNAUTHORIZED).build();
        }
    })
.build();import org.springframework.web.servlet.function.router
val securityManager: SecurityManager = ...
val route = router {
("/person" and accept(APPLICATION_JSON)).nest {
GET("/{id}", handler::getPerson)
GET("", handler::listPeople)
POST("/person", handler::createPerson)
filter { request, next ->
if (securityManager.allowAccessTo(request.path())) {
next(request)
}
else {
status(UNAUTHORIZED).build();
}
}
}
}The preceding example demonstrates that invoking the next.handle(ServerRequest) is optional.
We allow only the handler function to be executed when access is allowed.
Besides using the filter method on the router function builder, it is possible to apply a
filter to an existing router function via RouterFunction.filter(HandlerFilterFunction).
CORS support for functional endpoints is provided through a dedicated
CorsFilter.
|
1.5. URI Links
This section describes various options available in the Spring Framework to work with URI’s.
1.5.1. UriComponents
Spring MVC and Spring WebFlux
UriComponentsBuilder helps to build URI’s from URI templates with variables, as the following example shows:
UriComponents uriComponents = UriComponentsBuilder
        .fromUriString("https://example.com/hotels/{hotel}")  (1)
        .queryParam("q", "{q}")  (2)
        .encode() (3)
        .build(); (4)

URI uri = uriComponents.expand("Westin", "123").toUri(); (5)| 1 | Static factory method with a URI template. |
| 2 | Add or replace URI components. |
| 3 | Request to have the URI template and URI variables encoded. |
| 4 | Build a UriComponents. |
| 5 | Expand variables and obtain the URI. |
val uriComponents = UriComponentsBuilder
        .fromUriString("https://example.com/hotels/{hotel}")  (1)
        .queryParam("q", "{q}")  (2)
        .encode() (3)
        .build() (4)

val uri = uriComponents.expand("Westin", "123").toUri() (5)| 1 | Static factory method with a URI template. |
| 2 | Add or replace URI components. |
| 3 | Request to have the URI template and URI variables encoded. |
| 4 | Build a UriComponents. |
| 5 | Expand variables and obtain the URI. |
The preceding example can be consolidated into one chain and shortened with buildAndExpand,
as the following example shows:
URI uri = UriComponentsBuilder
        .fromUriString("https://example.com/hotels/{hotel}")
        .queryParam("q", "{q}")
        .encode()
        .buildAndExpand("Westin", "123")
.toUri();val uri = UriComponentsBuilder
.fromUriString("https://example.com/hotels/{hotel}")
.queryParam("q", "{q}")
.encode()
.buildAndExpand("Westin", "123")
.toUri()You can shorten it further by going directly to a URI (which implies encoding), as the following example shows:
URI uri = UriComponentsBuilder
        .fromUriString("https://example.com/hotels/{hotel}")
        .queryParam("q", "{q}")
.build("Westin", "123");val uri = UriComponentsBuilder
.fromUriString("https://example.com/hotels/{hotel}")
.queryParam("q", "{q}")
.build("Westin", "123")You shorter it further still with a full URI template, as the following example shows:
URI uri = UriComponentsBuilder
        .fromUriString("https://example.com/hotels/{hotel}?q={q}")
.build("Westin", "123");val uri = UriComponentsBuilder
.fromUriString("https://example.com/hotels/{hotel}?q={q}")
.build("Westin", "123")1.5.2. UriBuilder
Spring MVC and Spring WebFlux
UriComponentsBuilder implements UriBuilder. You can create a
UriBuilder, in turn, with a UriBuilderFactory. Together, UriBuilderFactory and
UriBuilder provide a pluggable mechanism to build URIs from URI templates, based on
shared configuration, such as a base URL, encoding preferences, and other details.
You can configure RestTemplate and WebClient with a UriBuilderFactory
to customize the preparation of URIs. DefaultUriBuilderFactory is a default
implementation of UriBuilderFactory that uses UriComponentsBuilder internally and
exposes shared configuration options.
The following example shows how to configure a RestTemplate:
// import org.springframework.web.util.DefaultUriBuilderFactory.EncodingMode;

String baseUrl = "https://example.org";
DefaultUriBuilderFactory factory = new DefaultUriBuilderFactory(baseUrl);
factory.setEncodingMode(EncodingMode.TEMPLATE_AND_VALUES);

RestTemplate restTemplate = new RestTemplate();
restTemplate.setUriTemplateHandler(factory);// import org.springframework.web.util.DefaultUriBuilderFactory.EncodingMode
val baseUrl = "https://example.org"
val factory = DefaultUriBuilderFactory(baseUrl)
factory.encodingMode = EncodingMode.TEMPLATE_AND_VALUES
val restTemplate = RestTemplate()
restTemplate.uriTemplateHandler = factoryThe following example configures a WebClient:
// import org.springframework.web.util.DefaultUriBuilderFactory.EncodingMode;

String baseUrl = "https://example.org";
DefaultUriBuilderFactory factory = new DefaultUriBuilderFactory(baseUrl);
factory.setEncodingMode(EncodingMode.TEMPLATE_AND_VALUES);

WebClient client = WebClient.builder().uriBuilderFactory(factory).build();// import org.springframework.web.util.DefaultUriBuilderFactory.EncodingMode
val baseUrl = "https://example.org"
val factory = DefaultUriBuilderFactory(baseUrl)
factory.encodingMode = EncodingMode.TEMPLATE_AND_VALUES
val client = WebClient.builder().uriBuilderFactory(factory).build()In addition, you can also use DefaultUriBuilderFactory directly. It is similar to using
UriComponentsBuilder but, instead of static factory methods, it is an actual instance
that holds configuration and preferences, as the following example shows:
String baseUrl = "https://example.com";
DefaultUriBuilderFactory uriBuilderFactory = new DefaultUriBuilderFactory(baseUrl);

URI uri = uriBuilderFactory.uriString("/hotels/{hotel}")
        .queryParam("q", "{q}")
.build("Westin", "123");val baseUrl = "https://example.com"
val uriBuilderFactory = DefaultUriBuilderFactory(baseUrl)
val uri = uriBuilderFactory.uriString("/hotels/{hotel}")
.queryParam("q", "{q}")
.build("Westin", "123")1.5.3. URI Encoding
Spring MVC and Spring WebFlux
UriComponentsBuilder exposes encoding options at two levels:
-
UriComponentsBuilder#encode(): Pre-encodes the URI template first and then strictly encodes URI variables when expanded.
-
UriComponents#encode(): Encodes URI components after URI variables are expanded.
Both options replace non-ASCII and illegal characters with escaped octets. However, the first option also replaces characters with reserved meaning that appear in URI variables.
| Consider ";", which is legal in a path but has reserved meaning. The first option replaces ";" with "%3B" in URI variables but not in the URI template. By contrast, the second option never replaces ";", since it is a legal character in a path. |
For most cases, the first option is likely to give the expected result, because it treats URI variables as opaque data to be fully encoded, while option 2 is useful only if URI variables intentionally contain reserved characters.
The following example uses the first option:
URI uri = UriComponentsBuilder.fromPath("/hotel list/{city}")
        .queryParam("q", "{q}")
        .encode()
        .buildAndExpand("New York", "foo+bar")
        .toUri();

// Result is "/hotel%20list/New%20York?q=foo%2Bbar"val uri = UriComponentsBuilder.fromPath("/hotel list/{city}")
.queryParam("q", "{q}")
.encode()
.buildAndExpand("New York", "foo+bar")
.toUri()
// Result is "/hotel%20list/New%20York?q=foo%2Bbar"You can shorten the preceding example by going directly to the URI (which implies encoding), as the following example shows:
URI uri = UriComponentsBuilder.fromPath("/hotel list/{city}")
        .queryParam("q", "{q}")
.build("New York", "foo+bar")val uri = UriComponentsBuilder.fromPath("/hotel list/{city}")
.queryParam("q", "{q}")
.build("New York", "foo+bar")You can shorten it further still with a full URI template, as the following example shows:
URI uri = UriComponentsBuilder.fromPath("/hotel list/{city}?q={q}")
.build("New York", "foo+bar")val uri = UriComponentsBuilder.fromPath("/hotel list/{city}?q={q}")
.build("New York", "foo+bar")The WebClient and the RestTemplate expand and encode URI templates internally through
the UriBuilderFactory strategy. Both can be configured with a custom strategy.
as the following example shows:
String baseUrl = "https://example.com";
DefaultUriBuilderFactory factory = new DefaultUriBuilderFactory(baseUrl)
factory.setEncodingMode(EncodingMode.TEMPLATE_AND_VALUES);

// Customize the RestTemplate..
RestTemplate restTemplate = new RestTemplate();
restTemplate.setUriTemplateHandler(factory);

// Customize the WebClient..
WebClient client = WebClient.builder().uriBuilderFactory(factory).build();val baseUrl = "https://example.com"
val factory = DefaultUriBuilderFactory(baseUrl).apply {
encodingMode = EncodingMode.TEMPLATE_AND_VALUES
}
// Customize the RestTemplate..
val restTemplate = RestTemplate().apply {
uriTemplateHandler = factory
}
// Customize the WebClient..
val client = WebClient.builder().uriBuilderFactory(factory).build()The DefaultUriBuilderFactory implementation uses UriComponentsBuilder internally to
expand and encode URI templates. As a factory, it provides a single place to configure
the approach to encoding, based on one of the below encoding modes:
-
TEMPLATE_AND_VALUES: UsesUriComponentsBuilder#encode(), corresponding to the first option in the earlier list, to pre-encode the URI template and strictly encode URI variables when expanded. -
VALUES_ONLY: Does not encode the URI template and, instead, applies strict encoding to URI variables throughUriUtils#encodeUriUriVariablesprior to expanding them into the template. -
URI_COMPONENT: UsesUriComponents#encode(), corresponding to the second option in the earlier list, to encode URI component value after URI variables are expanded. -
NONE: No encoding is applied.
The RestTemplate is set to EncodingMode.URI_COMPONENT for historic
reasons and for backwards compatibility. The WebClient relies on the default value
in DefaultUriBuilderFactory, which was changed from EncodingMode.URI_COMPONENT in
5.0.x to EncodingMode.TEMPLATE_AND_VALUES in 5.1.
1.5.4. Relative Servlet Requests
You can use ServletUriComponentsBuilder to create URIs relative to the current request,
as the following example shows:
HttpServletRequest request = ...

// Re-uses host, scheme, port, path and query string...

ServletUriComponentsBuilder ucb = ServletUriComponentsBuilder.fromRequest(request)
        .replaceQueryParam("accountId", "{id}").build()
        .expand("123")
.encode();val request: HttpServletRequest = ...
// Re-uses host, scheme, port, path and query string...
val ucb = ServletUriComponentsBuilder.fromRequest(request)
.replaceQueryParam("accountId", "{id}").build()
.expand("123")
.encode()You can create URIs relative to the context path, as the following example shows:
// Re-uses host, port and context path...

ServletUriComponentsBuilder ucb = ServletUriComponentsBuilder.fromContextPath(request)
.path("/accounts").build()// Re-uses host, port and context path...
val ucb = ServletUriComponentsBuilder.fromContextPath(request)
.path("/accounts").build()You can create URIs relative to a Servlet (for example, /main/*),
as the following example shows:
// Re-uses host, port, context path, and Servlet prefix...

ServletUriComponentsBuilder ucb = ServletUriComponentsBuilder.fromServletMapping(request)
.path("/accounts").build()// Re-uses host, port, context path, and Servlet prefix...
val ucb = ServletUriComponentsBuilder.fromServletMapping(request)
.path("/accounts").build()
As of 5.1, ServletUriComponentsBuilder ignores information from the Forwarded and
X-Forwarded-* headers, which specify the client-originated address. Consider using the
ForwardedHeaderFilter to extract and use or to discard
such headers.
|
1.5.5. Links to Controllers
Spring MVC provides a mechanism to prepare links to controller methods. For example, the following MVC controller allows for link creation:
@Controller
@RequestMapping("/hotels/{hotel}")
public class BookingController {

    @GetMapping("/bookings/{booking}")
    public ModelAndView getBooking(@PathVariable Long booking) {
        // ...
    }
}@Controller
@RequestMapping("/hotels/{hotel}")
class BookingController {
@GetMapping("/bookings/{booking}")
fun getBooking(@PathVariable booking: Long): ModelAndView {
// ...
}
}You can prepare a link by referring to the method by name, as the following example shows:
UriComponents uriComponents = MvcUriComponentsBuilder
    .fromMethodName(BookingController.class, "getBooking", 21).buildAndExpand(42);

URI uri = uriComponents.encode().toUri();val uriComponents = MvcUriComponentsBuilder
.fromMethodName(BookingController::class.java, "getBooking", 21).buildAndExpand(42)
val uri = uriComponents.encode().toUri()In the preceding example, we provide actual method argument values (in this case, the long value: 21)
to be used as a path variable and inserted into the URL. Furthermore, we provide the
value, 42, to fill in any remaining URI variables, such as the hotel variable inherited
from the type-level request mapping. If the method had more arguments, we could supply null for
arguments not needed for the URL. In general, only @PathVariable and @RequestParam arguments
are relevant for constructing the URL.
There are additional ways to use MvcUriComponentsBuilder. For example, you can use a technique
akin to mock testing through proxies to avoid referring to the controller method by name, as the following example shows
(the example assumes static import of MvcUriComponentsBuilder.on):
UriComponents uriComponents = MvcUriComponentsBuilder
    .fromMethodCall(on(BookingController.class).getBooking(21)).buildAndExpand(42);

URI uri = uriComponents.encode().toUri();val uriComponents = MvcUriComponentsBuilder
.fromMethodCall(on(BookingController::class.java).getBooking(21)).buildAndExpand(42)
val uri = uriComponents.encode().toUri()
Controller method signatures are limited in their design when they are supposed to be usable for
link creation with fromMethodCall. Aside from needing a proper parameter signature,
there is a technical limitation on the return type (namely, generating a runtime proxy
for link builder invocations), so the return type must not be final. In particular,
the common String return type for view names does not work here. You should use ModelAndView
or even plain Object (with a String return value) instead.
|
The earlier examples use static methods in MvcUriComponentsBuilder. Internally, they rely
on ServletUriComponentsBuilder to prepare a base URL from the scheme, host, port,
context path, and servlet path of the current request. This works well in most cases.
However, sometimes, it can be insufficient. For example, you may be outside the context of
a request (such as a batch process that prepares links) or perhaps you need to insert a path
prefix (such as a locale prefix that was removed from the request path and needs to be
re-inserted into links).
For such cases, you can use the static fromXxx overloaded methods that accept a
UriComponentsBuilder to use a base URL. Alternatively, you can create an instance of MvcUriComponentsBuilder
with a base URL and then use the instance-based withXxx methods. For example, the
following listing uses withMethodCall:
UriComponentsBuilder base = ServletUriComponentsBuilder.fromCurrentContextPath().path("/en");
MvcUriComponentsBuilder builder = MvcUriComponentsBuilder.relativeTo(base);
builder.withMethodCall(on(BookingController.class).getBooking(21)).buildAndExpand(42);

URI uri = uriComponents.encode().toUri();val base = ServletUriComponentsBuilder.fromCurrentContextPath().path("/en")
val builder = MvcUriComponentsBuilder.relativeTo(base)
builder.withMethodCall(on(BookingController::class.java).getBooking(21)).buildAndExpand(42)
val uri = uriComponents.encode().toUri()
As of 5.1, MvcUriComponentsBuilder ignores information from the Forwarded and
X-Forwarded-* headers, which specify the client-originated address. Consider using the
ForwardedHeaderFilter to extract and use or to discard
such headers.
|
1.5.6. Links in Views
In views such as Thymeleaf, FreeMarker, or JSP, you can build links to annotated controllers by referring to the implicitly or explicitly assigned name for each request mapping.
Consider the following example:
@RequestMapping("/people/{id}/addresses")
public class PersonAddressController {

    @RequestMapping("/{country}")
    public HttpEntity<PersonAddress> getAddress(@PathVariable String country) { ... }
}@RequestMapping("/people/{id}/addresses")
class PersonAddressController {
@RequestMapping("/{country}")
fun getAddress(@PathVariable country: String): HttpEntity<PersonAddress> { ... }
}Given the preceding controller, you can prepare a link from a JSP, as follows:
<%@ taglib uri="http://www.springframework.org/tags" prefix="s" %>
...
<a href="${s:mvcUrl('PAC#getAddress').arg(0,'US').buildAndExpand('123')}">Get Address</a>
The preceding example relies on the mvcUrl function declared in the Spring tag library
(that is, META-INF/spring.tld), but it is easy to define your own function or prepare a
similar one for other templating technologies.
Here is how this works. On startup, every @RequestMapping is assigned a default name
through HandlerMethodMappingNamingStrategy, whose default implementation uses the
capital letters of the class and the method name (for example, the getThing method in
ThingController becomes "TC#getThing"). If there is a name clash, you can use
@RequestMapping(name="..") to assign an explicit name or implement your own
HandlerMethodMappingNamingStrategy.
1.6. Asynchronous Requests
Spring MVC has an extensive integration with Servlet 3.0 asynchronous request processing:
-
DeferredResultandCallablereturn values in controller methods and provide basic support for a single asynchronous return value. -
Controllers can stream multiple values, including SSE and raw data.
-
Controllers can use reactive clients and return reactive types for response handling.
1.6.1. DeferredResult
Once the asynchronous request processing feature is enabled
in the Servlet container, controller methods can wrap any supported controller method
return value with DeferredResult, as the following example shows:
@GetMapping("/quotes")
@ResponseBody
public DeferredResult<String> quotes() {
    DeferredResult<String> deferredResult = new DeferredResult<String>();
    // Save the deferredResult somewhere..
    return deferredResult;
}

// From some other thread...
deferredResult.setResult(result);@GetMapping("/quotes")
@ResponseBody
fun quotes(): DeferredResult<String> {
val deferredResult = DeferredResult<String>()
// Save the deferredResult somewhere..
return deferredResult
}
// From some other thread...
deferredResult.setResult(result)The controller can produce the return value asynchronously, from a different thread — for example, in response to an external event (JMS message), a scheduled task, or other event.
1.6.2. Callable
A controller can wrap any supported return value with java.util.concurrent.Callable,
as the following example shows:
@PostMapping
public Callable<String> processUpload(final MultipartFile file) {

    return new Callable<String>() {
        public String call() throws Exception {
            // ...
            return "someView";
        }
    };
}@PostMapping
fun processUpload(file: MultipartFile) = Callable<String> {
// ...
"someView"
}The return value can then be obtained by running the given task through the
configured TaskExecutor.
1.6.3. Processing
Here is a very concise overview of Servlet asynchronous request processing:
-
A
ServletRequestcan be put in asynchronous mode by callingrequest.startAsync(). The main effect of doing so is that the Servlet (as well as any filters) can exit, but the response remains open to let processing complete later. -
The call to
request.startAsync()returnsAsyncContext, which you can use for further control over asynchronous processing. For example, it provides thedispatchmethod, which is similar to a forward from the Servlet API, except that it lets an application resume request processing on a Servlet container thread. -
The
ServletRequestprovides access to the currentDispatcherType, which you can use to distinguish between processing the initial request, an asynchronous dispatch, a forward, and other dispatcher types.
DeferredResult processing works as follows:
-
The controller returns a
DeferredResultand saves it in some in-memory queue or list where it can be accessed. -
Spring MVC calls
request.startAsync(). -
Meanwhile, the
DispatcherServletand all configured filters exit the request processing thread, but the response remains open. -
The application sets the
DeferredResultfrom some thread, and Spring MVC dispatches the request back to the Servlet container. -
The
DispatcherServletis invoked again, and processing resumes with the asynchronously produced return value.
Callable processing works as follows:
-
The controller returns a
Callable. -
Spring MVC calls
request.startAsync()and submits theCallableto aTaskExecutorfor processing in a separate thread. -
Meanwhile, the
DispatcherServletand all filters exit the Servlet container thread, but the response remains open. -
Eventually the
Callableproduces a result, and Spring MVC dispatches the request back to the Servlet container to complete processing. -
The
DispatcherServletis invoked again, and processing resumes with the asynchronously produced return value from theCallable.
For further background and context, you can also read the blog posts that introduced asynchronous request processing support in Spring MVC 3.2.
Exception Handling
When you use a DeferredResult, you can choose whether to call setResult or
setErrorResult with an exception. In both cases, Spring MVC dispatches the request back
to the Servlet container to complete processing. It is then treated either as if the
controller method returned the given value or as if it produced the given exception.
The exception then goes through the regular exception handling mechanism (for example, invoking
@ExceptionHandler methods).
When you use Callable, similar processing logic occurs, the main difference being that
the result is returned from the Callable or an exception is raised by it.
Interception
HandlerInterceptor instances can be of type AsyncHandlerInterceptor, to receive the
afterConcurrentHandlingStarted callback on the initial request that starts asynchronous
processing (instead of postHandle and afterCompletion).
HandlerInterceptor implementations can also register a CallableProcessingInterceptor
or a DeferredResultProcessingInterceptor, to integrate more deeply with the
lifecycle of an asynchronous request (for example, to handle a timeout event). See
AsyncHandlerInterceptor
for more details.
DeferredResult provides onTimeout(Runnable) and onCompletion(Runnable) callbacks.
See the javadoc of DeferredResult
for more details. Callable can be substituted for WebAsyncTask that exposes additional
methods for timeout and completion callbacks.
Compared to WebFlux
The Servlet API was originally built for making a single pass through the Filter-Servlet
chain. Asynchronous request processing, added in Servlet 3.0, lets applications exit
the Filter-Servlet chain but leave the response open for further processing. The Spring MVC
asynchronous support is built around that mechanism. When a controller returns a DeferredResult,
the Filter-Servlet chain is exited, and the Servlet container thread is released. Later, when
the DeferredResult is set, an ASYNC dispatch (to the same URL) is made, during which the
controller is mapped again but, rather than invoking it, the DeferredResult value is used
(as if the controller returned it) to resume processing.
By contrast, Spring WebFlux is neither built on the Servlet API, nor does it need such an asynchronous request processing feature, because it is asynchronous by design. Asynchronous handling is built into all framework contracts and is intrinsically supported through all stages of request processing.
From a programming model perspective, both Spring MVC and Spring WebFlux support asynchronous and Reactive Types as return values in controller methods. Spring MVC even supports streaming, including reactive back pressure. However, individual writes to the response remain blocking (and are performed on a separate thread), unlike WebFlux, which relies on non-blocking I/O and does not need an extra thread for each write.
Another fundamental difference is that Spring MVC does not support asynchronous or reactive
types in controller method arguments (for example, @RequestBody, @RequestPart, and others),
nor does it have any explicit support for asynchronous and reactive types as model attributes.
Spring WebFlux does support all that.
1.6.4. HTTP Streaming
You can use DeferredResult and Callable for a single asynchronous return value.
What if you want to produce multiple asynchronous values and have those written to the
response? This section describes how to do so.
Objects
You can use the ResponseBodyEmitter return value to produce a stream of objects, where
each object is serialized with an
HttpMessageConverter and written to the
response, as the following example shows:
@GetMapping("/events")
public ResponseBodyEmitter handle() {
    ResponseBodyEmitter emitter = new ResponseBodyEmitter();
    // Save the emitter somewhere..
    return emitter;
}

// In some other thread
emitter.send("Hello once");

// and again later on
emitter.send("Hello again");

// and done at some point
emitter.complete();@GetMapping("/events")
fun handle() = ResponseBodyEmitter().apply {
// Save the emitter somewhere..
}
// In some other thread
emitter.send("Hello once")
// and again later on
emitter.send("Hello again")
// and done at some point
emitter.complete()You can also use ResponseBodyEmitter as the body in a ResponseEntity, letting you
customize the status and headers of the response.
When an emitter throws an IOException (for example, if the remote client went away), applications
are not responsible for cleaning up the connection and should not invoke emitter.complete
or emitter.completeWithError. Instead, the servlet container automatically initiates an
AsyncListener error notification, in which Spring MVC makes a completeWithError call.
This call, in turn, performs one final ASYNC dispatch to the application, during which Spring MVC
invokes the configured exception resolvers and completes the request.
SSE
SseEmitter (a subclass of ResponseBodyEmitter) provides support for
Server-Sent Events, where events sent from the server
are formatted according to the W3C SSE specification. To produce an SSE
stream from a controller, return SseEmitter, as the following example shows:
@GetMapping(path="/events", produces=MediaType.TEXT_EVENT_STREAM_VALUE)
public SseEmitter handle() {
    SseEmitter emitter = new SseEmitter();
    // Save the emitter somewhere..
    return emitter;
}

// In some other thread
emitter.send("Hello once");

// and again later on
emitter.send("Hello again");

// and done at some point
emitter.complete();@GetMapping("/events", produces = [MediaType.TEXT_EVENT_STREAM_VALUE])
fun handle() = SseEmitter().apply {
// Save the emitter somewhere..
}
// In some other thread
emitter.send("Hello once")
// and again later on
emitter.send("Hello again")
// and done at some point
emitter.complete()While SSE is the main option for streaming into browsers, note that Internet Explorer does not support Server-Sent Events. Consider using Spring’s WebSocket messaging with SockJS fallback transports (including SSE) that target a wide range of browsers.
See also previous section for notes on exception handling.
Raw Data
Sometimes, it is useful to bypass message conversion and stream directly to the response
OutputStream (for example, for a file download). You can use the StreamingResponseBody
return value type to do so, as the following example shows:
@GetMapping("/download")
public StreamingResponseBody handle() {
    return new StreamingResponseBody() {
        @Override
        public void writeTo(OutputStream outputStream) throws IOException {
            // write...
        }
    };
}@GetMapping("/download")
fun handle() = StreamingResponseBody {
// write...
}You can use StreamingResponseBody as the body in a ResponseEntity to
customize the status and headers of the response.
1.6.5. Reactive Types
Spring MVC supports use of reactive client libraries in a controller (also read
Reactive Libraries in the WebFlux section).
This includes the WebClient from spring-webflux and others, such as Spring Data
reactive data repositories. In such scenarios, it is convenient to be able to return
reactive types from the controller method.
Reactive return values are handled as follows:
-
A single-value promise is adapted to, similar to using
DeferredResult. Examples includeMono(Reactor) orSingle(RxJava). -
A multi-value stream with a streaming media type (such as
application/stream+jsonortext/event-stream) is adapted to, similar to usingResponseBodyEmitterorSseEmitter. Examples includeFlux(Reactor) orObservable(RxJava). Applications can also returnFlux<ServerSentEvent>orObservable<ServerSentEvent>. -
A multi-value stream with any other media type (such as
application/json) is adapted to, similar to usingDeferredResult<List<?>>.
Spring MVC supports Reactor and RxJava through the
ReactiveAdapterRegistry from
spring-core, which lets it adapt from multiple reactive libraries.
|
For streaming to the response, reactive back pressure is supported, but writes to the
response are still blocking and are executed on a separate thread through the
configured TaskExecutor, to avoid
blocking the upstream source (such as a Flux returned from WebClient).
By default, SimpleAsyncTaskExecutor is used for the blocking writes, but that is not
suitable under load. If you plan to stream with a reactive type, you should use the
MVC configuration to configure a task executor.
1.6.6. Disconnects
The Servlet API does not provide any notification when a remote client goes away. Therefore, while streaming to the response, whether through SseEmitter or reactive types, it is important to send data periodically, since the write fails if the client has disconnected. The send could take the form of an empty (comment-only) SSE event or any other data that the other side would have to interpret as a heartbeat and ignore.
Alternatively, consider using web messaging solutions (such as STOMP over WebSocket or WebSocket with SockJS) that have a built-in heartbeat mechanism.
1.6.7. Configuration
The asynchronous request processing feature must be enabled at the Servlet container level. The MVC configuration also exposes several options for asynchronous requests.
Servlet Container
Filter and Servlet declarations have an asyncSupported flag that needs to be set to true
to enable asynchronous request processing. In addition, Filter mappings should be
declared to handle the ASYNC javax.servlet.DispatchType.
In Java configuration, when you use AbstractAnnotationConfigDispatcherServletInitializer
to initialize the Servlet container, this is done automatically.
In web.xml configuration, you can add <async-supported>true</async-supported> to the
DispatcherServlet and to Filter declarations and add
<dispatcher>ASYNC</dispatcher> to filter mappings.
Spring MVC
The MVC configuration exposes the following options related to asynchronous request processing:
-
Java configuration: Use the
configureAsyncSupportcallback onWebMvcConfigurer. -
XML namespace: Use the
<async-support>element under<mvc:annotation-driven>.
You can configure the following:
-
Default timeout value for async requests, which if not set, depends on the underlying Servlet container.
-
AsyncTaskExecutorto use for blocking writes when streaming with Reactive Types and for executingCallableinstances returned from controller methods. We highly recommended configuring this property if you stream with reactive types or have controller methods that returnCallable, since by default, it is aSimpleAsyncTaskExecutor. -
DeferredResultProcessingInterceptorimplementations andCallableProcessingInterceptorimplementations.
Note that you can also set the default timeout value on a DeferredResult,
a ResponseBodyEmitter, and an SseEmitter. For a Callable, you can use
WebAsyncTask to provide a timeout value.
1.7. CORS
Spring MVC lets you handle CORS (Cross-Origin Resource Sharing). This section describes how to do so.
1.7.1. Introduction
For security reasons, browsers prohibit AJAX calls to resources outside the current origin. For example, you could have your bank account in one tab and evil.com in another. Scripts from evil.com should not be able to make AJAX requests to your bank API with your credentials — for example withdrawing money from your account!
Cross-Origin Resource Sharing (CORS) is a W3C specification implemented by most browsers that lets you specify what kind of cross-domain requests are authorized, rather than using less secure and less powerful workarounds based on IFRAME or JSONP.
1.7.2. Processing
The CORS specification distinguishes between preflight, simple, and actual requests. To learn how CORS works, you can read this article, among many others, or see the specification for more details.
Spring MVC HandlerMapping implementations provide built-in support for CORS. After successfully
mapping a request to a handler, HandlerMapping implementations check the CORS configuration for the
given request and handler and take further actions. Preflight requests are handled
directly, while simple and actual CORS requests are intercepted, validated, and have
required CORS response headers set.
In order to enable cross-origin requests (that is, the Origin header is present and
differs from the host of the request), you need to have some explicitly declared CORS
configuration. If no matching CORS configuration is found, preflight requests are
rejected. No CORS headers are added to the responses of simple and actual CORS requests
and, consequently, browsers reject them.
Each HandlerMapping can be
configured
individually with URL pattern-based CorsConfiguration mappings. In most cases, applications
use the MVC Java configuration or the XML namespace to declare such mappings, which results
in a single global map being passed to all HandlerMappping instances.
You can combine global CORS configuration at the HandlerMapping level with more
fine-grained, handler-level CORS configuration. For example, annotated controllers can use
class- or method-level @CrossOrigin annotations (other handlers can implement
CorsConfigurationSource).
The rules for combining global and local configuration are generally additive — for example,
all global and all local origins. For those attributes where only a single value can be
accepted (such as allowCredentials and maxAge), the local overrides the global value. See
CorsConfiguration#combine(CorsConfiguration)
for more details.
|
To learn more from the source or make advanced customizations, check the code behind:
|
1.7.3. @CrossOrigin
The @CrossOrigin
annotation enables cross-origin requests on annotated controller methods,
as the following example shows:
@RestController
@RequestMapping("/account")
public class AccountController {

    @CrossOrigin
    @GetMapping("/{id}")
    public Account retrieve(@PathVariable Long id) {
        // ...
    }

    @DeleteMapping("/{id}")
    public void remove(@PathVariable Long id) {
        // ...
    }
}@RestController
@RequestMapping("/account")
class AccountController {
@CrossOrigin
@GetMapping("/{id}")
fun retrieve(@PathVariable id: Long): Account {
// ...
}
@DeleteMapping("/{id}")
fun remove(@PathVariable id: Long) {
// ...
}
}By default, @CrossOrigin allows:
-
All origins.
-
All headers.
-
All HTTP methods to which the controller method is mapped.
allowedCredentials is not enabled by default, since that establishes a trust level
that exposes sensitive user-specific information (such as cookies and CSRF tokens) and
should only be used where appropriate.
maxAge is set to 30 minutes.
@CrossOrigin is supported at the class level, too, and is inherited by all methods,
as the following example shows:
@CrossOrigin(origins = "https://domain2.com", maxAge = 3600)
@RestController
@RequestMapping("/account")
public class AccountController {
@GetMapping("/{id}")
public Account retrieve(@PathVariable Long id) {
// ...
}
@DeleteMapping("/{id}")
public void remove(@PathVariable Long id) {
// ...
}
}@CrossOrigin(origins = ["https://domain2.com"], maxAge = 3600)
@RestController
@RequestMapping("/account")
class AccountController {
@GetMapping("/{id}")
fun retrieve(@PathVariable id: Long): Account {
// ...
}
@DeleteMapping("/{id}")
fun remove(@PathVariable id: Long) {
// ...
}You can use @CrossOrigin at both the class level and the method level,
as the following example shows:
@CrossOrigin(maxAge = 3600)
@RestController
@RequestMapping("/account")
public class AccountController {
@CrossOrigin("https://domain2.com")
@GetMapping("/{id}")
public Account retrieve(@PathVariable Long id) {
// ...
}
@DeleteMapping("/{id}")
public void remove(@PathVariable Long id) {
// ...
}
}@CrossOrigin(maxAge = 3600)
@RestController
@RequestMapping("/account")
class AccountController {
@CrossOrigin("https://domain2.com")
@GetMapping("/{id}")
fun retrieve(@PathVariable id: Long): Account {
// ...
}
@DeleteMapping("/{id}")
fun remove(@PathVariable id: Long) {
// ...
}
}1.7.4. Global Configuration
In addition to fine-grained, controller method level configuration, you probably want to
define some global CORS configuration, too. You can set URL-based CorsConfiguration
mappings individually on any HandlerMapping. Most applications, however, use the
MVC Java configuration or the MVC XML namespace to do that.
By default, global configuration enables the following:
-
All origins.
-
All headers.
-
GET,HEAD, andPOSTmethods.
allowedCredentials is not enabled by default, since that establishes a trust level
that exposes sensitive user-specific information (such as cookies and CSRF tokens) and
should only be used where appropriate.
maxAge is set to 30 minutes.
Java Configuration
To enable CORS in the MVC Java config, you can use the CorsRegistry callback,
as the following example shows:
@Configuration
@EnableWebMvc
public class WebConfig implements WebMvcConfigurer {
@Override
public void addCorsMappings(CorsRegistry registry) {
registry.addMapping("/api/**")
.allowedOrigins("https://domain2.com")
.allowedMethods("PUT", "DELETE")
.allowedHeaders("header1", "header2", "header3")
.exposedHeaders("header1", "header2")
.allowCredentials(true).maxAge(3600);
// Add more mappings...
}
}@Configuration
@EnableWebMvc
class WebConfig : WebMvcConfigurer {
override fun addCorsMappings(registry: CorsRegistry) {
registry.addMapping("/api/**")
.allowedOrigins("https://domain2.com")
.allowedMethods("PUT", "DELETE")
.allowedHeaders("header1", "header2", "header3")
.exposedHeaders("header1", "header2")
.allowCredentials(true).maxAge(3600)
// Add more mappings...
}
}XML Configuration
To enable CORS in the XML namespace, you can use the <mvc:cors> element,
as the following example shows:
<mvc:cors>
<mvc:mapping path="/api/**"
allowed-origins="https://domain1.com, https://domain2.com"
allowed-methods="GET, PUT"
allowed-headers="header1, header2, header3"
exposed-headers="header1, header2" allow-credentials="true"
max-age="123" />
<mvc:mapping path="/resources/**"
allowed-origins="https://domain1.com" />
</mvc:cors>1.7.5. CORS Filter
You can apply CORS support through the built-in
CorsFilter.
If you try to use the CorsFilter with Spring Security, keep in mind that
Spring Security has
built-in support
for CORS.
|
To configure the filter, pass a
CorsConfigurationSource to its constructor, as the following example shows:
CorsConfiguration config = new CorsConfiguration();
// Possibly...
// config.applyPermitDefaultValues()
config.setAllowCredentials(true);
config.addAllowedOrigin("https://domain1.com");
config.addAllowedHeader("*");
config.addAllowedMethod("*");
UrlBasedCorsConfigurationSource source = new UrlBasedCorsConfigurationSource();
source.registerCorsConfiguration("/**", config);
CorsFilter filter = new CorsFilter(source);val config = CorsConfiguration()
// Possibly...
// config.applyPermitDefaultValues()
config.allowCredentials = true
config.addAllowedOrigin("https://domain1.com")
config.addAllowedHeader("*")
config.addAllowedMethod("*")
val source = UrlBasedCorsConfigurationSource()
source.registerCorsConfiguration("/**", config)
val filter = CorsFilter(source)1.8. Web Security
The Spring Security project provides support for protecting web applications from malicious exploits. See the Spring Security reference documentation, including:
HDIV is another web security framework that integrates with Spring MVC.
1.9. HTTP Caching
HTTP caching can significantly improve the performance of a web application. HTTP caching
revolves around the Cache-Control response header and, subsequently, conditional request
headers (such as Last-Modified and ETag). Cache-Control advises private (for example, browser)
and public (for example, proxy) caches on how to cache and re-use responses. An ETag header is used
to make a conditional request that may result in a 304 (NOT_MODIFIED) without a body,
if the content has not changed. ETag can be seen as a more sophisticated successor to
the Last-Modified header.
This section describes the HTTP caching-related options that are available in Spring Web MVC.
1.9.1. CacheControl
CacheControl provides support for
configuring settings related to the Cache-Control header and is accepted as an argument
in a number of places:
While RFC 7234 describes all possible
directives for the Cache-Control response header, the CacheControl type takes a
use case-oriented approach that focuses on the common scenarios:
// Cache for an hour - "Cache-Control: max-age=3600"
CacheControl ccCacheOneHour = CacheControl.maxAge(1, TimeUnit.HOURS);
// Prevent caching - "Cache-Control: no-store"
CacheControl ccNoStore = CacheControl.noStore();
// Cache for ten days in public and private caches,
// public caches should not transform the response
// "Cache-Control: max-age=864000, public, no-transform"
CacheControl ccCustom = CacheControl.maxAge(10, TimeUnit.DAYS).noTransform().cachePublic();// Cache for an hour - "Cache-Control: max-age=3600"
val ccCacheOneHour = CacheControl.maxAge(1, TimeUnit.HOURS)
// Prevent caching - "Cache-Control: no-store"
val ccNoStore = CacheControl.noStore()
// Cache for ten days in public and private caches,
// public caches should not transform the response
// "Cache-Control: max-age=864000, public, no-transform"
val ccCustom = CacheControl.maxAge(10, TimeUnit.DAYS).noTransform().cachePublic()WebContentGenerator also accept a simpler cachePeriod property (defined in seconds) that
works as follows:
-
A
-1value does not generate aCache-Controlresponse header. -
A
0value prevents caching by using the'Cache-Control: no-store'directive. -
An
n > 0value caches the given response fornseconds by using the'Cache-Control: max-age=n'directive.
1.9.2. Controllers
Controllers can add explicit support for HTTP caching. We recommended doing so, since the
lastModified or ETag value for a resource needs to be calculated before it can be compared
against conditional request headers. A controller can add an ETag header and Cache-Control
settings to a ResponseEntity, as the following example shows:
@GetMapping("/book/{id}")
public ResponseEntity<Book> showBook(@PathVariable Long id) {
Book book = findBook(id);
String version = book.getVersion();
return ResponseEntity
.ok()
.cacheControl(CacheControl.maxAge(30, TimeUnit.DAYS))
.eTag(version) // lastModified is also available
.body(book);
}@GetMapping("/book/{id}")
fun showBook(@PathVariable id: Long): ResponseEntity<Book> {
val book = findBook(id);
val version = book.getVersion()
return ResponseEntity
.ok()
.cacheControl(CacheControl.maxAge(30, TimeUnit.DAYS))
.eTag(version) // lastModified is also available
.body(book)
}The preceding example sends an 304 (NOT_MODIFIED) response with an empty body if the comparison
to the conditional request headers indicates that the content has not changed. Otherwise, the
ETag and Cache-Control headers are added to the response.
You can also make the check against conditional request headers in the controller, as the following example shows:
@RequestMapping
public String myHandleMethod(WebRequest webRequest, Model model) {
long eTag = ... (1)
if (request.checkNotModified(eTag)) {
return null; (2)
}
model.addAttribute(...); (3)
return "myViewName";
}| 1 | Application-specific calculation. |
| 2 | The response has been set to 304 (NOT_MODIFIED) — no further processing. |
| 3 | Continue with the request processing. |
@RequestMapping
fun myHandleMethod(webRequest: WebRequest, model: Model): String? {
val eTag: Long = ... (1)
if (request.checkNotModified(eTag)) {
return null (2)
}
model[...] = ... (3)
return "myViewName"
}| 1 | Application-specific calculation. |
| 2 | The response has been set to 304 (NOT_MODIFIED) — no further processing. |
| 3 | Continue with the request processing. |
There are three variants for checking conditional requests against eTag values, lastModified
values, or both. For conditional GET and HEAD requests, you can set the response to
304 (NOT_MODIFIED). For conditional POST, PUT, and DELETE, you can instead set the response
to 412 (PRECONDITION_FAILED), to prevent concurrent modification.
1.9.3. Static Resources
You should serve static resources with a Cache-Control and conditional response headers
for optimal performance. See the section on configuring Static Resources.
1.9.4. ETag Filter
You can use the ShallowEtagHeaderFilter to add “shallow” eTag values that are computed from the
response content and, thus, save bandwidth but not CPU time. See Shallow ETag.
1.10. View Technologies
The use of view technologies in Spring MVC is pluggable, whether you decide to use Thymeleaf, Groovy Markup Templates, JSPs, or other technologies, is primarily a matter of a configuration change. This chapter covers view technologies integrated with Spring MVC. We assume you are already familiar with View Resolution.
| The views of a Spring MVC application live within the internal trust boundaries of that application. Views have access to all the beans of your application context. As such, it is not recommended to use Spring MVC’s template support in applications where the templates are editable by external sources, since this can have security implications. |
1.10.1. Thymeleaf
Thymeleaf is a modern server-side Java template engine that emphasizes natural HTML templates that can be previewed in a browser by double-clicking, which is very helpful for independent work on UI templates (for example, by a designer) without the need for a running server. If you want to replace JSPs, Thymeleaf offers one of the most extensive set of features to make such a transition easier. Thymeleaf is actively developed and maintained. For a more complete introduction, see the Thymeleaf project home page.
The Thymeleaf integration with Spring MVC is managed by the Thymeleaf project.
The configuration involves a few bean declarations, such as
ServletContextTemplateResolver, SpringTemplateEngine, and ThymeleafViewResolver.
See Thymeleaf+Spring for more details.
1.10.2. FreeMarker
Apache FreeMarker is a template engine for generating any kind of text output from HTML to email and others. The Spring Framework has built-in integration for using Spring MVC with FreeMarker templates.
View Configuration
The following example shows how to configure FreeMarker as a view technology:
@Configuration
@EnableWebMvc
public class WebConfig implements WebMvcConfigurer {
@Override
public void configureViewResolvers(ViewResolverRegistry registry) {
registry.freeMarker();
}
// Configure FreeMarker...
@Bean
public FreeMarkerConfigurer freeMarkerConfigurer() {
FreeMarkerConfigurer configurer = new FreeMarkerConfigurer();
configurer.setTemplateLoaderPath("/WEB-INF/freemarker");
return configurer;
}
}@Configuration
@EnableWebMvc
class WebConfig : WebMvcConfigurer {
override fun configureViewResolvers(registry: ViewResolverRegistry) {
registry.freeMarker()
}
// Configure FreeMarker...
@Bean
fun freeMarkerConfigurer() = FreeMarkerConfigurer().apply {
setTemplateLoaderPath("/WEB-INF/freemarker")
}
}The following example shows how to configure the same in XML:
<mvc:annotation-driven/>
<mvc:view-resolvers>
<mvc:freemarker/>
</mvc:view-resolvers>
<!-- Configure FreeMarker... -->
<mvc:freemarker-configurer>
<mvc:template-loader-path location="/WEB-INF/freemarker"/>
</mvc:freemarker-configurer>Alternatively, you can also declare the FreeMarkerConfigurer bean for full control over all
properties, as the following example shows:
<bean id="freemarkerConfig" class="org.springframework.web.servlet.view.freemarker.FreeMarkerConfigurer">
<property name="templateLoaderPath" value="/WEB-INF/freemarker/"/>
</bean>Your templates need to be stored in the directory specified by the FreeMarkerConfigurer
shown in the preceding example. Given the preceding configuration, if your controller
returns a view name of welcome, the resolver looks for the
/WEB-INF/freemarker/welcome.ftl template.
FreeMarker Configuration
You can pass FreeMarker 'Settings' and 'SharedVariables' directly to the FreeMarker
Configuration object (which is managed by Spring) by setting the appropriate bean
properties on the FreeMarkerConfigurer bean. The freemarkerSettings property requires
a java.util.Properties object, and the freemarkerVariables property requires a
java.util.Map. The following example shows how to use a FreeMarkerConfigurer:
<bean id="freemarkerConfig" class="org.springframework.web.servlet.view.freemarker.FreeMarkerConfigurer">
<property name="templateLoaderPath" value="/WEB-INF/freemarker/"/>
<property name="freemarkerVariables">
<map>
<entry key="xml_escape" value-ref="fmXmlEscape"/>
</map>
</property>
</bean>
<bean id="fmXmlEscape" class="freemarker.template.utility.XmlEscape"/>See the FreeMarker documentation for details of settings and variables as they apply to
the Configuration object.
Form Handling
Spring provides a tag library for use in JSPs that contains, among others, a
<spring:bind/> element. This element primarily lets forms display values from
form-backing objects and show the results of failed validations from a Validator in the
web or business tier. Spring also has support for the same functionality in FreeMarker,
with additional convenience macros for generating form input elements themselves.
The Bind Macros
A standard set of macros are maintained within the spring-webmvc.jar file for
FreeMarker, so they are always available to a suitably configured application.
Some of the macros defined in the Spring templating libraries are considered internal
(private), but no such scoping exists in the macro definitions, making all macros visible
to calling code and user templates. The following sections concentrate only on the macros
you need to directly call from within your templates. If you wish to view the macro code
directly, the file is called spring.ftl and is in the
org.springframework.web.servlet.view.freemarker package.
Simple Binding
In your HTML forms based on FreeMarker templates that act as a form view for a Spring MVC
controller, you can use code similar to the next example to bind to field values and
display error messages for each input field in similar fashion to the JSP equivalent. The
following example shows a personForm view:
<!-- FreeMarker macros have to be imported into a namespace.
We strongly recommend sticking to 'spring'. -->
<#import "/spring.ftl" as spring/>
<html>
...
<form action="" method="POST">
Name:
<@spring.bind "personForm.name"/>
<input type="text"
name="${spring.status.expression}"
value="${spring.status.value?html}"/><br />
<#list spring.status.errorMessages as error> <b>${error}</b> <br /> </#list>
<br />
...
<input type="submit" value="submit"/>
</form>
...
</html><@spring.bind> requires a 'path' argument, which consists of the name of your command
object (it is 'command', unless you changed it in your controller configuration) followed
by a period and the name of the field on the command object to which you wish to bind. You
can also use nested fields, such as command.address.street. The bind macro assumes the
default HTML escaping behavior specified by the ServletContext parameter
defaultHtmlEscape in web.xml.
An alternative form of the macro called <@spring.bindEscaped> takes a second argument
that explicitly specifies whether HTML escaping should be used in the status error
messages or values. You can set it to true or false as required. Additional form
handling macros simplify the use of HTML escaping, and you should use these macros
wherever possible. They are explained in the next section.
Input Macros
Additional convenience macros for FreeMarker simplify both binding and form generation (including validation error display). It is never necessary to use these macros to generate form input fields, and you can mix and match them with simple HTML or direct calls to the Spring bind macros that we highlighted previously.
The following table of available macros shows the FreeMarker Template (FTL) definitions and the parameter list that each takes:
| macro | FTL definition |
|---|---|
|
<@spring.message code/> |
|
<@spring.messageText code, text/> |
|
<@spring.url relativeUrl/> |
|
<@spring.formInput path, attributes, fieldType/> |
|
<@spring.formHiddenInput path, attributes/> |
|
<@spring.formPasswordInput path, attributes/> |
|
<@spring.formTextarea path, attributes/> |
|
<@spring.formSingleSelect path, options, attributes/> |
|
<@spring.formMultiSelect path, options, attributes/> |
|
<@spring.formRadioButtons path, options separator, attributes/> |
|
<@spring.formCheckboxes path, options, separator, attributes/> |
|
<@spring.formCheckbox path, attributes/> |
|
<@spring.showErrors separator, classOrStyle/> |
In FreeMarker templates, formHiddenInput and formPasswordInput are not actually
required, as you can use the normal formInput macro, specifying hidden or password
as the value for the fieldType parameter.
|
The parameters to any of the above macros have consistent meanings:
-
path: The name of the field to bind to (ie "command.name") -
options: AMapof all the available values that can be selected from in the input field. The keys to the map represent the values that are POSTed back from the form and bound to the command object. Map objects stored against the keys are the labels displayed on the form to the user and may be different from the corresponding values posted back by the form. Usually, such a map is supplied as reference data by the controller. You can use anyMapimplementation, depending on required behavior. For strictly sorted maps, you can use aSortedMap(such as aTreeMap) with a suitableComparatorand, for arbitrary Maps that should return values in insertion order, use aLinkedHashMapor aLinkedMapfromcommons-collections. -
separator: Where multiple options are available as discreet elements (radio buttons or checkboxes), the sequence of characters used to separate each one in the list (such as<br>). -
attributes: An additional string of arbitrary tags or text to be included within the HTML tag itself. This string is echoed literally by the macro. For example, in atextareafield, you may supply attributes (such as 'rows="5" cols="60"'), or you could pass style information such as 'style="border:1px solid silver"'. -
classOrStyle: For theshowErrorsmacro, the name of the CSS class that thespanelement that wraps each error uses. If no information is supplied (or the value is empty), the errors are wrapped in<b></b>tags.
The following sections outline examples of the macros.
The formInput macro takes the path parameter (command.name) and an additional attributes
parameter (which is empty in the upcoming example). The macro, along with all other form
generation macros, performs an implicit Spring bind on the path parameter. The binding
remains valid until a new bind occurs, so the showErrors macro does not need to pass the
path parameter again — it operates on the field for which a binding was last created.
The showErrors macro takes a separator parameter (the characters that are used to
separate multiple errors on a given field) and also accepts a second parameter — this
time, a class name or style attribute. Note that FreeMarker can specify default
values for the attributes parameter. The following example shows how to use the formInput
and showWErrors macros:
<@spring.formInput "command.name"/>
<@spring.showErrors "<br>"/>The next example shows the output of the form fragment, generating the name field and displaying a validation error after the form was submitted with no value in the field. Validation occurs through Spring’s Validation framework.
The generated HTML resembles the following example:
Name:
<input type="text" name="name" value="">
<br>
<b>required</b>
<br>
<br>The formTextarea macro works the same way as the formInput macro and accepts the same
parameter list. Commonly, the second parameter (attributes) is used to pass style
information or rows and cols attributes for the textarea.
You can use four selection field macros to generate common UI value selection inputs in your HTML forms:
-
formSingleSelect -
formMultiSelect -
formRadioButtons -
formCheckboxes
Each of the four macros accepts a Map of options that contains the value for the form
field and the label that corresponds to that value. The value and the label can be the
same.
The next example is for radio buttons in FTL. The form-backing object specifies a default value of 'London' for this field, so no validation is necessary. When the form is rendered, the entire list of cities to choose from is supplied as reference data in the model under the name 'cityMap'. The following listing shows the example:
...
Town:
<@spring.formRadioButtons "command.address.town", cityMap, ""/><br><br>The preceding listing renders a line of radio buttons, one for each value in cityMap, and uses a
separator of "". No additional attributes are supplied (the last parameter to the macro is
missing). The cityMap uses the same String for each key-value pair in the map. The map’s
keys are what the form actually submits as POST request parameters. The map values are the
labels that the user sees. In the preceding example, given a list of three well known cities
and a default value in the form backing object, the HTML resembles the following:
Town:
<input type="radio" name="address.town" value="London">London</input>
<input type="radio" name="address.town" value="Paris" checked="checked">Paris</input>
<input type="radio" name="address.town" value="New York">New York</input>If your application expects to handle cities by internal codes (for example), you can create the map of codes with suitable keys, as the following example shows:
protected Map<String, ?> referenceData(HttpServletRequest request) throws Exception {
Map<String, String> cityMap = new LinkedHashMap<>();
cityMap.put("LDN", "London");
cityMap.put("PRS", "Paris");
cityMap.put("NYC", "New York");
Map<String, Object> model = new HashMap<>();
model.put("cityMap", cityMap);
return model;
}protected fun referenceData(request: HttpServletRequest): Map<String, *> {
val cityMap = linkedMapOf(
"LDN" to "London",
"PRS" to "Paris",
"NYC" to "New York"
)
return hashMapOf("cityMap" to cityMap)
}The code now produces output where the radio values are the relevant codes, but the user still sees the more user-friendly city names, as follows:
Town:
<input type="radio" name="address.town" value="LDN">London</input>
<input type="radio" name="address.town" value="PRS" checked="checked">Paris</input>
<input type="radio" name="address.town" value="NYC">New York</input>HTML Escaping
Default usage of the form macros described earlier results in HTML elements that are HTML 4.01
compliant and that use the default value for HTML escaping defined in your web.xml file, as
used by Spring’s bind support. To make the elements be XHTML compliant or to override
the default HTML escaping value, you can specify two variables in your template (or in
your model, where they are visible to your templates). The advantage of specifying
them in the templates is that they can be changed to different values later in the
template processing to provide different behavior for different fields in your form.
To switch to XHTML compliance for your tags, specify a value of true for a
model or context variable named xhtmlCompliant, as the following example shows:
<#-- for FreeMarker -->
<#assign xhtmlCompliant = true>After processing this directive, any elements generated by the Spring macros are now XHTML compliant.
In similar fashion, you can specify HTML escaping per field, as the following example shows:
<#-- until this point, default HTML escaping is used -->
<#assign htmlEscape = true>
<#-- next field will use HTML escaping -->
<@spring.formInput "command.name"/>
<#assign htmlEscape = false in spring>
<#-- all future fields will be bound with HTML escaping off -->1.10.3. Groovy Markup
The Groovy Markup Template Engine is primarily aimed at generating XML-like markup (XML, XHTML, HTML5, and others), but you can use it to generate any text-based content. The Spring Framework has a built-in integration for using Spring MVC with Groovy Markup.
| The Groovy Markup Template engine requires Groovy 2.3.1+. |
Configuration
The following example shows how to configure the Groovy Markup Template Engine:
@Configuration
@EnableWebMvc
public class WebConfig implements WebMvcConfigurer {
@Override
public void configureViewResolvers(ViewResolverRegistry registry) {
registry.groovy();
}
// Configure the Groovy Markup Template Engine...
@Bean
public GroovyMarkupConfigurer groovyMarkupConfigurer() {
GroovyMarkupConfigurer configurer = new GroovyMarkupConfigurer();
configurer.setResourceLoaderPath("/WEB-INF/");
return configurer;
}
}@Configuration
@EnableWebMvc
class WebConfig : WebMvcConfigurer {
override fun configureViewResolvers(registry: ViewResolverRegistry) {
registry.groovy()
}
// Configure the Groovy Markup Template Engine...
@Bean
fun groovyMarkupConfigurer() = GroovyMarkupConfigurer().apply {
resourceLoaderPath = "/WEB-INF/"
}
}The following example shows how to configure the same in XML:
<mvc:annotation-driven/>
<mvc:view-resolvers>
<mvc:groovy/>
</mvc:view-resolvers>
<!-- Configure the Groovy Markup Template Engine... -->
<mvc:groovy-configurer resource-loader-path="/WEB-INF/"/>Example
Unlike traditional template engines, Groovy Markup relies on a DSL that uses a builder syntax. The following example shows a sample template for an HTML page:
yieldUnescaped '<!DOCTYPE html>'
html(lang:'en') {
head {
meta('http-equiv':'"Content-Type" content="text/html; charset=utf-8"')
title('My page')
}
body {
p('This is an example of HTML contents')
}
}1.10.4. Script Views
The Spring Framework has a built-in integration for using Spring MVC with any templating library that can run on top of the JSR-223 Java scripting engine. We have tested the following templating libraries on different script engines:
| Scripting Library | Scripting Engine |
|---|---|
The basic rule for integrating any other script engine is that it must implement the
ScriptEngine and Invocable interfaces.
|
Requirements
You need to have the script engine on your classpath, the details of which vary by script engine:
-
The Nashorn JavaScript engine is provided with Java 8+. Using the latest update release available is highly recommended.
-
JRuby should be added as a dependency for Ruby support.
-
Jython should be added as a dependency for Python support.
-
org.jetbrains.kotlin:kotlin-script-utildependency and aMETA-INF/services/javax.script.ScriptEngineFactoryfile containing aorg.jetbrains.kotlin.script.jsr223.KotlinJsr223JvmLocalScriptEngineFactoryline should be added for Kotlin script support. See this example for more details.
You need to have the script templating library. One way to do that for Javascript is through WebJars.
Script Templates
You can declare a ScriptTemplateConfigurer bean to specify the script engine to use,
the script files to load, what function to call to render templates, and so on.
The following example uses Mustache templates and the Nashorn JavaScript engine:
@Configuration
@EnableWebMvc
public class WebConfig implements WebMvcConfigurer {
@Override
public void configureViewResolvers(ViewResolverRegistry registry) {
registry.scriptTemplate();
}
@Bean
public ScriptTemplateConfigurer configurer() {
ScriptTemplateConfigurer configurer = new ScriptTemplateConfigurer();
configurer.setEngineName("nashorn");
configurer.setScripts("mustache.js");
configurer.setRenderObject("Mustache");
configurer.setRenderFunction("render");
return configurer;
}
}@Configuration
@EnableWebMvc
class WebConfig : WebMvcConfigurer {
override fun configureViewResolvers(registry: ViewResolverRegistry) {
registry.scriptTemplate()
}
@Bean
fun configurer() = ScriptTemplateConfigurer().apply {
engineName = "nashorn"
setScripts("mustache.js")
renderObject = "Mustache"
renderFunction = "render"
}
}The following example shows the same arrangement in XML:
<mvc:annotation-driven/>
<mvc:view-resolvers>
<mvc:script-template/>
</mvc:view-resolvers>
<mvc:script-template-configurer engine-name="nashorn" render-object="Mustache" render-function="render">
<mvc:script location="mustache.js"/>
</mvc:script-template-configurer>The controller would look no different for the Java and XML configurations, as the following example shows:
@Controller
public class SampleController {
@GetMapping("/sample")
public String test(Model model) {
model.addAttribute("title", "Sample title");
model.addAttribute("body", "Sample body");
return "template";
}
}@Controller
class SampleController {
@GetMapping("/sample")
fun test(model: Model): String {
model["title"] = "Sample title"
model["body"] = "Sample body"
return "template"
}
}The following example shows the Mustache template:
<html>
<head>
<title>{{title}}</title>
</head>
<body>
<p>{{body}}</p>
</body>
</html>The render function is called with the following parameters:
-
String template: The template content -
Map model: The view model -
RenderingContext renderingContext: TheRenderingContextthat gives access to the application context, the locale, the template loader, and the URL (since 5.0)
Mustache.render() is natively compatible with this signature, so you can call it directly.
If your templating technology requires some customization, you can provide a script that implements a custom render function. For example, Handlerbars needs to compile templates before using them and requires a polyfill to emulate some browser facilities that are not available in the server-side script engine.
The following example shows how to do so:
@Configuration
@EnableWebMvc
public class WebConfig implements WebMvcConfigurer {
@Override
public void configureViewResolvers(ViewResolverRegistry registry) {
registry.scriptTemplate();
}
@Bean
public ScriptTemplateConfigurer configurer() {
ScriptTemplateConfigurer configurer = new ScriptTemplateConfigurer();
configurer.setEngineName("nashorn");
configurer.setScripts("polyfill.js", "handlebars.js", "render.js");
configurer.setRenderFunction("render");
configurer.setSharedEngine(false);
return configurer;
}
}@Configuration
@EnableWebMvc
class WebConfig : WebMvcConfigurer {
override fun configureViewResolvers(registry: ViewResolverRegistry) {
registry.scriptTemplate()
}
@Bean
fun configurer() = ScriptTemplateConfigurer().apply {
engineName = "nashorn"
setScripts("polyfill.js", "handlebars.js", "render.js")
renderFunction = "render"
isSharedEngine = false
}
}
Setting the sharedEngine property to false is required when using non-thread-safe
script engines with templating libraries not designed for concurrency, such as Handlebars or
React running on Nashorn. In that case, Java SE 8 update 60 is required, due to
this bug, but it is generally
recommended to use a recent Java SE patch release in any case.
|
polyfill.js defines only the window object needed by Handlebars to run properly, as follows:
var window = {};This basic render.js implementation compiles the template before using it. A production-ready
implementation should also store any reused cached templates or pre-compiled templates.
You can do so on the script side (and handle any customization you need — managing
template engine configuration, for example). The following example shows how to do so:
function render(template, model) {
var compiledTemplate = Handlebars.compile(template);
return compiledTemplate(model);
}1.10.5. JSP and JSTL
The Spring Framework has a built-in integration for using Spring MVC with JSP and JSTL.
View Resolvers
When developing with JSPs, you can declare a InternalResourceViewResolver or a
ResourceBundleViewResolver bean.
ResourceBundleViewResolver relies on a properties file to define the view names
mapped to a class and a URL. With a ResourceBundleViewResolver, you can mix
different types of views by using only one resolver, as the following example shows:
<!-- the ResourceBundleViewResolver -->
<bean id="viewResolver" class="org.springframework.web.servlet.view.ResourceBundleViewResolver">
<property name="basename" value="views"/>
</bean>
# And a sample properties file is used (views.properties in WEB-INF/classes):
welcome.(class)=org.springframework.web.servlet.view.JstlView
welcome.url=/WEB-INF/jsp/welcome.jsp
productList.(class)=org.springframework.web.servlet.view.JstlView
productList.url=/WEB-INF/jsp/productlist.jspInternalResourceViewResolver can also be used for JSPs. As a best practice, we strongly
encourage placing your JSP files in a directory under the 'WEB-INF' directory so there
can be no direct access by clients.
<bean id="viewResolver" class="org.springframework.web.servlet.view.InternalResourceViewResolver">
<property name="viewClass" value="org.springframework.web.servlet.view.JstlView"/>
<property name="prefix" value="/WEB-INF/jsp/"/>
<property name="suffix" value=".jsp"/>
</bean>JSPs versus JSTL
When using the JSP Standard Tag Library (JSTL) you must use a special view class, the
JstlView, as JSTL needs some preparation before things such as the I18N features can
work.
Spring’s JSP Tag Library
Spring provides data binding of request parameters to command objects, as described in earlier chapters. To facilitate the development of JSP pages in combination with those data binding features, Spring provides a few tags that make things even easier. All Spring tags have HTML escaping features to enable or disable escaping of characters.
The spring.tld tag library descriptor (TLD) is included in the spring-webmvc.jar.
For a comprehensive reference on individual tags, browse the
API reference
or see the tag library description.
Spring’s form tag library
As of version 2.0, Spring provides a comprehensive set of data binding-aware tags for handling form elements when using JSP and Spring Web MVC. Each tag provides support for the set of attributes of its corresponding HTML tag counterpart, making the tags familiar and intuitive to use. The tag-generated HTML is HTML 4.01/XHTML 1.0 compliant.
Unlike other form/input tag libraries, Spring’s form tag library is integrated with Spring Web MVC, giving the tags access to the command object and reference data your controller deals with. As we show in the following examples, the form tags make JSPs easier to develop, read, and maintain.
We go through the form tags and look at an example of how each tag is used. We have included generated HTML snippets where certain tags require further commentary.
Configuration
The form tag library comes bundled in spring-webmvc.jar. The library descriptor is
called spring-form.tld.
To use the tags from this library, add the following directive to the top of your JSP page:
<%@ taglib prefix="form" uri="http://www.springframework.org/tags/form" %>where form is the tag name prefix you want to use for the tags from this library.
The Form Tag
This tag renders an HTML 'form' element and exposes a binding path to inner tags for
binding. It puts the command object in the PageContext so that the command object can
be accessed by inner tags. All the other tags in this library are nested tags of the
form tag.
Assume that we have a domain object called User. It is a JavaBean with properties
such as firstName and lastName. We can use it as the form-backing object of our
form controller, which returns form.jsp. The following example shows what form.jsp could
look like:
<form:form>
<table>
<tr>
<td>First Name:</td>
<td><form:input path="firstName"/></td>
</tr>
<tr>
<td>Last Name:</td>
<td><form:input path="lastName"/></td>
</tr>
<tr>
<td colspan="2">
<input type="submit" value="Save Changes"/>
</td>
</tr>
</table>
</form:form>The firstName and lastName values are retrieved from the command object placed in
the PageContext by the page controller. Keep reading to see more complex examples of
how inner tags are used with the form tag.
The following listing shows the generated HTML, which looks like a standard form:
<form method="POST">
<table>
<tr>
<td>First Name:</td>
<td><input name="firstName" type="text" value="Harry"/></td>
</tr>
<tr>
<td>Last Name:</td>
<td><input name="lastName" type="text" value="Potter"/></td>
</tr>
<tr>
<td colspan="2">
<input type="submit" value="Save Changes"/>
</td>
</tr>
</table>
</form>The preceding JSP assumes that the variable name of the form-backing object is
command. If you have put the form-backing object into the model under another name
(definitely a best practice), you can bind the form to the named variable, as the
following example shows:
<form:form modelAttribute="user">
<table>
<tr>
<td>First Name:</td>
<td><form:input path="firstName"/></td>
</tr>
<tr>
<td>Last Name:</td>
<td><form:input path="lastName"/></td>
</tr>
<tr>
<td colspan="2">
<input type="submit" value="Save Changes"/>
</td>
</tr>
</table>
</form:form>The input Tag
This tag renders an HTML input element with the bound value and type='text' by default.
For an example of this tag, see The Form Tag. You can also use
HTML5-specific types, such as email, tel, date, and others.
The checkbox Tag
This tag renders an HTML input tag with the type set to checkbox.
Assume that our User has preferences such as newsletter subscription and a list of
hobbies. The following example shows the Preferences class:
public class Preferences {
private boolean receiveNewsletter;
private String[] interests;
private String favouriteWord;
public boolean isReceiveNewsletter() {
return receiveNewsletter;
}
public void setReceiveNewsletter(boolean receiveNewsletter) {
this.receiveNewsletter = receiveNewsletter;
}
public String[] getInterests() {
return interests;
}
public void setInterests(String[] interests) {
this.interests = interests;
}
public String getFavouriteWord() {
return favouriteWord;
}
public void setFavouriteWord(String favouriteWord) {
this.favouriteWord = favouriteWord;
}
}class Preferences(
var receiveNewsletter: Boolean,
var interests: StringArray,
var favouriteWord: String
)The corresponding form.jsp could then resemble the following:
<form:form>
<table>
<tr>
<td>Subscribe to newsletter?:</td>
<%-- Approach 1: Property is of type java.lang.Boolean --%>
<td><form:checkbox path="preferences.receiveNewsletter"/></td>
</tr>
<tr>
<td>Interests:</td>
<%-- Approach 2: Property is of an array or of type java.util.Collection --%>
<td>
Quidditch: <form:checkbox path="preferences.interests" value="Quidditch"/>
Herbology: <form:checkbox path="preferences.interests" value="Herbology"/>
Defence Against the Dark Arts: <form:checkbox path="preferences.interests" value="Defence Against the Dark Arts"/>
</td>
</tr>
<tr>
<td>Favourite Word:</td>
<%-- Approach 3: Property is of type java.lang.Object --%>
<td>
Magic: <form:checkbox path="preferences.favouriteWord" value="Magic"/>
</td>
</tr>
</table>
</form:form>There are three approaches to the checkbox tag, which should meet all your checkbox needs.
-
Approach One: When the bound value is of type
java.lang.Boolean, theinput(checkbox)is marked ascheckedif the bound value istrue. Thevalueattribute corresponds to the resolved value of thesetValue(Object)value property. -
Approach Two: When the bound value is of type
arrayorjava.util.Collection, theinput(checkbox)is marked ascheckedif the configuredsetValue(Object)value is present in the boundCollection. -
Approach Three: For any other bound value type, the
input(checkbox)is marked ascheckedif the configuredsetValue(Object)is equal to the bound value.
Note that, regardless of the approach, the same HTML structure is generated. The following HTML snippet defines some checkboxes:
<tr>
<td>Interests:</td>
<td>
Quidditch: <input name="preferences.interests" type="checkbox" value="Quidditch"/>
<input type="hidden" value="1" name="_preferences.interests"/>
Herbology: <input name="preferences.interests" type="checkbox" value="Herbology"/>
<input type="hidden" value="1" name="_preferences.interests"/>
Defence Against the Dark Arts: <input name="preferences.interests" type="checkbox" value="Defence Against the Dark Arts"/>
<input type="hidden" value="1" name="_preferences.interests"/>
</td>
</tr>You might not expect to see the additional hidden field after each checkbox.
When a checkbox in an HTML page is not checked, its value is not sent to the
server as part of the HTTP request parameters once the form is submitted, so we need a
workaround for this quirk in HTML for Spring form data binding to work. The
checkbox tag follows the existing Spring convention of including a hidden parameter
prefixed by an underscore (_) for each checkbox. By doing this, you are effectively
telling Spring that “the checkbox was visible in the form, and I want my object to
which the form data binds to reflect the state of the checkbox, no matter what.”
The checkboxes Tag
This tag renders multiple HTML input tags with the type set to checkbox.
This section build on the example from the previous checkbox tag section. Sometimes, you prefer
not to have to list all the possible hobbies in your JSP page. You would rather provide
a list at runtime of the available options and pass that in to the tag. That is the
purpose of the checkboxes tag. You can pass in an Array, a List, or a Map that contains
the available options in the items property. Typically, the bound property is a
collection so that it can hold multiple values selected by the user. The following example
shows a JSP that uses this tag:
<form:form>
<table>
<tr>
<td>Interests:</td>
<td>
<%-- Property is of an array or of type java.util.Collection --%>
<form:checkboxes path="preferences.interests" items="${interestList}"/>
</td>
</tr>
</table>
</form:form>This example assumes that the interestList is a List available as a model attribute
that contains strings of the values to be selected from. If you use a Map,
the map entry key is used as the value, and the map entry’s value is used as
the label to be displayed. You can also use a custom object where you can provide the
property names for the value by using itemValue and the label by using itemLabel.
The radiobutton Tag
This tag renders an HTML input element with the type set to radio.
A typical usage pattern involves multiple tag instances bound to the same property but with different values, as the following example shows:
<tr>
<td>Sex:</td>
<td>
Male: <form:radiobutton path="sex" value="M"/> <br/>
Female: <form:radiobutton path="sex" value="F"/>
</td>
</tr>The radiobuttons Tag
This tag renders multiple HTML input elements with the type set to radio.
As with the checkboxes tag, you might want to
pass in the available options as a runtime variable. For this usage, you can use the
radiobuttons tag. You pass in an Array, a List, or a Map that contains the
available options in the items property. If you use a Map, the map entry key is
used as the value and the map entry’s value are used as the label to be displayed.
You can also use a custom object where you can provide the property names for the value
by using itemValue and the label by using itemLabel, as the following example shows:
<tr>
<td>Sex:</td>
<td><form:radiobuttons path="sex" items="${sexOptions}"/></td>
</tr>The password Tag
This tag renders an HTML input tag with the type set to password with the bound value.
<tr>
<td>Password:</td>
<td>
<form:password path="password"/>
</td>
</tr>Note that, by default, the password value is not shown. If you do want the
password value to be shown, you can set the value of the showPassword attribute to
true, as the following example shows:
<tr>
<td>Password:</td>
<td>
<form:password path="password" value="^76525bvHGq" showPassword="true"/>
</td>
</tr>The select Tag
This tag renders an HTML 'select' element. It supports data binding to the selected
option as well as the use of nested option and options tags.
Assume that a User has a list of skills. The corresponding HTML could be as follows:
<tr>
<td>Skills:</td>
<td><form:select path="skills" items="${skills}"/></td>
</tr>If the User’s skill are in Herbology, the HTML source of the 'Skills' row could be
as follows:
<tr>
<td>Skills:</td>
<td>
<select name="skills" multiple="true">
<option value="Potions">Potions</option>
<option value="Herbology" selected="selected">Herbology</option>
<option value="Quidditch">Quidditch</option>
</select>
</td>
</tr>The option Tag
This tag renders an HTML option element. It sets selected, based on the bound
value. The following HTML shows typical output for it:
<tr>
<td>House:</td>
<td>
<form:select path="house">
<form:option value="Gryffindor"/>
<form:option value="Hufflepuff"/>
<form:option value="Ravenclaw"/>
<form:option value="Slytherin"/>
</form:select>
</td>
</tr>If the User’s house was in Gryffindor, the HTML source of the 'House' row would be
as follows:
<tr>
<td>House:</td>
<td>
<select name="house">
<option value="Gryffindor" selected="selected">Gryffindor</option> (1)
<option value="Hufflepuff">Hufflepuff</option>
<option value="Ravenclaw">Ravenclaw</option>
<option value="Slytherin">Slytherin</option>
</select>
</td>
</tr>| 1 | Note the addition of a selected attribute. |
The options Tag
This tag renders a list of HTML option elements. It sets the selected attribute,
based on the bound value. The following HTML shows typical output for it:
<tr>
<td>Country:</td>
<td>
<form:select path="country">
<form:option value="-" label="--Please Select"/>
<form:options items="${countryList}" itemValue="code" itemLabel="name"/>
</form:select>
</td>
</tr>If the User lived in the UK, the HTML source of the 'Country' row would be as follows:
<tr>
<td>Country:</td>
<td>
<select name="country">
<option value="-">--Please Select</option>
<option value="AT">Austria</option>
<option value="UK" selected="selected">United Kingdom</option> (1)
<option value="US">United States</option>
</select>
</td>
</tr>| 1 | Note the addition of a selected attribute. |
As the preceding example shows, the combined usage of an option tag with the options tag
generates the same standard HTML but lets you explicitly specify a value in the
JSP that is for display only (where it belongs), such as the default string in the
example: "-- Please Select".
The items attribute is typically populated with a collection or array of item objects.
itemValue and itemLabel refer to bean properties of those item objects, if
specified. Otherwise, the item objects themselves are turned into strings. Alternatively,
you can specify a Map of items, in which case the map keys are interpreted as option
values and the map values correspond to option labels. If itemValue or itemLabel (or both)
happen to be specified as well, the item value property applies to the map key, and
the item label property applies to the map value.
The textarea Tag
This tag renders an HTML textarea element. The following HTML shows typical output for it:
<tr>
<td>Notes:</td>
<td><form:textarea path="notes" rows="3" cols="20"/></td>
<td><form:errors path="notes"/></td>
</tr>The hidden Tag
This tag renders an HTML input tag with the type set to hidden with the bound value. To submit
an unbound hidden value, use the HTML input tag with the type set to hidden.
The following HTML shows typical output for it:
<form:hidden path="house"/>If we choose to submit the house value as a hidden one, the HTML would be as follows:
<input name="house" type="hidden" value="Gryffindor"/>The errors Tag
This tag renders field errors in an HTML span element. It provides access to the errors
created in your controller or those that were created by any validators associated with
your controller.
Assume that we want to display all error messages for the firstName and lastName
fields once we submit the form. We have a validator for instances of the User class
called UserValidator, as the following example shows:
public class UserValidator implements Validator {
public boolean supports(Class candidate) {
return User.class.isAssignableFrom(candidate);
}
public void validate(Object obj, Errors errors) {
ValidationUtils.rejectIfEmptyOrWhitespace(errors, "firstName", "required", "Field is required.");
ValidationUtils.rejectIfEmptyOrWhitespace(errors, "lastName", "required", "Field is required.");
}
}class UserValidator : Validator {
override fun supports(candidate: Class<*>): Boolean {
return User::class.java.isAssignableFrom(candidate)
}
override fun validate(obj: Any, errors: Errors) {
ValidationUtils.rejectIfEmptyOrWhitespace(errors, "firstName", "required", "Field is required.")
ValidationUtils.rejectIfEmptyOrWhitespace(errors, "lastName", "required", "Field is required.")
}
}The form.jsp could be as follows:
<form:form>
<table>
<tr>
<td>First Name:</td>
<td><form:input path="firstName"/></td>
<%-- Show errors for firstName field --%>
<td><form:errors path="firstName"/></td>
</tr>
<tr>
<td>Last Name:</td>
<td><form:input path="lastName"/></td>
<%-- Show errors for lastName field --%>
<td><form:errors path="lastName"/></td>
</tr>
<tr>
<td colspan="3">
<input type="submit" value="Save Changes"/>
</td>
</tr>
</table>
</form:form>If we submit a form with empty values in the firstName and lastName fields,
the HTML would be as follows:
<form method="POST">
<table>
<tr>
<td>First Name:</td>
<td><input name="firstName" type="text" value=""/></td>
<%-- Associated errors to firstName field displayed --%>
<td><span name="firstName.errors">Field is required.</span></td>
</tr>
<tr>
<td>Last Name:</td>
<td><input name="lastName" type="text" value=""/></td>
<%-- Associated errors to lastName field displayed --%>
<td><span name="lastName.errors">Field is required.</span></td>
</tr>
<tr>
<td colspan="3">
<input type="submit" value="Save Changes"/>
</td>
</tr>
</table>
</form>What if we want to display the entire list of errors for a given page? The next example
shows that the errors tag also supports some basic wildcarding functionality.
-
path="*": Displays all errors. -
path="lastName": Displays all errors associated with thelastNamefield. -
If
pathis omitted, only object errors are displayed.
The following example displays a list of errors at the top of the page, followed by field-specific errors next to the fields:
<form:form>
<form:errors path="*" cssClass="errorBox"/>
<table>
<tr>
<td>First Name:</td>
<td><form:input path="firstName"/></td>
<td><form:errors path="firstName"/></td>
</tr>
<tr>
<td>Last Name:</td>
<td><form:input path="lastName"/></td>
<td><form:errors path="lastName"/></td>
</tr>
<tr>
<td colspan="3">
<input type="submit" value="Save Changes"/>
</td>
</tr>
</table>
</form:form>The HTML would be as follows:
<form method="POST">
<span name="*.errors" class="errorBox">Field is required.<br/>Field is required.</span>
<table>
<tr>
<td>First Name:</td>
<td><input name="firstName" type="text" value=""/></td>
<td><span name="firstName.errors">Field is required.</span></td>
</tr>
<tr>
<td>Last Name:</td>
<td><input name="lastName" type="text" value=""/></td>
<td><span name="lastName.errors">Field is required.</span></td>
</tr>
<tr>
<td colspan="3">
<input type="submit" value="Save Changes"/>
</td>
</tr>
</table>
</form>The spring-form.tld tag library descriptor (TLD) is included in the spring-webmvc.jar.
For a comprehensive reference on individual tags, browse the
API reference
or see the tag library description.
HTTP Method Conversion
A key principle of REST is the use of the “Uniform Interface”. This means that all
resources (URLs) can be manipulated by using the same four HTTP methods: GET, PUT, POST,
and DELETE. For each method, the HTTP specification defines the exact semantics. For
instance, a GET should always be a safe operation, meaning that it has no side effects,
and a PUT or DELETE should be idempotent, meaning that you can repeat these operations
over and over again, but the end result should be the same. While HTTP defines these
four methods, HTML only supports two: GET and POST. Fortunately, there are two possible
workarounds: you can either use JavaScript to do your PUT or DELETE, or you can do a POST
with the “real” method as an additional parameter (modeled as a hidden input field in an
HTML form). Spring’s HiddenHttpMethodFilter uses this latter trick. This
filter is a plain Servlet filter and, therefore, it can be used in combination with any
web framework (not just Spring MVC). Add this filter to your web.xml, and a POST
with a hidden method parameter is converted into the corresponding HTTP method
request.
To support HTTP method conversion, the Spring MVC form tag was updated to support setting the HTTP method. For example, the following snippet comes from the Pet Clinic sample:
<form:form method="delete">
<p class="submit"><input type="submit" value="Delete Pet"/></p>
</form:form>The preceding example performs an HTTP POST, with the “real” DELETE method hidden behind
a request parameter. It is picked up by the HiddenHttpMethodFilter, which is defined in
web.xml, as the following example shows:
<filter>
<filter-name>httpMethodFilter</filter-name>
<filter-class>org.springframework.web.filter.HiddenHttpMethodFilter</filter-class>
</filter>
<filter-mapping>
<filter-name>httpMethodFilter</filter-name>
<servlet-name>petclinic</servlet-name>
</filter-mapping>The following example shows the corresponding @Controller method:
@RequestMapping(method = RequestMethod.DELETE)
public String deletePet(@PathVariable int ownerId, @PathVariable int petId) {
this.clinic.deletePet(petId);
return "redirect:/owners/" + ownerId;
}@RequestMapping(method = [RequestMethod.DELETE])
fun deletePet(@PathVariable ownerId: Int, @PathVariable petId: Int): String {
clinic.deletePet(petId)
return "redirect:/owners/$ownerId"
}HTML5 Tags
The Spring form tag library allows entering dynamic attributes, which means you can enter any HTML5 specific attributes.
The form input tag supports entering a type attribute other than text. This is
intended to allow rendering new HTML5 specific input types, such as email, date,
range, and others. Note that entering type='text' is not required, since text
is the default type.
1.10.6. Tiles
You can integrate Tiles - just as any other view technology - in web applications that use Spring. This section describes, in a broad way, how to do so.
This section focuses on Spring’s support for Tiles version 3 in the
org.springframework.web.servlet.view.tiles3 package.
|
Dependencies
To be able to use Tiles, you have to add a dependency on Tiles version 3.0.1 or higher and its transitive dependencies to your project.
Configuration
To be able to use Tiles, you have to configure it by using files that contain definitions
(for basic information on definitions and other Tiles concepts, see
https://tiles.apache.org). In Spring, this is done by using the TilesConfigurer.
The following example ApplicationContext configuration shows how to do so:
<bean id="tilesConfigurer" class="org.springframework.web.servlet.view.tiles3.TilesConfigurer">
<property name="definitions">
<list>
<value>/WEB-INF/defs/general.xml</value>
<value>/WEB-INF/defs/widgets.xml</value>
<value>/WEB-INF/defs/administrator.xml</value>
<value>/WEB-INF/defs/customer.xml</value>
<value>/WEB-INF/defs/templates.xml</value>
</list>
</property>
</bean>The preceding example defines five files that contain definitions. The files are all located in
the WEB-INF/defs directory. At initialization of the WebApplicationContext, the
files are loaded, and the definitions factory are initialized. After that has
been done, the Tiles included in the definition files can be used as views within your
Spring web application. To be able to use the views, you have to have a ViewResolver
as with any other view technology used with Spring. You can use either of two
implementations, the UrlBasedViewResolver and the ResourceBundleViewResolver.
You can specify locale-specific Tiles definitions by adding an underscore and then the locale, as the following example shows:
<bean id="tilesConfigurer" class="org.springframework.web.servlet.view.tiles3.TilesConfigurer">
<property name="definitions">
<list>
<value>/WEB-INF/defs/tiles.xml</value>
<value>/WEB-INF/defs/tiles_fr_FR.xml</value>
</list>
</property>
</bean>With the preceding configuration, tiles_fr_FR.xml is used for requests with the fr_FR locale,
and tiles.xml is used by default.
| Since underscores are used to indicate locales, we recommended not using them otherwise in the file names for Tiles definitions. |
UrlBasedViewResolver
The UrlBasedViewResolver instantiates the given viewClass for each view it has to
resolve. The following bean defines a UrlBasedViewResolver:
<bean id="viewResolver" class="org.springframework.web.servlet.view.UrlBasedViewResolver">
<property name="viewClass" value="org.springframework.web.servlet.view.tiles3.TilesView"/>
</bean>ResourceBundleViewResolver
The ResourceBundleViewResolver has to be provided with a property file that contains
view names and view classes that the resolver can use. The following example shows a bean
definition for a ResourceBundleViewResolver and the corresponding view names and view
classes (taken from the Pet Clinic sample):
<bean id="viewResolver" class="org.springframework.web.servlet.view.ResourceBundleViewResolver">
<property name="basename" value="views"/>
</bean> ...
welcomeView.(class)=org.springframework.web.servlet.view.tiles3.TilesView
welcomeView.url=welcome (this is the name of a Tiles definition)
vetsView.(class)=org.springframework.web.servlet.view.tiles3.TilesView
vetsView.url=vetsView (again, this is the name of a Tiles definition)
findOwnersForm.(class)=org.springframework.web.servlet.view.JstlView
findOwnersForm.url=/WEB-INF/jsp/findOwners.jsp
...
When you use the ResourceBundleViewResolver, you can easily mix
different view technologies.
Note that the TilesView class supports JSTL (the JSP Standard Tag Library).
SimpleSpringPreparerFactory and SpringBeanPreparerFactory
As an advanced feature, Spring also supports two special Tiles PreparerFactory
implementations. See the Tiles documentation for details on how to use
ViewPreparer references in your Tiles definition files.
You can specify SimpleSpringPreparerFactory to autowire ViewPreparer instances based on
specified preparer classes, applying Spring’s container callbacks as well as applying
configured Spring BeanPostProcessors. If Spring’s context-wide annotation configuration has
been activated, annotations in ViewPreparer classes are automatically detected and
applied. Note that this expects preparer classes in the Tiles definition files, as
the default PreparerFactory does.
You can specify SpringBeanPreparerFactory to operate on specified preparer names (instead
of classes), obtaining the corresponding Spring bean from the DispatcherServlet’s
application context. The full bean creation process is in the control of the Spring
application context in this case, allowing for the use of explicit dependency injection
configuration, scoped beans, and so on. Note that you need to define one Spring bean definition
for each preparer name (as used in your Tiles definitions). The following example shows
how to define a SpringBeanPreparerFactory property on a TilesConfigurer bean:
<bean id="tilesConfigurer" class="org.springframework.web.servlet.view.tiles3.TilesConfigurer">
<property name="definitions">
<list>
<value>/WEB-INF/defs/general.xml</value>
<value>/WEB-INF/defs/widgets.xml</value>
<value>/WEB-INF/defs/administrator.xml</value>
<value>/WEB-INF/defs/customer.xml</value>
<value>/WEB-INF/defs/templates.xml</value>
</list>
</property>
<!-- resolving preparer names as Spring bean definition names -->
<property name="preparerFactoryClass"
value="org.springframework.web.servlet.view.tiles3.SpringBeanPreparerFactory"/>
</bean>1.10.7. RSS and Atom
Both AbstractAtomFeedView and AbstractRssFeedView inherit from the
AbstractFeedView base class and are used to provide Atom and RSS Feed views, respectively. They
are based on ROME project and are located in the
package org.springframework.web.servlet.view.feed.
AbstractAtomFeedView requires you to implement the buildFeedEntries() method and
optionally override the buildFeedMetadata() method (the default implementation is
empty). The following example shows how to do so:
public class SampleContentAtomView extends AbstractAtomFeedView {
@Override
protected void buildFeedMetadata(Map<String, Object> model,
Feed feed, HttpServletRequest request) {
// implementation omitted
}
@Override
protected List<Entry> buildFeedEntries(Map<String, Object> model,
HttpServletRequest request, HttpServletResponse response) throws Exception {
// implementation omitted
}
}class SampleContentAtomView : AbstractAtomFeedView() {
override fun buildFeedMetadata(model: Map<String, Any>,
feed: Feed, request: HttpServletRequest) {
// implementation omitted
}
override fun buildFeedEntries(model: Map<String, Any>,
request: HttpServletRequest, response: HttpServletResponse): List<Entry> {
// implementation omitted
}
}Similar requirements apply for implementing AbstractRssFeedView, as the following example shows:
public class SampleContentRssView extends AbstractRssFeedView {
@Override
protected void buildFeedMetadata(Map<String, Object> model,
Channel feed, HttpServletRequest request) {
// implementation omitted
}
@Override
protected List<Item> buildFeedItems(Map<String, Object> model,
HttpServletRequest request, HttpServletResponse response) throws Exception {
// implementation omitted
}
}class SampleContentRssView : AbstractRssFeedView() {
override fun buildFeedMetadata(model: Map<String, Any>,
feed: Channel, request: HttpServletRequest) {
// implementation omitted
}
override fun buildFeedItems(model: Map<String, Any>,
request: HttpServletRequest, response: HttpServletResponse): List<Item> {
// implementation omitted
}
}The buildFeedItems() and buildFeedEntries() methods pass in the HTTP request, in case
you need to access the Locale. The HTTP response is passed in only for the setting of
cookies or other HTTP headers. The feed is automatically written to the response
object after the method returns.
For an example of creating an Atom view, see Alef Arendsen’s Spring Team Blog entry.
1.10.8. PDF and Excel
Spring offers ways to return output other than HTML, including PDF and Excel spreadsheets. This section describes how to use those features.
Introduction to Document Views
An HTML page is not always the best way for the user to view the model output, and Spring makes it simple to generate a PDF document or an Excel spreadsheet dynamically from the model data. The document is the view and is streamed from the server with the correct content type, to (hopefully) enable the client PC to run their spreadsheet or PDF viewer application in response.
In order to use Excel views, you need to add the Apache POI library to your classpath. For PDF generation, you need to add (preferably) the OpenPDF library.
| You should use the latest versions of the underlying document-generation libraries, if possible. In particular, we strongly recommend OpenPDF (for example, OpenPDF 1.2.12) instead of the outdated original iText 2.1.7, since OpenPDF is actively maintained and fixes an important vulnerability for untrusted PDF content. |
PDF Views
A simple PDF view for a word list could extend
org.springframework.web.servlet.view.document.AbstractPdfView and implement the
buildPdfDocument() method, as the following example shows:
public class PdfWordList extends AbstractPdfView {
protected void buildPdfDocument(Map<String, Object> model, Document doc, PdfWriter writer,
HttpServletRequest request, HttpServletResponse response) throws Exception {
List<String> words = (List<String>) model.get("wordList");
for (String word : words) {
doc.add(new Paragraph(word));
}
}
}class PdfWordList : AbstractPdfView() {
override fun buildPdfDocument(model: Map<String, Any>, doc: Document, writer: PdfWriter,
request: HttpServletRequest, response: HttpServletResponse) {
val words = model["wordList"] as List<String>
for (word in words) {
doc.add(Paragraph(word))
}
}
}A controller can return such a view either from an external view definition
(referencing it by name) or as a View instance from the handler method.
Excel Views
Since Spring Framework 4.2,
org.springframework.web.servlet.view.document.AbstractXlsView is provided as a base
class for Excel views. It is based on Apache POI, with specialized subclasses (AbstractXlsxView
and AbstractXlsxStreamingView) that supersede the outdated AbstractExcelView class.
The programming model is similar to AbstractPdfView, with buildExcelDocument()
as the central template method and controllers being able to return such a view from
an external definition (by name) or as a View instance from the handler method.
1.10.9. Jackson
Spring offers support for the Jackson JSON library.
Jackson-based JSON MVC Views
The MappingJackson2JsonView uses the Jackson library’s ObjectMapper to render the response
content as JSON. By default, the entire contents of the model map (with the exception of
framework-specific classes) are encoded as JSON. For cases where the contents of the
map need to be filtered, you can specify a specific set of model attributes to encode
by using the modelKeys property. You can also use the extractValueFromSingleKeyModel
property to have the value in single-key models extracted and serialized directly rather
than as a map of model attributes.
You can customize JSON mapping as needed by using Jackson’s provided
annotations. When you need further control, you can inject a custom ObjectMapper
through the ObjectMapper property, for cases where you need to provide custom JSON
serializers and deserializers for specific types.
Jackson-based XML Views
MappingJackson2XmlView uses the
Jackson XML extension’s XmlMapper
to render the response content as XML. If the model contains multiple entries, you should
explicitly set the object to be serialized by using the modelKey bean property. If the
model contains a single entry, it is serialized automatically.
You can customized XML mapping as needed by using JAXB or Jackson’s provided
annotations. When you need further control, you can inject a custom XmlMapper
through the ObjectMapper property, for cases where custom XML
you need to provide serializers and deserializers for specific types.
1.10.10. XML Marshalling
The MarshallingView uses an XML Marshaller (defined in the org.springframework.oxm
package) to render the response content as XML. You can explicitly set the object to be
marshalled by using a MarshallingView instance’s modelKey bean property. Alternatively,
the view iterates over all model properties and marshals the first type that is supported
by the Marshaller. For more information on the functionality in the
org.springframework.oxm package, see Marshalling XML using O/X Mappers.
1.10.11. XSLT Views
XSLT is a transformation language for XML and is popular as a view technology within web applications. XSLT can be a good choice as a view technology if your application naturally deals with XML or if your model can easily be converted to XML. The following section shows how to produce an XML document as model data and have it transformed with XSLT in a Spring Web MVC application.
This example is a trivial Spring application that creates a list of words in the
Controller and adds them to the model map. The map is returned, along with the view
name of our XSLT view. See Annotated Controllers for details of Spring Web MVC’s
Controller interface. The XSLT controller turns the list of words into a simple XML
document ready for transformation.
Beans
Configuration is standard for a simple Spring web application: The MVC configuration
has to define an XsltViewResolver bean and regular MVC annotation configuration.
The following example shows how to do so:
@EnableWebMvc
@ComponentScan
@Configuration
public class WebConfig implements WebMvcConfigurer {
@Bean
public XsltViewResolver xsltViewResolver() {
XsltViewResolver viewResolver = new XsltViewResolver();
viewResolver.setPrefix("/WEB-INF/xsl/");
viewResolver.setSuffix(".xslt");
return viewResolver;
}
}@EnableWebMvc
@ComponentScan
@Configuration
class WebConfig : WebMvcConfigurer {
@Bean
fun xsltViewResolver() = XsltViewResolver().apply {
setPrefix("/WEB-INF/xsl/")
setSuffix(".xslt")
}
}Controller
We also need a Controller that encapsulates our word-generation logic.
The controller logic is encapsulated in a @Controller class, with the
handler method being defined as follows:
@Controller
public class XsltController {
@RequestMapping("/")
public String home(Model model) throws Exception {
Document document = DocumentBuilderFactory.newInstance().newDocumentBuilder().newDocument();
Element root = document.createElement("wordList");
List<String> words = Arrays.asList("Hello", "Spring", "Framework");
for (String word : words) {
Element wordNode = document.createElement("word");
Text textNode = document.createTextNode(word);
wordNode.appendChild(textNode);
root.appendChild(wordNode);
}
model.addAttribute("wordList", root);
return "home";
}
}import org.springframework.ui.set
@Controller
class XsltController {
@RequestMapping("/")
fun home(model: Model): String {
val document = DocumentBuilderFactory.newInstance().newDocumentBuilder().newDocument()
val root = document.createElement("wordList")
val words = listOf("Hello", "Spring", "Framework")
for (word in words) {
val wordNode = document.createElement("word")
val textNode = document.createTextNode(word)
wordNode.appendChild(textNode)
root.appendChild(wordNode)
}
model["wordList"] = root
return "home"
}
}So far, we have only created a DOM document and added it to the Model map. Note that you
can also load an XML file as a Resource and use it instead of a custom DOM document.
There are software packages available that automatically 'domify' an object graph, but, within Spring, you have complete flexibility to create the DOM from your model in any way you choose. This prevents the transformation of XML playing too great a part in the structure of your model data, which is a danger when using tools to manage the DOMification process.
Transformation
Finally, the XsltViewResolver resolves the “home” XSLT template file and merges the
DOM document into it to generate our view. As shown in the XsltViewResolver
configuration, XSLT templates live in the war file in the WEB-INF/xsl directory
and end with an xslt file extension.
The following example shows an XSLT transform:
<?xml version="1.0" encoding="utf-8"?>
<xsl:stylesheet version="1.0" xmlns:xsl="http://www.w3.org/1999/XSL/Transform">
<xsl:output method="html" omit-xml-declaration="yes"/>
<xsl:template match="/">
<html>
<head><title>Hello!</title></head>
<body>
<h1>My First Words</h1>
<ul>
<xsl:apply-templates/>
</ul>
</body>
</html>
</xsl:template>
<xsl:template match="word">
<li><xsl:value-of select="."/></li>
</xsl:template>
</xsl:stylesheet>The preceding transform is rendered as the following HTML:
<html>
<head>
<META http-equiv="Content-Type" content="text/html; charset=UTF-8">
<title>Hello!</title>
</head>
<body>
<h1>My First Words</h1>
<ul>
<li>Hello</li>
<li>Spring</li>
<li>Framework</li>
</ul>
</body>
</html>1.11. MVC Config
The MVC Java configuration and the MVC XML namespace provide default configuration suitable for most applications and a configuration API to customize it.
For more advanced customizations, which are not available in the configuration API, see Advanced Java Config and Advanced XML Config.
You do not need to understand the underlying beans created by the MVC Java configuration and the MVC namespace. If you want to learn more, see Special Bean Types and Web MVC Config.
1.11.1. Enable MVC Configuration
In Java configuration, you can use the @EnableWebMvc annotation to enable MVC
configuration, as the following example shows:
@Configuration
@EnableWebMvc
public class WebConfig {
}@Configuration
@EnableWebMvc
class WebConfigIn XML configuration, you can use the <mvc:annotation-driven> element to enable MVC
configuration, as the following example shows:
<?xml version="1.0" encoding="UTF-8"?>
<beans xmlns="http://www.springframework.org/schema/beans"
xmlns:mvc="http://www.springframework.org/schema/mvc"
xmlns:xsi="http://www.w3.org/2001/XMLSchema-instance"
xsi:schemaLocation="
http://www.springframework.org/schema/beans
https://www.springframework.org/schema/beans/spring-beans.xsd
http://www.springframework.org/schema/mvc
https://www.springframework.org/schema/mvc/spring-mvc.xsd">
<mvc:annotation-driven/>
</beans>The preceding example registers a number of Spring MVC infrastructure beans and adapts to dependencies available on the classpath (for example, payload converters for JSON, XML, and others).
1.11.2. MVC Config API
In Java configuration, you can implement the WebMvcConfigurer interface, as the
following example shows:
@Configuration
@EnableWebMvc
public class WebConfig implements WebMvcConfigurer {
// Implement configuration methods...
}@Configuration
@EnableWebMvc
class WebConfig : WebMvcConfigurer {
// Implement configuration methods...
}In XML, you can check attributes and sub-elements of <mvc:annotation-driven/>. You can
view the Spring MVC XML schema or use
the code completion feature of your IDE to discover what attributes and
sub-elements are available.
1.11.3. Type Conversion
By default, formatters for various number and date types are installed, along with support
for customization via @NumberFormat and @DateTimeFormat on fields.
To register custom formatters and converters in Java config, use the following:
@Configuration
@EnableWebMvc
public class WebConfig implements WebMvcConfigurer {
@Override
public void addFormatters(FormatterRegistry registry) {
// ...
}
}@Configuration
@EnableWebMvc
class WebConfig : WebMvcConfigurer {
override fun addFormatters(registry: FormatterRegistry) {
// ...
}
}To do the same in XML config, use the following:
<?xml version="1.0" encoding="UTF-8"?>
<beans xmlns="http://www.springframework.org/schema/beans"
xmlns:mvc="http://www.springframework.org/schema/mvc"
xmlns:xsi="http://www.w3.org/2001/XMLSchema-instance"
xsi:schemaLocation="
http://www.springframework.org/schema/beans
https://www.springframework.org/schema/beans/spring-beans.xsd
http://www.springframework.org/schema/mvc
https://www.springframework.org/schema/mvc/spring-mvc.xsd">
<mvc:annotation-driven conversion-service="conversionService"/>
<bean id="conversionService"
class="org.springframework.format.support.FormattingConversionServiceFactoryBean">
<property name="converters">
<set>
<bean class="org.example.MyConverter"/>
</set>
</property>
<property name="formatters">
<set>
<bean class="org.example.MyFormatter"/>
<bean class="org.example.MyAnnotationFormatterFactory"/>
</set>
</property>
<property name="formatterRegistrars">
<set>
<bean class="org.example.MyFormatterRegistrar"/>
</set>
</property>
</bean>
</beans>By default Spring MVC considers the request Locale when parsing and formatting date values. This works for forms where dates are represented as Strings with "input" form fields. For "date" and "time" form fields, however, browsers use a fixed format defined in the HTML spec. For such cases date and time formatting can be customized as follows:
@Configuration
@EnableWebMvc
public class WebConfig implements WebMvcConfigurer {
@Override
public void addFormatters(FormatterRegistry registry) {
DateTimeFormatterRegistrar registrar = new DateTimeFormatterRegistrar();
registrar.setUseIsoFormat(true);
registrar.registerFormatters(registry);
}
}@Configuration
@EnableWebMvc
class WebConfig : WebMvcConfigurer {
override fun addFormatters(registry: FormatterRegistry) {
val registrar = DateTimeFormatterRegistrar()
registrar.setUseIsoFormat(true)
registrar.registerFormatters(registry)
}
}
See the FormatterRegistrar SPI
and the FormattingConversionServiceFactoryBean for more information on when to use
FormatterRegistrar implementations.
|
1.11.4. Validation
By default, if Bean Validation is present
on the classpath (for example, Hibernate Validator), the LocalValidatorFactoryBean is
registered as a global Validator for use with @Valid and
Validated on controller method arguments.
In Java configuration, you can customize the global Validator instance, as the
following example shows:
@Configuration
@EnableWebMvc
public class WebConfig implements WebMvcConfigurer {
@Override
public Validator getValidator() {
// ...
}
}@Configuration
@EnableWebMvc
class WebConfig : WebMvcConfigurer {
override fun getValidator(): Validator {
// ...
}
}The following example shows how to achieve the same configuration in XML:
<?xml version="1.0" encoding="UTF-8"?>
<beans xmlns="http://www.springframework.org/schema/beans"
xmlns:mvc="http://www.springframework.org/schema/mvc"
xmlns:xsi="http://www.w3.org/2001/XMLSchema-instance"
xsi:schemaLocation="
http://www.springframework.org/schema/beans
https://www.springframework.org/schema/beans/spring-beans.xsd
http://www.springframework.org/schema/mvc
https://www.springframework.org/schema/mvc/spring-mvc.xsd">
<mvc:annotation-driven validator="globalValidator"/>
</beans>Note that you can also register Validator implementations locally, as the following
example shows:
@Controller
public class MyController {
@InitBinder
protected void initBinder(WebDataBinder binder) {
binder.addValidators(new FooValidator());
}
}@Controller
class MyController {
@InitBinder
protected fun initBinder(binder: WebDataBinder) {
binder.addValidators(FooValidator())
}
}
If you need to have a LocalValidatorFactoryBean injected somewhere, create a bean and
mark it with @Primary in order to avoid conflict with the one declared in the MVC configuration.
|
1.11.5. Interceptors
In Java configuration, you can register interceptors to apply to incoming requests, as the following example shows:
@Configuration
@EnableWebMvc
public class WebConfig implements WebMvcConfigurer {
@Override
public void addInterceptors(InterceptorRegistry registry) {
registry.addInterceptor(new LocaleChangeInterceptor());
registry.addInterceptor(new ThemeChangeInterceptor()).addPathPatterns("/**").excludePathPatterns("/admin/**");
registry.addInterceptor(new SecurityInterceptor()).addPathPatterns("/secure/*");
}
}@Configuration
@EnableWebMvc
class WebConfig : WebMvcConfigurer {
override fun addInterceptors(registry: InterceptorRegistry) {
registry.addInterceptor(LocaleChangeInterceptor())
registry.addInterceptor(ThemeChangeInterceptor()).addPathPatterns("/**").excludePathPatterns("/admin/**")
registry.addInterceptor(SecurityInterceptor()).addPathPatterns("/secure/*")
}
}The following example shows how to achieve the same configuration in XML:
<mvc:interceptors>
<bean class="org.springframework.web.servlet.i18n.LocaleChangeInterceptor"/>
<mvc:interceptor>
<mvc:mapping path="/**"/>
<mvc:exclude-mapping path="/admin/**"/>
<bean class="org.springframework.web.servlet.theme.ThemeChangeInterceptor"/>
</mvc:interceptor>
<mvc:interceptor>
<mvc:mapping path="/secure/*"/>
<bean class="org.example.SecurityInterceptor"/>
</mvc:interceptor>
</mvc:interceptors>1.11.6. Content Types
You can configure how Spring MVC determines the requested media types from the request
(for example, Accept header, URL path extension, query parameter, and others).
By default, the URL path extension is checked first — with json, xml, rss, and atom
registered as known extensions (depending on classpath dependencies). The Accept header
is checked second.
Consider changing those defaults to Accept header only, and, if you must use URL-based
content type resolution, consider using the query parameter strategy over path extensions. See
Suffix Match and Suffix Match and RFD for
more details.
In Java configuration, you can customize requested content type resolution, as the following example shows:
@Configuration
@EnableWebMvc
public class WebConfig implements WebMvcConfigurer {
@Override
public void configureContentNegotiation(ContentNegotiationConfigurer configurer) {
configurer.mediaType("json", MediaType.APPLICATION_JSON);
configurer.mediaType("xml", MediaType.APPLICATION_XML);
}
}@Configuration
@EnableWebMvc
class WebConfig : WebMvcConfigurer {
override fun configureContentNegotiation(configurer: ContentNegotiationConfigurer) {
configurer.mediaType("json", MediaType.APPLICATION_JSON)
configurer.mediaType("xml", MediaType.APPLICATION_XML)
}
}The following example shows how to achieve the same configuration in XML:
<mvc:annotation-driven content-negotiation-manager="contentNegotiationManager"/>
<bean id="contentNegotiationManager" class="org.springframework.web.accept.ContentNegotiationManagerFactoryBean">
<property name="mediaTypes">
<value>
json=application/json
xml=application/xml
</value>
</property>
</bean>1.11.7. Message Converters
You can customize HttpMessageConverter in Java configuration by overriding
configureMessageConverters()
(to replace the default converters created by Spring MVC) or by overriding
extendMessageConverters()
(to customize the default converters or add additional converters to the default ones).
The following example adds XML and Jackson JSON converters with a customized
ObjectMapper instead of the default ones:
@Configuration
@EnableWebMvc
public class WebConfiguration implements WebMvcConfigurer {
@Override
public void configureMessageConverters(List<HttpMessageConverter<?>> converters) {
Jackson2ObjectMapperBuilder builder = new Jackson2ObjectMapperBuilder()
.indentOutput(true)
.dateFormat(new SimpleDateFormat("yyyy-MM-dd"))
.modulesToInstall(new ParameterNamesModule());
converters.add(new MappingJackson2HttpMessageConverter(builder.build()));
converters.add(new MappingJackson2XmlHttpMessageConverter(builder.createXmlMapper(true).build()));
}
}@Configuration
@EnableWebMvc
class WebConfiguration : WebMvcConfigurer {
override fun configureMessageConverters(converters: MutableList<HttpMessageConverter<*>>) {
val builder = Jackson2ObjectMapperBuilder()
.indentOutput(true)
.dateFormat(SimpleDateFormat("yyyy-MM-dd"))
.modulesToInstall(ParameterNamesModule())
converters.add(MappingJackson2HttpMessageConverter(builder.build()))
converters.add(MappingJackson2XmlHttpMessageConverter(builder.createXmlMapper(true).build()))In the preceding example,
Jackson2ObjectMapperBuilder
is used to create a common configuration for both MappingJackson2HttpMessageConverter and
MappingJackson2XmlHttpMessageConverter with indentation enabled, a customized date format,
and the registration of
jackson-module-parameter-names,
Which adds support for accessing parameter names (a feature added in Java 8).
This builder customizes Jackson’s default properties as follows:
-
DeserializationFeature.FAIL_ON_UNKNOWN_PROPERTIESis disabled. -
MapperFeature.DEFAULT_VIEW_INCLUSIONis disabled.
It also automatically registers the following well-known modules if they are detected on the classpath:
-
jackson-datatype-joda: Support for Joda-Time types.
-
jackson-datatype-jsr310: Support for Java 8 Date and Time API types.
-
jackson-datatype-jdk8: Support for other Java 8 types, such as
Optional. -
jackson-module-kotlin: Support for Kotlin classes and data classes.
Enabling indentation with Jackson XML support requires
woodstox-core-asl
dependency in addition to jackson-dataformat-xml one.
|
Other interesting Jackson modules are available:
-
jackson-datatype-money: Support for
javax.moneytypes (unofficial module). -
jackson-datatype-hibernate: Support for Hibernate-specific types and properties (including lazy-loading aspects).
The following example shows how to achieve the same configuration in XML:
<mvc:annotation-driven>
<mvc:message-converters>
<bean class="org.springframework.http.converter.json.MappingJackson2HttpMessageConverter">
<property name="objectMapper" ref="objectMapper"/>
</bean>
<bean class="org.springframework.http.converter.xml.MappingJackson2XmlHttpMessageConverter">
<property name="objectMapper" ref="xmlMapper"/>
</bean>
</mvc:message-converters>
</mvc:annotation-driven>
<bean id="objectMapper" class="org.springframework.http.converter.json.Jackson2ObjectMapperFactoryBean"
p:indentOutput="true"
p:simpleDateFormat="yyyy-MM-dd"
p:modulesToInstall="com.fasterxml.jackson.module.paramnames.ParameterNamesModule"/>
<bean id="xmlMapper" parent="objectMapper" p:createXmlMapper="true"/>1.11.8. View Controllers
This is a shortcut for defining a ParameterizableViewController that immediately
forwards to a view when invoked. You can use it in static cases when there is no Java controller
logic to execute before the view generates the response.
The following example of Java configuration forwards a request for / to a view called home:
@Configuration
@EnableWebMvc
public class WebConfig implements WebMvcConfigurer {
@Override
public void addViewControllers(ViewControllerRegistry registry) {
registry.addViewController("/").setViewName("home");
}
}@Configuration
@EnableWebMvc
class WebConfig : WebMvcConfigurer {
override fun addViewControllers(registry: ViewControllerRegistry) {
registry.addViewController("/").setViewName("home")
}
}The following example achieves the same thing as the preceding example, but with XML, by
using the <mvc:view-controller> element:
<mvc:view-controller path="/" view-name="home"/>If an @RequestMapping method is mapped to a URL for any HTTP method then a view
controller cannot be used to handle the same URL. This is because a match by URL to an
annotated controller is considered a strong enough indication of endpoint ownership so
that a 405 (METHOD_NOT_ALLOWED), a 415 (UNSUPPORTED_MEDIA_TYPE), or similar response can
be sent to the client to help with debugging. For this reason it is recommended to avoid
splitting URL handling across an annotated controller and a view controller.
1.11.9. View Resolvers
The MVC configuration simplifies the registration of view resolvers.
The following Java configuration example configures content negotiation view
resolution by using JSP and Jackson as a default View for JSON rendering:
@Configuration
@EnableWebMvc
public class WebConfig implements WebMvcConfigurer {
@Override
public void configureViewResolvers(ViewResolverRegistry registry) {
registry.enableContentNegotiation(new MappingJackson2JsonView());
registry.jsp();
}
}@Configuration
@EnableWebMvc
class WebConfig : WebMvcConfigurer {
override fun configureViewResolvers(registry: ViewResolverRegistry) {
registry.enableContentNegotiation(MappingJackson2JsonView())
registry.jsp()
}
}The following example shows how to achieve the same configuration in XML:
<mvc:view-resolvers>
<mvc:content-negotiation>
<mvc:default-views>
<bean class="org.springframework.web.servlet.view.json.MappingJackson2JsonView"/>
</mvc:default-views>
</mvc:content-negotiation>
<mvc:jsp/>
</mvc:view-resolvers>Note, however, that FreeMarker, Tiles, Groovy Markup, and script templates also require configuration of the underlying view technology.
The MVC namespace provides dedicated elements. The following example works with FreeMarker:
<mvc:view-resolvers>
<mvc:content-negotiation>
<mvc:default-views>
<bean class="org.springframework.web.servlet.view.json.MappingJackson2JsonView"/>
</mvc:default-views>
</mvc:content-negotiation>
<mvc:freemarker cache="false"/>
</mvc:view-resolvers>
<mvc:freemarker-configurer>
<mvc:template-loader-path location="/freemarker"/>
</mvc:freemarker-configurer>In Java configuration, you can add the respective Configurer bean,
as the following example shows:
@Configuration
@EnableWebMvc
public class WebConfig implements WebMvcConfigurer {
@Override
public void configureViewResolvers(ViewResolverRegistry registry) {
registry.enableContentNegotiation(new MappingJackson2JsonView());
registry.freeMarker().cache(false);
}
@Bean
public FreeMarkerConfigurer freeMarkerConfigurer() {
FreeMarkerConfigurer configurer = new FreeMarkerConfigurer();
configurer.setTemplateLoaderPath("/freemarker");
return configurer;
}
}@Configuration
@EnableWebMvc
class WebConfig : WebMvcConfigurer {
override fun configureViewResolvers(registry: ViewResolverRegistry) {
registry.enableContentNegotiation(MappingJackson2JsonView())
registry.freeMarker().cache(false)
}
@Bean
fun freeMarkerConfigurer() = FreeMarkerConfigurer().apply {
setTemplateLoaderPath("/freemarker")
}
}1.11.10. Static Resources
This option provides a convenient way to serve static resources from a list of
Resource-based locations.
In the next example, given a request that starts with /resources, the relative path is
used to find and serve static resources relative to /public under the web application
root or on the classpath under /static. The resources are served with a one-year future
expiration to ensure maximum use of the browser cache and a reduction in HTTP requests
made by the browser. The Last-Modified header is also evaluated and, if present, a 304
status code is returned.
The following listing shows how to do so with Java configuration:
@Configuration
@EnableWebMvc
public class WebConfig implements WebMvcConfigurer {
@Override
public void addResourceHandlers(ResourceHandlerRegistry registry) {
registry.addResourceHandler("/resources/**")
.addResourceLocations("/public", "classpath:/static/")
.setCachePeriod(31556926);
}
}@Configuration
@EnableWebMvc
class WebConfig : WebMvcConfigurer {
override fun addResourceHandlers(registry: ResourceHandlerRegistry) {
registry.addResourceHandler("/resources/**")
.addResourceLocations("/public", "classpath:/static/")
.setCachePeriod(31556926)
}
}The following example shows how to achieve the same configuration in XML:
<mvc:resources mapping="/resources/**"
location="/public, classpath:/static/"
cache-period="31556926" />The resource handler also supports a chain of
ResourceResolver implementations and
ResourceTransformer implementations,
which you can use to create a toolchain for working with optimized resources.
You can use the VersionResourceResolver for versioned resource URLs based on an MD5 hash
computed from the content, a fixed application version, or other. A
ContentVersionStrategy (MD5 hash) is a good choice — with some notable exceptions, such as
JavaScript resources used with a module loader.
The following example shows how to use VersionResourceResolver in Java configuration:
@Configuration
@EnableWebMvc
public class WebConfig implements WebMvcConfigurer {
@Override
public void addResourceHandlers(ResourceHandlerRegistry registry) {
registry.addResourceHandler("/resources/**")
.addResourceLocations("/public/")
.resourceChain(true)
.addResolver(new VersionResourceResolver().addContentVersionStrategy("/**"));
}
}@Configuration
@EnableWebMvc
class WebConfig : WebMvcConfigurer {
override fun addResourceHandlers(registry: ResourceHandlerRegistry) {
registry.addResourceHandler("/resources/**")
.addResourceLocations("/public/")
.resourceChain(true)
.addResolver(VersionResourceResolver().addContentVersionStrategy("/**"))
}
}The following example shows how to achieve the same configuration in XML:
<mvc:resources mapping="/resources/**" location="/public/">
<mvc:resource-chain resource-cache="true">
<mvc:resolvers>
<mvc:version-resolver>
<mvc:content-version-strategy patterns="/**"/>
</mvc:version-resolver>
</mvc:resolvers>
</mvc:resource-chain>
</mvc:resources>You can then use ResourceUrlProvider to rewrite URLs and apply the full chain of resolvers and
transformers — for example, to insert versions. The MVC configuration provides a ResourceUrlProvider
bean so that it can be injected into others. You can also make the rewrite transparent with the
ResourceUrlEncodingFilter for Thymeleaf, JSPs, FreeMarker, and others with URL tags that
rely on HttpServletResponse#encodeURL.
Note that, when using both EncodedResourceResolver (for example, for serving gzipped or
brotli-encoded resources) and VersionResourceResolver, you must register them in this order.
That ensures content-based versions are always computed reliably, based on the unencoded file.
WebJars are also supported through the
WebJarsResourceResolver which is automatically registered when the
org.webjars:webjars-locator-core library is present on the classpath. The resolver can
re-write URLs to include the version of the jar and can also match against incoming URLs
without versions — for example, from /jquery/jquery.min.js to
/jquery/1.2.0/jquery.min.js.
1.11.11. Default Servlet
Spring MVC allows for mapping the DispatcherServlet to / (thus overriding the mapping
of the container’s default Servlet), while still allowing static resource requests to be
handled by the container’s default Servlet. It configures a
DefaultServletHttpRequestHandler with a URL mapping of /** and the lowest priority
relative to other URL mappings.
This handler forwards all requests to the default Servlet. Therefore, it must
remain last in the order of all other URL HandlerMappings. That is the
case if you use <mvc:annotation-driven>. Alternatively, if you set up your
own customized HandlerMapping instance, be sure to set its order property to a value
lower than that of the DefaultServletHttpRequestHandler, which is Integer.MAX_VALUE.
The following example shows how to enable the feature by using the default setup:
@Configuration
@EnableWebMvc
public class WebConfig implements WebMvcConfigurer {
@Override
public void configureDefaultServletHandling(DefaultServletHandlerConfigurer configurer) {
configurer.enable();
}
}@Configuration
@EnableWebMvc
class WebConfig : WebMvcConfigurer {
override fun configureDefaultServletHandling(configurer: DefaultServletHandlerConfigurer) {
configurer.enable()
}
}The following example shows how to achieve the same configuration in XML:
<mvc:default-servlet-handler/>The caveat to overriding the / Servlet mapping is that the RequestDispatcher for the
default Servlet must be retrieved by name rather than by path. The
DefaultServletHttpRequestHandler tries to auto-detect the default Servlet for
the container at startup time, using a list of known names for most of the major Servlet
containers (including Tomcat, Jetty, GlassFish, JBoss, Resin, WebLogic, and WebSphere).
If the default Servlet has been custom-configured with a different name, or if a
different Servlet container is being used where the default Servlet name is unknown,
then you must explicitly provide the default Servlet’s name, as the following example shows:
@Configuration
@EnableWebMvc
public class WebConfig implements WebMvcConfigurer {
@Override
public void configureDefaultServletHandling(DefaultServletHandlerConfigurer configurer) {
configurer.enable("myCustomDefaultServlet");
}
}@Configuration
@EnableWebMvc
class WebConfig : WebMvcConfigurer {
override fun configureDefaultServletHandling(configurer: DefaultServletHandlerConfigurer) {
configurer.enable("myCustomDefaultServlet")
}
}The following example shows how to achieve the same configuration in XML:
<mvc:default-servlet-handler default-servlet-name="myCustomDefaultServlet"/>1.11.12. Path Matching
You can customize options related to path matching and treatment of the URL.
For details on the individual options, see the
PathMatchConfigurer javadoc.
The following example shows how to customize path matching in Java configuration:
@Configuration
@EnableWebMvc
public class WebConfig implements WebMvcConfigurer {
@Override
public void configurePathMatch(PathMatchConfigurer configurer) {
configurer
.setUseTrailingSlashMatch(false)
.setUseRegisteredSuffixPatternMatch(true)
.setPathMatcher(antPathMatcher())
.setUrlPathHelper(urlPathHelper())
.addPathPrefix("/api", HandlerTypePredicate.forAnnotation(RestController.class));
}
@Bean
public UrlPathHelper urlPathHelper() {
//...
}
@Bean
public PathMatcher antPathMatcher() {
//...
}
}@Configuration
@EnableWebMvc
class WebConfig : WebMvcConfigurer {
override fun configurePathMatch(configurer: PathMatchConfigurer) {
configurer
.setUseSuffixPatternMatch(true)
.setUseTrailingSlashMatch(false)
.setUseRegisteredSuffixPatternMatch(true)
.setPathMatcher(antPathMatcher())
.setUrlPathHelper(urlPathHelper())
.addPathPrefix("/api", HandlerTypePredicate.forAnnotation(RestController::class.java))
}
@Bean
fun urlPathHelper(): UrlPathHelper {
//...
}
@Bean
fun antPathMatcher(): PathMatcher {
//...
}
}The following example shows how to achieve the same configuration in XML:
<mvc:annotation-driven>
<mvc:path-matching
trailing-slash="false"
registered-suffixes-only="true"
path-helper="pathHelper"
path-matcher="pathMatcher"/>
</mvc:annotation-driven>
<bean id="pathHelper" class="org.example.app.MyPathHelper"/>
<bean id="pathMatcher" class="org.example.app.MyPathMatcher"/>1.11.13. Advanced Java Config
@EnableWebMvc imports DelegatingWebMvcConfiguration, which:
-
Provides default Spring configuration for Spring MVC applications
-
Detects and delegates to
WebMvcConfigurerimplementations to customize that configuration.
For advanced mode, you can remove @EnableWebMvc and extend directly from
DelegatingWebMvcConfiguration instead of implementing WebMvcConfigurer,
as the following example shows:
@Configuration
public class WebConfig extends DelegatingWebMvcConfiguration {
// ...
}@Configuration
class WebConfig : DelegatingWebMvcConfiguration() {
// ...
}You can keep existing methods in WebConfig, but you can now also override bean declarations
from the base class, and you can still have any number of other WebMvcConfigurer implementations on
the classpath.
1.11.14. Advanced XML Config
The MVC namespace does not have an advanced mode. If you need to customize a property on
a bean that you cannot change otherwise, you can use the BeanPostProcessor lifecycle
hook of the Spring ApplicationContext, as the following example shows:
@Component
public class MyPostProcessor implements BeanPostProcessor {
public Object postProcessBeforeInitialization(Object bean, String name) throws BeansException {
// ...
}
}@Component
class MyPostProcessor : BeanPostProcessor {
override fun postProcessBeforeInitialization(bean: Any, name: String): Any {
// ...
}
}Note that you need to declare MyPostProcessor as a bean, either explicitly in XML or
by letting it be detected through a <component-scan/> declaration.
1.12. HTTP/2
Servlet 4 containers are required to support HTTP/2, and Spring Framework 5 is compatible with Servlet API 4. From a programming model perspective, there is nothing specific that applications need to do. However, there are considerations related to server configuration. For more details, see the HTTP/2 wiki page.
The Servlet API does expose one construct related to HTTP/2. You can use the
javax.servlet.http.PushBuilder proactively push resources to clients, and it
is supported as a method argument to @RequestMapping methods.
2. REST Clients
This section describes options for client-side access to REST endpoints.
2.1. RestTemplate
RestTemplate is a synchronous client to perform HTTP requests. It is the original
Spring REST client and exposes a simple, template-method API over underlying HTTP client
libraries.
As of 5.0 the RestTemplate is in maintenance mode, with only minor requests for
changes and bugs to be accepted going forward. Please, consider using the
WebClient which offers a more modern API and
supports sync, async, and streaming scenarios.
|
See REST Endpoints for details.
2.2. WebClient
WebClient is a non-blocking, reactive client to perform HTTP requests. It was
introduced in 5.0 and offers a modern alternative to the RestTemplate, with efficient
support for both synchronous and asynchronous, as well as streaming scenarios.
In contrast to RestTemplate, WebClient supports the following:
-
Non-blocking I/O.
-
Reactive Streams back pressure.
-
High concurrency with fewer hardware resources.
-
Functional-style, fluent API that takes advantage of Java 8 lambdas.
-
Synchronous and asynchronous interactions.
-
Streaming up to or streaming down from a server.
See WebClient for more details.
3. Testing
This section summarizes the options available in spring-test for Spring MVC applications.
-
Servlet API Mocks: Mock implementations of Servlet API contracts for unit testing controllers, filters, and other web components. See Servlet API mock objects for more details.
-
TestContext Framework: Support for loading Spring configuration in JUnit and TestNG tests, including efficient caching of the loaded configuration across test methods and support for loading a
WebApplicationContextwith aMockServletContext. See TestContext Framework for more details. -
Spring MVC Test: A framework, also known as
MockMvc, for testing annotated controllers through theDispatcherServlet(that is, supporting annotations), complete with the Spring MVC infrastructure but without an HTTP server. See Spring MVC Test for more details. -
Client-side REST:
spring-testprovides aMockRestServiceServerthat you can use as a mock server for testing client-side code that internally uses theRestTemplate. See Client REST Tests for more details. -
WebTestClient: Built for testing WebFlux applications, but it can also be used for end-to-end integration testing, to any server, over an HTTP connection. It is a non-blocking, reactive client and is well suited for testing asynchronous and streaming scenarios.
4. WebSockets
This part of the reference documentation covers support for Servlet stack, WebSocket messaging that includes raw WebSocket interactions, WebSocket emulation through SockJS, and publish-subscribe messaging through STOMP as a sub-protocol over WebSocket.
4.1. Introduction to WebSocket
The WebSocket protocol, RFC 6455, provides a standardized way to establish a full-duplex, two-way communication channel between client and server over a single TCP connection. It is a different TCP protocol from HTTP but is designed to work over HTTP, using ports 80 and 443 and allowing re-use of existing firewall rules.
A WebSocket interaction begins with an HTTP request that uses the HTTP Upgrade header
to upgrade or, in this case, to switch to the WebSocket protocol. The following example
shows such an interaction:
GET /spring-websocket-portfolio/portfolio HTTP/1.1
Host: localhost:8080
Upgrade: websocket (1)
Connection: Upgrade (2)
Sec-WebSocket-Key: Uc9l9TMkWGbHFD2qnFHltg==
Sec-WebSocket-Protocol: v10.stomp, v11.stomp
Sec-WebSocket-Version: 13
Origin: http://localhost:8080| 1 | The Upgrade header. |
| 2 | Using the Upgrade connection. |
Instead of the usual 200 status code, a server with WebSocket support returns output similar to the following:
HTTP/1.1 101 Switching Protocols (1)
Upgrade: websocket
Connection: Upgrade
Sec-WebSocket-Accept: 1qVdfYHU9hPOl4JYYNXF623Gzn0=
Sec-WebSocket-Protocol: v10.stomp| 1 | Protocol switch |
After a successful handshake, the TCP socket underlying the HTTP upgrade request remains open for both the client and the server to continue to send and receive messages.
A complete introduction of how WebSockets work is beyond the scope of this document. See RFC 6455, the WebSocket chapter of HTML5, or any of the many introductions and tutorials on the Web.
Note that, if a WebSocket server is running behind a web server (e.g. nginx), you likely need to configure it to pass WebSocket upgrade requests on to the WebSocket server. Likewise, if the application runs in a cloud environment, check the instructions of the cloud provider related to WebSocket support.
4.1.1. HTTP Versus WebSocket
Even though WebSocket is designed to be HTTP-compatible and starts with an HTTP request, it is important to understand that the two protocols lead to very different architectures and application programming models.
In HTTP and REST, an application is modeled as many URLs. To interact with the application, clients access those URLs, request-response style. Servers route requests to the appropriate handler based on the HTTP URL, method, and headers.
By contrast, in WebSockets, there is usually only one URL for the initial connect. Subsequently, all application messages flow on that same TCP connection. This points to an entirely different asynchronous, event-driven, messaging architecture.
WebSocket is also a low-level transport protocol, which, unlike HTTP, does not prescribe any semantics to the content of messages. That means that there is no way to route or process a message unless the client and the server agree on message semantics.
WebSocket clients and servers can negotiate the use of a higher-level, messaging protocol
(for example, STOMP), through the Sec-WebSocket-Protocol header on the HTTP handshake request.
In the absence of that, they need to come up with their own conventions.
4.1.2. When to Use WebSockets
WebSockets can make a web page be dynamic and interactive. However, in many cases, a combination of Ajax and HTTP streaming or long polling can provide a simple and effective solution.
For example, news, mail, and social feeds need to update dynamically, but it may be perfectly okay to do so every few minutes. Collaboration, games, and financial apps, on the other hand, need to be much closer to real-time.
Latency alone is not a deciding factor. If the volume of messages is relatively low (for example, monitoring network failures) HTTP streaming or polling can provide an effective solution. It is the combination of low latency, high frequency, and high volume that make the best case for the use of WebSocket.
Keep in mind also that over the Internet, restrictive proxies that are outside of your control
may preclude WebSocket interactions, either because they are not configured to pass on the
Upgrade header or because they close long-lived connections that appear idle. This
means that the use of WebSocket for internal applications within the firewall is a more
straightforward decision than it is for public facing applications.
4.2. WebSocket API
The Spring Framework provides a WebSocket API that you can use to write client- and server-side applications that handle WebSocket messages.
4.2.1. WebSocketHandler
Creating a WebSocket server is as simple as implementing WebSocketHandler or, more
likely, extending either TextWebSocketHandler or BinaryWebSocketHandler. The following
example uses TextWebSocketHandler:
import org.springframework.web.socket.WebSocketHandler;
import org.springframework.web.socket.WebSocketSession;
import org.springframework.web.socket.TextMessage;
public class MyHandler extends TextWebSocketHandler {
@Override
public void handleTextMessage(WebSocketSession session, TextMessage message) {
// ...
}
}There is dedicated WebSocket Java configuration and XML namespace support for mapping the preceding WebSocket handler to a specific URL, as the following example shows:
import org.springframework.web.socket.config.annotation.EnableWebSocket;
import org.springframework.web.socket.config.annotation.WebSocketConfigurer;
import org.springframework.web.socket.config.annotation.WebSocketHandlerRegistry;
@Configuration
@EnableWebSocket
public class WebSocketConfig implements WebSocketConfigurer {
@Override
public void registerWebSocketHandlers(WebSocketHandlerRegistry registry) {
registry.addHandler(myHandler(), "/myHandler");
}
@Bean
public WebSocketHandler myHandler() {
return new MyHandler();
}
}The following example shows the XML configuration equivalent of the preceding example:
<beans xmlns="http://www.springframework.org/schema/beans"
xmlns:xsi="http://www.w3.org/2001/XMLSchema-instance"
xmlns:websocket="http://www.springframework.org/schema/websocket"
xsi:schemaLocation="
http://www.springframework.org/schema/beans
https://www.springframework.org/schema/beans/spring-beans.xsd
http://www.springframework.org/schema/websocket
https://www.springframework.org/schema/websocket/spring-websocket.xsd">
<websocket:handlers>
<websocket:mapping path="/myHandler" handler="myHandler"/>
</websocket:handlers>
<bean id="myHandler" class="org.springframework.samples.MyHandler"/>
</beans>The preceding example is for use in Spring MVC applications and should be included
in the configuration of a DispatcherServlet. However, Spring’s
WebSocket support does not depend on Spring MVC. It is relatively simple to
integrate a WebSocketHandler into other HTTP-serving environments with the help of
WebSocketHttpRequestHandler.
When using the WebSocketHandler API directly vs indirectly, e.g. through the
STOMP messaging, the application must synchronize the sending of messages
since the underlying standard WebSocket session (JSR-356) does not allow concurrent
sending. One option is to wrap the WebSocketSession with
ConcurrentWebSocketSessionDecorator.
4.2.2. WebSocket Handshake
The easiest way to customize the initial HTTP WebSocket handshake request is through
a HandshakeInterceptor, which exposes methods for “before” and “after” the handshake.
You can use such an interceptor to preclude the handshake or to make any attributes
available to the WebSocketSession. The following example uses a built-in interceptor
to pass HTTP session attributes to the WebSocket session:
@Configuration
@EnableWebSocket
public class WebSocketConfig implements WebSocketConfigurer {
@Override
public void registerWebSocketHandlers(WebSocketHandlerRegistry registry) {
registry.addHandler(new MyHandler(), "/myHandler")
.addInterceptors(new HttpSessionHandshakeInterceptor());
}
}The following example shows the XML configuration equivalent of the preceding example:
<beans xmlns="http://www.springframework.org/schema/beans"
xmlns:xsi="http://www.w3.org/2001/XMLSchema-instance"
xmlns:websocket="http://www.springframework.org/schema/websocket"
xsi:schemaLocation="
http://www.springframework.org/schema/beans
https://www.springframework.org/schema/beans/spring-beans.xsd
http://www.springframework.org/schema/websocket
https://www.springframework.org/schema/websocket/spring-websocket.xsd">
<websocket:handlers>
<websocket:mapping path="/myHandler" handler="myHandler"/>
<websocket:handshake-interceptors>
<bean class="org.springframework.web.socket.server.support.HttpSessionHandshakeInterceptor"/>
</websocket:handshake-interceptors>
</websocket:handlers>
<bean id="myHandler" class="org.springframework.samples.MyHandler"/>
</beans>A more advanced option is to extend the DefaultHandshakeHandler that performs
the steps of the WebSocket handshake, including validating the client origin,
negotiating a sub-protocol, and other details. An application may also need to use this
option if it needs to configure a custom RequestUpgradeStrategy in order to
adapt to a WebSocket server engine and version that is not yet supported
(see Deployment for more on this subject).
Both the Java configuration and XML namespace make it possible to configure a custom
HandshakeHandler.
Spring provides a WebSocketHandlerDecorator base class that you can use to decorate
a WebSocketHandler with additional behavior. Logging and exception handling
implementations are provided and added by default when using the WebSocket Java configuration
or XML namespace. The ExceptionWebSocketHandlerDecorator catches all uncaught
exceptions that arise from any WebSocketHandler method and closes the WebSocket
session with status 1011, which indicates a server error.
|
4.2.3. Deployment
The Spring WebSocket API is easy to integrate into a Spring MVC application where
the DispatcherServlet serves both HTTP WebSocket handshake and other
HTTP requests. It is also easy to integrate into other HTTP processing scenarios
by invoking WebSocketHttpRequestHandler. This is convenient and easy to
understand. However, special considerations apply with regards to JSR-356 runtimes.
The Java WebSocket API (JSR-356) provides two deployment mechanisms. The first
involves a Servlet container classpath scan (a Servlet 3 feature) at startup.
The other is a registration API to use at Servlet container initialization.
Neither of these mechanism makes it possible to use a single “front controller”
for all HTTP processing — including WebSocket handshake and all other HTTP
requests — such as Spring MVC’s DispatcherServlet.
This is a significant limitation of JSR-356 that Spring’s WebSocket support addresses with
server-specific RequestUpgradeStrategy implementations even when running in a JSR-356 runtime.
Such strategies currently exist for Tomcat, Jetty, GlassFish, WebLogic, WebSphere, and
Undertow (and WildFly).
| A request to overcome the preceding limitation in the Java WebSocket API has been created and can be followed at eclipse-ee4j/websocket-api#211. Tomcat, Undertow, and WebSphere provide their own API alternatives that make it possible to do this, and it is also possible with Jetty. We are hopeful that more servers will do the same. |
A secondary consideration is that Servlet containers with JSR-356 support are expected
to perform a ServletContainerInitializer (SCI) scan that can slow down application
startup — in some cases, dramatically. If a significant impact is observed after an
upgrade to a Servlet container version with JSR-356 support, it should
be possible to selectively enable or disable web fragments (and SCI scanning)
through the use of the <absolute-ordering /> element in web.xml, as the following example shows:
<web-app xmlns="http://java.sun.com/xml/ns/javaee"
xmlns:xsi="http://www.w3.org/2001/XMLSchema-instance"
xsi:schemaLocation="
http://java.sun.com/xml/ns/javaee
https://java.sun.com/xml/ns/javaee/web-app_3_0.xsd"
version="3.0">
<absolute-ordering/>
</web-app>You can then selectively enable web fragments by name, such as Spring’s own
SpringServletContainerInitializer that provides support for the Servlet 3
Java initialization API. The following example shows how to do so:
<web-app xmlns="http://java.sun.com/xml/ns/javaee"
xmlns:xsi="http://www.w3.org/2001/XMLSchema-instance"
xsi:schemaLocation="
http://java.sun.com/xml/ns/javaee
https://java.sun.com/xml/ns/javaee/web-app_3_0.xsd"
version="3.0">
<absolute-ordering>
<name>spring_web</name>
</absolute-ordering>
</web-app>4.2.4. Server Configuration
Each underlying WebSocket engine exposes configuration properties that control runtime characteristics, such as the size of message buffer sizes, idle timeout, and others.
For Tomcat, WildFly, and GlassFish, you can add a ServletServerContainerFactoryBean to your
WebSocket Java config, as the following example shows:
@Configuration
@EnableWebSocket
public class WebSocketConfig implements WebSocketConfigurer {
@Bean
public ServletServerContainerFactoryBean createWebSocketContainer() {
ServletServerContainerFactoryBean container = new ServletServerContainerFactoryBean();
container.setMaxTextMessageBufferSize(8192);
container.setMaxBinaryMessageBufferSize(8192);
return container;
}
}The following example shows the XML configuration equivalent of the preceding example:
<beans xmlns="http://www.springframework.org/schema/beans"
xmlns:xsi="http://www.w3.org/2001/XMLSchema-instance"
xmlns:websocket="http://www.springframework.org/schema/websocket"
xsi:schemaLocation="
http://www.springframework.org/schema/beans
https://www.springframework.org/schema/beans/spring-beans.xsd
http://www.springframework.org/schema/websocket
https://www.springframework.org/schema/websocket/spring-websocket.xsd">
<bean class="org.springframework...ServletServerContainerFactoryBean">
<property name="maxTextMessageBufferSize" value="8192"/>
<property name="maxBinaryMessageBufferSize" value="8192"/>
</bean>
</beans>
For client-side WebSocket configuration, you should use WebSocketContainerFactoryBean
(XML) or ContainerProvider.getWebSocketContainer() (Java configuration).
|
For Jetty, you need to supply a pre-configured Jetty WebSocketServerFactory and plug
that into Spring’s DefaultHandshakeHandler through your WebSocket Java config.
The following example shows how to do so:
@Configuration
@EnableWebSocket
public class WebSocketConfig implements WebSocketConfigurer {
@Override
public void registerWebSocketHandlers(WebSocketHandlerRegistry registry) {
registry.addHandler(echoWebSocketHandler(),
"/echo").setHandshakeHandler(handshakeHandler());
}
@Bean
public DefaultHandshakeHandler handshakeHandler() {
WebSocketPolicy policy = new WebSocketPolicy(WebSocketBehavior.SERVER);
policy.setInputBufferSize(8192);
policy.setIdleTimeout(600000);
return new DefaultHandshakeHandler(
new JettyRequestUpgradeStrategy(new WebSocketServerFactory(policy)));
}
}The following example shows the XML configuration equivalent of the preceding example:
<beans xmlns="http://www.springframework.org/schema/beans"
xmlns:xsi="http://www.w3.org/2001/XMLSchema-instance"
xmlns:websocket="http://www.springframework.org/schema/websocket"
xsi:schemaLocation="
http://www.springframework.org/schema/beans
https://www.springframework.org/schema/beans/spring-beans.xsd
http://www.springframework.org/schema/websocket
https://www.springframework.org/schema/websocket/spring-websocket.xsd">
<websocket:handlers>
<websocket:mapping path="/echo" handler="echoHandler"/>
<websocket:handshake-handler ref="handshakeHandler"/>
</websocket:handlers>
<bean id="handshakeHandler" class="org.springframework...DefaultHandshakeHandler">
<constructor-arg ref="upgradeStrategy"/>
</bean>
<bean id="upgradeStrategy" class="org.springframework...JettyRequestUpgradeStrategy">
<constructor-arg ref="serverFactory"/>
</bean>
<bean id="serverFactory" class="org.eclipse.jetty...WebSocketServerFactory">
<constructor-arg>
<bean class="org.eclipse.jetty...WebSocketPolicy">
<constructor-arg value="SERVER"/>
<property name="inputBufferSize" value="8092"/>
<property name="idleTimeout" value="600000"/>
</bean>
</constructor-arg>
</bean>
</beans>4.2.5. Allowed Origins
As of Spring Framework 4.1.5, the default behavior for WebSocket and SockJS is to accept
only same-origin requests. It is also possible to allow all or a specified list of origins.
This check is mostly designed for browser clients. Nothing prevents other types
of clients from modifying the Origin header value (see
RFC 6454: The Web Origin Concept for more details).
The three possible behaviors are:
-
Allow only same-origin requests (default): In this mode, when SockJS is enabled, the Iframe HTTP response header
X-Frame-Optionsis set toSAMEORIGIN, and JSONP transport is disabled, since it does not allow checking the origin of a request. As a consequence, IE6 and IE7 are not supported when this mode is enabled. -
Allow a specified list of origins: Each allowed origin must start with
http://orhttps://. In this mode, when SockJS is enabled, IFrame transport is disabled. As a consequence, IE6 through IE9 are not supported when this mode is enabled. -
Allow all origins: To enable this mode, you should provide
*as the allowed origin value. In this mode, all transports are available.
You can configure WebSocket and SockJS allowed origins, as the following example shows:
import org.springframework.web.socket.config.annotation.EnableWebSocket;
import org.springframework.web.socket.config.annotation.WebSocketConfigurer;
import org.springframework.web.socket.config.annotation.WebSocketHandlerRegistry;
@Configuration
@EnableWebSocket
public class WebSocketConfig implements WebSocketConfigurer {
@Override
public void registerWebSocketHandlers(WebSocketHandlerRegistry registry) {
registry.addHandler(myHandler(), "/myHandler").setAllowedOrigins("https://mydomain.com");
}
@Bean
public WebSocketHandler myHandler() {
return new MyHandler();
}
}The following example shows the XML configuration equivalent of the preceding example:
<beans xmlns="http://www.springframework.org/schema/beans"
xmlns:xsi="http://www.w3.org/2001/XMLSchema-instance"
xmlns:websocket="http://www.springframework.org/schema/websocket"
xsi:schemaLocation="
http://www.springframework.org/schema/beans
https://www.springframework.org/schema/beans/spring-beans.xsd
http://www.springframework.org/schema/websocket
https://www.springframework.org/schema/websocket/spring-websocket.xsd">
<websocket:handlers allowed-origins="https://mydomain.com">
<websocket:mapping path="/myHandler" handler="myHandler" />
</websocket:handlers>
<bean id="myHandler" class="org.springframework.samples.MyHandler"/>
</beans>4.3. SockJS Fallback
Over the public Internet, restrictive proxies outside your control may preclude WebSocket
interactions, either because they are not configured to pass on the Upgrade header or
because they close long-lived connections that appear to be idle.
The solution to this problem is WebSocket emulation — that is, attempting to use WebSocket first and then falling back on HTTP-based techniques that emulate a WebSocket interaction and expose the same application-level API.
On the Servlet stack, the Spring Framework provides both server (and also client) support for the SockJS protocol.
4.3.1. Overview
The goal of SockJS is to let applications use a WebSocket API but fall back to non-WebSocket alternatives when necessary at runtime, without the need to change application code.
SockJS consists of:
-
The SockJS protocol defined in the form of executable narrated tests.
-
The SockJS JavaScript client — a client library for use in browsers.
-
SockJS server implementations, including one in the Spring Framework
spring-websocketmodule. -
A SockJS Java client in the
spring-websocketmodule (since version 4.1).
SockJS is designed for use in browsers. It uses a variety of techniques to support a wide range of browser versions. For the full list of SockJS transport types and browsers, see the SockJS client page. Transports fall in three general categories: WebSocket, HTTP Streaming, and HTTP Long Polling. For an overview of these categories, see this blog post.
The SockJS client begins by sending GET /info to
obtain basic information from the server. After that, it must decide what transport
to use. If possible, WebSocket is used. If not, in most browsers,
there is at least one HTTP streaming option. If not, then HTTP (long)
polling is used.
All transport requests have the following URL structure:
https://host:port/myApp/myEndpoint/{server-id}/{session-id}/{transport}
where:
-
{server-id}is useful for routing requests in a cluster but is not used otherwise. -
{session-id}correlates HTTP requests belonging to a SockJS session. -
{transport}indicates the transport type (for example,websocket,xhr-streaming, and others).
The WebSocket transport needs only a single HTTP request to do the WebSocket handshake. All messages thereafter are exchanged on that socket.
HTTP transports require more requests. Ajax/XHR streaming, for example, relies on one long-running request for server-to-client messages and additional HTTP POST requests for client-to-server messages. Long polling is similar, except that it ends the current request after each server-to-client send.
SockJS adds minimal message framing. For example, the server sends the letter o
(“open” frame) initially, messages are sent as a["message1","message2"]
(JSON-encoded array), the letter h (“heartbeat” frame) if no messages flow
for 25 seconds (by default), and the letter c (“close” frame) to close the session.
To learn more, run an example in a browser and watch the HTTP requests.
The SockJS client allows fixing the list of transports, so it is possible to
see each transport one at a time. The SockJS client also provides a debug flag,
which enables helpful messages in the browser console. On the server side, you can enable
TRACE logging for org.springframework.web.socket.
For even more detail, see the SockJS protocol
narrated test.
4.3.2. Enabling SockJS
You can enable SockJS through Java configuration, as the following example shows:
@Configuration
@EnableWebSocket
public class WebSocketConfig implements WebSocketConfigurer {
@Override
public void registerWebSocketHandlers(WebSocketHandlerRegistry registry) {
registry.addHandler(myHandler(), "/myHandler").withSockJS();
}
@Bean
public WebSocketHandler myHandler() {
return new MyHandler();
}
}The following example shows the XML configuration equivalent of the preceding example:
<beans xmlns="http://www.springframework.org/schema/beans"
xmlns:xsi="http://www.w3.org/2001/XMLSchema-instance"
xmlns:websocket="http://www.springframework.org/schema/websocket"
xsi:schemaLocation="
http://www.springframework.org/schema/beans
https://www.springframework.org/schema/beans/spring-beans.xsd
http://www.springframework.org/schema/websocket
https://www.springframework.org/schema/websocket/spring-websocket.xsd">
<websocket:handlers>
<websocket:mapping path="/myHandler" handler="myHandler"/>
<websocket:sockjs/>
</websocket:handlers>
<bean id="myHandler" class="org.springframework.samples.MyHandler"/>
</beans>The preceding example is for use in Spring MVC applications and should be included in the
configuration of a DispatcherServlet. However, Spring’s WebSocket
and SockJS support does not depend on Spring MVC. It is relatively simple to
integrate into other HTTP serving environments with the help of
SockJsHttpRequestHandler.
On the browser side, applications can use the
sockjs-client (version 1.0.x). It
emulates the W3C WebSocket API and communicates with the server to select the best
transport option, depending on the browser in which it runs. See the
sockjs-client page and the list of
transport types supported by browser. The client also provides several
configuration options — for example, to specify which transports to include.
4.3.3. IE 8 and 9
Internet Explorer 8 and 9 remain in use. They are a key reason for having SockJS. This section covers important considerations about running in those browsers.
The SockJS client supports Ajax/XHR streaming in IE 8 and 9 by using Microsoft’s
XDomainRequest.
That works across domains but does not support sending cookies.
Cookies are often essential for Java applications.
However, since the SockJS client can be used with many server
types (not just Java ones), it needs to know whether cookies matter.
If so, the SockJS client prefers Ajax/XHR for streaming. Otherwise, it
relies on an iframe-based technique.
The first /info request from the SockJS client is a request for
information that can influence the client’s choice of transports.
One of those details is whether the server application relies on cookies
(for example, for authentication purposes or clustering with sticky sessions).
Spring’s SockJS support includes a property called sessionCookieNeeded.
It is enabled by default, since most Java applications rely on the JSESSIONID
cookie. If your application does not need it, you can turn off this option,
and SockJS client should then choose xdr-streaming in IE 8 and 9.
If you do use an iframe-based transport, keep in mind
that browsers can be instructed to block the use of IFrames on a given page by
setting the HTTP response header X-Frame-Options to DENY,
SAMEORIGIN, or ALLOW-FROM <origin>. This is used to prevent
clickjacking.
|
Spring Security 3.2+ provides support for setting See Default Security Headers
of the Spring Security documentation for details on how to configure the
setting of the |
If your application adds the X-Frame-Options response header (as it should!)
and relies on an iframe-based transport, you need to set the header value to
SAMEORIGIN or ALLOW-FROM <origin>. The Spring SockJS
support also needs to know the location of the SockJS client, because it is loaded
from the iframe. By default, the iframe is set to download the SockJS client
from a CDN location. It is a good idea to configure this option to use
a URL from the same origin as the application.
The following example shows how to do so in Java configuration:
@Configuration
@EnableWebSocketMessageBroker
public class WebSocketConfig implements WebSocketMessageBrokerConfigurer {
@Override
public void registerStompEndpoints(StompEndpointRegistry registry) {
registry.addEndpoint("/portfolio").withSockJS()
.setClientLibraryUrl("http://localhost:8080/myapp/js/sockjs-client.js");
}
// ...
}The XML namespace provides a similar option through the <websocket:sockjs> element.
During initial development, do enable the SockJS client devel mode that prevents
the browser from caching SockJS requests (like the iframe) that would otherwise
be cached. For details on how to enable it see the
SockJS client page.
|
4.3.4. Heartbeats
The SockJS protocol requires servers to send heartbeat messages to preclude proxies
from concluding that a connection is hung. The Spring SockJS configuration has a property
called heartbeatTime that you can use to customize the frequency. By default, a
heartbeat is sent after 25 seconds, assuming no other messages were sent on that
connection. This 25-second value is in line with the following
IETF recommendation for public Internet applications.
| When using STOMP over WebSocket and SockJS, if the STOMP client and server negotiate heartbeats to be exchanged, the SockJS heartbeats are disabled. |
The Spring SockJS support also lets you configure the TaskScheduler to
schedule heartbeats tasks. The task scheduler is backed by a thread pool,
with default settings based on the number of available processors. Your
should consider customizing the settings according to your specific needs.
4.3.5. Client Disconnects
HTTP streaming and HTTP long polling SockJS transports require a connection to remain open longer than usual. For an overview of these techniques, see this blog post.
In Servlet containers, this is done through Servlet 3 asynchronous support that allows exiting the Servlet container thread, processing a request, and continuing to write to the response from another thread.
A specific issue is that the Servlet API does not provide notifications for a client that has gone away. See eclipse-ee4j/servlet-api#44. However, Servlet containers raise an exception on subsequent attempts to write to the response. Since Spring’s SockJS Service supports server-sent heartbeats (every 25 seconds by default), that means a client disconnect is usually detected within that time period (or earlier, if messages are sent more frequently).
As a result, network I/O failures can occur because a client has disconnected, which
can fill the log with unnecessary stack traces. Spring makes a best effort to identify
such network failures that represent client disconnects (specific to each server) and log
a minimal message by using the dedicated log category, DISCONNECTED_CLIENT_LOG_CATEGORY
(defined in AbstractSockJsSession). If you need to see the stack traces, you can set that
log category to TRACE.
|
4.3.6. SockJS and CORS
If you allow cross-origin requests (see Allowed Origins), the SockJS protocol
uses CORS for cross-domain support in the XHR streaming and polling transports. Therefore,
CORS headers are added automatically, unless the presence of CORS headers in the response
is detected. So, if an application is already configured to provide CORS support (for example,
through a Servlet Filter), Spring’s SockJsService skips this part.
It is also possible to disable the addition of these CORS headers by setting the
suppressCors property in Spring’s SockJsService.
SockJS expects the following headers and values:
-
Access-Control-Allow-Origin: Initialized from the value of theOriginrequest header. -
Access-Control-Allow-Credentials: Always set totrue. -
Access-Control-Request-Headers: Initialized from values from the equivalent request header. -
Access-Control-Allow-Methods: The HTTP methods a transport supports (seeTransportTypeenum). -
Access-Control-Max-Age: Set to 31536000 (1 year).
For the exact implementation, see addCorsHeaders in AbstractSockJsService and
the TransportType enum in the source code.
Alternatively, if the CORS configuration allows it, consider excluding URLs with the
SockJS endpoint prefix, thus letting Spring’s SockJsService handle it.
4.3.7. SockJsClient
Spring provides a SockJS Java client to connect to remote SockJS endpoints without using a browser. This can be especially useful when there is a need for bidirectional communication between two servers over a public network (that is, where network proxies can preclude the use of the WebSocket protocol). A SockJS Java client is also very useful for testing purposes (for example, to simulate a large number of concurrent users).
The SockJS Java client supports the websocket, xhr-streaming, and xhr-polling
transports. The remaining ones only make sense for use in a browser.
You can configure the WebSocketTransport with:
-
StandardWebSocketClientin a JSR-356 runtime. -
JettyWebSocketClientby using the Jetty 9+ native WebSocket API. -
Any implementation of Spring’s
WebSocketClient.
An XhrTransport, by definition, supports both xhr-streaming and xhr-polling, since,
from a client perspective, there is no difference other than in the URL used to connect
to the server. At present there are two implementations:
-
RestTemplateXhrTransportuses Spring’sRestTemplatefor HTTP requests. -
JettyXhrTransportuses Jetty’sHttpClientfor HTTP requests.
The following example shows how to create a SockJS client and connect to a SockJS endpoint:
List<Transport> transports = new ArrayList<>(2);
transports.add(new WebSocketTransport(new StandardWebSocketClient()));
transports.add(new RestTemplateXhrTransport());
SockJsClient sockJsClient = new SockJsClient(transports);
sockJsClient.doHandshake(new MyWebSocketHandler(), "ws://example.com:8080/sockjs");
SockJS uses JSON formatted arrays for messages. By default, Jackson 2 is used and needs
to be on the classpath. Alternatively, you can configure a custom implementation of
SockJsMessageCodec and configure it on the SockJsClient.
|
To use SockJsClient to simulate a large number of concurrent users, you
need to configure the underlying HTTP client (for XHR transports) to allow a sufficient
number of connections and threads. The following example shows how to do so with Jetty:
HttpClient jettyHttpClient = new HttpClient();
jettyHttpClient.setMaxConnectionsPerDestination(1000);
jettyHttpClient.setExecutor(new QueuedThreadPool(1000));The following example shows the server-side SockJS-related properties (see javadoc for details) that you should also consider customizing:
@Configuration
public class WebSocketConfig extends WebSocketMessageBrokerConfigurationSupport {
@Override
public void registerStompEndpoints(StompEndpointRegistry registry) {
registry.addEndpoint("/sockjs").withSockJS()
.setStreamBytesLimit(512 * 1024) (1)
.setHttpMessageCacheSize(1000) (2)
.setDisconnectDelay(30 * 1000); (3)
}
// ...
}| 1 | Set the streamBytesLimit property to 512KB (the default is 128KB — 128 * 1024). |
| 2 | Set the httpMessageCacheSize property to 1,000 (the default is 100). |
| 3 | Set the disconnectDelay property to 30 property seconds (the default is five seconds — 5 * 1000). |
4.4. STOMP
The WebSocket protocol defines two types of messages (text and binary), but their content is undefined. The protocol defines a mechanism for client and server to negotiate a sub-protocol (that is, a higher-level messaging protocol) to use on top of WebSocket to define what kind of messages each can send, what the format is, the content of each message, and so on. The use of a sub-protocol is optional but, either way, the client and the server need to agree on some protocol that defines message content.
4.4.1. Overview
STOMP (Simple Text Oriented Messaging Protocol) was originally created for scripting languages (such as Ruby, Python, and Perl) to connect to enterprise message brokers. It is designed to address a minimal subset of commonly used messaging patterns. STOMP can be used over any reliable two-way streaming network protocol, such as TCP and WebSocket. Although STOMP is a text-oriented protocol, message payloads can be either text or binary.
STOMP is a frame-based protocol whose frames are modeled on HTTP. The following listing shows the structure of a STOMP frame:
COMMAND header1:value1 header2:value2 Body^@
Clients can use the SEND or SUBSCRIBE commands to send or subscribe for
messages, along with a destination header that describes what the
message is about and who should receive it. This enables a simple
publish-subscribe mechanism that you can use to send messages through the broker
to other connected clients or to send messages to the server to request that
some work be performed.
When you use Spring’s STOMP support, the Spring WebSocket application acts
as the STOMP broker to clients. Messages are routed to @Controller message-handling
methods or to a simple in-memory broker that keeps track of subscriptions and
broadcasts messages to subscribed users. You can also configure Spring to work
with a dedicated STOMP broker (such as RabbitMQ, ActiveMQ, and others) for the actual
broadcasting of messages. In that case, Spring maintains
TCP connections to the broker, relays messages to it, and passes messages
from it down to connected WebSocket clients. Thus, Spring web applications can
rely on unified HTTP-based security, common validation, and a familiar programming
model for message handling.
The following example shows a client subscribing to receive stock quotes, which
the server may emit periodically (for example, via a scheduled task that sends messages
through a SimpMessagingTemplate to the broker):
SUBSCRIBE id:sub-1 destination:/topic/price.stock.* ^@
The following example shows a client that sends a trade request, which the server
can handle through an @MessageMapping method:
SEND
destination:/queue/trade
content-type:application/json
content-length:44
{"action":"BUY","ticker":"MMM","shares",44}^@
After the execution, the server can broadcast a trade confirmation message and details down to the client.
The meaning of a destination is intentionally left opaque in the STOMP spec. It can
be any string, and it is entirely up to STOMP servers to define the semantics and
the syntax of the destinations that they support. It is very common, however, for
destinations to be path-like strings where /topic/.. implies publish-subscribe
(one-to-many) and /queue/ implies point-to-point (one-to-one) message
exchanges.
STOMP servers can use the MESSAGE command to broadcast messages to all subscribers.
The following example shows a server sending a stock quote to a subscribed client:
MESSAGE
message-id:nxahklf6-1
subscription:sub-1
destination:/topic/price.stock.MMM
{"ticker":"MMM","price":129.45}^@
A server cannot send unsolicited messages. All messages
from a server must be in response to a specific client subscription, and the
subscription-id header of the server message must match the id header of the
client subscription.
The preceding overview is intended to provide the most basic understanding of the STOMP protocol. We recommended reviewing the protocol specification in full.
4.4.2. Benefits
Using STOMP as a sub-protocol lets the Spring Framework and Spring Security provide a richer programming model versus using raw WebSockets. The same point can be made about HTTP versus raw TCP and how it lets Spring MVC and other web frameworks provide rich functionality. The following is a list of benefits:
-
No need to invent a custom messaging protocol and message format.
-
STOMP clients, including a Java client in the Spring Framework, are available.
-
You can (optionally) use message brokers (such as RabbitMQ, ActiveMQ, and others) to manage subscriptions and broadcast messages.
-
Application logic can be organized in any number of
@Controllerinstances and messages can be routed to them based on the STOMP destination header versus handling raw WebSocket messages with a singleWebSocketHandlerfor a given connection. -
You can use Spring Security to secure messages based on STOMP destinations and message types.
4.4.3. Enable STOMP
STOMP over WebSocket support is available in the spring-messaging and
spring-websocket modules. Once you have those dependencies, you can expose a STOMP
endpoints, over WebSocket with SockJS Fallback, as the following example shows:
import org.springframework.web.socket.config.annotation.EnableWebSocketMessageBroker;
import org.springframework.web.socket.config.annotation.StompEndpointRegistry;
@Configuration
@EnableWebSocketMessageBroker
public class WebSocketConfig implements WebSocketMessageBrokerConfigurer {
@Override
public void registerStompEndpoints(StompEndpointRegistry registry) {
registry.addEndpoint("/portfolio").withSockJS(); (1)
}
@Override
public void configureMessageBroker(MessageBrokerRegistry config) {
config.setApplicationDestinationPrefixes("/app"); (2)
config.enableSimpleBroker("/topic", "/queue"); (3)
}
}| 1 | /portfolio is the HTTP URL for the endpoint to which a WebSocket (or SockJS)
client needs to connect for the WebSocket handshake. |
| 2 | STOMP messages whose destination header begins with /app are routed to
@MessageMapping methods in @Controller classes. |
| 3 | Use the built-in message broker for subscriptions and broadcasting and
route messages whose destination header begins with /topic `or `/queue to the broker. |
The following example shows the XML configuration equivalent of the preceding example:
<beans xmlns="http://www.springframework.org/schema/beans"
xmlns:xsi="http://www.w3.org/2001/XMLSchema-instance"
xmlns:websocket="http://www.springframework.org/schema/websocket"
xsi:schemaLocation="
http://www.springframework.org/schema/beans
https://www.springframework.org/schema/beans/spring-beans.xsd
http://www.springframework.org/schema/websocket
https://www.springframework.org/schema/websocket/spring-websocket.xsd">
<websocket:message-broker application-destination-prefix="/app">
<websocket:stomp-endpoint path="/portfolio">
<websocket:sockjs/>
</websocket:stomp-endpoint>
<websocket:simple-broker prefix="/topic, /queue"/>
</websocket:message-broker>
</beans>
For the built-in simple broker, the /topic and /queue prefixes do not have any special
meaning. They are merely a convention to differentiate between pub-sub versus point-to-point
messaging (that is, many subscribers versus one consumer). When you use an external broker,
check the STOMP page of the broker to understand what kind of STOMP destinations and
prefixes it supports.
|
To connect from a browser, for SockJS, you can use the
sockjs-client. For STOMP, many applications have
used the jmesnil/stomp-websocket library
(also known as stomp.js), which is feature-complete and has been used in production for
years but is no longer maintained. At present the
JSteunou/webstomp-client is the most
actively maintained and evolving successor of that library. The following example code
is based on it:
var socket = new SockJS("/spring-websocket-portfolio/portfolio");
var stompClient = webstomp.over(socket);
stompClient.connect({}, function(frame) {
}Alternatively, if you connect through WebSocket (without SockJS), you can use the following code:
var socket = new WebSocket("/spring-websocket-portfolio/portfolio");
var stompClient = Stomp.over(socket);
stompClient.connect({}, function(frame) {
}Note that stompClient in the preceding example does not need to specify login
and passcode headers. Even if it did, they would be ignored (or, rather,
overridden) on the server side. See Connecting to a Broker
and Authentication for more information on authentication.
For more example code see:
-
Using WebSocket to build an interactive web application — a getting started guide.
-
Stock Portfolio — a sample application.
4.4.4. WebSocket Server
To configure the underlying WebSocket server, the information in
Server Configuration applies. For Jetty, however you need to set
the HandshakeHandler and WebSocketPolicy through the StompEndpointRegistry:
@Configuration
@EnableWebSocketMessageBroker
public class WebSocketConfig implements WebSocketMessageBrokerConfigurer {
@Override
public void registerStompEndpoints(StompEndpointRegistry registry) {
registry.addEndpoint("/portfolio").setHandshakeHandler(handshakeHandler());
}
@Bean
public DefaultHandshakeHandler handshakeHandler() {
WebSocketPolicy policy = new WebSocketPolicy(WebSocketBehavior.SERVER);
policy.setInputBufferSize(8192);
policy.setIdleTimeout(600000);
return new DefaultHandshakeHandler(
new JettyRequestUpgradeStrategy(new WebSocketServerFactory(policy)));
}
}4.4.5. Flow of Messages
Once a STOMP endpoint is exposed, the Spring application becomes a STOMP broker for connected clients. This section describes the flow of messages on the server side.
The spring-messaging module contains foundational support for messaging applications
that originated in Spring Integration and was
later extracted and incorporated into the Spring Framework for broader use across many
Spring projects and application scenarios.
The following list briefly describes a few of the available messaging abstractions:
-
Message: Simple representation for a message, including headers and payload.
-
MessageHandler: Contract for handling a message.
-
MessageChannel: Contract for sending a message that enables loose coupling between producers and consumers.
-
SubscribableChannel:
MessageChannelwithMessageHandlersubscribers. -
ExecutorSubscribableChannel:
SubscribableChannelthat uses anExecutorfor delivering messages.
Both the Java configuration (that is, @EnableWebSocketMessageBroker) and the XML namespace configuration
(that is,<websocket:message-broker>) use the preceding components to assemble a message
workflow. The following diagram shows the components used when the simple built-in message
broker is enabled:
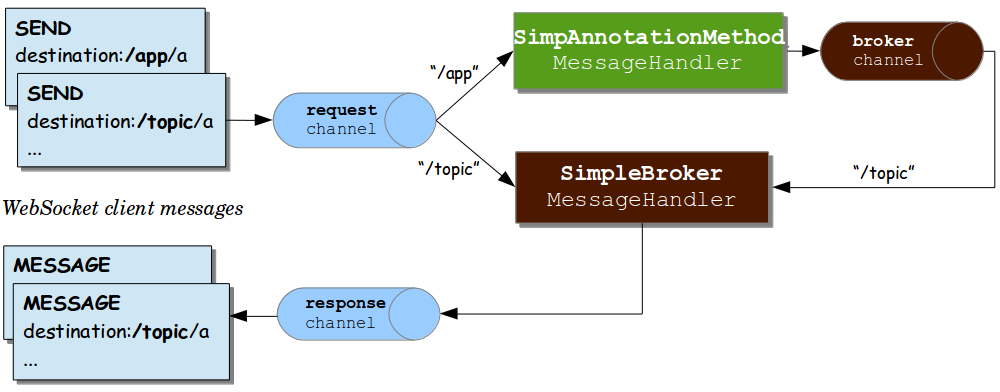
The preceding diagram shows three message channels:
-
clientInboundChannel: For passing messages received from WebSocket clients. -
clientOutboundChannel: For sending server messages to WebSocket clients. -
brokerChannel: For sending messages to the message broker from within server-side application code.
The next diagram shows the components used when an external broker (such as RabbitMQ) is configured for managing subscriptions and broadcasting messages:
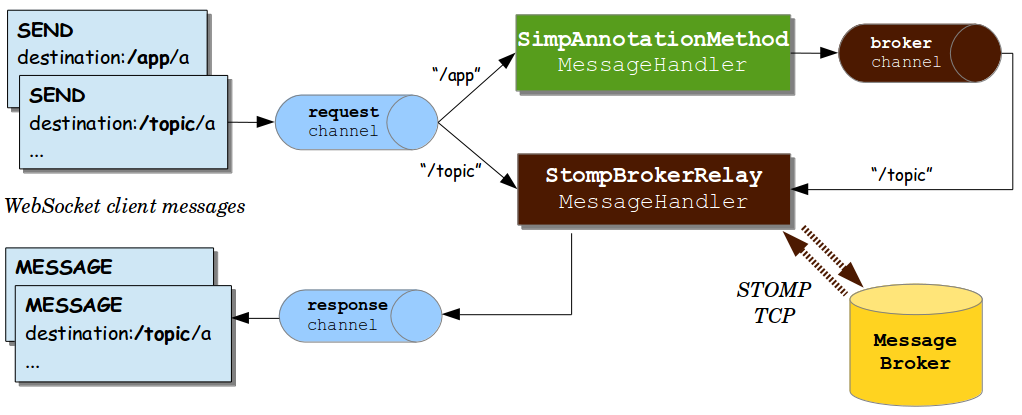
The main difference between the two preceding diagrams is the use of the “broker relay” for passing messages up to the external STOMP broker over TCP and for passing messages down from the broker to subscribed clients.
When messages are received from a WebSocket connection, they are decoded to STOMP frames,
turned into a Spring Message representation, and sent to the
clientInboundChannel for further processing. For example, STOMP messages whose
destination headers start with /app may be routed to @MessageMapping methods in
annotated controllers, while /topic and /queue messages may be routed directly
to the message broker.
An annotated @Controller that handles a STOMP message from a client may send a message to
the message broker through the brokerChannel, and the broker broadcasts the
message to matching subscribers through the clientOutboundChannel. The same
controller can also do the same in response to HTTP requests, so a client can perform an
HTTP POST, and then a @PostMapping method can send a message to the message broker
to broadcast to subscribed clients.
We can trace the flow through a simple example. Consider the following example, which sets up a server:
@Configuration
@EnableWebSocketMessageBroker
public class WebSocketConfig implements WebSocketMessageBrokerConfigurer {
@Override
public void registerStompEndpoints(StompEndpointRegistry registry) {
registry.addEndpoint("/portfolio");
}
@Override
public void configureMessageBroker(MessageBrokerRegistry registry) {
registry.setApplicationDestinationPrefixes("/app");
registry.enableSimpleBroker("/topic");
}
}
@Controller
public class GreetingController {
@MessageMapping("/greeting") {
public String handle(String greeting) {
return "[" + getTimestamp() + ": " + greeting;
}
}The preceding example supports the following flow:
-
The client connects to
http://localhost:8080/portfolioand, once a WebSocket connection is established, STOMP frames begin to flow on it. -
The client sends a SUBSCRIBE frame with a destination header of
/topic/greeting. Once received and decoded, the message is sent to theclientInboundChanneland is then routed to the message broker, which stores the client subscription. -
The client sends a aSEND frame to
/app/greeting. The/appprefix helps to route it to annotated controllers. After the/appprefix is stripped, the remaining/greetingpart of the destination is mapped to the@MessageMappingmethod inGreetingController. -
The value returned from
GreetingControlleris turned into a SpringMessagewith a payload based on the return value and a default destination header of/topic/greeting(derived from the input destination with/appreplaced by/topic). The resulting message is sent to thebrokerChanneland handled by the message broker. -
The message broker finds all matching subscribers and sends a MESSAGE frame to each one through the
clientOutboundChannel, from where messages are encoded as STOMP frames and sent on the WebSocket connection.
The next section provides more details on annotated methods, including the kinds of arguments and return values that are supported.
4.4.6. Annotated Controllers
Applications can use annotated @Controller classes to handle messages from clients.
Such classes can declare @MessageMapping, @SubscribeMapping, and @ExceptionHandler
methods, as described in the following topics:
@MessageMapping
You can use @MessageMapping to annotate methods that route messages based on their
destination. It is supported at the method level as well as at the type level. At the type
level, @MessageMapping is used to express shared mappings across all methods in a
controller.
By default, the mapping values are Ant-style path patterns (for example /thing*, /thing/**),
including support for template variables (for example, /thing/{id}). The values can be
referenced through @DestinationVariable method arguments. Applications can also switch to
a dot-separated destination convention for mappings, as explained in
Dots as Separators.
Supported Method Arguments
The following table describes the method arguments:
| Method argument | Description |
|---|---|
|
For access to the complete message. |
|
For access to the headers within the |
|
For access to the headers through typed accessor methods. |
|
For access to the payload of the message, converted (for example, from JSON) by a configured
The presence of this annotation is not required since it is, by default, assumed if no other argument is matched. You can annotate payload arguments with |
|
For access to a specific header value — along with type conversion using an
|
|
For access to all headers in the message. This argument must be assignable to
|
|
For access to template variables extracted from the message destination. Values are converted to the declared method argument type as necessary. |
|
Reflects the user logged in at the time of the WebSocket HTTP handshake. |
Return Values
By default, the return value from a @MessageMapping method is serialized to a payload
through a matching MessageConverter and sent as a Message to the brokerChannel,
from where it is broadcast to subscribers. The destination of the outbound message is the
same as that of the inbound message but prefixed with /topic.
You can use the @SendTo and @SendToUser annotations to customize the destination of
the output message. @SendTo is used to customize the target destination or to
specify multiple destinations. @SendToUser is used to direct the output message
to only the user associated with the input message. See User Destinations.
You can use both @SendTo and @SendToUser at the same time on the same method, and both
are supported at the class level, in which case they act as a default for methods in the
class. However, keep in mind that any method-level @SendTo or @SendToUser annotations
override any such annotations at the class level.
Messages can be handled asynchronously and a @MessageMapping method can return
ListenableFuture, CompletableFuture, or CompletionStage.
Note that @SendTo and @SendToUser are merely a convenience that amounts to using the
SimpMessagingTemplate to send messages. If necessary, for more advanced scenarios,
@MessageMapping methods can fall back on using the SimpMessagingTemplate directly.
This can be done instead of, or possibly in addition to, returning a value.
See Sending Messages.
@SubscribeMapping
@SubscribeMapping is similar to @MessageMapping but narrows the mapping to
subscription messages only. It supports the same
method arguments as @MessageMapping. However
for the return value, by default, a message is sent directly to the client (through
clientOutboundChannel, in response to the subscription) and not to the broker (through
brokerChannel, as a broadcast to matching subscriptions). Adding @SendTo or
@SendToUser overrides this behavior and sends to the broker instead.
When is this useful? Assume that the broker is mapped to /topic and /queue, while
application controllers are mapped to /app. In this setup, the broker stores all
subscriptions to /topic and /queue that are intended for repeated broadcasts, and
there is no need for the application to get involved. A client could also subscribe to
some /app destination, and a controller could return a value in response to that
subscription without involving the broker without storing or using the subscription again
(effectively a one-time request-reply exchange). One use case for this is populating a UI
with initial data on startup.
When is this not useful? Do not try to map broker and controllers to the same destination prefix unless you want both to independently process messages, including subscriptions, for some reason. Inbound messages are handled in parallel. There are no guarantees whether a broker or a controller processes a given message first. If the goal is to be notified when a subscription is stored and ready for broadcasts, a client should ask for a receipt if the server supports it (simple broker does not). For example, with the Java STOMP client, you could do the following to add a receipt:
@Autowired
private TaskScheduler messageBrokerTaskScheduler;
// During initialization..
stompClient.setTaskScheduler(this.messageBrokerTaskScheduler);
// When subscribing..
StompHeaders headers = new StompHeaders();
headers.setDestination("/topic/...");
headers.setReceipt("r1");
FrameHandler handler = ...;
stompSession.subscribe(headers, handler).addReceiptTask(() -> {
// Subscription ready...
});A server side option is to register an
ExecutorChannelInterceptor on the brokerChannel and implement the afterMessageHandled
method that is invoked after messages, including subscriptions, have been handled.
@MessageExceptionHandler
An application can use @MessageExceptionHandler methods to handle exceptions from
@MessageMapping methods. You can declare exceptions in the annotation
itself or through a method argument if you want to get access to the exception instance.
The following example declares an exception through a method argument:
@Controller
public class MyController {
// ...
@MessageExceptionHandler
public ApplicationError handleException(MyException exception) {
// ...
return appError;
}
}@MessageExceptionHandler methods support flexible method signatures and support
the same method argument types and return values as
@MessageMapping methods.
Typically, @MessageExceptionHandler methods apply within the @Controller class
(or class hierarchy) in which they are declared. If you want such methods to apply
more globally (across controllers), you can declare them in a class marked with
@ControllerAdvice. This is comparable to the
similar support available in Spring MVC.
4.4.7. Sending Messages
What if you want to send messages to connected clients from any part of the
application? Any application component can send messages to the brokerChannel.
The easiest way to do so is to inject a SimpMessagingTemplate and
use it to send messages. Typically, you would inject it by
type, as the following example shows:
@Controller
public class GreetingController {
private SimpMessagingTemplate template;
@Autowired
public GreetingController(SimpMessagingTemplate template) {
this.template = template;
}
@RequestMapping(path="/greetings", method=POST)
public void greet(String greeting) {
String text = "[" + getTimestamp() + "]:" + greeting;
this.template.convertAndSend("/topic/greetings", text);
}
}However, you can also qualify it by its name (brokerMessagingTemplate), if another
bean of the same type exists.
4.4.8. Simple Broker
The built-in simple message broker handles subscription requests from clients, stores them in memory, and broadcasts messages to connected clients that have matching destinations. The broker supports path-like destinations, including subscriptions to Ant-style destination patterns.
| Applications can also use dot-separated (rather than slash-separated) destinations. See Dots as Separators. |
If configured with a task scheduler, the simple broker supports STOMP heartbeats. For that, you can declare your own scheduler or use the one that is automatically declared and used internally. The following example shows how to declare your own scheduler:
@Configuration
@EnableWebSocketMessageBroker
public class WebSocketConfig implements WebSocketMessageBrokerConfigurer {
private TaskScheduler messageBrokerTaskScheduler;
@Autowired
public void setMessageBrokerTaskScheduler(TaskScheduler taskScheduler) {
this.messageBrokerTaskScheduler = taskScheduler;
}
@Override
public void configureMessageBroker(MessageBrokerRegistry registry) {
registry.enableSimpleBroker("/queue/", "/topic/")
.setHeartbeatValue(new long[] {10000, 20000})
.setTaskScheduler(this.messageBrokerTaskScheduler);
// ...
}
}4.4.9. External Broker
The simple broker is great for getting started but supports only a subset of STOMP commands (it does not support acks, receipts, and some other features), relies on a simple message-sending loop, and is not suitable for clustering. As an alternative, you can upgrade your applications to use a full-featured message broker.
See the STOMP documentation for your message broker of choice (such as RabbitMQ, ActiveMQ, and others), install the broker, and run it with STOMP support enabled. Then you can enable the STOMP broker relay (instead of the simple broker) in the Spring configuration.
The following example configuration enables a full-featured broker:
@Configuration
@EnableWebSocketMessageBroker
public class WebSocketConfig implements WebSocketMessageBrokerConfigurer {
@Override
public void registerStompEndpoints(StompEndpointRegistry registry) {
registry.addEndpoint("/portfolio").withSockJS();
}
@Override
public void configureMessageBroker(MessageBrokerRegistry registry) {
registry.enableStompBrokerRelay("/topic", "/queue");
registry.setApplicationDestinationPrefixes("/app");
}
}The following example shows the XML configuration equivalent of the preceding example:
<beans xmlns="http://www.springframework.org/schema/beans"
xmlns:xsi="http://www.w3.org/2001/XMLSchema-instance"
xmlns:websocket="http://www.springframework.org/schema/websocket"
xsi:schemaLocation="
http://www.springframework.org/schema/beans
https://www.springframework.org/schema/beans/spring-beans.xsd
http://www.springframework.org/schema/websocket
https://www.springframework.org/schema/websocket/spring-websocket.xsd">
<websocket:message-broker application-destination-prefix="/app">
<websocket:stomp-endpoint path="/portfolio" />
<websocket:sockjs/>
</websocket:stomp-endpoint>
<websocket:stomp-broker-relay prefix="/topic,/queue" />
</websocket:message-broker>
</beans>The STOMP broker relay in the preceding configuration is a Spring
MessageHandler
that handles messages by forwarding them to an external message broker.
To do so, it establishes TCP connections to the broker, forwards all messages to it,
and then forwards all messages received from the broker to clients through their
WebSocket sessions. Essentially, it acts as a “relay” that forwards messages
in both directions.
Add io.projectreactor.netty:reactor-netty and io.netty:netty-all
dependencies to your project for TCP connection management.
|
Furthermore, application components (such as HTTP request handling methods, business services, and others) can also send messages to the broker relay, as described in Sending Messages, to broadcast messages to subscribed WebSocket clients.
In effect, the broker relay enables robust and scalable message broadcasting.
4.4.10. Connecting to a Broker
A STOMP broker relay maintains a single “system” TCP connection to the broker.
This connection is used for messages originating from the server-side application
only, not for receiving messages. You can configure the STOMP credentials (that is,
the STOMP frame login and passcode headers) for this connection. This is exposed
in both the XML namespace and Java configuration as the systemLogin and
systemPasscode properties with default values of guest and guest.
The STOMP broker relay also creates a separate TCP connection for every connected
WebSocket client. You can configure the STOMP credentials that are used for all TCP
connections created on behalf of clients. This is exposed in both the XML namespace
and Java configuration as the clientLogin and clientPasscode properties with default
values of guest and guest.
The STOMP broker relay always sets the login and passcode headers on every CONNECT
frame that it forwards to the broker on behalf of clients. Therefore, WebSocket clients
need not set those headers. They are ignored. As the Authentication
section explains, WebSocket clients should instead rely on HTTP authentication to protect
the WebSocket endpoint and establish the client identity.
|
The STOMP broker relay also sends and receives heartbeats to and from the message broker over the “system” TCP connection. You can configure the intervals for sending and receiving heartbeats (10 seconds each by default). If connectivity to the broker is lost, the broker relay continues to try to reconnect, every 5 seconds, until it succeeds.
Any Spring bean can implement ApplicationListener<BrokerAvailabilityEvent>
to receive notifications when the “system” connection to the broker is lost and
re-established. For example, a Stock Quote service that broadcasts stock quotes can
stop trying to send messages when there is no active “system” connection.
By default, the STOMP broker relay always connects, and reconnects as needed if connectivity is lost, to the same host and port. If you wish to supply multiple addresses, on each attempt to connect, you can configure a supplier of addresses, instead of a fixed host and port. The following example shows how to do that:
@Configuration
@EnableWebSocketMessageBroker
public class WebSocketConfig extends AbstractWebSocketMessageBrokerConfigurer {
// ...
@Override
public void configureMessageBroker(MessageBrokerRegistry registry) {
registry.enableStompBrokerRelay("/queue/", "/topic/").setTcpClient(createTcpClient());
registry.setApplicationDestinationPrefixes("/app");
}
private ReactorNettyTcpClient<byte[]> createTcpClient() {
return new ReactorNettyTcpClient<>(
client -> client.addressSupplier(() -> ... ),
new StompReactorNettyCodec());
}
}You can also configure the STOMP broker relay with a virtualHost property.
The value of this property is set as the host header of every CONNECT frame
and can be useful (for example, in a cloud environment where the actual host to which
the TCP connection is established differs from the host that provides the
cloud-based STOMP service).
4.4.11. Dots as Separators
When messages are routed to @MessageMapping methods, they are matched with
AntPathMatcher. By default, patterns are expected to use slash (/) as the separator.
This is a good convention in web applications and similar to HTTP URLs. However, if
you are more used to messaging conventions, you can switch to using dot (.) as the separator.
The following example shows how to do so in Java configuration:
@Configuration
@EnableWebSocketMessageBroker
public class WebSocketConfig implements WebSocketMessageBrokerConfigurer {
// ...
@Override
public void configureMessageBroker(MessageBrokerRegistry registry) {
registry.setPathMatcher(new AntPathMatcher("."));
registry.enableStompBrokerRelay("/queue", "/topic");
registry.setApplicationDestinationPrefixes("/app");
}
}The following example shows the XML configuration equivalent of the preceding example:
<beans xmlns="http://www.springframework.org/schema/beans"
xmlns:xsi="http://www.w3.org/2001/XMLSchema-instance"
xmlns:websocket="http://www.springframework.org/schema/websocket"
xsi:schemaLocation="
http://www.springframework.org/schema/beans
https://www.springframework.org/schema/beans/spring-beans.xsd
http://www.springframework.org/schema/websocket
https://www.springframework.org/schema/websocket/spring-websocket.xsd">
<websocket:message-broker application-destination-prefix="/app" path-matcher="pathMatcher">
<websocket:stomp-endpoint path="/stomp"/>
<websocket:stomp-broker-relay prefix="/topic,/queue" />
</websocket:message-broker>
<bean id="pathMatcher" class="org.springframework.util.AntPathMatcher">
<constructor-arg index="0" value="."/>
</bean>
</beans>After that, a controller can use a dot (.) as the separator in @MessageMapping methods,
as the following example shows:
@Controller
@MessageMapping("red")
public class RedController {
@MessageMapping("blue.{green}")
public void handleGreen(@DestinationVariable String green) {
// ...
}
}The client can now send a message to /app/red.blue.green123.
In the preceding example, we did not change the prefixes on the “broker relay”, because those depend entirely on the external message broker. See the STOMP documentation pages for the broker you use to see what conventions it supports for the destination header.
The “simple broker”, on the other hand, does rely on the configured PathMatcher, so, if
you switch the separator, that change also applies to the broker and the way the broker matches
destinations from a message to patterns in subscriptions.
4.4.12. Authentication
Every STOMP over WebSocket messaging session begins with an HTTP request. That can be a request to upgrade to WebSockets (that is, a WebSocket handshake) or, in the case of SockJS fallbacks, a series of SockJS HTTP transport requests.
Many web applications already have authentication and authorization in place to secure HTTP requests. Typically, a user is authenticated through Spring Security by using some mechanism such as a login page, HTTP basic authentication, or another way. The security context for the authenticated user is saved in the HTTP session and is associated with subsequent requests in the same cookie-based session.
Therefore, for a WebSocket handshake or for SockJS HTTP transport requests,
typically, there is already an authenticated user accessible through
HttpServletRequest#getUserPrincipal(). Spring automatically associates that user
with a WebSocket or SockJS session created for them and, subsequently, with all
STOMP messages transported over that session through a user header.
In short, a typical web application needs to do nothing
beyond what it already does for security. The user is authenticated at
the HTTP request level with a security context that is maintained through a cookie-based
HTTP session (which is then associated with WebSocket or SockJS sessions created
for that user) and results in a user header being stamped on every Message flowing
through the application.
Note that the STOMP protocol does have login and passcode headers
on the CONNECT frame. Those were originally designed for and are still needed,
for example, for STOMP over TCP. However, for STOMP over WebSocket, by default,
Spring ignores authorization headers at the STOMP protocol level, assumes that
the user is already authenticated at the HTTP transport level, and expects that
the WebSocket or SockJS session contain the authenticated user.
Spring Security provides
WebSocket sub-protocol authorization
that uses a ChannelInterceptor to authorize messages based on the user header in them.
Also, Spring Session provides a
WebSocket integration
that ensures the user HTTP session does not expire when the WebSocket session is still active.
|
4.4.13. Token Authentication
Spring Security OAuth provides support for token based security, including JSON Web Token (JWT). You can use this as the authentication mechanism in Web applications, including STOMP over WebSocket interactions, as described in the previous section (that is, to maintain identity through a cookie-based session).
At the same time, cookie-based sessions are not always the best fit (for example, in applications that do not maintain a server-side session or in mobile applications where it is common to use headers for authentication).
The WebSocket protocol, RFC 6455 "doesn’t prescribe any particular way that servers can authenticate clients during the WebSocket handshake." In practice, however, browser clients can use only standard authentication headers (that is, basic HTTP authentication) or cookies and cannot (for example) provide custom headers. Likewise, the SockJS JavaScript client does not provide a way to send HTTP headers with SockJS transport requests. See sockjs-client issue 196. Instead, it does allow sending query parameters that you can use to send a token, but that has its own drawbacks (for example, the token may be inadvertently logged with the URL in server logs).
| The preceding limitations are for browser-based clients and do not apply to the Spring Java-based STOMP client, which does support sending headers with both WebSocket and SockJS requests. |
Therefore, applications that wish to avoid the use of cookies may not have any good alternatives for authentication at the HTTP protocol level. Instead of using cookies, they may prefer to authenticate with headers at the STOMP messaging protocol level Doing so requires two simple steps:
-
Use the STOMP client to pass authentication headers at connect time.
-
Process the authentication headers with a
ChannelInterceptor.
The next example uses server-side configuration to register a custom authentication
interceptor. Note that an interceptor needs only to authenticate and set
the user header on the CONNECT Message. Spring notes and saves the authenticated
user and associate it with subsequent STOMP messages on the same session. The following
example shows how register a custom authentication interceptor:
@Configuration
@EnableWebSocketMessageBroker
public class MyConfig implements WebSocketMessageBrokerConfigurer {
@Override
public void configureClientInboundChannel(ChannelRegistration registration) {
registration.interceptors(new ChannelInterceptor() {
@Override
public Message<?> preSend(Message<?> message, MessageChannel channel) {
StompHeaderAccessor accessor =
MessageHeaderAccessor.getAccessor(message, StompHeaderAccessor.class);
if (StompCommand.CONNECT.equals(accessor.getCommand())) {
Authentication user = ... ; // access authentication header(s)
accessor.setUser(user);
}
return message;
}
});
}
}Also, note that, when you use Spring Security’s authorization for messages, at present,
you need to ensure that the authentication ChannelInterceptor config is ordered
ahead of Spring Security’s. This is best done by declaring the custom interceptor in
its own implementation of WebSocketMessageBrokerConfigurer that is marked with
@Order(Ordered.HIGHEST_PRECEDENCE + 99).
4.4.14. User Destinations
An application can send messages that target a specific user, and Spring’s STOMP support
recognizes destinations prefixed with /user/ for this purpose.
For example, a client might subscribe to the /user/queue/position-updates destination.
This destination is handled by the UserDestinationMessageHandler and
transformed into a destination unique to the user session
(such as /queue/position-updates-user123). This provides the convenience of subscribing
to a generically named destination while, at the same time, ensuring no collisions
with other users who subscribe to the same destination so that each user can receive
unique stock position updates.
On the sending side, messages can be sent to a destination such as
/user/{username}/queue/position-updates, which in turn is translated
by the UserDestinationMessageHandler into one or more destinations, one for each
session associated with the user. This lets any component within the application
send messages that target a specific user without necessarily knowing anything more
than their name and the generic destination. This is also supported through an
annotation and a messaging template.
A message-handling method can send messages to the user associated with
the message being handled through the @SendToUser annotation (also supported on
the class-level to share a common destination), as the following example shows:
@Controller
public class PortfolioController {
@MessageMapping("/trade")
@SendToUser("/queue/position-updates")
public TradeResult executeTrade(Trade trade, Principal principal) {
// ...
return tradeResult;
}
}If the user has more than one session, by default, all of the sessions subscribed
to the given destination are targeted. However, sometimes, it may be necessary to
target only the session that sent the message being handled. You can do so by
setting the broadcast attribute to false, as the following example shows:
@Controller
public class MyController {
@MessageMapping("/action")
public void handleAction() throws Exception{
// raise MyBusinessException here
}
@MessageExceptionHandler
@SendToUser(destinations="/queue/errors", broadcast=false)
public ApplicationError handleException(MyBusinessException exception) {
// ...
return appError;
}
}
While user destinations generally imply an authenticated user, it is not strictly required.
A WebSocket session that is not associated with an authenticated user
can subscribe to a user destination. In such cases, the @SendToUser annotation
behaves exactly the same as with broadcast=false (that is, targeting only the
session that sent the message being handled).
|
You can send a message to user destinations from any application
component by, for example, injecting the SimpMessagingTemplate created by the Java configuration or
the XML namespace. (The bean name is brokerMessagingTemplate if required
for qualification with @Qualifier.) The following example shows how to do so:
@Service
public class TradeServiceImpl implements TradeService {
private final SimpMessagingTemplate messagingTemplate;
@Autowired
public TradeServiceImpl(SimpMessagingTemplate messagingTemplate) {
this.messagingTemplate = messagingTemplate;
}
// ...
public void afterTradeExecuted(Trade trade) {
this.messagingTemplate.convertAndSendToUser(
trade.getUserName(), "/queue/position-updates", trade.getResult());
}
}
When you use user destinations with an external message broker, you should check the broker
documentation on how to manage inactive queues, so that, when the user session is
over, all unique user queues are removed. For example, RabbitMQ creates auto-delete
queues when you use destinations such as /exchange/amq.direct/position-updates.
So, in that case, the client could subscribe to /user/exchange/amq.direct/position-updates.
Similarly, ActiveMQ has
configuration options
for purging inactive destinations.
|
In a multi-application server scenario, a user destination may remain unresolved because
the user is connected to a different server. In such cases, you can configure a
destination to broadcast unresolved messages so that other servers have a chance to try.
This can be done through the userDestinationBroadcast property of the
MessageBrokerRegistry in Java configuration and the user-destination-broadcast attribute
of the message-broker element in XML.
4.4.15. Order of Messages
Messages from the broker are published to the clientOutboundChannel, from where they are
written to WebSocket sessions. As the channel is backed by a ThreadPoolExecutor, messages
are processed in different threads, and the resulting sequence received by the client may
not match the exact order of publication.
If this is an issue, enable the setPreservePublishOrder flag, as the following example shows:
@Configuration
@EnableWebSocketMessageBroker
public class MyConfig implements WebSocketMessageBrokerConfigurer {
@Override
protected void configureMessageBroker(MessageBrokerRegistry registry) {
// ...
registry.setPreservePublishOrder(true);
}
}The following example shows the XML configuration equivalent of the preceding example:
<beans xmlns="http://www.springframework.org/schema/beans"
xmlns:xsi="http://www.w3.org/2001/XMLSchema-instance"
xmlns:websocket="http://www.springframework.org/schema/websocket"
xsi:schemaLocation="
http://www.springframework.org/schema/beans
https://www.springframework.org/schema/beans/spring-beans.xsd
http://www.springframework.org/schema/websocket
https://www.springframework.org/schema/websocket/spring-websocket.xsd">
<websocket:message-broker preserve-publish-order="true">
<!-- ... -->
</websocket:message-broker>
</beans>When the flag is set, messages within the same client session are published to the
clientOutboundChannel one at a time, so that the order of publication is guaranteed.
Note that this incurs a small performance overhead, so you should enable it only if it is required.
4.4.16. Events
Several ApplicationContext events are published and can be
received by implementing Spring’s ApplicationListener interface:
-
BrokerAvailabilityEvent: Indicates when the broker becomes available or unavailable. While the “simple” broker becomes available immediately on startup and remains so while the application is running, the STOMP “broker relay” can lose its connection to the full featured broker (for example, if the broker is restarted). The broker relay has reconnect logic and re-establishes the “system” connection to the broker when it comes back. As a result, this event is published whenever the state changes from connected to disconnected and vice-versa. Components that use theSimpMessagingTemplateshould subscribe to this event and avoid sending messages at times when the broker is not available. In any case, they should be prepared to handleMessageDeliveryExceptionwhen sending a message. -
SessionConnectEvent: Published when a new STOMP CONNECT is received to indicate the start of a new client session. The event contains the message that represents the connect, including the session ID, user information (if any), and any custom headers the client sent. This is useful for tracking client sessions. Components subscribed to this event can wrap the contained message withSimpMessageHeaderAccessororStompMessageHeaderAccessor. -
SessionConnectedEvent: Published shortly after aSessionConnectEventwhen the broker has sent a STOMP CONNECTED frame in response to the CONNECT. At this point, the STOMP session can be considered fully established. -
SessionSubscribeEvent: Published when a new STOMP SUBSCRIBE is received. -
SessionUnsubscribeEvent: Published when a new STOMP UNSUBSCRIBE is received. -
SessionDisconnectEvent: Published when a STOMP session ends. The DISCONNECT may have been sent from the client or it may be automatically generated when the WebSocket session is closed. In some cases, this event is published more than once per session. Components should be idempotent with regard to multiple disconnect events.
| When you use a full-featured broker, the STOMP “broker relay” automatically reconnects the “system” connection if broker becomes temporarily unavailable. Client connections, however, are not automatically reconnected. Assuming heartbeats are enabled, the client typically notices the broker is not responding within 10 seconds. Clients need to implement their own reconnecting logic. |
4.4.17. Interception
Events provide notifications for the lifecycle
of a STOMP connection but not for every client message. Applications can also register a
ChannelInterceptor to intercept any message and in any part of the processing chain.
The following example shows how to intercept inbound messages from clients:
@Configuration
@EnableWebSocketMessageBroker
public class WebSocketConfig implements WebSocketMessageBrokerConfigurer {
@Override
public void configureClientInboundChannel(ChannelRegistration registration) {
registration.interceptors(new MyChannelInterceptor());
}
}A custom ChannelInterceptor can use StompHeaderAccessor or SimpMessageHeaderAccessor
to access information about the message, as the following example shows:
public class MyChannelInterceptor implements ChannelInterceptor {
@Override
public Message<?> preSend(Message<?> message, MessageChannel channel) {
StompHeaderAccessor accessor = StompHeaderAccessor.wrap(message);
StompCommand command = accessor.getStompCommand();
// ...
return message;
}
}Applications can also implement ExecutorChannelInterceptor, which is a sub-interface
of ChannelInterceptor with callbacks in the thread in which the messages are handled.
While a ChannelInterceptor is invoked once for each message sent to a channel, the
ExecutorChannelInterceptor provides hooks in the thread of each MessageHandler
subscribed to messages from the channel.
Note that, as with the SesionDisconnectEvent described earlier, a DISCONNECT message
can be from the client or it can also be automatically generated when
the WebSocket session is closed. In some cases, an interceptor may intercept this
message more than once for each session. Components should be idempotent with regard to
multiple disconnect events.
4.4.18. STOMP Client
Spring provides a STOMP over WebSocket client and a STOMP over TCP client.
To begin, you can create and configure WebSocketStompClient, as the following example shows:
WebSocketClient webSocketClient = new StandardWebSocketClient();
WebSocketStompClient stompClient = new WebSocketStompClient(webSocketClient);
stompClient.setMessageConverter(new StringMessageConverter());
stompClient.setTaskScheduler(taskScheduler); // for heartbeatsIn the preceding example, you could replace StandardWebSocketClient with SockJsClient,
since that is also an implementation of WebSocketClient. The SockJsClient can
use WebSocket or HTTP-based transport as a fallback. For more details, see
SockJsClient.
Next, you can establish a connection and provide a handler for the STOMP session, as the following example shows:
String url = "ws://127.0.0.1:8080/endpoint";
StompSessionHandler sessionHandler = new MyStompSessionHandler();
stompClient.connect(url, sessionHandler);When the session is ready for use, the handler is notified, as the following example shows:
public class MyStompSessionHandler extends StompSessionHandlerAdapter {
@Override
public void afterConnected(StompSession session, StompHeaders connectedHeaders) {
// ...
}
}Once the session is established, any payload can be sent and is
serialized with the configured MessageConverter, as the following example shows:
session.send("/topic/something", "payload");You can also subscribe to destinations. The subscribe methods require a handler
for messages on the subscription and returns a Subscription handle that you can
use to unsubscribe. For each received message, the handler can specify the target
Object type to which the payload should be deserialized, as the following example shows:
session.subscribe("/topic/something", new StompFrameHandler() {
@Override
public Type getPayloadType(StompHeaders headers) {
return String.class;
}
@Override
public void handleFrame(StompHeaders headers, Object payload) {
// ...
}
});To enable STOMP heartbeat, you can configure WebSocketStompClient with a TaskScheduler
and optionally customize the heartbeat intervals (10 seconds for write inactivity,
which causes a heartbeat to be sent, and 10 seconds for read inactivity, which
closes the connection).
When you use WebSocketStompClient for performance tests to simulate thousands
of clients from the same machine, consider turning off heartbeats, since each
connection schedules its own heartbeat tasks and that is not optimized for
a large number of clients running on the same machine.
|
The STOMP protocol also supports receipts, where the client must add a receipt
header to which the server responds with a RECEIPT frame after the send or
subscribe are processed. To support this, the StompSession offers
setAutoReceipt(boolean) that causes a receipt header to be
added on every subsequent send or subscribe event.
Alternatively, you can also manually add a receipt header to the StompHeaders.
Both send and subscribe return an instance of Receiptable
that you can use to register for receipt success and failure callbacks.
For this feature, you must configure the client with a TaskScheduler
and the amount of time before a receipt expires (15 seconds by default).
Note that StompSessionHandler itself is a StompFrameHandler, which lets
it handle ERROR frames in addition to the handleException callback for
exceptions from the handling of messages and handleTransportError for
transport-level errors including ConnectionLostException.
4.4.19. WebSocket Scope
Each WebSocket session has a map of attributes. The map is attached as a header to inbound client messages and may be accessed from a controller method, as the following example shows:
@Controller
public class MyController {
@MessageMapping("/action")
public void handle(SimpMessageHeaderAccessor headerAccessor) {
Map<String, Object> attrs = headerAccessor.getSessionAttributes();
// ...
}
}You can declare a Spring-managed bean in the websocket scope.
You can inject WebSocket-scoped beans into controllers and any channel interceptors
registered on the clientInboundChannel. Those are typically singletons and live
longer than any individual WebSocket session. Therefore, you need to use a
scope proxy mode for WebSocket-scoped beans, as the following example shows:
@Component
@Scope(scopeName = "websocket", proxyMode = ScopedProxyMode.TARGET_CLASS)
public class MyBean {
@PostConstruct
public void init() {
// Invoked after dependencies injected
}
// ...
@PreDestroy
public void destroy() {
// Invoked when the WebSocket session ends
}
}
@Controller
public class MyController {
private final MyBean myBean;
@Autowired
public MyController(MyBean myBean) {
this.myBean = myBean;
}
@MessageMapping("/action")
public void handle() {
// this.myBean from the current WebSocket session
}
}As with any custom scope, Spring initializes a new MyBean instance the first
time it is accessed from the controller and stores the instance in the WebSocket
session attributes. The same instance is subsequently returned until the session
ends. WebSocket-scoped beans have all Spring lifecycle methods invoked, as
shown in the preceding examples.
4.4.20. Performance
There is no silver bullet when it comes to performance. Many factors affect it, including the size and volume of messages, whether application methods perform work that requires blocking, and external factors (such as network speed and other issues). The goal of this section is to provide an overview of the available configuration options along with some thoughts on how to reason about scaling.
In a messaging application, messages are passed through channels for asynchronous executions that are backed by thread pools. Configuring such an application requires good knowledge of the channels and the flow of messages. Therefore, it is recommended to review Flow of Messages.
The obvious place to start is to configure the thread pools that back the
clientInboundChannel and the clientOutboundChannel. By default, both
are configured at twice the number of available processors.
If the handling of messages in annotated methods is mainly CPU-bound, the
number of threads for the clientInboundChannel should remain close to the
number of processors. If the work they do is more IO-bound and requires blocking
or waiting on a database or other external system, the thread pool size
probably needs to be increased.
|
A common point of confusion is that configuring the core pool size (for example, 10) and max pool size (for example, 20) results in a thread pool with 10 to 20 threads. In fact, if the capacity is left at its default value of Integer.MAX_VALUE, the thread pool never increases beyond the core pool size, since all additional tasks are queued. See the javadoc of |
On the clientOutboundChannel side, it is all about sending messages to WebSocket
clients. If clients are on a fast network, the number of threads should
remain close to the number of available processors. If they are slow or on
low bandwidth, they take longer to consume messages and put a burden on the
thread pool. Therefore, increasing the thread pool size becomes necessary.
While the workload for the clientInboundChannel is possible to predict — after all, it is based on what the application does — how to configure the
"clientOutboundChannel" is harder, as it is based on factors beyond
the control of the application. For this reason, two additional
properties relate to the sending of messages: sendTimeLimit
and sendBufferSizeLimit. You can use those methods to configure how long a
send is allowed to take and how much data can be buffered when sending
messages to a client.
The general idea is that, at any given time, only a single thread can be used to send to a client. All additional messages, meanwhile, get buffered, and you can use these properties to decide how long sending a message is allowed to take and how much data can be buffered in the meantime. See the javadoc and documentation of the XML schema for important additional details.
The following example shows a possible configuration:
@Configuration
@EnableWebSocketMessageBroker
public class WebSocketConfig implements WebSocketMessageBrokerConfigurer {
@Override
public void configureWebSocketTransport(WebSocketTransportRegistration registration) {
registration.setSendTimeLimit(15 * 1000).setSendBufferSizeLimit(512 * 1024);
}
// ...
}The following example shows the XML configuration equivalent of the preceding example:
<beans xmlns="http://www.springframework.org/schema/beans"
xmlns:xsi="http://www.w3.org/2001/XMLSchema-instance"
xmlns:websocket="http://www.springframework.org/schema/websocket"
xsi:schemaLocation="
http://www.springframework.org/schema/beans
https://www.springframework.org/schema/beans/spring-beans.xsd
http://www.springframework.org/schema/websocket
https://www.springframework.org/schema/websocket/spring-websocket.xsd">
<websocket:message-broker>
<websocket:transport send-timeout="15000" send-buffer-size="524288" />
<!-- ... -->
</websocket:message-broker>
</beans>You can also use the WebSocket transport configuration shown earlier to configure the maximum allowed size for incoming STOMP messages. In theory, a WebSocket message can be almost unlimited in size. In practice, WebSocket servers impose limits — for example, 8K on Tomcat and 64K on Jetty. For this reason, STOMP clients (such as the JavaScript webstomp-client and others) split larger STOMP messages at 16K boundaries and send them as multiple WebSocket messages, which requires the server to buffer and re-assemble.
Spring’s STOMP-over-WebSocket support does this ,so applications can configure the maximum size for STOMP messages irrespective of WebSocket server-specific message sizes. Keep in mind that the WebSocket message size is automatically adjusted, if necessary, to ensure they can carry 16K WebSocket messages at a minimum.
The following example shows one possible configuration:
@Configuration
@EnableWebSocketMessageBroker
public class WebSocketConfig implements WebSocketMessageBrokerConfigurer {
@Override
public void configureWebSocketTransport(WebSocketTransportRegistration registration) {
registration.setMessageSizeLimit(128 * 1024);
}
// ...
}The following example shows the XML configuration equivalent of the preceding example:
<beans xmlns="http://www.springframework.org/schema/beans"
xmlns:xsi="http://www.w3.org/2001/XMLSchema-instance"
xmlns:websocket="http://www.springframework.org/schema/websocket"
xsi:schemaLocation="
http://www.springframework.org/schema/beans
https://www.springframework.org/schema/beans/spring-beans.xsd
http://www.springframework.org/schema/websocket
https://www.springframework.org/schema/websocket/spring-websocket.xsd">
<websocket:message-broker>
<websocket:transport message-size="131072" />
<!-- ... -->
</websocket:message-broker>
</beans>An important point about scaling involves using multiple application instances. Currently, you cannot do that with the simple broker. However, when you use a full-featured broker (such as RabbitMQ), each application instance connects to the broker, and messages broadcast from one application instance can be broadcast through the broker to WebSocket clients connected through any other application instances.
4.4.21. Monitoring
When you use @EnableWebSocketMessageBroker or <websocket:message-broker>, key
infrastructure components automatically gather statisticss and counters that provide
important insight into the internal state of the application. The configuration
also declares a bean of type WebSocketMessageBrokerStats that gathers all
available information in one place and by default logs it at the INFO level once
every 30 minutes. This bean can be exported to JMX through Spring’s
MBeanExporter for viewing at runtime (for example, through JDK’s jconsole).
The following list summarizes the available information:
- Client WebSocket Sessions
-
- Current
-
Indicates how many client sessions there are currently, with the count further broken down by WebSocket versus HTTP streaming and polling SockJS sessions.
- Total
-
Indicates how many total sessions have been established.
- Abnormally Closed
-
- Connect Failures
-
Sessions that got established but were closed after not having received any messages within 60 seconds. This is usually an indication of proxy or network issues.
- Send Limit Exceeded
-
Sessions closed after exceeding the configured send timeout or the send buffer limits, which can occur with slow clients (see previous section).
- Transport Errors
-
Sessions closed after a transport error, such as failure to read or write to a WebSocket connection or HTTP request or response.
- STOMP Frames
-
The total number of CONNECT, CONNECTED, and DISCONNECT frames processed, indicating how many clients connected on the STOMP level. Note that the DISCONNECT count may be lower when sessions get closed abnormally or when clients close without sending a DISCONNECT frame.
- STOMP Broker Relay
-
- TCP Connections
-
Indicates how many TCP connections on behalf of client WebSocket sessions are established to the broker. This should be equal to the number of client WebSocket sessions + 1 additional shared “system” connection for sending messages from within the application.
- STOMP Frames
-
The total number of CONNECT, CONNECTED, and DISCONNECT frames forwarded to or received from the broker on behalf of clients. Note that a DISCONNECT frame is sent to the broker regardless of how the client WebSocket session was closed. Therefore, a lower DISCONNECT frame count is an indication that the broker is pro-actively closing connections (maybe because of a heartbeat that did not arrive in time, an invalid input frame, or other issue).
- Client Inbound Channel
-
Statistics from the thread pool that backs the
clientInboundChannelthat provide insight into the health of incoming message processing. Tasks queueing up here is an indication that the application may be too slow to handle messages. If there I/O bound tasks (for example, slow database queries, HTTP requests to third party REST API, and so on), consider increasing the thread pool size. - Client Outbound Channel
-
Statistics from the thread pool that backs the
clientOutboundChannelthat provides insight into the health of broadcasting messages to clients. Tasks queueing up here is an indication clients are too slow to consume messages. One way to address this is to increase the thread pool size to accommodate the expected number of concurrent slow clients. Another option is to reduce the send timeout and send buffer size limits (see the previous section). - SockJS Task Scheduler
-
Statistics from the thread pool of the SockJS task scheduler that is used to send heartbeats. Note that, when heartbeats are negotiated on the STOMP level, the SockJS heartbeats are disabled.
4.4.22. Testing
There are two main approaches to testing applications when you use Spring’s STOMP-over-WebSocket support. The first is to write server-side tests to verify the functionality of controllers and their annotated message-handling methods. The second is to write full end-to-end tests that involve running a client and a server.
The two approaches are not mutually exclusive. On the contrary, each has a place in an overall test strategy. Server-side tests are more focused and easier to write and maintain. End-to-end integration tests, on the other hand, are more complete and test much more, but they are also more involved to write and maintain.
The simplest form of server-side tests is to write controller unit tests. However, this is not useful enough, since much of what a controller does depends on its annotations. Pure unit tests simply cannot test that.
Ideally, controllers under test should be invoked as they are at runtime, much like the approach to testing controllers that handle HTTP requests by using the Spring MVC Test framework — that is, without running a Servlet container but relying on the Spring Framework to invoke the annotated controllers. As with Spring MVC Test, you have two possible alternatives here, either use a “context-based” or use a “standalone” setup:
-
Load the actual Spring configuration with the help of the Spring TestContext framework, inject
clientInboundChannelas a test field, and use it to send messages to be handled by controller methods. -
Manually set up the minimum Spring framework infrastructure required to invoke controllers (namely the
SimpAnnotationMethodMessageHandler) and pass messages for controllers directly to it.
Both of these setup scenarios are demonstrated in the tests for the stock portfolio sample application.
The second approach is to create end-to-end integration tests. For that, you need to run a WebSocket server in embedded mode and connect to it as a WebSocket client that sends WebSocket messages containing STOMP frames. The tests for the stock portfolio sample application also demonstrate this approach by using Tomcat as the embedded WebSocket server and a simple STOMP client for test purposes.
5. Other Web Frameworks
This chapter details Spring’s integration with third-party web frameworks.
One of the core value propositions of the Spring Framework is that of enabling choice. In a general sense, Spring does not force you to use or buy into any particular architecture, technology, or methodology (although it certainly recommends some over others). This freedom to pick and choose the architecture, technology, or methodology that is most relevant to a developer and their development team is arguably most evident in the web area, where Spring provides its own web frameworks (Spring MVC and Spring WebFlux) while, at the same time, supporting integration with a number of popular third-party web frameworks.
5.1. Common Configuration
Before diving into the integration specifics of each supported web framework, let us first take a look at common Spring configuration that is not specific to any one web framework. (This section is equally applicable to Spring’s own web framework variants.)
One of the concepts (for want of a better word) espoused by Spring’s lightweight
application model is that of a layered architecture. Remember that in a “classic”
layered architecture, the web layer is but one of many layers. It serves as one of the
entry points into a server-side application, and it delegates to service objects
(facades) that are defined in a service layer to satisfy business-specific (and
presentation-technology agnostic) use cases. In Spring, these service objects, any other
business-specific objects, data-access objects, and others exist in a distinct “business
context”, which contains no web or presentation layer objects (presentation objects
,such as Spring MVC controllers, are typically configured in a distinct “presentation
context”). This section details how you can configure a Spring container (a
WebApplicationContext) that contains all of the 'business beans' in your application.
Moving on to specifics, all you one need to do is declare a
ContextLoaderListener
in the standard Java EE servlet web.xml file of your web application and add a
contextConfigLocation<context-param/> section (in the same file) that defines which
set of Spring XML configuration files to load.
Consider the following <listener/> configuration:
<listener>
<listener-class>org.springframework.web.context.ContextLoaderListener</listener-class>
</listener>Further consider the following <context-param/> configuration:
<context-param>
<param-name>contextConfigLocation</param-name>
<param-value>/WEB-INF/applicationContext*.xml</param-value>
</context-param>If you do not specify the contextConfigLocation context parameter, the
ContextLoaderListener looks for a file called /WEB-INF/applicationContext.xml to
load. Once the context files are loaded, Spring creates a
WebApplicationContext
object based on the bean definitions and stores it in the ServletContext of the web
application.
All Java web frameworks are built on top of the Servlet API, so you can use the
following code snippet to get access to this “business context” ApplicationContext
created by the ContextLoaderListener.
The following example shows how to get the WebApplicationContext:
WebApplicationContext ctx = WebApplicationContextUtils.getWebApplicationContext(servletContext);The
WebApplicationContextUtils
class is for convenience, so you need not remember the name of the ServletContext
attribute. Its getWebApplicationContext() method returns null if an object
does not exist under the WebApplicationContext.ROOT_WEB_APPLICATION_CONTEXT_ATTRIBUTE
key. Rather than risk getting NullPointerExceptions in your application, it is better
to use the getRequiredWebApplicationContext() method. This method throws an exception
when the ApplicationContext is missing.
Once you have a reference to the WebApplicationContext, you can retrieve beans by their
name or type. Most developers retrieve beans by name and then cast them to one of their
implemented interfaces.
Fortunately, most of the frameworks in this section have simpler ways of looking up beans. Not only do they make it easy to get beans from a Spring container, but they also let you use dependency injection on their controllers. Each web framework section has more detail on its specific integration strategies.
5.2. JSF
JavaServer Faces (JSF) is the JCP’s standard component-based, event-driven web user interface framework. It is an official part of the Java EE umbrella but also individually usable, e.g. through embedding Mojarra or MyFaces within Tomcat.
Please note that recent versions of JSF became closely tied to CDI infrastructure in application servers, with some new JSF functionality only working in such an environment. Spring’s JSF support is not actively evolved anymore and primarily exists for migration purposes when modernizing older JSF-based applications.
The key element in Spring’s JSF integration is the JSF ELResolver mechanism.
5.2.1. Spring Bean Resolver
SpringBeanFacesELResolver is a JSF compliant ELResolver implementation,
integrating with the standard Unified EL as used by JSF and JSP. It delegates to
Spring’s “business context” WebApplicationContext first and then to the
default resolver of the underlying JSF implementation.
Configuration-wise, you can define SpringBeanFacesELResolver in your JSF
faces-context.xml file, as the following example shows:
<faces-config>
<application>
<el-resolver>org.springframework.web.jsf.el.SpringBeanFacesELResolver</el-resolver>
...
</application>
</faces-config>5.2.2. Using FacesContextUtils
A custom ELResolver works well when mapping your properties to beans in
faces-config.xml, but, at times, you may need to explicitly grab a bean.
The FacesContextUtils
class makes this easy. It is similar to WebApplicationContextUtils, except that
it takes a FacesContext parameter rather than a ServletContext parameter.
The following example shows how to use FacesContextUtils:
ApplicationContext ctx = FacesContextUtils.getWebApplicationContext(FacesContext.getCurrentInstance());5.3. Apache Struts 2.x
Invented by Craig McClanahan, Struts is an open-source project hosted by the Apache Software Foundation. At the time, it greatly simplified the JSP/Servlet programming paradigm and won over many developers who were using proprietary frameworks. It simplified the programming model, it was open source (and thus free as in beer), and it had a large community, which let the project grow and become popular among Java web developers.
As a successor to the original Struts 1.x, check out Struts 2.x and the Struts-provided Spring Plugin for the built-in Spring integration.
5.4. Apache Tapestry 5.x
Tapestry is a ""Component oriented framework for creating dynamic, robust, highly scalable web applications in Java.""
While Spring has its own powerful web layer, there are a number of unique advantages to building an enterprise Java application by using a combination of Tapestry for the web user interface and the Spring container for the lower layers.
For more information, see Tapestry’s dedicated integration module for Spring.