1. Overview
Spring Native provides support for compiling Spring applications to native executables using the GraalVM native-image compiler.
Compared to the Java Virtual Machine, native images can enable cheaper and more sustainable hosting for many types of workloads. These include microservices, function workloads, well suited to containers, and Kubernetes
Using native image provides key advantages, such as instant startup, instant peak performance, and reduced memory consumption.
There are also some drawbacks and trade-offs that the GraalVM native project expect to improve on over time. Building a native image is a heavy process that is slower than a regular application. A native image has fewer runtime optimizations after warmup. Finally, it is less mature than the JVM with some different behaviors.
The key differences between a regular JVM and this native image platform are:
-
A static analysis of your application from the main entry point is performed at build time.
-
The unused parts are removed at build time.
-
Configuration is required for reflection, resources, and dynamic proxies.
-
Classpath is fixed at build time.
-
No class lazy loading: everything shipped in the executables will be loaded in memory on startup.
-
Some code will run at build time.
-
There are some limitations around some aspects of Java applications that are not fully supported.
The goal of this project is to incubate the support for Spring Native, an alternative to Spring JVM, and provide a native deployment option designed to be packaged in lightweight containers. In practice, the target is to support your Spring applications, almost unmodified, on this new platform.
| This is work in progress, see the list of supported features for more details. |
1.1. Modules
Spring Native is composed of the following modules:
-
spring-native: runtime dependency required for running Spring Native, provides also Native hints API. -
spring-native-configuration: configuration hints for Spring classes used by Spring AOT plugins, including various Spring Boot auto-configurations. -
spring-native-docs: reference guide, in asciidoc format. -
spring-native-tools: tools used for reviewing image building configuration and output. -
spring-aot: AOT transformation infrastructure common to Maven and Gradle plugins. -
spring-aot-gradle-plugin: Gradle plugin that invokes AOT transformations. -
spring-aot-maven-plugin: Maven plugin that invokes AOT transformations. -
samples: contains various samples that demonstrate features usage and are used as integration tests.
2. Getting Started
There are two main ways to build a Spring Boot native application:
-
Using Spring Boot Buildpacks support to generate a lightweight container containing a native executable.
-
Using the GraalVM native image Maven plugin support to generate a native executable.
| To use Spring Native from your IDE, additional steps are required. Check the dedicated section for more details. |
2.1. Getting started with Buildpacks
This section gives you a practical overview of building a Spring Boot native application using Cloud Native Buildpacks. This is a practical guide that uses the RESTful Web Service getting started guide.
| The easiest way to start a new native Spring Boot project is to go to start.spring.io, add the "Spring Native" dependency and generate the project. |
2.1.1. System Requirements
Docker should be installed, see Get Docker for more details. Configure it to allow non-root user if you are on Linux.
You can run docker run hello-world (without sudo) to check the Docker daemon is reachable as expected, see related Maven or Gradle Spring Boot plugin documentation.
|
On MacOS, it is recommended to increase the memory allocated to Docker to at least 8GB, and potentially add more CPUs as well.
See this Stackoverflow answer for more details.
On Microsoft Windows, make sure to enable the Docker WSL 2 backend for better performance.
|
2.1.2. Sample Project Setup
The completed "RESTful Web Service" guide can be retrieved using the following commands:
git clone https://github.com/spring-guides/gs-rest-service
cd gs-rest-service/complete
Validate Spring Boot version
| Spring Native 0.9.2 only supports Spring Boot 2.4.5, so change the version if necessary. |
<parent>
    <groupId>org.springframework.boot</groupId>
    <artifactId>spring-boot-starter-parent</artifactId>
    <version>2.4.5</version>
    <relativePath/>
</parent>plugins {
// ...
id 'org.springframework.boot' version '2.4.5'
}plugins {
// ...
id("org.springframework.boot") version "2.4.5"
}Add the Spring Native dependency
org.springframework.experimental:spring-native provides native configuration APIs like @NativeHint as well as other mandatory classes required to run a Spring application as a native image. You need to specify it explicitly only with Maven.
<dependencies>
    <!-- ... -->
    <dependency>
        <groupId>org.springframework.experimental</groupId>
        <artifactId>spring-native</artifactId>
        <version>0.9.2</version>
    </dependency>
</dependencies>// No need to add the spring-native dependency explicitly with Gradle, the Spring AOT plugin will add it automatically.// No need to add the spring-native dependency explicitly with Gradle, the Spring AOT plugin will add it automatically.Add the Spring AOT plugin
The Spring AOT plugin performs ahead-of-time transformations required to improve native image compatibility and footprint.
| The transformations also apply to the JVM so this can be applied regardless. |
<build>
    <plugins>
        <!-- ... -->
        <plugin>
            <groupId>org.springframework.experimental</groupId>
            <artifactId>spring-aot-maven-plugin</artifactId>
            <version>0.9.2</version>
            <executions>
                <execution>
                    <id>test-generate</id>
                    <goals>
                        <goal>test-generate</goal>
                    </goals>
                </execution>
                <execution>
                    <id>generate</id>
                    <goals>
                        <goal>generate</goal>
                    </goals>
                </execution>
            </executions>
        </plugin>
    </plugins>
</build>plugins {
// ...
id 'org.springframework.experimental.aot' version '0.9.2'
}plugins {
// ...
id("org.springframework.experimental.aot") version "0.9.2"
}The plugin provides a number of options to customize the transformations, see Configuring Spring AOT for more details.
Enable native image support
Spring Boot’s Cloud Native Buildpacks support lets you build a container for your Spring Boot application.
The native image buildpack can be enabled using the BP_NATIVE_IMAGE environment variable as follows:
<plugin>
    <groupId>org.springframework.boot</groupId>
    <artifactId>spring-boot-maven-plugin</artifactId>
    <configuration>
        <image>
            <builder>paketobuildpacks/builder:tiny</builder>
            <env>
                <BP_NATIVE_IMAGE>true</BP_NATIVE_IMAGE>
            </env>
        </image>
    </configuration>
</plugin>bootBuildImage {
builder = "paketobuildpacks/builder:tiny"
environment = [
"BP_NATIVE_IMAGE" : "true"
]
}tasks.getByName<BootBuildImage>("bootBuildImage") {
builder = "paketobuildpacks/builder:tiny"
environment = mapOf(
"BP_NATIVE_IMAGE" to "true"
)
}
tiny builder allows small footprint and reduced surface attack, you can also use base (the default) or full builders to have more tools available in the image for an improved developer experience.
|
Additional native-image arguments can be added using the BP_NATIVE_IMAGE_BUILD_ARGUMENTS environment variable.
|
Maven Repository
Configure your build to include the required repository for the spring-native dependency, as follows:
<repositories>
    <!-- ... -->
    <repository>
        <id>spring-milestone</id>;
        <name>Spring milestone</name>
        <url>https://repo.spring.io/milestone</url>
    </repository>
</repositories>repositories {
// ...
maven { url 'https://repo.spring.io/milestone' }
}repositories {
// ...
maven { url = uri("https://repo.spring.io/milestone") }
}The Spring AOT plugin also requires a dedicated plugin repository in the pom.xml file for Maven and in the in the settings.gradle(.kts) for Gradle.
<pluginRepositories>
<!-- ... -->
<pluginRepository>
<id>spring-milestone</id>;
<name>Spring milestone</name>
<url>https://repo.spring.io/milestone</url>
</pluginRepository>
</pluginRepositories>pluginManagement {
repositories {
    // ...
    maven { url 'https://repo.spring.io/milestone' }
}
}pluginManagement {
repositories {
    // ...
    maven { url = uri("https://repo.spring.io/milestone") }
}
}2.1.3. Build the native application
The native application can be built as follows:
$ mvn spring-boot:build-image$ gradle bootBuildImage$ gradle bootBuildImage
During the native compilation, you will see a lot of WARNING: Could not register reflection metadata messages. They are expected and will be removed in a future version, see #502 for more details.
|
This creates a Linux container to build the native application using the GraalVM native image compiler. By default, the container image is installed locally.
2.1.4. Run the native application
To run the application, you can use docker the usual way as shown in the following example:
$ docker run --rm -p 8080:8080 rest-service:0.0.1-SNAPSHOTIf you prefer docker-compose, you can write a docker-compose.yml at the root of the project with the following content:
version: '3.1'
services:
rest-service:
image: rest-service:0.0.1-SNAPSHOT
ports:
- "8080:8080"And then run
$ docker-compose upThe startup time should be less than 100ms, compared to the roughly 1500ms when starting the application on the JVM.
Now that the service is up, visit localhost:8080/greeting, where you should see:
{"id":1,"content":"Hello, World!"}2.2. Getting started with native image Maven plugin
This section gives you a practical overview of building a Spring Boot native application using the native image Maven plugin. This is a practical guide that uses the RESTful Web Service getting started guide.
| There is not yet an official native image Gradle plugin, that’s why this section is only about Maven. You can vote and subscribe to graal/issue3302 if you are interested about building native images with Gradle without using Buildpacks. |
2.2.1. System Requirements
A number of prerequisites are required before installing the GraalVM native-image compiler.
You then need a local installation of the native image compiler.
To install the native image compiler on MacOS or Linux, we recommend using SDKMAN:
-
Install GraalVM with
sdk install java 21.0.0.2.r8-grlfor Java 8 orsdk install java 21.0.0.2.r11-grlfor Java 11. -
Make sure to use the newly installed JDK with
sdk use java 21.0.0.2.r8-grlorsdk use java 21.0.0.2.r11-grl. -
Run
gu install native-imageto bring in the native-image extensions to the JDK.
Alternatively or if you are on Microsoft Windows, you can manually install GraalVM builds as follows:
-
Download GraalVM 21.0.0.2.
-
Set
JAVA_HOMEandPATHappropriately. -
Run
gu install native-imageto bring in the native-image extensions to the JDK.
2.2.2. Sample Project Setup
The completed "RESTful Web Service" guide can be retrieved using the following commands:
git clone https://github.com/spring-guides/gs-rest-service
cd gs-rest-service/completeValidate Spring Boot version
| Spring Native 0.9.2 only supports Spring Boot 2.4.5, so change the version if necessary. |
<parent>
<groupId>org.springframework.boot</groupId>
<artifactId>spring-boot-starter-parent</artifactId>
<version>2.4.5</version>
<relativePath/>
</parent>Add the Spring Native dependency
org.springframework.experimental:spring-native provides native configuration APIs like @NativeHint as well as other mandatory classes required to run a Spring application as a native image.
<dependencies>
<!-- ... -->
<dependency>
<groupId>org.springframework.experimental</groupId>
<artifactId>spring-native</artifactId>
<version>0.9.2</version>
</dependency>
</dependencies>Add the Spring AOT plugin
The Spring AOT plugin performs ahead-of-time transformations required to improve native image compatibility and footprint.
| The transformations also apply to the JVM so this can be applied regardless. |
<build>
<plugins>
<!-- ... -->
<plugin>
<groupId>org.springframework.experimental</groupId>
<artifactId>spring-aot-maven-plugin</artifactId>
<version>0.9.2</version>
<executions>
<execution>
<id>test-generate</id>
<goals>
<goal>test-generate</goal>
</goals>
</execution>
<execution>
<id>generate</id>
<goals>
<goal>generate</goal>
</goals>
</execution>
</executions>
</plugin>
</plugins>
</build>The plugin provides a number of options to customize the transformations, see Configuring Spring AOT for more details.
Enable native image support
GraalVM provides a Maven Plugin to invoke the native image compiler from your Maven build.
The following example adds a native-image profile that triggers the plugin during the package phase:
<profiles>
<profile>
<id>native-image</id>
<build>
<plugins>
<plugin>
<groupId>org.graalvm.nativeimage</groupId>
<artifactId>native-image-maven-plugin</artifactId>
<version>21.0.0.2</version>
<configuration>
<!-- The native image build needs to know the entry point to your application -->
<mainClass>com.example.restservice.RestServiceApplication</mainClass>
</configuration>
<executions>
<execution>
<goals>
<goal>native-image</goal>
</goals>
<phase>package</phase>
</execution>
</executions>
</plugin>
</plugins>
</build>
</profile>
</profiles>In a default Spring Boot setup, the spring-boot-maven-plugin also runs during the package phase and replaces the regular jar by the repackaged, executable jar.
To avoid a clash between the two plugins, make sure to specify a classifier like exec below for the executable jar:
<plugins>
<!-- ... -->
<plugin>
<groupId>org.springframework.boot</groupId>
<artifactId>spring-boot-maven-plugin</artifactId>
<configuration>
<classifier>exec</classifier>
</configuration>
</plugin>
</plugins>Maven Repository
Configure your build to include the required repository for the spring-native dependency, as follows:
<repositories>
<!-- ... -->
<repository>
<id>spring-milestone</id>;
<name>Spring milestone</name>
<url>https://repo.spring.io/milestone</url>
</repository>
</repositories>The Spring AOT plugin also requires a dedicated plugin repository:
<pluginRepositories>
    <!-- ... -->
    <pluginRepository>
        <id>spring-milestone</id>;
        <name>Spring milestone</name>
        <url>https://repo.spring.io/milestone</url>
    </pluginRepository>
</pluginRepositories>2.2.3. Build the native application
The native application can be built as follows:
$ mvn -Pnative-image package
During the native compilation, you will see a lot of WARNING: Could not register reflection metadata messages. They are expected and will be removed in a future version, see #502 for more details.
|
| On Windows make sure to use x64 Native Tools Command Prompt as recommended in the GraalVM native-image prerequisites. |
This command creates a native executable containing your Spring Boot application in the target directory.
2.2.4. Run the native application
To run your application, invoke the following:
$ target/com.example.restservice.restserviceapplicationThe startup time should be less than 100ms, compared to the roughly 1500ms when starting the application on the JVM.
Now that the service is up, visit localhost:8080/greeting, where you should see:
{"id":1,"content":"Hello, World!"}3. Support
This section defines the GraalVM version, languages and dependencies that have been validated against Spring Native 0.9.2, which provides beta support on the scope defined in this section. You can try it on your projects if they are using those supported dependencies, and raise bugs or contribute pull requests if something goes wrong.
Beta support also means that breaking changes will happen, but a migration path will be provided and documented.
3.1. GraalVM
GraalVM version 21.0.0.2 is supported, see the related release notes.
GraalVM issues impacting the Spring ecosystem are identified on their issue tracker using the spring label.
3.2. Language
Java 8, Java 11, and Kotlin 1.3+ are supported.
| Java 11 native images are currently impacted by a transient footprint issue that may lead (or not) to bigger images due to oracle/graal#3163. |
Be aware of that Kotlin bug which requires additional array reflection entries, it should be fixed in Kotlin 1.5+. Kotlin Coroutines are supported but require additional reflection entries due to how Coroutines generates bytecode with an Object return type.
3.3. Feature flags
Some features like HTTPS may require some additional flags, check Native image options for more details. When it recognizes certain usage scenarios, Spring Native tries to set required flags automatically.
3.4. Spring Boot
| Spring Native 0.9.2 is designed to be used with Spring Boot 2.4.5. A new release of Spring Native will happen for each patch release of the latest Spring Boot 2.x minor version in order to ensure support and compatibility. |
The following starters are supported, the group ID is org.springframework.boot unless specified otherwise.
-
spring-boot-starter-actuator: WebMvc and WebFlux are supported, as well as metrics and tracing infrastructure. Beware that actuators significantly increase the footprint, this will be optimized in a future release. -
spring-boot-starter-data-elasticsearch -
spring-boot-starter-data-jdbc -
spring-boot-starter-data-jpa-
You need to configure Hibernate build-time bytecode enhancement
-
hibernate.bytecode.provider=noneis automatically set
-
-
spring-boot-starter-data-mongodb -
spring-boot-starter-data-neo4j -
spring-boot-starter-data-r2dbc -
spring-boot-starter-data-redis -
spring-boot-starter-jdbc -
spring-boot-starter-logging -
spring-boot-starter-mail -
spring-boot-starter-thymeleaf -
spring-boot-starter-rsocket -
spring-boot-starter-validation -
spring-boot-starter-security: WebMvc and WebFlux form login, HTTP basic authentication and OAuth 2.0 are supported. RSocket security is also supported. -
spring-boot-starter-oauth2-resource-server: WebMvc and WebFlux are supported. -
spring-boot-starter-oauth2-client: WebMvc and WebFlux are supported. -
spring-boot-starter-webflux:-
For Web support, only Reactor Netty is supported for now.
-
For WebSocket support, Tomcat, Jetty 9, Undertow and Reactor Netty are supported. Jetty 10 is not supported.
-
-
spring-boot-starter-web:-
Only Tomcat is supported for now.
-
--enable-httpsflag is required for HTTPS support. -
org.apache.tomcat.experimental:tomcat-embed-programmaticdependency can be used instead oftomcat-embed-coreandtomcat-embed-websocketones for optimized footprint.
-
-
spring-boot-starter-websocket -
com.wavefront:wavefront-spring-boot-starter -
spring-boot-starter-quartz: supports the [Quartz Job Scheduling](www.quartz-scheduler.org/) engine. It adds types required by Quartz, and automatically registers anyJobsubclasses for reflection.
| Devtools is not supported yet, you can follow #532 to be aware when it will. |
3.5. Spring Cloud
| Spring Native 0.9.2 is designed to be used with Spring Cloud 2020.0.2. |
Group ID is org.springframework.cloud.
When using Spring Native, spring.cloud.refresh.enabled is set to false for compatibility and footprint reasons. spring.sleuth.async.enabled is also set to false since this feature leads to too much proxies created for a reasonable footprint.
|
-
spring-cloud-starter-bootstrap -
spring-cloud-starter-config -
spring-cloud-config-client -
spring-cloud-config-server -
spring-cloud-starter-netflix-eureka-client(Java 11 only) -
spring-cloud-starter-task -
spring-cloud-function-web-
--enable-httpsflag is required for HTTPS support.
-
-
spring-cloud-function-adapter-aws -
spring-cloud-starter-function-webflux-
--enable-httpsflag is required for HTTPS support.
-
-
spring-cloud-starter-sleuth
3.7. Limitations
CGLIB proxies on classes are not supported, only JDK dynamic proxies on interfaces are for now. As a consequence spring.aop.proxy-target-class is set to false when using Spring Native. You can subscribe to and vote for #356 if you are interested about proxy support on classes.
If you are using @Configuration without setting proxyBeanMethods=false and use only method parameters to inject bean dependencies, Spring Native handles that scenario so that a CGLIB proxy is not required.
|
4. Spring AOT
Spring AOT build plugins are designed to generate and compile sources by taking advantage of the context of your application (classpath, configuration) in order to improve native image compatibility and footprint. It is invoked before running your application and tests, and may potentially require additional IDE configuration.
4.1. Maven
The plugin should be declared as following:
<build>
<plugins>
<!-- ... -->
<plugin>
<groupId>org.springframework.experimental</groupId>
<artifactId>spring-aot-maven-plugin</artifactId>
<version>0.9.2</version>
<executions>
<execution>
<id>test-generate</id>
<goals>
<goal>test-generate</goal>
</goals>
</execution>
<execution>
<id>generate</id>
<goals>
<goal>generate</goal>
</goals>
</execution>
</executions>
</plugin>
</plugins>
</build>Maven goals spring-aot:generate (process-test-classes phase) and spring-aot:test-generate (prepare-package phase) are automatically invoked in the Maven lifecycle when using the mvn verify or mvn package commands.
The spring-aot:* goals are not meant to be called by themselves since they rely on other parts of the lifecycle.
Sources are generated in target/generated-sources/spring-aot/ and test sources in target/generated-test-sources/spring-aot/.
Because of a temporary limitation of the AOT plugin, developers need to trigger the package phase if they wish to run the application with the Spring Boot Maven plugin:
please use mvn package spring-boot:run.
|
Configuration can be performed if needed within the <configuration> element, for example to remove SpEL support at build-time if your application does not use it in order to optimize the footprint:
<configuration>
<removeSpelSupport>true</removeSpelSupport>
</configuration>See Configuring Spring AOT for a list of the configuration options available.
4.1.1. Intellij IDEA
If build/run actions are not delegated to Maven (default), you may want to configure triggers for Maven goals as following.
In the Maven tool window, go to "Plugins" and map:
-
Right click on
spring-aot:generatethen click on "After build". -
Add the JUnit configuration (or just try to run a firs time your tests) and then right click on
spring-aot:test-generatethen click on "Execute Run/Debug …" then select your JUnit test configurations.
If build/run actions are delegated to Maven, it should work out-of-the-box.
4.1.2. Eclipse and VSCode
Eclipse with m2e (Maven) or Buildship (Gradle) should configure out of the box the main generated sources, so the application should run out of the box with the sources generated by the Spring AOT plugin.
But Eclipse does not support having the same classes in main and test generated sources, so test sources generation is disabled by default and tests should run without the sources generated by the Spring AOT plugin in the IDE.
VSCode uses the same build tooling as Eclipse, so it should work the same.
4.2. Gradle
You can configure the Gradle Spring AOT plugin by declaring first the plugin repositories in your settings.gradle(.kts) file:
pluginManagement {
    repositories {
        // ...
        maven { url 'https://repo.spring.io/milestone' }
    }
}pluginManagement {
repositories {
// ...
maven { url = uri("https://repo.spring.io/milestone") }
}
}plugins {
// ...
id 'org.springframework.experimental.aot' version '0.9.2'
}plugins {
// ...
id("org.springframework.experimental.aot") version "0.9.2"
}The plugin creates two SourceSets for testing and running the application: "aot" and "aotTest".
The resulting classes and resources are automatically added to the runtime classpath of the application when running the test, bootRun and bootJar tasks.
Sources are generated in build/generated/sources/aot/, build/generated/resources/aot/ and test sources in build/generated/sources/aotTest/, build/generated/resources/aotTest/.
Configuration can be performed if needed using the springAot DSL extension, for example to remove SpEL support at build-time if your application does not use it in order to optimize the footprint:
springAot {
	removeSpelSupport = true
}springAot {
removeSpelSupport.set(true)
}Here is a complete code sample showing all the default values and how to set them:
import org.springframework.aot.gradle.dsl.AotMode

// ...

springAot {
	mode = AotMode.NATIVE
	debugVerify = false
	removeXmlSupport = true
	removeSpelSupport = false
	removeYamlSupport = false
	removeJmxSupport = true
	verify = true
	removeUnusedConfig = true
	failOnMissingSelectorHint = true
	buildTimePropertiesMatchIfMissing = true
	buildTimePropertiesChecks = ["default-include-all","!spring.dont.include.these.","!or.these"]
}import org.springframework.aot.gradle.dsl.AotMode
// ...
springAot {
mode.set(AotMode.NATIVE)
debugVerify.set(false)
removeXmlSupport.set(true)
removeSpelSupport.set(false)
removeYamlSupport.set(false)
removeJmxSupport.set(true)
verify.set(true)
removeUnusedConfig.set(true)
failOnMissingSelectorHint.set(true)
buildTimePropertiesMatchIfMissing.set(true)
buildTimePropertiesChecks.set(arrayOf("default-include-all","!spring.dont.include.these.","!or.these"))
}
The non-idomatic property.set(…) syntax in the Gradle Kotlin DSL is due to gradle#9268, feel free to vote for this issue.
|
See Configuring Spring AOT for more details on the configuration options.
4.3. Configuring Spring AOT
-
modeswitches how much configuration the plugin actually provides to the native image compiler:-
native(default) provides resource, initialization, proxy and reflection (using auto-configuration hints) configuration for native images as well as substitutions. -
native-initshould be used if only wishing to provide initialization configuration and substitutions. -
native-agentis using the configuration generated by the tracing agent as a basis and also provides additional hints for components like controllers, etc.
-
-
removeXmlSupportis set totrueby default to optimize the footprint, setting it tofalserestores Spring XML support (XML converters, codecs and XML application context support). -
removeSpelSupportis set tofalseby default, setting it totrueremoves Spring SpEL support to optimize the footprint (should be used only on applications not requiring SpEL). -
removeYamlSupportis set tofalseby default, setting it totrueremoves Spring Boot Yaml support to optimize the footprint. -
removeJmxSupportis set totrueby default to optimize the footprint, setting it tofalserestores Spring Boot JMX support. -
verifyis set totrueby default and perform some automated verification to ensure your application is native compliant, setting it tofalseswitches off the verifications. -
debugVerifyis set tofalseby default and enables verification debug when set totrue. -
removeUnusedConfigis set totrueby default, setting it tofalsedisables the removal of unused configurations. -
failOnMissingSelectorHintis set totrueby default and throw an error if no hint is provided for an active selector, setting it tofalseswitches the plugin from a hard error to a warning. See the Troubleshooting section for more details on this. -
[Experimental]
buildTimePropertiesMatchIfMissingis set totrueby default. Setting it tofalsemeans for any properties specifyingmatchIfMissing=truethat will be overridden and not respected. This does flip the application into a mode where it needs to be much more explicit about specifying properties that activate configurations. (This is a work-in-progress option really for experimenting with image size vs explicit property trade offs). -
[Experimental]
buildTimePropertiesChecks(experimental) switches on build time evaluation of some configuration conditions related to properties. It must include at least an initial setting ofdefault-include-allordefault-exclude-alland that may be followed by a comma separated list of prefixes to explicitly include or exclude (for exampledefault-include-all,!spring.dont.include.these.,!or.theseordefault-exclude-all,spring.include.this.one.though.,and.this.one). When considering a property the longest matching prefix in this setting will apply (in cases where a property matches multiple prefixes).
5. Native hints
GraalVM native image supports configuration via static files that are automatically discovered when located in the META-INF/native-image folder in your application classpath.
Those files can be native-image.properties, reflect-config.json, proxy-config.json or resource-config.json for example.
Spring Native is automatically generating configuration files like these (that would sit alongside any user provided ones) via the Spring AOT build plugin. However, there are situations where specifying additional native configuration is required:
-
When reflection-based serialization is used in a programmatic API like
WebClientwith Jackson -
When you try to use a feature or library not yet supported by Spring Native
-
When you are want to specify native configuration related to your own application.
For those, you can annotate classes already annotated with @Configuration or @SpringBootApplication with @NativeHint, or in the case of quite simple configuration a @TypeHint directly (a @NativeHint is a container for many kinds of configuration including @TypeHint s).
For example, an application using WebClient to deserialize a Data class with a SuperHero nested class should be configured as below (see the Javadoc for more details):
@TypeHint(types = Data.class, typeNames = "com.example.webclient.Data$SuperHero")
@SpringBootApplication
public class WebClientApplication {
	// ...
}
In fact, Spring Native itself is configuring most of your application with such annotations provided out of the box, you can browse them in order to see some concrete example of hints.
Those hints will be taken in account during the compilation and transformed to generated native configuration by the Spring AOT plugin. It is of course also possible to provide directly GraalVM native configuration files if you prefer to do so, but annotation based configuration is usually easier to write and to maintain thanks to autocompletion and compilation type checks.
Here is the full list of what can be specified in a hint:
-
proxieswhich list proxies for which types are needed and should be built into the image. -
typeswhich lists any reflective needs. It should use class references but string names for classes are allowed if visibility (private classes) prevents a class reference. If these are types that are accessed via JNI and should go into ajni-config.jsonfile rather thanreflect-config.jsonthen ensure the access bit JNI is set when defining access. -
serializableswhich lists any serialization needs via a list of@SerializationHintannotations. -
resourceswhich lists patterns that match resources (including .class files) that should be included in the image. -
initializationwhich lists classes/packages that should be explicitly initialized at either build-time or run-time. There should not really be a trigger specified on hints includedinitialization. -
importscan be useful if two hints share a number of@TypeHint/@ProxyHint/etc in common. For example reactive-web and webmvc may expose a lot of common infrastructure. Rather than duplicate those in two places, those info annotations (TypeHint/ProxyHint/etc) can all be placed on a separate type and thenimportscan reference that type to pull them into a particular@NativeHint.
You can check the Javadoc for more details, see also more dynamic ways to provide native configuration in the How to contribute section.
6. Samples
There are numerous samples in the samples subfolder of the root project.
Maven projects can be built and tested using a local native-image installation using the build.sh script file present at the root of each sample.
Maven or Gradle projects can be built using Buildpack support using mvn spring-boot:build-image or gradle bootBuildImage commands which require Docker to be installed.
Beware that native image compilation can take a long time and uses a lot of RAM.
The samples show the wide variety of tech that is working fine: Spring MVC with Tomcat, Spring WebFlux with Netty, Thymeleaf, JPA, and others. The Petclinic samples brings multiple technologies together in one application.
If you are starting to build your first Spring Boot application, we recommend you follow one of the Getting Started guides.
7. Native image options
GraalVM native-image options are documented here.
Spring Native is enabling automatically some of those, and some others especially useful are documented here as well.
They can be specified using the BP_NATIVE_IMAGE_BUILD_ARGUMENTS environment variable in Spring Boot plugin if you are using Buildpacks support or using the <buildArgs></buildArgs> configuration element if you are using native-image-maven-plugin.
7.1. Options enabled by default
These options are enabled by default when using Spring Native, since they are mandatory to make a Spring application work when compiled as GraalVM native images.
-
--allow-incomplete-classpathallows image building with an incomplete class path and reports type resolution errors at run time when they are accessed the first time, instead of during image building. -
--report-unsupported-elements-at-runtimereports usage of unsupported methods and fields at run time when they are accessed the first time, instead of as an error during image building. -
--no-fallbackenforces native image only runtime and disable fallback on regular JVM. -
--no-servermeans do not use the image-build server which can be sometimes unreliable, see graal#1952 for more details. -
--install-exit-handlersallows to react to a shutdown request from Docker. -
-H:+InlineBeforeAnalysisenables inlining before analysis in order to allow utility methods returning a constant to be taken in account for code removal for example.
7.2. Useful options
-
--verbosemakes image building output more verbose. -
-H:+ReportExceptionStackTracesprovides more detail should something go wrong. -
--initialize-at-build-timeinitializes classes by default at build time without any class or package being specified. This option is currently (hopefully, temporarily) required for Netty-based applications but is not recommended for other applications, since it can trigger compatibility issues, especially regarding logging and static fields. See this issue for more details. You can use it with specific classes or package specified if needed. -
-H:+PrintAnalysisCallTreehelps to find what classes, methods, and fields are used and why. You can find more details in GraalVM reports documentation. -
-H:ReportAnalysisForbiddenType=com.example.Foohelps to find why the specified class is included in the native image. -
--trace-class-initializationprovides a comma-separated list of fully-qualified class names that a class initialization is traced for. -
--trace-object-instantiationprovides a comma-separated list of fully-qualified class names that an object instantiation is traced for. -
--enable-all-security-servicesrequired for crypto and some security services (should be enabled by default via Native hints by Spring Native when needed). -
--enable-httpsenables HTTPS support (common need when usingWebClientorRestTemplatefor example).
8. Tracing agent
The GraalVM native image tracing agent allows to intercept reflection, resources or proxy usage on the JVM in order to generate the related native configuration. Spring Native should generate most of this native configuration automatically, but the tracing agent can be used to quickly identify the missing entries.
When using the agent to compute configuration for native-image, there are a couple of approaches:
-
Launch the app directly and exercise it.
-
Run application tests to exercise the application.
The first option is interesting for identifying the missing native configuration when a library or a pattern is not recognized by Spring Native.
| See this related graal#3283 issue that should make this process much easier. For now, you can make a manual diff between the native configuration generated by Spring Native and the one generated by the tracing agent. |
The second option sounds more appealing for a repeatable setup but by default the generated configuration will include anything required by the test infrastructure, which is unnecessary when the application runs for real. To address this problem the agent supports an access-filter file that will cause certain data to be excluded from the generated output.
8.1. Testing with the agent to compute configuration
8.1.1. A basic access-filter file
This is a simple access-filter.json file.
{ "rules": [
  {"excludeClasses": "org.apache.maven.surefire.**"},
  {"excludeClasses": "net.bytebuddy.**"},
  {"excludeClasses": "org.apiguardian.**"},
  {"excludeClasses": "org.junit.**"},
  {"excludeClasses": "org.mockito.**"},
  {"excludeClasses": "org.springframework.test.**"},
  {"excludeClasses": "org.springframework.boot.test.**"},
  {"excludeClasses": "com.example.demo.test.**"}
  ]
}
Most of these lines would apply to any Spring application, except for the last one which is application specific and will need tweaking to match the package of a specific applications tests.
8.1.2. Using the access-filter file
The access-filter.json file is specified with the access-filter-file option as part of the agentlib string:
-agentlib:native-image-agent=access-filter-file=access-filter.json,config-output-dir=target/classes/META-INF/native-image
8.1.3. Using it with maven
Let’s look at how to pull the ideas here together and apply them to a project.
Since Spring takes an eager approach when building the application context, a very basic test that starts the application context will exercise a lot of the Spring infrastructure that needs to produce native-image configuration.
This test would suffice for that and could be placed in src/test/java:
package com.example.demo.test;

import org.junit.jupiter.api.Test;

import org.springframework.boot.test.context.SpringBootTest;
import org.springframework.boot.test.context.SpringBootTest.WebEnvironment;

@SpringBootTest(webEnvironment = WebEnvironment.RANDOM_PORT)
public class AppContextStartupTest {

	@Test
	public void contextLoads() {
	}
}
Now take the access-filter.json file from above and place it in src/test/resources folder.
This following snippet would go into the maven pom:
<plugins>
    <!-- ... -->
    <plugin>
        <artifactId>maven-antrun-plugin</artifactId>
        <executions>
            <execution>
                <id>create-native-image-config-folder</id>
                <phase>test-compile</phase>
                <configuration>
                    <target>
                        <mkdir dir="target/classes/META-INF/native-image"/>
                    </target>
                </configuration>
                <goals>
                    <goal>run</goal>
                </goals>
            </execution>
        </executions>
    </plugin>
    <plugin>
        <groupId>org.apache.maven.plugins</groupId>
        <artifactId>maven-surefire-plugin</artifactId>
        <configuration>
            <argLine>-agentlib:native-image-agent=access-filter-file=src/test/resources/access-filter.json,config-merge-dir=target/classes/META-INF/native-image</argLine>
        </configuration>
    </plugin>
</plugins>
Notice the maven-antrun-plugin declaration to create the native image config directory before Surefire execution. This will not be required anymore with GraalVM 21.1.0+, see graal#3250 related issue.
|
Also update the spring-aot build plugin to enable the native-agent mode:
<plugin>
    <groupId>org.springframework.experimental</groupId>
    <artifactId>spring-aot-maven-plugin</artifactId>
    <configuration>
        <mode>native-agent</mode>
    </configuration>
</plugin>
That’s it, build your native image, it should generate the native configuration during the tests and run with the native-agent mode design to just add the missing bits.
If that’s not enough, you can add additional native configuration using @NativeHint annotations.
9. Troubleshooting
While trying to build native images, various things can go wrong, either at image build time or at runtime when you try to launch the built image. Usually, the problem is a lack of native configuration, so be sure to check Native hints first thing. Reading Native image reference documentation could also probably help.
This section explores some of the errors that can be encountered and possible fixes or workarounds.
Make sure to check GraalVM native image known issues related to Spring as well as Spring Native open issues before creating a new one.
9.1. native-image is failing
The image can fail for a number of reasons. We have described the most common causes and their solutions here.
9.1.1. DataSize was unintentionally initialized at build time
If you see an error like:
Error: Classes that should be initialized at run time got initialized during image building:
 org.springframework.util.unit.DataSize was unintentionally initialized at build time. To see why org.springframework.util.unit.DataSize got initialized use --trace-class-initialization
You have probably tried to compile a Spring Boot application to native without the spring-native dependency and Spring AOT plugin.
See related Getting started with native image Maven plugin and Getting started with Buildpacks documentation.
9.1.2. WARNING: Could not register reflection metadata
Those warnings are expected for now, and should be removed in a future version, see #502 for more details.
9.1.3. Out of memory error when building the native image
Out of memory error can materialize with error messages like Error: Image build request failed with exit status 137.
native-image consumes a lot of RAM, we recommend a machine with at least 16G of RAM.
If you are using containers, on Mac, it is recommended to increase the memory allocated to Docker to at least 8G (and potentially to add more CPUs as well) since native-image compiler is a heavy process.
See this Stackoverflow answer for more details.
On Windows, make sure to enable the Docker WSL 2 backend for better performances.
9.1.4. Builder lifecycle 'creator' failed with status code 145
This is a generic error triggered by Docker and forwarded by Spring Boot Buildpacks support. native-image command has likely failed, so check the error messages in the output. If you can’t find anything, check if that’s not an out of memory error as described above.
9.2. The built image does not run
If your built image does not run, you can try a number of fixes. This section describes those possible fixes.
9.2.1. Missing resource bundles
In some cases, when there is a problem, the error message tries to tell you exactly what to do, as follows:
Caused by: java.util.MissingResourceException:
  Resource bundle not found javax.servlet.http.LocalStrings.
  Register the resource bundle using the option
    -H:IncludeResourceBundles=javax.servlet.http.LocalStrings.
You should add resource configuration using Native hints.
9.2.2. Application failed to start when running mvn spring-boot:run
Because of a temporary limitation of the AOT plugin, developers need to trigger the package phase if they wish to run the application with the Spring Boot Maven plugin:
please use mvn package spring-boot:run.
9.2.3. Missing configuration
The Spring AOT plugin will do the best it can to catch everything but it doesn’t understand every bit of code out there. In these situations you can write native configuration yourself, see Native hints, Tracing agent and How to contribute.
9.3. Working with Multi-Modules projects
The Spring Boot and AOT plugins should only be applied to the module that contains the main application class. We’ve shared a sample application showing how to set up multi-modules projects with Gradle and Maven.
9.4. Working with snapshots
Snapshots are regularly published and obviously ahead of releases and milestones. If you wish to use the snapshot versions you should use the following repository:
<repositories>
    <!-- ... -->
    <repository>
        <id>spring-snapshots</id>
        <name>Spring Snapshots</name>
        <url>https://repo.spring.io/snapshot</url>
    </repository>
</repositories>
10. How to contribute
This section describes how to contribute native support for libraries or features used in Spring applications. This can be done either by submitting submit pull requests to Spring Native for the scope supported on start.spring.io, or by providing native support directly at library or application level otherwise.
10.1. Designing native-friendly Spring libraries
Native support is mostly about making an application and its libraries possible to analyze at build-time to configure what’s required or not at runtime. The goal is to do that in an optimal way to have a minimal footprint.
Spring applications are dynamic, which means they typically use Java language features like reflection in various places.
Spring Native and its Spring AOT build plugins performs AOT transformations, in the context of a specific application classpath and configuration in order to generate the optimal native configuration. They also generate programmatic versions of spring.factories or auto-configurations to reduce the amount of reflection required at runtime.
Each reflection entry (per constructor/method/field) leads to the creation of a proxy class by native-image, so from a footprint point of view, these AOT transformations allow a smaller and more optimal configuration to be generated.
The documentation below describes best practices to keep in mind when trying to make Spring code more compatible with native-images.
10.1.1. Use proxyBeanMethods=false or method parameter injection in @Configuration classes
In native applications, @Bean annotated methods do not support cross @Bean invocations since they require a CGLIB proxy created at runtime.
This is similar to the behavior you get with the so called lite mode or with @Configuration(proxyBeanMethods=false).
It is fine for applications to just use @Configuration without setting proxyBeanMethods=false and use method parameters to inject bean dependencies, this is handled by Spring Native to not require a CGLIB proxy.
Libraries are encouraged to use @Configuration(proxyBeanMethods=false) (most of Spring portfolio currently uses this variant) since it is generally a good idea to avoid CGLIB proxies if not needed and to provide native compatibility.
This behavior could potentially become the default in a future Spring Framework version.
10.1.2. Use NativeDetector for native conditional code paths
Spring related code should use NativeDetector.inNativeImage() (provided by spring-core dependency in the org.springframework.core package) to detect native-specific code paths.
Spring Framework or Spring Data takes advantage of this utility method to disable CGLIB proxies since they are not supported in native images for example.
However, where possible we recommend writing code that will work in both contexts rather always falling back on the NativeDetector, common code will be easier to reason about and test/debug.
10.1.3. Do classpath checks in static block/fields and configure build-time initialization
It is possible to configure code in your application/dependencies to run at image build time. This will speed up the runtime performance of your image and reduce the footprint.
If the behaviour of some code is conditional on some class being present on the classpath, that presence check can be performed when the image is built because the classpath cannot be changed after that.
A presence check is normally done via an attempt to reflectively load a class. It is optimal if that check can be performed as the native image is built, then no reflective configuration is necessary for that presence check at runtime. To achieve this optimization:
-
Perform the presence check in a static block/field in a type.
-
Configure that type containing the check to be initialized at build-time using
@NativeHint
| Care must be taken to limit as much as possible the amount of other classes transitively initialized at build-time, since it can introduce serious compatibility issues. |
10.1.4. Try to favor functional approaches when possible
For code executing at runtime, try to favor functional approaches like lambdas and method references instead of reflection when possible, since these constructs are automatically understood by the native-image static analysis.
For example, if your Spring project is using RootBeanDefinition, using the Supplier based constructor will be native friendly in the sense that the native-image compiler will understand bean creations without requiring native reflection configuration. So instead of new RootBeanDefinition(BeanFactoryChannelResolver.class), use new RootBeanDefinition(BeanFactoryChannelResolver.class, BeanFactoryChannelResolver::new). See the related Javadoc for more details.
10.1.5. Move reflection to build-time when possible
It is fine to use reflection in a native world but it is most optimal to do it in code executed at build-time:
-
In the static block/fields of a class initialized at build-time
-
In an AOT transformation run as a Spring AOT build plugin
| More guidelines will be provided here as Spring AOT matures. |
10.1.6. Provide hints for import selectors
Spring Native chases down configuration references to other configurations (@Import usages). However if you use an import selector, that means code is deciding what the next imported configuration should be, which is harder to follow.
Spring Native does not do that level of analysis (it could get very complicated). This means that, although Spring Native can tell it has encountered a selector, it does not know what types that selector needs reflective access to or what further configurations it references.
Now, Spring Native could simply continue, and maybe it would work, maybe it would crash at runtime. Typically, the error produced when things go wrong due to this missing information is very cryptic. If the selector is doing a "if this type is around, return this configuration to include", it may be not finding some type (when it is really there but is not exposed in the image) and not including some critical configuration. For this reason, Spring Native analysis fails early and fast, indicating that it does not know what a particular selector is doing.
To fix it, you should add a hint with the related import selector specified as trigger. See for example this hint and related service loader entry as an example.
You can temporarily turn this hard error into a warning by setting the failOnMissingSelectorHint option to false in Configuring Spring AOT.
10.2. Contributing new hints
For most cases Spring Native understands how Spring applications operate - how configurations refer to each other, how beans are going to be instantiated, etc. However, there are some subtleties that it doesn’t understand and to plug those knowledge gaps it relies on hints, these tell the system what extra configuration may be needed for the native image build when particular auto configurations or libraries are active in an application.
A hint may indicate that a specific resource must be included or that reflection on a particular type is required.
When adding support for a new area of Spring or new version of a library, the typical approach to work out the missing hints is as follows:
-
Notice an error if your application when you try to build it or run it — a
classnotfound,methodnotfound, or similar error. If you are using a piece of Spring we don’t have a sample for, this is likely to happen. -
Try to determine which configuration classes give rise to the need for that reflective access to occur. Usually, we do a few searches for references to the type that is missing, and those searches guide us to the configuration.
-
If there is already a
NativeConfigurationimplementation for that configuration, augment it with the extra type info. If there is not, create one, attach a@NativeHintto it to identify the triggering configuration and the classes that need to be exposed, and add it to theMETA-INF/services/org.springframework.nativex.extension.NativeConfiguration. You may also need to set the accessibility in the annotation (in the@TypeHint). It is possible that more dependencies may need to be added to the configuration project to allow the direct class references. That is OK, so long as you ensure that they are provided scope.
See Native hints for basic hint documentation. These @NativeHint can be hosted in one of two places:
-
In the
spring-native-configurationmodule, you can see that they are hosted on types that implement theorg.springframework.nativex.extension.NativeConfigurationinterface. Implementations of this interface should be listed in asrc/main/resources/META-INF/services/org.springframework.nativex.type.NativeConfigurationfile, which the feature loads through regular Java service loading. -
On Spring configuration classes. That’s useful for project-specific hints or while crafting hints on a sample before moving it to the
spring-native-configurationmodule (shorter feedback loop).
An attribute trigger can be specified on the @NativeHint annotation.
-
If the hint is on a
NativeConfigurationclass, and no trigger is specified then it is assumed this configuration should always apply. This is useful for common configuration necessary for all applications. -
If the hint is on something other than a
NativeConfigurationclass (e.g. on a Spring auto-configuration class) then that type is considered to be the trigger, and if the Spring AOT plugin determines that is 'active', the hint applies.
The trigger attribute might be a piece of Spring infrastructure (autoconfiguration, import selector) or just a regular class. If the Spring AOT plugin determines that Spring infrastructure may be active when the application runs, or (for a regular class trigger) that the named class is on the classpath, it will activate the associated hints, informing the native-image build process what is needed.
It is best practice to use the hints in a sample (existing or new one) in order to have automated testing of it. Once you are happy with the hints you crafted, you can submit a pull request.
Using the Tracing agent can also be useful an approximation of the required native configuration without having to run too many native builds.
10.3. Dynamic native configuration
| For now, providing dynamic native configuration is only supported as part of Spring Native itself since related API are not stable enough. External libraries requiring dynamic configuration can implement a GraalVM native image feature for now. |
Dynamic native configuration needs to be implemented in spring-aot. For debugging, you can use either mvnDebug or gradle -Dorg.gradle.debug=true --no-daemon and connect with a JVM remote debugger on port 8000 for Maven or 5005 for Gradle from your IDE.
10.3.1. Implementing NativeConfiguration
Sometimes the necessary configuration is hard to statically declare and needs a more dynamic approach.
For example, the interfaces involved in a proxy hint might need something to be checked beyond the simple presence of a class.
In this case the method computeHints can be implemented which allows computation of hints in a more dynamic way, which are then combined with those statically declared via annotations.
The NativeConfiguration interface contains a couple of default methods that can be implemented for more control.
For example whether the hints on a NativeConfiguration should activate may be a more subtle condition that simply whether a configuration is active.
It is possible to implement the isValid method in a NativeConfiguration implementation and perform a more detailed test, returning false from this method will deactivate the associated hints.
10.3.2. Taking more control via processors
Within a Spring application there are going to be a number of active components (the main application, configurations, controllers, etc).
There may be much more sophisticated domain specific analysis to be done for these components in order to compute the necessary configuration for the native-image invocation.
It is possible to implement a couple of interfaces to participate in the process the feature is going through:
-
ComponentProcessorimplementations are given the chance to process components and possibly register new configuration. For example this is used by spring-data (viaSpringDataComponentProcessor) to do deeper analysis of repositories and the types used in generic signatures to compute reflection/proxy/resource hints. -
SpringFactoriesProcessorimplementations are given a chance to process the keys and values loaded fromspring.factoriesfiles. Currently they are allowed to do filtering but this is likely to be expanded in the future. By filtering it means they may programmatically compute that for some spring.factories key one of the values makes no sense (by analysing classpath contents, for example), and decide to discard meaning no further processing will be performed on it.
10.4. Using container-based build environment
To allow easily reproducible builds of spring-native, dedicated interactive Docker images are available for local development (tested on Linux and Mac) and are also used on CI:
-
graalvm-ce: base image with Ubuntu bionic + GraalVM native, built daily by the CI and available from Docker hub -
spring-native: base image withgraalvm-ce+ utilities required to build the project, available from Docker hub -
spring-native-dev: local image built viarun-dev-container.shdesigned to share the same user between the host and the container.
To use it:
-
Configure it to allow non-root user if you are on Linux.
-
On Mac, ensure in the Docker preferences resources tab that you give it enough memory, ideally 10G or more, otherwise you may see out of memory issues when building images.
-
Run
run-dev-container.shto run the Docker container with an interactive shell suitable to runspring-nativebuild scripts (see below for more documentation). -
The first time, it will download remotely hosted images built by CI.
-
The current and the Maven home directories are shared between the host (where is typically the IDE) and the container (where you can run builds).
10.4.1. run-dev-container.sh
run-dev-container.sh runs Spring Native for GraalVM dev container with an interactive shell.
run-dev-container.sh [options]

options:
-h, --help                show brief help
-j, --java=VERSION        specify Java version to use, can be 8 or 11, 11 by default
-g, --graalvm=VERSION     specify GraalVM flavor to use, can be stable or dev, stable by default
-w, --workdir=/foo        specify the working directory, should be an absolute path, current one by default
-p, --pull                force pulling of remote container images
-r, --rebuild             force container image rebuild
10.4.2. Usual dev workflow
-
Import the root project in your IDE.
-
Eventually import the sample you are working on as a distinct project in your IDE.
-
Run the root project
build.sh(from the host or the container) if you have made modification to the feature, substitutions or configuration modules. -
Make sure
native-imageis in thePATH(usually done by switching to a GraalVM installation with SDKMAN). -
Run
build.shof the sample you are working on from the container.
To test the various samples You can also run the root build.sh then build-key-samples.sh (test only key samples) or build-samples.sh (test all samples) from the container.
10.5. Scripts
The native-image command supports a number of flags for producing information about what is in an image.
However, what can sometimes be really useful is comparing two images.
What is in one that isn’t in the other?
Sometimes sifting through the mass of output is tricky.
The scripts folder provides some tools to help with this.
10.5.1. Comparing images
First up is -H:+PrintAOTCompilation which prints logging information during compilation, looking a bit like this:
Compiling FieldPosition[] java.text.DecimalFormat.getNegativeSuffixFieldPositions()  [Direct call from StringBuffer DecimalFormat.subformat(StringBuffer, Format$FieldDelegate, boolean, boolean, int, int, int, int)]
Compiling FieldPosition[] java.text.DecimalFormat.getPositiveSuffixFieldPositions()  [Direct call from StringBuffer DecimalFormat.subformat(StringBuffer, Format$FieldDelegate, boolean, boolean, int, int, int, int)]
Thousands and thousands of lines typically.
Typically we turn on that option for native-image in the pom.xml.
The output is produced to stdout which our samples capture in target/native-image/output.txt.
With two builds done, we can use a script from this folder to produce a tree diff:
compilationDiff.sh java8build/target/native-image/output.txt java11build/target/native-image/output.txt 8-11.html
The inputs are the two collected PrintAOTCompilation outputs to compare and the name for an HTML file that should be generated (this will contain the navigable tree). Then simply open the HTML file.
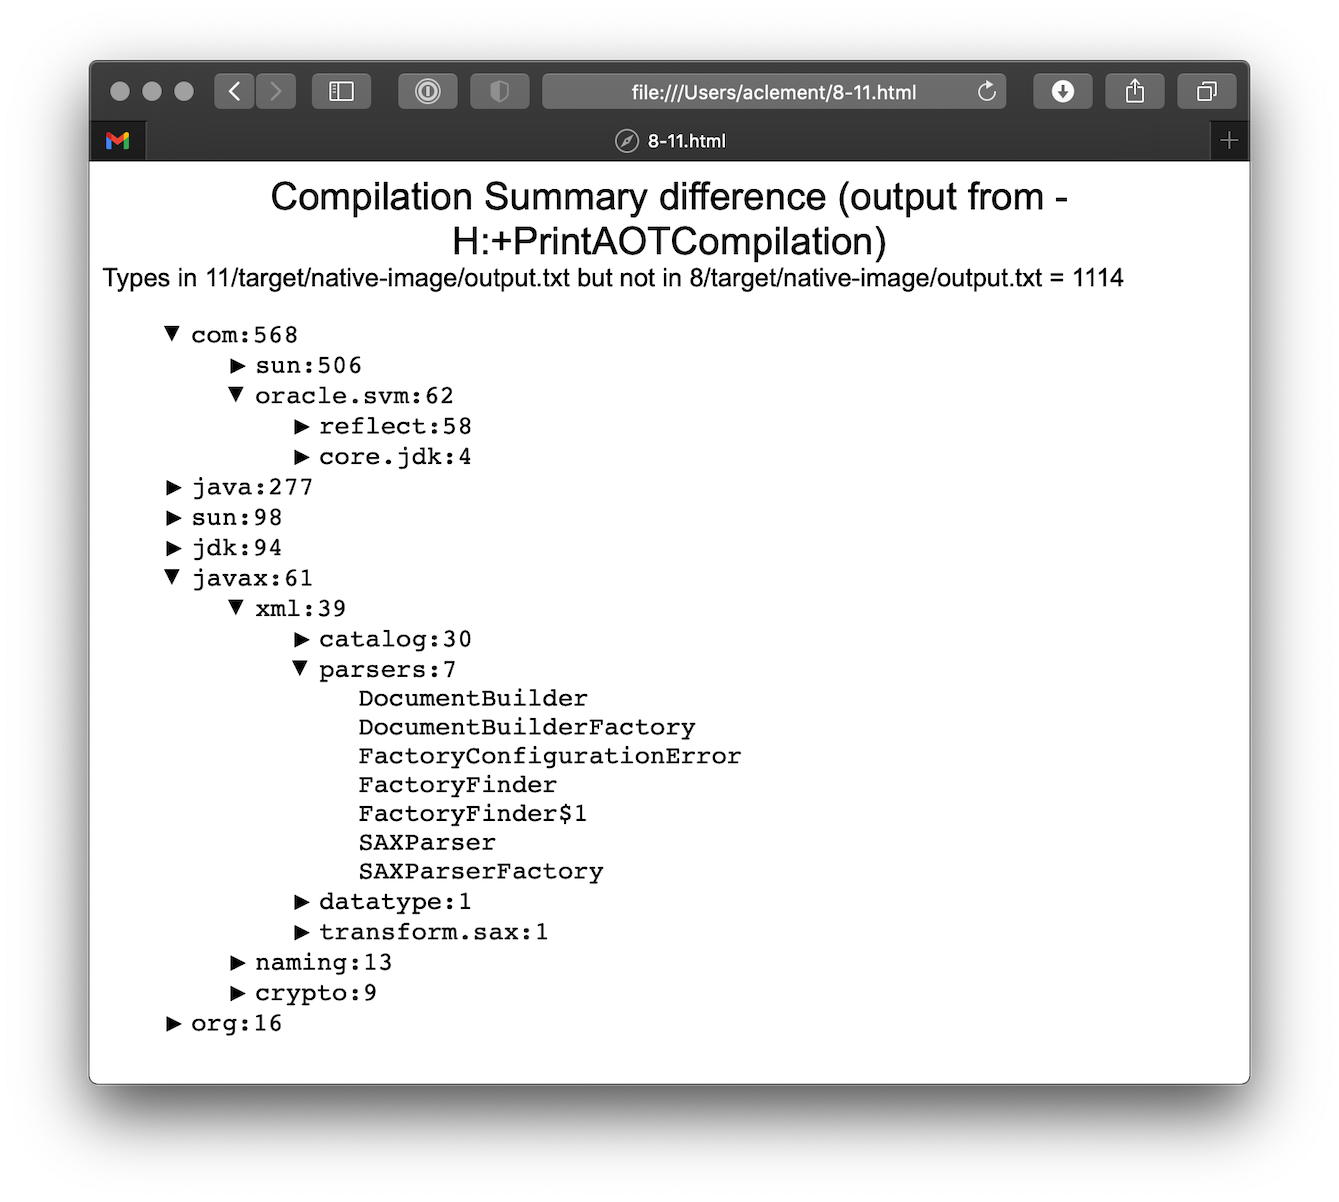
One of the key entries to look at in the diff is under the path com/oracle/svm/reflect as that shows the entries included due to reflection.
11. Contact us
We would love to hear about your successes and failures (with minimal repro projects) through the project issue tracker. Before raising an issue, please check the troubleshooting guide, which is full of information on pitfalls, common problems, and how to deal with them (through fixes and workarounds).
If you want to make a contribution here, see the how to contribute guide. Please be aware this project is still incubating and, as such, some of these options and extension APIs are still evolving and may change before it is finally considered done.