Once you are familiar with setting up and running some namespace-configuration based applications, you may wish to develop more of an understanding of how the framework actually works behind the namespace facade. Like most software, Spring Security has certain central interfaces, classes and conceptual abstractions that are commonly used throughout the framework. In this part of the reference guide we will look at some of these and see how they work together to support authentication and access-control within Spring Security.
Spring Security 5.2.2.RELEASE requires a Java 8 Runtime Environment or higher. As Spring Security aims to operate in a self-contained manner, there is no need to place any special configuration files into your Java Runtime Environment. In particular, there is no need to configure a special Java Authentication and Authorization Service (JAAS) policy file or place Spring Security into common classpath locations.
Similarly, if you are using an EJB Container or Servlet Container there is no need to put any special configuration files anywhere, nor include Spring Security in a server classloader. All the required files will be contained within your application.
This design offers maximum deployment time flexibility, as you can simply copy your target artifact (be it a JAR, WAR or EAR) from one system to another and it will immediately work.
As of Spring Security 3.0, the contents of the spring-security-core jar were stripped down to the bare minimum.
It no longer contains any code related to web-application security, LDAP or namespace configuration.
We’ll take a look here at some of the Java types that you’ll find in the core module.
They represent the building blocks of the framework, so if you ever need to go beyond a simple namespace configuration then it’s important that you understand what they are, even if you don’t actually need to interact with them directly.
The most fundamental object is SecurityContextHolder.
This is where we store details of the present security context of the application, which includes details of the principal currently using the application.
By default the SecurityContextHolder uses a ThreadLocal to store these details, which means that the security context is always available to methods in the same thread of execution, even if the security context is not explicitly passed around as an argument to those methods.
Using a ThreadLocal in this way is quite safe if care is taken to clear the thread after the present principal’s request is processed.
Of course, Spring Security takes care of this for you automatically so there is no need to worry about it.
Some applications aren’t entirely suitable for using a ThreadLocal, because of the specific way they work with threads.
For example, a Swing client might want all threads in a Java Virtual Machine to use the same security context.
SecurityContextHolder can be configured with a strategy on startup to specify how you would like the context to be stored.
For a standalone application you would use the SecurityContextHolder.MODE_GLOBAL strategy.
Other applications might want to have threads spawned by the secure thread also assume the same security identity.
This is achieved by using SecurityContextHolder.MODE_INHERITABLETHREADLOCAL.
You can change the mode from the default SecurityContextHolder.MODE_THREADLOCAL in two ways.
The first is to set a system property, the second is to call a static method on SecurityContextHolder.
Most applications won’t need to change from the default, but if you do, take a look at the JavaDoc for SecurityContextHolder to learn more.
Inside the SecurityContextHolder we store details of the principal currently interacting with the application.
Spring Security uses an Authentication object to represent this information.
You won’t normally need to create an Authentication object yourself, but it is fairly common for users to query the Authentication object.
You can use the following code block - from anywhere in your application - to obtain the name of the currently authenticated user, for example:
Object principal = SecurityContextHolder.getContext().getAuthentication().getPrincipal();

if (principal instanceof UserDetails) {
String username = ((UserDetails)principal).getUsername();
} else {
String username = principal.toString();
}
The object returned by the call to getContext() is an instance of the SecurityContext interface.
This is the object that is kept in thread-local storage.
As we’ll see below, most authentication mechanisms within Spring Security return an instance of UserDetails as the principal.
Another item to note from the above code fragment is that you can obtain a principal from the Authentication object.
The principal is just an Object.
Most of the time this can be cast into a UserDetails object.
UserDetails is a core interface in Spring Security.
It represents a principal, but in an extensible and application-specific way.
Think of UserDetails as the adapter between your own user database and what Spring Security needs inside the SecurityContextHolder.
Being a representation of something from your own user database, quite often you will cast the UserDetails to the original object that your application provided, so you can call business-specific methods (like getEmail(), getEmployeeNumber() and so on).
By now you’re probably wondering, so when do I provide a UserDetails object? How do I do that? I thought you said this thing was declarative and I didn’t need to write any Java code - what gives? The short answer is that there is a special interface called UserDetailsService.
The only method on this interface accepts a String-based username argument and returns a UserDetails:
UserDetails loadUserByUsername(String username) throws UsernameNotFoundException;
This is the most common approach to loading information for a user within Spring Security and you will see it used throughout the framework whenever information on a user is required.
On successful authentication, UserDetails is used to build the Authentication object that is stored in the SecurityContextHolder (more on this below).
The good news is that we provide a number of UserDetailsService implementations, including one that uses an in-memory map (InMemoryDaoImpl) and another that uses JDBC (JdbcDaoImpl).
Most users tend to write their own, though, with their implementations often simply sitting on top of an existing Data Access Object (DAO) that represents their employees, customers, or other users of the application.
Remember the advantage that whatever your UserDetailsService returns can always be obtained from the SecurityContextHolder using the above code fragment.
![[Note]](images/note.png) | Note |
|---|---|
|
There is often some confusion about |
Besides the principal, another important method provided by Authentication is getAuthorities().
This method provides an array of GrantedAuthority objects.
A GrantedAuthority is, not surprisingly, an authority that is granted to the principal.
Such authorities are usually "roles", such as ROLE_ADMINISTRATOR or ROLE_HR_SUPERVISOR.
These roles are later on configured for web authorization, method authorization and domain object authorization.
Other parts of Spring Security are capable of interpreting these authorities, and expect them to be present.
GrantedAuthority objects are usually loaded by the UserDetailsService.
Usually the GrantedAuthority objects are application-wide permissions.
They are not specific to a given domain object.
Thus, you wouldn’t likely have a GrantedAuthority to represent a permission to Employee object number 54, because if there are thousands of such authorities you would quickly run out of memory (or, at the very least, cause the application to take a long time to authenticate a user).
Of course, Spring Security is expressly designed to handle this common requirement, but you’d instead use the project’s domain object security capabilities for this purpose.
Just to recap, the major building blocks of Spring Security that we’ve seen so far are:
-
SecurityContextHolder, to provide access to theSecurityContext. -
SecurityContext, to hold theAuthenticationand possibly request-specific security information. -
Authentication, to represent the principal in a Spring Security-specific manner. -
GrantedAuthority, to reflect the application-wide permissions granted to a principal. -
UserDetails, to provide the necessary information to build an Authentication object from your application’s DAOs or other source of security data. -
UserDetailsService, to create aUserDetailswhen passed in aString-based username (or certificate ID or the like).
Now that you’ve gained an understanding of these repeatedly-used components, let’s take a closer look at the process of authentication.
Spring Security can participate in many different authentication environments. While we recommend people use Spring Security for authentication and not integrate with existing Container Managed Authentication, it is nevertheless supported - as is integrating with your own proprietary authentication system.
Let’s consider a standard authentication scenario that everyone is familiar with.
- A user is prompted to log in with a username and password.
- The system (successfully) verifies that the password is correct for the username.
- The context information for that user is obtained (their list of roles and so on).
- A security context is established for the user
- The user proceeds, potentially to perform some operation which is potentially protected by an access control mechanism which checks the required permissions for the operation against the current security context information.
The first four items constitute the authentication process so we’ll take a look at how these take place within Spring Security.
-
The username and password are obtained and combined into an instance of
UsernamePasswordAuthenticationToken(an instance of theAuthenticationinterface, which we saw earlier). -
The token is passed to an instance of
AuthenticationManagerfor validation. -
The
AuthenticationManagerreturns a fully populatedAuthenticationinstance on successful authentication. -
The security context is established by calling
SecurityContextHolder.getContext().setAuthentication(…), passing in the returned authentication object.
From that point on, the user is considered to be authenticated. Let’s look at some code as an example.
import org.springframework.security.authentication.*;
import org.springframework.security.core.*;
import org.springframework.security.core.authority.SimpleGrantedAuthority;
import org.springframework.security.core.context.SecurityContextHolder;

public class AuthenticationExample {
private static AuthenticationManager am = new SampleAuthenticationManager();

public static void main(String[] args) throws Exception {
    BufferedReader in = new BufferedReader(new InputStreamReader(System.in));

    while(true) {
    System.out.println("Please enter your username:");
    String name = in.readLine();
    System.out.println("Please enter your password:");
    String password = in.readLine();
    try {
        Authentication request = new UsernamePasswordAuthenticationToken(name, password);
        Authentication result = am.authenticate(request);
        SecurityContextHolder.getContext().setAuthentication(result);
        break;
    } catch(AuthenticationException e) {
        System.out.println("Authentication failed: " + e.getMessage());
    }
    }
    System.out.println("Successfully authenticated. Security context contains: " +
            SecurityContextHolder.getContext().getAuthentication());
}
}

class SampleAuthenticationManager implements AuthenticationManager {
static final List<GrantedAuthority> AUTHORITIES = new ArrayList<GrantedAuthority>();

static {
    AUTHORITIES.add(new SimpleGrantedAuthority("ROLE_USER"));
}

public Authentication authenticate(Authentication auth) throws AuthenticationException {
    if (auth.getName().equals(auth.getCredentials())) {
    return new UsernamePasswordAuthenticationToken(auth.getName(),
        auth.getCredentials(), AUTHORITIES);
    }
    throw new BadCredentialsException("Bad Credentials");
}
}
Here we have written a little program that asks the user to enter a username and password and performs the above sequence.
The AuthenticationManager which we’ve implemented here will authenticate any user whose username and password are the same.
It assigns a single role to every user.
The output from the above will be something like:
Please enter your username:
bob
Please enter your password:
password
Authentication failed: Bad Credentials
Please enter your username:
bob
Please enter your password:
bob
Successfully authenticated. Security context contains: \
org.springframework.security.authentication.UsernamePasswordAuthenticationToken@441d0230: \
Principal: bob; Password: [PROTECTED]; \
Authenticated: true; Details: null; \
Granted Authorities: ROLE_USER
Note that you don’t normally need to write any code like this.
The process will normally occur internally, in a web authentication filter for example.
We’ve just included the code here to show that the question of what actually constitutes authentication in Spring Security has quite a simple answer.
A user is authenticated when the SecurityContextHolder contains a fully populated Authentication object.
In fact, Spring Security doesn’t mind how you put the Authentication object inside the SecurityContextHolder.
The only critical requirement is that the SecurityContextHolder contains an Authentication which represents a principal before the AbstractSecurityInterceptor (which we’ll see more about later) needs to authorize a user operation.
You can (and many users do) write their own filters or MVC controllers to provide interoperability with authentication systems that are not based on Spring Security.
For example, you might be using Container-Managed Authentication which makes the current user available from a ThreadLocal or JNDI location.
Or you might work for a company that has a legacy proprietary authentication system, which is a corporate "standard" over which you have little control.
In situations like this it’s quite easy to get Spring Security to work, and still provide authorization capabilities.
All you need to do is write a filter (or equivalent) that reads the third-party user information from a location, build a Spring Security-specific Authentication object, and put it into the SecurityContextHolder.
In this case you also need to think about things which are normally taken care of automatically by the built-in authentication infrastructure.
For example, you might need to pre-emptively create an HTTP session to cache the context between requests, before you write the response to the client [1].
If you’re wondering how the AuthenticationManager is implemented in a real world example, we’ll look at that in the core services chapter.
Now let’s explore the situation where you are using Spring Security in a web application (without web.xml security enabled).
How is a user authenticated and the security context established?
Consider a typical web application’s authentication process:
- You visit the home page, and click on a link.
- A request goes to the server, and the server decides that you’ve asked for a protected resource.
- As you’re not presently authenticated, the server sends back a response indicating that you must authenticate. The response will either be an HTTP response code, or a redirect to a particular web page.
- Depending on the authentication mechanism, your browser will either redirect to the specific web page so that you can fill out the form, or the browser will somehow retrieve your identity (via a BASIC authentication dialogue box, a cookie, a X.509 certificate etc.).
- The browser will send back a response to the server. This will either be an HTTP POST containing the contents of the form that you filled out, or an HTTP header containing your authentication details.
- Next the server will decide whether or not the presented credentials are valid. If they’re valid, the next step will happen. If they’re invalid, usually your browser will be asked to try again (so you return to step two above).
- The original request that you made to cause the authentication process will be retried. Hopefully you’ve authenticated with sufficient granted authorities to access the protected resource. If you have sufficient access, the request will be successful. Otherwise, you’ll receive back an HTTP error code 403, which means "forbidden".
Spring Security has distinct classes responsible for most of the steps described above.
The main participants (in the order that they are used) are the ExceptionTranslationFilter, an AuthenticationEntryPoint and an "authentication mechanism", which is responsible for calling the AuthenticationManager which we saw in the previous section.
ExceptionTranslationFilter is a Spring Security filter that has responsibility for detecting any Spring Security exceptions that are thrown.
Such exceptions will generally be thrown by an AbstractSecurityInterceptor, which is the main provider of authorization services.
We will discuss AbstractSecurityInterceptor in the next section, but for now we just need to know that it produces Java exceptions and knows nothing about HTTP or how to go about authenticating a principal.
Instead the ExceptionTranslationFilter offers this service, with specific responsibility for either returning error code 403 (if the principal has been authenticated and therefore simply lacks sufficient access - as per step seven above), or launching an AuthenticationEntryPoint (if the principal has not been authenticated and therefore we need to go commence step three).
The AuthenticationEntryPoint is responsible for step three in the above list.
As you can imagine, each web application will have a default authentication strategy (well, this can be configured like nearly everything else in Spring Security, but let’s keep it simple for now).
Each major authentication system will have its own AuthenticationEntryPoint implementation, which typically performs one of the actions described in step 3.
Once your browser submits your authentication credentials (either as an HTTP form post or HTTP header) there needs to be something on the server that "collects" these authentication details.
By now we’re at step six in the above list.
In Spring Security we have a special name for the function of collecting authentication details from a user agent (usually a web browser), referring to it as the "authentication mechanism".
Examples are form-base login and Basic authentication.
Once the authentication details have been collected from the user agent, an Authentication "request" object is built and then presented to the AuthenticationManager.
After the authentication mechanism receives back the fully-populated Authentication object, it will deem the request valid, put the Authentication into the SecurityContextHolder, and cause the original request to be retried (step seven above).
If, on the other hand, the AuthenticationManager rejected the request, the authentication mechanism will ask the user agent to retry (step two above).
Depending on the type of application, there may need to be a strategy in place to store the security context between user operations.
In a typical web application, a user logs in once and is subsequently identified by their session Id.
The server caches the principal information for the duration session.
In Spring Security, the responsibility for storing the SecurityContext between requests falls to the SecurityContextPersistenceFilter, which by default stores the context as an HttpSession attribute between HTTP requests.
It restores the context to the SecurityContextHolder for each request and, crucially, clears the SecurityContextHolder when the request completes.
You shouldn’t interact directly with the HttpSession for security purposes.
There is simply no justification for doing so - always use the SecurityContextHolder instead.
Many other types of application (for example, a stateless RESTful web service) do not use HTTP sessions and will re-authenticate on every request.
However, it is still important that the SecurityContextPersistenceFilter is included in the chain to make sure that the SecurityContextHolder is cleared after each request.
| Note |
|---|---|
|
In an application which receives concurrent requests in a single session, the same |
The main interface responsible for making access-control decisions in Spring Security is the AccessDecisionManager.
It has a decide method which takes an Authentication object representing the principal requesting access, a "secure object" (see below) and a list of security metadata attributes which apply for the object (such as a list of roles which are required for access to be granted).
If you’re familiar with AOP, you’d be aware there are different types of advice available: before, after, throws and around. An around advice is very useful, because an advisor can elect whether or not to proceed with a method invocation, whether or not to modify the response, and whether or not to throw an exception. Spring Security provides an around advice for method invocations as well as web requests. We achieve an around advice for method invocations using Spring’s standard AOP support and we achieve an around advice for web requests using a standard Filter.
For those not familiar with AOP, the key point to understand is that Spring Security can help you protect method invocations as well as web requests. Most people are interested in securing method invocations on their services layer. This is because the services layer is where most business logic resides in current-generation Java EE applications. If you just need to secure method invocations in the services layer, Spring’s standard AOP will be adequate. If you need to secure domain objects directly, you will likely find that AspectJ is worth considering.
You can elect to perform method authorization using AspectJ or Spring AOP, or you can elect to perform web request authorization using filters. You can use zero, one, two or three of these approaches together. The mainstream usage pattern is to perform some web request authorization, coupled with some Spring AOP method invocation authorization on the services layer.
So what is a "secure object" anyway? Spring Security uses the term to refer to any object that can have security (such as an authorization decision) applied to it. The most common examples are method invocations and web requests.
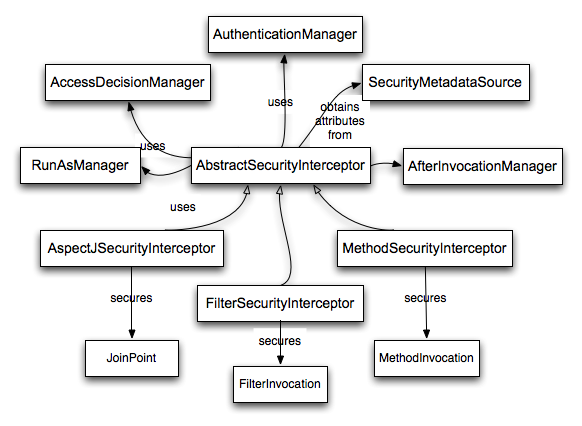
Each supported secure object type has its own interceptor class, which is a subclass of AbstractSecurityInterceptor.
Importantly, by the time the AbstractSecurityInterceptor is called, the SecurityContextHolder will contain a valid Authentication if the principal has been authenticated.
AbstractSecurityInterceptor provides a consistent workflow for handling secure object requests, typically:
- Look up the "configuration attributes" associated with the present request
-
Submitting the secure object, current
Authenticationand configuration attributes to theAccessDecisionManagerfor an authorization decision -
Optionally change the
Authenticationunder which the invocation takes place - Allow the secure object invocation to proceed (assuming access was granted)
-
Call the
AfterInvocationManagerif configured, once the invocation has returned. If the invocation raised an exception, theAfterInvocationManagerwill not be invoked.
A "configuration attribute" can be thought of as a String that has special meaning to the classes used by AbstractSecurityInterceptor.
They are represented by the interface ConfigAttribute within the framework.
They may be simple role names or have more complex meaning, depending on the how sophisticated the AccessDecisionManager implementation is.
The AbstractSecurityInterceptor is configured with a SecurityMetadataSource which it uses to look up the attributes for a secure object.
Usually this configuration will be hidden from the user.
Configuration attributes will be entered as annotations on secured methods or as access attributes on secured URLs.
For example, when we saw something like <intercept-url pattern='/secure/**' access='ROLE_A,ROLE_B'/> in the namespace introduction, this is saying that the configuration attributes ROLE_A and ROLE_B apply to web requests matching the given pattern.
In practice, with the default AccessDecisionManager configuration, this means that anyone who has a GrantedAuthority matching either of these two attributes will be allowed access.
Strictly speaking though, they are just attributes and the interpretation is dependent on the AccessDecisionManager implementation.
The use of the prefix ROLE_ is a marker to indicate that these attributes are roles and should be consumed by Spring Security’s RoleVoter.
This is only relevant when a voter-based AccessDecisionManager is in use.
We’ll see how the AccessDecisionManager is implemented in the authorization chapter.
Assuming AccessDecisionManager decides to allow the request, the AbstractSecurityInterceptor will normally just proceed with the request.
Having said that, on rare occasions users may want to replace the Authentication inside the SecurityContext with a different Authentication, which is handled by the AccessDecisionManager calling a RunAsManager.
This might be useful in reasonably unusual situations, such as if a services layer method needs to call a remote system and present a different identity.
Because Spring Security automatically propagates security identity from one server to another (assuming you’re using a properly-configured RMI or HttpInvoker remoting protocol client), this may be useful.
Following the secure object invocation proceeding and then returning - which may mean a method invocation completing or a filter chain proceeding - the AbstractSecurityInterceptor gets one final chance to handle the invocation.
At this stage the AbstractSecurityInterceptor is interested in possibly modifying the return object.
We might want this to happen because an authorization decision couldn’t be made "on the way in" to a secure object invocation.
Being highly pluggable, AbstractSecurityInterceptor will pass control to an AfterInvocationManager to actually modify the object if needed.
This class can even entirely replace the object, or throw an exception, or not change it in any way as it chooses.
The after-invocation checks will only be executed if the invocation is successful.
If an exception occurs, the additional checks will be skipped.
AbstractSecurityInterceptor and its related objects are shown in Figure 9.1, “Security interceptors and the "secure object" model”
Only developers contemplating an entirely new way of intercepting and authorizing requests would need to use secure objects directly.
For example, it would be possible to build a new secure object to secure calls to a messaging system.
Anything that requires security and also provides a way of intercepting a call (like the AOP around advice semantics) is capable of being made into a secure object.
Having said that, most Spring applications will simply use the three currently supported secure object types (AOP Alliance MethodInvocation, AspectJ JoinPoint and web request FilterInvocation) with complete transparency.
Now that we have a high-level overview of the Spring Security architecture and its core classes, let’s take a closer look at one or two of the core interfaces and their implementations, in particular the AuthenticationManager, UserDetailsService and the AccessDecisionManager.
These crop up regularly throughout the remainder of this document so it’s important you know how they are configured and how they operate.
The AuthenticationManager is just an interface, so the implementation can be anything we choose, but how does it work in practice? What if we need to check multiple authentication databases or a combination of different authentication services such as a database and an LDAP server?
The default implementation in Spring Security is called ProviderManager and rather than handling the authentication request itself, it delegates to a list of configured AuthenticationProvider s, each of which is queried in turn to see if it can perform the authentication.
Each provider will either throw an exception or return a fully populated Authentication object.
Remember our good friends, UserDetails and UserDetailsService? If not, head back to the previous chapter and refresh your memory.
The most common approach to verifying an authentication request is to load the corresponding UserDetails and check the loaded password against the one that has been entered by the user.
This is the approach used by the DaoAuthenticationProvider (see below).
The loaded UserDetails object - and particularly the GrantedAuthority s it contains - will be used when building the fully populated Authentication object which is returned from a successful authentication and stored in the SecurityContext.
If you are using the namespace, an instance of ProviderManager is created and maintained internally, and you add providers to it by using the namespace authentication provider elements (see the namespace chapter).
In this case, you should not declare a ProviderManager bean in your application context.
However, if you are not using the namespace then you would declare it like so:
<bean id="authenticationManager"
        class="org.springframework.security.authentication.ProviderManager">
    <constructor-arg>
        <list>
            <ref local="daoAuthenticationProvider"/>
            <ref local="anonymousAuthenticationProvider"/>
            <ref local="ldapAuthenticationProvider"/>
        </list>
    </constructor-arg>
</bean>
In the above example we have three providers.
They are tried in the order shown (which is implied by the use of a List), with each provider able to attempt authentication, or skip authentication by simply returning null.
If all implementations return null, the ProviderManager will throw a ProviderNotFoundException.
If you’re interested in learning more about chaining providers, please refer to the ProviderManager Javadoc.
Authentication mechanisms such as a web form-login processing filter are injected with a reference to the ProviderManager and will call it to handle their authentication requests.
The providers you require will sometimes be interchangeable with the authentication mechanisms, while at other times they will depend on a specific authentication mechanism.
For example, DaoAuthenticationProvider and LdapAuthenticationProvider are compatible with any mechanism which submits a simple username/password authentication request and so will work with form-based logins or HTTP Basic authentication.
On the other hand, some authentication mechanisms create an authentication request object which can only be interpreted by a single type of AuthenticationProvider.
An example of this would be JA-SIG CAS, which uses the notion of a service ticket and so can therefore only be authenticated by a CasAuthenticationProvider.
You needn’t be too concerned about this, because if you forget to register a suitable provider, you’ll simply receive a ProviderNotFoundException when an attempt to authenticate is made.
By default (from Spring Security 3.1 onwards) the ProviderManager will attempt to clear any sensitive credentials information from the Authentication object which is returned by a successful authentication request.
This prevents information like passwords being retained longer than necessary.
This may cause issues when you are using a cache of user objects, for example, to improve performance in a stateless application.
If the Authentication contains a reference to an object in the cache (such as a UserDetails instance) and this has its credentials removed, then it will no longer be possible to authenticate against the cached value.
You need to take this into account if you are using a cache.
An obvious solution is to make a copy of the object first, either in the cache implementation or in the AuthenticationProvider which creates the returned Authentication object.
Alternatively, you can disable the eraseCredentialsAfterAuthentication property on ProviderManager.
See the Javadoc for more information.
The simplest AuthenticationProvider implemented by Spring Security is DaoAuthenticationProvider, which is also one of the earliest supported by the framework.
It leverages a UserDetailsService (as a DAO) in order to lookup the username, password and GrantedAuthority s.
It authenticates the user simply by comparing the password submitted in a UsernamePasswordAuthenticationToken against the one loaded by the UserDetailsService.
Configuring the provider is quite simple:
<bean id="daoAuthenticationProvider"
    class="org.springframework.security.authentication.dao.DaoAuthenticationProvider">
<property name="userDetailsService" ref="inMemoryDaoImpl"/>
<property name="passwordEncoder" ref="passwordEncoder"/>
</bean>
The PasswordEncoder is optional.
A PasswordEncoder provides encoding and decoding of passwords presented in the UserDetails object that is returned from the configured UserDetailsService.
This will be discussed in more detail below.
As mentioned in the earlier in this reference guide, most authentication providers take advantage of the UserDetails and UserDetailsService interfaces.
Recall that the contract for UserDetailsService is a single method:
UserDetails loadUserByUsername(String username) throws UsernameNotFoundException;
The returned UserDetails is an interface that provides getters that guarantee non-null provision of authentication information such as the username, password, granted authorities and whether the user account is enabled or disabled.
Most authentication providers will use a UserDetailsService, even if the username and password are not actually used as part of the authentication decision.
They may use the returned UserDetails object just for its GrantedAuthority information, because some other system (like LDAP or X.509 or CAS etc) has undertaken the responsibility of actually validating the credentials.
Given UserDetailsService is so simple to implement, it should be easy for users to retrieve authentication information using a persistence strategy of their choice.
Having said that, Spring Security does include a couple of useful base implementations, which we’ll look at below.
Is easy to use create a custom UserDetailsService implementation that extracts information from a persistence engine of choice, but many applications do not require such complexity.
This is particularly true if you’re building a prototype application or just starting integrating Spring Security, when you don’t really want to spend time configuring databases or writing UserDetailsService implementations.
For this sort of situation, a simple option is to use the user-service element from the security namespace:
<user-service id="userDetailsService">
<!-- Password is prefixed with {noop} to indicate to DelegatingPasswordEncoder that
NoOpPasswordEncoder should be used. This is not safe for production, but makes reading
in samples easier. Normally passwords should be hashed using BCrypt -->
<user name="jimi" password="{noop}jimispassword" authorities="ROLE_USER, ROLE_ADMIN" />
<user name="bob" password="{noop}bobspassword" authorities="ROLE_USER" />
</user-service>
This also supports the use of an external properties file:
<user-service id="userDetailsService" properties="users.properties"/>
The properties file should contain entries in the form
username=password,grantedAuthority[,grantedAuthority][,enabled|disabled]
For example
jimi=jimispassword,ROLE_USER,ROLE_ADMIN,enabled
bob=bobspassword,ROLE_USER,enabled
Spring Security also includes a UserDetailsService that can obtain authentication information from a JDBC data source.
Internally Spring JDBC is used, so it avoids the complexity of a fully-featured object relational mapper (ORM) just to store user details.
If your application does use an ORM tool, you might prefer to write a custom UserDetailsService to reuse the mapping files you’ve probably already created.
Returning to JdbcDaoImpl, an example configuration is shown below:
<bean id="dataSource" class="org.springframework.jdbc.datasource.DriverManagerDataSource">
<property name="driverClassName" value="org.hsqldb.jdbcDriver"/>
<property name="url" value="jdbc:hsqldb:hsql://localhost:9001"/>
<property name="username" value="sa"/>
<property name="password" value=""/>
</bean>

<bean id="userDetailsService"
    class="org.springframework.security.core.userdetails.jdbc.JdbcDaoImpl">
<property name="dataSource" ref="dataSource"/>
</bean>
You can use different relational database management systems by modifying the DriverManagerDataSource shown above.
You can also use a global data source obtained from JNDI, as with any other Spring configuration.
By default, JdbcDaoImpl loads the authorities for a single user with the assumption that the authorities are mapped directly to users (see the database schema appendix).
An alternative approach is to partition the authorities into groups and assign groups to the user.
Some people prefer this approach as a means of administering user rights.
See the JdbcDaoImpl Javadoc for more information on how to enable the use of group authorities.
The group schema is also included in the appendix.