|
This version is still in development and is not considered stable yet. For the latest stable version, please use Spring Security 7.0.2! |
Form Login
Spring Security provides support for username and password being provided through an HTML form. This section provides details on how form based authentication works within Spring Security.
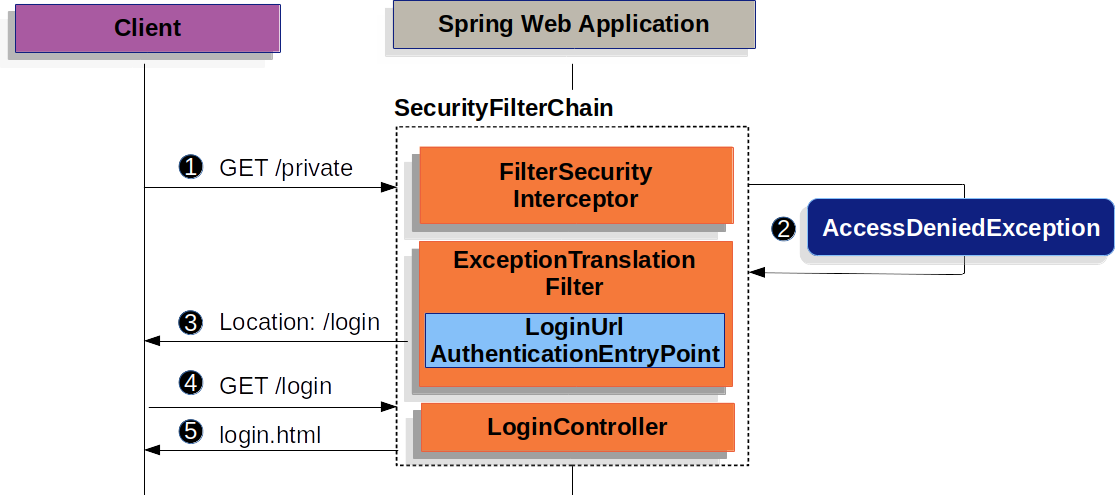
This section examines how form-based login works within Spring Security. First, we see how the user is redirected to the login form:

The preceding figure builds off our SecurityFilterChain diagram.
![]() First, a user makes an unauthenticated request to the resource (
First, a user makes an unauthenticated request to the resource (/private) for which it is not authorized.
![]() Spring Security’s
Spring Security’s AuthorizationFilter indicates that the unauthenticated request is Denied by throwing an AccessDeniedException.
![]() Since the user is not authenticated,
Since the user is not authenticated, ExceptionTranslationFilter initiates Start Authentication and sends a redirect to the login page with the configured AuthenticationEntryPoint.
In most cases, the AuthenticationEntryPoint is an instance of LoginUrlAuthenticationEntryPoint.
![]() The browser requests the login page to which it was redirected.
The browser requests the login page to which it was redirected.
![]() Something within the application, must render the login page.
Something within the application, must render the login page.
When the username and password are submitted, the UsernamePasswordAuthenticationFilter creates a UsernamePasswordAuthenticationToken which is a type of Authentication, by extracting the username and password from the HttpServletRequest instance.
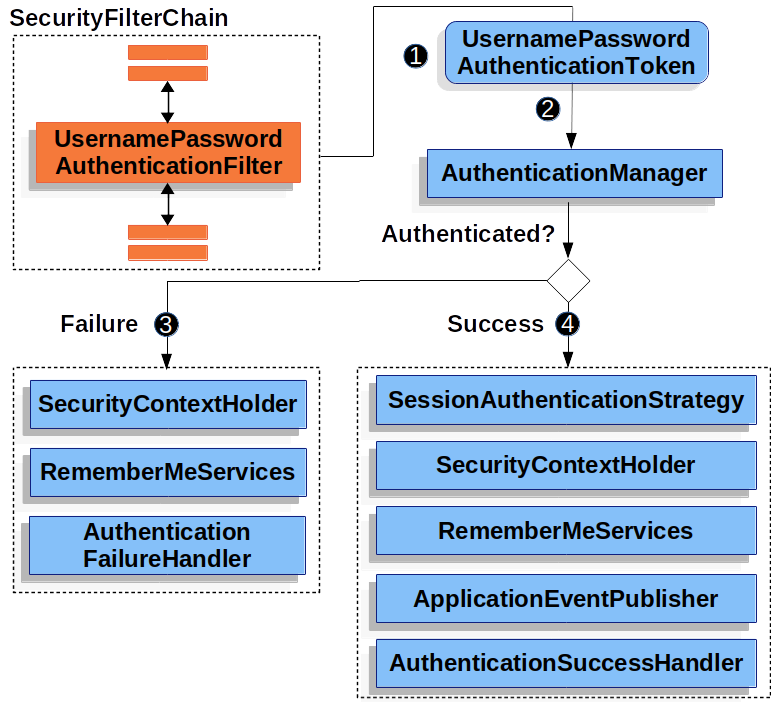
The UsernamePasswordAuthenticationFilter extends AbstractAuthenticationProcessingFilter, so the following diagram should look pretty similar:

The figure builds off our SecurityFilterChain diagram.
![]() When the user submits their username and password, the
When the user submits their username and password, the UsernamePasswordAuthenticationFilter creates a UsernamePasswordAuthenticationToken, which is a type of Authentication, by extracting the username and password from the HttpServletRequest instance.
![]() Next, the
Next, the UsernamePasswordAuthenticationToken is passed into the AuthenticationManager instance to be authenticated.
The details of what AuthenticationManager looks like depend on how the user information is stored.
![]() If authentication fails, then Failure.
If authentication fails, then Failure.
-
The SecurityContextHolder is cleared out.
-
RememberMeServices.loginFailis invoked. If remember me is not configured, this is a no-op. See theRememberMeServicesinterface in the Javadoc. -
AuthenticationFailureHandleris invoked. See theAuthenticationFailureHandlerclass in the Javadoc
![]() If authentication is successful, then Success.
If authentication is successful, then Success.
-
SessionAuthenticationStrategyis notified of a new login. See theSessionAuthenticationStrategyinterface in the Javadoc. -
The Authentication is set on the SecurityContextHolder. See the
SecurityContextPersistenceFilterclass in the Javadoc. -
RememberMeServices.loginSuccessis invoked. If remember me is not configured, this is a no-op. See theRememberMeServicesinterface in the Javadoc. -
ApplicationEventPublisherpublishes anInteractiveAuthenticationSuccessEvent. -
The
AuthenticationSuccessHandleris invoked. Typically, this is aSimpleUrlAuthenticationSuccessHandler, which redirects to a request saved byExceptionTranslationFilterwhen we redirect to the login page.
By default, Spring Security form login is enabled. However, as soon as any servlet-based configuration is provided, form based login must be explicitly provided. The following example shows a minimal, explicit Java configuration:
-
Java
-
XML
-
Kotlin
public SecurityFilterChain filterChain(HttpSecurity http) {
	http
		.formLogin(withDefaults());
	// ...
}
<http>
<!-- ... -->
<form-login />
</http>open fun filterChain(http: HttpSecurity): SecurityFilterChain {
http {
formLogin { }
}
// ...
}In the preceding configuration, Spring Security renders a default login page. Most production applications require a custom login form.
The following configuration demonstrates how to provide a custom login form.
-
Java
-
XML
-
Kotlin
public SecurityFilterChain filterChain(HttpSecurity http) {
	http
		.formLogin(form -> form
			.loginPage("/login")
			.permitAll()
		);
	// ...
}
<http>
<!-- ... -->
<intercept-url pattern="/login" access="permitAll" />
<form-login login-page="/login" />
</http>open fun filterChain(http: HttpSecurity): SecurityFilterChain {
http {
formLogin {
loginPage = "/login"
permitAll()
}
}
// ...
}When the login page is specified in the Spring Security configuration, you are responsible for rendering the page.
The following Thymeleaf template produces an HTML login form that complies with a login page of /login.:
<!DOCTYPE html>
<html xmlns="http://www.w3.org/1999/xhtml" xmlns:th="https://www.thymeleaf.org">
	<head>
		<title>Please Log In</title>
	</head>
	<body>
		<h1>Please Log In</h1>
		<div th:if="${param.error}">
			Invalid username and password.</div>
		<div th:if="${param.logout}">
			You have been logged out.</div>
		<form th:action="@{/login}" method="post">
			<div>
			<input type="text" name="username" placeholder="Username"/>
			</div>
			<div>
			<input type="password" name="password" placeholder="Password"/>
			</div>
			<input type="submit" value="Log in" />
		</form>
	</body>
</html>
There are a few key points about the default HTML form:
-
The form should perform a
postto/login. -
The form needs to include a CSRF Token, which is automatically included by Thymeleaf.
-
The form should specify the username in a parameter named
username. -
The form should specify the password in a parameter named
password. -
If the HTTP parameter named
erroris found, it indicates the user failed to provide a valid username or password. -
If the HTTP parameter named
logoutis found, it indicates the user has logged out successfully.
Many users do not need much more than to customize the login page. However, if needed, you can customize everything shown earlier with additional configuration.
If you use Spring MVC, you need a controller that maps GET /login to the login template we created.
The following example shows a minimal LoginController:
-
Java
-
Kotlin
@Controller
class LoginController {
	@GetMapping("/login")
	String login() {
		return "login";
	}
}
@Controller
class LoginController {
@GetMapping("/login")
fun login(): String {
return "login"
}
}
