|
For the latest stable version, please use spring-cloud-contract 5.0.2! |
Step-by-step Guide to Consumer Driven Contracts (CDC) with Contracts on the Producer Side
Consider an example of fraud detection and the loan issuance process. The business scenario is such that we want to issue loans to people but do not want them to steal from us. The current implementation of our system grants loans to everybody.
Assume that Loan Issuance is a client to the Fraud Detection server. In the current
sprint, we must develop a new feature: if a client wants to borrow too much money,
we mark the client as a fraud.
Technical remarks
-
Fraud Detection has an
artifact-idofhttp-server. -
Loan Issuance has an
artifact-idofhttp-client. -
Both have a
group-idofcom.example. -
For the sake of this example, the
Stub Storageis Nexus/Artifactory.
Social remarks
-
Both the client and the server development teams need to communicate directly and discuss changes while going through the process.
-
CDC is all about communication.
The server-side code is available under Spring Cloud Contract Samples repository samples/standalone/dsl/http-server path, and the client-side code is available under Spring Cloud Contract’s repository samples/standalone/dsl/http-client path.
| In this case, the producer owns the contracts. Physically, all the contracts are in the producer’s repository. |
Technical Note
IMPORTANT:All the code is available under spring Cloud Contract Samples repo.
For simplicity, we use the following acronyms:
-
Loan Issuance (LI): The HTTP client
-
Fraud Detection (FD): The HTTP server
-
SCC: Spring Cloud Contract
The Consumer Side (Loan Issuance)
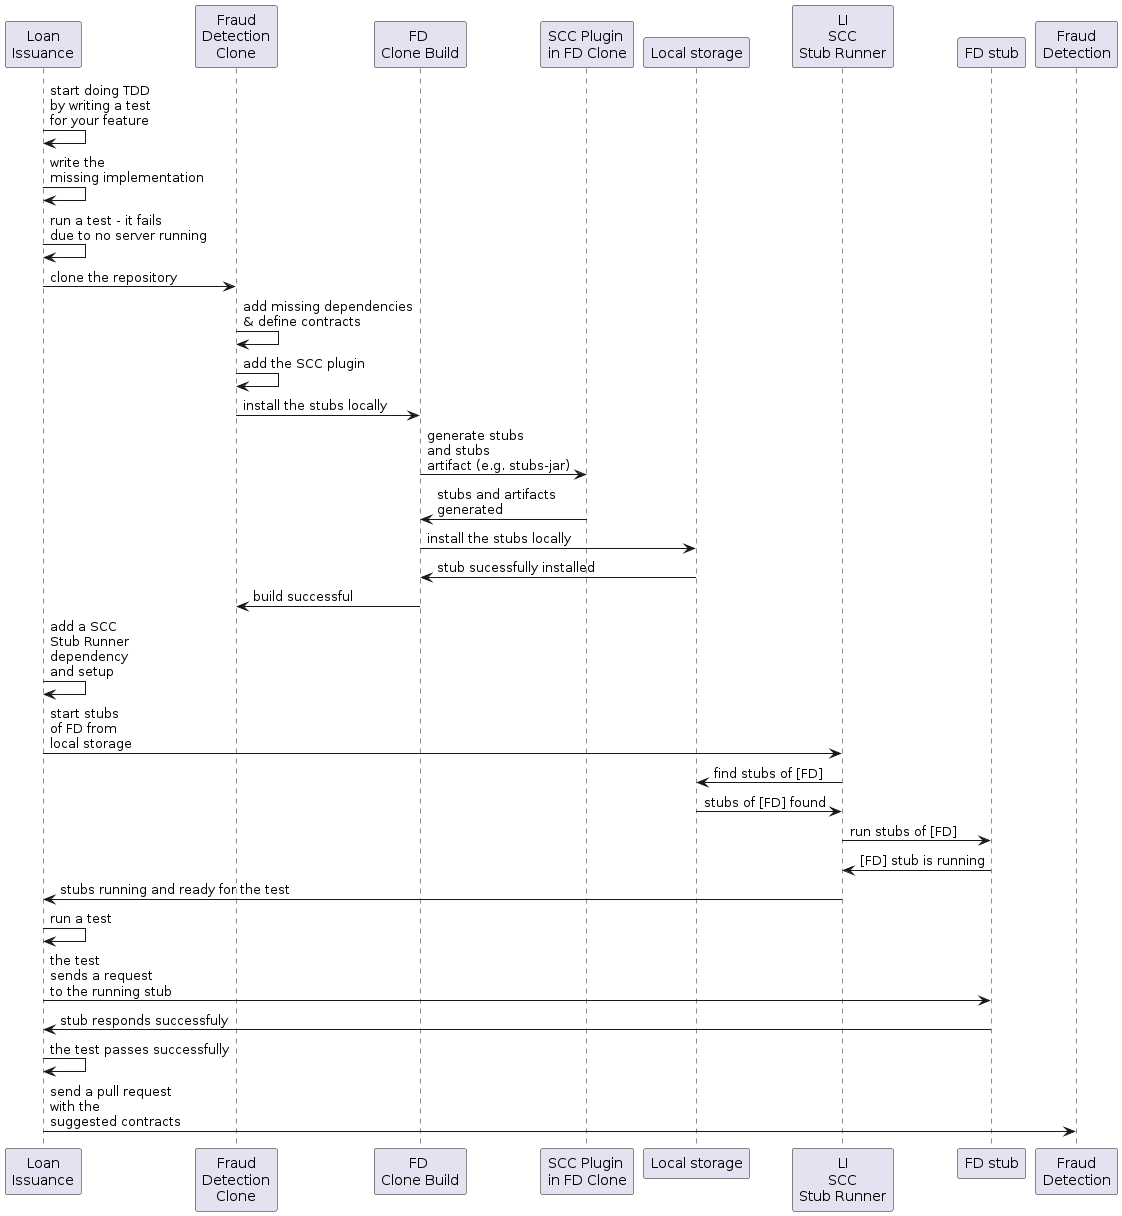
As a developer of the Loan Issuance service (a consumer of the Fraud Detection server), you might do the following steps:
-
Start doing TDD by writing a test for your feature.
-
Write the missing implementation.
-
Clone the Fraud Detection service repository locally.
-
Define the contract locally in the repository of the fraud detection service.
-
Add the Spring Cloud Contract (SCC) plugin.
-
Run the integration tests.
-
File a pull request.
-
Create an initial implementation.
-
Take over the pull request.
-
Write the missing implementation.
-
Deploy your application.
-
Work online.
We start with the loan issuance flow, which the following UML diagram shows:

Start Doing TDD by Writing a Test for Your Feature
The following listing shows a test that we might use to check whether a loan amount is too large:
Assume that you have written a test of your new feature. If a loan application for a big amount is received, the system should reject that loan application with some description.
Write the Missing Implementation
At some point in time, you need to send a request to the Fraud Detection service. Assume
that you need to send the request containing the ID of the client and the amount the
client wants to borrow. You want to send it to the /fraudcheck URL by using the PUT method.
To do so, you might use code similar to the following:
For simplicity, the port of the Fraud Detection service is set to 8080, and the
application runs on 8090.
If you start the test at this point, it breaks, because no service currently runs on port
8080.
|
Clone the Fraud Detection service repository locally
You can start by playing around with the server side contract. To do so, you must first clone it, by running the following command:
$ git clone https://your-git-server.com/server-side.git local-http-server-repoDefine the Contract Locally in the Repository of the Fraud Detection Service
As a consumer, you need to define what exactly you want to achieve. You need to formulate your expectations. To do so, write the following contract:
Place the contract in the src/test/resources/contracts/fraud folder. The fraud folder
is important because the producer’s test base class name references that folder.
|
The following example shows our contract, in both Groovy and YAML:
The YML contract is quite straightforward. However, when you take a look at the contract
written with a statically typed Groovy DSL, you might wonder what the
value(client(…), server(…)) parts are. By using this notation, Spring Cloud
Contract lets you define parts of a JSON block, a URL, or other structure that is dynamic. In the case
of an identifier or a timestamp, you need not hardcode a value. You want to allow some
different ranges of values. To enable ranges of values, you can set regular expressions
that match those values for the consumer side. You can provide the body by means of either
a map notation or a String with interpolations. We highly recommend using the map notation.
| To set up contracts, you must understand the map notation. See the Groovy docs regarding JSON. |
The previously shown contract is an agreement between two sides that:
-
If an HTTP request is sent with all of:
-
A
PUTmethod on the/fraudcheckendpoint -
A JSON body with a
client.idthat matches the regular expression[0-9]{10}andloanAmountequal to99999 -
A
Content-Typeheader with a value ofapplication/vnd.fraud.v1+json
-
-
Then an HTTP response is sent to the consumer that
-
Has status
200 -
Contains a JSON body with the
fraudCheckStatusfield containing a value ofFRAUDand therejectionReasonfield having a value ofAmount too high -
Has a
Content-Typeheader with a value ofapplication/vnd.fraud.v1+json
-
Once you are ready to check the API in practice in the integration tests, you need to install the stubs locally.
Add the Spring Cloud Contract Verifier Plugin
We can add either a Maven or a Gradle plugin. In this example, we show how to add Maven.
First, we add the Spring Cloud Contract BOM, as the following example shows:
Next, add the Spring Cloud Contract Verifier Maven plugin, as the following example shows:
Since the plugin was added, you get the Spring Cloud Contract Verifier features, which,
from the provided contracts:
-
Generate and run tests
-
Produce and install stubs
You do not want to generate tests, since you, as the consumer, want only to play with the stubs. You need to skip the test generation and invokation. To do so, run the following commands:
$ cd local-http-server-repo
$ ./mvnw clean install -DskipTests
Once you run those commands, you should you see something like the following content in the logs:
[INFO] --- spring-cloud-contract-maven-plugin:1.0.0.BUILD-SNAPSHOT:generateStubs (default-generateStubs) @ http-server ---
[INFO] Building jar: /some/path/http-server/target/http-server-0.0.1-SNAPSHOT-stubs.jar
[INFO]
[INFO] --- maven-jar-plugin:2.6:jar (default-jar) @ http-server ---
[INFO] Building jar: /some/path/http-server/target/http-server-0.0.1-SNAPSHOT.jar
[INFO]
[INFO] --- spring-boot-maven-plugin:1.5.5.BUILD-SNAPSHOT:repackage (default) @ http-server ---
[INFO]
[INFO] --- maven-install-plugin:2.5.2:install (default-install) @ http-server ---
[INFO] Installing /some/path/http-server/target/http-server-0.0.1-SNAPSHOT.jar to /path/to/your/.m2/repository/com/example/http-server/0.0.1-SNAPSHOT/http-server-0.0.1-SNAPSHOT.jar
[INFO] Installing /some/path/http-server/pom.xml to /path/to/your/.m2/repository/com/example/http-server/0.0.1-SNAPSHOT/http-server-0.0.1-SNAPSHOT.pom
[INFO] Installing /some/path/http-server/target/http-server-0.0.1-SNAPSHOT-stubs.jar to /path/to/your/.m2/repository/com/example/http-server/0.0.1-SNAPSHOT/http-server-0.0.1-SNAPSHOT-stubs.jar
The following line is extremely important:
[INFO] Installing /some/path/http-server/target/http-server-0.0.1-SNAPSHOT-stubs.jar to /path/to/your/.m2/repository/com/example/http-server/0.0.1-SNAPSHOT/http-server-0.0.1-SNAPSHOT-stubs.jarIt confirms that the stubs of the http-server have been installed in the local
repository.
Running the Integration Tests
In order to profit from the Spring Cloud Contract Stub Runner functionality of automatic
stub downloading, you must do the following in your consumer side project (Loan
Application service):
-
Add the
Spring Cloud ContractBOM, as follows: -
Add the dependency to
Spring Cloud Contract Stub Runner, as follows: -
Annotate your test class with
@AutoConfigureStubRunner. In the annotation, provide thegroup-idandartifact-idfor the Stub Runner to download the stubs of your collaborators. -
(Optional) Because you are playing with the collaborators offline, you can also provide the offline work switch (
StubRunnerProperties.StubsMode.LOCAL).
Now, when you run your tests, you see something like the following output in the logs:
2016-07-19 14:22:25.403  INFO 41050 --- [           main] o.s.c.c.stubrunner.AetherStubDownloader  : Desired version is + - will try to resolve the latest version
2016-07-19 14:22:25.438  INFO 41050 --- [           main] o.s.c.c.stubrunner.AetherStubDownloader  : Resolved version is 0.0.1-SNAPSHOT
2016-07-19 14:22:25.439  INFO 41050 --- [           main] o.s.c.c.stubrunner.AetherStubDownloader  : Resolving artifact com.example:http-server:jar:stubs:0.0.1-SNAPSHOT using remote repositories []
2016-07-19 14:22:25.451  INFO 41050 --- [           main] o.s.c.c.stubrunner.AetherStubDownloader  : Resolved artifact com.example:http-server:jar:stubs:0.0.1-SNAPSHOT to /path/to/your/.m2/repository/com/example/http-server/0.0.1-SNAPSHOT/http-server-0.0.1-SNAPSHOT-stubs.jar
2016-07-19 14:22:25.465  INFO 41050 --- [           main] o.s.c.c.stubrunner.AetherStubDownloader  : Unpacking stub from JAR [URI: file:/path/to/your/.m2/repository/com/example/http-server/0.0.1-SNAPSHOT/http-server-0.0.1-SNAPSHOT-stubs.jar]
2016-07-19 14:22:25.475  INFO 41050 --- [           main] o.s.c.c.stubrunner.AetherStubDownloader  : Unpacked file to [/var/folders/0p/xwq47sq106x1_g3dtv6qfm940000gq/T/contracts100276532569594265]
2016-07-19 14:22:27.737  INFO 41050 --- [           main] o.s.c.c.stubrunner.StubRunnerExecutor    : All stubs are now running RunningStubs [namesAndPorts={com.example:http-server:0.0.1-SNAPSHOT:stubs=8080}]
This output means that Stub Runner has found your stubs and started a server for your application
with a group ID of com.example and an artifact ID of http-server with version 0.0.1-SNAPSHOT of
the stubs and with the stubs classifier on port 8080.
Filing a Pull Request
What you have done until now is an iterative process. You can play around with the contract, install it locally, and work on the consumer side until the contract works as you wish.
Once you are satisfied with the results and the test passes, you can publish a pull request to the server side. Currently, the consumer side work is done.
The Producer Side (Fraud Detection server)
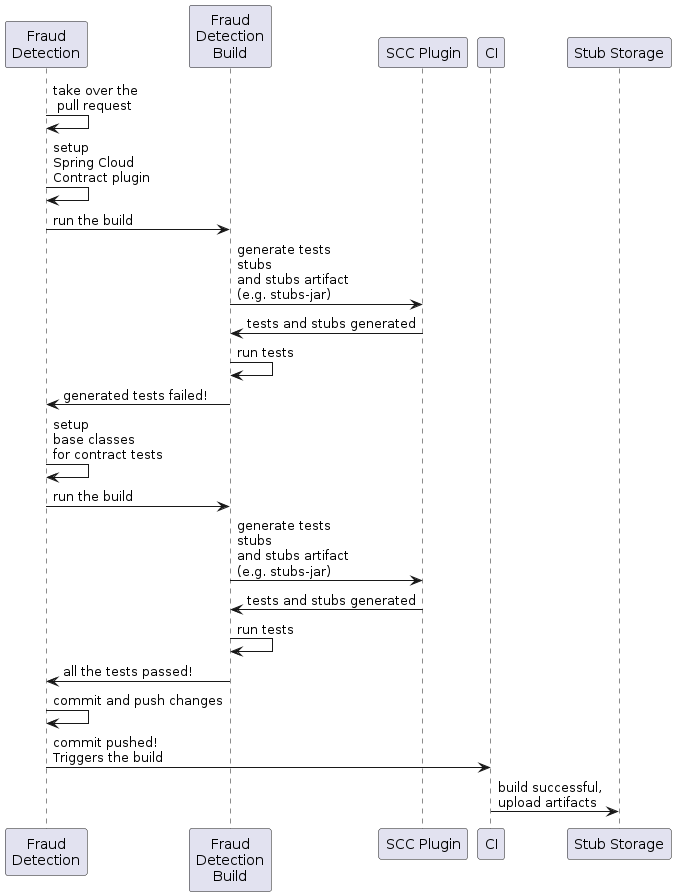
As a developer of the Fraud Detection server (a server to the Loan Issuance service), you might want to:
-
Take over the pull request
-
Write the missing implementation
-
Deploy the application
The following UML diagram shows the fraud detection flow:

Taking over the Pull Request
As a reminder, the following listing shows the initial implementation:
Then you can run the following commands:
$ git checkout -b contract-change-pr master
$ git pull https://your-git-server.com/server-side-fork.git contract-change-pr
You must add the dependencies needed by the autogenerated tests, as follows:
In the configuration of the Maven plugin, you must pass the packageWithBaseClasses property, as follows:
This example uses “convention-based” naming by setting the
packageWithBaseClasses property. Doing so means that the two last packages combine to
make the name of the base test class. In our case, the contracts were placed under
src/test/resources/contracts/fraud. Since you do not have two packages starting from
the contracts folder, pick only one, which should be fraud. Add the Base suffix and
capitalize fraud. That gives you the FraudBase test class name.
|
All the generated tests extend that class. Over there, you can set up your Spring Context
or whatever is necessary. In this case, you should use Rest Assured MVC to
start the server side FraudDetectionController. The following listing shows the
FraudBase class:
Now, if you run the ./mvnw clean install, you get something like the following output:
Results :

Tests in error:
  ContractVerifierTest.validate_shouldMarkClientAsFraud:32 » IllegalState Parsed...
This error occurs because you have a new contract from which a test was generated, and it failed since you have not implemented the feature. The auto-generated test would look like the following test method:
@Test
public void validate_shouldMarkClientAsFraud() throws Exception {
    // given:
        MockMvcRequestSpecification request = given()
                .header("Content-Type", "application/vnd.fraud.v1+json")
                .body("{\"client.id\":\"1234567890\",\"loanAmount\":99999}");

    // when:
        ResponseOptions response = given().spec(request)
                .put("/fraudcheck");

    // then:
        assertThat(response.statusCode()).isEqualTo(200);
        assertThat(response.header("Content-Type")).matches("application/vnd.fraud.v1.json.*");
    // and:
        DocumentContext parsedJson = JsonPath.parse(response.getBody().asString());
        assertThatJson(parsedJson).field("['fraudCheckStatus']").matches("[A-Z]{5}");
        assertThatJson(parsedJson).field("['rejection.reason']").isEqualTo("Amount too high");
}
If you used the Groovy DSL, you can see that all the producer() parts of the Contract that were present in the
value(consumer(…), producer(…)) blocks got injected into the test.
If you use YAML, the same applies for the matchers sections of the response.
Note that, on the producer side, you are also doing TDD. The expectations are expressed
in the form of a test. This test sends a request to our own application with the URL,
headers, and body defined in the contract. It also expects precisely defined values
in the response. In other words, you have the red part of red, green, and
refactor. It is time to convert the red into the green.
Write the Missing Implementation
Because you know the expected input and expected output, you can write the missing implementation as follows:
When you run ./mvnw clean install again, the tests pass. Since the Spring Cloud
Contract Verifier plugin adds the tests to the generated-test-sources, you can
actually run those tests from your IDE.
Deploying Your Application
Once you finish your work, you can deploy your changes. To do so, you must first merge the branch by running the following commands:
$ git checkout master
$ git merge --no-ff contract-change-pr
$ git push origin master
Your CI might run a command such as ./mvnw clean deploy, which would publish both the
application and the stub artifacts.
Consumer Side (Loan Issuance), Final Step
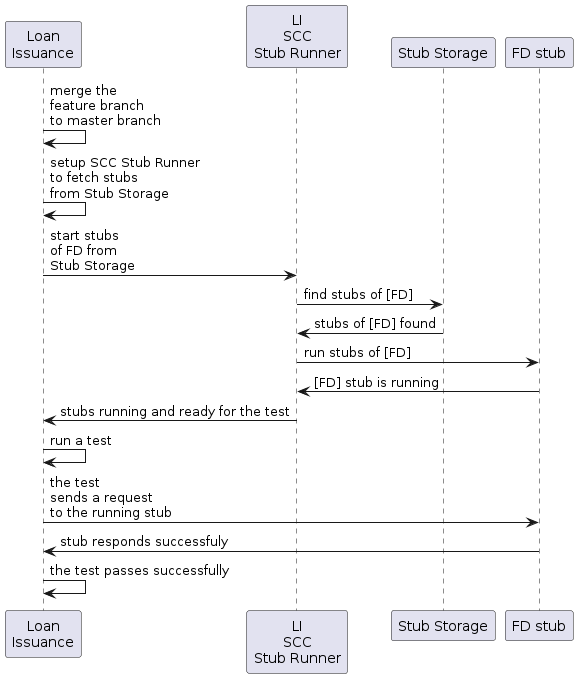
As a developer of the loan issuance service (a consumer of the Fraud Detection server), you need to:
-
Merge our feature branch to
master -
Switch to online mode of working
The following UML diagram shows the final state of the process:

Merging a Branch to Master
The following commands show one way to merge a branch into master with Git:
$ git checkout master
$ git merge --no-ff contract-change-pr
Working Online
Now you can disable the offline work for Spring Cloud Contract Stub Runner and indicate
where the repository with your stubs is located. At this moment, the stubs of the server
side are automatically downloaded from Nexus/Artifactory. You can set the value of
stubsMode to REMOTE. The following code shows an example of
achieving the same thing by changing the properties:
That’s it. You have finished the tutorial.

